Upgrade to Pro — share decks privately, control downloads, hide ads and more …

PharoJSで作るWebアプリケーション

 PharoJSで作るWebアプリケーション

PharoJSを使ってWebアプリケーションを開発する方法の紹介です。

第142回Smalltalk勉強会の発表資料です。
https://smalltalk.connpass.com/event/313973/
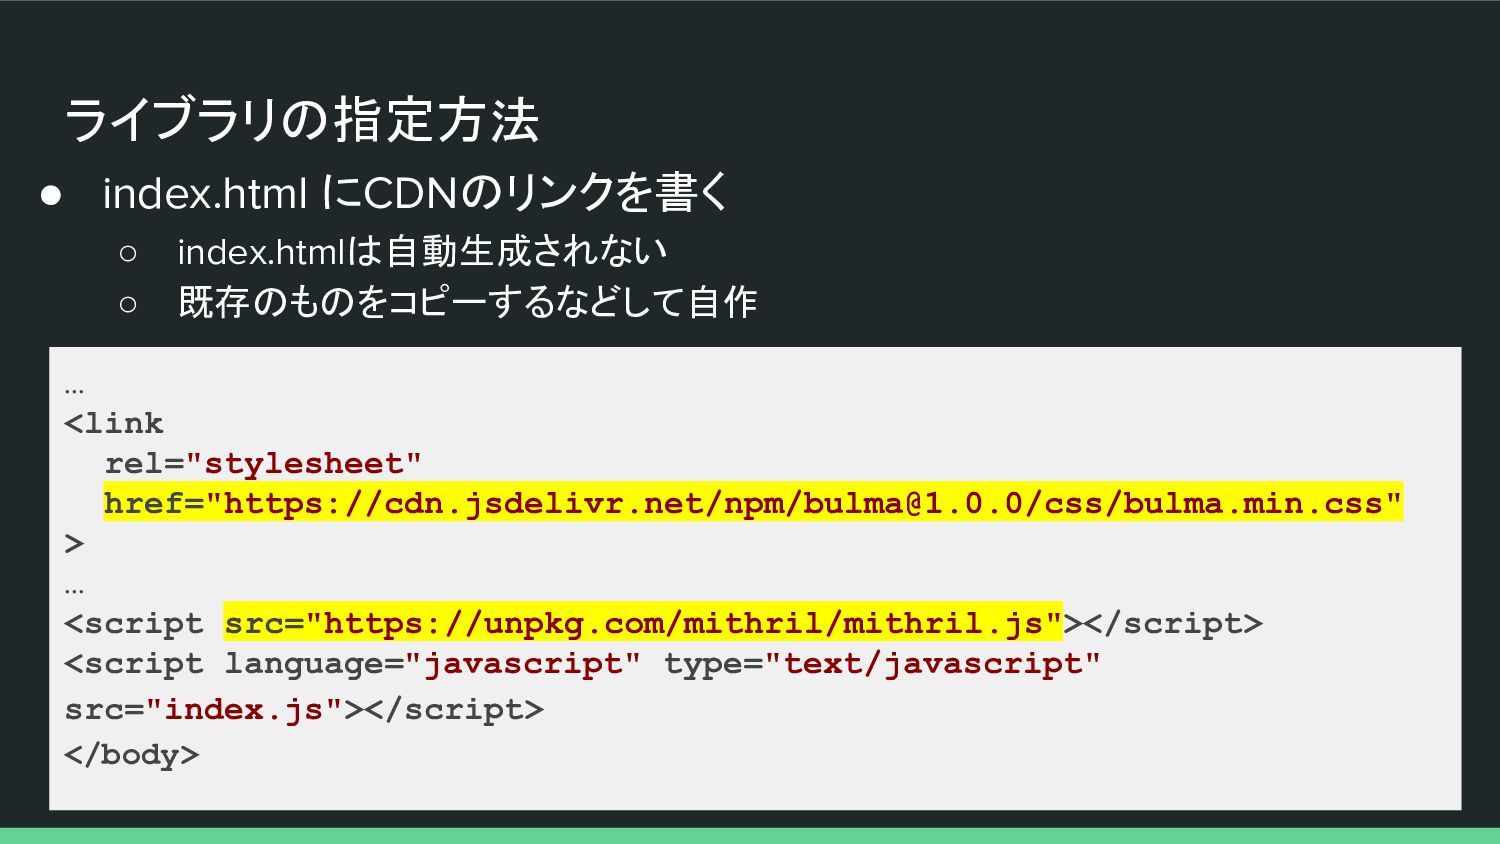
Masashi Umezawa

April 27, 2024
Tweet

Other Decks in Programming

Transcript

  1. PharoJSとは? • PharoでJavaScriptのアプリケーションを開発できる環境 ◦ Smalltalk → JS へのトランスパイラ ◦ PlaygroundからJSオブジェクトへメッセージ送信

    ◦ テストフレームワークも装備 • JavaScriptをほぼ意識せずに、JavaScriptランタイム (WebブラウザやNode.jsなど)で動作するアプリを開発できる
  2. DOMの要素にアクセス • document, window などにアクセス可能 ◦ テキストインプットに何か入力 ▪ #nameTextInput のidが

    振られているので... ◦ Playgroundで (document getElementById: 'nameTextInput') value. を"print it"すると
  3. DOMアクセスによるアプリ操作 • テキストインプットを編集した後、ボタンのクリックを させてみる (document getElementById: 'sayHelloButton') click. "こちらでも可" (document

    getElementById: 'sayHelloButton') dispatchEvent: (window Event new: 'click'). (document getElementById: 'nameTextInput') value: 'HI'. • テキストインプットを直接書き換える
  4. その他のメニュー • export ◦ Playgroundを開かず、単にトランスパイルしたJSを書き出す ▪ デバッグが不要な時 ▪ JSがコンパクトになる •

    browse ◦ Pharo側でアプリのクラスをブラウズ • files, OS files ◦ 生成されたファイルを一覧
  5. PjHelloWorldApp の構成要素 • index.html ◦ 基本的にはidを付与した要素が並んでいるだけ ◦ 生成されたindex.js を読み込むようになっている <div

    style="position:relative;width:100%;max-width:471px;"> <img src="pharoJsLogo.png" alt="PharoJS Logo" style="width:100%;" /> </div> <input type="text" id="nameTextInput"> <button id="sayHelloButton">Say Hello</button> <p><strong><span id="greetingMessageContainer"></span></strong></p> <script language="javascript" type="text/javascript" src="index.js"> </script>
  6. PjHelloWorldApp クラスを見る - start メソッド • アプリのエントリポイント ◦ getElementById: でDOM要素を取得

    ◦ addEventListener:block: でイベントハンドラを登録 | nameInput sayHelloButton greetingMessageContainer | super start. user := PjUser new. nameInput := document getElementById: #nameTextInput. sayHelloButton := document getElementById: #sayHelloButton. nameInput addEventListener: #change block: [ user name: nameInput value ]. greetingMessageContainer := document getElementById: #greetingMessageContainer. sayHelloButton addEventListener: #click block: [ greetingMessageContainer innerHTML: 'Hello ' , user name ]
  7. PjHelloWorldAppクラスを見る - PjUserの使用 • インスタンス変数userを定義 • PjUser自身はnameのgetter, setterを持つだけの単純なModelクラス • startメソッド内でnewして普通に使用している

    PjFileBasedWebApp subclass: #PjHelloWorldApp instanceVariableNames: 'user' classVariableNames: '' package: 'PharoJs-Examples-HelloWorld' user := PjUser new. greetingMessageContainer innerHTML: 'Hello ' , user name
  8. Smalltalk から JavaScript への変換ルール • 大体は想像通り • SmalltalkのメソッドはJavaScript側では pj_ の接頭辞がつく

    ◦ 既存のJavaScriptの関数名と衝突しないようにするため ◦ MNUもシミュレートされる • Smalltalk側で js_ の接頭辞をつけておくと js_ が取れた形でJavaScript の関数になる ◦ MNUにならない
  9. キーワードメッセージの変換ルール • セレクタの : 部分が _ になる ◦ add: item

    → pj_add_(item) ◦ copyFrom: from to: to → pj_copyFrom_to_(from, to)
  10. インラインJavaScript • メソッド定義時に javascript: プラグマを指定することでJavaScriptをその まま書ける • 例: log: anObject

    メソッドの実体を console.dir(anObject) にする log: anObject <javascript: 'console.dir(anObject)'> • これで利用時は self log: someObj と書ける
  11. playground / export 再び • Appクラスに playground メッセージを送ると ◦ index.js

    にbridgeの機能が入る ▪ 内部的にWebSocketを利用 ▪ デバッグ機能なのでデプロイ時には不要 • Appクラスに exportApp メッセージを送ると ◦ index.js にbridge は入らない ▪ Smalltalkの基本クラス群は入ったまま ▪ デプロイ時にはこちらを使う ▪ terserなどでminifyする
  12. ライブラリの指定方法 • index.html にCDNのリンクを書く ◦ index.htmlは自動生成されない ◦ 既存のものをコピーするなどして自作 … <link

    rel="stylesheet" href="https://cdn.jsdelivr.net/npm/[email protected]/css/bulma.min.css" > … <script src="https://unpkg.com/mithril/mithril.js"></script> <script language="javascript" type="text/javascript" src="index.js"></script> </body>
  13. index.jsの生成先を設定 • デフォルトは pharo-local/iceberg/PharoJS/PharoJS/HTML/(package名)/(class名) • 階層が深すぎるのでイメージ直下/(class名)とする defaultAppFolderParent <pharoJsSkip> ^ '.'

    asFileReference SsMithrilApp class • SsMithrilApp exportApp でindex.jsが生成されることを確認 • 前述のように index.html は別途用意して自分で置く defaults
  14. index.html … <head> <meta charset="utf-8" /> <link rel="stylesheet" href="https://cdn.jsdelivr.net/npm/[email protected]/css/bulma.min.css"> <title>Counter</title>

    </head> <body> <div id="app" class="hero"> <div class="container"> <p class="title">Counter</p> <button id="resetButton" class="button is-danger">Reset</button> <button id="incrementButton" class="button is-primary">Increment</button> </div> </div> <script src="https://unpkg.com/mithril/mithril.js"></script> <script language="javascript" type="text/javascript" src="index.js"></script> </body>
  15. htmlのアプリ表示部分 <div id="app" class="hero"> <div class="container"> <p class="title">Counter</p> <button id="resetButton"

    class="button is-danger">Reset</button> <button id="incrementButton" class="button is-primary">Increment</button> </div> </div>
  16. イベントハンドラの定義 • addEventListener:block:で、ボタンのclickイベントに対して イベントハンドラを登録 • モデルの状態を変更し、render で表示 setup self resetButton

    addEventListener: #click block: [ counter reset. self render ]. self incrementButton addEventListener: #click block: [ counter increment. self render ]. self render SsMithrilApp initialization
  17. m("main", [ m("h1", {class: "title"}, "My first app"), m("button", "A

    button"), ]) <main> <h1 class="title">My first app</h1> <button>A button</button> </main> m(selector, attributes, children) の利用 • m関数の入れ子で仮想DOMのツリーが作られる • HTMLだと...
  18. var vnodes = m("main", [ m("h1", {class: "title"}, "My first

    app"), m("button", "A button"), ]) m.render(document.getElementById("app"), vnodes) render(element, vnodes) によるHTML生成 • render関数でDOMにHTMLが適用される • これで id="app"の子要素が、mainタグによる要素に置きかわる
  19. インラインJavaScriptメソッド作成 - m:attrs:children: • mやrenderを楽に使うためPharoJS側にメソッドを用意しておく _m: selector attrs: attrs children:

    children <javascript: 'return m(selector, attrs, children)'> m: selector attrs: attrs children: children ^ self _m: selector attrs: attrs asDictionary children: children SsMithrilApp Mithril API
  20. インラインJavaScriptメソッド作成 - render:vnodes: • 便利な renderAt:vnodes: も定義した render: element vnodes:

    vnodes <javascript: 'm.render(element, vnodes)'> renderAt: elementId vnodes: vnodes ^ self render: (self elementAt: elementId) vnodes: vnodes SsMithrilApp Mithril API
  21. html側にcounter表示箇所を追加 <div id="app" class="hero"> <div class="container"> <p class="title">Counter</p> <p id="counter"

    class="subtitle">0</p> <button id="resetButton" class="button is-danger">Reset</button> <button id="incrementButton" class="button is-primary">Increment</button> </div> </div>
  22. renderメソッド • idが'counter'の要素をレンダリング SsMithrilApp rendering render self renderAt: 'counter' vnodes:

    (self m: 'div' attrs: { ('class' -> 'is-size-1'). ('style' -> 'color:gray') } children: counter count)
  23. renderメソッド • counterの値により色を変えてみる例 SsMithrilApp rendering render | style | style

    := counter count \\ 3 = 0 ifTrue: [ 'color:red' ] ifFalse: [ 'color:gray' ]. self renderAt: 'counter' vnodes: (self m: 'div' attrs: { ('class' -> 'is-size-1'). ('style' -> style) } children: counter count)
  24. TraitにAPIメソッドをまとめる - SsTMithril利用 • SsMithrilAppでSsTMithrilをuse: ◦ SsMithrilApp がすっきり ◦ TraitsがJavaScriptで使えてハッピー

    PjFileBasedWebApp subclass: #SsMithrilApp uses: SsTMithril instanceVariableNames: 'counter' classVariableNames: '' package: 'StStudy-Pjs-Mithril'
  25. Node.js用のWebアプリを作ってみる • サーバサイドで実行されるアプリの開発も可能 • ベースクラスが用意されている ◦ Node.js単体用 (PjNodeApp) ◦ Express.js

    用 (PjExpressApp) • 事前に Node.js, npm のインストールが必要 ◦ nvm などで入れる ◦ Pharoからnodeとnpmを呼び出せる必要がある ▪ PATHが通っているかチェック • LibC system: 'node --version' で0が返ればOK
  26. Node.js用のWebアプリ作成上の注意点 • index.jsの生成ディレクトリ ◦ パス中にスペースが含まれないようにする ▪ PharoJSがうまくハンドリングしてくれていない • Windowsでのexport ◦

    前段のnpmパッケージインストール処理がそのままでは動作しない ▪ 手動でnpm installする ▪ パッチ当て • あるいは環境変数ComSpecを一時的にPowerShellに設定 • Windowsでのplayground ◦ 動作しない
  27. PjApplication class >> inAppFolderRunCommandLine: aBlock のパッチ inAppFolderRunCommandLine: aBlock <pharoJsSkip> |

    commandLine | commandLine := String streamContents: [ :str | str << 'cd '; << self appFullJsFolderPath pathString; << $;. aBlock value: str ]. OSPlatform current isWindows ifTrue:[ ^ WBWindowsWebBrowser shellExecute: 'Open' file: 'pwsh' parameters:'-Command "',commandLine,'"' directory: '' show: 5. ]. LibC system: commandLine
  28. 簡単な Express.js アプリを作ってみる • 既存のJavaScriptやCSSのライブラリも利用 • JavaScript ◦ EJS (サーバ側)

    ▪ 軽量なテンプレートエンジン ◦ htmx (クライアント側) ▪ HTMLの属性指定でAjaxやDOM置き換えを可能にするライブラリ ◦ hyperscript (クライアント側) ▪ HTMLの属性指定で簡易なスクリプトを書けるライブラリ • CSS ◦ Bulma
  29. クラスメソッド群の定義 • index.js 生成ディレクトリの指定 defaultAppFolderParent <pharoJsSkip> ^ '.' asFileReference SsExpressCounterApp

    class defaults • 追加パッケージの指定 npmPackageNames <pharoJsSkip> ^ super npmPackageNames, #( ejs ) accessing SsExpressCounterApp class
  30. TIPS: nodemonの導入 • export時にアプリのリロードを自動的に行わせるため nodemon を 入れておくと良い $ npm install

    - D nodemon • package.jsonのscriptsセクションを編集 "scripts": { "start": "nodemon index.js", "debug": "nodemon --inspect index.js" } $ npm run start • 以下でアプリを開始すると、exportの度にリロードが行われる
  31. initializeメソッドを定義 • PjCounterでcounterを初期化してログを出してみる initialize super initialize. counter := PjCounter new.

    console log: counter count ◦ SsExpressCounterApp exportApp で更新 ▪ 0が表示される initialization SsExpressCounterApp
  32. ルーティングの定義 • initRoutes メソッドを定義してinitializeから呼ぶように変更 initRoutes server get: '/' handler: [

    :req :res | res send: 'hello' ] initialize super initialize. counter := PjCounter new. self initRoutes • exportApp で更新するとブラウザにhelloと出るようになる
  33. partials/main.ejs • MithrilAppのindex.htmlからapp部分を拝借 ◦ 後でhtmxを使うため hx-get, hx-target の指定が入っている <div id="app"

    class="hero"> <div class="container"> <p class="title">Counter</p> <p id="counter" class="subtitle is-size-1">0</p> <button hx-get="/reset" hx-target="#counter" class="button is-danger"> Reset </button> <button hx-get="/increment" hx-target="#counter" class="button is-primary"> Increment </button> </div> </div>
  34. EJSの利用 • initRoutes のhandler: 内をejsを使う形に変更 initRoutes server set: 'view engine'

    to: 'ejs'. server get: '/' handler: [ :req :res | self renderIndex: res ] initialization SsExpressCounterApp renderIndex: res res render: 'pages/index' rendering SsExpressCounterApp ◦ index.ejs の内容が表示されるようになる
  35. Counter部分のレンダリング • ボタンを押すと404になる • htmxの hx-get で/increment, /reset に対してGET は飛ぶようになって

    いる • hx-targetの指定で、GETの結果のHTMLはid="counter"のタグに反映さ れる ◦ ルーティングを追加し、counter部分のHTMLを返すようにする <button hx-get="/increment" hx-target="#counter" class="button is-primary"> Increment </button>
  36. initRoutesの修正 • increment, reset のルーティングを追加 ◦ GETリクエストがあったらモデルを更新し renderCounter: でレンダリング initRoutes

    server set: 'view engine' to: 'ejs'. server get: '/' handler: [ :req :res | self renderIndex: res ]. server get: '/increment' handler: [ :req :res | counter increment. self renderCounter: res ]. server get: '/reset' handler: [ :req :res | counter reset. self renderCounter: res ] initialization SsExpressCounterApp
  37. hyperscriptで連打対策 • ちょっとしたロジックをクライアント側に入れたい時 ◦ Incrementボタン連打の間隔をhyperscriptで調整 <div id="app" class="hero"> <div class="container">

    <p class="title">Counter</p> <p id="counter" class="subtitle is-size-1">0</p> <button hx-get="/reset" hx-target="#counter" class="button is-danger"> Reset </button> <button hx-get="/increment" hx-target="#counter" class="button is-primary" _="on click toggle [@disabled='true'] for 0.1s"> Increment </button> </div> </div>