Well, it’s sure been a long time since I’ve written a book chapter. Code Happy was released almost
12 months ago and amassed a total of nearly three thousand sales. Let’s see if I still remember how
to do this “writing” thing.
word about this book on Twitter! The suggested tweet for this book is: I just bought Laravel: Code Bright by @daylerees . http://leanpub.com/codebright The suggested hashtag for this book is #codebright. Find out what other people are saying about the book by clicking on this link to search for this hashtag on Twitter: https://twitter.com/search?q=#codebright
girlfriend Emma, for not only putting up with all my nerdy ventures, but also for taking the amazing red panda shots for both books! Love you Emma! Taylor Otwell, the last year has been incredible, thank you for giving me the opportunity to be part of the team, and for your friendship. Thanks for making a framework that’s a real pleasure to use, makes our code read like poetry, and for putting so much time and passion into it’s development. I have really enjoyed working with you on this new version of Laravel, and hope to work with you again on future projects! Eric Barnes, Phill Sparks, Shawn McCool, Jason Lewis, Ian Landsman, thanks for all the support with the framework and for being good pals. Thanks to my parents, who have been supporting my nerdy efforts for close to twenty eight year! Also thanks for buying a billion copies of the first book or so for family members! Thank you to everyone who bought the first book Code Happy, and all of the Laravel community. Without your support a second title would have never happened.
may have improved since the last one, but I assure you that there will be many, many errors. You can help support the title by sending an email with any errors you have found to [email protected]¹ along with the section title. Errors will be fixed as they are discovered. Fixes will be released within future editions of the book. ¹mailto:[email protected]
about the content of the book or otherwise by sending an email to [email protected]² or send a tweet to @daylerees. I will endeavour to reply to all mail that I receive. ²mailto:[email protected]
your language please send an email to [email protected]³ with your intentions. I will offer a 50/50 split of the the profits from the translated copy, which will be priced at the same as the English copy. Please note that the book is written in markdown format. ³mailto:[email protected]
written a book chapter. Code Happy was released almost 12 months ago and amassed a total of nearly three thousand sales. Let’s see if I still remember how to do this “writing” thing. If you have read the previous title you will already know that I am firstly a developer, and secondly a writer. For this reason you won’t find any long words in this book. Nothing that would impress Shakespeare (apart from the spelling errors?). What you will get is straight talking, simple to understand information about the Laravel framework. You will also get passion! Not the sweaty bed sheets type of passion, but enthusiasm for the Laravel framework which cannot be rivalled. I like to write my books as if I were standing right in front of you having a conversation. In fact, if you really want a conversation then come and see me in the Laravel IRC channel! Now it’s time for one of those little ‘about the author’ paragraphs. No one really wants to read it, but it never hurts to stroke the ego a little, does it? My name is Dayle Rees (it says so on the cover!) and I am a web developer and a design enthusiast. I come from a little town on the coast of Wales called Aberystwyth. At the time of writing my last book ‘Code Happy’ I worked for the National Library of Wales in Aberystwyth, which is one of three copyright libraries in the United Kingdom. I have since moved to Cardiff, which is the capital city of Wales and have started working with BoxUK. BoxUK is an internet consultancy and development organisation in which I get to work with a team of developers who are passionate about the world of web development. Web development isn’t just my work, it’s also my hobby. I enjoy finding useful and interesting pieces of code or beautiful designs. I believe that our skills let us do wonderfully creative things, and I love seeing ideas come to life. A little over a year ago I began helping the Laravel community with bundles of code, web designs, and helping out any way that I could. Since then my involvement has increased. Laravel is now my primary open source project and I am now a member of the core development team for the framework. With Laravel 4 (codenamed Illuminate) my involvement has hit a new high. I have been working alongside Taylor Otwell to make this release the best framework that you will have ever used. Don’t take my word for it! Start using it and thank us later when you can’t stop smiling while coding. Laravel is an example of how even a development tool can be creative. Laravel’s beautiful syntax straight from the genius mind of Taylor Otwell cannot be rivalled. It enables us to write code that will read like nerd poetry, and will allow us to enjoy our coding tasks. So Dayle, what has changed since the last release of the framework?
nothing! Laravel 4 has been rewritten from the ground up, allowing for increased flexibility and testability along with a billion (not entirely accurate - don’t count them) new features. Where Laravel 3 gave you some freedom with how to structure your code, Laravel 4 will allow hackers to go wild and change the framework to suit their needs. When I hear that something has improved I am always looking for a catch, but with Laravel 4 there isn’t one. It still has the beautiful and expressive syntax you love; you might even find that you love it more! So why did you write a new book? Code Happy covered the version stretch between 3.0 and 3.2.x, and with nearly three thousand copies sold I must have done something right. Sure, I could have probably re-worked the entire book to work with Laravel 4. However, this version of the framework is reinvention. If I was to update the book you would lose all the information about version 3 which I believe is still great framework. Many people will have large projects based on Laravel 3 and I think that they should have access to the information in Code Happy if they need it. Then there’s my own experiences. I have learned a lot about writing a book since finishing Code Happy. I have learned about my common mistakes, which I can now avoid. I can improve on what I have already done, and I hope to do so. I didn’t read Code Happy! Should I read that first? You can if you want to, I put some funny jokes in there. However this book is one for beginners, and so we will start from the very basics. If you have already been using Laravel go ahead and skip to the interesting bits to see what has changed. If you are new to the framework then I would suggest you stick with me and read it from cover to cover. Don’t worry! I will try to keep it interesting. Soon you will be building wonderfully expressive PHP applications with Laravel. When will the book be complete? As with my previous title, this book is a published while in progress title. It means that you get each chapter as I write it. In its current state the book may not be complete, but as I add additional chapters you will receive an email and will be able to download the updates for free. I feel that this method of writing offers a great deal of flexibility. I can be relaxed about my writing knowing that I can change something easily if I have got it wrong. By not rushing to hit a deadline I can write a book that I feel will be of greater quality. I can update the title for future versions, or to highlight additional information. You will be able to access the content faster. It also allows me to release the title alongside the launch of the new version of the framework.
now you should be eager to start the learning process. Jump right in and start enjoying Laravel. Feel free to send me a tweet or a message on IRC if you want a chat!
a true fan of Code Happy I just can’t put anything past you! Well done loyal reader! You see, Laravel 4 uses a number of new technologies regularly. These technologies can easily be taught on their own and parallel to the framework. With this in mind, I thought it might be best to open with a chapter about this new tech to ‘prime’ you for your learning experience. Experienced web developers may have already come across these technologies, or have already been using them. You are welcome to skip any of the primer chapters if you want to. I won’t be upset. No really… go on. You don’t need me anymore.. If you are still reading I’m going to assume you are my friend. Not like those traitors who skipped straight to the routing chapter! Let’s jump right in to our first primer to talk about PHP namespaces. Namespaces In PHP version 5.3 a new feature known as namespacing was added to the language. Many modern languages already had this feature for some time, but PHP was a little late to the scene. None the less, every new feature has a purpose. Let’s find out why PHP namespaces can benefit our application. In PHP you can’t have two classes that share the same name. They have to be unique. The issue with this restriction is that if you are using a third party library which has a class named User, then you can’t create your own class also called User. This is a real shame, because that’s a pretty convenient class name right? PHP namespaces allow us to circumvent this issue, in fact we can have as many User classes as we like. Not only that, but we can use namespaces to contain our similar code into neat little packages, or even to show ownership. Let’s take a look at a normal class. Yes… I know you have used them before. Just trust me on this one okay? Global Namespace Here’s a really simple class.
5 class Eddard 6 { 7 8 } There’s nothing special to it, if we want to use it then we can do this. 1 <?php 2 3 // app/routes.php 4 5 $eddard = new Eddard(); Dayle, I know some PHP… Okay, okay sorry. Basically, we can think of this class as being in the ‘global’ namespace. I don’t know if that’s the right term for it, but it sounds quite fitting to me. It essentially means that the class exists without a namespace. It’s just a normal class. Simple Namespacing Let’s create another class alongside the original, global Eddard. 1 <?php 2 3 namespace Stark; 4 5 // app/models/another.php 6 7 class Eddard 8 { 9 10 } Here we have another Eddard class, with one minor change. The addition of the namespace directive. The line namespace Stark; informs PHP that everything we do is relative to the Stark namespace. It also means that any classes created within this file will live inside the ‘Stark’ namespace. Now, when we try to use the ‘Eddard’ class once again.
5 $eddard = new Eddard(); Once again, we get an instance of the first class we created in the last section. Not the one within the ‘Stark’ namespace. Let’s try to create an instance of the ‘Eddard’ within the ‘Stark’ namespace. 1 <?php 2 3 // app/routes.php 4 5 $eddard = new Stark\Eddard(); We can instantiate a class within a namespace, by prefixing it with the name of the namespace, and separating the two with a backward (\) slash. Now we have an instance of the ‘Eddard’ class within the ‘Stark’ namespace. Aren’t we magical?! You should know that namespaces can have as many levels of hierarchy as they need to. For example: 1 This\Namespace\And\Class\Combination\Is\Silly\But\Works The Theory of Relativity Remember how I told you that PHP always reacts relative to the current namespace. Well let’s take a look at this in action. 1 <?php 2 3 namespace Stark; 4 5 // app/routes.php 6 7 $eddard = new Eddard(); By adding the namespace directive to the instantiation example, we have moved the execution of the PHP script into the ‘Stark’ namespace. Now because we are inside the same namespace as the one we put ‘Eddard’ into, this time we receive the namespaced ‘Eddard’ class. See how it’s all relative? Now that we have changed namespace, we have created a little problem. Can you guess what it is? How do we instantiate the original ‘Eddard’ class? The one not in the namespace. Fortunately, PHP has a trick for referring to classes that are located within the global namespace, we simply prefix them with a backward (\) slash.
5 $eddard = new \Eddard(); With the leading backward (\) slash, PHP knows that we are referring to the ‘Eddard’ in the global namespace, and instantiates that one. Use your imagination a little, like how Barney showed you. Imagine that we have another namespaced class called Tully\Edmure. Now we want to use this class from within the ‘Stark’ framework. How do we do that? 1 <?php 2 3 namespace Stark; 4 5 // app/routes.php 6 7 $edmure = new \Tully\Edmure(); Again, we need the prefixing backward slash to bring us back to the global namespace, before instantiating a class from the ‘Tully’ namespace. It could get tiring, referring to classes within other namespaces by their full hierarchy each time. Luckily, there’s a nice little shortcut we can use. Let’s see it in action. 1 <?php 2 3 namespace Stark; 4 5 use Tully\Edmure; 6 7 // app/routes.php 8 9 $edmure = new Edmure(); Using the use statement, we can bring one class from another namespace, into the current namespace. Allowing us to instantiate it by name only. Now don’t ask me why it doesn’t need the backward slash prefix, because I just don’t know. This is the only exception that I know of. Sorry about that! You can prefix it with a slash if you want to though, you just don’t need to. To make up for that horrible inconsistency, let me show you another neat trick. We can give our imported classes little nicknames, like we used to in the PHP playground. Let me show you.
5 use Tully\Brynden as Blackfish; 6 7 // app/routes.php 8 9 $edmure = new Blackfish(); By using the ‘as‘ keyword, we have given our ‘Tully/Brynden’ class the ‘Blackfish’ nickname, allowing us to use the new nickname to identify it within the current namespace. Neat trick right? It’s also really handy if you need to use two similarly named classes within the same namespace, for example: 1 <?php 2 3 namespace Targaryen; 4 5 use Dothraki\Daenerys as Khaleesi; 6 7 // app/routes.php 8 9 class Daenerys 10 { 11 12 } 13 14 // Targaryen\Daenerys 15 $daenerys = new Daenerys(); 16 17 // Dothraki\Daenerys 18 $khaleesi = new Khaleesi(); By giving the ‘Daenerys’ within the ‘Dothraki’ namespace a nickname of ‘Khaleesi’, we are able to use two ‘Daenerys’ classes by name only. Handy right? The game is all about avoiding conflicts, and grouping things by purpose or faction. You can use as many classes as you need to.
5 use Dothraki\Daenerys; 6 use Stark\Eddard; 7 use Lannister\Tyrion; 8 use Snow\Jon as Bastard; Structure Namespaces aren’t just about avoiding conflicts, we can also use them for organisation, and for ownership. Let me explain with another example. Let’s say I want to create an open source library. I’d love for others to use my code, it would be great! The trouble is, I don’t want to cause any problematic class name conflicts for the person using my code. That would be terribly inconvenient. Here’s how I can avoid causing hassle for the wonderful, open source embracing, individual. 1 Dayle\Blog\Content\Post 2 Dayle\Blog\Content\Page 3 Dayle\Blog\Tag Here we have used my name, to show that I created the original code, and to separate my code from that of the person using my library. Inside the base namespace, I have created a number of sub-namespaces to organise my application by its internal structure. In the composer section, you will learn how to use namespaces to simplify the act of loading class definitions. I strongly suggest you take a look at this useful mechanism. Limitations In truth, I feel a little guilty for calling this sub-heading ‘Limitations’. What I’m about to talk about isn’t really a bug. You see, in other languages, namespaces are implemented in a similar way, and those other languages provide an additional feature when interacting with namespaces. In Java for example, you are able to import a number of classes into the current namespace by using the import statement with a wildcard. In Java, ‘import’ is equivalent to ‘use’, and it uses dots to separate the nested namespaces (or packages). Here’s an example.
of the classes that are located within the ‘dayle.blog’ package. In PHP you can’t do that. You have to import each class individually. Sorry. Actually, why am I saying sorry? Go and complain to the PHP internals team instead, only, go gentle. They have given us a lot of cool stuff recently. Here’s a neat trick you can use however. Imagine that we have this namespace and class structure, as in the previous example. 1 Dayle\Blog\Content\Post 2 Dayle\Blog\Content\Page 3 Dayle\Blog\Tag We can give a sub-namespace a nickname, to use it’s child classes. Here’s an example: 1 <?php 2 3 namespace Baratheon; 4 5 use Dayle\Blog as Cms; 6 7 // app/routes.php 8 9 $post = new Cms\Content\Post; 10 $page = new Cms\Content\Page; 11 $tag = new Cms\Tag; This should prove useful if you need to use many classes within the same namespace. Enjoy! Next we will learn about Jason. No, not Jason Lewis the aussie, but JSON strings. Just turn the page and you’ll see what I mean! JSON What is JSON? JSON stands for JavaScript Object Notation. It was named this way because JavaScript was the first language to take advantage of the format. Essentially, JSON is a human readable method of storing arrays and objects with values as strings. It is used primarily for data transfer, and is a lot less verbose than some of the other options such as XML.
part of your application requires some data from the back- end without a page reload. This is normally achieved using JavaScript with an AJAX request. Many software APIs also serve content using this file format. Twitter’s own is a fine example of such an API. Since version 5.2.0, PHP has been able to serialize objects and arrays to JSON. This is something I have personally abused a billion or so times and was a great addition to the language. If you have been working with PHP for a while, you may have already used its serialize() method. to represent a PHP object as a string. You are then able to use the unserialize() to transform the string into a new instance containing the original value. It’s roughly what we will be using JSON for. However, the advantage is that JSON can be parsed by a variety of different languages, where as serialize()d strings can only be parsed by PHP. The additional advantage is that we (as humans, and pandas) can read JSON strings, but PHP serialized strings will look like garbage. Enough back story, let’s dive right in and have a look at some JSON. JSON Syntax 1 {"name":"Lushui","species":"Panda","diet":"Green Things","age":7,"colours":["red"\ 2 ,"brown","white"]} Yay JSON! Okay, so when I said it was readable to humans I may have forgotten to mention something. By default JSON is stored without any white space between its values which might make it a little more difficult to read. This is normally to save on bandwidth when transferring the data. Without all the extra whitespace, the JSON string will be much shorter and thus be less bytes to transfer. The good news is that JSON doesn’t care about whitespace or line breaks between its keys and values. Go wild! Throw all the white space you want in there to make it readable. Sure, we could do this by hand (let’s not), but there are plenty of tools out there on the web to beautify JSON. I won’t choose one for you. Go hunting! You might even find extensions for your web browser to allow you to read JSON responses from web servers more easily. I highly recommend finding one of these! Let’s add some whitespace to the JSON from before to make it easier to read. (Honestly, I did do this by hand. Don’t try this at home folks.)
"Panda", 4 "diet": "Green Things", 5 "age": 7, 6 "colours": ["red", "brown", "white"] 7 } Aha! There we go. We now have a JSON string representing the red panda that lives on the cover of my books. Lushui safely guards your Laravel knowledge from prying eyes. As you can see from the example, we have a number of key-value pairs. Within one of the key-value pairs we have an array. In honesty, if you have used some JavaScript before you may wonder what’s changed here? In fact, let’s have a look at how this would be represented in JavaScript. 1 var lushui = { 2 name: 'Lushui', 3 species: 'Panda', 4 diet: 'Green Things', 5 age: 7, 6 colours: ['red', 'brown', 'white'] 7 }; Hopefully, you will have spotted some similarities between the JavaScript and JSON snippets. The JavaScript snippet is assigning an object literal to a variable, like this: 1 var lushui = { .. }; Well, JSON is a data transfer format, and not a language. It has no concept of variables. This is why you don’t need the assignment within the JSON snippet. The method of representing an object literal is very similar. This is no coincidence! As I said before, JSON was originally invented for use with JavaScript. In both JSON and JavaScript, objects are contained within { two curly braces } and consist of key- value pairs of data. In the JavaScript variant the keys didn’t require quotes because they represent variables, but we just heard that JSON doesn’t have variables. This is fine since we can use strings as keys, and that’s exactly what JSON does to work around this problem. You may also have noticed that I used single quotes around the JavaScript values. This is a trap! That behaviour is perfectly acceptable with JavaScript, but JSON strings must be contained within double quotes. You must remember this, young padawan! In both JavaScript and JSON, key-value pairs must be separated with a colon (:), and sets of key- value pairs must be separated with a comma (,).
You can see that the value for Lushui’s age is set to an integer value of seven. 1 age: 7, JSON will allow the following value types. • Double • Float • String • Boolean • Array • Object • Null Numeric values are represented without quotes. Be careful when choosing whether to quote a value or not. For example, US zip codes consist of five numbers. However, if you were to omit the quotes from a zip code, then 07702 would act as an integer and be truncated to 7702. This has been a mistake that has taken many a life of a web-faring adventurer. Booleans are represented by the words true and false, both without quotes much like PHP itself. As I said before, string values are contained within double quotes and not single quotes. The null value works in a similar way to PHP, and is represented by the word null without quotes. This should be easy to remember! We have seen objects. Much like the main JSON object itself, they are wrapped with curly braces and can contain all sorts of value types. Arrays once again look very similar to their JavaScript counterpart. 1 // JavaScript 2 ['red', 'brown', 'white'] 3 4 5 ["red", "brown", "white"] *Note You will notice that I didn’t add an inline comment for the JSON snippet in the above example. That’s because JSON doesn’t support commenting since it’s used for data transfer. Keep that in mind! As you can see the arrays for both are wrapped within [ square braces ], and contain a list of comma (,) separated values with no indexes. Once again the only difference is that double quotes must be used for strings within JSON. Are you getting bored of me saying that yet? As I mentioned above, the values that can be contained within JSON include both objects and arrays. The clever chaps amongst my readers (aka all of you) may have realised that JSON can support nested objects and arrays. Let’s have a look at that in action!
[ 4 { "The": "secret" }, 5 { "is": "that" }, 6 { "I": "still" }, 7 { "love": "shoes!" } 8 ] 9 } 10 } Okay. Take a deep breath. Here we have a JSON object containing an object containing an array of objects. This is perfectly fine, and will allow JSON to represent some complex data collections. JSON and PHP As I mentioned earlier, since version 5.2.0 PHP has provided support for serializing and unserializing data to and from the JSON format. Let’s go ahead and have a look at that in action. Serialize a PHP array to JSON To serialize a PHP value we need only use the json_encode() method. Like this: 1 <?php 2 3 $truth = array('panda' => 'Awesome!'); 4 echo json_encode($truth); The result of this snippet of code would be a JSON string containing the following value. 1 {"panda":"Awesome!"} Great! That’s more like it. Let’s make sure that we can convert this data back into a format that can be understood by PHP. Unserialize a PHP array from a JSON string For this we will use the json_decode() method. I bet you didn’t see that one coming?
4 echo $truth['panda']; Awesome! We go… wait, what? 1 Fatal error: Cannot use object of type stdClass as array in ... You see, the json_decode() method doesn’t return our JSON as a PHP array; it uses a stdClass object to represent our data. Let’s instead access our object key as an object attribute. 1 <?php 2 3 $truth = json_decode('{"panda":"Awesome!"}'); 4 echo $truth->panda; 5 6 // Awesome! Great! That’s what we wanted. If we wanted an array then PHP provides a number of ways to convert this object into one, but fortunately json_decode() has another trick up its sleeve! If you provide true as the second parameter to the function we will receive our PHP array exactly as expected. Thanks json_decode()! 1 <?php 2 3 $truth = json_decode('{"panda":"Awesome!”}', true); 4 echo $truth['panda']; 5 6 // Awesome! Huzzah! So you might be wondering why I just wrote a gigantic chapter on JSON within a Laravel book. Furthermore, you are probably asking why I’m choosing to answer this question at the end of the chapter!? It’s just more fun that way. In the next section we will be taking a look at a new package manager for PHP. When we start looking at Composer you will understand why a knowledge of JSON is so important.
world of PHP. It has changed the way we handle application dependencies, and quelled the tears of many PHP developers. You see, in the olden days, when you wanted to build an application that relied on third party dependencies you would have to install them with PEAR or PECL. These two dependency managers both have a very limited set of outdated dependencies and have been a thorn in the side of PHP developers for a long time. When a package is finally available you could download a specific version and it would be installed on your system. However, the dependency is linked to PHP rather than your application itself. This means that if you had two applications that required different versions of the same dependencies… well, you’re gonna have a bad time. Enter Composer, king of the package managers. First let’s think about packages, what are they? First of all, let’s forget the concept of ‘applications’ and ‘projects’ for now. The tool that you are building is called a package. Imagine a little box containing everything needed to run your application, and describe it. This box requires only one piece of paper (file) inside for it to be registered as a package. Configuration You learned JSON in the last chapter, right? So you are ready for this now! Remember that I told you JSON was used for data transfer between web applications? Well I lied. It’s not that I’m nasty, it just made it easier to teach the topic with a smaller scope of its ability. I do this a lot, expect many lies! Do you remember how JSON represents a complex piece of data? Well, for that reason, why can’t we use it within flat files to provide configuration? That’s exactly what the Composer guys thought. Who are we to argue with them? JSON files use the .json extension. Composer expects its configuration to live at the root of your package along with the filename composer.json. Remember this! Laravel will use this file often. Let’s open it up and start entering some information about our package.
"Mutants saving the world for people who hate them.", 4 "keywords": ["mutant", "superhero", "bald", "guy"], 5 "homepage": "http://marvel.com/xmen", 6 "time": "1963-09-01", 7 "license": "MIT", 8 "authors": [ 9 { 10 "name": "Stan Lee", 11 "email": "[email protected]", 12 "homepage": "http://marvel.com", 13 "role": "Genius" 14 } 15 ] 16 } Right, here we have a composer.json file at the root of a package for the X-Men. Why the X-Men? They are awesome, that’s why. Truth be told, all of the options (keys) in this file are optional. Normally you would provide the above information if you intended to redistribute the package or release it into the wild. To be quite honest with you, I normally go ahead and fill in this information anyway. It doesn’t do any harm. The configuration above is used to identify the package. I have omitted a few keys that I felt were reserved for special circumstances. If you are curious about any additional config I would recommend checking out the Composer website⁴ which contains a wealth of information and documentation. I also found this handy cheat sheet⁵ online, which may be useful for newcomers to Composer when creating new packages. Mouse over each line to discover more about the configuration items. Anyway, let’s have a closer look at the configuration we have created for the X-Men package. 1 "name": "marvel/xmen", This is the package name. If you have used Github⁶ then the name format will be familiar to you, but I’m going to explain it anyway. The package name consists of two words separated by a forward slash (/). The part before the forward slash represents the owner of the package. In most circumstances developers tend to use ⁴http://getcomposer.org/ ⁵http://composer.json.jolicode.com/ ⁶http://github.com
I fully agree with this notion. You can, however, use whatever name you like. Be sure to keep it consistent across all packages that belong to you. The second part of the name string is the package name. Keep it simple and descriptive. Once again, many developers choose to use the repository name for the package when hosted on Github, and once again I fully agree with this system. 1 "description": "Mutants saving the world for people who hate them.", Provide a brief description of the functionality of the package. Remember, keep it simple. If the package is intended for open source then you can go into detail within the README file for your repository. If you want to keep some personal documentation then this isn’t the place for it. Maybe get it tattooed on your back, and keep a mirror handy? That makes the most sense to me. Sticky notes will also work well though. 1 "keywords": ["mutant", "superhero", "bald", "guy"], These keywords are an array of strings used to represent your package. They are similar to tags within a blogging platform, and essentially serve the same purpose. The tags will provide useful search metadata for when your package is listed within a repository. 1 "homepage": "http://marvel.com/xmen", The homepage configuration is useful for packages due to be open sourced. You could use the homepage for the project, or maybe the Github repository URL? Whatever you feel is more informative. Once again I must remind you that all of these configuration options are optional. Feel free to omit them if they don’t make sense for your package. 1 "time": "1963-09-01", This is one of those options that I don’t see very often. According to the cheat sheet, it represents the release date of your application or library. I’d imagine that it’s not required in most circumstances because of the fact that most packages are hosted on Github, or some other version control site. These sites normally date each commit, each tag, and other useful events. Formats accepted for the time configuration are YYYY-MM-DD and YYYY-MM-DD HH:MM:SS. Go ahead and provide these values if you feel like it!
due to be redistributed then you will want to provide a license with it. Without a license, many developers will not be able to use the package at all due to legal restrictions. Choose a license that suits your requirements, but isn’t too restrictive to those hoping to use your code. The Laravel project uses the MIT license which offers a great deal of freedom. Most licenses require you to keep a copy of the license within the source repository, but if you also provide this configuration entry within the composer.json file, then the package repository will be able to list the package by its license. The authors section of the configuration provides information about the package authors, and can be useful for package users wishing to make contact. Note that the authors section will allow an array of authors for collaborative packages. Let’s have a look at the options given. 1 "authors": [ 2 { 3 "name": "Stan Lee", 4 "email": "[email protected]", 5 "homepage": "http://marvel.com", 6 "role": "Genius" 7 } 8 ] Use an object to represent each individual author. Our example only has one author. Let’s take a look at Stan Lee. Not only does he have a cameo in every Marvel movie, but he’s also managed to make it into my book. What a cheeky old sausage! 1 "name": "Stan Lee", I don’t really know how to simplify this line. If you are having trouble understanding it then you might want to consider closing this book, and instead pursue a career in sock puppetry. 1 "email": "[email protected]", Be sure to provide a valid email address so that you can be contacted if the package is broken. 1 "homepage": "http://marvel.com", This time a personal homepage can be provided, go ahead and leech some hits!
the author’s role within the project. For example, developer, designer, or even sock puppetry artist. If you can’t think of something accurate then put something funny. That’s all you need to describe your package, now let’s look at something more interesting. Dependency management! Dependency Management You have a box that will contain the X-Men. Only there aren’t a lot of mutants in that box yet. To build a great superhero team (application) you will need to enlist the support of other mutants (3rd party dependencies). Let’s have a look at how Composer will help us accomplish this. 1 { 2 "name": "marvel/xmen", 3 "description": "Mutants saving the world for people who hate them." 4 "keywords": ["mutant", "superhero", "bald", "guy"], 5 "homepage": "http://marvel.com/xmen", 6 "time": "1963-09-01", 7 "license": "MIT", 8 "authors": [ 9 { 10 "name": "Stan Lee", 11 "email": "[email protected]", 12 "homepage": "http://marvel.com", 13 "role": "Genius" 14 } 15 ], 16 "require": { 17 18 } 19 } We now have a new section within our composer.json called require. This will be used to list our dependenc… mutants. From now on I’ll be omitting the rest of the configuration, and just showing the require block to shorten the examples. Make sure you know where it really lives though! We know that the X-Men will depend on: • Wolverine • Cyclops
of others, but these guys are pretty cool. We will stick with them for now. You see, we could copy the source files for these guys into our application directly, but then we would have to update them ourselves with any changes. That could get really boring. Let’s add them to the require section so that Composer will manage them for us. 1 "require": { 2 "xmen/wolverine": "1.0.0", 3 "xmen/cyclops": "1.0.1", 4 "xmen/storm": "1.2.0", 5 "xmen/gambit": "1.0.0" 6 } Here we are listing the packages for our mutant dependencies, and the versions that we would like to use. In this example, they all belong to the same owner as the X-Men package, but they could just as easily belong to another person. Most redistributable packages are hosted on a version control website such as Github⁷ or Bitbucket⁸. Version control repositories often have a tagging system where we can define stable versions of our application. For example with git we can use the command: 1 git tag -a 1.0.0 -m 'First version.' With this we have created version 1.0.0 of our application. This is a stable release which people can depend on. Let’s have a closer look at the Gambit dependency. 1 "xmen/gambit": "1.0.0" You should know by now that Composer package names consist of an owner and a package nickname separated by a forward slash (/) character. With this information we know that this is the gambit package written by the xmen user. Within the require section, the key for each item is the package name, and the value represents the required version. In the case of Gambit, the version number matches up to the tag available on Github where the code is versioned. Do you see how the versions of dependencies are now specific to our application, and not the whole system? ⁷http://github.com ⁸http://bitbucket.org
you like to your project. Go ahead, add a billion! Prove me wrong. Listen, do you want to know a secret? Do you promise not to tell? Woah, oh oh. Closer, let me whisper in your ear. Say the words you long to hear… Your dependencies can have their own dependencies. That’s right! Your dependencies are also Composer packages. They have their own composer.json files. This means that they have their own require section with a list of dependencies, and those dependencies might even have more dependencies. Even better news, is that Composer will manage and install these nested dependencies for you. How fantastic is that? Wolverine might need tools/claws, tools/yellow-mask, and power/regeneration but you don’t have to worry about that. As long as you require the xmen/wolverine package then Composer will take care of the rest. As for dependency versions, they can assume a number of different forms. For example, you might not care about minor updates to a component. In which case, you could use a wildcard within the version, like this: 1 "xmen/gambit": "1.0.*" Now Composer will install the latest version that starts with 1.0. For example, if Gambit had versions 1.0.0 and 1.0.1, then 1.0.1 would be installed. Your package might also have a minimum or maximum boundary for package versions. This can be defined using the greater-than and less-than operators. 1 "xmen/gambit": ">1.0.0" The above example would be satisfied by any versions of the xmen/gambit package that have a greater version number than 1.0.0. 1 "xmen/gambit": "<1.0.0" Similarly, the less-than operator is satisfiable by packages less than the version 1.0.0. Allowing your package to specify a maximum version dependency. 1 "xmen/gambit": "=>1.0.0" 2 "xmen/gambit": "=<1.0.0" Including an equals sign = along with a comparison operator will result in the comparative version being added to the list of versions which satisfy the version constraint. Occasionally, you may wish to enter more than one version, or provide a range value for a package version. More than one version constraint can be added by separating each constraint with a comma (,). For example:
be satisfied by the 1.0.1 version. If you don’t want to install stable dependencies, for example, you might be the type that enjoys bungee jumping or sky diving, then you might want to use bleeding edge versions. Composer is able to target branches of a repository using the following syntax. 1 "xmen/gambit": "dev-branchname" For example, if you wanted to use the current codebase from the develop branch of the Gambit project on Github, then you would use the dev-develop version constraint. 1 "xmen/gambit": "dev-develop" These development version constraints will not work unless you have a correct minimum stability setting for your package. By default Composer uses the stable minimum compatibility flag, which will restrict its dependency versions to stable, tagged releases. If you would like to override this option, simply change the minumum-stability configuration option within your composer.json file. 1 "require": { 2 "xmen/gambit": "dev-master" 3 }, 4 "minimum-stability": "dev" There are other values available for the minimum stability setting, but explaining those would involve delving into the depths of version stability tags. I don’t want to overcomplicate this chapter by looking at those. I might come back to this chapter later and tackle that topic, but for now I’d suggest looking at the Composer documentation for package versions⁹ to find additional information on the topic. Sometimes, you may find yourself needing to use dependencies that only relate to the development of your application. These dependencies might not be required for the day-to-day use of your application in a production environment. Composer has got your back covered in this situation thanks to its require-dev section. Let’s imagine for a moment that our application will require the Codeception testing framework¹⁰ to provide acceptance tests. These tests won’t be any use in our production environment, so let’s add them to the require-dev section of our composer.json. ⁹http://getcomposer.org/doc/01-basic-usage.md#package-versions ¹⁰http://codeception.com/
}, 4 "require-dev": { 5 "codeception/codeception": "1.6.0.3" 6 } The codeception/codeception package will now only be installed if we use the --dev switch with Composer. There will be more on this topic in the installation and usage section. As you can see above, the require-dev section uses exactly the same format as the require section. In fact, there are other sections which use the same format. Let’s have a quick look at what’s available. 1 "conflict": { 2 "marvel/spiderman": "1.0.0" 3 } The conflict section contains a list of packages that would not work happily alongside our package. Composer will not let you install these packages side by side. 1 "replace": { 2 "xmen/gambit": "1.0.0" 3 } The replace section informs you that this package can be used as a replacement for another package. This is useful for packages that have been forked from another, but provide the same functionality. 1 "provide": { 2 "xmen/gambit": "1.0.0" 3 } This section indicates packages that have been provided within the codebase of your package. If the Gambit packages source was included within our main package then it would be of little use to install it again. Use this section to let Composer know which packages have been embedded within your primary package. Remember, you need not list your package dependencies here. Anything found in require doesn’t count.
} Your package might have a number of extra packages that enhance its functionality, but aren’t strictly required. Why not add them to the suggest section? Composer will mention any packages in this section as suggestions to install when running the Composer install command. Well that’s all I have on dependencies. Let’s take a look at the next piece of Composer magic. Autoloading! Auto Loading By now we have the knowledge to enable Composer to retrieve our package dependencies for us, but how do we go about using them? We could require() the source files ourselves within PHP, but that requires knowing exactly where they live. Ain’t nobody got time for dat. Composer will handle this for us. If we tell Composer where our classes are located, and what method can be used to load them then it will generate its own autoload, which can be used by your application to load class definitions. Actions speak louder than words, so let’s dive right in with an example. 1 "autoload": { 2 3 } This is the section in which all of our autoloading configurations will be contained. Simple, right? Great! No sock puppetry for you. Let’s have a look at the simplest of loading mechanisms, the files method. 1 "autoload": { 2 "files": [ 3 "path/to/my/firstfile.php", 4 "path/to/my/secondfile.php" 5 ] 6 } The files loading mechanism provides an array of files which will be loaded when the Composer autoloader component is loaded within your application. The file paths are considered relative to your project’s root folder. This loading method is effective, but not very convenient. You won’t want to add every single file manually for a large project. Let’s take a look at some better methods of loading larger amounts of files.
"src/Models", 4 "src/Controllers" 5 ] 6 } The classmap is another loading mechanism which accepts an array. This time the array consists of a number of directories which are relative to the root of the project. When generating its autoloader code, Composer will iterate through the directories looking for files which contain PHP classes. These files will be added to a collection which maps a file path to a class name. When an application is using the Composer autoloader and attempts to instantiate a class that doesn’t exist, Composer will step in and load the required class definition using the information stored in its map. There is, however, a downside to using this loading mechanism. You will need to use the composer dump-autoload command to rebuild the class map every time you add a new file. Fortunately there is a final loading mechanism, and the best of all, which is intelligent enough to not require a map. Let’s first learn about PSR-0 class loading. PSR-0 class loading was first described in the PSR-0 PHP standard, and provides a simple way of mapping PHP name-spaced classes to the files that they are contained in. Know that if you add a namespace declaration to a file containing your class, like this: 1 <?php 2 3 namespace Xmen; 4 5 class Wolverine 6 { 7 // ... 8 } Then the class becomes Xmen\Wolverine and as far as PHP is concerned it is an entirely different animal to the Wolverine class. Using PSR-0 autoloading, the Xmen\Wolverine class would be located in the file Xmen/Wolverine.php. See how the namespace matches up with the directory that the class is contained within? The Xmen namespaced Wolverine class is located within the Xmen directory. You should also note that the filename matches the class name, including the uppercase character. Having the filename match the class name is essential for PSR-0 autoloading to function correctly. Namespaces may have several levels, for example, consider the following class.
5 class Time 6 { 7 // ... 8 } The Time class is located within the Super\Happy\Fun namespace. So PHP will recognise it as Super\Happy\Fun\Time and not Time. This class would be located at the following file path. 1 Super/Happy/Fun/Time.php Once again, see how the directory structure matches the namespace? Also, you will notice that the file is named exactly the same as the class. That’s all there is to PSR-0 autoloading. It’s quite simple really! Let’s have a look at how it can be used with Composer to simplify our class loading. 1 "autoload": { 2 "psr-0": { 3 "Super\\Happy\\Fun\\Time": "src/" 4 } 5 } This time, our psr-0 autoloading block is an object rather than an array. This is because it requires both a key and a value. The key for each value in the object represents a namespace. Don’t worry about the double backward slashes. They are used because a single slash would represent an escape character within JSON. Remember this when mapping namespaces in JSON files! The second value is the directory in which the namespace is mapped. I have found that you don’t actually need the trailing slash, but many examples like to use it to denote a directory. This next bit is very important, and is a serious ‘Gotcha’ for a lot of people. Please read it carefully. The second parameter is not the directory in which classes for that namespace are located. Instead, it is the directory which begins the namespace to directory mapping. Let’s take a look at the previous example to illustrate this. Remember the super happy fun time class? Let’s have another look at it.
5 class Time 6 { 7 // ... 8 } Well, we now know that this class would be located in the Super/Happy/Fun/Time.php file. With that in mind, consider the following autoload snippet. 1 "autoload": { 2 "psr-0": { 3 "Super\\Happy\\Fun\\Time": "src/" 4 } 5 } You might expect Composer to look in src/Time.php for the class. This would be incorrect, and the class would not be found. Instead, the directory structure should exist in the following format. 1 src/Super/Happy/Fun/Time.php This is something that catches so many people out when first using Composer. I can’t stress enough how important this fact is to remember. If we were to run an installation of Composer now, and later add a new class Life.php to the same namespace, then we would not have to regenerate the autoloader. Composer knows exactly where classes with that namespace exist, and how to load them. Great! You might wonder why I put my namespaces files in a src folder? This is a common convention when writing Composer based libraries. In fact, here is a common directory/file structure for a Composer package. 1 src/ (Classes.) 2 tests/ (Unit/Acceptance tests.) 3 docs/ (Documentation.) 4 composer.json Feel free to keep to this standard, or do whatever makes you happy. Laravel provides its own locations for classes which we will describe in a later chapter. Now that you have learned how to define your autoload mechanisms, it’s time that we looked at how to install and use Composer, so that you can start taking advantage of its autoloader.
I chose to cover installation and usage at the end of this chapter? I feel that having a good knowledge of the configuration will help you understand what Composer is doing behind the scenes as we are using it. Let me know! The following installation methods will be specifically for unix based development environments such as Linux or Mac OSX. I’m hoping that Taylor might be able to edit this chapter and provide information on installing Composer in a Windows environment, since I avoid that particular operating system like the plague. Composer is a PHP based application, so you should have the CLI client for PHP installed before attempting to use it. Double check this by running the following command. 1 php -v If PHP has been installed correctly, you will see something similar to.. 1 $ php -v 2 PHP 5.4.4 (cli) (built: Jul 4 2012 17:28:56) 3 Copyright (c) 1997-2012 The PHP Group 4 Zend Engine v2.4.0, Copyright (c) 1998-2012 Zend Technologies 5 with XCache v2.0.0, Copyright (c) 2005-2012, by mOo If the output states that you are using anything less than PHP version 5.3.2, then you aren’t going to be able to use Composer until you upgrade your PHP version. In fact, if you are using anything less than PHP 5.3.7 then you won’t be able to use Laravel at all. You can use CURL to download Composer. Mac OSX comes with it by default. Many Linux distributions will have CURL within their software repositories, if it has not already been installed as standard. Let’s use CURL to download Composer’s executable. 1 curl -sS https://getcomposer.org/installer | php Experienced linux users may be concerned that CURL is piping the installation script into PHP. This is a fair concern, but the Composer installation has been used by thousands of developers and has been proven to be secure. Don’t let it put you off using this lovely piece of software! Assuming the installation process was completed successfully (it will tell you), you will now have a composer.phar file in your application directory. This is the executable that can be used to launch Composer, for example..
list of commands that are available to you. Now, you could continue to use Composer this way, but I would suggest installing it globally. That way it can be used across all of your Composer projects, and will have a shorter command to execute it. To install Composer globally, simply move it to a location within your PATH environmental variable. You can see these locations by using the following command. 1 echo $PATH However, /usr/local/bin is an acceptable location for most systems. When we move the file, we will also rename it to composer to make it much easier to launch. Here is the command we need: 1 sudo mv composer.phar /usr/local/bin/composer Having installed Composer globally, we can now use the following shorter syntax to see the same list of commands. This command is also executable from any location on the system. 1 composer Hey, that’s a lot cleaner isn’t it? Let’s start using this thing. Usage Let’s assume that we have created the following composer.json file in our package directory. 1 { 2 "name": "marvel/xmen", 3 "description": "Mutants saving the world for people who hate them." 4 "keywords": ["mutant", "superhero", "bald", "guy"], 5 "homepage": "http://marvel.com/xmen", 6 "time": "1963-09-01", 7 "license": "MIT", 8 "authors": [ 9 { 10 "name": "Stan Lee", 11 "email": "[email protected]", 12 "homepage": "http://marvel.com", 13 "role": "Genius"
Cloning bc0e1f0cc285127a38c6c8ea88bc5dba2fd56642 24 25 Writing lock file 26 Generating autoload files Remember that these are fake packages used as an example. Downloading them won’t work! They are however more fun, since they are X-men! Yay! So why are there seven packages installed when I only listed four? Well you are forgetting that Composer automatically manages the dependencies of dependencies. The three extra packages are dependencies of the xmen/wolverine package. I’d imagine you are probably wondering where these packages have been installed to? Composer creates a vendor directory in the root of your project to contain your package’s source files. The package xmen/wolverine can be found at vendor/xmen/wolverine, where you will find its source files along with its own composer.json. Composer also stores some of its own files relating to the autoload system in the vendor/composer directory. Don’t worry about it. You will never have to edit it directly. So how do we take advantage of the awesome autoloading abilities? Well the answer to that is even simpler than setting up the autoloading itself. Simply require() or include() the vendor/autoload.php file within your application. For example: 1 <?php 2 3 require 'vendor/autoload.php'; 4 5 // Your awesome application bootstrap here! Great! Now you can instantiate a class belonging to one of your dependencies, for example.. 1 <?php 2 3 $gambit = new \Xmen\Gambit; Composer will do all the magic and autoload the class definition for you. How fantastic is that? No more littering your source files with thousands of include() statements. If you have added a file in a class-mapped directory, you will need to run a command before Composer is able to load it.
rebuild all mappings and create a new autoload.php for you. What if we want to add another dependency to our project? Let’s add xmen/beast to our composer.json file. 1 { 2 "name": "marvel/xmen", 3 "description": "Mutants saving the world for people who hate them.", 4 "keywords": ["mutant", "superhero", "bald", "guy"], 5 "homepage": "http://marvel.com/xmen", 6 "time": "1963-09-01", 7 "license": "MIT", 8 "authors": [ 9 { 10 "name": "Stan Lee", 11 "email": "[email protected]", 12 "homepage": "http://marvel.com", 13 "role": "Genius" 14 } 15 ], 16 "require": { 17 "xmen/wolverine": "1.0.0", 18 "xmen/cyclops": "1.0.1", 19 "xmen/storm": "1.2.0", 20 "xmen/gambit": "1.0.0", 21 "xmen/beast": "1.0.0" 22 }, 23 "autoload": { 24 "classmap": [ 25 "src/Xmen" 26 ] 27 } 28 } Now we need to run composer install again so that Composer can install our newly added package.
2 Installing dependencies 3 4 - Installing xmen/beast (1.1.0) 5 Cloning bc0e1f0c34343347a38c232132132121a2fd53e94 6 7 Writing lock file 8 Generating autoload files Now xmen/beast has been installed and we can use it right away. Smashing! You may have noticed the following line in the output from the composer install command. 1 Writing lock file You might also have noticed that Composer has created a file called composer.lock at the root of your application. What’s that for I hear you cry? The composer.lock file contains the information about your package at the time that the last composer install or composer update was performed. It also contains a list of the *exact version of each dependency that has been installed. Why is that? It’s simple. Whenever you use composer install when a composer.lock file is present in the directory, it will use the versions contained within the file instead of pulling down fresh versions of each dependency. This means that if you version your composer.lock file along with your application source (and I highly recommend this), when you deploy to your production environment it will be using the exact same versions of dependencies that have been tried and tested in your local development environment. This means you can be sure that Composer won’t install any dependency versions that might break your application. Note that you should never edit the composer.lock file manually. While we are on the topic of dependency versions, why not find out about updating them? For example if we had the following requirement in our composer.json file. 1 "xmen/gambit": "1.0.*" Composer might install version 1.0.0 for us. However, what if the package was updated to 1.0.1 a few days later? Well, we can use the composer update command to update all of our dependencies to their latest versions. Let’s have a look at the output.
repositories with package information 3 Updating dependencies (including require-dev) 4 5 - Installing xmen/gambit (1.0.1) 6 Cloning bc0e1f0cc285127a38c6c8ea88bc5dba2fd56642 7 8 Generating autoload files Great! The xmen/gambit package has been updated to its latest version, and our composer.lock file has been updated. If we wanted to update only that one dependency rather than all of them, we could specify the package name when using the update command. For example: 1 composer update xmen/gambit Wait, what’s that (including require-dev) bit mean? Well you must remember the require-dev section in the composer.json file where we list our development only dependencies? Well, Composer expects the update command to be only executed within a safe development or testing environment. For this reason, it assumes that you will want your development dependencies, and downloads them for you. If you don’t want it to install development dependencies then you can use the following switch. 1 composer update --no-dev Also, if you would like to install dependencies when using the install command, simply use the following switch. 1 composer install --dev The last thing you should know, is that you can use the composer self-update command to update the Composer binary itself. Be sure to use sudo if you have installed it globally. 1 sudo composer self-update Well, that just about covers all the Composer knowledge we will need when working with Laravel. It has been a lot of information to take in, and a long chapter for these weary fingers, but I hope you have gained something from it. If you feel that a particular topic needs expanding, be sure to let me know!
learning experience, and for that reason, I have decided to include this chapter. If you are busting to get started with your coding, feel free to skip it. However, I think it will be really useful down the line to learn how Laravel is constructed. In Laravel 3, the IoC container was a component that confused a lot of people. In Laravel 4, it is the part of the framework that holds everything together. I can’t begin to express its importance. Well, actually, I need to for this chapter to make sense. Let’s give it a go. The Container In Laravel 4, the container gets created early during the bootstrap process. It’s an object called $app. So when we talk about a container, what comes to mind? Let’s have a look at the dictionary definition. Why? I’m not sure… I’ve seen other authors do it though. I don’t want them to look down on me. Here we go. Noun - Container. An object used for or capable of holding, esp for transport or storage, such as a carton, box, etc. I think the description fits the Laravel container component rather well. It’s certainly used to store things. Let’s be honest… if it didn’t store things, then ‘Container’ would be a terrible name. As for transport, it certainly makes it easier to ‘move’ other components around the framework when we need to access them. It’s not really a carton, or a box. It’s more of a keyed storage system. Once the $app object has been created, you can access it from anywhere using the app() helper method. In all honesty, you probably won’t need to. This is due to a feature that we will explain later in this chapter. Let’s get a hold of the app object and take a look at it. We can do this in our app/routes.php file.
var_dump($app); 6 7 die(); Note that we don’t need to use the app() helper within the app/routes.php file. It’s available in the global scope, so we can access it directly. Woah, that’s a huge object! Well I guess it should be… it’s the core of the framework. You will notice that it’s an instance of Illuminate\Foundation\Application. All of the Laravel 4 components live within the Illuminate namespace. It was a codename used during the early stages of the framework’s design, and we just don’t have the heart to remove it. Think of it as Laravel “illuminating” the world of PHP! If we take a look at the source for the Application class, we will see that it extends Container. Go ahead, you can find the source at: https://github.com/laravel/framework/blob/master/src/Illuminate/Foundation/Application.php¹¹ The Container class is where all the magic happens. It also implements the ArrayAccess interface. This is a special interface that allows the attributes of an object to be accessed as an array in a similar fashion to that of JavaScript object literals. For example, the following two methods of accessing object attributes would both be possible: 1 <?php 2 3 $object->attribute = 'foo'; 4 $object['attribute'] = 'foo'; During the bootstrap of the framework, a number of service provider classes are executed. These classes serve the purpose of registering the framework’s individual components within the application container. So what do I mean by a component? Well, a framework is made up of many different parts. For example, we have a routing layer, a validation system, an authentication layer, and many more packages of code which handle a specific function. We call these our framework components, and they all fit together within the container to create the complete framework. If you are a first time user of Laravel, then this next example won’t make a great deal of sense to you. Don’t dwell on it! It’s just something for Laravel 3 users to think about. Take a look at this. ¹¹https://github.com/laravel/framework/blob/master/src/Illuminate/Foundation/Application.php
$app['router']->get('/', function() 6 { 7 return 'Thanks for buying Code Bright!'; 8 }); Here we are accessing the routing layer within the container to create a route that responds to a ‘GET’ HTTP request. This will be familiar to Laravel 3 users, although the syntax will look a little strange. As you can see, we are accessing the routing component using an array syntax on our container. This is the magic provided by the ArrayAccess interface. If we wanted to, we could also access the routing layer like this: 1 <?php 2 3 // app/routes.php 4 5 $app->router->get('/', function() 6 { 7 return 'Seriously, thanks for buying Code Bright!'; 8 }); Accessing the component as an attribute of our container works exactly the same as the method we used earlier. It’s not very pretty though, is it? I mean, if you are new to the framework, you have probably heard about Laravel’s beautiful syntax. If you used Laravel 3 previously, then you have already been enjoying it. Surely we aren’t going to ruin that reputation? Of course not! Let’s have a look at some more magic in action. Facades My buddy Kenny Meyers gave the original book ‘Code Happy’ a lovely review on The Nerdary¹². I’d love to repay the favor. He told us at the last Laravel conference that he has difficulty with the pronunciation of certain words, and I bet this one is tricky. So for Kenny, and those who don’t speak English as their first language, here’s how you pronounce Facade. ¹²http://www.thenerdary.net/
using a static method. For example, the routing example in the last chapter would look like this: 1 <?php 2 3 // app/routes.php 4 5 Route::get('/', function() 6 { 7 return 'Thanks Kenny, we love you!'; 8 }); It looks beautiful… we have a descriptive name for the component, and often a verb describing the action performed on that component. Unfortunately, experienced developers will cringe at the sight of a static method. You see, static methods can be rather difficult to test. I don’t want complicate things so early in the book by explaining why that is, so you will have to trust me. This created a big problem during the design of Laravel 4. We love our beautifully simple syntax, but we also want to embrace coding best practice, and this includes writing many, many, tests to ensure that our code is robust. Fortunately, Taylor came up with the wonderful idea of Facade classes, named after the ‘Facade’ design pattern. Using Facades can have the best of both worlds. Pretty static methods, yet instantiated components with public methods. This means that our code is beautiful, and highly testable. Let’s see how it works. In Laravel 4, there are a number of classes that are aliased to the root namespace. These are our Facade classes, and they all extend the Illuminate\Support\Facades\Facade class. This class is very clever. I’m going to explain its cleverness with some code samples. You see, we can use a static routing method, just like in good old Laravel 3, like this: 1 <?php 2 3 // app/routes.php 4 5 Route::get('/', function() 6 { 7 return 'Thanks for Facades, Taylor!'; 8 });
class. Each Facade is linked to an instance of a component in the container. The static methods of a Facade are shortcuts, and when called, they call the appropriate public method of the object that they represent within the container. This means that the Route::get() method will actually call the following method: 1 <?php 2 3 // app/routes.php 4 5 $app['router']->get('/', function() 6 { 7 return 'Thanks for Facades, Taylor!'; 8 }); Why is this important? Well, you see, it offers a great deal of flexibility. Flexibility What does flexibility mean? I’m not going to refer to the dictionary this time. I know that it means the ability to change. That’s a rather good explanation of the benefit of the container. You see, we can change, or rather, replace objects and components that have been registered within the container. This offers us a great deal of power. Let’s imagine for a moment that we don’t really like how the routing layer works (don’t worry, you will love it, just imagine that you don’t). Since we are all epic coders, we’ll go ahead and write our own routing layer, with the primary class being called SuperRouter. Due to the flexibility of the container, we can replace the routing layer with our own. It’s honestly as easy as you might imagine. We just assign our router to the existing router index. Let’s see this in action. Oh, please note that I don’t recommend doing this right now, especially if you are a beginner. It just makes for a great example. 1 <?php 2 3 // app/routes.php 4 5 $app['router'] = new SuperRouter(); Now, not only can we use our router by accessing it directly within the container, but our Route Facade will continue to access this component. In fact, it gets even more impressive. When you replace Laravel’s components, the framework will attempt to use your replacement component for its tasks, just as if it was its own. Allowing access to core framework components in this way offers a great deal of power to you the user. You sure are spoiled aren’t you!
Laravel is made from a set of individual components. Each component is responsible for its own little bit of functionality. This means that they are very respectful of the single responsibility principle. In fact, many of the Laravel components can act alone, completely decoupled from the framework. For this reason, copies of the components can be found under the Illuminate organisation on github¹³. This set of components is also available on Packagist¹⁴ so that you can take advantage of them in your own projects that leverage Composer. So why is the chapter called Robustness? Well you see, every component used by the Laravel framework is well tested. The entire framework contains a suite of over 900 tests and 1700 assertions. Thanks to the tests, we can accept contributions and make changes that will provide a fruitful future for the framework, without worrying about whether a change has broken something, or removed existing functionality. Well, that’s enough about architecture. I bet you’re ready to get stuck into some development right? Let’s get started. ¹³https://github.com/illuminate ¹⁴https://packagist.org/
language. While PHP is known to have a less than desirable syntax, it is easy to use, easy to deploy, and can be found powering many of the modern web sites you use day to day. Laravel not only provides useful shortcuts, tools, and components to help you achieve success with all of your web based projects, but it also aims to fix some of PHP’s flaws. Laravel has a beautiful, semantic, and creative syntax that allows it to stand out among a large number of frameworks available for the language. This makes PHP a joy to use, without sacrificing power and efficiency. Laravel is a great choice for amateur projects and enterprise solutions alike, and whether you are a seasoned pro with the language, or a newcomer, Code Bright will help you turn the ideas you have into fully functional web applications. Let’s have a quick look at the requirements for both the framework and this book. Requirements • A Computer Reading is great, but you will learn more from playing with the examples that you find in the book. • A Webserver Laravel needs a web server. It doesn’t matter which one you use but I find the majority of the community use either Apache or Nginx and doing the same will make it much easier to find support if needed. • PHP: Hypertext Preprocessor 5.3 or greater Laravel is a PHP framework, it requires the PHP programming language. Trust me you are going to need this one. Since Laravel uses some modern features of the language you will also need version 5.3.7 or greater. You can find out the PHP version used by most web servers by typing php -v at the console, or using the phpinfo() method. • A Database Server While not a requirement of the framework, many of the examples in the book interact with a database. For this reason I would recommend setting up a database server supported by the PDO connector. While I would recommend using the flexible and free MySQL by Su.. Oracle, other popular database servers include SQL Server, Postgres and SQLite. • A Text Editor You will need this to play with the examples found within the book. I highly recommend Sublime Text 2, and while it’s not free, it is extremely sexy. There are however millions of editors and IDEs available, find one that suits the way you work. Now before we can start working on our Laravel projects, we must first download a copy of the framework.
is the right title for this section. However, I couldn’t really think of anything better. You see, Laravel has a Github repository that acts as a kind of ‘template’ for your new Laravel application. Let’s copy that down to our local machine. We will use git to ‘clone’ the repository down to a folder on our development web server. Here is the command. 1 git clone https://github.com/laravel/laravel.git my_project Now you will have a template application for Laravel within the my_project folder. You might find others referring to this template as the ‘app package’. This package will contain your entire application and the entire directory will likely be versioned. Some experienced Laravel users may remember a directory called laravel which used to contain the files that would power the framework. We sometimes would refer to this as the frameworks ‘core’ files. Well this directory can no longer be found. Leveraging the power of Composer, the core files for the framework now exist as a separate package that is a dependency of our template package. Let’s take a look at the composer.json file within our my_project directory to see what’s new. 1 { 2 "require": { 3 "laravel/framework": "4.0.*" 4 }, 5 "autoload": { 6 "classmap": [ 7 "app/commands", 8 "app/controllers", 9 "app/models", 10 "app/database/migrations", 11 "app/database/seeds", 12 "app/tests/TestCase.php" 13 ] 14 }, 15 "scripts": { 16 "post-update-cmd": "php artisan optimize" 17 }, 18 "minimum-stability": "dev" 19 }
may have changed since this section was last updated. The result however, will remain the same. Our application package depends only upon the laravel/framework package, which contains all of the components needed to power your application. This composer.json file is ours. It is for our application and we may edit it however we please. However, some sensible defaults have been provided for you. I also wouldn’t recommend removing the laravel/framework package. Very bad things will happen. Right now we only have a template. Let’s run composer install to install the frameworks core. 1 Loading composer repositories with package information 2 Installing dependencies 3 - Installing doctrine/lexer (dev-master bc0e1f0) 4 Cloning bc0e1f0cc285127a38c6c8ea88bc5dba2fd53e94 5 6 - Installing doctrine/annotations (v1.1) 7 Loading from cache 8 9 ... Many more packages here. ... 10 11 - Installing ircmaxell/password-compat (1.0.x-dev v1.0.0) 12 Cloning v1.0.0 13 14 - Installing swiftmailer/swiftmailer (dev-master e77eb35) 15 Cloning e77eb358a1aa7157afb922f33e2afc22f6a7bef2 16 17 - Installing laravel/framework (dev-master 227f5b8) 18 Cloning 227f5b85cc2201b6330a8f7ea75f0093a311fe3b 19 20 predis/predis suggests installing ext-phpiredis (Allows faster serialization and \ 21 deserialization of the Redis protocol) 22 symfony/translation suggests installing symfony/config (2.2.*) 23 symfony/translation suggests installing symfony/yaml (2.2.*) 24 symfony/routing suggests installing symfony/config (2.2.*) 25 symfony/routing suggests installing symfony/yaml (2.2.*) 26 symfony/event-dispatcher suggests installing symfony/dependency-injection (2.2.*) 27 symfony/http-kernel suggests installing symfony/class-loader (2.2.*) 28 symfony/http-kernel suggests installing symfony/config (2.2.*) 29 symfony/http-kernel suggests installing symfony/dependency-injection (2.2.*) 30 symfony/debug suggests installing symfony/class-loader (~2.1) 31 monolog/monolog suggests installing mlehner/gelf-php (Allow sending log messages \ 32 to a GrayLog2 server) 33 monolog/monolog suggests installing ext-amqp (Allow sending log messages to an AM\
suggests installing ext-mongo (Allow sending log messages to a Mo\ 36 ngoDB server) 37 monolog/monolog suggests installing doctrine/couchdb (Allow sending log messages \ 38 to a CouchDB server) 39 monolog/monolog suggests installing raven/raven (Allow sending log messages to a \ 40 Sentry server) 41 Writing lock file 42 Generating autoload files Once again, the package versions may have changed, but the result will still be the same. Well that sure was a long list of packages! What are they all for? Well, you see, Laravel leverages the power of open source, and the wealth of packages that exist on Composer. These packages are dependencies of the framework itself. You should definitely take after Laravel and check out the packages that are listed on the Packagist website¹⁵. There’s no point in re-inventing the wheel when it comes to boilerplate code. Since you have read the Composer chapter, you will now know that the core files for Laravel have been installed to the vendor folder. You don’t really want to version your dependencies along the code, so Laravel has provided a sample .gitignore file to ignore the vendors folder, along with a few other sensible defaults. We’re almost done setting up our Laravel development environment. Only one topic remains. How to set up your webserver. Web Server Configuration This section was always going to be a difficult one to write. You see, everyone has a slightly different setup, and there are a number of different web servers available. So here’s what I’m going to do. I will cover the basics of where the web server needs to be pointed. I will also provide some sample configurations for common web servers. They will however be very generic, and require many tweaks to fit into every situation. Still, you can’t say I didn’t try! Let’s have a look at what the goal is here. Laravel has a directory called public which contains its bootstrap code. This code used to launch the framework, and handle all requests to your application. The public folder also contains all of your public assets, such as JavaScript, CSS and images. Essentially, anything that can be accessed via a direct link should exist within the public directory. What does this mean for our web server configuration? Well our first task is to make sure that the web server is looking in the right place. We need to edit its configuration so that it will be looking at the public directory, and not the root of our project. ¹⁵http://packagist.org
the web server know how to handle pretty URLs. I chose a really cool domain name, don’t I already have a pretty URL? Sadly, that’s not quite how it works. Life isn’t all cakes and pies you know? The Laravel bootstrap exists within a file called index.php within the public folder. All requests to the framework are going to go through this file. This means that by default, the URL to our guestbook page will look like this: 1 http://islifeallcakesandpies.com/index.php/guestbook Our websites users don’t really need to know that everything is being directed through index.php. It’s also not a great feature for search engine optimisation. For that reason our web server should be configured to remove the index.php from the URL, leaving only the ‘pretty’ segment remaining. Normally this is achieved by a piece of config crafted by a regular expression wizard. Let’s now take a look at some sample web server configurations that will allow us to achieve the goals mentioned above. Once again I must remind you that these configurations are to be used as rough guidance. For more detailed information on server configuration I would recommend visiting the documentation for the web server that you have chosen. Let’s start with nginx. Nginx Nginx, pronounced ‘engine-X’, is a wonderful web server that I have recently started using. For me the choice was simple. It performed much faster than apache, and didn’t require XML(ish) configuration. It all made sense to me. On a Debian based linux distribution, like Ubuntu, you can install nginx and PHP by running the following command. 1 sudo apt-get install nginx php5-fpm The second package is PHP-FPM, a FastCGI module that will allow nginx to execute PHP code. On Mac these packages are available on Macports¹⁶. The required packages can be installed with the following command. 1 sudo port install php54-fpm nginx Your Nginx site configuration files are normally located at /etc/nginx/sites-enabled. Here is a template that you can use to setup a new site. ¹⁶http://www.macports.org/
all; 45 } 46 47 } Now, not all web servers are going to be the same. This means that providing a generic configuration to suit all situations would be an impossible task. Still, it’s enough to get you started. I’ve shared the standard configurations used in this chapter on Github so that everyone can contribute to them. You can find them in the daylerees/laravel-website-configs¹⁷ repository. While nginx is a great choice of web server, the Apache web server is also widely used. Let’s take a look at how to configure it. Apache The Apache web server can be installed on Debian based systems using the following command. 1 sudo apt-get install apache2 php5 Here’s an Apache VirtualHost configuration that will fit most situations, feel free to contribute to the repository on github¹⁸ if any amendments are needed. 1 <VirtualHost *:80> 2 3 # Host that will serve this project. 4 ServerName app.dev 5 6 # The location of our projects public directory. 7 DocumentRoot /path/to/our/public 8 9 # Useful logs for debug. 10 CustomLog /path/to/access.log common 11 ErrorLog /path/to/error.log 12 13 # Rewrites for pretty URLs, better not to rely on .htaccess. 14 <Directory /path/to/our/public> 15 <IfModule mod_rewrite.c> 16 Options -MultiViews ¹⁷http://github.com/daylerees/laravel-website-configs ¹⁸http://github.com/laravel-website-configs
19 RewriteRule ^ index.php [L] 20 </IfModule> 21 </Directory> 22 23 </VirtualHost> Project Structure I had a chapter in the previous book that covered the directory structure of the package, and where everything likes to live. I think there was a lot of value in this chapter, so I’d like to reiterate it along with the directory structure changes that have happened since Laravel 3. This section of the getting started will assume that you have already ran composer install on a fresh Laravel 4 project. Project Root Let’s start by taking a look at the root folder structure. • app/ • bootstrap/ • vendor/ • public/ • .gitattributes • .gitignore • artisan • composer.json • composer.lock • phpunit.xml • server.php Why don’t we have a run through these root items? Sounds like a great idea to me! app First up we have the app directory. App is used to provide a default home for all of your projects custom code. This includes classes that provide application functionality, config files, and more. The app folder is quite important, so rather than giving it a poor summary in a single paragraph, we will cover it in detail at the end of this section. For now, just know this is where your project files live. bootstrap
bootstrap directory contains a few files that relate to the startup procedures of the framework. The autoload.php file contains most of these procedures, and should only be edited by experienced Laravel users. The paths.php file builds an array of the common filesystem paths that are used by the framework. If for some reason you decide to alter the directory structure of the framework packages, you may need to alter the contents of this file to reflect your changes. The start.php file contains more startup procedures for the framework. I don’t want to dig into these in detail right now as that may cause unnecessary confusion. Instead you should probably take note that framework environments can be set here. If you don’t know what the environments are used for then don’t worry. We will cover that later! Simply put, the contents of the bootstrap directory should only be edited by experienced Laravel users who need to alter the shape of the framework on the filesystem. If you are new to Laravel, then just ignore it for now, but don’t delete it! Laravel needs this directory to function. vendor The vendor directory contains all of the composer packages that are used by your application. This, of course, includes the Laravel framework package. For more information about this directory please refer back to the Composer primer chapter. public • packages/ • .htaccess • favicon.ico • index.php • robots.txt The public directory should be the only web facing directory of a Laravel application. It’s normally where your assets such as CSS, Javascript files and images will live. Let’s have a closer look at the contents. The packages directory will be used to contain any assets that need to be installed by third party packages. They are kept in a separate directory so that they don’t conflict with our applications own assets. Laravel 4 ships with a standard .htaccess file for the Apache web server. It contains some standard configuration directives that will make sense for most users of the framework. If you use an alternative web server you can either ignore this file or delete it.
look at the directory index of a site to find a favicon.ico file. This is the file that controls the little 16 x 16px image that is displayed in your browsers tabs. The trouble is, when this file doesn’t exist the web server likes to complain about it. This causes unnecessary log entries. To counteract this problem Laravel has provided a default, blank favicon.ico file, which can be later replaced if so desired. The index.php file is the Laravel framework front controller. It’s the first file that the web server hits when a request is received from the browser. This is the file that will launch the framework bootstrap and start the ball rolling so to speak. Don’t delete this file, it wouldn’t be a good idea! Laravel has included standard robots.txt file that allows all hosts by default. This is for your convenience, feel free to alter this file as necessary. .gitattributes Laravel has provided some default Git version control configuration for use out of this box. Git is currently the most popular choice of version control. If you don’t intend to version your project with Git then feel free to remove these files. .gitignore The .gitignore file contains some defaults to inform the Git version control system of which folders should not be versioned. You should note that this also includes both the vendor directory and the application storage directory. The vendor directory has been included to prevent third party packages being versioned. The composer.lock has also been included, although you may wish to remove this entry, and version your lock file to allow for your production environment to install the exact same dependency versions as your development environment. You will find more on this topic within the Composer primer chapter. artisan The artisan file is an executable which is used to execute the Artisan command line interface for Laravel. Artisan contains a number of useful commands to provide shortcuts or additional functionality to the framework. Its commands will be covered in detail in a later chapter. composer.json and composer.lock Both the composer.json and composer.lock file, contain information about the composer packages used by this project. Once again, you can find more information about these files within the Composer primer chapter. phpunit.xml The phpunit.xml file provides a default configuration for the PHP Unit testing framework. It will handle the loading of composer dependencies, and execute any tests located in the app/tests folder. Information on testing with Laravel will be revealed in a later chapter, stay tuned! server.php
built in webserver to create an easy means of executing your web applications. Simply use the artisan serve command to launch a local development webserver for the application. The Application Directory Here is where your application will take its shape. It is the directory in which you will spend most of your time. For that reason, why don’t we get better acquainted with it? • commands/ • config/ • controllers/ • database/ • lang/ • models/ • start/ • storage/ • tests/ • views/ • filters.php • routes.php commands The commands directory contains any custom artisan command line interface commands that are required by your application. You see the Artisan CLI not only provides default functionality to help you build your project, but you may also create custom commands to do your bidding. config The configuration for both the framework and your application are kept within this directory. Laravel’s configuration exists as a set of PHP files containing key-value arrays. This directory will also contain sub directories which allow for different configurations to be loaded in different environments. controllers As the name suggests, this directory will hold your controllers. Controllers can be used to provide application logic, and to glue the separate parts of your application together. This directory has been added to the default composer.json as a classmap autoload location for your convenience. database Should you choose to use a database as a method of long term storage, then this directory will be used to hold the files that will create your database schema, and methods for seeding it with sample data. The default SQLite database is also located in this directory.
with arrays of strings that can be used to provide localisation support to your application. Sub folders named by region allow for string files to exist for multiple languages. models The models directory will contain your models. Surprised? Models are used to represent your business model, or provide interaction with storage. Confused? Don’t worry. We will cover models in detail in a later chapter. Know that a User model has been provided for you to enable application authentication ‘out of the box’. Like the controllers directory, this has been added to the classmap autoload section of the default composer.json. start Where the bootstrap directory contains the startup procedures that belong to the framework, the start directory contains startup procedures that belong to your application. As always, some sensible defaults have been provided for you. storage When Laravel needs to write anything to disk, it does so within the storage directory. For this reason your web server must be able to write to this location. tests The tests directory will contain all of the unit and acceptance tests for your application. The default PHP Unit configuration that has been included with Laravel, will look for tests within this directory by default. views The views directory is used to contain the visual templates for your application. A default hello view has been provided for your convenience. filters.php The filters.php file is used to contain the route filters for your application. You will learn more about filters in a future chapter. routes.php The routes file contains all of the routes for your application. You don’t know what routes are? Well, let’s not waste any more time then. Onwards to the next chapter!
out in the wilderness of… What country has a wilderness? Australia! That will do. Don’t freak out! This section requires a little imagination, so work with me on this one. I suppose our main character should have a name because books seem to do that. Hmm… let’s call him Browsy Mc’Request. Browsy Mc’Request is walking along a straight, muddy, path somewhere in kangaroo country. Browsy isn’t a native to this land and has found himself lost with no idea where he is heading. He does, however know where he wants to be. A friend had earlier told him about “Jason Lewis’ Shelter for Moustached Marsupials”. He knows that Movember is fast approaching and the Kangaroo stylists will need all the help they can get. All of a sudden, Browsy spots what looks like a fork in the road way off in the distance. Excited at seeing anything other than his old familiar straight, muddy path, he sprints towards the fork hoping he might find some kind of direction. Upon reaching the fork, he searches high and low for any indication of which path might lead to the shelter, but finds nothing. Fortunately for Browsy, at that exact moment, a wild web developer appears. The strong and handsome web developer slams a signpost into the tough, dry dirt with ease, and dashes away in the blink of an eye. Browsy is left dumbfounded by both the speed and rugged handsomeness of the web developer. Did I mention he was handsome? The web developer… not Browsy. Browsy looks kind of like THAT GUY from THAT BOOK who keeps saying ‘my precious’ a lot. At least that’s how I see it. After catching his breath, Browsy begins to study the signpost. To the left you will find “Bob’s Bobcat Riding Stables”, and to the right… ah! Here we go. To the right you will find “Jason Lewis’ Shelter for Moustached Marsupials”. Browsy eventually found his way to the Marsupial Shelter and lived a long and happy life learning to groom the many types of moustaches that kangaroos are able to grow. You see, the moral of the story is that without a (HANDSOME) developer showing him the way, Browsy Mc’Request wouldn’t have found his way to our applic… to the Marsupial Shelter. Just like in the story, a web browser request wouldn’t be directed to your application logic without some form of routing.
a request being made to the Laravel framework. 1 http://domain.com/my/page In this example, we are using the http protocol (used by most web browsers) to access your Laravel application hosted on domain.com. The my/page portion of the URL is what we will use to route web requests to the appropriate logic. I’ll go ahead and throw you in at the deep end. Routes are defined in the app/routes.php file, so let’s go ahead and create a route that will listen for the request we mentioned above. 1 <?php 2 3 // app/routes.php 4 5 Route::get('my/page', function() { 6 return 'Hello world!'; 7 }); Now enter http://domain.com/my/page into your web browser, replacing domain.com with the address to your Laravel application. This is likely localhost. If everything has been configured correctly, you will now see the words ‘Hello world!’ in wonderful Times New Roman! Why don’t we have a closer look at the route declaration to see how it works. Routes are always declared using the Route class. That’s the bit right at the start, before the ::. The get part is a method on the route class that is used to ‘catch’ requests that are made using the HTTP verb ‘GET’ to a certain URL. You see, all requests made by a web browser contain a verb. Most of the time, the verb will be GET, which is used to request a web page. A GET request gets sent every time you type a new web address into your web browser. It’s not the only request though. There is also POST, which is used to make a request and supply a little bit of data with it. These are normally the result of submitting a form, where data must be sent to the web server without displaying it in the URL. There are other HTTP verbs available as well. Here are some of the methods that the routing class has available to you:
5 Route::get(); 6 Route::post(); 7 Route::put(); 8 Route::delete(); 9 Route::any(); All of these methods accept the same parameters, so feel free to use whatever HTTP verb is correct in the given situation. This is known as RESTful routing. We will go into more detail on this topic later. For now, all you need to know is that GET is used to make requests, and that POST is used when you need to send additional data with the request. The Route::any() method is used to match any HTTP verb. However, I would recommend using the correct verb for the situation you are using it in to make the application more transparent. Let’s get back to the example at hand. Here it is again to refresh your memory: 1 <?php 2 3 // app/routes.php 4 5 Route::get('my/page', function() { 6 return 'Hello world!'; 7 }); The next portion of the snippet is the first parameter to the get() (or any other verb) method. This parameter defines the URI that you wish the URL to match. In this case, we are matching the URI my/page. The final parameter is used in this instance to provide the application logic to handle the request. Here we are using a Closure, which is also known as an anonymous function. Closures are simply functions without a name that can be assigned to variables, as with other simple types. For example, the snippet above could also be written as:
5 $logic = function() { 6 return 'Hello world!'; 7 }; 8 9 Route::get('my/page', $logic); Here we are storing the Closure within the $logic variable, and later passing it to the Route::get() method. In this instance, Laravel will execute the Closure only when the current request is using the HTTP verb GET and matches the URI my/page. Under these conditions, the return statement will be processed and the “Hello world!” string will be handed to the browser. You can define as many routes as you like, for example: 1 <?php 2 3 // app/routes.php 4 5 Route::get('first/page', function() { 6 return 'First!'; 7 }); 8 9 Route::get('second/page', function() { 10 return 'Second!'; 11 }); 12 13 Route::get('third/page', function() { 14 return 'Potato!'; 15 }); Try navigating to following URLs to see how our application behaves. 1 http://domain.com/first/page 2 http://domain.com/second/page 3 http://domain.com/third/page You will likely want to map the root of your web application. For example..
to house your application’s home page. Let’s create a route to match this. 1 <?php 2 3 // app/routes.php 4 5 Route::get('/', function() { 6 return 'In soviet Russia, function defines you.'; 7 }); Hey, wait a minute! We don’t have a forward slash in our URI?! CALM YOURSELF READER! You are becoming frantic. You see, a route containing only a forward slash will match the URL of the website, whether it has a trailing backslash or not. The route above will respond to either of the following URLs. 1 http://domain.com 2 http://domain.com/ URLs can have as many segments (the parts between the slashes) as you like. You can use this to build a site hierarchy. Consider the following site structure: 1 / 2 /books 3 /fiction 4 /science 5 /romance 6 /magazines 7 /celebrity 8 /technology OK, so it’s a fairly minimal site, but a great example of a structure you will find often on the web. Let’s recreate this using Laravel routes. For clarity, the handling Closure of each route has been truncated.
5 // home page 6 Route::get('/', function() {}); 7 8 9 // routes for the books section 10 Route::get('/books', function() {}); 11 Route::get('/books/fiction', function() {}); 12 Route::get('/books/science', function() {}); 13 Route::get('/books/romance', function() {}); 14 15 // routes for the magazines section 16 Route::get('/magazines', function() {}); 17 Route::get('/magazines/celebrity', function() {}); 18 Route::get('/magazines/technology', function() {}); With this collection of routes, we have easily created a site hierarchy. However, you may have noticed a certain amount of repetition. Let’s find a way to minimise this repetition, and thus adhere to DRY (Don’t Repeat Yourself) principles. Route Parameters Route parameters can be used to insert placeholders into your route definition. This will effectively create a pattern in which URI segments can be collected and passed to the application’s logic handler. This might sound a little confusing, but when you see it in action everything will fall into place. Here we go… 1 <?php 2 3 // app/routes.php 4 5 // routes for the books section 6 Route::get('/books', function() 7 { 8 return 'Books index.'; 9 }); 10 11 Route::get('/books/{genre}', function($genre)
{$genre} category."; 14 }); In this example, we have eliminated the need for all of the book genre routes by including a route placeholder. The {genre} placeholder will map anything that is provided after the /books/ URI. This will pass its value into the Closure’s $genre parameter, which will allow us to make use of this information within our logic portion. For example, if you were to visit the following URL: 1 http://domain.com/books/crime You would be greeted with this text response: 1 Books in the crime category. We could also remove the requirement for the book’s index route by using an optional parameter. A parameter can be made optional by adding a question mark (?) to the end of its name. For example: 1 <?php 2 3 // app/routes.php 4 5 // routes for the books section 6 Route::get('/books/{genre?}', function($genre = null) 7 { 8 if ($genre == null) return 'Books index.'; 9 return "Books in the {$genre} category."; 10 }); If a genre isn’t provided with the URL, then the value of the $genre variable will be equal to null, and the message Books index. will be displayed. If we don’t want the value of a route parameter to be null by default, we can specify an alternative using assignment. For example:
5 // routes for the books section 6 Route::get('/books/{genre?}', function($genre = 'Crime') 7 { 8 return "Books in the {$genre} category."; 9 }); Now if we visit the following the following URL: 1 http://domain.com/books We will receive this response: 1 Books in the Crime category. Hopefully, you are starting to see how routes are used to direct requests to your site, and as the ‘code glue’ that is used to tie your application together. There’s a lot more to routing. Before we come back to that, let’s cover more of the basics. In the next chapter we will look at the types of responses that Laravel has to offer.
in a mood or the question doesn’t make sense, you will most likely give them a response. I guess other exceptions are those question-like greetings like when someone says, ‘Alright?’. Even then, you should give them at least a nod in return…some form of response. Requests made to a web server are no different than the guy that said ‘Alright?’. They will hope to get something back. In a previous chapter our responses took the shape of strings returned from routed closures. Something like this: 1 <?php 2 3 // app/routes.php 4 5 Route::get('/', function() 6 { 7 return 'Yeh am alright guv.'; 8 }); So here we have the string “Yeh am alright guv.” sent back to the browser. The string is our response and is always returned by a routed closure, or a Controller action which we will cover later. It would be fair to assume that we would like to send some HTML as our response. This is often the case when developing web applications. I guess we could enclose the HTML in the response string? 1 <?php 2 3 // app/routes.php 4 5 Route::get('/', function() 6 { 7 return '<!doctype html> 8 <html lang="en"> 9 <head> 10 <meta charset="UTF-8"> 11 <title>Alright!</title> 12 </head>
15 </body> 16 </html>'; 17 }); Awesome! Now you see the power and grace of Laravel… just kidding. We don’t want to serve HTML this way. Embedding logic would get annoying and, more importantly, it’s just plain wrong! Luckily for us, Laravel has a number of Response objects that make returning a meaningful reply a whole lot easier. Let’s check out the View response since that’s the most exciting one! Views Views are the visual part of your application. Within the Model View Controller pattern they make up the View portion. That’s why they are called views. It’s not rocket science. Rocket science will be covered in a later chapter. A view is just a plain text template that can be returned to the browser, though it’s likely that your views will contain HTML. Views use the .php extension and are normally located within the app/views directory. This means that PHP code can also be parsed within your views. Let’s just create a very simple view for now. 1 <!-- app/views/simple.php --> 2 3 <!doctype html> 4 <html lang="en"> 5 <head> 6 <meta charset="UTF-8"> 7 <title>Views!</title> 8 </head> 9 <body> 10 <p>Oh yeah! VIEWS!</p> 11 </body> 12 </html> Great! A tiny bit of HTML stored in app/views/simple.php. Now let’s make a view. Didn’t we just do that? Haha! Yes you did little one, but I didn’t mean ‘Let’s make another view file.’. Instead let’s make() a new view response object based upon the view file we just created. The files representing views can be called templates. This may help you distinguish between the View objects and the HTML templates.
Route::get('/', function() 6 { 7 return View::make('simple'); 8 }); Oh, I see! You were on about the make() method. Indeed I was little buddy! Using the View::make() method we can create a new instance of a View response object. The first parameter we hand to the make() method is the view template that we wish to use. You will notice that we didn’t use the full path app/views/simple.php. This is because Laravel is clever. It will by default assume that your views are located in app/views and will look for a file with an appropriate view extension. If you look a little closer at the Closure you will see that the View object we have created is being returned. This is very important since Laravel will serve the result of our Closure to the web browser. Go ahead and try hitting the / URI for your application. Great, that’s the template we wrote! Later in the book you will learn how to make different types of templates that work with the View response to make your lives easier. For now we will stick to the basics to get a good grasp on the fundamental Laravel concepts. View Data Being able to show templates is awesome. It really is. What if we want to use some data from our Closure though? In an earlier chapter we learned how we can use Route parameters. Maybe we want to be able to refer to these parameters in the View? Let’s take a look at how this can be done. 1 <?php 2 3 // app/routes.php 4 5 Route::get('/{squirrel}', function($squirrel) 6 { 7 $data['squirrel'] = $squirrel; 8 9 return View::make('simple', $data); 10 });
parameter and add it to our view data array. You see, the second parameter of the make() method accepts an array that is passed to the view template. I normally call my array $data to indicate that it is my view data array, but you may use any name you like! Before we start using this data, let’s talk a little more about the view data array. When the array is passed to the view, the array keys are ‘extracted’ into variables that have the array key as their name and the given value. It’s a little confusing to explain without an example so let me simplify it for you. Here we have an array to be handed to View::make() as view data. 1 <?php 2 array('name' => 'Taylor Otwell', 'status' => 'Code Guru') In the resulting view template we are able to access these values like this: 1 <?php echo $name; // gives 'Taylor Otwell' ?> 2 3 <?php echo $status; // gives 'Code Guru' ?> So our name array key becomes the $name variable within the template. You can store multi- dimensional arrays as deep as you like in your view data array. Feel free to experiment! Let’s use the $squirrel variable in the simple template we created earlier. 1 <!-- app/views/simple.php --> 2 3 <!doctype html> 4 <html lang="en"> 5 <head> 6 <meta charset="UTF-8"> 7 <title>Squirrels</title> 8 </head> 9 <body> 10 <p>I wish I were a <?php echo $squirrel; ?> squirrel!</p> 11 </body> 12 </html> Now if we visit the URI /gray we receive a page stating ‘I wish I were a gray squirrel!’. Well that was simple wasn’t it? Using views, you will no longer have to return strings from your Closures! Earlier I mentioned that there are different types of response objects. In some circumstances you may wish to redirect the flow of your application to another route or logic portion. In such a circumstance the Redirect reponse object will be useful. See, Laravel’s got your back!
response object which redirects the flow of the application to another route. Let’s create a couple of sample routes so that I can explain in more detail. 1 <?php 2 3 // app/routes.php 4 5 Route::get('first', function() 6 { 7 return 'First route.'; 8 }); 9 10 Route::get('second', function() 11 { 12 return 'Second route.'; 13 }); Having added the above routes, you will receive ‘First route.’ upon visiting the /first URI and ‘Second route.’ upon visiting the /second URI. Excellent, that’s exactly what we expected to happen. Now let’s completely shift the flow of the application by adding a redirect to the first routed closure. 1 <?php 2 3 // app/routes.php 4 5 Route::get('first', function() 6 { 7 return Redirect::to('second'); 8 }); 9 10 Route::get('second', function() 11 { 12 return 'Second route.'; 13 }); In the first route we are now returning the result of the Redirect::to() method and passing the URI of the target location. In this case we are passing the URI for the second route second as the location.
will be greeted with the text ‘Second route.’. This is because upon receiving the returned Redirect object, Laravel has shifted the flow of our application to the target destination. In this case the flow has been shifted to the closure of the second route. This can be really useful when a condition of some kind has failed and you need to redirect the user to a more useful location. Here’s an example using the authentication system (which we will cover later) that will provide another use case. 1 <?php 2 3 // app/routes.php 4 5 Route::get('books', function() 6 { 7 if (Auth::guest()) return Redirect::to('login'); 8 9 // Show books to only logged in users. 10 }); In this example, if a user who has not yet logged into the system visits the /books URI then they are considered a guest and would be redirected to the login page. Later you will find a better way to limit access when we discuss route filters, so don’t read too much into the above example. Instead, just consider that we could redirect the user to a more sensible destination if our conditions are not met. Custom Responses Both View and Redirect inherit from the Laravel Response object. The response object is an instance of a class that can be handed back to Laravel as the result of a routed closure or a controller action to enable the framework to serve the right kind of response to the browser. Response objects generally contain a body, a status code, HTTP headers, and other useful informa- tion. For example, the body segment of the View would be its HTML content. The status code for a Redirect would be a 301. Laravel uses this information to construct a sensible result that can be returned to the browser. We aren’t merely limited to using View and Redirect. We could also create our own response object to suit our needs. Let’s have a look at how this can be done.
Route::get('custom/response', function() 6 { 7 return Response::make('Hello world!', 200); 8 }); In the above example we use the Response::make() method to create a new response object. The first parameter is the content or body of the response and the second parameter is the HTTP status code that will be served with the response. If you haven’t seen HTTP status codes before, then think of them as status notifications for the web browser receiving your page. For example, if all goes well, a standard response may contain a 200 status code, which is web-server speak for ‘A-OK’. A 302 status code indicates that a redirect has been performed. In fact, I bet you have already come across the now infamous 404 not found page. The 404 part is the status code received by the browser when a requested resource could not be found. Simply put, the above response will serve the content ‘Hello world!’ with a HTTP status code of 200 to let the browser know that its request was a success. HTTP headers are a collection of key-value pairs of data which represent useful information to the web browser that is receiving the response. Normally they are used to indicate the format of the result or how long a piece of content should be cached for. However, we are able to define custom headers as we please. Let’s have a look at how we can set some header values. 1 <?php 2 3 // app/routes.php 4 5 Route::get('custom/response', function() 6 { 7 $response = Response::make('Hello world!', 200); 8 $response->headers->set('our key', 'our value'); 9 return $response; 10 }); We have created a sample response object just as we did in the previous example. However this time we have also set a custom header. The collection of HTTP headers can be accessed as the headers property of the response object.
method on this collection we can add our own header to the collection by providing a key as a first parameter and the associated value as the second. Once our header has been added we simply return the response object as we have done previously. The browser will receive the headers along with the response and can use this information however it wishes. Let’s think of a more useful example. Hrrm… let’s instead imagine that we want our application to serve markdown responses instead of HTML. We know that a web browser would not be able to parse a markdown response, but we might have another desktop application that can. To indicate that the content is markdown and not HTML we will modify the Content-Type header. The Content-Type is a common header key used by browsers to distinguish between the various formats of content that are sent to them. Don’t be confused! Let’s have an example. 1 <?php 2 3 // app/routes.php 4 5 Route::get('markdown/response', function() 6 { 7 $response = Response::make('***some bold text***', 200); 8 $response->headers->set('Content-Type', 'text/x-markdown'); 9 return $response; 10 }); Having set the body of the response object to some sample markdown, in this case some bold text, and the Content-Type header to the mime type for the Markdown plain text format, we have served a response that can be identified as Markdown. Our desktop application can now make a request to the /markdown/response URI, examine the Content-Type header, and by receiving the text/x-markdown value it will know to use a markdown transformer to handle the body. Now because we are all friends here I’m going to share a secret with you. Come closer. Get in here. Let’s have a huddle. The response object doesn’t actually belong to Laravel. TREACHERY? WHAT MADNESS IS THIS? Now don’t get too worked up. You see, to avoid a lot of ‘re-inventing the wheel’, Laravel has used some of the more robust components that belong to the Symfony 2 project. The Laravel response
the Response object belonging to the Symfony HTTPFoundation component. What this means is that if we take a look at the API for the Symfony response object, suddenly we have access to a whole heap of extra methods that aren’t covered in the Laravel docs! Holy smokes! Now that I have given away this secret, there’s nothing to stop you from becoming a Laravel master! The API documentation for the Symfony Response object can be found here¹⁹. If you look at the page you will notice that the class has an attribute called $headers. That’s right! That’s the collection of headers we were using only a minute ago. Since the Laravel response object inherits from this one, feel free to use any of the methods you see in the Symfony API documentation. For example, let’s have a look at the setTtl() method. What does the API say? public Response setTtl(**integer $seconds**) Sets the response’s time-to-live for shared caches. This method adjusts the Cache-Control/s-maxage directive. Parameters: integer $seconds Number of seconds Return Value: Response Right, so this method sets the time-to-live value for shared caches. I’m no expert on this kind of thing, but a time to live suggests how long a piece of information is considered useful before it is discarded. In this instance the TTL relates to the content caching. Let’s give it a value for funsies. Having looked at the method signature, we see that it accepts an integer representing the time-to-live value in seconds. Let’s give this response 60 seconds to live. Like some kind of cruel James Bond villain. ¹⁹http://api.symfony.com/2.2/Symfony/Component/HttpFoundation/Response.html“TheSymfonyResponseObject”
Route::get('our/response', function() 6 { 7 $response = Response::make('Bond, James Bond.', 200); 8 $response->setTtl(60); 9 return $response; 10 }); Now when our response is served, it will have a time to live value of 60 seconds. You see, by interrogating the underlying Symfony component, we have a wealth of advanced options that we can use to modify our application responses to suit our needs. Don’t feel overwhelmed by the amount of complexity contained within the base Response object. For the most part, you will be happy using Laravel’s View and Response classes to serve simple HTTP responses. The above example simply serves as a good starting point for advanced users looking to tweak their applications for specific scenarios. Response Shortcuts Laravel is your friend. It’s true… no actually it’s not true. Laravel is more than a friend. It loves you. It really does. Because of this, it has provided a number of response shortcuts to make your life easier. Let’s have a look at what’s available to us. JSON Responses Often within our application we will have some data that we wish to serve as JSON. It could be a simple object or an array of values. Laravel provides a Response::json() method that will configure the response object with a number of details that are specific to JSON results. For example an appropriate HTTP Content-Type header. We could set these up manually, but why bother when Laravel will do it for us? Let’s have a look at this method in action.
Route::get('markdown/response', function() 6 { 7 $data = array('iron', 'man', 'rocks'); 8 return Response::json($data); 9 }); By handing an array to the Response::json() method it has been converted to a JSON string and set as the body of our new Response object. Appropriate headers have been set to explain that the provided data is infact a JSON string. The web browser will receive the following body: 1 ["iron","man","rocks"] Which is both compact and true. Enjoy using this shortcut to build clean yet functional JSON APIs! Download Responses Serving files directly requires certain headers to be set. Fortunately, Laravel takes care of this for you using the Response::download() shortcut. Let’s see this in action. 1 <?php 2 3 // app/routes.php 4 5 Route::get('file/download', function() 6 { 7 $file = 'path_to_my_file.pdf'; 8 return Response::download($file); 9 }); Now if we navigate to the /file/download URI the browser will intiate a download instead of displaying a response. The Response::download() method received a path to a file which will be served when the response is returned. You can also provide optional second and third parameters to configure a custom HTTP status code and an array of headers. For example:
Route::get('file/download', function() 6 { 7 $file = 'path_to_my_file.pdf'; 8 return Response::download($file, 418, array('iron', 'man')); 9 }); Here we will serve our file with the HTTP status code of 418 (I’m a Teapot) and a header value of iron=man. Well this chapter was a lot longer than I originally anticipated, but I’m sure you will see that returning appropriate response objects can be a lot more valuable than returning simple strings. In the next chapter we will take a look at route filters, which will allow us to protect our routes or perform actions before/after they are executed.
O’brien was planning a private event where he and his buddies could watch the local hockey team play their latest match against the Laravel Pandas. Now we all know that the mighty Laravel Pandas could never be beaten by the London Knights, but Jesse refused to listen. Insisting that this could be the start of the road to glory for the Knights. The event was planned to take place at the Hoser Hut in central London. A friendly welcoming place for anyone born in ‘very-north’ America. (Maple syrup land.) Unfortunately the Hoser Hut had a reputation for being not so welcoming to those who visit from over the border. It was a known fact that Americans were thrown out of the windows of the Hoser Hut on a regular basis. It was for that reason that Jesse decided he needed some kind of door filter to keep the nasty Americans out. Of course the good ol’ british chap Dayle Rees was always welcome at the Hoser Hut. He was welcome anywhere. Jesse employed a bouncer to stand at the front of the Hoser Hut and ask to see ID to confirm whether the guest visiting the hut was Canadian or not. You see, what Jesse did was implement a filter. Those passing the requirements of the filter would be granted entrance to the warm and cozy Hoser Hut to watch the Laravel Pandas destroy the London Knights. However Americans attempting to enter the bar would not meet the criteria of the filter, and would be shown the shiny side of a boot. Let’s leave Jesse to his game and see how we can use filters to protect our application routes. Basic Filters Filters are certain sets of rules or actions that can be applied to a route. They can be performed before or after a route’s logic is executed, however, you will find before filters to be more useful. Using before filters we can alter the flow of the application if a certain set of rules or criteria are not met. It’s a great way of protecting our routes. As always, an example speaks a thousand words. Let’s have a look at a filter, but first we need something else. Let’s see: 1 <!-- app/views/birthday.php --> 2 3 <h1>Happy Birthday!</h1> 4 <p>Happy birthday to Dayle, hurray!</p> Great! Now that we have a happy birthday view, we can create our first filter. Here we go:
Route::filter('birthday', function() 6 { 7 if (date('d/m/y') == '12/12/84') { 8 return View::make('birthday'); 9 } 10 }); Here we have our first filter. Laravel has provided a file at app/filters.php as a generic location for our filters, but we can actually put them wherever we like. We use the Route::filter() method to create a new filter. The first parameter is a friendly name that we will later use to assign the filter to a route. In this example I have named the filter ‘birthday’. The second parameter to the route is a callback, which in the example is a Closure. The callback is a function that is called when the filter is executed. If it returns a response type object, just like those that we use within our route logic, then that response will be returned and will be served instead of the result of the route logic. If no response is returned from the filter callback, then the routes logic will continue as normal. This gives us a great deal of power, so go ahead and practice your evil mastermind laugh. Seriously, this is important business. Muahahahah! Well, I suppose that will have to do. You see we can either alter the flow of the application, or perform an action and allow the route logic to continue its execution. For example, we might want to only show a certain type of content on our website, to a certain type of user. This would mean returning a redirect response to another page. Alternatively, we could write a log each time the filter is executed, to see which pages have been visited. Perhaps I am getting ahead of myself, let’s have another look at our example filter.
Route::filter('birthday', function() 6 { 7 if (date('d/m') == '12/12') { 8 return View::make('birthday'); 9 } 10 }); Looking closely at our closure, we can see that we have a condition, and a response. In our filter, if the current date is equal to ’12/12/84’, which is of course the date that the most important person in the universe was born, then the closure will return the response. If the response is returned from the Closure, then we will be redirected to the happy birthday view. Otherwise our route logic will continue as normal. Of course, before the filter will become useful we need to attach it to a route. However, before we can do that we need to change the route’s structure a little. Do you remember how I told you that routing methods accept a closure as the second parameter? Well I told a little white lie again. Sorry. You see the route methods can also accept an array as the second parameter. We can use this array to assign additional parameters to the route. Let’s have a look at how a route looks with an array as a second parameter. 1 <?php 2 3 // app/routes.php 4 5 Route::get('/', array(function() 6 { 7 return View::make('hello'); 8 })); You see, it’s pretty similar. What we have done is shifted the Closure into the array. It functions just as it did before. In fact, as long as we keep the closure in the array, we can include other values. That’s how we are going to attach our filter. Let’s start by taking a look at the ‘before’ filter option.
Route::get('/', array( 6 'before' => 'birthday', 7 function() 8 { 9 return View::make('hello'); 10 } 11 )); As you can see, we have created another option within our array. The index ‘before’ tells the framework that we want to run our ‘birthday’ filter before the routes logic is executed. The value ‘birthday’ matches up with the nickname that we gave to our filter. Let’s go ahead and execute our route by visiting /. Now, assuming today isn’t the 12th of December then you will see the Laravel welcome page. This is because the filter conditional logic failed, and no response was returned. Right, so let’s wait until the 12th of December so that we can see what happens when the filters condition passes and the response is returned. Just kidding, let’s change the filter to force it to pass. We can change the condition to the boolean value true. 1 <?php 2 3 // app/filters.php 4 5 Route::filter('birthday', function() 6 { 7 if (true) { 8 return View::make('birthday'); 9 } 10 }); There we go, now let’s visit / to see if anything has changed. Hurray, it’s my birthday! Let’s all sing happy birthday to me. Actually, let’s just wait until December. So we can see that the birthday filters logic has succeeded, and the happy birthday view has been returned. We can attach a filter using the ‘after’ option of a route array, this way the filter will be executed after your route logic. Here’s an example:
Route::get('/', array( 6 'after' => 'birthday', 7 function() 8 { 9 return View::make('hello'); 10 } 11 )); You need to remember, however, that the after filter cannot replace the response. Thus, our birthday filter is a little pointless when using ‘after’. You could however perform some logging, or a cleanup operation. Just remember that it’s there if you need it! Multiple Filters One other thing you should know is that you can apply as many filters as you like to a route. Let’s have a look at some examples of this in action. First, let’s attach multiple before filters: 1 <?php 2 3 // app/routes.php 4 5 Route::get('/', array( 6 'before' => 'birthday|christmas', 7 function() 8 { 9 return View::make('hello'); 10 } 11 )); Here we have attached both the ‘birthday’ and ‘christmas’ before filters to the route. I’ll let your imagination decide what the ‘christmas’ filter does, but make sure it’s something magical. The pipe | character can be used to separate a list of filters. They will be executed from left to right, and the first that returns a response will end the request, and that response will be delivered as the result. If you like, you can use an array instead to provide your multiple filters. this might strike you as being more ‘phpish’.
Route::get('/', array( 6 'before' => array('birthday', 'christmas'), 7 function() 8 { 9 return View::make('hello'); 10 } 11 )); Use whichever suits the way you code, personally I like the arrays. If you want, you can also assign a ‘before’ and ‘after’ filter at the same time, like this: 1 <?php 2 3 // app/routes.php 4 5 Route::get('/', array( 6 'before' => 'birthday', 7 'after' => 'christmas', 8 function() 9 { 10 return View::make('hello'); 11 } 12 )); Naturally, the before filter will run first, then the route logic, and finally the after filter. So, you think you’re done with filters? Don’t get carried away! Filter Parameters Just like PHP functions, filters can accept parameters. This is a great way to avoid repetition, and allow for increased flexibility. Let’s lead with an example, as always.
// before 6 7 Route::filter('test', function($route, $request) 8 { 9 10 }); 11 12 // after 13 14 Route::filter('test', function($route, $request, $response) 15 { 16 17 }); Wait, why are there two filters? Well spotted! Well, actually they are the same filter, but still, your question is valid. You see, Laravel provides a different set of parameters to ‘before’ and ‘after’ filters. You will notice that both filters receive $route and $request variables. You can actually call them whatever you like, but I named them this way for a reason. If you were to var_dump() the first parameter, you will see that it is an instance of Illuminate\Routing\Route. You will remember that ‘Illuminate’ is the codename used for Laravel 4 components. The ‘Route’ class represents a route used by the routing layer. This instance represents the current route that is being executed. Clever right? The ‘Route’ instance is gigantic, go ahead and var_dump() it if you don’t believe this shifty welshman. You could interrogate it for the detailed information contained within, or even alter some of its values to manipulate the framework. However, this is an advanced topic, and outside the scope of this chapter, so let’s look at the next parameter instead. As you might have guessed, the next parameter is an instance of the current request object. The Illuminate\Http\Request instance represents the state of the request being sent to your web server. It contains information about the URL, and data passed with the request, along with a great wealth of additional information. The after filter receives an additional parameter, an instance of response object that is returned from the route the filter is acting on. This instance is due to be served as the response of the current request. Right, those parameters Laravel gave us might be useful to advanced users of the framework, but wouldn’t it be great if we could provide our own parameters to our route filters? Let’s take a look at how we can do that.
to our filter Closure, it should come after the ones that laravel provides, like this: 1 <?php 2 3 // app/filters.php 4 5 Route::filter('birthday', function($route, $request, $date) 6 { 7 if (date('d/m') == $date) { 8 return View::make('birthday'); 9 } 10 }); Our birthday filter has been altered to accept a $date parameter. If the current date matches the date provided then the birthday filter is executed. Now all we need to know is how to provide the parameters to our route filter. Let’s take a look. 1 <?php 2 3 // app/routes.php 4 5 Route::get('/', array( 6 'before' => 'birthday:12/12', 7 function() 8 { 9 return View::make('hello'); 10 } 11 )); The parameter we pass to our filter comes after the colon : character when we assign it to the route. Go ahead and test it, change the date to the current day and watch the filter fire. If we want to provide additional parameters, then we need to provide extra placeholder variables with the Closure. It will look something like this.
Route::filter('birthday', function($route, $request, $first, $second, $third) 6 { 7 return "{$first} - {$second} - {$third}"; 8 }); We can accept as many parameters as we like. To provide multiple parameters we must first add a colon : between the filter name and its parameters. The parameters themselves must be separated by a comma ,. Here’s an example: 1 <?php 2 3 // app/routes.php 4 5 Route::get('/', array( 6 'before' => 'birthday:foo,bar,baz', 7 function() 8 { 9 return View::make('hello'); 10 } 11 )); The values ‘foo’, ‘bar’, and ‘baz’ will be passed to the placeholders we added to the filter. It’s worth noting that just like functions, filter parameters can be assigned default values, making them optional. Here’s an example: 1 <?php 2 3 // app/filter.php 4 5 Route::filter('example', function($route, $request, $optional = 'Yep!') 6 { 7 return $optional; 8 }); Provide the optional parameter or don’t. It’s up to you, it’s your framework! Feel free to use as many parameters as you like to make your filter more efficient. Take advantage of this great feature.
convenient, and work great in my examples. However, they are strapped to the logic that we are writing. We can’t instantiate them, this makes them difficult to test. For that reason, any Laravel feature that requires a Closure will also have an alternative. A PHP Class. Let’s have a look at how we can use a class to represent our filters. Before we make the class, we need somewhere to put it. Let’s create a new folder in /app called filters, and update our composer.json classmap to include the new folder. 1 "autoload": { 2 "classmap": [ 3 "app/commands", 4 "app/controllers", 5 "app/models", 6 "app/filters", 7 "app/database/migrations", 8 "app/database/seeds", 9 "app/tests/TestCase.php" 10 ] 11 } Now let’s create a new class for our birthday filter. Here we go: 1 <?php 2 3 // app/filters/Birthday.php 4 5 class BirthdayFilter 6 { 7 public function filter($route, $request, $date) 8 { 9 if (date('d/m') == $date) { 10 return View::make('birthday'); 11 } 12 } 13 } I have called my class ‘BirthdayFilter’, you don’t need the ‘Filter’ suffix, but I like to do it anyway, it’s up to you. What you do need however, is the filter() method. It works just like the Closure. In fact, because it works just like the Closure I don’t need to explain it again. Instead, let’s take a look at how we can hook up a filter to a route.
once again we will use the Route::filter() method. However, this time we will pass a string instead of a closure as the second parameter. Like this: 1 <?php 2 3 // app/routes.php 4 5 Route::filter('birthday', 'BirthdayFilter'); The second parameter for the method is a string that identifies the filter class to use. If the filter class is located within a namespace, go ahead and supply the namespace too. Now that the filter alias has been created, we can add it to the route just as we did before. 1 <?php 2 3 // app/routes.php 4 5 Route::get('/', array( 6 'before' => 'birthday', 7 function() 8 { 9 return View::make('hello'); 10 } 11 )); Remember that you will need to run composer dump-autoload before Composer, and Laravel, will be able to find our filter class. If you intend to fully test your code, then writing filters as classes is the best way to go about your business. We’ll discover more about testing in a later chapter. Global Filters If you take a look inside /app/filters.php you will notice two strange looking filters. These are the global filters and are executed before, and after, every request to your application.
App::before(function($request) 6 { 7 // 8 }); 9 10 11 App::after(function($request, $response) 12 { 13 // 14 }); They work exactly like normal filters, except that they apply to all routes by default. This means there is no need to add them to the before and after array indexes of our routes. Default Filters In the app/filters.php there are some filters that have already been created for you. Let’s have a look at the first three. 1 <?php 2 3 // app/filters.php 4 5 Route::filter('auth', function() 6 { 7 if (Auth::guest()) return Redirect::guest('login'); 8 }); 9 10 11 Route::filter('auth.basic', function() 12 { 13 return Auth::basic(); 14 }); 15 16 Route::filter('guest', function() 17 { 18 if (Auth::check()) return Redirect::to('/'); 19 });
layer of Laravel. They can be used to restrict route access to users who are, or are not, logged in to the web application at present. In a later chapter we will be taking a closer look at the authentication layer, and the content of these filters will make more sense. For now, just know that they are there waiting for you! The fourth filter is the cross site request forgery filter, and looks like this: 1 <?php 2 3 // app/filters.php 4 5 Route::filter('csrf', function() 6 { 7 if (Session::token() != Input::get('_token')) 8 { 9 throw new Illuminate\Session\TokenMismatchException; 10 } 11 }); You can attach it to your routes to protect requests being posted from an origin other than your own application. This is a very useful security measure that is used primarily to protect routes that are the target of forms, or data submission. Feel free to take advantage of the filters Laravel has provided, they have been put there to save you time. Pattern Filters Don’t want to attach the filter manually to all your routes? No I can’t blame you. Tired fingers happen, I’m writing a book, I know this. Let’s try to find a way to save your poor little phalanges some effort. Here’s a pattern filter. The pattern filter will allow you to match a before filter to a number of routes by supplying a routing pattern with a wildcard. Let’s see this in action. 1 <?php 2 3 // app/routes.php 4 5 Route::when('profile/*', 'birthday'); The Route::when() method above, will run the ‘birthday’ filter on all route URIs that start with ‘profile/‘. The star within the first parameter will act as a wildcard. This is a great way of attaching a before filter to a number of different routes at once.
taught how to link routes to closures, little pockets of logic, which make up the structure of our application. Closures are a nice and quick way of writing an application, and personally, I believe they look great within the book’s code examples. However, the preferred choice for housing application logic is the Controller. The Controller is a class used to house routing logic. Normally, the Controller will contain a number of public methods known as actions. You can think of actions as the direct alternative to the closures we were using in the previous chapter, they are very similar in both appearance and functionality. I don’t like explaining what something is, without first showing you an example. So let’s dive right in and look at a controller. Here’s one I made earlier! Cue Blue Peter theme. Actually that last reference might only make sense to British folk. Never mind, it’s been done now and I don’t have the heart to delete it! So, controllers.. 1 <?php 2 3 // app/controllers/ArticleController.php 4 5 class ArticleController extends BaseController 6 { 7 public function showIndex() 8 { 9 return View::make('index'); 10 } 11 12 public function showSingle($articleId) 13 { 14 return View::make('single'); 15 } 16 } There’s our controller! Nice and simple. This example would be suited to a blog or some other form of CMS. Ideally, a blog would have a page to view a listing of all articles, and another page to show a single article in detail. Both of these activities are related to the concept of an Article, which means
together. This is why the logic is contained in one single ArticleController. In honesty, you can call the Controller whatever you like. As long as your controller extends either BaseController or Controller then Laravel will know what you are trying to do. However, suffixing a controllers name with Controller, for example ArticleController is somewhat of a standard that web developers employ. If you plan to be working with others, then standards can be extremely useful. Our controller has been created in the app/controllers directory which Laravel has created for us. This directory is being ‘classmap file loaded’ from our composer.json by default. If app/controllers doesn’t suit your workflow, then you can put the file wherever you like. However, you must make sure that the class can be autoloaded by Composer. For more information on this topic, please refer back to the Composer primer. The class methods of our Controller are what actually contain our logic. Once again you can name them however you like, but personally I like to use the word ’show’ as a prefix if the result is that they display a web page. These methods must be public for Laravel to be able to route to them. You can add additional private methods to the class for abstraction, but they cannot be routed to. In fact, there’s a better place for that kind of code which we will learn about in the models chapter. Let’s have a closer look at our first action, which in this example would be used to display a blog article listing. 1 public function showIndex() 2 { 3 return View::make('index'); 4 } Hmm, doesn’t that look awfully familiar? Let’s quickly compare it to a routed closure that could be used to achieve the same effect. 1 Route::get('index', function() 2 { 3 return View::make('index'); 4 }); As you can see, the inner function is almost identical. The only difference is that the controller action has a name, and the closure is anonymous. In fact, the controller action can contain any code that the Closure can. This means that everything we have learned so far is still applicable. Shame, if it was different I could have sold another book on controllers! There is one other difference between the two snippets however. In the basic routing chapter we were taught how to route a URI to a piece of logic contained within a Closure. In the above routed closure example the URI /index would be routed to our application logic. However, our Controller action doesn’t mention a URI at all. How does Laravel know how to direct it’s routes to our controller? Let’s take a look at Controller routing and hope we find an answer to our question.
provide a clean way of grouping common logic together. However, they are useless unless our users can actually reach that logic. Fortunately, the method of linking a URI to a Controller is similar to the routing method we used for Closures. Let’s take a closer look. 1 <?php 2 3 // app/routes.php 4 5 Route::get('index', 'ArticleController@showIndex'); In order to link a URI to a Controller we must define a new route within the /app/routes.php file. We are using the same Route::get() method that we used when routing Closures. However, the second parameter is completely different. This time we have a string. The string consists of two sections that are separated by an at sign (@). Let’s have another look at the Controller that we created in the last section. 1 <?php 2 3 // app/controllers/ArticleController.php 4 5 class ArticleController extends BaseController 6 { 7 public function showIndex() 8 { 9 return View::make('index'); 10 } 11 12 public function showSingle($articleId) 13 { 14 return View::make('single'); 15 } 16 } So we can see from the example that the class name is ArticleController, and the action we wish to route to is called showIndex. Let’s put them together, with an at (@) in the middle. 1 ArticleController@showIndex It really is as simple as that. Now we can use any of the methods that we discovered in the basic routing chapter, and point them to controllers. For example, here’s a controller action that would respond to a POST HTTP request verb.
Route::post('article/new', 'ArticleController@newArticle'); You guys are pretty smart chaps, you bought this book right? So now you can see that the above route will respond to POST requests to the /article/new URI, and that it will be handled by the newArticle() action on the ArticleController. Here’s a neat thing to know. You can namespace your controller and Laravel won’t bat an eyelid. Just make sure to include the namespace within your route declaration and everything will be just dandy! Let’s see this in action. 1 <?php 2 3 // app/controllers/Article.php 4 5 namespace Blog\Controller; 6 7 use View; 8 use BaseController; 9 10 class Article extends BaseController 11 { 12 public function showIndex() 13 { 14 return View::make('index'); 15 } 16 } So here we have a similar Controller to that used in the other example. This time however, it is contained within the Blog\Controller namespace. Since it’s located within the Controller section of the namespace, I have omitted the Controller suffix from the class name. This is my own personal preference, I leave it up to you to decide whether you keep it or not. Let’s see how this namespaced controller can be routed to. You’ve probably already guessed it!
Route::post('index', 'Blog\Controller\Article@showIndex'); Just as before, only this time the name of the controller has been prefixed with its namespace. See, namespaces don’t have to complicate things! You can even store your namespaced Controller in a nested directory, or elsewhere in a PSR-0 loading scheme. Laravel doesn’t care, as long as Composer knows where to find your class, then Laravel will be able to use it. RESTful Controllers Laravel offers solutions, we know this much. It also provides options, RESTful Controllers are a prime example of this. We know that we can define the HTTP request verb that we want to match using the routing methods. This is really convenient when routing to Closures. However, when routing to Controllers you might want to keep the defining of the request verb close to your application logic. Well the good news is that Laravel provides this alternative configuration. Let’s alter our Controller a little shall we? 1 <?php 2 3 // app/controllers/Article.php 4 5 namespace Blog\Controller; 6 7 use View; 8 use BaseController; 9 10 class Article extends BaseController 11 { 12 public function getCreate() 13 { 14 return View::make('create'); 15 } 16 17 public function postCreate() 18 { 19 // Handle the creation form. 20 } 21 }
The intention of the actions are to provide a form to create and handle the creation of a new blog article. You’ll notice that the names of the actions have been prefixed with get and post. Those are our HTTP request verbs. So, in the above example you might think that we have represented end points for the following URLs: 1 GET /create 2 POST /create You might also be wondering how we route to our RESTful controller. You see, using the verb methods on the Route class wouldn’t make much sense here. Well, say goodbye to routing to individual actions. Let’s take a look at another routing method. 1 <?php 2 3 // app/routes.php 4 5 Route::controller('article', 'Blog\Controller\Article'); This single method will route all of the actions represented by our RESTful controller. Let’s take a closer look at the method signature. The first parameter is the base URL. Normally RESTful routing is used to represent an object, so in most circumstances the base URL will be the name of that object. You can think of it as some what of a prefix to the actions that we have created within our RESTful controller. The second parameter you will already be familiar with. It’s the controller that we intend to route to. Once again, Laravel will happily accept a namespaced controller as a routing target so feel free to organise your Controllers however suits your needs. As you can see, using this method to route to your controllers provides a distinct advantage over the original routing method. With this method, you will only have to provide a single routing entry for the Controller, rather than routing to every action independently.
the Blade. You will need it. In order to claim your rightful place as a PHP artisan you will need to challenge and defeat High Lord Otwell in armed combat. It’s a rite of passage. Only then will you be able to take your rightful place amongst the Laravel council, and earn a spot at Phil Sturgeon’s drinking table. Once a month, us Council members ride out to the PHP battleground sat atop our fearsome Laravel riding pandas, to do battle with the developers of other frameworks. If you want to ride into battle alongside us, and fight for the honour of Laravel you must learn to master the Blade. Well, must is a strong word I suppose. I mean, you could also master Blade templating. It’s not quite as extravagant, and there are no fierce riding pandas involved. It is pretty handy though, and perhaps more suited to coder types than hardcore battle? Yeah that’s settled then, let’s have a look at Blade templating. You might be wondering about the name ‘Blade’? Well so was I as I wrote this chapter, so I decided to ask Taylor. It turns out that the .NET web development platform has a templating tool called ‘Razor’, from which much of the Blade syntax was derived. Razor..blade.. razorblade. That’s it. Nothing funny there really, sorry. :( Actually forget what I just told you, let’s reinvent that story. Just between us. The templating language was named after Taylor’s alter ego ‘Blade’ back during his days of Vampire hunting. That’s the real story. Right, let’s make a template. Creating Templates I know, I know, I already taught you how to create views right? They are really useful for separating the visual aspect of your application from its logic, but, it doesn’t mean they can’t be improved upon. The problem with standard PHP templates is that we have to insert those ugly PHP tags within them to use the data that our logic portions have provided. They look out of place within our neat HTML templates. They soil them! It makes me so angry… I could… I could. No, let me be for a moment. Erm… It’s ok, my rage has settled now. Let’s create a Blade template to get that nasty PHP mess out of the way. To get started we will need to make a new file. Blade templates live in the same location as our
they use the .blade.php extension rather than just .php. Let’s create a simple template. 1 <!-- app/views/example.blade.php --> 2 3 <h1>Dear Lord Otwell</h1> 4 <p>I hereby challenge you to a duel for the honour of Laravel.</p> 5 6 <?php echo $squirrel; ?> Here we have our blade template, looks kinda similar to what we have seen already right? That’s because Blade first parses the file as PHP. You see our $squirrel? Every view file must have a squirrel. OK, that’s not true, but it does show that PHP can be parsed just as before. We can show this using the same syntax as we would for a normal view. You might have assumed that it would require passing example.blade to the View::make() method, but that would be incorrect. 1 <?php 2 3 // app/routes.php 4 5 Route::get('example', function() 6 { 7 return View::make('example'); 8 }); See? Laravel knows what a Blade template is, and how to look for one. For this reason the View::make() statement hasn’t changed at all. How convenient?! Blade does have some tricks of its own however. Let’s take a look at the first one. PHP Output A lot of your templates will involve echoing out data provided by the logic portion of your application. Normally it would look something like this:
$taylorTheVampireSlayer; ?></p> It’s not exactly verbose, but it could be improved upon. Let’s see how we can echo values using Blade templates. 1 <!-- app/views/example.blade.php --> 2 3 <p>{{ $taylorTheVampireSlayer }}</p> Everything surrounded by {{ double curly brackets }} is transformed into an echo by Blade when the template is processed. This is a much cleaner syntax, and a whole lot easier to type. Since the Blade template directives are translated directly to PHP we can use any PHP code within these brackets, including methods. 1 <!-- app/views/example.blade.php --> 2 3 <p>{{ date('d/m/y') }}</p> You don’t even need to provide the closing semi-colon. Laravel does that for you. Sometimes you will want to protect yourself by escaping a value that you output. You might be familiar with using methods such as strip_tags() and htmlentities() for this purpose. Why? well consider the output of this template. 1 <!-- app/views/example.blade.php --> 2 3 <p>{{ '<script>alert(“CHUNKY BACON!”);</script>' }}</p> What a nasty piece of Code! It would cause some Javascript to be injected into the page and a browser popup to be displayed containing the text ‘CHUNKY BACON!’. Bad _why! Nasty ruby developers are always trying to break our websites. We have the power to protect our templates from the output though. If we were to use {{{ three curly brackets }}} instead of {{ two }} then our output will be escaped, the angular brackets will be converted to HTML entities, and the Javascript will show as text within the page. Harmless! Let’s see this in action.
BACON!");</script>' }}}</p> All we have changed is the number of brackets around our nasty Javascript snippet. Let’s view the source of the page to see how it looks. 1 <!-- app/views/example.blade.php --> 2 3 <p><script>alert("CHUNKY BACON!");</script></p> As you can see, the HTML tags and some other characters have been replaced with the equivalent HTML entities. Our website is saved! Moving on! Control Structures PHP has a number of control structures. If statements, while, for and foreach loops. If you haven’t heard of these before then this book really isn’t the one for you! Within templates you will most likely be familiar with using the alternative syntax for control structures using colons :. Your if statements will look like this: 1 <!-- app/views/example.blade.php --> 2 3 <? if ($something) : ?> 4 <p>Something is true!</p> 5 <? else : ?> 6 <p>Something is false!</p> 7 <? endif; ?> Once again, these do the trick, but they aren’t very fun to type. They will slow you down, but fortunately for you, Blade will come to your rescue! Here’s how the above snippet looks within a Blade template.
4 <p>Something is true!</p> 5 @else 6 <p>Something is false!</p> 7 @endif That’s much cleaner, right? Let’s have a look at what we have stripped out. For a start, the PHP opening <? and closing ?> tags are gone. Those are probably the most complicated to type. We can also strip out the colons : and semi ; colons. We don’t need those wasting space in our templates! Lastly we have made an addition to the usual syntax. We have prefixed our control statement lines with an at @ symbol. In fact, all blade control structures and helper methods are prefixed with this symbol, so that the template compiler knows how to handle them. Let’s add an elseif to the mix for a further example. 1 <!-- app/views/example.blade.php --> 2 3 @if ($something == 'Red Panda') 4 <p>Something is red, white, and brown!</p> 5 @elseif ($something == 'Giant Panda') 6 <p>Something is black and white!</p> 7 @else 8 <p>Something could be a squirrel.</p> 9 @endif We’ve added another statement into the mix, following the same rules of removing PHP tags, colons and semi colons, and adding the @ sign. Everything works perfectly. Here’s a challenge. Try to picture a foreach PHP loop represented with blade syntax. Close your eyes, picture it. Focus… focus! Did it look like this?
4 ,---'oo ) \ 5 ( O O )/ 6 `=^=' / 7 \ , . / 8 \\ |-----'| / 9 ||__| |_|__| No? Good, because that is a hippo. However, if it looked a little like the following snippet then you will get a cookie. 1 <!-- app/views/example.blade.php --> 2 3 @foreach ($manyThings as $thing) 4 <p>{{ $thing }}</p> 5 @endforeach Enjoy your cookie! As you can see, we used the Blade {{ echo }} syntax to output the loop value. A for loop looks just as you might imagine. Here is an example for reference. 1 <!-- app/views/example.blade.php --> 2 3 @for ($i = 0; $i < 999; $i++) 4 <p>Even {{ $i }} red pandas, aren't enough!</p> 5 @endfor Simple, and exactly what you might have expected. The while loop follows the same rules, but I’m going to show a quick example to allow this to be a useful reference chapter. 1 <!-- app/views/example.blade.php --> 2 3 @while (isPretty($kieraKnightly)) 4 <p>This loop probably won't ever end.</p> 5 @endwhile Right, so you are the conditional master now. Nothing can phase you, right buddy? Not even PHP’s ‘unless’ condition. Err Dayle, Ruby has that. I dunno if PHP ha.. OK, you caught me out. PHP doesn’t have an ‘unless’ condition. However, Blade has provided a helper to allow it. Let’s have a look at an example.
4 <p>Keep smiling.</p> 5 @endunless Unless is the exact opposite of an if statement. An if statement checks if a condition equates to a true value, and then executes some logic. However, the unless statement will execute its logic only if the condition equates to false. You can think of it as a control structure for pessimists. Templates Blade includes a few other helper methods to make your templates easier to construct and manage. It won’t write your views for you however, maybe we could add that to the task list for Laravel 5? • php artisan project:complete • Allow view composers to construct hair styles. • Have views write themselves. There we go. Until those features are in place, we will have to write our own templates. That doesn’t mean we have to put everything in one file though. With PHP, you are able to include() a file into the current file, executing its contents. You could do that with views to break them apart into separate files for organisational purposes. Laravel helps us achieve this goal by providing the @include() Blade helper method to import one view into another, parsing its contents as a Blade template if required. Let’s have a look at an example of this in action. Here’s header.blade.php file containing the header for our page, and possibly even other pages. 1 <!-- app/views/header.blade.php --> 2 3 <h1>When does the Narwhal bacon?</h1> Here’s the associated footer template. 1 <!-- app/views/footer.blade.php --> 2 3 <small>Information provided based on research as of 3rd May '13.</small> Now here’s our primary template. The one that is being displayed by our routed Closure or Controller action.
4 <html lang="en"> 5 <head> 6 <meta charset="UTF-8"> 7 <title>Narwhals</title> 8 </head> 9 <body> 10 @include('header') 11 <p>Why, the Narhwal surely bacons at midnight, my good sir!</p> 12 @include('footer') 13 </body> 14 </html> As you can see, the helper methods within the example.blade.php template are pulling in the contents of our header and footer templates using the @include() helper. Include takes the name of the view as a parameter, in the same short format as the View::make() method that we used earlier. Let’s have a look at the resulting document. 1 <!doctype html> 2 <html lang="en"> 3 <head> 4 <meta charset="UTF-8"> 5 <title>Narwhals</title> 6 </head> 7 <body> 8 <h1>When does the Narwhal bacon?</h1> 9 <p>Why, the Narhwal surely bacons at midnight, my good sir!</p> 10 <small>Information provided based on research as of 3rd May '13.</small> 11 </body> 12 </html> Our included templates have been… well, included into the page. This makes our header and footer templates reusable and DRY. We can include them into other pages to save repeating content, and to make that content editable in a single location. There is a better way of doing this though, so keep reading! Template Inheritance Laravel’s Blade provides a way to build templates that can benefit from inheritance. Many people find this confusing, yet it’s a really neat feature. I’m going to try and simplify it as best as I can and hopefully you will soon find the art of creating templates to be a pleasurable experience.
are some parts of a web page that don’t really change across each page. These are the tags that need to be present for any web page we view. We can call it our boilerplate code if you like. Here’s an example: 1 <!doctype html> 2 <html lang="en"> 3 <head> 4 <meta charset="UTF-8"> 5 <title></title> 6 </head> 7 <body> 8 </body> 9 </html> We’re gonna use this layout for all of our pages. Why don’t we tell Laravel? Let’s say that it’s a Blade layout. To do that, we just need to define some areas that content can be inserted into. In Laravel we call these areas ‘sections’. This is how we define them: 1 <!-- app/views/layouts/base.blade.php --> 2 3 <!doctype html> 4 <html lang="en"> 5 <head> 6 <meta charset="UTF-8"> 7 <title></title> 8 @section('head') 9 <link rel="stylesheet" href="style.css" /> 10 @show 11 </head> 12 <body> 13 @yield('body') 14 </body> 15 </html> Here we have created a template with two sections. Let’s look at the one within the body first, that’s the easy one. It looks like this: 1 @yield('body') This statement tells blade to create a section here that we can fill in content for later. We give it the nickname ‘body’ so we can refer back to it later. The other section looks like this:
@show This one is very similar to the ‘yield’ section, except that you can provide some default content. In the above example, the content between the @section and @show tags will be shown unless a child template chooses to override it. So what do I mean by a child template? Well as always, let’s jump right in with an example. 1 <!-- app/views/home.blade.php --> 2 3 @extends('layouts.base') 4 5 @section('body') 6 <h1>Hurray!</h1> 7 <p>We have a template!</p> 8 @stop Right, let’s walk through this. First we have the ‘extends’ blade function: 1 @extends('layouts.base') This tells Blade which layout we will be using to render our content. The name that we pass to the function should look like those that you pass to View::make(), so in this situation we are referring to the ‘base.blade.php’ file in the ‘layouts’ directory within ‘app/views’. Remember that a period (.) character represents a directory separator when dealing with views. In Laravel 3 this function was called ‘@layout()’, but it has been renamed to bring it more inline with other templating engines such as Symfony’s twig. Beware, Laravel 3 devs! Now that we know which layout we are using, it’s time to fill in the gaps. We can use the @section blade function to inject content into sections within the parent template. It looks like this: 1 @section('body') 2 <h1>Hurray!</h1> 3 <p>We have a template!</p> 4 @stop We pass the ‘@section’ function the nickname that we gave our section within the parent template. Remember? We called it ‘body’. Everything that is contained between ‘@section’ and ‘@stop’ will be injected into the parent template, where the ‘@yield(‘body’)’ is. Let’s create a route to see this in action. To render the template, we need only add a View::make() response to render the child template. Like this:
Route::get('/', function() 6 { 7 return View::make('home'); 8 }); Now if we visit / and view the source, we see that the page looks like this: 1 <!doctype html> 2 <html lang="en"> 3 <head> 4 <meta charset="UTF-8"> 5 <title></title> 6 <link rel="stylesheet" href="style.css" /> 7 </head> 8 <body> 9 <h1>Hurray!</h1> 10 <p>We have a template!</p> 11 </body> 12 </html> Okay, so the formatting might be a little different, but the content should be the same. Our section has been injected into our parent template. Since we didn’t override the contents of the ‘head’ section, the default value has been inserted. So you see, we could have as many child templates as we want inheriting from this parent template. This saves us the effort of having to repeat the boilerplate code. Let’s change the child template a little to provide some content for the ‘head’ section. Like this: 1 <!-- app/views/home.blade.php --> 2 3 @extends('layouts.base') 4 5 @section('head') 6 <link rel="stylesheet" href="another.css" /> 7 @stop 8 9 @section('body') 10 <h1>Hurray!</h1>
you can imagine, the head section has been injected with our additional CSS file, and the source for our page now looks like this: 1 <!doctype html> 2 <html lang="en"> 3 <head> 4 <meta charset="UTF-8"> 5 <title></title> 6 <link rel="stylesheet" href="another.css" /> 7 </head> 8 <body> 9 <h1>Hurray!</h1> 10 <p>We have a template!</p> 11 </body> 12 </html> Do you remember how the head section had some default content between the ‘@section’ and ‘@show’? Well, we might wish to append to this content, rather than replace it. To do this we can use the @parent helper. Let’s modify our child template to use it, like this: 1 <!-- app/views/home.blade.php --> 2 3 @extends('layouts.base') 4 5 @section('head') 6 @parent 7 <link rel="stylesheet" href="another.css" /> 8 @stop 9 10 @section('body') 11 <h1>Hurray!</h1> 12 <p>We have a template!</p> 13 @stop The ‘@parent’ helper tells Blade to replace the parent marker, with the default content found within the parent’s section. That sentence might sound a little confusing, but it’s actually quite simple. Let’s have a look at how the source has changed for some clarity.
4 <meta charset="UTF-8"> 5 <title></title> 6 <link rel="stylesheet" href="style.css" /> 7 <link rel="stylesheet" href="another.css" /> 8 </head> 9 <body> 10 <h1>Hurray!</h1> 11 <p>We have a template!</p> 12 </body> 13 </html> See? Our ‘@parent’ marker was replaced with the default content from the parent’s section. You can use this method to append new menu entries, or extra asset files. You can have as many chains of inheritance within blade templates as you like, the following example is perfectly fine. 1 <!-- app/views/first.blade.php --> 2 3 <p>First</p> 4 @yield('message') 5 @yield('final') 6 7 <!-- app/views/second.blade.php --> 8 @extends('first') 9 10 @section('message') 11 <p>Second</p> 12 @yield('message') 13 @stop 14 15 <!-- app/views/third.blade.php --> 16 @extends('second') 17 18 @section('message') 19 @parent 20 <p>Third</p> 21 @yield('message') 22 @stop 23
@section('message') 28 @parent 29 <p>Fourth</p> 30 @stop 31 32 @section('final') 33 <p>Fifth</p> 34 @stop Woah crazy right! Try to follow the inheritance chain to see how the output is constructed. It might be best to work from the child templates upwards to each parent. If we were to render the ‘fourth’ view, this would be the outputted source. 1 <p>First</p> 2 <p>Second</p> 3 <p>Third</p> 4 <p>Fourth</p> 5 <p>Fifth</p> To put it simply: Fourth extends Third which extends Second which extends First which is the base template. You may also have noticed that the ‘final’ section of the base template had content provided by the fourth template file. This means you can provide content for a section from any ‘layer’. As you can see, Blade is very flexible. Comments As you probably know already, HTML has its own method of including comments. They look like this. 1 <!-- This is a lovely HTML comment. --> You are right comment, you are lovely, but unfortunately, you also get outputted along with the rest of the page source. We don’t really want people reading the information that is meant for our developers. Unlike HTML comments, PHP comments are stripped out when the page is pre-processed. This means that they won’t show up when you try to view source. We could include PHP comments in our view files like this:
comment. ?> Sure, now our content is hidden. It’s a bit ugly though right? No room for ugliness in our utopian Blade templates. Let’s use a Blade comment instead, they compile directly to PHP comments. 1 {{-- This is a pretty, and secret Blade comment. --}} Use blade comments when you want to put notes in your views that only the developers will see.
Basic routing just wasn’t good enough for you? A bit greedy are we? Well fear not Laravel adventurer, because I have some dessert for you. In the Filters chapter you learned about how we can give an array as the second parameter to the routing methods to allow for more information to be included with our route definition. Like this: 1 <?php 2 3 // app/routes.php 4 5 Route::get('/', array( 6 'before' => 'sexyfilter', 7 function() { 8 return View::make('hello'); 9 } 10 )); In this example, we are using the array syntax to include information about what filters we want to apply to the route. It doesn’t end there though, you can do a lot more with this array. Let’s take a look at what we have available. Named Routes URIs are fine and dandy. They sure help when it comes to giving structure to the site, but when you have a more complex site they can become a little long. You don’t really want to have to remember every single URI of your site, it will become boring fast. Fortunately, Laravel has provided the named routing ability to alleviate some of this boredom. You see, we can give our routes a nickname, it looks a little like this:
5 Route::get('/my/long/calendar/route', array( 6 'as' => 'calendar', 7 function() { 8 return View::make('calendar'); 9 } 10 )); Using the as index of our route array we can assign a nickname to a route. Try to keep it short, yet descriptive. You see, Laravel has a number of methods that help you generate links to the resources served by your application, and many of these have the ability to support route names. I’m not going to cover them all here, there’s a chapter coming up that will cover it all in detail, however here’s one simple example. 1 // app/views/example.blade.php 2 3 {{ route('calendar') }} This simple helper will output the URL to the named route who’s nickname you pass to it. In this case it would return http://localhost/my/long/calendar/route. The curly braces are just to echo it out within a Blade template. You still remember Blade right? I hope so! So how useful is this? Well, as I said before, you don’t have to remember long URLs anymore. Although, maybe you have a super brain. Remembering URLs might be trivial for you. Well, there’s another advantage I’d like to share. Let’s imagine for a second that you had a number of views with links to a certain route. If the route links were entered manually, and you were to change the URL for the route, then you would also have to change all of the URLs. In a large application this could be an incredible waste of your time, and let’s face it, you’re a Laravel developer now. Your time is worth big money. If we use the route() helper, and then decide to change our URL, we no longer need to modify all of the links. They will all be resolved by their nickname. I always try to name my routes if I can, it saves so much time later if you need to restructure. Do you remember the Redirect response object? Well you can use the route method on it to redirect to a named route. For example:
Also, if you want to retrieve the nickname of the current route, you can use the handy currentRouteName() method on the ‘Route’ class. Like this: 1 <?php 2 3 // app/routes.php 4 5 $current = Route::currentRouteName(); Be sure to remember that all of these advanced features are available to Controllers as well as routed Closures. To route to a Controller, simply add the uses parameter to the routing array, along with a controller-action pair. 1 <?php 2 3 // app/routes.php 4 5 Route::get('/my/long/calendar/route', array( 6 'as' => 'calendar', 7 'uses' => 'CalendarController@showCalendar' 8 )); Easy right? Now let’s look at how we can make our routes more secure. Secure Routes You may want your routes to respond to secure HTTP URLs so that they can handle confidential data. HTTPS URLs are layered on top of the SSL or TLS protocol to allow for increased security when you need it. Here’s how you can allow your routes to match this protocol.
5 Route::get('secret/content', array( 6 'https', 7 function () { 8 return 'Secret squirrel!'; 9 } 10 )); By adding the HTTPS index to our routing array, our route will now respond to requests made to the route using the HTTPS protocol. Parameter Constraints In the basic routing chapter we discovered how we could use parameters from our URL structure within our application logic. For a routed Closure it looks like this: 1 <?php 2 3 // app/routes.php 4 5 Route::get('save/{princess}', function($princess) 6 { 7 return "Sorry, {$princess} is in another castle. :("; 8 }); Well, I for one have never heard of a princess called ‘!1337f15h’. It sounds a lot more like a Counterstrike player to me. We don’t really want our route to respond to fake princesses, so why don’t we try and validate our parameter to make sure that it consists of letters only. Let’s lead with an example of this in action.
5 Route::get('save/{princess}', function($princess) 6 { 7 return "Sorry, {$princess} is in another castle. :("; 8 })->where('princess', '[A-Za-z]+'); In the above example, we chain an additional where() method onto the end of our route definition. The ‘where’ method accepts the placeholder name as the first parameter, and a regular expression as the second. Now I’m not going to cover regular expressions in detail. The topic is vast, no really, it’s incredibly vast. It could be a complete book of its own. Simply put, the regular expression above ensures that the princess’ name must be made up of either capital or lowercase letters, and must have at least one letter. If the parameter doesn’t satisfy the regular expression that we have provided, then the route won’t be matched. The router will continue to attempt to match the other routes in the collection. You can attach as many conditions to your route as you like. Take a look at this for example: 1 <?php 2 3 // app/routes.php 4 5 Route::get('save/{princess}/{unicorn}', function($princess, $unicorn) 6 { 7 return "{$princess} loves {$unicorn}"; 8 })->where('princess', '[A-Za-z]+') 9 ->where('unicorn', '[0-9]+'); The unicorn parameter has been validated against one or more numbers, because as we know, unicorns always have numerical names. Just like my good friend 3240012. Route Groups Remember how we were able to provide conditions to our routes in the Filters chapter? That was really handy right? It would be a shame to have to attach the same filter to many route definitions though. Wouldn’t it be great if we could encapsulate our routes, and apply a filter to the container? Well, you might have guessed already, but here’s an example that does exactly that.
5 Route::group(array('before' => 'onlybrogrammers'), function() 6 { 7 8 // First Route 9 Route::get('/first', function() { 10 return 'Dude!'; 11 }); 12 13 // Second Route 14 Route::get('/second', function() { 15 return 'Duuuuude!'; 16 }); 17 18 // Third Route 19 Route::get('/third', function() { 20 return 'Come at me bro.'; 21 }); 22 23 }); In the above example we are using the group() method on the ‘Route’ object. The first parameter is an array. It works just like the ones we have been using within our routing methods. It can accept filters, secure indexes, and many of the other routing filters. The second parameter should be a Closure. When you define additional routes within this Closure, the routes inherit the properties of the group. The three routes within the group above are all protected by the ‘onlybrogrammers’ before filter. Now, we can use the routing array filters we discovered earlier in the chapter on the groups, but we can also use some new features that are specific to route groups. Let’s take a look at these new features. Route Prefixing If many of your routes share a common URL structure, you could use a route prefix to avoid a small amount of repetition. Take a look at the following example.
5 Route::group(array('prefix' => 'books'), function() 6 { 7 8 // First Route 9 Route::get('/first', function() { 10 return 'The Colour of Magic'; 11 }); 12 13 // Second Route 14 Route::get('/second', function() { 15 return 'Reaper Man'; 16 }); 17 18 // Third Route 19 Route::get('/third', function() { 20 return 'Lords and Ladies'; 21 }); 22 23 }); Using the prefix array option of the route group, we can specify a prefix for all of the URIs defined within the group. For example, the three routes above are now accessible at the following URLs. 1 /books/first 2 3 /books/second 4 5 /books/third Use route prefixes to avoid repetition within your routes, and to group them by purpose for organisational or structural value. Domain Routing URI’s are not the only way to differentiate a route. The host can also change. For example, the following URLs can reference different resources.
http://third.myapp.dev/my/route In the above examples you can see that the subdomain is different. Let’s discover how we can use domain routing to serve different content from different domains. Here’s an example of domain based routing: 1 <?php 2 3 // app/routes.php 4 5 Route::group(array('domain' => 'myapp.dev'), function() 6 { 7 Route::get('my/route', function() { 8 return 'Hello from myapp.dev!'; 9 }); 10 }); 11 12 Route::group(array('domain' => 'another.myapp.dev'), function() 13 { 14 Route::get('my/route', function() { 15 return 'Hello from another.myapp.dev!'; 16 }); 17 }); 18 19 Route::group(array('domain' => 'third.myapp.dev'), function() 20 { 21 Route::get('my/route', function() { 22 return 'Hello from third.myapp.dev!'; 23 }); 24 }); By attaching the ‘domain’ index to the route grouping array, we are able to provide a host name, that must match the current hostname for any of the routes inside to be executed. The host name can either be a subdomain, or a completely different subdomain. As long as the web server is configured to serve requests from each host to Laravel, then it will be able to match them. That’s not all there is to domain based routing. We can also capture portions of the host name to use as parameters, just as we did with URI based routing. Here’s an example of this in action.
5 Route::group(array('domain' => '{user}.myapp.dev'), function() 6 { 7 Route::get('profile/{page}', function($user, $page) { 8 // ... 9 }); 10 }); You can provide a placeholder for a domain parameter within the ‘domain’ index by using { curly braces }, just like our URI parameters. The value of the parameter will be passed before any parameters of the routes held within the group. For example, if we were to visit the URL: 1 http://taylor.myapp.dev/profile/avatar Then the first value $user that is passed to the inner Closure, would be ‘taylor’, and the second value $page would be ‘avatar’. By using a combination of wildcard subdomains, and routing parameters, you could prefix the domain with the username of your application’s users.
After all, they are what direct your users to your pages. At the end of the day, serving pages is what any web application must do. Your users might not be interested for long if you are only serving one page, and if you intend to move them around your website or web application, then you will need to use a critical feature of the web. What feature, you ask? Well, hyper-links! In order to construct hyper links we need to build URLs to our application. We could do them by hand, but Laravel can save us some effort by providing a number of helpers to assist with the construction of URLs. Let’s take a look at those features. The current URL Getting the current URL in Laravel is easy. Simply use the URL::current() helper. Let’s create a simple route to test it. 1 <?php 2 3 // app/routes.php 4 5 Route::get('/current/url', function() 6 { 7 return URL::current(); 8 }); Now if we visit our /current/url url, we receive the following response. 1 http://myapp.dev/current/url Well that was simple wasn’t it? Let’s have a look at URL::full() next, you see it returns the current URL. Erm. Didn’t we just do that? Well, it’s a little bit different. Let’s try that last route once more, but this time we will include some additional data as GET parameters.
result of URL::current() strips off the extra request data, like this: 1 http://myapp.dev/current/url Well the URL::full() method is a little different. Let’s modify our existing route to use it. Like this: 1 <?php 2 3 // app/routes.php 4 5 Route::get('/current/url', function() 6 { 7 return URL::full(); 8 }); Now let’s try the /current/url?foo=bar URL again. This time we get the following result: 1 http://myapp.dev/current/url?foo=bar You see, the URL::full() method also includes additional request data. This next one isn’t really a way of getting the current URL, but I feel that it certainly has its place in this sub heading. You see, it’s a method of getting the previous URL, as denoted by the ‘referer’ request header. I have come up with a cunning trap using a Redirect response type to display the output. Take a look at the following example. 1 <?php 2 3 // app/routes.php 4 5 Route::get('first', function() 6 { 7 // Redirect to the second route. 8 return Redirect::to('second'); 9 }); 10 11 Route::get('second', function() 12 { 13 return URL::previous(); 14 });
second route. The second route will output the URL of the previous request using the URL::previous() method. Let’s visit the /first URI to see what happens. You might have seen the redirect notice displayed for a split second, but hopefully you will have received the following response: 1 http://demo.dev/first You see, after the redirect, the URL::previous method gives the URL for the previous request, which in this instance is the URL to the first route. It’s as simple as that! Generating Framework URLs This section is all about generating URLs that will help us navigate around the different routes or pages of our site or application. Let’s start by generating URLs to specific URI’s. We can do this using the URL::to() method. Like this: 1 <?php 2 3 // app/routes.php 4 5 Route::get('example', function() 6 { 7 return URL::to('another/route'); 8 }); The response we receive when we visit /example looks like this. 1 http://demo.dev/another/route As you can see, Laravel has built a URL to the route we requested. You should note that the another/route doesn’t exist, but we can link to it anyway. Make sure that you remember this when generating links to URIs. You can specify additional parameters to the URL::to() method in the form of an array. These parameters will be appended to the end of the route. Here’s an example:
5 Route::get('example', function() 6 { 7 return URL::to('another/route', array('foo', 'bar')); 8 }); The resulting string will take the following form. 1 http://myapp.dev/another/route/foo/bar If you want your generated URLs to use the HTTPS protocol, then you have two options. The first option is to pass true as the third parameter to the URL::to() method, like this: 1 URL::to('another/route', array('foo', 'bar'), true); However, if you don’t want to provide parameters to your URL, you will have to pass an empty array, or null as the second parameter. Instead, it’s more effective to use the descriptive URL::secure() method, like this: 1 URL::secure('another/route'); Once again, you can pass an array of route parameters as the second method parameter to the URL::secure() method, like this: 1 URL::secure('another/route', array('foo', 'bar')); Let’s look at the next generation method. Do you remember that we discovered how to give our routes nicknames within the advanced routing chapter? Named routes look like this:
5 Route::get('the/best/avenger', array('as' => 'ironman', function() 6 { 7 return 'Tony Stark'; 8 })); 9 10 Route::get('example', function() 11 { 12 return URL::route('ironman'); 13 }); If we visit the /example route, we receive the following response. 1 http://myapp.dev/the/best/avenger Laravel has taken our route nickname, and found the associated URI. If we were to change the URI, the output would also change. This is very useful for avoiding having to change a single URI for many views. Just like the URL::to() method, the URL::route() method can accept an array of parameters as the second method parameter. Not only that, but it will insert them in the correct order within the URI. Let’s take a look at this in action. 1 <?php 2 3 // app/routes.php 4 5 Route::get('the/{first}/avenger/{second}', array( 6 'as' => 'ironman', 7 function($first, $second) { 8 return "Tony Stark, the {$first} avenger {$second}."; 9 } 10 )); 11 12 Route::get('example', function() 13 { 14 return URL::route('ironman', array('best', 'ever')); 15 }); If we visit the following URL…
blanks in the correct order, with the parameters we have provided. The following URL is displayed a response. 1 http://myapp.dev/the/best/avenger/ever There’s one final routing method of this type that you need to know, and that’s how to route to controller actions. In fact, this one should be pretty simple, since it follows the same pattern as the URL::route() method. Let’s take a look at an example. 1 <?php 2 3 // app/routes.php 4 5 // Our Controller. 6 class Stark extends BaseController 7 { 8 public function tony() 9 { 10 return 'You can count on me, to pleasure myself.'; 11 } 12 } 13 14 // Route to the Stark controller. 15 Route::get('i/am/iron/man', 'Stark@tony'); 16 17 Route::get('example', function() 18 { 19 return URL::action('Stark@tony'); 20 }); In this example, we create a new controller called ‘Stark’ with a ‘tony()’ action. We create a new route for the controller action. Next we create an example route which returns the value of the URL::action() method. The first parameter of this method is the Class and action combination that we wish to retrieve the URL for. The format for this parameter is identical to that which we use for routing to controllers. If we visit the /example URL, we receive the following response.
for the controller action pair that we requested, and delivered it as a response. Just as with the other methods, we can supply an array of parameters as a second parameter to the URL::action() method. Let’s see this in action. 1 <?php 2 3 // app/routes.php 4 5 // Our Controller. 6 class Stark extends BaseController 7 { 8 public function tony($whatIsTony) 9 { 10 // ... 11 } 12 } 13 14 // Route to the Stark controller. 15 Route::get('tony/the/{first}/genius', 'Stark@tony'); 16 17 Route::get('example', function() 18 { 19 return URL::action('Stark@tony', array('narcissist')); 20 }); Just as in the last example, we supply an array with a single parameter as a parameter to the URL::action() method, and Laravel constructs the URL to the controller, with the parameter in the correct location. The URL that we receive looks like this. 1 http://myapp.dev/tony/the/narcissist/genius Well that’s it for route URL generation. I’m sorry if that got a bit repetitive, but hopefully it will make for a good reference chapter. Asset URLs URLs to assets such as images, CSS files and JavaScript need to be handled a little differently. Most of you will be using pretty URLs with Laravel. This is the act of rewriting the URL to remove the index.php front controller, and making our URLs more SEO friendly.
wish to use pretty URLs. However, if you were to try to link to an asset using the helpers mentioned in the previous subchapter, then the index.php portion of the URL would be included, and the asset links would break. Even with pretty URLs, we don’t want to link to our assets using relative URLs because our routing segments will be confused for a folder structure. As always, Laravel, and Taylor, are one step ahead of us. Helpers are provided to generate absolute URLs to our assets. Let’s take a look at some of these helpers. First we have the URL::asset() method, let’s take a look at it in action. The first parameter to the method is the relative path to the asset. 1 <?php 2 3 // app/routes.php 4 5 Route::get('example', function() 6 { 7 return URL::asset('img/logo.png'); 8 }); Now, if we visit the URL /example then we are greeted with the following response. 1 http://myapp.dev/img/logo.png Laravel has created an absolute asset path for us. If we want to use a secure HTTPS protocol to reference our assets, then we can pass true as a second parameter to the URL::asset() method, like this: 1 <?php 2 3 // app/routes.php 4 5 Route::get('example', function() 6 { 7 return URL::asset('img/logo.png', true); 8 }); Now we receive the following response from the /example URL.
much more descriptive method of generating secure asset URLs. Simply use the URL::secureAsset() method and pass the relative path to your asset. 1 <?php 2 3 // app/routes.php 4 5 Route::get('example', function() 6 { 7 return URL::secureAsset('img/logo.png'); 8 }); The response from this route is the same as the previous method. 1 https://demo.dev/img/logo.png Generation Shortcuts The methods mentioned in the previous subheadings are freely available for you to use in your views. Go ahead and take advantage of all of the features that they have to offer. However, it’s good practice for the logic in your views to be short and neat. Also, it takes some stress off your fingers. This is why Laravel has provided some shortcuts to some of the methods available on the URL class. Let’s take a closer look at what’s available. First we have the url() function. It accepts identical parameters to the URL::to() method, so I won’t cover them again. Here’s an example of it in action. 1 <!-- app/views/example.blade.php --> 2 3 <a href="{{ url('my/route', array('foo', 'bar'), true) }}">My Route</a> Now if we look at the link within the rendered view’s source, we see the following. 1 <a href="https://demo.dev/my/route/foo/bar">My Route</a> The URL has been created in the same manner as the URL::to() method. As before, there is also a shortcut method that can be used to generate a secure URL. It looks like this:
href="{{ secure_url('my/route', array('foo', 'bar')) }}">My Route</a> The secure_url() function accepts the same signature as the URL::secure() method. The first parameter is the route, and the second is an array of route parameters to be appended. The route() function is a shortcut to the URL::route() method, and be used for generating URLs to named routes. It looks like this: 1 <!-- app/views/example.blade.php --> 2 3 <a href="{{ route('myroute') }}">My Route</a> As you might have guessed, there is also a shortcut for the third method of route URL generation. The action() function can be used as a shortcut to the URL::action() method, and can be used to generate links to controller actions. 1 <!-- app/views/example.blade.php --> 2 3 <a href="{{ action('MyController@myAction') }}">My Link</a> Just as with the URL::action() method, they can accept second and third parameters for route parameters and secure URL generation. 1 <!-- app/views/example.blade.php --> 2 3 <a href="{{ action('MyController@myAction', array('foo'), true) }}">My Link</a> The shortcut to the URL::asset() method is the asset() function, and as with all the other shortcuts, it accepts identical function parameters. Here’s an example: 1 <!-- app/views/example.blade.php --> 2 3 <img src="{{ asset('img/logo.png') }}" /> Likewise, the shortcut to URL::secureAsset() is the secure_asset() function. It looks like this:
src="{{ secure_asset('img/logo.png') }}" /> Feel free to use the shortcuts in your views to simplify their content, and to avoid repetitive strain injury.
web application. Most of them rely upon retrieving data, changing it, creating it, and storing it. Data doesn’t always have to be a long term thing. The data provided from an HTML form, or attached to a request is, by default, only available for the duration of the request. Before we can manipulate or store the data from the request, we will first need to retrieve it. Fortunately, Laravel has a long winded, complicated method of accessing request data. Let’s take a look at an example. 1 <?php 2 3 // app/providers/input/data/request.php 4 5 namespace Laravel\Input\Request\Access; 6 7 use Laravel\Input\Request\Access\DataProvider; 8 use Laravel\Input\Request\Access\DataProvider\DogBreed; 9 10 class Data extends DataProvider 11 { 12 public function getDataFromRequest($requestDataIndicator) 13 { 14 $secureRequestDataToken = sin(2754) - cos(23 + 52 - pi() / 2); 15 $retriever = $this->getContainer()->get('retriever'); 16 $goldenRetriever = $retriever->decorate(DogBreed::GOLDEN); 17 $request = $goldenRetriever->retrieveCurrentRequestByImaginaryFigure(); 18 return $request->data->input->getDataByKey($requestDataIndicator); 19 } 20 } 21 22 // app/routes.php 23 24 $myDataProvider = new Laravel\Input\Request\Access\Data; 25 $data = $myDataProvider->getDataFromRequest('example'); Right first we create a DataProvider Claaaaahahahahhaa! Got ya! I’m just messing around. Laravel would never provide anything that ugly and complicated, you should know this by now! Hmm, I
this book and will never look at Laravel again now. Well, it’s their loss I guess! Let’s take a look at some real methods of accessing request data. Retrieval Retrieval is easy. Let’s jump right in with an example of how to retrieve some GET data from our URL. This type of data is appended to the URL in the form of key/value pairs. It’s what you might expect to see stored within the PHP $_GET array. 1 <?php 2 3 // app/routes.php 4 5 Route::get('/', function() 6 { 7 $data = Input::all(); 8 var_dump($data); 9 }); The Input::all() method is used to return an associative array of both $_POST and $_GET data contained within the current request. Let’s test this out by first providing a URL with some ‘GET’ type data included in the URL. 1 http://myapp.dev/?foo=bar&baz=boo We receive the following reply. It’s an associative array of the data that we provided to the URL. 1 array(2) { ["foo"]=> string(3) "bar" ["baz"]=> string(3) "boo" } The request data can come from another source, the $_POST data. To demonstrate this we are going to need to create another route to a simple form. Let’s start with the form.
action="{{ url('/') }}" method="POST"> 4 5 <input type="hidden" name="foo" value="bar" /> 6 <input type="hidden" name="baz" value="boo" /> 7 8 <input type="submit" value="Send" /> 9 10 </form> We have created a form with some hidden data that will be posted to the / URL. However, we need to work on the routing before we can test this out. Let’s take a look at the routing file. 1 <?php 2 3 // app/routes.php 4 5 Route::post('/', function() 6 { 7 $data = Input::all(); 8 var_dump($data); 9 }); 10 11 Route::get('post-form', function() 12 { 13 return View::make('form'); 14 }); Here we have added an additional route to display our form. However, there’s another little change that you may not have spotted. Take another look. Can you see it? That was fun right? It was like playing where’s Waldo. Well, in case you didn’t spot it, here it is. We altered the original route to only respond to POST method requests. The first route is now using the Route::post() method instead. This is because we set the method of the form to POST. Our destination route won’t be matched unless the HTTP verb matches the method used to create the route. Let’s visit the /post-form route and hit the ‘Send’ button to see what kind of reply we get. 1 array(2) { ["foo"]=> string(3) "bar" ["baz"]=> string(3) "boo" }
Although this raises an interesting question. Even on a POST route, we can still attach data to the URL. I wonder which piece of data takes priority if the keys are the same? There’s only one way to find out. Let’s alter our form to test the theory. 1 <!-- app/views/form.blade.php --> 2 3 <form action="{{ url('/') }}?foo=get&baz=get" method="POST"> 4 5 <input type="hidden" name="foo" value="bar" /> 6 <input type="hidden" name="baz" value="boo" /> 7 8 <input type="submit" value="Send" /> 9 10 </form> There we go. We have attached some extra data to the URL that our form is targeting. Let’s hit the send button again and see what happens. 1 array(2) { ["foo"]=> string(3) "get" ["baz"]=> string(3) "get" } It seems that the GET data is handled last, and the values are replaced. Now we know that GET data, takes a higher priority than POST data within the request data array. Be sure to remember this if you ever happen to use both. Retrieving the entire request data array could be useful in some circumstances, however, we might also want to retrieve a single piece of information by key. That’s what the Input::get() method is for. Let’s see it in action. 1 <?php 2 3 // app/routes.php 4 5 Route::get('/', function() 6 { 7 $data = Input::get('foo'); 8 var_dump($data); 9 }); We have changed the routing to use the get() method once more, but this time we are using the Input::get() method to retrieve a single piece of data by providing a string with the name of its key. Let’s visit /?foo=bar to see if our piece of data has been retrieved successfully.
would happen if the data didn’t exist? Let’s find out by visiting /. 1 NULL So why do we have a null value? Well, if something can’t be found in Laravel, it likes to provide null instead of throwing an exception or interfering with our application’s execution. Instead, Laravel does something much more useful. It allows us to provide a default value as a fallback. Let’s alter our route to provide a fallback to the Input::get() method. 1 <?php 2 3 // app/routes.php 4 5 Route::get('/', function() 6 { 7 $data = Input::get('foo', 'bar'); 8 var_dump($data); 9 }); Now let’s take a look at the result from the / URI. 1 string(3) "bar" Great, it worked! By providing a default, now we can be sure that the result of the method will always be a string, we won’t get caught out. Still, if we want to find out whether a piece of request data exists or not, we can use the Input::has() option. Let’s take a look at it in action. 1 <?php 2 3 // app/routes.php 4 5 Route::get('/', function() 6 { 7 $result = Input::has('foo'); 8 var_dump($result); 9 });
bool(false), and if we visit /?foo=bar we receive bool(true). We call this a ‘boolean’ value, it can be eith… just kidding! I know that you know what a boolean value is. Feel free to use the Input::get() method whenever you need to set your mind at ease. Pfff… Still not happy? Well aren’t you a fussy one! Oh right, you don’t want a single value, or an array of all values? Ah I see, you must want to access a subset of the data then. Don’t worry buddy. Laravel has you covered. First, let’s take a look at the Input::only() method. It does exactly what it says on the… tin? Here’s an example. 1 <?php 2 3 // app/routes.php 4 5 Route::get('/', function() 6 { 7 $result = Input::only(array('foo', 'baz')); 8 var_dump($result); 9 }); In the above example we pass the Input::only() method an array containing the keys of the request data values we wish to return as an associative array. Actually, the array is optional. We could also pass each key as additional parameters to the method, like this: 1 <?php 2 3 // app/routes.php 4 5 Route::get('/', function() 6 { 7 $result = Input::only('foo', 'baz'); 8 var_dump($result); 9 }); Let’s test the response by visiting the following URL. 1 http://myapp.dev/?foo=one&bar=two&baz=three It doesn’t matter which method of implementation we use. The result will be the same.
string(5) "three" } Laravel has returned the subset of the request data that matches the keys that we requested. The data has been returned as an associative array. Of course, the only() method has an opposite. The except() method. The except() method will return an associative array of data that excludes the keys we have provided. Once again, you can either pass an array of keys, like this: 1 <?php 2 3 // app/routes.php 4 5 Route::get('/', function() 6 { 7 $result = Input::except(array('foo', 'baz')); 8 var_dump($result); 9 }); Or, we can provide the list of keys as additional parameters, like this: 1 <?php 2 3 // app/routes.php 4 5 Route::get('/', function() 6 { 7 $result = Input::except('foo', 'baz'); 8 var_dump($result); 9 }); Now let’s visit the following URL. 1 http://demo.dev/?foo=one&bar=two&baz=three We receive the following associative array, containing the keys and values that aren’t matched by the keys we provided. The exact opposite of the Input::only() method. 1 array(1) { ["bar"]=> string(3) "two" }
data is only available for a single request. They are short-term values. Kind of like how information is stored in RAM within your computer. Unless we move our request data to a data store, we won’t be able to keep it for very long. However, we can tell Laravel to hold onto it for another request cycle. To demonstrate this, we can set up another clever trap for the Laravel routing engine. As you may have already gathered, returning a Redirect response creates a new request cycle, just like a browser refresh. We can use this to test our next method. Let’s create two routes. 1 <?php 2 3 // app/routes.php 4 5 Route::get('/', function() 6 { 7 return Redirect::to('new/request'); 8 }); 9 10 Route::get('new/request', function() 11 { 12 var_dump(Input::all()); 13 }); Here we have a route that redirects to the new/request route. Let’s hand some GET data to the first route and see what happens. Here’s the URL we will try. 1 http://myapp.dev/?foo=one&bar=two Here’s the response we receive after the redirect. 1 array(0) { } See? I didn’t lie to you this time. After the redirect, the response data set is an empty array. There is no response data. Using the Input::flash() method, we can tell Laravel to hold on to the request data for an additional request. Let’s modify the initial route. Here’s the complete routing example again, but this time we are using the Input::flash() method.
5 Route::get('/', function() 6 { 7 Input::flash(); 8 return Redirect::to('new/request'); 9 }); 10 11 Route::get('new/request', function() 12 { 13 var_dump(Input::all()); 14 }); Now if we hit the same URL we receive… oh hold on. 1 array(0) { } Ah that’s right! We don’t want to mix the request data for the current and previous request together. That would be messy and complicate things. Laravel and Taylor are clever. Together, they have stored the request data in another collection. Let’s alter our routes again. 1 <?php 2 3 // app/routes.php 4 5 Route::get('/', function() 6 { 7 Input::flash(); 8 return Redirect::to('new/request'); 9 }); 10 11 Route::get('new/request', function() 12 { 13 var_dump(Input::old()); 14 }); The Input::old() method lets Laravel know that we want the entire array of data that we flashed from the previous request. All of it, and be swift about it! Let’s see what our old data looks like, we will visit the /?foo=one&bar=two URL once again.
string(3) "two" } Great! That’s exactly what we are looking for. We’ve now got hold of the data that we flash()ed from the previous request. As with the Input::get(), we can also retrieve a single value from the array of old data. Bring on the code! 1 <?php 2 3 // app/routes.php 4 5 Route::get('/', function() 6 { 7 Input::flash(); 8 return Redirect::to('new/request'); 9 }); 10 11 Route::get('new/request', function() 12 { 13 var_dump(Input::old('bar')); 14 }); By passing a string to the Input::old() method, we can specify a key to return a single value. It works just like the Input::get() method, except that it will act upon the the old data array. We don’t need to flash all the data, you know? Laravel isn’t going to force us into anything. For that reason, we can flash only a subset of data. It works kind of like the only() and except() methods we used earlier. Only this time we refer to the data that is flashed, and not the data retrieved. Gosh, it always sounds more complicated when put into words. Isn’t it great to see a nice, descriptive example using Laravel’s clean syntax? I completely agree! 1 <?php 2 3 // app/routes.php 4 5 Route::get('/', function() 6 { 7 Input::flashOnly('foo'); 8 return Redirect::to('new/request'); 9 }); 10 11 Route::get('new/request', function() 12 {
have told Laravel to only flash the ‘foo’ index into the old data collection. After the redirect, we dump the entire old data collection to see what result is returned. Let’s go ahead and take a look at that result from the /?foo=one&bar=two URL. 1 array(1) { ["foo"]=> string(3) "one" } Laravel has provided only the value for foo. That’s the only value that was saved for the redirected request, and it’s exactly what we wanted! As with the only() method, the flashOnly() method has a direct opposite which works in a similar fashion to except(). It will save only the values that don’t match the keys we provide for the next request. Let’s take a quick look. 1 <?php 2 3 // app/routes.php 4 5 Route::get('/', function() 6 { 7 Input::flashExcept('foo'); 8 return Redirect::to('new/request'); 9 }); 10 11 Route::get('new/request', function() 12 { 13 var_dump(Input::old()); 14 }); We have told Laravel that we want to save only the request values that don’t have an index of ‘foo’. Of course, Laravel behaves itself and provides the following result like a good framework. -Pets Laravel- Let’s visit the /?foo=one&bar=two URL once more. 1 array(1) { ["bar"]=> string(3) "two" } Great! We got everything but ‘foo’. Just like the get(), only() and except() methods, the old(), flashOnly() and flashExcept() methods can accept either a list of keys as parameters, or an array. Like this:
'third'); 3 Input::flashExcept('first', 'second', 'third'); 4 5 Input::old(array('first', 'second', 'third')); 6 Input::flashOnly(array('first', 'second', 'third')); 7 Input::flashExcept(array('first', 'second', 'third')); It really is up to you! The second option might be really useful if you want to limit your request data using an existing array as keys. Otherwise, I’d imagine the first method of supplying arguments would look a little cleaner in your code. In the previous examples, we flashed our input data, and then redirected to the next request. That’s actually something that happens all the time within web applications. For example, imagine that your user has filled in a form and hit the submit button. Your piece of logic that handles the form decides that there’s an error in the response, so you choose to flash the form data and redirect to the route that shows the form. This will allow you to use the existing data to repopulate the form so that your users won’t have to enter all the information again. Well, Taylor identified that this was a common practice. For that reason the withInput() method was included. Take a look at the following example. 1 <?php 2 3 // app/routes.php 4 5 Route::get('/', function() 6 { 7 return Redirect::to('new/request')->withInput(); 8 }); If you chain the withInput() method onto the redirect, Laravel will flash all of the current request data to the next request for you. That’s nice of it, isn’t it? Laravel loves you. It really does. Sometimes at night, when you are all curled up in bed, Laravel sneaks quietly into your room and sits next to your bed as you sleep. It brushes your cheek softly and sings sweet lullabies to you. Even your mum will never love you as much as Laravel does. Sorry, I got a little carried away again. Anyway, the withInput() chain executes in an identical fashion to the following snippet.
5 Route::get('/', function() 6 { 7 Input::flash(); 8 return Redirect::to('new/request'); 9 }); With a clever trick, you can also use flashOnly() and flashExcept() with the withInput() chain method. Here’s an example of an alternative to Input::flashOnly(). 1 <?php 2 3 // app/routes.php 4 5 Route::get('/', function() 6 { 7 return Redirect::to('new/request')->withInput(Input::only('foo')); 8 }); By passing the result of the Input::only() method to the withInput() chained method, we can limit the request data to the set of keys identified within the Input::only() method. Similarly, we can pass the Input::except() method to the withInput() method to limit the request data to the inverse of the above example. Like this: 1 <?php 2 3 // app/routes.php 4 5 Route::get('/', function() 6 { 7 return Redirect::to('new/request')->withInput(Input::except('foo')); 8 }); Now we know how to access standard request data, but files are a little more complicated. Let’s take a look at how we can retrieve information about files supplied as request data.
request data our application can receive. We can also receive files that have been uploaded as part of a multipart encoded form. Before we can look at how to retrieve this data, we need to create a test bed. I can’t demonstrate this feature using GET data, because we can’t really attach a file to the current URL. Let’s setup a simple form instead. We will start with a view. 1 <!-- app/views/form.blade.php --> 2 3 <form action="{{ url('handle-form') }}" 4 method="POST" 5 enctype="multipart/form-data"> 6 7 <input type="file" name="book" /> 8 <input type="submit"> 9 </form> So here we have a form with an file upload field and a submit button. Uploading files won’t work unless we include the ‘multipart/form-data’ encoding type. Great, now that’s sorted. What do we need to go along with the view? That’s right, we need a route to display the form. How about this? 1 <?php 2 3 // app/routes.php 4 5 Route::get('/', function() 6 { 7 return View::make('form'); 8 }); Nothing new there, hope you aren’t surprised! OMG, WHAT IS THAT!? Erm, I think perhaps you should go back to the routing chapter! As for the rest of us, let’s create a second route and dump out our request data to see what we get.
5 Route::get('/', function() 6 { 7 return View::make('form'); 8 }); 9 10 Route::post('handle-form', function() 11 { 12 var_dump(Input::all()); 13 }); Right, let’s go ahead and visit the / route to show the form. Now we need to upload a file to see what we receive from the dumped request data. Right, we need a file… hrm. Oh yeah, I remember some clever chap released a wonderful book about Laravel. Let’s upload the PDF for that! You should note that I don’t encourage the upload of this book to any public websites. It’s a week into the release and I’ve already had to send 5 copyright infringement emails! Let’s not add to that total! Right, select the Code Bright PDF and hit that wonderful submit button! What response do we get? 1 array(0) { } Hey, what are you doing Laravel!? What have you done with our file? Oh that’s right, in PHP, files aren’t stored in the $_GET or $_POST arrays. PHP stores these values in the $_FILES array… but Laravel (well, actually Symfony) provides a lovely wrapper for this array instead. Let’s see it in action. 1 <?php 2 3 // app/routes.php 4 5 Route::get('/', function() 6 { 7 return View::make('form'); 8 }); 9 10 Route::post('handle-form', function() 11 { 12 var_dump(Input::file('book')); 13 });
instead, dump the value of the Input::file() method, providing the name attribute (in the form) for the input that we wish to retrieve as a string. What we receive back is an object that represents our file. 1 object(Symfony\Component\HttpFoundation\File\UploadedFile)#9 (7) { 2 ["test":"Symfony\Component\HttpFoundation\File\UploadedFile":private]=> 3 bool(false) 4 ["originalName":"Symfony\Component\HttpFoundation\File\UploadedFile":private]=> 5 string(14) "codebright.pdf" 6 ["mimeType":"Symfony\Component\HttpFoundation\File\UploadedFile":private]=> 7 string(15) "application/pdf" 8 ["size":"Symfony\Component\HttpFoundation\File\UploadedFile":private]=> 9 int(2370413) 10 ["error":"Symfony\Component\HttpFoundation\File\UploadedFile":private]=> 11 int(0) 12 ["pathName":"SplFileInfo":private]=> 13 string(36) "/Applications/MAMP/tmp/php/phpPOb0vX" 14 ["fileName":"SplFileInfo":private]=> 15 string(9) "phpPOb0vX" 16 } Beautiful! Well… OK maybe not beautiful. Well constructed though! Fortunately, this object has a bunch of methods that will let us interact with it. You should note that the methods of this object belong to the Symfony project, and some are even inherited from the PHP SplFileInfo class. That’s the beauty of open source, sharing is caring! Symfony and PHP’s naming conventions tend to be a little bit longer than Laravel’s, but they are just as effective. Let’s have a look at the first one. 1 <?php 2 3 // app/routes.php 4 5 Route::get('/', function() 6 { 7 return View::make('form'); 8 }); 9 10 Route::post('handle-form', function() 11 { 12 return Input::file('book')->getFileName(); 13 });
our file object and we return its value as the result of our ‘handle-form’ routed Closure. Let’s upload the Code Bright PDF once more to see the result. 1 phpaL1eZS Wait, what’s that? Your result might even look different, but equally confusing. You see, this is the temporary filename given to our upload in its temporary location. If we don’t move it somewhere by the end of the request, it will be removed. The temporary name isn’t very useful at the moment. Let’s see if we can find the actual name of the file from when it was uploaded. Hmm, let’s try this method. 1 <?php 2 3 // app/routes.php 4 5 Route::get('/', function() 6 { 7 return View::make('form'); 8 }); 9 10 Route::post('handle-form', function() 11 { 12 return Input::file('book')->getClientOriginalName(); 13 }); This time we will try the getClientOriginalName() method instead. Let’s see what result we receive after uploading our book. 1 codebright.pdf Now that’s more like it! We’ve got the real name of the file. The method’s name is a little clumsy, but it seems to function correctly. Of course, when we think of file uploads, there is a lot of extra information other then the file name. Let’s have a look at how we can find the file size.
5 Route::get('/', function() 6 { 7 return View::make('form'); 8 }); 9 10 Route::post('handle-form', function() 11 { 12 return Input::file('book')->getClientSize(); 13 }); What we receive after uploading our book is a number. 1 2370413 These numbers are your winning lottery numbers. Make sure to buy a ticket! Well that would be nice, but sorry, it’s just the size of the file uploaded. The Symfony API didn’t seem to mention what the format of the value was, so after some clever maths I discovered it was the size of the file in bytes. It might be useful to know what kind of file we’re working with, so let’s look at a couple of methods which will serve that purpose. The first is the getMimeType() method. Let’s give it a go. 1 <?php 2 3 // app/routes.php 4 5 Route::get('/', function() 6 { 7 return View::make('form'); 8 }); 9 10 Route::post('handle-form', function() 11 { 12 return Input::file('book')->getMimeType(); 13 }); The result that we get is a mime type. This is a convention used to identify files. Here’s the result for the Code Bright book.
clearly see that our file is a PDF. The file class also has a useful method that will attempt to guess the file extension from it’s mime type. Here’s the guessExtension() method in action. 1 <?php 2 3 // app/routes.php 4 5 Route::get('/', function() 6 { 7 return View::make('form'); 8 }); 9 10 Route::post('handle-form', function() 11 { 12 return Input::file('book')->guessExtension(); 13 }); Uploading our book once more yields the following response. 1 pdf Excellent, that’s definitely what we have, a PDF. Right, let’s get things back on track shall we? Our uploaded file isn’t going to hang around. If we don’t move it before the request has ended, then we are going to lose the file. We don’t want that to happen! It’s a lovely book. We should keep it. First let’s take a look and see if we can find out where the file currently resides. The UploadedFile class has a method to help us out with this task. Let’s take a look. 1 <?php 2 3 // app/routes.php 4 5 Route::get('/', function() 6 { 7 return View::make('form'); 8 }); 9
Input::file('book')->getRealPath(); 13 }); We can use the getRealPath() method to get the current location of our uploaded file. Let’s see the response that we receive when uploading Code Bright. 1 /tmp/php/phpLfBUaq Now that we know where our file lives, we could easily use something like copy() or rename() to save our file somewhere so that we can restore it later. There’s a better way though. We can use the move() method on the file object. Let’s see how the method works. 1 <?php 2 3 // app/routes.php 4 5 Route::get('/', function() 6 { 7 return View::make('form'); 8 }); 9 10 Route::post('handle-form', function() 11 { 12 Input::file('book')->move('/storage/directory'); 13 return 'File was moved.'; 14 }); The move() method’s first parameter is the destination that the file will be moved to. Make sure that the user that executes your web-server has write access to the destination, or an exception will be thrown. Let’s upload the book once more and see what happens. If you take a look in your storage directory, you will see that the file has been moved, but still has the temporary name that PHP has provided for it. Perhaps we want to keep the file’s real name instead of the temporary name. Fortunately, the move() method accepts an additional, optional parameter that will allow us to give the file a name of our own choosing. If we retrieve the file’s real name and pass it as the second parameter to the move() method, it should arrive in the destination with a more sensible name. Let’s take a look at an example.
5 Route::get('/', function() 6 { 7 return View::make('form'); 8 }); 9 10 Route::post('handle-form', function() 11 { 12 $name = Input::file('book')->getClientOriginalName(); 13 Input::file('book')->move('/storage/directory', $name); 14 return 'File was moved.'; 15 }); First we retrieve the actual filename with the getClientOriginalName() method. Then we pass the value as the second parameter to the move() method. Let’s take another look at the storage directory. There it is! We have a file named ‘codebright.pdf’. That’s all I have to cover about files within this chapter, but if you have some time to spare, then I would suggest taking a look at the Symfony API documentation for the UploadedFile class²⁰ and its inherited methods. Cookies I won’t be looking at cookies, because I have been on a low carb diet for the past year. These things are just full of sugar. There’s no way I can do it. Sorry guys. What about low carb almond cookies? Oh look at you. You know all the low carb tricks, don’t you. Fine, I guess we can cover cookies if they are low carb. So what are cookies? Well they aren’t food really. They are a method of storing some data on the client side; in the browser. They can be really handy for lots of things. For example, you might want to show your users a message the first time they visit your site. When a cookie isn’t present you could show the message, and when the message has been seen, set the cookie. You can store anything you like in the cookie. Be as creative as you want! Have I got your attention? Great! Let’s look at how we can create a cookie. ²⁰http://api.symfony.com/2.0/Symfony/Component/HttpFoundation/File/UploadedFile.html
3 // app/routes.php 4 5 Route::get('/', function() 6 { 7 $cookie = Cookie::make('low-carb', 'almond cookie', 30); 8 }); We can use the Cookie::make() method to create a new cookie. Very descriptive isn’t it? Nice work Taylor! The first parameter of the method is a key that can be used to identify our cookie. We will need to use this key to retrieve the value later. The second parameter is the value of our cookie. In this instance the string ‘almond cookie’. The third and final parameter lets Laravel know how long to store the cookie for, in minutes. In our example above, the cookie will exist for 30 minutes. Once this time has passed, the cookie will expire and will not be able to be retrieved. Let’s change our routing a little so that we can test the cookie functionality. Our new routing file looks like this: 1 <?php 2 3 // app/routes.php 4 5 Route::get('/', function() 6 { 7 $cookie = Cookie::make('low-carb', 'almond cookie', 30); 8 return Response::make('Nom nom.')->withCookie($cookie); 9 }); 10 11 Route::get('/nom-nom', function() 12 { 13 $cookie = Cookie::get('low-carb'); 14 var_dump($cookie); 15 }); In our first route that responds to /, we are creating the cookie in the same way as we did in the earlier example. This time however, we are attaching it to our response using the withCookie() method.
attach a cookie to a response object. When the response is served, the cookie is created. The only parameter to the withCookie() method is the cookie we created. The /nom-nom route will retrieve the cookie using the Cookie::get() method. The first and only parameter is the name of the cookie to retrieve. In this example we are retrieving our ‘low-carb’ cookie and dumping the result. Let’s test this out. First we will visit the / route to set our cookie. 1 Nom nom. Great, the response has been served and our cookie must have been set. Let’s visit the /nom-nom route to make sure. 1 string(13) "almond cookie" Wonderful! Our cookie value has been retrieved successfully. If we were to wait 30 minutes and then try to retrieve the cookie once more, we would receive the value null. As with Input::get(), the Cookie::get() method will accept a default value as the second parameter, like this: 1 $cookie = Cookie::get('low-carb', 'chicken'); Great, now we will at least get some chicken if there are no low carb cookies available. We can use the Cookie::has() method to check to see if a cookie is set. This method accepts the cookie’s name as the first parameter and returns a boolean result. It looks like this. 1 Route::get('/nom-nom', function() 2 { 3 var_dump(Cookie::has('low-carb')); 4 }); As we mentioned earlier, your cookies will have an expiry time. Perhaps you don’t want your cookies to expire though? Thanks to Laravel’s mind reading, we can use the Cookie::forever() method to create a cookie that will never expire. The first and second parameters of the method are the same: a key, and a cookie value. Here’s an example:
5 Route::get('/', function() 6 { 7 $cookie = Cookie::forever('low-carb', 'almond cookie'); 8 return Response::make('Nom nom.')->withCookie($cookie); 9 }); Unlike the cookies in your kitchen cupboard, those made with the forever() method have no expiry date. If we want to delete a cookie, or rather… force it to expire, we can use the Cookie::forget() method. The only parameter to this method is the name of the cookie we wish to forget. Here’s an example. 1 <?php 2 3 // app/routes.php 4 5 Route::get('/', function() 6 { 7 Cookie::forget('low-carb'); 8 return 'I guess we are going to have chicken.'; 9 }); Just like that, our low-carb cookie is gone. Cookie Security Here’s another example of why Laravel is a clever little monkey. A user can edit the cookies stored within the browser. If your cookie was somehow important to your website, you wouldn’t want the user to interfere with it. We need to make sure that our cookies aren’t tampered with. Fortunately, Laravel signs our cookies with an authentication code and encrypts them so that our users can’t read the cookies or edit them. If a cookie is tampered with and the authentication code isn’t what Laravel expects, then it will be ignored by Laravel. Isn’t that clever?
but the lights of the Dolby Theatre lit the street so bright that you could be forgiven for thinking that it was daytime. You see, the venue had been the setting for the Academy Awards back in February, where the Iron Man movies had won all of the Oscars presented that night for being absolutely, completely, AWESOME. In fact, if this book sells well, I might buy a mansion in California; perhaps build a super-lab underneath it. There I could work on an exoskeletal suit fashioned in the likeness of a red panda. Unlike Tony Stark, I’d have to leave the supermodels alone. I don’t think Emma would stand for any of that funny business. I’d call myself ‘The Fire Fox’, and use my powers and gadgets to settle any tabs versus spaces arguments that arise within the PHP community. I’d also have the power of receiving lawsuits from Mozilla. I’d probably not drive an Audi though. Instead, I… well. Sorry, I got a little carried away. Where were we? Ah yes, the Dolby Theatre. You see, the Oscars were only paving way to a much more high profile event, the Laravel four premiere. PHP developers who had been saved by Laravel 3 gathered by the millions to await the launch of the new framework. Crowds littered the streets, reporters everywhere! Picture it, no really. You will have to imagine most of this, I’m not a fictional writer you see. Just picture it how you see it on the telly. A long, black stretch limousine approaches the curb. The door bursts open and a tall figure steps out onto the red carpet. The crowd goes wild! Ladies rip off their tops, men rip off each other’s tops, reporters rip off their tops, everyone is topless. I don’t know where I’m going with this, but it’s my story, and I say everyone is topless. Anyway, the figure of course is none other than Taylor Otwell, the creator of Laravel. Before Taylor has taken a step towards the entrance of the theatre he is bombarded with a pack of reporters hungering for the inside scoop on Laravel four. He tries to shove the topless reporters away but there are too many of them. How long have you been working on Laravel four? “A year or so now.” says Taylor, realising that his only chance of proceeding would be to answer some of the questions. The topless reporter seems satisfied with having her question answered, and allows Taylor to pass. Another topless reporter quickly steps in front of Taylor, pouncing with another question. How long have you been working on Laravel four?
that? “Not again.” thought Taylor, who hated repeating himself. “About a year.” he said with a stern voice. He pushed forward through the crowd only to have his path blocked by yet another topless reporter. Laravel is quite a large project. How long did it take you to write it? Something in Taylor snapped, he reached into his suit pocket and pulled out a keyboard. Taylor is kind of tall, long pockets… oh who cares how the keyboard fit in there, I’m making this up. He struck the reporter across the face with the keyboard, sending the topless chap flying into a nearby dumpster. “Did you not read the documentation!?” Taylor screamed at the startled reporter, who was struggling to climb out of the greasy dumpster. “I built the form builder so that you can define your forms within templates. If you had all built a form before hand we could have avoided all this repetition. I HATE REPETITION”, snarled Taylor. He spun around and darted for the door where the Laravel team were waiting for him backstage. Yes. That was all just to build up to the form builder. Don’t look at me so disappointed! I’m a technical writer, not a fictional one. What were you expecting… A Song of Ice and Fire? Right, let’s just get on with it! This chapter posed a real dilemma. Well, not just this chapter. Let’s see if you can solve the problem better than I can. Here are topics that intertwine. • Request Data • Forms • Validation You see, they are all big topics, but they also rely on each other. You can’t test the response from a form without knowing how to retrieve request data. You can’t show form repopulation without first teaching validation. It’s a real tangle. Well, this is how I am going to resolve the problem. We are going to learn how to build forms and target them to framework routes. However, some of our forms explanation will take place in the next chapter, where we will learn how forms can be repopulated after validation. Let’s get started shall we? Opening Forms Before we start submitting data, we need to decide where we are going to send it. We took a look at how to generate framework URLs within the URL generation chapter. We could easily build a form open tag using the skills we picked up from that chapter, right? Let’s build a simple view:
url('our/target/route') }}" method="POST"> 4 5 </form> Here, we use the url() helper method to provide a framework URL for the action attribute of our form. Let’s also add a routed closure to display our form.blade.php blade template. 1 <?php 2 3 // app/routes.php 4 5 Route::get('/', function() 6 { 7 return View::make('form'); 8 }); Great! Now let’s go ahead and visit the / url to see the source that was rendered. It looks like this. 1 <!-- app/views/form.blade.php --> 2 3 <form action="http://demo.dev/our/target/route" method="POST"> 4 5 </form> Our form now has a destination for the data that it collects. This is how I tend to construct my forms, but Laravel is a framework of options. Here’s another method of building form opening HTML that you might prefer. Let’s take a look. 1 <!-- app/views/form.blade.php --> 2 3 {{ Form::open(array('url' => 'our/target/route')) }} 4 5 {{ Form::close() }} To create our opening form tag, we use the Form::open() generator method. This method accepts only a single parameter, with many parameters. Confused? I’m talking about an array! In the above example we are using the URL index, with a value of the route that we wish to be the target of the form. We also use the Form::close() method to close the form, although I see no reason why you would need to do this. I suppose it looks neater next to the other source generator methods? It’s up to you whether you choose to use it, or </form> instead. Here’s the resulting source from our rendered form view.
action="http://demo.dev/our/target/route" accept-charset="UTF\ 4 -8"> 5 <input name="_token" type="hidden" value="83KCsmJF1Z2LMZfhb17ihvt9ks5NEcAwFoR\ 6 FTq6u"> 7 </form> Wonderful, our form has been generated to the same target. I’m going to ask you to do something really important here, could you please ignore the _token hidden attribute? Don’t worry, we will come back to it later! For now, I’m going to pretend that it doesn’t exist. Wait, we only provided a URL. Why are there other attributes? Well done for changing the topic away from the _token input. What _token? Great! Well, let’s get back to your question. You see, Laravel knows that POST forms are the most popular choice when building web applications. For that reason it will use the POST method by default, overriding the default GET method that HTML assumes. The accept-charset attribute is another useful attribute that Laravel provides for us. It will ensure that ‘UTF-8‘ will be used for character encoding when submitting the form. It’s a sensible default for most situations. Perhaps sensible defaults don’t suit our situation? What if we want to provide our own? 1 <!-- app/views/form.blade.php --> 2 3 {{ Form::open(array( 4 'url' => 'our/target/route', 5 'method' => 'GET', 6 'accept-charset' => 'ISO-8859-1' 7 )) }} 8 9 {{ Form::close() }} Here we have used the method index of our Form::open() array to specify that we wish to use GET as the method for our form. We have also used the accept-charset index to provide a different character set for encoding. Here’s the new HTML source.
action="http://demo.dev/our/target/route" accept-charset="ISO-\ 4 8859-1"> 5 <input name="_token" type="hidden" value="83KCsmJF1Z2LMZfhb17ihvt9ks5NEcAwFoR\ 6 FTq6u"> 7 </form> Great! While we value Laravel’s opinion on acceptable defaults, we have all the flexibility we need to overrule them. Since we have so much power, why don’t we create a form that uses the ‘DELETE’ HTTP verb as its method attribute. We know that we can override the form method using the method array index. Let’s give it a go. 1 <!-- app/views/form.blade.php --> 2 3 {{ Form::open(array( 4 'url' => 'our/target/route', 5 'method' => 'DELETE' 6 )) }} 7 8 {{ Form::close() }} That looks perfect to me, now let’s check out the generated HTML source. 1 <!-- app/views/form.blade.php --> 2 3 <form method="POST" action="http://demo.dev/our/target/route" accept-charset="UTF\ 4 -8"> 5 <input name="_token" type="hidden" value="83KCsmJF1Z2LMZfhb17ihvt9ks5NEcAwFoR\ 6 FTq6u"> 7 <input name="_method" type="hidden" value="DELETE"> 8 </form> Wait, what’s going on there? We didn’t want a ‘POST’ method. What’s the extra input? Oh yes, I remember now. HTML forms are a little dumb. You see, HTML4 will only support ‘POST’ and ‘GET’ methods on forms. HTML5 does support additional methods, but we don’t want to limit our application to browsers that fully support HTML5. Don’t worry, Laravel has another trick up its sleeve. By providing a hidden input called ‘_method’ we can supply a value to represent our non HTML5 compatible HTTP verbs. Laravel’s routing will look at this POST request, see the included ‘_method’ data and route to the appropriate action. This will work on both HTML4 and HTML5, isn’t that great?
and retrieve information about them in the last chapter? You might also remember that the form requires an ‘enctype’ attribute of value ‘multipart/form-data’ for files to be uploaded correctly. Well Laravel provided an easy way of enabling the ‘enctype’ attribute. Let’s see how it works. 1 <!-- app/views/form.blade.php --> 2 3 {{ Form::open(array( 4 'url' => 'our/target/route', 5 'files' => true 6 )) }} 7 8 {{ Form::close() }} By providing a new index named files with a boolean value of true, Laravel will add the necessary attribute to allow the uploading of files. Here’s the generated source from the above example. 1 <!-- app/views/form.blade.php --> 2 3 <form method="POST" 4 action="http://demo.dev/our/target/route" 5 accept-charset="UTF-8" 6 enctype="multipart/form-data"> 7 <input name="_token" type="hidden" value="83KCsmJF1Z2LMZfhb17ihvt9ks5NEcAwFoR\ 8 FTq6u"> 9 </form> I have formatted the response a little to make it more readable, but I haven’t changed the content. As you can see, Laravel has supplied the correct encoding type on our behalf. Thanks again Laravel! In the URL generation and routing chapters you may have learned that URLs to named routes and controller actions can be generated using special methods. Let’s find out how we can target these routes and actions using special indexes on the Form::open() method. First let’s take a look at how to target named routes. Here’s an example.
4 'route' => 'my_route' 5 )) }} 6 7 {{ Form::close() }} Instead of using the url index, we use the route index and provide the name of the route as a value. It’s as simple as that! In fact, it’s just as easy to target controller actions. Let’s take a look at another example. 1 <!-- app/views/form.blade.php --> 2 3 {{ Form::open(array( 4 'action' => 'MyController@myAction' 5 )) }} 6 7 {{ Form::close() }} To target our form at a controller action, instead of the url and route indexes, we use the action index and the controller-action pair as its value. Well, now that we know how to open forms, I think it’s about time that we started adding some fields. Let’s get going! Form Fields Forms aren’t very useful unless they provide a means of collecting data. Let’s look at some of the form fields that we can generate using Laravel’s form builder library. Field Labels Wait, there’s something else we need other than the fields themselves. We need labels so that people know what values to enter. Labels can be generated using the Form::label() method. Let’s take a look at an example.
=> 'my/route')) }} 4 {{ Form::label('first_name', 'First Name') }} 5 {{ Form::close() }} The first parameter of the Form::label() method matches the name attribute of the field that they are describing. The second value, is the text of the label. Let’s take a look at the generated source. 1 <!-- app/views/form.blade.php --> 2 3 <form method="POST" 4 action="http://demo.dev/my/route" 5 accept-charset="UTF-8"> 6 <input name="_token" type="hidden" value="83KCsmJF1Z2LMZfhb17ihvt9ks5NEcAwFoR\ 7 FTq6u"> 8 <label for="first_name">First Name</label> 9 </form> Great! We should use labels whenever we can to describe our fields. I’ll lead by example by including them with the other field examples within the chapter. It’s worth noting that we can include other attribute and value pairs within our generated label element by providing a third parameter to the label() method. The third parameter is an array of attribute and value pairs. Here’s an example. 1 <!-- app/views/form.blade.php --> 2 3 {{ Form::open(array('url' => 'my/route')) }} 4 {{ Form::label('first_name', 'First Name', 5 array('id' => 'first_name')) }} 6 {{ Form::close() }} In the above example we have added an ‘id’ of value ‘first_name’ to the label element. Here’s the generated source.
4 action="http://demo.dev/my/route" 5 accept-charset="UTF-8"> 6 <input name="_token" type="hidden" value="83KCsmJF1Z2LMZfhb17ihvt9ks5NEcAwFoR\ 7 FTq6u"> 8 <label for="first_name" id="first_name">First Name</label> 9 </form> Brilliant! Well, now that we know how to label our fields, it’s about time to start creating some of them. Text Fields Text fields can be used to collect string data values. Let’s take a look at the generator method for this field type. 1 <!-- app/views/form.blade.php --> 2 3 {{ Form::open(array('url' => 'my/route')) }} 4 {{ Form::label('first_name', 'First Name') }} 5 {{ Form::text('first_name', 'Taylor Otwell') }} 6 {{ Form::close() }} The first parameter for the Form::text() method is the name attribute for the element. This is what we will use to identify the field’s value within our request data collection. The second parameter is an optional one. It is a default value for the input element. Let’s see the source that has been generated by the method. 1 <!-- app/views/form.blade.php --> 2 3 <form method="POST" 4 action="http://demo.dev/my/route" 5 accept-charset="UTF-8"> 6 <input name="_token" type="hidden" value="83KCsmJF1Z2LMZfhb17ihvt9ks5NEcAwFoR\ 7 FTq6u"> 8 <label for="first_name">First Name</label> 9 <input name="first_name" type="text" value="Taylor Otwell" id="first_name"> 10 </form> Our input element has been created, along with its ‘name’ attribute and default value. Just like the Form::label() method, our Form::text() method can accept an optional third parameter to supply an array of HTML attribute and value pairs, like this:
=> 'my/route')) }} 4 {{ Form::label('first_name', 'First Name') }} 5 {{ Form::text('first_name', 'Taylor Otwell', 6 array('id' => 'first_name')) }} 7 {{ Form::close() }} The truth is, every single one of the input generators will accept an optional array of attributes as a final parameter. They all work in the same way, so I won’t describe this feature in every section. Just keep it in mind! Textarea Fields The textarea field functions in a similar way to the text input type, except that they allow multiline data. Let’s see how they can be generated. 1 <!-- app/views/form.blade.php --> 2 3 {{ Form::open(array('url' => 'my/route')) }} 4 {{ Form::label('description', 'Description') }} 5 {{ Form::textarea(‘description', 'Best field ever!') }} 6 {{ Form::close() }} The first parameter is the name attribute for the element, and the second parameter once again is the default value. Here’s the form element as it appears in the generated HTML source. 1 <!-- app/views/form.blade.php --> 2 3 <form method="POST" 4 action="http://demo.dev/my/route" 5 accept-charset="UTF-8"> 6 <input name="_token" type="hidden" value="83KCsmJF1Z2LMZfhb17ihvt9ks5NEcAwFoR\ 7 FTq6u"> 8 <label for="description">Description</label> 9 <textarea name="description" 10 cols="50" 11 rows="10" 12 id="description">Best field ever!</textarea> 13 </form> As you can see from the generated source, Laravel has provided some default values, such as the amount of columns and rows for the field. We could easily override these values by adding new values for them to the optional final parameter. I hope you haven’t forgot about the attributes array!
can tell me your secrets if you like. I’m not the type of person who would publish them as jokes in a technical book for extra laughs. However, if we want our users to be able to type their innermost secrets into our application securely, then we need to make sure that their characters don’t display on screen. The ‘password’ input type is perfect for this. Here’s how you can generate one. 1 <!-- app/views/form.blade.php --> 2 3 {{ Form::open(array('url' => 'my/route')) }} 4 {{ Form::label('secret', 'Super Secret') }} 5 {{ Form::password('secret') }} 6 {{ Form::close() }} The first parameter for the Form::password() method is the name attribute. As always, there is a final optional parameter for an array of additional element attributes. Here’s the generated source from the above example. 1 <!-- app/views/form.blade.php --> 2 3 <form method="POST" 4 action="http://demo.dev/my/route" 5 accept-charset="UTF-8"> 6 <input name="_token" type="hidden" value="83KCsmJF1Z2LMZfhb17ihvt9ks5NEcAwFoR\ 7 FTq6u"> 8 <label for="secret">Super Secret</label> 9 <input name="secret" type="password" value="" id="secret"> 10 </form> Checkboxes Checkboxes allow for your form to capture boolean values. Let’s take a look at how we can generate a checkbox form element.
=> 'my/route')) }} 4 {{ Form::label('pandas_are_cute', 'Are pandas cute?') }} 5 {{ Form::checkbox('pandas_are_cute', '1', true) }} 6 {{ Form::close() }} The first parameter to the Form::checkbox() method is the field name attribute, and the second parameter is the field value. The third, optional value is whether or not the checkbox will be checked by default. The default is for the checkbox to be unchecked. Here’s the source generated by the above example. 1 <!-- app/views/form.blade.php --> 2 3 <form method="POST" 4 action="http://demo.dev/my/route" 5 accept-charset="UTF-8"> 6 <input name="_token" type="hidden" value="83KCsmJF1Z2LMZfhb17ihvt9ks5NEcAwFoR\ 7 FTq6u"> 8 <label for="pandas_are_cute">Are pandas cute?</label> 9 <input checked="checked" 10 name="pandas_are_cute" 11 type="checkbox" 12 value="1" 13 id="pandas_are_cute"> 14 </form> Radio Buttons Radio buttons have an identical method signature to that of checkboxes. The difference is that you can use a number of radio input types to provide a method of selection within a small group of values. Here’s an example.
=> 'my/route')) }} 4 {{ Form::label('panda_colour', 'Pandas are?') }} 5 {{ Form::radio('panda_colour', 'red', true) }} Red 6 {{ Form::radio('panda_colour', 'black') }} Black 7 {{ Form::radio('panda_colour', 'white') }} White 8 {{ Form::close() }} In the above example you will notice that we have a number of radio buttons with the same name attribute. Only one of them will be able to be selected at once. This will allow our users to choose the colour of a panda. Here’s how our generated source looks when the form view is rendered. 1 <!-- app/views/form.blade.php --> 2 3 <form method="POST" 4 action="http://demo.dev/my/route" 5 accept-charset="UTF-8"> 6 <input name="_token" type="hidden" value="83KCsmJF1Z2LMZfhb17ihvt9ks5NEcAwFoR\ 7 FTq6u"> 8 <label for="panda_colour">Pandas are?</label> 9 <input checked="checked" 10 name="panda_colour" 11 type="radio" 12 value="red" 13 id="panda_colour"> Red 14 <input name="panda_colour" 15 type="radio" 16 value="black" 17 id="panda_colour"> Black 18 <input name="panda_colour" 19 type="radio" 20 value="white" 21 id="panda_colour"> White 22 </form> Select Boxes Select boxes, or drop-downs, are another way of providing a choice of values to the user of your application. Let’s take a look at how they can be constructed.
=> 'my/route')) }} 4 {{ Form::label('panda_colour', 'Pandas are?') }} 5 {{ Form::select('panda_colour', array( 6 'red' => 'Red', 7 'black' => 'Black', 8 'white' => 'White' 9 ), 'red') }} 10 {{ Form::close() }} The Form::select() method accepts a name attribute as the first parameter, and an array of key- value pairs as a second parameter. The key for the selected option will be returned within the request data. The third, optional, parameter is the key for a value that will appear as selected by default. In the above example, the ‘Red’ option will be selected when the page loads. Here’s the generated source. 1 <!-- app/views/form.blade.php --> 2 3 <form method="POST" 4 action="http://demo.dev/my/route" 5 accept-charset="UTF-8"> 6 <input name="_token" type="hidden" value="83KCsmJF1Z2LMZfhb17ihvt9ks5NEcAwFoR\ 7 FTq6u"> 8 <label for="panda_colour">Pandas are?</label> 9 <select id="panda_colour" name="panda_colour"> 10 <option value="red" selected="selected">Red</option> 11 <option value="black">Black</option> 12 <option value="white">White</option> 13 </select> 14 </form> If we want to, we can organise our select box options by category. To enable this option, all we need to do is provide a multidimensional array as the second parameter. The first level of the array will be the category, and the second level will be the list of values just as before. Here’s an example.
same method signature as the Form::text() method. The difference is that the Form::email() method creates a new HTML5 input element that will validate the value provided client side to ensure that a valid email address will be provided. Here’s another example. 1 <!-- app/views/form.blade.php --> 2 3 {{ Form::open(array('url' => 'my/route')) }} 4 {{ Form::label('email', 'E-Mail Address') }} 5 {{ Form::email('email', '[email protected]') }} 6 {{ Form::close() }} The first parameter to the Form::email() method is the name attribute for our input type. The second parameter is a default value. As always, and I hope you haven’t forgotten, there’s always a last, optional, array of additional element attributes. Here’s how the page source for the above example would be rendered. 1 <!-- app/views/form.blade.php --> 2 3 <form method="POST" 4 action="http://demo.dev/my/route" 5 accept-charset="UTF-8"> 6 <input name="_token" type="hidden" value="83KCsmJF1Z2LMZfhb17ihvt9ks5NEcAwFoR\ 7 FTq6u"> 8 <label for="email">E-Mail Address</label> 9 <input name="email" 10 type="email" 11 value="[email protected]" 12 id="email"> 13 </form> File Upload Field In the previous chapter, we learned how to handle uploaded files. Let’s see how we can generate a file upload field.
4 'url' => 'my/route', 5 'files' => true 6 )) }} 7 {{ Form::label('avatar', 'Avatar') }} 8 {{ Form::file('avatar') }} 9 {{ Form::close() }} The first parameter for the Form::file() method is the name attribute of the file upload element, however, in order for the upload to work, we need to ensure that the form is opened with the files option to include the multipart encoding type. Here’s the generate page source. 1 <!-- app/views/form.blade.php --> 2 3 <form method="POST" 4 action="http://demo.dev/my/route" 5 accept-charset="UTF-8" 6 enctype="multipart/form-data"> 7 <input name="_token" type="hidden" value="83KCsmJF1Z2LMZfhb17ihvt9ks5NEcAwFoR\ 8 FTq6u"> 9 <label for="avatar">Avatar</label> 10 <input name="avatar" type="file" id="avatar"> 11 </form> Hidden Fields Sometimes our fields aren’t meant to capture input. We can use hidden fields to supply extra data along with our forms. Let’s take a look at how hidden fields can be generated. 1 <!-- app/views/form.blade.php --> 2 3 {{ Form::open(array('url' => 'my/route')) }} 4 {{ Form::hidden('panda', 'luishi') }} 5 {{ Form::close() }} The first parameter to the Form::hidden() method is the name attribute, I bet you didn’t see that coming? The second parameter is of course the value. This is how the generated page source looks.
4 action="http://demo.dev/my/route" 5 accept-charset="UTF-8"> 6 <input name="_token" type="hidden" value="83KCsmJF1Z2LMZfhb17ihvt9ks5NEcAwFoR\ 7 FTq6u"> 8 <input name="panda" type="hidden" value="luishi"> 9 </form> Form Buttons Our forms are no good if we can’t submit them. Let’s have a close look at the buttons that we have available to us. Submit Button First up is the submit button. There’s nothing quite like a classic! Here’s how it looks. 1 <!-- app/views/form.blade.php --> 2 3 {{ Form::open(array('url' => 'my/route')) }} 4 {{ Form::submit('Save') }} 5 {{ Form::close() }} The first parameter to the Form::submit() is the value, which in the case of a button is the label used to identify the button. As with all of the input generation methods, the button generation methods will accept an optional last parameter to provide additional attributes. Here’s the generated HTML source code from the above example. 1 <!-- app/views/form.blade.php --> 2 3 <form method="POST" 4 action="http://demo.dev/my/route" 5 accept-charset="UTF-8"> 6 <input name="_token" type="hidden" value="83KCsmJF1Z2LMZfhb17ihvt9ks5NEcAwFoR\ 7 FTq6u"> 8 <input type="submit" value="Save"> 9 </form> Great! We can now submit our forms. Let’s have another look at an alternative form of button.
won’t be used to submit our form, we can use the Form::button() method. Here’s an example. 1 <!-- app/views/form.blade.php --> 2 3 {{ Form::open(array('url' => 'my/route')) }} 4 {{ Form::button('Smile') }} 5 {{ Form::close() }} The parameters for the Form::button() method are exactly the same as the Form::submit() method mentioned previously. Here’s the generated source from the example. 1 <!-- app/views/form.blade.php --> 2 3 <form method="POST" 4 action="http://demo.dev/my/route" 5 accept-charset="UTF-8"> 6 <input name="_token" type="hidden" value="83KCsmJF1Z2LMZfhb17ihvt9ks5NEcAwFoR\ 7 FTq6u"> 8 <button type="button">Smile</button> 9 </form> Image Buttons Instead of a native button, you could use the HTML5 image button type to submit your form. Here’s an example. 1 <!-- app/views/form.blade.php --> 2 3 {{ Form::open(array('url' => 'my/route')) }} 4 {{ Form::image(asset('my/image.gif', 'submit')) }} 5 {{ Form::close() }} The first parameter to the Form::image() method is the URL to an image to use for the button. I have used the asset() helper method to generate the URL. The second parameter is the value of the button. Here’s the generated source code.
4 action="http://demo.dev/my/route" 5 accept-charset="UTF-8"> 6 <input name="_token" type="hidden" value="83KCsmJF1Z2LMZfhb17ihvt9ks5NEcAwFoR\ 7 FTq6u"> 8 <input src="https://demo.dev/my/image.gif" type="image"> 9 </form> Reset Button The reset button can be used to clear the contents of your form. It’s used by your application’s users when they have made a mistake. Here’s an example of how to generate one. 1 <!-- app/views/form.blade.php --> 2 3 {{ Form::open(array('url' => 'my/route')) }} 4 {{ Form::reset('Clear') }} 5 {{ Form::close() }} The first parameter to the Form::reset() method is the label that you would like to appear on the button. Here’s the generated source from the above example. 1 <!-- app/views/form.blade.php --> 2 3 <form method="POST" 4 action="http://demo.dev/my/route" 5 accept-charset="UTF-8"> 6 <input name="_token" type="hidden" value="83KCsmJF1Z2LMZfhb17ihvt9ks5NEcAwFoR\ 7 FTq6u"> 8 <input type="reset" value="Clear"> 9 </form> Form Macros In the previous subsection we discovered the various form input generator methods. They can be used to save you a lot of time, but perhaps you have a custom type of form input that is specific to your own applications. Lucky for us, Taylor already thought about this. Laravel comes equipped with a method that will allow you to define your own form generators, let’s see how it works. So, where shall we put our form macros? Ah I know, let’s make a file called app/macros.php, then we can include it from within our routes file. Here’s the contents:
Form::macro('fullName', function() 6 { 7 return '<p>Full name: <input type="text" name="full_name"></p>'; 8 }); To define a macro we use the Form::macro() method. The first parameter is the name that will be used by the method that generates our form field. I’d suggest making it camelCase for this very reason. The second parameter to the method is a Closure. The value returned from this closure must be the source code required to construct our field. Let’s create a simple route to show the result from our new form macro. Here it is: 1 <?php 2 3 // app/routes.php 4 5 Route::get('/', function() 6 { 7 return Form::fullName(); 8 }); Our route is returning the value of the fullName() method on the Form class. This isn’t your average static method, it’s a bit of magic that Laravel provides to call our own form macros. The name of the method matches up to the nickname that we gave to our form macro. Let’s take a look at what is returned from the route we just created. 1 <p>Full name: <input type="text" name="full_name"></p> As you can see, the result of our Closure has been returned. What if we want to supply parameters to our form macros? Sure, no problem! Let’s first alter our form macro.
Form::macro('fullName', function($name) 6 { 7 return '<p>Full name: <input type="text" name="'.$name.'"></p>'; 8 }); By providing placeholders within our macro closure, we can use their values within our rendered source. In the above example we have added a method to provide a name attribute for our new input type. Let’s take a look at how this new parameter can be provided. 1 <?php 2 3 // app/routes.php 4 5 Route::get('/', function() 6 { 7 return Form::fullName('my_field'); 8 }); Well, that was easy wasn’t it? We just pass the value for our parameter to the magical method that Laravel has provided for us. Let’s take a look at the new result of our / route. 1 <p>Full name: <input type="text" name="my_field"></p> Awesome, the new name value has been inserted into our form field! There’s another great way to avoid repetition. Enjoy! Form Security It’s great when we receive data from our forms. It’s what they are there for right? The trouble is, if our routes can be a target of our own forms, then what’s to stop an external source posting some dangerous data to our site? What we need is a way of making sure that the data that is sent to us belongs to our own website. Not a problem. Laravel can handle this for us. You should probably know that this form of attack is known as ‘Cross Site Request Forgery’ or CSRF for short. Now then, do you remember that _token hidden field that I told you not to worry about? Well now I want you to start worrying about it.
done. Let me explain what this token is. It’s kind of like a secret passphrase that Laravel knows about. It’s been created using the ‘secret’ value from our application config. If we tell Laravel to check for this value within our input data, then we can ensure that the data has been provided by a form that belongs to our application. We could check for the token ourselves by comparing its value to the result of the Session::token() method, but Laravel has provided a better option. Do you remember the defaults from our filters chapter? Well, Laravel has included the csrf filter. Let’s attach it to a route. 1 <?php 2 3 // app/routes.php 4 5 Route::post('/handle-form', array('before' => 'csrf', function() 6 { 7 // Handle our posted form data. 8 })); By attaching the csrf filter as a before filter to the route that will handle our form data, we can ensure that the _token field is present and correct. If our token is not present, or has been tampered with, then a Illuminate\Session\TokenMismatchException will be thrown, and our route logic will not be executed. In a later chapter we will learn how to attach error handlers to certain types of exceptions in an effort to handle this circumstance appropriately. If you used Form::open() to create the wrapping form markup, then the security token will be included by default. However, if you want to add the token to manually written forms, then you must simply add the token generator method. Here’s an example. 1 <!-- app/views/form.blade.php --> 2 3 <form action="{{ url('handle-form') }}" method="POST"> 4 {{ Form::token() }} 5 </form> The Form::token() method will insert the hidden token field into our form. Here’s the source that will be generated.
method="POST"> 4 <input name="_token" type="hidden" value="83KCsmJF1Z2LMZfhb17ihvt9ks5NEcAwFoR\ 5 FTq6u"> 6 </form> To summarise, unless you want external applications and users to be able to post data to your forms, you should use the ‘CSRF’ filter to protect the routes which handle your form data.
out. Work was mounting for the release of Laravel 4, which meant designing and building the new site, responding to documentation alterations, along with the typical support role that any framework developer will have to assume. They were hard times. On top of all of that work, I also had the pressure of trying to build Code Bright into as much of a success as Code Happy was so that I could bring a bunch of new developers into the community. What I should have done is taken a short break at one of Phill’s Parks. You see, Phill’s Parks are a number of holiday parks located around the world that are holiday destinations for developers. They were originally opened by the CEO of Phill’s Parks, Phill Sparks, back in the year two thousand. The parks are now the only place that developers can go to unwind and feel comfortable in a bathing suit. Phill’s Parks offer a wide variety of activities for developers wishing to wind down after a hard year of work. These events include competitive FizzBuzz tournaments, tabs versus spaces debates, and neck-beard pageants. If I had known about Phill’s Parks, I would have been able to chill out and enjoy the weeks leading up to the Laravel four launch. Oh well, at least you know about them right? As a lucky reader of Code Bright, you have access to a coupon that will allow a 90% discount off entry to the parks. To take advantage of this deal, simply track down Phill Sparks on IRC, Twitter, E-Mail or in person, and quote coupon code ‘CODE_BRIGHT_TROLLS_YOU’. If he doesn’t respond right away, just keep spamming him with it. Sooner or later he will hook you up with a coding holiday. So what does this have to do with Validation? Well, when I started writing this chapter, I had a wonderful, magnificent plan in mind. Sadly, I have gotten completely distracted by the fun and games offered by Phill’s Parks and now I have no idea. I’ll just make something up. It’s turned out fine so far right? Phill’s Parks are a very special place for developers, and developers only. The problem with developers is that, without care an attention, they can be hard to determine from other roles within the web development industry. For example, designers. We don’t want designers sneaking into Phill’s Parks posing as developers. They will start judging the choice of decoration and complaining about the use of Comic Sans on the cafeteria menus. It will completely ruin the atmosphere! No, we don’t want them in the park at all. What we need is some way of validating our visitors to ensure that they are developers. See, I told you I could bring it back. What we validate is a set of attributes. Let’s think about some of the attributes of a park visitor. Oh, oh, I know. We can create a list! Lists are fun!
• Facial hair type. • Ability to talk to females. Excellent, we have a number of attributes that can be used to describe visitors to the park. Using some validation constraints or rules, we can be sure that our visitor is a developer. For the park, we will just make sure that the attributes of a park visitor match the following requirements. • Favourite beverage: Beer. • Choice of web browser: Google Chrome. • Facial hair type: Neck-beard. • Ability to talk to females: None. Disclaimer: These values are just for fun. For example, I know many female web developers who are fantastic at what they do, and I’m fairly sure they have the ability to talk to other females. Also, I’m sporting a rather fabulous van dyke facial hair combo right now and not the traditional neck-beard. It does have beer soaked into it though… Anyway, by ensuring that the attributes of a park visitor match those of a developer, we can go ahead and let them into the park. However, if a shifty fella steps up to the reception with the following attributes… • Favourite beverage: Starbuck Frappechino. • Choice of web browser: Mobile Safari. • Facial hair type: None. • Ability to talk to females: Talk at females, sure. …then oh no, we have a designer, or a Ruby developer, and we can’t let them through the gates. Once more, this is just a bit of fun. Please don’t send me hate mail. Wait until I kill off a main character in a later chapter… erm, I mean, just forget it. What we have done is implemented validation so that we can be sure that the people who enter the park are developers and not imposters. Phill’s Parks are now safe, but what about your applications? Let’s have a look at how we can use validation in Laravel to make sure that we get exactly what we expect.
one thing that I have learned working in the IT industry, is that if you have a point of weakness in your application, then your users will find it. Trust me when I say that they will exploit it. Don’t give them the opportunity. Use validation to ensure that you receive good input. What do we mean by good input? Well let’s have a look at an example. Let’s say that we have an HTML form that is used to collect registration information for our application. In fact, it’s always great to have a little review session. Let’s create the form with the Blade templating engine and the form builder. Here’s our view. 1 <!-- app/views/form.blade.php --> 2 3 <h1>Registration form for Phill's Parks</h1> 4 5 {{ Form::open(array('url' => 'registration')) }} 6 7 {{-- Username field. ------------------------}} 8 {{ Form::label('username', 'Username') }} 9 {{ Form::text('username') }} 10 11 {{-- Email address field. -------------------}} 12 {{ Form::label('email', 'Email address') }} 13 {{ Form::email('email') }} 14 15 {{-- Password field. ------------------------}} 16 {{ Form::label('password', 'Password') }} 17 {{ Form::password('password') }} 18 19 {{-- Password confirmation field. -----------}} 20 {{ Form::label('password_confirmation', 'Password confirmation') }} 21 {{ Form::password('password_confirmation') }} 22 23 {{-- Form submit button. --------------------}} 24 {{ Form::submit('Register') }} 25 26 {{ Form::close() }} Woah, how beautiful is that view?
to see that you’re still mentally conditioned from reading Code Happy. You can see that our registration form is targeting the /registration route and will by default use the POST request verb. We have a textfield for a username, an email field for a user’s email address, and two password fields to collect a password and a password confirmation. At the bottom of the form we have a submit button that we can use to send the form on its merry way. You may have noticed the blade comments I have added to the source. This is a habit of mine which I find it makes it easier to browse for the field I want if I have to return to the form. You can feel free to do the same, but if you don’t want to, then don’t worry about it! Code your own way! Right, now we are going to need a couple of routes to display and handle this form. Let’s go ahead and add them into our routes.php file now. 1 <?php 2 3 // app/routes.php 4 5 Route::get('/', function() 6 { 7 return View::make('form'); 8 }); 9 10 Route::post('/registration', function() 11 { 12 $data = Input::all(); 13 14 // handle the form... 15 }); We have a GET / route that will be used to display our form and a POST /registration route to handle its submission. In the form handler route we have collected all the data from the form, but we can’t use it yet. Why? Well OK then, I guess I’ll show you. Go ahead and load up the / route and you should see the form. Right, don’t fill it in, just hit the ‘Register’ button. The screen will go blank as the second route is triggered and our form has posted blank information. If we were to use the blank information then it could cause severe problems for our application or even a security vulnerability. This is bad data. We can avoid this hassle by implementing validation to ensure that our data is instead good data. Before we perform the validation, we first need to provide a list of validation constraints. We can do this in the form of an array. Are you ready? Great, let’s take a look.
Route::get('/', function() 6 { 7 return View::make('form'); 8 }); 9 10 Route::post('/registration', function() 11 { 12 $data = Input::all(); 13 14 $rules = array( 15 'username' => 'alpha_num' 16 ); 17 }); Right, let’s start small. A set of validation rules takes the form of an associative array. The array key represents the field that is being validated. The array value will consist of one or many rules that will be used to validate. We will start by looking at a single validation constraint on a single field. 1 array( 2 'username' => 'alpha_num' 3 ) In the above example, we wish to validate that the ‘username’ field conforms to the alpha_num validation rule. The alpha_num rule can be used to ensure that a value consists of only alphanumeric characters. Let’s set up the validation object to make sure our rule is working correctly. To perform validation within Laravel, we first need to create an instance of the Validation object. Here we go. 1 <?php 2 3 // app/routes.php 4 5 Route::get('/', function() 6 { 7 return View::make('form'); 8 }); 9
all request data. 13 $data = Input::all(); 14 15 // Build the validation constraint set. 16 $rules = array( 17 'username' => 'alpha_num' 18 ); 19 20 // Create a new validator instance. 21 $validator = Validator::make($data, $rules); 22 }); We can use the Validator::make() method to create a new instance of our validator. The first parameter to the make() method is an array of data that will be validated. In this example we intend to validate our request data, but we could just as easily validate any other array of data. The second parameter to the method is the set of rules that will be used to validate the data. Now that our validator instance has been created, we can use it to check whether or not the data we provided conforms to the validation constraints that we have provided. Let’s set up an example. 1 <?php 2 3 // app/routes.php 4 5 Route::get('/', function() 6 { 7 return View::make('form'); 8 }); 9 10 Route::post('/registration', function() 11 { 12 // Fetch all request data. 13 $data = Input::all(); 14 15 // Build the validation constraint set. 16 $rules = array( 17 'username' => 'alpha_num' 18 ); 19 20 // Create a new validator instance. 21 $validator = Validator::make($data, $rules);
we would do something with the data. 25 return 'Data was saved.'; 26 } 27 28 return Redirect::to('/'); 29 }); To test the result of the validation we can use the passes() method on the validator instance. This method will return a boolean response to show whether or not the validation has passed. A true response indicates that the data conforms to all of the validation rules. A false indicates that the data does not meet the validation requirements. We use an if statement in the above example to decide whether to store the data or to redirect to the entry form. Let’s test this by visiting the / URI. First enter the value ‘johnzoidberg’ into the username field and hit the submit button. We know that the username ‘johnzoidberg’ consists of alphanumeric characters, so the validation will pass. We are presented with the following sentence. 1 Data was saved. Great, that’s what we expected. Now let’s invert the result of the validation. Go ahead and visit the / URI once again. This time, enter the value ‘!!!’. We know that an exclamation mark is not an alphabetical or numerical character, so the validation should fail. Hit the submit button, and we should be redirected back to the registration form. I love that passes() method, it’s really useful. The only problem is that it’s a little optimistic. The world isn’t a perfect place, let’s be honest with ourselves. We aren’t all Robert Downey Jr. Let’s allow ourselves to be a little more pessimistic shall we? Excellent, wait… satisfactory. Let’s try the fails() method instead. 1 <?php 2 3 // app/routes.php 4 5 Route::get('/', function() 6 { 7 return View::make('form'); 8 }); 9 10 Route::post('/registration', function()
13 $data = Input::all(); 14 15 // Build the validation constraint set. 16 $rules = array( 17 'username' => 'alpha_num' 18 ); 19 20 // Create a new validator instance. 21 $validator = Validator::make($data, $rules); 22 23 if ($validator->fails()) { 24 return Redirect::to('/'); 25 } 26 27 // Normally we would do something with the data. 28 return 'Data was saved.'; 29 }); The fails() method returns the boolean opposite to the passes() method. How wonderfully pessimistic! Feel free to use whichever method suits your current mood. If you like, you could also write about your feelings using PHP comments. Some validation rules are able to accept parameters. Let’s swap out our alpha_num rule for the min one. Here’s the source. 1 <?php 2 3 // app/routes.php 4 5 Route::get('/', function() 6 { 7 return View::make('form'); 8 }); 9 10 Route::post('/registration', function() 11 { 12 // Fetch all request data. 13 $data = Input::all(); 14 15 // Build the validation constraint set. 16 $rules = array(
// Create a new validator instance. 21 $validator = Validator::make($data, $rules); 22 23 if ($validator->passes()) { 24 // Normally we would do something with the data. 25 return 'Data was saved.'; 26 } 27 28 return Redirect::to('/'); 29 }); The min validation rule ensures that the value is greater than or equal to the parameter provided. The parameter is provided after the colon :. This validation rule is a little special. It will react differently depending on the data that has been provided. For example, on a string value, our parameter ‘3’ will ensure that the value is at least 3 characters long. On a numerical value, it will ensure that the value is mathematically greater than or equal to our parameter. Finally, on uploaded files, the min validation rule will ensure that the uploaded file’s size in bytes is greater than or equal to the provided parameter. Let’s test out our new validation rule. First visit the / page and enter the value ‘Jo’ into the username field. If you submit the form, you will be redirected back to the registration form. This is because our value is not long enough. That’s what she s… Oh no you don’t. This is a serious book, we aren’t going to soil it with ‘she said’ jokes. Right, we have now used two validation constrains, but what if we want to use them together? That’s not a problem. Laravel will allow us to use any number of validation rules on our fields. Let’s take a look at how this can be done.
Route::get('/', function() 6 { 7 return View::make('form'); 8 }); 9 10 Route::post('/registration', function() 11 { 12 // Fetch all request data. 13 $data = Input::all(); 14 15 // Build the validation constraint set. 16 $rules = array( 17 'username' => 'alpha_num|min:3' 18 ); 19 20 // Create a new validator instance. 21 $validator = Validator::make($data, $rules); 22 23 if ($validator->passes()) { 24 // Normally we would do something with the data. 25 return 'Data was saved.'; 26 } 27 28 return Redirect::to('/'); 29 }); As you can see, we are able to pass a number of validation constraints within the value portion of our rules array by separating them with pipe | characters. This chapter would have arrived much sooner, however, I use Linux in work and a Mac at home, and it just took me 30 seconds to find the pipe key. Anyway, there’s an alternative way to provide multiple validation rules. If you aren’t a 60s grandfather then you might not appreciate pipes. If you like, you can use a multidimensional array to specify additional validation rules. Here’s an example.
Route::get('/', function() 6 { 7 return View::make('form'); 8 }); 9 10 Route::post('/registration', function() 11 { 12 // Fetch all request data. 13 $data = Input::all(); 14 15 // Build the validation constraint set. 16 $rules = array( 17 'username' => array('alpha_num', 'min:3') 18 ); 19 20 // Create a new validator instance. 21 $validator = Validator::make($data, $rules); 22 23 if ($validator->passes()) { 24 // Normally we would do something with the data. 25 return 'Data was saved.'; 26 } 27 28 return Redirect::to('/'); 29 }); Laravel is a flexible framework, and it gives its users options. Use whichever method of assigning multiple validation rules that you prefer. I’ll be using the pipe, to emulate a distinguished British gentleman. Validation Rules Right people, listen up. There are a bunch of validation rules, so if we are going to get through this in one go then I’m going to need your full attention. If you are reading this on your Kindle while in bed, put the book down and go to sleep. You are going to need to be more awake. Here are the available validation rules in alphabetical order.
that a positive confirmation has been provided. It will pass if the value under validation is one of the following values: ‘yes’, ‘on’ or a numeric 1. Its intended purpose is for when you wish to ensure that the user has agreed to something, for example, a terms and conditions checkbox. 1 array( 2 'field' => 'accepted' 3 ); active_url The ‘active_url’ validation will check to make sure that the value is a valid URL. To do this, it uses PHP’s own checkdnsrr() method, which not only checks the structure of the URL but also confirms that the URL is available within your DNS records. 1 array( 2 'field' => 'active_url' 3 ); after The ‘after’ validation rule accepts a single parameter, a string representation of a time. The rule will ensure that the field contains a date that occurs after the given parameter. Laravel will use the strtotime() PHP method to convert both the value and the rule’s parameter to a timestamp for comparison. 1 array( 2 'field' => 'after:12/12/13' 3 ); alpha The ‘alpha’ validation rule ensures that the provided value consists entirely of alphabetical characters.
alpha_dash The ‘alpha_dash’ rule will ensure that the provided value consists of alphabetical characters and also dashes - and/or underscores _. This validation rule is very useful for validating URL portions such as ‘slugs’. 1 array( 2 'field' => 'alpha_dash' 3 ); alpha_num The ‘alpha_num’ rule will ensure that the provided value consists of alphabetical and numeric characters. I like to use this rule to validate username fields. 1 array( 2 'field' => 'alpha_num' 3 ); before The ‘before’ rule accepts a single parameter. The value under question must occur before the parameter when both values are converted to timestamps using PHP’s strtotime() method. It is the exact opposite of the ‘after’ rule. 1 array( 2 'field' => 'before:12/12/13' 3 ); between The ‘between’ rule accepts two parameters. The value that is being validated must have a size that exists between these two parameters. The type of comparison depends on the type of data being compared. For example, on numerical fields the comparison will be a mathematical one. On a string, the comparison will be based upon the length of the string in characters. On a file, the comparison will be based upon the size of the file in bytes.
confirmed The ‘confirmed’ validation rule can be used to ensure that another field exists that matches the current name of the current field appended with _confirmation. The value being validated must match the value of this other field. One use for this rule is for password field confirmations to ensure that the user has not inserted a typographical error into either of the fields. The following example will ensure that ‘field’ matches the value of ‘field_confirmation’. 1 array( 2 'field' => 'confirm' 3 ); date The ‘date’ validation rule will ensure that our value is a valid date. It will be confirmed by running the value through PHP’s own strtotime() method. 1 array( 2 'field' => 'date' 3 ); date_format The ‘date_format’ validation rule will ensure that our value is a date string that matches the format provided as a parameter. To learn how to construct a date format string, take a look at the PHP documentation for the date() method. 1 array( 2 'field' => 'date_format:d/m/y' 3 ); different The ‘different’ validation rule will ensure that the value being validated is different to the value contained in the field described by the rule parameter.
email The ‘email’ validation rule will ensure that the value being validated is a valid email address. This rule is very useful when constructing registration forms. 1 array( 2 'field' => 'email' 3 ); exists The ‘exists’ validation rule will ensure that the value is present within a database table identified by the rule parameter. The column that will be searched will be of the same name as the field being validated. Alternatively, you can provide an optional second parameter to specify a column name. This rule can be very useful for registration forms to check whether a username has already been taken by another user. 1 array( 2 'field' => 'exists:users,username' 3 ); Any additional pairs of parameters passed to the rule will be added to the query as additional where clauses. Like this: 1 array( 2 'field' => 'exists:users,username,role,admin' 3 ); The above example will check to see if the value exists within the username column of the users table. The role column must also contain the value ‘admin’. image The ‘image’ validation rule will ensure that the file that has been uploaded is a valid image. For example, the extension of the file must be one of the following: .bmp, .gif, .jpeg or .png.
in The ‘in’ validation rule will ensure that the value of the field matches one of the provided parameters. 1 array( 2 'field' => 'in:red,brown,white' 3 ); integer This is an easy one! The ‘integer’ validation rule will ensure that the value of the field is an integer. That’s it! 1 array( 2 'field' => 'integer' 3 ); ip The ‘ip’ validation rule will check to make sure that the value of the field contains a well formatted IP address. 1 array( 2 'field' => 'ip' 3 ); max The ‘max’ validation rule is the exact opposite of the ‘min’ rule. It will ensure that the size of the field being validated is less than or equal to the supplied parameter. If the field is a string, the parameter will refer to the length of the string in characters. For numerical values, the comparison will be made mathematically. For file upload fields the comparison will be made upon the size of the file in bytes.
mimes The ‘mimes’ validation rule ensures that the provided string is the name of a French mime. Just kidding. This rule will check the mime type of an uploaded file to ensure that it matches one of the parameters provided. 1 array( 2 'field' => 'mimes:pdf,doc,docx' 3 ); min The ‘min’ validation rule is the direct opposite of the ‘max’ rule. It can be used to ensure that a field value is greater than or equal to the provided parameter. If the field is a string, the parameter will refer to the length of the string in characters. For numerical values, the comparison will be made mathematically. For file upload fields the comparison will be made upon the size of the file in bytes. 1 array( 2 'field' => 'min:5' 3 ); not_in As the name suggests, this validation rule is the exact opposite of the ‘in’ rule. It will ensure that the field’s value does not exist within the list of supplied parameters. 1 array( 2 'field' => 'not_in:blue,green,pink' 3 ); numeric The ‘numeric’ rule will check to make sure that the field being validated contains a numeric value.
regex The ‘regex’ validation rule is the most flexible rule available within Laravel’s validation component. With this rule you can provide a custom regular expression as a parameter that the field under validation must match. This book will not cover regular expressions in detail since it is a very large topic worthy of a book of its own. You should note that because pipe | characters can be used within regular expressions, you should use nested arrays rather than pipes to attach multiple validation rules when using the ‘regex’ rule. 1 array( 2 'field' => 'regex:[a-z]' 3 ); required The ‘required’ validation rule can be used to ensure that the current field exists within the validation data array. 1 array( 2 'field' => 'required' 3 ); required_if The ‘required_if’ validation rule ensures that the current field must be present only if a field defined by the first parameter of the rule matches the value supplied by the second parameter. 1 array( 2 'field' => 'required_if:username,zoidberg' 3 ); required_with The ‘required_with’ is used to ensure that the current value is present only if one or more fields defined by the rule parameters are also present.
required_without The ‘required_without’ rule is the direct opposite to the ‘required_with’ rule. It can be used to ensure that the current field is present only when the fields defined by the rule parameters are not present. 1 array( 2 'field' => 'required_without:age,height' 3 ); same The ‘same’ validation rule is the direct opposite of the ‘different’ rule. It is used to ensure that the value of the current field is the same as another field defined by the rule parameter. 1 array( 2 'field' => 'same:age' 3 ); size The ‘size’ rule can be used to ensure that the value of the field is of a given size provided by the rule parameter. If the field is a string, the parameter will refer to the length of the string in characters. For numerical values, the comparison will be made mathematically. For file upload fields the comparison will be made upon the size of the file in bytes. 1 array( 2 'field' => 'size:8' 3 ); unique The ‘unique’ rule ensures that the value of the current field is not already present within the database table defined by the rule parameter. By default, the rule will use the name of the field as the table column in which to look for the value, however, you can provide an alternate column within the second rule parameter. This rule is useful for checking whether a users provide username is unique when handling registration forms.
You can provide extra optional parameters to list a number of IDs for rows that will be ignored by the unique rule. 1 array( 2 'field' => 'unique:users,username,4,3,2,1' 3 ); url The ‘url’ validation rule can be used to ensure that the field contains a valid URL. Unlike the ‘active_- url’ validation rule, the ‘url’ rule only checks the format of the string and does not check DNS records. 1 array( 2 'field' => 'url' 3 ); Well that’s all of them. That wasn’t so bad right? We aren’t done yet though. Let’s take a look at error messages. Error Messages In the first chapter we learned how we can perform validation and how to redirect back to a form upon failure. However, that method doesn’t offer the user much in the way of constructive feedback. Fortunately, Laravel collects a number of error messages describing why the validation attempt failed. Let’s take a look at how we can access this information.
Route::get('/', function() 6 { 7 return View::make('form'); 8 }); 9 10 Route::post('/registration', function() 11 { 12 // Fetch all request data. 13 $data = Input::all(); 14 15 // Build the validation constraint set. 16 $rules = array( 17 'username' => 'alpha_num' 18 ); 19 20 // Create a new validator instance. 21 $validator = Validator::make($data, $rules); 22 23 if ($validator->passes()) { 24 // Normally we would do something with the data. 25 return 'Data was saved.'; 26 } 27 28 // Collect the validation error messages object. 29 $errors = $validator->messages(); 30 31 return Redirect::to('/'); 32 }); In the above example, you will see that we can access the validation error messages object using the messages() method of our validator instance. Now, since we are redirecting to our form route, how do we access the error messages within our forms? Well, I think we could probably use the withErrors() method for this. I don’t believe you, you keep lying to me! Oh yeah? Well check this out.
Route::get('/', function() 6 { 7 return View::make('form'); 8 }); 9 10 Route::post('/registration', function() 11 { 12 // Fetch all request data. 13 $data = Input::all(); 14 15 // Build the validation constraint set. 16 $rules = array( 17 'username' => 'alpha_num' 18 ); 19 20 // Create a new validator instance. 21 $validator = Validator::make($data, $rules); 22 23 if ($validator->passes()) { 24 // Normally we would do something with the data. 25 return 'Data was saved.'; 26 } 27 28 return Redirect::to('/')->withErrors($validator); 29 }); You will notice that we pass the validator instance to the withErrors() chained method. This method flashes the errors from the form to the session. Before we continue any further, let’s add more validation rules to our example.
for Phill's Parks</h1> 4 5 {{ Form::open(array('url' => 'registration')) }} 6 7 <ul class="errors"> 8 @foreach($errors->all() as $message) 9 <li>{{ $message }}</li> 10 @endforeach 11 </ul> 12 13 {{-- Username field. ------------------------}} 14 {{ Form::label('username', 'Username') }} 15 {{ Form::text('username') }} 16 17 {{-- Email address field. -------------------}} 18 {{ Form::label('email', 'Email address') }} 19 {{ Form::email('email') }} 20 21 {{-- Password field. ------------------------}} 22 {{ Form::label('password', 'Password') }} 23 {{ Form::password('password') }} 24 25 {{-- Password confirmation field. -----------}} 26 {{ Form::label('password_confirmation', 'Password confirmation') }} 27 {{ Form::password('password_confirmation') }} 28 29 {{-- Form submit button. --------------------}} 30 {{ Form::submit('Register') }} 31 32 {{ Form::close() }} When our view is loaded the $errors variable is added to the view data. It’s always there, and it’s always an error messages container instance, so you don’t have to worry about checking for its existence or contents. If we have used withErrors() to flash our error messages to the session in a previous request then Laravel will automatically add them to the errors object. How convenient! We can access an array of all error messages by using the all() method on the $errors error messages instance. In the above view, we loop through the entire array of messages outputting each of them within a list element. Right, thats enough yapping. Let’s give it a try. Go ahead and visit the / URL. Submit the form without entering any information to see what happens.
time however, a set of error messages are displayed. • The username field is required. • The email field is required. • The password field is required. Great! Now our application’s users are aware of any validation errors upon registration. However, it’s more convenient for our users if the error messages are nearer to the fields that they describe. Let’s alter the view a little. 1 <!-- app/views/form.blade.php --> 2 3 <h1>Registration form for Phill's Parks</h1> 4 5 {{ Form::open(array('url' => 'registration')) }} 6 7 {{-- Username field. ------------------------}} 8 <ul class="errors"> 9 @foreach($errors->get('username') as $message) 10 <li>{{ $message }}</li> 11 @endforeach 12 </ul> 13 {{ Form::label('username', 'Username') }} 14 {{ Form::text('username') }} 15 16 {{-- Email address field. -------------------}} 17 <ul class="errors"> 18 @foreach($errors->get('email') as $message) 19 <li>{{ $message }}</li> 20 @endforeach 21 </ul> 22 {{ Form::label('email', 'Email address') }} 23 {{ Form::email('email') }} 24 25 {{-- Password field. ------------------------}} 26 <ul class="errors"> 27 @foreach($errors->get('password') as $message) 28 <li>{{ $message }}</li> 29 @endforeach 30 </ul> 31 {{ Form::label('password', 'Password') }} 32 {{ Form::password('password') }}
{{ Form::label('password_confirmation', 'Password confirmation') }} 36 {{ Form::password('password_confirmation') }} 37 38 {{-- Form submit button. --------------------}} 39 {{ Form::submit('Register') }} 40 41 {{ Form::close() }} We can use the get() method on the validation errors object to retrieve an array of errors for a single field. Simply pass the name of the field as the first parameter to the get() method. Let’s resubmit the form. This time, place a single exclamation ! mark within the username field. Let’s take a look at the errors that appear above the username field. • The username may only contain letters and numbers. • The username must be at least 3 characters. That’s better. Well… it’s a little bit better. Most forms only show a single validation error per field, so as not to overwhelm the application’s user. Let’s take a look at how this is done with the Laravel validation errors object. 1 <!-- app/views/form.blade.php --> 2 3 <h1>Registration form for Phill's Parks</h1> 4 5 {{ Form::open(array('url' => 'registration')) }} 6 7 {{-- Username field. ------------------------}} 8 <span class="error">{{ $errors->first('username') }}</span> 9 {{ Form::label('username', 'Username') }} 10 {{ Form::text('username') }} 11 12 {{-- Email address field. -------------------}} 13 <span class="error">{{ $errors->first('email') }}</span> 14 {{ Form::label('email', 'Email address') }} 15 {{ Form::email('email') }} 16 17 {{-- Password field. ------------------------}} 18 <span class="error">{{ $errors->first('password') }}</span> 19 {{ Form::label('password', 'Password') }}
confirmation field. -----------}} 23 {{ Form::label('password_confirmation', 'Password confirmation') }} 24 {{ Form::password('password_confirmation') }} 25 26 {{-- Form submit button. --------------------}} 27 {{ Form::submit('Register') }} 28 29 {{ Form::close() }} By using the first() method on the validation errors object and passing the field name as a parameter, we can retrieve the first error message for that field. Once again, submit the form with only an exclamation ! mark within the username field. This time we receive only a single error message for the first field. • The username may only contain letters and numbers. By default the validation messages instance’s methods return an empty array or null if no messages exist. This means that you can use it without having to check for the existence of messages. However, if for some reason you wish to check whether or not an error message exists for a field, you can use the has() method. 1 @if($errors->has('email')) 2 <p>Yey, an error!</p> 3 @endif In the previous examples for the all() and first() methods you will have noticed that we wrapped our error messages within HTML elements. However, if one of our methods return null, the HTML would still be displayed. We can avoid having empty HTML elements appearing in our view source code by passing the containing HTML in string format as the second parameter to the all() and first() methods. For example, here’s the all() method with the wrapping list elements as a second parameter.
for Phill's Parks</h1> 4 5 {{ Form::open(array('url' => 'registration')) }} 6 7 {{-- Username field. ------------------------}} 8 {{ $errors->first('username', '<span class="error">:message</span>') }} 9 {{ Form::label('username', 'Username') }} 10 {{ Form::text('username') }} 11 12 {{-- Email address field. -------------------}} 13 {{ $errors->first('email', '<span class="error">:message</span>') }} 14 {{ Form::label('email', 'Email address') }} 15 {{ Form::email('email') }} 16 17 {{-- Password field. ------------------------}} 18 {{ $errors->first('password', '<span class="error">:message</span>') }} 19 {{ Form::label('password', 'Password') }} 20 {{ Form::password('password') }} 21 22 {{-- Password confirmation field. -----------}} 23 {{ Form::label('password_confirmation', 'Password confirmation') }} 24 {{ Form::password('password_confirmation') }} 25 26 {{-- Form submit button. --------------------}} 27 {{ Form::submit('Register') }} 28 29 {{ Form::close() }} Custom Validation Rules Oh I see, you’re not happy with all that Laravel has given you? You wish to have your own validation methods do you? Very well, time to bring out the big guns. Laravel is flexible enough to let you specify your own rules. Let’s have a look at how this can be done.
Validator::extend('awesome', function($field, $value, $params) 6 { 7 return $value == 'awesome'; 8 }); 9 10 Route::get('/', function() 11 { 12 return View::make('form'); 13 }); 14 15 Route::post('/registration', function() 16 { 17 // Fetch all request data. 18 $data = Input::all(); 19 20 // Build the validation constraint set. 21 $rules = array( 22 'username' => 'awesome', 23 ); 24 25 // Create a new validator instance. 26 $validator = Validator::make($data, $rules); 27 28 if ($validator->passes()) { 29 // Normally we would do something with the data. 30 return 'Data was saved.'; 31 } 32 33 return Redirect::to('/')->withErrors($validator); 34 }); There’s no default location for custom validation rules to be defined, so I have added it within the routes.php file to simplify the example. You could include a validators.php file and provide custom validations in there if you like. We have attached our ‘awesome’ validation rule to our username field. Let’s take a closer look at how the validation rule is created.
Validator::extend('awesome', function($field, $value, $params) 6 { 7 return $value == 'awesome'; 8 }); To create a custom validation rule we use the Validator::extend() method. The first parameter to the method is the nickname that will be given to the validation rule. This is what we will use to attach it to a field. The second parameter to the method is a closure. Should the closure return a boolean result of true then the validation attempt will have passed. If a boolean false is returned from the closure then the validation attempt will have failed. The parameters that are handed to the closure are as follows. The first parameter is a string containing the name of the field that is being validated. In the above example the first parameter would contain the string ‘username’. The second parameter to the extend closure contains the value of the field. The third parameter contains an array of any parameters that have been passed to the validation rule. Use them to customise your validation rules as required. If you prefer to define your custom validation rule within a class, rather than a closure, then you won’t be able to. Stop wanting things. Now wait, I’m just kidding. Laravel can do that. Let’s create a class that will accomplish this. 1 <?php 2 3 // app/validators/CustomValidation.php 4 5 class CustomValidation 6 { 7 public function awesome($field, $value, $params) 8 { 9 return $value == 'awesome'; 10 } 11 } As you can see, our validation class contains any number of methods that have the same method signature as our validation closure. This means that a custom validator class can have as many validation rules as we like.
classes, so you will have to define your own project structure. I chose to put my validation class within the app/validators folder and classmap that folder with Composer. Well that’s everything covered. Wait, the validation class doesn’t contain the validation nickname. Ah yes, I almost forgot. Well done observant reader! You see, for the validation rule to be discovered, we need to use the Validator::extend() method again. Let’s take a look. 1 <?php 2 3 // app/routes.php 4 5 Validator::extend('awesome', 'CustomValidation@awesome'); This time the Validator::extend() method is given a string as a second parameter. Just like when routing to a controller, the string consists of the class name of the validation rule class and the action representing the rule separated by an @ symbol. In a later chapter we will learn how to extend the Validation class as an alternative, more advanced method of providing custom validation rules. Custom Validation Messages Laravel has provided default validation messages for all the inbuilt validation rules, but what if you don’t like the default ones or want want to write your application for a region that doesn’t use English as its primary language. Well don’t panic! Laravel will let you override the inbuilt validation messages. We just need to build an additional array and pass it to the make() method of the validator instance. Hey, we already looked at the Validator::make() method?! That’s true, but once again I lied to you. Why do you keep tormenting me? I’m not really sure. I guess I think of it as a hobby at this point. Anyway, let’s take a look at an example array of custom validation messages.
Route::get('/', function() 6 { 7 return View::make('form'); 8 }); 9 10 Route::post('/registration', function() 11 { 12 // Fetch all request data. 13 $data = Input::all(); 14 15 // Build the validation constraint set. 16 $rules = array( 17 'username' => 'min:3', 18 ); 19 20 // Build the custom messages array. 21 $messages = array( 22 'min' => 'Yo dawg, this field aint long enough.' 23 ); 24 25 // Create a new validator instance. 26 $validator = Validator::make($data, $rules, $messages); 27 28 if ($validator->passes()) { 29 // Normally we would do something with the data. 30 return 'Data was saved.'; 31 } 32 33 return Redirect::to('/')->withErrors($validator); 34 }); That’s a big example, let’s hit the focus button. I can’t find the focus button on my keyboard. Well, if you have a Mac, it’s that one above the tab key. It looks like this ‘ ±‘. Are you sure?
what that button means? Ah, I see your point. Right, let’s focus on the example. 1 <?php 2 3 // Build the custom messages array. 4 $messages = array( 5 'min' => 'Yo dawg, this field aint long enough.' 6 ); 7 8 // Create a new validator instance. 9 $validator = Validator::make($data, $rules, $messages); The messages array is an optional third parameter to the Validator::make() method. It contains any custom validation messages that you wish to provide and will also override the default validation messages. The key for the validation message array represents the name of the validation rule, and the value is the message to display if the validation rule fails. In the above example we have overridden the failed validation message for the min validation rule. We can also use this method to provide validation errors for our custom validation rule. Our custom rules won’t have validation error messages by default, so it’s normally a good idea to do so. 1 <?php 2 3 // Build the custom messages array. 4 $messages = array( 5 'awesome' => 'Please enter a value that is awesome enough.' 6 ); 7 8 // Create a new validator instance. 9 $validator = Validator::make($data, $rules, $messages); If we want to provide a custom error message for a specific field, we can do so by providing the name of the field, a period . character, and the type of validation as the key within the array.
messages array. 4 $messages = array( 5 'username.min' => 'Hmm, that looks a little small.' 6 ); 7 8 // Create a new validator instance. 9 $validator = Validator::make($data, $rules, $messages); The message in the above example will only be shown when the min validation rule fails for the ‘username’ field. All other min failures will use the default error message. That’s all I have to offer on validation right now. In a later chapter we will learn how to extend Laravel’s validator class and how to provide translatable validation error messages, but, for now, let’s move on to the next chapter to learn about databases.
not a big fan of databases. I got bitten by one as a child you see, and once bitten, twice shy. Okay, okay, I’m kidding again. It’s because a database killed my brother. Once more, just kidding, I don’t have any siblings. I don’t really know why I don’t enjoy them, I suppose I like visual things, pretty things, fun things. Databases are simply big grids of data, not pretty, the anti-fun. Fortunately, these days we are spoiled by lovely ORMs that will allow us to access our database rows as object instances. In a later chapter you will discover more about Laravel’s own ORM named Eloquent. Eloquent is lovely, and it makes working with databases a pleasurable experience, even for a grim database-hater like myself. Well let’s put my own hates aside for a moment and talk about the concept of a database. Why do we need one? Well, maybe we don’t? Does your application need to store data that will be available within all future requests? I just want to show static pages. Well then you don’t need a database, but what happens when you do need to store data across multiple requests, and display or use it on other routes of your application? Well then you need a data storage method, and you will be glad that you read these next few chapters. Abstraction So what databases can we use with Laravel four? Well let’s see if any of the following take your fancy. • MySQL Community / Standard / Enterprise Server²¹ • SQLite²² • PostgreSQL²³ • SQL Server²⁴ ²¹http://www.mysql.com/products/ ²²http://www.sqlite.org/ ²³http://www.postgresql.org/ ²⁴http://www.microsoft.com/en-us/sqlserver/default.aspx
deal of choice when selecting a database platform. For this book, I will be using the MySQL Community Server Edition²⁵. It’s a great free platform, and one of the most popular ones used for development. You don’t have to worry about using another database server though. You see, Laravel provides an abstraction layer, it decouples the framework’s database components from the RAW SQL, providing different queries for different types of databases. Simply put, you don’t have to worry about the SQL syntax, let Laravel take care of it. Another advantage of using Laravel’s database abstraction layer is security. In most situations, unless I indicate otherwise, you won’t have to worry about escaping the values that you send to the database from Laravel. Laravel will escape these values for you, in an effort to prevent various forms of injection attacks. Let’s weigh up the flexibility of Laravel’s database abstraction layer for a moment. So you can switch database servers whenever you like, without having to change any of the database code you have written, and you won’t have to worry about simple matters of security? That to me sounds like a great chunk of work has been removed from your projects. Escaping values is boilerplate, we don’t need to do that. Let’s let Laravel take care of it. Now that we know that we wish to use a database, let’s learn how we can setup Laravel to use one. Don’t worry, it’s quite a simple process! First let’s take a look at the configuration options. Configuration All of Laravel’s database configuration is contained in the file located at app/config/database.php. That’s easy to remember, right? Let’s take a trip through the file, and look at some of the configuration options available. 1 /* 2 |-------------------------------------------------------------------------- 3 | PDO Fetch Style 4 |-------------------------------------------------------------------------- 5 | 6 | By default, database results will be returned as instances of the PHP 7 | stdClass object; however, you may desire to retrieve records in an 8 | array format for simplicity. Here you can tweak the fetch style. 9 | 10 */ 11 12 'fetch' => PDO::FETCH_CLASS, ²⁵http://www.mysql.com/products/community/
one of Laravel’s database components executes, they will be default be in the form of a PHP stdClass object. This means that you are able to access the data in their columns in a format similar to this. 1 <?php 2 3 echo $book->name; 4 echo $book->author; However, if you wish to alter the format in which rows are returned you may simply change the fetch option of the database configuration to something more suitable. Let’s alter the option to PDO::FETCH_ASSOC which will instead use an associative PHP array to store our rows. Now we can access our database rows in the following manner. 1 <?php 2 3 echo $book['name']; 4 echo $book['author']; For a full list of PDO fetch modes, take a look at the PHP PDO constants documentation page²⁶, look at the constants that start with FETCH_. Next let’s take a look at the connections array. Here’s how it looks in its default form. 1 <?php 2 3 'connections' => array( 4 5 'sqlite' => array( 6 'driver' => 'sqlite', 7 'database' => __DIR__.'/../database/production.sqlite', 8 'prefix' => '', 9 ), 10 11 'mysql' => array( 12 'driver' => 'mysql', 13 'host' => 'localhost', 14 'database' => 'database', 15 'username' => 'root', 16 'password' => '', ²⁶http://www.php.net/manual/en/pdo.constants.php
19 'prefix' => '', 20 ), 21 22 'pgsql' => array( 23 'driver' => 'pgsql', 24 'host' => 'localhost', 25 'database' => 'database', 26 'username' => 'root', 27 'password' => '', 28 'charset' => 'utf8', 29 'prefix' => '', 30 'schema' => 'public', 31 ), 32 33 'sqlsrv' => array( 34 'driver' => 'sqlsrv', 35 'host' => 'localhost', 36 'database' => 'database', 37 'username' => 'root', 38 'password' => '', 39 'prefix' => '', 40 ), 41 42 ), Woah, that’s a huge list of default connections! That makes it a lot easier to get started. Now, looking at the above array, you might think that we have a different index for each type of database. However, if you look more closely, you will notice that each nested array has a driver that can be used to specify the type of database. This means that we could easily have an array of different MySQL database connections, like this: 1 <?php 2 3 'connections' => array( 4 5 'mysql' => array( 6 'driver' => 'mysql', 7 'host' => 'localhost', 8 'database' => 'database', 9 'username' => 'root',
12 'collation' => 'utf8_unicode_ci', 13 'prefix' => '', 14 ), 15 16 'mysql_2' => array( 17 'driver' => 'mysql', 18 'host' => 'localhost', 19 'database' => 'database2', 20 'username' => 'root', 21 'password' => '', 22 'charset' => 'utf8', 23 'collation' => 'utf8_unicode_ci', 24 'prefix' => '', 25 ), 26 27 'mysql_3' => array( 28 'driver' => 'mysql', 29 'host' => 'localhost', 30 'database' => 'database3', 31 'username' => 'root', 32 'password' => '', 33 'charset' => 'utf8', 34 'collation' => 'utf8_unicode_ci', 35 'prefix' => '', 36 ), 37 38 ), By having a number of different database connections, we can switch databases at will. This way our application doesn’t only have to have a single database. Very flexible, I think you will agree. The first index of the connections array is simply a nickname given to the connection, that we can supply when we need to perform an action on a specific database from within our code. You can call your databases anything you like! Now let’s get to the meat and potatoes. We will take a closer look at an individual connection array. Here’s an example once more.
3 'host' => 'localhost', 4 'database' => 'database', 5 'username' => 'root', 6 'password' => '', 7 'charset' => 'utf8', 8 'collation' => 'utf8_unicode_ci', 9 'prefix' => '', 10 ), The driver option can be used to specify the type of database that we intend to connect to. 1 'driver' => 'mysql', Here are the possible values. • mysql - MySQL • sqlite - SQLite • pgsql - PostgreSQL • sqlsrv - SQL Server Next up we have the host index, which can be used to specify the network location of the machine that hosts the database server. 1 'host' => 'localhost', You can provide either an IP address (168.122.122.5) or a host name (database.example.com). In the local development environment you will be primarily using 127.0.0.1 or localhost to refer to the current machine. SQLite Databases SQLite databases are stored at a location on disk, and thus do not have a host entry. For this reason you can simply ommit this index from a SQLite database connection block. The next index of the connection array is the database option. 1 'database' => 'database_name', It is a string value used to identify the name of the database which the connection is due to act upon. In the case of an SQLite database, it is used to specify the file that is used to store the database, for example:
indexes can be used to provide access credentials for your database connection. 1 'username' => 'dayle', 2 'password' => 'emma_w4tson_is_hot', SQLite Databases Once again, SQLite databases are a bit different here. They don’t have credentials. You can ommit these indexes from an SQLite connection block. The next configuration index is is charset, it can be used to specify the default character set for a database connection. 1 'charset' => 'utf8', SQLite Databases You guessed it! The SQLite database doesn’t support this option. Just leave this index out of the connection array. You can set the default database collation using the collation index. 1 'collation' => 'utf8_unicode_ci', SQLite Databases Once again, SQLite chooses to be a unique snowflake. You don’t need to provide the character set or collation index for it. Finally, we have the prefix option, which can be used to add a common prefix to your database tables. 1 'prefix' => '',
examples in the next few chapters, you are going to want to setup a working database connection. Go ahead and download a database platform, and install it. Next create a connection array, and fill in all the required parameters. You are almost there. We simply need to tell Laravel which database connection to use by default. Take another look at the app/config/database.php file. 1 /* 2 |-------------------------------------------------------------------------- 3 | Default Database Connection Name 4 |-------------------------------------------------------------------------- 5 | 6 | Here you may specify which of the database connections below you wish 7 | to use as your default connection for all database work. Of course 8 | you may use many connections at once using the Database library. 9 | 10 */ 11 12 'default' => 'mysql', Within the default array index, we should place the identifier for the new connection that we have created. This way, we won’t have to specify a connection every time we intend to use the database. Well I know you are excited by databases. You strange, strange person you! Let’s not waste any more time. Flip the page, let’s examine the schema builder.
to store things in the database. The database isn’t exactly a simple key-value store though. Within the database our data can have structure, consist of different types, and have relationships. Sexy, wonderful relationships. In order to store our structured data, we first need to define the structure. This isn’t a book about SQL, so I hope by now that you will understand the concept of a database table and it’s columns. In this chapter we are going to take a look at the Schema class, that we can use to define the structure of our tables. We aren’t going to be storing any data in this chapter, so make sure that you are in the mindset of structure, and not content. In the next chapter you will learn about an ideal location to start building your database structure, but I like to describe each feature in isolation. For now, we will be writing our schema-building code within routed closures. Well let’s not waste any more time, and take a quick look at the query builder. Creating Tables To create a table we must make use of the create() method of the Schema class. Here’s an example. 1 <?php 2 3 // app/routes.php 4 5 Route::get('/', function() 6 { 7 Schema::create('users', function($table) 8 { 9 // Let's not get carried away. 10 }); 11 }); The Schema::create() method accepts two parameters. The first is the name of the table that we wish to create. In this case we are creating a table named ‘users’. If the table we are creating will be used to store data representing a type of object, we should name the table in lowercase as the plural of the object. Database columns and tables are commonly named using snake-casing, where spaces are replaced with underscores (_) and all characters are lowercase.
a Closure, with a single parameter. In the above example I have called the parameter $table, but you can call it whatever you want! The $table parameter can be used to build the table structure. Let’s add auto incrementing primary key to our table, this way our table rows can be identified by a unique index. 1 <?php 2 3 // app/routes.php 4 5 Route::get('/', function() 6 { 7 Schema::create('users', function($table) 8 { 9 $table->increments('id'); 10 }); 11 }); The increments() method is available on our $table instance to create a new auto incremental column. An auto incremental column will automatically be populated with an integer value that increments as each row is added. It will start at one. This column will also be the primary key for the table. The first parameter to the increments method is the name of the column that will be created. That was simple right? Let’s go ahead and add some more columns to this table. 1 <?php 2 3 // app/routes.php 4 5 Route::get('/', function() 6 { 7 Schema::create('users', function($table) 8 { 9 $table->increments('id'); 10 $table->string('username', 32); 11 $table->string('email', 320); 12 $table->string('password', 60); 13 $table->timestamps(); 14 }); 15 });
create the structure of our users table. Don’t worry about each of the individual columns right now, we will cover them in detail in the next section. First let’s build this table by visiting the / URI to fire our routed Closure. Now let’s take a look at the database structure that has been created for us. Now I don’t know which database you chose to use, but I’m going to be using mySQL for this book, so I will take a look at the database using the mySQL command line interface. Feel free to use whatever software you feel most comfortable with. 1 mysql> use myapp; 2 Database changed 3 4 mysql> describe users; 5 +------------+------------------+-----+----------------+ 6 | Field | Type | Key | Extra | 7 +------------+------------------+-----+----------------+ 8 | id | int(10) unsigned | PRI | auto_increment | 9 | username | varchar(32) | | | 10 | email | varchar(320) | | | 11 | password | varchar(60) | | | 12 | created_at | timestamp | | | 13 | updated_at | timestamp | | | 14 +------------+------------------+-----+----------------+ 15 6 rows in set (0.00 sec) Well I’ve simplified the describe table a little to fit in the books formatting restrictions, but I hope you get the picture. Our user table structure has been built using the blueprint that we created with our $table object. You must be wondering what methods and columns we have available on the $table object? Well let’s take a look! Column Types We are going to examine the methods that are available on the $table blueprint object. I’m going to leave the routed closure out of these examples to simplify things, so you will have to use your imagination! Let’s get started. increments The increments method will add an auto incremental integer primary key to the table. This is a very useful method for building the structure for Eloquent ORM models, which we will learn about in a later chapter.
{ 5 $table->increments('id'); 6 }); The first and only parameter for the increments() method is the name of the column to create. Here’s the resulting table structure: 1 +-------+------------------+-----+----------------+ 2 | Field | Type | Key | Extra | 3 +-------+------------------+-----+----------------+ 4 | id | int(10) unsigned | PRI | auto_increment | 5 +-------+------------------+-----+----------------+ bigIncrements Oh, so the increments method wasn’t big enough for you? Well the bigIncrements() method will create a big integer, rather than a regular one. 1 <?php 2 3 Schema::create('example', function($table) 4 { 5 $table->bigIncrements('id'); 6 }); Just like the increments() method, the bigIncrements() method will accept a single string parameter as the column name. 1 +-------+---------------------+-----+----------------+ 2 | Field | Type | Key | Extra | 3 +-------+---------------------+-----+----------------+ 4 | id | bigint(20) unsigned | PRI | auto_increment | 5 +-------+---------------------+-----+----------------+ string The string() method can be used to create varchar columns, which are useful for storing short string values.
{ 5 $table->string('nickname', 128); 6 }); The first parameter to string() method is the name of the column to create, however, there is an optional second parameter to define the length of the string in characters. The default value is 255. 1 +----------+--------------+ 2 | Field | Type | 3 +----------+--------------+ 4 | nickname | varchar(255) | 5 +----------+--------------+ text The text() method can be used to store large amounts of text that will not fit into a varchar column type. For example, this column type could be used to contain the body text of a blog post. 1 <?php 2 3 Schema::create('example', function($table) 4 { 5 $table->text('body'); 6 }); The text() method accepts a single parameter. The name of the column that will be created. 1 +-------+------+ 2 | Field | Type | 3 +-------+------+ 4 | body | text | 5 +-------+------+ integer The integer column type can be used to store integer values, are you surprised? Well I can’t think of a way to make it any more interesting! Well, I suppose I could mention how integer values are useful when referencing the auto incremented id of another table. We can use this method to create relationships between tables.
{ 5 $table->integer('shoe_size'); 6 }); The first parameter to the integer() method is the name of the column. The second parameter is a boolean value that can be used to define whether or not the column should be auto incremental. The third parameter is used to define whether or not the integer is unsigned. A signed integer can be positive or negative, however, if you define an integer as unsigned, then it can only be postive. Signed integers can contain a range of integers from –2,147,483,648 to 2,147,483,647, where an unsigned integer can hold value from 0 to 4,294,967,295. 1 +-----------+---------+ 2 | Field | Type | 3 +-----------+---------+ 4 | shoe_size | int(11) | 5 +-----------+---------+ bigInteger Big integer values work exactly like normal integers, only they have a much larger range. A signed inter has a range of –9,223,372,036,854,775,808 to 9,223,372,036,854,775,807, and unsigned integers have a range of 0 to 18,446,744,073,709,551,615. An integer of this size is normally used to store my waist size in inches. 1 <?php 2 3 Schema::create('example', function($table) 4 { 5 $table->bigInteger('waist_size'); 6 }); The method signature for all of the integer variants is exactly the same as the integer() method, so I won’t waste any time by repeating it! If you have forgotten already, maybe you should take a look at the ‘integer’ section again?
| 3 +------------+------------+ 4 | waist_size | bigint(20) | 5 +------------+------------+ mediumInteger This column is another type of integer, let’s see if we can get through these column types a little faster shall we? I’m just going to specify the column value ranges from now on. The signed range is –8388608 to 8388607. The unsigned range is 0 to 16777215. 1 <?php 2 3 Schema::create('example', function($table) 4 { 5 $table->mediumInteger('size'); 6 }); The method signature is identical to that of the integer() method. 1 +-------+--------------+ 2 | Field | Type | 3 +-------+--------------+ 4 | size | mediumint(9) | 5 +-------+--------------+ tinyInteger This is another integer type column. The signed range is –128 to 127. The unsigned range is 0 to 255.
{ 5 $table->tinyInteger('size'); 6 }); The method signature is identical to that of the integer() method. 1 +-------+------------+ 2 | Field | Type | 3 +-------+------------+ 4 | size | tinyint(1) | 5 +-------+------------+ smallInteger This is another integer type column. The signed range is –32768 to 32767. The unsigned range is 0 to 65535. 1 <?php 2 3 Schema::create('example', function($table) 4 { 5 $table->smallInteger('size'); 6 }); The method signature is identical to that of the integer() method. 1 +-------+-------------+ 2 | Field | Type | 3 +-------+-------------+ 4 | size | smallint(6) | 5 +-------+-------------+ float Float column types are used to store floating point numbers. Here’s how they can be defined.
{ 5 $table->float('size'); 6 }); The first value parameter is the name used to identify the column. The optional second and third integer parameters can be used to specify the length of the value, and the number of decimal places to use to represent the value. The defaults for these parameters are 8 and 2 respectively. 1 +-------+------------+ 2 | Field | Type | 3 +-------+------------+ 4 | size | float(8,2) | 5 +-------+------------+ decimal The decimal() method is used to store… wait for it… decimal values! It looks very similar to the float() method. 1 <?php 2 3 Schema::create('example', function($table) 4 { 5 $table->decimal('size'); 6 }); The method accepts a column name as the first parameter, and two optional parameters to represent the length and number of decimal places that should be used to define the column. The defaults for the optional parameters are again, 8 and 2. 1 +-------+--------------+ 2 | Field | Type | 3 +-------+--------------+ 4 | size | decimal(8,2) | 5 +-------+--------------+
ranges of digits and characters. Some only have two states, true or false, 1 or 0. Boolean column types can be used to represent these values. 1 <?php 2 3 Schema::create('example', function($table) 4 { 5 $table->boolean('hot'); 6 }); The only parameter for the boolean method is the name given to the column it creates. 1 +-------+------------+ 2 | Field | Type | 3 +-------+------------+ 4 | hot | tinyint(1) | 5 +-------+------------+ The tinyint in the above example is not a typo. Tiny integers are used to represent boolean values as 1 or 0. I’d also like to mention at this point that I almost burnt the kitchen down while being distracted writing this section. I thought it might be interesting to know about the perilous life of a technical writer! No? Fine, let’s carry on with the column descriptions. enum The enumerated type will store strings that are contained within a list of allowed values. Here’s an example. 1 <?php 2 3 Schema::create('example', function($table) 4 { 5 $allow = array('Walt', 'Jesse', 'Saul'); 6 $table->enum('who', $allow); 7 }); The first parameter is the name of the column that will be created. The second parameter is an array of values that are permitted for this enumerated type.
| Null | 3 +-------+-----------------------------+------+ 4 | who | enum('Walt','Jesse','Saul') | NO | 5 +-------+-----------------------------+------+ date As the name suggests, the date() method can be used to create columns that store dates. 1 <?php 2 3 Schema::create('example', function($table) 4 { 5 $table->date('when'); 6 }); The first and only parameter is used to specify the name of the column that will be created. 1 +-------+------+ 2 | Field | Type | 3 +-------+------+ 4 | when | date | 5 +-------+------+ dateTime The dateTime() method will not only store a date, but also the time. No kidding, it really will. I know, I know, a lot of these methods are similar, but trust me, this will make a great reference chapter!
{ 5 $table->dateTime('when'); 6 }); Once again, the name of the column to be created is the only parameter. 1 +-------+----------+ 2 | Field | Type | 3 +-------+----------+ 4 | when | datetime | 5 +-------+----------+ time Don’t want the date included with your times? Fine! Just use the time() method instead. 1 <?php 2 3 Schema::create('example', function($table) 4 { 5 $table->time('when'); 6 }); Once again, the first and only parameter to the time() method is the name of the column being created. 1 +-------+------+ 2 | Field | Type | 3 +-------+------+ 4 | when | time | 5 +-------+------+ timestamp The timestamp() method can be used to store a date and time in the TIMESTAMP format. Surprised? No? Oh… well, let’s take a look at how it works.
{ 5 $table->timestamp('when'); 6 }); The first and only value is the name of the database column that will be created. 1 +-------+-----------+---------------------+ 2 | Field | Type | Default | 3 +-------+-----------+---------------------+ 4 | when | timestamp | 0000-00-00 00:00:00 | 5 +-------+-----------+---------------------+ binary The binary() method can be used to create columns that will store binary data. These types of columns can be useful for storing binary files such as images. 1 <?php 2 3 Schema::create('example', function($table) 4 { 5 $table->binary('image'); 6 }); The only parameter to the binary method is the name of the column that is being created. 1 +-------+------+ 2 | Field | Type | 3 +-------+------+ 4 | image | blob | 5 +-------+------+
column types that have varied uses. Let’s take a look at them. First up, we have the timestamps() method. The timestamps() method can be used to add two ‘TIMESTAMP’ columns to the table. The created_at and updated_at columns can be used to indicate when a row was created, and updated. In a later chapter we will learn how Laravel’s own Eloquent ORM can be told to automatically update these columns when an ORM instance is created or updated. Let’s have a look at how the timestamps() method is used. 1 <?php 2 3 Schema::create('example', function($table) 4 { 5 $table->timestamps(); 6 }); The timestamps() method doesn’t accept any parameters. Here’s the table structure that is created. 1 +------------+-----------+---------------------+ 2 | Field | Type | Default | 3 +------------+-----------+---------------------+ 4 | created_at | timestamp | 0000-00-00 00:00:00 | 5 | updated_at | timestamp | 0000-00-00 00:00:00 | 6 +------------+-----------+---------------------+ Next we have the softDeletes() method. Occasionally you will want to mark table row as deleted, without actually deleting the data contained within. This is useful if you may wish to restore the data in the future. With the softDeletes() method you can place an indicator column on the row to show that the row has been deleted. The column that is created will be called deleted_at and will be of type ‘TIMESTAMP’. Once again, Laravel’s Eloquent ORM will be able to update this column, without deleting the row when you use the delete method on an ORM instance. Here’s how we can add the deleted_at column to our table.
{ 5 $table->softDeletes(); 6 }); The softDeletes() method does not accept any parameters. Here’s the resulting table. 1 +------------+-----------+------+ 2 | Field | Type | Null | 3 +------------+-----------+------+ 4 | deleted_at | timestamp | YES | 5 +------------+-----------+------+ Column Modifiers Column modifiers can be used to add extra constraints or properties to the columns that we create with the create() method. For example, earlier we used the increments() method to create a table index column that was both auto incremental, and a primary key. That’s a handy shortcut, but let’s take a look at how we can turn another column into a primary key using column modifiers. First we will make a new column, and declare that it must contain unique values. 1 <?php 2 3 Schema::create('example', function($table) 4 { 5 $table->string('username')->unique(); 6 }); By chaining the unique() method on to our column creation method, we have told the database that duplicate values will not be allowed for this column. Our primary key should be used to identify individual rows, so we don’t want to have duplicate values, do we! Let’s make the ‘username’ column the table’s primary key.
{ 5 $table->string('username')->unique(); 6 $table->primary('username'); 7 }); We can mark any column as a primary key using the primary() method. The only parameter to this method a string representing the name of the column to mark as the key. Let’s describe the table we have just created. 1 +----------+--------------+------+-----+---------+-------+ 2 | Field | Type | Null | Key | Default | Extra | 3 +----------+--------------+------+-----+---------+-------+ 4 | username | varchar(255) | NO | PRI | NULL | | 5 +----------+--------------+------+-----+---------+-------+ Great! We have a new primary key. Here’s a neat trick, both the primary() key, and the unique() methods are able to act on their own, or fluently chained to an existing value. This means that the above example could also be written like this: 1 <?php 2 3 Schema::create('example', function($table) 4 { 5 $table->string('username')->unique()->primary(); 6 }); The above example shows how the column modifiers can be chained to an existing column definition. Alternatively, the column modifiers can be used in isolation by providing a column name as a parameter.
{ 5 $table->string('username'); 6 $table->unique('username'); 7 $table->primary('username'); 8 }); If you aren’t satisfied with a single primary key for your table, you can use multiple composite keys by providing an array of column names to the primary() method that we used in the previous example. Let’s take a look. 1 <?php 2 3 Schema::create('example', function($table) 4 { 5 $table->integer('id'); 6 $table->string('username'); 7 $table->string('email'); 8 $keys = array('id', 'username', 'email'); 9 $table->primary($keys); 10 }); Now our three new columns will act as a composite key, whereby any combination of the values contained in the columns will be a unique reference to an individual role. Let’s have a look at the output from ‘describe’. 1 +----------+--------------+------+-----+---------+-------+ 2 | Field | Type | Null | Key | Default | Extra | 3 +----------+--------------+------+-----+---------+-------+ 4 | id | int(11) | NO | PRI | NULL | | 5 | username | varchar(255) | NO | PRI | NULL | | 6 | email | varchar(255) | NO | PRI | NULL | | 7 +----------+--------------+------+-----+---------+-------+ We can speed up our queries by marking columns that are used to lookup information as indexes. We can use the index() method to mark a column as an index. It can be used fluently, like this:
{ 5 $table->integer('age')->index(); 6 }); Or in isolation, like this: 1 <?php 2 3 Schema::create('example', function($table) 4 { 5 $table->integer('age'); 6 $table->index('age'); 7 }); Either way, the result will be the same. The column will be marked as an index. 1 +-------+---------+------+-----+---------+-------+ 2 | Field | Type | Null | Key | Default | Extra | 3 +-------+---------+------+-----+---------+-------+ 4 | age | int(11) | NO | MUL | NULL | | 5 +-------+---------+------+-----+---------+-------+ We can also pass an array of column names to the index() method to mark multiple columns as indexes. Here’s an example. 1 <?php 2 3 Schema::create('example', function($table) 4 { 5 $table->integer('age'); 6 $table->integer('weight'); 7 $table->index(array('age', 'weight')); 8 }); Here’s the resulting table structure.
| Null | Key | Default | Extra | 3 +--------+---------+------+-----+---------+-------+ 4 | age | int(11) | NO | MUL | NULL | | 5 | weight | int(11) | NO | | NULL | | 6 +--------+---------+------+-----+---------+-------+ Sometimes we want to set a constraint on a column to state whether or not it can contain a null value. We can set a column to nullable using the nullable() method. It can be used as part of a method chain, like this: 1 <?php 2 3 Schema::create('example', function($table) 4 { 5 $table->string('name')->nullable(); 6 }); Here’s the resulting table structure. 1 +-------+--------------+------+ 2 | Field | Type | Null | 3 +-------+--------------+------+ 4 | name | varchar(255) | YES | 5 +-------+--------------+------+ As you can see, the column can now contain a null value. If we don’t want the column to allow a null value, we can pass boolean false as the first parameter to the nullable() chained method, like this: 1 <?php 2 3 Schema::create('example', function($table) 4 { 5 $table->string('name')->nullable(false); 6 }); Now let’s take another look at the resulting table structure.
| Null | 3 +-------+--------------+------+ 4 | name | varchar(255) | NO | 5 +-------+--------------+------+ As you can see, the ‘name’ column can no longer contain a null value. If we wish for our columns to contain a default value when a new row is created, we can provide the default value by chaining the default() method onto the new column definition. Here’s an example. 1 <?php 2 3 Schema::create('example', function($table) 4 { 5 $table->string('name')->default('John Doe'); 6 }); The first and only parameter to the default() method is the intended default value for the column. Let’s take a look at the resulting table structure. 1 +-------+--------------+------+-----+----------+ 2 | Field | Type | Null | Key | Default | 3 +-------+--------------+------+-----+----------+ 4 | name | varchar(255) | NO | | John Doe | 5 +-------+--------------+------+-----+----------+ If we don’t provide a value for the ‘name’ column when creating a new row, then it will default to ‘John Doe’. We have one final column modifier to look at. This one isn’t really needed, but it’s a nice little shortcut. Do you remember creating integer columns in the previous section? We used a boolean parameter to specify whether or not an integer was signed, and could contain a negative value. Well we can use the unsigned() chained method on an integer column to specify that it may not contain negative numbers. Here’s an example.
{ 5 $table->integer('age')->unsigned(); 6 }); Here’s the resulting table structure after using the unsigned() chained method. 1 +-------+------------------+ 2 | Field | Type | 3 +-------+------------------+ 4 | age | int(10) unsigned | 5 +-------+------------------+ Whether you choose to use the boolean switch, or the unsigned() method, the choice is entirely yours. Updating Tables Once a table has been created, there’s no way to change it. Are you sure, because the heading say… I’m sure, there’s absolutely no way. Hmm, but the heading says updating tables? You just won’t let it go will you? Fine, I was going to go take a nap, but you have convinced me. You need to know about updating tables, so let’s get started. First of all, we can change the name of a table that we have already created quite easily using the Schema::rename() method. Let’s take a look at an example.
users table. 4 Schema::create('users', function($table) 5 { 6 $table->increments('id'); 7 }); 8 9 // Rename the users table to idiots. 10 Schema::rename('users', 'idiots'); The first parameter of the rename() method is the name of the table that we wish to change. The second parameter to the method, is the new name for the table. If we want to alter the columns of an existing table, we need to use the Schema::table() method. Let’s take a closer look. 1 <?php 2 3 Schema::table('example', function($table) 4 { 5 // Modify the $table... 6 }); The table() method is almost identical to the create() method we used earlier to create a table. The only difference is that it acts upon an existing table that we specify within the first parameter to the method. Once again, the second parameter contains a Closure with a parameter of a table builder instance. We can use any of the column creation methods that we discovered in the previous section to add new columns to the existing table. Here’s an example. 1 <?php 2 3 Schema::create('example', function($table) 4 { 5 $table->increments('id'); 6 }); 7 8 Schema::table('example', function($table) 9 { 10 $table->string('name'); 11 });
Schema::create() method to build the ‘example’ table with a primary key. Then we use the Schema::table() method to add a string column to the existing table. Here’s the result from describe example;: 1 +-------+------------------+-----+----------------+ 2 | Field | Type | Key | Extra | 3 +-------+------------------+-----+----------------+ 4 | id | int(10) unsigned | PRI | auto_increment | 5 | name | varchar(255) | | | 6 +-------+------------------+-----+----------------+ Now you can use any of the column creation methods that we learned about in the previous section to add additional columns to a table. I won’t cover every creation method again, their signatures haven’t changed. If you need a quick refresher course, then have another look at the ‘Column Types’ section. If we decide that we no longer wish to have a column on our table, we can use the dropColumn() method to remove it. Let’s take a look at this in action. 1 <?php 2 3 Schema::create('example', function($table) 4 { 5 $table->increments('id'); 6 $table->string('name'); 7 }); 8 9 Schema::table('example', function($table) 10 { 11 $table->dropColumn('name'); 12 }); In the above example, we create the ‘example’ table with two columns. Then we use thedropColumn() method to remove the ‘name’ column from the table. The dropColumn() method will accept a string parameter, which is the name of the column that we wish to remove. Here is what our ‘example’ table will look like after the above code has been executed.
| Null | Key | Extra | 3 +-------+------------------+------+-----+----------------+ 4 | id | int(10) unsigned | NO | PRI | auto_increment | 5 +-------+------------------+------+-----+----------------+ As you can see, the ‘name’ column was removed succesfully. If we wish to remove more than one column at once, we can either provide an array of column names as the first parameter to the dropColumn() method… 1 <?php 2 3 Schema::table('example', function($table) 4 { 5 $table->dropColumn(array('name', 'age')); 6 }); …or we can simply provide multiple string parameters for column names. 1 <?php 2 3 Schema::table('example', function($table) 4 { 5 $table->dropColumn('name', 'age'); 6 }); Feel free to use whichever method suits your style of coding. We don’t have to drop our columns, though. If we want to, we can simply rename them. Let’s have a look at an example. 1 <?php 2 3 Schema::create('example', function($table) 4 { 5 $table->string('name'); 6 }); 7 8 Schema::table('example', function($table) 9 { 10 $table->renameColumn('name', 'nickname'); 11 });
the name of a column. The first parameter to the method is the name of the column that we wish to rename, and the second parameter is the new name for the column. Here’s the resulting table structure for the above example. 1 +----------+--------------+ 2 | Field | Type | 3 +----------+--------------+ 4 | nickname | varchar(255) | 5 +----------+--------------+ Now, do you remember the primary keys that we constructed in the previous section? What happens if we no longer wish for those columns to be primary keys? Not a problem, we just remove the key. Here’s an example. 1 <?php 2 3 Schema::create('example', function($table) 4 { 5 $table->string('name')->primary(); 6 }); 7 8 Schema::table('example', function($table) 9 { 10 $table->dropPrimary('name'); 11 }); Using the dropPrimary() method, we supply the name of a column as a parameter. This column will have its primary key attribute removed. Here’s how the table looks after the code has executed. 1 +-------+--------------+------+-----+---------+-------+ 2 | Field | Type | Null | Key | Default | Extra | 3 +-------+--------------+------+-----+---------+-------+ 4 | name | varchar(255) | NO | | NULL | | 5 +-------+--------------+------+-----+---------+-------+ As you can see, the name column is no longer a primary key. To remove a number of composite keys from a table, we can instead supply an array of column names as the first parameter of the dropPrimary() method. Here’s an example.
{ 5 $table->string('name'); 6 $table->string('email'); 7 $table->primary(array('name', 'email')); 8 }); 9 10 Schema::table('example', function($table) 11 { 12 $table->dropPrimary(array('name', 'email')); 13 }); We can remove the unique attribute for a column by using the dropUnique() method. This method accepts a single parameter, which consists of the table name, column name, and ‘unique’ separated by underscores. Here’s an example of removing the unique attribute from a column. 1 <?php 2 3 Schema::create('example', function($table) 4 { 5 $table->string('name')->unique(); 6 }); 7 8 Schema::table('example', function($table) 9 { 10 $table->dropUnique('example_name_unique'); 11 }); Once again, we can pass an array of column names in same format to the dropUnique() method if we wish. Here’s an example.
{ 5 $table->string('name')->unique(); 6 $table->string('email')->unique(); 7 }); 8 9 Schema::table('example', function($table) 10 { 11 $columns = array('example_name_unique', 'example_email_unique'); 12 $table->dropUnique($columns); 13 }); Finally, we can drop an index attribute from a table column by using… wait for it… okay you guessed it. We can use the dropIndex() method. Simply provide the column name in the same format as we used with the dropUnique() method, that’s table name, column name, and ‘index’. For example: 1 <?php 2 3 Schema::create('example', function($table) 4 { 5 $table->string('name')->index(); 6 }); 7 8 Schema::table('example', function($table) 9 { 10 $table->dropIndex('example_name_index'); 11 }); For some reason, I was unable to provide an array of columns to the dropIndex() method. I will ask Taylor about this and update the chapter with any changes. For now, let’s move on. Dropping Tables To drop a table, simply cut off its legs. Just kidding, we can drop a table using the Schema::drop() method, let’s take a look at this method in action.
{ 5 $table->string('name'); 6 }); 7 8 Schema::drop('example'); To drop a table we simply pass the name of the table as the first parameter of the Schema::drop() method. Let’s try to describe the table to see if it exists. 1 mysql> describe example; 2 ERROR 1146 (42S02): Table 'myapp.example' doesn't exist Well I guess it worked! It looks like the table is gone. If we try to drop a table that doesn’t exist, then we will get an error. We can avoid this by instead using the dropIfExists() method. As the name suggests, it will only drop a table that exists. Here’s an example. 1 <?php 2 3 Schema::create('example', function($table) 4 { 5 $table->string('name'); 6 }); 7 8 Schema::dropIfExists('example'); Just like the drop() method, the dropIfExists() method accepts a single parameter, the name of the table to drop. Schema Tricks Tricks? Maybe not. However, this section is used for methods that simply don’t fit into the previous sections. Let’s waste no time by taking a look at the first method. We can use the Schema::connection() method to perform our schema changes on an alternative database or connection. Let’s take a look at an example.
{ 5 $table->increments('id'); 6 }); 7 8 Schema::connection('mysql')->table('example', function($table) 9 { 10 $table->string('name'); 11 }); The connection() method can be placed before any of the Schema class methods to form a chain. The first parameter for the method, is the name of the database connection which subsequent methods will act upon. The connection() method can be very useful if you need to write an application that uses multiple databases. Next up, we have a couple of methods that can be used to check the existance of columns and tables. Let’s go ahead and jump right in with an example. 1 <?php 2 3 if (Schema::hasTable('author')) { 4 Schema::create('books', function($table) 5 { 6 $table->increments('id'); 7 }); 8 } We can use the hasTable() method to check for the existance of a table. The first parameter to the method is the name of the table that we wish to check. In the above example we create the ‘books’ table only if the ‘authors’ table exists. As you might have already guessed, we have a similar method to check for the existance of a column. Let’s take a look at another example.
{ 4 Schema::table('example', function($table) 5 { 6 $table->string('name'); 7 }); 8 } We can use the Schema::hasColumn() method to check if a table has a column. The first parameter to the method is the table, and the second parameter is the name of the column that we want to look for. In the above example, a ‘name’ column will be added to the ‘example’ table. If you happen to be a database genius, you might want to change the storage engine used by the table. Here’s an example. 1 <?php 2 3 Schema::create('example', function($table) 4 { 5 $table->engine = 'InnoDB'; 6 $table->increments('id'); 7 }); Simply change the value of the engine attribute on the table blueprint to the name of the storage engine that you wish to use. Here are some of the available storange engines for the mySQL database: • MyISAM • InnoDB • IBMDM2I • MERGE • MEMORY • EXAMPLE • FEDERATED • ARCHIVE • CSV • BLACKHOLE For more information about these storage engines, please consult the mySQL documentation²⁷ for the topic. On mySQL databases, you are able to reorder the columns of a table by using the after() method. Here’s an example. ²⁷http://dev.mysql.com/doc/refman/5.1/en/storage-engines.html
{ 5 $table->string('name')->after('id'); 6 $table->increments('id'); 7 }); Simply chain the after() method onto the column that you wish to reposition. The only parameter to the method is the name of the column that you wish for the new column to be placed after. Feel free to use this method, although I would recommend simply building your tables in the intended order, this will look much clearer. Well that’s all that I have about building database schemas. Why don’t we learn about a more suitable place to build our schemas. Let’s move on to the migrations chapter.
A system that will allow all of the days tasks to be completed without any fuss by my army of red panda butlers. Let me share it with you. Here’s a list of tasks for my butlers. You can give them a hand you like? • 9:00 AM - Wash and dress Dayle. • 10:00 AM - Cook and grill a number of rare and exotic meats for breakfast. • 12:00 PM - (Lunch) The pandas will climb a tree and sleep for a while. • 02:00 PM - Polish the Apple hardware collection. • 04:00 PM - Prepare the writing throne for the next Code Bright chapter. • 09:00 PM - Drag sleeping Dayle from the writing throne, and tuck him into bed. So that’s my list for the red pandas. They have quite a busy day, and I don’t know what I would do without them. The problem is that the list has a very specific order. We don’t want the pandas to tuck me into bed before I have visited the writing throne, otherwise you won’t get a new chapter. Also, there wouldn’t be a lot of point in doing these tasks twice. The pandas need to ensure that they are done once, sequentially. The pandas are so smart, it was them that came up to the solution to the problem all on their own. I gave them the original list on a notepad with a pencil, and well, they get rather excited when you give them gifts. There was a lot of playful rolling. Anyway, they decided that they would write their own list, double the fun right? The pandas decided to write a secondary list. Whenever they completed a task, which of course were completed in time order from the first list, they would write the time and name of the task on the second list. This way, the same task would never be repeated. Not a bad idea, I have to admit. Fortunately some clever chaps invented a similar idea for databases. Let’s take a look at migrations. Basic Concept When building your database, you could create it’s structure by hand. Type up some nifty SQL to describe your columns, but what happens when you accidentally drop the database? What if you are working as a team? You don’t want to have to pass your SQL dumps around the team all the time to keep the database synchronized.
a number of PHP scripts that are used to change the structure or content of your database. Migrations are time stamped, so that they are always executed in the correct order. Laravel keeps a record of which migrations have already been executed within another table on your default database connection. This way, it will only ever execute any additional migrations that have been added. Using migrations, you and your team will always have the same database structure, in a consistant, stable state. You know what? Actions speak louder than words. Let’s create a new migration and start the learning process. Creating Migrations To create a migration we need to use the Artisan command line interface. Go ahead and open a terminal window, and navigate to the project folder using whichever shell you call home. We learned about schema building in the previous chapter, and I told you there was a better place to use the schema. Well of course I was talking about migrations. Let’s recreate the schema build that we used to create the users table. We will start by using Artisan to build a create_users migration. 1 $ php artisan migrate:make create_users 2 Created Migration: 2013_06_30_124846_create_users 3 Generating optimized class loader 4 Compiling common classes We call the Artisan migrate:make command, and provide a name for our new migration. Laravel has new generated a new migration template within the app/database/migrations directory. The template will be located in a file named after the parameter that you supplied to the migrate:make command, with an attached timestamp. In this instance, our template is located within the following file. 1 app/database/migrations/2013_06_30_124846_create_users.php Let’s open up the file in our text editor and see what we have.
class CreateUsers extends Migration { 6 7 /** 8 * Run the migrations. 9 * 10 * @return void 11 */ 12 public function up() 13 { 14 // 15 } 16 17 /** 18 * Reverse the migrations. 19 * 20 * @return void 21 */ 22 public function down() 23 { 24 // 25 } 26 27 } Here we have our migration class. Now it’s important that you always use the Artisan command to generate migrations, you don’t want to risk breaking the timestamps and thus the history of your database structure. Be a good reader, use the command. Within the migration class we have two public methods, up() and down(). Now imagine a line between these two methods, or write one within a comment if you didn’t learn about imagination from our friend Barney. You see either side of the line, a direct opposite must happen. Whatever you do in the up() method, you must undo within the down() method. You see, migrations are bi-directional. We can run a migration to update the structure or content of our database, but we can also undo that migration to revert it to its orignal state. First let’s fill in the up() method.
the migrations. 5 * 6 * @return void 7 */ 8 public function up() 9 { 10 Schema::create('users', function($table) 11 { 12 $table->increments('id'); 13 $table->string('name', 128); 14 $table->string('email'); 15 $table->string('password', 60); 16 $table->timestamps(); 17 }); 18 } Hopefully there’s nothing confusing within this schema construction snippet. If you don’t under- stand any of it, simply take another look at the ‘Schema Builder’ chapter. Right, we know that what goes up, must come down. For that reason, let’s tackle the down() method and create the inverse of the structure change within the up() method. Here we go… 1 <?php 2 3 /** 4 * Reverse the migrations. 5 * 6 * @return void 7 */ 8 public function down() 9 { 10 Schema::drop('users'); 11 } Alright, alright, I suppose it’s not the direct opposite. I’m guessing you wanted to drop all of the columns individually and then the table. Well, you see, they would both end in the same result. The users table would be dropped. So why not do it in one line?
take a look at a few tricks that relate to creating migrations. Using the --create and --table switches on the migrate:make command we can automatically create a stub for the creation of a new table. We simply run… 1 php artisan migrate:make create_users --create --table=users …and we receive the following migration stub. 1 <?php 2 3 use Illuminate\Database\Schema\Blueprint; 4 use Illuminate\Database\Migrations\Migration; 5 6 class CreateUsers extends Migration { 7 8 /** 9 * Run the migrations. 10 * 11 * @return void 12 */ 13 public function up() 14 { 15 Schema::create('users', function(Blueprint $table) 16 { 17 $table->increments('id'); 18 $table->timestamps(); 19 }); 20 } 21 22 /** 23 * Reverse the migrations. 24 * 25 * @return void 26 */ 27 public function down() 28 { 29 Schema::drop('users'); 30 } 31 32 }
of time. You will notice that as well as adding the Schema::create() and Schema::drop() methods for our new table, Laravel has also added the increments() and timestamps() methods. This makes it easy to create Eloquent ORM compatible models very quickly. Don’t worry too much about Eloquent for now, we will discover all about it soon enough. One final trick for the creation of migrations, is how to store them in a different location to the default app/database/migrations directory. We can use the --path switch to define a new location for our migration class. 1 $ php artisan migrate:make create_users --path=app/migs 2 Created Migration: 2013_06_30_155341_create_users 3 Generating optimized class loader 4 Compiling common classes Now our migration will be created within the app/migs directory relative to the root of our project. However, when running your migrations, Artisan won’t look in this new location by default, so be sure to let it know where to find you migrations,. We will discover more about this within the next section. Running Migrations We went to all this effort to create our new migration, it would be a shame not to run it wouldn’t it? Let’s prepare the database to use migrations. Remember how I told you that Laravel uses a database table to record the status of its migrations? Well first we need to create that table. Now you can call the migrations table whatever you like. The configuration for the table name is located within app/config/database.php. 1 /* 2 |-------------------------------------------------------------------------- 3 | Migration Repository Table 4 |-------------------------------------------------------------------------- 5 | 6 | This table keeps track of all the migrations that have already run for 7 | your application. Using this information, we can determine which of 8 | the migrations on disk have not actually be run in the databases. 9 | 10 */ 11 12 'migrations' => 'migrations',
of the table which you wish to use to track your migration status. A sensible default has been provided. We can install our migrations table by running another Artisan command. Let’s run the install command now. 1 $ php artisan migrate:install 2 Migration table created successfully. Now let’s examine our database, and look for the migrations table to see what has been created. 1 mysql> describe migrations; 2 +-----------+--------------+------+-----+---------+-------+ 3 | Field | Type | Null | Key | Default | Extra | 4 +-----------+--------------+------+-----+---------+-------+ 5 | migration | varchar(255) | NO | | NULL | | 6 | batch | int(11) | NO | | NULL | | 7 +-----------+--------------+------+-----+---------+-------+ 8 2 rows in set (0.01 sec) A new table with two fields has been created. Don’t trouble yourself with the implementation of the migrations table, just rest assured that it has been created, and the migrations system has been installed. Okay, well I have lied to you again. I don’t know how this keeps happening? Perhaps I should visit a psychiatrist or something. Well anyway, I told you that we needed to install the migrations table, and I lied. You see, Laravel will automatically create the table for us if it doesn’t exist when your migrations are executed. It will install the migrations system for you. At least you know about the migrate:install command now though right? It’s almost as if I planned this whole deception… Right, let’s get started and run our migration for the first time. We can use the migrate command to do this. 1 $ php artisan migrate 2 Migrated: 2013_06_30_124846_create_users The output from the command is a list of migrations that have been executed. Let’s take a look at our database to see if our ‘users’ table has been created.
Field | Type | 4 +------------+------------------+ 5 | id | int(10) unsigned | 6 | name | varchar(128) | 7 | email | varchar(255) | 8 | password | varchar(60) | 9 | created_at | timestamp | 10 | updated_at | timestamp | 11 +------------+------------------+ 12 6 rows in set (0.01 sec) I shortened the table a little to be more inline with the book’s formatting, but you can see that our ‘users’ table has been created correctly. Awesome! Now let’s add a ‘title’ column to our users table. You might be tempted to open up the migration that we have already made and update the schema to include the new column. Please don’t do that. You see, if one of your teammates had been working on the project, and had already ran our first migration then he wouldn’t receive our change, and our databases would be in different states. Instead, let’s create a new migration to alter our database. Here we go. 1 $ php artisan migrate:make add_title_to_users 2 Created Migration: 2013_06_30_151627_add_title_to_users 3 Generating optimized class loader 4 Compiling common classes You will notice that I have given the new migration a descriptive name, you should follow this pattern. Let’s alter the schema of our users table within the up() method to add the title column. 1 <?php 2 3 use Illuminate\Database\Migrations\Migration; 4 5 class AddTitleToUsers extends Migration { 6 7 /** 8 * Run the migrations. 9 * 10 * @return void 11 */
function($table) 15 { 16 $table->string('title'); 17 }); 18 } 19 20 /** 21 * Reverse the migrations. 22 * 23 * @return void 24 */ 25 public function down() 26 { 27 // 28 } 29 30 } Great, that should add the column that we need to our ‘users’ table. Now say it with me. What goes up, must come down. You’re right, we need to provide the down() method for this migration class. Let’s alter the table to remove the ‘title’ column. 1 <?php 2 3 use Illuminate\Database\Migrations\Migration; 4 5 class AddTitleToUsers extends Migration { 6 7 /** 8 * Run the migrations. 9 * 10 * @return void 11 */ 12 public function up() 13 { 14 Schema::table('users', function($table) 15 {
been added to the users table. If our migration was commited and shared with the rest of the team, they could simply run migrate to bring their own databases in line with the new structure. If for some reason we do need to alter one of our existing migration files, we can use the migrate:refresh Artisan command to revert all migrations, and then run them once more. Let’s try this now with our users table. 1 $ php artisan migrate:refresh 2 Rolled back: 2013_06_30_151627_add_title_to_users 3 Rolled back: 2013_06_30_124846_create_users 4 Nothing to rollback. 5 Migrated: 2013_06_30_124846_create_users 6 Migrated: 2013_06_30_151627_add_title_to_users Our migrations have been rolled back using the down() methods, and then executed once again in the correct order using their respective up() methods. Our database is once again in its perfect state. Remember how we used the --path switch in the previous chapter to write our migrations to a new location on the filesystem? Well I promised you that I would show you how to execute them. I may lie once in a while, but I never go back on a promise. Let’s take a look at how we can execute our non standard migrations. 1 $ php artisan migrate --path=app/migs 2 Migrated: 2013_06_30_155341_create_users See, it’s easy? We just use the --path switch again to specify the location where our migrations are stored relative to the application root. I told you that migrations are bi-directional, so that means that we must be able to roll them back? Let’s move on. Rolling Back Rolling, rolling, rolling on the riverrrrr… Sorry about that, I was a little distracted. Let’s see… ah yes! Rolling back migrations. We know that we can use migrate to execute our migrations, but how do we roll them back? Well let’s assume that we used the migrate command to restructure our database based upon one of our teammates migration. Unfortunately, our friends schema changes have broken some of our code, leaving our application broken. We need to rollback the changes that our teammate has made. To do this we can use the rollback command. Let’s give it a try.
2013_06_30_151627_add_title_to_users When we use the rollback command, Laravel rolls back only the migrations that were ran the last time we used migrate. It’s as if the last time that we ran migrate never happened. If we want to roll back all migrations, we can use the reset command. 1 $ php artisan migrate:reset 2 Rolled back: 2013_06_30_151627_add_title_to_users 3 Rolled back: 2013_06_30_124846_create_users 4 Nothing to rollback. You should note that the reset command will not remove our migrations table. Migration Tricks Oh, you want more do you? I see. Well don’t worry, I’m not going to hold anything back. Let’s learn a few extra features of the migrations system. Do you remember the array of connections that we discovered in the database configuration file at app/config/database.php? We can perform our migrations on another connection by supplying the --database switch to any of the migration commands, like this: 1 $ php artisan migrate --database=mysql 2 Migrated: 2013_06_30_124846_create_users 3 Migrated: 2013_06_30_151627_add_title_to_users Now our migrations will be performed on the connection that we nicknamed mysql within the configuration file. Hrm… you still don’t sound impressed? Well alright, I have another trick for you. Sometimes I think that I spoil you… but I have to admit it. You are a great listener. We can execute our migrations without altering the database, and we can see the intended SQL queries that are the result of our migrations. This way we can check to see what the next migration will do, without risking any damage to our database. This is really useful for debugging. To see the intended SQL result of a migration command, just add the --pretend switch. Here’s an example.
create table `users` (`id` int unsigned not null 3 auto_increment primary key, `name` varchar(128) not null, 4 `email` varchar(255) not null, `password` varchar(60) not null, 5 `created_at` timestamp default 0 not null, `updated_at` timestamp 6 default 0 not null) default character set utf8 collate utf8_unicode_ci 7 AddTitleToUsers: alter table `users` add `title` varchar(255) not null Now we can see the queries that would have been executed against our database if the --pretend switch wasn’t provided. Neat trick, right? Yep, you got me… I told you so! In the next chapter we will be taking a look at the Eloquent ORM. Eloquent is a wonderful method of representing your database rows as PHP objects, to that they fit in nicely with object-oriented programming.
how we can use the schema builder to structure tables within our database, but now it’s time to get down to the nitty gritty and learn how we can store information in the database. Now some of you who have already encountered the database components of Laravel, or even those of you who have been using Laravel 3 might be wondering why I’m choosing to start with the ORM? Why don’t I begin with SQL statements, then query building? Well, let’s take a step back and think about why we are here. You are a developer, a PHP developer in fact! Since you are reading this book, I’m hoping that you are a PHP 5+ developer, and will have embraced object-oriented development. If we are are describing the entities in our application as objects, then it makes sense to store them as objects, retrieve them as objects, and more. Let’s imagine that we are writing an online book store. Object-oriented application design has taught us that we need to identify the objects within our application. Well, a bookstore isn’t going to be very successful without any books, right? So there’s a fair change that we will be wanting a book object to represent the individual books used by our application. Normally we will refer to these application objects as ‘Models’, since they represent part of our applications business model. Here’s an example. 1 <?php 2 3 class Book 4 { 5 /** 6 * The name of our book. 7 * 8 * @var string 9 */ 10 public $name; 11 12 /** 13 * A description for our book. 14 * 15 * @var string 16 */ 17 public $description;
Book; 21 $book->name = 'The Colour of Magic'; 22 $book->description = 'Rincewind and Twoflower in trouble!'; Wonderful! We have created a book to represent Terry Pratchett’s ‘The Colour of Magic’, one of my personal favourites! Now let’s store this book in our database. We will assume that we used the schema builder and have already created a ‘books’ table with all required columns. First we will need to construct an SQL query. Now I know that you would probably build a prepared query for security reasons, but I want to keep the example simple. This should do the trick… 1 <?php 2 3 $query = " 4 INSERT INTO 5 books 6 VALUES ( 7 '{$book->name}', 8 '{$book->description}' 9 ); 10 "; We construct an SQL query to insert our object into the database. This query can then be executed using whichever database adapter you normally use. I think that it’s a real shame that we have to build a string SQL query just to store that data in the database. Why bother creating the object in the first place if we are going to transform it into a string for storage? We’d just have to build the object again when retrieving it from the database too. It’s a waste of time if you ask me… I think that we should be able to ‘throw’ our objects directly at the database, without having to build those ugly SQL queries. Hmm, perhaps something like this? 1 <?php 2 3 $book = new Book; 4 $book->name = 'The Colour of Magic'; 5 $book->description = 'Rincewind and Twoflower in trouble!'; 6 $book->save();
side of things for us. Persisting the object to the database. That would be great! Someone should really build on this idea of mine. It’s already been done buddy. What, really? Shame… I thought I had found the idea that might bring me fame and fortune. Well I guess it’s a good thing really. Ah yes, I remember now. This functionality is provided by object relational mappers, or simply ‘ORM’s. ORMs can be used to allow us to map our application objects to database tables, and individual instances of these objects as rows. You can think of the class attributes of these objects as the individual columns for the table. The ORM will take care of object retrieval and persistance for us, we won’t have to write a single line of SQL. This is great news, because I can’t stand SQL! It’s ugly and boring. Objects are much more fun, right? Many ORMs also offer the ability to manage the relationships between multiple object types. For example, books and authors. Authors and publishers, etc. Laravel ships with its own ORM component called ‘Eloquent’. Eloquent is very much true to its name. Its syntax is quite beautiful, and it makes interacting with the database layer of your application stack a pleasing experience, rather than a chore. When I think about a storage layer the word CRUD comes to mind. No, I’m not refering to my dislike for SQL this time, but rather the actions that can be performed upon the storage layer. • C - Create a new row. • R - Read existing rows. • U - Update existing rows. • D - Delete existing rows. Let’s learn more about Eloquent by tackling these actions in order. We will start with the creation of Eloquent model instances. Creating new models. Before we create our first Eloquent model, we need a quirky example data topic. Hrm… I’ve just built a new gaming PC, so let’s go with video games. We can create some objects to represent video games, but first, we need to create a table schema. We will create a new migration to build the schema for our ‘games’ table.
5 use Illuminate\Database\Migrations\Migration; 6 7 class CreateGames extends Migration { 8 9 /** 10 * Run the migrations. 11 * 12 * @return void 13 */ 14 public function up() 15 { 16 Schema::create('games', function($table) 17 { 18 $table->increments('id'); 19 $table->string('name', 128); 20 $table->text('description'); 21 }); 22 } 23 24 /** 25 * Reverse the migrations. 26 * 27 * @return void 28 */ 29 public function down() 30 { 31 Schema::drop('games'); 32 } 33 34 } Hopefully this sample code requires no introduction. If you have found anything confusing within the example then take another look at the schema builder chapter. You will notice that we named our table games. This is because we intend to call our Eloquent model Game. Eloquent is clever, by default it will look for the plural form of the model name as the table to use to store instances of our objects. This behaviour can be overriden, but let’s keep things simple for now. Eloquent models have a basic requirements. A model must have an auto incremental column named
that can be used to identify a single row within the table. You can add this column to the table structure easily by using the increments() method. Let’s run the migration to update the database. 1 $ php artisan migrate 2 Migrated: 2013_07_10_213946_create_games Now we can get started. Let’s create a new Eloquent model to represent our games. 1 <?php 2 3 // app/models/Game.php 4 5 class Game extends Eloquent 6 { 7 8 } Here we have a complete Eloquent model that can be used to represent our games. Surprised? Yes I suppose it is a little sparse, but that’s a good thing really. Many other ORMs will demand that you build an XML map of the database schema, or create annotations for each of the database columns of the table representing the object. We don’t need to do this because Eloquent makes some sensible assumptions. Let’s create a new game. 1 <?php 2 3 // app/routes.php 4 5 Route::get('/', function() 6 { 7 $game = new Game; 8 $game->name = 'Assassins Creed'; 9 $game->description = 'Assassins VS templars.'; 10 $game->save(); 11 }); Hey, that looks familiar! Isn’t that how we wanted to persist our objects in the first place? It’s clean and simple. We create a new instance of our ‘Game’ model and set its public attributes, which map to table columns, to the values that we require. When we are done, we simply call the save() method on the object to persist the new row to the database.
to receive no response, since the query will execute and return nothing from our routed logic. However, we receive something quite different. We receive an error screen. A beautiful error screen. A really beautiful error screen! The guy who themed that must have had some serious skills, right? Heh… Anyway, what’s this error? 1 SQLSTATE[42S22]: Column not found: 1054 Unknown column 'updated_at' in 'field lis\ 2 t' (SQL: insert into `games` (`name`, `description`, `updated_at`, `created_at`) \ 3 values (?, ?, ?, ?)) (Bindings: array ( 0 => 'Assassins Creed', 1 => 'Assassins V\ 4 S templars.', 2 => '2013-07-14 16:30:55', 3 => '2013-07-14 16:30:55', )) When Eloquent creates our new model, it attempts to populate the updated_at and created_at columns of our table with the current time. This is because it expects us to have added the ->timestamps() method when building our table schema. It’s a sensible default, since it never hurts to have a record of creation/update times. However, if you are using an existing database table, or simply don’t wish to have the timestamp columns present within your database table, you may want to disable this functionality. To disable automatic timestamp updates with Eloquent models, just add a new public attribute to your model. 1 <?php 2 3 // app/models/Game.php 4 5 class Game extends Eloquent 6 { 7 public $timestamps = false; 8 } The public attribute $timestamps is inherited from the Eloquent base class. It is a boolean value that can be used to enable or disable the automatic timestamp functionality. In the above example we have set it to false, which will let Eloquent know that we wish to disable timestamping. Let’s visit that / URI once more. This time the page shows a black result. Don’t panic, this is simply because we have not returned a response from our routed logic. We received no error message, so the SQL query must have been executed. Let’s examine the games table to see the result.
3 mysql> select * from games; 4 +----+-----------------+------------------------+ 5 | id | name | description | 6 +----+-----------------+------------------------+ 7 | 1 | Assassins Creed | Assassins VS templars. | 8 +----+-----------------+------------------------+ 9 1 row in set (0.00 sec) We can see that our new row has been inserted correctly. Great! We have inserted a new record without writing a single line of SQL. Now that’s my kind of victory. You will notice that we didn’t have to specify an id value for our object. The id column is automatically incremented, so the database layer will handle the numbering of our rows for us. It’s generally a bad idea to modify the id column of an Eloquent model. Try to avoid it unless you really know what you’re doing. We used the $timestamps attribute to disable automatic timestamps. Instead, let’s take a look at what happens when we enable them. First we need to alter our database schema. It’s a bad idea to manually modify our database schema, or to update existing migrations. This is because our database state might become ‘out-of-sync’ with our teammates. Instead, let’s create a new migration that our teammates could also execute to receive our changes. 1 $ php artisan migrate:make add_timestamps_to_games 2 Created Migration: 2013_07_14_165416_add_timestamps_to_games Our migration has been created. You will notice that we gave the migration a discriptive name to represent our intentions with the migration. This could be useful information should your teammates later execute the migration. Let’s use the schema builder to add timestamps to our game table. 1 <?php 2 3 // app/database/migrations/2013_07_14_165416_add_timestamps_to_games.php 4 5 use Illuminate\Database\Migrations\Migration; 6 7 class AddTimestampsToGames extends Migration { 8 9 /** 10 * Run the migrations. 11 * 12 * @return void
{ 16 Schema::table('games', function($table) 17 { 18 $table->timestamps(); 19 }); 20 } 21 22 /** 23 * Reverse the migrations. 24 * 25 * @return void 26 */ 27 public function down() 28 { 29 // 30 } 31 32 } We have used Schema::table() to alter our ‘games’ table, and the timestamps() method to automatically add the timestamps column. Now ladies and gentlemen, say it with me. What goes up, must come down! You really do learn fast! Great work. Let’s remove the timestamps columns from the table within the down() method. 1 <?php 2 3 // app/database/migrations/2013_07_14_165416_add_timestamps_to_games.php 4 5 use Illuminate\Database\Migrations\Migration; 6 7 class AddTimestampsToGames extends Migration { 8 9 /** 10 * Run the migrations. 11 * 12 * @return void 13 */
Schema::table('games', function($table) 17 { 18 $table->timestamps(); 19 }); 20 } 21 22 /** 23 * Reverse the migrations. 24 * 25 * @return void 26 */ 27 public function down() 28 { 29 Schema::table('games', function($table) 30 { 31 $table->dropColumn('updated_at', 'created_at'); 32 }); 33 } 34 35 } I have used the dropColumn() schema builder method to remove the updated_at and created_at columns from the table within the down() method. I thought there might be a lovely dropTimestamps() method for this, but apparently not. Not a problem! It’s an open source project, so I’ll just send a pull request later when I get some free time. Hint hint… Let’s execute our new migration to add the new columns to our ‘games’ table. 1 $ php artisan migrate 2 Migrated: 2013_07_14_165416_add_timestamps_to_games Now we have a choice, we could either set the $timestamps attribute within our model to true, which would enable the automatic timestamping feature.
5 class Game extends Eloquent 6 { 7 public $timestamps = true; 8 } Or… we could simply remove it. This is because the default value of the $timestamps attribute within the parent Eloquent model is true. Its value will be inherited within our model. 1 <?php 2 3 // app/models/Game.php 4 5 class Game extends Eloquent 6 { 7 8 } Great, now let’s execute our / URI once again to insert a new row. We will examine the ‘games‘ table within the database to see the result. 1 mysql> use myapp; 2 Database changed 3 mysql> select * from games; 4 +----+-----------------+------------------------+---------------------+----------\ 5 -----------+ 6 | id | name | description | created_at | updated_a\ 7 t | 8 +----+-----------------+------------------------+---------------------+----------\ 9 -----------+ 10 | 1 | Assassins Creed | Assassins VS templars. | 2013-07-14 17:14:13 | 2013-07-1\ 11 4 17:14:13 | 12 +----+-----------------+------------------------+---------------------+----------\ 13 -----------+ 14 1 row in set (0.00 sec) As you can see, the created_at and updated_at columns have been populated with the current timestamp for us. This is a great timesaver! You may wish to remind your applications users about
and could compare the current date with the created_at column for this purpose. Before we move to the next section I’d like to share a little trick with you. If you don’t want your database table name to be the plural form of your model then you will need to let Eloquent know about it. Just add the $table public attribute to your model and set its value to the string name of your table. Eloquent will then use the provided table name for all future queries relating to this model. 1 <?php 2 3 // app/models/Game.php 4 5 class Game extends Eloquent 6 { 7 public $table = 'gamezilla_roar'; 8 } If you chose to namespace your models you will need to use the $table attribute to provide simple ta- ble names. This is because a model with the namespace and class combination of MyApp\Models\Game will result in an expected table name of my_app_models_games to avoid collisions with packages within other namespaces which also use the database. You will also notice that Eloquent is very clever, and will expand a camel cased namespace or model name into its snake cased variant. We have learned how to create new rows within our database tables by using Eloquent to treat them as PHP objects. Next, let’s take a look at how we can retrieve these existing rows. Reading Existing Models Eloquent offers a number of methods of querying for instances of models. We will examine them all in a future chapter, but for now we will use the find() method to retrieve a single model instance from the database by its id column. Here’s an example. 1 <?php 2 3 // app/routes.php 4 5 Route::get('/', function() 6 { 7 $game = Game::find(1); 8 return $game->name; 9 });
of our model to retrieve an instance of Game representing the database row with an id value of 1. We can then access the public attributes of the model instance to retrieve the column values. Let’s visit the / URL to see the result. 1 Assassins Creed Great, our existing value has been retrieved. The static find() method is inherited from the Eloquent parent class, and does not need to be created within your model. As I said earlier, there are many other retrieval methods, which will be covered in a later chapter about querying Eloquent models. For now, let’s look at how we can update existing table rows. Updating Existing Models If you have recently created a new model, then the chances are that you have assigned it to a variable. In the previous section we created a new instance of our Game model, assigned the instance to the $game variable, updated its columns and used the save() method to persist it to the database. 1 <?php 2 3 // app/routes.php 4 5 Route::get('/', function() 6 { 7 $game = new Game; 8 $game->name = 'Assassins Creed'; 9 $game->description = 'Assassins VS templars.'; 10 $game->save(); 11 }); Just because we have save()d our model instance, it doesn’t have to mean we can’t modify it. We can alter its values directly and call the save() method once more to update the existing row. You see, the first time save() is used on a new object, it will create a new row and assign an auto incremental id column value. Future calls to the save() method will persist only the changes to columns for the existing row in our database. Take a look at the following example.
5 Route::get('/', function() 6 { 7 $game = new Game; 8 $game->name = 'Assassins Creed'; 9 $game->description = 'Show them what for, Altair.'; 10 $game->save(); 11 12 $game->name = 'Assassins Creed 2'; 13 $game->description = 'Requiescat in pace, Ezio.'; 14 $game->save(); 15 16 $game->name = 'Assassins Creed 3'; 17 $game->description = 'Break some faces, Connor.'; 18 $game->save(); 19 }); You might imagine that the above example would create three entries within the games table, but you would be wrong. You will notice that we are only creating a single new instance of the Game class. All future calls to save() serve to modify this existing database row. The last saved state of the object will be present within the database. I’m going to truncate my games table within the database to demonstrate this example. Go ahead and do it too if you’re following along at home. 1 mysql> truncate games; 2 Query OK, 0 rows affected (0.00 sec) Now let’s visit the / URI once more to execute our routed logic. Here’s the resulting contents for the games table.
+----+-------------------+---------------------------+---------------------+-----\ 3 ----------------+ 4 | id | name | description | created_at | upda\ 5 ted_at | 6 +----+-------------------+---------------------------+---------------------+-----\ 7 ----------------+ 8 | 1 | Assassins Creed 3 | Break some faces, Connor. | 2013-07-14 17:38:50 | 2013\ 9 -07-14 17:38:50 | 10 +----+-------------------+---------------------------+---------------------+-----\ 11 ----------------+ 12 1 row in set (0.00 sec) As you can see, ‘Assassins Creed 3’ was updated by our last save() method. The above method is very useful when you already have a reference to an existing instance of our model, but what if you don’t? What if you created the model a long time ago? We can simply use the find() method to retrieve an instance representing an existing database row, and alter it accordingly. Here’s an example. 1 <?php 2 3 // app/routes.php 4 5 Route::get('/', function() 6 { 7 $game = Game::find(1); 8 $game->name = 'Assassins Creed 4'; 9 $game->description = 'Shiver me timbers, Edward.'; 10 $game->save(); 11 }); Upon inspecting the games table, we discovered that our previous row was inserted with an id value of 1. Using the static find() method on our model, and the known id, we are able to retrieve an instance of Game representing the existing table row. Once the new instance has been returned, we can modify its column values and use save() in the same way as we did earlier. Here’s the resulting table row.
+----+-------------------+----------------------------+---------------------+----\ 3 -----------------+ 4 | id | name | description | created_at | upd\ 5 ated_at | 6 +----+-------------------+----------------------------+---------------------+----\ 7 -----------------+ 8 | 1 | Assassins Creed 4 | Shiver me timbers, Edward. | 2013-07-14 17:38:50 | 201\ 9 3-07-14 17:49:28 | 10 +----+-------------------+----------------------------+---------------------+----\ 11 -----------------+ 12 1 row in set (0.00 sec) As you can see, our existing row has been updated accordingly. Once again, we did not write a single line of SQL. Only beautiful, eloquent PHP. You will also notice that the updated_at column has been populated with update time automatically. Very useful! Deleting Existing Models Deleting Eloquent models is a simple process. First we need to get our hands on the instance of the model that we wish to delete. For example, we could use the find() method that we discovered in a previous sub chapter. 1 <?php 2 3 // app/routes.php 4 5 Route::get('/', function() 6 { 7 $game = Game::find(1); 8 }); Once we have our grubby little mitts on an Eloquent model instance, we can use the delete() method to remove the row represented by our model from the database.
5 Route::get('/', function() 6 { 7 $game = Game::find(1); 8 $game->delete(); 9 }); We can also delete a single instance, or multiple instances of our models from the database using their id column values and the destroy() static method. 1 <?php 2 3 // app/routes.php 4 5 Route::get('/', function() 6 { 7 Game::destroy(1); 8 }); To destroy multiple records, you can either pass a number of id value as parameters to the destroy() method… 1 <?php 2 3 // app/routes.php 4 5 Route::get('/', function() 6 { 7 Game::destroy(1, 2, 3); 8 }); … or an array of id’s, like this:
5 Route::get('/', function() 6 { 7 Game::destroy(array(1, 2, 3)); 8 }); It’s entirely up to you! SQL offers a number of different and complex ways to query for a specific subset of records. Don’t worry, Eloquent can also perform this simple task. In the next chapter we will learn about the variety of query methods available to the Eloquent ORM. Go ahead, flip the page!
express our database rows as columns, and our tables as classes. This removes the need for writing statements using the Structured Query Language (SQL) and will result in code that is much more readable. We’re writing PHP, right? Why bother complicating things by adding another language? Well, there are some good bits about the SQL. For example, the Q part. Querying. With SQL, we can use a number of complex comparisons and set arithmatic to retrieve only the results that we require. Replicating all of this functionality with Eloquent would be a tremendous task, but fortunately, Eloquent has alternate methods for the most useful of queries. For all the bits that are missing we can use raw queries to provide SQL statements that will return Eloquent ORM result instances. We’ll take a closer look at this a bit later. Let’s first prepare our database for this chapter. Preperation Soon we will learn how to fill our database with sample data using a technique known as ‘seeding’, but for now we will create some dummy records within our database using Eloquent. We won’t use any new functionality here, we will use the skills that we have learned in recent chapters. First we are going to need to create a migration to build the schema for our sample table. We are going to use music albums as our demo data. Let’s create a migration to build an albums table. 1 $ php artisan migrate:make create_albums 2 Created Migration: 2013_07_21_103250_create_albums Now let’s fill in the method stubs with the code required to build the schema for our new albums table. 1 <?php 2 3 use Illuminate\Database\Migrations\Migration; 4 5 // app/database/migrations/2013_07_21_103250_create_albums.php 6 7 class CreateAlbums extends Migration { 8 9 /**
12 * @return void 13 */ 14 public function up() 15 { 16 Schema::create('albums', function($table) 17 { 18 $table->increments('id'); 19 $table->string('title', 256); 20 $table->string('artist', 256); 21 $table->string('genre', 128); 22 $table->integer('year'); 23 }); 24 } 25 26 /** 27 * Reverse the migrations. 28 * 29 * @return void 30 */ 31 public function down() 32 { 33 Schema::drop('albums'); 34 } 35 36 } In the up() method of our migration, we use the Schema facade to create a new table called albums. The table will contain varchar columns for the album title, the artist that performed the music, and the genre of the music. We also have an auto-incremental id field as required by the Eloquent ORM, and finally an integer field to store the release year for the album. In the down() method we drop the table, restoring the database to its original form. Let’s run our migration to structure the database. 1 $ php artisan migrate 2 Migration table created successfully. 3 Migrated: 2013_07_21_103250_create_albums Our database now has a structure to hold our sample album data. Now we need to create an Eloquent model definition so that we can interact with our tables rows using PHP objects.
5 class Album extends Eloquent 6 { 7 public $timestamps = false; 8 } Lovely, simple, clean. We have disabled timestamps on our Album model definition to simplify the examples within this section. Normally I like to add timestamps to all of my models. While there may be a slight performance overhead in doing so, and a little extra storage required, I find that the timestamps are most useful in providing an audit trail for an individual application model. Now we have all we need to fill our database table with the dummy album data. As I mentioned earlier, ideally we would be using database seeding for this task, but for now we will simply create a routed Closure. As a result we will encounter a little repetition, but we will let it slide this time. We only intend to visit this route once. 1 <?php 2 3 // app/routes.php 4 5 Route::get('/seed', function() 6 { 7 $album = new Album; 8 $album->title = 'Some Mad Hope'; 9 $album->artist = 'Matt Nathanson'; 10 $album->genre = 'Acoustic Rock'; 11 $album->year = 2007; 12 $album->save(); 13 14 $album = new Album; 15 $album->title = 'Please'; 16 $album->artist = 'Matt Nathanson'; 17 $album->genre = 'Acoustic Rock'; 18 $album->year = 1993; 19 $album->save(); 20 21 $album = new Album; 22 $album->title = 'Leaving Through The Window'; 23 $album->artist = 'Something Corporate'; 24 $album->genre = 'Piano Rock';
28 $album = new Album; 29 $album->title = 'North'; 30 $album->artist = 'Something Corporate'; 31 $album->genre = 'Piano Rock'; 32 $album->year = 2002; 33 $album->save(); 34 35 $album = new Album; 36 $album->title = '...Anywhere But Here'; 37 $album->artist = 'The Ataris'; 38 $album->genre = 'Punk Rock'; 39 $album->year = 1997; 40 $album->save(); 41 42 $album = new Album; 43 $album->title = '...Is A Real Boy'; 44 $album->artist = 'Say Anything'; 45 $album->genre = 'Indie Rock'; 46 $album->year = 2006; 47 $album->save(); 48 }); These are some personal favourites of mine. I’m hoping that those of you who aren’t fans of punk rock haven’t been too offended by music taste, and will continue with the chapter. As you can see, for each of our dummy rows we create a new instance of an Album model, populate all fields, and save our populated model to the database. Go a head and visit the /seed URI to fill the albums table with our sample data. You should receive a blank page because we did not return a response from the route. Now that our sample data has been written to the database, you may delete the /seed route. We don’t need it anymore! Our preperation is complete, let’s start learning about Eloquent queries. Eloquent To String Objects in PHP can optionally include a __toString() method. You may have come across this in the past, it was added in PHP 5.2 along with some of the other double _ underscore prefixed magic methods. This method can be used to control how the object should be represented as a string.
can also be expressed as a string. You see, the Eloquent base class that we extend with our own models contains a __toString() method. This method will return a JSON string that will represent the values of our Eloquent model. This might sound a little confusing, and it’s been a while since we have seen an example. Let’s first look at the normal way of exposing the values contained within our Eloquent model instances. 1 <?php 2 3 // app/routes.php 4 5 Route::get('/', function() 6 { 7 $album = Album::find(1); 8 return $album->title; 9 }); In the example above we use the inherited static find() method of our Album model and pass an integer value of 1 to retrieve a model instance representing the album table row with an id column value of 1. Next we return the title attribute of the model instance to be displayed as the response of the view. If we visit the / URI we receive the following response. Some Mad Hope The title of the first dummy album inserted into our database, as expected. Now let’s modify the route to instead return the model instance itself as a response from the routed Closure. 1 <?php 2 3 // app/routes.php 4 5 Route::get('/', function() 6 { 7 return Album::find(1); 8 }); Let’s visit the / URI to examine the response. That looks like JSON to me! All JSON strings created by the framework have all extra whitespace and indentation removed to save bandwidth when transfering the data. I’m going to manually beautify all of the JSON examples within this chapter, so don’t be surprised if your own outputs look a little more jumbled than the ones displayed in this chapter. Let’s beautify the above output.
"Some Mad Hope", 4 artist: "Matt Nathanson", 5 genre: "Acoustic Rock", 6 year: 2007 7 } Laravel has executed the inherited __toString() method of our Eloquent model instance to represent its values as a JSON string. This is really useful when creating RESTful API’s that serve JSON data. It’s also a great way of expressing the output of our queries for the rest of the chapter. Some Eloquent methods will return a number of model instances as a result, instead of the single model instance returned by the above example. Let’s take a quick look at the all() method, which is used to retrieve all rows as Eloquent model instances. 1 <?php 2 3 // app/routes.php 4 5 Route::get('/', function() 6 { 7 $albums = Album::all(); 8 foreach ($albums as $album) { 9 echo $album->title; 10 } 11 }); We use the all() method of our Album model to retrieve an array of Eloquent model instances that represent the rows of our albums table. Then we loop through the array, and output the title for each of the Album instances. Here’s the result that we receive from the / URI. 1 Some Mad HopePleaseLeaving Through The WindowNorth...Anywhere But Here...Is A Rea\ 2 l Boy Great, those are all of the album titles. They are all stuck together because we didn’t insert a HTML line break <br /> element. Don’t worry about it, at least we retrieve them all. I’m really sorry about this, but, once again I have lied to you. If you previously used Laravel 3, the concept of a retrieval method returning an array of model instances will be familiar to you. However, Laravel 4 doesn’t return an array from such methods, instead, it returns a Collection.
return an array then how did we loop through the results? That’s simple. The Collection object implements an interface which allows for the object to be iterable. It can be looped through using the same functionality as standard PHP arrays. Hmm, I see. I’m not going to take the word of a lier so easily, though. Ah I see, you require additional proof? Let’s dump the $albums attribute to see what we are working with. This should do the trick. 1 <?php 2 3 // app/routes.php 4 5 Route::get('/', function() 6 { 7 $albums = Album::all(); 8 var_dump($albums); 9 }); When we visit the / URI we receive the following response. 1 object(Illuminate\Database\Eloquent\Collection)[134] 2 protected 'items' => 3 array (size=6) 4 0 => 5 object(Album)[127] 6 public 'timestamps' => boolean false 7 protected 'connection' => null 8 protected 'table' => null 9 protected 'primaryKey' => stri 10 11 ... loads more information ... Woah, you weren’t lying this time! As you can see, the result of any methods that return multiple model instances is represented by an instance of Illuminate\Database\Eloquent\Collection. You can see from the output of var_dump that this object holds an internal array of our model instances called items.
that it also includes a number of useful methods for transforming and retreiving our model instances. In a later chapter we will examine these methods in more detail, but for now it’s worth knowing that the Collection object also includes a __toString() method. This method functions in a similar manner to the one on our model instances, but instead creates a JSON string that will represent our model instances as a multi dimensional array. Let’s return the Collection object that is the result of the all() method as the response for our routed Closure. Like this: 1 <?php 2 3 // app/routes.php 4 5 Route::get('/', function() 6 { 7 return Album::all(); 8 }); The response that we receive after visiting the / URI is as follows. 1 [ 2 { 3 id: 1, 4 title: "Some Mad Hope", 5 artist: "Matt Nathanson", 6 genre: "Acoustic Rock", 7 year: 2007 8 }, 9 { 10 id: 2, 11 title: "Please", 12 artist: "Matt Nathanson", 13 genre: "Acoustic Rock", 14 year: 1993 15 }, 16 { 17 id: 3, 18 title: "Leaving Through The Window", 19 artist: "Something Corporate", 20 genre: "Piano Rock", 21 year: 2002 22 }, 23 {
artist: "Something Corporate", 27 genre: "Piano Rock", 28 year: 2002 29 }, 30 { 31 id: 5, 32 title: "...Anywhere But Here", 33 artist: "The Ataris", 34 genre: "Punk Rock", 35 year: 1997 36 }, 37 { 38 id: 6, 39 title: "...Is A Real Boy", 40 artist: "Say Anything", 41 genre: "Indie Rock", 42 year: 2006 43 } 44 ] We receive a JSON string containing an array of objects that represent the values of our individual albums. So why are we learning about the __toString() functionality now? We aren’t intending to build a JSON API in this chapter, are we? No, we’re not quite ready for that yet. You see, I can use the JSON output to display the results of the queries that we will be executing throughout the rest of the chapter. It will be more readable than a bunch of foreach() loops for our result sets. Now you know exactly why these results are being outputted as JSON. Everyone’s a winner! Now that we have our database filled with dummy data, and have identified a way of displaying query results, let’s take a look at the structure of Eloquent queries. Query Structure Eloquent queries are used to retrieve results based on a number of rules or criteria. You don’t always want to retrieve all of your album rows. Sometimes you will only want to retrieve the discography for a single artist. In these circumstances we would use a query, to ask for only rows that have a title column value of the artist that we desire. Eloquent queries can be broken down into three parts.
Fetch methods. The model is the model instance that we wish to perform the query upon. All of the examples within this section will be forming queries based upon the Album model. Query constraints are rules that are used to match a subset of our table rows. This way we can return only the rows that we are interested in. The most familiar constraint used with SQL is the WHERE clause. Finally, we have the fetch methods. These are the methods that are used to perform the query, and return the result. Let’s take a look at the structure of an Eloquent query in its simplest form. 1 <?php 2 3 Model::fetch(); All of our queries act upon one of our Eloquent models. The constraint methods are entirely optional, and in the above example, are not present. Next we have a fetch method. This method doesn’t exist, we’re just using it to demonstrate the shape of a query. The first method of a query chain is always called statically, with two colons ::. Eloquent queries can consist of no constrains, a single constraint, or many constraints. It’s entirely up to you. Here’s how a query will look with a single constraint. 1 <?php 2 3 Model::constraint() 4 ->fetch(); Notice how the constraint is now the static method, and our fetch method has been chained onto the end of the first method. We can add as many constraints to the query as we require, for example: 1 <?php 2 3 Model::constraint() 4 ->constraint() 5 ->constraint() 6 ->fetch(); Constraints are entirely optional, but all queries must begin with a model, and end with a fetch method. Here’s an example using our Album model.
is our model, and all() is one of our fetch methods, because it is used to retrieve the result of our query. Fetch methods can be used to return either a single model instance, or a Collection of model instances. However, as we discovered earlier, both can be expressed in JSON format as the response of a routed Closure or controller action. We know that our query constraints are optional, so let’s start by looking at the variety of fetch methods that are available. Fetch Methods Let’s begin with some of the fetch methods that you might have encountered within previous chapters. First we have the find() method. Find The find() method can be used to retrieve a single Eloquent model instance by the id column of its row. If the first parameter of the method is an integer, then only a single instance will be returned. Here is an example. 1 <?php 2 3 // app/routes.php 4 5 Route::get('/', function() 6 { 7 return Album::find(1); 8 }); We want to retrieve the database row with an id of 1, so only a single model instance is returned.
"Some Mad Hope", 4 artist: "Matt Nathanson", 5 genre: "Acoustic Rock", 6 year: 2007 7 } If we instead provide an array of id values, we receive a Collection of model instances. 1 <?php 2 3 // app/routes.php 4 5 Route::get('/', function() 6 { 7 return Album::find(array(1, 3)); 8 }); Here is the result. A collection containing the model instances that represent rows with an id column value of 1 and 3. 1 [ 2 { 3 id: 1, 4 title: "Some Mad Hope", 5 artist: "Matt Nathanson", 6 genre: "Acoustic Rock", 7 year: 2007 8 }, 9 { 10 id: 3, 11 title: "Leaving Through The Window", 12 artist: "Something Corporate", 13 genre: "Piano Rock", 14 year: 2002 15 } 16 ] All The all() method can be used to return a collection of model instances that represent all rows contained within the table. Here is an example of the all() method.
"The Ataris", 34 genre: "Punk Rock", 35 year: 1997 36 }, 37 { 38 id: 6, 39 title: "...Is A Real Boy", 40 artist: "Say Anything", 41 genre: "Indie Rock", 42 year: 2006 43 } 44 ] First In circumstances where a collection of model instances will normally be returned, the first() fetch method can be used to retrieve the first model instance stored within. It’s very useful if you would rather that a query return a single instance, rather than a collection of model instances. Without a constraint, first() will simply return the first row in the database table. Here’s an example. 1 <?php 2 3 // app/routes.php 4 5 Route::get('/', function() 6 { 7 return Album::first(); 8 }); We receive a single model instance, the first album stored within our database table. 1 { 2 id: 1, 3 title: "Some Mad Hope", 4 artist: "Matt Nathanson", 5 genre: "Acoustic Rock", 6 year: 2007 7 }
model instances, we can also change them. Using the update() method we can update the values of the table rows that are the result of the Eloquent query. Simply pass a key-value array as the first parameter to the update() method to change the column values for each row. The array key represents the name of the column to change, and the value represents the new intended value for the column. The update() method is special, and cannot be used without a constraint, therefore I will use a simple where() constraint within the example. If you don’t understand it, then don’t worry about it. We will cover constraints in detail within the next section. Here’s an example that will modify our albums table. (Don’t worry, I will restore it for the next example.) 1 <?php 2 3 // app/routes.php 4 5 Route::get('/', function() 6 { 7 Album::where('artist', '=', 'Matt Nathanson') 8 ->update(array('artist' => 'Dayle Rees')); 9 10 return Album::all(); 11 }); We update the artist field of all rows with an artist of Matt Nathanson, changing its value to Dayle Rees. The update() method doesn’t retrieve model instances, so instead we return a collection of all model instances using all(). 1 [ 2 { 3 id: 1, 4 title: "Some Mad Hope", 5 artist: "Dayle Rees", 6 genre: "Acoustic Rock", 7 year: 2007 8 }, 9 { 10 id: 2, 11 title: "Please", 12 artist: "Dayle Rees", 13 genre: "Acoustic Rock", 14 year: 1993
18 title: "Leaving Through The Window", 19 artist: "Something Corporate", 20 genre: "Piano Rock", 21 year: 2002 22 }, 23 { 24 id: 4, 25 title: "North", 26 artist: "Something Corporate", 27 genre: "Piano Rock", 28 year: 2002 29 }, 30 { 31 id: 5, 32 title: "...Anywhere But Here", 33 artist: "The Ataris", 34 genre: "Punk Rock", 35 year: 1997 36 }, 37 { 38 id: 6, 39 title: "...Is A Real Boy", 40 artist: "Say Anything", 41 genre: "Indie Rock", 42 year: 2006 43 } 44 ] As you can see, I’m now a rockstar. Awesome! Delete Much like the update() method, the delete() method will not return any instances. Instead, it will remove the rows that are the result of the query from the database table.
The albums by Matt Nathanson have been removed from our database. Which is a real shame, because he makes beautiful music! Here’s a quick tip. If you intend to delete all table rows for a specific model, you might find the truncate() method to be more descriptive. Here’s an example. 1 <?php 2 3 // app/routes.php 4 5 Route::get('/', function() 6 { 7 Album::truncate(); 8 return Album::all(); 9 }); As you can see, all of our table rows have vanished! 1 [ ] Get Get is the most important of our fetch methods. It is used to retrieve the result of the query. For example, if we use a where() constraint to limit a result set to a single artist, then it wouldn’t make any sense to use the all() trigger method. Instead we use the get() method to retrieve a model instance collection. Confused? Here’s the get() method in combination with a where() constraint.
5 Route::get('/', function() 6 { 7 return Album::where('artist', '=', 'Something Corporate') 8 ->get(); 9 }); We receive a collection of model instances that have an artist column containing a value of Something Corporate. 1 [ 2 { 3 id: 3, 4 title: "Leaving Through The Window", 5 artist: "Something Corporate", 6 genre: "Piano Rock", 7 year: 2002 8 }, 9 { 10 id: 4, 11 title: "North", 12 artist: "Something Corporate", 13 genre: "Piano Rock", 14 year: 2002 15 } 16 ] The get() method has an optional parameter. You can pass an array of column names to it and the result objects will only contain values for those columns. Here’s an example.
5 Route::get('/', function() 6 { 7 return Album::where('artist', '=', 'Something Corporate') 8 ->get(array('id', 'title')); 9 }); We pass an array with the values id and title to the get() method, here is the result set that we retrieve. 1 [ 2 { 3 id: 3, 4 title: "Leaving Through The Window" 5 }, 6 { 7 id: 4, 8 title: "North" 9 } 10 ] As you can see, only the columns that we requested are present within the results. Pluck The pluck() method can be used to retrieve a value for a single column. Here’s an example. 1 <?php 2 3 // app/routes.php 4 5 Route::get('/', function() 6 { 7 return Album::pluck('artist'); 8 }); The first and only parameter, is the name of the column that we wish to retrieve the value for. If the query matches multiple results, then only the value of the first result will be returned. Here’s the result that we receive from the above example.
method will retrieve only one value for a specific column, the lists() method will retrieve an array of values for the specified column across all result instances. Let’s clarify this with an example. 1 <?php 2 3 // app/routes.php 4 5 Route::get('/', function() 6 { 7 return Album::lists('artist'); 8 }); Once again, the lists() method accepts one single parameter. The name of column that we wish to retrieve all values for. Here is the result from our query. 1 [ 2 "Matt Nathanson", 3 "Matt Nathanson", 4 "Something Corporate", 5 "Something Corporate", 6 "The Ataris", 7 "Say Anything" 8 ] As you can see, we have retrieved the values contained within the artist column for all of our table rows. ToSql Right, this one isn’t exactly a fetch method, but it is really useful! You can use the toSql() method anywhere where you would normally use a fetch method, typically the end of a query chain, and it will return the SQL that represents the query as a string. Let’s look at an example.
5 Route::get('/', function() 6 { 7 return Album::where('artist', '=', 'Something Corporate') 8 ->toSql(); 9 }); Similar to the previous example, but this time we call toSql() instead of get(). Here’s the result we receive. 1 select * from `albums` where `artist` = ? Very useful for debug indeed! What’s the question mark for? Laravel’s query builder uses prepared statements. This means that the question marks are place- holders that will be replaced with your actual values or ‘bindings’. The benefit is that your bindings will be escaped before replaced into the string, to avoid an SQL injection attempt. Now that we have discovered the fetch methods, it’s time to learn about how to add rules to our queries. Query Constraints The fetch methods from the previous chapter are useful for retrieving model collections and instances from our database. However, sometimes we need to fine tune the result to only a few specific rows. That’s when query constraints become useful. In mathematics, set based arithmatic allows us to capture a subset of a much larger set of values. This is essentially what we are trying to accomplish using query constraints, however, I have also snuck some transformation methods into the chapter to change the ordering of results. Let’s get started with a method that represents the most common SQL query constraint, the WHERE clause. Where The first constraint method that we will examine is the where() method. If you have used SQL in the past, then you will likely have come across the WHERE clause for retrieving table rows by matching the value of their columns. Let’s lead with an example.
5 Route::get('/', function() 6 { 7 return Album::where('artist', '=', 'Matt Nathanson') 8 ->get(); 9 }); We use the where() method to limit the results to albums which have an artist column value of Matt Nathanson only. The where() method will accept three parameters. The first parameter is name of the column that we wish to perform the comparison on. In this example we wish to perform the comparison on the artist column. The second parameter is the operator to use for the comparison. In our example we wish to ensure that the artist column is equal to a value, so we use the equals = symbol. We could have used any of the other common comparison operators supported by the SQL, such as <, >, =>, =<, etc. Experiment with operator types to retrieve the results that you require. The third parameter is value that we will compare with. In our example we wish to ensure that the artist column matches Matt Nathanson, so, in this instance Matt Nathanson is the value. Once again, the where() method is only a query constraint. We will use the get() method to retrieve a Collection of results. Let’s take a look at the response from the / URI. 1 [ 2 { 3 id: 1, 4 title: "Some Mad Hope", 5 artist: "Matt Nathanson", 6 genre: "Acoustic Rock", 7 year: 2007 8 }, 9 { 10 id: 2, 11 title: "Please", 12 artist: "Matt Nathanson", 13 genre: "Acoustic Rock", 14 year: 1993 15 } 16 ]
have an artist column value of Matt Nathanson were returned to us. This would be useful if we intended on providing sections of a music website for displaying the discographies for an individual artist. It’s worth remembering that the get() and first() methods are interchangable. Let’s alter the existing example to retrieve only the first instance that matches the provided condition. 1 <?php 2 3 // app/routes.php 4 5 Route::get('/', function() 6 { 7 return Album::where('artist', '=', 'Matt Nathanson') 8 ->first(); 9 }); Now the query will only retrieve a single model instance representing the first row that is a match to the provided constraint. Here is the result from the / URI. 1 { 2 id: 1, 3 title: "Some Mad Hope", 4 artist: "Matt Nathanson", 5 genre: "Acoustic Rock", 6 year: 2007 7 } Let’s try another operator with the where() method. How about LIKE? The LIKE SQL operator can be used to compare parts of a string by using a percentage % symbol as a wildcard. Here’s an example. 1 <?php 2 3 // app/routes.php 4 5 Route::get('/', function() 6 { 7 return Album::where('title', 'LIKE', '...%') 8 ->get(); 9 });
to retrieve all rows with a title field that starts with three period characters .... The percentage % sign will let the database know that we don’t care what value comes after our triple period. As a side note, I know that a triple period is known as an ellipsis, I just thought this might be easier for readers who don’t have English as a first language. Let’s take a look at the result from the / URI. 1 [ 2 { 3 id: 5, 4 title: "...Anywhere But Here", 5 artist: "The Ataris", 6 genre: "Punk Rock", 7 year: 1997 8 }, 9 { 10 id: 6, 11 title: "...Is A Real Boy", 12 artist: "Say Anything", 13 genre: "Indie Rock", 14 year: 2006 15 } 16 ] We receive a result collection for the albums titled ‘…Anywhere But Here’ and ‘…Is A Real Boy’, both of which start with a triple period, and are fabulous albums. We aren’t limited to a single where() method call within a query. We can chain multiple where() methods together to retrieve rows based on a number of different criteria. Here’s an example. 1 <?php 2 3 // app/routes.php 4 5 Route::get('/', function() 6 { 7 return Album::where('title', 'LIKE', '...%') 8 ->where('artist', '=', 'Say Anything') 9 ->get(); 10 }); In the above example, we wish to find rows that have a artist column that starts with a triple period and an artist column that is equal to ‘Say Anything’. The and is important. Both constraints must match for a row to exist within the result set. Here’s the result from the above example.
4 title: "...Is A Real Boy", 5 artist: "Say Anything", 6 genre: "Indie Rock", 7 year: 2006 8 } 9 ] A collection containing a single model instance, an album with a title that begins with a triple period and an artist value of ‘Say Anything’. We receive a Collection containing Say Anything’s ‘…Is A Real Boy’ album. One of my personal favourites! OrWhere We don’t always need both constraints to match. Sometimes a match for either condition is good enough for us. In situations such as this, we can use the orWhere() method. In fact, most of the constraints within this chapter will have an alternative version prefixed with or that will allow an alternate constraint to match. For this reason I won’t provide seperate sections for the or method variations in future. As always, here’s an example. 1 <?php 2 3 // app/routes.php 4 5 Route::get('/', function() 6 { 7 return Album::where('title', 'LIKE', '...%') 8 ->orWhere('artist', '=', 'Something Corporate') 9 ->get(); 10 }); We provide an initial constraint, stating that the album title must begin with a triple period (yes, I know it’s called an ellipses). Then we include an orWhere() method that states that our result set can also consist of results which have an artist column value of Something Corporate. Let’s take a look at the result.
4 title: "Leaving Through The Window", 5 artist: "Something Corporate", 6 genre: "Piano Rock", 7 year: 2002 8 }, 9 { 10 id: 4, 11 title: "North", 12 artist: "Something Corporate", 13 genre: "Piano Rock", 14 year: 2002 15 }, 16 { 17 id: 5, 18 title: "...Anywhere But Here", 19 artist: "The Ataris", 20 genre: "Punk Rock", 21 year: 1997 22 }, 23 { 24 id: 6, 25 title: "...Is A Real Boy", 26 artist: "Say Anything", 27 genre: "Indie Rock", 28 year: 2006 29 } 30 ] We receive a Collection of result instances that have an album title that starts with a triple period or artist columns with a value of Something Corporate. You can chain together as many where() and orWhere() methods as you need to filter your table rows down to the required result set. WhereRaw The whereRaw() method can be used to provide a string of SQL to perform a WHERE condition on the result set. Here’s an example.
5 Route::get('/', function() 6 { 7 return Album::whereRaw('artist = ? AND title LIKE ?', array( 8 'Say Anything', '...%' 9 )) 10 ->get(); 11 }); The whereRaw() method accepts a string of SQL as its first paramater. All question ? marks within the string are replaced by array elements from the second parameter to the method in sequential order. If you have ever bound properties to a prepared statement with SQL then this syntax will be familiar to you. The values provided will be escaped to avoid SQL injection attacks. Once the query builder has performed the neccesary transformation, the resulting SQL will look like this: 1 artist = 'Say Anything' AND title LIKE '...%' The result of our query is as follows. 1 [ 2 { 3 id: 6, 4 title: "...Is A Real Boy", 5 artist: "Say Anything", 6 genre: "Indie Rock", 7 year: 2006 8 } 9 ] You can use the whereRaw() method in circumstances where you require complex SQL in addition to your where() type constraints. Just like the where() method, the whereRaw() method can be chained multiple times and with other constraint methods to limit your result set. Once again the orWhereRaw() method is included to allow for alternate conditions. WhereBetween The whereBetween() method is used to check that the value of a column is between two provided values. It’s best described with an example, in fact, I think everything is. Strange, right? Maybe it’s because Laravel code tends to speak for itself!
5 Route::get('/', function() 6 { 7 return Album::whereBetween('year', array('2000', '2010')) 8 ->get(); 9 }); The first parameter to the whereBetween() method is the name of the column that we wish to compare. The second parameter is an array of two values, a starting value and a limit. In the above example, we are looking for albums that have a release year between 2000 and 2010. Here are the results. 1 [ 2 { 3 id: 1, 4 title: "Some Mad Hope", 5 artist: "Matt Nathanson", 6 genre: "Acoustic Rock", 7 year: 2007 8 }, 9 { 10 id: 3, 11 title: "Leaving Through The Window", 12 artist: "Something Corporate", 13 genre: "Piano Rock", 14 year: 2002 15 }, 16 { 17 id: 4, 18 title: "North", 19 artist: "Something Corporate", 20 genre: "Piano Rock", 21 year: 2002 22 }, 23 { 24 id: 6, 25 title: "...Is A Real Boy", 26 artist: "Say Anything", 27 genre: "Indie Rock",
The result is as expected, a number of albums from the 2000s. Just as with the other where() type methods, you can chain as many as you need to, and as always, we have an orWhereBetween() alternative method. WhereNested The whereNested() method is a clean way of applying multiple where constraints to a query. Simply pass a Closure as the first parameter to the method, and give the Closure a placeholder parameter named whatever you like. I like to name mine $query. 1 <?php 2 3 // app/routes.php 4 5 Route::get('/', function() 6 { 7 return Album::whereNested(function($query) 8 { 9 $query->where('year', '>', 2000); 10 $query->where('year', '<', 2005); 11 }) 12 ->get(); 13 }); Within the Closure you may apply as many where() type constraints or orWhere() type constraints to the $query object, which will then become part of your main query. It just looks a whole lot neater! Here’s the result set from the above example. 1 [ 2 { 3 id: 3, 4 title: "Leaving Through The Window", 5 artist: "Something Corporate", 6 genre: "Piano Rock", 7 year: 2002 8 }, 9 {
artist: "Something Corporate", 13 genre: "Piano Rock", 14 year: 2002 15 } 16 ] Note that there is no orWhereNested() alternative to this method, but here’s the secret… you can also pass a Closure to orWhere(). Here’s an example. 1 <?php 2 3 // app/routes.php 4 5 Route::get('/', function() 6 { 7 return Album::whereNested(function($query) 8 { 9 $query->where('year', '>', 2000); 10 $query->where('year', '<', 2005); 11 }) 12 ->orWhere(function($query) 13 { 14 $query->where('year', '=', 1997); 15 }) 16 ->get(); 17 }); We wish for an album to have a release year between 2000 and 2005 or have a release year of 1997. Here’s the SQL that is generated from the above method. 1 select * from `albums` where (`year` > ? and `year` < ?) or (`year` = ?) These are the results from the above query.
4 title: "Leaving Through The Window", 5 artist: "Something Corporate", 6 genre: "Piano Rock", 7 year: 2002 8 }, 9 { 10 id: 4, 11 title: "North", 12 artist: "Something Corporate", 13 genre: "Piano Rock", 14 year: 2002 15 }, 16 { 17 id: 5, 18 title: "...Anywhere But Here", 19 artist: "The Ataris", 20 genre: "Punk Rock", 21 year: 1997 22 } 23 ] WhereIn The whereIn() method can be used to check that a column value exists within a set of values. It’s really useful when you already have an array of possible values to hand. Let’s take a look at how it can be used. 1 <?php 2 3 // app/routes.php 4 5 Route::get('/', function() 6 { 7 $values = array('Something Corporate', 'The Ataris'); 8 return Album::whereIn('artist', $values)->get(); 9 }); The first parameter to the whereIn() method is the column that we wish to perform the comparison on. The second value is the array of values to search within. The resulting SQL from the above query looks like this.
in (?, ?) Here’s the collection of results that we receive from the example query. 1 [ 2 { 3 id: 3, 4 title: "Leaving Through The Window", 5 artist: "Something Corporate", 6 genre: "Piano Rock", 7 year: 2002 8 }, 9 { 10 id: 4, 11 title: "North", 12 artist: "Something Corporate", 13 genre: "Piano Rock", 14 year: 2002 15 }, 16 { 17 id: 5, 18 title: "...Anywhere But Here", 19 artist: "The Ataris", 20 genre: "Punk Rock", 21 year: 1997 22 } 23 ] The whereIn() method also has the usual method alternative in the form of orWhereIn() and can be chained multiple times. WhereNotIn The whereNotIn() method is the direct opposite to the whereIn() method. This time you provide a list of values, and the column value must not exist within the set. Let’s take a look at an example.
5 Route::get('/', function() 6 { 7 $values = array('Something Corporate', 'The Ataris'); 8 return Album::whereNotIn('artist', $values)->get(); 9 }); Once again, we pass the comparison column as the first parameter, and our array of values as the second parameter. Here’s the resulting SQL. 1 select * from `albums` where `artist` not in (?, ?) Finally, here’s the result set from our sample query. All of the albums that aren’t identified by the artists within our values array. 1 [ 2 { 3 id: 1, 4 title: "Some Mad Hope", 5 artist: "Matt Nathanson", 6 genre: "Acoustic Rock", 7 year: 2007 8 }, 9 { 10 id: 2, 11 title: "Please", 12 artist: "Matt Nathanson", 13 genre: "Acoustic Rock", 14 year: 1993 15 }, 16 { 17 id: 6, 18 title: "...Is A Real Boy", 19 artist: "Say Anything", 20 genre: "Indie Rock", 21 year: 2006 22 } 23 ] Once again, the orWhereNotIn() is also available as an alternative.
when you need to retrieve rows that have a column value of NULL. Let’s check an example. 1 <?php 2 3 // app/routes.php 4 5 Route::get('/', function() 6 { 7 return Album::whereNull('artist')->get(); 8 }); The single parameter for the whereNull() method is name of the column that you wish to contain a null value. Let’s take a look at the generated SQL for this query. 1 select * from `albums` where `artist` is null Now let’s take a look at the result set for the query. 1 [ ] Oh that’s right, we don’t have any NULL values in our database! I don’t want to rewrite this chapter again, so you will have to use your imagination here. If we had an artist column with a value of NULL then its row would appear in the result set. Yes, you guessed it! The orWhereNull() method is also available. WhereNotNull The whereNotNull() method is the opposite of the whereNull() method, so this time we should be able to see some results. It will return rows that have a column value that isn’t equal to NULL. Let’s take a closer look.
5 Route::get('/', function() 6 { 7 return Album::whereNotNull('artist')->get(); 8 }); The first, and only parameter to the method is the column name. Here’s the generated SQL for the query. 1 select * from `albums` where `artist` is not null Here is the result set matching the example query. 1 [ 2 { 3 id: 1, 4 title: "Some Mad Hope", 5 artist: "Matt Nathanson", 6 genre: "Acoustic Rock", 7 year: 2007 8 }, 9 { 10 id: 2, 11 title: "Please", 12 artist: "Matt Nathanson", 13 genre: "Acoustic Rock", 14 year: 1993 15 }, 16 ... 4 more ... 17 ] 18 19 All of the albums in our database. This is because none of the `artist` columns h\ 20 ave a value of `NULL`. Once more, the orWhereNotNull() method is available to perform an or type query. OrderBy The orderBy() method can be used to order the results returned by your query by the value of a specific column. Let’s dive right in with an example.
5 Route::get('/', function() 6 { 7 return Album::where('artist', '=', 'Matt Nathanson') 8 ->orderBy('year') 9 ->get(); 10 }); The first parameter to the orderBy() method is the name of the column that we wish to order by. By default, the ordering will be in ascending order. Here’s the generated SQL. 1 select * from `albums` where `artist` = ? order by `year` asc Here’s the result set from the query. 1 [ 2 { 3 id: 2, 4 title: "Please", 5 artist: "Matt Nathanson", 6 genre: "Acoustic Rock", 7 year: 1993 8 }, 9 { 10 id: 1, 11 title: "Some Mad Hope", 12 artist: "Matt Nathanson", 13 genre: "Acoustic Rock", 14 year: 2007 15 } 16 ] Great, our albums have been returned in ascending order by release year. What if we want them to be descending? Don’t worry, Laravel’s got you covered!
5 Route::get('/', function() 6 { 7 return Album::where('artist', '=', 'Matt Nathanson') 8 ->orderBy('year', 'desc') 9 ->get(); 10 }); We add a second parameter to the orderBy() method with a value of desc. This tells Laravel that we wish to retrieve our results in descending order. Here’s the generated SQL. 1 select * from `albums` where `artist` = ? order by `year` desc Now here’s the updated result set. 1 [ 2 { 3 id: 1, 4 title: "Some Mad Hope", 5 artist: "Matt Nathanson", 6 genre: "Acoustic Rock", 7 year: 2007 8 }, 9 { 10 id: 2, 11 title: "Please", 12 artist: "Matt Nathanson", 13 genre: "Acoustic Rock", 14 year: 1993 15 } 16 ] Switcheroo! Our results are now in descending order. You can use the orderBy() clause with any combination of the constraints within this chapter. You can also use additional orderBy() methods to provide additional ordering, in the order that the methods are provided. Take The take() method can be used to limit the resultset. Here’s an example.
5 Route::get('/', function() 6 { 7 return Album::take(2) 8 ->get(); 9 }); The first parameter to the take() method is the amount of rows that you wish to limit by. In the above example we only wish for the query to return two result objects. Here’s the SQL that is generated by the query. 1 select * from `albums` limit 2 Finally, here is the result set that we receive. 1 [ 2 { 3 id: 1, 4 title: "Some Mad Hope", 5 artist: "Matt Nathanson", 6 genre: "Acoustic Rock", 7 year: 2007 8 }, 9 { 10 id: 2, 11 title: "Please", 12 artist: "Matt Nathanson", 13 genre: "Acoustic Rock", 14 year: 1993 15 } 16 ] Take can be used in combination with any of the other query constraints. Mix and match! Skip When using the take() method, the skip() method can be used to provide an offset for the query result set. Here’s an example.
5 Route::get('/', function() 6 { 7 return Album::take(2) 8 ->skip(2) 9 ->get(); 10 }); The skip() method accepts a single parameter to provide an offset. In the above example, the first two rows will be disgarded from the result set. Here is the generated SQL. 1 select * from `albums` limit 2 offset 2 Here’s the result set that we receive. 1 [ 2 { 3 id: 3, 4 title: "Leaving Through The Window", 5 artist: "Something Corporate", 6 genre: "Piano Rock", 7 year: 2002 8 }, 9 { 10 id: 4, 11 title: "North", 12 artist: "Something Corporate", 13 genre: "Piano Rock", 14 year: 2002 15 } 16 ] As you can see, the first and second rows have been skipped, starting at the third row in the database. Magic Where Queries Right, now time for something magical! By now, you must be more than familiar with the where() query. The where() query is responsible for restricting a column to a certain value within your result set. Here’s an example to remind you.
5 Route::get('/', function() 6 { 7 return Album::where('artist', '=', 'Something Corporate') 8 ->get(); 9 }); We intend to retrieve a result set where the artist column of each row is equal to Something Corporate. It’s a nice clean way of restricting the database rows to our desired result set. Could it get any cleaner? Well, as it happens, yes it could! We could use the magical where query syntax. Take a close look at the following example. 1 <?php 2 3 // app/routes.php 4 5 Route::get('/', function() 6 { 7 return Album::whereArtist('Something Corporate')->get(); 8 }); Wait, what’s that whereArtist() method? We didn’t learn about that in our query constraints chapter. Well, this method is a little special. First let’s visit the / URI to see the result. 1 [ 2 { 3 id: 3, 4 title: "Leaving Through The Window", 5 artist: "Something Corporate", 6 genre: "Piano Rock", 7 year: 2002 8 }, 9 { 10 id: 4, 11 title: "North", 12 artist: "Something Corporate", 13 genre: "Piano Rock", 14 year: 2002 15 } 16 ]
manner to our where() method with an equals = operator. Right, time to explain what’s happening. You see, the where() equals query is likely the most common query of all, and because of this, Taylor has provided a convenient shortcut. You can simply append the name of the column that you wish to query on to the where() method. First you must capitalize the first letter of the field that you wish to compare. In our example, we used the artist column, so the resulting method name is whereArtist(). If our field name is snake cased, for example, shoe_size, then we must uppercase the first letter of each word to whereShoeSize(). The only parameter to the magical where() method is the expected value of the column. Let’s see another example. 1 <?php 2 3 // app/routes.php 4 5 Route::get('/', function() 6 { 7 return Album::whereTitle('North')->get(); 8 }); Fetch all albums, with a title column value of North. Here’s the result from the query. 1 [ 2 { 3 id: 4, 4 title: "North", 5 artist: "Something Corporate", 6 genre: "Piano Rock", 7 year: 2002 8 } 9 ] Wonderful, there’s our album! Be sure to remember the magical where() query if you ever find yourself wanting to retrieve ORM instances by column values. Query Scopes Query scopes can be very useful if you find yourself repeating the same queries over and over again. Let’s begin with an example. Remember those two albums with names beginning with triple periods? ‘…Is A Real Boy’ and ‘…Anywhere But Here’. Let’s imagine that fetching albums that begin with a triple period is a common action within our application. Let’s see, we could query for the albums every time, like this.
5 Route::get('/', function() 6 { 7 return Album::where('title', 'LIKE', '...%')->get(); 8 }); That would be awfully repetetive though, wouldn’t it? We don’t want to be repeating ourselves. Why don’t we use a Query Scope? Let’s get started. First let’s revisit our Album model. Right now it looks like this. 1 <?php 2 3 // app/models/Album.php 4 5 class Album extends Eloquent 6 { 7 public $timestamps = false; 8 } Let’s add a new method to this model. Now our model looks like this. 1 <?php 2 3 // app/models/Album.php 4 5 class Album extends Eloquent 6 { 7 public $timestamps = false; 8 9 public function scopeTriplePeriod($query) 10 { 11 return $query->where('title', 'LIKE', '...%'); 12 } 13 } We’ve added the scopeTriplePeriod() method to our model. It’s a special method with a specific function, it will help us re-use common queries. All scope methods begin with the word scope, and then an identifier. The method will accept a single parameter, a $query object. This object can be
that we discovered in the previous sections. In our example, we use the return statement to return the value from our where() method. The where() method takes the same shape as our previous example. Now let’s switch back to our routing file. Let’s alter our existing query. Here’s the new routed Closure. 1 <?php 2 3 // app/routes.php 4 5 Route::get('/', function() 6 { 7 return Album::triplePeriod()->get(); 8 }); We change our where() query to instead call the triplePeriod() scope. Then we simply call get() on the result to retrieve the results. Note that the scope part of the method name is not included, be sure to leave that out of you method calls! Let’s take a look at the result. 1 [ 2 { 3 id: 5, 4 title: "...Anywhere But Here", 5 artist: "The Ataris", 6 genre: "Punk Rock", 7 year: 1997 8 }, 9 { 10 id: 6, 11 title: "...Is A Real Boy", 12 artist: "Say Anything", 13 genre: "Indie Rock", 14 year: 2006 15 } 16 ] Great, that’s the result set we were expecting. Use as many scopes as you need to reduce your repetition.
of them. As a kid I used to collect eggcups and transformer toys. As an adult I collect video games and manga comics. Nerdy collections are the best. Laravel has its own collections too. It has a collection of wonderful fans, eager to help eachother and develop the community. It has a collection of amazing developers contributing to it. It has a collection of stories about where the name came from, most of them false. It also has Eloquent Collections. The Collection Class Eloquent collections are an extension of Laravel’s Collection class with some handy methods for dealing with query results. The Collection class itself, is merely a wrapper for an array of objects, but has a bunch of other interesting methods to help you pluck items out of the array. In Laravel three, an array of model instances was returned from any query method that is used to provide multiple results. However, in Laravel four you will instead receive a Collection of model instances. Don’t worry, you can still iterate through a collection of results with the variety of loops that PHP offers because it inherits some properties of an array, but because the collection is a class, and not native type, there are also methods available on the object. Let’s take a look at the available methods of the Collection class. For our sample data we will use the albums table from the previous chapter, and assume that the collection is the result of a call to Album::all(), like this. 1 <?php 2 3 // app/routes.php 4 5 Route::get('/', function() 6 { 7 $collection = Album::all(); 8 }); Collection Methods Let’s look at the methods available to the Collection class. Some of the methods are related to inserting, and retrieving elements by their key. However, in the case of Eloquent results, the keys do not match the primary key of the tables that the model instances represent, and so these methods will be very useful to us. Instead, I will cover the methods that do have some use.
to get hold of the internal array used by the Collection object. This means that if you want your results to be identical to those supplied by Laravel 3, then just call the all() method and you will have your instance array. Let’s var_dump() the result. Here’s our code. 1 <?php 2 3 // app/routes.php 4 5 Route::get('/', function() 6 { 7 $collection = Album::all(); 8 var_dump($collection->all()); 9 }); And here is the result. 1 array (size=6) 2 0 => 3 object(Album)[127] 4 public 'timestamps' => boolean false 5 protected 'connection' => null 6 protected 'table' => null 7 protected 'primaryKey' => string 'id' (length=2) 8 protected 'perPage' => int 15 9 public 'incrementing' => boolean true 10 protected 'attributes' => 11 array (size=5) 12 'id' => int 1 13 'title' => string 'Some Mad Hope' (length=13) 14 'artist' => string 'Matt Nathanson' (length=14) 15 'genre' => string 'Acoustic Rock' (length=13) 16 'year' => int 2007 17 protected 'original' => 18 array (size=5) 19 'id' => int 1 20 'title' => string 'Some Mad Hope' (length=13) 21 'artist' => string 'Matt Nathanson' (length=14)
23 'year' => int 2007 24 protected 'relations' => 25 array (size=0) 26 empty 27 protected 'hidden' => 28 array (size=0) 29 empty 30 protected 'visible' => 31 array (size=0) 32 empty 33 protected 'fillable' => 34 array (size=0) 35 empty 36 protected 'guarded' => 37 array (size=1) 38 0 => string '*' (length=1) 39 protected 'touches' => 40 array (size=0) 41 empty 42 protected 'with' => 43 array (size=0) 44 empty 45 public 'exists' => boolean true 46 protected 'softDelete' => boolean false 47 1 => 48 object(Album)[128] 49 ... TONNES MORE INFO ... As you can see, we have an array of our Eloquent model instances. First The first() method of the collection can be used to retrieve the first element in the set. This will be the first element contained within the collections internal array. Let’s give it a go.
33 empty 34 protected 'guarded' => 35 array (size=1) 36 0 => string '*' (length=1) 37 protected 'touches' => 38 array (size=0) 39 empty 40 protected 'with' => 41 array (size=0) 42 empty 43 public 'exists' => boolean true 44 protected 'softDelete' => boolean false That’s right! It’s a single model instance that represents one of our albums. The first row that we inserted into the table. Note that it’s only the first row because we used the all() method as part of the query. If we had used a different query, then the array in our result set might be of a different order and then a call to first() could yield a different result. Last This one should be obvious. The first() method was used to retrieve the first value contained within the collections internal array, this means that the last() method must retrieve the last item of the array. Let’s prove this theory. 1 <?php 2 3 // app/routes.php 4 5 Route::get('/', function() 6 { 7 $collection = Album::all(); 8 var_dump($collection->last()); 9 }); Here’s the result from the / URI.
protected 'softDelete' => boolean false Great, that’s the last album contained within the internal array. It’s also the last row of the database, but that just depends on the query we use to retrieve the collection. Shift The shift() method is similar to the first() method. It will retrieve the first value within the collections internal array. However, unlike the first() method, the shift() method will also remove that value from the array. Let’s prove this with a little test. 1 <?php 2 3 // app/routes.php 4 5 Route::get('/', function() 6 { 7 $collection = Album::all(); 8 var_dump(count($collection)); 9 var_dump($collection->shift()); 10 var_dump(count($collection)); 11 }); Our test will display the number of elements within the collection using the PHP count() method before and after we have shift()ed a value. Remember that the collection inherits many properties of an array, this allows the count() method to act upon it. Let’s take a look at the result of our test. 1 int 6 2 object(Album)[127] 3 public 'timestamps' => boolean false 4 protected 'connection' => null 5 protected 'table' => null 6 protected 'primaryKey' => string 'id' (length=2) 7 protected 'perPage' => int 15 8 public 'incrementing' => boolean true 9 protected 'attributes' => 10 array (size=5) 11 'id' => int 1 12 'title' => string 'Some Mad Hope' (length=13)
14 'genre' => string 'Acoustic Rock' (length=13) 15 'year' => int 2007 16 protected 'original' => 17 array (size=5) 18 'id' => int 1 19 'title' => string 'Some Mad Hope' (length=13) 20 'artist' => string 'Matt Nathanson' (length=14) 21 'genre' => string 'Acoustic Rock' (length=13) 22 'year' => int 2007 23 protected 'relations' => 24 array (size=0) 25 empty 26 protected 'hidden' => 27 array (size=0) 28 empty 29 protected 'visible' => 30 array (size=0) 31 empty 32 protected 'fillable' => 33 array (size=0) 34 empty 35 protected 'guarded' => 36 array (size=1) 37 0 => string '*' (length=1) 38 protected 'touches' => 39 array (size=0) 40 empty 41 protected 'with' => 42 array (size=0) 43 empty 44 public 'exists' => boolean true 45 protected 'softDelete' => boolean false 46 int 5 As you can see, we receive our Album model instance. It’s the same as the one we received using the first() method. However, if you look at the two integer values, you will noticed that the size of the array has decreased. This is because the instance has not only been returned from the method, but also removed from the array.
that has been around for decades, and is generally used to encourage the consumption of alcohol, or the wild dreams of teenagers. Oh yes, it’s also a method on the Eloquent model instances collection. It works in a similar way to the shift() method in that it will return the value from the end of the internal array, and remove it. Let’s trap it’s result with our test. 1 <?php 2 3 // app/routes.php 4 5 Route::get('/', function() 6 { 7 $collection = Album::all(); 8 var_dump(count($collection)); 9 var_dump($collection->pop()); 10 var_dump(count($collection)); 11 }); Here is the result. 1 int 6 2 object(Album)[138] 3 public 'timestamps' => boolean false 4 protected 'connection' => null 5 protected 'table' => null 6 protected 'primaryKey' => string 'id' (length=2) 7 protected 'perPage' => int 15 8 public 'incrementing' => boolean true 9 protected 'attributes' => 10 array (size=5) 11 'id' => int 6 12 'title' => string '...Is A Real Boy' (length=16) 13 'artist' => string 'Say Anything' (length=12) 14 'genre' => string 'Indie Rock' (length=10) 15 'year' => int 2006 16 protected 'original' => 17 array (size=5) 18 'id' => int 6 19 'title' => string '...Is A Real Boy' (length=16) 20 'artist' => string 'Say Anything' (length=12)
22 'year' => int 2006 23 protected 'relations' => 24 array (size=0) 25 empty 26 protected 'hidden' => 27 array (size=0) 28 empty 29 protected 'visible' => 30 array (size=0) 31 empty 32 protected 'fillable' => 33 array (size=0) 34 empty 35 protected 'guarded' => 36 array (size=1) 37 0 => string '*' (length=1) 38 protected 'touches' => 39 array (size=0) 40 empty 41 protected 'with' => 42 array (size=0) 43 empty 44 public 'exists' => boolean true 45 protected 'softDelete' => boolean false 46 int 5 We receive the last element of the array, and the result from our count() methods suggest that the length of the array has been decreased. This is because the value we received was removed from the internal array. Each If you have used the ‘Underscore’ library for Javascript or PHP then you will be familiar with the next few methods. Instead of creating a foreach() loop to iterate over our results, we can instead pass a Closure to the each() method. This is best described with an example.
5 Route::get('/', function() 6 { 7 $collection = Album::all(); 8 $collection->each(function($album) 9 { 10 var_dump($album->title); 11 }); 12 }); Our Closure accepts a parameter that will be a placeholder for the current object within the iteration. This closure is then passed to the each() method. For each iteration, we will dump the value of the model’s ‘title’ column. Let’s examine the result. 1 string 'Some Mad Hope' (length=13) 2 string 'Please' (length=6) 3 string 'Leaving Through The Window' (length=26) 4 string 'North' (length=5) 5 string '...Anywhere But Here' (length=20) 6 string '...Is A Real Boy' (length=16) Brilliant! Those are our album titles as expected. Map The map() function works in a similar way to the each() method. However it can be used to iterate and work with our collection elements, returning a new collection as a result. Let’s imagine that we want to prefix all of our album titles with An ode to a fair panda: . We can do this using the map() function.
5 Route::get('/', function() 6 { 7 $collection = Album::all(); 8 9 $new = $collection->map(function($album) 10 { 11 return 'An ode to a fair panda: '.$album->title; 12 }); 13 14 var_dump($new); 15 }); First we ensure that the value of Collection::map() method is assigned to a variable. Then we iterate the collection in the same manner as the each() method, but this time we return each value that we wish to be present within the new collection. Here’s the result. 1 object(Illuminate\Database\Eloquent\Collection)[117] 2 protected 'items' => 3 array (size=6) 4 0 => string 'An ode to a fair panda: Some Mad Hope' (length=37) 5 1 => string 'An ode to a fair panda: Please' (length=30) 6 2 => string 'An ode to a fair panda: Leaving Through The Window' (length=50) 7 3 => string 'An ode to a fair panda: North' (length=29) 8 4 => string 'An ode to a fair panda: ...Anywhere But Here' (length=44) 9 5 => string 'An ode to a fair panda: ...Is A Real Boy' (length=40) Now we have a collection of strings that we built using our iterative map() method. Filter The filter() method can be used to reduce the number of elements contained within the resulting collection by using a Closure. If the result of the Closure is boolean true then the current element of the iteration will be given to the resulting collection. If the Closures iteration returns a false or nothing at all, then that element will not exist within the new collection. This might be easier to understand with an example.
5 Route::get('/', function() 6 { 7 $collection = Album::all(); 8 9 $new = $collection->filter(function($album) 10 { 11 if ($album->artist == 'Something Corporate') { 12 return true; 13 } 14 }); 15 16 var_dump($new); 17 }); We iterate the collection with the filter() method and our Closure. For each iteration, if the value of the artist column on our model instance is equal to ‘Something Corporate’ then we will return true. This indicates that the model instance should be present within the new collection. Here’s the result. 1 object(Illuminate\Database\Eloquent\Collection)[117] 2 protected 'items' => 3 array (size=2) 4 2 => 5 object(Album)[135] 6 public 'timestamps' => boolean false 7 protected 'connection' => null 8 protected 'table' => null 9 protected 'primaryKey' => string 'id' (length=2) 10 protected 'perPage' => int 15 11 public 'incrementing' => boolean true 12 protected 'attributes' => 13 array (size=5) 14 'id' => int 3 15 'title' => string 'Leaving Through The Window' (length=26) 16 'artist' => string 'Something Corporate' (length=19) 17 'genre' => string 'Piano Rock' (length=10) 18 'year' => int 2002 19 protected 'original' =>
3 22 'title' => string 'Leaving Through The Window' (length=26) 23 'artist' => string 'Something Corporate' (length=19) 24 'genre' => string 'Piano Rock' (length=10) 25 'year' => int 2002 26 3 => 27 object(Album)[136] 28 public 'timestamps' => boolean false 29 protected 'connection' => null 30 protected 'table' => null 31 protected 'primaryKey' => string 'id' (length=2) 32 protected 'perPage' => int 15 33 public 'incrementing' => boolean true 34 protected 'attributes' => 35 array (size=5) 36 'id' => int 4 37 'title' => string 'North' (length=5) 38 'artist' => string 'Something Corporate' (length=19) 39 'genre' => string 'Piano Rock' (length=10) 40 'year' => int 2002 41 protected 'original' => 42 array (size=5) 43 'id' => int 4 44 'title' => string 'North' (length=5) 45 'artist' => string 'Something Corporate' (length=19) 46 'genre' => string 'Piano Rock' (length=10) 47 'year' => int 2002 I shortened the results a little to save space, but you can clearly see that we have our two albums by ‘Something Corporate’. Sort The sort() method can be used to sort the collection. It hands our Closure to the uasort() PHP method which uses integer values to represent a comparison between two values. Our closure receives two parameters, let’s call them A and B. Then we apply the rules of our sorting to provide an integer result from our closure. If A > B then we return 1. If A < B then we return -1. If A = B then we return 0. Here’s an example.
5 Route::get('/', function() 6 { 7 $collection = Album::all(); 8 9 $collection->sort(function($a, $b) 10 { 11 $a = $a->year; 12 $b = $b->year; 13 if ($a === $b) { 14 return 0; 15 } 16 return ($a > $b) ? 1 : -1; 17 }); 18 19 $collection->each(function($album) 20 { 21 var_dump($album->year); 22 }); 23 }); We provide a closure with two parameters, these represent any two albums from the collection. First we assign $a and $b to the year column to simplify our comparison code. If $a is equal to $b we return 0. If $a is greater than $b we return 1, otherwise -1. This method is descructive. It alters the original collection. We iterate through the collection dumping the year values to show the now order. Here is the result. 1 int 1993 2 int 1997 3 int 2002 4 int 2002 5 int 2006 6 int 2007 As you can see, our albums are now ordered by year in ascending order. Here’s some homework for you. Try to modify the above example changing only a single character so that the album years are instead presented in descending order. I promise it can be done!
to reverse() the models contained within the internal array. Does this really require an example? Oh go on then, you are wonderfully handsome readers after all… 1 <?php 2 3 // app/routes.php 4 5 Route::get('/', function() 6 { 7 $collection = Album::all(); 8 9 $collection->each(function($album) 10 { 11 var_dump($album->title); 12 }); 13 14 $reverse = $collection->reverse(); 15 16 $reverse->each(function($album) 17 { 18 var_dump($album->title); 19 }); 20 }); First we iterate through all of the albums outputting their title. Next we reverse the collection, assigning the now collection to the $reverse variable. We then iterate through the $reverse collection to see what has changed. Here is the result. 1 string 'Some Mad Hope' (length=13) 2 string 'Please' (length=6) 3 string 'Leaving Through The Window' (length=26) 4 string 'North' (length=5) 5 string '...Anywhere But Here' (length=20) 6 string '...Is A Real Boy' (length=16) 7 8 9 string '...Is A Real Boy' (length=16) 10 string '...Anywhere But Here' (length=20)
Through The Window' (length=26) 13 string 'Please' (length=6) 14 string 'Some Mad Hope' (length=13) Great! Our collection has been reversed. Merge The merge() method can be used to combine two collections. The only parameter to the method is the collection that should be merged. Here’s an example. 1 <?php 2 3 // app/routes.php 4 5 Route::get('/', function() 6 { 7 $a = Album::where('artist', '=', 'Something Corporate') 8 ->get(); 9 $b = Album::where('artist', '=', 'Matt Nathanson') 10 ->get(); 11 12 $result = $a->merge($b); 13 14 $result->each(function($album) 15 { 16 echo $album->title.'<br />'; 17 }); 18 }); In the above example we perform two queries. Result set $a is a collection of albums by ‘Something Corporate’. Set $b contains albums by ‘Matt Nathanson’. We use the merge() method to merge the collections, and assign the result to a new collection named $result. Then we echo the album titles within an each() loop. Here are the results.
3 Some Mad Hope 4 Please Slice The slice() method is the equivelent of the PHP slice() function. It can be used to produce a subset of models using a collection offset. Confused? Take a look at this. 1 <?php 2 3 // app/routes.php 4 5 Route::get('/', function() 6 { 7 $collection = Album::all(); 8 9 $sliced = $collection->slice(2, 4); 10 11 $sliced->each(function($album) 12 { 13 echo $album->title.'<br />'; 14 }); 15 }); We create a new collection using the slice() method. The first parameter is the position that the new sub set is started. Here we are telling it to start slicing at the second element of the array. The second optional parameter is the length of the collection. We tell the slice() method that we want four elements, after the second element in the array. Let’s take a look at the result. 1 Leaving Through The Window 2 North 3 ...Anywhere But Here 4 ...Is A Real Boy Did you know that you can pass a negative value to slice()? For example…
5 Route::get('/', function() 6 { 7 $collection = Album::all(); 8 9 $sliced = $collection->slice(-2, 4); 10 11 $sliced->each(function($album) 12 { 13 echo $album->title.'<br />'; 14 }); 15 }); By passing -2 as the first parameter, we are telling it to start the collection two elements from the end of the collection. Here’s the result. 1 ...Anywhere But Here 2 ...Is A Real Boy Wait, didn’t we tell it to retrieve four models? We did, however since we are positioned two elements from the end of the array, only two elements are available to retrieve. The slice() method does not wrap around the collection. IsEmpty The isEmpty() method can be used to check whether or not the container has elements within it. I bet you didn’t see that coming! It accepts no value, and returns a boolean result. Here’s an example. 1 <?php 2 3 // app/routes.php 4 5 Route::get('/', function() 6 { 7 // This query will return items. 8 $a = Album::all(); 9
= Album::where('title', '=', 'foo')->get(); 12 13 var_dump($a->isEmpty()); 14 var_dump($b->isEmpty()); 15 }); Aha, a cunning trap! We know that the first query will return results, and that the second query will not. Let’s dump the result of the isEmpty() method for both to see what we get. 1 boolean false 2 boolean true The first isEmpty() returns a boolean false because the array has elements within it. The second collection is empty, and the isEmpty() method returns a boolean true. ToArray The toArray() method can be used to return the internal array of the collection. Also, any elements within the array that that can be transformed into an array, for example objects, will be transformed during the process. 1 <?php 2 3 // app/routes.php 4 5 Route::get('/', function() 6 { 7 $collection = Album::all(); 8 var_dump( $collection->toArray() ); 9 }); Here’s our result.
array (size=5) 4 'id' => int 1 5 'title' => string 'Some Mad Hope' (length=13) 6 'artist' => string 'Matt Nathanson' (length=14) 7 'genre' => string 'Acoustic Rock' (length=13) 8 'year' => int 2007 9 1 => 10 array (size=5) 11 'id' => int 2 12 'title' => string 'Please' (length=6) 13 'artist' => string 'Matt Nathanson' (length=14) 14 'genre' => string 'Acoustic Rock' (length=13) 15 'year' => int 1993 16 2 => 17 array (size=5) 18 'id' => int 3 19 'title' => string 'Leaving Through The Window' (length=26) 20 'artist' => string 'Something Corporate' (length=19) 21 'genre' => string 'Piano Rock' (length=10) 22 'year' => int 2002 23 ... and more ... As you can see, not only has an array representing our collection been returned, but the model instances held within have also been transformed into arrays. ToJson The toJson() method will tranform the collection into a JSON string that can be used to represent it’s contents. In the previous chapter we discovered how to return collections directly from a routed closure or controller action to serve a JSON response. The toString() method allowing the collection to be transformed to JSON makes a call to the toJson() method internally. Let’s take a look at an example.
5 Route::get('/', function() 6 { 7 $collection = Album::all(); 8 var_dump( $collection->toJson() ); 9 }); Here is the result from the above example. 1 string '[{"id":1,"title":"Some Mad Hope","artist":"Matt Nathanson","genre":"Acous\ 2 tic Rock","year":2007},{"id":2,"title":"Please","artist":"Matt Nathanson","genre"\ 3 :"Acoustic Rock","year":1993},{"id":3,"title":"Leaving Through The Window","artis\ 4 t":"Something Corporate","genre":"Piano Rock","year":2002},{"id":4,"title":"North\ 5 ","artist":"Something Corporate","genre":"Piano Rock","year":2002},{"id":5,"title\ 6 ":"...Anywhere But Here","artist":"The Ataris","genre":"Punk Rock","year":1997},{\ 7 "id":6,"title":"...Is A Real Boy","artist":"Say Anything","genre":"Indie Rock","y\ 8 ear":2006}]' (length=570) It’s our entire collection represented by a JSON string. Count In an earlier example I used the PHP count() method to count the number of model instances contained within the collection’s internal array. How silly of me! I had completely forgotten about the count() method of the collection. In honesty, it does the same thing. Let me show you. 1 <?php 2 3 // app/routes.php 4 5 Route::get('/', function() 6 { 7 $collection = Album::all(); 8 var_dump( $collection->count() ); 9 }); Here’s the result. I bet you can’t wait!
the same, which should we use? Whichever ever one suits us best. I leave the decision up to you. You are over 300 pages into the book by now, and are old and wise. Still handsome though. Well done you! Best Practice Some of the methods available to the collection are duplicates of those available on the query builder. For example, we can use the first() method when building eloquent queries to retrieve only a single model instance. We can also use the first() method of the collection to retrieve the first element contained within. Take a close look at the following example. 1 Album::all()->first(); 2 Album::first(); These two lines both arrive at the same result. The first item within the albums table will be returned as a result. So which should we use? Well, as always, the answer is ‘it depends’. Yes, I know that nobody likes to hear that reply, but sometimes it’s true. Let’s take a look at two different scenarios. In the first scenario, we wish to display the title of the first album stored within the database within one of our templates. Sure, not a problem! We can use the first() method on the Eloquent query builder. Album::first(); In the second scenario, we wish to display a listing of all album titles, but also display the title of the first album within it’s own little box. For example, the ‘album of the year’ section. Well, we could do something like this I suppose. 1 $allAlbums = Album::all(); 2 $albumOfTheYear = Album::first(); I’m sure that would do what we need, but this method will run two queries against the database. Increasing the number of queries sent to the database server is a way of rapidly decreasing application performance. It might not matter within our examples, but within your enterprise software every split second wasted is money lost. We could alleviate some stress upon the database server, and reduce the number of queries to one by shifting some of the query responsibilities to the collection.
$allAlbums->first(); We retrieve all of our albums as usual, but this time we use the first() method on the collection to retrieve the album of the year. This results in only a single query. Choosing whether to perform a query on the collection, or on the database is a matter of choice. Querying against the database will allow for faster and more complex searches that would result in high CPU / memory usage on the webserver if performed on the collection. Then again, using the collection effectively can also benefit your application with fewer individual SQL queries. Use your best judgement to decide when to use the collection helper methods. I trust you!
who’s askin.” “I’m looking for your Boss. Enrico Barnez. Where can I find him?” said Zack, sternly. “Lookz, the boss has many dangerous friends. Howz I gonna stay safe if I tellz ya where he is? See this warehouse, it all belongs to him. Everythingz I own. Sorry pal, I just can’t help yez.” Zack decided that he wasn’t going to get any more information out of mister Stinkman without a little inspiration. He took hold of a nearby muffler, and proceeded to beat seven shades of hell out of Messy. Zack Kitzmiller is a total badass. “Alrightz, I givez in. You want to know where Enrico is? Turn around.” whimpered Messy. Zack turned around slowly, and came chest to face with Enrico Barnez. You see, Enrico was a powerful man. A very powerful, very short man. His natural prey were packs of minstrels, and wild squirrels. Not to mention the inhabitants of Eloquent city. “Stranger, why were you looking for me?” Zack knew how dangerous the man that stood before him was. He decided not to answer, instead he pulled a gun from the pocket of his longcoat, and pointed it at Enrico’s forehead. He wasn’t fast enough, Enrico also drew his gun. Zack and Enrico were caught in a standoff. Both men drew a long breathe, and exhaled a deep sigh. A gun was fired and a body fell to the ground. Life isn’t all cakes and pies. Introduction to Relationships In the previous chapters we have discovered how to represent the rows stored within our database table as objects. Class instances which represent a single row. This means that we have broken down our objects into their simplest form. Book, Fruit, BoyBand, whatever they happen to be. Since these objects are now simple, if we wish to store data related to them we will need to create new objects and form a relationship between them. So what do we mean by ‘relationship’? Well I don’t mean the hugs and kisses and sweaty bedsheets type of relationship. This kind of relationship is best explained with an example. Let’s take our Book model from the previous chapter. If we think about books for a moment we soon come to the conclusion that they have to have been written by someone. I know that you would like to believe that I don’t really exist, but the sad truth is that I do. Somewhere out there there’s a crazy British guy who is fanatical about Laravel. There are other authors out there too, not just me. So we know that a Book belongs to an author. There’s our first relationship. The author has a ‘link’ to the book. In a way, the author identifies the book. It’s not neccessarily a property of the book, like its title for example. No, an author has its own set of properties. A name, a birth place, a favourite pizza topping. It deserves to be its own model. An Author class. So how do we link these two together? With relational databases we can use ‘foreign key’s to identify relationships. These are normally integer columns.
+---------+------------------------+ 2 | id (PK) | name | 3 +---------+------------------------+ 4 | 1 | Code Sexy | 5 | 2 | Code Dutch | 6 | 3 | Code Bright | 7 +----------------------------------+ Here’s our Book table with three books held within. You will notice that each table has a unique integer primary key as required by the Eloquent ORM. This can be used to identify each individual row. Now let’s take a look at the second table. authors 1 +---------+------------------------+ 2 | id (PK) | name | 3 +---------+------------------------+ 4 | 1 | Dayle Rees | 5 | 2 | Matthew Machuga | 6 | 3 | Shawn McCool | 7 +----------------------------------+ Here we have another table containing the names of three fantastically handsome developers. We will call this the Author table. Notice how each row once again has an integer primary key that can be used as a unique identifier? Right, let’s form a relationship between the two tables. This is a relationship between a Book and an Author, we will ignore co-authorship for now and assume that a book will only have a single author. Let’s add a new column to the Book table. books
name | author_id (FK) | 3 +---------+------------------------+-----------------+ 4 | 1 | Code Sexy | 2 | 5 | 2 | Code Dutch | 3 | 6 | 3 | Code Bright | 1 | 7 +----------------------------------+-----------------+ We have added our first foreign key. This is the author_id field. Once again it’s an integer field, but it isn’t used to identify rows on this table, instead it’s used to identify related rows on another table. A foreign key field is normally used to identify a primary key on an adjacent table, however in some circumstances it can be used to identify other fields. Do you see how the addition of a foreign key has created a relationship between the author and a book? Our author_id foreign key references the primary key within the Author table. Take a closer look at row three of the book table. Code Bright has an author_id of 1. Now look at row 1 of the Author table and we will see Dayle Rees. This means that Code Bright was written by Dayle Rees. It’s as simple as that. Why didn’t we place the foreign key on the Author table? Well, an Author could have many books, couldn’t they? For example, take a look at this relationship. authors 1 +---------+------------------------+ 2 | id (PK) | name | 3 +---------+------------------------+ 4 | 1 | Dayle Rees | 5 | 2 | Matthew Machuga | 6 | 3 | Shawn McCool | 7 +----------------------------------+ books
name | author_id (FK) | 3 +---------+------------------------+-----------------+ 4 | 1 | Code Sexy | 2 | 5 | 2 | Code Dutch | 3 | 6 | 3 | Code Bright | 1 | 7 | 4 | Code Happy | 1 | 8 +----------------------------------+-----------------+ Notice how Dayle Rees, I mean, me, notice how I… oh dear I’ve ruined this sentence. Notice how there are two books belonging to myself. Both ‘Code Happy’ and ‘Code Bright’ have an author_id value of 1. This means that they were both written by Dayle Rees. Now let’s try to express the above example with the foreign key on the Author table instead. authors 1 +---------+------------------------+---------------+-----------+ 2 | id (PK) | name | book_one (FK) | book_two | 3 +---------+------------------------+---------------+-----------+ 4 | 1 | Dayle Rees | 3 | 4 | 5 | 2 | Matthew Machuga | 1 | null | 6 | 3 | Shawn McCool | 2 | null | 7 +----------------------------------+---------------+-----------+ books 1 +---------+------------------------+-----------------+ 2 | id (PK) | name | author_id (FK) | 3 +---------+------------------------+-----------------+ 4 | 1 | Code Sexy | 2 | 5 | 2 | Code Dutch | 3 | 6 | 3 | Code Bright | 1 | 7 | 4 | Code Happy | 1 | 8 +----------------------------------+-----------------+ As you can see, we have had to add a number of foreign keys to the Author table. Not only that, but because some authors will not have two books, many of the columns will have null values contained within. What happens if we want our authors to have three or four books? We can’t keep adding columns, our tables will start to look messy! Very well, we will keep the foreign key on the Book table.
of these relationship types? It will be useful when we become to implement these relationship types with Eloquent. Here we go. We have the author_id field on the Book, which identified its single author. This means that it belongs to an Author. That’s our first relationship name. Book belongs_to Author Relationships also have inverse variations. If a Book belongs_to an Author, then this means that an Author has_many Books. Now we have learned the name of another relationship. Author has_many Book If the Author instead only had a single book, but the books table contained the identifying primary key, we would use the has_one relationship type instead. Now don’t forget those three relationship types, but let’s go ahead and move on to a fourth. Now we need another example. Hmm… How about a ‘favourites’ system? Where Users can vote on Book. Let’s try to express this using the relationships we have already discovered. User has_many Book Book has_many User The has many is the relationship that created the favourite. We don’t need an entire entity to express a favourite, since it will have no attributes. When both the relationship and its inverse relationship are has_many then we will need to implement a new type of relationship. First of all, instead of saying has_many we will say belongs_to_many. This way we won’t confuse it with the other relationship. This new type of relationship forms a many_to_many relationship, and requires an additional table. Let’s view the table structure. users 1 +---------+------------------------+ 2 | id (PK) | name | 3 +---------+------------------------+ 4 | 1 | Dayle Rees | 5 | 2 | Matthew Machuga | 6 | 3 | Shawn McCool | 7 +----------------------------------+ books
name | 3 +---------+------------------------+ 4 | 1 | Code Sexy | 5 | 2 | Code Dutch | 6 | 3 | Code Bright | 7 | 4 | Code Happy | 8 +----------------------------------+ book_user 1 +-------------------------+ 2 | id | user_id | book_id | 3 +-----+---------+---------+ 4 | 1 | 1 | 2 | 5 | 2 | 1 | 3 | 6 | 3 | 2 | 2 | 7 | 4 | 3 | 2 | 8 +-----+---------+---------+ Wait a minute, what’s that third table? Well spotted! That would be our join table, or pivot table, or lookup table, or intermediatory table, or doing the hibbity-bibbity table. It has a lot of names. The Laravel documentation tends to refer to them as pivot tables, so I’m going to stick with that. Whenever you need a many_to_many relationship you will find a need for a pivot table. It’s the database table that links the two entities together by using two foreign keys to define the rows from the other tables. Looking at the first two rows of the pivot table, we can see that the user ‘Dayle Rees’ has favourited both ‘Code Dutch’ and ‘Code Bright’. We can also see that the users Matthew Machuga and Shawn McCool have both favourited Code Dutch. There is an additional type of relationship known as a polymorphic relationship. Due to it’s complex nature, and it’s long name, we will cover it within a later chapter on advanced Eloquent tactics. We won’t need it yet. That’s enough learning. It’s time for different learning! Practical learning. Now that we have discovered the variety of relationships available, let’s learn how to implement them with Eloquent. Implementing Relationships Right, let’s set the stage. First we are going to need to construct some tables. Normally I’d create a new migration for each table, but to simplify the examples I will put them all in one.
using Artists, Albums and Listeners. Listeners are simply users that like to listen to a variety of albums. Let’s think about the relationships. • An Artist has_many Albums. • An Album belongs_to an Artist. • A Listener belongs_to_many Albums. • An Album belongs_to_many Listeners. We have a simple relationship between an Artist and many Albums, and a many to many relationship between Listeners and Albums. So let’s think about our table structure. If an Album belongs_to an Artist then the identifying foreign key for the relationship will exist on the Album table. The many to many relationship will require a pivot table. We know that Eloquent required a plural form of the model for its table name (unless we specify otherwise), but how do we name the pivot table? The default format for the pivot table is the singular form of the two related models separated by an _ underscore. The order of the instances should be alphabetical. This means that our pivot table is called album_listener. All foreign key columns follow a similar naming convention. The singular form of the related model appended with _id. Our pivot table will contain both album_id and listener_id. The foreign keys will be unsigned, and we will use the references() and on() schema builder methods to reference other tables. Let’s look at the constructed migration, then we will examine anything that’s new in more detail. 1 <?php 2 3 use Illuminate\Database\Migrations\Migration; 4 5 // app/datebase/migrations/2013_08_26_130751_create_tables.php 6 7 class CreateTables extends Migration { 8 9 /** 10 * Run the migrations. 11 * 12 * @return void 13 */ 14 public function up() 15 { 16 Schema::create('artists', function($table) 17 { 18 $table->increments('id');
the Album, Artist, and Listener are typical of Eloquent model schema definitions, however we have yet to construct a pivot table. We simply create a album_listener table and add two integer fields to act as foreign keys. We don’t need timestamps or a primary key since this table simply acts as a ‘join’ between the two model instances. Time to create our Eloquent models. Let’s start with the Artist. 1 <?php 2 3 class Artist extends Eloquent 4 { 5 // Artist __has_many__ Album 6 public function albums() 7 { 8 return $this->hasMany('Album'); 9 } 10 } Here’s something new! Inside our Eloquent model definition we have a relationships method. Let’s examine this a little more closely. 1 public function albums() The name of the public method doesn’t require a strict format. It will serve as a nickname that we can use to refer to the relationship. This method could have just as easily been called relatedAlbums(). 1 return $this->hasMany('Album'); Within the relationship method we return the result of the $this->hasMany() method. This is ony of the many relationship methods that are inherited from the Eloquent base class. The first parameter to the relationship method is the full name of the model to be related. If we decide to namespace our Album model later, we will need to insert the full namespaced class as a parameter. If our foreign key on the Album table is named differently to the default naming scheme of artist_id then we can specify the alternative name of the column as an optional second parameter to this method. For example: 1 return $this->hasMany('Album', 'the_related_artist'); So what exactly is being returned? Well don’t worry about that for now! Let’s finish creating our model definitions first. Next we have the Album model.
Eloquent 4 { 5 // Album __belongs_to__ Artist 6 public function artist() 7 { 8 return $this->belongsTo('Artist'); 9 } 10 11 // Album __belongs_to_many__ Listeners 12 public function listeners() 13 { 14 return $this->belongsToMany('Listener'); 15 } 16 } The Album table has two relationship methods. Once again, the names of our public methods aren’t important. Let’s look at the content of the first method. 1 return $this->belongsTo('Artist'); Since the foreign key exists in this table, we use the $this->belongsTo() method to state that the Album model is related to an Artist. The first parameter once again is the related model name, and once again we can provide an optional second parameter to use an alternative column name. The second method forms one side of our many to many relationship. Let’s take a closer look. 1 return $this->belongsToMany('Listener'); The $this->belongsToMany() method informs Eloquent that it should look at a pivot table for related models. The first parameter is, once again, the name of the related model including namespace if present. This time we have a different set of optional parameters. Let’s construct another example. 1 return $this->belongsToMany('Listener', 'my_pivot_table', 'first', 'second'); The second, optional parameter is the name of the pivot table to use for related objects. The third and fourth parameters are used to identify alternate naming schemes for the two foreign keys that are used to related our objects within the pivot table. We have one model left. Let’s take a look at the Listener.
ELoquent 4 { 5 // Listener __belongs_to_many__ Album 6 public function albums() 7 { 8 return $this->belongsToMany('Album'); 9 } 10 } The listener forms the inverse side… well is it really inverse? The listener forms the other side of the many to many relationship. Once again we can use the $this->belongsToMany() method to construct the relationship. Right then! Our models have been created. Let’s create some model instances. Relating and Querying First let’s create an Artist and a Album, and an association between the two. I’ll be using my / routed closures as I believe that they are a nice simply way to demo code. 1 <?php 2 3 // app/routes.php 4 5 Route::get('/', function() 6 { 7 $artist = new Artist; 8 $artist->name = 'Eve 6'; 9 $artist->save(); 10 11 $album = new Album; 12 $album->name = 'Horrorscope'; 13 $album->artist()->associate($artist); 14 $album->save(); 15 16 return View::make('hello'); 17 }); Wait, what’s this new line?
down. Here’s the first method. 1 $album->artist(); Do you remember that method? That’s the relationship method that we created on the Album object. So what exactly does it return? The method returns an instance of the Eloquent query builder, just like the the one that we used in a previous chapter. However, this query builder instance will have some constraints placed on it for us. The current set of results represented by the query builder will be the related Artists (in this case, a collection of one) to our Album. It’s the same as the following. 1 Artist::where('album_id', '=', __OUR__CURRENT__ALBUM__); That’s handy right? We could chain on more queries if we wanted to. For example: 1 $album->artist()->where('genre', '=', 'rock')->take(2); Be sure to remember that the query builder required a trigger method at the end of the join to return a result collection. Like this: 1 $album->artist()->where('genre', '=', 'rock')->take(2)->get(); This also means that we can retrieve a full collection of related artists by performing the following. 1 $album->artist()->get(); Or, a single instance using the first() trigger method. 1 $album->artist()->first(); Oh the flexibility! Right, let’s take a look at our earlier example. 1 $album->artist()->associate($artist); I haven’t seen associate before! Don’t panic! Just because it’s new doesn’t mean it’s evil. Only spiders are evil. Also Kevin Bacon. The associate method is a helper method available on relationships to create the relation between two objects. It will update the foreign key for the relationship accordingly. This means that by passing our $artist instance to the associate() method we will have updated the artist_id column of our Album table row with the ID of the Artist. If we wanted to, we could also handle the foreign key directly. Here’s an example.
5 Route::get('/', function() 6 { 7 $artist = new Artist; 8 $artist->name = 'Eve 6'; 9 $artist->save(); 10 11 $album = new Album; 12 $album->name = 'Horrorscope'; 13 $album->artist_id = $artist->id; 14 $album->save(); 15 16 return View::make('hello'); 17 }); Both code snippets would have the same result, and a relationship will have been created between the two objects. Don’t forget to save() the model that you intend to relate, before passing it to the associate() method. The reason for this is that the model instance will require a primary key to create the relation, and the model will only receive a primary key value when it has been saved. Relating objects that form many to many relationships is handled in a slightly different way. Let’s take a closer look by introducing the Listener model. 1 <?php 2 3 // app/routes.php 4 5 Route::get('/', function() 6 { 7 $artist = new Artist; 8 $artist->name = 'Eve 6'; 9 $artist->save(); 10 11 $album = new Album; 12 $album->name = 'Horrorscope'; 13 $album->artist()->associate($artist); 14 $album->save(); 15
= 'Naruto Uzumaki'; 18 $listener->save(); 19 $listener->albums()->save($album); 20 21 return View::make('hello'); 22 }); Let’s focus on this bit: 1 $listener = new Listener; 2 $listener->name = 'Naruto Uzumaki'; 3 $listener->save(); 4 $listener->albums()->save($album); After we have populated our new Listener model instance, we must save() it. This is because we need it to have a primary key before we can create an entry in our pivot table. This time, instead of using the associate() method on our relationship, we instead use the save() method, passing the object to relate as the first parameter. The effect is the same, only this time the pivot table will be updated to define the relationship. If you would like to associate a model by its primary key directly, you can use the attach() method which accepts the primary key as the first parameter. For example. 1 $album->artist()->attach(2); To remove a relationship between two objects you can use the detach() method on the relationship. Just pass either a primary key, or an object as the first parameter. For example: 1 <?php 2 3 // app/routes.php 4 5 Route::get('/', function() 6 { 7 $album = Album::find(5); 8 $listener = Listener::find(2); 9 $album->listeners()->detach($listener); 10 11 return View::make('hello'); 12 });
object that has a many to many relationship by calling the detach() method with no parameter on the relationship method. Here’s an example. 1 $album->listeners()->detach(); Now the album will have no related listeners. Eloquent is a beautiful and vast topic full of many amazing features, but I don’t want to burden you with all of them right now. It will only cause you to forget some of the basics that we have just learned. Right now we have all the knowledge we need to start building a basic application. We will be building a system to manage the many Playstation 3 games that I posses. I’d hate to forget which ones I own! If you’re still hungering for more Eloquent then don’t panic. We will return to this wonderfully elegant ORM solution in a later chapter.
finally come! We are going to construct a complete Laravel application. I know that you’re as excited as I am. Our first application will be a simple one, an inventory application to manage my Playstation games. I have way too many (or just enough?) of them! Our application is going to manage a number of games including their names, publishers and whether or not we have completed the game. It will be a simple CRUD (create/read/update/delete) based application, but a great starting point for the features that we have learned in previous chapters. Once the application is complete, we will start to look at some advanced features of the framework, and how they can be used to add extra features to our application. Let’s not waste any more time. We need to start planning our application. Let’s think this through We know that our application will manage video games, so why don’t we take a look at what properties we wish to record for each game. • Title • Publisher • Completed Next we need to think about what shape our video game properties will take. This will help us to build the database schema later in the chapter. We will look at each field and assign it a type and length where appropriate. • Title string 128 • Publisher string 128 • Completed boolean I think that this Schema will allow us to describe our video games in a meaningful way. Strings of 128 characters in length can be used to store the title and publisher, and a simple boolean to control whether the game has been completed or not. Next we should think about the features that our application will have. Let’s go ahead and make another list.
video game records. • List video game records. • Edit video game records. • Delete video game records. We want to be able to create new video games, and view a list of those that have been created. We also wish to update or delete our video game records. This is why we earlier described the application as a ‘CRUD’ app. It’s not cruddy! It will be fantastic! It is a common pattern that will apply to many real world applications. Next I like to think about the pages required to allow these actions to be performed. Let’s see… the create page will need to be a form to input our new games. The list view will be some form of tabular display to list all of the games we have previously created. The next part is a little more tricky. It’s good user experience to have the ‘edit’ button on the listing of games, but we also want a page to display a form to edit the game. Many developers will use a single page for both creation and editing, but to keep this simple we will separate them. Finally, the delete button will also be displayed on the video game listing page. I think we are going to want another page to confirm whether or not the game should be deleted. It is quite a destructive task after all! Right, let’s summarize those pages. • List of games. • Create game form. • Edit game form. • Delete game confirmation. Great! I think that we have everything that we need to get started. Time to get hacking! All of the code for this project will be available in a repostory on the github website at codebright/games- app²⁸. Feel free to download it and tinker with it to your hearts content! First I’m going to deploy a copy of the Laravel framework to my games project folder. As always, we will need to install all of the framework dependencies with composer. ²⁸http://github.com/codebright/gamesapp
suggests installing ext-phpiredis (Allows faster serialization and \ 44 deserialization of the Redis protocol) 45 Writing lock file 46 Generating autoload files 47 Generating optimized class loader Great, now we can get started. Let’s begin with the database. Database First we will want to create a database on our development platform. I will be creating a MySQL database called games. We will then need to update our application database configuration file to reflect our new database. Here’s mine. 1 // app/config/database.php 2 3 /* 4 |-------------------------------------------------------------------------- 5 | Default Database Connection Name 6 |-------------------------------------------------------------------------- 7 */ 8 9 'default' => 'mysql', 10 11 /* 12 |-------------------------------------------------------------------------- 13 | Database Connections 14 |-------------------------------------------------------------------------- 15 */ 16 17 'connections' => array( 18 19 'mysql' => array( 20 'driver' => 'mysql', 21 'host' => 'localhost', 22 'database' => 'games', 23 'username' => 'root', 24 'password' => 'foobar', 25 'charset' => 'utf8', 26 'collation' => 'utf8_unicode_ci',
=> '', 28 ), 29 30 ), Next let’s create our database Schema using the schema builder component. We will generate a new migration stub using the Artisan CLI. 1 $ php artisan migrate:make create_games 2 Created Migration: 2013_09_14_155847_create_games 3 Generating optimized class loader Let’s fill in the gaps in the up() and down() methods to create our Schema. We will use the property types and lengths that we thought of in the planning subchapter. Here’s the resulting migration. 1 <?php 2 3 use Illuminate\Database\Migrations\Migration; 4 5 // app/database/migrations/2013_09_14_155847_create_games.php 6 7 class CreateGames extends Migration { 8 9 /** 10 * Run the migrations. 11 * 12 * @return void 13 */ 14 public function up() 15 { 16 Schema::create('games', function($table) 17 { 18 $table->increments('id'); 19 $table->string('title', 128); 20 $table->string('publisher', 128); 21 $table->boolean('complete'); 22 $table->timestamps(); 23 }); 24 } 25
27 * Reverse the migrations. 28 * 29 * @return void 30 */ 31 public function down() 32 { 33 Schema::drop('games'); 34 } 35 36 } In the up() method we create our games table with the properties mentioned in the planning chapter. We also add the auto incremental id column, and timestamps columns because we intend for our games to be represented by Eloquent ORM instances. In the drop() method we discard our table. It’s like it never existed! With our migration in place, we can build the schema in our local database by running the Artisan migrate command. 1 $ php artisan migrate 2 Migration table created successfully. 3 Migrated: 2013_09_14_155847_create_games Our database has now been updated. The schema has been implemented. Why don’t we create an Eloquent model to represent our video game? Here’s our new class. 1 <?php 2 3 // app/models/Game.php 4 5 class Game extends Eloquent 6 { 7 8 } Well that sure was easy! I always find the simplicity of Eloquent really amusing. Let’s laugh maniacally together for a few moments, and then continue to the next section. Muahahahaahhaahahahhahahahahaah. cough.
application will only have four pages, and thus a single controller will suffice. Let’s create the controller now, but stub its methods. We will also create some routes and empty views which we can implement later. We will call the controller GamesController. Not related to the FatController from Thomas the Tank Engine. Don’t forget to delete that default HomeController, we won’t need that! 1 <?php 2 3 // app/controllers/GamesController.php 4 5 class GamesController extends BaseController 6 { 7 public function index() 8 { 9 // Show a listing of games. 10 return View::make('index'); 11 } 12 13 public function create() 14 { 15 // Show the create game form. 16 return View::make('create'); 17 } 18 19 public function handleCreate() 20 { 21 // Handle create form submission. 22 } 23 24 public function edit(Game $game) 25 { 26 // Show the edit game form. 27 return View::make('edit'); 28 } 29 30 public function handleEdit() 31 { 32 // Handle edit form submission. 33 } 34
function delete() 36 { 37 // Show delete confirmation page. 38 return View::make('delete'); 39 } 40 41 public function handleDelete() 42 { 43 // Handle the delete confirmation. 44 } 45 } We have implemented a whole bunch of new actions for our application. Some are simply used to display the appropriate form, others are used to handle form submissions. You will notice that the edit() and delete() methods accept a type-hinted Game instance as it’s parameter. Don’t dwell on this. I will explain it when we get to routing! Let’s create the empty views that are being used by the controller. We will update them later. We will delete the default hello view. • app/views/index.blade.php • app/views/create.blade.php • app/views/edit.blade.php • app/views/delete.blade.php Routes Now we must create our routes so that our controller actions can be reached via URLs. Here we go… 1 <?php 2 3 // app/routes.php 4 5 /* 6 |-------------------------------------------------------------------------- 7 | Application Routes 8 |-------------------------------------------------------------------------- 9 | 10 | Here is where you can register all of the routes for an application. 11 | It's a breeze. Simply tell Laravel the URIs it should respond to 12 | and give it the Closure to execute when that URI is requested.
14 */ 15 16 // Bind route parameters. 17 Route::model('game', 'Game'); 18 19 // Show pages. 20 Route::get('/', 'GamesController@index'); 21 Route::get('/create', 'GamesController@create'); 22 Route::get('/edit/{game}', 'GamesController@edit'); 23 Route::get('/delete/{game}', 'GamesController@delete'); 24 25 // Handle form submissions. 26 Route::post('/create', 'GamesController@handleCreate'); 27 Route::post('/edit', 'GamesController@handleEdit'); 28 Route::post('/delete', 'GamesController@handleDelete'); Wait, what’s that Route::model() method? Well here’s a lovely piece of black magic that Laravel has to offer. The Route::model() method will let Laravel know that any route parameters with the same name as the first parameter to the method will be an Eloquent model instance defined by the second parameter. So in the above example, any route paramers named game, like the one within /edit/{game} will be bound to Eloquent Game model instances. Laravel will look at the integer supplied as a parameter, and perform a lookup on the model by primary key. It will then pass the appropriate model instance as a parameter to the controller action. How useful is that? The answer is… VERY! You should be more than familiar with the rest of the routing process by now. We have four GET routes used to display our application pages, and three POST routes to handle form submissions. Let’s make sure that everything is working as expected. We will use the Artisan serve command to fire up a basic webserver and test our application. 1 $ php artisan serve 2 Laravel development server started on http://localhost:8000 We see that our development server is running on port 8000, so let’s visit the http://localhost:8000 to ensure that we receive our blank template. It works great for me! Onwards to templating. Views For our templates we are going to use Twitter Bootstrap. It’s a CSS framework that will handle the styling of typical application HTML for us. I find that it’s great for prototyping applications. We will
describing the templates in detail because this book is not a front-end development book, but we will solve some common templating problems. First of all, we know that our templates will share some common code. All of them will likely be wrapped in a simple HTML5 template, something like this: 1 <!doctype html> 2 <html lang="en"> 3 <head> 4 <meta charset="UTF-8"> 5 <title>Games Collection</title> 6 </head> 7 <body> 8 <!-- website content here --> 9 </body> 10 </html> We also know that the application will share a common stylesheet, so we don’t want to have to add it to each page. If we did that, it would mean updating all of the templates should we later wish to change the location of the stylesheet. Instead, let’s solve this problem by leveraging the Blade templating engine’s template inhertance. We will create a base template called layout that all of our other pages will extend. Here’s our layout.blade.php view. It’s going to look horrible in e-readers, but I can’t really compact HTML. Sorry about that! 1 <!doctype html> 2 <html lang="en"> 3 <head> 4 <meta charset="UTF-8"> 5 <title>Games Collection</title> 6 <link rel="stylesheet" href="{{ asset('css/bootstrap.min.css') }}" /> 7 </head> 8 <body> 9 <div class="container"> 10 <nav class="navbar navbar-default" role="navigation"> 11 <div class="navbar-header"> 12 <a href="{{ action('GamesController@index') }}" class="navbar-bra\ 13 nd">Games Collection</a> 14 </div> 15 </nav> 16 @yield('content') 17 </div>
19 </html> So we have a simple HTML5 wrapper with a few interesting lines. Let’s take a closer look at them. The first is the line which specifies which CSS stylesheet to use. 1 <link rel="stylesheet" href="{{ asset('css/bootstrap.min.css') }}" /> We want to use a single global stylesheet for all of our views. By including the Twitter Bootstrap CSS within our master layout, we will be able to make use of it within all of our views that extend it. We use the asset() helper function to specify a path to our asset that is relative to the project’s public directory. This means that the path used to route our application will not interfere with the URLs to our assets. The next interesting line is the menu home link. Let’s take a closer look. 1 <a href="{{ action('GamesController@index') }}" class="navbar-brand">Games Collec\ 2 tion</a> Once again, we use a helper function to avoid collisions with our path based routing system. This time we use the action() function to generate an absolute URL to our framework route. Using action() in combination with the {{ echo braces }} we can create a back to home link for our application. The parameter to the action() function is a controller and action pair separated with an at @ symbol, just like the pairs we used when defining our routes. Now it’s time for the final line of the template, and the most important too! Let’s take a look. 1 @yield('content') The @yield() blade template method allows us to create an injectable section within our layout. This means that templates which extend our layout will be able to inject content into this area. We use the name ‘content’ to identify this region. We can now being to create some views that will extend this layout. Let’s start with the view that will be used to list all of our games. Before we begin editing the view file itself, let’s first modify our index() action to include a little logic.
function index() 2 { 3 // Show a listing of games. 4 $games = Game::all(); 5 return View::make('index', compact('games')); 6 } In our index() action we use Game::all() to retrieve a collection of all of the games in the system. Then we use compact() and View::make() to pass the collection into our index view. If you haven’t used compact() before, it simply creates an array out of a number of variables, using their names as array keys. It’s the exact opposite of the extract() PHP function. I like to use compact() when I only need to pass a small number of values to my views. Now that we have a complete collection of our games, why not create a view to display them? Here’s the contents of app/views/index.blade.php. 1 @extends('layout') 2 3 @section('content') 4 <div class="page-header"> 5 <h1>All Games <small>Gotta catch 'em all!</small></h1> 6 </div> 7 8 <div class="panel panel-default"> 9 <div class="panel-body"> 10 <a href="{{ action('GamesController@create') }}" class="btn btn-prima\ 11 ry">Create Game</a> 12 </div> 13 </div> 14 15 @if ($games->isEmpty()) 16 <p>There are no games! :(</p> 17 @else 18 <table class="table table-striped"> 19 <thead> 20 <tr> 21 <th>Title</th> 22 <th>Publisher</th> 23 <th>Complete</th> 24 <th>Actions</th> 25 </tr> 26 </thead> 27 <tbody>
as $game) 29 <tr> 30 <td>{{ $game->title }}</td> 31 <td>{{ $game->publisher }}</td> 32 <td>{{ $game->complete ? 'Yes' : 'No' }}</td> 33 <td> 34 <a href="{{ action('GamesController@edit', $game->id) }}"\ 35 class="btn btn-default">Edit</a> 36 <a href="{{ action('GamesController@delete', $game->id) }\ 37 }" class="btn btn-danger">Delete</a> 38 </td> 39 </tr> 40 @endforeach 41 </tbody> 42 </table> 43 @endif 44 @stop The @extends('layout') blade function on the first line, indicates that we wish for this view to extend the layout that we created just a minute ago. The layout should be a wrapper, and this view should be injected within the yielded regions it contains. Next we have a @section. 1 @section('content') 2 <!-- HTML here --> 3 @stop The @section blade function is used to define content that we inject into the regions in our layout using the @yield blade function. The only parameter to this function is the name of the region that we wish to inject our content into. We create some boilerplate HTML to structure the page, and the next line of interest is the one containing the @if blade function. First we check to see if the games collection is empty using the isEmpty() method. If we have no games, then we will output a little paragraph element to let the user know. If we do have games then we should display them. We create a table, and within the tables body, a loop. The loop will iterate through all of our games and output any interesting attributes of our games, including their title and publisher.
as $game) 2 <tr> 3 <td>{{ $game->title }}</td> 4 <td>{{ $game->publisher }}</td> 5 <td>{{ $game->complete ? 'Yes' : 'No' }}</td> 6 <td> 7 <a href="{{ action('GamesController@edit', $game->id) }}" class="btn btn-\ 8 default">Edit</a> 9 <a href="{{ action('GamesController@delete', $game->id) }}" class="btn bt\ 10 n-danger">Delete</a> 11 </td> 12 </tr> 13 @endforeach To indicate whether a game has been completed we use the PHP ternary operator in combination with the {{ echo braces }} to output a string. It will be either ‘Yes’ or ‘No’. 1 {{ $game->complete ? 'Yes' : 'No' }} Lastly, we have two buttons that can be used to edit a game, or delete it from the system. 1 <a href="{{ action('GamesController@edit', $game->id) }}" class="btn btn-default"\ 2 >Edit</a> 3 <a href="{{ action('GamesController@delete', $game->id) }}" class="btn btn-danger\ 4 ">Delete</a> Once again we use the action() helper function, but we also provide a second parameter. This is the id of the game that we wish to edit or delete. Next up we have the view to create a new game within the system. Here’s the view at app/views/create.blade.php. 1 @extends('layout') 2 3 @section('content') 4 <div class="page-header"> 5 <h1>Create Game <small>and someday finish it!</small></h1> 6 </div> 7 8 <form action="{{ action('GamesController@handleCreate') }}" method="post" rol\ 9 e="form"> 10 <div class="form-group"> 11 <label for="title">Title</label>
type="text" class="form-control" name="title" /> 13 </div> 14 <div class="form-group"> 15 <label for="publisher">Publisher</label> 16 <input type="text" class="form-control" name="publisher" /> 17 </div> 18 <div class="checkbox"> 19 <label for="complete"> 20 <input type="checkbox" name="complete" /> Complete? 21 </label> 22 </div> 23 <input type="submit" value="Create" class="btn btn-primary" /> 24 <a href="{{ action('GamesController@index') }}" class="btn btn-link">Canc\ 25 el</a> 26 </form> 27 @stop The create page extends our base layout in a similar fashion to the index. This time however, we inject a form into the content region. Let’s take a closer look at the form. 1 <form action="{{ action('GamesController@handleCreate') }}" method="post" role="f\ 2 orm"> Here we use the action() method to provide an action for our form. Now you might be wondering why not instead use one of the form opening methods that we learned about in the forms chapter? It’s true, doing so would prevent having to specify the form method. However, I find that using the route helpers instead leads to cleaner views. They are more HTML than they are PHP, and the syntax highlighting in my editor seems to work better. This is a matter of preference, so please make your own judgement call here. The rest of the form is fairly standard. We have a number of form fields that represent the properties of a Game. We have a submit button, and a cancel link just in case our user happens to change their mind. Next up we have the delete view. We want to confirm that our user intends to delete a game from the database. Here’s the content of app/views/delete.blade.php.
2 3 @section('content') 4 <div class="page-header"> 5 <h1>Delete {{ $game->title }} <small>Are you sure?</small></h1> 6 </div> 7 <form action="{{ action('GamesController@handleDelete') }}" method="post" rol\ 8 e="form"> 9 <input type="hidden" name="game" value="{{ $game->id }}" /> 10 <input type="submit" class="btn btn-danger" value="Yes" /> 11 <a href="{{ action('GamesController@index') }}" class="btn btn-default">N\ 12 o way!</a> 13 </form> 14 @stop Now we’re getting into the swing of things. We have another view form. This one targets the handleDelete route, and contains a hidden field that can be used to identify the game that we wish to delete. The ‘Yes’ button will cause the form to be submitted, and the game will be deleted. The ‘No’ button will simply redirect to the home page. This acts as a cancel mechanism. So what do we have remaining? Oh that’s right! The edit view. Once we have created a new game entry, it shouldn’t be set in stone. We should be able to change it, so let’s create a view for that. Here’s our view at app/views/edit.blade.php. 1 @extends('layout') 2 3 @section('content') 4 <div class="page-header"> 5 <h1>Edit Game <small>Go on, mark it complete!</small></h1> 6 </div> 7 8 <form action="{{ action('GamesController@handleEdit') }}" method="post" role=\ 9 "form"> 10 <input type="hidden" name="id" value="{{ $game->id }}" /> 11 12 <div class="form-group"> 13 <label for="title">Title</label> 14 <input type="text" class="form-control" name="title" value="{{ $game-\ 15 >title }}" /> 16 </div> 17 <div class="form-group">
for="publisher">Publisher</label> 19 <input type="text" class="form-control" name="publisher" value="{{ $g\ 20 ame->publisher }}" /> 21 </div> 22 <div class="checkbox"> 23 <label for="complete"> 24 <input type="checkbox" name="complete" {{ $game->complete ? 'chec\ 25 ked' : '' }} /> Complete? 26 </label> 27 </div> 28 <input type="submit" value="Save" class="btn btn-primary" /> 29 <a href="{{ action('GamesController@index') }}" class="btn btn-link">Canc\ 30 el</a> 31 </form> 32 @stop Once more we inject a form within the ‘content’ section, but since the game instance already exists we can pre-populate the form fields with its default values. Once more we use the ternary operator to apply the ‘checked’ attribute to the completed checkbox if required. Excellent! We now have all our views in place, and all of the models required to manipulate our data are functional. It’s time to hook the views and our data together by filling in our controller action stubs. Application Logic Let’s start with our index route. What do we have at the moment? 1 public function index() 2 { 3 // Show a listing of games. 4 $games = Game::all(); 5 6 return View::make('index', compact('games')); 7 } Oh, well that will cover it! All we need is our collection of games. That was easy wasn’t it? We don’t need to worry about the create() action because it only serves to display our view. Let’s take a look at our handleCreate() action instead.
function handleCreate() 2 { 3 // Handle create form submission. 4 } I’m fairly sure that our comment won’t handle the form submission for us. Why don’t we fill in the blanks? Let’s start by creating a new game object and populate its properties with the values submitted from our create new game form. 1 public function handleCreate() 2 { 3 // Handle create form submission. 4 $game = new Game; 5 $game->title = Input::get('title'); 6 $game->publisher = Input::get('publisher'); 7 $game->complete = Input::has('complete'); 8 $game->save(); 9 } We create a new instance of a Game model, and set it’s properties to the values retrieved from our request using the Input::get() method. Finally we use the save() method to persist the row to the database. We need to return some kind of response from this page so that we don’t receive an error. The user should be taken somewhere meaningful. We could display a success page, but that would just waste time. The user would have to click once again to go back to the index. Why don’t we just take them straight to the index? 1 public function handleCreate() 2 { 3 // Handle create form submission. 4 $game = new Game; 5 $game->title = Input::get('title'); 6 $game->publisher = Input::get('publisher'); 7 $game->complete = Input::has('complete'); 8 $game->save(); 9 10 return Redirect::action('GamesController@index'); 11 } This time we return a redirect reponse using a similar format to the links that we generated within our templates. Next up we have the edit() action. Here’s how it looks at the moment.
function edit(Game $game) 2 { 3 // Show the edit game form. 4 return View::make('edit'); 5 } Our edit form needs to be able to populate the form with default items from our game, so we need to pass our game instance into the view. Let’s change this now. 1 public function edit(Game $game) 2 { 3 // Show the edit game form. 4 return View::make('edit', compact('game')); 5 } We have used the compact() method once again to create the view data array. Now it’s time to handle form submission for the edit form. This is the handleEdit() action as it currently stands. 1 public function handleEdit() 2 { 3 // Handle edit form submission. 4 } Well that’s a little plain isn’t? I’m fairly sure that comment isn’t going to persist our edited game to the database. Let’s fill in the blanks. The edit form provides the game’s ID as a hidden field so we can use that to retrieve the game instance and modify its column values. 1 public function handleEdit() 2 { 3 // Handle edit form submission. 4 $game = Game::findOrFail(Input::get('id')); 5 $game->title = Input::get('title'); 6 $game->publisher = Input::get('publisher'); 7 $game->complete = Input::has('complete'); 8 $game->save(); 9 10 return Redirect::action('GamesController@index'); 11 } That’s better! We use the findOrFail() method on the Game class. It’s similar to the find() method, except that it will trigger an application 404 event if an object with the provided primary key cannot
Once we have our game object, we fill it with the information from our form. Finally, we save the updated Game instance and redirect to the index page. Our games can now be created and edited. It’s time that we provide the functionality to delete a game. Let’s take a look at the current handleDelete() action of the GamesController. 1 public function handleDelete() 2 { 3 // Handle the delete confirmation. 4 } That’s not going to cut it! Let’s fill in the blanks. 1 public function handleDelete() 2 { 3 // Handle the delete confirmation. 4 $id = Input::get('game'); 5 $game = Game::findOrFail($id); 6 $game->delete(); 7 8 return Redirect::action('GamesController@index'); 9 } Just as with the handleEdit() action we retrieve a game instance using the game hidden field identifier provided by our delete form. Then we simply delete() the instance to remove the row from the database. With the game deleted we can now redirect back to the index page. Let’s take a look at the now completed GamesController. 1 <?php 2 3 // app/controllers/GamesController.php 4 5 class GamesController extends BaseController 6 { 7 public function index() 8 { 9 // Show a listing of games. 10 $games = Game::all(); 11 12 return View::make('index', compact('games')); 13 } 14
function handleDelete() 58 { 59 // Handle the delete confirmation. 60 $id = Input::get('game'); 61 $game = Game::findOrFail($id); 62 $game->delete(); 63 64 return Redirect::action('GamesController@index'); 65 } 66 } The entire logic of our application held within 66 lines. A thing of beauty! It’s time to try our new application. Let’s give it a go. Relax First make sure that your application is being served by the PHP webserver. If it’s not being served, you can use the serve command. 1 php artisan serve Now visit http://localhost:8000 to be greeted by our index page which is absolutely full to the brim with ga… wait. Where are all the games? Well, no matter. Let’s create our first game. Hit the ‘Create Game’ button and the create a new game form will be presented. I’m going to enter ‘Beyond: Two Souls’ into the title box, and ‘Sony Computer Entertainment’ into the publisher field. I haven’t completed this game yet, because it won’t be released for two days (he says, giddy with excitement) so let’s just hit the ‘Create’ button. Beyond: Two Souls is now displayed on our index page. Great news! I’ve completed the game already. (Not really, but let’s use our imagination here.) It’s time to update our game. Go ahead and click the ‘Edit’ button. Now you can check the complete box and click ‘Save’ to update the record. It pains me to do so, but why don’t we delete ‘Beyond’ to test that piece of functionality. Hit the ‘Delete’ button and click ‘Yes’ to delete the game. It seems all our functionality is working as expected. Congratulations on completing your first application with Laravel! Don’t forget that the full code for this project can be found on github under the codebright/games- app²⁹ repository. ²⁹http://github.com/codebright/gamesapp
round everyone, it’s time for this weeks homework to be assigned. Well, in honesty I rarely find myself using the ‘Exercises’ of books so feel free to skip this section if you feel the need. Right now our application will accept any value from its forms. For example, we could create a game with a ‘blank’ title. This could break our system. Why not try to add validation to the application using our ‘Validation’ chapter as a reference? In the next chapter we will be covering authentication, which can be used to protect our application from unauthorized use. Why not come back to this chapter and attempt to implement authentica- tion? Don’t have time for homework? Don’t worry about it! Let’s continue to the next chapter.
witty little story, but I’m a bit short on time this week, so here’s the plan. If we all work together and use our imagination, we can pretend that I wrote a really funny tale about Ian Landsman, two trained sea lions, a bottle of advocaat and the Rome metro system. Yep. That should do it. So what are we going to learn about in this chapter? Well we all have secret stuff don’t we? Dark secrets that you don’t want anyone to know? Oh, just me? Well if you were to have these dark secrets, you would want a secure way of protecting them from prying eyes. In this chapter we are going to learn how we can use Laravel’s authentication system to ensure that only authenticated users are able to access our restricted content. Right then! Let’s get started. Before we begin, we are going to need a fresh Laravel project, with the database configured correctly. You remember how to set up the database right? If not, why not have a browse over the database chapter once more? Before we begin using the authentication system, we need to decide where we will store our sessions. A session is a little text payload with an associated browser cookie that will allow PHP and Laravel to remember your user between requests. Let’s take a look inside the app/config/session.php file for more information. 1 /* 2 |-------------------------------------------------------------------------- 3 | Default Session Driver 4 |-------------------------------------------------------------------------- 5 | 6 | This option controls the default session "driver" that will be used on 7 | requests. By default, we will use the lightweight native driver but 8 | you may specify any of the other wonderful drivers provided here. 9 | 10 | Supported: "native", "cookie", "database", "apc", 11 | "memcached", "redis", "array" 12 | 13 */ 14 15 'driver' => 'database', As you can see, Laravel offers us a number of ways to store our session. You can use whichever storage method is most suitable to your application, but for now we are going to be using the ‘database’ option to store our sessions within a database table.
within this config file, including the length of the session, the name of the session cookie, the name of the sessions table and more. We will be leaving all of these settings as their default values for this example, but feel free to have a browse and see what further configuration is available. Now that we have decided on the database as our method of session storage, we need to create a table to store the session information in. Once again, Laravel swoops down out of the sky in a colourful leotard. Ready and willing to save the day. “Simply use the artisan session:table command to deploy your session table.” says Laravel in a deep and booming manly voice. “Thanks Laravel!”. Let’s try it out. 1 $ php artisan session:table 2 Migration created successfully! The artisan session:table command has created a migration that will create our sesion table within the database. We’ve already learned about migrations, so let’s run the migrate command to run the generated migration. 1 $ php artisan migrate 2 Migrated: 2013_12_07_231153_create_session_table If we examine our database, we see that our session table has been created. Wonderful! Next we need to create some users that will be used to login to our application. By default, Laravel ships with a User Eloquent model with app/models/User.php. Let’s take a look at that. 1 <?php 2 3 use Illuminate\Auth\UserInterface; 4 use Illuminate\Auth\Reminders\RemindableInterface; 5 6 class User extends Eloquent implements UserInterface, RemindableInterface { 7 8 /** 9 * The database table used by the model. 10 * 11 * @var string 12 */ 13 protected $table = 'users'; 14 15 /**
Illuminate\Auth\Reminders\RemindableInterface; 5 6 class User extends Eloquent implements UserInterface, RemindableInterface { Our User model implements both UserInterface and RemindableInterface. What are these for? Well the UserInterface let’s Laravel know that the model contains all methods needed for it to authenticate with Laravel’s own authentication system. The RemindableInterface allows Laravel to retrieve the users email address or other contact information to allow for the functionality of sending password reminder emails. We know what the $table property does from our time with the Eloquent ORM chapter, so what’s this next property? 1 /** 2 * The attributes excluded from the model's JSON form. 3 * 4 * @var array 5 */ 6 protected $hidden = array('password'); The fields that are contained within the $hidden array will be excluded from any output that is generated using the toJson() and __toString() methods. We may not want our user’s password to display within these results. You are of course welcome to remove this property if you like. I’m going to leave it there. Let’s take a look at the methods that are defined on the model in more detail. We will begin with the getAuthIdentifier() method. 1 <?php 2 3 /** 4 * Get the unique identifier for the user. 5 * 6 * @return mixed 7 */ 8 public function getAuthIdentifier() 9 { 10 return $this->getKey(); 11 }
property that will act as a unique identifier for the user. By default it is set to the primary key using the $this->getKey() method inherited from the base model, however, we can change this to any unique property that we like. Let’s leave it as the key for now. 1 /** 2 * Get the password for the user. 3 * 4 * @return string 5 */ 6 public function getAuthPassword() 7 { 8 return $this->password; 9 } The getAuthPassword() method is used to identify the property that is used for the users password within the model. The default value is the password column, but once again we are free to change this to suit our needs. Lastly, we have the getReminderEmail() method. 1 /** 2 * Get the e-mail address where password reminders are sent. 3 * 4 * @return string 5 */ 6 public function getReminderEmail() 7 { 8 return $this->email; 9 } This method is used to identify the model property that will contain the users email address. This can later be used if we wish to use Laravel’s inbuilt password reminder mechanism. Let’s create a migration for our User model shall we? You remember how to use the Schema builder and migrations system, right? It goes a little something like this… 1 $ php artisan migrate:make create_user_table 2 Created Migration: 2013_12_07_233727_create_user_table 3 Generating optimized class loader Now let’s fill in the generated migration. We will keep this simple with a ‘username’, ‘password’ and ‘email’ field. The password field will be 60 characters long in order to support the full length of our bcrypt encrypted password. More on that later!
adding users to the system. Hurray! We need a form. All web developers like forms… right? We will skip the validation for our registration form in this circumstance to speed up the chapter and approach the feature in isolation, but if you want to implement validation then why not take a look at the Validation chapter and try it? Consider it homework! Let’s start by creating a view for our registration form. We’ll keep it really simple. Now, it’s true that I do a fair bit of front end development as well as this stuff, so I know it doesn’t make sense to wrap our form elements in <p> tags. However, I don’t want to add a style-sheet to this example project, so let’s just use them to have our form fields display in a block style. Here’s our simple form view that I have saved in app/views/create_user_form.blade.php. 1 <html> 2 <head> 3 <title>Create User</title> 4 </head> 5 <body> 6 <form action="{{ url('user') }}" method="post"> 7 <p><label for="username">Username:</label></p> 8 <p><input type="text" name="username" placeholder="Username" /></p> 9 <p><label for="email">Email:</label></p> 10 <p><input type="text" name="email" placeholder="Email" /></p> 11 <p><label for="password">Password:</label></p> 12 <p><input type="password" name="password" placeholder="Password" /></\ 13 p> 14 <p><input type="submit" value="Create" /></p> 15 </form> 16 </body> 17 </html> A work of art, I’m sure you’ll agree! I feel comfortable writing HTML myself, so I rarely use the form builder component of Laravel. If you want to, then go ahead. I’m not gonna stop you! Laravel allows us the freedom of being able to make our own decisions, and I encourage you to take advantage of this freedom. We have created a form with the three fields that our User model needs, and a ‘Create’ submit button. I’ve left out the csrf token for simplicity, and have used the url() helper to target the form to our POST /user route. Let’s go ahead and create the required routes.
Route::get('/', function() 6 { 7 return View::make('hello'); 8 }); 9 10 Route::get('/user', function() 11 { 12 return View::make('create_user_form'); 13 }); 14 15 16 Route::post('/user', function() 17 { 18 $user = new User; 19 $user->username = Input::get('username'); 20 $user->password = Hash::make(Input::get('password')); 21 $user->email = Input::get('email'); 22 $user->save(); 23 24 return Response::make('User created! Hurray!'); 25 }); We have left the framework’s / welcome route within our routes.php file. Next we have added a GET /user route which will simply be used to show the create new user form. Finally we have a POST /user route that creates a new User instance. Sets the values that we retrieve from our create user form, and persists the user to the database. Note that we have used the Hash::make() method to encrypt the users password with the bcrypt encryption mechanism that Laravel uses for it’s authentication system. It’s worth noting that you could use Hash::make() on a value multiple times and receive different string results each time. Don’t panic! This is normal behaviour. There’s some clever mathematics involved and I assure you that your password can still be authenticated against. We return a simple text response from the route to let us know that the act was successful. Great! Go ahead and visit /user to create a new user. If you haven’t pointed your local webserver to the public directory then you might want to use the php artisan serve command to quickly start the PHP inbuilt webserver.
our secret content. Oh wait, we’re forgetting something. The secret content. Right then… secret content… hmm. Okay, the secret content will be a list of my celebrity crushes. Don’t tell my other half! We need to make sure this is really secure. First let’s create a GET /crush route to show a view. 1 <?php 2 3 // app/routes.php 4 5 Route::get('/crush', function() 6 { 7 return View::make('crush'); 8 }); Right then, now we need to create the crush view. Let’s go ahead and create a HTML list of my celebrity crushes within app/views/crush.blade.php. 1 <ul> 2 <li>Keira Knightley</li> 3 <li>Emma Watson</li> 4 </ul> Here we have two list entries for Keira Knightley and Emma Watson. Two very fine ladies. Well, Emma Watson is fine now, but I don’t suggest drooling over her, and then watching the first Harry Potter movie. You will feel VERY bad. Don’t do that. Quite a traumatic experience. shudder Anyway, moving on… Now that we have our top secret data, we need to protect it. Let’s start with the most basic form of authentication. HTTP basic auth. Basic auth is an authentication system that is a collaboration between the browser and the webserver. It will allow us to create an authentication mechanism without the need for a custom login form. It’s the perfect way to start. To enforce authentication within our system we need to protect a route. We can do this by using a route filter. Let’s use the auth.basic filter to protect our GET /crush route from prying eyes. Here’s our updated route.
function() 4 { 5 return View::make('crush'); 6 } 7 )); We have changed the GET /crush route to provide an array as a second parameter so that we might attach additional information to the route. We include a before route filter called auth.basic. This is an inbuilt filter method which you can find within app/filters.php. Including this filter is all that we need to do to protect this route using HTTP basic authentication. Let’s give it a go. First we need to visit the GET /crush URL in our browser. Our web browser will display its own HTTP basic login form. This may look different depending on the browser you are using. By default, the HTTP basic authentication mechanism will use the User email address as the username. So let’s go ahead and enter the email address and password that we entered into the create user form. We are presented with our list of crushes. This list is now protected with basic auth, and will only be presented if we enter the correct credentials. We will continue to be granted access to this page until our browser’s session expires. How about logging out? Well we can create a GET /logout route for this purpose. Let’s take a closer look. 1 Route::get('/logout', function() 2 { 3 Auth::logout(); 4 return Response::make('You are now logged out. :('); 5 }); The Auth::logout() method will destroy out authentication session. If you visit the GET /logout route and then return to GET /crush you will notice that the prompt for login is once again presented. Logging in with our email address is fine, but what if we wish to authenticate using the username field instead? Sure! No problem. Simply alter the auth.basic filter within app/filters.php as follows.
4 }); We have supplied a string as the first parameter to the Auth::basic() method to specify which field to use as the username for the basic login process. In our example we are specifying that HTTP basic auth use the username field of the User model. Let’s try again, visit the GET /logout route to destroy your session. Now visit GET /crush one more. This time use your username and password to login. Great, once again we see our crushes. While HTTP basic auth is very quick to get setup with, we do have to rely on the browsers own login form. Unfortunately we have no control over how it appears, and it is a little inflexible. Let’s try using Laravel’s own auth system and create a login form. First we will need a form view to enter our login credentials within app/views/login_form.blade.php. 1 <html> 2 <head> 3 <title>Login</title> 4 </head> 5 <body> 6 <form action="{{ url('login') }}" method="post"> 7 <p><label for="username">Username:</label></p> 8 <p><input type="text" name="username" placeholder="Username" /></p> 9 <p><label for="password">Password:</label></p> 10 <p><input type="password" name="password" placeholder="Password" /></\ 11 p> 12 <p><input type="submit" value="Login" /></p> 13 <p><input type="checkbox" name="remember" /> <label for="remember">Re\ 14 member me.</label></p> 15 </form> 16 </body> 17 </html> Here we have our login form. It’s very similar to our create user form, only this time we have only the username and password fields. The form will target the POST /login URI. We also have a ‘Remember me.’ checkbox to state that the password can be remembered for the next login attempt. I’m sure you have seen a system such as this before. You have been using the internet, right? :) Let’s create a route to display our login form. We will call it GET /login. I know. Creative, right?
Route::get('/login', function() 6 { 7 return View::make('login_form'); 8 }); Right then, let’s change our super secret GET /crush route to use the auth filter instead of auth.basic. Like this. 1 <?php 2 3 // app/routes.php 4 5 Route::get('/crush', array( 6 'before' => 'auth', 7 function() 8 { 9 return View::make('crush'); 10 } 11 )); Now let’s logout and visit /crush once more. What happened there? We were redirected to our newly created login form. Well let’s take a look at the auth filter within app/filters.php to find out more. 1 Route::filter('auth', function() 2 { 3 if (Auth::guest()) return Redirect::guest('login'); 4 }); Aha, I see. The auth filter uses the Auth::guest() method to determine whether the user is a guest, and is not logged into the system. If this is the case then the filter will use the Redirect::guest() method to serve a Redirect response to the /login form. Woah! That’s what we called our login form route? Isn’t that convenient? It’s almost like I plan this stuff before hand. Now that we have our login form, we need a route to handle the form’s submission. Let’s create the POST /login route.
Route::post('/login', function() 6 { 7 $credentials = Input::only('username', 'password'); 8 if (Auth::attempt($credentials)) { 9 return Redirect::intended('/'); 10 } 11 return Redirect::to('login'); 12 }); In order to authenticate with the system, we must first build a credentials array. We pull the values for username and password from the request data. We don’t have to worry about hashing the password, Laravel will do that for us. It’s worth noting that we can add other constraints to the credentials array. For example, we may wish to add 'enabled' => true to ensure that the account is active. Once the credentials array has been constructed, we pass it to the Auth::attempt() method. This method will return a boolean result that is used to indicate if the login attempt was successful or not. If the authentication attempt was successful, then our session will have been created, and we are now logged into the system. You’ll notice the Redirect::intended() method in the above example. What’s all that about? Well, let’s imagine that you are trying to find a second hand car online. Why? Well because the new ones all look the same and boring. Anyway, your buddy Dayle sends you a direct link to a car you might be interested in. An old WRX Impreza or something. Well unfortunately the site requires that you login to be able to see cars. You click the link that Dayle sent you and you are directed to the login form. Once you have logged into the site, you are redirected to the home page. Well that’s not use- ful is it? You wanted to see the car. Now you have to click the link over again? Well the Redirect::intended() method can be used to avoid this situation. The Redirect::intended() method will redirect our users to the route that they were attempting to access before they hit our authentication filter. Once the authentication process is complete, we send them back to where they wanted to go. The first parameter of the method is a default route, to ensure that our users are delivered to an appropriate page if they have hit the login route directly. Let’s test our newly constructed authentication system shall we? First hit the GET /logout route to ensure that we are logged out of the system. Next hit the GET /crush route to be redirected to our login form. Fill and submit the form and hopefully you will arrive at the GET /crush page. Well done you!
We forgot the ‘Remember me.’ functionality! Well I suppose I could go back and edit it, but you know what, let’s just fix it here? Let’s attack our POST /login route once again. 1 <?php 2 3 // app/routes.php 4 5 Route::post('/login', function() 6 { 7 $credentials = Input::only('username', 'password'); 8 $remember = Input::has('remember'); 9 if (Auth::attempt($credentials, $remember)) { 10 return Redirect::intended('/'); 11 } 12 return Redirect::to('login'); 13 }); We’ve added a line to retrieve a boolean value representing our remember me check-box. Next we pass the $remember value as a second parameter to the Auth::attempt() method. Now if we check the box on the login form, it will remember our username and password for next time that we want to login to the site. Right then. We can move on now. Once we are logged in to the system, it might be useful to be able to identify our currently logged in user. Don’t worry! Taylor already thought about this one too. The Auth::user() method will return an Eloquent ORM instance used to represent the currently logged in user. This means that we can use all of the goodness baked into Eloquent. We can access the user’s relationships or perhaps something more simple like its username property. 1 $user = Auth::user(); 2 echo $user->username; Right! Ladies and gentlemen. We have one final trick to share with you today. Have you ever seen a web application that allow for the administrators to ‘emulate’ another user. “Switch to Derek” for example. No? Well trust me, there are applications like that our there in the wild. Mostly CMS type things. Anyway, I realize that I’m getting a little tired and my writing is getting a bit weird, so I’m gonna finish on a high note and show you how you can achieve the same functionality in your own applications.
Now we're Derek! Well there we have it! Simply pass an instance of an Eloquent model for the user that we wish to emulate to the Auth::login() method to login that user. Super useful!
a question that Taylor and I receive on an almost daily basis. “Where does xxx go?” or “Where do I put xxx?”. It’s an interesting question. In a way, we have brought this question upon ourselves by inventing standard locations for classes such as controllers and models, but in the PHP world, and with a Composer driven application, we are given more freedom than we are used to. Let’s see if we can find an answer ourselves. Close your eyes. Dang, I did it again. Now how can I tell you to open your eyes later? Oh well, I assume you got bored and finally opened your eyes. The closing of eyes is a requirement for imagination land, a place where I spent most of my time. Let’s imagine that you are in a kitchen. I know! Exciting right? In your hand is a plate. Where do you put the plate? I know! It’s a really difficult question. So many places, I mean, we could put it in the draining rack, but it’s not really wet is it? I suppose it would go there, but does that make sense to you? I guess we could put it on the kitchen counter, it would definitely work there, but do you consider that neat? We could put it in the cupboard! Now we’re talking! Out of sight, not clutter. This is perfect. So let’s just put this plate in the cupb… oh. Which cupboard? Oh no, another question. You see, it’s really a matter of preference. I can’t tell you where to put your plate. I can’t place it for you. You’d never find it again. I like to celotape all of my plates to the kitchen ceiling. It’s half organization and half a security mechanism. That’s not the answer you were hoping for was it? Gee… thanks a lot Dayle! OR SHOULD I CALL YOU FAYLE!! Amusing, yes. Not the first time I’ve heard that one. Now hold on a minute there Skippy. Don’t get to the name calling. It’s true, I can’t tell you where you put your code, but I can help you make the decisions. I can show you how to shape your own project. How does that sound? Well…. I suppose that will have to do? That’s more like it! Kind of. Right then, let’s think about Laravel code for a moment. The way I see it, we have two types of code. Good code and ba… haha just kidding. We have procedural code, and object-oriented code. Wait! Procedural code? I’m a modern programmer, I’m not writing QBasic here. Give me some objects!
You’re a feisty one tonight aren’t you? PHP is always going to be a little bit procedural. Here’s a fun game. Try and write an executing PHP application with only one class. No other code. :( Yes, that’s what I thought. PHP doesn’t have the equivalent of public static void main(). Sup Java homies? It needs a little bit of bootstrapping before our object oriented code is executed. 1 <?php 2 3 $a = new MyApplication; 4 $a->init(); // Start our doom machine. There’s an example of a PHP bootstrap. We need to create an instance of our class, and kick off the first method. If we don’t do this, we are stuck with procedural code. Laravel is no different. Go ahead, take a look at the public/index.php file. This is the first file that our web server hits when we get a new request. 1 <?php 2 /** 3 * Laravel - A PHP Framework For Web Artisans 4 * 5 * @package Laravel 6 * @author Taylor Otwell <[email protected]> 7 */ 8 9 require __DIR__.'/../bootstrap/autoload.php'; 10 $app = require_once __DIR__.'/../bootstrap/start.php'; 11 $app->run(); I’ve stripped out a boatload of Taylor’s nicely slanted comments, but you get the idea. We have a procedural bit of code, and then finally we kick start the application with $app->run();. It’s not just the core though, go ahead and take a look at app/routes.php or app/global/start.php. It’s all procedural code. Why is that? Well most of the time, the procedural files within Laravel are used either for configuration, or for registering things. Event listeners, model observers, routes, custom validators. The logic for these components is often located within a class, and that’s our object-oriented code, but we use a line such as…
'Me\Validators\Validate@validate'); … to let Laravel know that it exists. If we didn’t do that, then Laravel would have to spin through directories to find our files. These files would need a known location. That’s not very flexible is it? Let’s you and me think about your bedroom for a second… Turns lights down. - Turns on stereo with Barry White. That’s right. It’s business time. So anyway, your bedroom doesn’t have magnolia walls, a brown carpet and a bed in one corner does it? No way. It’s your space. You have posters of Keira Knightley. You have Star Wars figurines. You have plenty of knick-knacks all over the place. You have customized it. It represents your personality. This is how your codebase should be. Well… if you’re in a team, then it should represent the personality and needs of the team. Let’s think about solo projects for now. This application is yours. You make the rules. You are the big kahuna. This is why Laravel doesn’t look for Validators, and Observers, and all that other fun stuff in default locations. You have the freedom to put them where you want them to live. What about controllers and models? Yes, yes… I know there are directories in app for those. This is because everyone expects controllers and models from their MVC framework. If we shipped the framework as an empty directory, people would shy away from it. You have to start somewhere. That doesn’t mean you have to stick to that directory structure. We aren’t forcing you to use it. Break the mould! Let’s look at each type of code, and see what we can do to customize our project environment. Procedural Code When we think of procedural code, app/routes.php comes up early on our radar. Hmm, I wonder where routes.php is executed from? Well let’s take a look inside vendor/laravel/framework/src/Illuminate/Foun It’s just a guess!
Lots of other bootstrap code here... 4 5 /* 6 |-------------------------------------------------------------------------- 7 | Load The Application Routes 8 |-------------------------------------------------------------------------- 9 | 10 | The Application routes are kept separate from the application starting 11 | just to keep the file a little cleaner. We'll go ahead and load in 12 | all of the routes now and return the application to the callers. 13 | 14 */ 15 16 $routes = $app['path'].'/routes.php'; 17 18 if (file_exists($routes)) require $routes; 19 20 }); Hey, there it is! That sure was a lucky guess, wasn’t it? If the app/routes.php exists, it is loaded during the bootstrap process. Since this piece of code is in the vendor directory, and hopefully not versioned along with our application, it would be a bad idea to include additional files here. Go ahead and take a look a little further up the start.php file. Do you see this section? 1 <?php 2 3 /* 4 |-------------------------------------------------------------------------- 5 | Load The Application Start Script 6 |-------------------------------------------------------------------------- 7 | 8 | The start script gives us the application the opportunity to override 9 | any of the existing IoC bindings, as well as register its own new 10 | bindings for things like repositories, etc. We'll load it here. 11 | 12 */ 13 14 $path = $app['path'].'/start/global.php'; 15 16 if (file_exists($path)) require $path;
comment included, it says that in this file we are able to override bindings within the IoC container. This means that Laravel’s components have been loaded at this point, and are available for use. What this means is we can use our good old friend the require() method to include our own files from app/start/global.php and define our own structure for our procedural code. I think that this is best illustrated with an example. 1 <?php 2 3 // More bootstrap code.. 4 5 /* 6 |-------------------------------------------------------------------------- 7 | Require The Filters File 8 |-------------------------------------------------------------------------- 9 | 10 | Next we will load the filters file for the application. This gives us 11 | a nice separate location to store our route and application filter 12 | definitions instead of putting them all in the main routes file. 13 | 14 */ 15 16 require app_path().'/filters.php'; 17 18 // Create our own structure for files. 19 20 require app_path().'/observers.php'; // Model observers. 21 require app_path().'/validators.php'; // Custom validators. 22 require app_path().'/listeners.php'; // Event listeners. 23 require app_path().'/composers.php'; // View composers. 24 require app_path().'/services.php'; // Container bindings. 25 require app_path().'/helpers.php'; // Helper functions. Don’t forget to actually create those PHP files, your application will error otherwise. The app_path() helper gives the file path to the /app directory. We have now created a bunch of different files to store our procedural registrations within. This means that we aren’t cluttering the routes.php file with a mix of everything. Now don’t take those files as the best way of organizing your application. Make sure to create your own structure. This is your bedroom. Put up posters of your favourite bands, not mine. If you want to, you can break out of the /app directory. In fact, here’s a little secret. When I’m structuring my own applications, the app folder is almost empty. Only the configuration remains.
job recently, my buddy Anthony, who is right now jumping up and down and doing a happy dance because I named him in the book, or will be handing me my P45 on Monday because I didn’t ask his permission, was startled to see how I had structured the application. It’s nothing like the examples of Laravel applications that you see on Github. Nothing in the app directory. My routes file is at /src/routes.php. This is because he wanted me to define the project environment, and I did it to my own preferences. Obviously, if you are working on a large team, you will need to collaboratively build a structure that makes sense to the entire team. You don’t want to confuse anyone. So you might be wondering, why don’t I use this structure for the Laravel applications within my examples? Well there’s a slight catch to being an educator. When you suggest a technique, people tend to turn it into a standard. They tell their friends about it, and before long it becomes the way to solve a problem. I’m worried that this will be the case with application structure. I’d really love for it to be something that’s personal to you, or your team. For that reason my examples usually make use of the locations that are pre-defined by Laravel. Now that we have the ability to structure our procedural code, let’s take a look at where we can put our classes. Object-oriented code Your Laravel application is powered by Composer. This allows for a great deal of freedom when structuring your classes. Let’s take a look at the default composer.json file that ships with Laravel, specifically the autoload section. 1 "autoload": { 2 "classmap": [ 3 "app/commands", 4 "app/controllers", 5 "app/models", 6 "app/database/migrations", 7 "app/database/seeds", 8 "app/tests/TestCase.php" 9 ] 10 }, Now, we’ve all read the Composer chapter of the book, so you know that the classes within the classmap, and all classes held within the registered directories will be converted into a giant map of class names every time that a composer dump command is executed. This is how Laravel finds our files. The trouble is, people weren’t used to Composer when Laravel 4 was first released, and they often forgot to use composer dump each time they created a new class.
issues from users stating that “Laravel is saying my class cannot be found.”. We had tonnes of them. To avoid this problem, Taylor added a secondary loading mechanism within the framework core. Let’s take a look at app/start/global.php once again. This time we are looking at the top of the file. 1 <?php 2 3 /* 4 |-------------------------------------------------------------------------- 5 | Register The Laravel Class Loader 6 |-------------------------------------------------------------------------- 7 | 8 | In addition to using Composer, you may use the Laravel class loader to 9 | load your controllers and models. This is useful for keeping all of 10 | your classes in the "global" namespace without Composer updating. 11 | 12 */ 13 14 ClassLoader::addDirectories(array( 15 16 app_path().'/commands', 17 app_path().'/controllers', 18 app_path().'/models', 19 app_path().'/database/seeds', 20 21 )); Classes that are located within these directories won’t need the composer dump run every single time you add a class. So if we want to add new locations for our classes, we can simply add extra directories to either the composer.json or the app/start/global.php file. This is cool, but I like to think that the true power of Composer comes into play when you namespace your classes. Let’s go ahead and set up a new autoloading mechanism in the composer.json for our Laravel application.
[ 3 "app/database/migrations", 4 "app/database/seeds" 5 ], 6 "psr-0": { 7 "Example": "src" 8 } 9 }, To use psr-0 class loading, you will first need to think of a base namespace. In the example above, I have used the ‘Example’ namespace, which points to it’s classes and directory structure located within the src directory relative to the project root. You should probably use something other than Example for your root namespace. People tend to use their surname, or company name. Anything but example. Please! Once we have run composer update and our loading mechanism has been registered, we are now free to create any structure that we like within the src folder, as long as it sits within an Example sub directory. For example, our application might look like this. 1 src/Example/Controllers/UsersController.php 2 src/Example/Controllers/BooksController.php 3 src/Example/Models/User.php 4 src/Example/Models/Book.php 5 src/Example/Validators/UsersValidator.php 6 src/Example/Validators/BooksValidator.php 7 src/Example/Observers/BooksObserver.php 8 src/Example/SomethingDoer/Other/DoSomething.php You see? We can create our own directory structure. If we don’t like the name of the Controllers directory, then we are free to call it something else. Laravel and Composer do not have any rules for where your classes are located. This is your bedroom. Just remember that your folder structure, and Class name/namespace must match. For example, in the above example, this is what our src/Example/Validators/UsersValidator.php file will contain.
Example\Validators; 4 5 class UsersValidator 6 { 7 // Your code here... 8 } When using namespaced classes with any of Laravel’s “registration” type methods, be sure to provide the full namespace along with the class name. For example, this is how you would route to a namespaced file. 1 Route::get('/', 'Example\Controllers\UsersController@showUsers'); There’s one other ‘gotcha’ that might catch you out when using namespaced classes. I often forget about this one! Silly me. When your class is namespaced, PHP assumes that all classes that you use within, will be located in the same namespace. Let’s take a look at a quick example. 1 <?php 2 3 namespace Example\Controllers; 4 5 class UsersController extends Controller 6 { 7 public function showUsers() 8 { 9 return 'all the users! \o/'; 10 } 11 } Here we have our namespaced UsersController which is extending the Laravel base Controller class. Right? Right!? Wrong. Since we are within the Example\Controllers directory, PHP will assume that we are extending the Example\Controllers\Controller file. We need to explicitly state that we intend to use the Controller from the root namespace.
Example\Controllers; 4 5 use Controller; 6 7 class UsersController extends Controller 8 { 9 public function showUsers() 10 { 11 return 'all the users! \o/'; 12 } 13 } Now our controller will function as expected. Although this works fine, I’m a little fussy. Can you tell? So instead of useing the alias, I like to use the real class. What? You didn’t know that \Controller is an alias? Go ahead and look at the app/config/app.php. 1 'aliases' => array( 2 3 'App' => 'Illuminate\Support\Facades\App', 4 'Artisan' => 'Illuminate\Support\Facades\Artisan', 5 'Auth' => 'Illuminate\Support\Facades\Auth', 6 'Blade' => 'Illuminate\Support\Facades\Blade', 7 8 .. many other aliases .. 9 10 'Seeder' => 'Illuminate\Database\Seeder', 11 'Session' => 'Illuminate\Support\Facades\Session', 12 'SSH' => 'Illuminate\Support\Facades\SSH', 13 'Str' => 'Illuminate\Support\Str', 14 'URL' => 'Illuminate\Support\Facades\URL', 15 'Validator' => 'Illuminate\Support\Facades\Validator', 16 'View' => 'Illuminate\Support\Facades\View', 17 18 ), Oh hey look! A bunch of aliases. You didn’t think Laravel would dump all of its classes in the root namespace did you? Within the aliases we can see the real classes that these aliases represent.
classes, I like to use the real classes. I think this makes the code more descriptive, and improves any annotation-driven documentation generation packages you may use. Here’s another example. Go on. It’s a freebie at the end of the chapter! 1 <?php 2 3 namespace Example\Controllers; 4 5 use Illuminate\Routing\Controller; 6 use Illuminate\Support\Facades\Input; 7 8 class UsersController extends Controller 9 { 10 public function showUsers() 11 { 12 return Input::get('name'); 13 } 14 } Well there we have it. You have discovered a number of ways to structure your application in a non-standard format. Please don’t go copying the examples within this chapter word for word. Experiment, and try to build your own project structures. It’s your bedroom. So next time you feel like asking the question… Where do I put xxx? You shouldn’t be downloading xxx stuff, you filthy pervert! Just kidding. The answer will always be… wherever you want to!
Dayle Rees’ happy panda party. Please dress suitably and bring the enclosed coloured flags. More will be explained at the event. Kind Regards, Lushui. Chief panda butler esq. Exciting times, right? You arrive at Code Bright Manor wearing your Sunday best with coloured flag in hand. In the grand hall you are surrounded by thousands of other handsome developers. On the walls are oil paintings of famous red pandas that have served the Rees family throughout history. Champagne and caviare are served by red panda butlers wearing their finest orange and white tuxedos. It’s a really swish event. I mean, I’m a guy of good tastes, right? I suppose it’s time that I address my guests? Let me step up to the panda podium. Welcome, beautiful people, to the annual panda party. You have all been invited due to your own fantastic taste in technical writing. Now, I know that small-talk at these types of events can be a little awkward for developers. Fear not! I have devised a clever system. I hope that you have all brought your coloured flags along with you? • cheers * Excellent! I’m glad to see that you’re all so enthusiastic. Here’s how it’s going to work. If you would like to small-talk about the weather, then please hold up your red flag. If you would like to small-talk about recent sporting events, then please hold up the blue flag. Finally, if you would like to small-talk about video games, then please hold up the green flag. With this simple system in place we are all free to enjoy ourselves this evening. Please help yourself to champagne and let’s drink to your future projects with the Laravel framework. Concept So what was that all about? Well, apart from a little fun, it serves to illustrate the basics of event driven programming. By holding up a coloured flag we are ‘firing’ an event. Here’s an example.
this event. Here’s how that would look. 1 Event::listen('raise.blue.flag', function() 2 { 3 return new SmallTalk::make('sports'); 4 }); With our event listener in place, as soon as someone raises a blue flag we automatically initiate small talk about sports with the person. It’s a very efficient process. We can register as many listeners as we like. We can even register multiple listeners to the same event. So how do we employ a system such as this within Laravel? Well, it’s exactly as in the previous examples. Ok, I lied again, a little. That SmallTalk class doesn’t exist. The rest is just fine though! Why don’t we take a closer look? Firing Events Events are fired with a ‘key’. We can use this key to register listeners later. We fire the events using the fire() method on the Event class. The first and only required parameter is the key itself. Let’s take a look at an example. 1 Event::fire('my.event'); Any listeners that have been registered will be executed when this line of code has been run. It’s useful to be able to be notified in this way, but we can do much more with this eventing system. We can pass additional information along with our events. Our listeners can respond to this information, or may even modify it. Let’s take a look at another example. 1 Event::fire('my.event', array($object, $value)); With an optional second parameter, we can pass an array of PHP variables that will be handed to registered listeners. The standard rules of PHP apply. Objects themselves are passed directly, and basic types are passed as a copy. This means that if you place an object or class instance into the second parameter array, then the listener will be able to modify it. Let’s take a look at the other side of the equation shall we? It’s time to register some listeners.
simple. We can use the Event::listen() method. The first parameter is the ‘key’ of the event that we wish to respond to. The second parameter is a Closure that can be used to respond to the event. As always, let’s take a look at an example. 1 Event::listen('my.event', function() 2 { 3 // Perform some action. 4 // Update the database? 5 }); Within the Closure we can perform any action that we need to. We could log that an event occurred. We could update a database model. Anything is possible. Use your imagination! If our event is fired with with additional parameters then we can capture them by placing place- holder parameters within our Closure. Let’s take a look at this in action. 1 Event::listen('my.event', function($first, $second) 2 { 3 // Use $first and $second. 4 }); The parameters are provided in the same order as they are represented within the array passed to the event firing method. As I mentioned earlier, we can register multiple listeners to a single event. All registered listeners will be executed. Here’s an example. 1 Event::listen('my.event', function() 2 { 3 // First listener. 4 }); 5 6 Event::listen('my.event', function() 7 { 8 // Second listener. 9 }); 10 11 Event::listen('my.event', function() 12 {
Event::fire('my.event'); Within the above example, all listeners will be executed once the my.event has been fired. Maybe we have dealt with the event within the first listener? What if we don’t want the other listeners to be processed? Not a problem! If we return a boolean false value from our listener, then we will break the event chain and subsequent listeners will not be executed. For example, within this code snippet… 1 Event::listen('my.event', function() 2 { 3 // First listener. 4 return false; 5 }); 6 7 Event::listen('my.event', function() 8 { 9 // Second listener. 10 }); 11 12 Event::listen('my.event', function() 13 { 14 // Third listener. 15 }); 16 17 Event::fire('my.event'); … only the first event listener will be executed. Now I’m sure you’re getting tired of me telling you this, but wherever there’s a Closure, you could also use a PHP class. The syntax is the same as it always is. First you define your event listener class.
process() 4 { 5 // Handle the event here. 6 } 7 } Next you register the listener using a notation that’s similar to how you define a controller and action pair. Here’s an example. 1 Event::listen('my.event', 'MyListener@process'); The second parameter to the listen() method is now the class and method pair. If you don’t provide a method, then the event system will automatically look for a method named handle(). Events can also be subscribed to with a priority. This way we can change the order used to execute our listeners. Here’s an example. 1 Event::listen('my.event', function() 2 { 3 // First listener. 4 }, 1); 5 6 Event::listen('my.event', function() 7 { 8 // Second listener. 9 }, 3); 10 11 Event::listen('my.event', function() 12 { 13 // Third listener. 14 }, 5); 15 16 Event::fire('my.event'); By specifying an integer as the third parameter of the listen() method we can change the order that our listeners are processed. Listeners with a higher integer value will be executed first. In the above example the listeners will be executed in reverse order. Nice and simple! When registering events, you don’t have to be exact about your event key. If you like, you could use a wildcard (*) within your listener to register for a subset of events. Here’s an example.
4 }); The event listener will now be executed once any event that starts with the prefix my. is fired. Event Subscribers In the previous chapter I shared some locations where you could register your code. With events you have an additional option. An event subscriber can be used to create a class that will handle multiple events. Here’s an example of a simple event subscriber. 1 class MyListeners 2 { 3 public function firstListener() 4 { 5 // First event listener. 6 } 7 8 public function secondListener() 9 { 10 // Second event listener. 11 } 12 13 public function thirdListener() 14 { 15 // Third event listener. 16 } 17 18 public function subscribe($events) 19 { 20 $events->listen('first.event', 'MyListeners@firstListener'); 21 $events->listen('second.event', 'MyListeners@secondListener'); 22 $events->listen('third.event', 'MyListeners@thirdListener'); 23 } 24 } Our event subscriber is similar to our standard event class. It has a number of listener methods, but also a new method named subscribe(). This method accepts an eventing instance, which we have called $events in the example above.
to fire and listen for events, do you remember? Well this instance is exactly the same. We can use it to register our listeners from within our subscriber class. To allow for our subscriber class to function correctly, we need only provide a call to the subscribe() method with an instance of our subscriber class, like this. 1 Event::subscribe(new MyListeners); Whichever method you choose to register your events, I’m sure it will work fantastically for you. Now have another sip of champagne. It’s on me! Global Events Want to hear another secret? This is just between you and me. I don’t want you sharing this with the other developers, okay? We can spy on Laravel. That’s right. We can intercept its messages if we choose. You see, Laravel fires its own events. For example, when Laravel executes an SQL query the illuminate.query event is fired. Remember that illuminate is the codename for Laravel’s component suite. The parameters passed with the illuminate.query event are related to the query itself. Which includes the SQL query that is to be executed. Laravel also fires an illuminate.log event when a new call to the Log class is made. By interrogating the parameters that are passed to the event we can easily intercept any messages that are logged by the system. There are also several events that are so useful that Taylor has provided some simple short-cuts that can be used to listen for them. If you pass a Closure to the App::after() method, then the Closure will be executed after the framework has completed it’s request-response cycle. Just before the response is sent to the client. The current request and response are sent as parameters to the event, which means you have a ‘last-chance’ to alter the response before it is sent. Here’s an example. 1 App::after(function ($request, $response) { 2 $response->headers->set('Access-Control-Allow-Origin', '*'); 3 }); In the above example we modify the $response parameter to add the ‘Access-Control-Allow-Origin’ header. This head will now be served along with every response from the system. You also have access to the App::before() method that is an event which is triggered before the routing has been performed. This event only passes the current request as a parameter.
example filters.php file that ships with the framework. While they exist in the filters file, they are actually implemented in a fashion that is more similar to an event. Use Cases I certainly encourage you to use the event system in a creative manner to solve your own problems, but here are some example use cases that I have found useful. Logging & Audit When a specific function relating to my application occurs, I like to fire an event. Here are some examples of the events that might be fired. • user.created • user.deleted • profile.updated Should I wish to log this information, forward it to an external service for analytical purposes, or event audit actions within the system, I need only register an event subscriber to watch for these defined events. The overhead for firing an event is rather small, so I tend to place them wherever is useful. You never know what kind of actions you wish to track at a later date. Hooks With software pages similar to CMS’s or task management systems, or “those kind” of re- distributable packages you will often find a way of ‘hooking’ your own extensions into the code. Or modifying the objects that the system works with. Events are a fantastic way of allowing developers to mod on top of your system without having to extend classes. This chapter has been in preparation for an upcoming chapter on the inversion of control principle and Laravel’s own service container.
the entrance of the Otwell mansion. She kept to the shadows, crouched low and out of sight. Shauna was no stranger to stealth. You see, she wasn’t just a developer, she was one of the most renowned cat burglars in the United States of Americaland. This evening however, she wouldn’t be stealing cats. No, she had her eyes set on a much bigger prize. She removed her lock-picking kit and set to work on the door. The Otwell mansion had six locks on its outer door protecting the rare and valuable treasures held within. The locks were no match for Shauna’s nimble fingers. One by one they all went click. The door swung open quietly. Shauna crept along the wooden floorboards of the main landing. Her five-fingered shoes made no noise as they came in contact with the cold varnished floors. All around her were trinkets and treasures. Priceless components from previous versions of Laravel’s history. Trophies for development battles and award ceremonies. None of these treasures caught Shauna’s eyes. She had her gaze firmly fixed on a greater treasure. There it was, in all of its shiny golden glory! Actually, I kinda imagine it looking like the Ark of the Covenant from the Indy movies. You know, like a big decorated solid gold box? Sure that will do. Maybe with some kind of light ‘aaaaaaaaaaaahhhh’ background noise playing when you stand near it. It was the container. The heart of Laravel! This was the most valuable treasure in the mansion. Shauna slithered up to the container silently and laid her hands upon its cool-to-the-touch exterior. She couldn’t contain her excitement. She had to know what was inside. Slowly, she slid the lid to one side and peered into the depths of the container. With a burst of light and screams of pain a number of entities filled the room. Bound closures and object instances swirled around the landing of the Otwell mansion. The screams and storms were so violent that the Otwell clan had been woken. Taylor leaned over the balcony of the mansion, holding a sawn-off shotgun in each hand. “Shauna!? You again? Get out of my house! Just go and clone the Laravel repository if you want your own container so bad!” Okay, I know what you must be thinking. Dayle, you wrote about the container in the architecture chapter.
think that was all there was to know about the Container? The mysterious beating heart of Laravel has only a single trick to share? No, handsome reader, you are very much mistaken! The container is the most important part of the framework. It holds everything together. Without the container, there would be no Laravel four. There would be no Code Bright. Everyone would be sad, and developers might not be as beautiful. In the architecture chapter I previously mentioned how the $app object at the heart of Laravel extends the Illuminate\Container\Container class. I explained how we could store things within it using a syntax similar to arrays. It becomes a magical box, holding anything we wish to keep within it. It’s a little mysterious though, and tends to be confusing for many first-timers. A little like the Ark of the Covenant I suppose. Did I mention how much I love those movies? Dun-da-dun-dun… Do-dee-do! Well, before I get an angry email from Mr Lucas, let’s start playing with the container. Inversion of Control You may have heard of the container being called an ‘IoC’ container. Can you guess what the ‘IoC’ stands for? Inversion of Control. Don’t be a smart Aleck, you saw it right there in the heading, didn’t you?! If you weren’t so dang handsome I’d have to be angry with you. Inversion of control is self-explanatory, right? Let’s move on. I’m just kidding! It’s a terrible term. I despise when developers invent over-complex terms to make ourselves sound smarter than we are. It truly aggravates me! Let’s simplify the term. IoC essentially means: 1 Allow the framework to build things for us. We give the framework a recipe for creating objects or values for us. This means that we are transferring (or inverting) control of the instantiation of these objects to the framework. We’re trusting it to build them for us. Earlier, I told you how we could use the $app instance as an array to hold things within the container. Well, in Laravel we have the ‘App’ facade which can be used to make the container (and application object) available to all parts of the framework. It’s aliased right there in the root namespace. We can use the facade to store and retrieve things from within the container, sharing them amongst the different classes that make up our application. First, here’s an example without the facade.
5 // Get hold of the app object. 6 $app = app(); 7 8 // Bind the integer 3 into the container. 9 $app['three'] = 3; 10 11 // Output the response. 12 echo $app['three']; This works absolutely fine. We get the value 3 as we might expect. It’s no different to working with any other array. The truth is, the container is doing something very clever under the hood. Let’s take a look at the instantiation of an imaginary ‘sms’ library. Normally you’d want to hold the parameters within a configuration file, but let’s keep this simple for the sake of this example. 1 <?php 2 3 // app/routes.php 4 5 // Get hold of the app object. 6 $app = app(); 7 8 // Create a new SMS component. 9 $sms = new SMSClient; 10 $sms->setUsername('shauna'); 11 $sms->setPassword('1_5t341_c4t5!'); 12 13 // Bind the component. 14 $app['sms'] = $sms; 15 16 // Send an SMS. 17 $app['sms']->send('+55121212153', 'Yo dawg.'); It looks like we’re just setting the sms index of the $app array (really, we know it’s a container) to an instance of our SMS client, but under the hood, the Laravel container is doing clever things for us. You see, the Laravel container implements the ArrayAccess interface, which allows it to simulate some properties of an array. For one, direct access to its values through indexes.
two methods, offsetGet() and offsetSet(), to let the language know what should happen when the object is used in a similar manner to an array. Let’s take a look at the source of the Illuminate container. Yes, I know it’s a complicated class, but I promise this will be useful. We’re going to be looking at the two methods that I mentioned a second ago, offsetGet() and offsetSet(). 1 <?php 2 3 // Container.php 4 5 /** 6 * Get the value at a given offset. 7 * 8 * @param string $key 9 * @return mixed 10 */ 11 public function offsetGet($key) 12 { 13 return $this->make($key); 14 } 15 16 /** 17 * Set the value at a given offset. 18 * 19 * @param string $key 20 * @param mixed $value 21 * @return void 22 */ 23 public function offsetSet($key, $value) 24 { 25 // If the value is not a Closure, we will make it one. This simply gives 26 // more "drop-in" replacement functionality for the Pimple which this 27 // container's simplest functions are base modeled and built after. 28 if ( ! $value instanceof Closure) 29 { 30 $value = function() use ($value) 31 { 32 return $value; 33 }; 34 } 35
confusing? Not a problem. Let me explain. Let’s look at the content of the offsetGet() method. 1 <?php 2 3 // Container.php 4 5 return $this->make($key); Here the container is saying, when you try to access anything in an array like fashion, use the make() method with the key to get our value. The make method can be used to build values and objects from the storage of the container. It does some other clever stuff, but we’ll be taking a look at that in the next section. The offsetSet() method looks a little more confusing. Here’s the bit we’re interested in. 1 <?php 2 3 // Container.php 4 5 if ( ! $value instanceof Closure) 6 { 7 $value = function() use ($value) 8 { 9 return $value; 10 }; 11 } 12 13 $this->bind($key, $value); When we try to set a value onto the container using an array-like syntax, we first check to see if the provided value is not a Closure. If it’s not a Closure, then we set the stored value to a Closure that returns the original value. Why do we do that? Well, just like how the make() method is used to internally retrieve values from within the container, the bind() method is used to store them. The bind() method takes a Closure as a parameter, so we need to wrap it first. Once it’s wrapped, we use bind() and store it within the internal storage of the container. Looking at our previous example step by step, we see that…
5 // Bind the component. 6 $app['sms'] = $sms; … effectively becomes… 1 <?php 2 3 // app/routes.php 4 5 $app['sms'] = function () use ($sms) { 6 return $sms; 7 }; … when bound within the container. Hopefully you’re still with me. We know that everything bound within the container is now wrapped within a Closure. So when we try to retrieve our SMS component from the container… 1 <?php 2 3 // app/routes.php 4 5 $sms = $app['sms']; …we know that a Closure is being executed internally, and is returning the $sms instance held within. Now that’s enough of the $app object. That’s messy. Let’s use the facade instead. We can’t use the ArrayAccess syntax on the facade itself, since it is simply masking the $app instance behind it. Instead, what we can do is use the bind() and make() methods directly. Now that we know that bind() receives a Closure, we can use it to store values and objects using the facade. Let’s store an integer again.
5 // Bind an integer into the container. 6 App::bind('three', function () { 7 return 3; 8 }); 9 10 // Retrieve the integer from the container. 11 echo App::make('three'); We aren’t really doing anything new here. We’re simply masking our old ugly code with the new and beautiful facade. The bind method takes a container ‘key’ (used to later retrieve the value) as the first parameter, and as a second parameter we give our Closure that returns an integer. We can then use the make() method, supplying the container key that we used to set the value, and are given the result of the bound Closure. Let’s look at a similar example using our SMS component. 1 <?php 2 3 // app/routes.php 4 5 // Create a new SMS component. 6 $sms = new SMSClient; 7 $sms->setUsername('shauna'); 8 $sms->setPassword('1_5t341_c4t5!'); 9 10 // Bind the component. 11 App::bind('sms', function () use ($sms) { 12 return $sms; 13 }); 14 15 // Send an SMS. 16 App::make('sms')->send('+55121212153', 'Yo dawg.'); First we create the component. Next we bind it within the container using a key string and Closure. Finally, we resolve the value from the container by key and make use of it. There’s a problem here, though. Have you managed to spot it? It can be a little difficult to spot, you need to think about the flow of execution of the application.
binding it to the container. What happens if we don’t wish to use it in every request? The likelyhood is that we only want certain routes to send SMS notifications. In all other requests we are wasting time and resource by creating that SMS component upfront. This is where the Closure becomes useful. You see, our Closure within the container is only ever executed when you attempt to resolve it from the container. You can think of it as a form of blueprint for creating your stored value. Why don’t we move the whole creation of the SMS component into the Closure? Let’s take a look at how that might be implemented in code. 1 <?php 2 3 // app/routes.php 4 5 // Bind the component. 6 App::bind('sms', function () { 7 8 // Create a new SMS component. 9 $sms = new SMSClient; 10 $sms->setUsername('shauna'); 11 $sms->setPassword('1_5t341_c4t5!'); 12 13 // Return the created SMS component. 14 return $sms; 15 }); 16 17 // Send an SMS. 18 App::make('sms')->send('+55121212153', 'Yo dawg.'); It’s not a big change is it? We simply move the creation of the SMS instance to within the Closure. We’re inverting control right here. We’re providing the framework with the power to create our SMS component only when we need it. We know that the $sms instance will only ever be instantiated when we call App::make('sms') in the requests that intend to use it. You see, Inversion of Control isn’t as scary as it sounds, is it? Perhaps it should have been named ‘Allowing the framework to create things for you only when you need them container.’, or the AtFtCTFYOWYNT container for short. That’s much better! There’s one final flaw with the binding of our SMS component, though. If you’ve managed to spot it, then go ahead and help yourself to some of Dayle’s gold stars. They taste like plastic and glitter. Take a look at the following example, maybe you’ll be able to spot the problem?
5 // Bind the component. 6 App::bind('sms', function () { 7 8 // Create a new SMS component. 9 $sms = new SMSClient; 10 $sms->setUsername('shauna'); 11 $sms->setPassword('1_5t341_c4t5!'); 12 13 // Return the created SMS component. 14 return $sms; 15 }); 16 17 // Send an SMS. 18 App::make('sms')->send('+55121212153', 'Yo doge.'); 19 20 // Send another SMS. 21 App::make('sms')->send('+55121223432', 'SUCH TEXT. WOW'); Here, all we’ve added is a second line to send an SMS message. It shouldn’t be a problem, right? Well, it’s true that the code will function just fine. The problem is that it’s not very efficient. To spot the flaw, we need to think about the flow of execution once more. We create the blueprint for building an object. We resolve the component to send an SMS message, then we resolve the component and send another. We resolve the component twice. We resolve the Closure twice. Uh oh! That means that we are instantiating the SMS component twice. We’re setting the credentials twice. Are you getting tired of hearing twice yet? I’m getting tired of typing it. Let me get it out of my system. TWICE TWICE TWICE TWICE TWICE. Right, we’re good. This double resolution is a problem. It’s wasteful, isn’t it? The component is being used the exact same way the second time. It’s using the same credentials. Why should we bother to instantiate it again? It’s a waste of memory and CPU cycles. Surely the smart and mighty Otwell must have thought of a way around this problem? Of course he did, and as ever, Laravel has got your back! We can use the magical share() method of the container. It will allow the result of a Closure to be cached internally for the current request, so that subsequent container resolutions return the same value without repeatedly executing the Closure. Let’s take a look at how it can be used.
5 // Bind the component as a singleton. 6 App::singleton('sms', function () { 7 8 // Create a new SMS component. 9 $sms = new SMSClient; 10 $sms->setUsername('shauna'); 11 $sms->setPassword('1_5t341_c4t5!'); 12 13 // Return the created SMS component. 14 return $sms; 15 }); 16 17 // Send an SMS. 18 App::make('sms')->send('+55121212153', 'Yo doge.'); 19 20 // Send another SMS. 21 App::make('sms')->send('+55121223432', 'SUCH TEXT. WOW'); All we need to do, is swap the bind() method for the singleton() method which has the same signature. You may have heard of the Singleton design pattern. It ensures that there is only ever one instance of a class, and does not allow it to be duplicated. This isn’t a true singleton, but it’s a similar process, and a fitting name for it. The Closure will only ever be resolved once. You’ll get the same instance of the SMS component back every time. Why should I believe you? Now then, you’re a feisty one today aren’t you reader? You think I’d lie to you? Well… erm, again? I suppose I don’t have a great track record here, do I? Fine, let me prove it to you. Let’s go back to numbers! Take a look at the following snippet.
5 App::bind('rand', function () { 6 return rand(); 7 }); 8 9 var_dump(App::make('rand')); 10 var_dump(App::make('rand')); 11 var_dump(App::make('rand')); We know that the rand() function for PHP can be used to generate a ‘pseudo’ random number. Let’s execute this piece of code and see what we get. 1 int 1742870120 2 int 385800925 3 int 1573429337 Wow. Such random. So number. It’s exactly as we expected. Using the bind() method, the Closure is executed each and every time that it is resolved using the make() method. We receive a new ‘random’ number each time. Let’s try the singleton() method instead, shall we? 1 <?php 2 3 // app/routes.php 4 5 App::singleton('rand', function () { 6 return rand(); 7 }); 8 9 var_dump(App::make('rand')); 10 var_dump(App::make('rand')); 11 var_dump(App::make('rand')); It’s a slight change, but I have a feeling that it will have a very dramatic result. Let’s take a look at the output.
int 903162162 You see, the Closure is executed only once. The integer 903162162 that we get back from the rand() function the first time the Closure is executed, is cached, and given on all subsequent calls to make(). When we use the container, we need to decide whether our resource can be shared or not. Sometimes we need a ‘fresh’ resource every time, and sometimes it’s simply a waste of resources. As always, we need to use our best judgement as developers to decide which method is appropriate. Well, do you think that we’ve explored all the mysteries of the container now? Of course not! In fact I’ve got a whole extra section dedicated to my favourite container trick. Prepare to be amazed! Dependency Injection Oh no! It’s another scary term, isn’t it? If you’re just starting out with object-oriented coding then you may have heard of this technique being thrown around the internet in the PHP community recently. You might be thinking “Oh no, it’s that thing related to testing!”. I know that testing code can be intimidating, but even without writing a single test, I promise that dependency injection can be useful to you. It’s not going to be scary. I promise! I once saw a quote once about dependency injection that I absolutely loved. Unfortunately, I can’t for the life of me remember who it was that said it. I like to think that the semi-anonymous author would be happy for me to use it anyway, so here goes. Dependency injection… or as I like to call it.. ‘setting things’. - Anon Code Philosopher. It’s fantastic because it’s completely true. Here we have another prime example of developers using a complicated name, to make a technique sound much more complicated and advanced than it needs to be. Let’s start small. Before we get started on dependency injection, let’s take a look at reflection-based class resolution using the container. Oh dear, that sounded fairly complicated didn’t it? Maybe that’s where these names come from? Let’s take a look at a code example that will help serve to clarify that horrible wording! 1 <?php 2 3 // app/routes.php 4 5 $collection = App::make('Illuminate\Support\Collection');
gives is an empty collection. Why does it do that though? I don’t remember binding that key into the container, do you? The container is awfully clever. If we try to resolve a key that doesn’t exist, but instead a class with that namespace and name exists, then that’s obviously what we want, right? The container says to itself “Hey, I see this Illuminate\Support\Collection class definition over here, why don’t I create a new one?”. The talking to itself isn’t actually implemented in the code, unfortunately. Perhaps someone could send a pull request for that? Let’s quickly take a look at the signature for the constructor of the Collection class. 1 <?php 2 3 // Collection.php 4 5 public function __construct(array $items = array()) You’ll notice that you can pass an array of items to the constructor to set the initial content of the collection. However, it has a default value of an empty array. When resolving classes from the container by name, the container will use the PHP reflection API to examine the parameters that it needs to be constructed. Since this parameter has a default value, the class can be constructed without passing any additional values. Let’s make our own class to see what happens when our constructor parameters don’t have a default value. 1 <?php 2 3 // app/routes.php 4 5 // An example class, injecting a 'something' instance. 6 class Example 7 { 8 protected $something; 9 10 public function __construct($something) 11 { 12 $this->something = $something; 13 } 14 } 15 16 // Attempt to resolve the example class by name from the container. 17 $example = App::make('Example');
takes a $something instance within its constructor. We’re injecting that dependency into the class. We’re ‘setting it’. That’s all dependency injection is. Unfortunately, the container has no idea what our $something is. So, what happens when we execute this code? Well, we get an error. An Illuminate\Container\BindingResolutionException is thrown with the message ‘Unresolvable dependency resolving [Parameter #0 [ Well at least it tried, right? So how can we help the container to tackle this problem? Well, the best thing that we could do is somehow describe the instance that we are injecting. We need to let the Container know what we intend for it to be. We can do this by type-hinting the parameter in the constructor. Let’s implement the Something class, and then type-hint its injection within the Example class. That sounded fairly jargon filled, didn’t it? It’s always much more simple to explain with code! 1 <?php 2 3 // app/routes.php 4 5 // A Something class. 6 class Something 7 { 8 // ... 9 } 10 11 // An example class, injecting a 'something' instance. 12 class Example 13 { 14 protected $something; 15 16 public function __construct(Something $something) 17 { 18 $this->something = $something; 19 } 20 } 21 22 // Attempt to resolve the example class by name from the container. 23 $example = App::make('Example'); This time, the Example class is instantiated correctly. So how does it work? Well, the container will take a look at all the parameters required in the constructor of the Example class. It will notice that the Example class requires an instance of a Something class as a parameter. Since the container is aware that there is a class definition for a Something class, and is also aware
simply created a new instance and pass it to the new Example. Laravel is managing our dependency hierarchy for us. What’s even more impressive about this process, is that it happens all the way down the dependency tree. Let’s take a look at an overcomplicated example. 1 <?php 2 3 // app/routes.php 4 5 class First 6 { 7 public function __construct(Second $second) {} 8 } 9 10 class Second 11 { 12 public function __construct(Third $third, Fourth $fourth) {} 13 } 14 15 class Third 16 { 17 public function __construct( 18 Fourth $fourth, 19 Illuminate\Container\Container $container 20 ) {} 21 } 22 23 class Fourth 24 { 25 public function __construct(array $myArray = array()) {} 26 } 27 28 $first = App::make('First'); Here we have a four level dependency hierarchy, which the container is happy to instantiate for us using make(). I’m not going to cover each step of the example, but for a little homework, why not try to identify the following? • Injection of the four levels of classes. • Injection of a default value. • Injection of multiple parameters.
not try drawing a diagram of the dependency tree? Tweet it to @daylerees and I’ll give you a grade! :) The best part about the reflection-based injection, is that most of the classes that are used by the framework are also resolved through the container. Anywhere where you specify a class/action pair in the following format… 1 Some\Namespaced\Class@andMethod … the class will be resolved from the container. This means that any dependencies, and dependencies of dependencies, will be resolved automatically. Your controllers, filters, composers, listeners and other classes can all take advantage of this automatic injection mechanism! In the next chapter we will build on what we’ve learned about the controller, to create service providers for third party libraries.
I clearly wrote on the book’s description page, this title is published while in progress. Since you are seeing this page, it means it’s not done yet. Don’t worry though, I have big plans for this title. I will continue to write chapters, and add fixes and updates until I deem the book a complete source of knowledge for the framework. All of the future chapters and updates are available for free to those who have purchased the title. Just head over to Leanpub whenever you get an email from them about updates. It’s as simple as that! I’d also like to take this time to thank each and every one of you for supporting my writing. I have really enjoyed writing both titles, and intend to write a whole lot more in the future. If you guys hadn’t supported me by buying my books, and emailing me with your feedback, I probably wouldn’t have found this wonderful hobby (job?) of mine. If Code Happy and Code Bright have helped you in anyway, then I would really appreciate if you would share the URL to the book with your friends. It’s at http://leanpub.com/codebright³⁰, in case you lost it. :) My overall plan for the title at present is the following. • Describe basic framework concepts and components in detail. • Write a ‘build-an-app’ chapter for a simple application, building on what we have learned. • Further explore advanced framework features. • Several ‘build-an-app’ chapters based on the advanced features. • Best practice, and clever tricks. I’m also considering an FAQ chapter based on the feedback that I get from the title, so if you have a burning question that isn’t likely to be covered by a future feature chapter, then please let me know. If you have anything you want to talk about you can contact me at [email protected]³¹ or daylerees on Twitter³². You will often find me hanging around in #laravel on Freenode IRC too, but please don’t be offended if I don’t reply right away, I have a day job too! Thanks once again for being part of Code Bright. Love, Dayle, and his faithful army of red pandas. xxx ³⁰http://leanpub.com/codebright ³¹mailto:[email protected] ³²http://twitter.com/daylerees
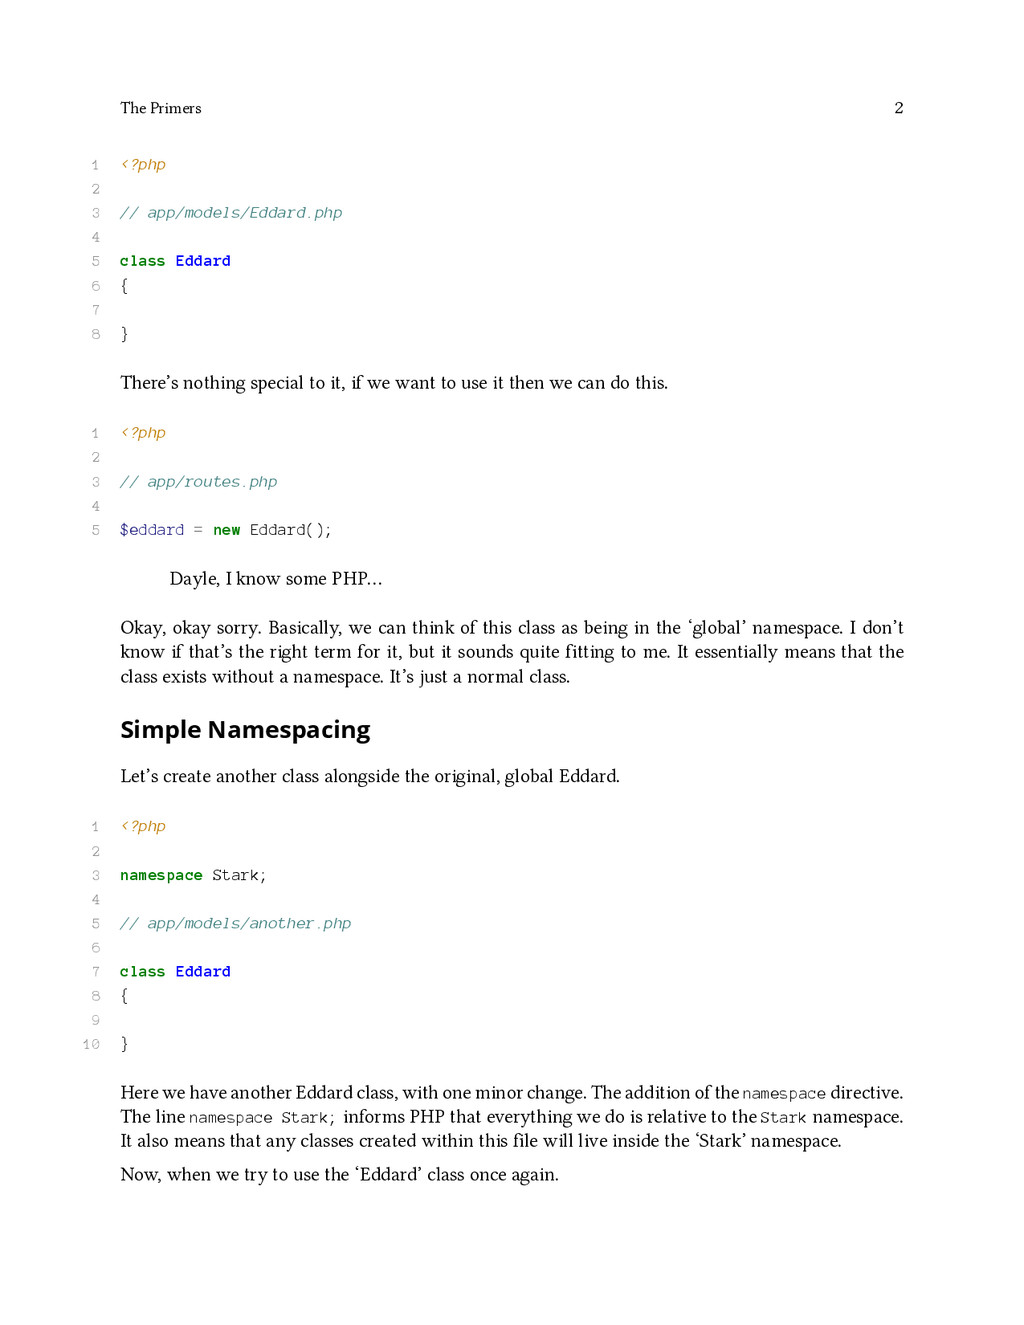
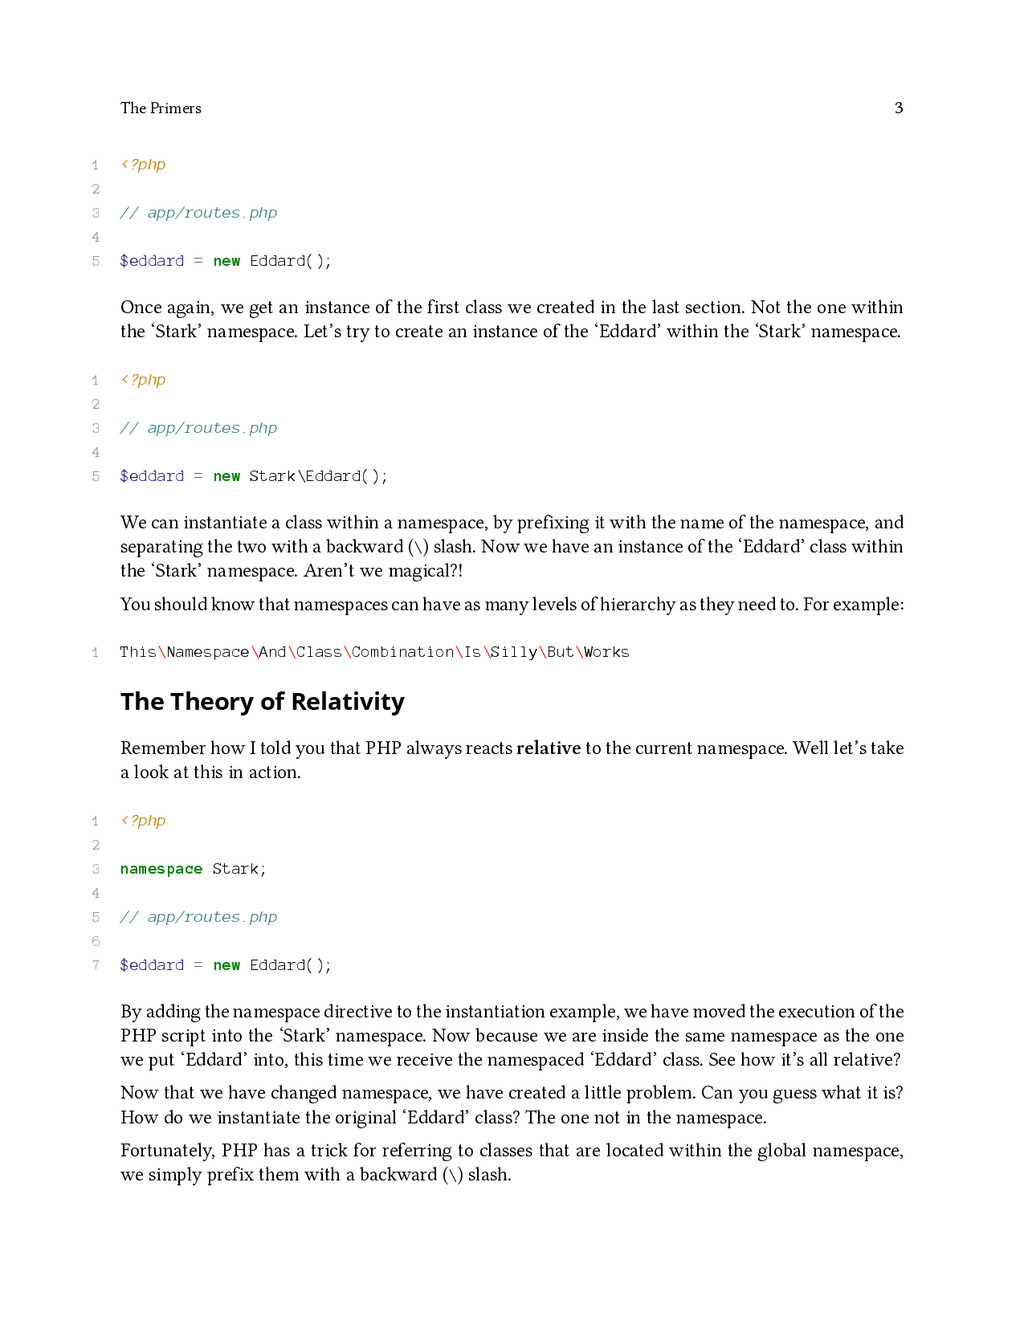
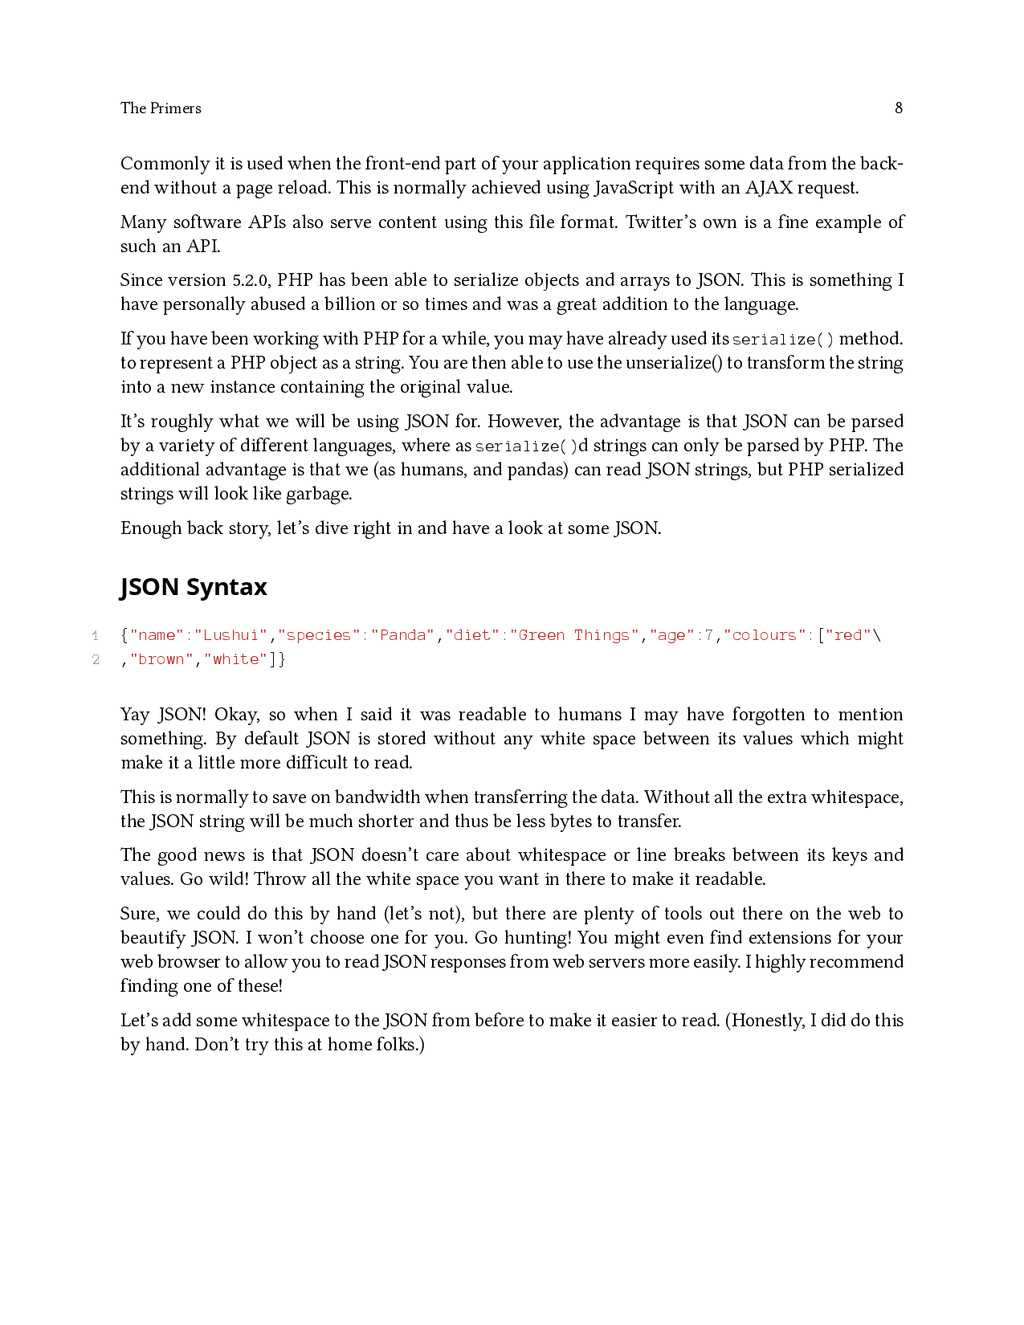
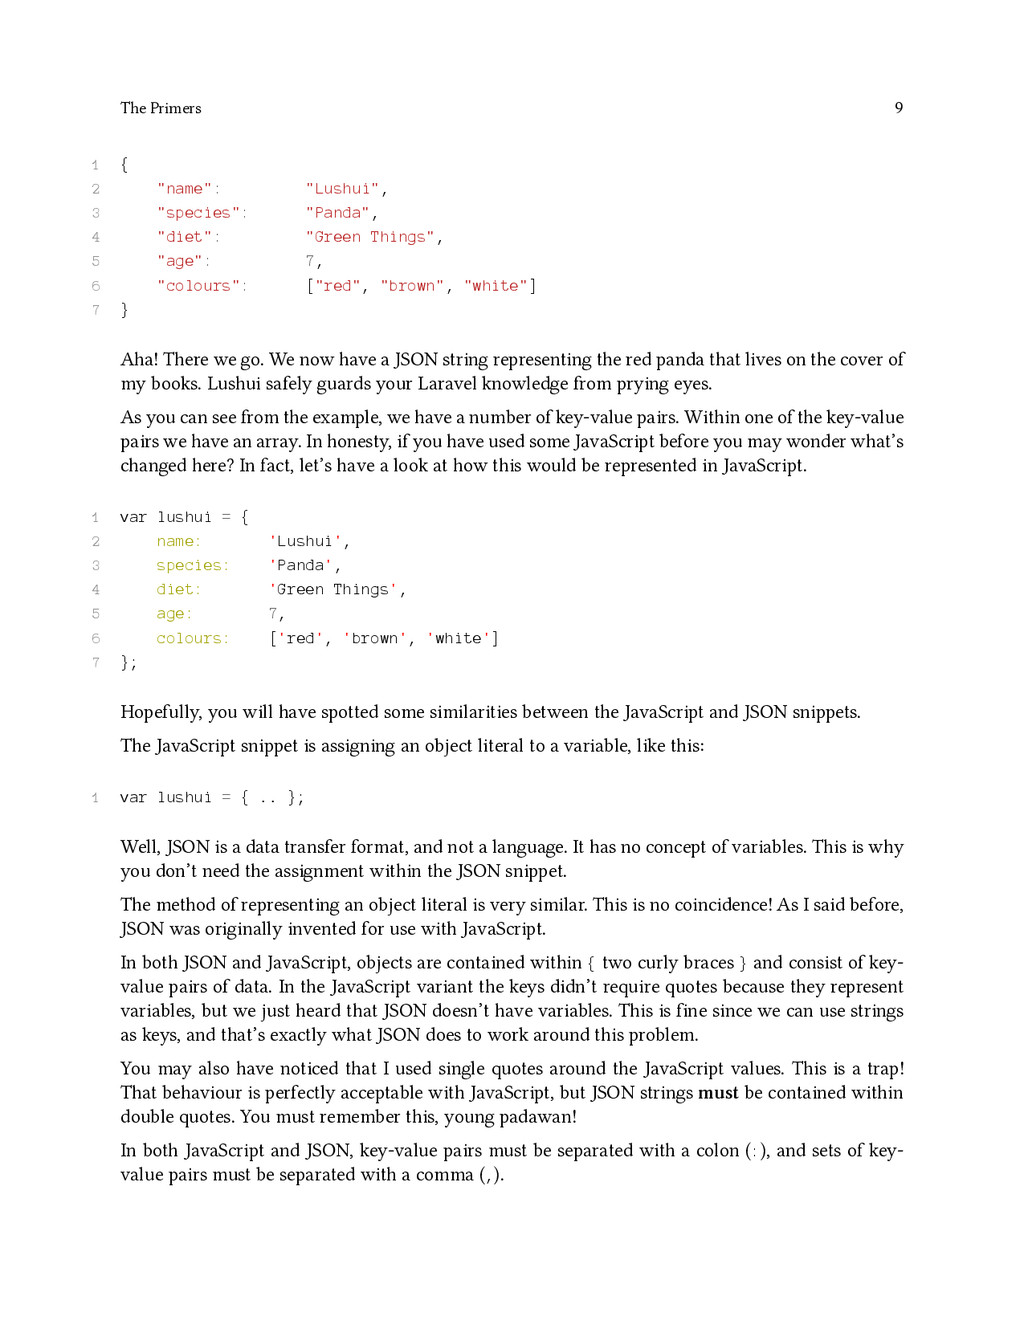
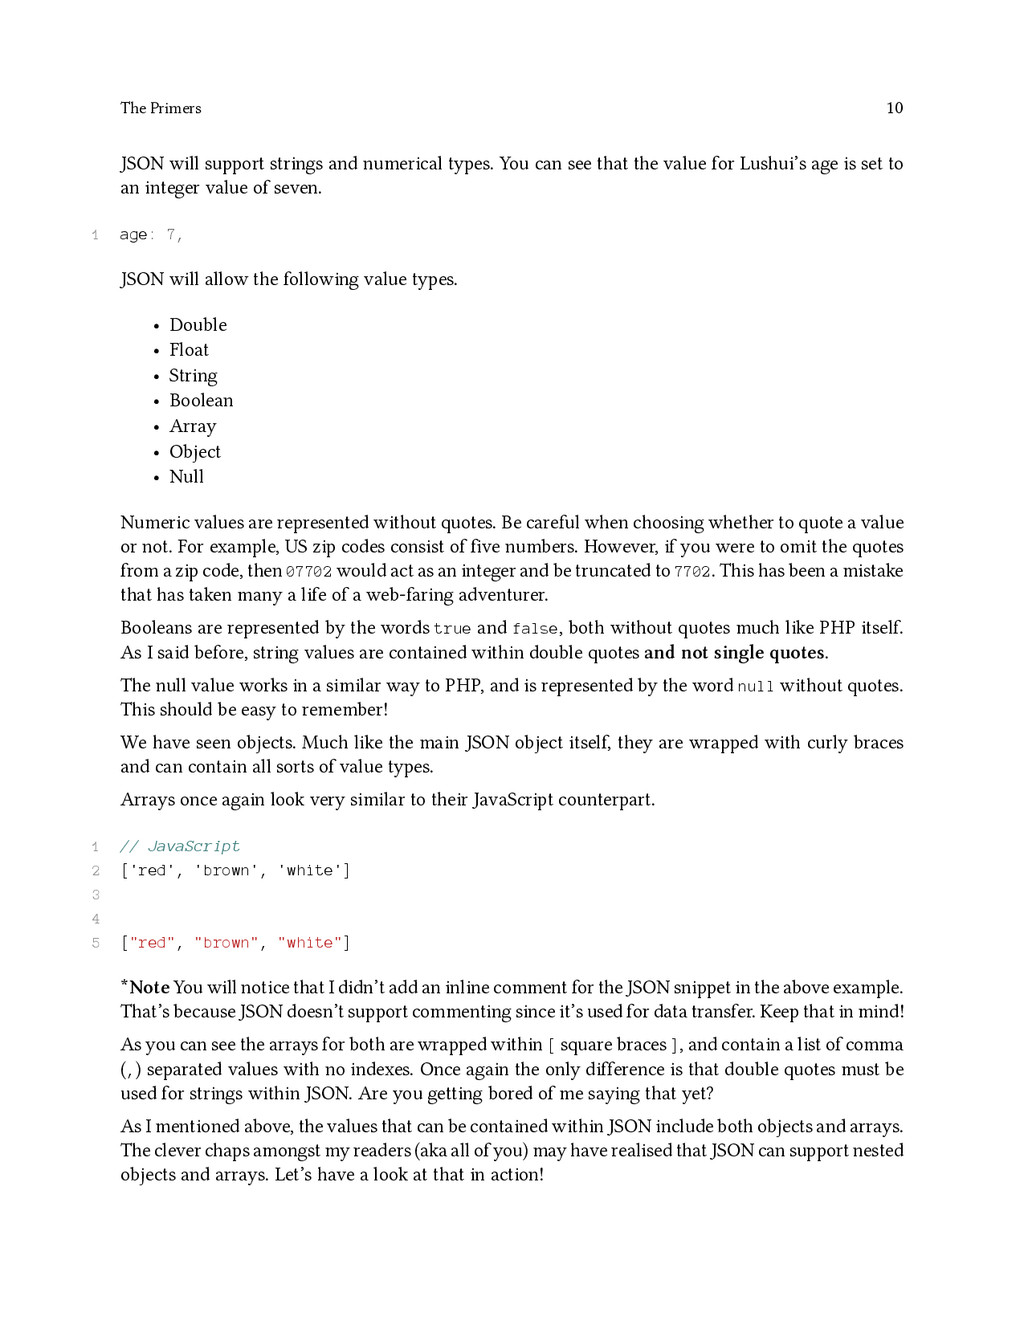
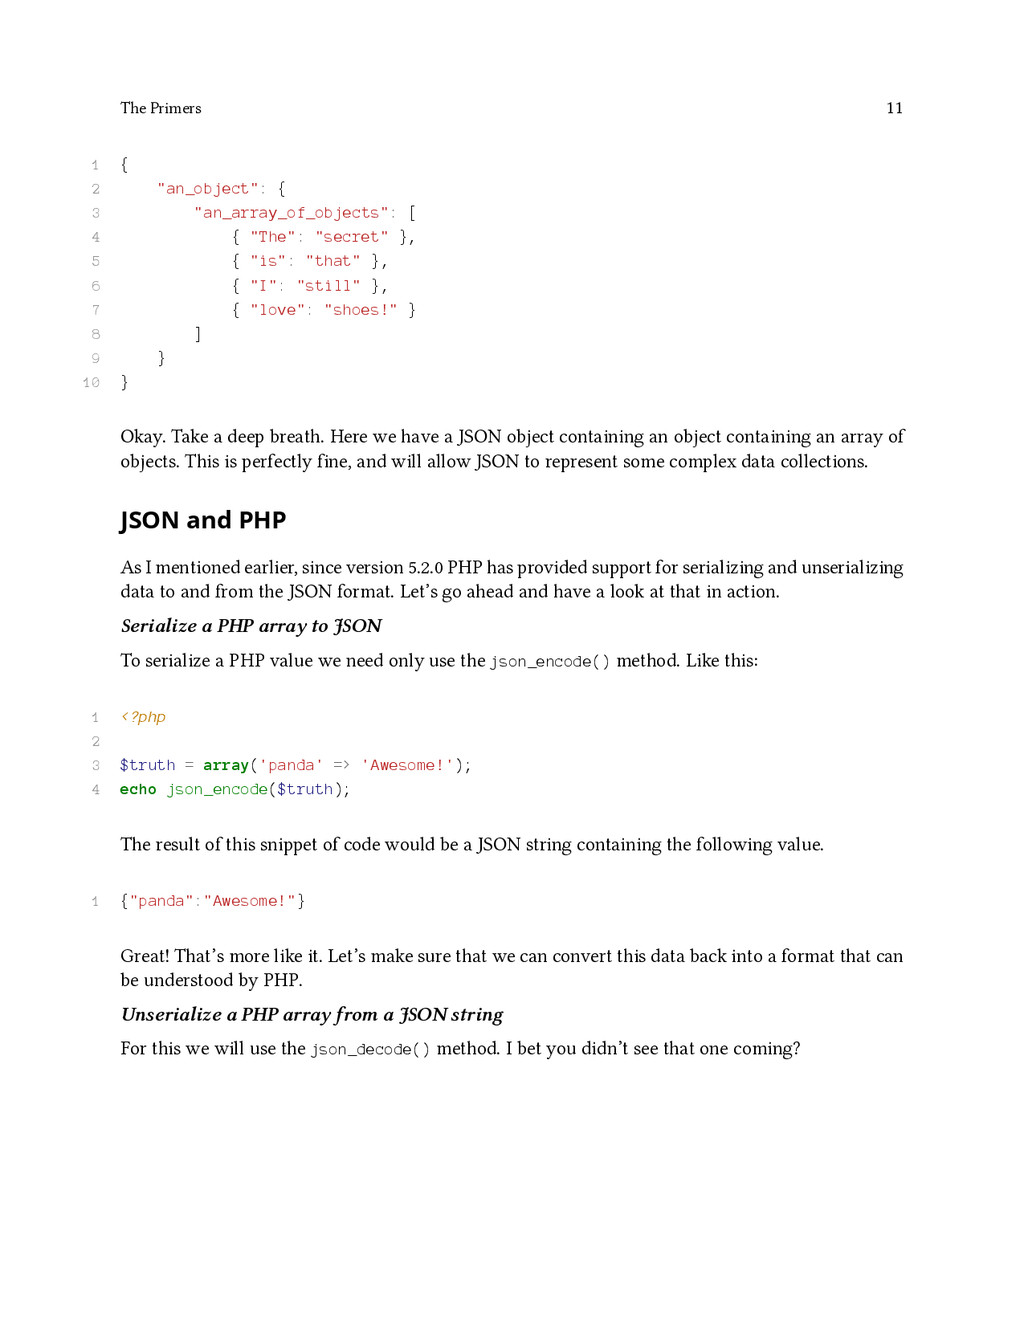
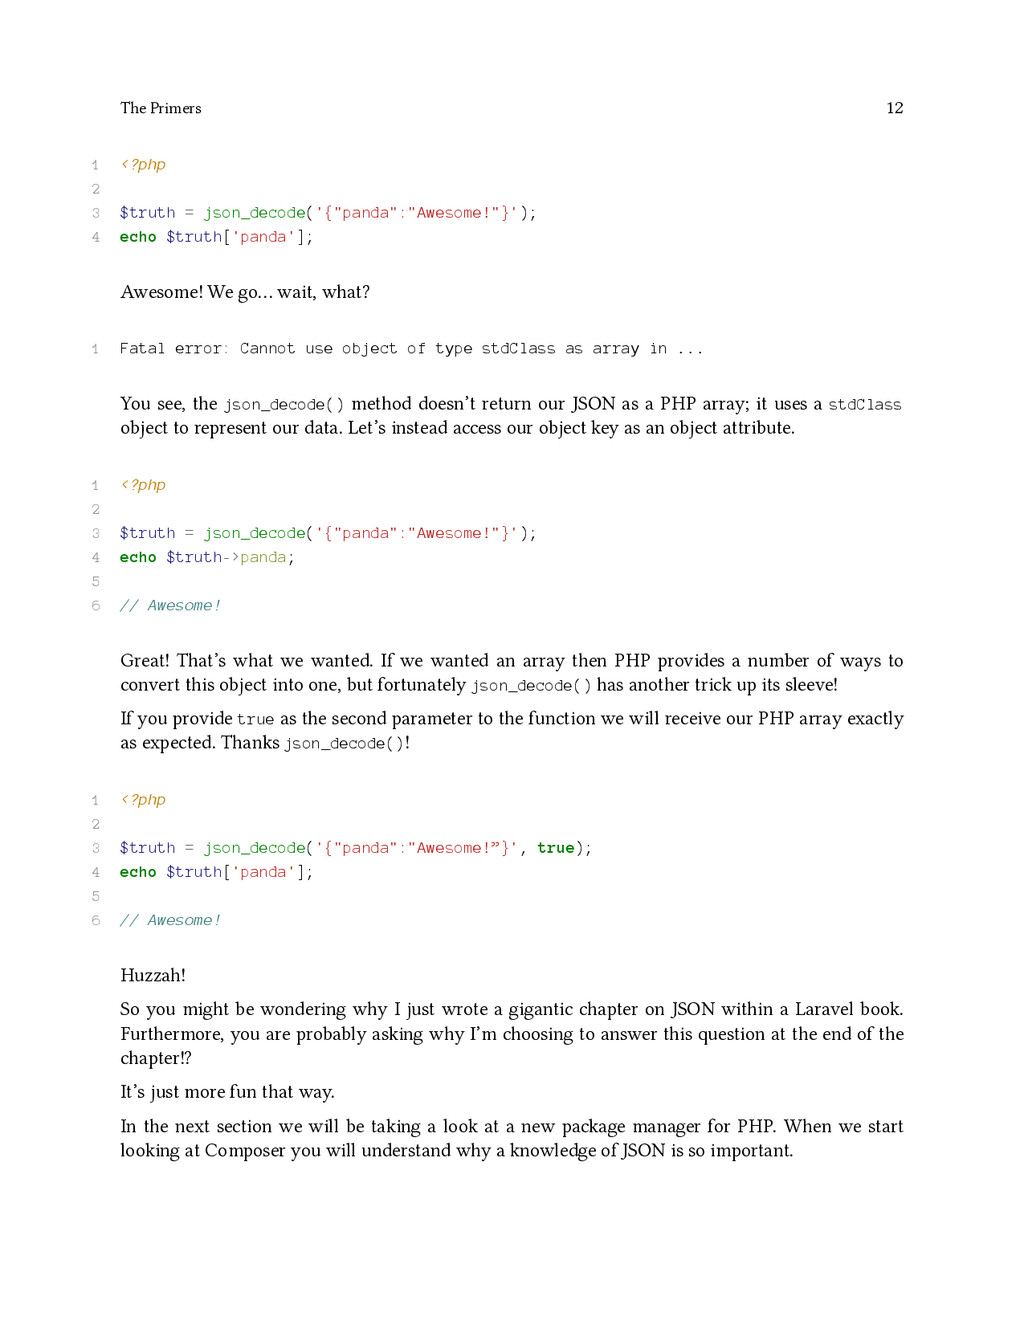
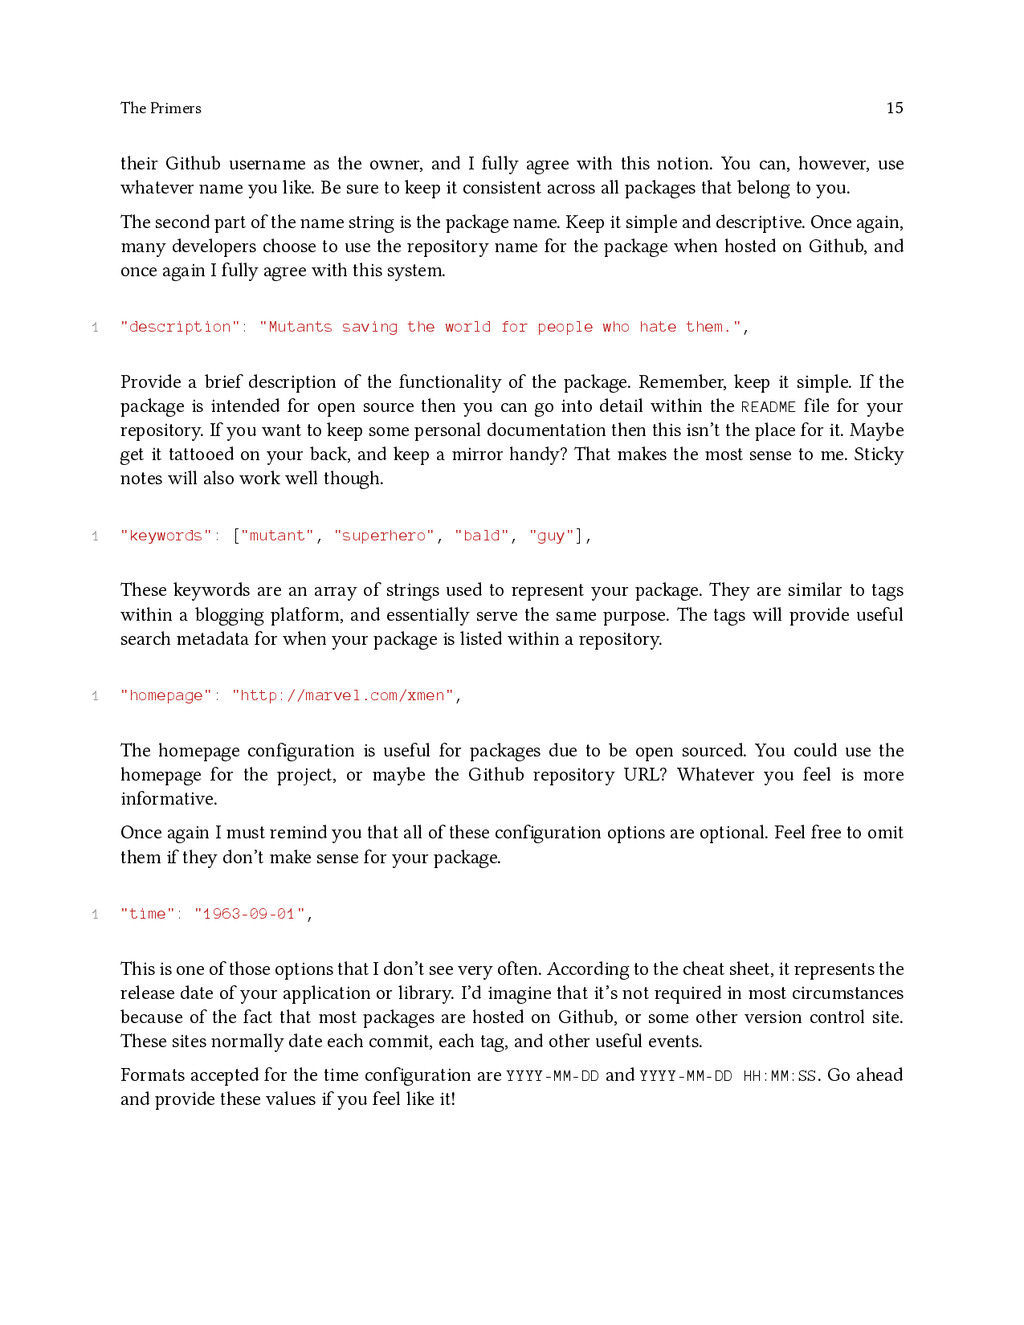
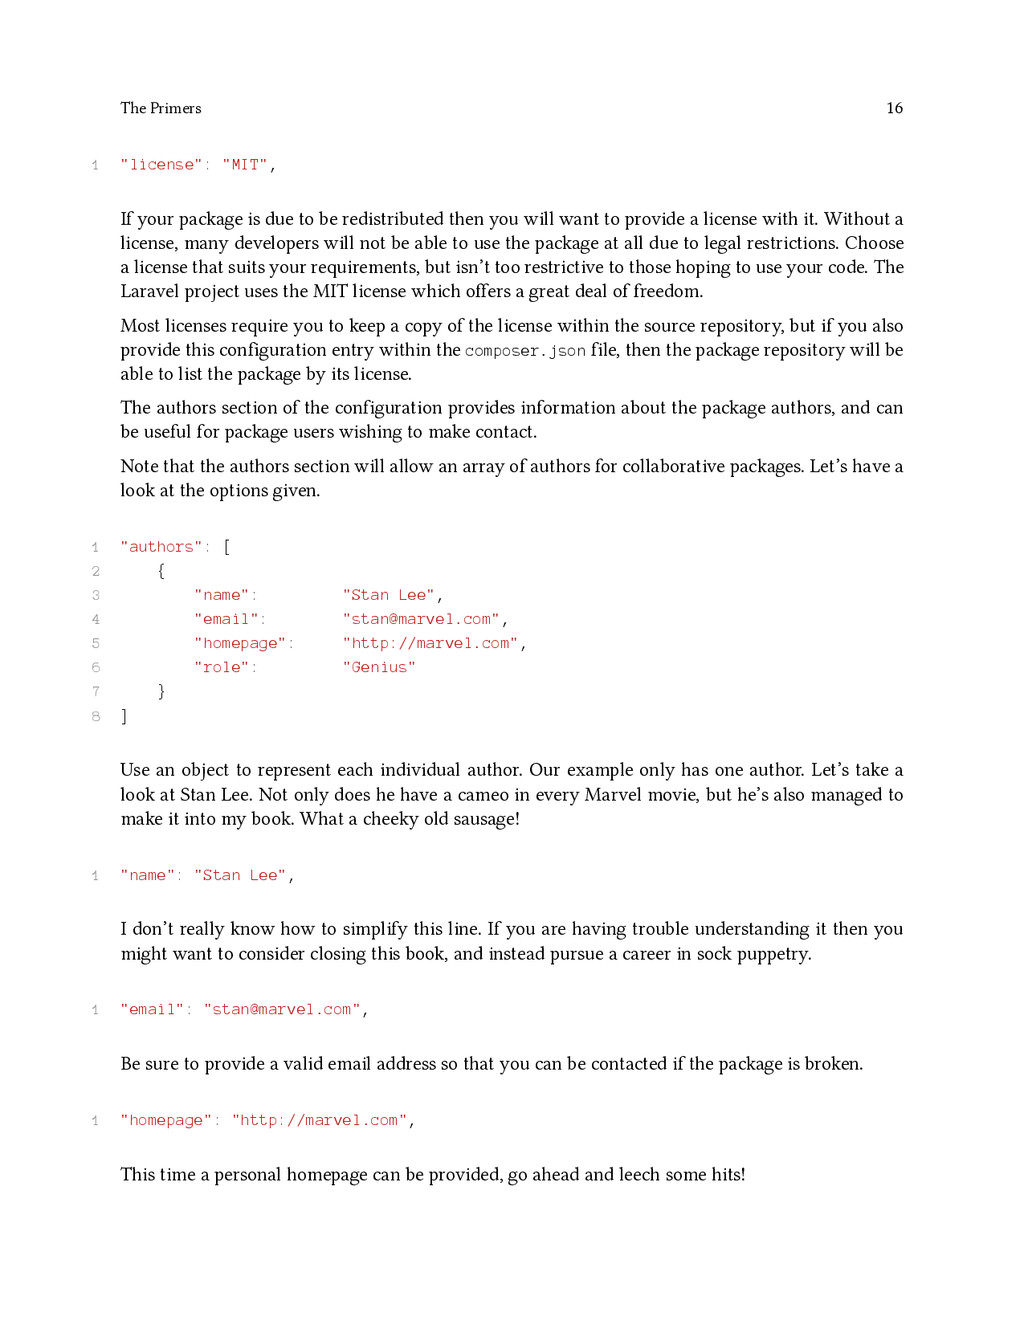
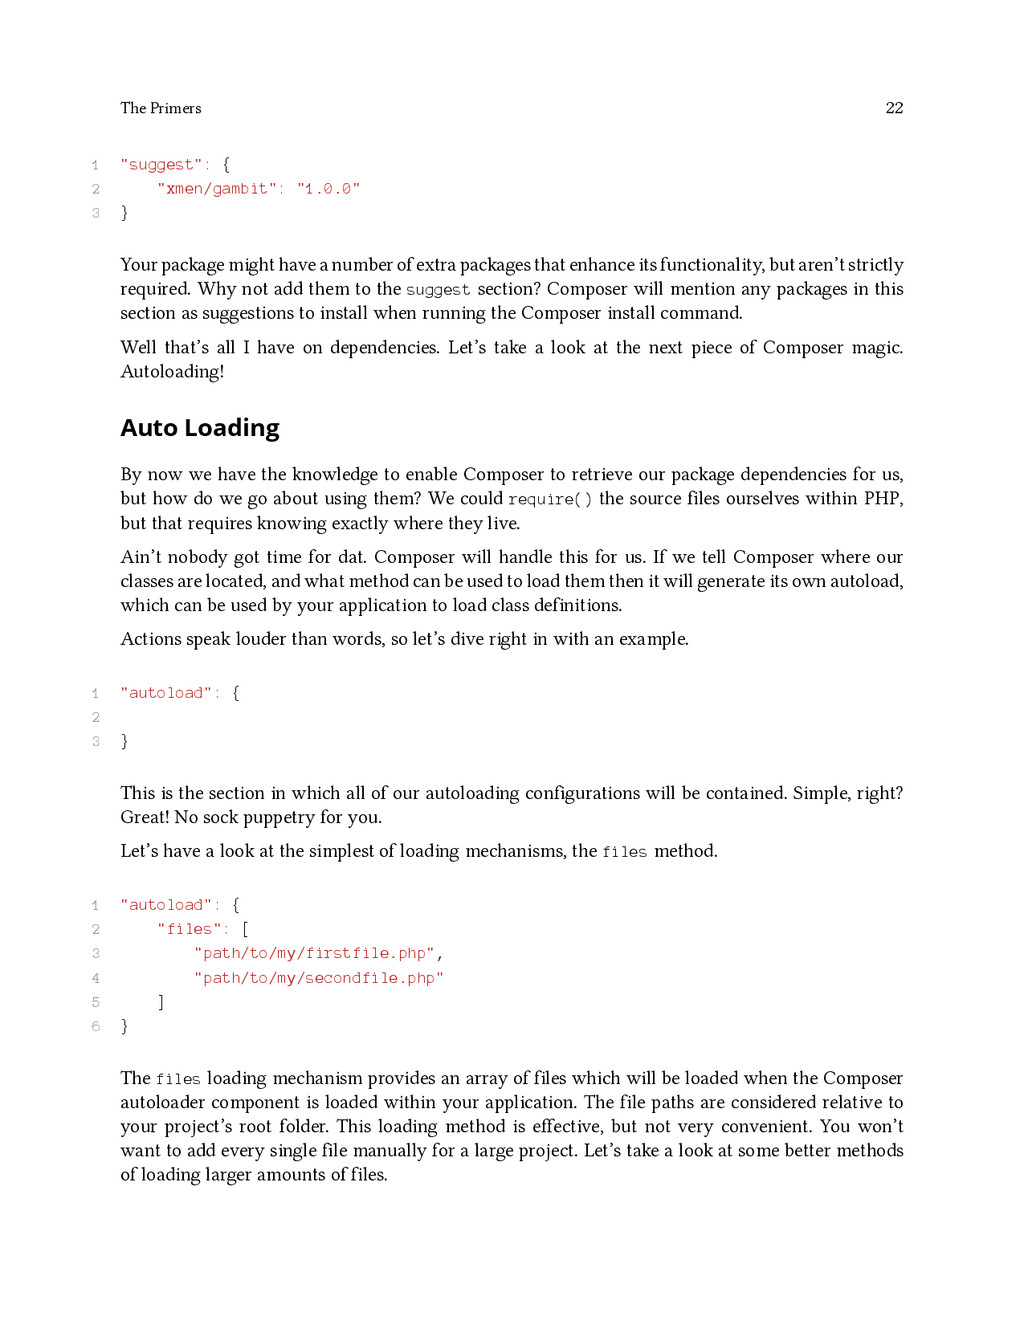
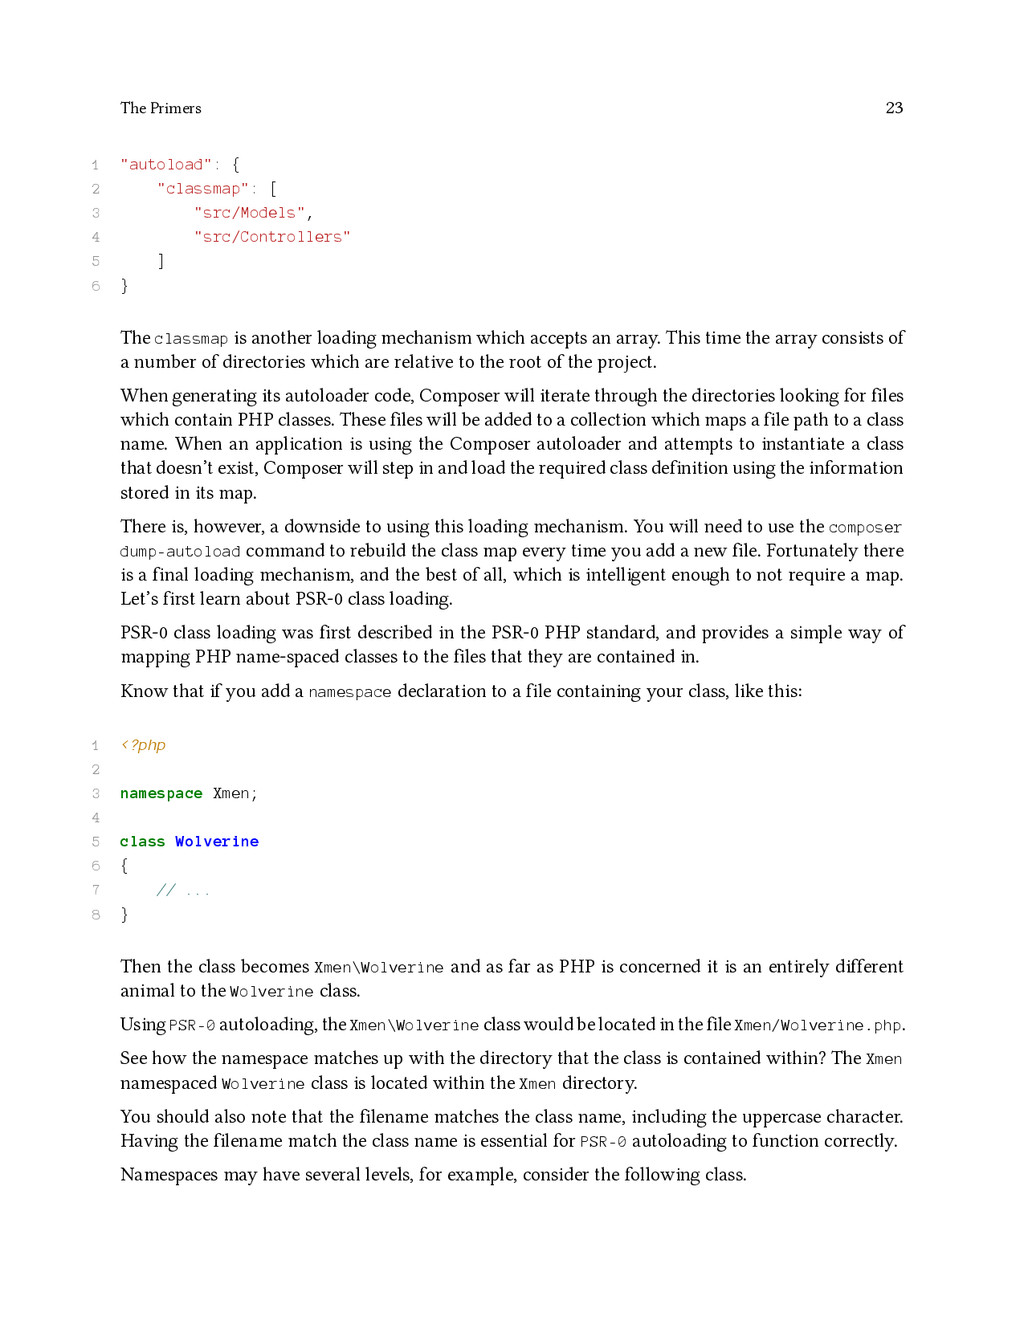
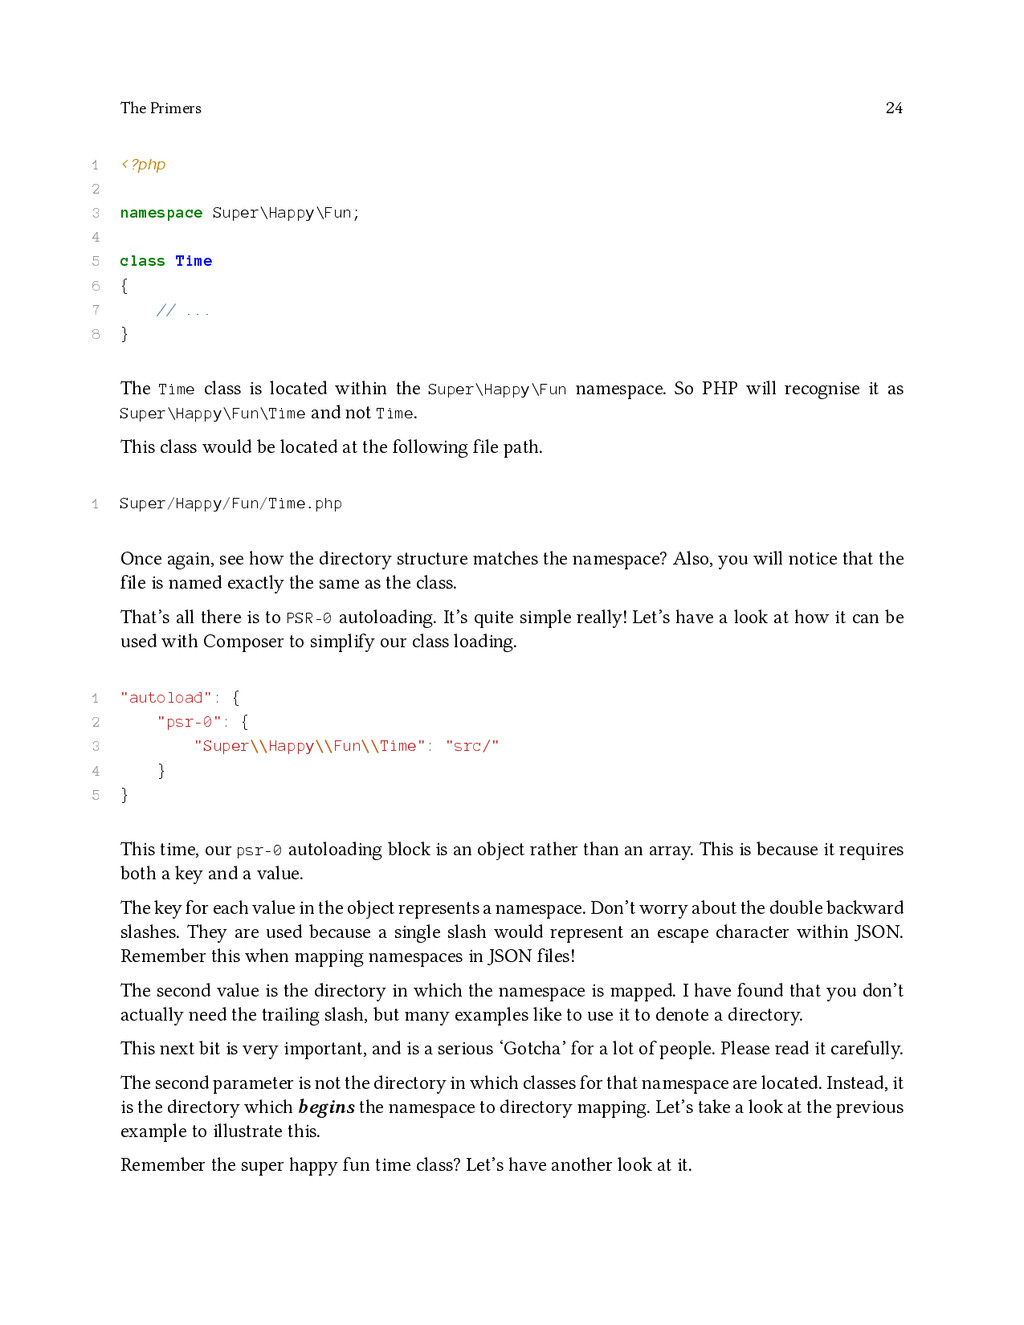
![The Primers 28 14 } 15 ], 16 "require": {](https://files.speakerdeck.com/presentations/93bfbe605f48013231b75a35dee7ad3b/slide_42.jpg)
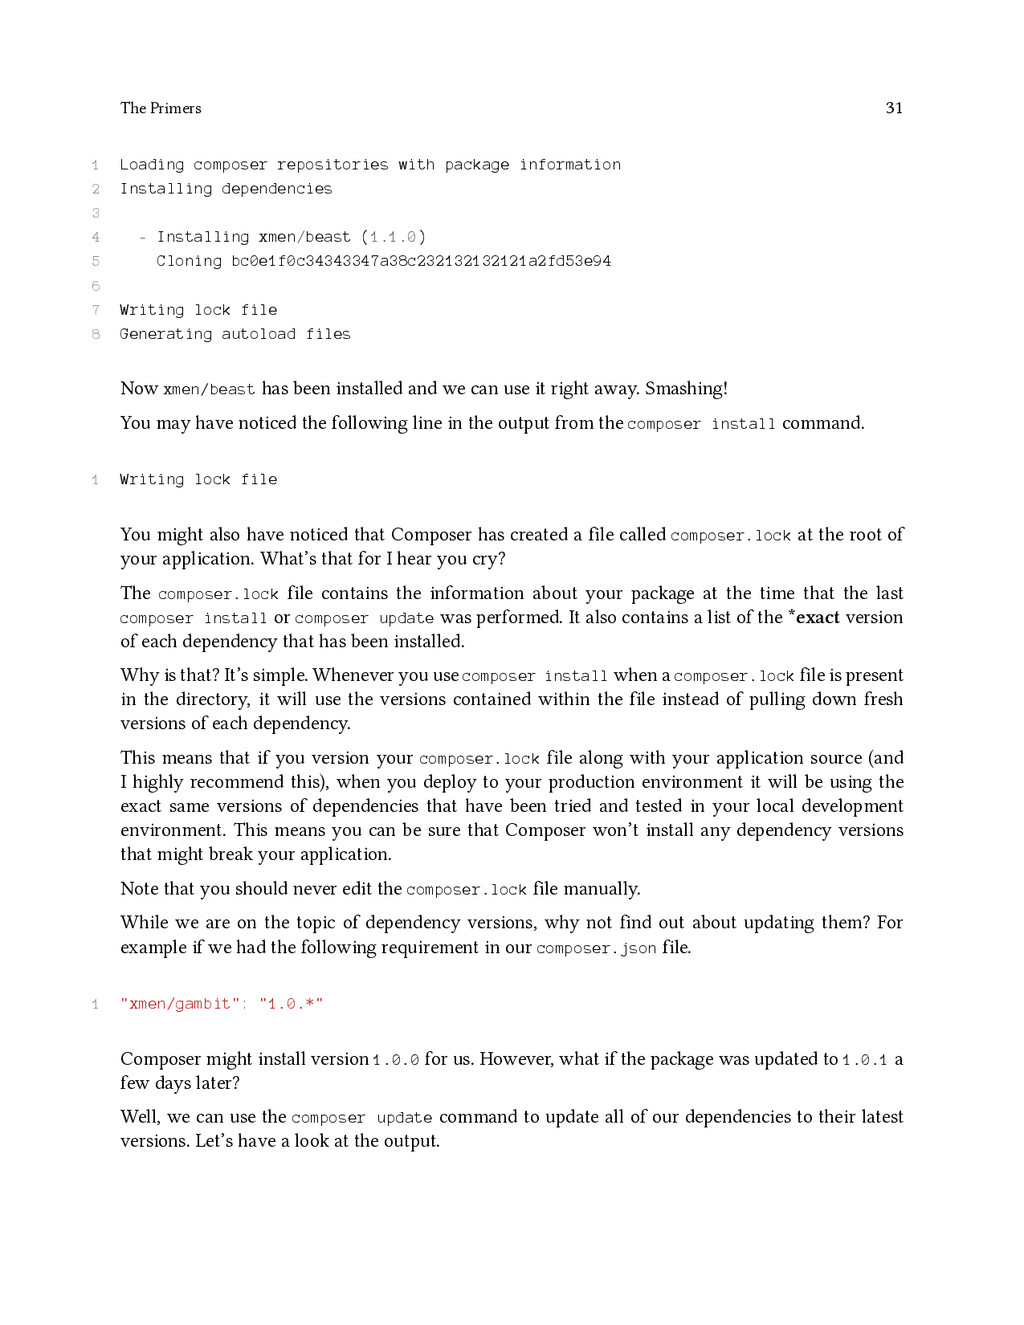
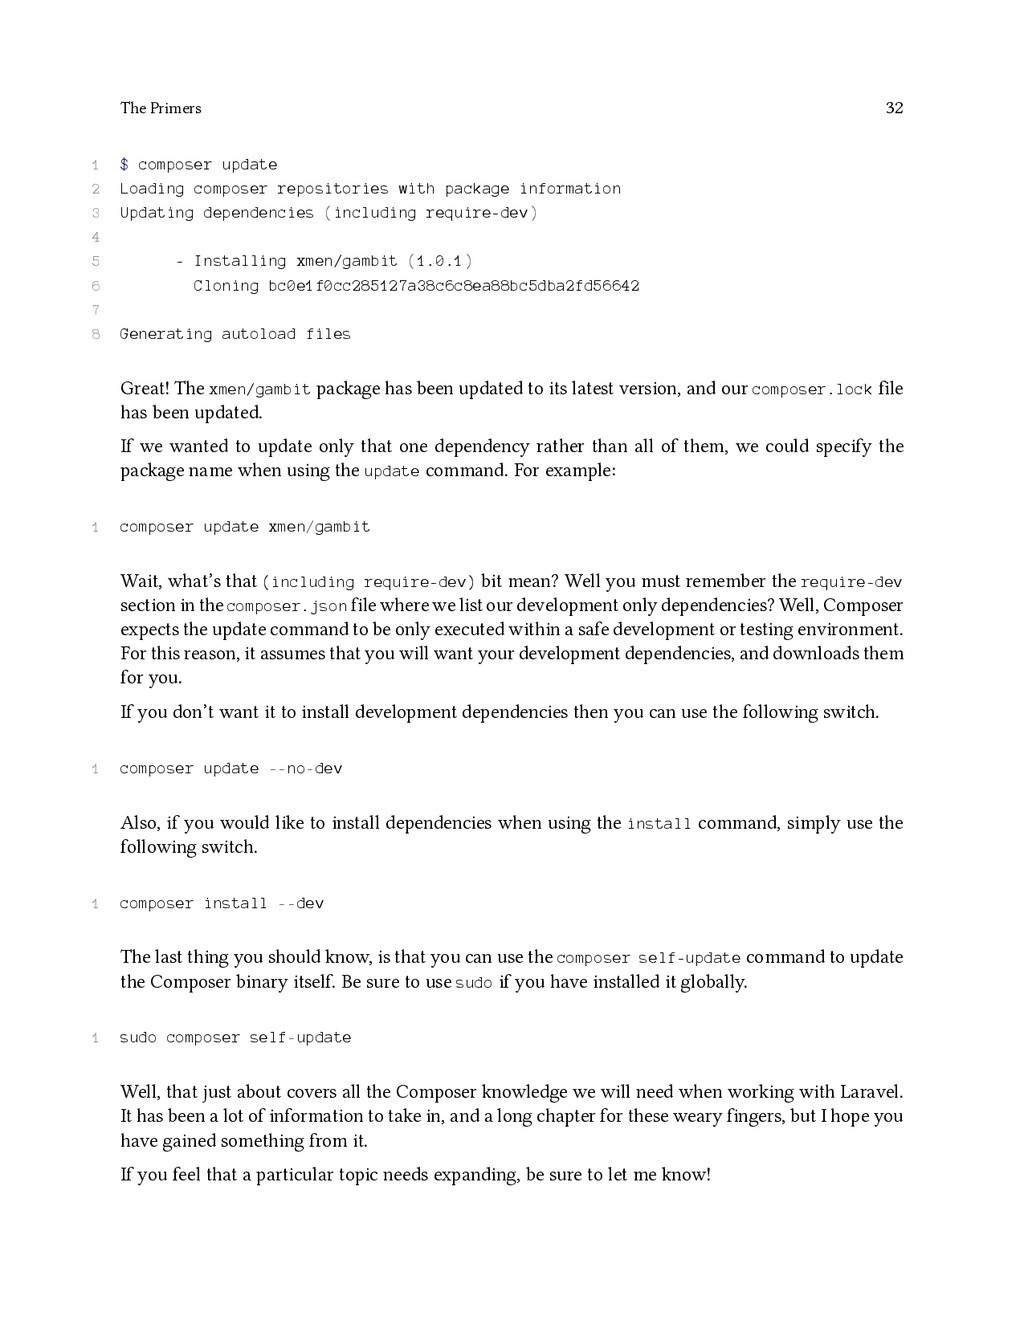
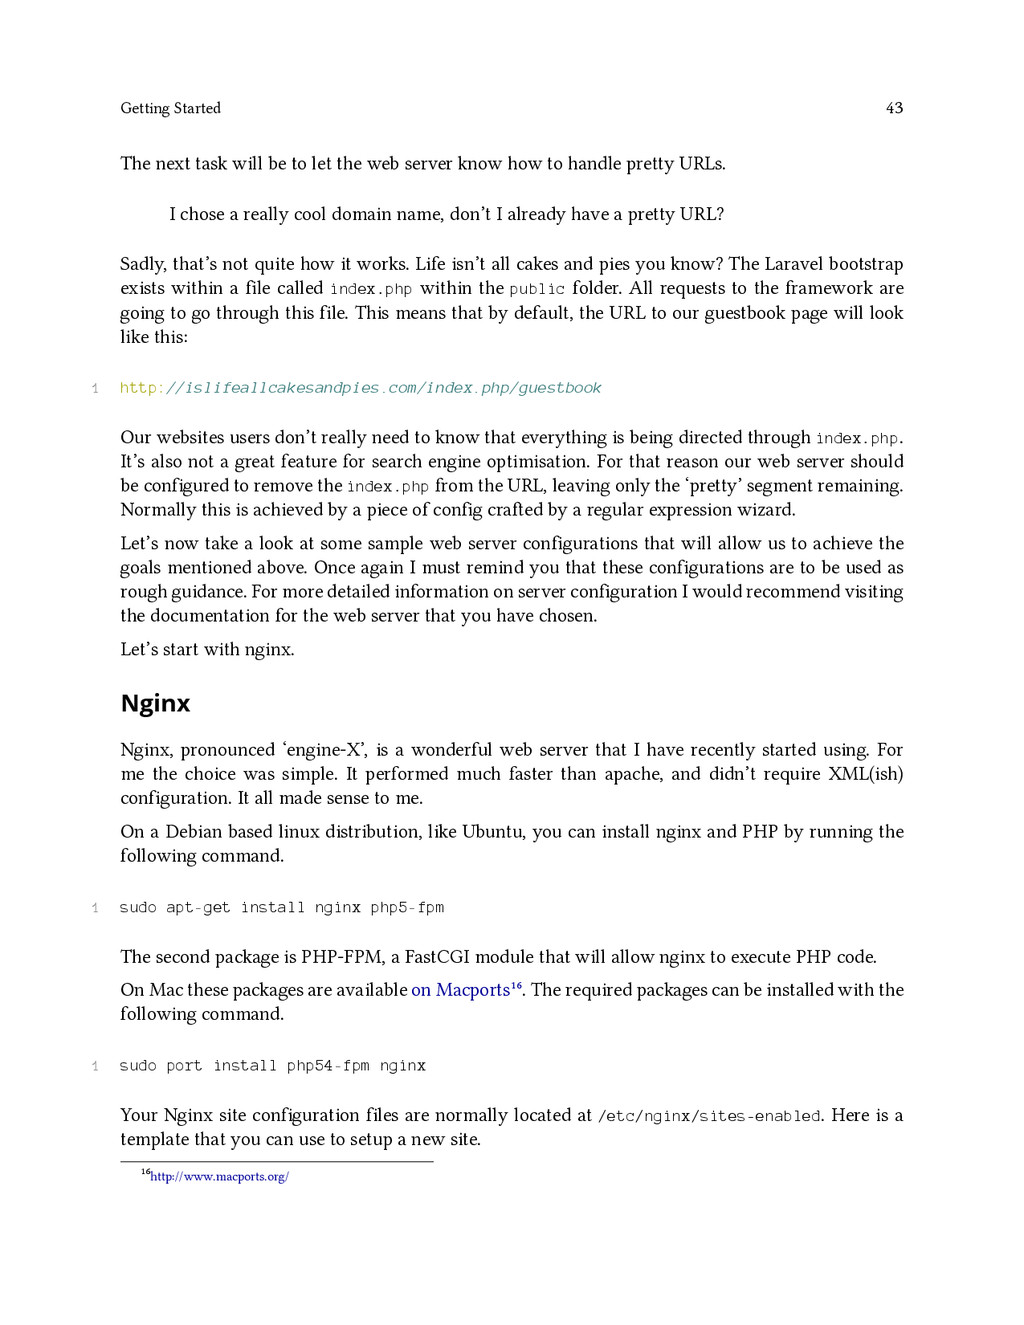
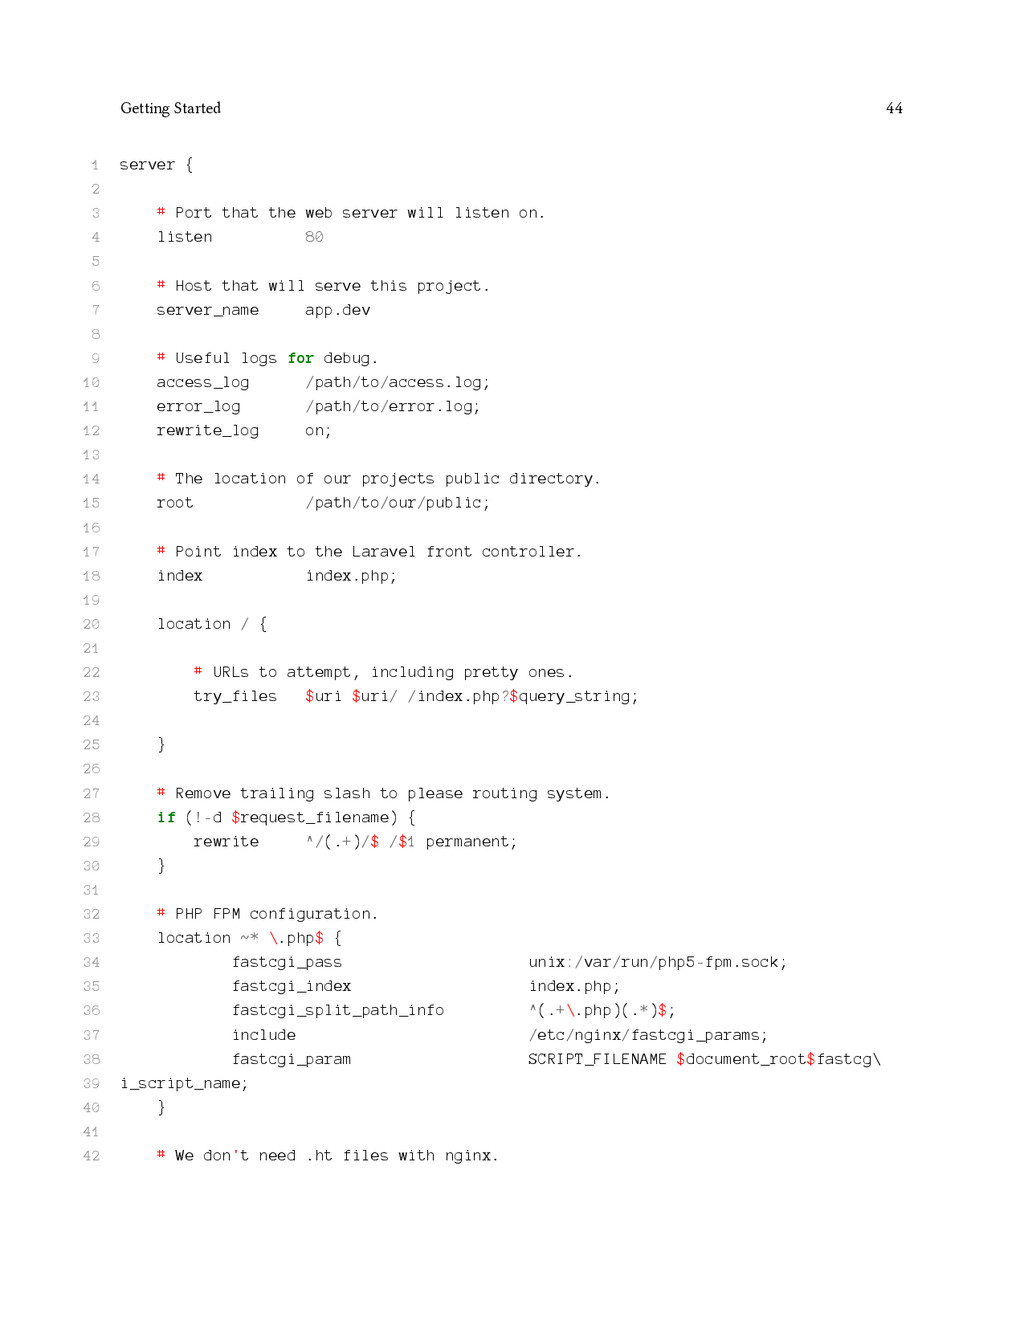
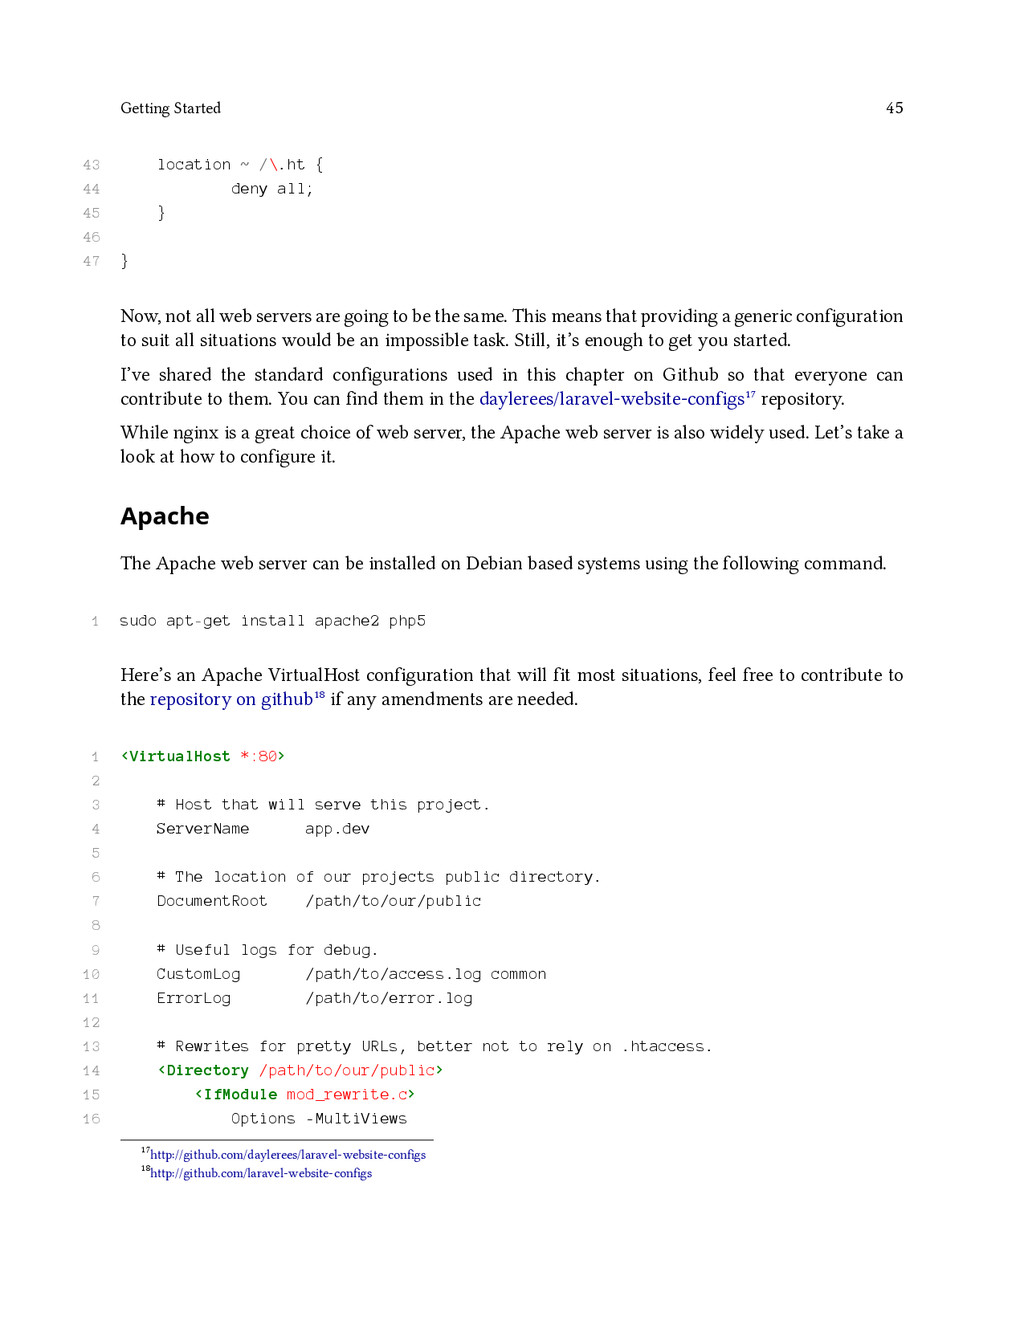
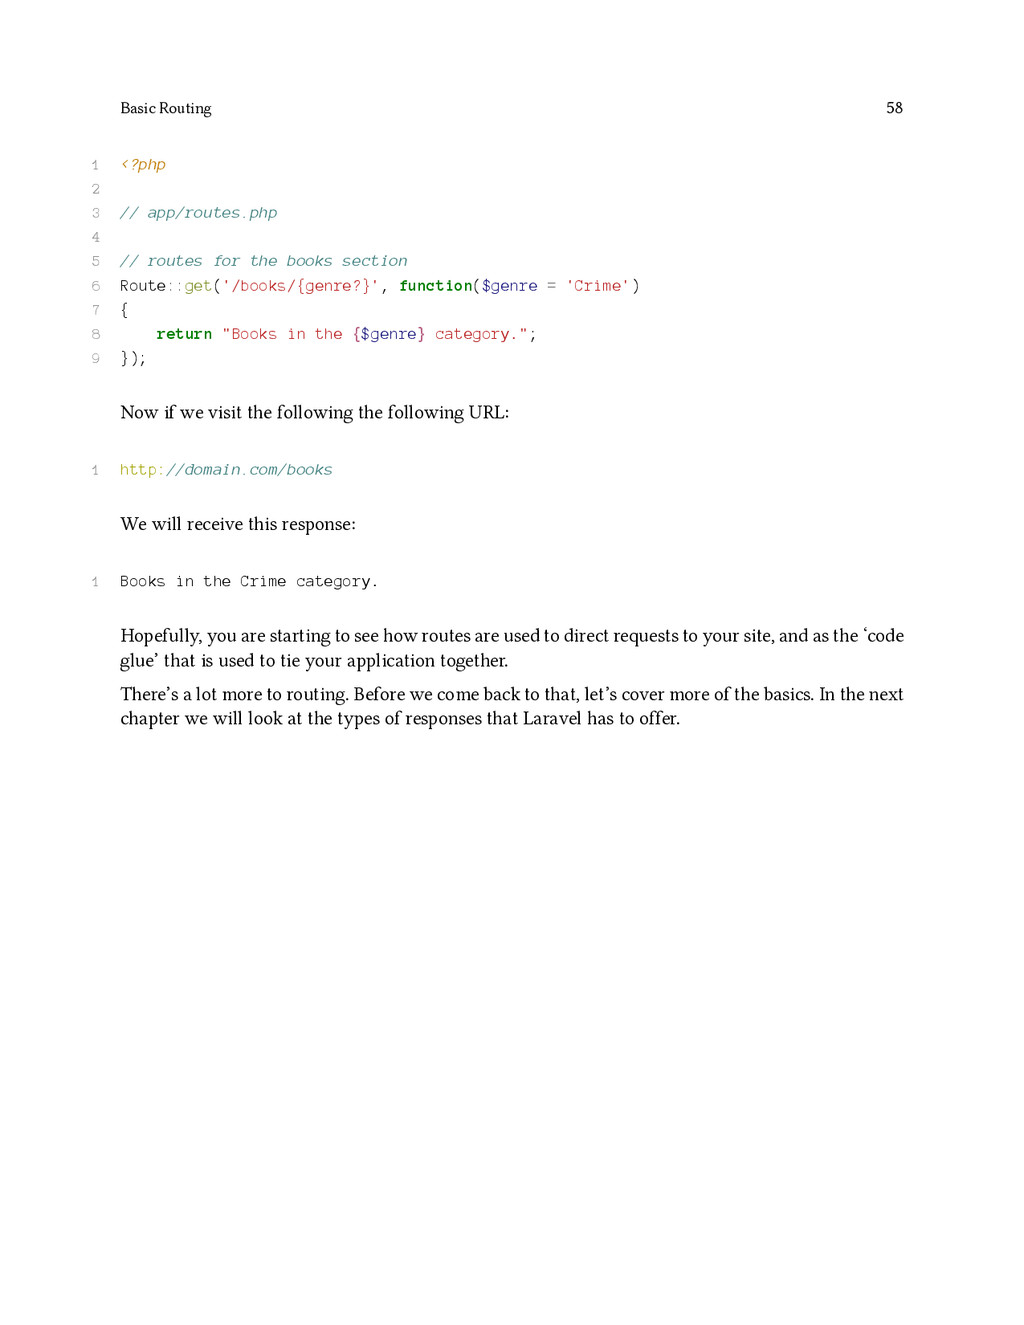
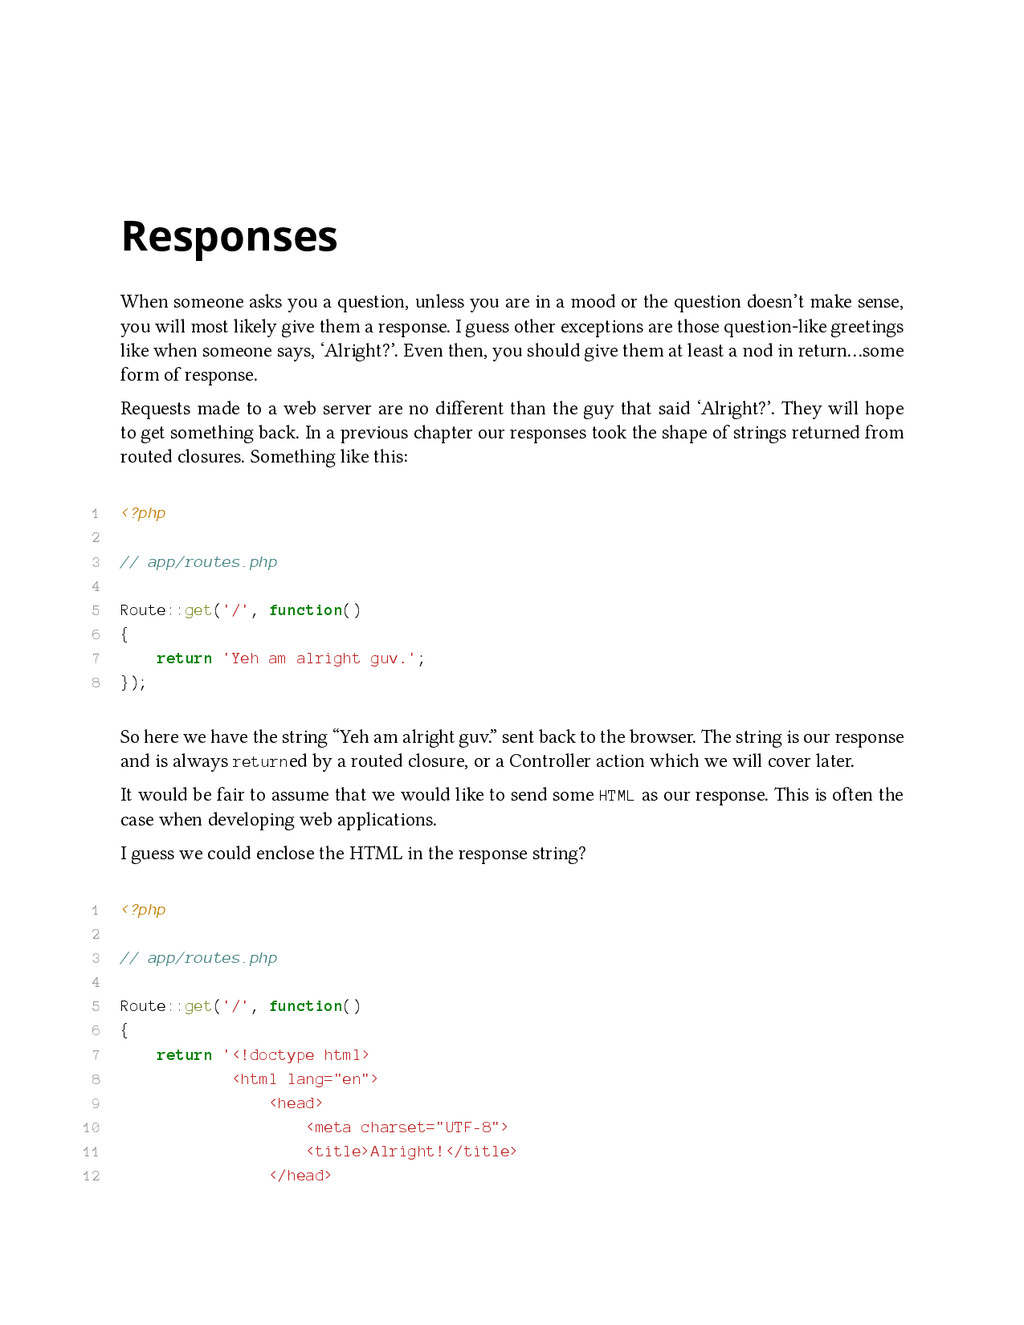
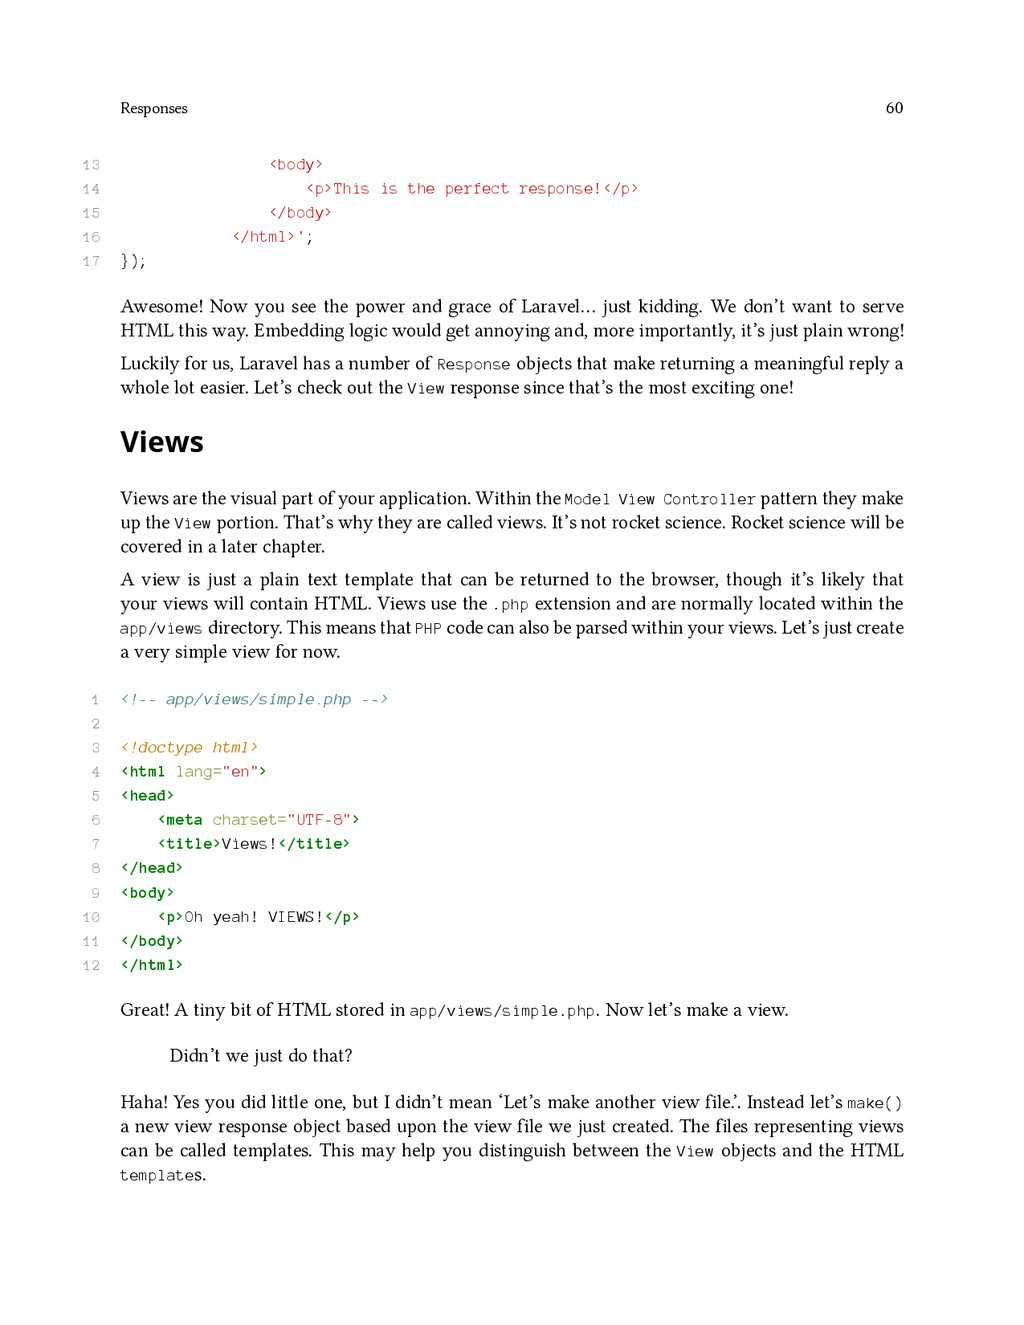
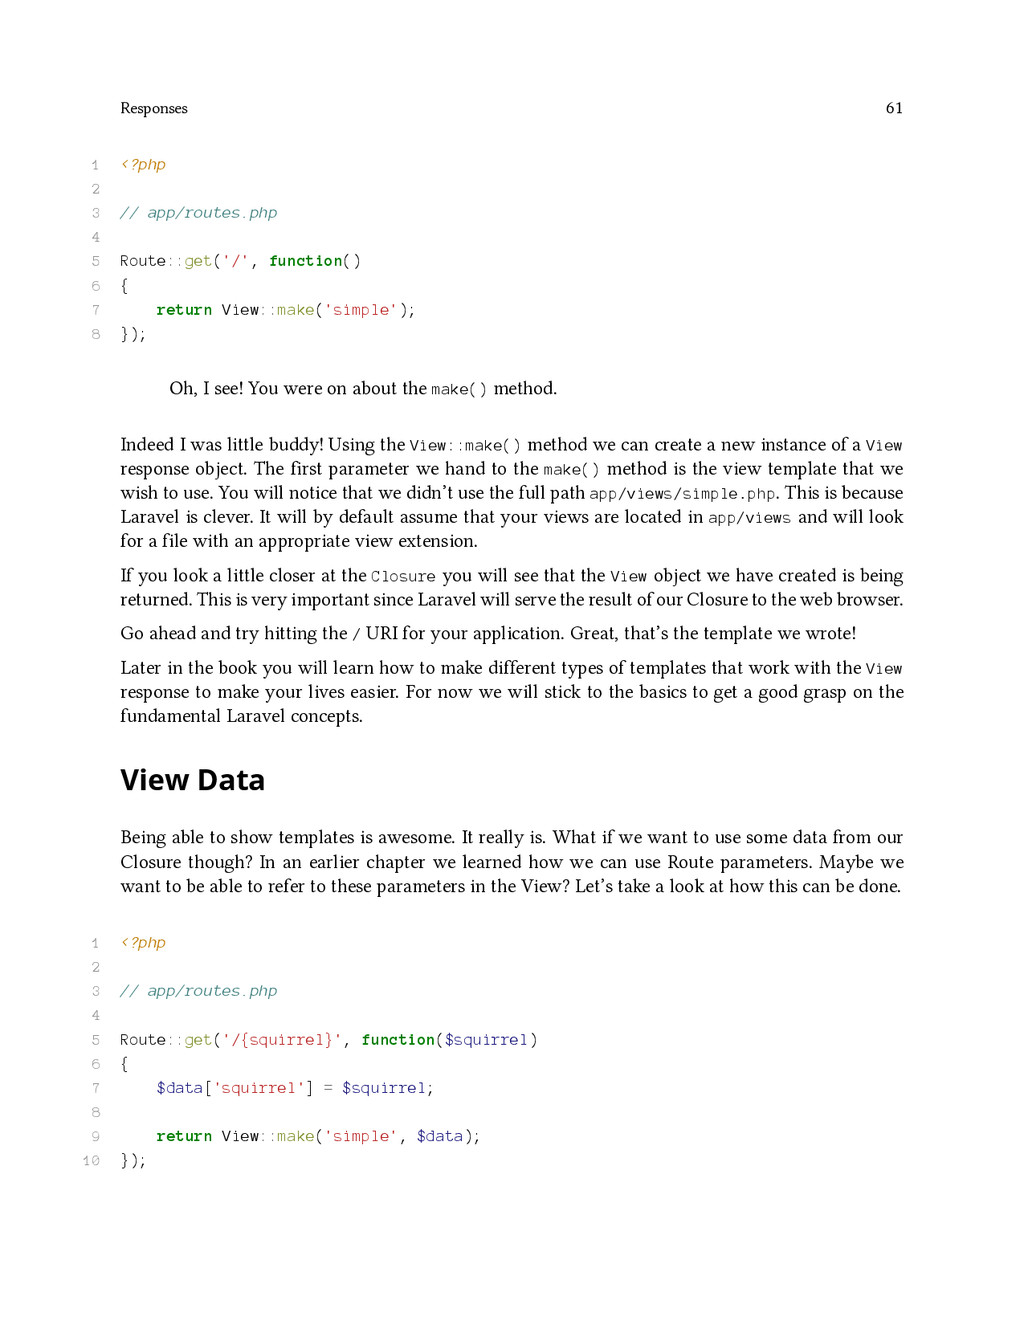
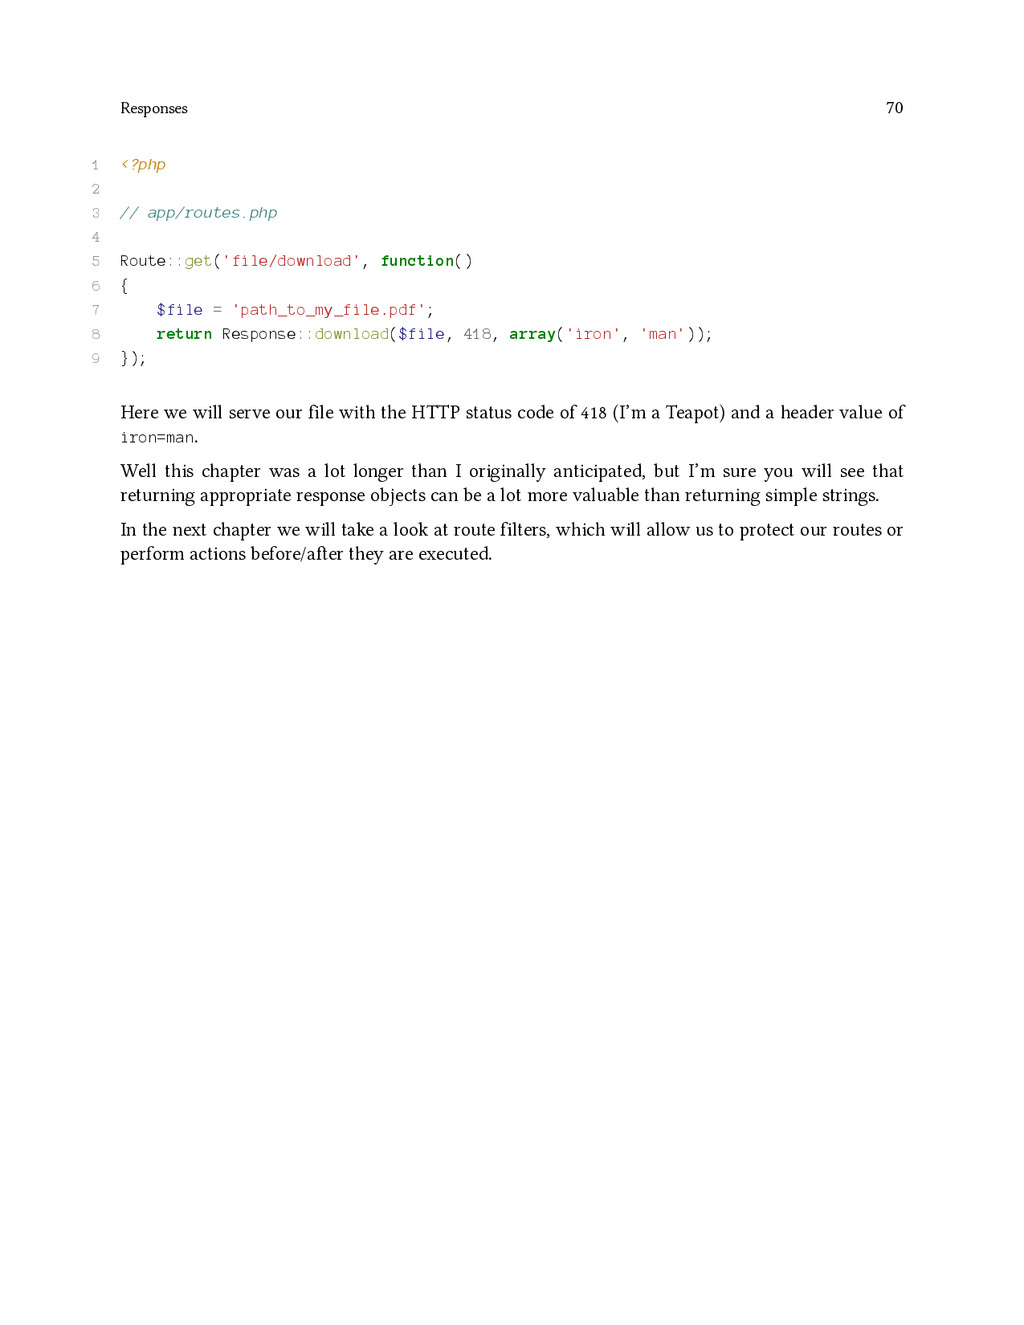
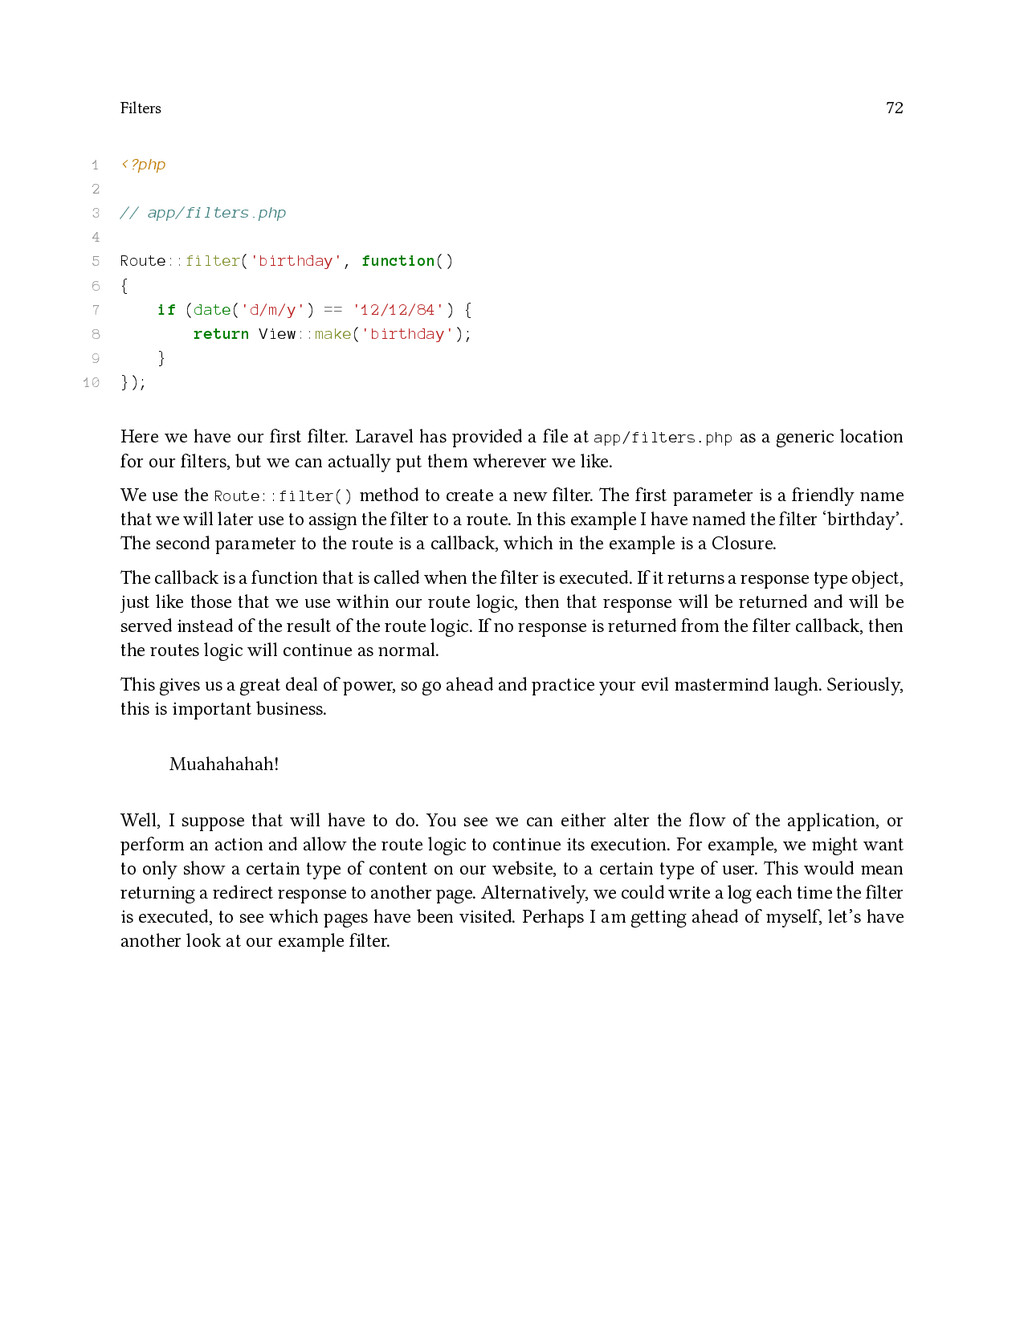
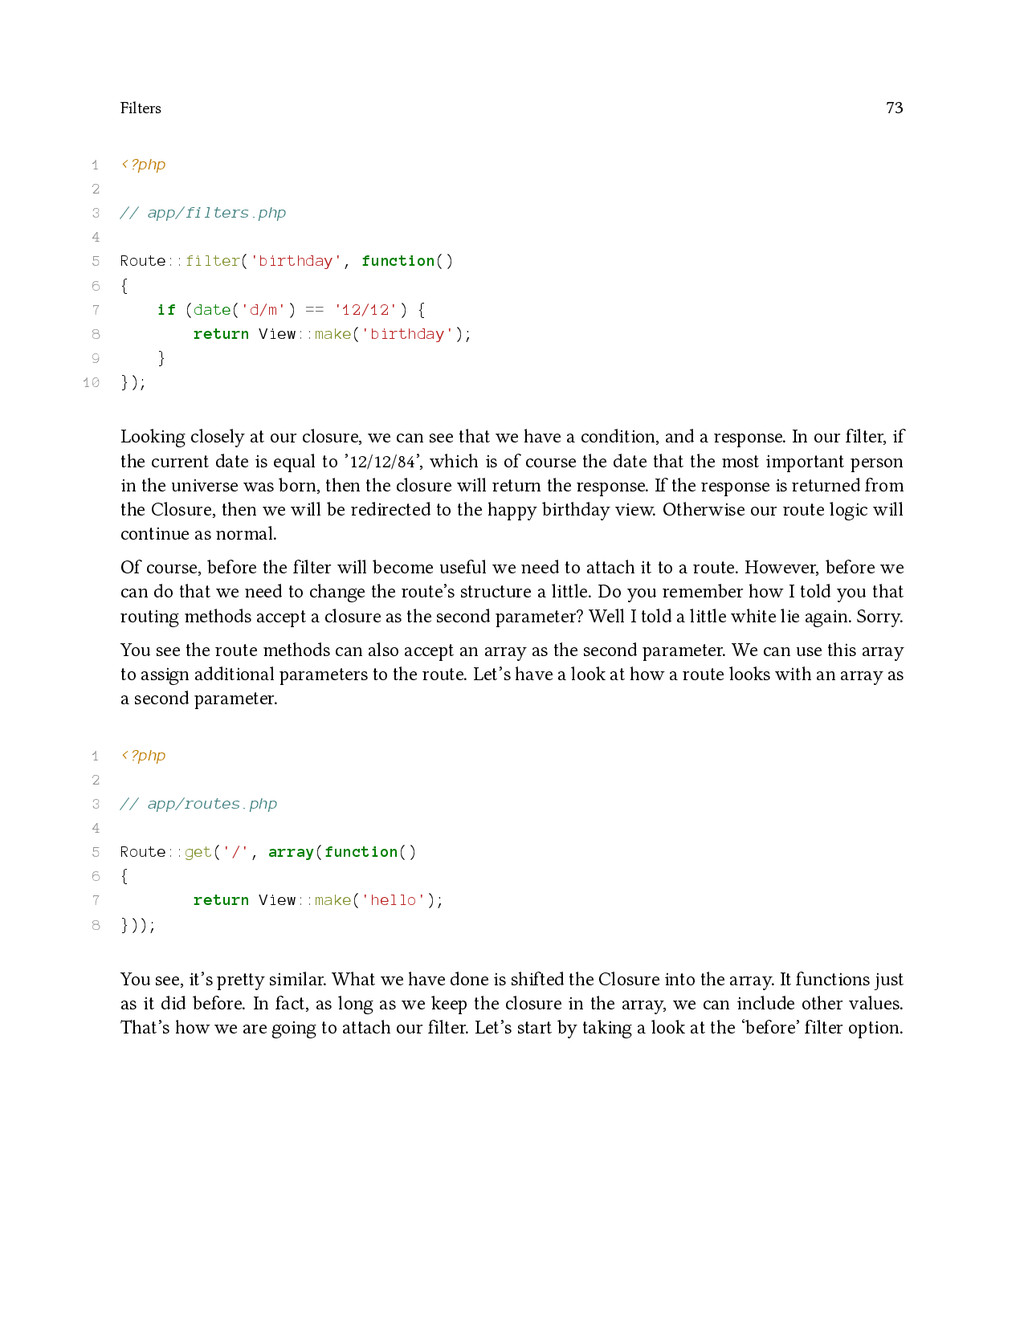
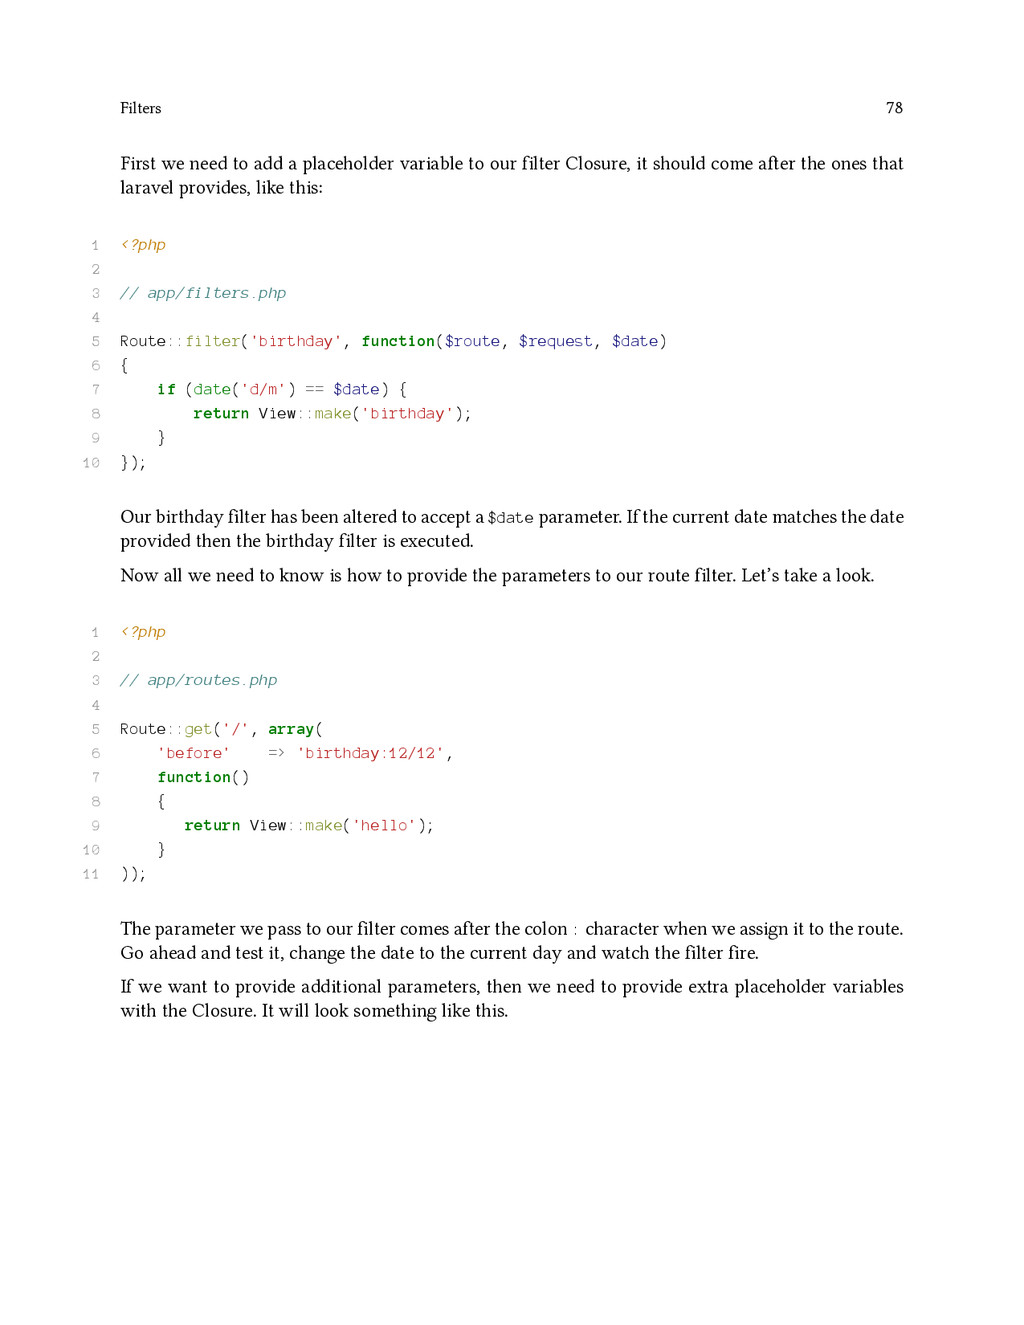
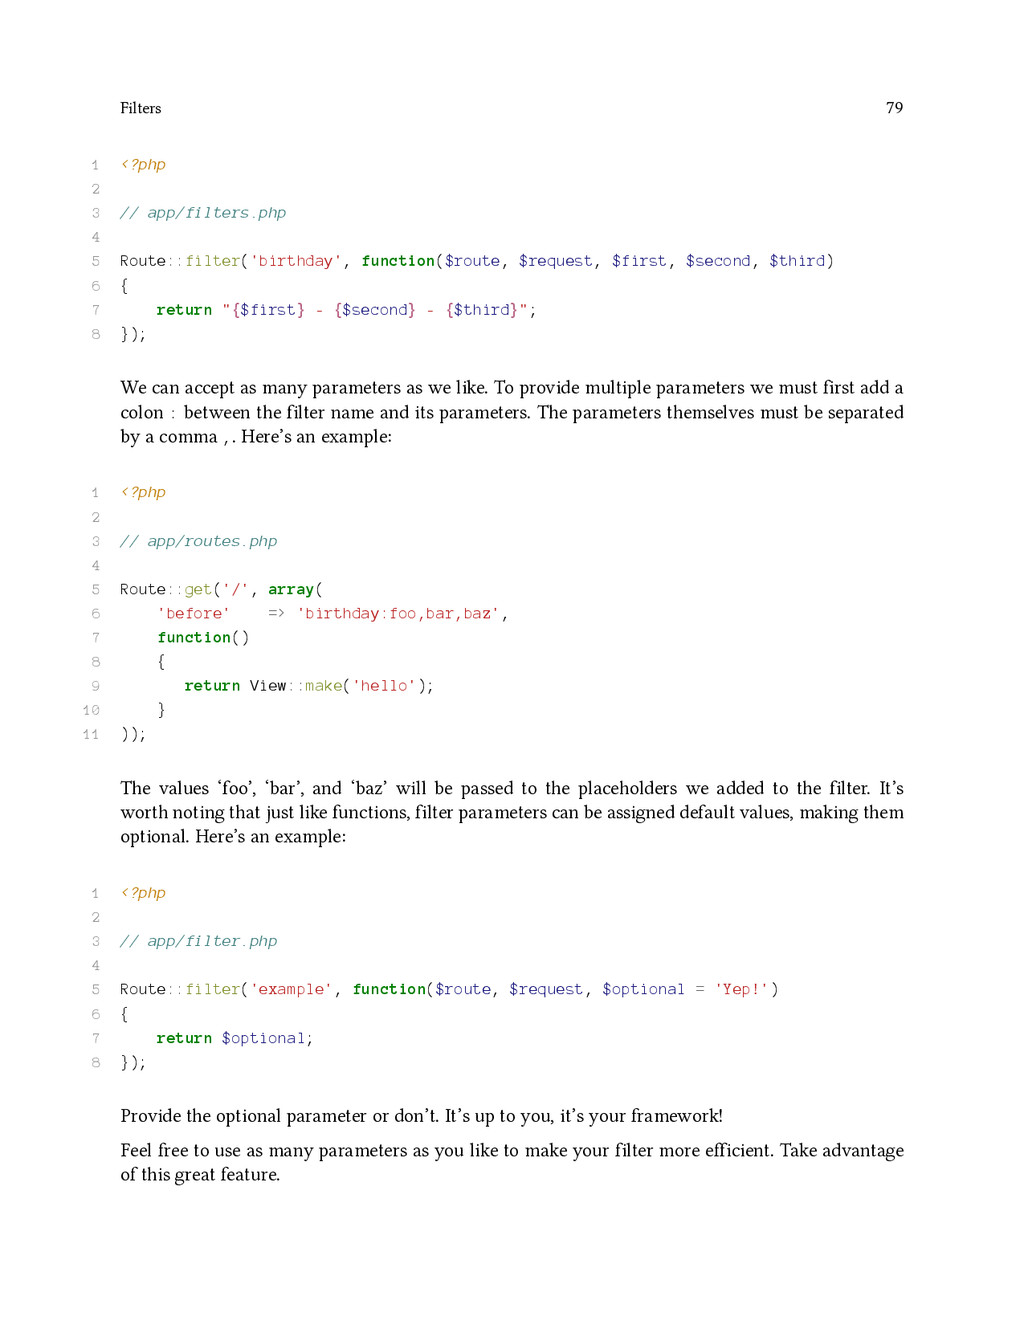
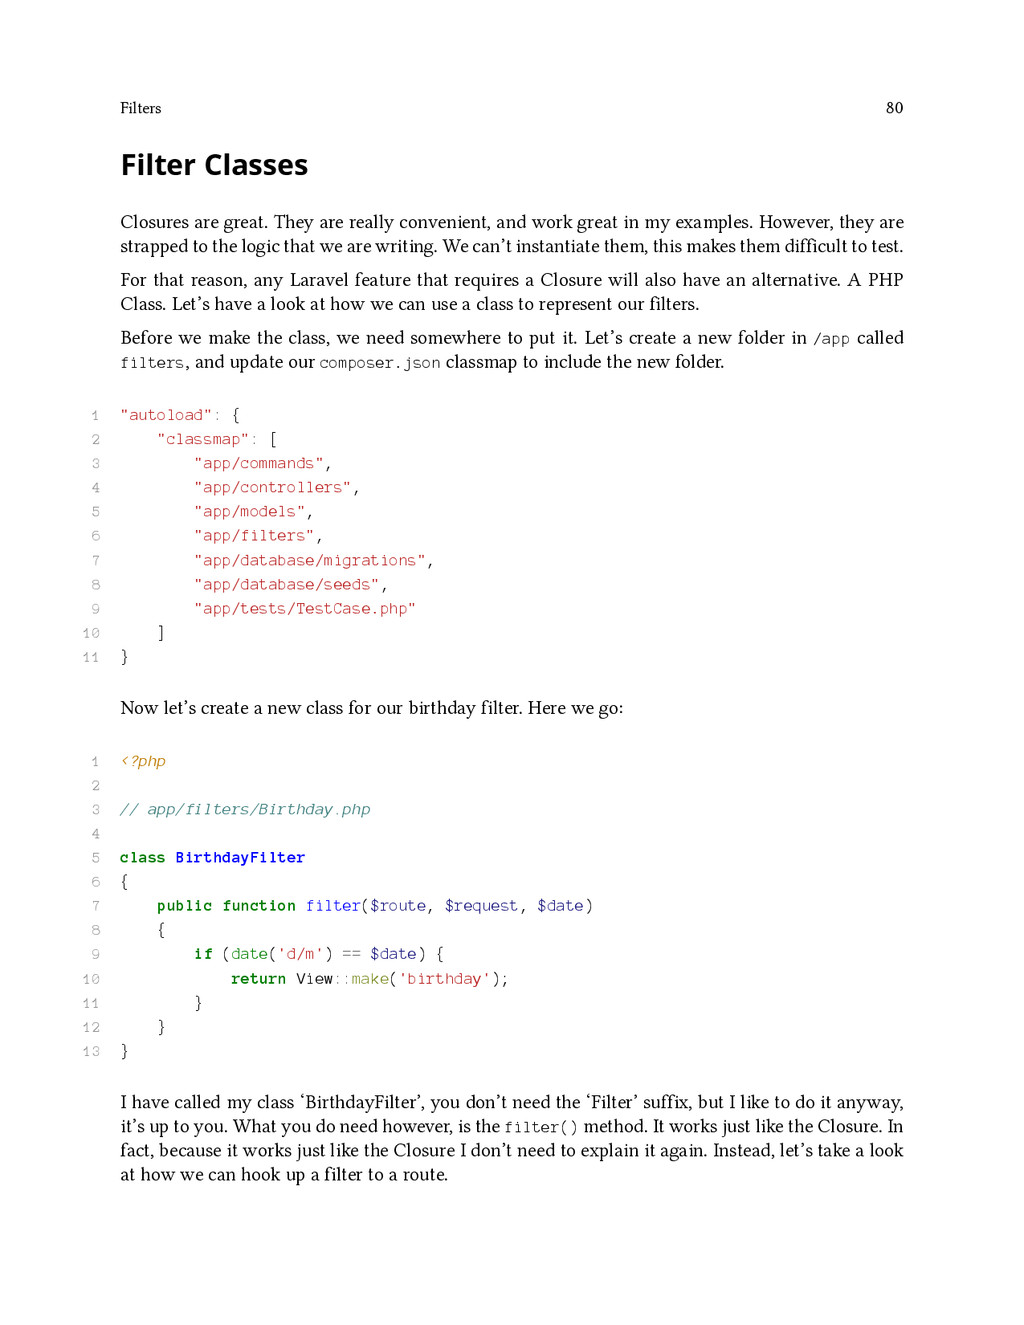
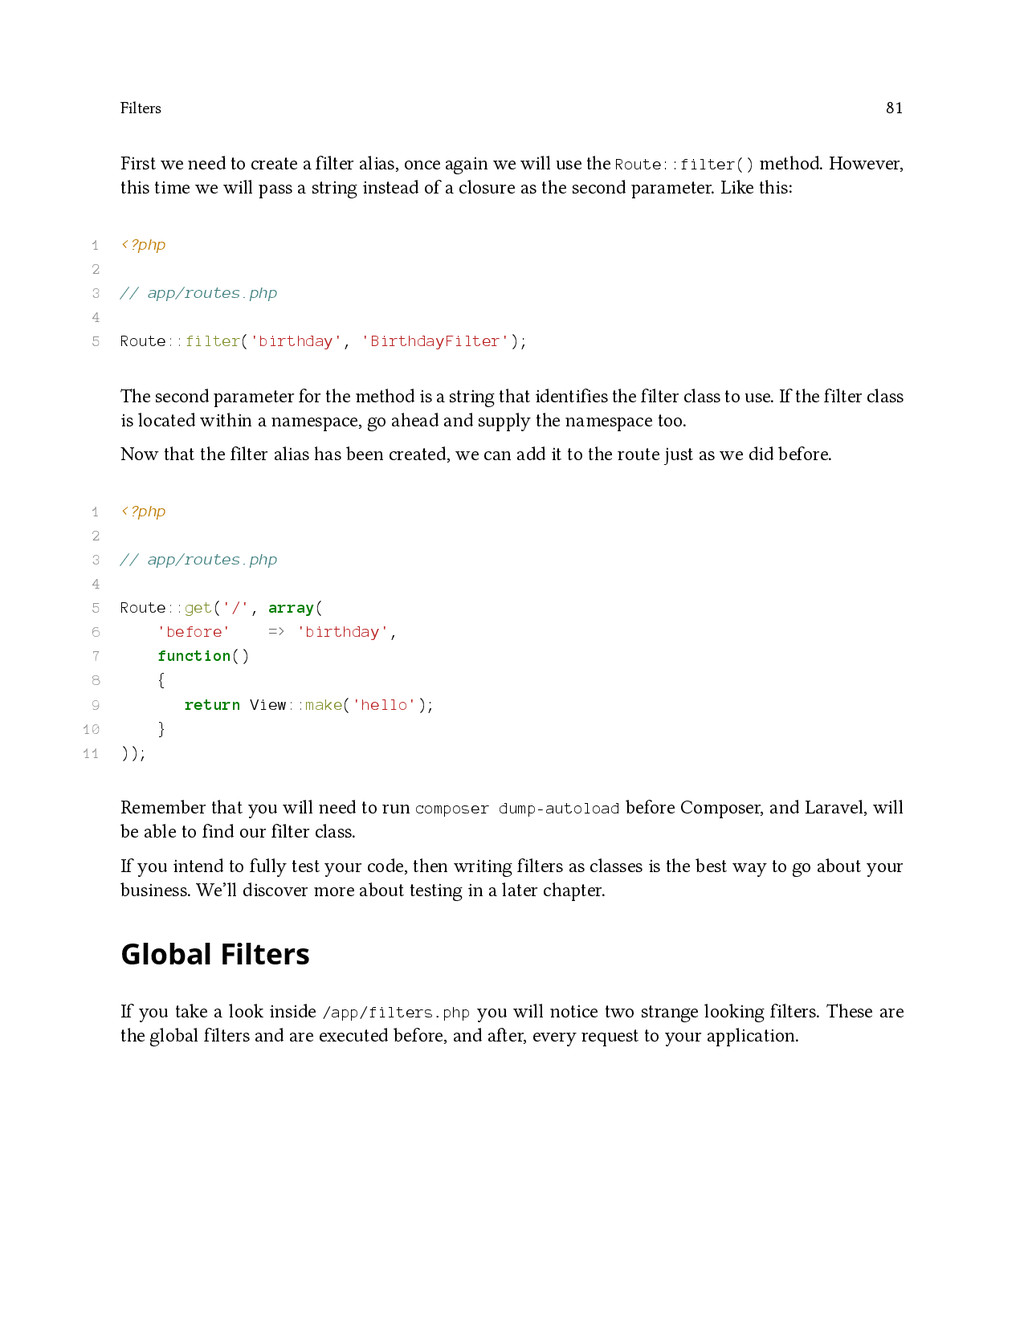
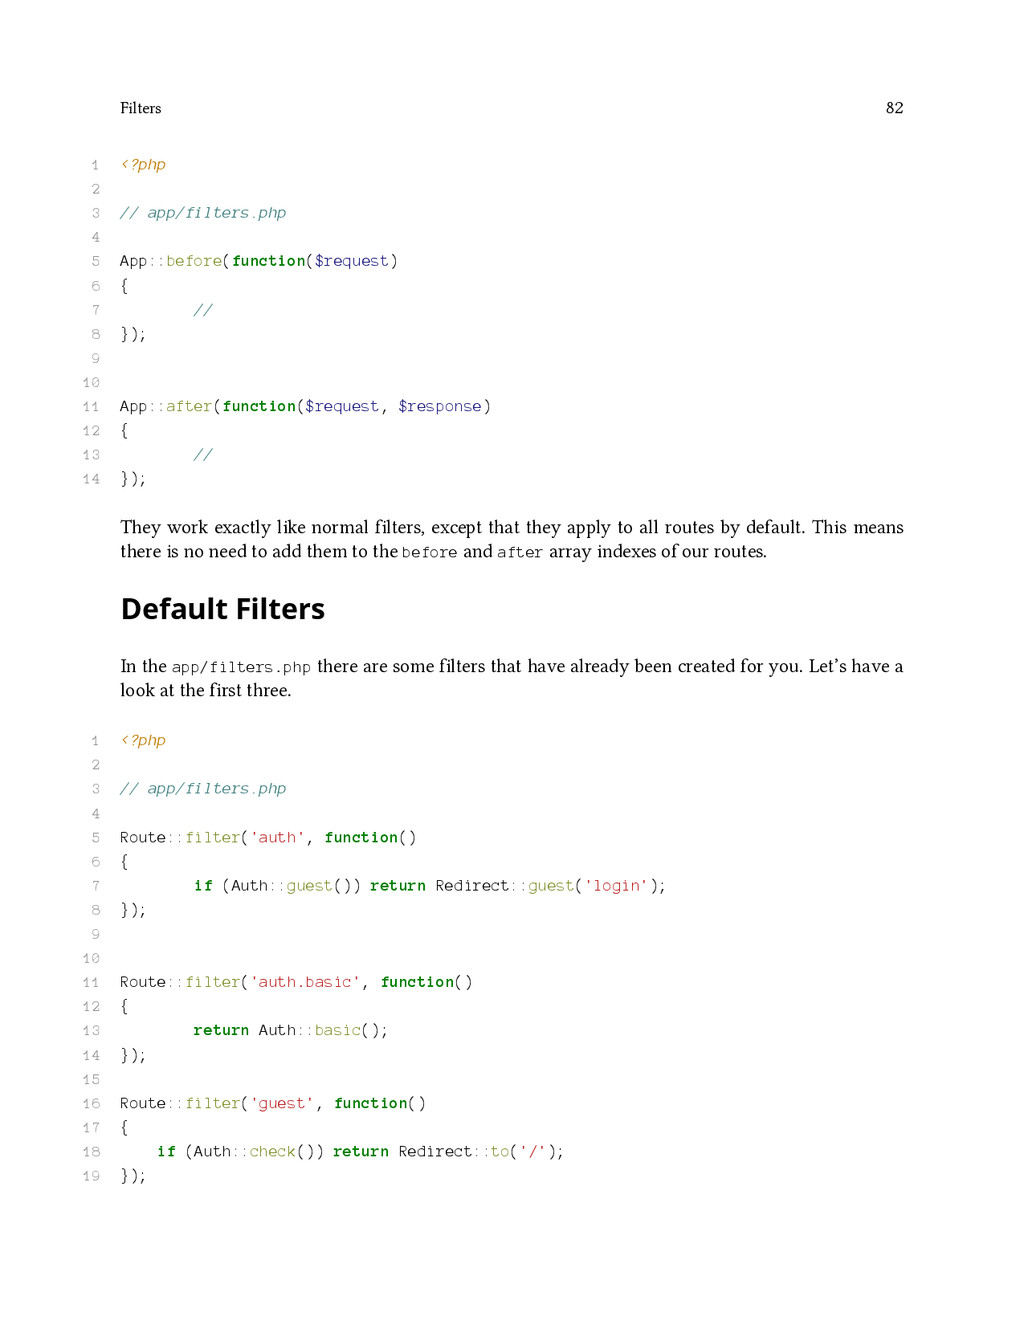
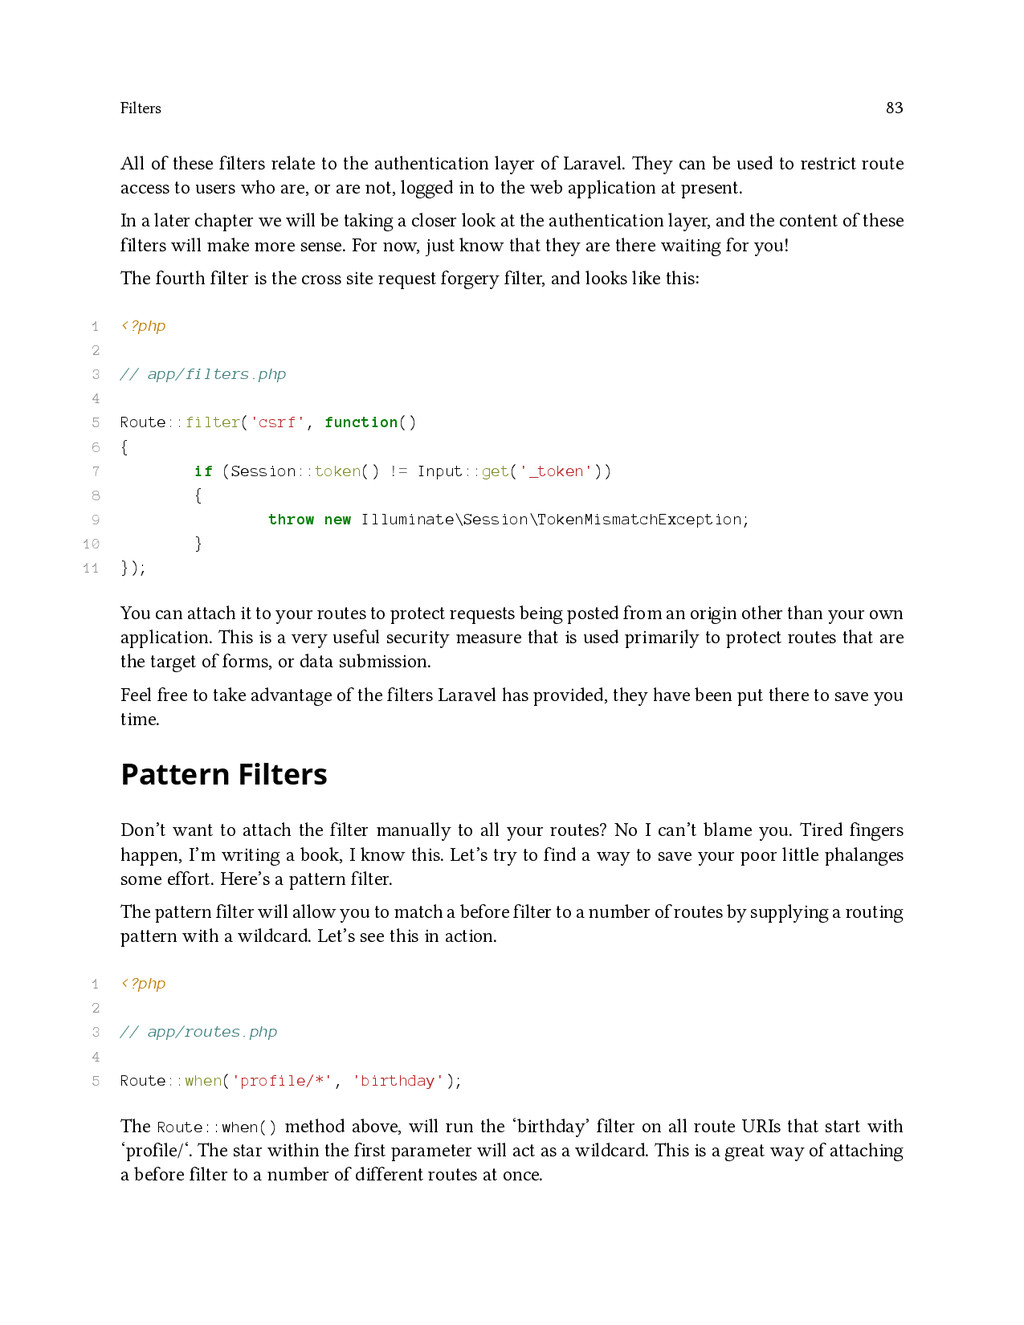
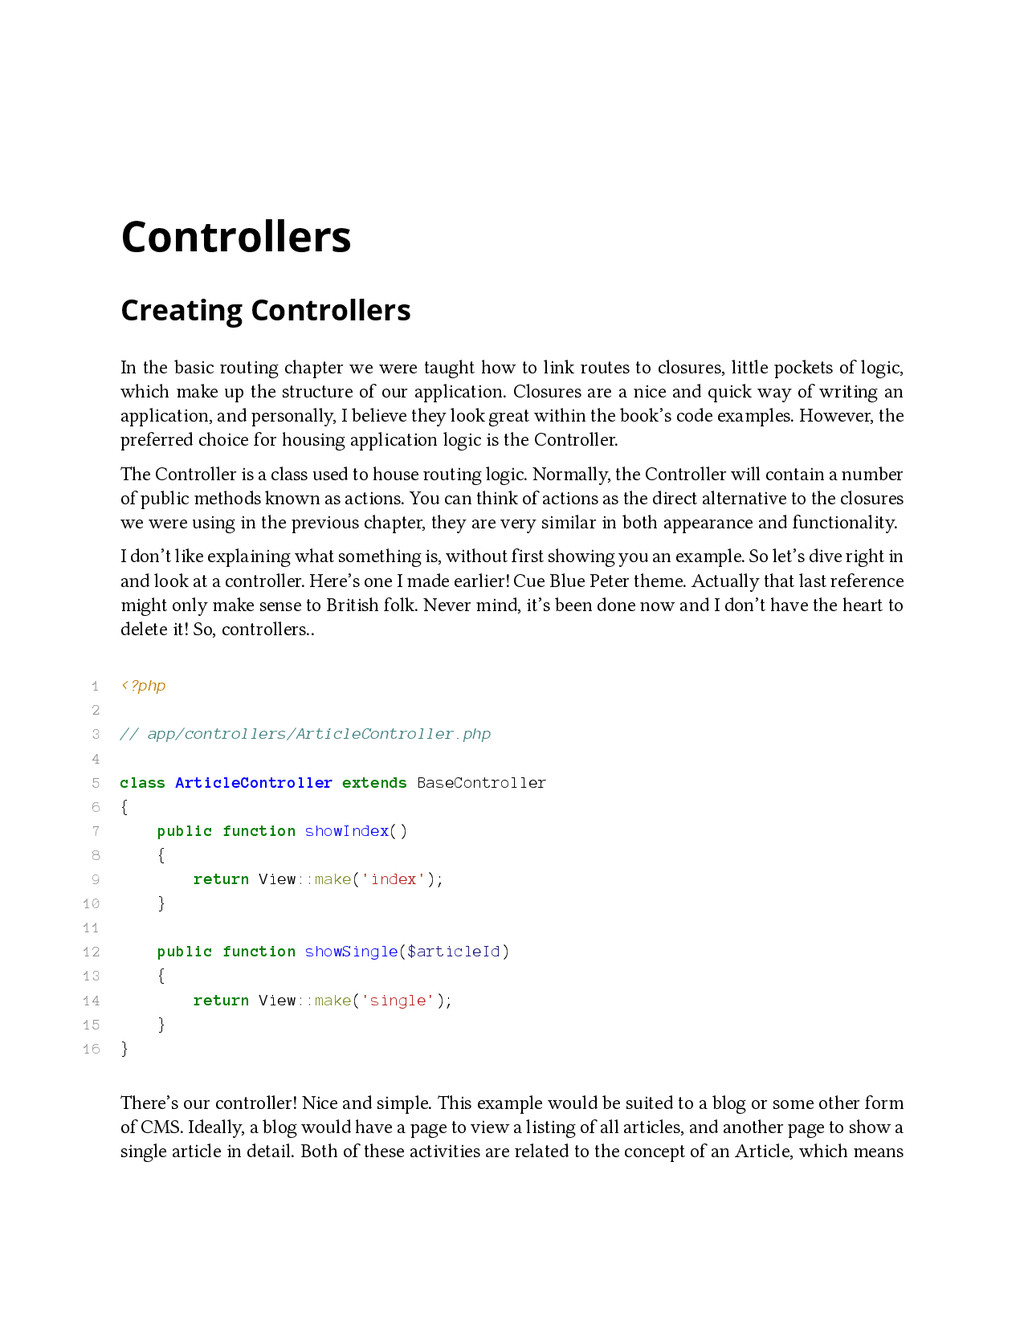
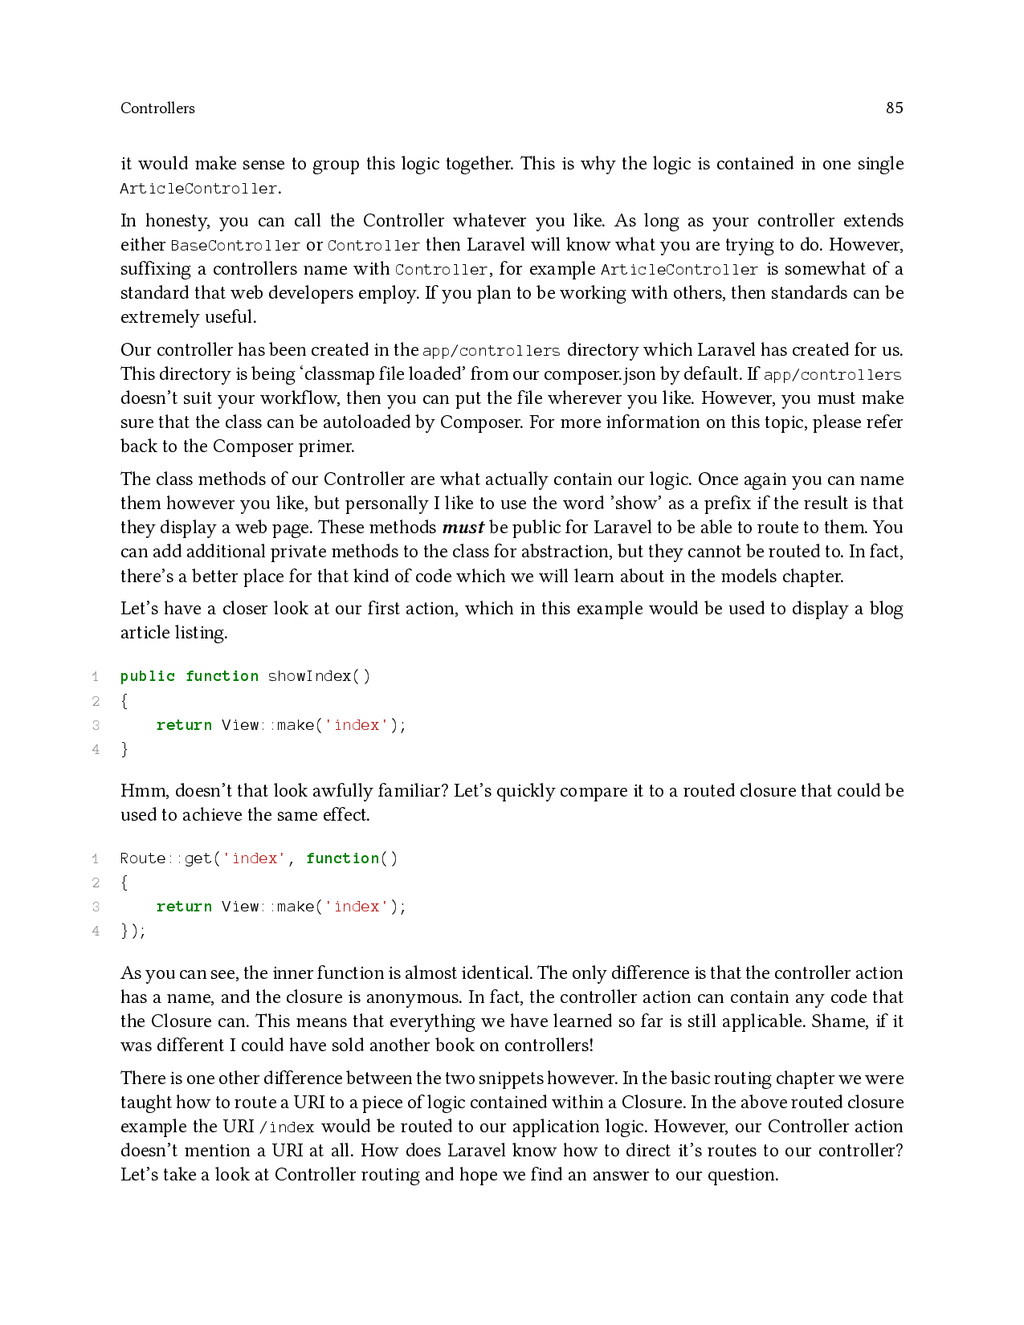
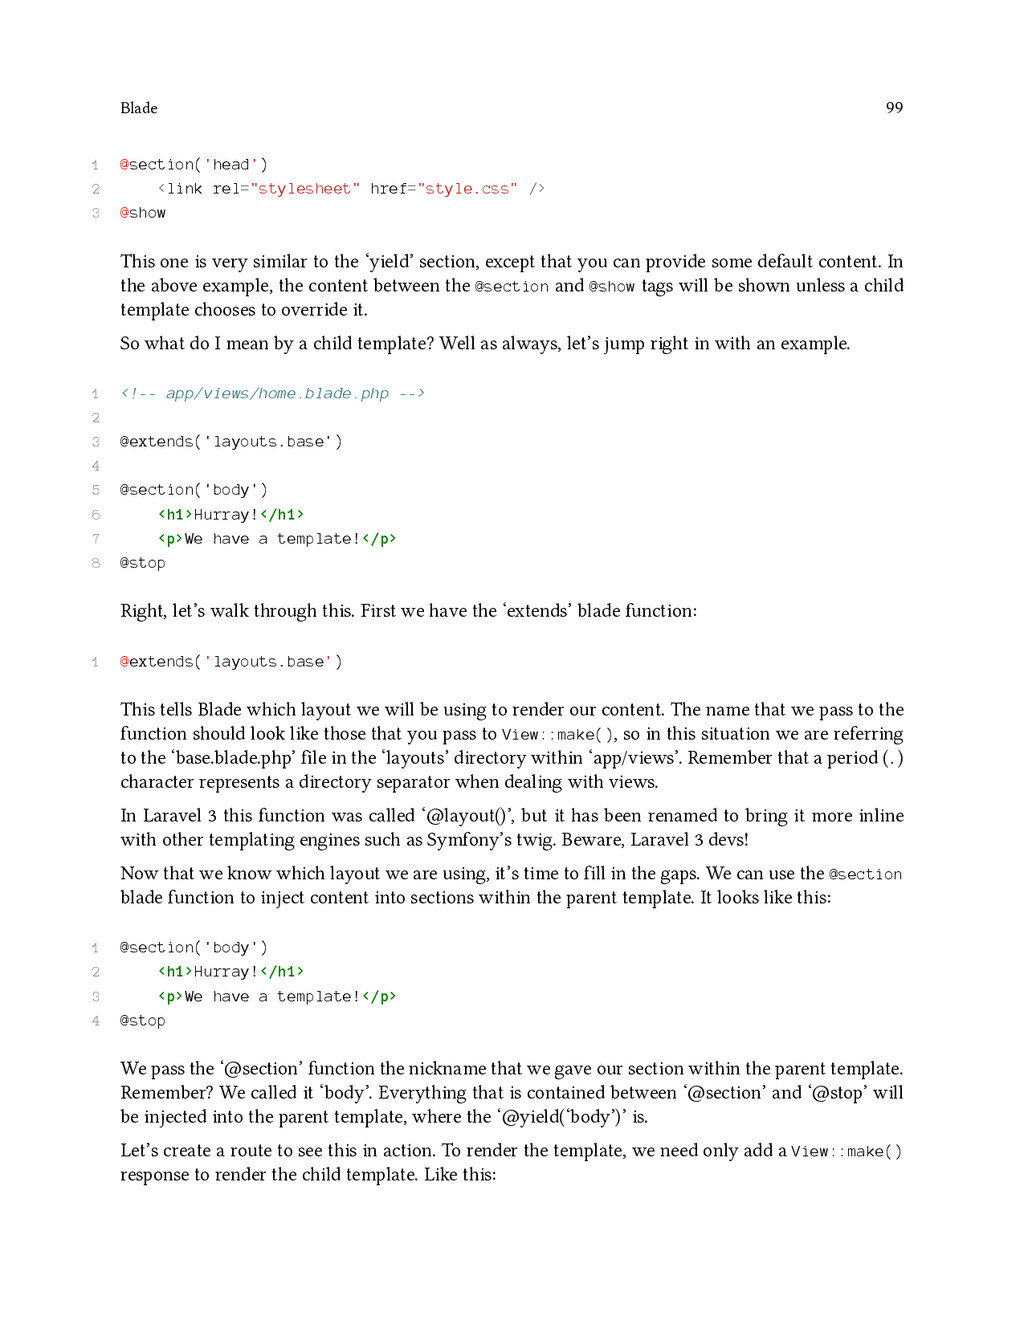
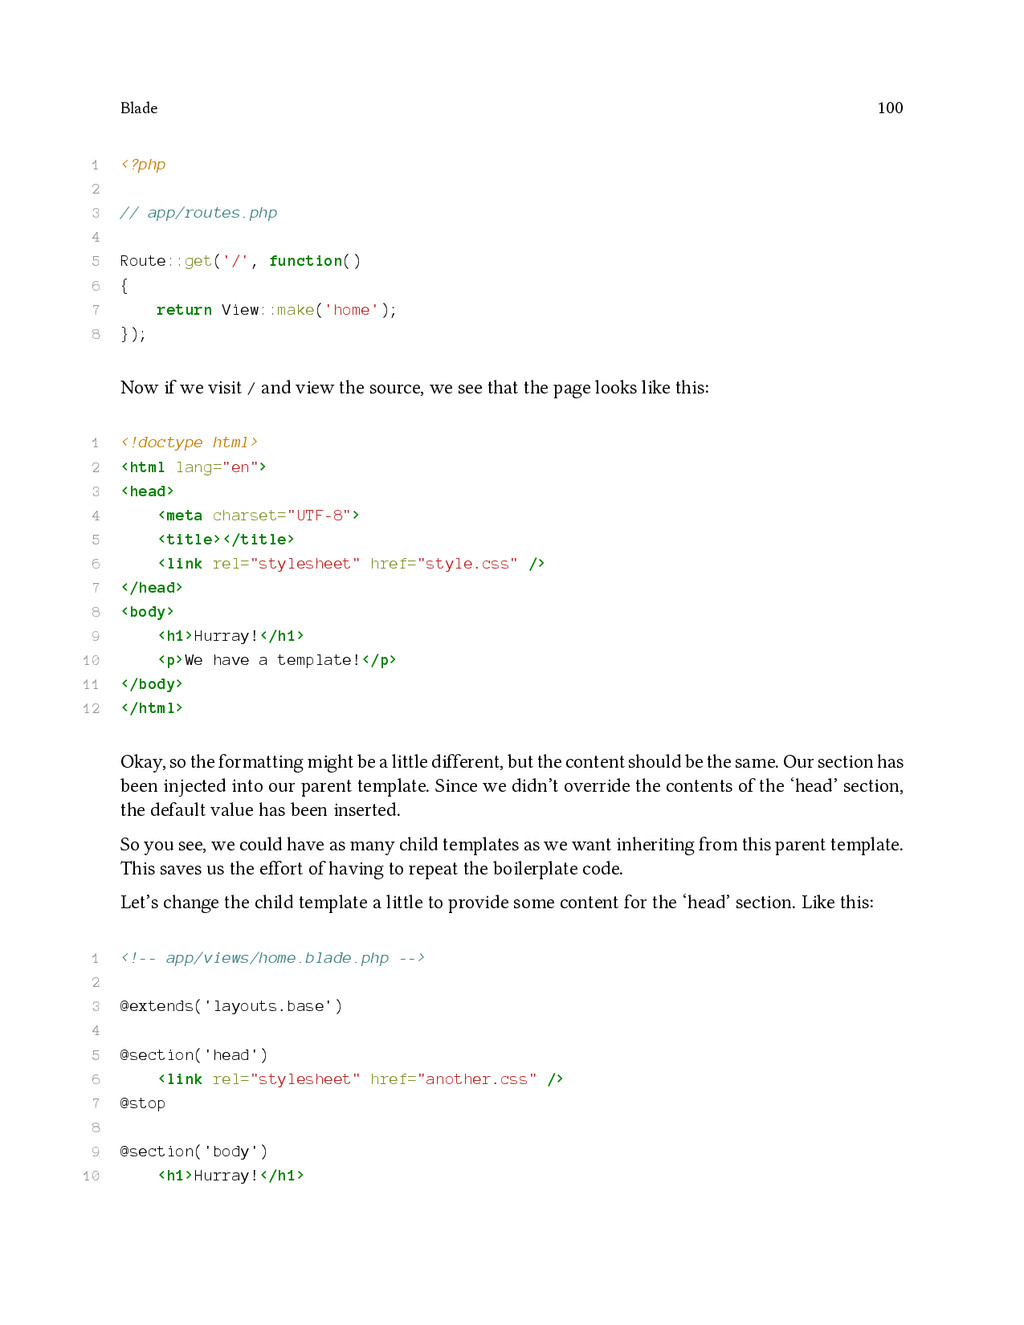
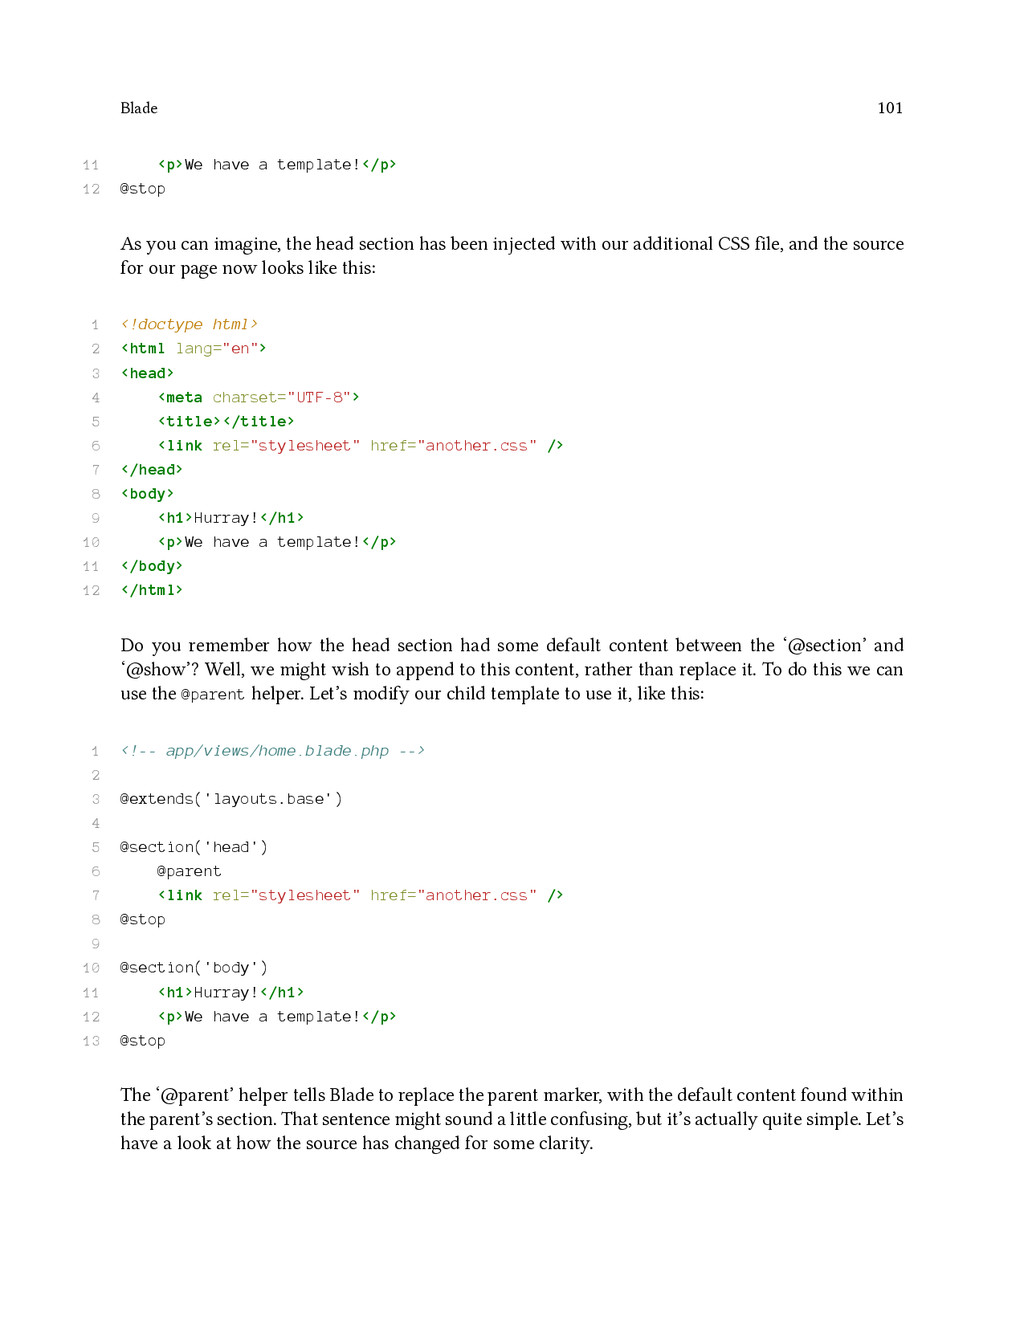
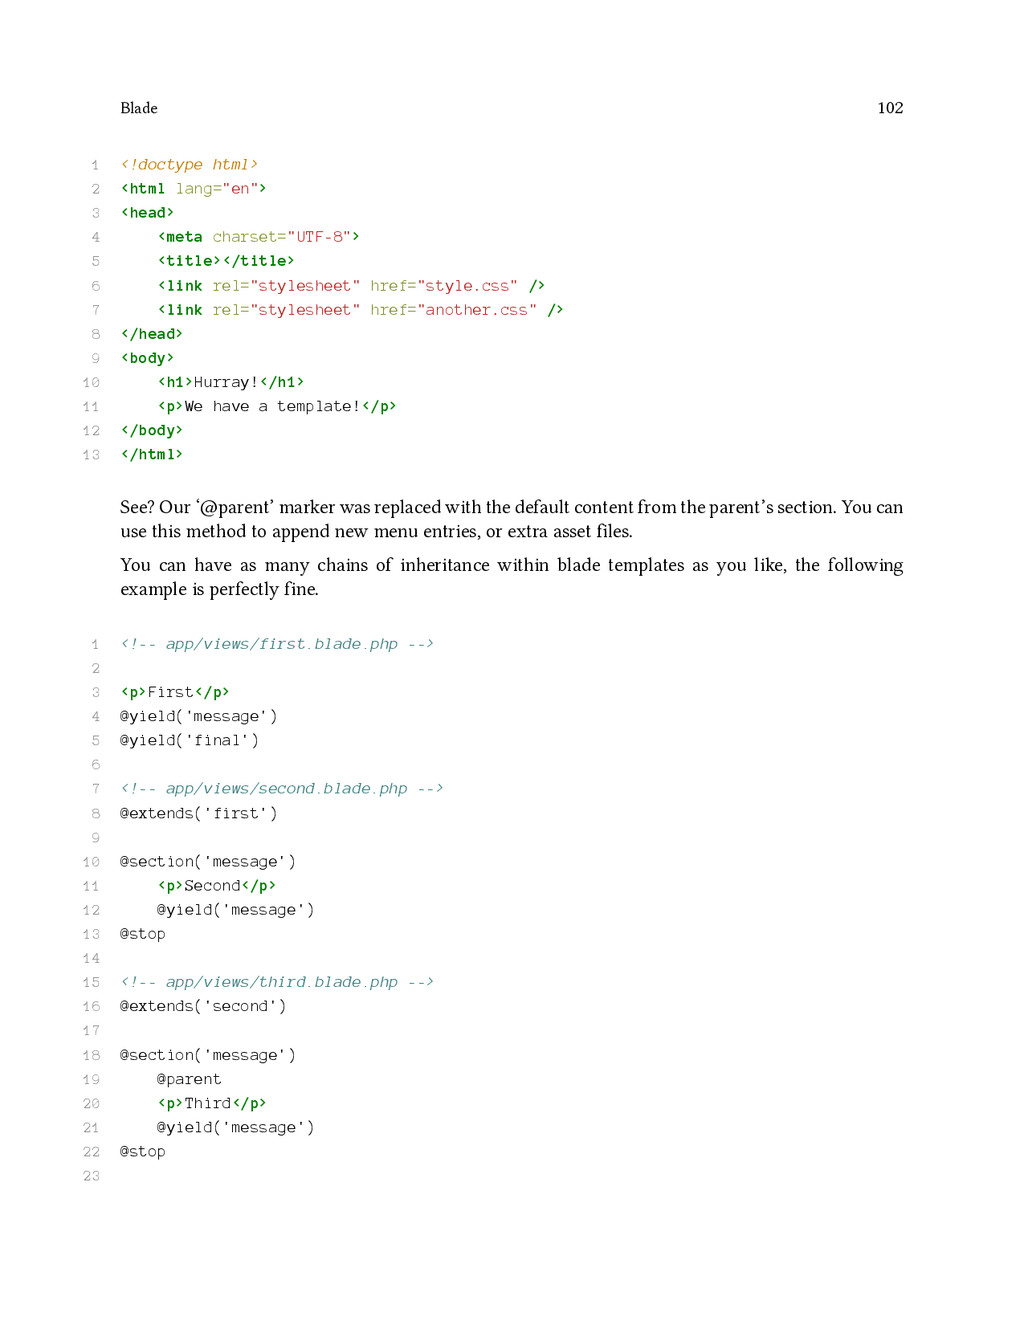
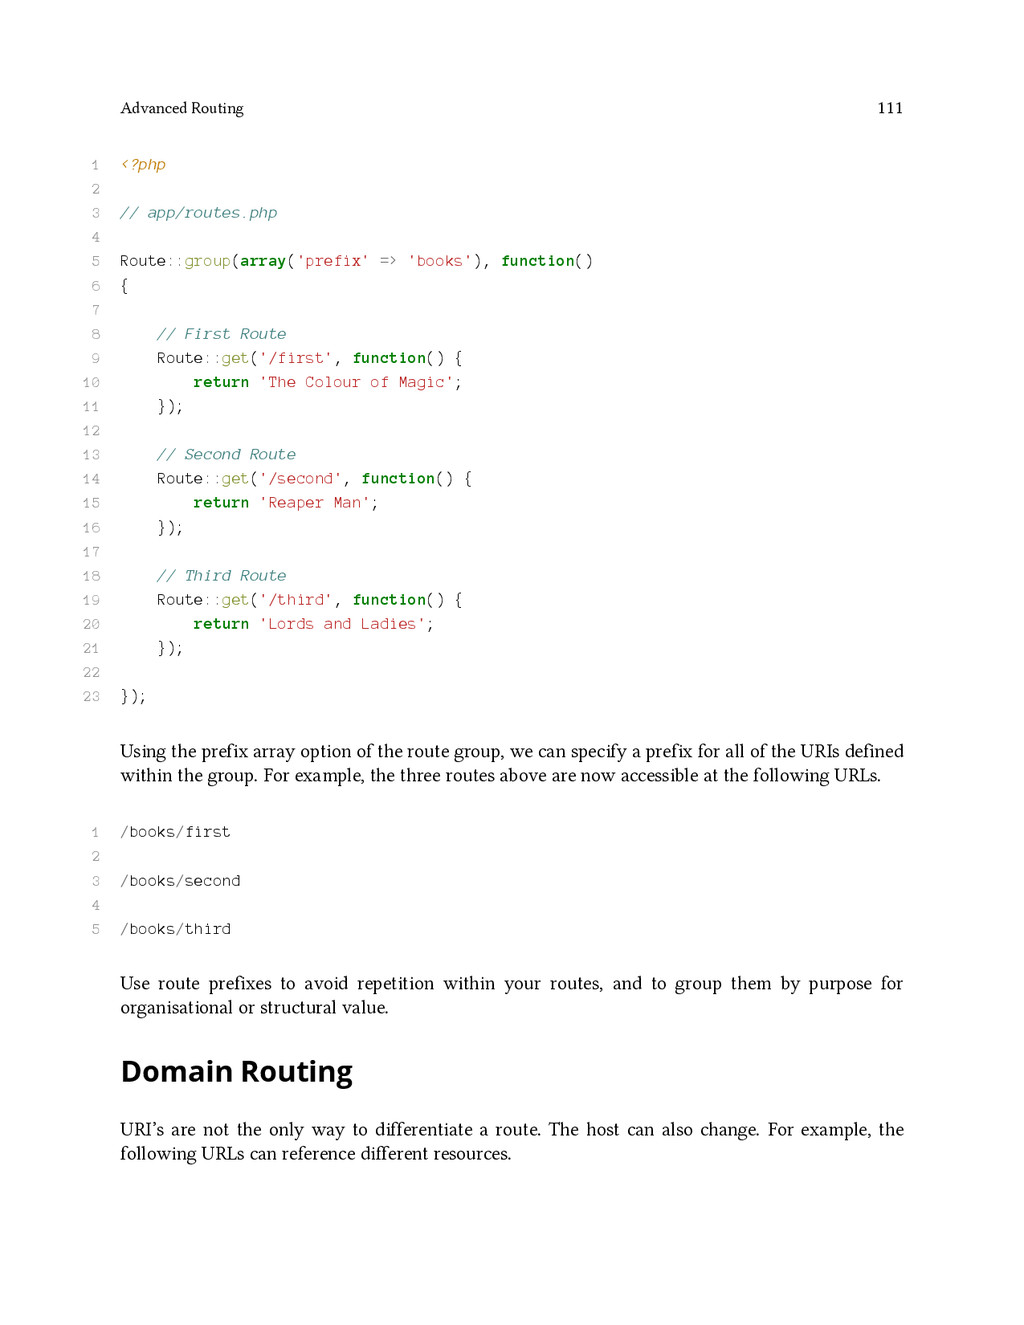
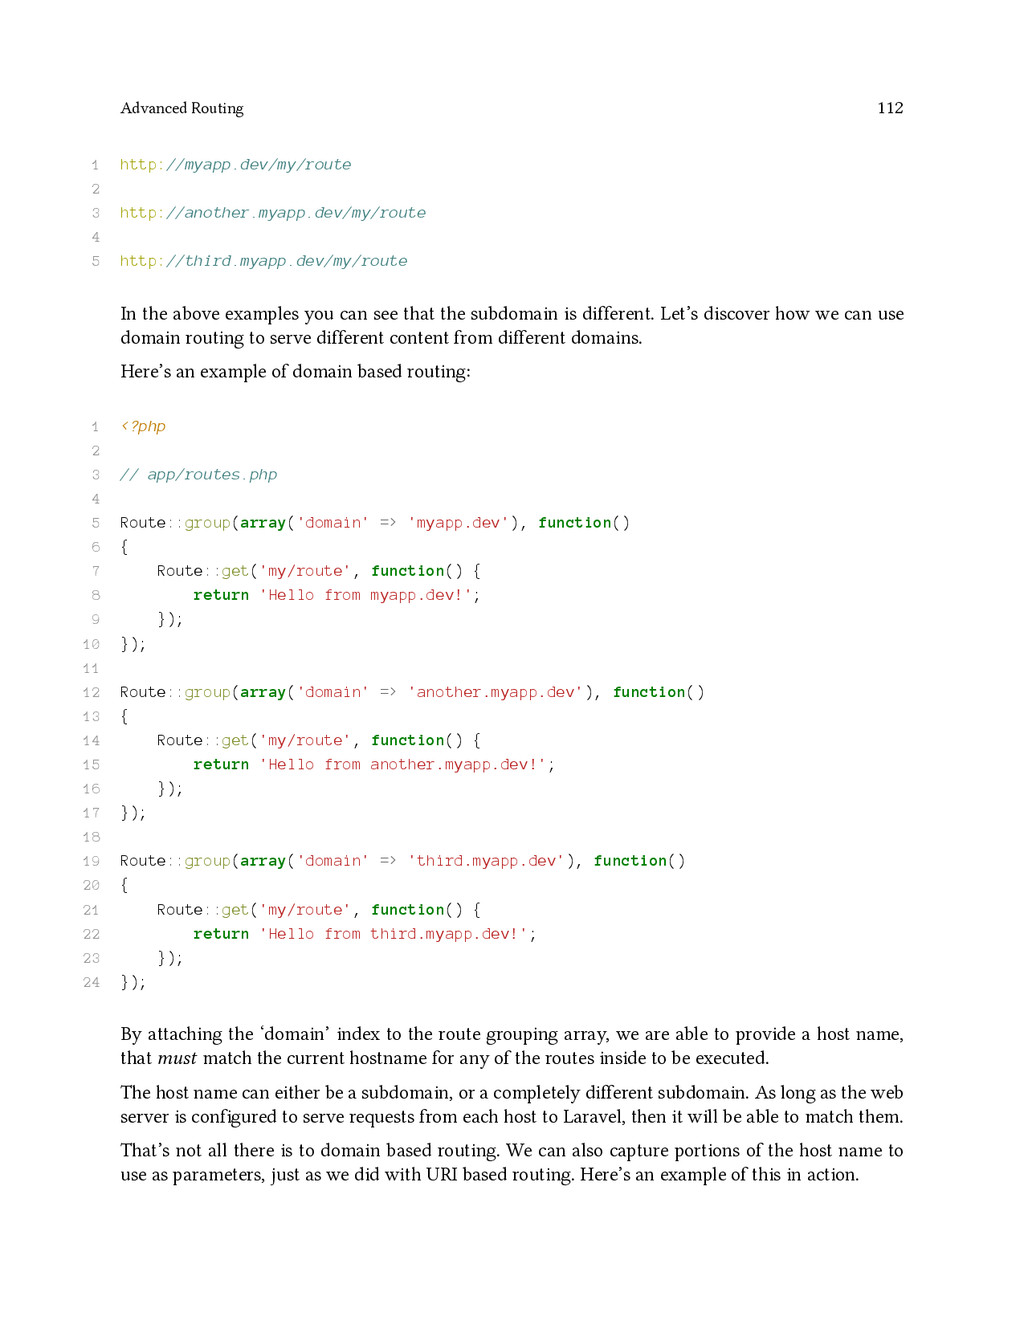
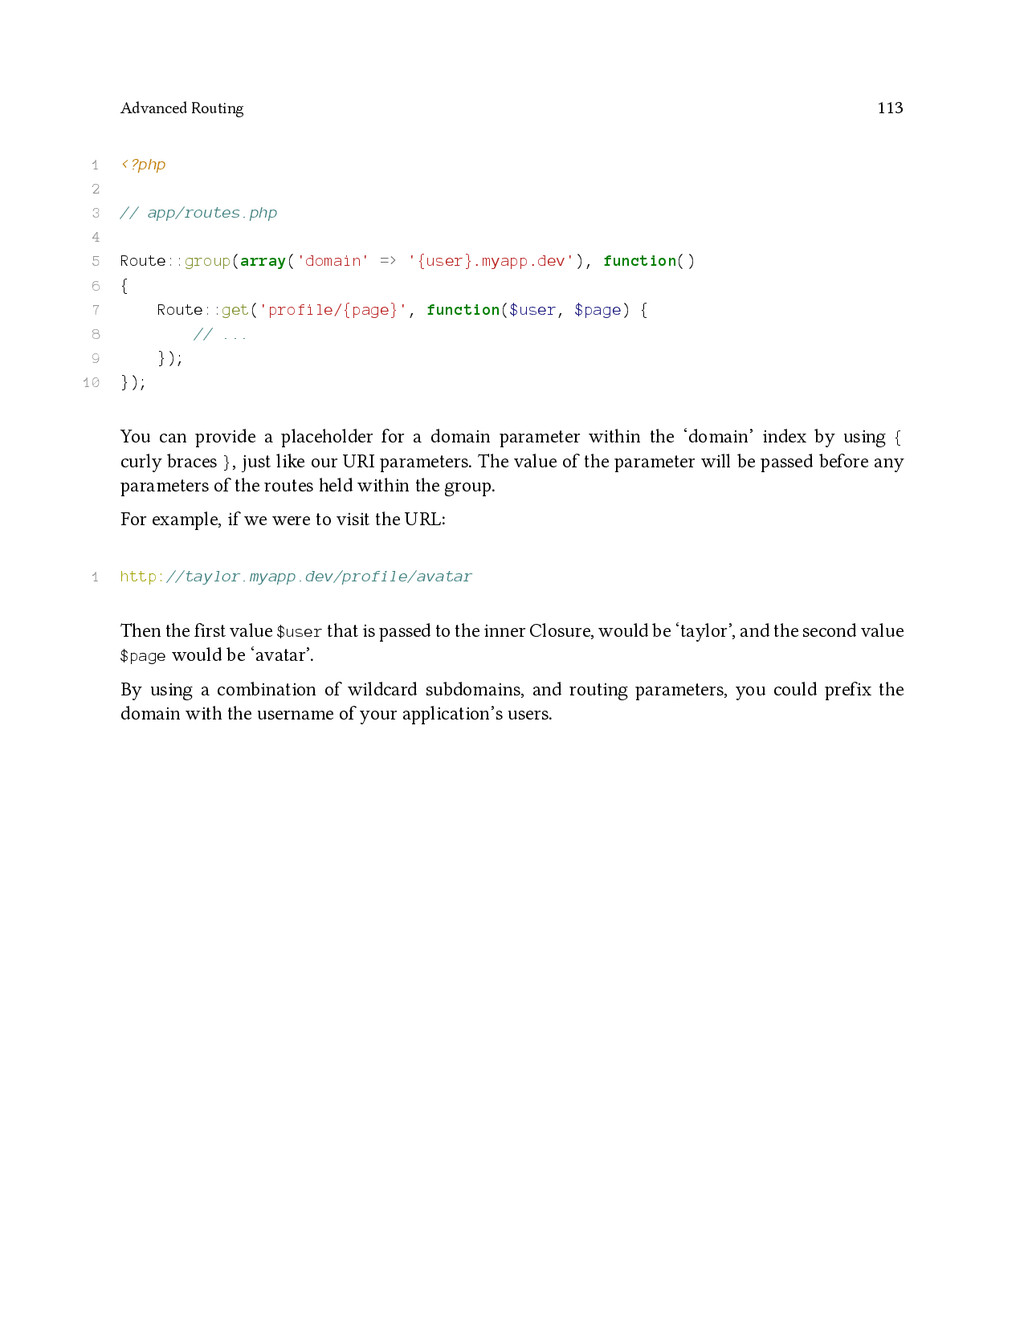
![Request Data 131 1 array(2) { ["foo"]=> string(3) "one" ["baz"]=>](https://files.speakerdeck.com/presentations/93bfbe605f48013231b75a35dee7ad3b/slide_145.jpg)
![Request Data 134 1 array(2) { ["foo"]=> string(3) "one" ["bar"]=>](https://files.speakerdeck.com/presentations/93bfbe605f48013231b75a35dee7ad3b/slide_148.jpg)
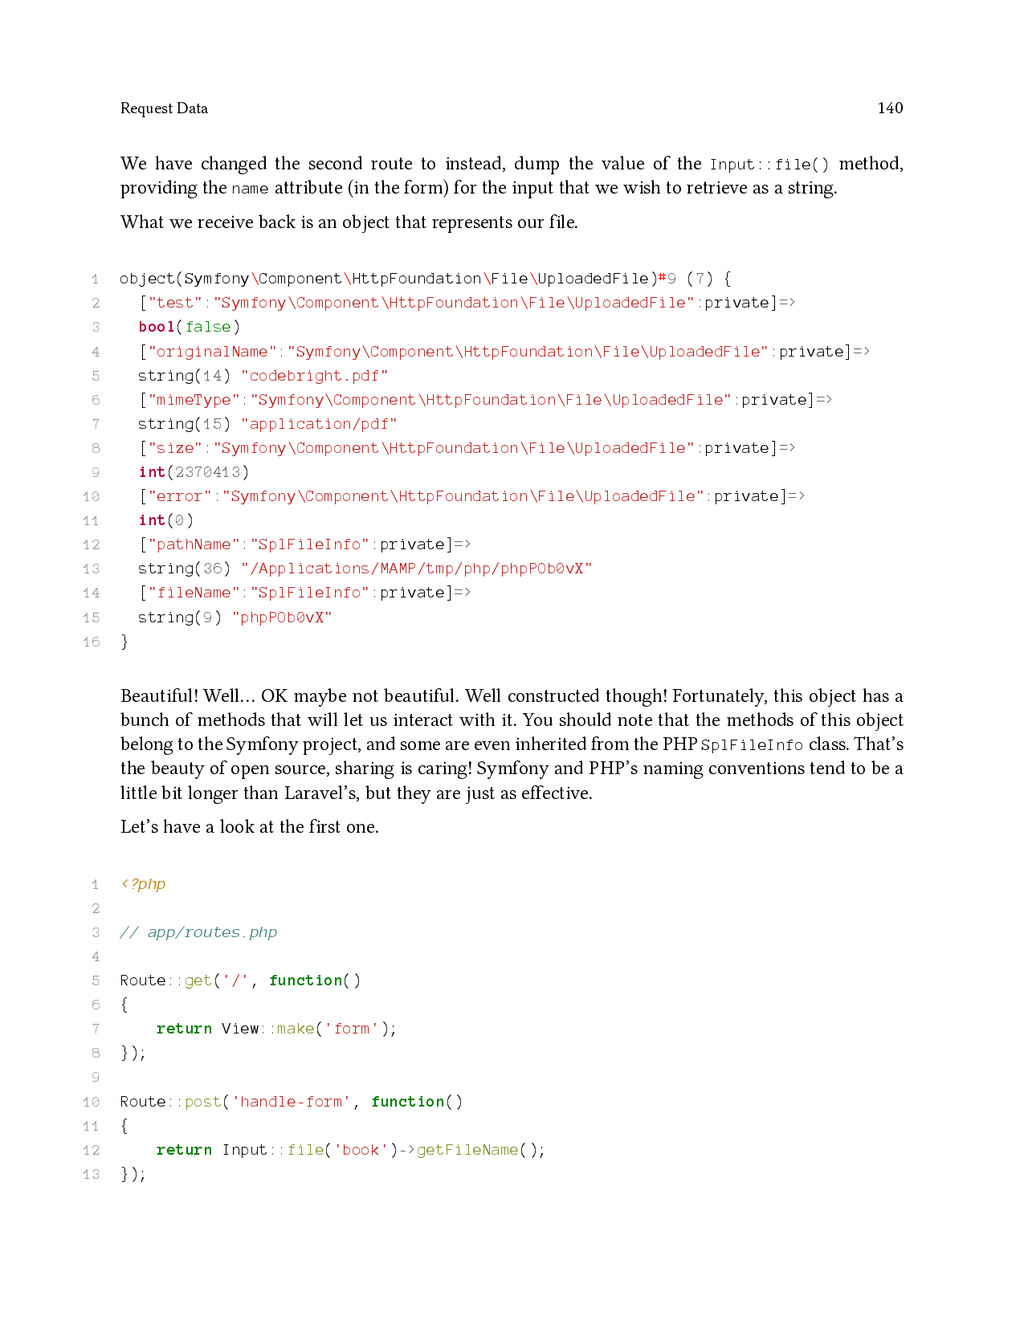
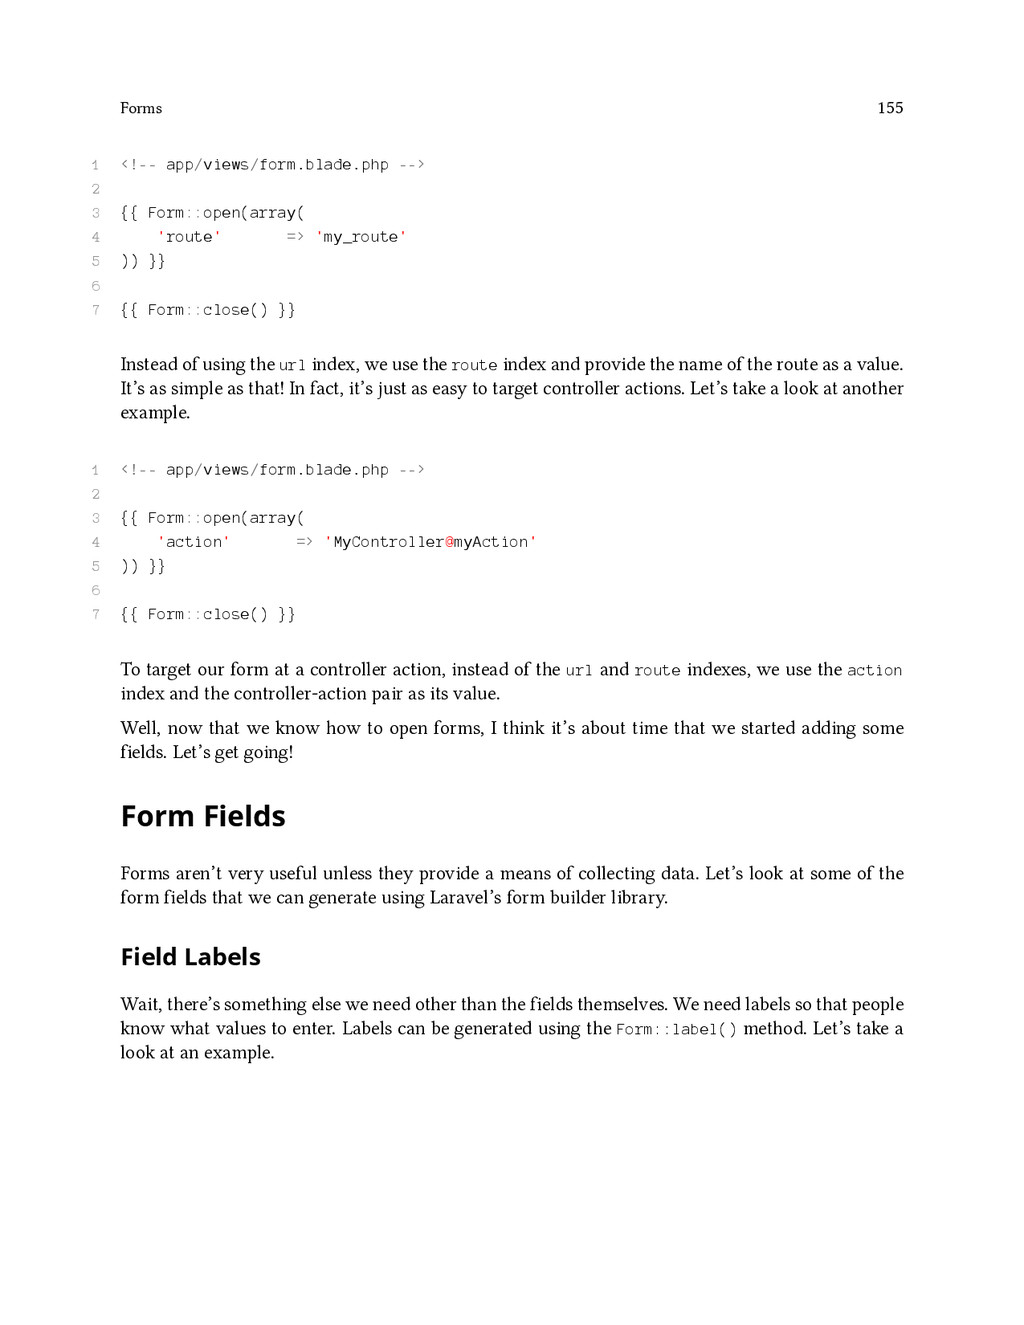
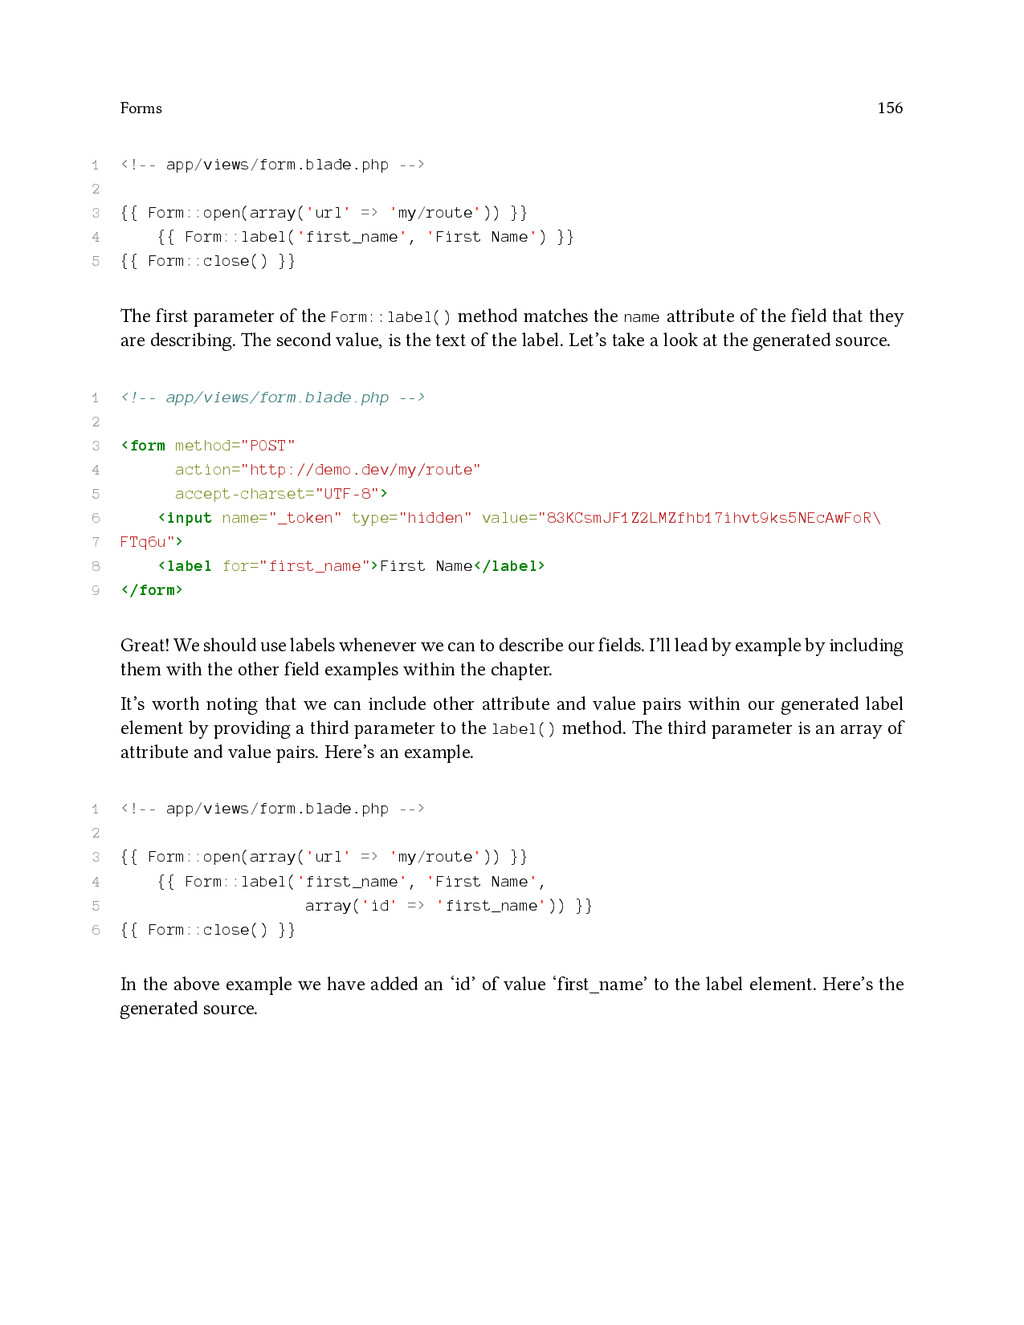
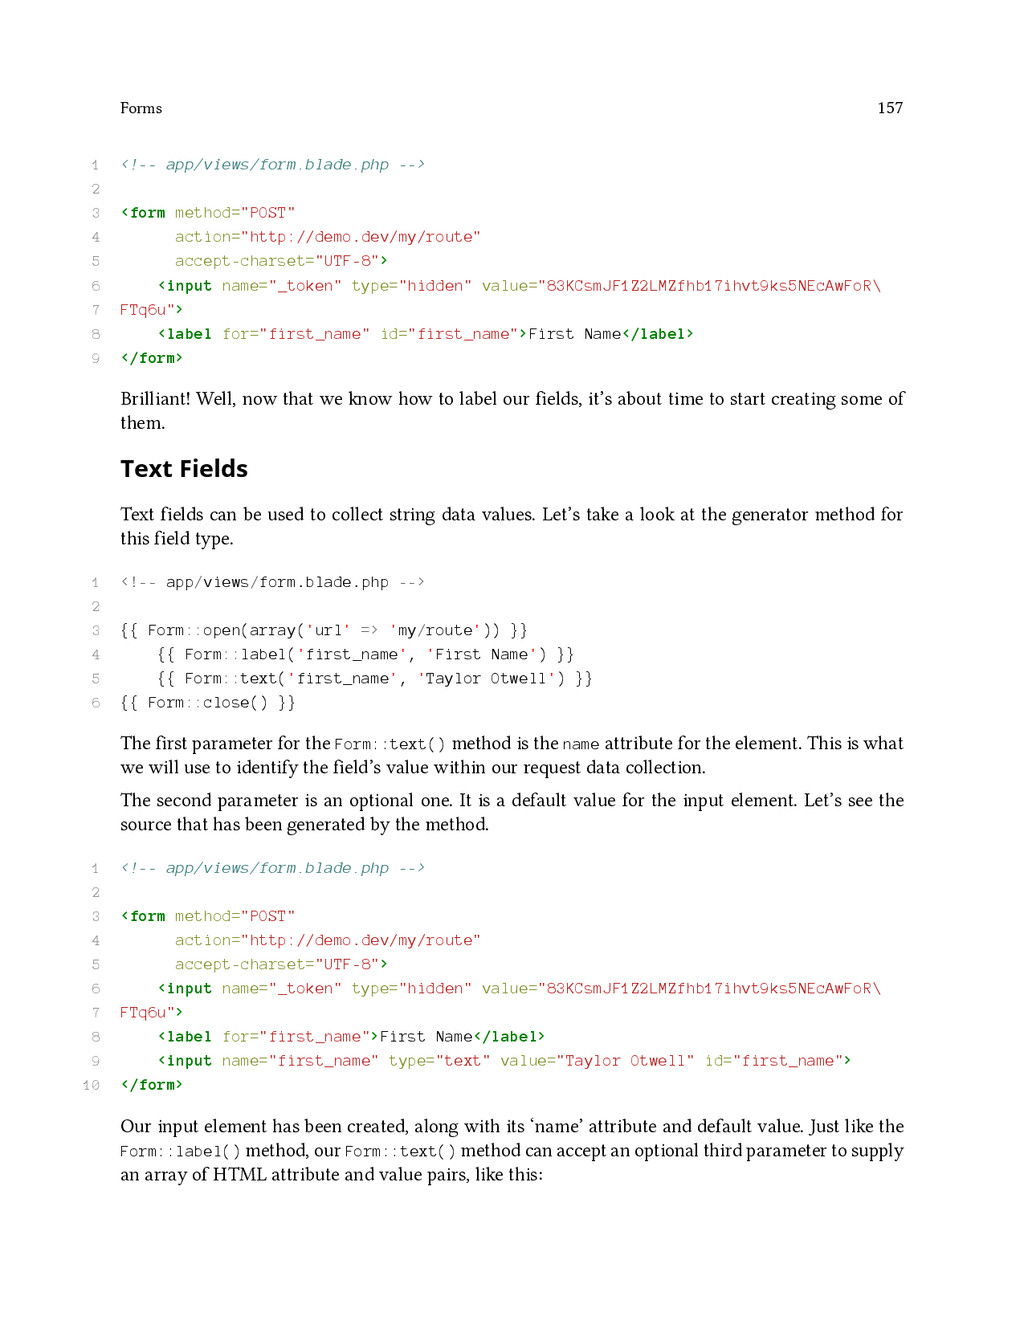
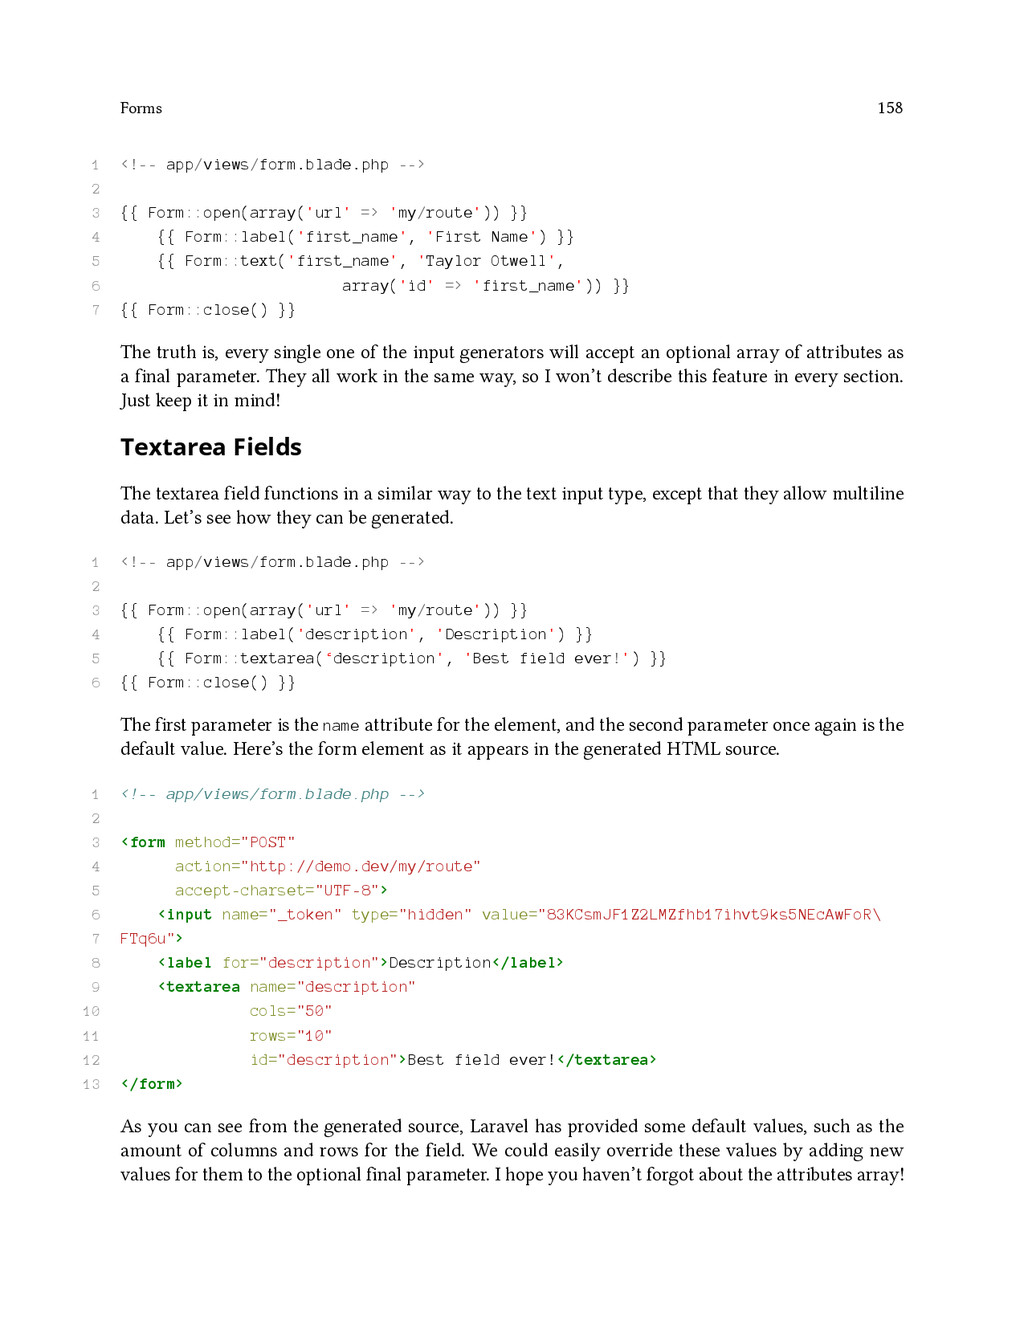
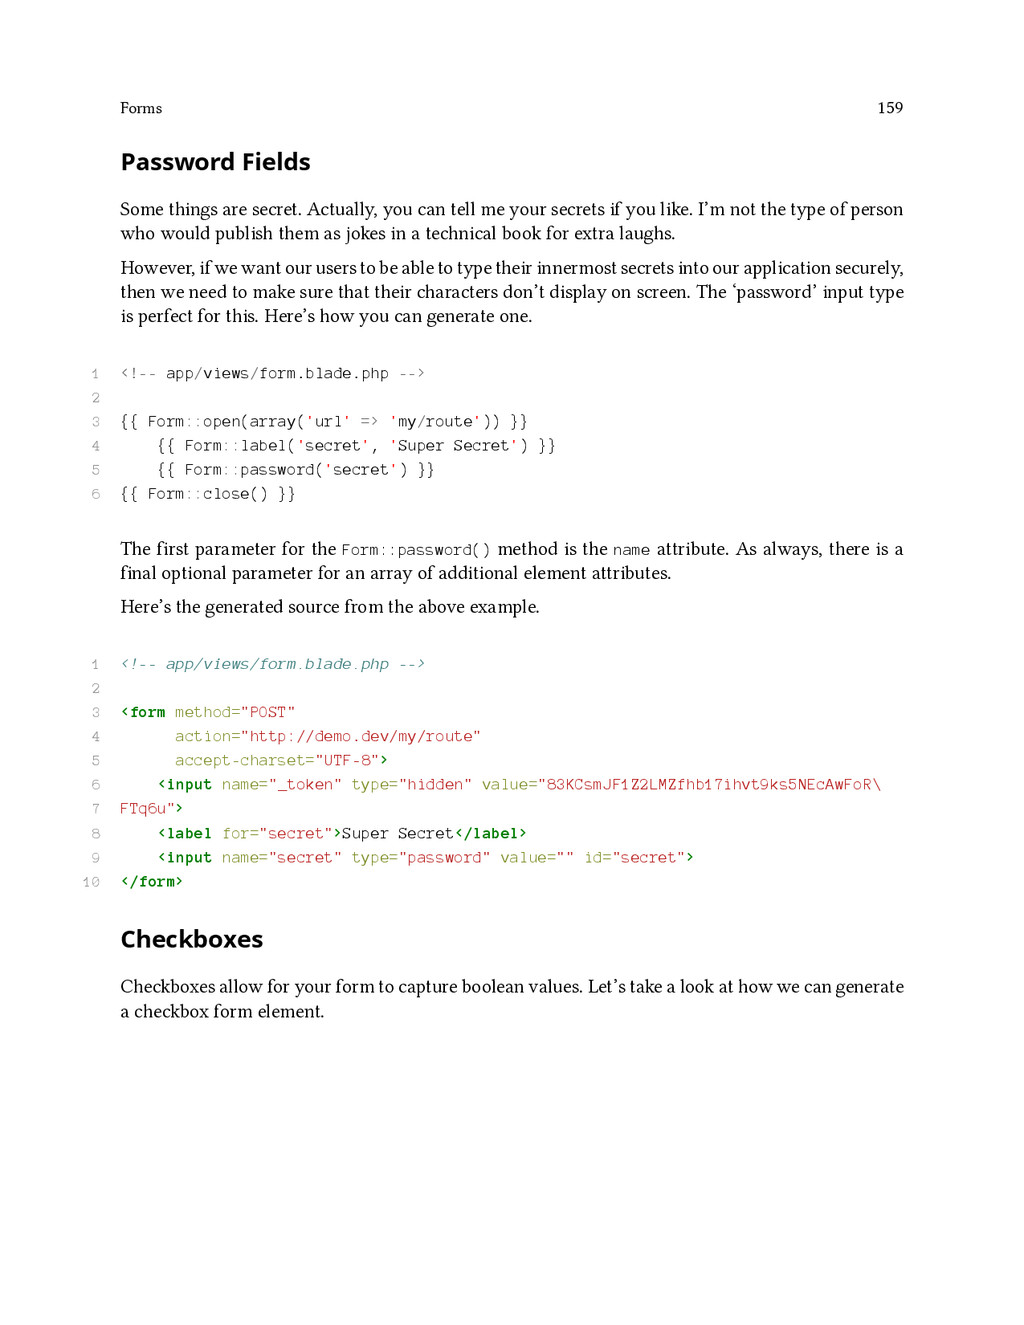
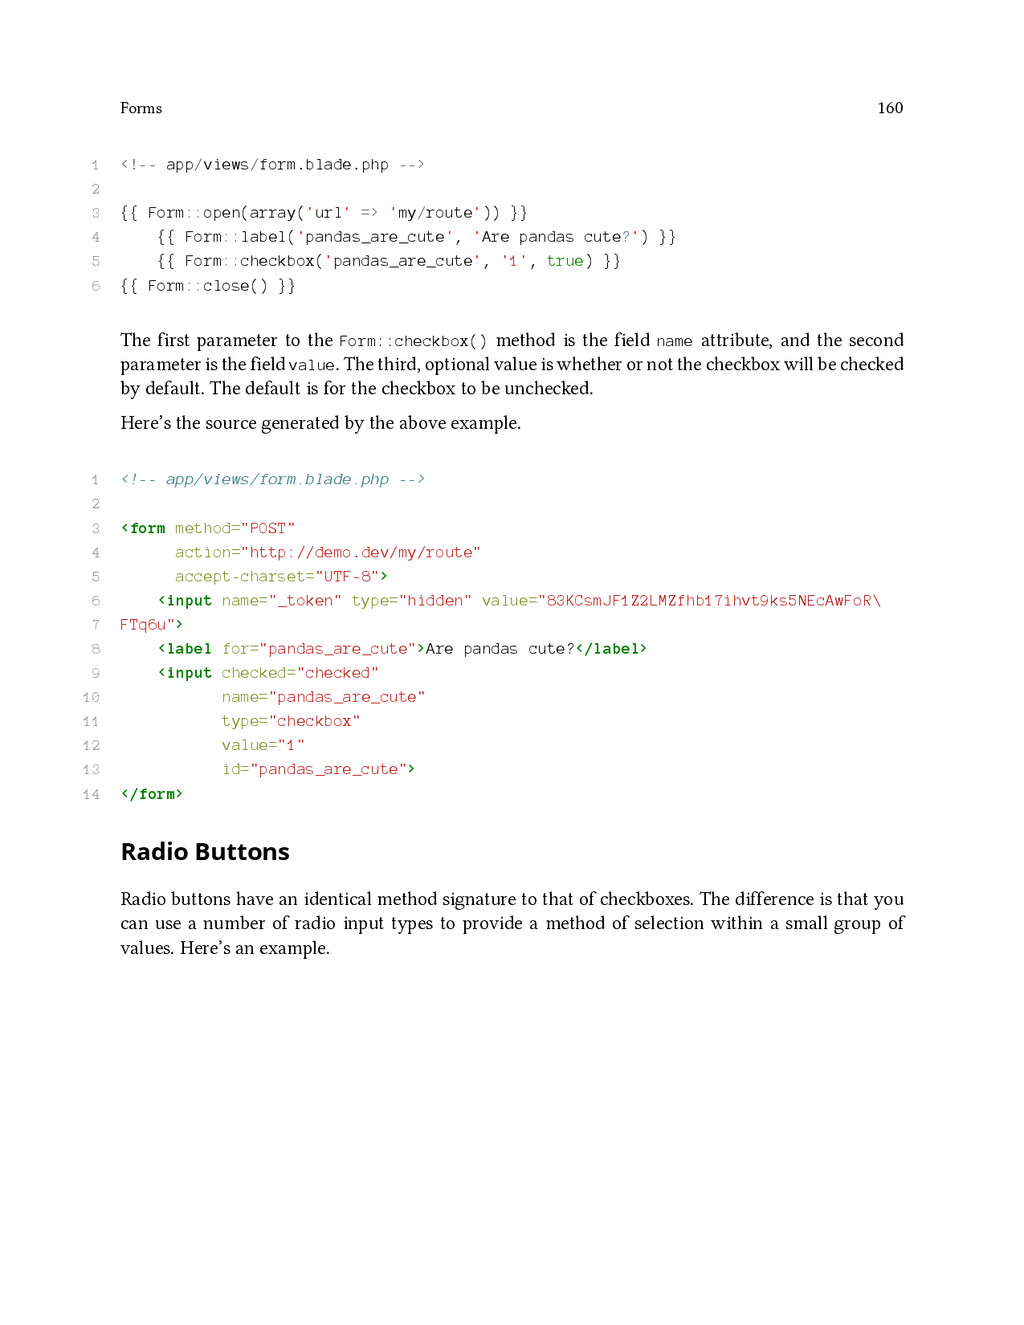
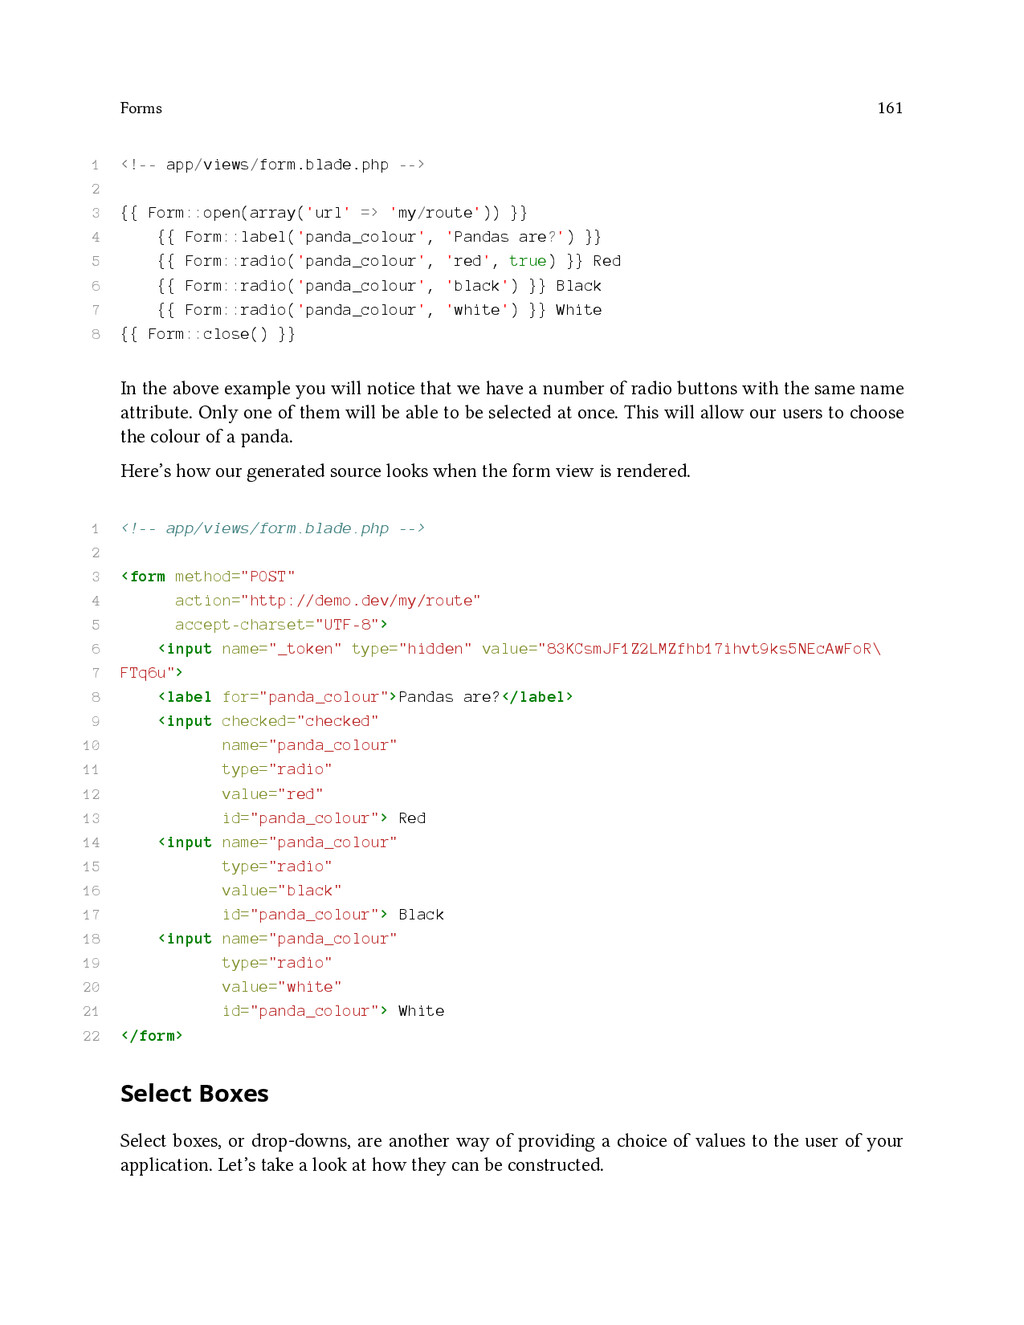
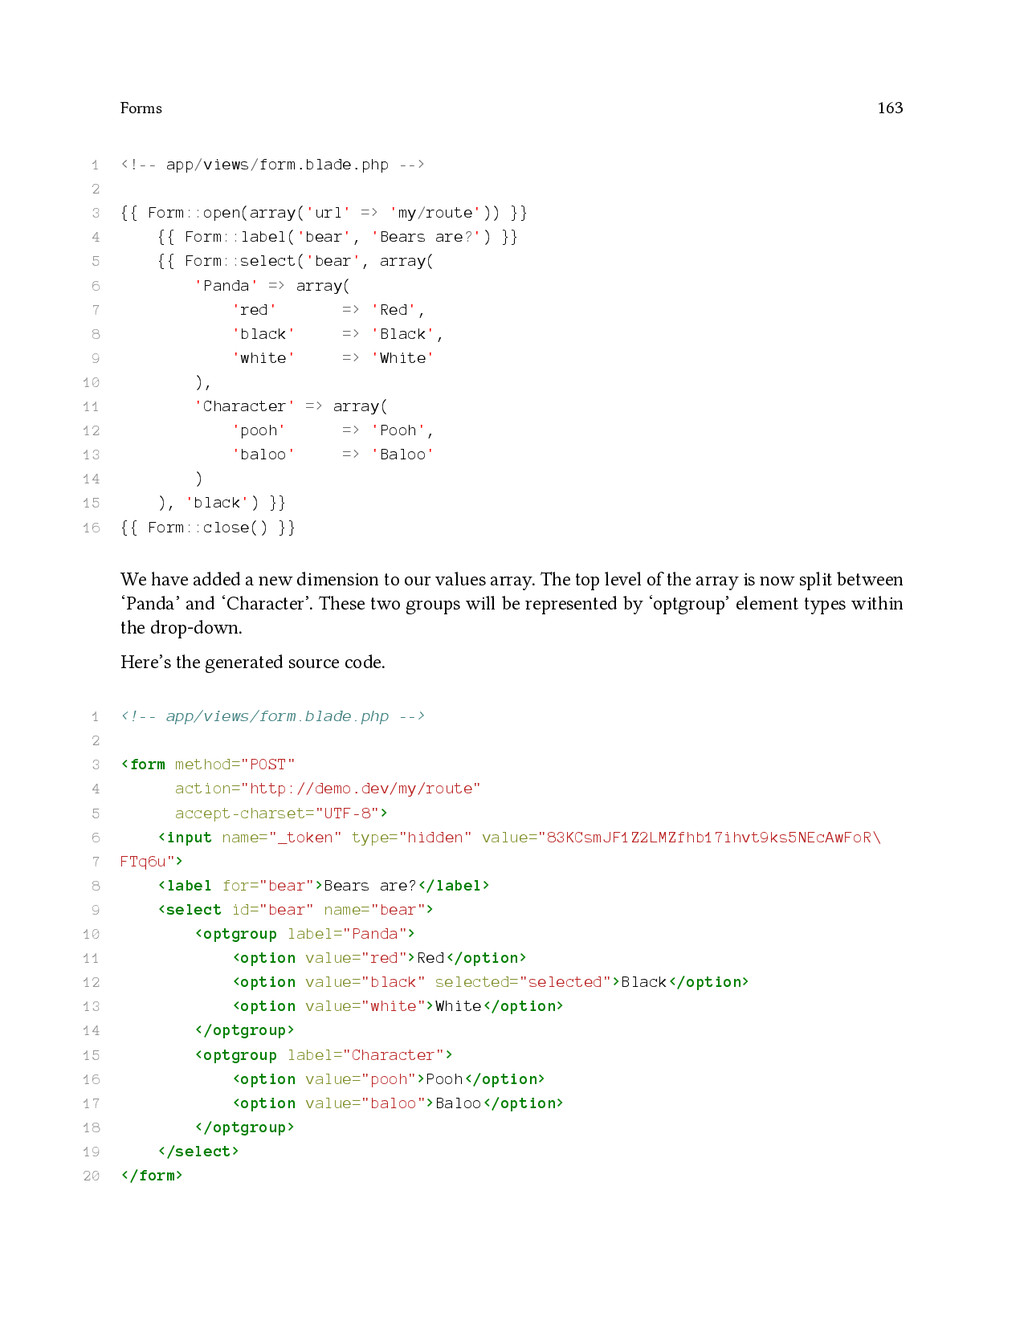
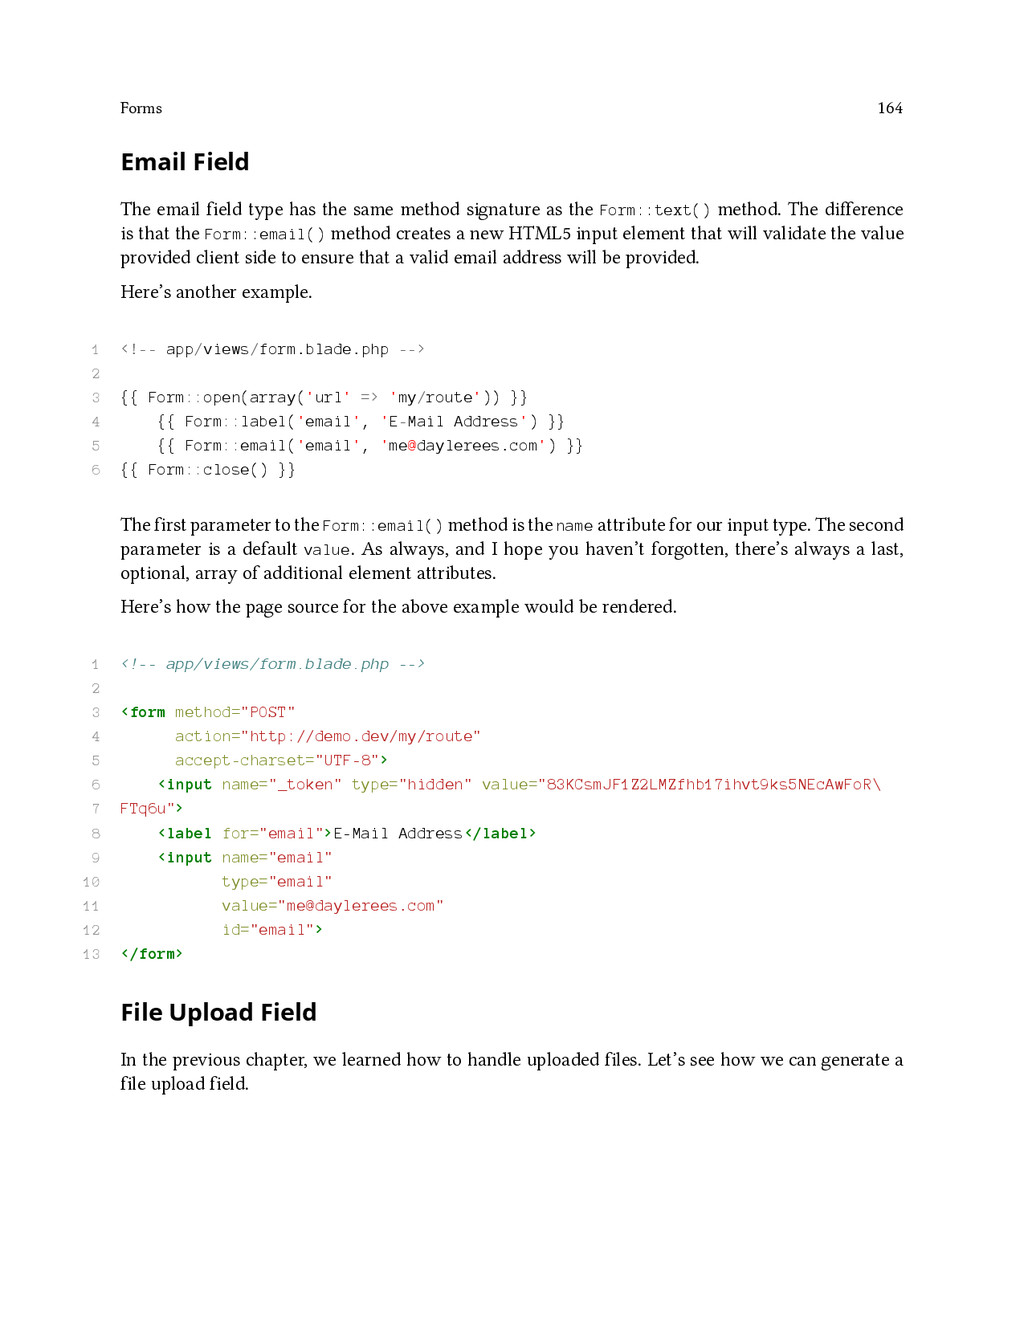
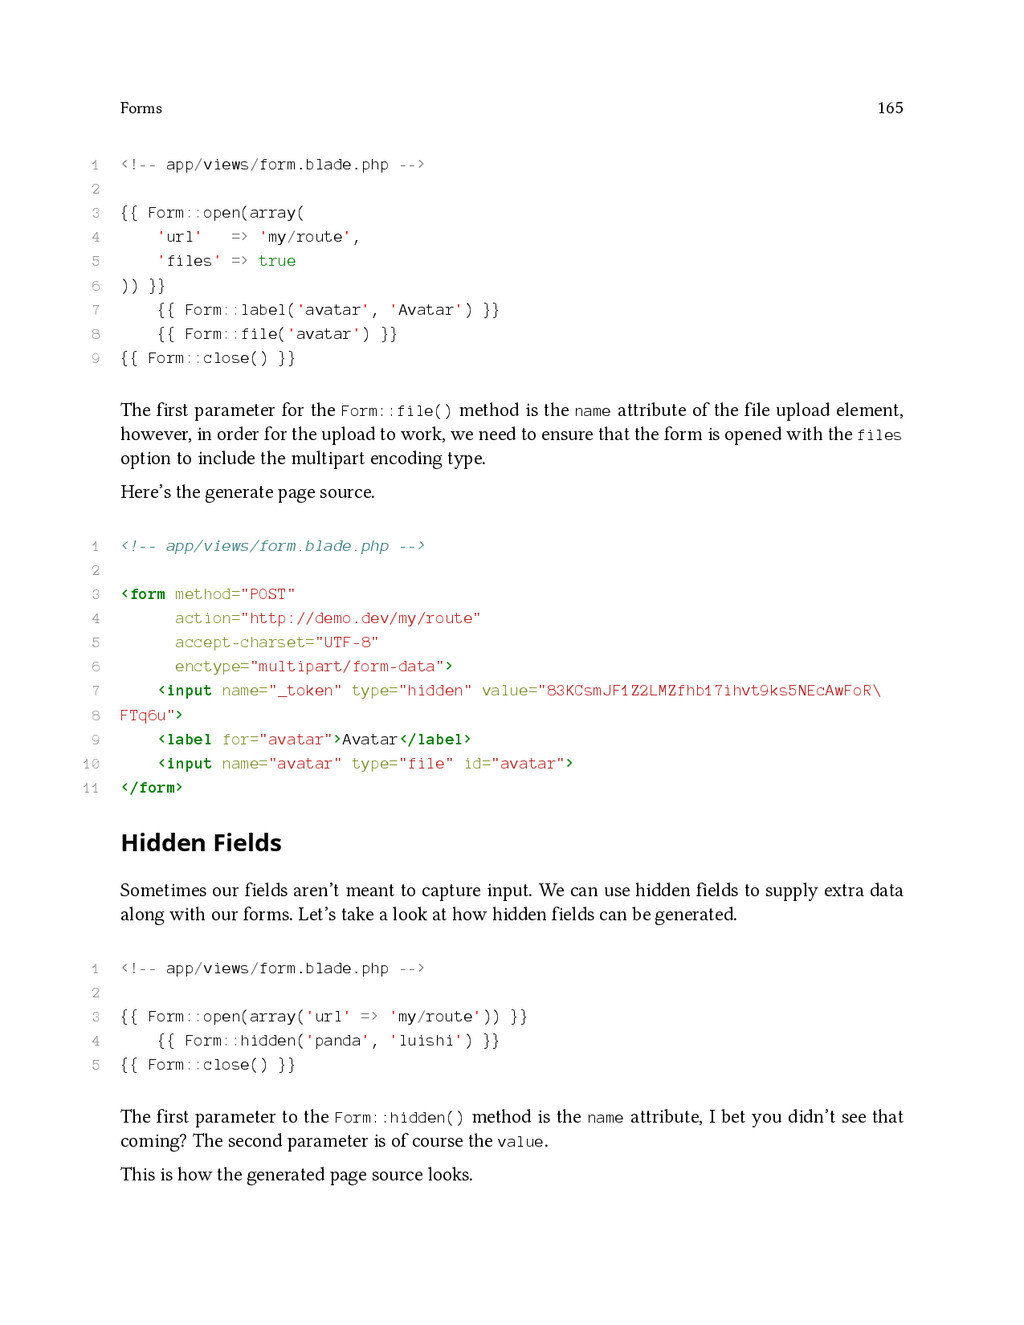
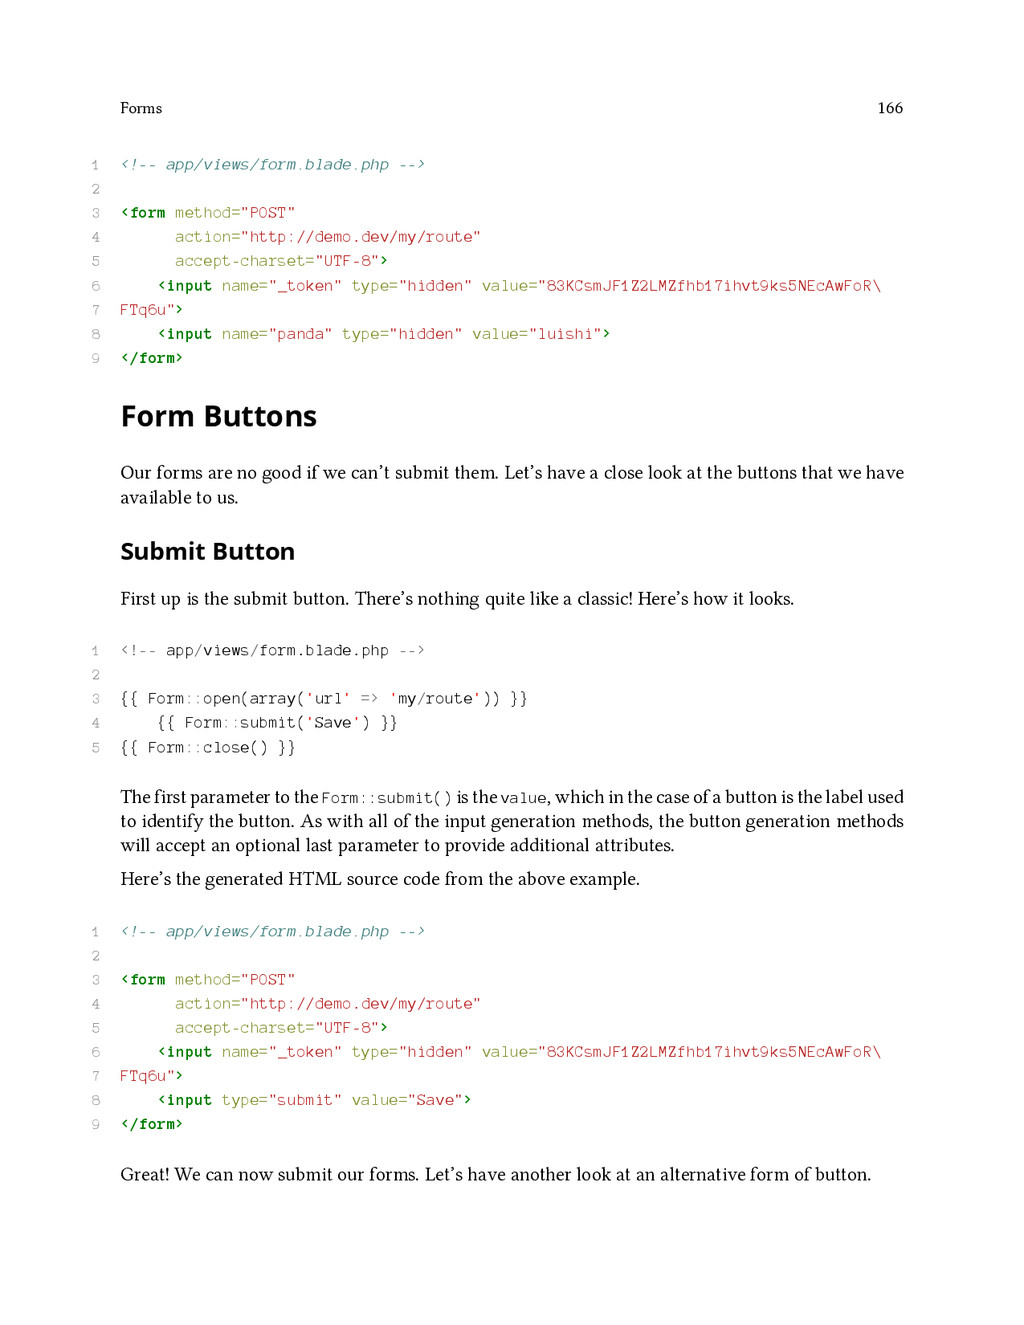
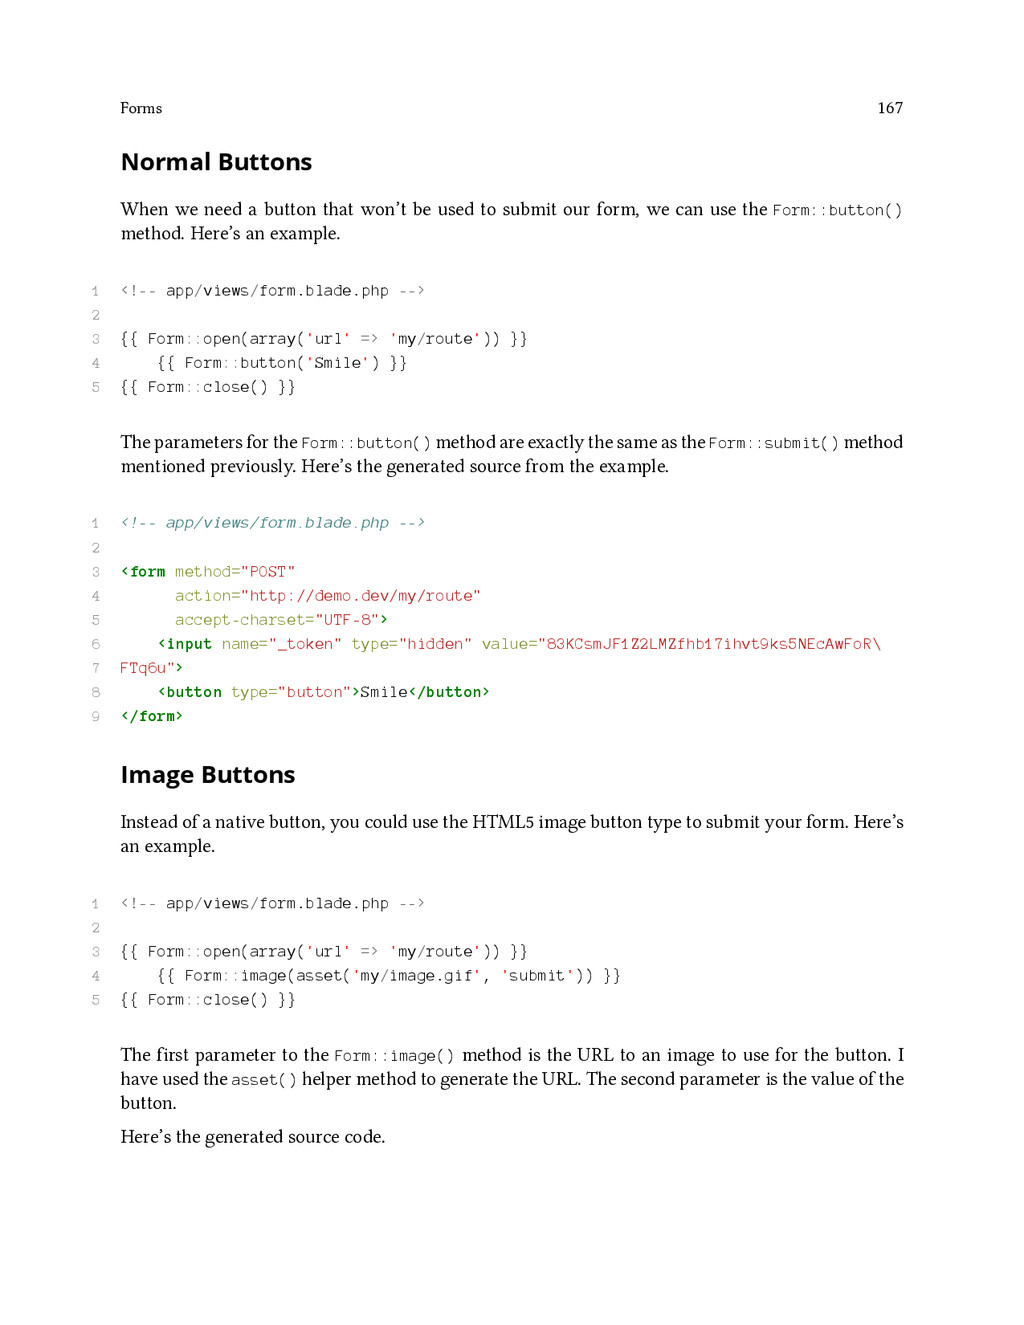
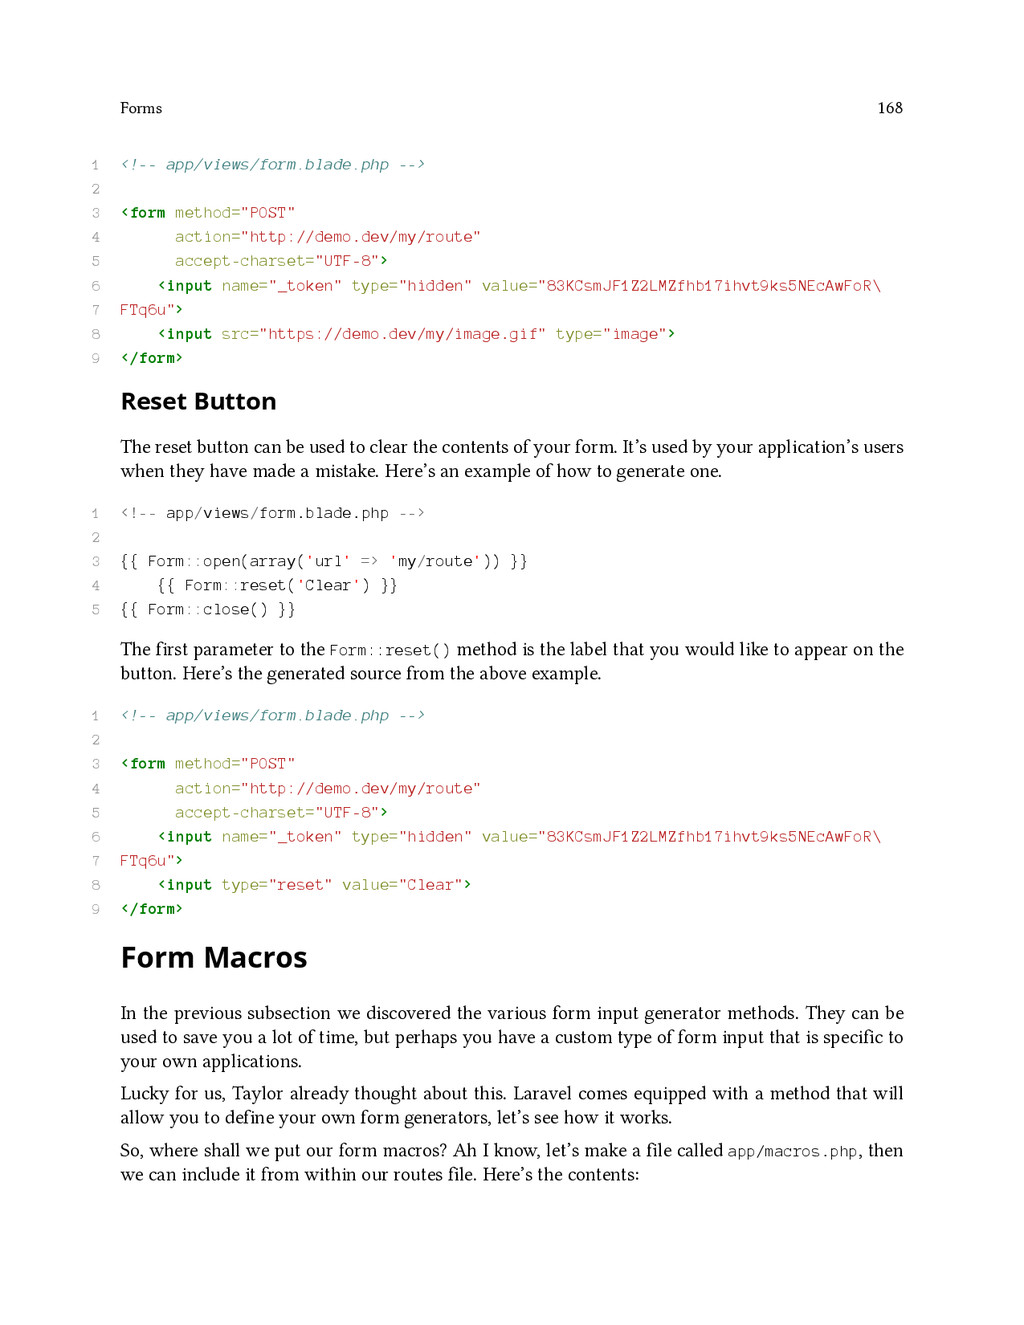
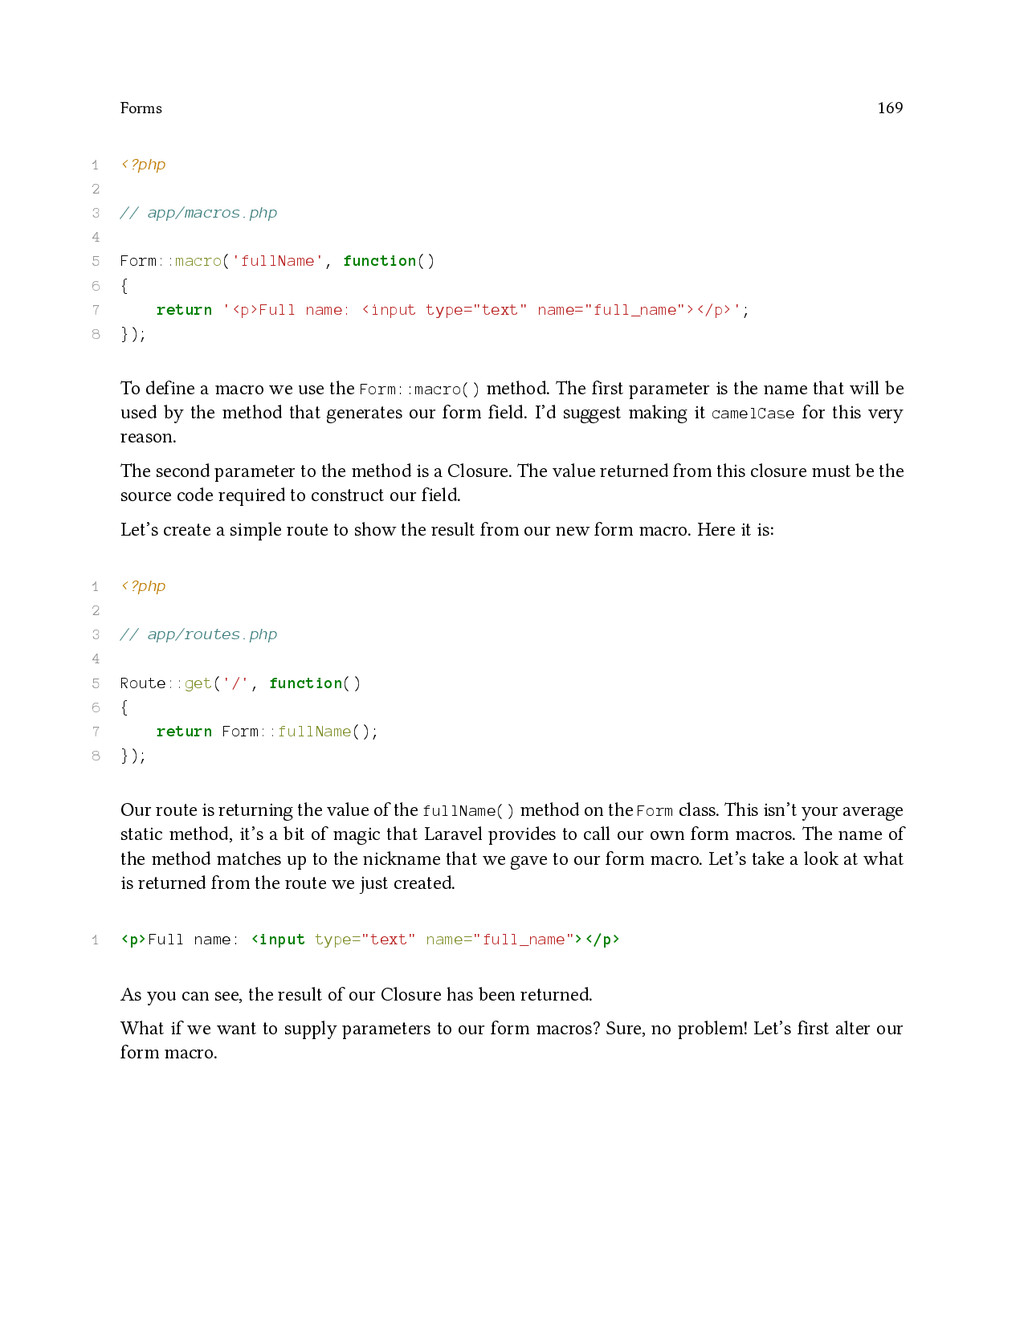
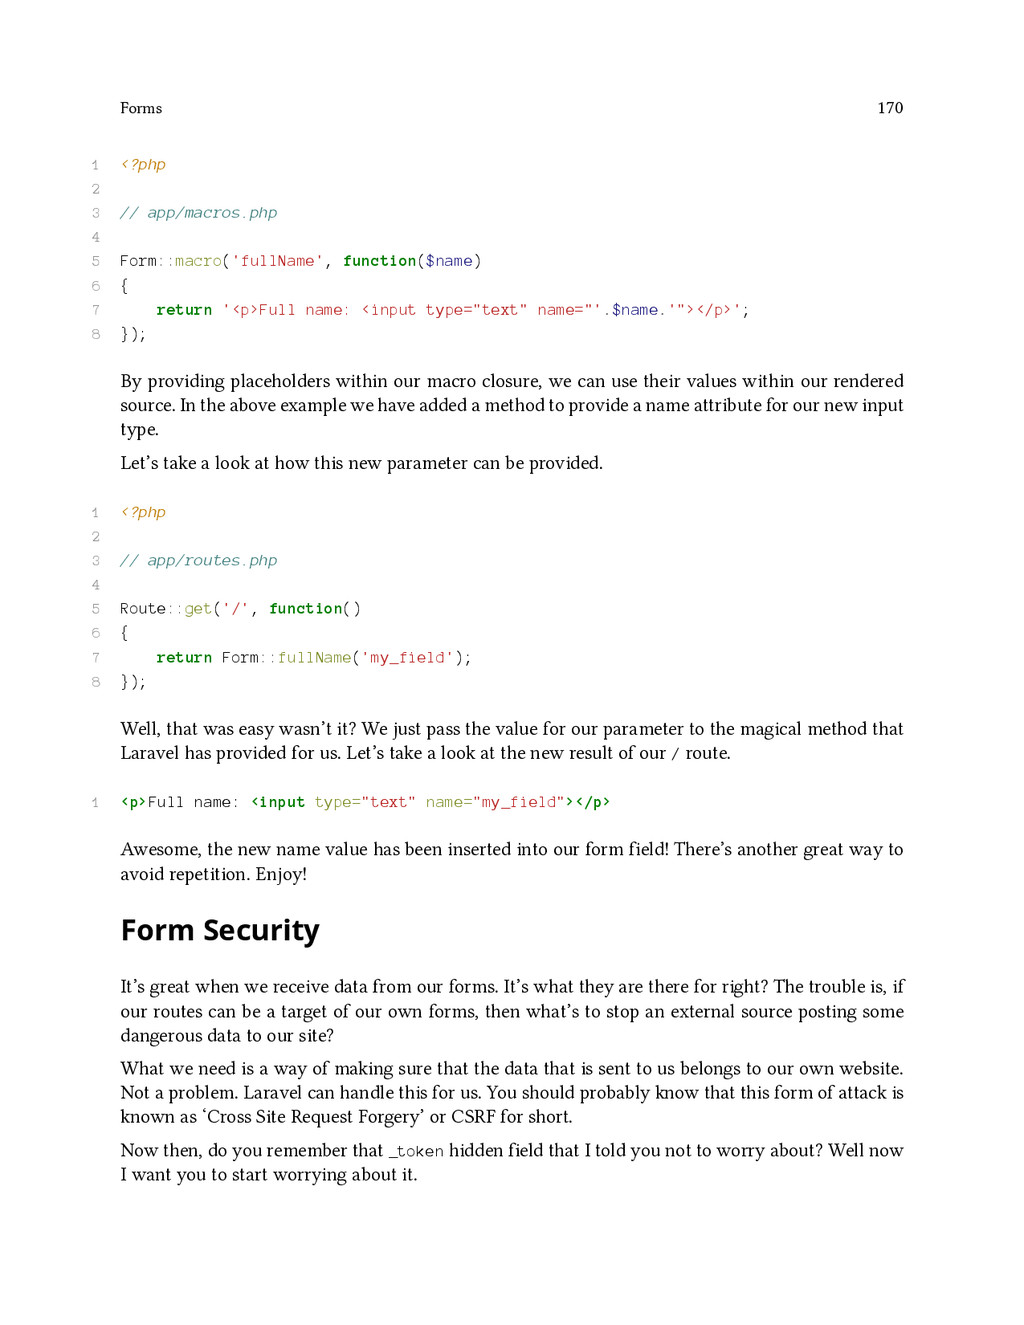
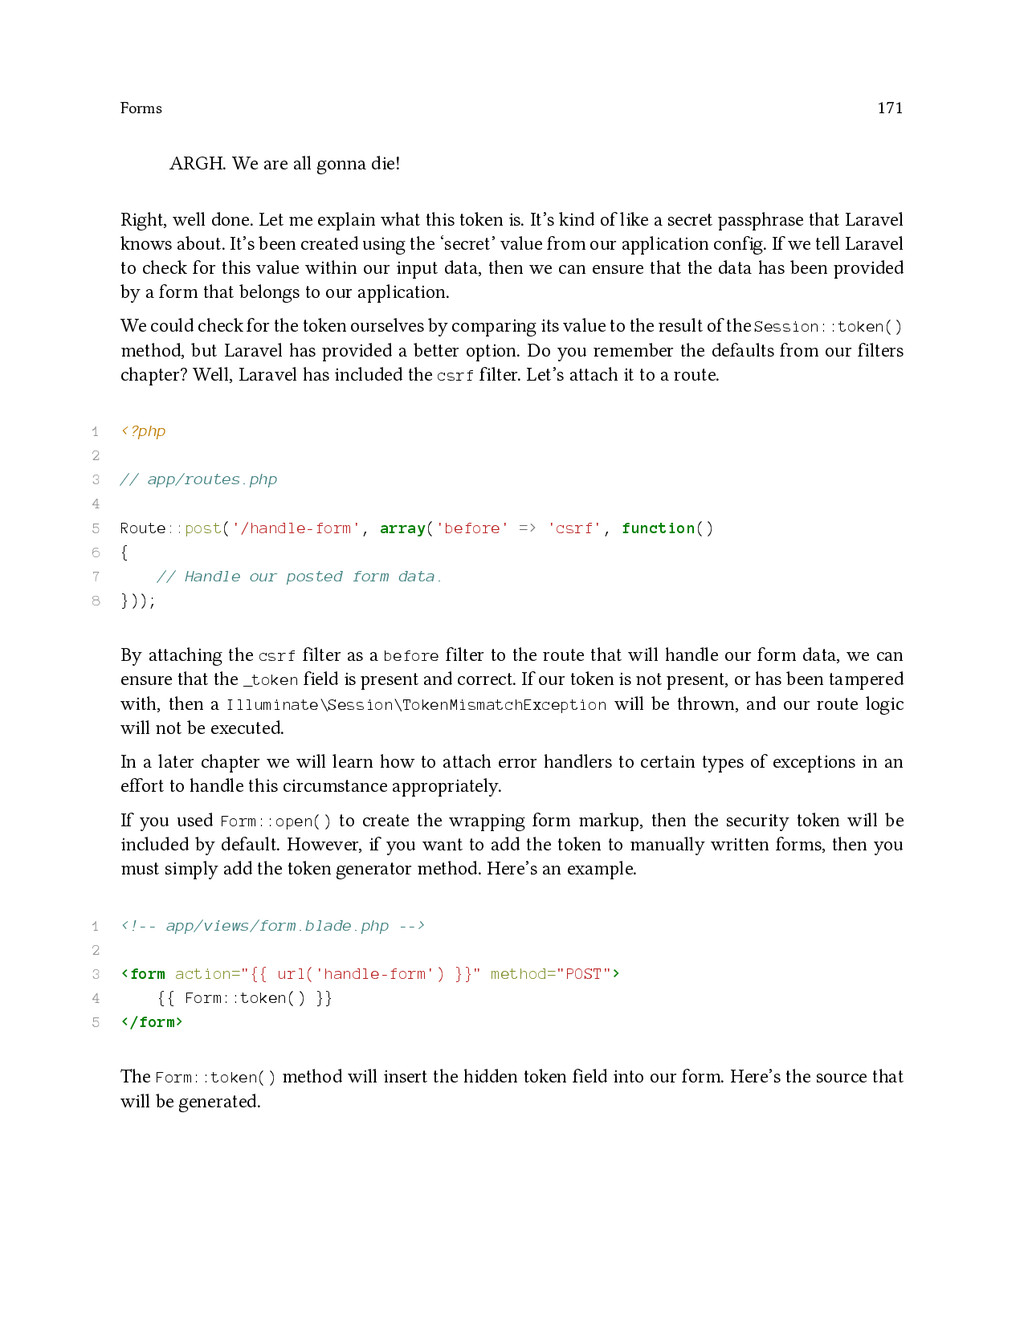
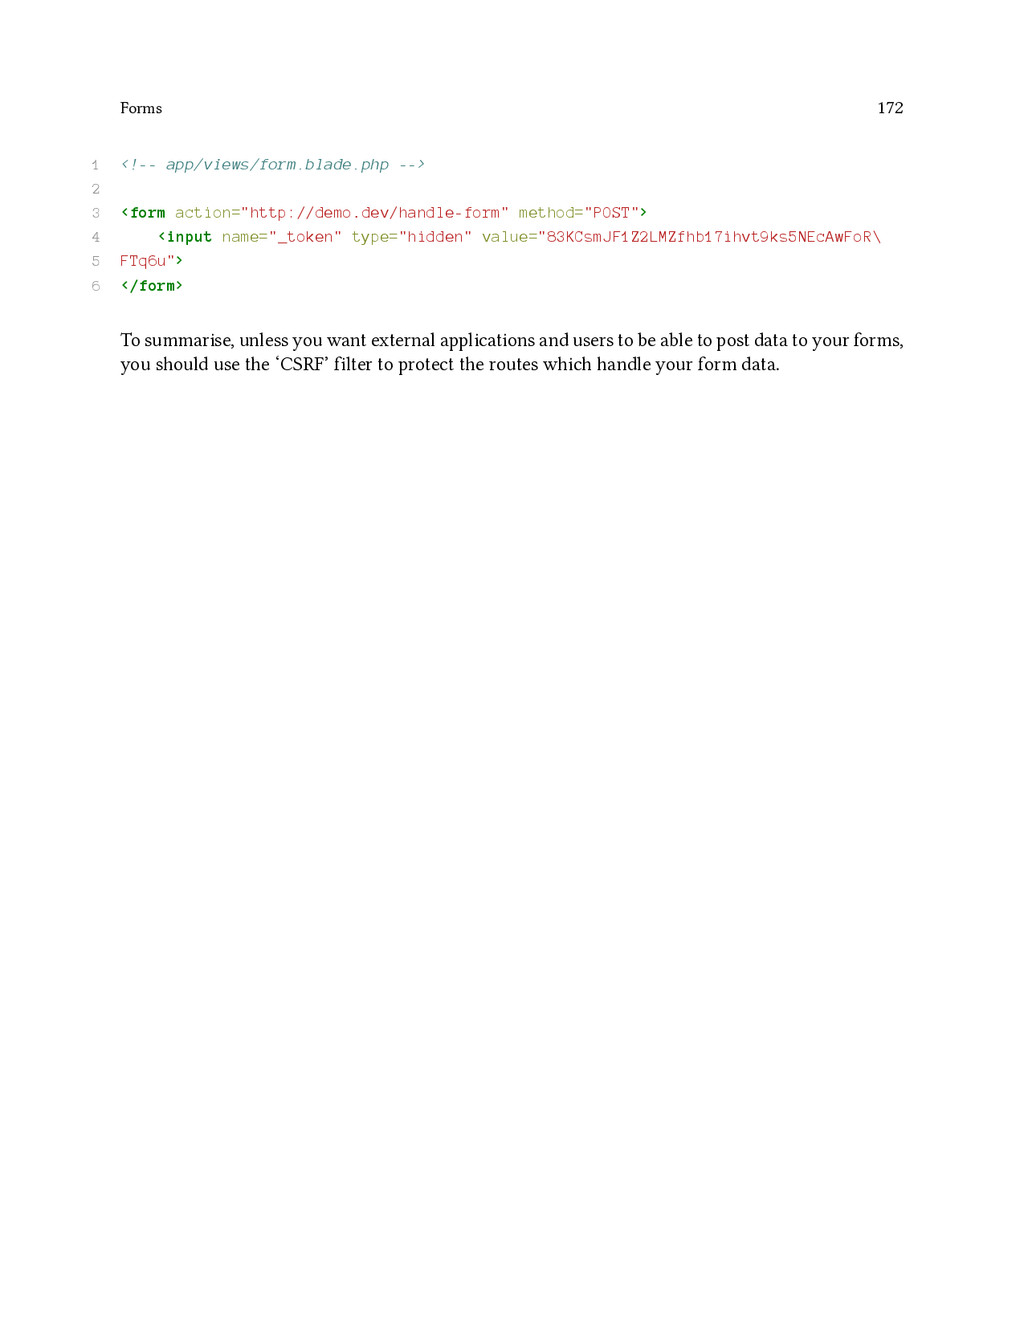
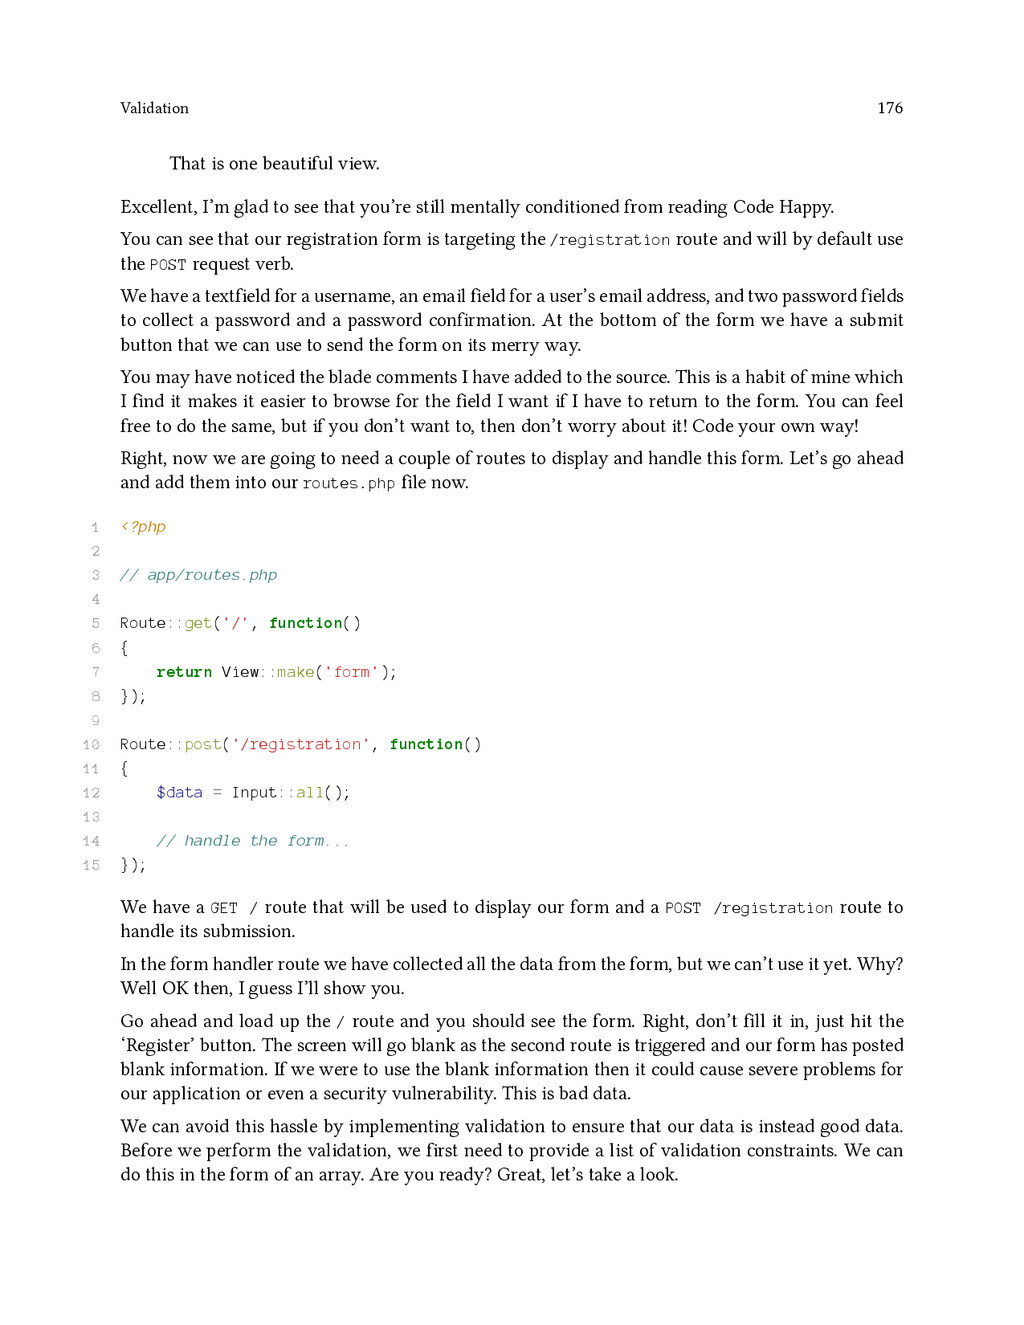
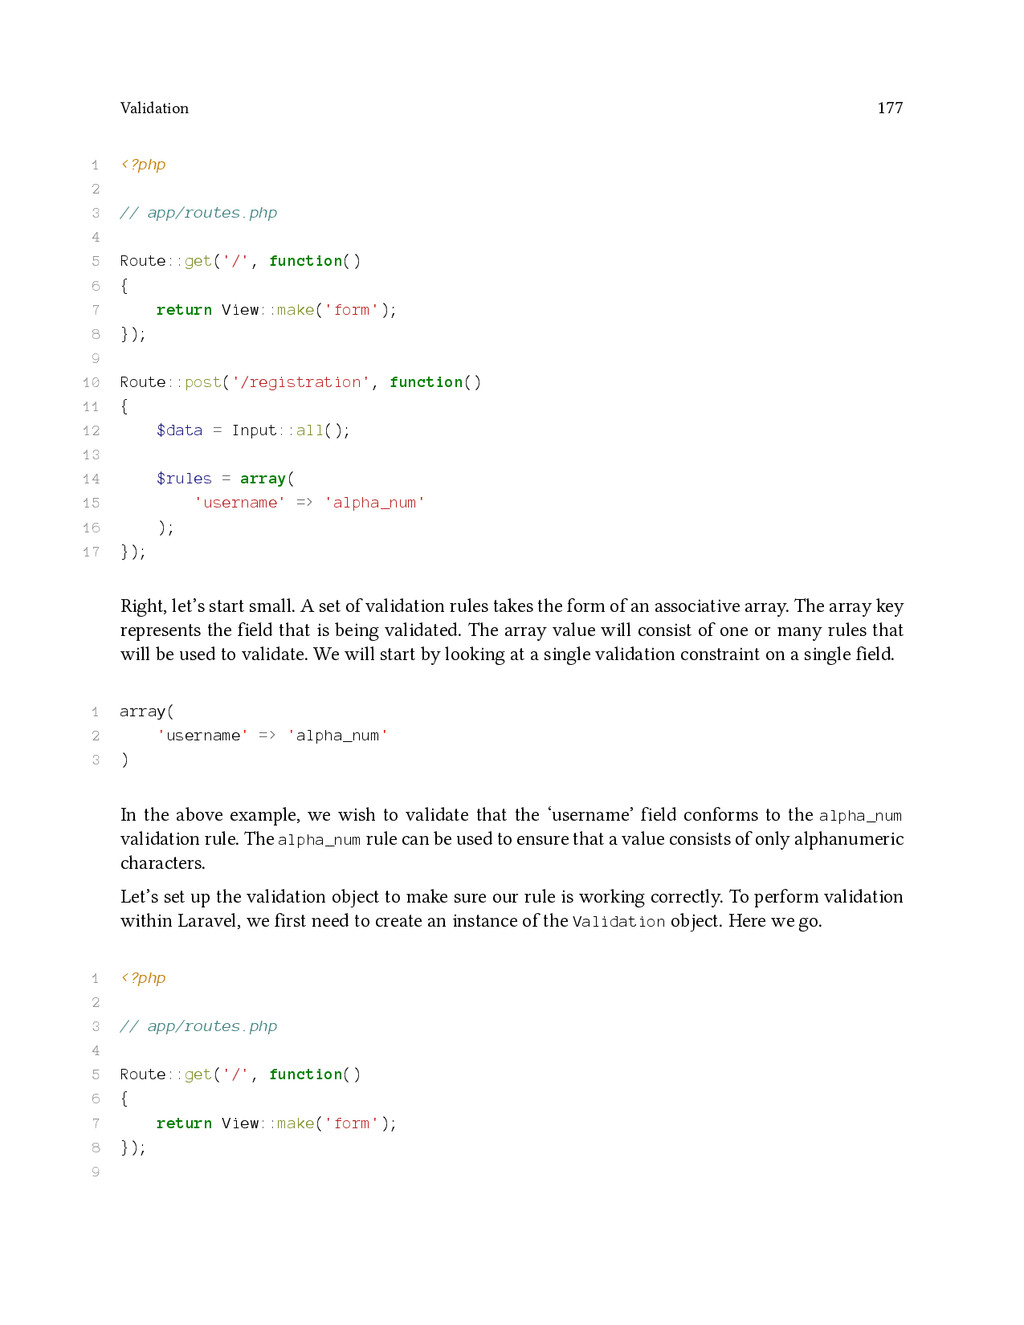
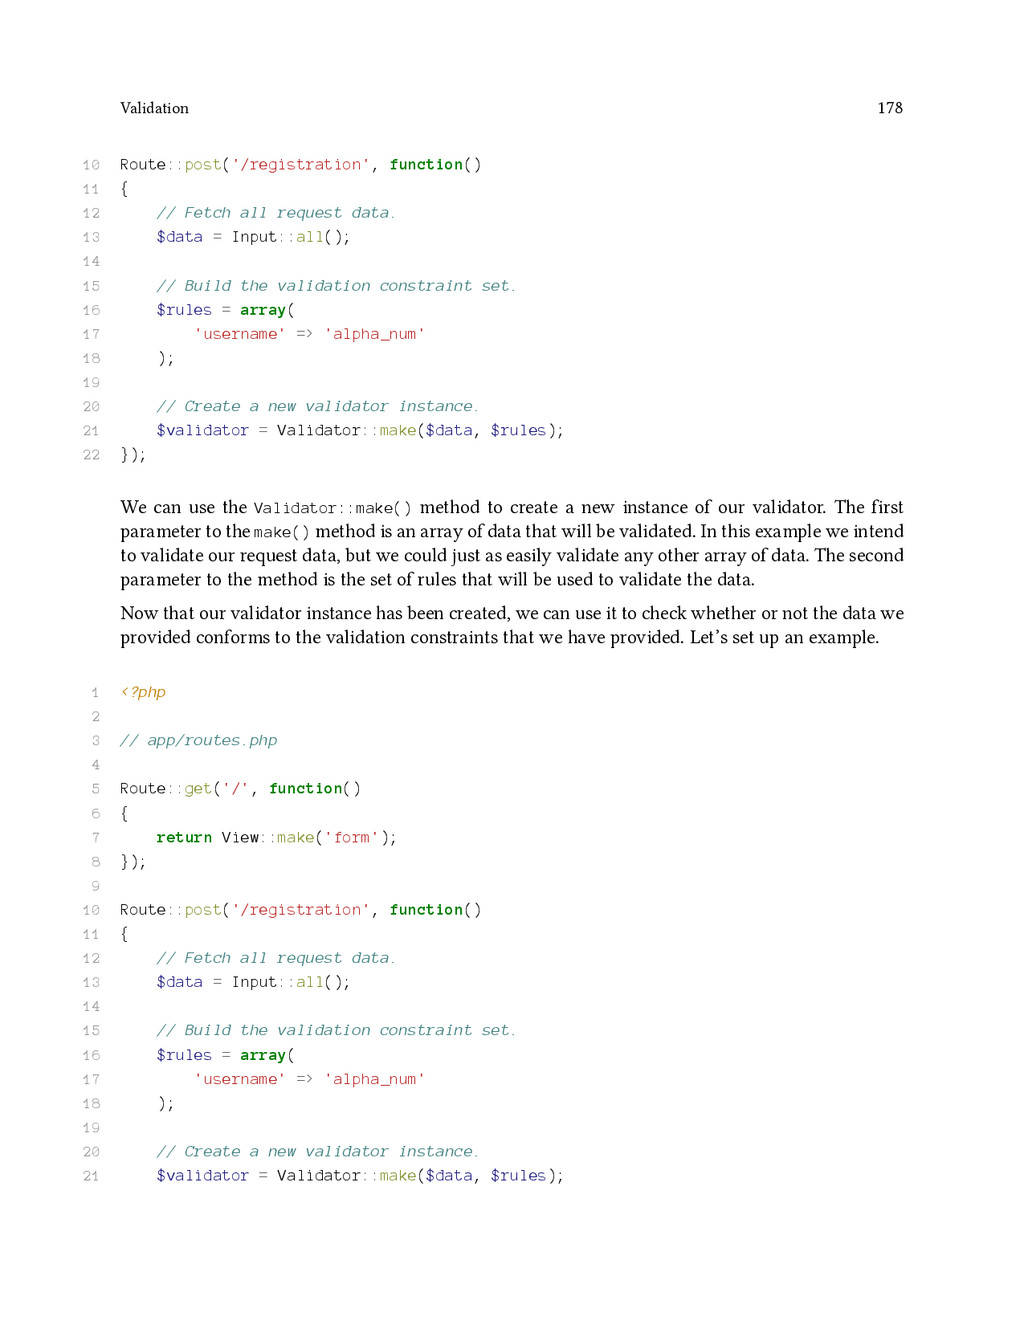
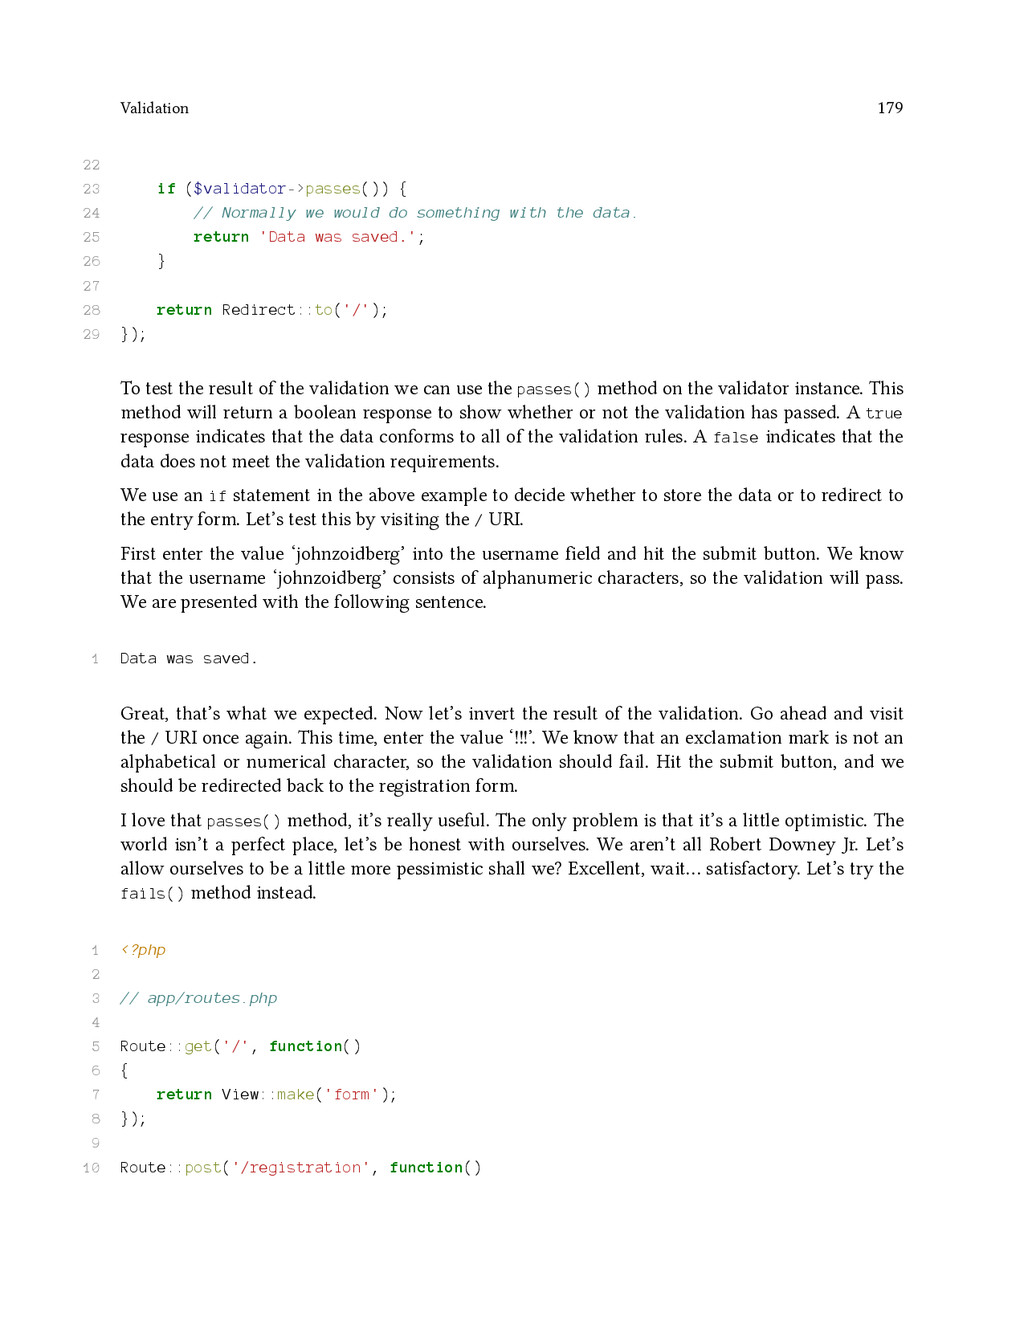
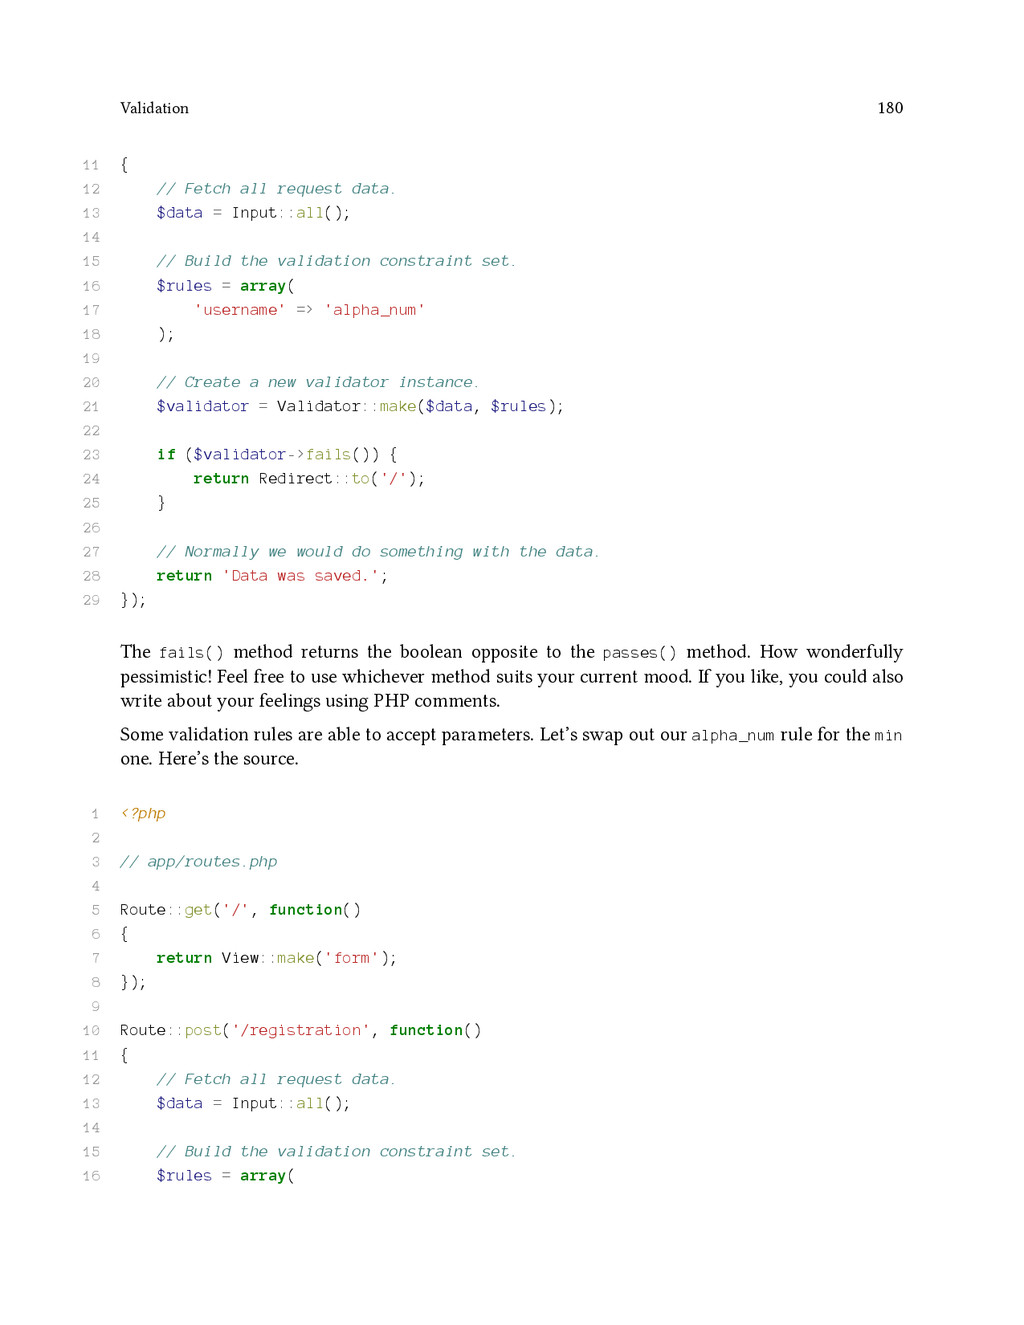
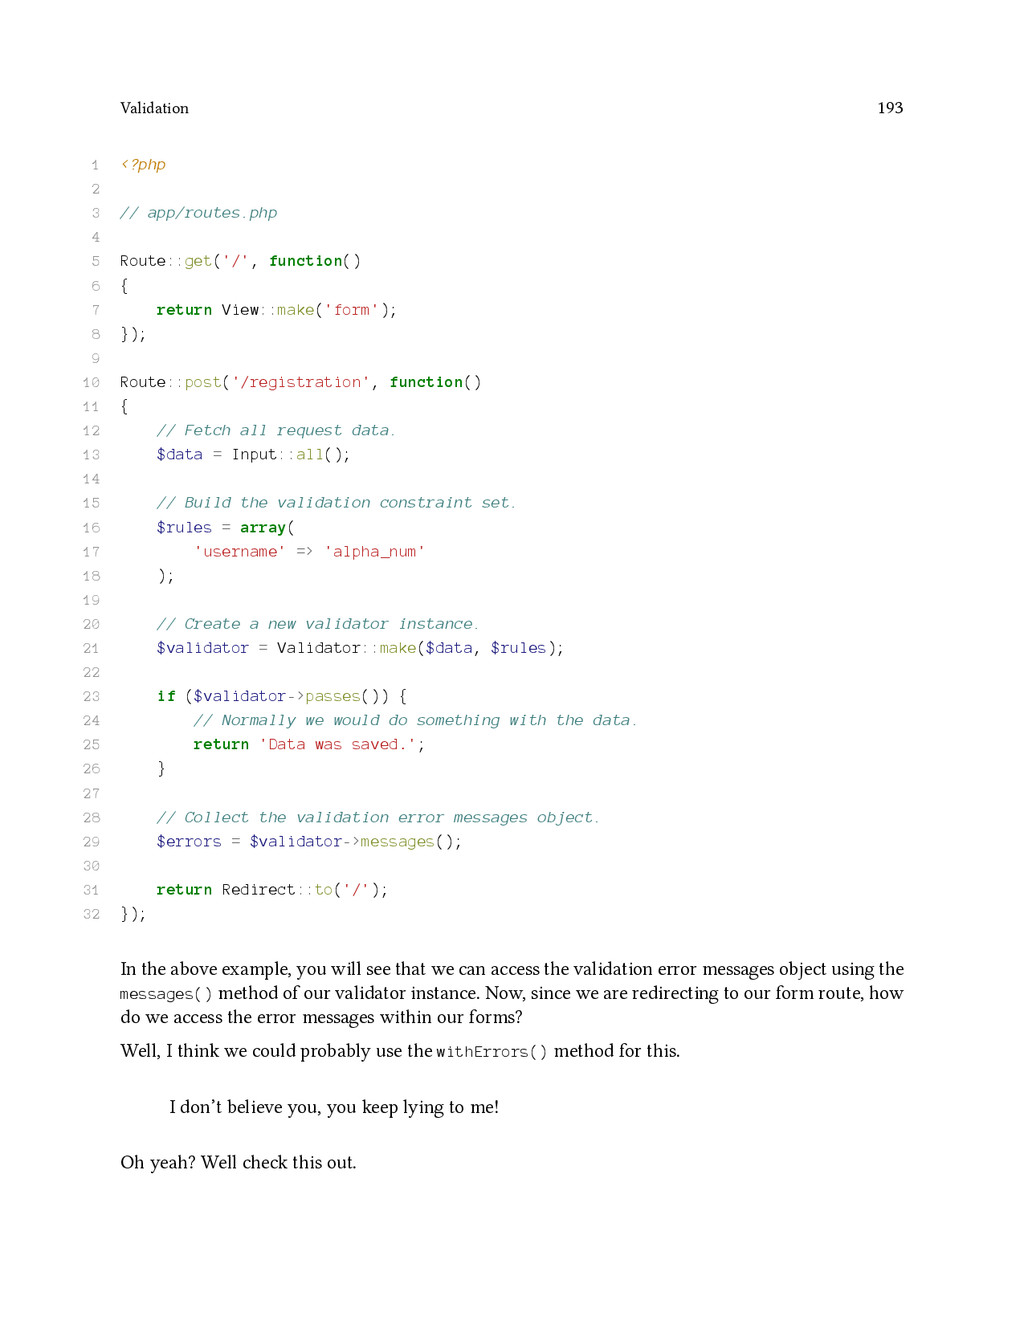
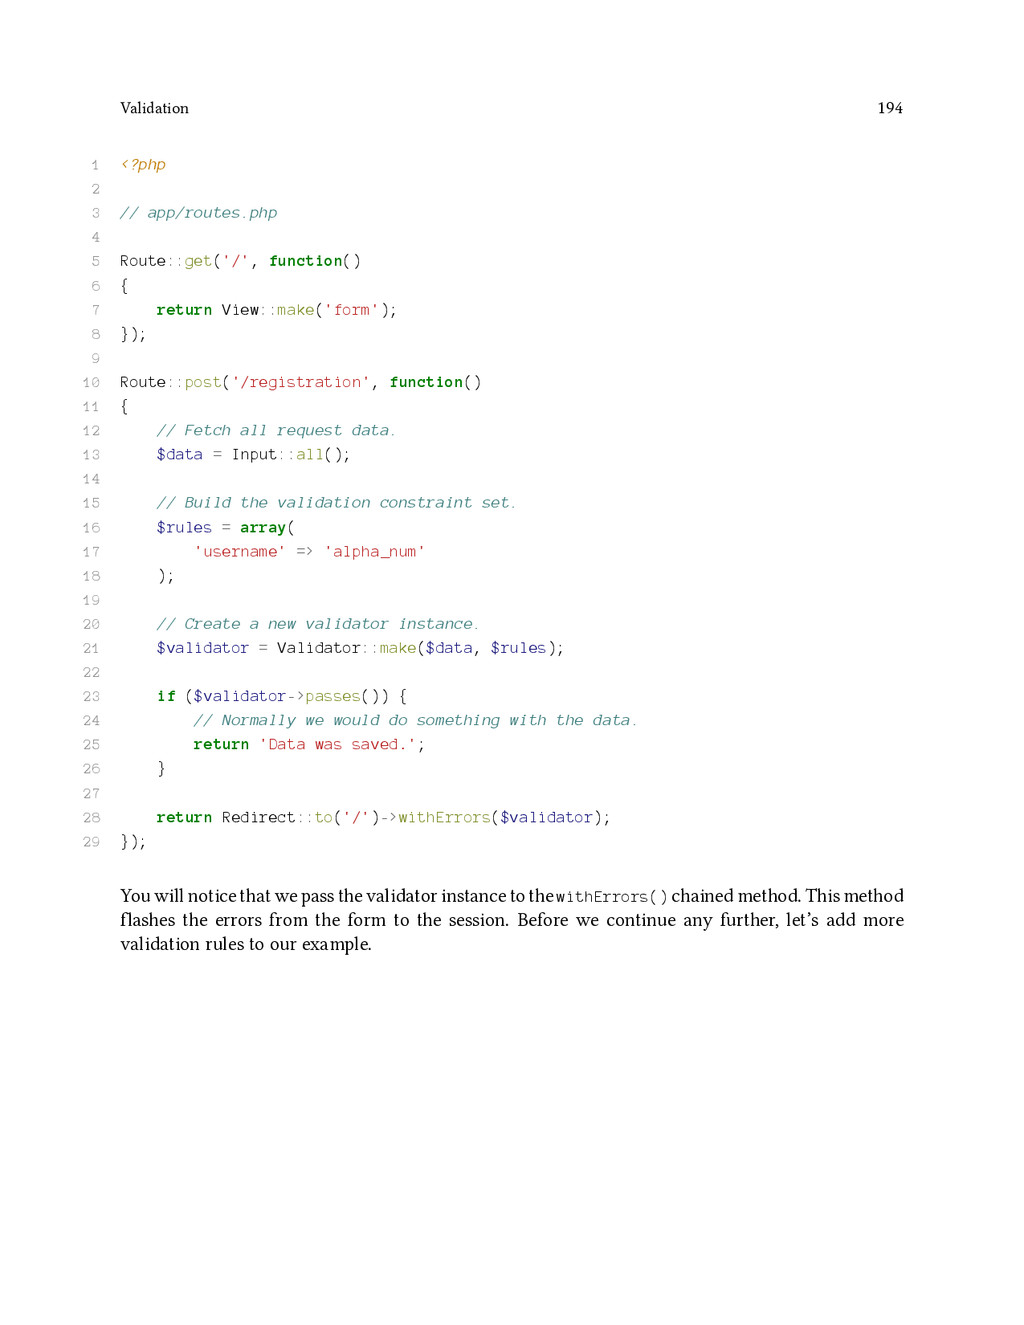
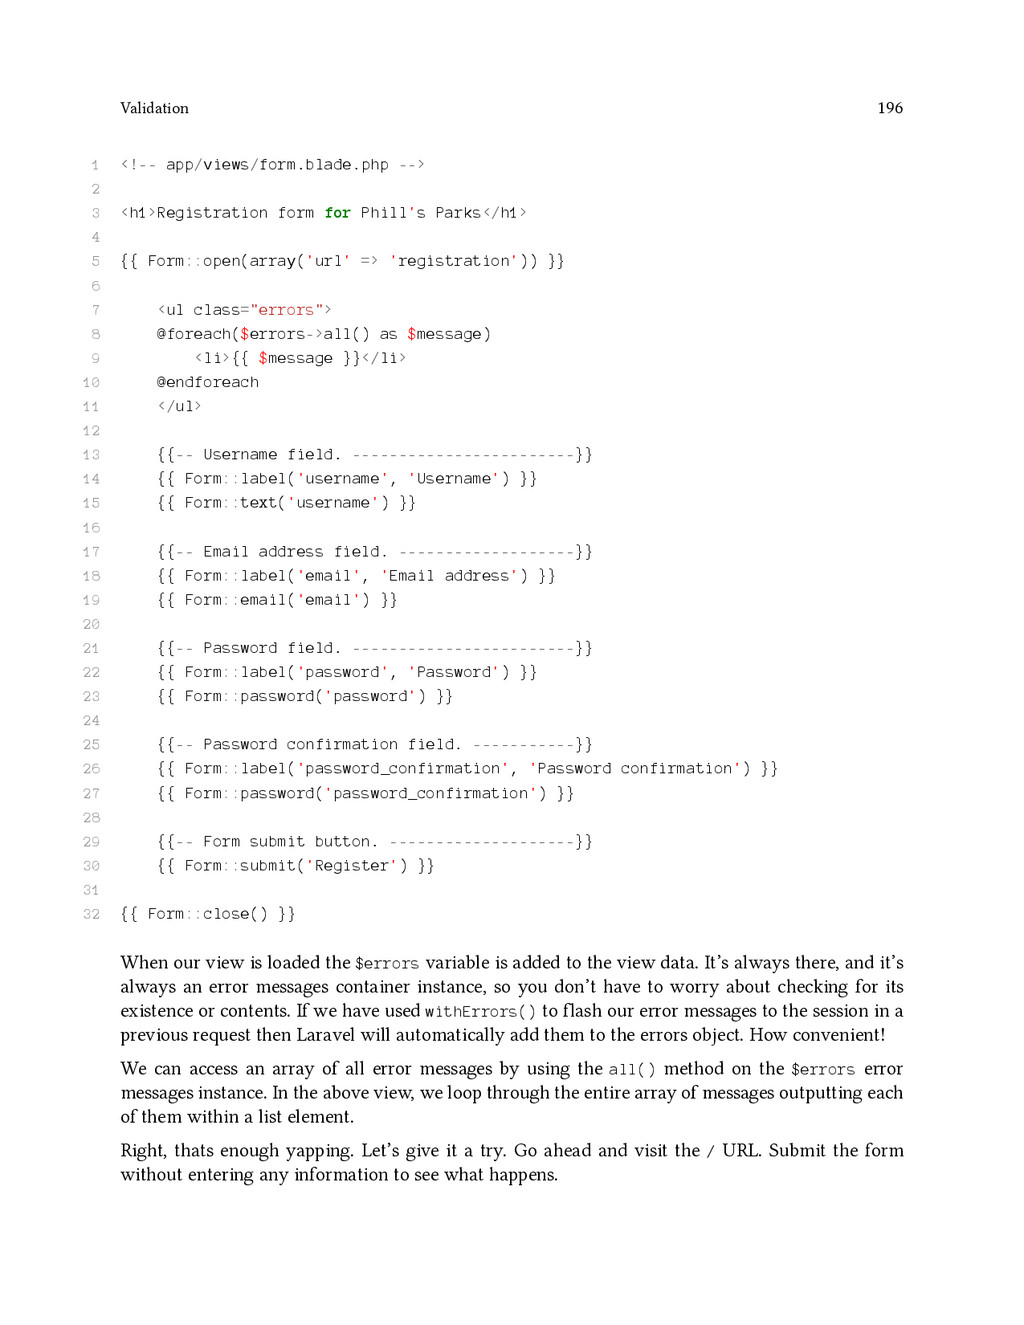
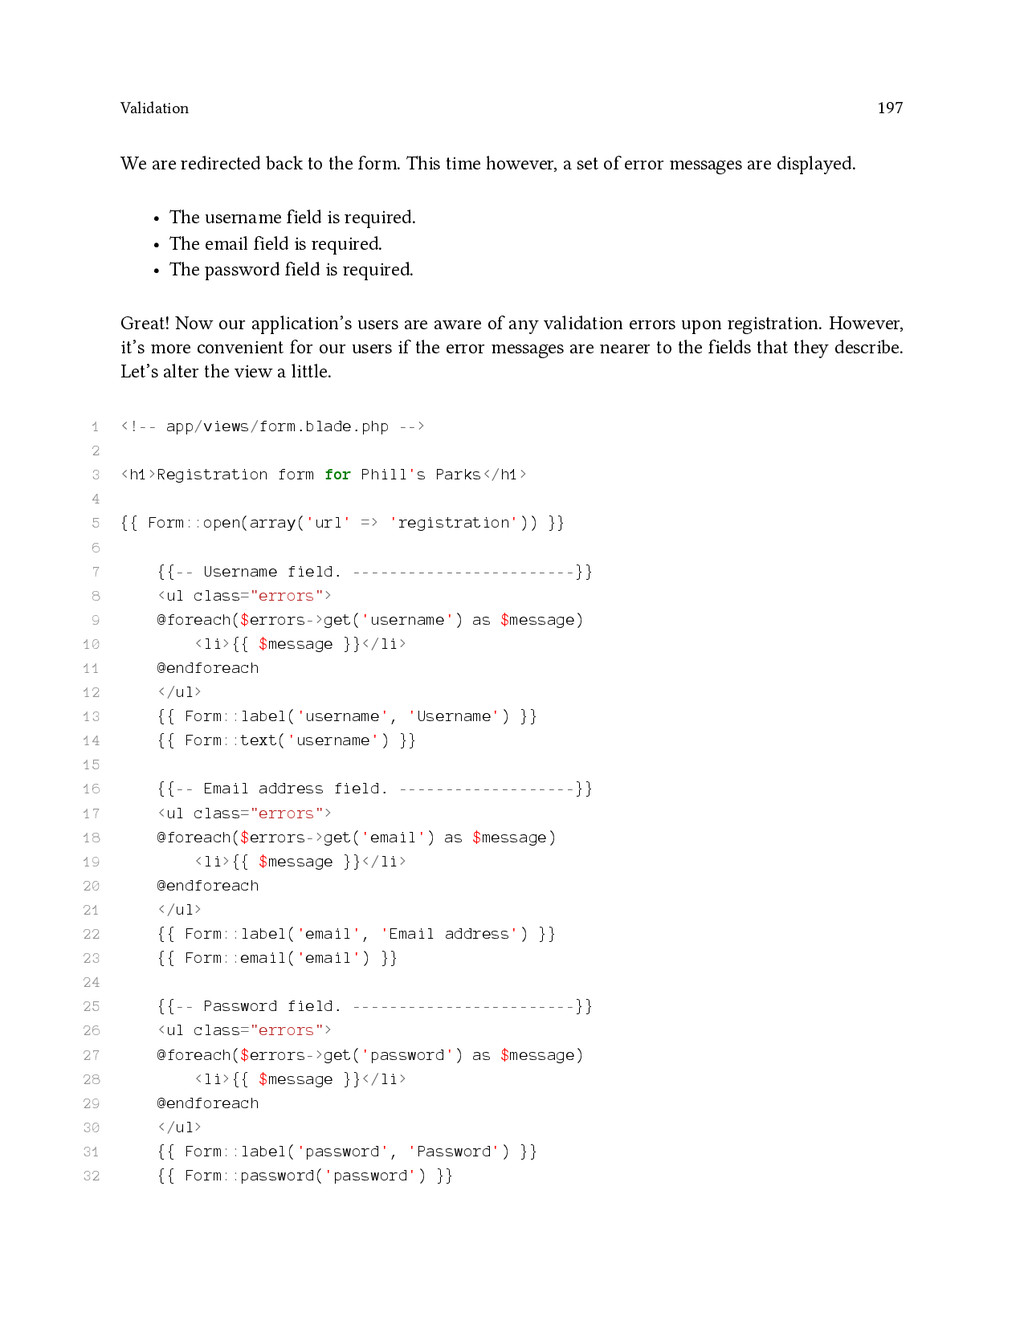
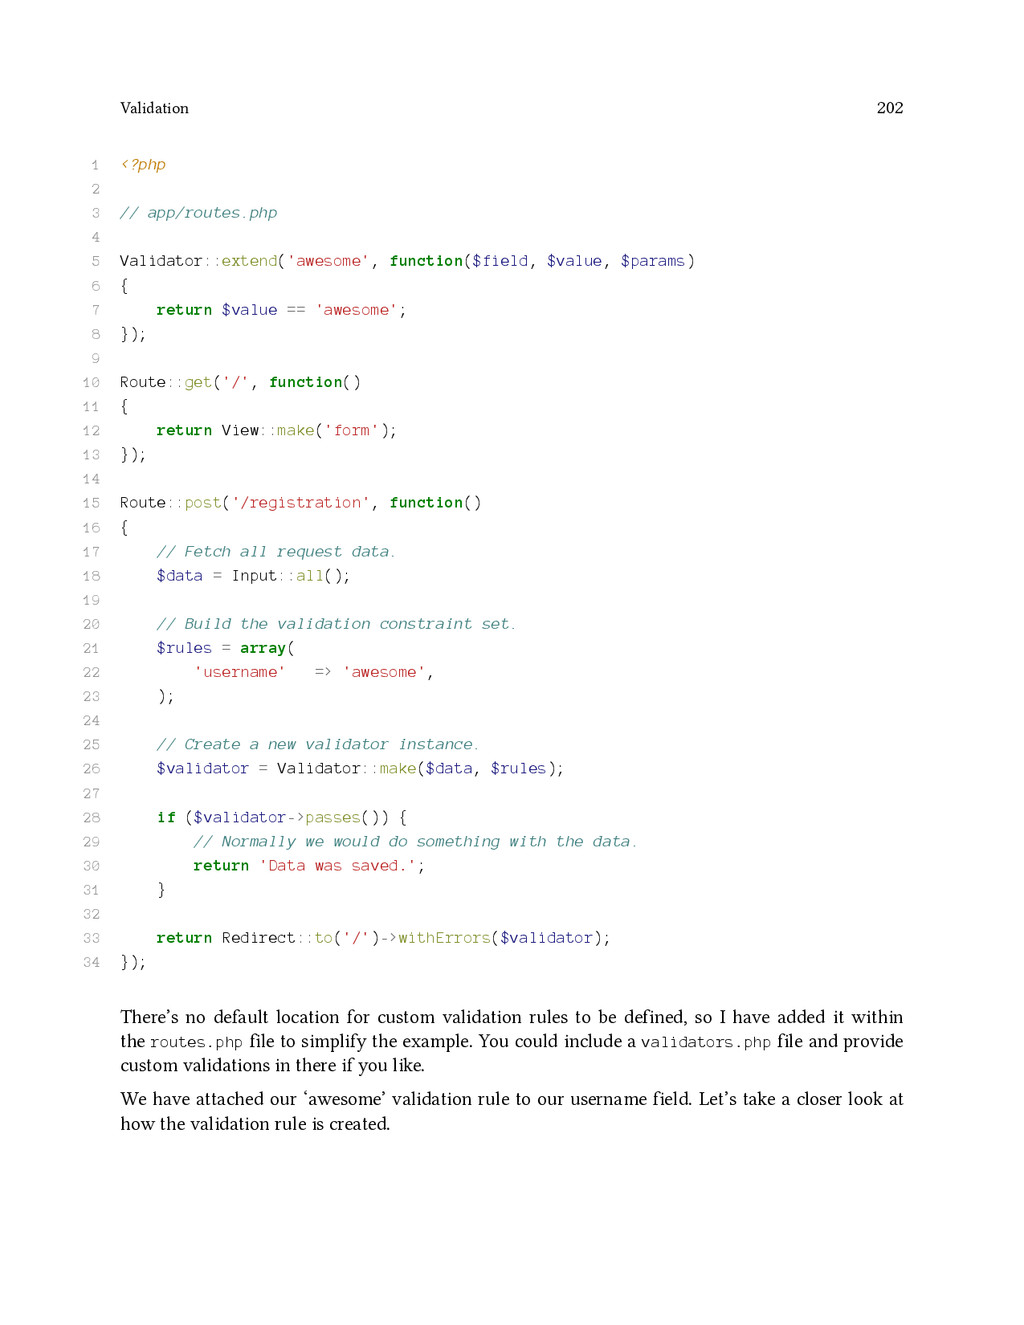
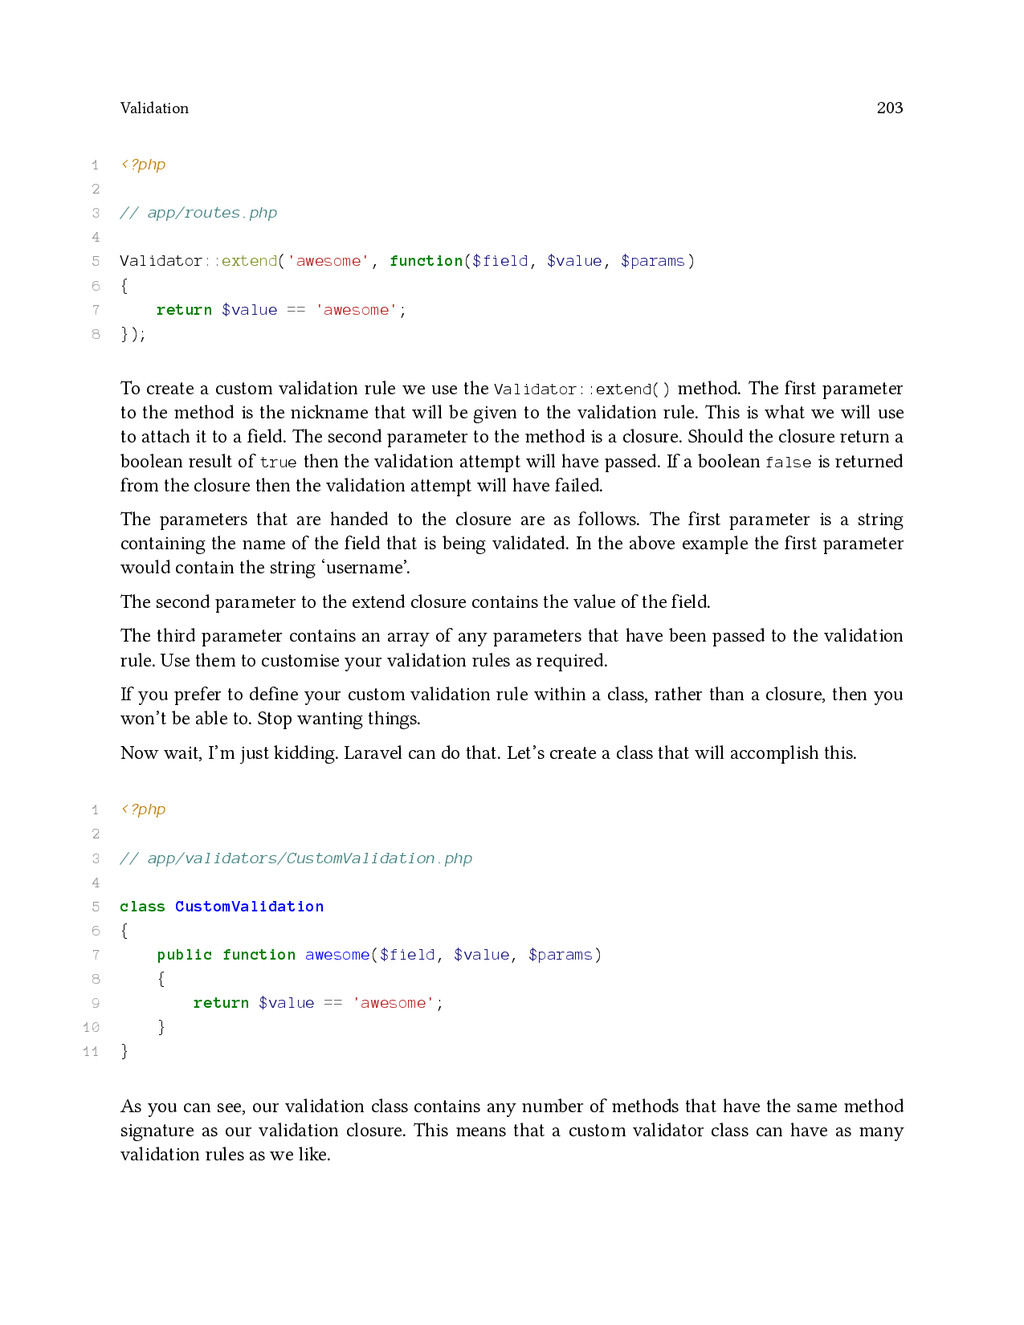
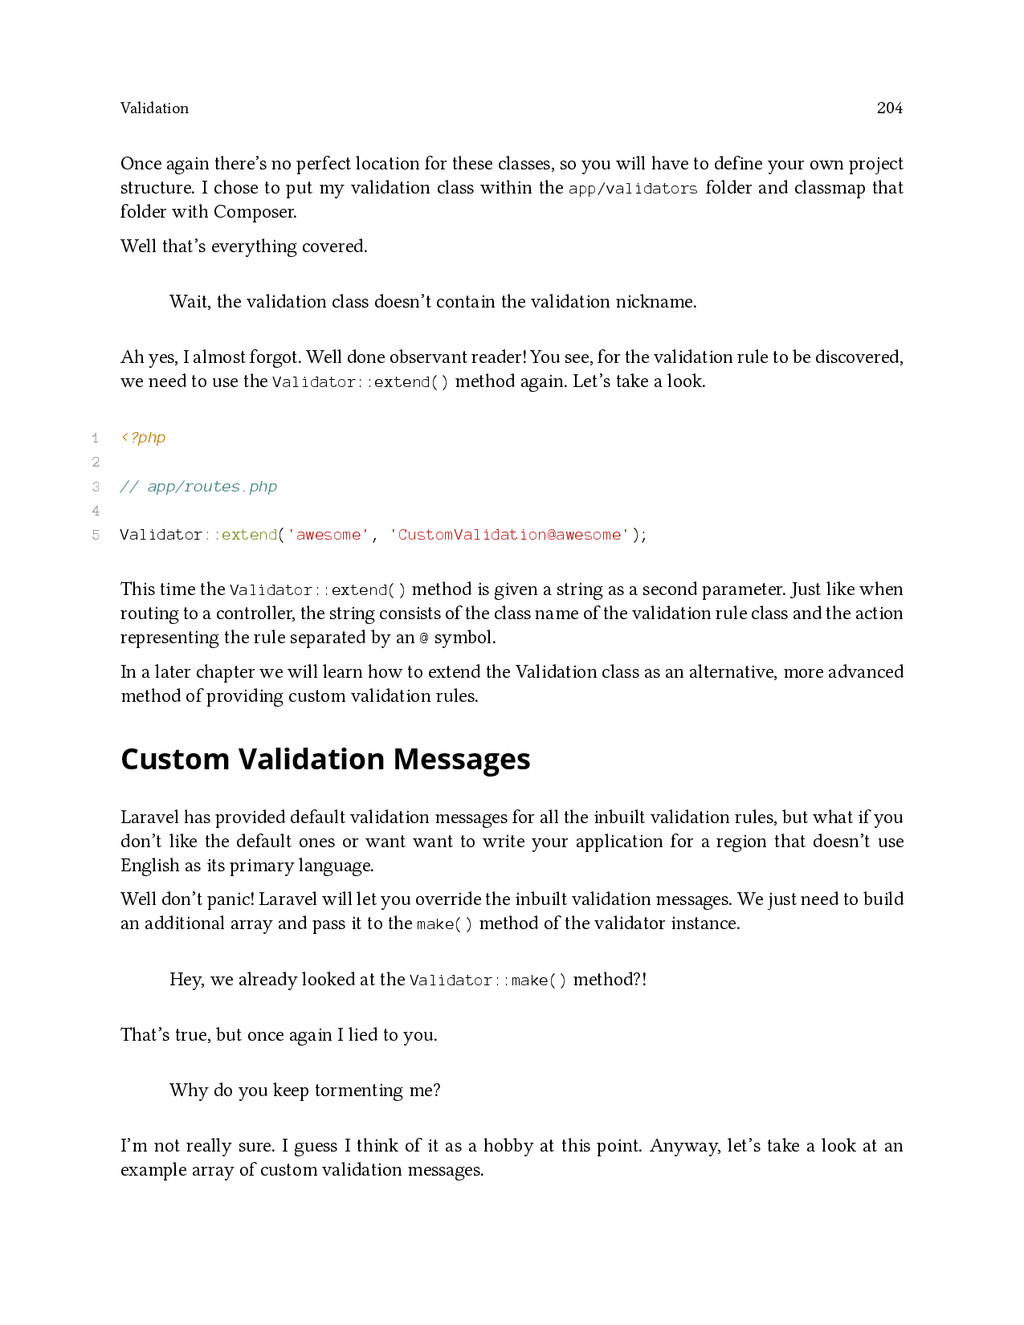
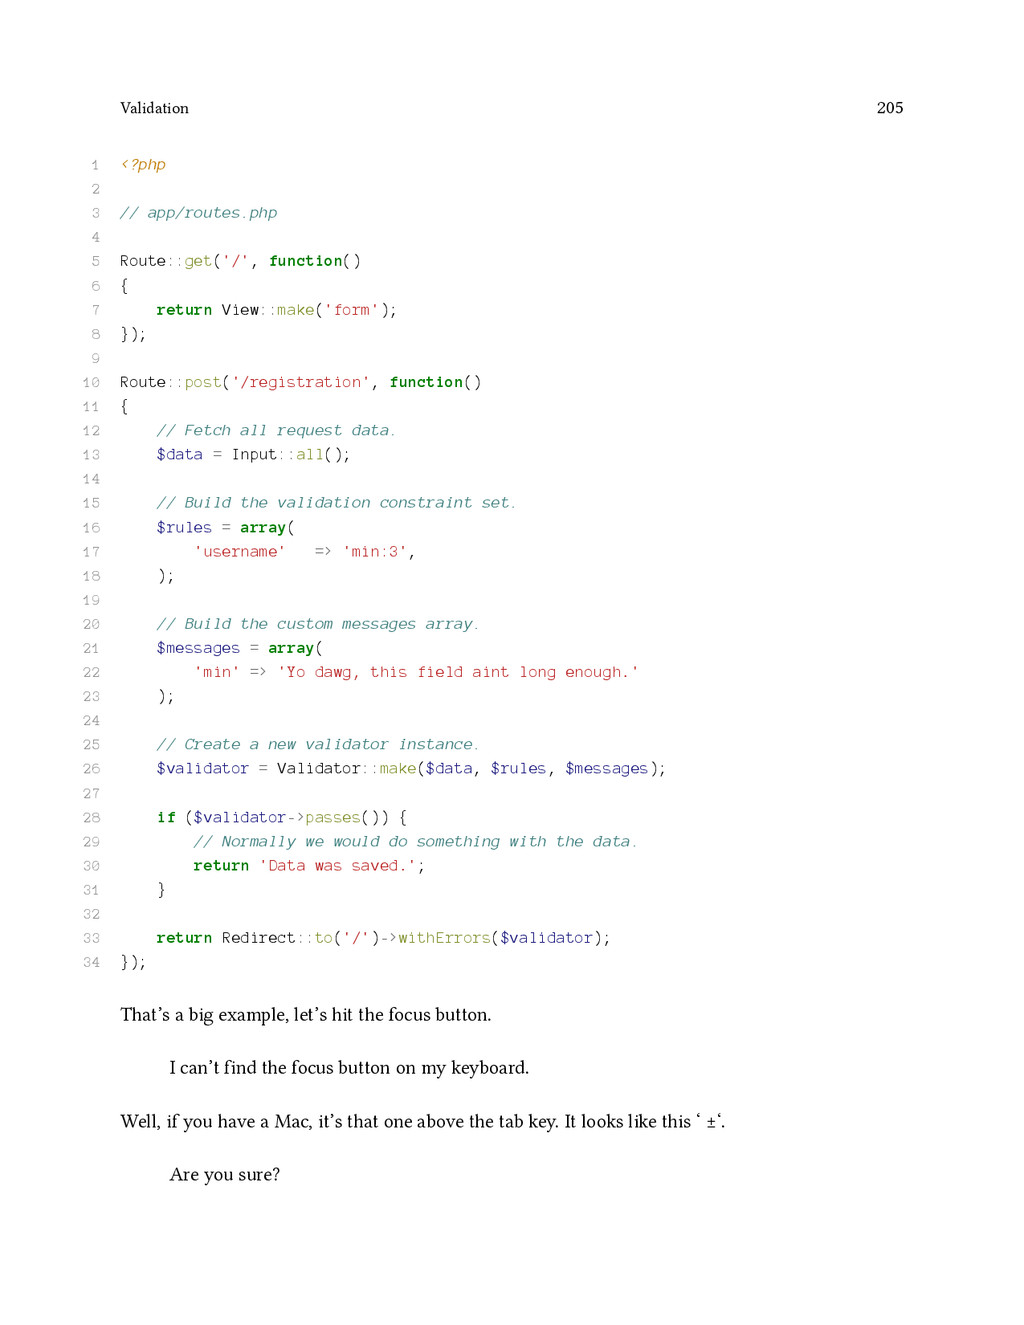
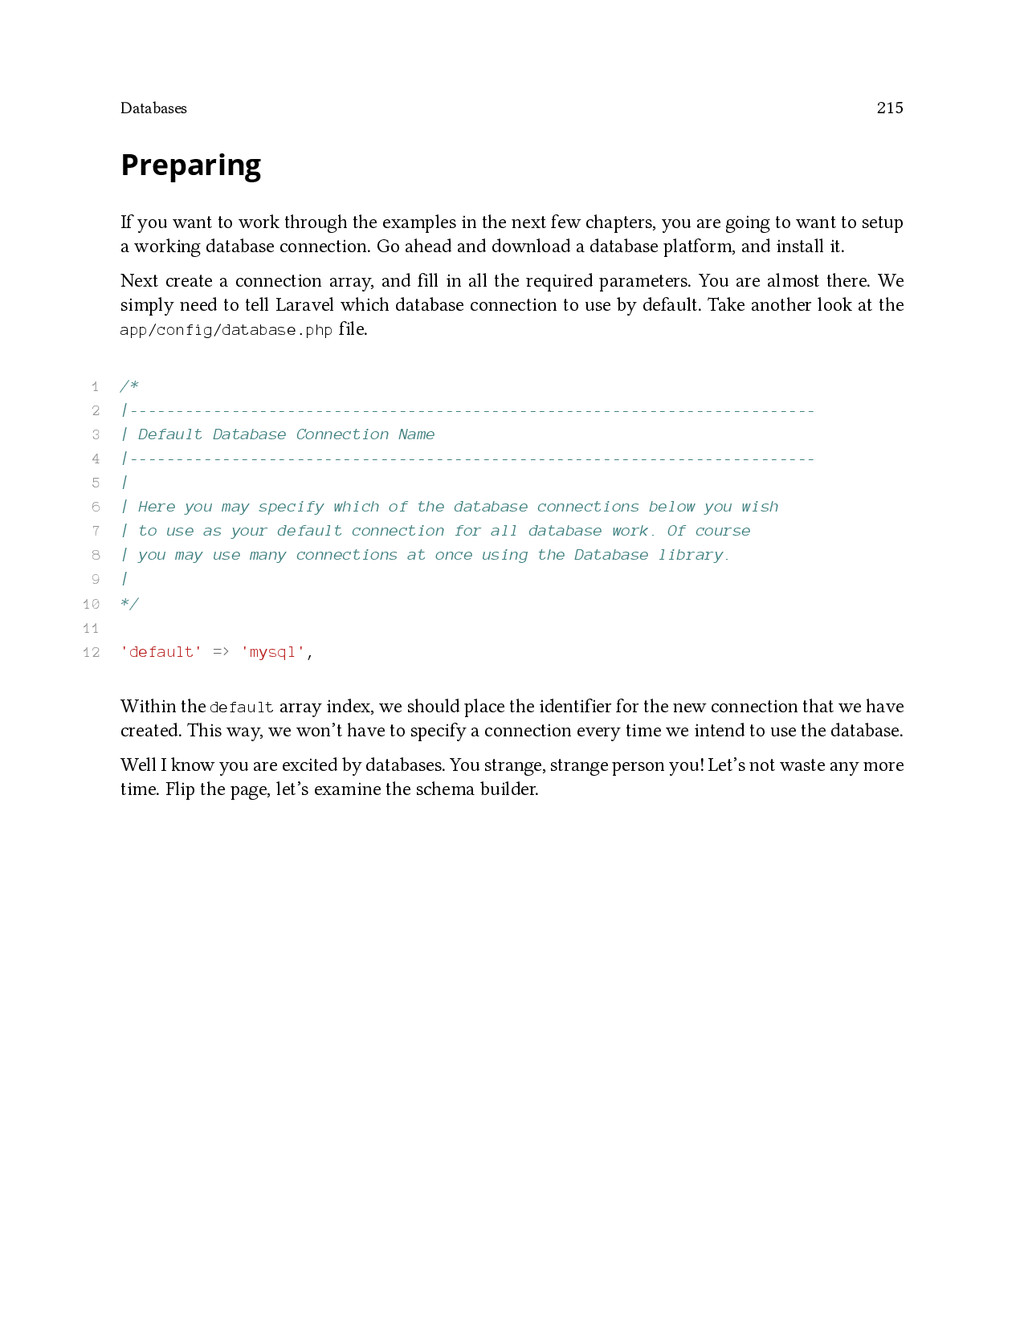
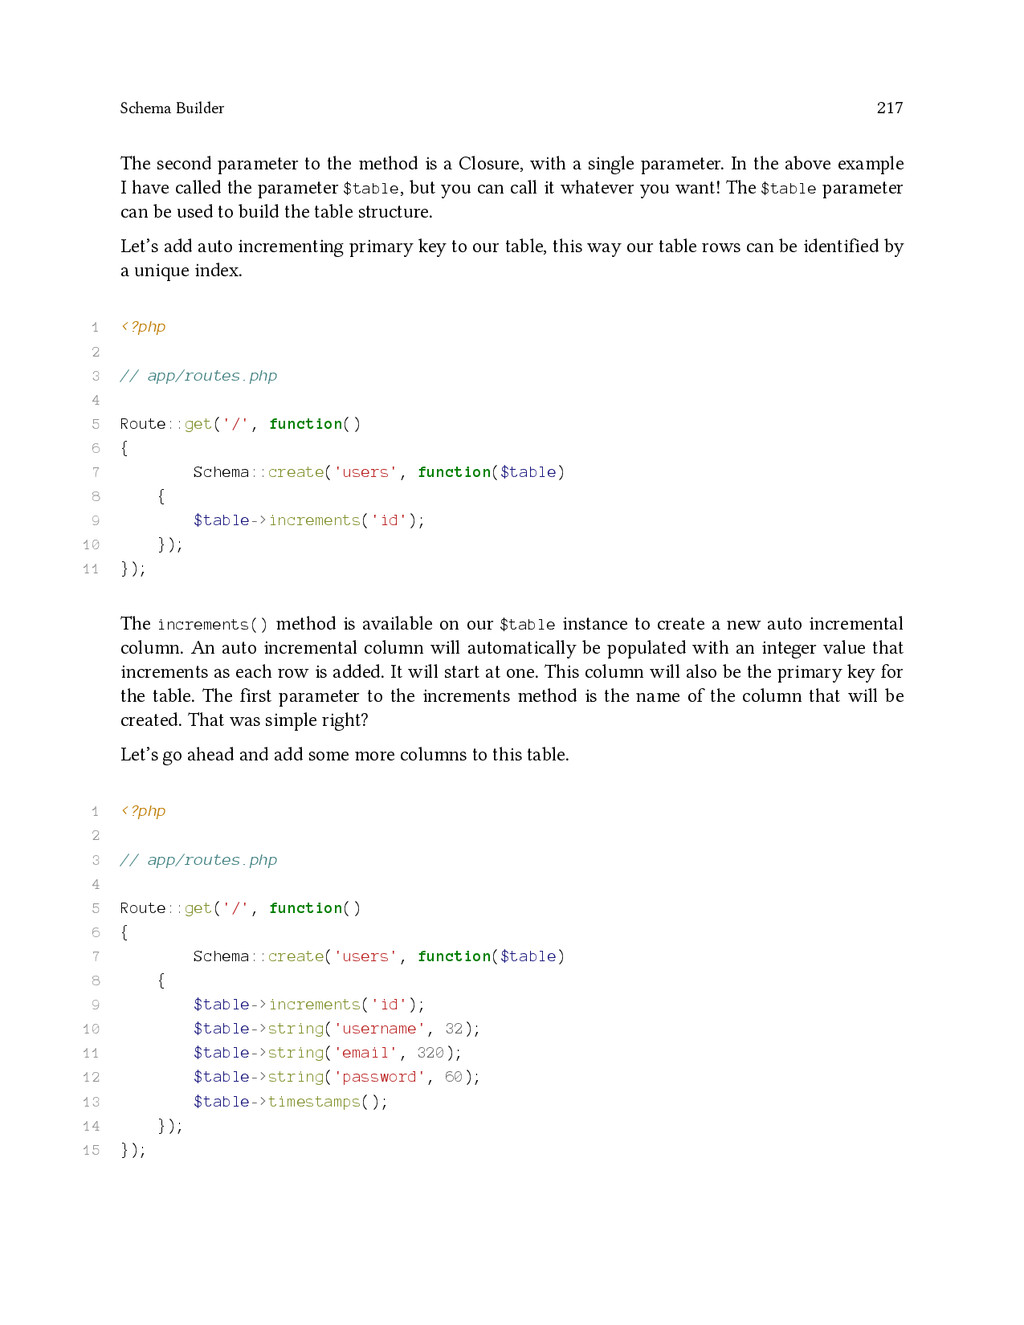
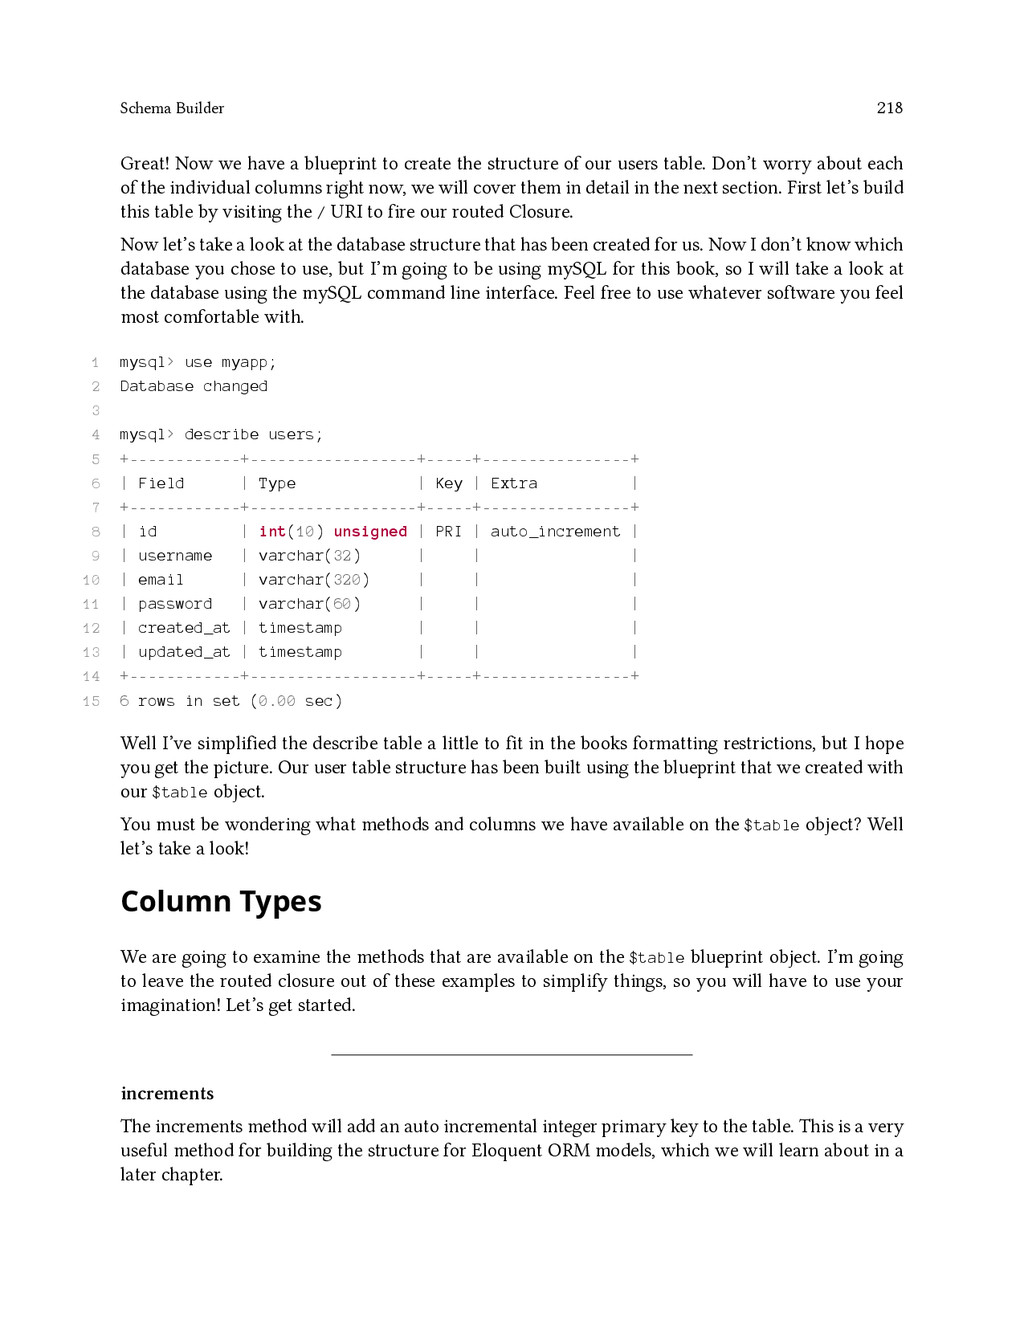
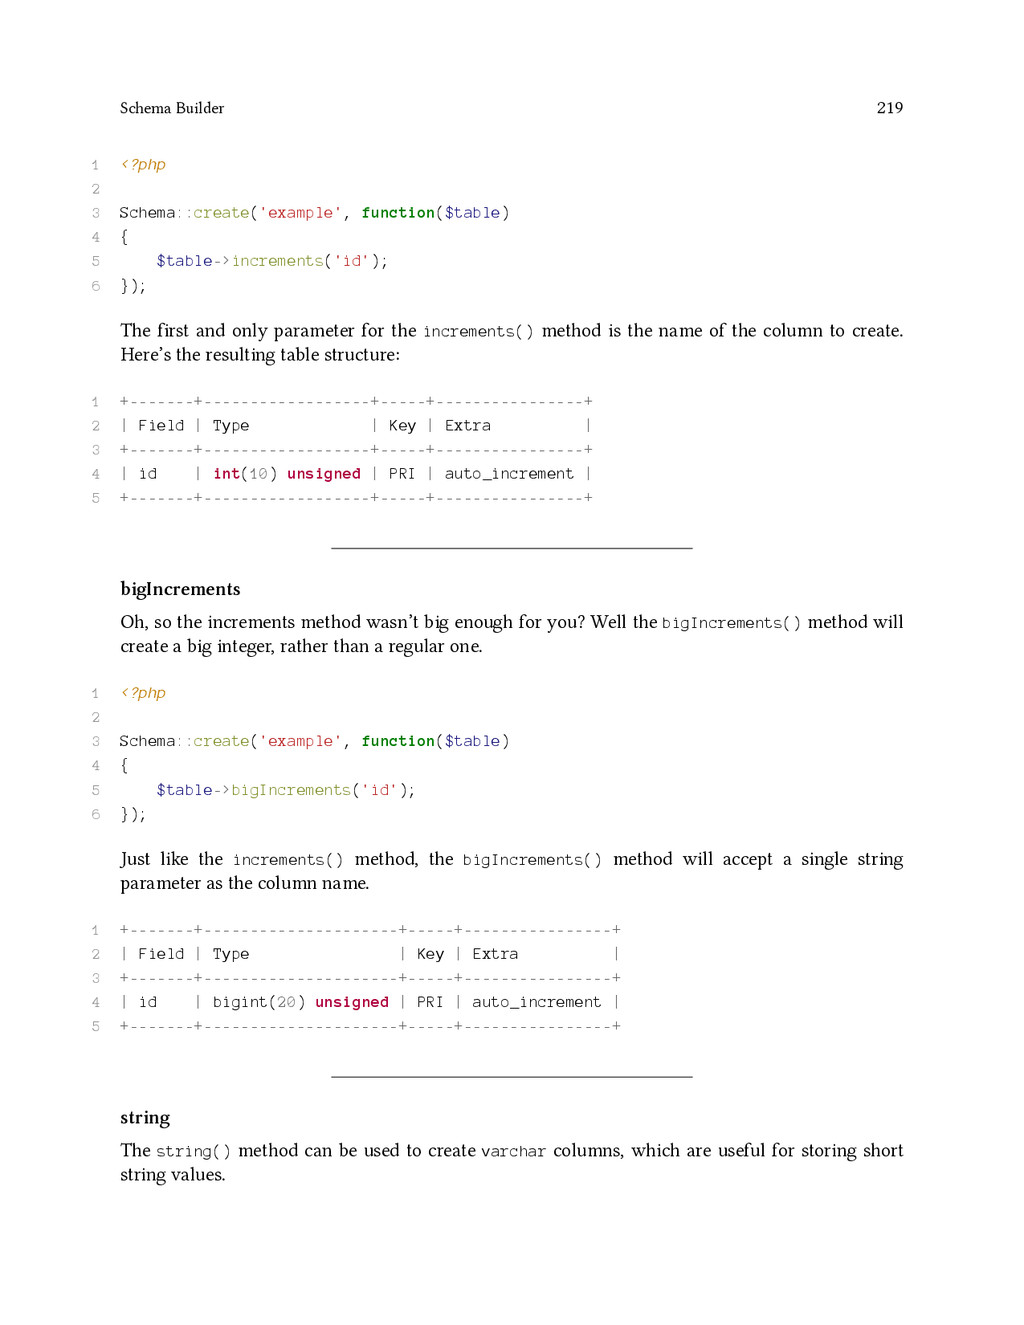
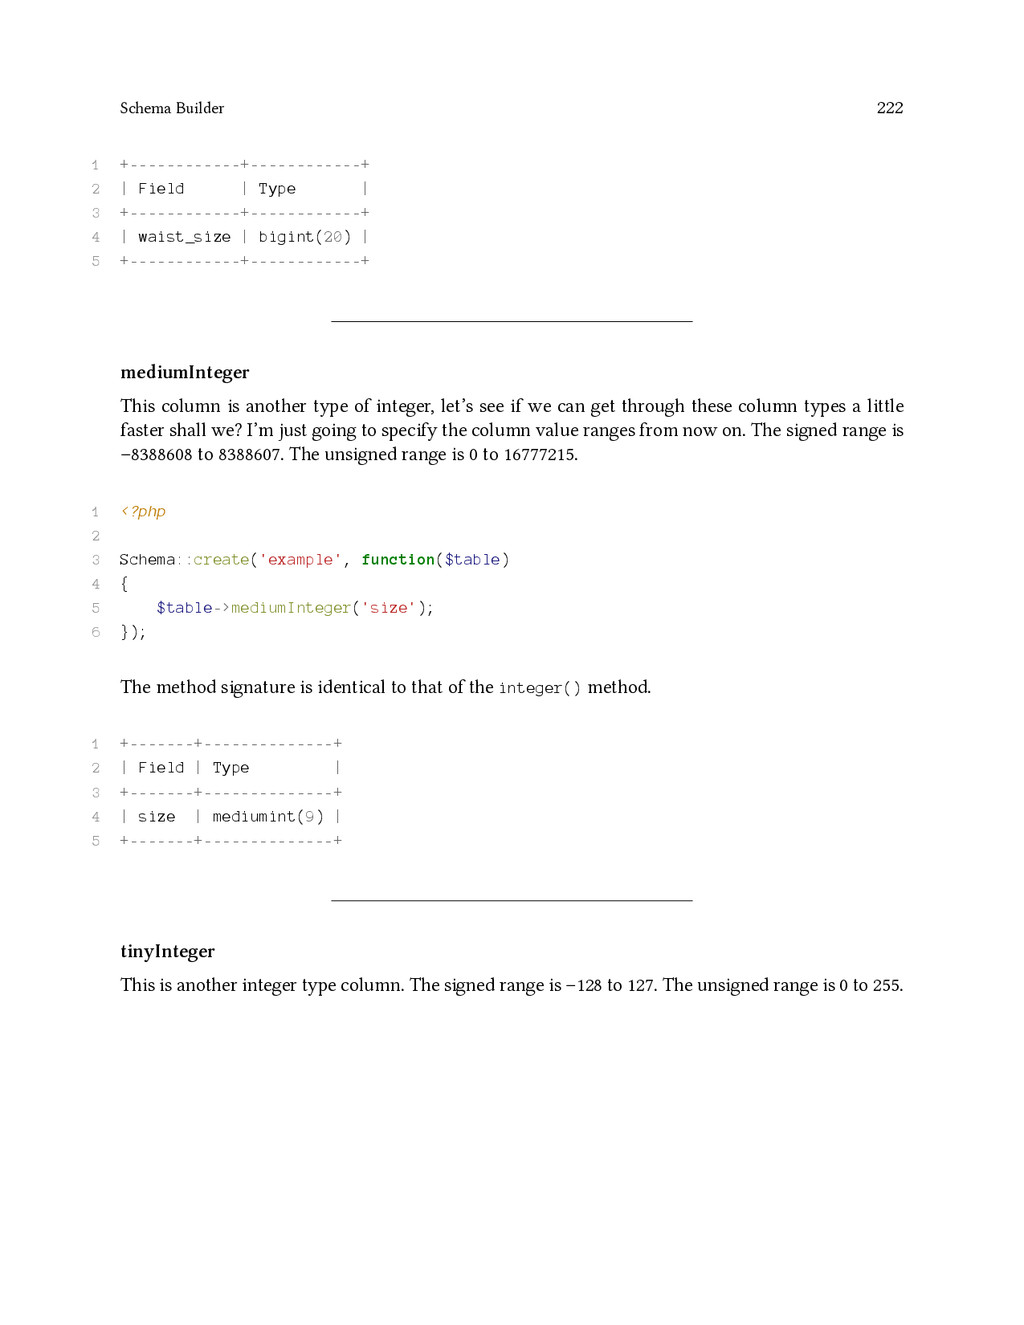
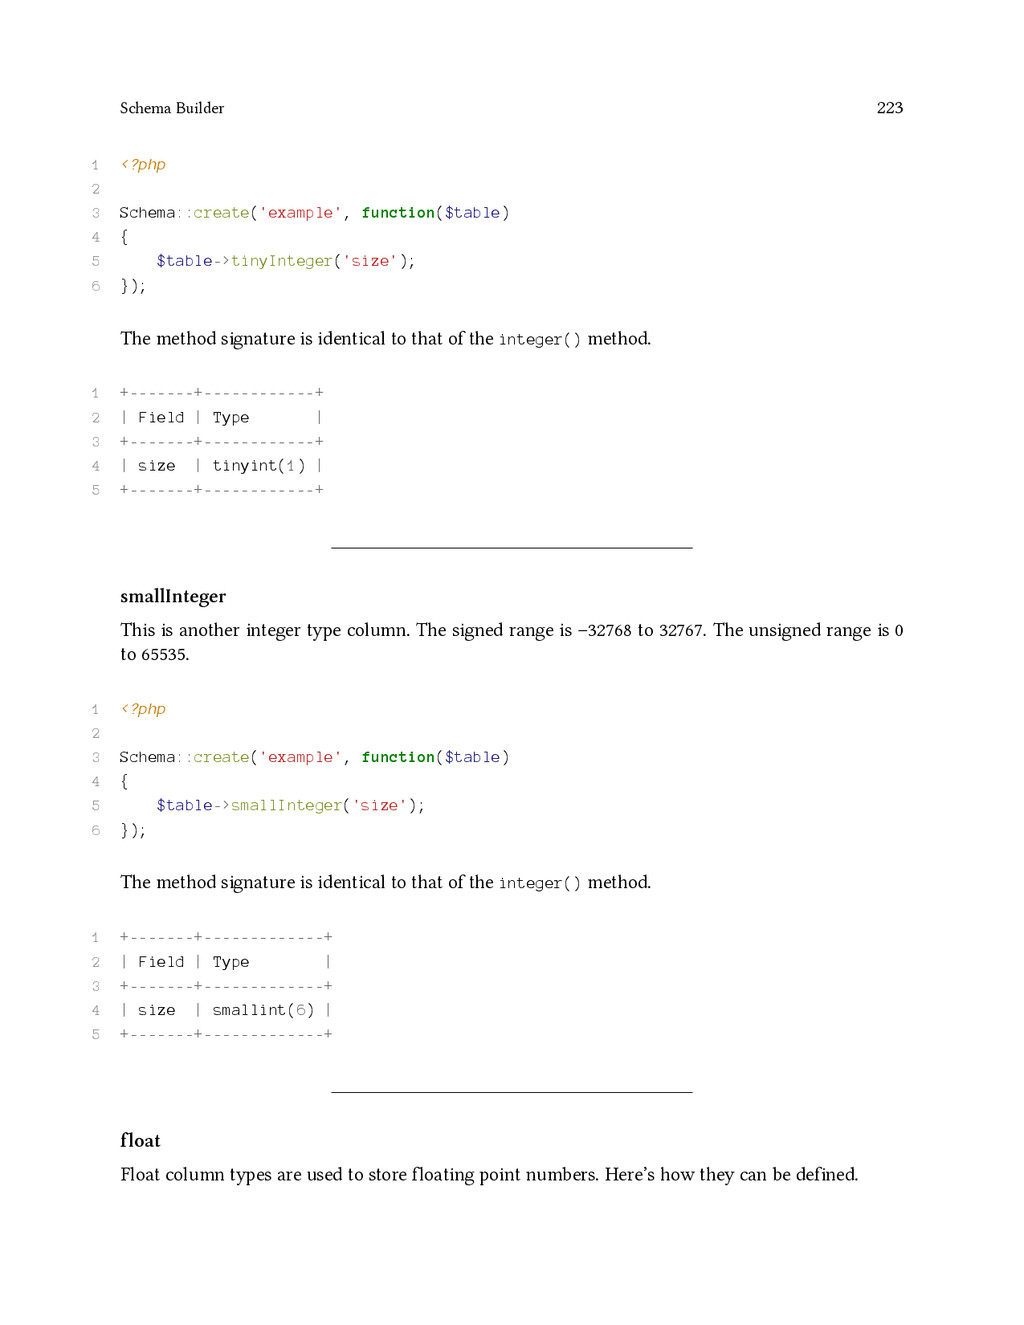
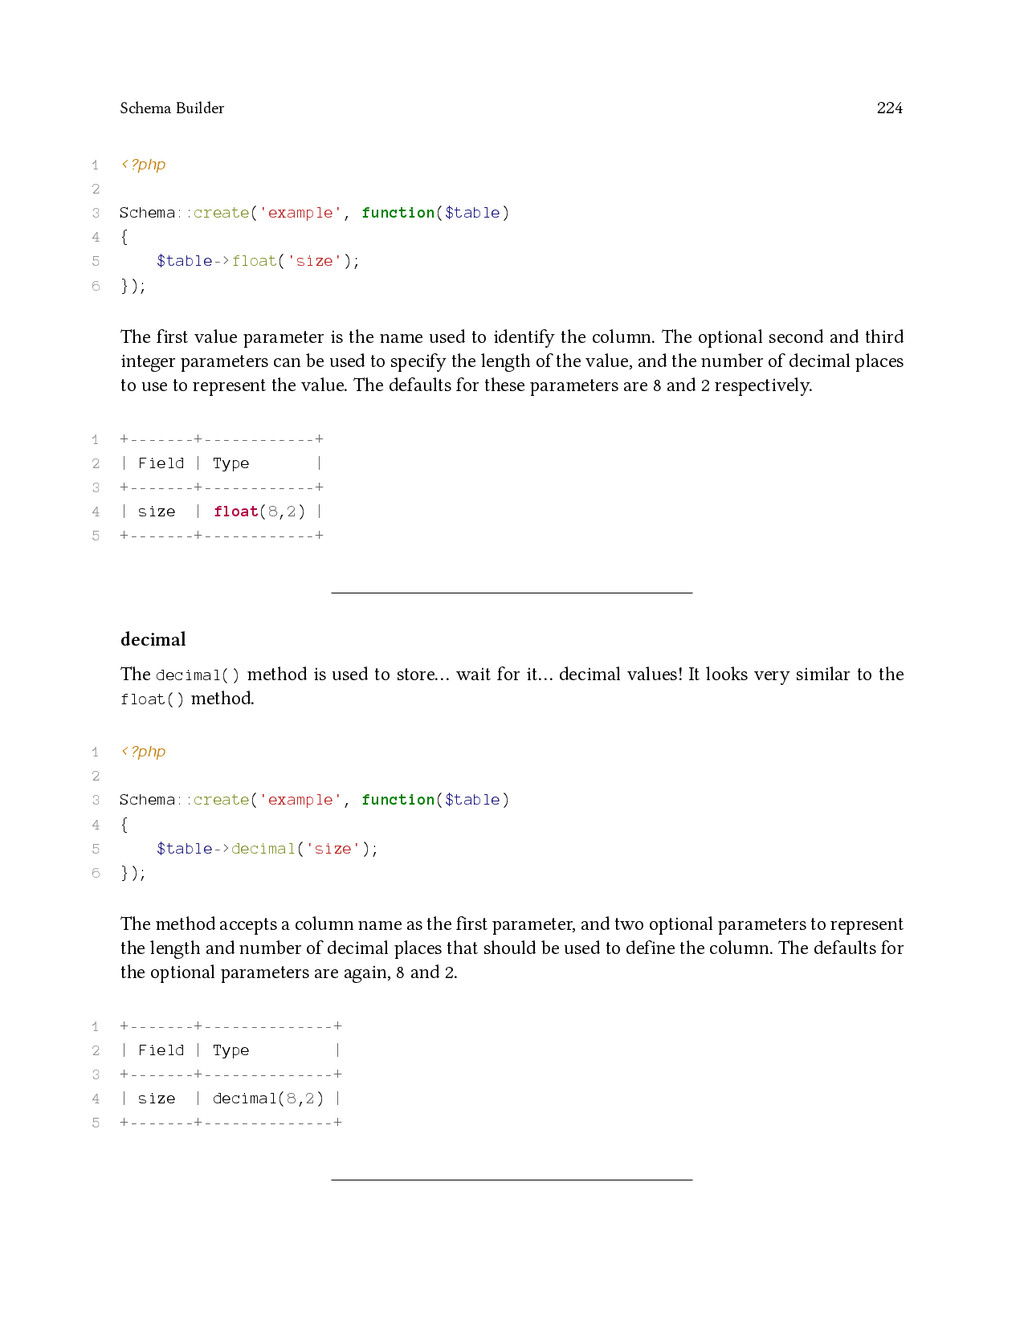
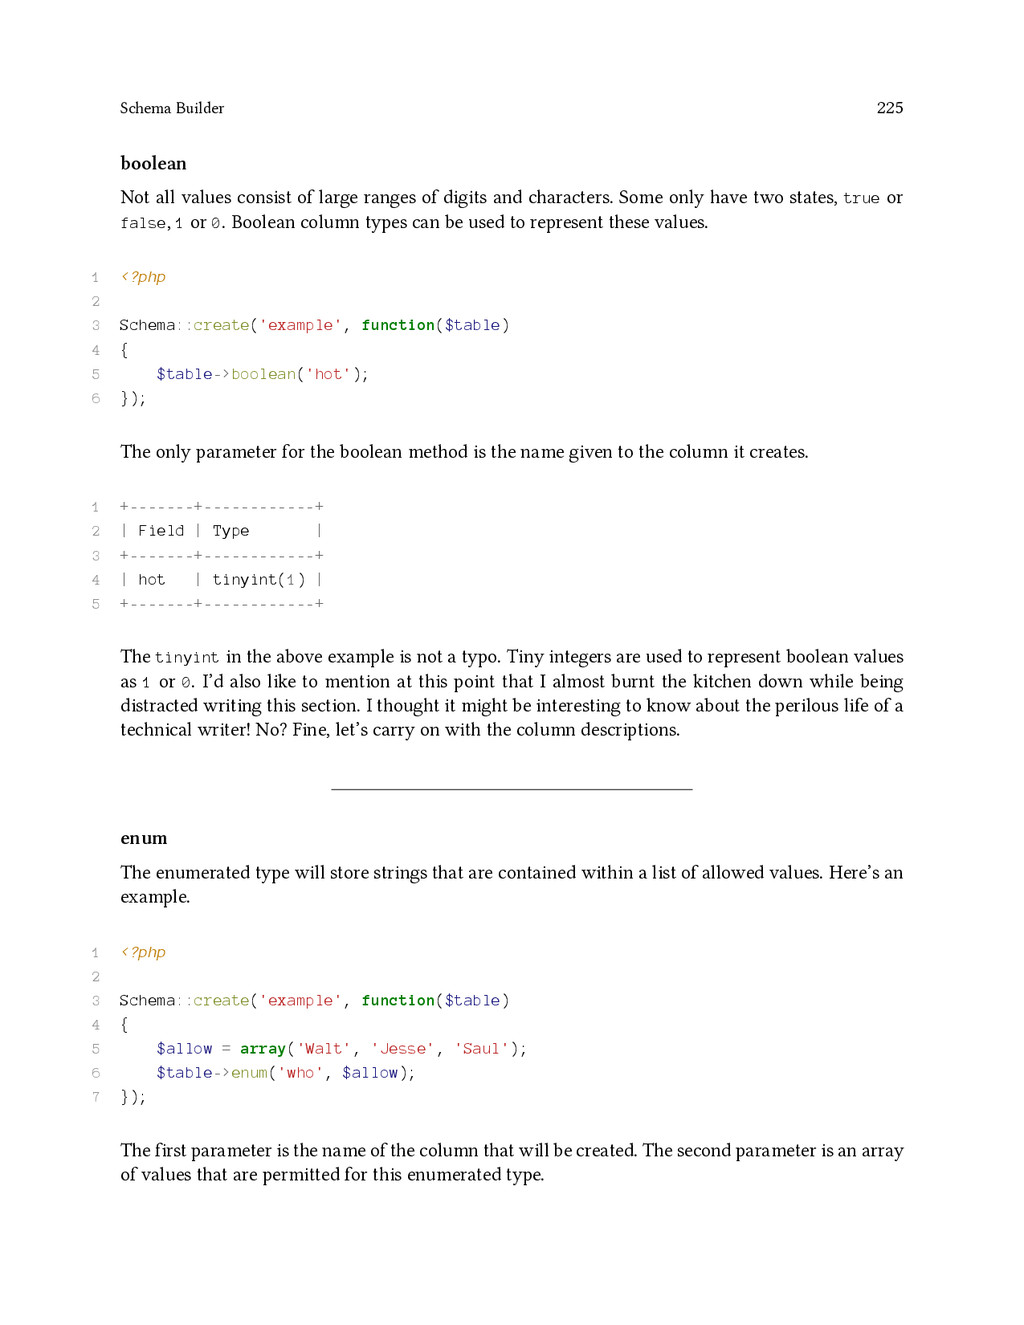
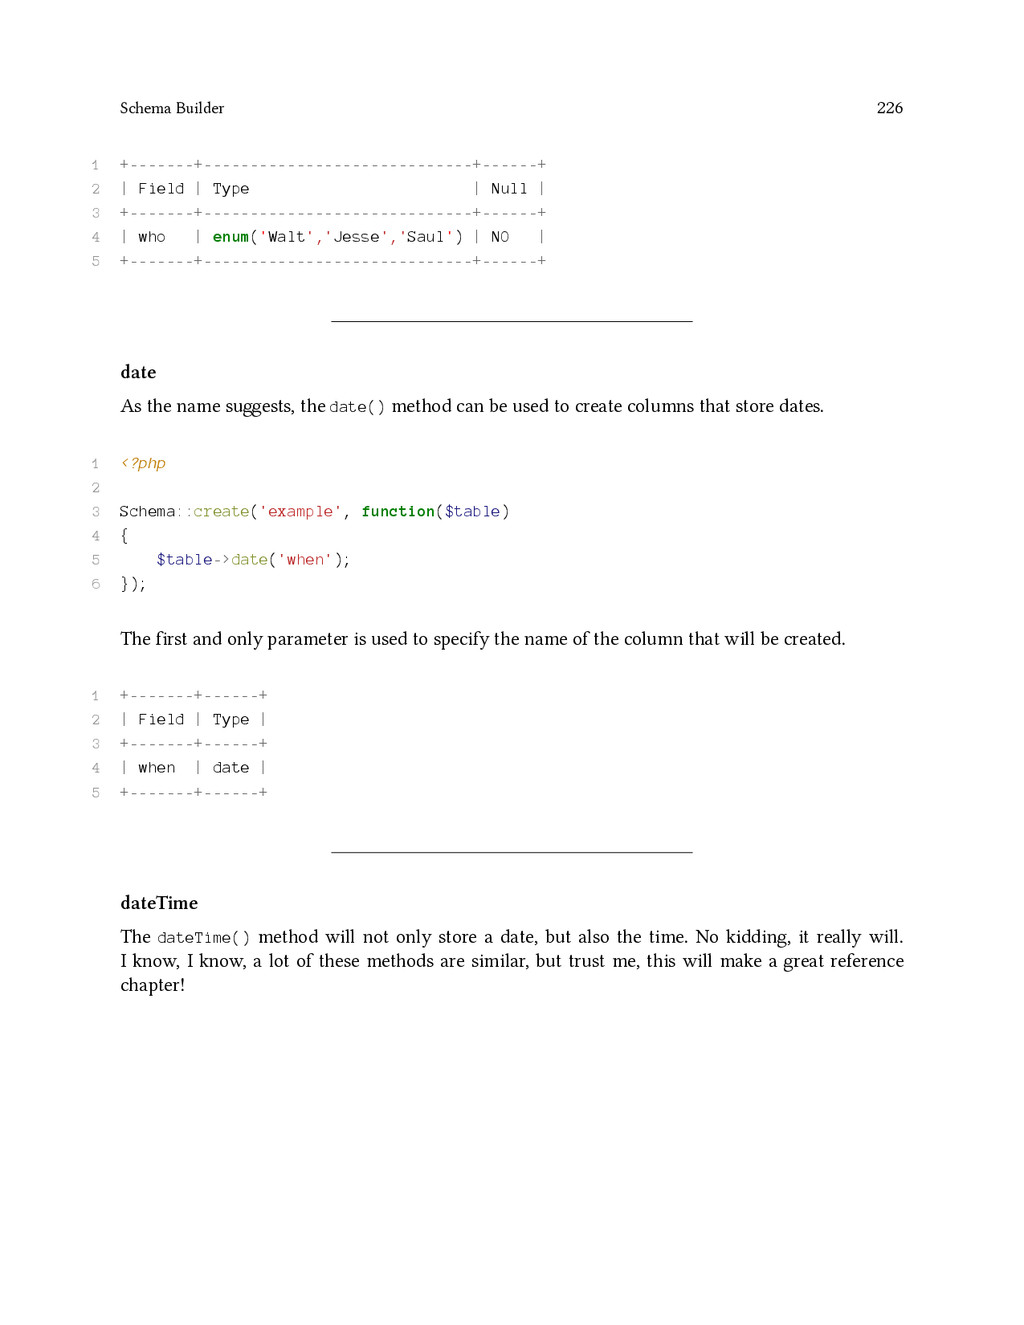
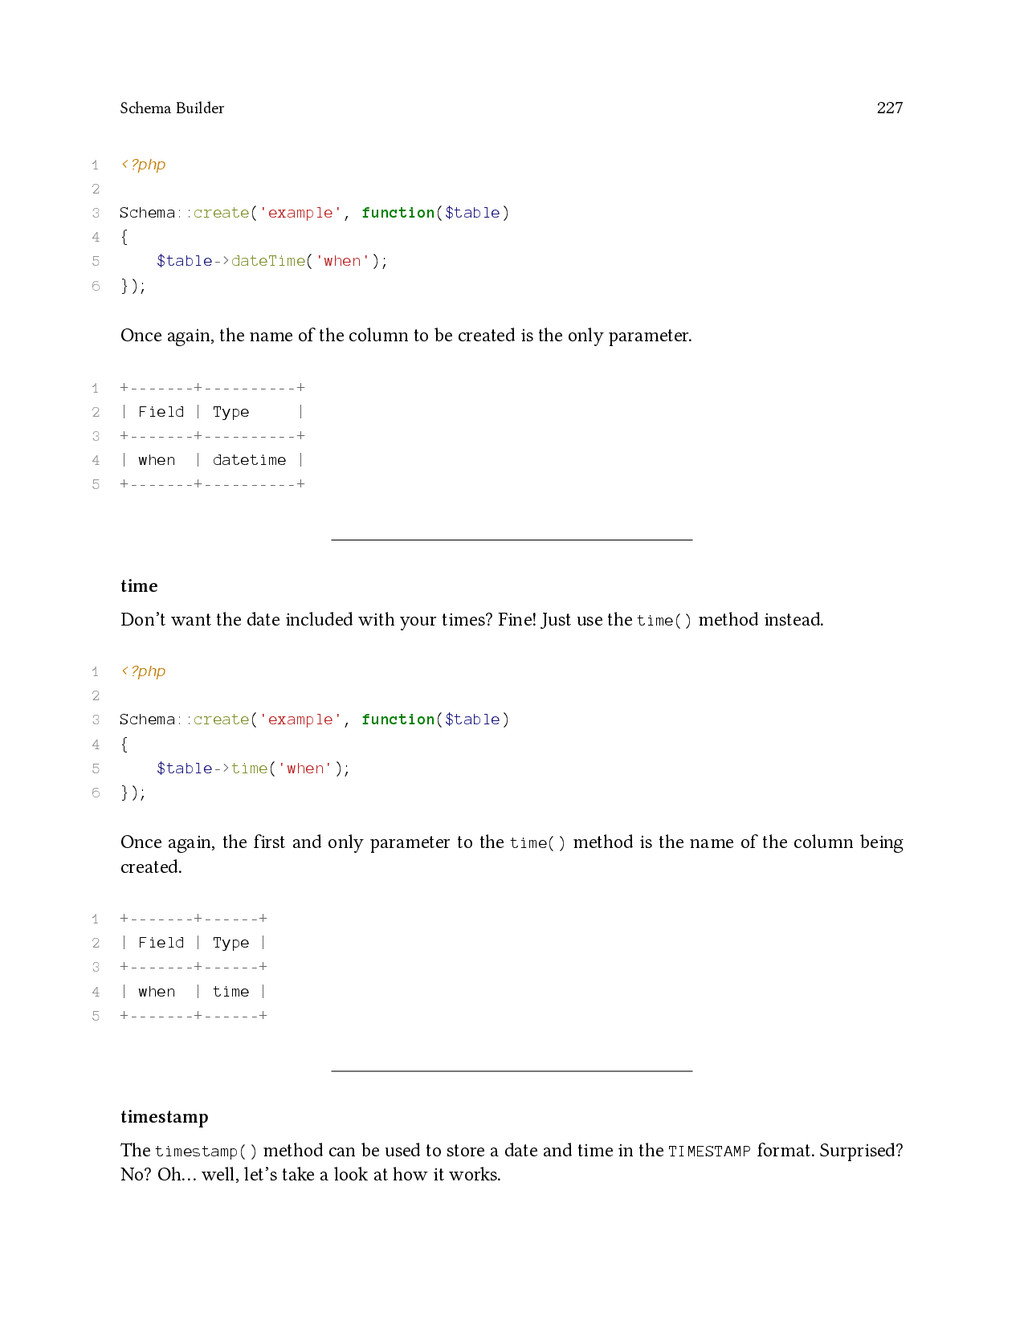
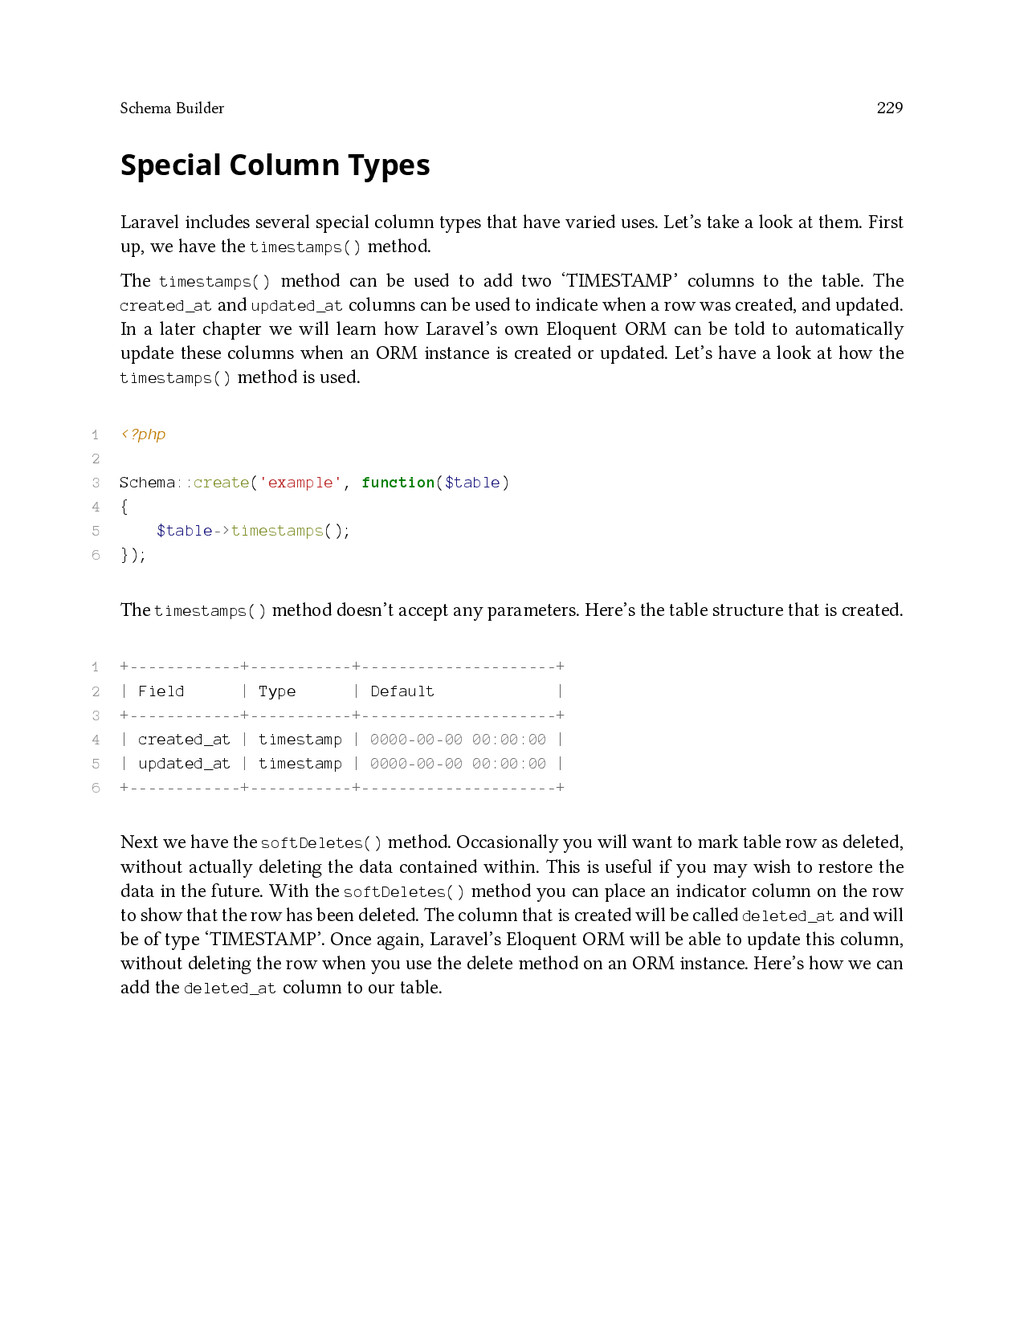
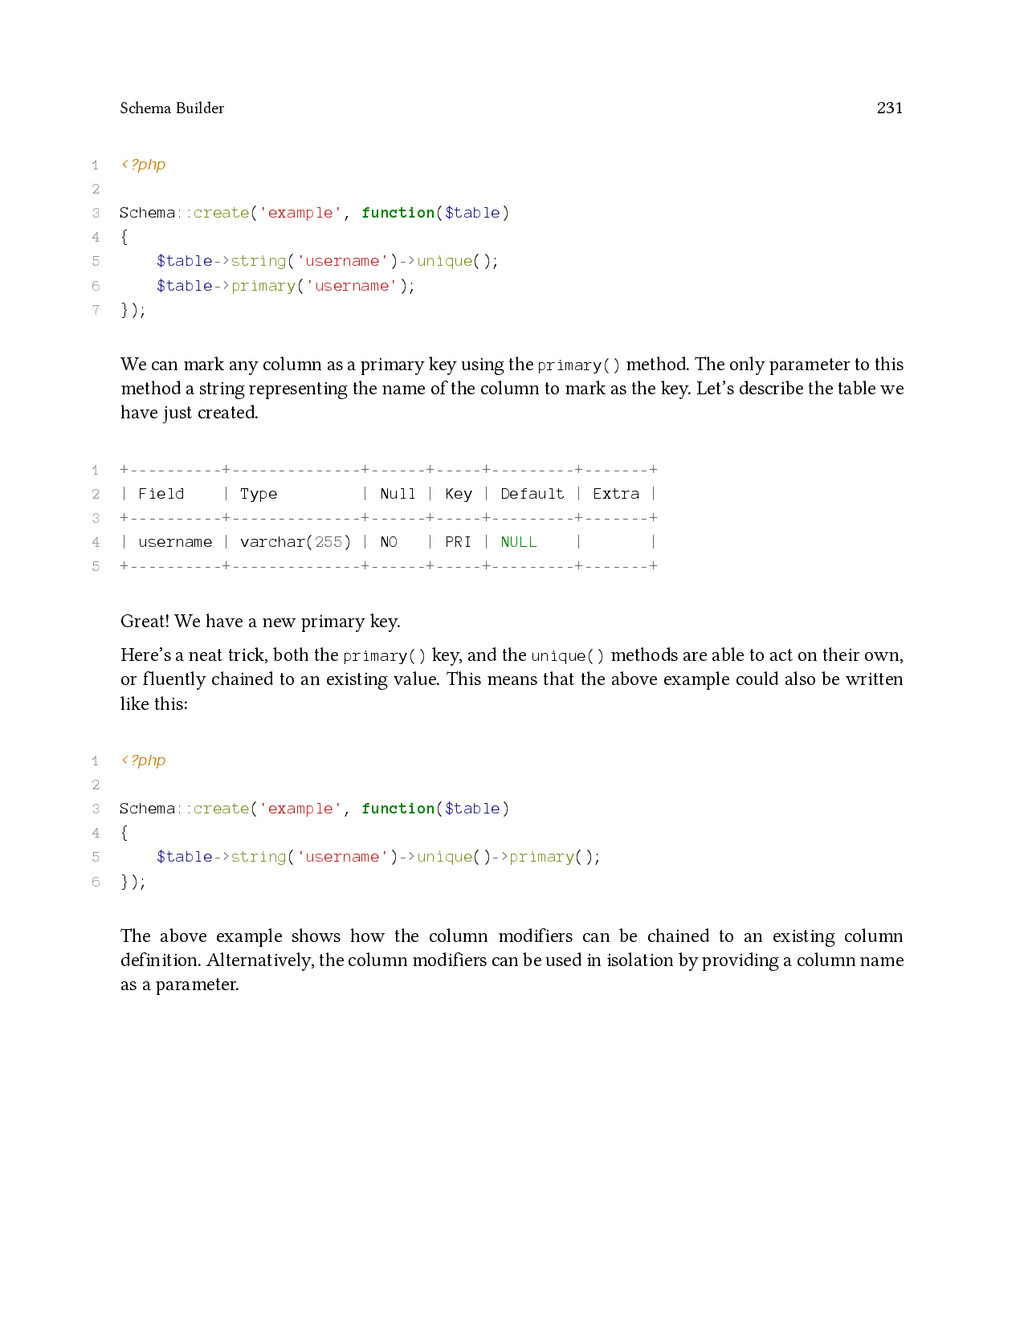
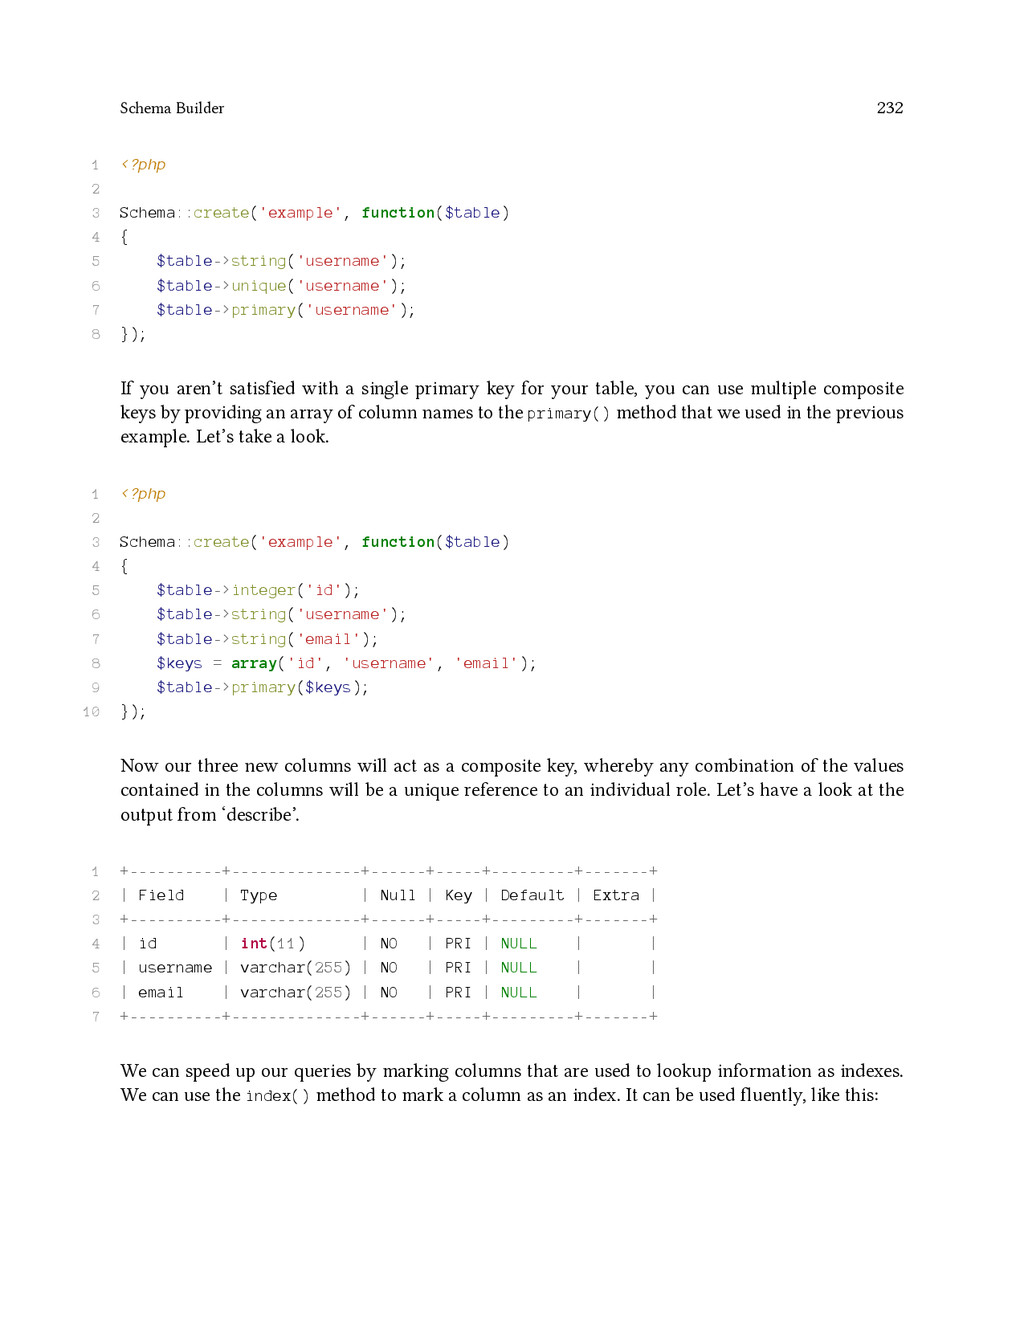
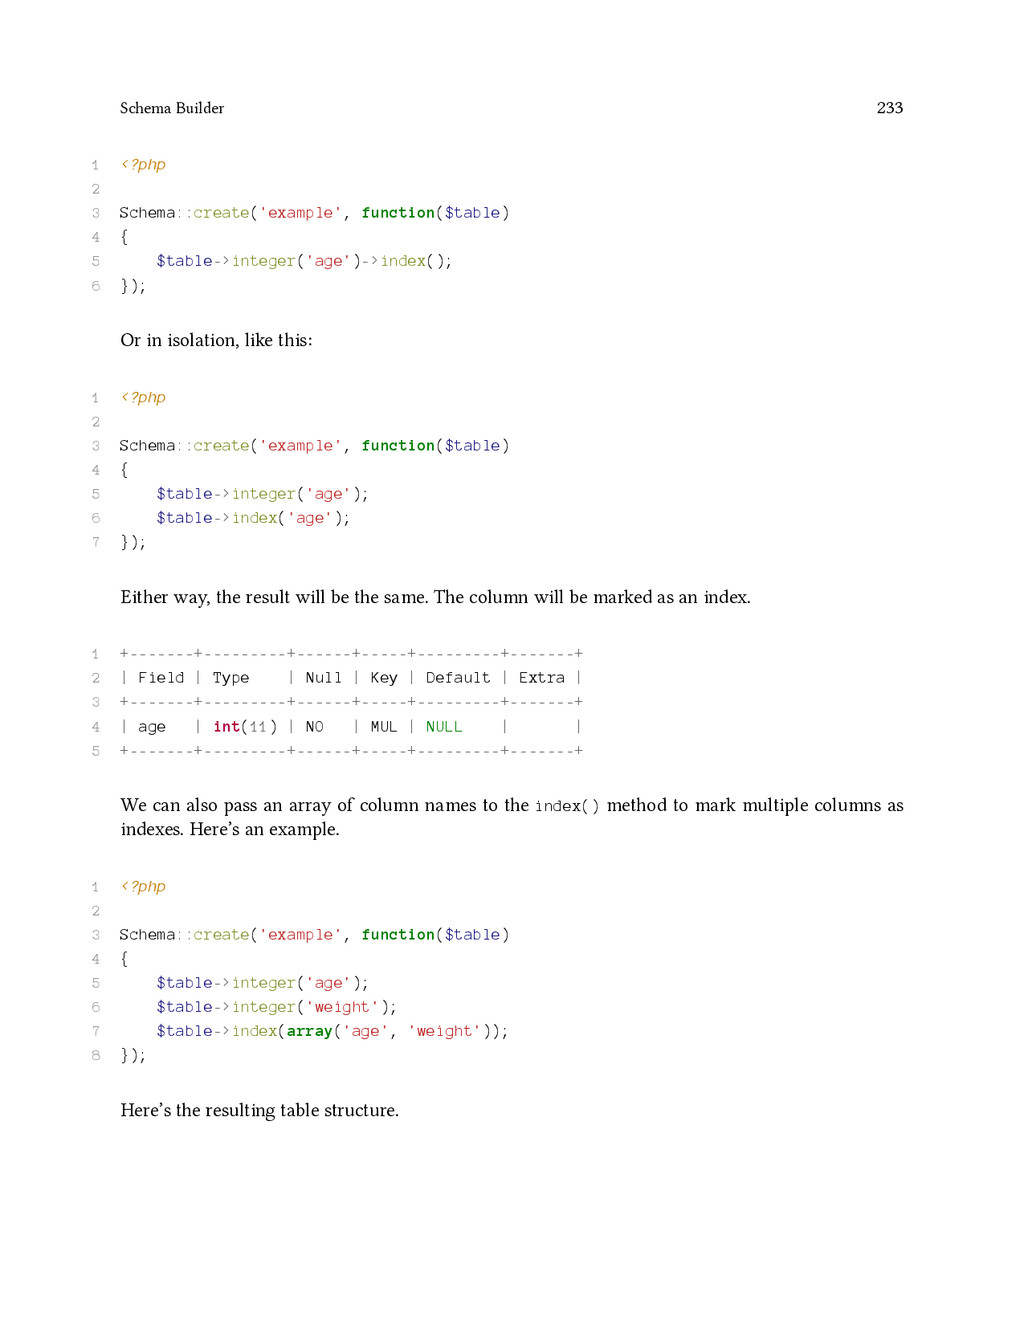
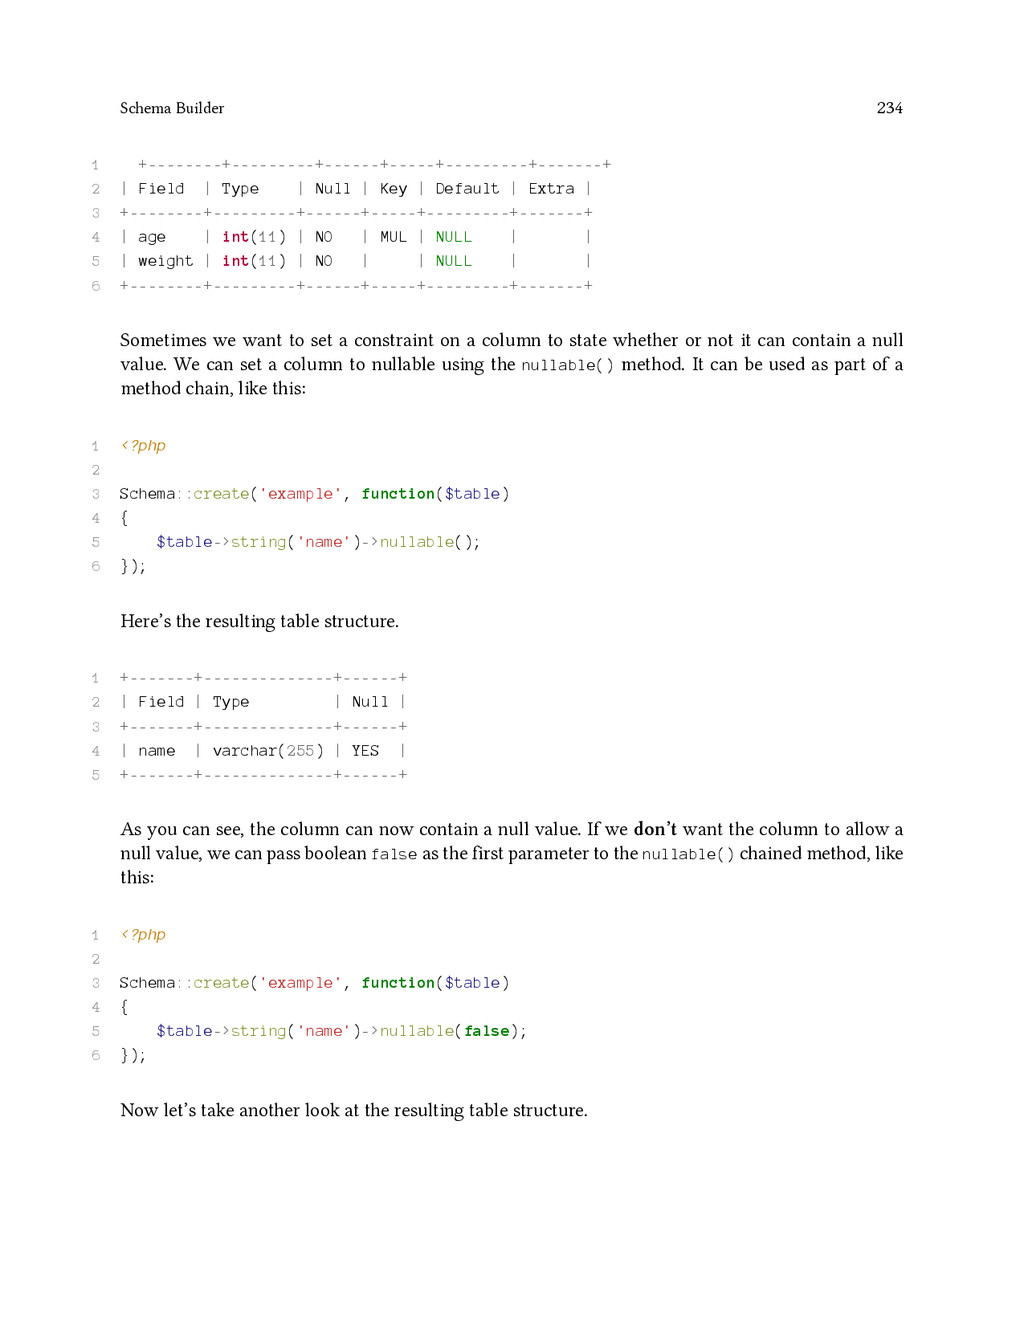
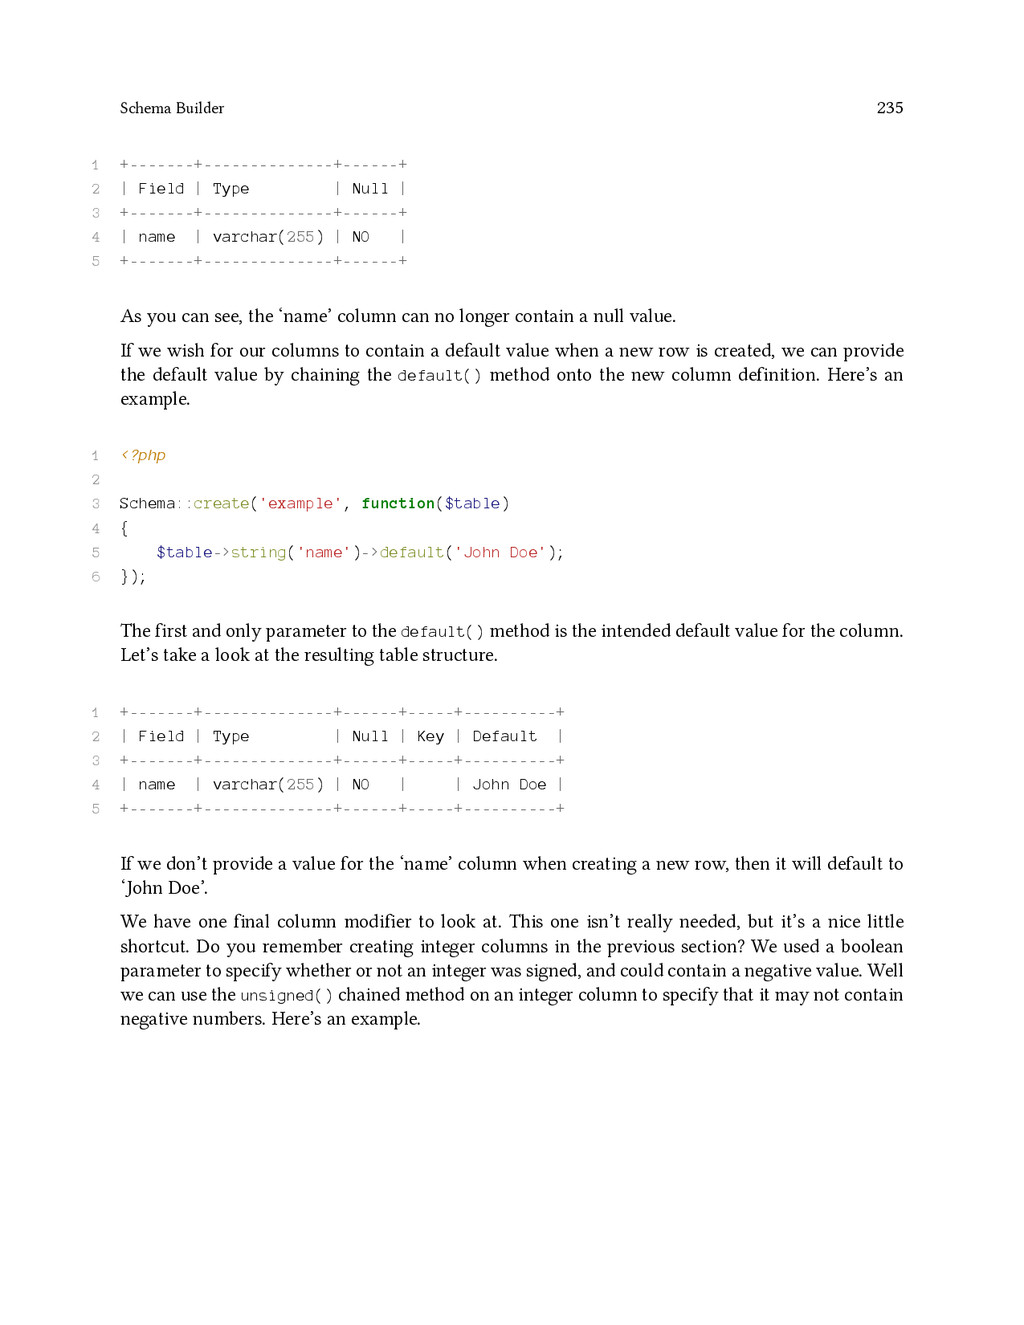
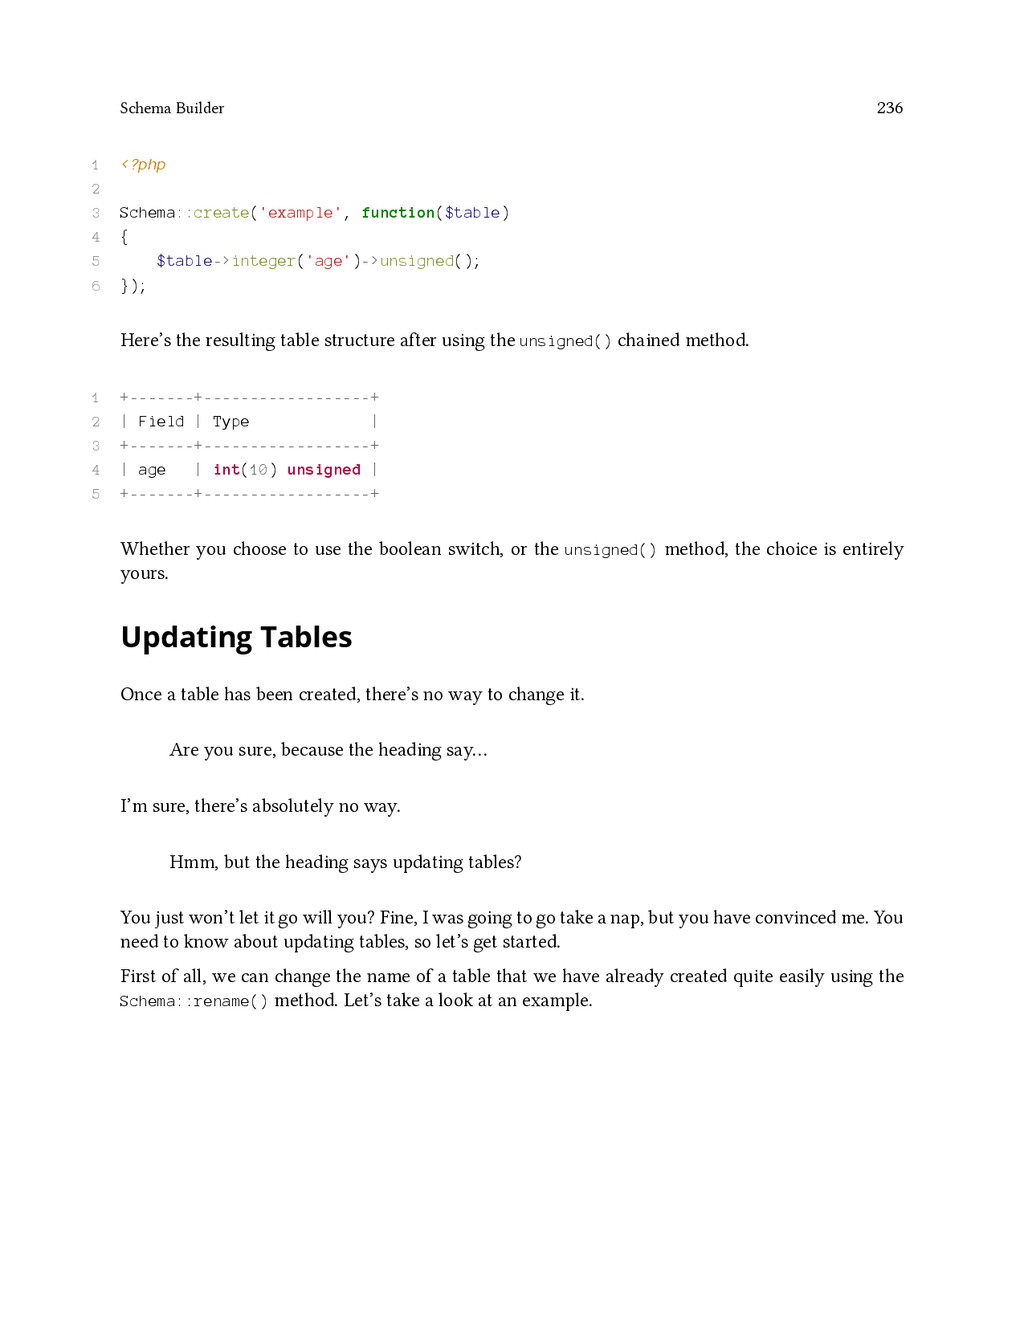
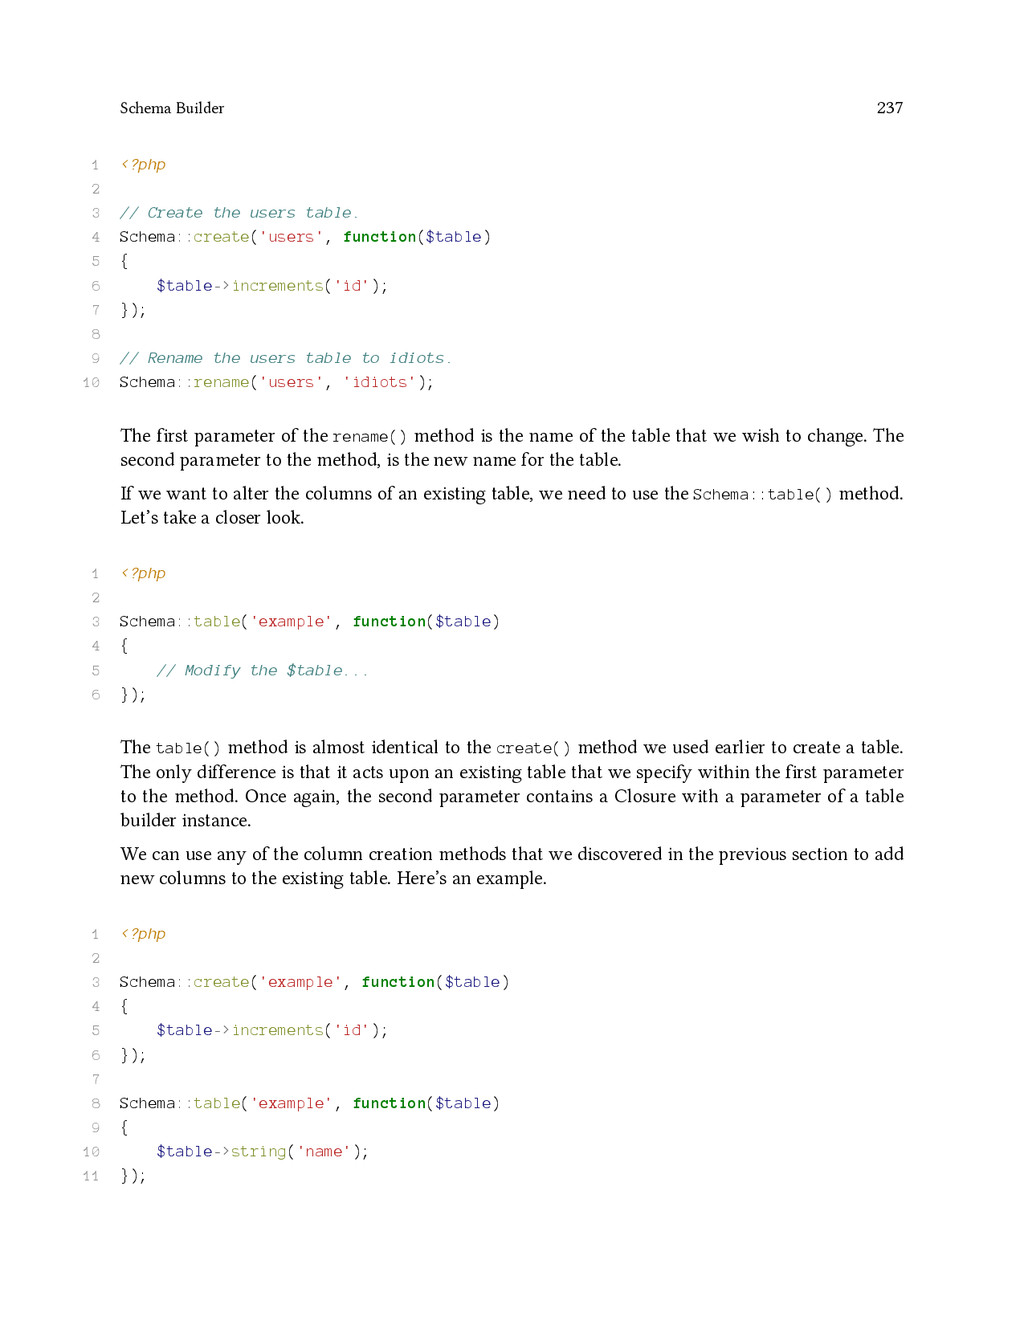
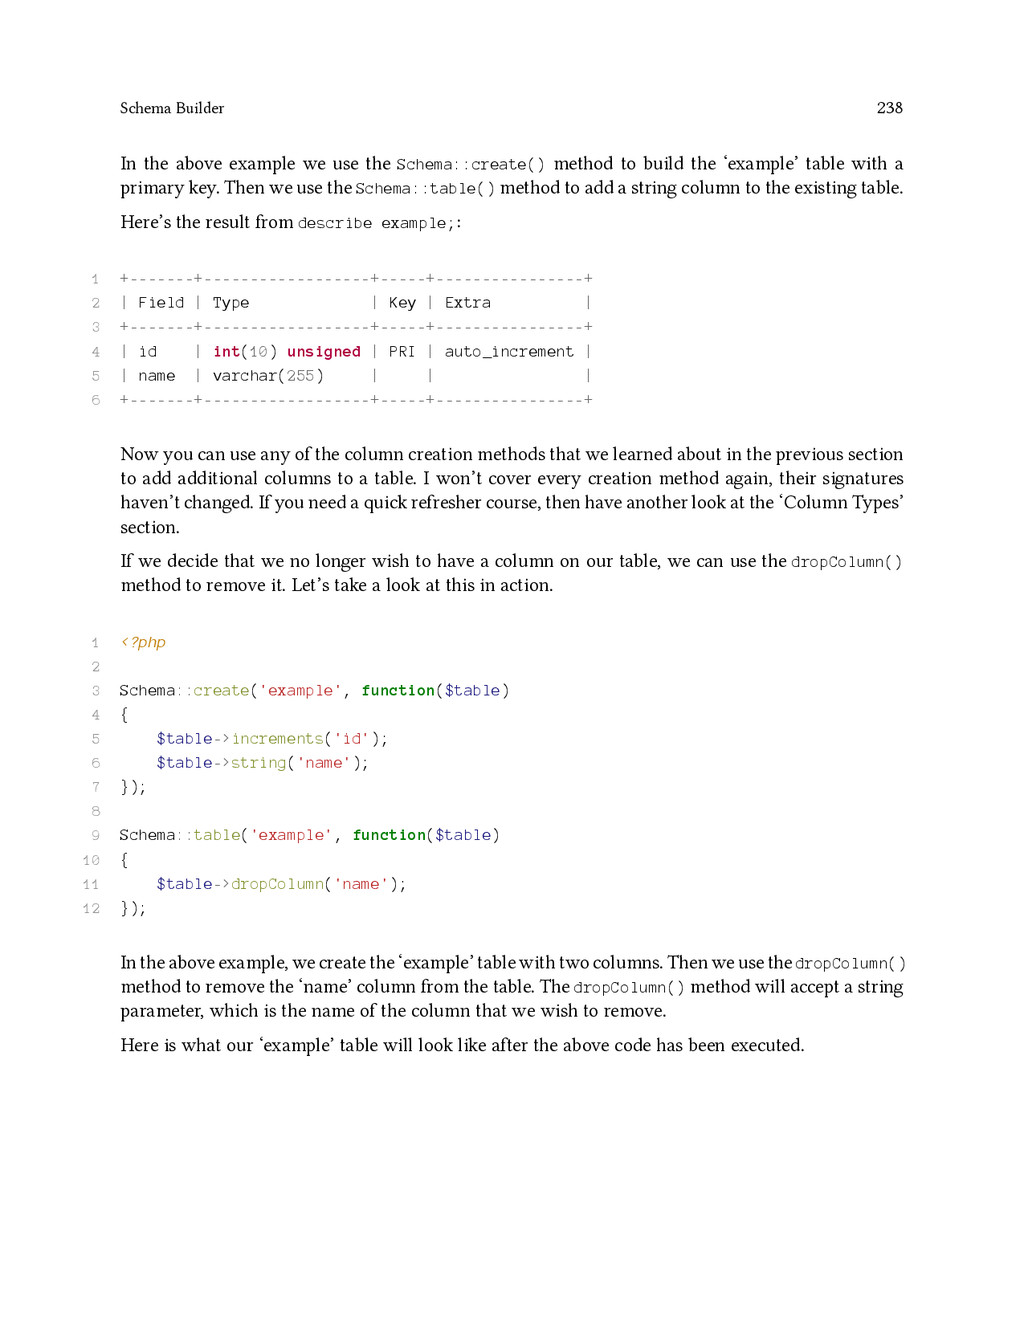
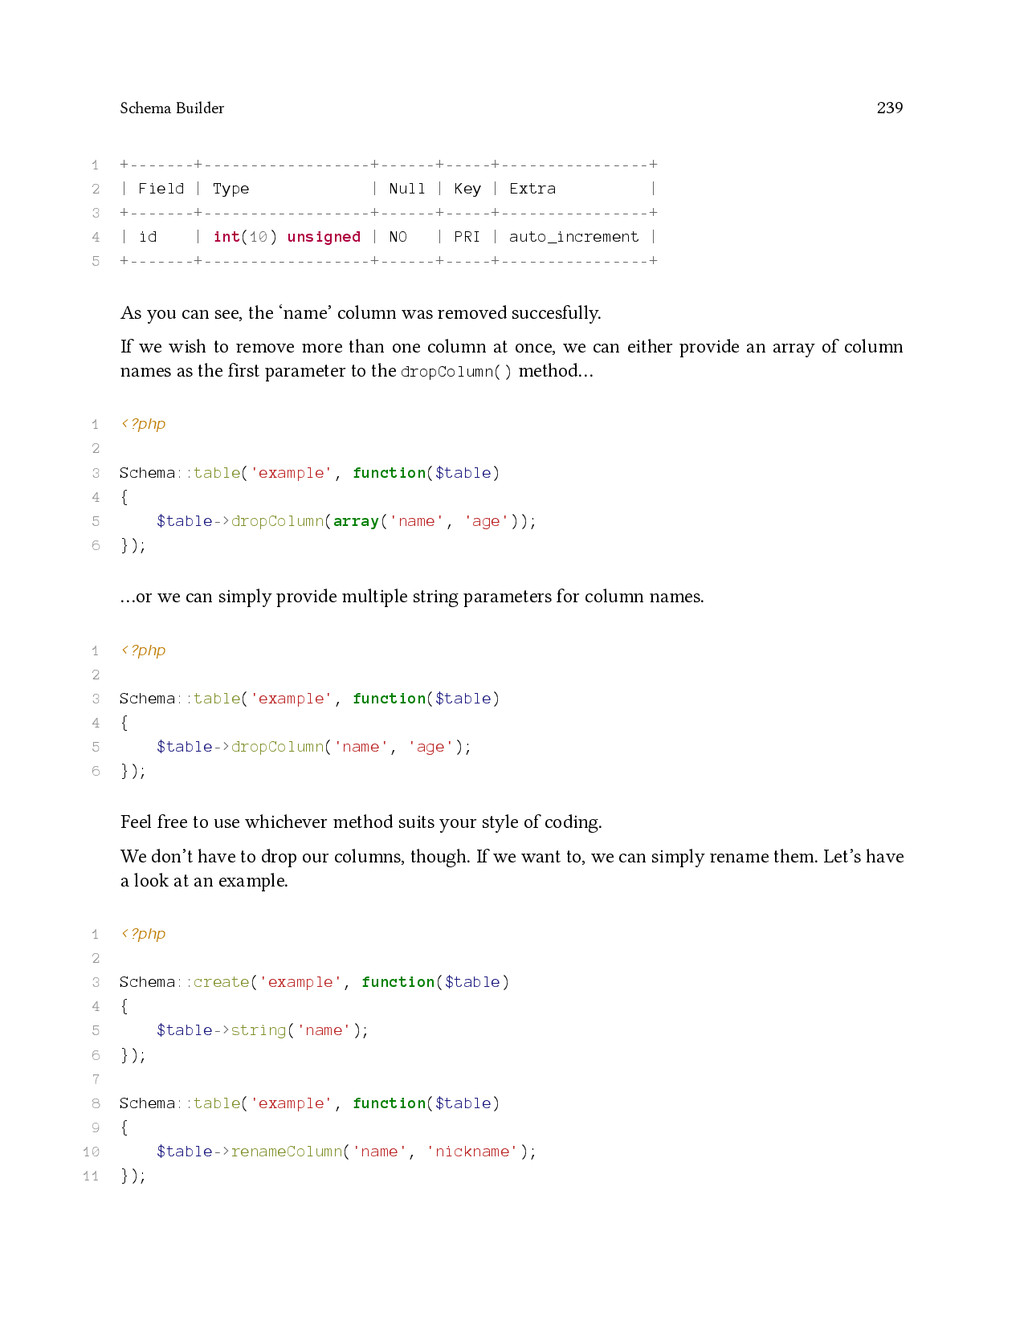
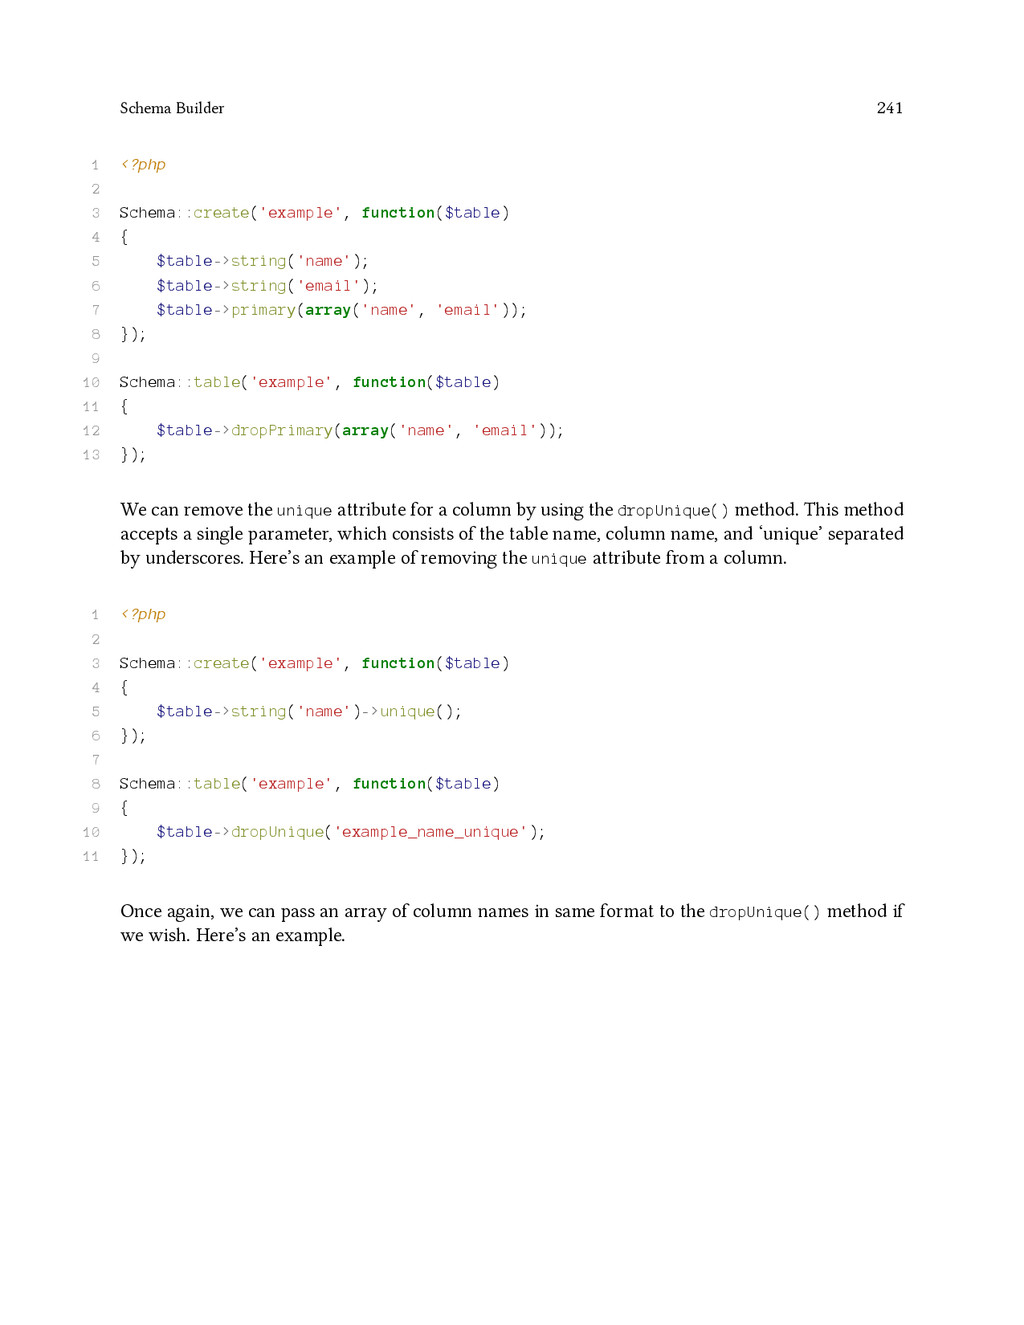
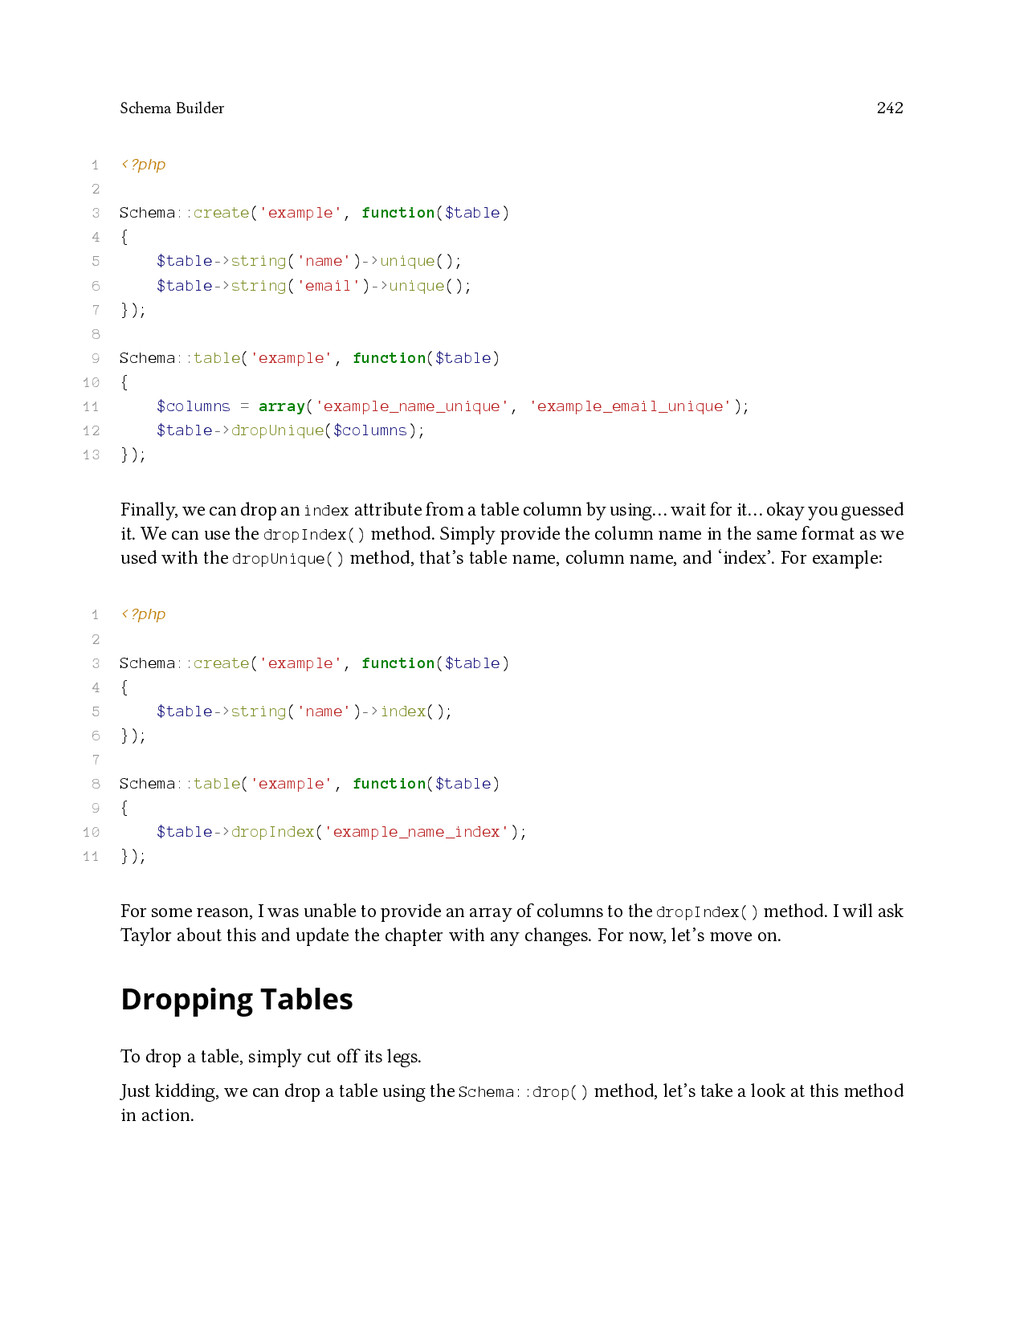
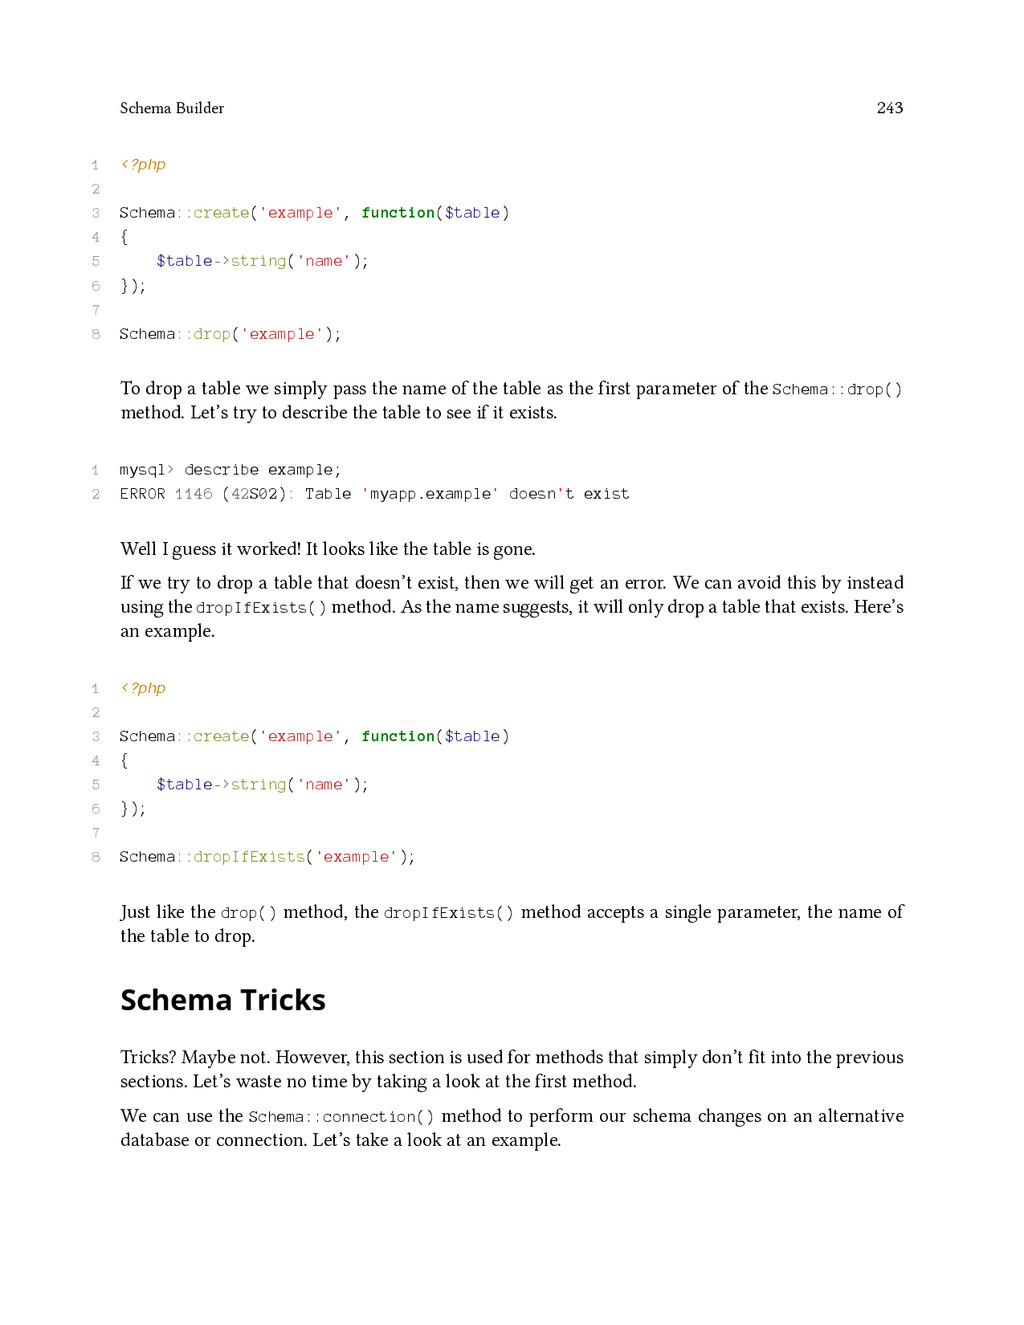
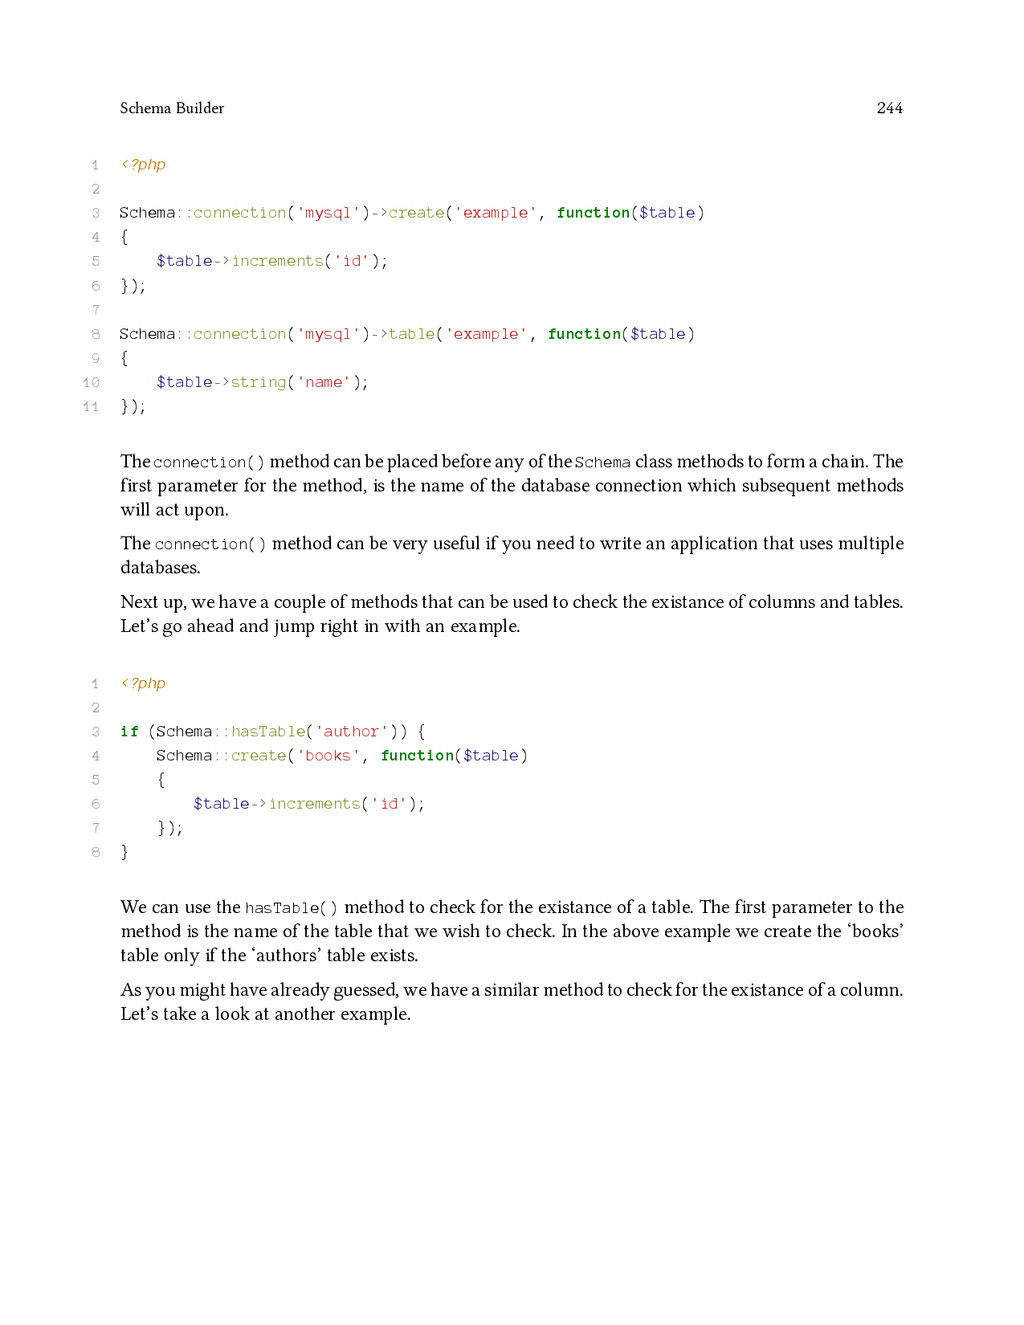
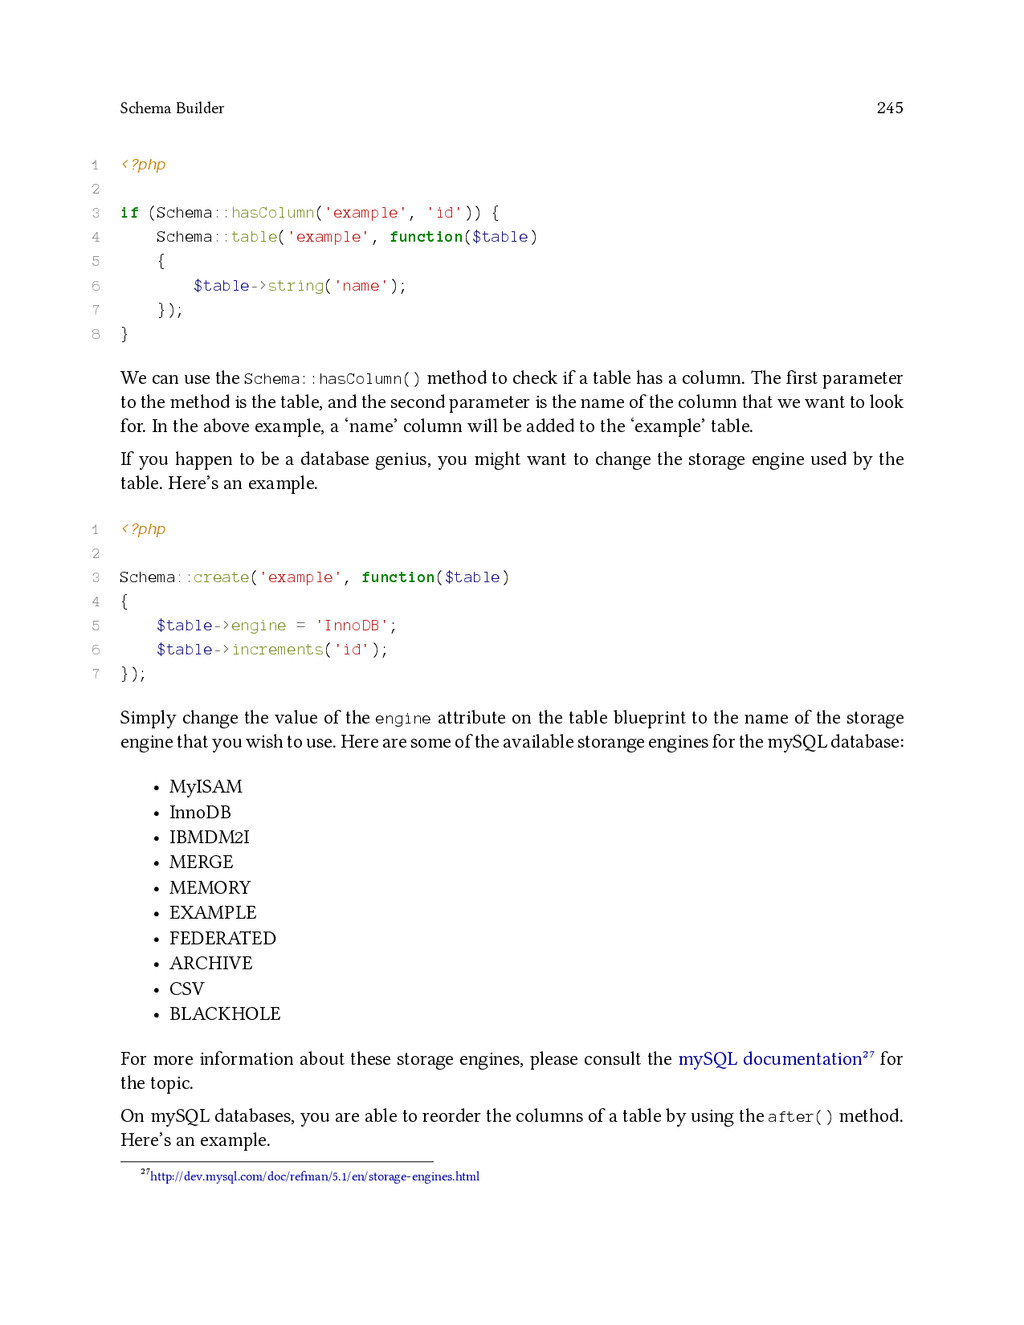
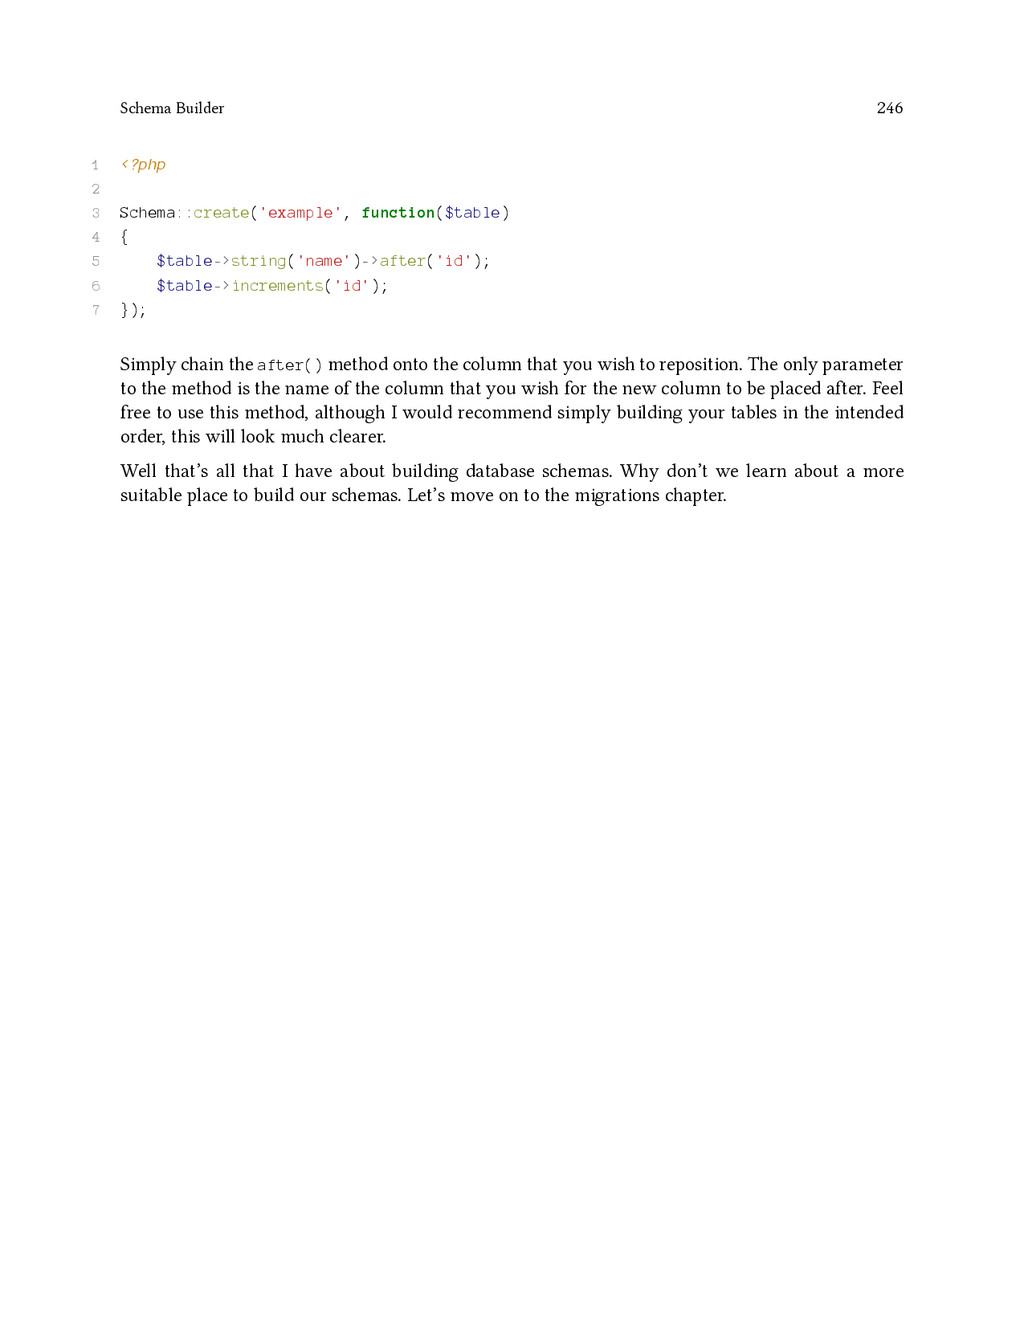
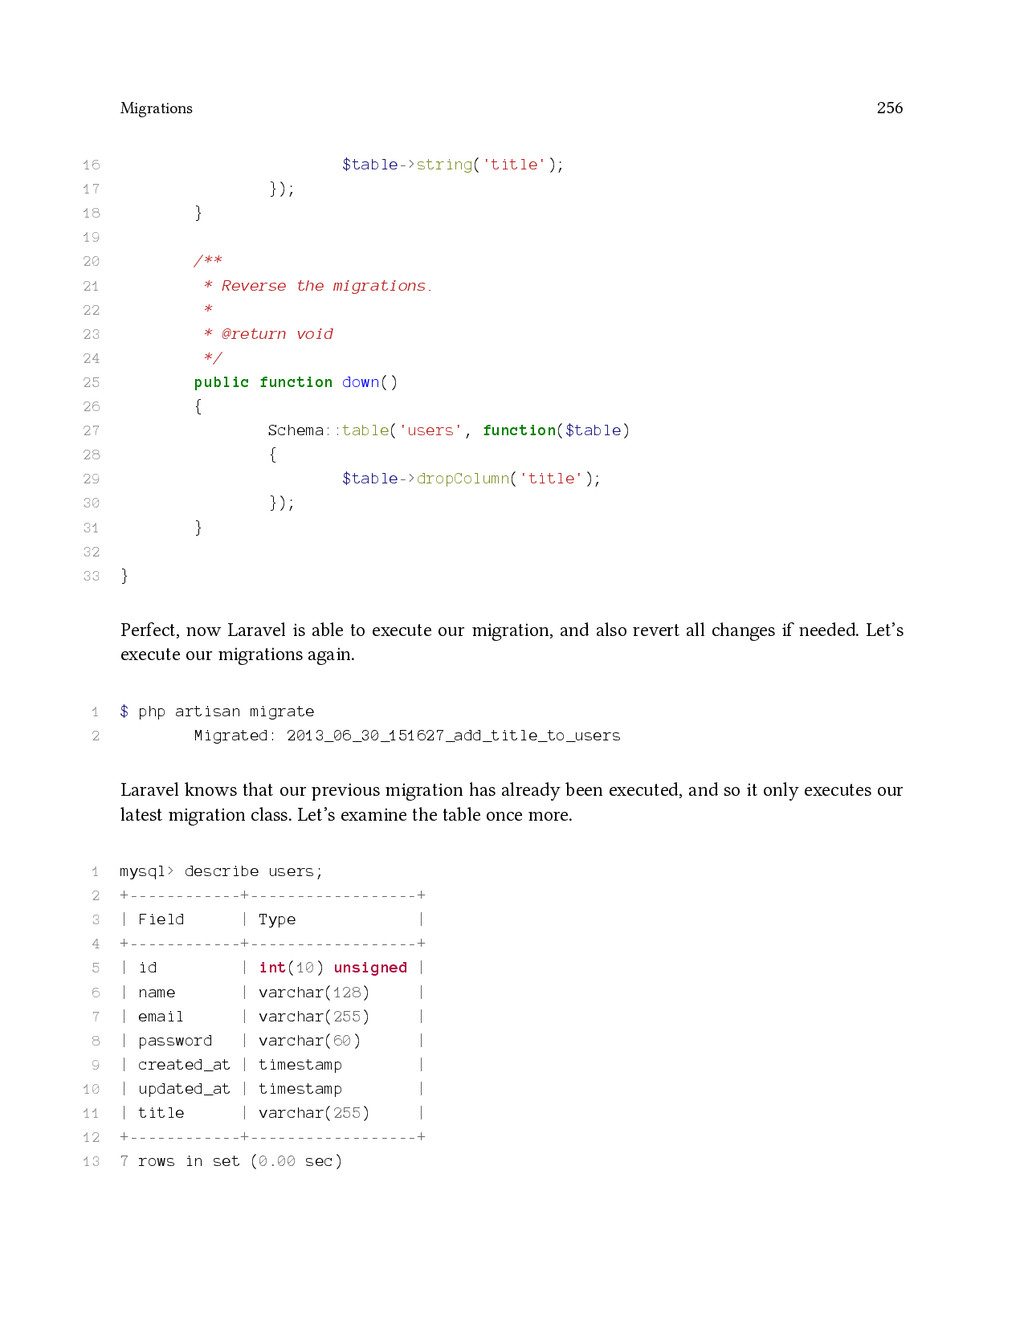
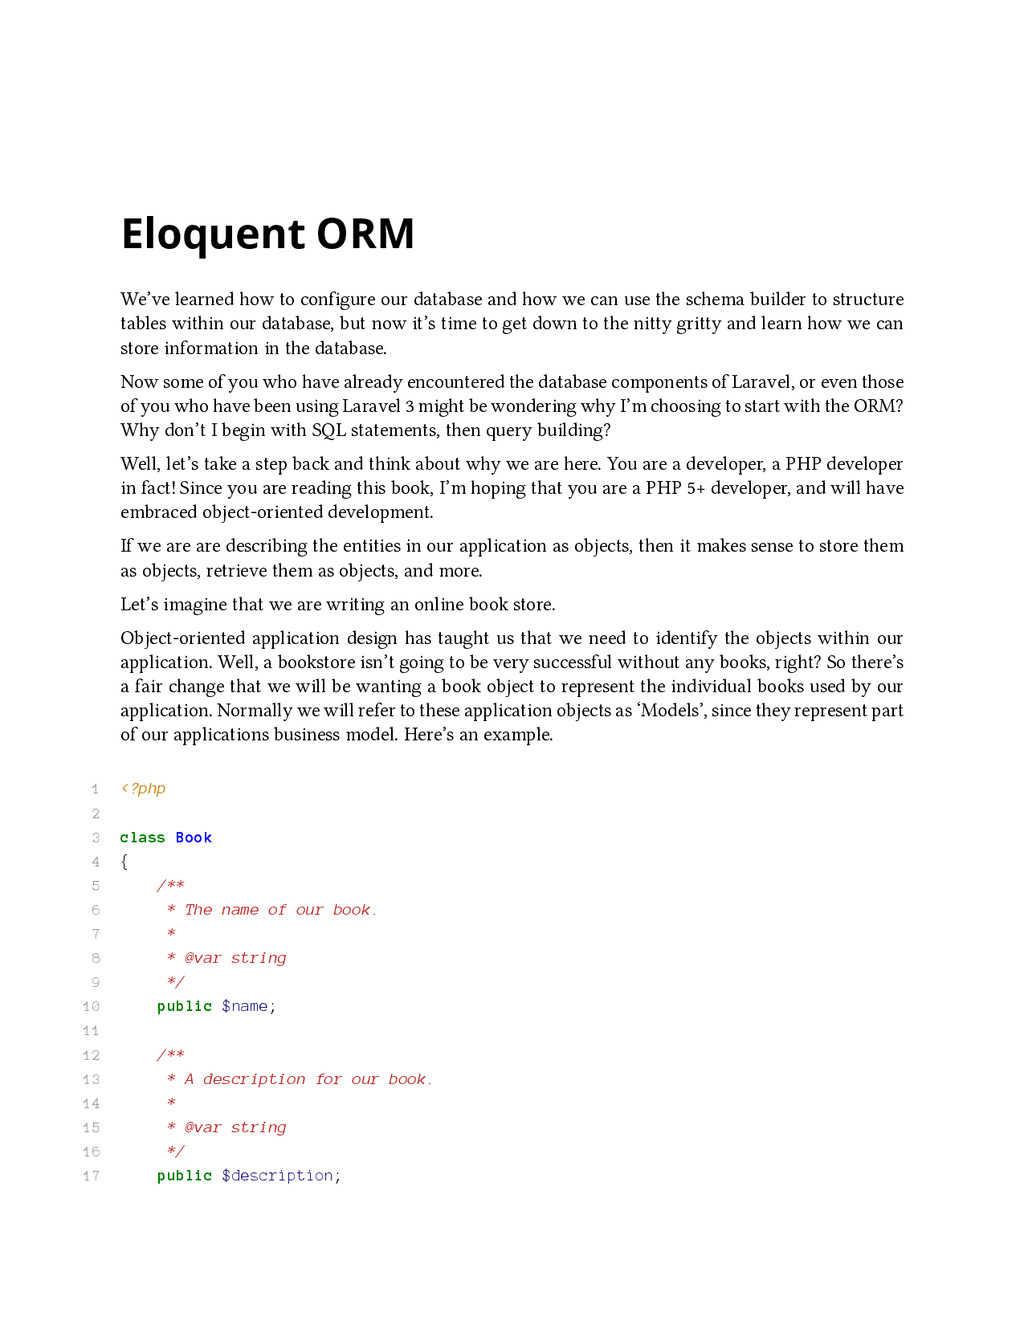
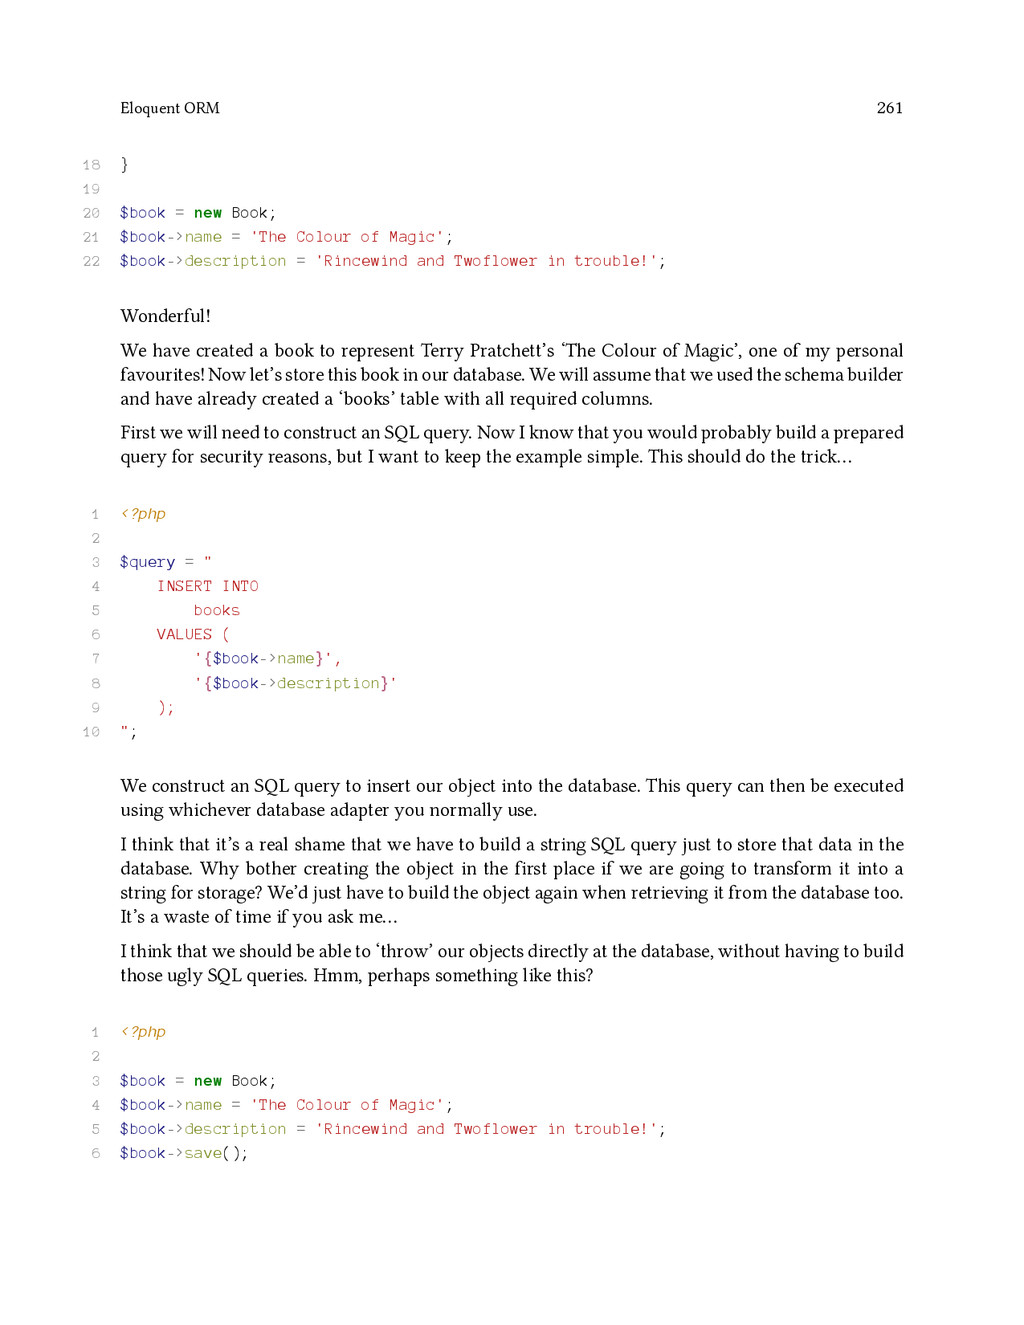
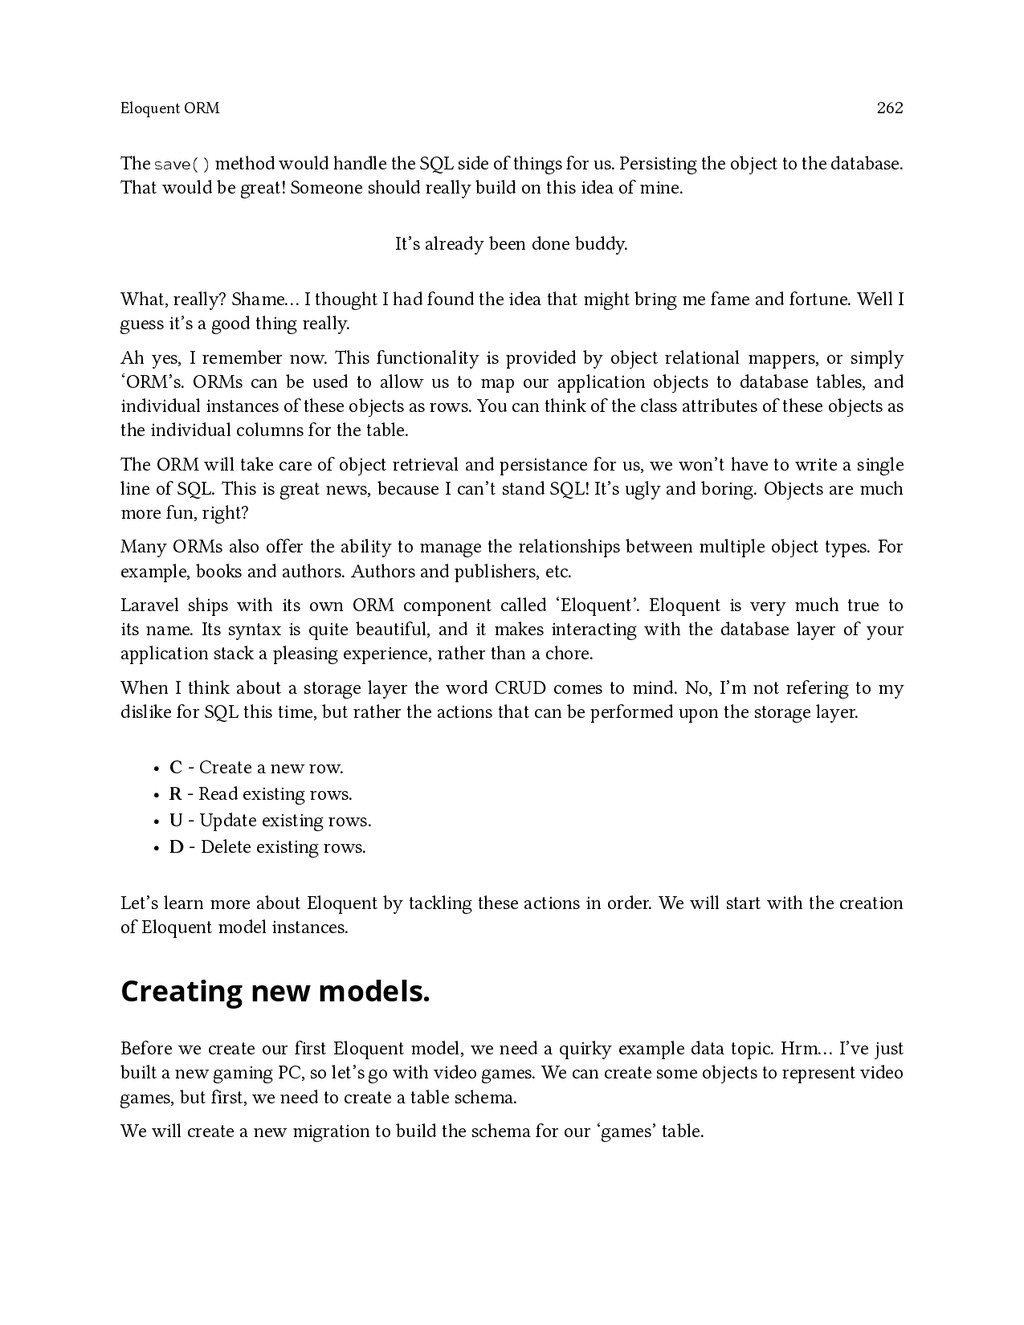
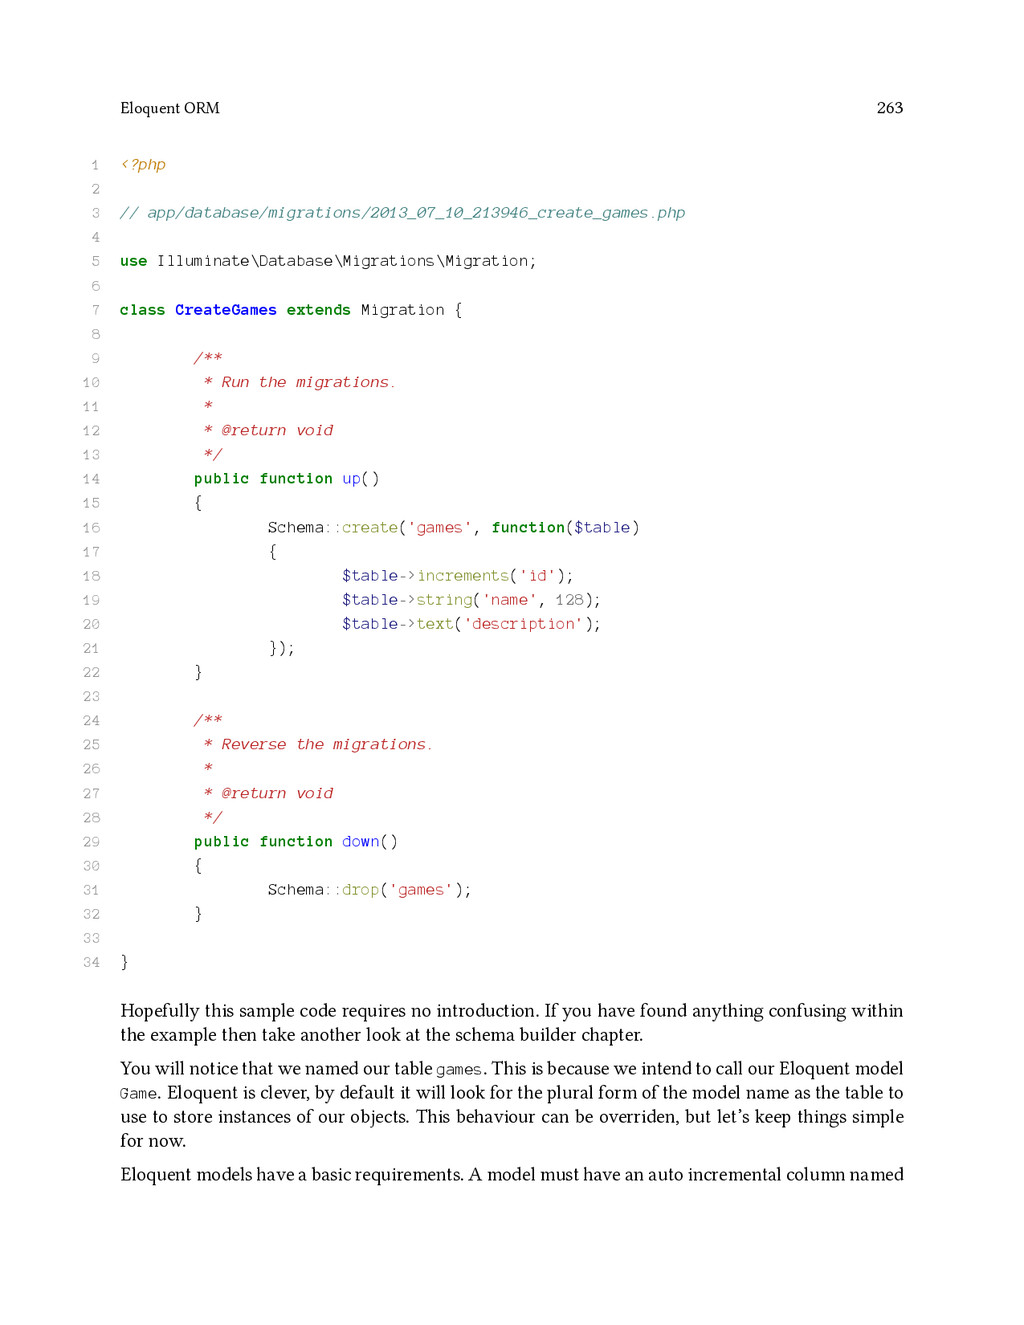
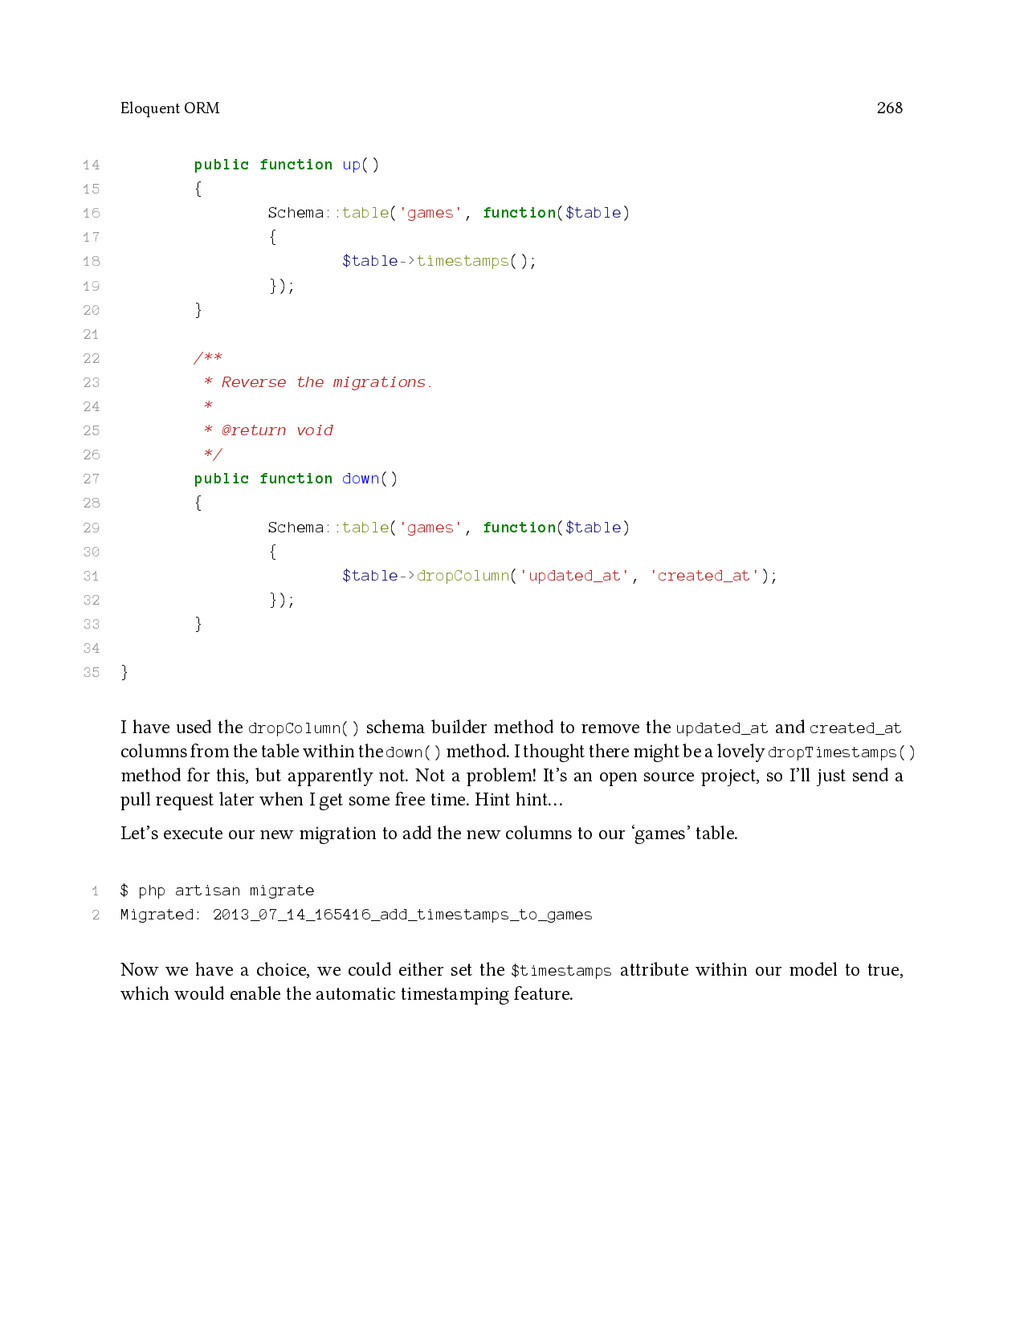
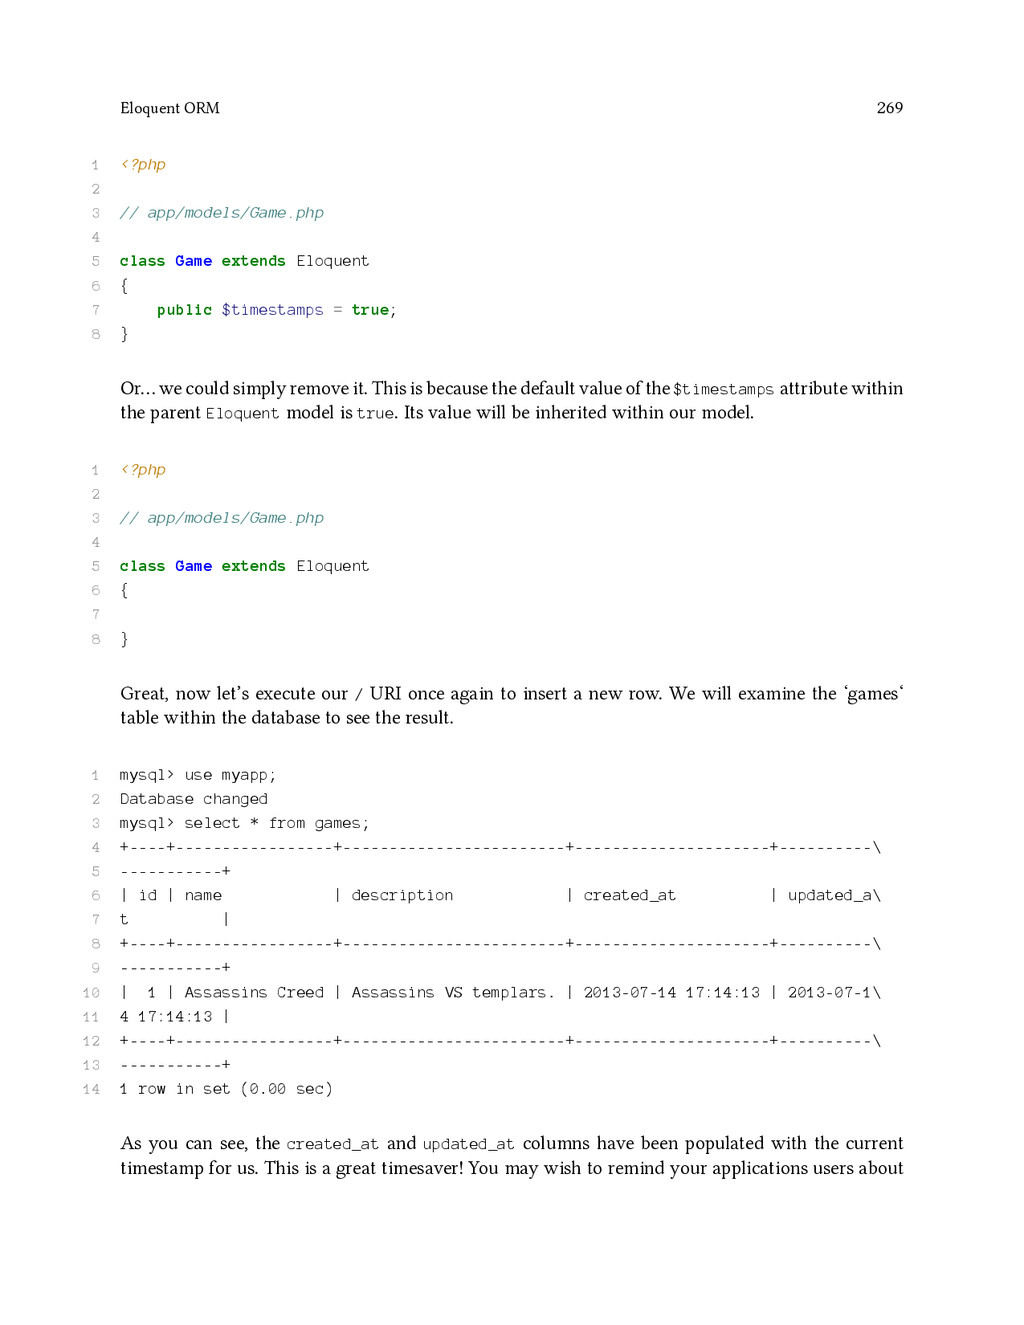
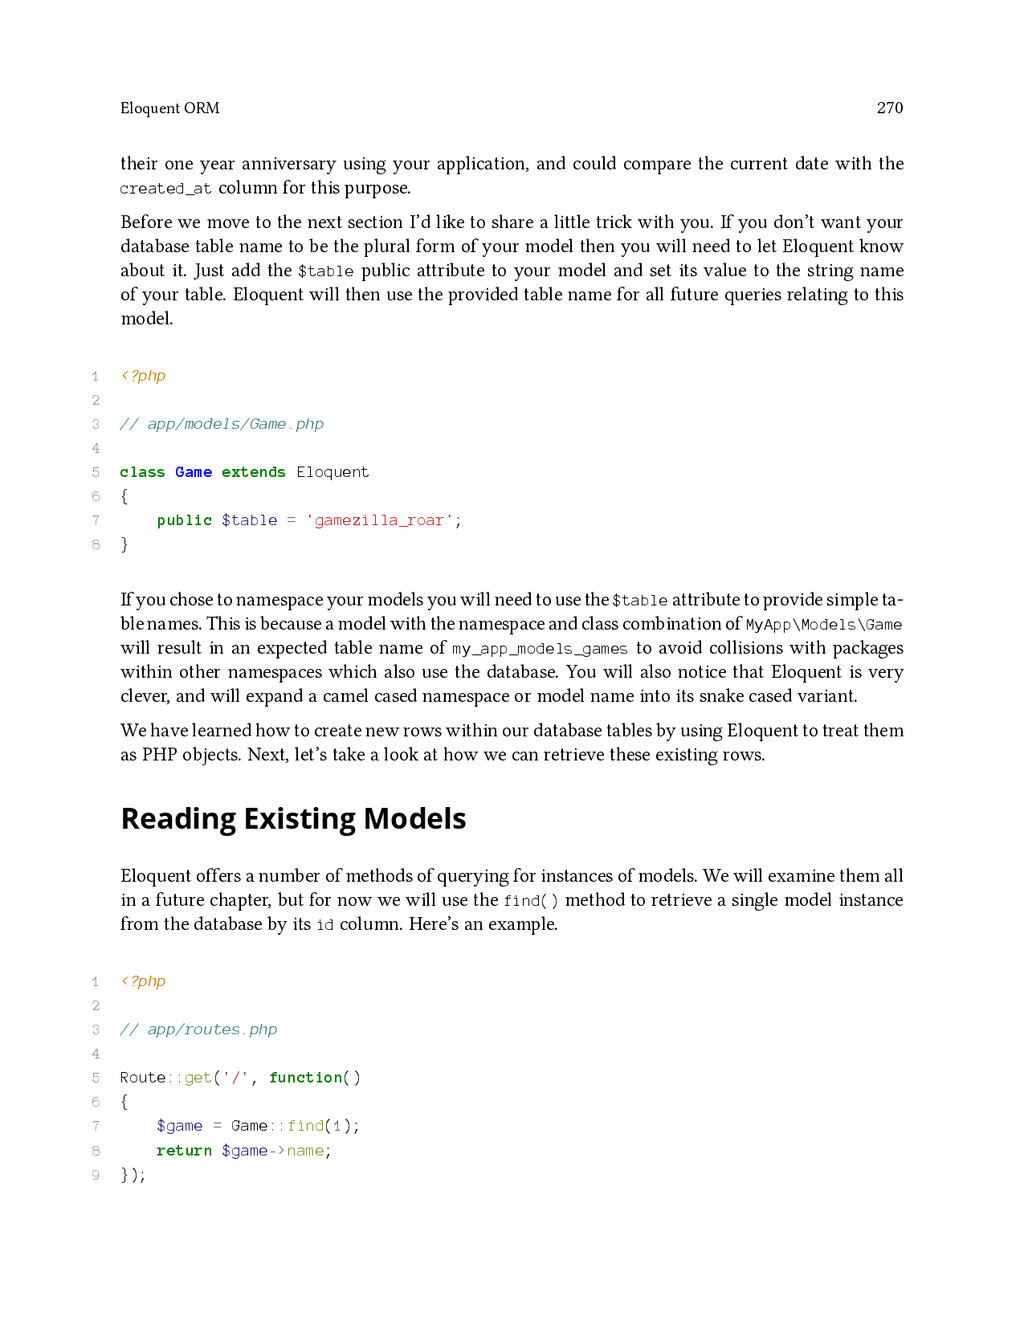
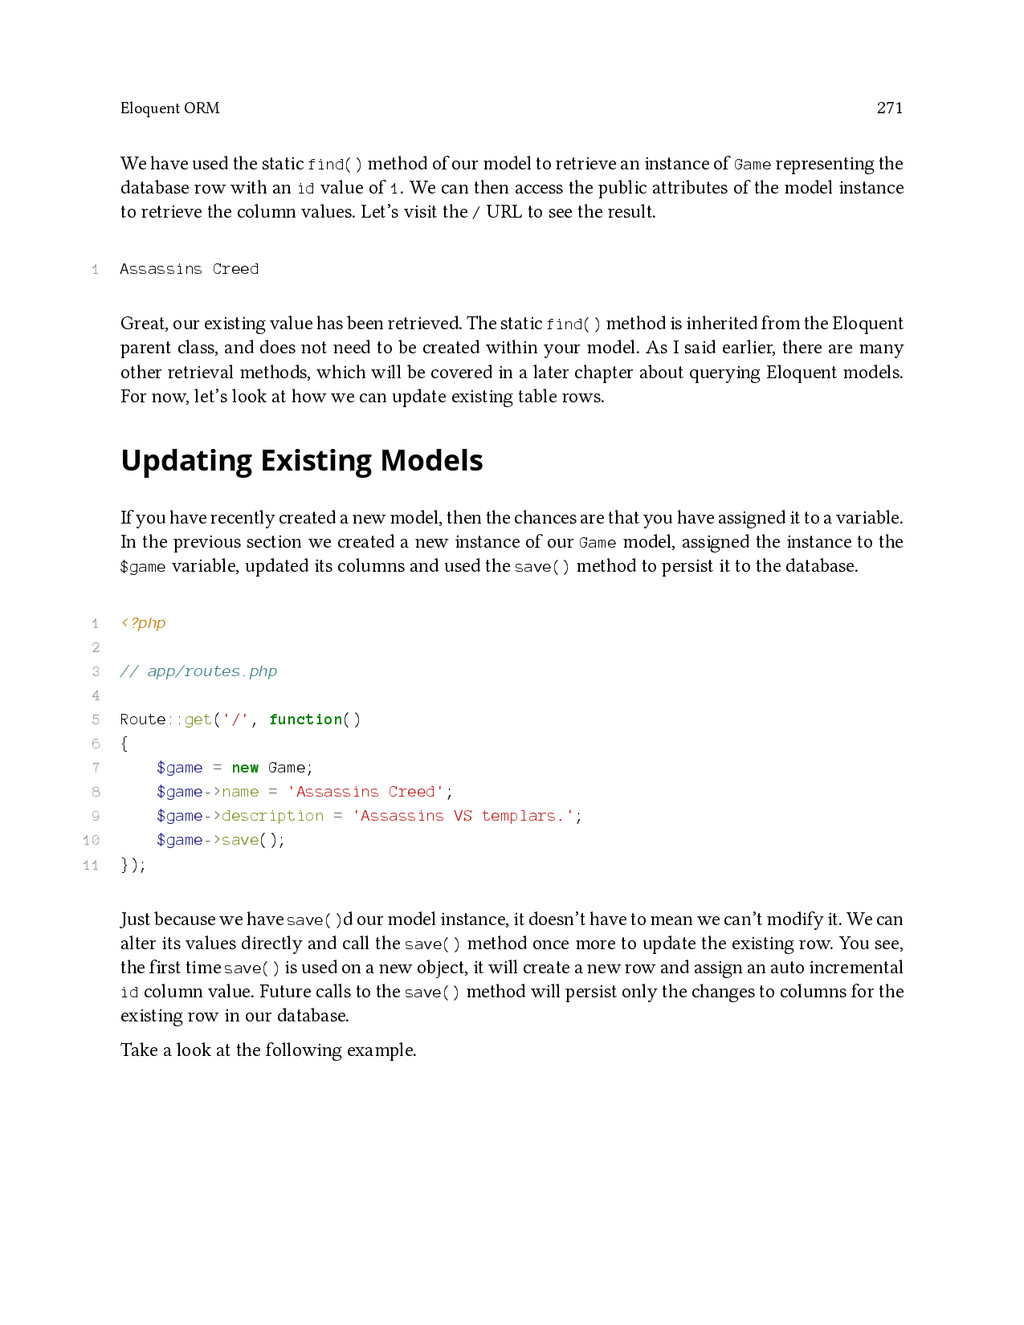
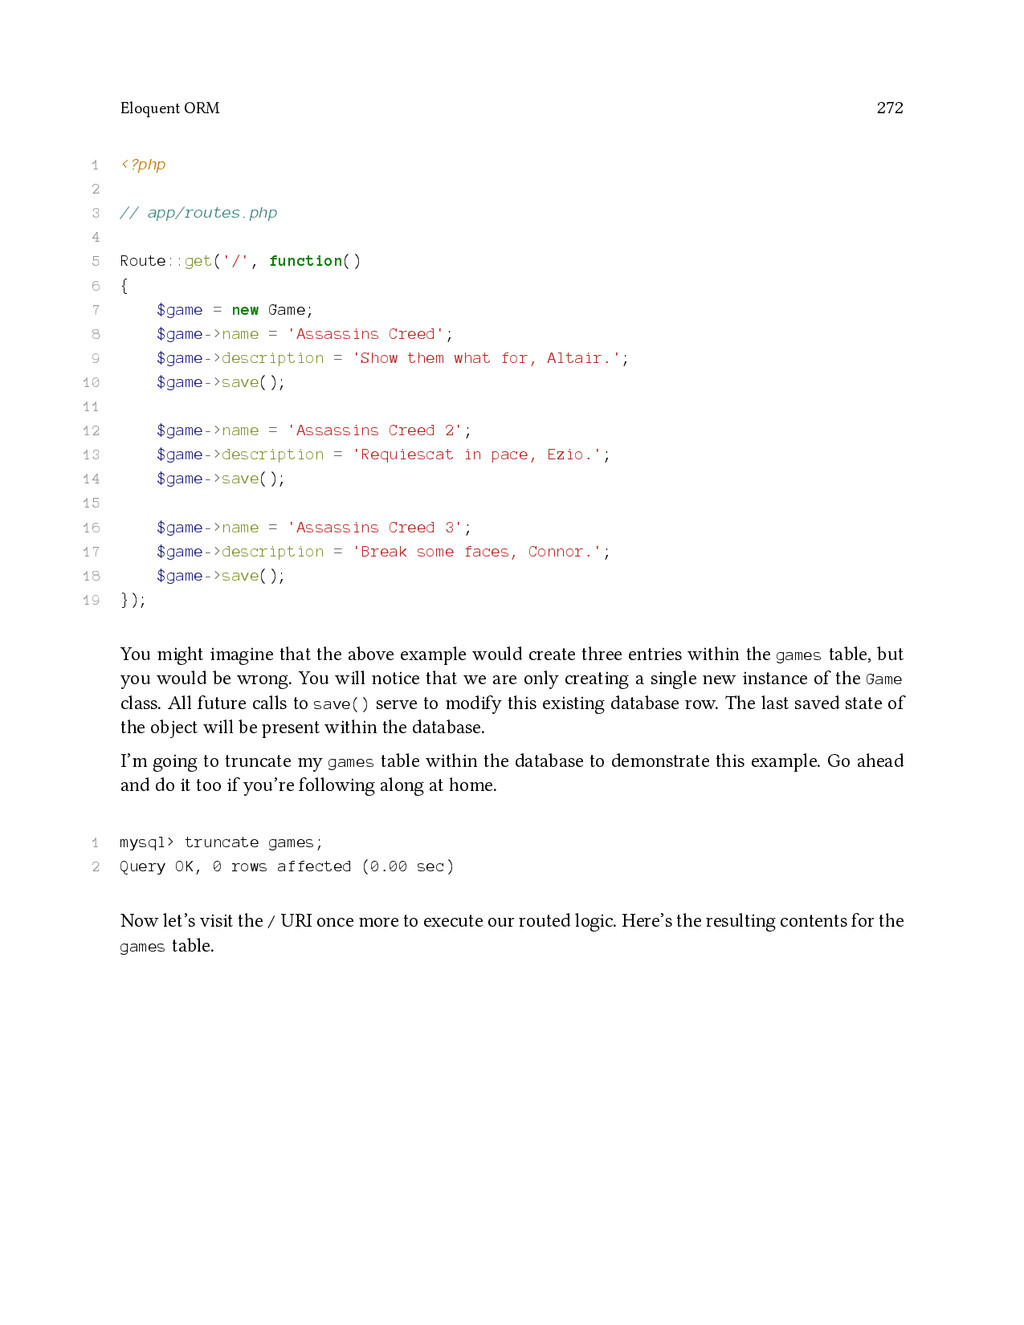
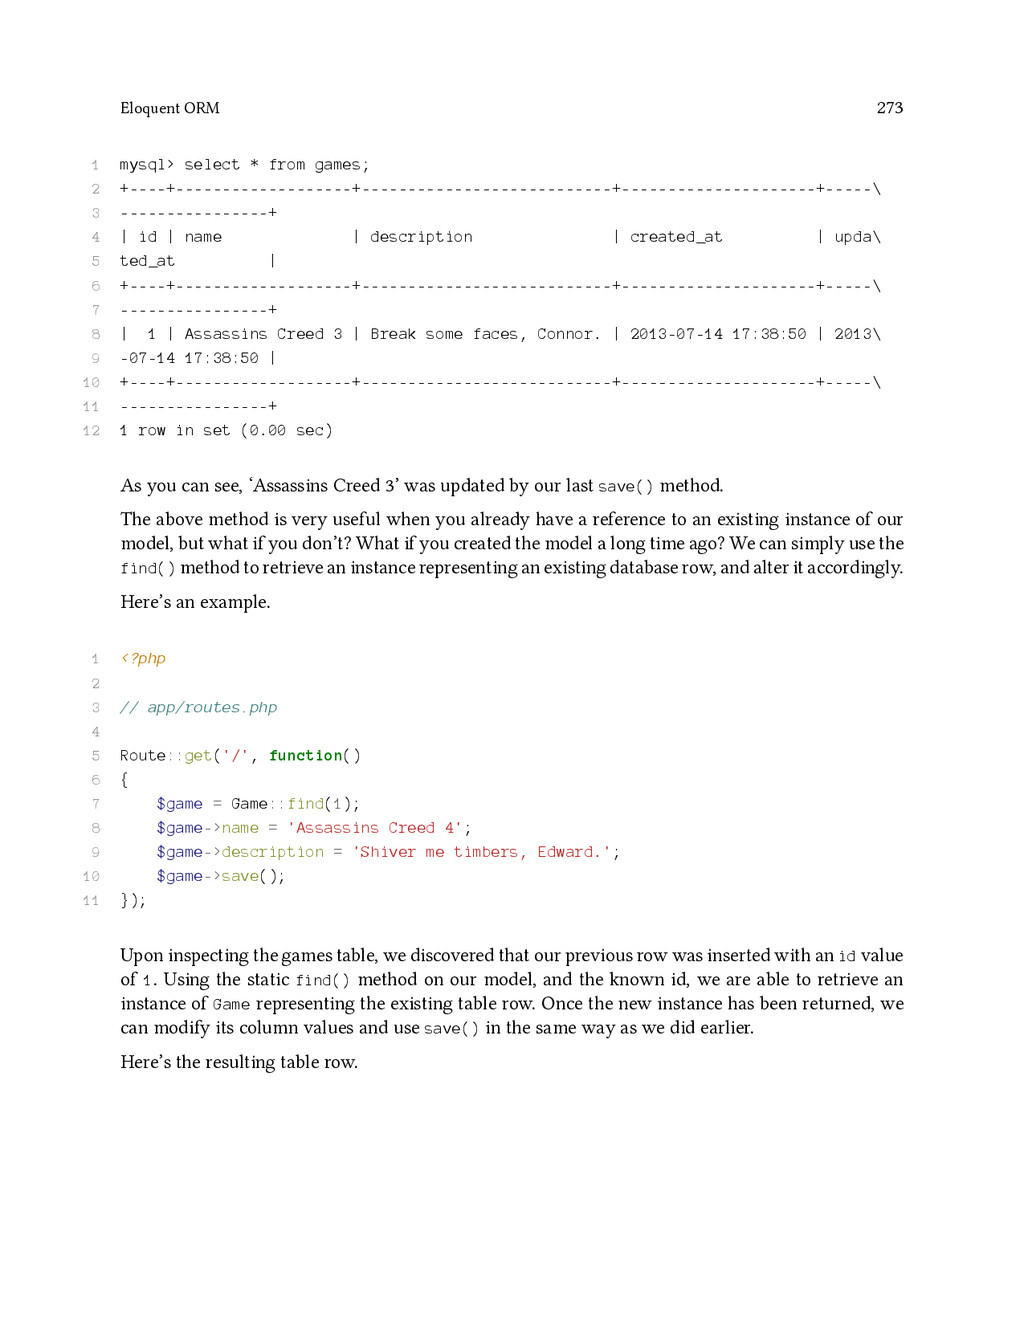
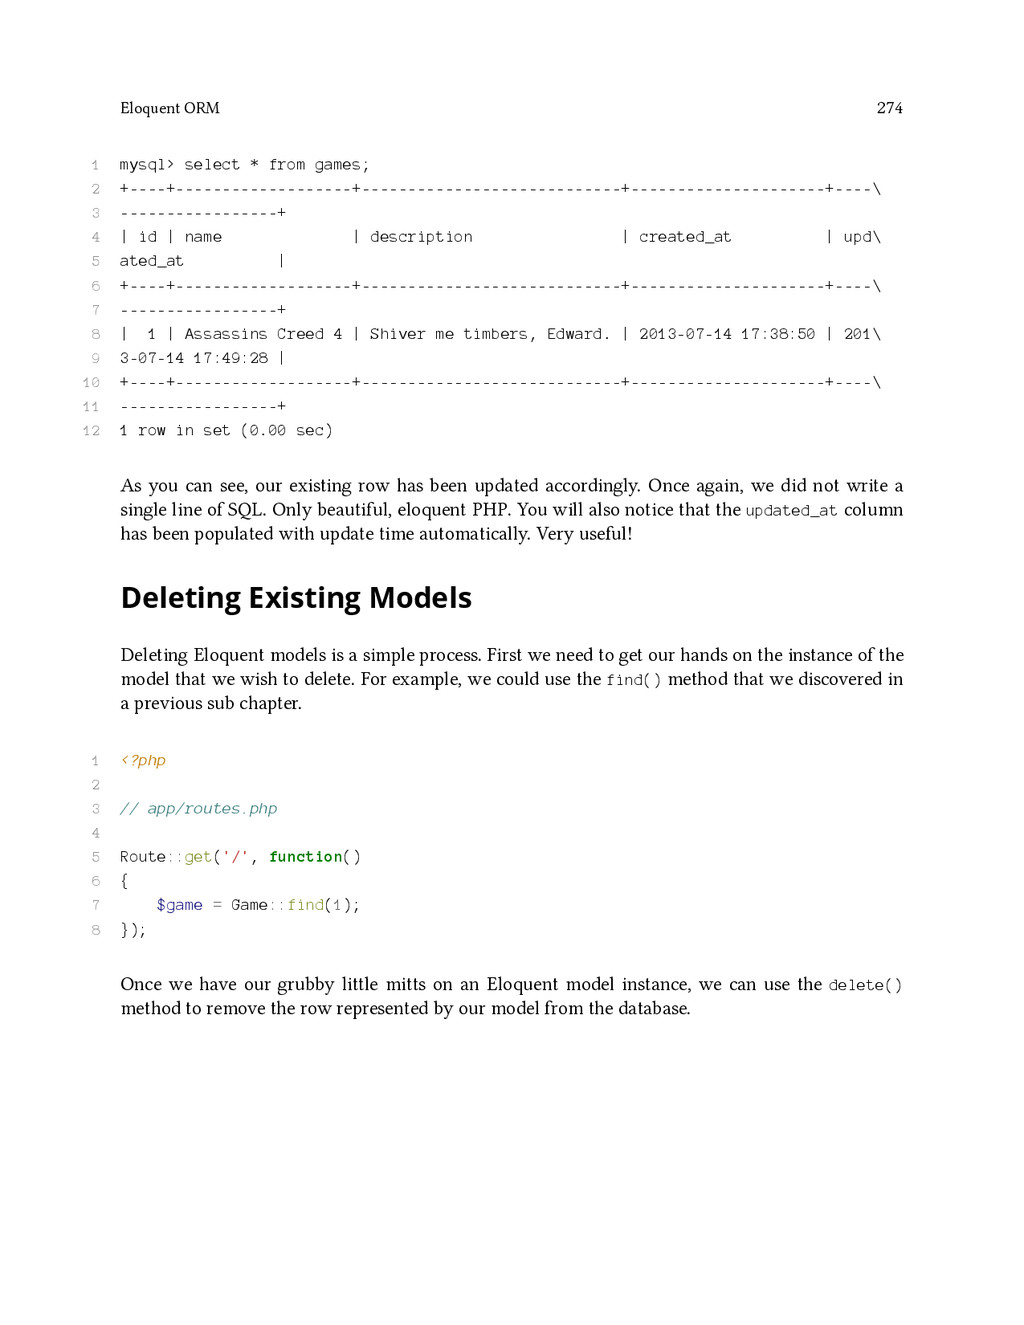
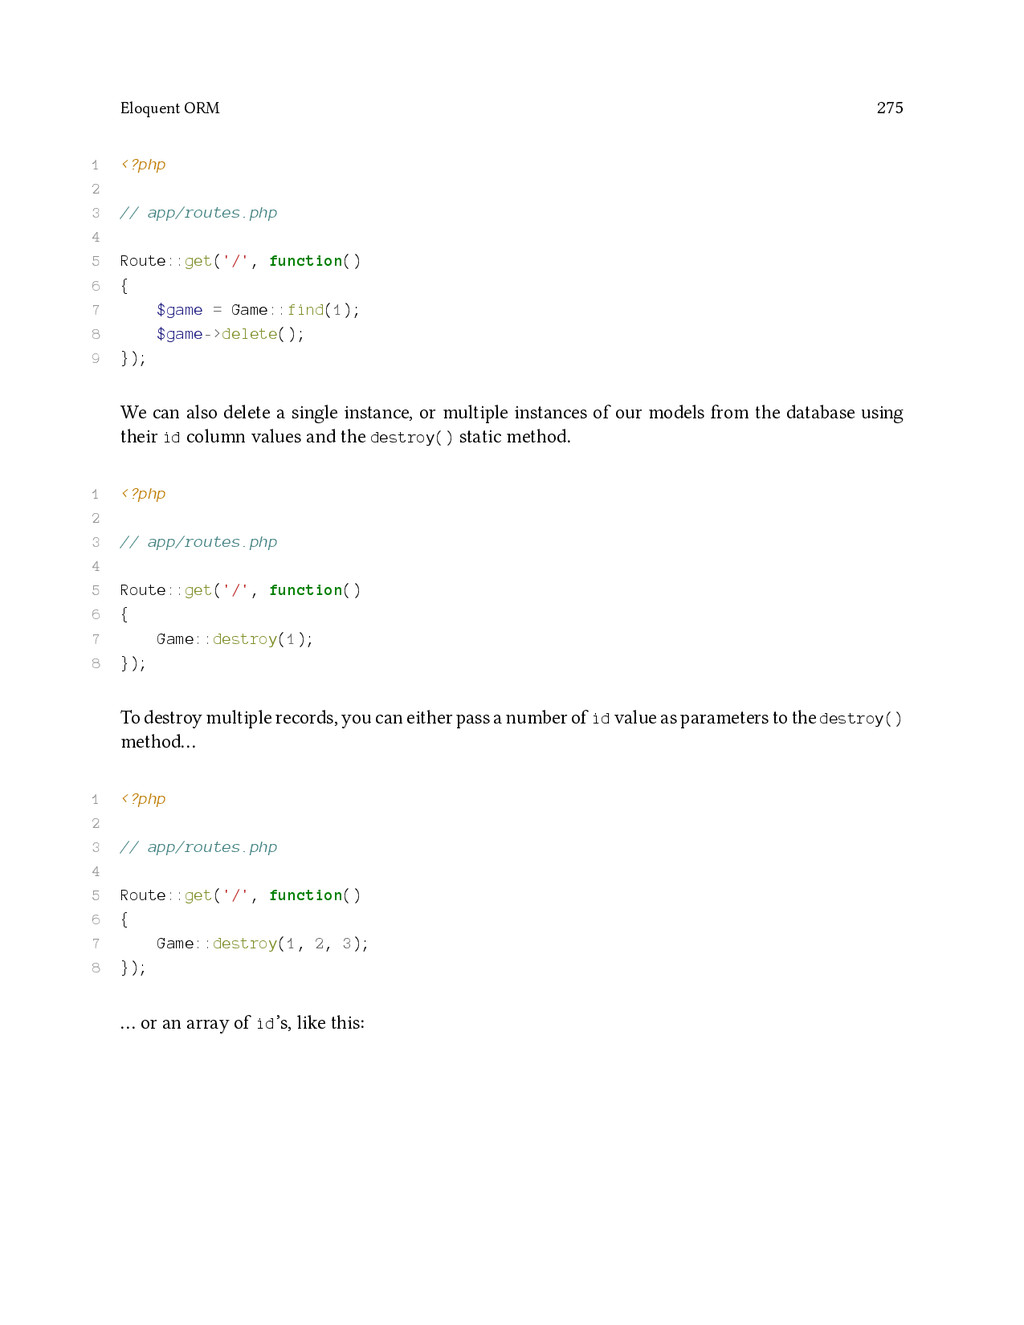
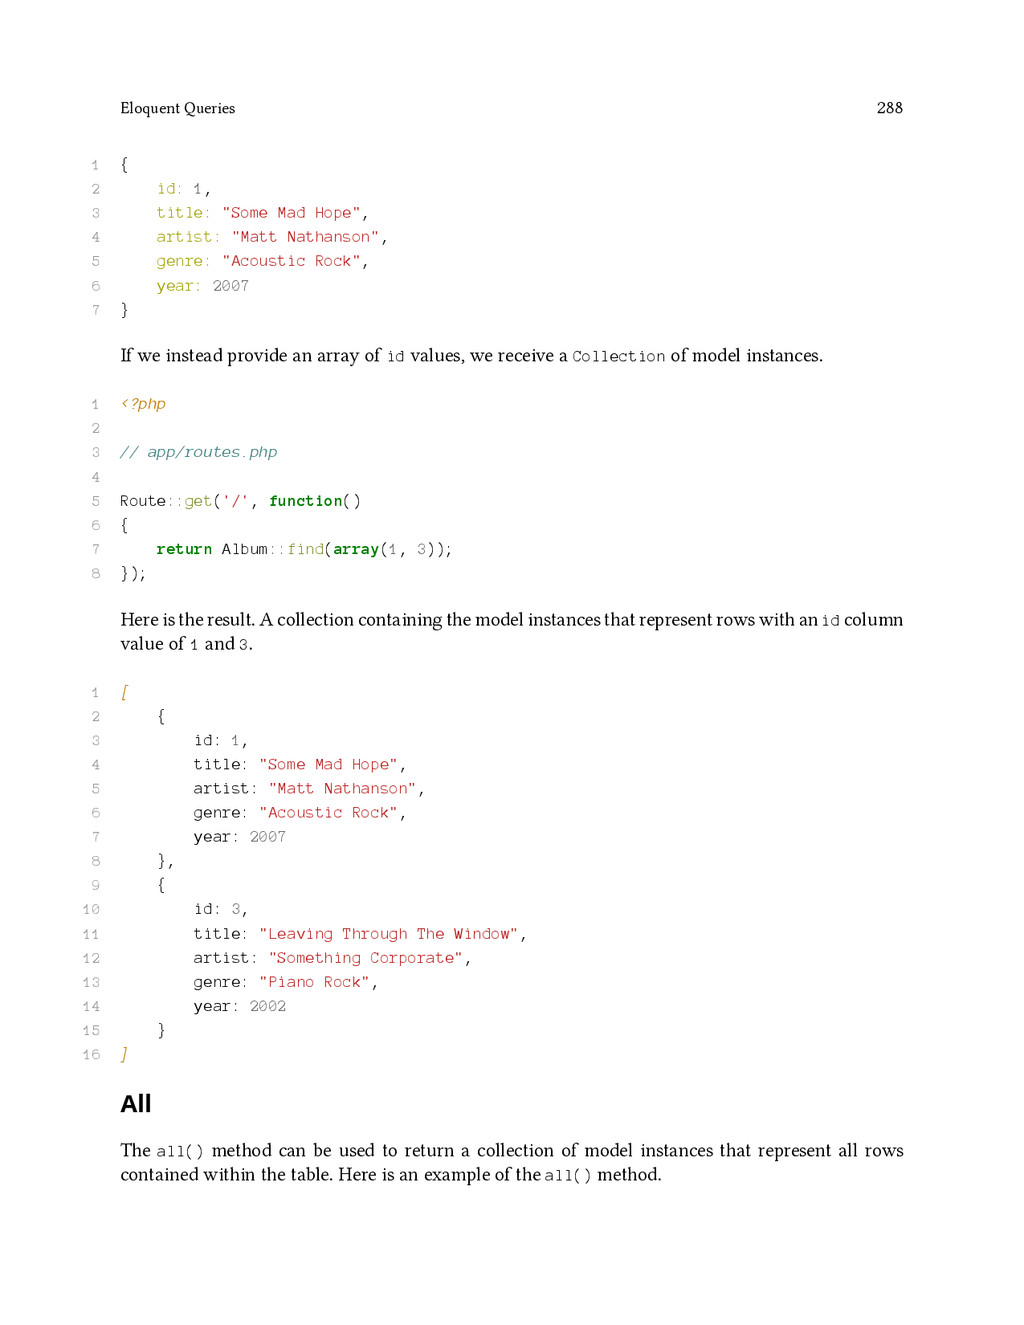
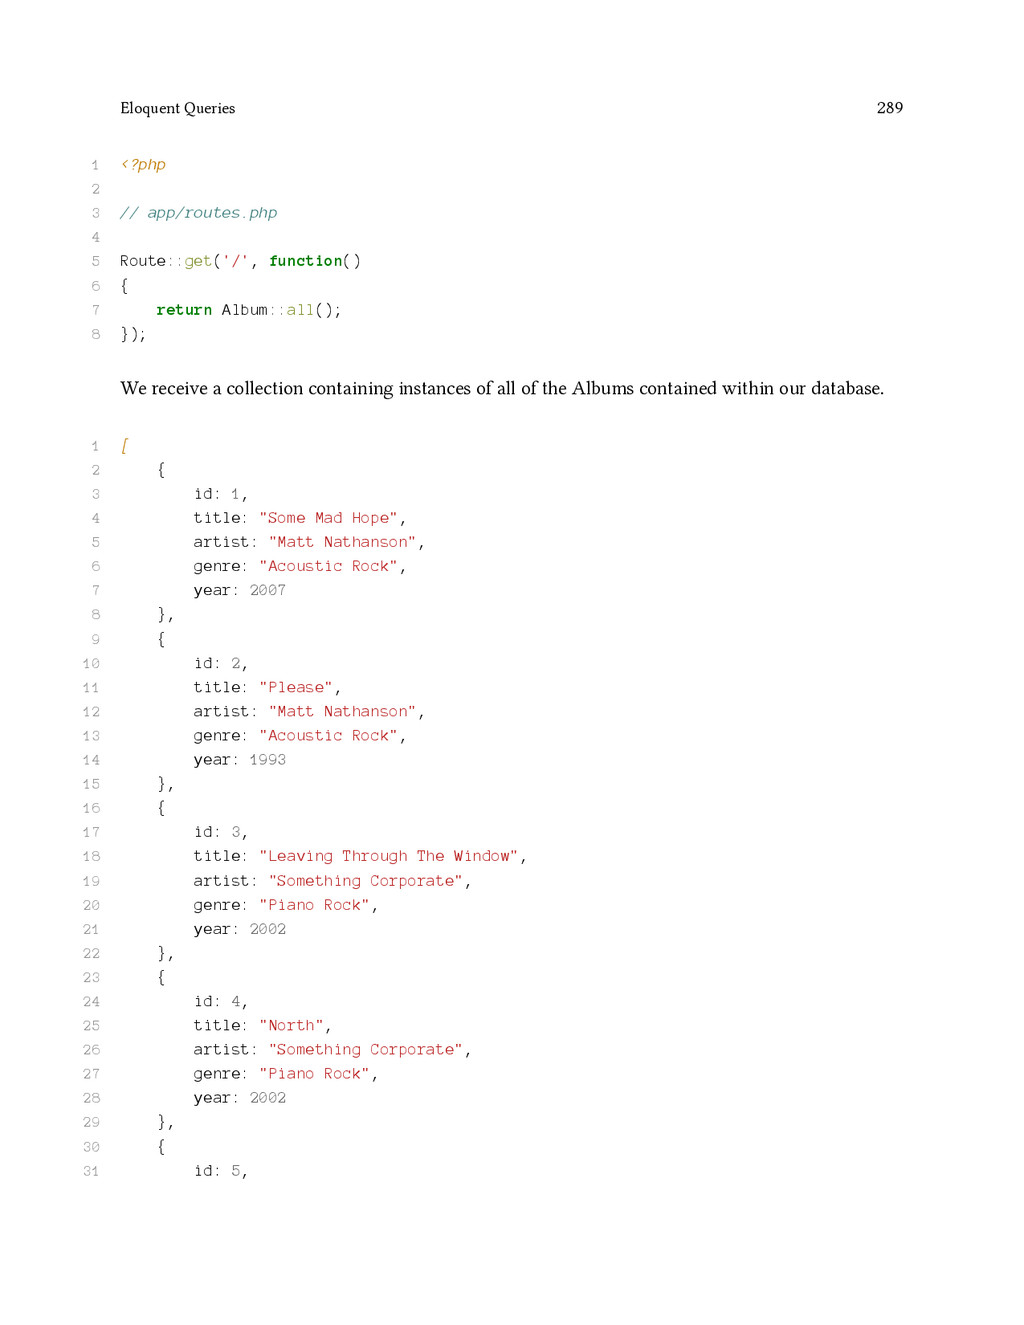
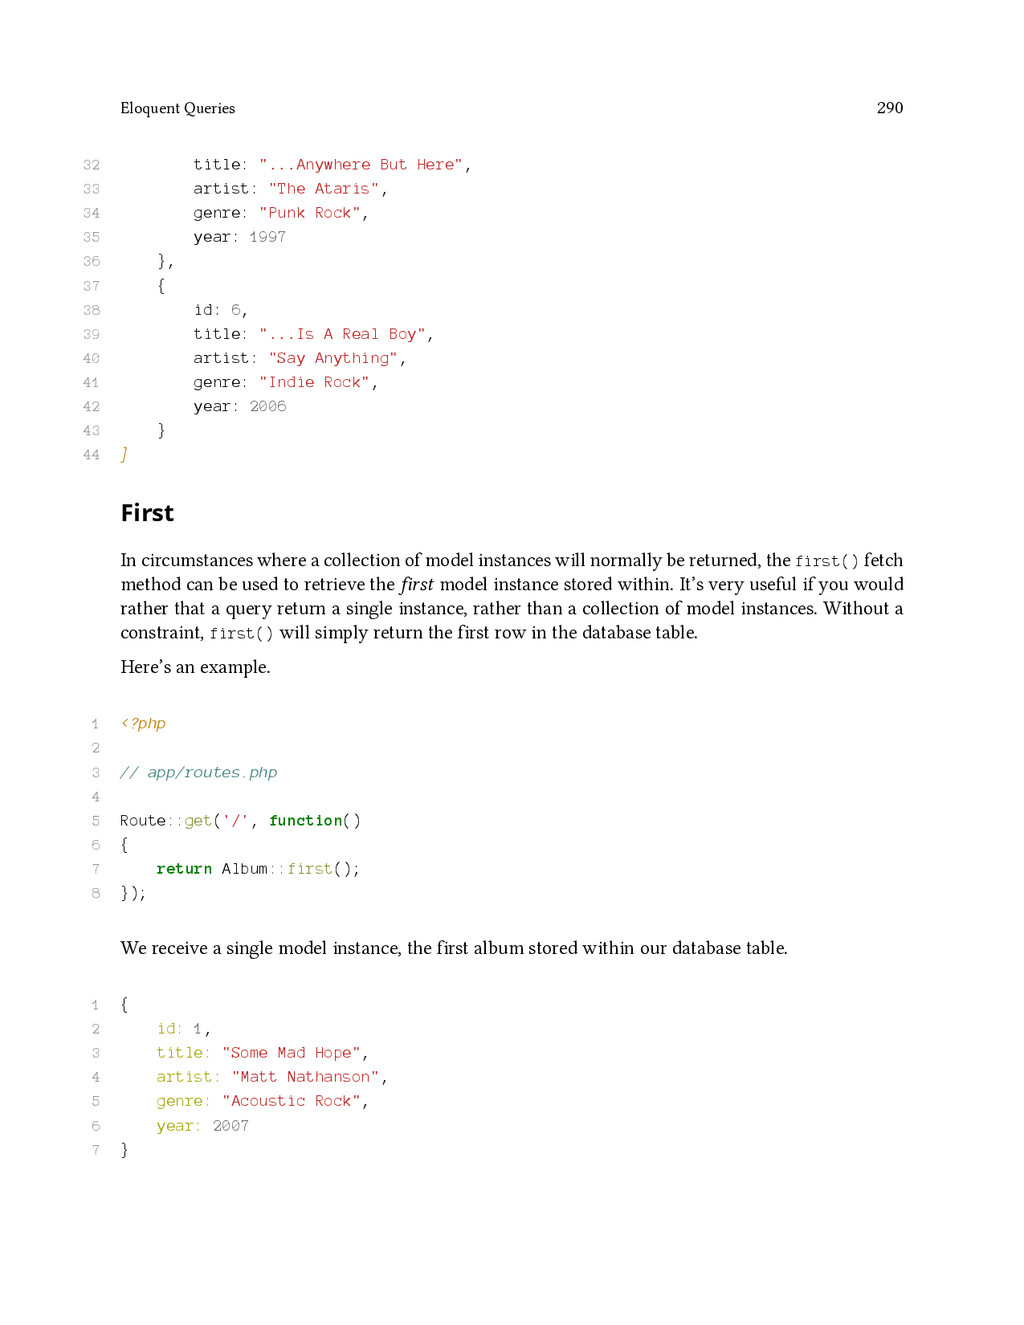
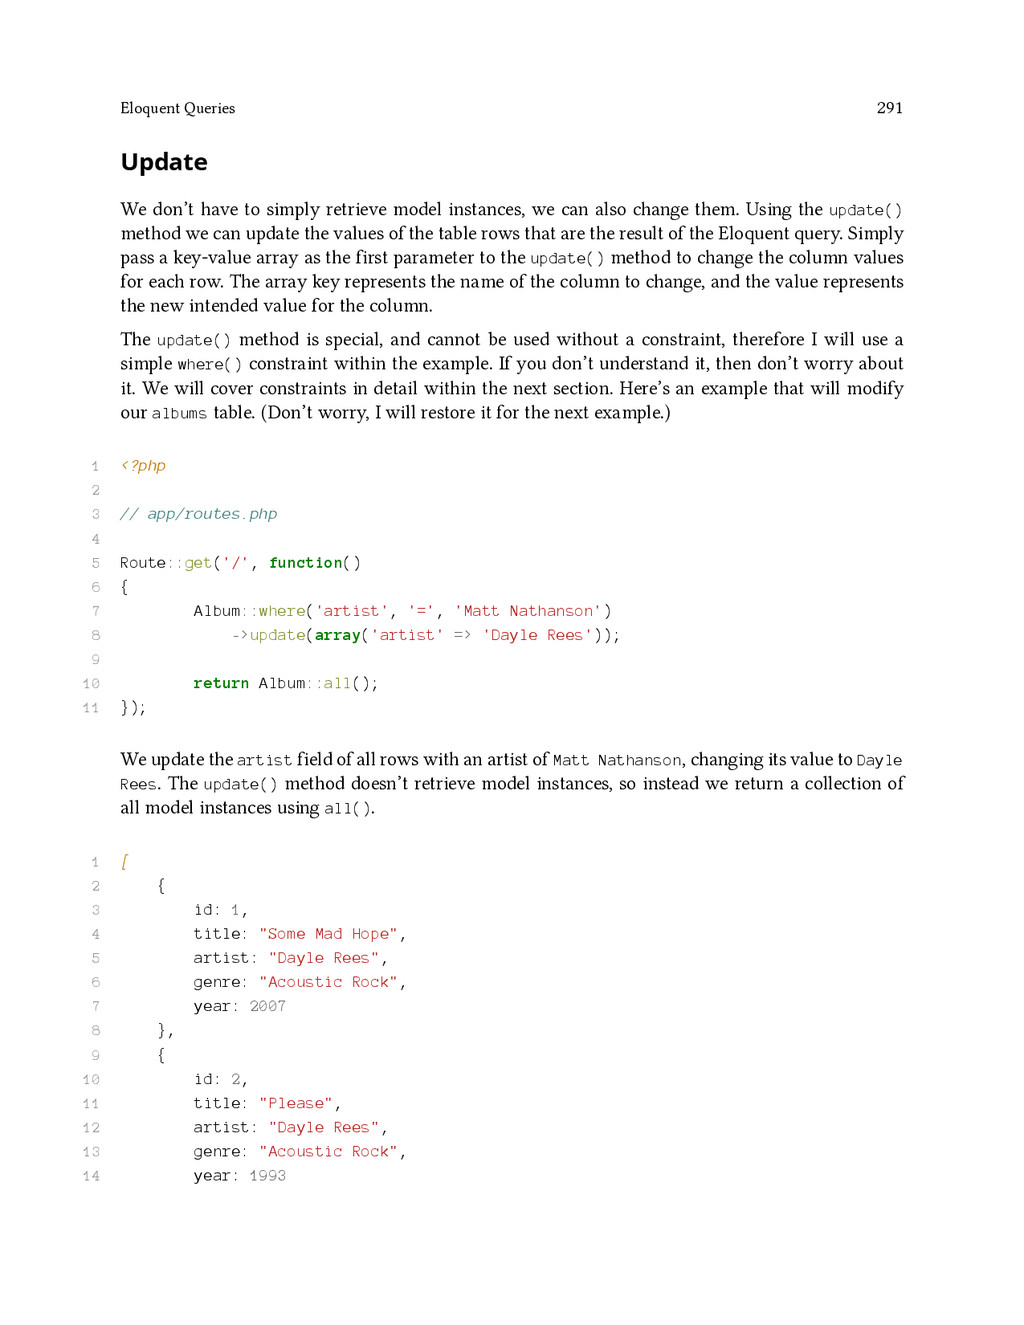
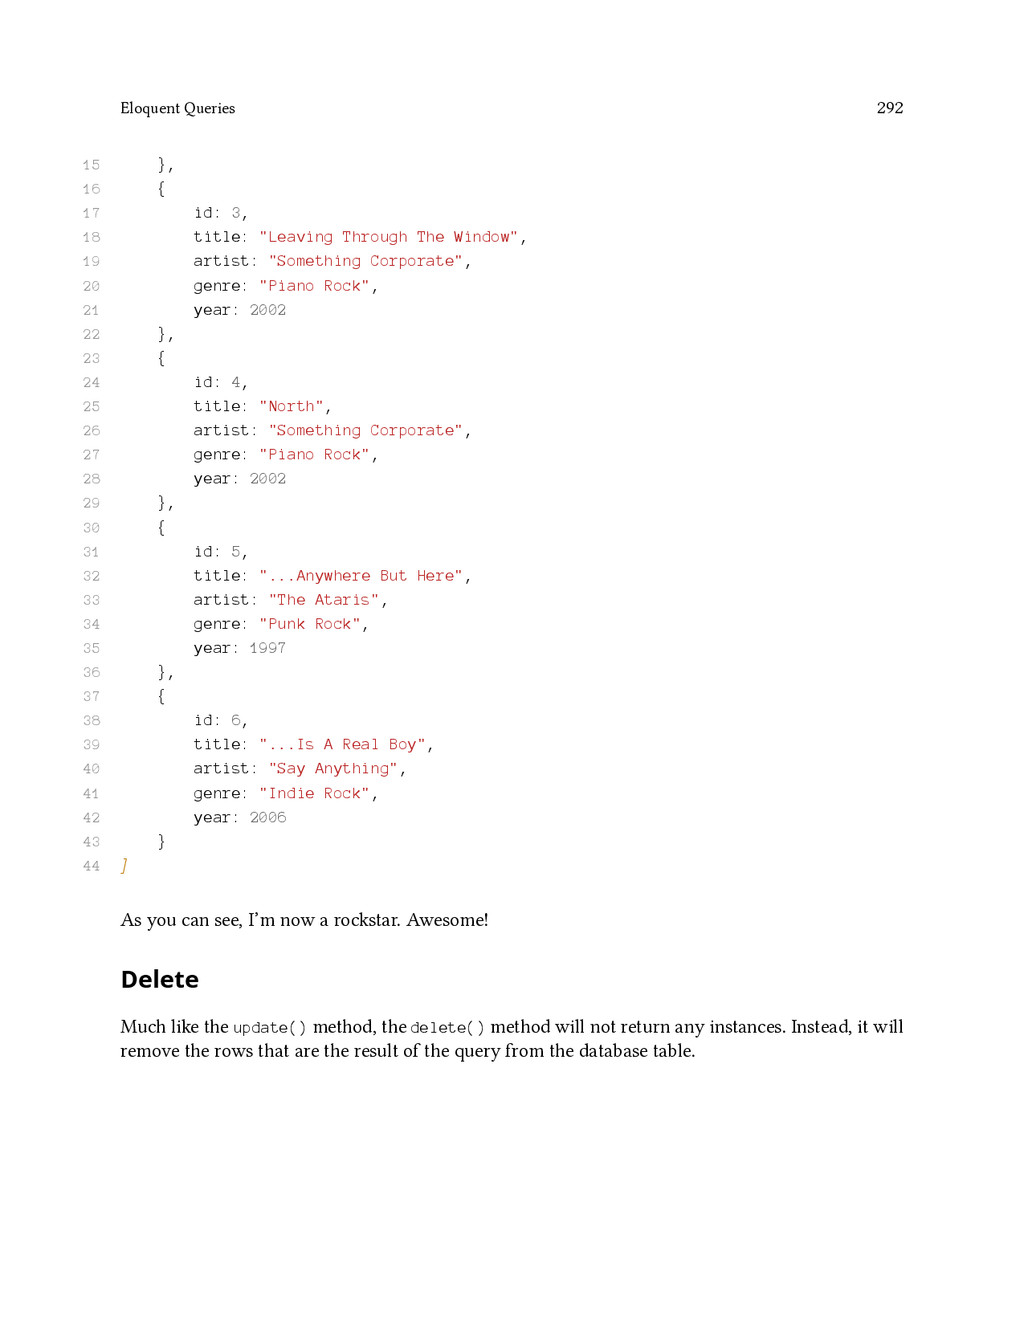
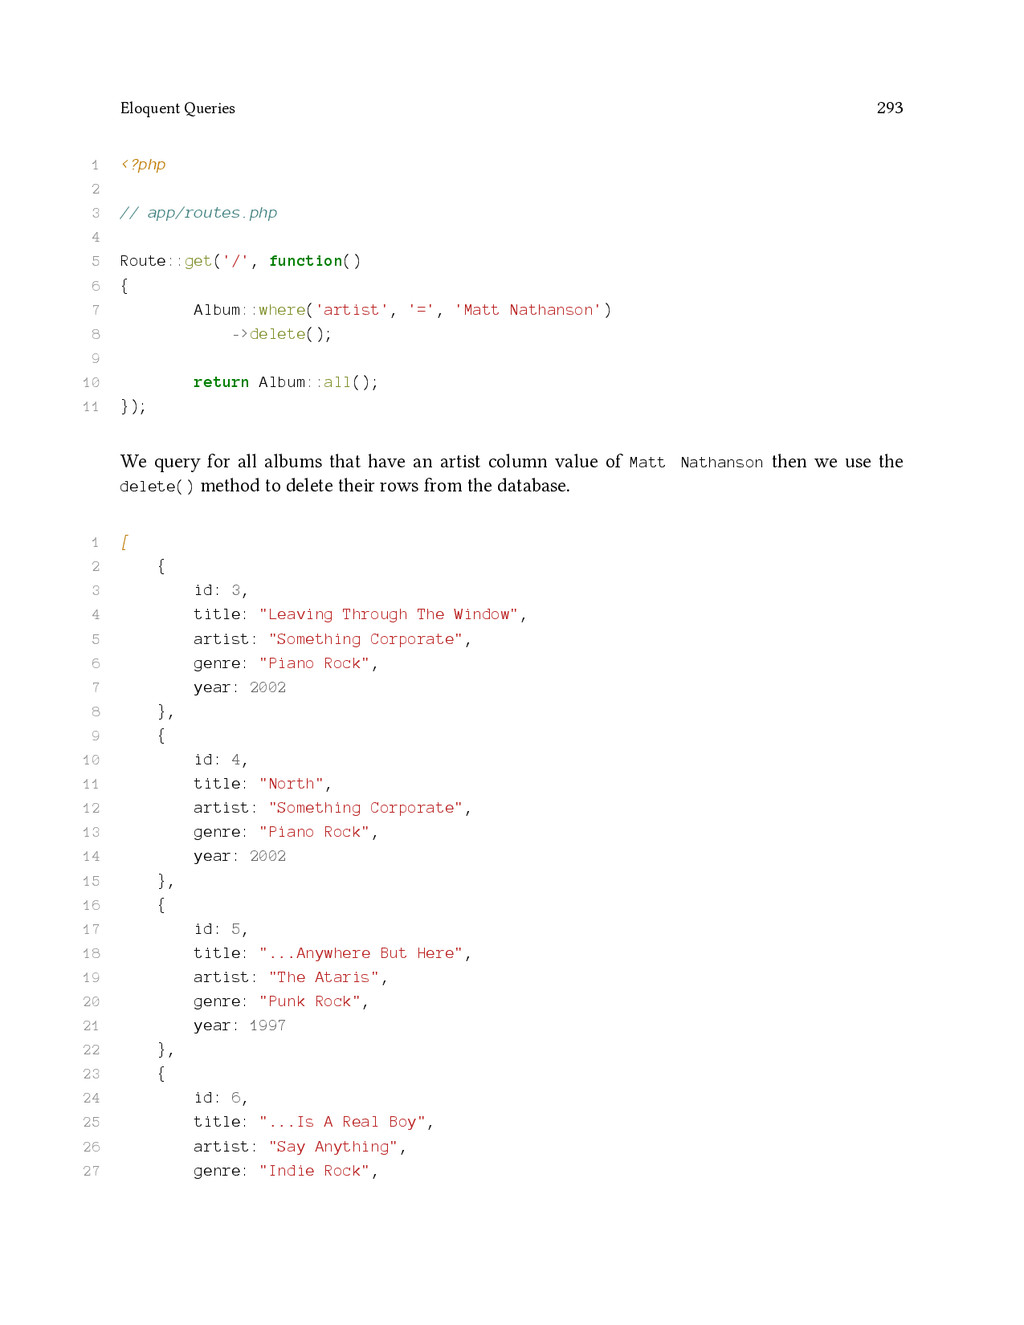
![Eloquent Queries 294 28 year: 2006 29 } 30 ]](https://files.speakerdeck.com/presentations/93bfbe605f48013231b75a35dee7ad3b/slide_308.jpg)
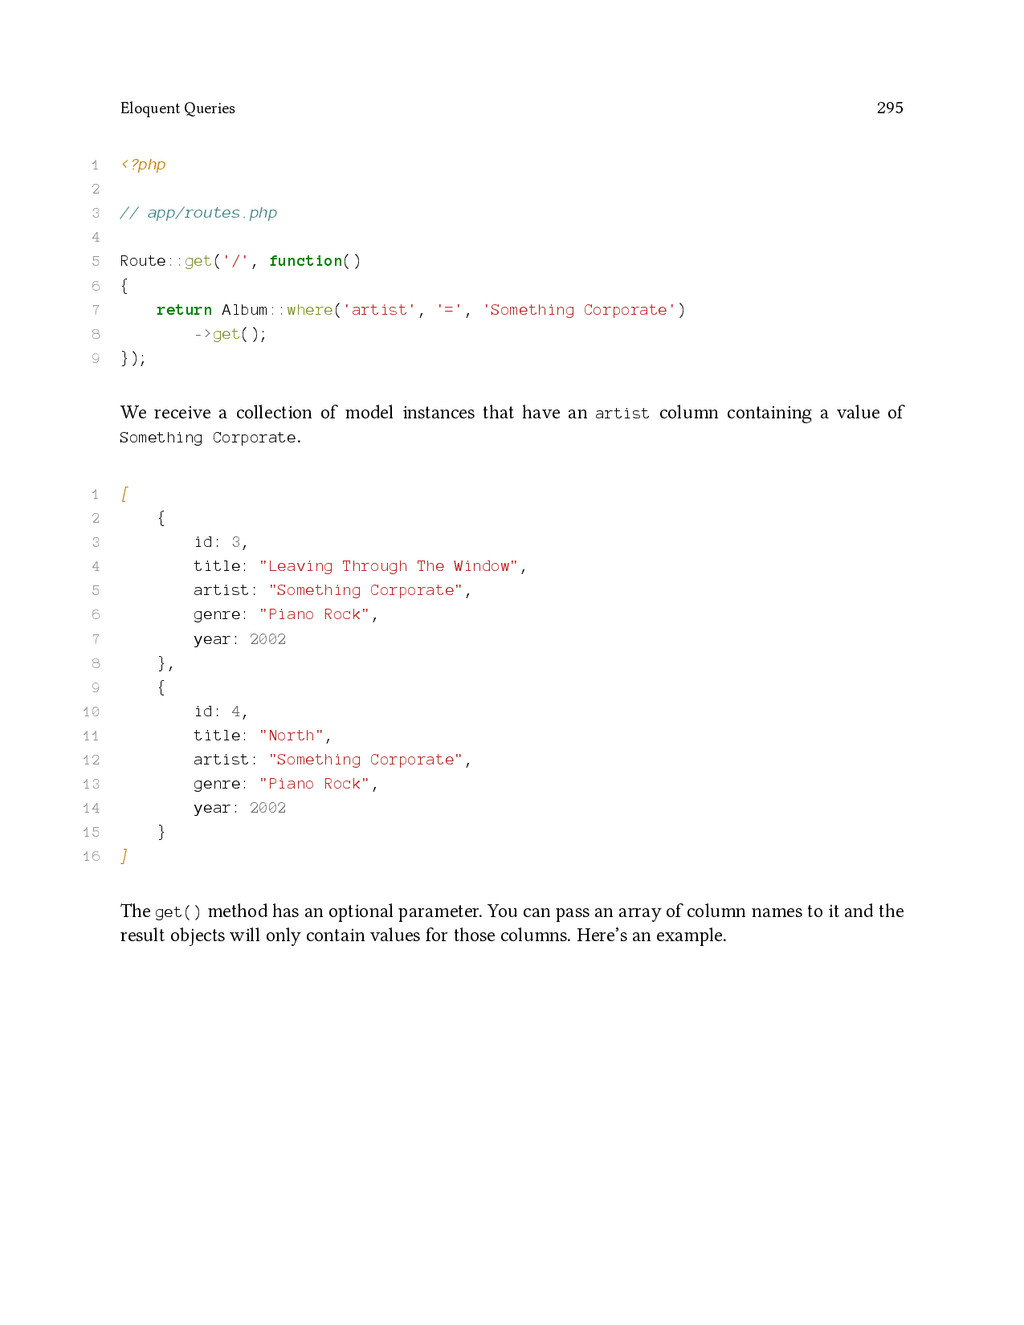
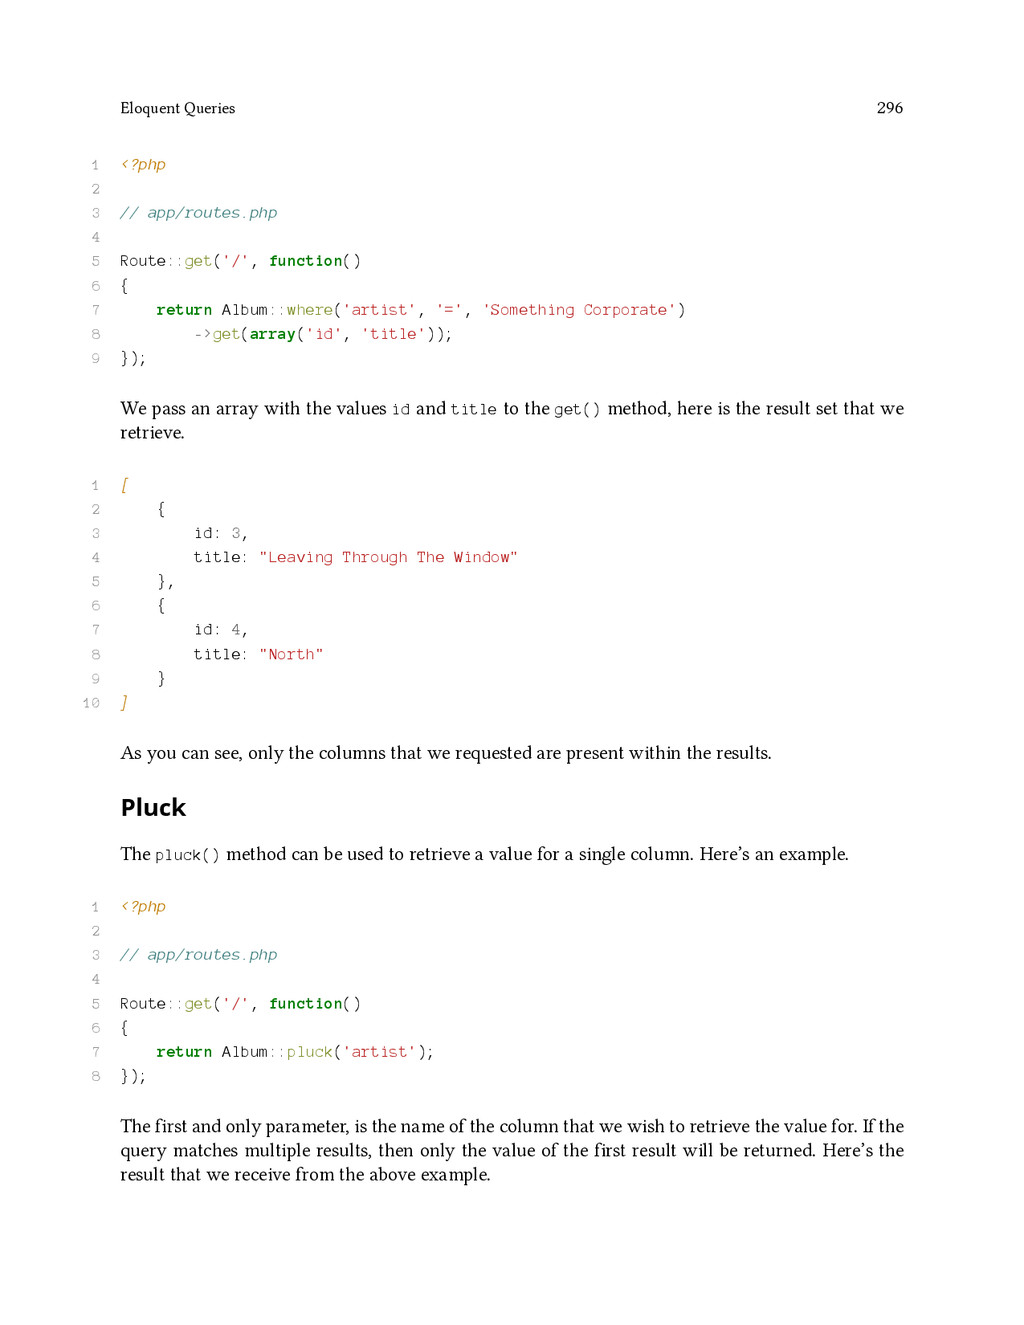
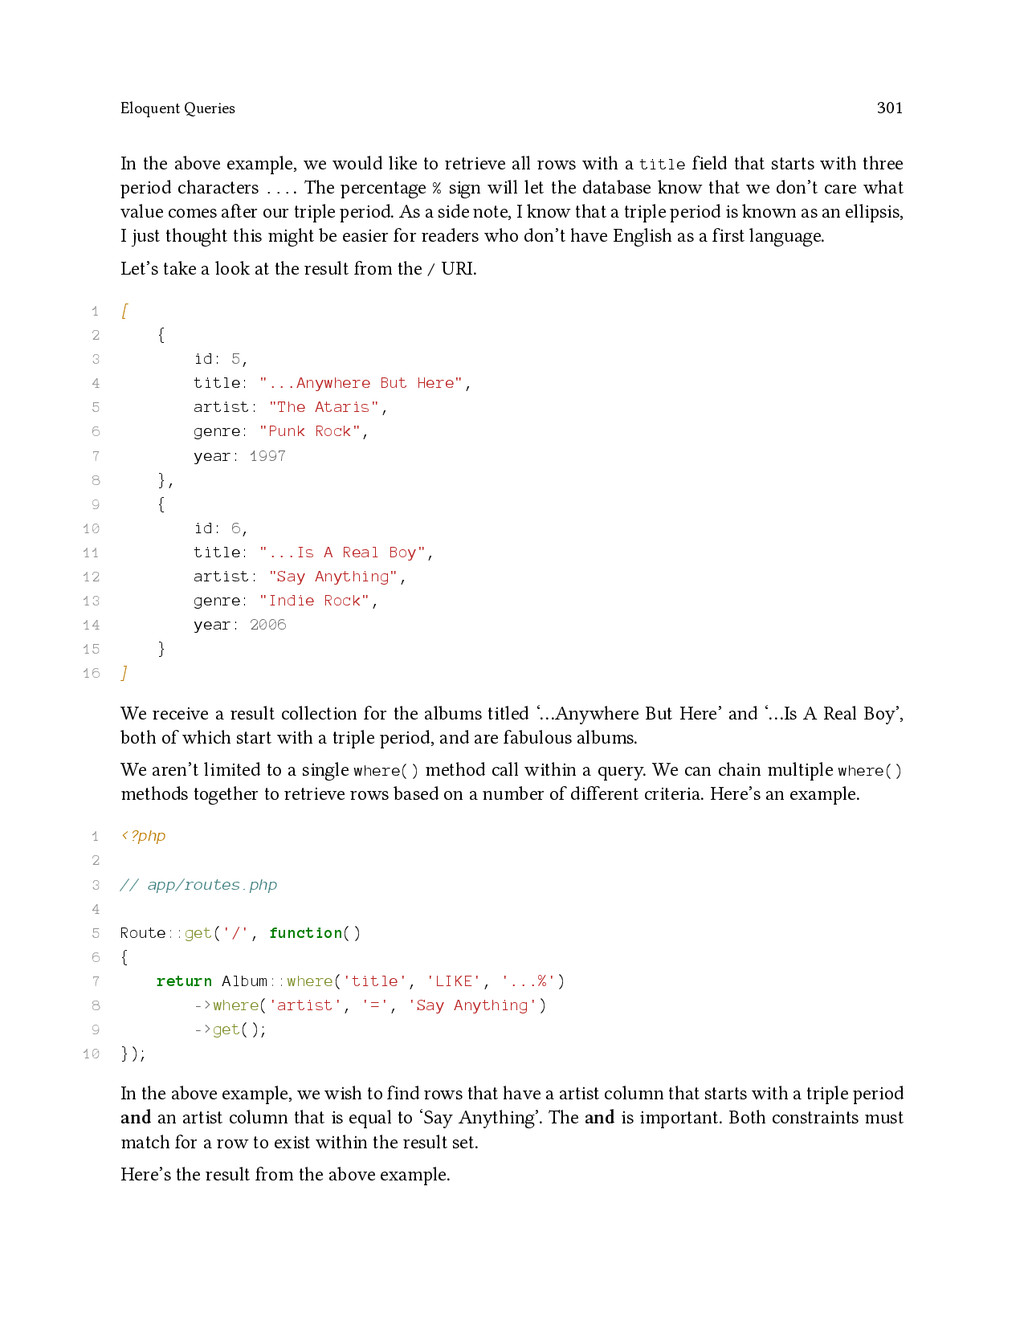
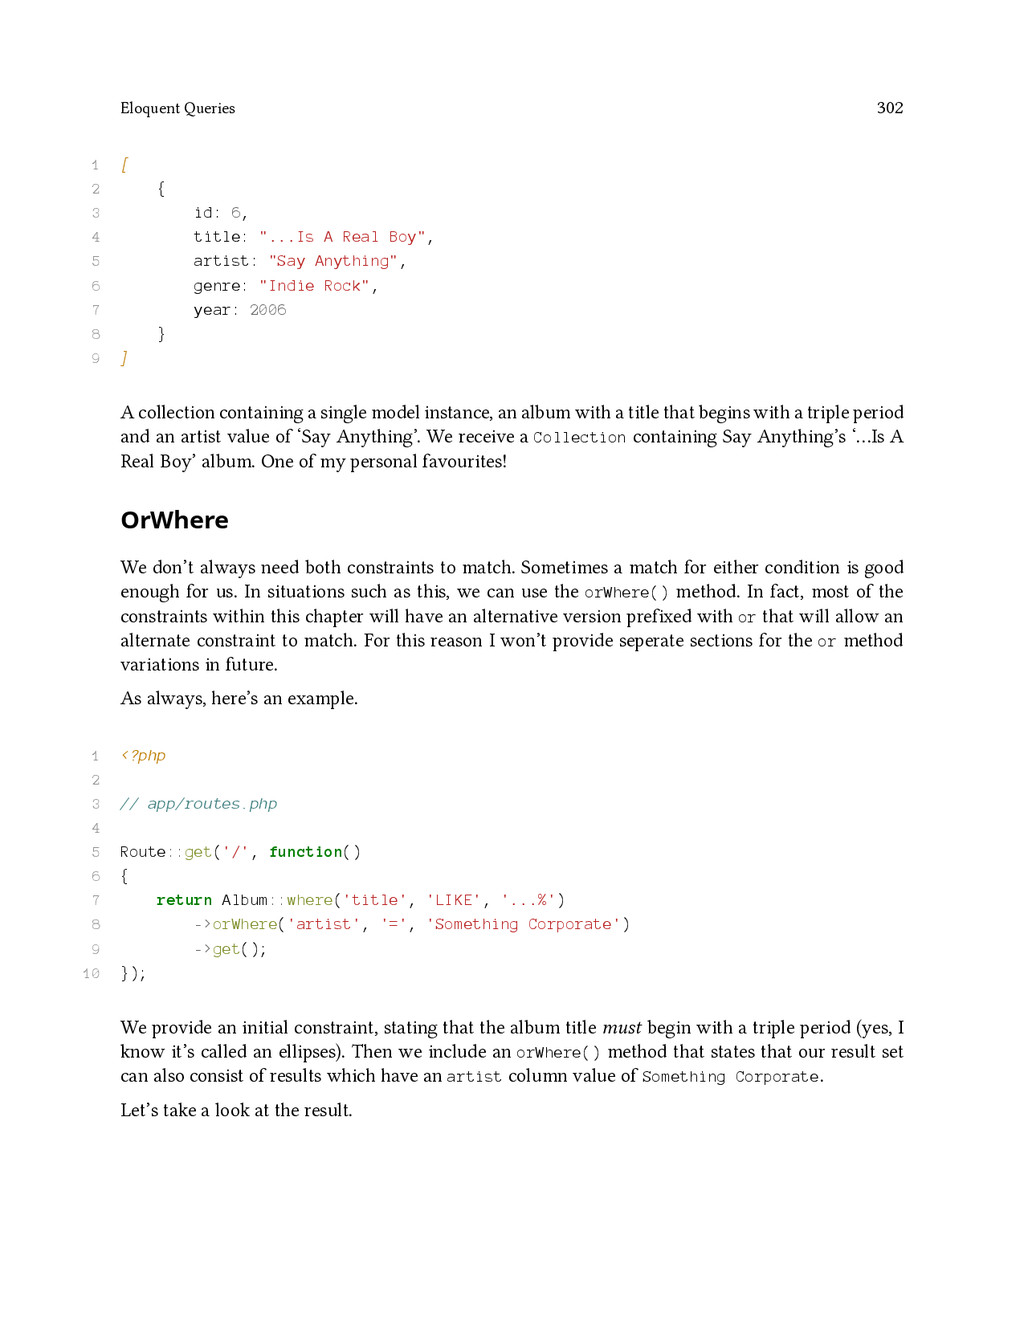
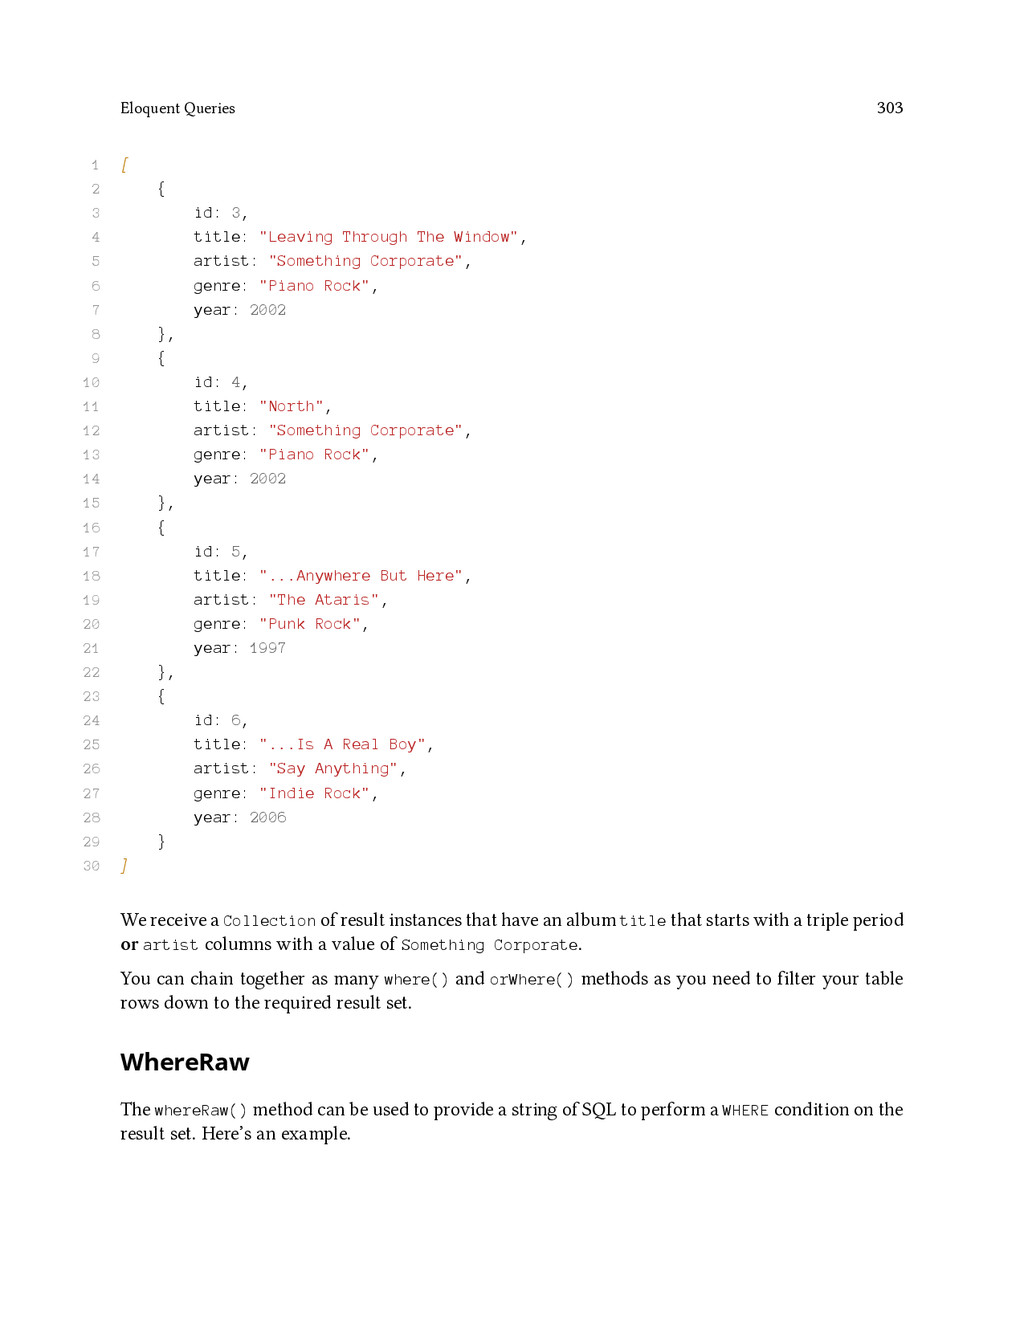
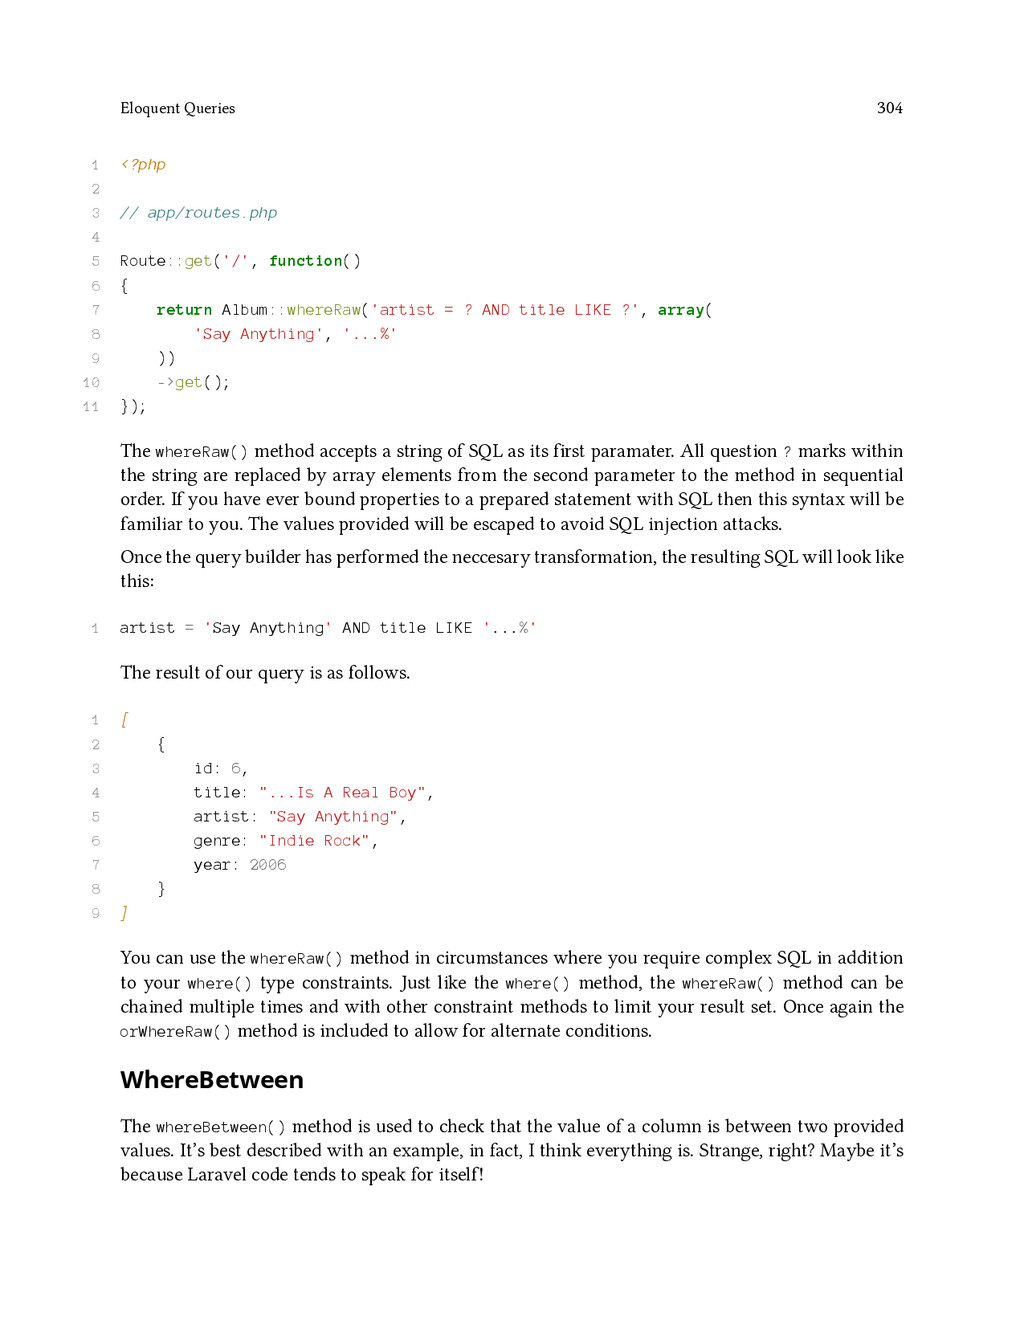
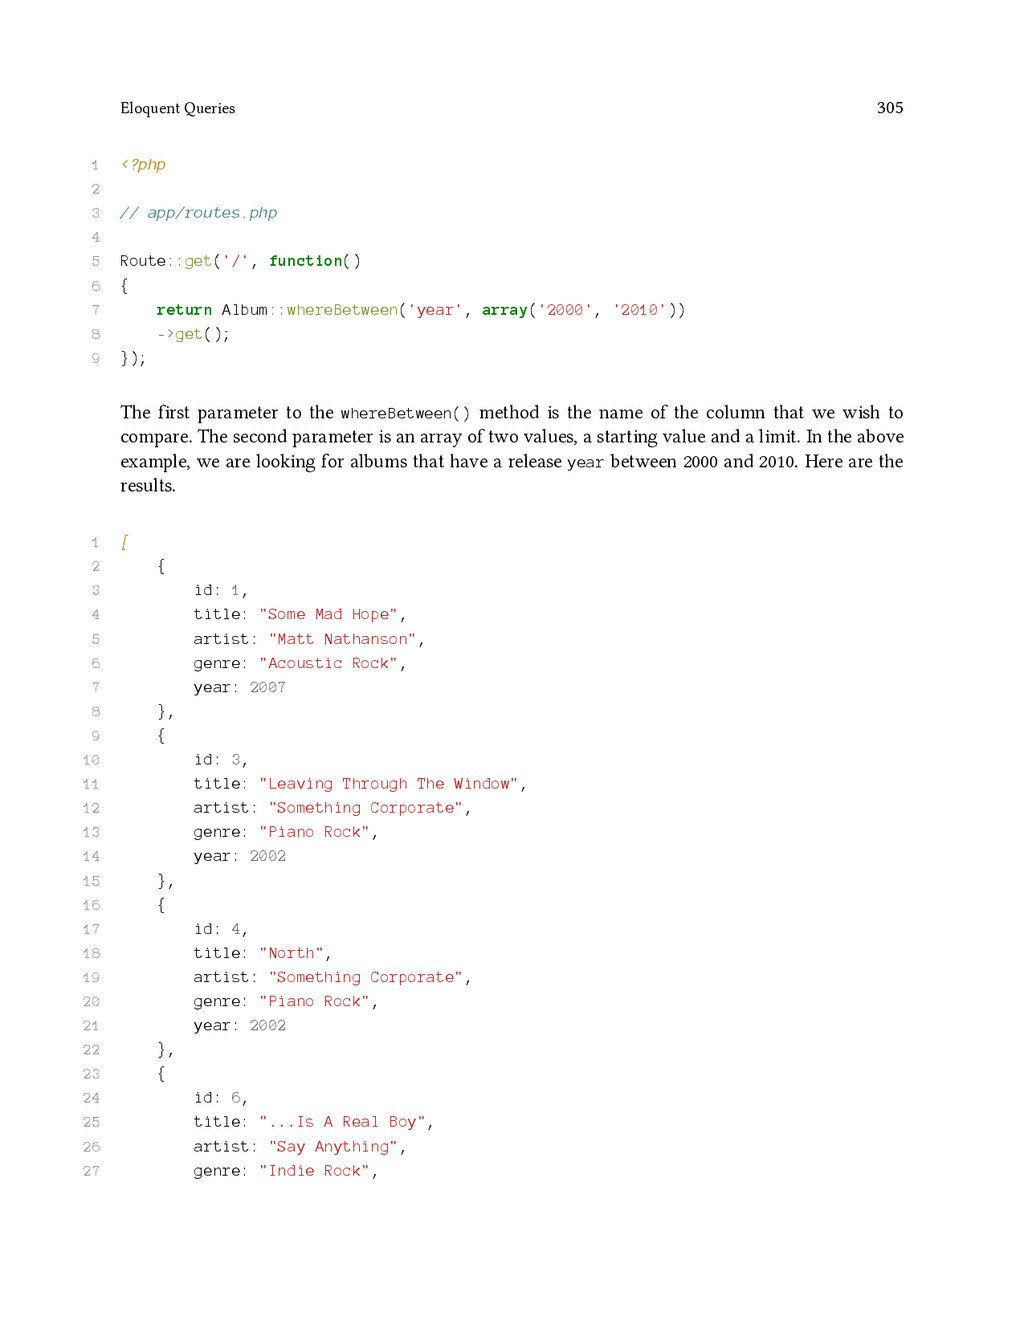
![Eloquent Queries 306 28 year: 2006 29 } 30 ]](https://files.speakerdeck.com/presentations/93bfbe605f48013231b75a35dee7ad3b/slide_320.jpg)
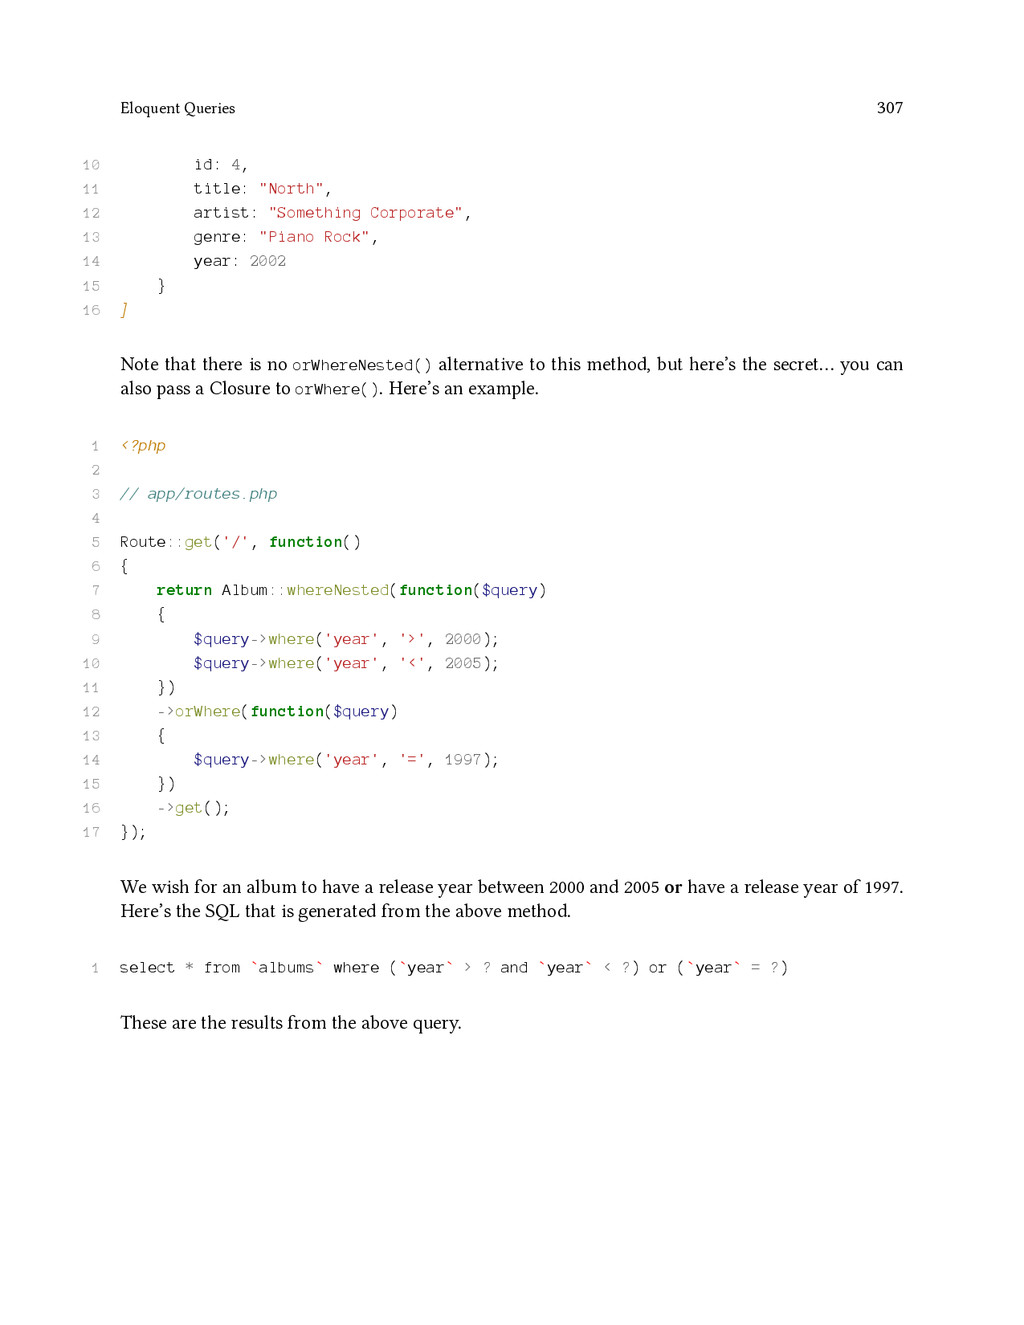
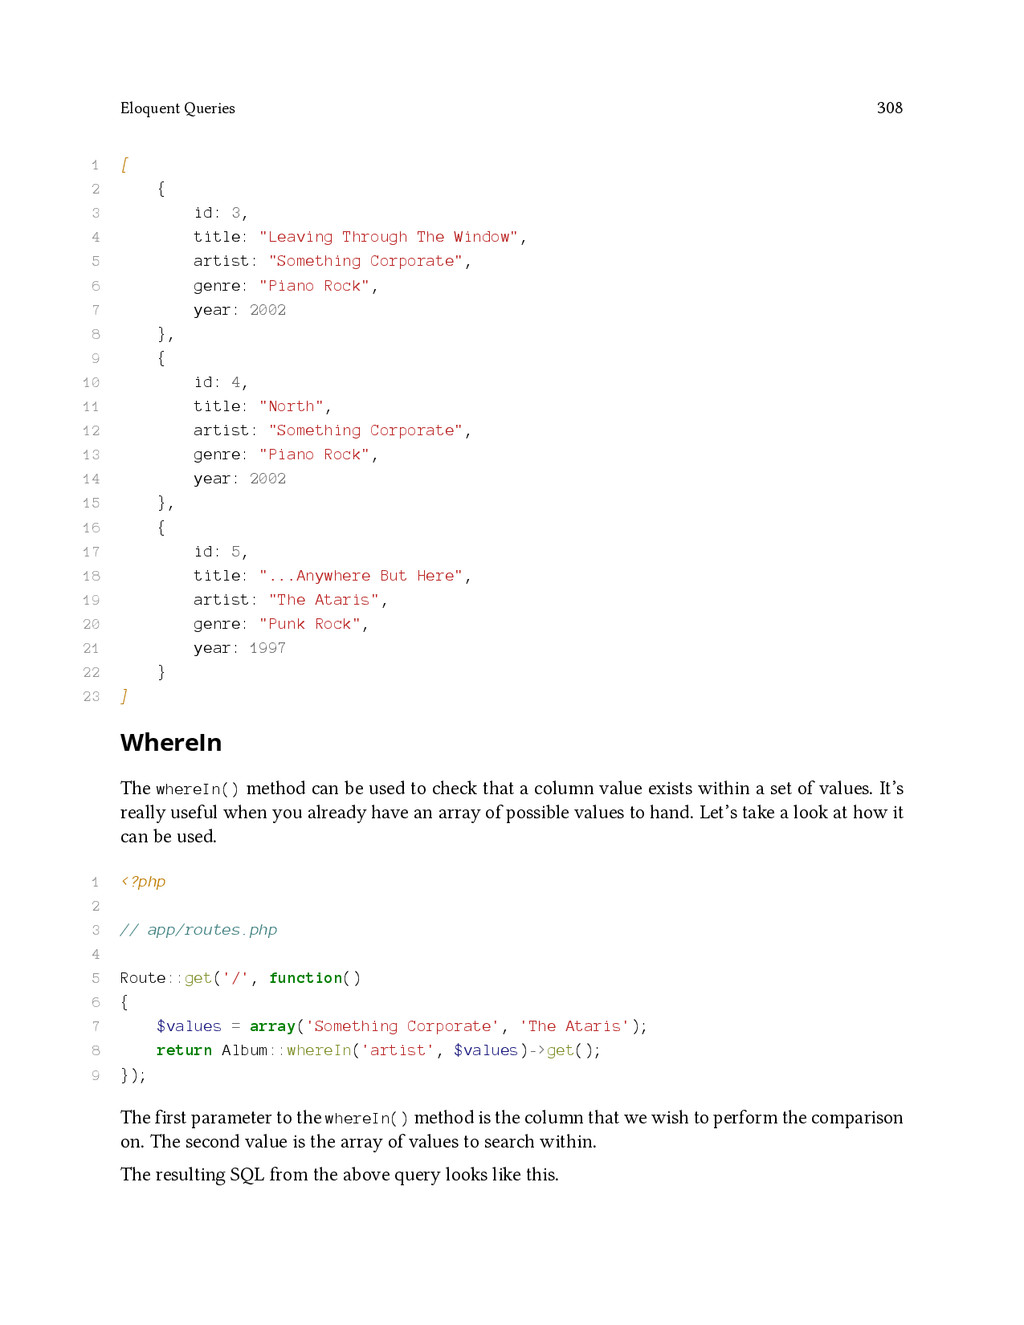
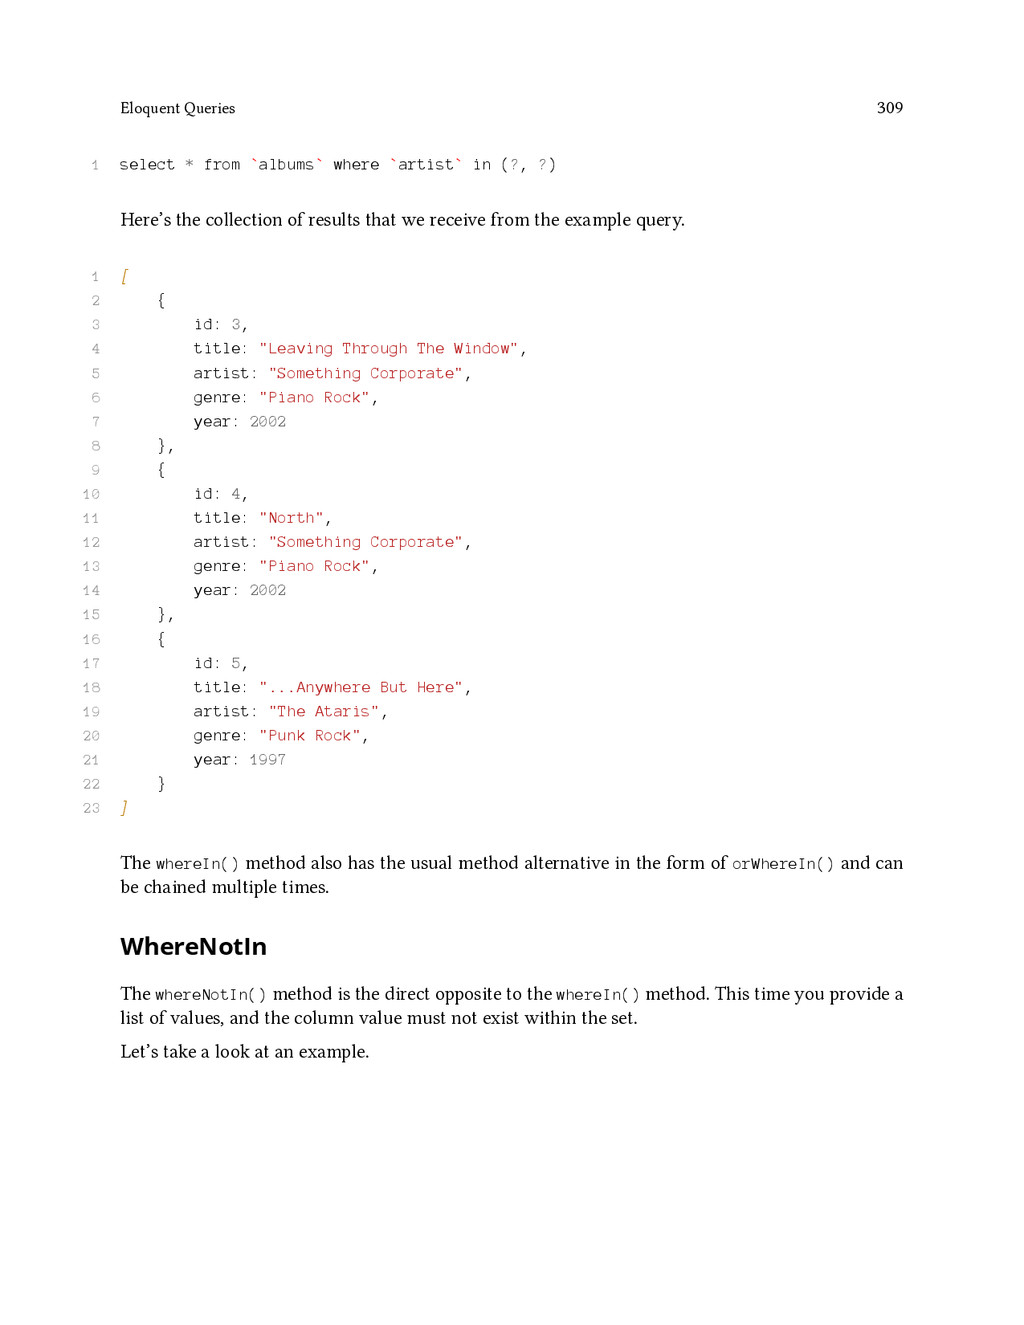
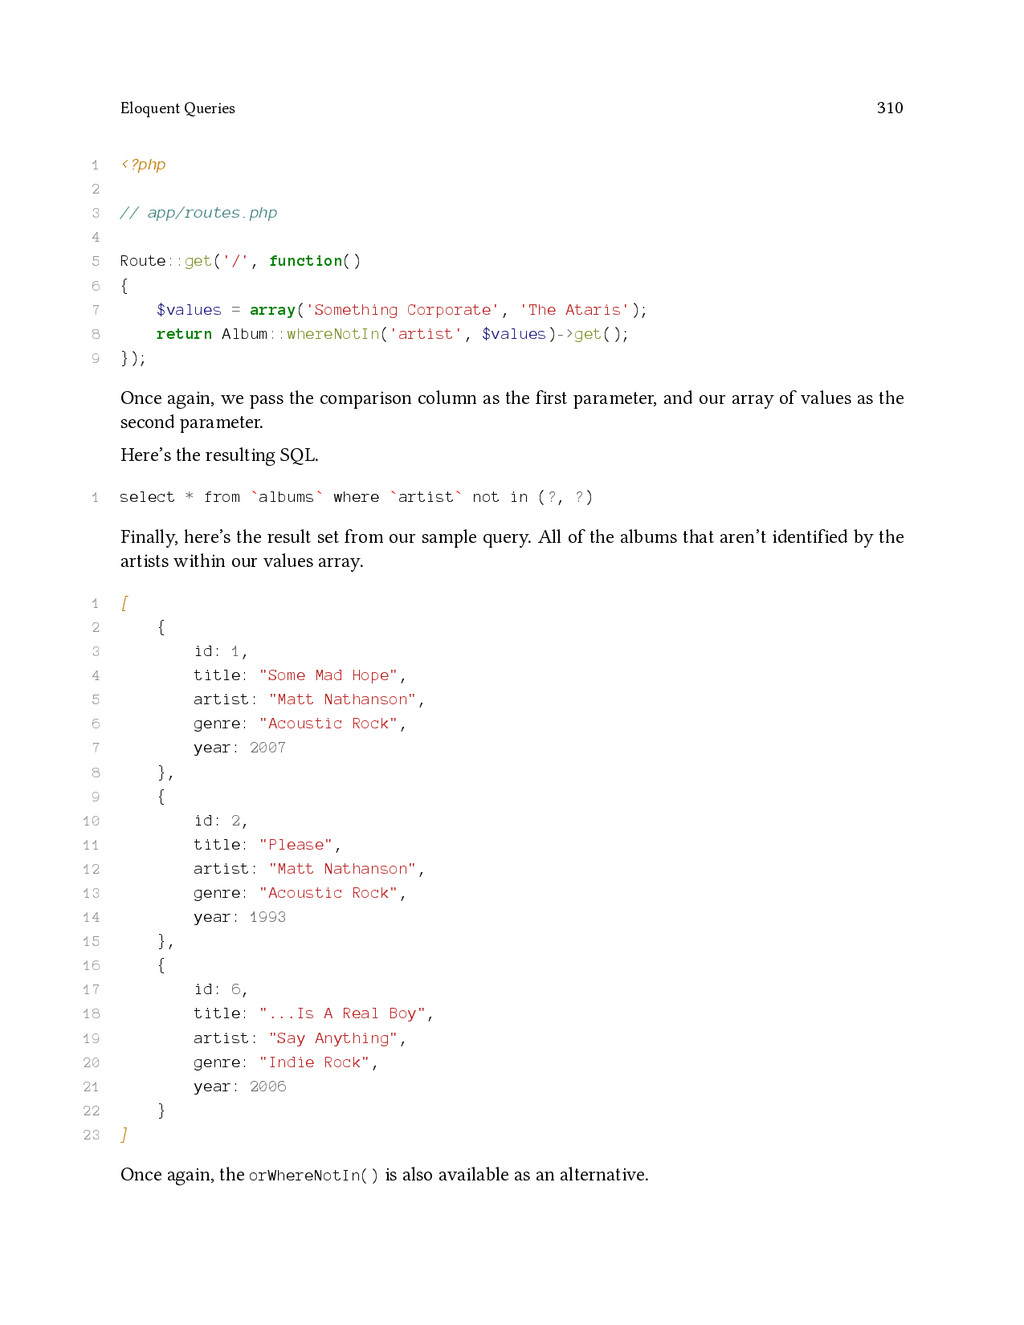
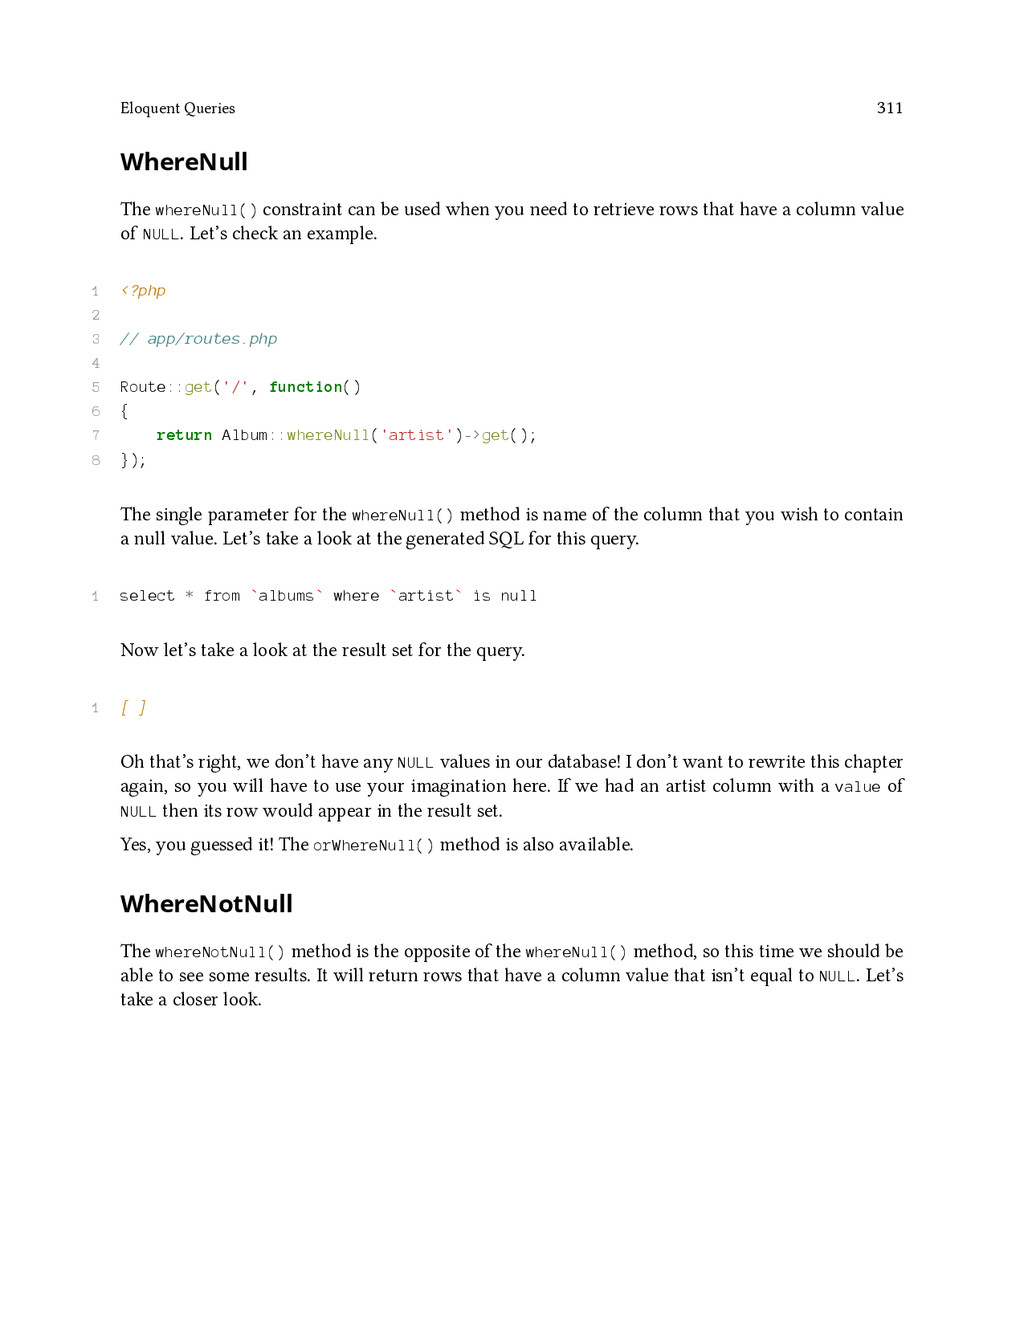
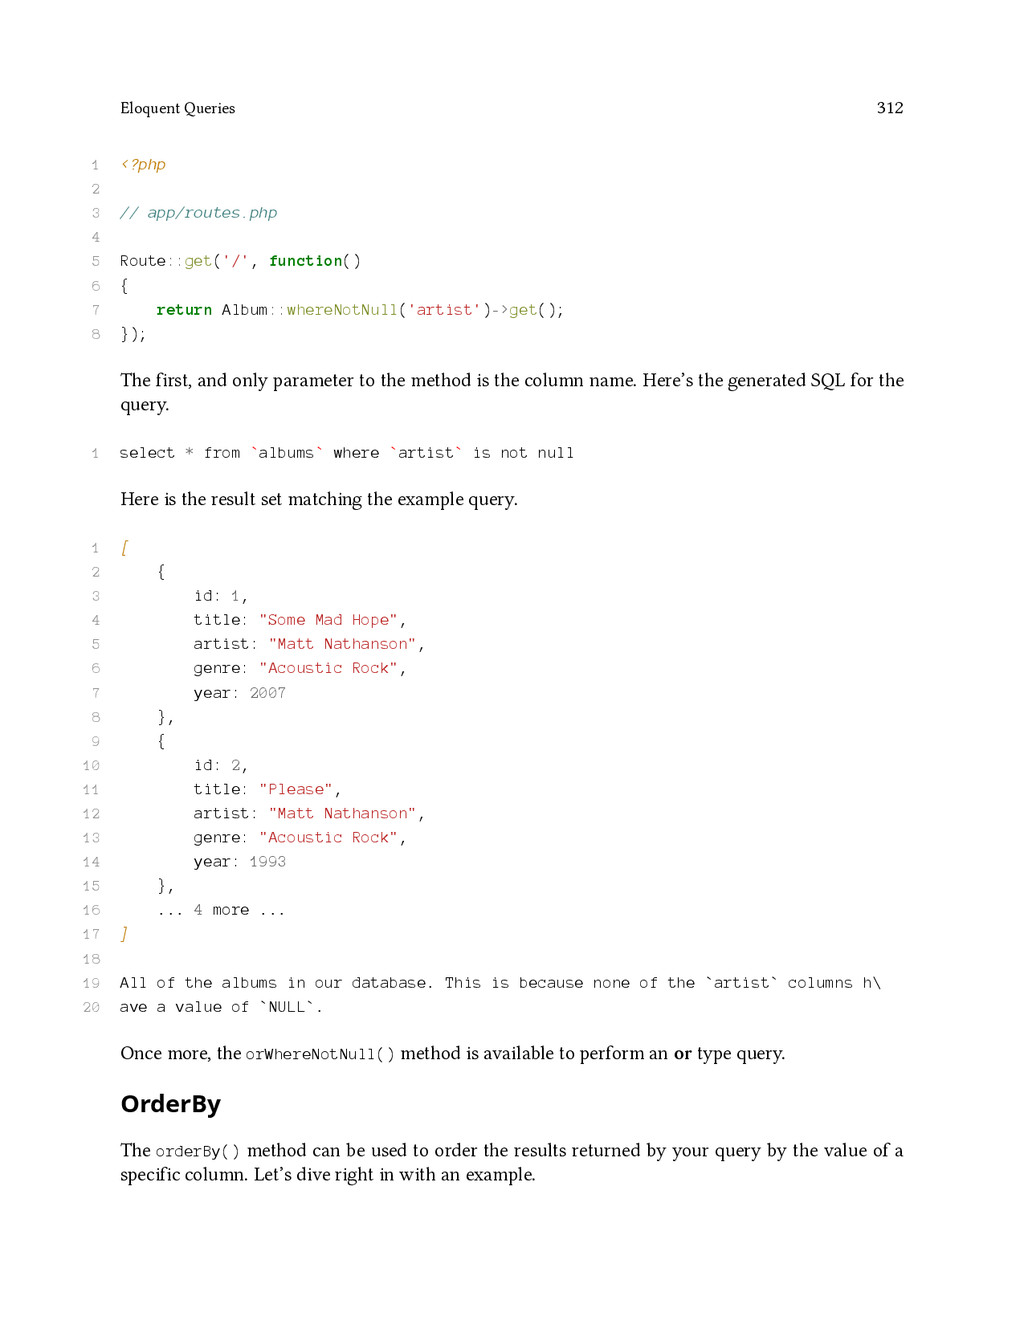
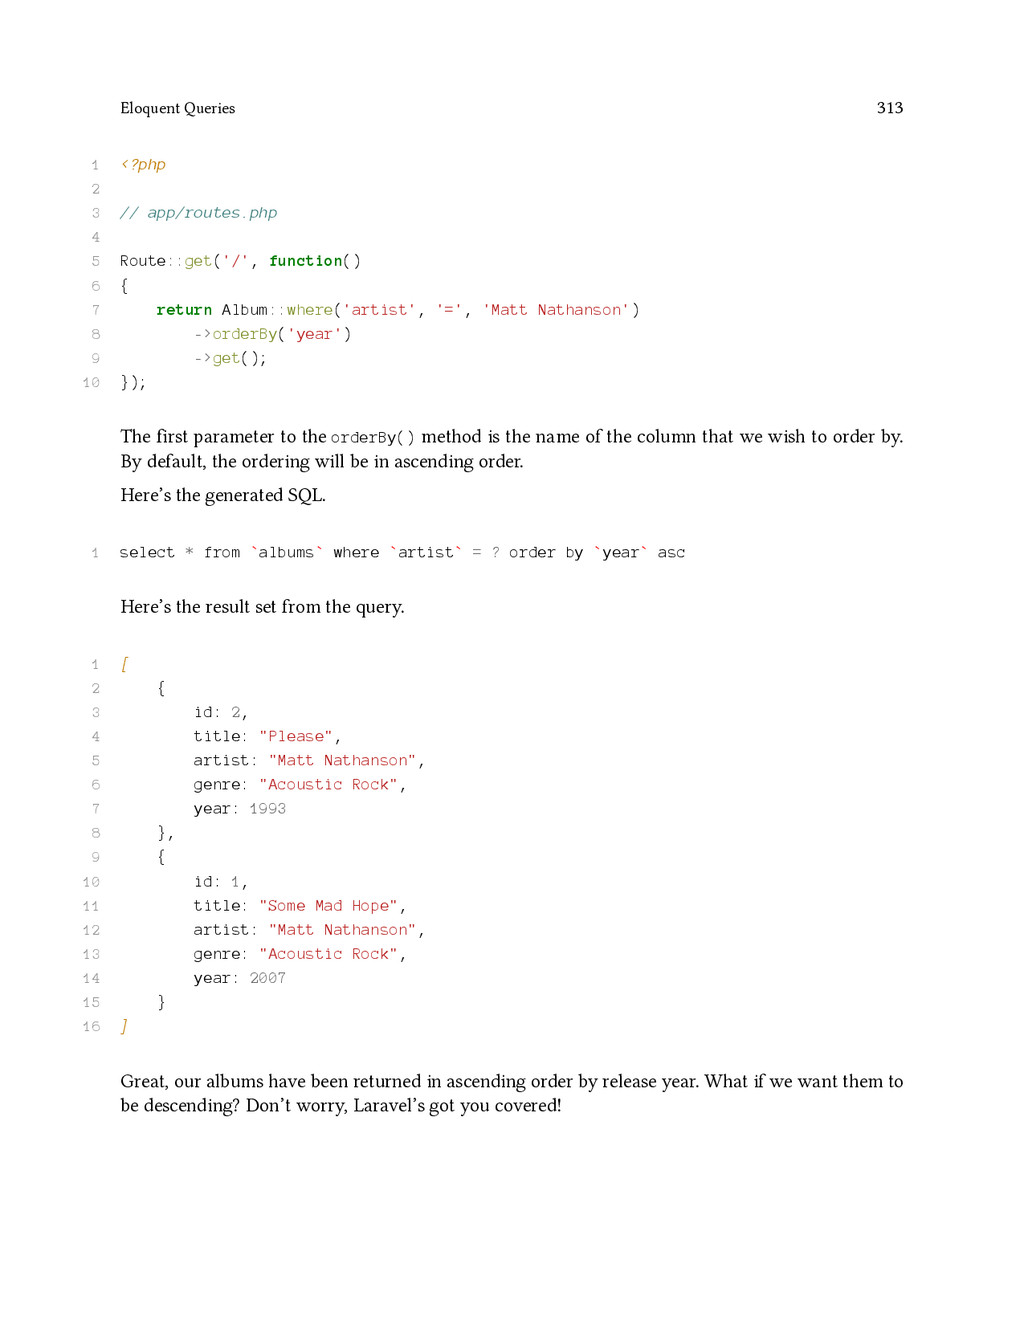
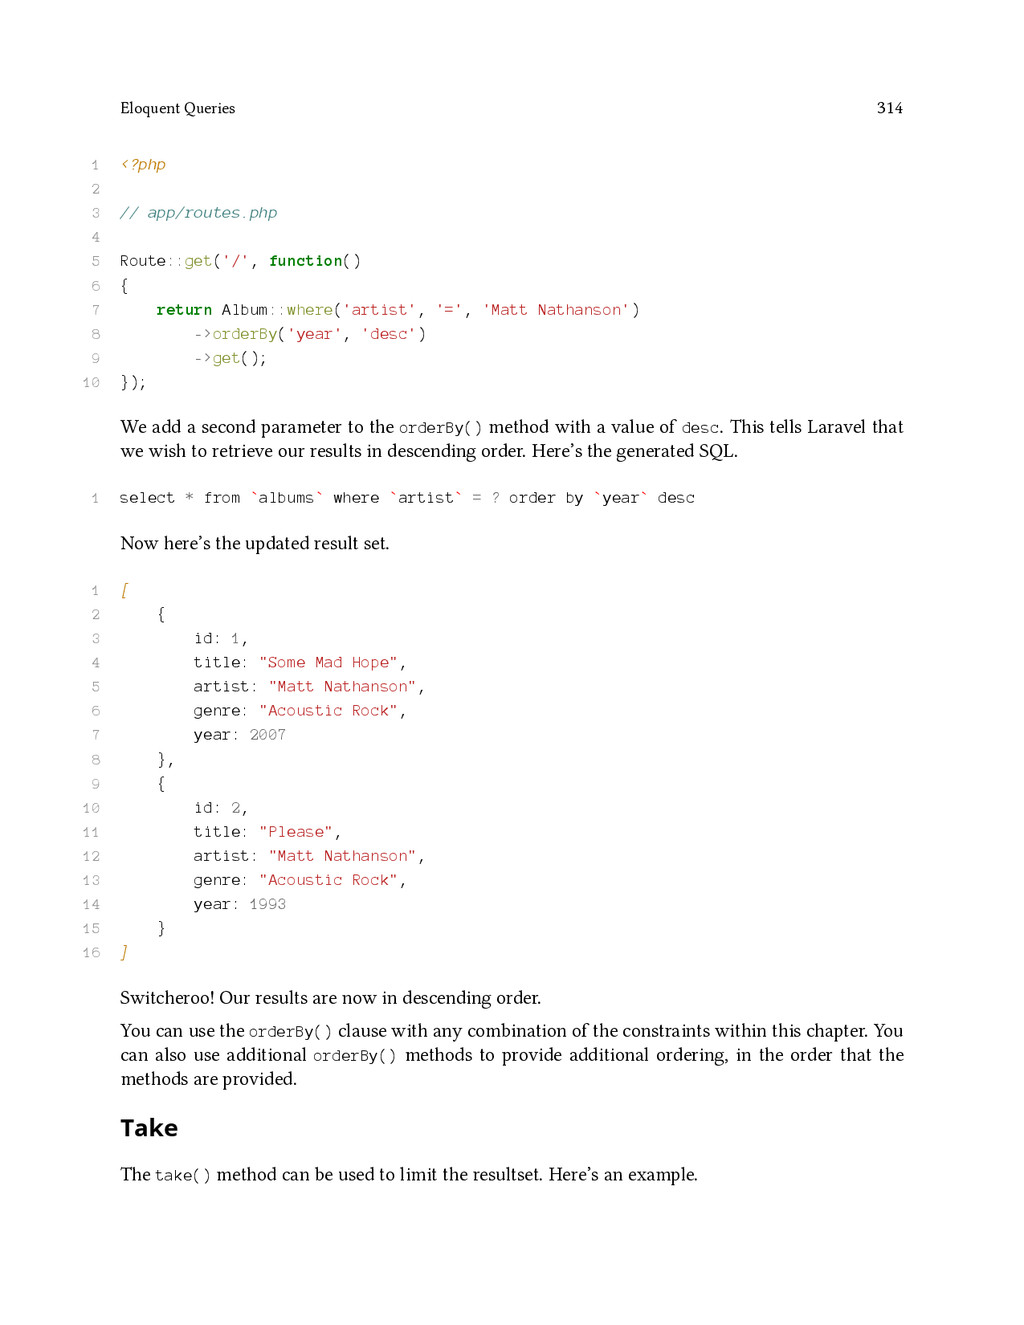
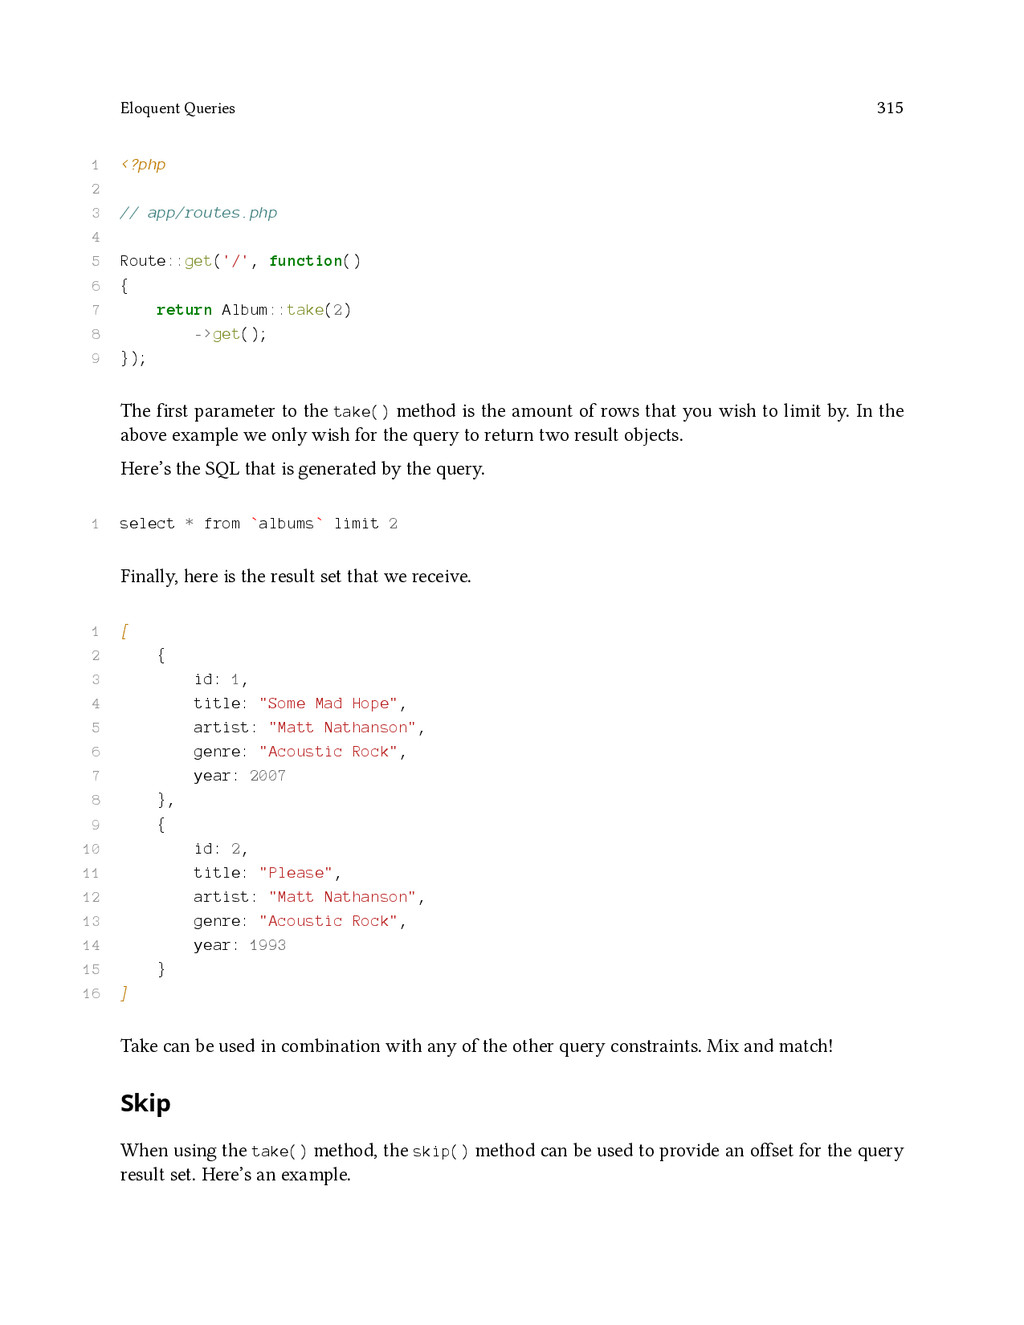
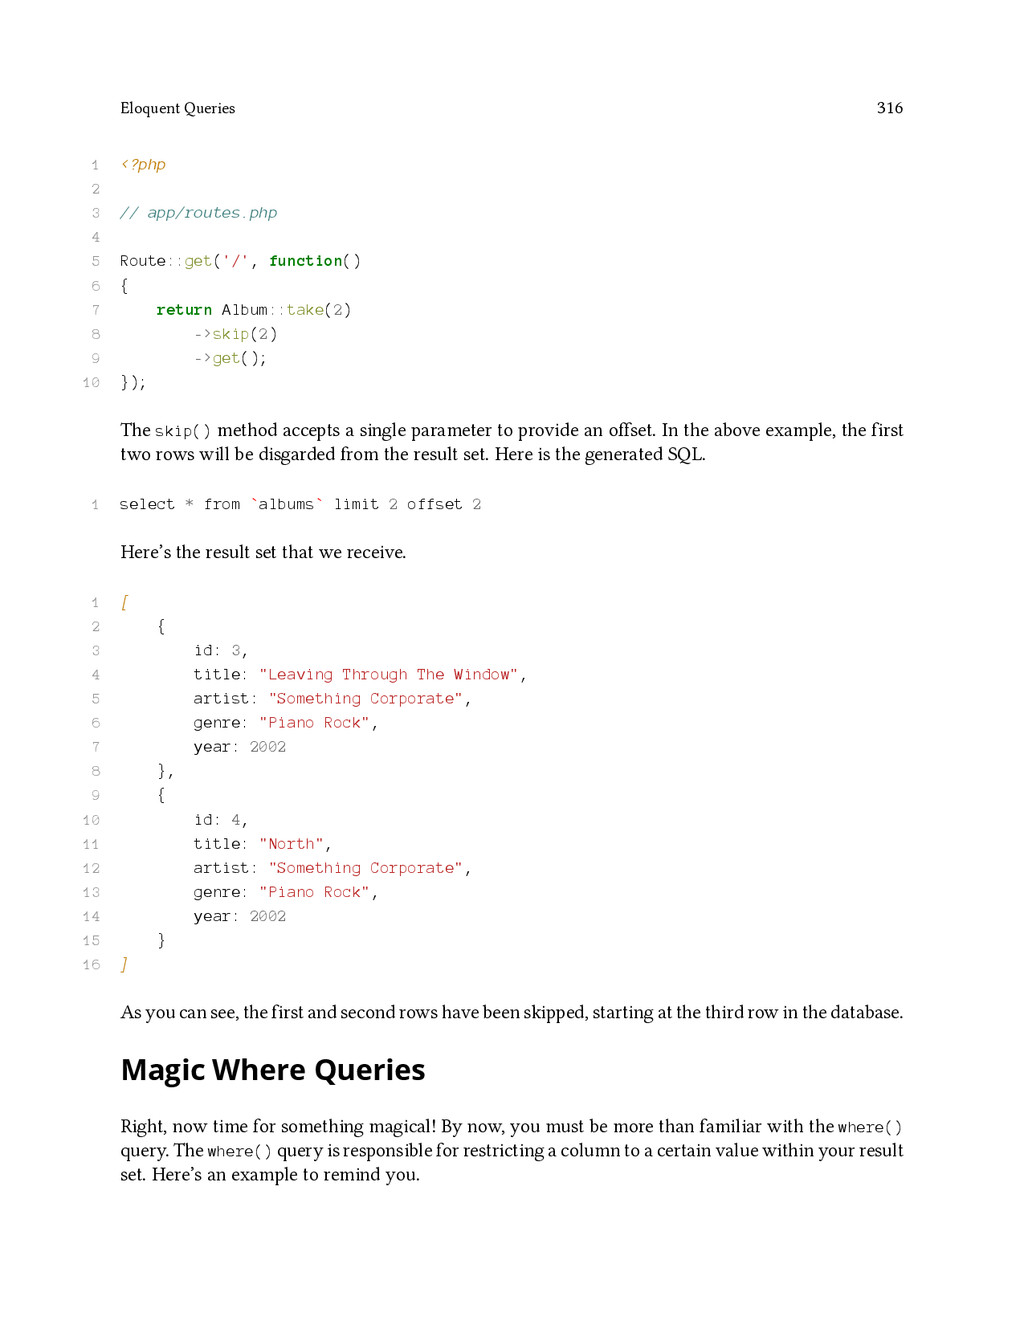
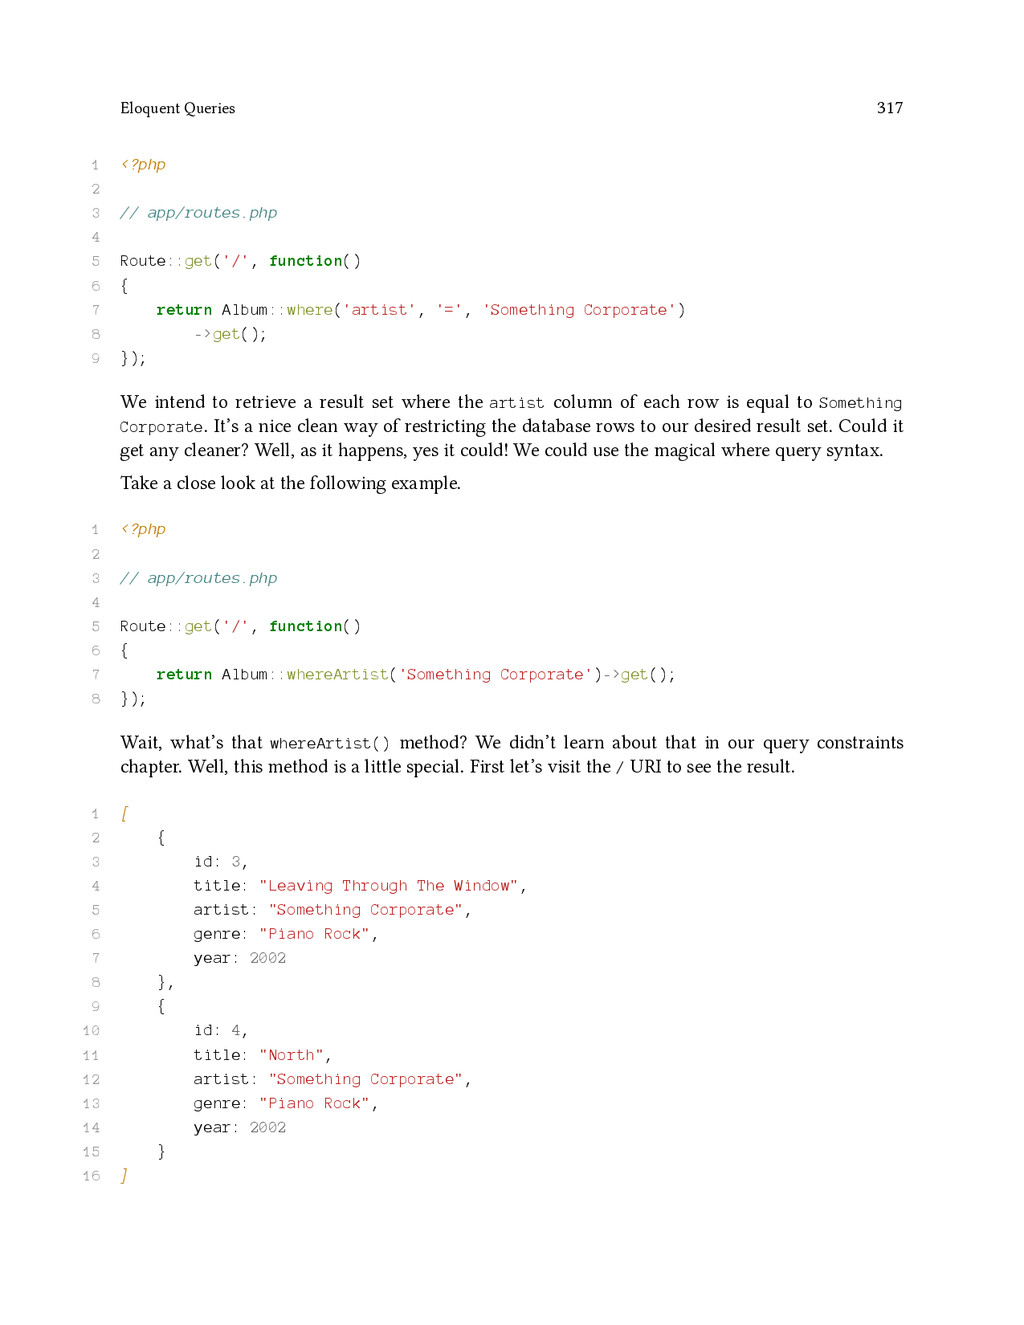
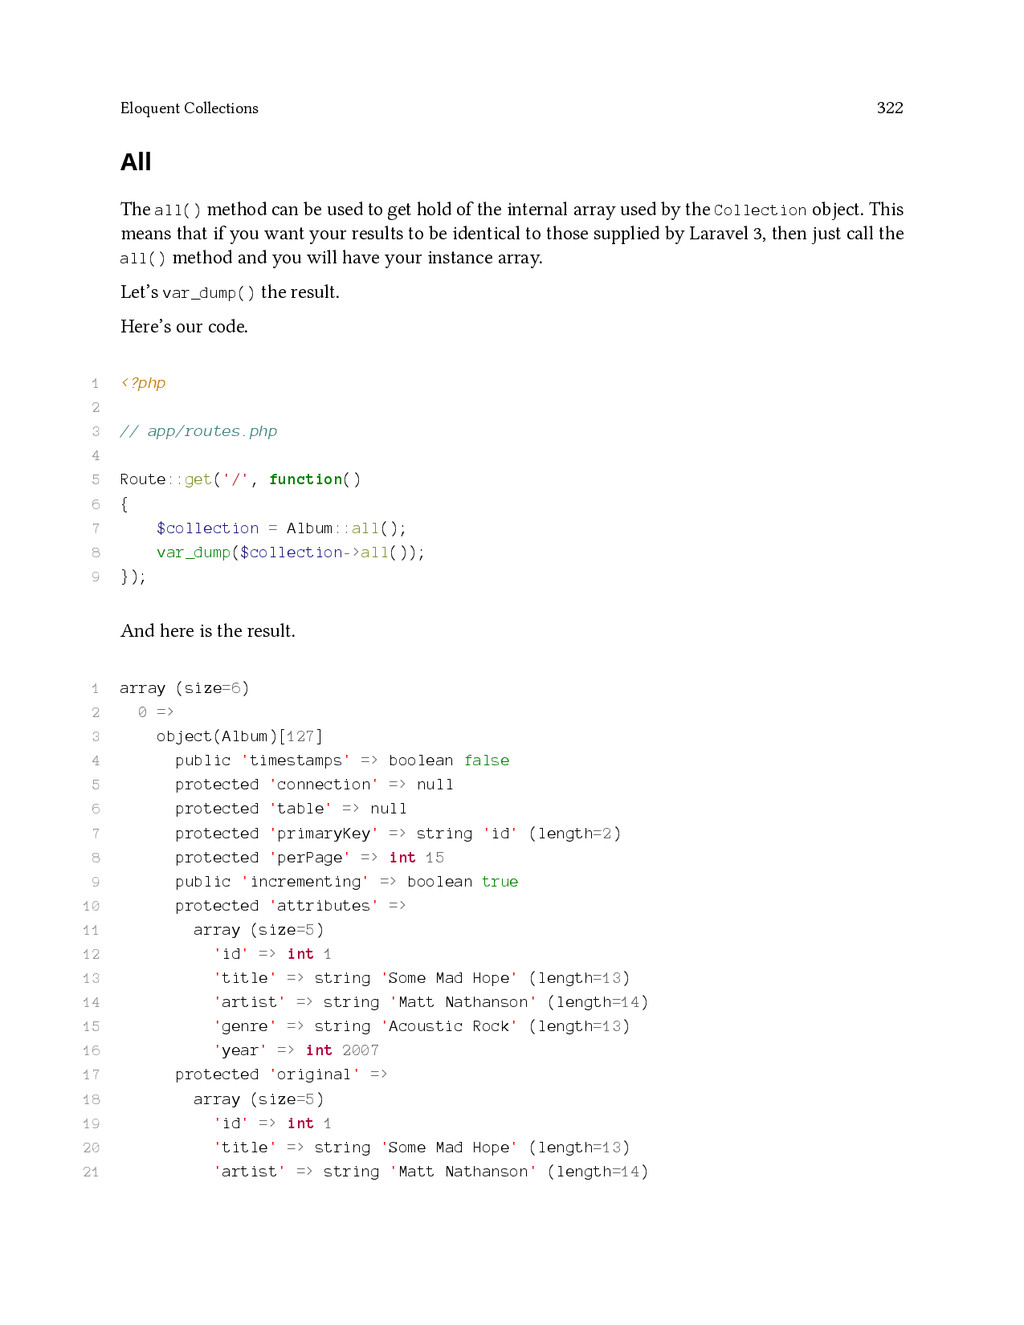
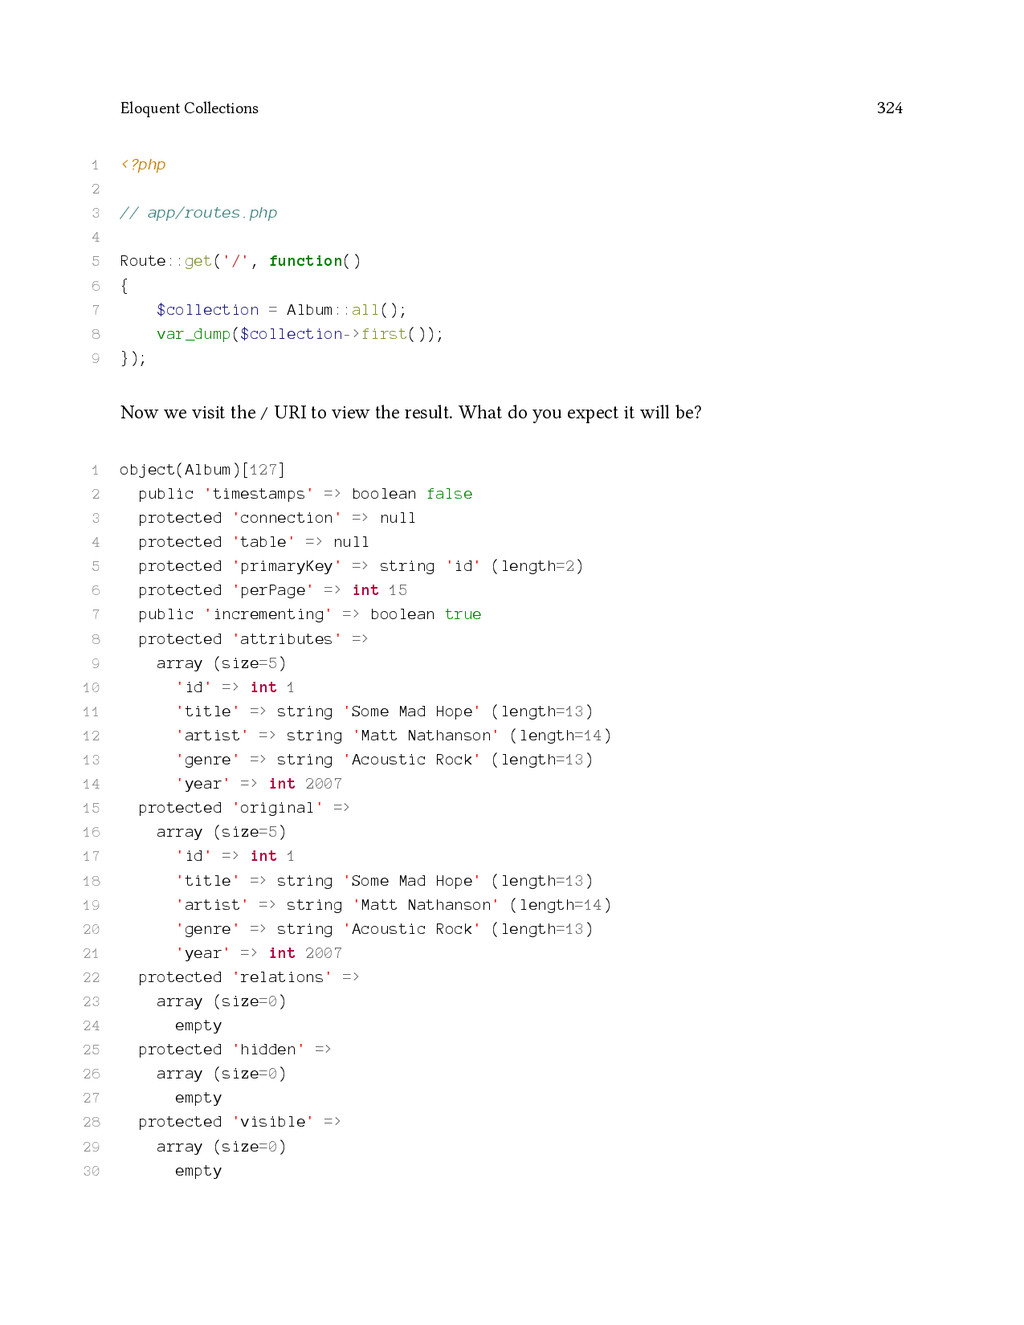
![Eloquent Collections 326 1 object(Album)[138] 2 public 'timestamps' => boolean](https://files.speakerdeck.com/presentations/93bfbe605f48013231b75a35dee7ad3b/slide_340.jpg)
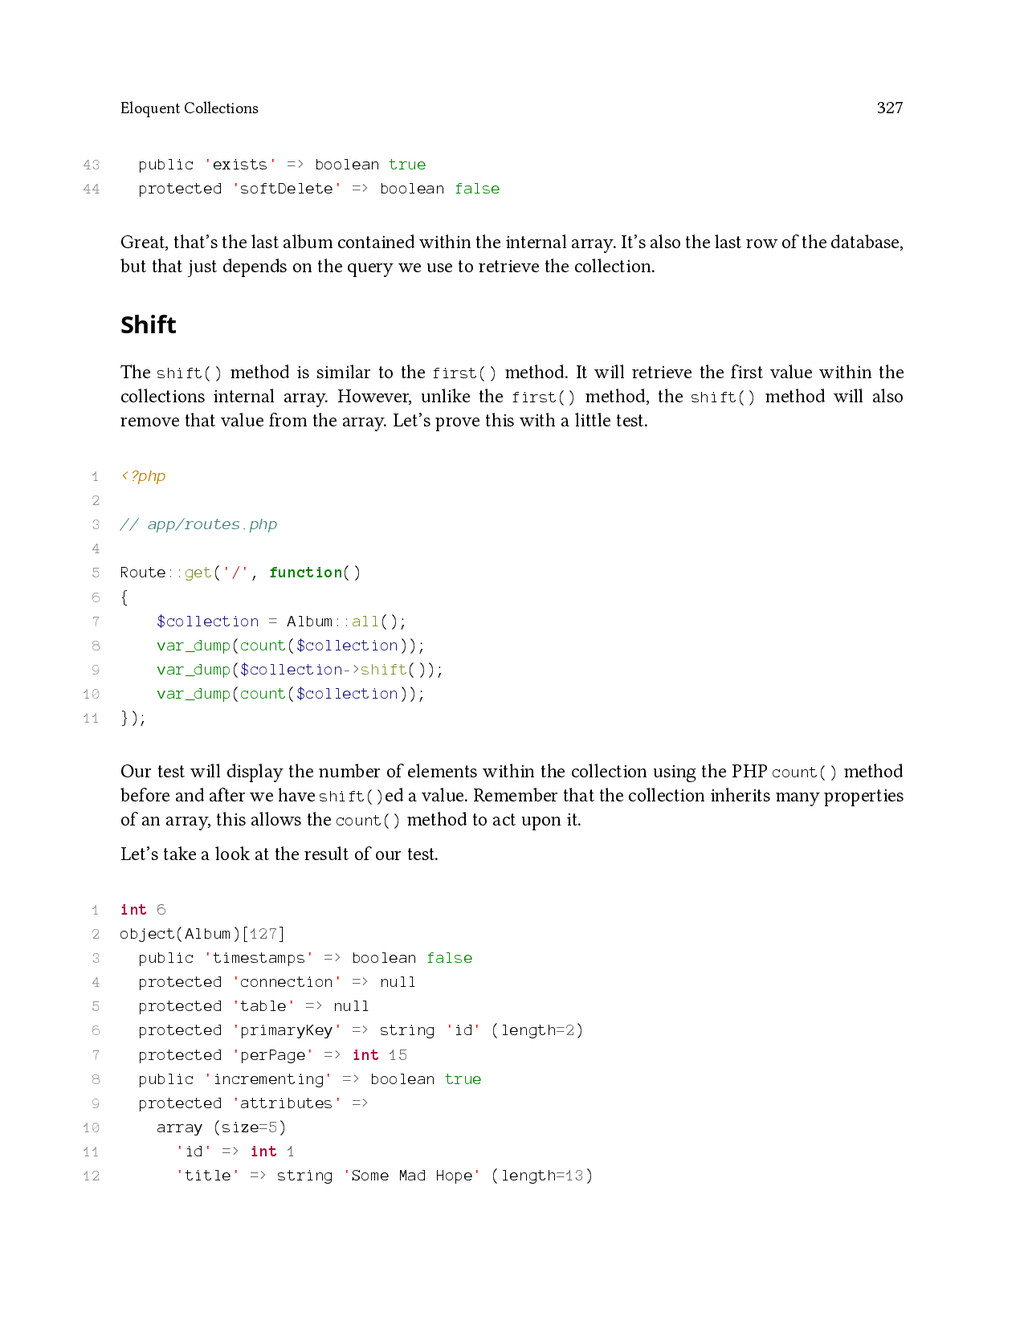
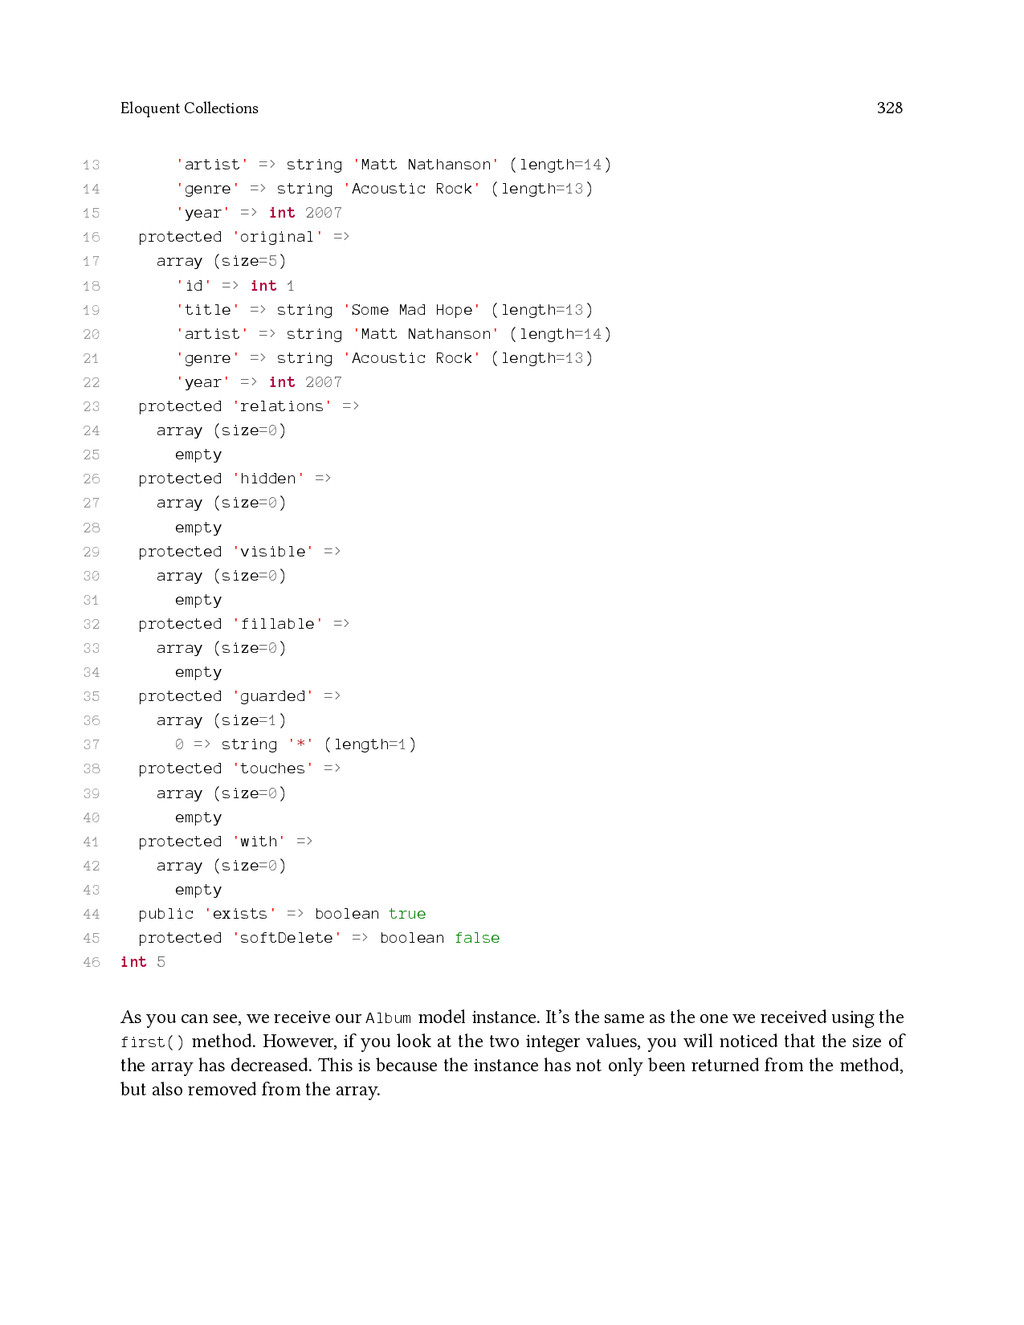
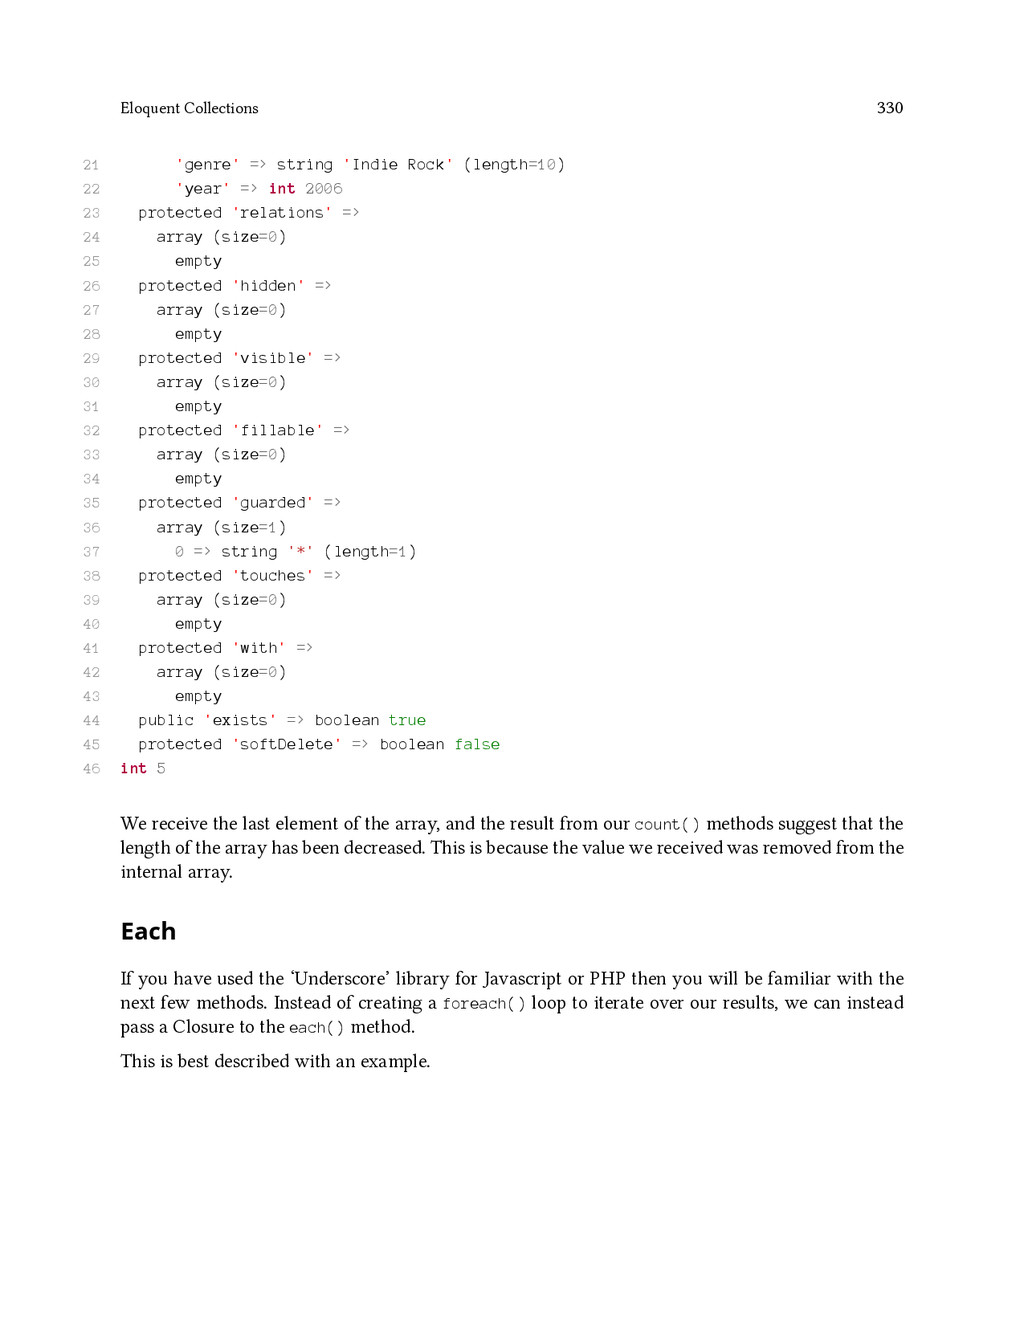
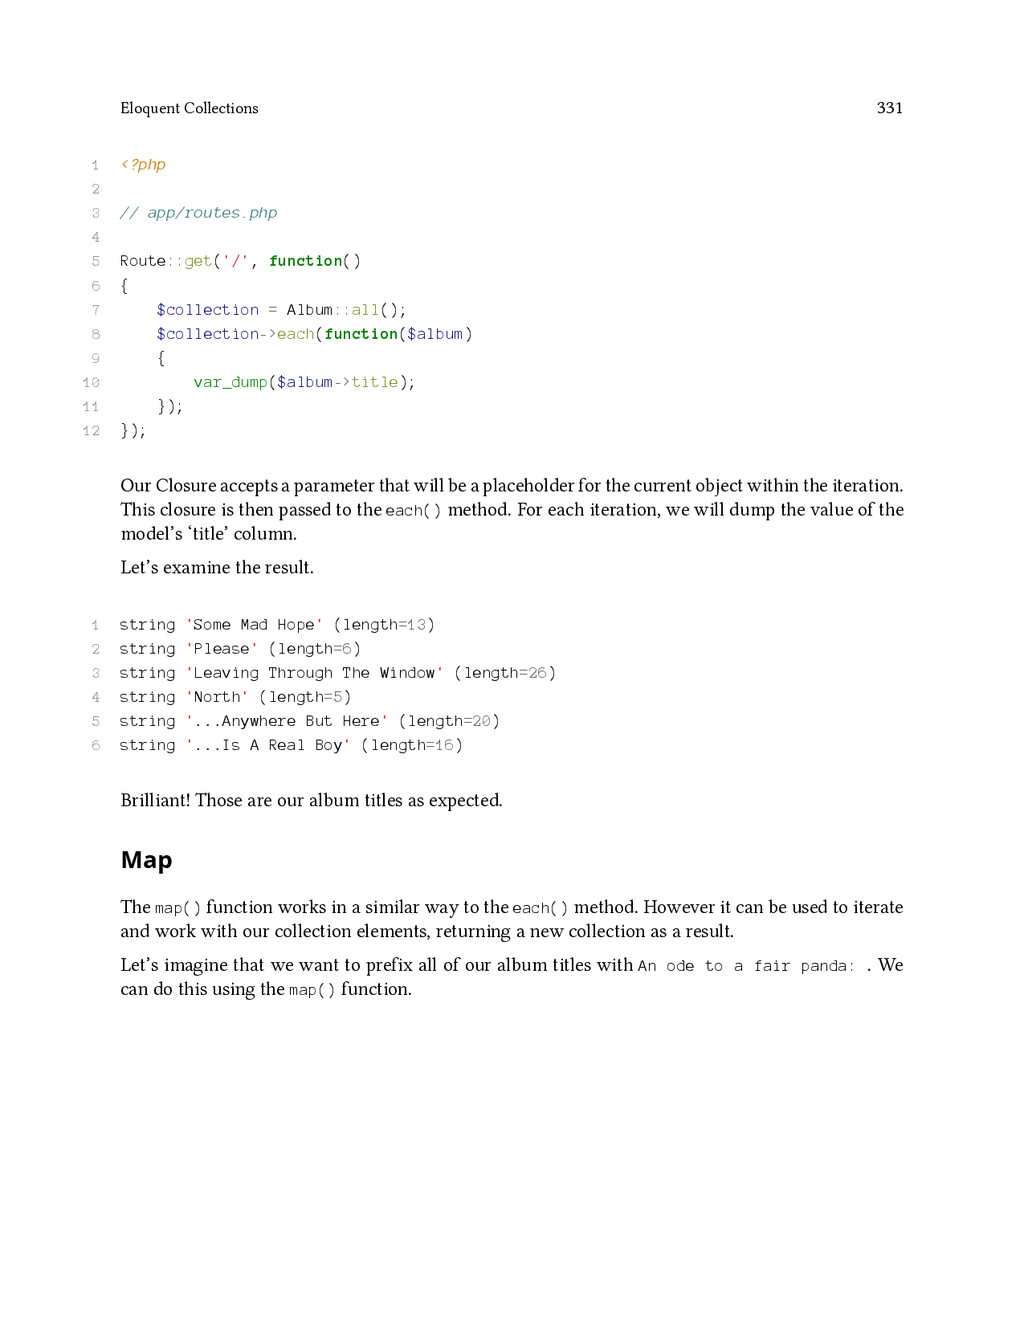
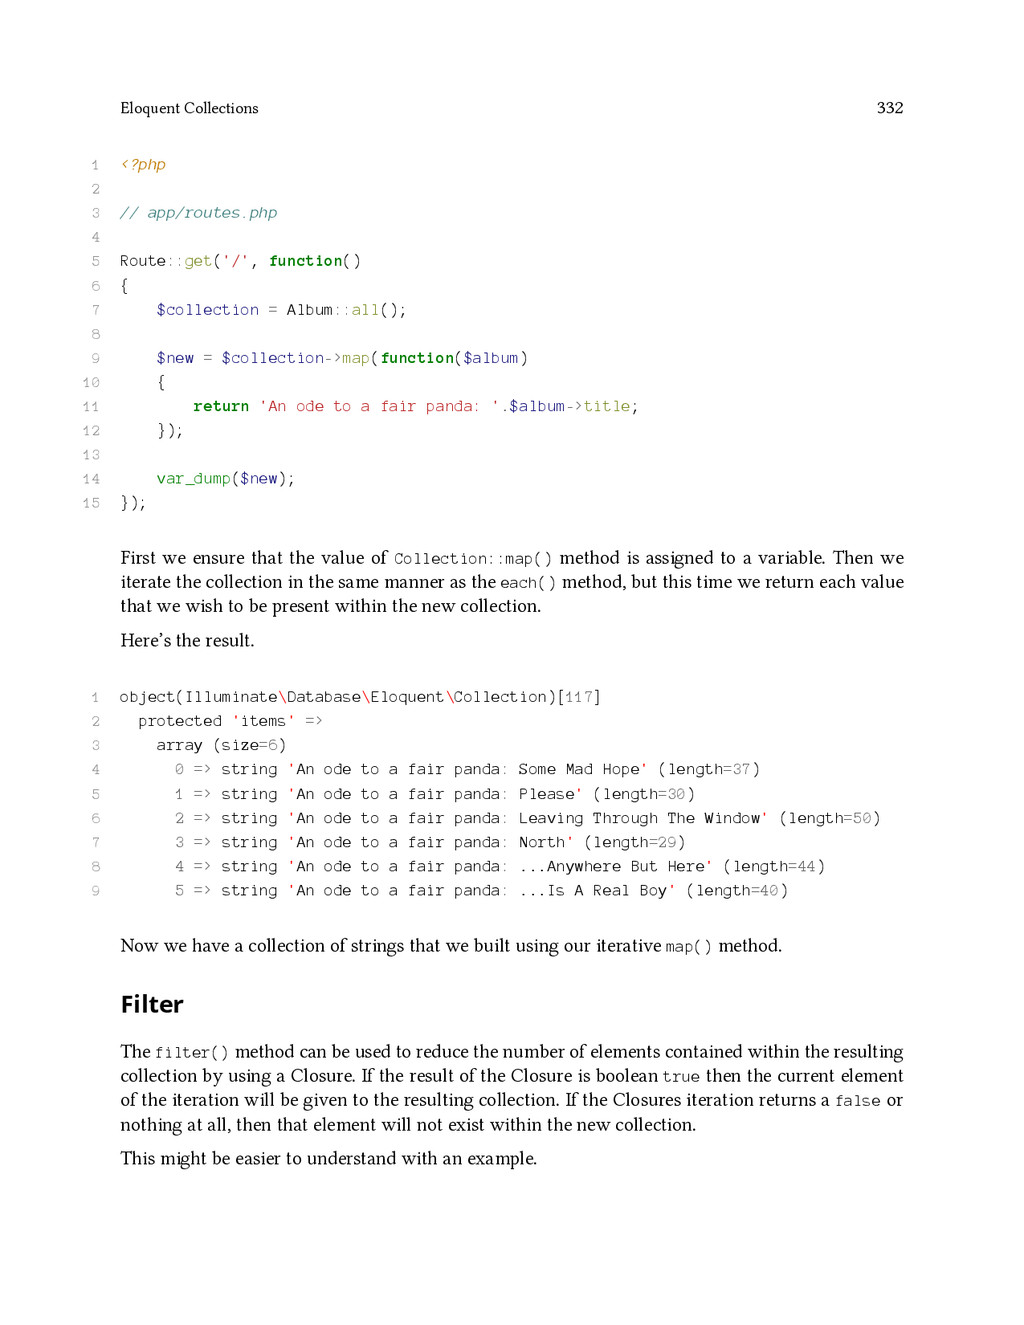
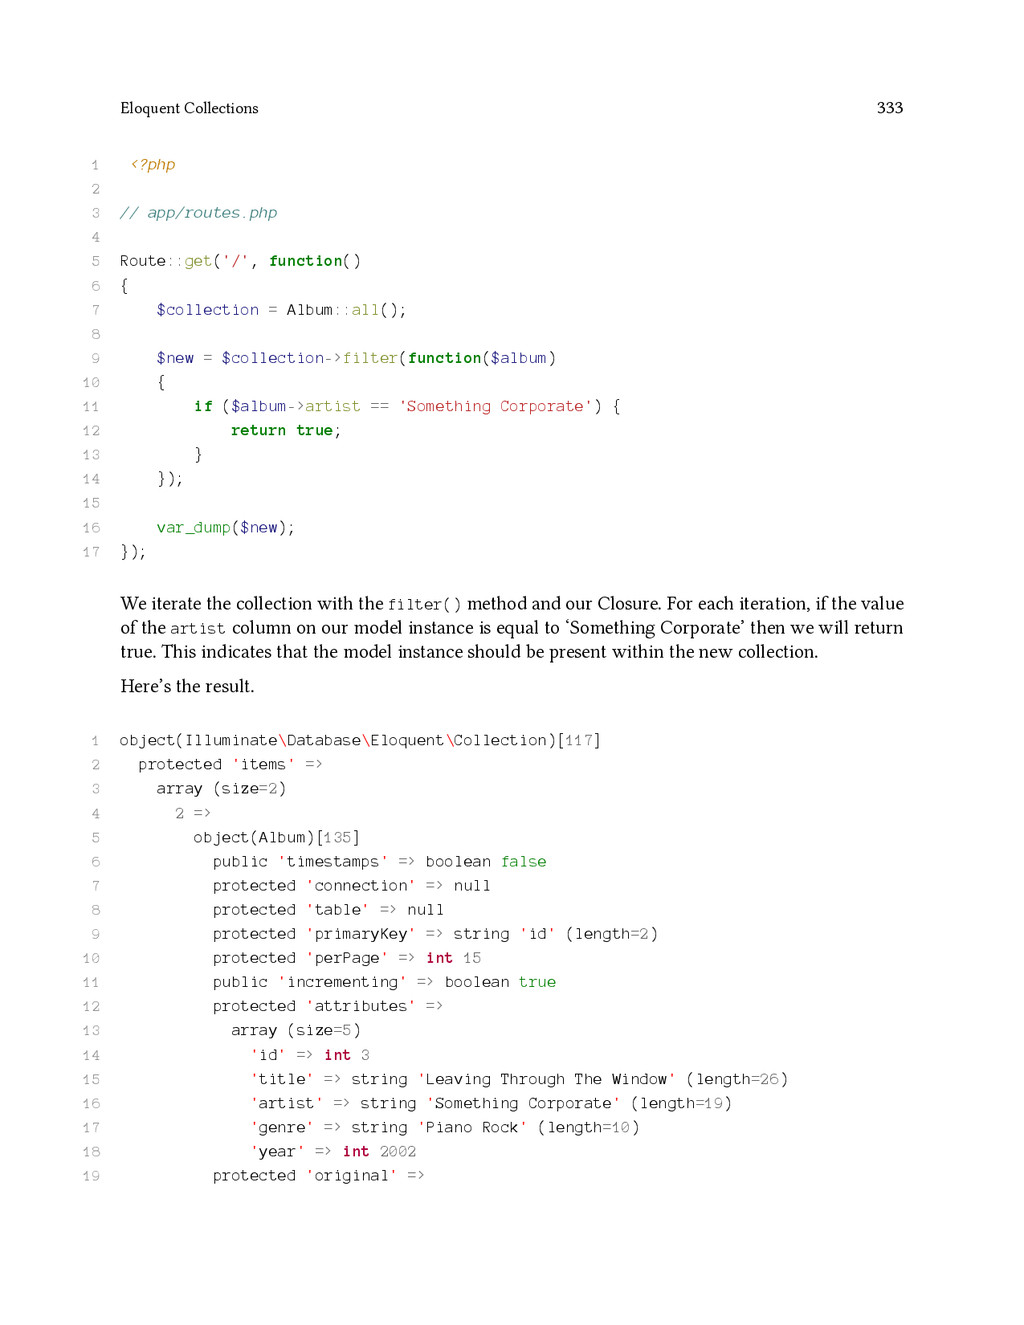
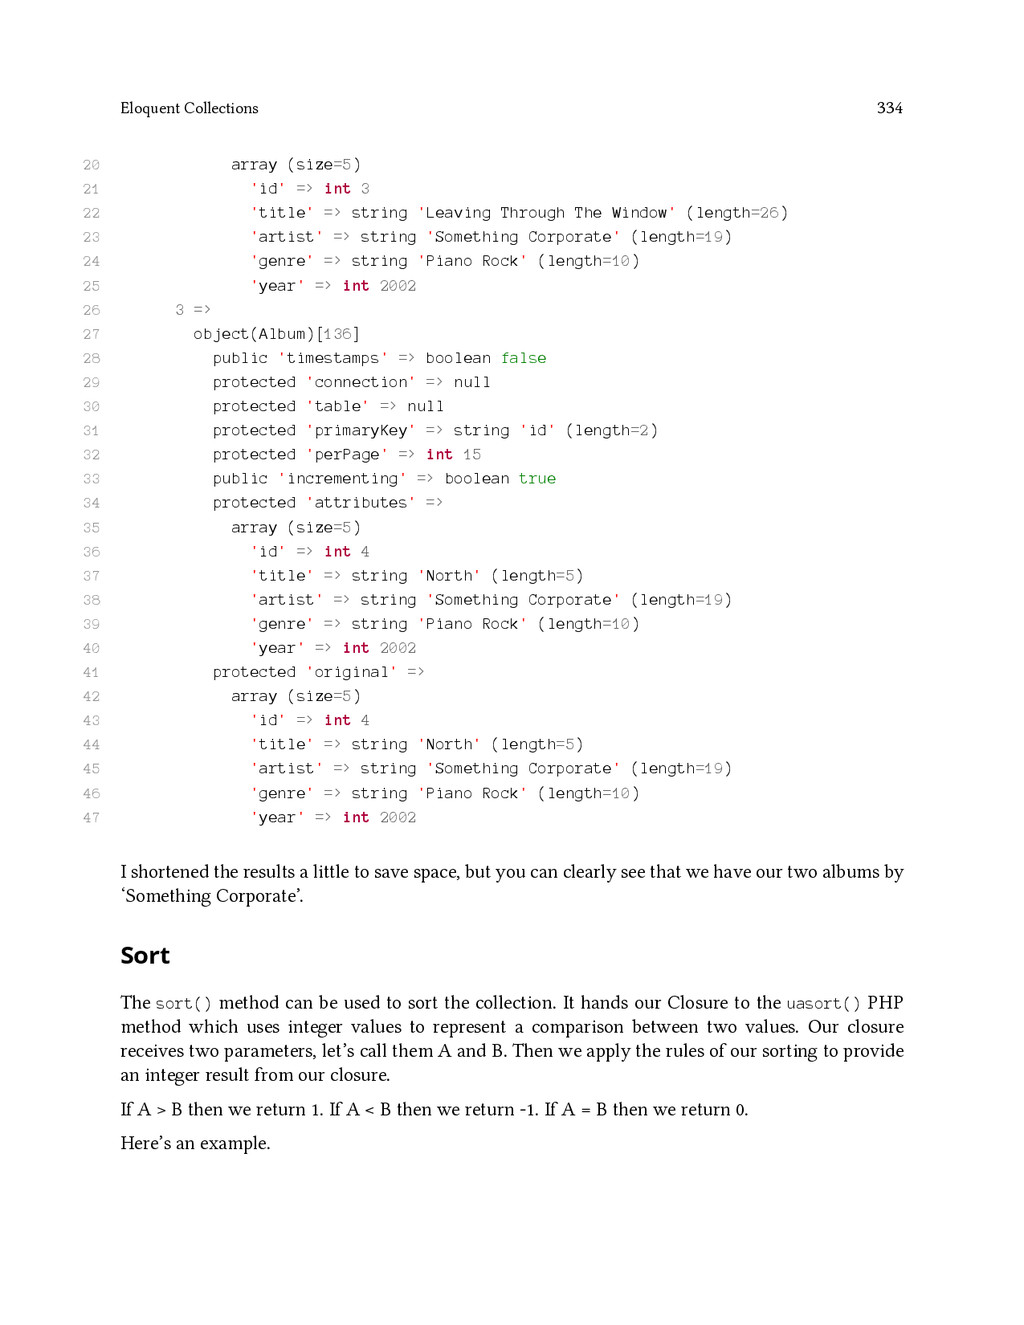
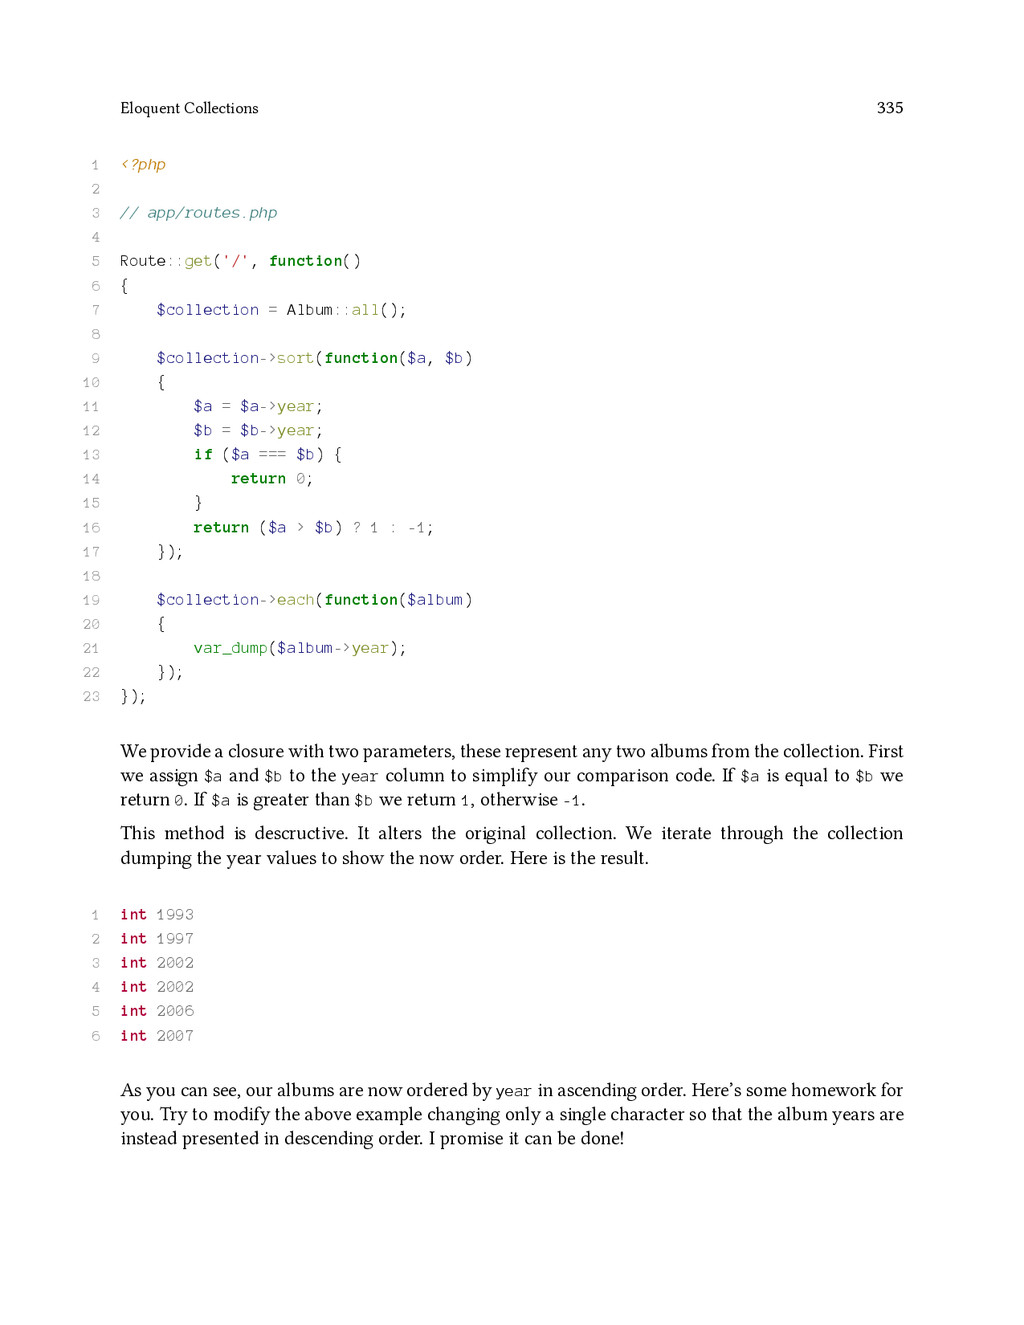
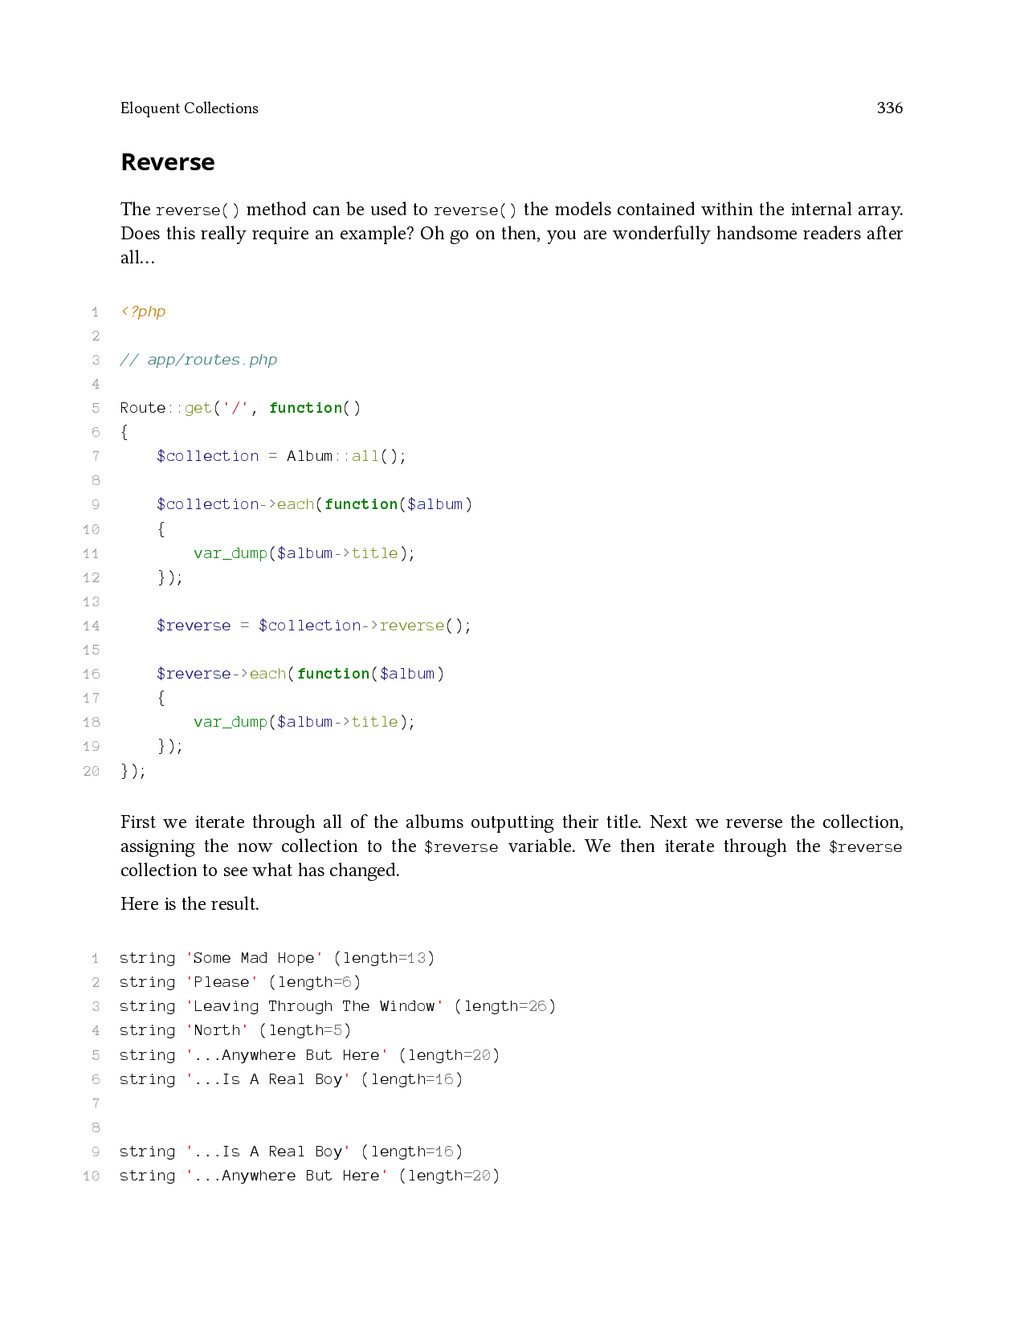
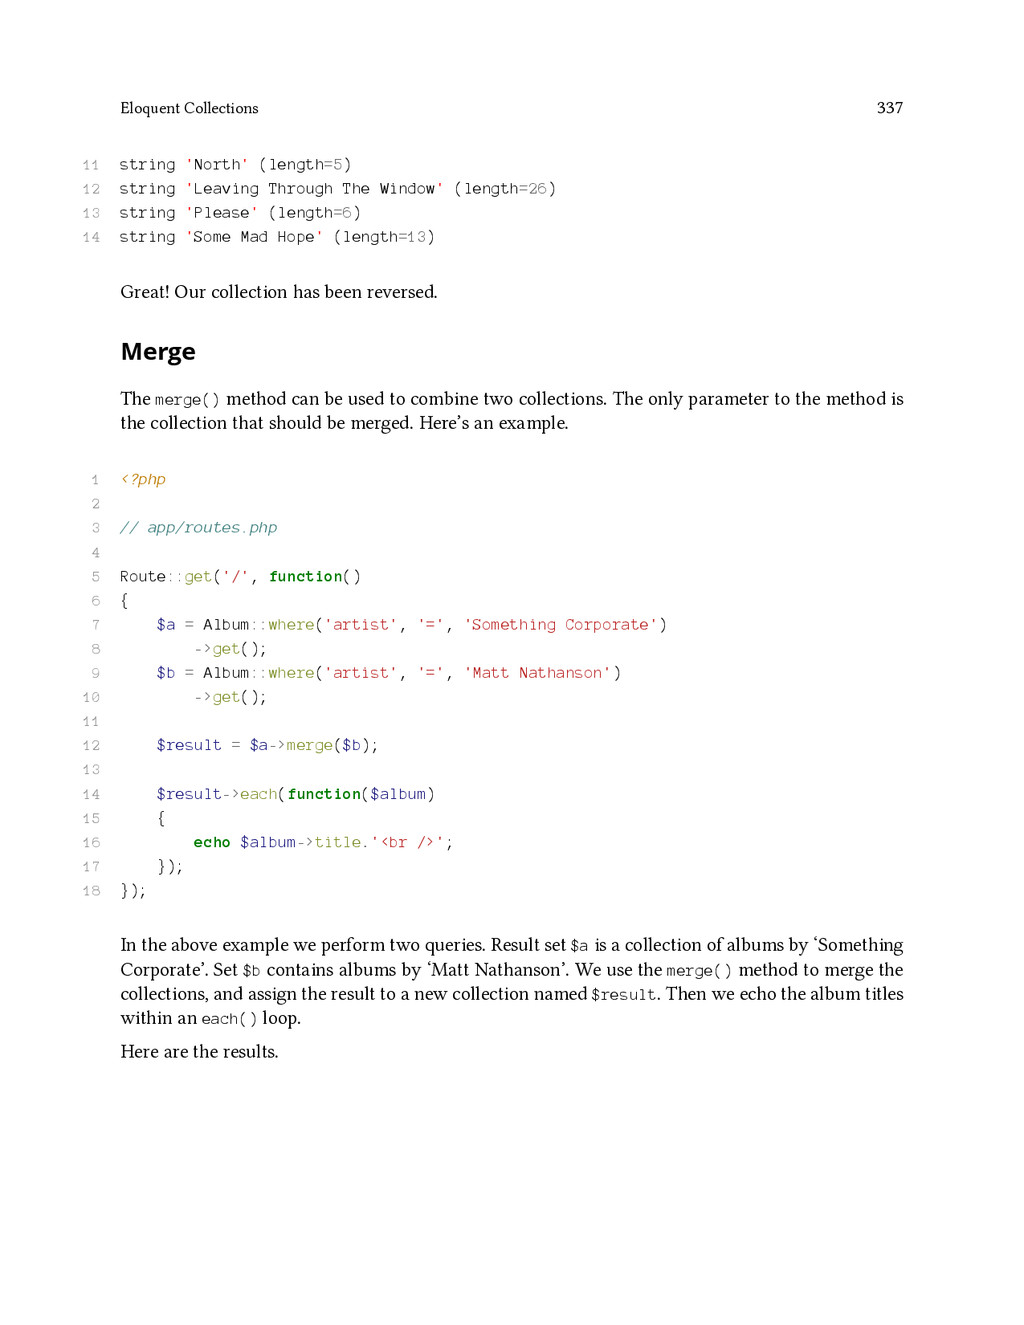
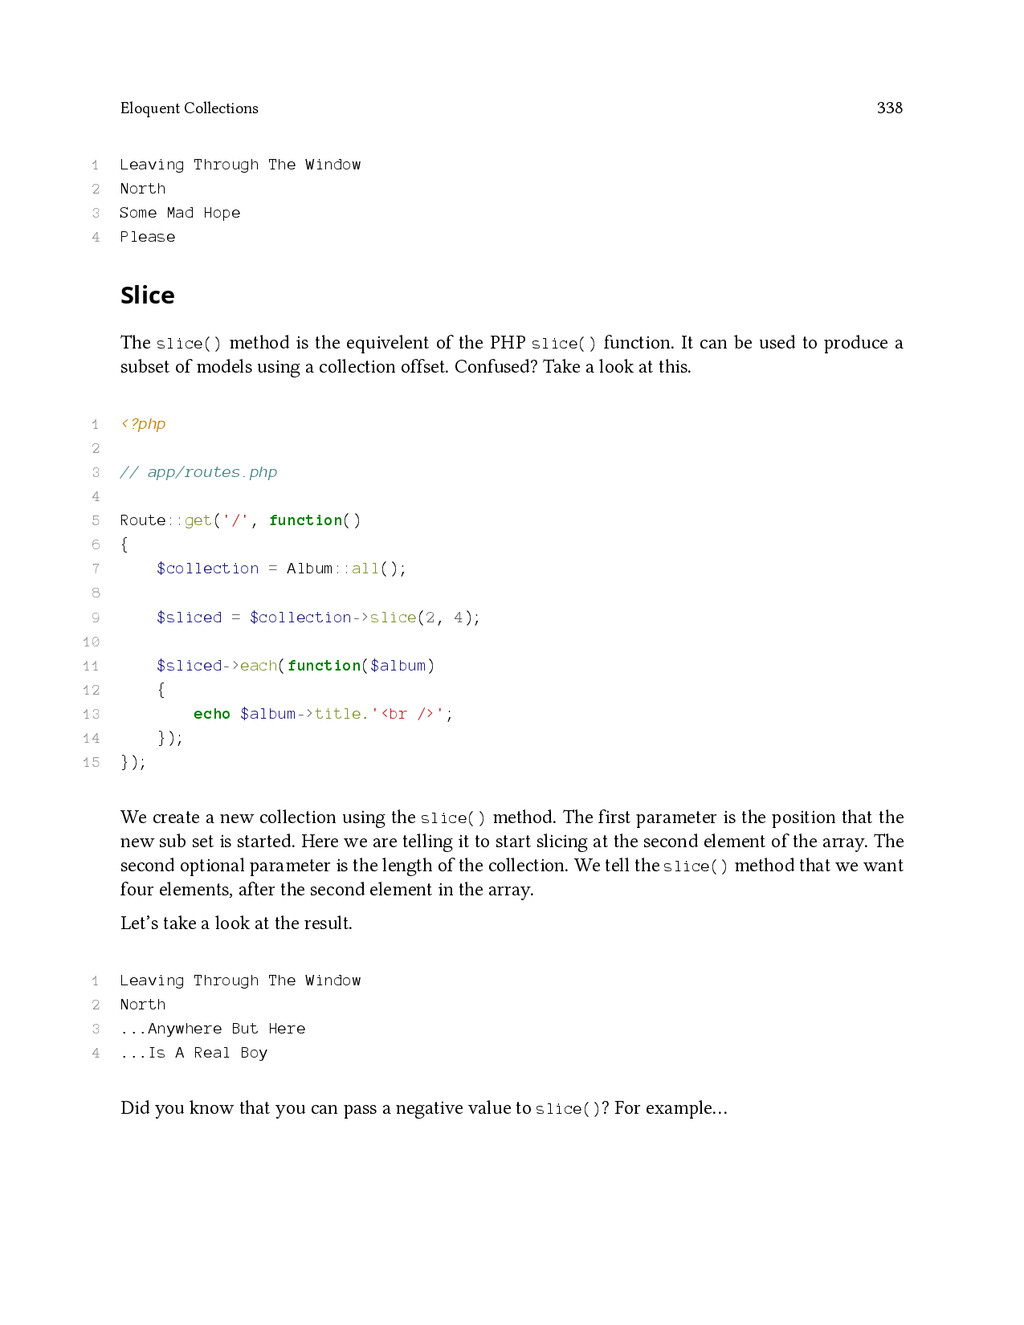
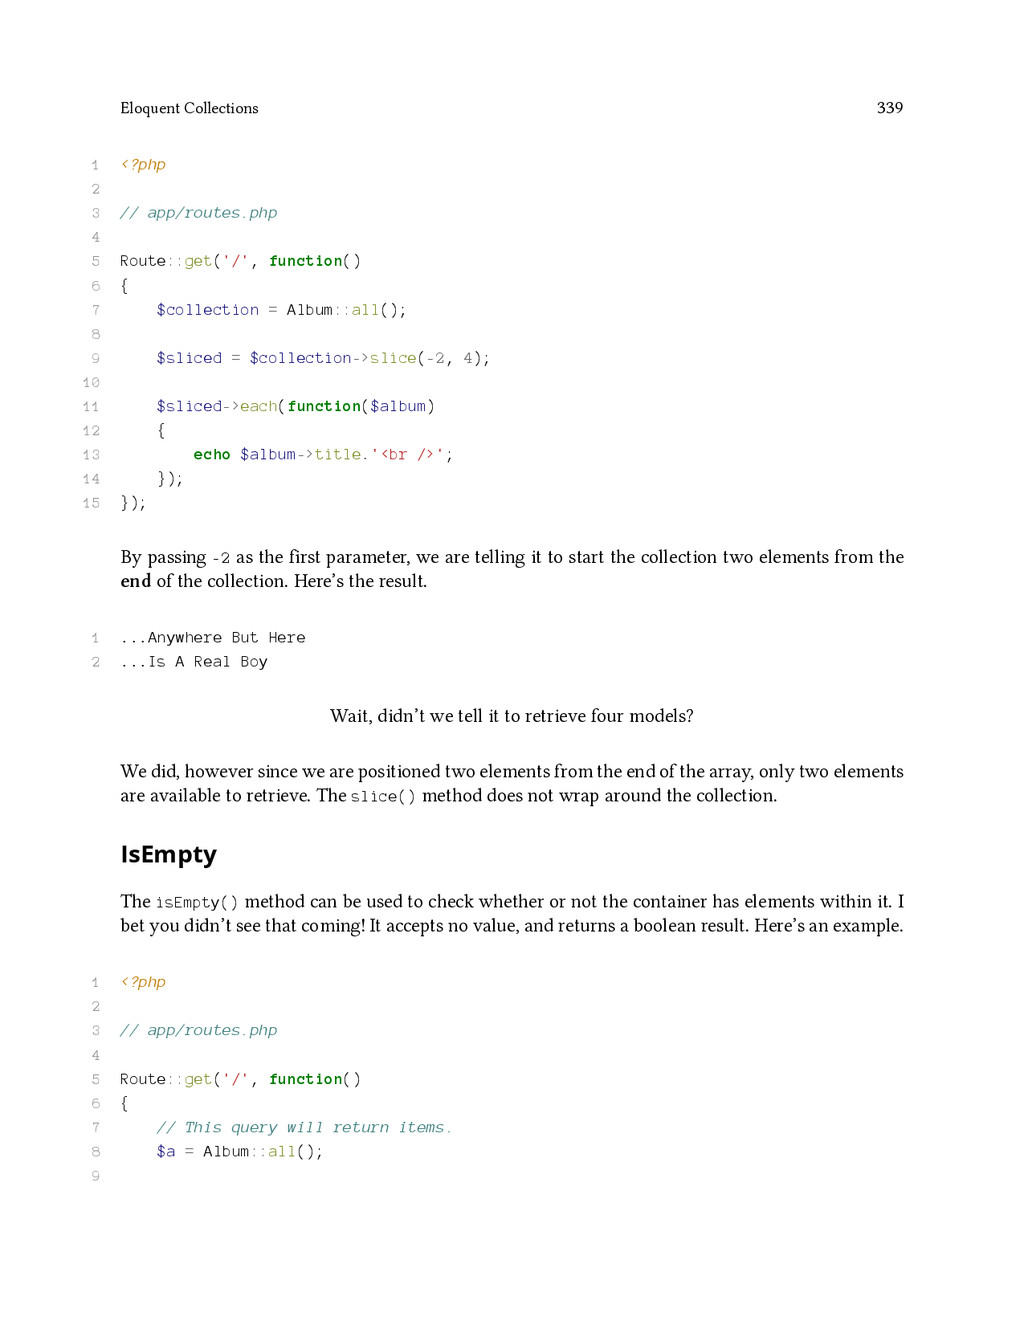
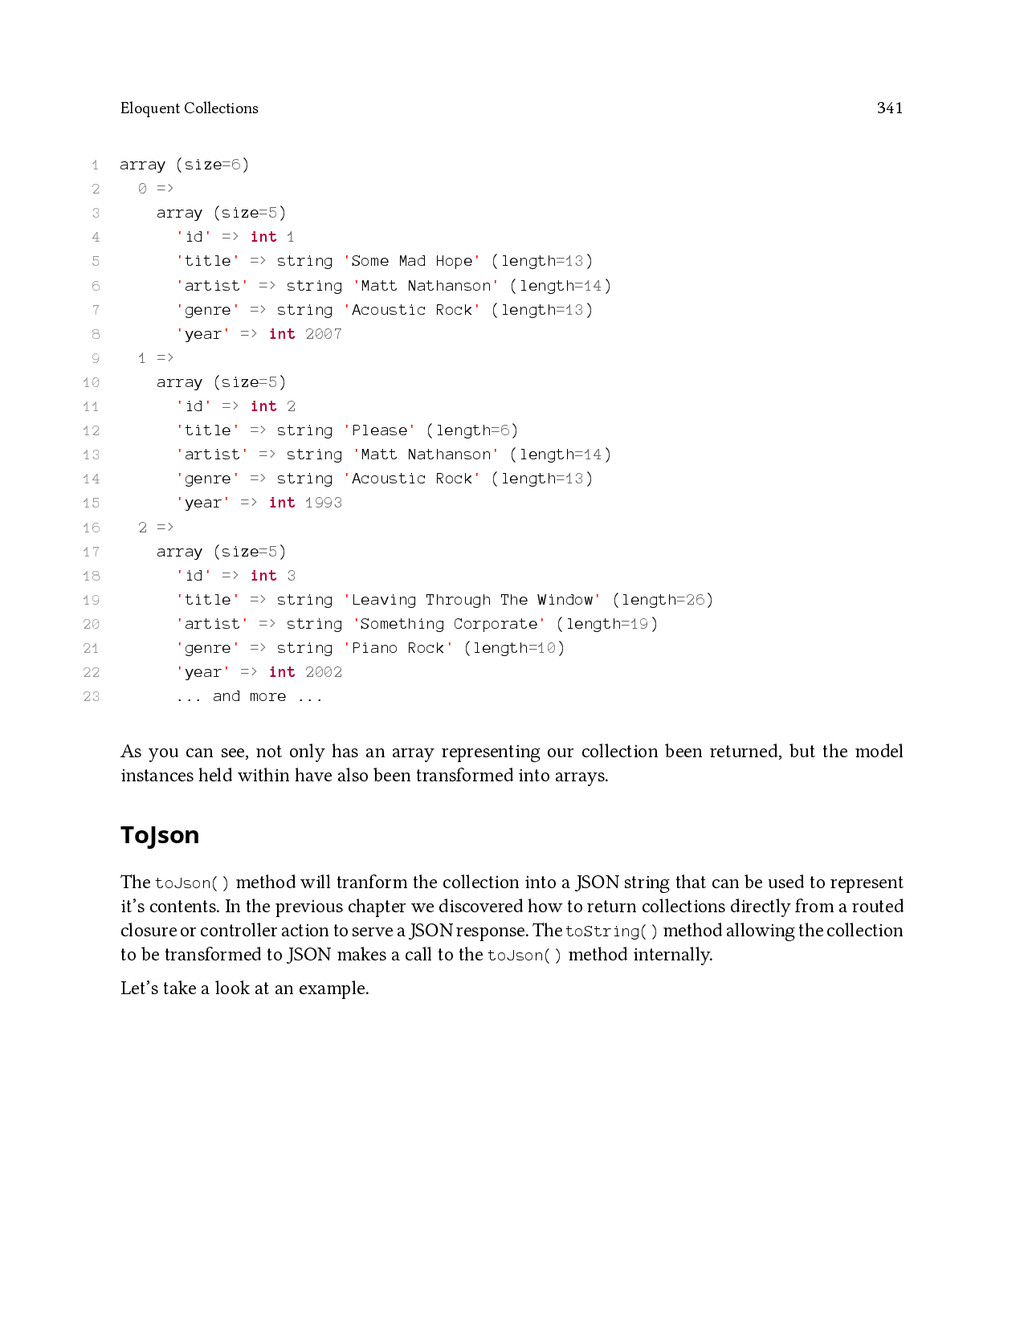
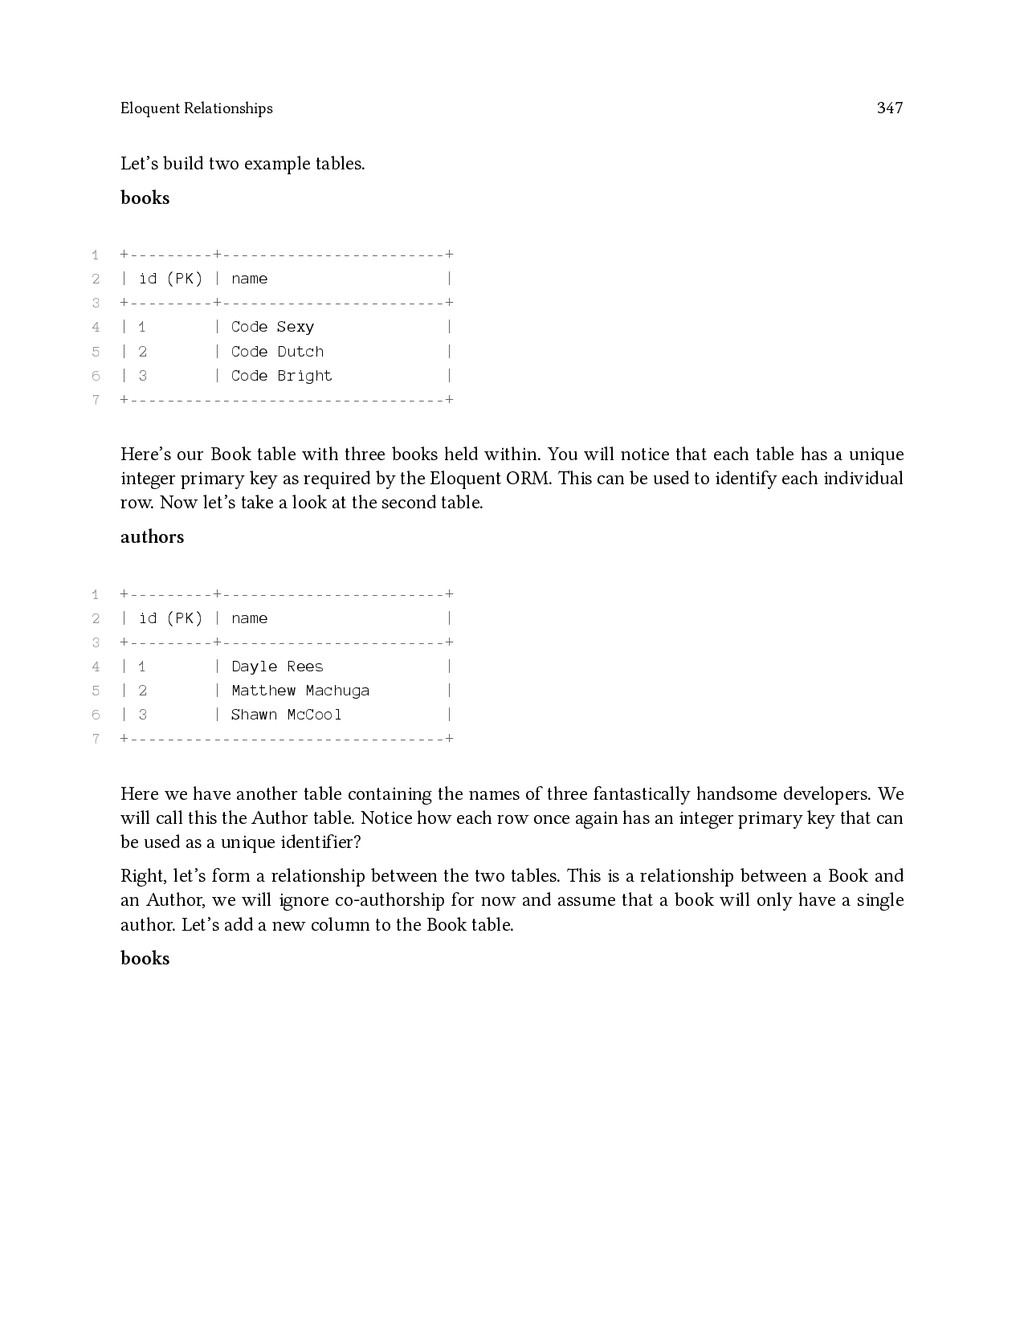
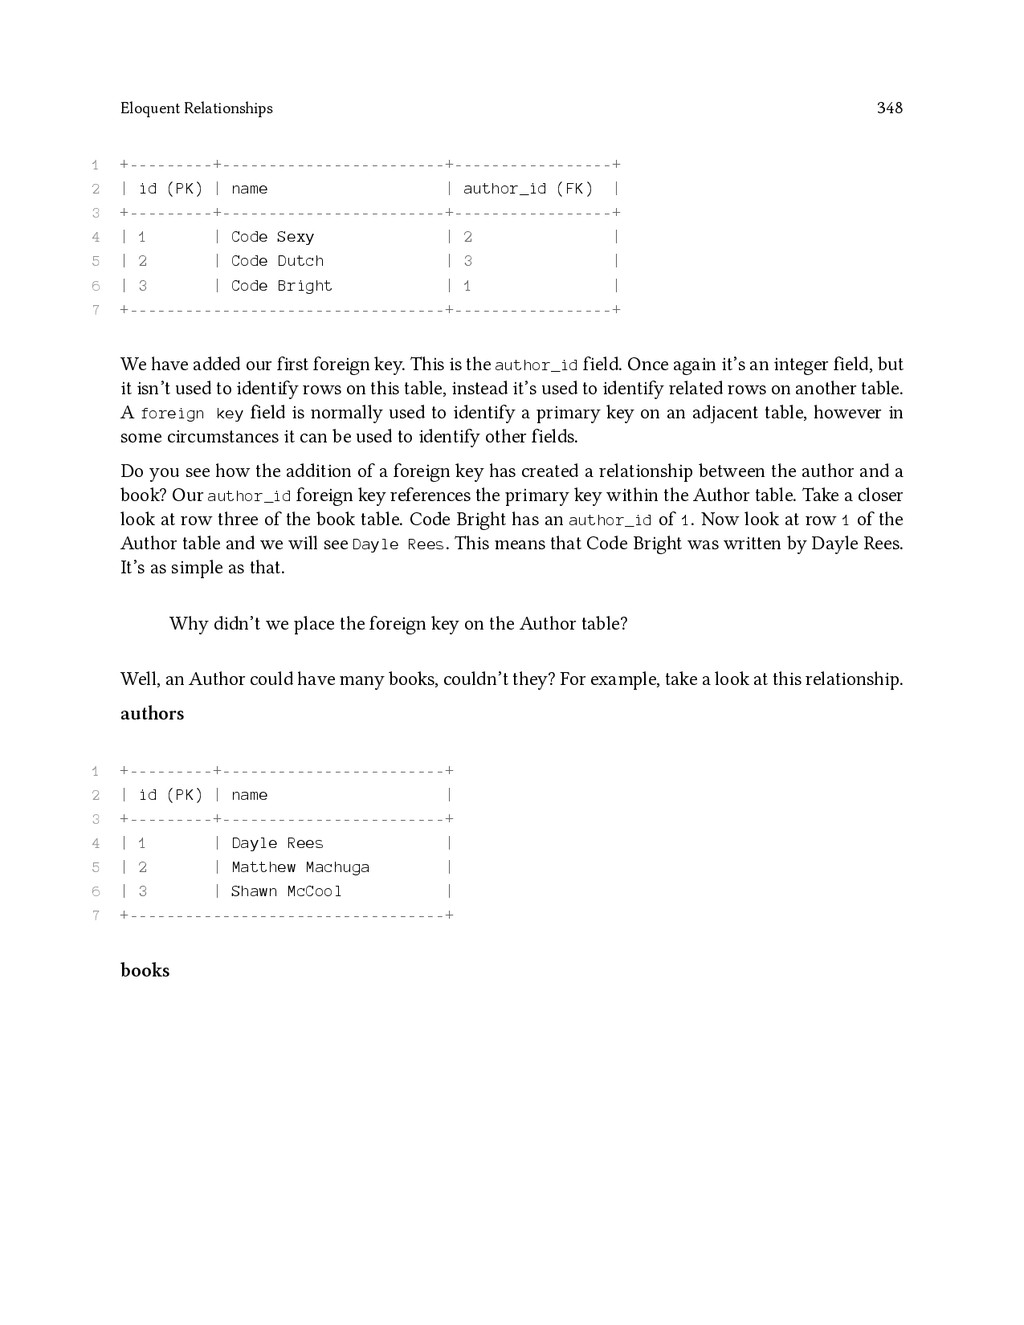
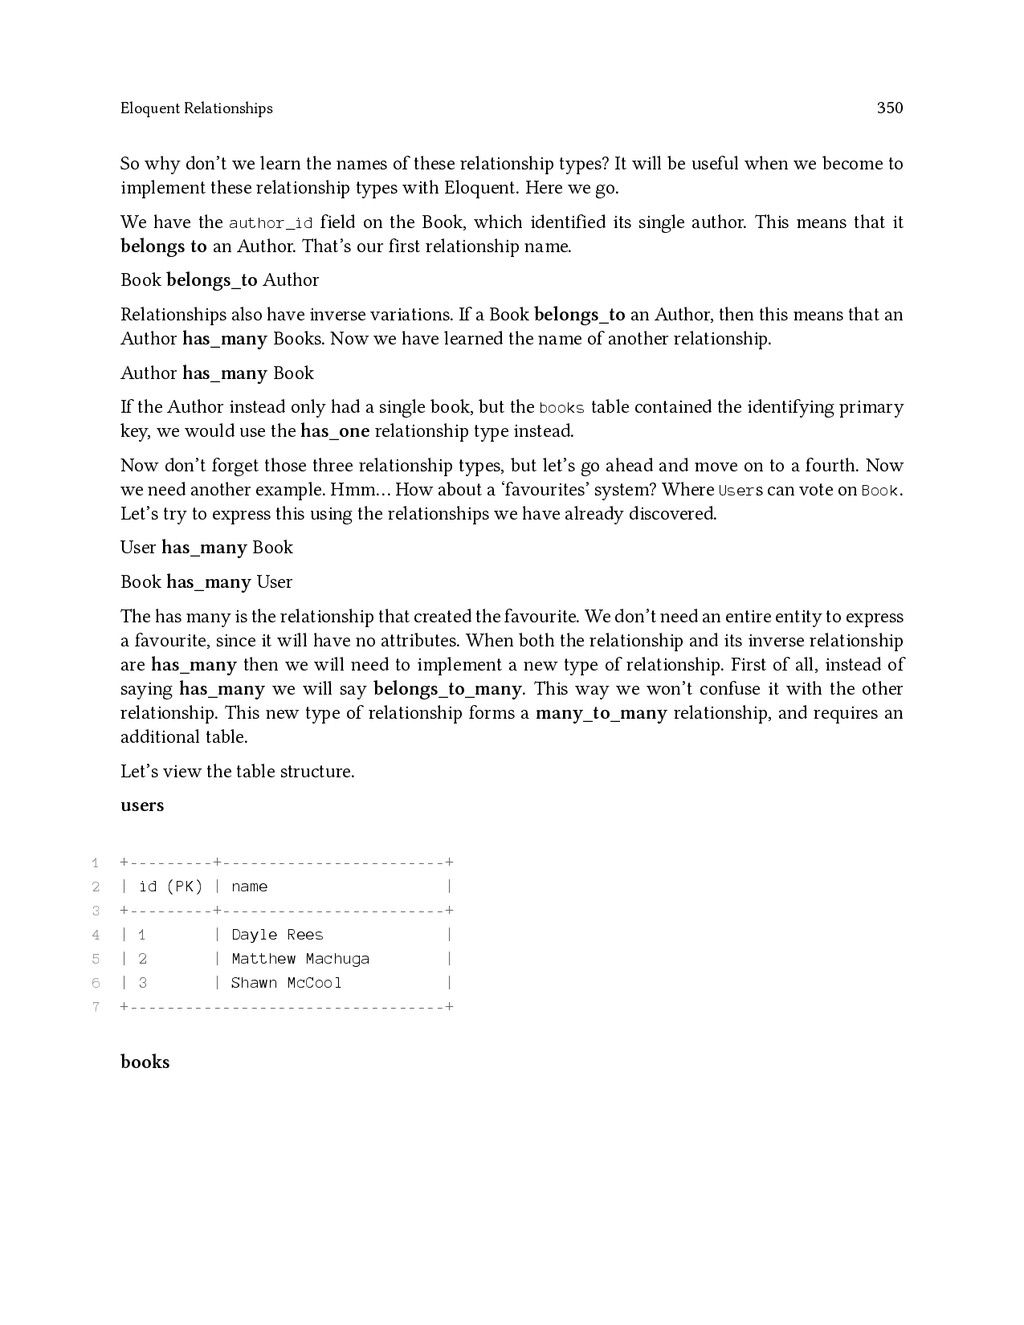
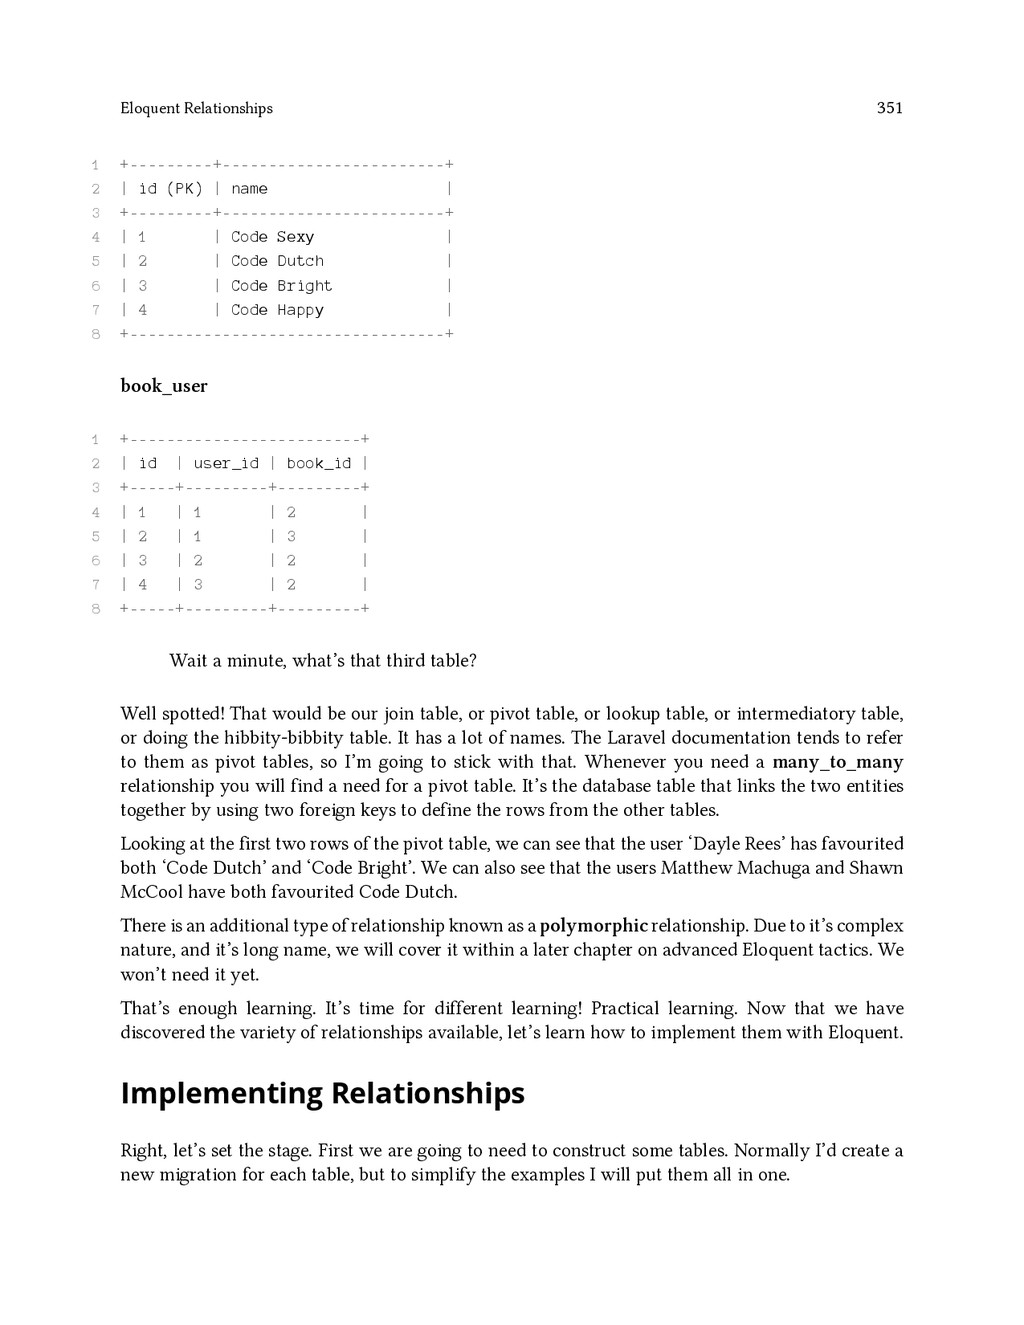
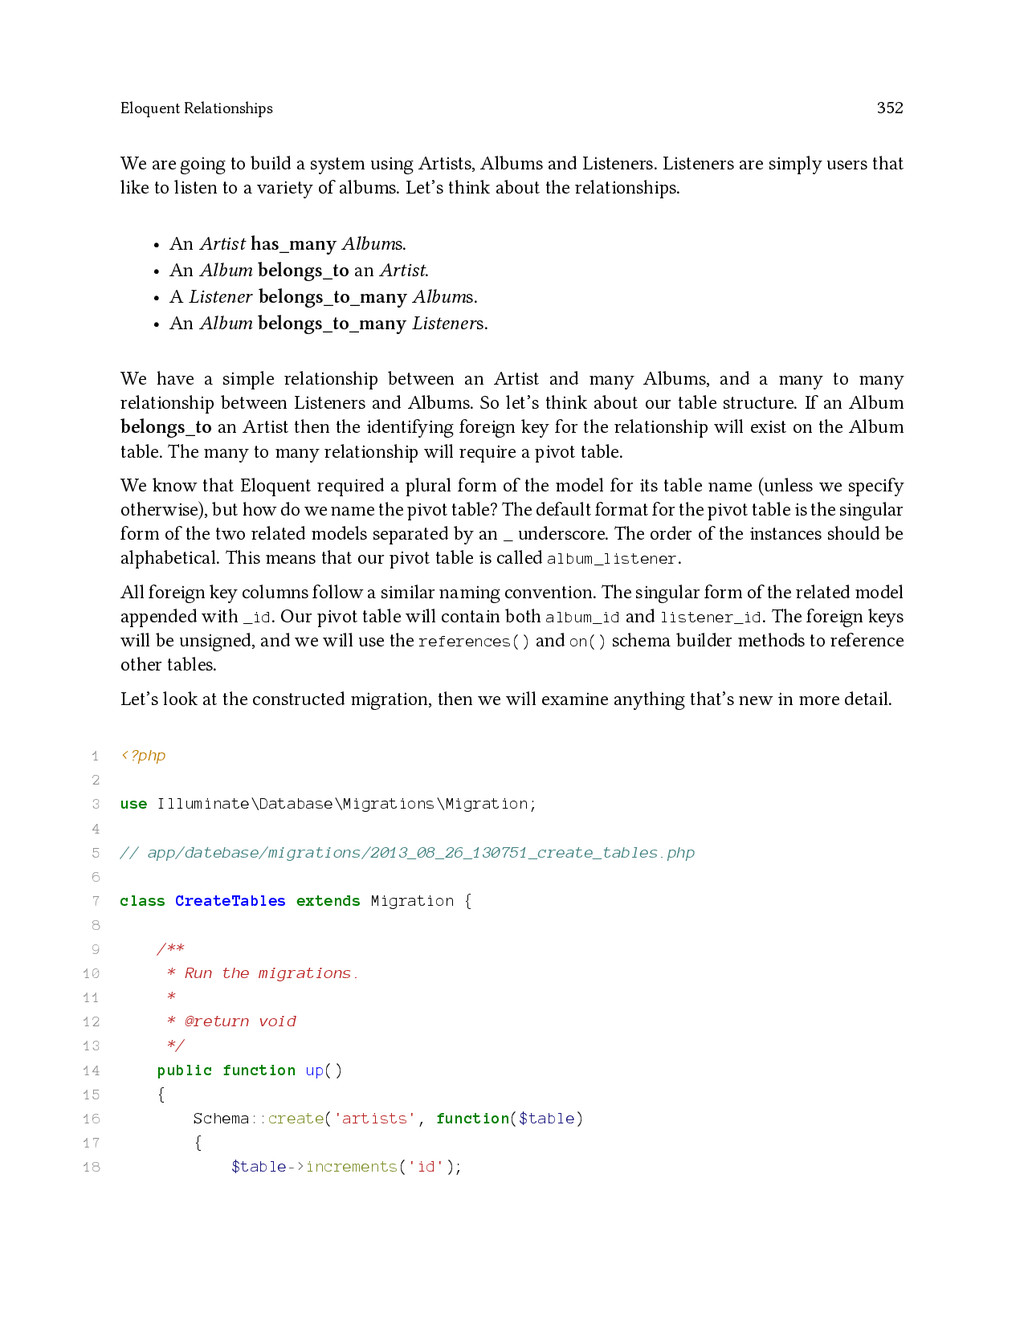
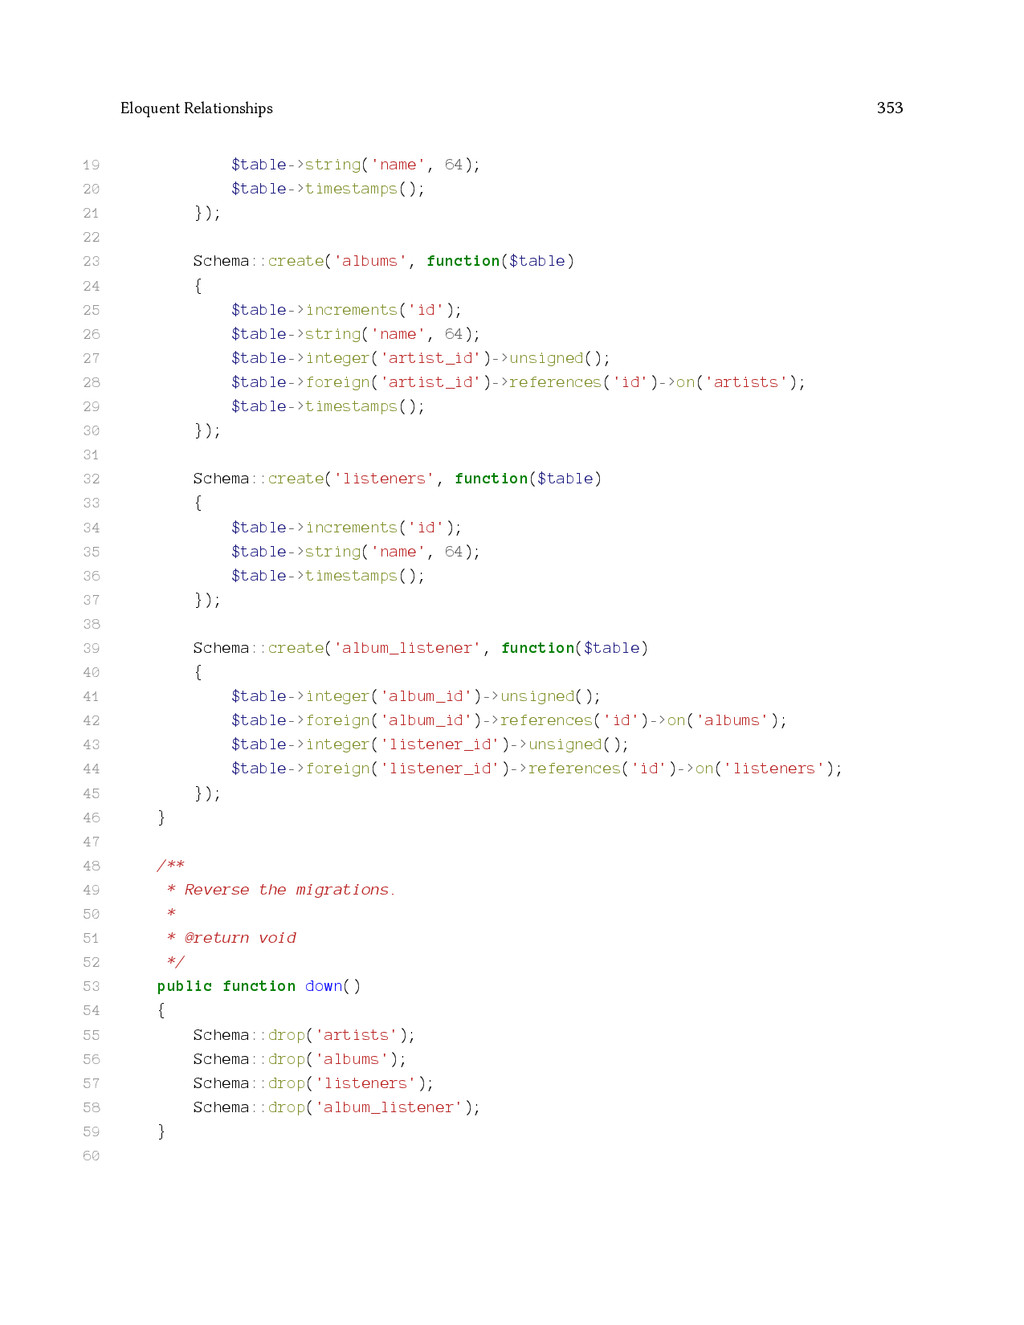
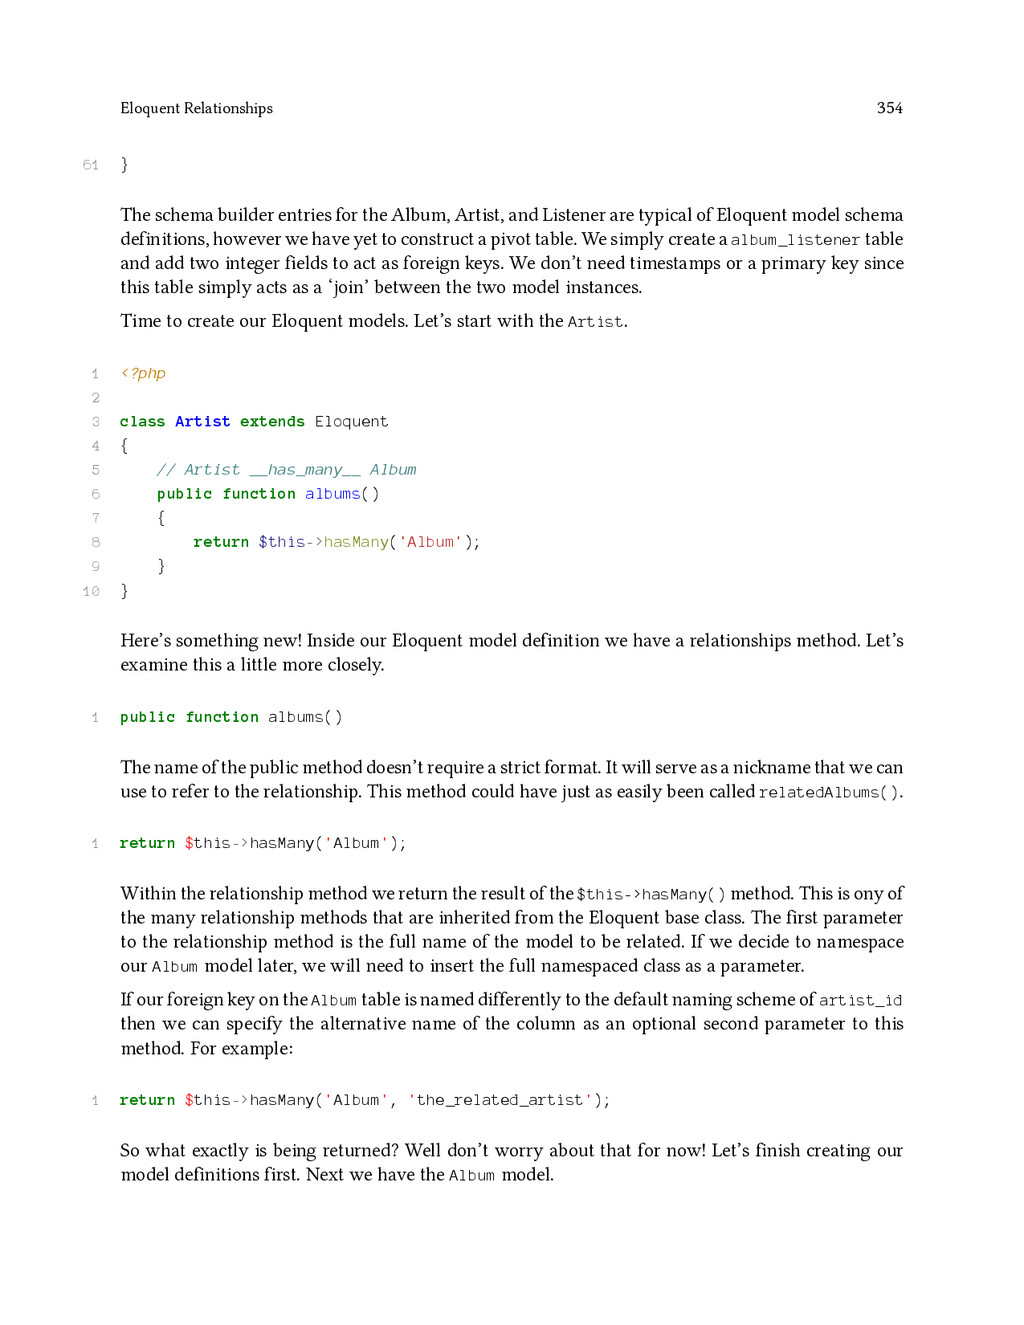
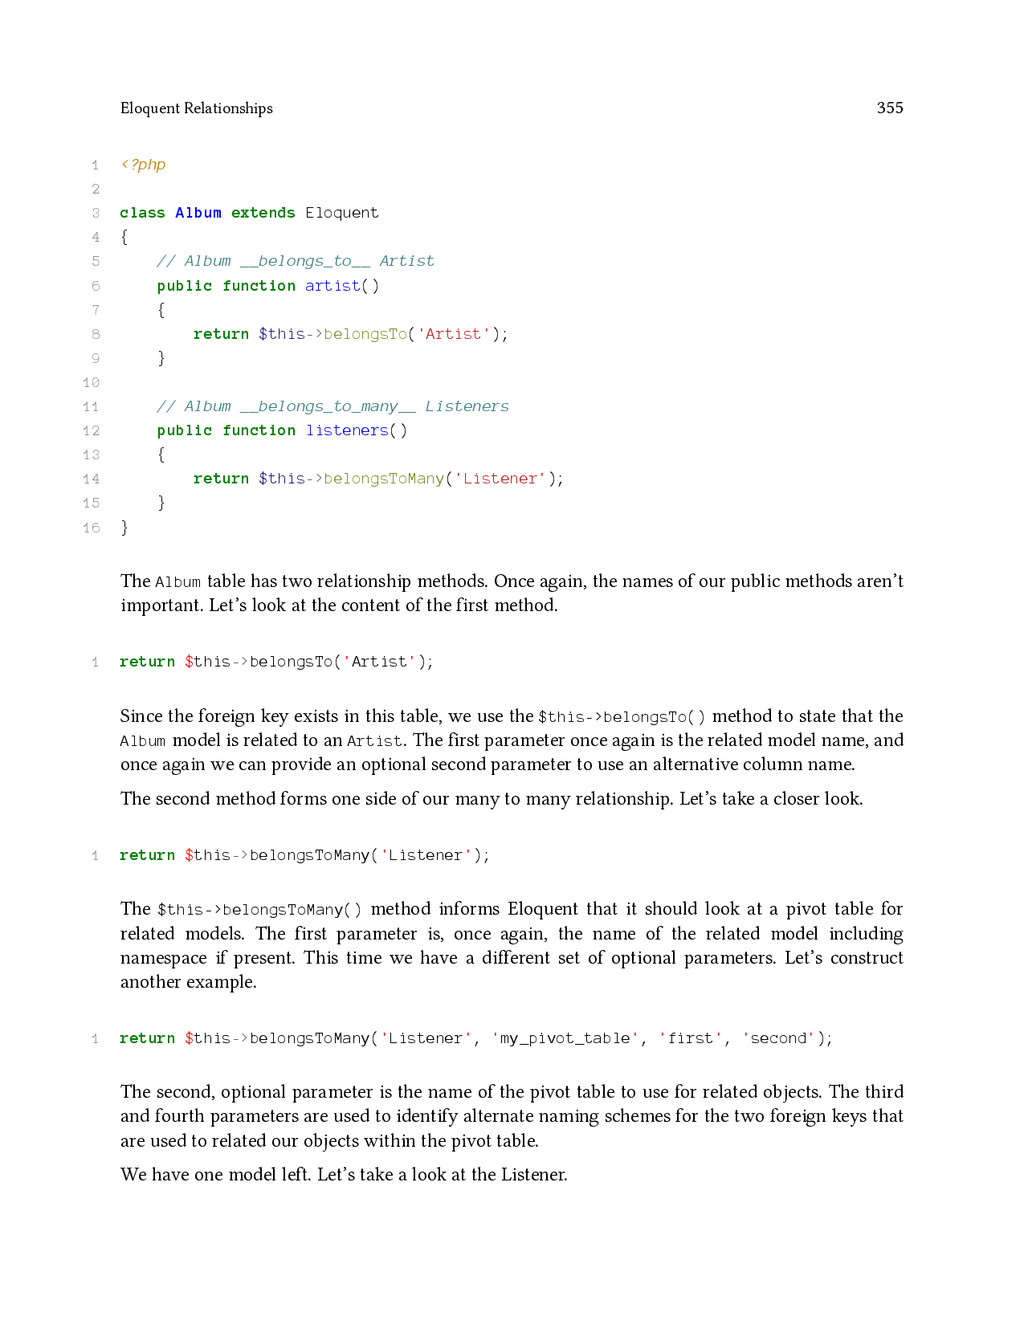
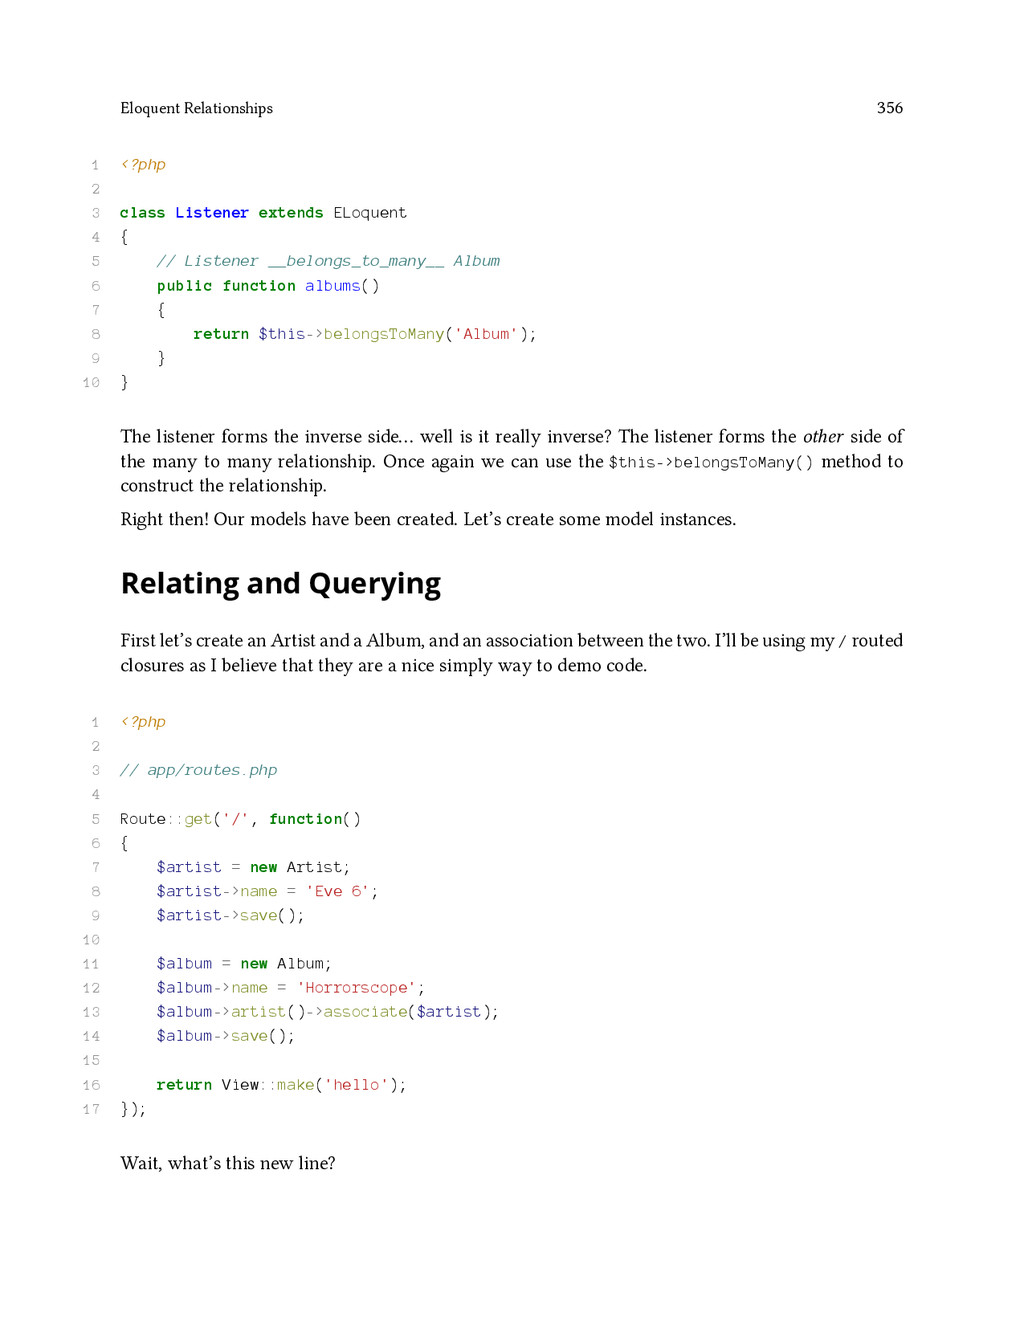
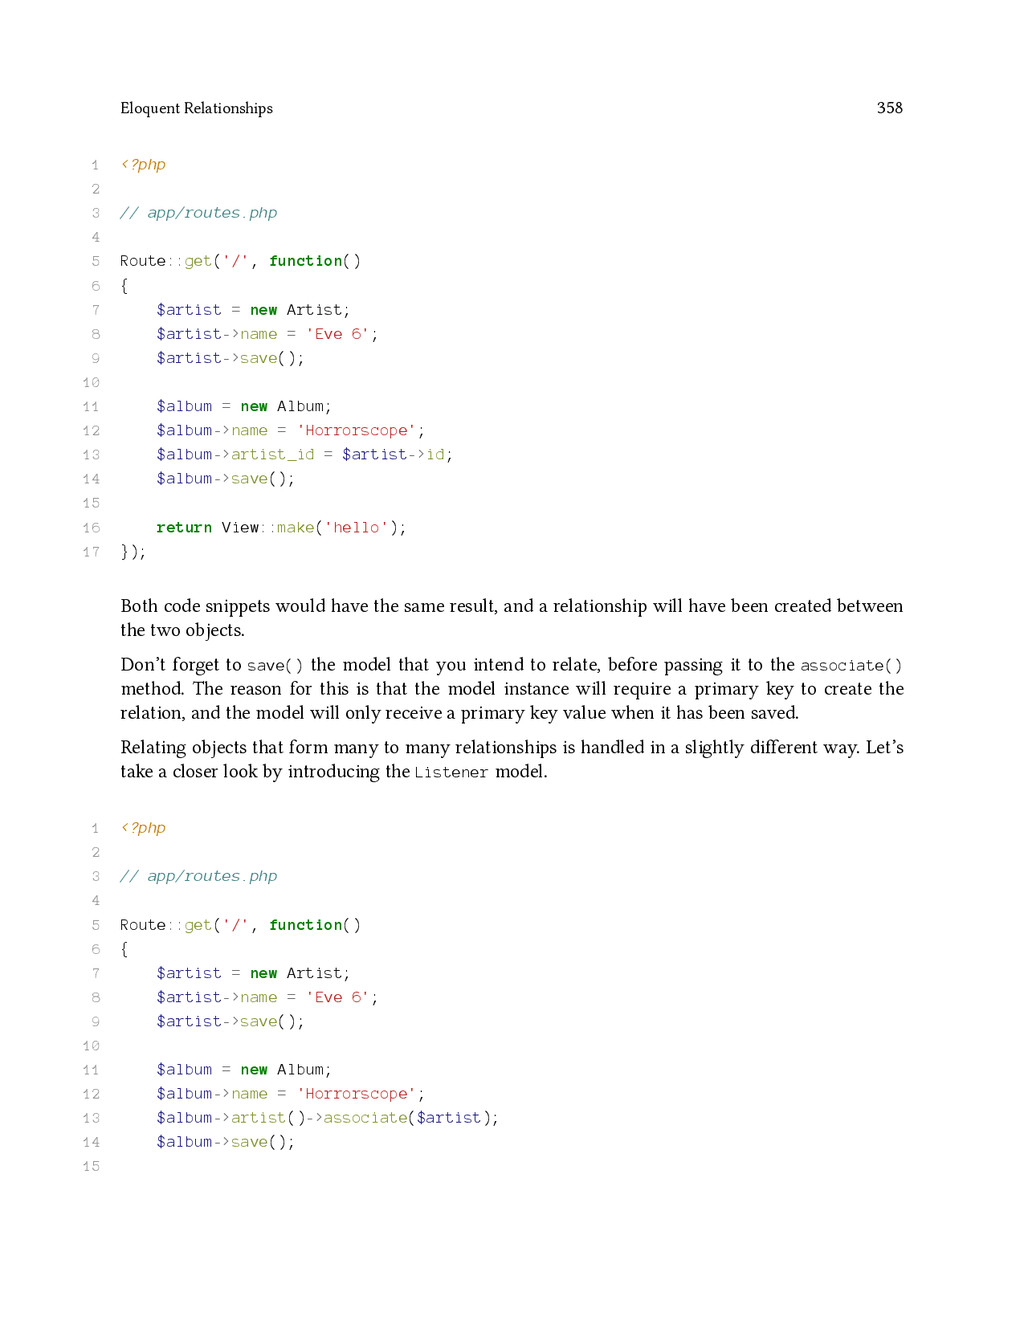
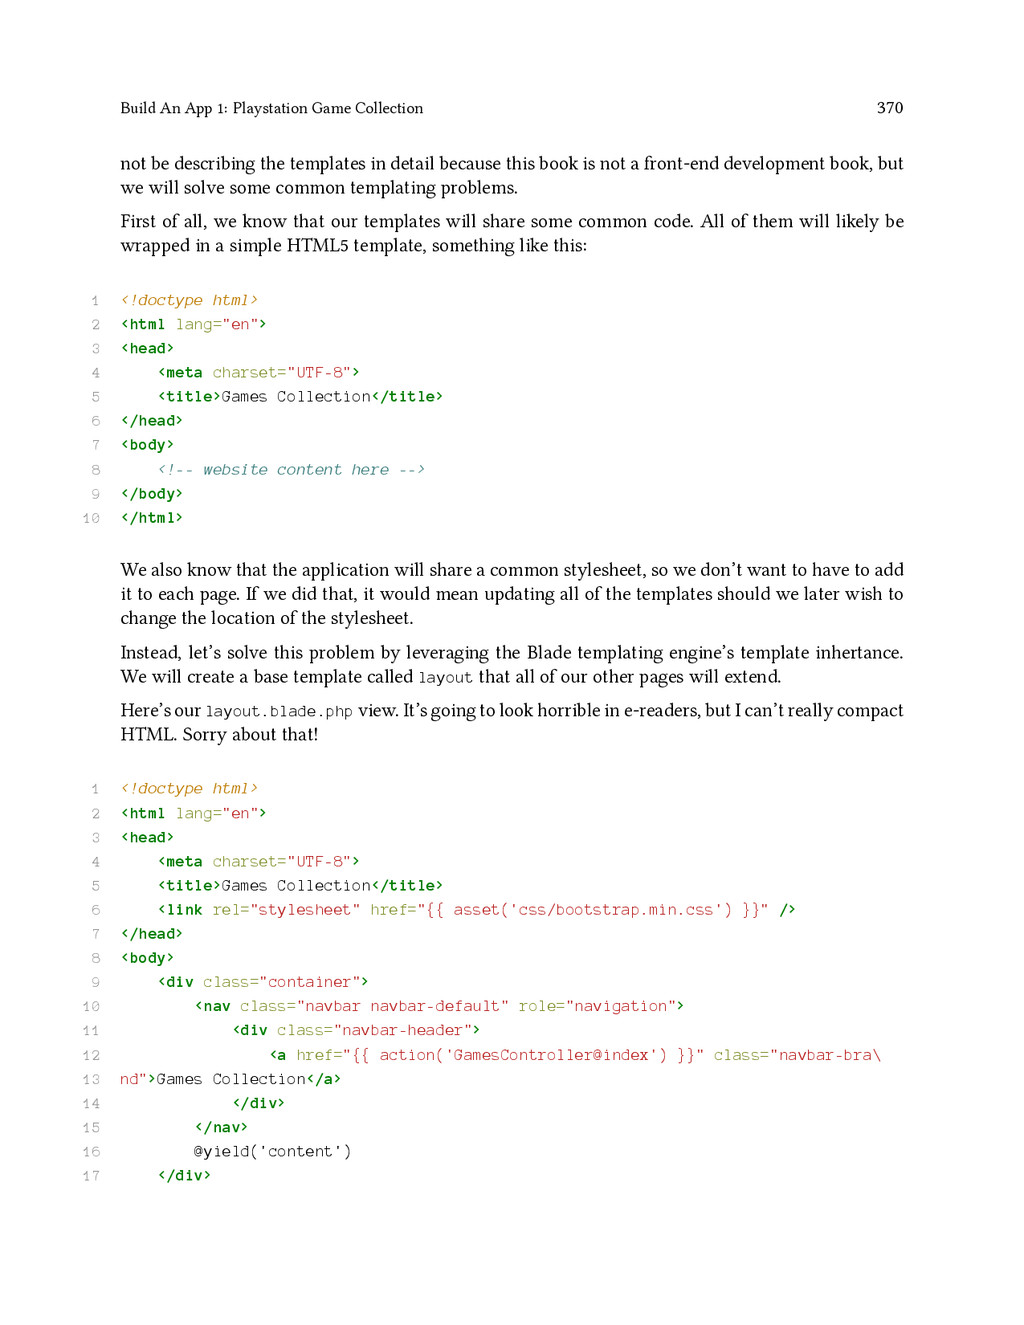
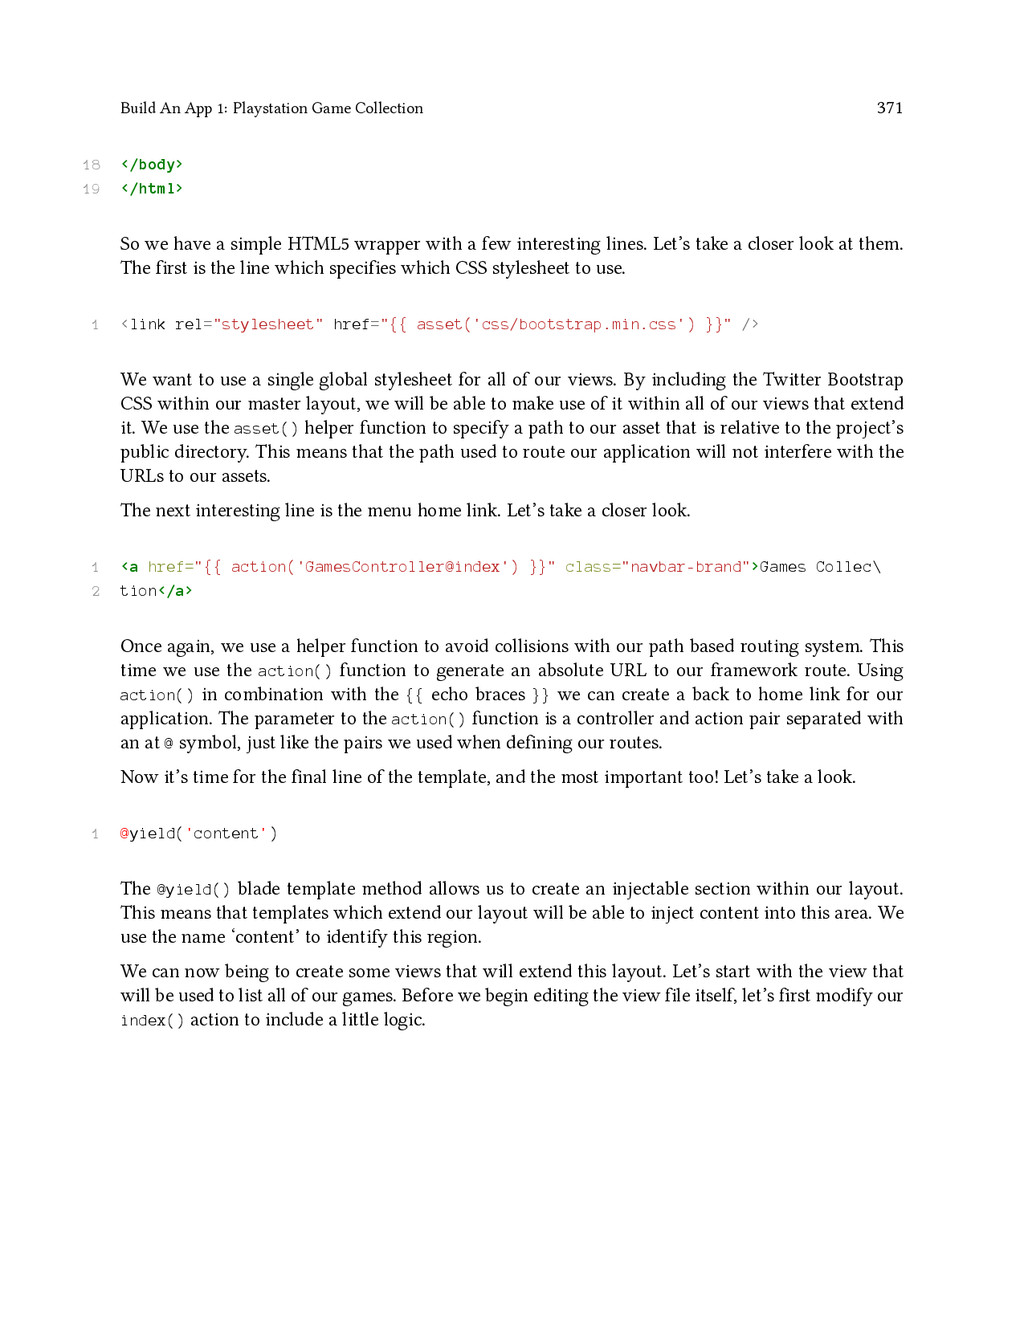
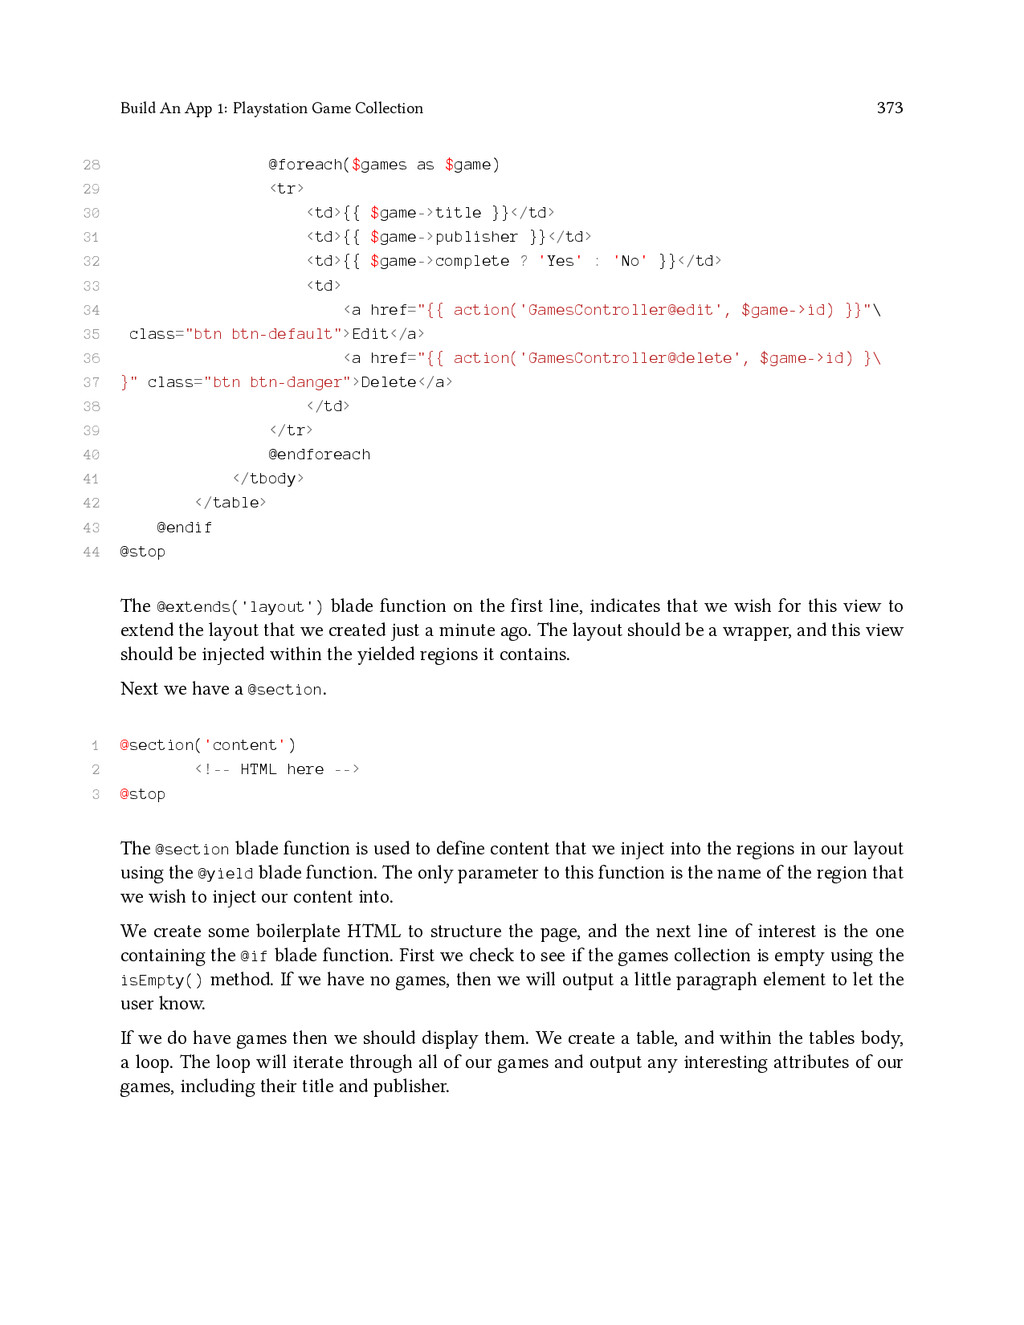
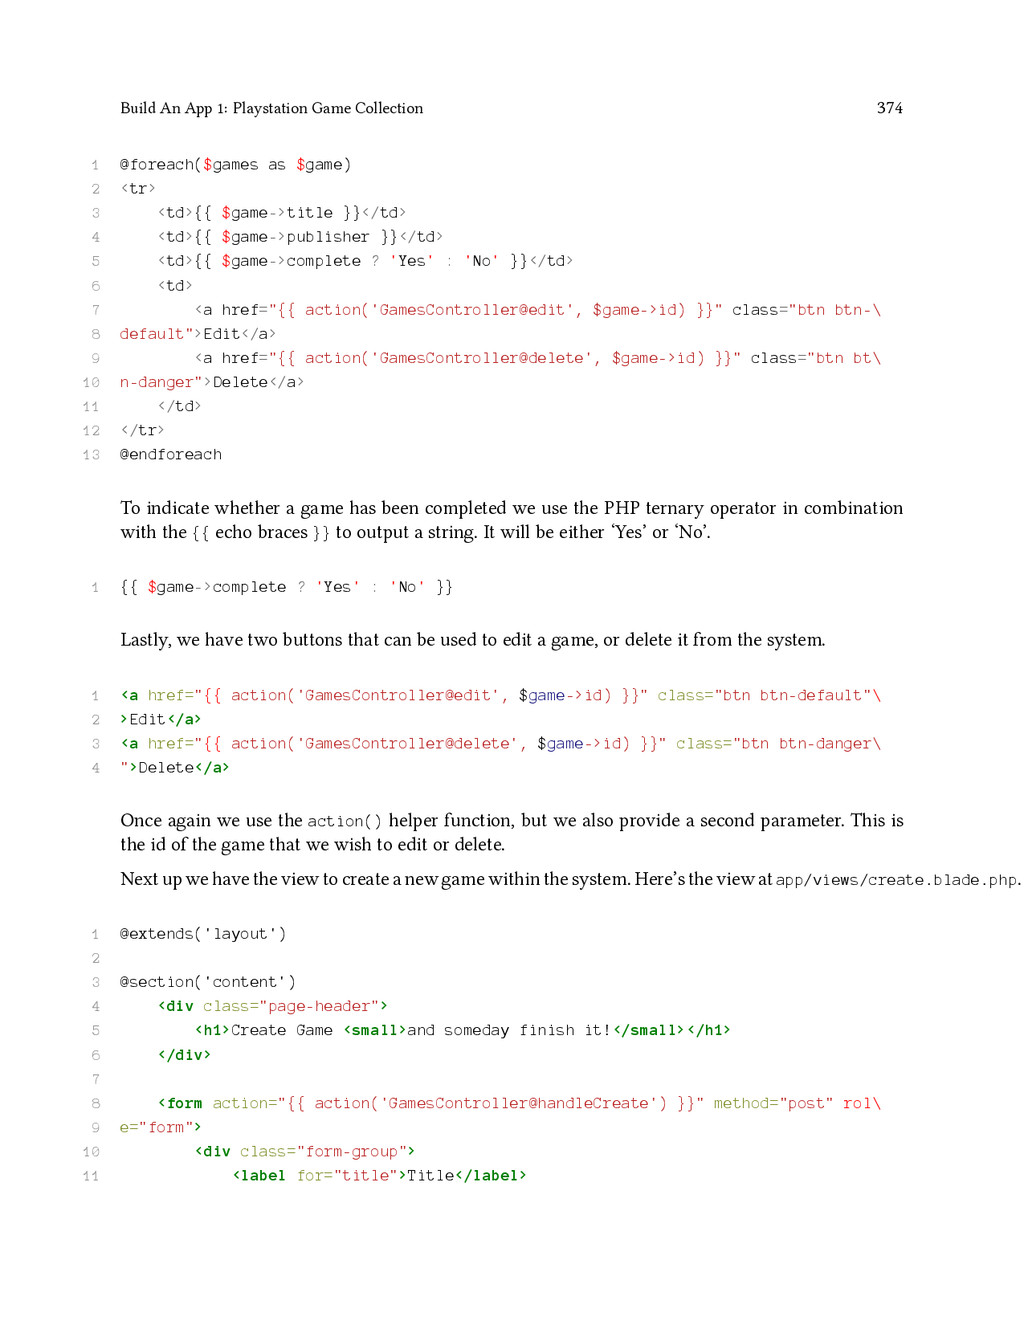
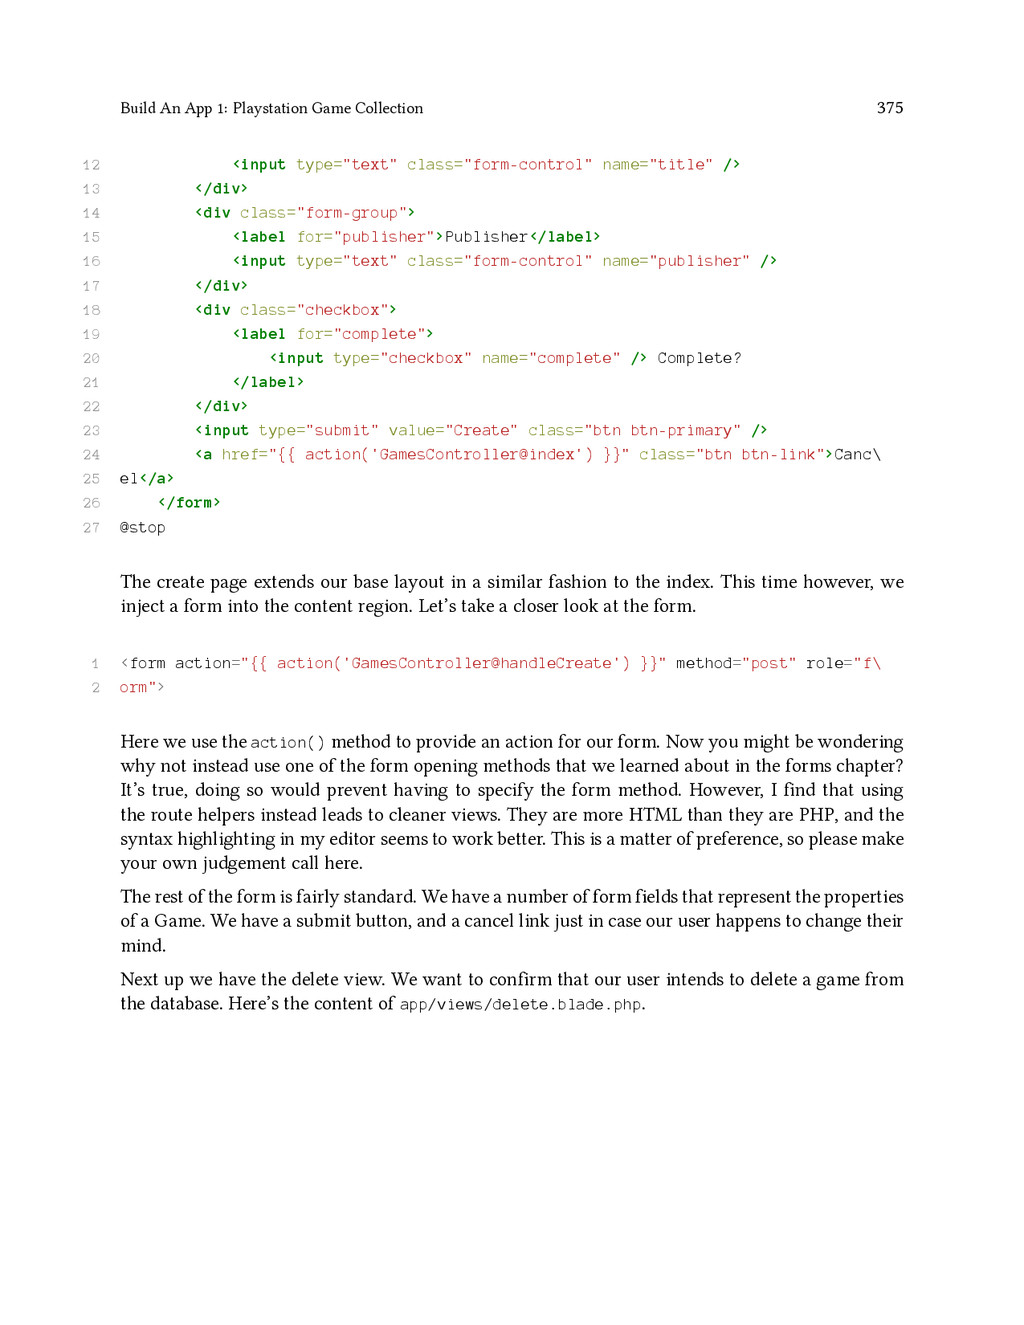
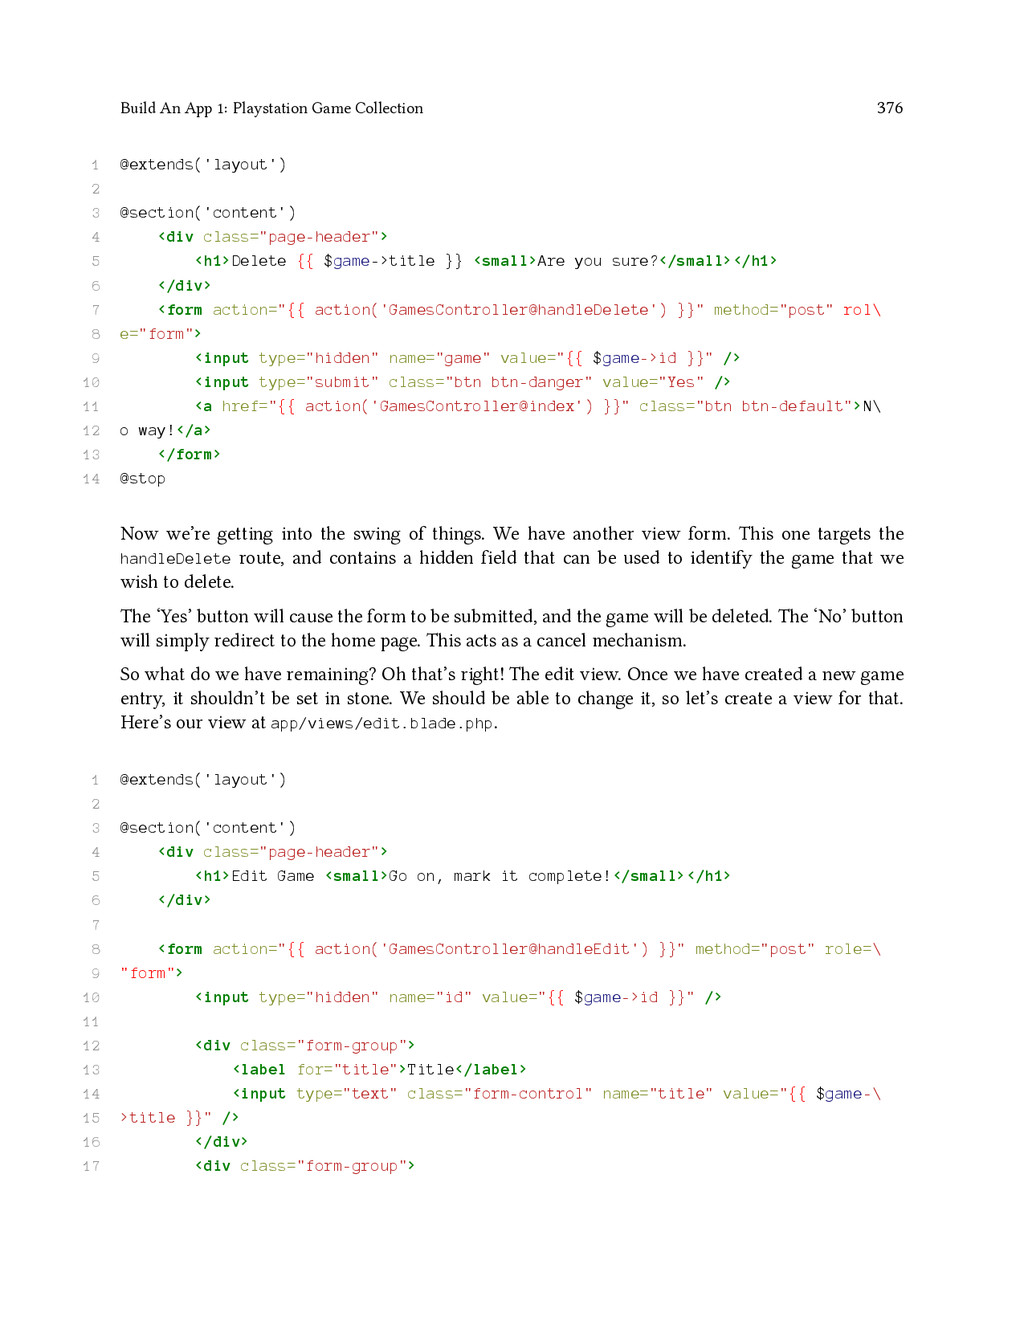
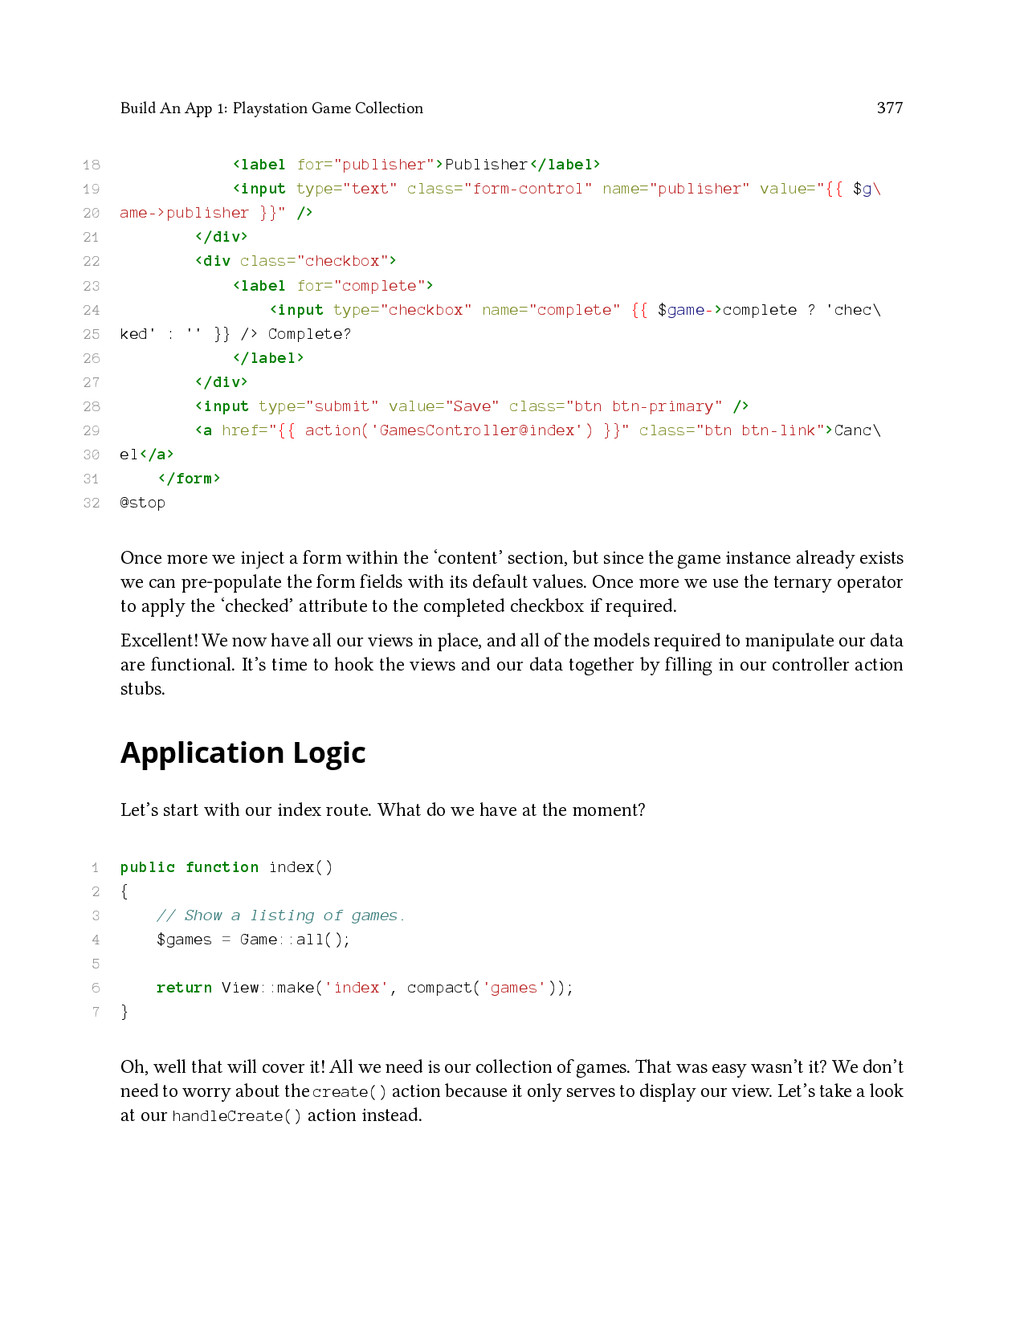
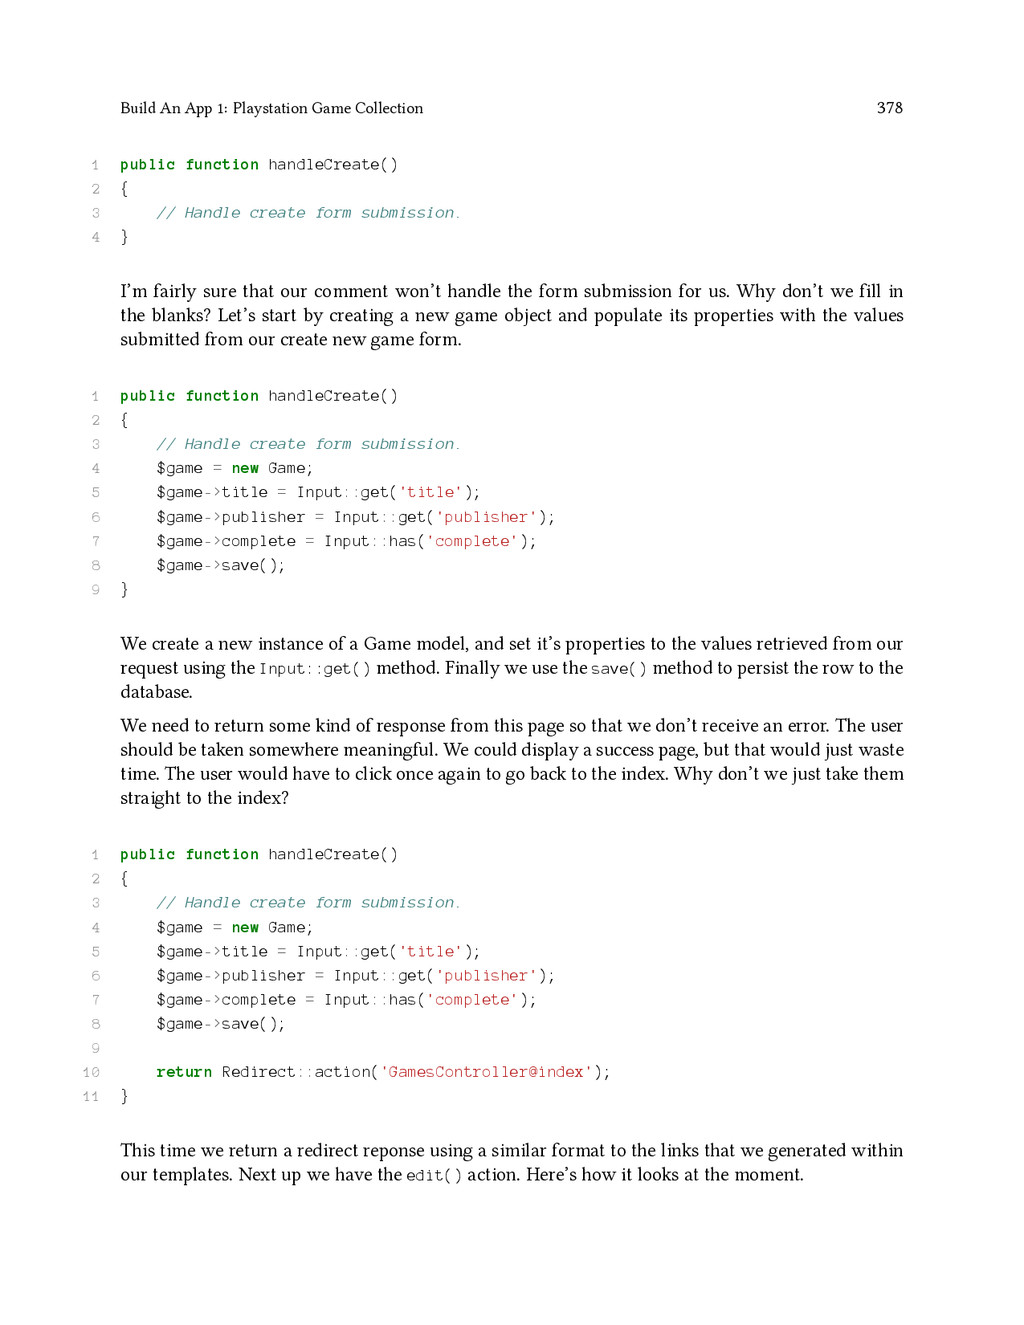
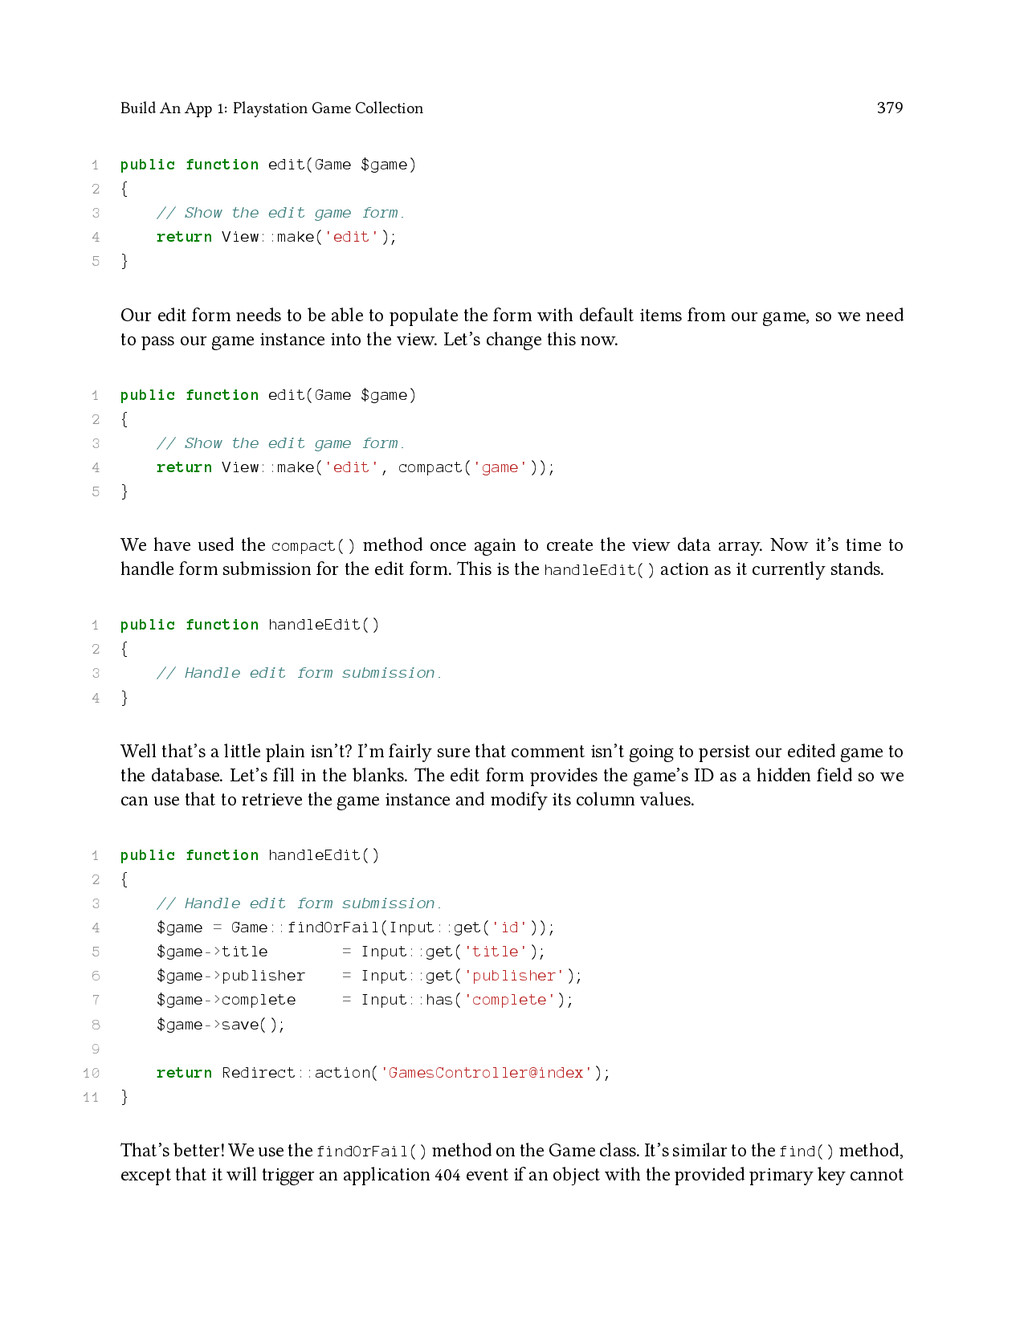
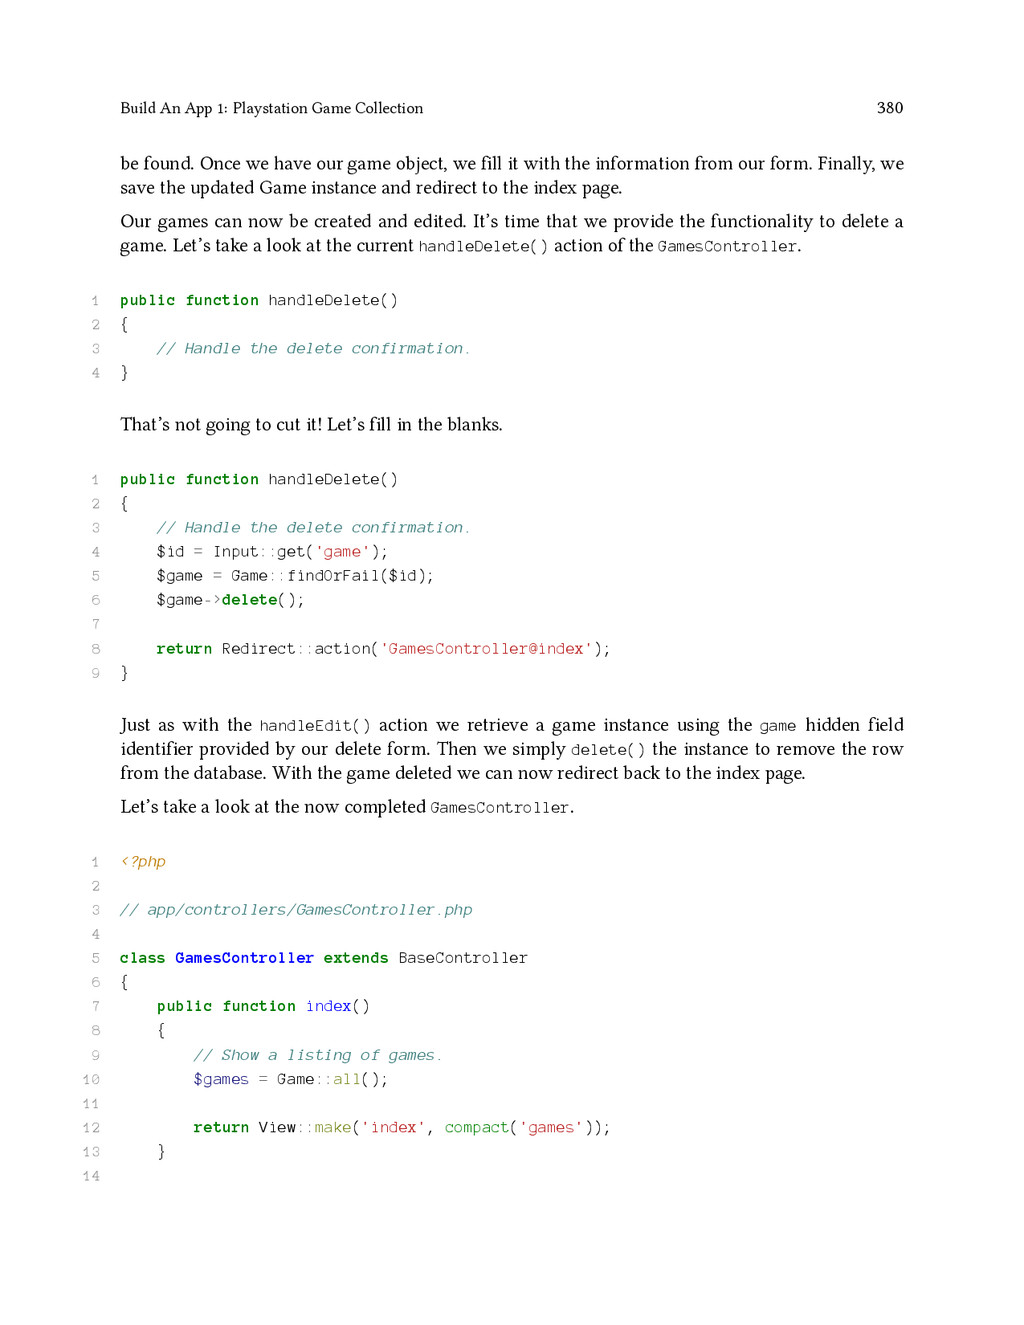
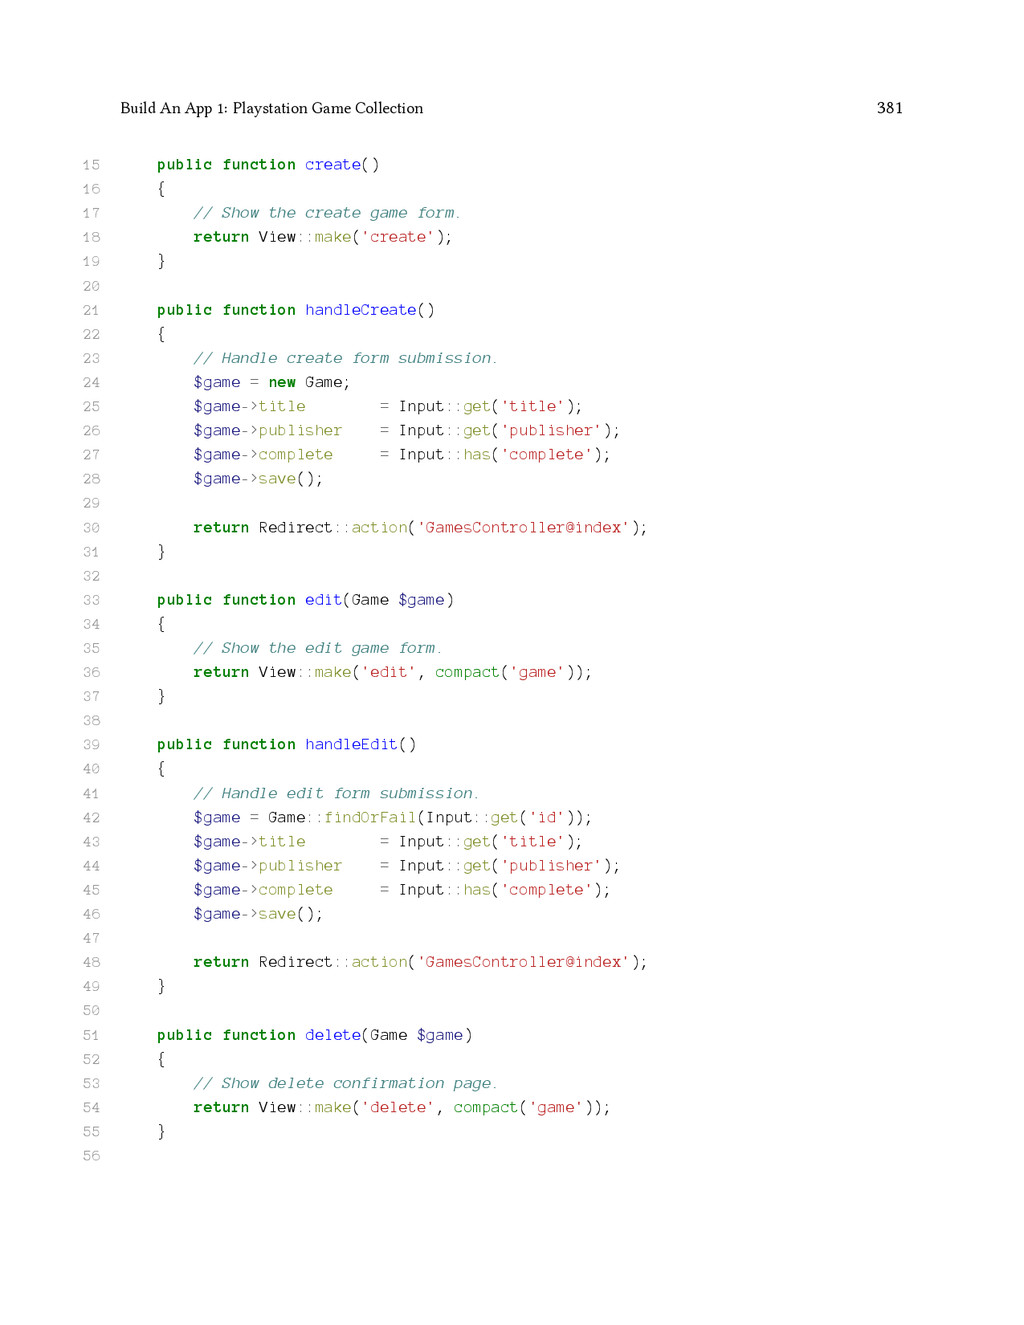
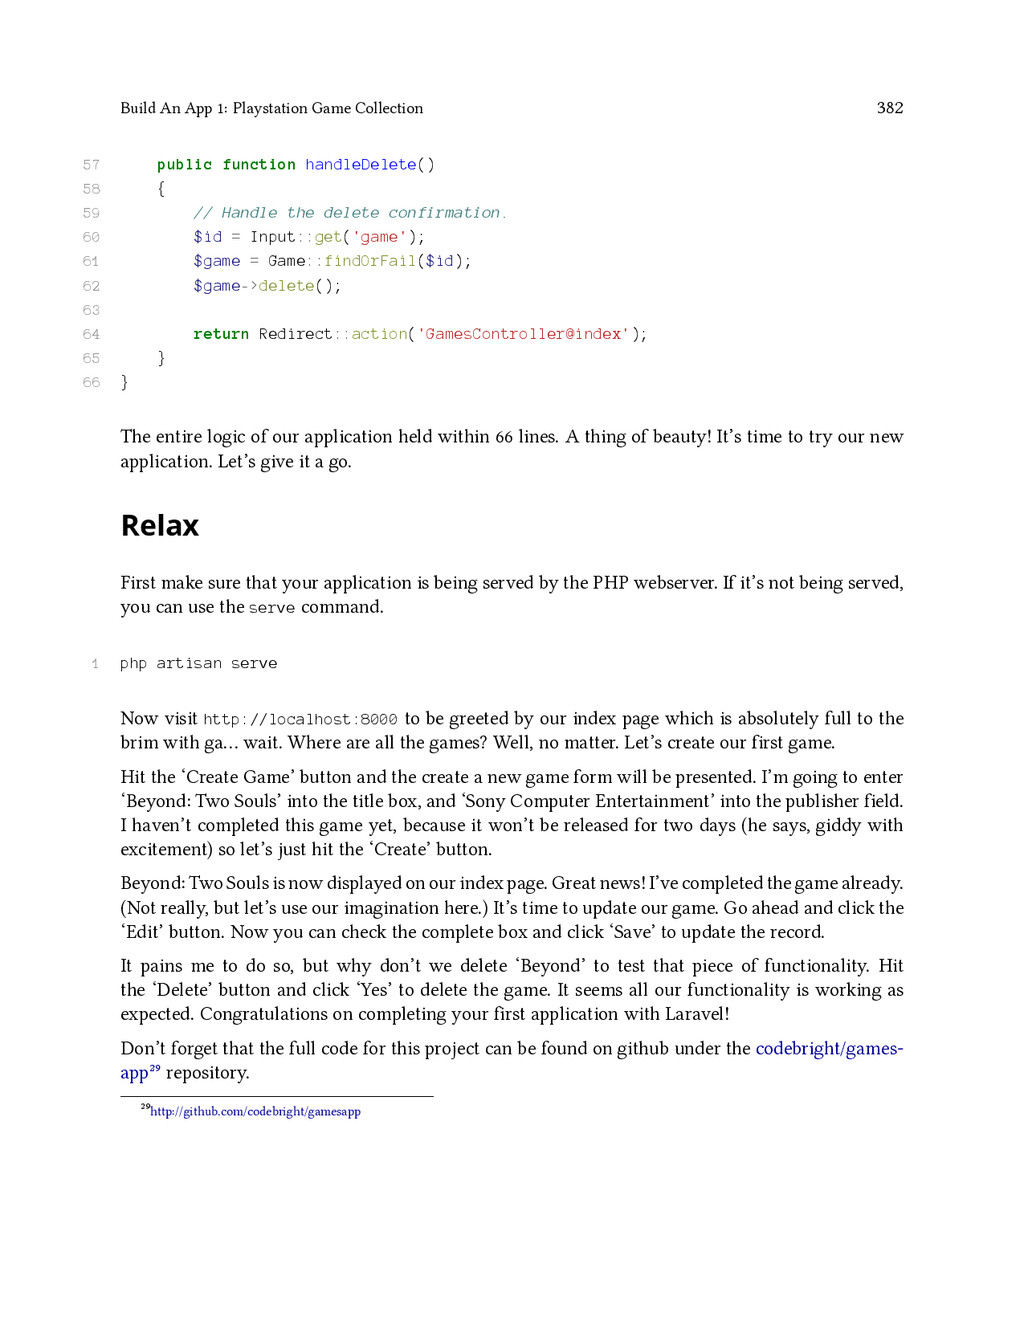
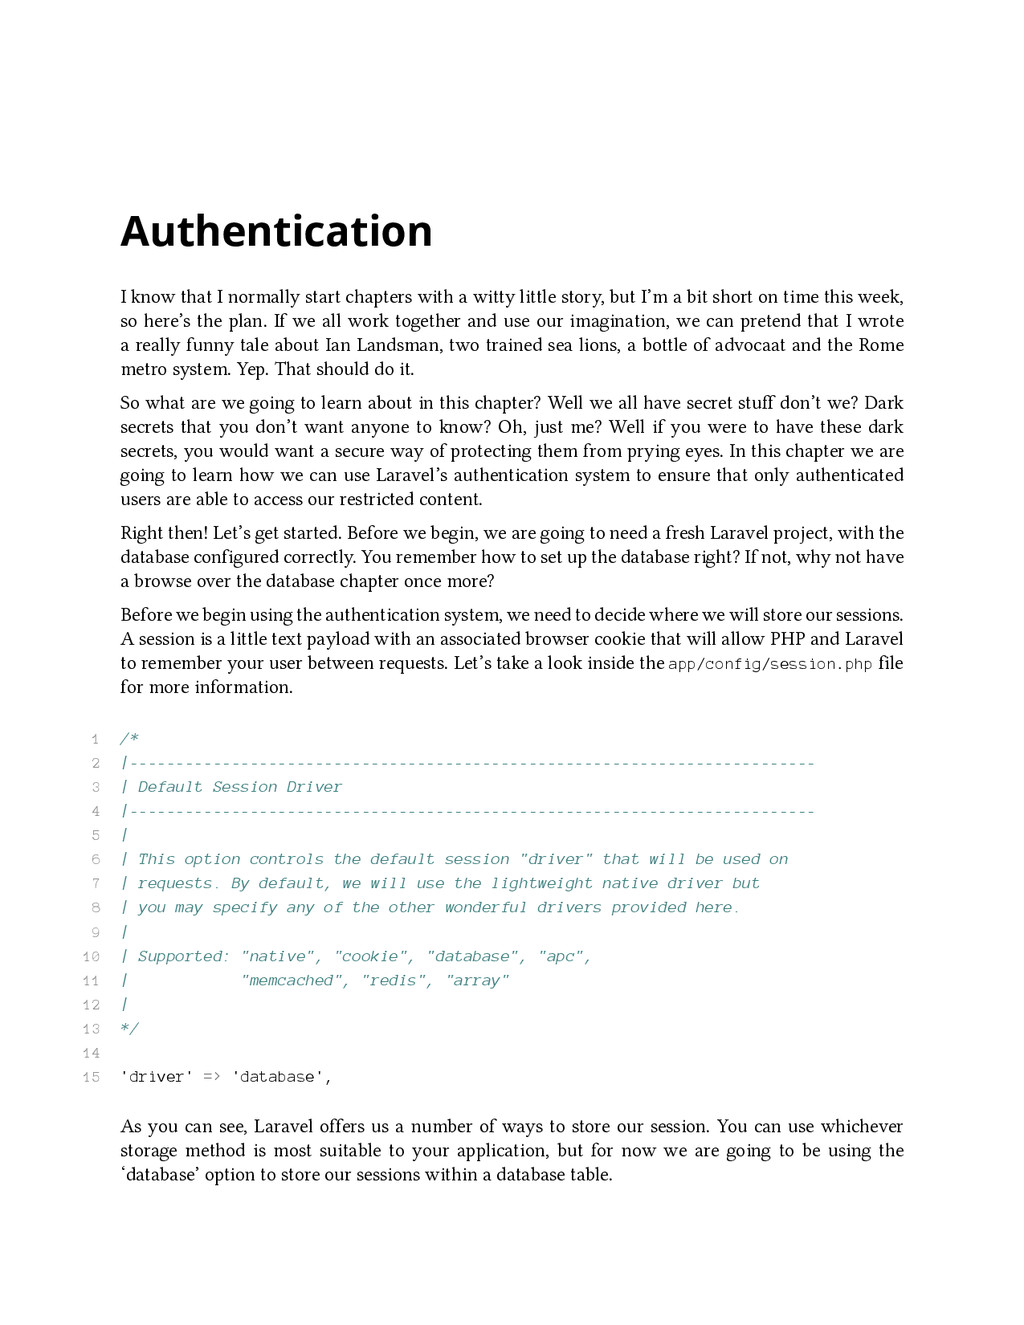
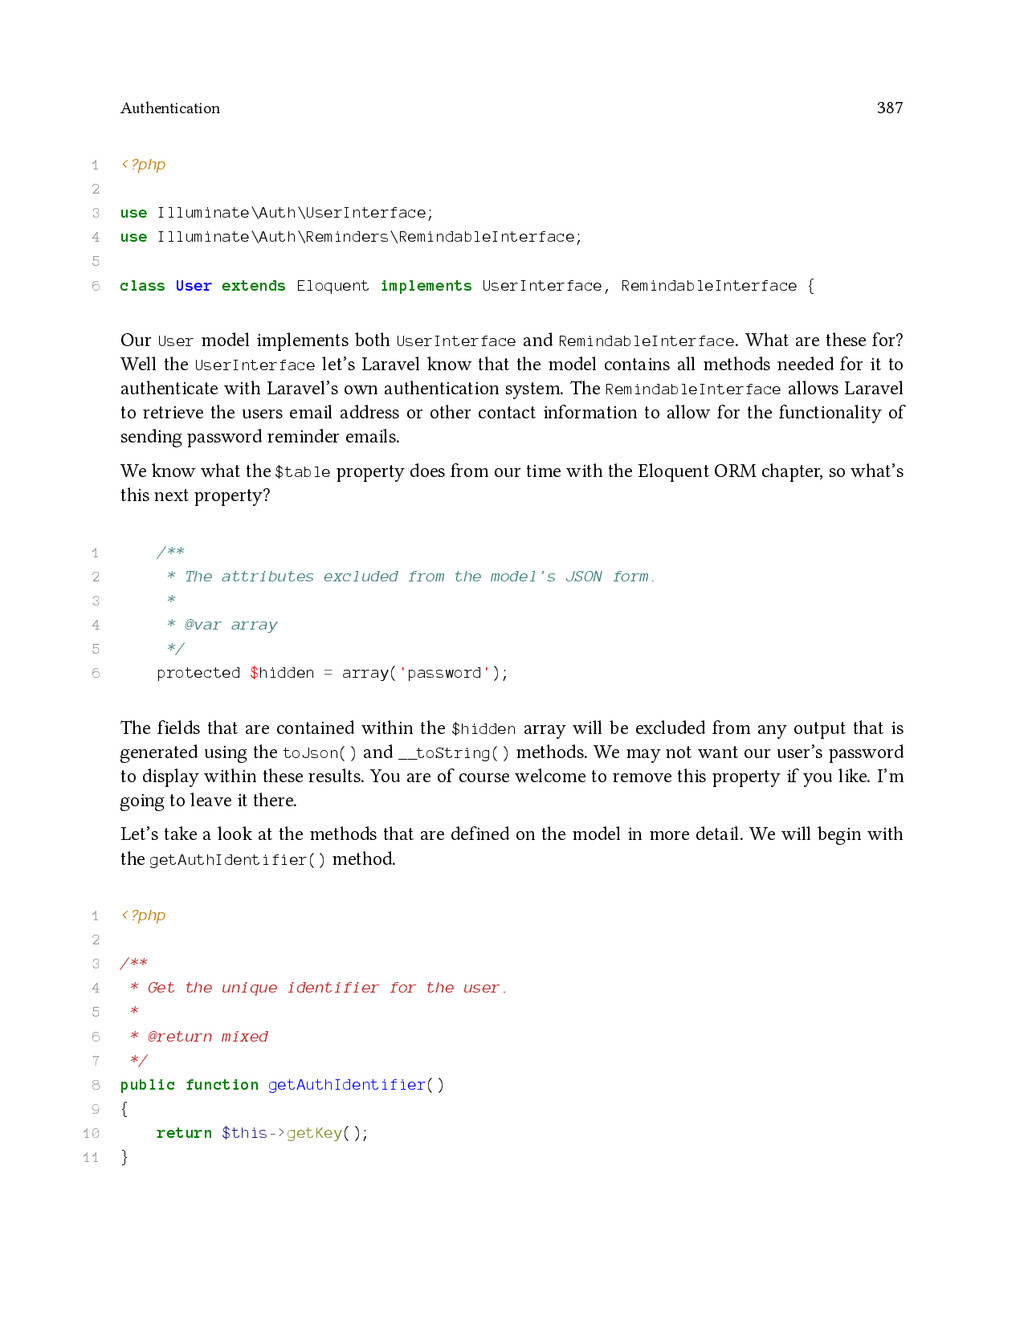
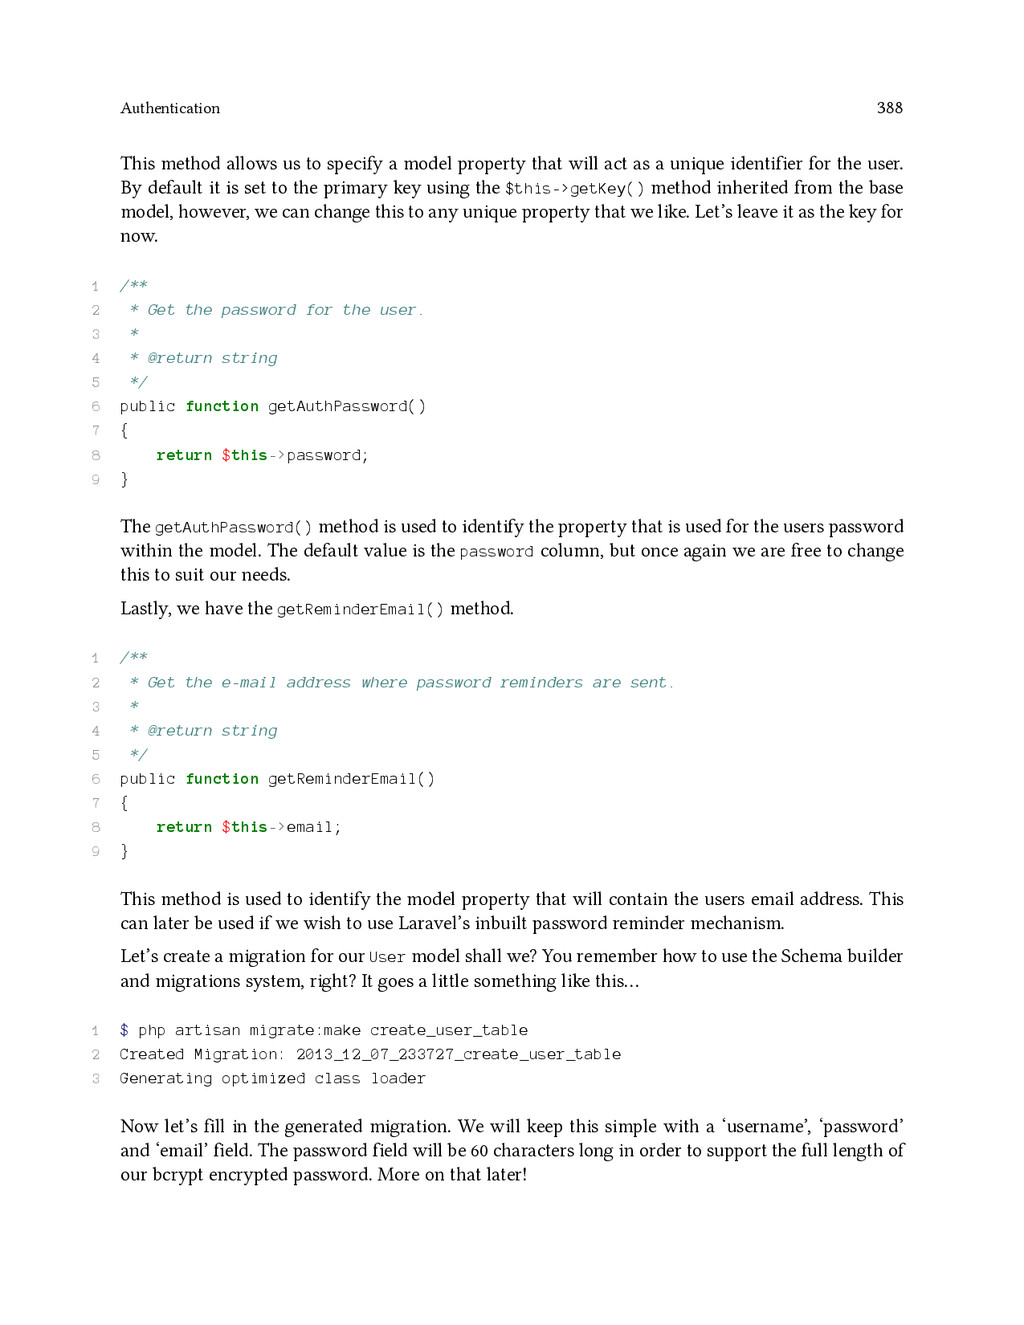
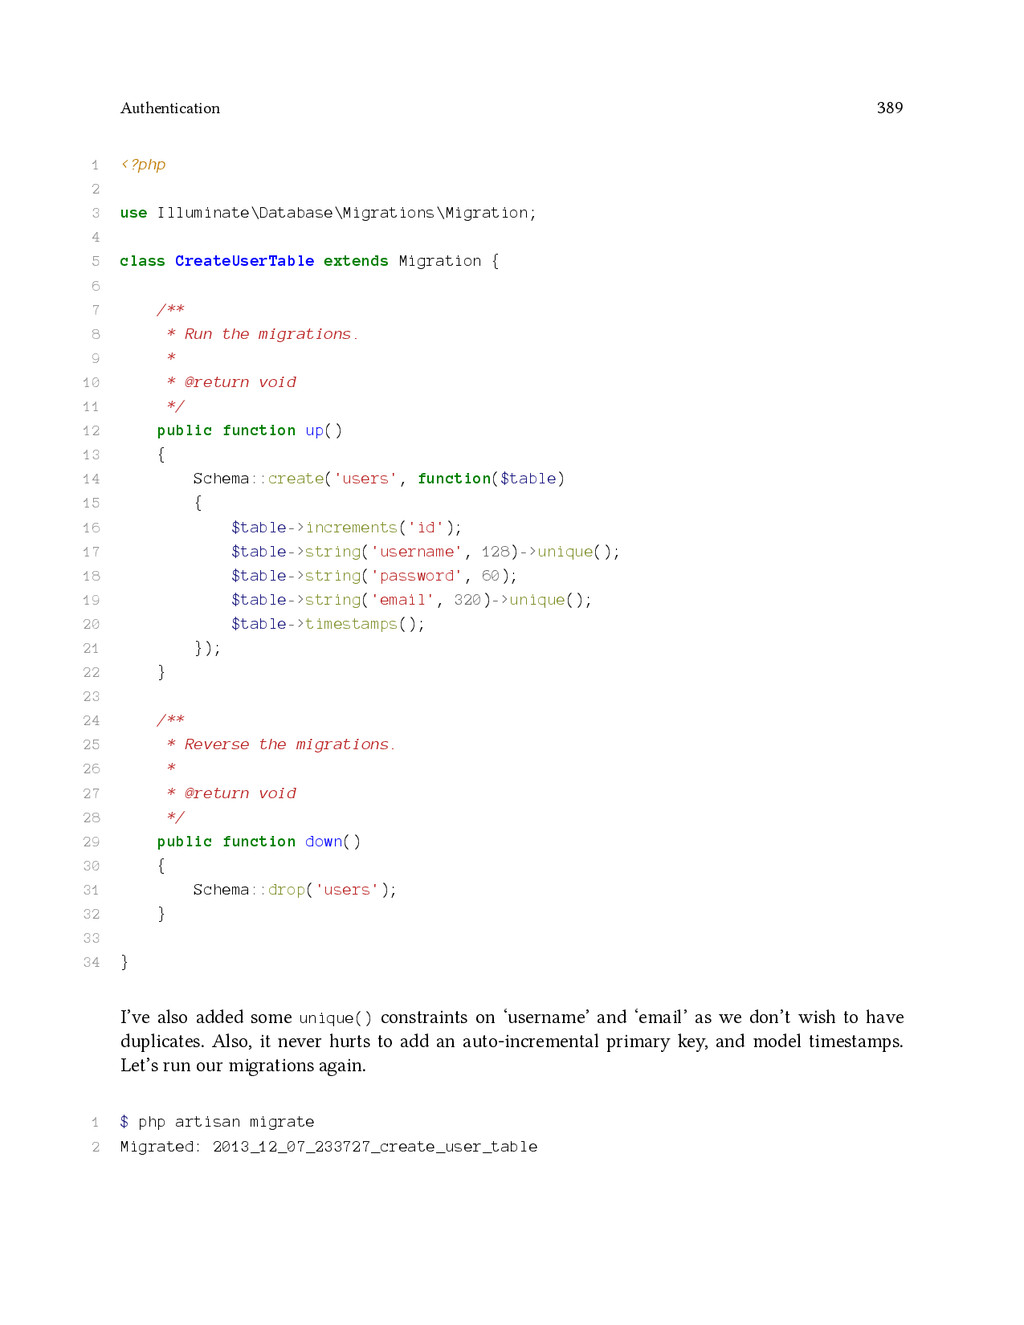
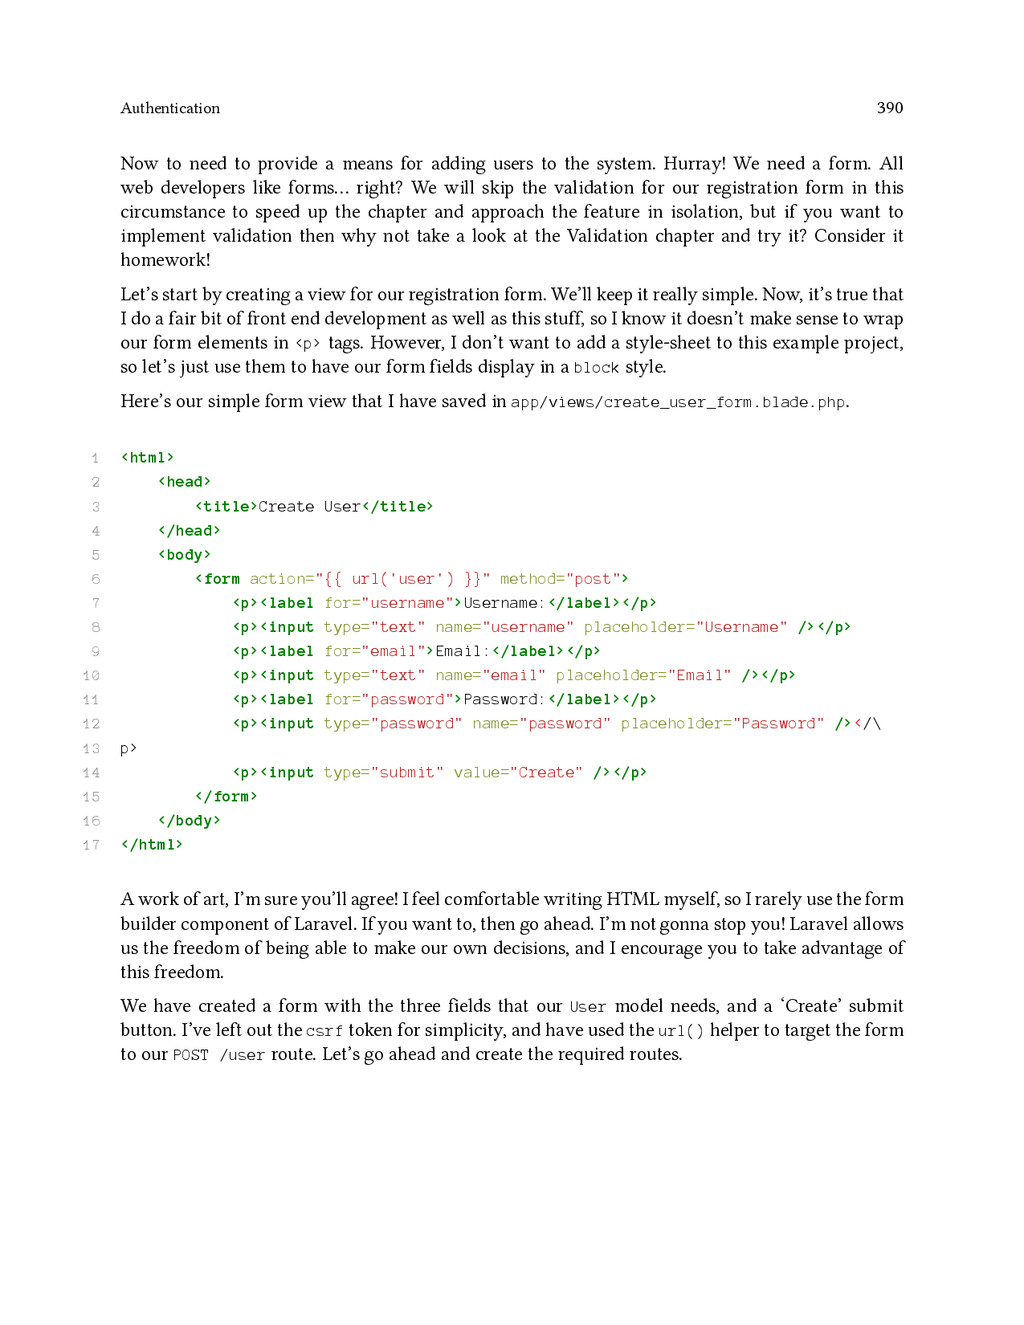
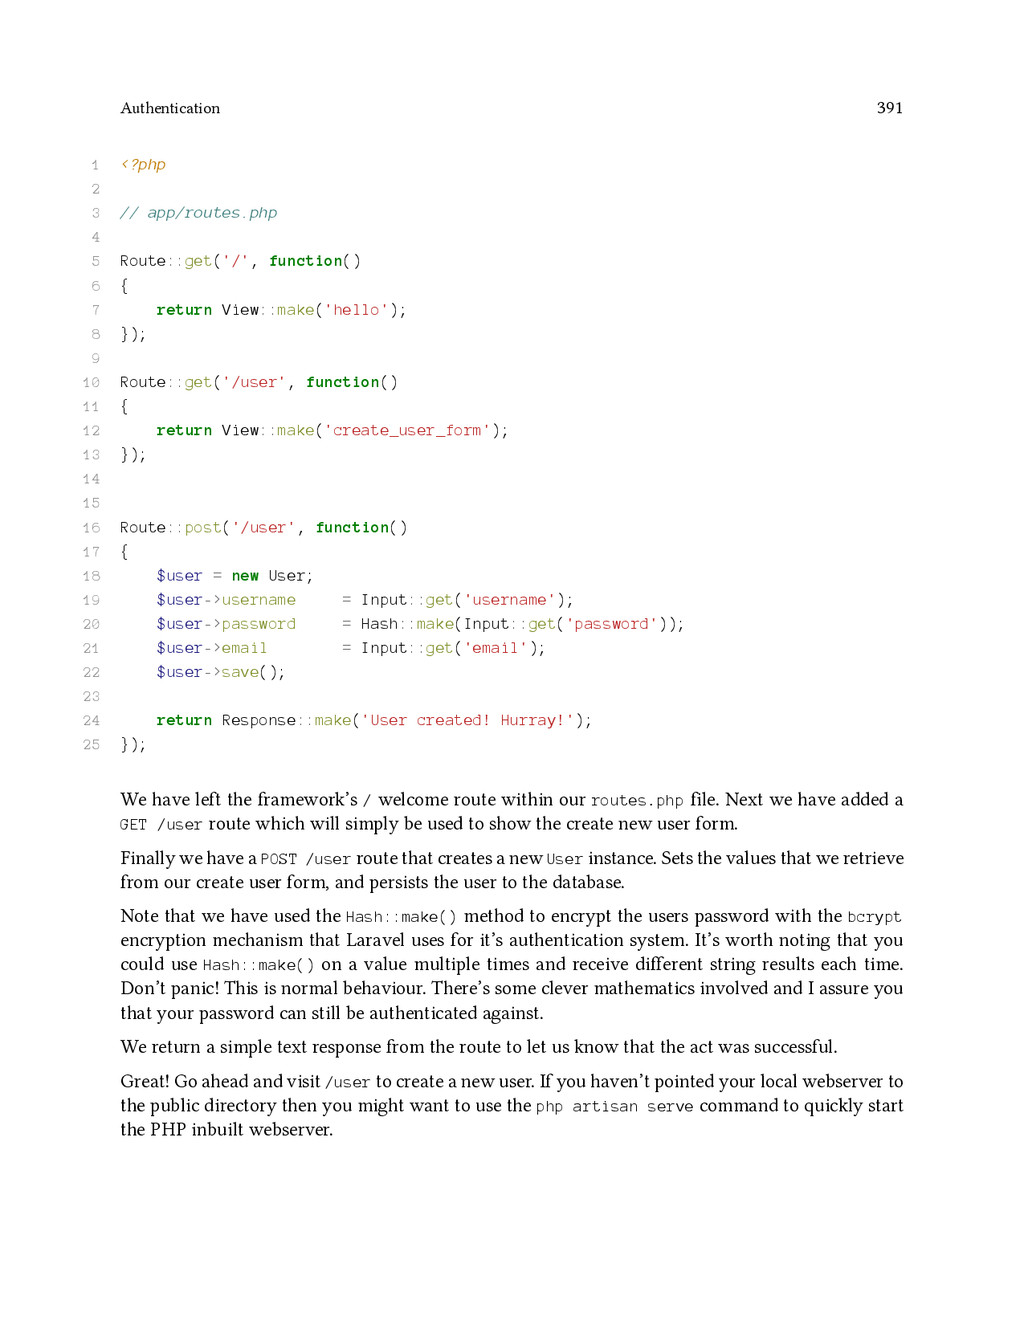
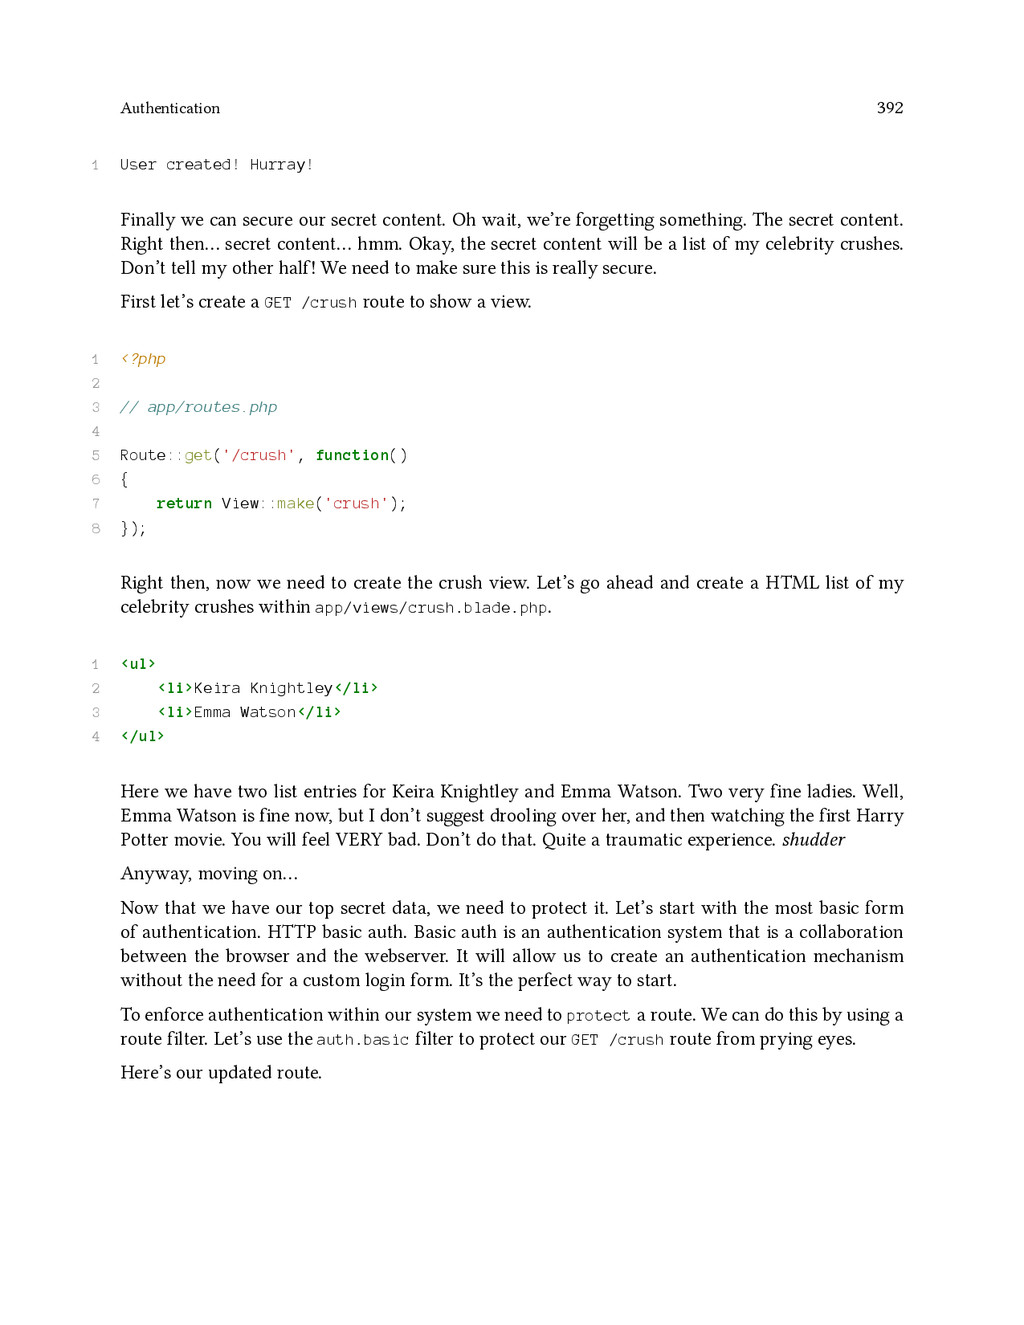
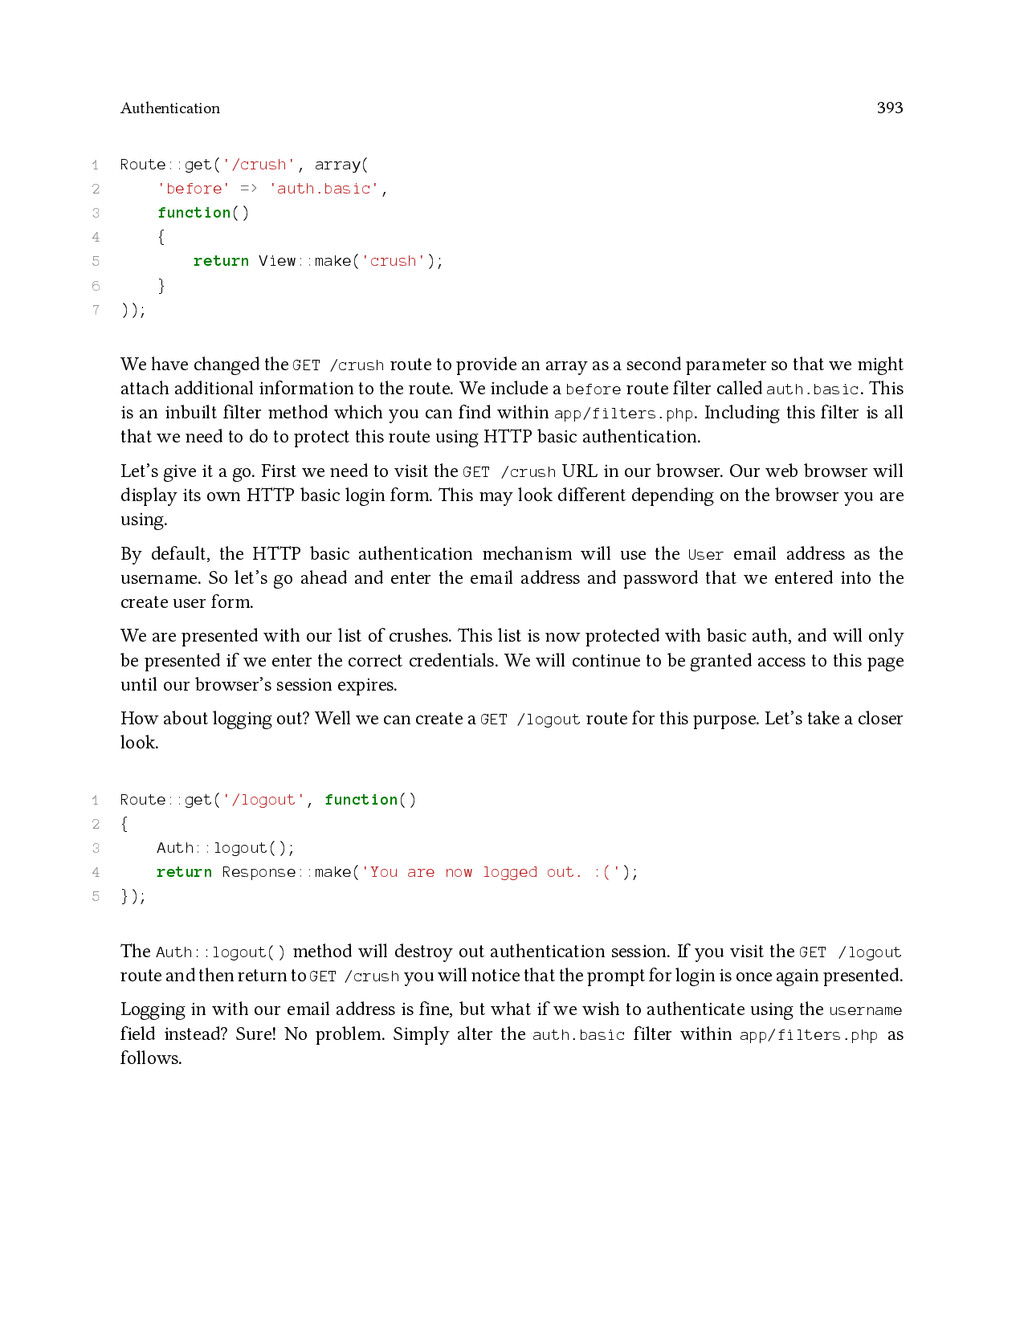
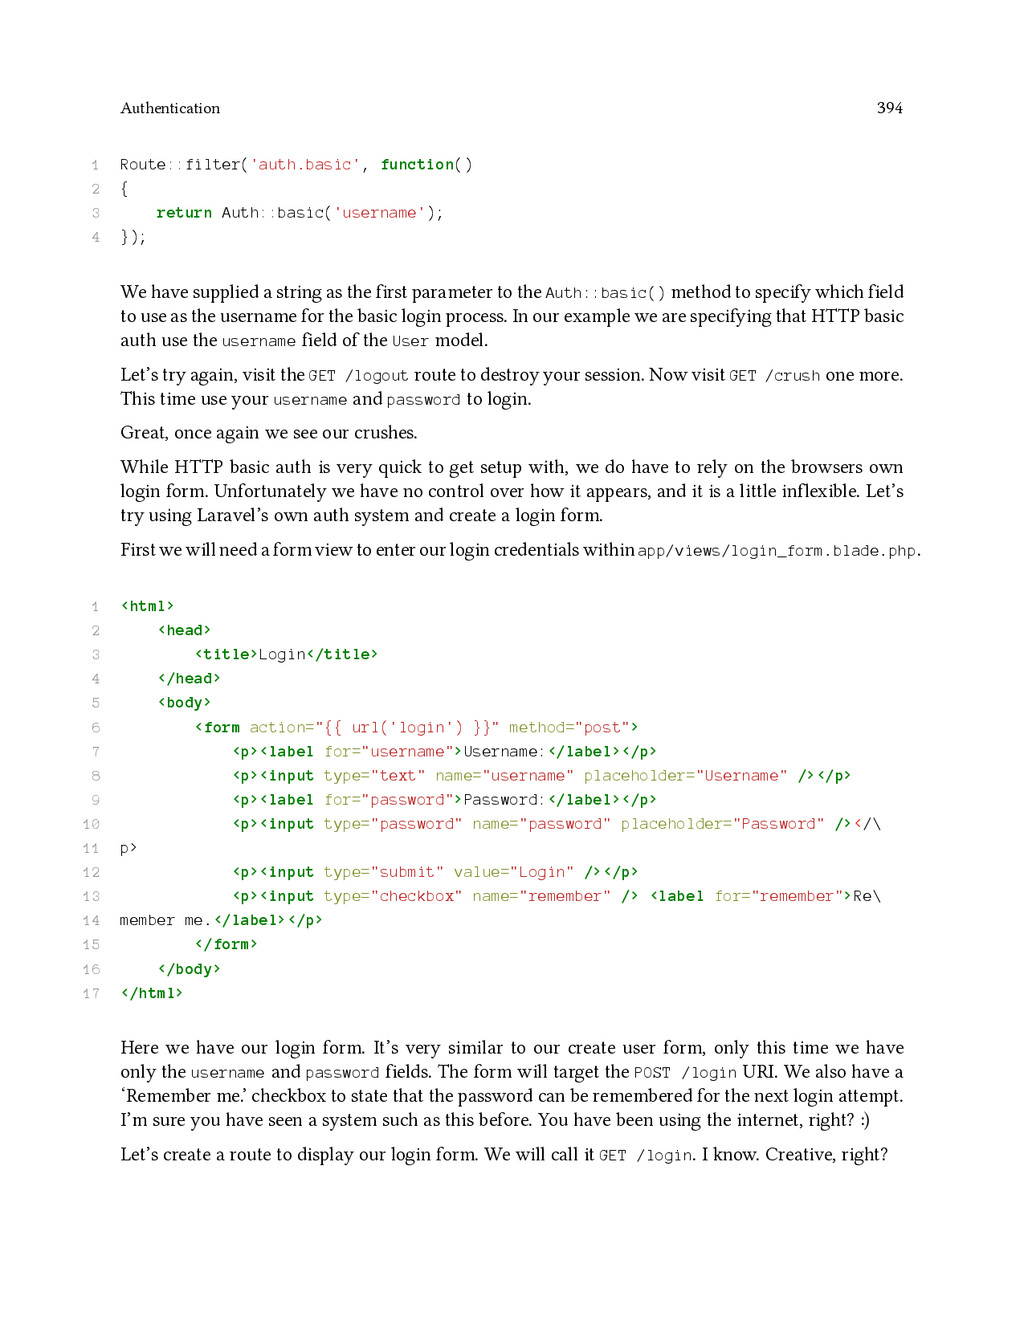
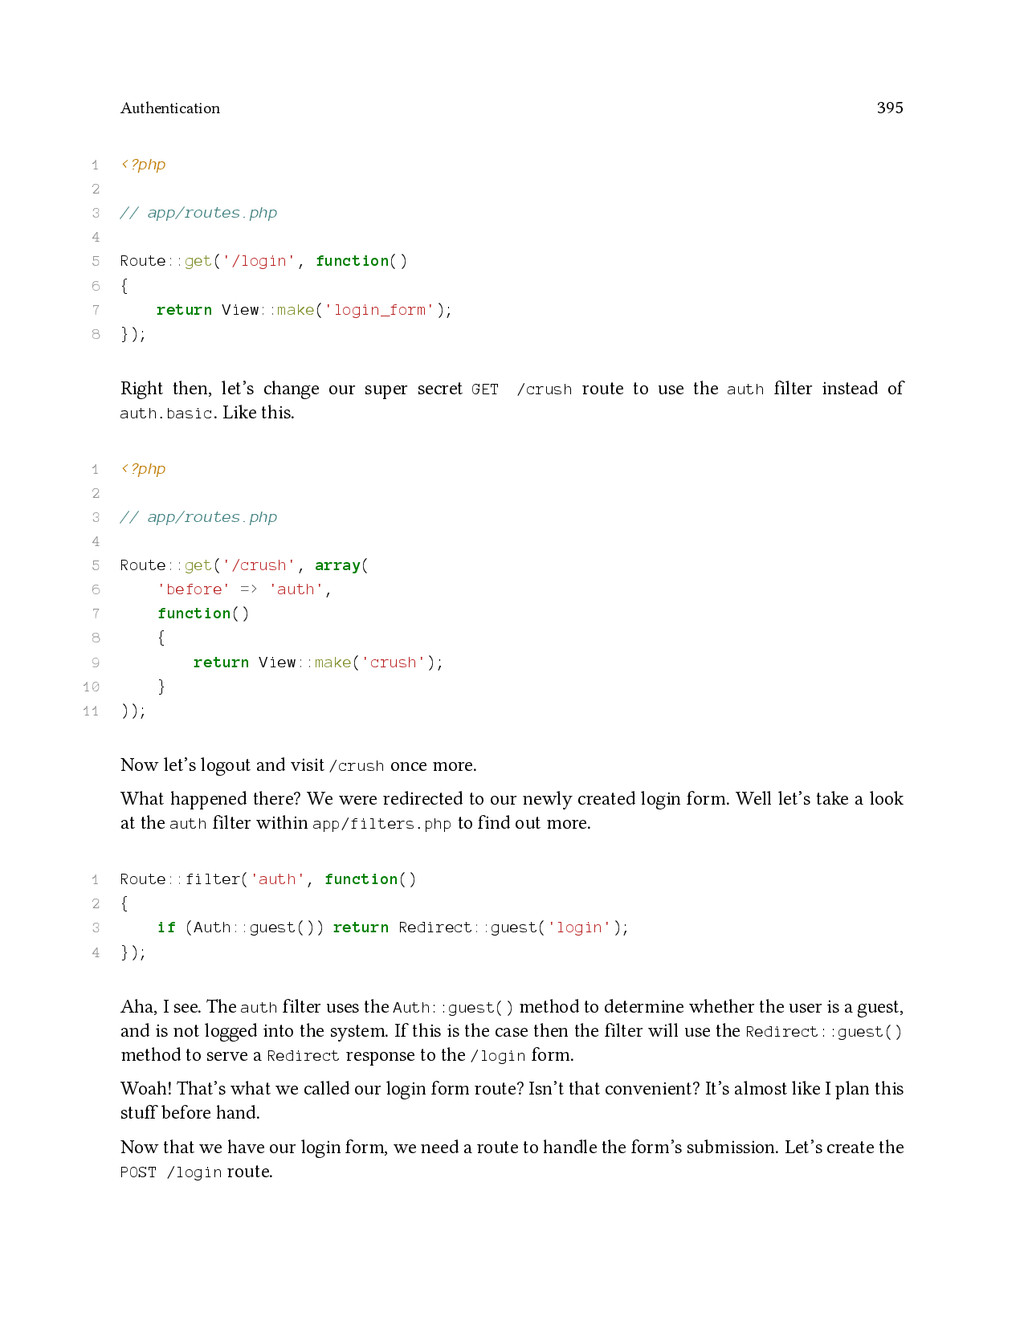
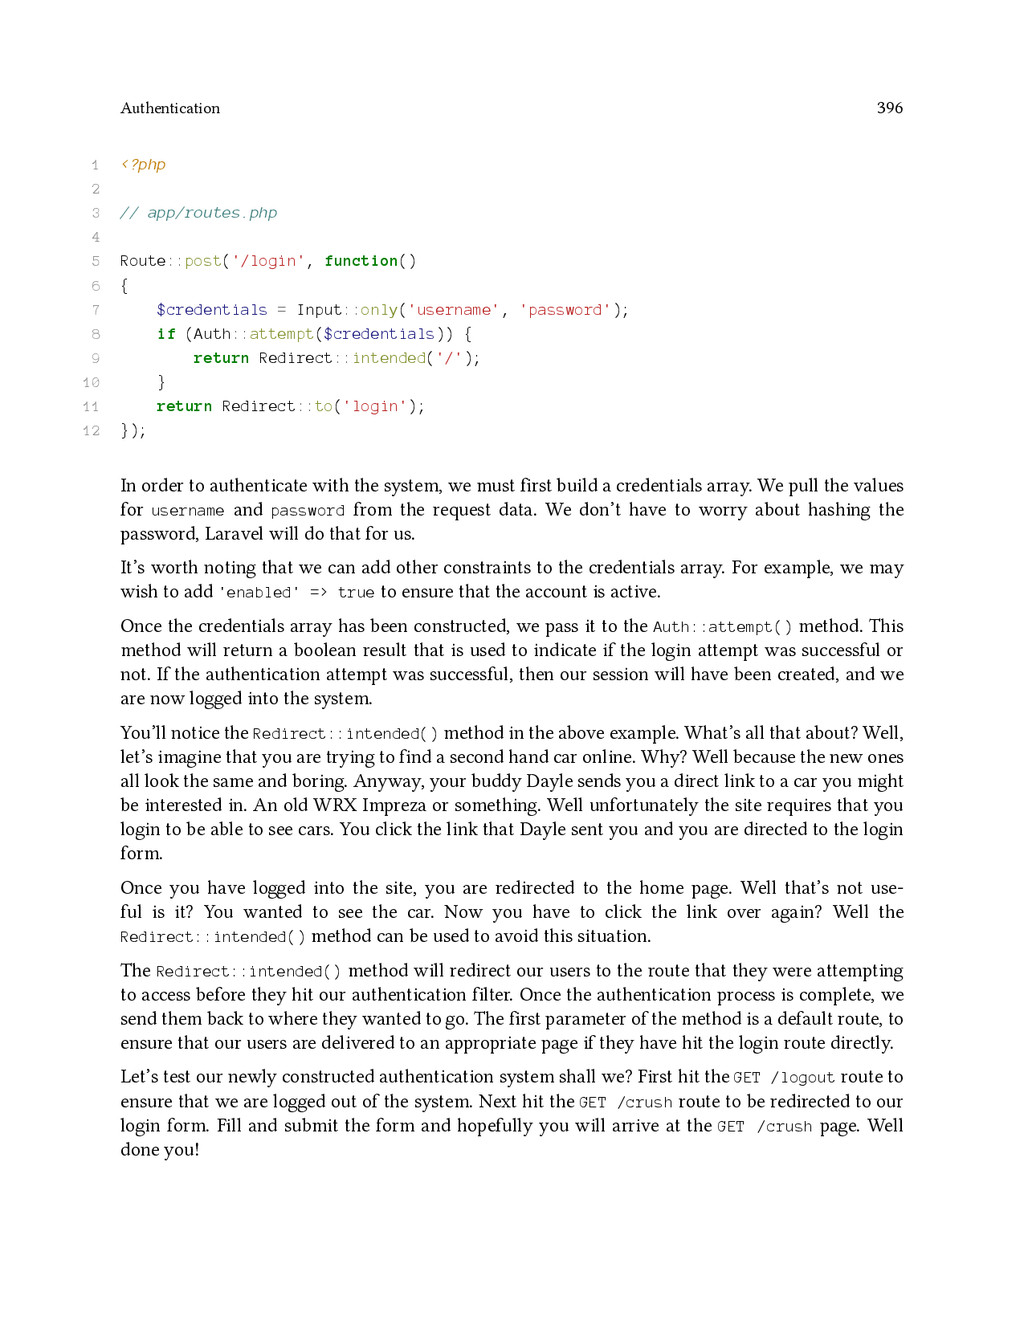
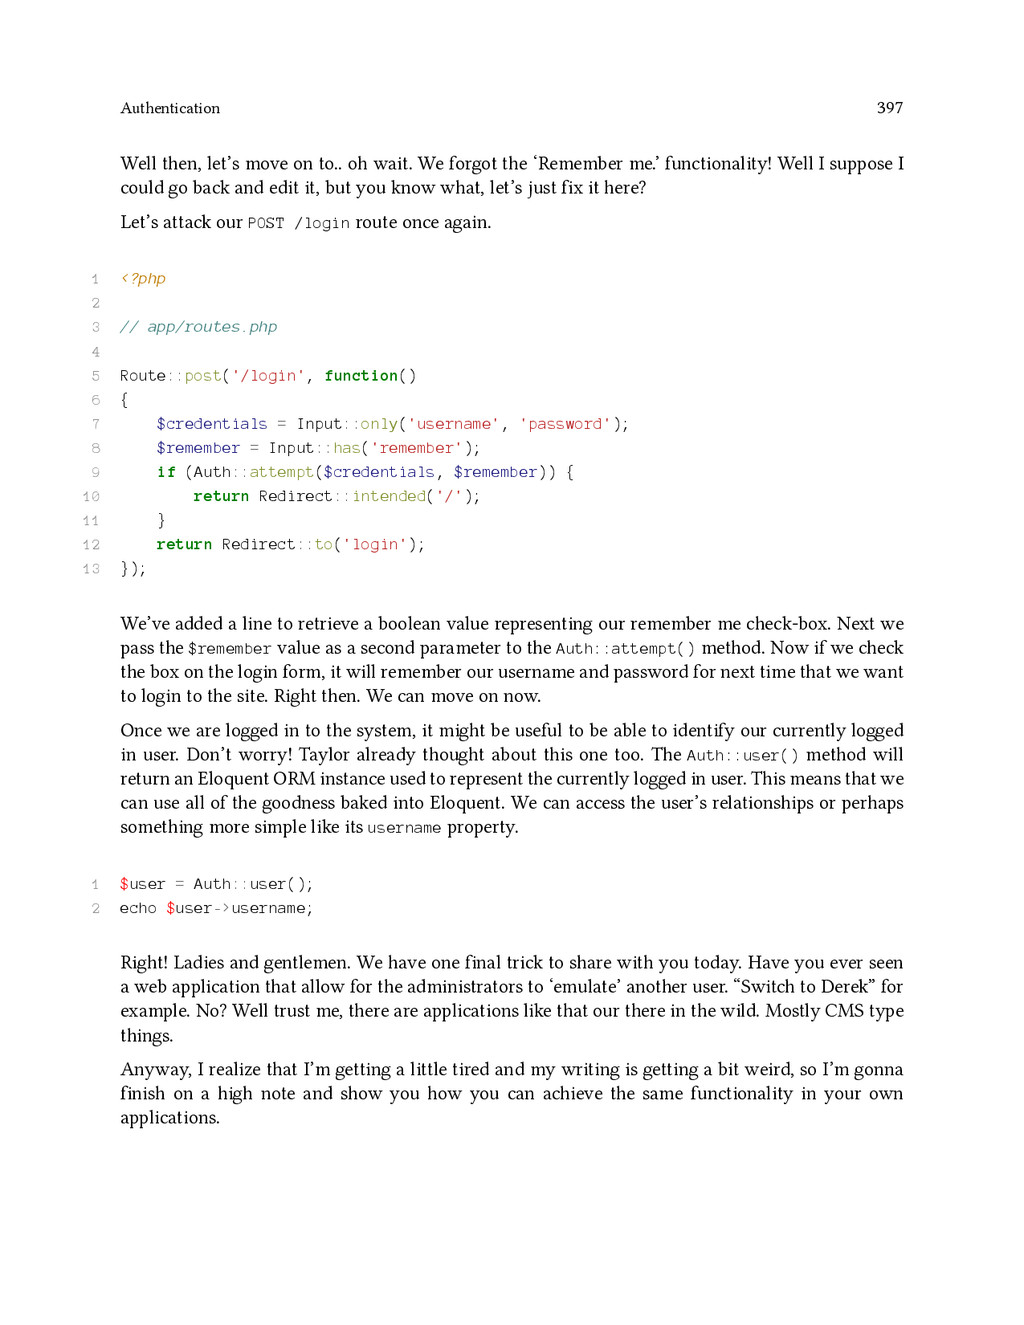
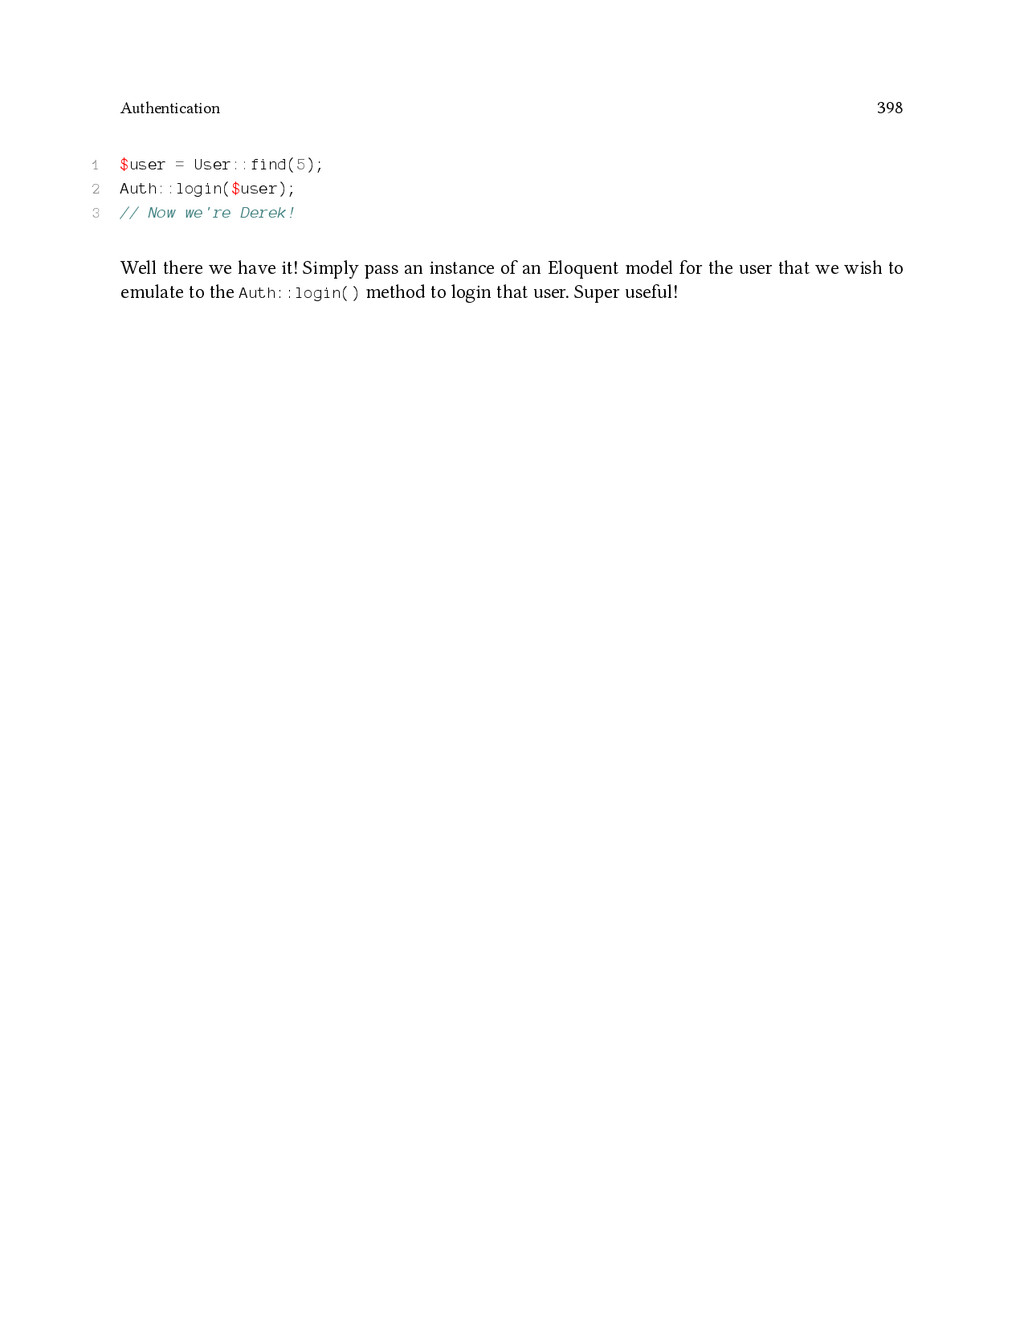
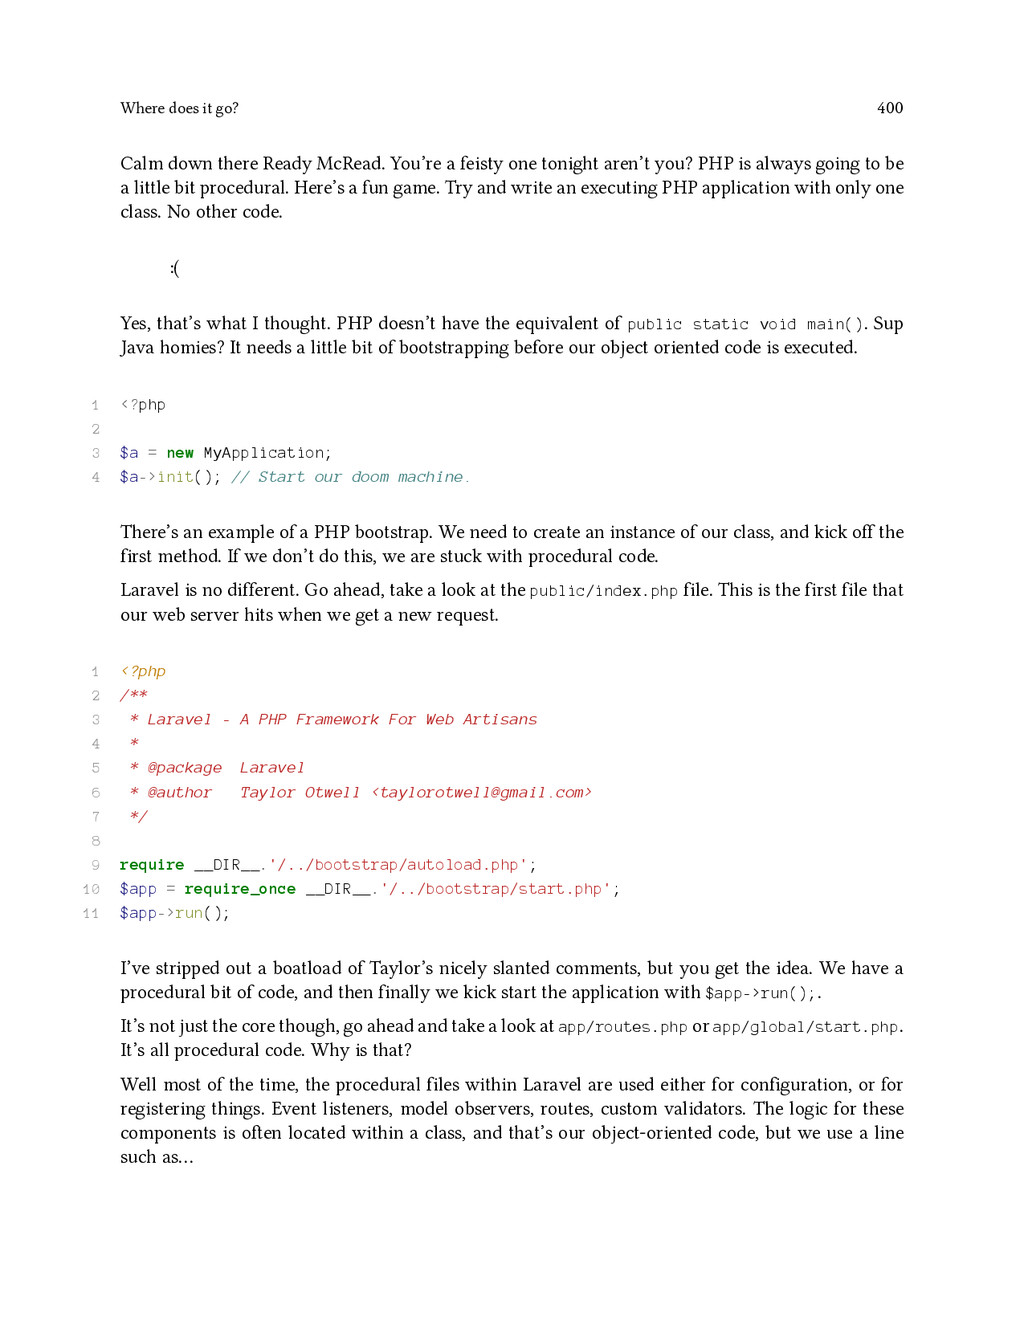
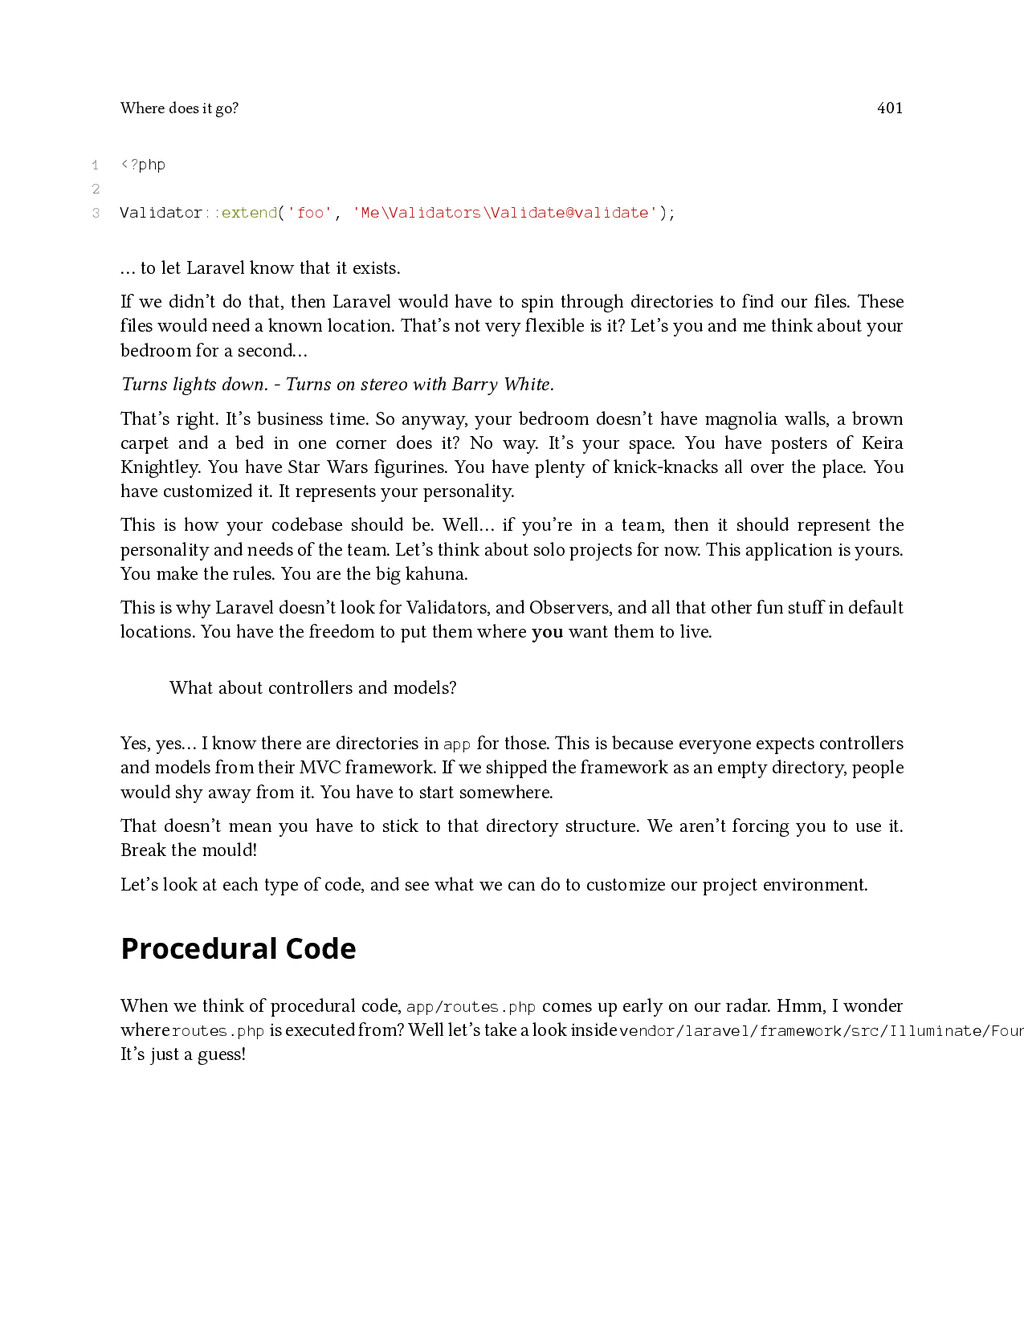
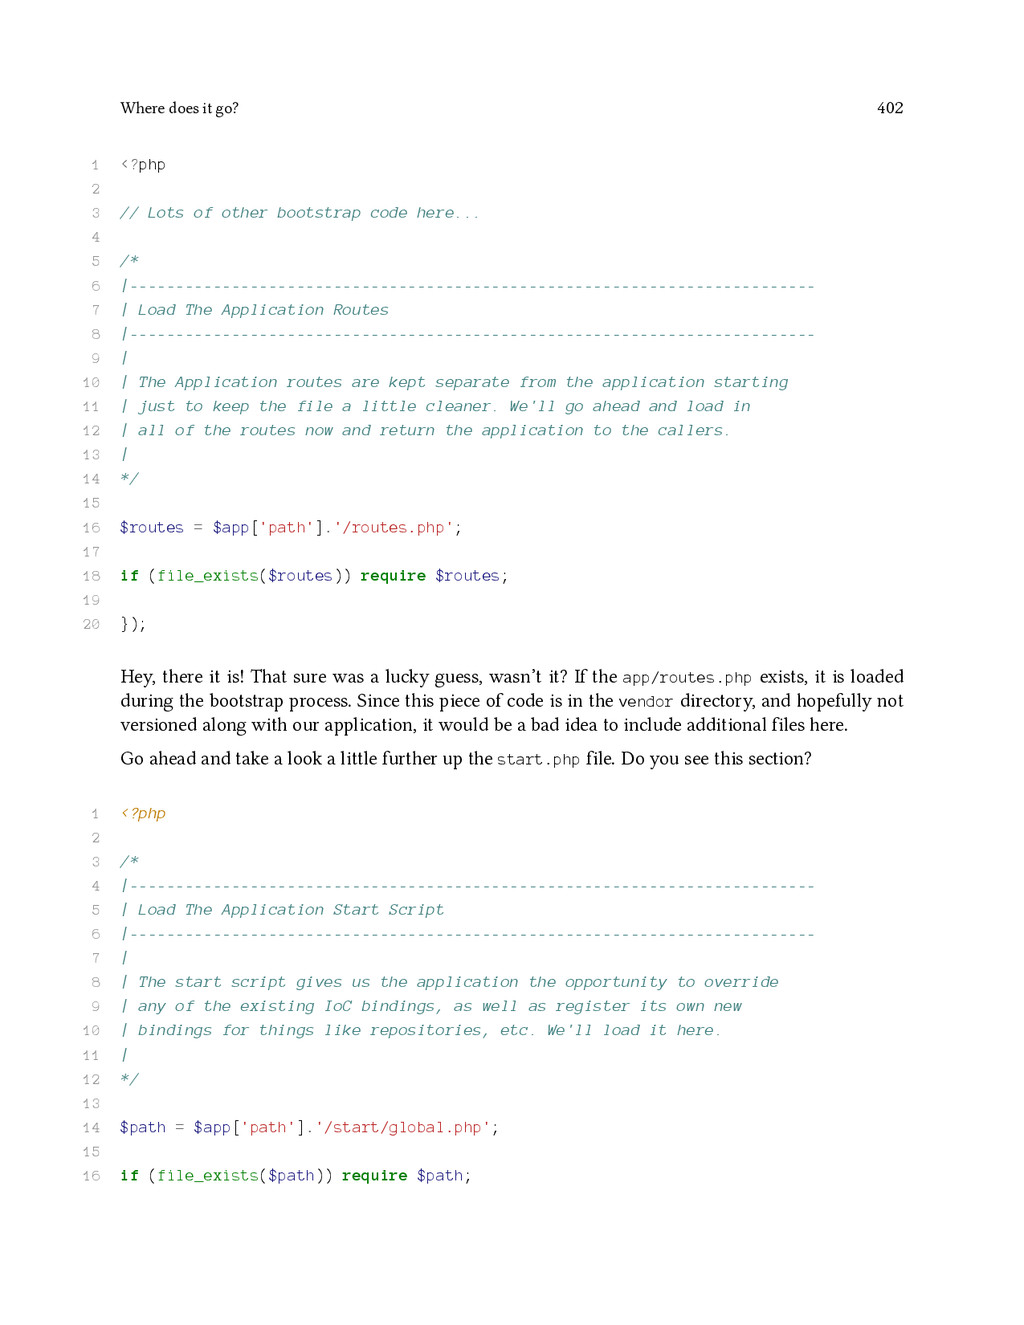
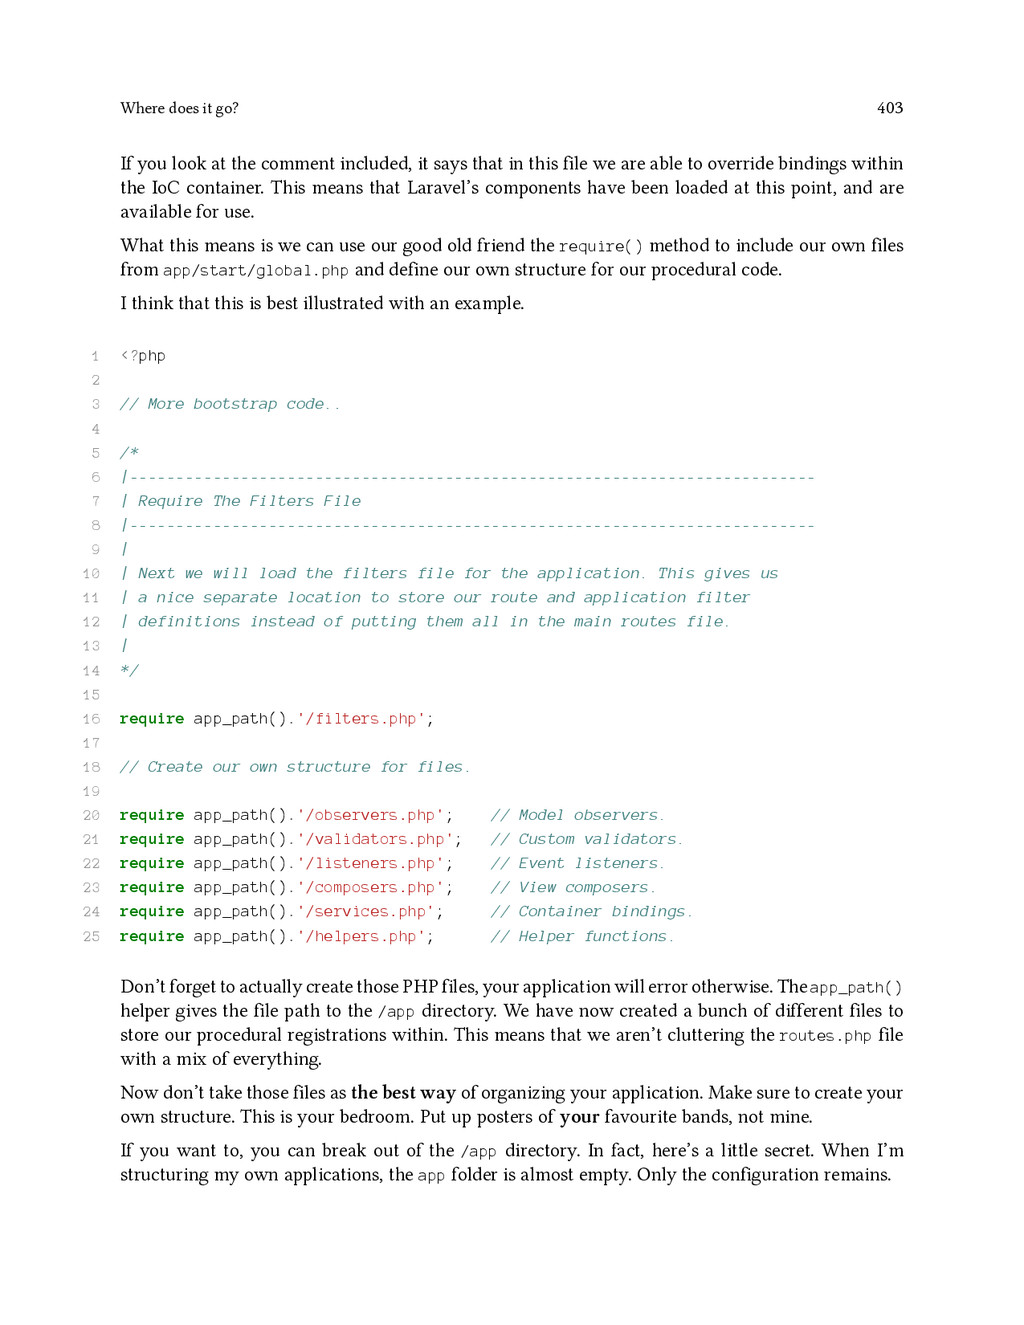
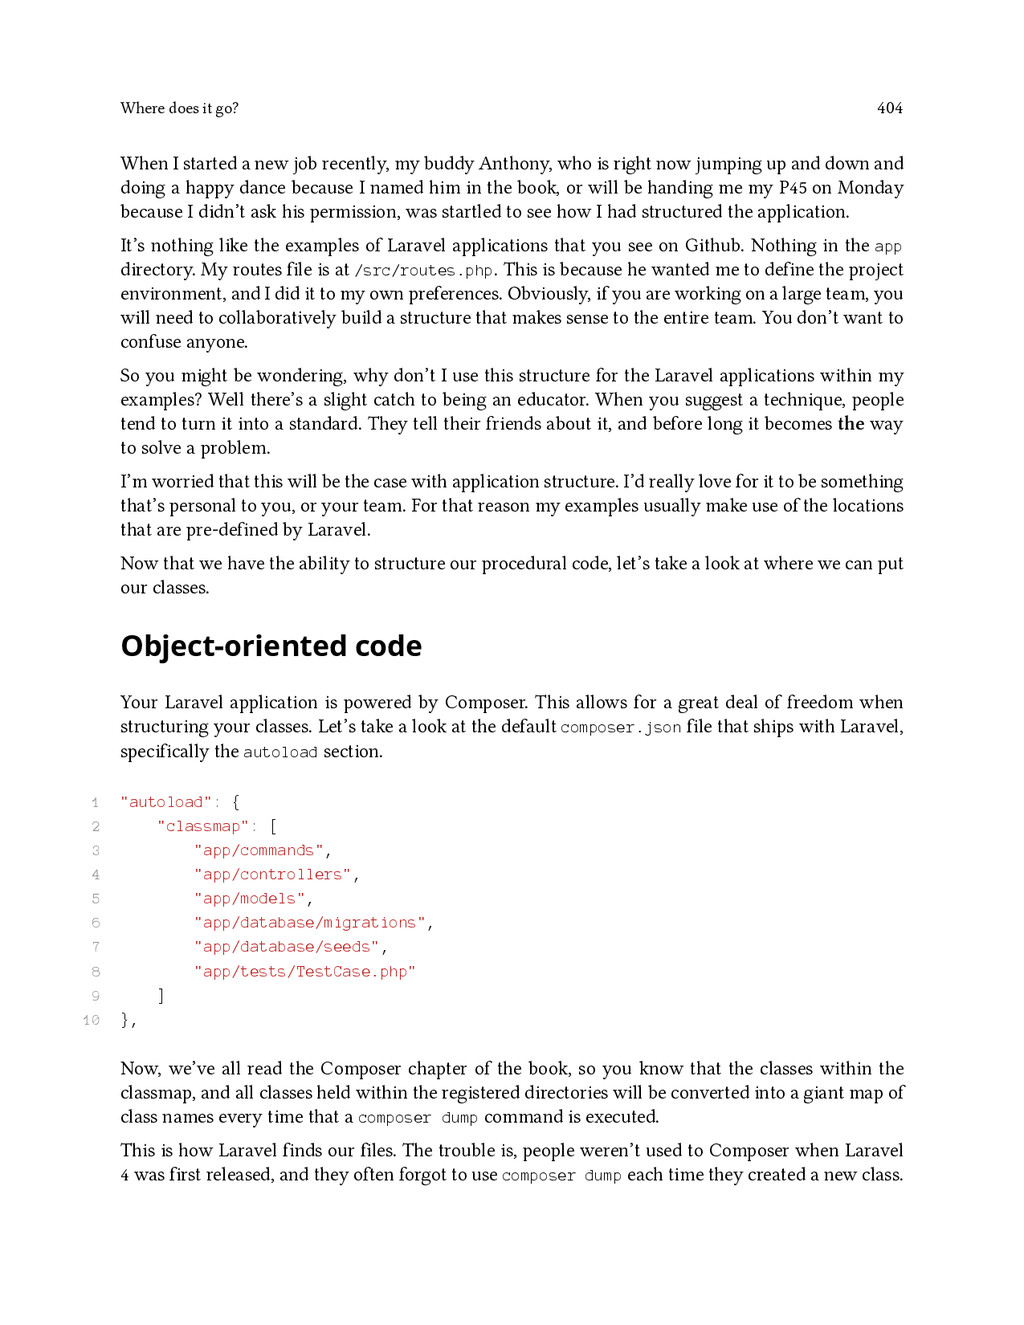
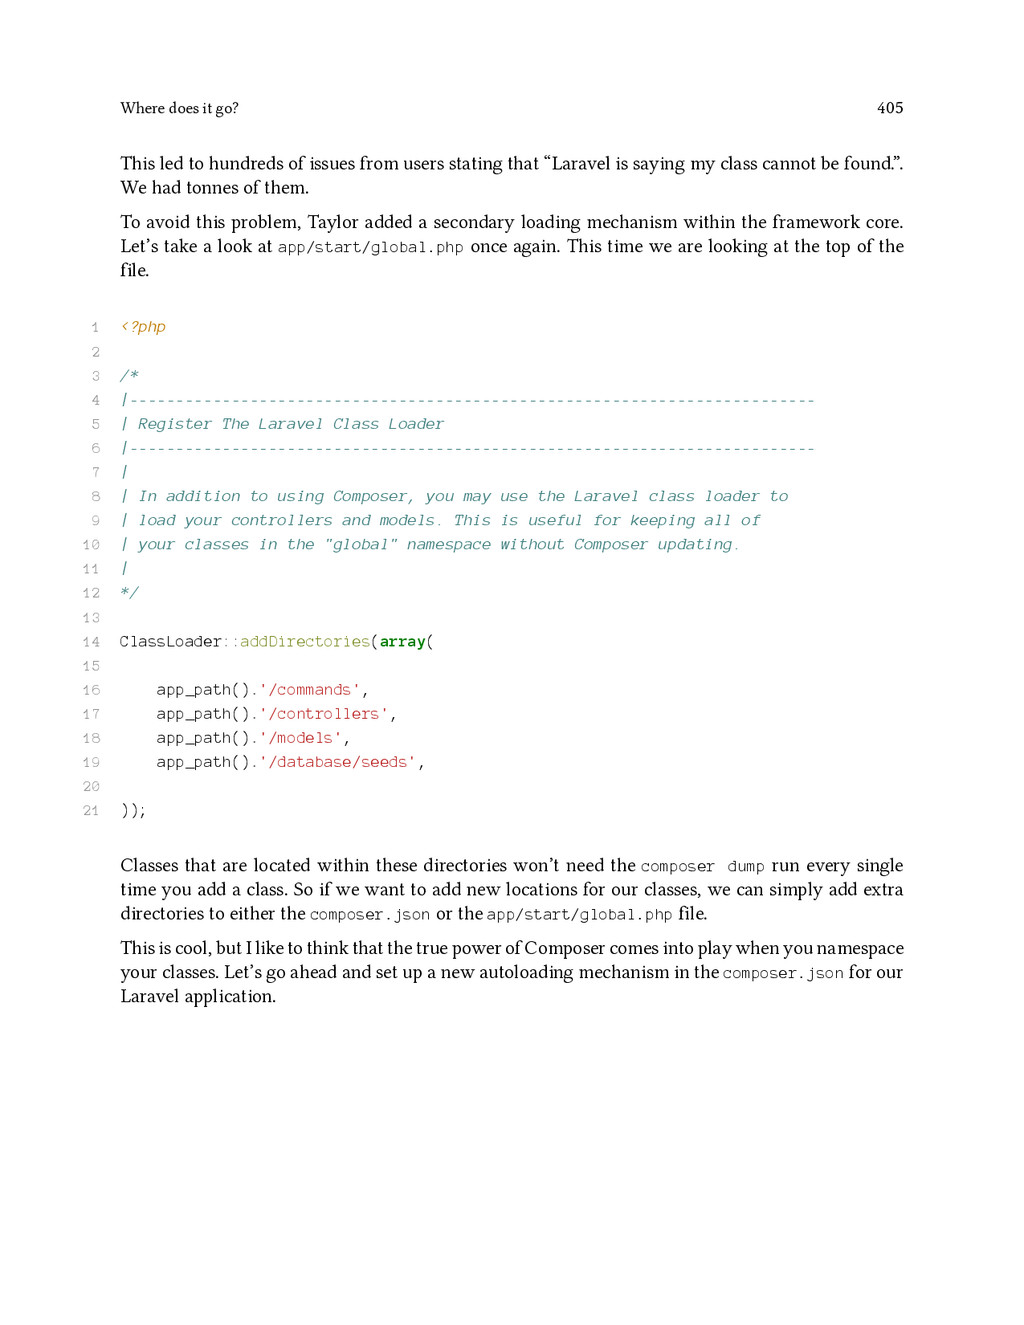
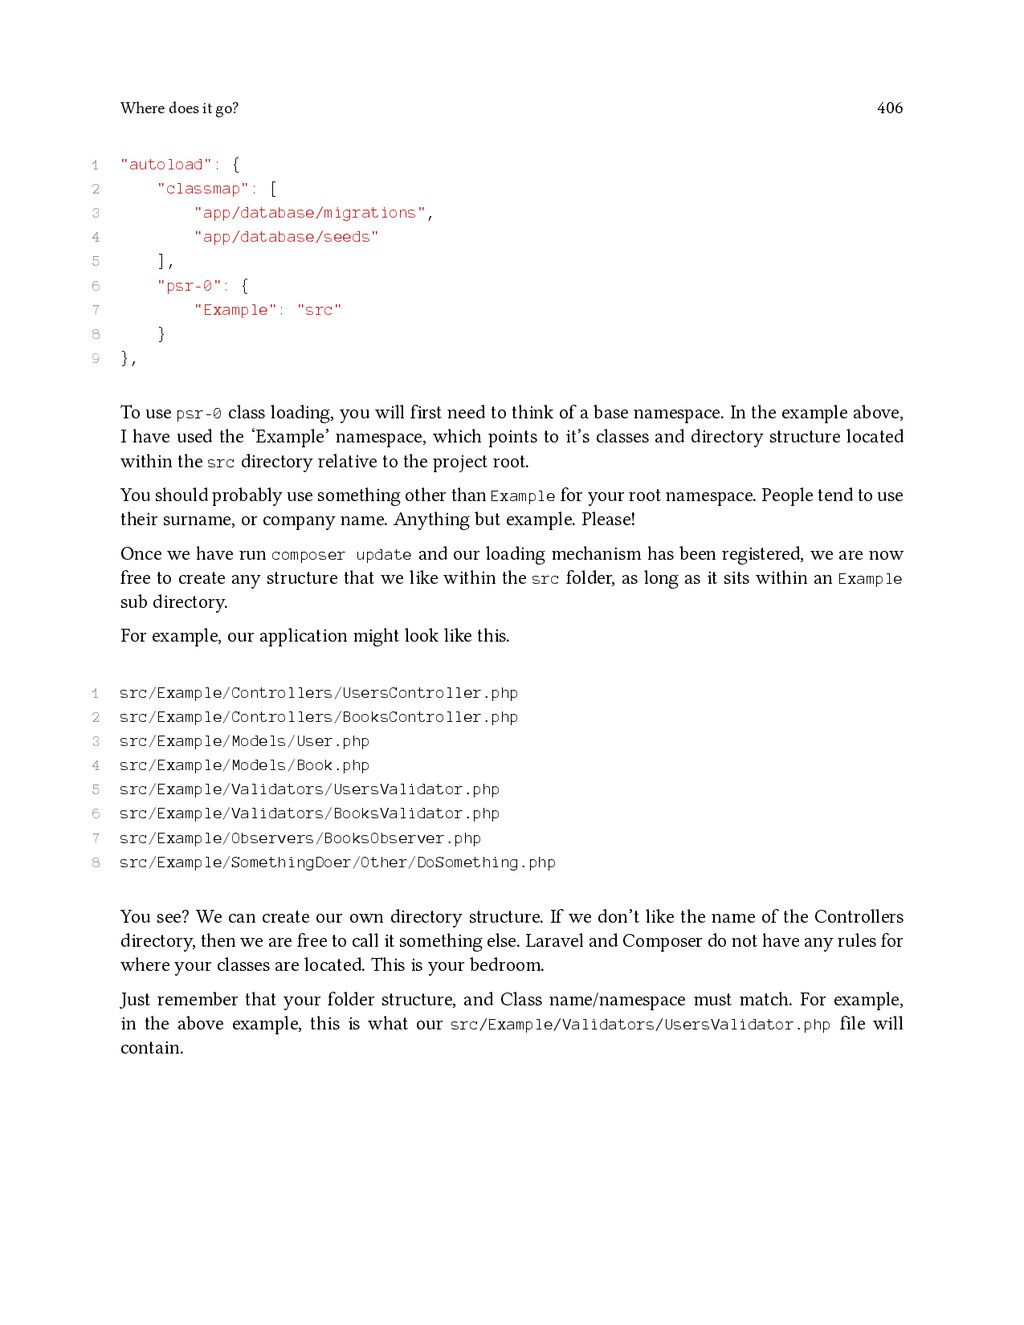
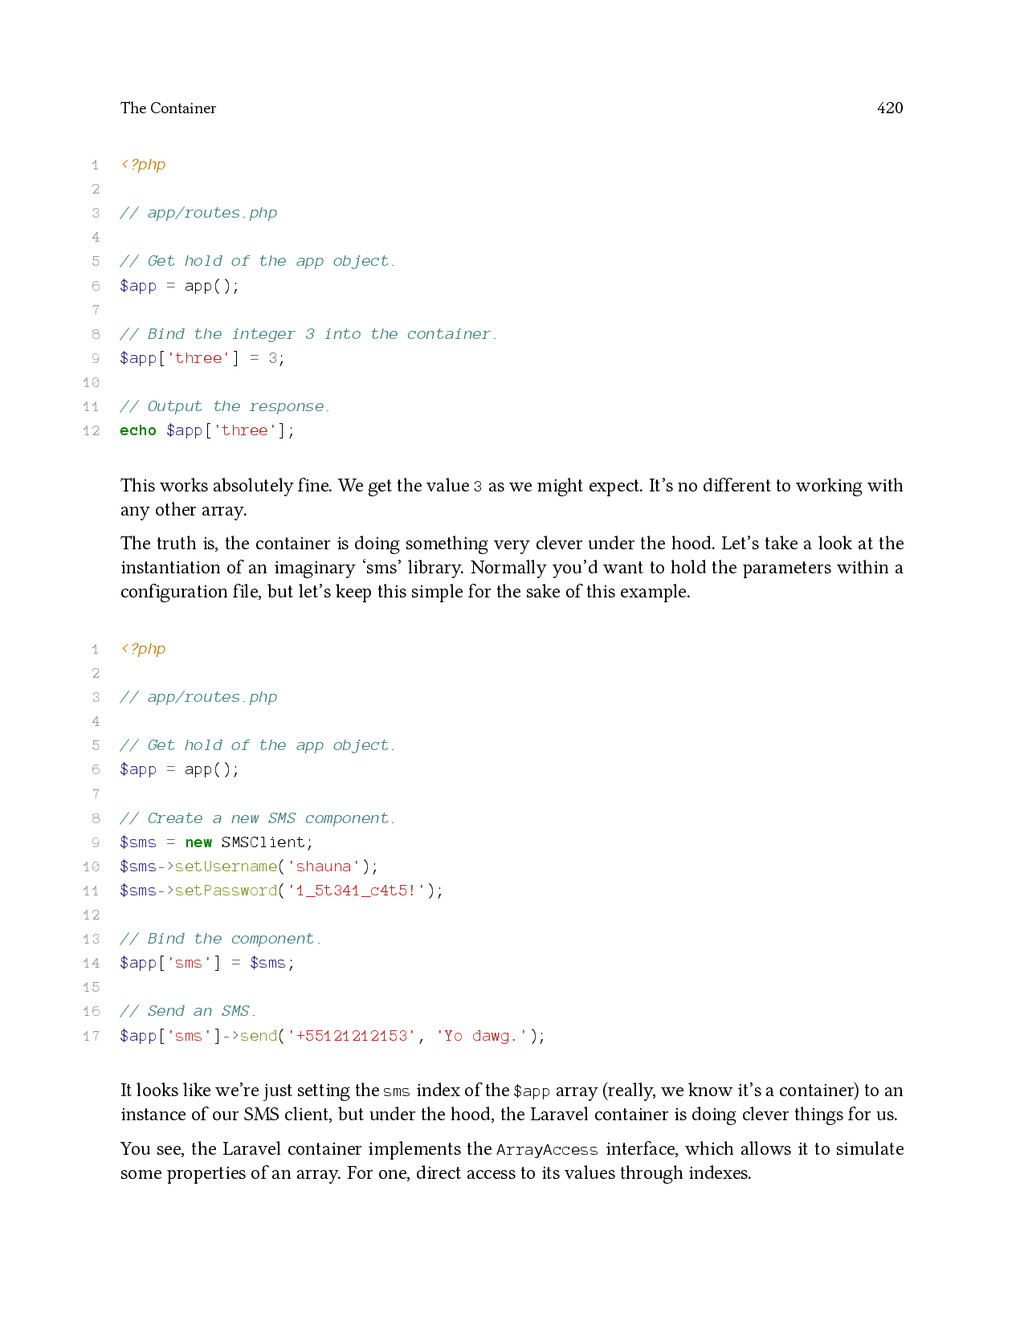
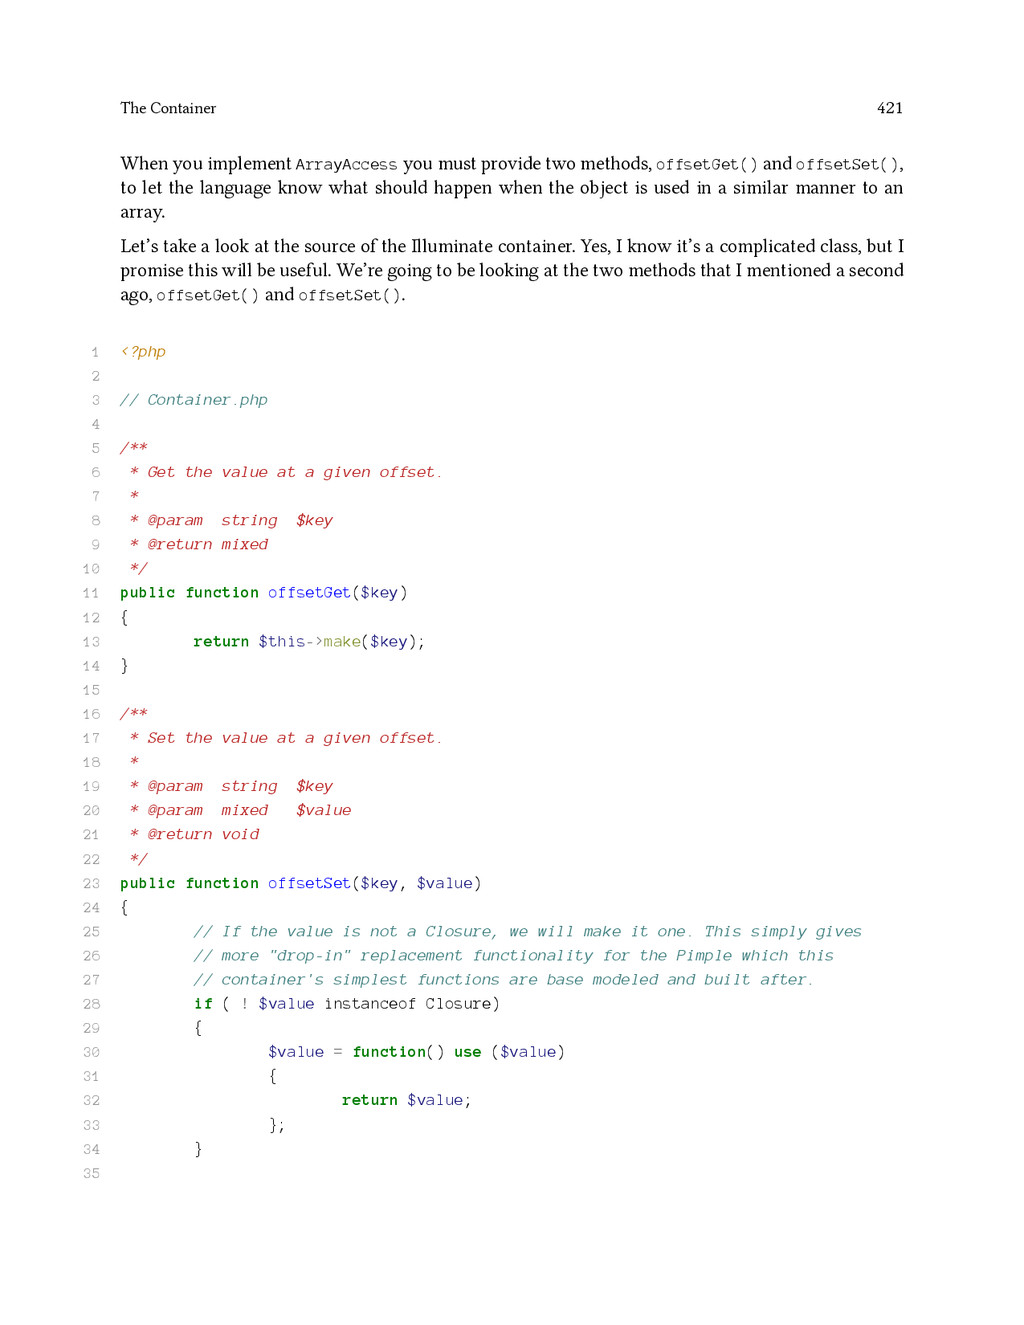
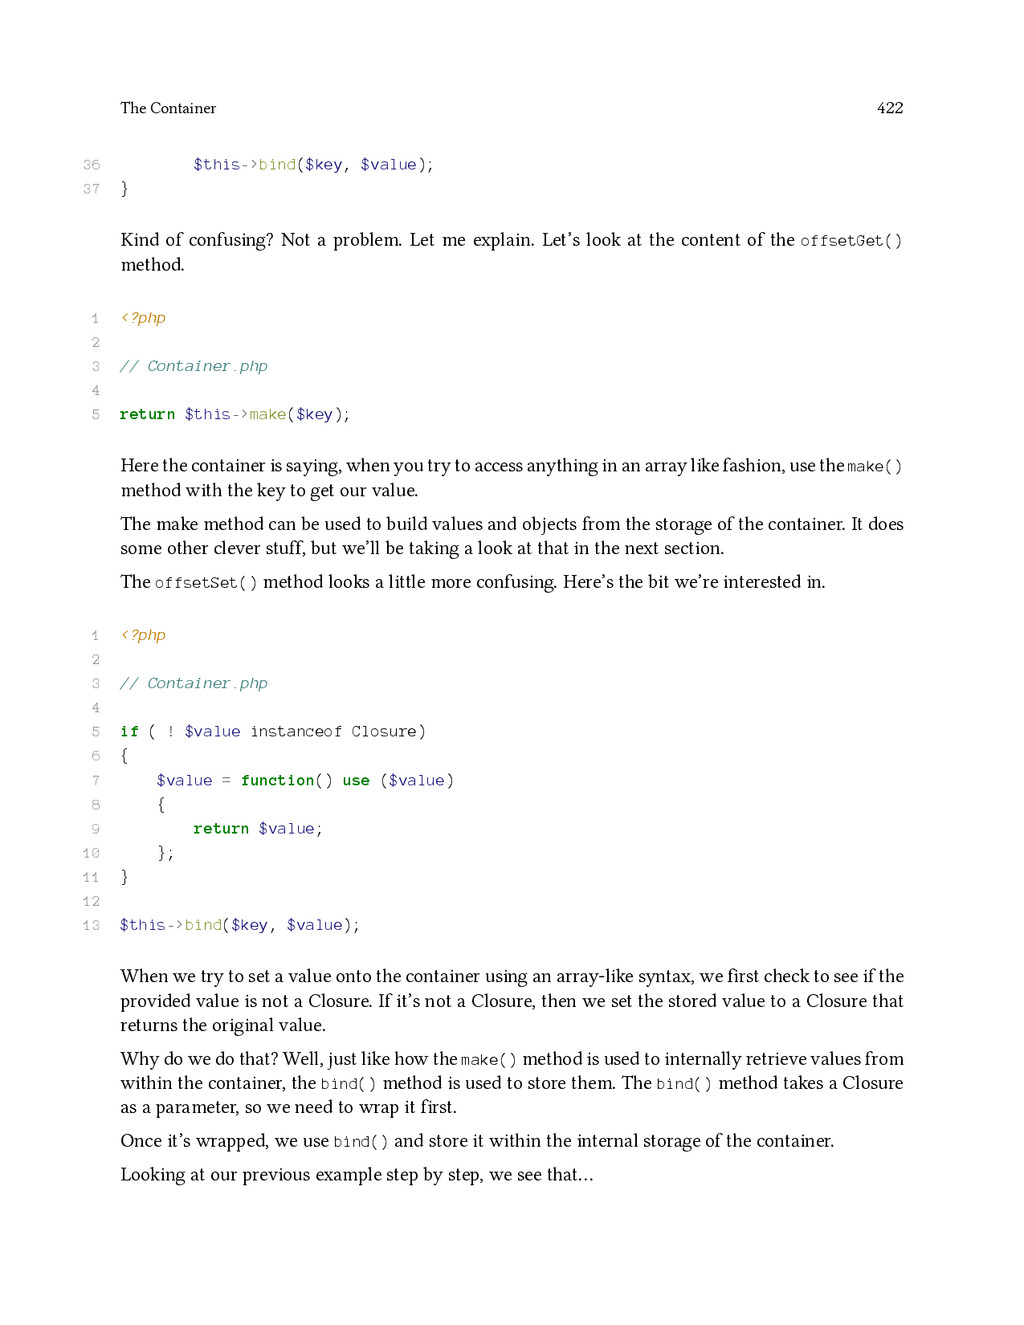
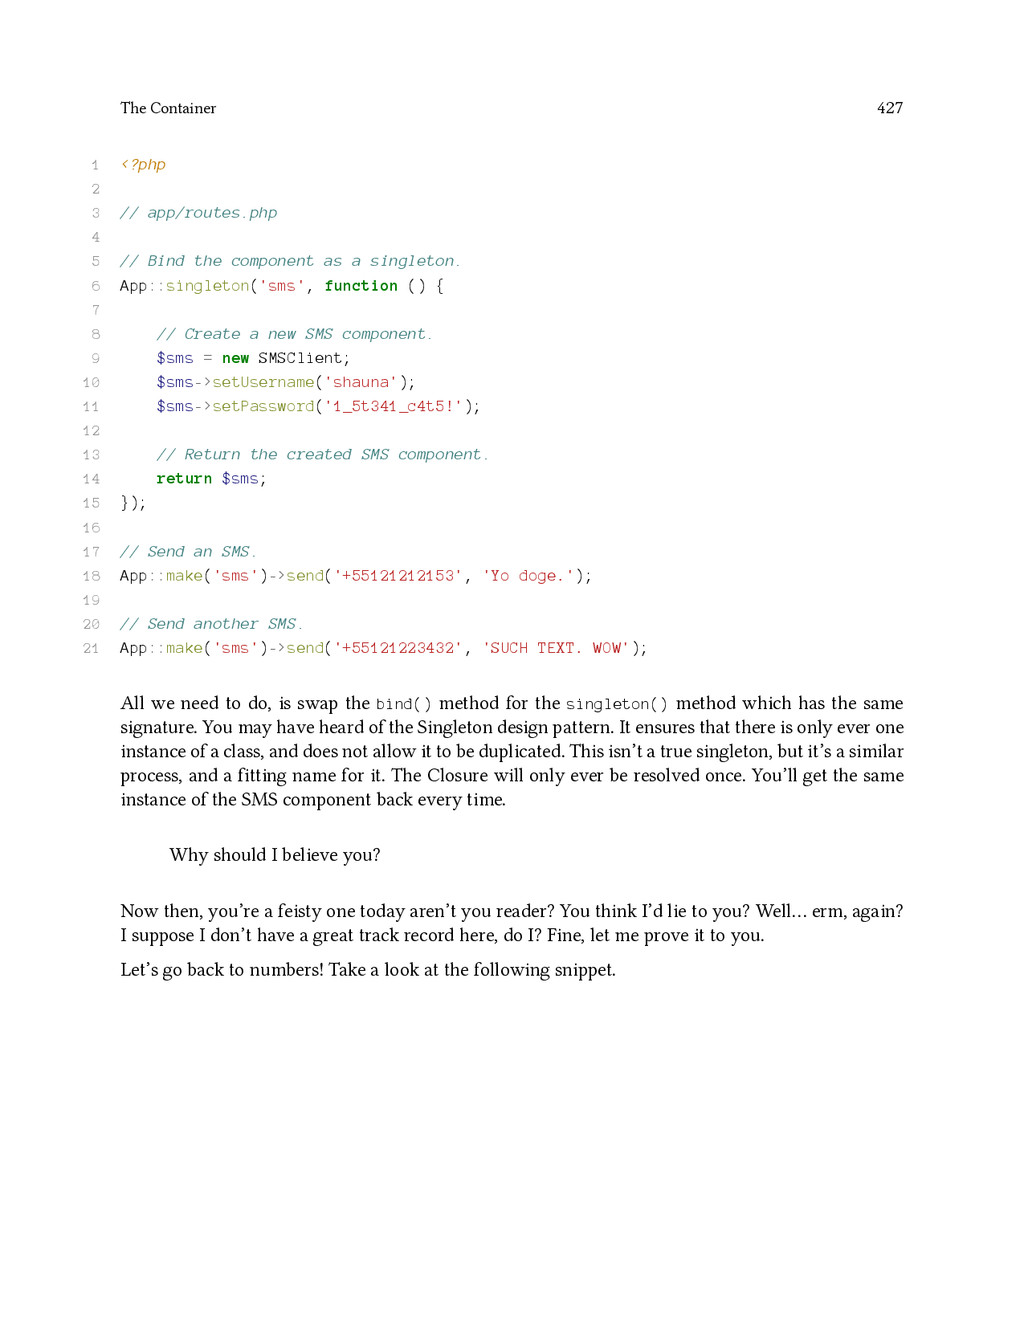
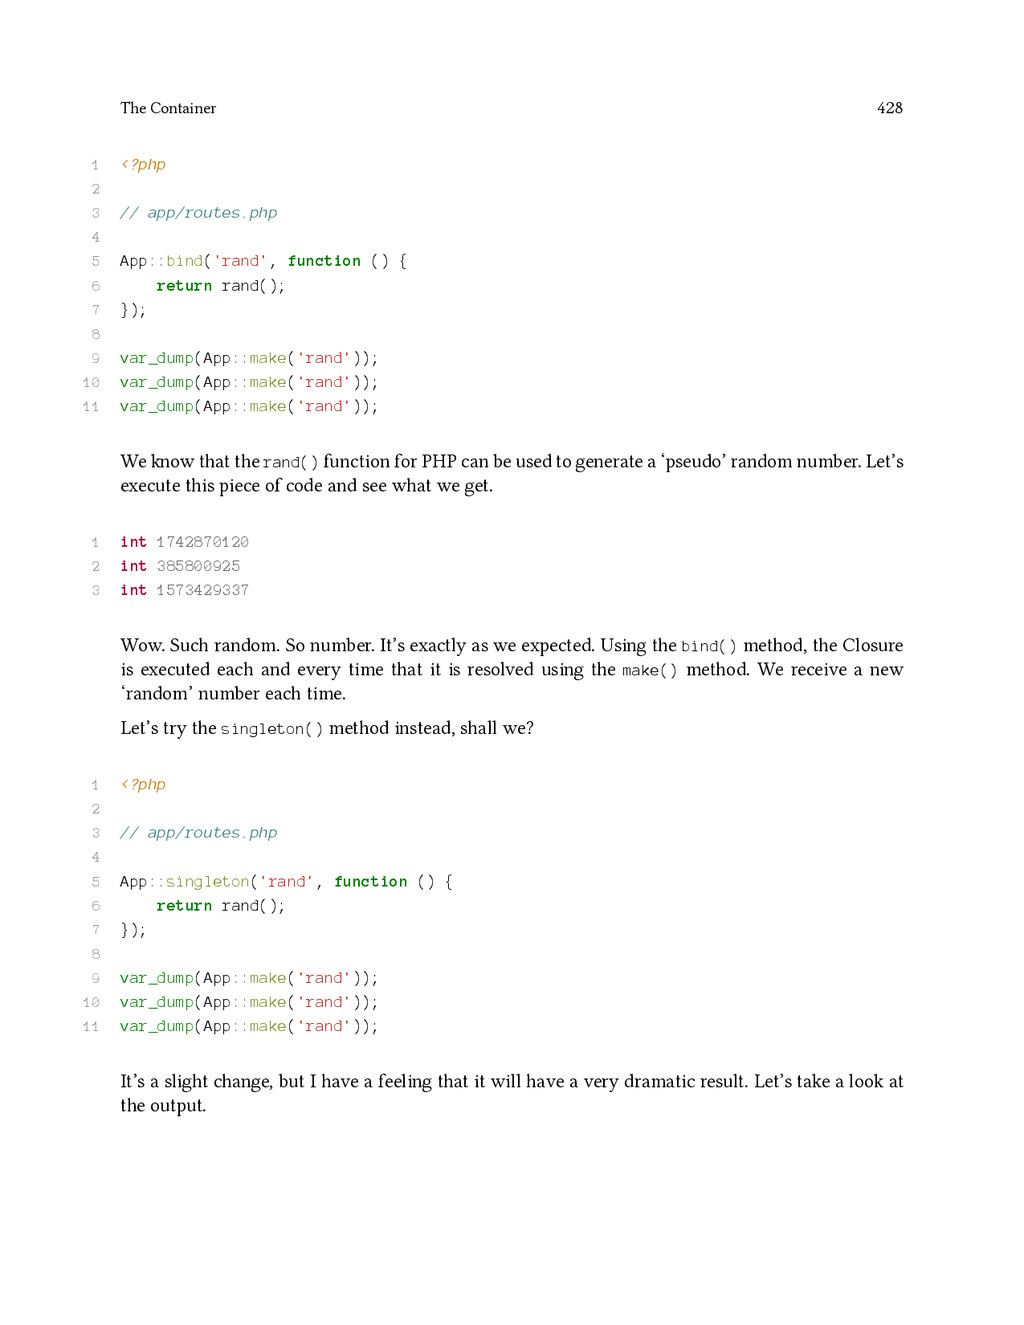
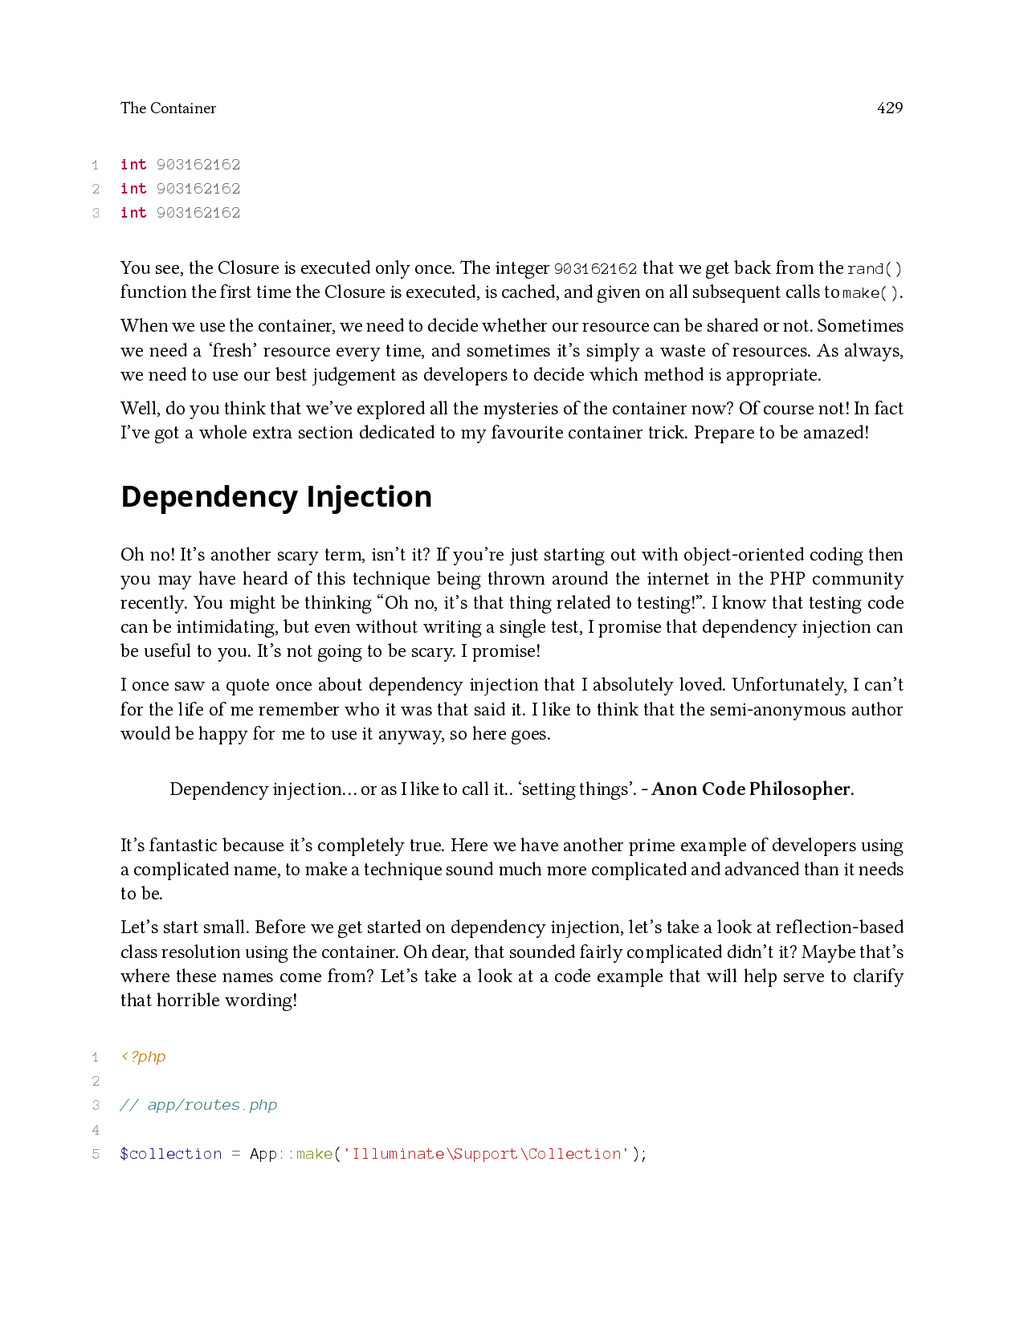
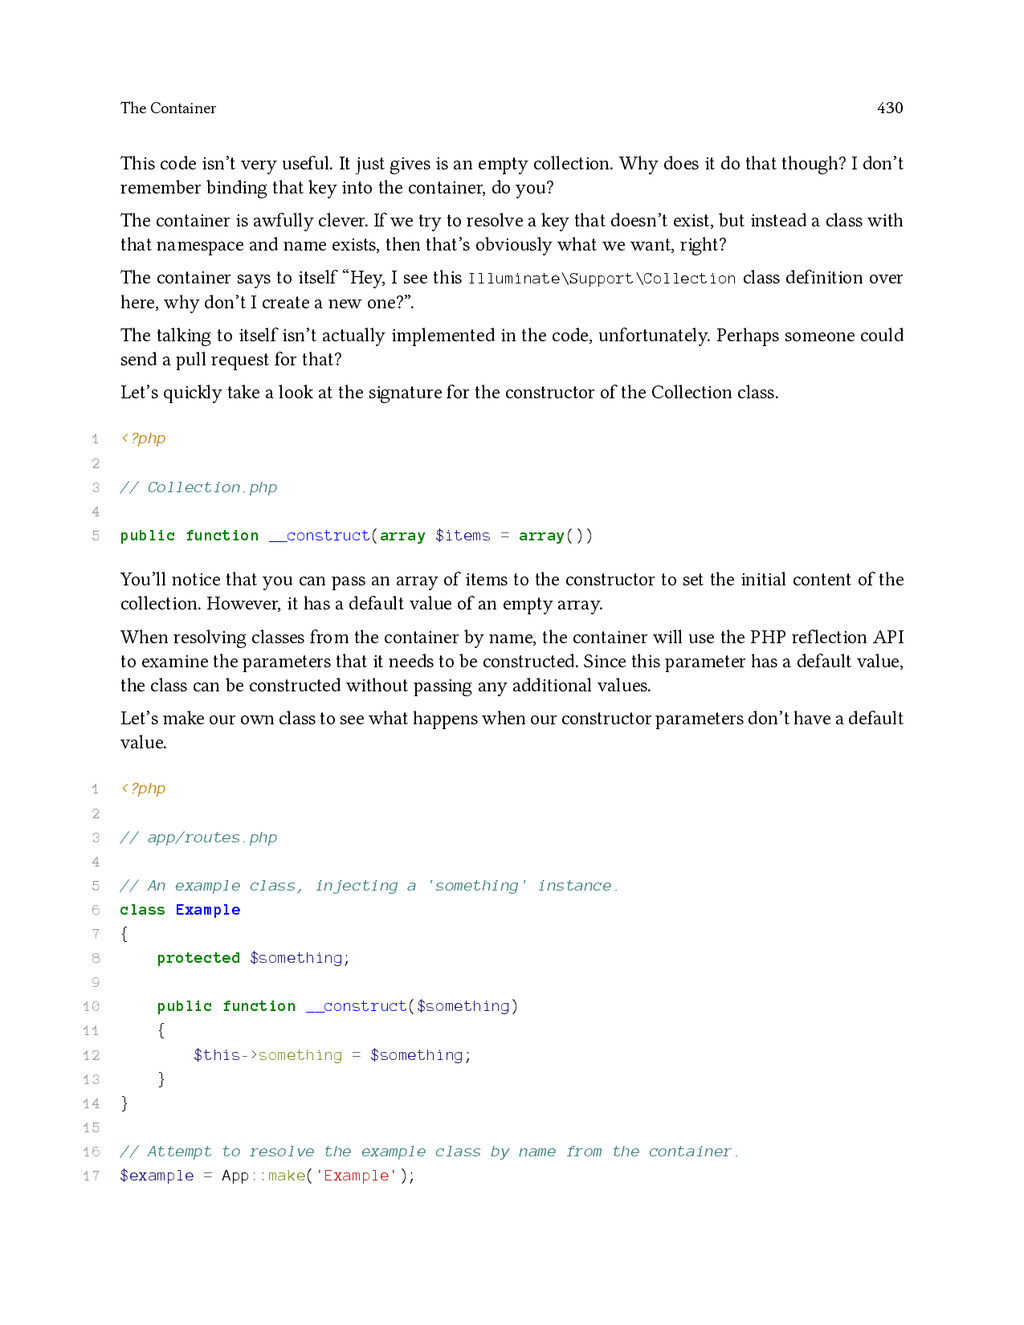