Upgrade to Pro — share decks privately, control downloads, hide ads and more …

java presentation part III

Avatar for jamspidy jamspidy
January 27, 2012
310

java presentation part III

java powerpoint presentation part3

Avatar for jamspidy

jamspidy

January 27, 2012
Tweet

Transcript

  1. What Is an Exception? The term exception is shorthand for

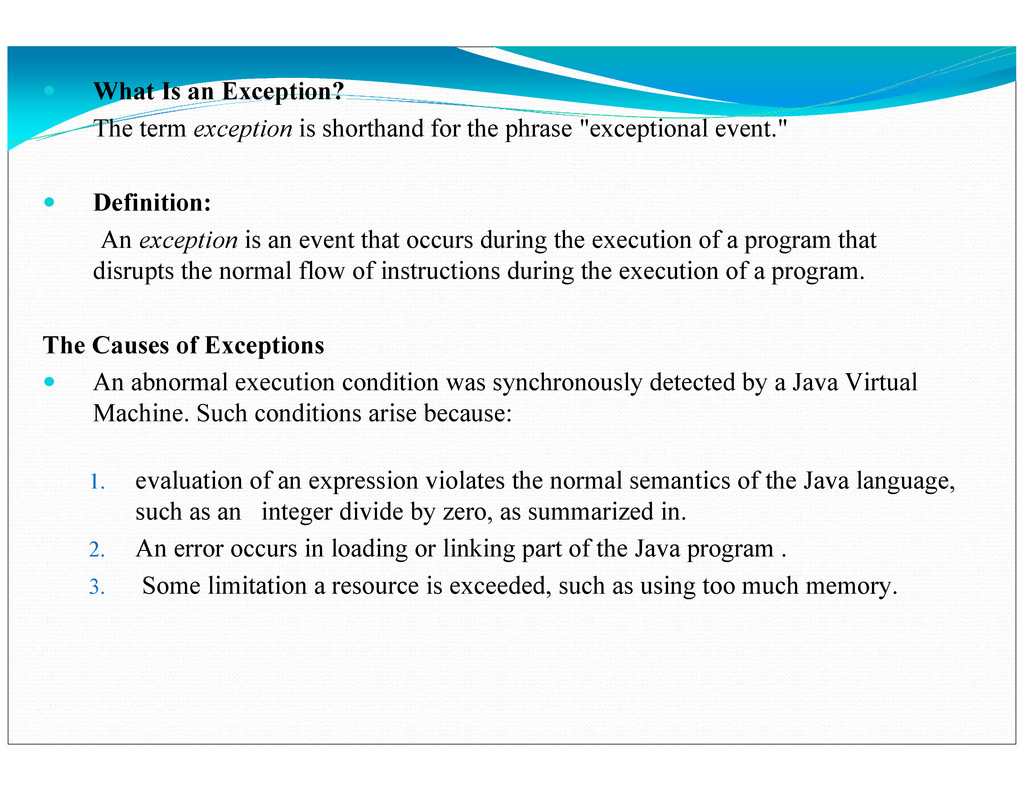
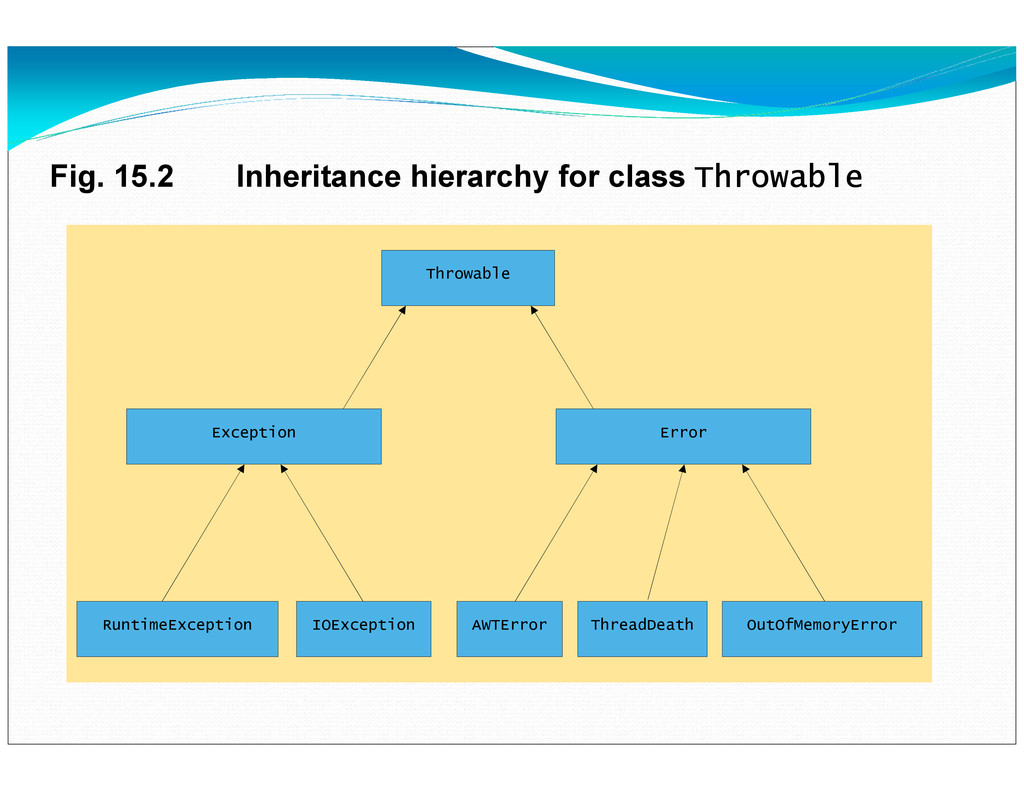
    the phrase "exceptional event." Definition: An exception is an event that occurs during the execution of a program that disrupts the normal flow of instructions during the execution of a program. The Causes of Exceptions An abnormal execution condition was synchronously detected by a Java Virtual Machine. Such conditions arise because: 1. evaluation of an expression violates the normal semantics of the Java language, such as an integer divide by zero, as summarized in. 2. An error occurs in loading or linking part of the Java program . 3. Some limitation a resource is exceeded, such as using too much memory.
  2. A throw statement was executed in Java code. An asynchronous

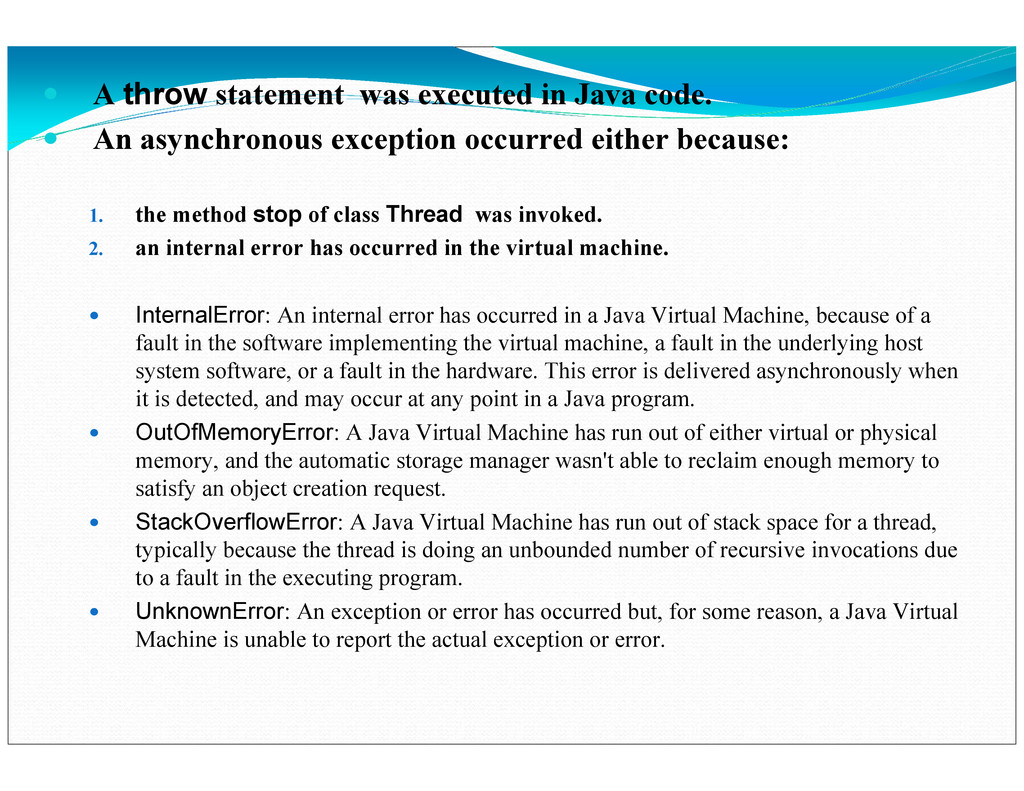
    exception occurred either because: 1. the method stop of class Thread was invoked. 2. an internal error has occurred in the virtual machine. InternalError: An internal error has occurred in a Java Virtual Machine, because of a fault in the software implementing the virtual machine, a fault in the underlying host system software, or a fault in the hardware. This error is delivered asynchronously when it is detected, and may occur at any point in a Java program. OutOfMemoryError: A Java Virtual Machine has run out of either virtual or physical memory, and the automatic storage manager wasn't able to reclaim enough memory to satisfy an object creation request. StackOverflowError: A Java Virtual Machine has run out of stack space for a thread, typically because the thread is doing an unbounded number of recursive invocations due to a fault in the executing program. UnknownError: An exception or error has occurred but, for some reason, a Java Virtual Machine is unable to report the actual exception or error.
  3. Exception Handling Statements The Java programming language provides a mechanism

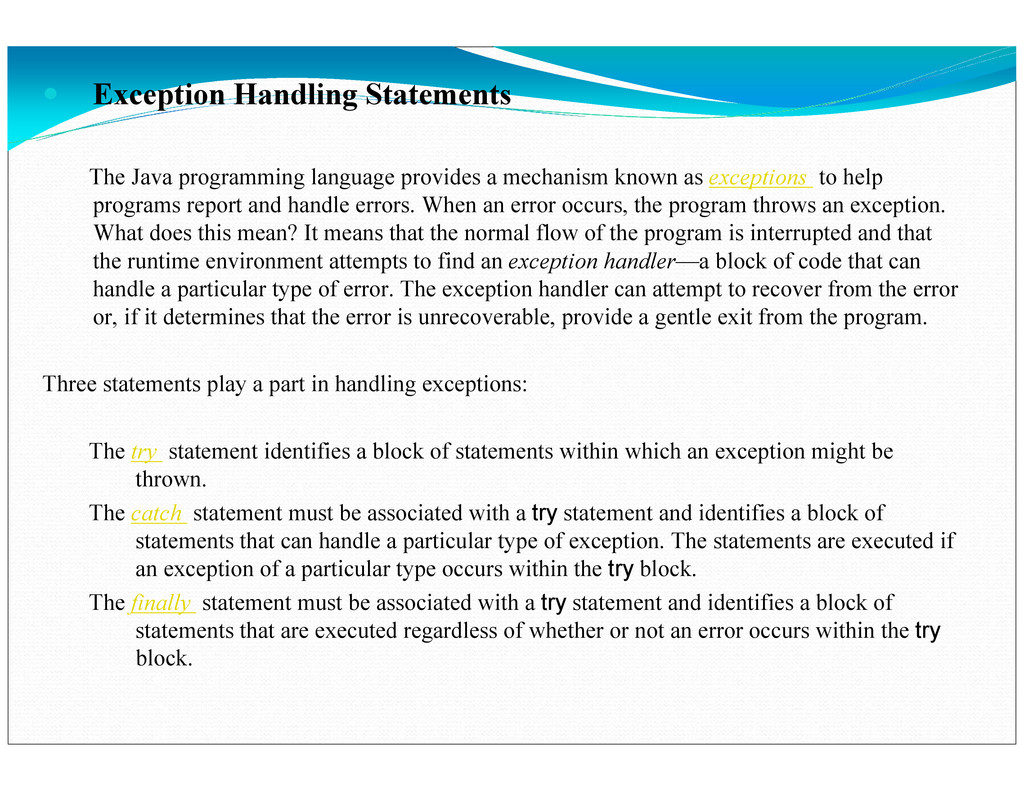
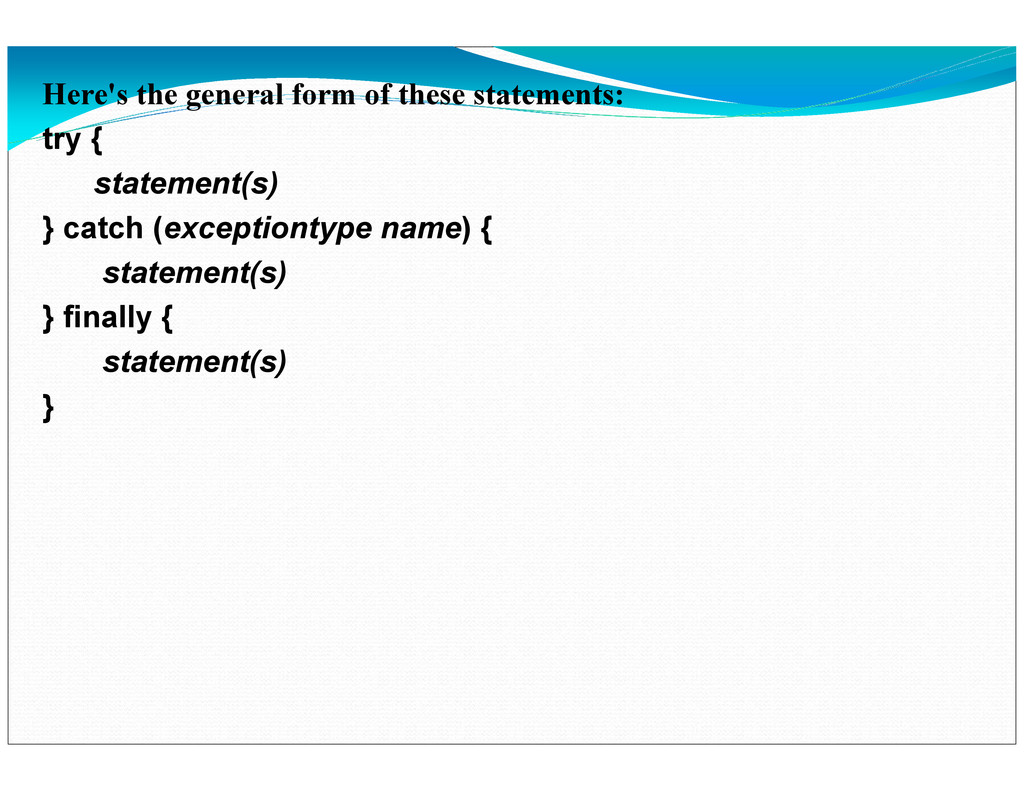
    known as exceptions to help programs report and handle errors. When an error occurs, the program throws an exception. What does this mean? It means that the normal flow of the program is interrupted and that the runtime environment attempts to find an exception handler—a block of code that can handle a particular type of error. The exception handler can attempt to recover from the error or, if it determines that the error is unrecoverable, provide a gentle exit from the program. Three statements play a part in handling exceptions: The try statement identifies a block of statements within which an exception might be thrown. The catch statement must be associated with a try statement and identifies a block of statements that can handle a particular type of exception. The statements are executed if an exception of a particular type occurs within the try block. The finally statement must be associated with a try statement and identifies a block of statements that are executed regardless of whether or not an error occurs within the try block.
  4. Fig. 15.2 Inheritance hierarchy for class Throwable Throwable Throwable Throwable

    Throwable Exception Error AWTError ThreadDeath IOException RuntimeException OutOfMemoryError
  5. Here's the general form of these statements: try { statement(s)

    } catch (exceptiontype name) { statement(s) } finally { statement(s) }
  6. Exercise Create Module notNUmberException.java using the pseudo code listed below

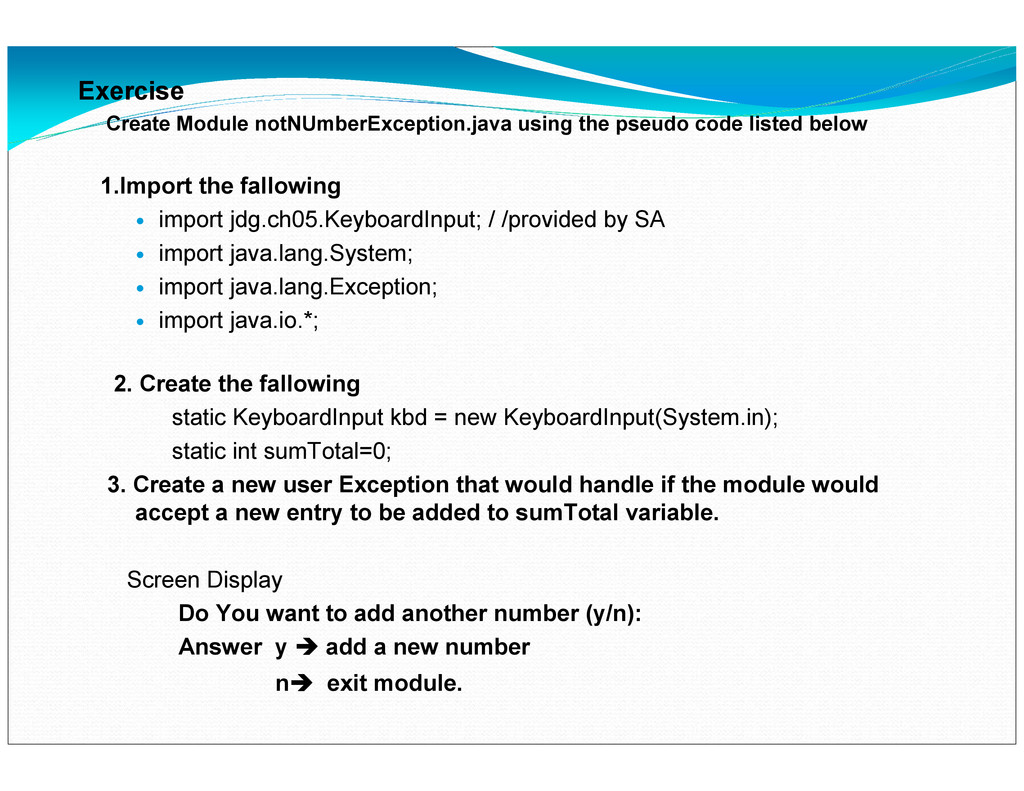
    1.Import the fallowing import jdg.ch05.KeyboardInput; / /provided by SA import java.lang.System; import java.lang.Exception; import java.io.*; 2. Create the fallowing static KeyboardInput kbd = new KeyboardInput(System.in); static int sumTotal=0; 3. Create a new user Exception that would handle if the module would accept a new entry to be added to sumTotal variable. Screen Display Do You want to add another number (y/n): Answer y add a new number n exit module.
  7. 4. Create function processUserInput() 4.1 Create the fallowing variables. 4.1.1

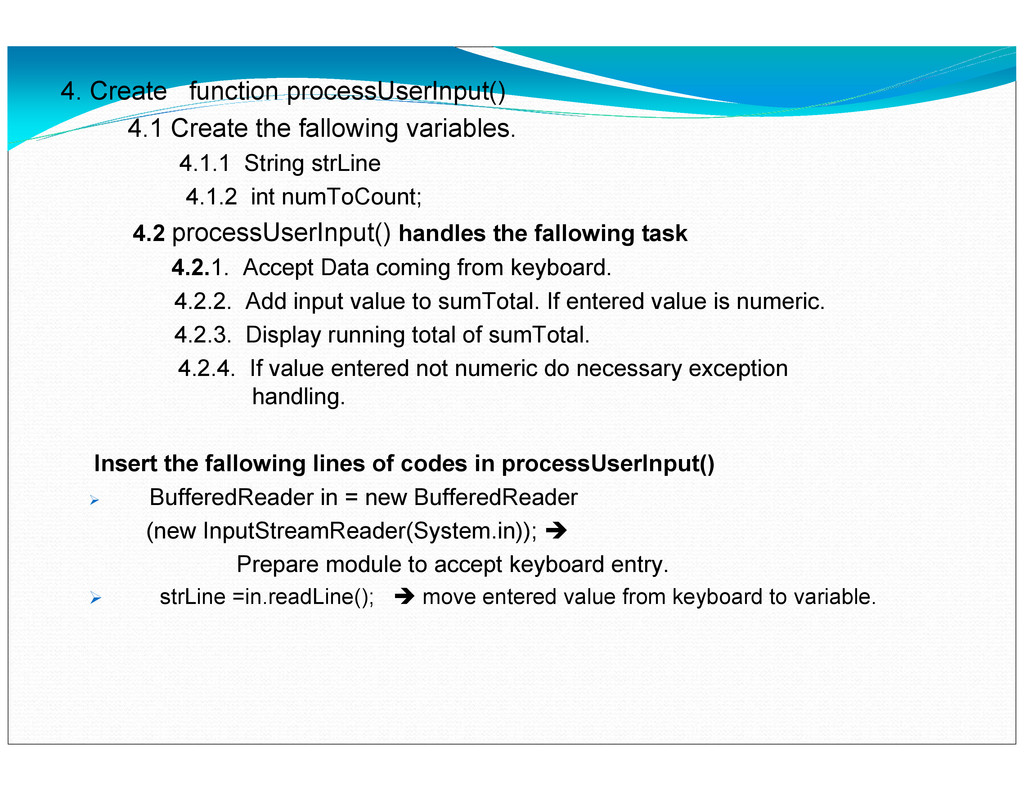
    String strLine 4.1.2 int numToCount; 4.2 processUserInput() handles the fallowing task 4.2.1. Accept Data coming from keyboard. 4.2.2. Add input value to sumTotal. If entered value is numeric. 4.2.3. Display running total of sumTotal. 4.2.4. If value entered not numeric do necessary exception handling. Insert the fallowing lines of codes in processUserInput() BufferedReader in = new BufferedReader (new InputStreamReader(System.in)); Prepare module to accept keyboard entry. strLine =in.readLine(); move entered value from keyboard to variable.
  8. Console Display Screen Enter a number 44 Accumulated Value: 44

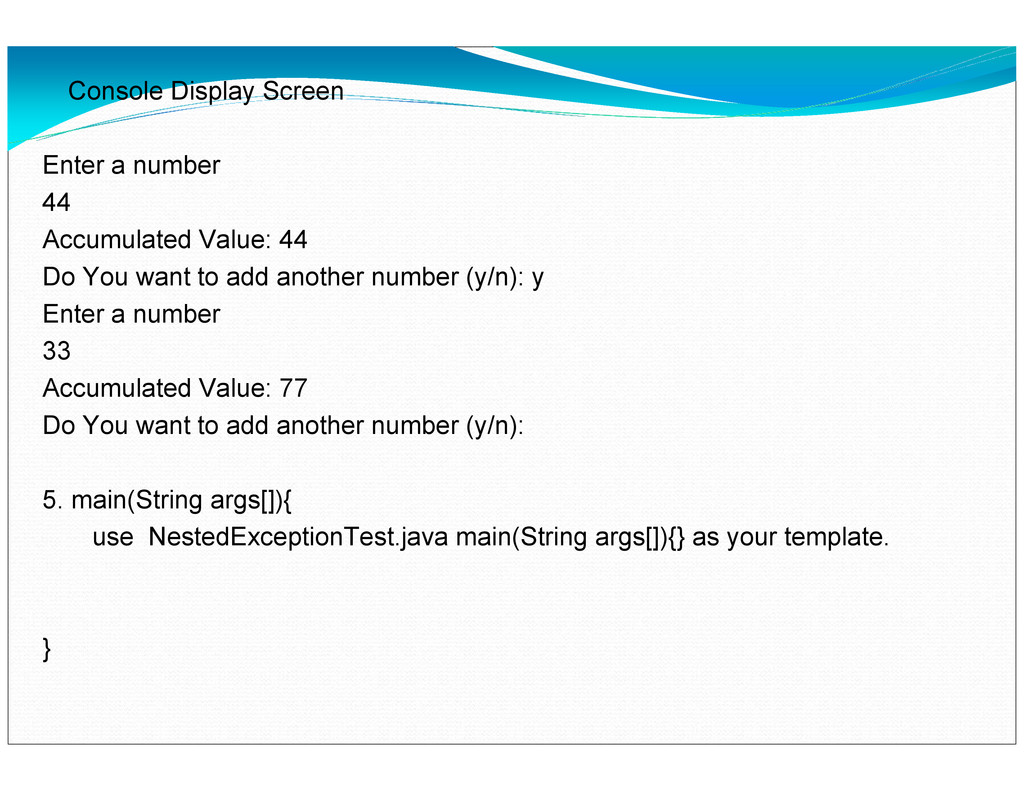
    Do You want to add another number (y/n): y Enter a number 33 Accumulated Value: 77 Do You want to add another number (y/n): 5. main(String args[]){ use NestedExceptionTest.java main(String args[]){} as your template. }
  9. Introduction Graphical User Interface (GUI) Gives program distinctive “look” and

    “feel” Provides users with basic level of familiarity Built from GUI components (controls, widgets, etc.) User interacts with GUI component via mouse, keyboard, etc.
  10. Layout Managers Layout managers Provided for arranging GUI components Provide

    basic layout capabilities Processes layout details Programmer can concentrate on basic “look and feel” Interface LayoutManager
  11. Layout managers Layout manager Description FlowLayout Default for java.awt.Applet, java.awt.Panel

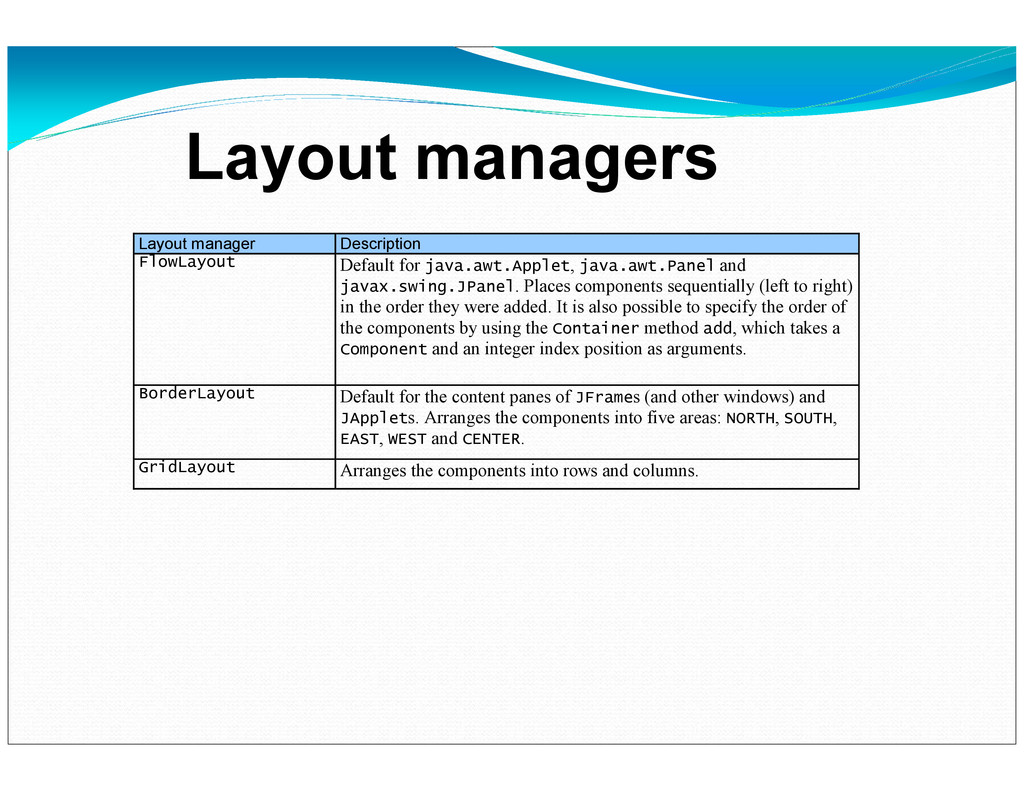
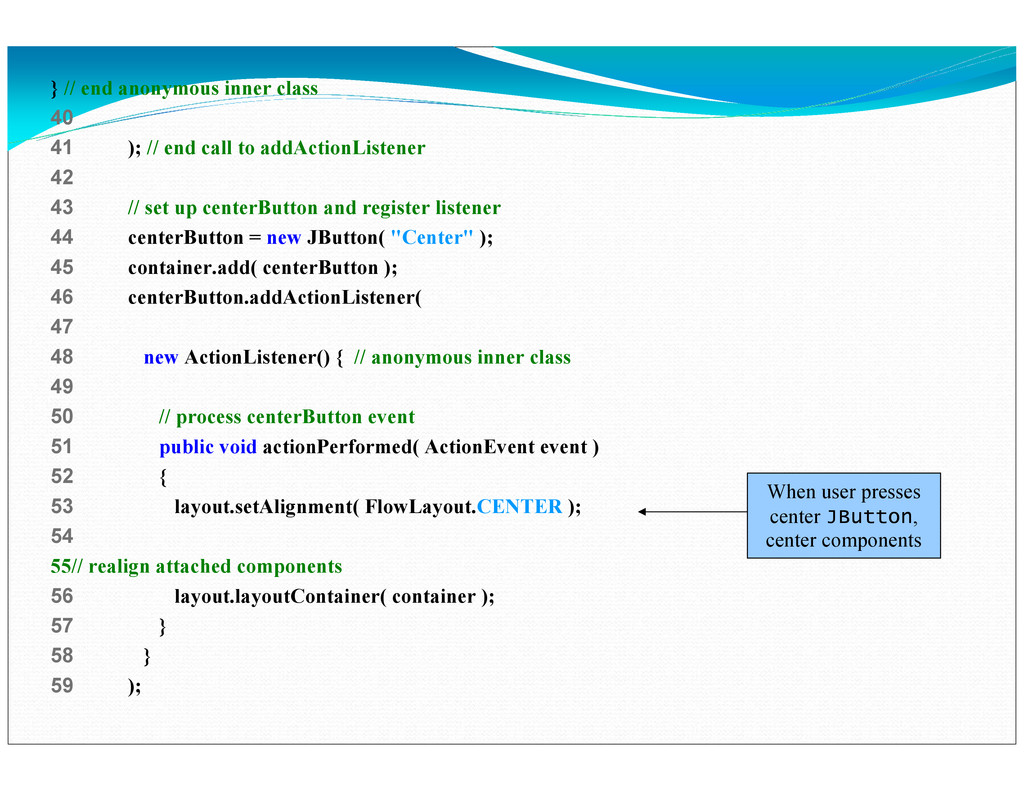
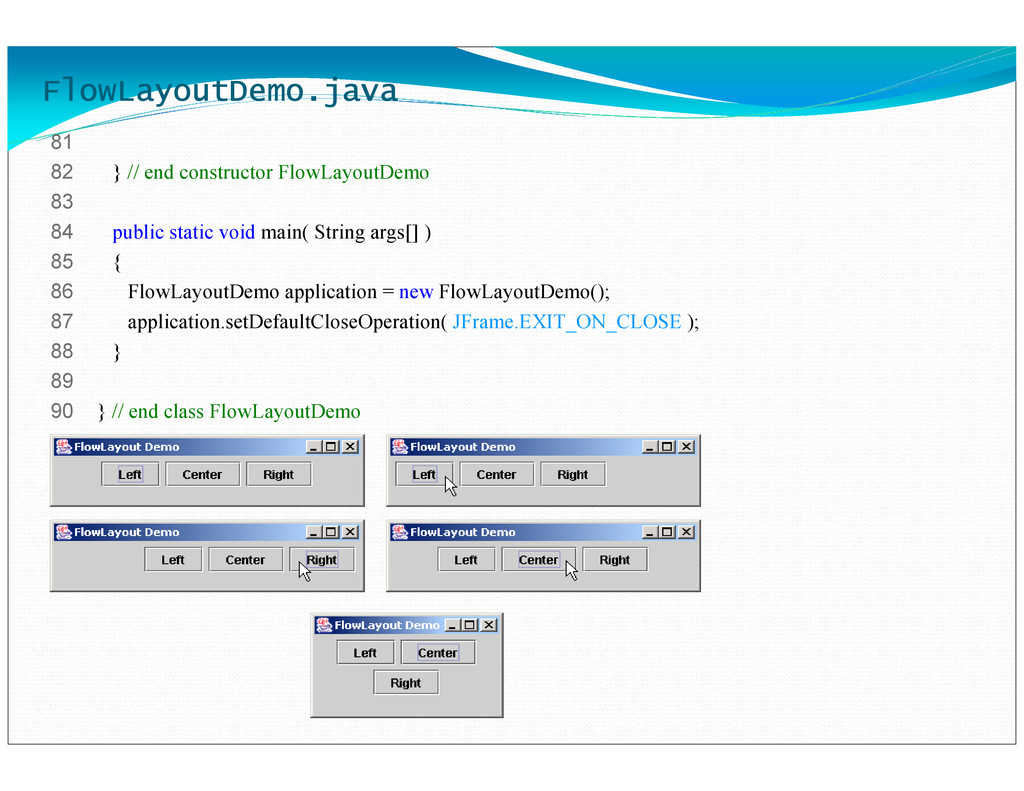
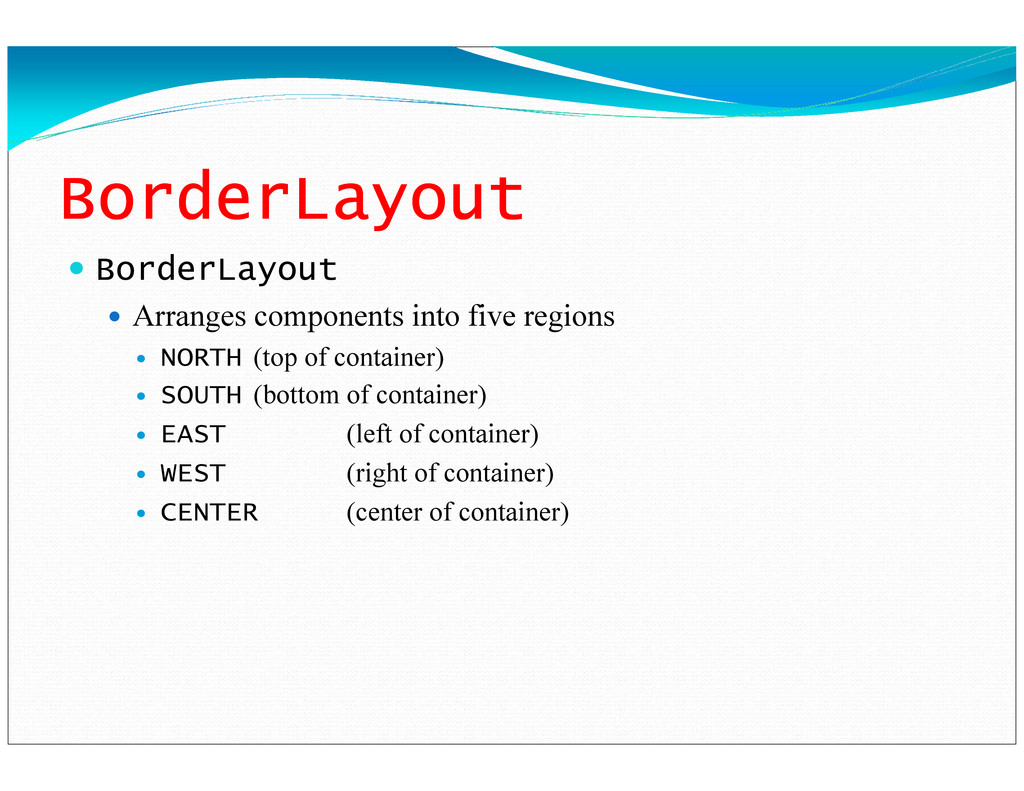
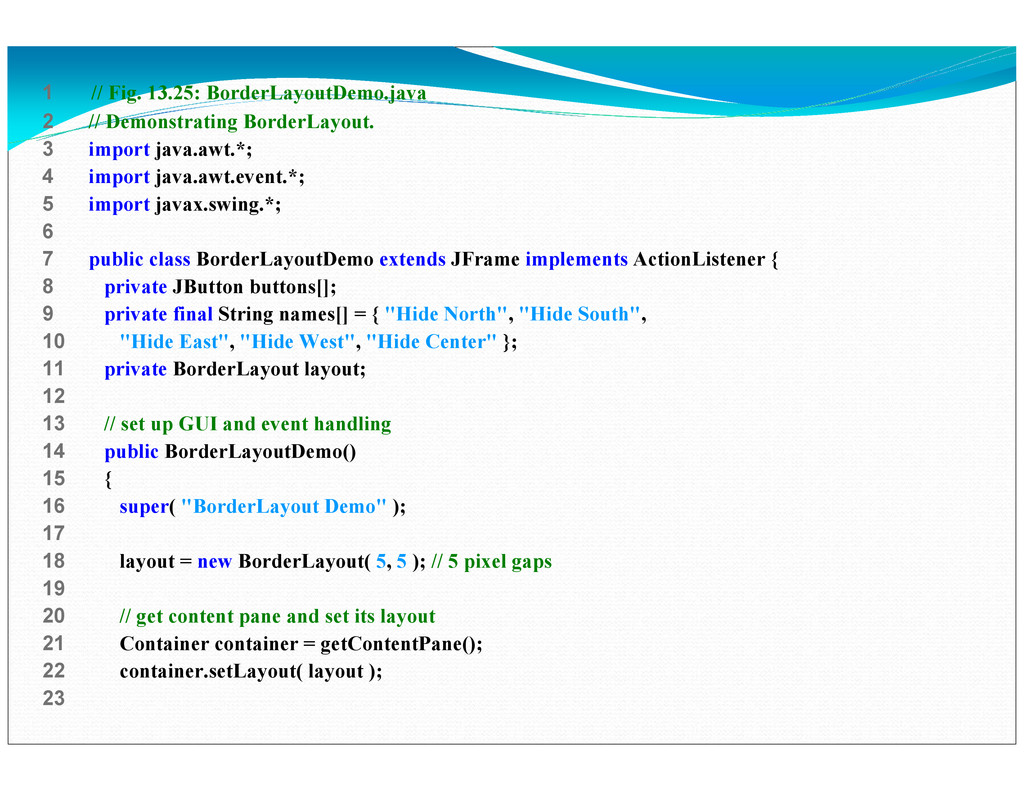
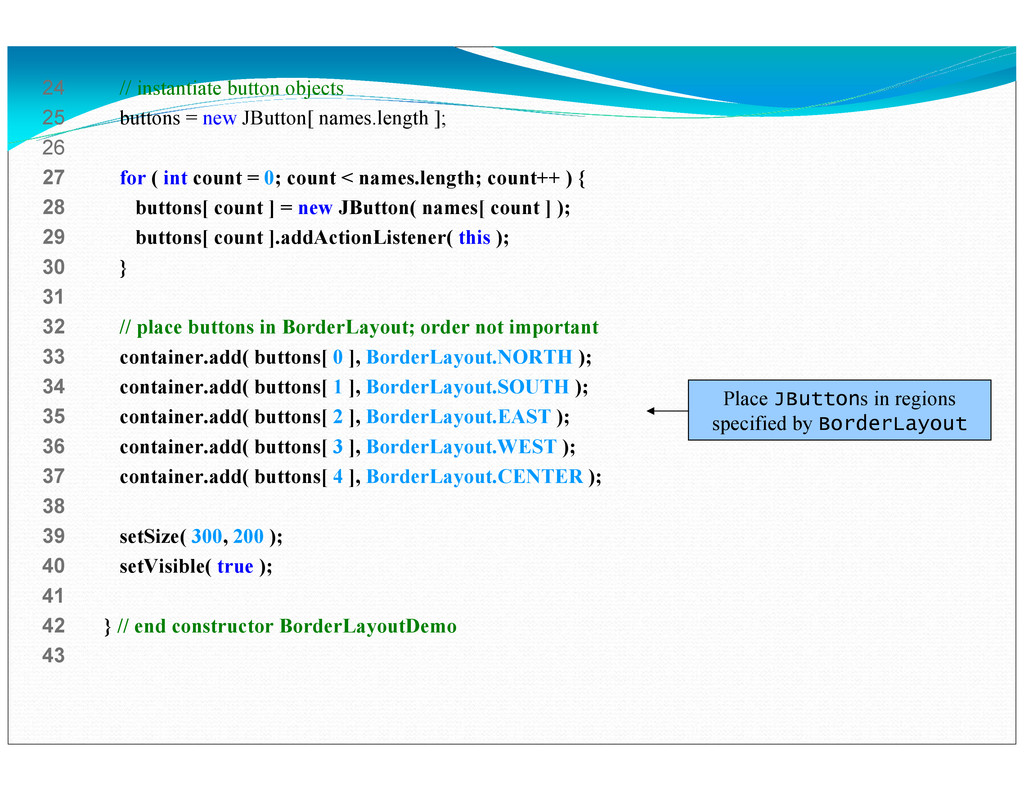
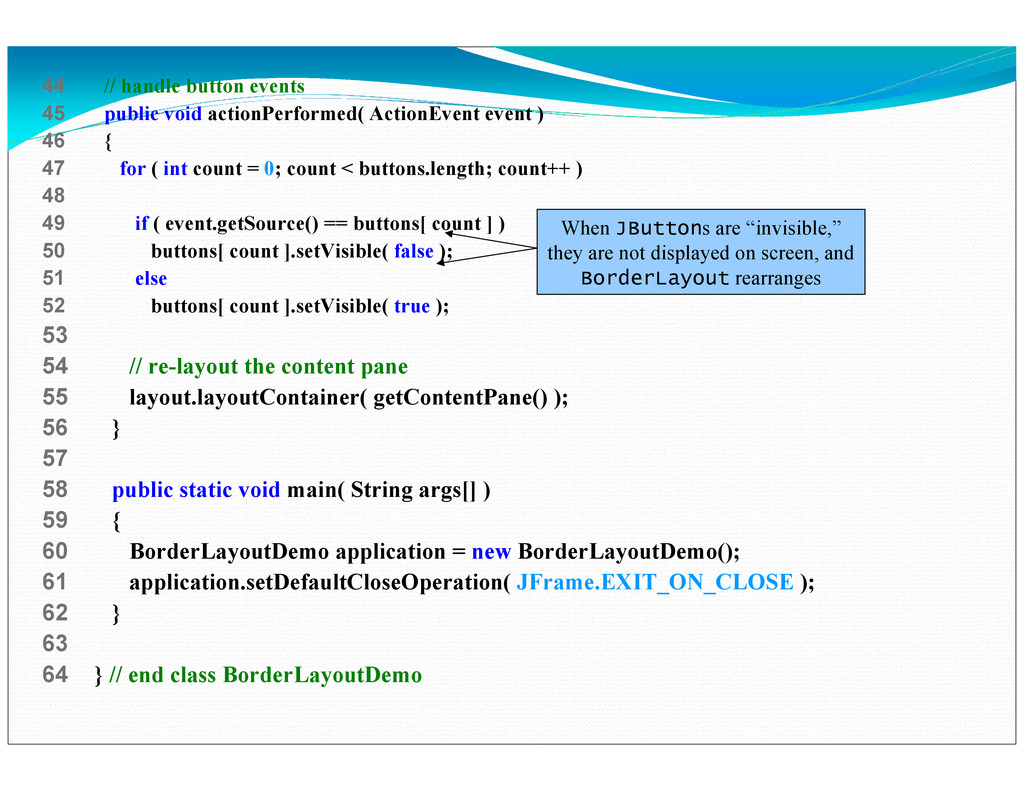
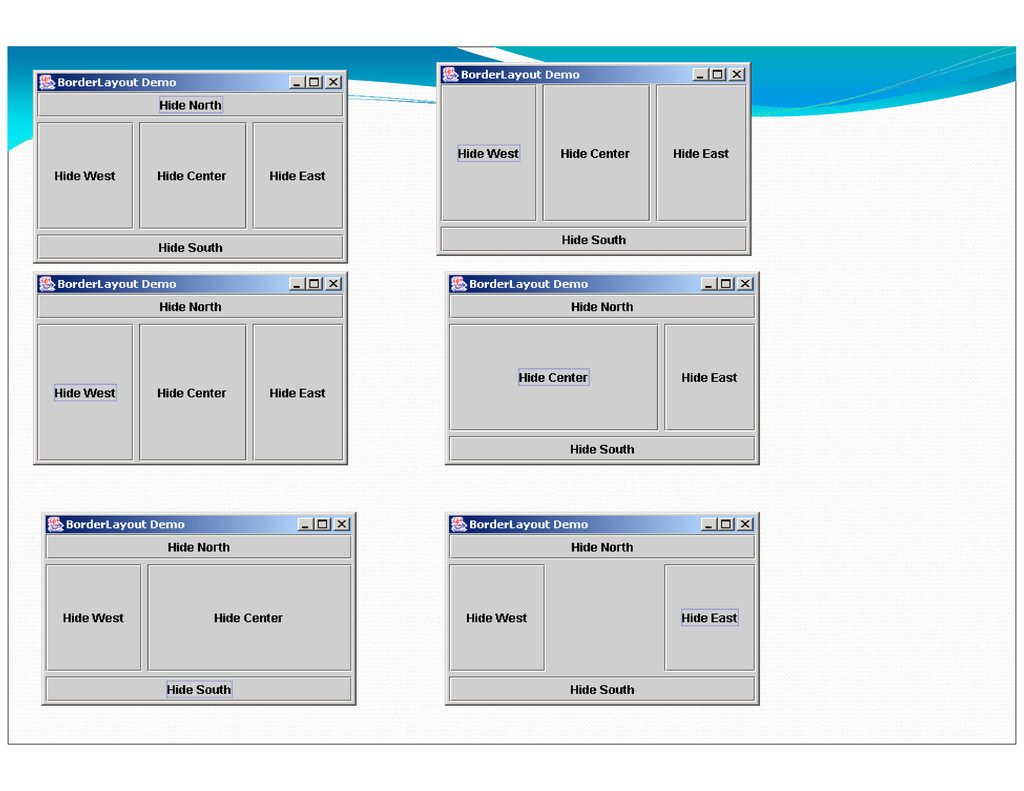
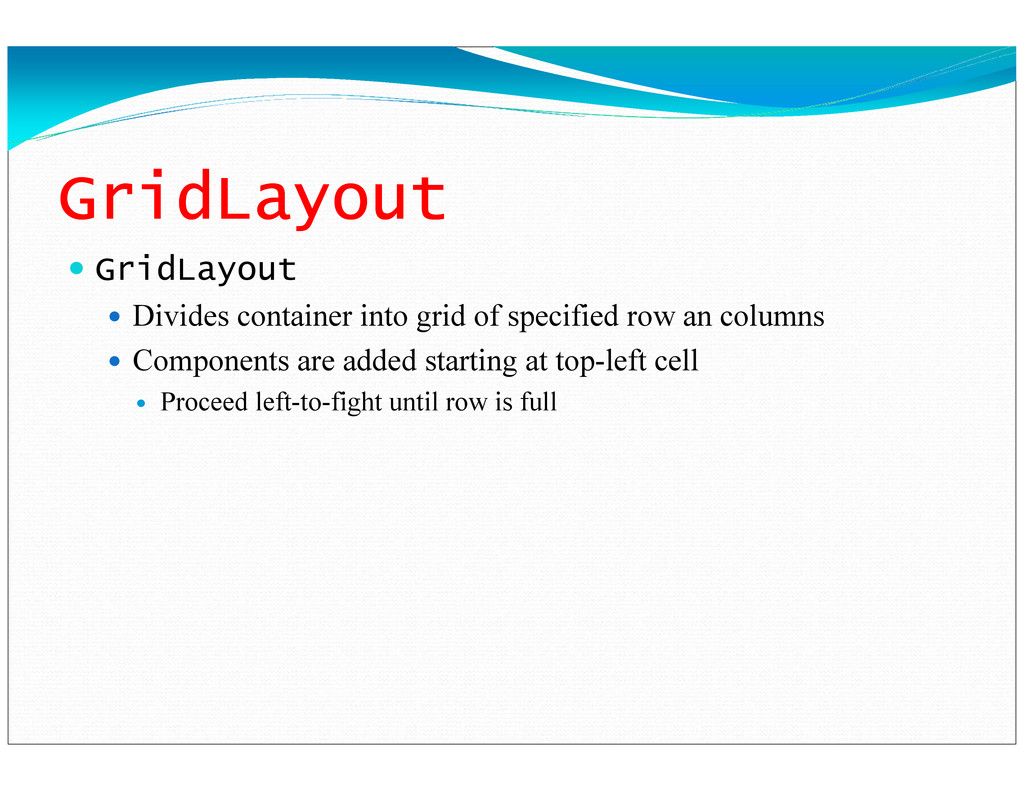
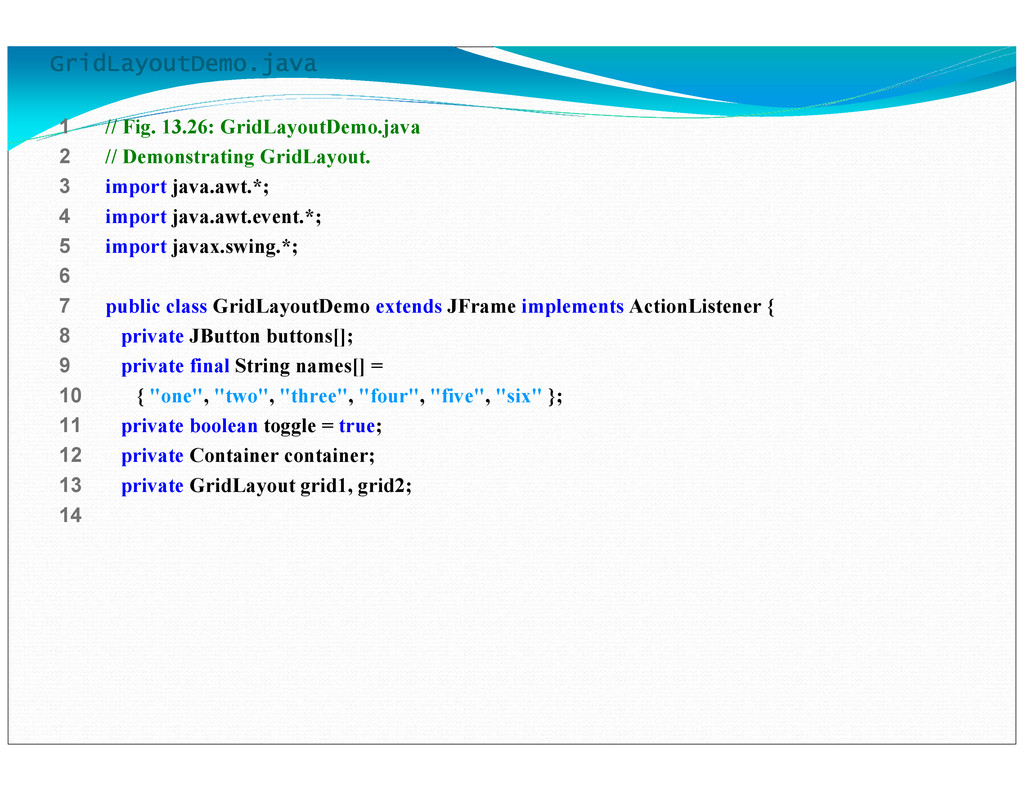
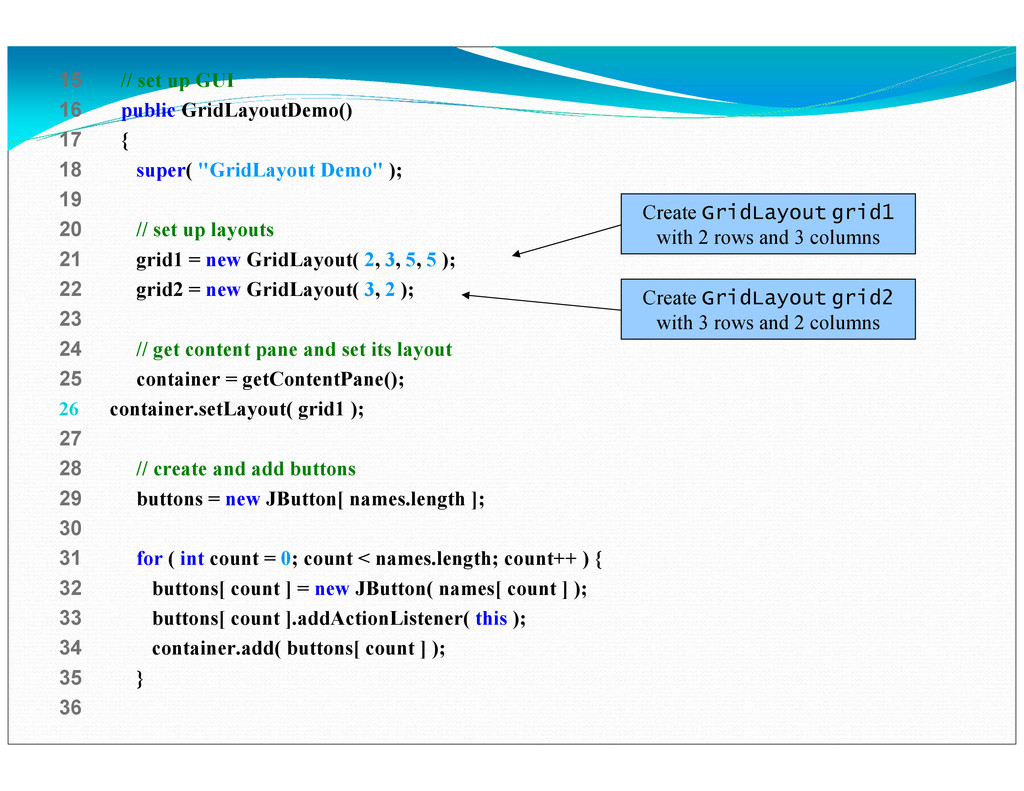
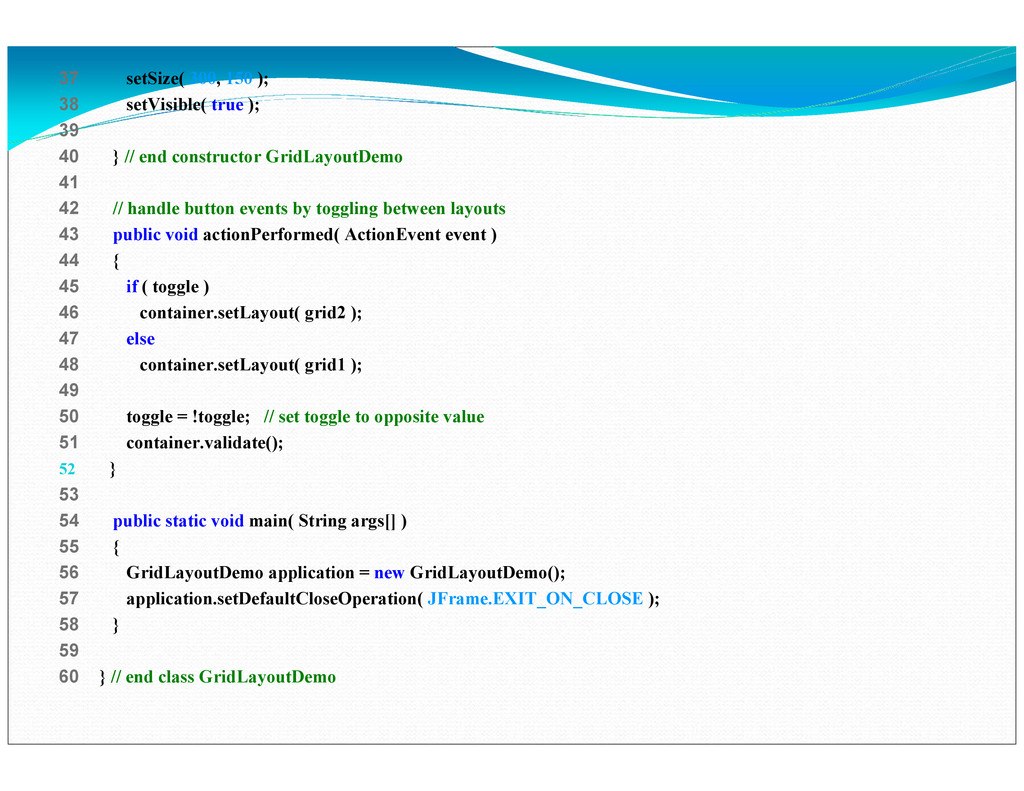
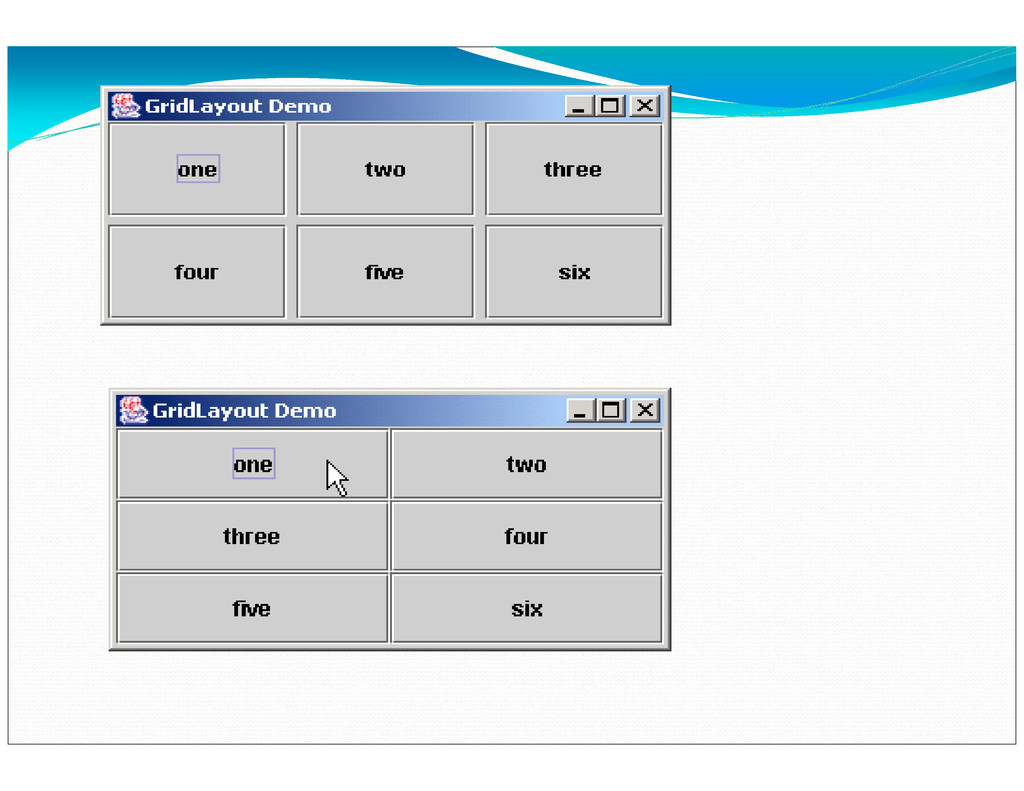
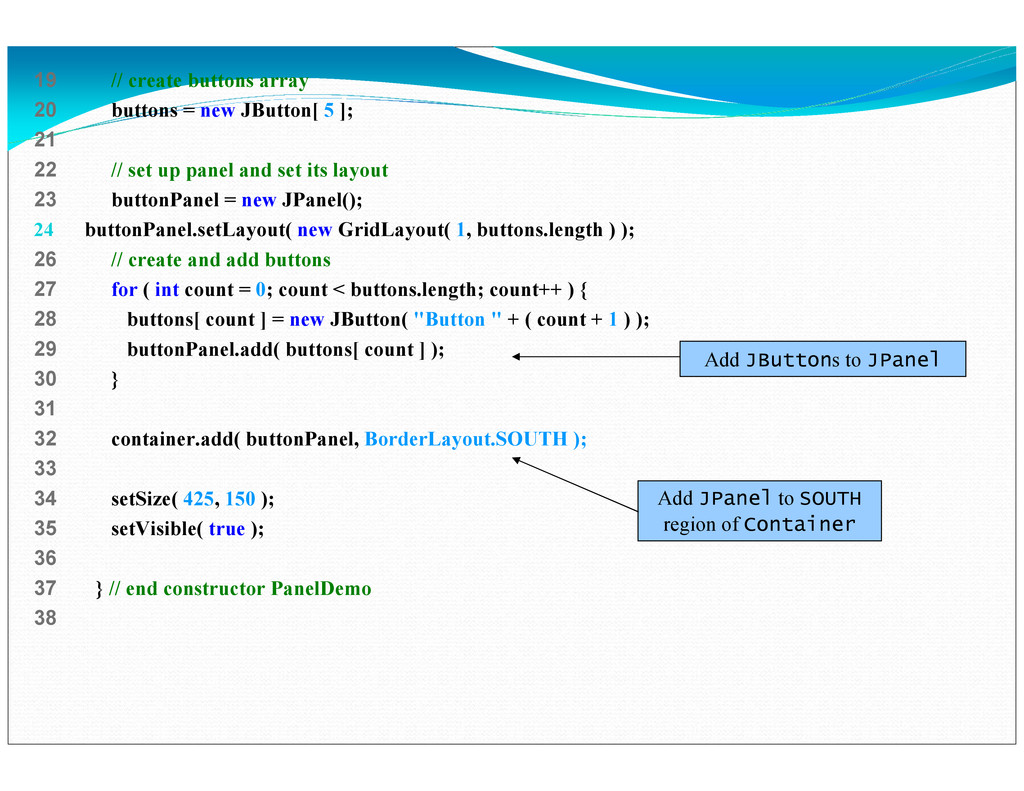
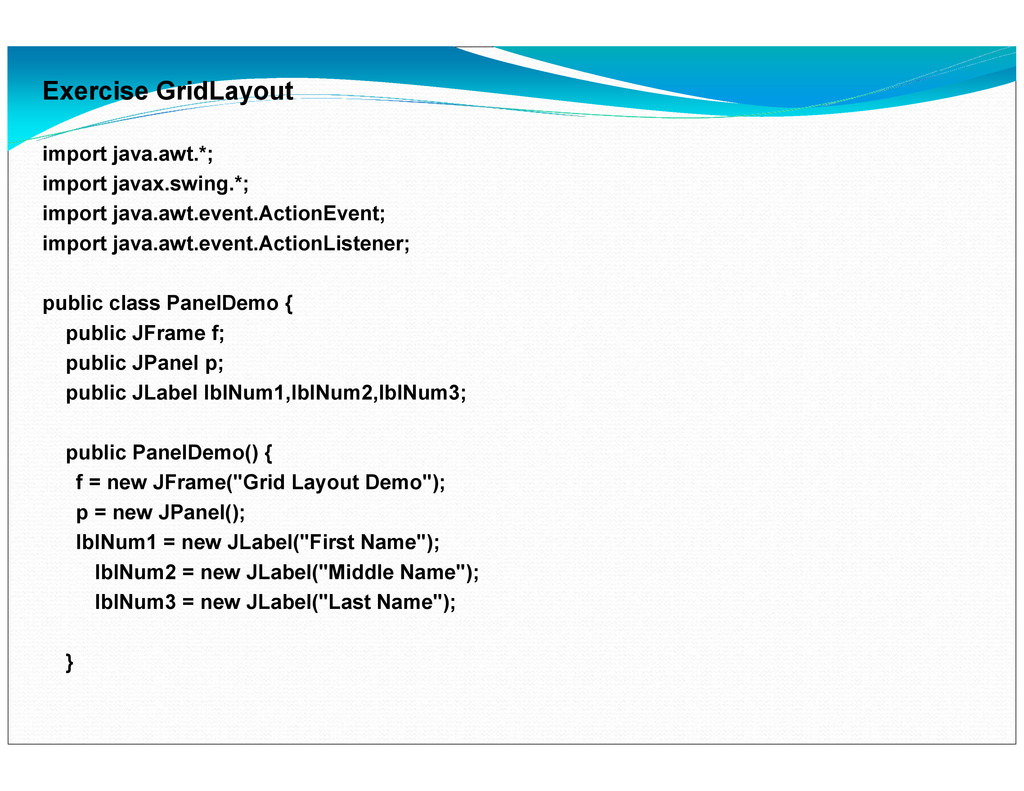
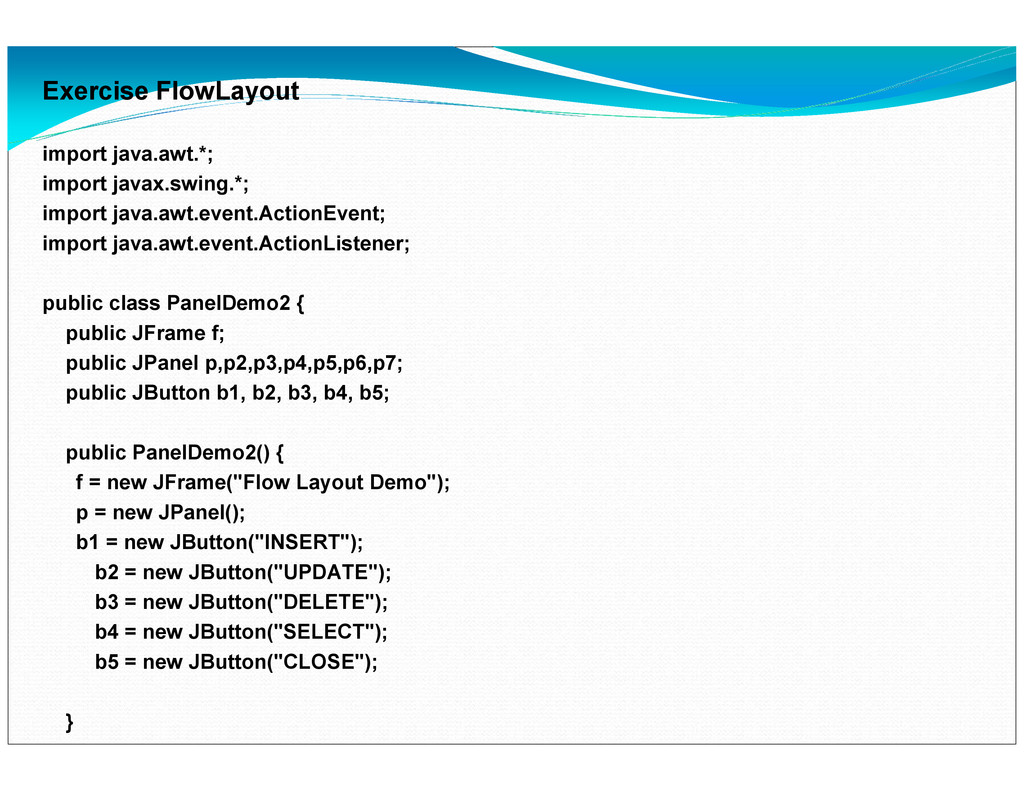
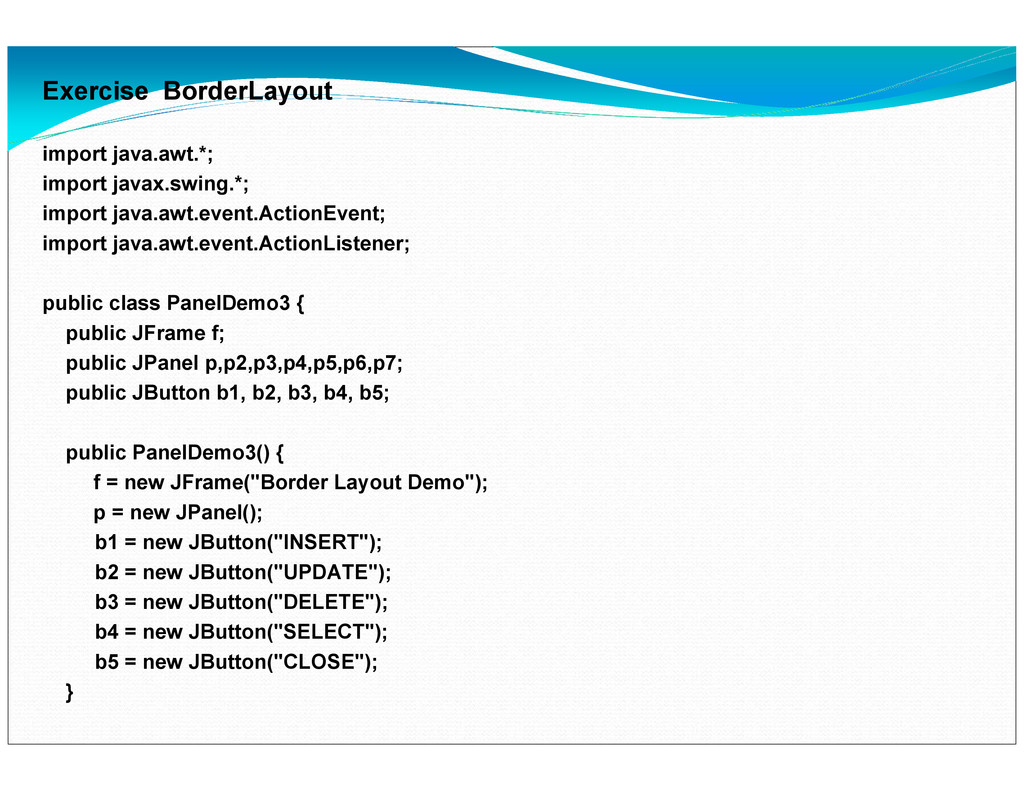
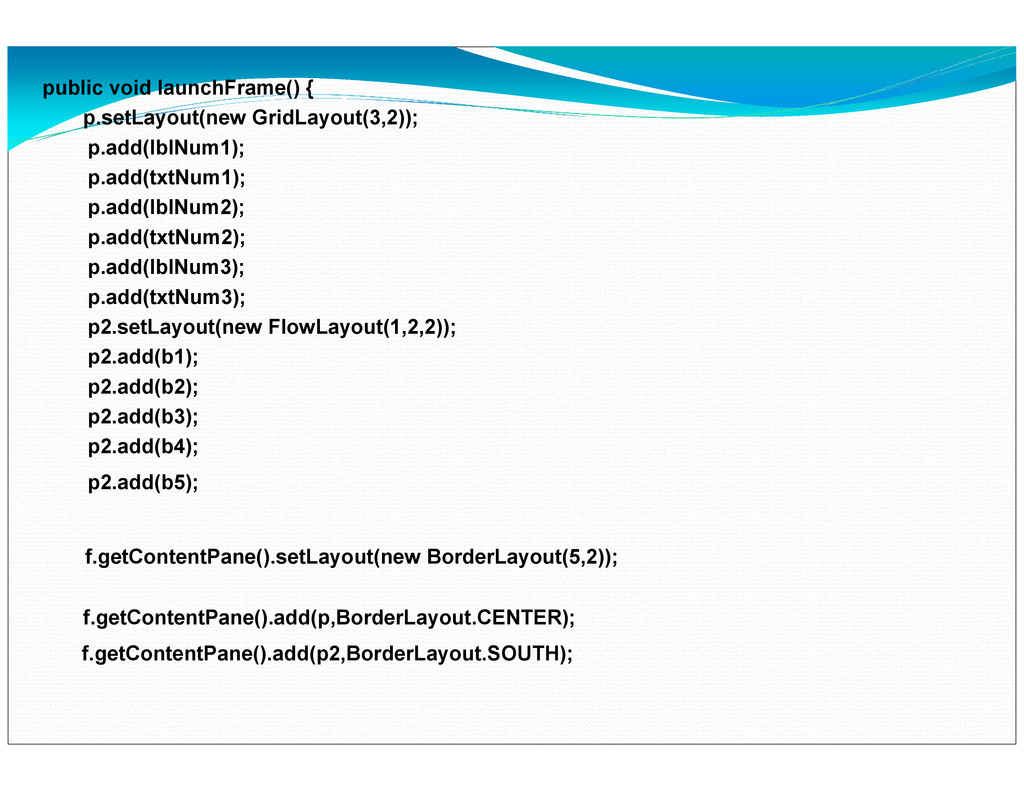
    and javax.swing.JPanel. Places components sequentially (left to right) in the order they were added. It is also possible to specify the order of the components by using the Container method add, which takes a Component and an integer index position as arguments. BorderLayout Default for the content panes of JFrames (and other windows) and JApplets. Arranges the components into five areas: NORTH, SOUTH, EAST, WEST and CENTER. GridLayout Arranges the components into rows and columns.
  12. FlowLayoutDemo FlowLayoutDemo FlowLayoutDemo FlowLayoutDemo.java .java .java .java Lines 17 and

    21 1 // Fig. 13.24: FlowLayoutDemo.java 2 // Demonstrating FlowLayout alignments. 3 import java.awt.*; 4 import java.awt.event.*; 5 import javax.swing.*; 6 7 public class FlowLayoutDemo extends JFrame { 8 private JButton leftButton, centerButton, rightButton; 9 private Container container; 10 private FlowLayout layout; 11 12 // set up GUI and register button listeners 13 public FlowLayoutDemo() 14 { 15 super( "FlowLayout Demo" ); 16 Set layout as FlowLayout
  13. 17 layout = new FlowLayout(); 18 19 // get content

    pane and set its layout 20 container = getContentPane(); 21 container.setLayout( layout ); 22 23 // set up leftButton and register listener 24 leftButton = new JButton( "Left" ); 25 container.add( leftButton ); 26 leftButton.addActionListener( 27 28 new ActionListener() { // anonymous inner class 29 30 // process leftButton event 31 public void actionPerformed( ActionEvent event ) 32 { 33 layout.setAlignment( FlowLayout.LEFT ); 34 35 // realign attached components 36 layout.layoutContainer( container ); 37 } 38 Set layout as FlowLayout When user presses left JButton, left align components
  14. } // end anonymous inner class 40 41 ); //

    end call to addActionListener 42 43 // set up centerButton and register listener 44 centerButton = new JButton( "Center" ); 45 container.add( centerButton ); 46 centerButton.addActionListener( 47 48 new ActionListener() { // anonymous inner class 49 50 // process centerButton event 51 public void actionPerformed( ActionEvent event ) 52 { 53 layout.setAlignment( FlowLayout.CENTER ); 54 55// realign attached components 56 layout.layoutContainer( container ); 57 } 58 } 59 ); When user presses center JButton, center components
  15. 60 61 // set up rightButton and register listener 62

    rightButton = new JButton( "Right" ); 63 container.add( rightButton ); 64 rightButton.addActionListener( 65 66 new ActionListener() { // anonymous inner class 67 68 // process rightButton event 69 public void actionPerformed( ActionEvent event ) 70 { 71 layout.setAlignment( FlowLayout.RIGHT ); 72 73 // realign attached components 74 layout.layoutContainer( container ); 75 } 76 } 77 ); 78 79 setSize( 300, 75 ); 80 setVisible( true ); When user presses center JButton, center components
  16. FlowLayoutDemo FlowLayoutDemo FlowLayoutDemo FlowLayoutDemo.java .java .java .java 81 82 }

    // end constructor FlowLayoutDemo 83 84 public static void main( String args[] ) 85 { 86 FlowLayoutDemo application = new FlowLayoutDemo(); 87 application.setDefaultCloseOperation( JFrame.EXIT_ON_CLOSE ); 88 } 89 90 } // end class FlowLayoutDemo
  17. BorderLayout BorderLayout BorderLayout BorderLayout BorderLayout Arranges components into five regions

    NORTH (top of container) SOUTH (bottom of container) EAST (left of container) WEST (right of container) CENTER (center of container)
  18. 1 // Fig. 13.25: BorderLayoutDemo.java 2 // Demonstrating BorderLayout. 3

    import java.awt.*; 4 import java.awt.event.*; 5 import javax.swing.*; 6 7 public class BorderLayoutDemo extends JFrame implements ActionListener { 8 private JButton buttons[]; 9 private final String names[] = { "Hide North", "Hide South", 10 "Hide East", "Hide West", "Hide Center" }; 11 private BorderLayout layout; 12 13 // set up GUI and event handling 14 public BorderLayoutDemo() 15 { 16 super( "BorderLayout Demo" ); 17 18 layout = new BorderLayout( 5, 5 ); // 5 pixel gaps 19 20 // get content pane and set its layout 21 Container container = getContentPane(); 22 container.setLayout( layout ); 23
  19. 24 // instantiate button objects 25 buttons = new JButton[

    names.length ]; 26 27 for ( int count = 0; count < names.length; count++ ) { 28 buttons[ count ] = new JButton( names[ count ] ); 29 buttons[ count ].addActionListener( this ); 30 } 31 32 // place buttons in BorderLayout; order not important 33 container.add( buttons[ 0 ], BorderLayout.NORTH ); 34 container.add( buttons[ 1 ], BorderLayout.SOUTH ); 35 container.add( buttons[ 2 ], BorderLayout.EAST ); 36 container.add( buttons[ 3 ], BorderLayout.WEST ); 37 container.add( buttons[ 4 ], BorderLayout.CENTER ); 38 39 setSize( 300, 200 ); 40 setVisible( true ); 41 42 } // end constructor BorderLayoutDemo 43 Place JButtons in regions specified by BorderLayout
  20. 44 // handle button events 45 public void actionPerformed( ActionEvent

    event ) 46 { 47 for ( int count = 0; count < buttons.length; count++ ) 48 49 if ( event.getSource() == buttons[ count ] ) 50 buttons[ count ].setVisible( false ); 51 else 52 buttons[ count ].setVisible( true ); 53 54 // re-layout the content pane 55 layout.layoutContainer( getContentPane() ); 56 } 57 58 public static void main( String args[] ) 59 { 60 BorderLayoutDemo application = new BorderLayoutDemo(); 61 application.setDefaultCloseOperation( JFrame.EXIT_ON_CLOSE ); 62 } 63 64 } // end class BorderLayoutDemo When JButtons are “invisible,” they are not displayed on screen, and BorderLayout rearranges
  21. GridLayout GridLayout GridLayout GridLayout GridLayout Divides container into grid of

    specified row an columns Components are added starting at top-left cell Proceed left-to-fight until row is full
  22. GridLayoutDemo GridLayoutDemo GridLayoutDemo GridLayoutDemo.java .java .java .java 1 // Fig.

    13.26: GridLayoutDemo.java 2 // Demonstrating GridLayout. 3 import java.awt.*; 4 import java.awt.event.*; 5 import javax.swing.*; 6 7 public class GridLayoutDemo extends JFrame implements ActionListener { 8 private JButton buttons[]; 9 private final String names[] = 10 { "one", "two", "three", "four", "five", "six" }; 11 private boolean toggle = true; 12 private Container container; 13 private GridLayout grid1, grid2; 14
  23. 15 // set up GUI 16 public GridLayoutDemo() 17 {

    18 super( "GridLayout Demo" ); 19 20 // set up layouts 21 grid1 = new GridLayout( 2, 3, 5, 5 ); 22 grid2 = new GridLayout( 3, 2 ); 23 24 // get content pane and set its layout 25 container = getContentPane(); 26 container.setLayout( grid1 ); 27 28 // create and add buttons 29 buttons = new JButton[ names.length ]; 30 31 for ( int count = 0; count < names.length; count++ ) { 32 buttons[ count ] = new JButton( names[ count ] ); 33 buttons[ count ].addActionListener( this ); 34 container.add( buttons[ count ] ); 35 } 36 Create GridLayout grid1 with 2 rows and 3 columns Create GridLayout grid2 with 3 rows and 2 columns
  24. 37 setSize( 300, 150 ); 38 setVisible( true ); 39

    40 } // end constructor GridLayoutDemo 41 42 // handle button events by toggling between layouts 43 public void actionPerformed( ActionEvent event ) 44 { 45 if ( toggle ) 46 container.setLayout( grid2 ); 47 else 48 container.setLayout( grid1 ); 49 50 toggle = !toggle; // set toggle to opposite value 51 container.validate(); 52 } 53 54 public static void main( String args[] ) 55 { 56 GridLayoutDemo application = new GridLayoutDemo(); 57 application.setDefaultCloseOperation( JFrame.EXIT_ON_CLOSE ); 58 } 59 60 } // end class GridLayoutDemo
  25. Panels Panel Helps organize components Class JPanel is JComponent subclass

    May have components (and other panels) added to them
  26. PanelDemo PanelDemo PanelDemo PanelDemo.java .java .java .java 1 // Fig.

    13.27: PanelDemo.java 2 // Using a JPanel to help lay out components. 3 import java.awt.*; 4 import java.awt.event.*; 5 import javax.swing.*; 6 7 public class PanelDemo extends JFrame { 8 private JPanel buttonPanel; 9 private JButton buttons[]; 10 11 // set up GUI 12 public PanelDemo() 13 { 14 super( "Panel Demo" ); 15 16 // get content pane 17 Container container = getContentPane(); 18
  27. 19 // create buttons array 20 buttons = new JButton[

    5 ]; 21 22 // set up panel and set its layout 23 buttonPanel = new JPanel(); 24 buttonPanel.setLayout( new GridLayout( 1, buttons.length ) ); 26 // create and add buttons 27 for ( int count = 0; count < buttons.length; count++ ) { 28 buttons[ count ] = new JButton( "Button " + ( count + 1 ) ); 29 buttonPanel.add( buttons[ count ] ); 30 } 31 32 container.add( buttonPanel, BorderLayout.SOUTH ); 33 34 setSize( 425, 150 ); 35 setVisible( true ); 36 37 } // end constructor PanelDemo 38 Add JButtons to JPanel Add JPanel to SOUTH region of Container
  28. 37 } // end constructor PanelDemo 38 39 public static

    void main( String args[] ) 40 { 41 PanelDemo application = new PanelDemo(); 42 application.setDefaultCloseOperation( JFrame.EXIT_ON_CLOSE ); 43 } 44 45 } // end class PanelDemo
  29. Exercise GridLayout import java.awt.*; import javax.swing.*; import java.awt.event.ActionEvent; import java.awt.event.ActionListener;

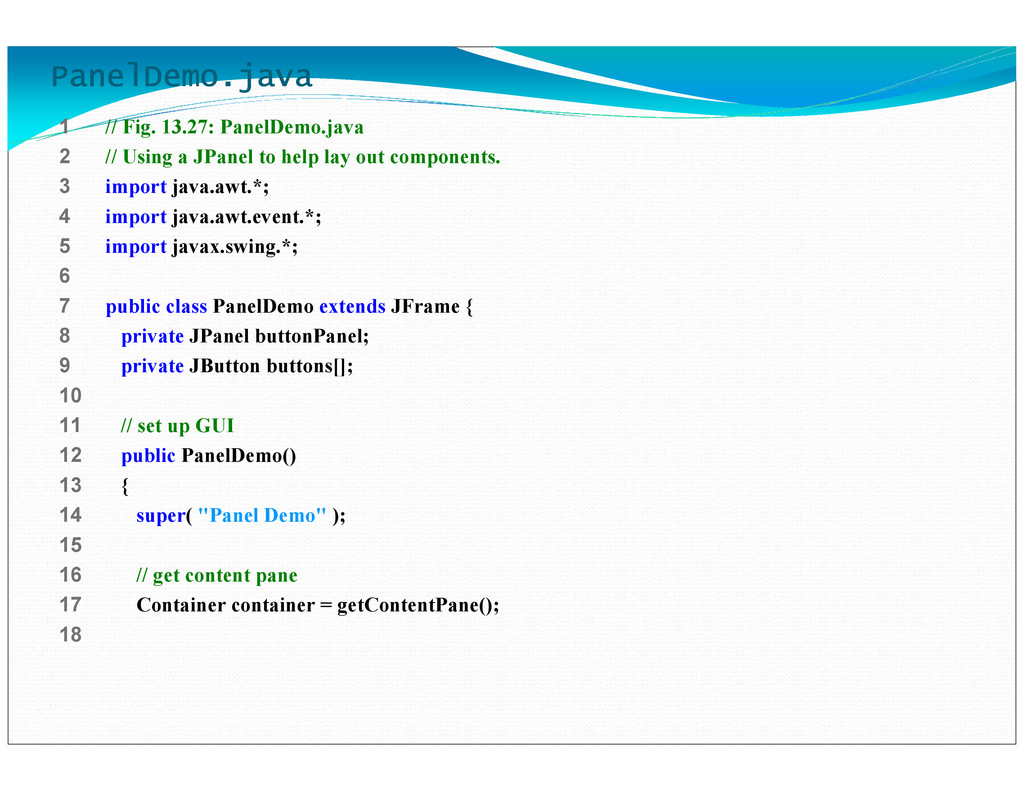
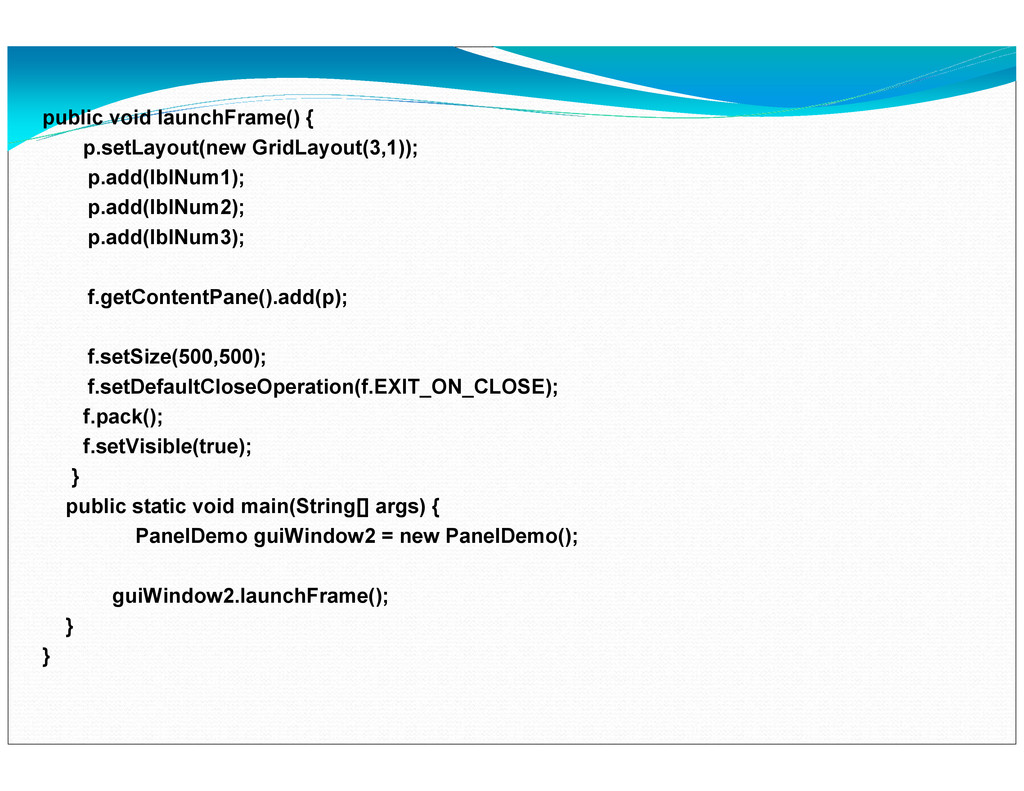
    public class PanelDemo { public JFrame f; public JPanel p; public JLabel lblNum1,lblNum2,lblNum3; public PanelDemo() { f = new JFrame("Grid Layout Demo"); p = new JPanel(); lblNum1 = new JLabel("First Name"); lblNum2 = new JLabel("Middle Name"); lblNum3 = new JLabel("Last Name"); }
  30. public void launchFrame() { p.setLayout(new GridLayout(3,1)); p.add(lblNum1); p.add(lblNum2); p.add(lblNum3); f.getContentPane().add(p);

    f.setSize(500,500); f.setDefaultCloseOperation(f.EXIT_ON_CLOSE); f.pack(); f.setVisible(true); } public static void main(String[] args) { PanelDemo guiWindow2 = new PanelDemo(); guiWindow2.launchFrame(); } }
  31. Exercise FlowLayout import java.awt.*; import javax.swing.*; import java.awt.event.ActionEvent; import java.awt.event.ActionListener;

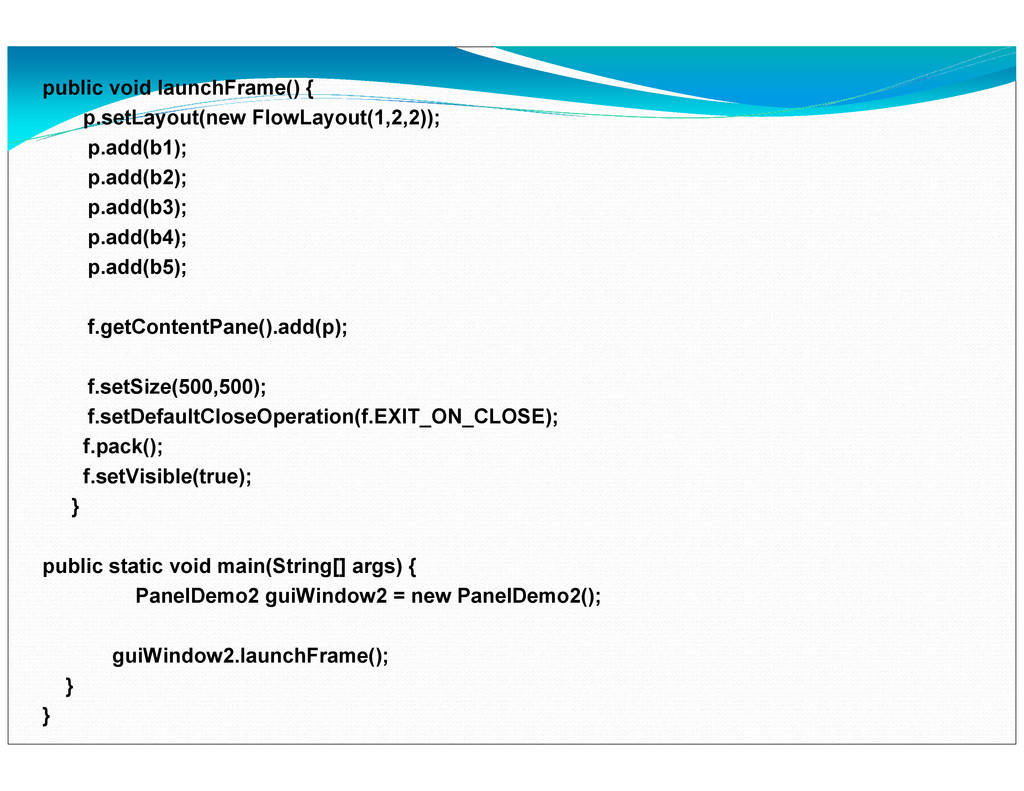
    public class PanelDemo2 { public JFrame f; public JPanel p,p2,p3,p4,p5,p6,p7; public JButton b1, b2, b3, b4, b5; public PanelDemo2() { f = new JFrame("Flow Layout Demo"); p = new JPanel(); b1 = new JButton("INSERT"); b2 = new JButton("UPDATE"); b3 = new JButton("DELETE"); b4 = new JButton("SELECT"); b5 = new JButton("CLOSE"); }
  32. public void launchFrame() { p.setLayout(new FlowLayout(1,2,2)); p.add(b1); p.add(b2); p.add(b3); p.add(b4);

    p.add(b5); f.getContentPane().add(p); f.setSize(500,500); f.setDefaultCloseOperation(f.EXIT_ON_CLOSE); f.pack(); f.setVisible(true); } public static void main(String[] args) { PanelDemo2 guiWindow2 = new PanelDemo2(); guiWindow2.launchFrame(); } }
  33. Exercise BorderLayout import java.awt.*; import javax.swing.*; import java.awt.event.ActionEvent; import java.awt.event.ActionListener;

    public class PanelDemo3 { public JFrame f; public JPanel p,p2,p3,p4,p5,p6,p7; public JButton b1, b2, b3, b4, b5; public PanelDemo3() { f = new JFrame("Border Layout Demo"); p = new JPanel(); b1 = new JButton("INSERT"); b2 = new JButton("UPDATE"); b3 = new JButton("DELETE"); b4 = new JButton("SELECT"); b5 = new JButton("CLOSE"); }
  34. public void launchFrame() { f.getContentPane().setLayout(new BorderLayout(5,1)); f.getContentPane().add(b1,BorderLayout.NORTH); f.getContentPane().add(b2,BorderLayout.SOUTH); f.getContentPane().add(b3,BorderLayout.CENTER); f.getContentPane().add(b4,BorderLayout.EAST);

    f.getContentPane().add(b5,BorderLayout.WEST); f.setSize(500,500); f.setDefaultCloseOperation(f.EXIT_ON_CLOSE); f.pack(); f.setVisible(true); } public static void main(String[] args) { PanelDemo3 guiWindow2 = new PanelDemo3(); guiWindow2.launchFrame(); } }
  35. Exercise Combination import java.awt.*; import javax.swing.*; import java.awt.event.ActionEvent; import java.awt.event.ActionListener;

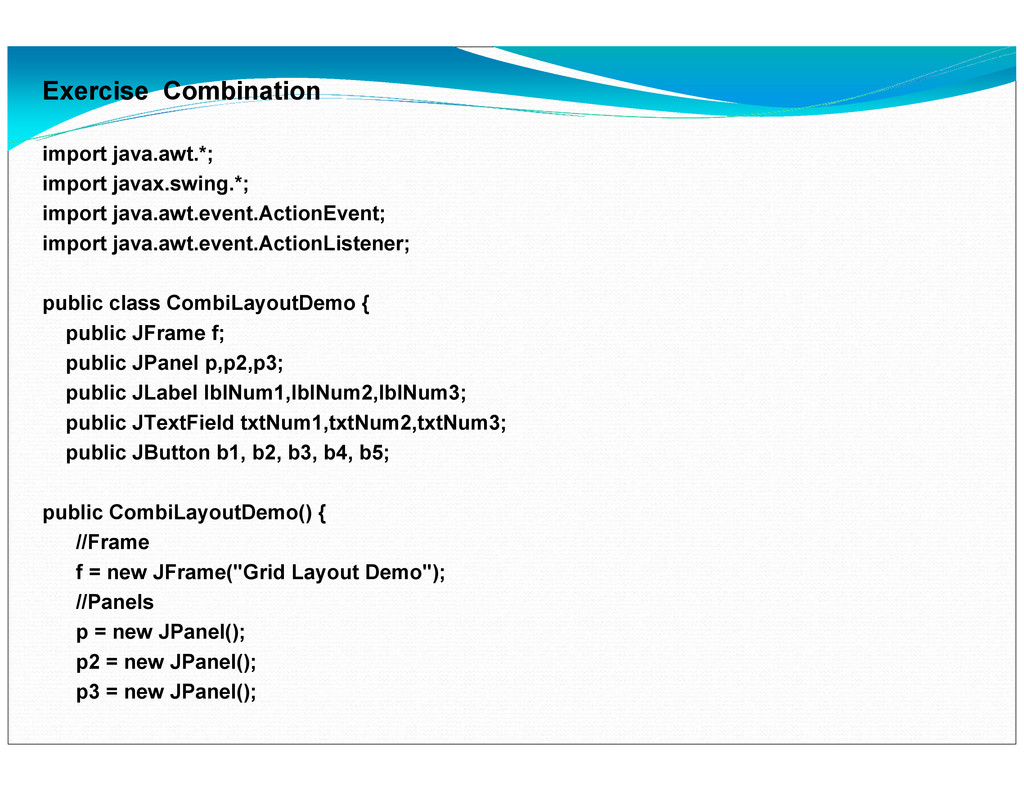
    public class CombiLayoutDemo { public JFrame f; public JPanel p,p2,p3; public JLabel lblNum1,lblNum2,lblNum3; public JTextField txtNum1,txtNum2,txtNum3; public JButton b1, b2, b3, b4, b5; public CombiLayoutDemo() { //Frame f = new JFrame("Grid Layout Demo"); //Panels p = new JPanel(); p2 = new JPanel(); p3 = new JPanel();
  36. //labels lblNum1 = new JLabel("First Name"); lblNum2 = new JLabel("Middle

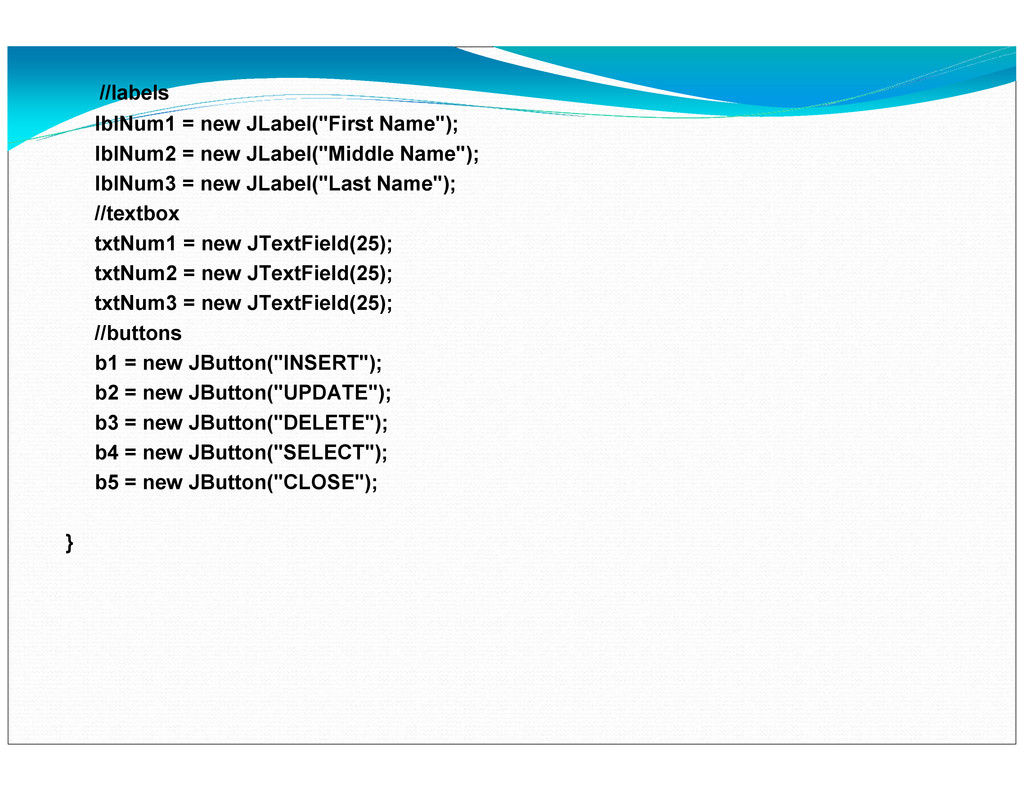
    Name"); lblNum3 = new JLabel("Last Name"); //textbox txtNum1 = new JTextField(25); txtNum2 = new JTextField(25); txtNum3 = new JTextField(25); //buttons b1 = new JButton("INSERT"); b2 = new JButton("UPDATE"); b3 = new JButton("DELETE"); b4 = new JButton("SELECT"); b5 = new JButton("CLOSE"); }
  37. public void launchFrame() { p.setLayout(new GridLayout(3,2)); p.add(lblNum1); p.add(txtNum1); p.add(lblNum2); p.add(txtNum2);

    p.add(lblNum3); p.add(txtNum3); p2.setLayout(new FlowLayout(1,2,2)); p2.add(b1); p2.add(b2); p2.add(b3); p2.add(b4); p2.add(b5); f.getContentPane().setLayout(new BorderLayout(5,2)); f.getContentPane().add(p,BorderLayout.CENTER); f.getContentPane().add(p2,BorderLayout.SOUTH);
  38. Event Handling GUIs are event driven Generate events when user

    interacts with GUI e.g., moving mouse, pressing button, typing in text field, etc. Class java.awt.AWTEvent
  39. Some event classes of package java.awt.event java.awt.event java.awt.event java.awt.event Object

    EventObject AWTEvent ActionEvent AdjustmentEvent ItemEvent TextEvent ContainerEvent FocusEvent PaintEvent WindowEvent InputEvent MouseWheelEvent ComponentEvent KeyEvent MouseEvent Object EventObject AWTEvent ComponentEvent TextEvent ItemEvent AdjustmentEvent ActionEvent WindowEvent InputEvent MouseEvent KeyEvent MouseWheelEvent FocusEvent PaintEvent ContainerEvent
  40. Event Handling Event-handling model Three parts Event source GUI component

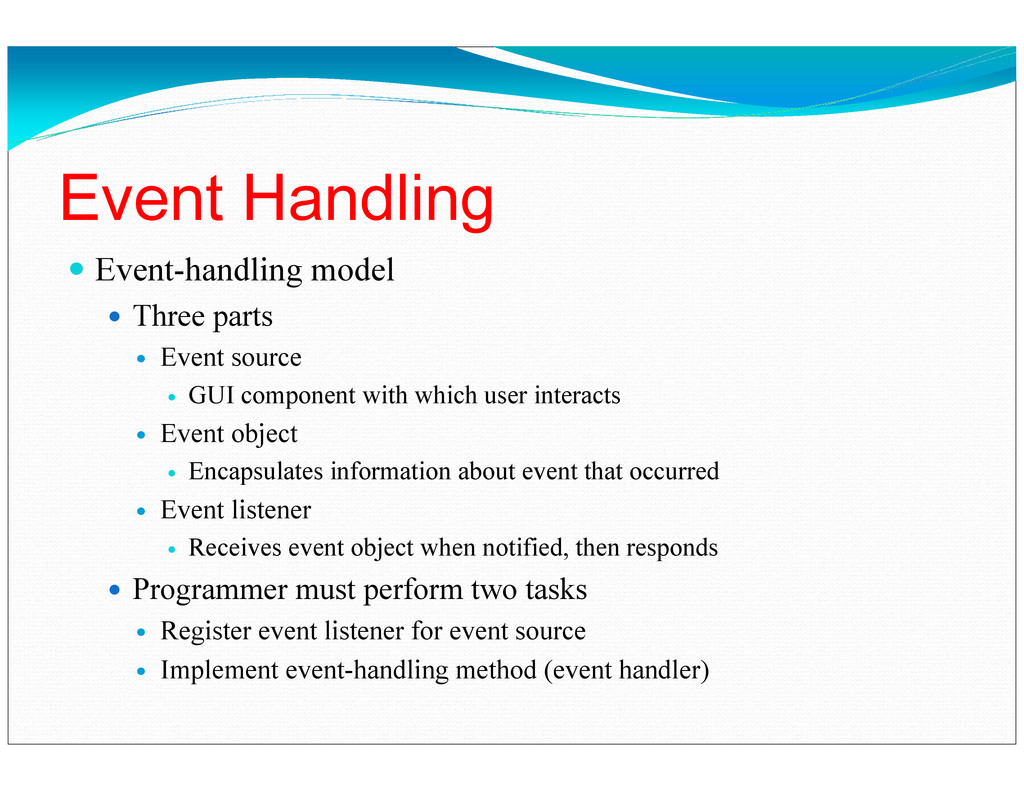
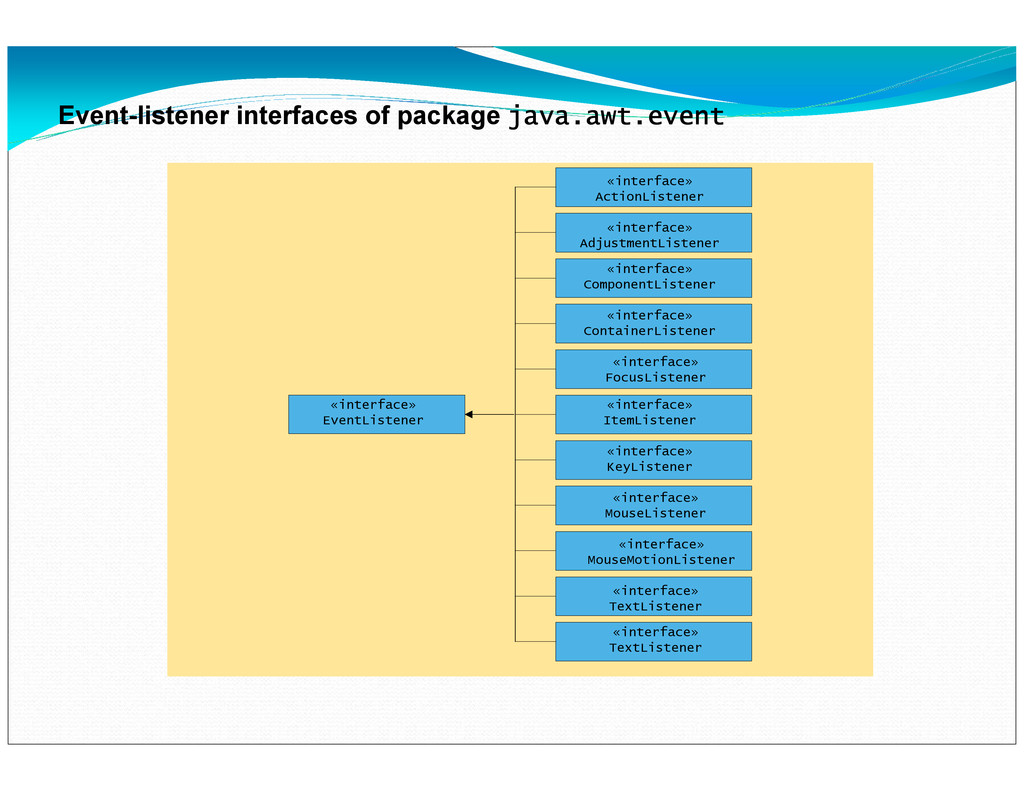
    with which user interacts Event object Encapsulates information about event that occurred Event listener Receives event object when notified, then responds Programmer must perform two tasks Register event listener for event source Implement event-handling method (event handler)
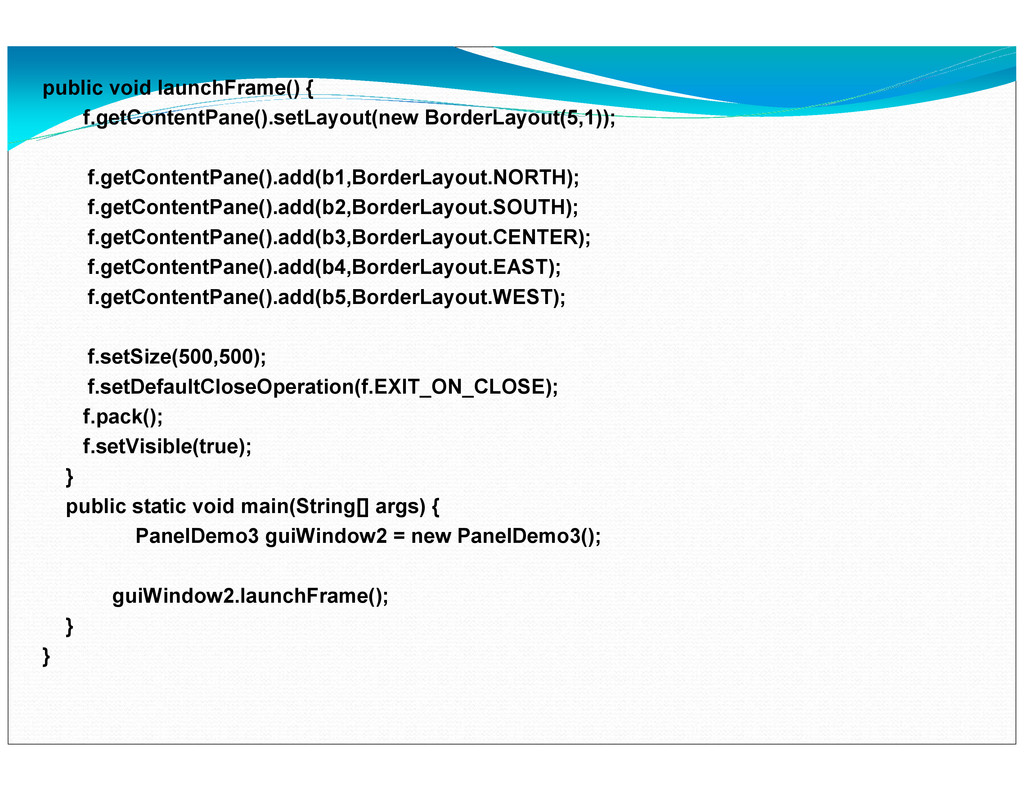
  41. Event-listener interfaces of package java.awt.event java.awt.event java.awt.event java.awt.event interface EventListener

    interface ActionListener interface AdjustmentListener interface ComponentListener interface ContainerListener interface FocusListener interface ItemListener interface KeyListener interface MouseListener interface MouseMotionListener interface TextListener interface WindowListener «interface» EventListener «interface» ActionListener «interface» AdjustmentListener «interface» ComponentListener «interface» ContainerListener «interface» FocusListener «interface» ItemListener «interface» KeyListener «interface» MouseListener «interface» MouseMotionListener «interface» TextListener «interface» TextListener