piece of clip art 3. A box, specifically designed to keep out light. It’s primary function is keep any and all light away from it’s light reactive core until the user says how much light comes in and how fast it comes in
light. It’s primary function is keep any and all light away from it’s light reactive core until the user says how much light comes in , how fast it comes in and when it should come in.
ways to control how much light gets to the sensor/film • Aperture • Shutter Speed • ISO sets how sensitive your camera is to that light • Changes in Aperture also affect the depth of field in your image • Changes in Shutter Speed affect how much motion blur will be visible in your image • Changes in ISO affect the amount of digital noise in your image The easiest way to learn how to use your camera? Think in terms of “Stops of Light” Each change in whole number aperture, shutter speed or ISO changes the amount of light coming into the camera by 1 stop.
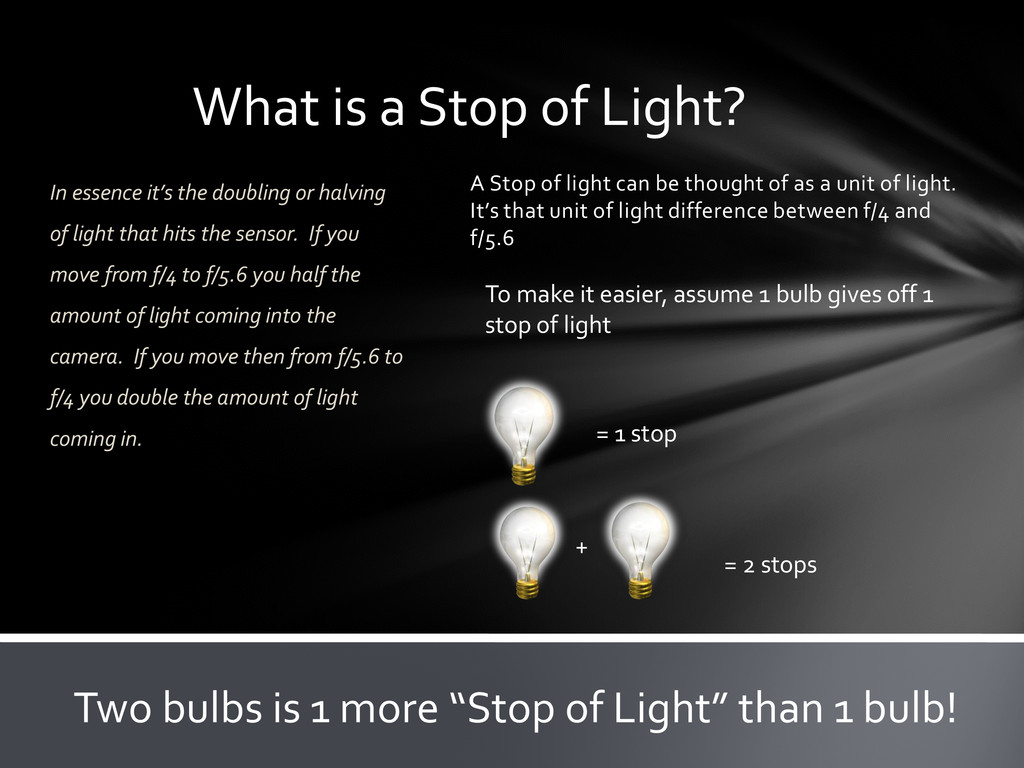
doubling or halving of light that hits the sensor. If you move from f/4 to f/5.6 you half the amount of light coming into the camera. If you move then from f/5.6 to f/4 you double the amount of light coming in. A Stop of light can be thought of as a unit of light. It’s that unit of light difference between f/4 and f/5.6 = 1 stop + = 2 stops To make it easier, assume 1 bulb gives off 1 stop of light Two bulbs is 1 more “Stop of Light” than 1 bulb!
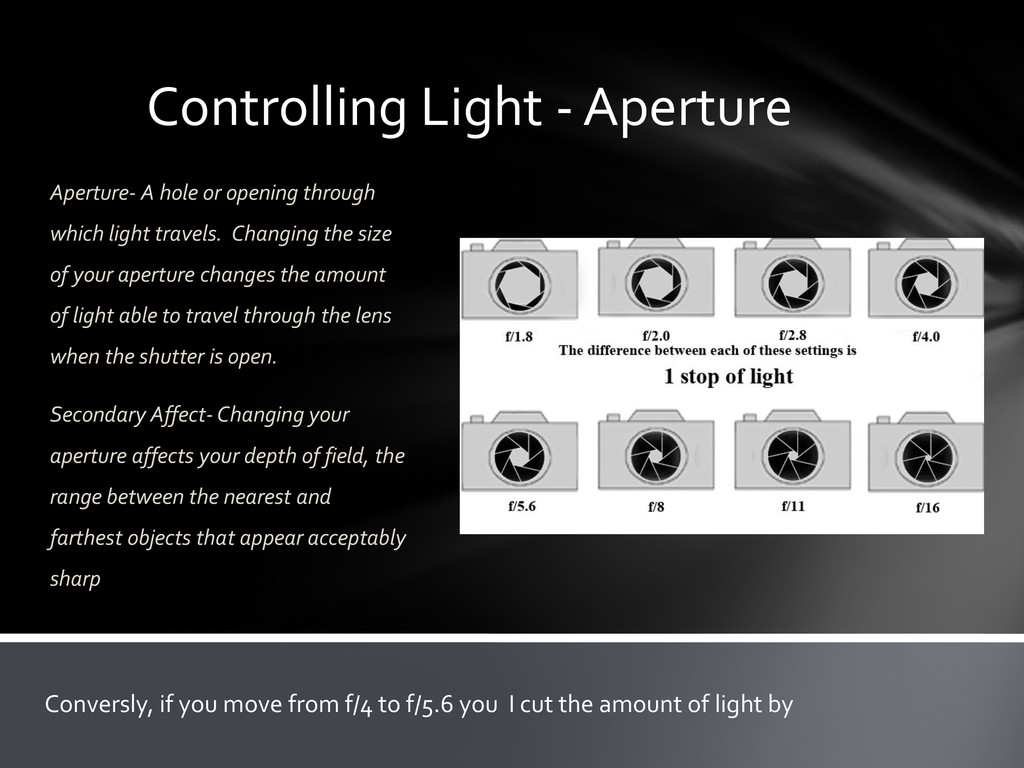
which light travels. Changing the size of your aperture changes the amount of light able to travel through the lens when the shutter is open. Secondary Affect- Changing your aperture affects your depth of field, the range between the nearest and farthest objects that appear acceptably sharp Conversly, if you move from f/4 to f/5.6 you I cut the amount of light by
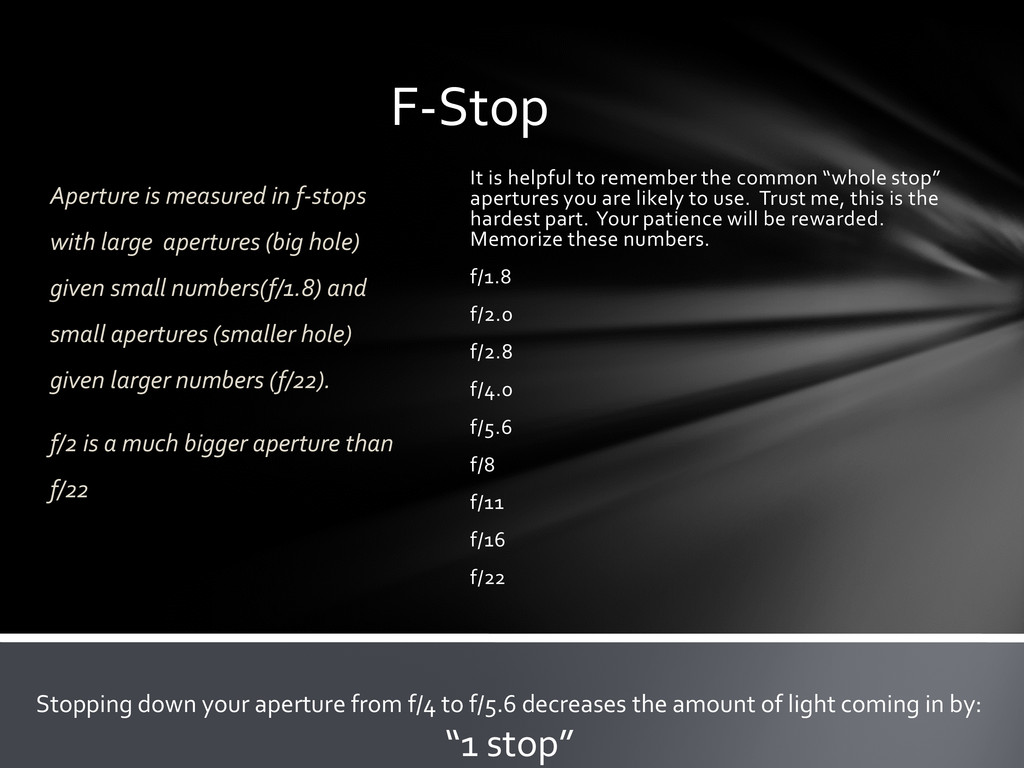
hole) given small numbers(f/1.8) and small apertures (smaller hole) given larger numbers (f/22). f/2 is a much bigger aperture than f/22 It is helpful to remember the common “whole stop” apertures you are likely to use. Trust me, this is the hardest part. Your patience will be rewarded. Memorize these numbers. f/1.8 f/2.0 f/2.8 f/4.0 f/5.6 f/8 f/11 f/16 f/22 Stopping down your aperture from f/4 to f/5.6 decreases the amount of light coming in by: “1 stop”
picture with a very narrow depth of field. Only a small area will be in focus. Think close up of a flower A small aperture, such as f/22 will give you a picture with a wider depth of field and much more of your image in focus. Think wide open landscape pictures. Aperture: secondary affect Understanding and controlling aperture and depth of field opens up the creative aspects of photography. Use larger apertures to isolate your subject against a blurry background, use a smaller aperture to ensure that most of your image, from foreground to horizon will be in focus. No blurry background here. Using whole stop apertures as a reference you can quickly and easily adjust the shutter speed or ISO to properly expose your image.
because there’s a shutter curtain which sits just in front of the sensor. It stays closed until you press the shutter button which opens the curtain, allowing light to hit the sensor/film for a set amount of time. Shutter speed is measured in seconds, or rather usually fractions of a second. Light travels pretty fast, remember. The bigger the denominator, the faster the speed. For example 1/1000 of a second is much faster than 1/30 of a second. Slower shutter speeds will allow the motion of your subject to be recorded on your sensor/film. Faster shutter speeds will freeze the motion of your subject. Whole stop shutter speeds are easier to remember: 1/1000, 1/500, 1/250, 1/125, 1/60, 1/30, 1/15, 1/8, ¼, ½, 1” (1 second), 2” (2 seconds) etc. Usually you won’t see the 1/ part of it. Unless you are much slower than your hand holding limit of around 1/60 of a second assume when you see 60 it means 1/60 and 500 means 1/500 of a second Each change in whole stop shutter speeds represents a 1 stop light change. You’ll benefit from running through the list several times. Start at 1000 and slow your shutter down by 1 stop out loud. Go ahead, I’ll wait. 1000…500…250…125 Shutter Speed
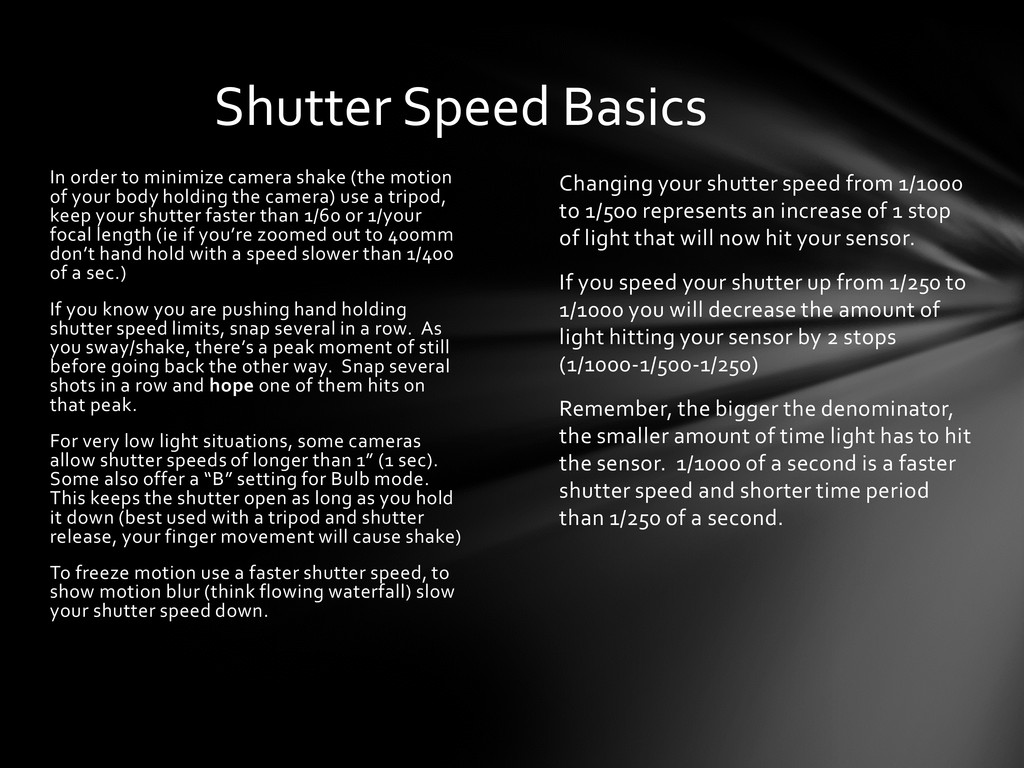
increase of 1 stop of light that will now hit your sensor. If you speed your shutter up from 1/250 to 1/1000 you will decrease the amount of light hitting your sensor by 2 stops (1/1000-1/500-1/250) Remember, the bigger the denominator, the smaller amount of time light has to hit the sensor. 1/1000 of a second is a faster shutter speed and shorter time period than 1/250 of a second. In order to minimize camera shake (the motion of your body holding the camera) use a tripod, keep your shutter faster than 1/60 or 1/your focal length (ie if you’re zoomed out to 400mm don’t hand hold with a speed slower than 1/400 of a sec.) If you know you are pushing hand holding shutter speed limits, snap several in a row. As you sway/shake, there’s a peak moment of still before going back the other way. Snap several shots in a row and hope one of them hits on that peak. For very low light situations, some cameras allow shutter speeds of longer than 1” (1 sec). Some also offer a “B” setting for Bulb mode. This keeps the shutter open as long as you hold it down (best used with a tripod and shutter release, your finger movement will cause shake) To freeze motion use a faster shutter speed, to show motion blur (think flowing waterfall) slow your shutter speed down. Shutter Speed Basics
The lower the number, the less sensitive your camera is to light. It will result in finer grain, more detail and less noise. This is everything you want in a great picture. Leave your ISO on the lowest setting possible, 50 if you can or 100 as often as possible. In cooking terms it’s like barbeque, low and slow. In film days it was an actual physical property of the film and it’s reactive coatings. ISO 400 film reacted to light twice as fast as ISO 200 and half as fast as ISO 800. Higher ISO settings are used in darker situations. They increase the sensor’s/film’s sensitivity to light and make it possible to shoot with faster shutter speeds or smaller apertures in a darker setting. There is a trade off. The higher the ISO setting, the more noise and less detail you will have in your image. With film it was called grain. Today it’s called digital noise. Whole stop ISO settings: 100, 200, 400, 800, 1600, 3200 etc. Some cameras have the ability to shoot with an ISO as low as 50 and over 100,000. The higher you go, the bigger the price tag in the form of noise and loss of detail. If ISO 50 is low and slow cooking, ISO 3200 is microwaving that food. It will make the difference of whether you get the shot at all and if you’re only going to have it printed in newsprint. Each change in whole stop ISO settings represents a change in 1 stop of light, just like Aperture and Shutter Speed. ISO
affects the others Function Primary Effect Secondary Effect The following chart is a quick reference as to how the changes you make affect your image. If you decrease your shutter speed you increase the amount of light coming into the camera and therefore allow more possible motion blur. If you open up your aperture (low number) you allow more light in but have a shallow depth of field (flower close up) If you increase your ISO you will increase the sensitivity of your sensor but will have more noise. Cause and Effect Shutter Speed Shutter Speed Light Light Light Light Aperture Aperture ISO ISO Sensitivity Sensitivity Motion Blur Motion Blur Depth of Field Depth of Field Noise Noise
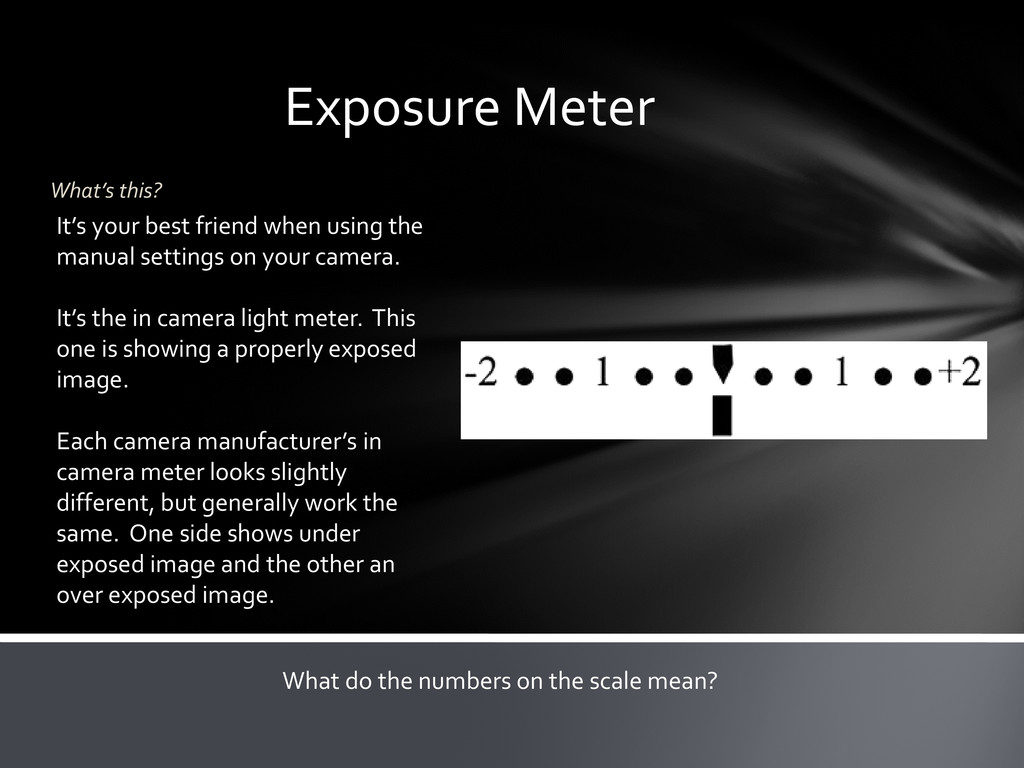
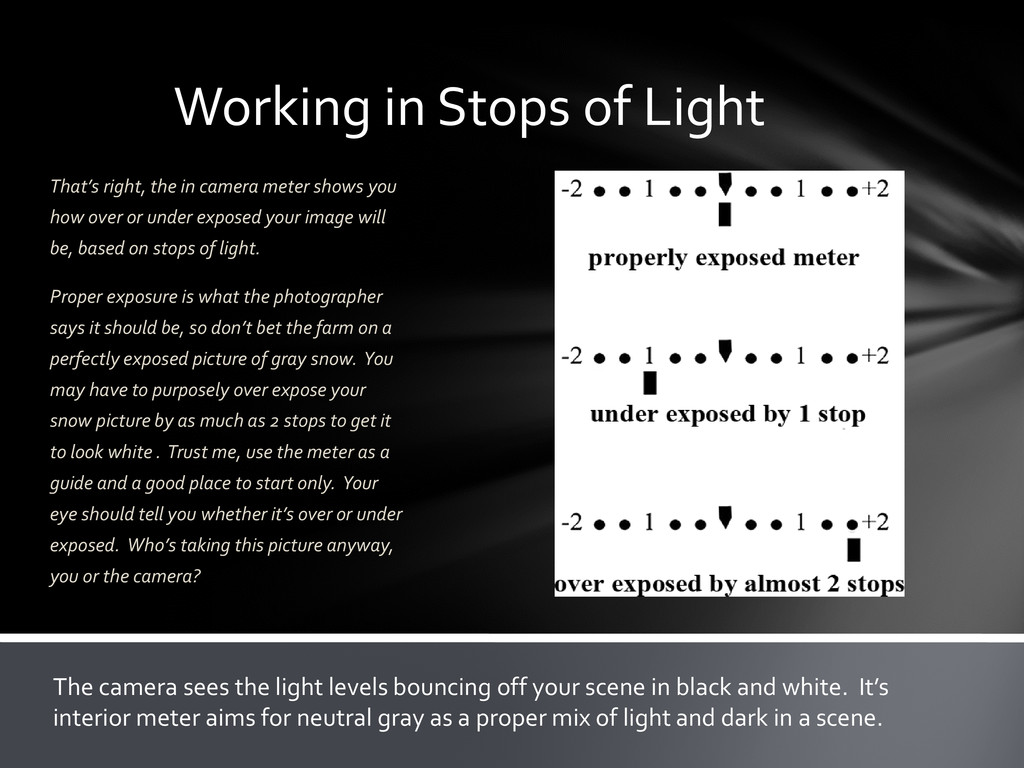
the manual settings on your camera. It’s the in camera light meter. This one is showing a properly exposed image. Each camera manufacturer’s in camera meter looks slightly different, but generally work the same. One side shows under exposed image and the other an over exposed image. What do the numbers on the scale mean?
meter shows you how over or under exposed your image will be, based on stops of light. Proper exposure is what the photographer says it should be, so don’t bet the farm on a perfectly exposed picture of gray snow. You may have to purposely over expose your snow picture by as much as 2 stops to get it to look white . Trust me, use the meter as a guide and a good place to start only. Your eye should tell you whether it’s over or under exposed. Who’s taking this picture anyway, you or the camera? The camera sees the light levels bouncing off your scene in black and white. It’s interior meter aims for neutral gray as a proper mix of light and dark in a scene.
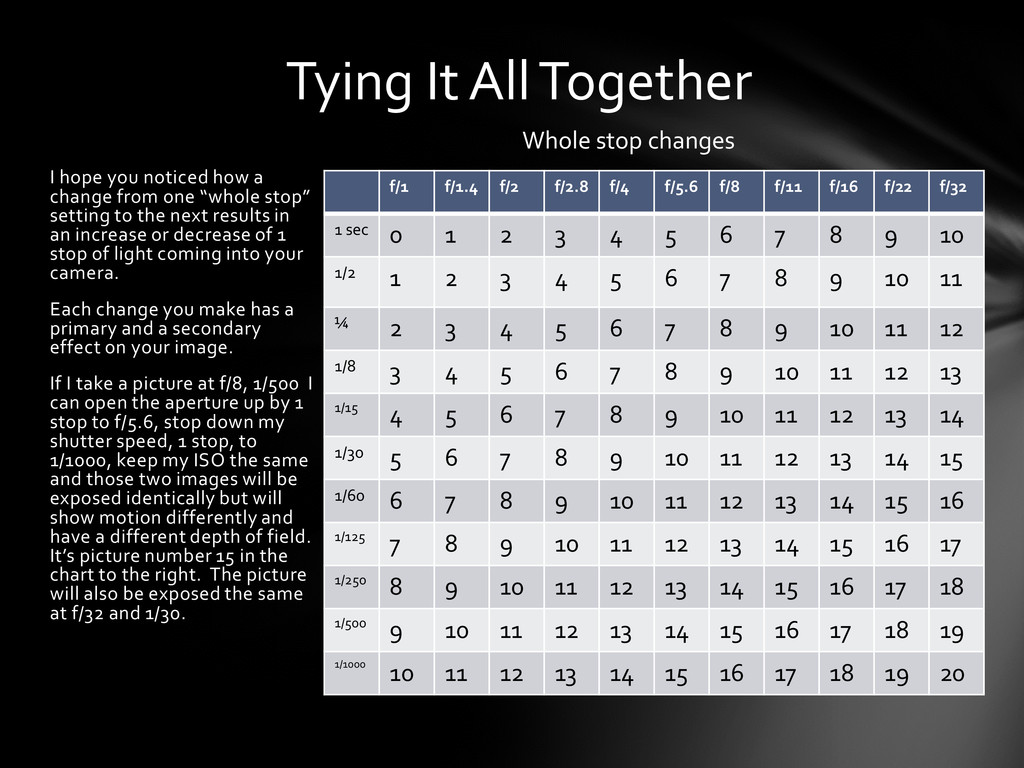
stop” setting to the next results in an increase or decrease of 1 stop of light coming into your camera. Each change you make has a primary and a secondary effect on your image. If I take a picture at f/8, 1/500 I can open the aperture up by 1 stop to f/5.6, stop down my shutter speed, 1 stop, to 1/1000, keep my ISO the same and those two images will be exposed identically but will show motion differently and have a different depth of field. It’s picture number 15 in the chart to the right. The picture will also be exposed the same at f/32 and 1/30. Tying It All Together Whole stop changes f/1 f/1.4 f/2 f/2.8 f/4 f/5.6 f/8 f/11 f/16 f/22 f/32 1 sec 0 1 2 3 4 5 6 7 8 9 10 1/2 1 2 3 4 5 6 7 8 9 10 11 ¼ 2 3 4 5 6 7 8 9 10 11 12 1/8 3 4 5 6 7 8 9 10 11 12 13 1/15 4 5 6 7 8 9 10 11 12 13 14 1/30 5 6 7 8 9 10 11 12 13 14 15 1/60 6 7 8 9 10 11 12 13 14 15 16 1/125 7 8 9 10 11 12 13 14 15 16 17 1/250 8 9 10 11 12 13 14 15 16 17 18 1/500 9 10 11 12 13 14 15 16 17 18 19 1/1000 10 11 12 13 14 15 16 17 18 19 20
pull out your manual and find the following: Manual Mode Exposure meter How to change your Aperture How to change your Shutter Speed How to change your ISO Once you have that, PLAY with it. Those are really the only settings you NEED on your camera. Using the manual controls on your camera is actually very easy when you think about it in terms of what a change in those numbers do to the amount of light entering your camera. Leave your ISO at the lowest setting you can to still get your shot. Each change to the next whole stop number, be it aperture, shutter speed or ISO is a change up or down of 1 stop of light. If your picture is too bright, stop down your aperture to restrict how much light comes in (next higher number, smaller hole) If your picture is too dark, slow down your shutter by 1 stop and see what happens. If it’s just too dark to shoot where you are, bump up your ISO by 1 stop. Final Thoughts
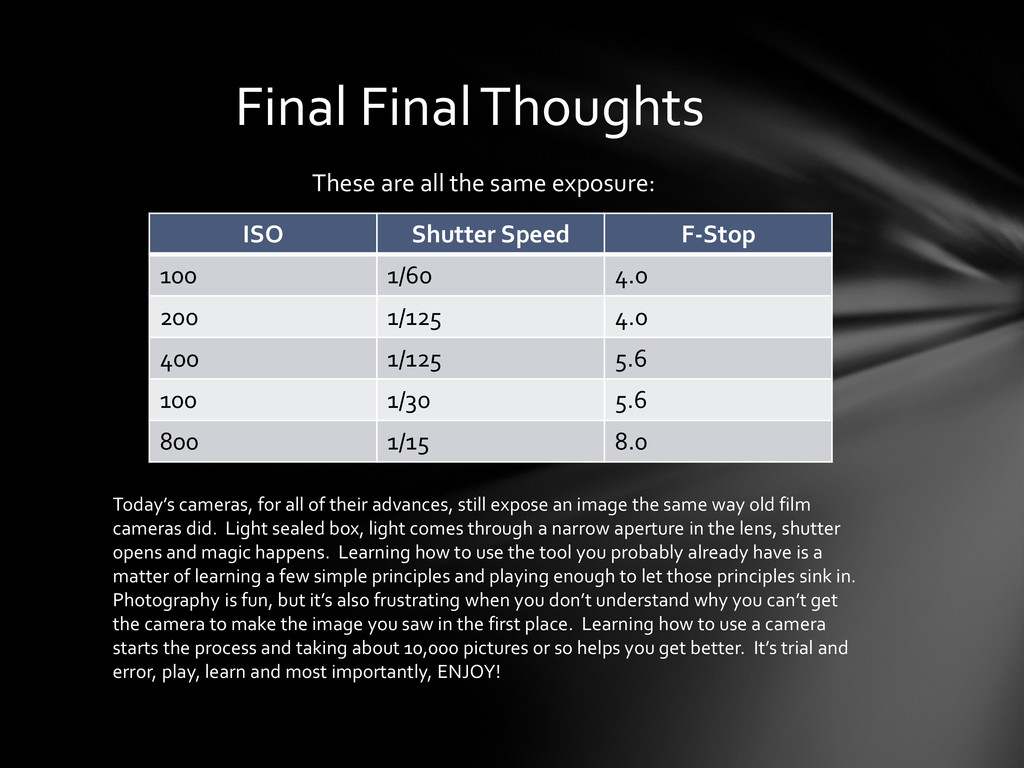
still expose an image the same way old film cameras did. Light sealed box, light comes through a narrow aperture in the lens, shutter opens and magic happens. Learning how to use the tool you probably already have is a matter of learning a few simple principles and playing enough to let those principles sink in. Photography is fun, but it’s also frustrating when you don’t understand why you can’t get the camera to make the image you saw in the first place. Learning how to use a camera starts the process and taking about 10,000 pictures or so helps you get better. It’s trial and error, play, learn and most importantly, ENJOY! ISO Shutter Speed F-Stop 100 1/60 4.0 200 1/125 4.0 400 1/125 5.6 100 1/30 5.6 800 1/15 8.0 These are all the same exposure: