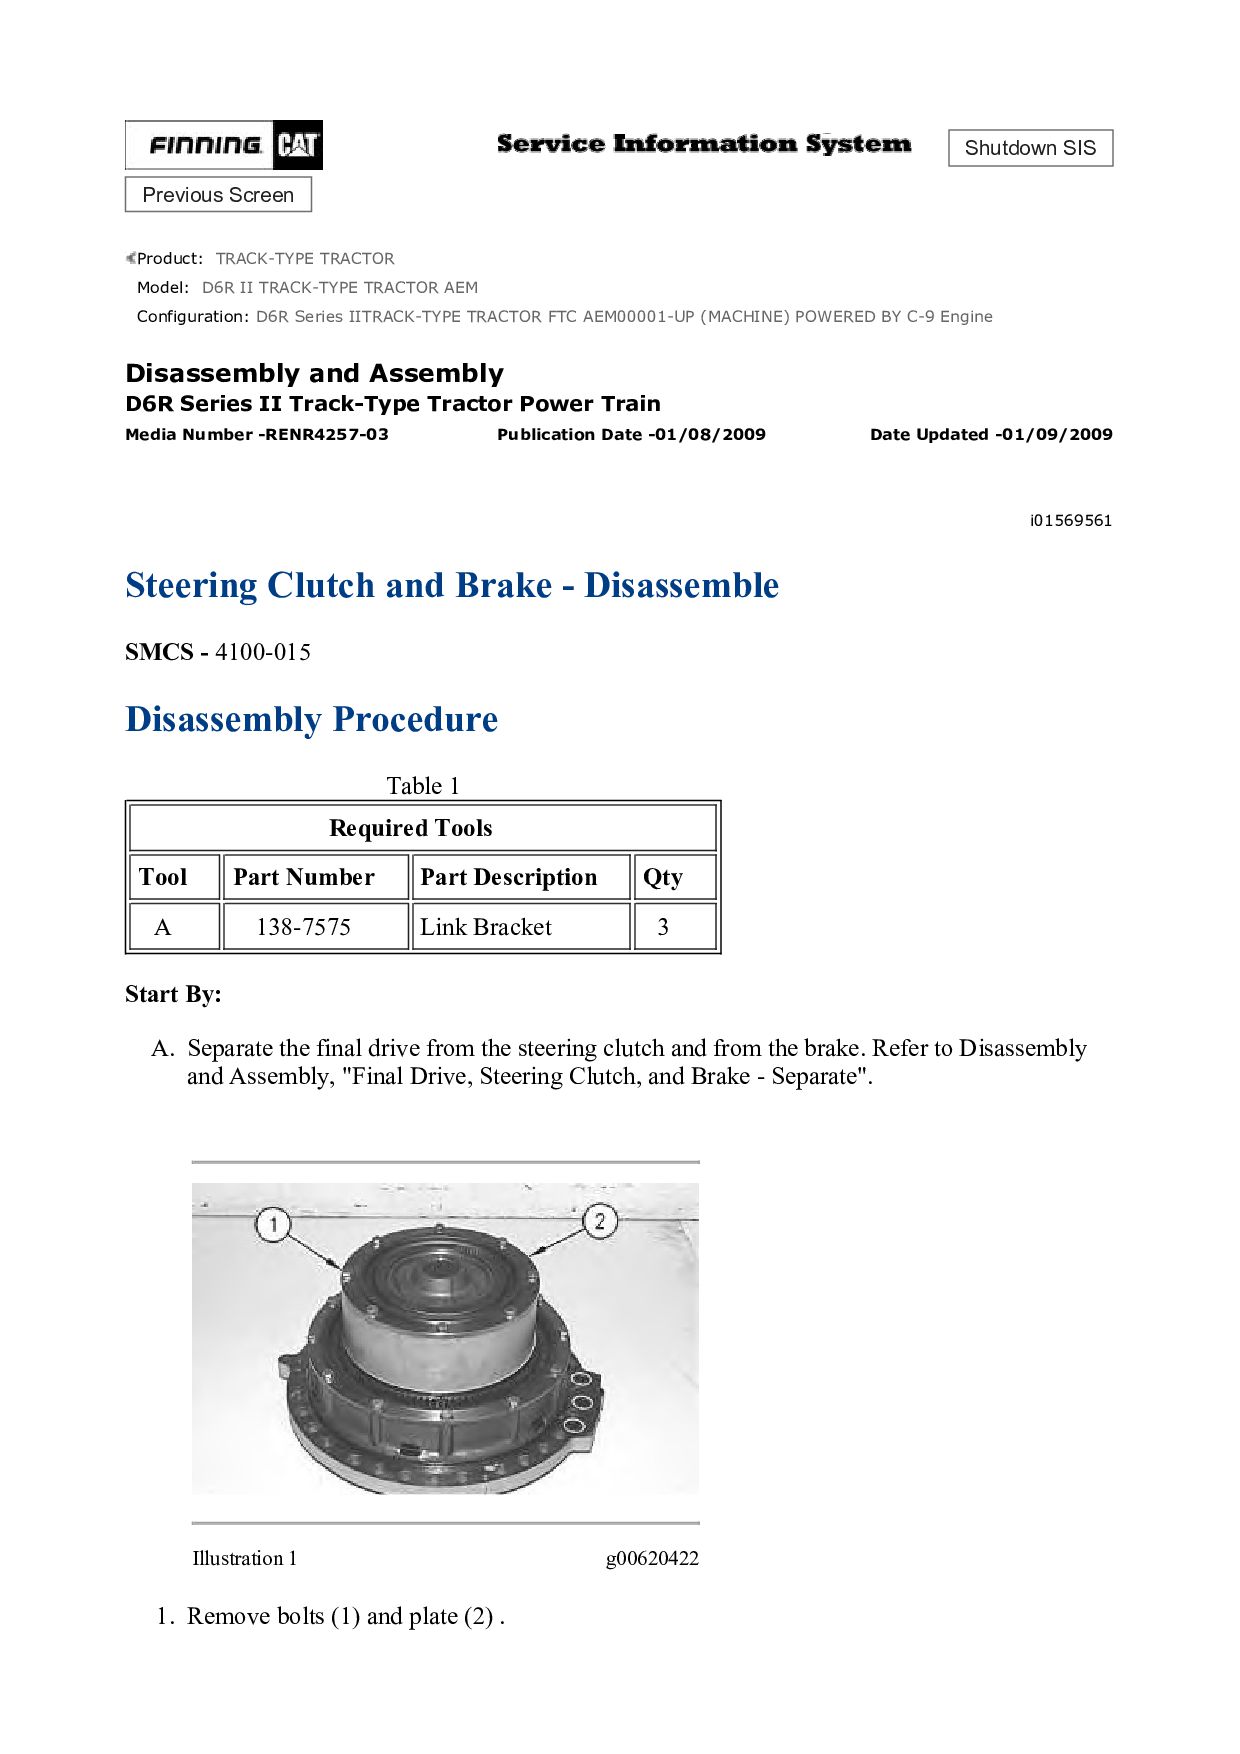
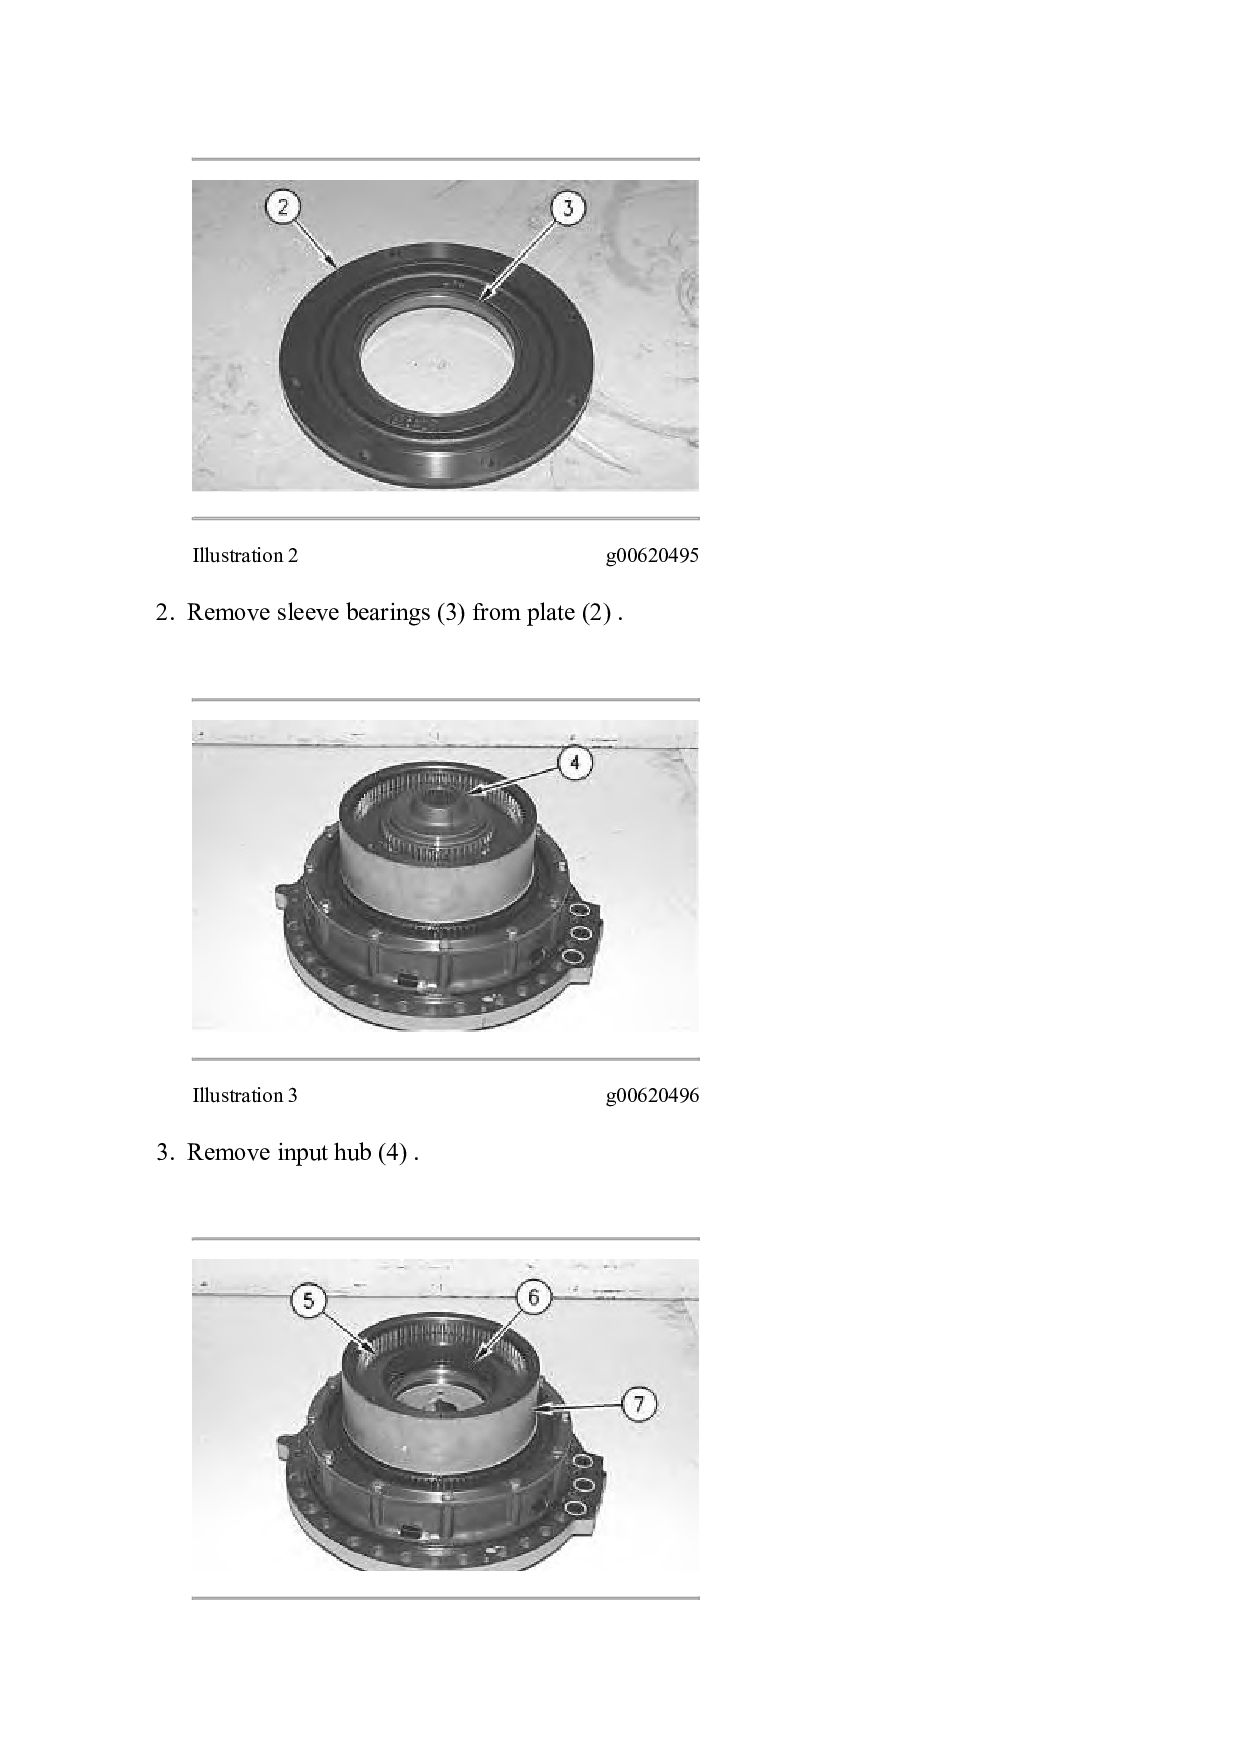
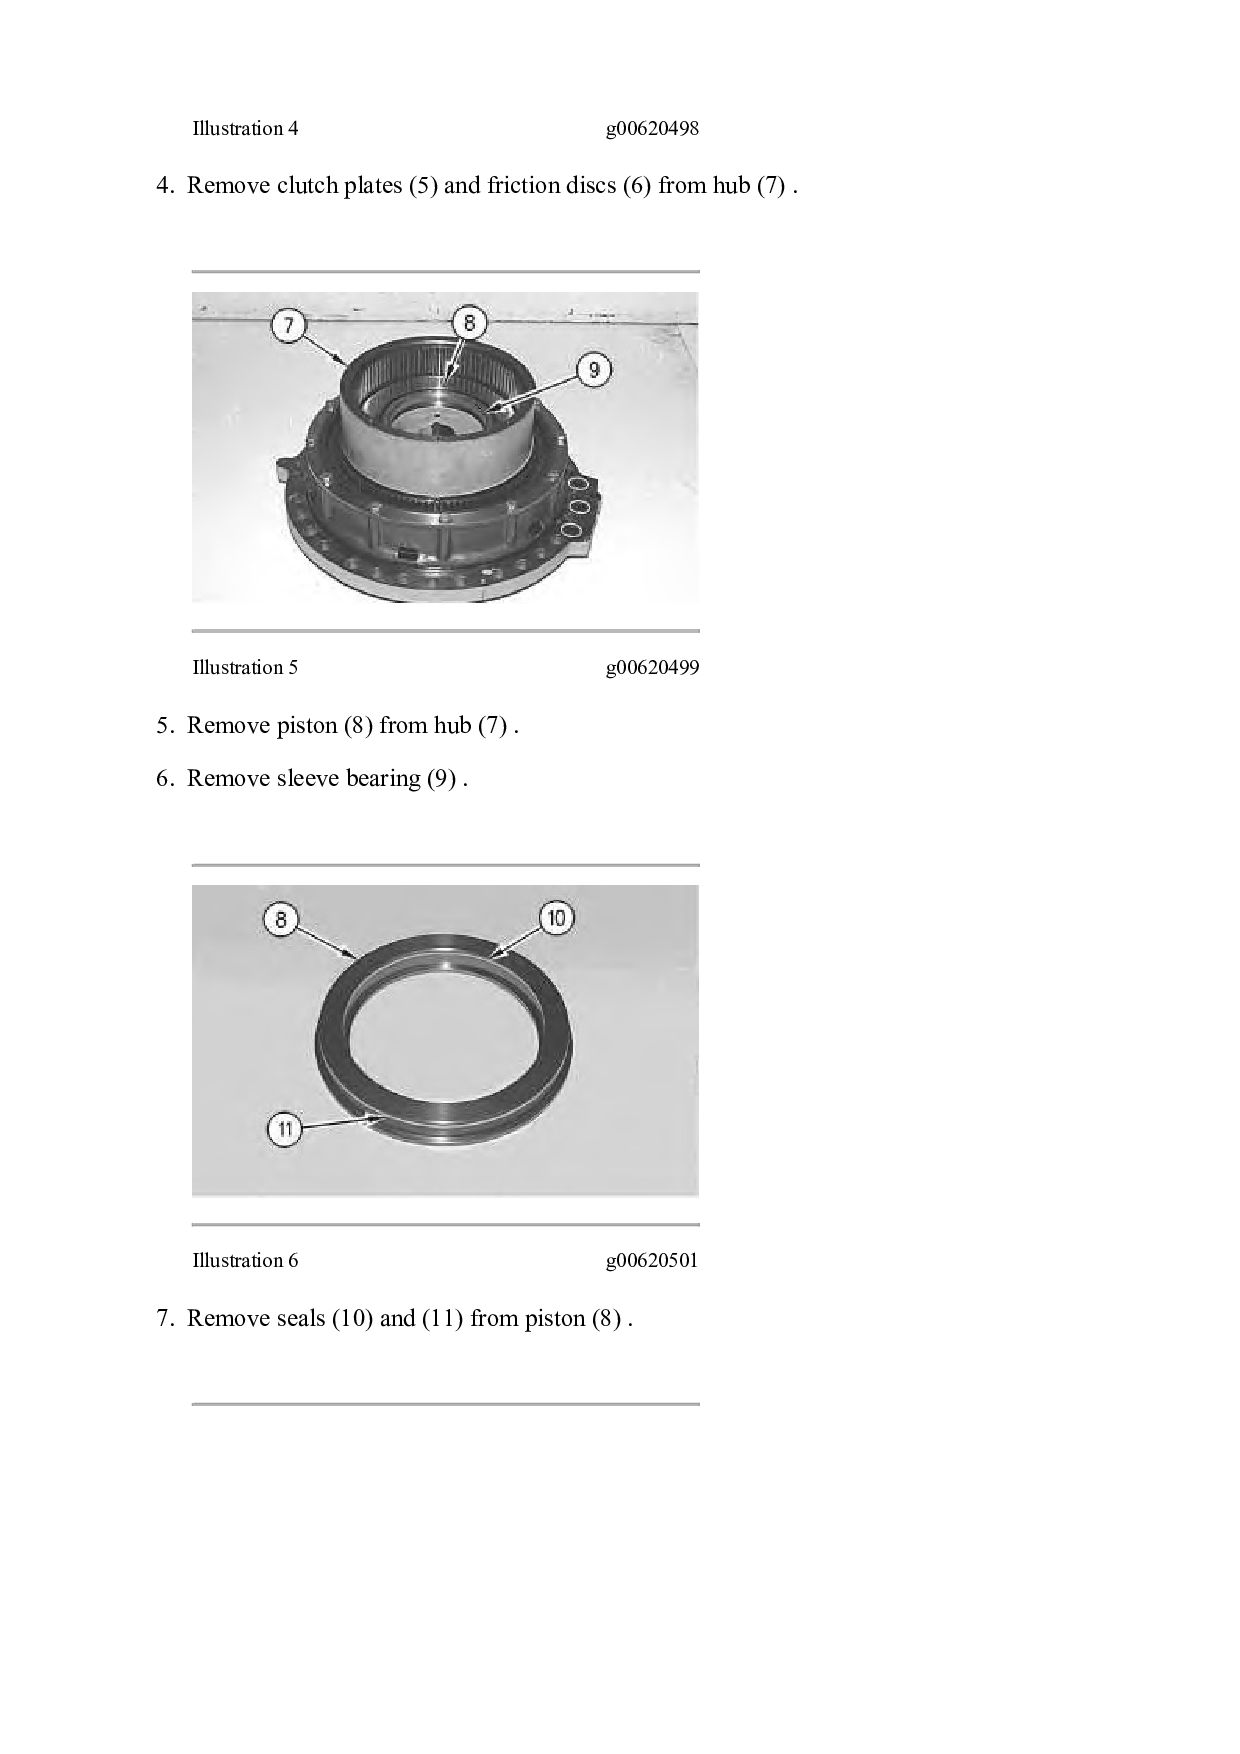
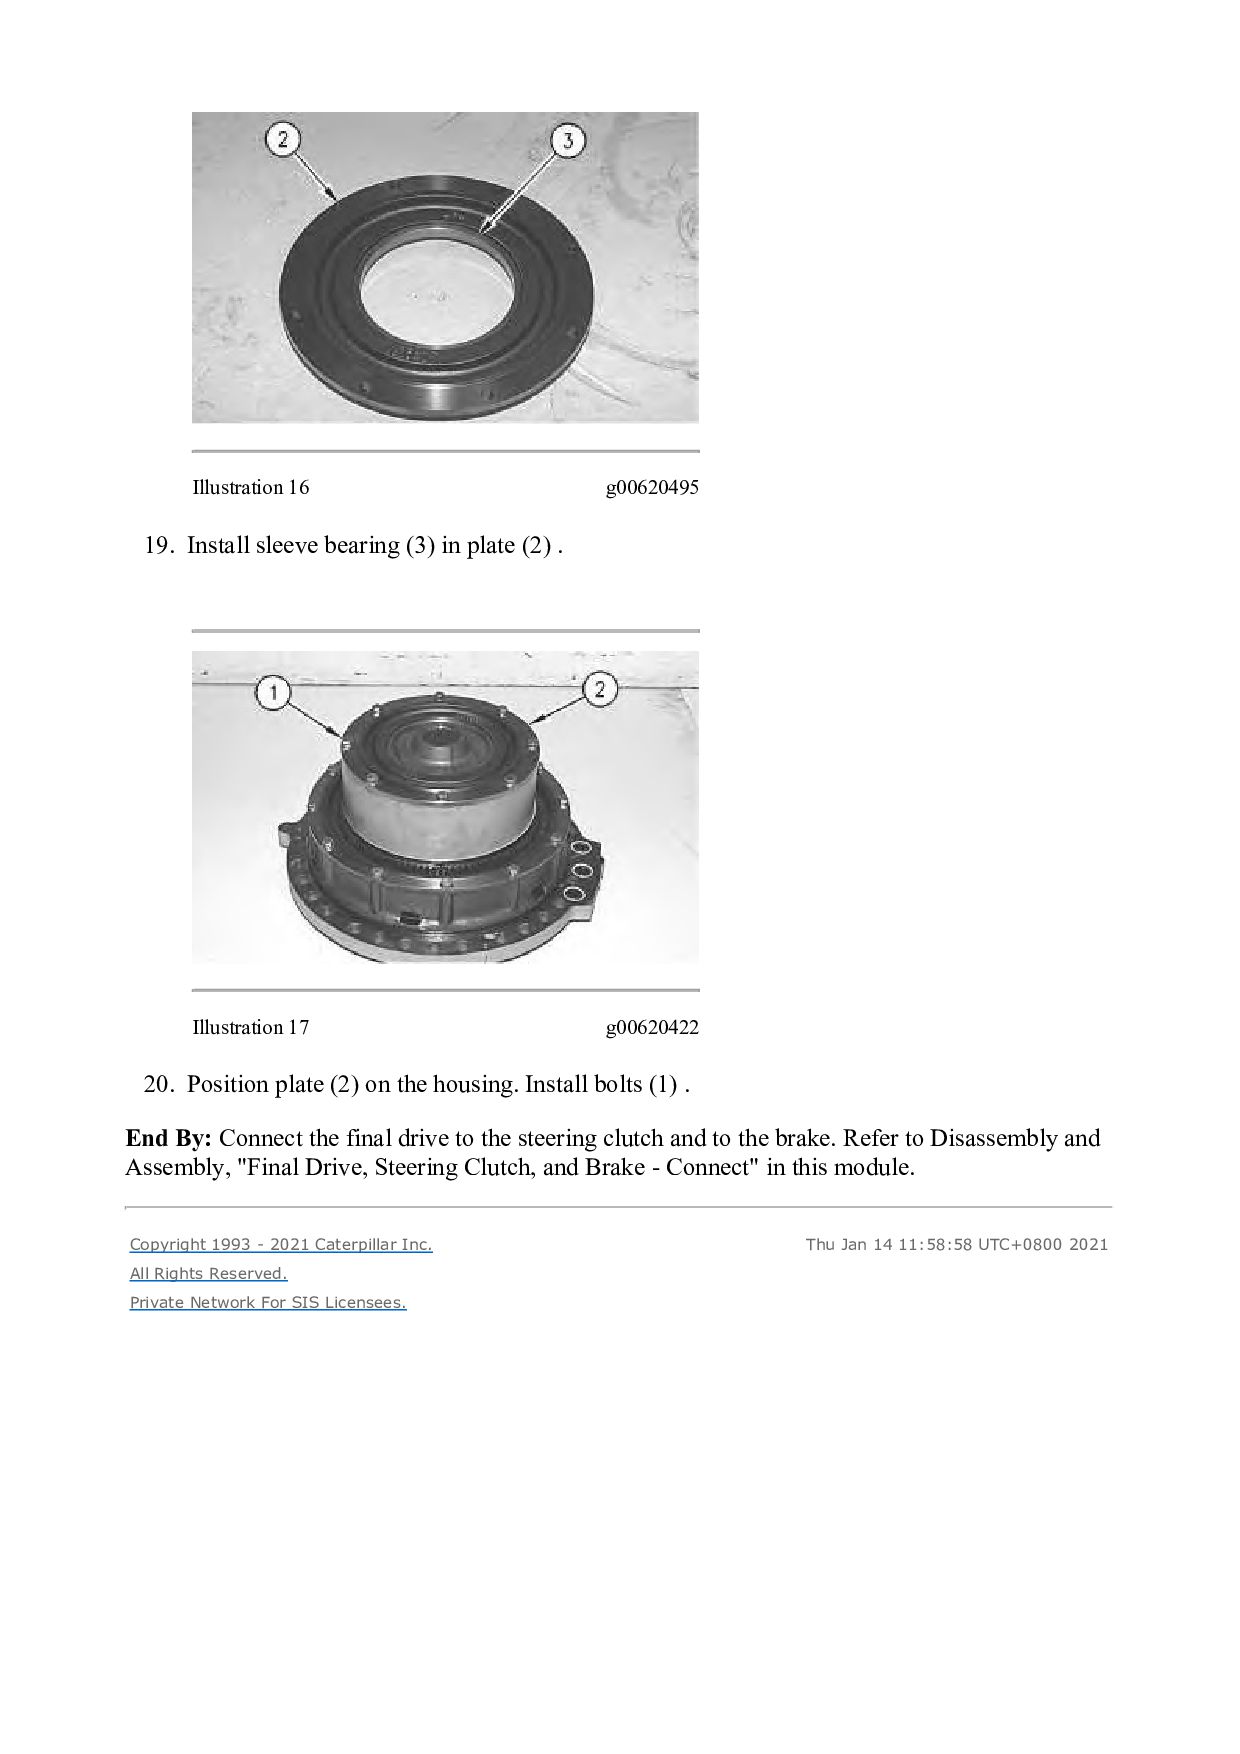
TRACK-TYPE TRACTOR AEM Configuration: D6R Series IITRACK-TYPE TRACTOR FTC AEM00001-UP (MACHINE) POWERED BY C-9 Engine Disassembly and Assembly D6R Series II Track-Type Tractor Power Train Media Number -RENR4257-03 Publication Date -01/08/2009 Date Updated -01/09/2009 i01569561 Steering Clutch and Brake - Disassemble SMCS - 4100-015 Disassembly Procedure Table 1 Required Tools Tool Part Number Part Description Qty A 138-7575 Link Bracket 3 Start By: A. Separate the final drive from the steering clutch and from the brake. Refer to Disassembly and Assembly, "Final Drive, Steering Clutch, and Brake - Separate". Illustration 1 g00620422 1. Remove bolts (1) and plate (2) .
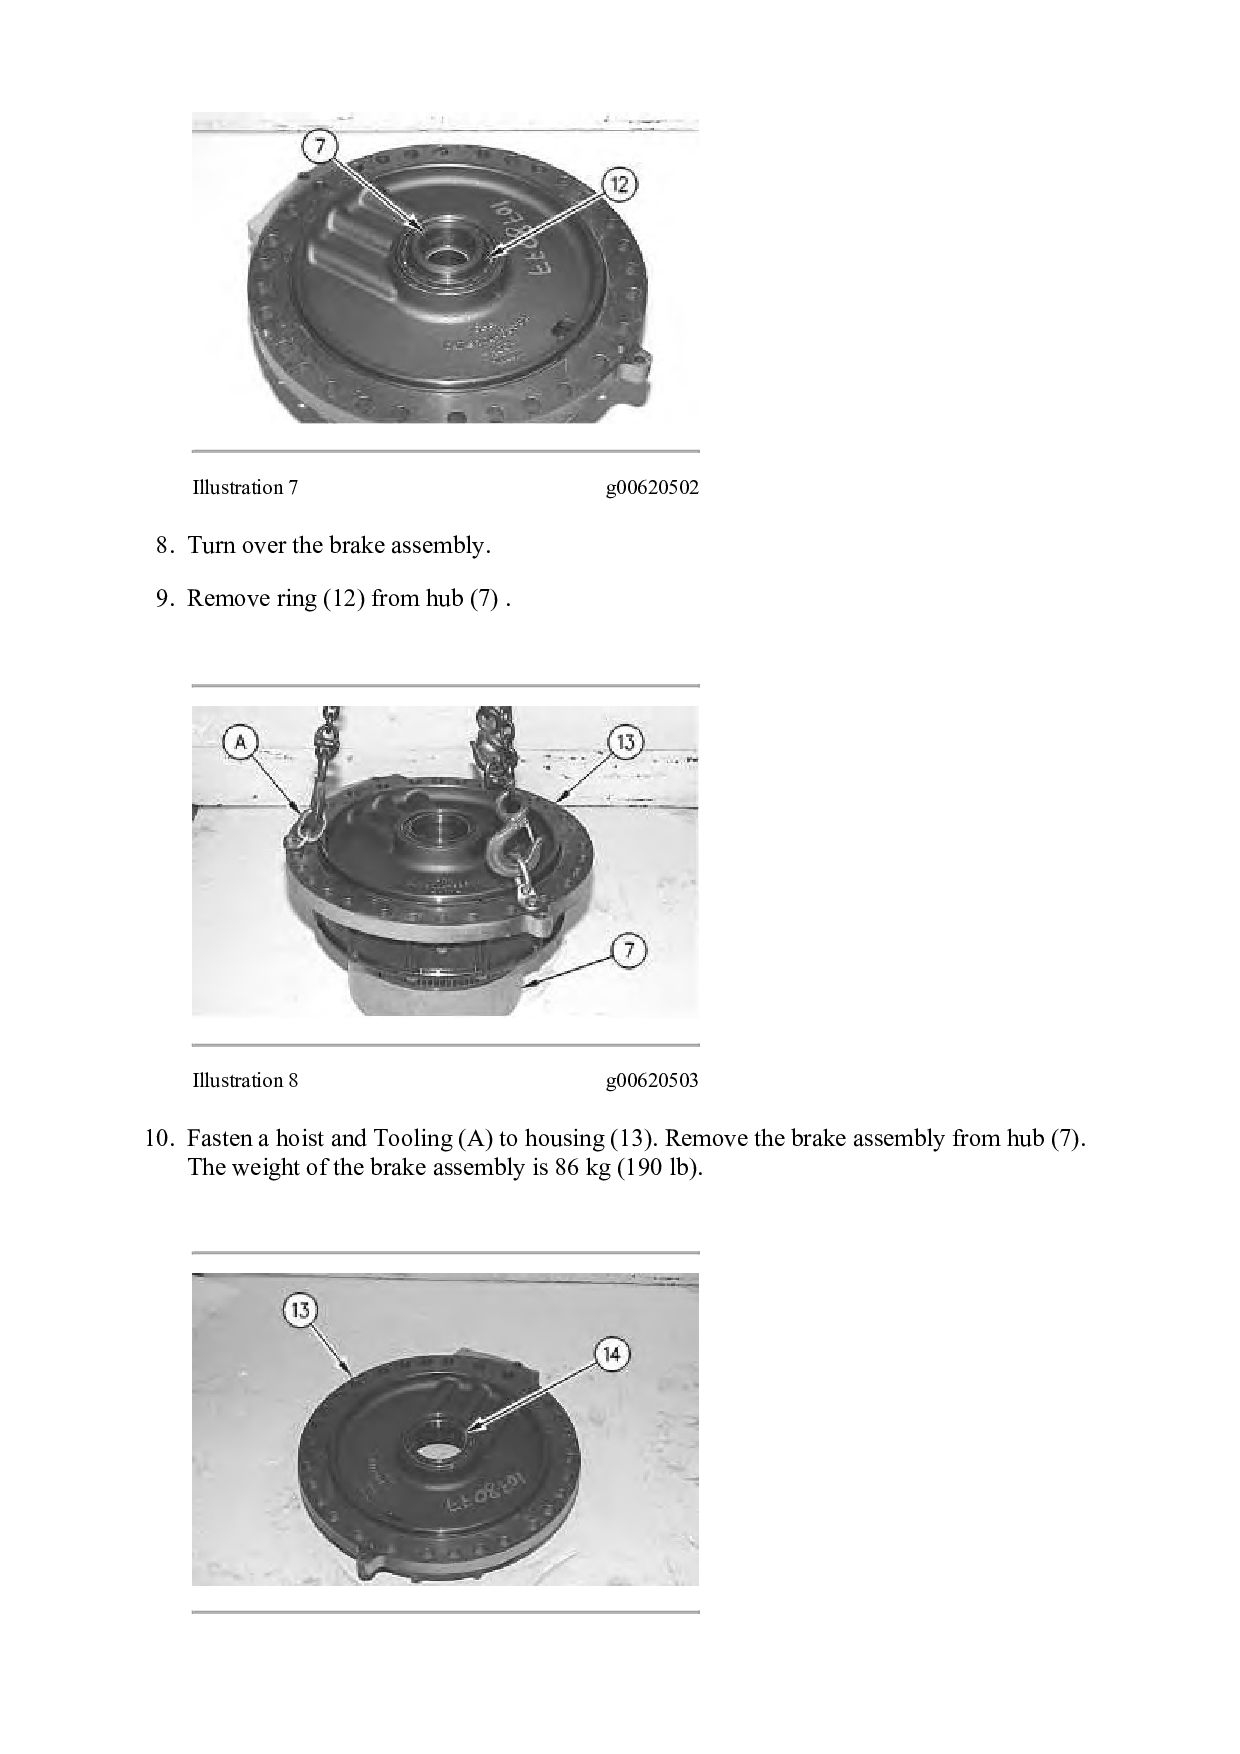
Remove ring (12) from hub (7) . Illustration 8 g00620503 10. Fasten a hoist and Tooling (A) to housing (13). Remove the brake assembly from hub (7). The weight of the brake assembly is 86 kg (190 lb).
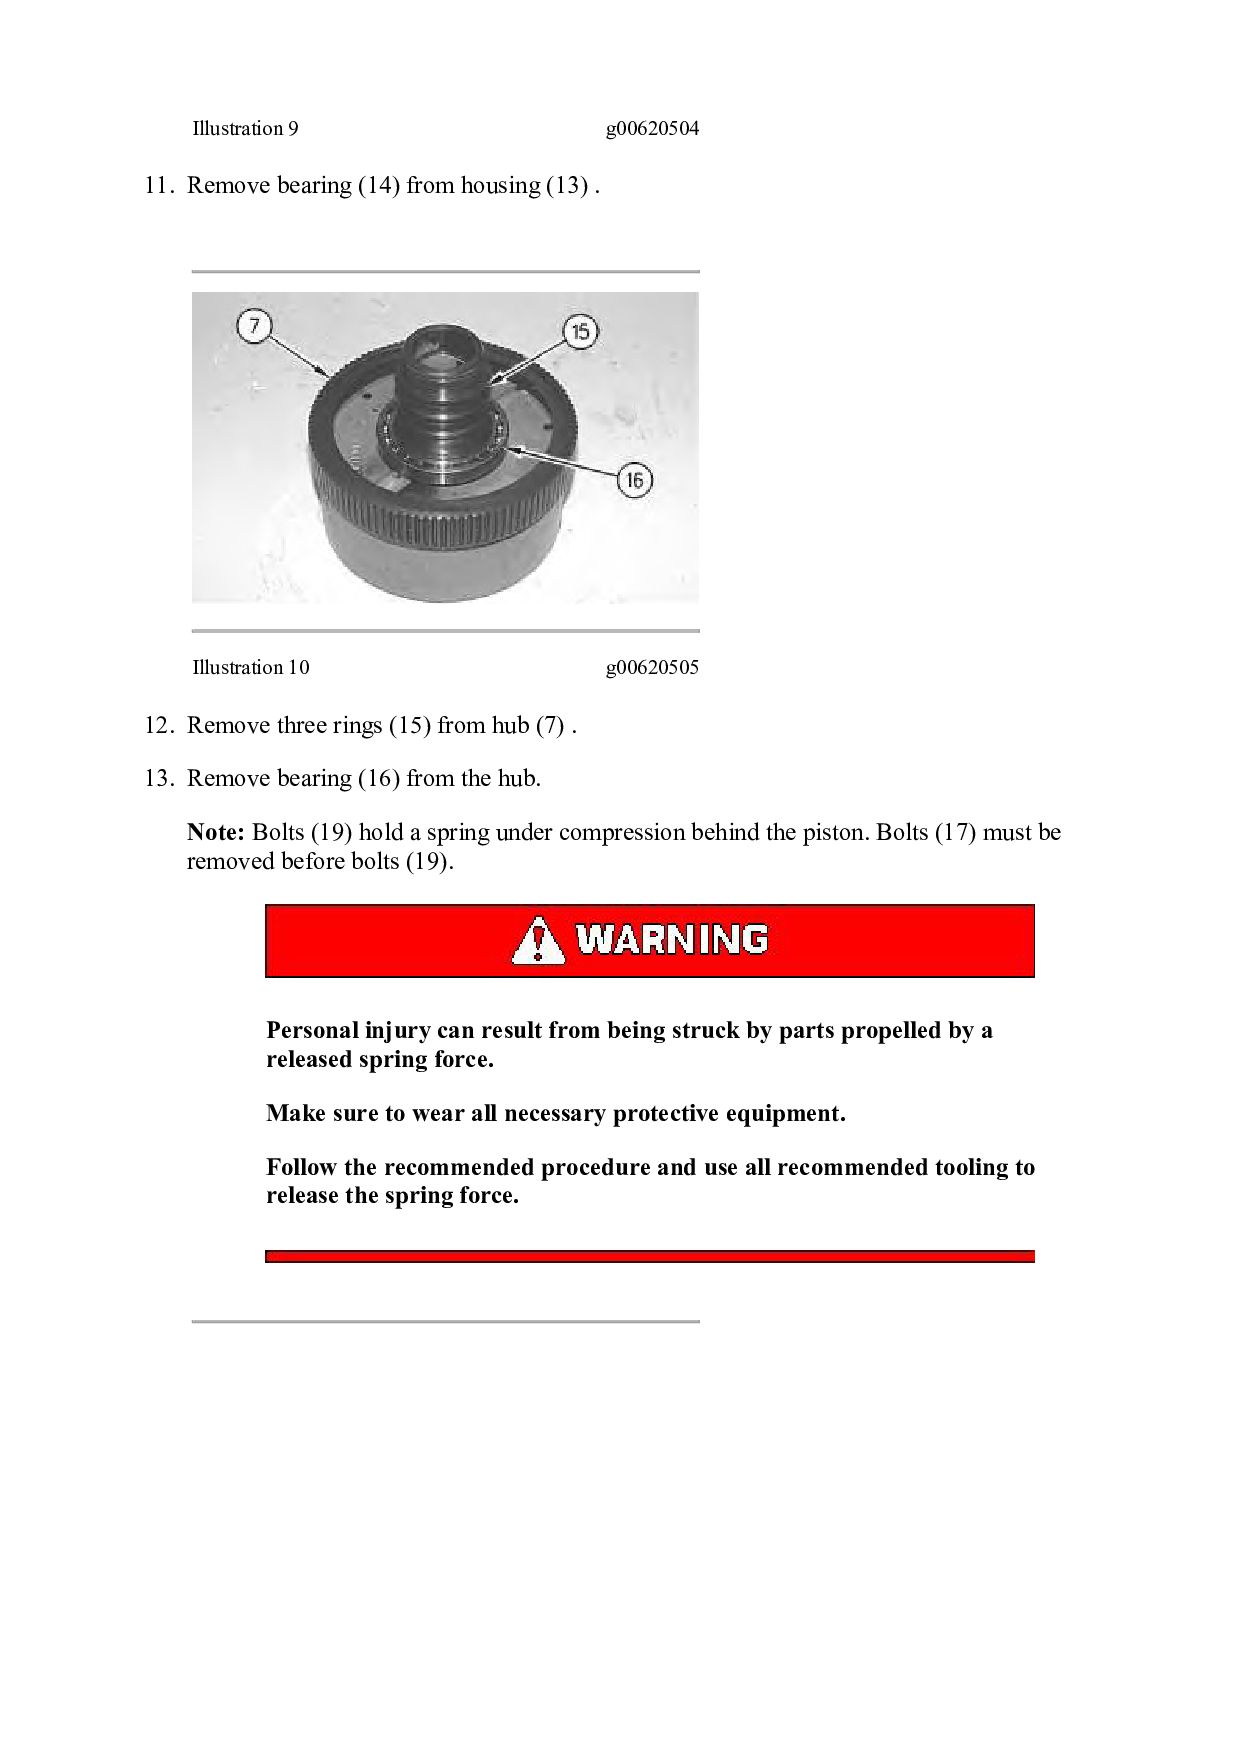
. Illustration 10 g00620505 12. Remove three rings (15) from hub (7) . 13. Remove bearing (16) from the hub. Note: Bolts (19) hold a spring under compression behind the piston. Bolts (17) must be removed before bolts (19). Personal injury can result from being struck by parts propelled by a released spring force. Make sure to wear all necessary protective equipment. Follow the recommended procedure and use all recommended tooling to release the spring force.
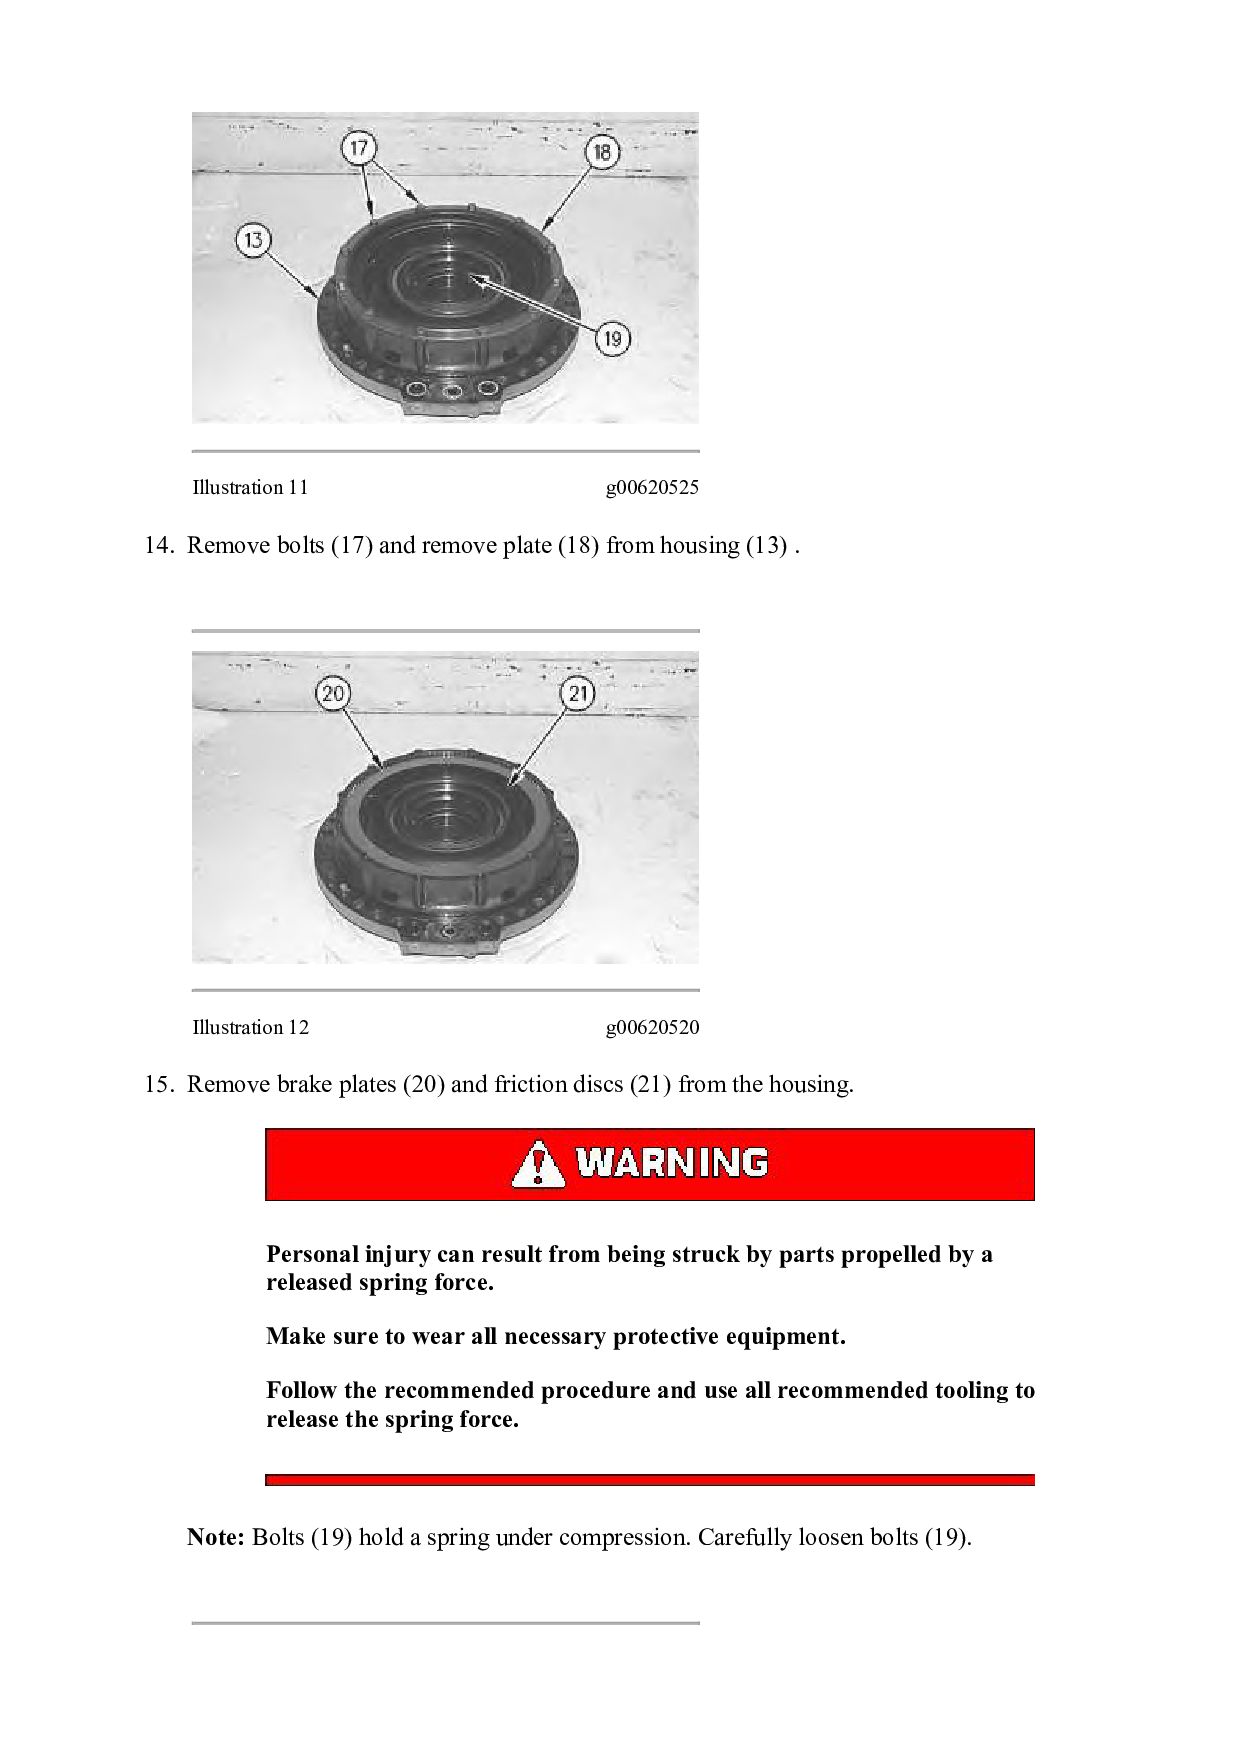
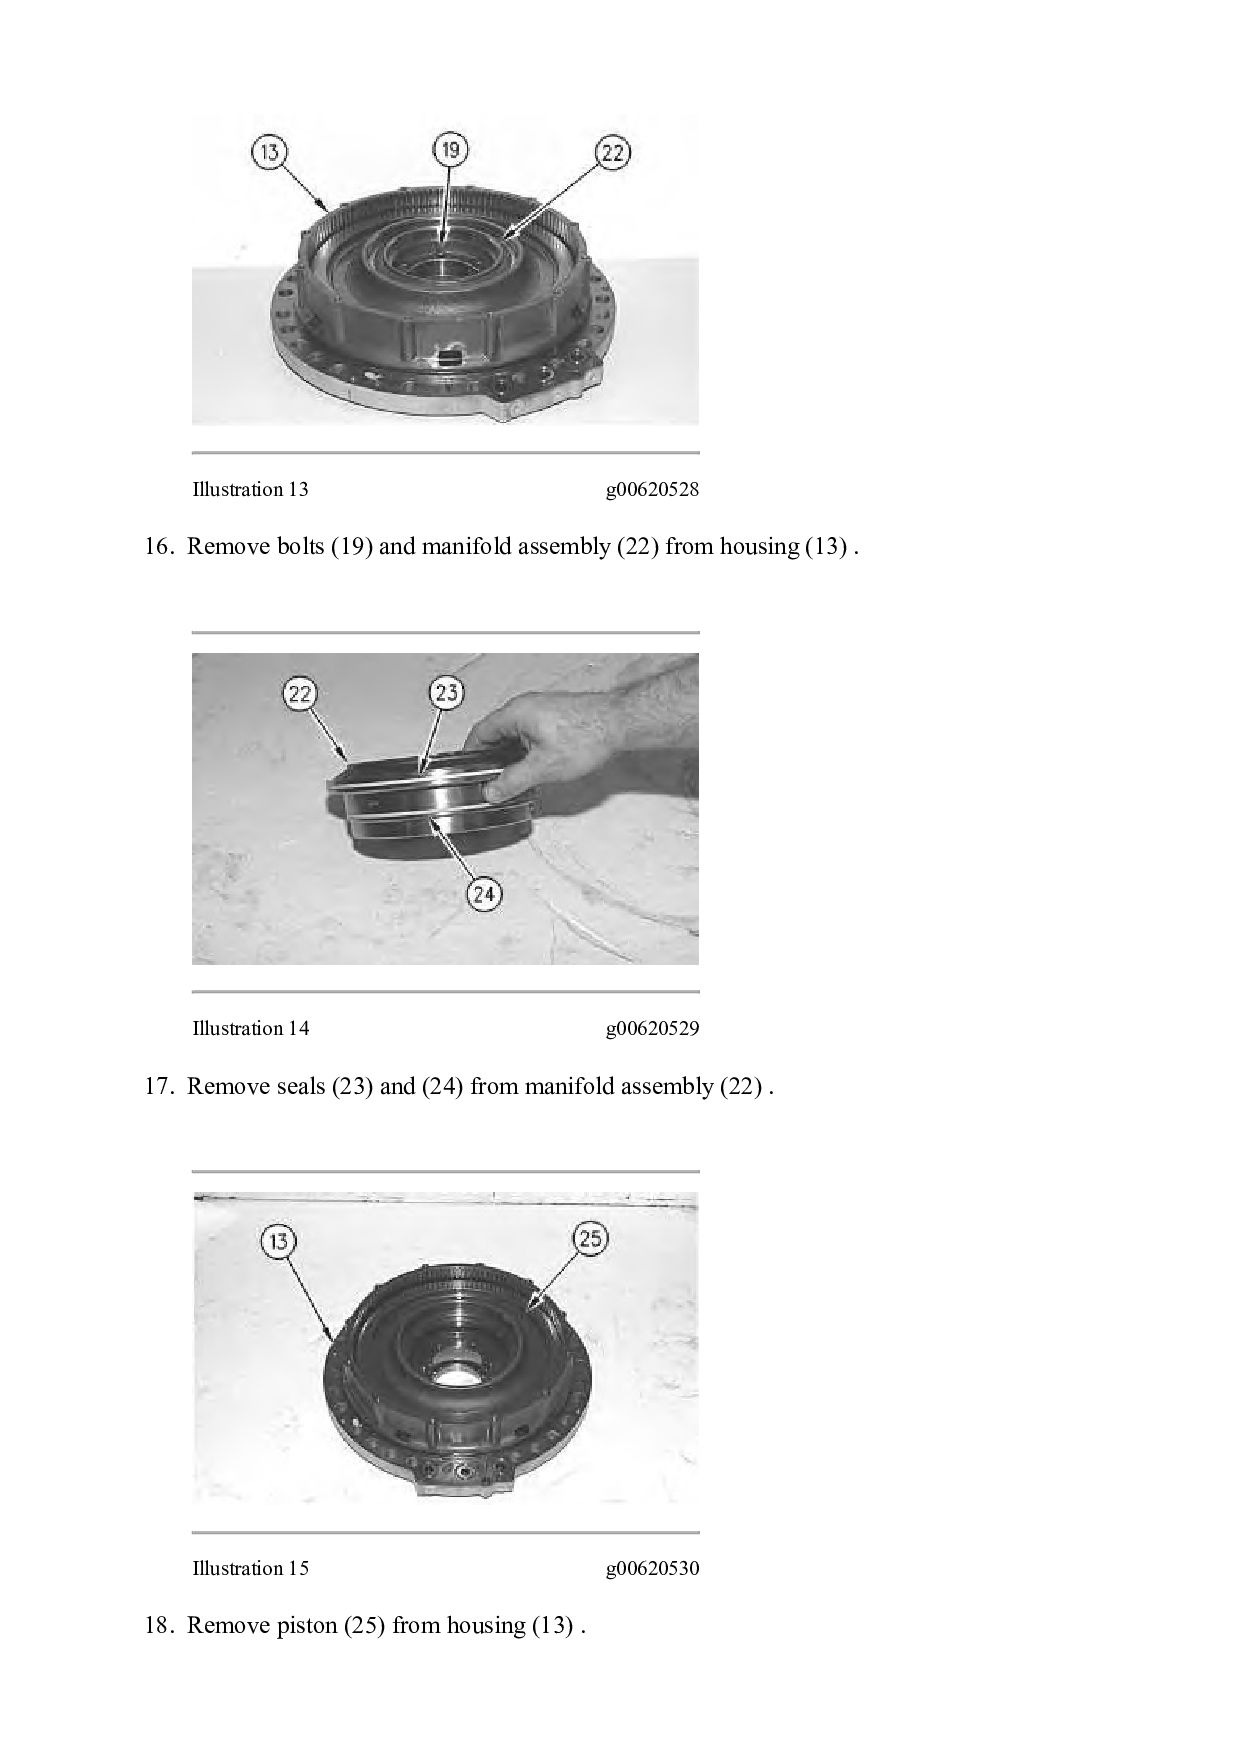
(18) from housing (13) . Illustration 12 g00620520 15. Remove brake plates (20) and friction discs (21) from the housing. Personal injury can result from being struck by parts propelled by a released spring force. Make sure to wear all necessary protective equipment. Follow the recommended procedure and use all recommended tooling to release the spring force. Note: Bolts (19) hold a spring under compression. Carefully loosen bolts (19).
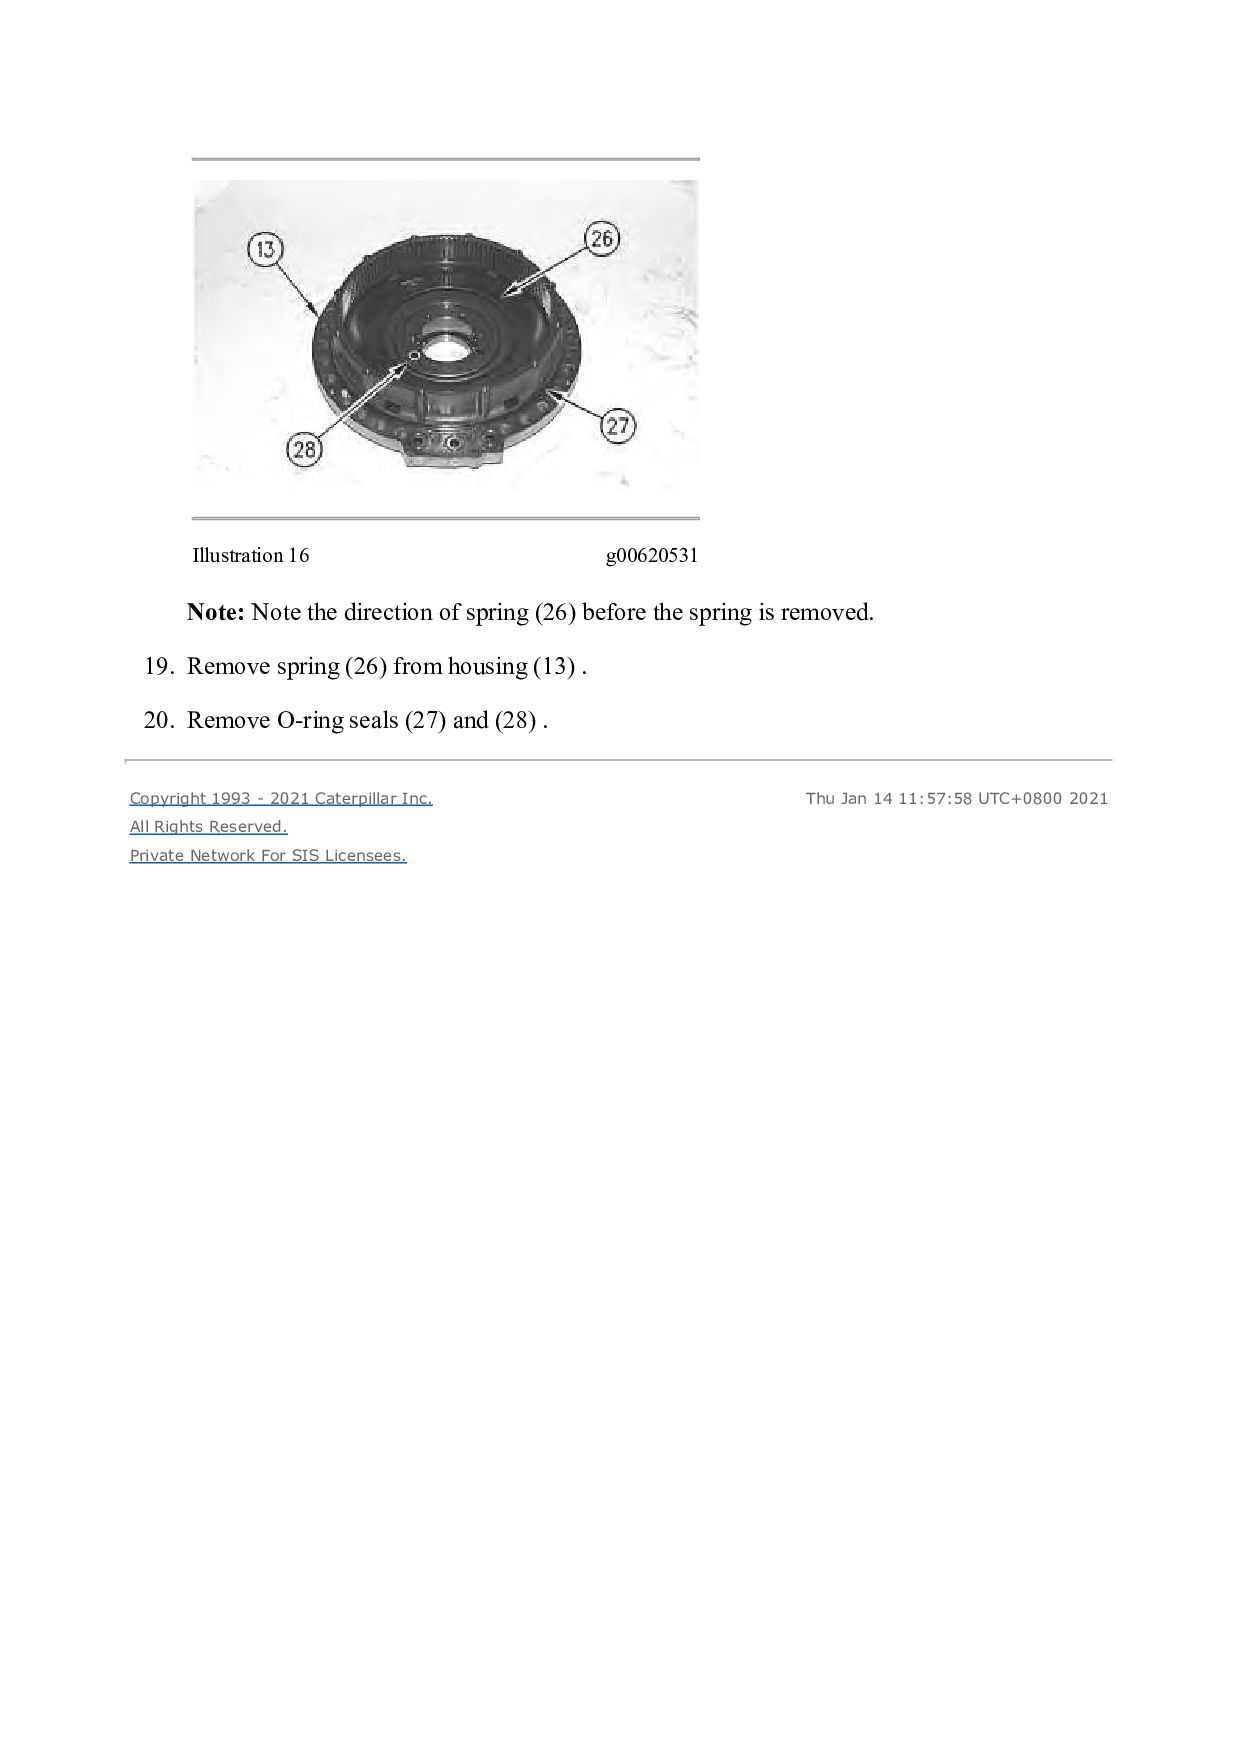
before the spring is removed. 19. Remove spring (26) from housing (13) . 20. Remove O-ring seals (27) and (28) . Copyright 1993 - 2021 Caterpillar Inc. All Rights Reserved. Private Network For SIS Licensees. Thu Jan 14 11:57:58 UTC+0800 2021
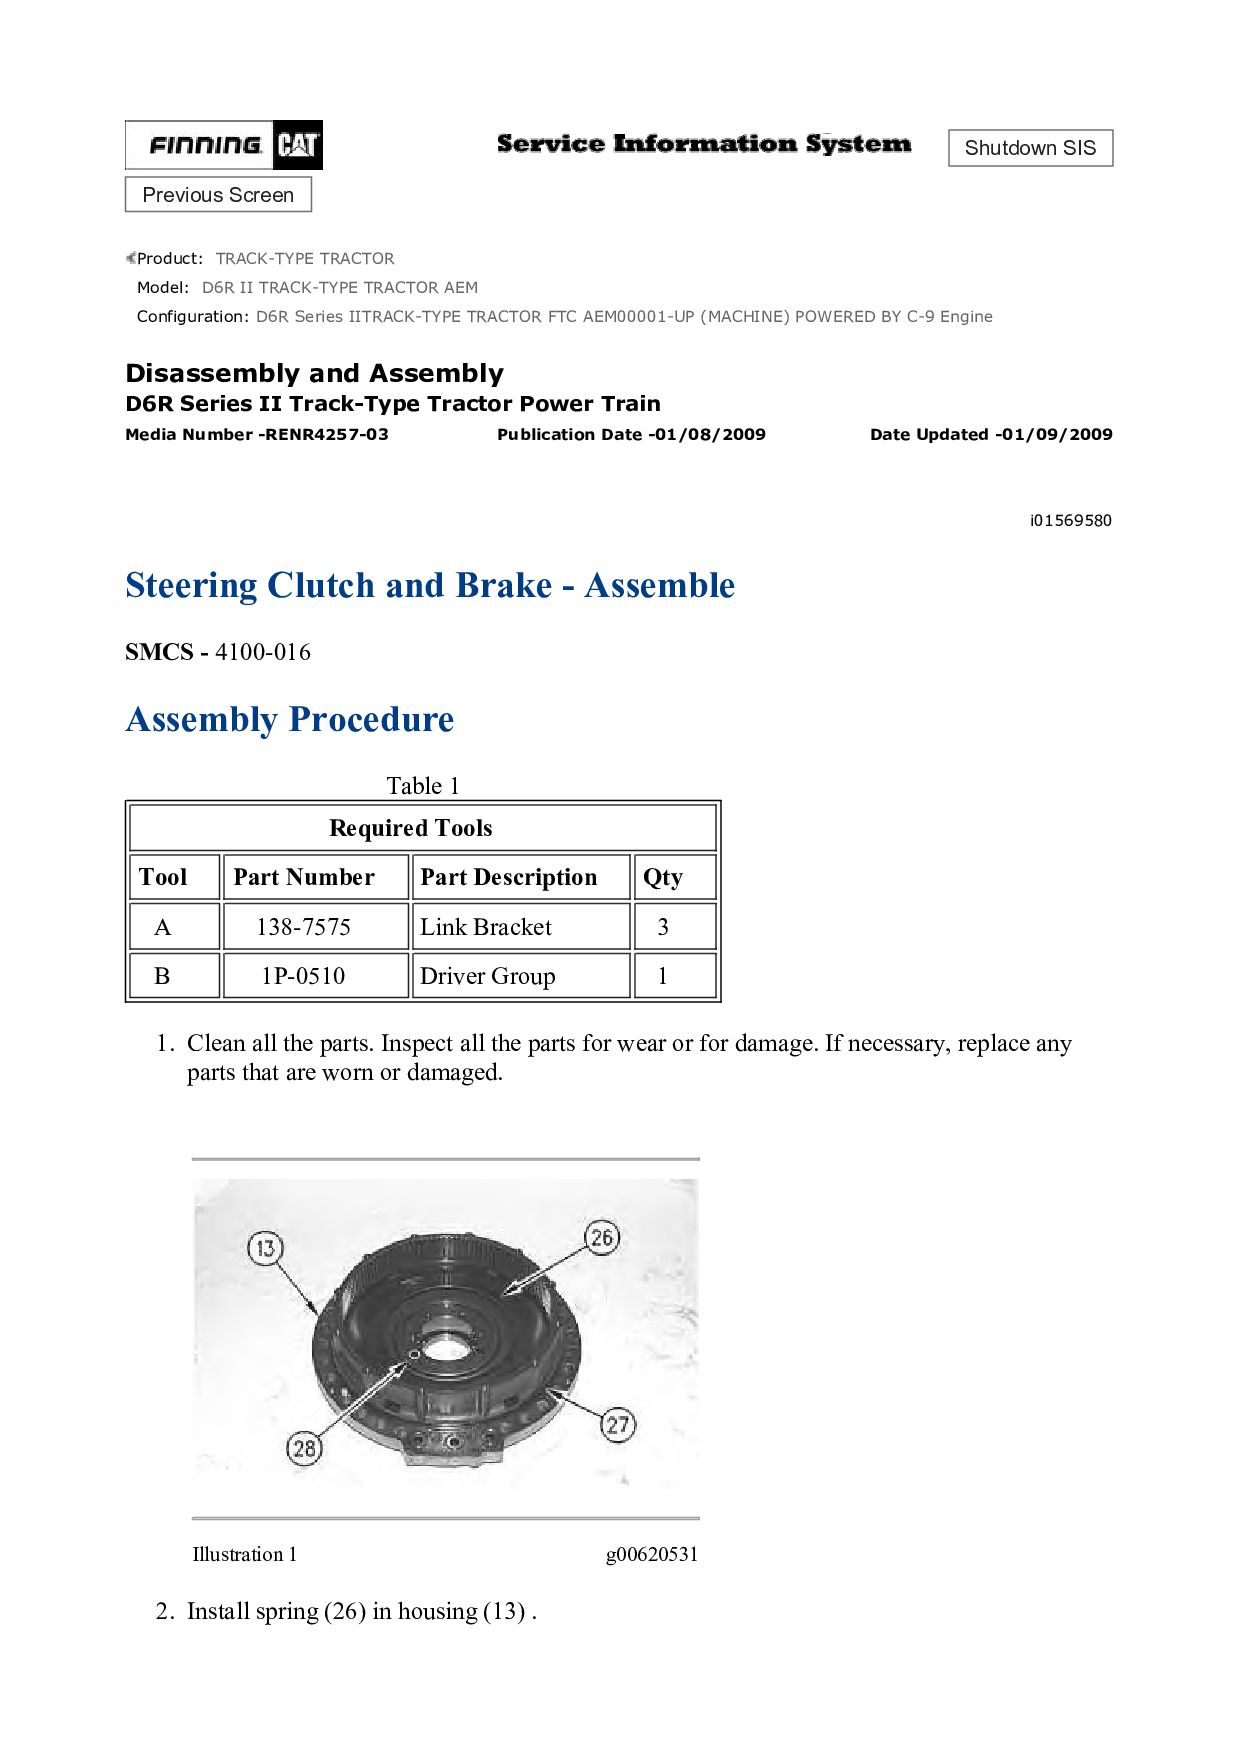
TRACK-TYPE TRACTOR AEM Configuration: D6R Series IITRACK-TYPE TRACTOR FTC AEM00001-UP (MACHINE) POWERED BY C-9 Engine Disassembly and Assembly D6R Series II Track-Type Tractor Power Train Media Number -RENR4257-03 Publication Date -01/08/2009 Date Updated -01/09/2009 i01569580 Steering Clutch and Brake - Assemble SMCS - 4100-016 Assembly Procedure Table 1 Required Tools Tool Part Number Part Description Qty A 138-7575 Link Bracket 3 B 1P-0510 Driver Group 1 1. Clean all the parts. Inspect all the parts for wear or for damage. If necessary, replace any parts that are worn or damaged. Illustration 1 g00620531 2. Install spring (26) in housing (13) .
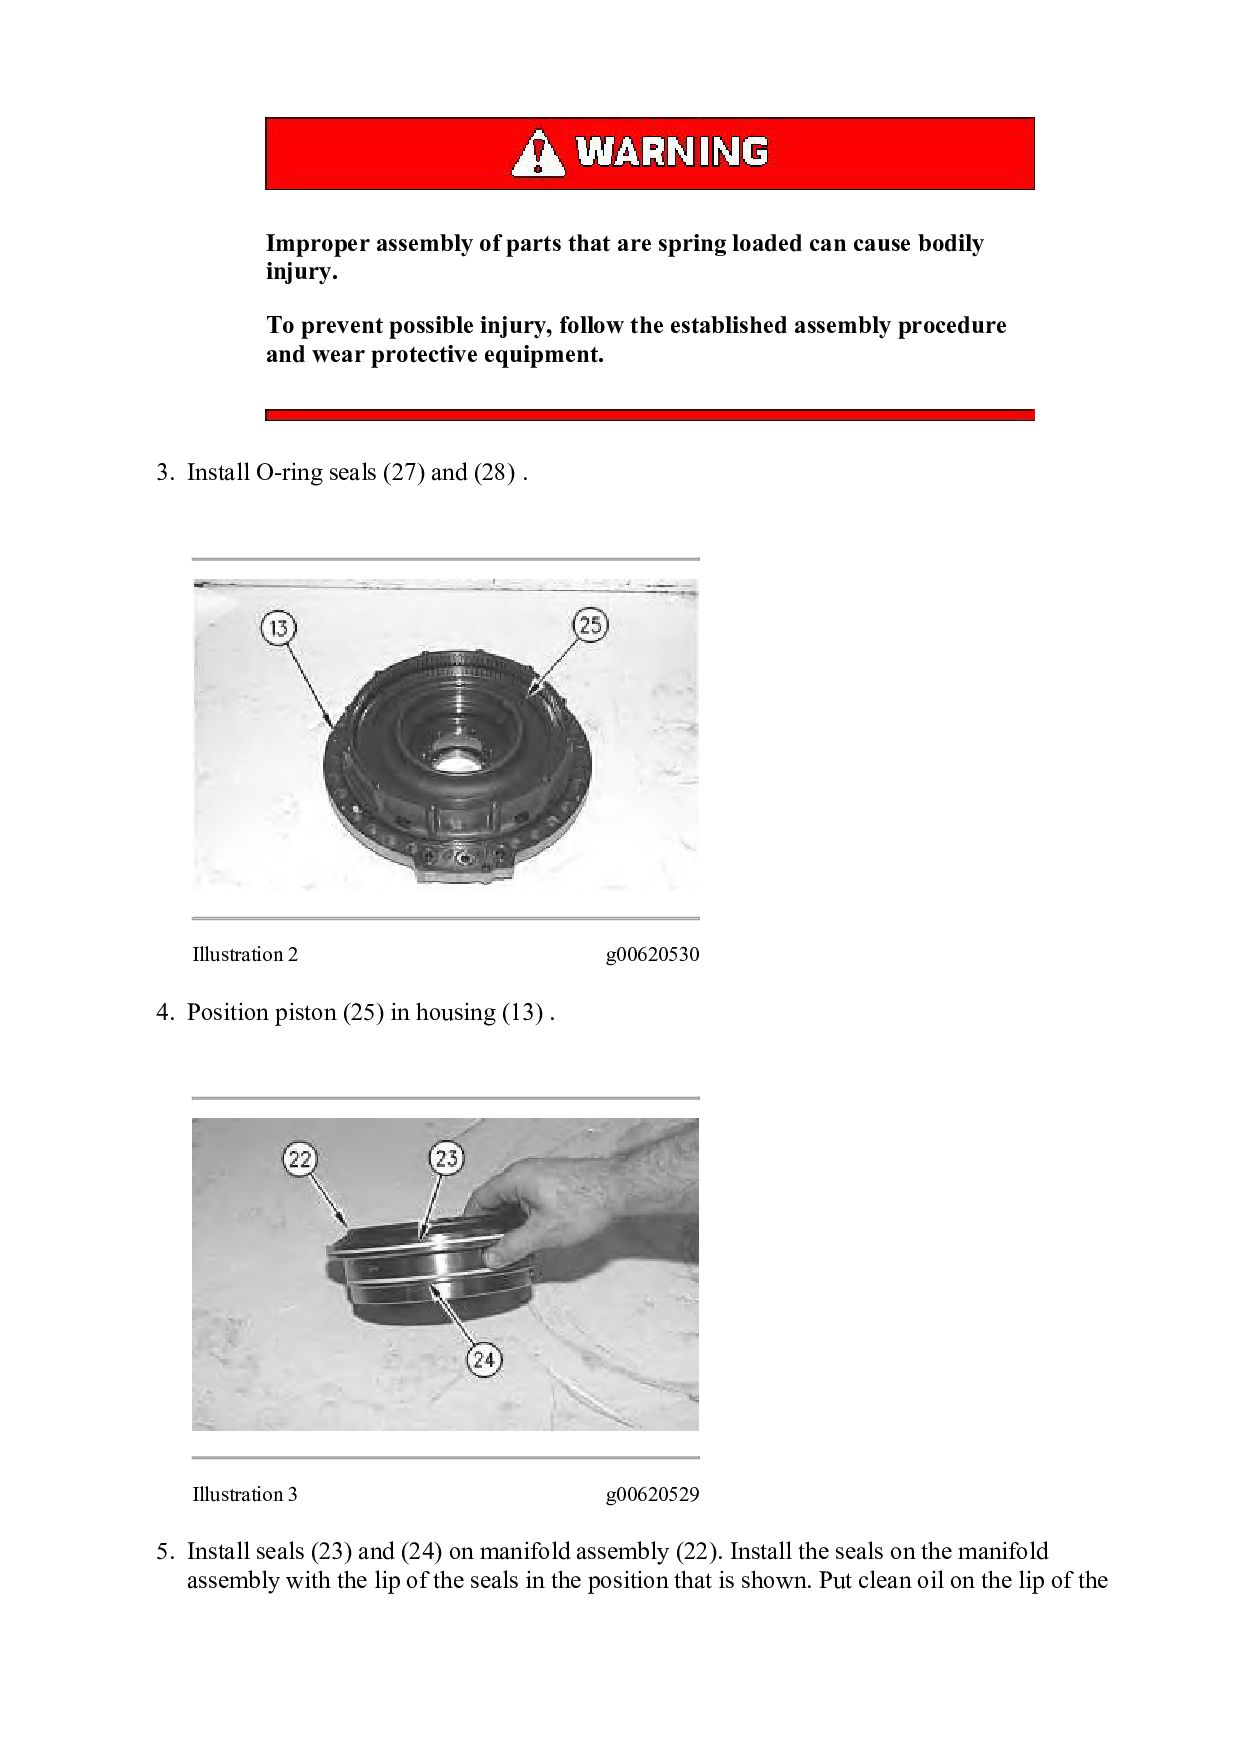
bodily injury. To prevent possible injury, follow the established assembly procedure and wear protective equipment. 3. Install O-ring seals (27) and (28) . Illustration 2 g00620530 4. Position piston (25) in housing (13) . Illustration 3 g00620529 5. Install seals (23) and (24) on manifold assembly (22). Install the seals on the manifold assembly with the lip of the seals in the position that is shown. Put clean oil on the lip of the
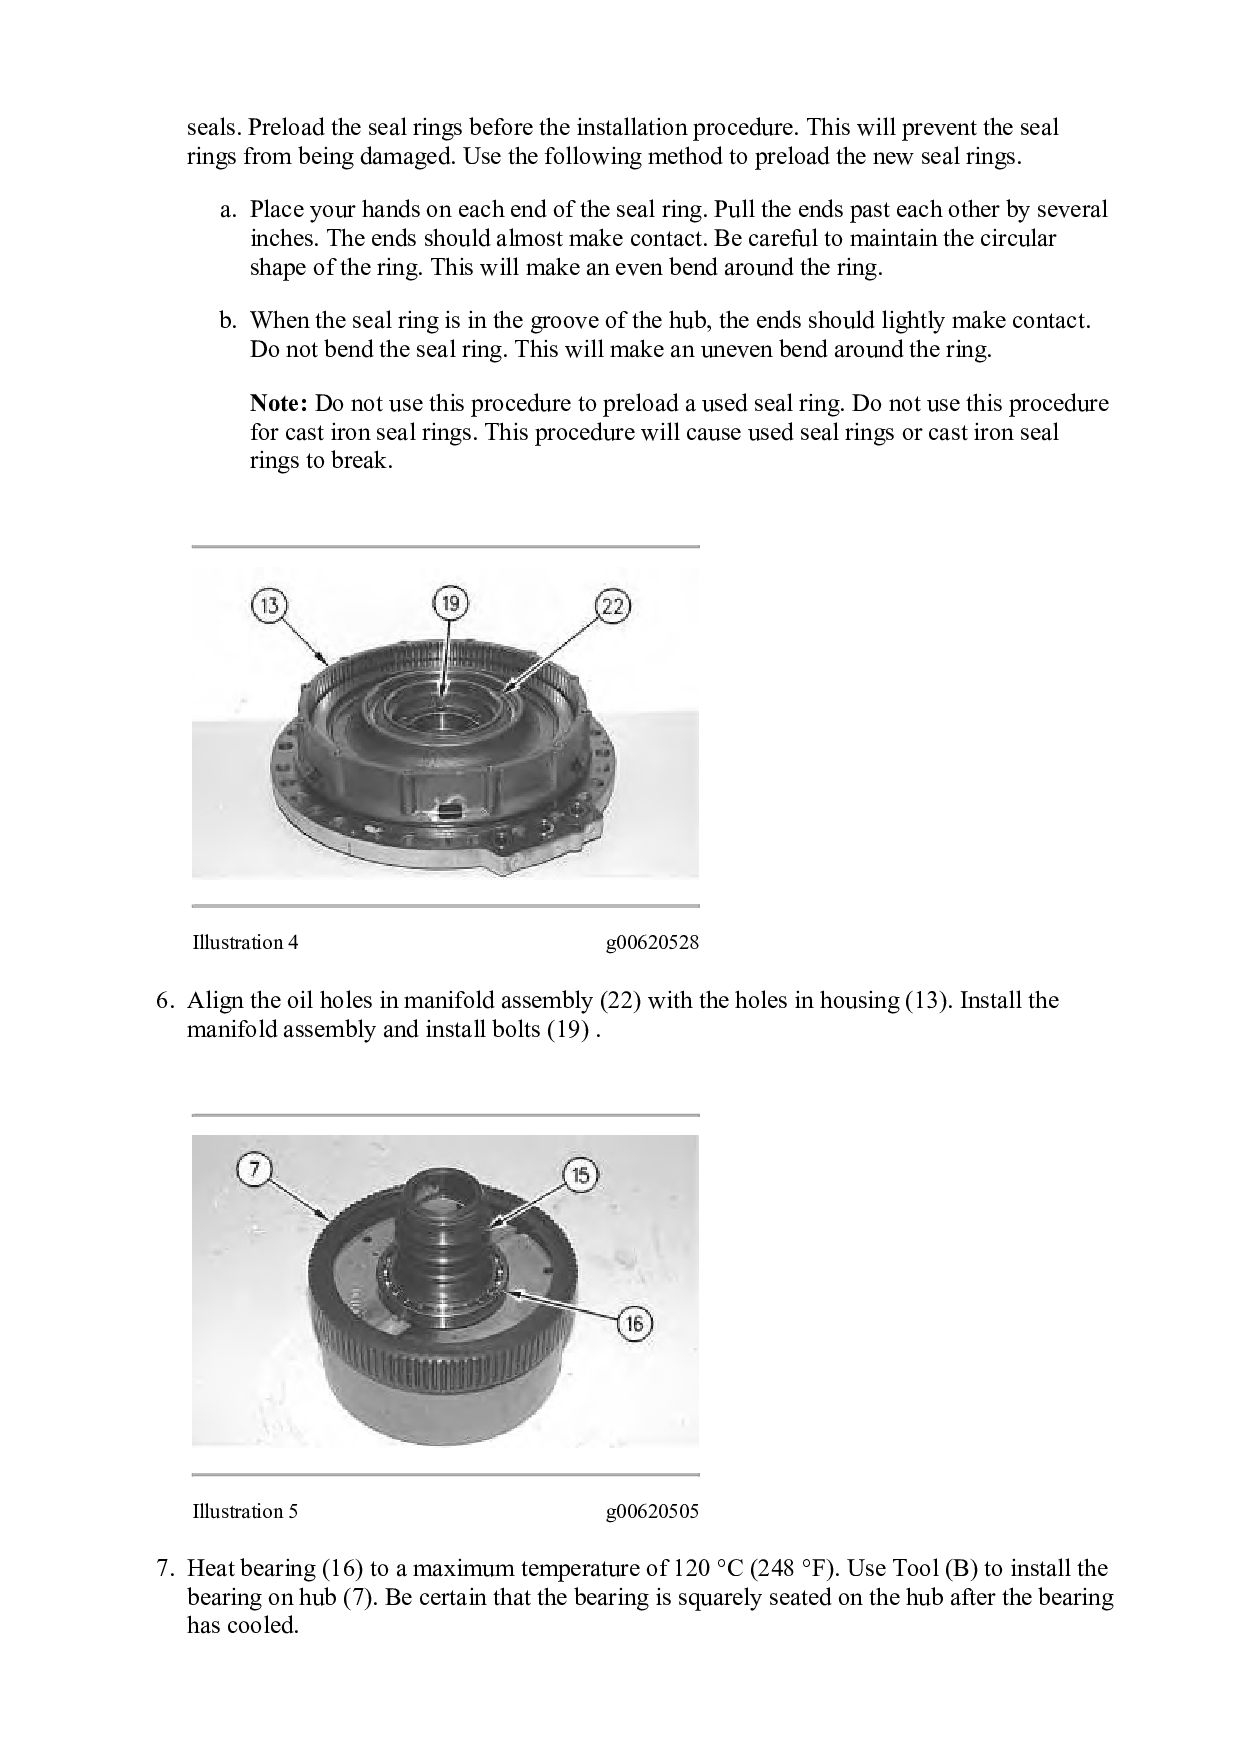
will prevent the seal rings from being damaged. Use the following method to preload the new seal rings. a. Place your hands on each end of the seal ring. Pull the ends past each other by several inches. The ends should almost make contact. Be careful to maintain the circular shape of the ring. This will make an even bend around the ring. b. When the seal ring is in the groove of the hub, the ends should lightly make contact. Do not bend the seal ring. This will make an uneven bend around the ring. Note: Do not use this procedure to preload a used seal ring. Do not use this procedure for cast iron seal rings. This procedure will cause used seal rings or cast iron seal rings to break. Illustration 4 g00620528 6. Align the oil holes in manifold assembly (22) with the holes in housing (13). Install the manifold assembly and install bolts (19) . Illustration 5 g00620505 7. Heat bearing (16) to a maximum temperature of 120 °C (248 °F). Use Tool (B) to install the bearing on hub (7). Be certain that the bearing is squarely seated on the hub after the bearing has cooled.
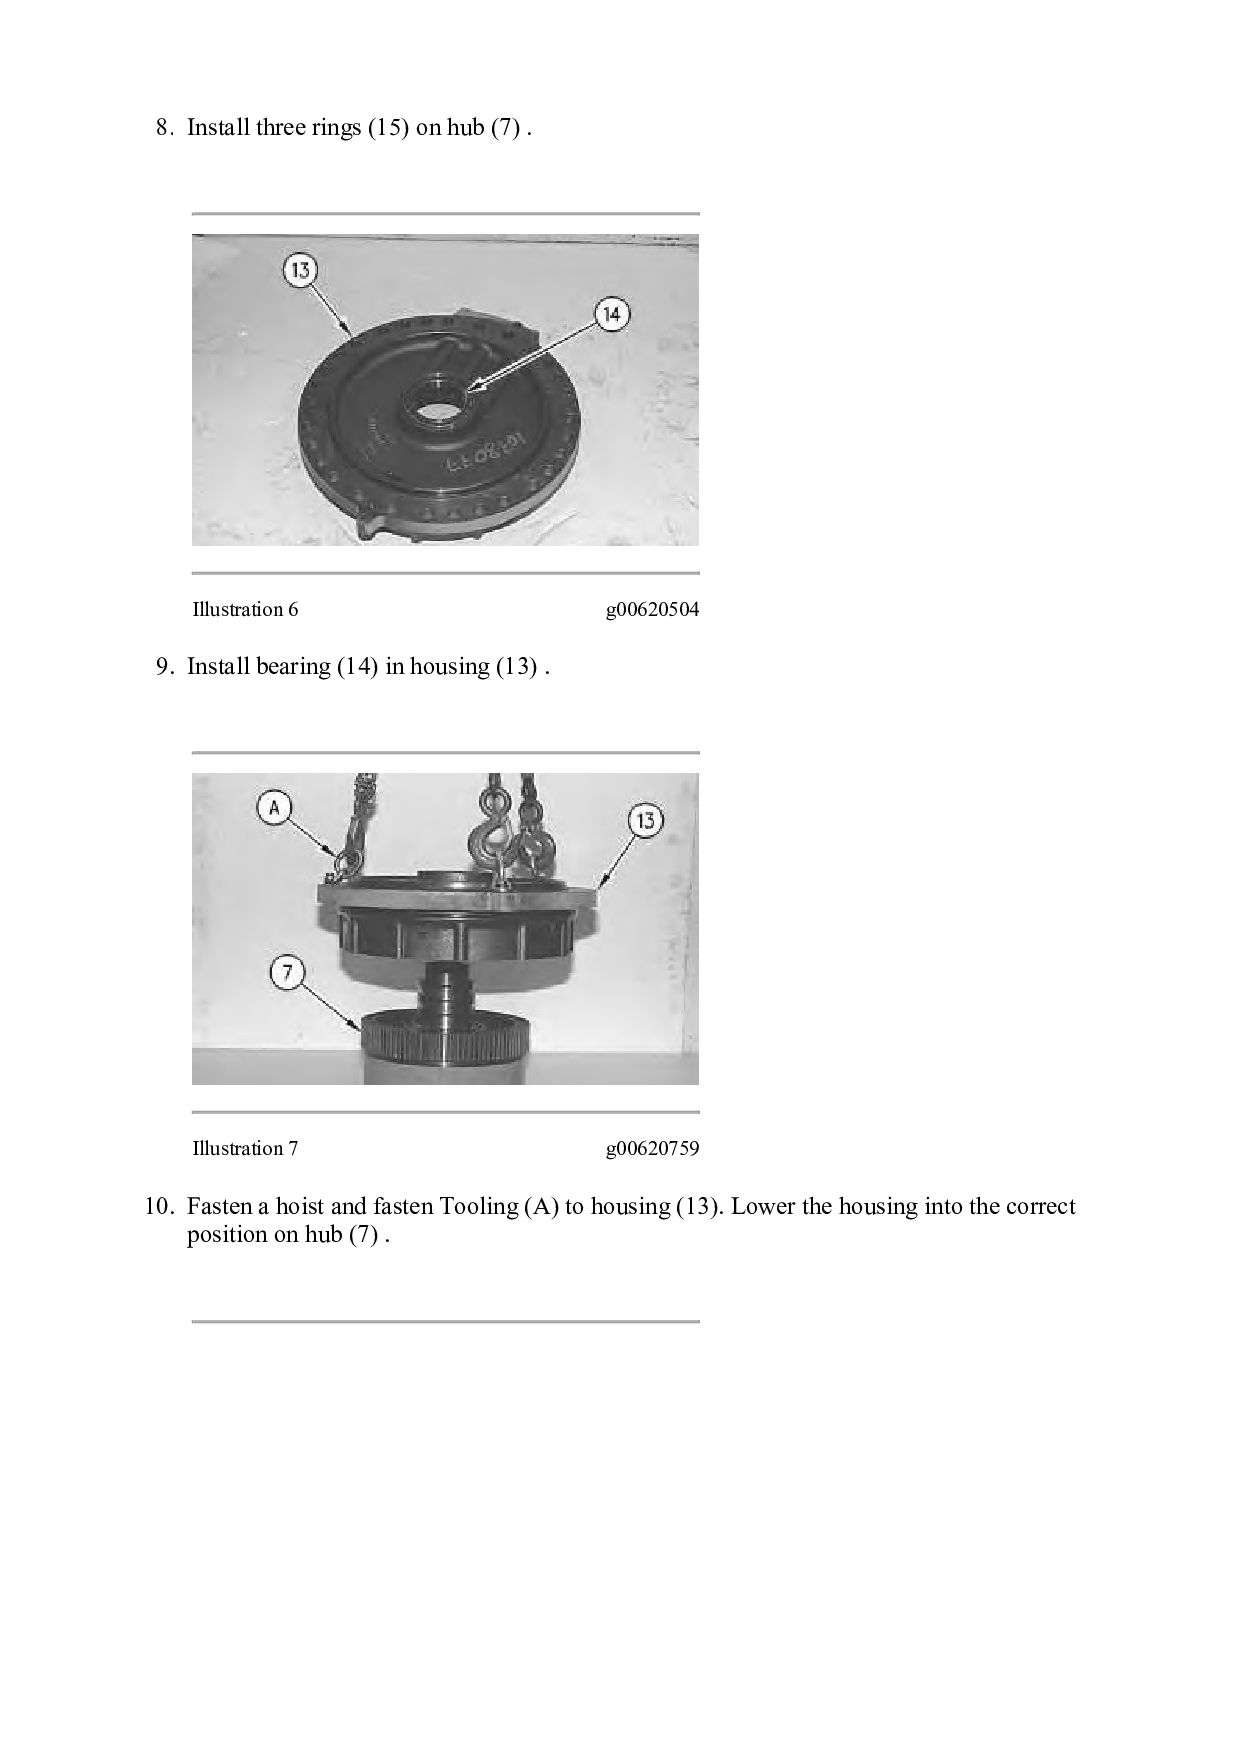
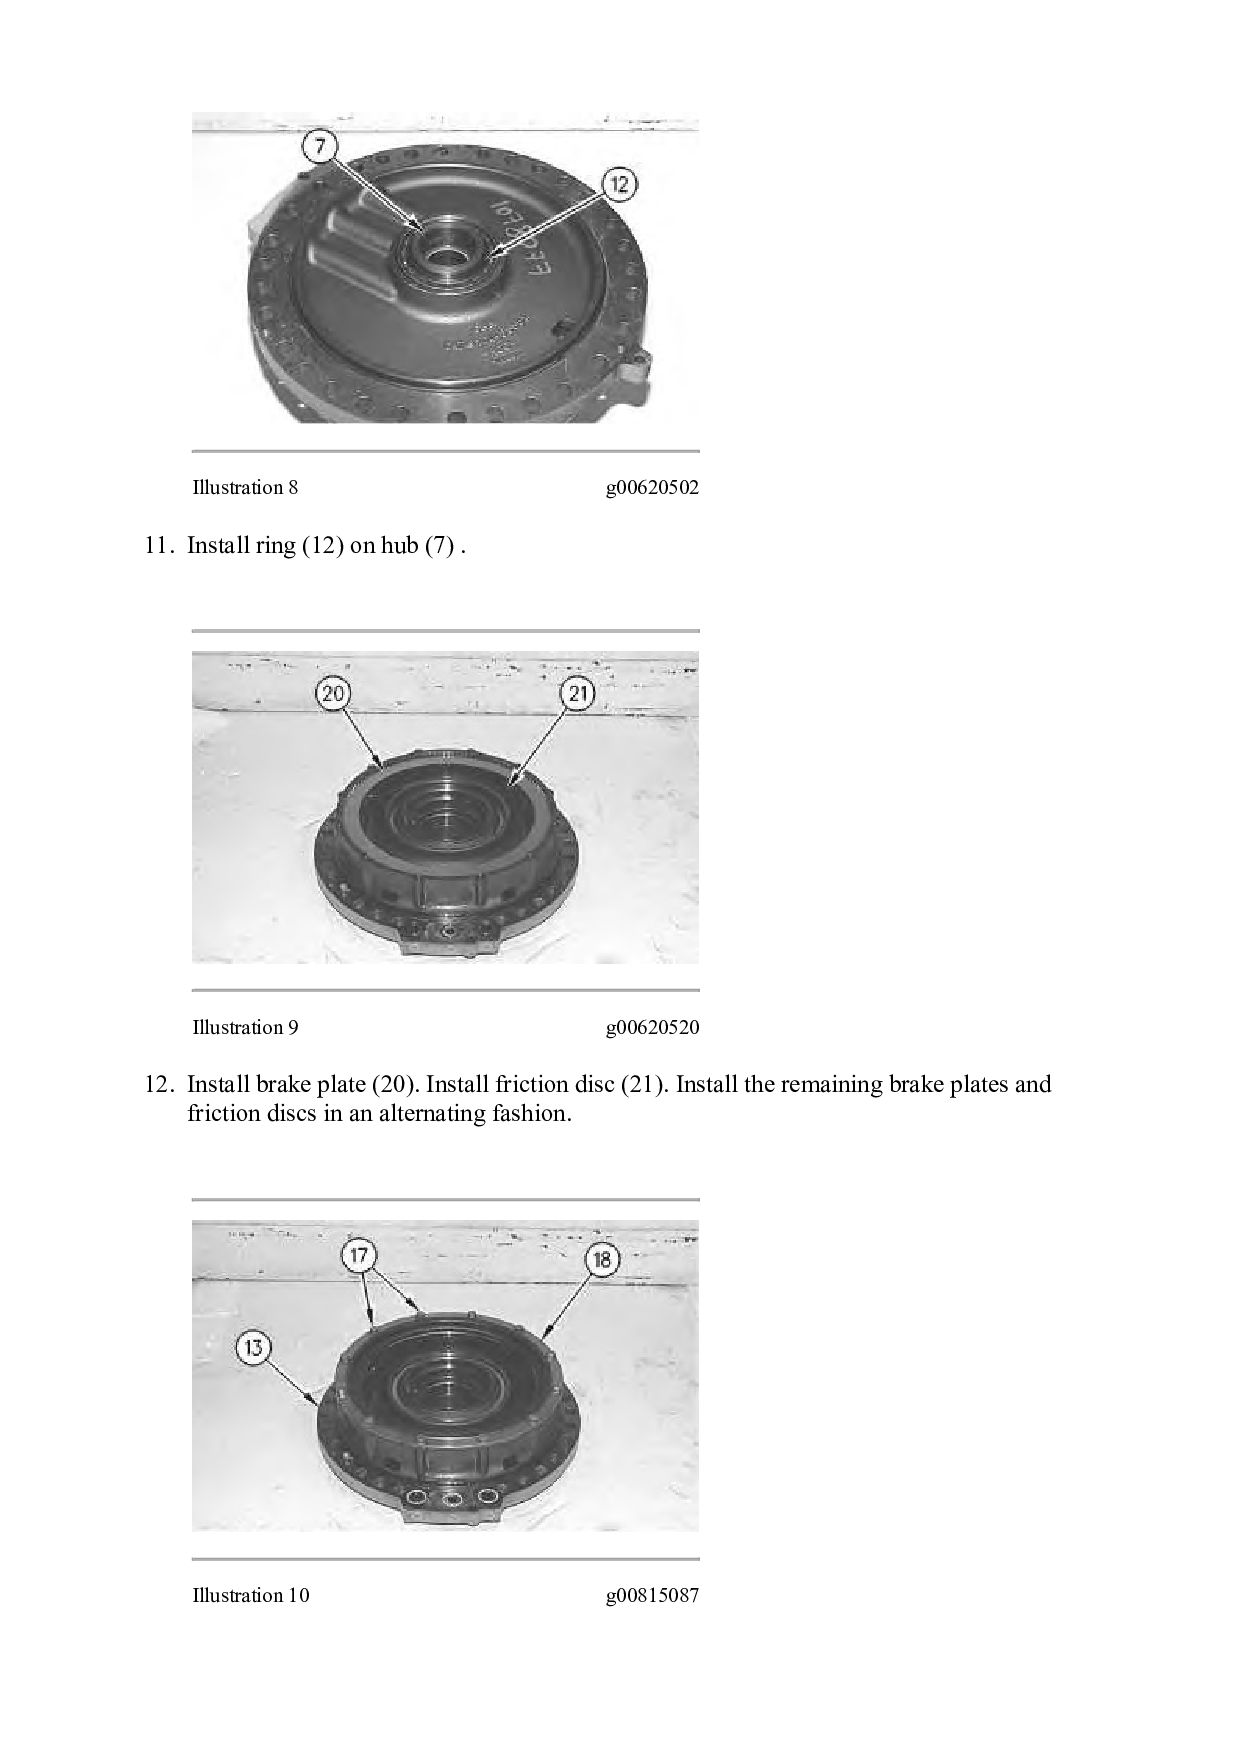
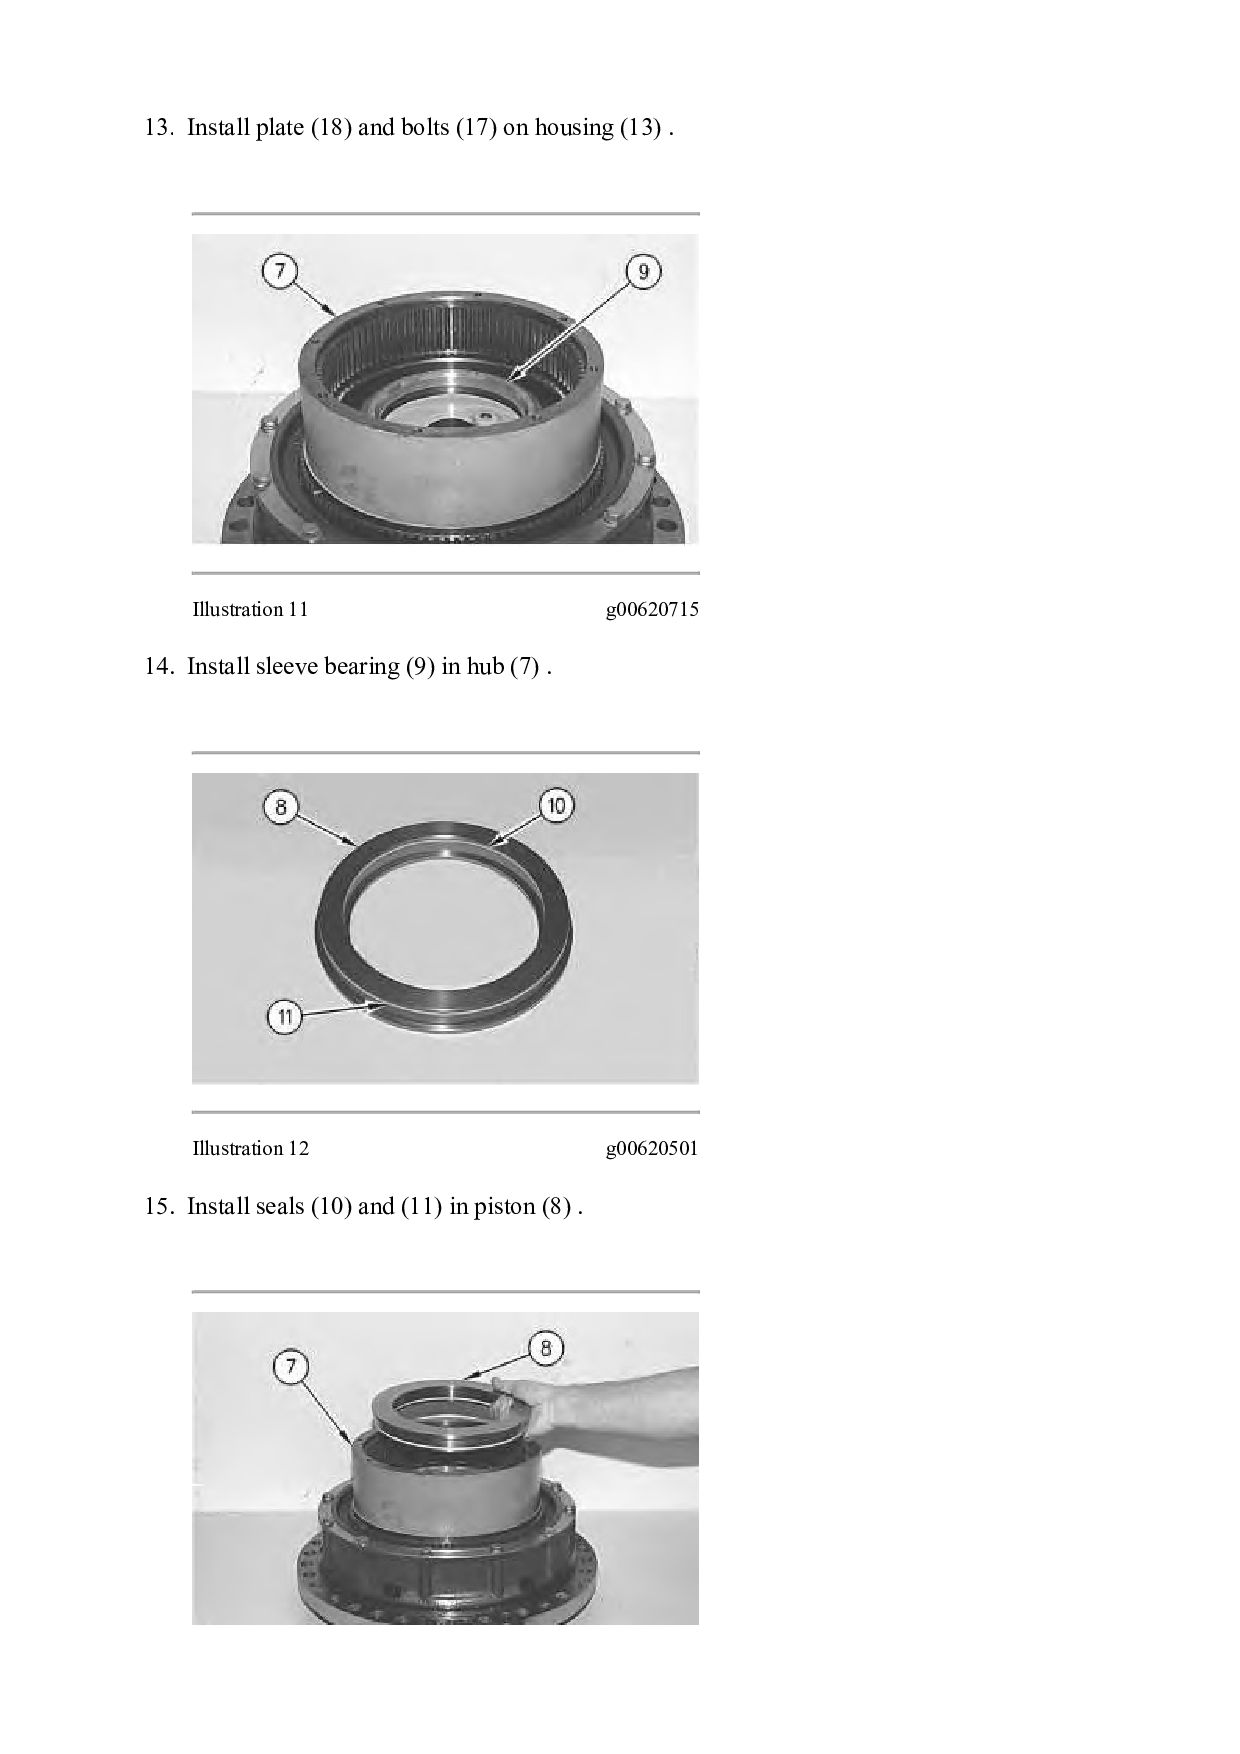
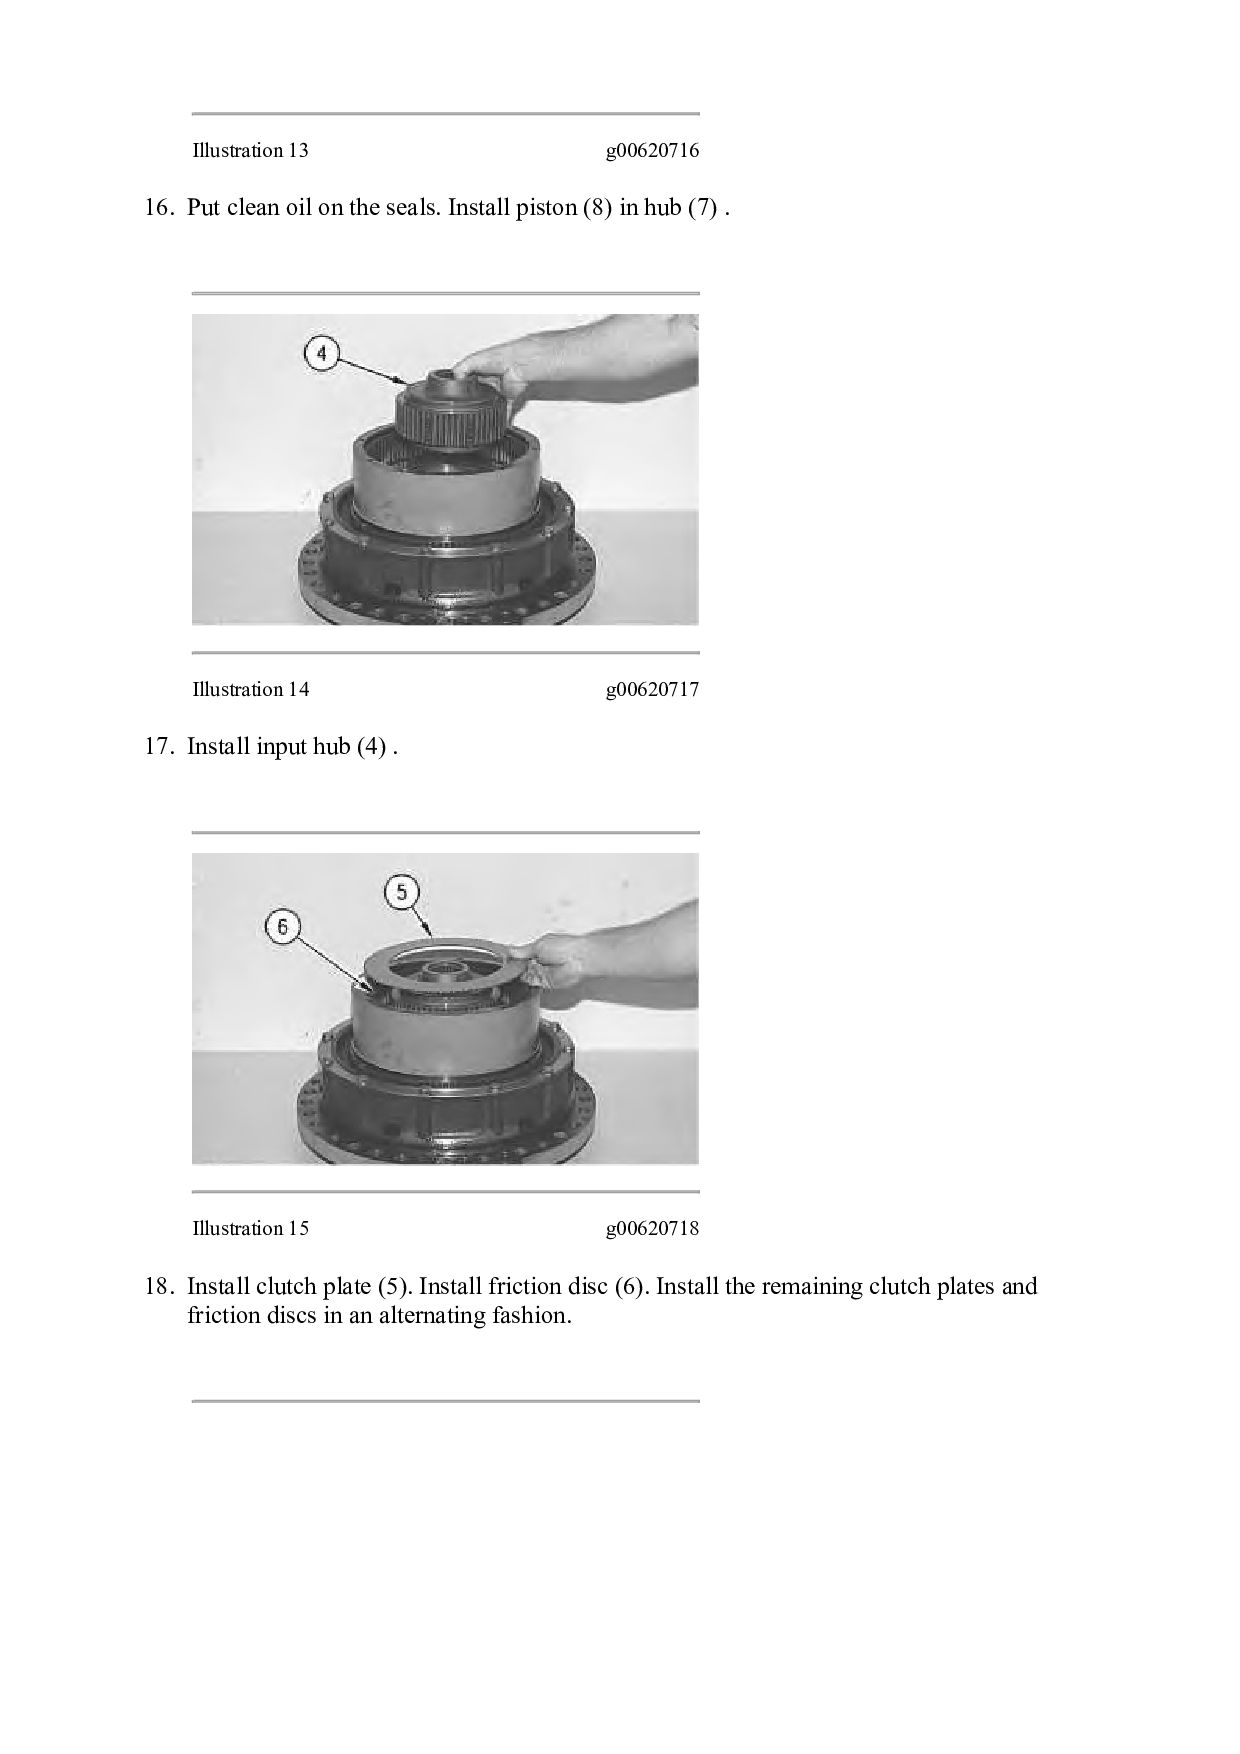
6 g00620504 9. Install bearing (14) in housing (13) . Illustration 7 g00620759 10. Fasten a hoist and fasten Tooling (A) to housing (13). Lower the housing into the correct position on hub (7) .
(2) . Illustration 17 g00620422 20. Position plate (2) on the housing. Install bolts (1) . End By: Connect the final drive to the steering clutch and to the brake. Refer to Disassembly and Assembly, "Final Drive, Steering Clutch, and Brake - Connect" in this module. Copyright 1993 - 2021 Caterpillar Inc. All Rights Reserved. Private Network For SIS Licensees. Thu Jan 14 11:58:58 UTC+0800 2021
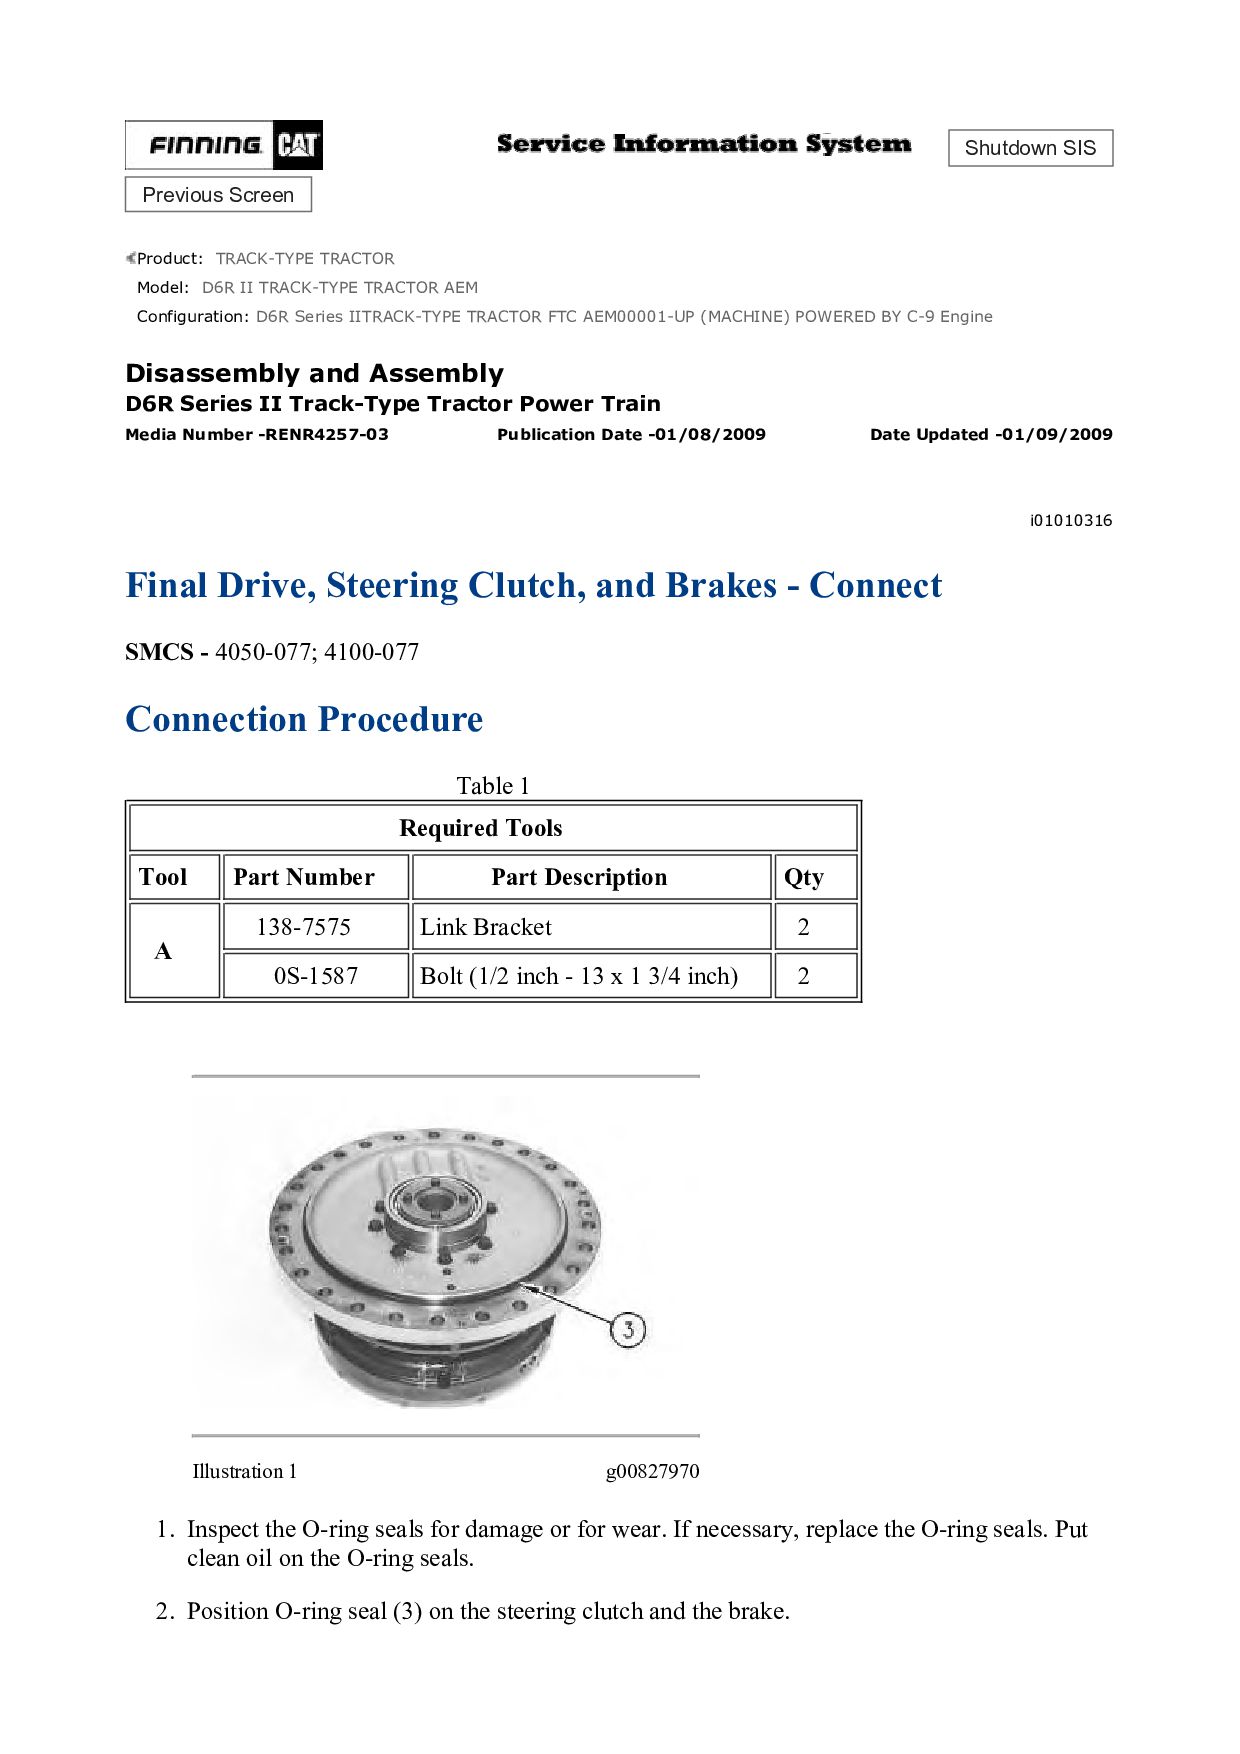
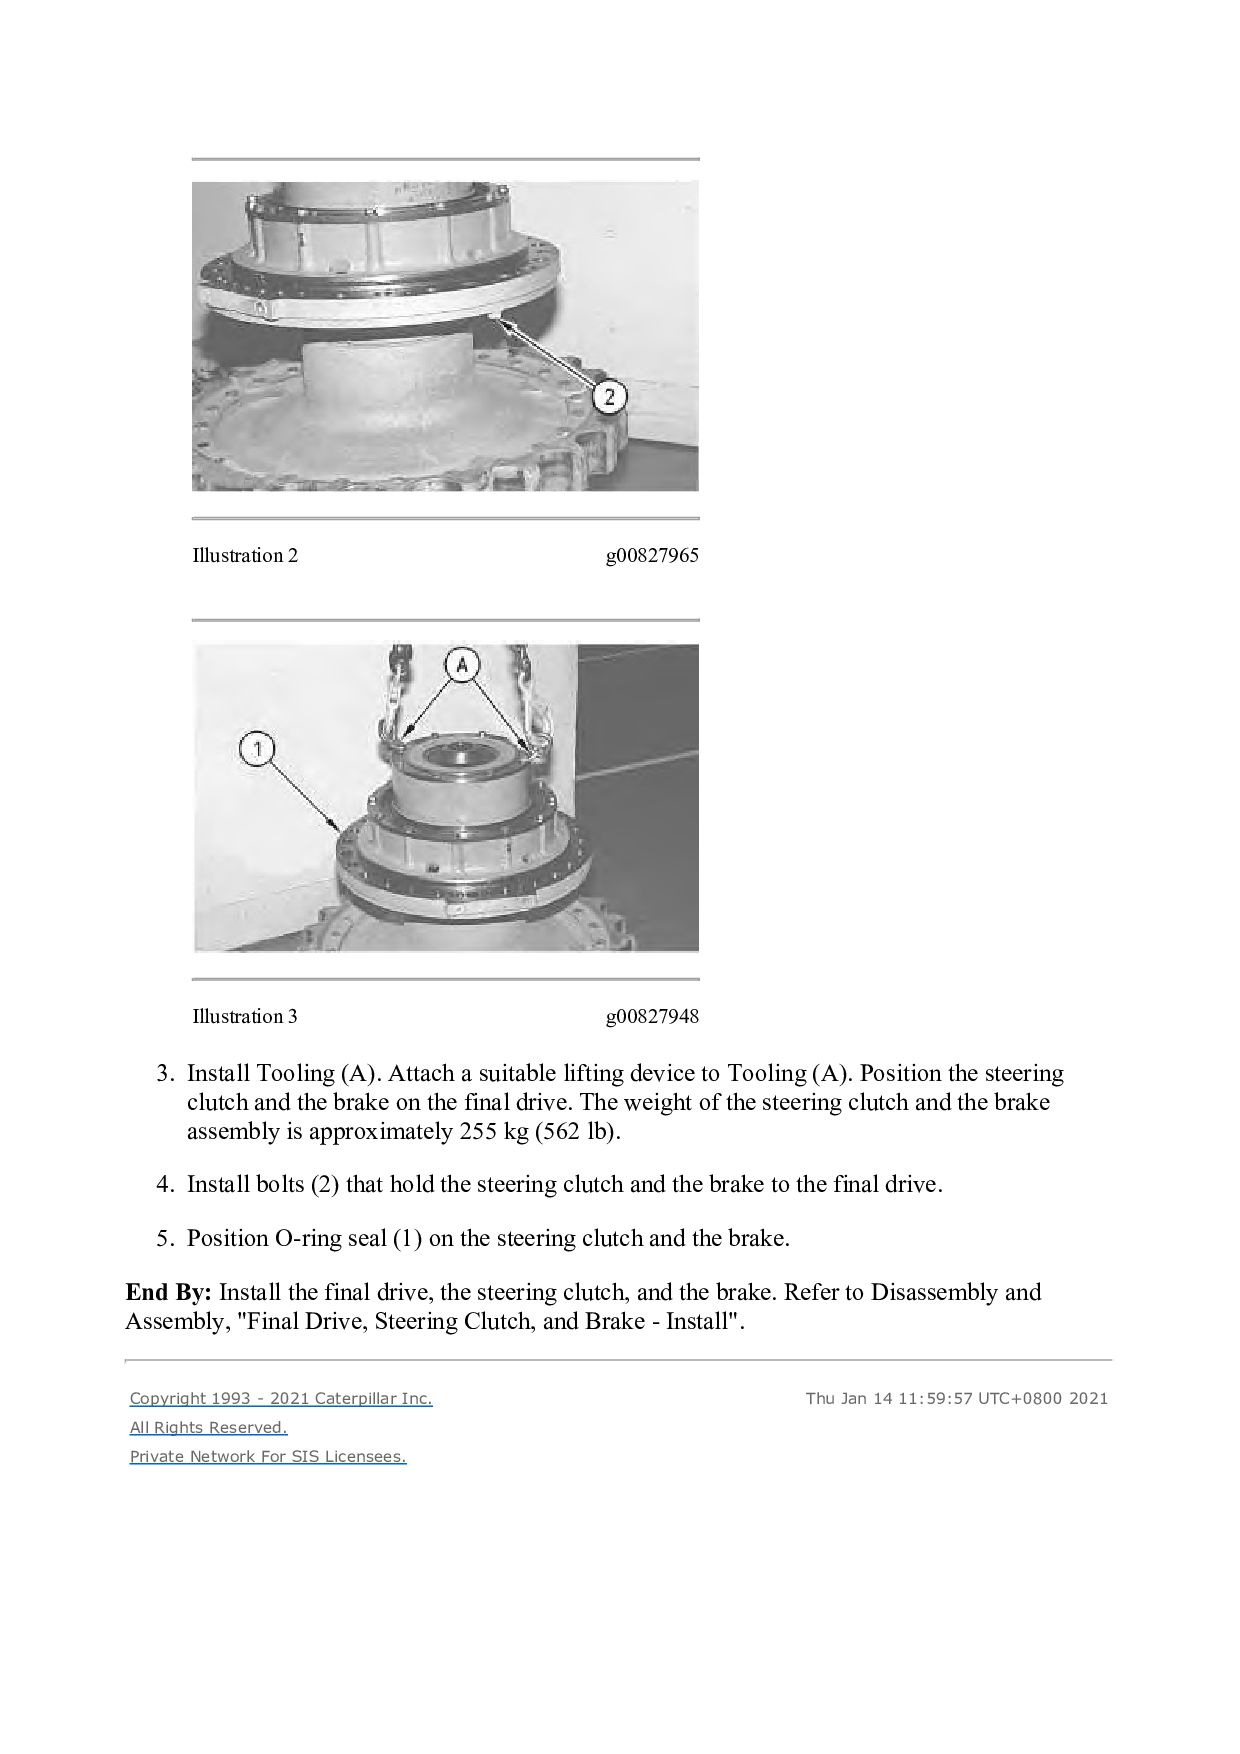
TRACK-TYPE TRACTOR AEM Configuration: D6R Series IITRACK-TYPE TRACTOR FTC AEM00001-UP (MACHINE) POWERED BY C-9 Engine Disassembly and Assembly D6R Series II Track-Type Tractor Power Train Media Number -RENR4257-03 Publication Date -01/08/2009 Date Updated -01/09/2009 i01010316 Final Drive, Steering Clutch, and Brakes - Connect SMCS - 4050-077; 4100-077 Connection Procedure Table 1 Required Tools Tool Part Number Part Description Qty A 138-7575 Link Bracket 2 0S-1587 Bolt (1/2 inch - 13 x 1 3/4 inch) 2 Illustration 1 g00827970 1. Inspect the O-ring seals for damage or for wear. If necessary, replace the O-ring seals. Put clean oil on the O-ring seals. 2. Position O-ring seal (3) on the steering clutch and the brake.
Attach a suitable lifting device to Tooling (A). Position the steering clutch and the brake on the final drive. The weight of the steering clutch and the brake assembly is approximately 255 kg (562 lb). 4. Install bolts (2) that hold the steering clutch and the brake to the final drive. 5. Position O-ring seal (1) on the steering clutch and the brake. End By: Install the final drive, the steering clutch, and the brake. Refer to Disassembly and Assembly, "Final Drive, Steering Clutch, and Brake - Install". Copyright 1993 - 2021 Caterpillar Inc. All Rights Reserved. Private Network For SIS Licensees. Thu Jan 14 11:59:57 UTC+0800 2021
TRACK-TYPE TRACTOR AEM Configuration: D6R Series IITRACK-TYPE TRACTOR FTC AEM00001-UP (MACHINE) POWERED BY C-9 Engine Disassembly and Assembly D6R Series II Track-Type Tractor Power Train Media Number -RENR4257-03 Publication Date -01/08/2009 Date Updated -01/09/2009 i01676030 Final Drive, Steering Clutch and Brake - Install SMCS - 4050-012; 4100-012 Installation Procedure Table 1 Required Tools Tool Part Number Part Description Qty A 8T-3207 Lifting Bracket 1 5P-8622 Shackle 1 1D-4615 Bolt (3/4 inch by 10 by 5 1/2 inch) 2 1B-4331 Nut (3/4 inch by 10) 2 5P-8248 Washer 4 Without the sun gear in place, the brakes are ineffective. Personal injury or death could result. Provide other means to hold or stop the machine.
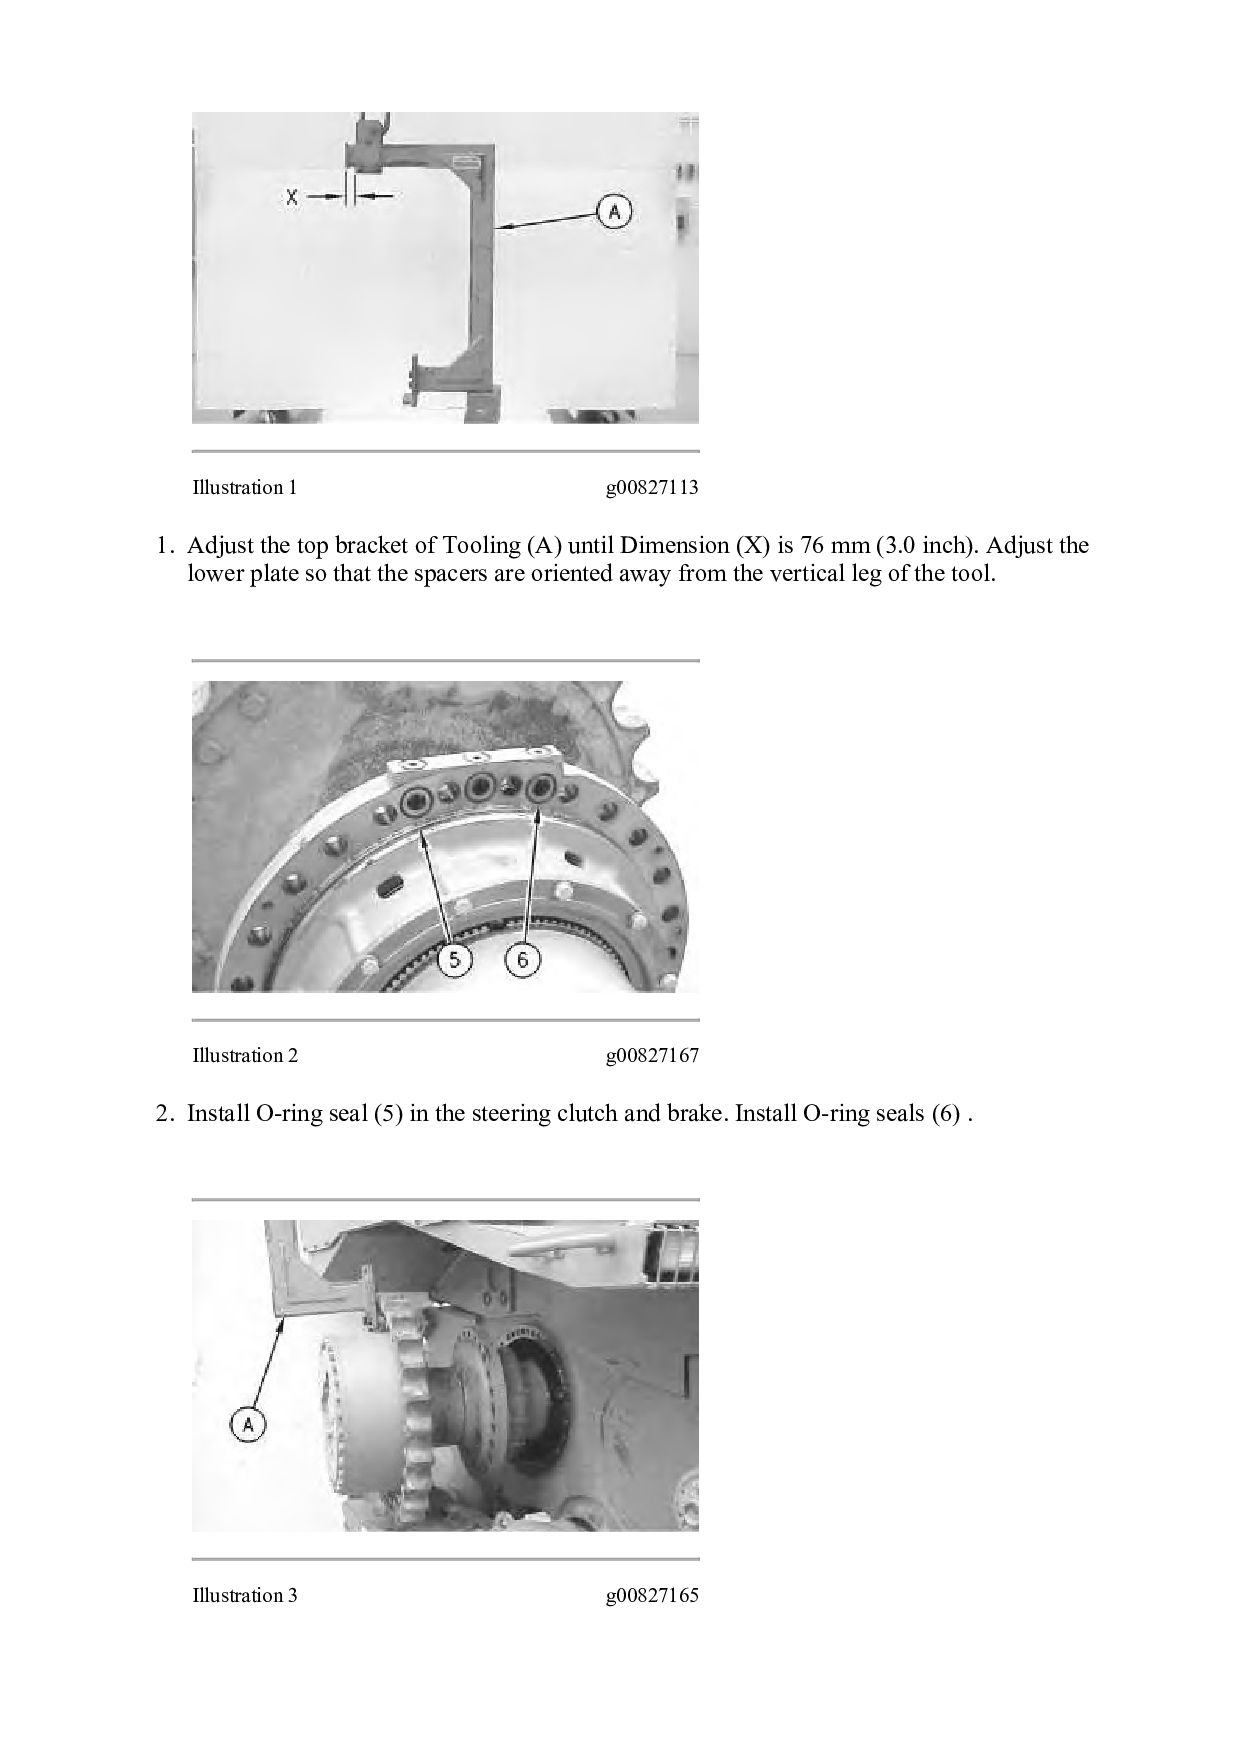
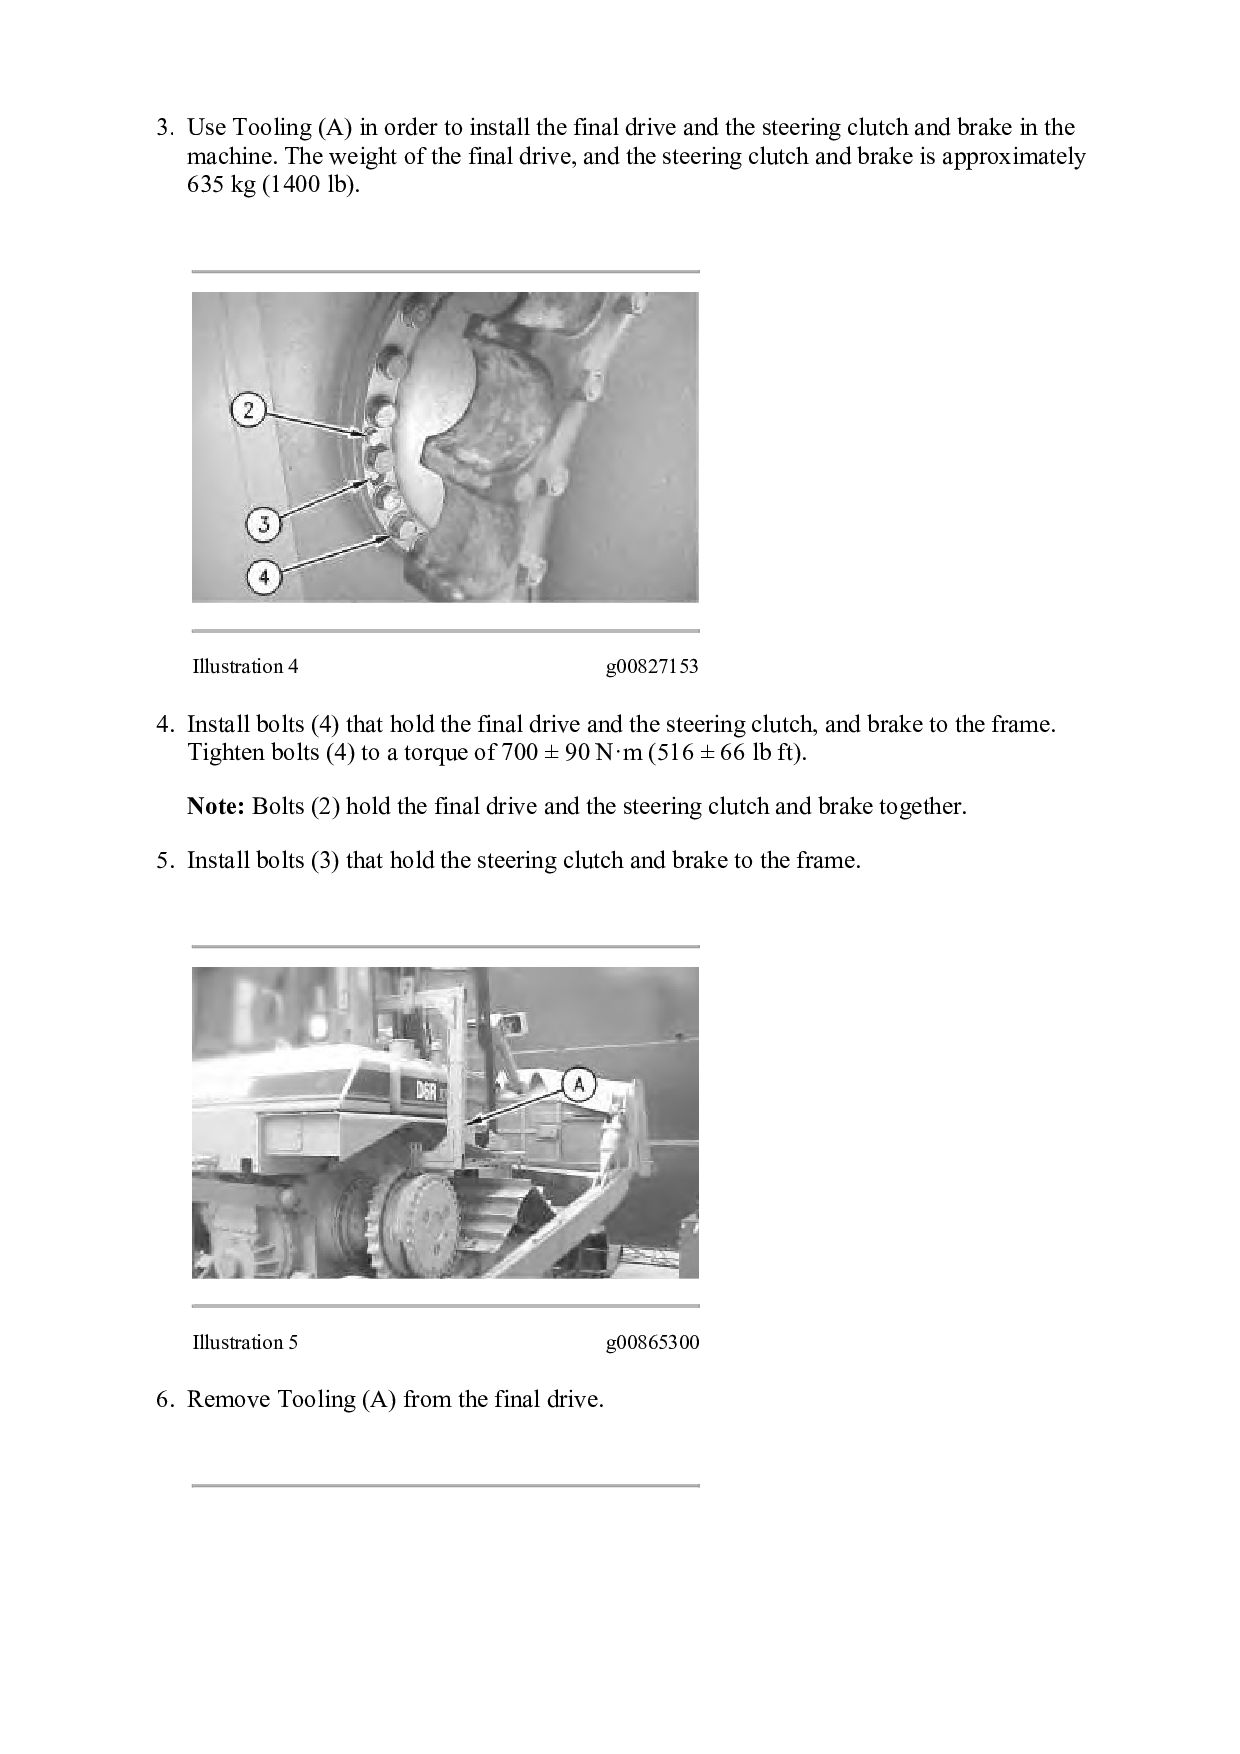
(A) until Dimension (X) is 76 mm (3.0 inch). Adjust the lower plate so that the spacers are oriented away from the vertical leg of the tool. Illustration 2 g00827167 2. Install O-ring seal (5) in the steering clutch and brake. Install O-ring seals (6) . Illustration 3 g00827165
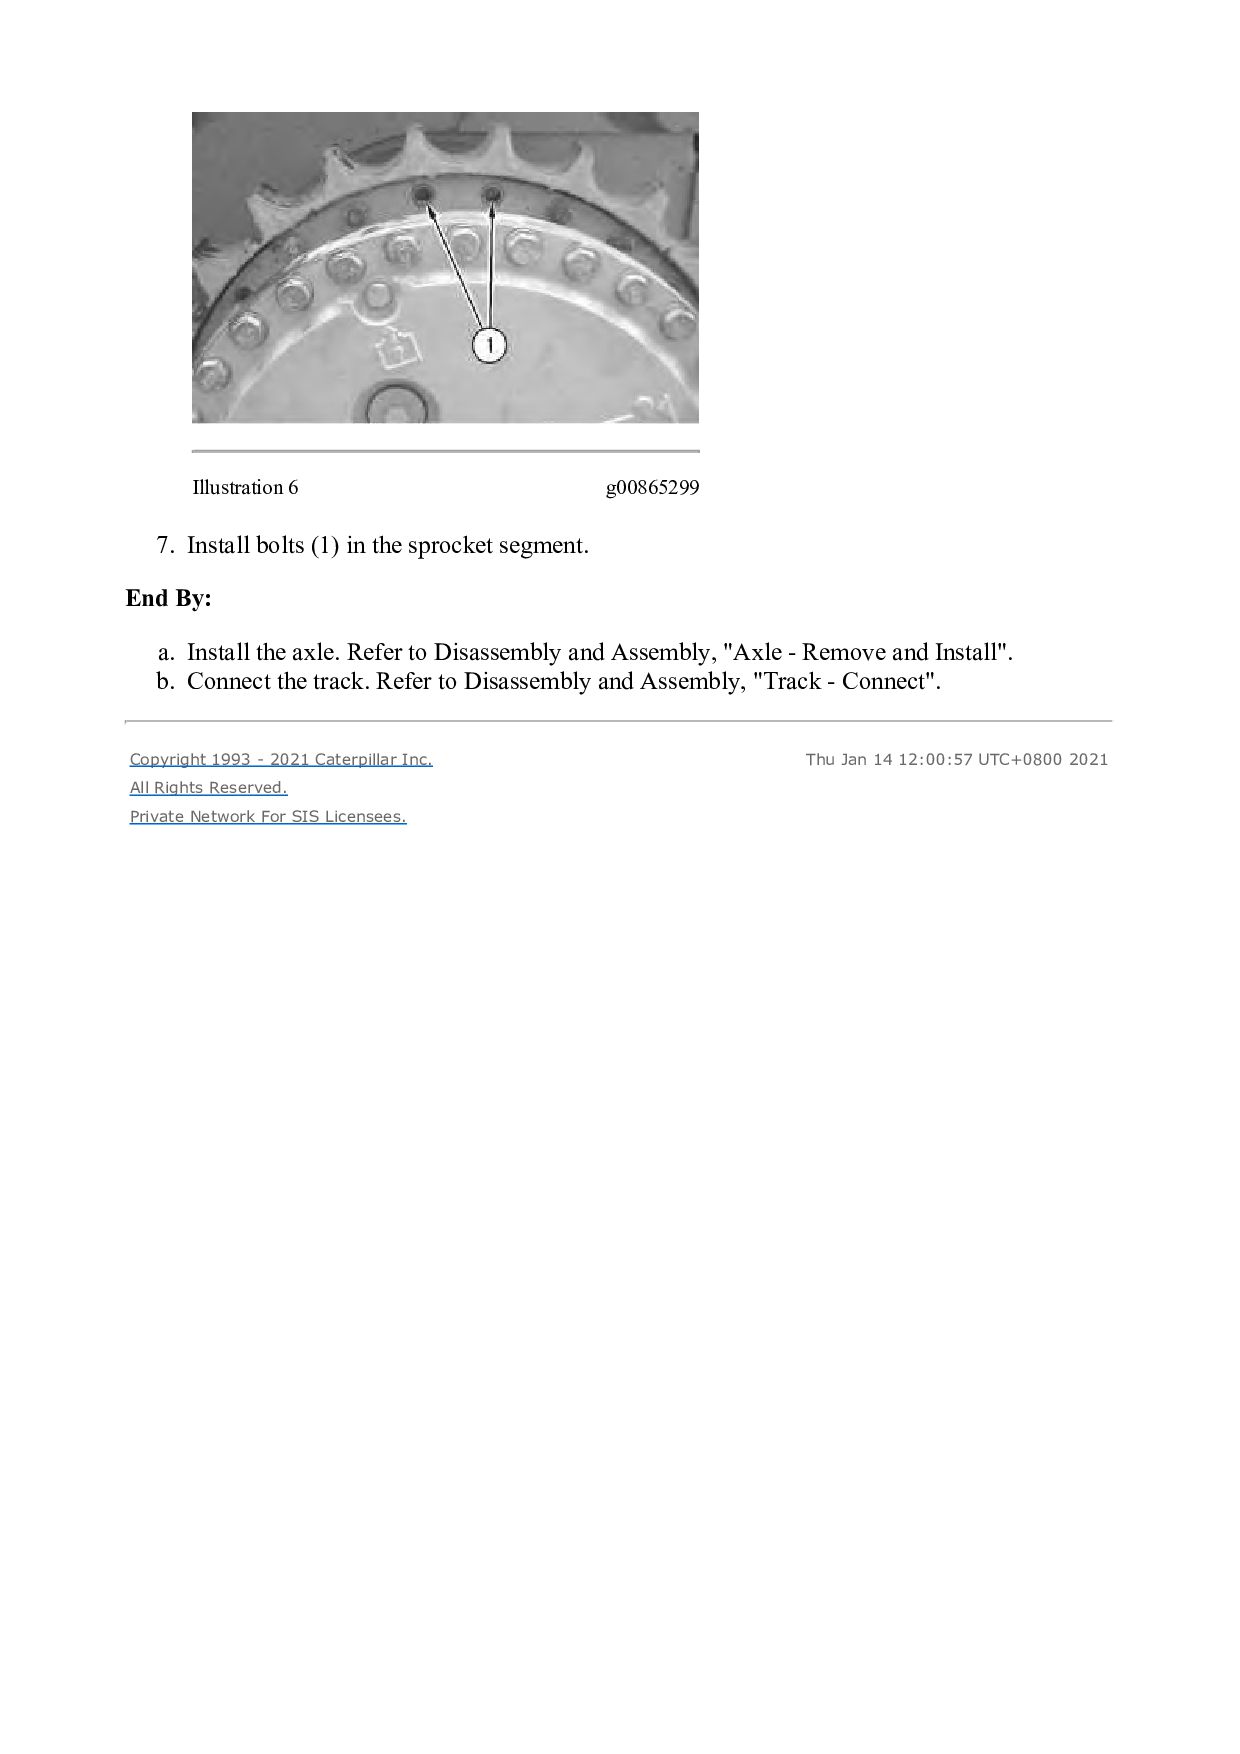
drive and the steering clutch and brake in the machine. The weight of the final drive, and the steering clutch and brake is approximately 635 kg (1400 lb). Illustration 4 g00827153 4. Install bolts (4) that hold the final drive and the steering clutch, and brake to the frame. Tighten bolts (4) to a torque of 700 ± 90 N·m (516 ± 66 lb ft). Note: Bolts (2) hold the final drive and the steering clutch and brake together. 5. Install bolts (3) that hold the steering clutch and brake to the frame. Illustration 5 g00865300 6. Remove Tooling (A) from the final drive.
segment. End By: a. Install the axle. Refer to Disassembly and Assembly, "Axle - Remove and Install". b. Connect the track. Refer to Disassembly and Assembly, "Track - Connect". Copyright 1993 - 2021 Caterpillar Inc. All Rights Reserved. Private Network For SIS Licensees. Thu Jan 14 12:00:57 UTC+0800 2021
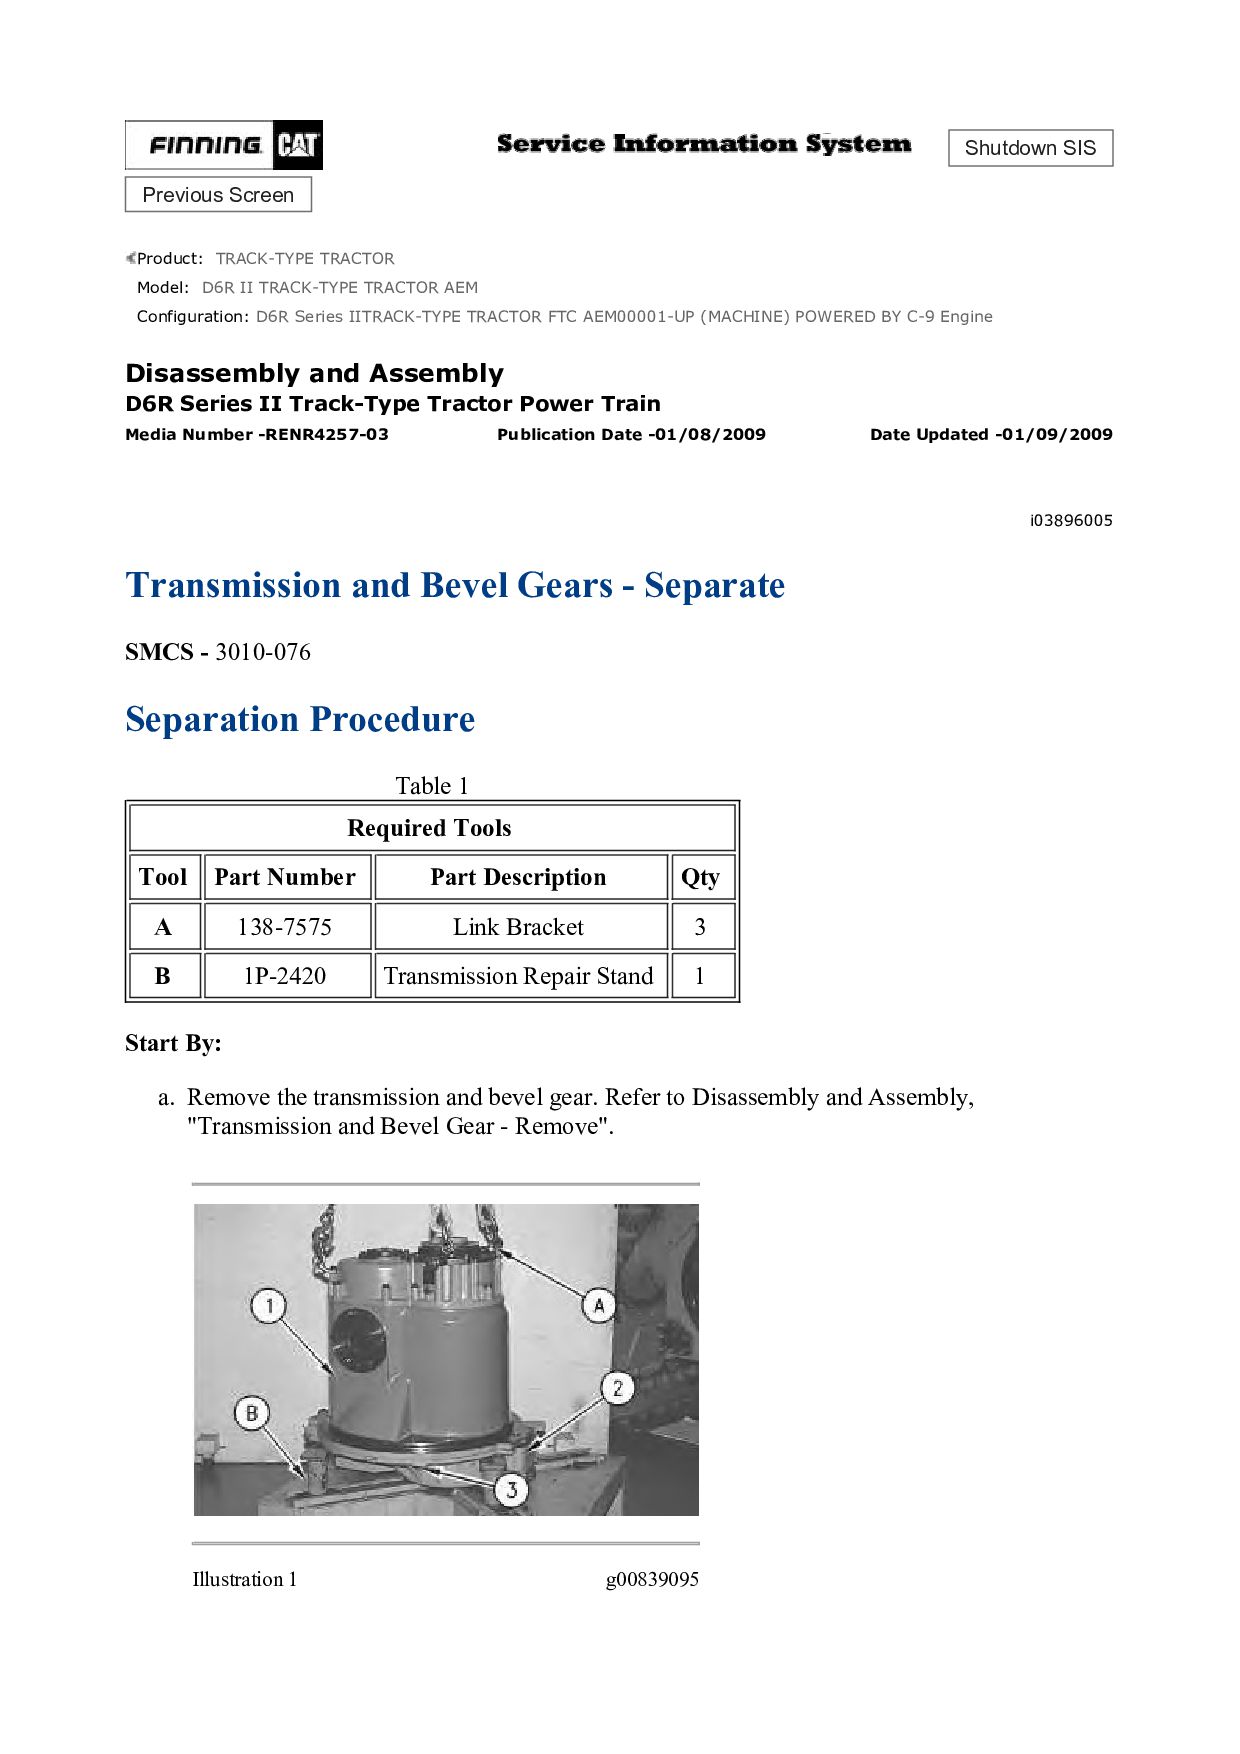
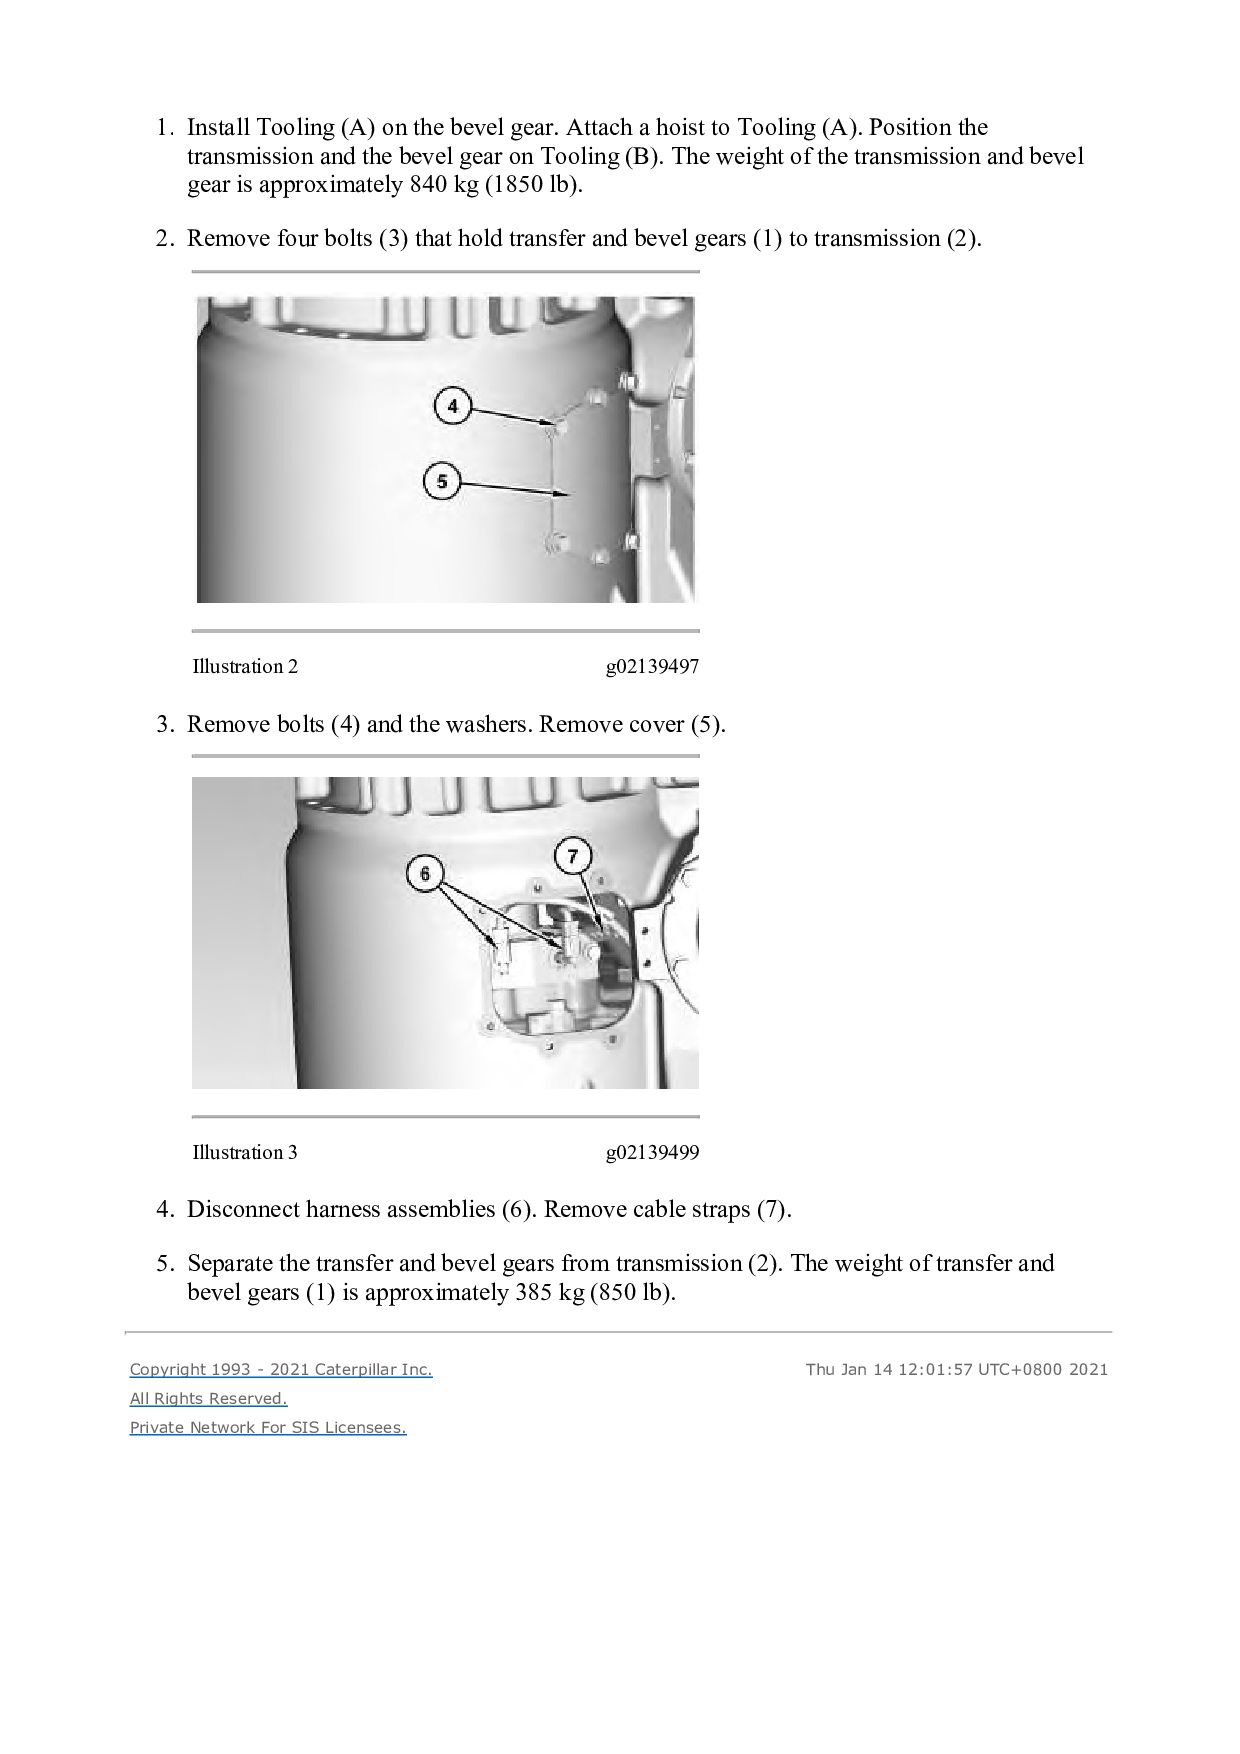
TRACK-TYPE TRACTOR AEM Configuration: D6R Series IITRACK-TYPE TRACTOR FTC AEM00001-UP (MACHINE) POWERED BY C-9 Engine Disassembly and Assembly D6R Series II Track-Type Tractor Power Train Media Number -RENR4257-03 Publication Date -01/08/2009 Date Updated -01/09/2009 i03896005 Transmission and Bevel Gears - Separate SMCS - 3010-076 Separation Procedure Table 1 Required Tools Tool Part Number Part Description Qty A 138-7575 Link Bracket 3 B 1P-2420 Transmission Repair Stand 1 Start By: a. Remove the transmission and bevel gear. Refer to Disassembly and Assembly, "Transmission and Bevel Gear - Remove". Illustration 1 g00839095
hoist to Tooling (A). Position the transmission and the bevel gear on Tooling (B). The weight of the transmission and bevel gear is approximately 840 kg (1850 lb). 2. Remove four bolts (3) that hold transfer and bevel gears (1) to transmission (2). Illustration 2 g02139497 3. Remove bolts (4) and the washers. Remove cover (5). Illustration 3 g02139499 4. Disconnect harness assemblies (6). Remove cable straps (7). 5. Separate the transfer and bevel gears from transmission (2). The weight of transfer and bevel gears (1) is approximately 385 kg (850 lb). Copyright 1993 - 2021 Caterpillar Inc. All Rights Reserved. Private Network For SIS Licensees. Thu Jan 14 12:01:57 UTC+0800 2021
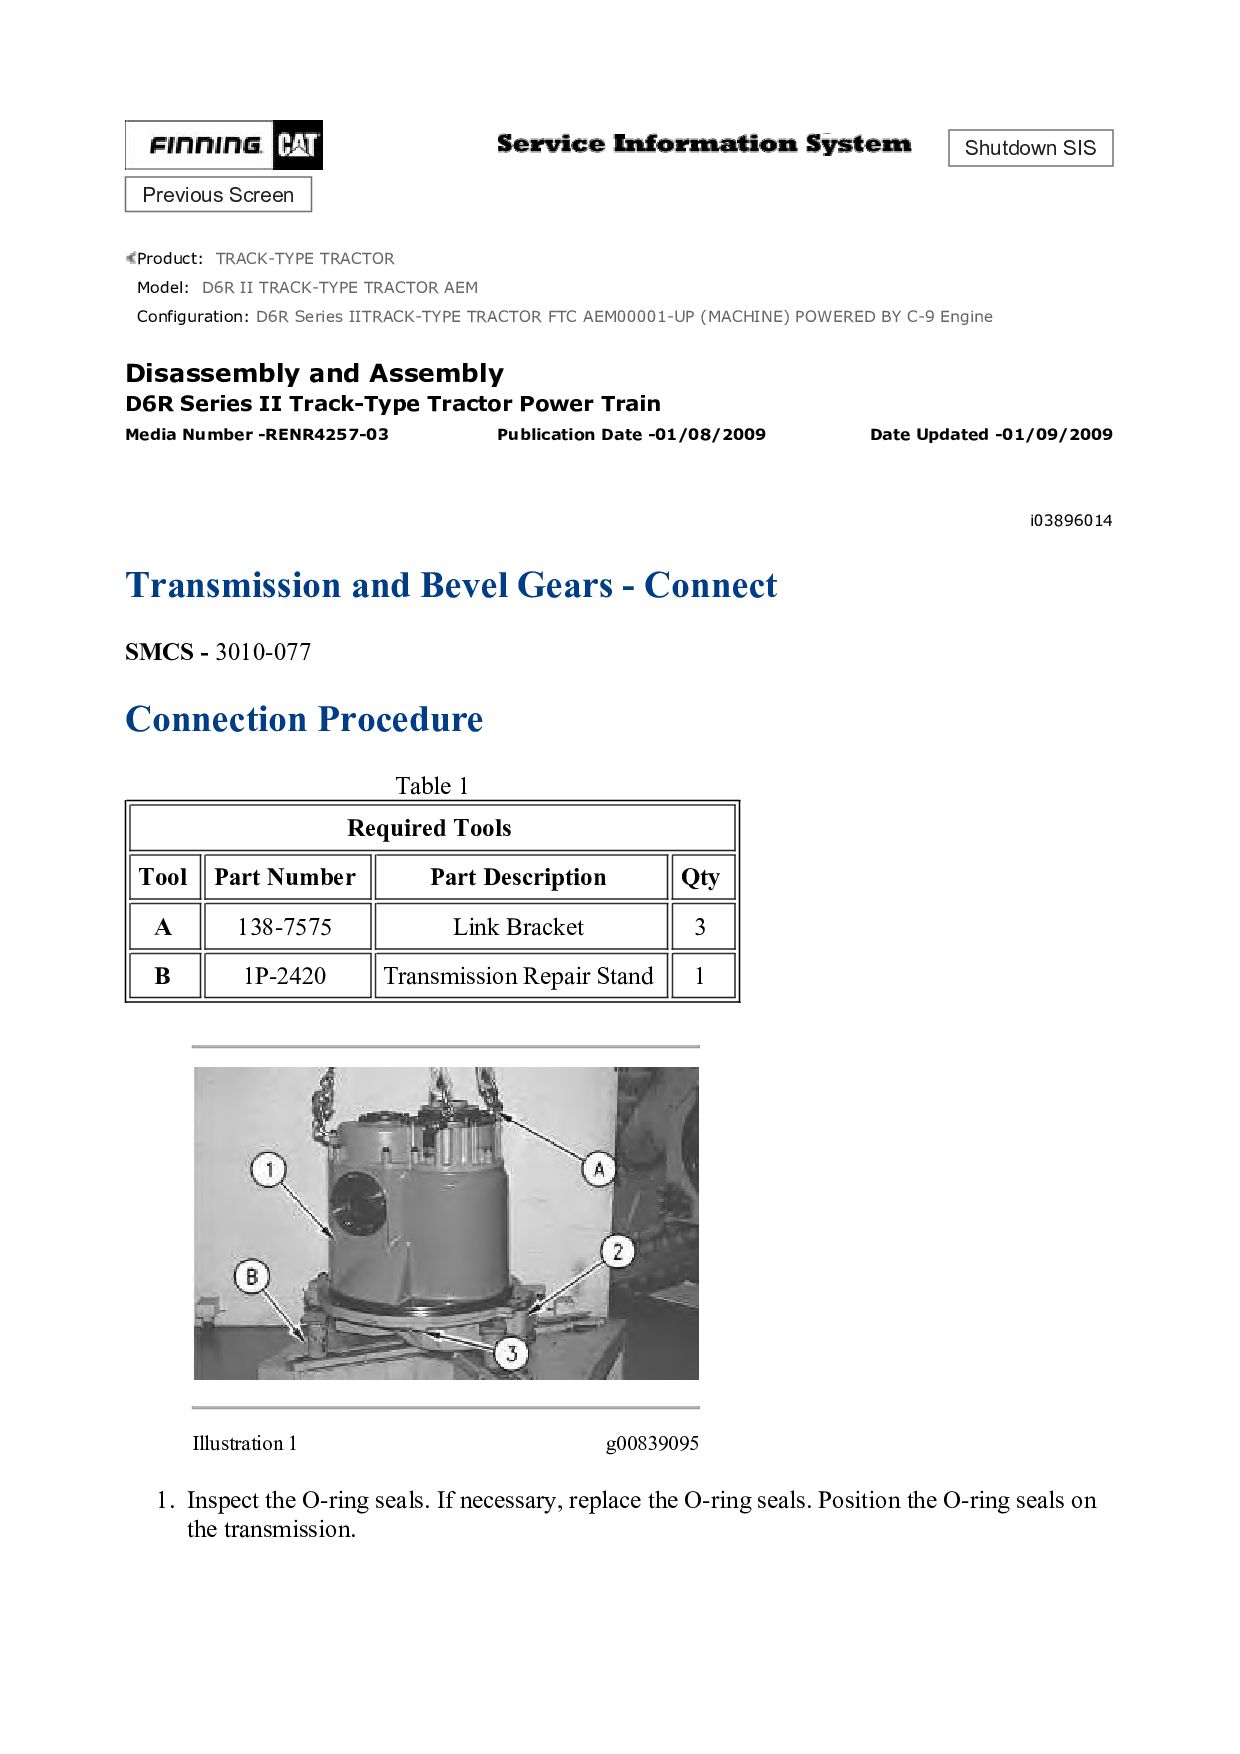
TRACK-TYPE TRACTOR AEM Configuration: D6R Series IITRACK-TYPE TRACTOR FTC AEM00001-UP (MACHINE) POWERED BY C-9 Engine Disassembly and Assembly D6R Series II Track-Type Tractor Power Train Media Number -RENR4257-03 Publication Date -01/08/2009 Date Updated -01/09/2009 i03896014 Transmission and Bevel Gears - Connect SMCS - 3010-077 Connection Procedure Table 1 Required Tools Tool Part Number Part Description Qty A 138-7575 Link Bracket 3 B 1P-2420 Transmission Repair Stand 1 Illustration 1 g00839095 1. Inspect the O-ring seals. If necessary, replace the O-ring seals. Position the O-ring seals on the transmission.
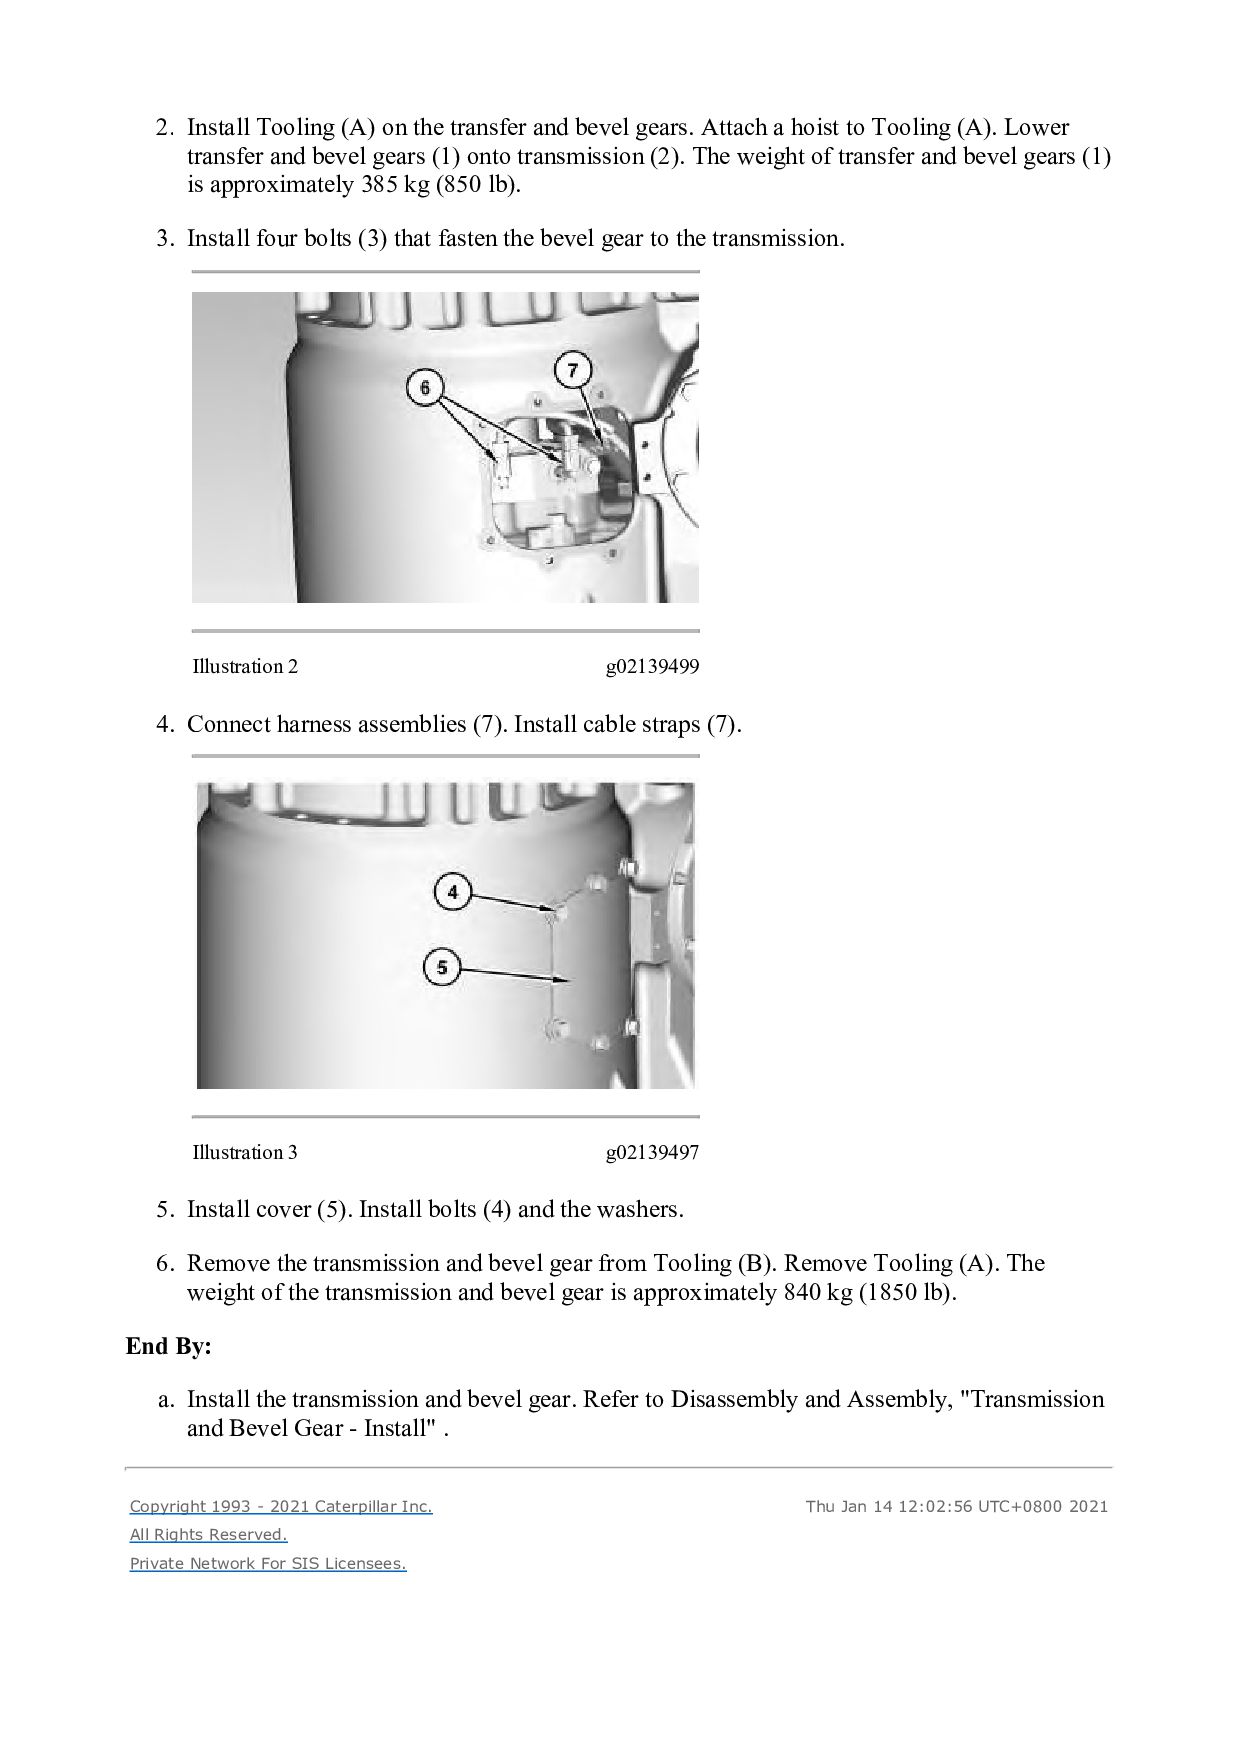
Attach a hoist to Tooling (A). Lower transfer and bevel gears (1) onto transmission (2). The weight of transfer and bevel gears (1) is approximately 385 kg (850 lb). 3. Install four bolts (3) that fasten the bevel gear to the transmission. Illustration 2 g02139499 4. Connect harness assemblies (7). Install cable straps (7). Illustration 3 g02139497 5. Install cover (5). Install bolts (4) and the washers. 6. Remove the transmission and bevel gear from Tooling (B). Remove Tooling (A). The weight of the transmission and bevel gear is approximately 840 kg (1850 lb). End By: a. Install the transmission and bevel gear. Refer to Disassembly and Assembly, "Transmission and Bevel Gear - Install" . Copyright 1993 - 2021 Caterpillar Inc. All Rights Reserved. Private Network For SIS Licensees. Thu Jan 14 12:02:56 UTC+0800 2021
TRACK-TYPE TRACTOR AEM Configuration: D6R Series IITRACK-TYPE TRACTOR FTC AEM00001-UP (MACHINE) POWERED BY C-9 Engine Disassembly and Assembly D6R Series II Track-Type Tractor Power Train Media Number -RENR4257-03 Publication Date -01/08/2009 Date Updated -01/09/2009 i01621804 Bevel and Transfer Gears - Disassemble SMCS - 3011-015 Disassembly Procedure Table 1 Required Tools Tool Part Number Part Description Qty A 138-7575 Link Bracket 3 B 138-7575 Link Bracket 1 C 8H-0663 Bearing Puller 1 D 8T-2839 Spanner 1 E 1P-1863 Retaining Ring Pliers 1 F 1P-2321 Puller Assembly 1 5P-4170 Step Plate 1 G Forcing Screw (1/2 inch by 13) 2 H Bolt (1/4 inch by 20) 1 Start By: a. Separate the transmission and bevel gears. Note: Put identifying marks on all of the shims as the shims are removed. The identifying marks will ensure correct installation at assembly.
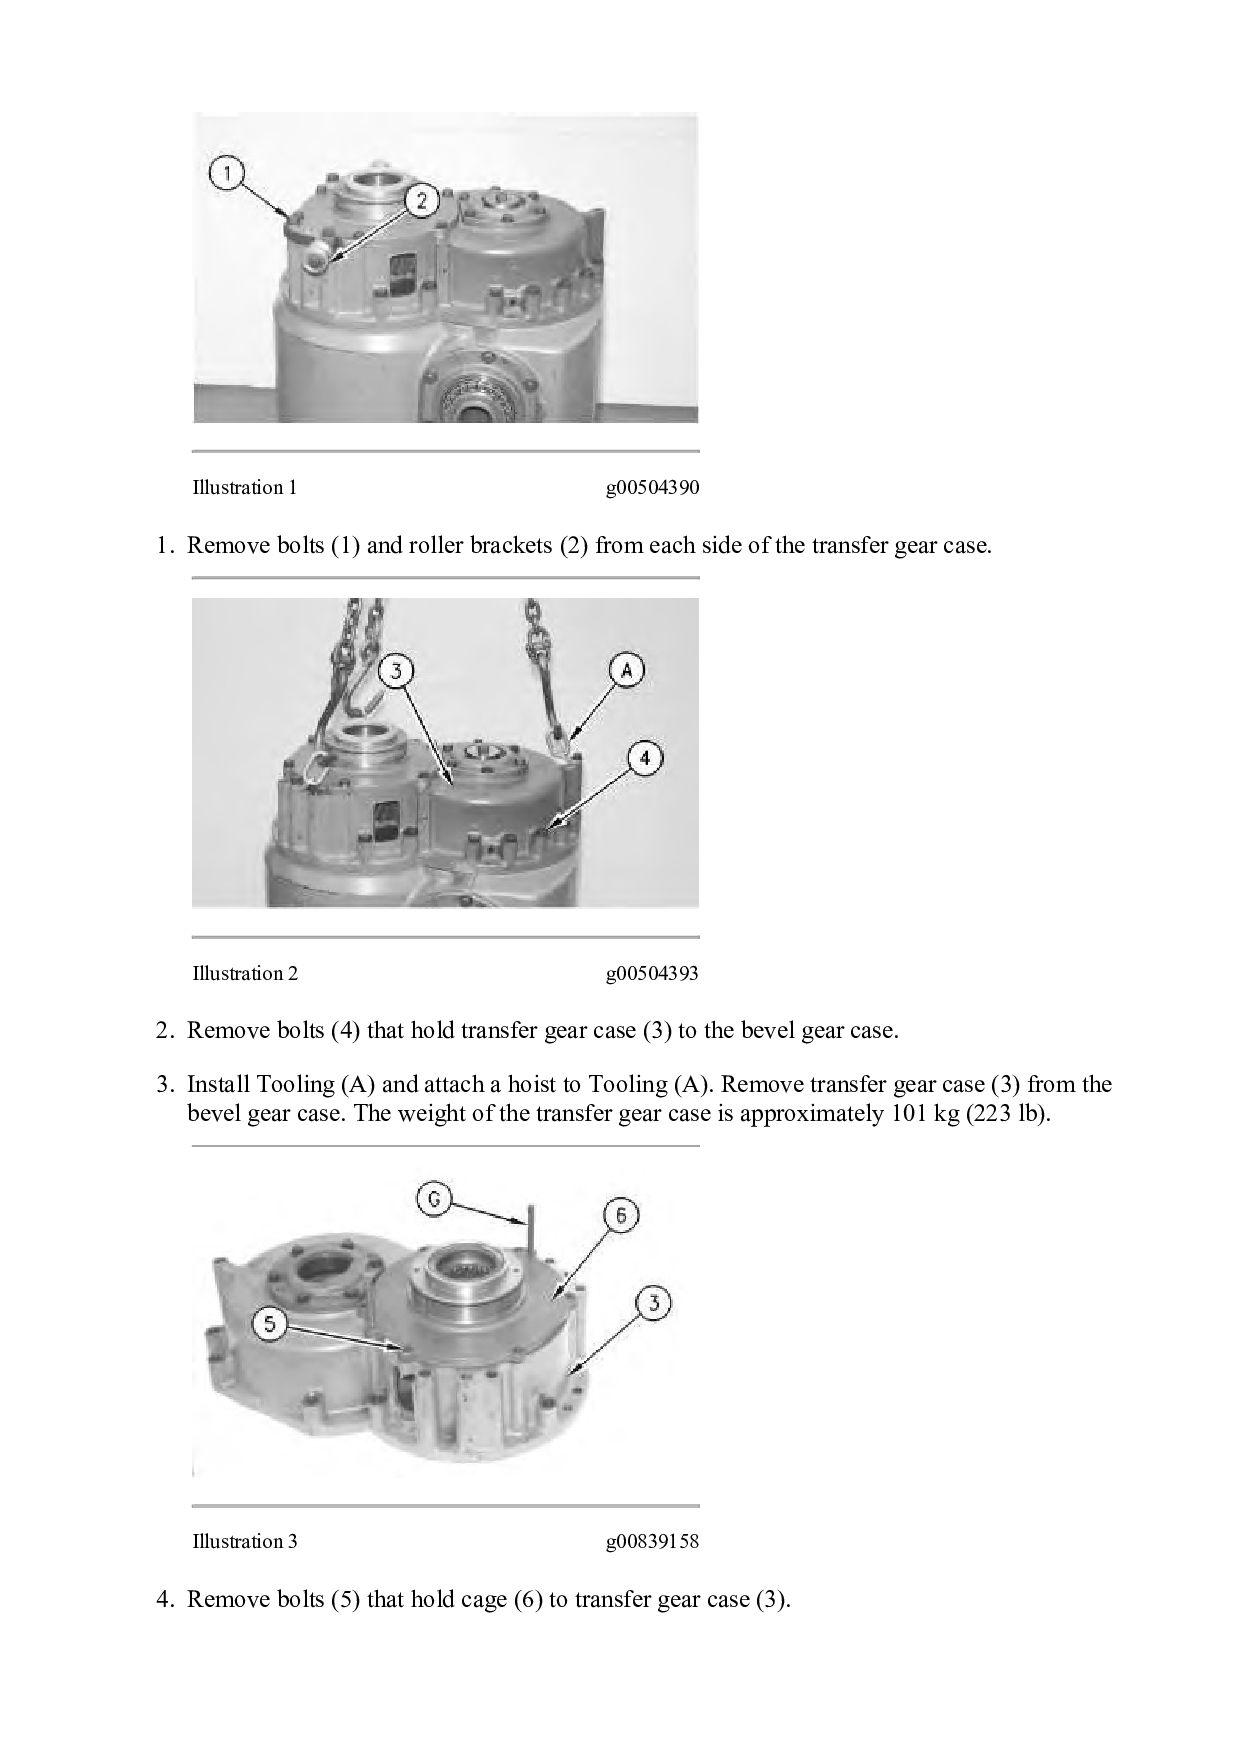
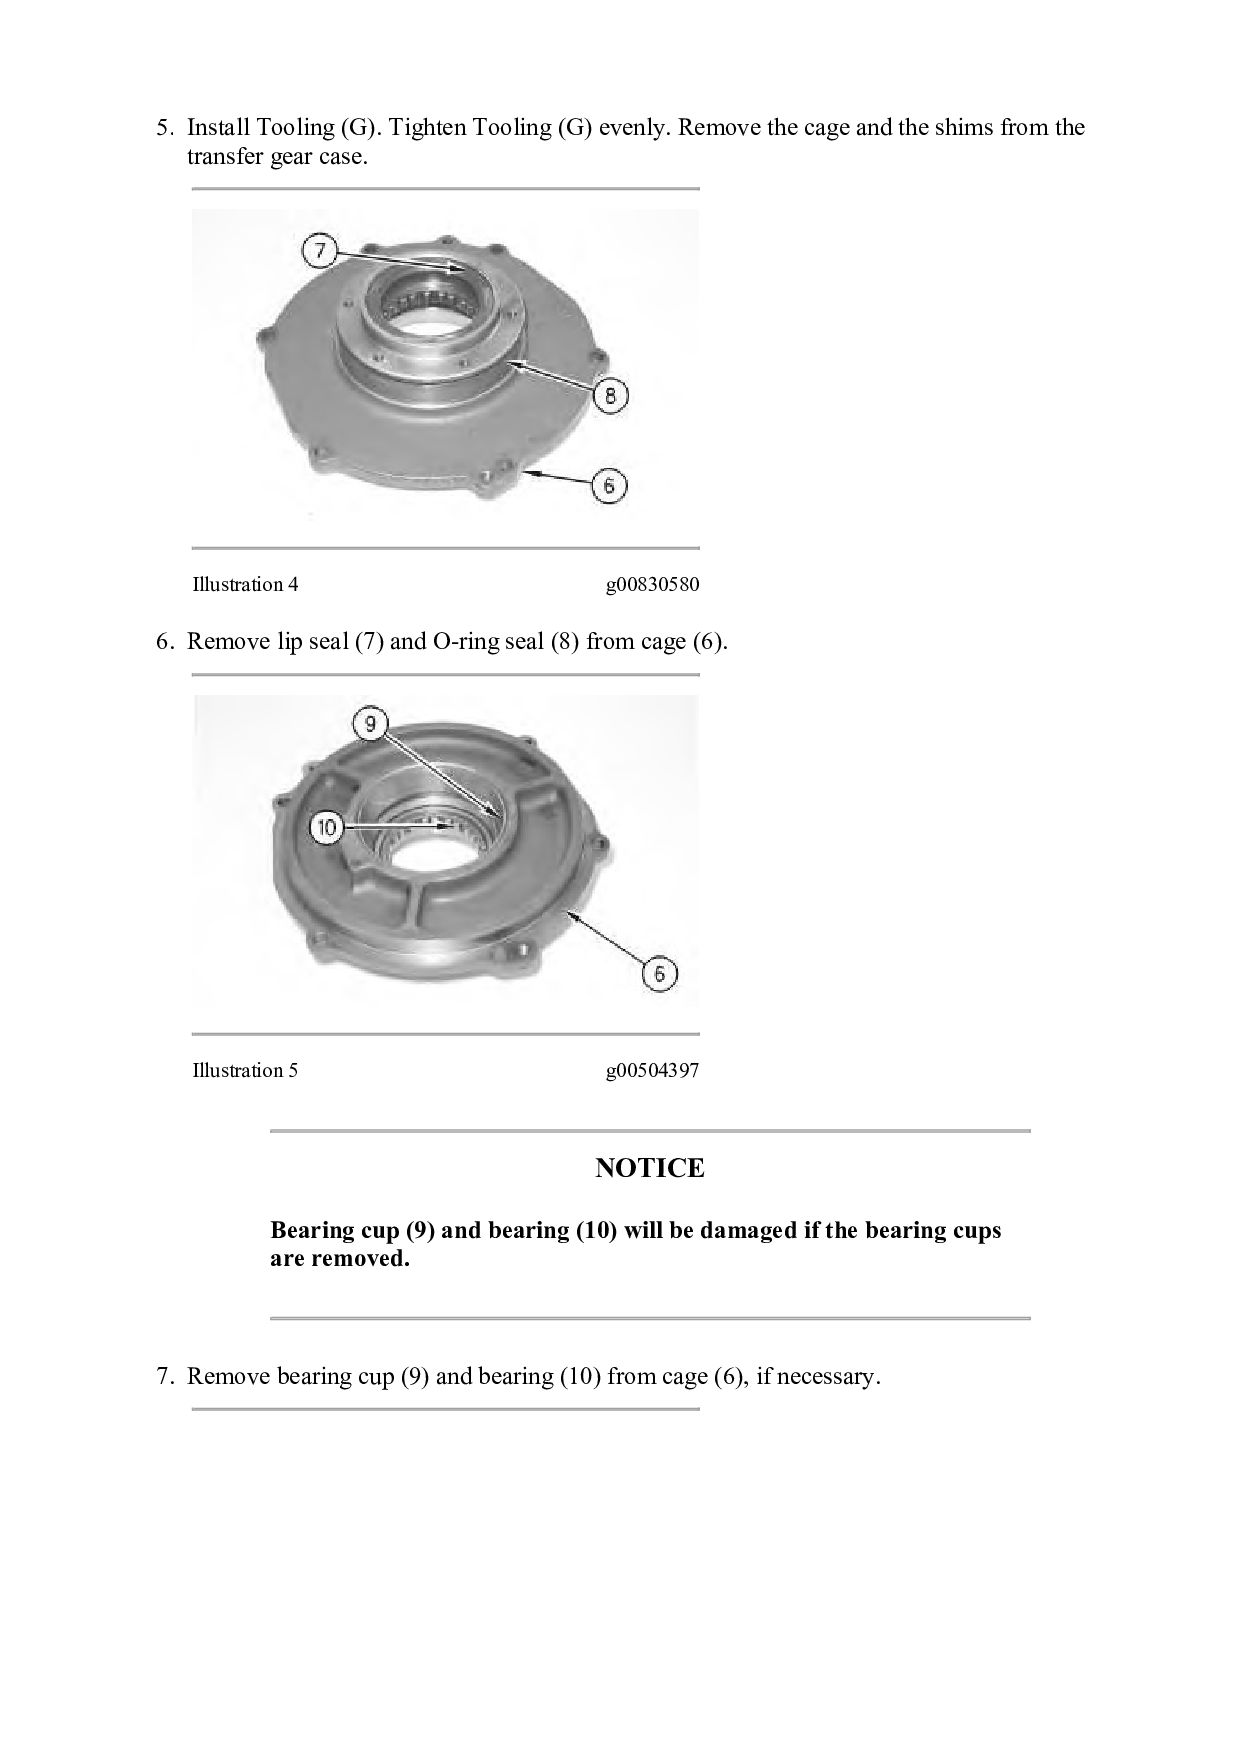
(2) from each side of the transfer gear case. Illustration 2 g00504393 2. Remove bolts (4) that hold transfer gear case (3) to the bevel gear case. 3. Install Tooling (A) and attach a hoist to Tooling (A). Remove transfer gear case (3) from the bevel gear case. The weight of the transfer gear case is approximately 101 kg (223 lb). Illustration 3 g00839158 4. Remove bolts (5) that hold cage (6) to transfer gear case (3).
Then Get COMPLETE MANUAL. NO WAITING NOTE: If there is no response to click on the link above, please download the PDF document first and then click on it.
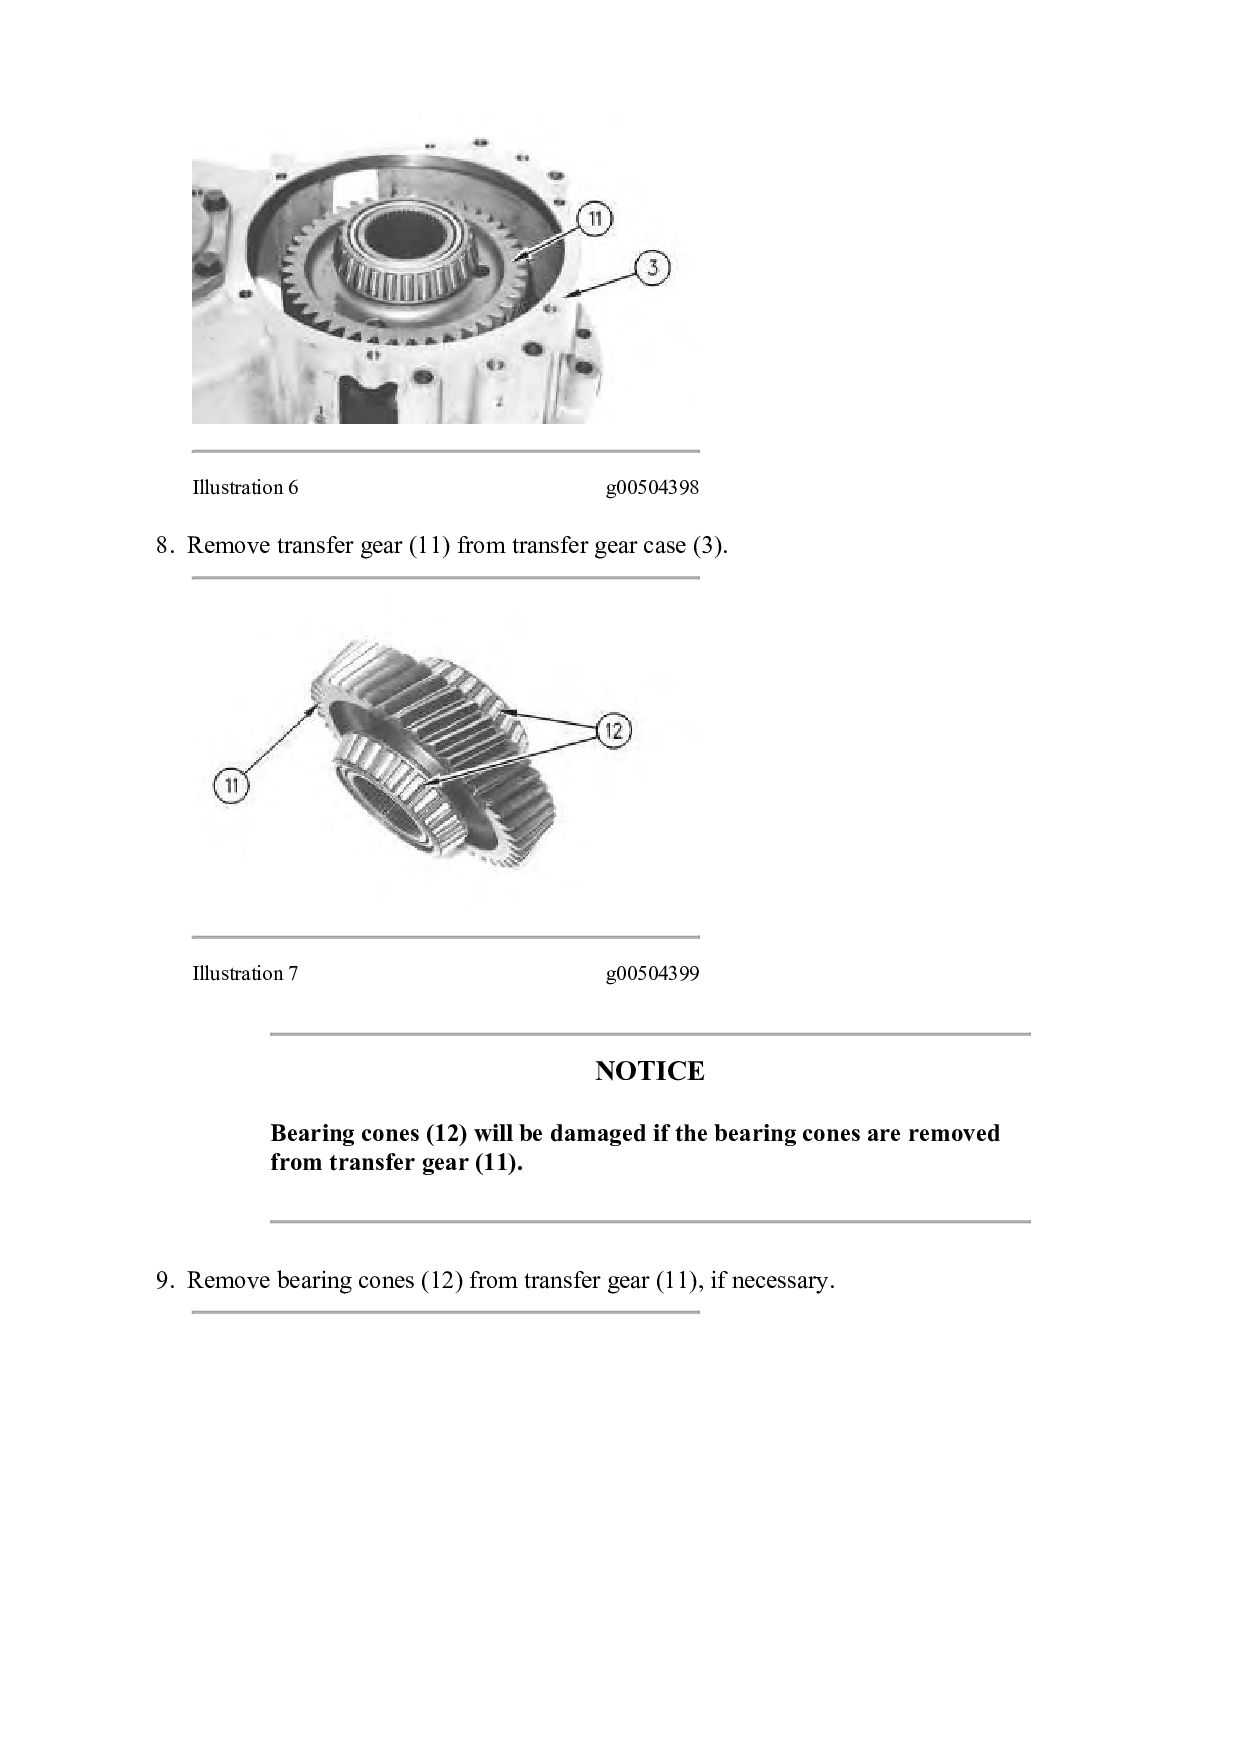
cage and the shims from the transfer gear case. Illustration 4 g00830580 6. Remove lip seal (7) and O-ring seal (8) from cage (6). Illustration 5 g00504397 NOTICE Bearing cup (9) and bearing (10) will be damaged if the bearing cups are removed. 7. Remove bearing cup (9) and bearing (10) from cage (6), if necessary.
gear case (3). Illustration 7 g00504399 NOTICE Bearing cones (12) will be damaged if the bearing cones are removed from transfer gear (11). 9. Remove bearing cones (12) from transfer gear (11), if necessary.
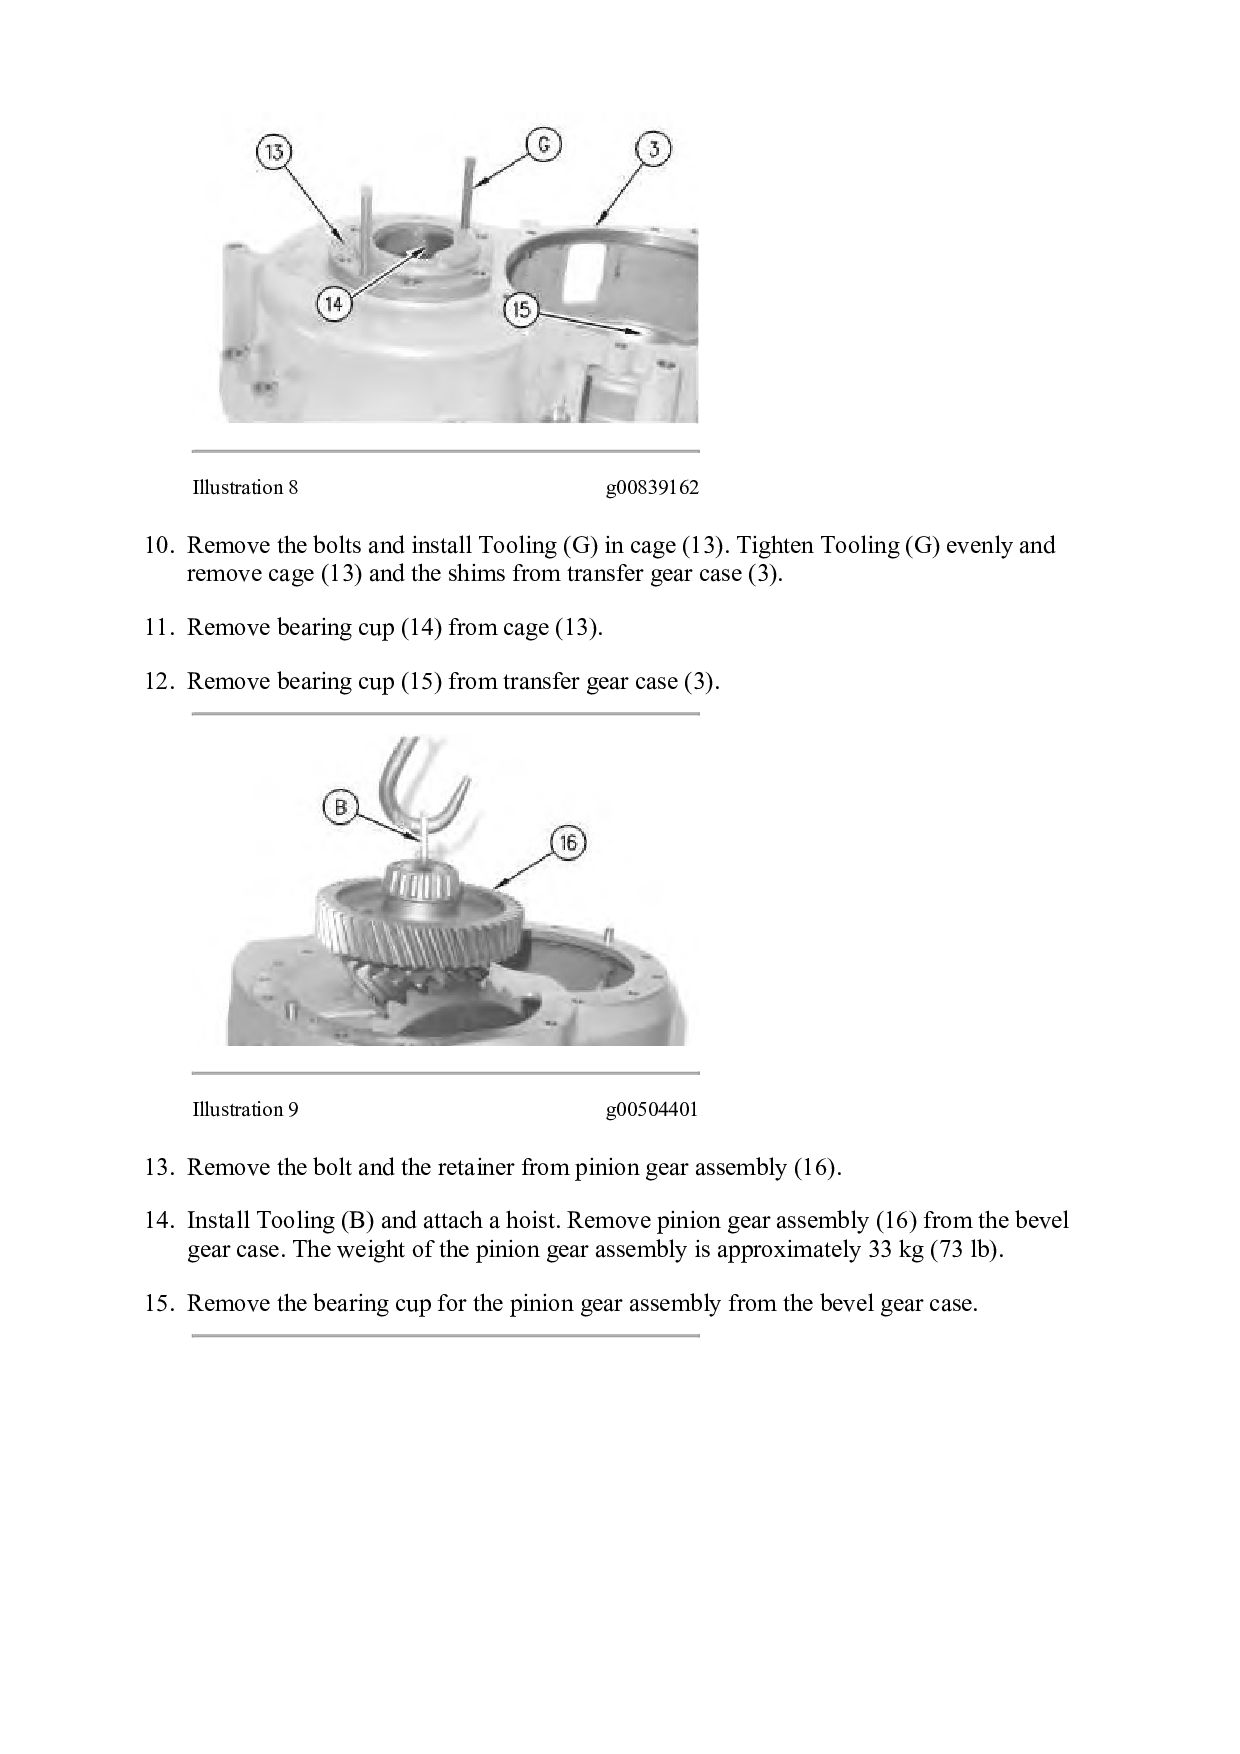
(G) in cage (13). Tighten Tooling (G) evenly and remove cage (13) and the shims from transfer gear case (3). 11. Remove bearing cup (14) from cage (13). 12. Remove bearing cup (15) from transfer gear case (3). Illustration 9 g00504401 13. Remove the bolt and the retainer from pinion gear assembly (16). 14. Install Tooling (B) and attach a hoist. Remove pinion gear assembly (16) from the bevel gear case. The weight of the pinion gear assembly is approximately 33 kg (73 lb). 15. Remove the bearing cup for the pinion gear assembly from the bevel gear case.


 dcrfvfbnmk
 jonoalderson
 chikuwait
 coloredviolet
 sferik
 samlambert
 oripsolob
 hatefulcrawdad
 reverentgeek
 427marketing
 garrettdimon
 tammyeverts
 ivargrimstad