Upgrade to Pro — share decks privately, control downloads, hide ads and more …

TouchDevelop_Cloud_Tutorial_20150401_KevLai

Kev
April 03, 2015

 TouchDevelop_Cloud_Tutorial_20150401_KevLai

TouchDevelop Tutorial by Kevin Lai

Kev

April 03, 2015
Tweet

More Decks by Kev

Other Decks in Education

Transcript

  1. Who am I? ◦ Kevin Lai ◦ Studying Computer Science

    in CUHK (yr.3) ◦ Intern at ASM Pacific ◦ Coding Trainer of Microsoft
  2. Roadmap Basic Database Real deal #3: Plant the data on

    the map Getting Started Cloud Set-up Create a button Get a location Real deal #1: Ask for a message Real deal #2: Upload a picture
  3. Getting Started Steps: ◦ Open TouchDevelop (link) ◦ Login ◦

    Tap “Create Script” ◦ Choose “blank app”
  4. Page ◦ A user interface made of boxes ◦ Imagine

    your app is a book, which is full of pages, and on every page you can place different stuff, like buttons, maps, etc.
  5. Page ◦ A user interface made of boxes ◦ Imagine

    your app is a book, which is full of pages, and on every page you can place different stuff, like buttons, maps, etc.
  6. Cloud Data ◦ TouchDevelop has provided an simple way for

    cloud session management ◦ Simply speaking, saving data in the cloud has become very easy
  7. Cloud Data ◦ Type this line of code ◦ Whenever

    you run a script with cloud data, you can start in the ‘just-me session”, or the “everyone session”
  8. Create a button: Forms ◦ We have a library called

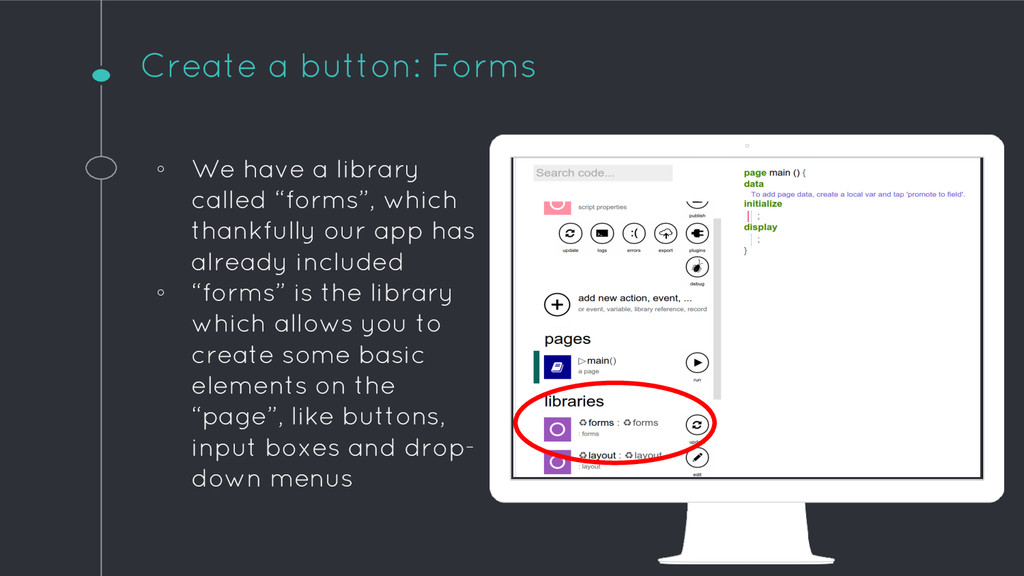
    “forms”, which thankfully our app has already included ◦ “forms” is the library which allows you to create some basic elements on the “page”, like buttons, input boxes and drop- down menus
  9. Create a button ◦ Inside the “”, give the button

    a name ◦ And we just created a button!
  10. Where’d you go? I miss you so. Start where you

    are. Use what you have. Do what you can. 4
  11. Get your location ◦ Inside “on tapped() {}”, declare a

    variable to store a location, which would be your exact location
  12. Get your location: Error Checking ◦ Let’s write some code

    to handle if your exact location can be obtained or not
  13. Database ◦ Click it and you’ll see a screen like

    this ◦ You can tap the “thing” to change the name of your table
  14. Database ◦ But I want you to click on the

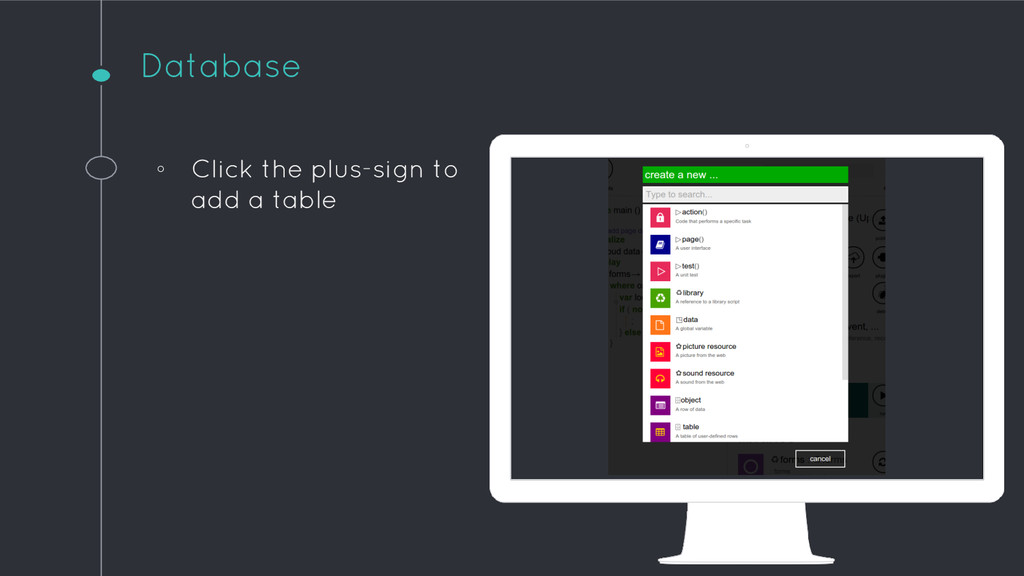
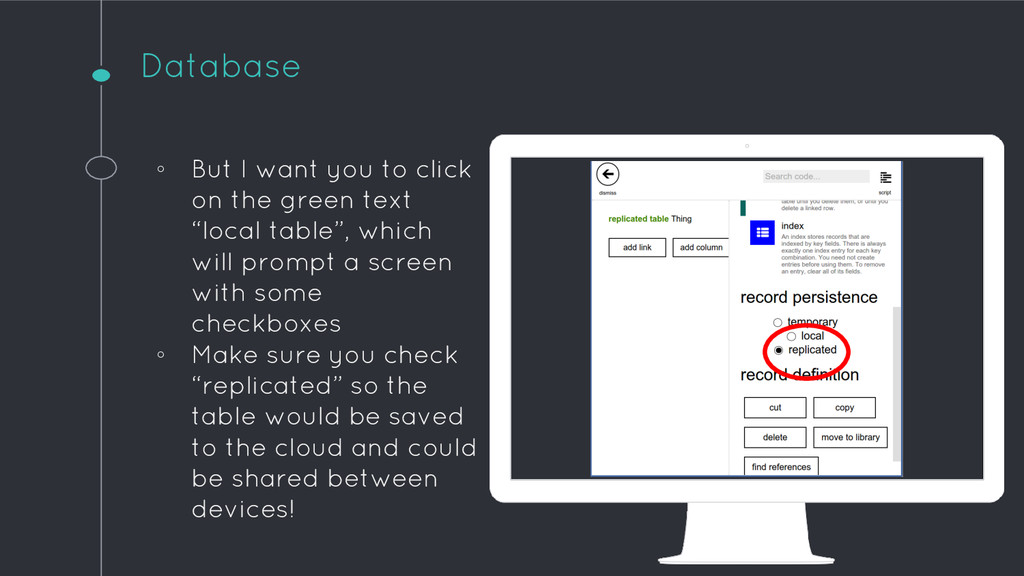
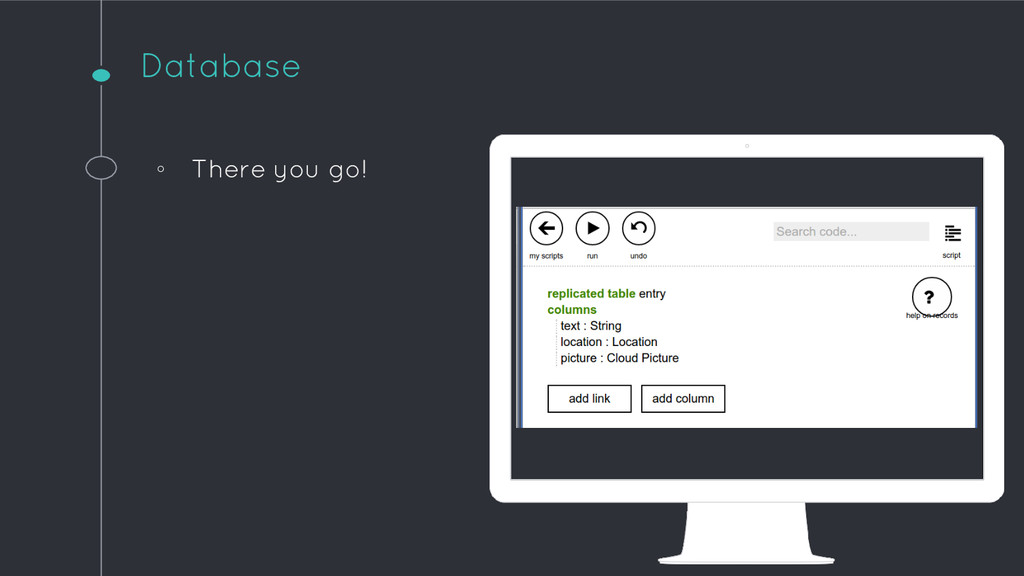
    green text “local table”, which will prompt a screen with some checkboxes ◦ Make sure you check “replicated” so the table would be saved to the cloud and could be shared between devices!
  15. Database ◦ Remember our objective here? We’re creating an app

    which can ◦ upload pictures ◦ upload text messages ◦ and pin these data on an location
  16. Database ◦ Imagine if our database, or record, or table

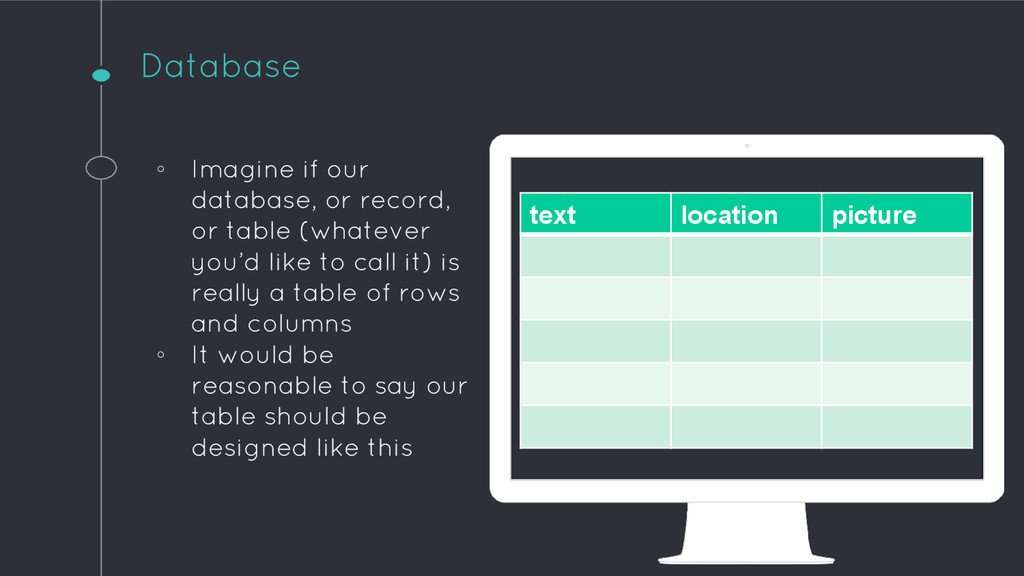
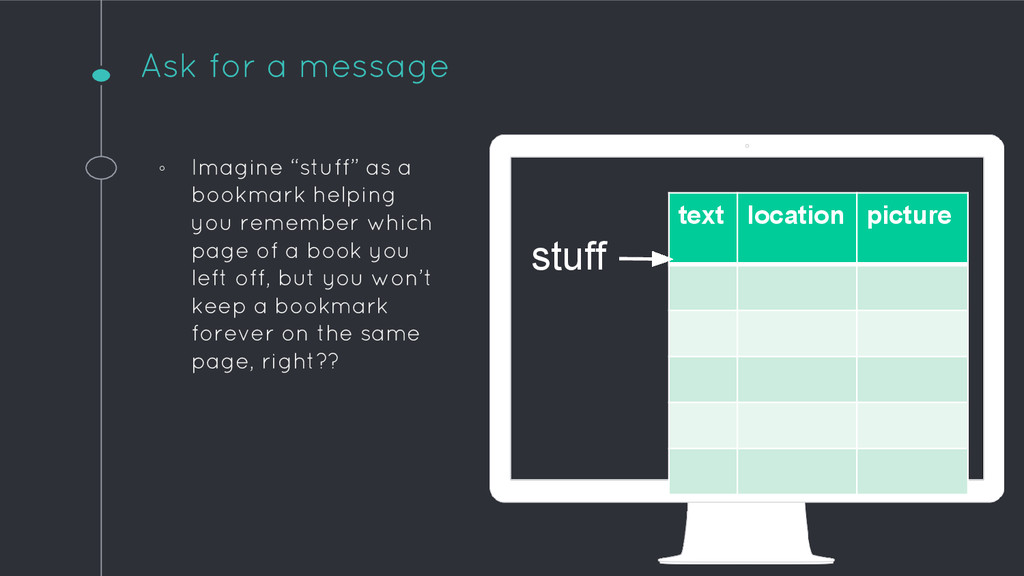
    (whatever you’d like to call it) is really a table of rows and columns ◦ It would be reasonable to say our table should be designed like this text location picture
  17. Real Deal#1: Ask for a message 'Have fun' is my

    message. Be silly. You're allowed to be silly. There's nothing wrong with it. 6
  18. Ask for a message ◦ Now let’s go back to

    page main() and find that “on tapped()” function. ◦ Then start inserting data to the table
  19. Ask for a message ◦ What we basically just did

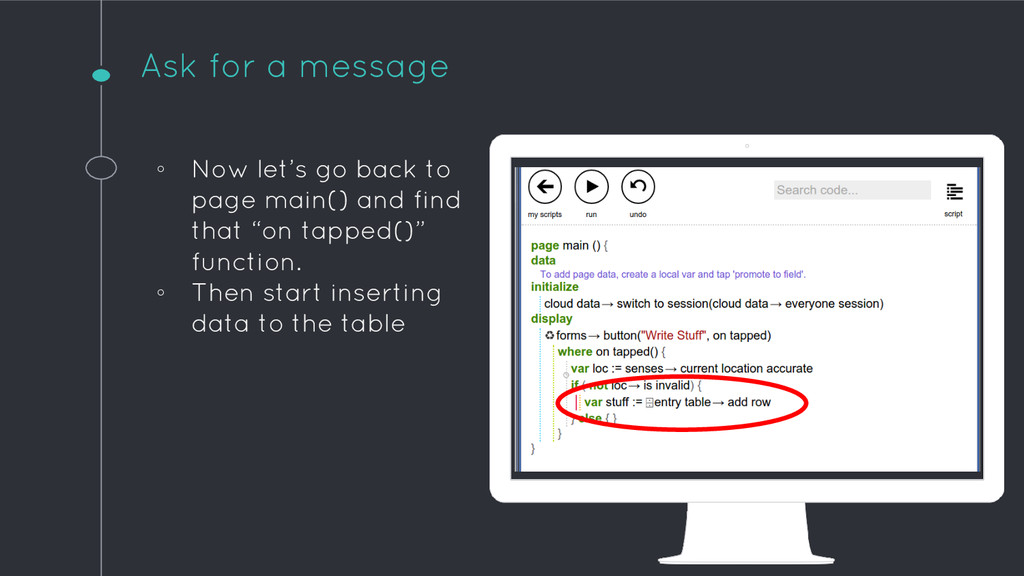
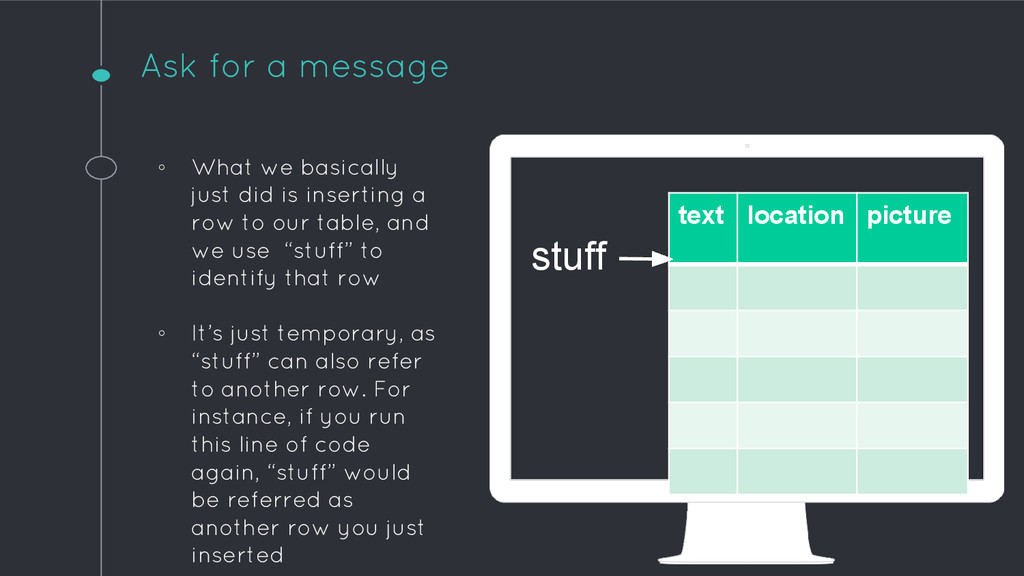
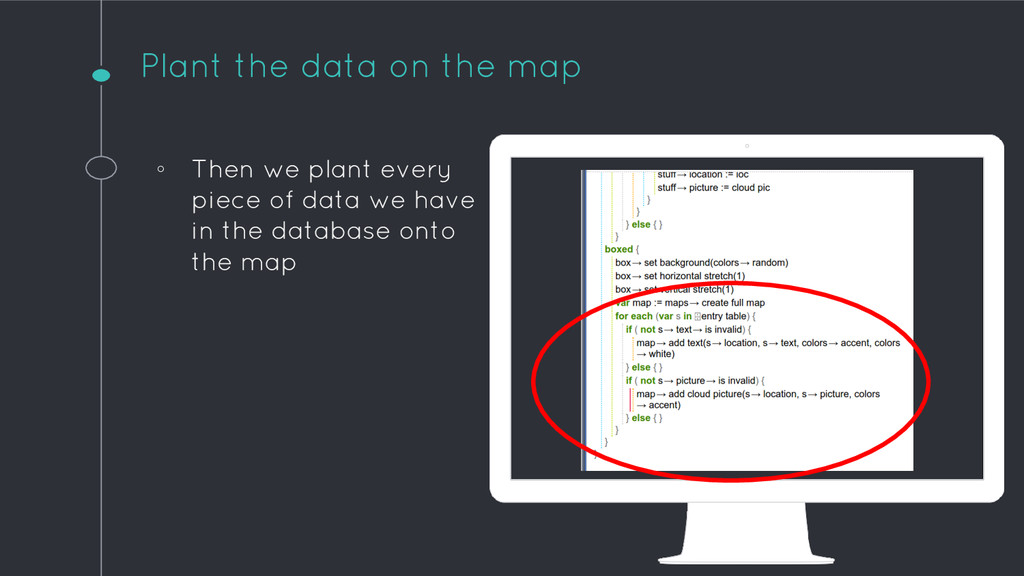
    is inserting a row to our table, and we use “stuff” to identify that row ◦ It’s just temporary, as “stuff” can also refer to another row. For instance, if you run this line of code again, “stuff” would be referred as another row you just inserted text location picture stuff
  20. Ask for a message ◦ Imagine “stuff” as a bookmark

    helping you remember which page of a book you left off, but you won’t keep a bookmark forever on the same page, right?? text location picture stuff
  21. Ask for a message ◦ Now add another 2 lines

    to fill up the row in the table ◦ First, we store the location we just found earlier ◦ Second, we prompt a box out to ask the user to input a message
  22. Ask for a message ◦ Try and click “Run” to

    see what’ll happen ◦ A screen like this should appear ◦ Click the button at the top left hand corner
  23. Ask for a message ◦ For the sake of error

    handling, let’s add a message to tell the user his/her location can’t be found
  24. Upload a picture ◦ Like last part, we create a

    button, and call it “Picture” this time
  25. Upload a picture ◦ Also, this time we would create

    a menu letting the use choose between taking a picture and upload it, or just upload a picture instead
  26. Upload a picture ◦ For the first “”, input your

    question ◦ And for the second, input the instruction
  27. Upload a picture ◦ Find the location, same old same

    old ◦ And yes, the error handling part
  28. Upload a picture ◦ Then we’re gonna handle the 2

    choices ◦ First, for the “Take a photo part
  29. Upload a picture ◦ Then let’s check if a pic

    is taken or not ◦ If yes, we’re gonna upload it ◦ If not, prompt a message to the user
  30. Upload a picture ◦ To seal it, we’re adding some

    error handling for the pic uploading ◦ If the uploading process is successful, we’re adding all the information to our database
  31. Upload a picture ◦ We’re half way there, hang in

    there! ◦ Now we’re finishing the “Upload a picture” part ◦ This part is almost 90% like what we just did
  32. Plant the data on the map ◦ For one, we

    place the map on our app ◦ Create a box
  33. Plant the data on the map ◦ Then set the

    margina of the box, which would contain the map
  34. Plant the data on the map ◦ Then we plant

    every piece of data we have in the database onto the map
  35. Done! (http://tdev.ly/iyvfa) Everything is finished, but here’s a challenge: ◦

    I wrote the code in a teaching- oriented manner ◦ You can shorten my code by at least ⅓ in length ◦ Hint: see those duplicated code?