Upgrade to Pro — share decks privately, control downloads, hide ads and more …

Kintone Technical Training - Plug-in

Kintone Technical Training - Plug-in

Here is the Plug-in study content of Kintone Technical Training.
If you want to access the reference link in it directly, please download this PDF file.
We hope you enjoy Kintone technical training journey!

[ Video ]
https://www.youtube.com/watch?v=9DQD0HO4Fks

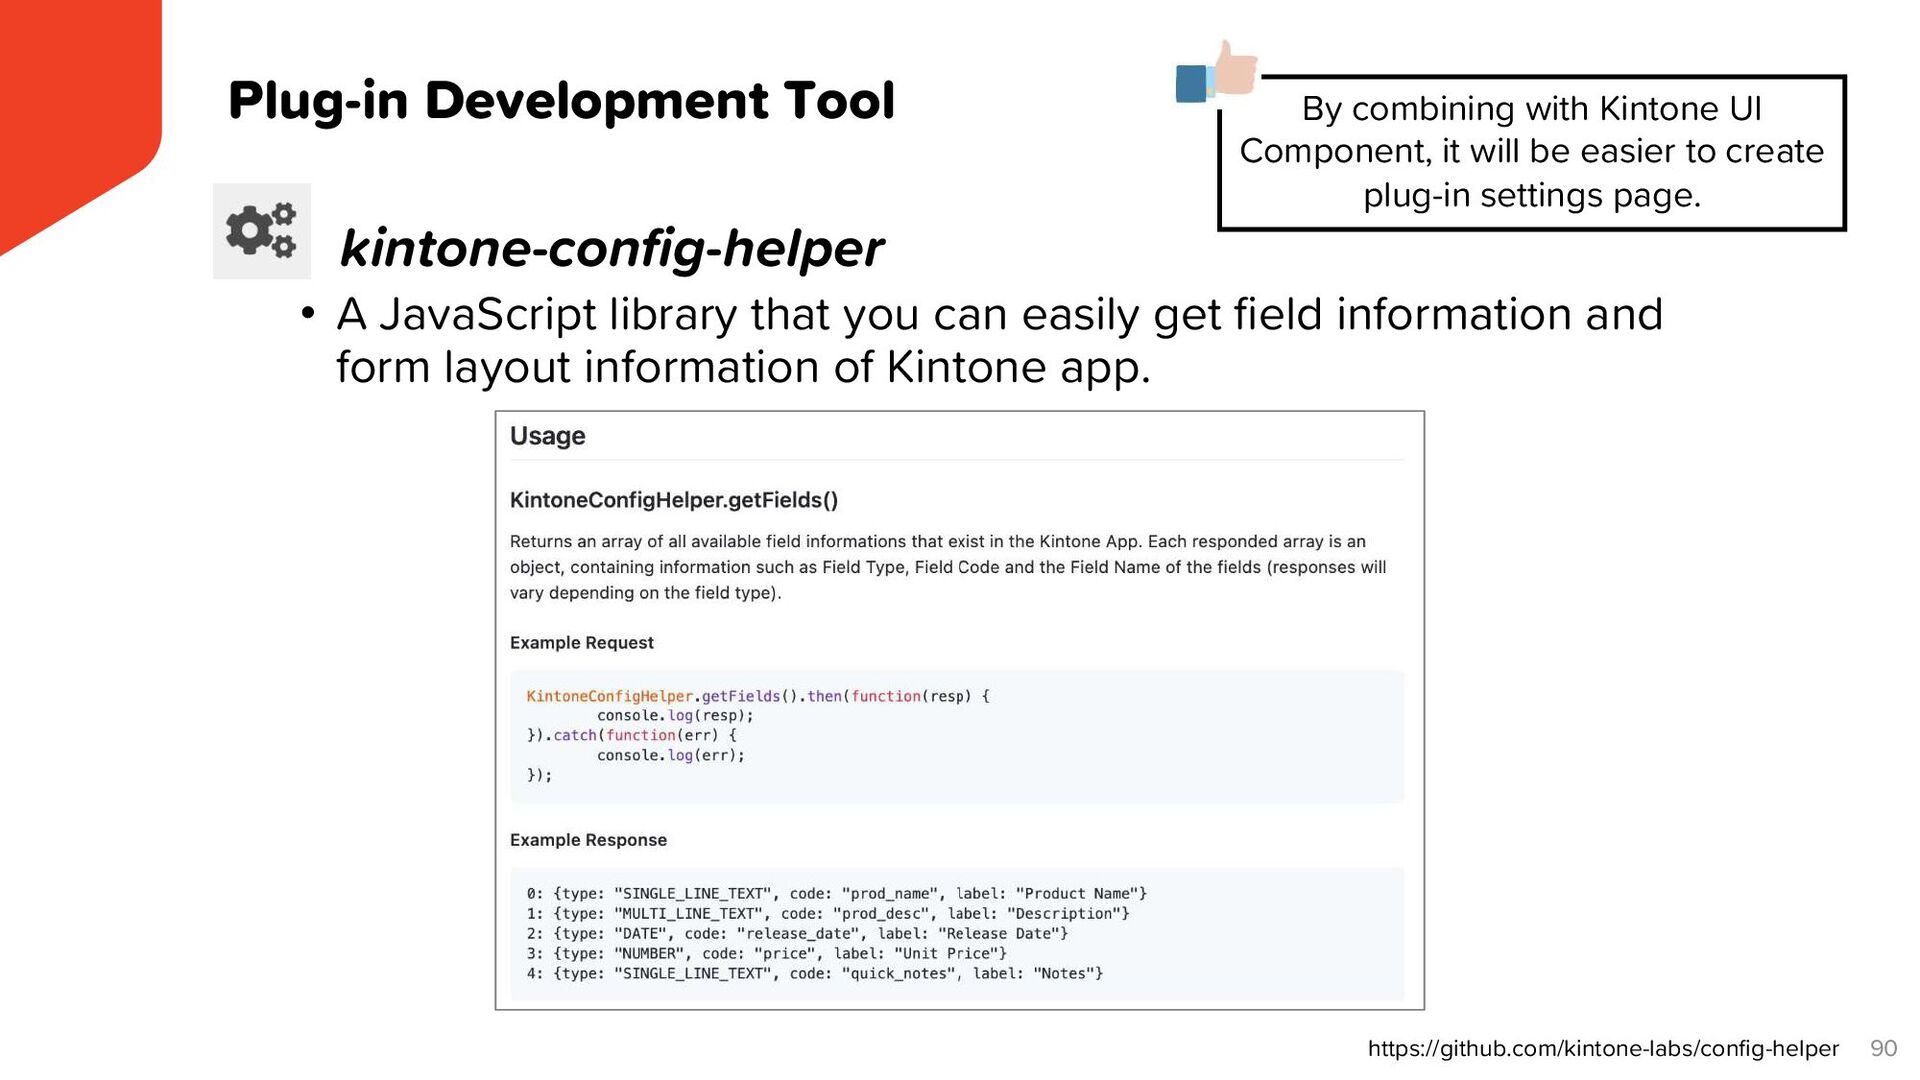
[ Programs & App Template ]
https://github.com/Cybozu-GTA/kintone-technical-training-materials

More Decks by kintone-technical-training

Other Decks in Programming

Transcript

  1. 2 Notice • This material was created using the April

    2021 version of Kintone. • We may change our contents without prior notice.
  2. 3 Prerequisites • You have a Kintone Account with Kintone

    System Administrator's privilege. • You understand the basics of JavaScript. • You have Google Chrome and a code editor installed. • You have cloned our GitHub Repository to local. • You have created apps with App Template (Plug_in/Plug_in_AppTemplate.zip) in our GitHub Repository. • You can also use the apps that you created in Kintone Technical Training – JavaScript API. • You have installed Node.js. For detail, please refer to this slide.
  3. 4 Useful Resources • Kintone Developer Program – API Docs

    • https://kintone.dev/en/docs/ • Kintone Help Site • https://get.kintone.help/k/en/ • Kintone Technical Training • https://speakerdeck.com/cybozugta • Kintone Technical Training YouTube Channel • https://www.youtube.com/playlist?list=PLJOThIyQA7oOINO73ah34ZdHy13Sd6331 • Google Chrome DevTools • https://developers.google.com/web/tools/chrome-devtools • https://developers.google.com/web/tools/chrome-devtools/javascript • MDN Web docs • https://developer.mozilla.org/en-US/
  4. 5 Agenda • What is Kintone Plug-in? • Creating a

    Plug-in Template Using create-plugin • Overview • Step by Step • Hands-on • #1 Prepare Environment for Creating Kintone Plug-in • #2 Let’s Create Kintone Plug-in • Appendix: Useful Plug-in Tools
  5. What is Kintone Plug-in? • A packaged program built with

    multiple JavaScript and CSS files in a pack. • By simply installing the plug-in on Kintone and applying it to your app, you can easily extend the app's functionality and connect it with other services. 7 jquery.min.js ol.js Kintone Customize.js load-image. all.min.js ol.css
  6. Plug-in - Advantages 8 When you use plug-in, you can

    get the following advantages. 1. JavaScript and CSS files can all be applied at once 2. Changes can easily be made in the settings 3. Batch application to multiple apps and bulk upgrading is possible 4. Sensitive information can be concealed 5. Easy to upgrade https://kintone.dev/en/plugins/introduction-to-plug-ins/advantages-of-developing-plug-ins/
  7. • JavaScript and CSS files can all be applied at

    once • Without plug-ins, admins need to edit the JavaScript files. • Plug-ins enable you to configure settings from the setting page instead. Plug-in - Advantage 1 9
  8. • Changes can easily be made in the settings •

    You can change the setting on the plug-in settings page. • It is possible to minimize the effect of app changes such as field additions compared to customizations where you need to modify the programs. 10 Plug-in - Advantage 2 JavaScript file Plug-in
  9. • Batch application to multiple apps and bulk upgrading is

    possible • Once you load the plug-in into your environment, you can easily apply it to multiple apps. 11 Plug-in - Advantage 3 JavaScript Customization Plug-in
  10. • Sensitive information can be concealed • Sensitive information such

    as the API key necessary for running an external API can be stored in the Kintone server by using “kintone.plugin.app.setProxyConfig”. • Using the function “kintone.plugin.app.proxy()”, blocks app users from referencing information stored in the plug-in. (cannot check the info by viewing the source) 12 Plug-in - Advantage 4 1. Display the screen 2. Send Request (Including API Key) 3. Receive Response 4. Reflected on screen Cannot check the API Key Kintone Other Web Services https://kintone.dev/en/docs/kintone/js-api/plugin/plug-in-javascript-api/
  11. • Easy to upgrade • You will get a secret

    key while packaging the plug-in. • If you register the plug-in again with the secret key, it will be overwritten and immediately applied to the corresponding apps. 13 Plug-in - Advantage 5 App A App B Ver.1 Ver.1 Apply Ver.2 for Kintone App A App B Ver.2 Ver.2
  12. • Plug-in development tool designed to make the development of

    Kintone plug-ins easier. • CLI tool that allows users to create templates of Kintone plug-ins through interactive dialogue in the command prompt or terminal. 15 What is create-plugin? https://kintone.dev/en/plugins/plug-in-tool-guides/create-plug-in-templates-using-create-plugin/ $ create-kintone-plugin sample-plugin Please answer some questions to create your Kintone plug-in project :) Let's start! ? Input your plug-in name in English [1-64chars] Sample Plug-in ? Input your plug-in description in English [1-200] Sample Plug-in ? Does your plug-in support Japanese ? No ? Does your plug-in support Chinese ? No ? Input your homepage url for English (Optional) ? Does your plug-in support mobile views ? No ? Would you like to use @kintone/plugin-uploader ? Yes * The “create-plugin” described in this document refers to “@kintone/create-plugin”.
  13. 16 Optional Features - ESLint create-plugin also has other useful

    functions besides creating a plug-in template. 1. Source code check using ESLint • ESLint is a tool to check JavaScript syntax. • @cybozu/eslint-config is an ESLint rule set for Kintone development. # Change your working current directory to created one $ cd sample-plugin # Execute the validation check $ npm run lint Using ESLint has the following advantages: • Maintains the quality of code for Kintone development. • ESLint is originally a command line tool. In addition, it can be installed on supported editors as an extension. This makes it possible to check code in real time. • When using ESLint in the command line, the autofix function can be used. https://kintone.dev/en/plugins/plug-in-tool-guides/create-plug-in-templates-using-create-plugin/#optional-features
  14. create-plugin also has other useful functions besides creating a plug-in

    template. 2. Automatic packaging and uploading • Running “npm start” command directly to the plug-in will create a zip file of the plug-in. • If Use @kintone/plugin-uploader is chosen when running create-plugin, plugin-uploader will run. plugin-uploader automatically upload plug-in zip file to Kintone. 17 Optional Features - Automatic packaging and uploading # Execute automatic processing $ npm start : Succeeded: dist/plugin.zip # Enter Kintone subdomain information interactively ? Input your Kintone subdomain (example.cybozu.com): <subdomain>.kintone.com ? Input your username: <login name> ? Input your password: [hidden]<password> Open https://<subdomain>.kintone.com/login?saml=off Trying to log in... Navigate to https://<>subdomain.kintone.com/k/admin/system/plugin/ Trying to upload dist/plugin.zip dist/plugin.zip has been uploaded! * The details will be covered in the Hands-on. https://kintone.dev/en/plugins/plug-in-tool-guides/create-plug-in-templates-using-create-plugin/#optional-features
  15. • Plug-in development using create-plugin generally follows the following flow.

    18 2. Create plug-in template using create-plugin 3. Modify HTML/CSS/JavaScript for plug-in settings page 4. Modify JavaScript customization 6. Packaging & uploading 5. Modify configuration files (Icon file, manifest.json) 1. Prepare environment for using create-plugin Validation Basic Procedure to Develop Kintone Plug-in using create-plugin If you need to modify the customization, return to step.3.
  16. 1-1. Install Node.js (it was already done in Prerequisite) •

    Node.js is required since create-plugin is published on npm and is available for Windows, macOS, and Linux. • Please refer to the “engines” property in the package.json in the repository for the version of Node.js required to use this tool. • Example: In the following example, Node.js version 10 or higher is required. 1-2. Install create-plugin • Please refer to this article for the specific installation procedure. 20 1. Prepare environment for using create-plugin "engines": { "node": ">=10" }, https://kintone.dev/en/plugins/plug-in-tool-guides/create-plug-in-templates-using-create-plugin/#installation
  17. $ create-kintone-plugin sample-plugin Please answer some questions to create your

    Kintone plug-in project :) Let's start! ? Input your plug-in name in English [1-64chars] Sample Plug-in ? Input your plug-in description in English [1-200] Sample Plug-in ? Does your plug-in support Japanese ? No ? Does your plug-in support Chinese ? No ? Input your homepage url for English (Optional) ? Does your plug-in support mobile views ? No ? Would you like to use @kintone/plugin-uploader ? Yes • Create plug-in template • You can configure your Kintone plug-in development settings interactively as below. 21 2. Create plug-in template using create-plugin If use @kintone/plugin- uploader is chosen when running create-plugin, plugin-uploader will run. plugin-uploader automatically upload plug-in zip file to Kintone. https://kintone.dev/en/plugins/plug-in-tool-guides/create-plug-in-templates-using-create-plugin/#basic-usage
  18. sample-plugin ├ node_modules/../.. ├ package-lock.json ├ package.json ├ private.ppk ├

    .eslintrc.js ├ scripts │ └ npm-start.js └ src ├ css │ ├ 51-modern-default.css │ ├ config.css │ └ desktop.css ├ html │ └ config.html ├ image │ └ icon.png ├ js │ ├ config.js │ └ desktop.js └ manifest.json - Stylesheet for plug-in settings - Stylesheet for desktop/mobile view - HTML for plug-in settings - Plug-in icon - JavaScript initiated on plug-in settings - App customization for desktop/mobile - Configuration file for packaging 22 2. Create plug-in template using create-plugin • Plug-in template files and directories created by create-plugin are included in the “src” directory. https://kintone.dev/en/plugins/plug-in-tool-guides/create-plug-in-templates-using-create-plugin/#basic-usage
  19. 23 3. Modify HTML/CSS/JavaScript for plug-in settings page 3-1. Modify

    HTML/CSS for plug-in settings page 3-2. Modify JavaScript for plug-in settings page sample-plugin ├ node_modules/../.. ├ package-lock.json ├ package.json ├ private.ppk ├ .eslintrc.js ├ scripts │ └ npm-start.js └ src ├ css │ ├ 51-modern-default.css │ ├ config.css │ └ desktop.css ├ html │ └ config.html ├ image │ └ icon.png ├ js │ ├ config.js │ └ desktop.js └ manifest.json - Stylesheet for plug-in settings - Stylesheet for desktop/mobile view - HTML for plug-in settings - Plug-in icon - JavaScript initiated on plug-in settings - App customization for desktop/mobile - Configuration file for packaging
  20. 3. Modify HTML/CSS/JavaScript for plug-in settings page 24 Message: Save

    Cancel • We may need a text box to enter the message to be displayed. • We also need an explanation for the input box. Settings for Sample_plug-in 3-1. Modify HTML/CSS for plug-in settings page Think about what kind of plug-in settings page is required. This message is displayed on the app page after the app has been updated.
  21. 25 3. Modify HTML/CSS/JavaScript for plug-in settings page - HTML

    It would be nice to apply the Kintone-like design... 3-1. Modify HTML/CSS for plug-in settings page Create HTML/CSS according to the settings page you want to create. Only HTML
  22. 26 https://kintone.dev/en/plugins/introduction-to-plug-ins/plug-in-stylesheet-guide/ 3. Modify HTML/CSS/JavaScript for plug-in settings page -

    CSS The plug-in stylesheet (51-modern-default.css) is used to apply the Kintone-like style to the plug-in settings page. Assign this class name to the tag and then load the CSS file.
  23. 27 HTML + CSS 3. Modify HTML/CSS/JavaScript for plug-in settings

    page - CSS I could make a settings page designed like Kintone! The plug-in stylesheet (51-modern-default.css) has been applied and the setting screen looks like Kintone.
  24. 28 3. Modify HTML/CSS/JavaScript for plug-in settings page 3-1. Modify

    HTML/CSS for plug-in settings page 3-2. Modify JavaScript for plug-in settings page sample-plugin ├ node_modules/../.. ├ package-lock.json ├ package.json ├ private.ppk ├ .eslintrc.js ├ scripts │ └ npm-start.js └ src ├ css │ ├ 51-modern-default.css │ ├ config.css │ └ desktop.css ├ html │ └ config.html ├ image │ └ icon.png ├ js │ ├ config.js │ └ desktop.js └ manifest.json - Stylesheet for plug-in settings - Stylesheet for desktop/mobile view - HTML for plug-in settings - Plug-in icon - JavaScript initiated on plug-in settings - App customization for desktop/mobile - Configuration file for packaging
  25. 29 Event : Timing to execution - When the “Save”

    button is pressed. Input : Data required for processing - Acquire the data selected in each fields. Processing : Processing required for output - Format the data so that Kintone can receive it. Output : Output - Save the information to the Kintone environment. 3. Modify HTML/CSS/JavaScript for plug-in settings page - JavaScript 3-2. Modify JavaScript for plug-in settings page Think about what happens when the save button is pressed.
  26. 30 API that can be used to set information to

    the plug-in Settings page kintone.plugin.app.setConfig(config,callback) API that can be used to retrieve information from the plug-in Settings page kintone.plugin.app.getConfig(pluginId) Argument Type Required Description config Object Required Specify the settings to be stored in the plug-in in the form of a key-value paired object. Values are specified as strings. E.g. : { "key1": "value1", "key2": "value2" } callback Function Specify the function to be executed after the settings are saved. callback If the function is omitted, the plug-in list screen will be displayed after the settings are saved. Argument Type Required Description pluginId Text Required Specify the ID of the plug-in to retrieve configuration information config config getConfig() setConfig() How to save the settings in Kintone Kintone https://kintone.dev/en/docs/kintone/js-api/plugin/plug-in-javascript-api/ 3. Modify HTML/CSS/JavaScript for plug-in settings page - JavaScript
  27. 31 3. Modify HTML/CSS/JavaScript for plug-in settings page - JavaScript

    3-2. Modify JavaScript for plug-in settings page • Specify elements and obtain the input so it can be passed to Kintone customization. ØBasic form • Using IIFE(Immediately Invoked Function Expression) is recommended. ((PLUGIN_ID) => { 'use strict'; })(kintone.$PLUGIN_ID); • The reason it is different from the regular Kintone JavaScript is “to pass the input value entered in the setting screen to Kintone JavaScript”. A dedicated ID uniquely assigned to the plug-in is stored in PLUGIN_ID. IIFE (Immediately Invoked Function Expression) https://developer.mozilla.org/en-US/docs/Glossary/IIFE
  28. 32 3. Modify HTML/CSS/JavaScript for plug-in settings page - JavaScript

    Check the settings for actions that are often forgotten. If the settings are already saved in the plug-in when you open the settings page, set the values as the initial values. Do not let the user save if there are blank fields when saving. When the Cancel button is pressed, do nothing and go back to the plug-in settings page.
  29. Note: Actions required when there are fields where users can

    enter text. • The user can include any text, which makes the plug-in highly vulnerable. During actual development, be sure to code according to the secure coding guidelines of the Kintone developer program. • In addition, it is necessary to check the operation in multiple browsers and to check whether the input values are appropriate. 33 3. Modify HTML/CSS/JavaScript for plug-in settings page - JavaScript https://kintone.dev/en/legal/secure-coding-guidelines/
  30. 34 4. Modify JavaScript customization 4-1. Modify JavaScript Customization sample-plugin

    ├ node_modules/../.. ├ package-lock.json ├ package.json ├ private.ppk ├ .eslintrc.js ├ scripts │ └ npm-start.js └ src ├ css │ ├ 51-modern-default.css │ ├ config.css │ └ desktop.css ├ html │ └ config.html ├ image │ └ icon.png ├ js │ ├ config.js │ └ desktop.js └ manifest.json - Stylesheet for plug-in settings - Stylesheet for desktop/mobile view - HTML for plug-in settings - Plug-in icon - JavaScript initiated on plug-in settings - App customization for desktop/mobile - Configuration file for packaging
  31. 35 4. Modify JavaScript customization Slightly modify the code to

    use the info obtained from the configuration file. (1) Inherit the PLUGIN_ID and associate it with the configuration file. (2) Obtain the information entered in the configuration file. (3) Change the variable to the content obtained from the configuration file. (function($, PLUGIN_ID) { 'use strict’; : })(jQuery, kintone.$PLUGIN_ID); var config = kintone.plugin.app.getConfig(PLUGIN_ID); messageEl.textContent = config.message;
  32. 36 5. Modify configuration files • Modify the sample file

    created by create-plugin. 5-1. Icon file 5-2. manifest.json sample-plugin ├ node_modules/../.. ├ package-lock.json ├ package.json ├ private.ppk ├ .eslintrc.js ├ scripts │ └ npm-start.js └ src ├ css │ ├ 51-modern-default.css │ ├ config.css │ └ desktop.css ├ html │ └ config.html ├ image │ └ icon.png ├ js │ ├ config.js │ └ desktop.js └ manifest.json - Stylesheet for plug-in settings - Stylesheet for desktop/mobile view - HTML for plug-in settings - Plug-in icon - JavaScript initiated on plug-in settings - App customization for desktop/mobile - Configuration file for packaging
  33. 37 5. Modify configuration files – Icon file https://kintone.dev/en/plugins/introduction-to-plug-ins/steps-for-plug-in-development/ 5-1.

    Icon file displayed on each plug-in settings page ・ This is a required file. ・ The file type you can use is either png, jpg, gif or bmp. ・ The maximum file size is 20MB. Icon (example) [Kintone Administration] – [Plug-ins] App - [App Settings] – [Plug-ins]
  34. 38 5. Modify configuration files – manifest file Parameter name

    Type Required Description manifest_version Number ◦ Manifest version of the plug-in version Number ◦ Plug-in version type String ◦ Plug-in type. Specify the string “APP” name Object.<String> ◦ Plug-in name for each language that use the locale (ja, en, zh) as the key name.<locale> String ◦ Name of the plug-in for the specified locale description Object.<String> Description of the language that use the locale as the key description.<locale> String ◦ Description of the specified locale icon String ◦ Icon file desktop Object.<String> Customization file for PC that has the file type (JavaScript, css) as the key desktop.js Array.<String> An array of JavaScript file URLs for PC desktop.css Array.<String> An array of CSS file URLs for PC mobile Object.<String> Customization file for smartphone that has the file type (JavaScript) as the key mobile.js Array.<String> An array of JavaScript file URLs for smartphone config Object.<String> Individual setting file with file type (html, JavaScript, css) as key and the setting information config.html String HTML file for the settings page config.js Array.<String> An array of JavaScript file URLs for the settings page config.css Array.<String> An array of CSS file URLs for the settings page config.required_params Array.<String> An array of parameters that are required to be filled in in the settings page 5-2. Modify manifest file The manifest file format is as below. Specify each parameter in a JSON format. https://kintone.dev/en/plugins/introduction-to-plug-ins/steps-for-plug-in-development/#the-manifest-file
  35. { "manifest_version": 1, "version": 1, "type": "APP", "desktop": { "js":

    [ "https://js.cybozu.com/jquery/3.3.1/jquery.min.js", "js/desktop.js" ], "css": [ "css/51-modern-default.css", "css/desktop.css" ] }, "icon": "image/icon.png", "config": { "html": "html/config.html", "js": [ "https://js.cybozu.com/jquery/3.3.1/jquery.min.js", "js/config.js" ], "css": [ "css/51-modern-default.css", "css/config.css" ], "required_params": [ "message" ] }, "name": { "en": "Sample_Plugin" }, "description": { "en": "Sample_Plugin" } } 5-2. Modify manifest file - Specify each parameter in a JSON format to configure plug-in basic information, file name and so on. 5. Modify configuration files – manifest file 39 Icon file JavaScript/CSS files for the desktop customization HTML/CSS/JavaScript files for the plug-in settings page Required parameters for the plug-in setting Plug-in basic information
  36. • If you are using create-plugin, packaging and uploading will

    be done automatically by running “npm start” command. • If you want to package the plug-in and upload it to the Kintone environment separately, you can use the following commands. For details, please refer to this article. 1. “npm run build” 2. “npm run upload” 40 6. Packaging & uploading – npm start $ npm start … Succeeded: dist/plugin.zip # Enter Kintone subdomain information interactively ? Input your Kintone subdomain (example.cybozu.com): <subdomain>.kintone.com ? Input your username: <login name> ? Input your password: [hidden]<password> https://kintone.dev/en/plugins/plug-in-tool-guides/create-plug-in-templates-using-create-plugin/ The “npm start” command has a script change detection feature (--watch option), so you need to “Ctrl + c” to terminate the process.
  37. • “private.ppk” file is generated automatically when plug-in zip file

    is created in the same directory of PLUGIN_DIR. • It is used to identify the same plug-in when updating a plug-in. • When you use “kintone-plugin-packer” to manually update the plug- in without “create-plugin”, you need to specify the .ppk file as follows. 41 6. Packaging & uploading – private.ppk https://github.com/kintone/js-sdk/tree/master/packages/plugin-packer sample-plugin ├ node_modules/../.. ├ package-lock.json ├ package.json ├ private.ppk ├ .eslintrc.js ├ scripts │ └ npm-start.js └ src $ kintone-plugin-packer --ppk private.ppk src
  38. 42 Checklist for Validation The following is a checklist of

    general validation points. [ Installation ] p1. Can it be loaded into the Kintone environment and applied to the Kintone App? [ Plug-in settings page ] p2. Does the Cancel button work? p3. Does the Save button work? p4. Does it work as intended? [ App customization ] p5. Does it work as intended in the loaded application?
  39. 44 Hands-on #1 Goals https://kintone.dev/en/plugins/plug-in-tool-guides/create-plug-in-templates-using-create-plugin/ 1. Prepare your environment to

    use the create-plugin command. 2. Learn how to use the create-plugin command. 3. Apply the sample plugin created by create-plugin to your app.
  40. 45 Basic Procedure to Develop Kintone Plug-in using create-plugin #1

    2. Create plug-in template using create-plugin 3. Modify HTML/CSS/JavaScript for plug-in settings page 4. Modify JavaScript customization 6. Packaging & uploading 5. Modify configuration files (Icon file, manifest.json) 1. Prepare environment for using create-plugin Validation
  41. 1-1. Install Node.js (it was already done in Prerequisite) •

    Node.js is required since create-plugin is published on npm and is available for Windows, macOS, and Linux. • Please refer to the “engines” property in the package.json in the repository for the version of Node.js required to use this tool. • Example: In the following example, Node.js version 10 or higher is required. 1-2. Install create-plugin • An example of global installation of create-plugin using npm: 46 1. Prepare environment for using create-plugin "engines": { "node": ">=10" }, $ npm install –g @kintone/create-plugin
  42. 47 Basic Procedure to Develop Kintone Plug-in using create-plugin #2

    2. Create plug-in template using create-plugin 3. Modify HTML/CSS/JavaScript for plug-in settings page 4. Modify JavaScript customization 6. Packaging & uploading 5. Modify configuration files (Icon file, manifest.json) 1. Prepare environment for using create-plugin Validation
  43. $ create-kintone-plugin sample-plugin Please answer some questions to create your

    Kintone plug-in project :) Let's start! ? Input your plug-in name in English [1-64chars] Sample Plug-in ? Input your plug-in description in English [1-200] Sample Plug-in ? Does your plug-in support Japanese ? No ? Does your plug-in support Chinese ? No ? Input your homepage url for English (Optional) ? Does your plug-in support mobile views ? No ? Would you like to use @kintone/plugin-uploader ? Yes 48 2. Create plug-in template using create-plugin • Create plug-in template • Entering the following command will create a directory named “sample-plugin”. https://kintone.dev/en/plugins/plug-in-tool-guides/create-plug-in-templates-using-create-plugin/#basic-usage
  44. 49 2. Create plug-in template using create-plugin • A directory

    named “sample-plugin” will be created. • Plug-in template files and directories are included in the “src” directory of this directory. * “package-lock.json” is a file that is generated when installed with npm5 or later. $ tree sample-plugin sample-plugin ├ node_modules/../.. ├ package-lock.json ├ package.json ├ private.ppk ├ .eslintrc.js ├ scripts │ └ npm-start.js └ src ├ css │ ├ 51-modern-default.css │ ├ config.css │ └ desktop.css ├ html │ └ config.html ├ image │ └ icon.png ├ js │ ├ config.js │ └ desktop.js └ manifest.json GitHub Code Plug-in/Hands-on #1/sample-plugin/ https://kintone.dev/en/plugins/plug-in-tool-guides/create-plug-in-templates-using-create-plugin/#basic-usage
  45. 50 Let’s use optional features https://kintone.dev/en/plugins/plug-in-tool-guides/create-plug-in-templates-using-create-plugin/ create-plugin also has other

    useful functions besides creating a plug-in template. 1. Source code check using ESLint 2. Automatic packaging and uploading
  46. 1. Source code check using ESLint • JavaScript source code

    can be checked using ESLint. *No messages will be displayed if the file does not have any errors. 51 Let’s use optional features - ESLint # Change your working current directory to created one $ cd sample-plugin # Execute the validation check $ npm run lint https://kintone.dev/en/plugins/plug-in-tool-guides/create-plug-in-templates-using-create-plugin/#optional-features
  47. 52 Let’s use optional features – Automatic packaging and uploading

    2. Automatic packaging and uploading • Running the following command directly to the plug-in will create a zip file of the plug-in. • If “Use @kintone/plugin-uploader” option is chosen when running create-plugin, plugin-uploader will run. *Plugin-uploader must be run by a user with admin rights for Kintone. • After running the command, the monitoring mode will be activated. Modifying the source code while in monitoring mode will automatically package the plug-in and upload the changes to the related Kintone subdomain. # Execute automatic processing $ npm start Succeeded: dist/plugin.zip # Enter Kintone subdomain information interactively ? Input your Kintone subdomain (example.cybozu.com): <subdomain>.kintone.com ? Input your username: <login name> ? Input your password: [hidden]<password> Open https://<subdomain>.kintone.com/login?saml=off Trying to log in... Navigate to https://<>subdomain.kintone.com/k/admin/system/plugin/ Trying to upload dist/plugin.zip dist/plugin.zip has been uploaded! https://kintone.dev/en/plugins/plug-in-tool-guides/create-plug-in-templates-using-create-plugin/#optional-features
  48. 53 Let’s check if “sample-plugin” is uploaded to your Kintone

    environment. [Kintone Administration] – [Plug-ins] Validation - uploading https://get.kintone.help/k/en/admin/system_customization/add_plugin/plugin.html
  49. 54 Let’s apply “sample-plugin” to “Sales Deals” App. “Sales Deals”

    App - [App Settings] – [Plug-ins] https://get.kintone.help/k/en/user/app_settings/plugin.html Validation - Applying 1. Click “Add plug-in” button. 2. Select “Sample Plug-in” and click “Add” button. 3. Check “Sample Plug-in” is applied.
  50. 55 Let’s check behavior of “sample-plugin”. [sample-plugin] – [Change Settings]

    App – Record list page Message set in “Settings for sample-plugin” is displayed. Validation - Checking
  51. 57 Hands-on #2 Goals 1. Learn the steps to develop

    a plugin using create-plugin In this hands-on session, we will cover the already developed “user-selection-conditional-format-plug-in” as a sample and explain the source code of the plug-in configuration screen, etc.
  52. Plug-in we will create in this training - requirements 58

    • Kintone plug-in for changing the background color if the user selected in the user selection field matches the logged-in user. In the case that the “login-user” and the selected “user” match, the background color has been changed. Record list page in App Record detail page in App In the case that the “login-user” and the selected “user” match, the background color has been changed. In the case that the “logged-in user” and the selected “user” match, the background color will be changed in index/detail view.
  53. 59 Record list page in App Plug-in Settings Page One

    of “User selection field” can be selected from the dropdown. Background color can be selected from color palette. • Background color can be selected from color palette. Plug-in we will create in this training - Settings Page Record detail page in App Background color in record list/detail page is changed.
  54. 60 Plug-in we will create in this training - Preparation

    1. Clone our GitHub Repository to local. (it was already done in prerequisite) 2. Change your working folder and install packages. kintone-technical-training-materials/ Plug-in/Hands-on #2 user-selection-conditional-format-plug-in ├ node_modules/../.. ├ package-lock.json ├ package.json ├ private.ppk ├ .eslintrc.js ├ dist │ └ plugin.zip ├ scripts │ └ npm-start.js └ src ├ css │ ├ 51-modern-default.css │ ├ config.css ├ html │ └ config.html ├ image │ └ icon.png ├ js │ ├ config.js │ └ desktop.js └ manifest.json # Change your working current directory to created one $ cd "kintone-technical-training-materials/Plug- in/Hands-on #2/ user-selection-conditional-format-plug-in" # Install packages $ npm install In this hands-on session, let's go through the files that make up the plug-in one by one.
  55. 61 Basic Procedure to Develop Kintone Plug-in using create-plugin #3

    2. Create plug-in template using create-plugin 3. Modify HTML/CSS/JavaScript for plug-in settings page 4. Modify JavaScript customization 6. Packaging & uploading 5. Modify configuration files (Icon file, manifest.json) 1. Prepare environment for using create-plugin Validation
  56. 3. Modify HTML/CSS/JavaScript for plug-in settings page - HTML 62

    <div> <h2 class="settings-heading">Settings for User Selection Conditional Format Plug-in</h2> <div class="block"> <div class="kintoneplugin-title">User Selection Field<span class="kintoneplugin-require">*</span></div> <div class="kintoneplugin-desc">Please specify the user selection field which you want to add background color.</div> <div class="kintoneplugin-select-outer"> <div class="kintoneplugin-select"> <select id="field-selection"> <option value="null">-----</option> </select> </div> </div> </div> <div class="block"> <div class="kintoneplugin-title">Background Color<span class="kintoneplugin-require">*</span></div> <div class="kintoneplugin-desc">Please click and specify the color for the user selection field's background.</div> <div class="kintoneplugin-input-outer"> <input id="bg-color" type="color"> </div> </div> <div class="block"> <button id="save" class="kintoneplugin-button-dialog-ok">Save</button> <button id="cancel" class="kintoneplugin-button-dialog-cancel">Cancel</button> </div> </div> GitHub Code Plug-in/Hands-on #2/user-selection~/src/html/config.html Use the “51-modern-default.css” classes
  57. 3. Modify HTML/CSS/JavaScript for plug-in settings page - CSS 63

    .settings-heading { padding: 1em 0; } .block { padding: 0 0 20px 0; } .kintoneplugin-title { padding: 0 10px; border-left: 10px solid #3498db; } GitHub Code In addition to the “51-modern-default.css”, write the custom CSS Plug-in/Hands-on #2/ user-selection~/ src/css/config.css
  58. 3. Modify HTML/CSS/JavaScript for plug-in settings page - JavaScript 64

    ((PLUGIN_ID) => { 'use strict’; const client = new KintoneRestAPIClient({}); // Get the elements const fieldSelection = document.getElementById('field-selection’); const bgColor = document.getElementById('bg-color’); const saveButton = document.getElementById('save’); const cancelButton = document.getElementById('cancel'); // Escape HTML const escapeHtml = (htmlStr) => { return htmlStr .replace(/&/g, '&amp;’) .replace(/</g, '&lt;’) .replace(/>/g, '&gt;’) .replace(/"/g, '&quot;’) .replace(/'/g, '&#39;’); }; ... })(kintone.$PLUGIN_ID); GitHub Code Plug-in/Hands-on #2/user-selection~/src/js/config.js Get the elements from HTML Get the unique plug-in ID with the variable named PLUGIN_ID Escape HTML for the user input value Use the @kintone/rest-api-client to handle Kintone APIs
  59. // Set the user selection field const setUserSelection = ()

    => { const APP_ID = kintone.app.getId(); const params = { app: APP_ID, preview: true }; return client.app.getFormFields(params).then((resp) => { for (const key of Object.keys(resp.properties)) { if (!resp.properties[key]) { continue; } const option = document.createElement('option’); const prop = resp.properties[key]; if (prop.type === 'USER_SELECT') { option.setAttribute('value', escapeHtml(prop.code)); option.innerText = escapeHtml(prop.label); fieldSelection.appendChild(option); } } }).catch((error) => { console.log(error); alert('Error occurred.'); }); }; ... Get the user selection fields via @kintone/rest-api-client and set it to the dropdown item 3. Modify HTML/CSS/JavaScript for plug-in settings page - JavaScript 65 ... // Set the saved data if it exists const setDefault = () => { const conf = kintone.plugin.app.getConfig(PLUGIN_ID); if (conf) { fieldSelection.value = conf.fieldSelection; bgColor.value = conf.bgColor; } }; GitHub Code Plug-in/Hands-on #2/user-selection~/src/js/config.js Set the saved data (fieldSelection, bgColor) if it exists Get information from the plug-in settings page
  60. 3. Modify HTML/CSS/JavaScript for plug-in settings page - JavaScript 66

    ... // Set the input data if the save button is clicked saveButton.onclick = () => { const config = {}; if (!fieldSelection.value || fieldSelection.value === 'null') { alert('The user selection field has not been selected.’); return false; } config.fieldSelection = fieldSelection.value; config.bgColor = bgColor.value; kintone.plugin.app.setConfig(config); return true; }; // Cancel the process if the cancel button is clicked cancelButton.onclick = () => { history.back(); }; setUserSelection().then(() => { setDefault(); }); ... When the save button is clicked, validate the fieldSelection.value and set parameters (fieldSelection, bgColor) When the plug-in settings page load, execute setUserSelection() and then setDefault() functions Set information to the plug-in settings page When the cancel button is clicked, execute history.back() to cancel the process GitHub Code Plug-in/Hands-on #2/user-selection~/src/js/config.js
  61. 67 Basic Procedure to Develop Kintone Plug-in using create-plugin #4

    2. Create plug-in template using create-plugin 3. Modify HTML/CSS/JavaScript for plug-in settings page 4. Modify JavaScript customization 6. Packaging & uploading 5. Modify configuration files (Icon file, manifest.json) 1. Prepare environment for using create-plugin Validation
  62. 4. Modify JavaScript customization 68 ((PLUGIN_ID) => { 'use strict’;

    const config = kintone.plugin.app.getConfig(PLUGIN_ID); const loginUserCode = kintone.getLoginUser().code; // Change the background color const changeUserSelectionFieldColor = (element) => { if (element) { element.style.backgroundColor = config.bgColor; } }; kintone.events.on('app.record.detail.show', (event) => { const record = event.record; const userEl = kintone.app.record.getFieldElement(config.fieldSelection); if (!userEl) { return event; } const users = record[config.fieldSelection].value; const userList = users.map((user) => { return user.code; }); if (userList.includes(loginUserCode)) { changeUserSelectionFieldColor(userEl); } return event; }); ... })(kintone.$PLUGIN_ID); GitHub Code Plug-in/Hands-on #2/user-selection~/src/js/desktop.js Get the unique plug-in ID with the variable named PLUGIN_ID Define Kintone event at record detail page and set background color if the user selection value matches logged- in user Get information from the plug-in settings page Change the background color depending on the plug-in setting
  63. 4. Modify JavaScript customization 69 ... kintone.events.on('app.record.index.show', (event) => {

    if (!event.size) { return event; } const userEls = kintone.app.getFieldElements(config.fieldSelection); if (!userEls) { return event; } event.records.forEach((record, i) => { const users = record[config.fieldSelection].value; const userList = users.map((user) => { return user.code; }); if (userList.includes(loginUserCode)) { const userEl = userEls[i]; changeUserSelectionFieldColor(userEl); } }); return event; }); ... Define Kintone event at record list page and set background color if the user selection value matches logged- in user GitHub Code Plug-in/Hands-on #2/user-selection~/src/js/desktop.js
  64. 70 Basic Procedure to Develop Kintone Plug-in using create-plugin #5

    2. Create plug-in template using create-plugin 3. Modify HTML/CSS/JavaScript for plug-in settings page 4. Modify JavaScript customization 6. Packaging & uploading 5. Modify configuration files (Icon file, manifest.json) 1. Prepare environment for using create-plugin Validation
  65. 71 5. Modify configuration files – Icon file https://kintone.dev/en/plugins/introduction-to-plug-ins/steps-for-plug-in-development/ Use

    this icon file in this training. (icon.png is saved in icon folder) 5-1. Icon file displayed on each plug-in settings page ・ This is a required file. ・ The file type you can use is either png, jpg, gif or bmp. ・ The maximum file size is 20MB. [Kintone Administration] – [Plug-ins] App - [App Settings] – [Plug-ins]
  66. { "manifest_version": 1, "version": 1, "type": "APP", "name": { "en":

    "User Selection Conditional Format Plug-in" }, "description": { "en": "You can change the background color of the specified user selection field on the Record List and Details screen if the user name value matches the logged-in user." }, "icon": "image/icon.png", "desktop": { "js": [ "js/desktop.js" ], "css": [ ] }, "config": { "html": "html/config.html", "js": [ "https://unpkg.com/@kintone/rest-api- client@latest/umd/KintoneRestAPIClient.min.js", "js/config.js" ], "css": [ "css/51-modern-default.css", "css/config.css" ], "required_params": [ "fieldSelection", "bgColor" ] } } 5-2. Modify manifest file - Specify each parameter in a JSON format to configure plug-in basic information, file name and so on. 5. Modify configuration files - manifest file 72 Icon file GitHub Code JavaScript/CSS files for the desktop customization HTML/CSS/JavaScript files for the plug-in settings page Required parameters for the plug-in setting Plug-in/Hands-on #2/user-selection~/src/manifest.json Plug-in basic information
  67. 73 Basic Procedure to Develop Kintone Plug-in using create-plugin #6

    2. Create plug-in template using create-plugin 3. Modify HTML/CSS/JavaScript for plug-in settings page 4. Modify JavaScript customization 6. Packaging & uploading 5. Modify configuration files (Icon file, manifest.json) 1. Prepare environment for using create-plugin Validation
  68. • In this training, we are using create-plugin. Packaging and

    uploading will be done automatically by running “npm start” command. 74 6. Packaging & uploading $ npm start … Succeeded: dist/plugin.zip # Enter Kintone subdomain information interactively ? Input your Kintone subdomain (example.cybozu.com): <subdomain>.kintone.com ? Input your username: <login name> ? Input your password: [hidden]<password> https://kintone.dev/en/plugins/plug-in-tool-guides/create-plug-in-templates-using-create-plugin/ [Kintone Administration] – [Plug-ins]
  69. 75 Basic Procedure to Develop Kintone Plug-in using create-plugin 2.

    Create plug-in template using create-plugin 3. Modify HTML/CSS/JavaScript for plug-in settings page 4. Modify JavaScript customization 6. Packaging & uploading 5. Modify configuration files (Icon file, manifest.json) 1. Prepare environment for using create-plugin Validation If you need to modify the customization, return to step #3.
  70. 76 Let’s apply “User Selection Conditional Format Plug-in” to “Sales

    Deals” App. “Sales Deals” App - [App Settings] – [Plug-ins] Validation - Applying https://get.kintone.help/k/en/user/app_settings/plugin.html 4. After adding the plug-in, don’t forget to “Update App” in “App Settings” page. 1. Click “Add plug-in” button. 2. Select “Sample Plug-in” and click “Add” button. 3. Check “Sample Plug-in” is applied
  71. 77 Let’s add sample records to “Sales Deals” App. Validation

    - Adding sample records Let's add records which the value of the “Rep” field is same as the logged-in user and records which the value is not same as it, respectively. Let's add records which the value of the “Rep” field is same as the logged-in user and records which the value is not same as it, respectively. Let's add the following records: 1. the value of the “Rep” field is same as the logged-in user 2. the value of the “Rep” field is not same as the logged-in user
  72. 78 Checklist for Validation The following is a checklist of

    general validation points. [ Installation ] p1. Can it be loaded into the Kintone environment and applied to the Kintone App? [ Plug-in settings page ] p2. Does the Cancel button work? p3. Does the Save button work? p4. Does it work as intended? [ App customization ] p5. Does it work as intended in the loaded application?
  73. 79 Validation #1 • Let’s check the behavior of “User

    Selection Conditional Format Plug-in”. [Kintone Administration] – [Plug-ins] “Sales Deals” App - [App Settings] – [Plug-ins] ☑ 1. Can it be loaded into the Kintone environment / applied to the case management application? ☑ 1. Can it be loaded into the Kintone environment / applied to the Kintone App?
  74. 80 Validation #2, #3 [User Selection Conditional Format Plug-in] –

    [Change Settings] ☑ 2. Does the Cancel button work? ☑ 3. Does the Save button work? ☑ 4. Does it work as intended? Does an alert appear when you click "Save" without entering any information? If user selection field has not been selected… • Let’s check the behavior of “User Selection Conditional Format Plug-in”.
  75. 81 Validation #4 [User Selection Conditional Format Plug-in] – [Change

    Settings] ☑ 4. Does it work as intended? After saving the settings, when you open the settings page again, do the previous settings appear? • Let’s check the behavior of “User Selection Conditional Format Plug-in”.
  76. 82 Validation #5 Index Page in App Detail Page in

    App • Let’s check the behavior of “User Selection Conditional Format Plug-in”. ☑ 5. Does it work as intended in the loaded application? e.g. change the background color if the user selected in the user selection field matches the logged-in user. ☑ 5. Does it work as intended in the loaded application? Has background color been changed if the user selected in the user selection field matches the logged-in user?
  77. 83 Key Takeaways • The advantages of Kintone plug-in 1.

    JavaScript and CSS files can all be applied at once 2. Changes can easily be made in the settings 3. Batch application to multiple apps and bulk upgrading is possible 4. Sensitive information can be concealed 5. Easy to upgrade • Use the “create-plugin” to make the development of Kintone plug-in easier. 1. Create templates of Kintone plug-in through interactive dialogue 2. Modify HTML/CSS/JavaScript for plug-in settings page 3. Modify JavaScript customization 4. Modify configuration files 5. Packing & uploading
  78. UI Customization Tool Kintone UI Component • A tool that

    you can easily create Kintone-like user interfaces. https://github.com/kintone-labs/kintone-ui-component 86
  79. Plug-in Development Tool create-kintone-plugin • A command line tool that

    you can create a template for the files needed to create a Kintone plug-in. https://github.com/kintone/js-sdk/tree/master/packages/create-plugin 88 Recommended for those who have no experience in plug-in development and who want to make from scratch. create-kintone-plugin contains kintone-plugin- packer and plugin- uploader.
  80. Plug-in Development Tool webpack-plugin-kintone-plugin • A command line tool that

    supports Kintone plug-in development using webpack. https://github.com/kintone/js-sdk/tree/master/packages/webpack-plugin-kintone-plugin/ 89 Recommended for those who want to use webpack to package plug-in files.
  81. Plug-in Development Tool kintone-config-helper • A JavaScript library that you

    can easily get field information and form layout information of Kintone app. https://github.com/kintone-labs/config-helper 90 By combining with Kintone UI Component, it will be easier to create plug-in settings page.