Upgrade to Pro — share decks privately, control downloads, hide ads and more …

Goらしいコードを業務でも書くために

tom
September 01, 2018
14k

 Goらしいコードを業務でも書くために

DevFest18 session6 roomA+B

tom

September 01, 2018
Tweet

Transcript

  1. Goらしいコードを
    業務でも書くために
    TOKYO JP, SEPT 01 2018
    Kohki Ikeuchi
    DeNA Co., Ltd.
    tom

    View Slide

  2. ● tom
    ● @Kender_09
    ● golan.tokyo運営お手伝い
    ● DeNA2017年新卒入社
    ○ GAE/Goで開発
    自己紹介

    View Slide

  3. 今日話すこと
    ● Goらしさ
    ● 業務でも活用できる
    標準パッケージの
    実装コードを紹介

    View Slide

  4. Goの哲学 1.
    標準パッケージから学ぶ
    インターフェース
    非同期処理
    テスト
    まとめ
    2.
    2.1.
    2.2.
    2.3.
    3.

    View Slide

  5. Goの哲学
    SECTION 1.

    View Slide

  6. ROB PIKE
    Go's purpose is to make its designers'
    programming lives better.
    Go言語が目指していることは、Goを利用するプ
    ログラマを幸せにすること。
    1. Goの哲学

    View Slide

  7. Go Philosophy
    1. Goの哲学
    + 現実世界の問題解決が目的
    + 大規模なソフトウェア開発を行う人のための言語
    https://talks.golang.org/2012/splash.article

    View Slide

  8. {
    Go Design
    Simplicity.
    シンプルで
    各言語機能が
    理解しやすい
    1. Goの哲学

    View Slide

  9. UNIX Philosophy
    1. Goの哲学
    ● スモールイズビューティフル
    ● 1つのプログラムには1つのことをうまく
    やらせる
    ○ レイク・フライの様に
    ● ソフトウェアを梃子として使う
    ○ よいプログラマはよいコードを書く。偉大な
    プログラマはよいコードを借りてくる。
    ● 全てのプログラムはフィルタとして設計
    する
    ● 90%の解を求める
    ● etc...

    View Slide

  10. Go Way
    1. Goの哲学
    ● GoをGoらしく使えれば最大限に活用できる
    ● コードフォーマットはfmtやvetを
    ○ https://golang.org/doc/effective_go.html
    ● シンプルであることを心がける
    ○ https://go-proverbs.github.io/
    ● これができればSOLIDの原則を満たせるかも
    ○ https://dave.cheney.net/2016/08/20/solid-go-design

    View Slide

  11. Go Wayを身に付けたいなら、
    標準パッケージを参考にしながら
    学んでいくと良いよ
    強い人

    View Slide

  12. そう言われても
    どれを読めば
    何から読めば
    業務に活かせるのか
    1. Goの哲学

    View Slide

  13. 独断と偏見で
    Web API開発の
    1年間で為になった
    パッケージを簡単に紹介
    1. Goの哲学

    View Slide

  14. 標準パッケージ
    から学ぶ
    SECTION 2.

    View Slide

  15. Go Doc
    2. 標準パッケージから学ぶ
    ● 公式サイト
    ○ https://golang.org/pkg/
    ● コードからドキュメントが書き出されている
    ○ go/doc
    ● ドキュメントからコードが追いやすいので身構え
    ずとも読むことはできる
    ● ?m=all つけると非公開のものも表示される

    View Slide

  16. インターフェース
    SECTION 2.1.

    View Slide

  17. net/http
    2.1. 標準パッケージから学ぶ - インターフェース
    使い方
    http.Handle("/foo", fooHandler)
    http.HandleFunc("/bar", func(w http.ResponseWriter, r
    *http.Request) {
    fmt.Fprintf(w, "Hello, Gopher")
    })
    log.Fatal(http.ListenAndServe(":8080", nil))
    標準のWebサーバ
    HandleはHandlerを登録
    HandleFuncは関数を登録
    指定したパスへ
    リクエストが来ると
    登録した処理が実行される

    View Slide

  18. net/http
    2.1. 標準パッケージから学ぶ - インターフェース
    type Handler interface {
    ServeHTTP(ResponseWriter, *Request)
    }
    type redirectHandler struct {
    url string code int
    }
    func (rh *redirectHandler) ServeHTTP(w
    ResponseWriter, r *Request) {
    Redirect(w, r, rh.url, rh.code)
    }
    type HandlerFunc func(ResponseWriter, *Request)
    func (f HandlerFunc) ServeHTTP(w ResponseWriter, r
    *Request) {
    f(w, r)
    }
    http.Handler
    HandlerはServeHTTPを
    持つことと定義
    構造体(struct)でも
    関数(func)でもServeHTTP
    を持てばHandlerとして振る
    舞う

    View Slide

  19. net/http
    2.1. 標準パッケージから学ぶ - インターフェース
    func HandleFunc(pattern string, handler
    func(ResponseWriter, *Request)) {
    DefaultServeMux.HandleFunc(pattern, handler)
    }
    var DefaultServeMux = &defaultServeMux
    var defaultServeMux ServeMux
    func (mux *ServeMux) HandleFunc(pattern string,
    handler func(ResponseWriter, *Request)) {
    mux.Handle(pattern, HandlerFunc(handler))
    }
    func (mux *ServeMux) Handle(pattern string, handler
    Handler) {
    // 省略
    }
    http.HandleFunc
    HandleFuncは引数の関数
    をHandlerとして振る舞える
    HandlerFuncに型キャスト
    してる

    View Slide

  20. net/http
    2.1. 標準パッケージから学ぶ - インターフェース
    type methodHandler map[string]http.Handler
    func (m methodHandler) ServeHTTP(w
    http.ResponseWriter, r *http.Request) {
    if h, ok := m[r.Method]; ok {
    h.ServeHTTP(w, r)
    return
    }
    http.Error(w, "Method Not Allowed",
    http.StatusMethodNotAllowed)
    }
    func Build() *http.ServeMux {
    mux := http.NewServeMux()
    mux.Handle("/1.0.0/hoge", methodHandler{
    "POST": http.HandlerFunc(Hoge),
    })
    return mux
    }
    自分でも使ってみる
    mux.HandleはHandlerで
    あれば登録できる
    メソッドとしてServeHTTPを
    もつのでHandlerとして振る
    舞う

    View Slide

  21. {
    net/http
    学びポイント
    インターフェースの定義の仕方
    インターフェースを満たす構造
    体の作り方
    インターフェースを満たす関数
    の作り方
    2.1. 標準パッケージから学ぶ - インターフェース

    View Slide

  22. io
    2.1. 標準パッケージから学ぶ - インターフェース
    type Reader interface {
    Read(p []byte) (n int, err error)
    }
    type Writer interface {
    Write(p []byte) (n int, err error)
    }
    type Closer interface {
    Close() error
    }
    type ReadWriter interface {
    Reader
    Writer
    }
    type WriteCloser interface {
    Writer
    Closer
    }
    io.Reader, io.Writer, io.Closer
    インターフェースもコンポジ
    ションできる
    できる限り小さい単位でイン
    ターフェースを定義
    必要に応じで埋め込み

    View Slide

  23. fmt
    2.1. 標準パッケージから学ぶ - インターフェース
    type Stringer interface {
    String() string
    }
    package time
    func (l *Location) String() string {
    return l.get().name
    }
    // おまけ
    type Cat struct{}
    func (c Cat) Cry() { fmt.Println(c) }
    func (c Cat) String() string { return "nyaaa" }
    type OctoCat struct { Cat }
    func (o OctoCat) String() string { return "approve" }
    func main() {
    var octo OctoCat
    fmt.Println(octo) // “approve” 拡張が適用されている
    octo.Cry() // “nyaaa” Cry内で呼ばれるStringは
    Catの
    }
    Stringer
    文字列の出力もインターフェー
    スで定義
    元々の振る舞いも変更できる
    拡張にはオープン
    自身の振る舞いはクローズ

    View Slide

  24. (番外編)go-cloud
    2.1. 標準パッケージから学ぶ - インターフェース
    switch *cloud {
    case "gcp":
    b, err = setupGCP(ctx, *bucketName)
    case "aws":
    b, err = setupAWS(ctx, *bucketName)
    }
    func setupGCP(ctx context.Context, bucket string)
    (*blob.Bucket, error) {
    creds, err := gcp.DefaultCredentials(ctx)
    if err != nil {
    return nil, err
    }
    c, err :=
    gcp.NewHTTPClient(gcp.DefaultTransport(),
    gcp.CredentialsTokenSource(creds))
    if err != nil {
    return nil, err
    }
    return gcsblob.OpenBucket(ctx, bucket, c)
    }
    https://github.com/google/go-cloud
    aws, gcpどちらでも同じコー
    ドで書くことができる
    setupは各時用意
    その後はプラットフォームを
    意識せず同じコード
    技術的制約に対して有効的
    に活用できる

    View Slide

  25. {
    インターフェース
    学びポイント
    インターフェースは小さく
    振る舞いを受け継ぐ
    埋め込みを活用する
    オープン・クローズド
    2.1. 標準パッケージから学ぶ - インターフェース

    View Slide

  26. 非同期処理
    SECTION 2.2.

    View Slide

  27. io.Pipe
    2.2. 標準パッケージから学ぶ - 非同期処理
    func main() {
    r, w := io.Pipe()
    go func() {
    fmt.Fprint(w, "some text to be read\n")
    w.Close()
    }()
    buf := new(bytes.Buffer)
    buf.ReadFrom(r)
    fmt.Print(buf.String())
    }
    使い方
    io.Pipe()でReadCloserと
    WriteCloserを作成
    通常のReader Writer同様
    書き込み読み込みが可能
    Writerに書き込まれClose
    されるのをReaderは待つ

    View Slide

  28. io.Pipe
    2.2. 標準パッケージから学ぶ - 非同期処理
    type pipe struct {
    wrMu sync.Mutex
    wrCh chan []byte
    rdCh chan int
    once sync.Once
    done chan struct{}
    rerr atomicError
    werr atomicError
    }
    type PipeReader struct { p *pipe }
    type PipeWriter struct { p *pipe }
    func Pipe() (*PipeReader, *PipeWriter) {
    p := &pipe{
    wrCh: make(chan []byte),
    rdCh: make(chan int),
    done: make(chan struct{}),
    }
    return &PipeReader{p}, &PipeWriter{p}
    }
    func Pipe
    pipeから
    PipeReader(Reader)と
    PipeWriter(Writer)
    外部から好きに操作されたく
    ないものは公開しない
    チャネルなどが意識せずに使
    われ非同期処理が実現

    View Slide

  29. io.Pipe
    2.2. 標準パッケージから学ぶ - 非同期処理
    func (p *pipe) Write(b []byte) (n int, err error) {
    select {
    case return 0, p.writeCloseError()
    default:
    p.wrMu.Lock()
    defer p.wrMu.Unlock()
    }
    for once:=true; once||len(b)> 0; once=false {
    select {
    case p.wrCh nw := b = b[nw:]
    n += nw
    case return n, p.writeCloseError()
    }
    }
    return n, nil
    }
    Write
    func (p *pipe) Read(b []byte) (n int, err error) {
    select {
    case return 0, p.readCloseError()
    default:
    }
    select {
    case bw := nr := copy(b, bw)
    p.rdCh return nr, nil
    case return 0, p.readCloseError()
    }
    }
    Read
    pipeにメソッドが実装
    p.doneでクローズされているか確認
    バイト配列のチャネルp.wrChでの受け渡し

    View Slide

  30. io.Pipe
    2.2. 標準パッケージから学ぶ - 非同期処理
    func (p *pipe) CloseWrite(err error) error {
    if err == nil {
    err = EOF
    }
    p.werr.Store(err)
    p.once.Do(func() {close(p.done) })
    return nil
    }
    func (p *pipe) CloseRead(err error) error {
    if err == nil {
    err = ErrClosedPipe
    }
    p.rerr.Store(err)
    p.once.Do(func() { close(p.done) })
    return nil
    }
    Close
    p.done(chan struct{})を
    closeすることで閉じたこと
    を伝える
    p.once(sync.Once)で1度
    だけしか閉じられないことを
    保証

    View Slide

  31. {
    io.Pipe
    学びポイント
    チャネルの使い方
    非公開の構造体
    カプセル化
    io.Writer, io.Reader
    io.Closerの実装の仕方
    2.2. 標準パッケージから学ぶ - 非同期処理

    View Slide

  32. テスト
    SECTION 2.3.

    View Slide

  33. TDT Table-driven tests
    2.3. 標準パッケージから学ぶ - テスト
    package strings_test
    type 
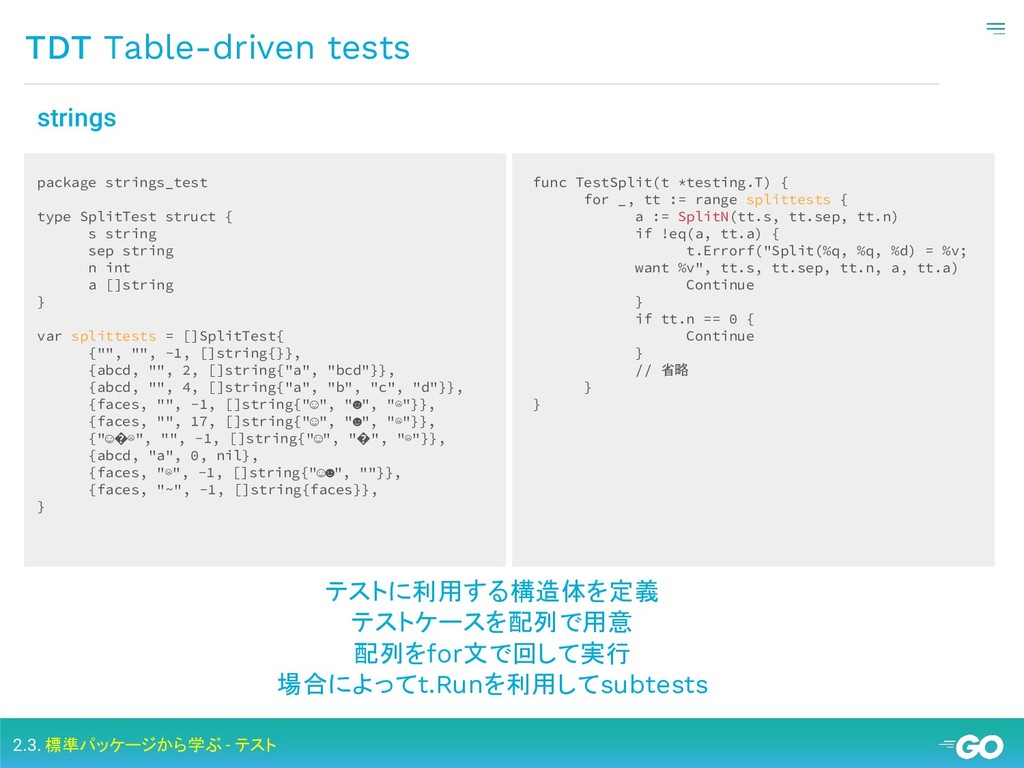
SplitTest struct {
    s string
    sep string
    n int
    a []string
    }
    var splittests = []SplitTest{
    {"", "", -1, []string{}},
    {abcd, "", 2, []string{"a", "bcd"}},
    {abcd, "", 4, []string{"a", "b", "c", "d"}},
    {faces, "", -1, []string{"☺", "☻", "☹"}},
    {faces, "", 17, []string{"☺", "☻", "☹"}},
    {"☺�☹", "", -1, []string{"☺", "�", "☹"}},
    {abcd, "a", 0, nil},
    {faces, "☹", -1, []string{"☺☻", ""}},
    {faces, "~", -1, []string{faces}},
    }
    strings
    func TestSplit(t *testing.T) {
    for _, tt := range splittests {
    a := SplitN(tt.s, tt.sep, tt.n)
    if !eq(a, tt.a) {
    t.Errorf("Split(%q, %q, %d) = %v;
    want %v", tt.s, tt.sep, tt.n, a, tt.a)
    Continue
    }
    if tt.n == 0 {
    Continue
    }
    // 省略
    }
    }
    テストに利用する構造体を定義
    テストケースを配列で用意
    配列をfor文で回して実行
    場合によってt.Runを利用してsubtests

    View Slide

  34. Run Test Func
    2.3. 標準パッケージから学ぶ - テスト
    package strings_test
    // Execute f on each test case.
    func runIndexTests(t *testing.T, f func(s, sep string) int, funcName string, testCases []IndexTest) {
    for _, test := range testCases {
    actual := f(test.s, test.sep)
    if actual != test.out {
    t.Errorf("%s(%q,%q) = %v; want %v", funcName, test.s, test.sep, actual, test.out)
    }
    }
    }
    func TestIndex(t *testing.T) { runIndexTests(t, Index, "Index", indexTests) }
    func TestLastIndex(t *testing.T) { runIndexTests(t, LastIndex, "LastIndex", lastIndexTests) }
    func TestIndexAny(t *testing.T) { runIndexTests(t, IndexAny, "IndexAny", indexAnyTests) }
    strings
    TDTをしやすくテスト実行関数を用意ができる
    テストケース × テスト実行関数

    View Slide

  35. Test Package
    2.3. 標準パッケージから学ぶ - テスト
    package time
    import (
    "Sync"
    )
    func ResetLocalOnceForTest() {
    localOnce = sync.Once{}
    localLoc = Location{}
    }
    var (
    ForceZipFileForTesting = forceZipFileForTesting
    ParseTimeZone = parseTimeZone
    SetMono = (*Time).setMono
    GetMono = (*Time).mono
    ErrLocation = errLocation
    )
    export_time.go
    Testは別パッケージ
    package ***_test
    必要な非公開機能は
    export_***.goから

    View Slide

  36. まとめ
    SECTION 3.

    View Slide

  37. 1年間の振り返り
    3. まとめ
    ● 最初標準パッケージを見れていなかった
    ○ まだ読むには早い…
    ○ 読むの難しそう…
    ○ 業務には活かせなそう…
    実はそんなことはなく
    業務での実装でも十分参考になる

    View Slide

  38. 例: 新卒1年目エンジニア
    3. まとめ
    ● 読み始める前:
    ○ 深く考えず全部構造体で書く
    ○ 近くにある業務のコードを脳死で真似る
    ↓ 非同期処理を書くのに読み始める
    ● 読み始めた後:
    ○ 標準パッケージなどからいいコードを真似る
    ○ 振る舞いの求められる最小単位を考える
    ○ 責務の境界線を意識する

    View Slide

  39. 読み方
    3. まとめ
    ● 悩んでいるのに似た機能から読んでみる
    ○ 非同期処理に悩んでいたら、非同期処理を提供
    しているio.Pipeをみてみるなど
    ● 準標準パッケージや後から実装された機能を
    読んでみる
    ○ 従来ある機能で拡張するように書かれていること
    が多い
    ○ 読みやすいことが多い(気がする

    View Slide

  40. 最後に
    3. まとめ
    ● 標準パッケージは初心者が読んでも学べる
    ● そして本当に色々なことを教えてくれる
    ○ Go Wayな書き方とその効力
    ● 紹介したのは氷山の一角
    ○ 参考になるコードは至る所にある
    ● Go Wayは枷ではない
    ○ 解決のために利用していることを忘れない

    View Slide

  41. 標準パッケージを
    読むのは楽しい!!
    ご静聴ありがとうございました

    View Slide