Upgrade to Pro — share decks privately, control downloads, hide ads and more …

axe-core-depp-dive.pdf

Avatar for ryokatsuse ryokatsuse
January 08, 2026
1

 axe-core-depp-dive.pdf

Avatar for ryokatsuse

ryokatsuse

January 08, 2026
Tweet

Transcript

  1. 💻 axe-cli axe-cli を使ってコマンドラインから実行できる # インストール npm install -g @axe-core/cli

    # 実行 npx @axe-core/cli "https://example.com/" # テスト結果のJSON を出力 npx @axe-core/cli "https://example.com/" --stdout > results.json
  2. 📋 テスト結果の例(問題があるサイト) 駒瑠市 アクセシビリティ上の問題の体験サイトでテストした結果 コマンドを叩いて該当ページのアクセシビリティテストを行い、テストの結果をJSON に吐き出す 結果を確認すると、クリティカルなエラーが見つかった npx axe-cli "https://a11yc.com/city-komaru/practice/?preset=1.1.1-alt&wcagver=22"

    --save city-komaru-practice-results.js violations: 6 件 1. [critical] image-alt - 1 件 → 市のロゴ画像にalt 属性がない 2. [minor] image-redundant-alt - 4 件 → 画像のalt が周囲のテキストと重複 3. [moderate] landmark-unique - 1 件 → <nav> が複数あるが区別できる名前がない
  3. 🔍 例)image-alt 違反の詳細 見方については後ほど説明します。 { id: 'image-alt', // ルールID impact:

    'critical', // 深刻度(最も重大) nodes: [{ // 違反が見つかった要素 html: '<img src="./images/city-logo.png">', // 問題のあったHTML any: [ // any 配列:どれか1 つpass すればOK { id: 'has-alt', message: 'Element does not have an alt attribute' }, { id: 'aria-label', message: 'aria-label attribute does not exist...' }, { id: 'aria-labelledby', message: 'aria-labelledby attribute does not exist...' }, { id: 'non-empty-title', message: 'Element has no title attribute' }, { id: 'presentational-role', message: "Element's default semantics were not overridden..." } ] // → しかし5 つ全部fail = 違反! }] }
  4. 📍5 つのステップ 1. axe.run() の実行 - エントリーポイント 2. HTML 解析と扱いやすい形式に変換

    - 整理整頓 3. ルールの適用 - チェック関数の実行 4. 違反判定 - any/all/none の結果を集計 5. 結果出力 - JSON 形式で結果をレポート
  5. 🎯 run.js はエントリーポイント axe.run() 引数チェック Step2-4 実行 結果を受け取る Step5 実行

    結果を返す 順序 処理 説明 1 引数チェック context, options を整理・検証 2 Step2-4 実行 扱いやすい形式に変換→対象要素抽出→違反判定 3 結果を受け取る Step2-4 の結果がrun.js に戻る 4 Step5 実行 レポート生成(JSON 形式) 5 結果を返す Promise で結果を返却 run.js
  6. 📝 axe.run() の使い方 詳細は公式ドキュメントへ: axe-core API Documentation // ページ全体をチェック axe.run().then(results

    => { console.log(results.violations); }); // 特定のセレクタのみをチェック axe.run('img').then(results => { console.log(results.violations); }); // テストしたいルールを指定してチェック axe.run(document, { rules: { 'image-alt': { enabled: true }, 'color-contrast': { enabled: false } } }).then(results => { console.log(results.violations); });
  7. 🔍 run.js の処理フロー ポイント 引数の正規化: context , options , callback

    に整理 コールバック: Step2 〜4 の結果を受け取り、Step5 (レポート生成)を実行 run.js / normalize-run-params.js export default function run(...args) { // 1. 引数の正規化(context, options, callback ) const { context, options, callback } = normalizeRunParams(args); // 2. 検証:audit が設定されているか、すでに実行中でないか assert(axe._audit, 'No audit configured'); assert(!axe._running, 'Axe is already running...'); // 3. _runRules を呼び出し、結果をコールバックで受け取る axe._runRules(context, options, handleRunRules, errorRunRules); return thenable; }
  8. 🔄 処理の流れ DOM Context 作成 DOM 走査 VirtualNode 作成 索引に登録

    扱いやすい形式に変換完了 処理 説明 DOM ブラウザが解析した実際のHTML 要素のツリー構造 Context 作成 チェック対象のDOM を受け取り、処理の起点を作る DOM 走査 全ノードを再帰的に処理( getFlattenedTree ) VirtualNode 作成 各要素をVirtualNode に変換( createNode ) 索引に登録 img や button など要素タイプ別にselectorMap へ登録 run-rules.js / get-flattened-tree.js
  9. 📚 変換は図書館の本棚を整理する作業 axe._runRules が呼び出されると、渡されたcontext (チェック対象のDOM )を扱いやすい形式に変換す る 通常のHTML だと「 img

    要素を全部探して」と言われたら、DOM を順番に走査する必要がある 変換する際、 selectorMap という索引も同時に作成 「 img 要素コーナー」 「 button 要素コーナー」のように要素タイプ別に整理される
  10. 🌳 getFlattenedTree: DOM →扱いやすい形式(オブジ ェクト)に変換 function flattenTree(node, shadowId, parent) {

    // Shadow Root の処理 if (isShadowRoot(node)) { hasShadowRoot = true; vNode = createNode(node, parent, shadowId); shadowId = 'a' + Math.random().toString().substring(2); childNodes = Array.from(node.shadowRoot.childNodes); vNode.children = createChildren(childNodes, vNode, shadowId); return [vNode]; } // 要素ノードの処理(img, div, button など) if (node.nodeType === document.ELEMENT_NODE) { vNode = createNode(node, parent, shadowId); childNodes = Array.from(node.childNodes); // 再帰的に実行 vNode.children = createChildren(childNodes, vNode, shadowId); return [vNode]; } // ... }
  11. get-flattened-tree.js 📦 VirtualNode の作成 各ノードをVirtualNode オブジェクトに変換 索引(selectorMap )に登録 virtual-node.js function

    createNode(node, parent, shadowId) { const vNode = new VirtualNode(node, parent, shadowId); cacheNodeSelectors(vNode, cache.get('selectorMap')); return vNode; }
  12. 📄 VirtualNode への変換 VirtualNode に変換されると以下のような形式になる <img src="./images/city-logo.png" alt=" 駒瑠市ロゴ"> {

    actualNode: <img src="./images/city-logo.png" alt="...">, parent: <header> shadowId: undefined, props: { nodeType: 1, nodeName: 'img', id: null, type: undefined, nodeValue: null }, children: [], attr('alt') }
  13. 📚 selectorMap: 要素タイプ別の索引 VirtualNode 作成時に、要素をタイプ別に索引に登録する cache-node-selectors.js { img: [VirtualNode, VirtualNode,

    ...], // 全img タグ button: [VirtualNode, VirtualNode, ...], // 全button タグ a: [VirtualNode, VirtualNode, ...], // 全a タグ // ... }
  14. 🔄 処理の流れ VirtualNode ツリー ルール定義 (JSON ) 対象要素を取得 チェック関数 実行

    処理 説明 VirtualNode ツリー Step2 で作成した扱いやすい形式のツリー ルール定義 JSON で定義されたルール(selector, チェック関数など) 対象要素を取得 selector で該当要素を取得(内部処理) チェック関数実行 各VirtualNode に対してチェック関数を実行 rule.js
  15. 📚 たくさんのルール(手動で定義) axe-core には多数のルールがJSON ファイルとして定義されている ルールは自動生成ではなく、手動で作成されている 開発者がWCAG などの仕様を読み、JSON として定義 GitHub

    上のPR でコードレビューを経てマージ npm run rule-gen はテンプレート生成のみ(雛形作成の補助) lib/rules/ lib/rules/ ├── image-alt.json # 画像にalt があるか ├── color-contrast.json # コントラスト比は十分か ├── button-name.json # ボタンに名前があるか ├── link-name.json # リンクにテキストがあるか ├── ... # 他にも多数
  16. 📋 ルールの定義(JSON ファイル) image-alt.json { "id": "image-alt", "impact": "critical", "selector":

    "img", "matches": "no-explicit-name-required-matches", "tags": ["wcag2a", "wcag111", "section508", ...], "any": [ "has-alt", "aria-label", "aria-labelledby", "non-empty-title", "presentational-role" ], "none": ["alt-space-value"] }
  17. 💡 チェック関数の例 has-alt-evaluate.js 各チェック関数は true / false を返すだけ function hasAltEvaluate(node,

    options, virtualNode) { const { nodeName } = virtualNode.props; if (!['img', 'input', 'area'].includes(nodeName)) { return false; } return virtualNode.hasAttr('alt'); }
  18. 📝 他のチェック関数の例 // ページにタイトルがあるか function docHasTitleEvaluate() { const title =

    document.title; return !!sanitize(title); } // tabindex が0 より大きくないか function tabindexEvaluate(node, options, virtualNode) { const tabIndex = parseTabindex(virtualNode.attr('tabindex')); return tabIndex === null || tabIndex <= 0; } // alt 属性が空白のみじゃないか function altSpaceValueEvaluate(node, options, virtualNode) { const alt = virtualNode.attr('alt'); return typeof alt === 'string' && /^\s+$/.test(alt); }
  19. 🔬 複雑なチェック関数の例 color-contrast-evaluate.js フォントサイズで基準値が変わる 太字かどうかで基準値が変わる 背景が画像やグラデーションの場合の処理 テキストシャドウがある場合の処理 擬似要素(::before, ::after )の考慮

    // 一部を抜粋: フォントサイズと太さで基準を切り替え const isSmallFont = (bold && ptSize < boldTextPt) || (!bold && ptSize < largeTextPt); const { expected } = isSmallFont ? contrastRatio.normal : contrastRatio.large;
  20. 🔄 処理の流れ すべてOK 1 つでもNG チェック実行 any/all/none 判定 結果は? ✅

    合格 ❌ 違反 配列 意味 合格条件 any どれか1 つ満たせばOK 1 つでも true なら合格 all すべて満たす必要あり すべて true なら合格 none どれも該当してはダメ すべて false なら合格 aggregate-checks.js
  21. 🧮 image-alt ルールの判定構造 any 配列(どれか1 つでOK ) has-alt : alt

    属性がある aria-label : aria-label 属性がある aria-labelledby : aria-labelledby 属性がある non-empty-title : title 属性がある presentational-role : 装飾画像として設定 none 配列(該当したらNG ) alt-space-value : alt 属性が空白のみ all 配列(すべて満たす必要) (このルールでは使用なし) { "id": "image-alt", "all": [], "any": [ "has-alt", "aria-label", "aria-labelledby", "non-empty-title", "presentational-role" ], "none": ["alt-space-value"] }
  22. ✅ 合格パターン none alt-space-value: false ✅ any has-alt: true ✅

    ✅ ✅ ✅ 合格 判定の流れ 1. any 配列(どれか1 つtrue でOK ) has-alt: true ✅ → any: OK 2. none 配列(すべてfalse でOK ) alt-space-value: false ✅ → none: OK 3. 最終判定 両方OK なので → 合格 <img src="./images/city-logo.png" alt=" 駒瑠市ロゴ">
  23. ❌ 違反パターン any has-alt: false ❌ aria-label: false ❌ ❌

    違反 判定の流れ 1. any 配列(どれか1 つtrue でOK ) has-alt: false ❌ aria-label: false ❌ aria-labelledby: false ❌ → any: NG (全部false ) 2. 最終判定 → 違反(critical ) 代替テキストの提供方法が1 つもない <img src="./images/city-logo.png"> <!-- alt 属性なし -->
  24. 📊 4 種類の「判定結果」 判定結果は4 つのカテゴリに分類される aggregate-node-results.js { violations: [...], //

    🔴 違反あり(要修正) passes: [...], // 🟢 合格 incomplete: [...], // 🟡 要確認(人間の判断が必要) inapplicable: [...] // ⚪ 対象外(チェック不要だった) }
  25. 🔴 violations 修正に必要な情報が全部入っている どの要素か(html, target ) なぜダメか(failureSummary ) どう直せばいいか(helpUrl )

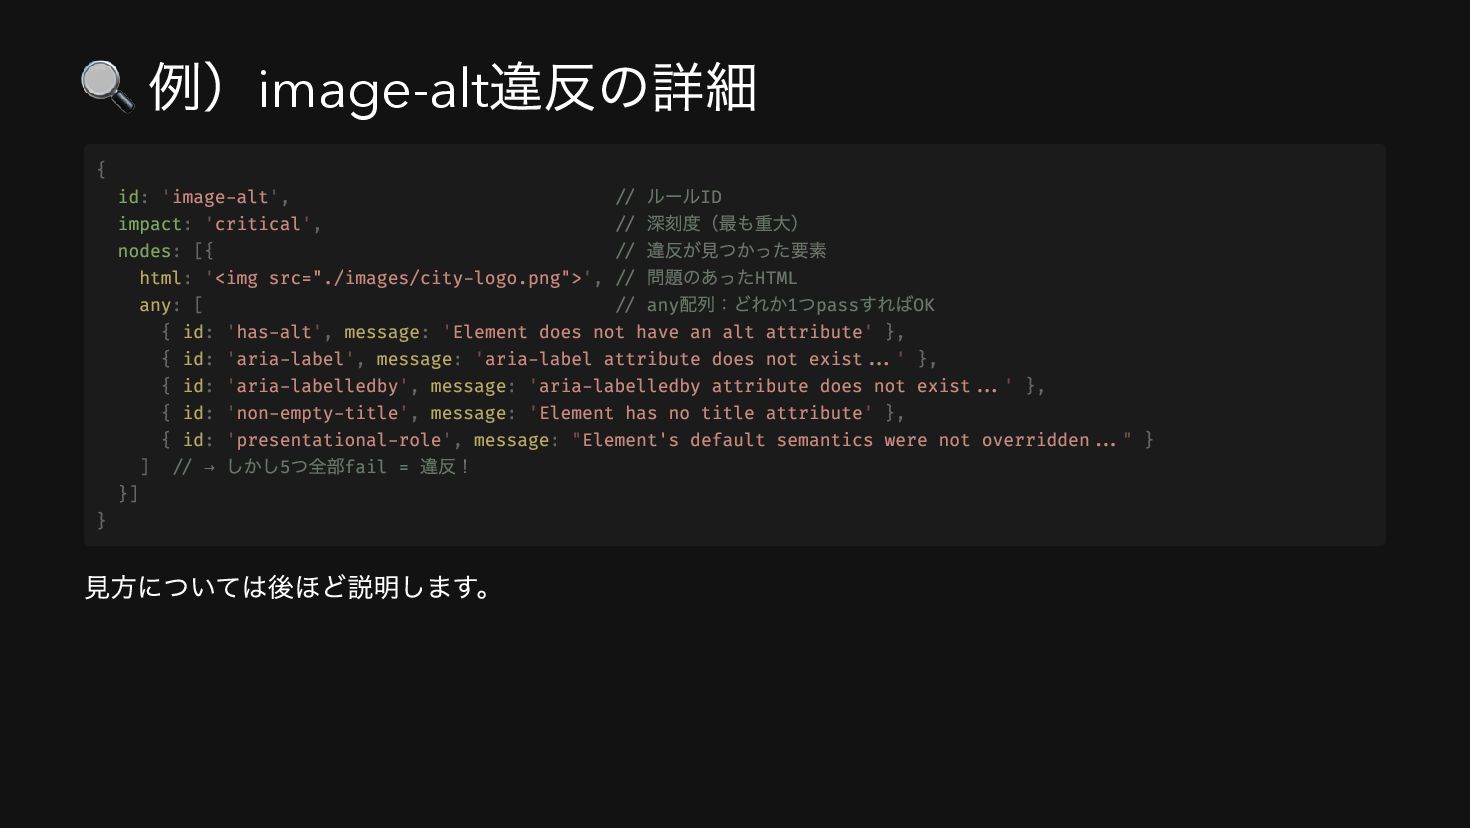
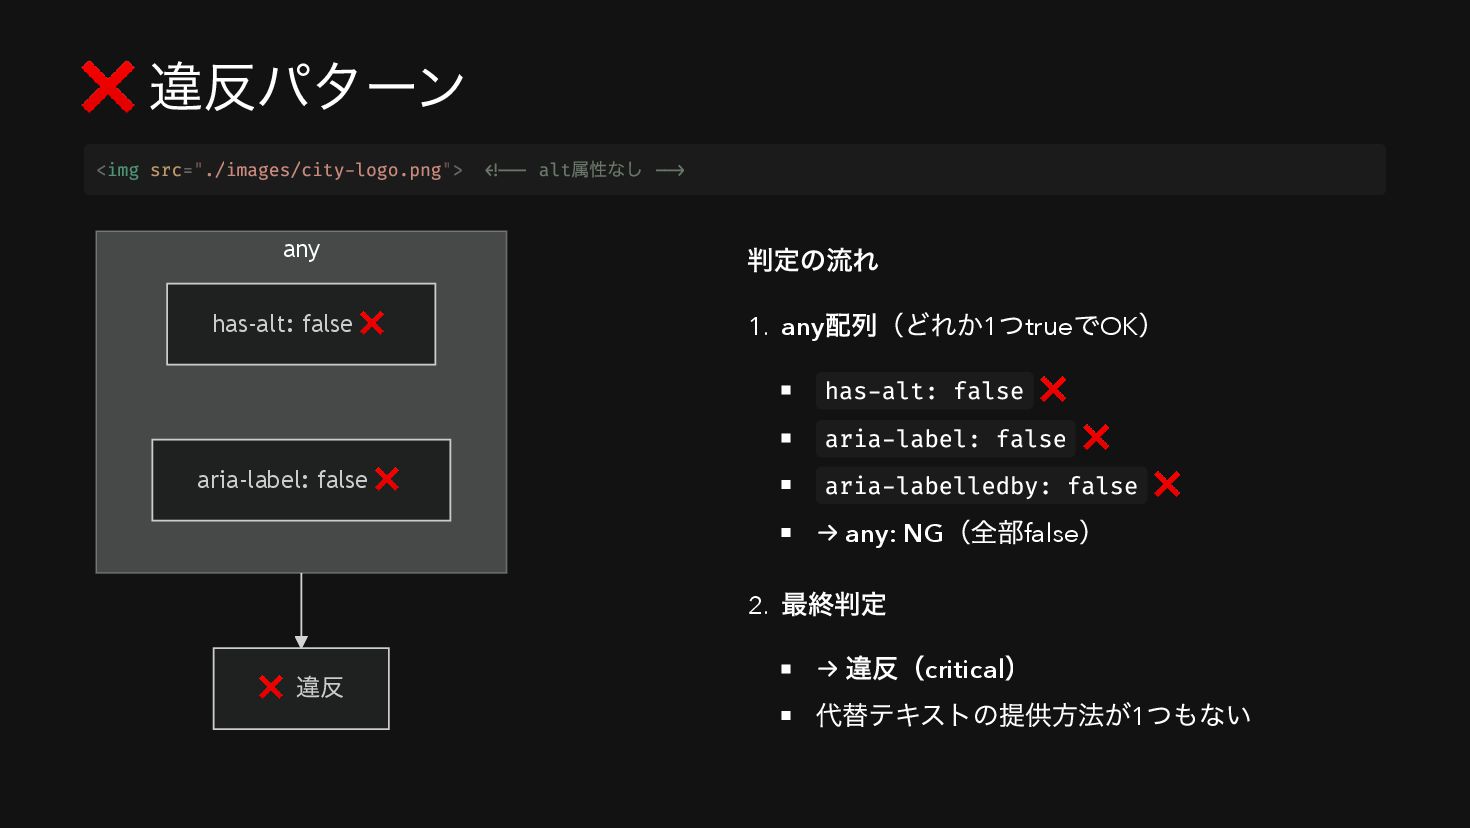
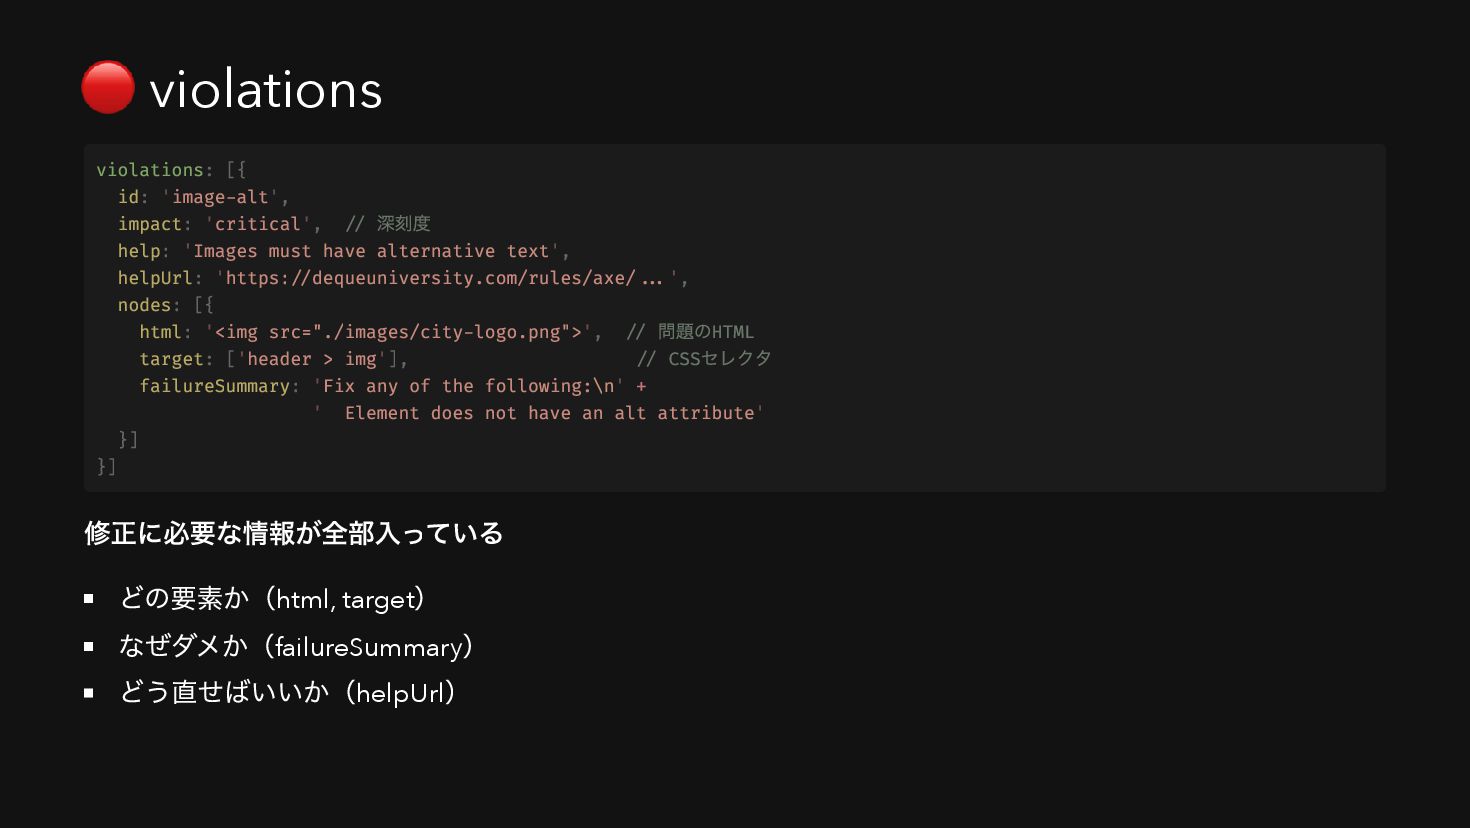
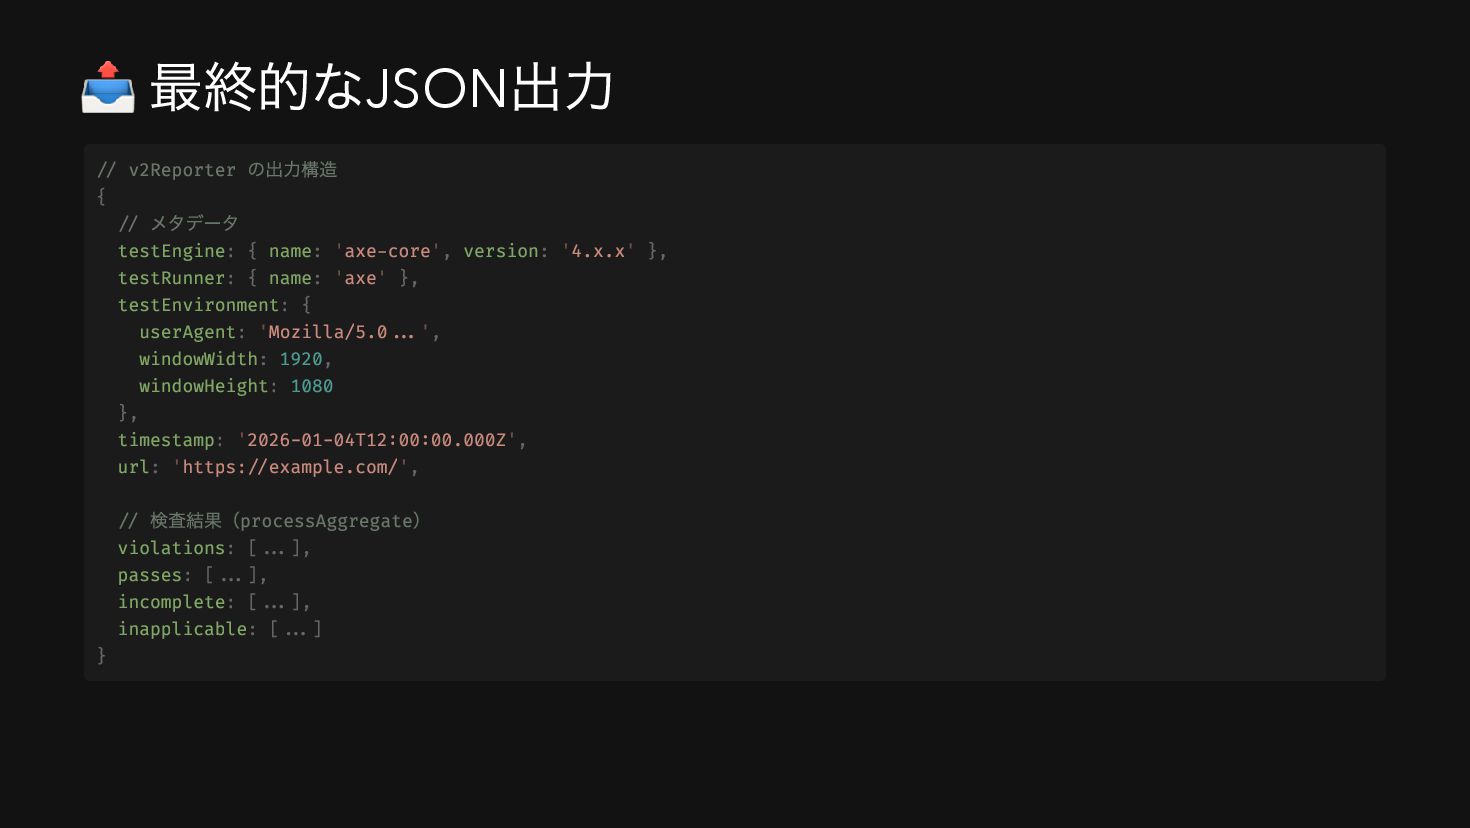
    violations: [{ id: 'image-alt', impact: 'critical', // 深刻度 help: 'Images must have alternative text', helpUrl: 'https://dequeuniversity.com/rules/axe/...', nodes: [{ html: '<img src="./images/city-logo.png">', // 問題のHTML target: ['header > img'], // CSS セレクタ failureSummary: 'Fix any of the following:\n' + ' Element does not have an alt attribute' }] }]
  26. 🟡 incomplete incomplete になるケース 背景が画像やグラデーションでコントラストを計算できない場合 疑似要素でスタイルが変わる場合 タッチターゲットのサイズの計算が困難な場合 全チェック関数115 個のうち、 incomplete

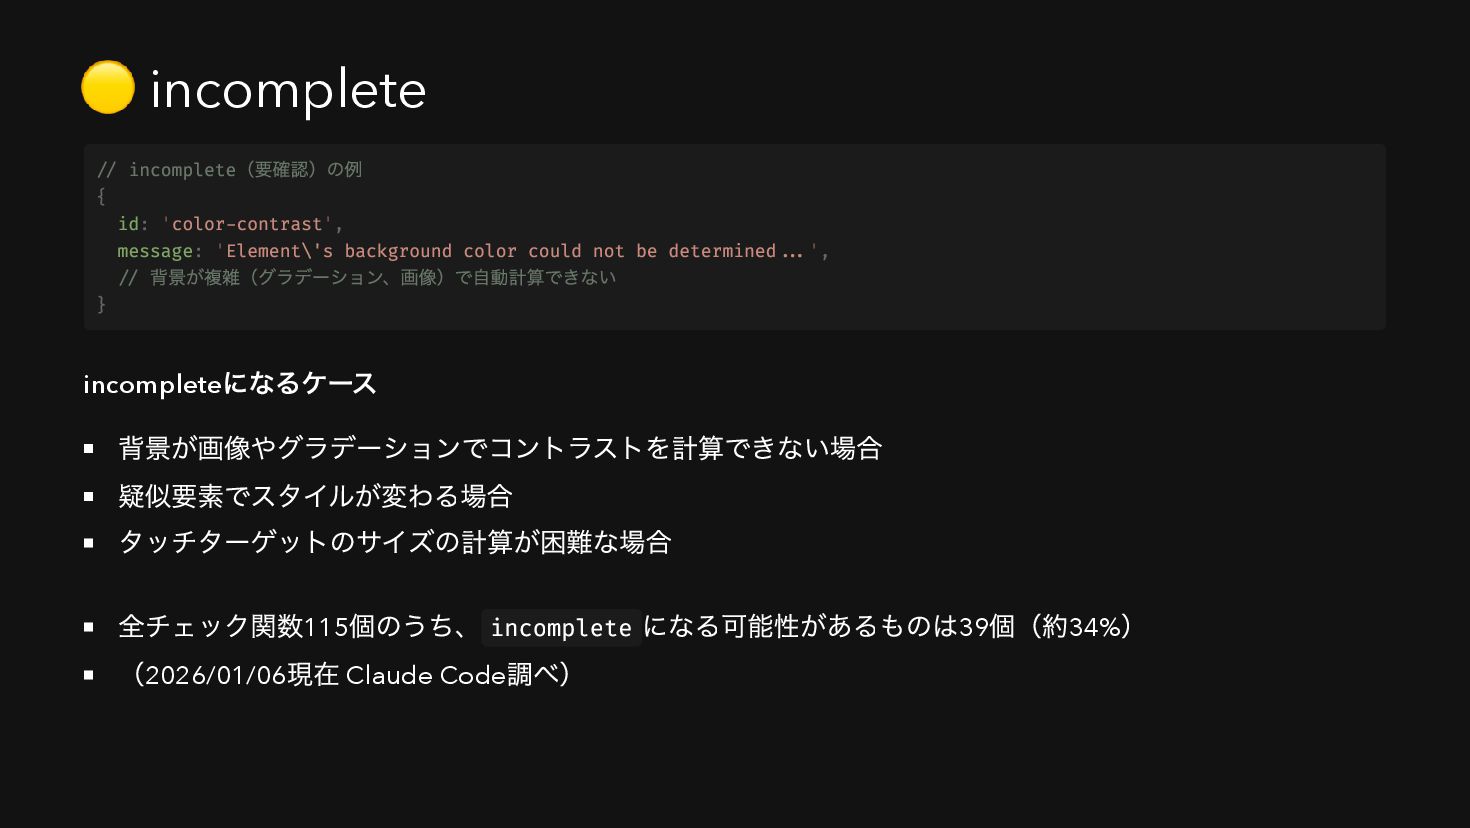
    になる可能性があるものは39 個(約34% ) (2026/01/06 現在 Claude Code 調べ) // incomplete (要確認)の例 { id: 'color-contrast', message: 'Element\'s background color could not be determined...', // 背景が複雑(グラデーション、画像)で自動計算できない }
  27. ⚠️ impact は4 段階の深刻度 レベル 意味 例 critical 致命的 alt

    なしの画像、ラベルなしのフォーム serious 深刻 コントラスト不足、tabindex の正の値 moderate 中程度 見出し順序の乱れ、ランドマーク不足 minor 軽微 冗長なalt 、空の見出し aggregate-checks.js
  28. 🔄 処理の流れ Step4 までの 判定結果 processAggregate() v2Reporter() JSON 出力 処理

    関数 説明 結果の整形 processAggregate() ノード情報をシリアライズ可能な形式に変換 レポート生成 v2Reporter() メタ情報(UA 、URL 、タイムスタンプ)を付与 process-aggregate.js / v2.js
  29. 📤 最終的なJSON 出力 // v2Reporter の出力構造 { // メタデータ testEngine:

    { name: 'axe-core', version: '4.x.x' }, testRunner: { name: 'axe' }, testEnvironment: { userAgent: 'Mozilla/5.0...', windowWidth: 1920, windowHeight: 1080 }, timestamp: '2026-01-04T12:00:00.000Z', url: 'https://example.com/', // 検査結果(processAggregate ) violations: [...], passes: [...], incomplete: [...], inapplicable: [...] }
  30. ✅ axe-core の処理まとめ Step1 axe.run() Step2 扱いやすい形式に変換 Step3 ルールの適用 Step4

    違反判定 Step5 結果出力 Step 処理 主要関数 1 axe.run() 実行 normalizeRunParams(), axe._runRules() 2 扱いやすい形式に変換 getFlattenedTree(), createNode() 3 ルールの適用 Rule.run(), チェック関数 4 違反判定 aggregateChecks(), aggregateNodeResults() 5 結果出力 processAggregate(), v2Reporter()
  31. 🚧 自動テストの限界 With axe-core, you can find on average 57%

    of WCAG issues automatically. — axe-core README - The Accessibility Rules 自動で検出できること(57% ) 属性の有無(alt 、aria-label など) 数値の比較(コントラスト比など) 構造的なエラー(重複ID 、ネストの誤りなど) 人力が必要なこと(43% ) alt の内容が適切か リンクテキストが意味をなすか 見出しの階層構造が論理的か フォーカス順序が適切か
  32. 🧠 残り43% に必要なのは「文脈」と「意味」の理解 自動テストが判断できないこと 「文脈」の理解 この画像は何を伝えるべきか? この見出しの順序は論理的か? このフォーカス順序は自然か? 「意味」の理解 このalt

    テキストは適切か? このリンクテキストで伝わるか? この操作説明で理解できるか? アプリケーションやサービスによって「文脈」は異なる EC サイト、行政サービス、SNS… それぞれで「適切さ」の基準が変わるため、最終的な判断は人間が行 う必要がある
  33. 自動テスト + 半自動テストで80% カバー 自動テストのみ 57% + IGT (半自動) 80%+

    調査の根拠 13,000+ ページ、約30 万件の問題を分析 初回監査顧客の実データを使用 発生頻度ベースで計算 IGT (Intelligent Guided Tests ) 質問に答えるだけで複雑なチェックを実行する 専門家でなくても実行可能 Auto Replay 機能で自動化も可能 ⚠️ 80% はaxe DevTools (有料)の数値。axe-core (OSS )単体は57% 参考: Semi-Automated Accessibility Testing Coverage Report | Deque
  34. 🔄 AI の進化で変わること・まだ変わらないこと 変わること AI によって手動作業が削減 視覚的な問題の検出精度向上 AI による回帰テストの効率化 変わらないこと

    最終判断は人間が必要(Human-in-the-loop ) 「文脈」 「意味」の理解は依然として課題 ユーザーテストの重要性 Deque のアプローチ: Human-in-the-loop AI の自動化と人間の専門知識を組み合わせ、効率性と正確性を両立 参考: Advancing AI for axe | Deque
  35. 💪 私たちができること 1. 自動テストを「入口」として活用 axe-core で最低限のアクセシビリティテストを自動化する CI に組み込んで継続的にチェック 2. 手動テストを組み合わせる

    キーボード操作で全機能にアクセスできるか スクリーンリーダーで意味が伝わるか 3. 当事者の声を聞く 実際のユーザーによるテスト フィードバックを設計に反映 自動テストは「手段」であり「目的」ではない
  36. 📝 まとめ: 今日話したかったこと 1. axe-core は5 つのステップで自動テストを行っている Step1 axe.run() Step2

    扱いやすい形式 Step3 ルール適用 Step4 違反判定 Step5 JSON 出力 2. 自動テストでは全てを網羅できない 自動検出できるのは約57% の問題 AI によって網羅率は増えている。 しかし「文脈」 「意味」の判断には人間が必要 3. 自動テストは「手段」であり「目的」ではない 自動テストで何を解決したいのかを明確に 手動テスト、当事者テストとの組み合わせが重要
  37. 🔗 参考リンク axe-core 関連 axe-core GitHub axe-core API Documentation Automated

    Testing Identifies 57% | Deque Semi-Automated Testing Coverage Report | Deque Advancing AI for axe | Deque デモで使用したサイト 駒瑠市 アクセシビリティ上の問題の体験サイト Burikaigi 2026 書籍 見えにくい、読みにくい「困った!」を解決するデザイン【改訂 版】 本発表の元記事 axe-core でアクセシビリティチェックをどうやっているのか雑に 調べた 本スライドに使ったツール Slidev