Upgrade to Pro — share decks privately, control downloads, hide ads and more …

IndexedDB and Push Notifications in Progressive Web Apps

IndexedDB and Push Notifications in Progressive Web Apps

GDG Ibadan Progressive Web Apps 2

Adegoke Obasa

August 28, 2016
Tweet

More Decks by Adegoke Obasa

Other Decks in Programming

Transcript

  1. What you’ll learn - IndexedDB • Create an indexed database.

    • Create object stores. • Store data in the object stores. • Retrieve data from the object stores. • Update and delete data from the object stores.
  2. What you’ll learn - Push Notifications • How to set

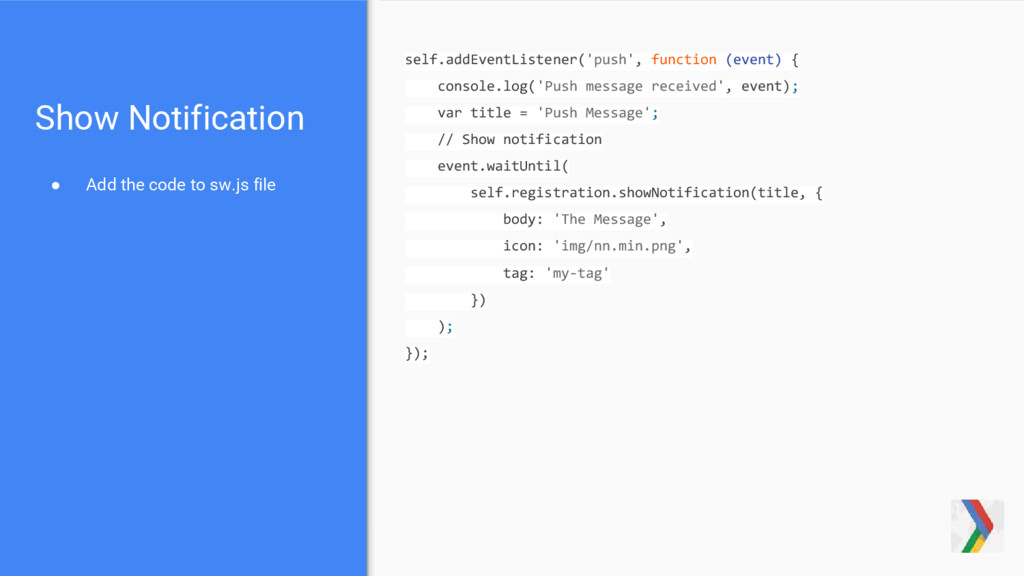
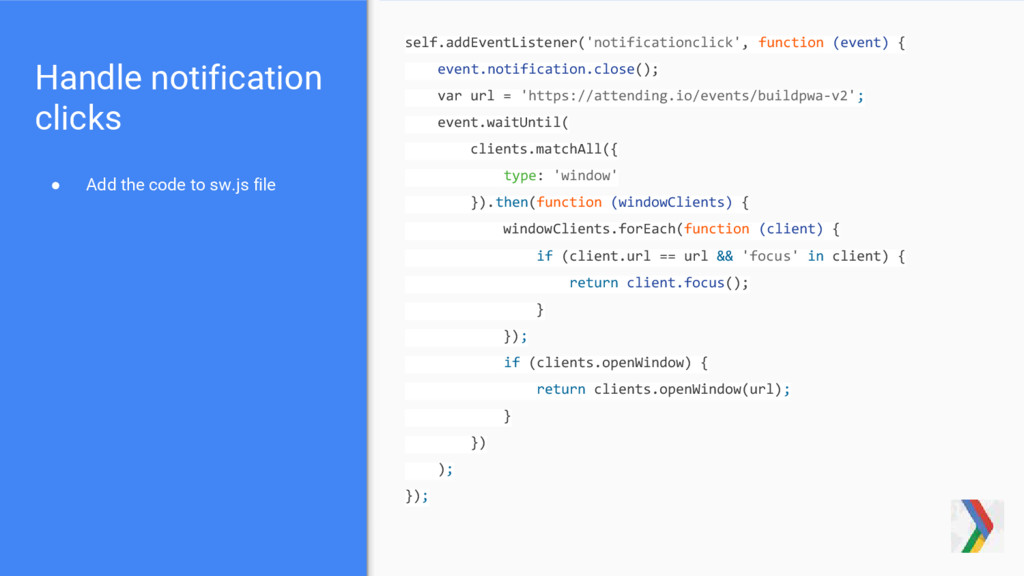
    up a Firebase Cloud Messaging (FCM) account • Techniques for requesting GCM to send a notification to a web client • Notification display • Notification click handling
  3. What you’ll need • Chrome 42 or above • A

    basic understanding of git, and Chrome DevTools • Experience of service worker would also be useful, but is not crucial • The sample code • A text editor • Python or a simple local web server.
  4. Pros of IndexedDB • It stores the data as Key-Pair

    values. • It is asynchronous. • It is non relational. • Can access the data from the same domain. • It allows indexed database queries.
  5. IndexedDB Support Method 1 • Open the Chrome Developer Tools

    • Switch to the Console • Run `indexedDB`command Method 2 • Go to the Application tab Method 1 Method 2
  6. Create Database and object store • Add code to js/idb.js

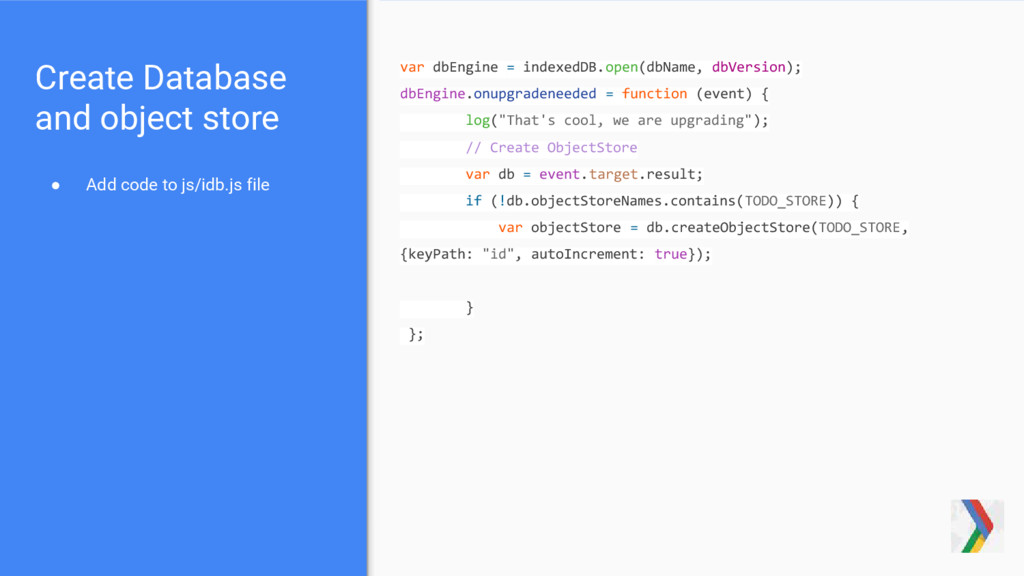
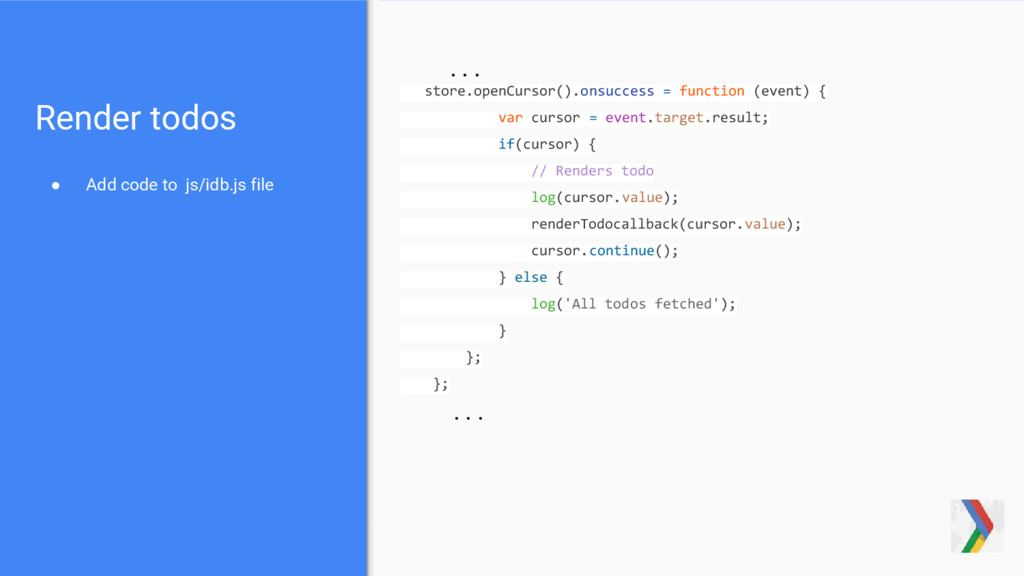
    file var dbEngine = indexedDB.open(dbName, dbVersion); dbEngine.onupgradeneeded = function (event) { log("That's cool, we are upgrading"); // Create ObjectStore var db = event.target.result; if (!db.objectStoreNames.contains(TODO_STORE)) { var objectStore = db.createObjectStore(TODO_STORE, {keyPath: "id", autoIncrement: true}); } };
  7. Add todo • Add code to js/idb.js file var engine

    = indexedDB.open(dbName, dbVersion); engine.onsuccess = function (event) { var db = event.target.result; var transaction = db.transaction([TODO_STORE], "readwrite"); var store = transaction.objectStore(TODO_STORE); var request = store.add(todo); request.onsuccess = function (e) { log('TODO inserted >> ', e.target.result); }; request.error = function (e) { error('An error occurred'); }; }; engine.onerror = function (error) { error('An error occured ', error); };
  8. Clear all todos • Add code to js/idb.js file var

    engine = indexedDB.open(dbName, dbVersion); engine.onsuccess = function (event) { var db = event.target.result; var transaction = db.transaction([TODO_STORE], "readwrite"); var store = transaction.objectStore(TODO_STORE); var request = store.clear(); request.onsuccess = function (e) { log('All todos deleted'); }; request.error = function (e) { error('An error occurred); }; }; engine.onerror = function (error) { error('An error occured ', error); };
  9. Render todos • Add code to js/idb.js file ... store.openCursor().onsuccess

    = function (event) { var cursor = event.target.result; if(cursor) { // Renders todo log(cursor.value); renderTodocallback(cursor.value); cursor.continue(); } else { log('All todos fetched'); } }; }; ...
  10. Delete todo • Add code to js/idb.js file ... var

    transaction = db.transaction([TODO_STORE], "readwrite"); var store = transaction.objectStore(TODO_STORE); var request = store.delete(Number(id)); request.onsuccess = function (e) { log('Todo ' + id + 'deleted'); if (typeof callback != 'undefined') { callback(); } }; request.error = function (e) { error('An error occurred'); }; ...
  11. Implementing Push Notifications in the Todo App Switch to the

    push-notifications-starter branch git reset --hard git checkout push-notifications-starter
  12. Create a Firebase Cloud Messaging (FCM ) project. Navigate to

    the Google Developers Console - https://console.cloud.google.com
  13. Enable FCM • From Use Google APIs, select Enable and

    manage APIs • From the Google APIs list, select Google Cloud Messaging • Click the Enable button
  14. Get credentials • From the API Manager menu, select Credentials

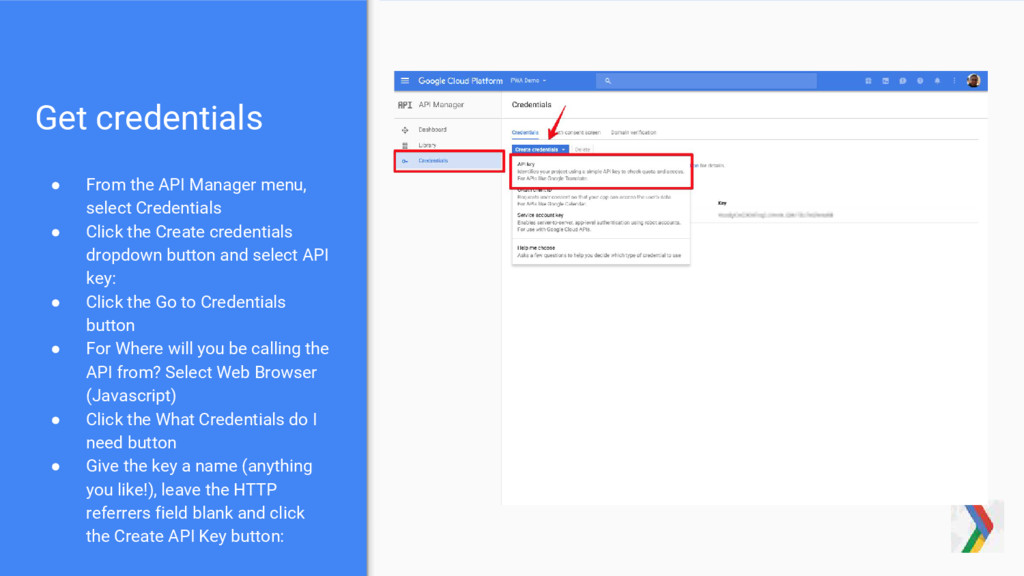
    • Click the Create credentials dropdown button and select API key: • Click the Go to Credentials button • For Where will you be calling the API from? Select Web Browser (Javascript) • Click the What Credentials do I need button • Give the key a name (anything you like!), leave the HTTP referrers field blank and click the Create API Key button:
  15. Update Manifest Add gcm_sender_id to the manifest.json file. The gcm_sender_id

    value should be the Project Number you saved earlier. { "short_name" : "GDG Ibadan", "name" : "GDG Ibadan", "icons" : [ { "src" : "/img/nn.min.png", "sizes" : "192x192", "type" : "image/png" } ], "start_url" : "/", "display" : "standalone", "theme_color" : "#666", "background_color" : "#666", "gcm_sender_id": "**************" }
  16. Set Variables • Add the code to js/app.js file in

    the immediately after // TODO Set subscribe button disabled attribute to false reg = serviceWorkerRegistration; subscribeButton.disabled = false;
  17. Add Subscription Code • Add the code to js/app.js file

    reg.pushManager.subscribe({ userVisibleOnly: true }).then(function (pushSubscription) { sub = pushSubscription; console.log('Subscribed! endpoint:', sub.endpoint); subscribeButton.textContent = 'Unsubscribe'; isSubscribed = true; })
  18. Add Unsubscription Code • Add the code to js/app.js file

    sub.unsubscribe().then(function (event) { subscribeButton.textContent = 'Subscribe'; console.log('Unsubscribed!', event); isSubscribed = false; }).catch(function (error) { console.log('Error unubscribing', error); subscribeButton.textContent = 'Subscribe'; })
  19. Get Subscription ID • Open the Chrome Developer Tools and

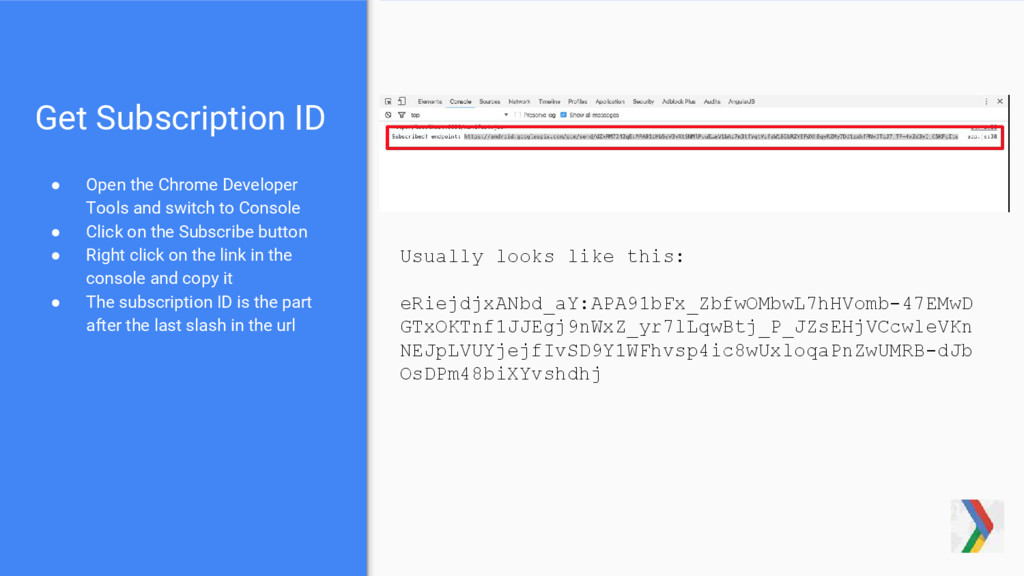
    switch to Console • Click on the Subscribe button • Right click on the link in the console and copy it • The subscription ID is the part after the last slash in the url Usually looks like this: eRiejdjxANbd_aY:APA91bFx_ZbfwOMbwL7hHVomb-47EMwD GTxOKTnf1JJEgj9nWxZ_yr7lLqwBtj_P_JZsEHjVCcwleVKn NEJpLVUYjejfIvSD9Y1WFhvsp4ic8wUxloqaPnZwUMRB-dJb OsDPm48biXYvshdhj
  20. Send GCM Push message request • Using curl or any

    HTTP Client Sample command using curl: curl --header "Authorization: key=XXXXXXXXXXXX" --header "Content-Type: application/json" https://android.googleapis.com/gcm/send -d "{\"registration_ids\":[\"fs...Tw:APA...SzXha\"] }"
  21. Show Notification • Add the code to sw.js file self.addEventListener('push',

    function (event) { console.log('Push message received', event); var title = 'Push Message'; // Show notification event.waitUntil( self.registration.showNotification(title, { body: 'The Message', icon: 'img/nn.min.png', tag: 'my-tag' }) ); });
  22. Handle notification clicks • Add the code to sw.js file

    self.addEventListener('notificationclick', function (event) { event.notification.close(); var url = 'https://attending.io/events/buildpwa-v2'; event.waitUntil( clients.matchAll({ type: 'window' }).then(function (windowClients) { windowClients.forEach(function (client) { if (client.url == url && 'focus' in client) { return client.focus(); } }); if (clients.openWindow) { return clients.openWindow(url); } }) ); });
  23. Pat yourself on the back. You built a web app

    that enables Push Notifications!
  24. Thanks! Adegoke Obasa Software Engineer Cotta & Cush Limited |

    adKandi @goke_epapa www.adegokeobasa.me