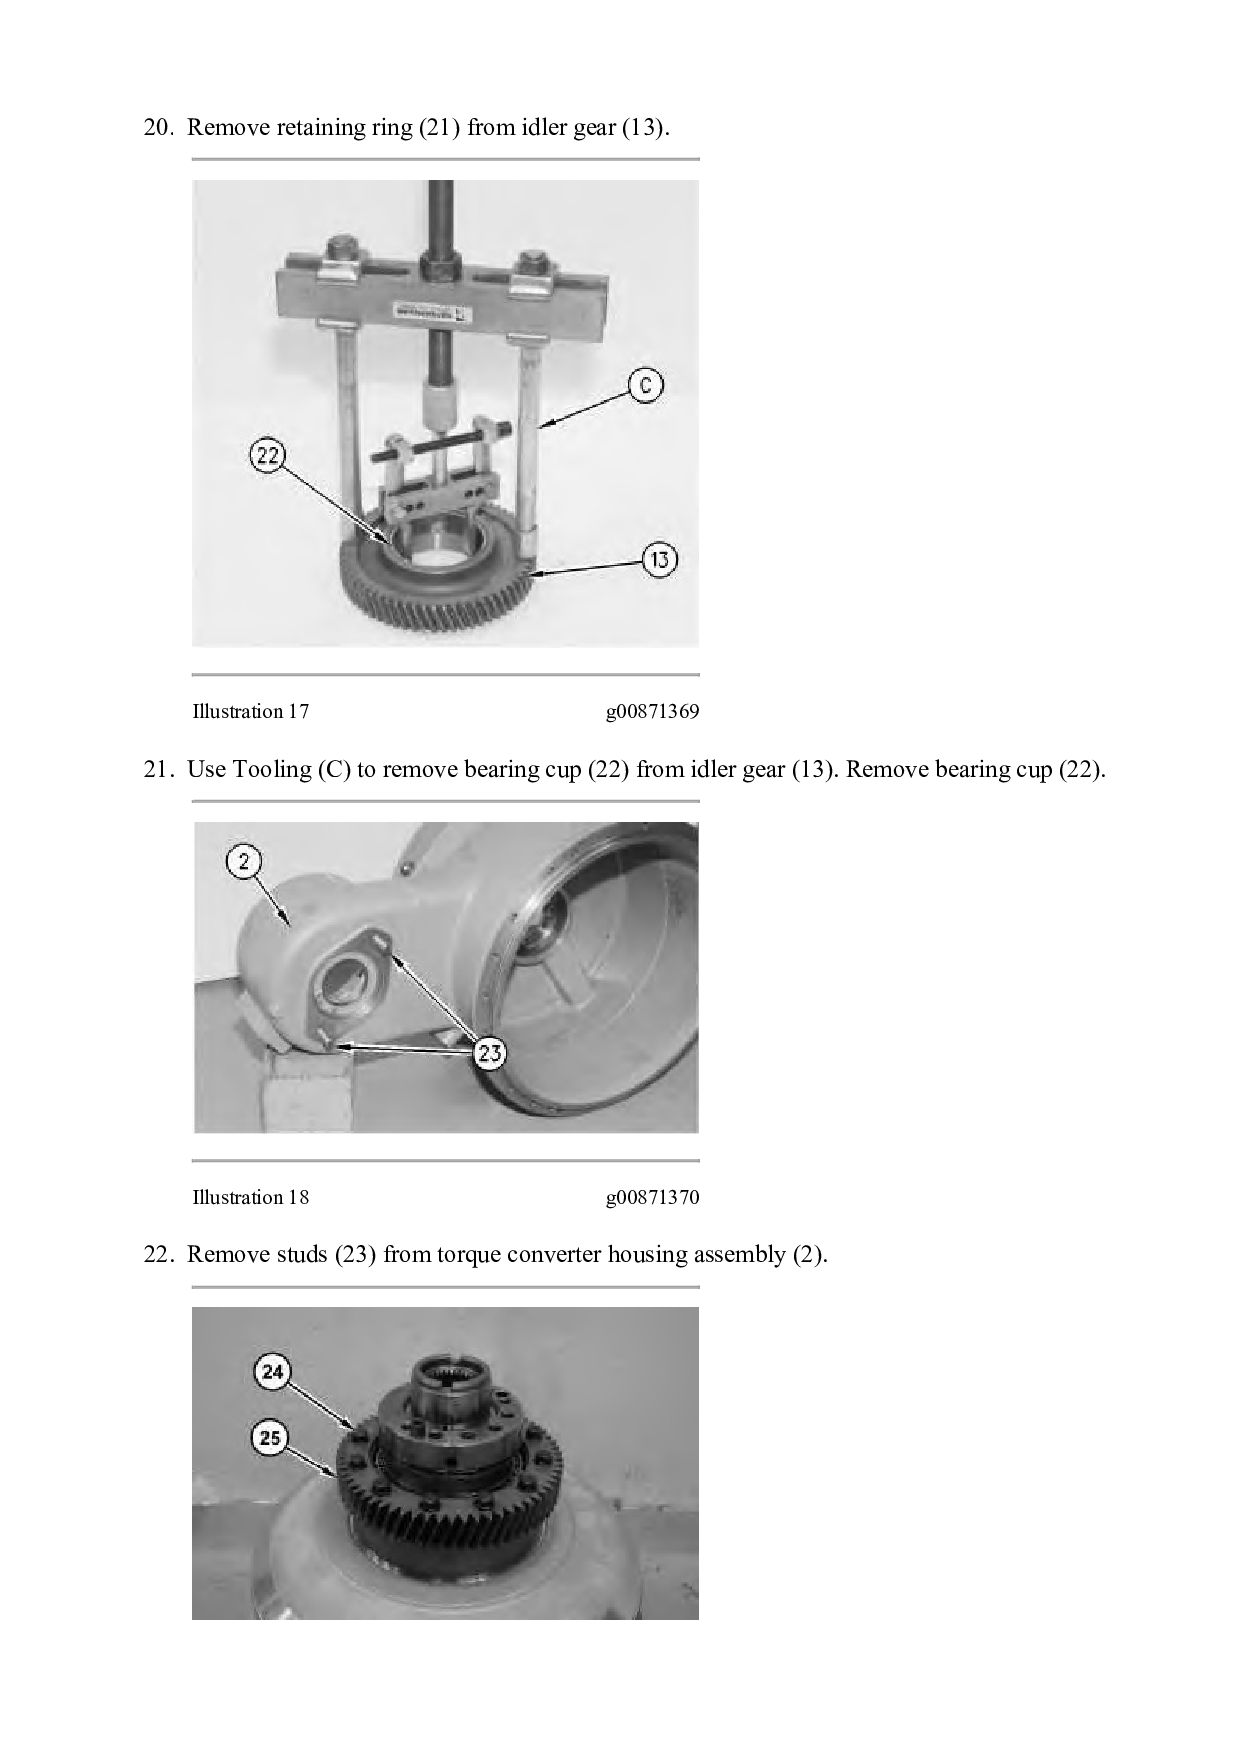
LOADER XDJ Configuration: 980M Wheel Loader XDJ00001-UP (MACHINE) POWERED BY C13 Engine Disassembly and Assembly 980M T4 and 982M T4 Wheel Loader Power Train Media Number -M0075587-02 Publication Date -01/08/2012 Date Updated -17/07/2018 i06838048 Torque Converter - Disassemble - Lock Up Clutch With Freewheel Stator SMCS - 3101-015 Disassembly Procedure Table 1 Required Tools Tool Part Number Part Description Qty A 439-3938 Link Bracket 3 B 8B-7548 Push-Puller 1 8B-7550 Leg 2 8H-0684 Ratchet Wrench 1 8B-7560 Step Plate 1 8H-0663 Bearing Puller Attachment 1 C 8B-7548 Push-Puller 1 8H-0684 Ratchet Wrench 1 8B-7549 Leg 2 5P-4808 Cap 2 8B-7554 Bearing Cup Puller Attachment 1 D 5F-7343 Bearing Puller Attachment 1 1P-0520 Driver Group 1 E 1P-0510 Driver Group 1
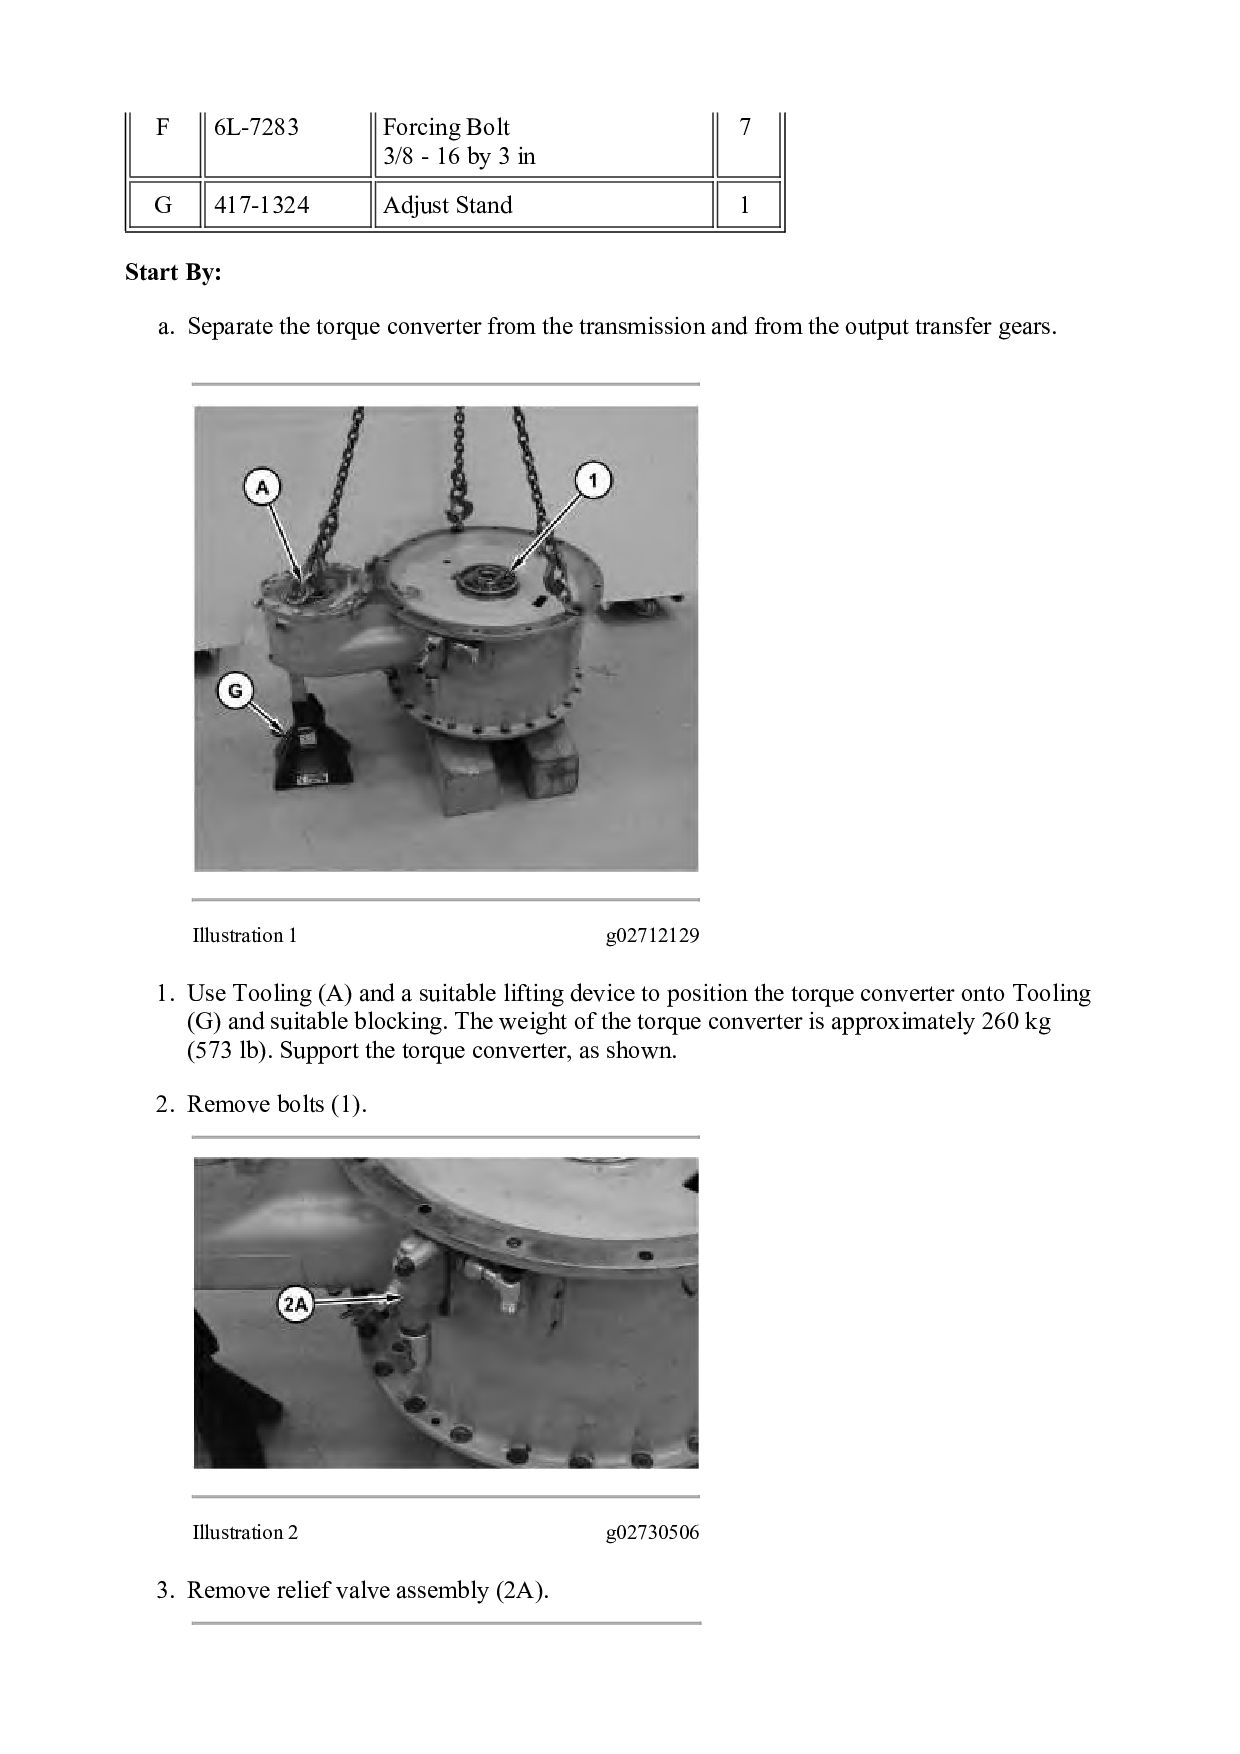
7 G 417-1324 Adjust Stand 1 Start By: a. Separate the torque converter from the transmission and from the output transfer gears. Illustration 1 g02712129 1. Use Tooling (A) and a suitable lifting device to position the torque converter onto Tooling (G) and suitable blocking. The weight of the torque converter is approximately 260 kg (573 lb). Support the torque converter, as shown. 2. Remove bolts (1). Illustration 2 g02730506 3. Remove relief valve assembly (2A).
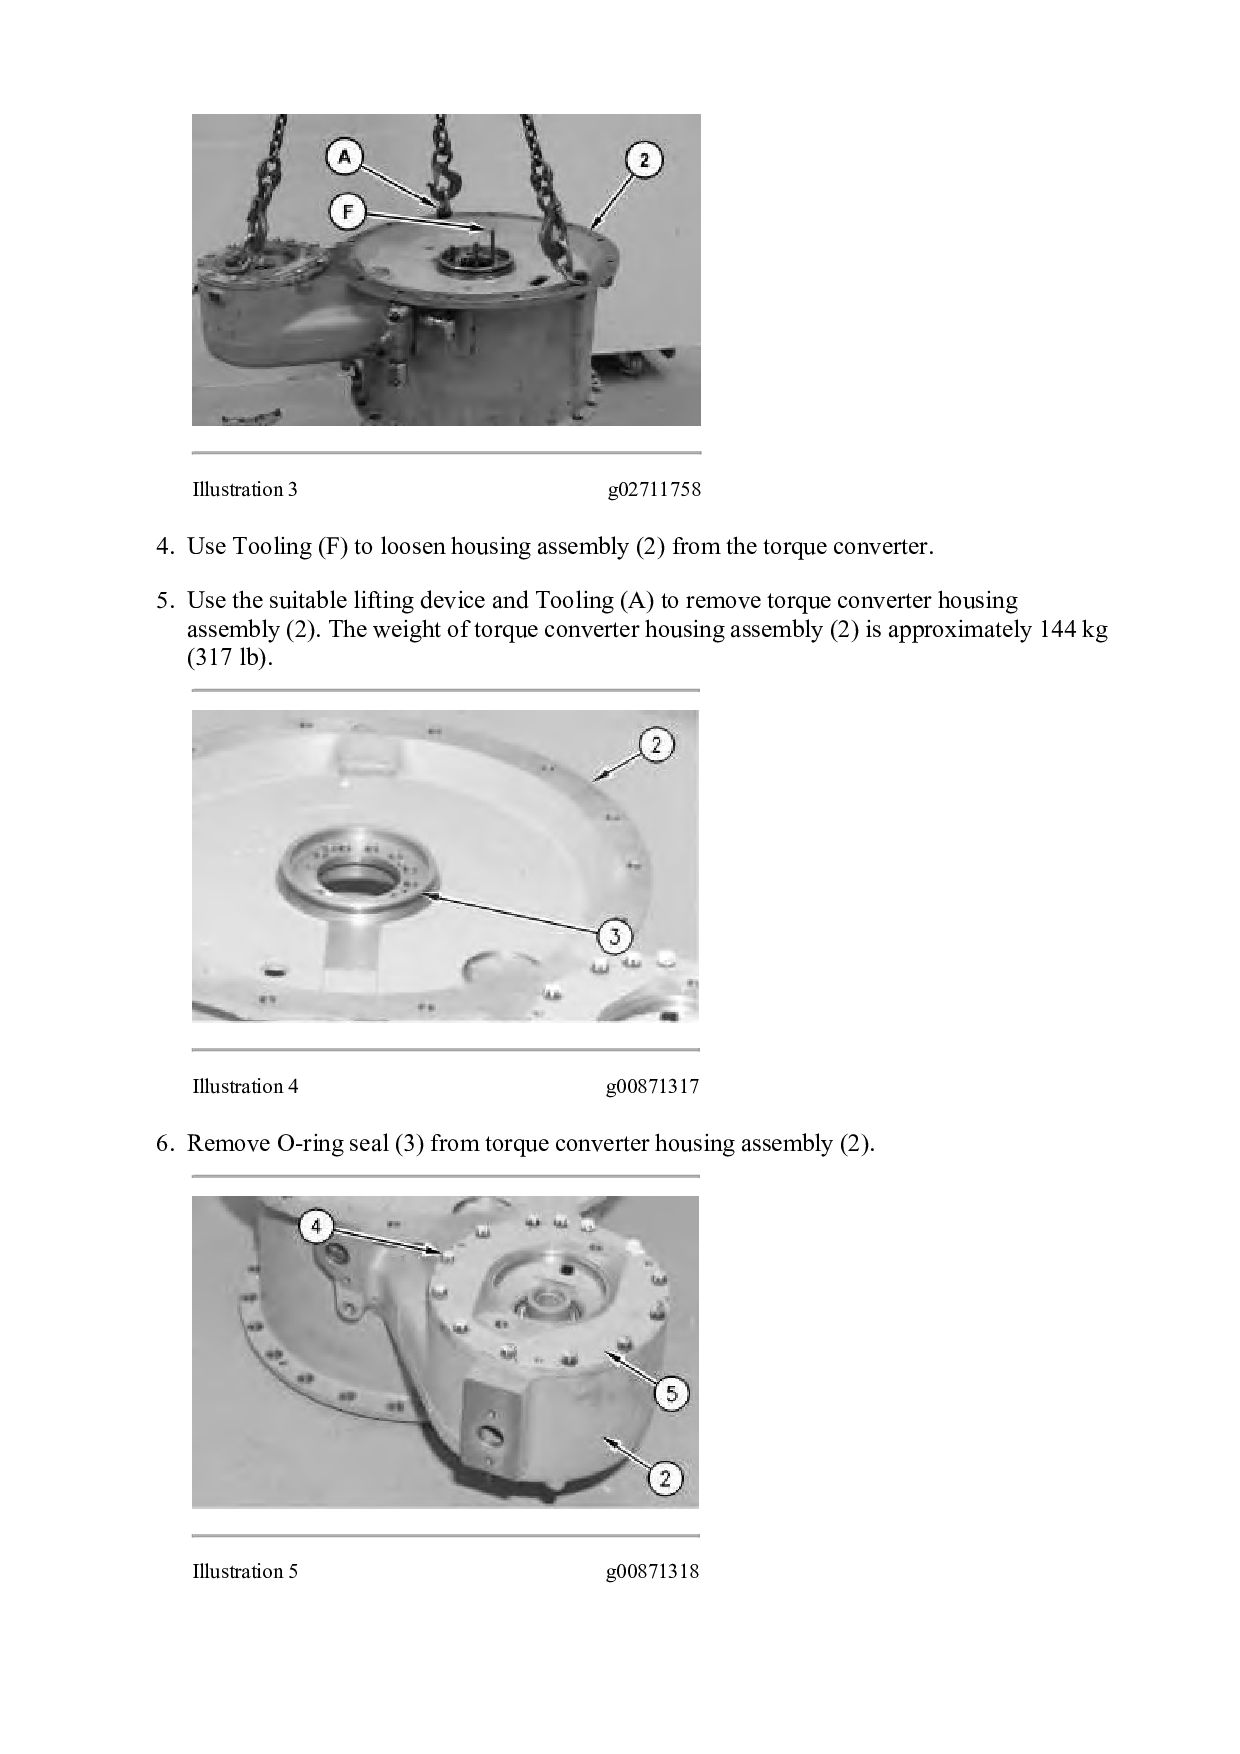
assembly (2) from the torque converter. 5. Use the suitable lifting device and Tooling (A) to remove torque converter housing assembly (2). The weight of torque converter housing assembly (2) is approximately 144 kg (317 lb). Illustration 4 g00871317 6. Remove O-ring seal (3) from torque converter housing assembly (2). Illustration 5 g00871318
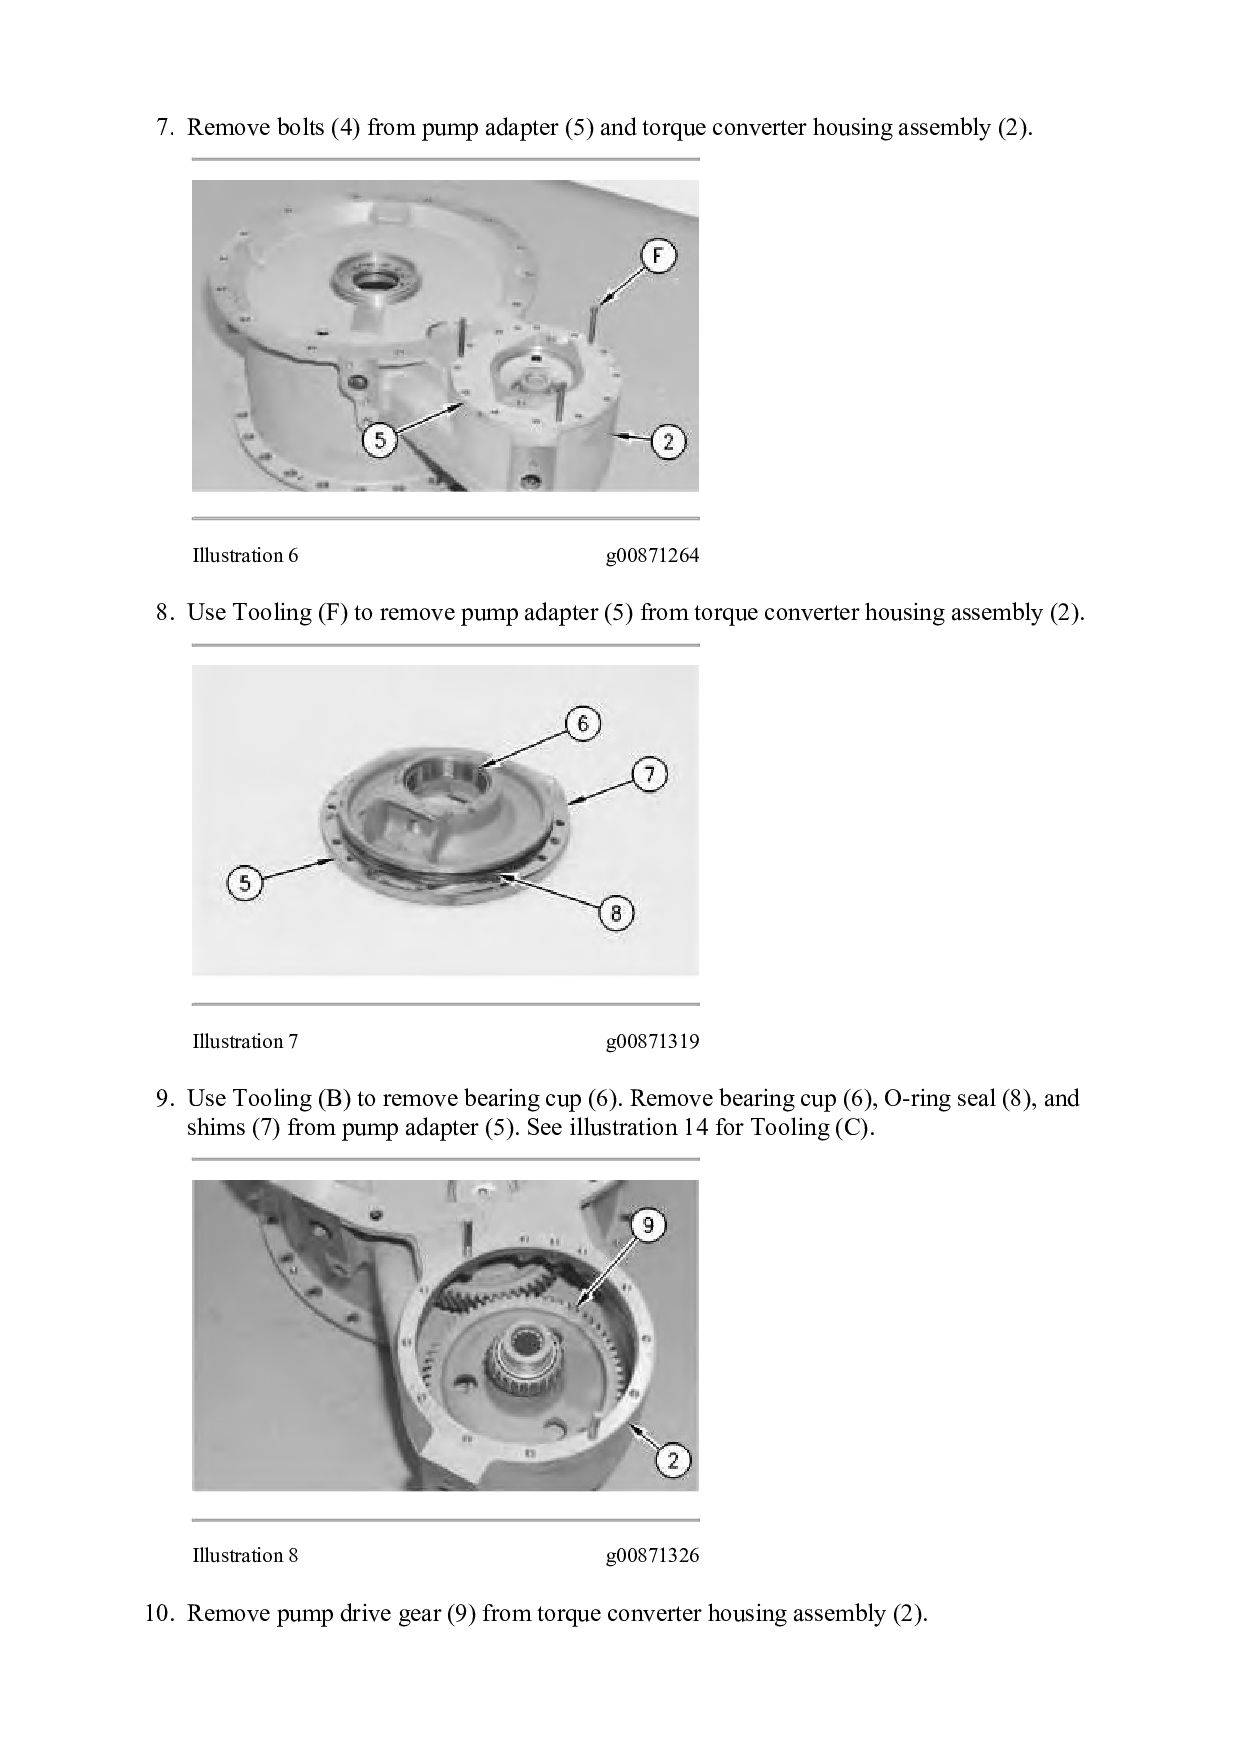
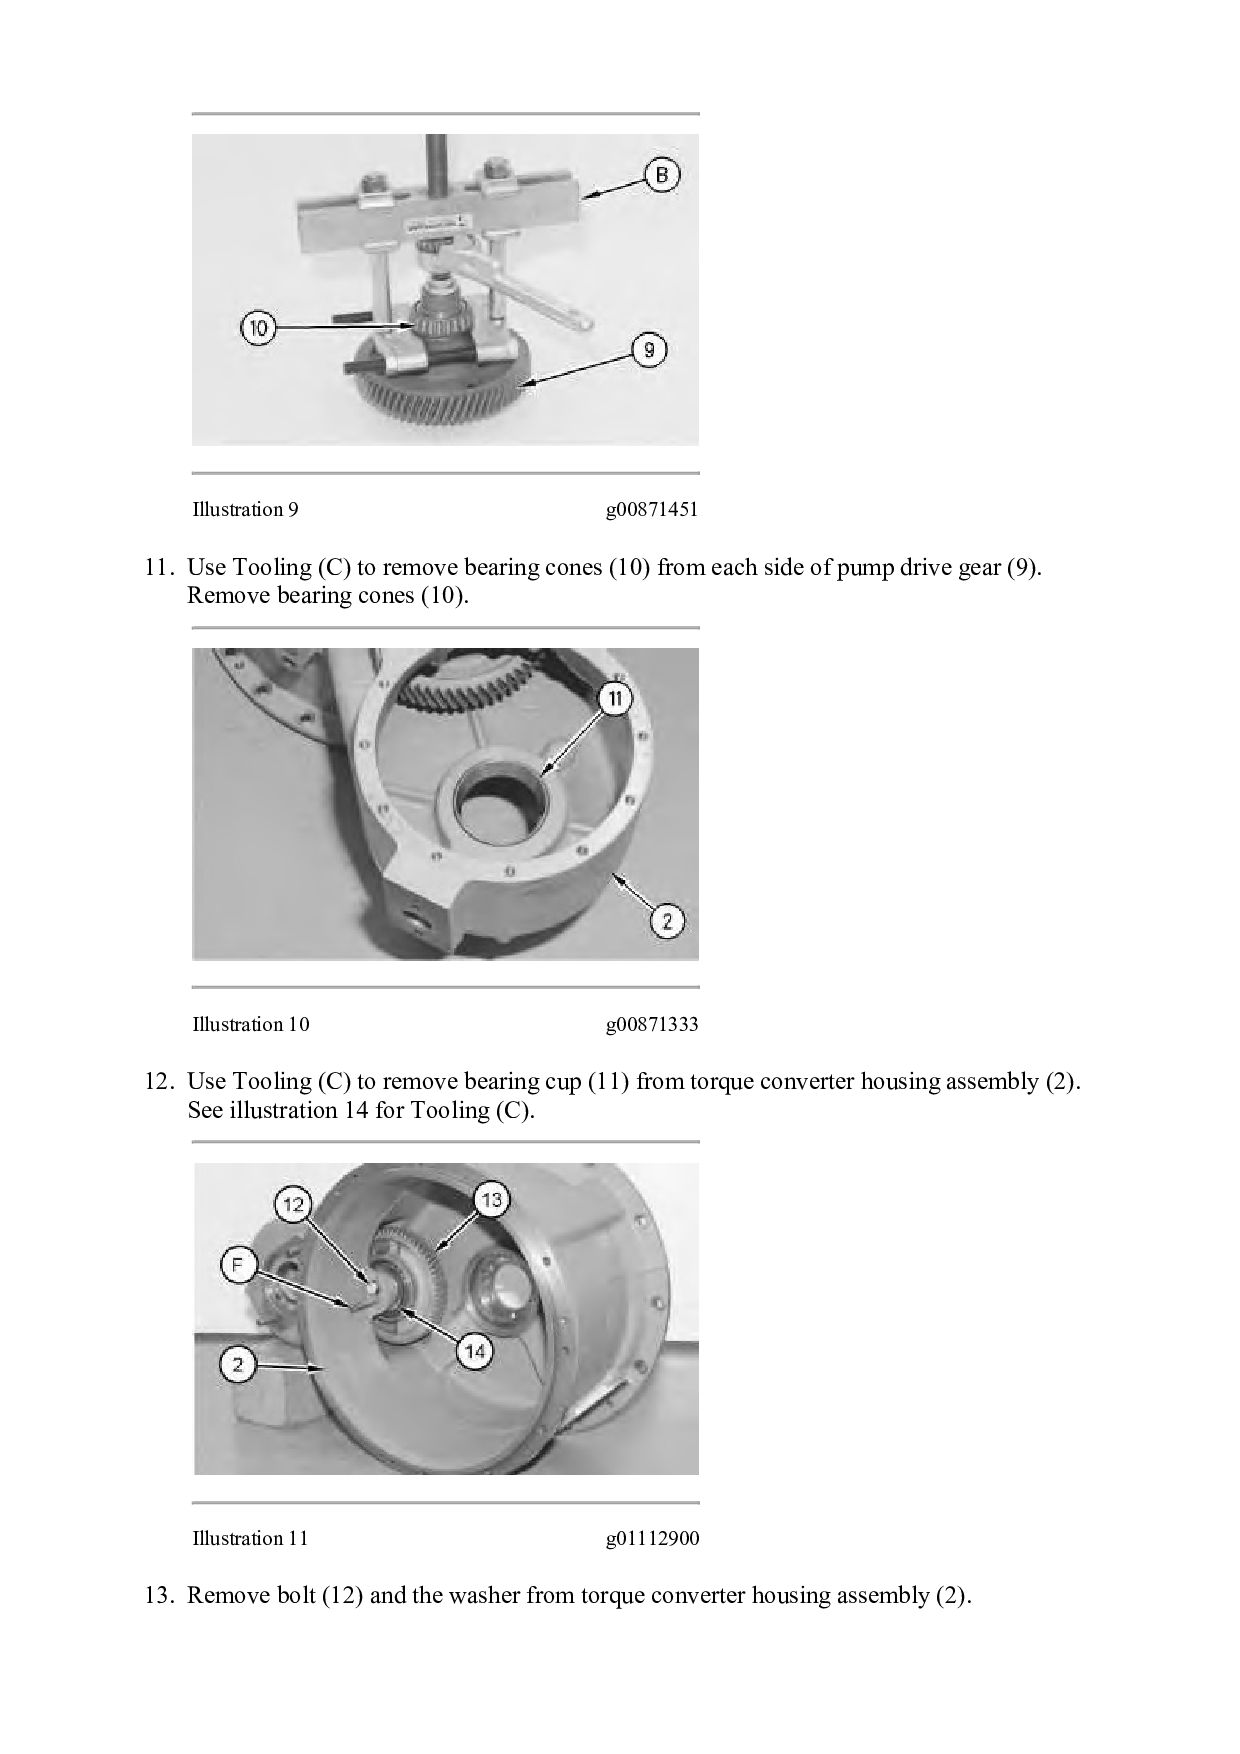
cones (10) from each side of pump drive gear (9). Remove bearing cones (10). Illustration 10 g00871333 12. Use Tooling (C) to remove bearing cup (11) from torque converter housing assembly (2). See illustration 14 for Tooling (C). Illustration 11 g01112900 13. Remove bolt (12) and the washer from torque converter housing assembly (2).
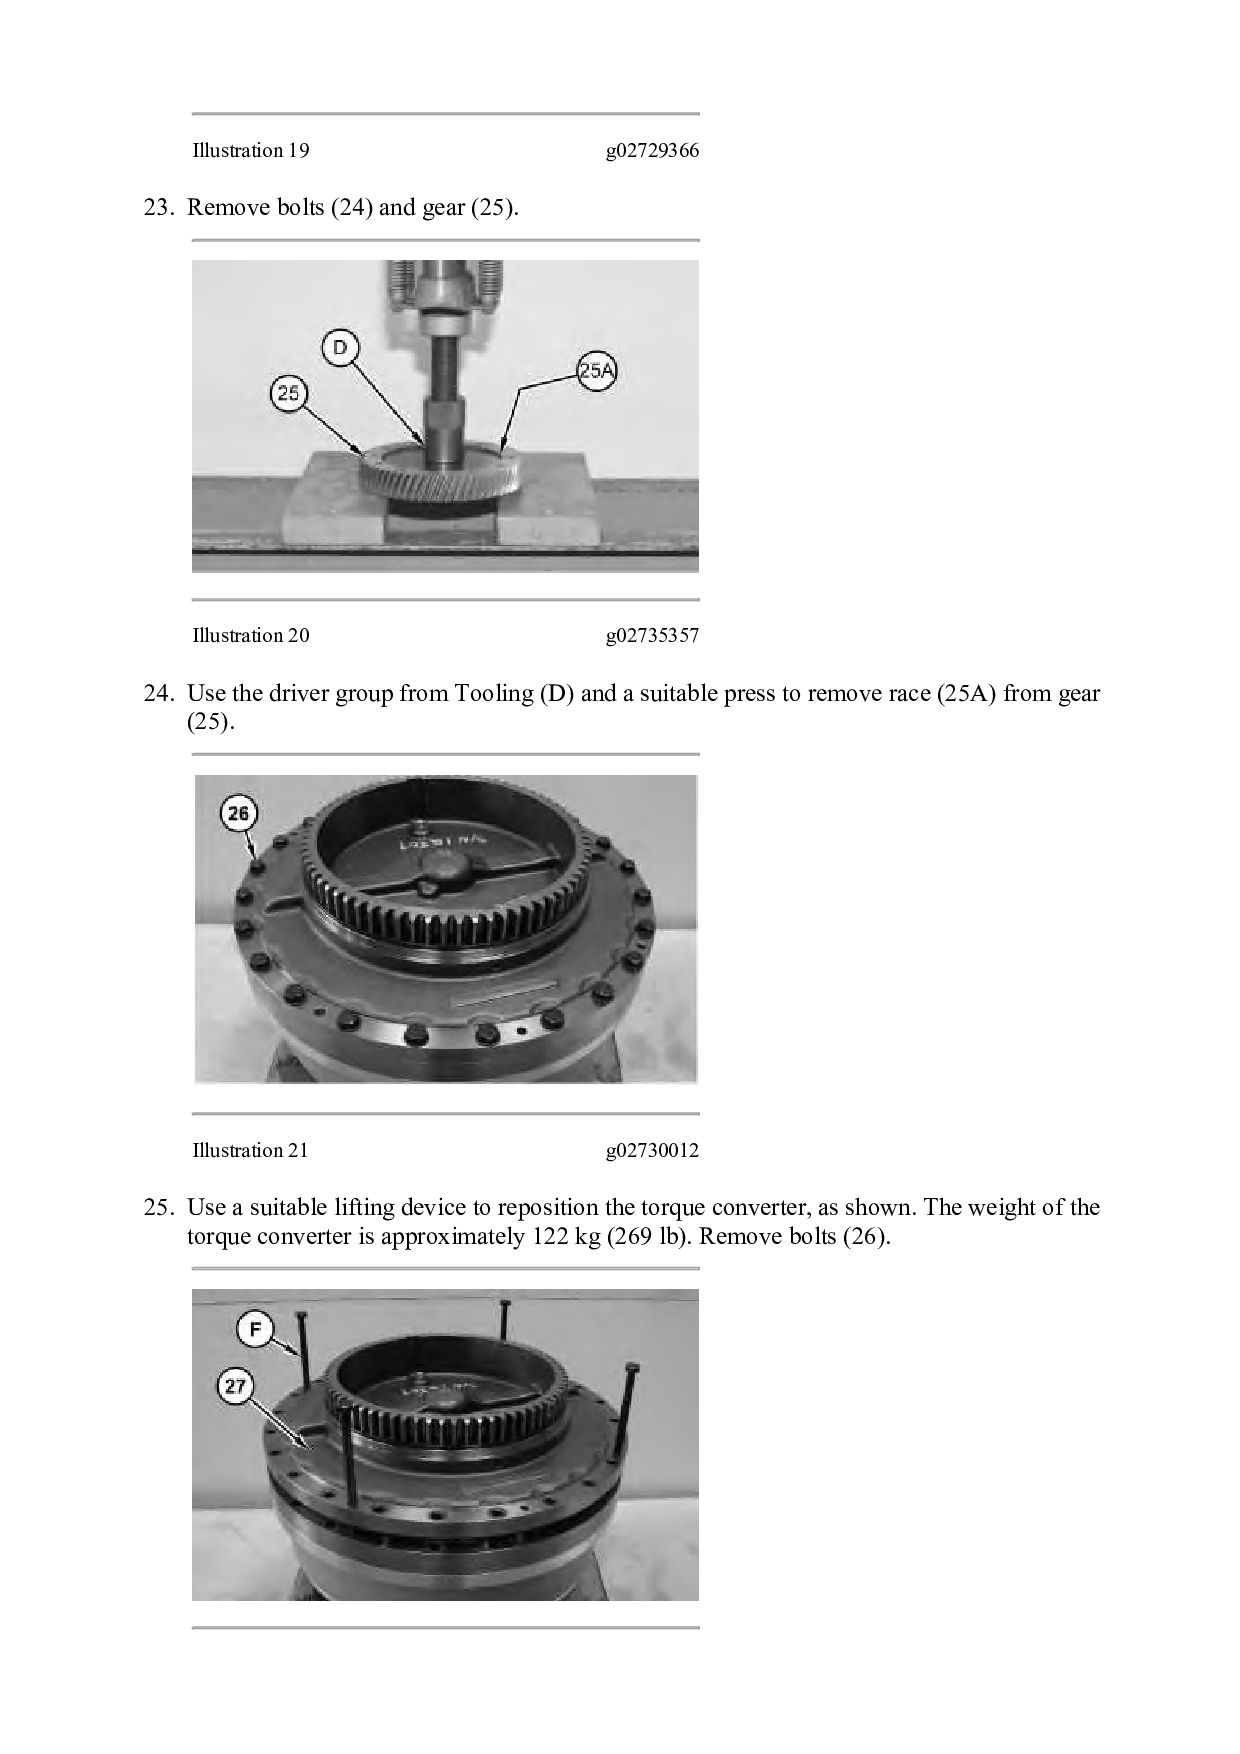
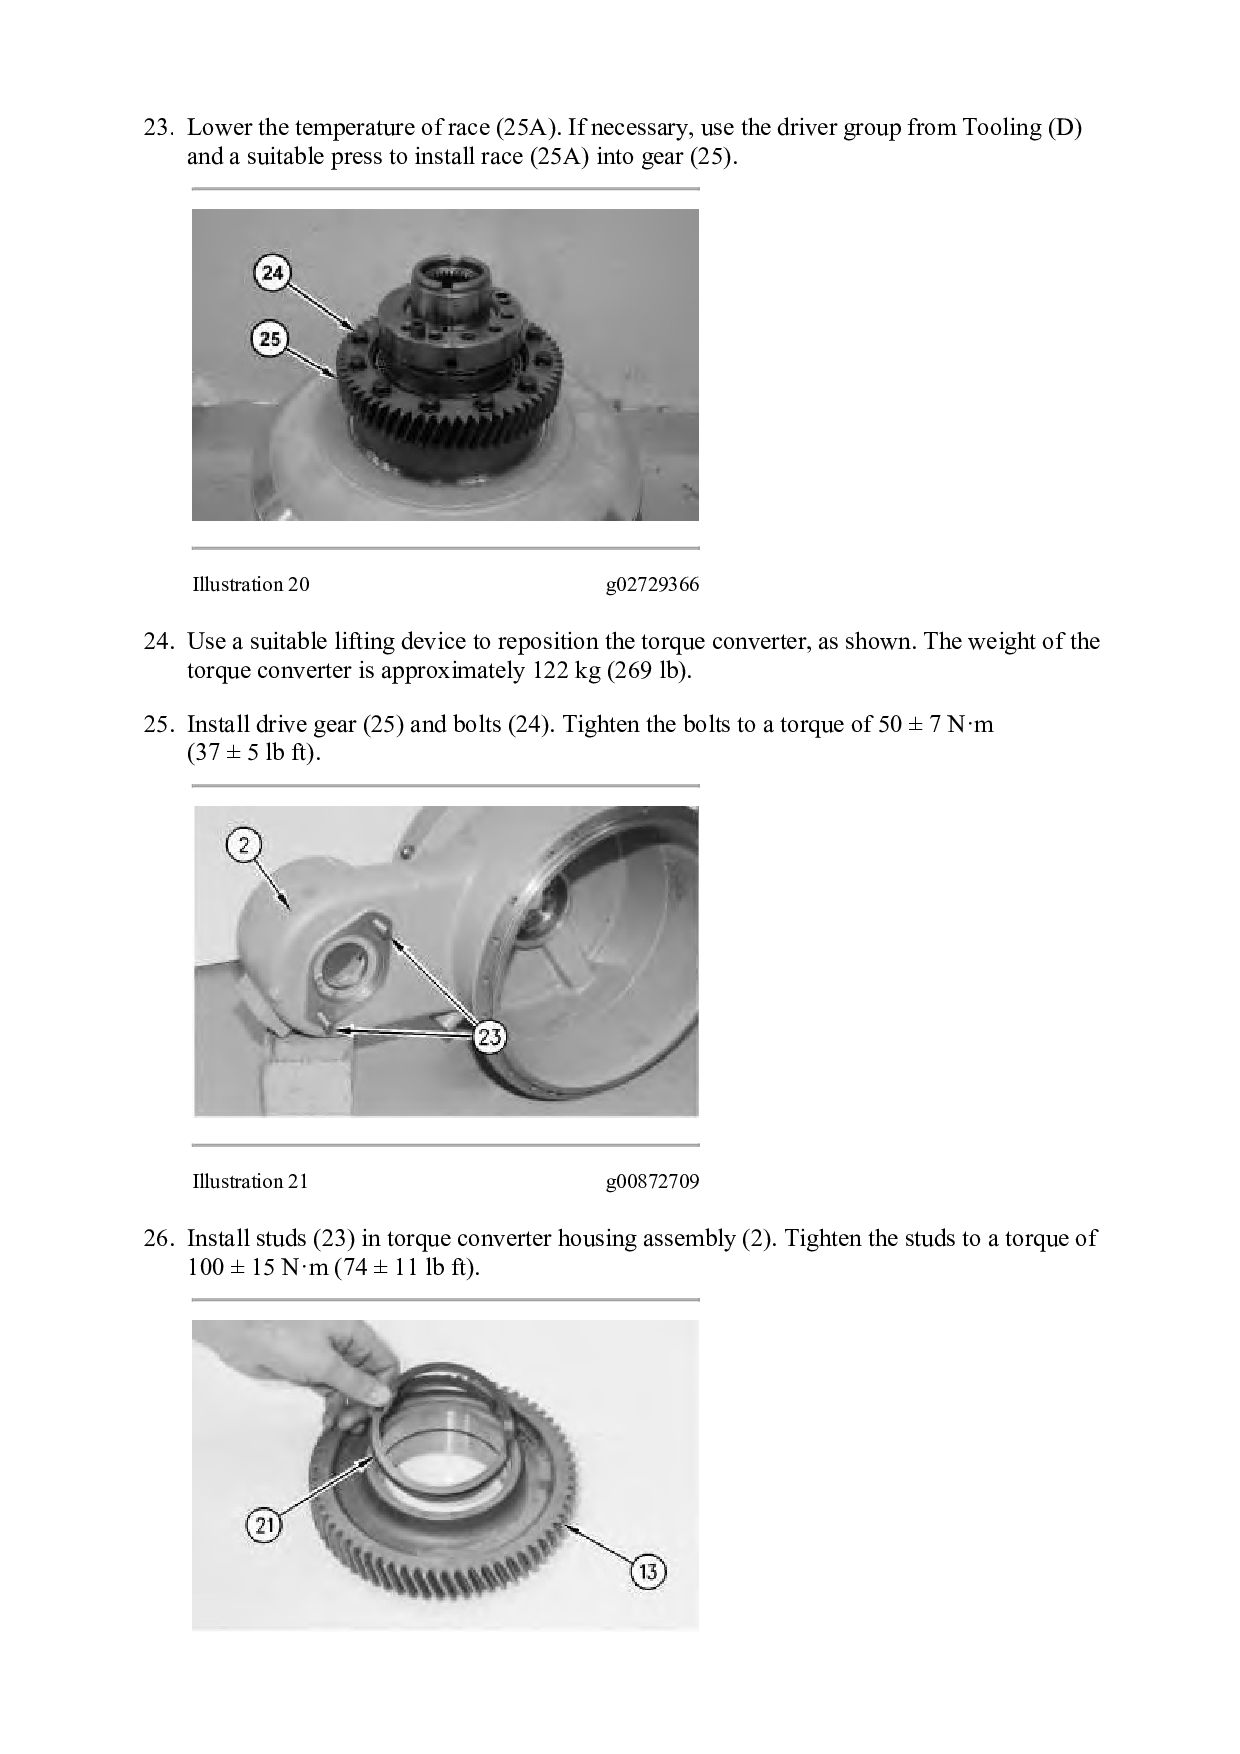
Illustration 20 g02735357 24. Use the driver group from Tooling (D) and a suitable press to remove race (25A) from gear (25). Illustration 21 g02730012 25. Use a suitable lifting device to reposition the torque converter, as shown. The weight of the torque converter is approximately 122 kg (269 lb). Remove bolts (26).
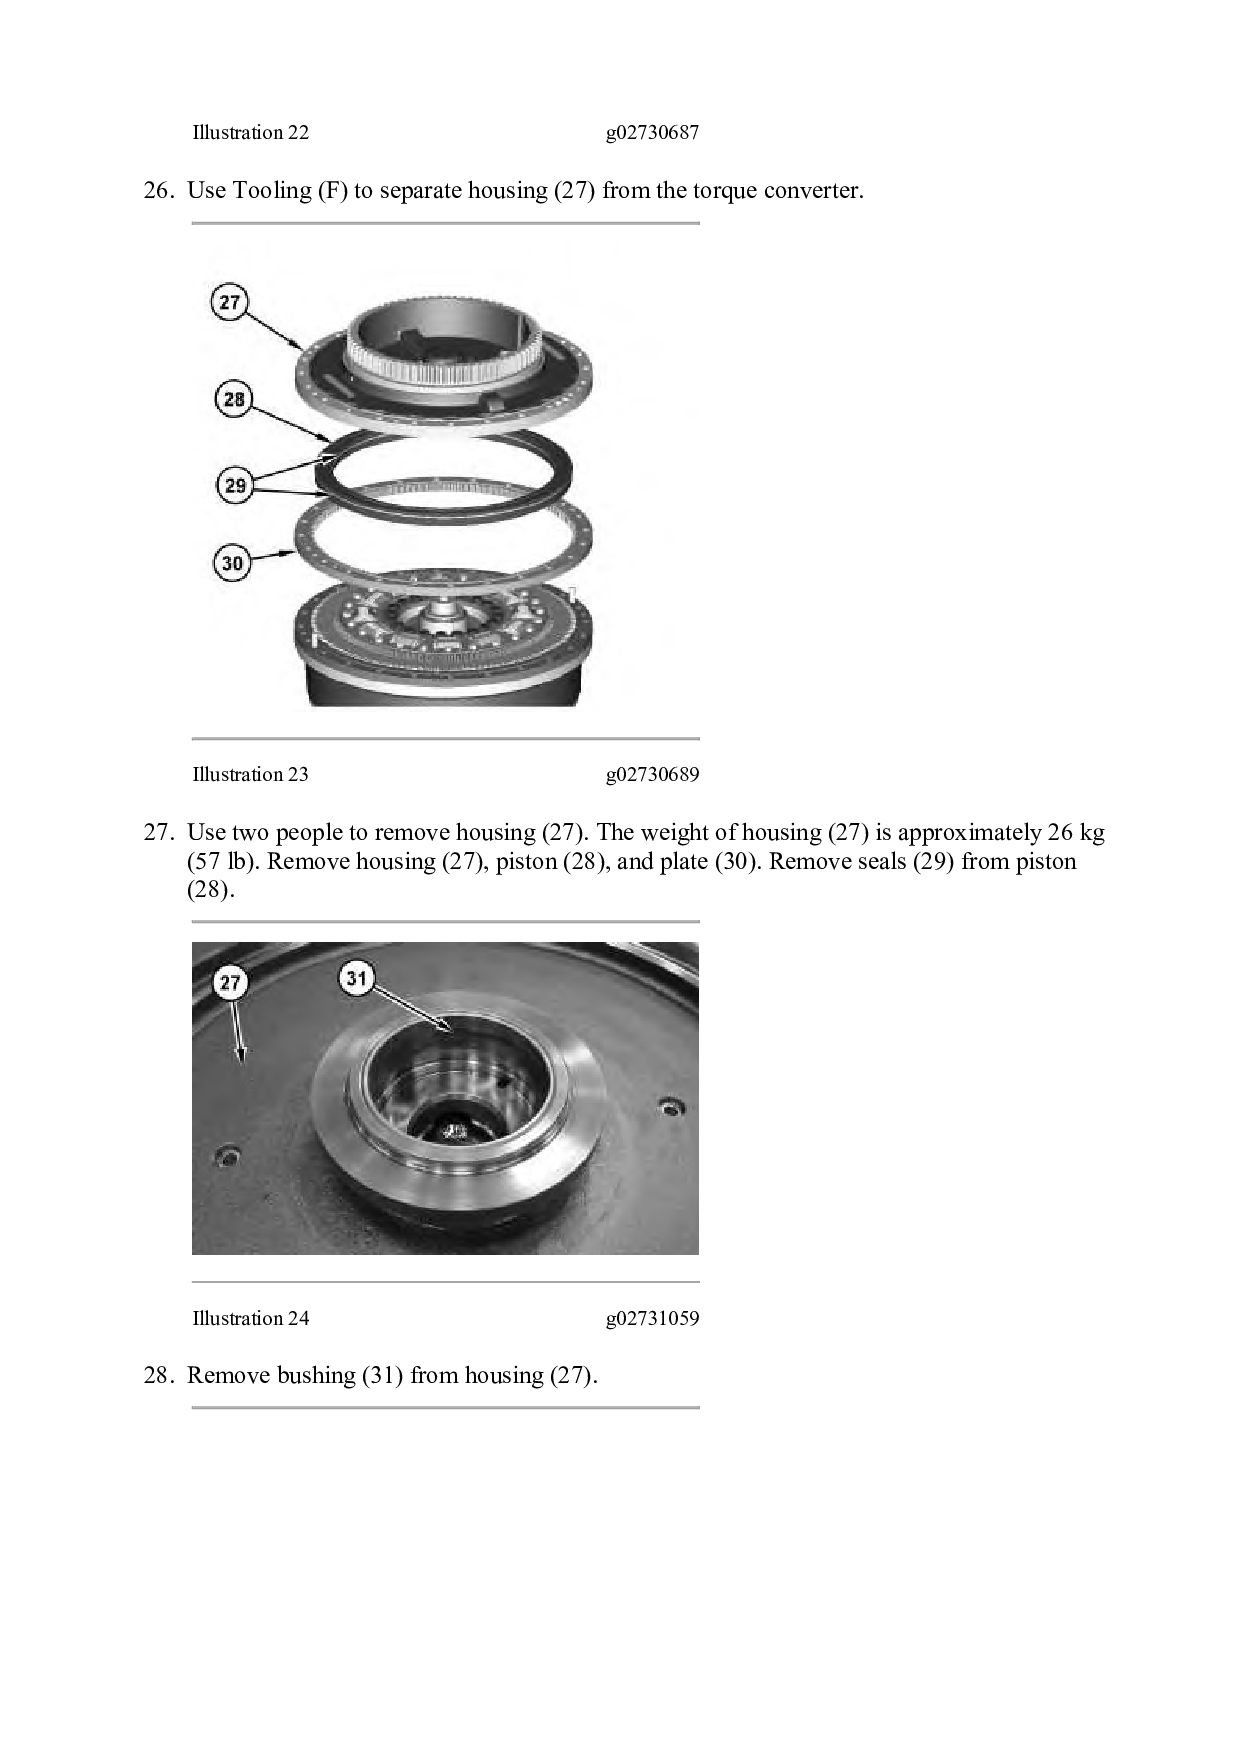
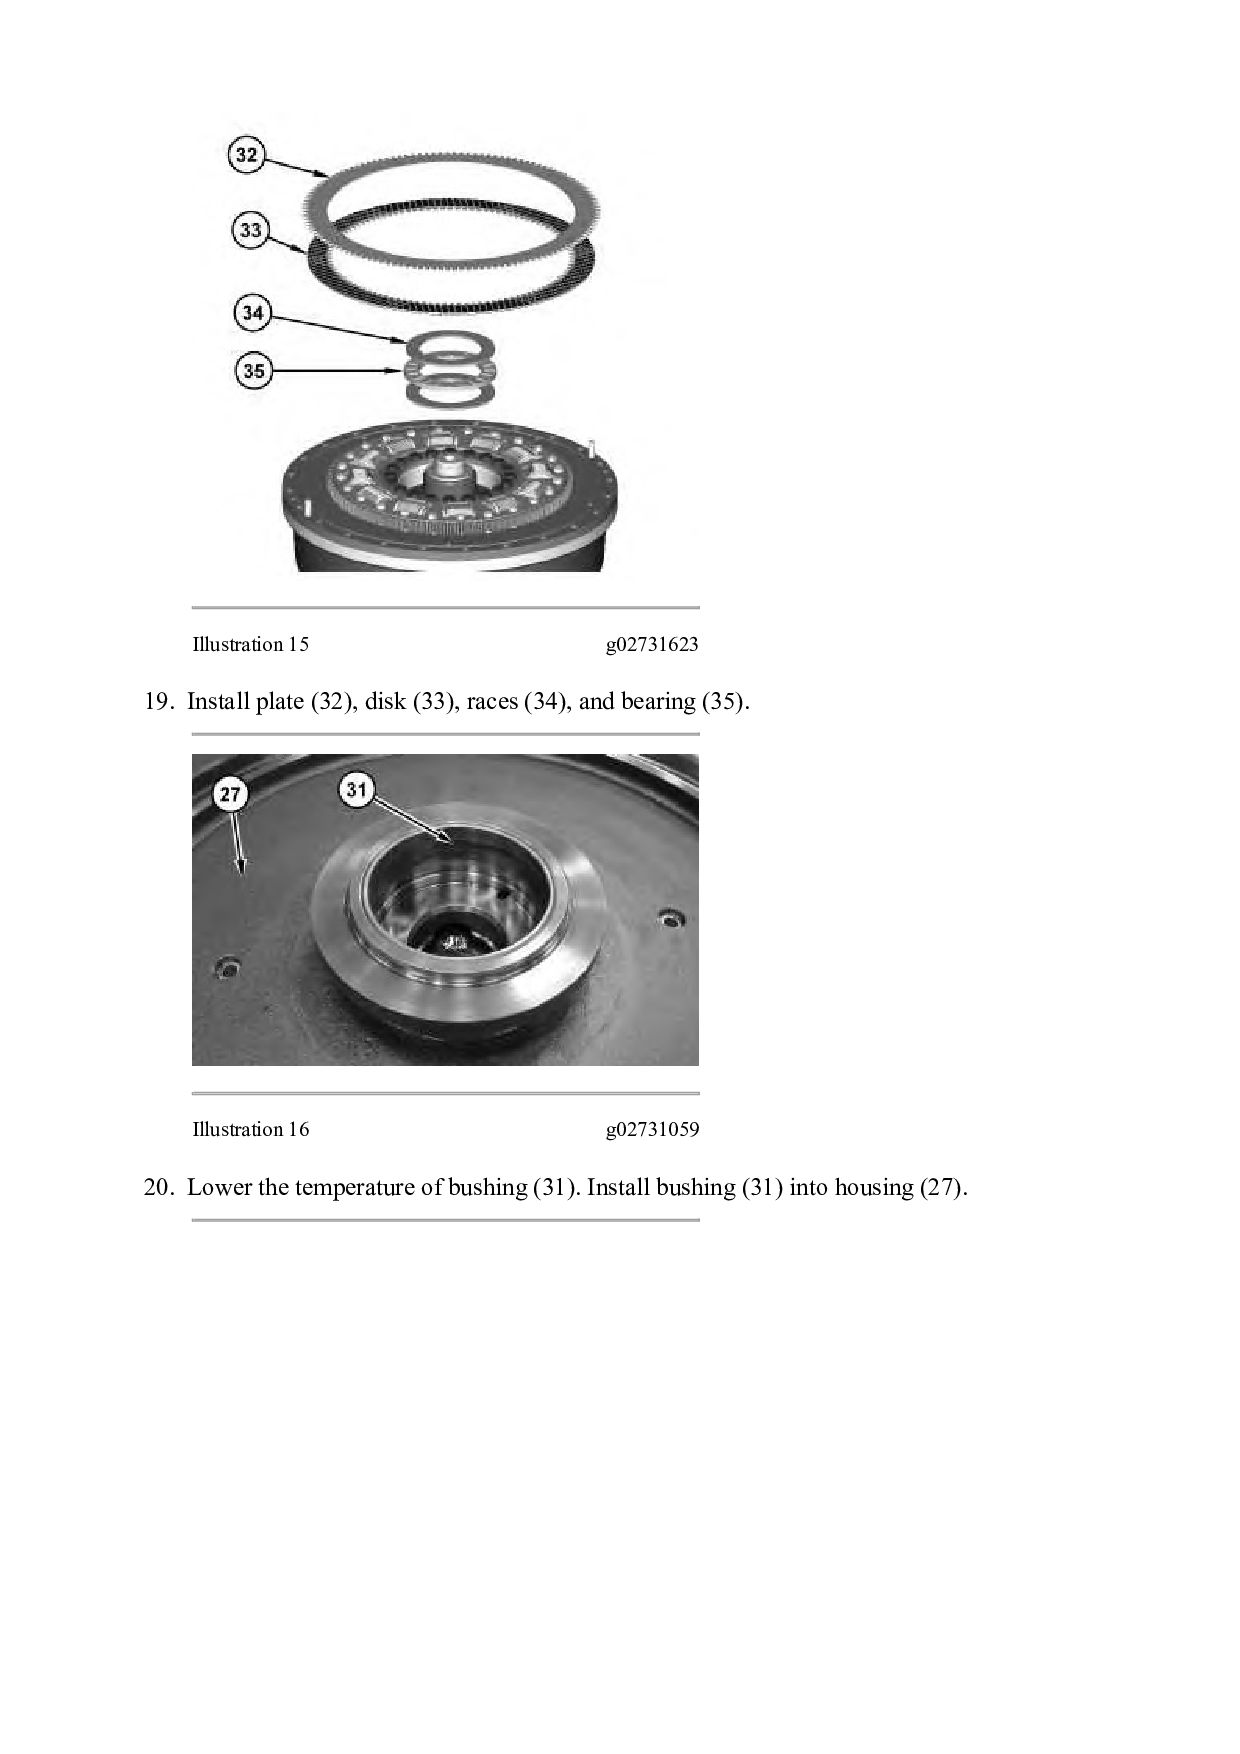
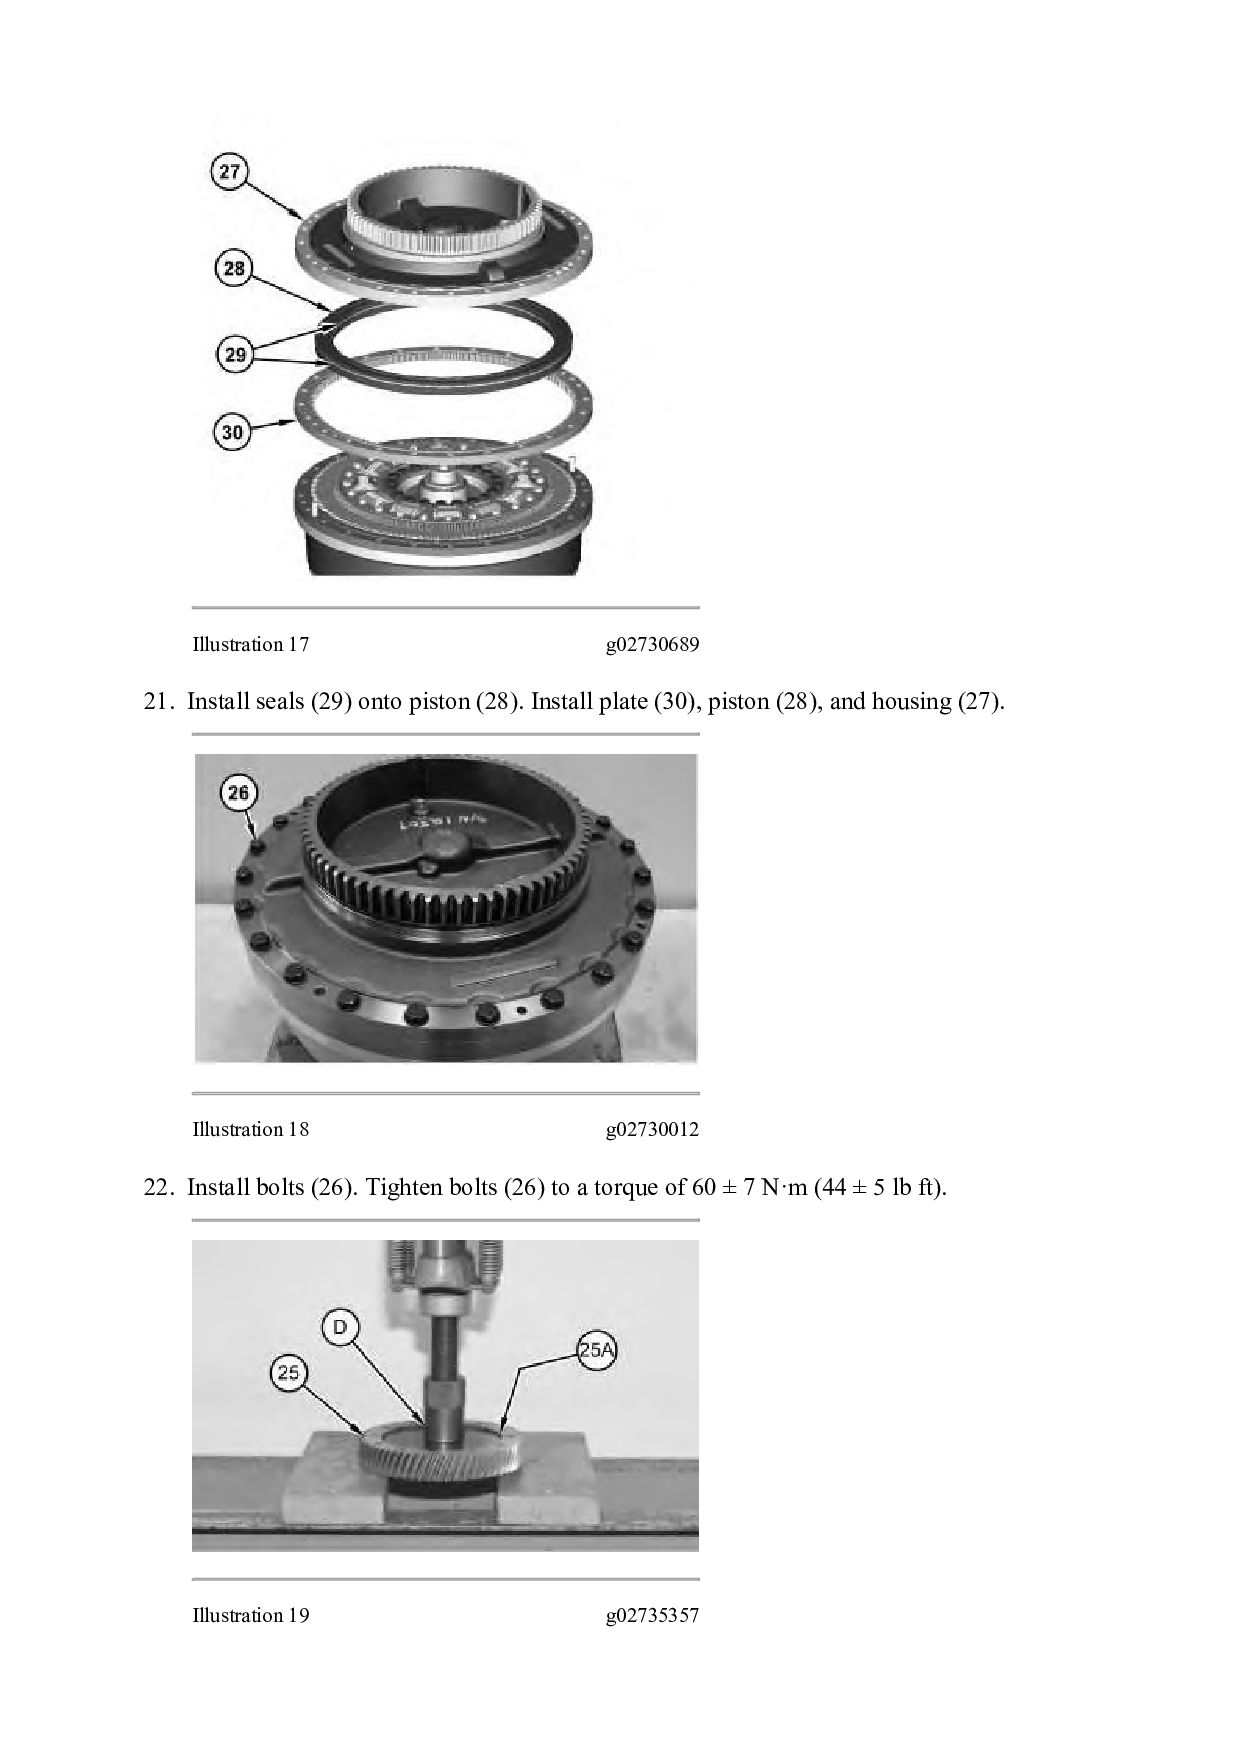
(27) from the torque converter. Illustration 23 g02730689 27. Use two people to remove housing (27). The weight of housing (27) is approximately 26 kg (57 lb). Remove housing (27), piston (28), and plate (30). Remove seals (29) from piston (28). Illustration 24 g02731059 28. Remove bushing (31) from housing (27).
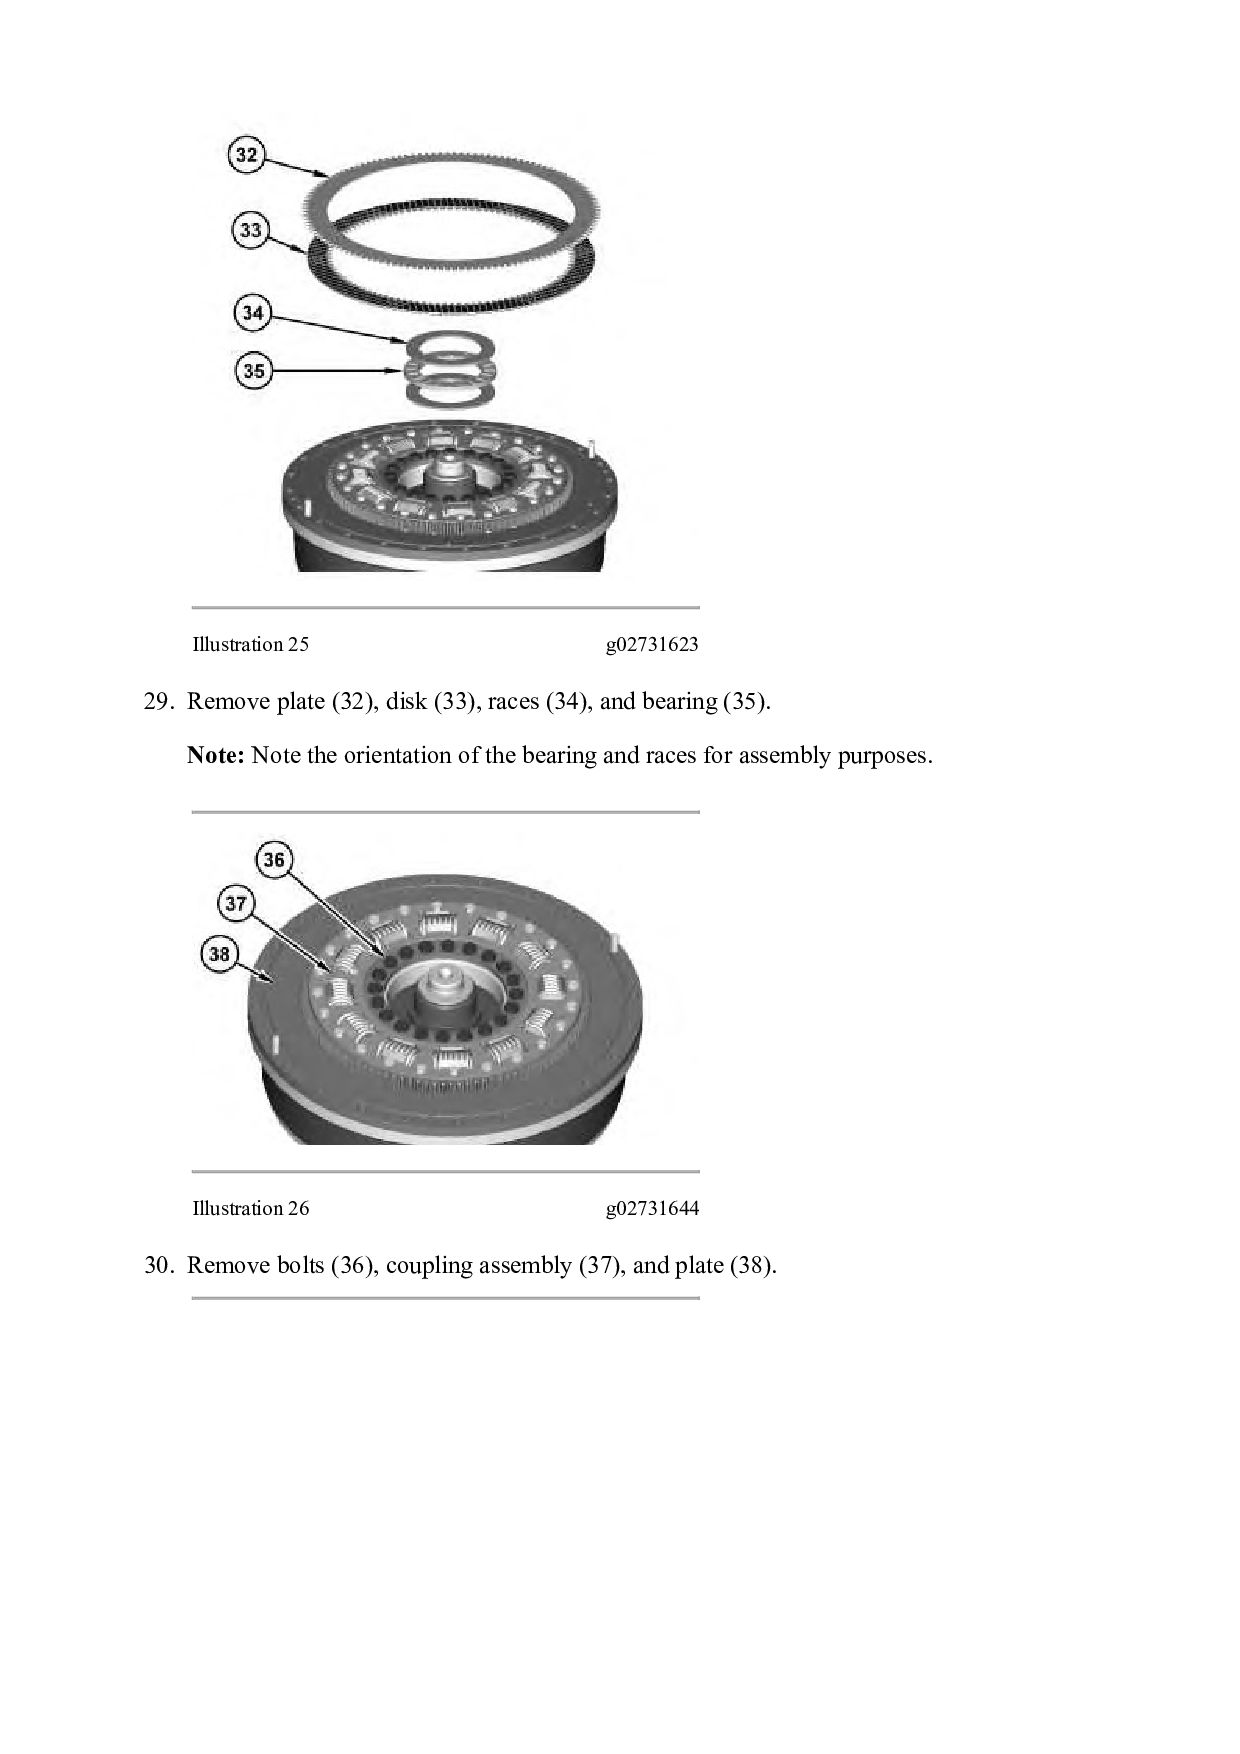
(34), and bearing (35). Note: Note the orientation of the bearing and races for assembly purposes. Illustration 26 g02731644 30. Remove bolts (36), coupling assembly (37), and plate (38).
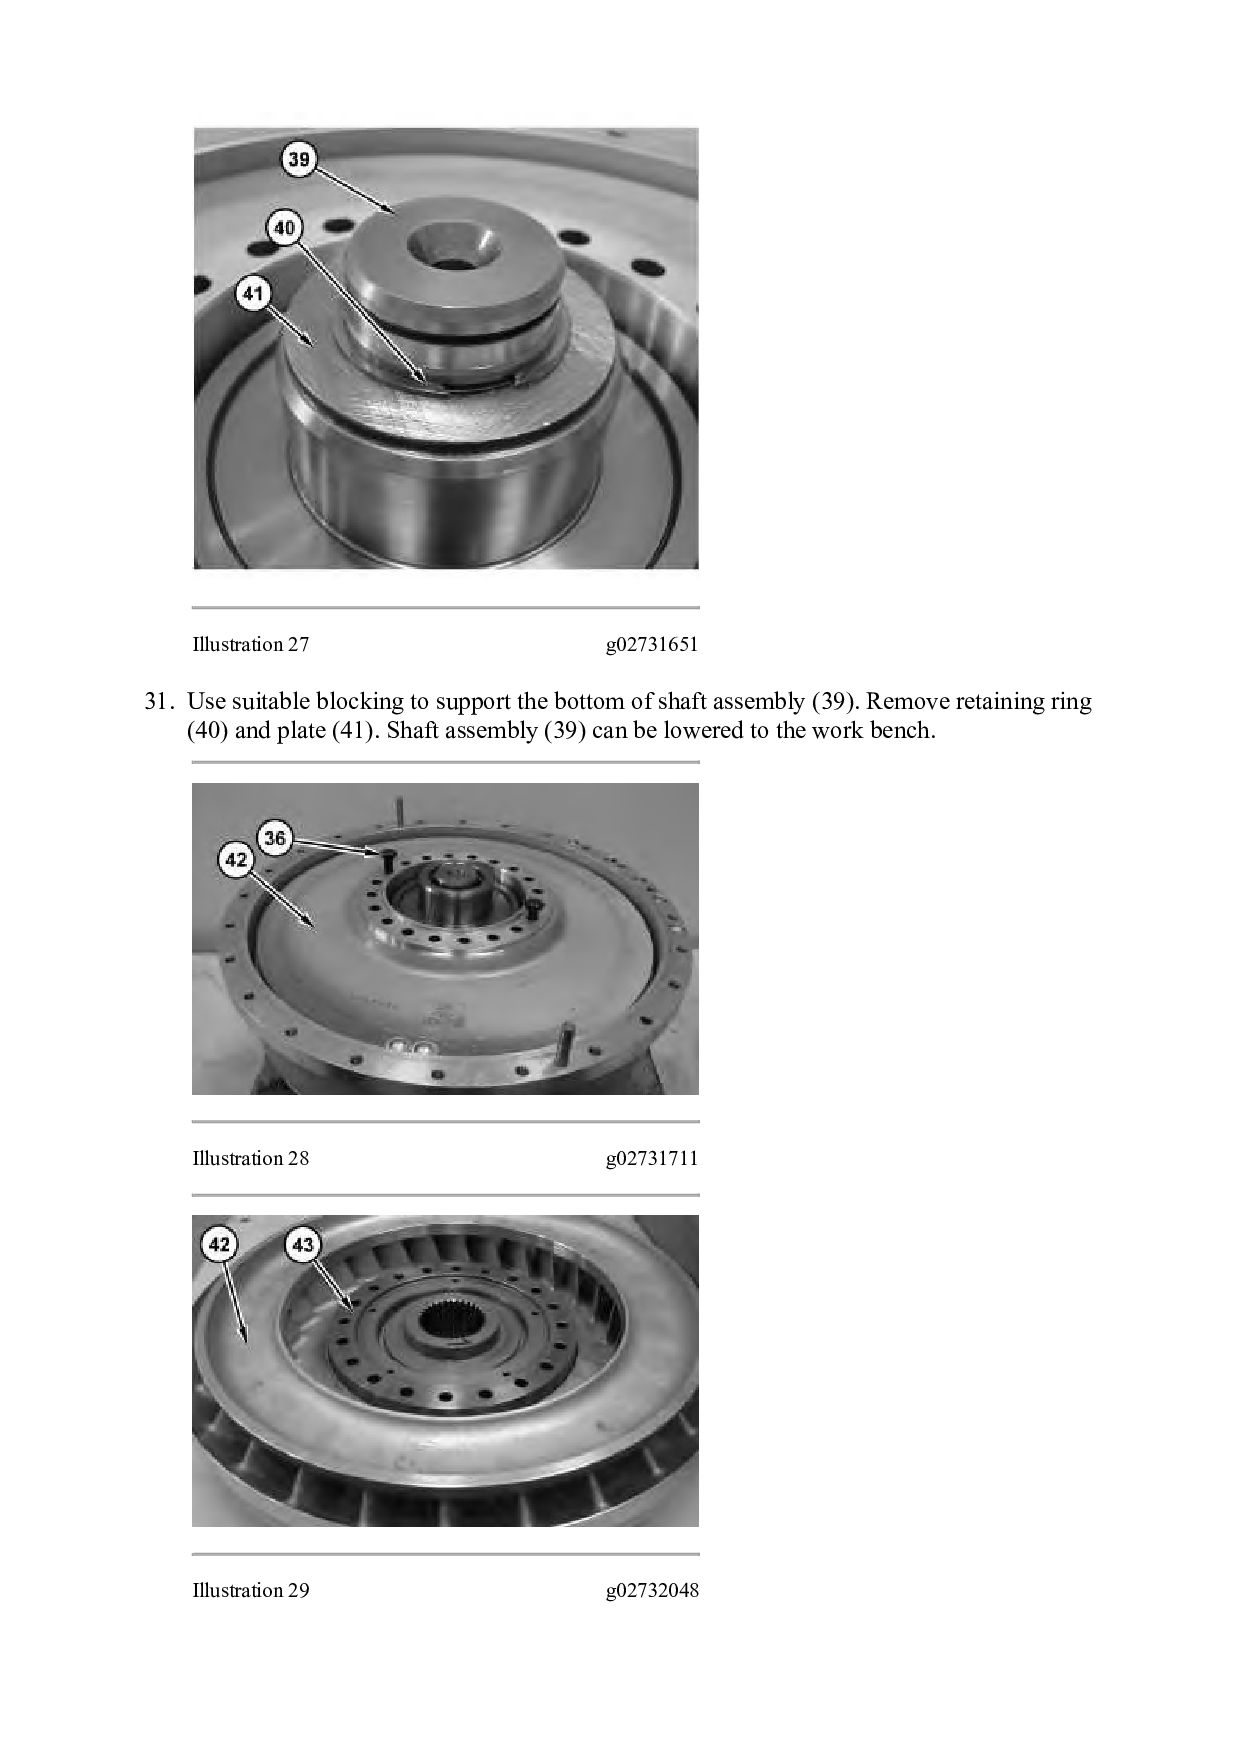
bottom of shaft assembly (39). Remove retaining ring (40) and plate (41). Shaft assembly (39) can be lowered to the work bench. Illustration 28 g02731711 Illustration 29 g02732048
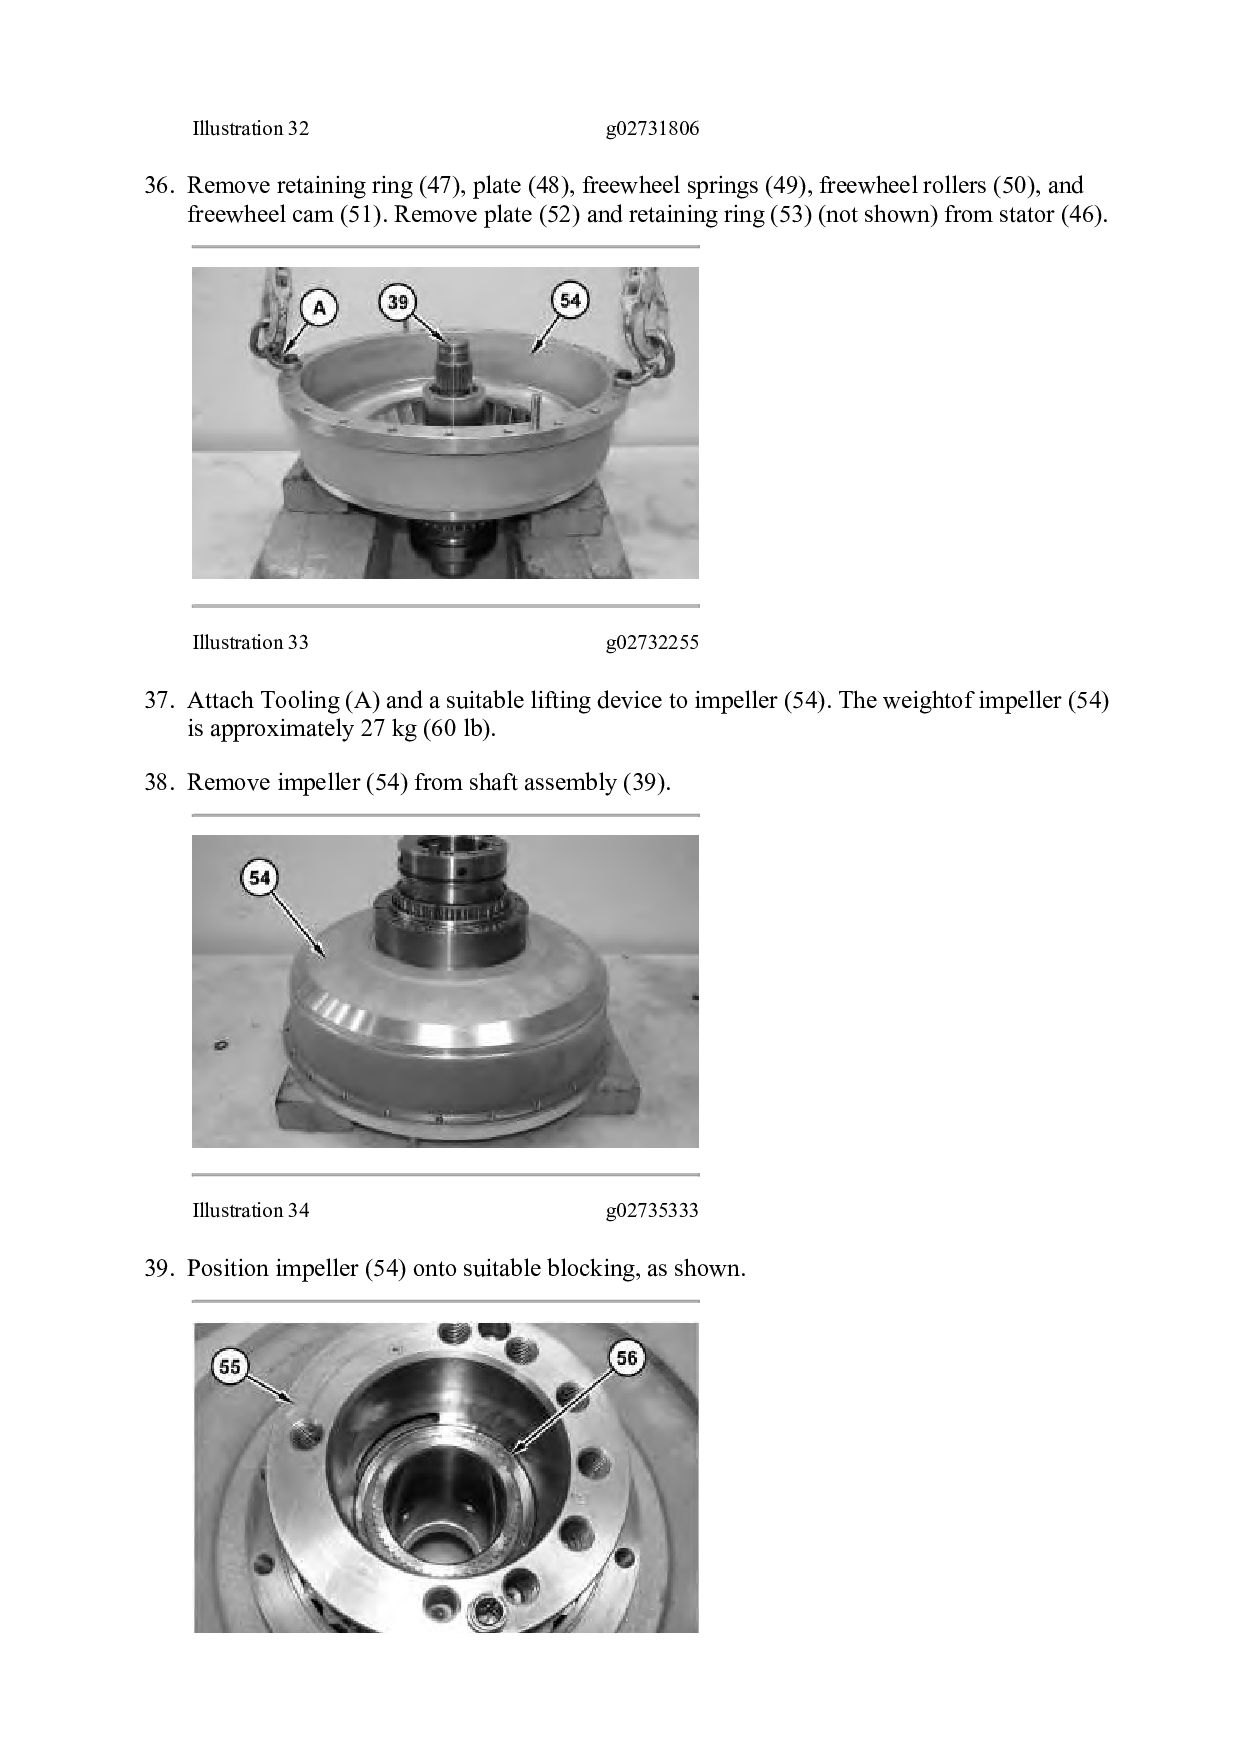
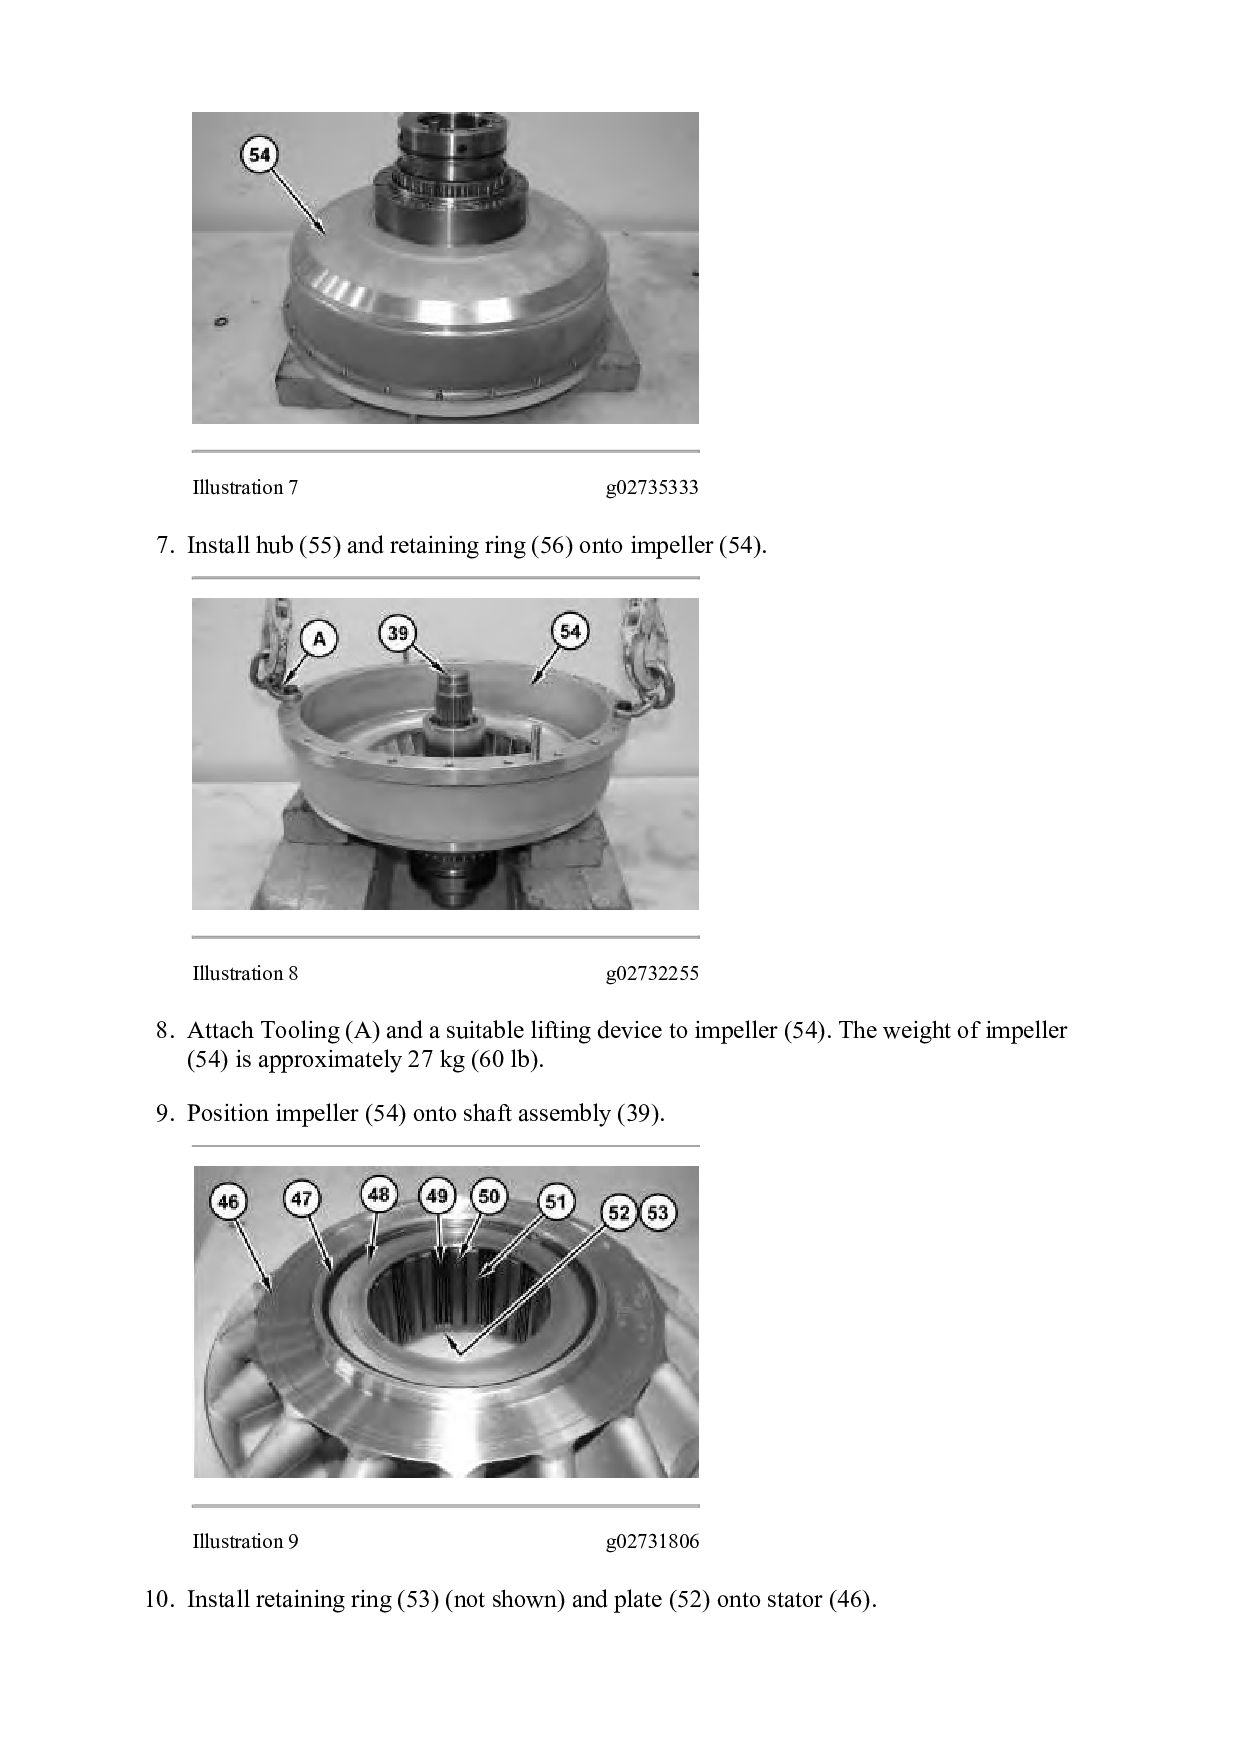
freewheel springs (49), freewheel rollers (50), and freewheel cam (51). Remove plate (52) and retaining ring (53) (not shown) from stator (46). Illustration 33 g02732255 37. Attach Tooling (A) and a suitable lifting device to impeller (54). The weightof impeller (54) is approximately 27 kg (60 lb). 38. Remove impeller (54) from shaft assembly (39). Illustration 34 g02735333 39. Position impeller (54) onto suitable blocking, as shown.
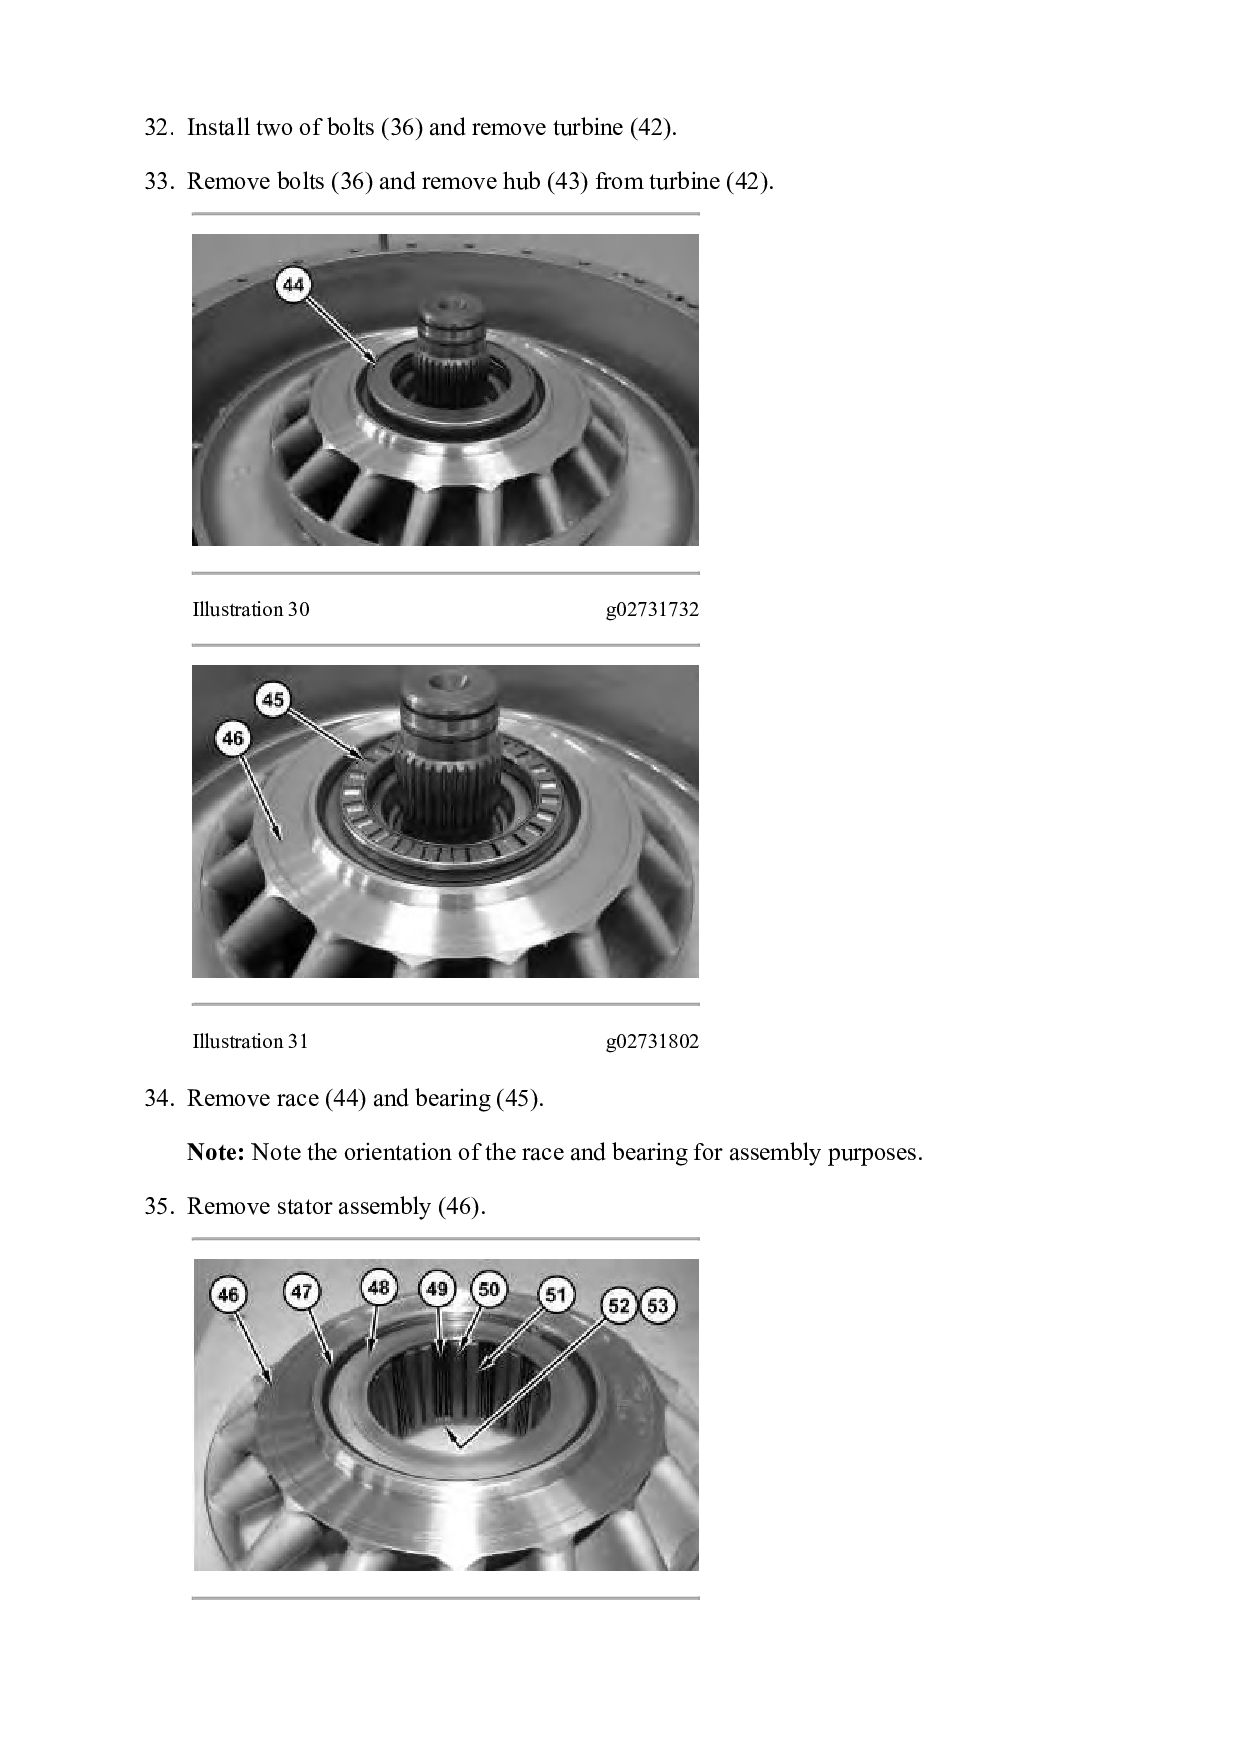
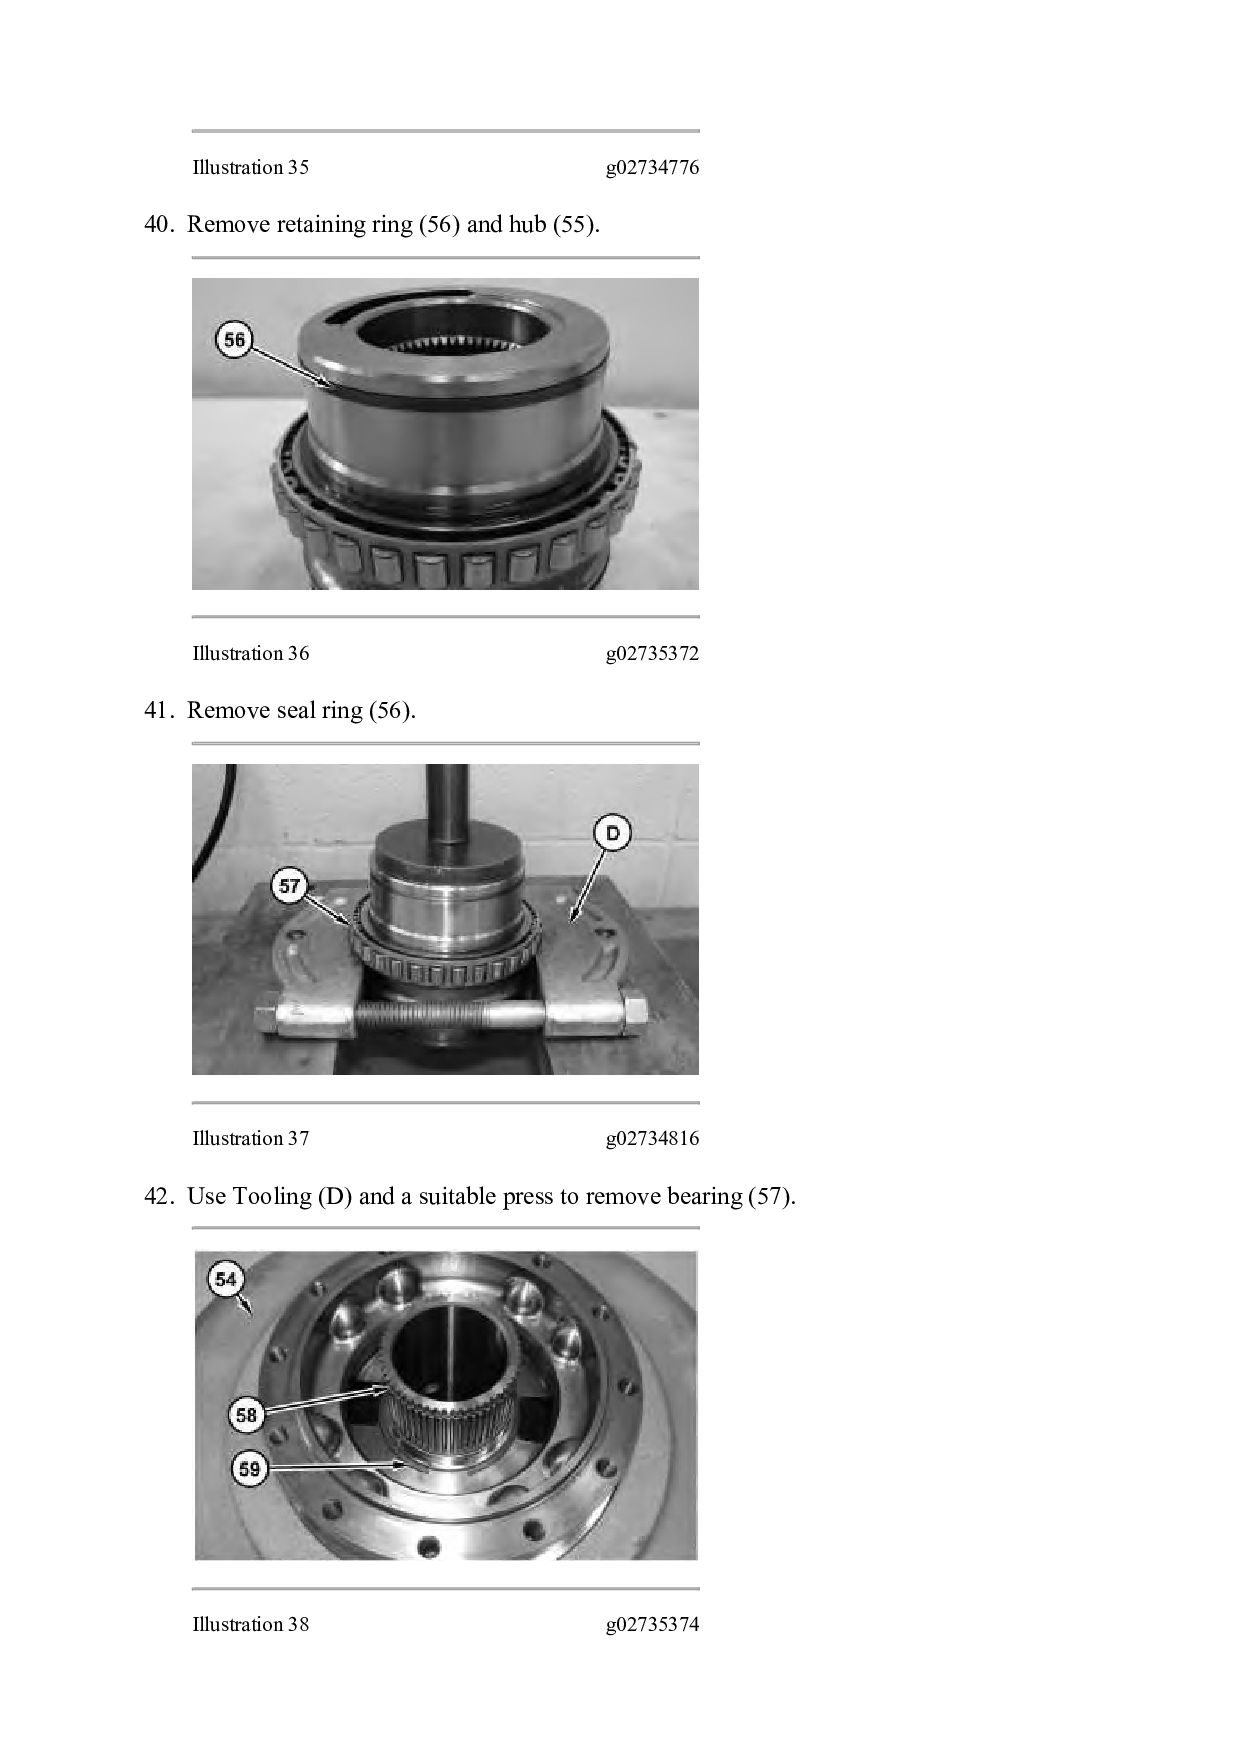
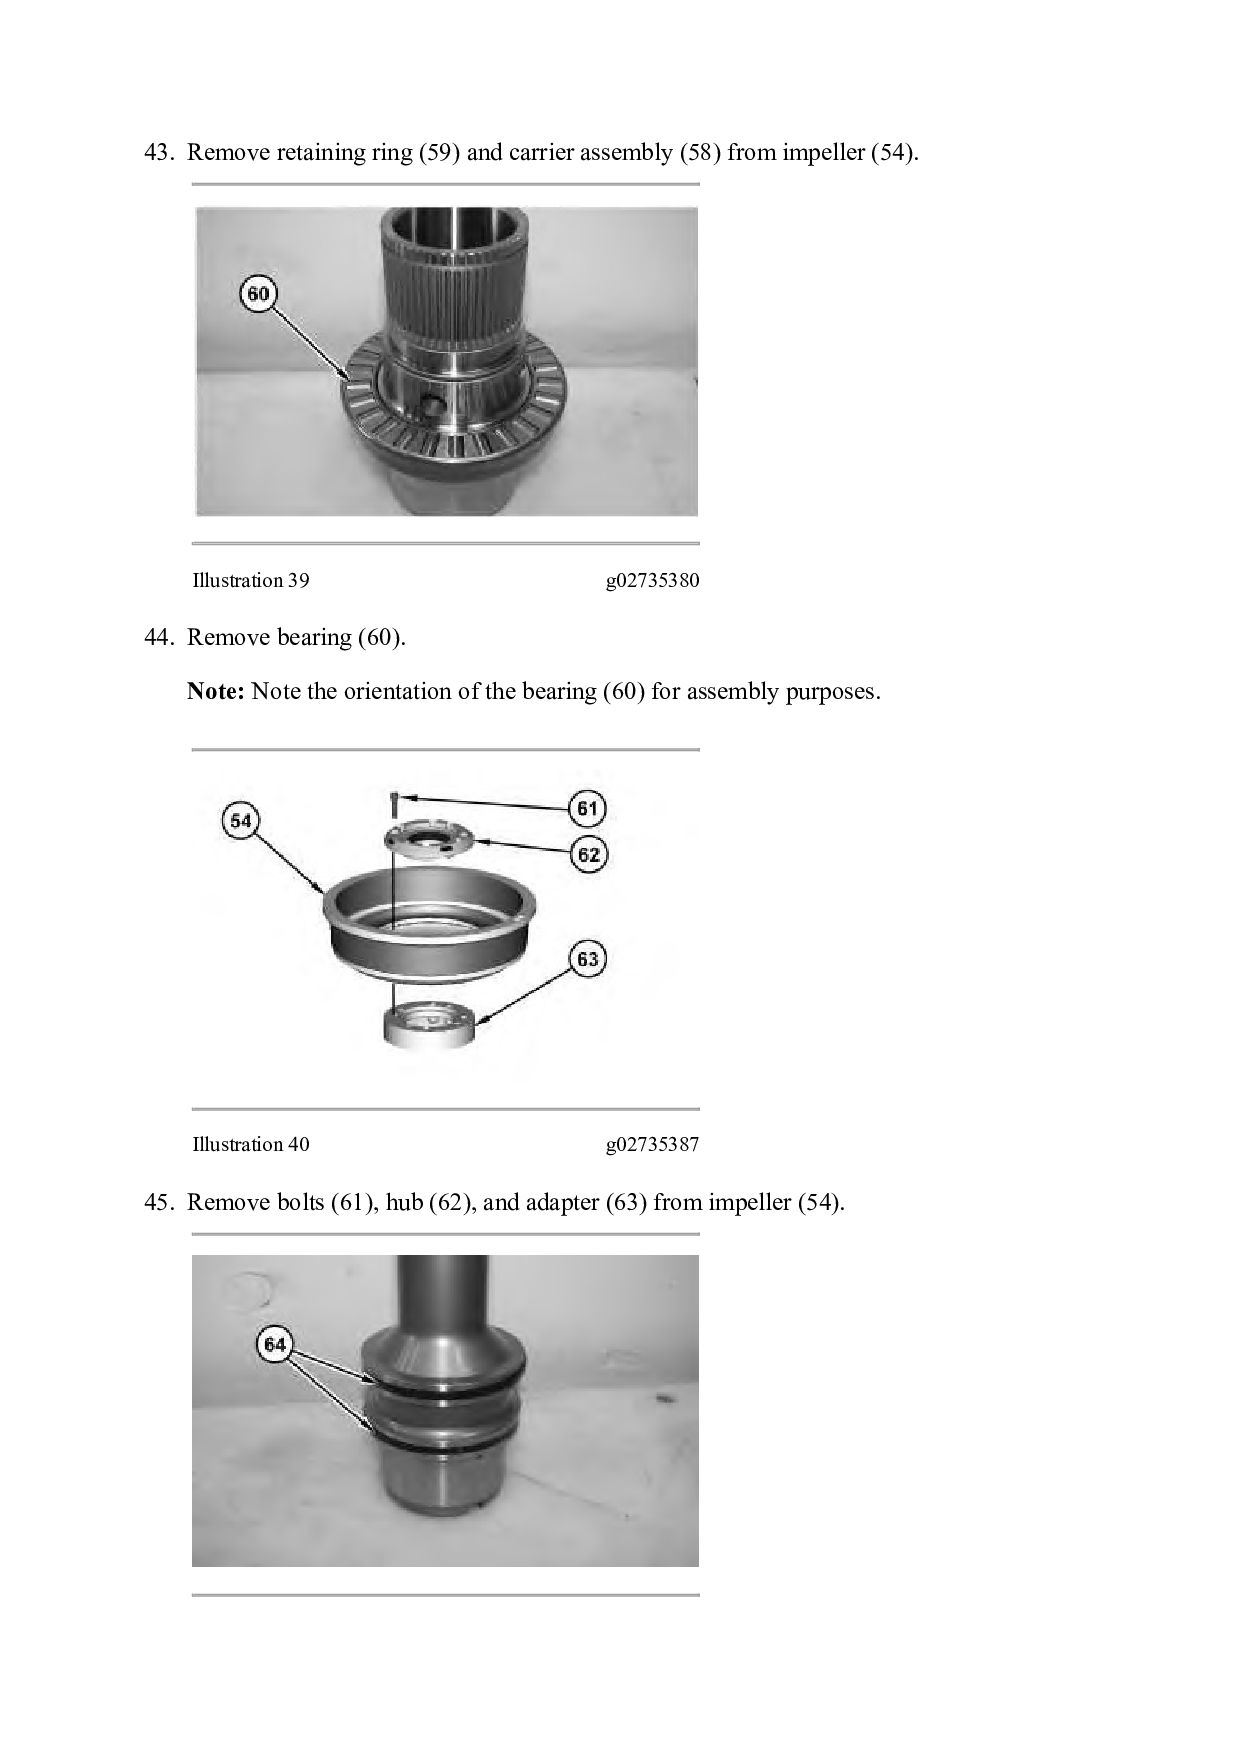
(55). Illustration 36 g02735372 41. Remove seal ring (56). Illustration 37 g02734816 42. Use Tooling (D) and a suitable press to remove bearing (57). Illustration 38 g02735374
LOADER XDJ Configuration: 980M Wheel Loader XDJ00001-UP (MACHINE) POWERED BY C13 Engine Disassembly and Assembly 980M T4 and 982M T4 Wheel Loader Power Train Media Number -M0075587-02 Publication Date -01/08/2012 Date Updated -17/07/2018 i06838485 Torque Converter - Assemble - Lock Up Clutch with Freewheel Stator SMCS - 3101-016 Assembly Procedure Table 1 Required Tools Tool Part Number Part Description Qty A 439-3938 Link Bracket 3 G 8T-5096 Dial Indicator Test Group 1 5P-2390 Gauge Tool Group 1 H 1P-0520 Driver Group 1 J - Guide Stud (3/8 - 16 by 8 in) 2 K - Guide Stud (1/2 - 13 by 3 in) 3 L 2P-8312 Retaining Ring Pliers 1
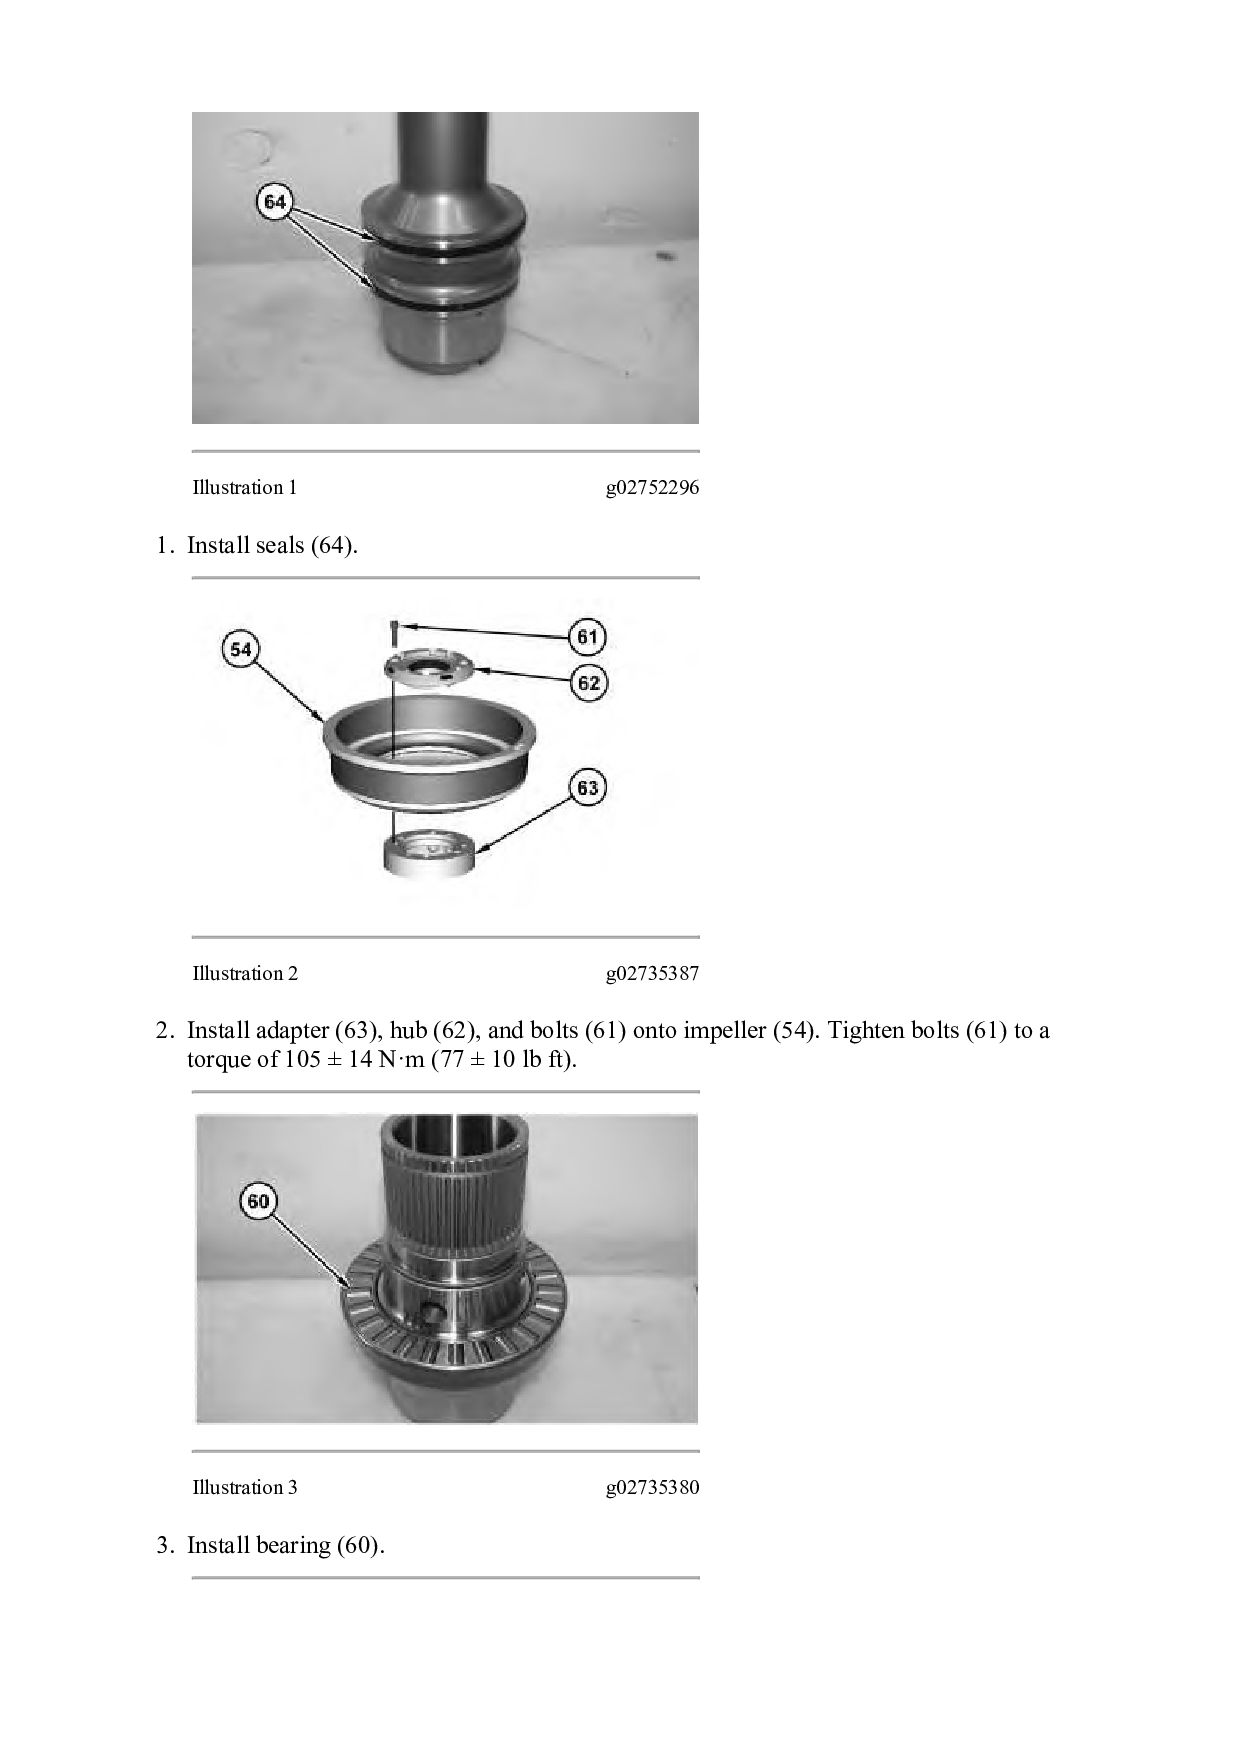
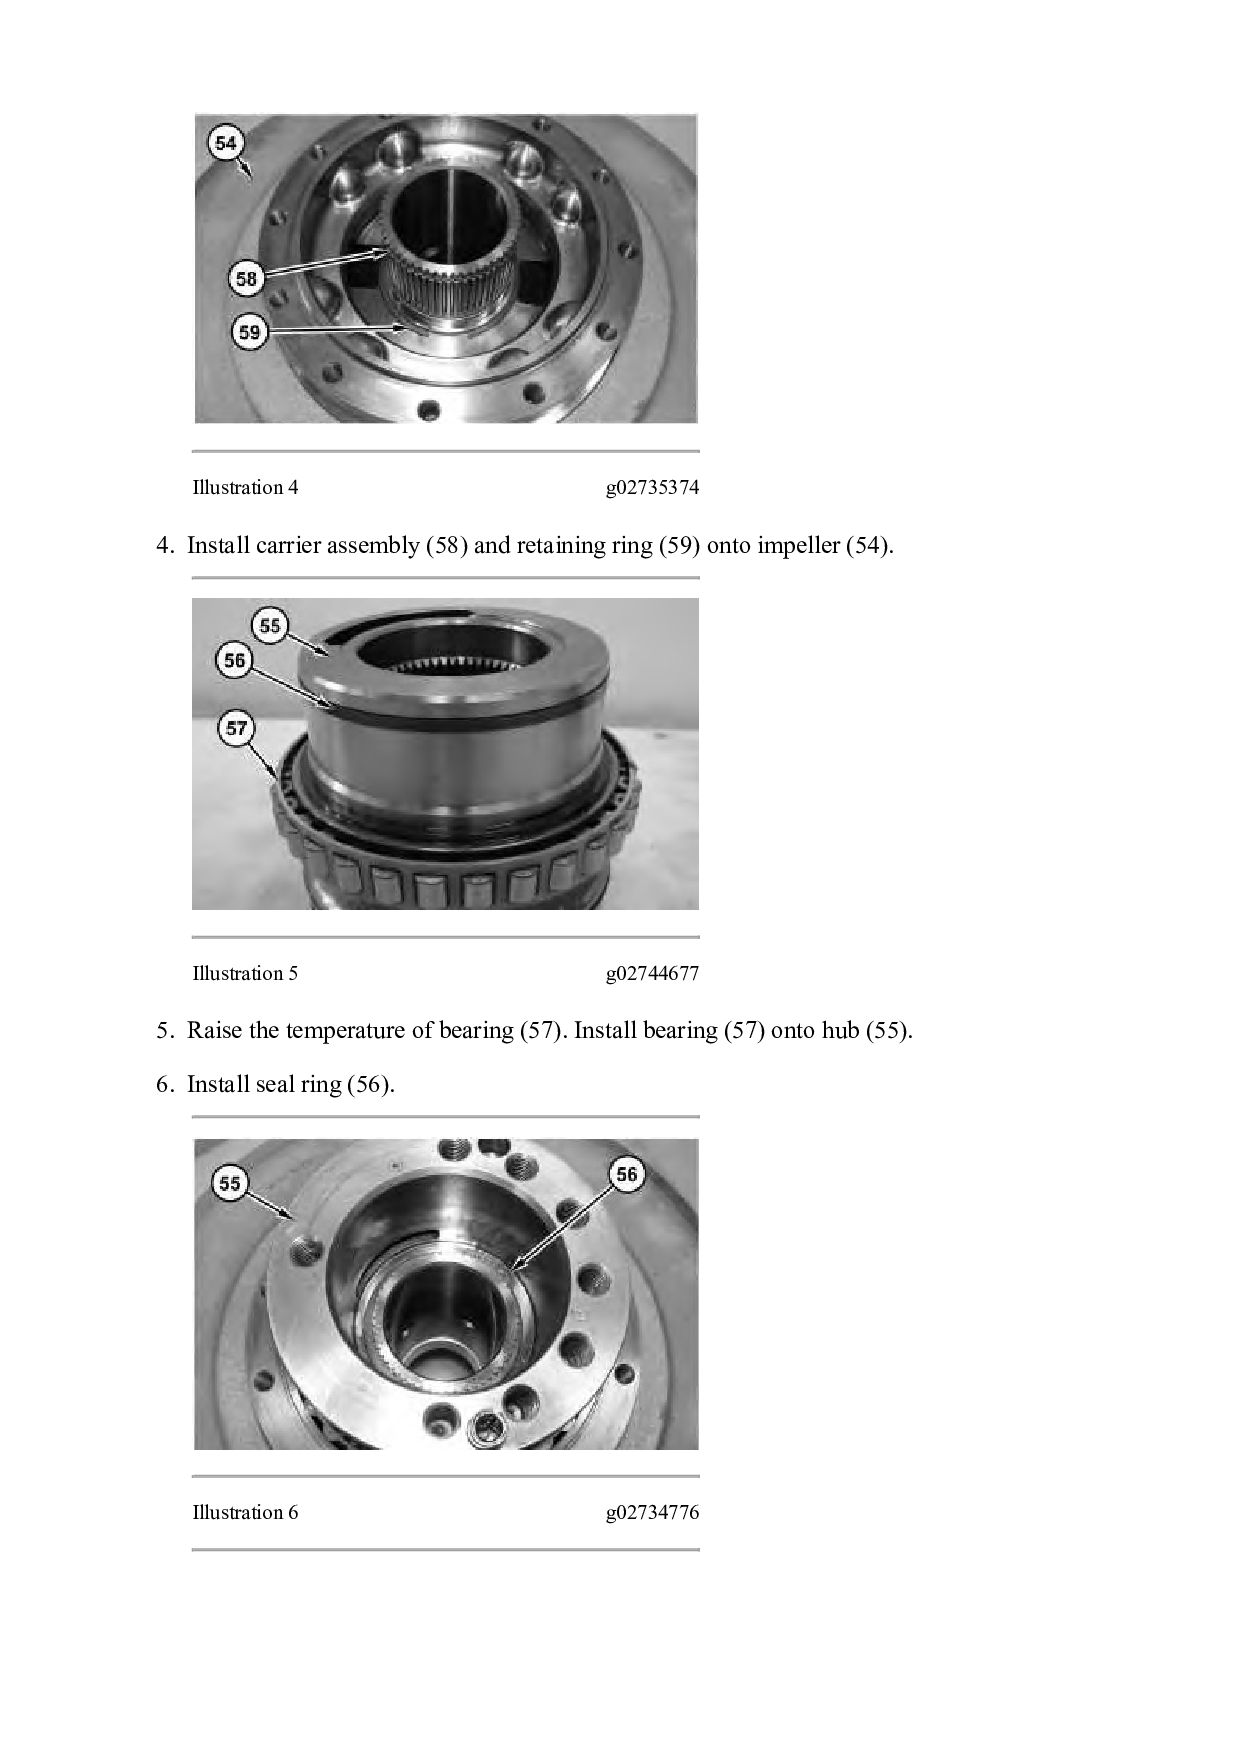
ring (59) onto impeller (54). Illustration 5 g02744677 5. Raise the temperature of bearing (57). Install bearing (57) onto hub (55). 6. Install seal ring (56). Illustration 6 g02734776
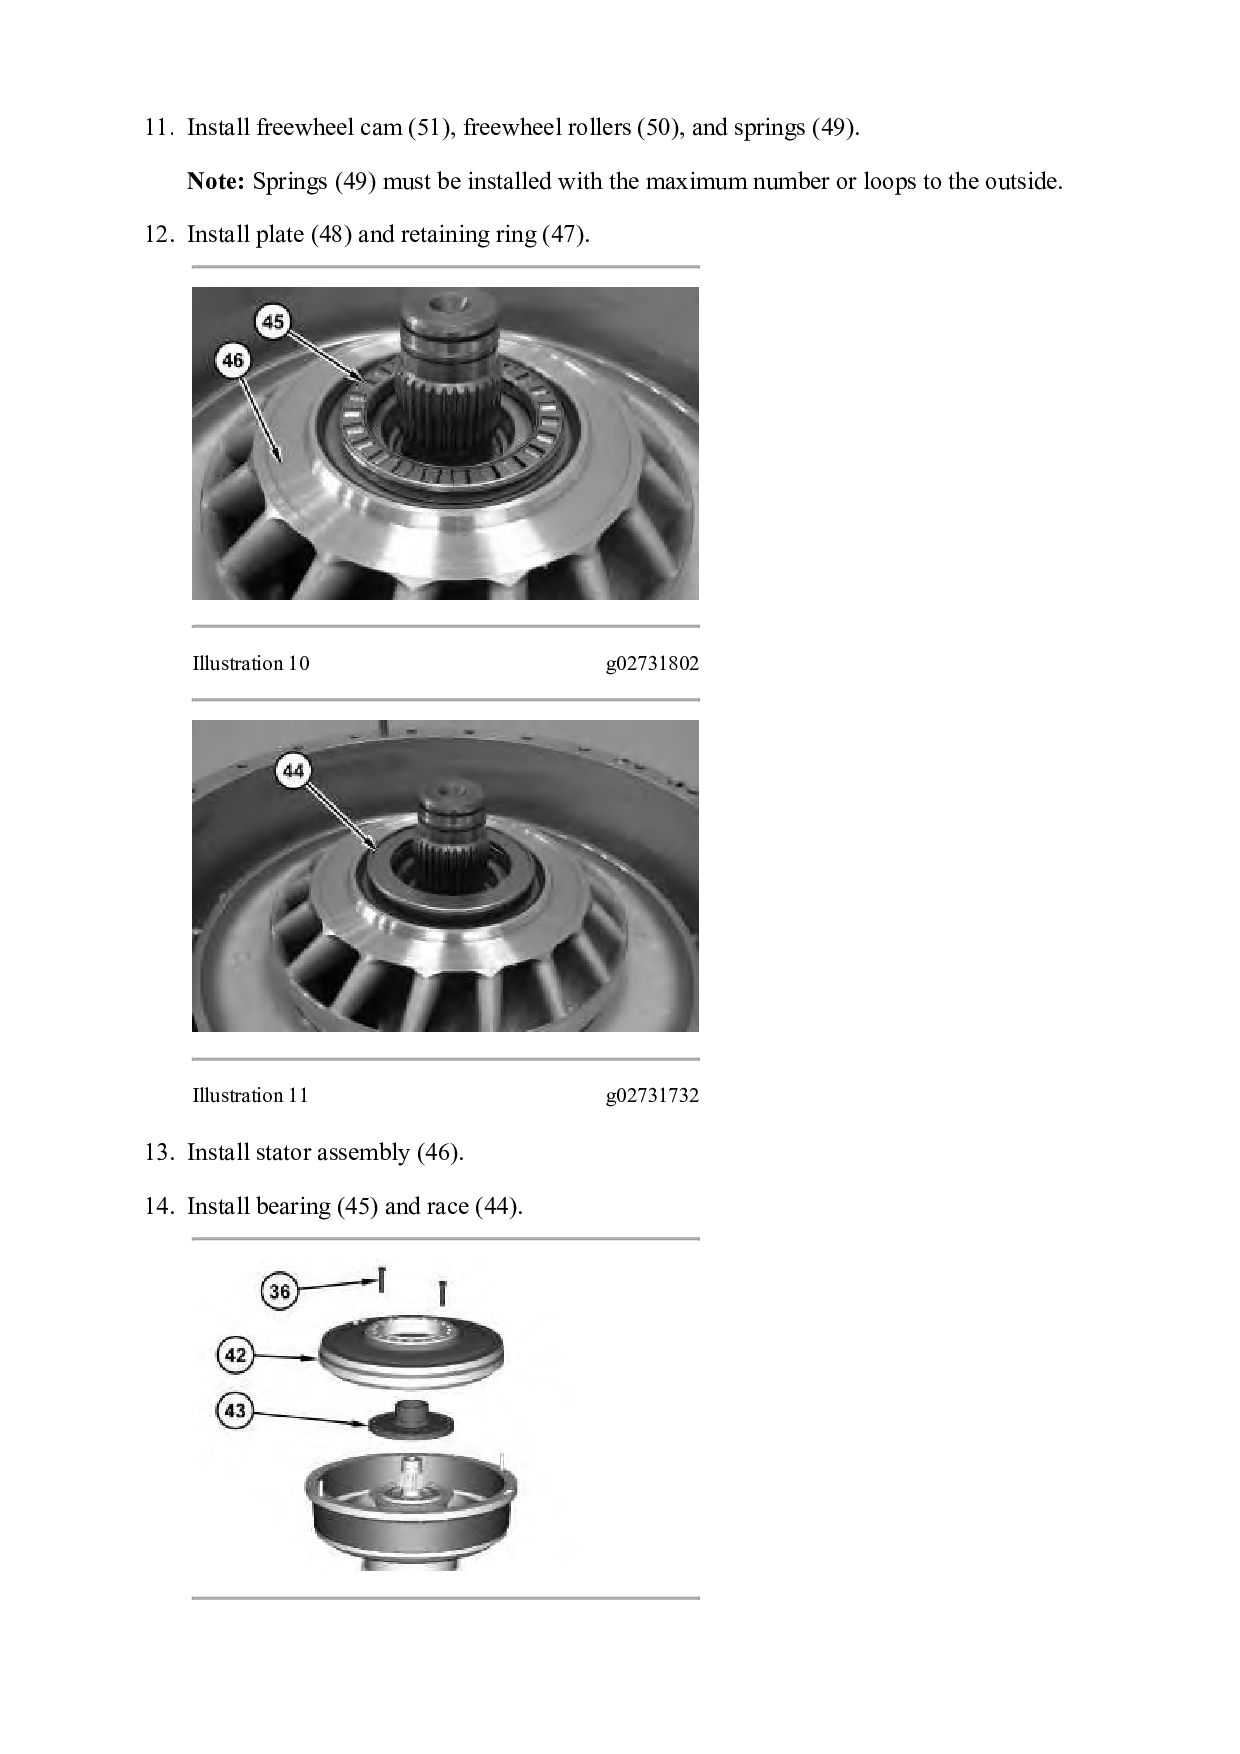
(56) onto impeller (54). Illustration 8 g02732255 8. Attach Tooling (A) and a suitable lifting device to impeller (54). The weight of impeller (54) is approximately 27 kg (60 lb). 9. Position impeller (54) onto shaft assembly (39). Illustration 9 g02731806 10. Install retaining ring (53) (not shown) and plate (52) onto stator (46).
(49). Note: Springs (49) must be installed with the maximum number or loops to the outside. 12. Install plate (48) and retaining ring (47). Illustration 10 g02731802 Illustration 11 g02731732 13. Install stator assembly (46). 14. Install bearing (45) and race (44).
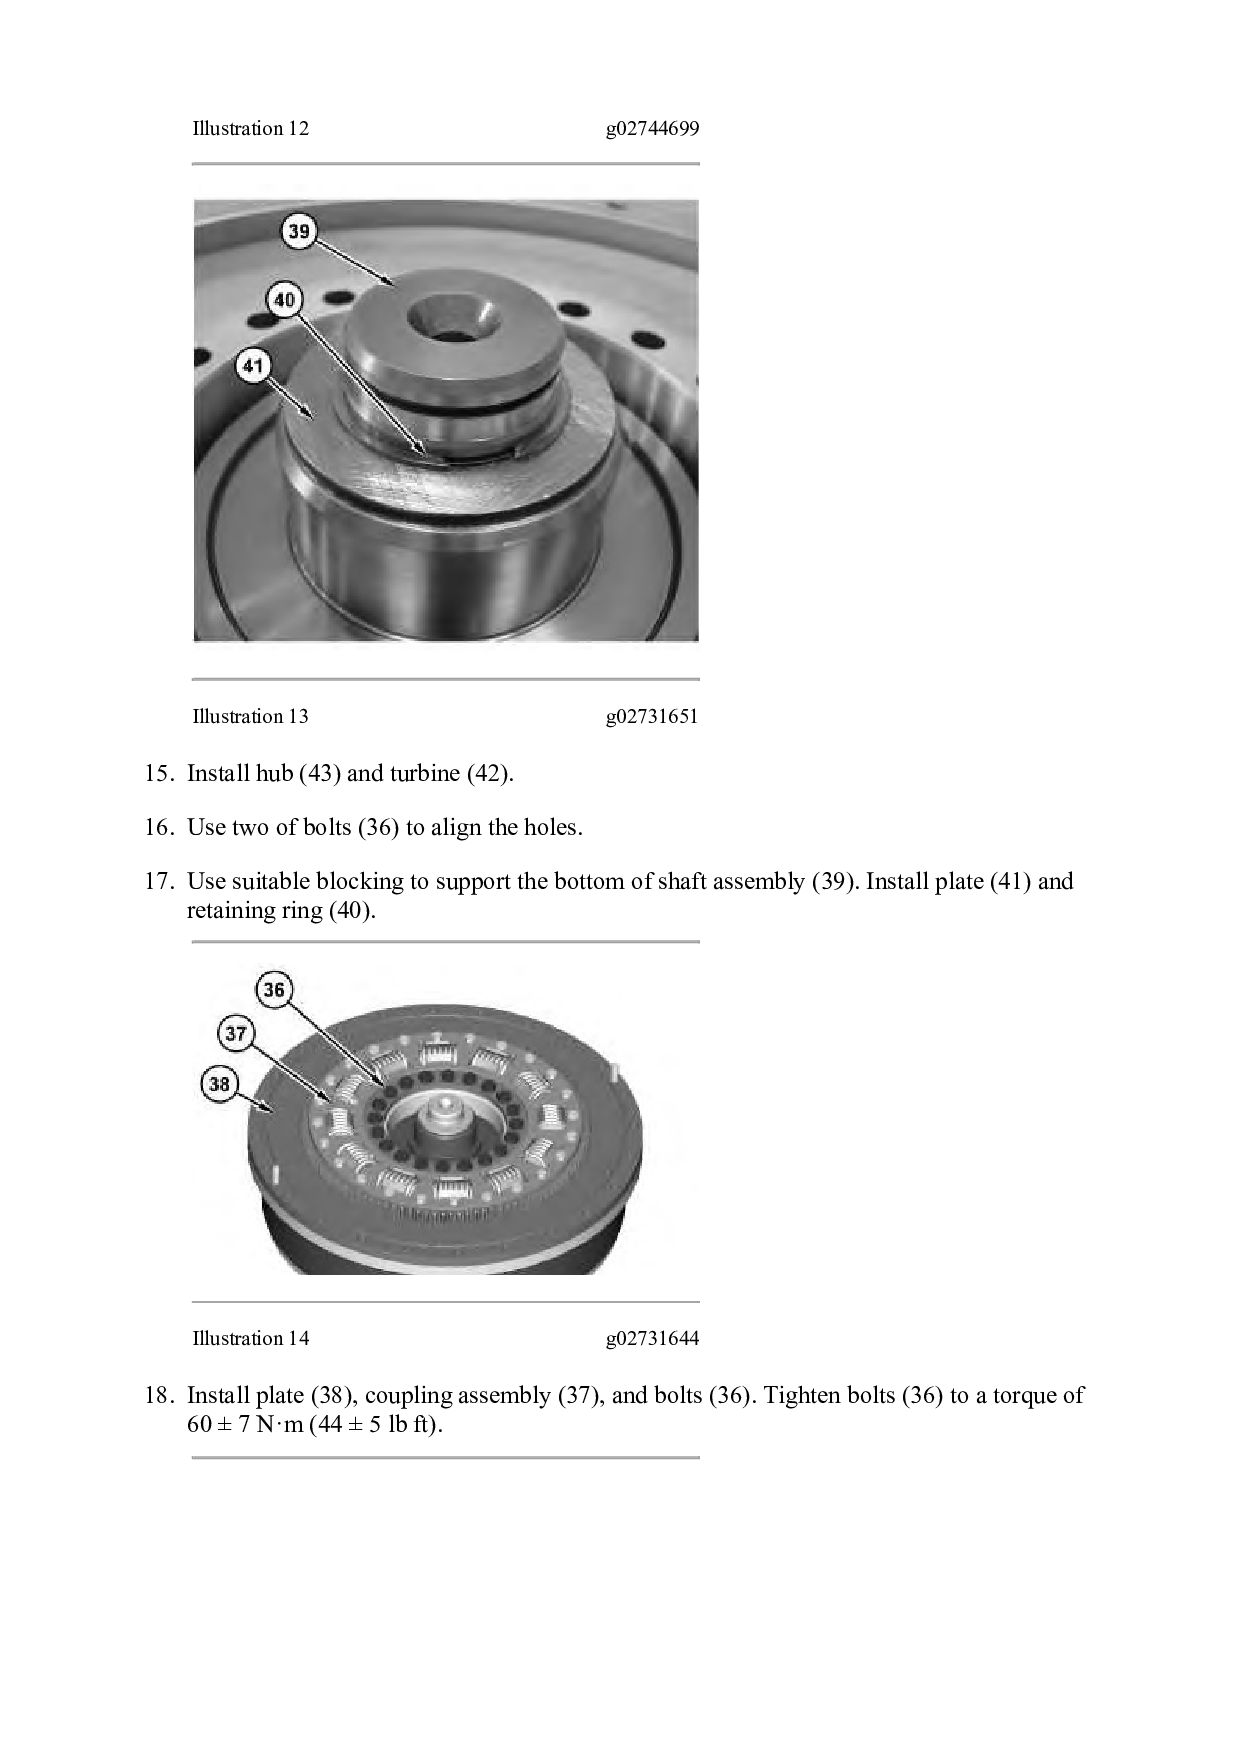
and turbine (42). 16. Use two of bolts (36) to align the holes. 17. Use suitable blocking to support the bottom of shaft assembly (39). Install plate (41) and retaining ring (40). Illustration 14 g02731644 18. Install plate (38), coupling assembly (37), and bolts (36). Tighten bolts (36) to a torque of 60 ± 7 N·m (44 ± 5 lb ft).
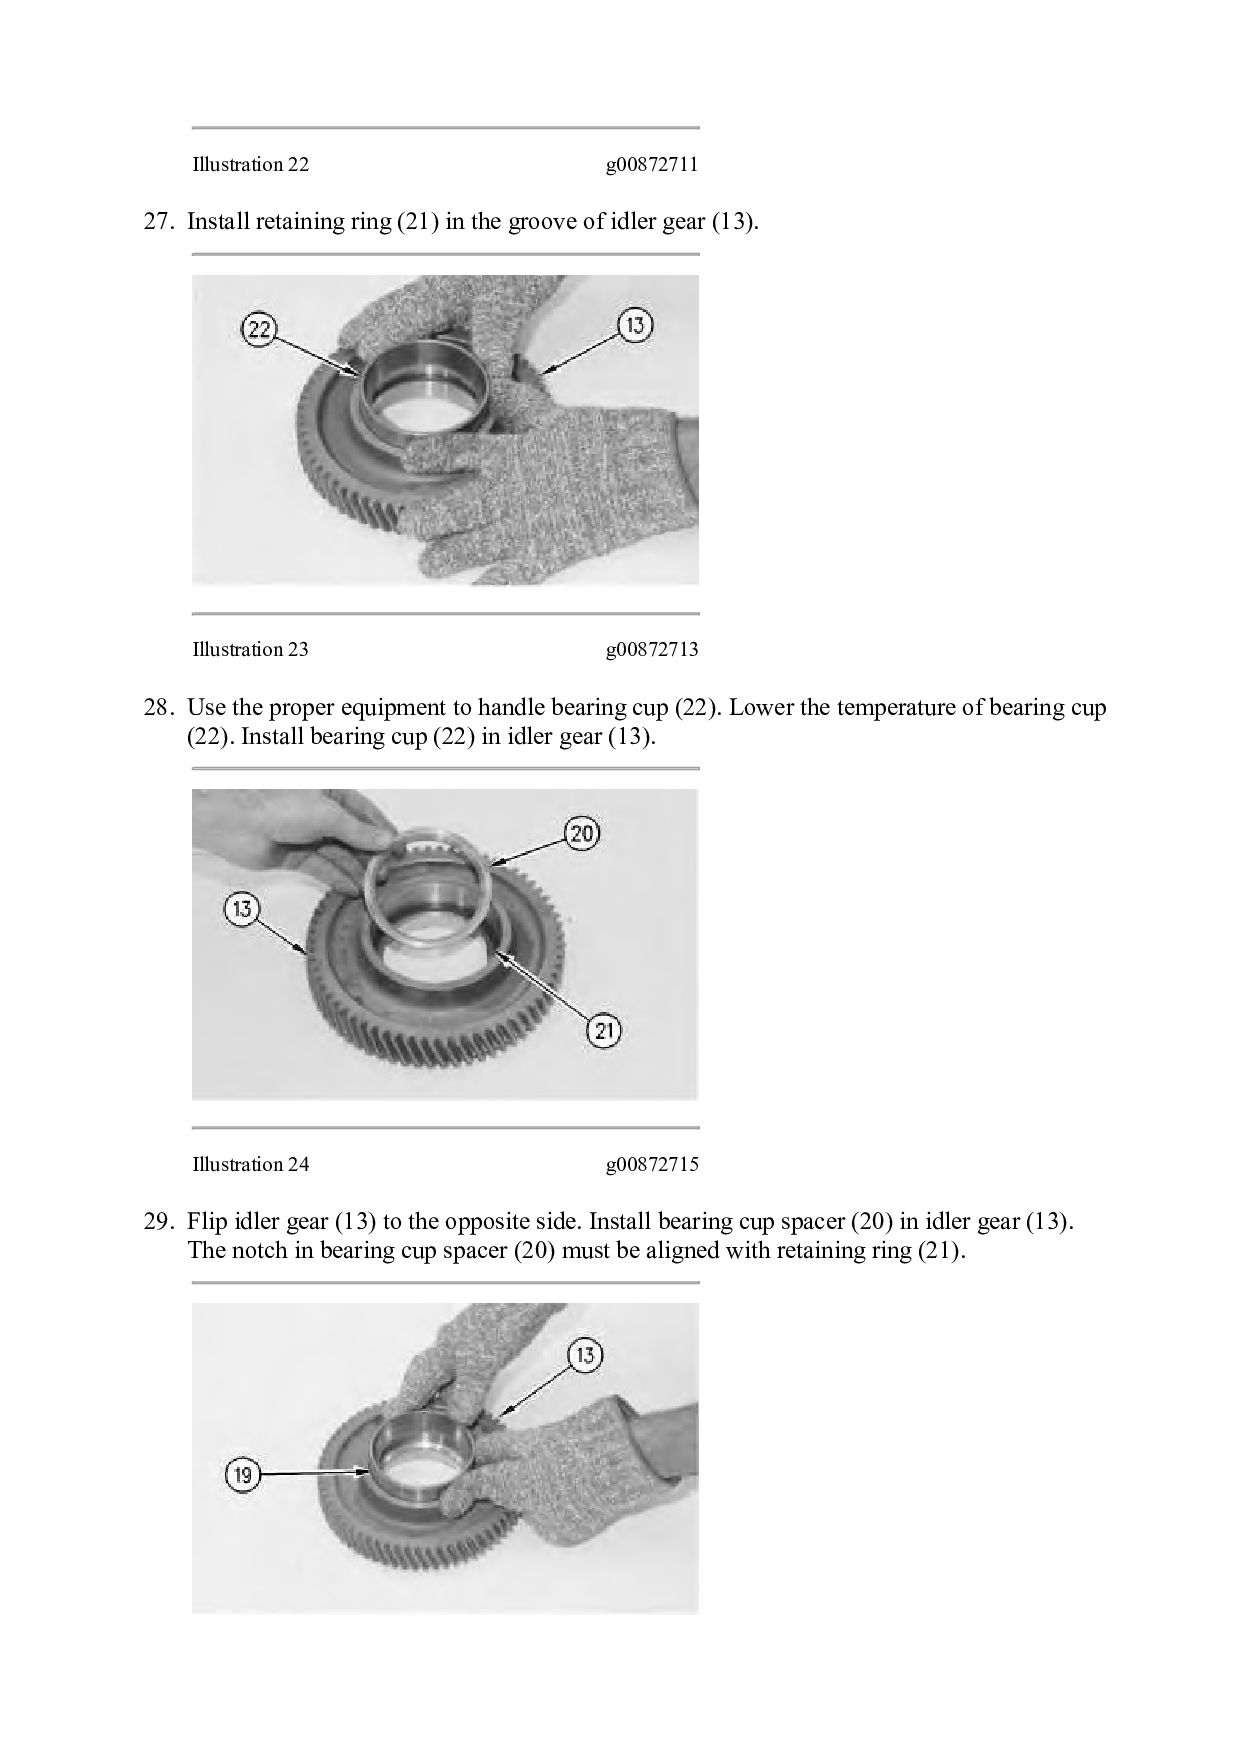
the driver group from Tooling (D) and a suitable press to install race (25A) into gear (25). Illustration 20 g02729366 24. Use a suitable lifting device to reposition the torque converter, as shown. The weight of the torque converter is approximately 122 kg (269 lb). 25. Install drive gear (25) and bolts (24). Tighten the bolts to a torque of 50 ± 7 N·m (37 ± 5 lb ft). Illustration 21 g00872709 26. Install studs (23) in torque converter housing assembly (2). Tighten the studs to a torque of 100 ± 15 N·m (74 ± 11 lb ft).
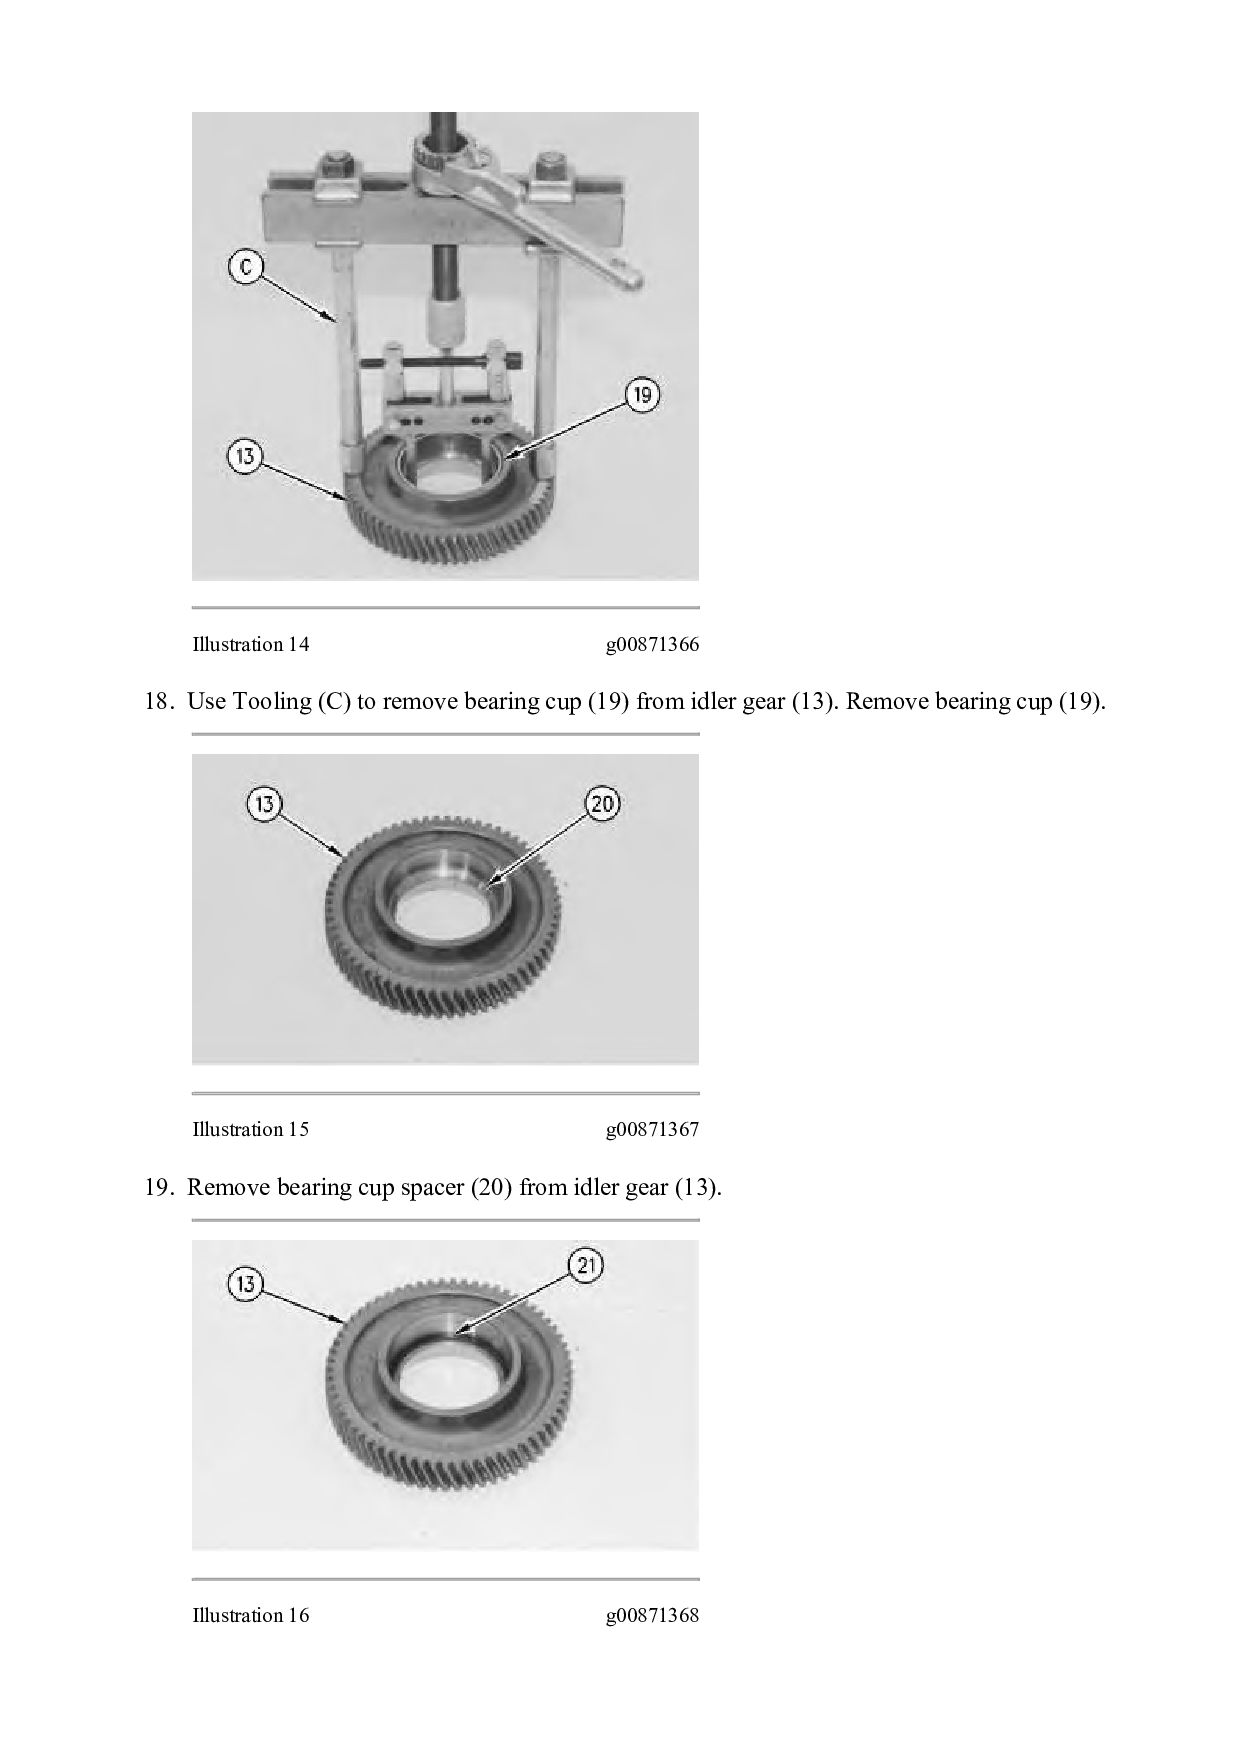
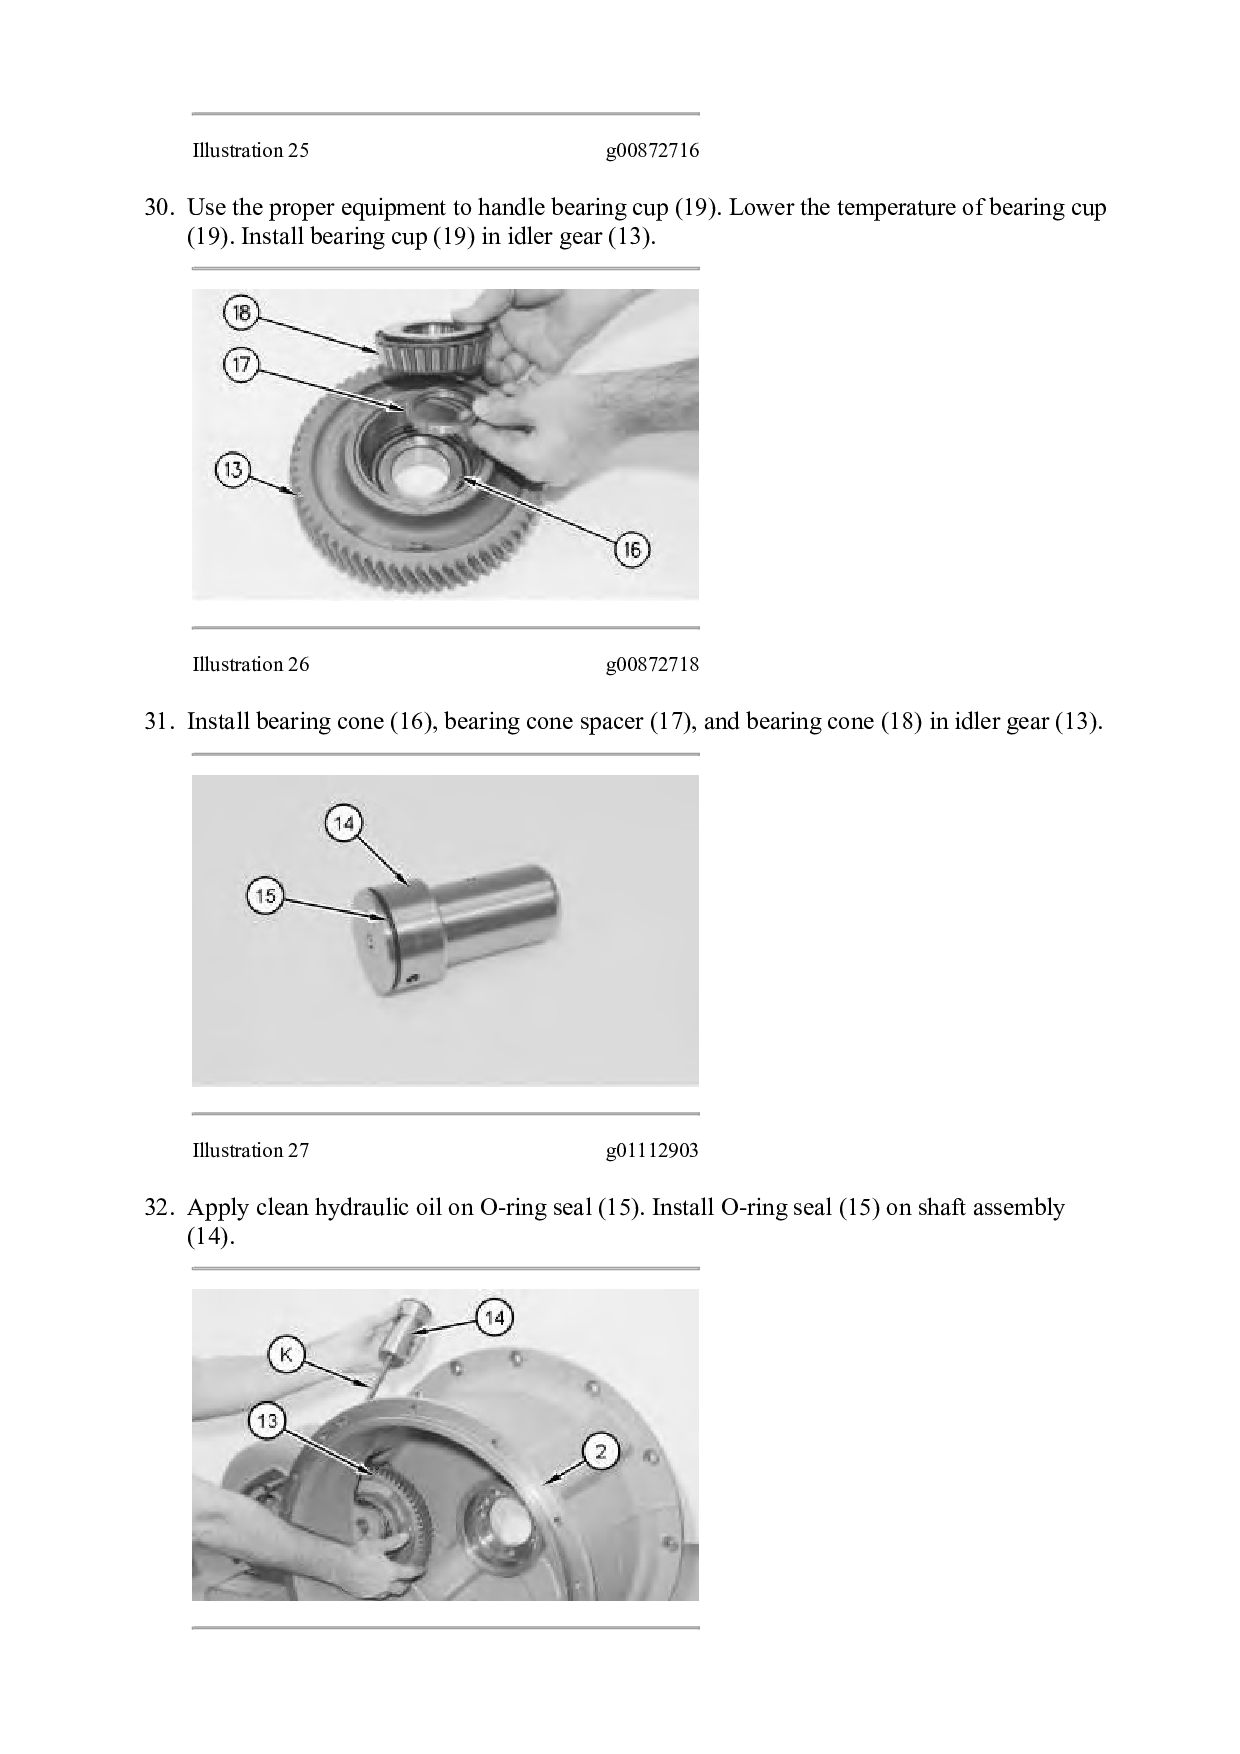
groove of idler gear (13). Illustration 23 g00872713 28. Use the proper equipment to handle bearing cup (22). Lower the temperature of bearing cup (22). Install bearing cup (22) in idler gear (13). Illustration 24 g00872715 29. Flip idler gear (13) to the opposite side. Install bearing cup spacer (20) in idler gear (13). The notch in bearing cup spacer (20) must be aligned with retaining ring (21).
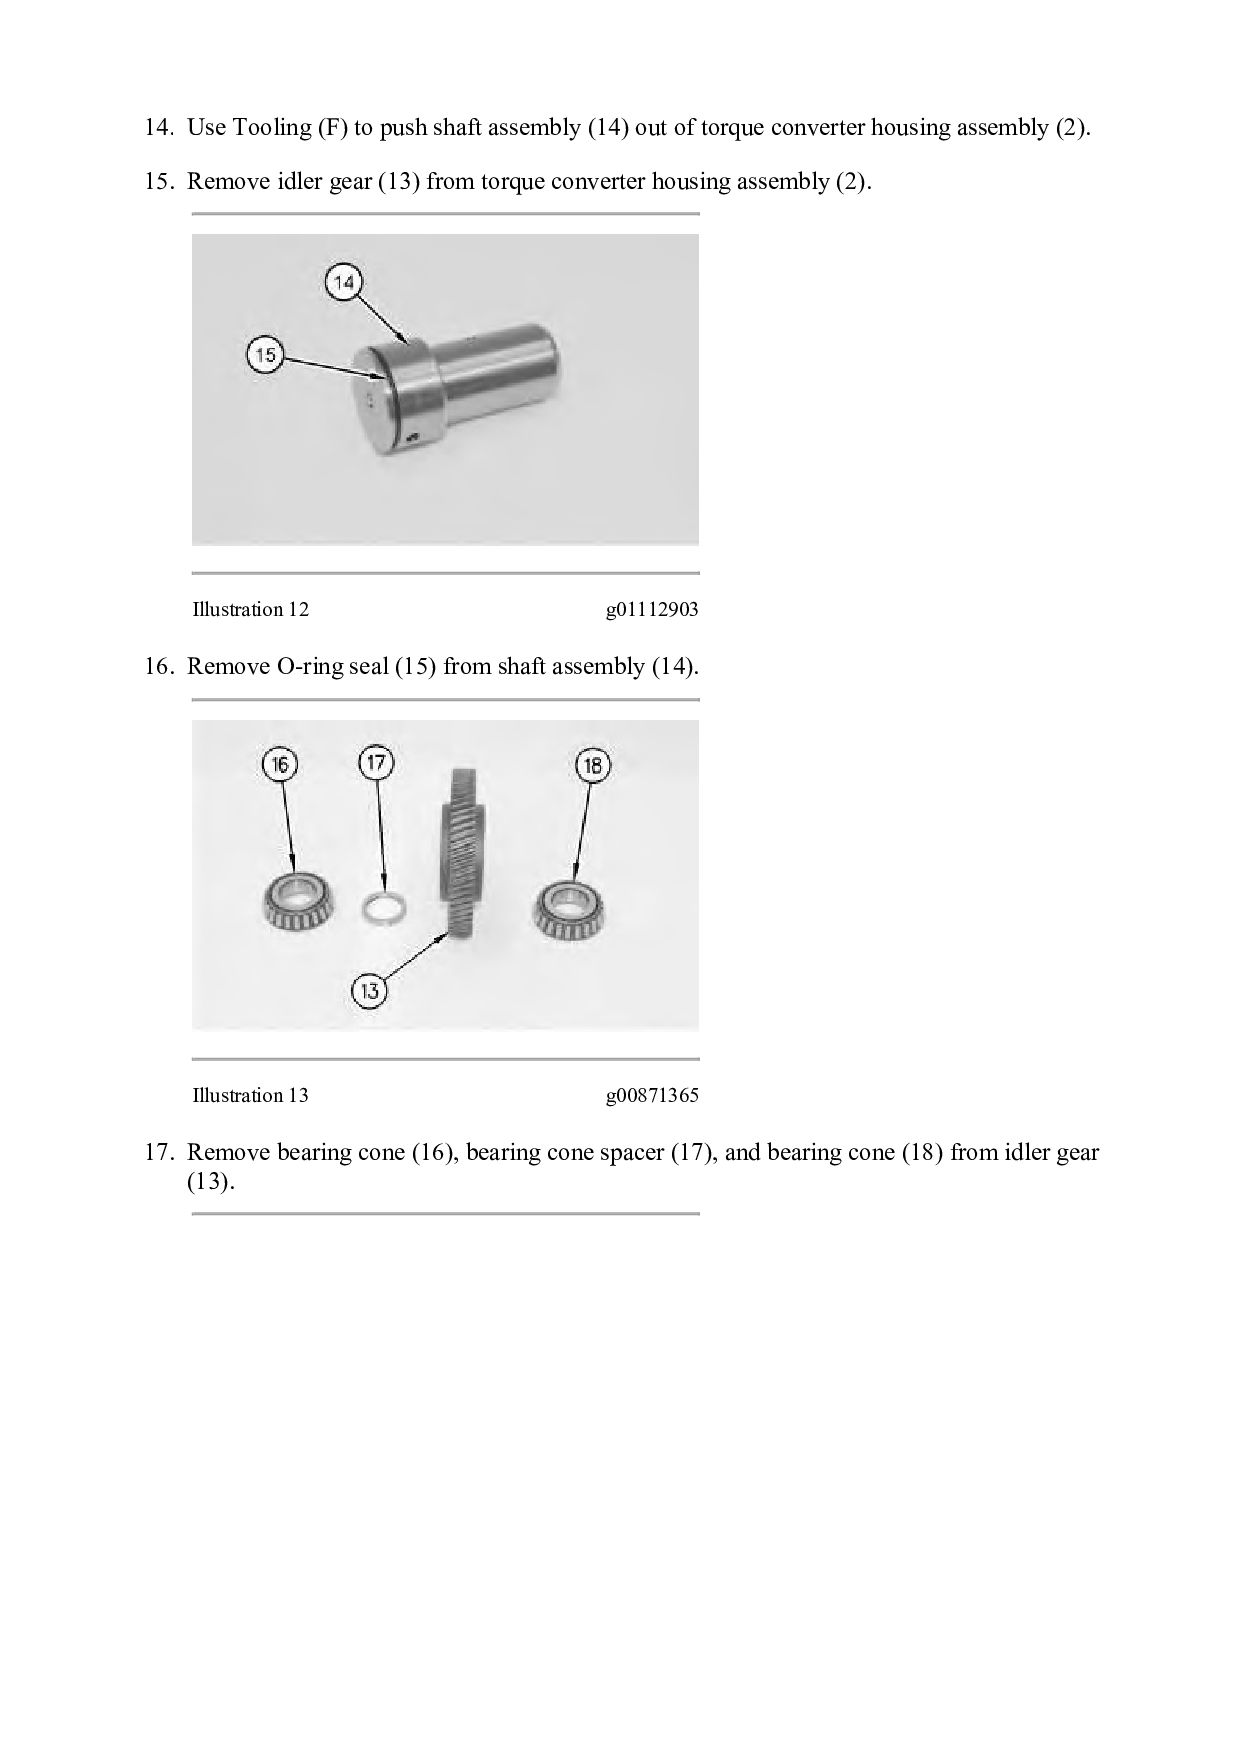
bearing cup (19). Lower the temperature of bearing cup (19). Install bearing cup (19) in idler gear (13). Illustration 26 g00872718 31. Install bearing cone (16), bearing cone spacer (17), and bearing cone (18) in idler gear (13). Illustration 27 g01112903 32. Apply clean hydraulic oil on O-ring seal (15). Install O-ring seal (15) on shaft assembly (14).
Then Get COMPLETE MANUAL. NO WAITING NOTE: If there is no response to click on the link above, please download the PDF document first and then click on it.
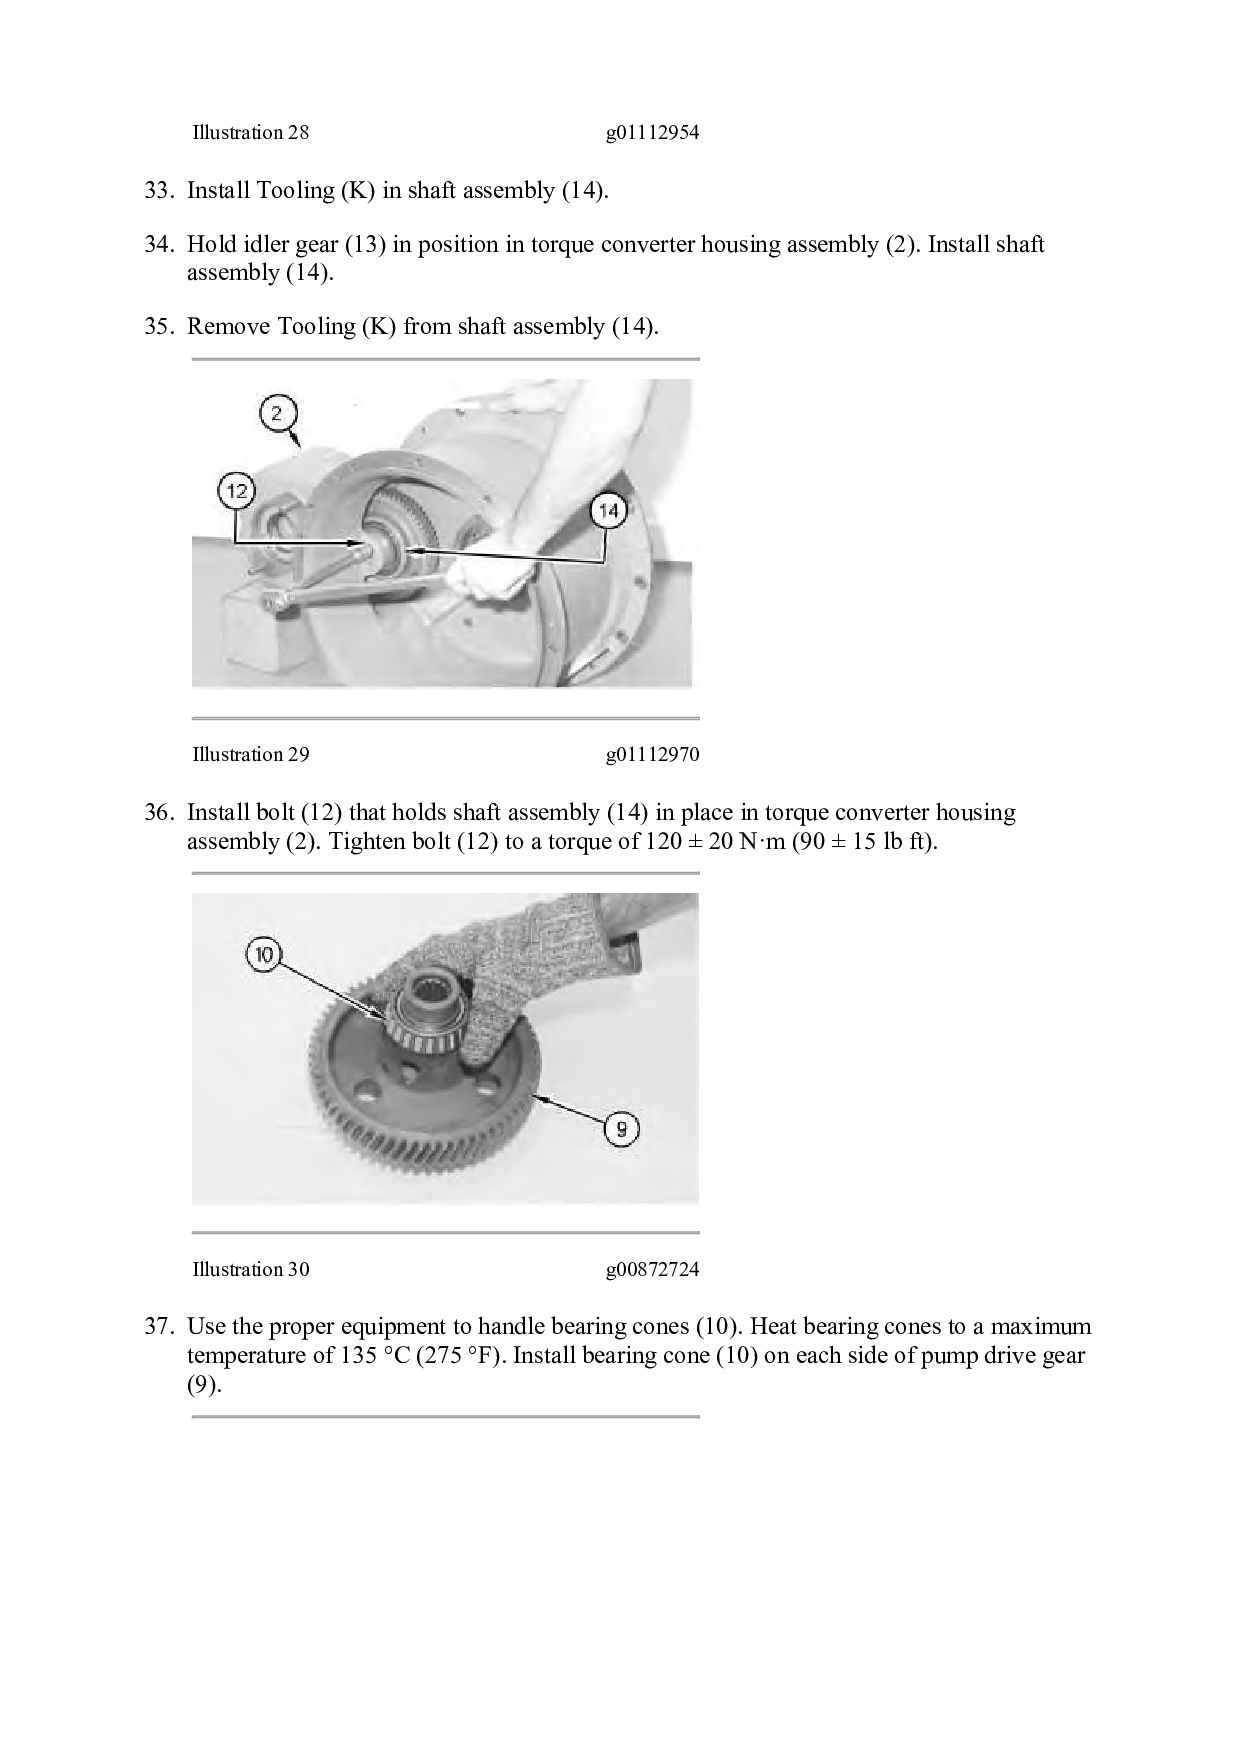
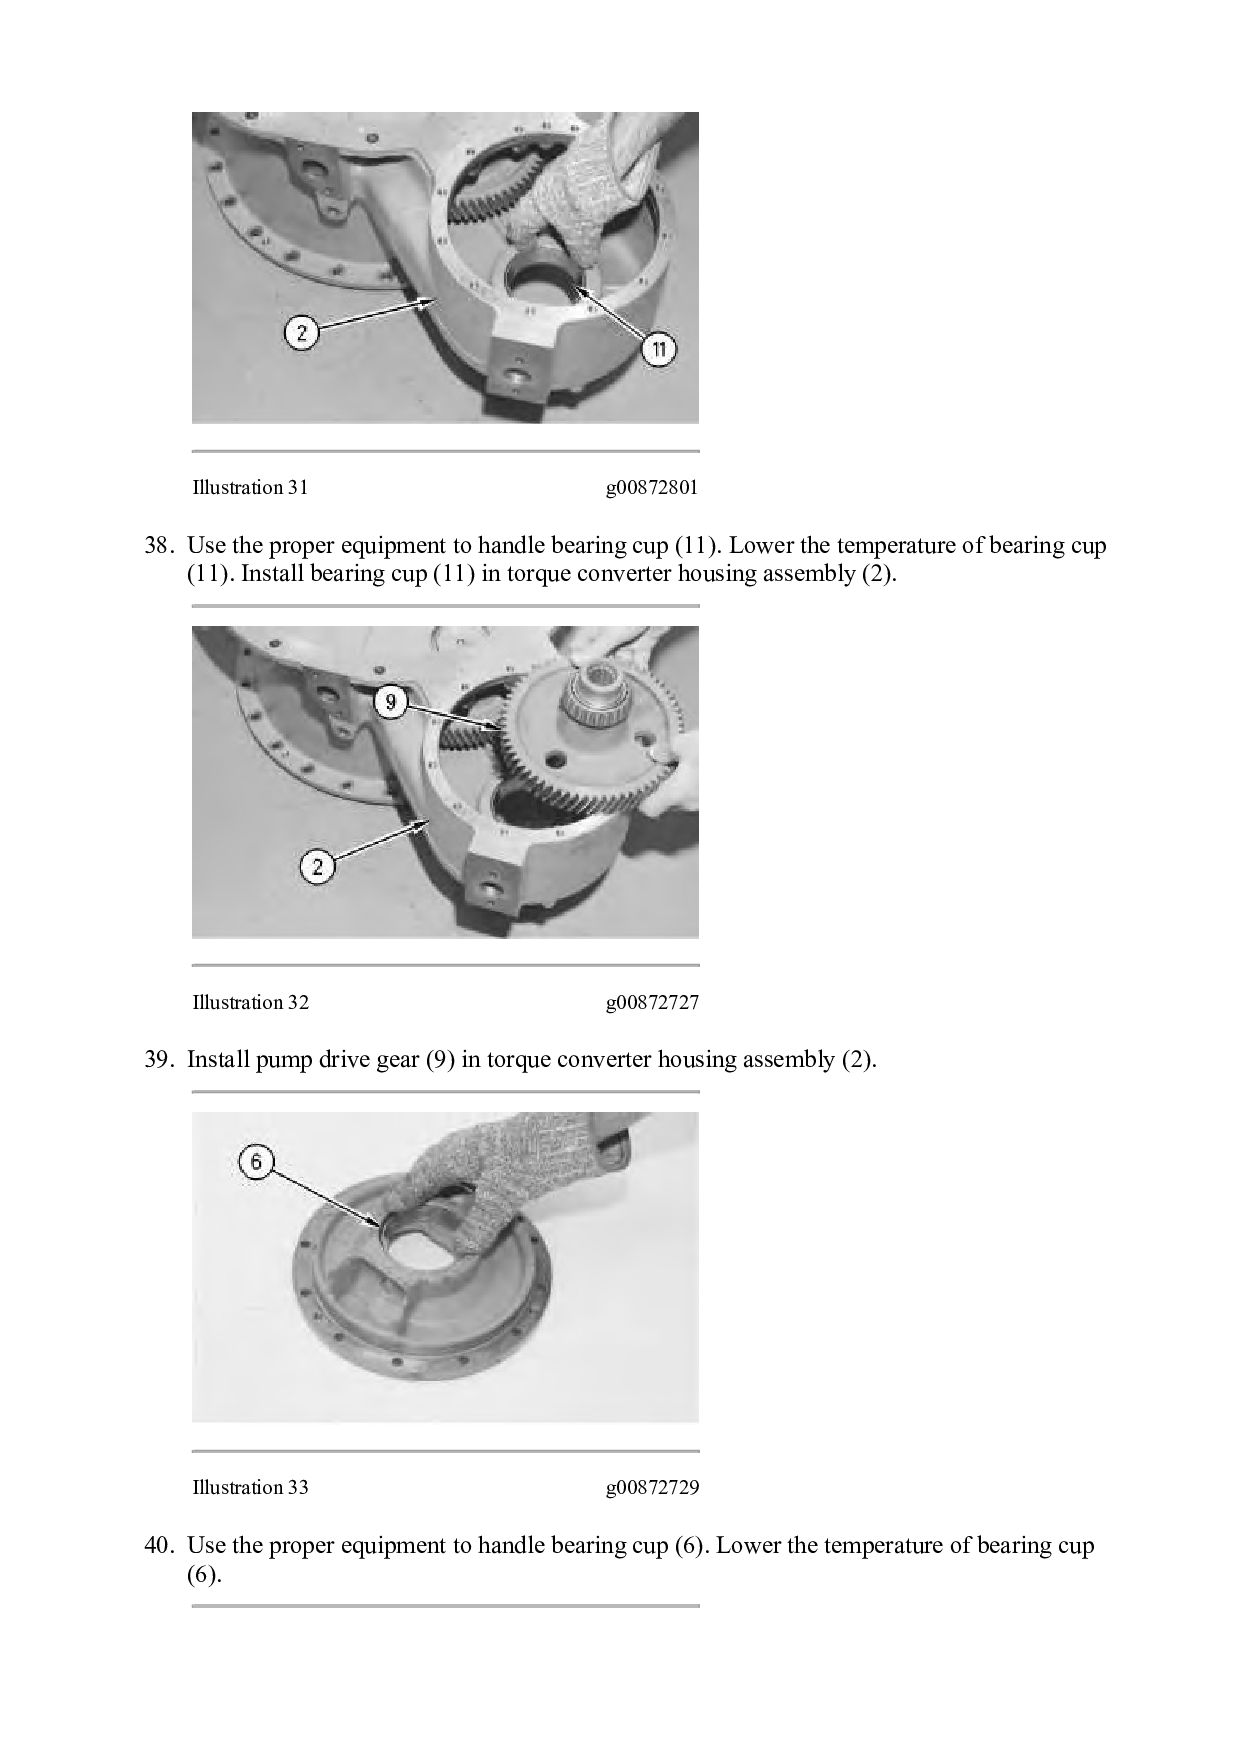
(14). 34. Hold idler gear (13) in position in torque converter housing assembly (2). Install shaft assembly (14). 35. Remove Tooling (K) from shaft assembly (14). Illustration 29 g01112970 36. Install bolt (12) that holds shaft assembly (14) in place in torque converter housing assembly (2). Tighten bolt (12) to a torque of 120 ± 20 N·m (90 ± 15 lb ft). Illustration 30 g00872724 37. Use the proper equipment to handle bearing cones (10). Heat bearing cones to a maximum temperature of 135 °C (275 °F). Install bearing cone (10) on each side of pump drive gear (9).
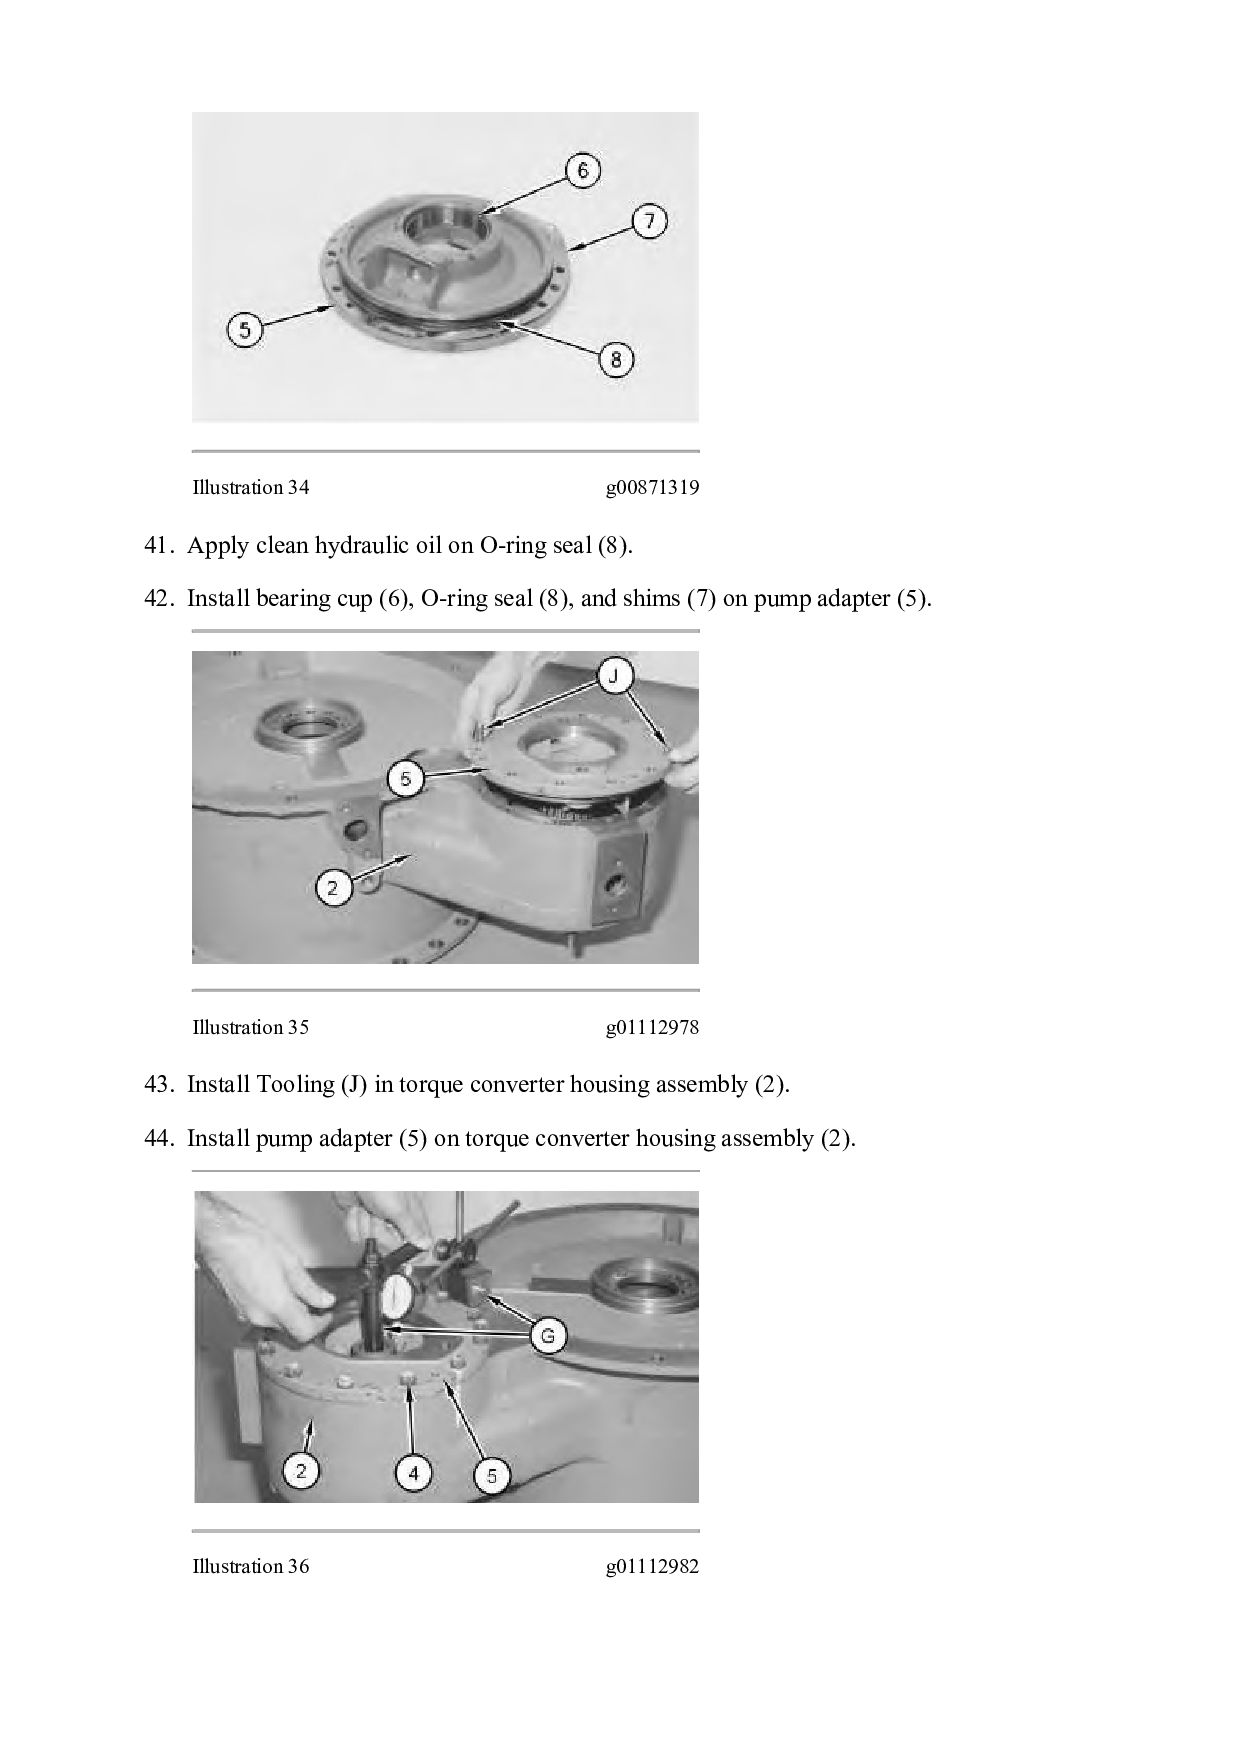
bearing cup (11). Lower the temperature of bearing cup (11). Install bearing cup (11) in torque converter housing assembly (2). Illustration 32 g00872727 39. Install pump drive gear (9) in torque converter housing assembly (2). Illustration 33 g00872729 40. Use the proper equipment to handle bearing cup (6). Lower the temperature of bearing cup (6).

 Your Podcast. Everywhere. Effortlessly.


 dcrfdycnvk
 auna
 aleyda
 ryanjones
 katarinadahlin
 cromwellryan
 minecr
 irinanazarova
 cassininazir
 geshan
 jonoalderson
 lauravandoore
 techseoconnect