and I am the Co-Founder and CTO at Callstack. I am also one of the core contributors to React Native. Today I’ll be demystifying Javascript bundlers, specifically in React Native context.
question - do you know what a bundler is? Please raise your hand! > (Quite good) Nice! I can see a lot of hands! Please bear with me as we get through those slides > (Not good) Great! This might be the most educational presentation I have ever made then haha
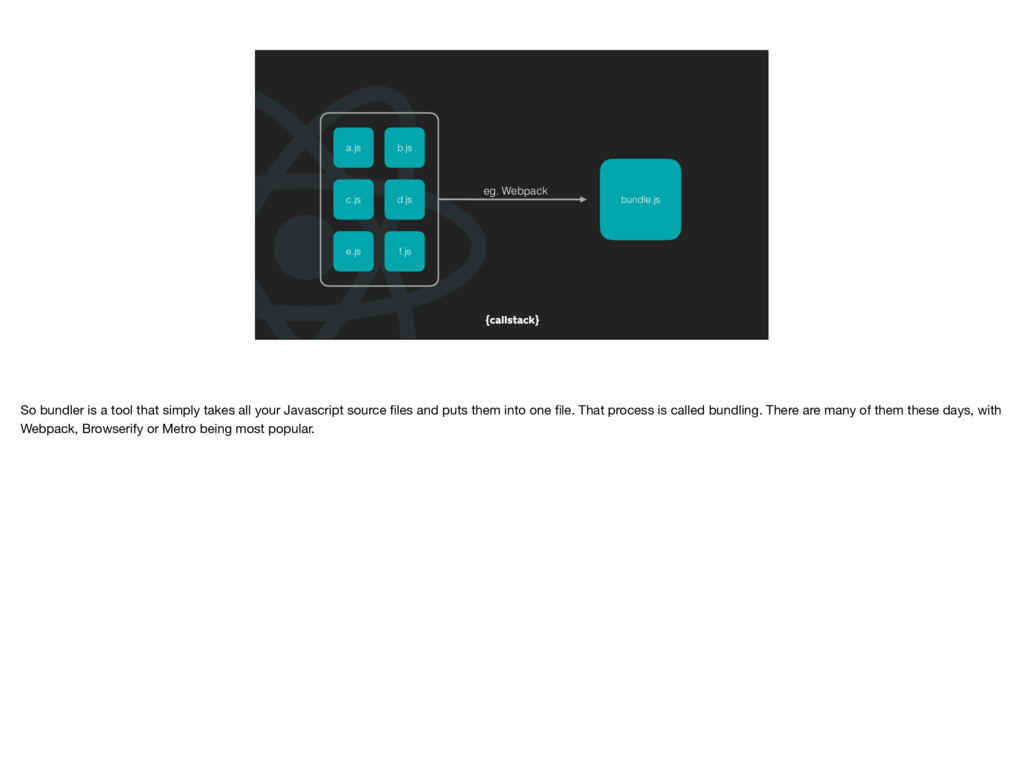
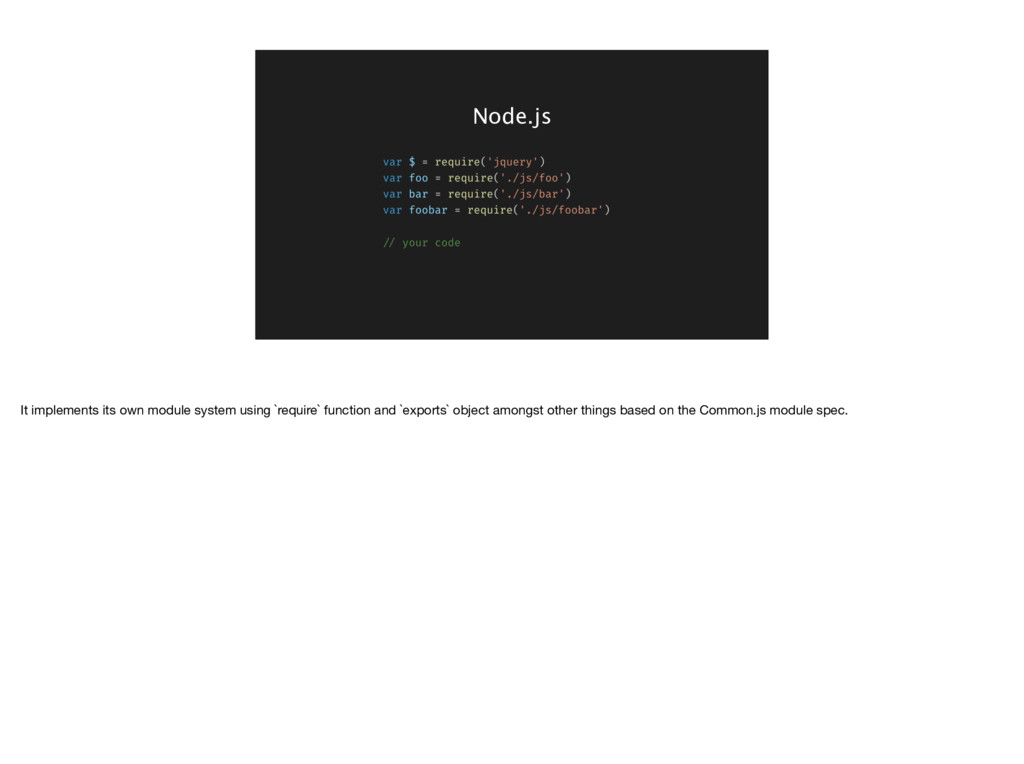
bundler is a tool that simply takes all your Javascript source files and puts them into one file. That process is called bundling. There are many of them these days, with Webpack, Browserify or Metro being most popular.
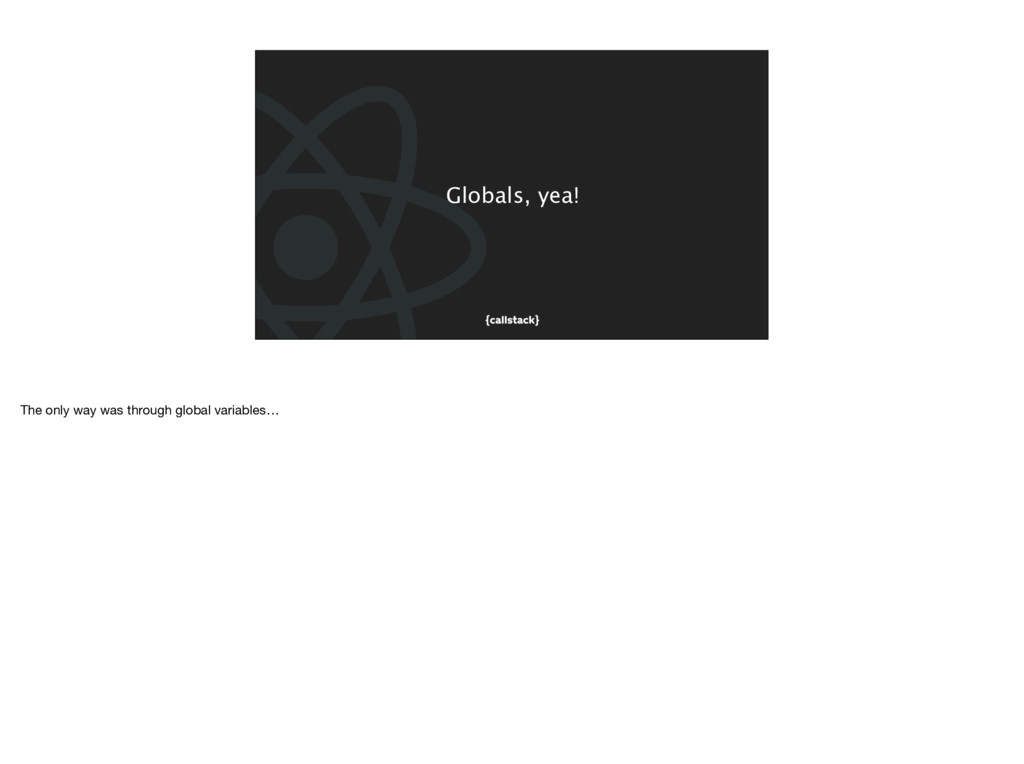
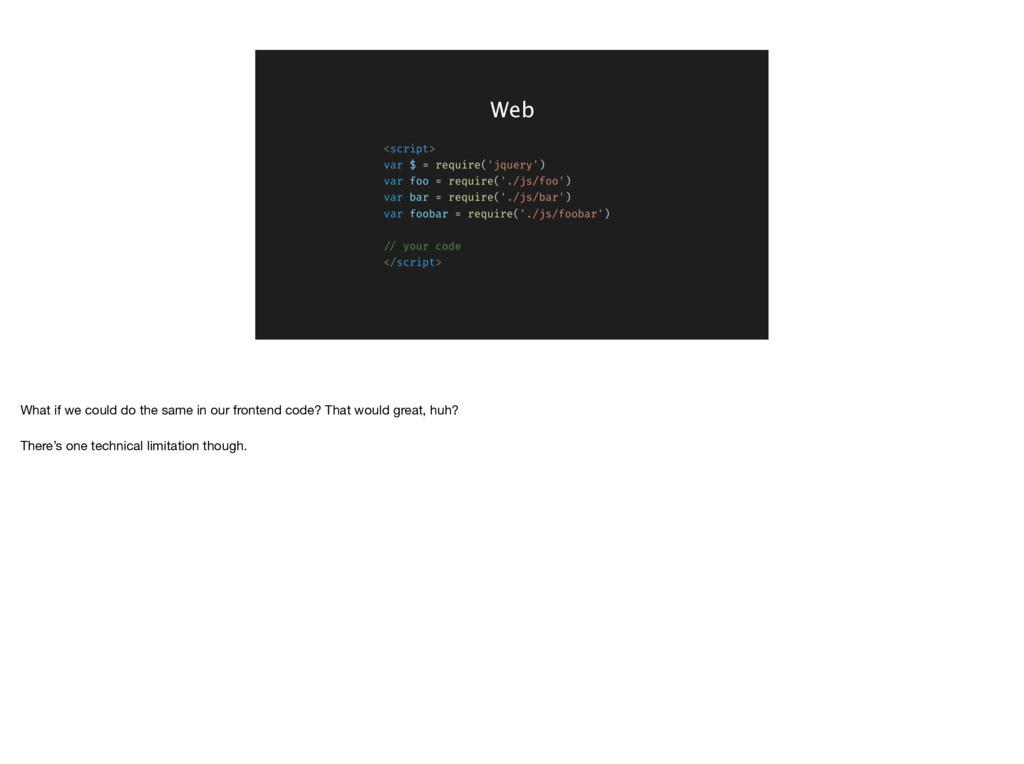
dependencies from your code. There was no `import` or `require` statements. So how did we make functions of our code visible to the outer world and how did we import functions from other people’s code?
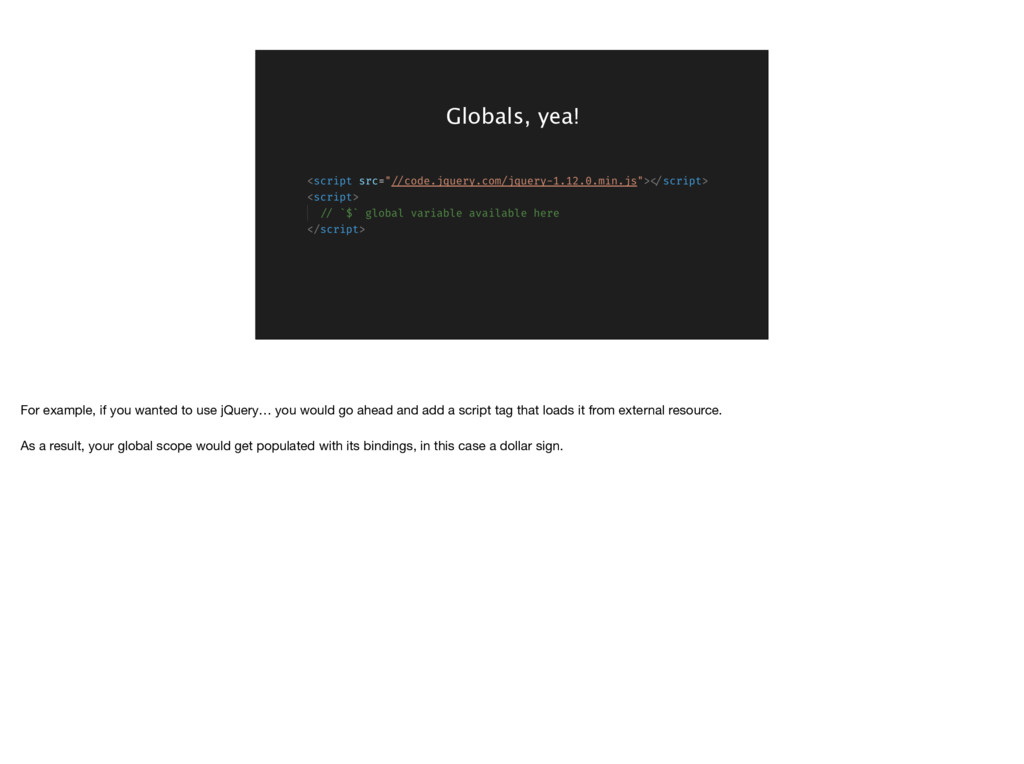
you would go ahead and add a script tag that loads it from external resource. As a result, your global scope would get populated with its bindings, in this case a dollar sign.
actually neat. All set with just a few lines of code, right? Imagine this scenario: Your prototype works out, your application grows and you end up looking into splitting your file into smaller, reusable pieces.
on slide. Now, the code that will get executed in the script tag should have access to all globals defined in the preceding files. The problem here is the order. What if foo.js wanted to use bar.js code. Manipulating the order files are loaded and executed is a design flaw. I call it script hell. From callback hell we know it’s bad!
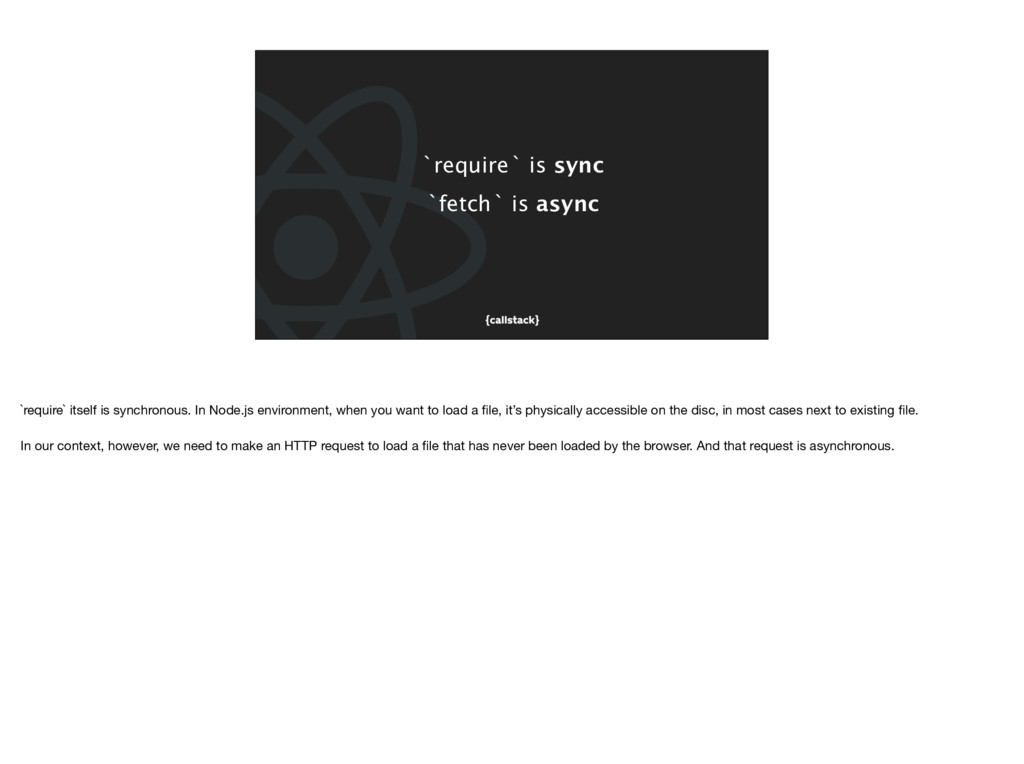
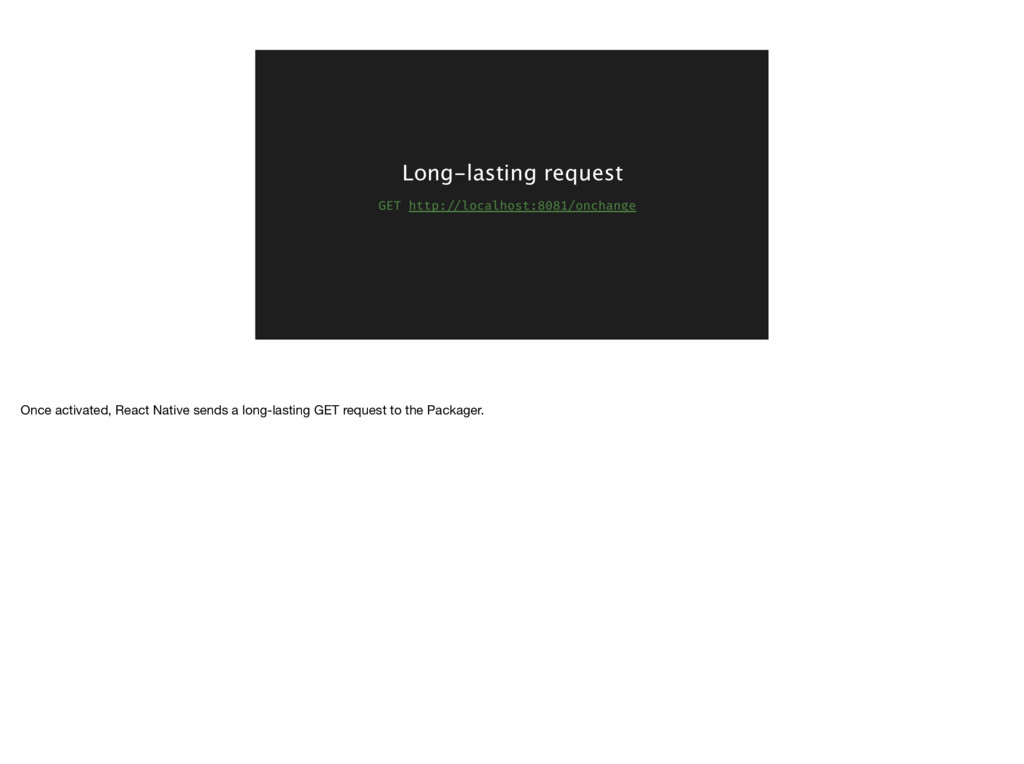
In Node.js environment, when you want to load a file, it’s physically accessible on the disc, in most cases next to existing file. In our context, however, we need to make an HTTP request to load a file that has never been loaded by the browser. And that request is asynchronous.
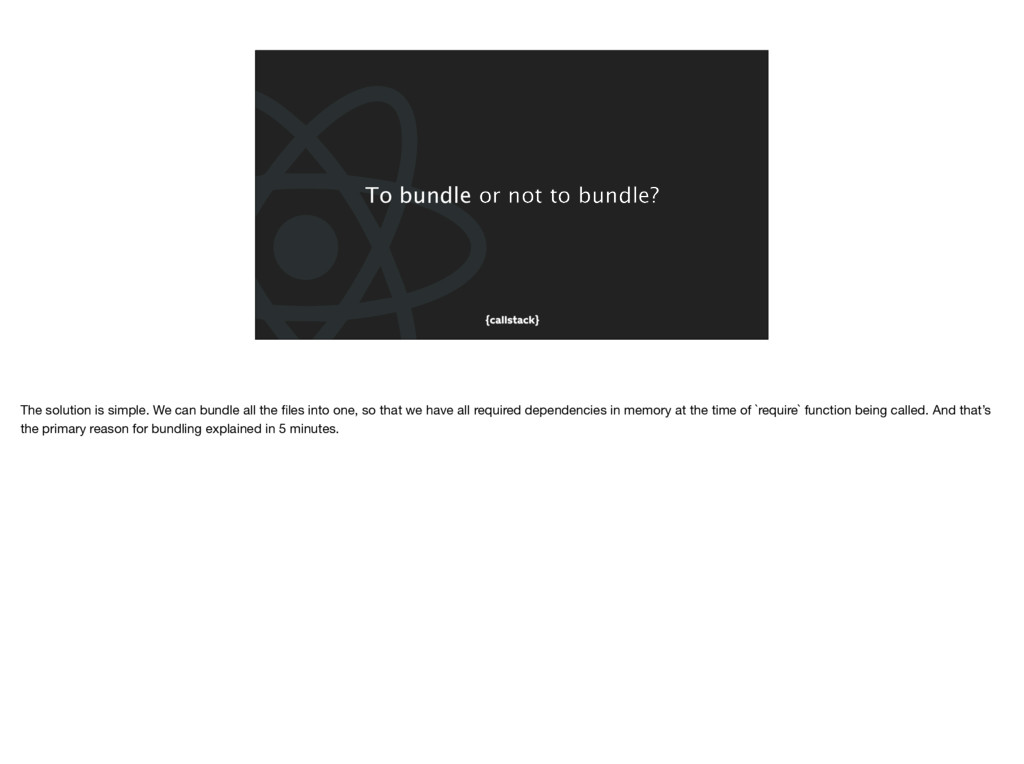
We can bundle all the files into one, so that we have all required dependencies in memory at the time of `require` function being called. And that’s the primary reason for bundling explained in 5 minutes.
be perceived as a natural evolution of task runners, like Gulp or Grunt that happened over the course of past few years. There are lots of responsibilities in scope for them rather than just getting your code into one chunk for sake of organising dependencies.
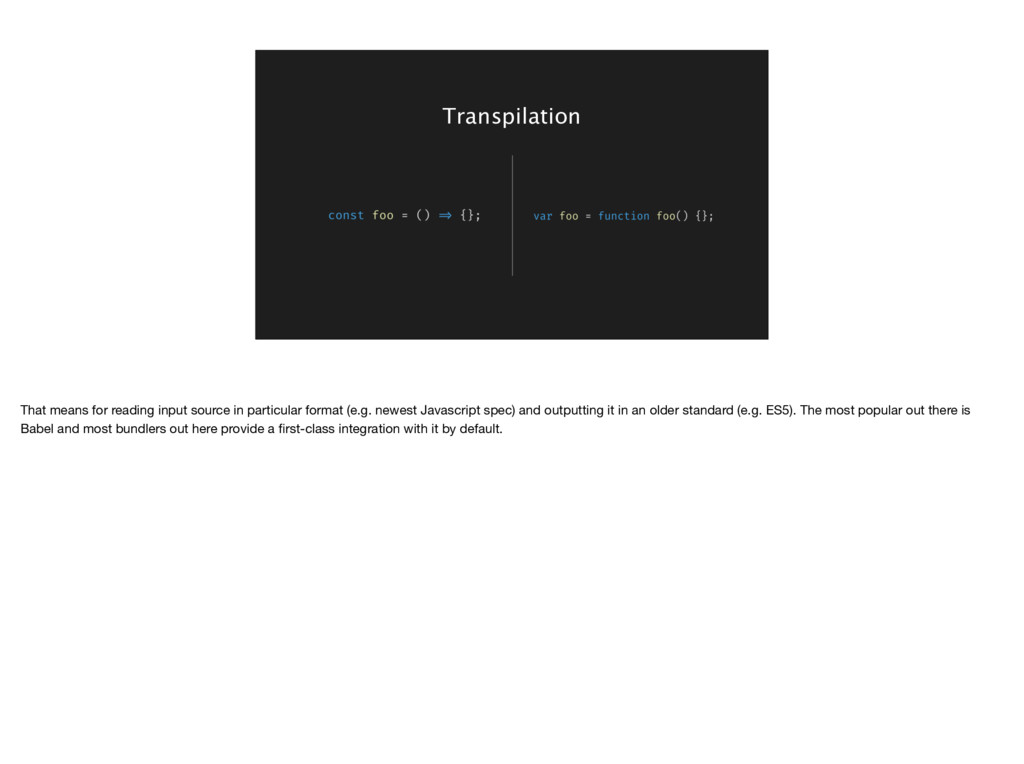
(e.g. newest Javascript spec) and outputting it in an older standard (e.g. ES5). The most popular out there is Babel and most bundlers out here provide a first-class integration with it by default.
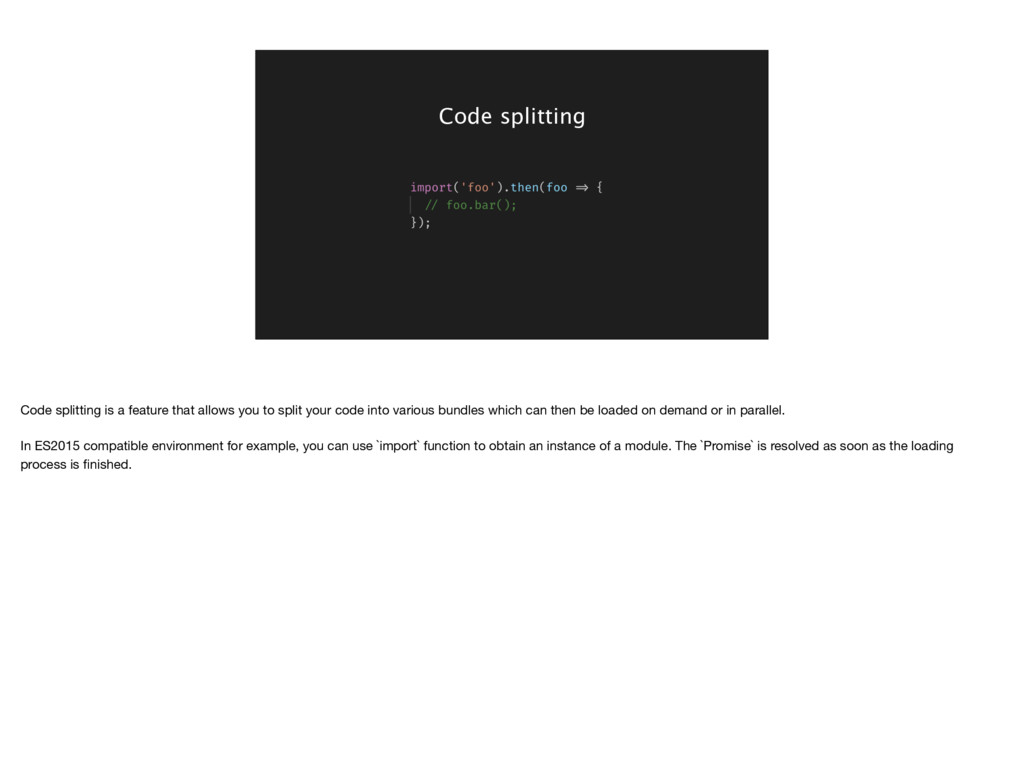
to work, entire application has to be loaded into memory. That causes your bundle size to increase and ship with modules that don’t necessarily need to be loaded on the initial page run.
to split your code into various bundles which can then be loaded on demand or in parallel. In ES2015 compatible environment for example, you can use `import` function to obtain an instance of a module. The `Promise` is resolved as soon as the loading process is finished.
2 ships with a built-in support for tree shaking. That means it can determine what parts of your modules are not used (e.g. module foo is never required) and effectively remove those parts. Combined with regular minifiers, like Uglify, it contributes to smaller bundle size that gets delivered to users.
native mobile applications by writing Javascript and layouts - by writing React components. However, since both iOS and Android are distinctive platforms with their own SDKs, languages and tools, there is no way to run the Javascript in the simple way.
the ability to spin a Javascript VM that can process and execute an arbitrary application bundle. React Native then sets up a bi-directional data flow by using a “bridge” - layer that can accept calls from Javascript and pass them through to a given native module
constraints we just talked in context of web, applicable here as well. Just to give you a great example: On iOS, React Native uses built-in Safari to execute your application logic. Its features and performance changes on per system basis. You will find a different set of ES6 supported on your testing Mac than on iOS8, 9 or 10. So you definitely want to transpile your code to lowest common subset supported.
pretty similar to web, right? We have access to some of the same polyfills, globals, APIs. The language and spec is also the same. We bundle code the same way. There are even modules on npm that work in both environments. However, there’s one thing that is fundamentally different.
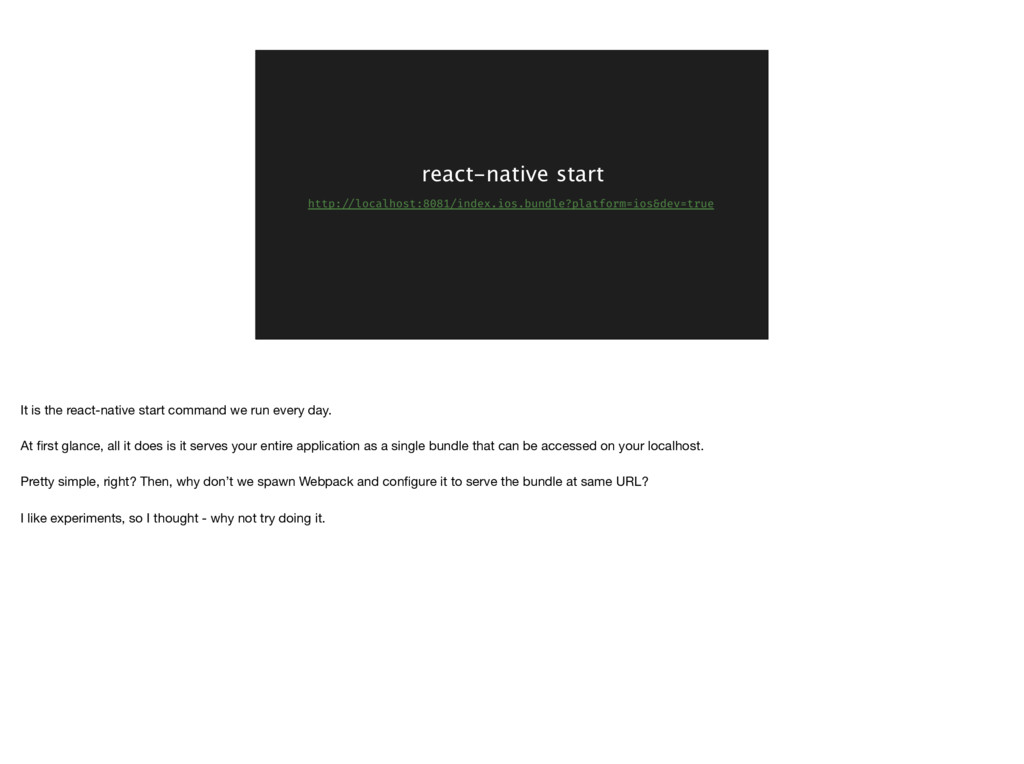
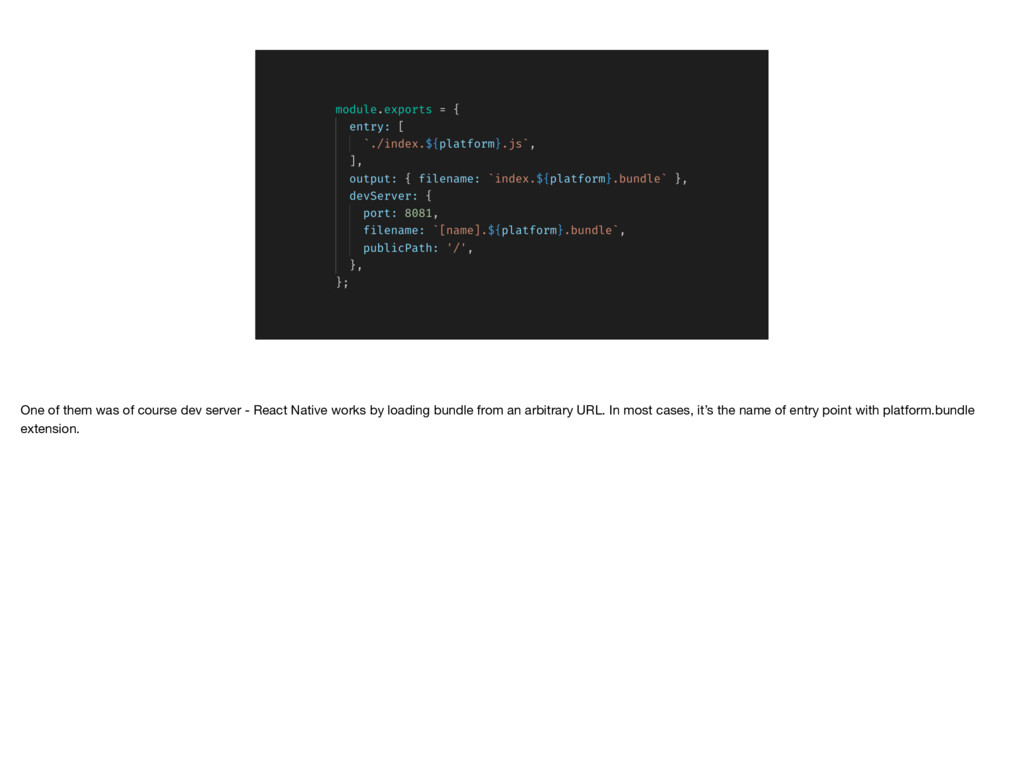
every day. At first glance, all it does is it serves your entire application as a single bundle that can be accessed on your localhost. Pretty simple, right? Then, why don’t we spawn Webpack and configure it to serve the bundle at same URL? I like experiments, so I thought - why not try doing it.
where I could just point to an entry point and define some other settings for React Native to load the bundle. Then, I thought of all React Native specific features I knew I have to support for the first implementation to work.
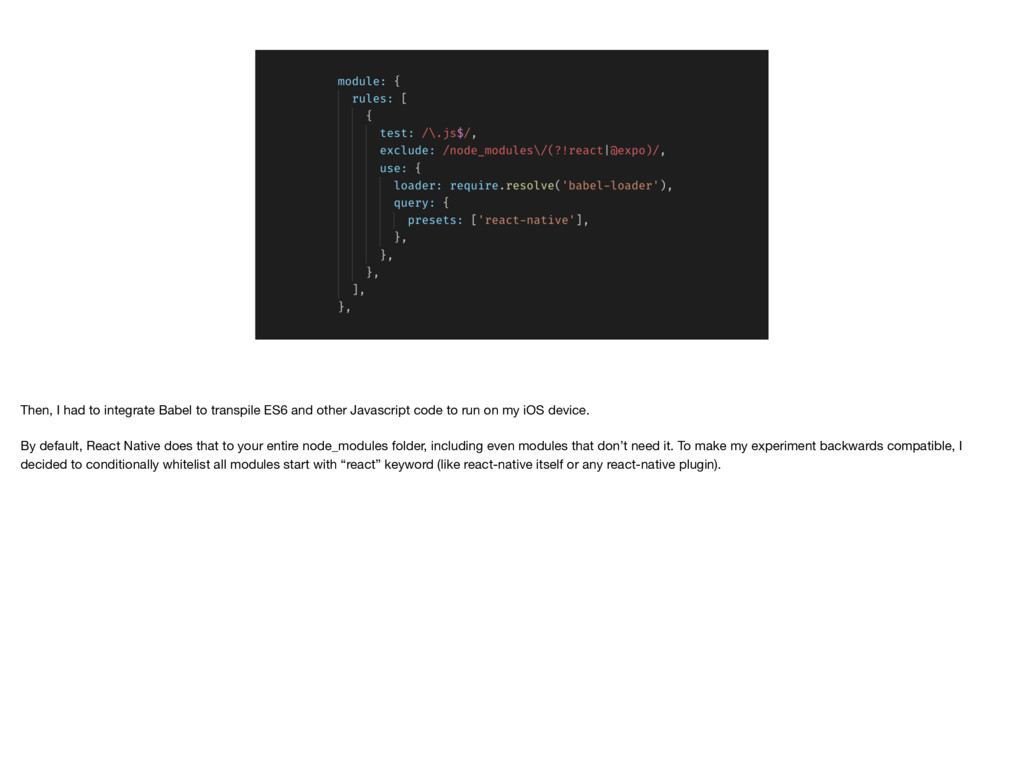
other Javascript code to run on my iOS device. By default, React Native does that to your entire node_modules folder, including even modules that don’t need it. To make my experiment backwards compatible, I decided to conditionally whitelist all modules start with “react” keyword (like react-native itself or any react-native plugin).
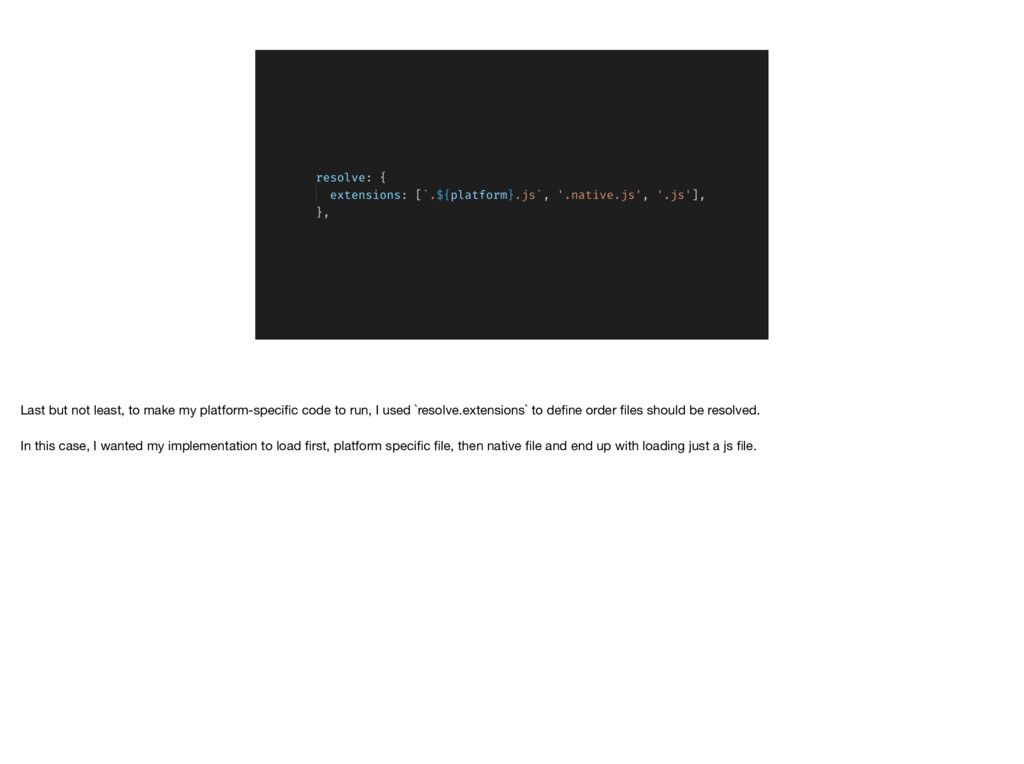
run, I used `resolve.extensions` to define order files should be resolved. In this case, I wanted my implementation to load first, platform specific file, then native file and end up with loading just a js file.
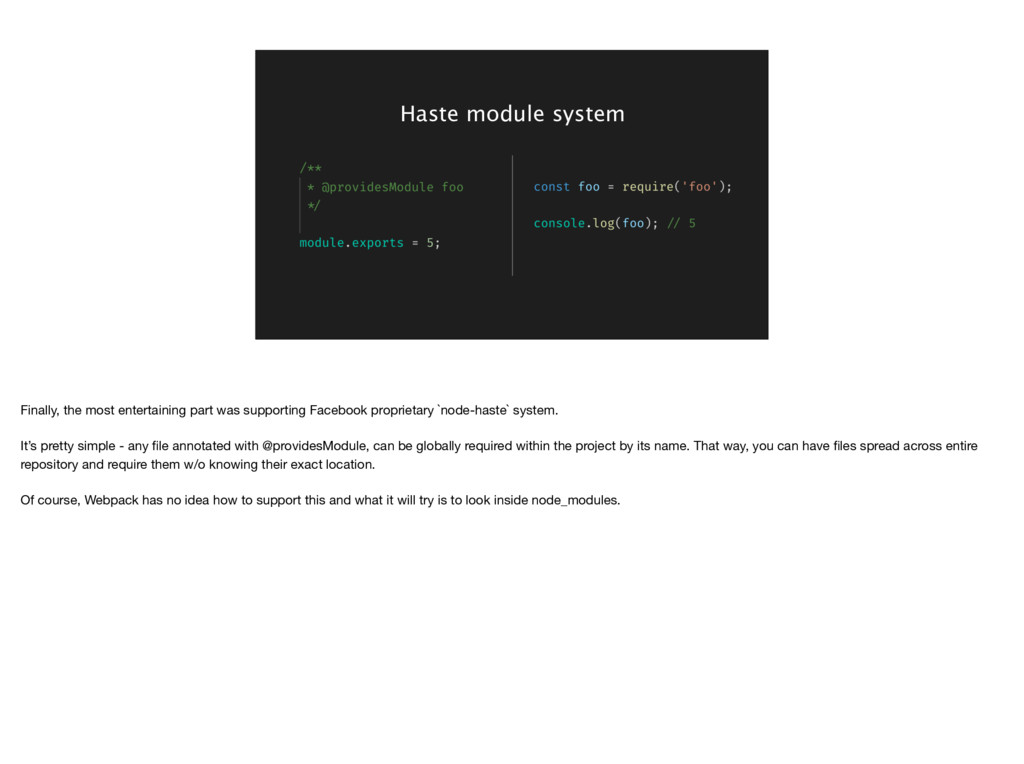
Facebook proprietary `node-haste` system. It’s pretty simple - any file annotated with @providesModule, can be globally required within the project by its name. That way, you can have files spread across entire repository and require them w/o knowing their exact location. Of course, Webpack has no idea how to support this and what it will try is to look inside node_modules.
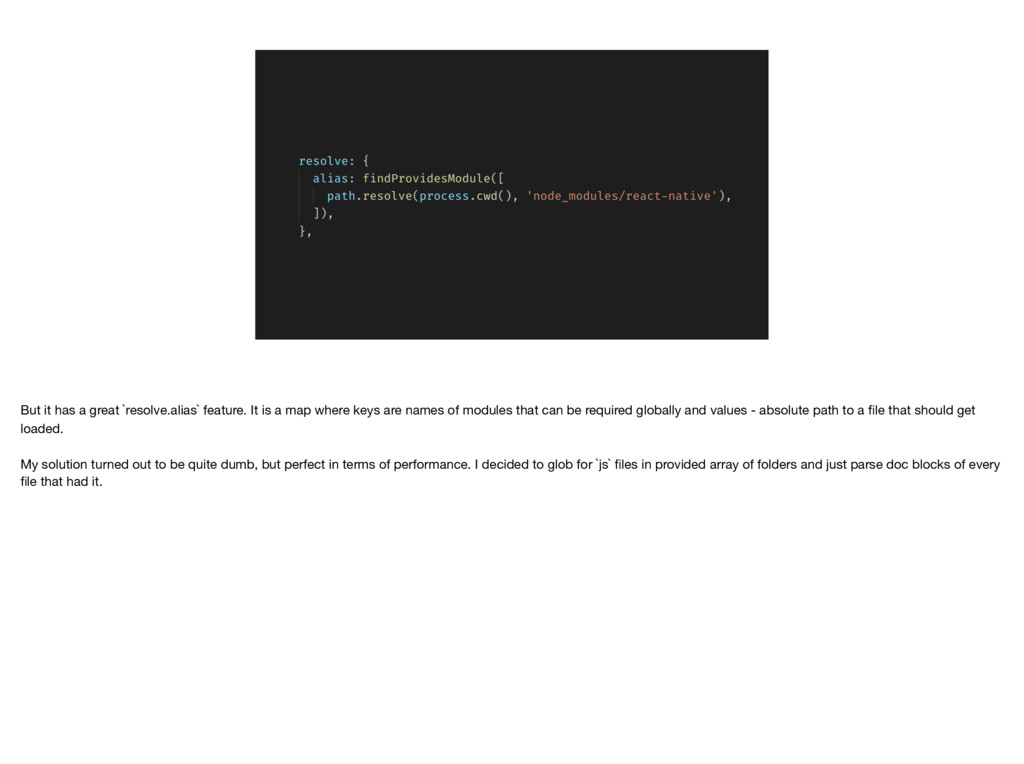
map where keys are names of modules that can be required globally and values - absolute path to a file that should get loaded. My solution turned out to be quite dumb, but perfect in terms of performance. I decided to glob for `js` files in provided array of folders and just parse doc blocks of every file that had it.
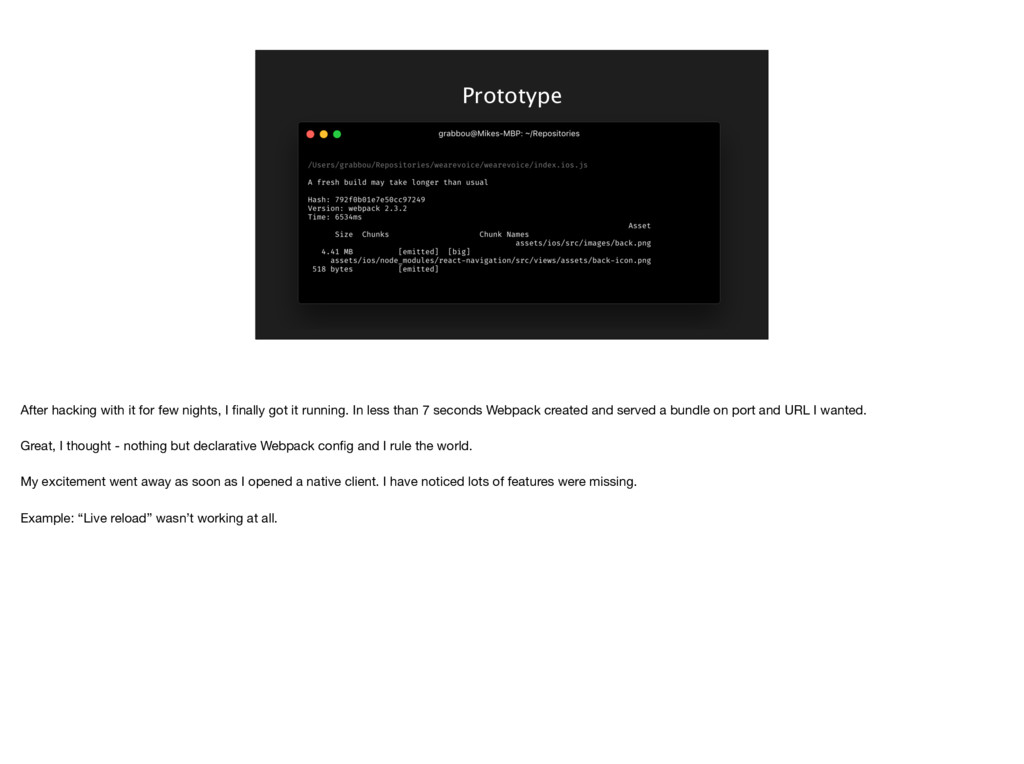
got it running. In less than 7 seconds Webpack created and served a bundle on port and URL I wanted. Great, I thought - nothing but declarative Webpack config and I rule the world. My excitement went away as soon as I opened a native client. I have noticed lots of features were missing. Example: “Live reload” wasn’t working at all.
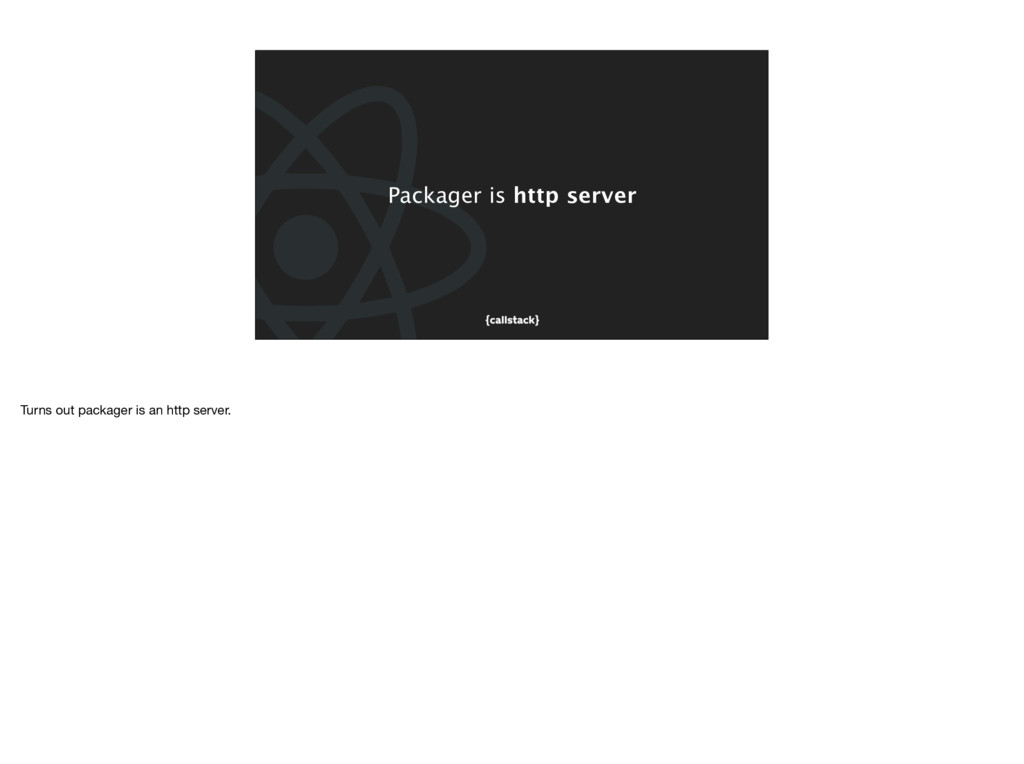
context of React Native, there has to be more than just a bundler that is running. Turns out, running `react-native start` spins up entire set of tools focused on providing a better developer experience. At its core, there’s a bundler. All the rest are just complementary features built on top of it.
to develop, debug and package an application. It builds on top of an arbitrary bundler, like Webpack and ships with pre-configured set of transforms required for the code to run in particular environment.
going and see if I can make Webpack work with React Native. The plan was to support all its features, including symlinks, that never worked with default packager yet. I was in particular interested where’s the boundary, that is - how many features I’ll have to write on top in order to make it a drop-in replacement.
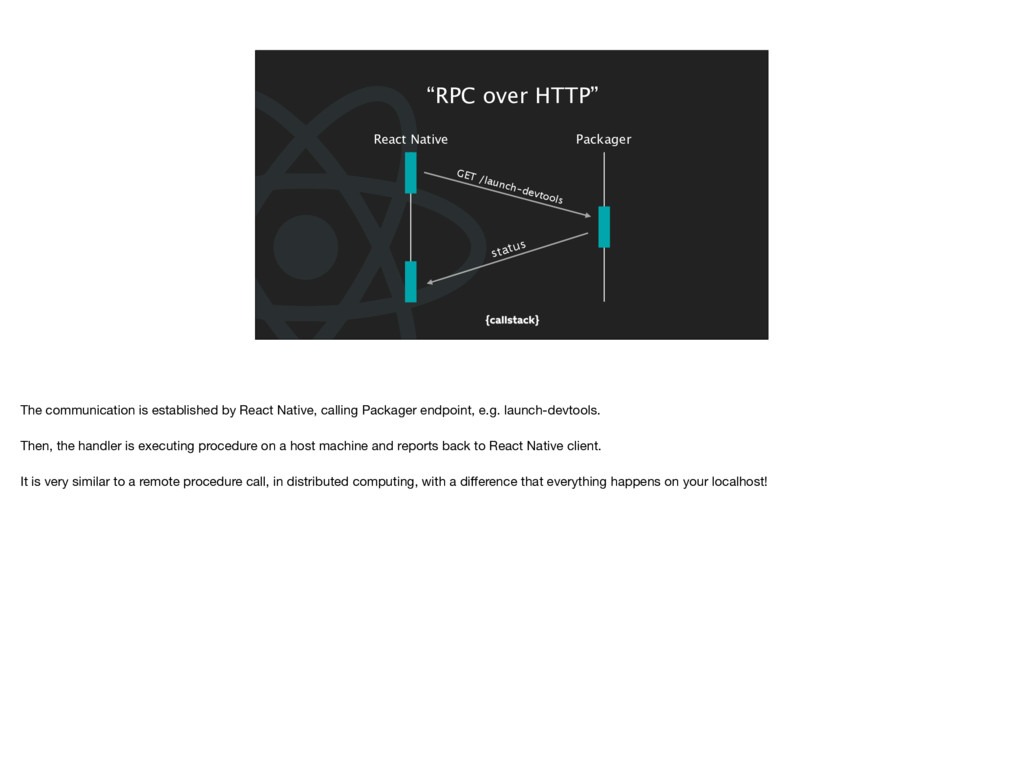
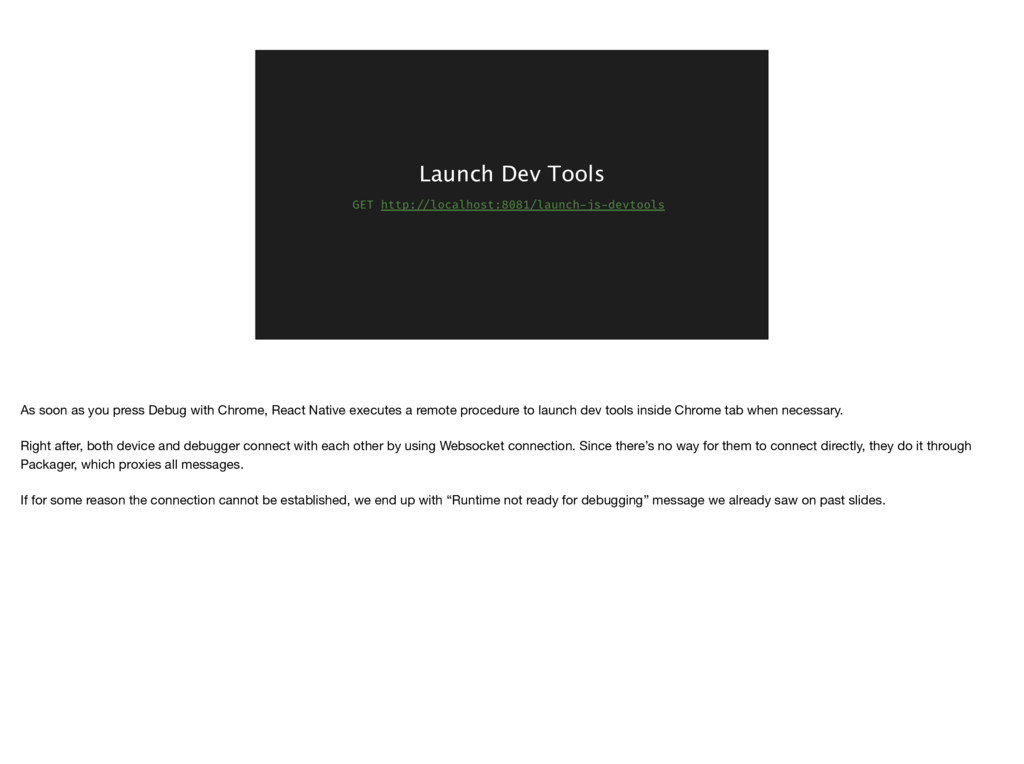
was the Chrome Debugger. On standard React Native app, turning that mode opens a new tab in the browser. However, there wasn’t any API on iOS or Android that I was aware of to open an arbitrary app on a Mac. I quickly realised that it has to be packager that opens a Chrome tab, not React Native. Since it is a process running on a host machine, it has access to all required APIs. Now how do those two pieces talk to each other?
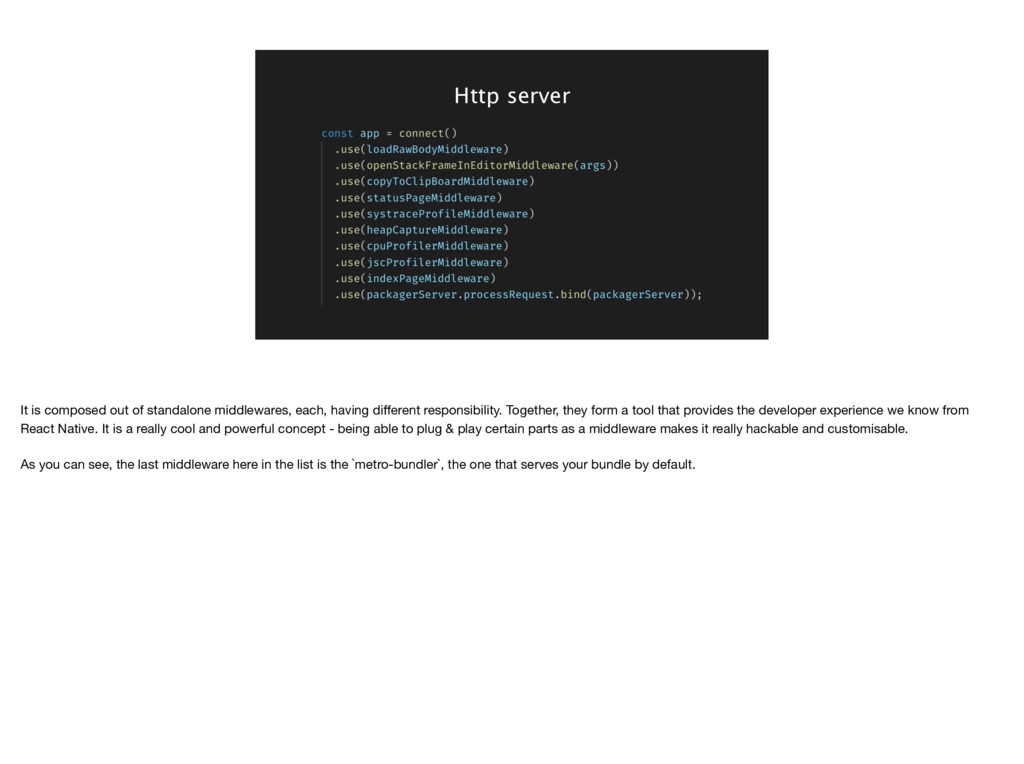
having different responsibility. Together, they form a tool that provides the developer experience we know from React Native. It is a really cool and powerful concept - being able to plug & play certain parts as a middleware makes it really hackable and customisable. As you can see, the last middleware here in the list is the `metro-bundler`, the one that serves your bundle by default.
communication is established by React Native, calling Packager endpoint, e.g. launch-devtools. Then, the handler is executing procedure on a host machine and reports back to React Native client. It is very similar to a remote procedure call, in distributed computing, with a difference that everything happens on your localhost!
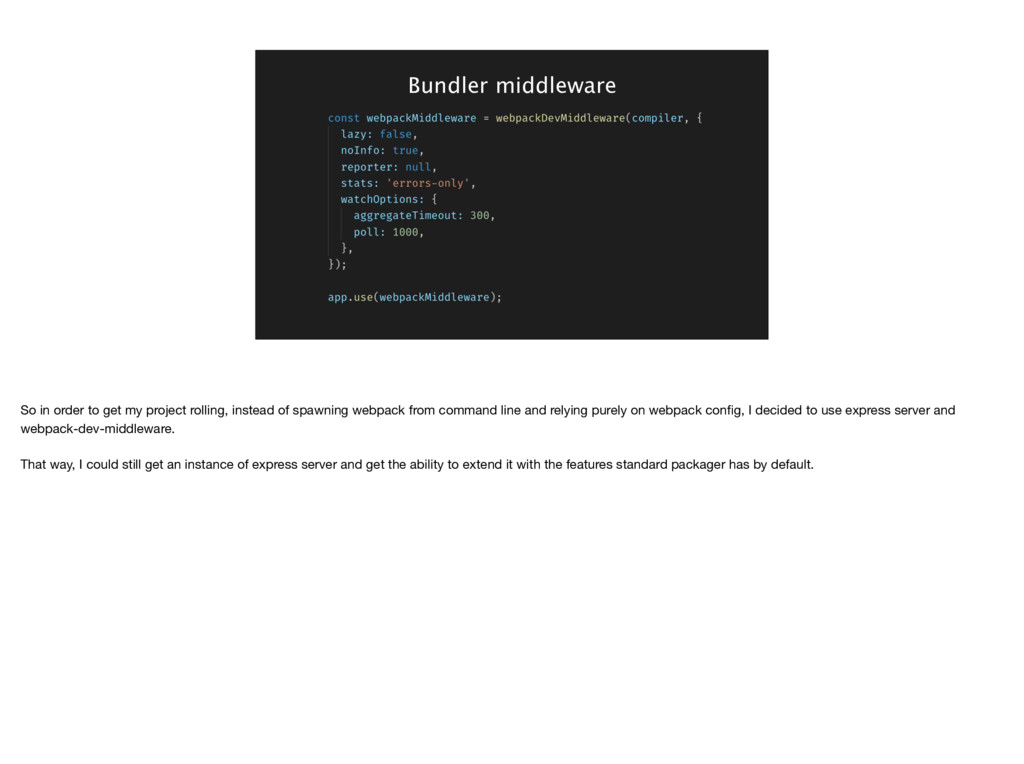
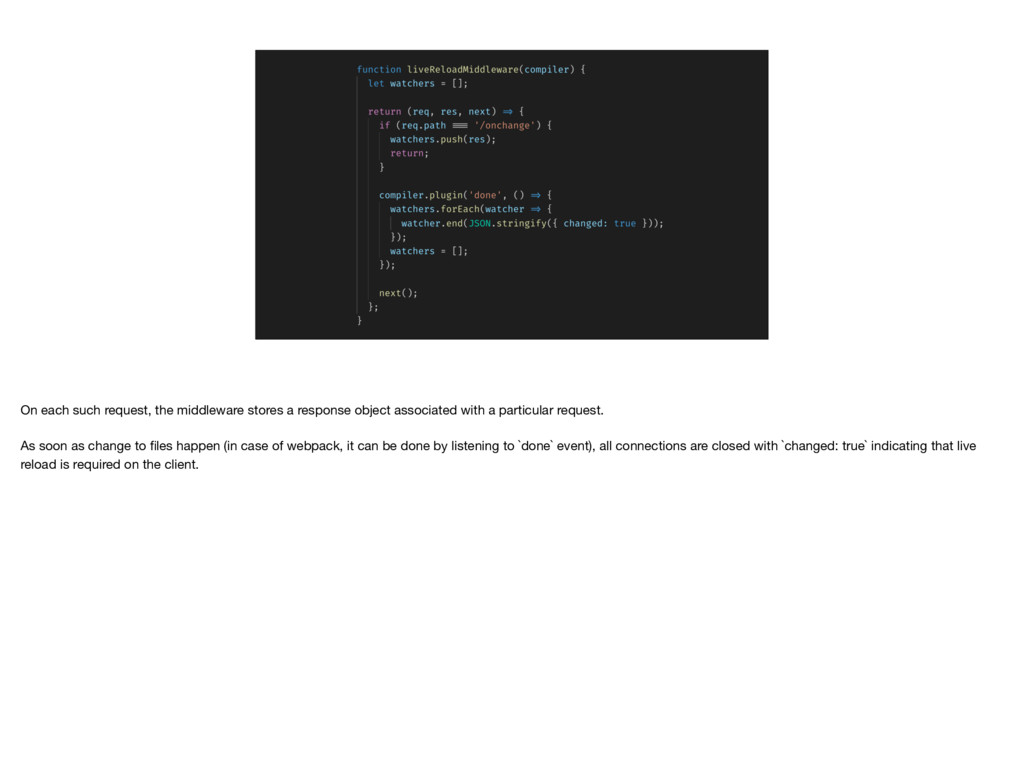
instead of spawning webpack from command line and relying purely on webpack config, I decided to use express server and webpack-dev-middleware. That way, I could still get an instance of express server and get the ability to extend it with the features standard packager has by default.
associated with a particular request. As soon as change to files happen (in case of webpack, it can be done by listening to `done` event), all connections are closed with `changed: true` indicating that live reload is required on the client.
of how the communication between Packager and React Native is done, it’s finally the time to look at the dev tools middleware. I am quite excited about that one - the ability to use an arbitrary browser to run and debug our Javascript was pure magic to me the first time I saw it.
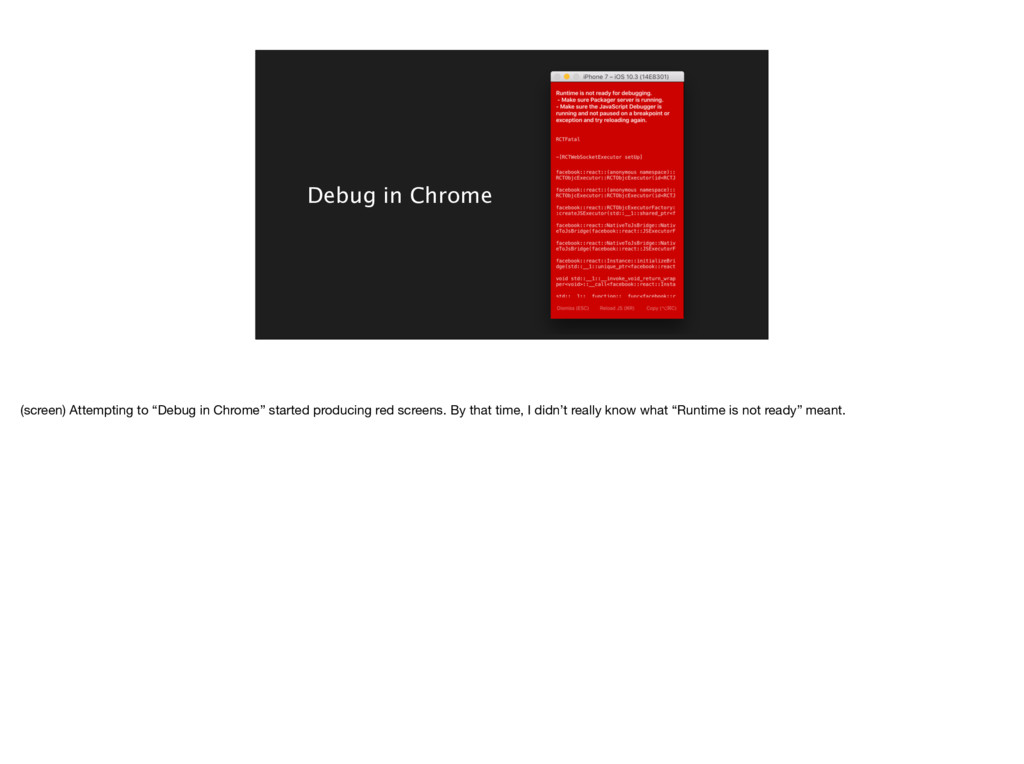
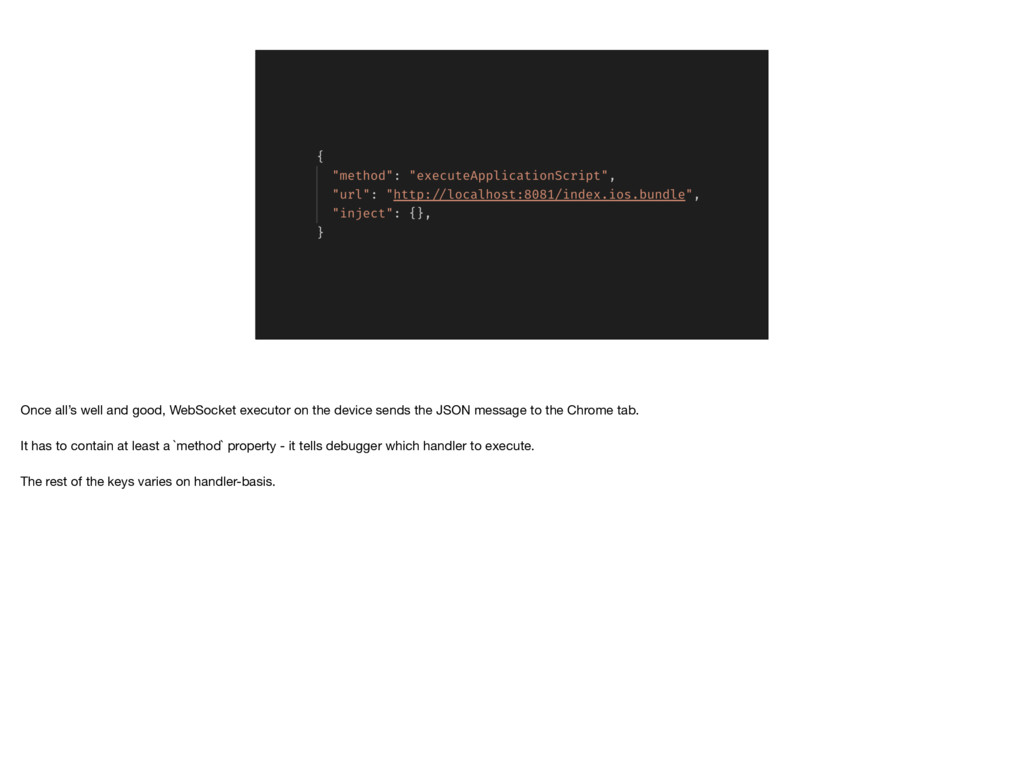
Chrome, React Native executes a remote procedure to launch dev tools inside Chrome tab when necessary. Right after, both device and debugger connect with each other by using Websocket connection. Since there’s no way for them to connect directly, they do it through Packager, which proxies all messages. If for some reason the connection cannot be established, we end up with “Runtime not ready for debugging” message we already saw on past slides.
sends the JSON message to the Chrome tab. It has to contain at least a `method` property - it tells debugger which handler to execute. The rest of the keys varies on handler-basis.
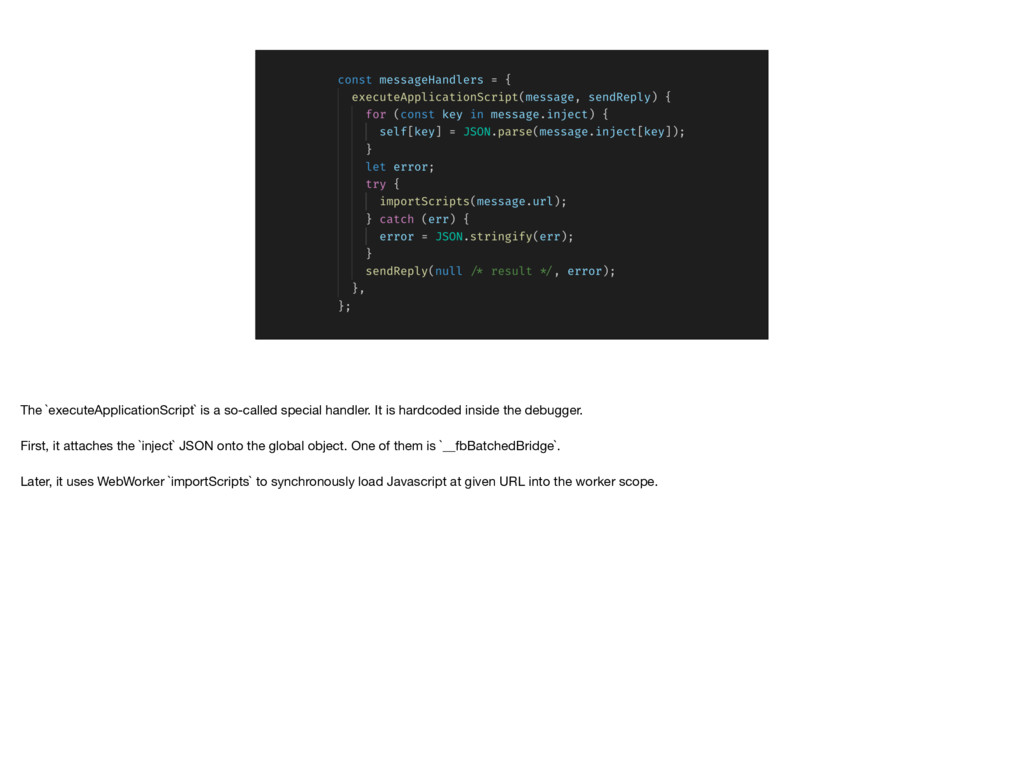
inside the debugger. First, it attaches the `inject` JSON onto the global object. One of them is `__fbBatchedBridge`. Later, it uses WebWorker `importScripts` to synchronously load Javascript at given URL into the worker scope.
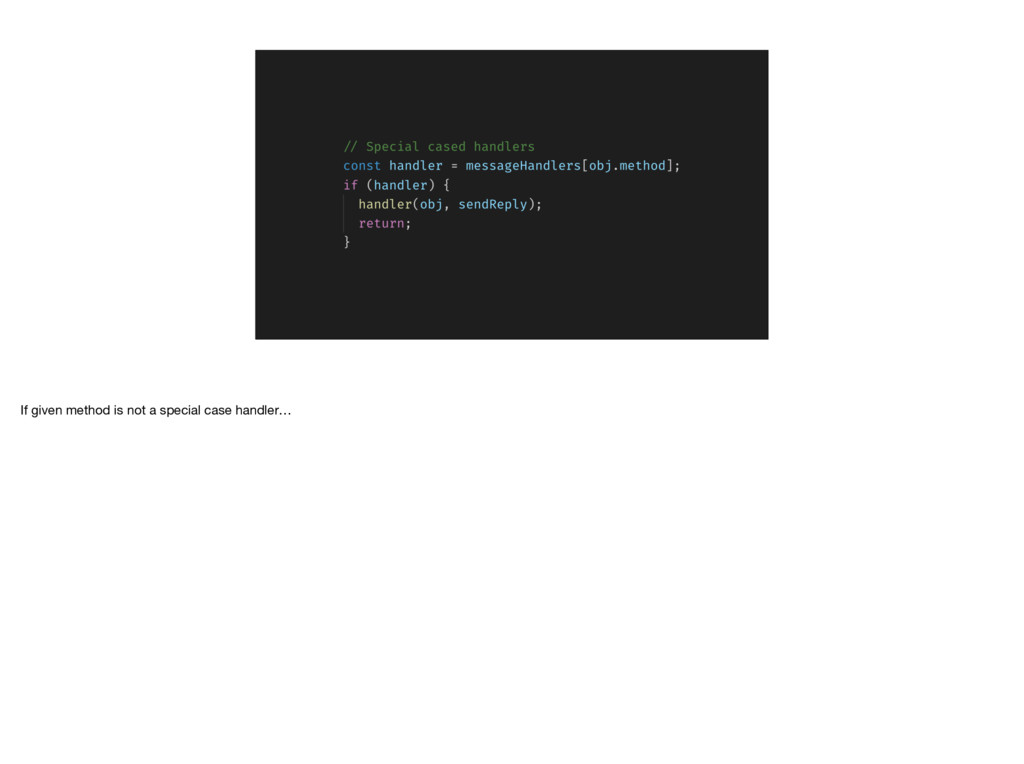
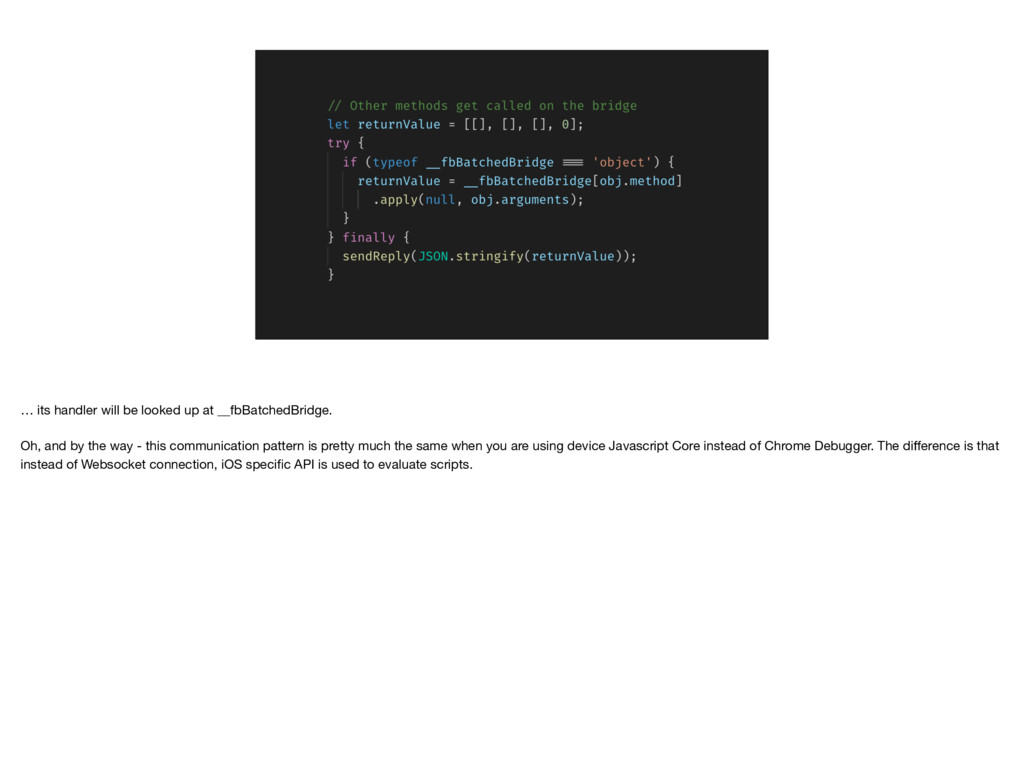
and by the way - this communication pattern is pretty much the same when you are using device Javascript Core instead of Chrome Debugger. The difference is that instead of Websocket connection, iOS specific API is used to evaluate scripts.
started looking into understanding why error messages didn’t have proper stack traces. Now I didn’t include this in my initial prototype - Steve Kellock from Infinite Red contributed it later - thank you! However, I find it very interesting so decided to describe it as if it was there from the very beginning.
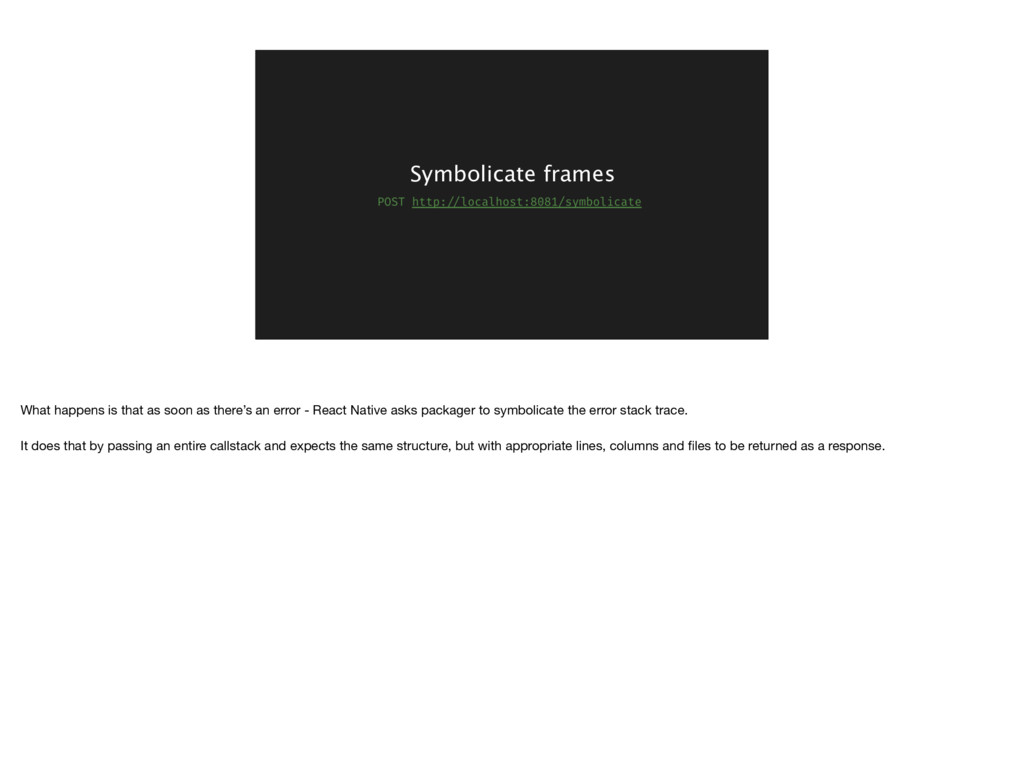
an error - React Native asks packager to symbolicate the error stack trace. It does that by passing an entire callstack and expects the same structure, but with appropriate lines, columns and files to be returned as a response.
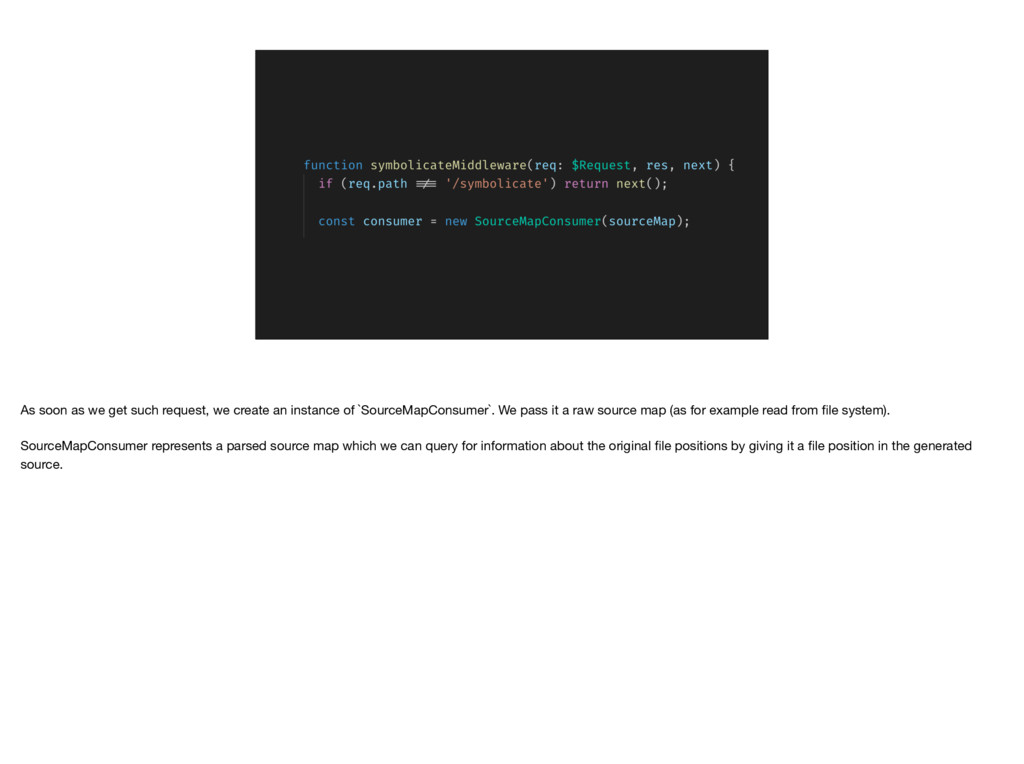
instance of `SourceMapConsumer`. We pass it a raw source map (as for example read from file system). SourceMapConsumer represents a parsed source map which we can query for information about the original file positions by giving it a file position in the generated source.
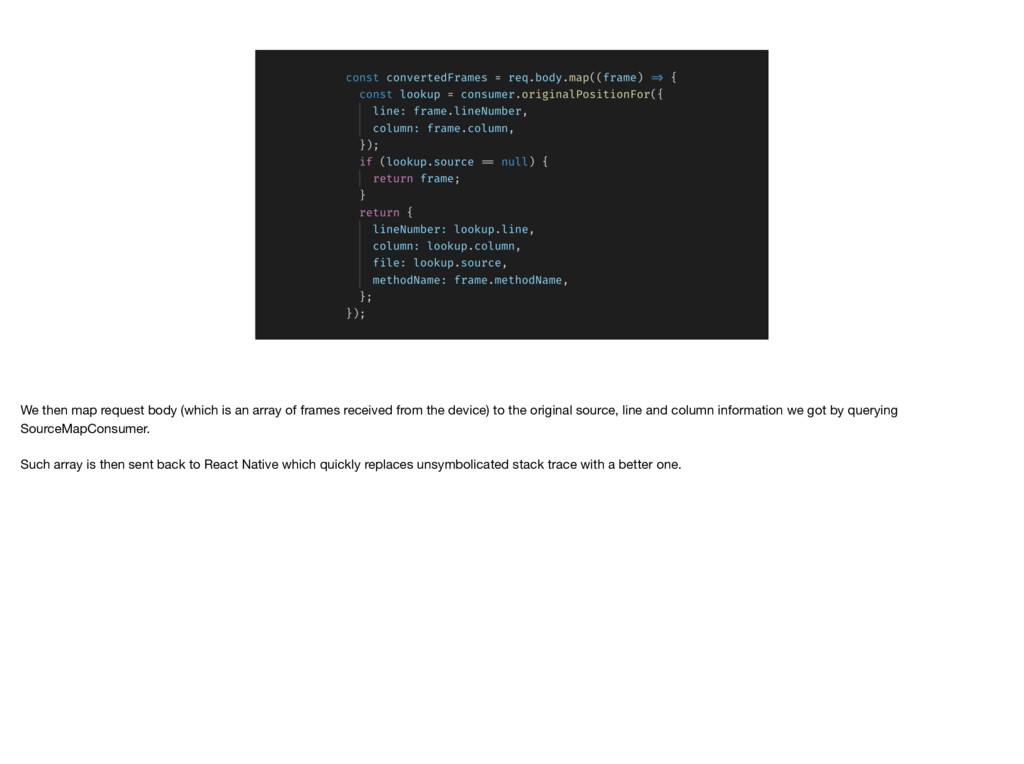
frames received from the device) to the original source, line and column information we got by querying SourceMapConsumer. Such array is then sent back to React Native which quickly replaces unsymbolicated stack trace with a better one.
this is I believe the bundler implementation should be pluggable. The packager in React Native does way more things than just compiling our code. And those things are not trivial - some of them were carefully designed over the course of months. From my experience, it took me two weeks to implement Webpack to work with React Native. If the entire platform was pluggable, it would’ve been a breeze.
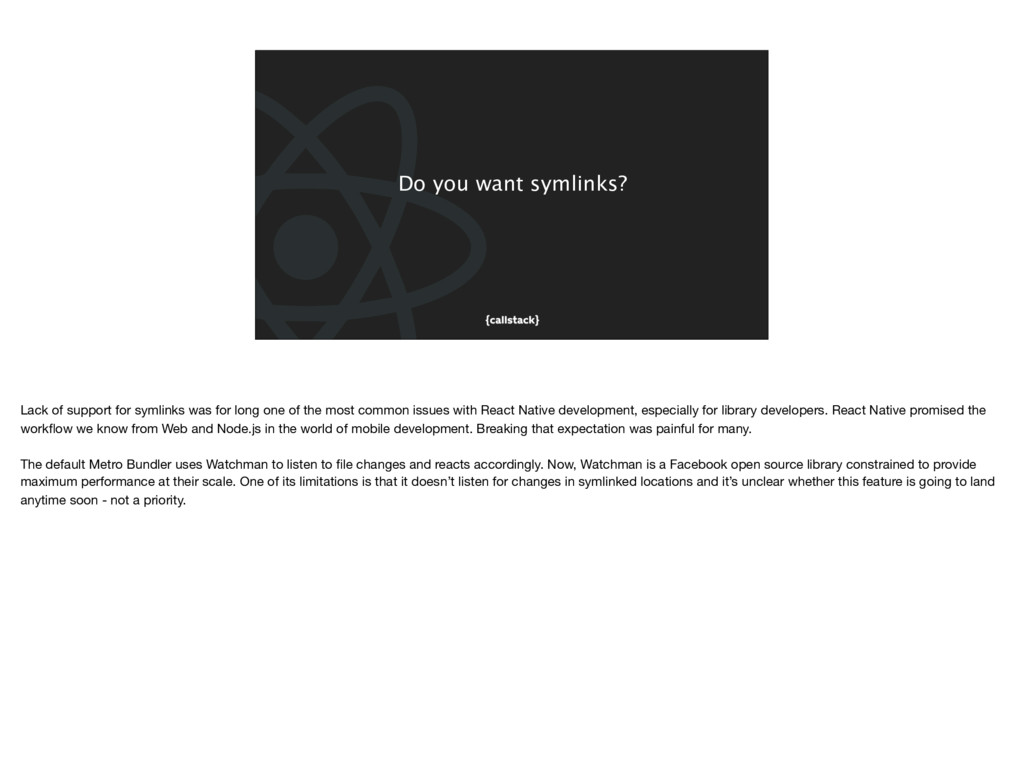
for long one of the most common issues with React Native development, especially for library developers. React Native promised the workflow we know from Web and Node.js in the world of mobile development. Breaking that expectation was painful for many. The default Metro Bundler uses Watchman to listen to file changes and reacts accordingly. Now, Watchman is a Facebook open source library constrained to provide maximum performance at their scale. One of its limitations is that it doesn’t listen for changes in symlinked locations and it’s unclear whether this feature is going to land anytime soon - not a priority.
irrelevant to us matter a lot. It’s great that we get performance improvements for free. However, at the same time, I believe one should be able to opt-in for a slightly slower but more feature-rich solution.
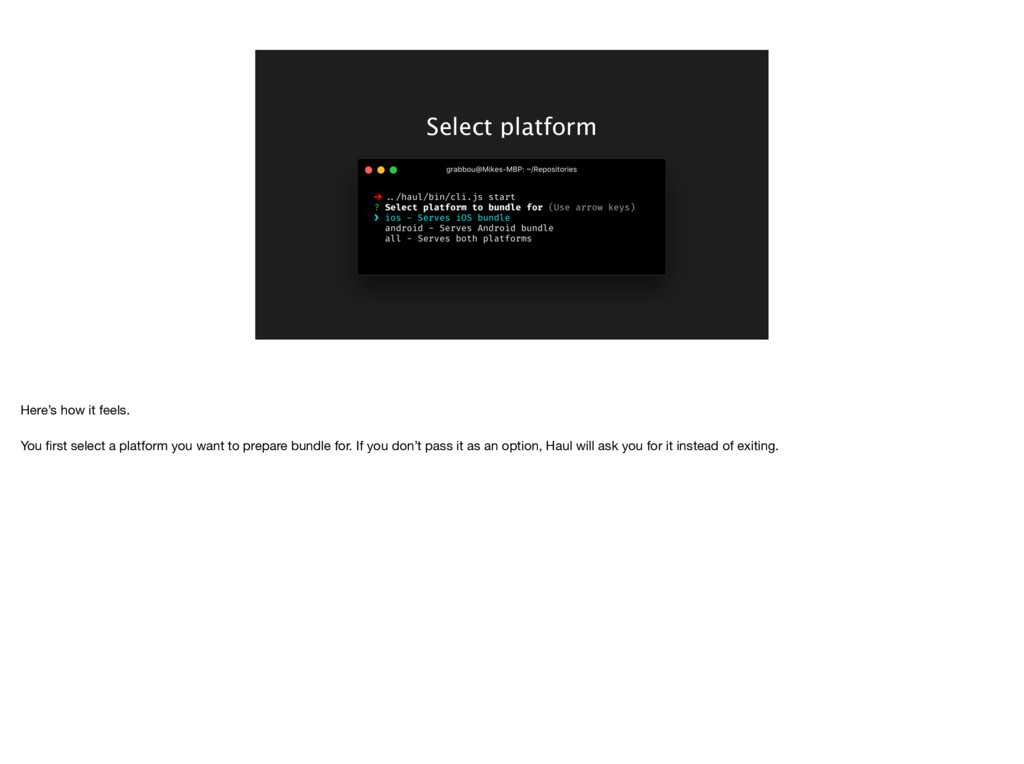
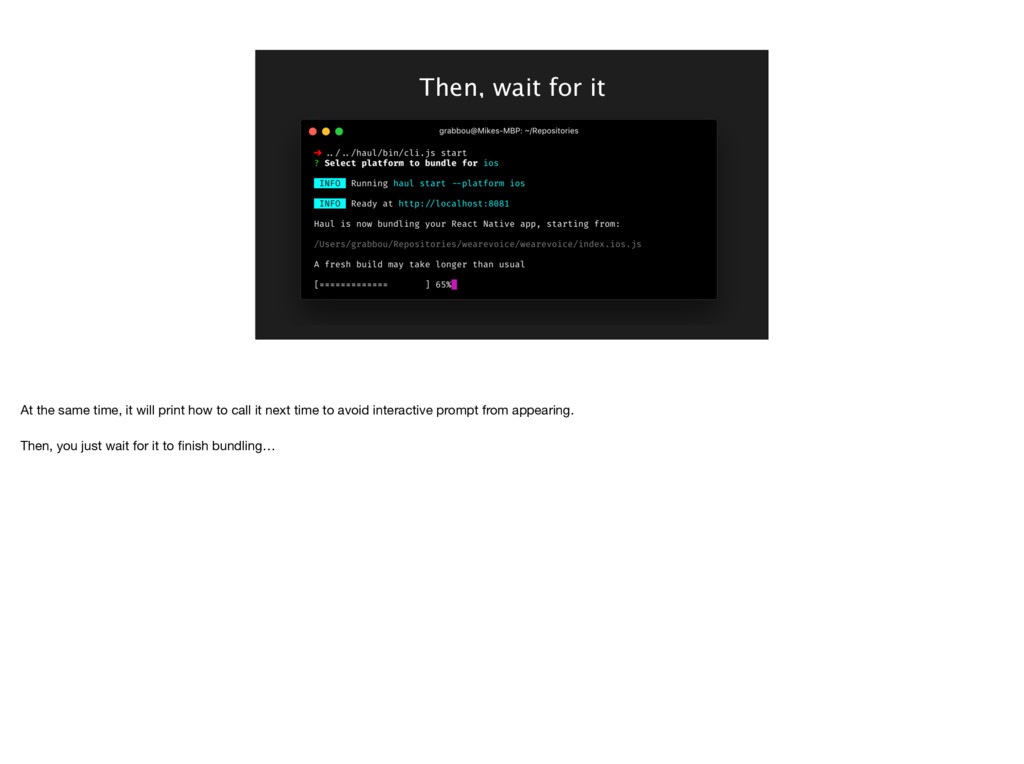
is a drop-in replacement for existing packager. It builds on top of open tools, like Webpack. At its core, there’s Express server with pluggable middlewares. It’s a hackable dev server with predictable workflow. Most of the code snippets you have seen so far in this talk can be found in the repo.
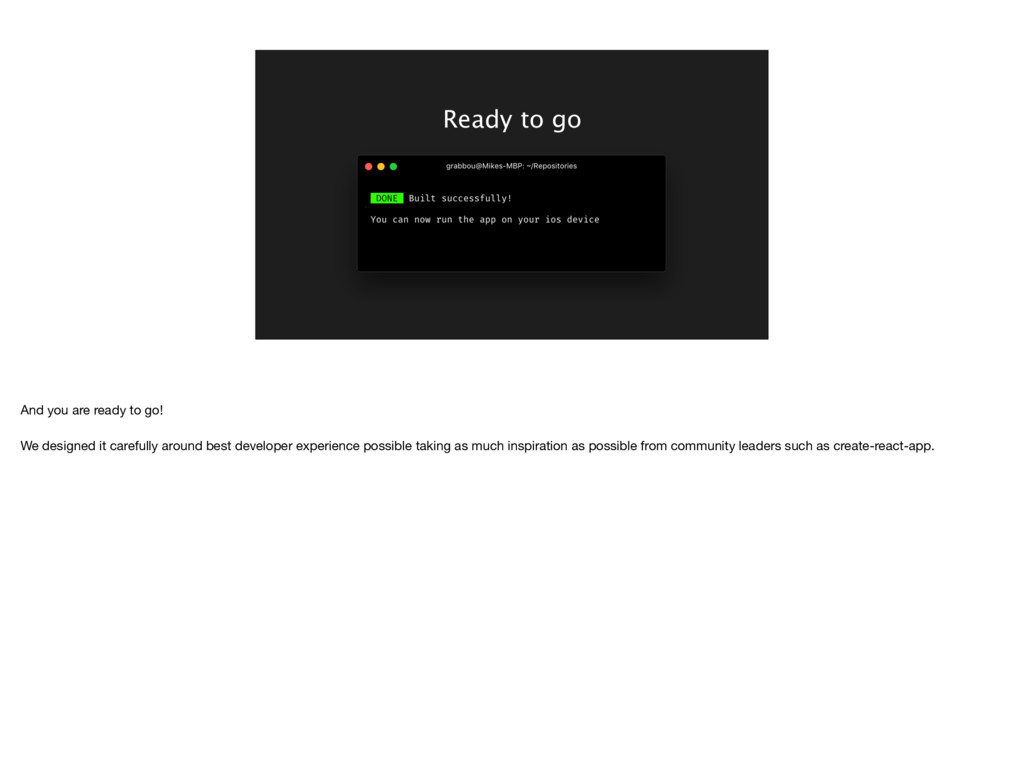
designed it carefully around best developer experience possible taking as much inspiration as possible from community leaders such as create-react-app.
Two of them were already mentioned today, so to recap: (first) First one was to have a support for symlinks, something we could die for (second) Second was to embrace potential of plug-ability and make something, that can be extended in an easy way
just awesome! What I like about it is its extensive, well documented interface with a broad ecosystem. It opens lots of exciting possibilities, like using new extensions for your files, using CSS, new loaders or even Typescript. Also, if you are already using Webpack on web, you could share the config and maximise the percentage of common business logic in your codebase.
are working on. Currently, our top priority is to increase its adoption so that we get more bug reports and can move forward! If the idea of Haul sounds interesting to you and you are likely to use it in the future, please give it a go and let us know your feedback!
looking into making Haul a platform for other bundlers to run. There are faster alternatives to Webpack, like Fusebox. I believe that one should be able to use whatever works for him to bundle the app and still, get first class developer experience that Haul gives him.