Upgrade to Pro — share decks privately, control downloads, hide ads and more …

Chapter 2: Creating and Editing a Web Page Using Inline Styles Slides

DrJohnH
March 26, 2015

Chapter 2: Creating and Editing a Web Page Using Inline Styles Slides

DrJohnH

March 26, 2015
Tweet

Other Decks in Education

Transcript

  1. • Identify elements of a Web page • Start Notepad++

    and describe the Notepad++ window • Enable word wrap in Notepad++ • Enter HTML tags • Enter a centered heading and a paragraph of text Chapter 2: Creating and Editing a Web Page Using Inline Styles 2 Chapter Objectives
  2. • Create an unordered, ordered, or definition list • Save

    an HTML file • Use a browser to view a Web page • Activate Notepad++ • Identify Web page image types and attributes Chapter 2: Creating and Editing a Web Page Using Inline Styles 3 Chapter Objectives
  3. • Add an image, change the color of headings on

    a Web page, change bulleted list style, and add a horizontal rule using inline styles • View the HTML source code in a browser • Quit Notepad++ and a browser Chapter 2: Creating and Editing a Web Page Using Inline Styles 4 Chapter Objectives
  4. • Complete Web page planning • Analyze the need for

    the Web page • Choose the content for the Web page • Determine the file naming convention that you will use for this Web page • Determine where to save the Web page Chapter 2: Creating and Editing a Web Page Using Inline Styles 5 Plan Ahead
  5. • Determine what folder structure to use on your storage

    device • Identify how to format various elements of the Web page • Find appropriate graphical images • Establish where to position and how to format the graphical images • Test the Web page for W3C compliance Chapter 2: Creating and Editing a Web Page Using Inline Styles 6 Plan Ahead
  6. • Click the Start button on the Windows taskbar to

    display the Start menu • Click All Programs at the bottom of the left pane on the Start menu to display the All Programs list • Click the Notepad++ folder in the All Programs list • Click Notepad++ in the list to display a blank Notepad++ window • If the Notepad++ window is not maximized, click the Maximize button on the Notepad++ title bar to maximize it Chapter 2: Creating and Editing a Web Page Using Inline Styles 7 Starting Notepad++
  7. • Click View on the menu bar • If Word

    Wrap does not have a check mark next to it, click Word Wrap Chapter 2: Creating and Editing a Web Page Using Inline Styles 9 Enabling Word Wrap in Notepad++
  8. Chapter 2: Creating and Editing a Web Page Using Inline

    Styles 10 Enabling Word Wrap in Notepad++
  9. Chapter 2: Creating and Editing a Web Page Using Inline

    Styles 11 Defining the Web Page Structure Using HTML Tags
  10. Chapter 2: Creating and Editing a Web Page Using Inline

    Styles 13 Entering a Paragraph of Text
  11. Chapter 2: Creating and Editing a Web Page Using Inline

    Styles 15 Using Lists to Present Content
  12. • A definition list offsets information in a dictionary- like

    style Chapter 2: Creating and Editing a Web Page Using Inline Styles 16 More About List Formats
  13. • Content placed in a footer generally has to do

    with the company’s address, copyright, or contact information Chapter 2: Creating and Editing a Web Page Using Inline Styles 17 Adding a Footer
  14. • With a USB flash drive connected to one of

    the computer’s USB ports, click File on the Notepad++ menu bar • Click Save As on the File menu to display the Save As dialog box • Type the desired Web page name in the File name text box to change the file name. Do not press ENTER after typing the file name • Navigate to the desired location to save the file • Click the Save button in the Save As dialog box to save the file in the desired location with the desired name Chapter 2: Creating and Editing a Web Page Using Inline Styles 18 Saving an HTML File
  15. • Click the Internet Explorer icon on the taskbar •

    If necessary, click the Maximize button to maximize the browser window Chapter 2: Creating and Editing a Web Page Using Inline Styles 20 Starting a Browser
  16. • Click the Address bar to select the URL •

    Type the path and file name of the Web page to display • Press the ENTER key to display the Web page as if it were available on the Web Chapter 2: Creating and Editing a Web Page Using Inline Styles 21 Viewing a Web Page in a Browser
  17. Chapter 2: Creating and Editing a Web Page Using Inline

    Styles 22 Viewing a Web Page in a Browser
  18. • Click the Notepad++ button on the taskbar to maximize

    Notepad++ and make it the active window Chapter 2: Creating and Editing a Web Page Using Inline Styles 23 Activating Notepad++
  19. Chapter 2: Creating and Editing a Web Page Using Inline

    Styles 24 Types of Web Page Images
  20. Chapter 2: Creating and Editing a Web Page Using Inline

    Styles 26 Adding Color to a Web Page Heading
  21. Chapter 2: Creating and Editing a Web Page Using Inline

    Styles 27 Changing the Bulleted List Style
  22. Chapter 2: Creating and Editing a Web Page Using Inline

    Styles 28 Adding a Horizontal Rule
  23. Chapter 2: Creating and Editing a Web Page Using Inline

    Styles 29 Changing the Footer Style
  24. • Click the Internet Explorer button on the taskbar to

    display the Web page • Click the Refresh button on the Address bar to display the modified Web page Chapter 2: Creating and Editing a Web Page Using Inline Styles 30 Refreshing the View in a Browser
  25. Chapter 2: Creating and Editing a Web Page Using Inline

    Styles 31 Refreshing the View in a Browser
  26. • Click the Address bar on the browser to highlight

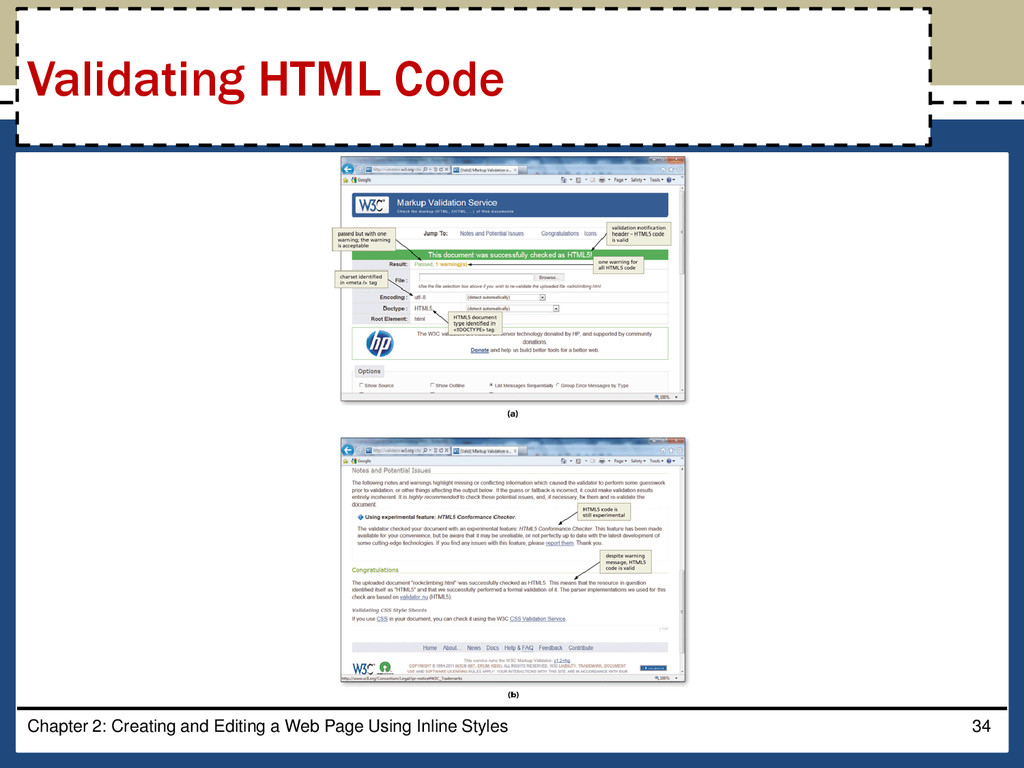
    the current URL • Type validator.w3.org to replace the current entry, and then press the ENTER key • If necessary, click OK if the browser asks to open a new window • Click the Validate by File Upload tab Chapter 2: Creating and Editing a Web Page Using Inline Styles 32 Validating HTML Code
  27. • Click the Browse button • Navigate to the location

    containing the file to validate • Click the Open button on the Choose File to Upload dialog box and the file path and name will be inserted into the File box • Click the Check button. The resulting validation should be displayed Chapter 2: Creating and Editing a Web Page Using Inline Styles 33 Validating HTML Code
  28. • Click Page on the Command bar • Click View

    source to view the HTML code in the default text editor • Click the Close button on the text editor title bar to close the active text editor window Chapter 2: Creating and Editing a Web Page Using Inline Styles 35 Viewing HTML Source Code for a Web Page
  29. Chapter 2: Creating and Editing a Web Page Using Inline

    Styles 36 Viewing HTML Source Code for a Web Page
  30. • In Notepad++, click the File menu, then Close All

    • Click the Close button on the Notepad++ title bar • Click the Close button on the Hunger Fight Internet Explorer title bar Chapter 2: Creating and Editing a Web Page Using Inline Styles 37 Quitting Notepad++ and a Browser
  31. • Identify elements of a Web page • Start Notepad++

    and describe the Notepad++ window • Enable word wrap in Notepad++ • Enter HTML tags • Enter a centered heading and a paragraph of text Chapter 2: Creating and Editing a Web Page Using Inline Styles 38 Chapter Summary
  32. • Create an unordered, ordered, or definition list • Save

    an HTML file • Use a browser to view a Web page • Activate Notepad++ • Identify Web page image types and attributes Chapter 2: Creating and Editing a Web Page Using Inline Styles 39 Chapter Summary
  33. • Add an image, change the color of headings on

    a Web page, change bulleted list style, and add a horizontal rule using inline styles • View the HTML source code in a browser • Quit Notepad++ and a browser Chapter 2: Creating and Editing a Web Page Using Inline Styles 40 Chapter Summary