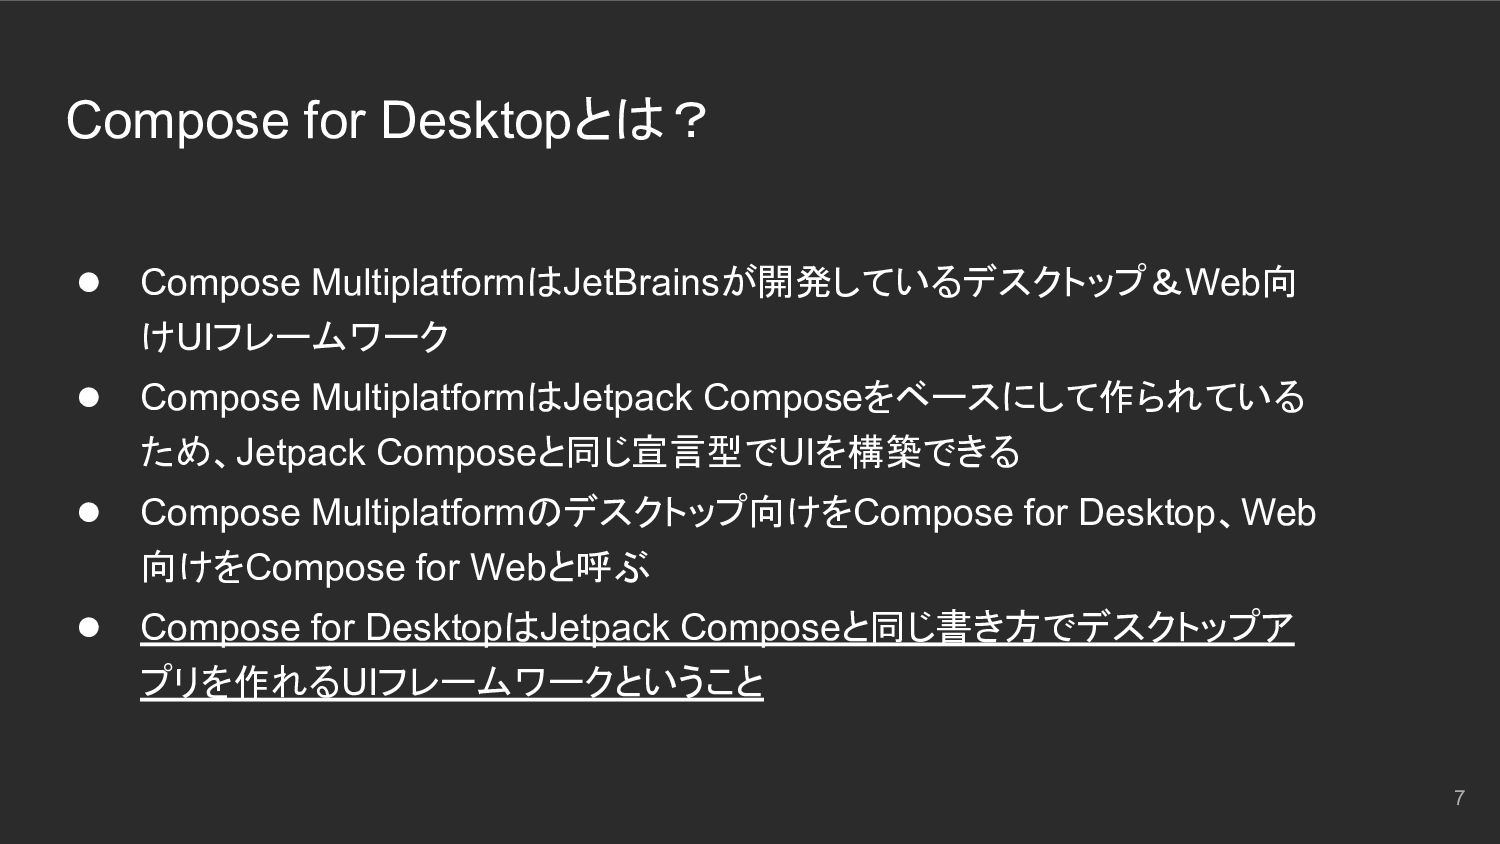
Upgrade to Pro — share decks privately, control downloads, hide ads and more …

Compose for Deskopで始めるAndroid開発効率化ツールの作成

Compose for Deskopで始めるAndroid開発効率化ツールの作成

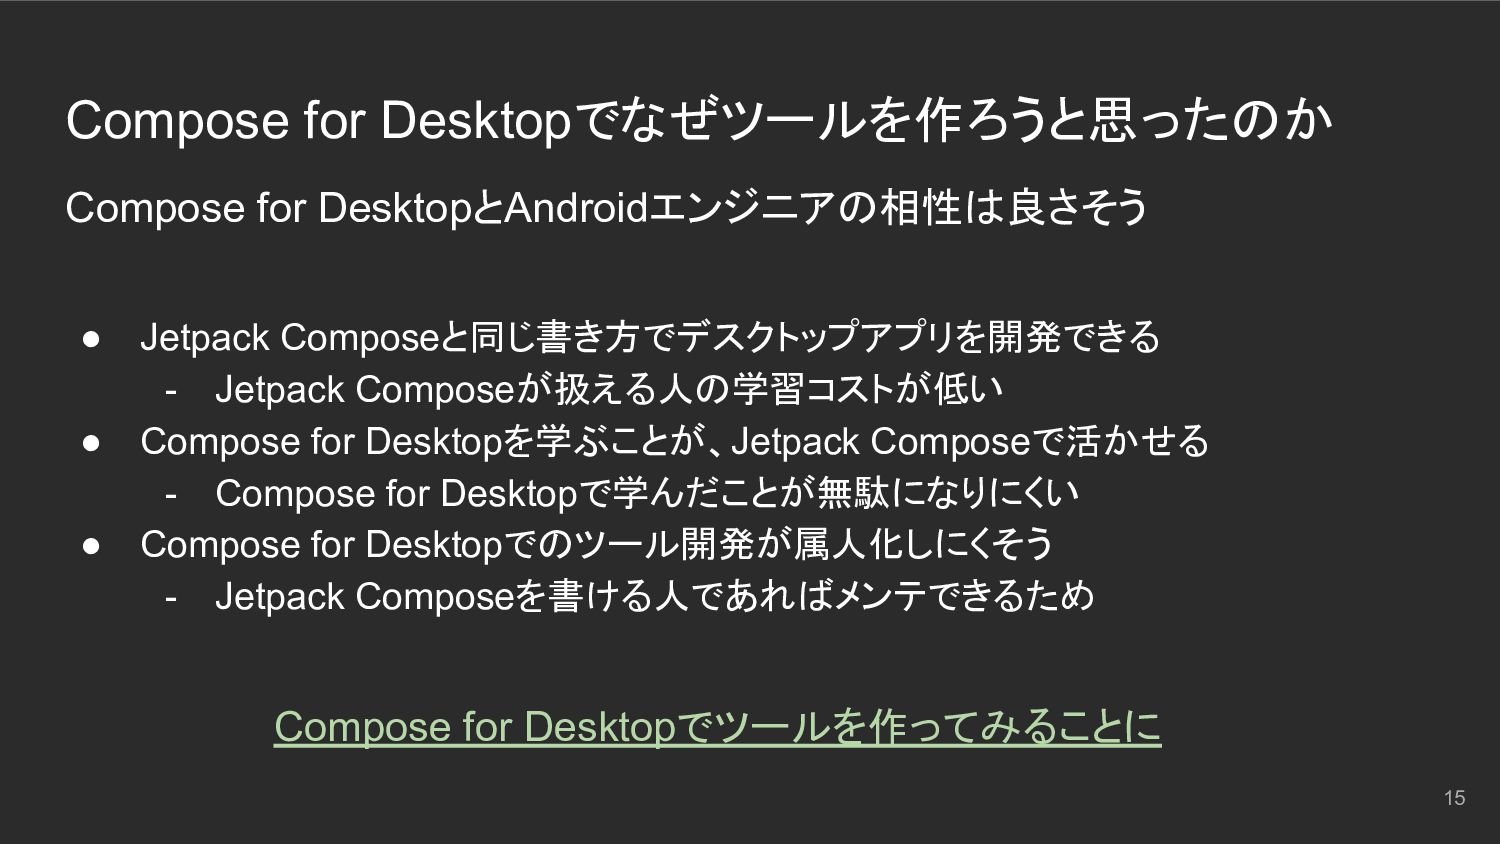
DroidKaigi2022で発表しました。Compose for Deskopで始めるAndroid開発効率化ツールの作成の資料になります。

https://droidkaigi.jp/2022/timetable/364461

Yusuke Katsuragawa

October 05, 2022
Tweet

More Decks by Yusuke Katsuragawa

Other Decks in Programming

Transcript

  1. アジェンダ • Compose for Desktopとは • Compose for Desktopでなぜツールを作るのか •

    Compose for Desktopでどのようにツールを作るか a. 作成したツール b. 開発環境 c. プロジェクトのセットアップ d. 依存関係のセットアップ e. 機能実装 • Compose for Desktopでツールを使ってみて 5
  2. Compose for Desktopとは? • Compose MultiplatformはJetBrainsが開発しているデスクトップ&Web向 けUIフレームワーク • Compose MultiplatformはJetpack

    Composeをベースにして作られている ため、Jetpack Composeと同じ宣言型でUIを構築できる • Compose Multiplatformのデスクトップ向けをCompose for Desktop、Web 向けをCompose for Webと呼ぶ • Compose for DesktopはJetpack Composeと同じ書き方でデスクトップア プリを作れるUIフレームワークということ 7
  3. Compose for Desktopでなぜツールを作ろうと思ったのか Compose for DesktopとAndroidエンジニアの相性は良さそう • Jetpack Composeと同じ書き方でデスクトップアプリを開発できる -

    Jetpack Composeが扱える人の学習コストが低い • Compose for Desktopを学ぶことが、Jetpack Composeで活かせる - Compose for Desktopで学んだことが無駄になりにくい • Compose for Desktopでのツール開発が属人化しにくそう - Jetpack Composeを書ける人であればメンテできるため Compose for Desktopでツールを作ってみることに 15
  4. 開発環境 IntelliJ IDEA Community 2022.2 • インストールするだけでCompose for Desktopで開発できる •

    JetBrainsが開発しているのでAndroid Studioと操作感に違いはない 24
  5. 開発環境 Compose Multiplatform IDE Support • Compose for Desktopでプレビューを可能にするIDEAプラグイン •

    Stable版は1.1.1ですがIDEA 2022.2と互換性が無いのでAlpha版の1.2.0を利用 25
  6. 依存関係のセットアップ プロジェクトで利用する以下の依存関係を追加する 依存関係 バージョン 備考 Compose for Desktop v1.1.1 •

    Compose for Desktopのv1.2.0はアルファ版なのでv1.1.1を利用す る Kotlin v1.6.10 • Compose for Desktopに合わせv1.6.10を利用する Kotlin Coroutines v1.6.0 Kotlin Serialization v1.3.1 • アプリの設定ファイル(json)の書き込みに利用する Adam v0.4.5 • ADBのヘルパーライブラリ 31
  7. kotlin.code.style =official kotlin.version =1.6.10 kotlin.coroutines =1.6.0 kotlin.serialization =1.3.1 agp.version=4.2.2 compose.version

    =1.1.1 library.ktlint.plugin =10.3.0 library.adam=0.4.5 library.junit=5.9.0 アーティファクトのバージョンを定義する 依存関係のセットアップ gradle.properties 33
  8. dependencyResolutionManagement { versionCatalogs { create("libs") { val adamVer = extra["library.adam"

    ] as String library( "adam", "com.malinskiy.adam:adam: $adamVer") val coroutinesVer = extra["kotlin.coroutines" ] as String library( "kotlin-coroutines" , "org.jetbrains.kotlinx:kotlinx-coroutines-core: $coroutinesVer") val serializationVer = extra["kotlin.serialization" ] as String library( "kotlin-serialization" , "org.jetbrains.kotlinx:kotlinx-serialization-json: $serializationVer ") val junitVer = extra["library.junit" ] as String library( "junit5", "org.junit.jupiter:junit-jupiter: $junitVer") } } } pluginManagement { repositories { … } plugins { kotlin("multiplatform" ).version(extra["kotlin.version" ] as String) id("org.jetbrains.compose" ).version(extra["compose.version" ] as String) kotlin("plugin.serialization" ).version(extra["kotlin.version" ] as String) id("org.jlleitschuh.gradle.ktlint" ).version(extra["library.ktlint.plugin" ] as String) } } 利用するプラグインを宣言する 依存関係のセットアップ setting.gradle.kts 34
  9. dependencyResolutionManagement { versionCatalogs { create("libs") { val adamVer = extra["library.adam"

    ] as String library( "adam", "com.malinskiy.adam:adam: $adamVer") val coroutinesVer = extra["kotlin.coroutines" ] as String library( "kotlin-coroutines" , "org.jetbrains.kotlinx:kotlinx-coroutines-core: $coroutinesVer") val serializationVer = extra["kotlin.serialization" ] as String library( "kotlin-serialization" , "org.jetbrains.kotlinx:kotlinx-serialization-json: $serializationVer ") val junitVer = extra["library.junit" ] as String library( "junit5", "org.junit.jupiter:junit-jupiter: $junitVer") } } } pluginManagement { repositories { … } plugins { kotlin("multiplatform" ).version(extra["kotlin.version" ] as String) id("org.jetbrains.compose" ).version(extra["compose.version" ] as String) kotlin("plugin.serialization" ).version(extra["kotlin.version" ] as String) id("org.jlleitschuh.gradle.ktlint" ).version(extra["library.ktlint.plugin" ] as String) } } 依存関係のセットアップ setting.gradle.kts Versioni Catalogを使ってライブラリのアーティファクトを宣言する 35
  10. kotlin { sourceSets { val jvmMain by getting { dependencies

    { implementation( compose.desktop.currentOs) implementation( compose.material) implementation( compose.materialIconsExtended ) implementation( libs.adam) implementation( libs.kotlin.coroutines) implementation( libs.kotlin.serialization) } } } } plugins { kotlin("multiplatform" ) id("org.jetbrains.compose" ) kotlin("plugin.serialization" ) id("org.jlleitschuh.gradle.ktlint" ) } setting.gradle.ktsに定義したアーティファクトを参照する 依存関係のセットアップ build.gradle.kts 36
  11. kotlin { sourceSets { val jvmMain by getting { dependencies

    { implementation( compose.desktop.currentOs) implementation( compose.material) implementation( compose.materialIconsExtended ) implementation( libs.adam) implementation( libs.kotlin.coroutines) implementation( libs.kotlin.serialization) } } } } plugins { kotlin("multiplatform" ) id("org.jetbrains.compose" ) kotlin("plugin.serialization" ) id("org.jlleitschuh.gradle.ktlint" ) } setting.gradle.ktsに定義したアーティファクトを参照する 依存関係のセットアップ build.gradle.kts 37
  12. kotlin { sourceSets { val jvmMain by getting { dependencies

    { implementation( compose.desktop.currentOs) implementation( compose.material) implementation( compose.materialIconsExtended ) implementation( libs.adam) implementation( libs.kotlin.coroutines) implementation( libs.kotlin.serialization) } } } } plugins { kotlin("multiplatform" ) id("org.jetbrains.compose" ) kotlin("plugin.serialization" ) id("org.jlleitschuh.gradle.ktlint" ) } 依存関係のセットアップ build.gradle.kts あらかじめCompose Pluginが予め依存関係の定義 を用意してくれています。このように記述すると local.propertiesに定義したバージョンで依存関係を セットアップされる。 ※ Compose for Desktopの依存関係の定義 : https://bit.ly/3L2wnKN 38
  13. 機能実装 - ADBと連携する ADBとは • Android Debug Bridge(adb)は、デバイスと通信するための多用途のコマンドライ ン ツール

    • ADBのshellコマンドを利用することでAndroid OSのシェルを通して端末を操作でき る • その他にもアプリのインストールやスクリーンキャプチャなどの操作が実行できる 40
  14. 機能実装 - ADBと連携する Adamとは • AdamはKotlinで作られたADBのヘルパーライブラリ • AdamからADBを操作し、端末一覧取得・シェル実行・スクリーンショット取得などが できる •

    Kotlin Coroutinesにも対応しているので簡単に非同期処理を実行できる • 今回はこのAdamというライブラリを利用しADBを実行します 41
  15. 機能実装 - ADBと連携する Adamの使い方 StartAdbInteractor().execute() val adb = AndroidDebugBridgeClientFactory().build() val

    output = adb.execute( request = ShellCommandRequest( "echo hello"), serial = "emulator-5554" ) ①ADBサーバーを開始する 42
  16. 機能実装 - ADBと連携する Adamの使い方 StartAdbInteractor().execute() val adb = AndroidDebugBridgeClientFactory().build() val

    output = adb.execute( request = ShellCommandRequest( "echo hello"), serial = "emulator-5554" ) ②ADBクライアントを作成する 43
  17. 機能実装 - ADBと連携する Adamの使い方 StartAdbInteractor().execute() val adb = AndroidDebugBridgeClientFactory().build() val

    output = adb.execute( request = ShellCommandRequest( "echo hello"), serial = "emulator-5554" ) ③ADBクライアントからリクエストを送信する 44
  18. 機能実装 - 端末一覧をADBから取得し表示する レイヤ 役割 説明 Model Data • 機能を実現するデータ

    UseCase • 機能を実現するための処理 View UI Component • UIコンポーネントの定義 State • UIコンポーネントの状態 StateHolder • UI ComponentとStateをつなぎ合わせる • UI ComponentにStateを通知する • UI ComponentのEventに反応して処理する ViewとModelの2つのレイヤに大きく分けて実装を進める 46
  19. 機能実装 - 端末一覧をADBから取得し表示する class GetDevicesFlowUseCase { operator fun invoke(coroutineScope: CoroutineScope):

    Flow<List<Device>> { val adbClient = AndroidDebugBridgeClientFactory().build() val receiveChannel = adbClient.execute( request = AsyncDeviceMonitorRequest() , scope = coroutineScope ) return receiveChannel. receiveAsFlow() } } UseCase 48 端末一覧を購読するためのFlowを作成する
  20. 機能実装 - 端末一覧をADBから取得し表示する class GetDevicesFlowUseCase { operator fun invoke(coroutineScope: CoroutineScope):

    Flow<List<Device>> { val adbClient = AndroidDebugBridgeClientFactory().build() val receiveChannel = adbClient.execute( request = AsyncDeviceMonitorRequest() , scope = coroutineScope ) return receiveChannel. receiveAsFlow() } } UseCase AdbClientを生成する 49
  21. 機能実装 - 端末一覧をADBから取得し表示する class GetDevicesFlowUseCase { operator fun invoke(coroutineScope: CoroutineScope):

    Flow<List<Device>> { val adbClient = AndroidDebugBridgeClientFactory().build() val receiveChannel = adbClient.execute( request = AsyncDeviceMonitorRequest() , scope = coroutineScope ) return receiveChannel. receiveAsFlow() } } UseCase AsyncDeviceMonitorRequestで端末一覧を通知してくれるChannelを作成する 50
  22. 機能実装 - 端末一覧をADBから取得し表示する class GetDevicesFlowUseCase { operator fun invoke(coroutineScope: CoroutineScope):

    Flow<List<Device>> { val adbClient = AndroidDebugBridgeClientFactory().build() val receiveChannel = adbClient.execute( request = AsyncDeviceMonitorRequest() , scope = coroutineScope ) return receiveChannel. receiveAsFlow() } } UseCase ChannelよりもFlowのほうが扱いやすいのでreceiveAsFlowで変換する 51
  23. @Composable fun DropDownDeviceMenu ( selectedDevice: Device? , devices: List<Device> ,

    onSelectDevice: (Device) -> Unit , modifier: Modifier = Modifier ) { var expanded by remember { mutableStateOf(false) } Box(modifier) { // 選択中のデバイス表示 Box(...) { ... } // デバイス一覧表示 DropdownMenu(...) { ... } } } 機能実装 - 端末一覧をADBから取得し表示する UI Component 選択している端末、接続している端末一覧を表示できるようにする 52
  24. @Composable fun DropDownDeviceMenu ( selectedDevice: Device? , devices: List<Device> ,

    onSelectDevice: (Device) -> Unit , modifier: Modifier = Modifier ) { var expanded by remember { mutableStateOf(false) } Box(modifier) { Box( modifier = Modifier.clickable { if (!expanded && devices. isNotEmpty()) expanded = true } ) { Text(...) Icon(...) } DropdownMenu(...) { ... } } } 機能実装 - 端末一覧をADBから取得し表示する UI Component 53 選択された端末をクリックで DropdownMenuを表示できるようにする
  25. @Composable fun DropDownDeviceMenu ( selectedDevice: Device? , devices: List<Device> ,

    onSelectDevice: (Device) -> Unit , modifier: Modifier = Modifier ) { var expanded by remember { mutableStateOf(false) } Box(modifier) { Box(...) { Text( text = selectedDevice?. serial ?: StringRes.NOT_FOUND_DEVICE , modifier = Modifier.fillMaxWidth() ) Icon(...) } DropdownMenu(...) { ... } } } 機能実装 - 端末一覧をADBから取得し表示する UI Component 54 選択された端末名を表示する
  26. @Composable fun DropDownDeviceMenu ( selectedDevice: Device? , devices: List<Device> ,

    onSelectDevice: (Device) -> Unit , modifier: Modifier = Modifier ) { var expanded by remember { mutableStateOf(false) } Box(modifier) { Box(...) { Text(...) Icon( imageVector = Icons.Filled.ArrowDropDown, contentDescription = "Device DropDown Icon" , modifier = Modifier.align(Alignment.CenterEnd) ) } DropdownMenu(...) { ... } } } 機能実装 - 端末一覧をADBから取得し表示する UI Component 55 選択できることがわかるようにアイコンを表示する
  27. @Composable fun DropDownDeviceMenu ( selectedDevice: Device? , devices: List<Device> ,

    onSelectDevice: (Device) -> Unit , modifier: Modifier = Modifier ) { var expanded by remember { mutableStateOf(false) } Box(modifier) { Box(...) DropdownMenu( expanded = expanded, onDismissRequest = { expanded = false }, modifier = Modifier.fillMaxWidth() ) { ... } } } 機能実装 - 端末一覧をADBから取得し表示する UI Component 56 接続している端末リストを表示するためにDropdownMenuを定義する。 expandedを渡して開閉状態を同期してやる。
  28. @Composable fun DropDownDeviceMenu ( selectedDevice: Device? , devices: List<Device> ,

    onSelectDevice: (Device) -> Unit , modifier: Modifier = Modifier ) { var expanded by remember { mutableStateOf(false) } Box(modifier) { Box(...) DropdownMenu(...) { devices.forEach { device -> DropdownMenuItem(...) { Text(text = device.serial) } } } } } 機能実装 - 端末一覧をADBから取得し表示する UI Component 57 接続している端末の名称を表示する
  29. @Composable fun DropDownDeviceMenu ( selectedDevice: Device? , devices: List<Device> ,

    onSelectDevice: (Device) -> Unit , modifier: Modifier = Modifier ) { var expanded by remember { mutableStateOf(false) } Box(modifier) { Box(...) DropdownMenu(...) { devices.forEach { device -> DropdownMenuItem( onClick = { onSelectDevice(device) expanded = false } ) {...} } } } } 機能実装 - 端末一覧をADBから取得し表示する UI Component 58 接続している端末リストを選択する処理を実装する
  30. data class MainState( val devices: List<Device> = emptyList(), val selectedDevice

    : Device? = null, ) リストに渡すための情報をまとめる 機能実装 - 端末一覧をADBから取得し表示する State 59
  31. 機能実装 - 端末一覧をADBから取得し表示する StateHolder class MainStateHolder( val getDevicesFlow : GetDevicesFlowUseCase

    = GetDevicesFlowUseCase() ) { ︙ val state: StateFlow<MainState> = combine(devices, selectedDevice ) { devices, selected -> MainState(devices = devices, selectedDevice = selected) }.stateIn(coroutineScope , SharingStarted.WhileSubscribed() , MainState()) ︙ fun setup() {...} fun selectDevice(device: Device) { ... } fun dispose() { ... } } Stateの変化をUI Componentに通知する、また画面表示時、コマンド実行時、画面非表示時 に処理を実行する、というのをできるようにするためのStateHolderを作成する 60
  32. 機能実装 - 端末一覧をADBから取得し表示する StateHolder class MainStateHolder( val getDevicesFlow : GetDevicesFlowUseCase

    = GetDevicesFlowUseCase() ) { private val coroutineContext get() = SupervisorJob() + Dispatchers. Main + Dispatchers. IO private val coroutineScope : CoroutineScope = CoroutineScope(coroutineContext ) private val devices: MutableStateFlow<List<Device>> = MutableStateFlow(emptyList()) private val selectedDevice : MutableStateFlow<Device?> = MutableStateFlow(null) val state: StateFlow<MainState> = combine(devices, selectedDevice ) { devices, selected -> MainState(devices = devices, selectedDevice = selected) }.stateIn(coroutineScope , SharingStarted.WhileSubscribed() , MainState()) fun setup() {...} fun selectDevice(device: Device) { ... } fun dispose() { ... } } StateをUI Componentに通知する仕組みを実装する。 端末一覧と選択端末が更新されたらStateを再生成して通知する 61
  33. 機能実装 - 端末一覧をADBから取得し表示する StateHolder class MainStateHolder( val getDevicesFlow : GetDevicesFlowUseCase

    = GetDevicesFlowUseCase() ) { ︙ private val devices: MutableStateFlow<List<Device>> = MutableStateFlow(emptyList()) private val selectedDevice : MutableStateFlow<Device?> = MutableStateFlow(null) ︙ fun setup() { coroutineScope .launch { StartAdbInteractor().execute() getAndroidDevicesFlowUseCase (coroutineScope ).collect { devices.value = it val hasNotValue = !it.contains(selectedDevice.value) if (hasNotValue) selectedDevice.value = it.firstOrNull() } } } fun selectDevice(device: Device) { ... } fun dispose() { ... } } 画面表示時の処理を実装する。 adbサーバーを起動しFlowをcollectして端末一覧を更新する 62
  34. 機能実装 - 端末一覧をADBから取得し表示する StateHolder class MainStateHolder( val getDevicesFlow : GetDevicesFlowUseCase

    = GetDevicesFlowUseCase() ) { ︙   private val selectedDevice : MutableStateFlow<Device?> = MutableStateFlow(null) ︙ fun setup() { ... } fun selectDevice(device: Device) { selectedDevice .value = device } fun dispose() { ... } } 選択時にデバイス選択状況を更新する 63
  35. 機能実装 - 端末一覧をADBから取得し表示する StateHolder class MainStateHolder( val getDevicesFlow : GetDevicesFlowUseCase

    = GetDevicesFlowUseCase() ) { ︙ private val coroutineContext get() = SupervisorJob() + Dispatchers. Main + Dispatchers. IO private val coroutineScope : CoroutineScope = CoroutineScope(coroutineContext ) ︙ fun setup() {...} fun selectDevice(device: Device) { ... } fun dispose() { coroutineScope .cancel() } } 画面非表示時に実行されている コルーチンをキャンセルする 64
  36. fun main() = application { Window(title = StringRes.WINDOW_TITLE, onCloseRequest =

    ::exitApplication) { val stateHolder by remember { mutableStateOf(MainStateHolder()) } DisposableEffect(stateHolder) { stateHolder.setup() onDispose { stateHolder.dispose() } } val state by stateHolder.state.collectAsState() DropDownDeviceMenu( devices = state.devices, selectedDevice = state.selectedDevice , onSelectDevice = { stateHolder.selectDevice( it) }, modifier = Modifier.wrapContentSize() ) } } 機能実装 - 端末一覧をADBから取得し表示する main Compose for Desktopのメイン関数で、今まで作成したクラスを使ってアプリを組み立てる 65
  37. fun main() = application { Window(title = StringRes.WINDOW_TITLE, onCloseRequest =

    ::exitApplication) { val stateHolder by remember { mutableStateOf(MainStateHolder()) } DisposableEffect(stateHolder) { stateHolder.setup() onDispose { stateHolder.dispose() } } val state by stateHolder.state.collectAsState() DropDownDeviceMenu( devices = state.devices, selectedDevice = state.selectedDevice , onSelectDevice = { stateHolder.selectDevice( it) }, modifier = Modifier.wrapContentSize() ) } } 機能実装 - 端末一覧をADBから取得し表示する main 画面表示時にsetupを実行する また画面非表示にdisposeを実行する 66
  38. fun main() = application { Window(title = StringRes.WINDOW_TITLE, onCloseRequest =

    ::exitApplication) { val stateHolder by remember { mutableStateOf(MainStateHolder()) } DisposableEffect(stateHolder) { stateHolder.setup() onDispose { stateHolder.dispose() } } val state by stateHolder.state.collectAsState() DropDownDeviceMenu( devices = state.devices, selectedDevice = state.selectedDevice , onSelectDevice = { stateHolder.selectDevice( it) }, modifier = Modifier.wrapContentSize() ) } } 機能実装 - 端末一覧をADBから取得し表示する main stateをcollectしてDropDownDeviceMenuに渡す、 DropDownDeviceMenuからイベントをstateHolderに伝 える 67
  39. 機能実装 - ADBでコマンドを実行し端末を操作する 分類 役割 説明 Model Data • 機能を実現するデータ

    UseCase • 機能を実現するための処理 View UI Component • UIコンポーネントの定義 State • UIコンポーネントの状態 StateHolder • UI ComponentとStateをつなぎ合わせる 同じくこの構造を用いて作成を進める 71
  40. sealed class Command( val title: String, val details: String, val

    requests: List<ShellCommandRequest> ) { object DarkThemeOn : Command( "ダークテーマON", "端末のダークテーマ設定を ONにします", listOf(ShellCommandRequest( "cmd uimode night yes" )) ) object WifiAndDataOn : Command( "Wi-Fi&データ通信 ON", "端末のWi-Fi設定とデータ通信設定の両方を ONにします", listOf( ShellCommandRequest( "svc wifi enable" ), ShellCommandRequest( "svc data enable" ) ) ) ︙ } 機能実装 - ADBでコマンドを実行し端末を操作する Data コマンドのタイトルと説明を定義しておく。 またこのコマンドで実行したいAdamのリ クエストにして定義しておく。 72
  41. sealed class Command( val title: String, val details: String, val

    requests: List<ShellCommandRequest> ) { object DarkThemeOn : Command( "ダークテーマON", "端末のダークテーマ設定を ONにします", listOf(ShellCommandRequest( "cmd uimode night yes" )) ) object WifiAndDataOn : Command( "Wi-Fi&データ通信 ON", "端末のWi-Fi設定とデータ通信設定の両方を ONにします", listOf( ShellCommandRequest( "svc wifi enable" ), ShellCommandRequest( "svc data enable" ) ) ) ︙ } 機能実装 - ADBでコマンドを実行し端末を操作する Data ダークテーマONにする ためのコマンド 73
  42. sealed class Command( val title: String, val details: String, val

    requests: List<ShellCommandRequest> ) { object DarkThemeOn : Command( "ダークテーマON", "端末のダークテーマ設定を ONにします", listOf(ShellCommandRequest( "cmd uimode night yes" )) ) object WifiAndDataOn : Command( "Wi-Fi&データ通信 ON", "端末のWi-Fi設定とデータ通信設定の両方を ONにします", listOf( ShellCommandRequest( "svc wifi enable" ), ShellCommandRequest( "svc data enable" ) ) ) ︙ } 機能実装 - ADBでコマンドを実行し端末を操作する Data もし複数リクエストがある場合 にこのように2つのリクエスト を定義する 74
  43. 機能実装 - ADBでコマンドを実行し端末を操作する class GetCommandListUseCase { operator fun invoke(): List<Command>

    { return listOf(Command.DarkThemeOn ,Command.WifiAndDataOn) } } UseCase 定義したコマンド情報をリストで返す 75
  44. 機能実装 - ADBでコマンドを実行し端末を操作する class ExecuteCommandUseCase { suspend operator fun invoke(serial:

    String? , command: Command): Boolean { return withContext(Dispatchers. IO) { val adbClient = AndroidDebugBridgeClientFactory().build() command. requests.forEach { request -> val result = adbClient.execute(request , serial) if (result.exitCode != 0) return@withContext false } return@withContext true } } } UseCase 定義したコマンドをAdamで実行する 76
  45. 機能実装 - ADBでコマンドを実行し端末を操作する class ExecuteCommandUseCase { suspend operator fun invoke(serial:

    String? , command: Command): Boolean { return withContext(Dispatchers. IO) { val adbClient = AndroidDebugBridgeClientFactory().build() command. requests.forEach { request -> val result = adbClient.execute(request , serial) if (result.exitCode != 0) return@withContext false } return@withContext true } } } UseCase AdbClientを生成する 77
  46. 機能実装 - ADBでコマンドを実行し端末を操作する class ExecuteCommandUseCase { suspend operator fun invoke(serial:

    String? , command: Command): Boolean { return withContext(Dispatchers. IO) { val adbClient = AndroidDebugBridgeClientFactory().build() command. requests.forEach { request -> val result = adbClient.execute(request , serial) if (result.exitCode != 0) return@withContext false } return@withContext true } } } UseCase リクエストを順番に実行し、途中で失敗したらfalse、 そうでなければtrueを返すようにする 78
  47. 機能実装 - ADBでコマンドを実行し端末を操作する UI Component @Composable fun CommandList( commands: List<Command>

    , onExecute: (Command) -> Unit , modifier: Modifier = Modifier ) { Box(modifier = modifier) { Column(...) { commands.forEach { command -> Card(...) { ... } } } } } 受け取ったコマンドをリストで表示する、 また選択したコマンドを実行できるようにする 79
  48. 機能実装 - ADBでコマンドを実行し端末を操作する UI Component @Composable fun CommandList( commands: List<Command>

    , onExecute: (Command) -> Unit , modifier: Modifier = Modifier ) { Box(modifier = modifier) { Column(...) { commands.forEach { command -> Card(...) { ... } } } } } ColumnとCardを利用してコマンドリストを作成する 80
  49. @Composable fun CommandList( commands: List<Command> , onExecute: (Command) -> Unit

    , modifier: Modifier = Modifier ) { Box(modifier = modifier) { Column(...) { commands.forEach { command -> Card(...) { Row(...) { Column(modifier = Modifier.weight(0.9f, true)) { Text(text = command.title) Text(text = command.details) } Button(...) { ... } } } } } } } 機能実装 - ADBでコマンドを実行し端末を操作する UI Component コマンドのタイトルと説明を並べて表示する 81
  50. @Composable fun CommandList( commands: List<Command> , onExecute: (Command) -> Unit

    , modifier: Modifier = Modifier ) { Box(modifier = modifier) { Column(...) { commands.forEach { command -> Card(...) { Row(...) { Column(...) { ... } Button(onClick = { onExecute(command) }) { Text(text = StringRes.EXECUTE) } } } } } } } 機能実装 - ADBでコマンドを実行し端末を操作する UI Component StateHolderにコマンド実行を依頼できるようにする 82
  51. data class MainState( val commands: List<Command> = emptyList(), ) 機能実装

    - ADBでコマンドを実行し端末を操作する State リストに渡すための情報をまとめる 83
  52. 機能実装 - ADBでコマンドを実行し端末を操作する StateHolder class MainStateHolder( val getCommandListUseCase : GetCommandListUseCase

    = GetCommandListUseCase() , val executeCommandUseCase : ExecuteCommandUseCase = ExecuteCommandUseCase() , ) { ︙ val state: StateFlow<MainState> = commands.map { MainState(commands = it) }.stateIn(coroutineScope , SharingStarted.WhileSubscribed() , MainState()) ︙ fun setup() {...} fun executeCommand (command: Command) { ... } fun dispose() { ... } } Stateの変化をUI Componentに通知する、また画面表示時、コマンド実行時、画面非表示時 に処理を実行する、というのをできるようにするためのStateHolderを作成する 84
  53. 機能実装 - ADBでコマンドを実行し端末を操作する StateHolder class MainStateHolder( val getCommandListUseCase : GetCommandListUseCase

    = GetCommandListUseCase() , val executeCommandUseCase : ExecuteCommandUseCase = ExecuteCommandUseCase() , ) { private val coroutineContext get() = SupervisorJob() + Dispatchers. Main + Dispatchers. IO private val coroutineScope : CoroutineScope = CoroutineScope(coroutineContext ) private val commands: MutableStateFlow<List<Command>> = MutableStateFlow(emptyList()) val state: StateFlow<MainState> = commands.map { MainState(commands = it) }.stateIn(coroutineScope , SharingStarted.WhileSubscribed() , MainState()) fun setup() {...} fun executeCommand (command: Command) { ... } fun dispose() { ... } } StateをUI Componentに通知する仕組みを実装する。 コマンド一覧が更新されたらStateを再生成して通知する 85
  54. 機能実装 - ADBでコマンドを実行し端末を操作する StateHolder class MainStateHolder( val getCommandListUseCase : GetCommandListUseCase

    = GetCommandListUseCase() , val executeCommandUseCase : ExecuteCommandUseCase = ExecuteCommandUseCase() , ) { ︙ private val commands: MutableStateFlow<List<Command>> = MutableStateFlow(emptyList()) ︙ fun setup() { coroutineScope .launch { StartAdbInteractor().execute() } commands.value = getCommandListUseCase () } fun executeCommand (command: Command) { ... } fun dispose() { ... } } 画面表示時の処理を実装する。 コマンド実行に備えて、 adbサーバーを起動する。 そのあとコマンドの一覧を更新する。 86
  55. 機能実装 - ADBでコマンドを実行し端末を操作する StateHolder class MainStateHolder( val getCommandListUseCase : GetCommandListUseCase

    = GetCommandListUseCase() , val executeCommandUseCase : ExecuteCommandUseCase = ExecuteCommandUseCase() , ) { ︙ fun setup() { ... } fun executeCommand (command: Command) { coroutineScope .launch { executeCommandUseCase ("XXX", command) } } fun dispose() { ... } } 選択したコマンドを実行する。今回 はシリアル番号は仮で固定値を入 れている。 87
  56. 機能実装 - ADBでコマンドを実行し端末を操作する StateHolder class MainStateHolder( val getCommandListUseCase : GetCommandListUseCase

    = GetCommandListUseCase() , val executeCommandUseCase : ExecuteCommandUseCase = ExecuteCommandUseCase() , ) { ︙ fun setup() { ... } fun executeCommand (command: Command) { ... } fun dispose() { coroutineScope .cancel() } } 画面非表示時に実行されている コルーチンをキャンセルする 88
  57. fun main() = application { Window(title = StringRes.WINDOW_TITLE, onCloseRequest =

    ::exitApplication) { val stateHolder by remember { mutableStateOf(MainStateHolder()) } DisposableEffect(stateHolder) { stateHolder.setup() onDispose { stateHolder.dispose() } } val state by stateHolder.state.collectAsState() CommandList( commands = state.commands, onExecute = { stateHolder.executeCommand( it) }, modifier = Modifier.fillMaxSize() ) } } 機能実装 - ADBでコマンドを実行し端末を操作する main 89 Compose for Desktopのメイン関数で、今まで作成したクラスを使ってアプリを組み立てる
  58. fun main() = application { Window(title = StringRes.WINDOW_TITLE, onCloseRequest =

    ::exitApplication) { val stateHolder by remember { mutableStateOf(MainStateHolder()) } DisposableEffect(stateHolder) { stateHolder.setup() onDispose { stateHolder.dispose() } } val state by stateHolder.state.collectAsState() CommandList( commands = state.commands, onExecute = { stateHolder.executeCommand( it) }, modifier = Modifier.fillMaxSize() ) } } 機能実装 - ADBでコマンドを実行し端末を操作する main 画面表示時にsetupを実行する。 また画面非表示にdisposeを実行 する。 90
  59. fun main() = application { Window(title = StringRes.WINDOW_TITLE, onCloseRequest =

    ::exitApplication) { val stateHolder by remember { mutableStateOf(MainStateHolder()) } DisposableEffect(stateHolder) { stateHolder.setup() onDispose { stateHolder.dispose() } } val state by stateHolder.state.collectAsState() CommandList( commands = state.commands, onExecute = { stateHolder.executeCommand( it) }, modifier = Modifier.fillMaxSize() ) } } 機能実装 - ADBでコマンドを実行し端末を操作する main stateをcollectしてCommandListに渡す、 CommandListからイベントをstateHolderに伝 える 91
  60. Compose for Desktopを使ってみて • Jetpack Composeと同じ仕組みでUIを作れる - Jetpack Composeが使えればCompose for

    Destkopも簡単に使える • Androidのアプリ開発で得た知識を流用しやすい - IDE - IntelliJ IDEAとAndroid Studioは大きな違いはなく使いやすい - Coroutines・Flow - CoroutinesとFlowを使えるので非同期処理などの実装がかなり楽 - アーキテクチャ - Androidアーキテクチャガイドを参考にできる 良かったところ 95
  61. • Compose for DesktopのリリースはJetpack Composeの後追い - Jetpack Composeの最新版で使えるようになってもCompose for Desktopで

    使えない • プレビュー機能が弱い - プレビューの実行&更新は手動なので少々手間がかかる • ドキュメントが少なめ - 困ったらGitHubのIssueで解決策を調べることが多い Compose for Desktopを使ってみて 辛かったところ 96
  62. まとめ • Compose for Desktop × Adamで気軽にadbを利用したツールを開発できる • Androidのアプリ開発で得た知識を流用できるので、学び直しが少なく効率的に開 発ができる

    • Jetpack Composeと比べると開発体験は少し悪いところがある - リリース・ドキュメント・プレビューなど - Compose for Desktop 1.2.0の開発が続いているので改善に期待 97