Upgrade to Pro
— share decks privately, control downloads, hide ads and more …
Speaker Deck
Features
Speaker Deck
PRO
Sign in
Sign up for free
Search
Search
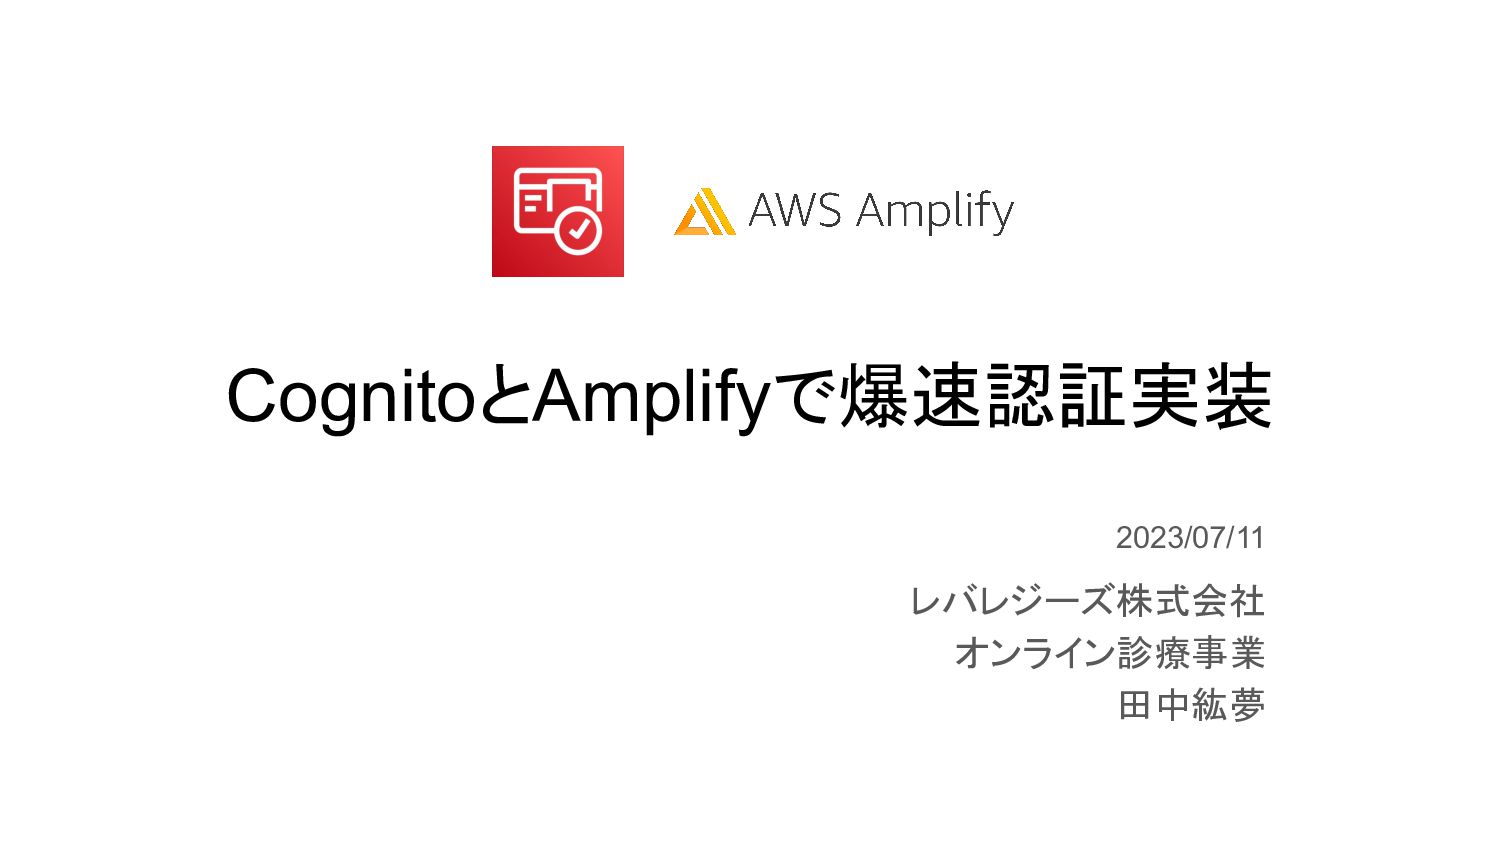
CognitoとAmplifyで爆速認証実装
Search
Sponsored
·
Your Podcast. Everywhere. Effortlessly.
Share. Educate. Inspire. Entertain. You do you. We'll handle the rest.
→
Tech Leverages
PRO
July 20, 2023
5.5k
0
Share
Embed
Copy iframe code
Copy JS code
Copy link
Start on current slide
CognitoとAmplifyで爆速認証実装
Tech Leverages
PRO
July 20, 2023
More Decks by Tech Leverages
See All by Tech Leverages
Slackを「AIエージェントのHub」にする 〜 SlackbotとHolmesGPTで実現するAIOps
leveragestech
PRO
0
10
データ組織の転換期 一足飛びしない段階的戦略
leveragestech
PRO
0
96
並列化でチームのアウトプットを増やす
leveragestech
PRO
0
45
Engineering ManagerがAI時代に この先生きのこるには?
leveragestech
PRO
1
99
最新技術を"今は選ばない"という技術選定
leveragestech
PRO
0
550
毎⽇dumpされるDBにCDCは無⼒だっ た、、FederatedQueryで繋ぎ直した データ連携の試⾏錯誤
leveragestech
PRO
0
83
Tableauを活かすためにTableauに制約を設けた話
leveragestech
PRO
0
82
営業支援システムと歩んだ7年半の変遷
leveragestech
PRO
0
150
DMBOKを使ってレバレジーズのデータマネジメントを評価した
leveragestech
PRO
0
840
Featured
See All Featured
First, design no harm
axbom
PRO
2
1.2k
Statistics for Hackers
jakevdp
799
230k
Marketing Yourself as an Engineer | Alaka | Gurzu
gurzu
0
260
Designing for Performance
lara
611
70k
What does AI have to do with Human Rights?
axbom
PRO
1
2.3k
Are puppies a ranking factor?
jonoalderson
1
3.7k
GraphQLの誤解/rethinking-graphql
sonatard
75
12k
Introduction to Domain-Driven Design and Collaborative software design
baasie
1
910
Sharpening the Axe: The Primacy of Toolmaking
bcantrill
46
2.9k
Into the Great Unknown - MozCon
thekraken
41
2.6k
What the history of the web can teach us about the future of AI
inesmontani
PRO
1
640
Helping Users Find Their Own Way: Creating Modern Search Experiences
danielanewman
31
3.3k
Transcript
CognitoとAmplifyで爆速認証実装 レバレジーズ株式会社 オンライン診療事業 田中紘夢 2023/07/11
自己紹介
名前:田中紘夢(ひろむ) 出身:神奈川県横浜市 趣味:⚾🧖🏉🏖🍺 開発:TypeScript(React, Next.js, Nest.js)、趣味でFlutter 経歴 2021年3月 早稲田大学卒業 2021年4月
レバレジーズ新卒入社 2022年11月〜 オンライン診療事業に異動
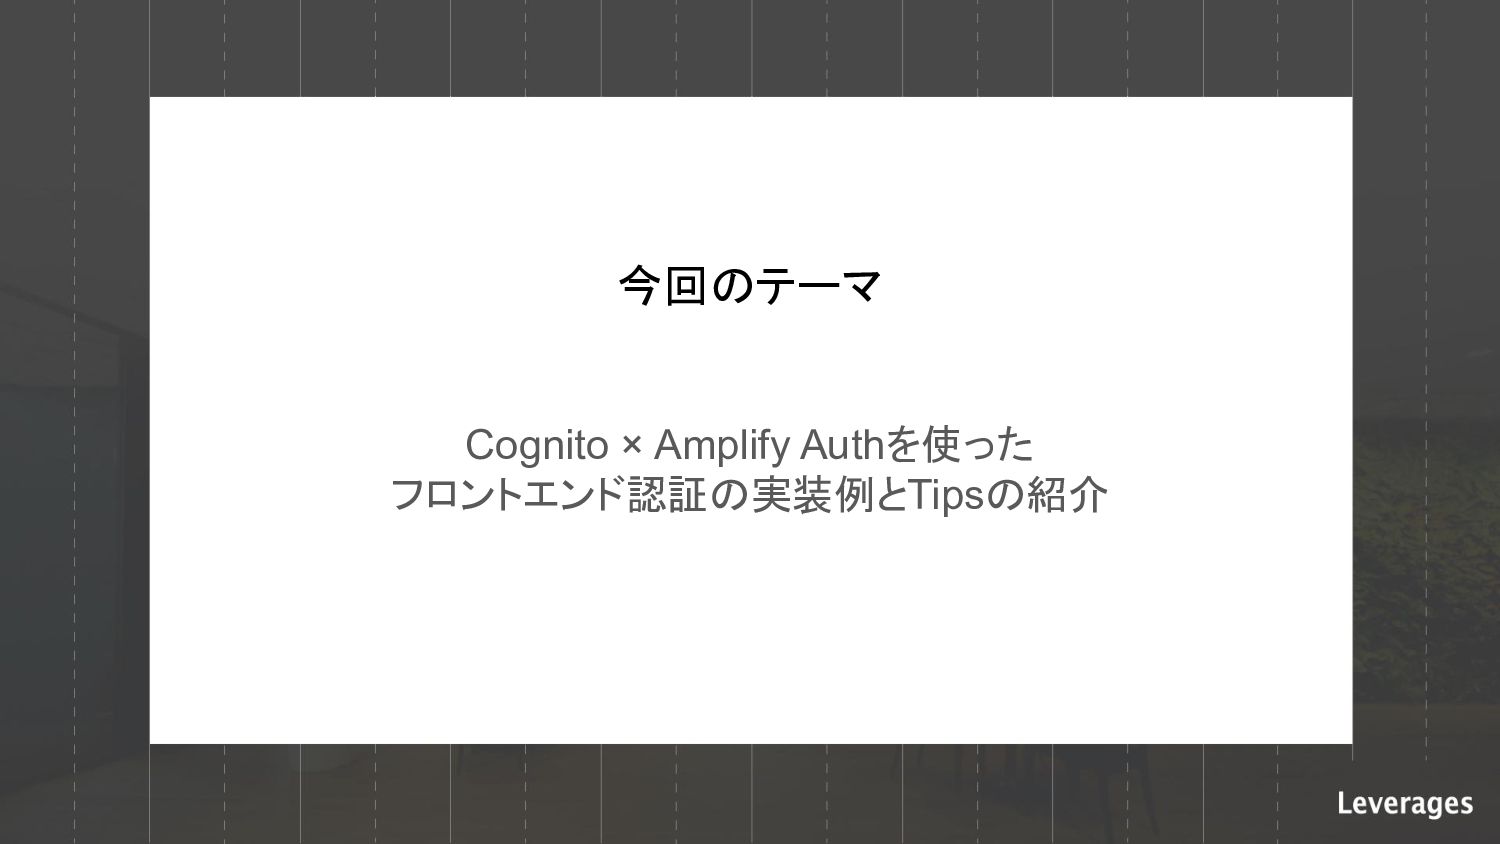
今回のテーマ Cognito × Amplify Authを使った フロントエンド認証の実装例とTipsの紹介
IDaaS(特にCognito)を触ったことがない方や 導入を迷っている方にとって 少しでも参考になれば幸いです!
まずはじめに
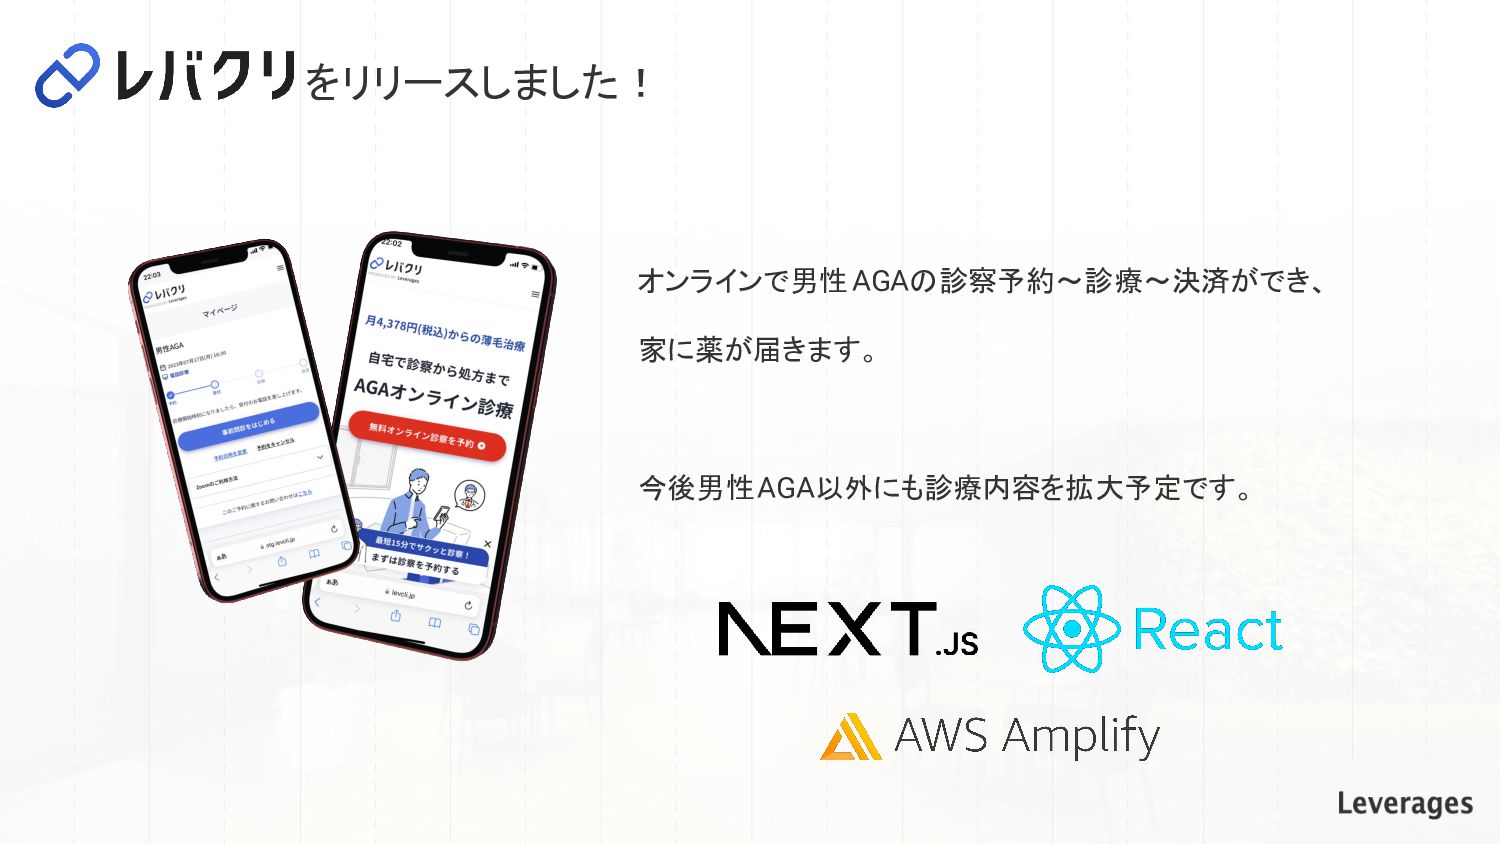
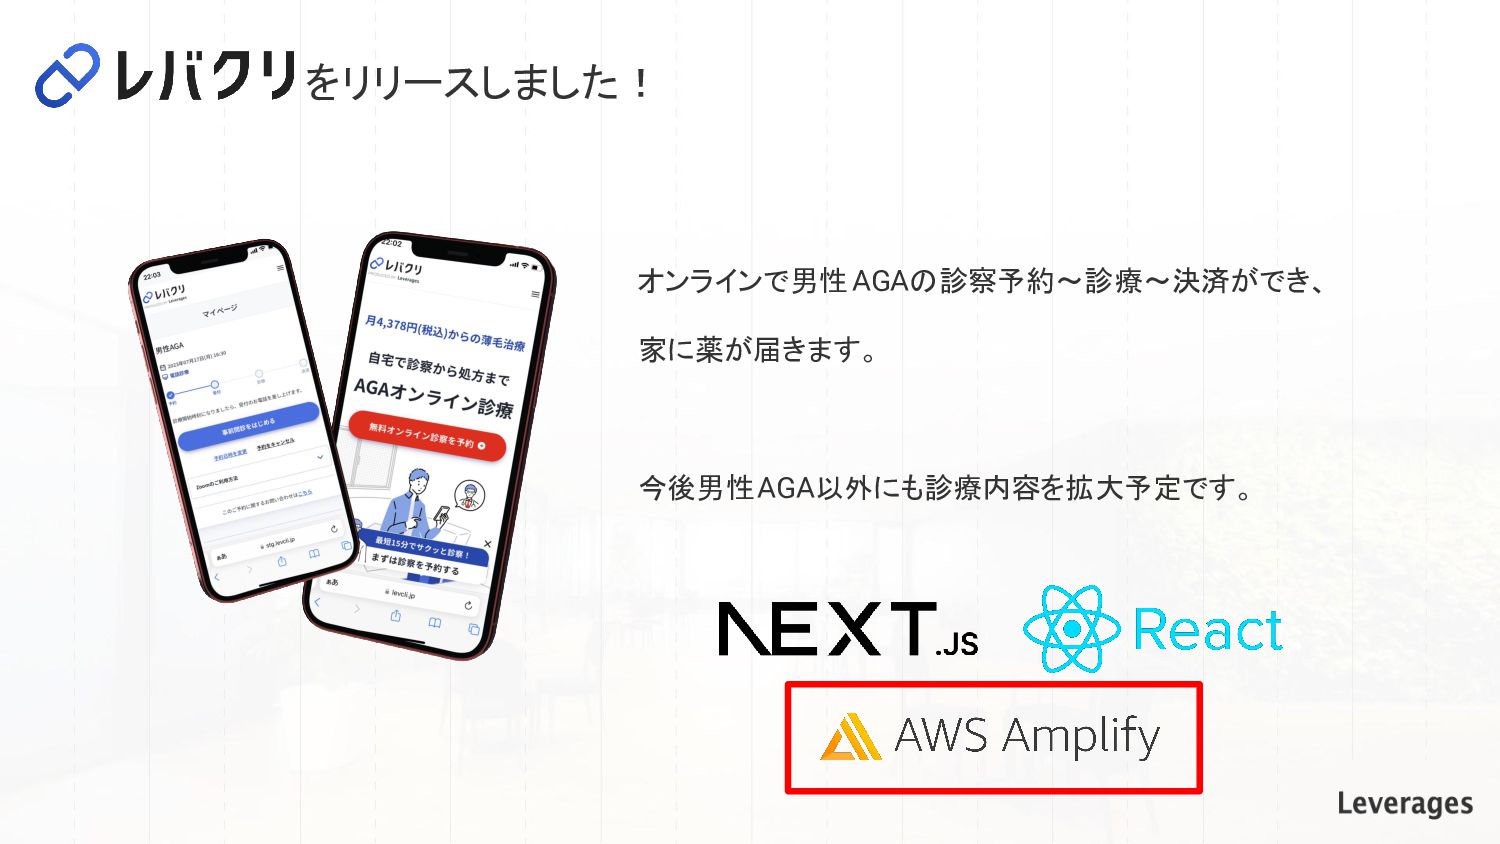
オンラインで男性AGAの診察予約〜診療〜決済ができ、 家に薬が届きます。 今後男性AGA以外にも診療内容を拡大予定です。 をリリースしました!
オンラインで男性AGAの診察予約〜診療〜決済ができ、 家に薬が届きます。 今後男性AGA以外にも診療内容を拡大予定です。 をリリースしました!
AWS Amplifyとは AWSいわく「フロントエンドのウェブ/モバイルデベロッパーが AWS でフルスタックアプリケーショ ンを簡単に構築、出荷、ホストできる」サービス。 今回はAmplifyが提供しているSDKのなかのAuthライブラリを使って、cogintoの認証をフロント エンドで実装しました。
なぜcognitoなのか ・IDaaSを使って認証基盤の構築を実装面でも工数面でも楽にしたかった ・Auth0はコスト面、クオータの制限が見合わなかった ・Firebaseはコスト面、実装面で優位なもののセキュリティ面に課題あり →登録しているメールアドレスが簡単にわかってしまう(※) ※詳しく知りたい方はこちらの記事がおすすめです(https://zenn.dev/rdlabo/articles/c899eee25d0191) サービスの性質上センシティブな内容を扱う( AGA治療など)こともあり、登録されているメールア ドレスがわかってしまうリスクを回避する理由で Cognitoを採用
Amplify Authを使った認証実装例
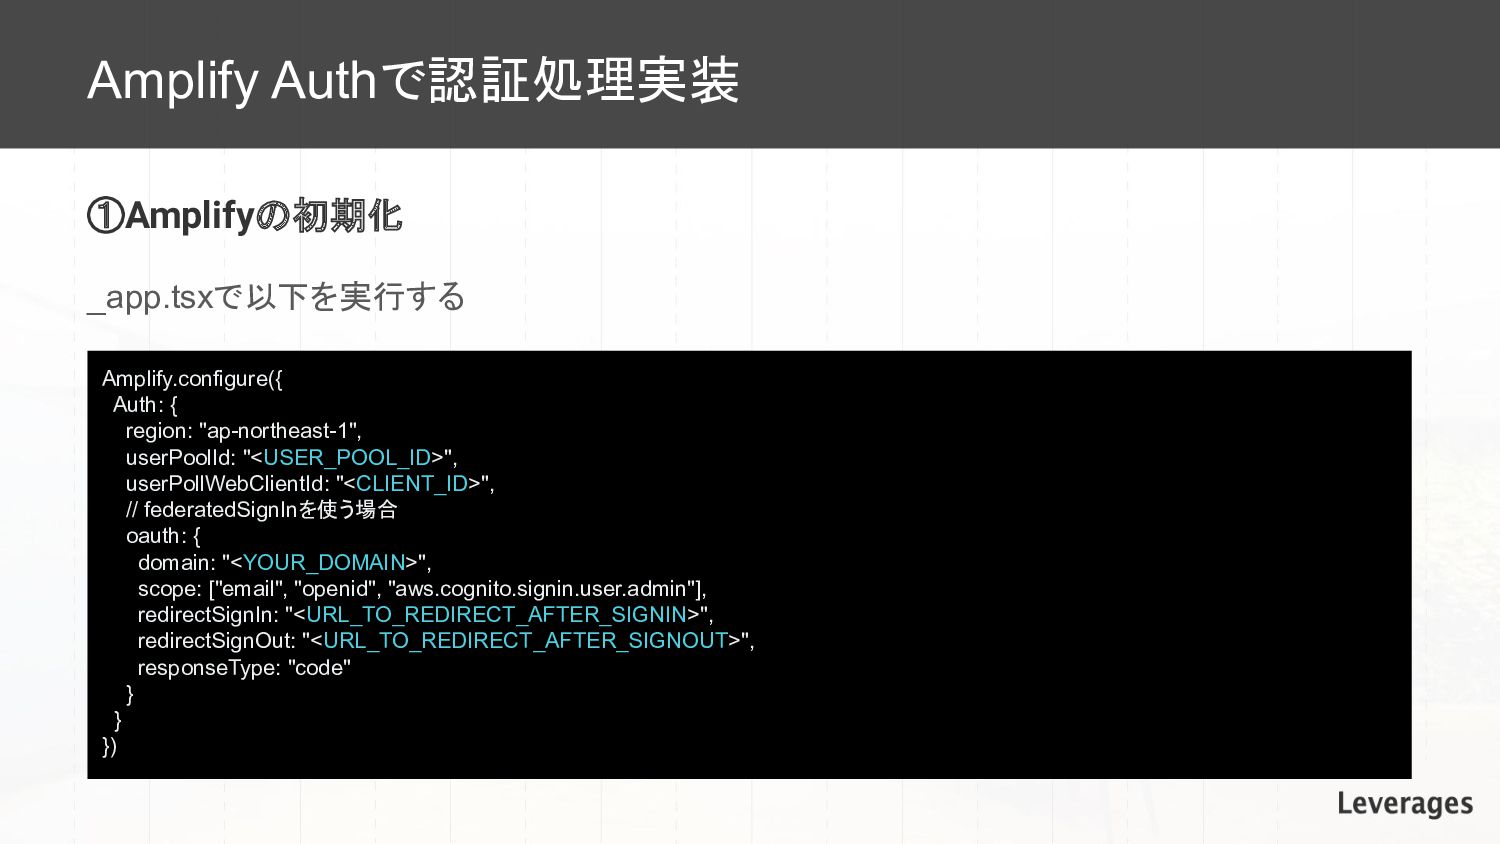
Amplify Authで認証処理実装 ①Amplifyの初期化 Amplify.configure({ Auth: { region: "ap-northeast-1", userPoolId: "<USER_POOL_ID>",
userPollWebClientId: "<CLIENT_ID>", // federatedSignInを使う場合 oauth: { domain: "<YOUR_DOMAIN>", scope: ["email", "openid", "aws.cognito.signin.user.admin"], redirectSignIn: "<URL_TO_REDIRECT_AFTER_SIGNIN>", redirectSignOut: "<URL_TO_REDIRECT_AFTER_SIGNOUT>", responseType: "code" } } }) _app.tsxで以下を実行する
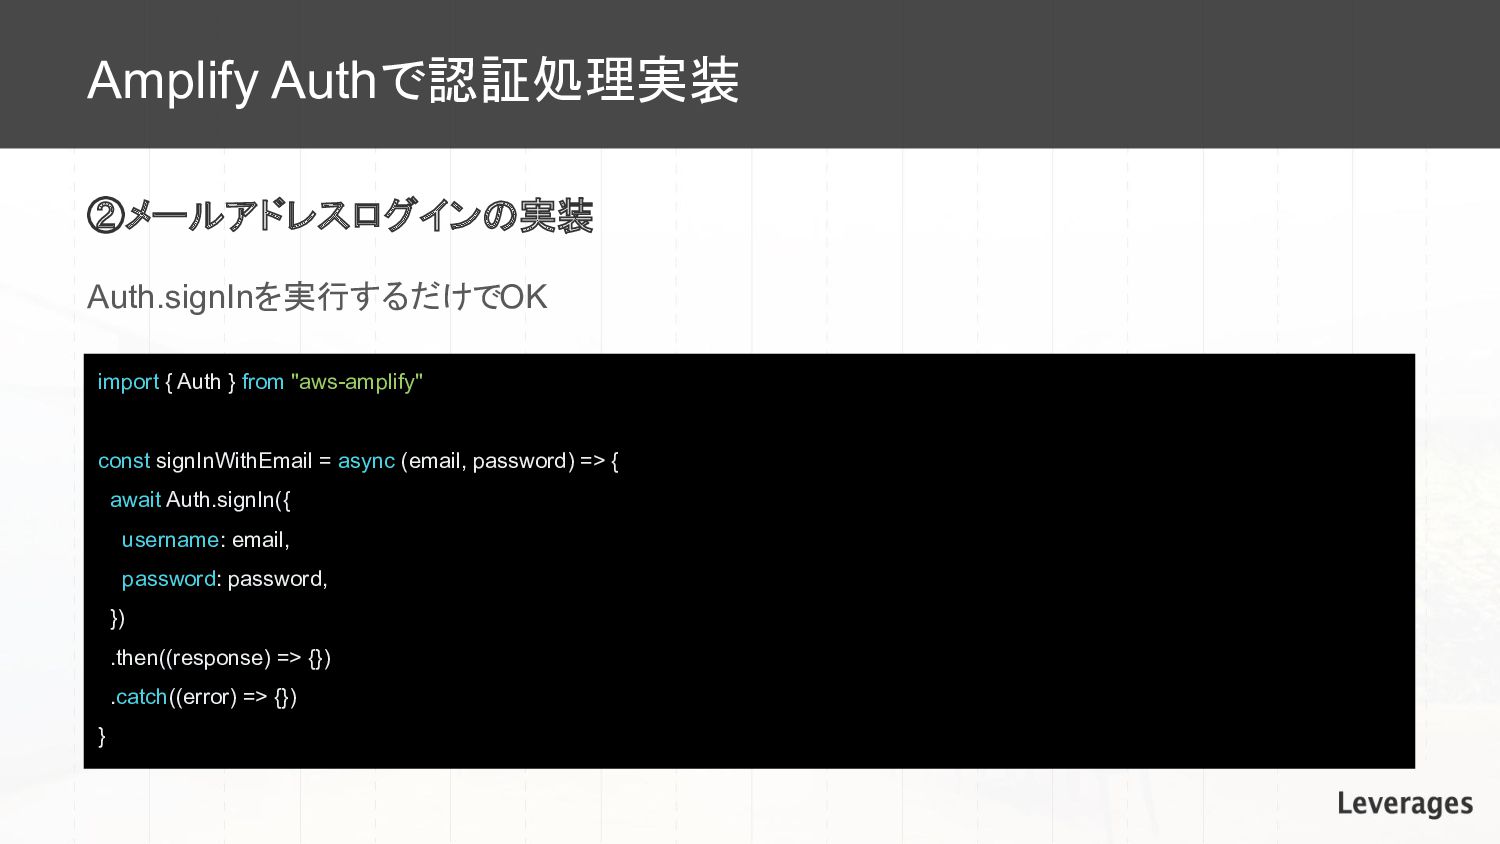
Amplify Authで認証処理実装 ②メールアドレスログインの実装 import { Auth } from "aws-amplify" const
signInWithEmail = async (email, password) => { await Auth.signIn({ username: email, password: password, }) .then((response) => {}) .catch((error) => {}) } Auth.signInを実行するだけでOK
Amplify Authで認証処理実装 ③Googleログイン(アイデンティティプロバイダーを使った認証) Auth.federatedSignInを実行する。成功するとconfigureに書いたurlにリダイレクト import { CognitoHostedUIIdentityProvider } from "@aws-amplify/auth"
import { Auth } from "aws-amplify" const signInWithGoogle = async () => { await Auth.federatedSignIn({ provider: CognitoHostedUIIdentityProvider.Google, }) }
Amplify Authで認証処理実装 ④セッション(jwt)の取得 AmplifyではlocalStorageもしくはcookieにjwtを自動で保持してくれるため currentSessionを呼び出すだけでセッション情報が取得可能 import { Auth } from
"aws-amplify" const getAccessToken = async () => { const session = await Auth.currentSession() if (!session?.isValid()) { return null } return session.getAccessToken().getJwtToken() }
Amplify Authで認証処理実装 ⑤ログアウト Auth.signOutを呼び出すだけでOK アイデンティティプロバイダーのログインの場合はconfigureで指定したsignOutUrlにリダイレクト import { Auth } from
"aws-amplify" const signOut = () => Auth.signOut()
Amplify Authとうまく付き合うTips
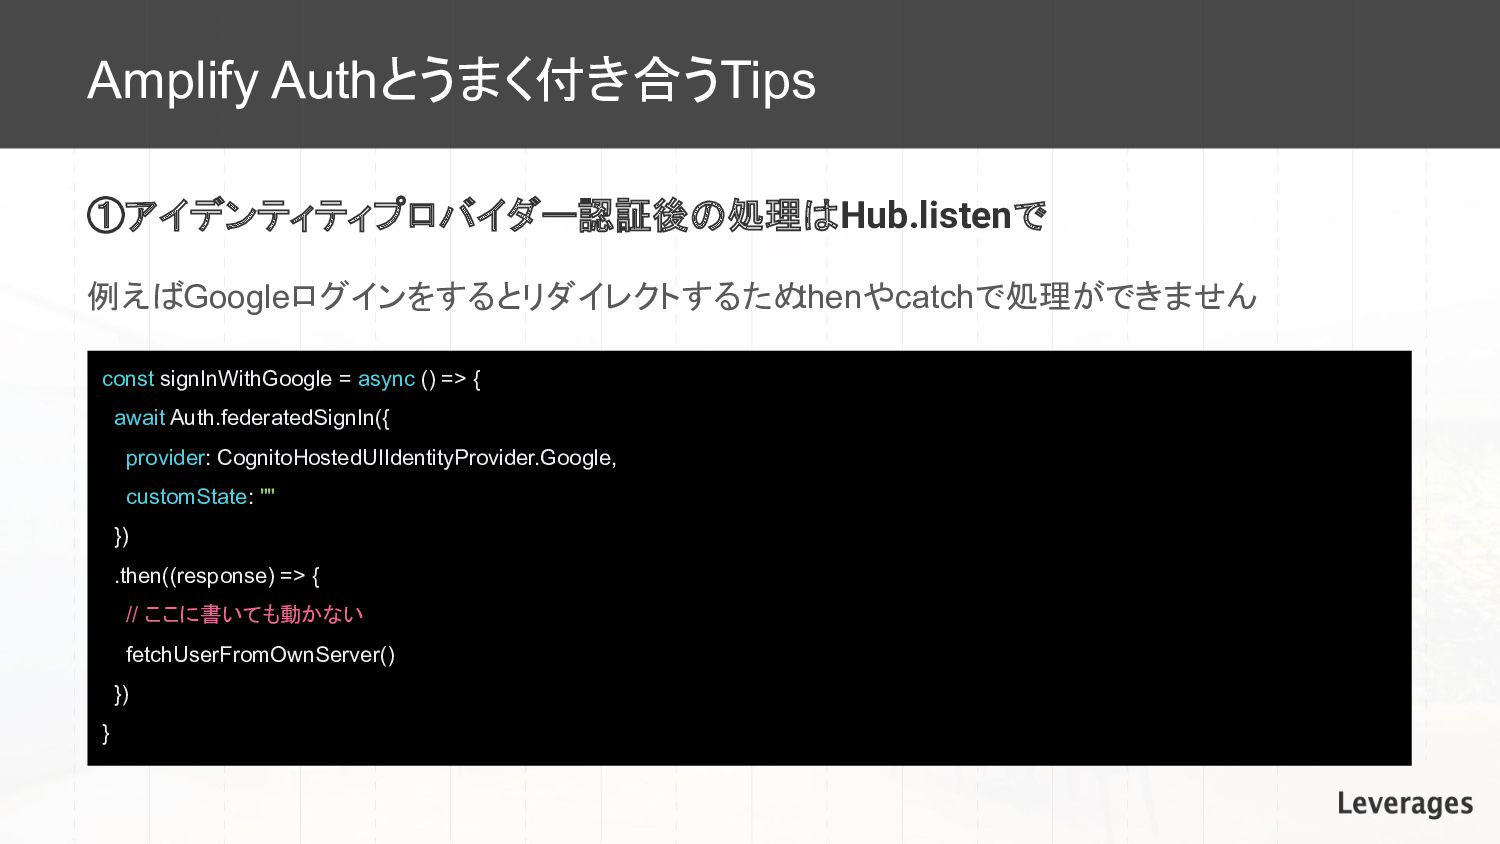
Amplify Authとうまく付き合うTips ①アイデンティティプロバイダー認証後の処理はHub.listenで const signInWithGoogle = async () => {
await Auth.federatedSignIn({ provider: CognitoHostedUIIdentityProvider.Google, customState: "" }) .then((response) => { // ここに書いても動かない fetchUserFromOwnServer() }) } 例えばGoogleログインをするとリダイレクトするため thenやcatchで処理ができません
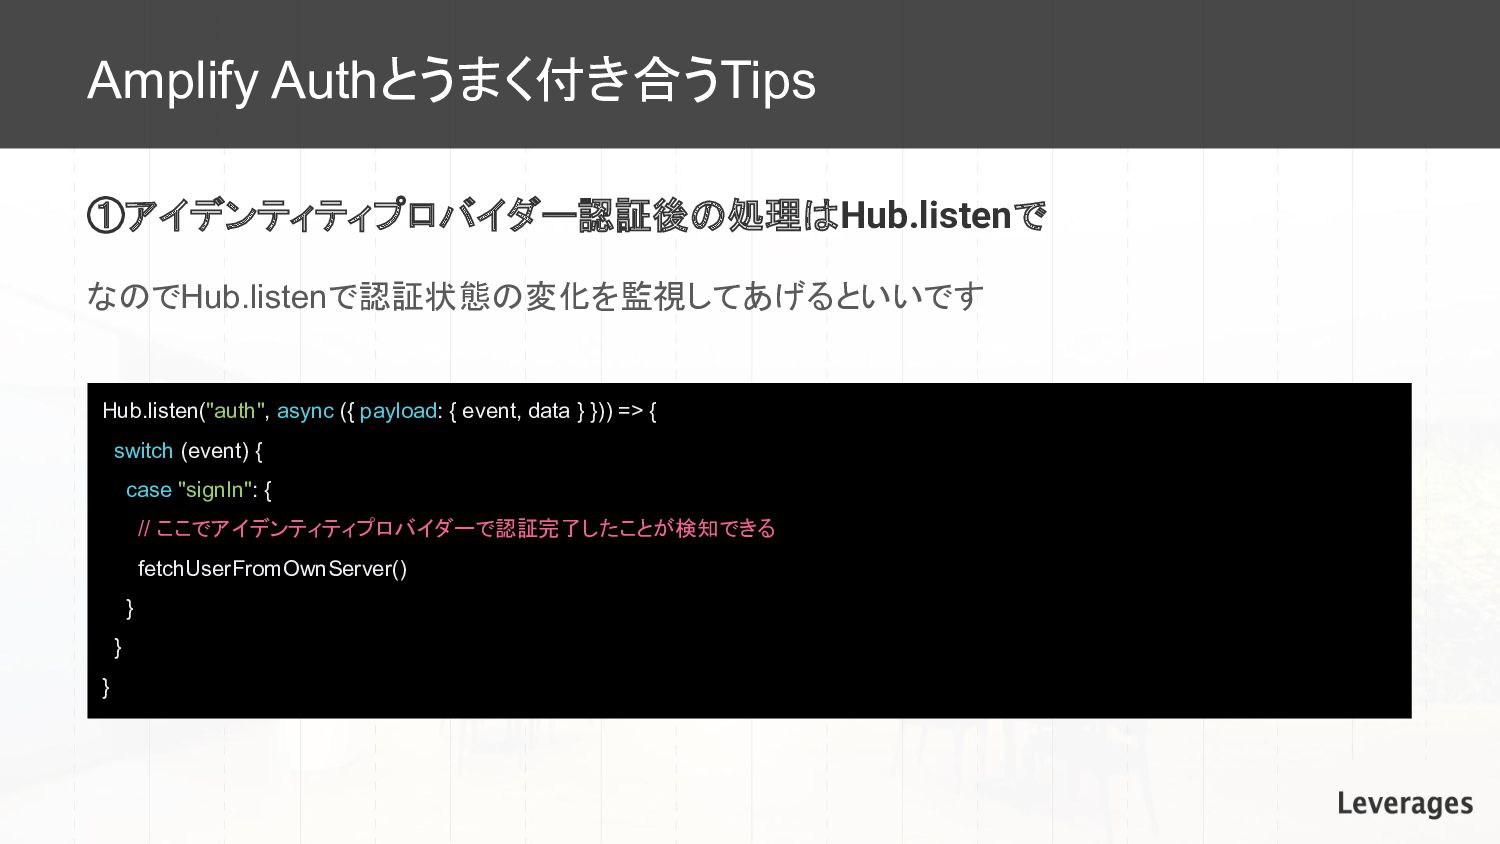
Amplify Authとうまく付き合うTips ①アイデンティティプロバイダー認証後の処理はHub.listenで Hub.listen("auth", async ({ payload: { event, data
} })) => { switch (event) { case "signIn": { // ここでアイデンティティプロバイダーで認証完了したことが検知できる fetchUserFromOwnServer() } } } なのでHub.listenで認証状態の変化を監視してあげるといいです
Amplify Authとうまく付き合うTips ②アイデンティティプロバイダーの認証後のリダイレクト先を動的に変える Amplify.configure({ Auth: { // 省略 oauth: {
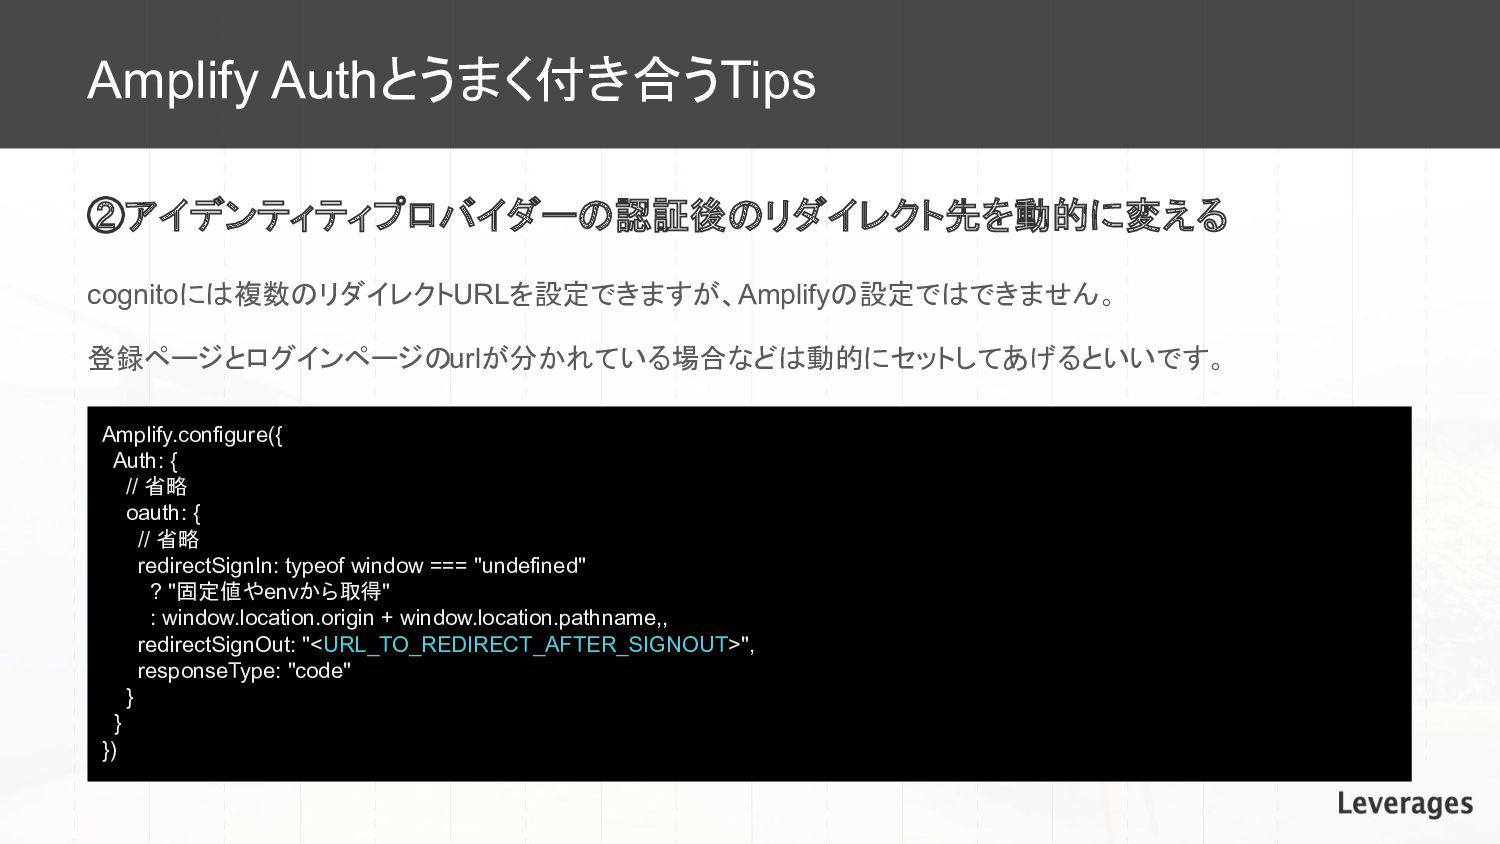
// 省略 redirectSignIn: typeof window === "undefined" ? "固定値やenvから取得" : window.location.origin + window.location.pathname,, redirectSignOut: "<URL_TO_REDIRECT_AFTER_SIGNOUT>", responseType: "code" } } }) cognitoには複数のリダイレクトURLを設定できますが、Amplifyの設定ではできません。 登録ページとログインページのurlが分かれている場合などは動的にセットしてあげるといいです。
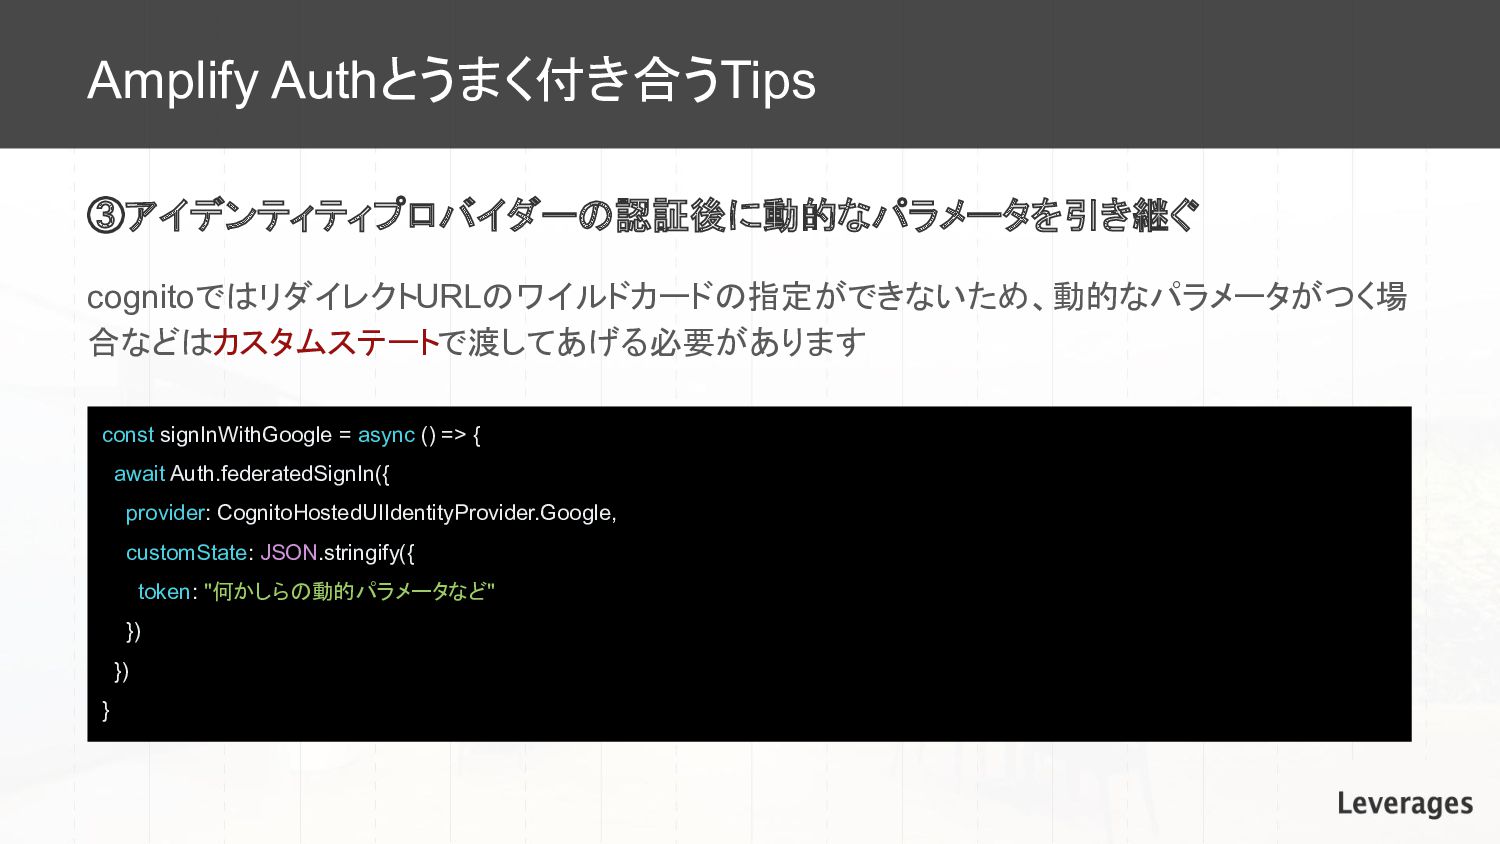
Amplify Authとうまく付き合うTips ③アイデンティティプロバイダーの認証後に動的なパラメータを引き継ぐ cognitoではリダイレクトURLのワイルドカードの指定ができないため、動的なパラメータがつく場 合などはカスタムステートで渡してあげる必要があります const signInWithGoogle = async ()
=> { await Auth.federatedSignIn({ provider: CognitoHostedUIIdentityProvider.Google, customState: JSON.stringify({ token: "何かしらの動的パラメータなど" }) }) }
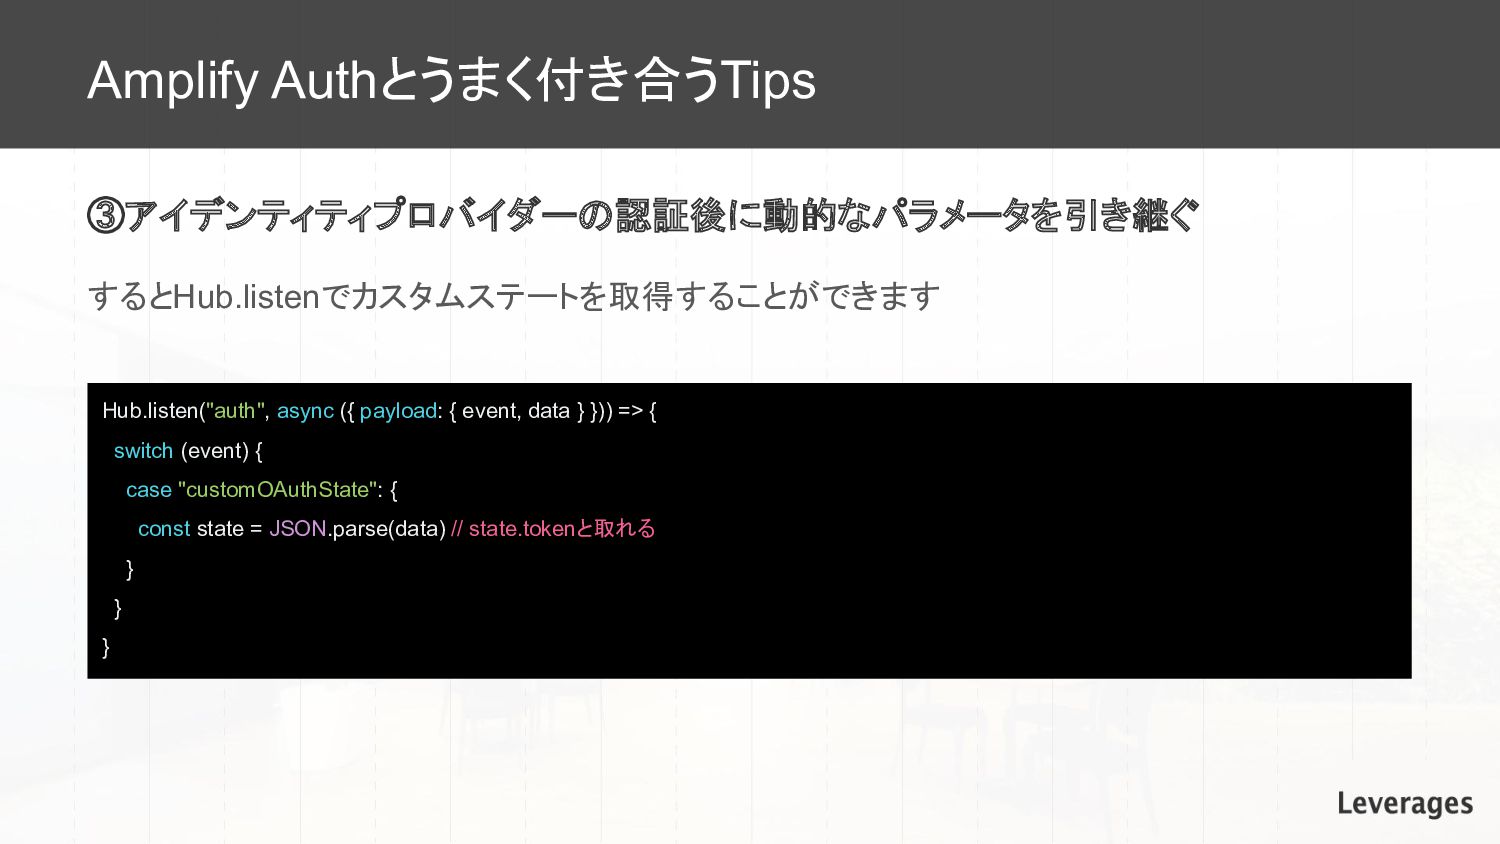
Amplify Authとうまく付き合うTips ③アイデンティティプロバイダーの認証後に動的なパラメータを引き継ぐ Hub.listen("auth", async ({ payload: { event, data
} })) => { switch (event) { case "customOAuthState": { const state = JSON.parse(data) // state.tokenと取れる } } } するとHub.listenでカスタムステートを取得することができます
Amplify Auth / Cognitoの辛いところ
Amplify Auth / Cognitoの辛いところ 先述の通り、Amplify AuthはjwtをデフォルトでlocalStorageもしくはcookie(http-onlyにはできな い)に保持するため、セキュリティ上の脆弱性となる可能性もあります。 http-onlyのcookieに保持するためにはサーバーの処理を噛ませる必要があり、 cognitoのデフォ ルトの機能では実装できません。
利便性とセキュリティ要件を踏まえて採用を検討する必要があります。 jwtをどこに管理するか
終わり