Upgrade to Pro — share decks privately, control downloads, hide ads and more …

CloudGarageRancherMeetupTokyo#9

MiyataAKiyoshi
September 13, 2017

 CloudGarageRancherMeetupTokyo#9

Let's start Rancher with multiple instances

MiyataAKiyoshi

September 13, 2017
Tweet

More Decks by MiyataAKiyoshi

Other Decks in Technology

Transcript

  1. Copyright © NHN Techorus Corp. NHNテコラス株式会社 クラウドサービス開発室 宮⽥ 晃佳 複数インスタンスでRancherをはじめよう

    Service Site Facebook Twitter ハッシュタグ https://cloudgarage.jp @CloudGarage.PR @CloudGarage_PR #CloudGarage
  2. Page 3 Instance-01 Instance-02 Instance-03 Replication 最終ゴール DB (Rancher-Server) DB

    (Rancher-Server) DB (Rancher-Server) Docker-container RANCHER-Server Docker-container RANCHER-Server Docker-container RANCHER-Server
  3. Page 6 サーバーインスタンスの⽤意 インスタンス :CPU 3Core メモリ 4GB SSD 150GB

    OS :Ubuntu 16.04 64bit 接続許可ポート :22, 8080 インスタンス名 :Instance01、02、03 rootパスワード :内緒 3つのインスタンスを⽤意します Instahce01 Instance02 Instance03
  4. Page 11 各インスタンスで以下のコマンドを実⾏し、Dockerをインストールします Dockerインストール # apt-get update # apt-get install

    ¥ apt-transport-https ¥ ca-certificates ¥ curl ¥ software-properties-common # curl -fsSL https://download.docker.com/linux/ubuntu/gpg | sudo apt-key add - # add-apt-repository ¥ "deb [arch=amd64] https://download.docker.com/linux/ubuntu ¥ $(lsb_release -cs) ¥ stable" # apt-get update # apt-get install docker-ce # docker info 【Tips:最新版のDockerがRancherに対応していない場合】 Dockerのインストール時にバージョンを指定してください # apt-get install docker-ce=<VERSION> 参考: https://docs.docker.com/engine/installation/linux/docker-ce/ubuntu/#install-using-the-repository Instahce01 Instance02 Instance03
  5. Page 12 MariaDB Serverを各インスタンスへインストールします DBインストール # apt-key adv --recv-keys --keyserver

    hkp://keyserver.ubuntu.com:80 ¥ 0xF1656F24C74CD1D8 ¥ add-apt-repository 'deb [arch=amd64,i386,ppc64el] ¥ http://nyc2.mirrors.digitalocean.com/mariadb/repo/10.1/ubuntu xenial main‘ ¥ apt-get update ¥ apt-get -y install mariadb-server Rootのパスワード⼊⼒を忘れずに Instahce01 Instance02 Instance03
  6. Page 13 各インスタンスのMariaDB Serverを停⽌します DBクラスタリング設定 # systemctl stop mysql 各インスタンスのgalera.confの/etc/mysql/conf.d/への配置します

    [mysqld] bind-address=0.0.0.0 [galera] binlog_format=ROW default-storage-engine=innodb innodb_autoinc_lock_mode=2 wsrep_on=ON wsrep_provider=/usr/lib/galera/libgalera_smm.so wsrep_cluster_name="test_cluster" wsrep_cluster_address=“gcomm:// (instance01プライベートIPアドレス), (instance02プライ ベートIPアドレス), (instance03プライベートIPアドレス)" wsrep_sst_method=rsync wsrep_node_address=“ (設定中のインスタンスプライベートIPアドレス)" Instahce01 Instance02 Instance03
  7. Page 14 DBクラスタリング設定(続き) MariaDB Galera Clusterを起動します # galera_new_cluster 他のインスタンスのMariaDBをClusterに参加させます #

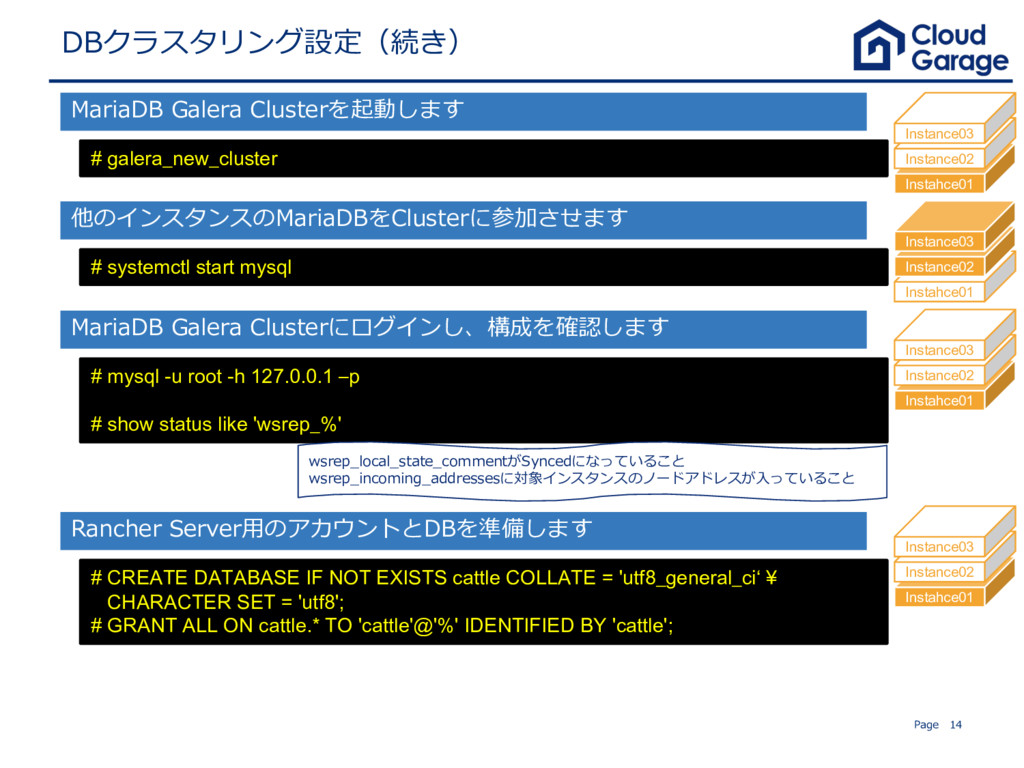
    systemctl start mysql MariaDB Galera Clusterにログインし、構成を確認します # mysql -u root -h 127.0.0.1 –p # show status like 'wsrep_%' Instahce01 Instance02 Instance03 Instahce01 Instance02 Instance03 Instahce01 Instance02 Instance03 wsrep_local_state_commentがSyncedになっていること wsrep_incoming_addressesに対象インスタンスのノードアドレスが⼊っていること Rancher Server⽤のアカウントとDBを準備します # CREATE DATABASE IF NOT EXISTS cattle COLLATE = 'utf8_general_ci‘ ¥ CHARACTER SET = 'utf8'; # GRANT ALL ON cattle.* TO 'cattle'@'%' IDENTIFIED BY 'cattle'; Instahce01 Instance02 Instance03
  8. Page 15 Rancherインストール # docker run -d --restart=unless-stopped --name rancher_server

    -p 8080:8080 -p 9345:9345 rancher/server ¥ --db-host (各インスタンスのプライベートネットワークのIPアドレス) --db-port 3306 -- db-user cattle --db-pass cattle --db-name cattle ¥ --advertise-address (各インスタンスのプライベートネットワークのIPアドレス) Rancher Serverを起動します 起動を確認します Instahce01 Instance02 Instance03 http://(ロードバランサーのバーチャルIP):8080
  9. Page 21 Instance-01 Instance-02 Instance-03 Replication まとめ DB (Rancher Server)

    DB (Rancher Server) DB (Rancher Server) Docker-container RANCHER Server Docker-container RANCHER Server Docker-container RANCHER Server