Upgrade to Pro
— share decks privately, control downloads, hide ads and more …
Speaker Deck
Sign up for free
Menu
Search
Features
All features
Private URLs
Password Protection
Custom URLS
Scheduled publishing
Remove Branding
Restrict embedding
Deck Collections
Notes
Features
All features
Private URLs
Password Protection
Custom URLS
Scheduled publishing
Remove Branding
Restrict embedding
Deck Collections
Notes
Explore
Featured decks
Featured speakers
Programming
Technology
Storyboards
Explore
Featured decks
Featured speakers
Programming
Technology
Storyboards
Pricing
Search
Sign in
Sign up for free
OpenShift on IBM DEMO site
Search
Sponsored
·
Your Podcast. Everywhere. Effortlessly.
Share. Educate. Inspire. Entertain. You do you. We'll handle the rest.
→
osonoi
May 27, 2020
420
1
Share
Embed
Copy iframe code
Copy JS code
Copy link
Start on current slide
OpenShift on IBM DEMO site
osonoi
May 27, 2020
More Decks by osonoi
See All by osonoi
伊勢神宮参拝の旅
osonoi
0
100
南総里見八犬伝 ゆかりの地めぐり
osonoi
0
180
江戸城 石垣めぐり
osonoi
0
49
秩父巡礼プラン
osonoi
0
49
大洗 1日旅行プラン
osonoi
0
79
osonoi-2026-Aug
osonoi
0
350
歴史を知って散歩に 出かけましょう!パート2、伊能忠敬、間宮林蔵
osonoi
0
76
清和天皇から新田初代、義重まで
osonoi
0
66
織田信雄
osonoi
0
93
Featured
See All Featured
Google's AI Overviews - The New Search
badams
0
1.6k
GraphQLの誤解/rethinking-graphql
sonatard
75
12k
Build The Right Thing And Hit Your Dates
maggiecrowley
39
3.5k
Sam Torres - BigQuery for SEOs
techseoconnect
PRO
0
570
コードの90%をAIが書く世界で何が待っているのか / What awaits us in a world where 90% of the code is written by AI
rkaga
63
46k
Technical Leadership for Architectural Decision Making
baasie
3
600
Six Lessons from altMBA
skipperchong
29
4.5k
The #1 spot is gone: here's how to win anyway
tamaranovitovic
4
1.2k
Gemini Prompt Engineering: Practical Techniques for Tangible AI Outcomes
mfonobong
2
580
Ecommerce SEO: The Keys for Success Now & Beyond - #SERPConf2024
aleyda
1
2.2k
[RailsConf 2023] Rails as a piece of cake
palkan
59
7.1k
What’s in a name? Adding method to the madness
productmarketing
PRO
24
4.2k
Transcript
IBM DEMOサイトでの AI アプリのDeploy Yasushi Osonoi 2020/05/27
⼿順 1. デモサイトの準備 2. Visual Recognitionサービスの作成 3. アプリのDeploy
1.デモサイトの準備 こちらのサイトに登録をしてください。(無料) https://www.ibm.com/demos/
ログイン後下にスクロールして“Red Hat OpenShift on IBM Cloud”を選択
Launch Labを選択
右側のコマンド画⾯で操作できます。
OpenShiftへのログイン:下にスクロールし て”Launch the OpenShift web console”をクリック
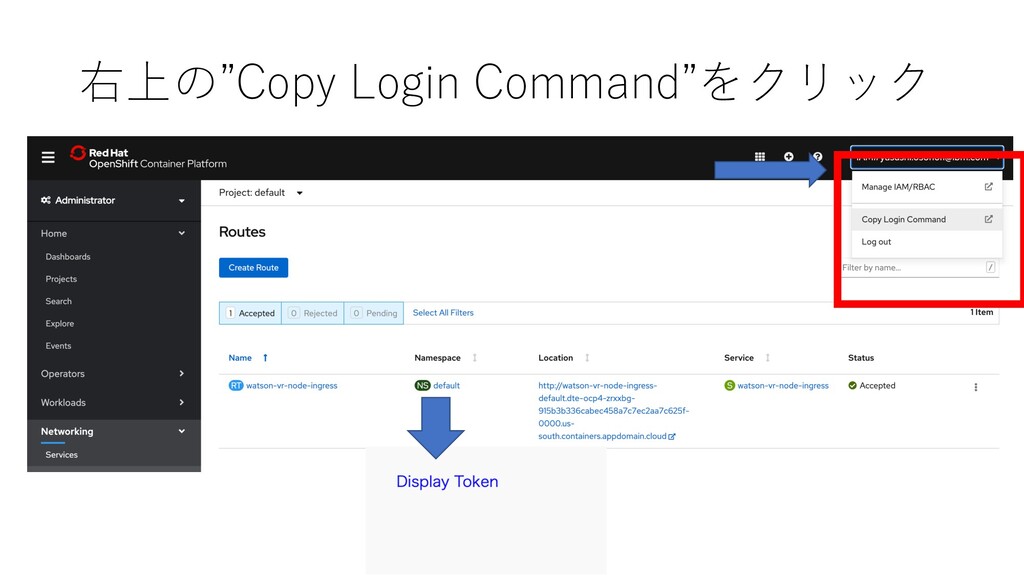
右上の”Copy Login Command”をクリック
ログインコマンドをコピー
先ほどの画⾯でコマンドを貼り付け
2. Visual Recognitionサービスの作成 Visual Recognitionを新規に作成する⽅は次のページに進んでください。 既に以前に作成済みの⽅は、作成済みのものが使⽤できます。 作成済みの⽅は以下の⼿順を参照しVisual Recognitionの管理の画⾯を表⽰後、 http://ibm.biz/watson-service-screen 当資料「4.
Visual Recognitionサービスibm-credentials.env のダウンロード」まで進んでく ださい。 https://cloud.ibm.com/ にアクセスして、ダッシュボードを開きます。
2.1 上部のメニューにある「カタログ」をクリックします 次に左側のメニューから“サービス”を洗濯し
2.2 Visual Recognitionサービスの選択 1. 左側のメニューから「AI」をクリック 2. 下にスクロールして表⽰された「Visual Recognition」をクリック
• 地域の選択は「ダラス」、価格プランに「ライト」が選択されていることを確認して、 • 「作成」をクリック 2.3 Visual Recognitionサービスを作成する
2.4 Visual Recognitionサービスを作成確認、管理画⾯の表⽰ 左のメニューから「管理」をクリックして次に進 んでください。
2.5. Visual Recognitionサービス API鍵をコピー(クリップボードに)してください。
3.1. プロジェクトを作成する oc new-project watson-vr --display-name="watson-vr" -- description="Sample Watson Visual
Recognition Node.js app" ターミナルに下記コマンドを⼊⼒し、新しいアプリケーション⽤に新しいプ ロジェクトを作成します。 3. Openshift アプリの作成 出⼒例:
3.2. アプリケーションの作成 ターミナルに下記のコマンドを⼊⼒し、 githubのソースコードから、アプ リケーションを作成します。 oc new-app https://github.com/kyokonishito/watson-vr-node.git -e CLASSIFIER_ID=food
-e WATSON_VISION_COMBINED_APIKEY=<APIKEY> <APIKEY>に先ほどコピーしたAPI鍵を⼊れてくだ さい。<>は削除してください
3.2. アプリケーションの作成 出⼒例:
3.3 ビルドログを表⽰します oc logs -f bc/watson-vr-node ターミナルに下記のコマンドを⼊⼒しビルドログを表⽰し、 「 Push successful
」で終わるまで待ちます。 3.4 ロードバランサーのサービスを作成します oc expose dc watson-vr-node --port=3000 --type=LoadBalancer -- name=watson-vr-node-ingress ターミナルに下記のコマンドを⼊⼒し実⾏します。 (コマンドは1⾏です。コマンドは以下からコピペできます。 https://ibm.box.com/v/openshift-101-command)
3.5. ロードバランサーのサービスを公開します oc expose service watson-vr-node-ingress ターミナルに下記のコマンドを⼊⼒し実⾏します。 これで完了です!ターミナルに下記のコマンドを⼊⼒し実⾏し、その結果を 参照して、OpenShift で実⾏されているアプリケーションにアクセスでき
ます。 oc get route/watson-vr-node-ingress NAME HOST/PORT PATH SERVICES PORT TERMINATION WILDCARD watson-vr-node-ingress watson-vr-node-ingress-watson-vr.openshifttokyo17-0e3e0ef4c9c6d831e8aa6fe01f33bfc4-0002.jp- tok.containers.appdomain.cloud watson-vr-node-ingress 3000 None 以下のような出⼒があった場合は、 watson-vr-node-ingress-watson-vr.openshifttokyo17-0e3e0ef4c9c6d831e8aa6fe01f33bfc4-0002.jp- tok.containers.appdomain.cloud にブラウザでアクセスします。
3.6 ブラウザーでアプリケーションにアクセスします アプリケーションは表⽰できましたか? ボタンを押して動作確認してみましょう! 「ファイルの選択」から写真を選んだ後、各⻘ボタンをク リックして、Visual Recognitionの結果を確認します。 • Watsonで認識(Watson学習済みモデルを利⽤): •
Watsonが写真を認識した内容を表⽰します。 • Watsonで認識(カスタムモデルを利⽤): • IBM提供の⾷品に特化したカスタムモデルFoodで認識し たクラスを表⽰します。 ※スマートフォンでの確認 ⼀番下にQRコードが表⽰されているので、それをスマートフォン のカメラで読んでアプリケーションのURLにアクセすると、ス マートフォンでも結果を確認できます。 スマートフォンでは「ファイルの選択」ボタンでその場で撮った 写真も認識可能です。


 osonoi
 badams
 sonatard
 maggiecrowley
 techseoconnect
 rkaga
rkaga
 baasie
 skipperchong
 tamaranovitovic
 mfonobong
 aleyda
 palkan
 productmarketing