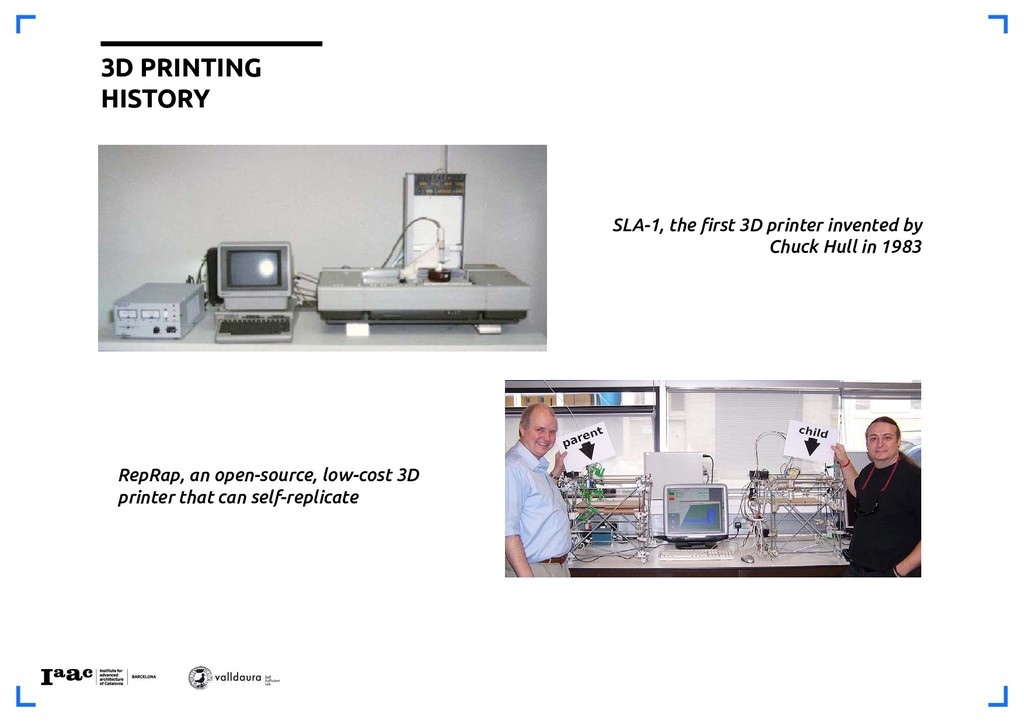
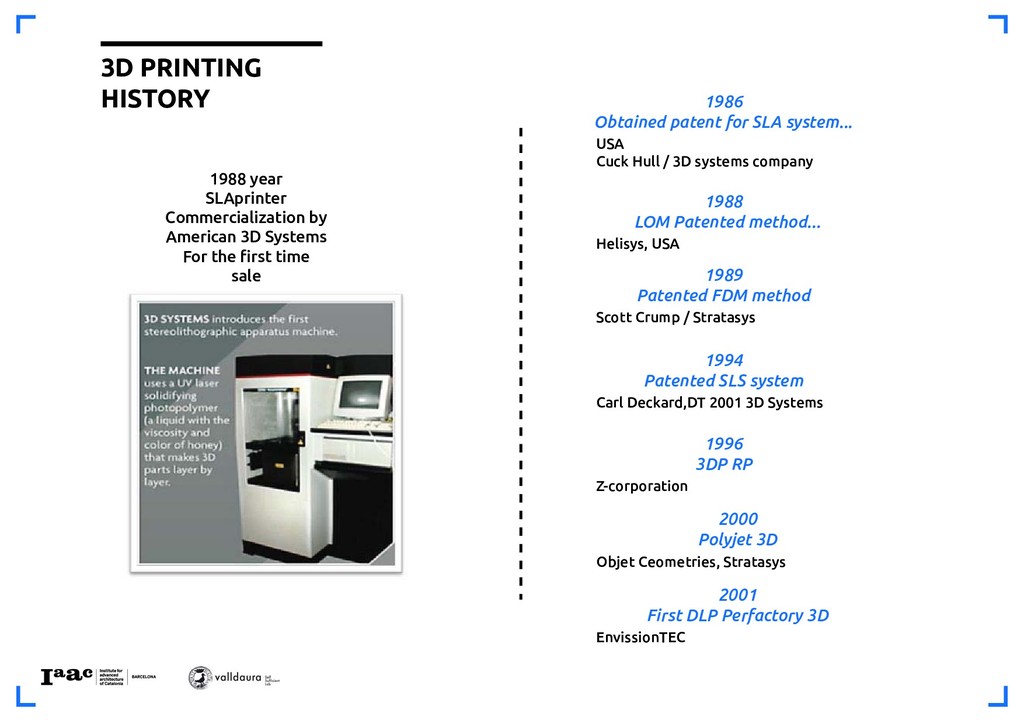
for SLA system... Helisys, USA 1988 LOM Patented method... Scott Crump / Stratasys 1989 Patented FDM method Carl Deckard,DT 2001 3D Systems 1994 Patented SLS system Z-corporation 1996 3DP RP Objet Ceometries, Stratasys 2000 Polyjet 3D EnvissionTEC 2001 First DLP Perfactory 3D 3D PRINTING HISTORY 1988 year SLAprinter Commercialization by American 3D Systems For the first time sale
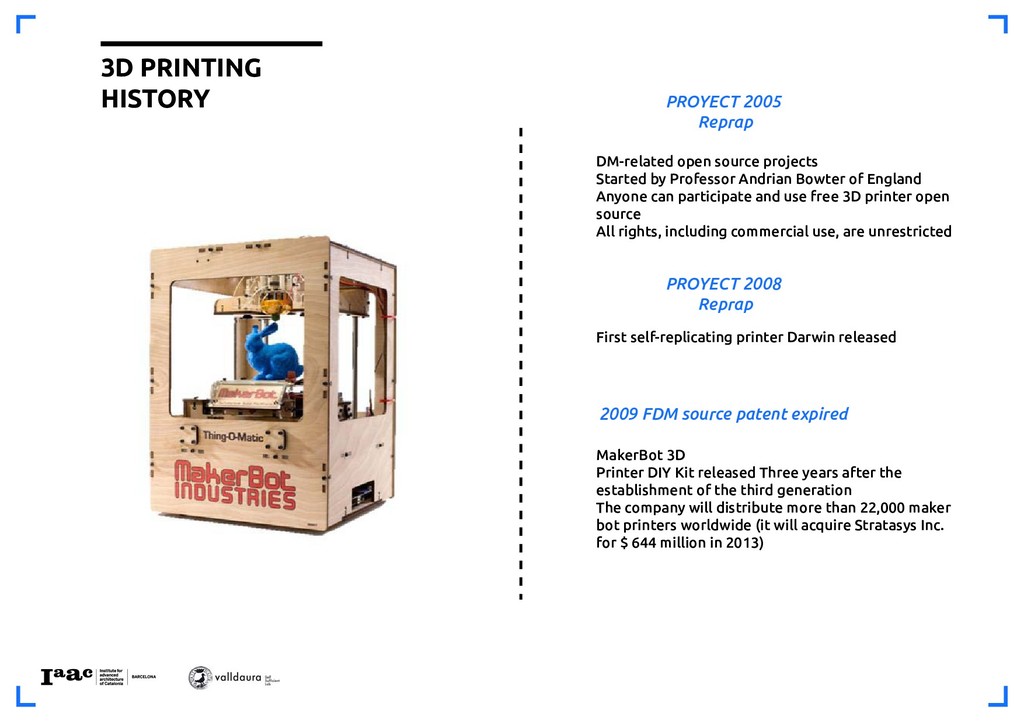
Andrian Bowter of England Anyone can participate and use free 3D printer open source All rights, including commercial use, are unrestricted PROYECT 2005 Reprap First self-replicating printer Darwin released PROYECT 2008 Reprap MakerBot 3D Printer DIY Kit released Three years after the establishment of the third generation The company will distribute more than 22,000 maker bot printers worldwide (it will acquire Stratasys Inc. for $ 644 million in 2013) 2009 FDM source patent expired
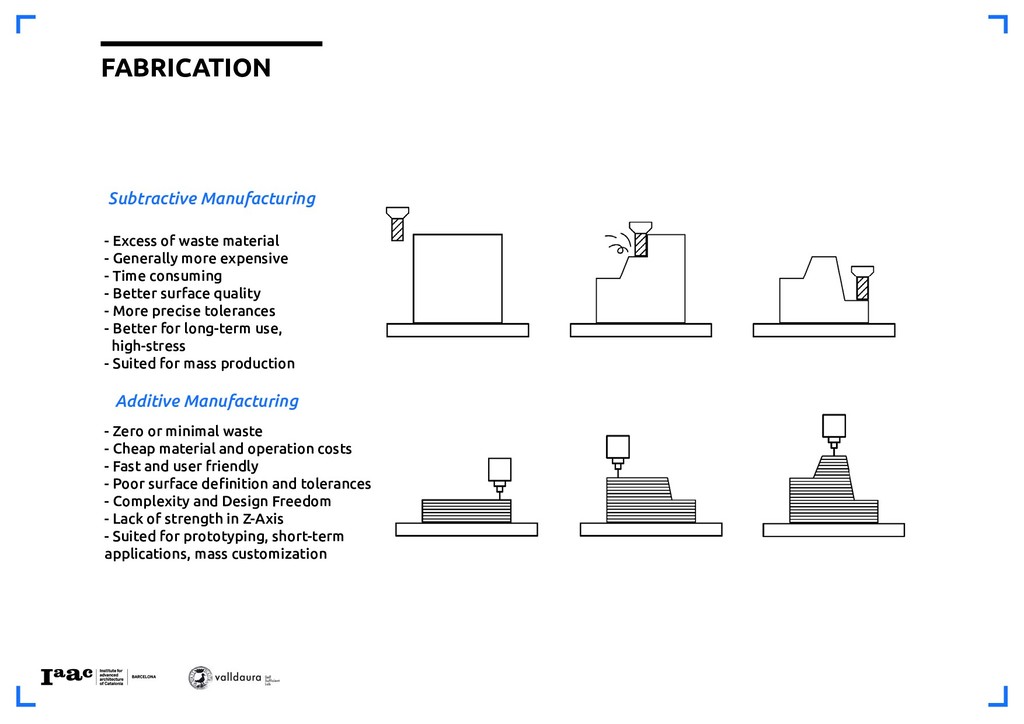
costs - Fast and user friendly - Poor surface definition and tolerances - Complexity and Design Freedom - Lack of strength in Z-Axis - Suited for prototyping, short-term applications, mass customization - Excess of waste material - Generally more expensive - Time consuming - Better surface quality - More precise tolerances - Better for long-term use, high-stress - Suited for mass production Subtractive Manufacturing Additive Manufacturing FABRICATION
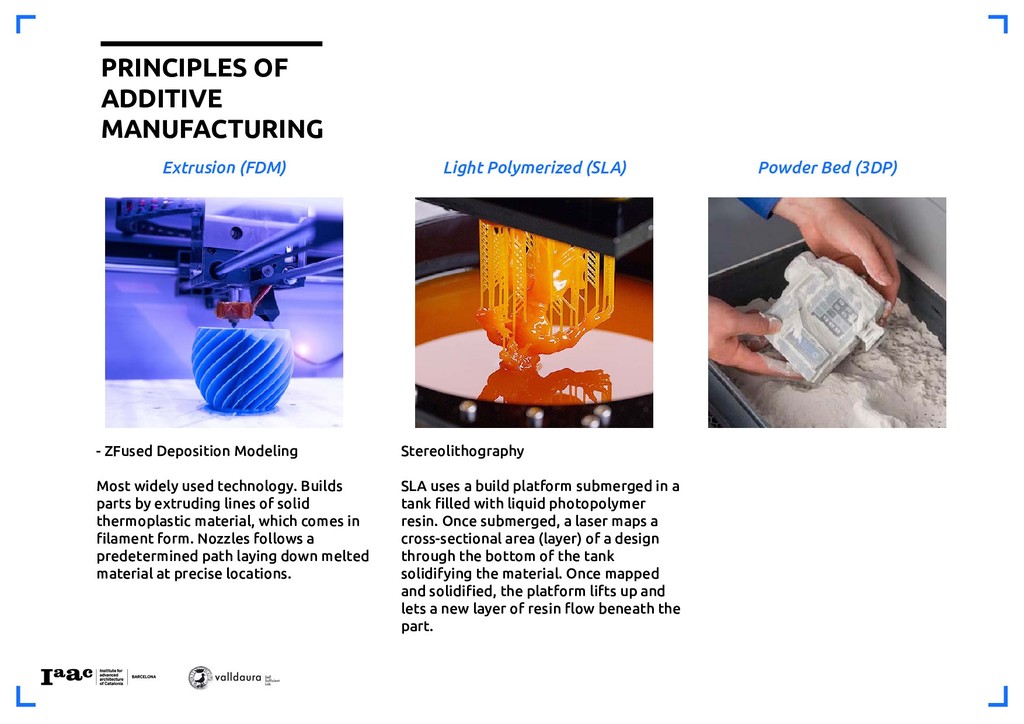
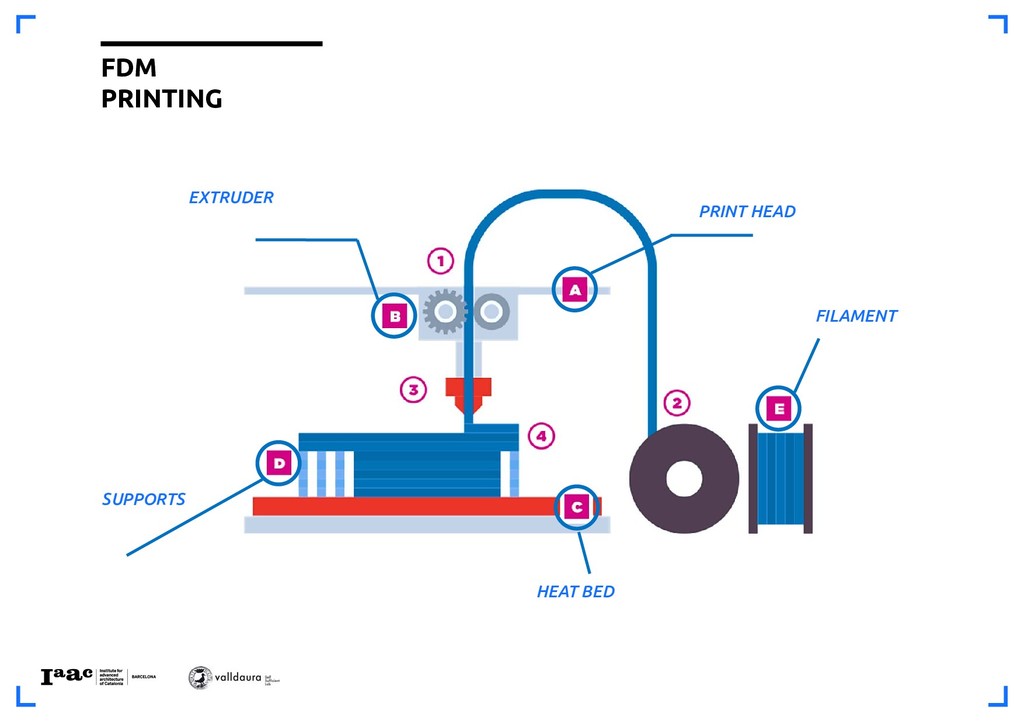
by extruding lines of solid thermoplastic material, which comes in filament form. Nozzles follows a predetermined path laying down melted material at precise locations. Stereolithography SLA uses a build platform submerged in a tank filled with liquid photopolymer resin. Once submerged, a laser maps a cross-sectional area (layer) of a design through the bottom of the tank solidifying the material. Once mapped and solidified, the platform lifts up and lets a new layer of resin flow beneath the part. Extrusion (FDM) Light Polymerized (SLA) Powder Bed (3DP) PRINCIPLES OF ADDITIVE MANUFACTURING
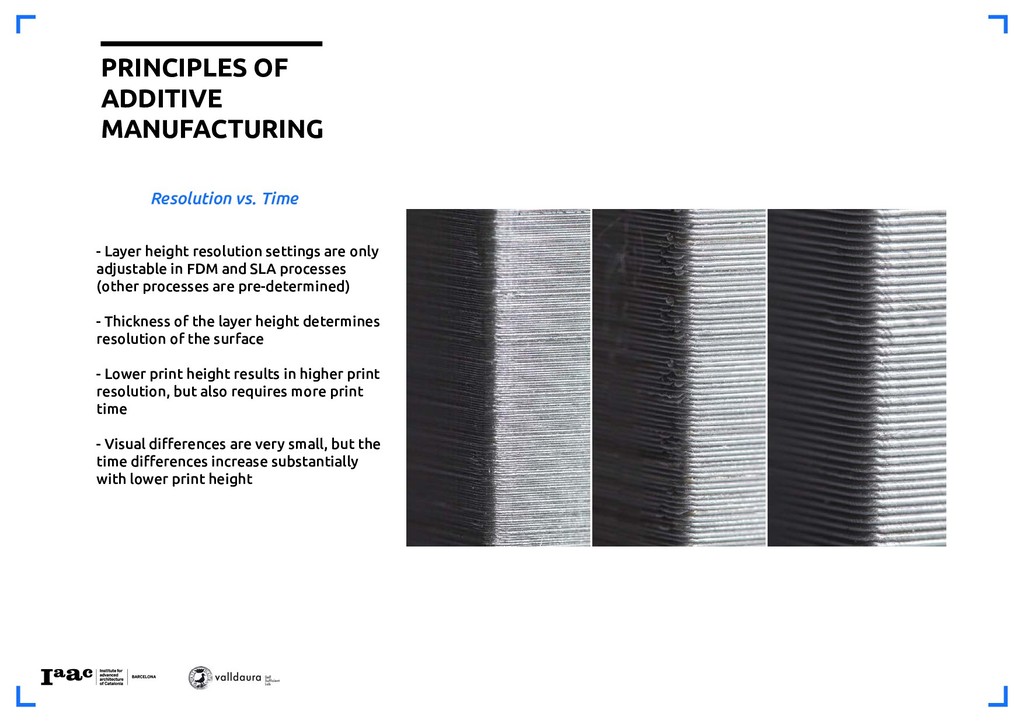
and SLA processes (other processes are pre-determined) - Thickness of the layer height determines resolution of the surface - Lower print height results in higher print resolution, but also requires more print time - Visual differences are very small, but the time differences increase substantially with lower print height Resolution vs. Time PRINCIPLES OF ADDITIVE MANUFACTURING
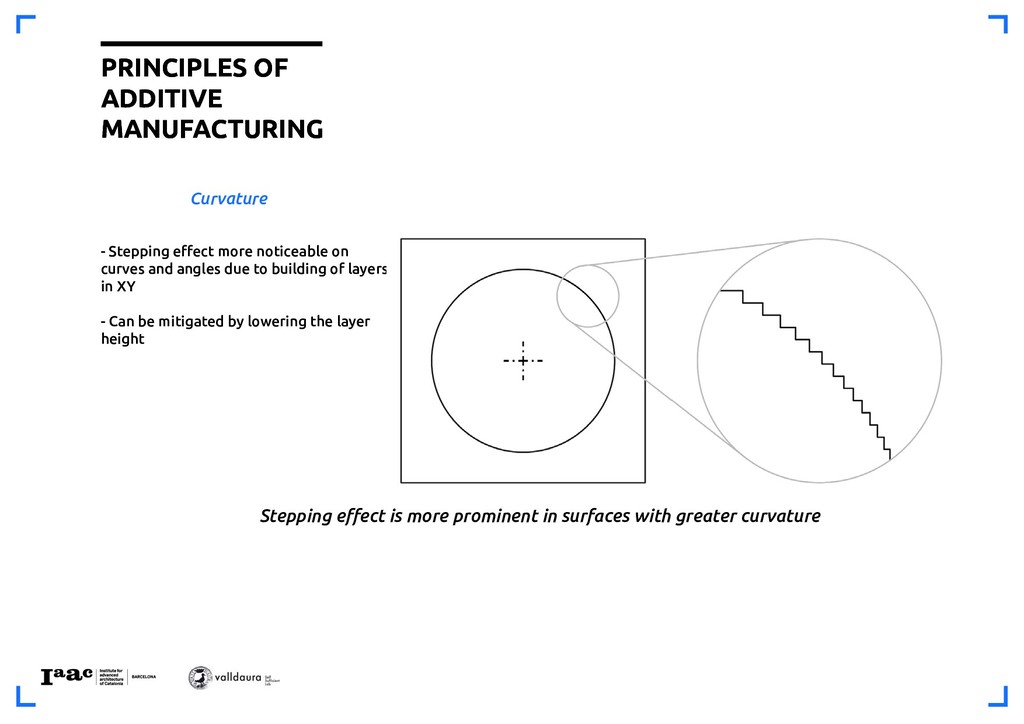
- Stepping effect more noticeable on curves and angles due to building of layers in XY - Can be mitigated by lowering the layer height Curvature PRINCIPLES OF ADDITIVE MANUFACTURING PRINCIPLES OF ADDITIVE MANUFACTURING
outside of the print (Top/Bottom/Shell) - Increasing shell thickness increases the strength, without having to increase infill density - Post-production methods like sanding or chemical smoothing require thicker shells - Any increase in the number of the shells increases time and material for printing - Shell thickness should be a multiple of nozzle diameter to prevent voids from being formed Shell Thickness
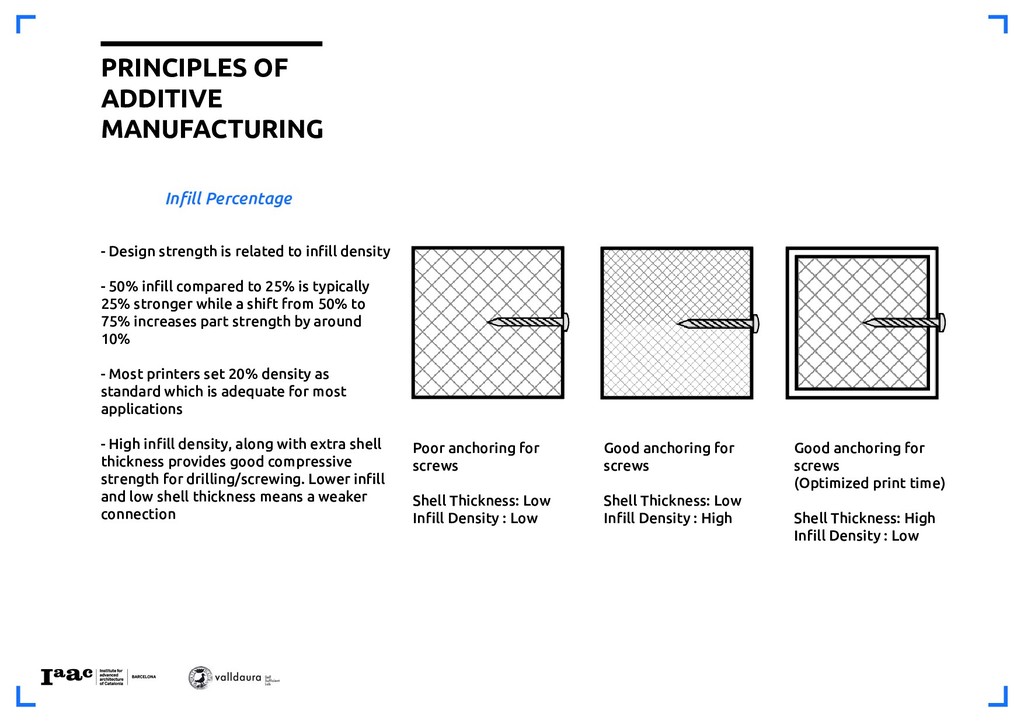
Low Good anchoring for screws Shell Thickness: Low Infill Density : High Good anchoring for screws (Optimized print time) Shell Thickness: High Infill Density : Low PRINCIPLES OF ADDITIVE MANUFACTURING - Design strength is related to infill density - 50% infill compared to 25% is typically 25% stronger while a shift from 50% to 75% increases part strength by around 10% - Most printers set 20% density as standard which is adequate for most applications - High infill density, along with extra shell thickness provides good compressive strength for drilling/screwing. Lower infill and low shell thickness means a weaker connection Infill Percentage
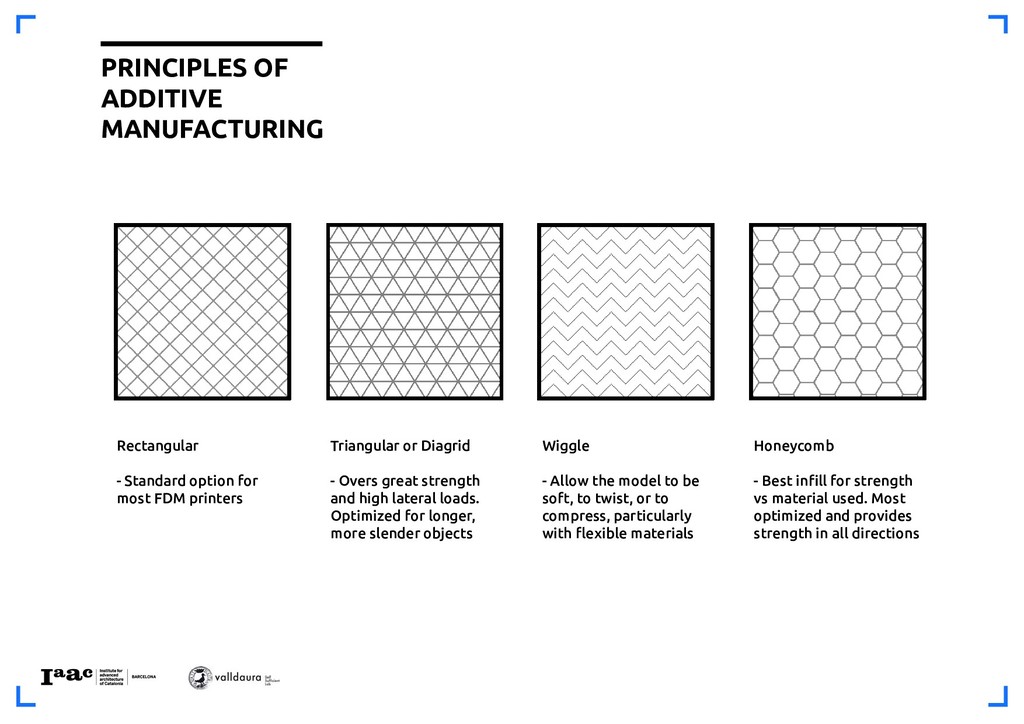
Diagrid - Overs great strength and high lateral loads. Optimized for longer, more slender objects Wiggle - Allow the model to be soft, to twist, or to compress, particularly with flexible materials Honeycomb - Best infill for strength vs material used. Most optimized and provides strength in all directions PRINCIPLES OF ADDITIVE MANUFACTURING
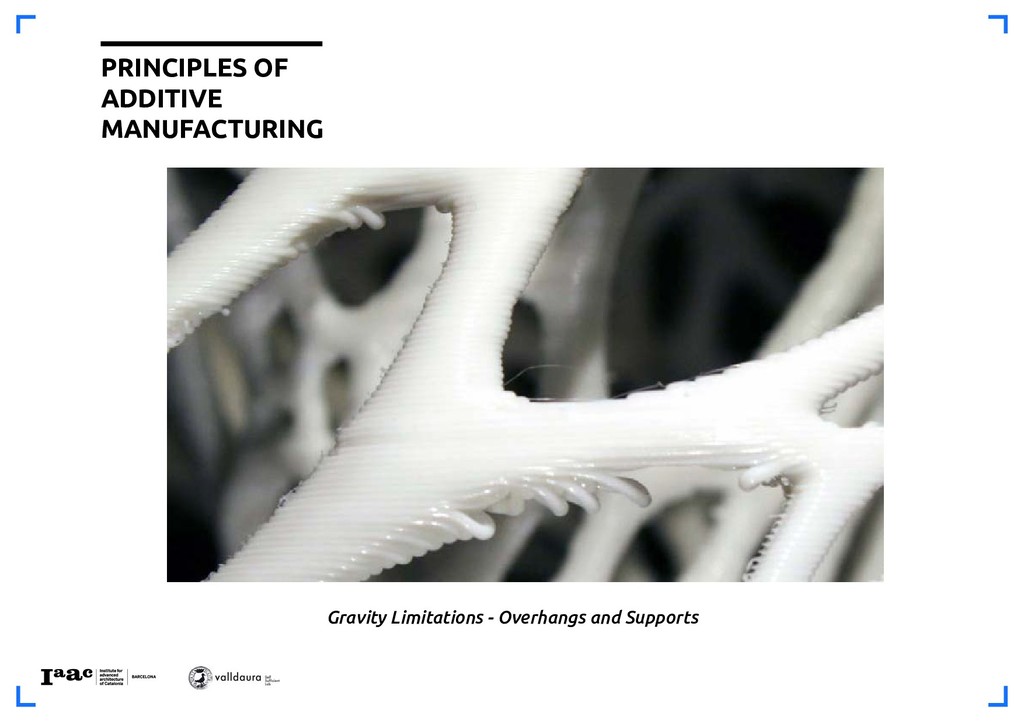
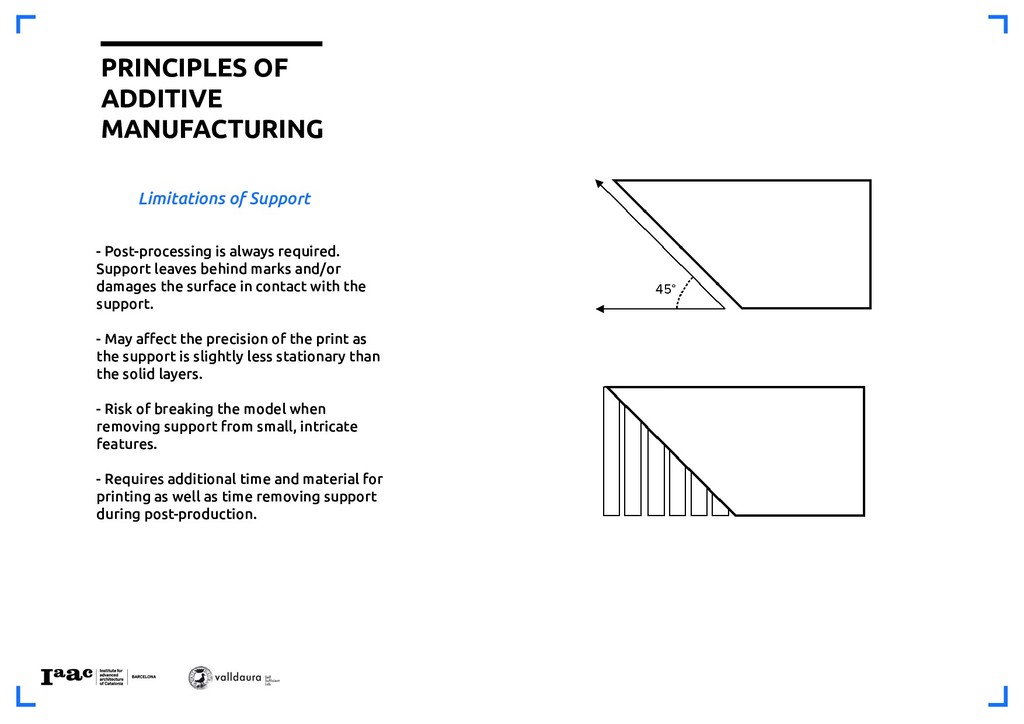
damages the surface in contact with the support. - May affect the precision of the print as the support is slightly less stationary than the solid layers. - Risk of breaking the model when removing support from small, intricate features. - Requires additional time and material for printing as well as time removing support during post-production. Limitations of Support PRINCIPLES OF ADDITIVE MANUFACTURING
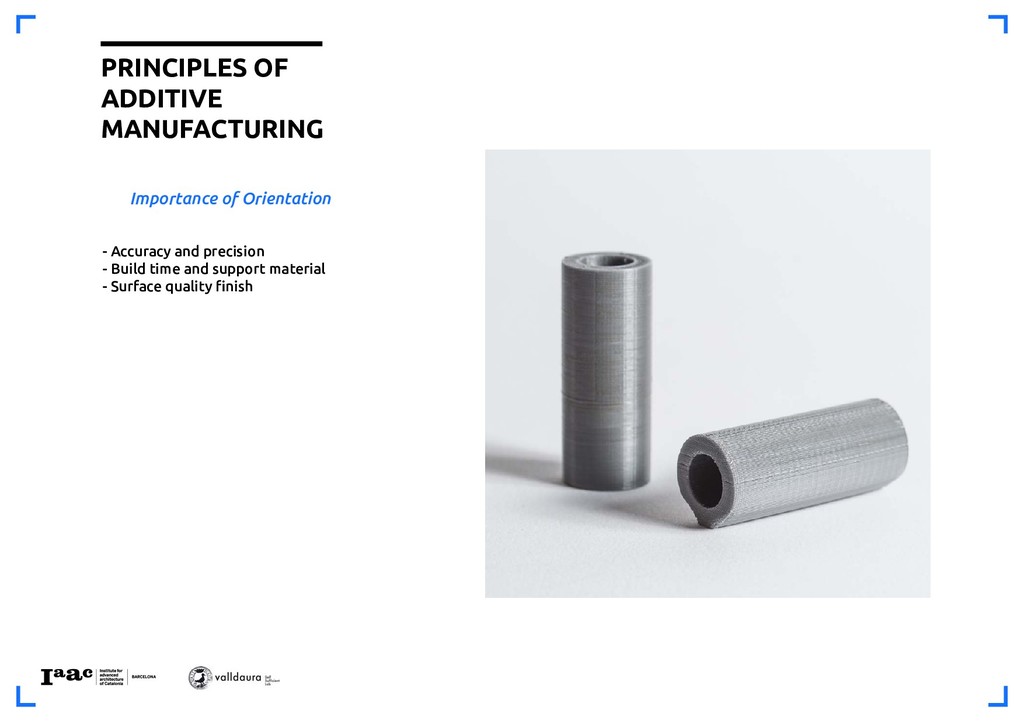
Z direction - Consider application and direction of loads for functional parts Tension load parallel to layers Part is strong Adhesion between layers is weak Part Strength PRINCIPLES OF ADDITIVE MANUFACTURING
existing manufacturing processes and enable rapid and inexpensive prototyping . Shortening product production process Since it is added and laminated molding, it is possible to mold to the inside of the molding, and it is possible to form irregular and complex structures such as a fractal structure Molding the interior of complex shapes and sculptures Low material waste and various materials available There are many differences in accuracy depending on the printing method. Compared to existing mold, tolerance error is big and laminate side is visible to the naked eye. Relatively low precision The speed is relatively slow because of the way of laminating more thin materials . It is therefore suitable for small quantity production of many kinds of products rather than mass production of small items. The speed is relatively slow Advantages Disadvantages
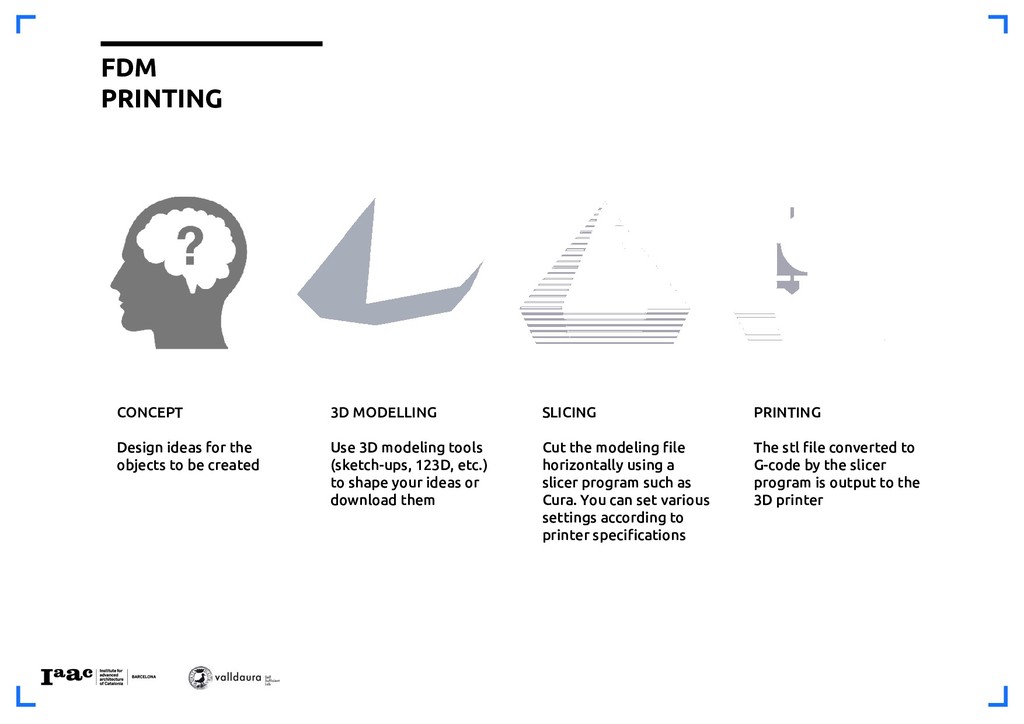
created 3D MODELLING Use 3D modeling tools (sketch-ups, 123D, etc.) to shape your ideas or download them SLICING Cut the modeling file horizontally using a slicer program such as Cura. You can set various settings according to printer specifications PRINTING The stl file converted to G-code by the slicer program is output to the 3D printer
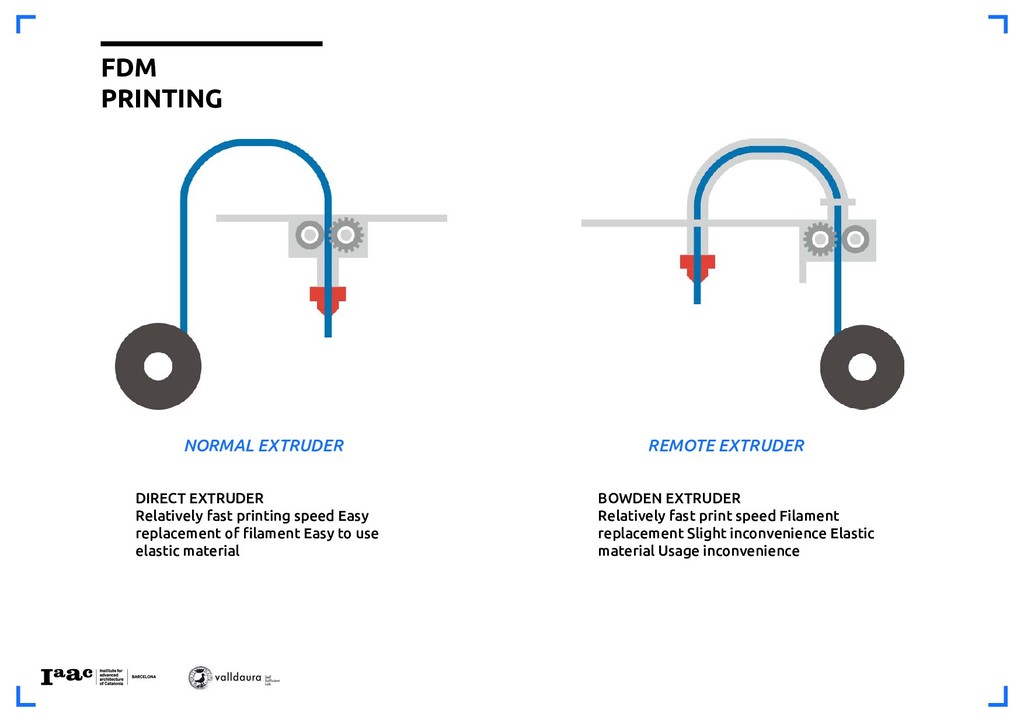
of filament Easy to use elastic material NORMAL EXTRUDER BOWDEN EXTRUDER Relatively fast print speed Filament replacement Slight inconvenience Elastic material Usage inconvenience REMOTE EXTRUDER
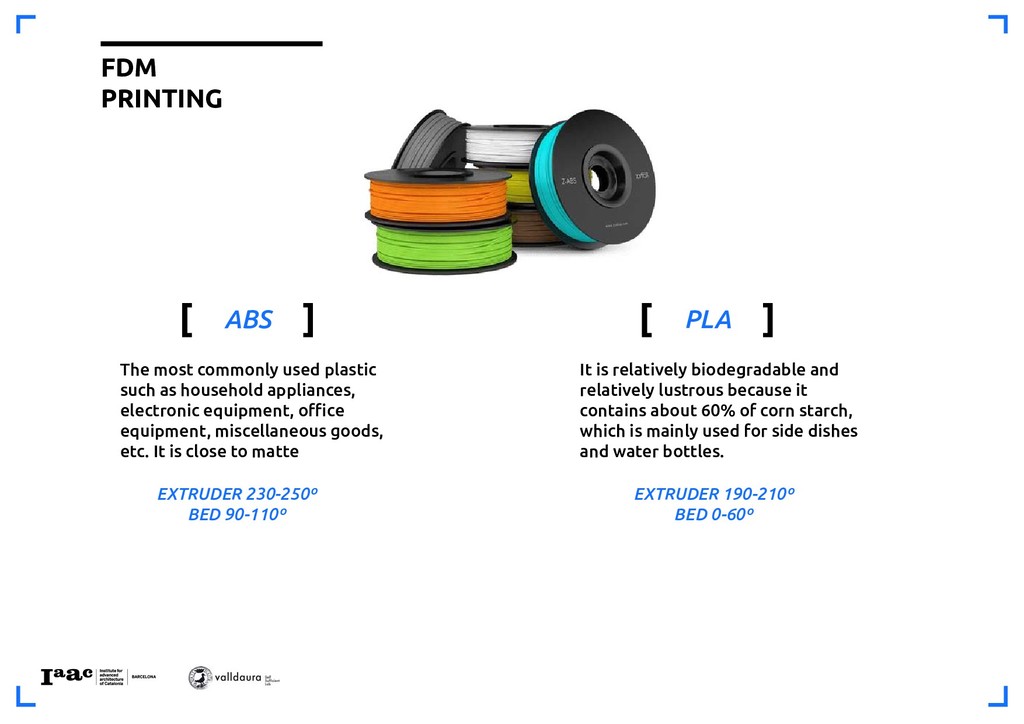
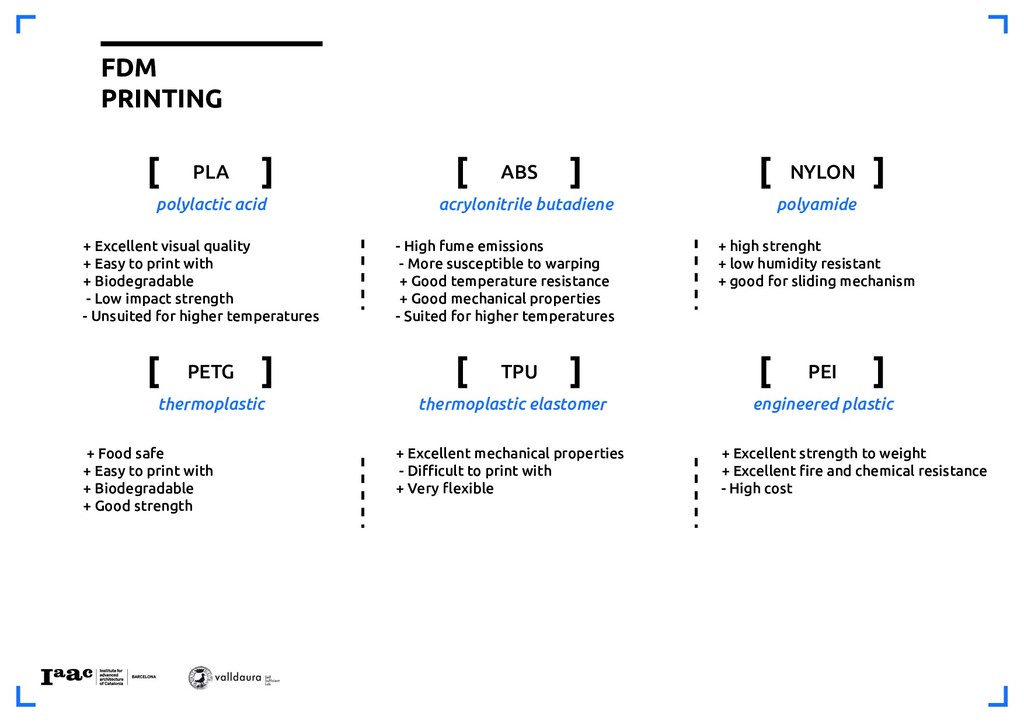
The most commonly used plastic such as household appliances, electronic equipment, office equipment, miscellaneous goods, etc. It is close to matte ABS It is relatively biodegradable and relatively lustrous because it contains about 60% of corn starch, which is mainly used for side dishes and water bottles. PLA
with + Biodegradable - Low impact strength - Unsuited for higher temperatures - High fume emissions - More susceptible to warping + Good temperature resistance + Good mechanical properties - Suited for higher temperatures + high strenght + low humidity resistant + good for sliding mechanism + Food safe + Easy to print with + Biodegradable + Good strength + Excellent mechanical properties - Difficult to print with + Very flexible + Excellent strength to weight + Excellent fire and chemical resistance - High cost PLA ABS NYLON PETG TPU PEI thermoplastic polylactic acid acrylonitrile butadiene polyamide engineered plastic thermoplastic elastomer
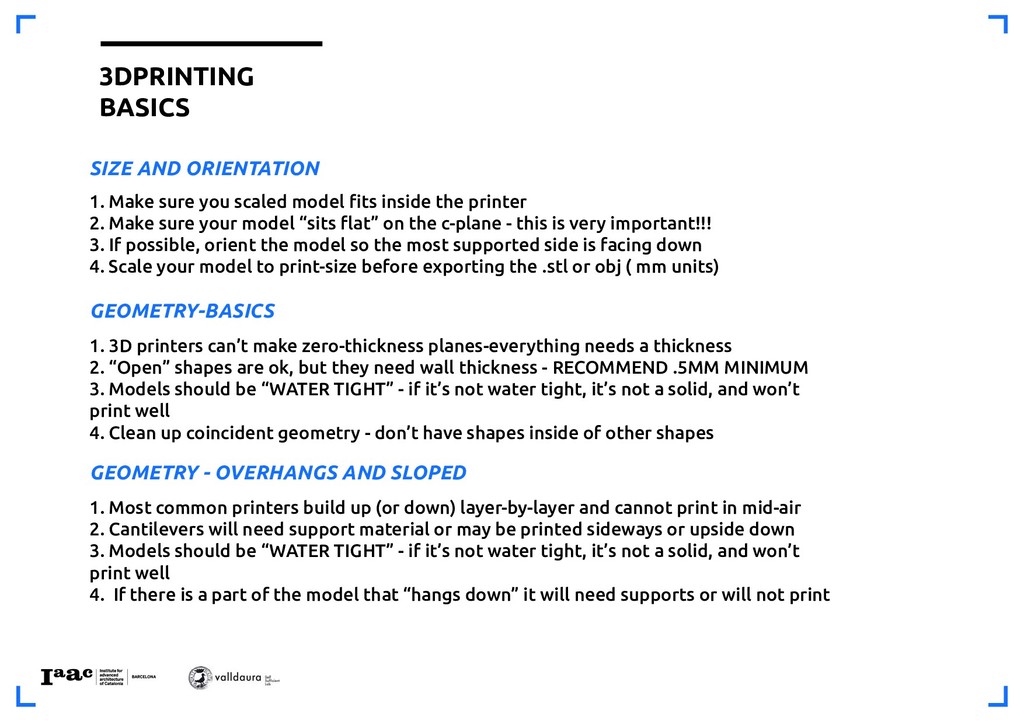
fits inside the printer 2. Make sure your model “sits flat” on the c-plane - this is very important!!! 3. If possible, orient the model so the most supported side is facing down 4. Scale your model to print-size before exporting the .stl or obj ( mm units) 1. 3D printers can’t make zero-thickness planes-everything needs a thickness 2. “Open” shapes are ok, but they need wall thickness - RECOMMEND .5MM MINIMUM 3. Models should be “WATER TIGHT” - if it’s not water tight, it’s not a solid, and won’t print well 4. Clean up coincident geometry - don’t have shapes inside of other shapes GEOMETRY - OVERHANGS AND SLOPED 1. Most common printers build up (or down) layer-by-layer and cannot print in mid-air 2. Cantilevers will need support material or may be printed sideways or upside down 3. Models should be “WATER TIGHT” - if it’s not water tight, it’s not a solid, and won’t print well 4. If there is a part of the model that “hangs down” it will need supports or will not print 3DPRINTING BASICS
can work but needs work and careful attention to surfaces 2. Revit is very much not recommended 3. AutoCad 3d is also not recommended, but can work 4.Check your model with analyze programs like Meshmixer 1. Surfaces need to be oriented correctly - to the “outside” of the model 2. Be mindful of and remove from the printing model, geometry that intersects other geometry 3. Consider removing very small geometry for small - scale buil dings- door handles, mullions, etc. 3DPRINTING BASICS
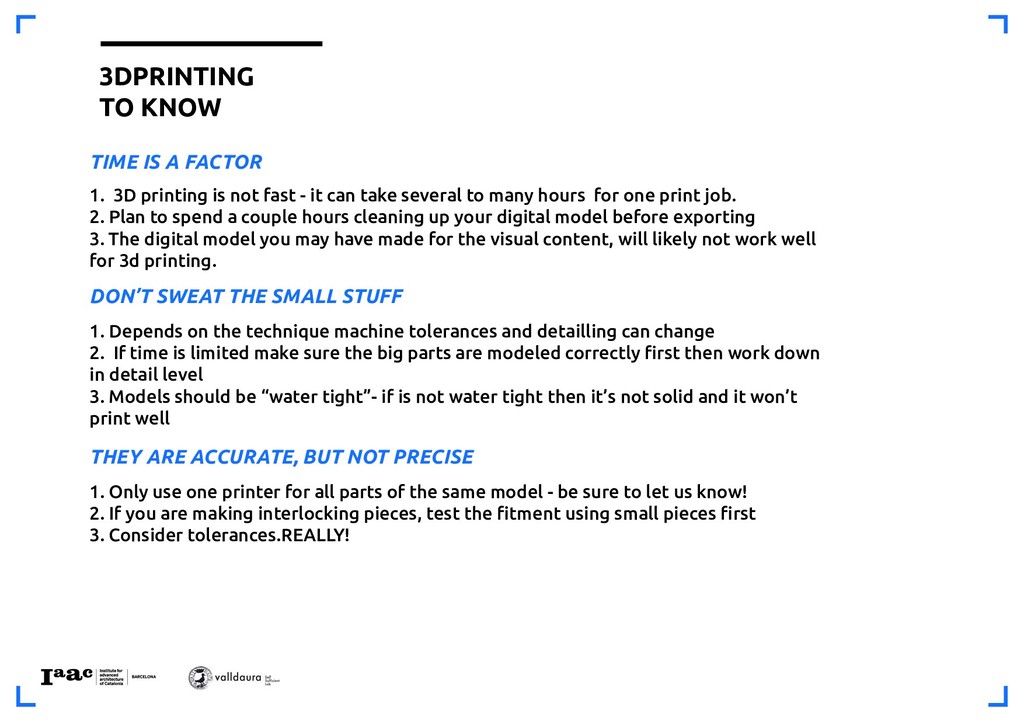
3D printing is not fast - it can take several to many hours for one print job. 2. Plan to spend a couple hours cleaning up your digital model before exporting 3. The digital model you may have made for the visual content, will likely not work well for 3d printing. 1. Depends on the technique machine tolerances and detailling can change 2. If time is limited make sure the big parts are modeled correctly first then work down in detail level 3. Models should be “water tight”- if is not water tight then it’s not solid and it won’t print well THEY ARE ACCURATE, BUT NOT PRECISE 1. Only use one printer for all parts of the same model - be sure to let us know! 2. If you are making interlocking pieces, test the fitment using small pieces first 3. Consider tolerances.REALLY! 3DPRINTING TO KNOW
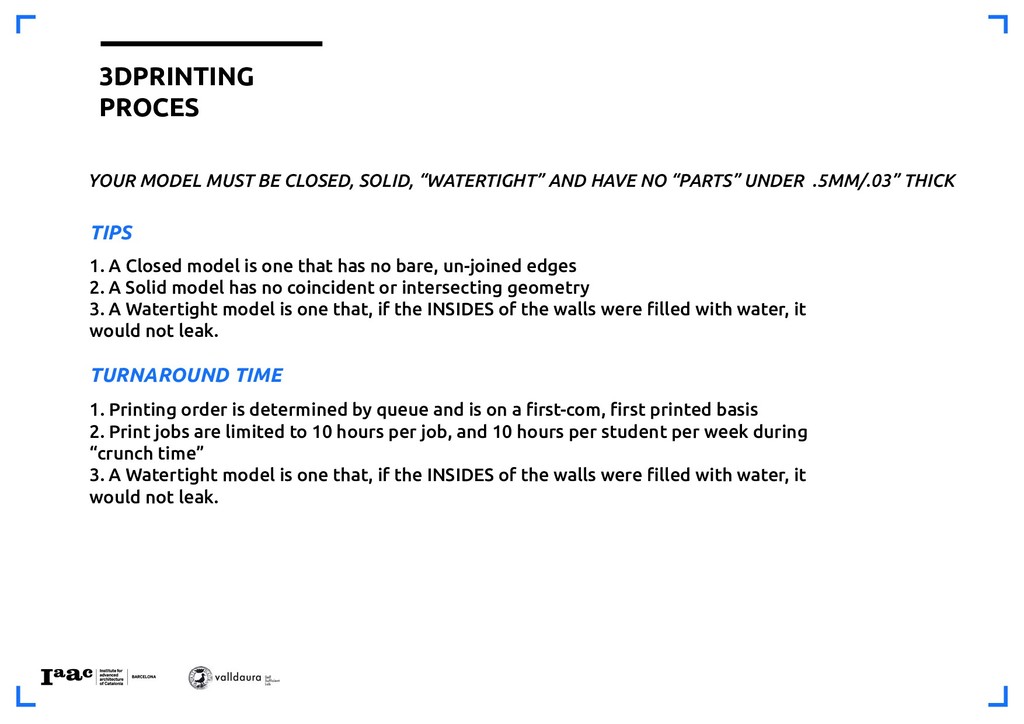
AND HAVE NO “PARTS” UNDER .5MM/.03” THICK 1. A Closed model is one that has no bare, un-joined edges 2. A Solid model has no coincident or intersecting geometry 3. A Watertight model is one that, if the INSIDES of the walls were filled with water, it would not leak. 1. Printing order is determined by queue and is on a first-com, first printed basis 2. Print jobs are limited to 10 hours per job, and 10 hours per student per week during “crunch time” 3. A Watertight model is one that, if the INSIDES of the walls were filled with water, it would not leak. 3DPRINTING PROCES
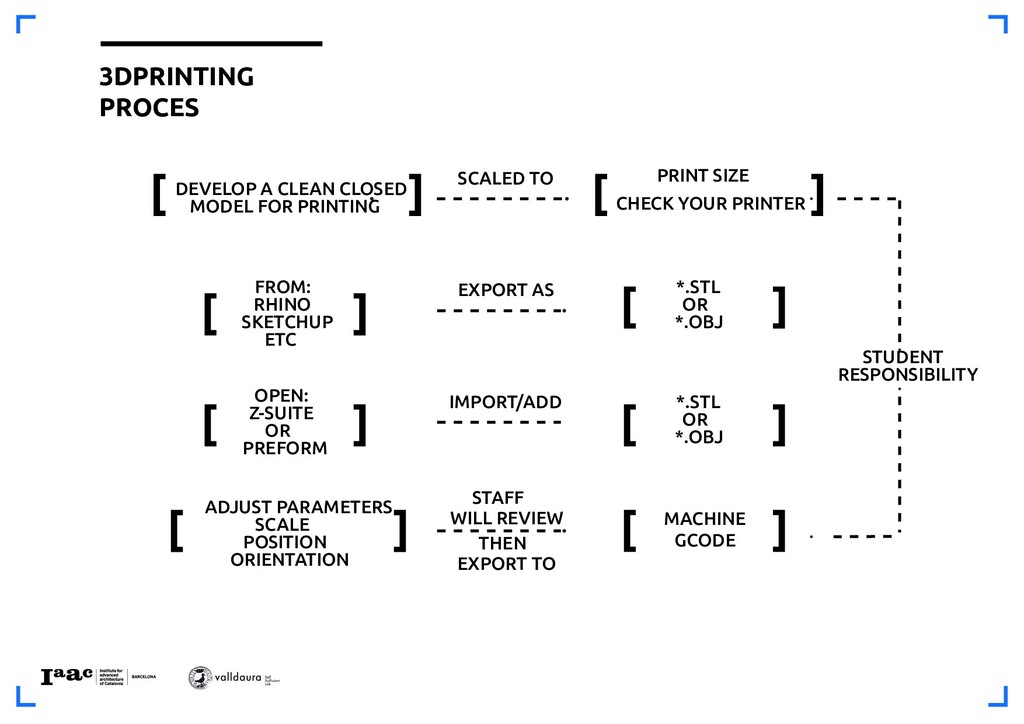
YOUR PRINTER FROM: RHINO SKETCHUP ETC *.STL OR *.OBJ OPEN: Z-SUITE OR PREFORM *.STL OR *.OBJ ADJUST PARAMETERS SCALE POSITION ORIENTATION MACHINE GCODE SCALED TO EXPORT AS IMPORT/ADD STAFF WILL REVIEW THEN EXPORT TO STUDENT RESPONSIBILITY 3DPRINTING PROCES
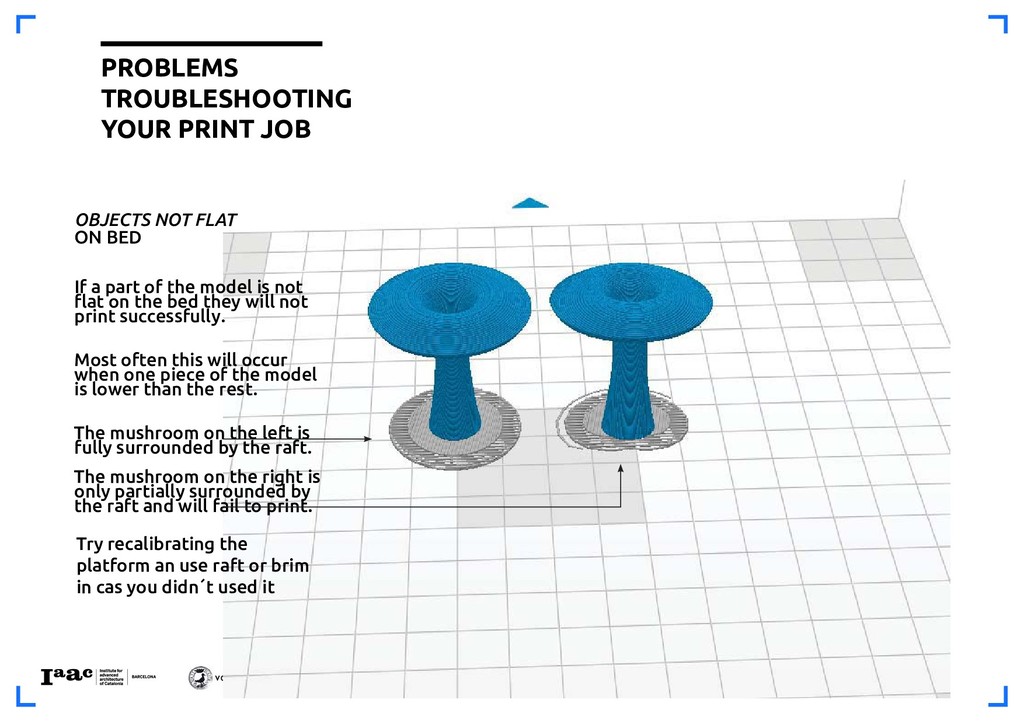
If a part of the model is not flat on the bed they will not print successfully. Most often this will occur when one piece of the model is lower than the rest. The mushroom on the left is fully surrounded by the raft. The mushroom on the right is only partially surrounded by the raft and will fail to print. Try recalibrating the platform an use raft or brim in cas you didn´t used it
![[ Prototyping ] Digital 3D PRIN TING Architecture 2018 -](https://files.speakerdeck.com/presentations/fa816b69ff634303b5992b0fbddf0ec9/slide_0.jpg)
![principles [ printing ]](https://files.speakerdeck.com/presentations/fa816b69ff634303b5992b0fbddf0ec9/slide_6.jpg)
![preparation [ printing ]](https://files.speakerdeck.com/presentations/fa816b69ff634303b5992b0fbddf0ec9/slide_18.jpg)
![preparation [ printing ]](https://files.speakerdeck.com/presentations/fa816b69ff634303b5992b0fbddf0ec9/slide_39.jpg)