Upgrade to Pro — share decks privately, control downloads, hide ads and more …

芝加哥大學的圈圈叉叉_App.pdf

 芝加哥大學的圈圈叉叉_App.pdf

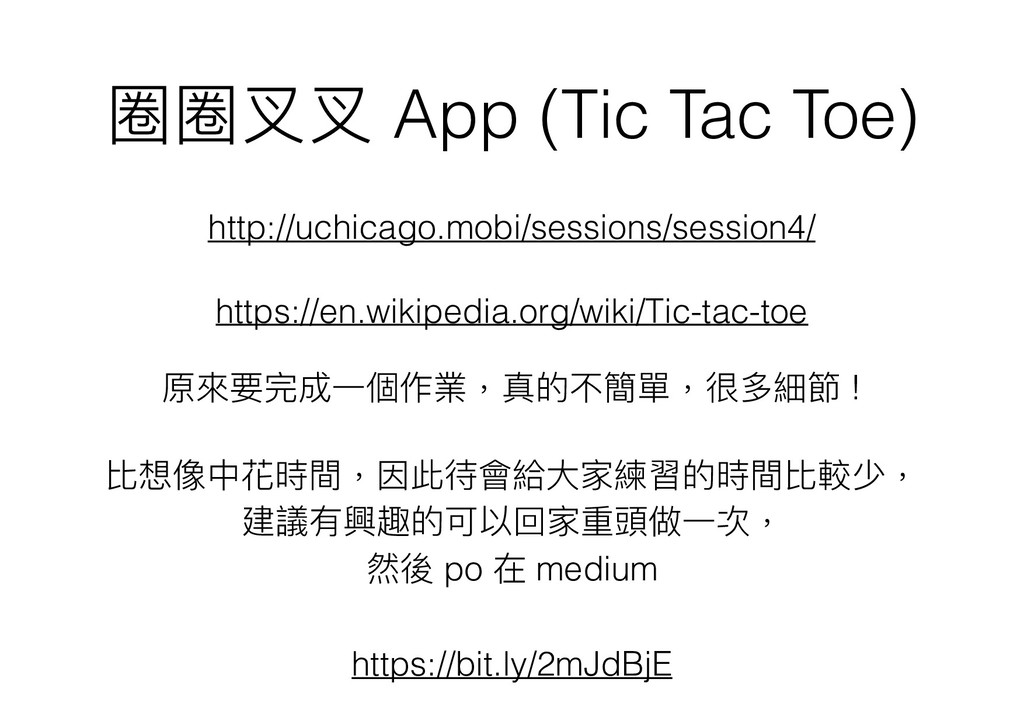
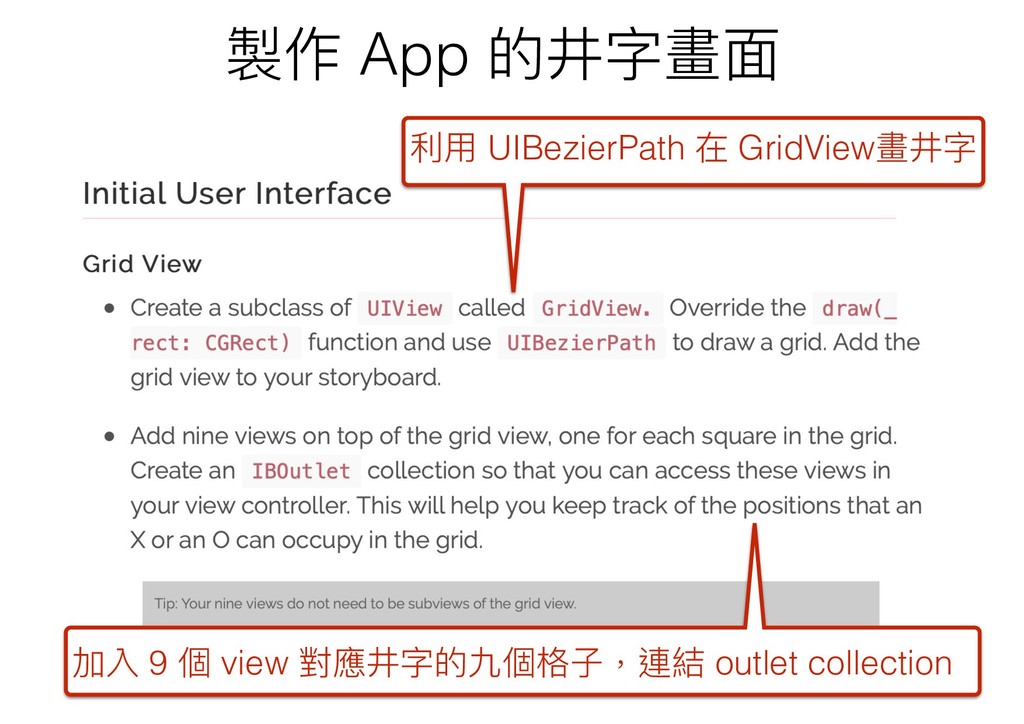
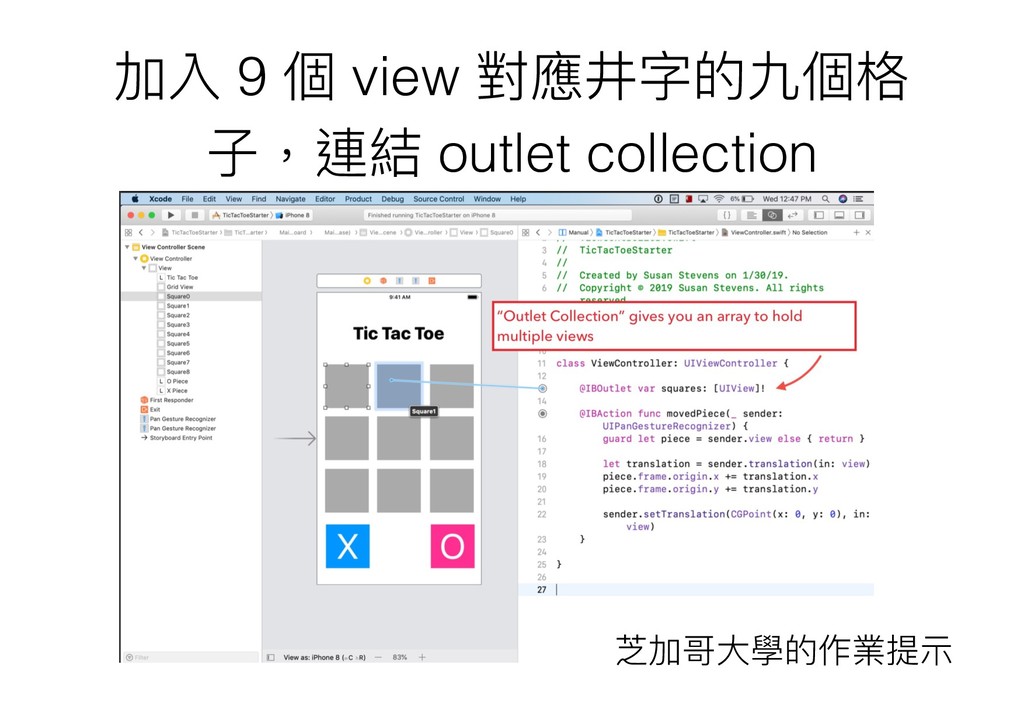
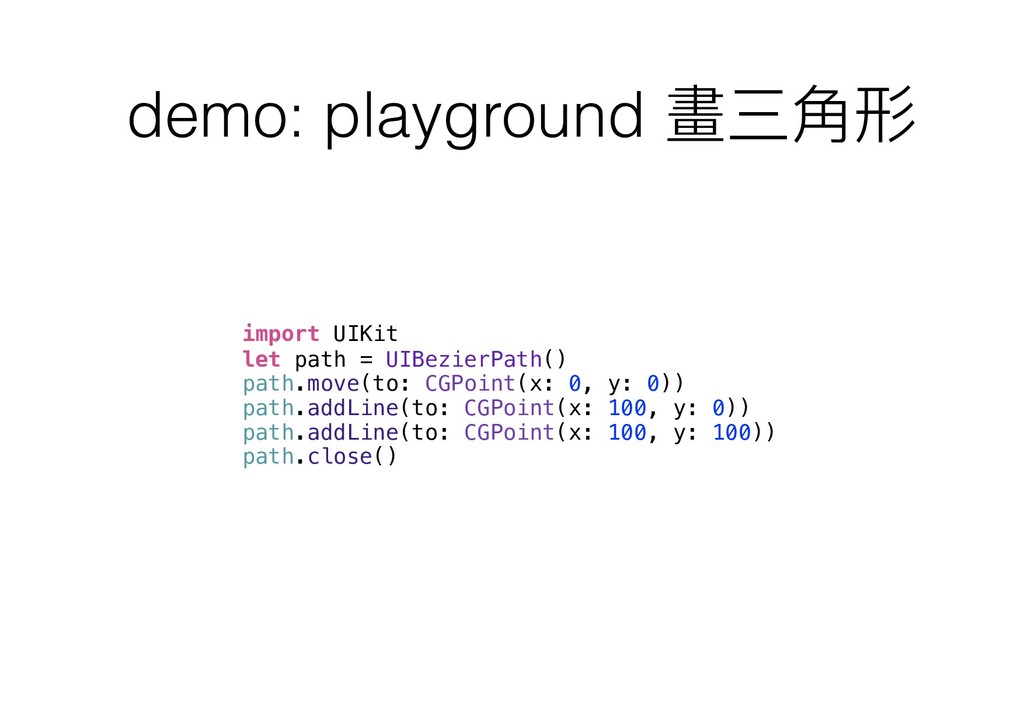
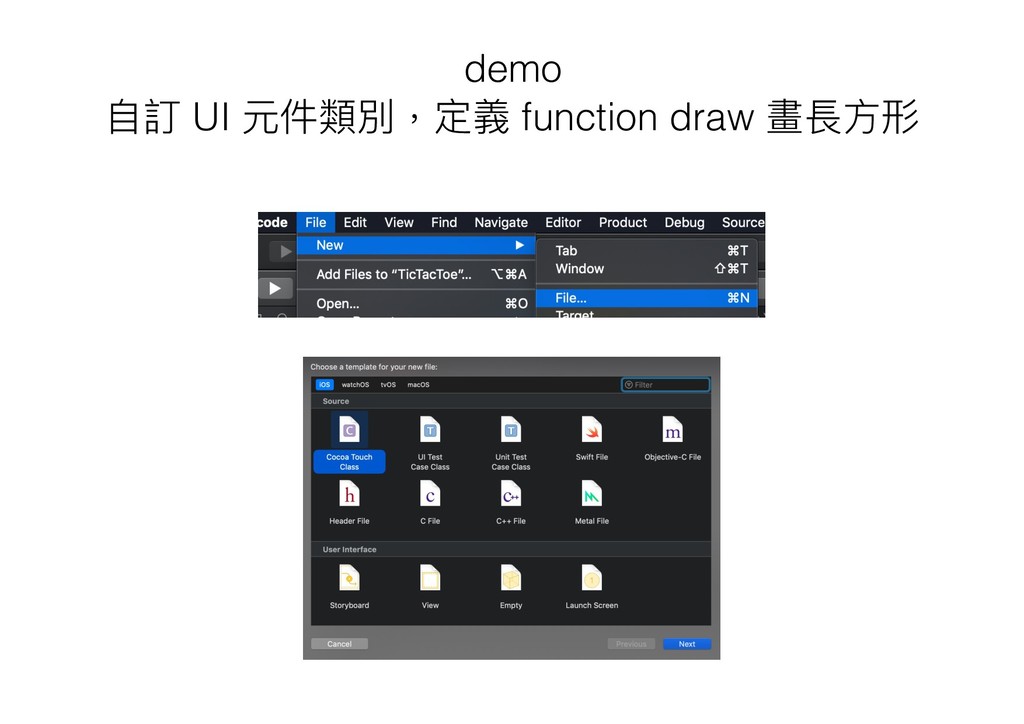
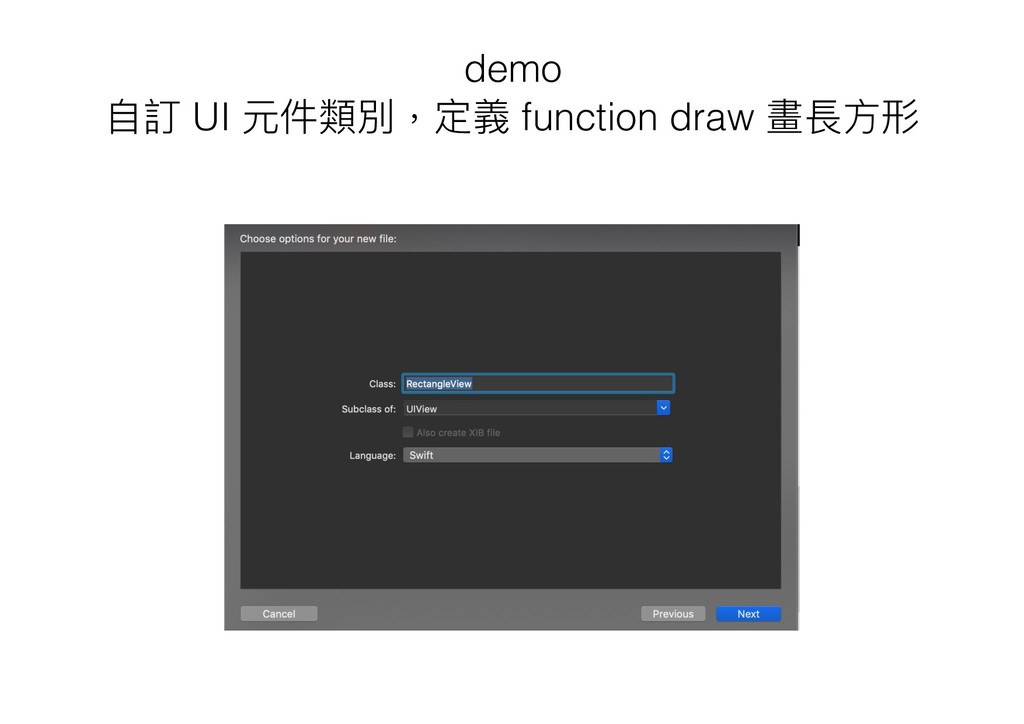
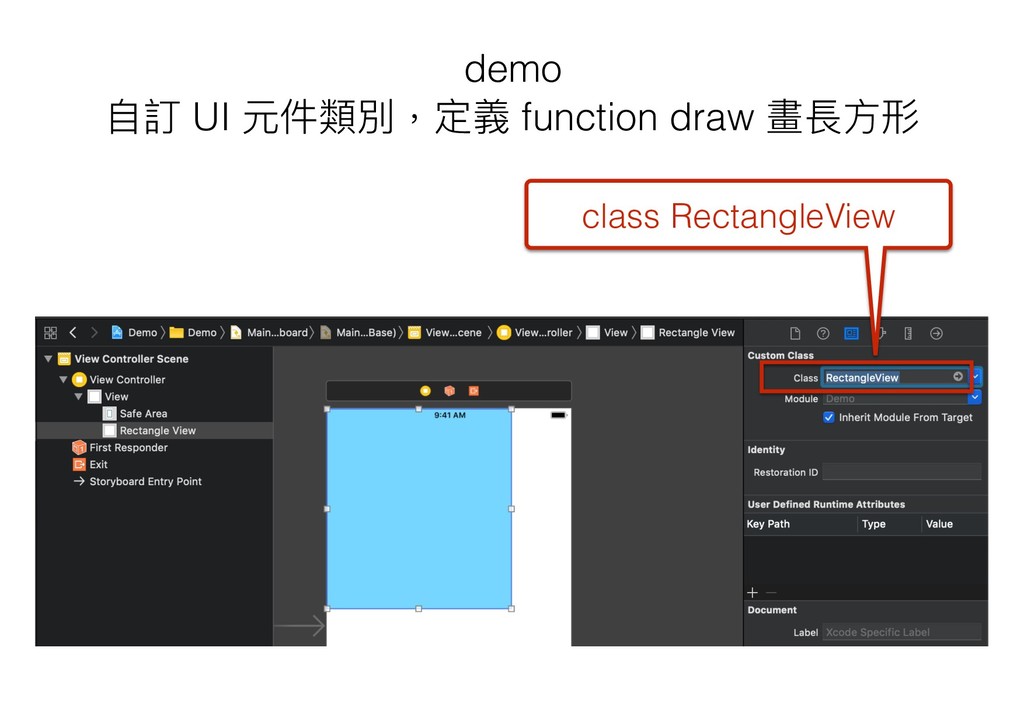
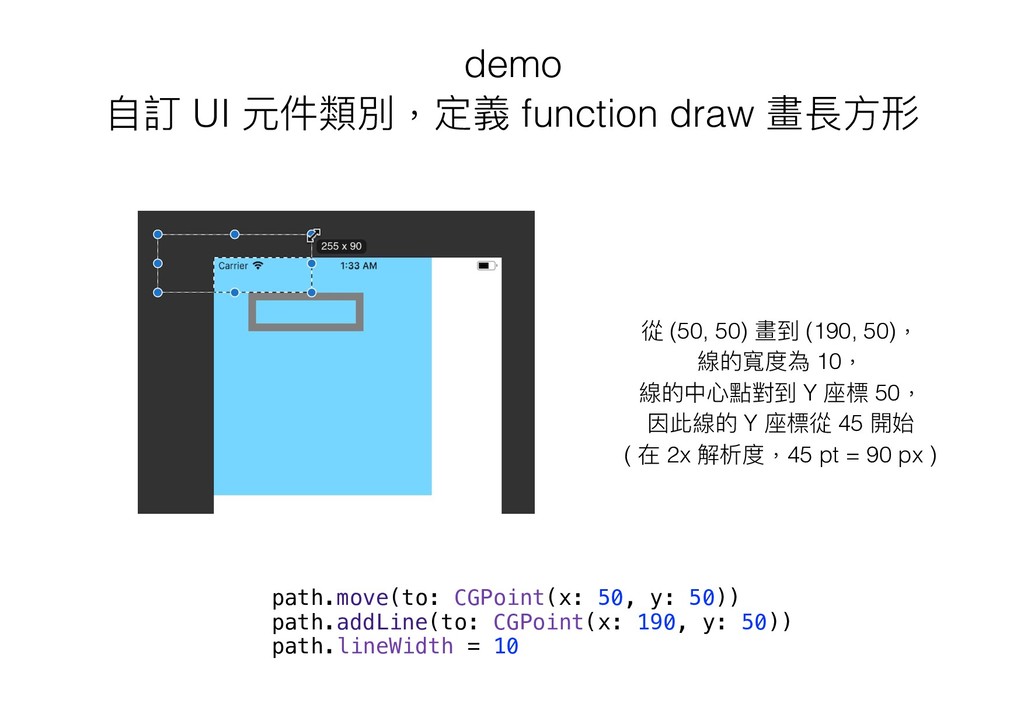
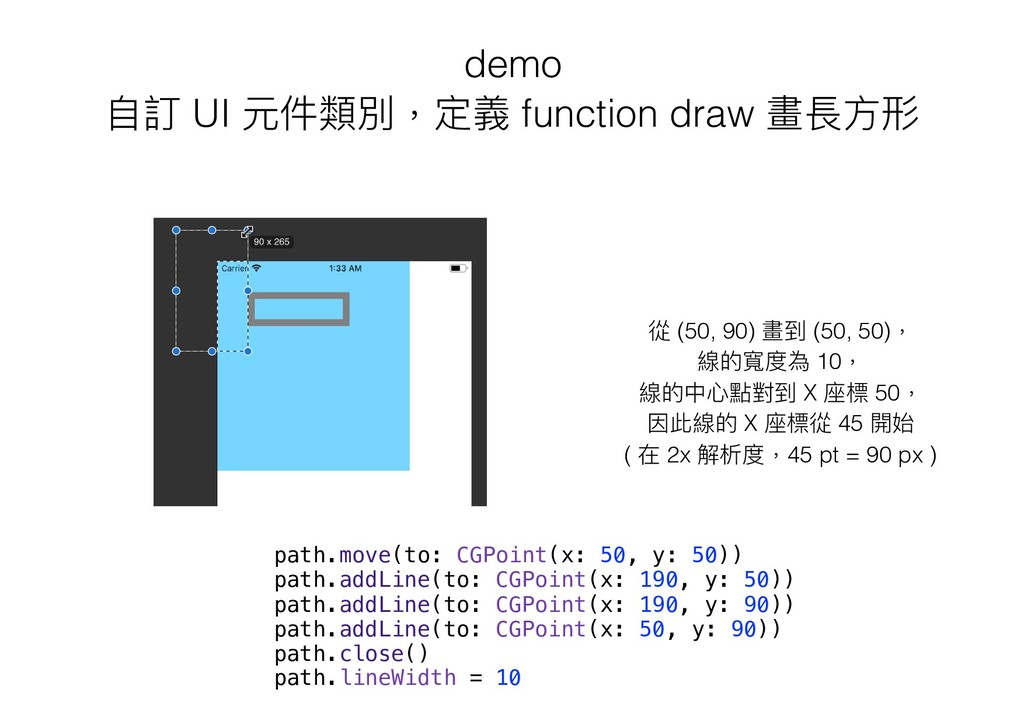
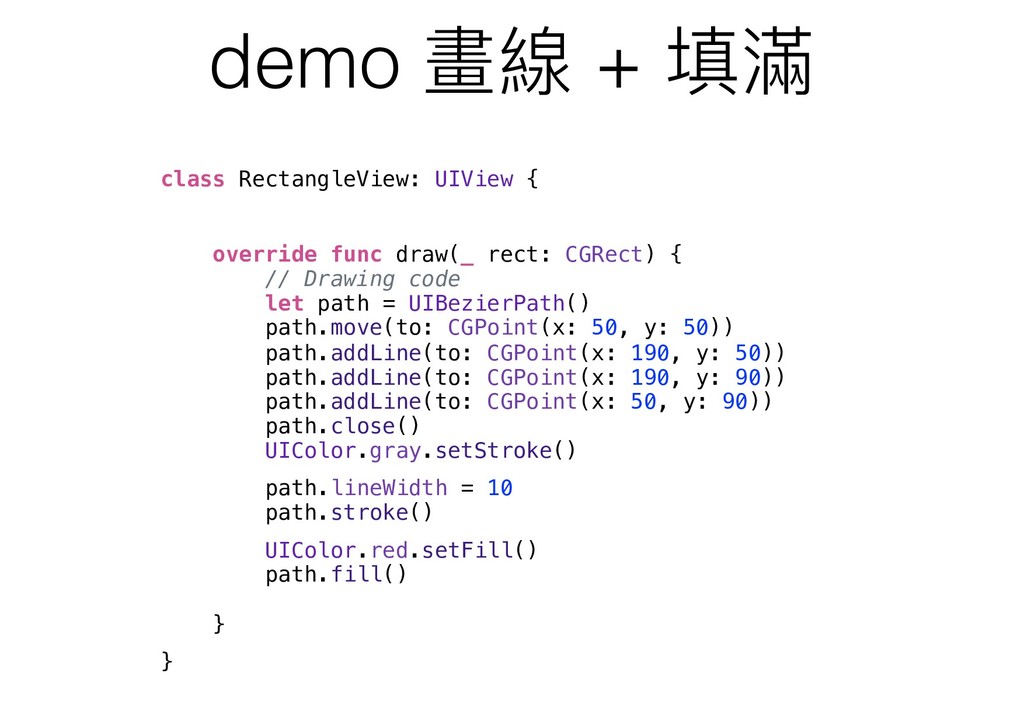
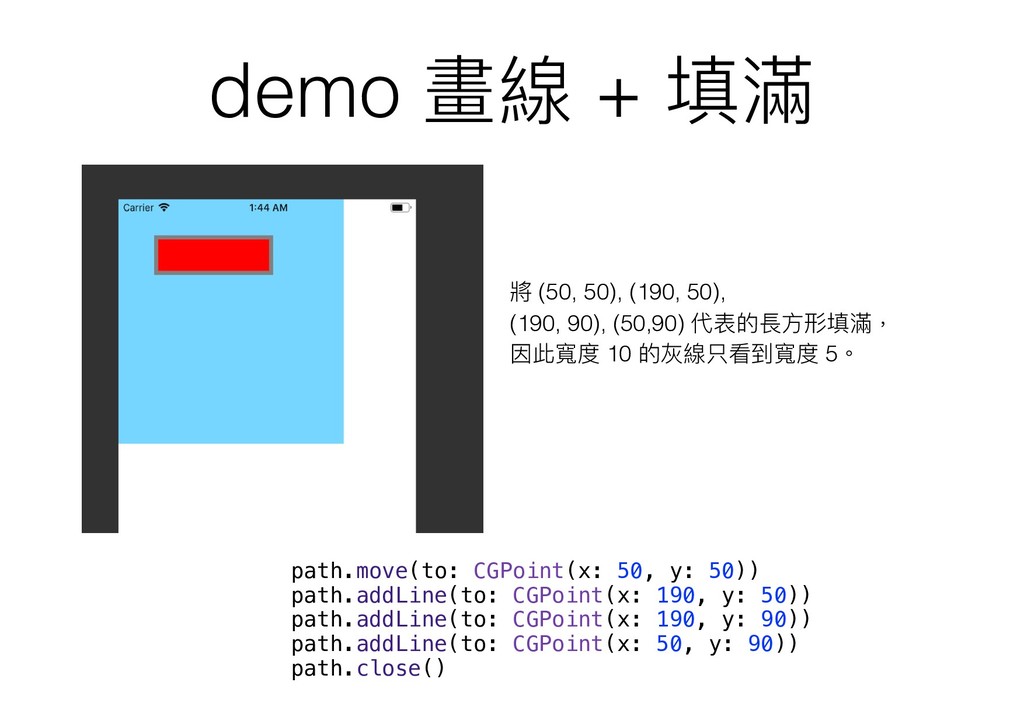
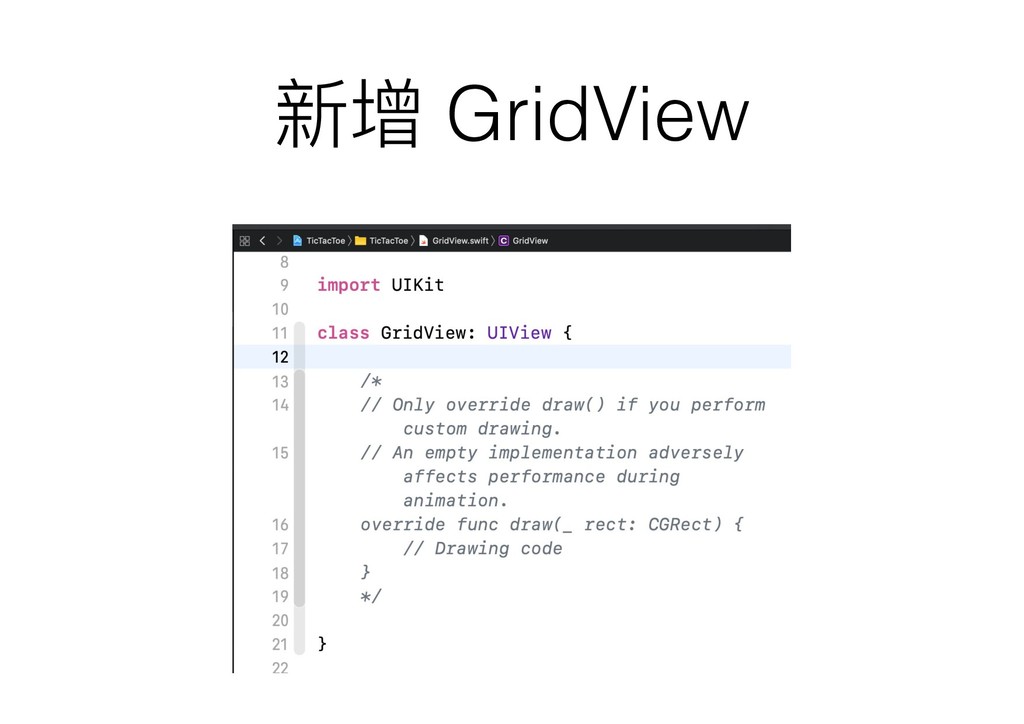
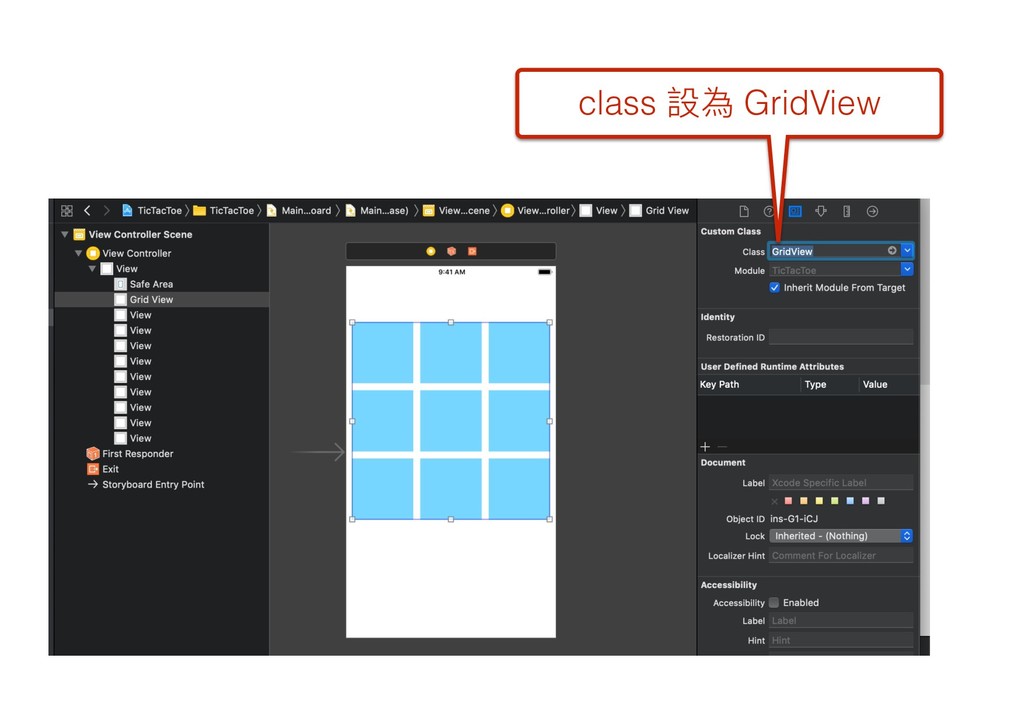
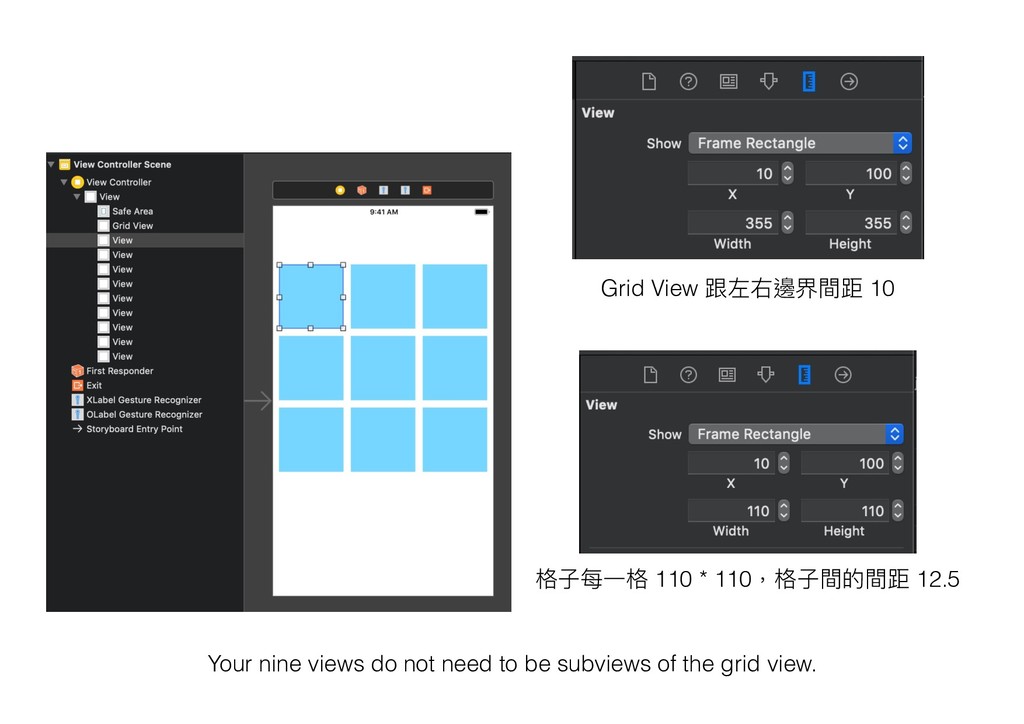
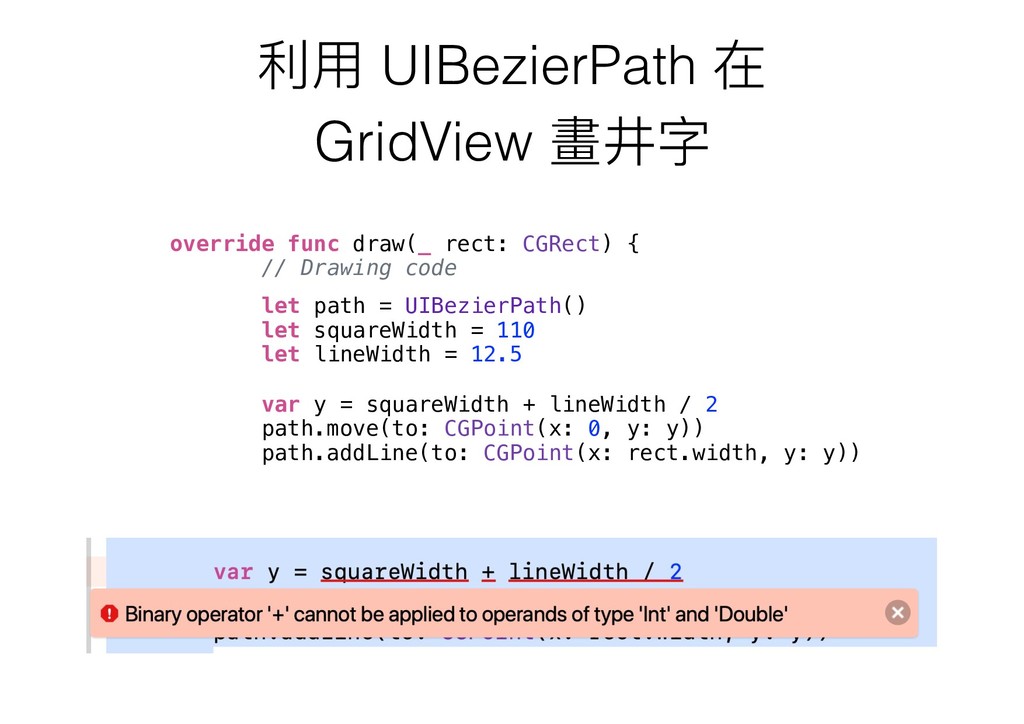
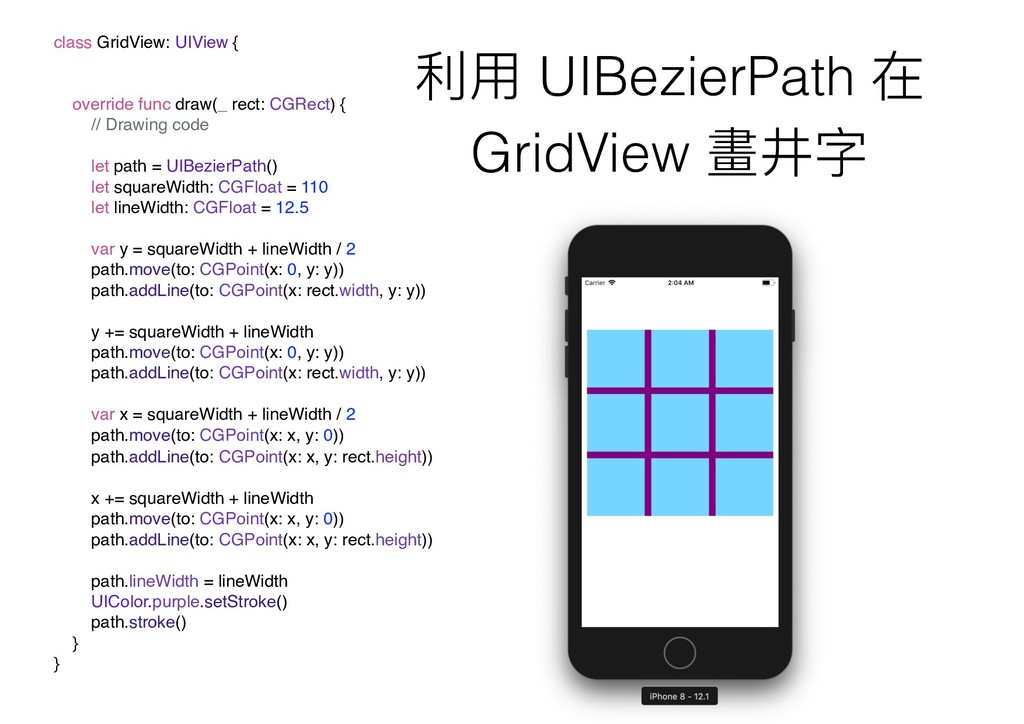
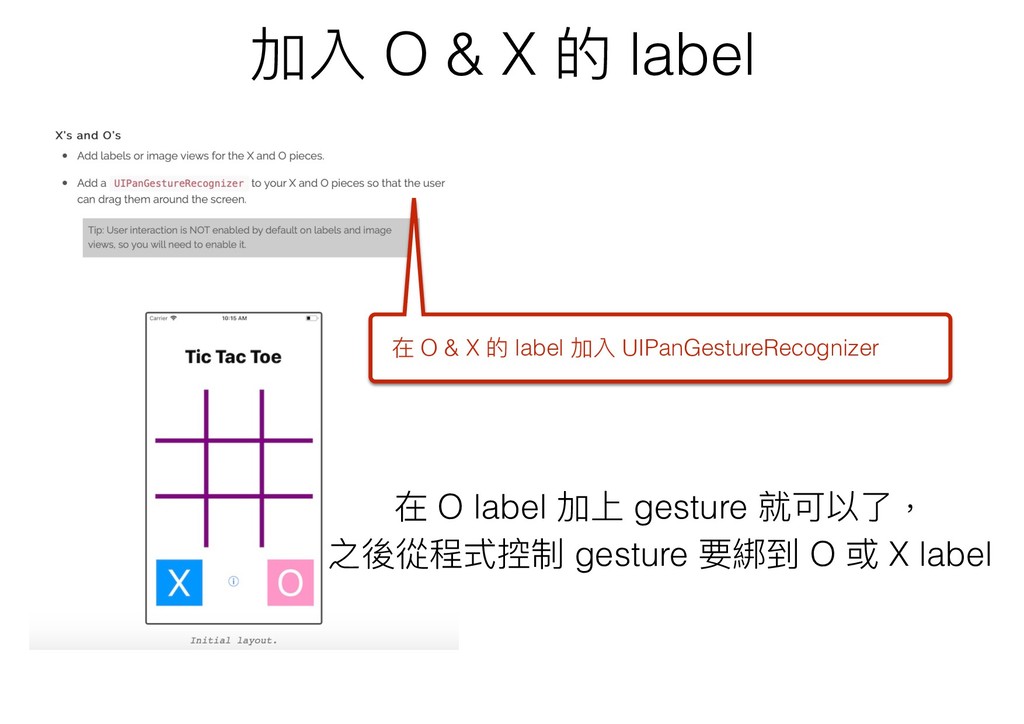
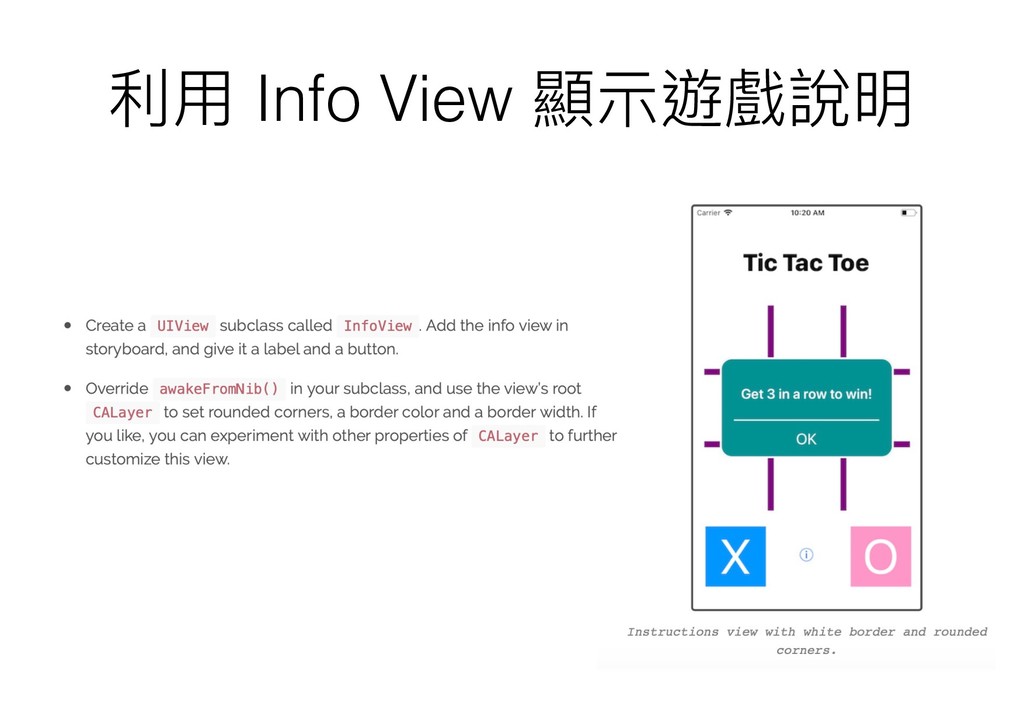
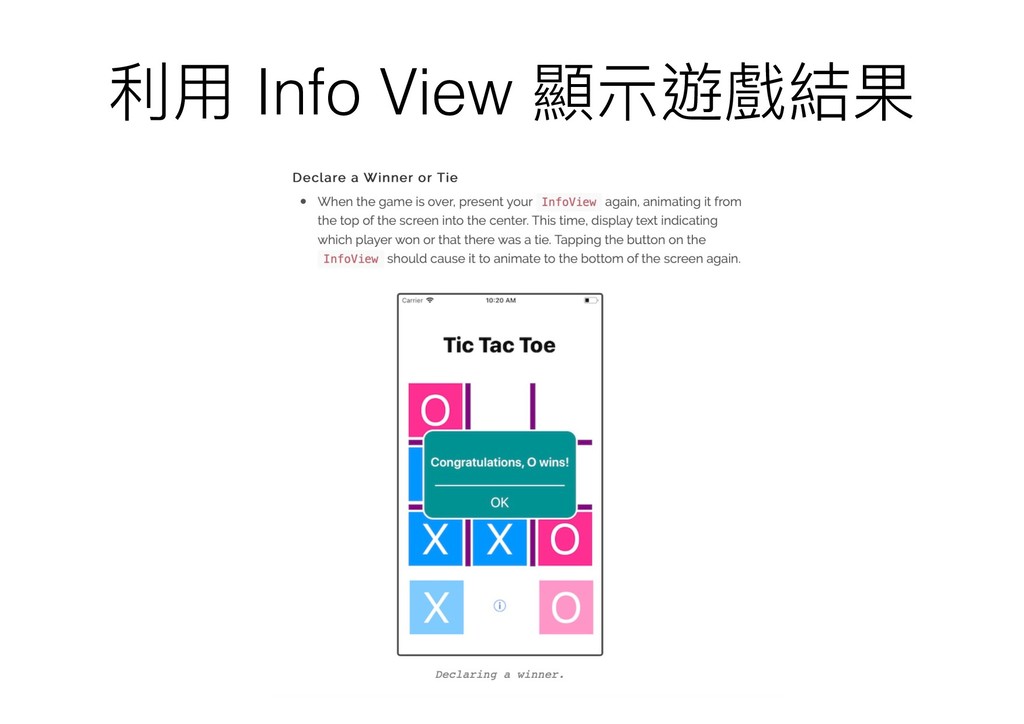
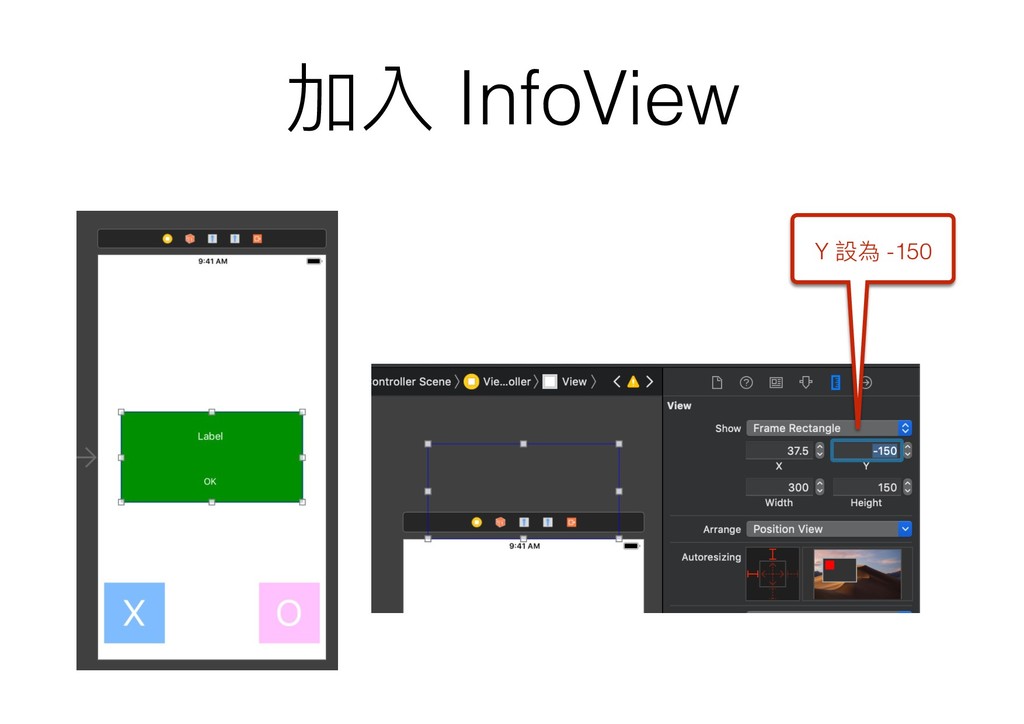
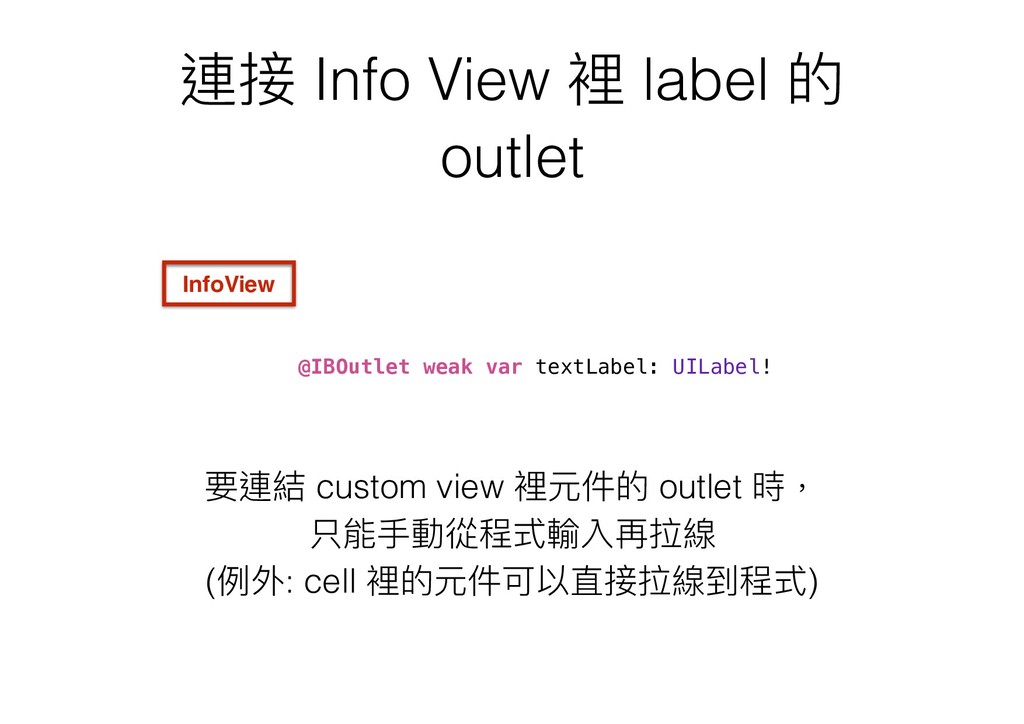
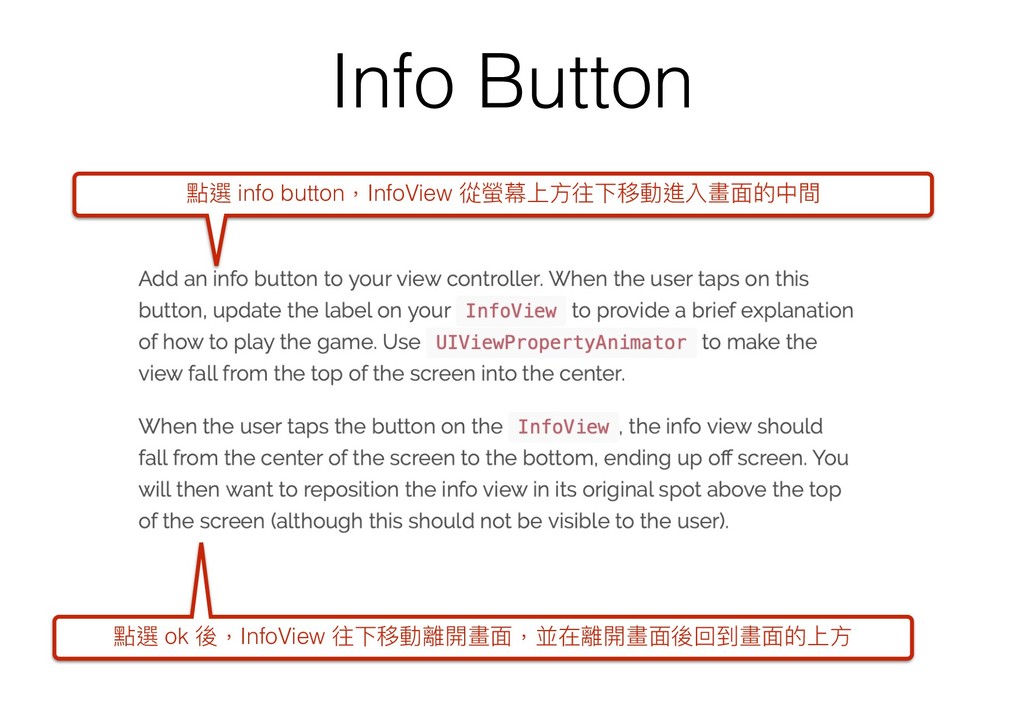
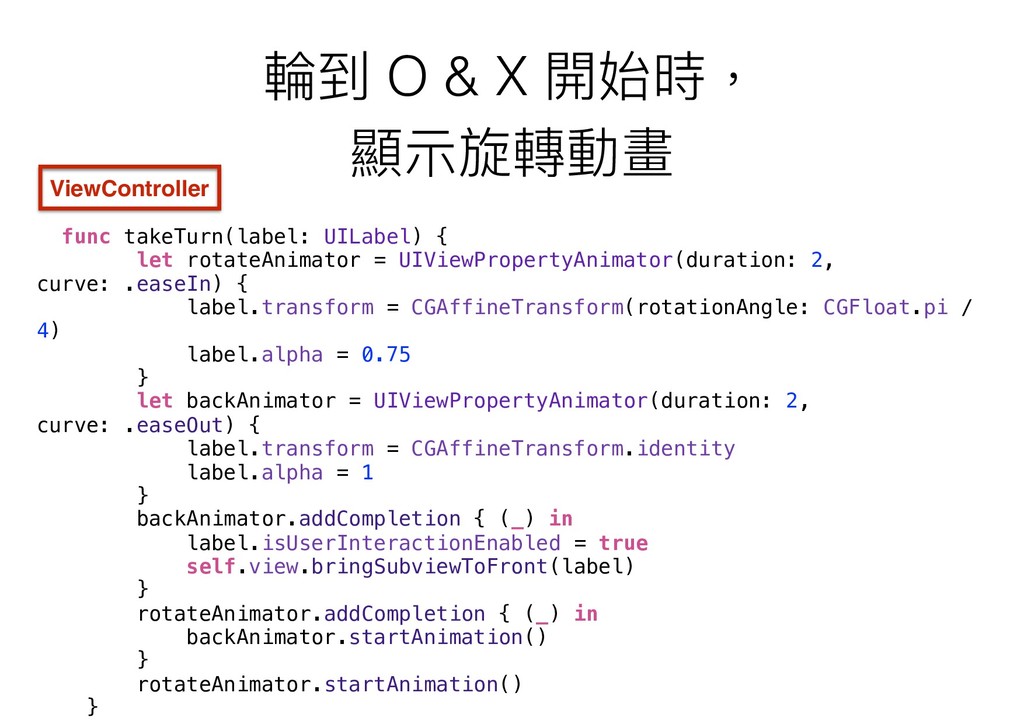
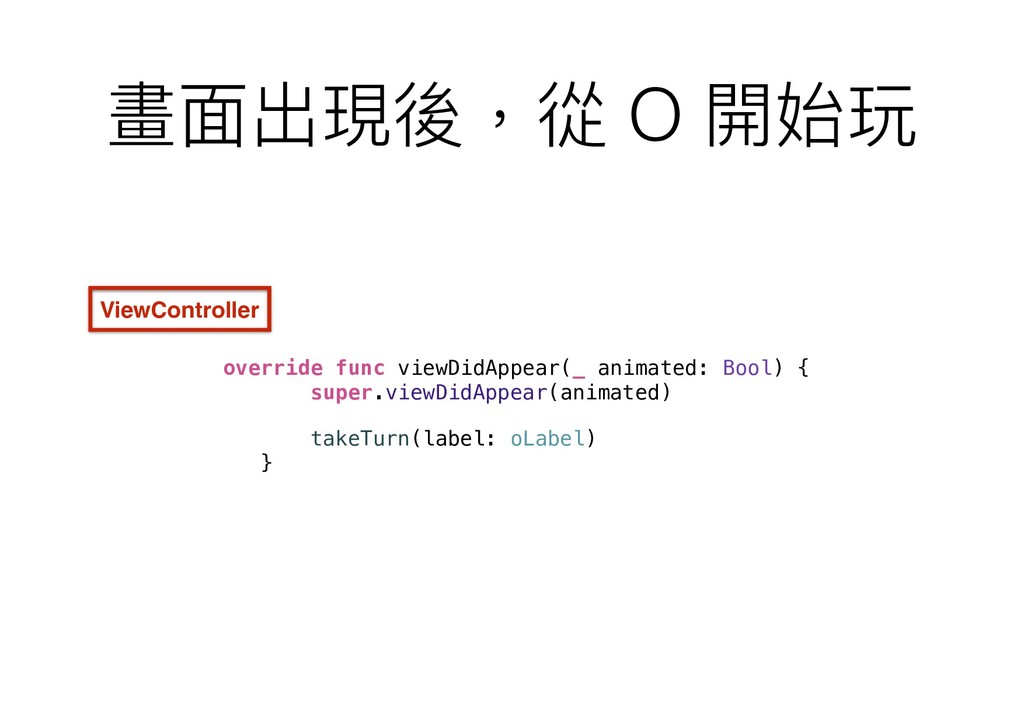
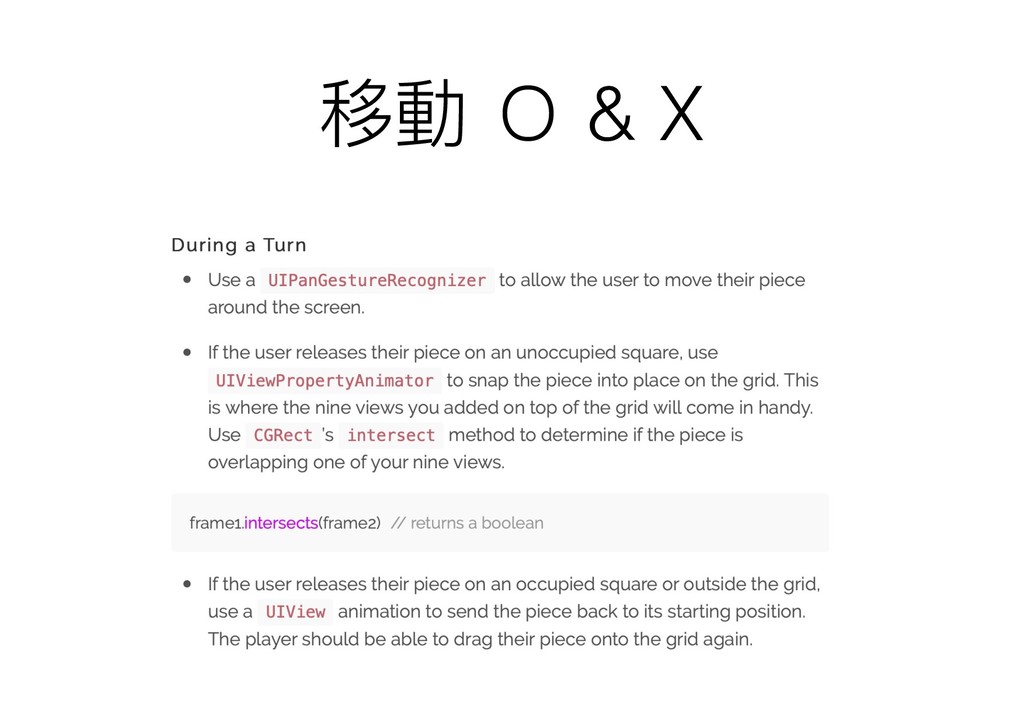
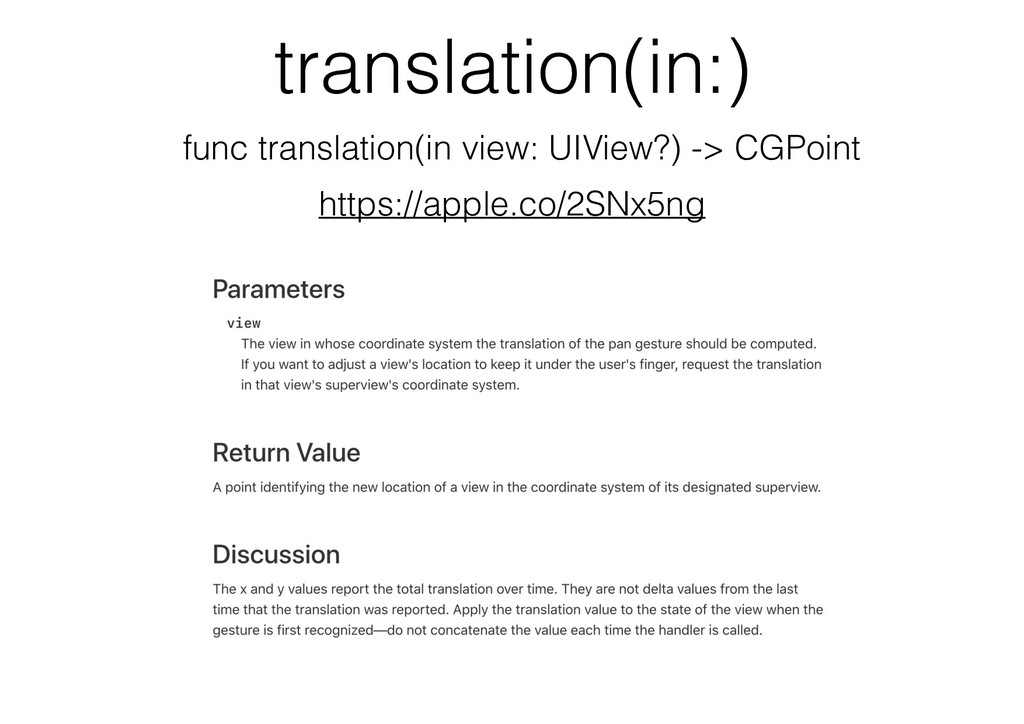
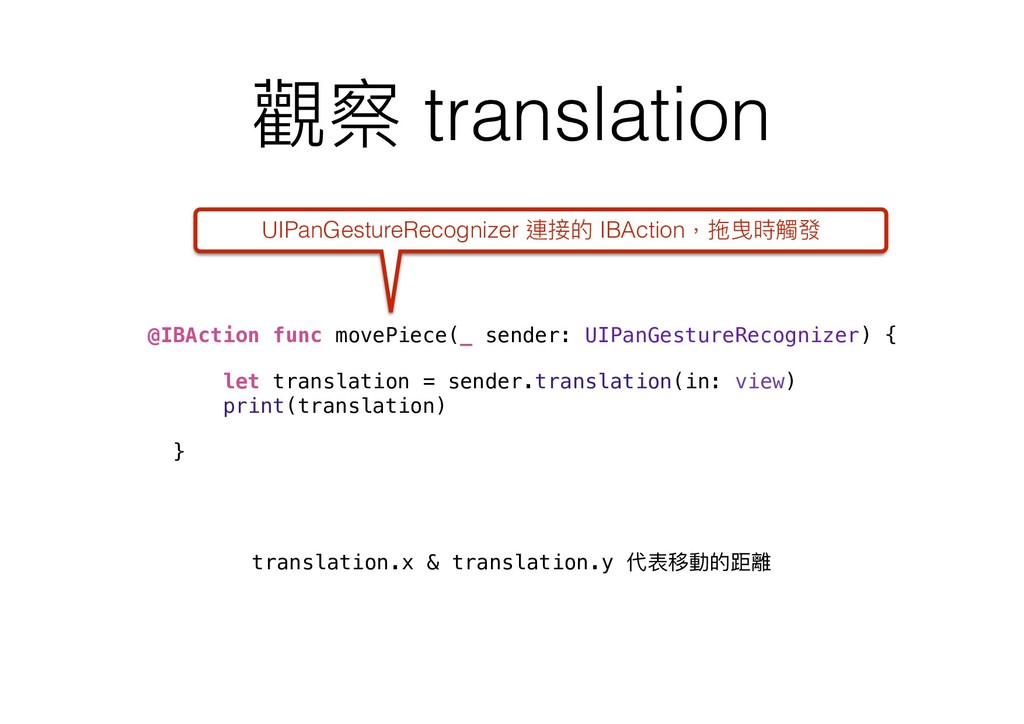
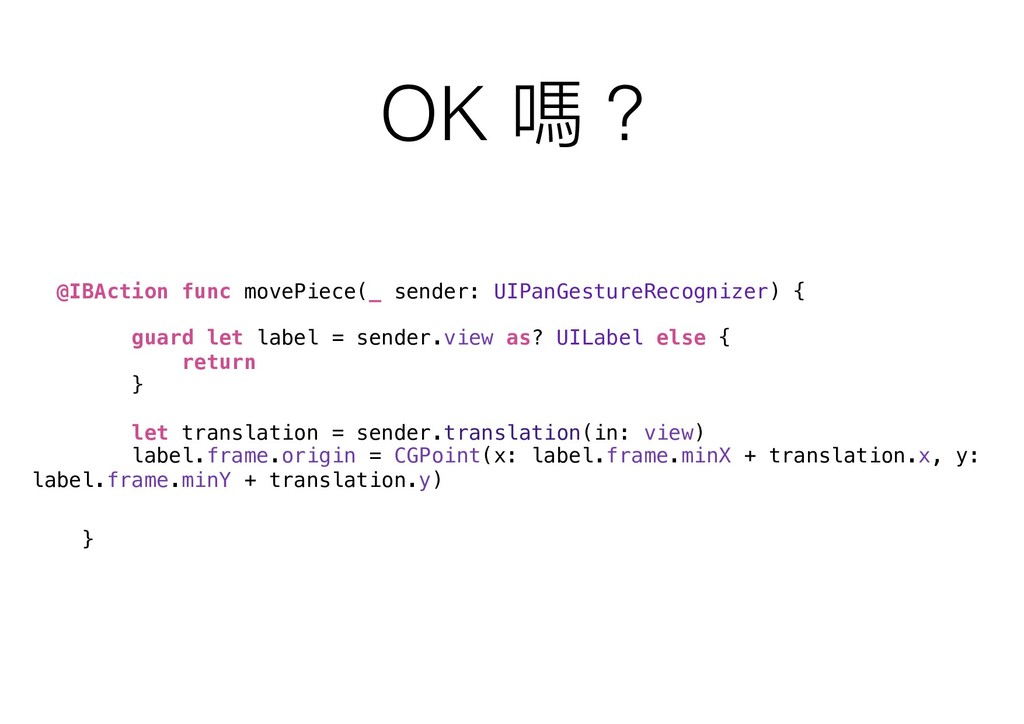
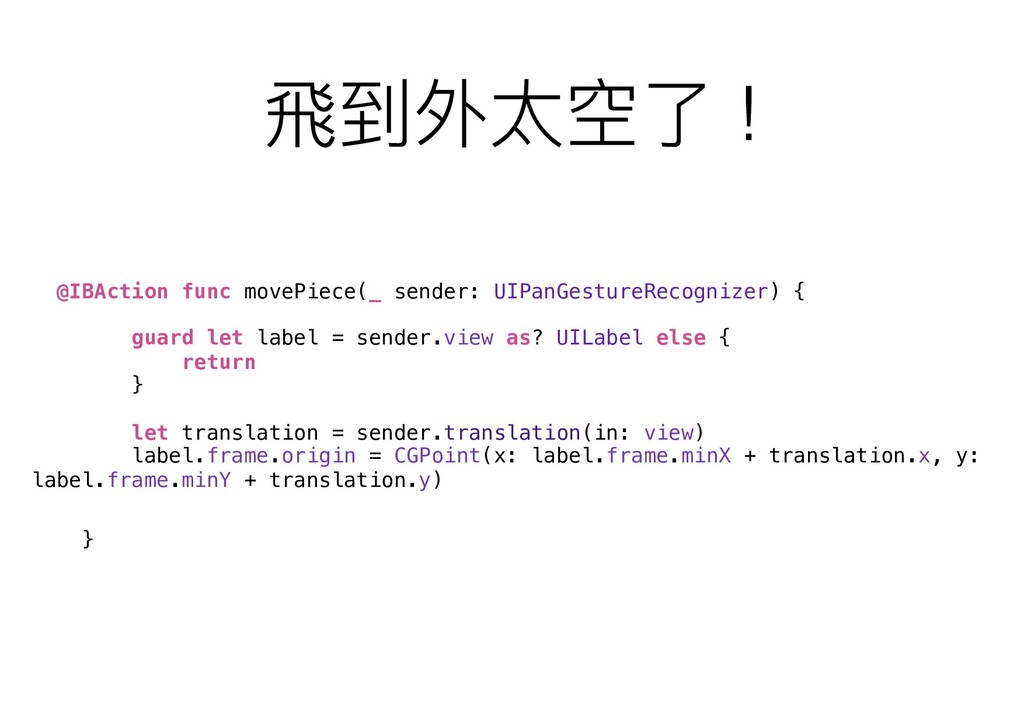
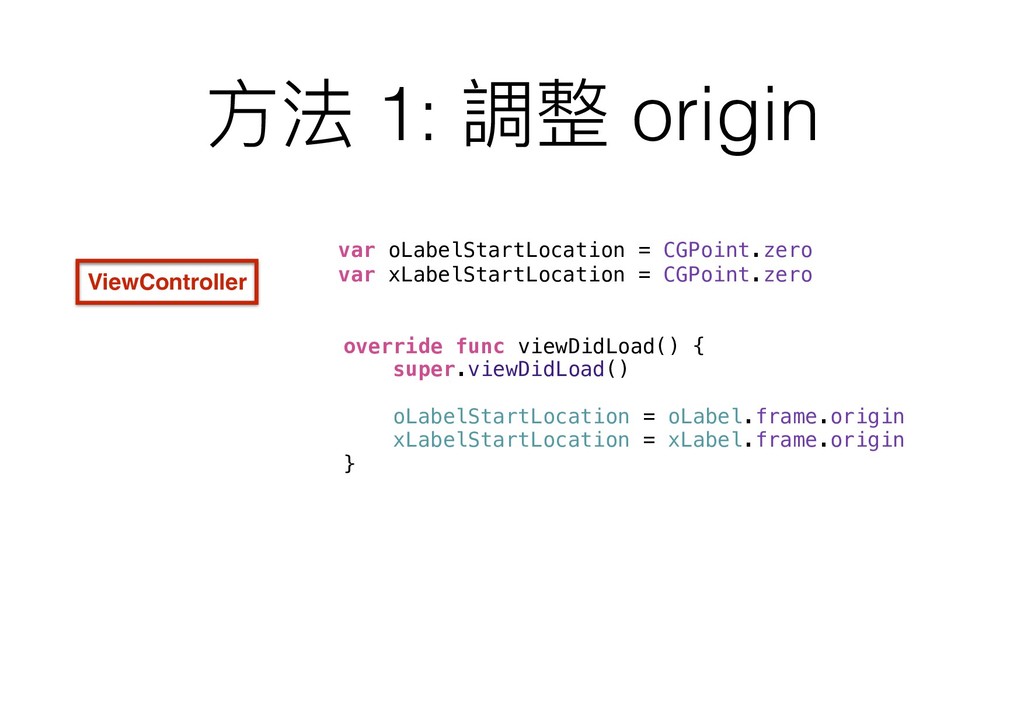
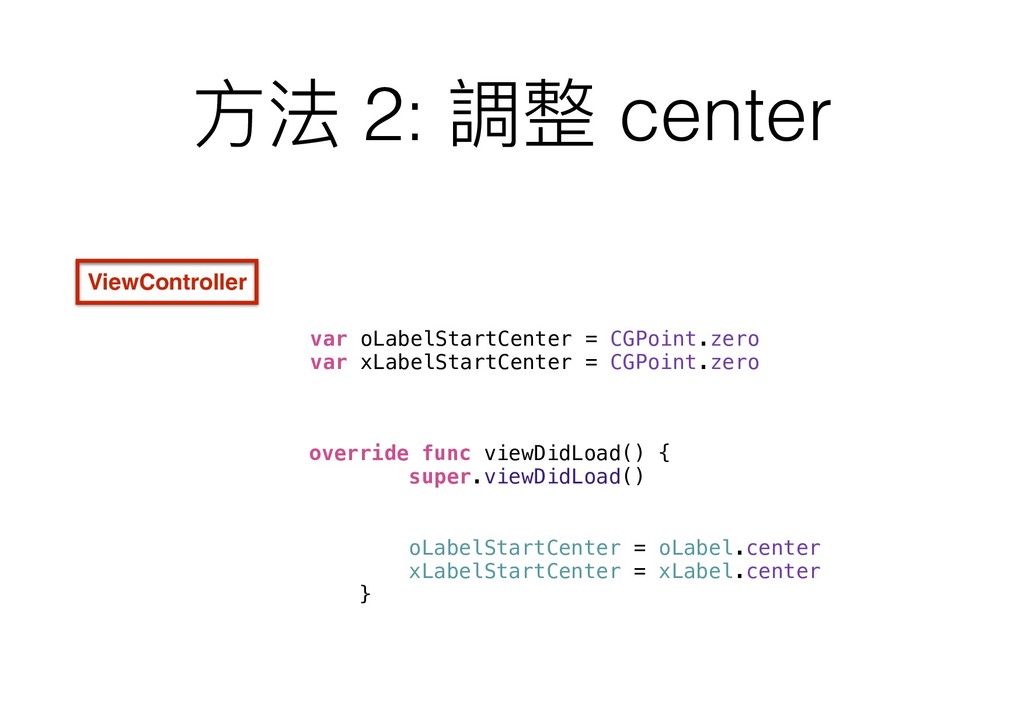
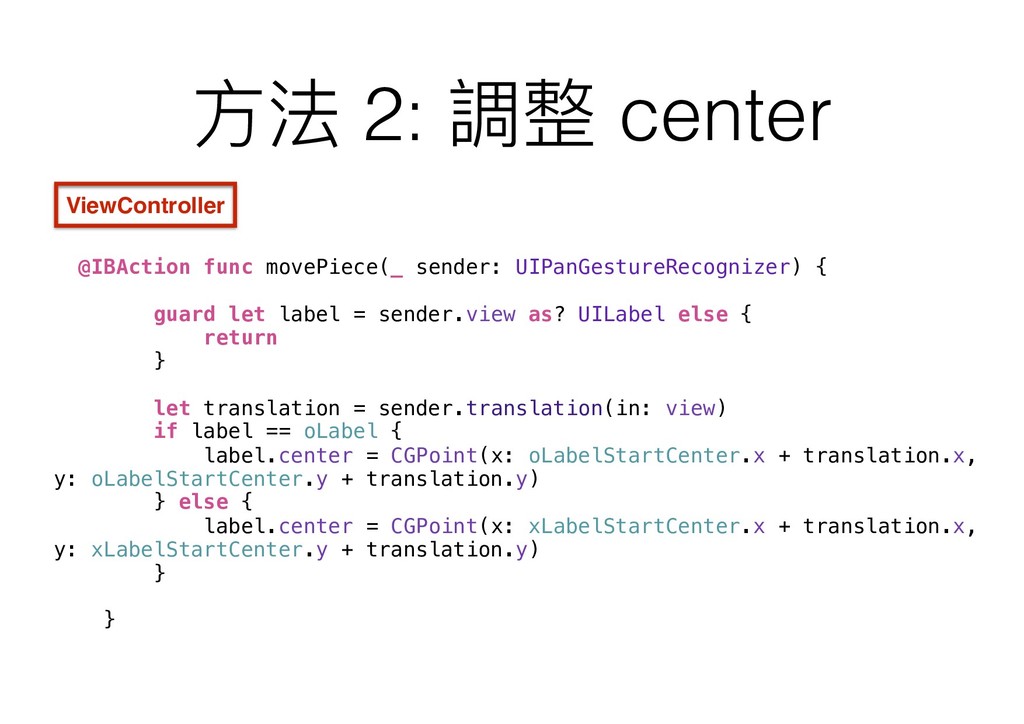
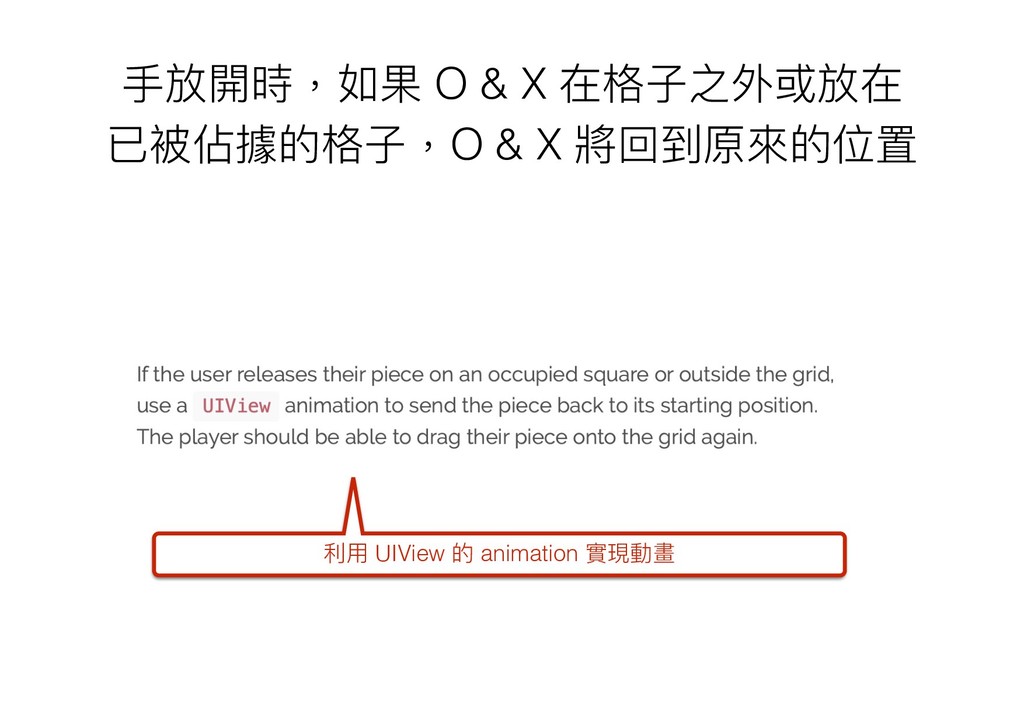
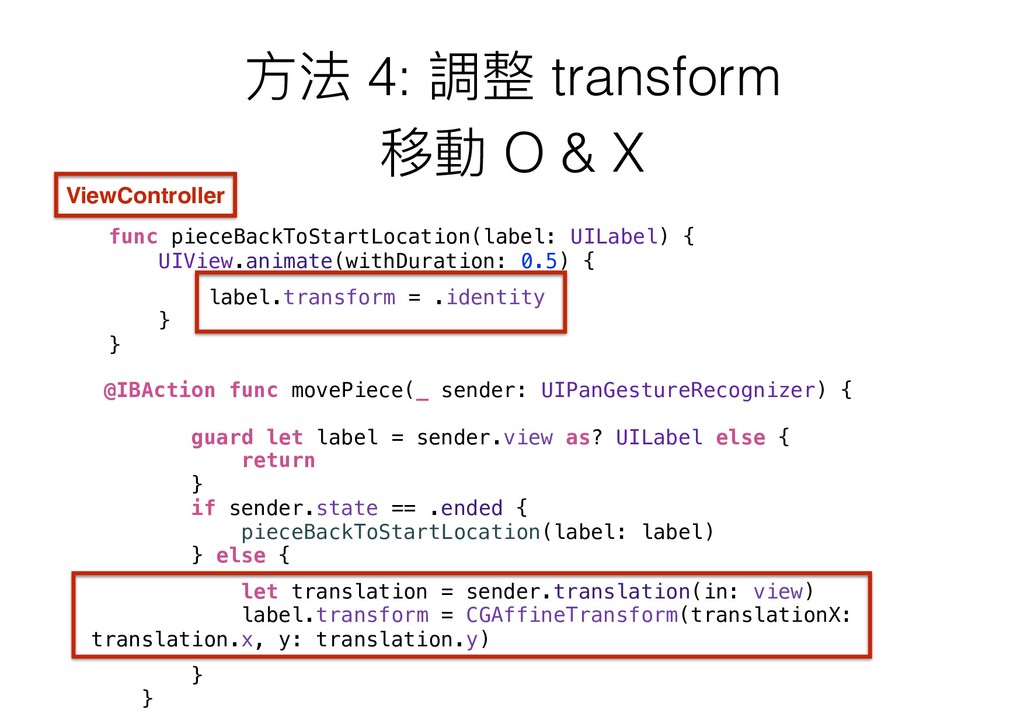
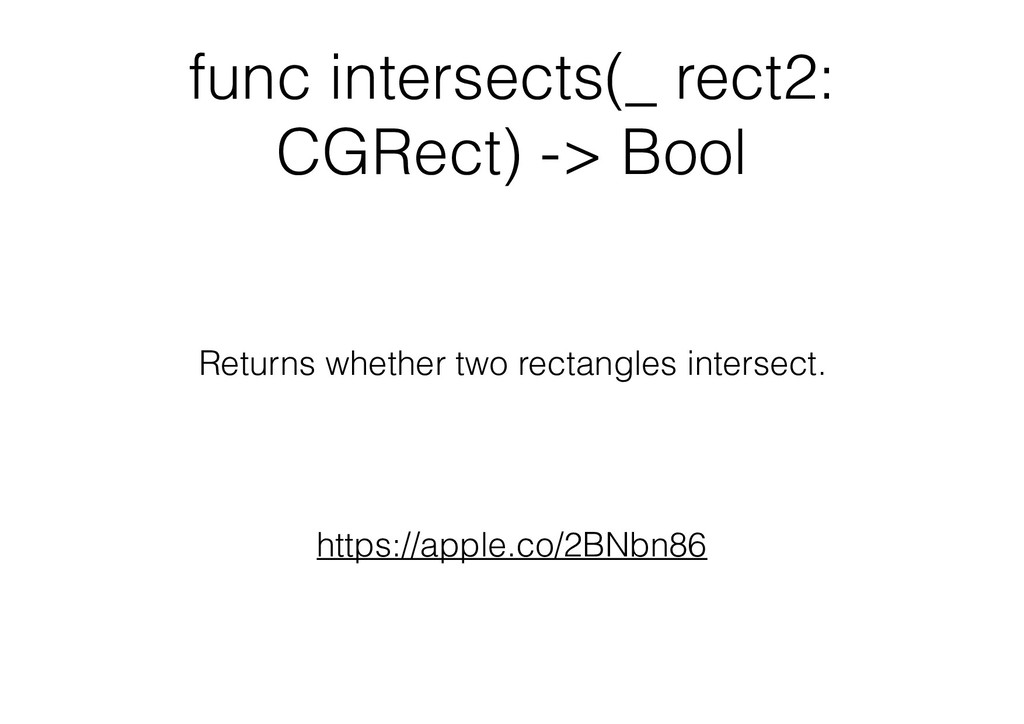
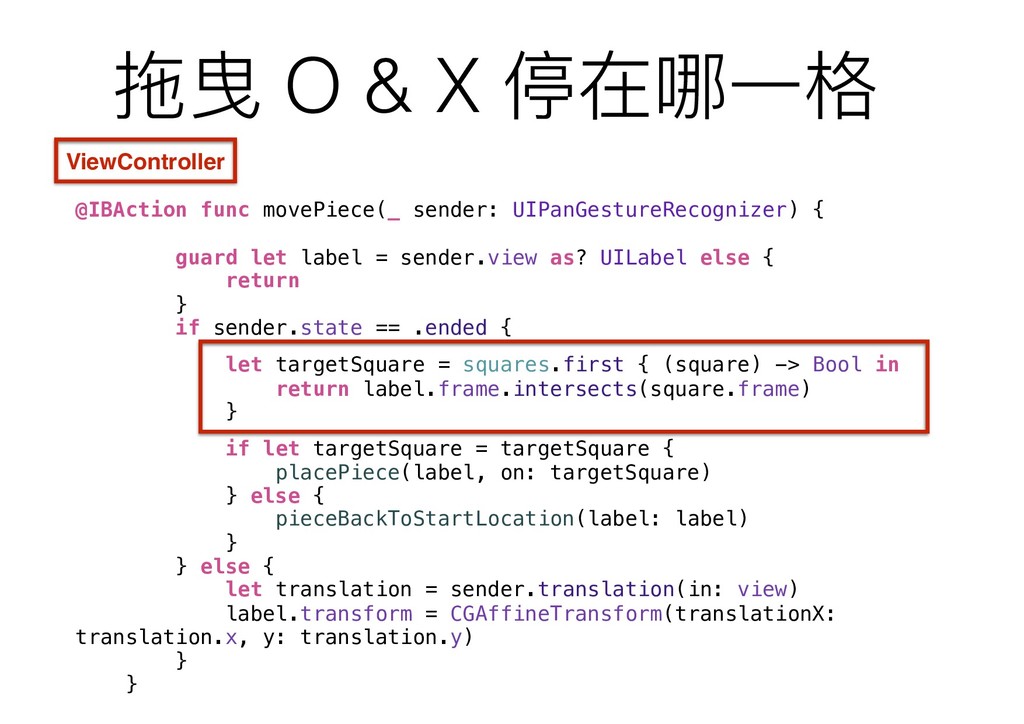
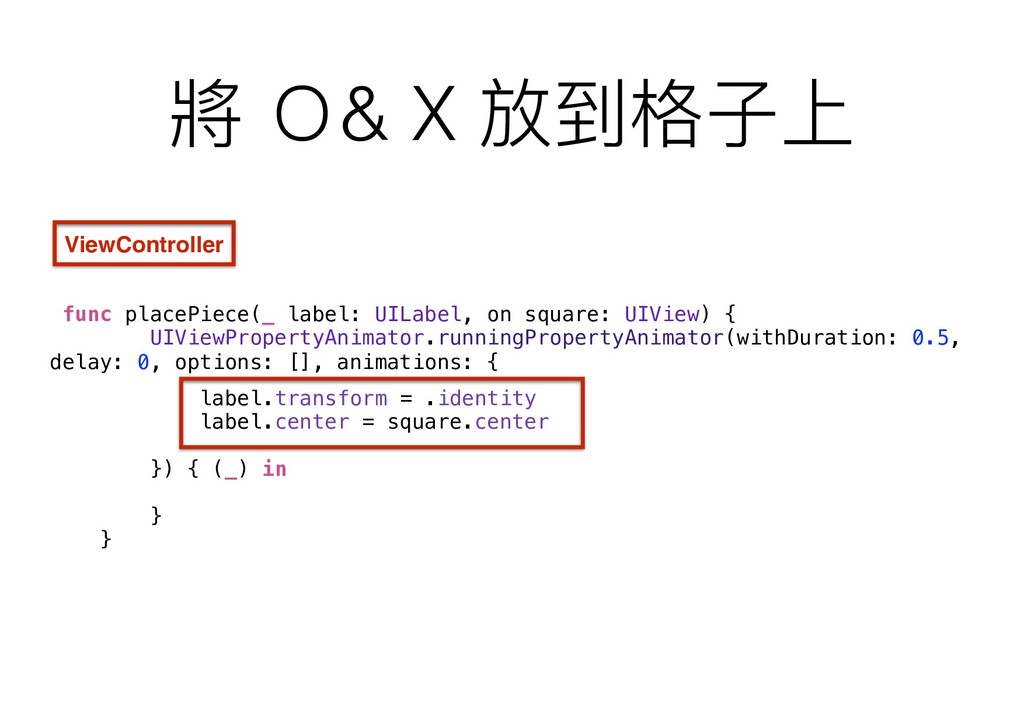
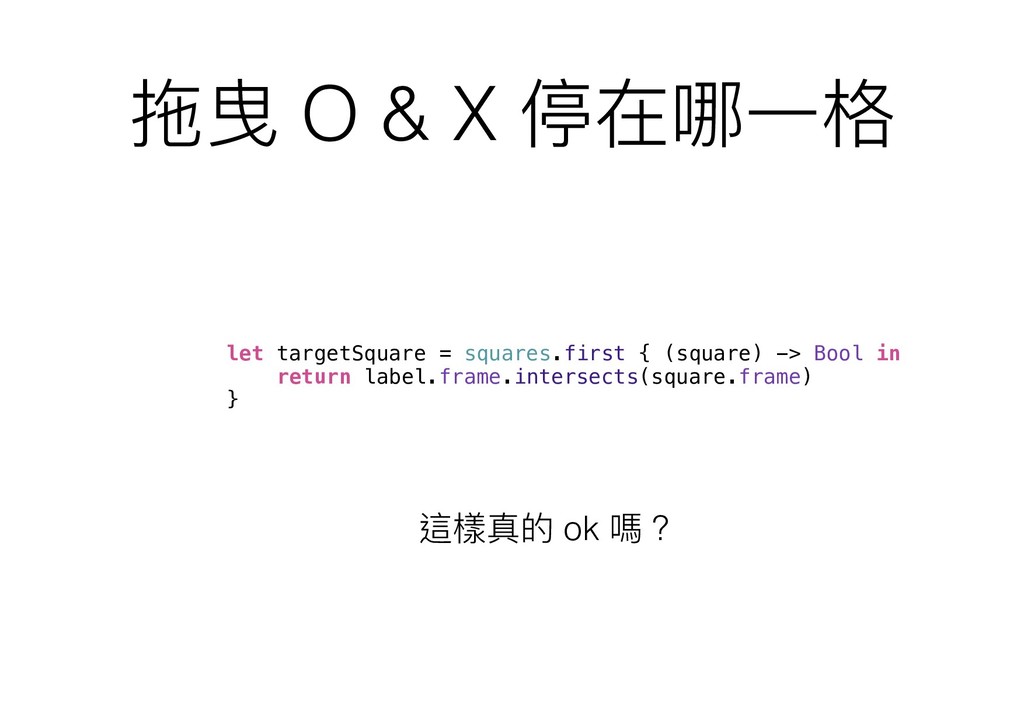
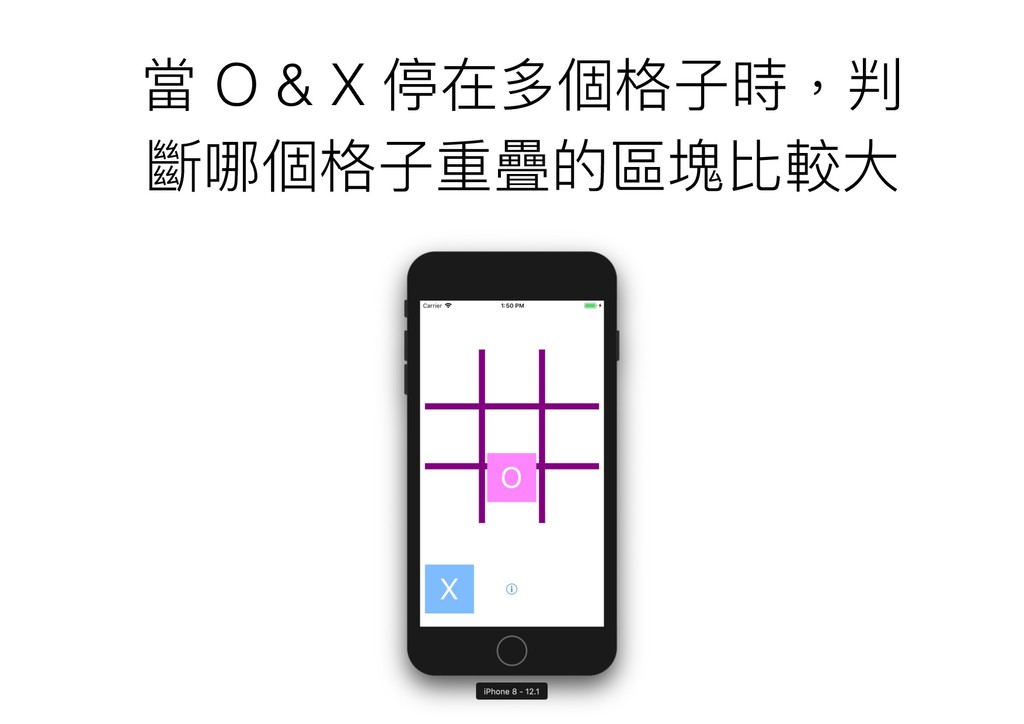
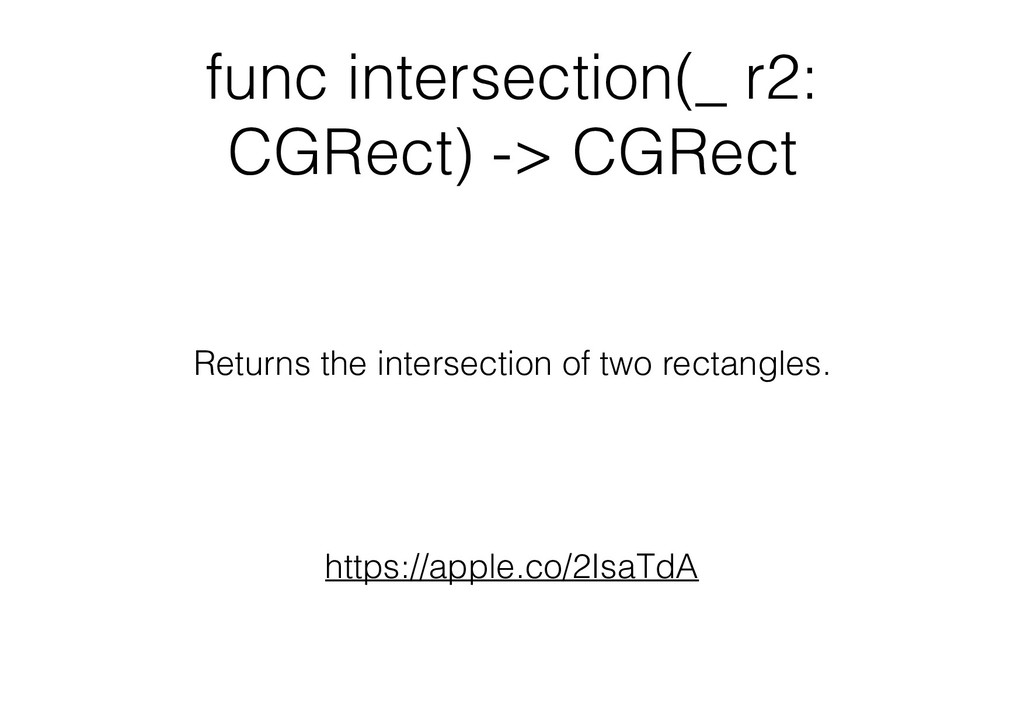
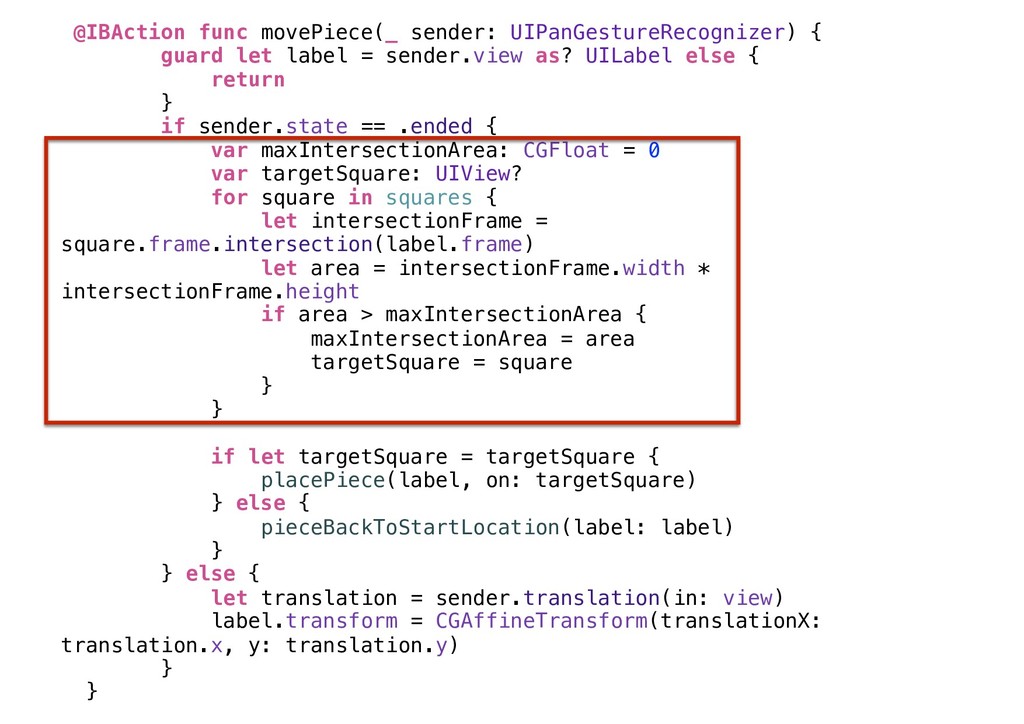
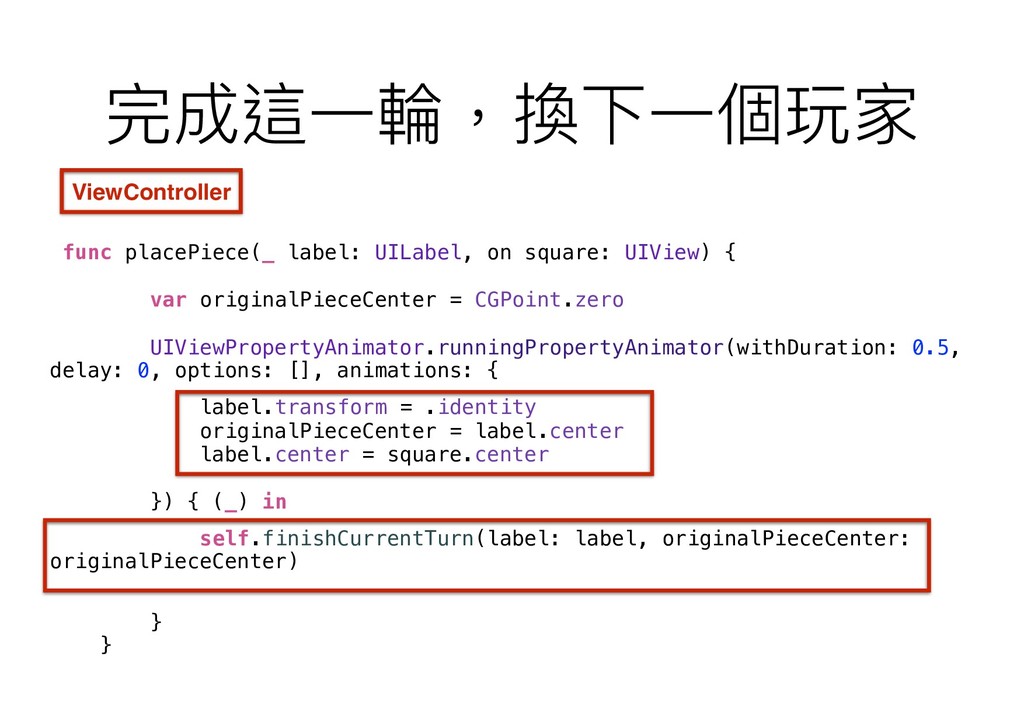
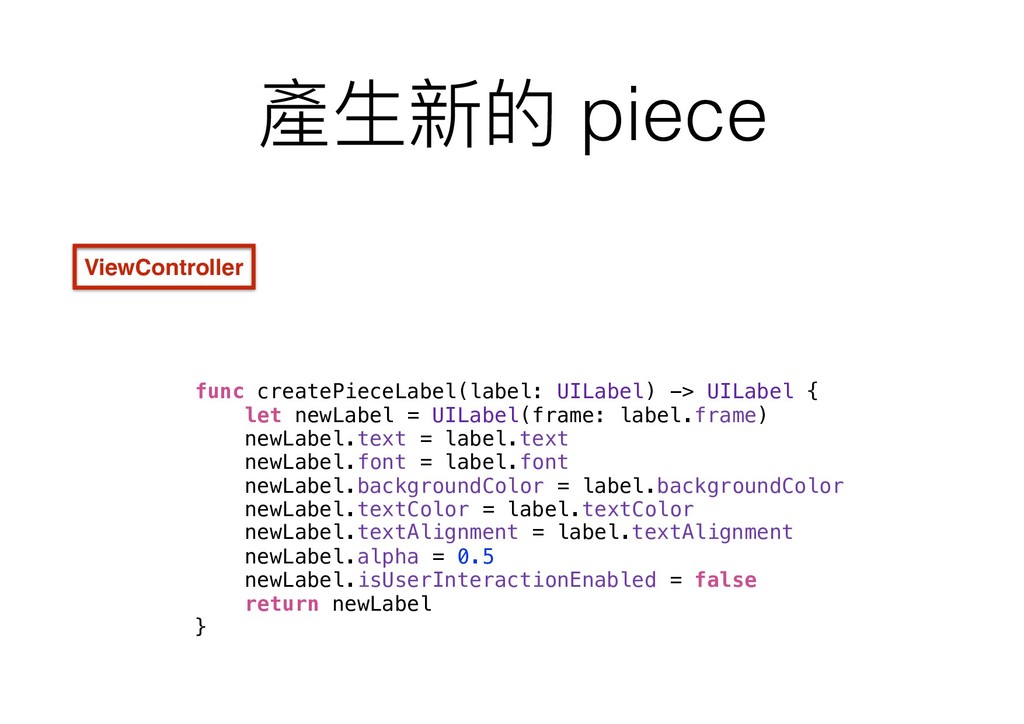
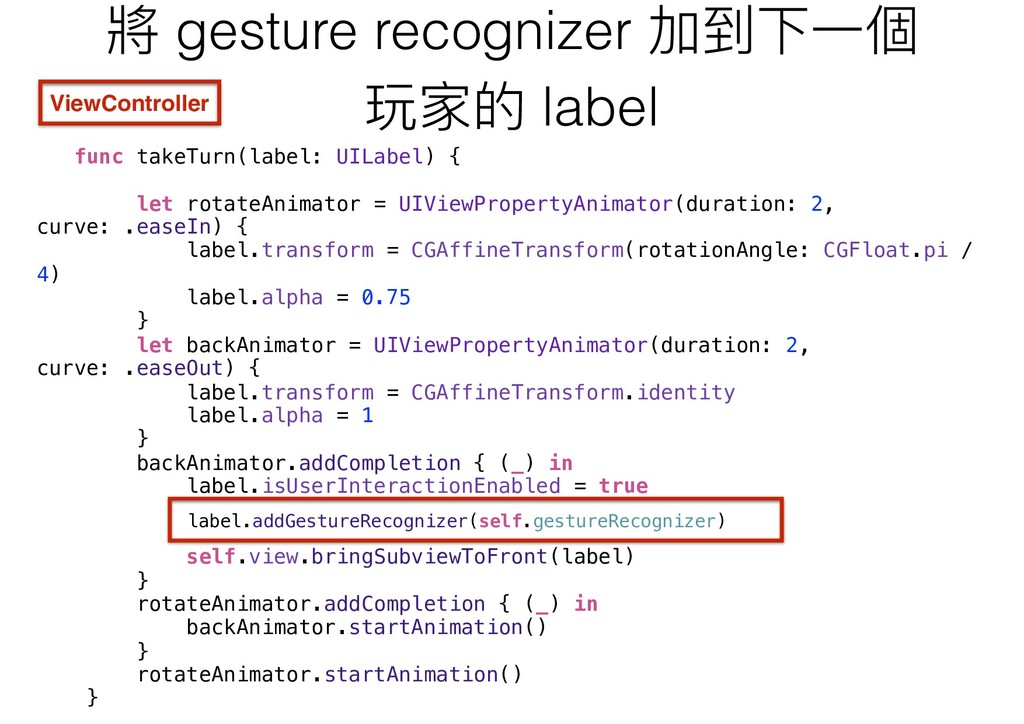
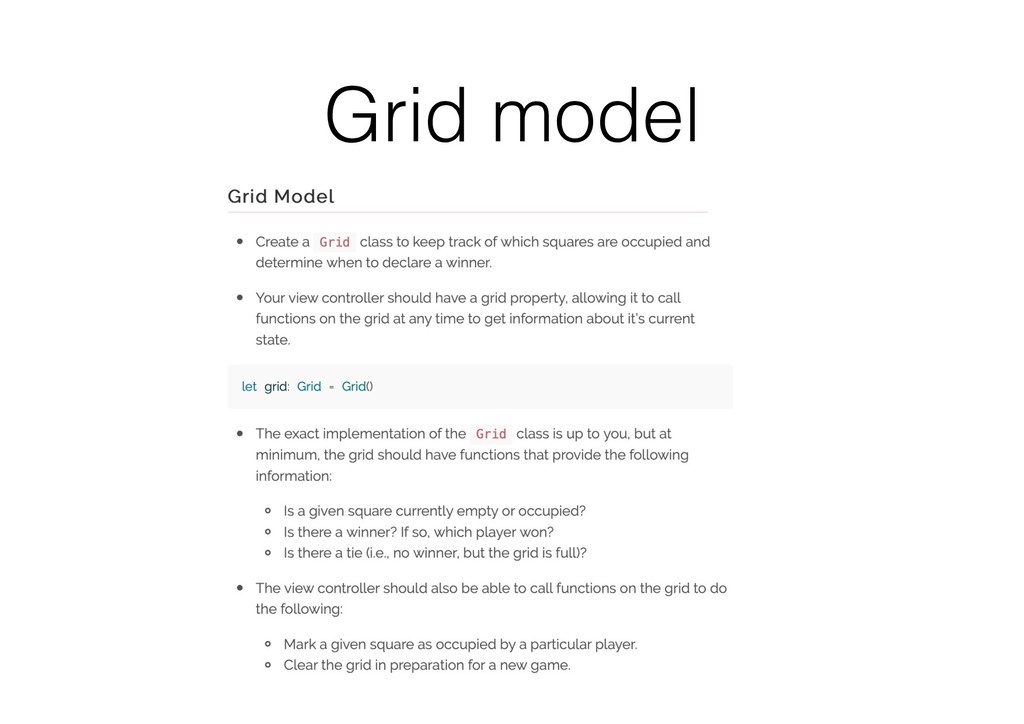
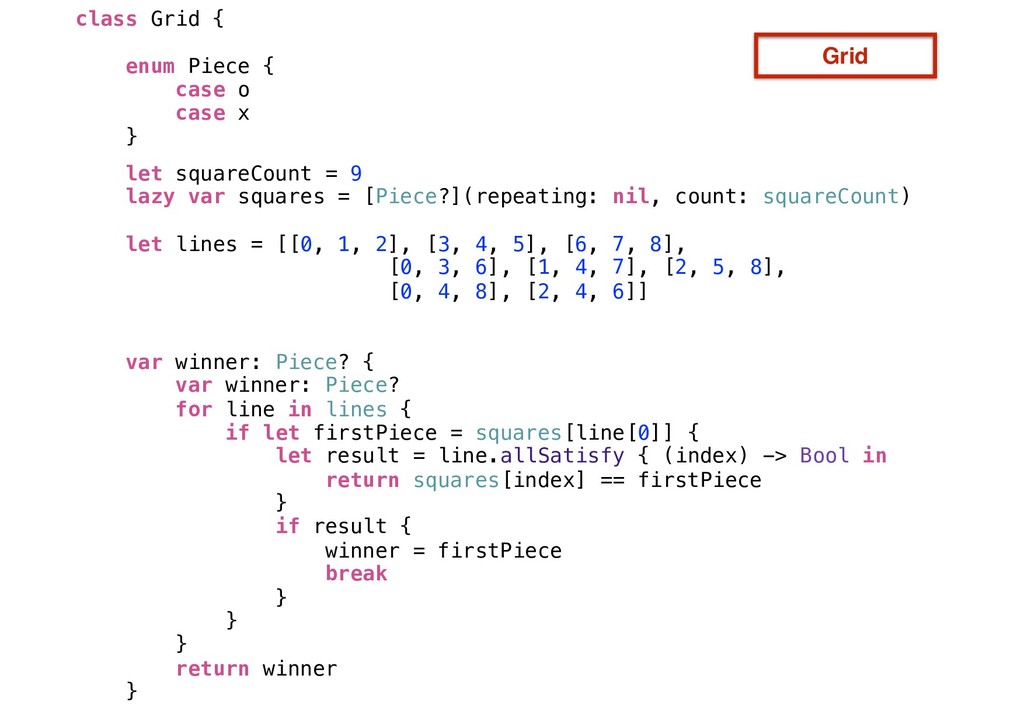
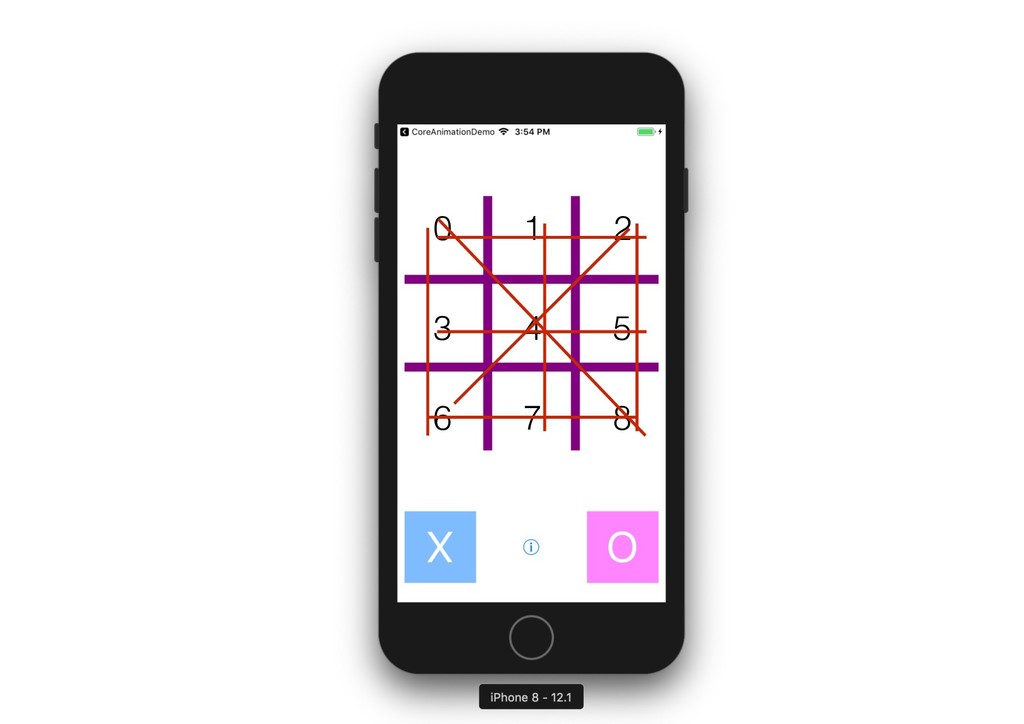
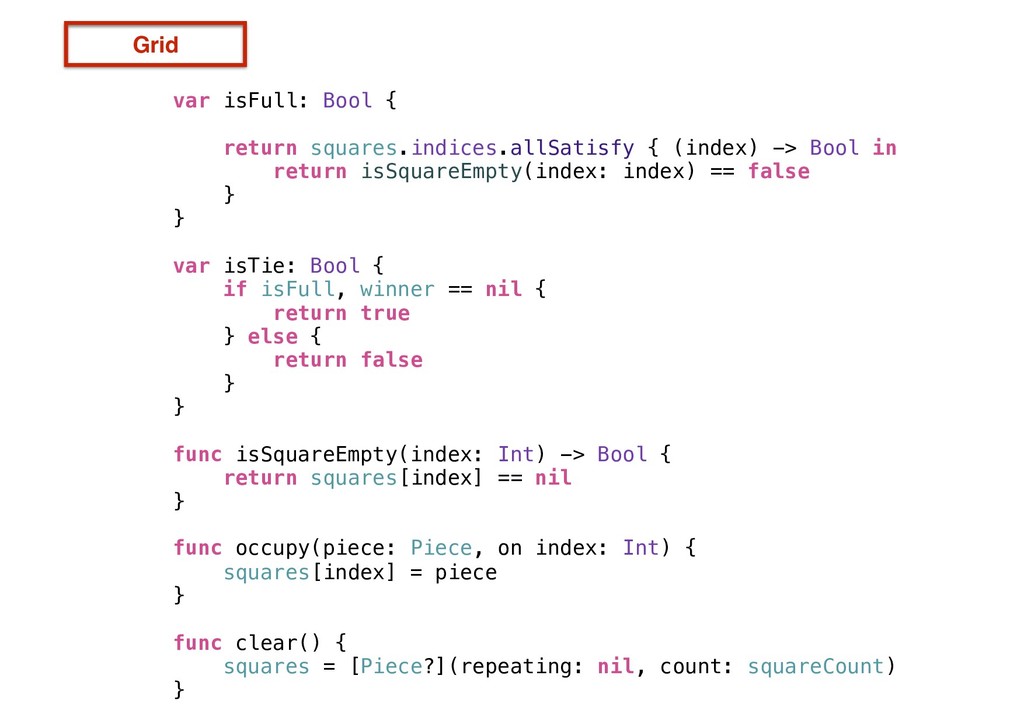
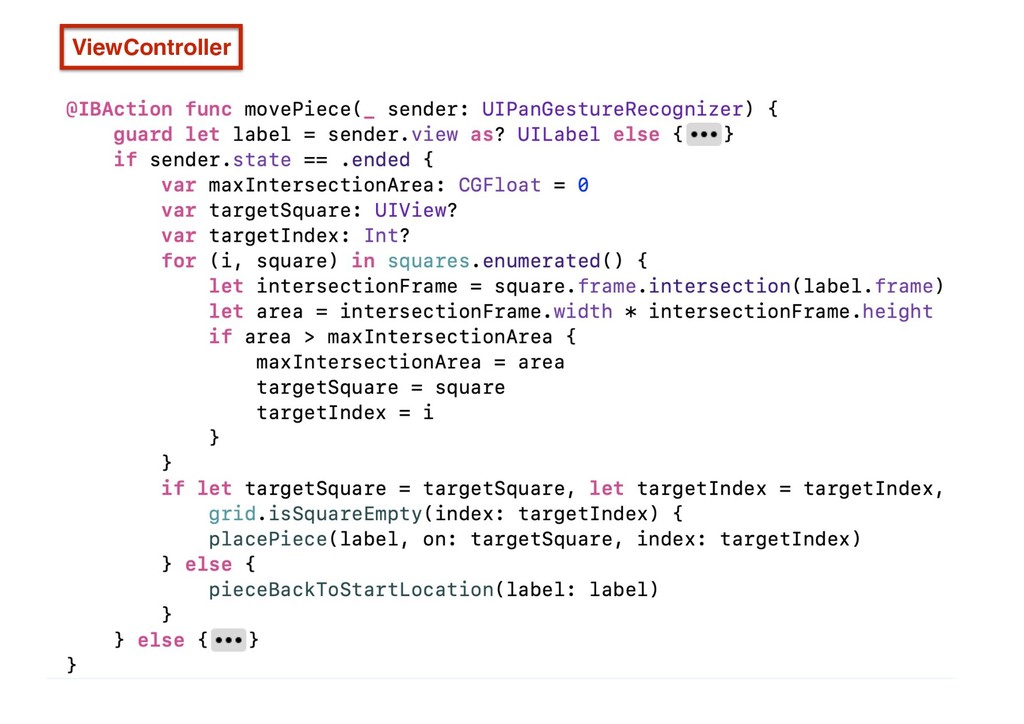
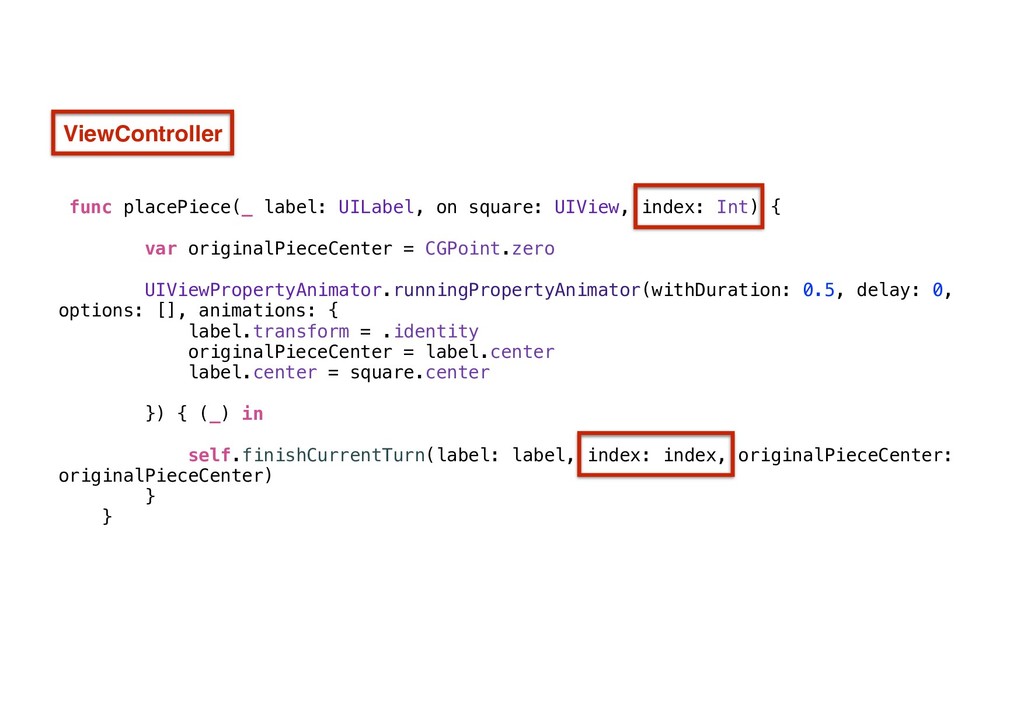
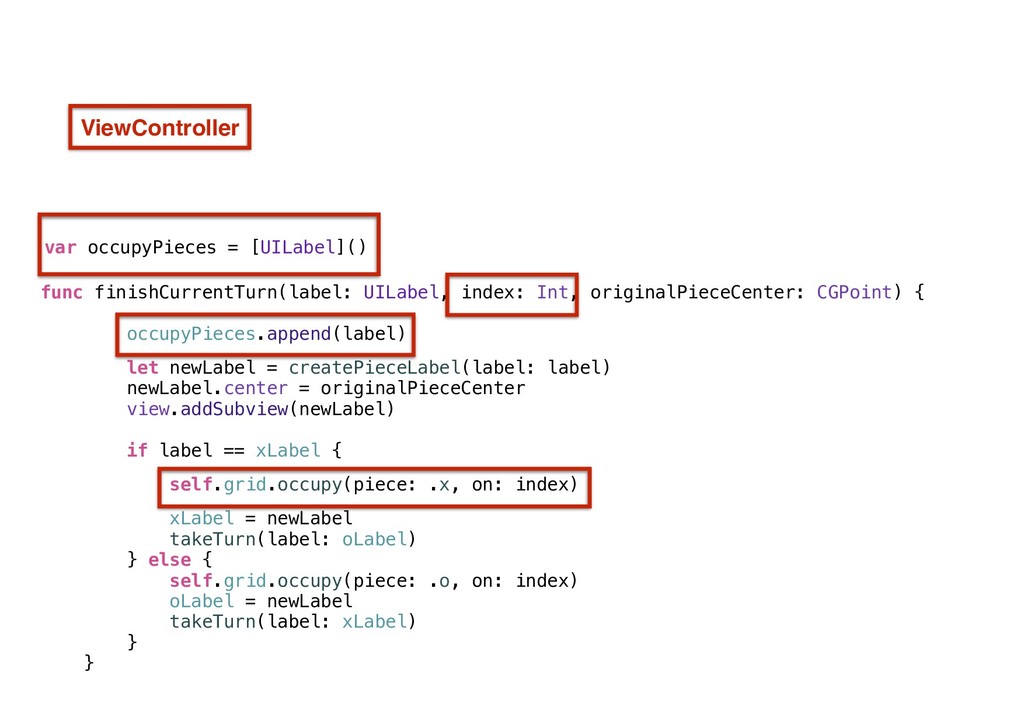
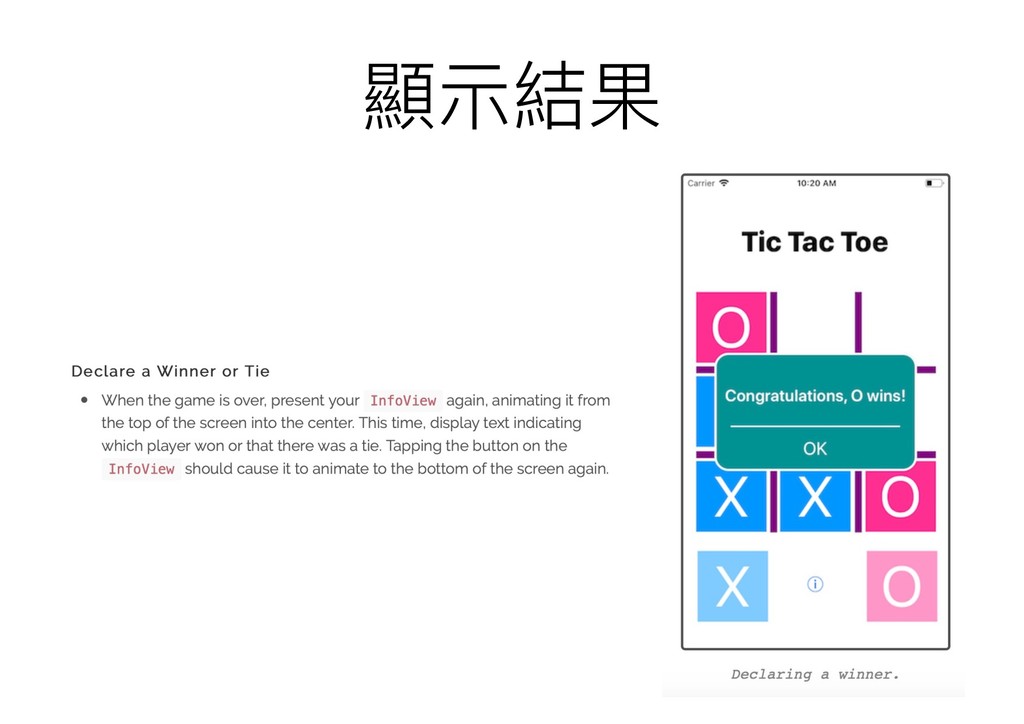
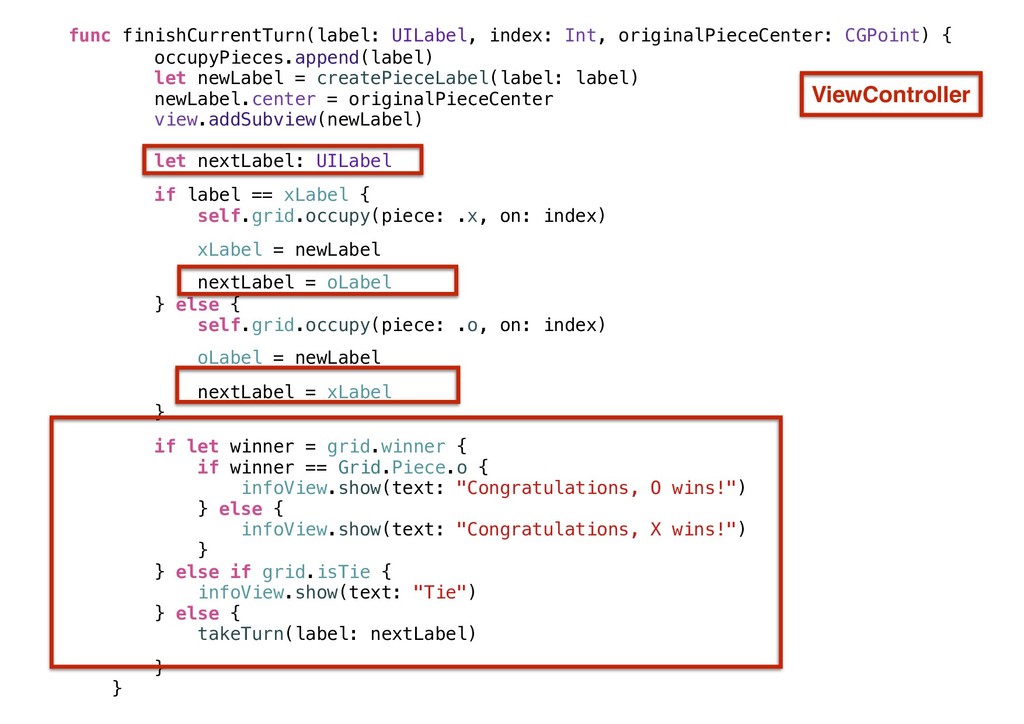
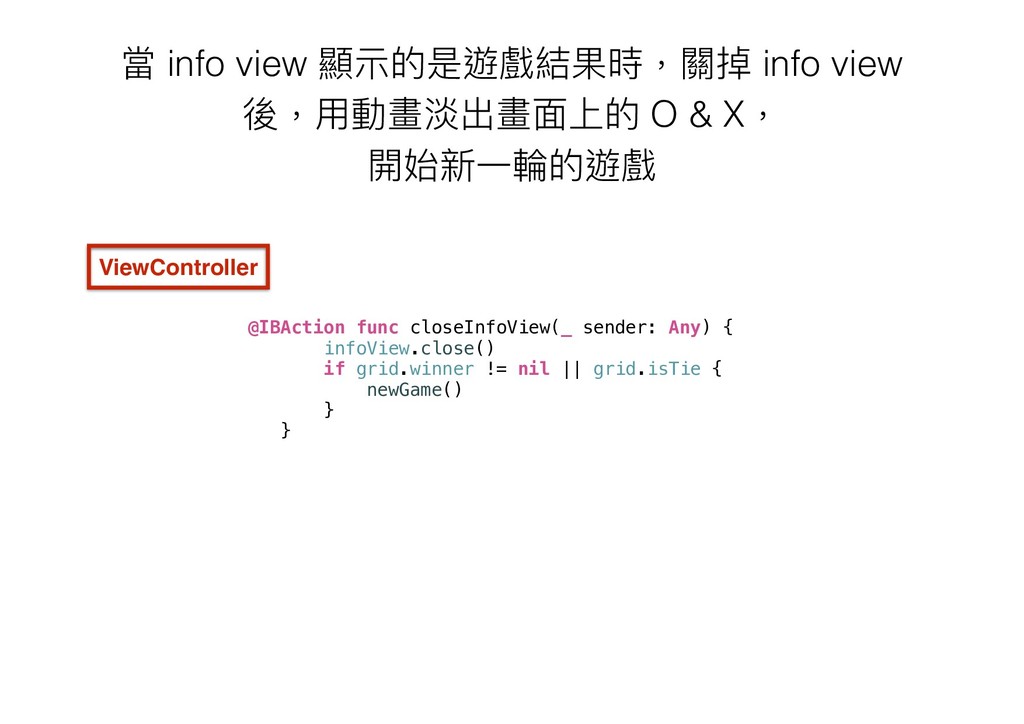
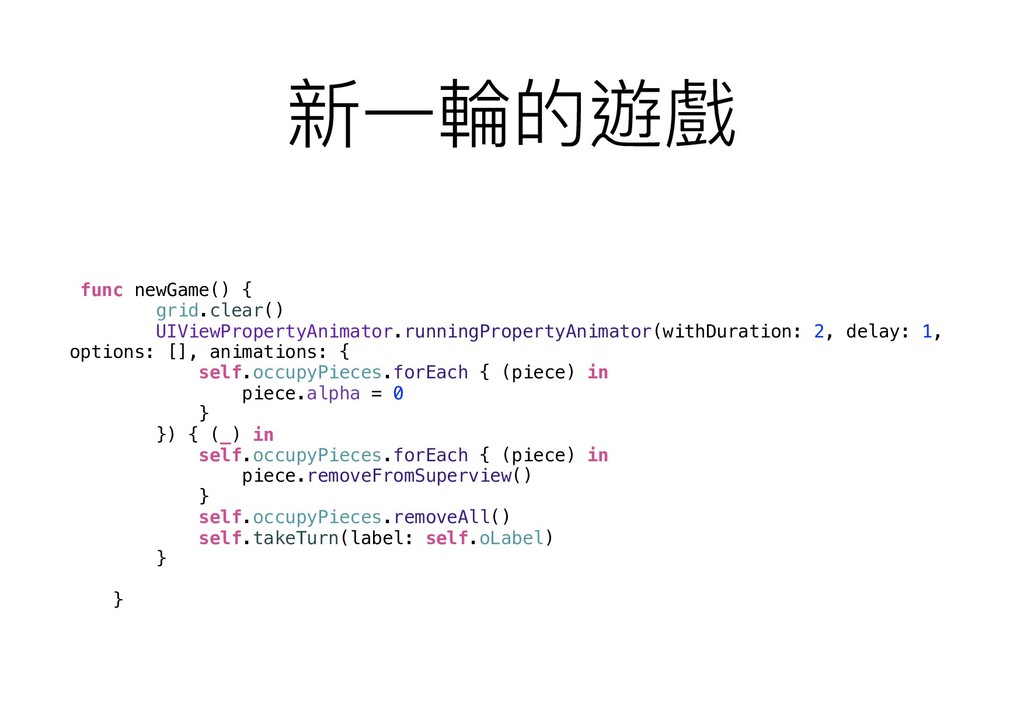
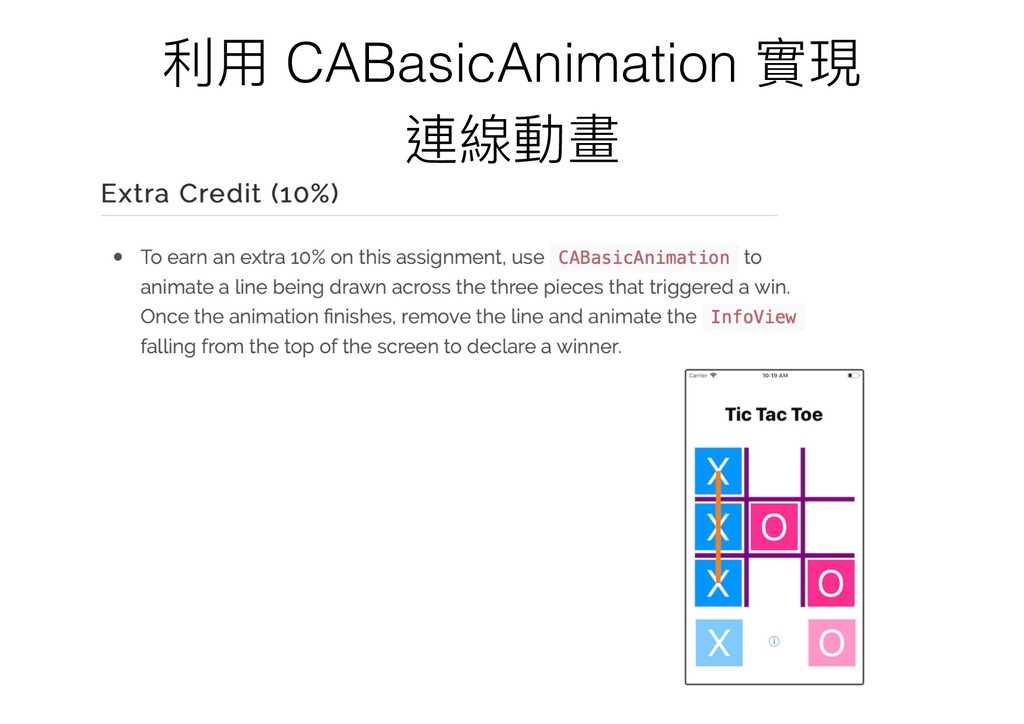
現場操作練習,製作芝加哥大學的 iOS App 作業,圈圈叉叉 App。
使用 UIBezierPath 繪製圈圈叉叉的井字格線。
使用 UIPanGestureRecognizer 移動圈圈 & 叉叉。
使用 UIViewPropertyAnimator 製作動畫效果。
CGRect 的 function intersection(_:)。
MVC 架構,設計 model 類別 Grid。
CABasicAnimation 的動畫效果。

More Decks by 愛瘋一切為蘋果的彼得潘

Other Decks in Programming

Transcript

  1. 製作 App 的井字畫⾯面 利利⽤用 UIBezierPath 在 GridView畫井字 加入 9 個

    view 對應井字的九個格⼦子,連結 outlet collection
  2. demo: playground 畫三⾓角形 import UIKit let path = UIBezierPath() path.move(to:

    CGPoint(x: 0, y: 0)) path.addLine(to: CGPoint(x: 100, y: 0)) path.addLine(to: CGPoint(x: 100, y: 100)) path.close()
  3. 將 view 變成任意形狀狀的三種⽅方法 • https://bit.ly/2EiDVZ1 • ⽅方法1: 利利⽤用 mask •

    ⽅方法2: addSublayer • ⽅方法3: ⾃自訂 UI 元件類別,定義它的 function draw
  4. demo 畫線 ⾃自訂 UI 元件類別,定義 function draw 畫長⽅方形 class RectangleView:

    UIView { // Only override draw() if you perform custom drawing. // An empty implementation adversely affects performance during animation. override func draw(_ rect: CGRect) { // Drawing code let path = UIBezierPath() path.move(to: CGPoint(x: 50, y: 50)) path.addLine(to: CGPoint(x: 190, y: 50)) path.addLine(to: CGPoint(x: 190, y: 90)) path.addLine(to: CGPoint(x: 50, y: 90)) path.close() UIColor.gray.setStroke() path.lineWidth = 10 path.stroke() } }
  5. demo ⾃自訂 UI 元件類別,定義 function draw 畫長⽅方形 path.move(to: CGPoint(x: 50,

    y: 50)) path.addLine(to: CGPoint(x: 190, y: 50)) path.lineWidth = 10 從 (50, 50) 畫到 (190, 50), 線的寬度為 10, 線的中⼼心點對到 Y 座標 50, 因此線的 Y 座標從 45 開始 ( 在 2x 解析度,45 pt = 90 px )
  6. demo ⾃自訂 UI 元件類別,定義 function draw 畫長⽅方形 path.move(to: CGPoint(x: 50,

    y: 50)) path.addLine(to: CGPoint(x: 190, y: 50)) path.addLine(to: CGPoint(x: 190, y: 90)) path.addLine(to: CGPoint(x: 50, y: 90)) path.close() path.lineWidth = 10 從 (50, 90) 畫到 (50, 50), 線的寬度為 10, 線的中⼼心點對到 X 座標 50, 因此線的 X 座標從 45 開始 ( 在 2x 解析度,45 pt = 90 px )
  7. demo 畫線 + 填滿 class RectangleView: UIView { override func

    draw(_ rect: CGRect) { // Drawing code let path = UIBezierPath() path.move(to: CGPoint(x: 50, y: 50)) path.addLine(to: CGPoint(x: 190, y: 50)) path.addLine(to: CGPoint(x: 190, y: 90)) path.addLine(to: CGPoint(x: 50, y: 90)) path.close() UIColor.gray.setStroke() path.lineWidth = 10 path.stroke() UIColor.red.setFill() path.fill() } }
  8. demo 畫線 + 填滿 將 (50, 50), (190, 50), (190,

    90), (50,90) 代表的長⽅方形填滿, 因此寬度 10 的灰線只看到寬度 5。 path.move(to: CGPoint(x: 50, y: 50)) path.addLine(to: CGPoint(x: 190, y: 50)) path.addLine(to: CGPoint(x: 190, y: 90)) path.addLine(to: CGPoint(x: 50, y: 90)) path.close()
  9. 利利⽤用 UIBezierPath 在 GridView 畫井字 override func draw(_ rect: CGRect)

    { // Drawing code let path = UIBezierPath() let squareWidth = 110 let lineWidth = 12.5 var y = squareWidth + lineWidth / 2 path.move(to: CGPoint(x: 0, y: y)) path.addLine(to: CGPoint(x: rect.width, y: y))
  10. 利利⽤用 UIBezierPath 在 GridView 畫井字 class GridView: UIView { override

    func draw(_ rect: CGRect) { // Drawing code let path = UIBezierPath() let squareWidth: CGFloat = 110 let lineWidth: CGFloat = 12.5 var y = squareWidth + lineWidth / 2 path.move(to: CGPoint(x: 0, y: y)) path.addLine(to: CGPoint(x: rect.width, y: y)) y += squareWidth + lineWidth path.move(to: CGPoint(x: 0, y: y)) path.addLine(to: CGPoint(x: rect.width, y: y)) var x = squareWidth + lineWidth / 2 path.move(to: CGPoint(x: x, y: 0)) path.addLine(to: CGPoint(x: x, y: rect.height)) x += squareWidth + lineWidth path.move(to: CGPoint(x: x, y: 0)) path.addLine(to: CGPoint(x: x, y: rect.height)) path.lineWidth = lineWidth UIColor.purple.setStroke() path.stroke() } }
  11. 加入 O & X 的 label 在 O & X

    的 label 加入 UIPanGestureRecognizer 在 O label 加上 gesture 就可以了了, 之後從程式控制 gesture 要綁到 O 或 X label
  12. O & X 的 label alpha 設為 0.5 User Interaction

    設為 false 之後再從程式設定輪輪到玩家玩時,alpha 設為 1, user interaction 設為 true
  13. 在 awakeFromNib 設定 InfoView 顯⽰示的樣⼦子 override func awakeFromNib() { super.awakeFromNib()

    layer.cornerRadius = 10 layer.borderWidth = 5 layer.borderColor = UIColor.white.cgColor } InfoView
  14. 連接 Info View 裡 label 的 outlet @IBOutlet weak var

    textLabel: UILabel! 要連結 custom view 裡元件的 outlet 時, 只能⼿手動從程式輸入再拉線 (例例外: cell 裡的元件可以直接拉線到程式) InfoView
  15. 利利⽤用 UIViewPropertyAnimator 製作顯⽰示 info view 的動畫效果 func show(text: String) {

    textLabel.text = text superview?.bringSubviewToFront(self) let animator = UIViewPropertyAnimator(duration: 1, curve: .easeIn) { self.center = self.superview!.center } animator.startAnimation() } InfoView
  16. 點擊 info button , 顯⽰示遊戲說明 @IBAction func infoButtonTapped(_ sender: Any)

    { infoView.show(text: "Get 3 in a row to win!") } ViewController
  17. 按下 info view 的 button InfoView 往下移動離開畫⾯面,並在離開畫⾯面後回到畫⾯面的上⽅方 當 info view

    顯⽰示的是遊戲結果時,關掉 info view 後,
 ⽤用動畫淡出畫⾯面上的 O & X,開始新⼀一輪輪的遊戲
  18. 利利⽤用 UIViewPropertyAnimator 製作關掉 info view 的動畫效果 func close() { let

    animator = UIViewPropertyAnimator(duration: 1, curve: .easeIn) { self.frame.origin.y = self.superview!.frame.maxY } animator.addCompletion { (_) in self.frame.origin.y = -self.frame.height } animator.startAnimation() } InfoView
  19. 按下 info view 的 button 時, 關掉 info view @IBAction

    func closeInfoView(_ sender: Any) { infoView.close() // 當 info view 顯⽰示的是遊戲結果時,關掉 info view 後,
 ⽤用動畫淡出畫⾯面上的 O & X,開始新⼀一輪輪的遊戲 } ViewController
  20. 連接 O & X label 的 outlet @IBOutlet weak var

    xLabel: UILabel! @IBOutlet weak var oLabel: UILabel! ViewController
  21. 輪輪到 O & X 開始時, 顯⽰示旋轉動畫 func takeTurn(label: UILabel) {

    let rotateAnimator = UIViewPropertyAnimator(duration: 2, curve: .easeIn) { label.transform = CGAffineTransform(rotationAngle: CGFloat.pi / 4) label.alpha = 0.75 } let backAnimator = UIViewPropertyAnimator(duration: 2, curve: .easeOut) { label.transform = CGAffineTransform.identity label.alpha = 1 } backAnimator.addCompletion { (_) in label.isUserInteractionEnabled = true self.view.bringSubviewToFront(label) } rotateAnimator.addCompletion { (_) in backAnimator.startAnimation() } rotateAnimator.startAnimation() } ViewController
  22. 觀察 translation @IBAction func movePiece(_ sender: UIPanGestureRecognizer) { let translation

    = sender.translation(in: view) print(translation) } translation.x & translation.y 代表移動的距離 UIPanGestureRecognizer 連接的 IBAction,拖曳時觸發
  23. OK 嗎 ? @IBAction func movePiece(_ sender: UIPanGestureRecognizer) { guard

    let label = sender.view as? UILabel else { return } let translation = sender.translation(in: view) label.frame.origin = CGPoint(x: label.frame.minX + translation.x, y: label.frame.minY + translation.y) }
  24. ⾶飛到外太空了了 ! @IBAction func movePiece(_ sender: UIPanGestureRecognizer) { guard let

    label = sender.view as? UILabel else { return } let translation = sender.translation(in: view) label.frame.origin = CGPoint(x: label.frame.minX + translation.x, y: label.frame.minY + translation.y) }
  25. ⽅方法 1: 調整 origin var oLabelStartLocation = CGPoint.zero var xLabelStartLocation

    = CGPoint.zero override func viewDidLoad() { super.viewDidLoad() oLabelStartLocation = oLabel.frame.origin xLabelStartLocation = xLabel.frame.origin } ViewController
  26. ⽅方法 1: 調整 origin @IBAction func movePiece(_ sender: UIPanGestureRecognizer) {

    guard let label = sender.view as? UILabel else { return } let translation = sender.translation(in: view) if label == oLabel { label.frame.origin = CGPoint(x: oLabelStartLocation.x + translation.x, y: oLabelStartLocation.y + translation.y) } else { label.frame.origin = CGPoint(x: xLabelStartLocation.x + translation.x, y: xLabelStartLocation.y + translation.y) } } ViewController
  27. ⽅方法 2: 調整 center ViewController var oLabelStartCenter = CGPoint.zero var

    xLabelStartCenter = CGPoint.zero override func viewDidLoad() { super.viewDidLoad() oLabelStartCenter = oLabel.center xLabelStartCenter = xLabel.center }
  28. ⽅方法 2: 調整 center @IBAction func movePiece(_ sender: UIPanGestureRecognizer) {

    guard let label = sender.view as? UILabel else { return } let translation = sender.translation(in: view) if label == oLabel { label.center = CGPoint(x: oLabelStartCenter.x + translation.x, y: oLabelStartCenter.y + translation.y) } else { label.center = CGPoint(x: xLabelStartCenter.x + translation.x, y: xLabelStartCenter.y + translation.y) } } ViewController
  29. ⽅方法 3: 將 translation 歸 0 不⽤用先儲存 label ⼀一開始的位置 @IBAction

    func movePiece(_ sender: UIPanGestureRecognizer) { guard let label = sender.view as? UILabel else { return } let translation = sender.translation(in: view) label.center = CGPoint(x: label.center.x + translation.x, y: label.center.y + translation.y) sender.setTranslation(.zero, in: view) } ViewController
  30. ⽅方法 4: 調整 transform 移動 O & X func pieceBackToStartLocation(label:

    UILabel) { UIView.animate(withDuration: 0.5) { label.transform = .identity } } @IBAction func movePiece(_ sender: UIPanGestureRecognizer) { guard let label = sender.view as? UILabel else { return } if sender.state == .ended { pieceBackToStartLocation(label: label) } else { let translation = sender.translation(in: view) label.transform = CGAffineTransform(translationX: translation.x, y: translation.y) } } ViewController
  31. 拖曳 O & X 停在哪⼀一格 @IBAction func movePiece(_ sender: UIPanGestureRecognizer)

    { guard let label = sender.view as? UILabel else { return } if sender.state == .ended { let targetSquare = squares.first { (square) -> Bool in return label.frame.intersects(square.frame) } if let targetSquare = targetSquare { placePiece(label, on: targetSquare) } else { pieceBackToStartLocation(label: label) } } else { let translation = sender.translation(in: view) label.transform = CGAffineTransform(translationX: translation.x, y: translation.y) } } ViewController
  32. 將 O& X 放到格⼦子上 func placePiece(_ label: UILabel, on square:

    UIView) { UIViewPropertyAnimator.runningPropertyAnimator(withDuration: 0.5, delay: 0, options: [], animations: { label.transform = .identity label.center = square.center }) { (_) in } } ViewController
  33. 拖曳 O & X 停在哪⼀一格 let targetSquare = squares.first {

    (square) -> Bool in return label.frame.intersects(square.frame) } 這樣真的 ok 嗎 ?
  34. @IBAction func movePiece(_ sender: UIPanGestureRecognizer) { guard let label =

    sender.view as? UILabel else { return } if sender.state == .ended { var maxIntersectionArea: CGFloat = 0 var targetSquare: UIView? for square in squares { let intersectionFrame = square.frame.intersection(label.frame) let area = intersectionFrame.width * intersectionFrame.height if area > maxIntersectionArea { maxIntersectionArea = area targetSquare = square } } if let targetSquare = targetSquare { placePiece(label, on: targetSquare) } else { pieceBackToStartLocation(label: label) } } else { let translation = sender.translation(in: view) label.transform = CGAffineTransform(translationX: translation.x, y: translation.y) } }
  35. 完成這⼀一輪輪,換下⼀一個玩家 func placePiece(_ label: UILabel, on square: UIView) { var

    originalPieceCenter = CGPoint.zero UIViewPropertyAnimator.runningPropertyAnimator(withDuration: 0.5, delay: 0, options: [], animations: { label.transform = .identity originalPieceCenter = label.center label.center = square.center }) { (_) in self.finishCurrentTurn(label: label, originalPieceCenter: originalPieceCenter) } } ViewController
  36. 完成這⼀一輪輪,換下⼀一個玩家 func finishCurrentTurn(label: UILabel, originalPieceCenter: CGPoint) { let newLabel =

    createPieceLabel(label: label) newLabel.center = originalPieceCenter view.addSubview(newLabel) if label == xLabel { xLabel = newLabel takeTurn(label: oLabel) } else { oLabel = newLabel takeTurn(label: xLabel) } }
  37. 產⽣生新的 piece func createPieceLabel(label: UILabel) -> UILabel { let newLabel

    = UILabel(frame: label.frame) newLabel.text = label.text newLabel.font = label.font newLabel.backgroundColor = label.backgroundColor newLabel.textColor = label.textColor newLabel.textAlignment = label.textAlignment newLabel.alpha = 0.5 newLabel.isUserInteractionEnabled = false return newLabel } ViewController
  38. 將 gesture recognizer 加到下⼀一個 玩家的 label func takeTurn(label: UILabel) {

    let rotateAnimator = UIViewPropertyAnimator(duration: 2, curve: .easeIn) { label.transform = CGAffineTransform(rotationAngle: CGFloat.pi / 4) label.alpha = 0.75 } let backAnimator = UIViewPropertyAnimator(duration: 2, curve: .easeOut) { label.transform = CGAffineTransform.identity label.alpha = 1 } backAnimator.addCompletion { (_) in label.isUserInteractionEnabled = true label.addGestureRecognizer(self.gestureRecognizer) self.view.bringSubviewToFront(label) } rotateAnimator.addCompletion { (_) in backAnimator.startAnimation() } rotateAnimator.startAnimation() } ViewController
  39. class Grid { enum Piece { case o case x

    } let squareCount = 9 lazy var squares = [Piece?](repeating: nil, count: squareCount) let lines = [[0, 1, 2], [3, 4, 5], [6, 7, 8], [0, 3, 6], [1, 4, 7], [2, 5, 8], [0, 4, 8], [2, 4, 6]] var winner: Piece? { var winner: Piece? for line in lines { if let firstPiece = squares[line[0]] { let result = line.allSatisfy { (index) -> Bool in return squares[index] == firstPiece } if result { winner = firstPiece break } } } return winner } Grid
  40. var isFull: Bool { return squares.indices.allSatisfy { (index) -> Bool

    in return isSquareEmpty(index: index) == false } } var isTie: Bool { if isFull, winner == nil { return true } else { return false } } func isSquareEmpty(index: Int) -> Bool { return squares[index] == nil } func occupy(piece: Piece, on index: Int) { squares[index] = piece } func clear() { squares = [Piece?](repeating: nil, count: squareCount) } Grid
  41. func placePiece(_ label: UILabel, on square: UIView, index: Int) {

    var originalPieceCenter = CGPoint.zero UIViewPropertyAnimator.runningPropertyAnimator(withDuration: 0.5, delay: 0, options: [], animations: { label.transform = .identity originalPieceCenter = label.center label.center = square.center }) { (_) in self.finishCurrentTurn(label: label, index: index, originalPieceCenter: originalPieceCenter) } } ViewController
  42. func finishCurrentTurn(label: UILabel, index: Int, originalPieceCenter: CGPoint) { occupyPieces.append(label) let

    newLabel = createPieceLabel(label: label) newLabel.center = originalPieceCenter view.addSubview(newLabel) if label == xLabel { self.grid.occupy(piece: .x, on: index) xLabel = newLabel takeTurn(label: oLabel) } else { self.grid.occupy(piece: .o, on: index) oLabel = newLabel takeTurn(label: xLabel) } } ViewController var occupyPieces = [UILabel]()
  43. func finishCurrentTurn(label: UILabel, index: Int, originalPieceCenter: CGPoint) { occupyPieces.append(label) let

    newLabel = createPieceLabel(label: label) newLabel.center = originalPieceCenter view.addSubview(newLabel) let nextLabel: UILabel if label == xLabel { self.grid.occupy(piece: .x, on: index) xLabel = newLabel nextLabel = oLabel } else { self.grid.occupy(piece: .o, on: index) oLabel = newLabel nextLabel = xLabel } if let winner = grid.winner { if winner == Grid.Piece.o { infoView.show(text: "Congratulations, O wins!") } else { infoView.show(text: "Congratulations, X wins!") } } else if grid.isTie { infoView.show(text: "Tie") } else { takeTurn(label: nextLabel) } } ViewController
  44. 當 info view 顯⽰示的是遊戲結果時,關掉 info view 後,⽤用動畫淡出畫⾯面上的 O & X,

    開始新⼀一輪輪的遊戲 @IBAction func closeInfoView(_ sender: Any) { infoView.close() if grid.winner != nil || grid.isTie { newGame() } } ViewController
  45. 新⼀一輪輪的遊戲 func newGame() { grid.clear() UIViewPropertyAnimator.runningPropertyAnimator(withDuration: 2, delay: 1, options:

    [], animations: { self.occupyPieces.forEach { (piece) in piece.alpha = 0 } }) { (_) in self.occupyPieces.forEach { (piece) in piece.removeFromSuperview() } self.occupyPieces.removeAll() self.takeTurn(label: self.oLabel) } }
  46. 取得 winner 連線的位置 var winnerLines: [[Int]] { var winnerLines =

    [[Int]]() for line in lines { if let firstPiece = squares[line[0]] { let result = line.allSatisfy { (index) -> Bool in return squares[index] == firstPiece } if result { winnerLines.append(line) } } } return winnerLines }
  47. func showWinLineAnimation(startPoint: CGPoint, endPoint: CGPoint) { let path = UIBezierPath()

    path.move(to: startPoint) path.addLine(to: endPoint) let shapeLayer = CAShapeLayer() shapeLayer.path = path.cgPath shapeLayer.strokeColor = UIColor.red.cgColor shapeLayer.lineWidth = 10 shapeLayer.lineCap = .round CATransaction.begin() CATransaction.setAnimationDuration(3) let strokeAnimation = CABasicAnimation(keyPath: #keyPath(CAShapeLayer.strokeEnd)) strokeAnimation.fromValue = 0 strokeAnimation.toValue = 1 CATransaction.setCompletionBlock { shapeLayer.removeFromSuperlayer() if let winner = self.grid.winner { if winner == Grid.Piece.o { self.infoView.show(text: "Congratulations, O wins!") } else { self.infoView.show(text: "Congratulations, X wins!") } } } shapeLayer.add(strokeAnimation, forKey: nil) view.layer.addSublayer(shapeLayer) CATransaction.commit() }
  48. 相關教學資源 • FB粉絲團: 愛瘋⼀一切為蘋果的彼得潘
 http://www.facebook.com/iphone.peterpan • 個⼈人網站
 http://apppeterpan.strikingly.com • medium:

    彼得潘的App Neverland
 https://medium.com/@apppeterpan • GitBook: 彼得潘的iOS App開發便便利利貼
 https://www.gitbook.com/book/apppeterpan/iosappcodestickies/ • FB社團: 彼得潘的蘋果App開發教室
 https://www.facebook.com/groups/peterpanappclass/
  49. 相關教學資源 • SlideShare
 http://www.slideshare.net/deeplovepan • email: [email protected] • 彼得潘的 SWIFT

    iOS APP office hour
 http://swiftiosappofficehour.strikingly.com • FB: https://www.facebook.com/deeplove.pan • LINE: deeplovepeterpan
 如果沒加我朋友,但是有設定阻擋訊息的,會看不到我傳的訊 息。 line 官⽅方 IG