Upgrade to Pro
— share decks privately, control downloads, hide ads and more …
Speaker Deck
Features
Speaker Deck
PRO
Sign in
Sign up for free
Search
Search
Pythonではじめる3Dセンシング / 3D Sensing with Python
Search
moonlight-aska
July 22, 2018
1.5k
0
Share
Embed
Copy iframe code
Copy JS code
Copy link
Start on current slide
Pythonではじめる3Dセンシング / 3D Sensing with Python
2018年7月22日開催の「大江橋Pythonの会#1」の資料です.
moonlight-aska
July 22, 2018
More Decks by moonlight-aska
See All by moonlight-aska
Create Your Own AI with Dify×Gemma3
aska
0
70
Generative AI Prototyping
aska
0
28
【入門】プロンプトの書き方のコツ / Tips for writing prompts
aska
0
230
CHATGPT。はじめの一歩 / ChatGPT. Get Started
aska
0
150
「Kingyo AI Navi」アプリ / Kingyo AI Navi App
aska
0
280
Kingo AI Navi LINEをもっと使い倒せ!!
aska
0
160
Depth画像で物体検知やってみたー。/ Objects Detection with Depth Images
aska
0
840
Kingyo AI Naviアプリ開発 / Kingyo AI Navi App
aska
0
460
AutoML Vision Edgeで金魚分類モデルを学習してみた / Kingyo Classification Model with AutoML Vision Edge
aska
0
590
Featured
See All Featured
Odyssey Design
rkendrick25
PRO
2
730
Navigating the Design Leadership Dip - Product Design Week Design Leaders+ Conference 2024
apolaine
1
370
[SF Ruby Conf 2025] Rails X
palkan
2
1.2k
The Straight Up "How To Draw Better" Workshop
denniskardys
239
140k
Leo the Paperboy
mayatellez
8
1.9k
Getting science done with accelerated Python computing platforms
jacobtomlinson
2
330
How People are Using Generative and Agentic AI to Supercharge Their Products, Projects, Services and Value Streams Today
helenjbeal
1
240
Building a A Zero-Code AI SEO Workflow
portentint
PRO
0
630
Documentation Writing (for coders)
carmenintech
77
5.4k
Templates, Plugins, & Blocks: Oh My! Creating the theme that thinks of everything
marktimemedia
31
2.8k
Let's Do A Bunch of Simple Stuff to Make Websites Faster
chriscoyier
508
140k
Large-scale JavaScript Application Architecture
addyosmani
515
110k
Transcript
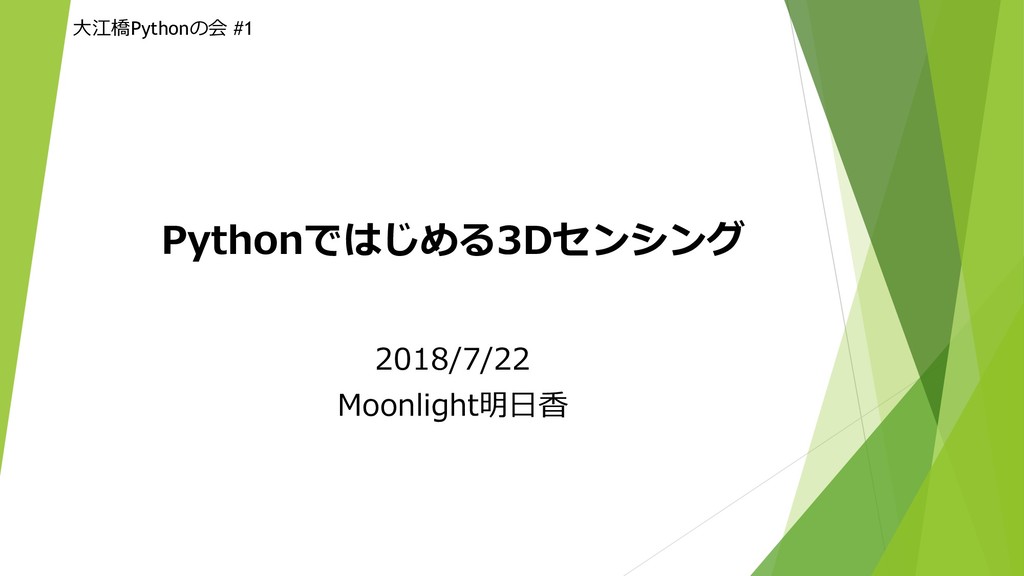
2018/7/22 Moonlight明日香 Pythonではじめる3Dセンシング 大江橋Pythonの会 #1
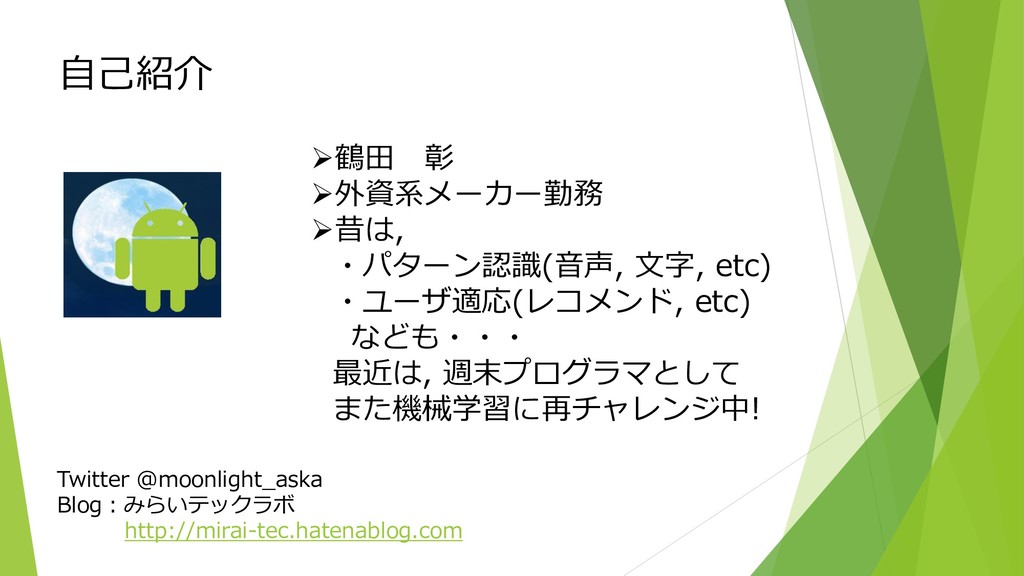
自己紹介 鶴田 彰 外資系メーカー勤務 昔は, ・パターン認識(音声, 文字, etc) ・ユーザ適応(レコメンド, etc)
なども・・・ 最近は, 週末プログラマとして また機械学習に再チャレンジ中! Twitter @moonlight_aska Blog:みらいテックラボ http://mirai-tec.hatenablog.com
Contents 3Dセンシングとは? RealSense Depthカメラの使い方 ピープルカウンタ
3Dセンシングとは? RealSense Depthカメラの使い方 ピープルカウンタ
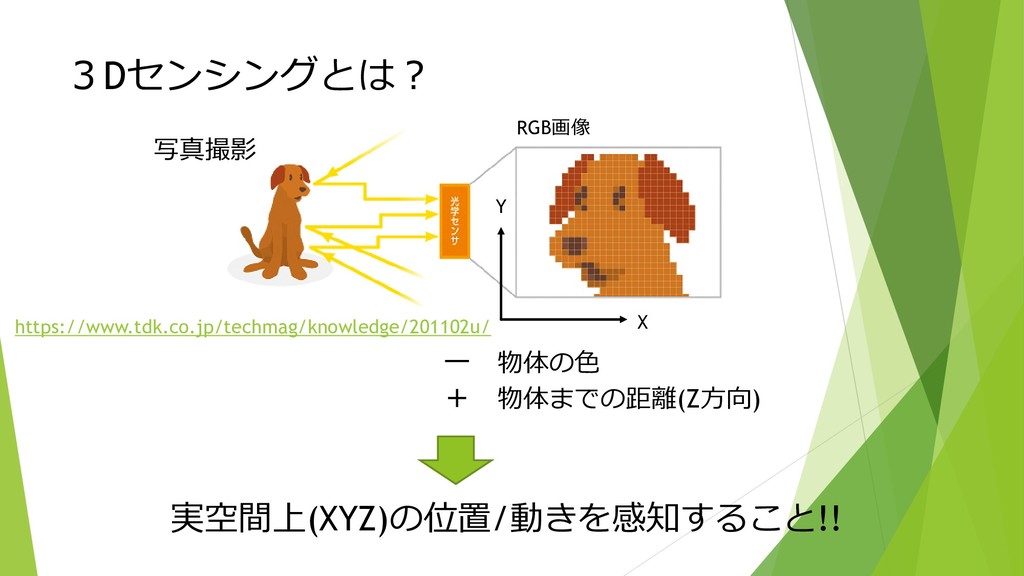
X Y ー 物体の色 + 物体までの距離(Z方向) 実空間上(XYZ)の位置/動きを感知すること!! 写真撮影 3Dセンシングとは? RGB画像
https://www.tdk.co.jp/techmag/knowledge/201102u/
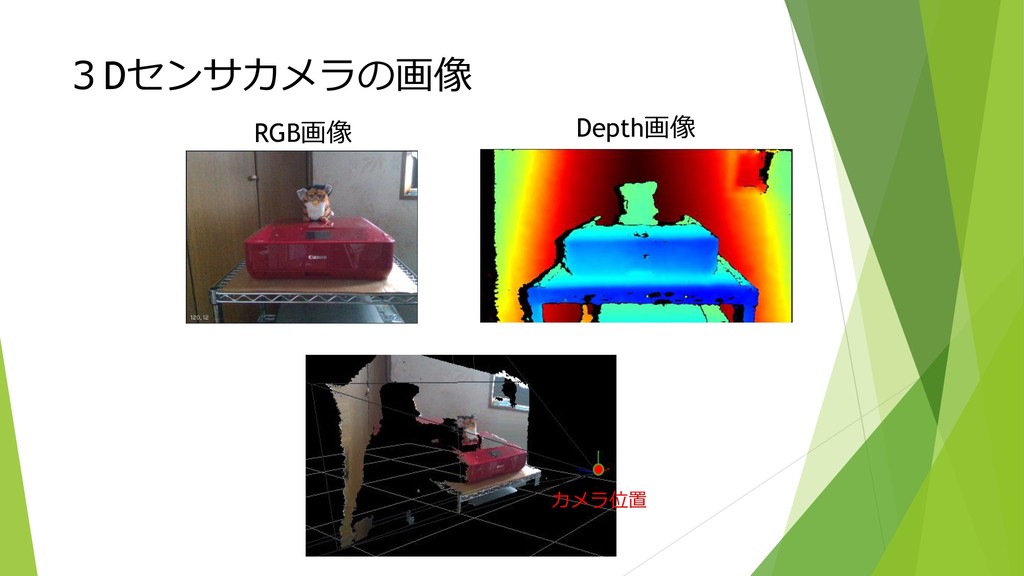
3Dセンサカメラの画像 RGB画像 Depth画像 カメラ位置
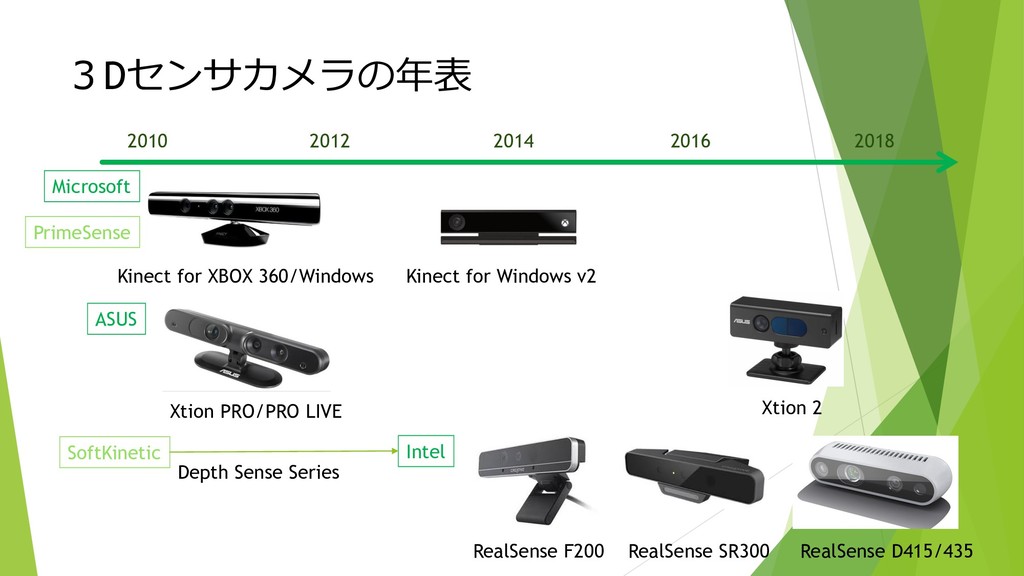
3Dセンサカメラの年表 Kinect for XBOX 360/Windows Xtion PRO/PRO LIVE 2010 2012
2014 2016 2018 Kinect for Windows v2 Xtion 2 RealSense D415/435 RealSense F200 RealSense SR300 Microsoft ASUS Intel SoftKinetic PrimeSense Depth Sense Series
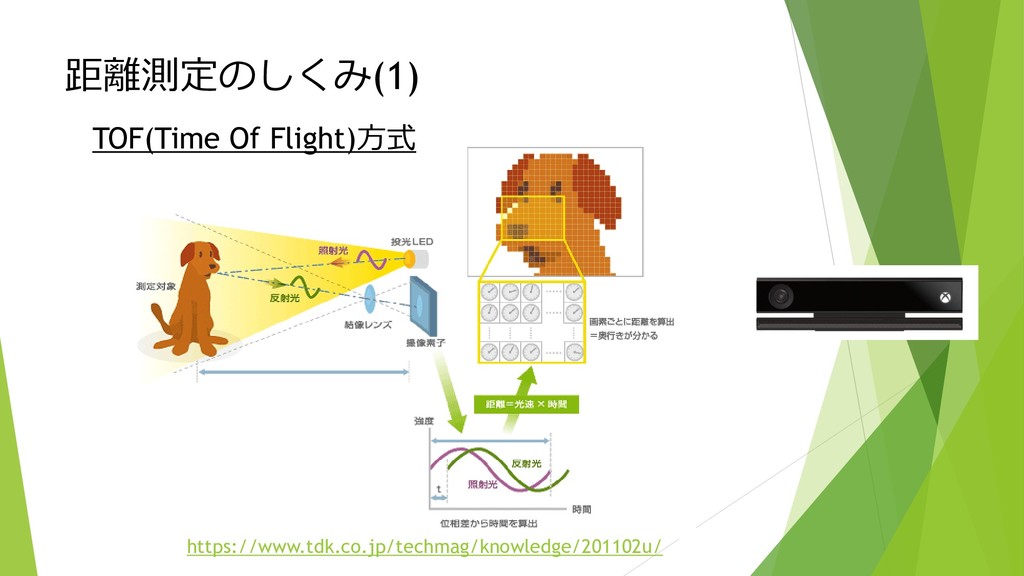
距離測定のしくみ(1) TOF(Time Of Flight)方式 https://www.tdk.co.jp/techmag/knowledge/201102u/
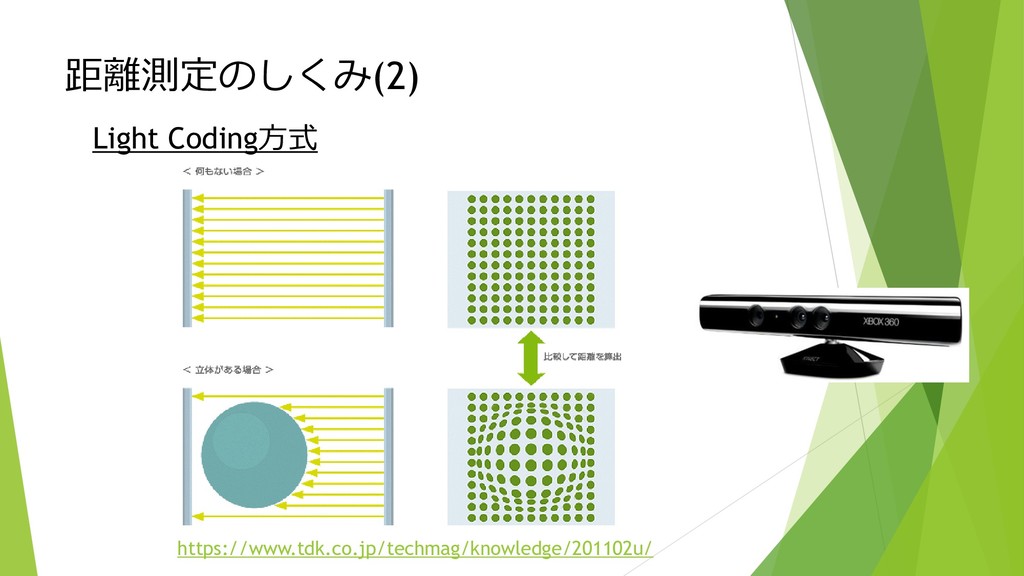
距離測定のしくみ(2) Light Coding方式 https://www.tdk.co.jp/techmag/knowledge/201102u/
何に使えるか? https://www.tekwind.co.jp/ASU/products/entry_13578.php
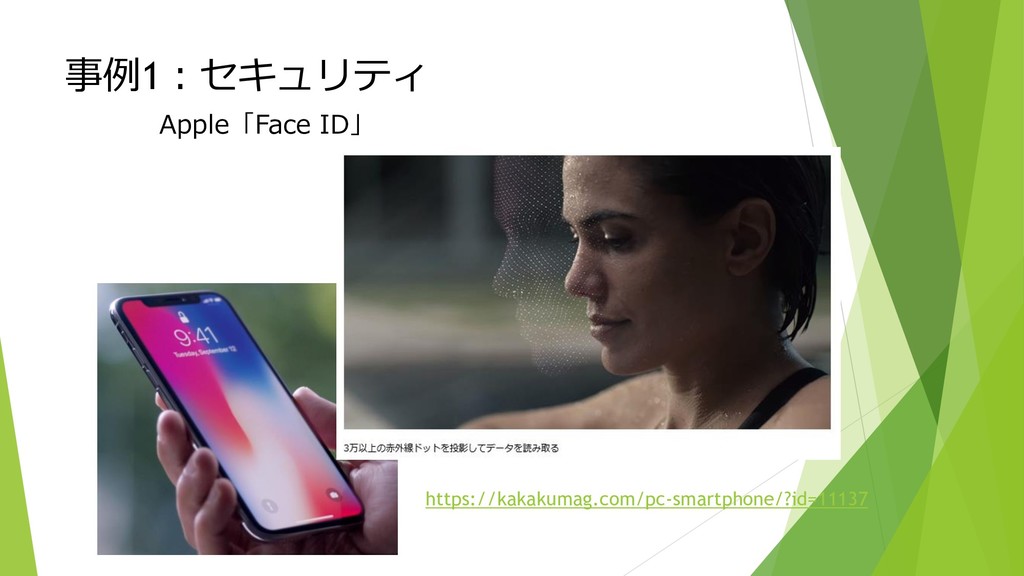
事例1:セキュリティ https://kakakumag.com/pc-smartphone/?id=11137 Apple「Face ID」
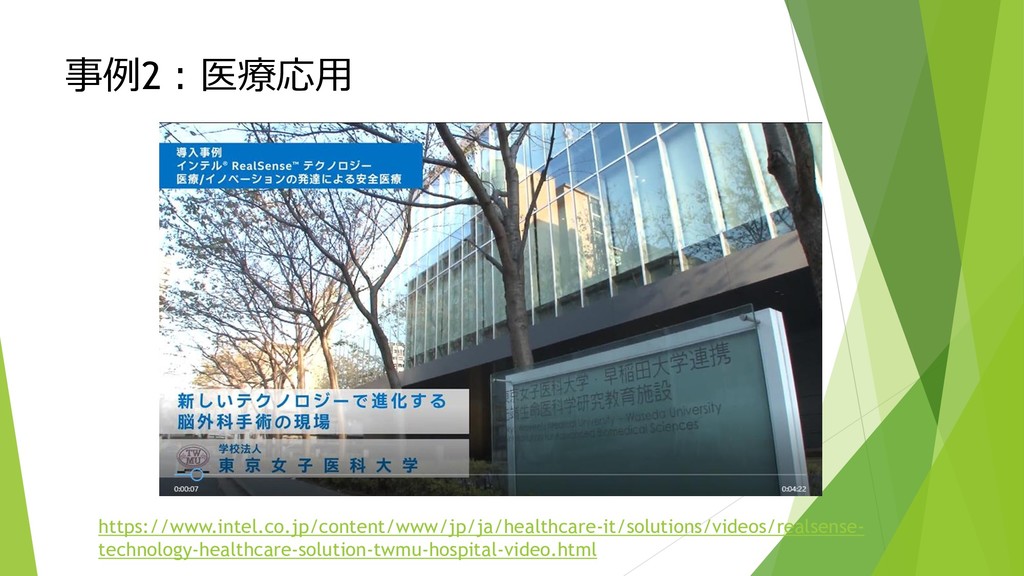
事例2:医療応用 https://www.intel.co.jp/content/www/jp/ja/healthcare-it/solutions/videos/realsense- technology-healthcare-solution-twmu-hospital-video.html
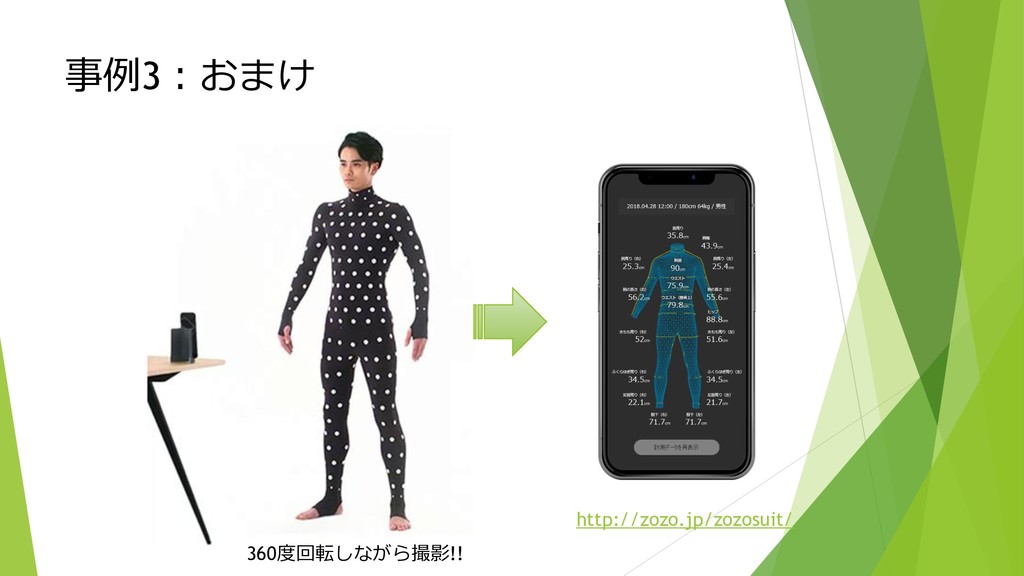
事例3:おまけ http://zozo.jp/zozosuit/ 360度回転しながら撮影!!
3Dセンシングとは? RealSense Depthカメラの使い方 ピープルカウンタ
RealSense Depth Camera D400 Series Intel RealSense D415 項目 D415
深度技術 Active IR stereo Vision 出力解像度(DepthStream) 最大1280x720 出力フレームレート (DepthStream) 最大30fps 最大レンジ 10m以上 コネクタ USB 3.0 Type-C OS Windows, Linux, MacOS 2018年1月発売
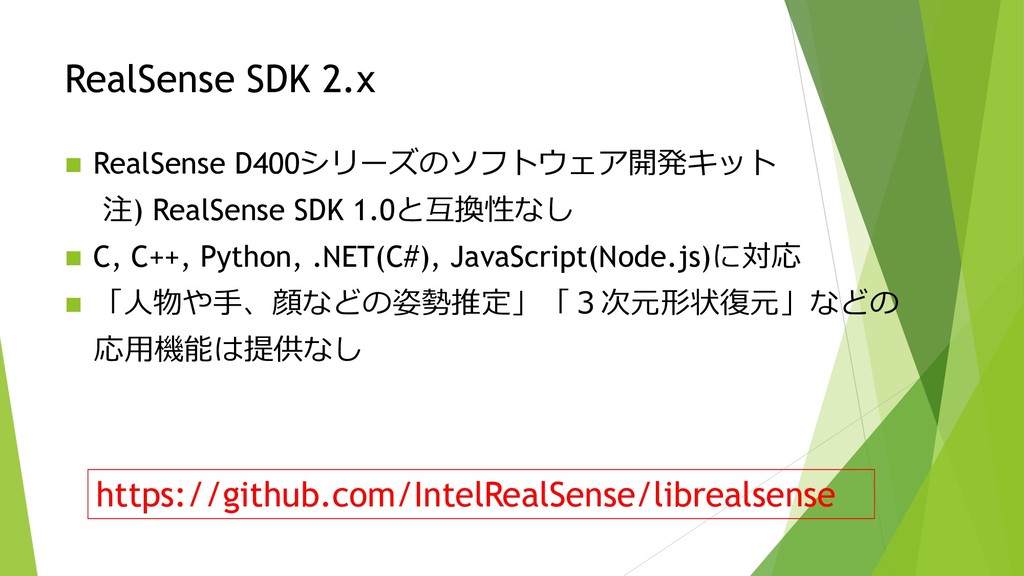
RealSense SDK 2.x RealSense D400シリーズのソフトウェア開発キット 注) RealSense SDK 1.0と互換性なし
C, C++, Python, .NET(C#), JavaScript(Node.js)に対応 「人物や手、顔などの姿勢推定」「3次元形状復元」などの 応用機能は提供なし https://github.com/IntelRealSense/librealsense
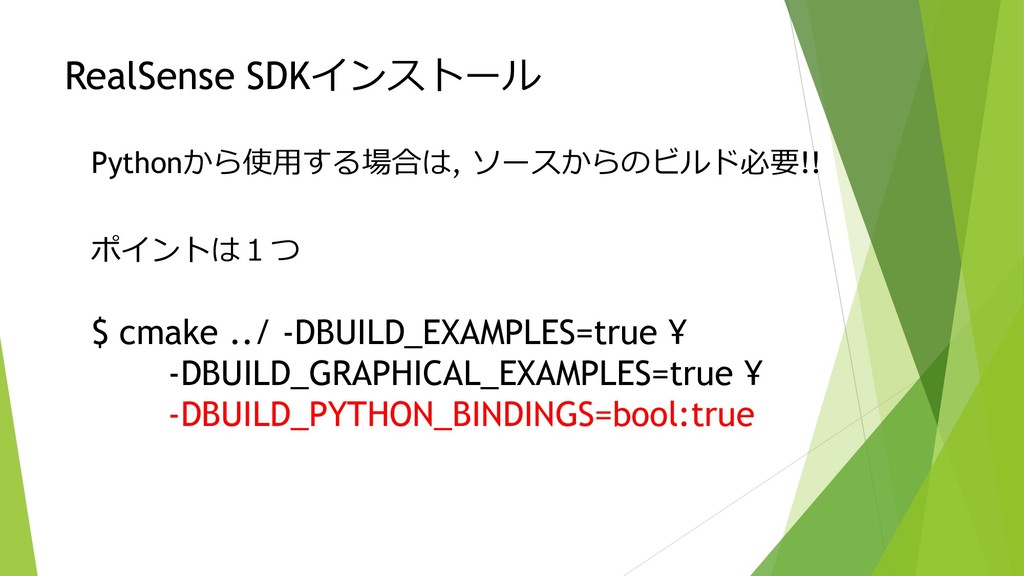
RealSense SDKインストール Pythonから使用する場合は, ソースからのビルド必要!! ポイントは1つ $ cmake ../ -DBUILD_EXAMPLES=true ¥
-DBUILD_GRAPHICAL_EXAMPLES=true ¥ -DBUILD_PYTHON_BINDINGS=bool:true
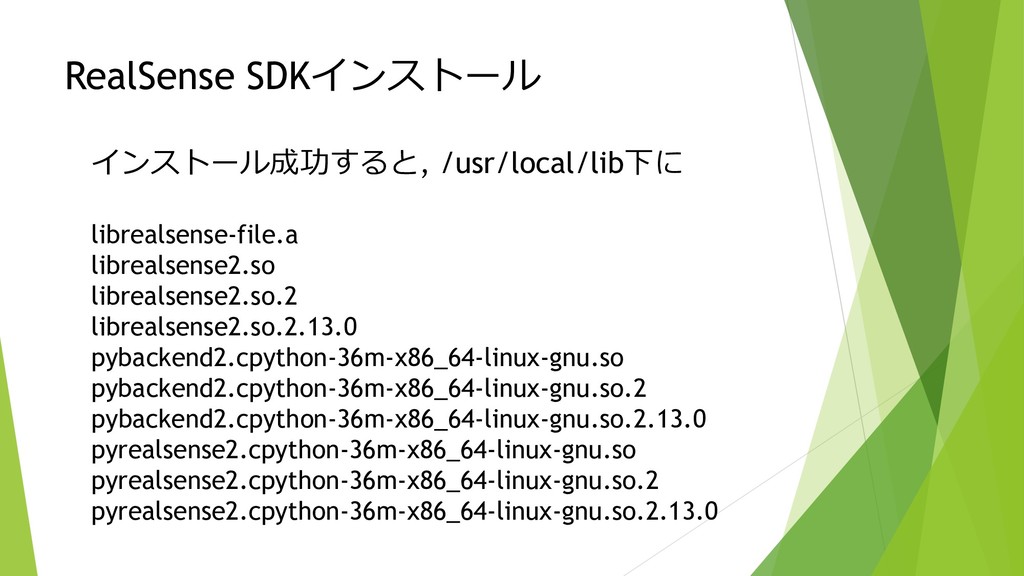
RealSense SDKインストール インストール成功すると, /usr/local/lib下に librealsense-file.a librealsense2.so librealsense2.so.2 librealsense2.so.2.13.0 pybackend2.cpython-36m-x86_64-linux-gnu.so pybackend2.cpython-36m-x86_64-linux-gnu.so.2
pybackend2.cpython-36m-x86_64-linux-gnu.so.2.13.0 pyrealsense2.cpython-36m-x86_64-linux-gnu.so pyrealsense2.cpython-36m-x86_64-linux-gnu.so.2 pyrealsense2.cpython-36m-x86_64-linux-gnu.so.2.13.0
基本的な使い方 Depth画像の表示 ファイルへの保存 ファイルの再生 距離情報の利用
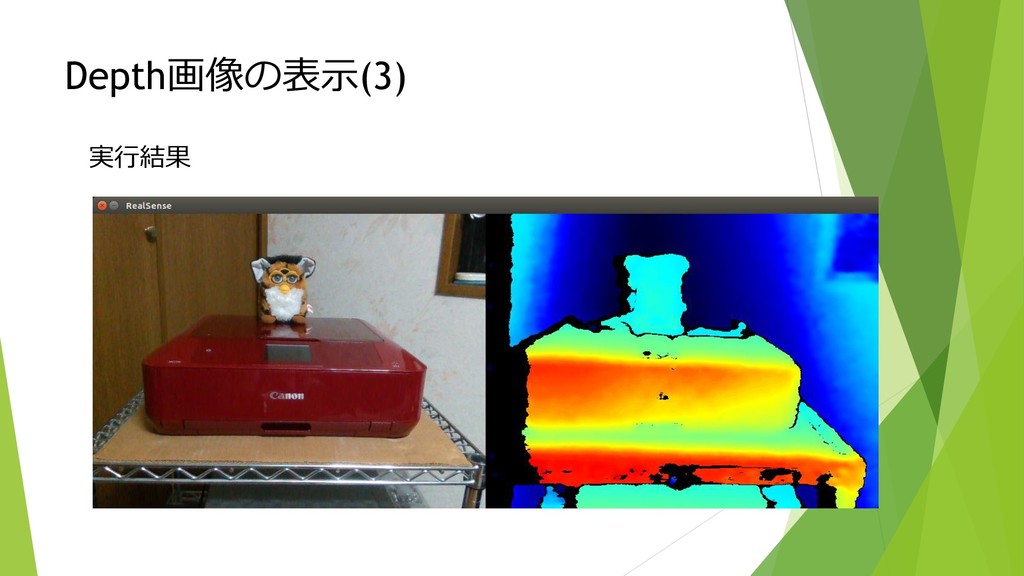
Depth画像の表示(1) コード: import pyrealsense2 as rs import numpy as np
import cv2 # ストリーム(Color/Depth)の設定 config = rs.config() config.enable_stream(rs.stream.color, 640, 480, rs.format.bgr8, 30) config.enable_stream(rs.stream.depth, 640, 480, rs.format.z16, 30) # ストリーミング開始 pipeline = rs.pipeline() profile = pipeline.start(config)
Depth画像の表示(2) try: while True: # フレーム待ち(Color & Depth) frames =
pipeline.wait_for_frames() color_frame = frames.get_color_frame() depth_frame = frames.get_depth_frame() if not depth_frame or not color_frame: continue color_image = np.asanyarray(color_frame.get_data()) depth_color_frame = rs.colorizer().colorize(depth_frame) depth_color_image = np.asanyarray(depth_color_frame.get_data()) # 表示 images = np.hstack((color_image, depth_color_image)) cv2.namedWindow('RealSense', cv2.WINDOW_AUTOSIZE) cv2.imshow('RealSense', images) if cv2.waitKey(1) & 0xff == 27: break
Depth画像の表示(3) 実行結果
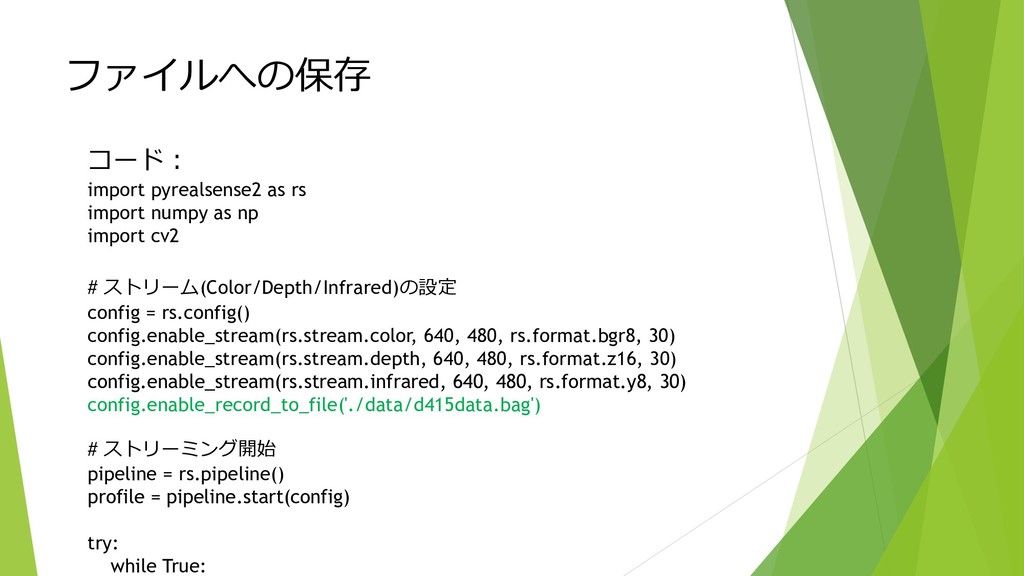
ファイルへの保存 コード: import pyrealsense2 as rs import numpy as np
import cv2 # ストリーム(Color/Depth/Infrared)の設定 config = rs.config() config.enable_stream(rs.stream.color, 640, 480, rs.format.bgr8, 30) config.enable_stream(rs.stream.depth, 640, 480, rs.format.z16, 30) config.enable_stream(rs.stream.infrared, 640, 480, rs.format.y8, 30) config.enable_record_to_file('./data/d415data.bag') # ストリーミング開始 pipeline = rs.pipeline() profile = pipeline.start(config) try: while True:
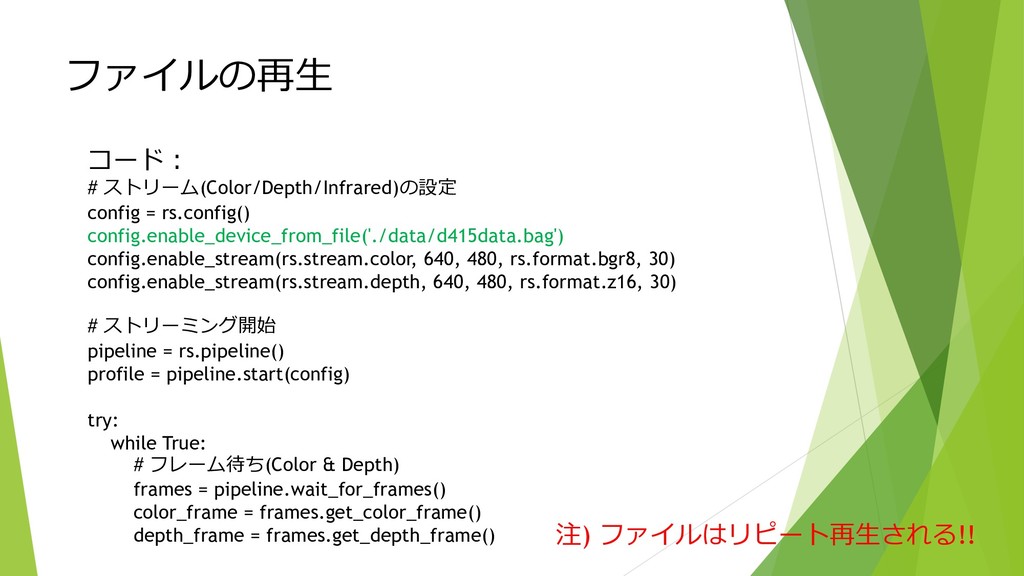
ファイルの再生 コード: # ストリーム(Color/Depth/Infrared)の設定 config = rs.config() config.enable_device_from_file('./data/d415data.bag') config.enable_stream(rs.stream.color, 640,
480, rs.format.bgr8, 30) config.enable_stream(rs.stream.depth, 640, 480, rs.format.z16, 30) # ストリーミング開始 pipeline = rs.pipeline() profile = pipeline.start(config) try: while True: # フレーム待ち(Color & Depth) frames = pipeline.wait_for_frames() color_frame = frames.get_color_frame() depth_frame = frames.get_depth_frame() 注) ファイルはリピート再生される!!
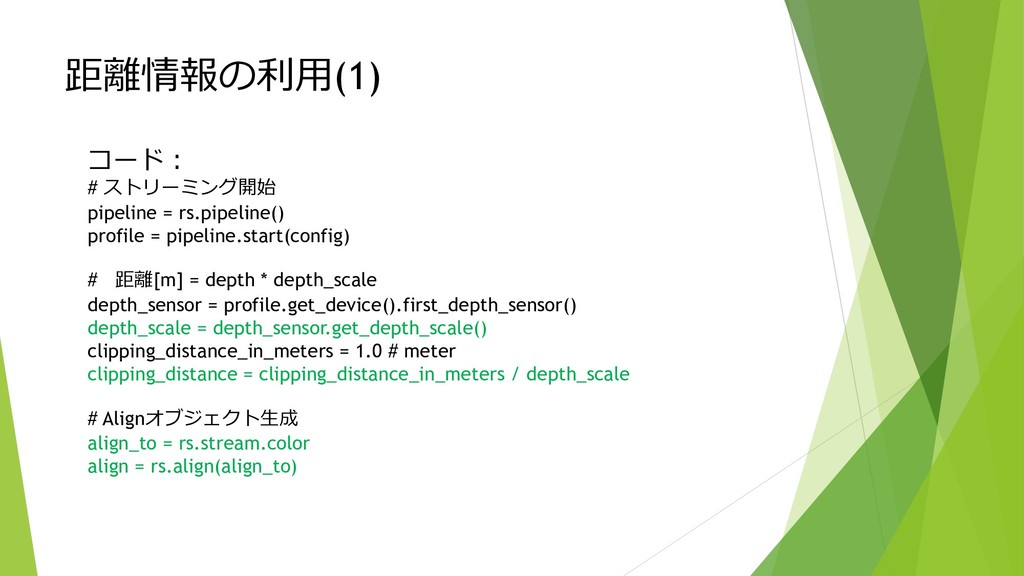
距離情報の利用(1) コード: # ストリーミング開始 pipeline = rs.pipeline() profile = pipeline.start(config)
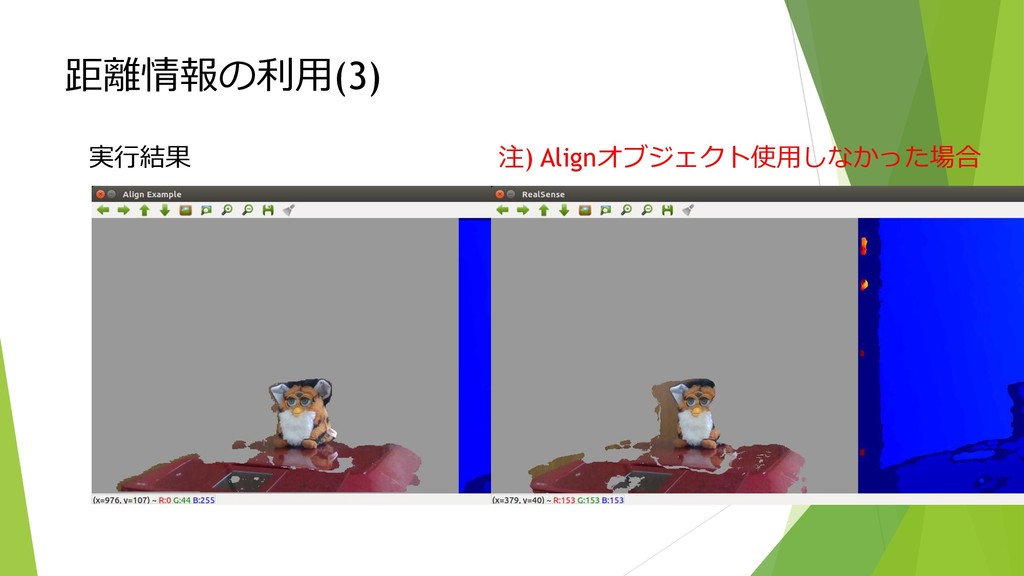
# 距離[m] = depth * depth_scale depth_sensor = profile.get_device().first_depth_sensor() depth_scale = depth_sensor.get_depth_scale() clipping_distance_in_meters = 1.0 # meter clipping_distance = clipping_distance_in_meters / depth_scale # Alignオブジェクト生成 align_to = rs.stream.color align = rs.align(align_to)
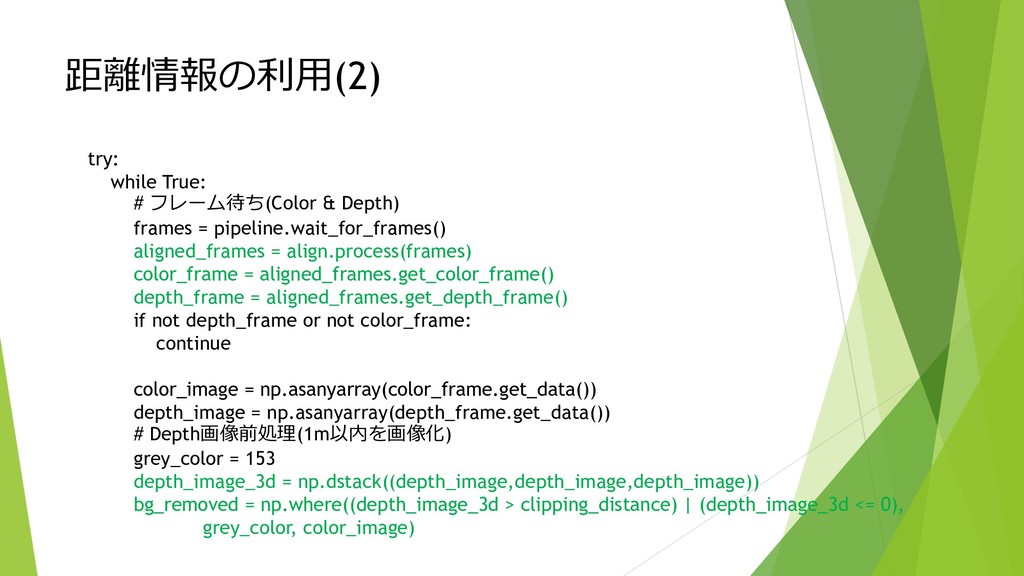
距離情報の利用(2) try: while True: # フレーム待ち(Color & Depth) frames =
pipeline.wait_for_frames() aligned_frames = align.process(frames) color_frame = aligned_frames.get_color_frame() depth_frame = aligned_frames.get_depth_frame() if not depth_frame or not color_frame: continue color_image = np.asanyarray(color_frame.get_data()) depth_image = np.asanyarray(depth_frame.get_data()) # Depth画像前処理(1m以内を画像化) grey_color = 153 depth_image_3d = np.dstack((depth_image,depth_image,depth_image)) bg_removed = np.where((depth_image_3d > clipping_distance) | (depth_image_3d <= 0), grey_color, color_image)
距離情報の利用(3) 実行結果 注) Alignオブジェクト使用しなかった場合
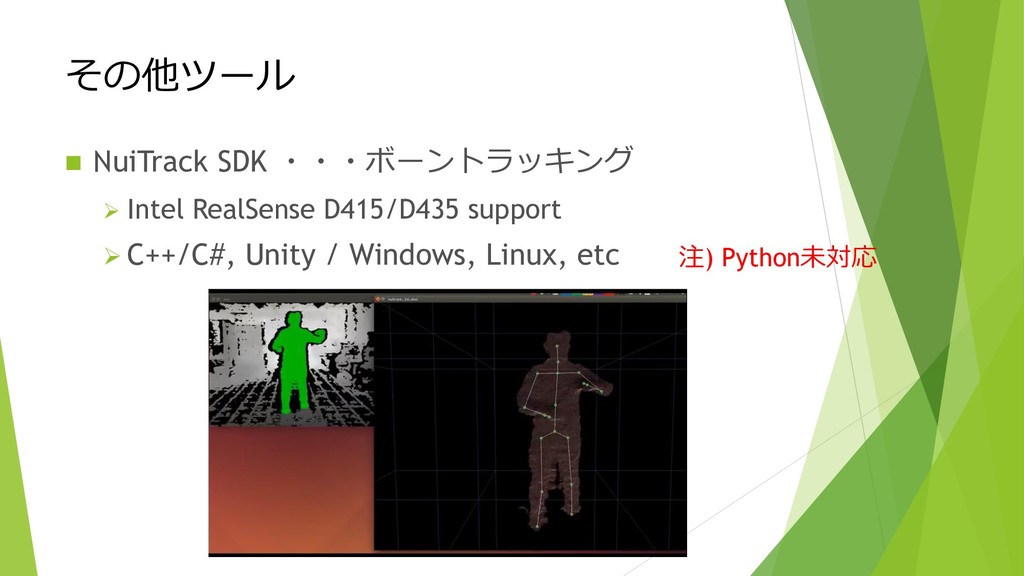
その他ツール NuiTrack SDK ・・・ボーントラッキング Intel RealSense D415/D435 support
C++/C#, Unity / Windows, Linux, etc 注) Python未対応
3Dセンシングとは? RealSense Depthカメラの使い方 ピープルカウンタ
ピープルカウンタ ある施設への入退場者をカウントしたい アイデア出し(’18/1) 1. カメラ RGBカメラだと個人特定できるのでカメラ設置を嫌がれる. ⇒ 3Dセンサなら個人特定が困難 施設内での動線(人の流れ)解析へ拡張しやすそう.
2. 感圧マット 3. 赤外線センサ :
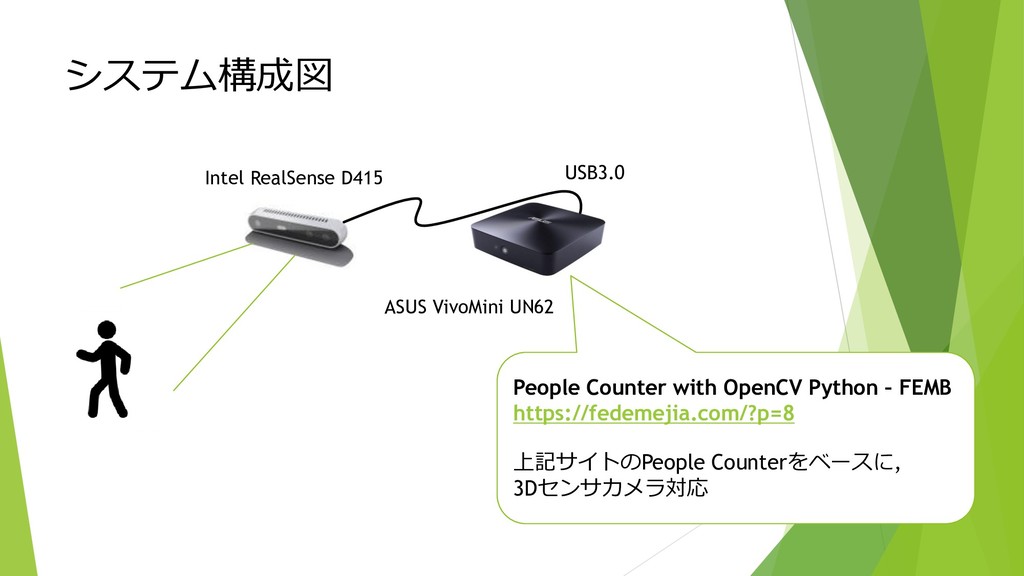
システム構成図 Intel RealSense D415 ASUS VivoMini UN62 USB3.0 People Counter
with OpenCV Python – FEMB https://fedemejia.com/?p=8 上記サイトのPeople Counterをベースに, 3Dセンサカメラ対応
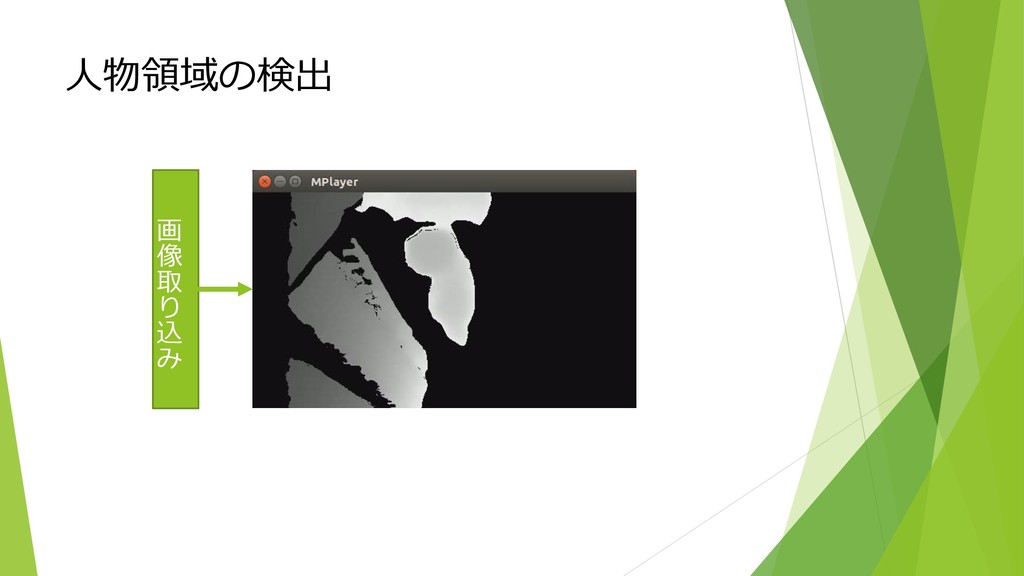
人物領域の検出 画 像 取 り 込 み
人物領域の検出 画 像 取 り 込 み 背 景 差
分 cv2.createBackgroundSubtractorMOG2()
人物領域の検出 画 像 取 り 込 み 背 景 差
分 二 値 化 cv2.threshold()
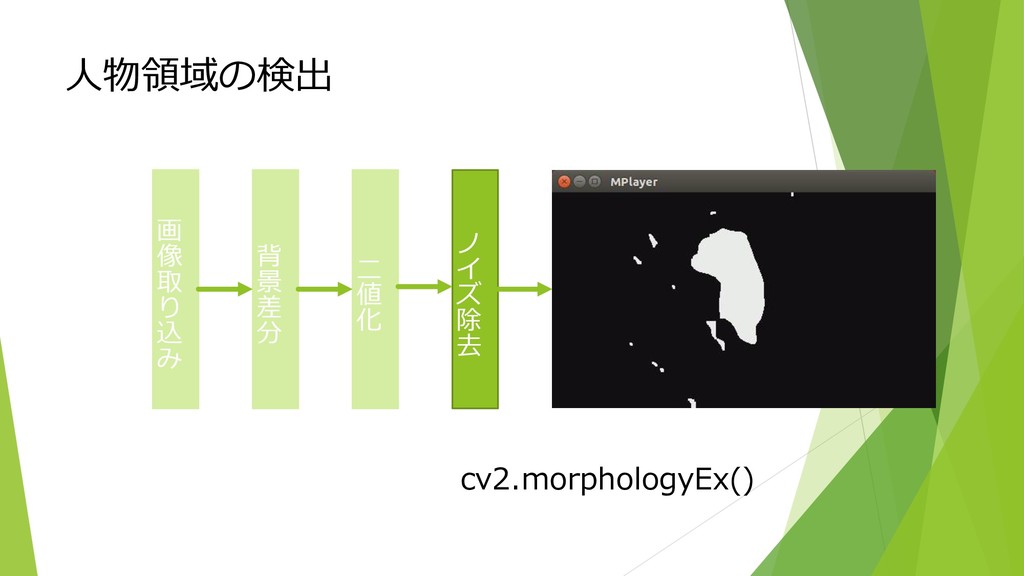
人物領域の検出 画 像 取 り 込 み 背 景 差
分 二 値 化 ノ イ ズ 除 去 cv2.morphologyEx()
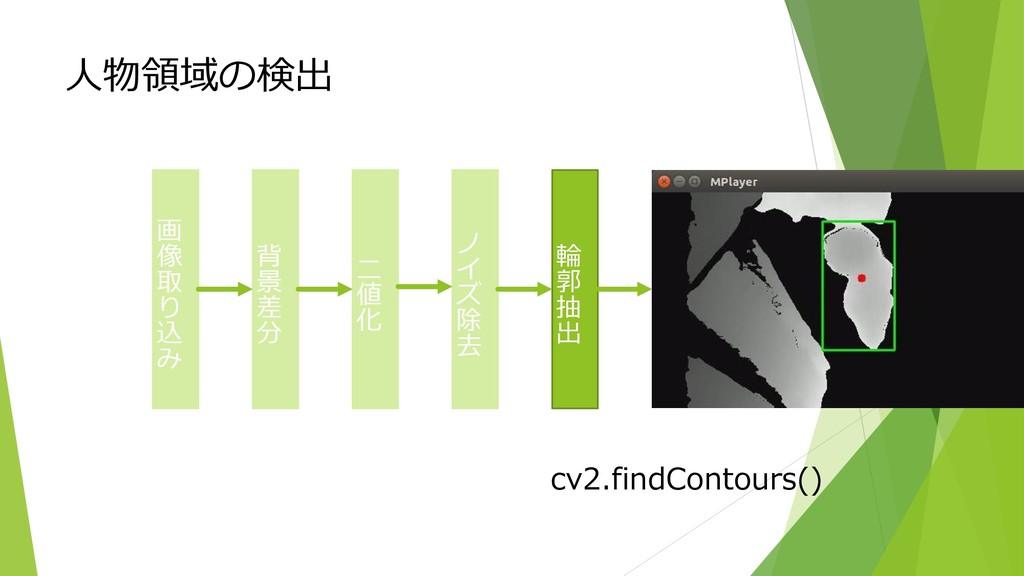
人物領域の検出 画 像 取 り 込 み 背 景 差
分 二 値 化 ノ イ ズ 除 去 輪 郭 抽 出 cv2.findContours()
人物のトラッキング 追跡中 人物 ID=10 ID=12 ID=13 処理中 フレーム 人 物
領 域 重 心 計 算 追 跡 中 人 物 と 照 合 人 物 情 報 更 新 ト ラ ッ キ ン グ
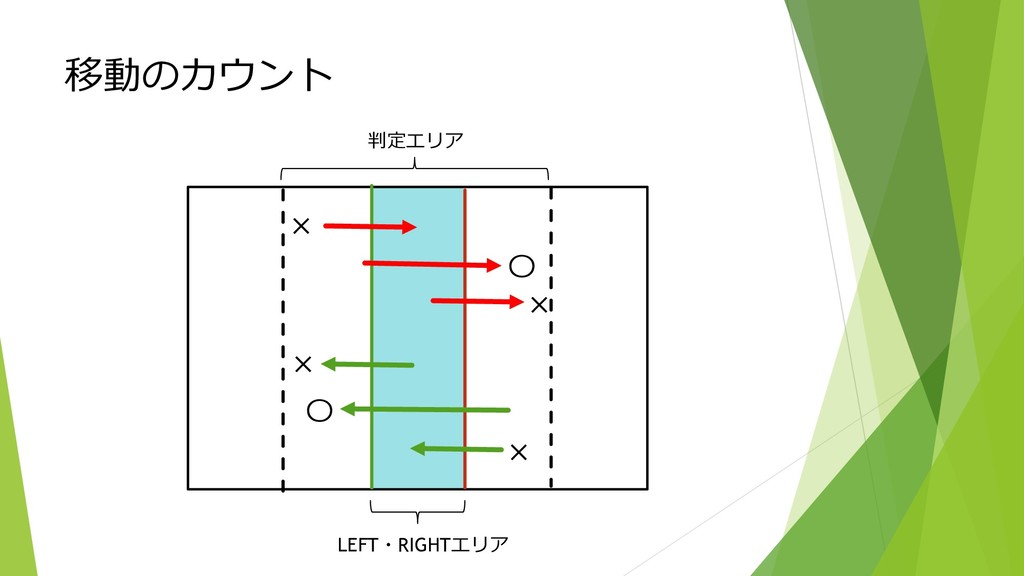
移動のカウント LEFT・RIGHTエリア × × × × 〇 〇 判定エリア
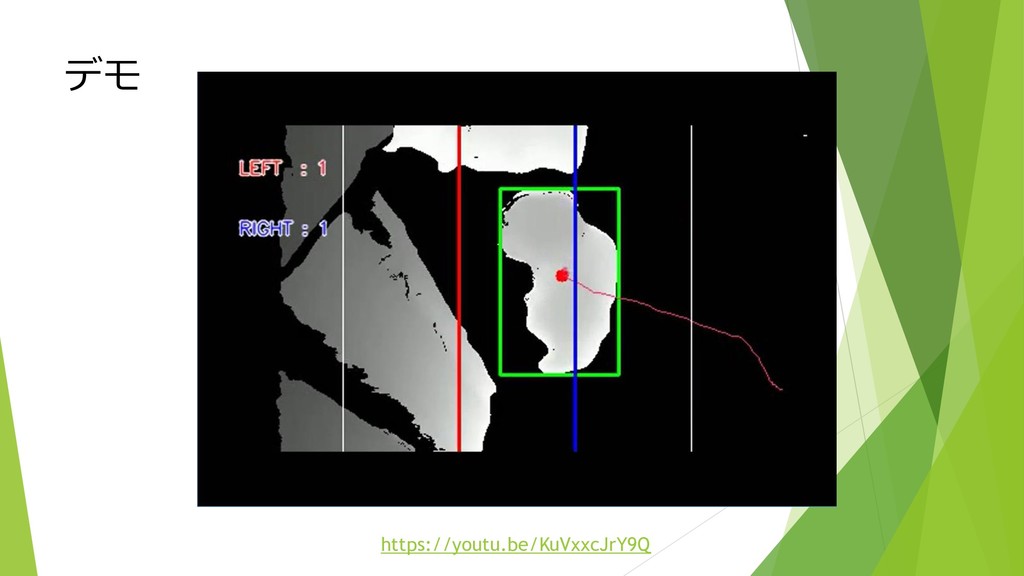
デモ https://youtu.be/KuVxxcJrY9Q
最後に 3Dセンシングに興味もってもらったらOK. Intel RealSense SDK 2.xのPythonドキュメント少ないが, 画像入力程度なら十分. ただ,
細かな設定など使いこなすならC/C++で… Depth画像で画像処理やDeep Learningやるなら, OpenCVやKerasなどの使い方もぜひ覚えましょう!!
Thank You!