Upgrade to Pro
— share decks privately, control downloads, hide ads and more …
Speaker Deck
Features
Speaker Deck
PRO
Sign in
Sign up for free
Search
Search
Riot.jsでSemanticUIを使ってみる
Search
Sponsored
·
Your Podcast. Everywhere. Effortlessly.
Share. Educate. Inspire. Entertain. You do you. We'll handle the rest.
→
Nobuki Inoue
June 23, 2018
Programming
600
2
Share
Embed
Copy iframe code
Copy JS code
Copy link
Start on current slide
Riot.jsでSemanticUIを使ってみる
Nobuki Inoue
June 23, 2018
More Decks by Nobuki Inoue
See All by Nobuki Inoue
Webサービスを作ってみて気づいたこと
black_trooper
0
490
10年使ったDBFluteに思う事
black_trooper
0
530
UI Component 作ってますか?
black_trooper
1
560
Other Decks in Programming
See All in Programming
SLOをサービス品質の共通言語にするために 取り組んできたこと
wakana0222
0
420
ローカルLLMでどこまでコードが書けるか -拡張版 / How much code can be written on a local LLM Extended
kishida
12
4.7k
TSKaigi Night Talks 2026_TypeScriptでサプライチェーンの整合性を型に閉じ込める
geekplus_tech
0
430
Hunting Vulnerabilities in Symfony with LLMs
vinceamstoutz
0
580
これからAgentCoreを触る方へ トレンドはGatewayです
har1101
6
480
LLMによるContent Moderationの本番運用の裏側と品質担保への挑戦
suikabar
3
840
アルゴリズムは何を圧縮しているのか ─ Haskell から育った「圧縮代数」というメンタルモデル
naoya
15
3.1k
Signal Forms: Details & Live Coding @enterJS 2026 in Mannheim
manfredsteyer
PRO
0
220
Dataformのリポジトリを立ち上げるときにまずやること / dataform-day0-2026
snhryt
0
210
自作OSでスライド発表する
uyuki234
1
3.7k
Contextとはなにか
chiroruxx
1
390
Go1.27で導入されるジェネリクスメソッドでできること
mackee
0
260
Featured
See All Featured
Templates, Plugins, & Blocks: Oh My! Creating the theme that thinks of everything
marktimemedia
31
2.8k
I Don’t Have Time: Getting Over the Fear to Launch Your Podcast
jcasabona
34
2.8k
How to Create Impact in a Changing Tech Landscape [PerfNow 2023]
tammyeverts
55
3.4k
The Web Performance Landscape in 2024 [PerfNow 2024]
tammyeverts
12
1.2k
Building an army of robots
kneath
306
46k
The Cost Of JavaScript in 2023
addyosmani
55
10k
The MySQL Ecosystem @ GitHub 2015
samlambert
251
13k
Sam Torres - BigQuery for SEOs
techseoconnect
PRO
0
300
The World Runs on Bad Software
bkeepers
PRO
72
12k
Ethics towards AI in product and experience design
skipperchong
2
320
Why Mistakes Are the Best Teachers: Turning Failure into a Pathway for Growth
auna
0
180
The browser strikes back
jonoalderson
0
1.4k
Transcript
Riot.js で Semantic UI を使ってみる 2018/06/23 【第2回】React (JSフレームワーク他)x ビアバッシュ 初心者勉強会
HELLO! 井上 暢己(いのうえ のぶき) @black_trooper フリーのWebエンジニア フロントエンドとサーバサイドどっちもやって ます。 2
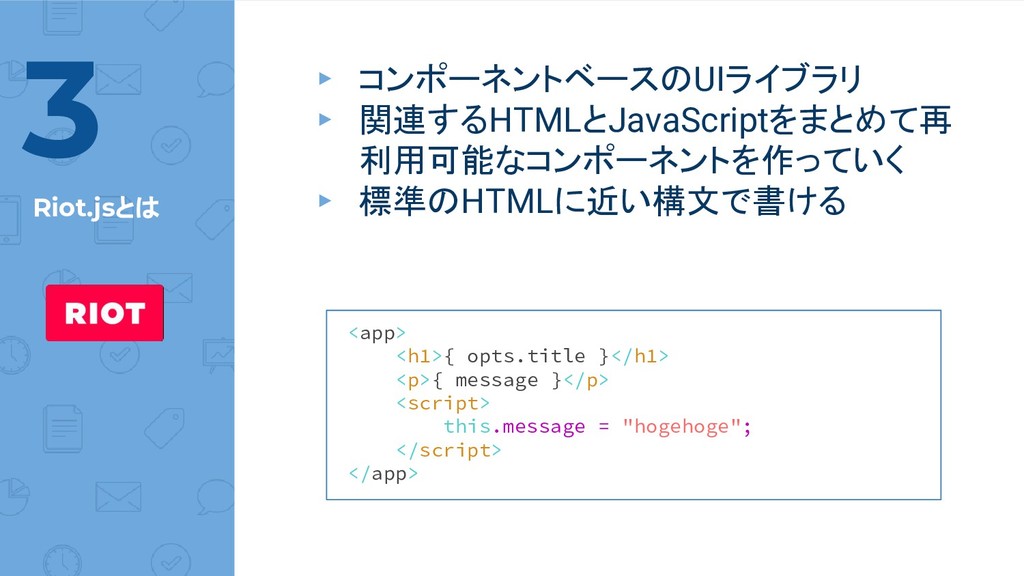
Riot.jsとは ▸ コンポーネントベースのUIライブラリ ▸ 関連するHTMLとJavaScriptをまとめて再 利用可能なコンポーネントを作っていく ▸ 標準のHTMLに近い構文で書ける 3 <app>
<h1>{ opts.title }</h1> <p>{ message }</p> <script> this.message = "hogehoge"; </script> </app>
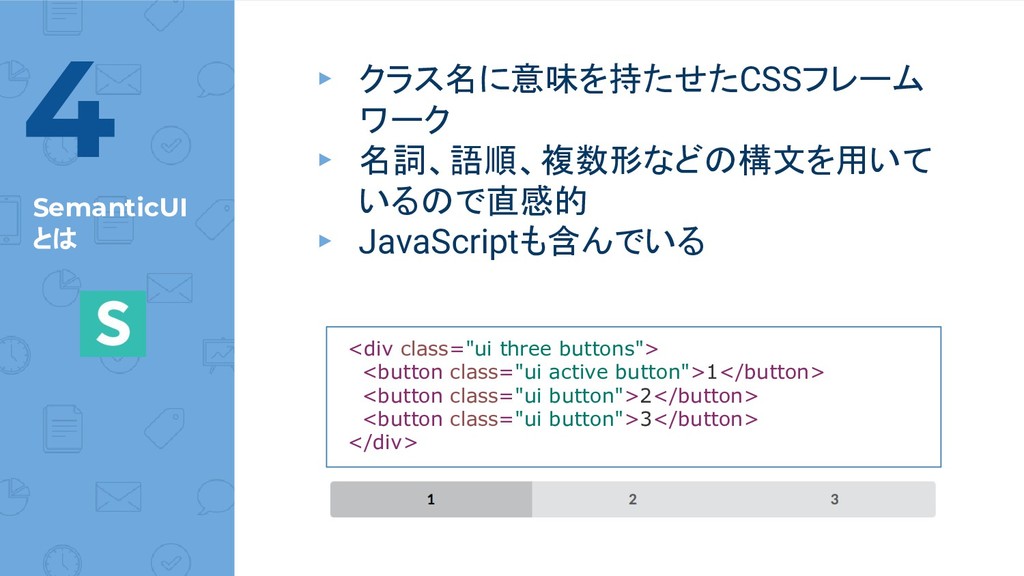
SemanticUI とは ▸ クラス名に意味を持たせたCSSフレーム ワーク ▸ 名詞、語順、複数形などの構文を用いて いるので直感的 ▸ JavaScriptも含んでいる
4 <div class="ui three buttons"> <button class="ui active button">1</button> <button class="ui button">2</button> <button class="ui button">3</button> </div>
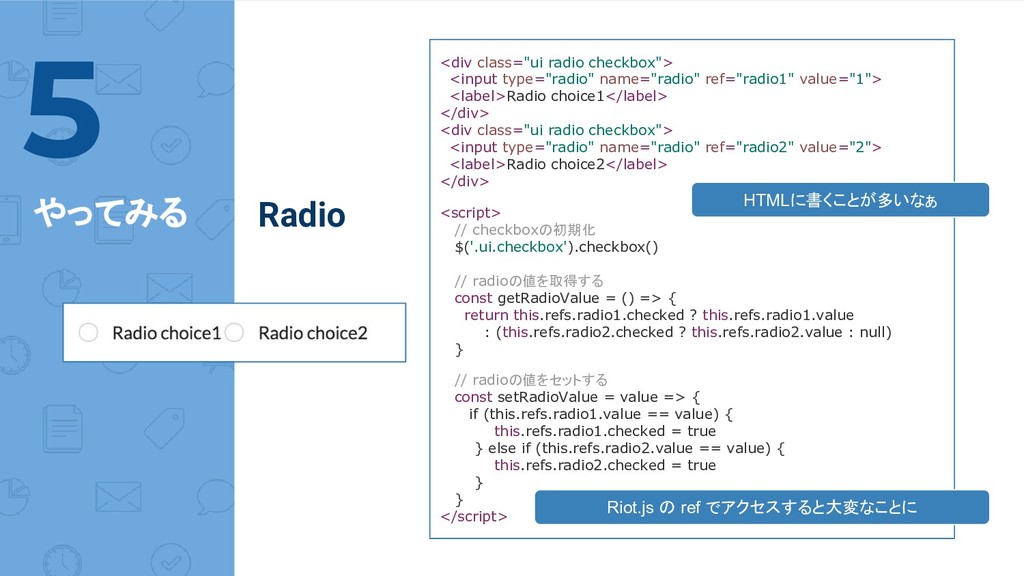
やってみる 5 <div class="ui radio checkbox"> <input type="radio" name="radio" ref="radio1"
value="1"> <label>Radio choice1</label> </div> <div class="ui radio checkbox"> <input type="radio" name="radio" ref="radio2" value="2"> <label>Radio choice2</label> </div> <script> // checkboxの初期化 $('.ui.checkbox').checkbox() // radioの値を取得する const getRadioValue = () => { return this.refs.radio1.checked ? this.refs.radio1.value : (this.refs.radio2.checked ? this.refs.radio2.value : null) } // radioの値をセットする const setRadioValue = value => { if (this.refs.radio1.value == value) { this.refs.radio1.checked = true } else if (this.refs.radio2.value == value) { this.refs.radio2.checked = true } } </script> Radio HTMLに書くことが多いなぁ Riot.js の ref でアクセスすると大変なことに
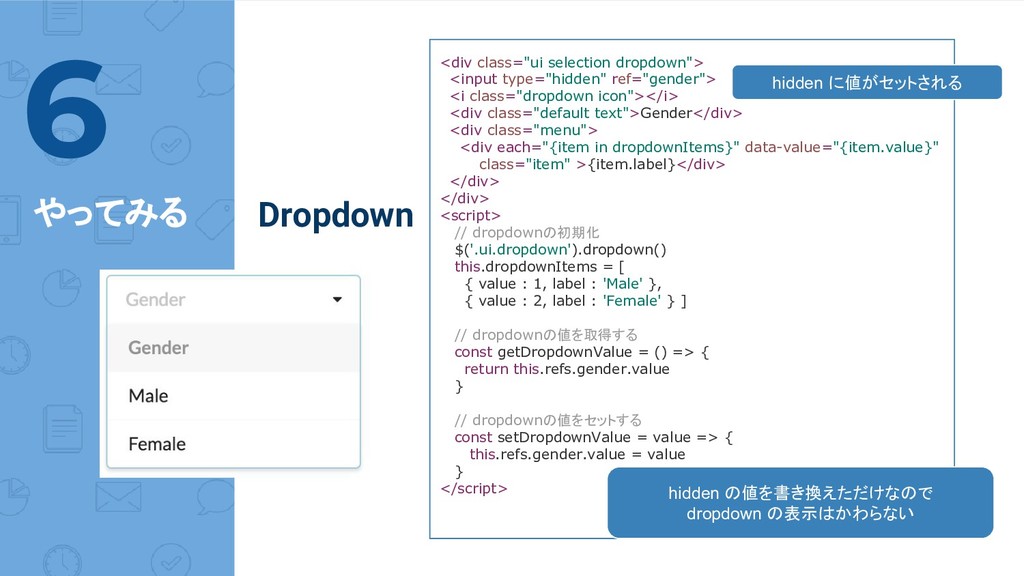
やってみる 6 <div class="ui selection dropdown"> <input type="hidden" ref="gender"> <i
class="dropdown icon"></i> <div class="default text">Gender</div> <div class="menu"> <div each="{item in dropdownItems}" data-value="{item.value}" class="item" >{item.label}</div> </div> </div> <script> // dropdownの初期化 $('.ui.dropdown').dropdown() this.dropdownItems = [ { value : 1, label : 'Male' }, { value : 2, label : 'Female' } ] // dropdownの値を取得する const getDropdownValue = () => { return this.refs.gender.value } // dropdownの値をセットする const setDropdownValue = value => { this.refs.gender.value = value } </script> Dropdown hidden に値がセットされる hidden の値を書き換えただけなので dropdown の表示はかわらない
思ったよりつらい・・・ Semantic UI 用のコンポーネントも見つからないし困ったな 7
どこにも無いなら作るしかない! 自分専用で作ってもいいけど、どうせなら npm に公開してしまえー 8
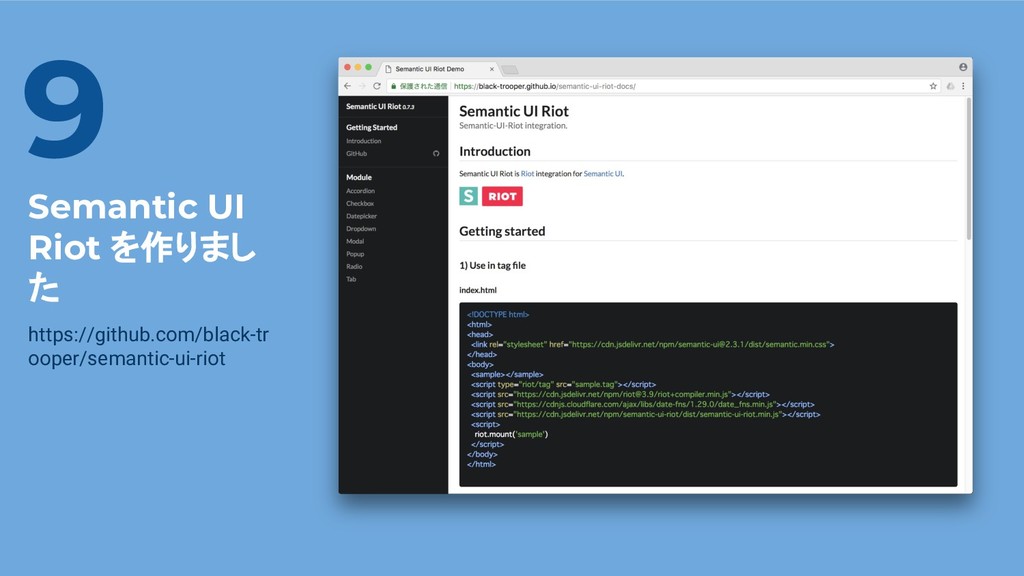
Semantic UI Riot を作りまし た https://github.com/black-tr ooper/semantic-ui-riot Place your screenshot
here 9
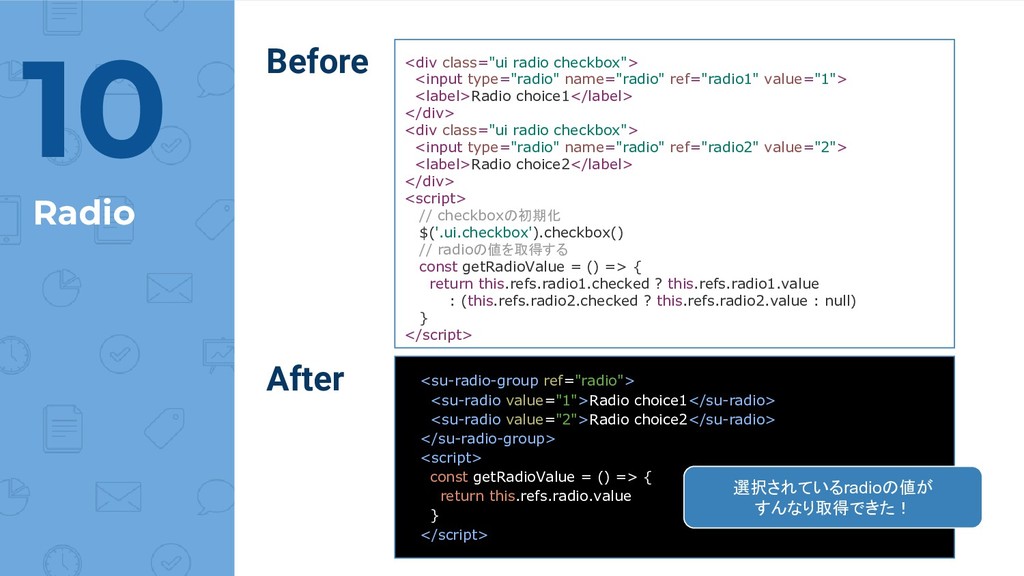
<su-radio-group ref="radio"> <su-radio value="1">Radio choice1</su-radio> <su-radio value="2">Radio choice2</su-radio> </su-radio-group> <script>
const getRadioValue = () => { return this.refs.radio.value } </script> Radio 10 <div class="ui radio checkbox"> <input type="radio" name="radio" ref="radio1" value="1"> <label>Radio choice1</label> </div> <div class="ui radio checkbox"> <input type="radio" name="radio" ref="radio2" value="2"> <label>Radio choice2</label> </div> <script> // checkboxの初期化 $('.ui.checkbox').checkbox() // radioの値を取得する const getRadioValue = () => { return this.refs.radio1.checked ? this.refs.radio1.value : (this.refs.radio2.checked ? this.refs.radio2.value : null) } </script> Before After 選択されているradioの値が すんなり取得できた!
<su-dropdown items="{ dropdownItems }" ref="gender" /> <script> this.dropdownItems = [
{ value: null, label: 'Gender', default: true }, { value: 1, label: 'Male' }, { value: 2, label: 'Female' } ] alert(this.refs.gender.value ) </script> Dropdown 11 <div class="ui selection dropdown"> <input type="hidden" ref="gender"> <i class="dropdown icon"></i> <div class="default text">Gender</div> <div class="menu"> <div each="{item in dropdownItems}" data-value="{item.value}" class="item" >{item.label}</div> </div> </div> <script> $('.ui.dropdown').dropdown() // dropdownの初期化 this.dropdownItems = [ { value : 1, label : 'Male' }, { value : 2, label : 'Female' } ] alert(this.refs.gender.value) // dropdownの値を取得する </script> Before After HTMLの記述がコンパクトになった!
<su-tabset class="top tabular"> <su-tab title="First">First content</su-tab> <su-tab title="Second">Second content</su-tab> <su-tab
title="Third">Third content</su-tab> </su-tabset> Tab 12 <div class="ui top attached tabular menu"> <a class="active item" data-tab="first">First</a> <a class="item" data-tab="second">Second</a> <a class="item" data-tab="third">Third</a> </div> <div class="ui bottom attached active tab segment" data-tab="first"> First content</div> <div class="ui bottom attached tab segment" data-tab="second"> Second content</div> <div class="ui bottom attached tab segment" data-tab="third"> Third content</div> <script> // tabの初期化 $('.tabular.menu .item').tab() </script> Before After HTMLの記述がコンパクトになった!
他にも いろいろ ▸ Accordion ▸ Checkbox ▸ Datepicker ▸ Dropdown
▸ Modal ▸ Popup ▸ Radio ▸ Tab 今後も少しずつですが追加していきます。 13
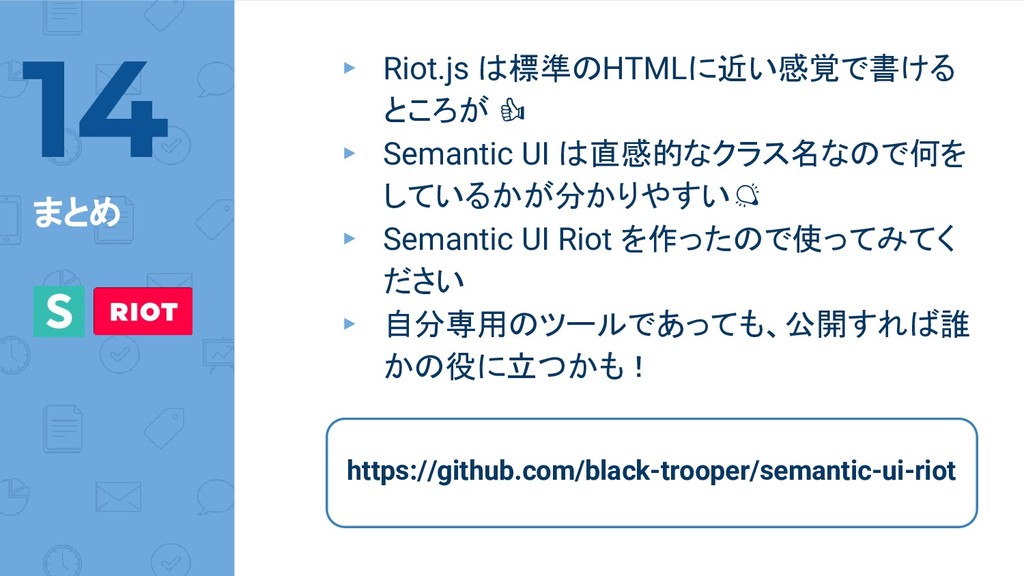
まとめ ▸ Riot.js は標準のHTMLに近い感覚で書ける ところが ▸ Semantic UI は直感的なクラス名なので何を しているかが分かりやすい
▸ Semantic UI Riot を作ったので使ってみてく ださい ▸ 自分専用のツールであっても、公開すれば誰 かの役に立つかも! 14 https://github.com/black-trooper/semantic-ui-riot
15 THANKS! ご清聴ありがとうございました。