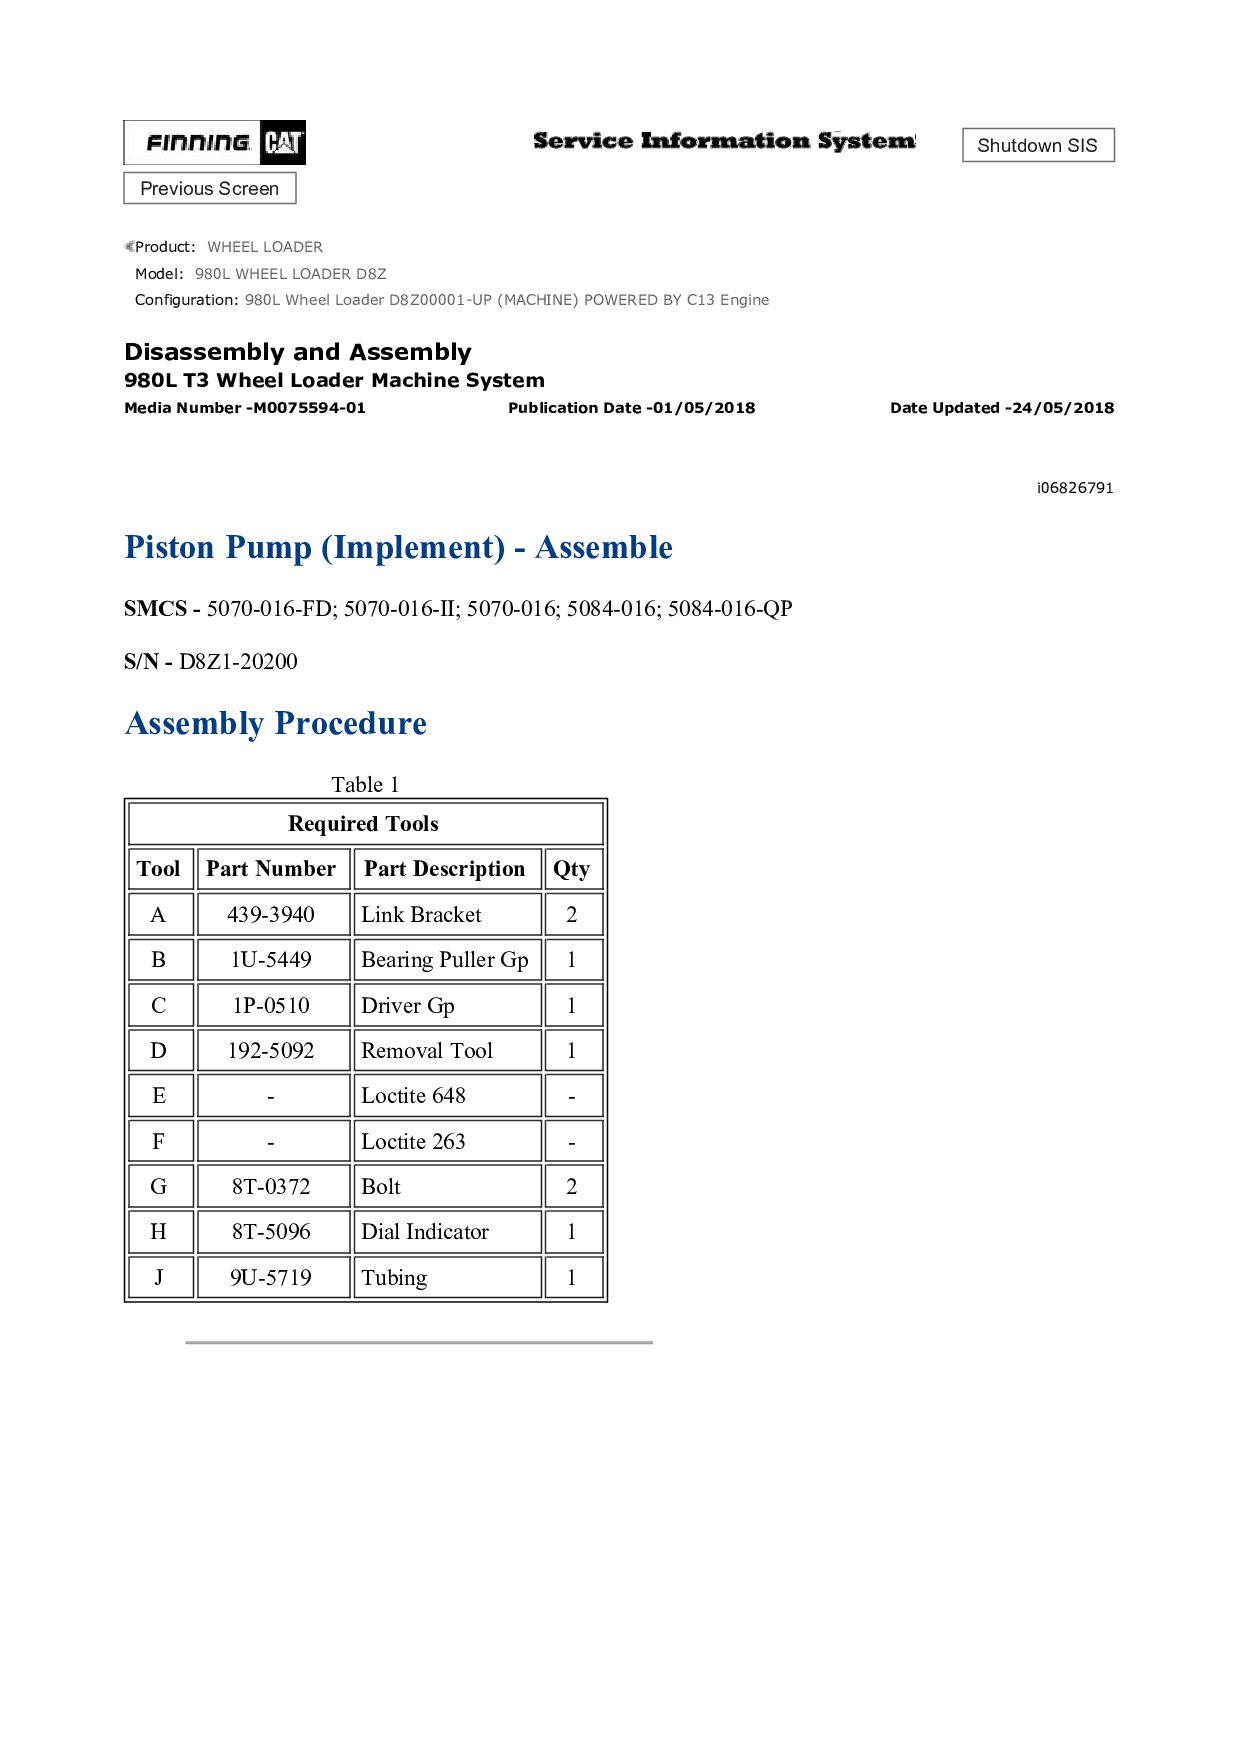
LOADER D8Z Configuration: 980L Wheel Loader D8Z00001-UP (MACHINE) POWERED BY C13 Engine Disassembly and Assembly 980L T3 Wheel Loader Machine System Media Number -M0075594-01 Publication Date -01/05/2018 Date Updated -24/05/2018 i06826791 Piston Pump (Implement) - Assemble SMCS - 5070-016-FD; 5070-016-II; 5070-016; 5084-016; 5084-016-QP S/N - D8Z1-20200 Assembly Procedure Table 1 Required Tools Tool Part Number Part Description Qty A 439-3940 Link Bracket 2 B 1U-5449 Bearing Puller Gp 1 C 1P-0510 Driver Gp 1 D 192-5092 Removal Tool 1 E - Loctite 648 - F - Loctite 263 - G 8T-0372 Bolt 2 H 8T-5096 Dial Indicator 1 J 9U-5719 Tubing 1
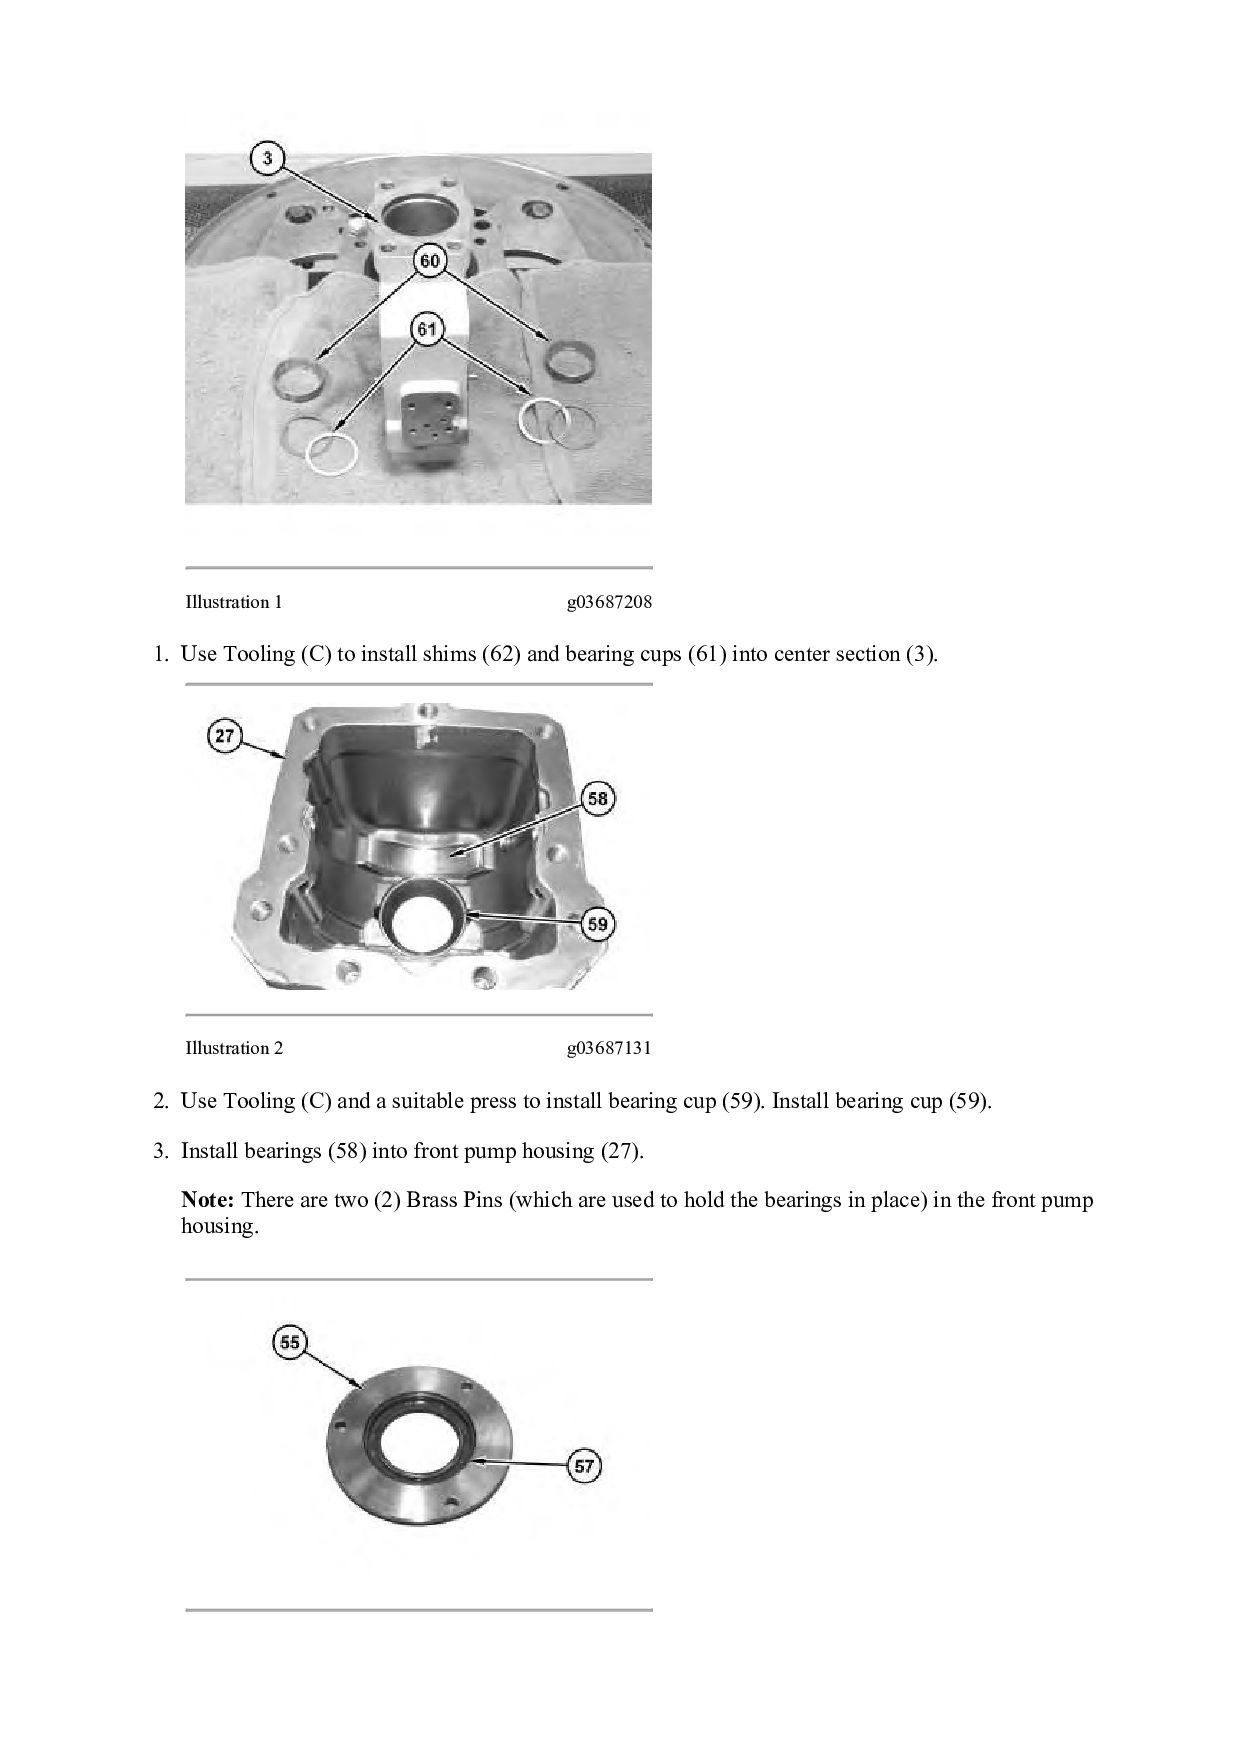
(62) and bearing cups (61) into center section (3). Illustration 2 g03687131 2. Use Tooling (C) and a suitable press to install bearing cup (59). Install bearing cup (59). 3. Install bearings (58) into front pump housing (27). Note: There are two (2) Brass Pins (which are used to hold the bearings in place) in the front pump housing.
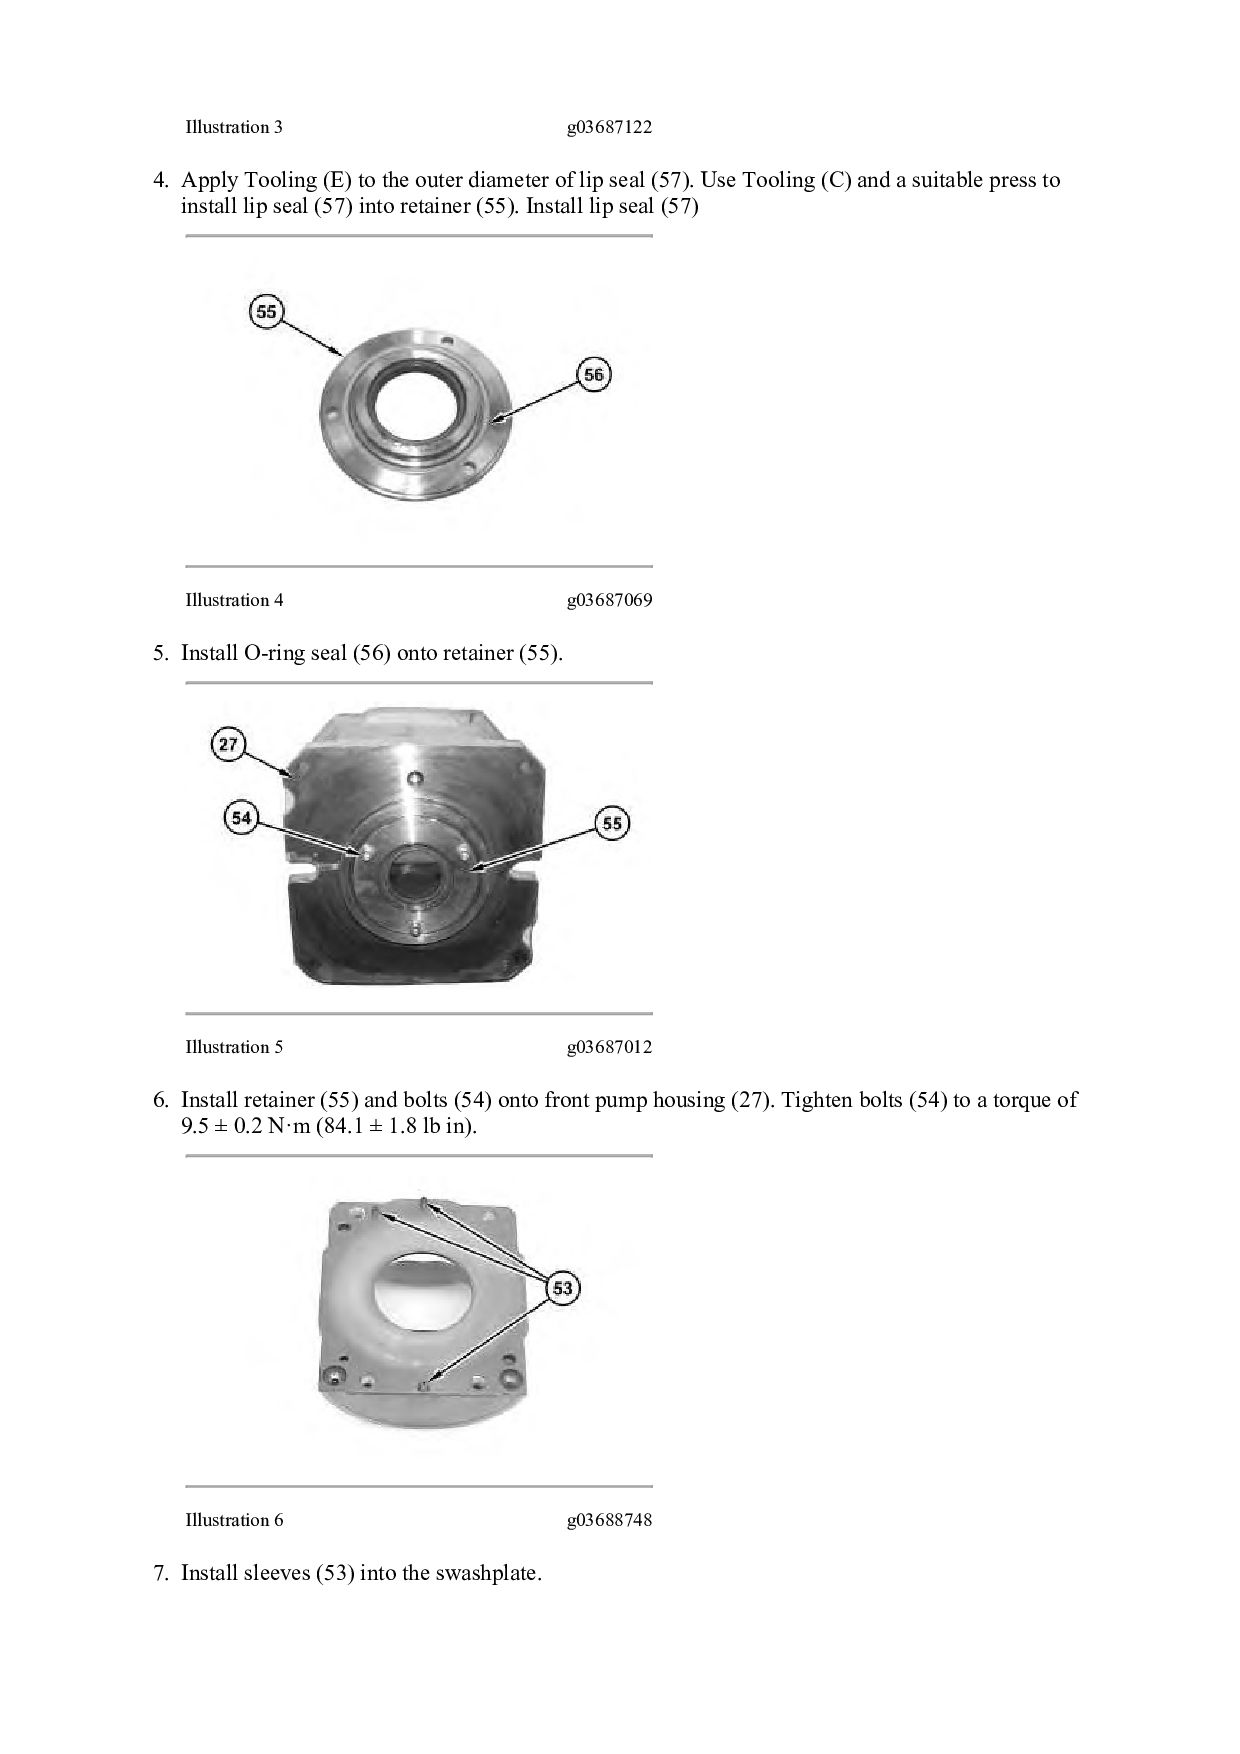
diameter of lip seal (57). Use Tooling (C) and a suitable press to install lip seal (57) into retainer (55). Install lip seal (57) Illustration 4 g03687069 5. Install O-ring seal (56) onto retainer (55). Illustration 5 g03687012 6. Install retainer (55) and bolts (54) onto front pump housing (27). Tighten bolts (54) to a torque of 9.5 ± 0.2 N·m (84.1 ± 1.8 lb in). Illustration 6 g03688748 7. Install sleeves (53) into the swashplate.
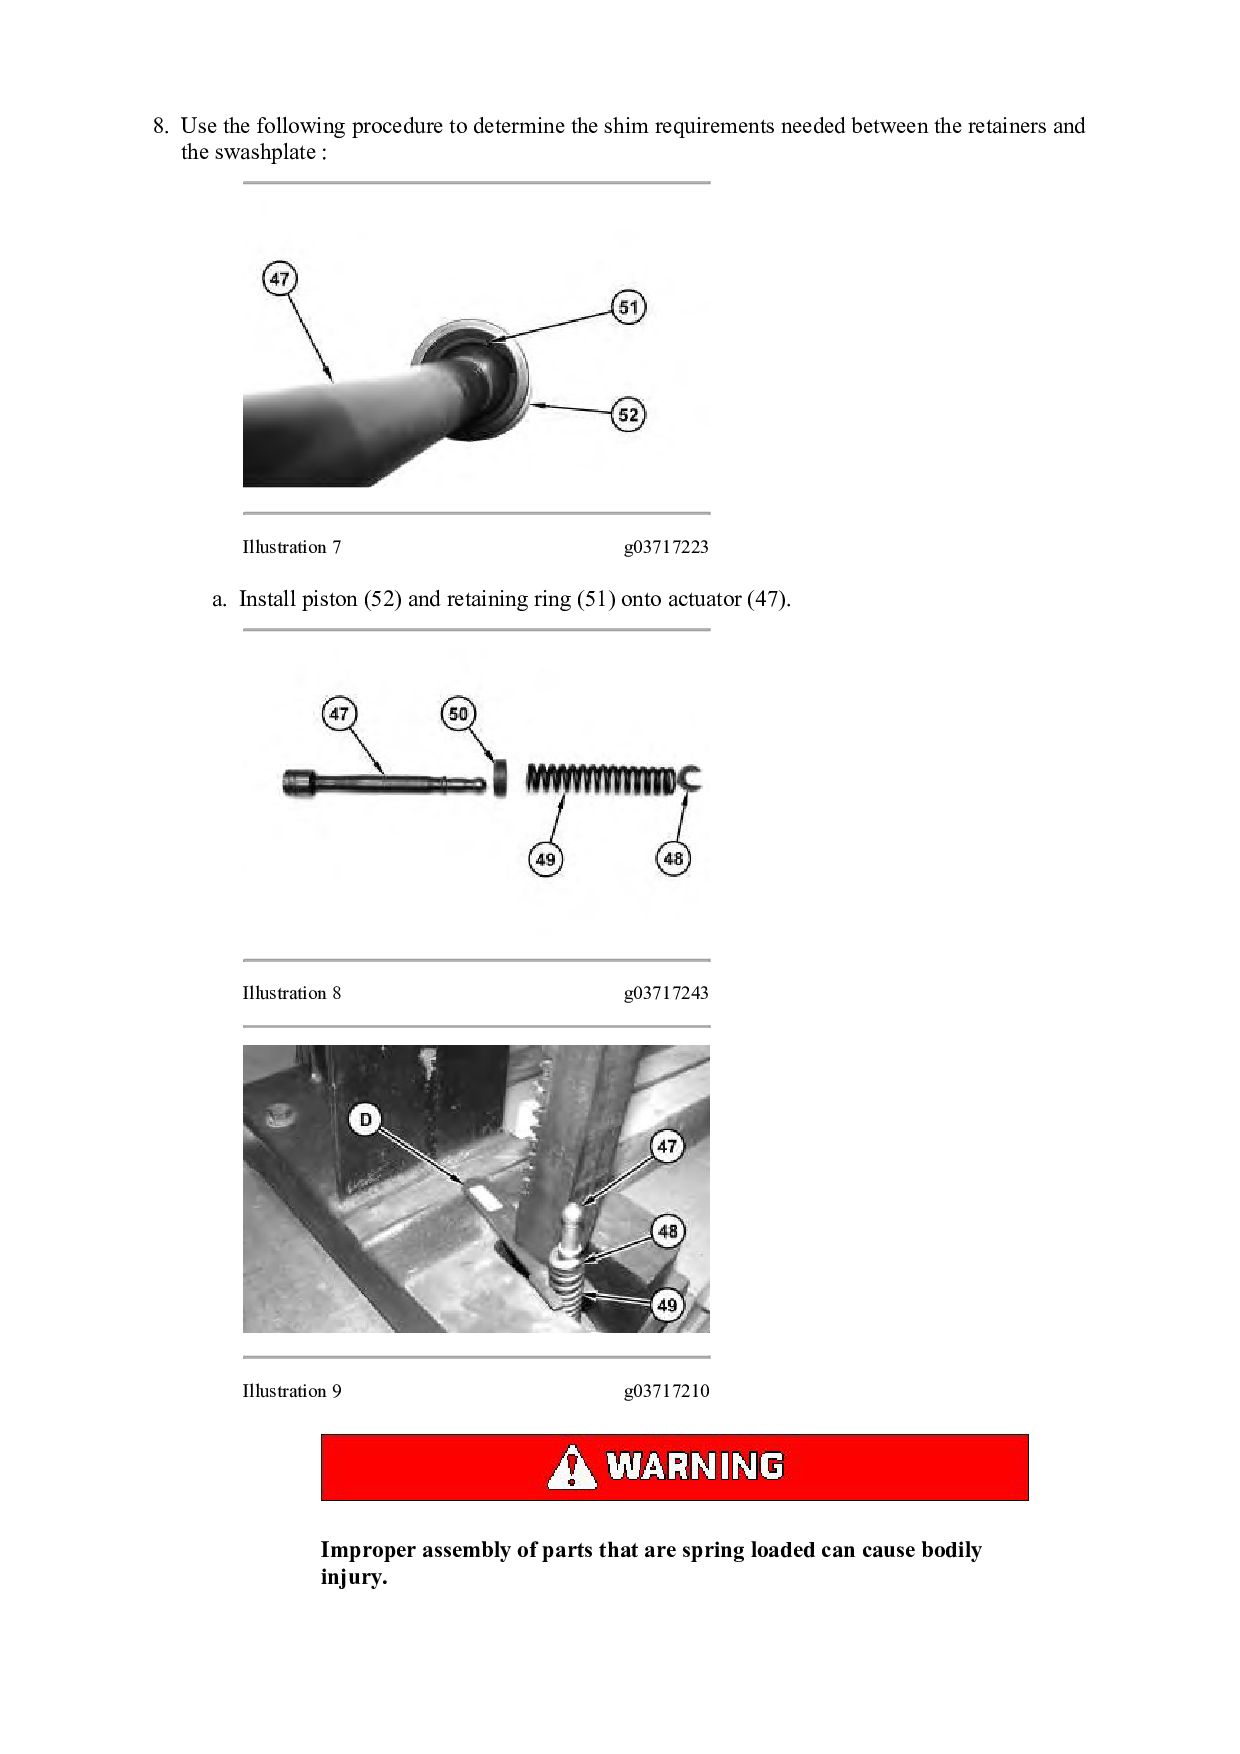
needed between the retainers and the swashplate : Illustration 7 g03717223 a. Install piston (52) and retaining ring (51) onto actuator (47). Illustration 8 g03717243 Illustration 9 g03717210 Improper assembly of parts that are spring loaded can cause bodily injury.
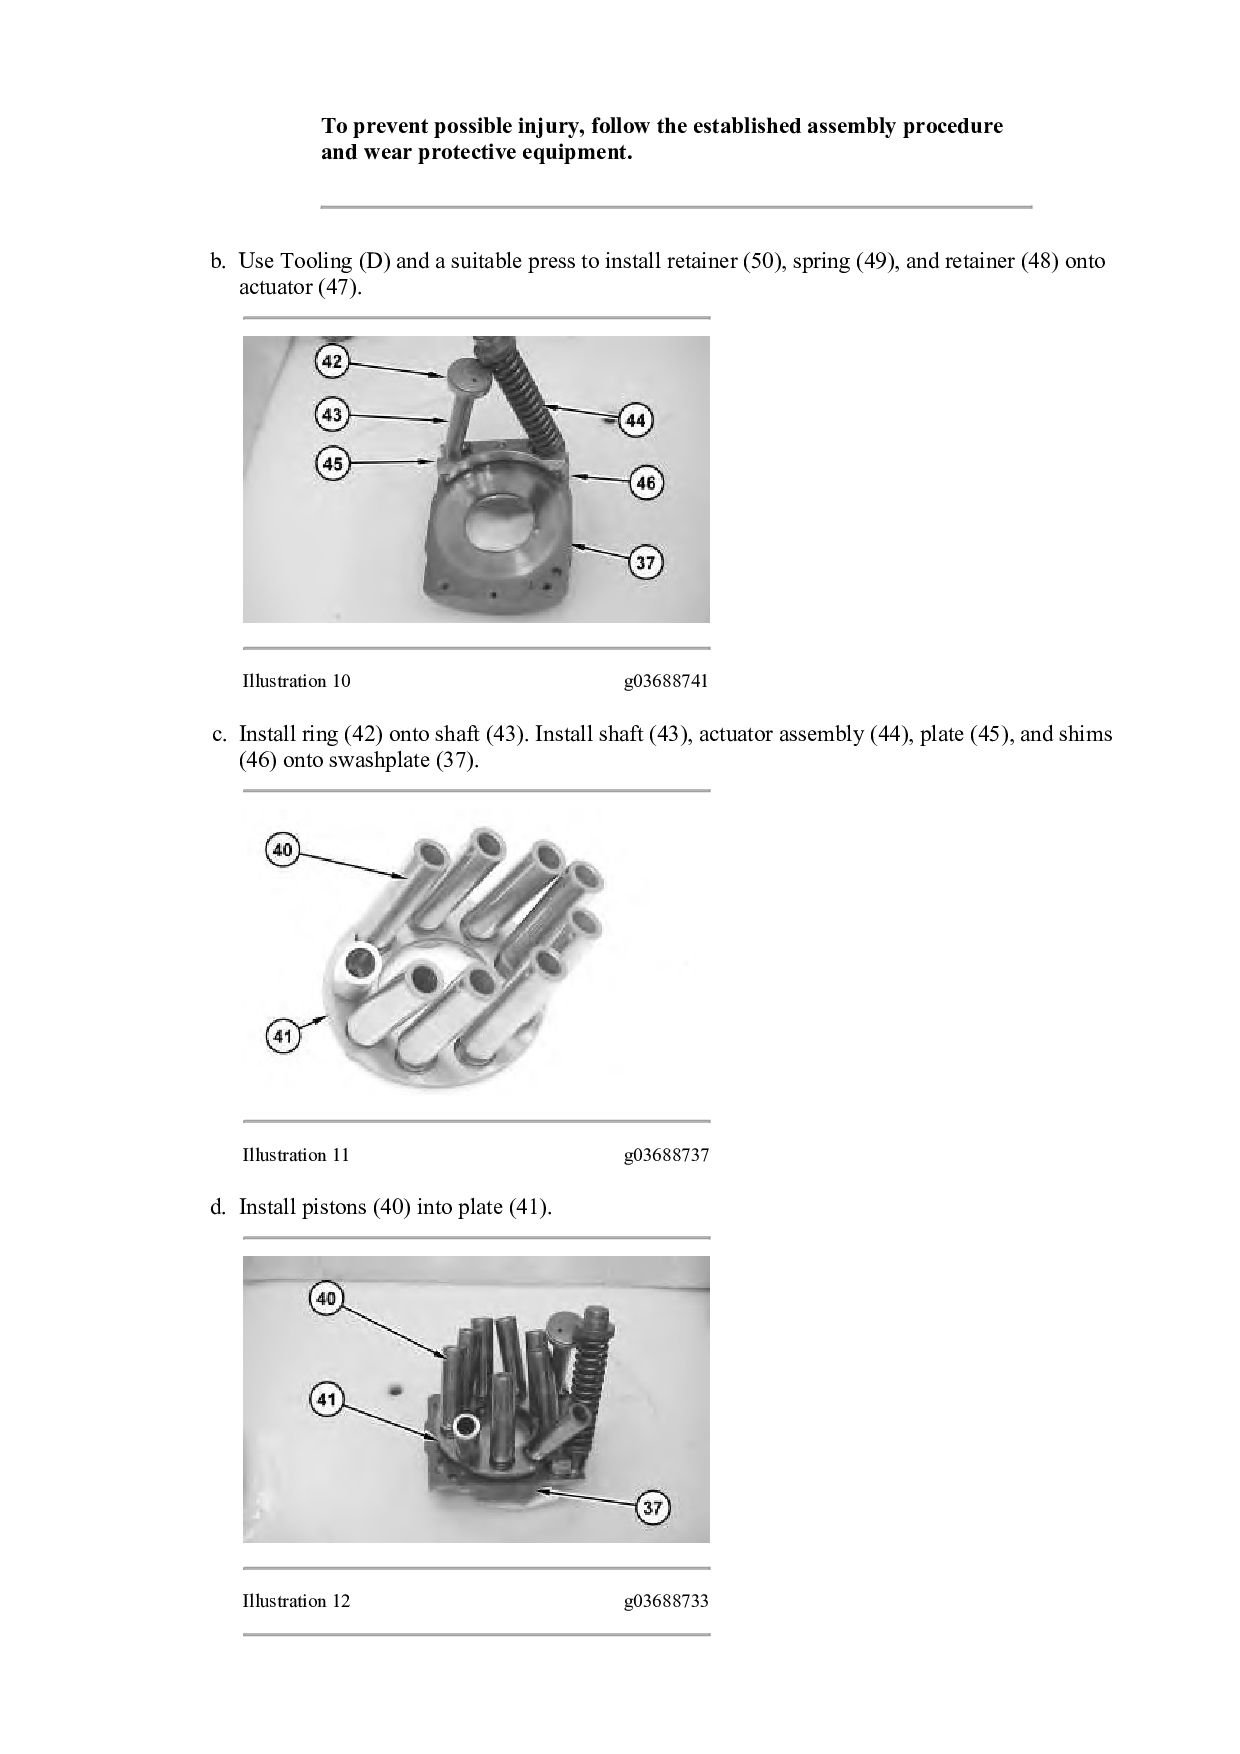
wear protective equipment. b. Use Tooling (D) and a suitable press to install retainer (50), spring (49), and retainer (48) onto actuator (47). Illustration 10 g03688741 c. Install ring (42) onto shaft (43). Install shaft (43), actuator assembly (44), plate (45), and shims (46) onto swashplate (37). Illustration 11 g03688737 d. Install pistons (40) into plate (41). Illustration 12 g03688733
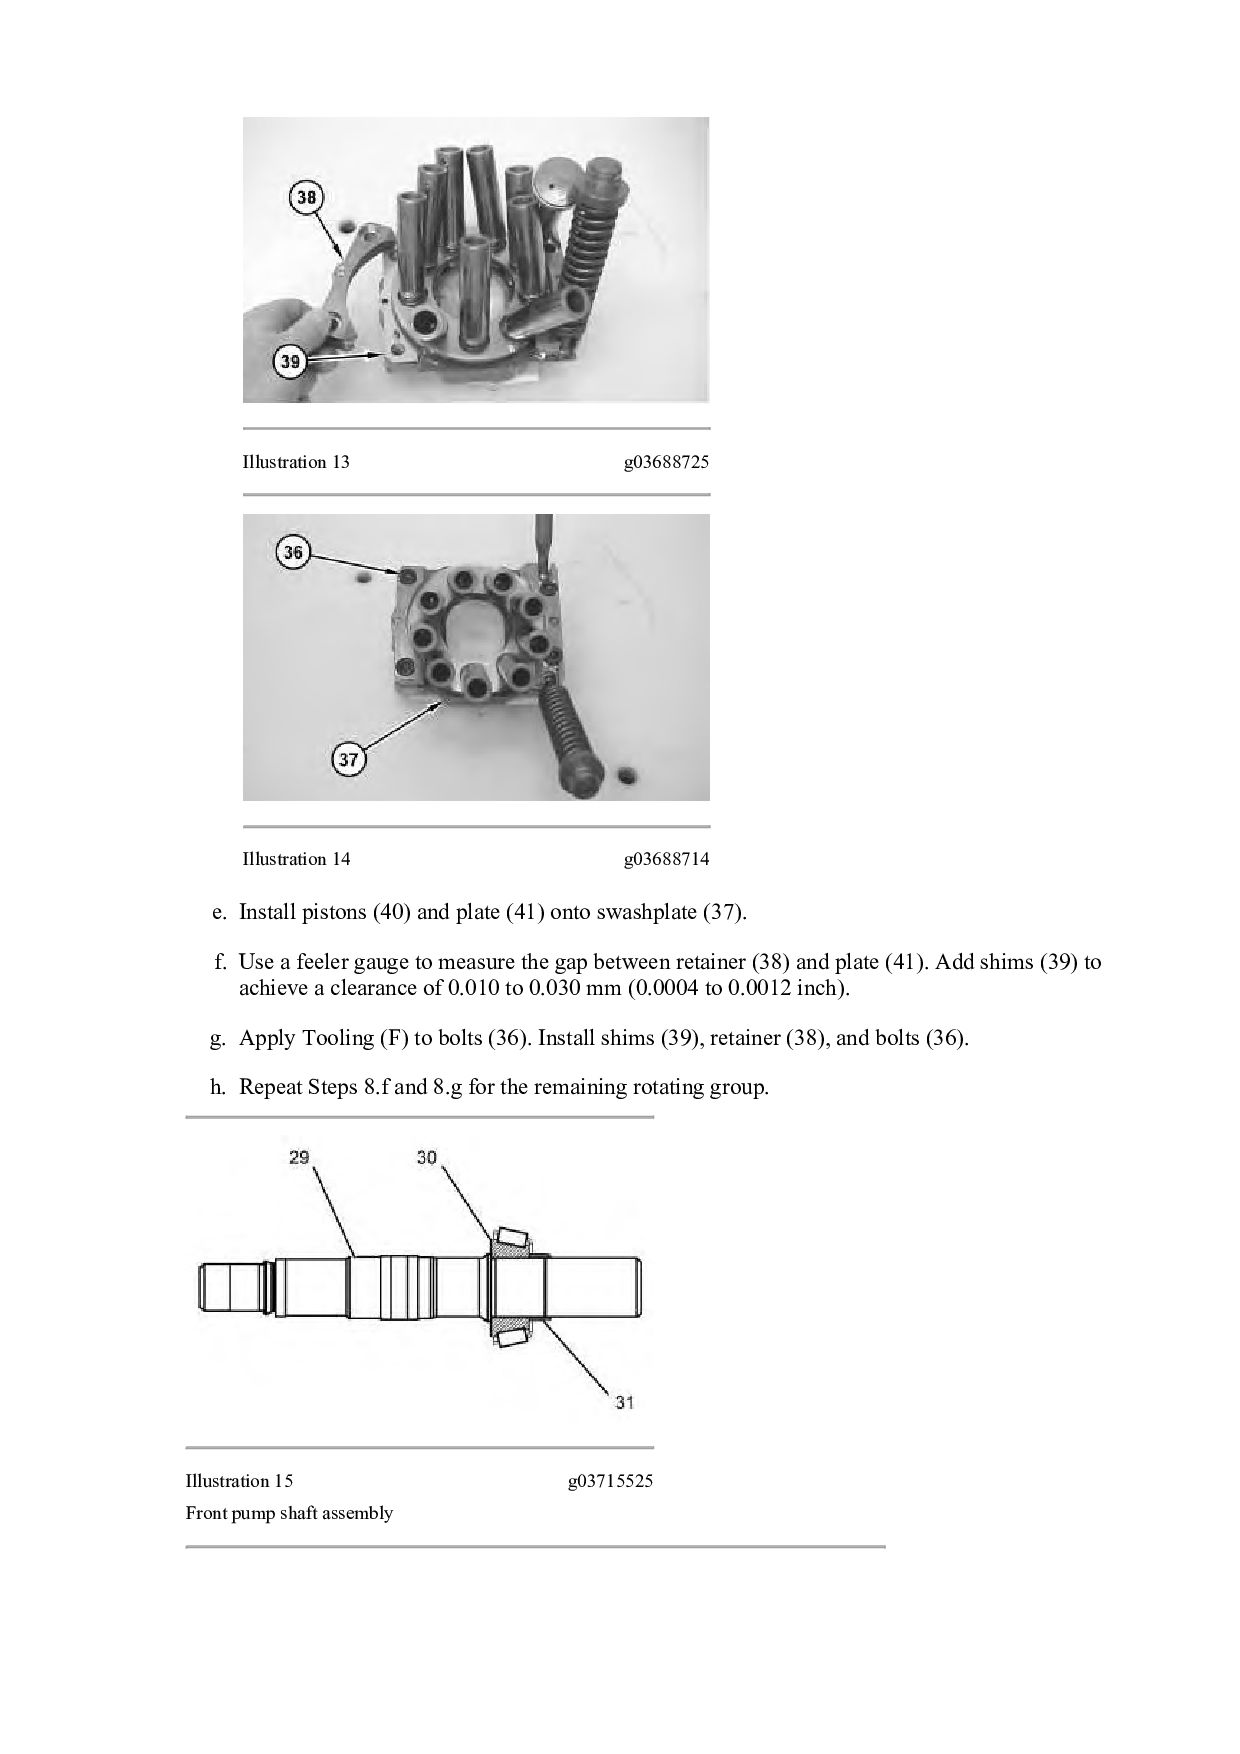
and plate (41) onto swashplate (37). f. Use a feeler gauge to measure the gap between retainer (38) and plate (41). Add shims (39) to achieve a clearance of 0.010 to 0.030 mm (0.0004 to 0.0012 inch). g. Apply Tooling (F) to bolts (36). Install shims (39), retainer (38), and bolts (36). h. Repeat Steps 8.f and 8.g for the remaining rotating group. Illustration 15 g03715525 Front pump shaft assembly
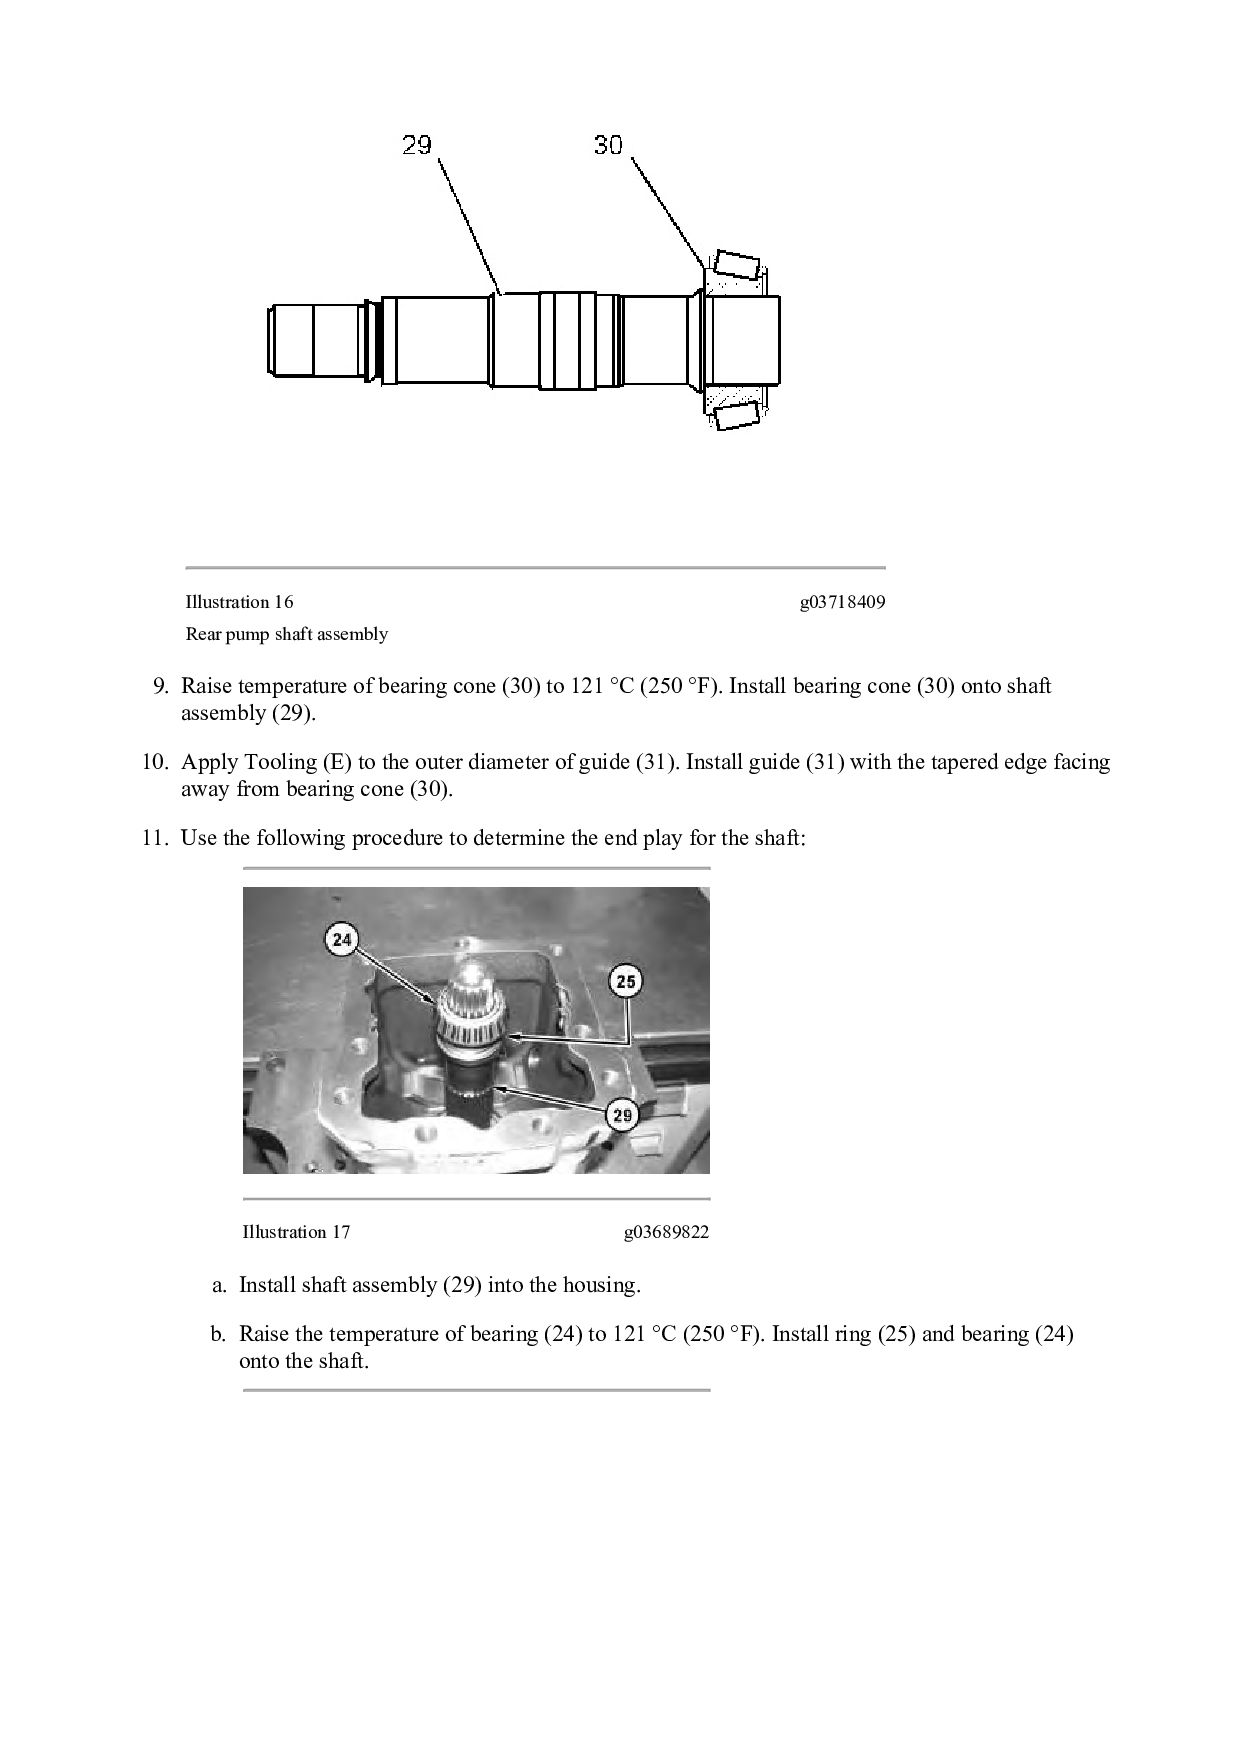
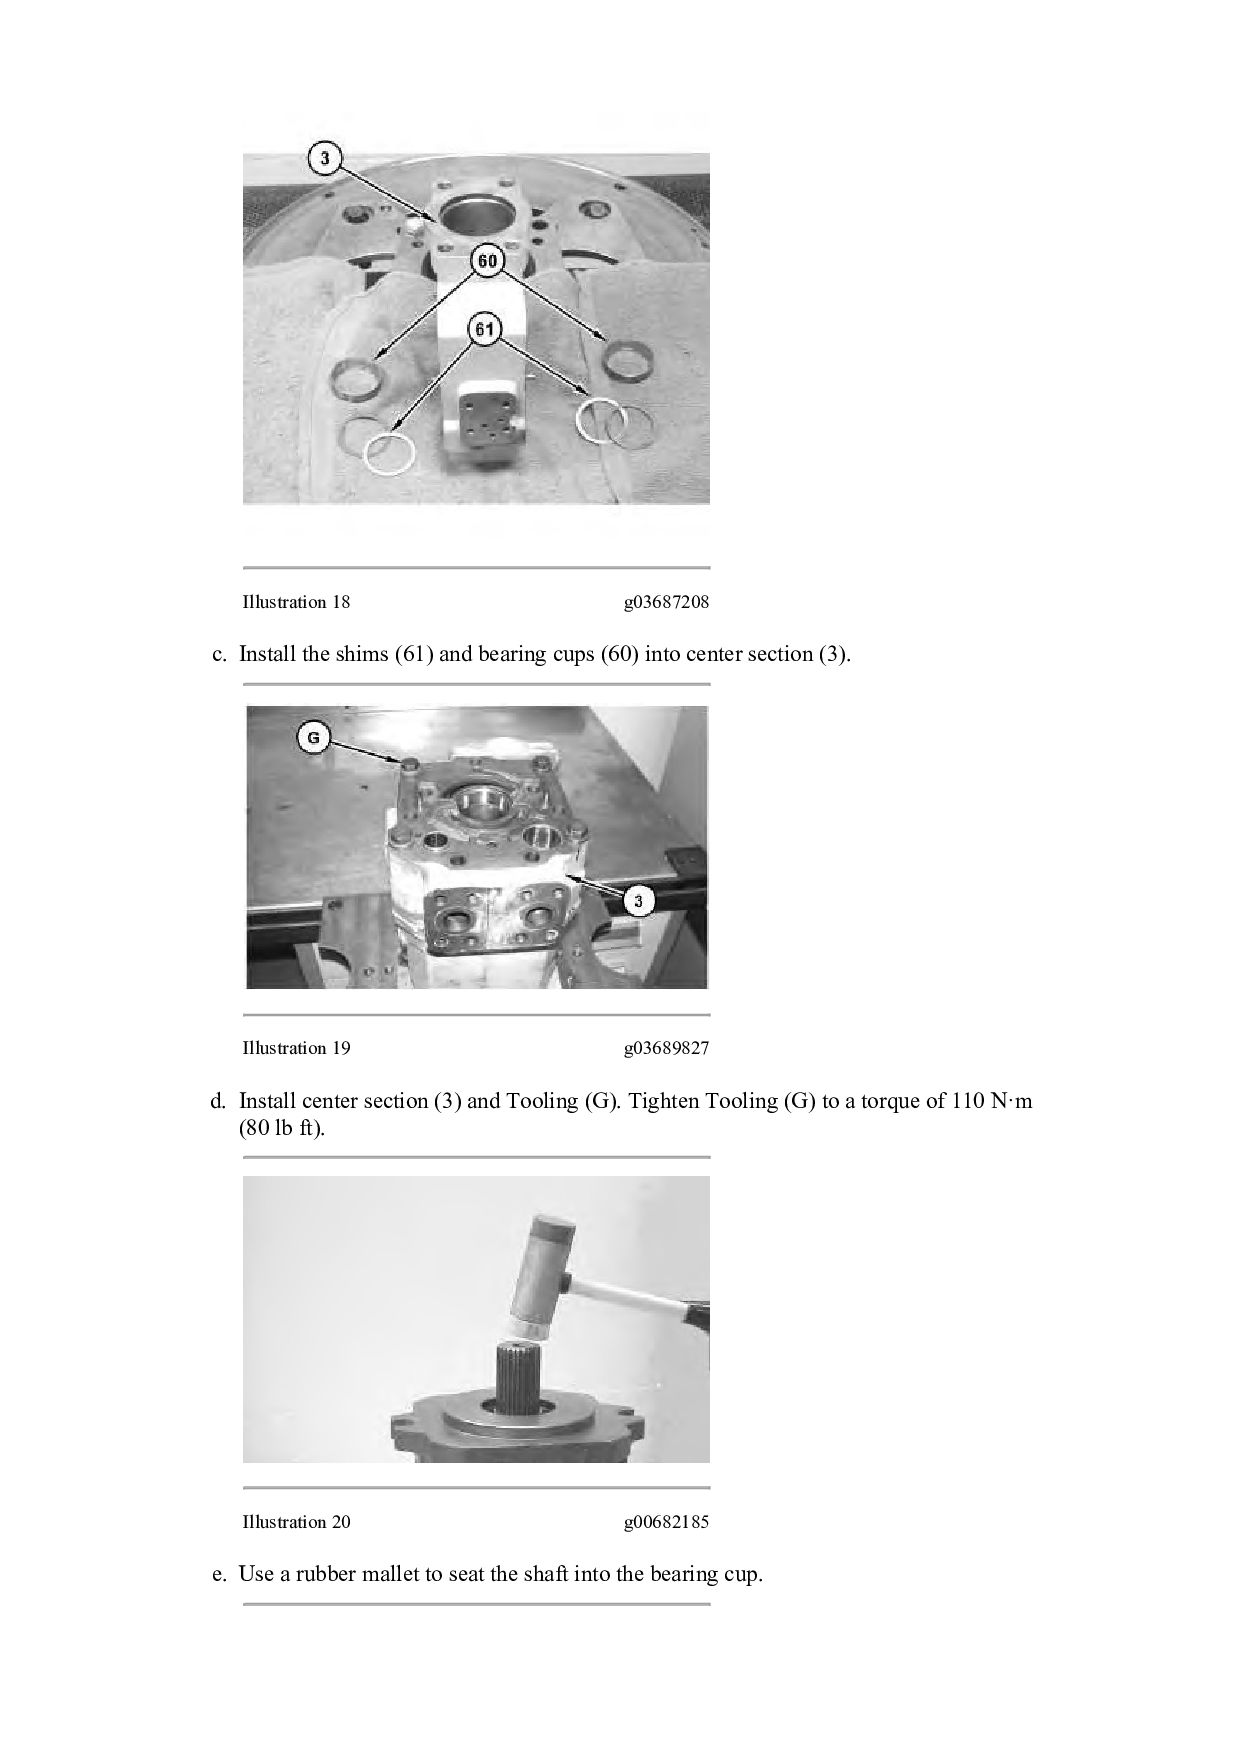
of bearing cone (30) to 121 °C (250 °F). Install bearing cone (30) onto shaft assembly (29). 10. Apply Tooling (E) to the outer diameter of guide (31). Install guide (31) with the tapered edge facing away from bearing cone (30). 11. Use the following procedure to determine the end play for the shaft: Illustration 17 g03689822 a. Install shaft assembly (29) into the housing. b. Raise the temperature of bearing (24) to 121 °C (250 °F). Install ring (25) and bearing (24) onto the shaft.
cups (60) into center section (3). Illustration 19 g03689827 d. Install center section (3) and Tooling (G). Tighten Tooling (G) to a torque of 110 N·m (80 lb ft). Illustration 20 g00682185 e. Use a rubber mallet to seat the shaft into the bearing cup.
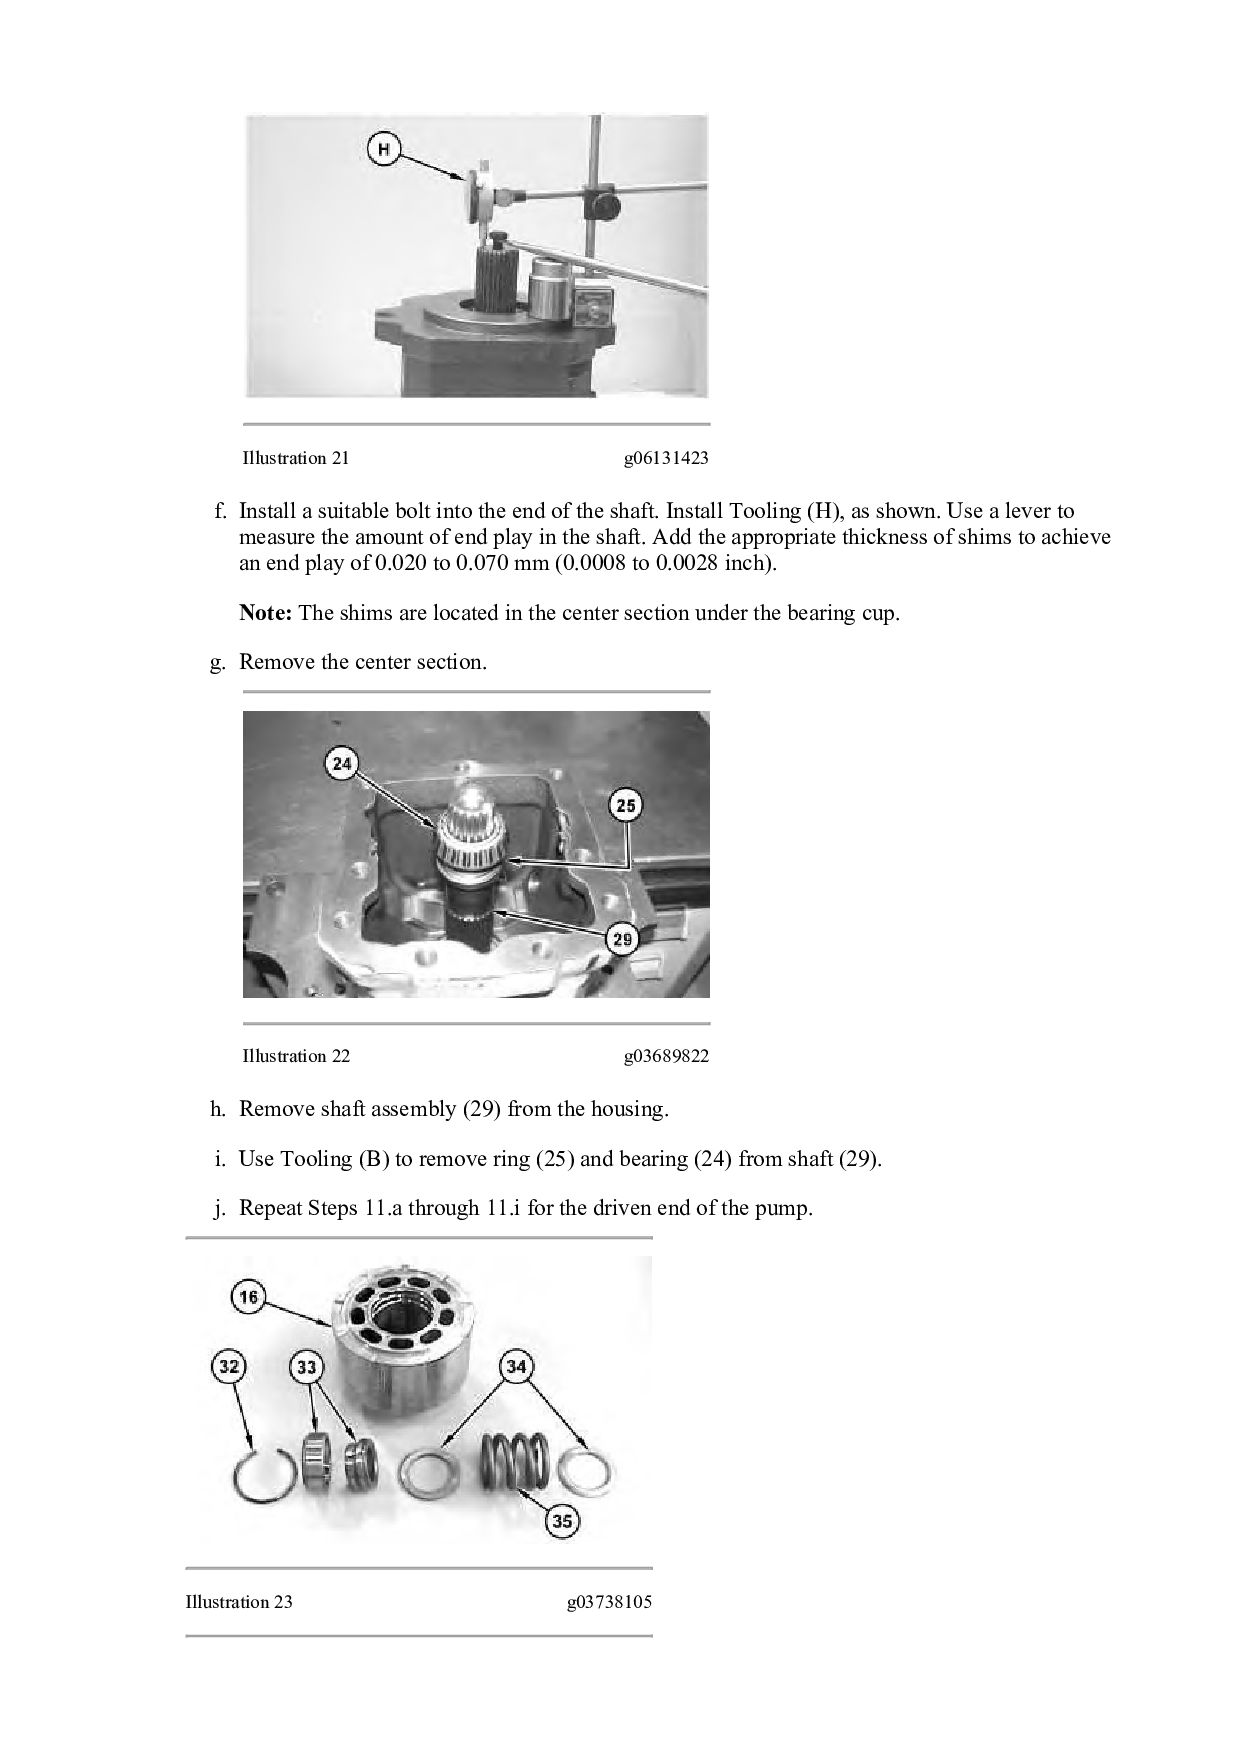
end of the shaft. Install Tooling (H), as shown. Use a lever to measure the amount of end play in the shaft. Add the appropriate thickness of shims to achieve an end play of 0.020 to 0.070 mm (0.0008 to 0.0028 inch). Note: The shims are located in the center section under the bearing cup. g. Remove the center section. Illustration 22 g03689822 h. Remove shaft assembly (29) from the housing. i. Use Tooling (B) to remove ring (25) and bearing (24) from shaft (29). j. Repeat Steps 11.a through 11.i for the driven end of the pump. Illustration 23 g03738105
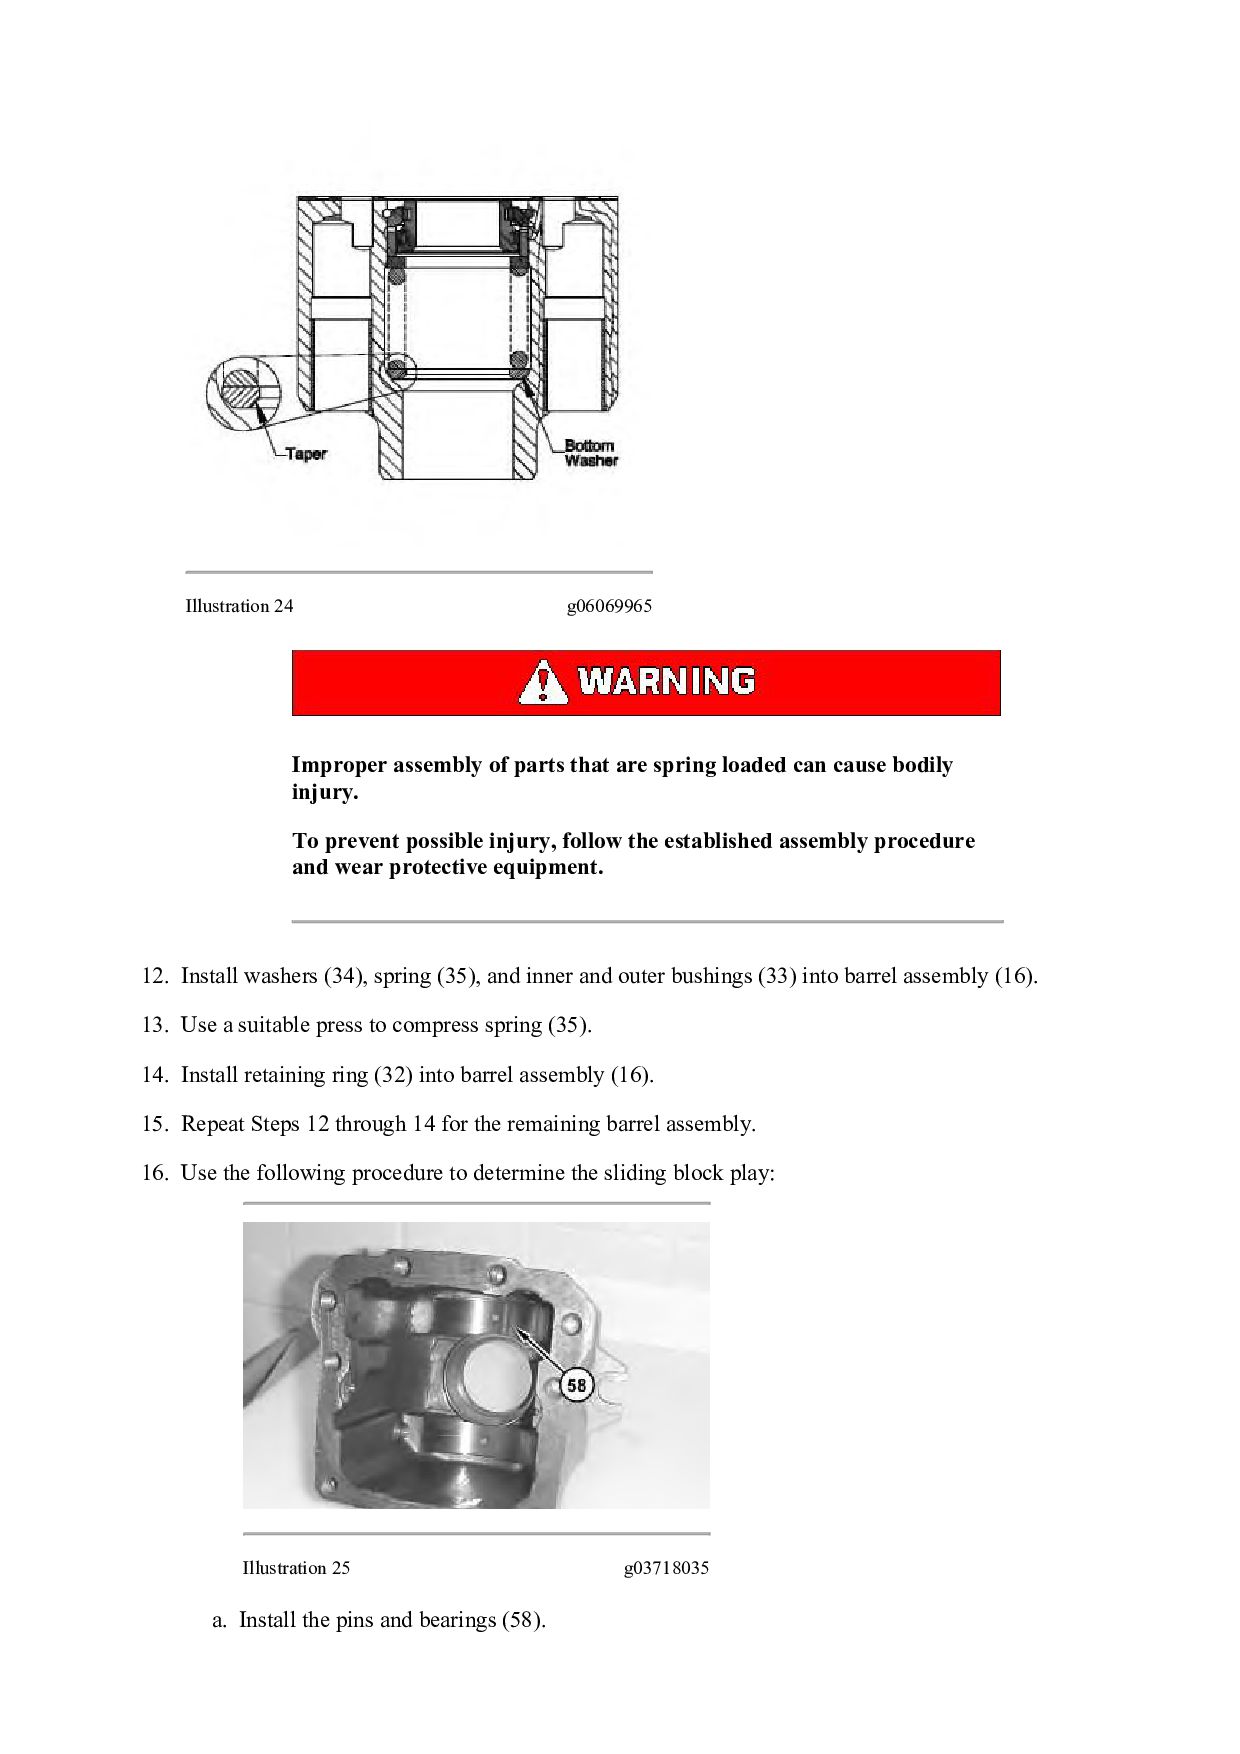
loaded can cause bodily injury. To prevent possible injury, follow the established assembly procedure and wear protective equipment. 12. Install washers (34), spring (35), and inner and outer bushings (33) into barrel assembly (16). 13. Use a suitable press to compress spring (35). 14. Install retaining ring (32) into barrel assembly (16). 15. Repeat Steps 12 through 14 for the remaining barrel assembly. 16. Use the following procedure to determine the sliding block play: Illustration 25 g03718035 a. Install the pins and bearings (58).
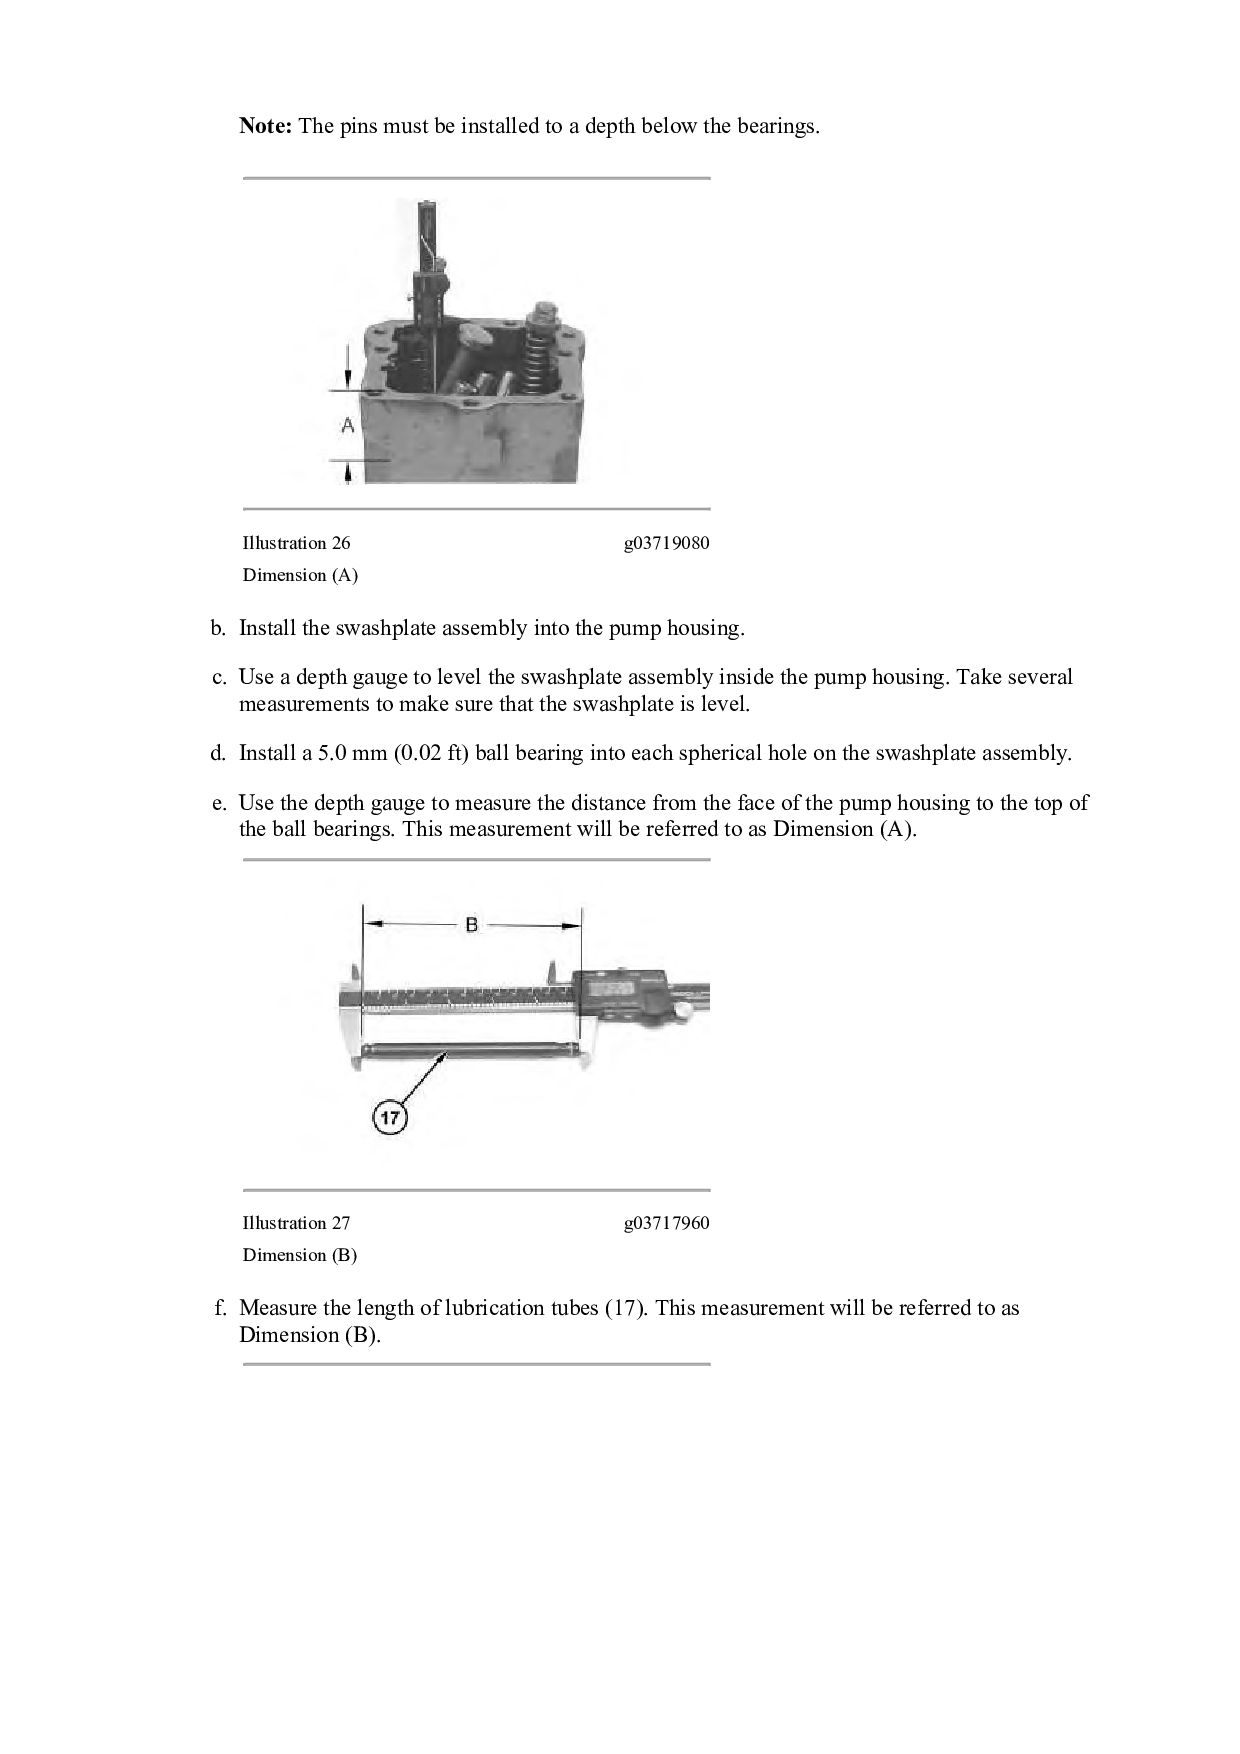
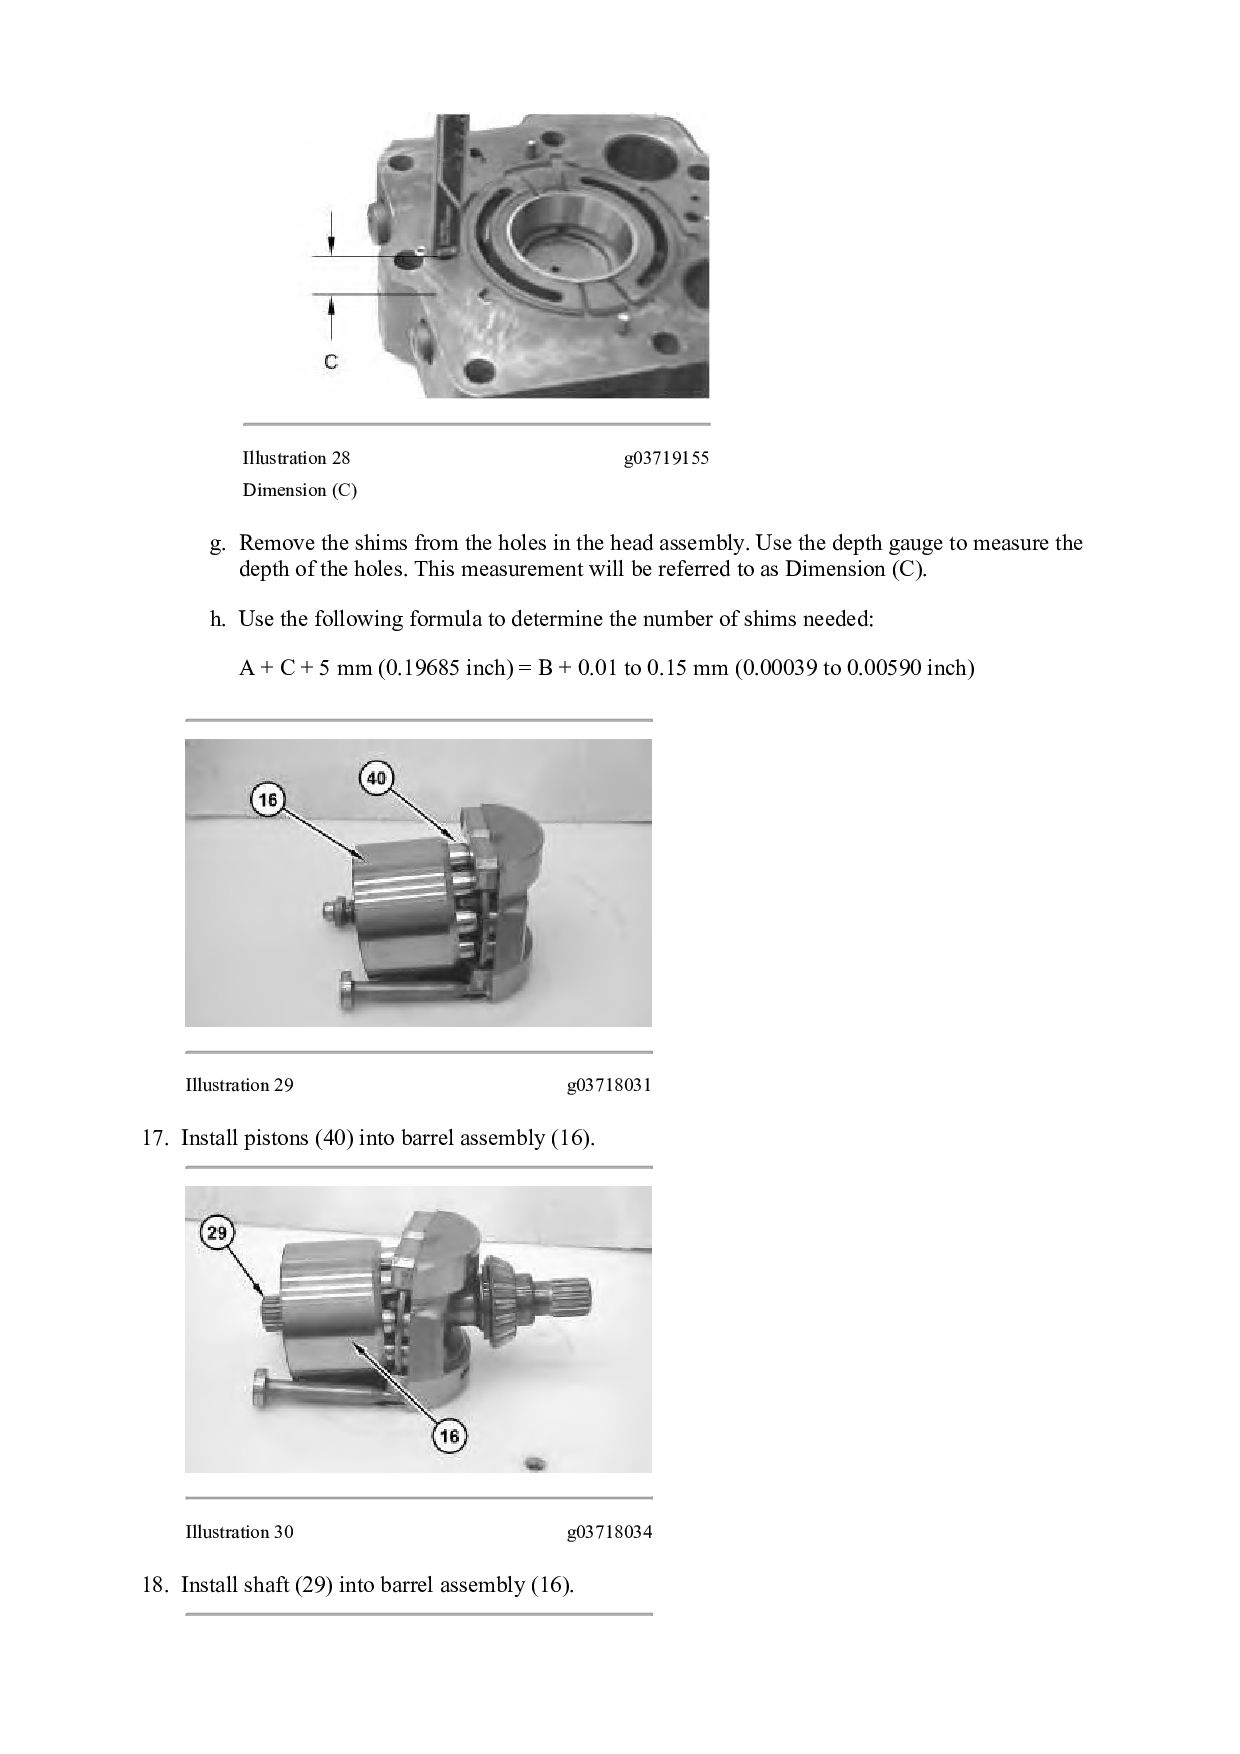
the bearings. Illustration 26 g03719080 Dimension (A) b. Install the swashplate assembly into the pump housing. c. Use a depth gauge to level the swashplate assembly inside the pump housing. Take several measurements to make sure that the swashplate is level. d. Install a 5.0 mm (0.02 ft) ball bearing into each spherical hole on the swashplate assembly. e. Use the depth gauge to measure the distance from the face of the pump housing to the top of the ball bearings. This measurement will be referred to as Dimension (A). Illustration 27 g03717960 Dimension (B) f. Measure the length of lubrication tubes (17). This measurement will be referred to as Dimension (B).
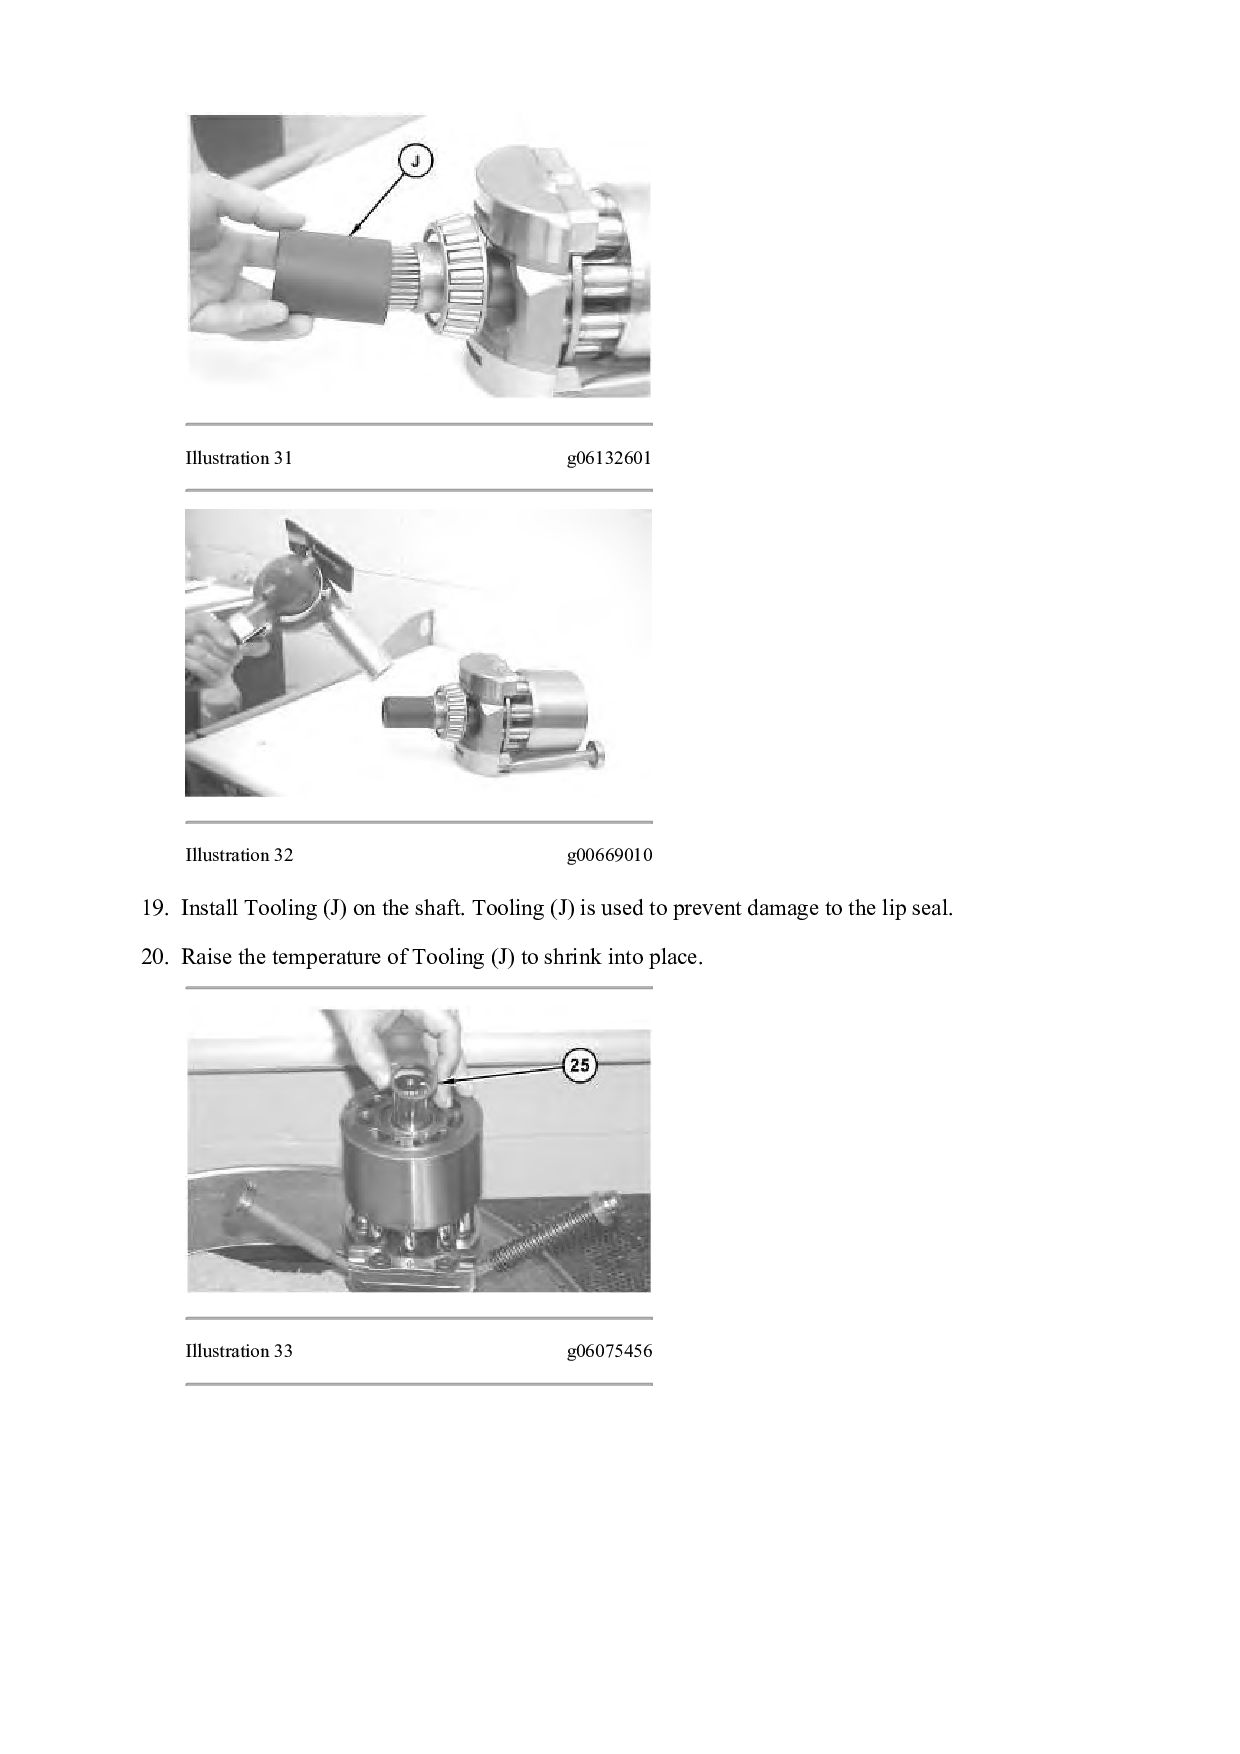
the holes in the head assembly. Use the depth gauge to measure the depth of the holes. This measurement will be referred to as Dimension (C). h. Use the following formula to determine the number of shims needed: A + C + 5 mm (0.19685 inch) = B + 0.01 to 0.15 mm (0.00039 to 0.00590 inch) Illustration 29 g03718031 17. Install pistons (40) into barrel assembly (16). Illustration 30 g03718034 18. Install shaft (29) into barrel assembly (16).
on the shaft. Tooling (J) is used to prevent damage to the lip seal. 20. Raise the temperature of Tooling (J) to shrink into place. Illustration 33 g06075456
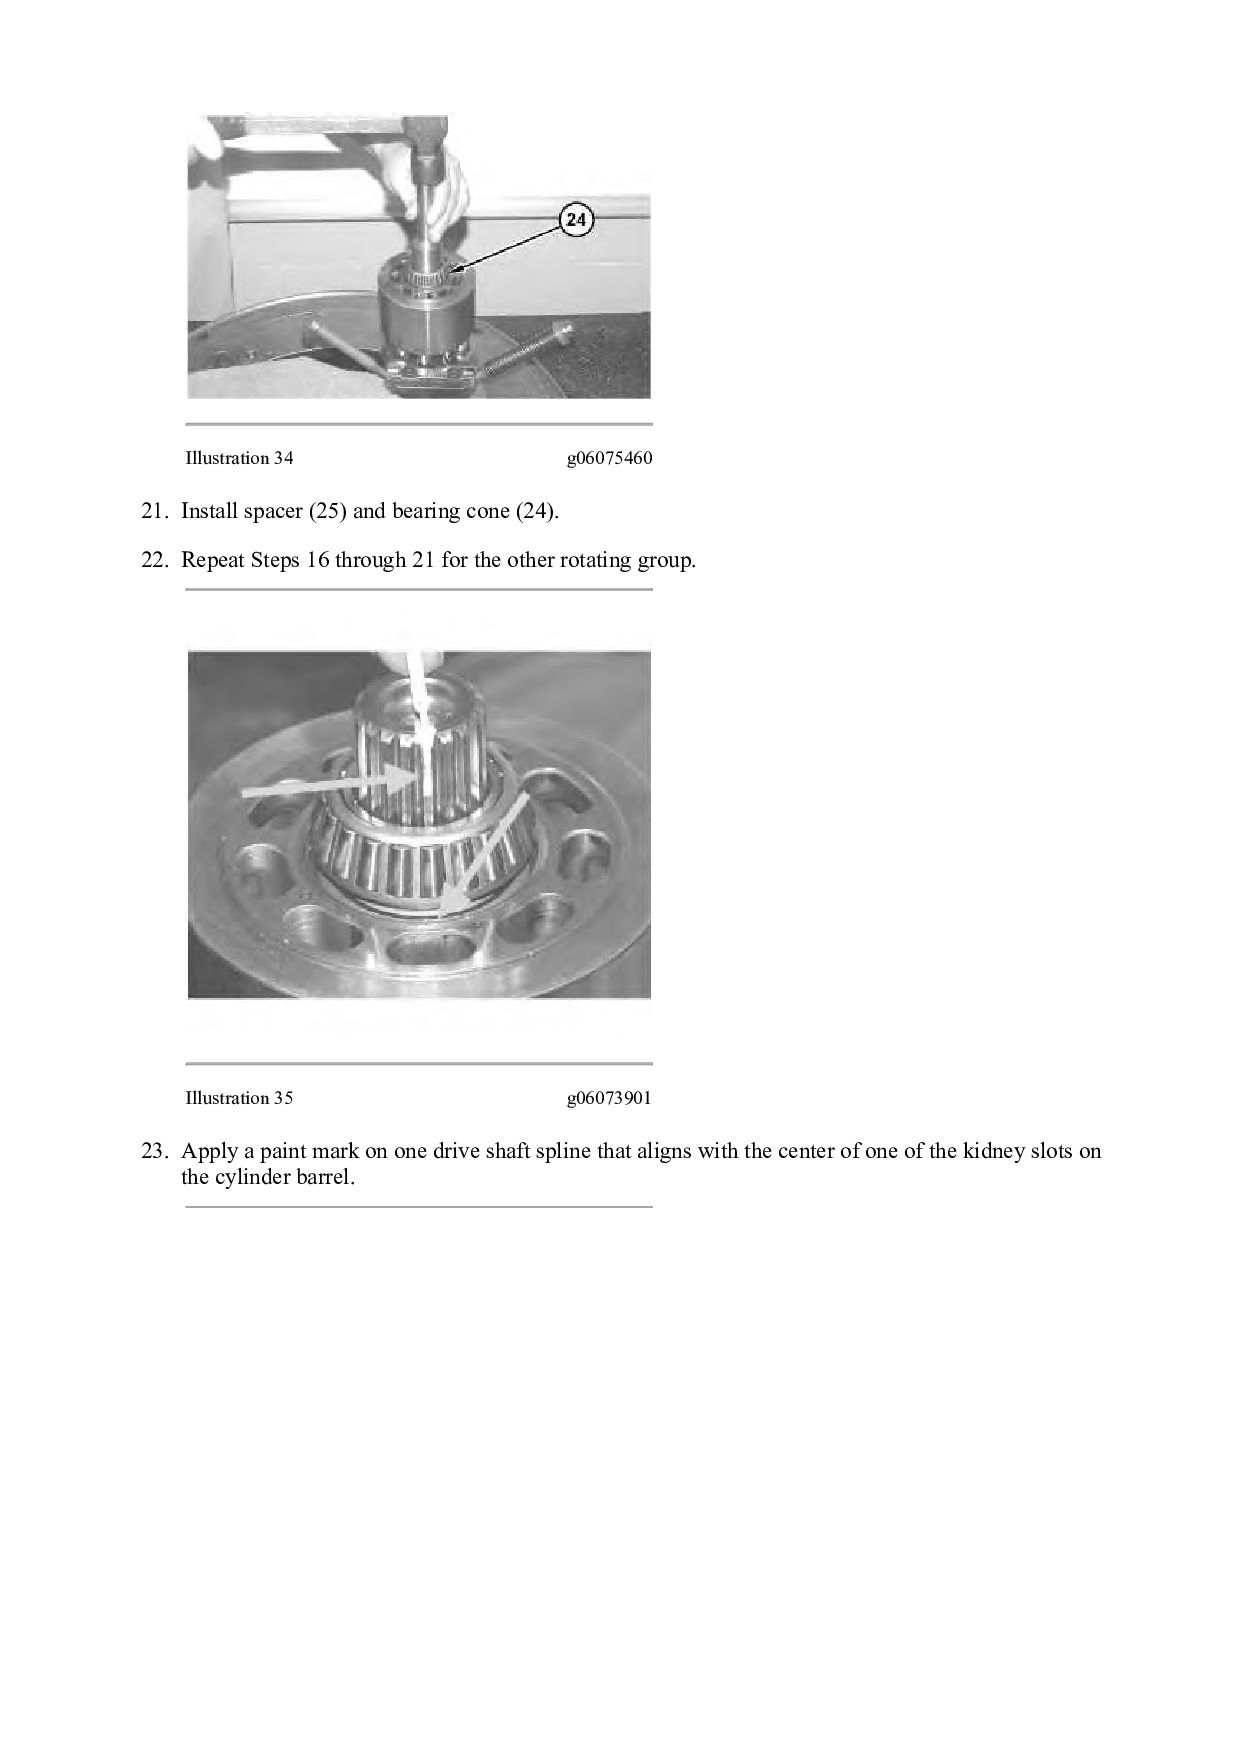
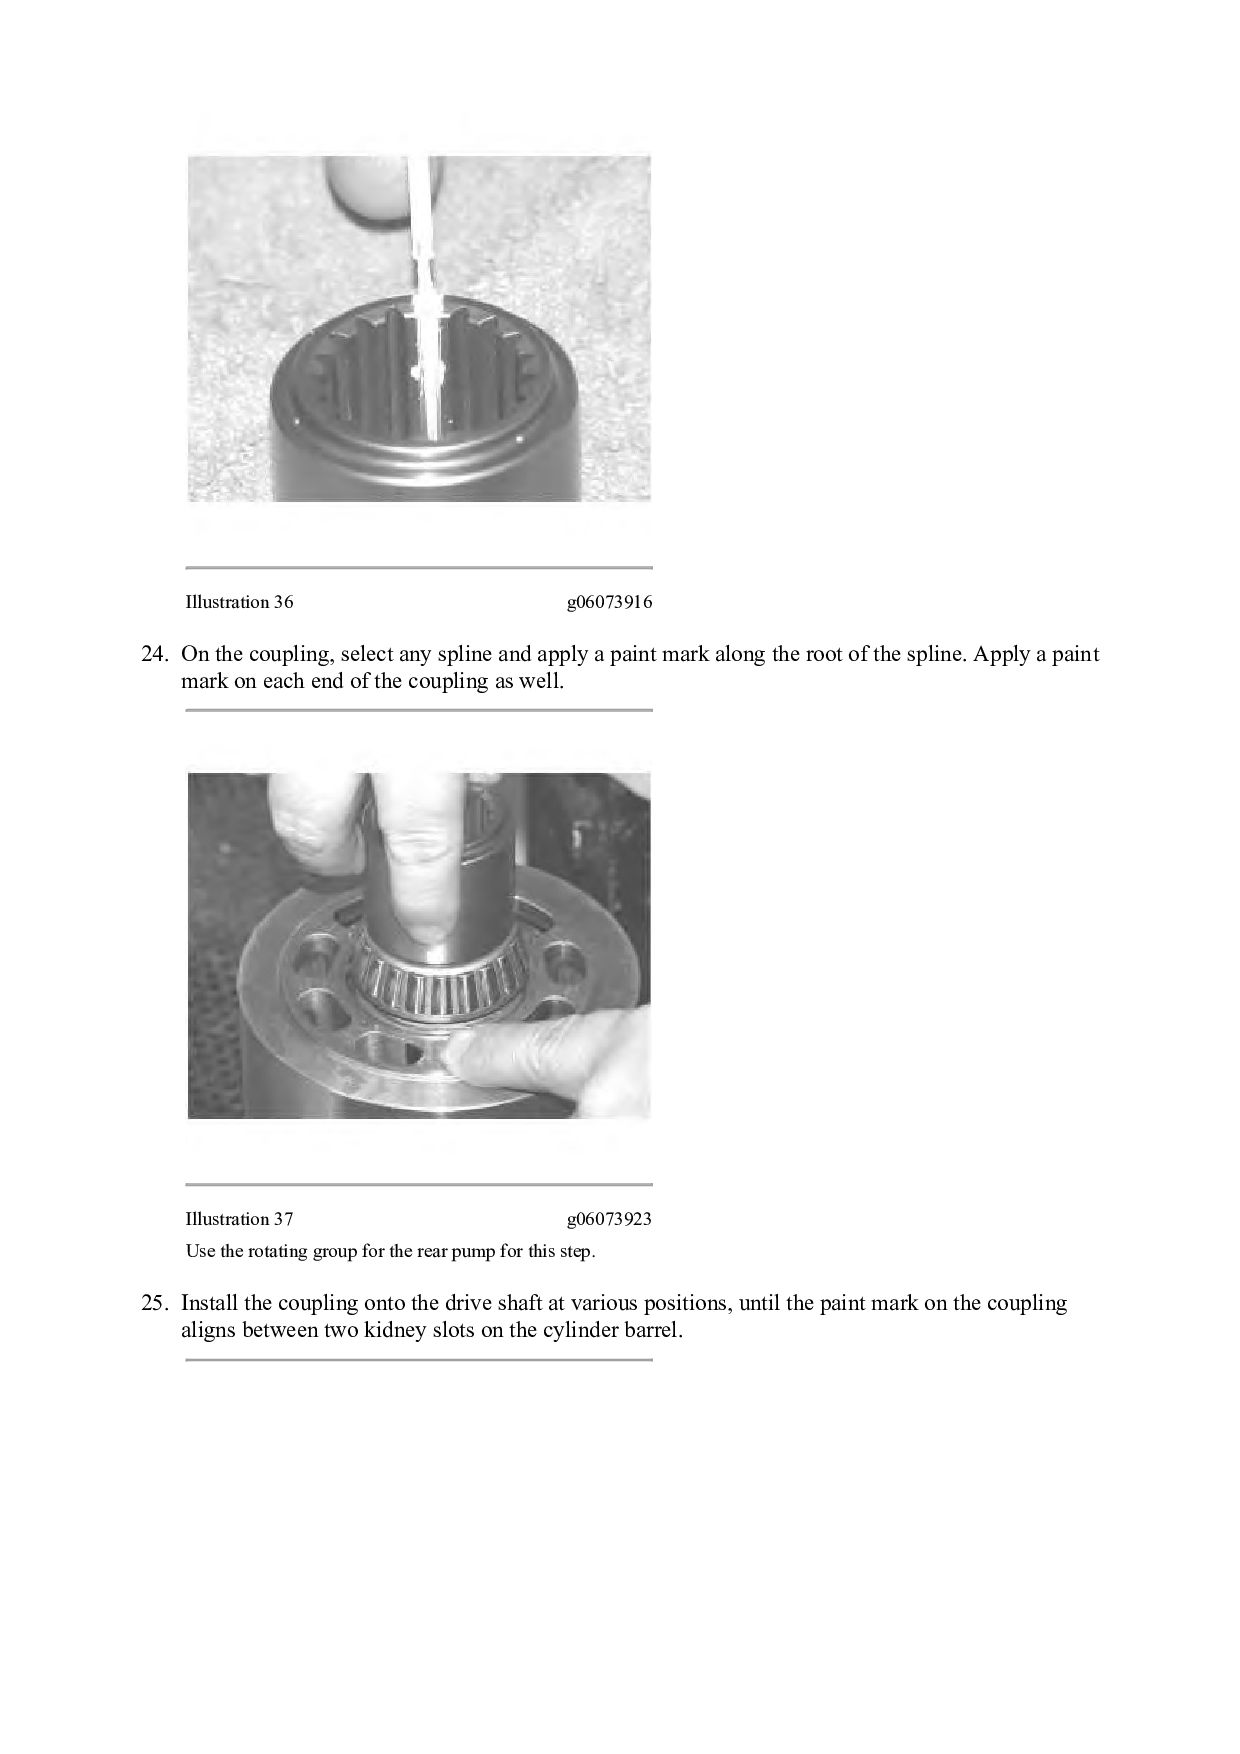
(24). 22. Repeat Steps 16 through 21 for the other rotating group. Illustration 35 g06073901 23. Apply a paint mark on one drive shaft spline that aligns with the center of one of the kidney slots on the cylinder barrel.
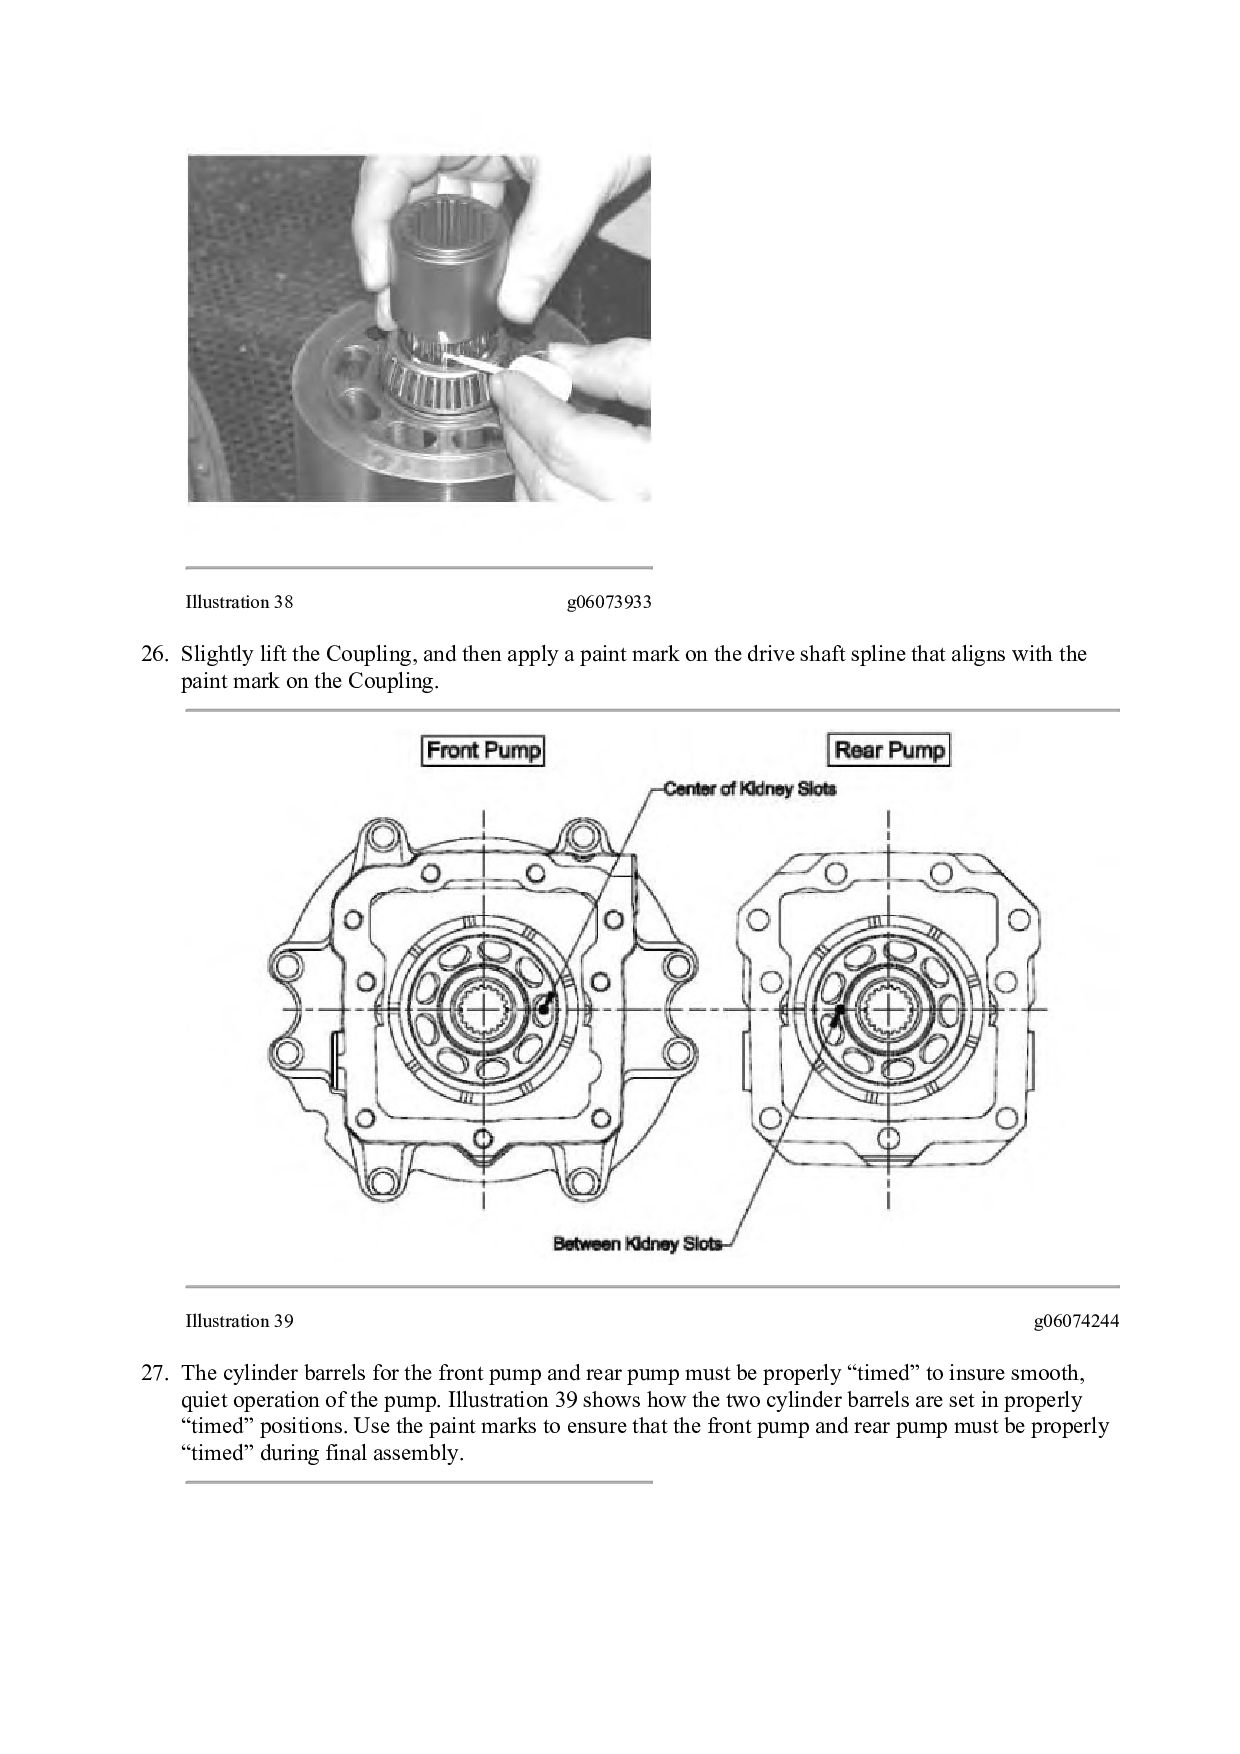
and apply a paint mark along the root of the spline. Apply a paint mark on each end of the coupling as well. Illustration 37 g06073923 Use the rotating group for the rear pump for this step. 25. Install the coupling onto the drive shaft at various positions, until the paint mark on the coupling aligns between two kidney slots on the cylinder barrel.
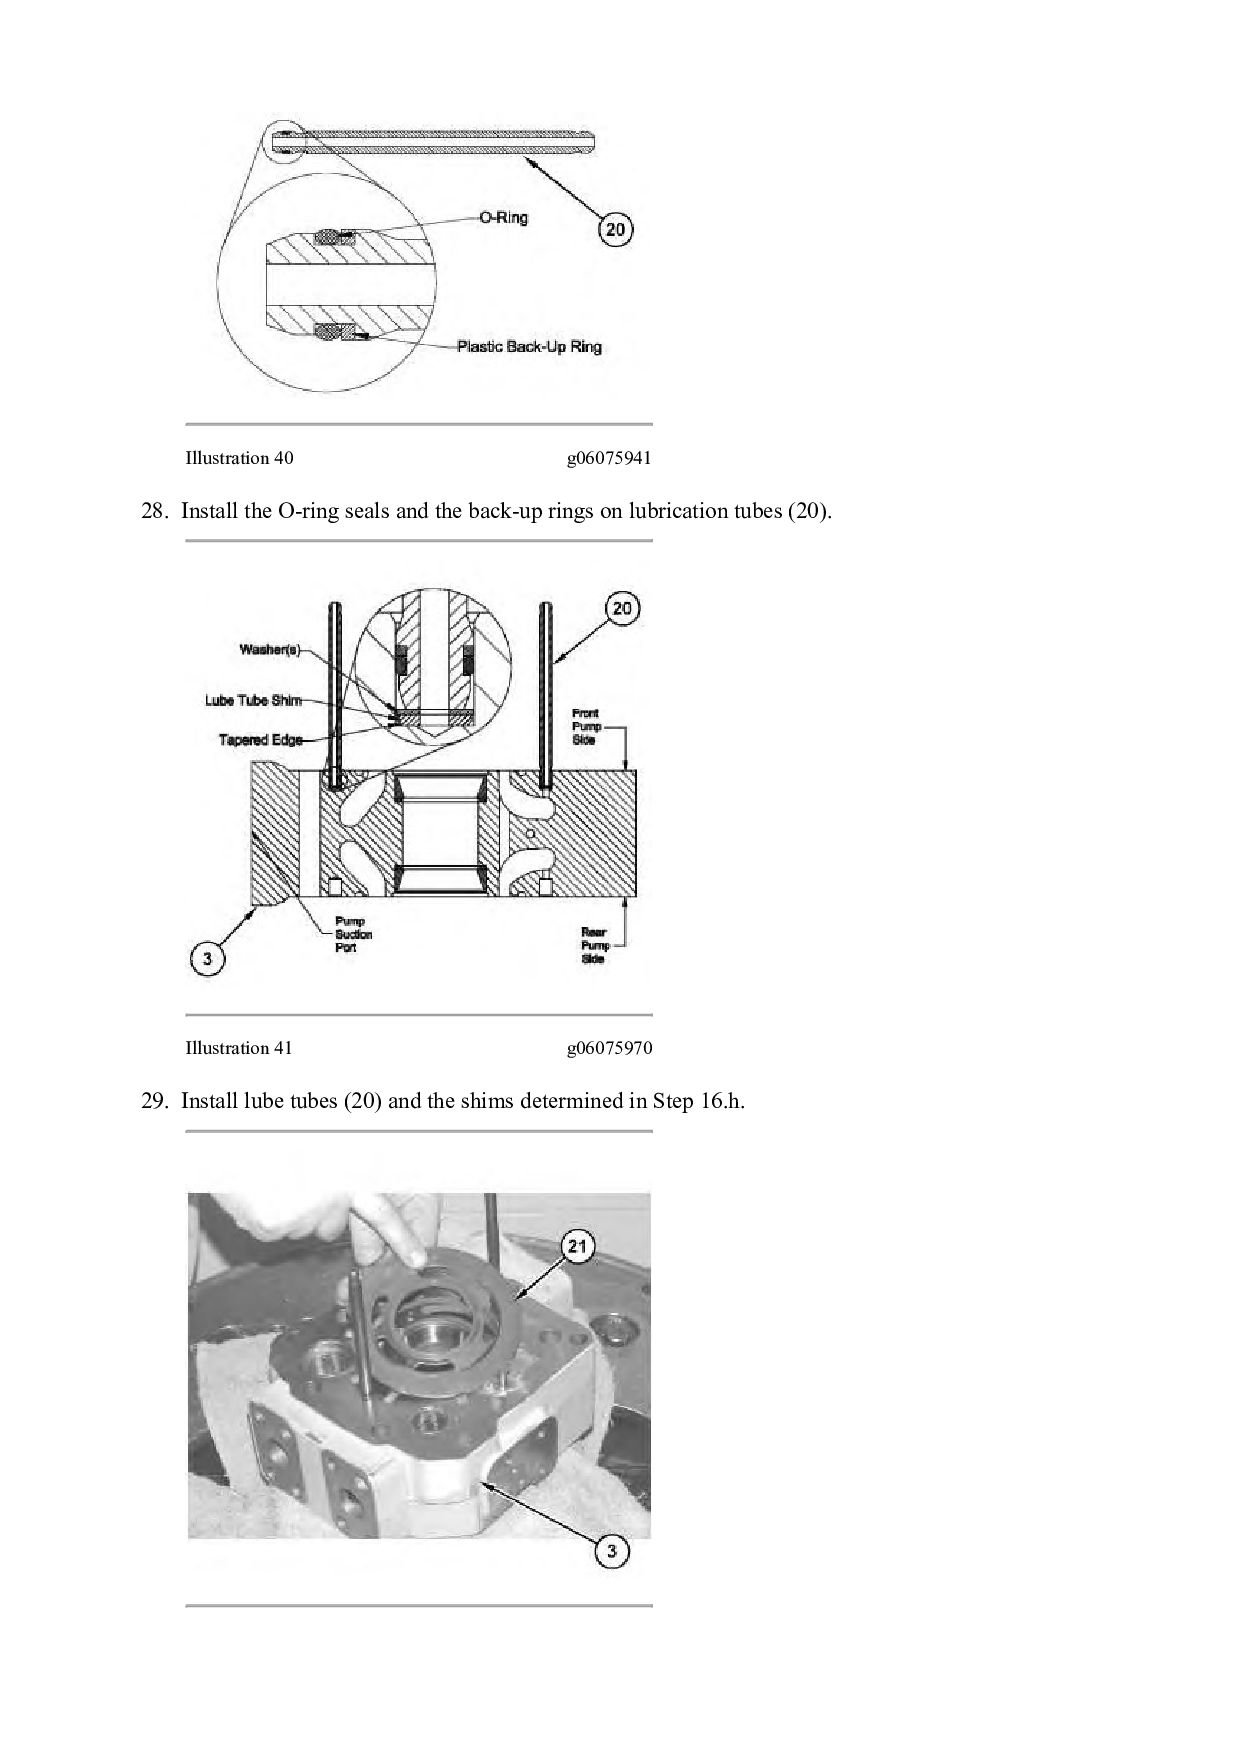
apply a paint mark on the drive shaft spline that aligns with the paint mark on the Coupling. Illustration 39 g06074244 27. The cylinder barrels for the front pump and rear pump must be properly “timed” to insure smooth, quiet operation of the pump. Illustration 39 shows how the two cylinder barrels are set in properly “timed” positions. Use the paint marks to ensure that the front pump and rear pump must be properly “timed” during final assembly.
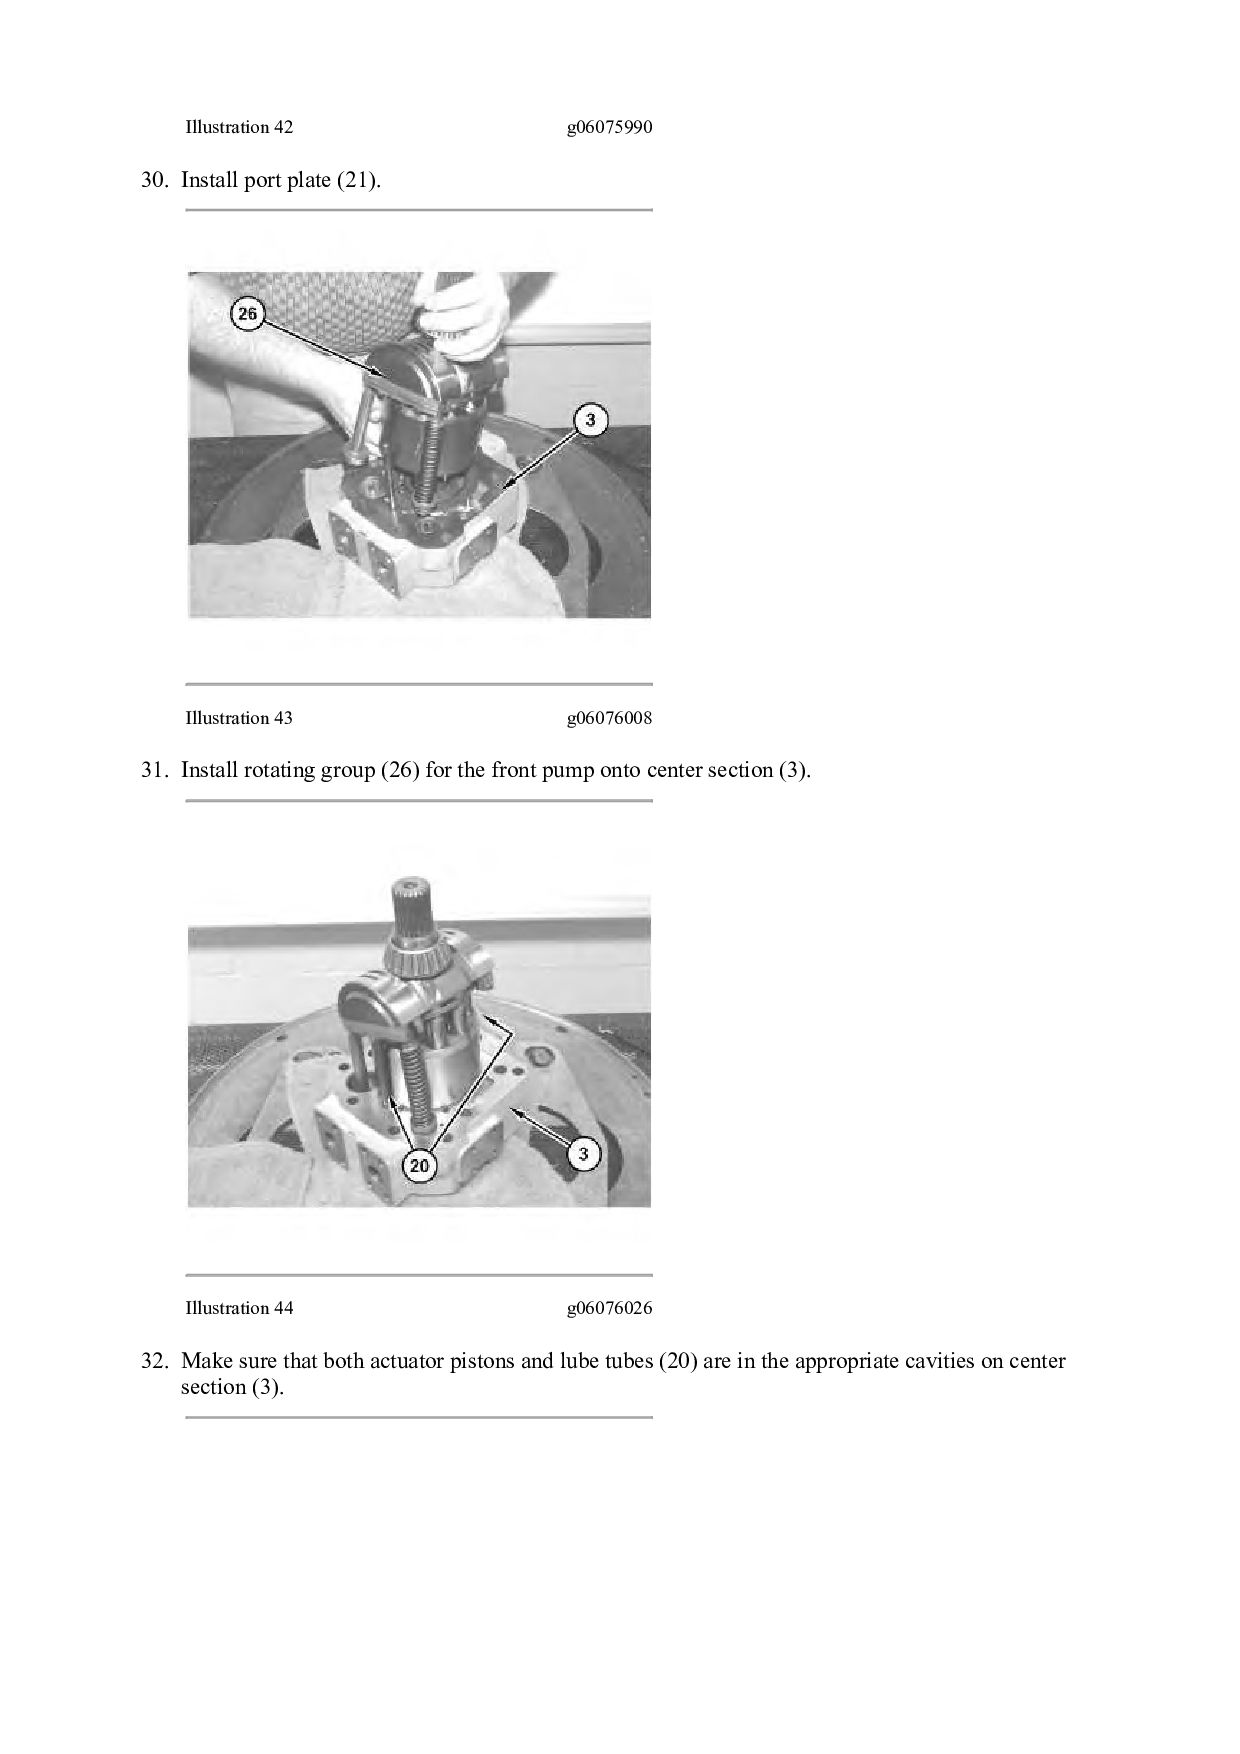
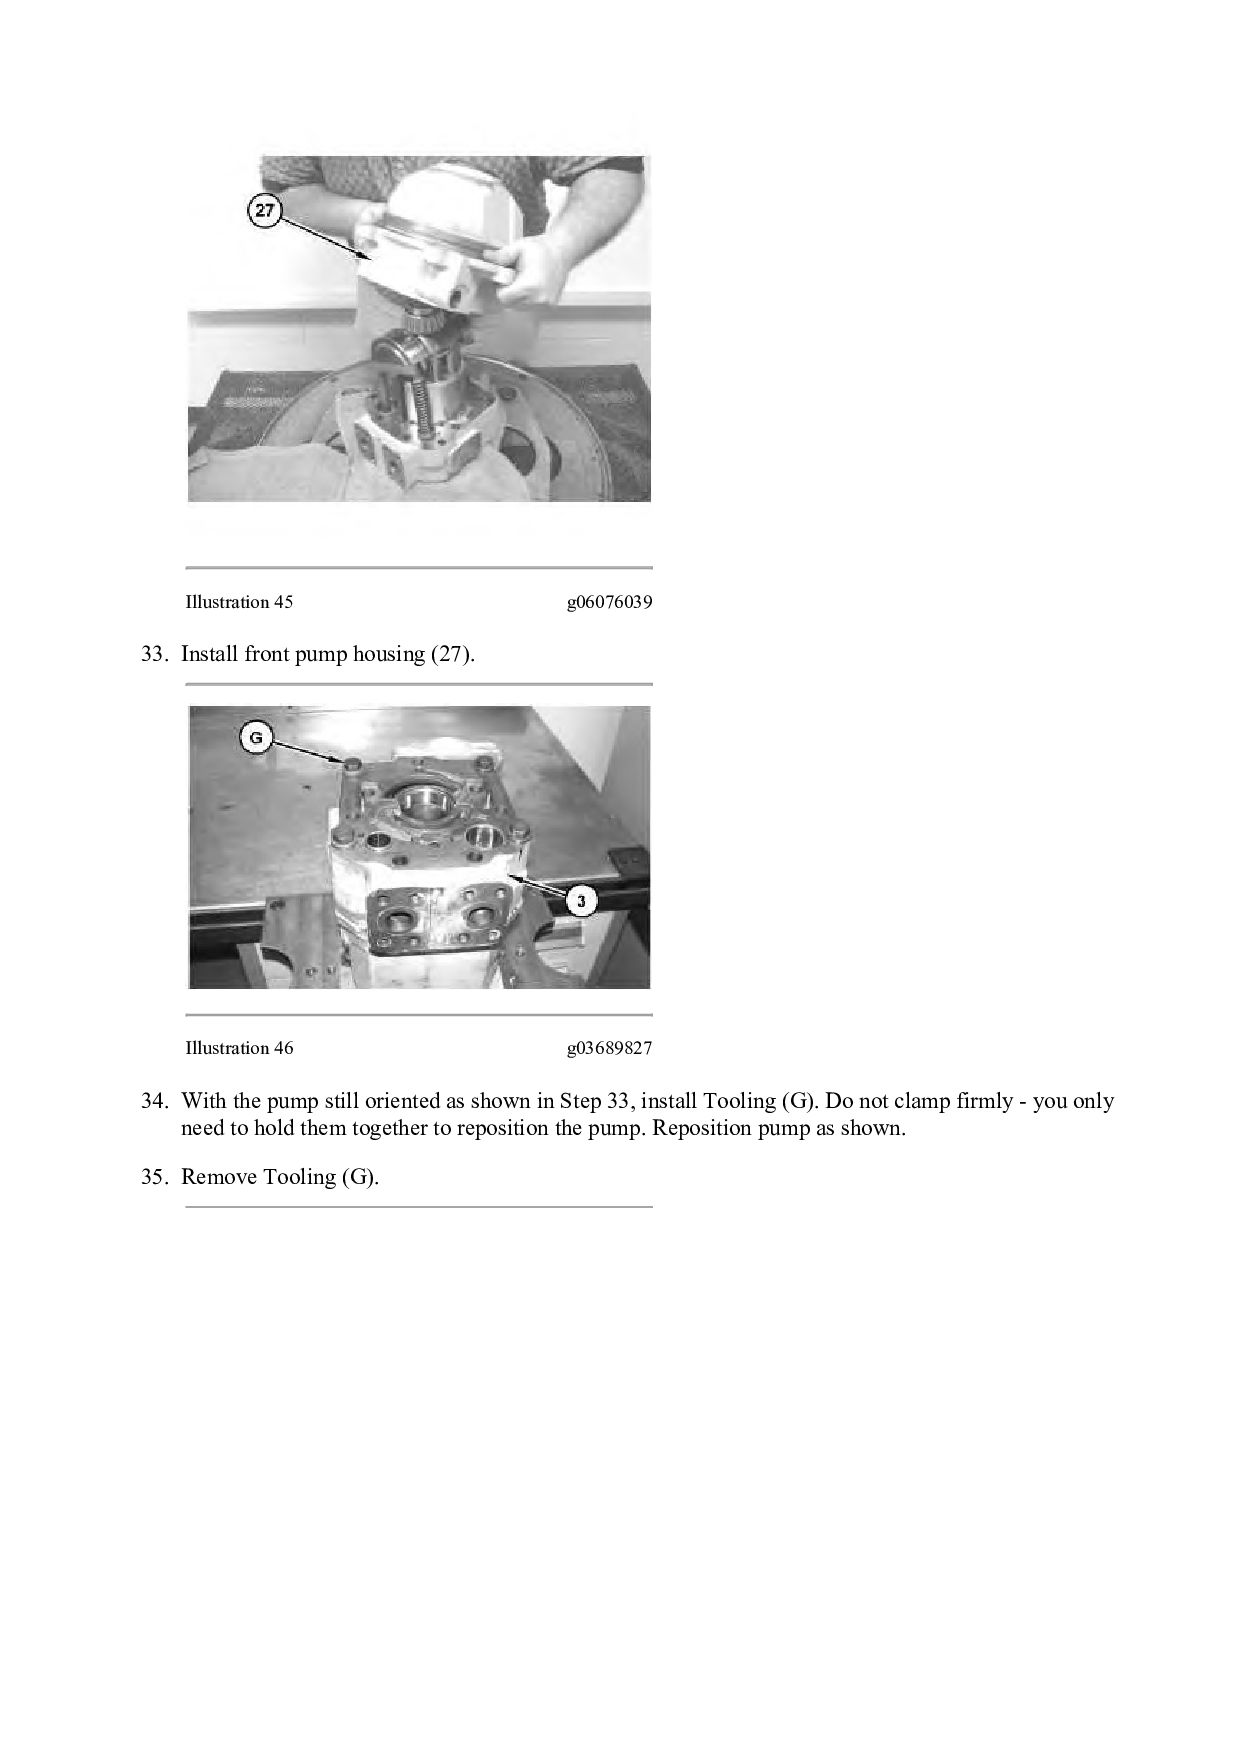
g06076008 31. Install rotating group (26) for the front pump onto center section (3). Illustration 44 g06076026 32. Make sure that both actuator pistons and lube tubes (20) are in the appropriate cavities on center section (3).
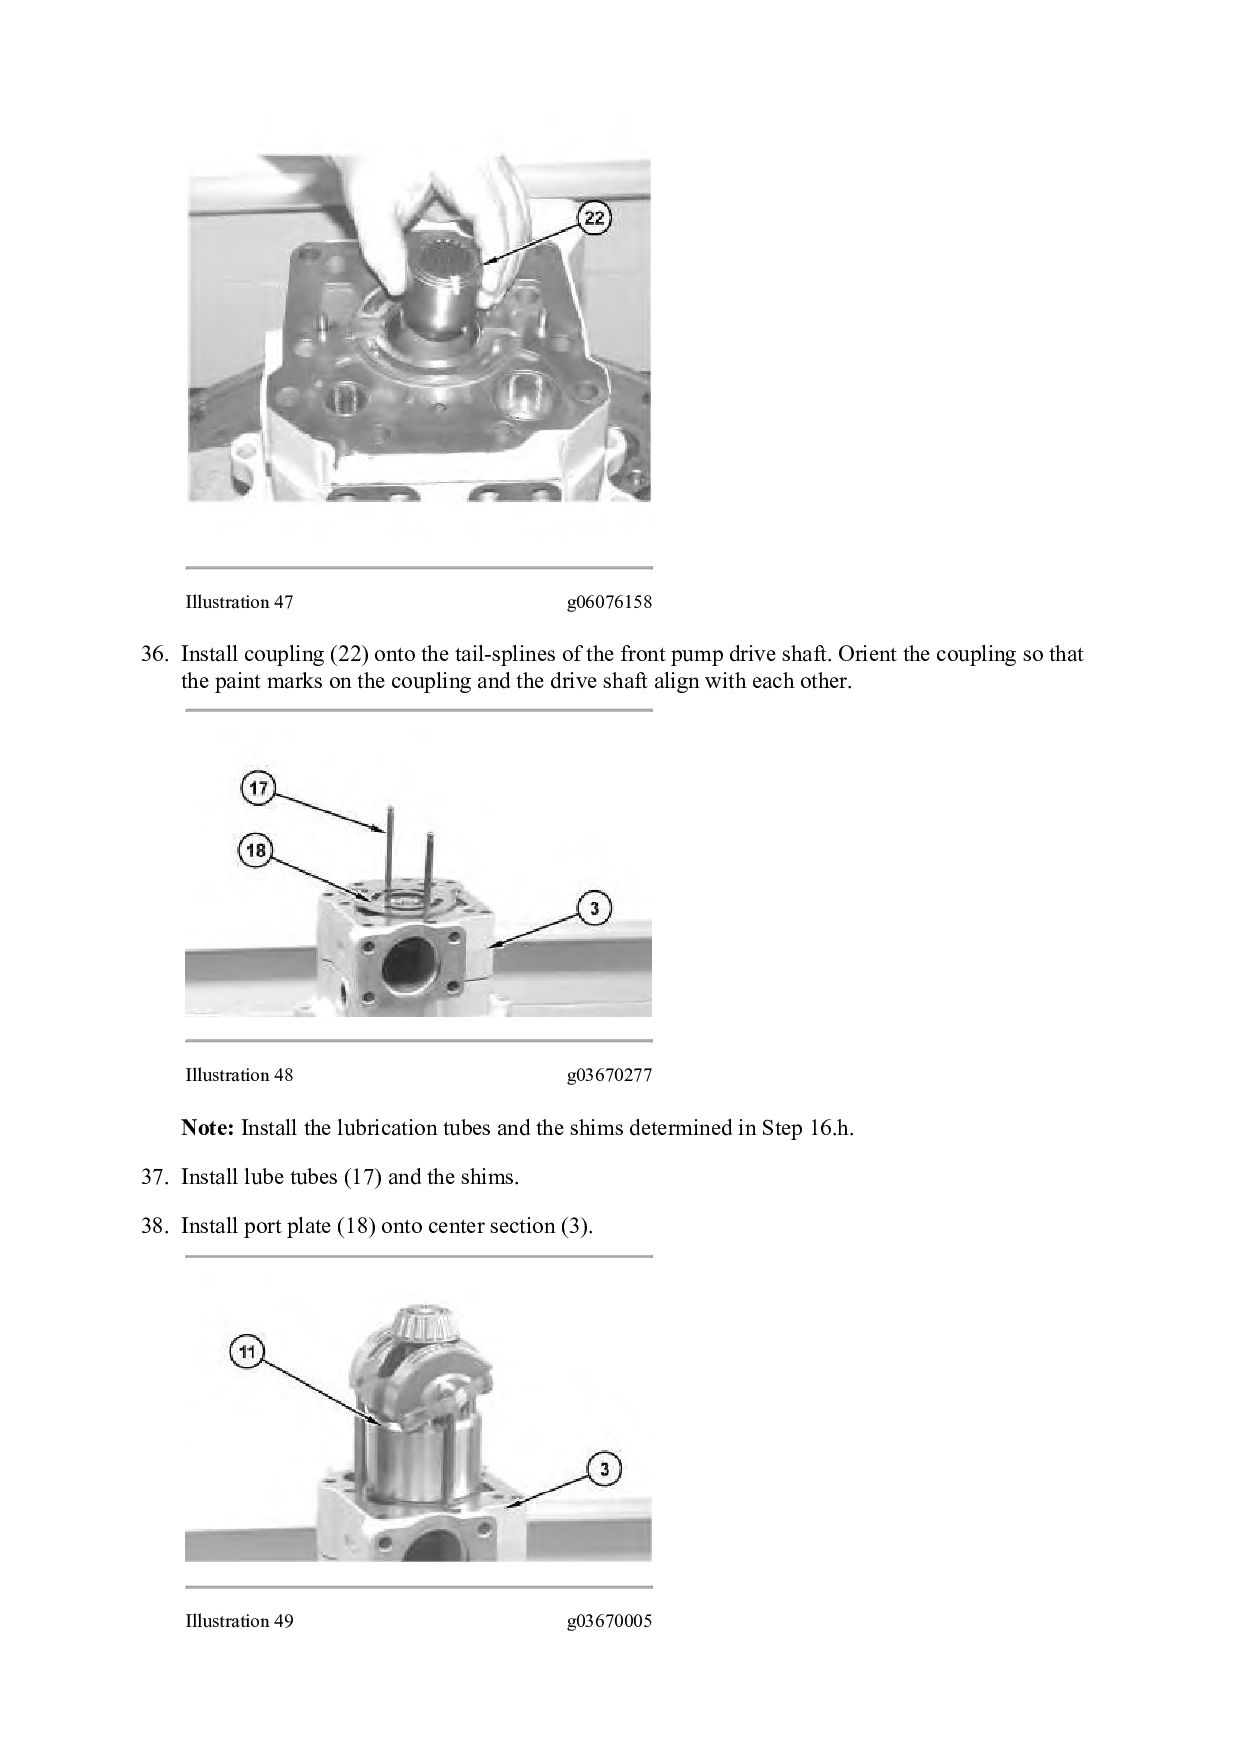
46 g03689827 34. With the pump still oriented as shown in Step 33, install Tooling (G). Do not clamp firmly - you only need to hold them together to reposition the pump. Reposition pump as shown. 35. Remove Tooling (G).
of the front pump drive shaft. Orient the coupling so that the paint marks on the coupling and the drive shaft align with each other. Illustration 48 g03670277 Note: Install the lubrication tubes and the shims determined in Step 16.h. 37. Install lube tubes (17) and the shims. 38. Install port plate (18) onto center section (3). Illustration 49 g03670005
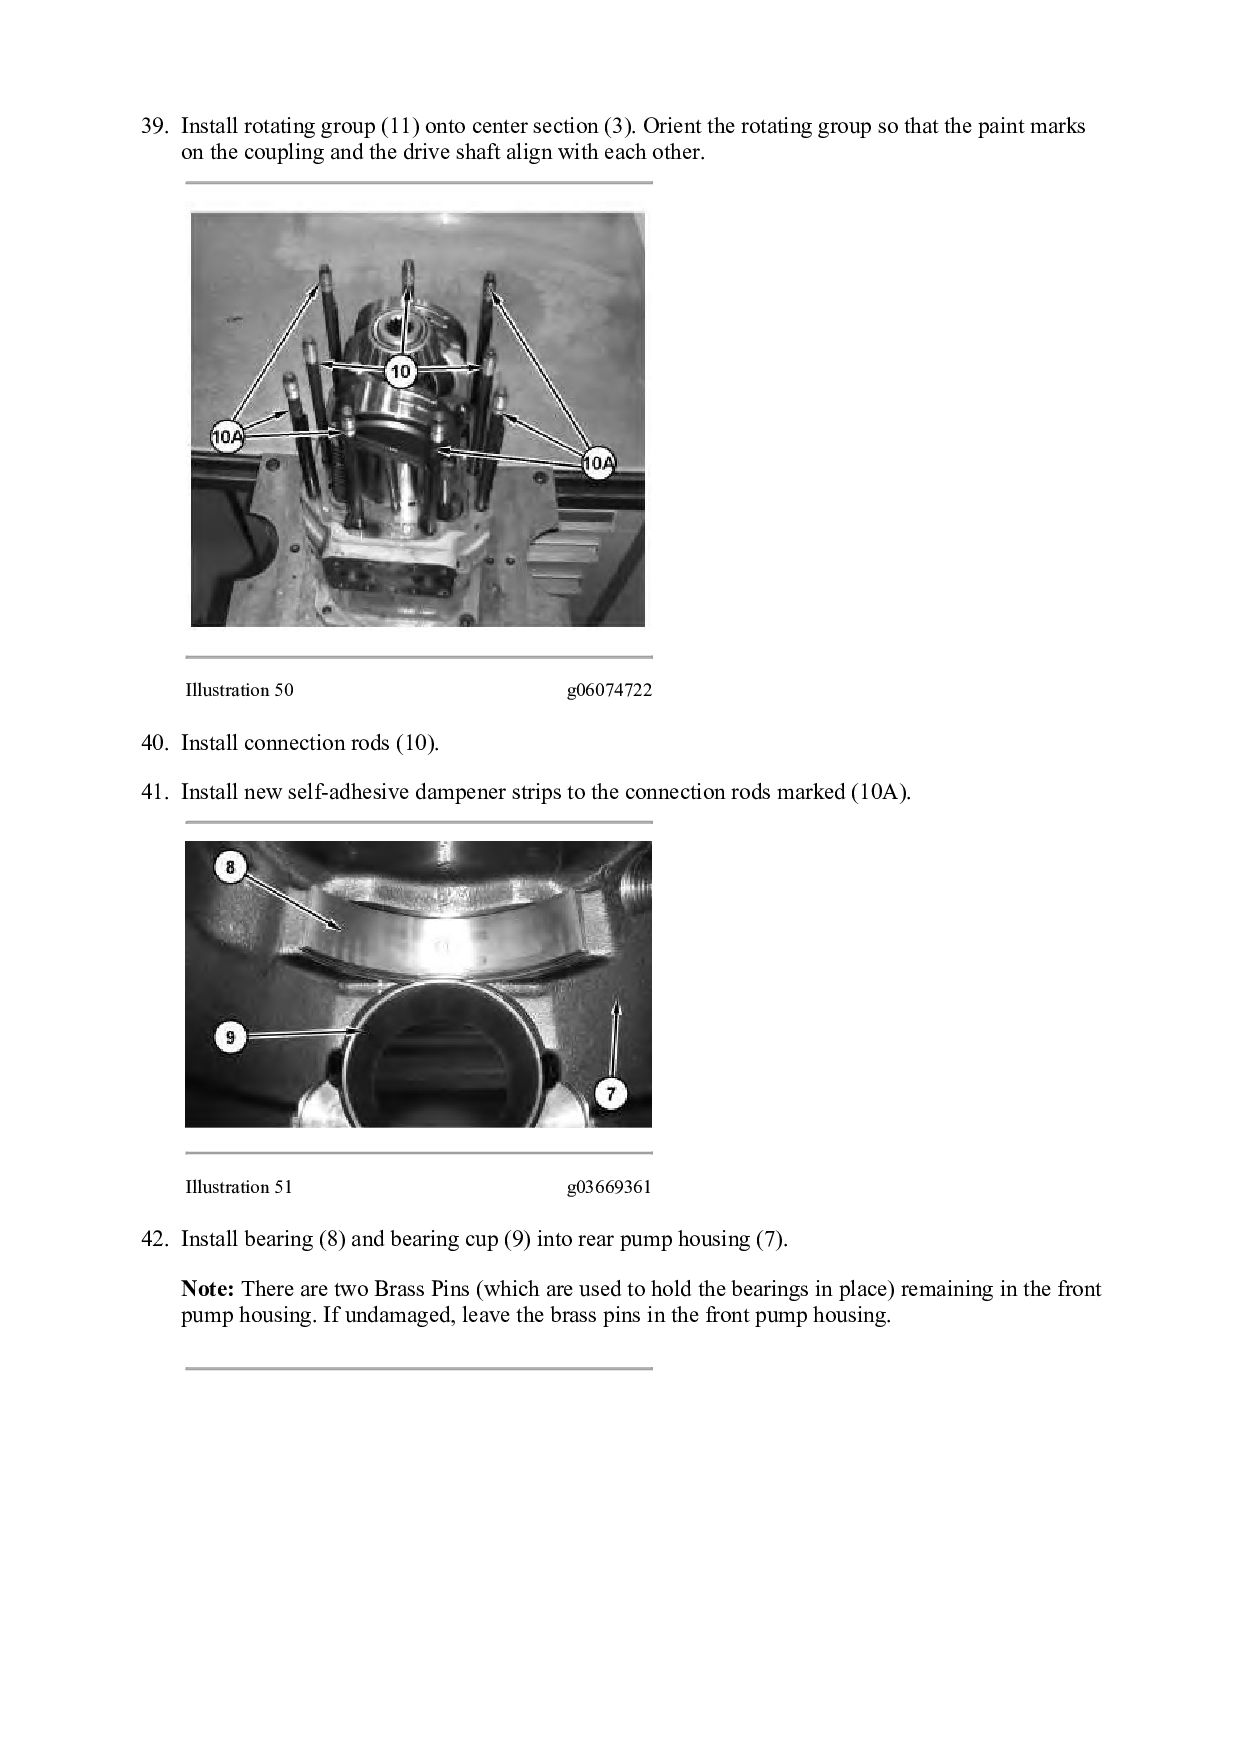
the rotating group so that the paint marks on the coupling and the drive shaft align with each other. Illustration 50 g06074722 40. Install connection rods (10). 41. Install new self-adhesive dampener strips to the connection rods marked (10A). Illustration 51 g03669361 42. Install bearing (8) and bearing cup (9) into rear pump housing (7). Note: There are two Brass Pins (which are used to hold the bearings in place) remaining in the front pump housing. If undamaged, leave the brass pins in the front pump housing.
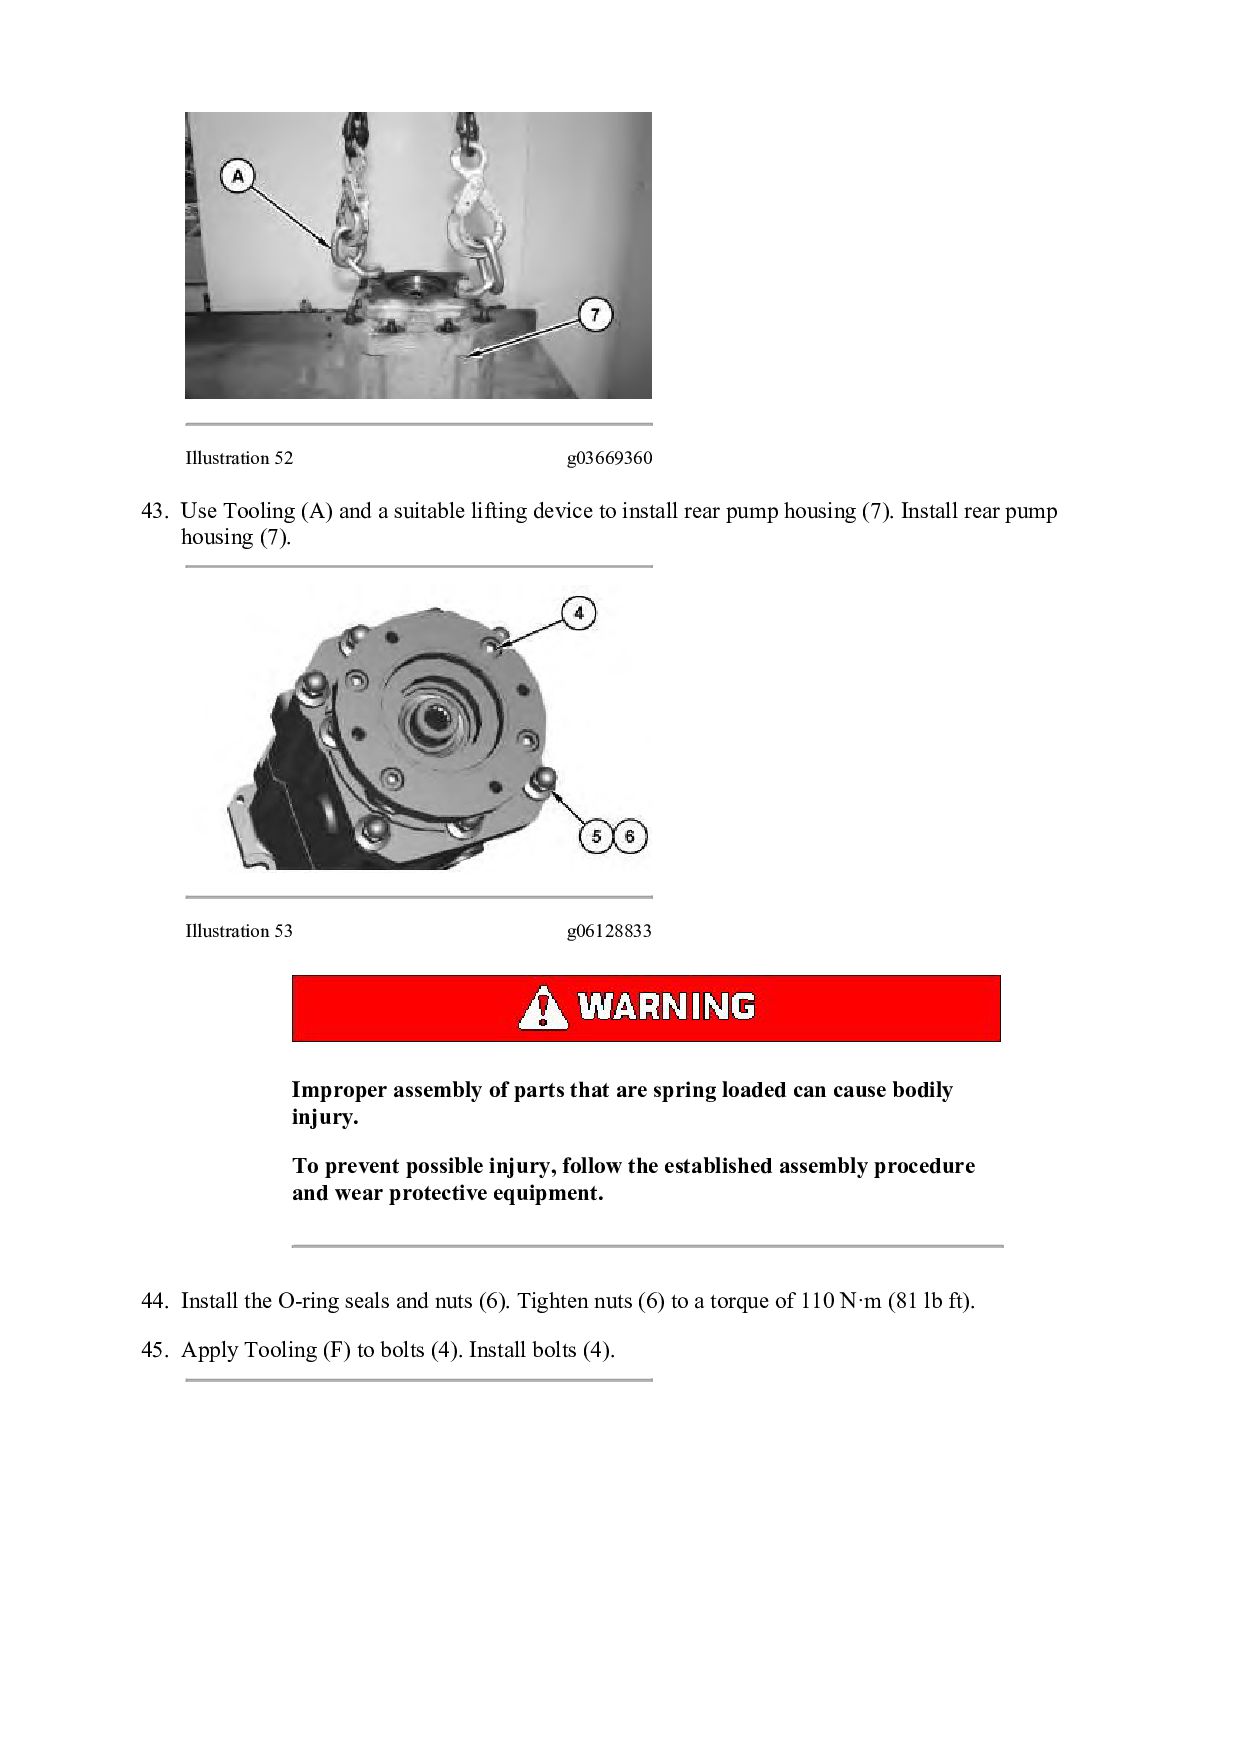
lifting device to install rear pump housing (7). Install rear pump housing (7). Illustration 53 g06128833 Improper assembly of parts that are spring loaded can cause bodily injury. To prevent possible injury, follow the established assembly procedure and wear protective equipment. 44. Install the O-ring seals and nuts (6). Tighten nuts (6) to a torque of 110 N·m (81 lb ft). 45. Apply Tooling (F) to bolts (4). Install bolts (4).
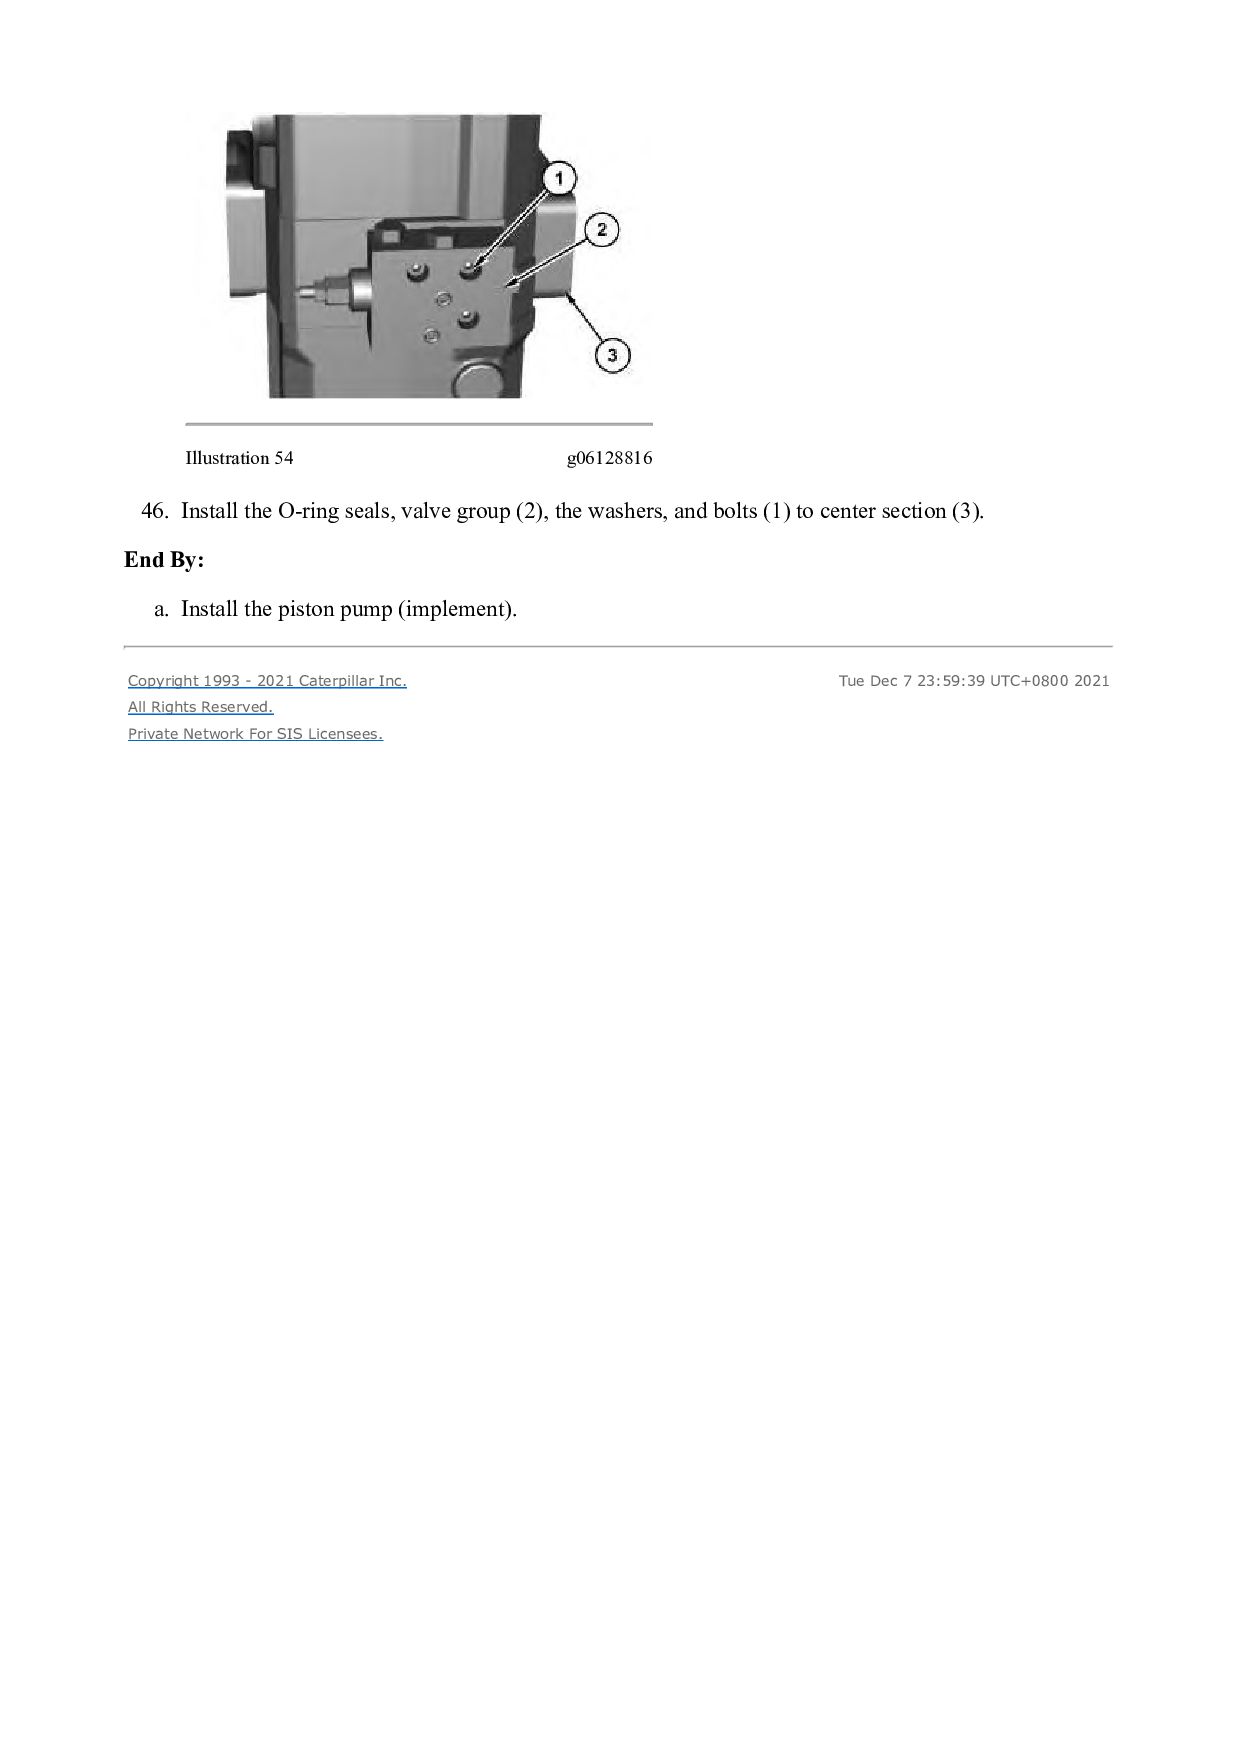
(2), the washers, and bolts (1) to center section (3). End By: a. Install the piston pump (implement). Copyright 1993 - 2021 Caterpillar Inc. All Rights Reserved. Private Network For SIS Licensees. Tue Dec 7 23:59:39 UTC+0800 2021
LOADER D8Z Configuration: 980L Wheel Loader D8Z00001-UP (MACHINE) POWERED BY C13 Engine Disassembly and Assembly 980L T3 Wheel Loader Machine System Media Number -M0075594-01 Publication Date -01/05/2018 Date Updated -24/05/2018 i07322205 Piston Pump (Implement) - Assemble SMCS - 5070-016-FD; 5070-016-II; 5070-016; 5084-016; 5084-016-QP S/N - D8Z20201-UP Assembly Procedure Table 1 Required Tools Tool Part Number Part Description Qty A 1U-9130 Stand Assembly 1 1U-9129 Plate 1 B - M20 x 2.5 threaded rod 2 C 4C-8359 Eyebolt 2 D 1P-0510 Driver Gp 1 E 6V-2012 Depth Gage 1 F 421-5660 Lifting Eye Assembly 2 G 8H-0663 Bearing Puller 1 H 153-3568 Bolt 1
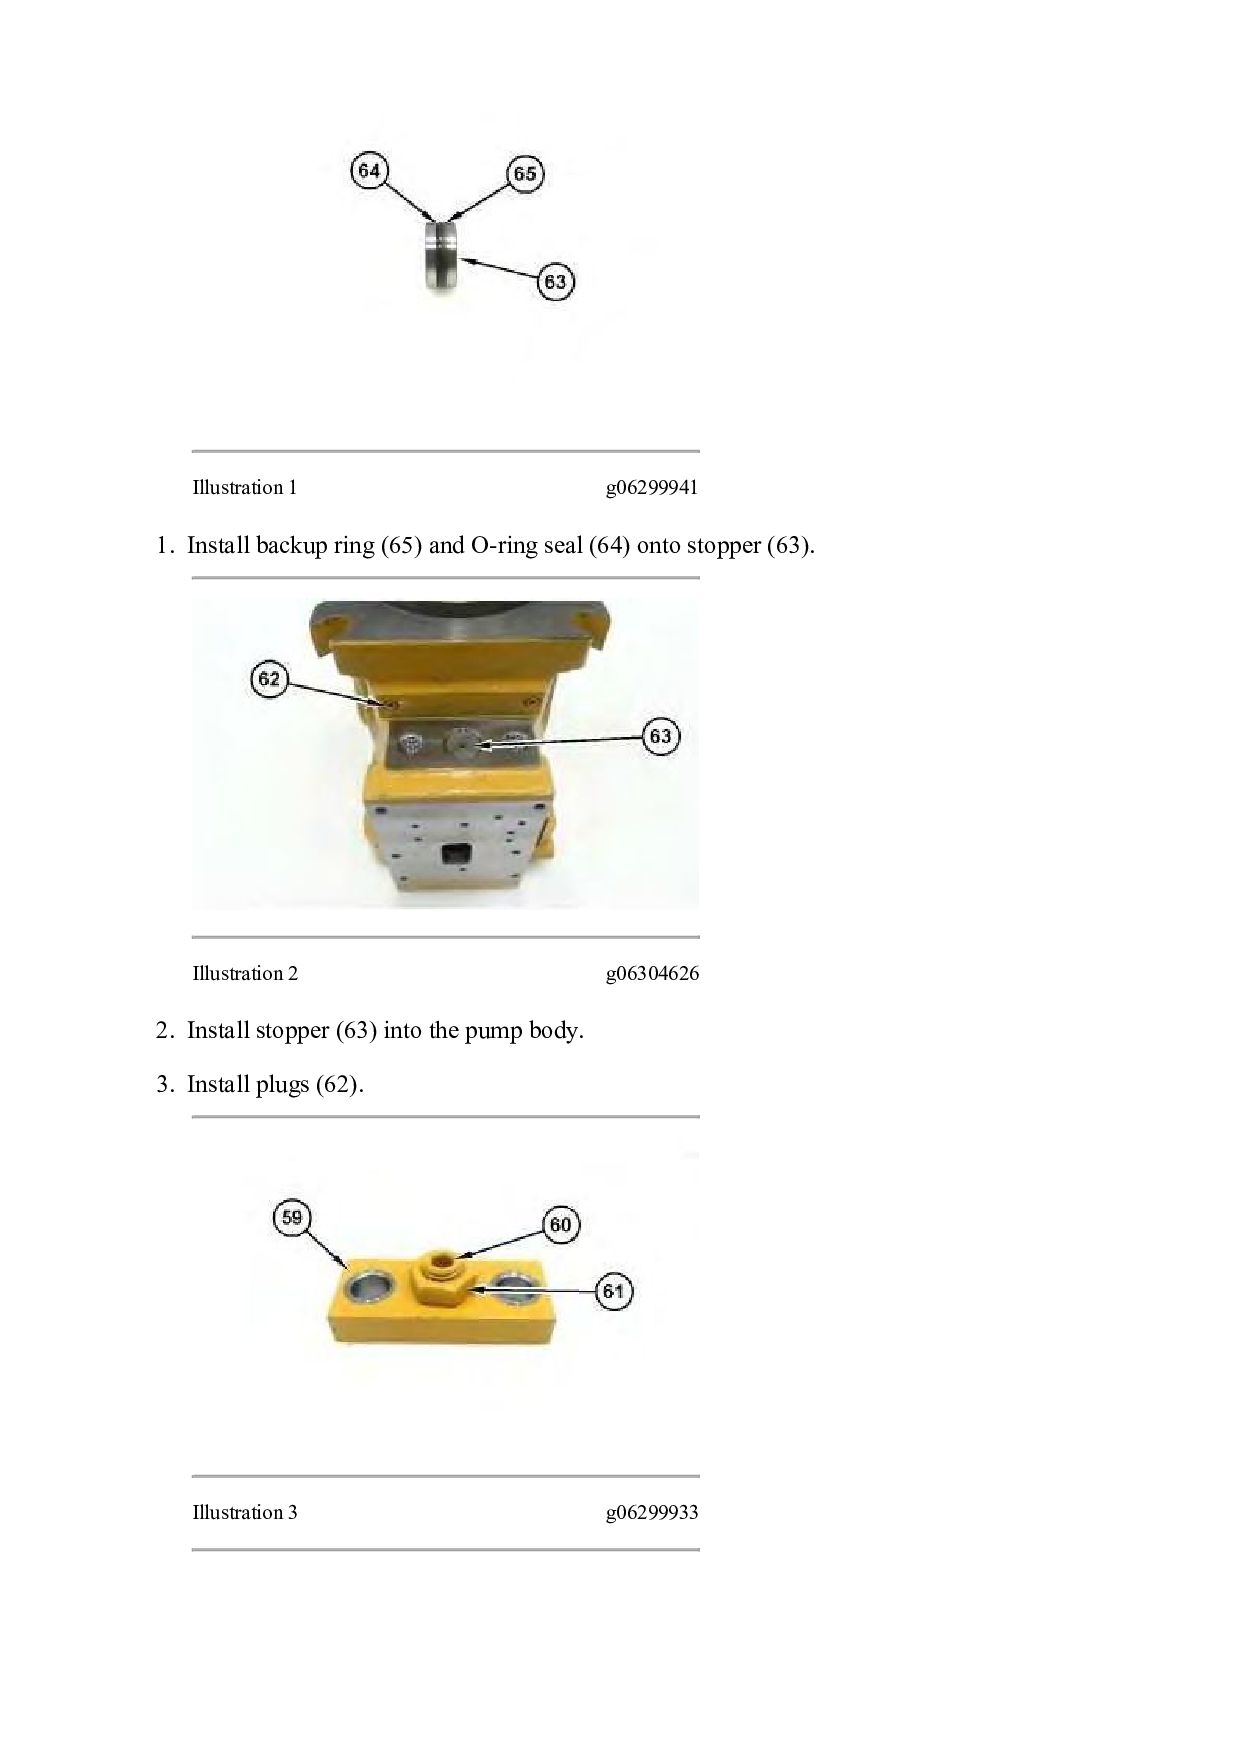
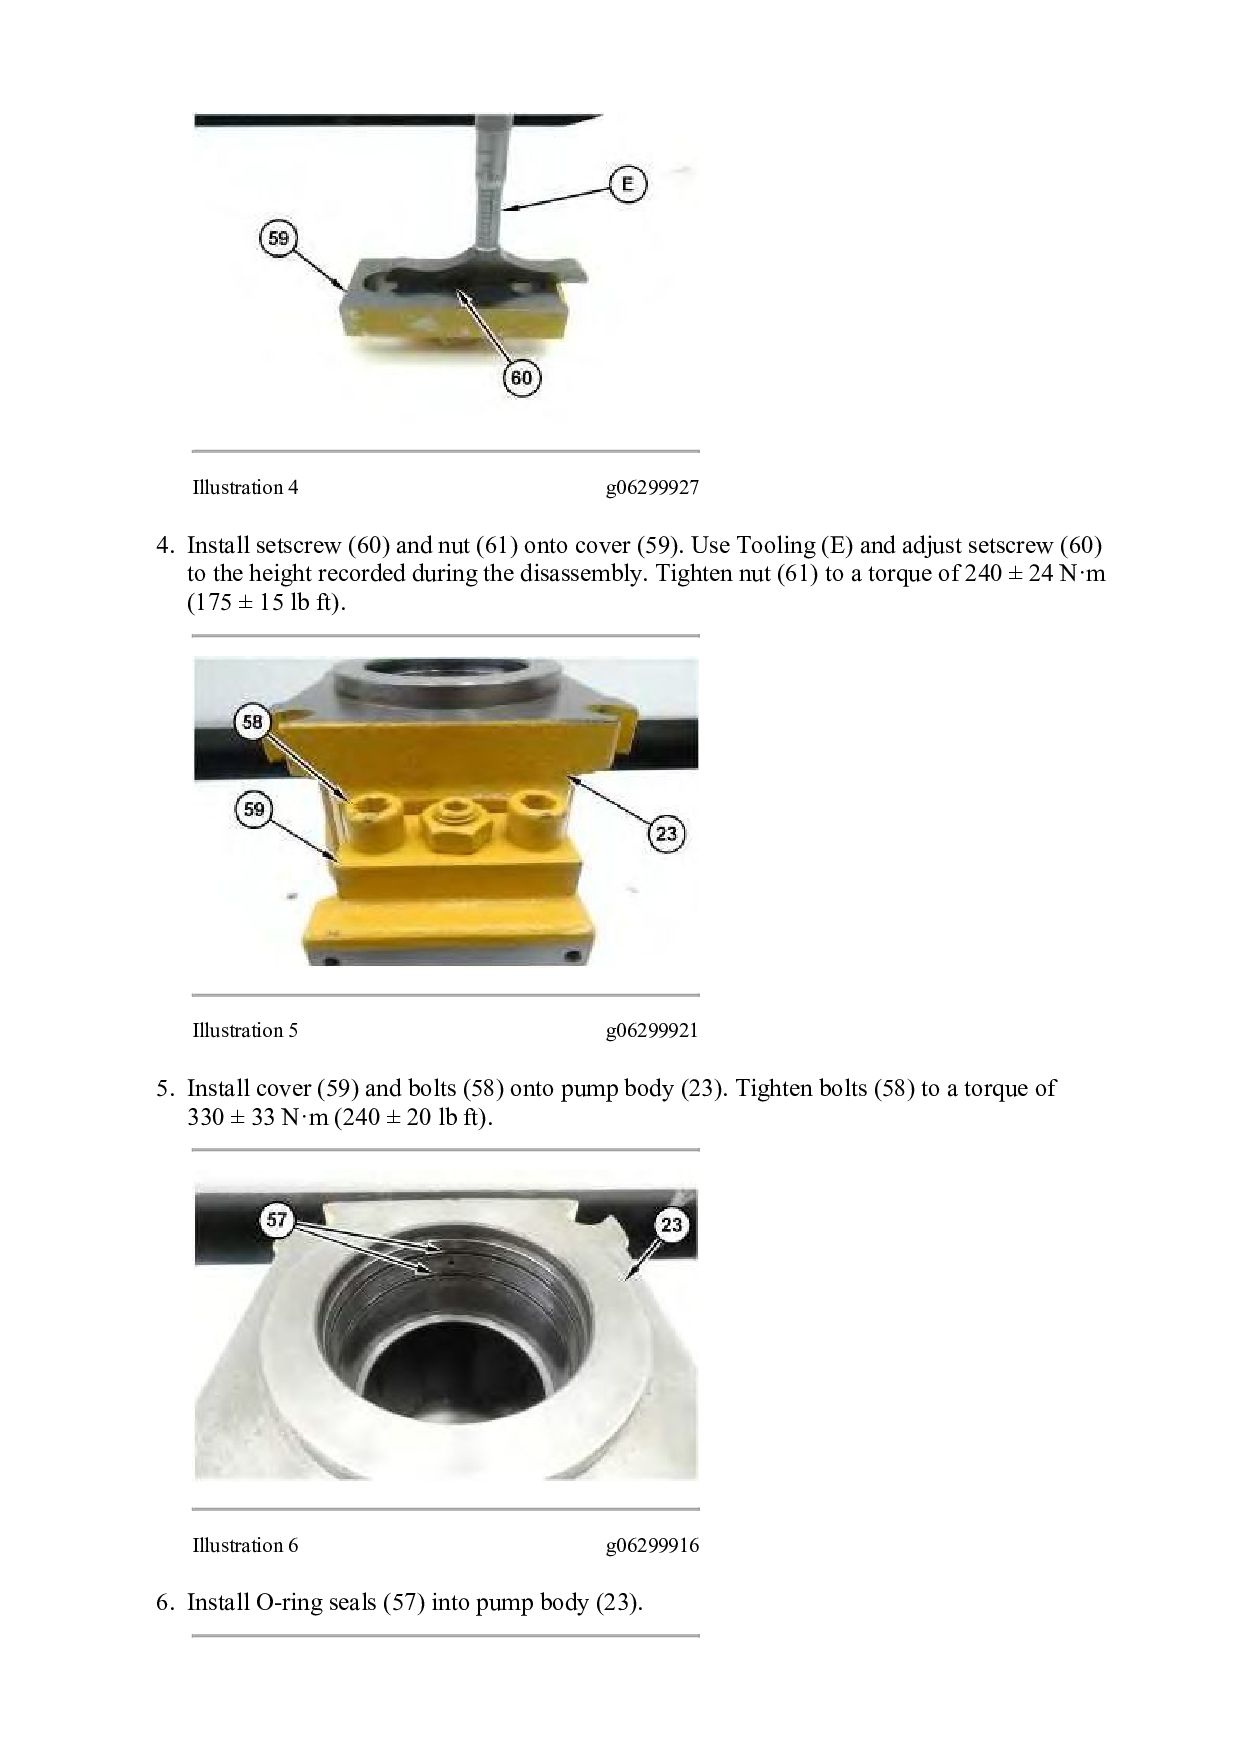
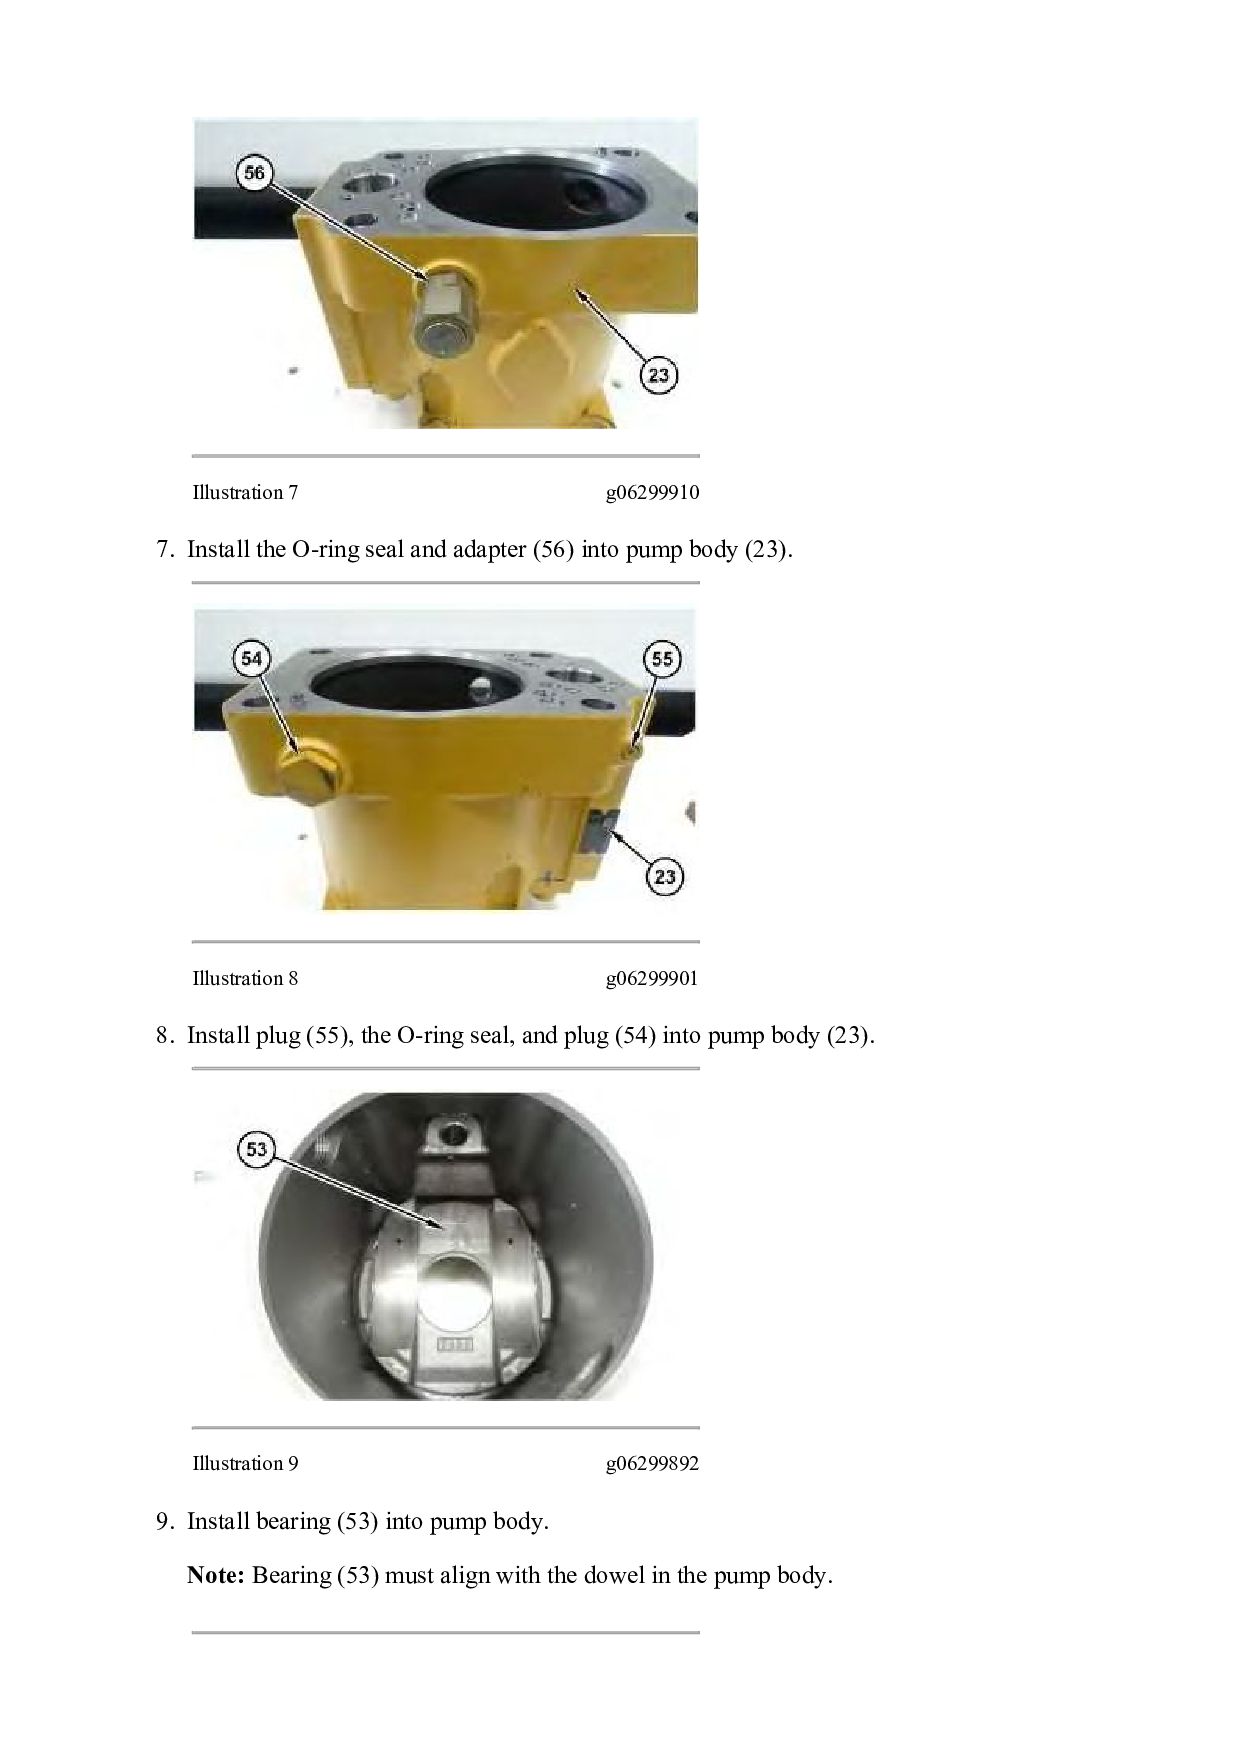
onto cover (59). Use Tooling (E) and adjust setscrew (60) to the height recorded during the disassembly. Tighten nut (61) to a torque of 240 ± 24 N·m (175 ± 15 lb ft). Illustration 5 g06299921 5. Install cover (59) and bolts (58) onto pump body (23). Tighten bolts (58) to a torque of 330 ± 33 N·m (240 ± 20 lb ft). Illustration 6 g06299916 6. Install O-ring seals (57) into pump body (23).
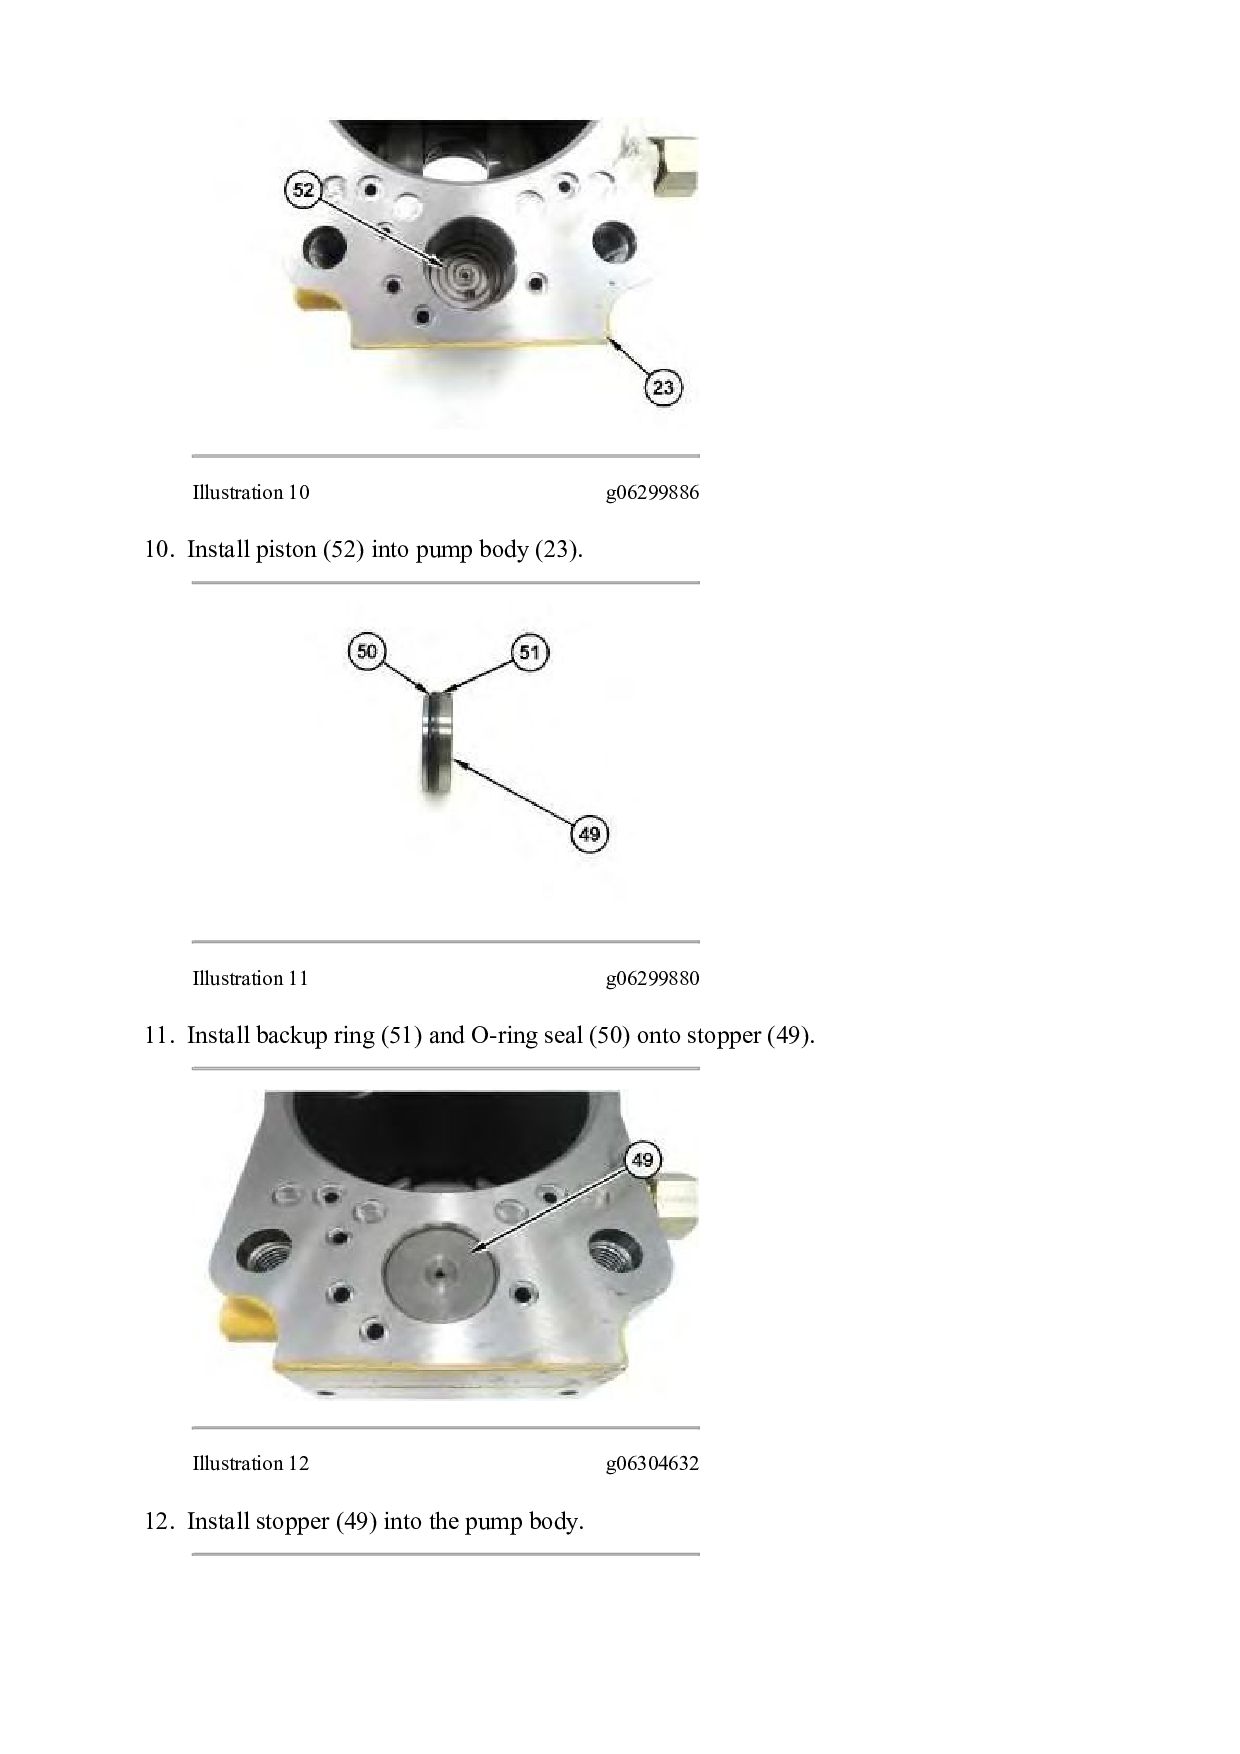
(56) into pump body (23). Illustration 8 g06299901 8. Install plug (55), the O-ring seal, and plug (54) into pump body (23). Illustration 9 g06299892 9. Install bearing (53) into pump body. Note: Bearing (53) must align with the dowel in the pump body.
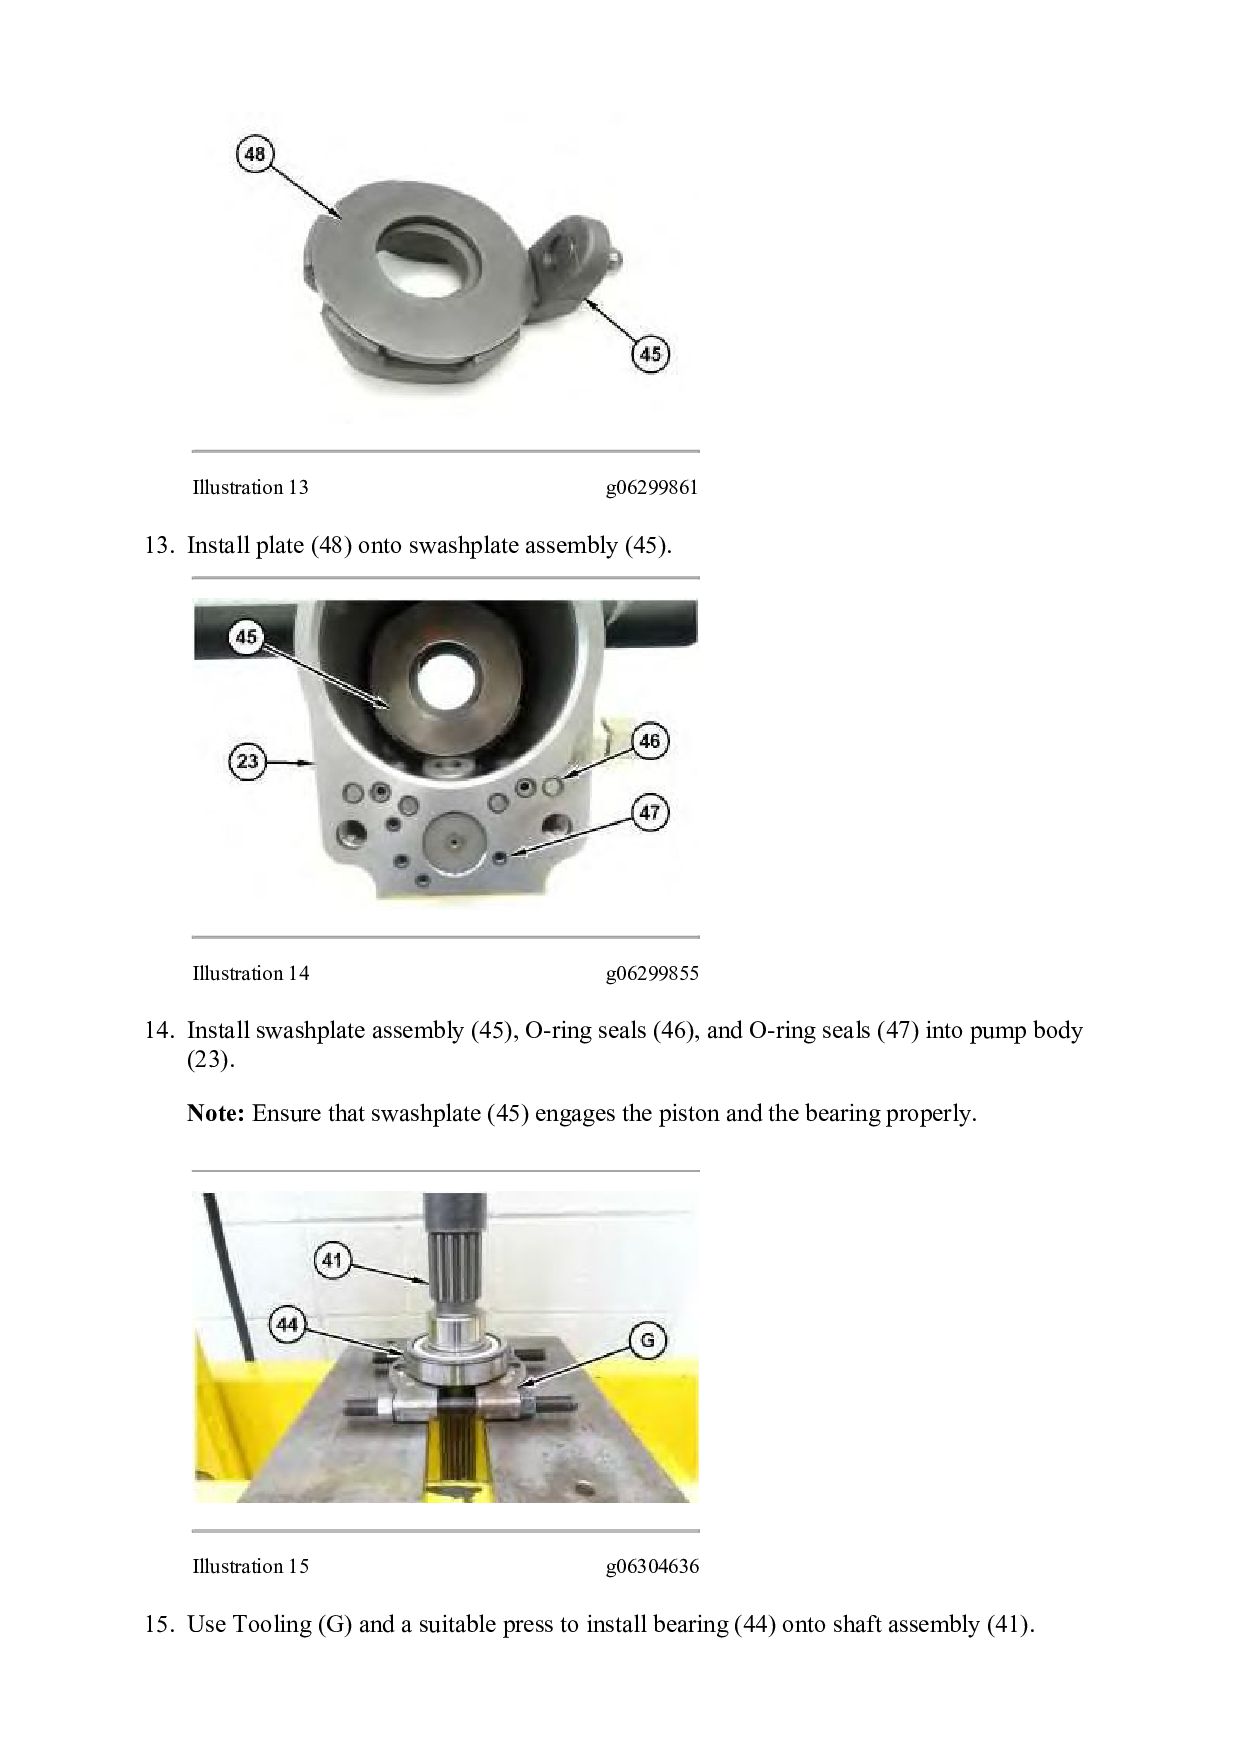
(45). Illustration 14 g06299855 14. Install swashplate assembly (45), O-ring seals (46), and O-ring seals (47) into pump body (23). Note: Ensure that swashplate (45) engages the piston and the bearing properly. Illustration 15 g06304636 15. Use Tooling (G) and a suitable press to install bearing (44) onto shaft assembly (41).
Then Get COMPLETE MANUAL. NO WAITING NOTE: If there is no response to click on the link above, please download the PDF document first and then click on it.
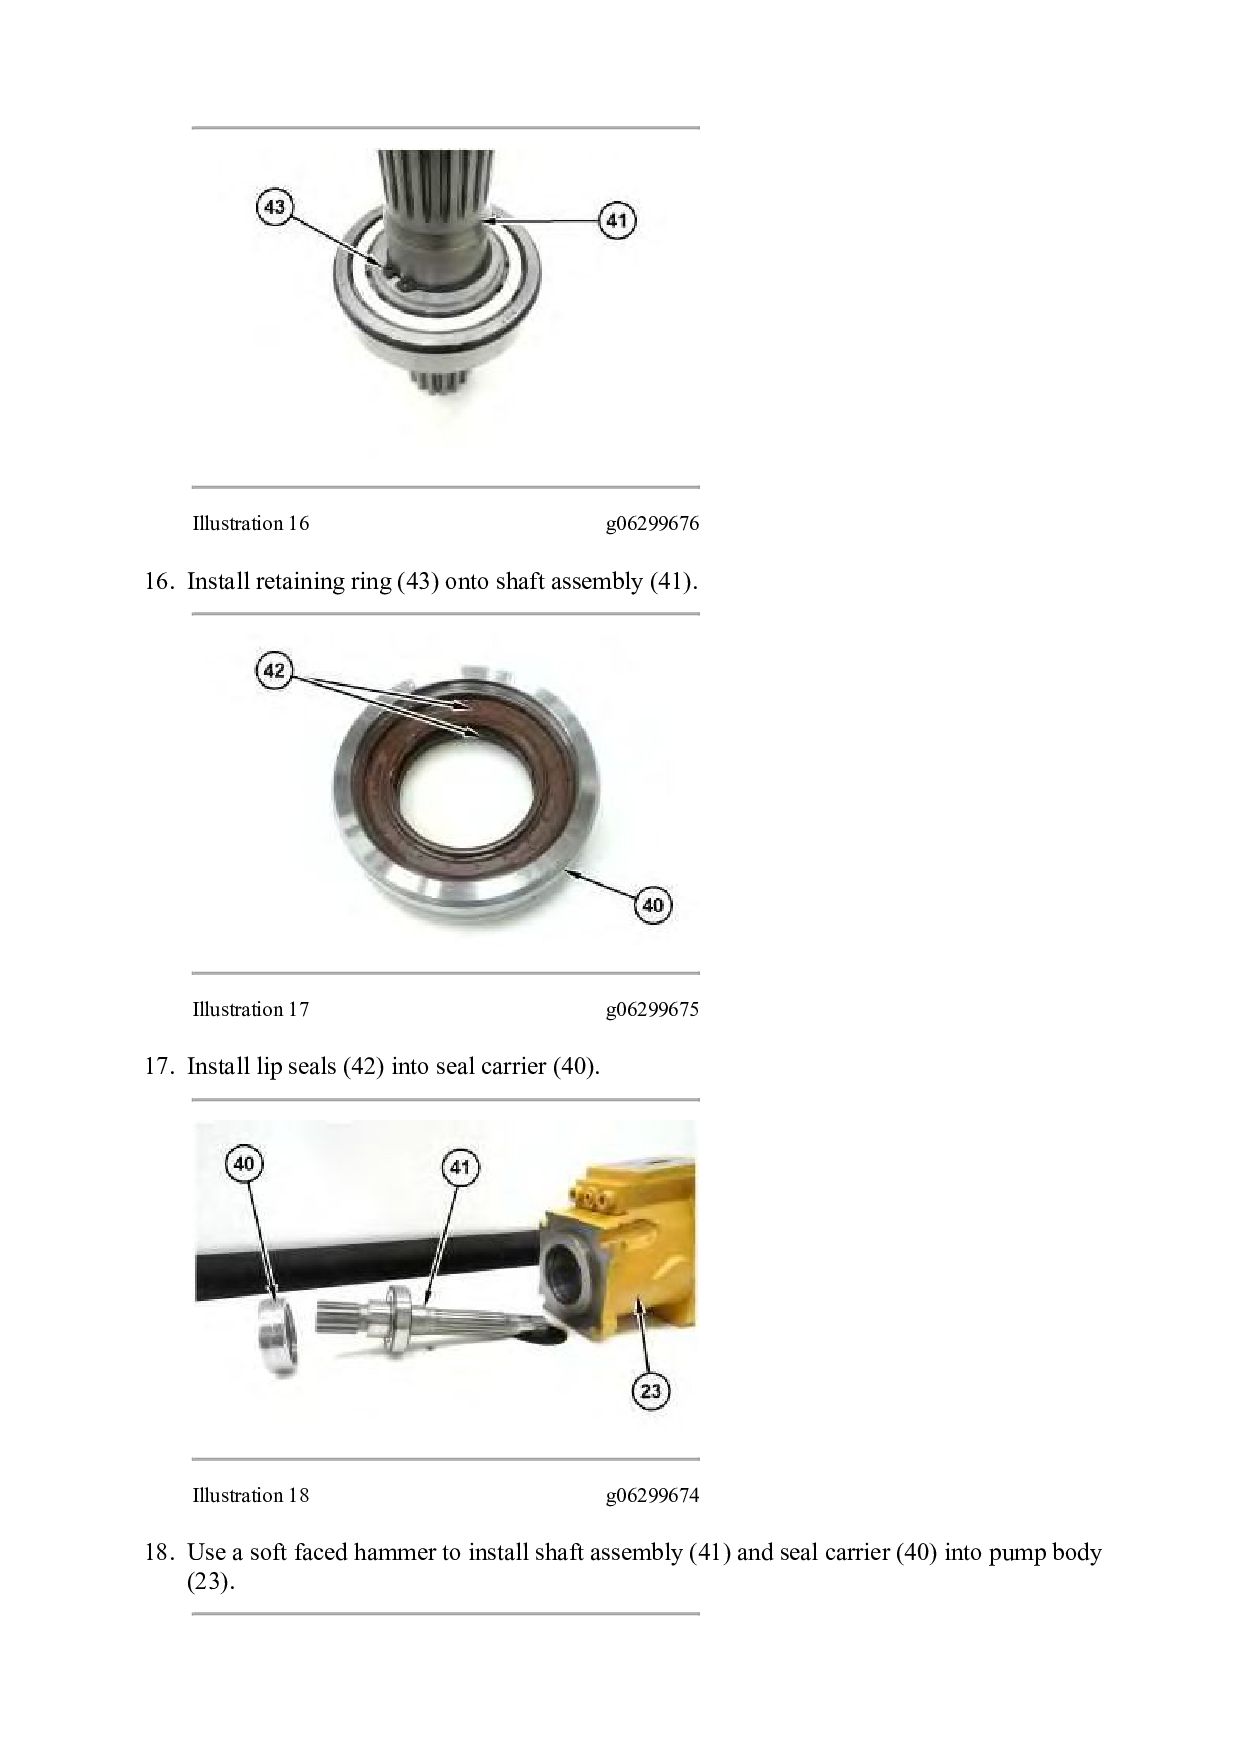
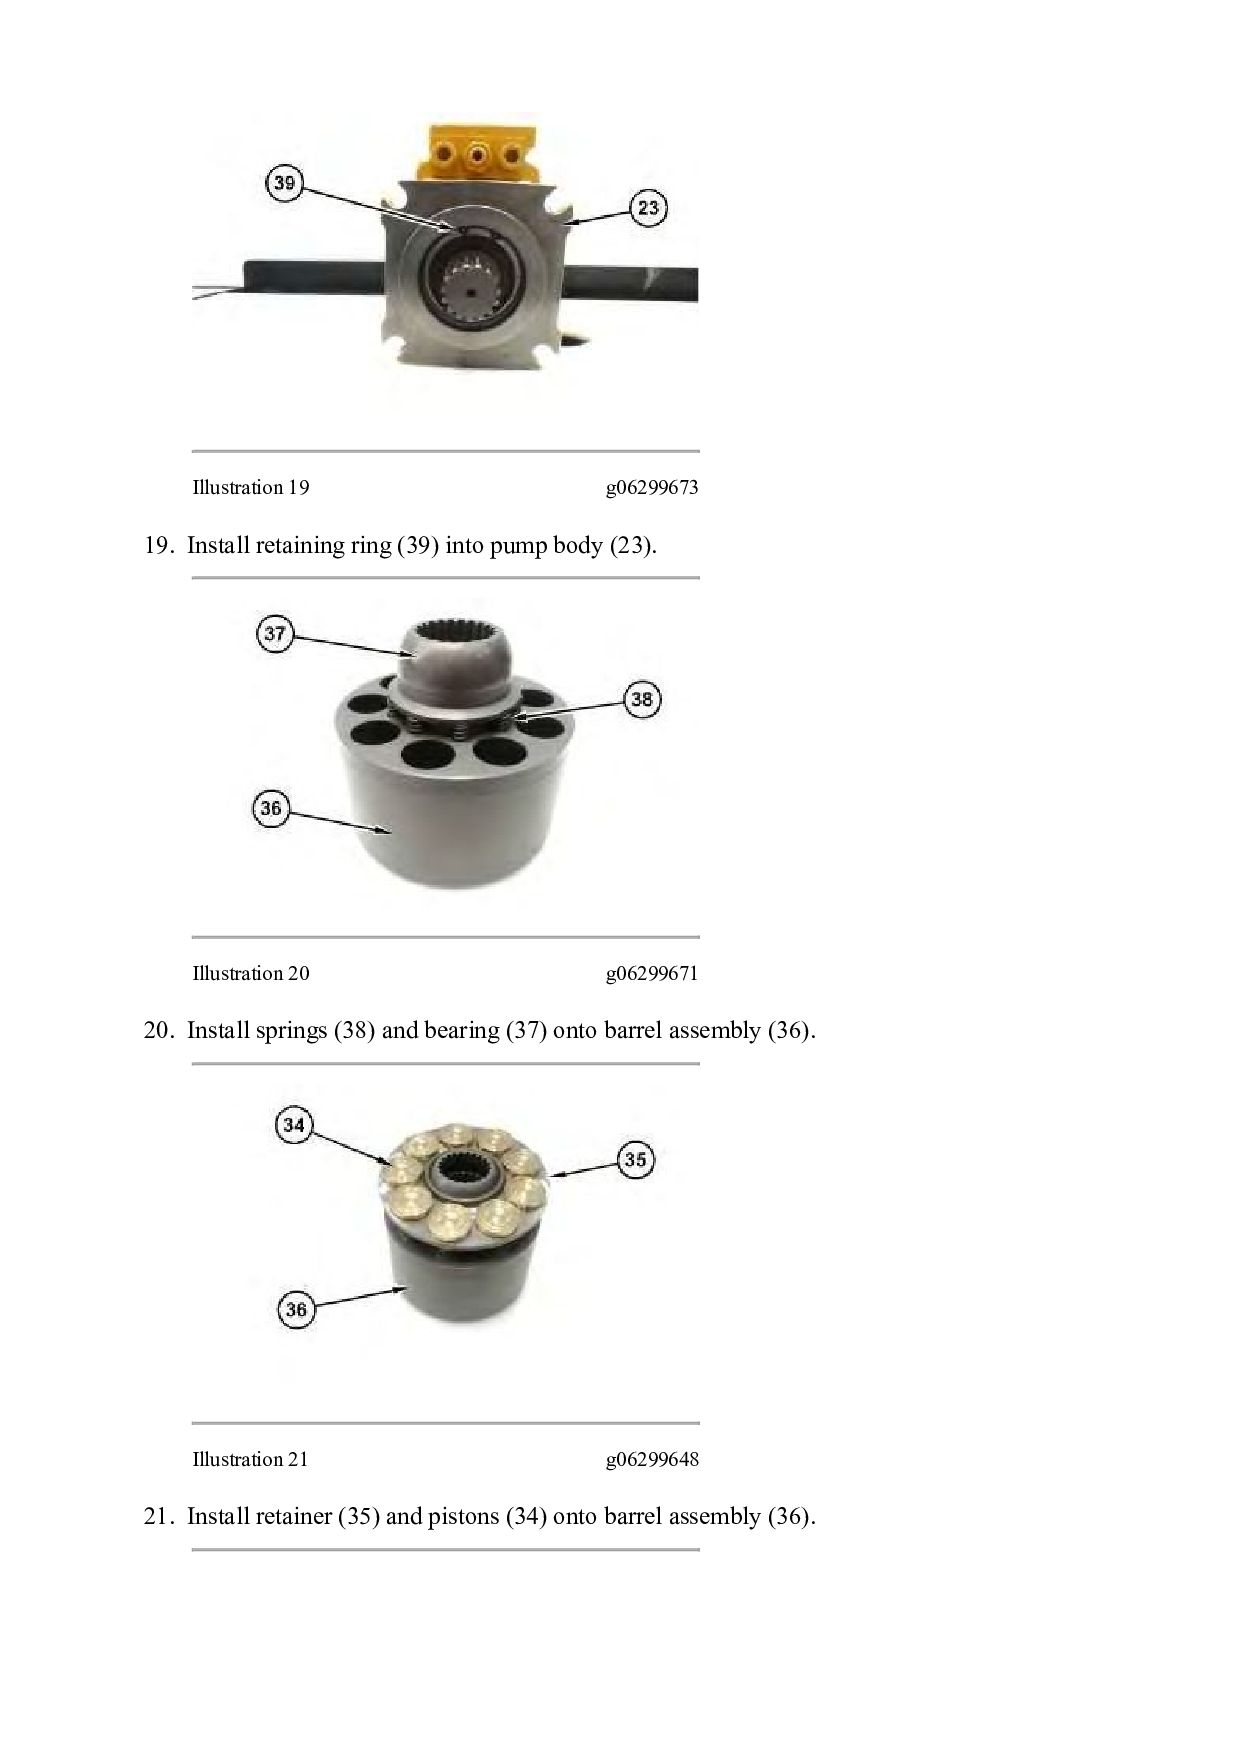
assembly (41). Illustration 17 g06299675 17. Install lip seals (42) into seal carrier (40). Illustration 18 g06299674 18. Use a soft faced hammer to install shaft assembly (41) and seal carrier (40) into pump body (23).
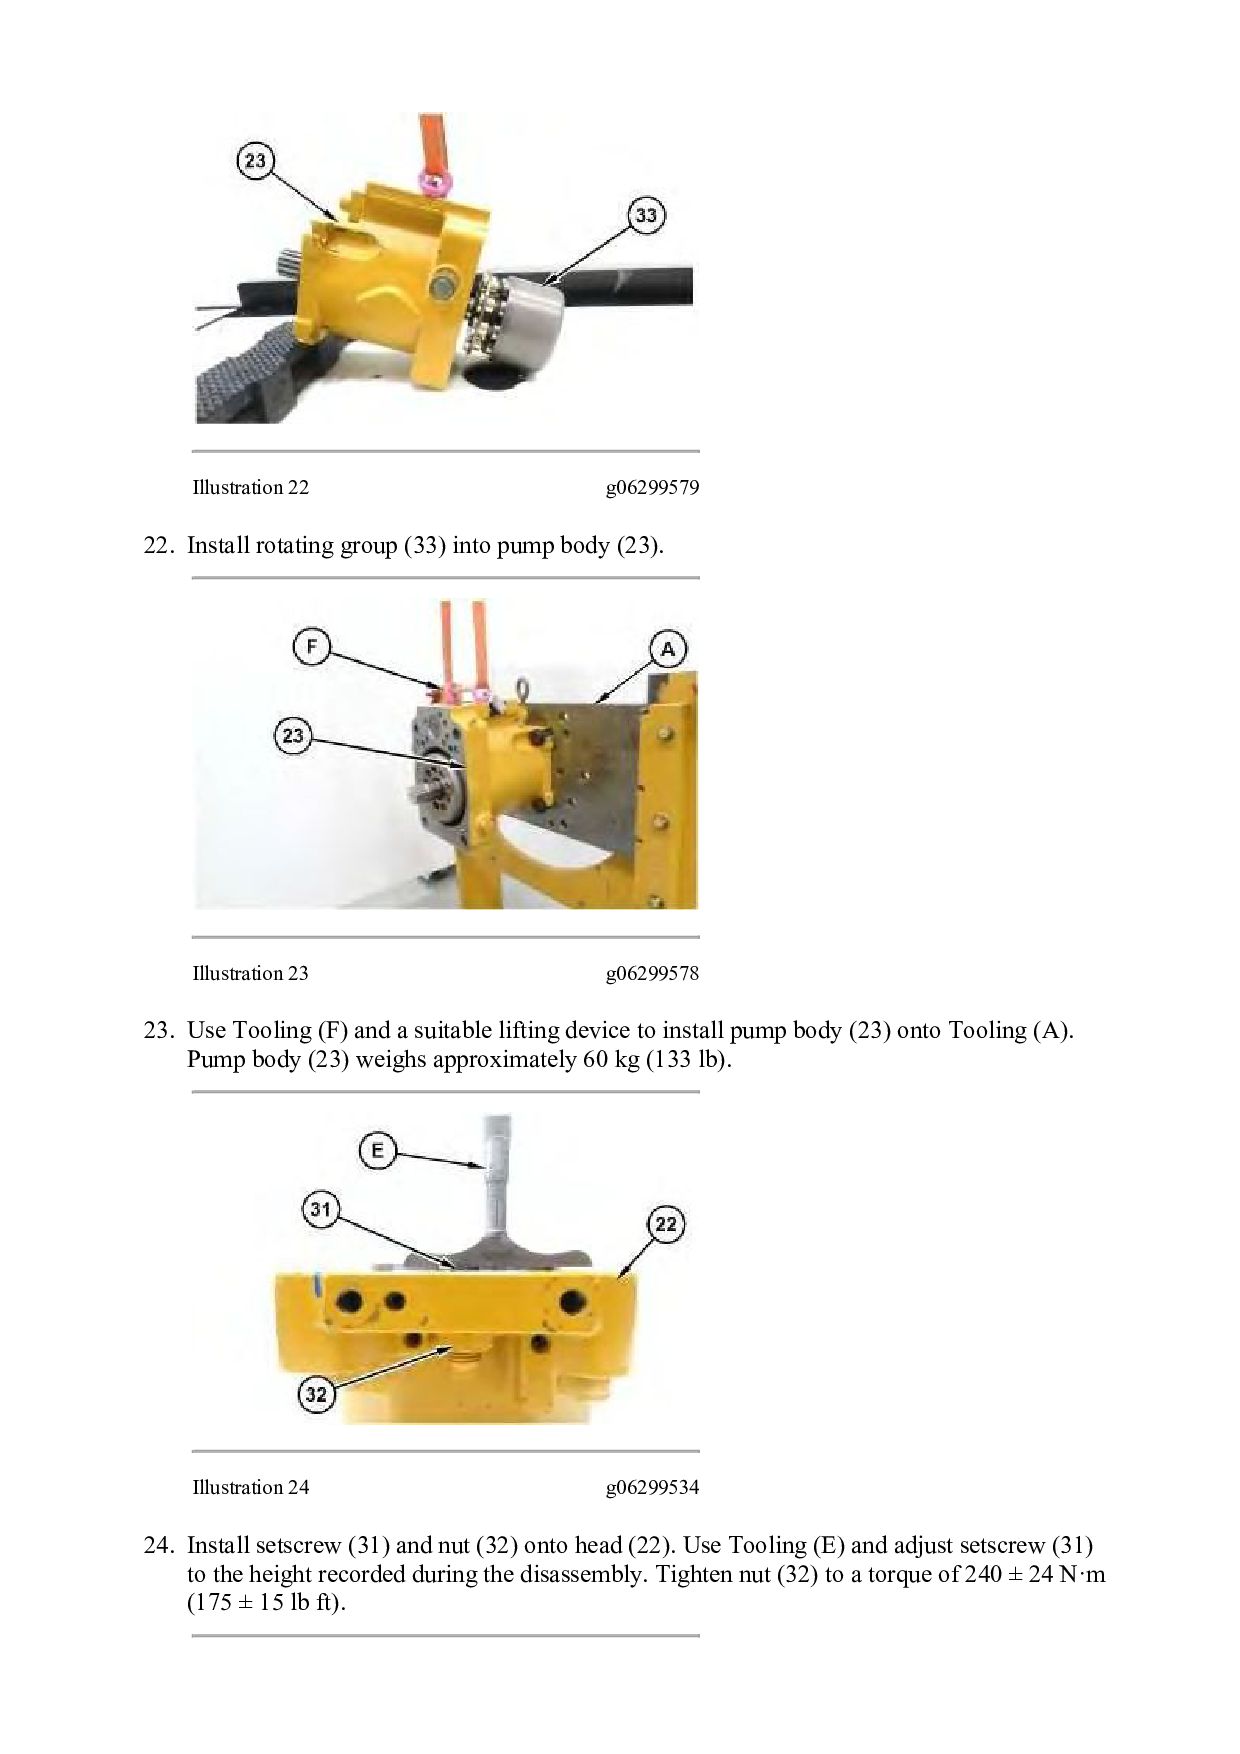
body (23). Illustration 23 g06299578 23. Use Tooling (F) and a suitable lifting device to install pump body (23) onto Tooling (A). Pump body (23) weighs approximately 60 kg (133 lb). Illustration 24 g06299534 24. Install setscrew (31) and nut (32) onto head (22). Use Tooling (E) and adjust setscrew (31) to the height recorded during the disassembly. Tighten nut (32) to a torque of 240 ± 24 N·m (175 ± 15 lb ft).

 Your Podcast. Everywhere. Effortlessly.


 dcrfdycnvk
 addyosmani
 akihiro_kokubo
 tanoku
 aleyda
 seathinner
 destraynor
 jakevdp
 techseoconnect
 cassininazir
 reverentgeek
 brad_frost
 inesmontani