Upgrade to Pro — share decks privately, control downloads, hide ads and more …

User guide for care and support plan users

eHNA Team
July 15, 2014
1.4k

User guide for care and support plan users

eHNA Team

July 15, 2014
Tweet

Transcript

  1. Index Logging in 3 Home Screen 4 Creating a care

    plan 5 Adding a new concern 12 Lifestyle and Information Needs 13 Save and Lock 14 Downloading the care plan 15 Printing the care plan 16 Searching for completed care plans 17 How to get help 18 Assessments at home 19 Resources to support you 25 Care and Support Plan Users Care and Support Plan Users have the functionality to create and complete care plans as well as share them with the person completing the assessment.
  2. Logging in 3 To log into My Care Plan, you

    will need your email address and password. If you have not received a password, please contact [email protected]. Once this has been obtained, go to http://mycareplan.co.uk/. You will see there are three options for logging into My Care Plan: • NHS trust • Private cancer service provider • Social care provider Click on the appropriate option, enter your email address and password, then click ‘Sign in’. You will be asked to change your password the first time you login. Passwords should contain: •A minimum of eight characters •Uppercase letters, lowercase letters and digits
  3. Home Page Once you have successfully signed in you will

    be directed to the home page. From here you can navigate around the website. You can: •Create or view a care plan •Manage your account settings by changing your password or general account details •Review userguides •Look at data and charts 4
  4. From the home page there are a number of ways

    of searching for assessments that do not have care plans. For the purpose of this guide, we will search via the option ‘All assessments without care plans’, but there are other options to search by, such as date or name. Within the Create/View a Care Plan panel, click on ‘All assessments without care plans’. Creating a care plan 5
  5. After selecting ‘All assessments without care plans’, you will be

    taken to a list of all assessments that do not currently have completed care plans. You can scroll down the list and when you have located the assessment you wish to look at, click the blue View button. If an assessment is not developed into a care plan within four months it will be automatically deleted. 6 Creating a care plan (cont)
  6. After clicking View, you will see three tabs. The first

    tab headed ‘Concerns’, lists all concerns raised by the person who completed the assessment, with the highest at the top. This will give you a very quick overview of what’s most important to the person who completed the assessment. ______________ Sites within London, will see Concerns ranked out of three due to a different assessment being used. 7 Creating a care plan (cont)
  7. The second tab headed ‘Answers’, will show a complete list

    of the concerns and scores given by the person completing the assessment. You will notice that any concern selected will have their respective score beside them. 8 Creating a care plan (cont)
  8. Creating a care plan (cont) The third tab is the

    ‘Care plan’ and this will take you to the care and planning page. Within the ‘Patient details’ panel, First name, Last name and date of birth will be automatically populated. Make sure you check these details are correct. Note that the NHS Number can be entered in a 3-3-4 format or as 10 digits without spaces. It will be checked to make sure it is a valid number, so leave blank if you are unsure of the number. The Hospital number and gender are mandatory fields. 9
  9. Creating a care plan (cont) In the ‘Clinical Info’ panel,

    you will be asked for more information about the person. You will be able to choose the relevant diagnosis from the first drop down box. This should be completed on all care plans. The Pathway stage will allow you to select between Newly diagnosed, On treatment, End of Treatment, Follow up or Other. Stratified follow up is only applicable when the person is on the Follow up pathway stage. If they are not, then leave blank. Treatment intent will allow you to select from Curative, Support and Palliative care, End of life care, Life prolonging and Other. 10
  10. After you have completed the top part of the care

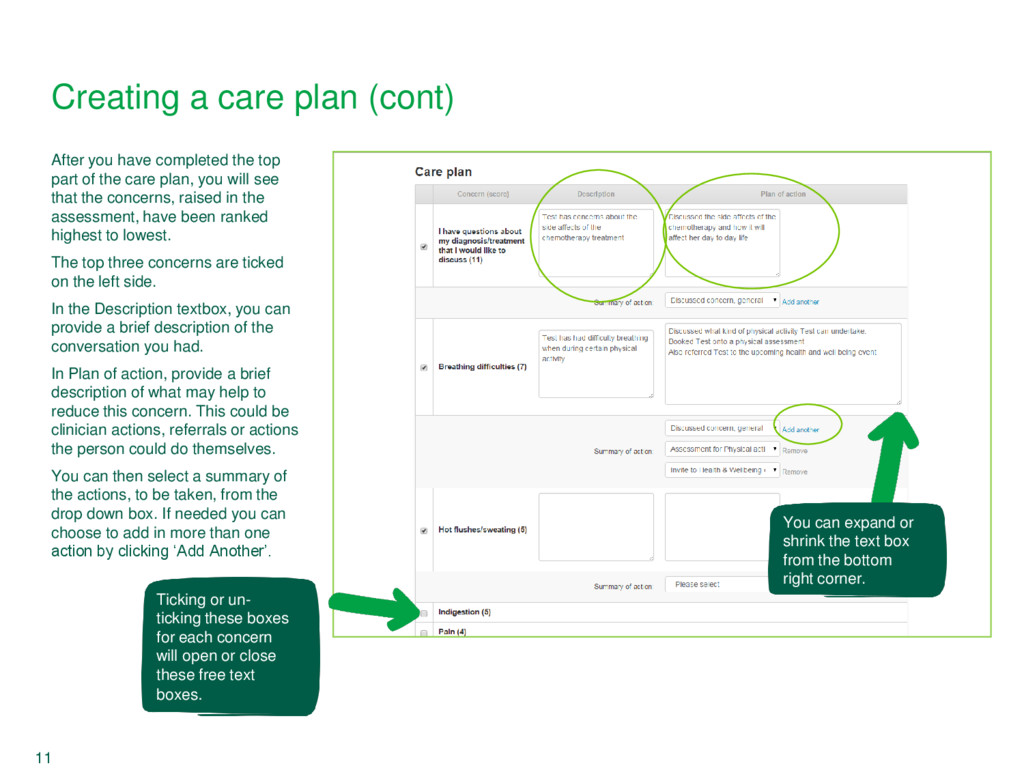
    plan, you will see that the concerns, raised in the assessment, have been ranked highest to lowest. The top three concerns are ticked on the left side. In the Description textbox, you can provide a brief description of the conversation you had. In Plan of action, provide a brief description of what may help to reduce this concern. This could be clinician actions, referrals or actions the person could do themselves. You can then select a summary of the actions, to be taken, from the drop down box. If needed you can choose to add in more than one action by clicking ‘Add Another’. You can expand or shrink the text box from the bottom right corner. 11 Creating a care plan (cont) Ticking or un- ticking these boxes for each concern will open or close these free text boxes.
  11. Adding a new concern Sometimes additional concerns come up in

    the care and support planning discussion. To record these additional concerns, you can scroll down to ‘Add additional concern to care plan’. Here you can specify the concern from the drop down list, and give it a score. You will need to save the work you’ve done so far before an additional concern can be added. You can scroll to the bottom of the form and click ‘Save without locking’. After saving, click on ‘Add to careplan’, and it will add it to the list and the two free text boxes will automatically open and be highlighted. ______________ Sites within London, be able to provide a ranking out of three, due to the different type of assessment used 12
  12. Lifestyle and information needs The lifestyle and information needs which

    the person identified during the assessment, are shown here. 13
  13. As a final step before completing this care plan, you

    will need to select what is going to happen to it. Do this by selecting the relevant option. As a final step the care plan will need to be saved. Once you are ready to save the care plan, there are two options: ‘Save without locking’ is a functionality which allows you to save partially completed care plans. ‘Save and lock’ is only to be used once the care plan has been completed. After it has been locked, only you and members of you team will be able to see it. Only locked care plans can be downloaded or printed. 14 Save and Lock If ‘No care plan was required’ was selected, it will stay on the list of ‘Assessments without care plans’ (see page 6).
  14. Downloading the care plan Once you have selected ‘Save and

    lock’, you are then able to download the care plan via PDF, RTF or TIFF formats. PDF is the most commonly used format. This format is useful for printing, attaching to electronic patient records and emailing. RTF can be used when attaching to trust systems that accept Word format documents. TIFF is useful when documents are scanned into trust systems. Most scanners produce TIFF format files so these can be used directly. 15
  15. Printing the care plan Once saved and downloaded in the

    relevant format, the care plan can be printed and given to the person completing the assessment. Together with the list of actions that you selected, the comments added in the free text boxes will show on the care plan. Depending on the actions they will be divided up into Clinician and Patient. Your Site Administrator will be able to tell you about any processes you will need to follow to attach them to your Trust system. 16
  16. Searching for completed care plans If you want to search

    for completed care plans, click on ‘Create/view a Care Plan’ which is located on the top menu of every page. If you use the hospital, NHS or CHI number to search, you will see a list of all previous care plans for the same person. 17
  17. How to get help If you are experiencing any technical

    difficulties on the website, click on the purple Help desk button. This will open up a blank email to the help desk where you can enter the details of your query. Please try to provide as much information as possible including what you were trying to do as well as any error message that you may have received. Please also provide your contact number. Alternatively you can contact the eHNA team at [email protected]. 18
  18. Assessments at home Setting up the assessment (Note that these

    instructions are correct as at 01/02/2016) Log into mycareplan.co.uk as normal You will notice an extra box on the left hand side of the home screen, called “Assessments at home” Click on “Set up assessment for patient”
  19. This will bring up a screen where you will enter

    the basic details for the patient Note that you will need to explain this to the patient, and make sure that you have their consent to create the assessment for them – their name and date of birth will be stored on the system and we cannot do this without consent. Note that you can select the Concerns Checklist (English or Welsh language version), or LHNA (in London). To avoid ambiguity, the full four digits should be used for the year of birth. Clicking on “Next” will bring up a screen with instructions
  20. You will need to repeat these instructions to the patient,

    including the URL for the assessment questionnaire, and the six digit code. You might want to copy and paste from this screen into a letter or email (depending on your Trust IG rules) or simply read the information out to the patient so they can write it down for later. Click on “Set up assessment for another patient” to set up another patient.
  21. Completing the assessment The patient can use any laptop or

    desktop PC, tablet device, or smartphone at home. The patient goes to http://mycareplan.co.uk/home This gives them a login screen Here they will enter their date of birth, (dd/mm/yyyy) to avoid ambiguity, the full four digits should be used for the year of birth. They will need to enter the passcode you provided them earlier. This should work with or without the space.
  22. If correct, this will take them into the Concerns Checklist/LHNA

    as usual. You might notice some formatting changes and that it looks slightly different to the standard version. This has been done to improve stability on a wider range of devices. They will start with the consent screen, and from that point onwards the assessment will behave exactly as it does when used in a Trust setting. They will be able to progress through the assessment as normal, and submit at the end.
  23. When the patient reaches the end of the assessments and

    submits it, the nurse who created the assessment will receive an email to confirm this. The patient will be identified only by initials. After submitting the assessment, the patient will see a summary of the assessment – what they’ve highlighted and the scores they’ve given. If the patient reaches the consent screen but declines, the nurse who created the assessment will receive an email to that effect. Note that the patient will only be able to use the code once. They will be told that it has expired if they try to go in again using the same code. The code will also expire after seven days if it hasn’t been used. What happens next?
  24. Resources to support you Free and available to order from

    www.be.macmillan.org.uk (*Note, you do not have to be a Macmillan professional to place an order) Macmillan organiser MAC13281 Assessment and Care planning folder MAC13689 Assessment and Care planning booklet MAC12957 eHNA and care planning: Sharing good practice MAC5772 19 Holistic needs assessment and care planning: Sharing good practice MAC14583
  25. You are now ready to use My Care Plan! Based

    on this User Guide you can now see the functionality available as a care and support plan user. This includes creating care plans, adding new concerns as well as printing and saving care plans. However if you do have any queries, please contact us at [email protected] 20