Upgrade to Pro — share decks privately, control downloads, hide ads and more …

eHNA Site Administrators

eHNA Team
May 27, 2015
700

eHNA Site Administrators

eHNA Team

May 27, 2015
Tweet

Transcript

  1. Index Site Administrator Each eHNA site will allocate a minimum

    of one Site Administrator. Each Site Administrator will be able to create and disable user accounts, create teams, review care plan activity as well as delete test assessments and care plans. Logging In to My Care Plan 3 Create a User for your site 4 Create a User for your site - Allocating members to your team 6 View all users for your site 9 Removing site users 10 Viewing care plan reports 11 Viewing care plan reports – Export to CSV 13 Deleting test care plans 14 How to get help 15 Resources to support you 16 2
  2. Logging in to My Care Plan 3 To log into

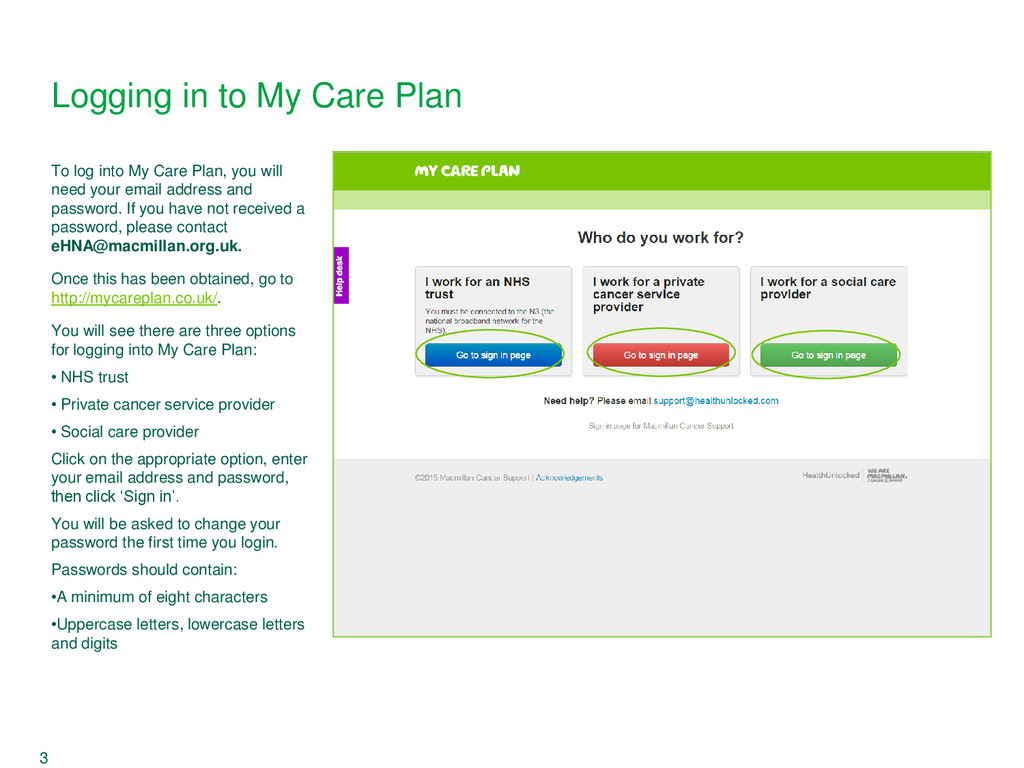
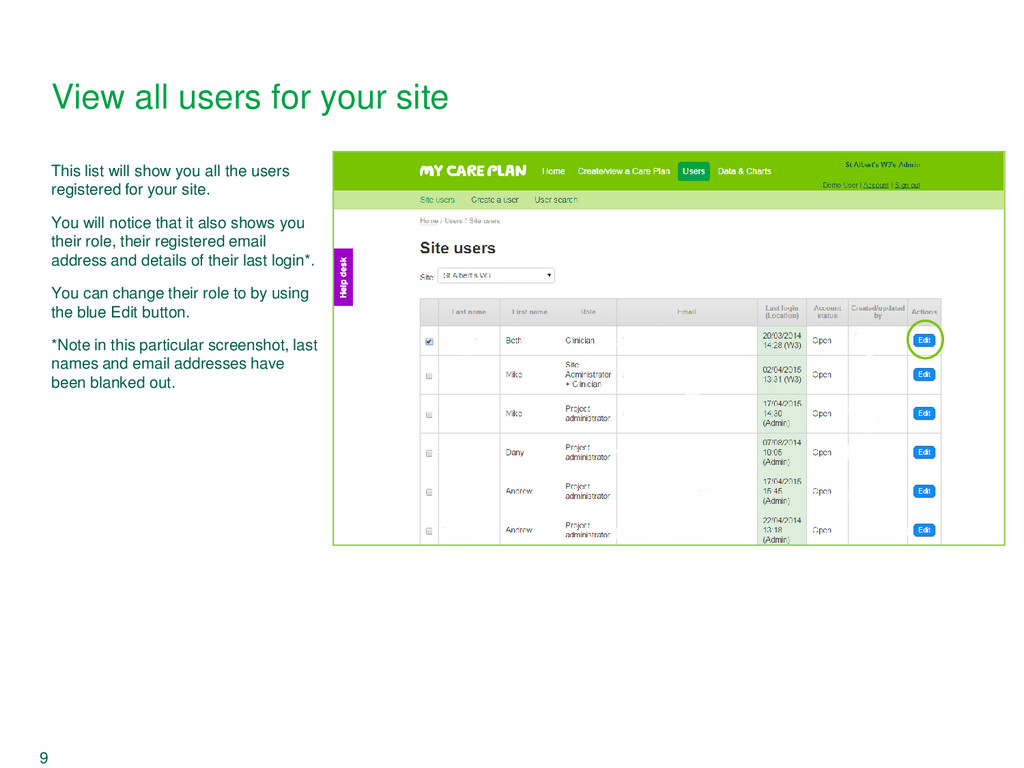
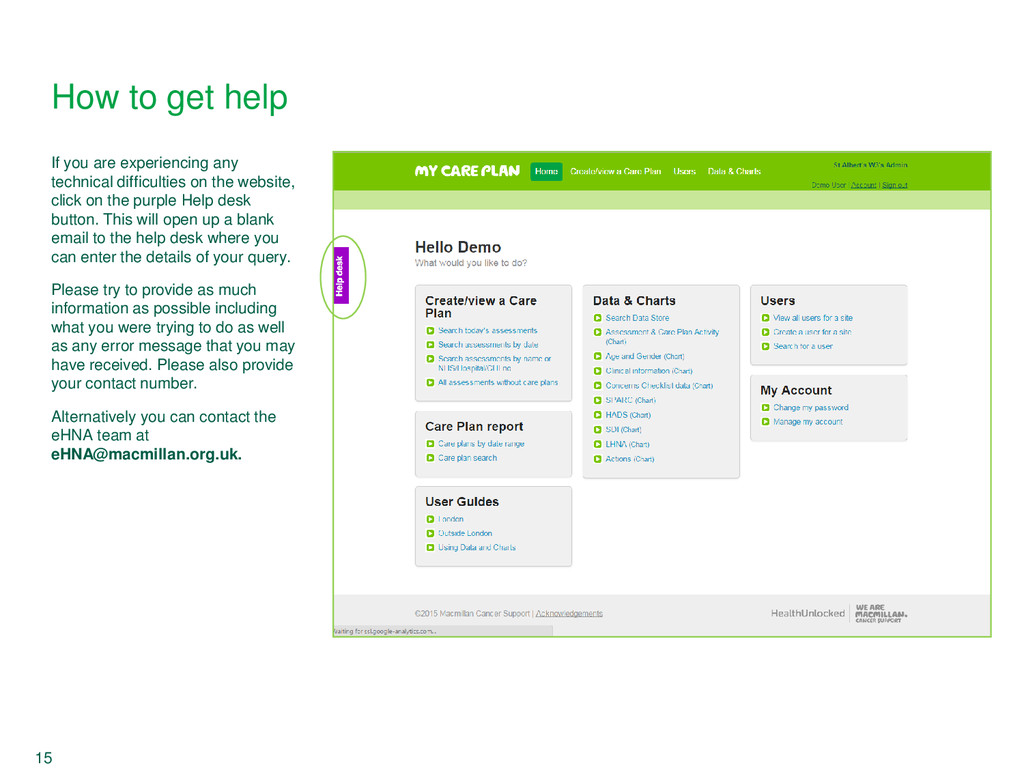
    My Care Plan, you will need your email address and password. If you have not received a password, please contact 
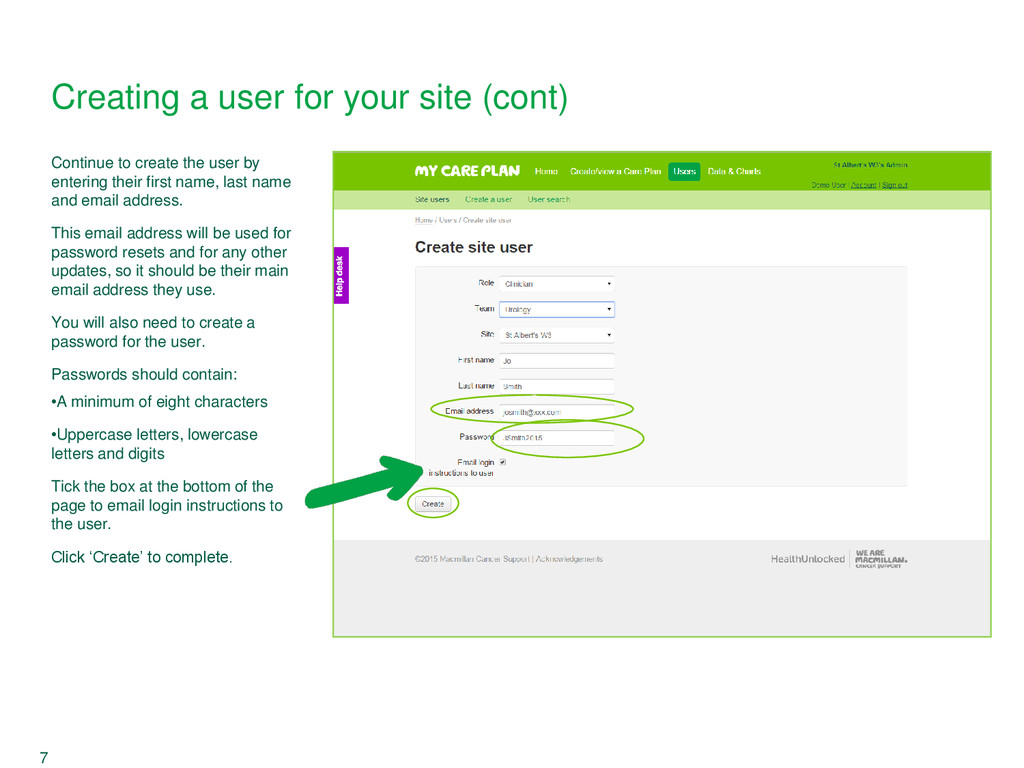
[email protected]. Once this has been obtained, go to http://mycareplan.co.uk/. You will see there are three options for logging into My Care Plan: • NHS trust • Private cancer service provider • Social care provider Click on the appropriate option, enter your email address and password, then click ‘Sign in’. You will be asked to change your password the first time you login. Passwords should contain: •A minimum of eight characters •Uppercase letters, lowercase letters and digits
  3. Creating a user for your site Once logged in, you

    will be directed to a home screen. Click on the panel ‘Users’ select the heading ‘Create a user for a site’. 4 If a user has previously worked on another eHNA site or in another department, their account may have been disabled. If you get a message saying the email address is in use, you will need to contact the eHNA help desk to reactivate their account. You can do this by using the purple Help desk button on the left side.
  4. To create a user, first select from one of three

    roles. Clinician will allow the user to view assessments and create care plans and to view data and charts. Site Analyst will allow the user to view data and charts. Clinician/Site Administrator will give the user the same access to control the system as you have. Create a user for your site (cont) 5
  5. Create a user for your site (cont) - Allocating users

    to a team To allocate an individual to a team, select the team from the drop down list. Allocating users to teams allows completed care plans to be visible to all its members. An advantage of this is if a care and support user has completed care plans but has left the trust, their care plans can still be accessed by other members of the same team. Care plans can only be viewed by other members of the team after a user has been allocated to that team. This cannot be done retrospectively. 6
  6. Creating a user for your site (cont) 7 Continue to

    create the user by entering their first name, last name and email address. This email address will be used for password resets and for any other updates, so it should be their main email address they use. You will also need to create a password for the user. Passwords should contain: •A minimum of eight characters •Uppercase letters, lowercase letters and digits Tick the box at the bottom of the page to email login instructions to the user. Click ‘Create’ to complete.
  7. View all users for your site To view all users

    for the site, you can go back to the home screen and click on ‘View all users for a site’. This will take you to the list all the users as shown on the next page. 8 Regular review of users should be undertaken to see who is using the site.
  8. View all users for your site This list will show

    you all the users registered for your site. You will notice that it also shows you their role, their registered email address and details of their last login*. You can change their role to by using the blue Edit button. *Note in this particular screenshot, last names and email addresses have been blanked out. 9
  9. Removing site users If a registered user has either transferred,

    left the trust or no longer uses My Care Plan, their user account must be disabled. To do this, from the home screen click ‘View all users for a site’. You will then see a list of users for your site. On the first column of the table, there is a tick box. Add a tick against the users to be disabled. Scroll down to the bottom of the page and select ‘Disable selected’. 10
  10. Viewing care plan reports (cont) 12 This will give a

    listing of all assessments carried out. You can also see which have a care plan and the name of the clinician who last saved it. You can choose whether you want to see: • all assessments • only assessments with care plans • only assessments without care plans You can also select the date range you want to see, remember to click ‘Update’ to refresh the table. Sort the table into order by clicking the column headings such as ‘Name’ and ‘Diagnosis’. If you want to do more detailed analysis you can ‘Export to CSV’ and create charts and tables of your own.
  11. Viewing care plan reports - Export to CSV The CSV

    file will load straight into Excel (as per the screenshot on the right), and you will be able to analyse it and create charts, tables and graphs. 13
  12. Within the Care plan report page, under the Actions column,

    click on ‘Select’. This will display a drop down list. If users have been creating test assessments and care plans, here you can delete the test assessment and care plans created whilst they were training. Depending on the status of the assessment and care plan, you will be able to: •Delete the assessment •Delete the care plan, keep assessment •Delete the care plan and assessment The delete function should only be used to delete test records and not live data. 14 Deleting test care plans
  13. How to get help If you are experiencing any technical

    difficulties on the website, click on the purple Help desk button. This will open up a blank email to the help desk where you can enter the details of your query. Please try to provide as much information as possible including what you were trying to do as well as any error message that you may have received. Please also provide your contact number. Alternatively you can contact the eHNA team at [email protected]. 15
  14. Resources to support you Free and available to order from

    www.be.macmillan.org.uk (*Note, you do not have to be a Macmillan professional to place an order) Macmillan organiser MAC13281 Assessment and Care planning folder MAC13689 Assessment and Care planning booklet MAC12957 eHNA and care planning: Sharing good practice MAC5772 16 Holistic needs assessment and care planning: Sharing good practice MAC14583
  15. You are now ready to use My Care Plan! This

    User guide has provided you with details of functionalities available as site administrators. They include creating new users, disabling users, deleting assessments and producing care plan reports. However if you do have any queries, please contact us at [email protected] 17