26 Selecting a care plan from activity page. .................................................................................................... 29 Assessment tab .............................................................................................................................................. 30 Collecting Additional Info .......................................................................................................................... 31 Collecting Additional Info .......................................................................................................................... 32 The Clinical Info tabs ..................................................................................................................................... 33 Additional Information & Treatments .......................................................................................................... 34 The Care Plan tab .......................................................................................................................................... 35 The Notes tab ................................................................................................................................................. 37 The Preview tabs ........................................................................................................................................... 38 The Download tabs ........................................................................................................................................ 39 Creating a team ............................................................................................................................................. 41 Create a user .................................................................................................................................................. 42 Care plan additional information settings................................................................................................... 44 Docman - Automatic Transfers ..................................................................................................................... 45 Docman Integration ....................................................................................................................................... 46 Local Actions .................................................................................................................................................. 47 The Manage tab .............................................................................................................................................. 48 Individual declining eHNA ............................................................................................................................. 49 Unlocking a care plan .................................................................................................................................... 51
to care plan ............................................................................................................... 53 SCR Integration .............................................................................................................................................. 55 Recovery Package resources ........................................................................................................................ 56 For Individuals ............................................................................................................................................. 57 For Professionals ......................................................................................................................................... 57
– eHNA and mycareplan.co.uk Macmillan’s Electronic Holistic Needs Assessment (eHNA) is an individual-held assessment questionnaire that allows an individual to identify their most significant concerns at key points along their cancer pathway. The assessment covers a wide range of physical, practical, emotional, family, and spiritual concerns. Assessment responses are sent to the team providing their care via Mycareplan.co.uk allowing for a meaningful conversation, to help resolve concerns raised and record the actions to be taken in a care or support plan. Care and Support plans can be shared with the individual and others providing care. Data reports are available to all users via CSV files and can be used for reporting or analysis. This user guide has been developed to help you use the Macmillan eHNA and the Care & Support planning tools. Overview of key activities: • Depending on your level of access as a care and support plan user you will be able to set up assessments, view assessments and care plans, contribute to care plans, lock/unlock care plans, download care plans and view some of the data that eHNA collects. • The assessment can be completed anywhere by the individual: i.e. while visiting the hospital or organisation site, on their own smartphone, tablet, laptop, or PC. • Assessment results will automatically appear in the care and support planning website to allow the care planning process to begin. • Once the care plans are completed, they can be downloaded as PDF files for sharing with the individual or with other members of the team, AHPs, and so on. • Data from the assessment & care planning is available in a CSV file format for local analysis in Excel or other tools. Note: - The eHNA is made up of two separate websites: o one used by the individual to complete the eHNA assessment, o one used by the professional to set up assessments and complete the care planning.
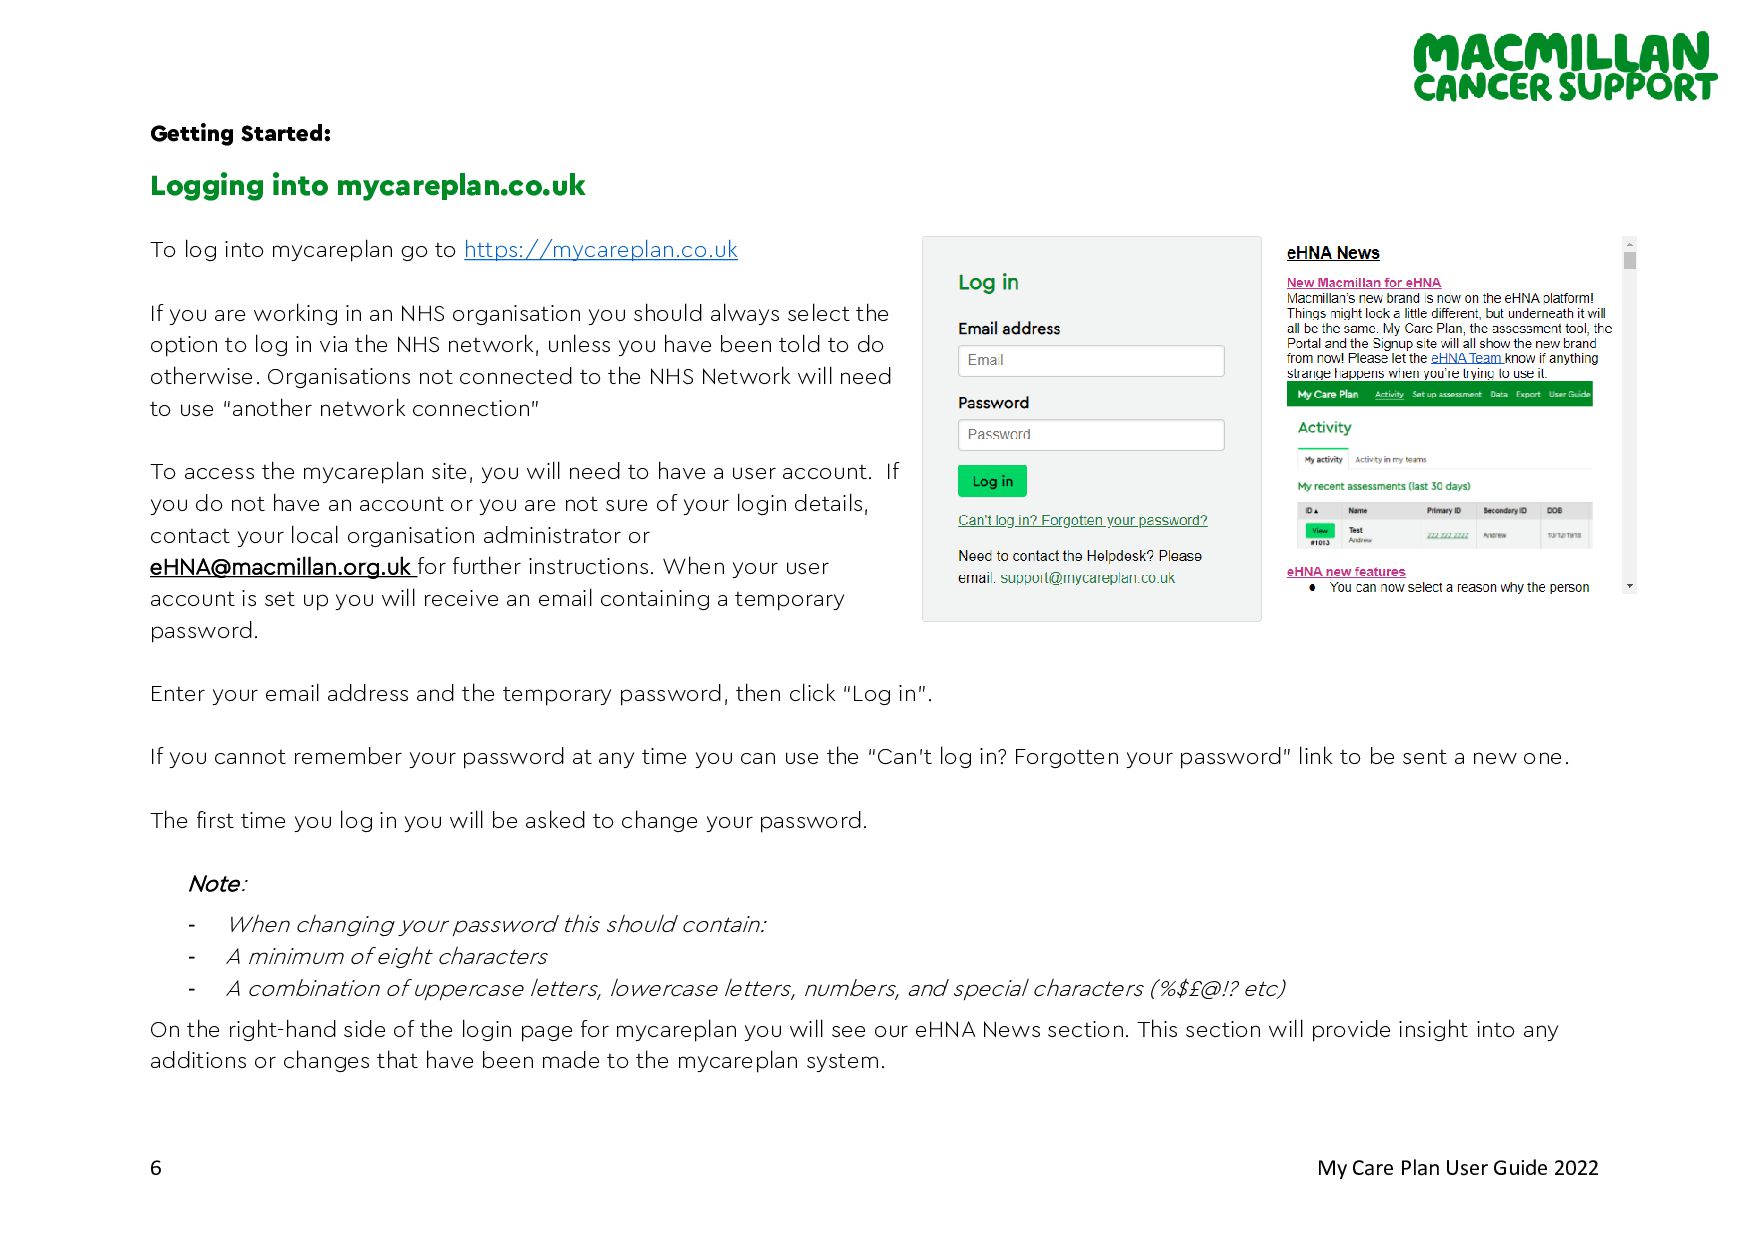
into mycareplan.co.uk To log into mycareplan go to https://mycareplan.co.uk If you are working in an NHS organisation you should always select the option to log in via the NHS network, unless you have been told to do otherwise. Organisations not connected to the NHS Network will need to use “another network connection” To access the mycareplan site, you will need to have a user account. If you do not have an account or you are not sure of your login details, contact your local organisation administrator or [email protected] for further instructions. When your user account is set up you will receive an email containing a temporary password. Enter your email address and the temporary password, then click “Log in”. If you cannot remember your password at any time you can use the “Can’t log in? Forgotten your password” link to be sent a new one. The first time you log in you will be asked to change your password. Note: - When changing your password this should contain: - A minimum of eight characters - A combination of uppercase letters, lowercase letters, numbers, and special characters (%$£@!? etc) On the right-hand side of the login page for mycareplan you will see our eHNA News section. This section will provide insight into any additions or changes that have been made to the mycareplan system.
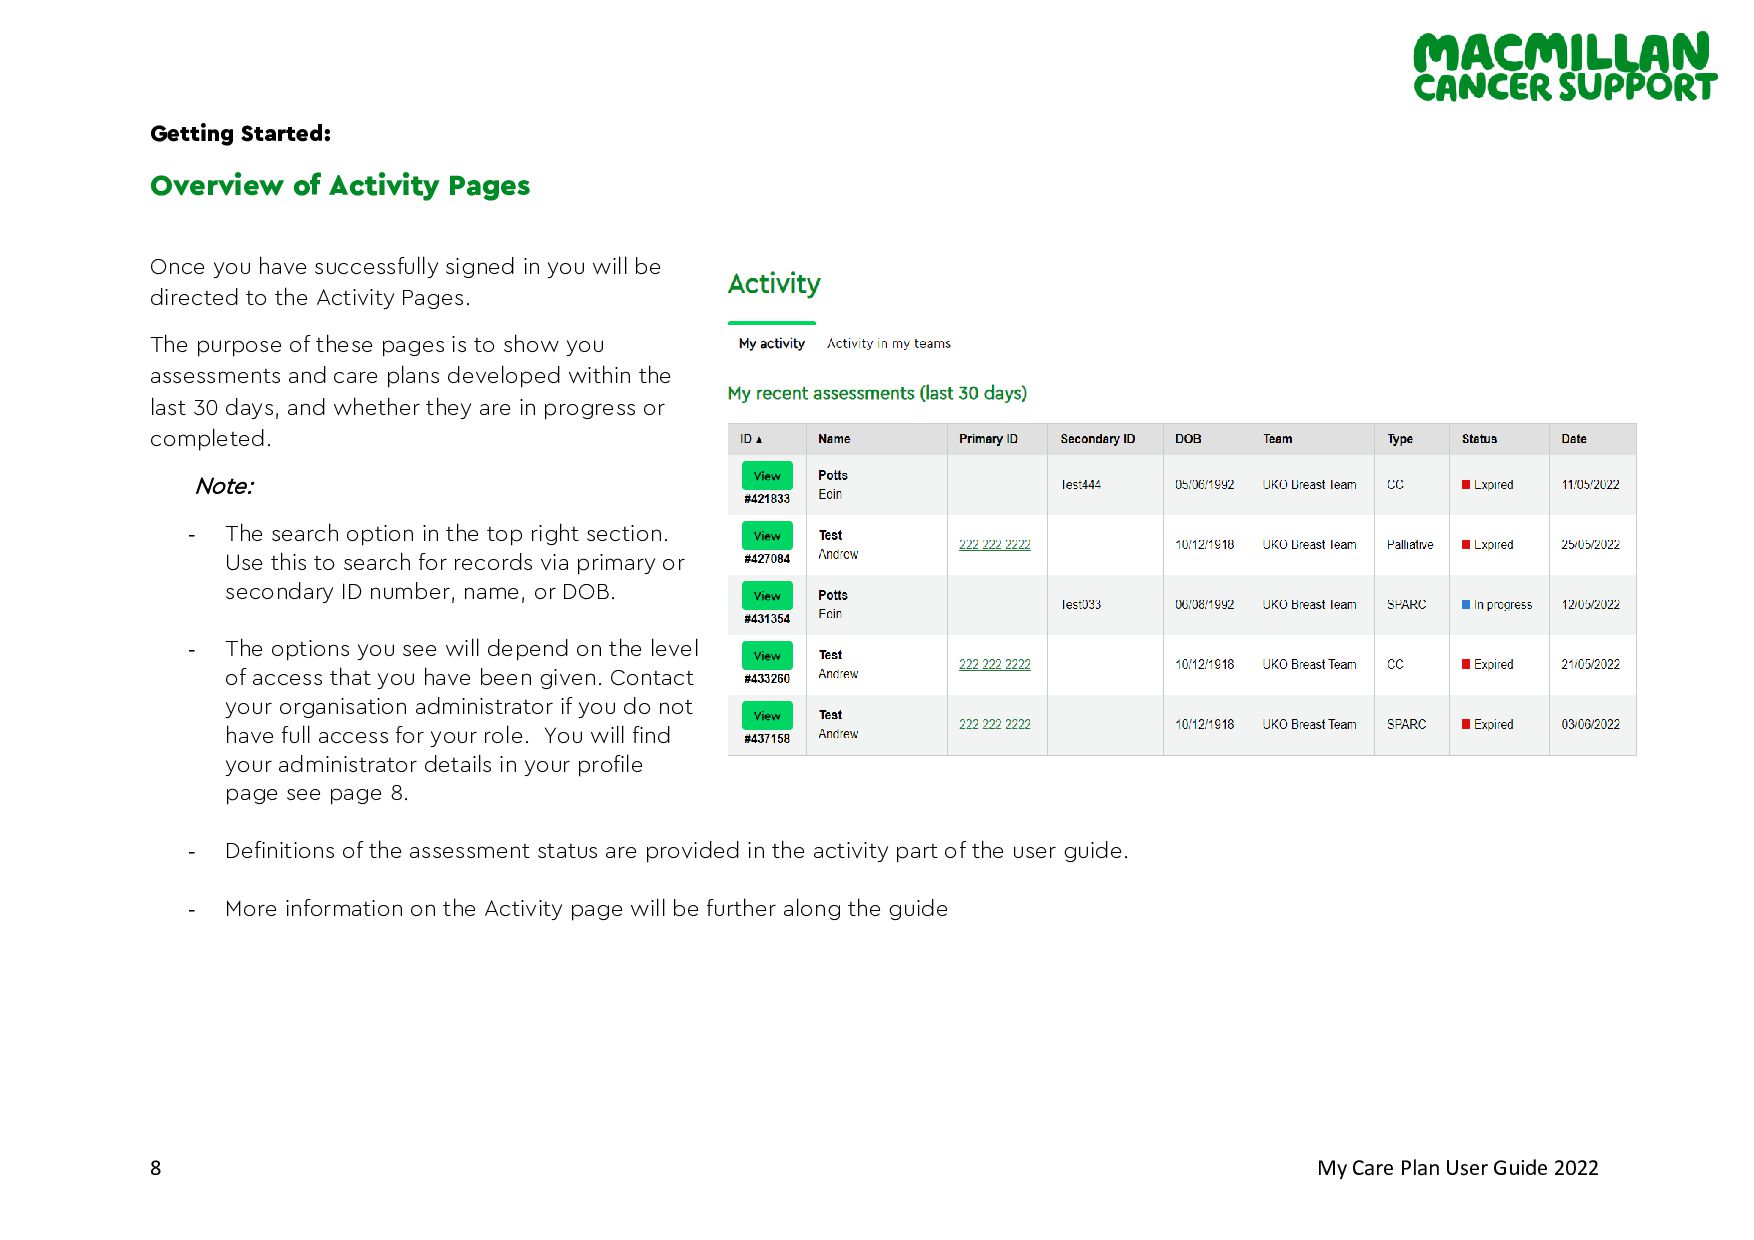
of Activity Pages Once you have successfully signed in you will be directed to the Activity Pages. The purpose of these pages is to show you assessments and care plans developed within the last 30 days, and whether they are in progress or completed. Note: - The search option in the top right section. Use this to search for records via primary or secondary ID number, name, or DOB. - The options you see will depend on the level of access that you have been given. Contact your organisation administrator if you do not have full access for your role. You will find your administrator details in your profile page see page 8. - Definitions of the assessment status are provided in the activity part of the user guide. - More information on the Activity page will be further along the guide
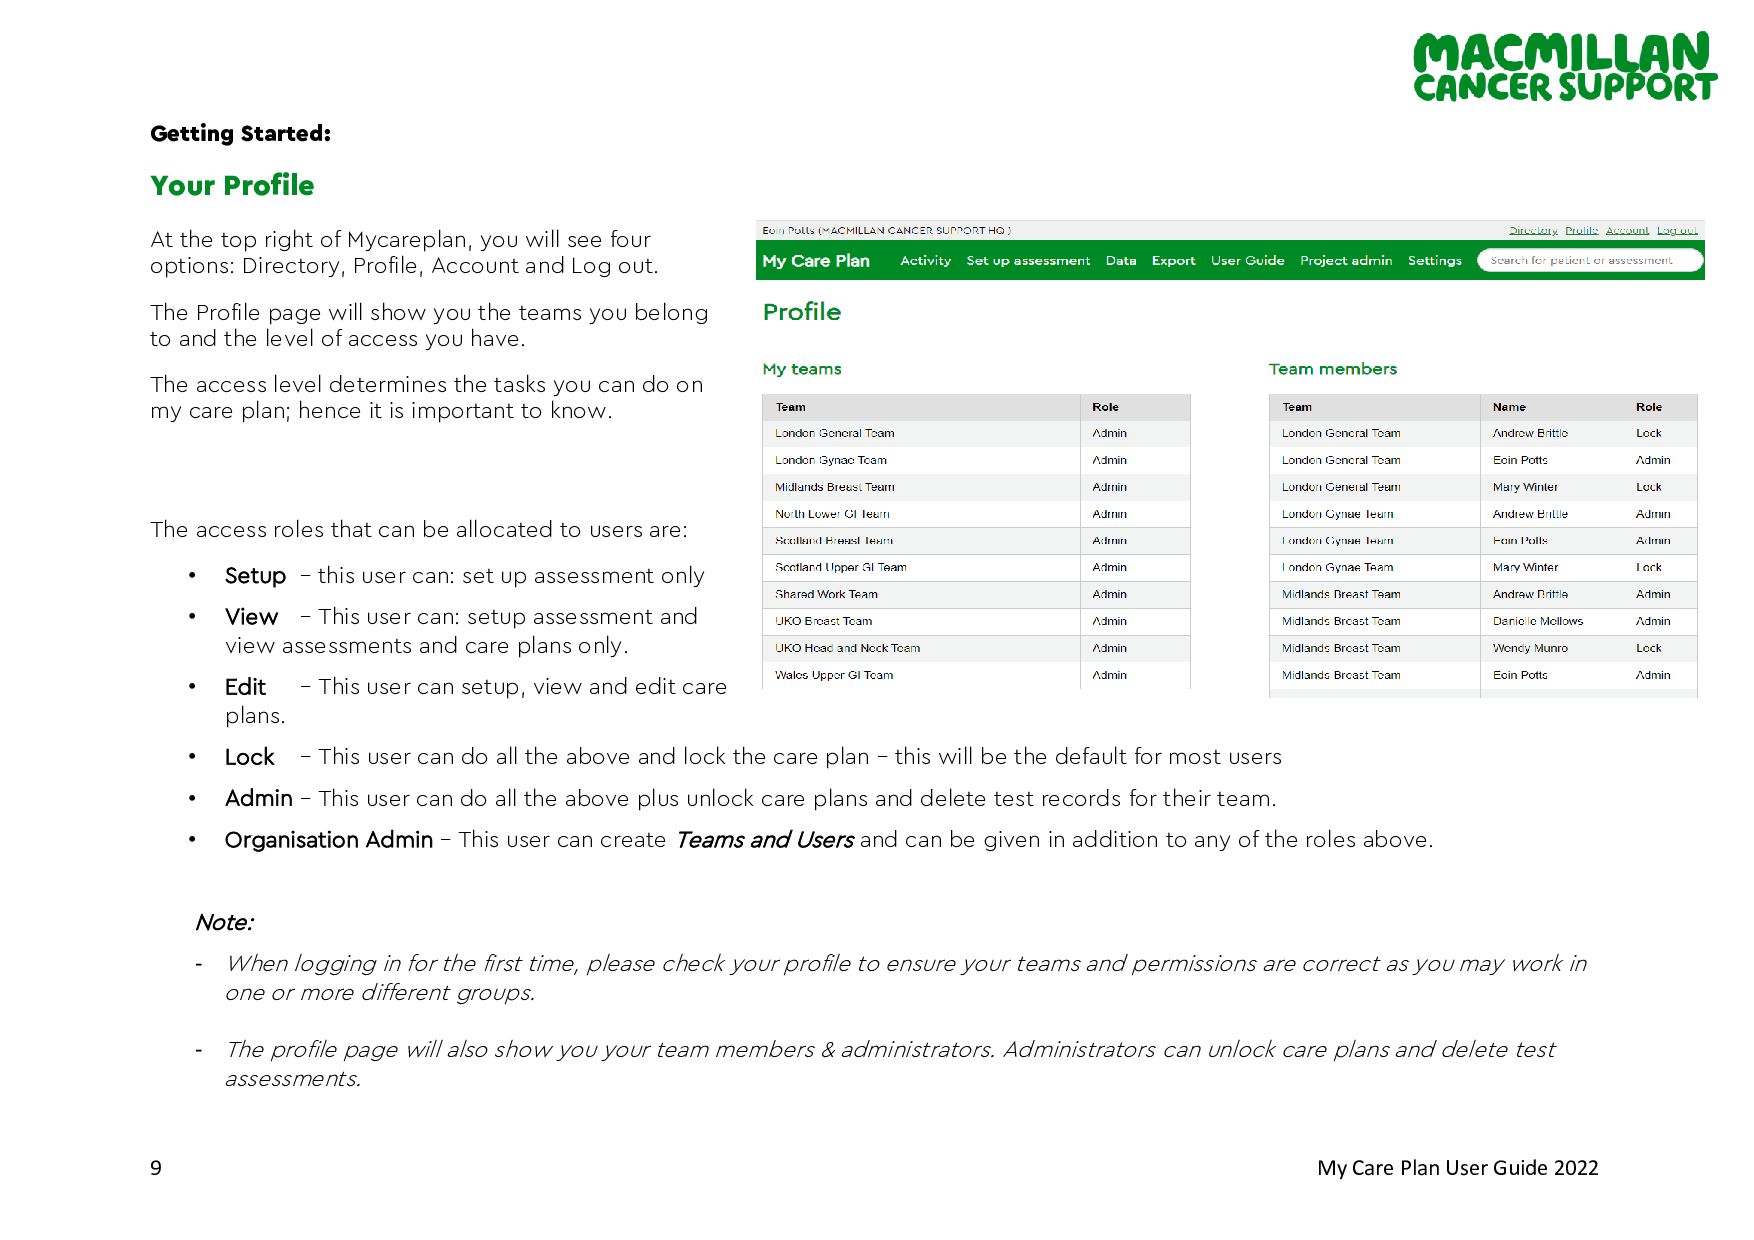
Profile At the top right of Mycareplan, you will see four options: Directory, Profile, Account and Log out. The Profile page will show you the teams you belong to and the level of access you have. The access level determines the tasks you can do on my care plan; hence it is important to know. The access roles that can be allocated to users are: • Setup – this user can: set up assessment only • View – This user can: setup assessment and view assessments and care plans only. • Edit – This user can setup, view and edit care plans. • Lock – This user can do all the above and lock the care plan – this will be the default for most users • Admin – This user can do all the above plus unlock care plans and delete test records for their team. • Organisation Admin – This user can create Teams and Users and can be given in addition to any of the roles above. Note: - When logging in for the first time, please check your profile to ensure your teams and permissions are correct as you may work in one or more different groups. - The profile page will also show you your team members & administrators. Administrators can unlock care plans and delete test assessments.
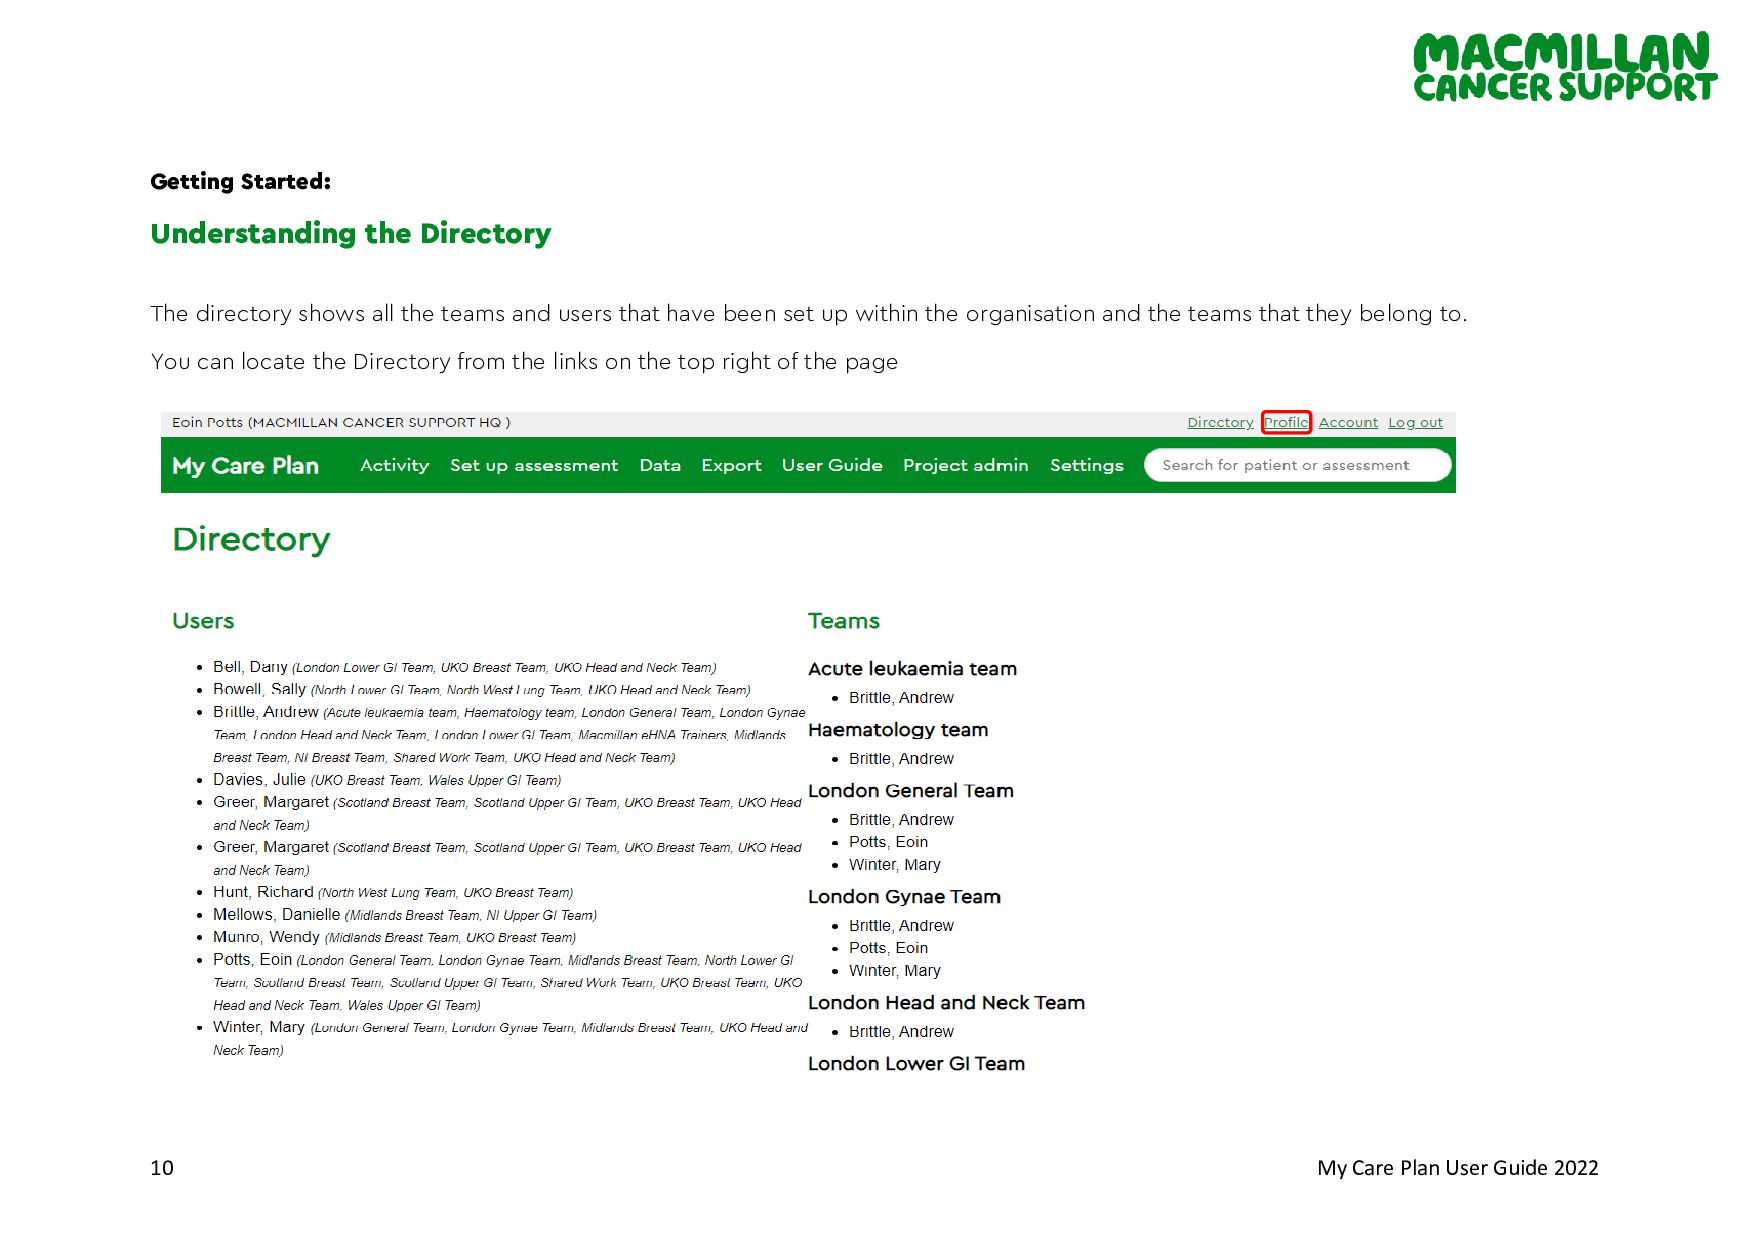
the Directory The directory shows all the teams and users that have been set up within the organisation and the teams that they belong to. You can locate the Directory from the links on the top right of the page
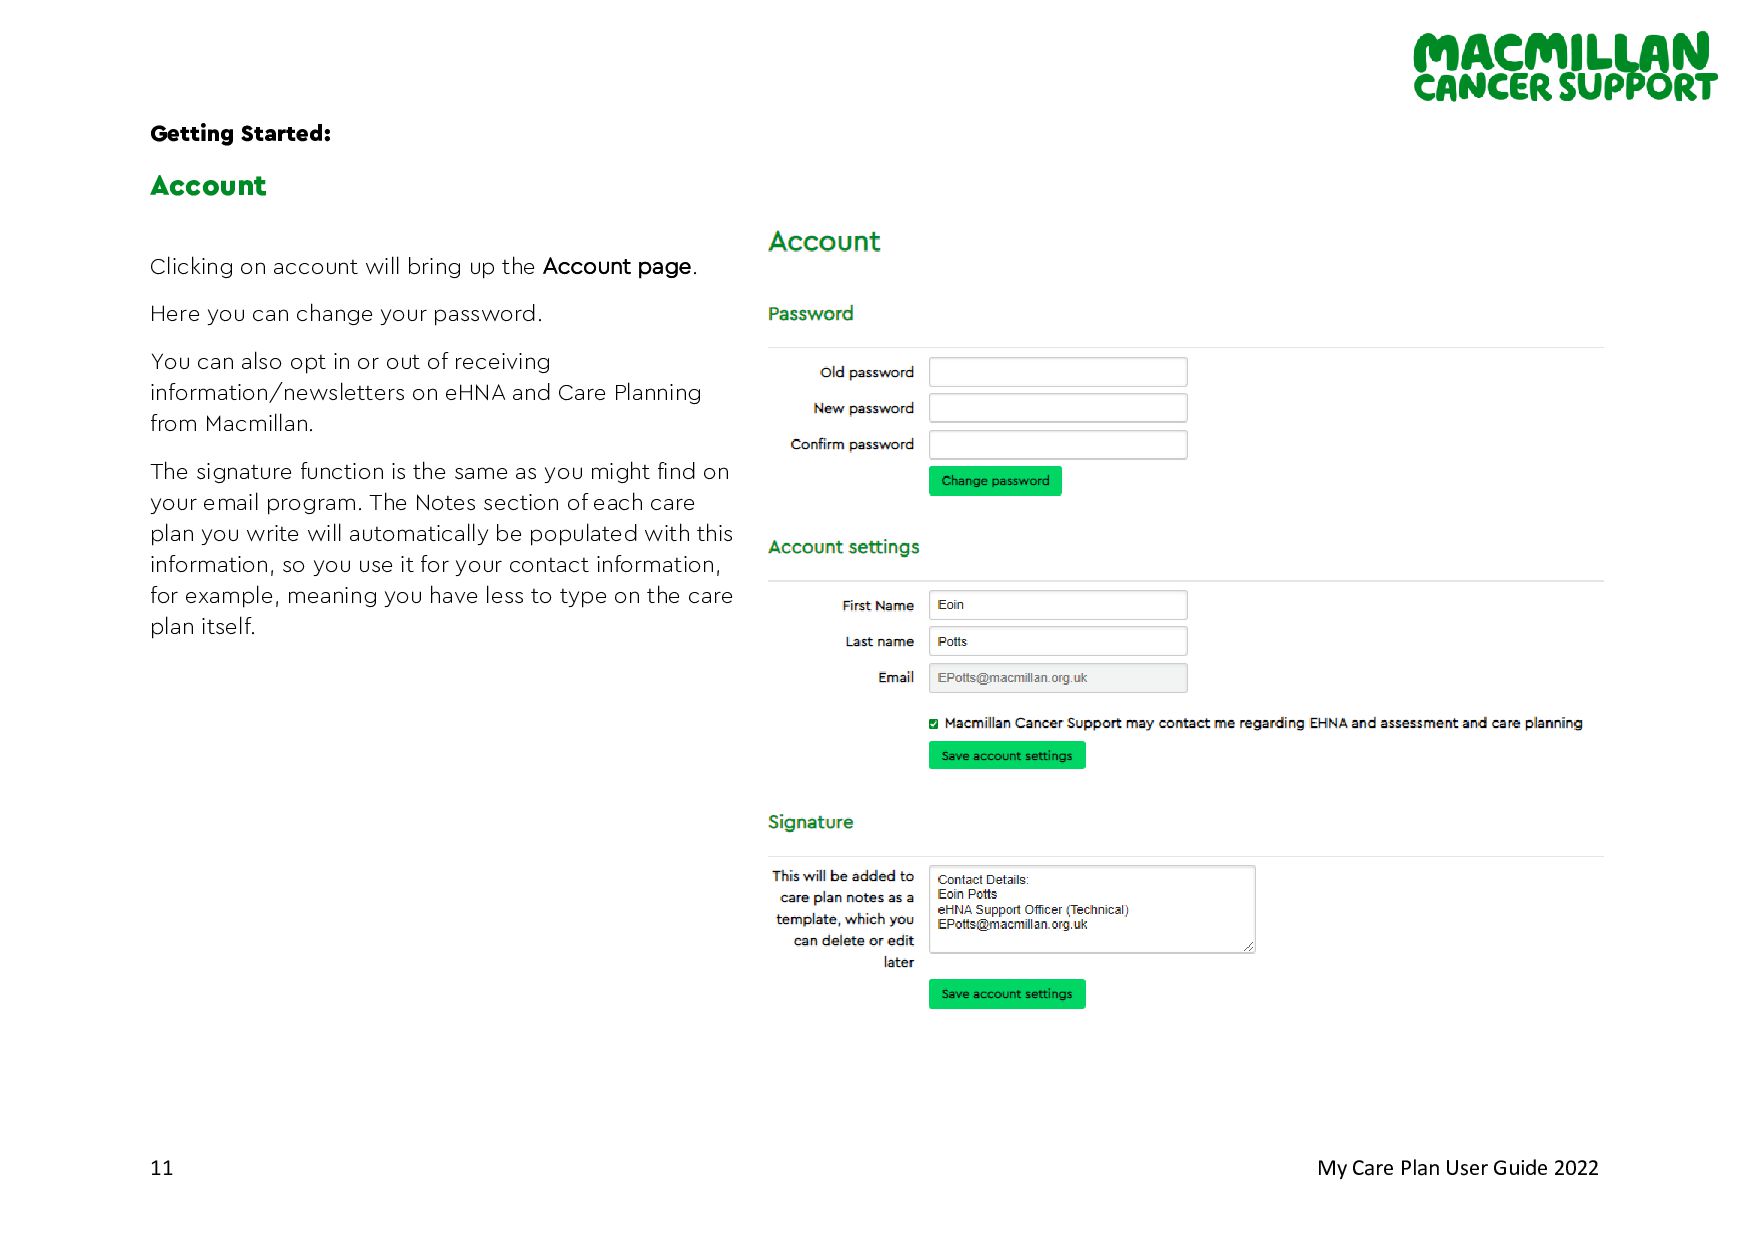
Clicking on account will bring up the Account page. Here you can change your password. You can also opt in or out of receiving information/newsletters on eHNA and Care Planning from Macmillan. The signature function is the same as you might find on your email program. The Notes section of each care plan you write will automatically be populated with this information, so you use it for your contact information, for example, meaning you have less to type on the care plan itself.
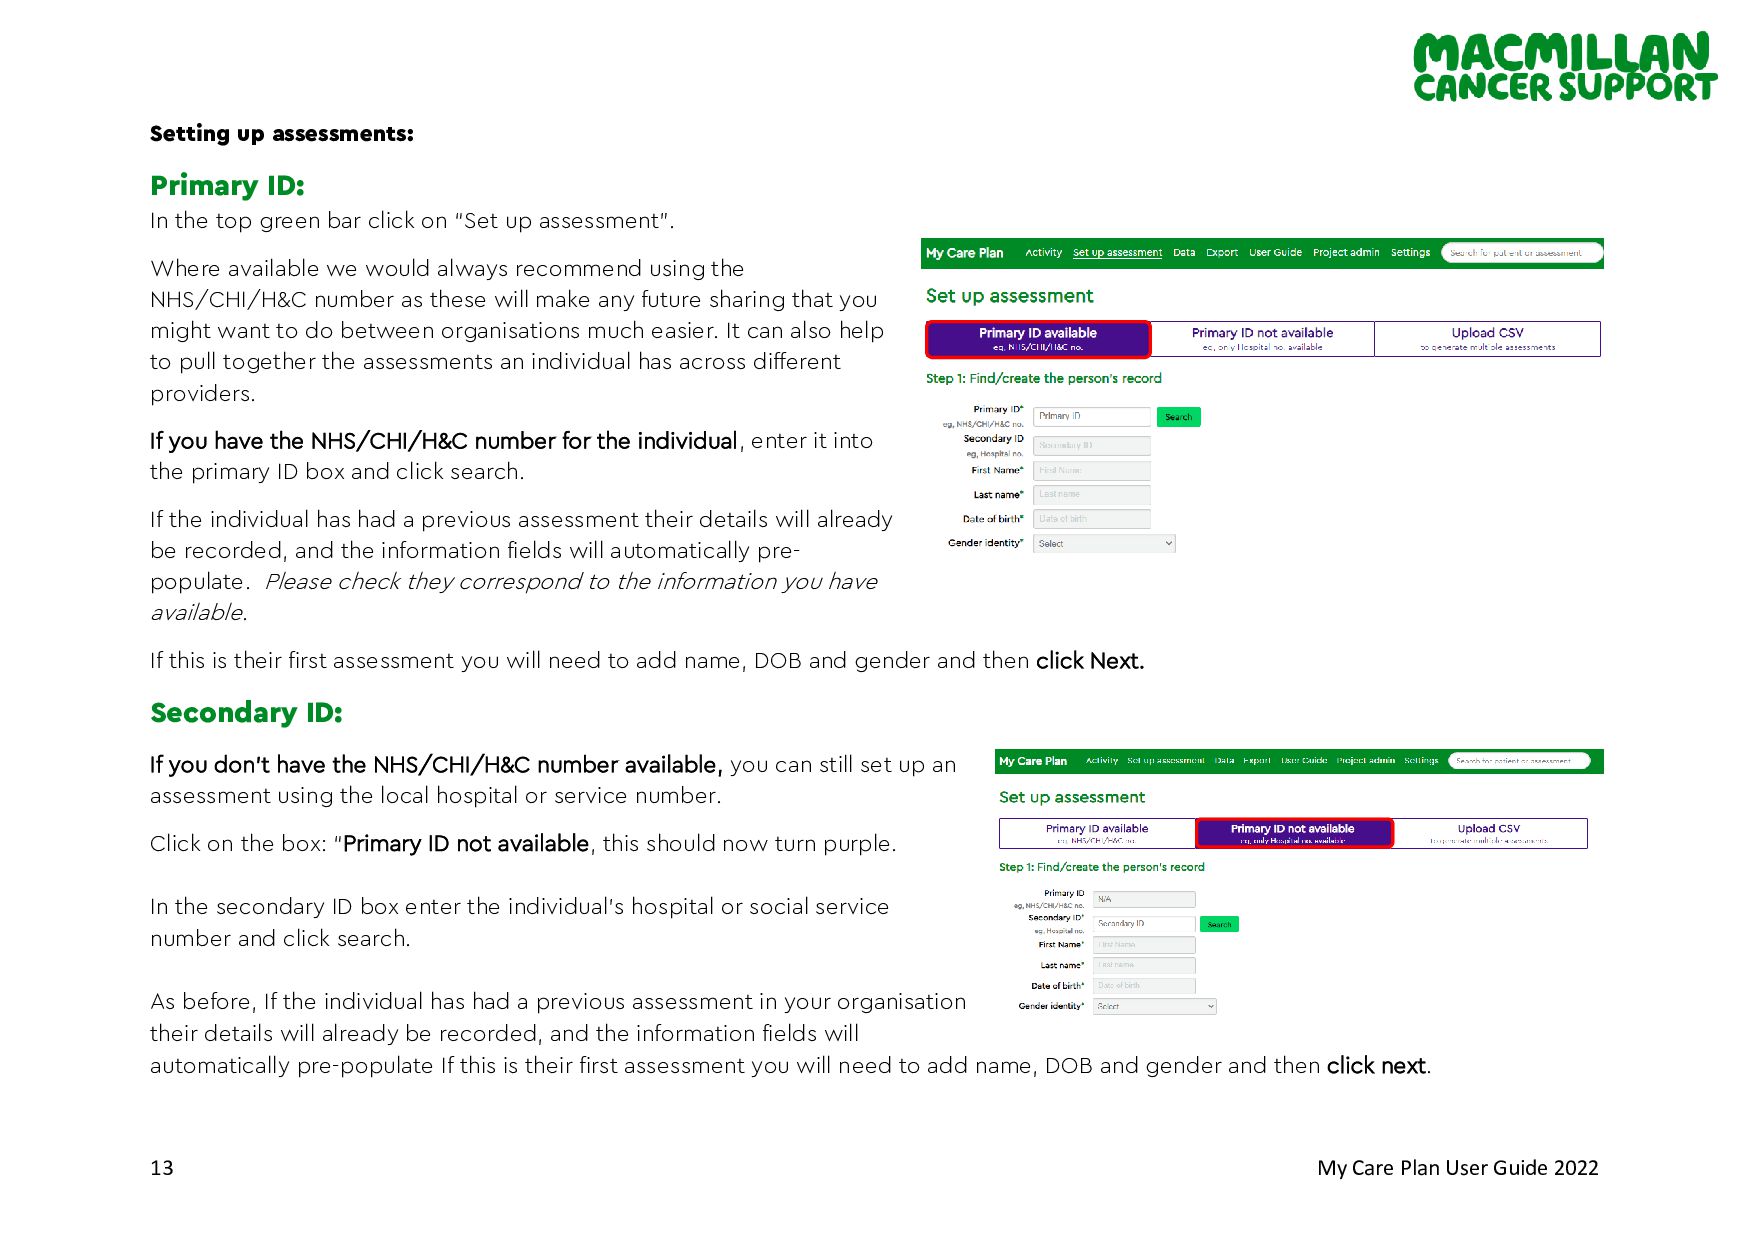
Primary ID: In the top green bar click on “Set up assessment”. Where available we would always recommend using the NHS/CHI/H&C number as these will make any future sharing that you might want to do between organisations much easier. It can also help to pull together the assessments an individual has across different providers. If you have the NHS/CHI/H&C number for the individual, enter it into the primary ID box and click search. If the individual has had a previous assessment their details will already be recorded, and the information fields will automatically pre- populate. Please check they correspond to the information you have available. If this is their first assessment you will need to add name, DOB and gender and then click Next. Secondary ID: If you don’t have the NHS/CHI/H&C number available, you can still set up an assessment using the local hospital or service number. Click on the box: “Primary ID not available, this should now turn purple. In the secondary ID box enter the individual’s hospital or social service number and click search. As before, If the individual has had a previous assessment in your organisation their details will already be recorded, and the information fields will automatically pre-populate If this is their first assessment you will need to add name, DOB and gender and then click next.
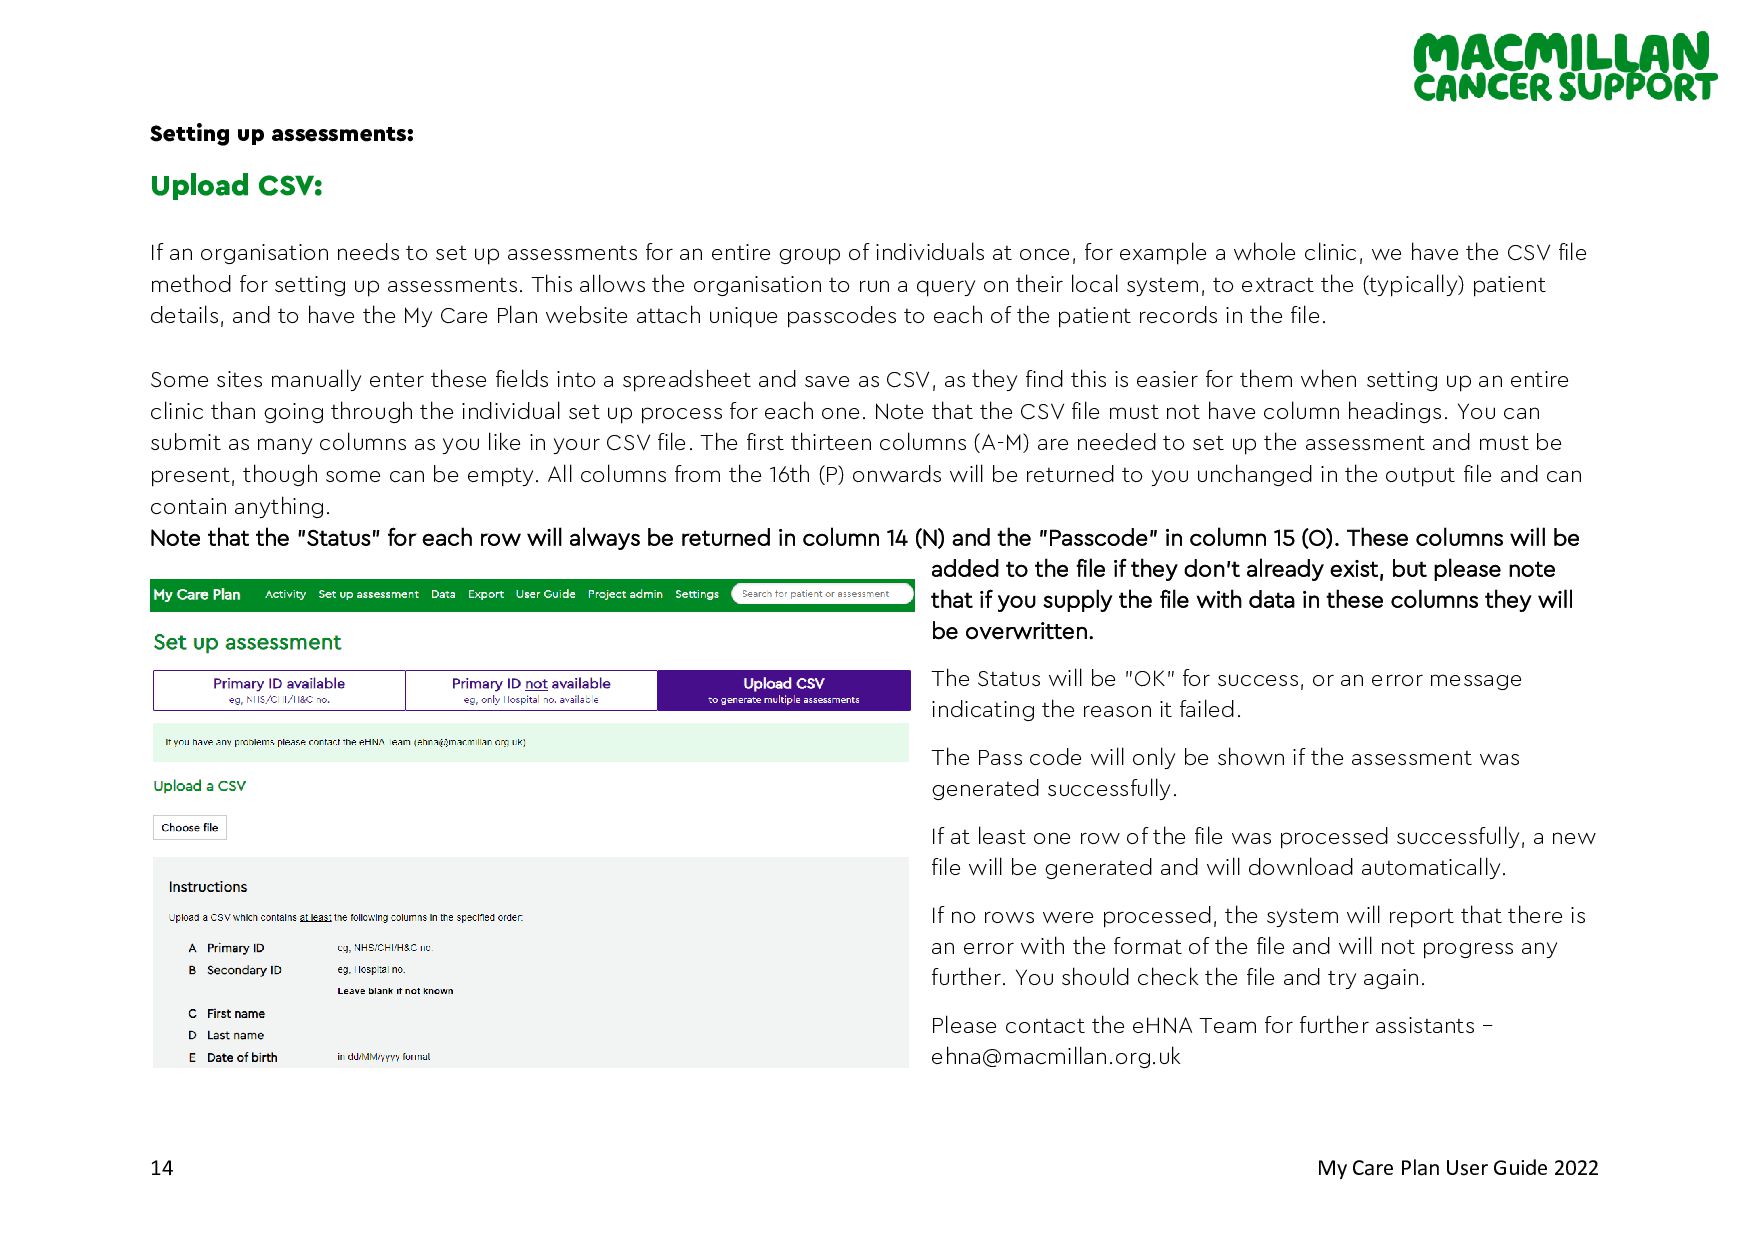
Upload CSV: If an organisation needs to set up assessments for an entire group of individuals at once, for example a whole clinic, we have the CSV file method for setting up assessments. This allows the organisation to run a query on their local system, to extract the (typically) patient details, and to have the My Care Plan website attach unique passcodes to each of the patient records in the file. Some sites manually enter these fields into a spreadsheet and save as CSV, as they find this is easier for them when setting up an entire clinic than going through the individual set up process for each one. Note that the CSV file must not have column headings. You can submit as many columns as you like in your CSV file. The first thirteen columns (A-M) are needed to set up the assessment and must be present, though some can be empty. All columns from the 16th (P) onwards will be returned to you unchanged in the output file and can contain anything. Note that the "Status" for each row will always be returned in column 14 (N) and the "Passcode" in column 15 (O). These columns will be added to the file if they don't already exist, but please note that if you supply the file with data in these columns they will be overwritten. The Status will be "OK" for success, or an error message indicating the reason it failed. The Pass code will only be shown if the assessment was generated successfully. If at least one row of the file was processed successfully, a new file will be generated and will download automatically. If no rows were processed, the system will report that there is an error with the format of the file and will not progress any further. You should check the file and try again. Please contact the eHNA Team for further assistants – [email protected]
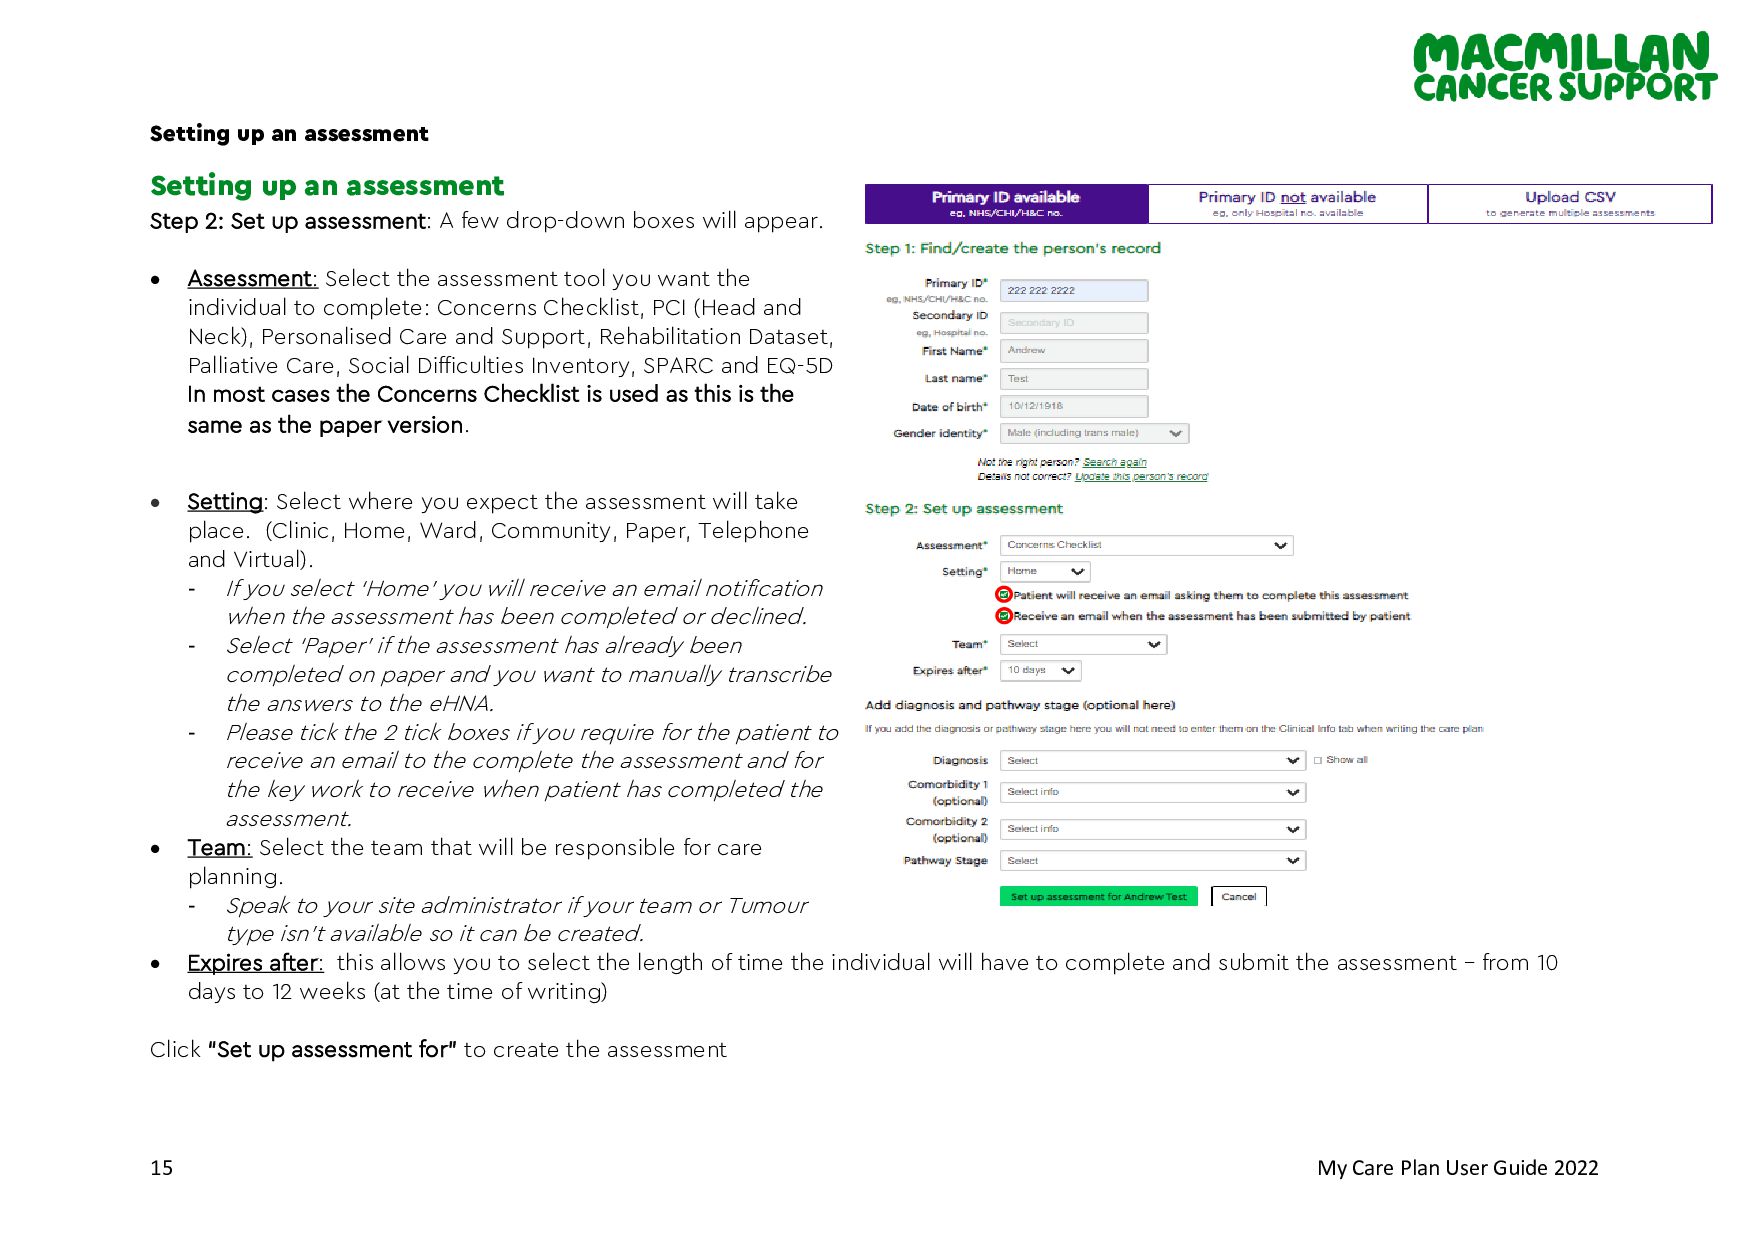
assessment Setting up an assessment Step 2: Set up assessment: A few drop-down boxes will appear. • Assessment: Select the assessment tool you want the individual to complete: Concerns Checklist, PCI (Head and Neck), Personalised Care and Support, Rehabilitation Dataset, Palliative Care, Social Difficulties Inventory, SPARC and EQ-5D In most cases the Concerns Checklist is used as this is the same as the paper version. • Setting: Select where you expect the assessment will take place. (Clinic, Home, Ward, Community, Paper, Telephone and Virtual). - If you select ‘Home’ you will receive an email notification when the assessment has been completed or declined. - Select ‘Paper’ if the assessment has already been completed on paper and you want to manually transcribe the answers to the eHNA. - Please tick the 2 tick boxes if you require for the patient to receive an email to the complete the assessment and for the key work to receive when patient has completed the assessment. • Team: Select the team that will be responsible for care planning. - Speak to your site administrator if your team or Tumour type isn’t available so it can be created. • Expires after: this allows you to select the length of time the individual will have to complete and submit the assessment – from 10 days to 12 weeks (at the time of writing) Click “Set up assessment for” to create the assessment
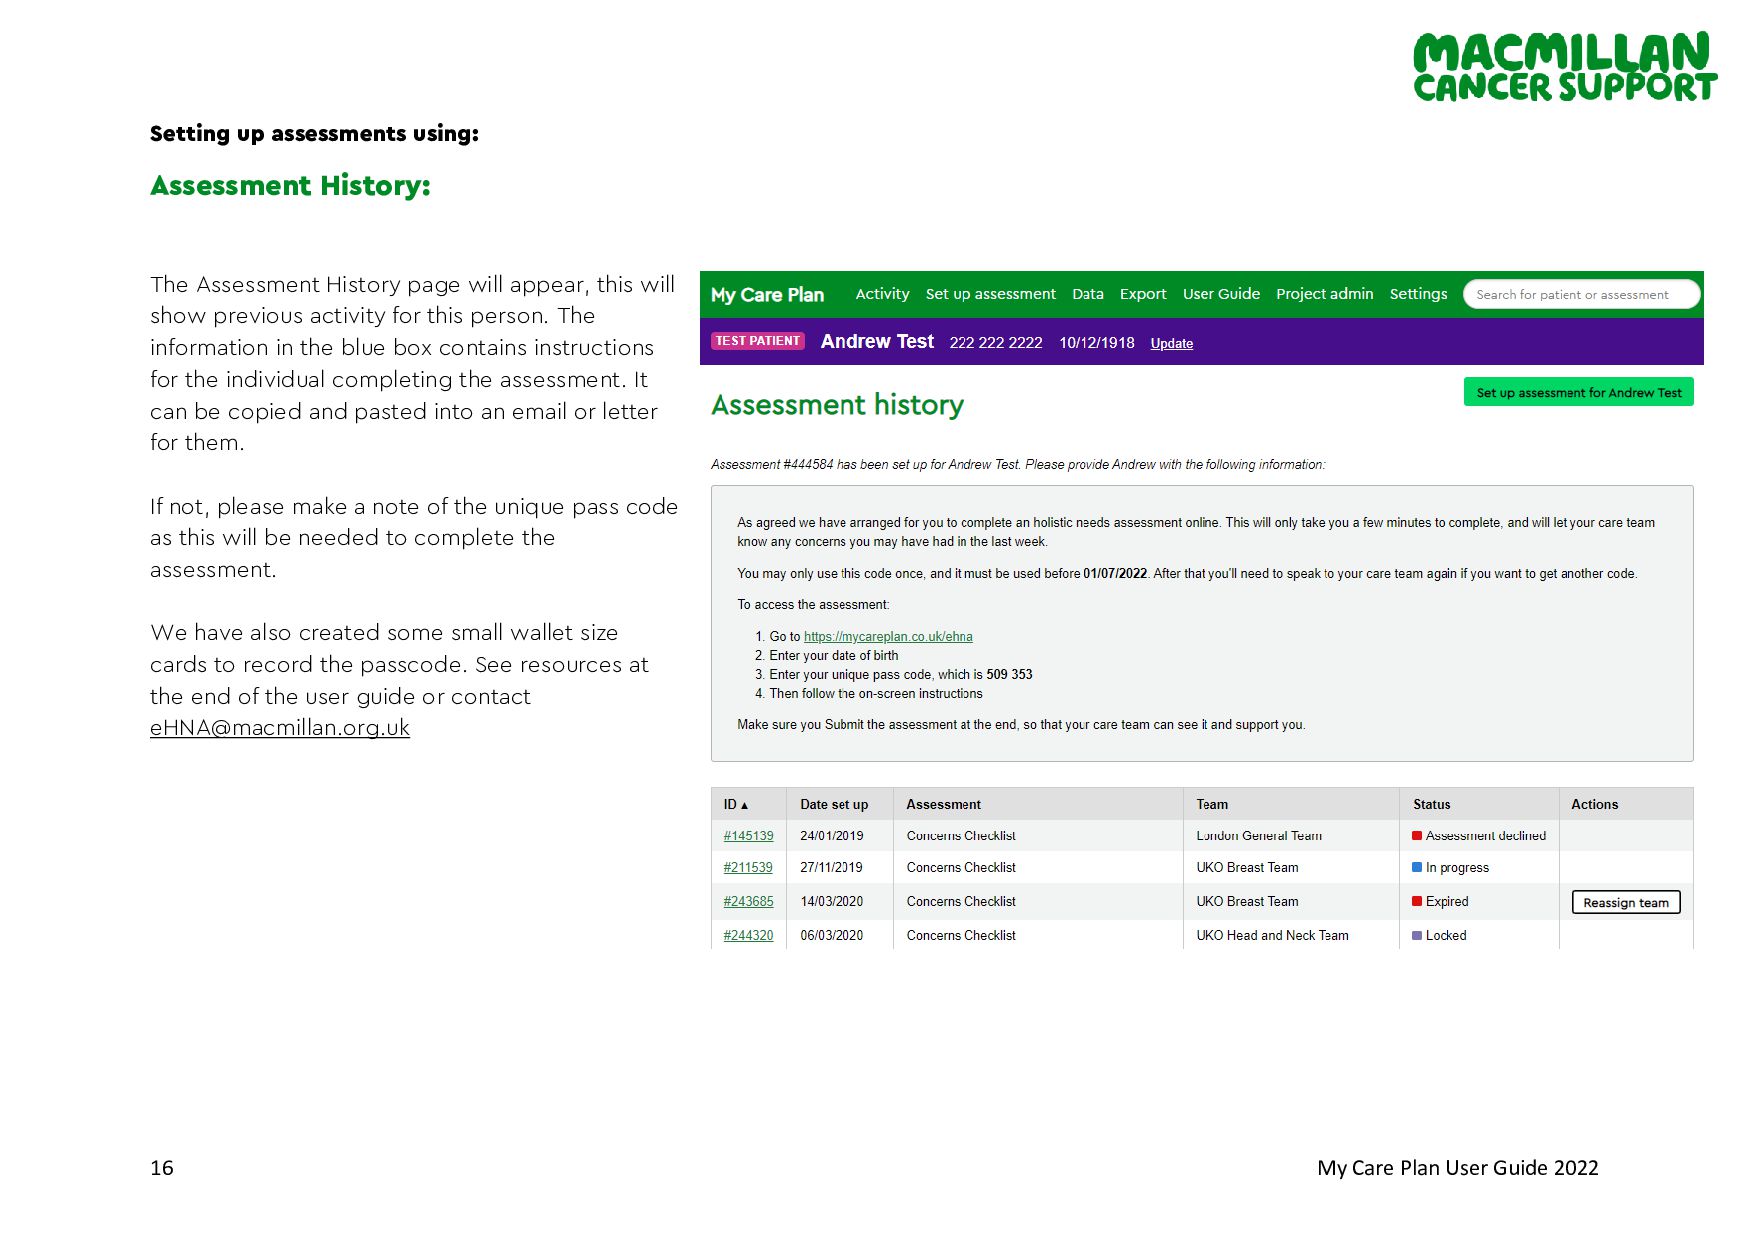
using: Assessment History: The Assessment History page will appear, this will show previous activity for this person. The information in the blue box contains instructions for the individual completing the assessment. It can be copied and pasted into an email or letter for them. If not, please make a note of the unique pass code as this will be needed to complete the assessment. We have also created some small wallet size cards to record the passcode. See resources at the end of the user guide or contact [email protected]
Completing the assessment If individual is completing the assessment on their own device they should use https://mycareplan.co.uk/ehna they will need to use the unique pass code and their Date of Birth. The Concerns Checklist assessment is available in other languages. At the time of writing, Welsh and Polish are available, with other languages to follow soon by clicking on the language at the top. When the individual completes the assessment, they can choose the language they would prefer to use. The responses will always come through to the professional in English.
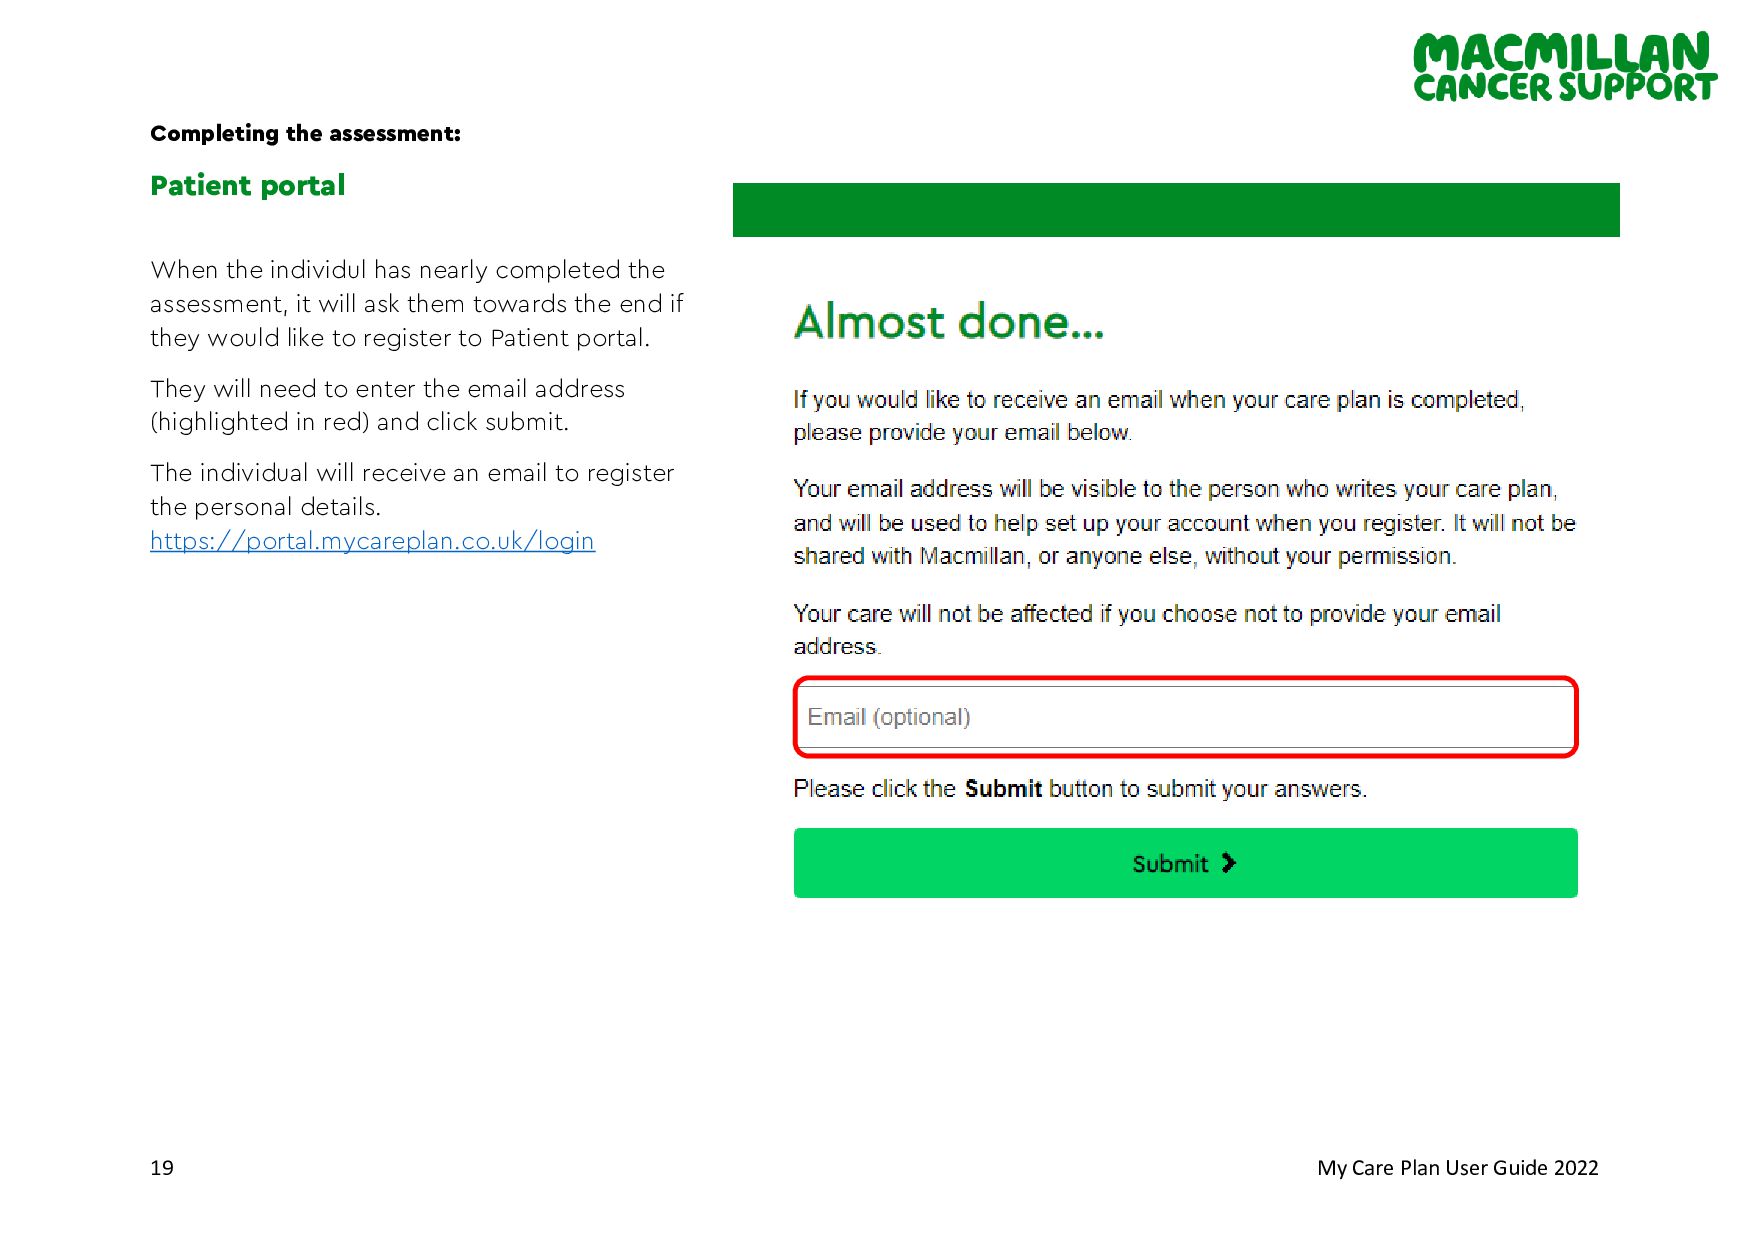
Patient portal When the individul has nearly completed the assessment, it will ask them towards the end if they would like to register to Patient portal. They will need to enter the email address (highlighted in red) and click submit. The individual will receive an email to register the personal details. https://portal.mycareplan.co.uk/login
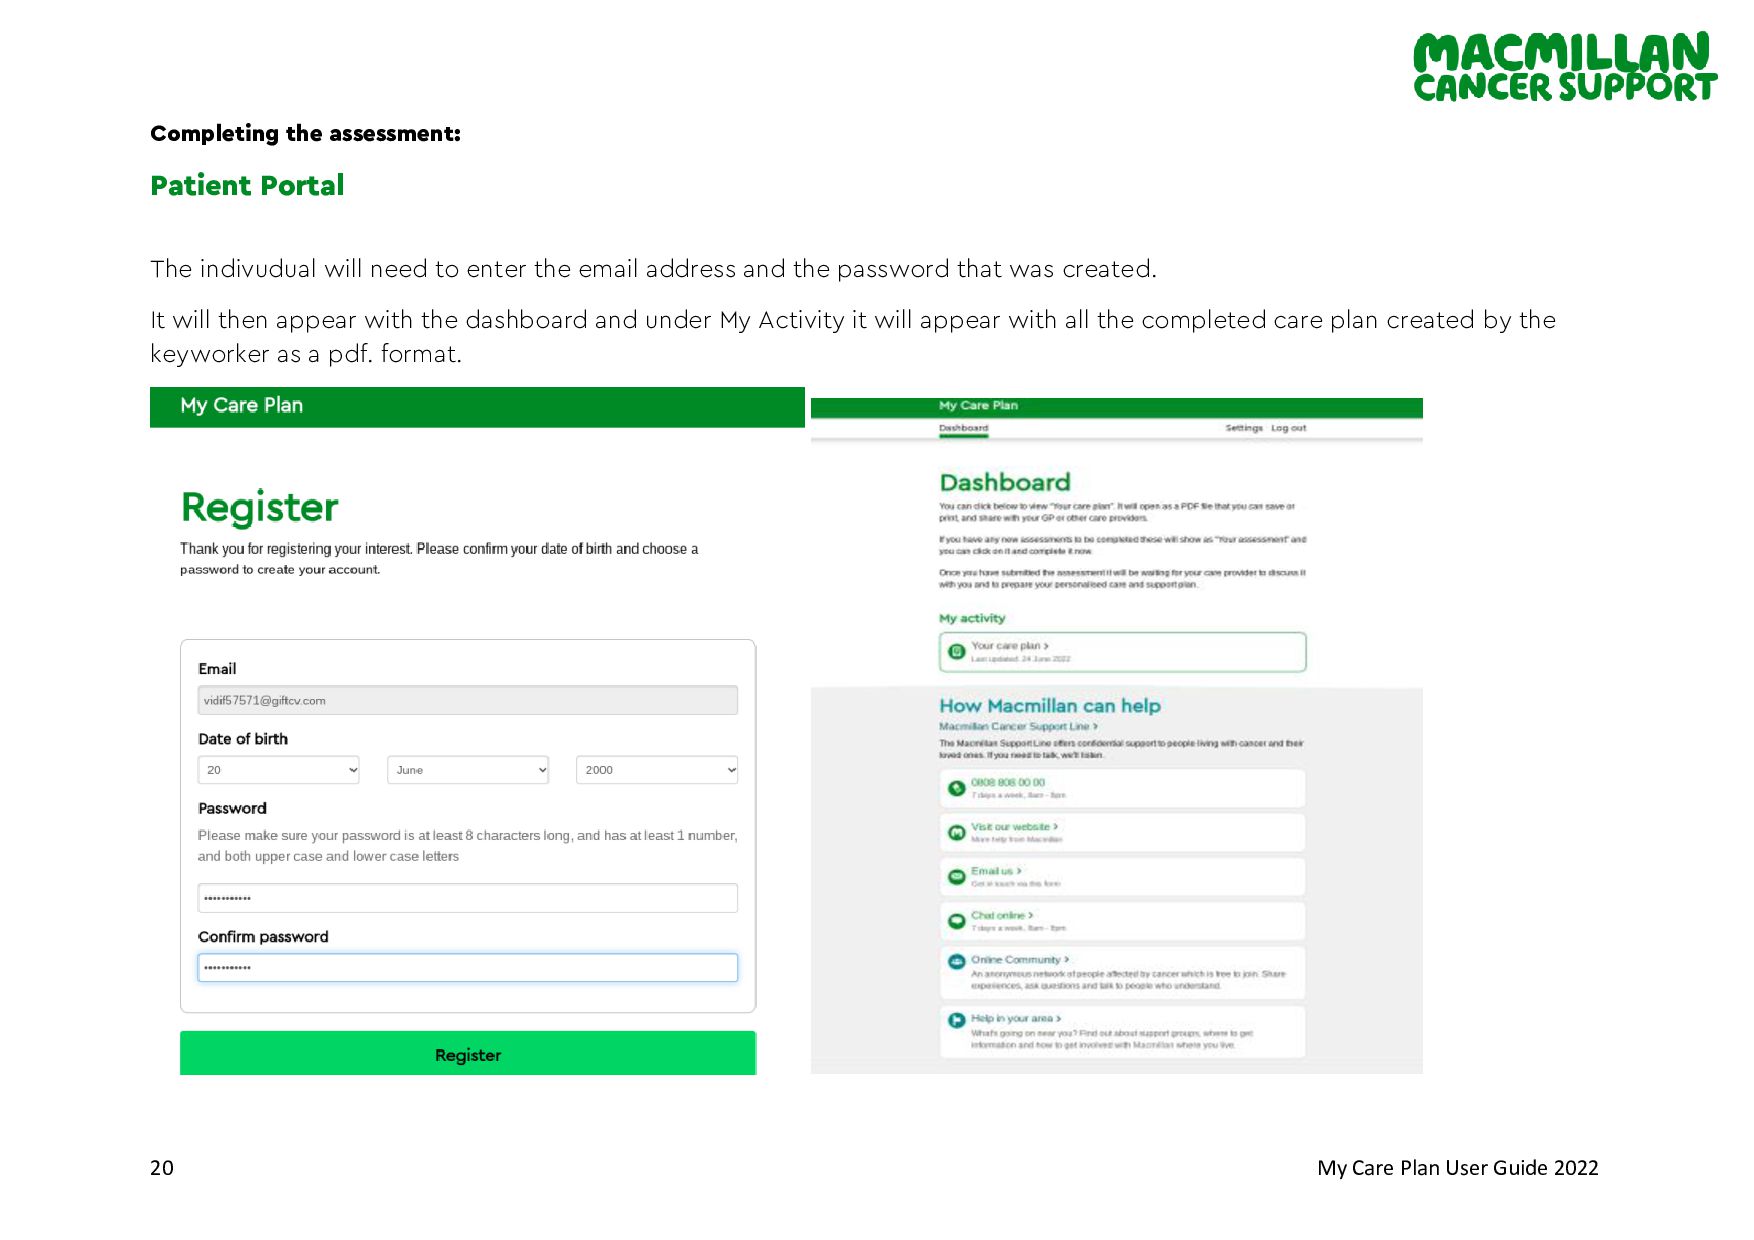
Patient Portal The indivudual will need to enter the email address and the password that was created. It will then appear with the dashboard and under My Activity it will appear with all the completed care plan created by the keyworker as a pdf. format.
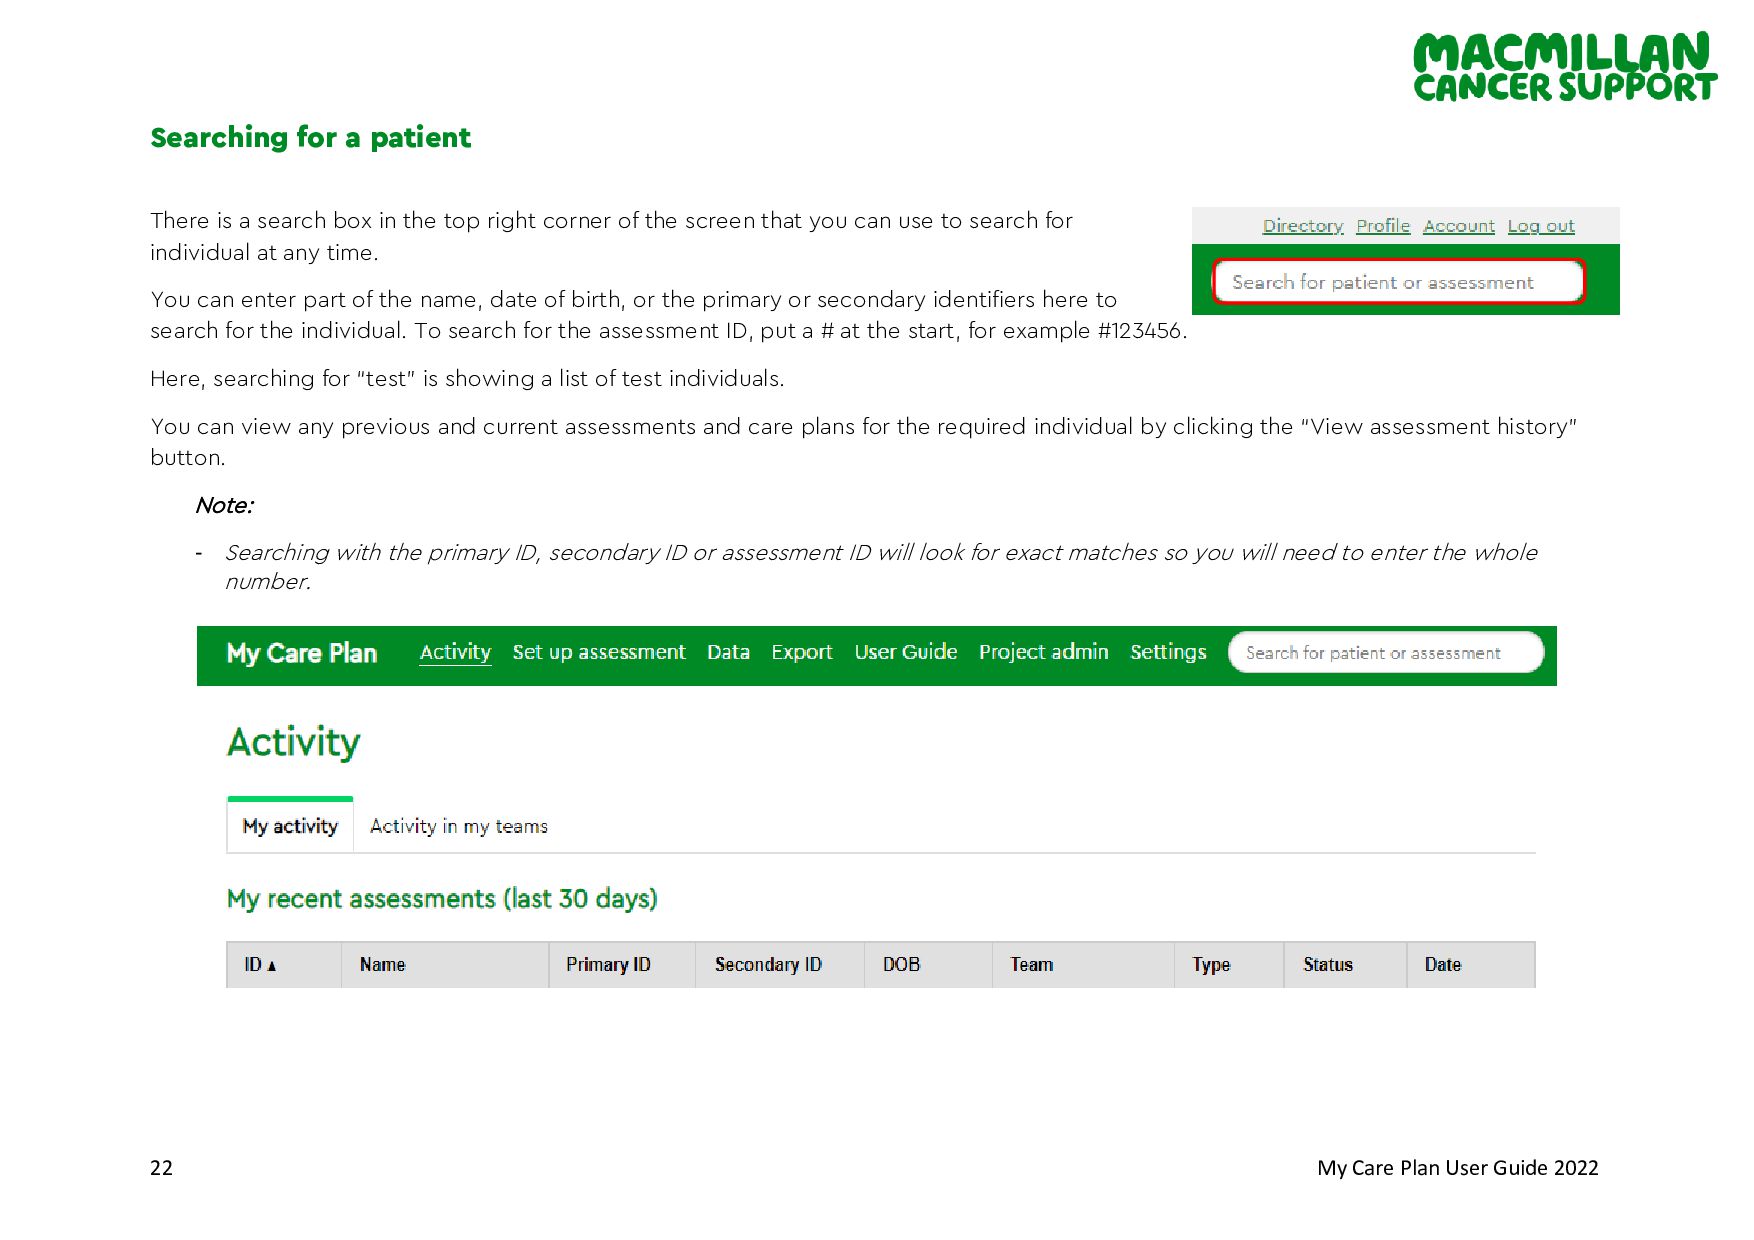
patient There is a search box in the top right corner of the screen that you can use to search for individual at any time. You can enter part of the name, date of birth, or the primary or secondary identifiers here to search for the individual. To search for the assessment ID, put a # at the start, for example #123456. Here, searching for “test” is showing a list of test individuals. You can view any previous and current assessments and care plans for the required individual by clicking the “View assessment history” button. Note: - Searching with the primary ID, secondary ID or assessment ID will look for exact matches so you will need to enter the whole number.
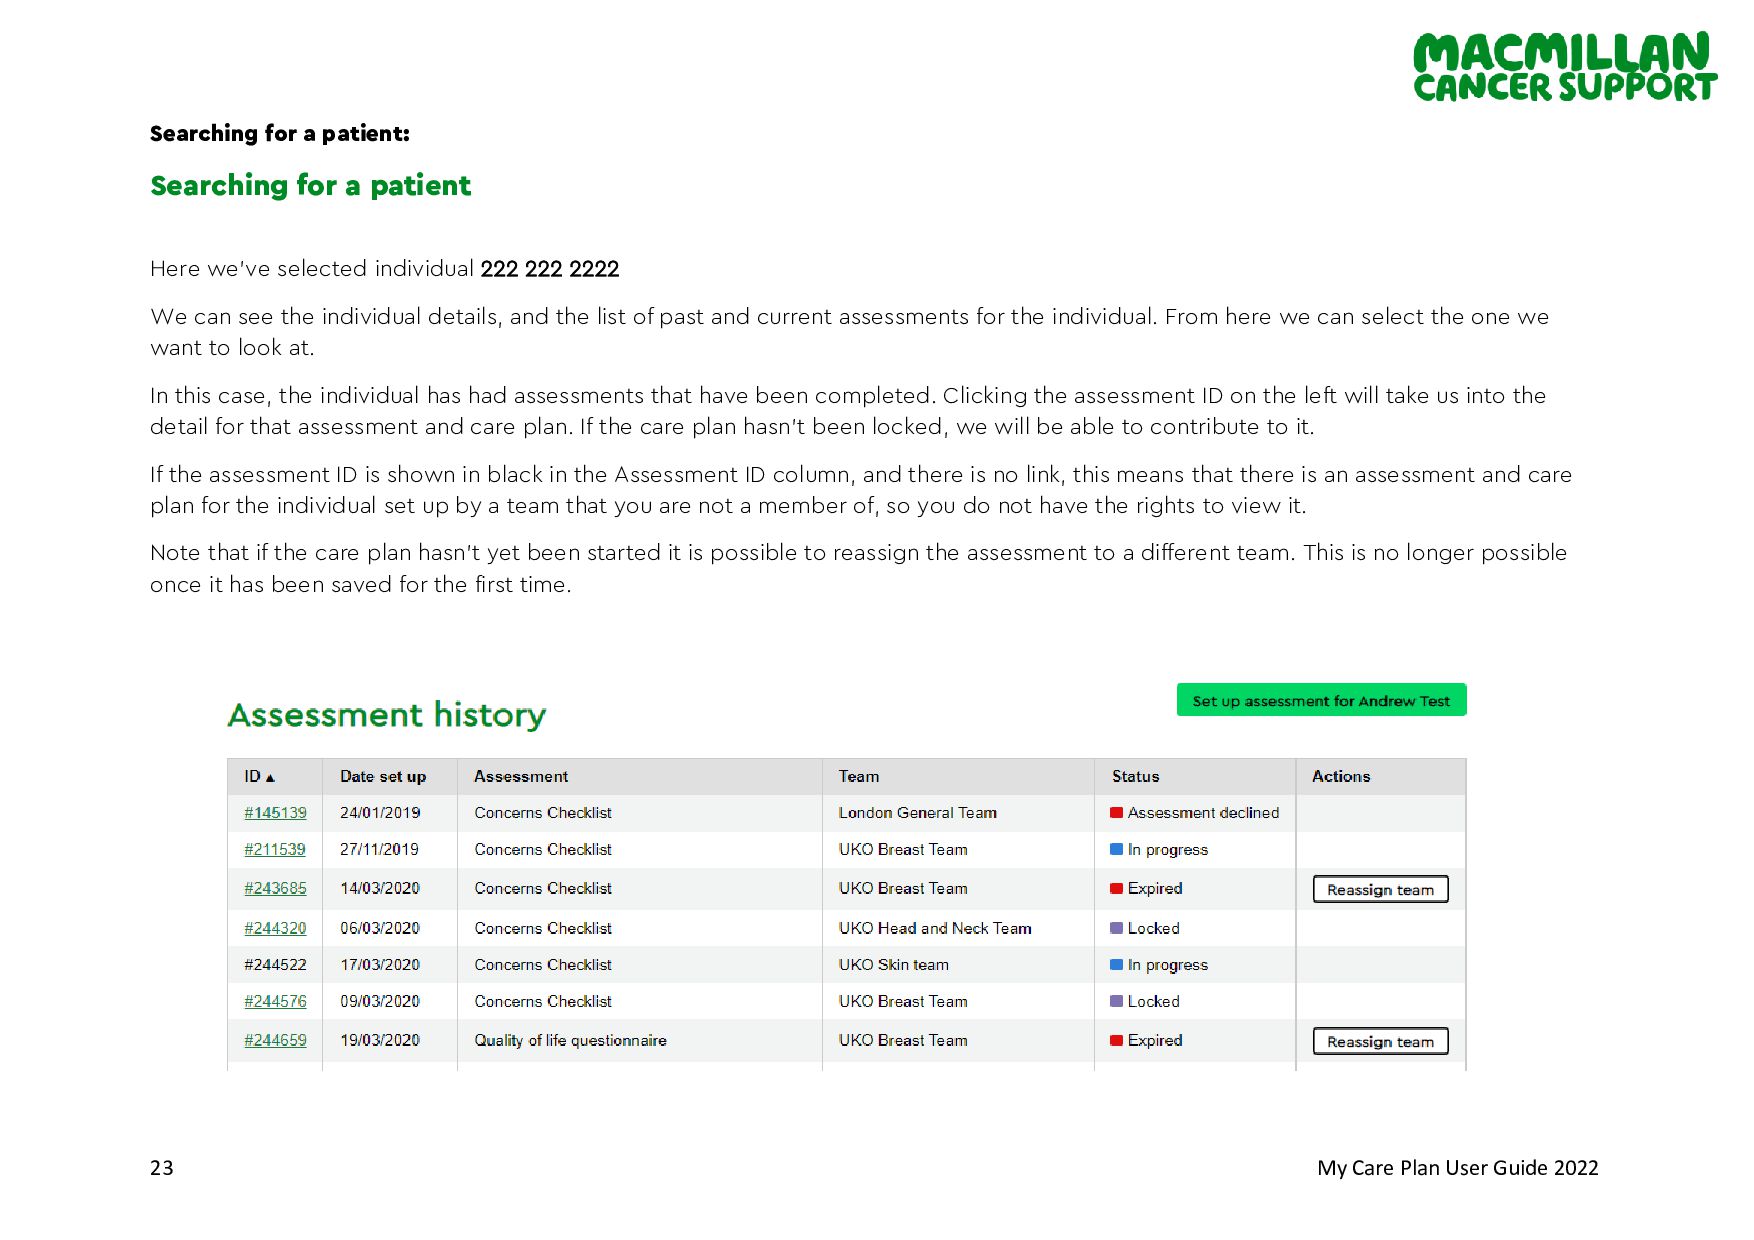
patient: Searching for a patient Here we’ve selected individual 222 222 2222 We can see the individual details, and the list of past and current assessments for the individual. From here we can select the one we want to look at. In this case, the individual has had assessments that have been completed. Clicking the assessment ID on the left will take us into the detail for that assessment and care plan. If the care plan hasn’t been locked, we will be able to contribute to it. If the assessment ID is shown in black in the Assessment ID column, and there is no link, this means that there is an assessment and care plan for the individual set up by a team that you are not a member of, so you do not have the rights to view it. Note that if the care plan hasn’t yet been started it is possible to reassign the assessment to a different team. This is no longer possible once it has been saved for the first time.
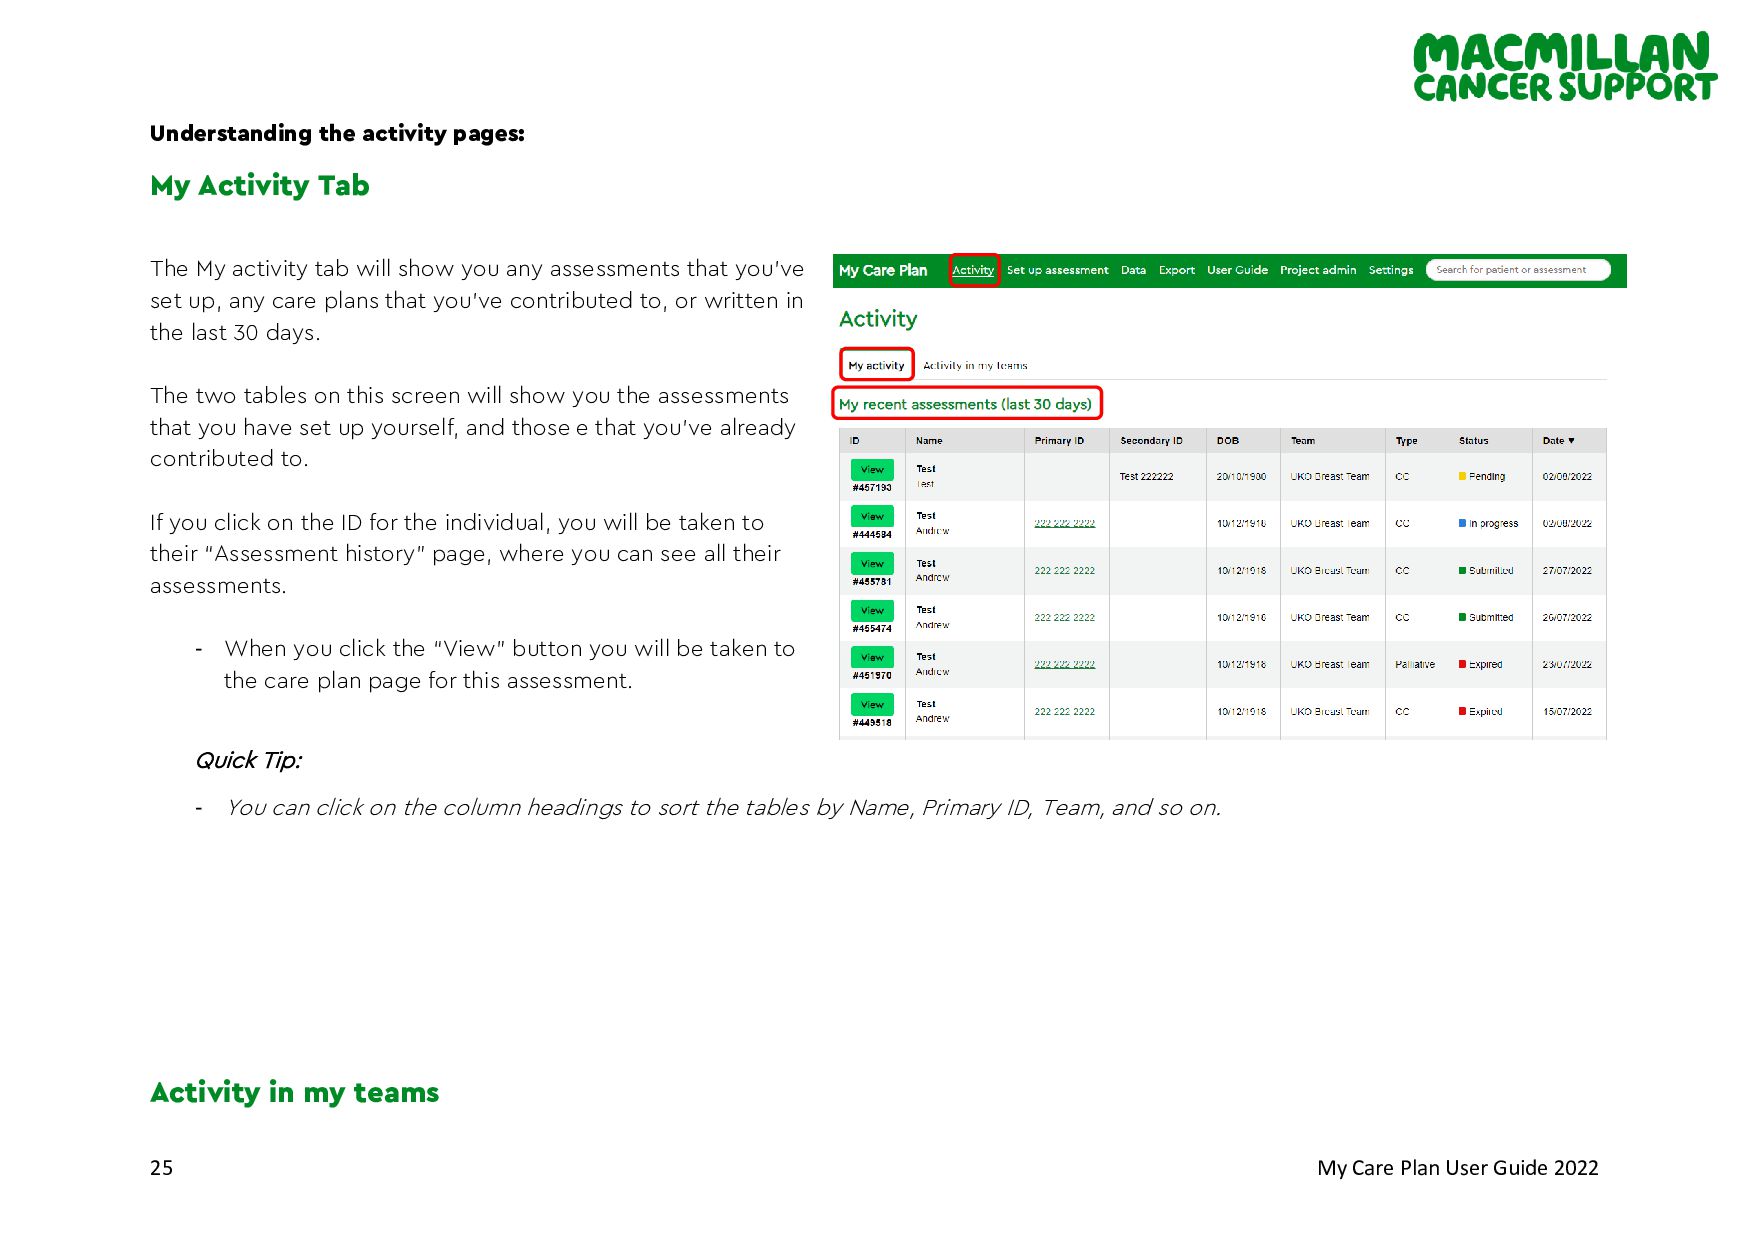
pages: My Activity Tab The My activity tab will show you any assessments that you’ve set up, any care plans that you’ve contributed to, or written in the last 30 days. The two tables on this screen will show you the assessments that you have set up yourself, and those e that you’ve already contributed to. If you click on the ID for the individual, you will be taken to their “Assessment history” page, where you can see all their assessments. - When you click the “View” button you will be taken to the care plan page for this assessment. Quick Tip: - You can click on the column headings to sort the tables by Name, Primary ID, Team, and so on. Activity in my teams
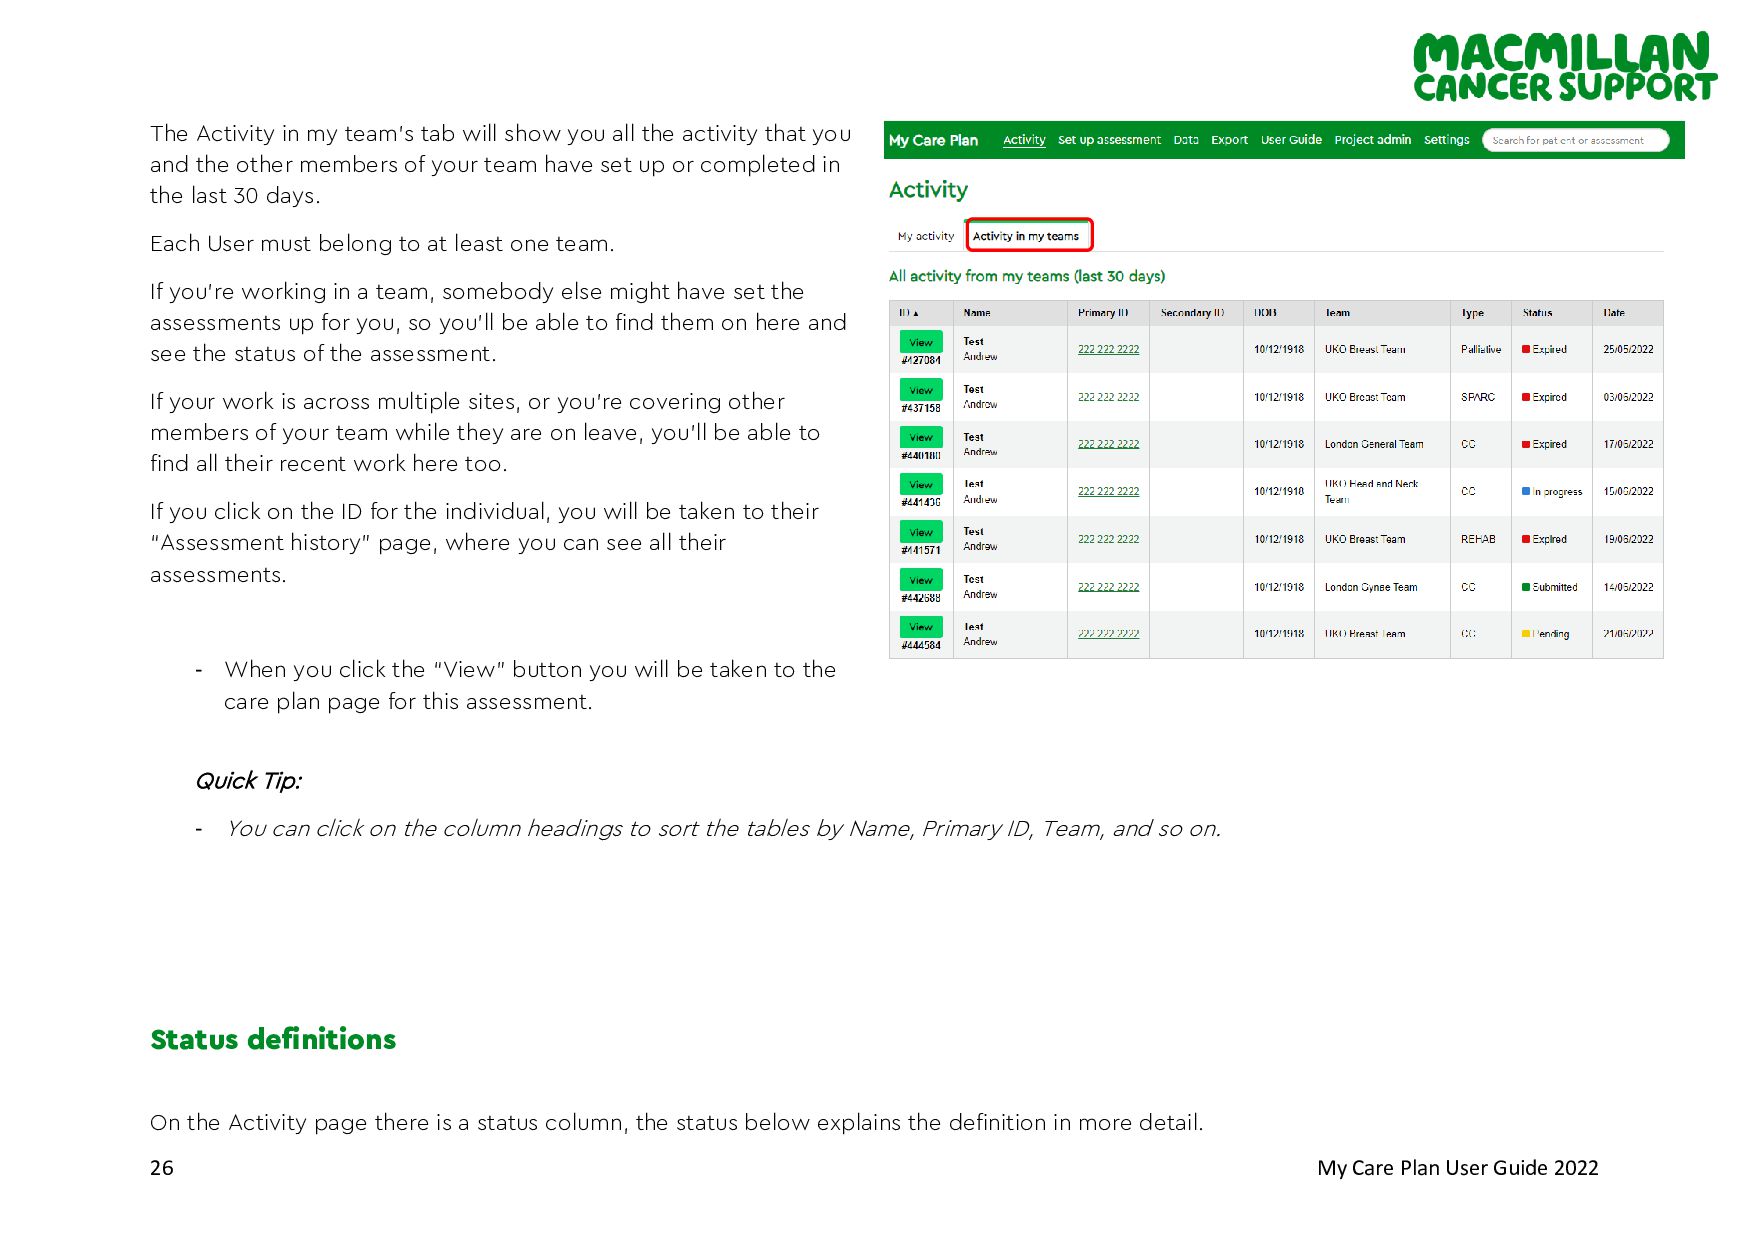
my team’s tab will show you all the activity that you and the other members of your team have set up or completed in the last 30 days. Each User must belong to at least one team. If you’re working in a team, somebody else might have set the assessments up for you, so you’ll be able to find them on here and see the status of the assessment. If your work is across multiple sites, or you’re covering other members of your team while they are on leave, you’ll be able to find all their recent work here too. If you click on the ID for the individual, you will be taken to their “Assessment history” page, where you can see all their assessments. - When you click the “View” button you will be taken to the care plan page for this assessment. Quick Tip: - You can click on the column headings to sort the tables by Name, Primary ID, Team, and so on. Status definitions On the Activity page there is a status column, the status below explains the definition in more detail.
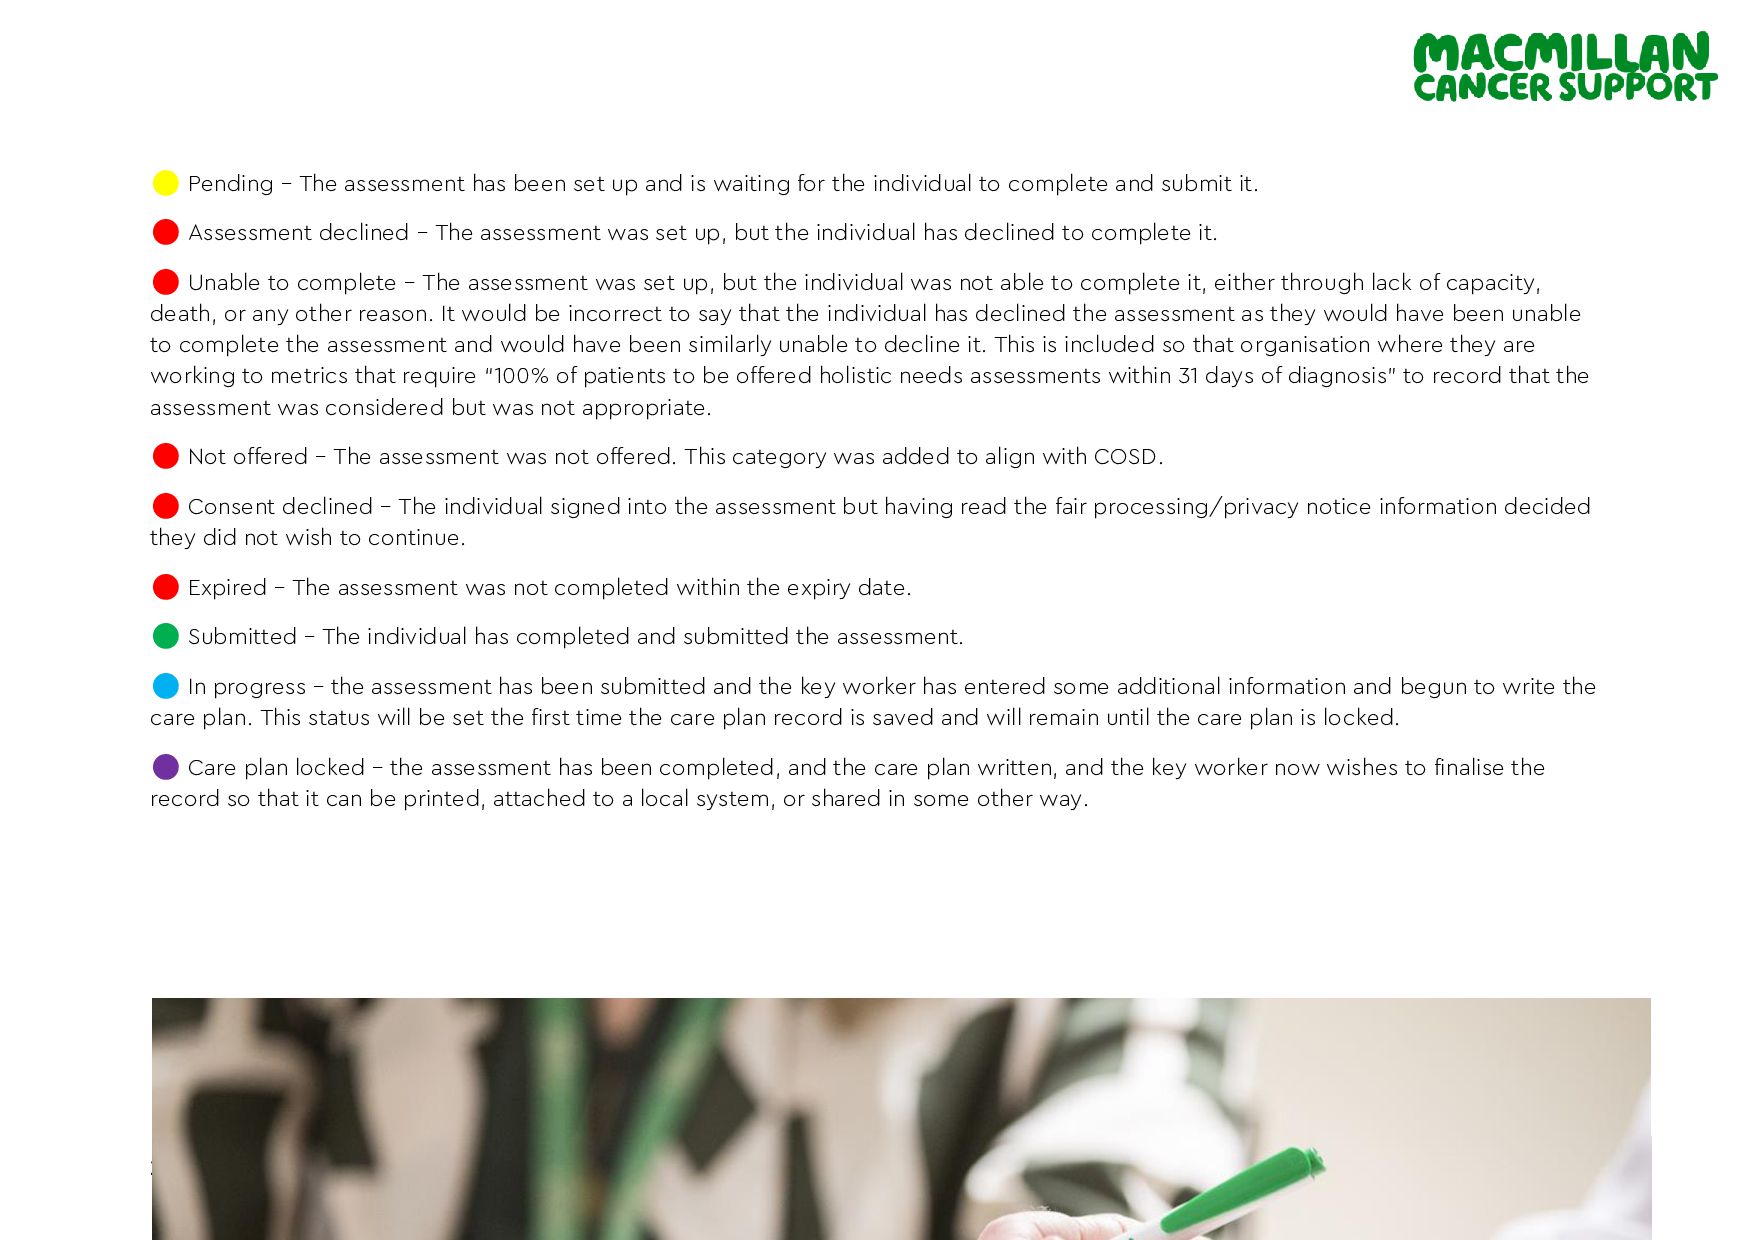
The assessment has been set up and is waiting for the individual to complete and submit it. ⚫ Assessment declined – The assessment was set up, but the individual has declined to complete it. ⚫ Unable to complete – The assessment was set up, but the individual was not able to complete it, either through lack of capacity, death, or any other reason. It would be incorrect to say that the individual has declined the assessment as they would have been unable to complete the assessment and would have been similarly unable to decline it. This is included so that organisation where they are working to metrics that require “100% of patients to be offered holistic needs assessments within 31 days of diagnosis” to record that the assessment was considered but was not appropriate. ⚫ Not offered – The assessment was not offered. This category was added to align with COSD. ⚫ Consent declined – The individual signed into the assessment but having read the fair processing/privacy notice information decided they did not wish to continue. ⚫ Expired – The assessment was not completed within the expiry date. ⚫ Submitted – The individual has completed and submitted the assessment. ⚫ In progress – the assessment has been submitted and the key worker has entered some additional information and begun to write the care plan. This status will be set the first time the care plan record is saved and will remain until the care plan is locked. ⚫ Care plan locked – the assessment has been completed, and the care plan written, and the key worker now wishes to finalise the record so that it can be printed, attached to a local system, or shared in some other way.
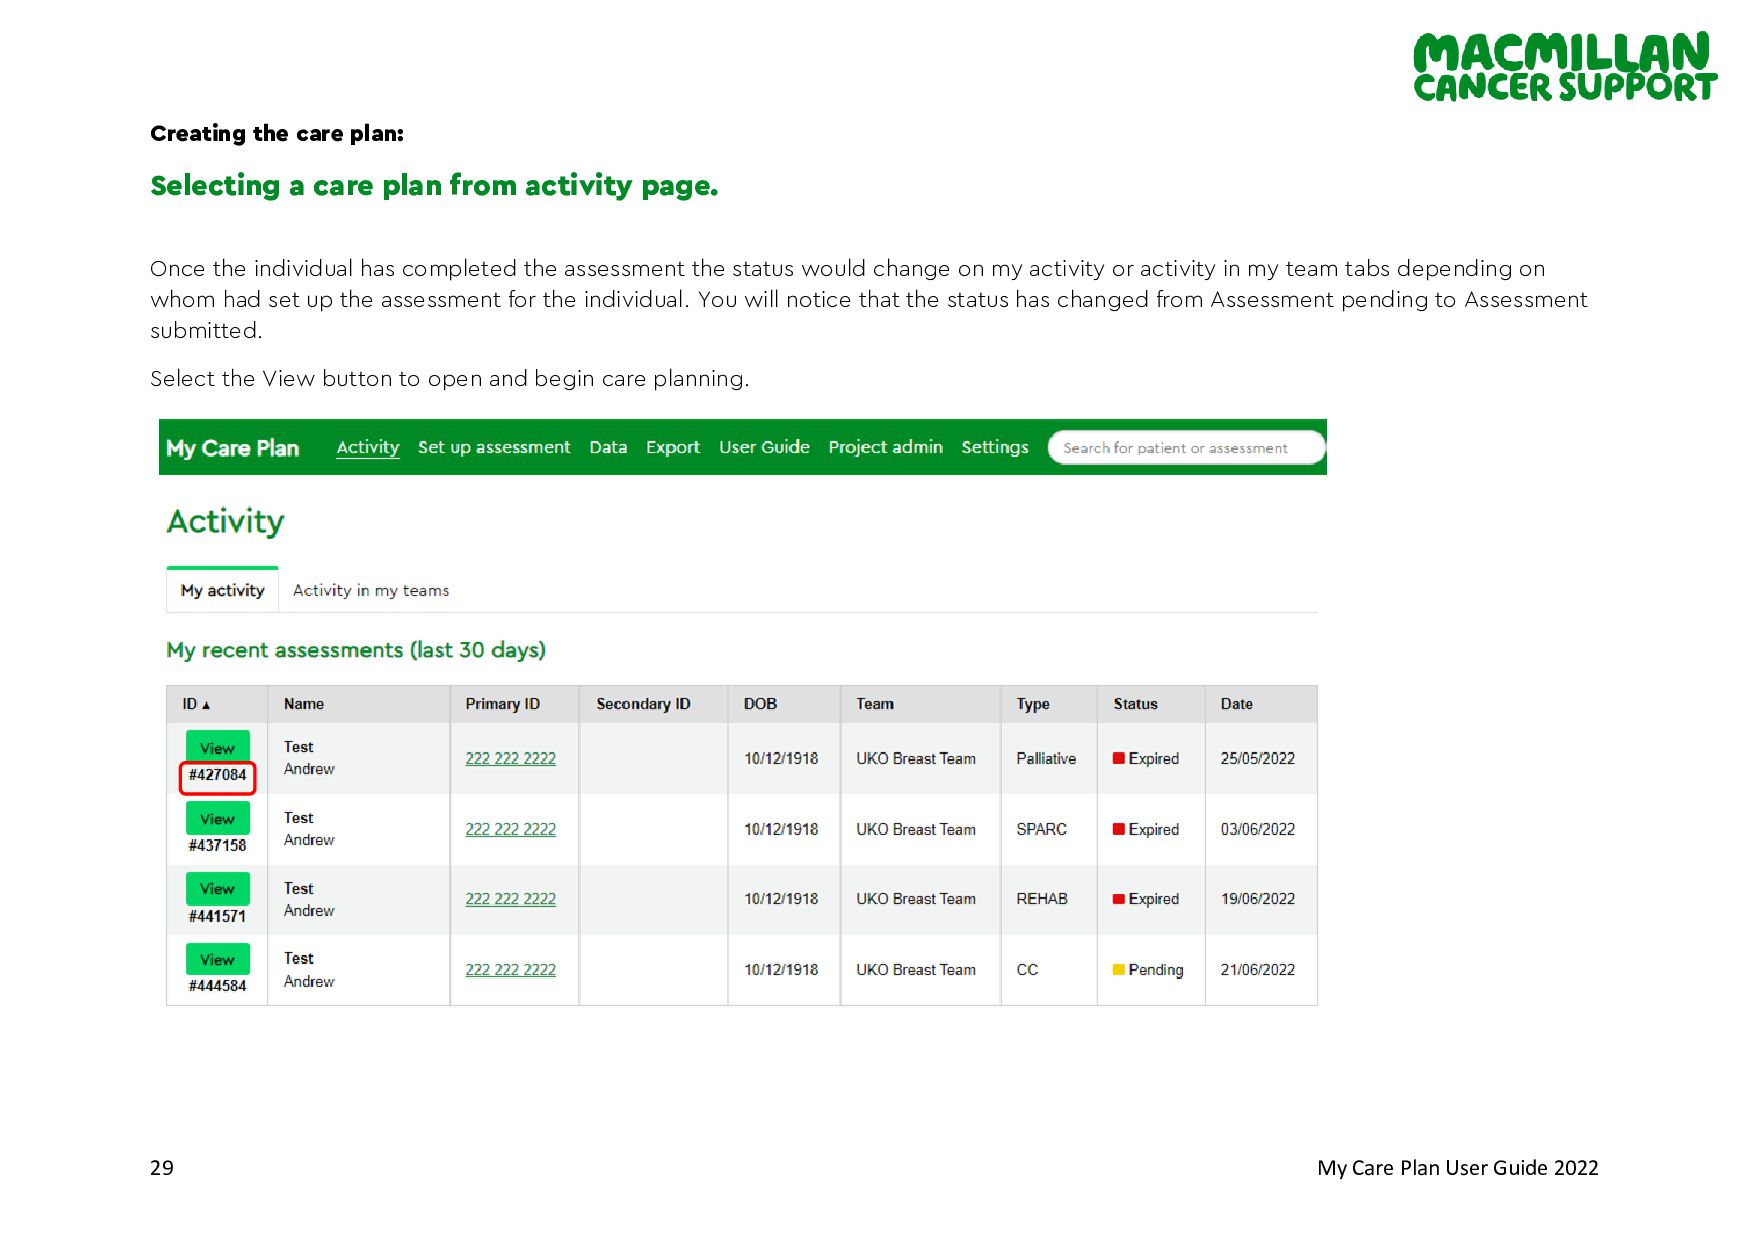
plan: Selecting a care plan from activity page. Once the individual has completed the assessment the status would change on my activity or activity in my team tabs depending on whom had set up the assessment for the individual. You will notice that the status has changed from Assessment pending to Assessment submitted. Select the View button to open and begin care planning.
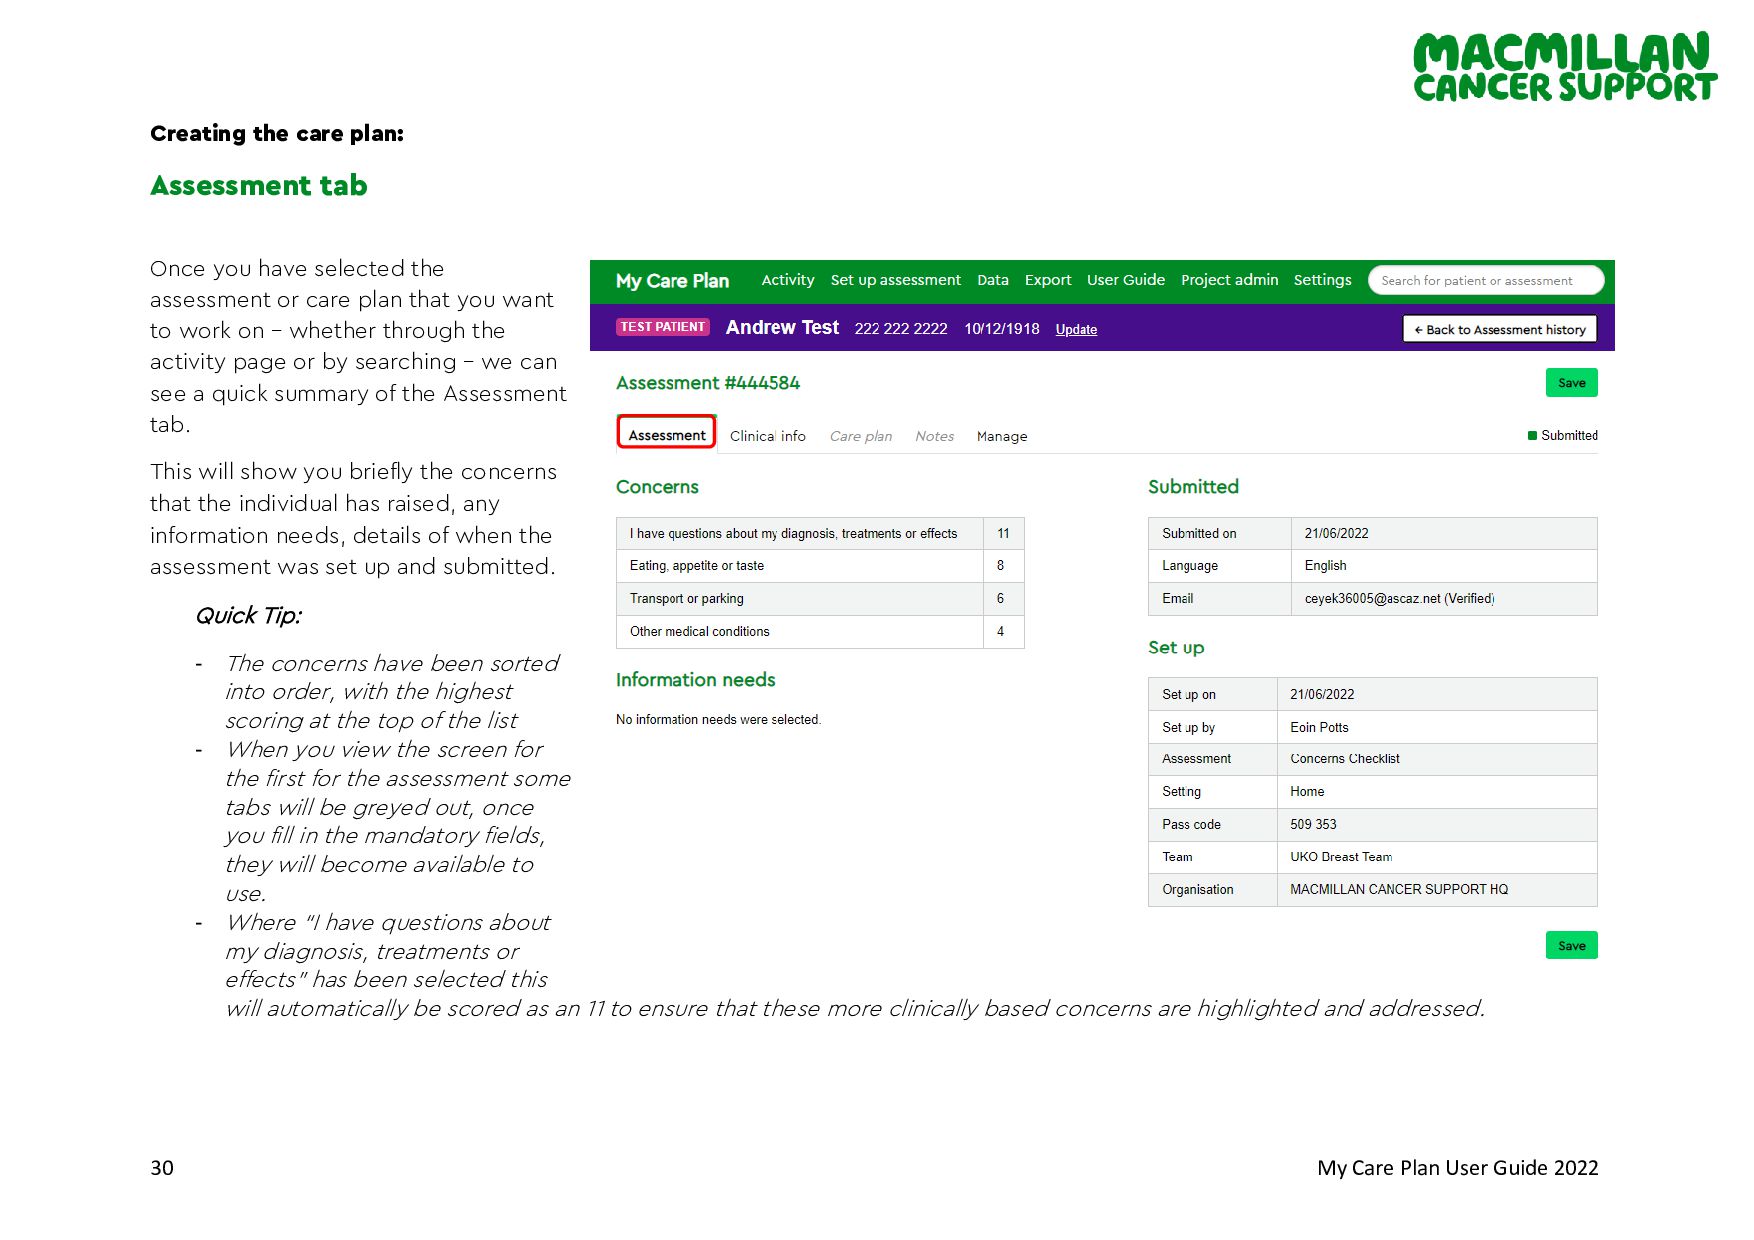
plan: Assessment tab Once you have selected the assessment or care plan that you want to work on – whether through the activity page or by searching – we can see a quick summary of the Assessment tab. This will show you briefly the concerns that the individual has raised, any information needs, details of when the assessment was set up and submitted. Quick Tip: - The concerns have been sorted into order, with the highest scoring at the top of the list - When you view the screen for the first for the assessment some tabs will be greyed out, once you fill in the mandatory fields, they will become available to use. - Where “I have questions about my diagnosis, treatments or effects” has been selected this will automatically be scored as an 11 to ensure that these more clinically based concerns are highlighted and addressed.
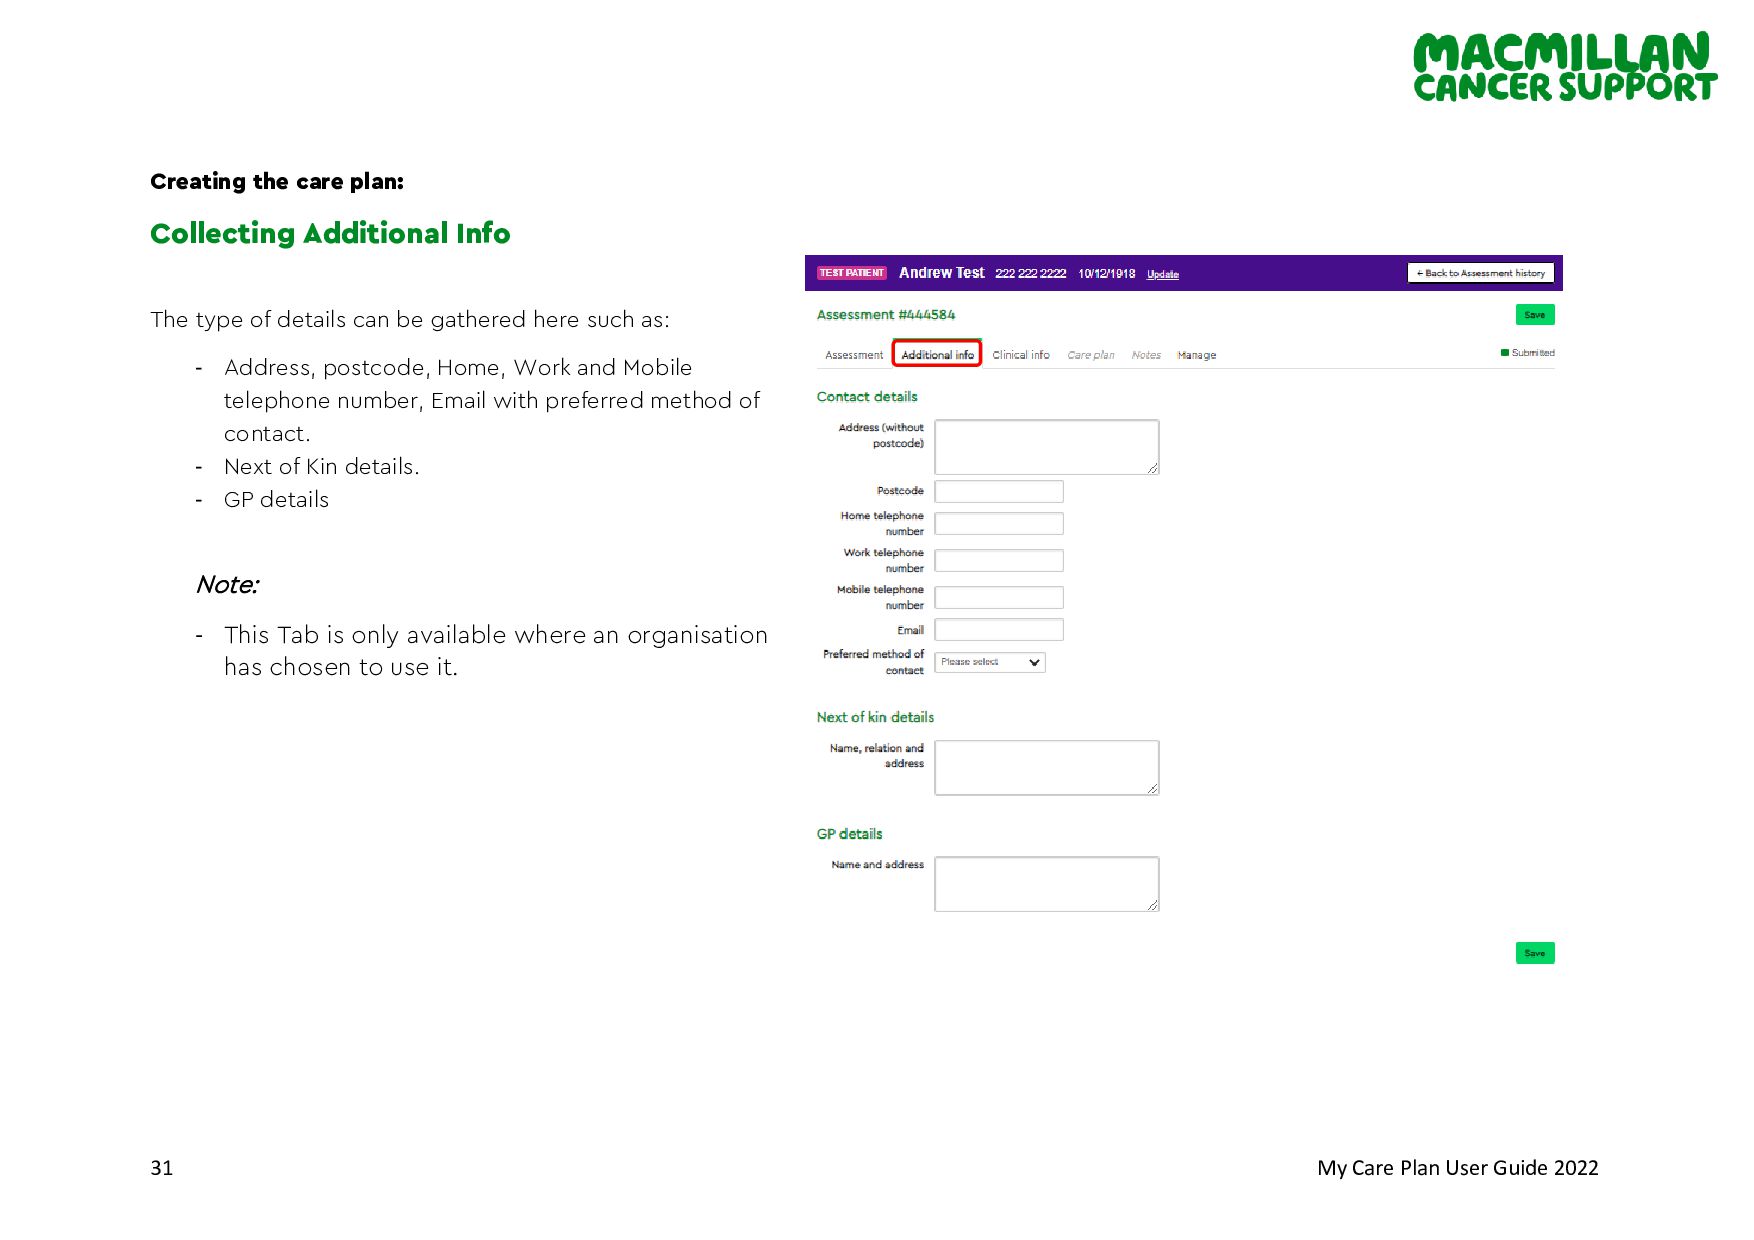
plan: Collecting Additional Info The type of details can be gathered here such as: - Address, postcode, Home, Work and Mobile telephone number, Email with preferred method of contact. - Next of Kin details. - GP details Note: - This Tab is only available where an organisation has chosen to use it.
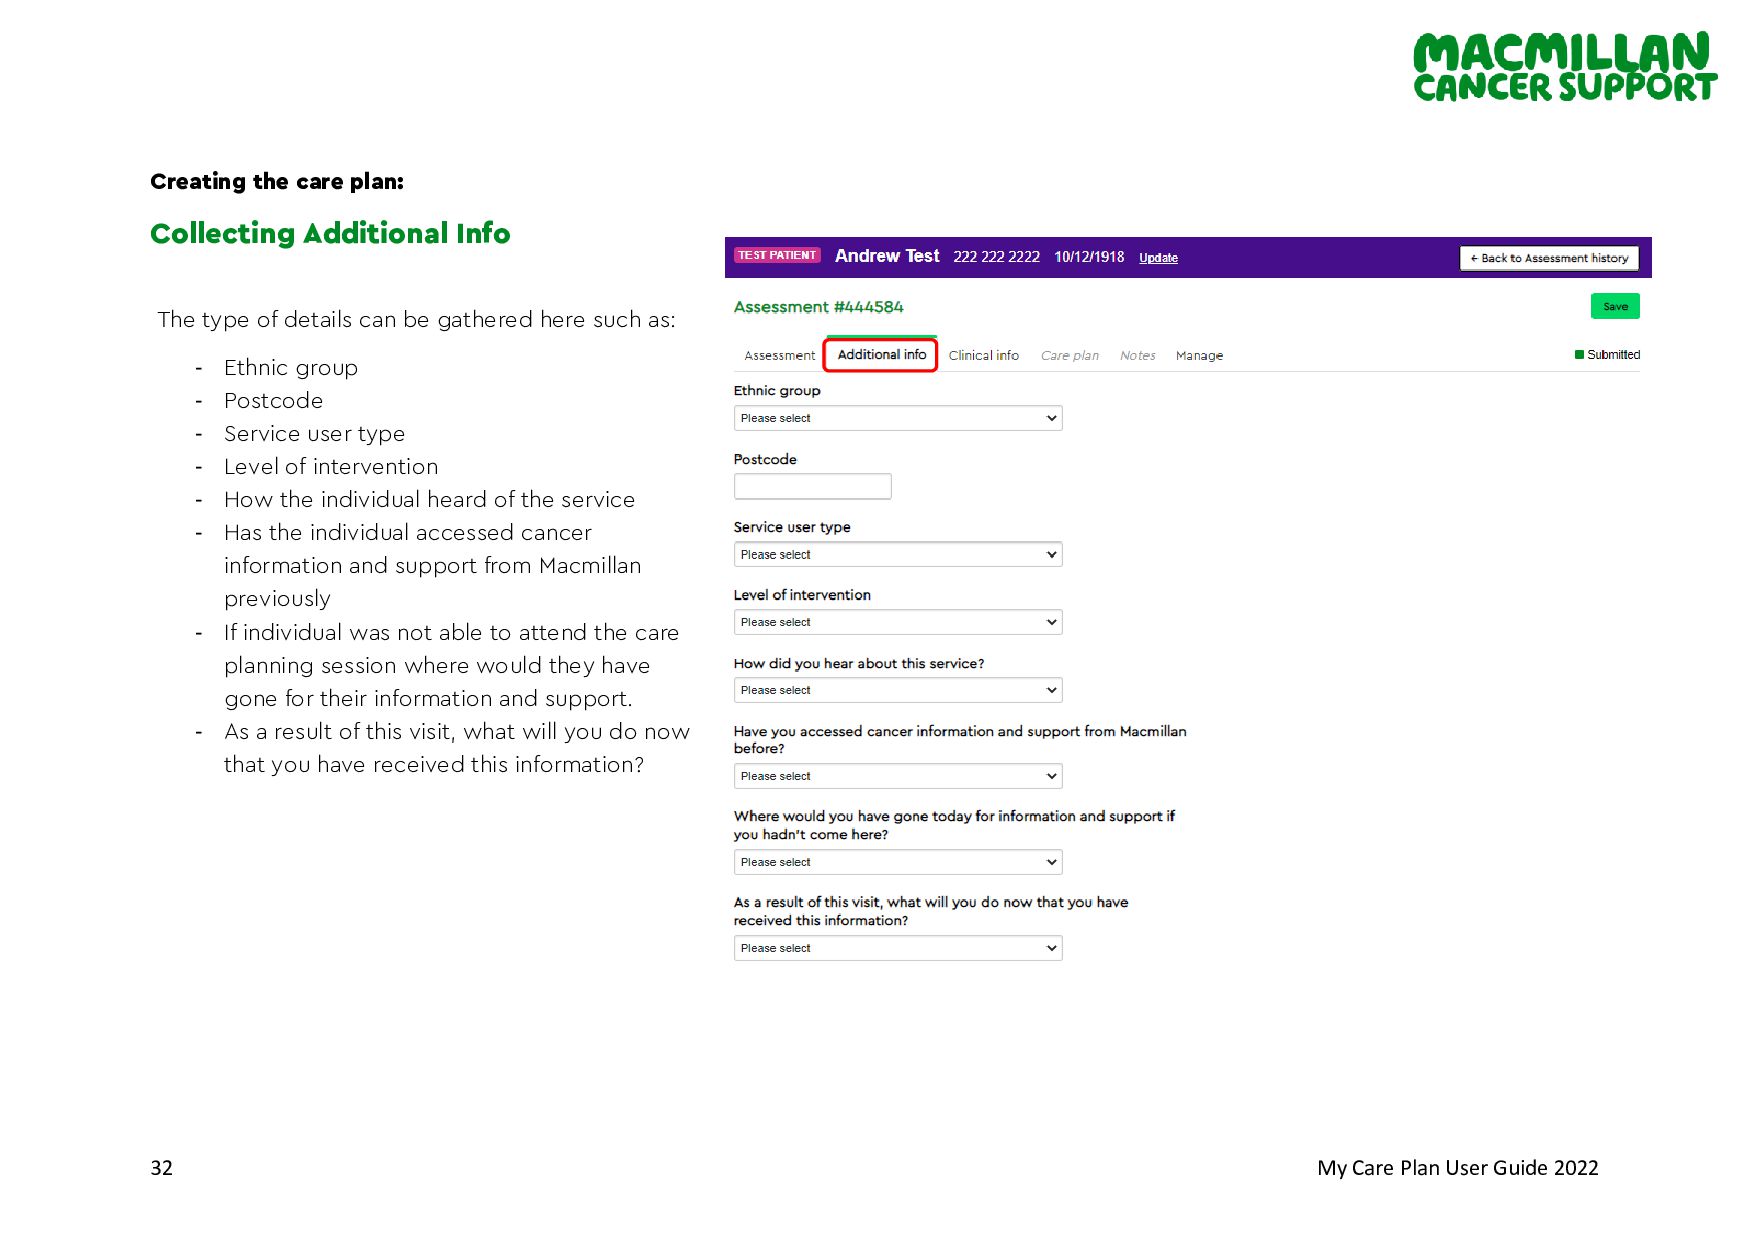
plan: Collecting Additional Info The type of details can be gathered here such as: - Ethnic group - Postcode - Service user type - Level of intervention - How the individual heard of the service - Has the individual accessed cancer information and support from Macmillan previously - If individual was not able to attend the care planning session where would they have gone for their information and support. - As a result of this visit, what will you do now that you have received this information?
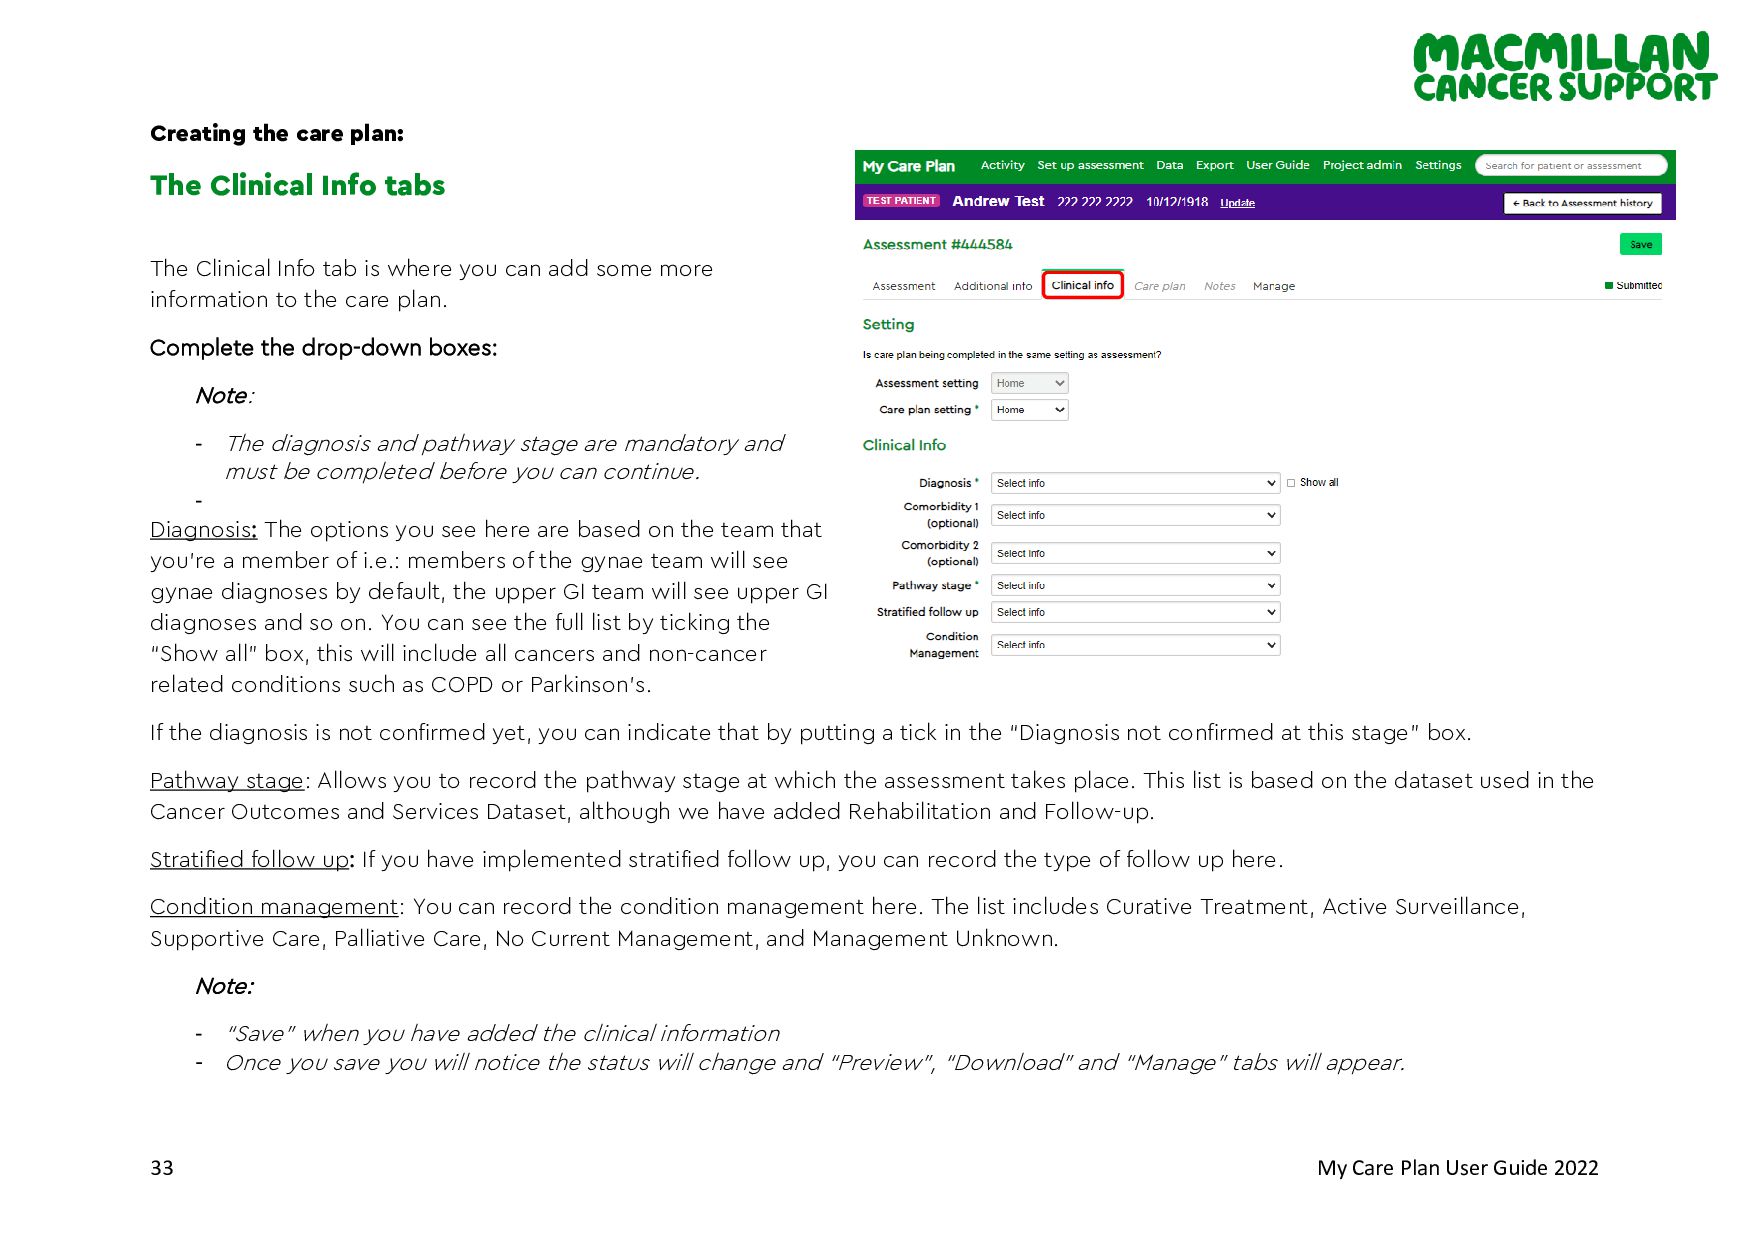
plan: The Clinical Info tabs The Clinical Info tab is where you can add some more information to the care plan. Complete the drop-down boxes: Note: - The diagnosis and pathway stage are mandatory and must be completed before you can continue. - Diagnosis: The options you see here are based on the team that you’re a member of i.e.: members of the gynae team will see gynae diagnoses by default, the upper GI team will see upper GI diagnoses and so on. You can see the full list by ticking the “Show all” box, this will include all cancers and non-cancer related conditions such as COPD or Parkinson’s. If the diagnosis is not confirmed yet, you can indicate that by putting a tick in the “Diagnosis not confirmed at this stage” box. Pathway stage: Allows you to record the pathway stage at which the assessment takes place. This list is based on the dataset used in the Cancer Outcomes and Services Dataset, although we have added Rehabilitation and Follow-up. Stratified follow up: If you have implemented stratified follow up, you can record the type of follow up here. Condition management: You can record the condition management here. The list includes Curative Treatment, Active Surveillance, Supportive Care, Palliative Care, No Current Management, and Management Unknown. Note: - “Save” when you have added the clinical information - Once you save you will notice the status will change and “Preview”, “Download” and “Manage” tabs will appear.
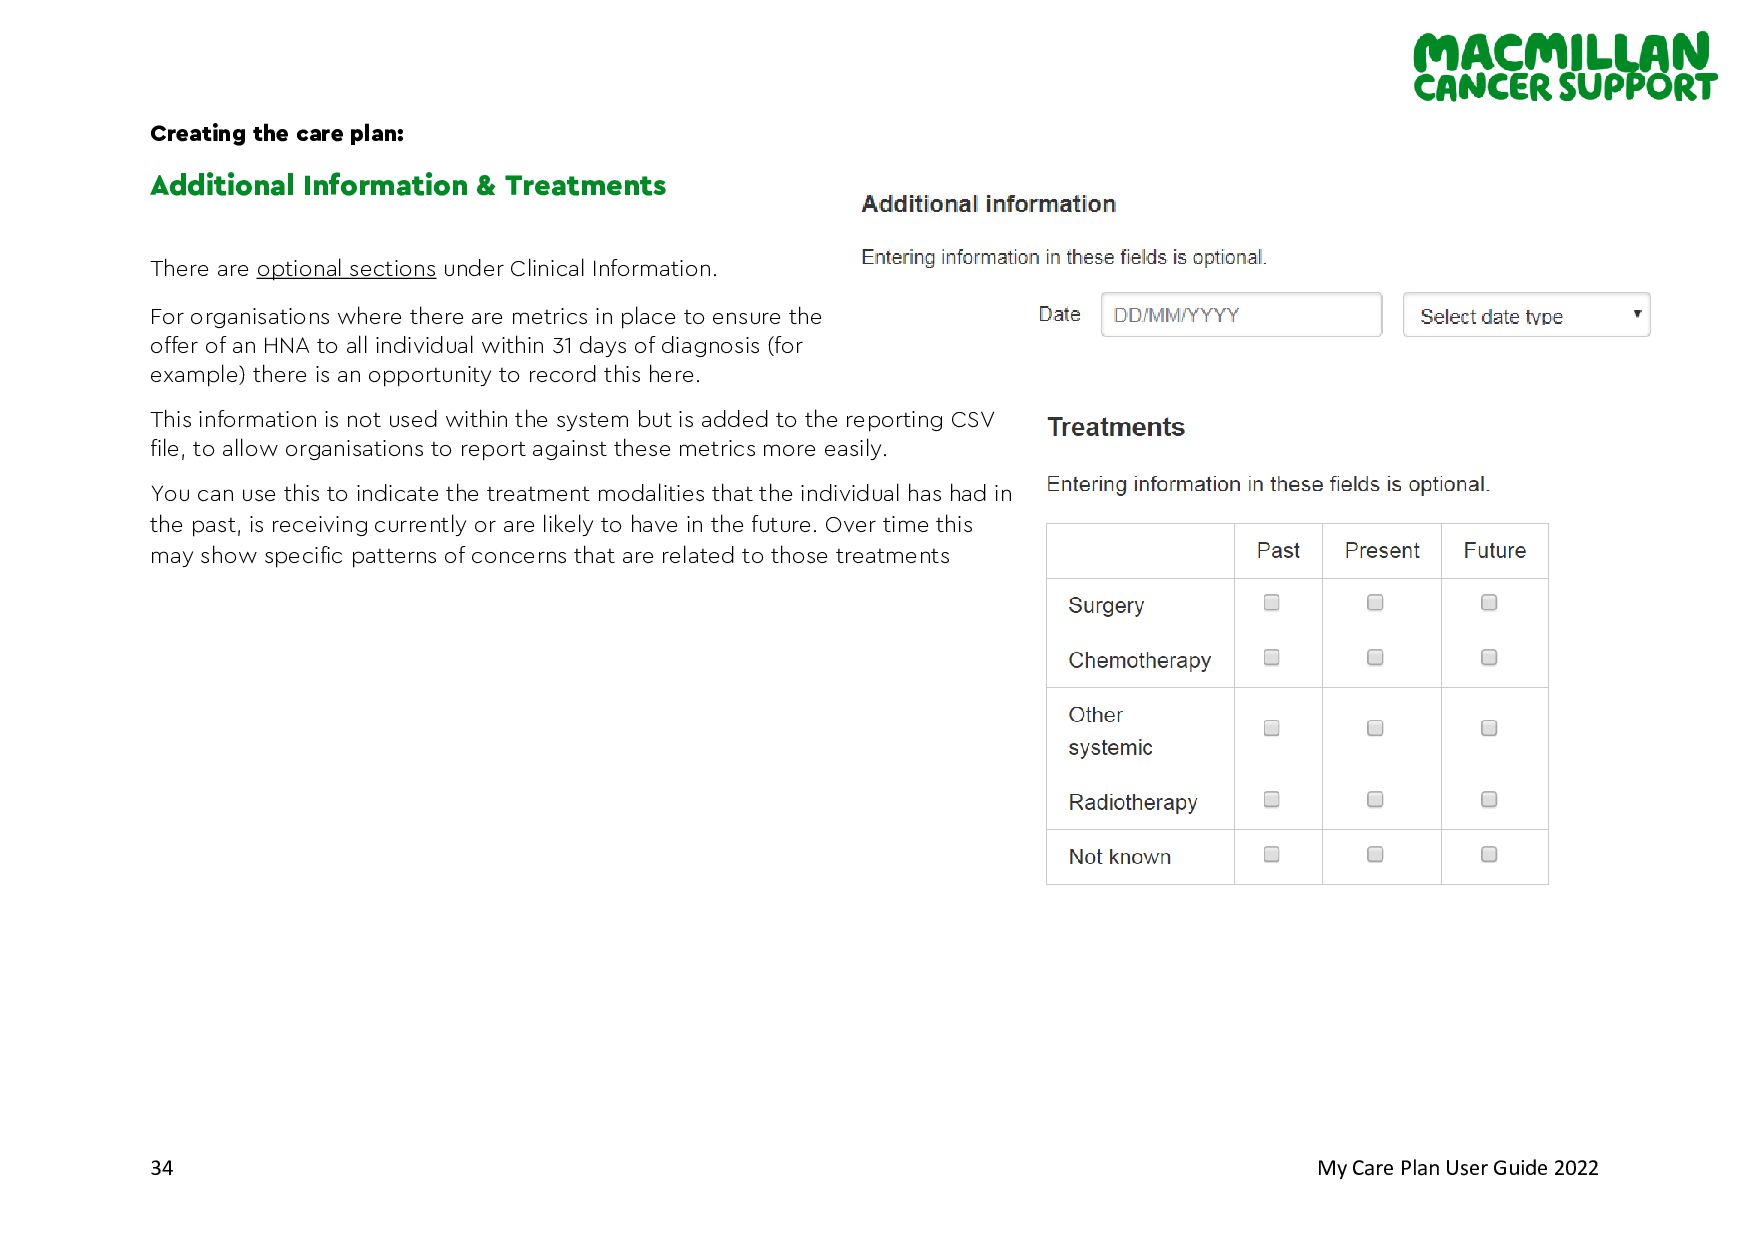
plan: Additional Information & Treatments There are optional sections under Clinical Information. For organisations where there are metrics in place to ensure the offer of an HNA to all individual within 31 days of diagnosis (for example) there is an opportunity to record this here. This information is not used within the system but is added to the reporting CSV file, to allow organisations to report against these metrics more easily. You can use this to indicate the treatment modalities that the individual has had in the past, is receiving currently or are likely to have in the future. Over time this may show specific patterns of concerns that are related to those treatments
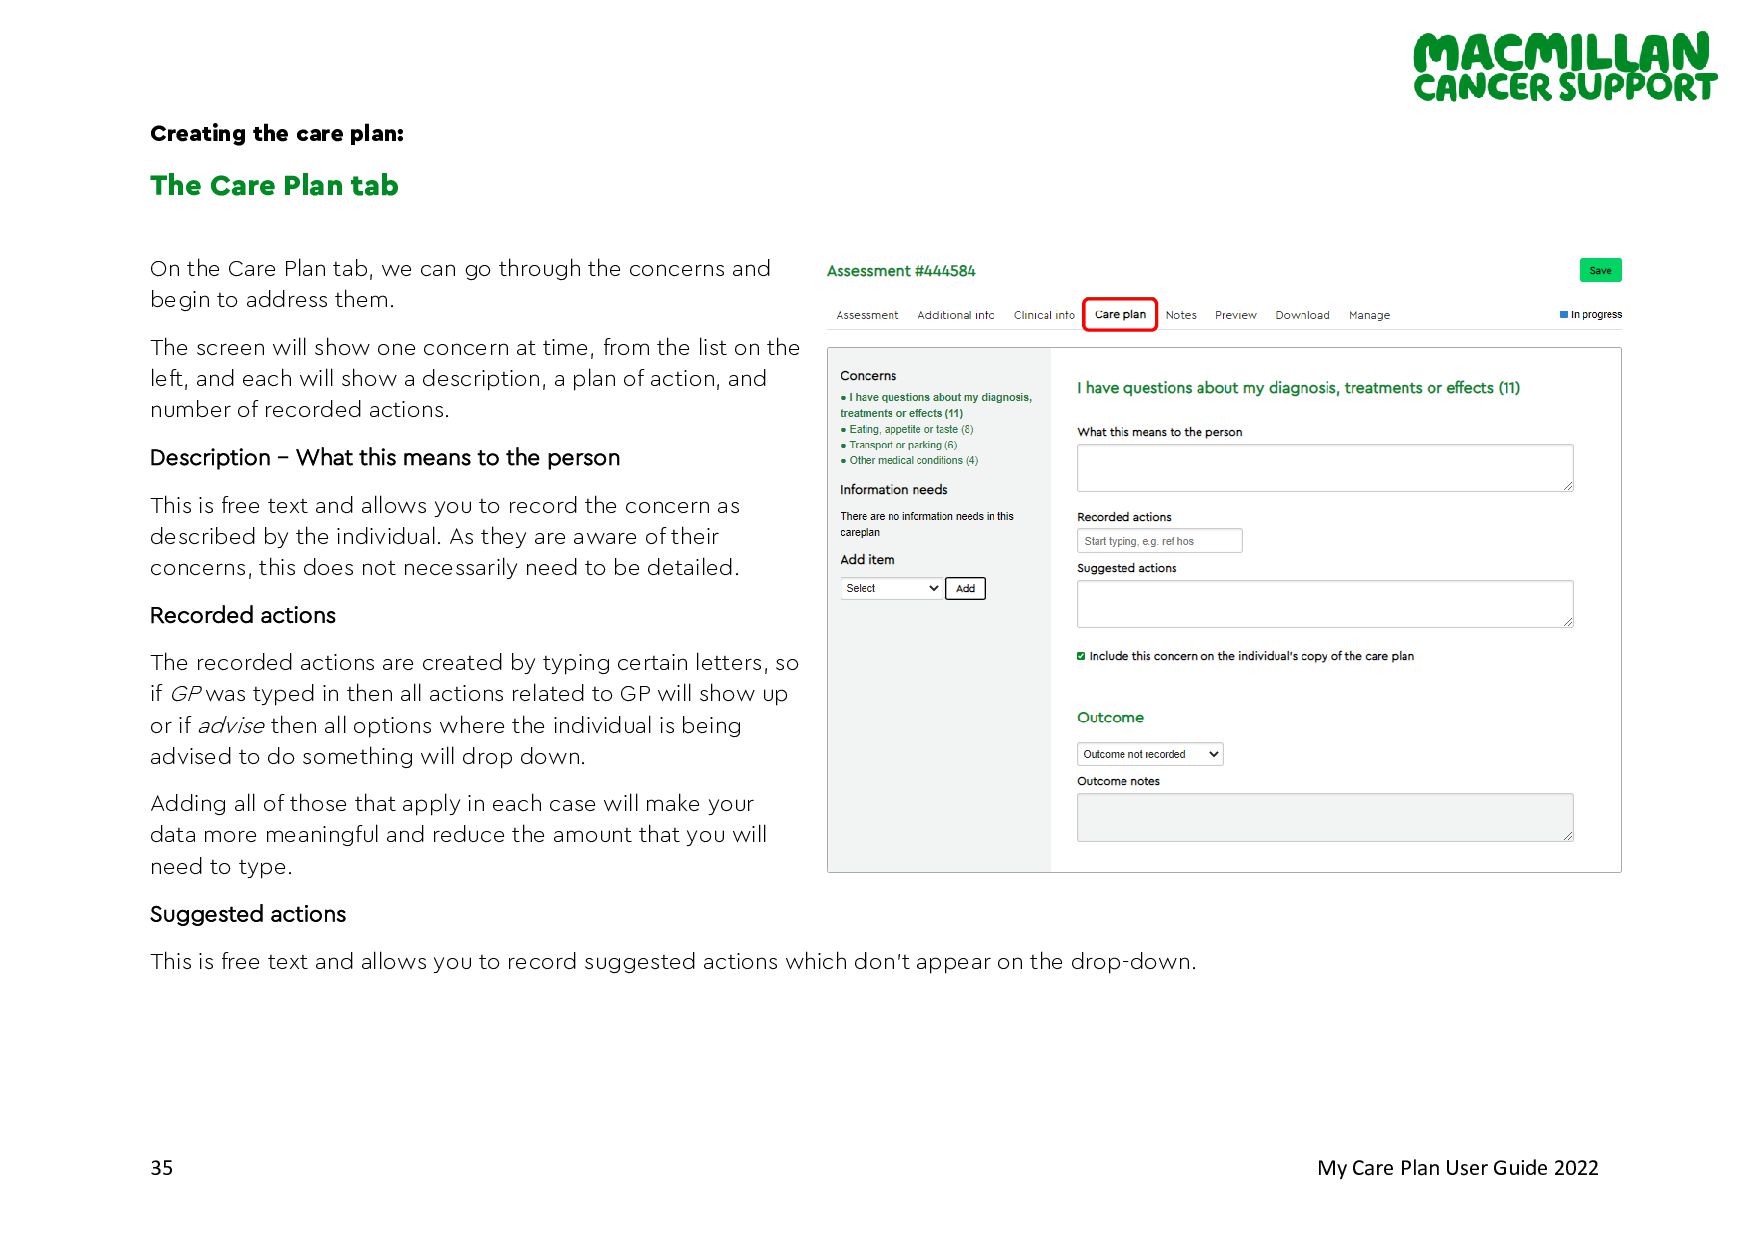
plan: The Care Plan tab On the Care Plan tab, we can go through the concerns and begin to address them. The screen will show one concern at time, from the list on the left, and each will show a description, a plan of action, and number of recorded actions. Description – What this means to the person This is free text and allows you to record the concern as described by the individual. As they are aware of their concerns, this does not necessarily need to be detailed. Recorded actions The recorded actions are created by typing certain letters, so if GP was typed in then all actions related to GP will show up or if advise then all options where the individual is being advised to do something will drop down. Adding all of those that apply in each case will make your data more meaningful and reduce the amount that you will need to type. Suggested actions This is free text and allows you to record suggested actions which don’t appear on the drop-down.
There may be times when the individual expresses another concern which they did not identify when they were completing the assessment. These additional concerns can be added during the care planning discussion and included in the care planning process as if they had been selected originally. This option is on the left-hand side under the concerns raised by the individual in the assessment. Recording the outcome In some cases, you might know at the time that the concern has been re solved through the discussion, in which case you can record whether it is fully resolved, partially resolved, or not resolved at that time. More generally you might want to record whether the actions suggested have been successful in resolving the concern some time afterwards when the individual has had time to complete any outstanding actions. The outcome field and the text box that goes with it are available even when the care plan is locked, so that the resolution of the concern can be recorded. These outcomes will then be available in the reporting CSV files. Additional Information Leaflets On some of the frequently raised concerns on the care plans will have additional one-page information which can be printed, emailed to the individual or can be used as prompt during the concern’s discussion. If you tick the box next to the link, it will embed the link on the completed care plan. Quick Tip: - You can delete any recorded actions that you’ve selected accidentally by clicking the “x”.
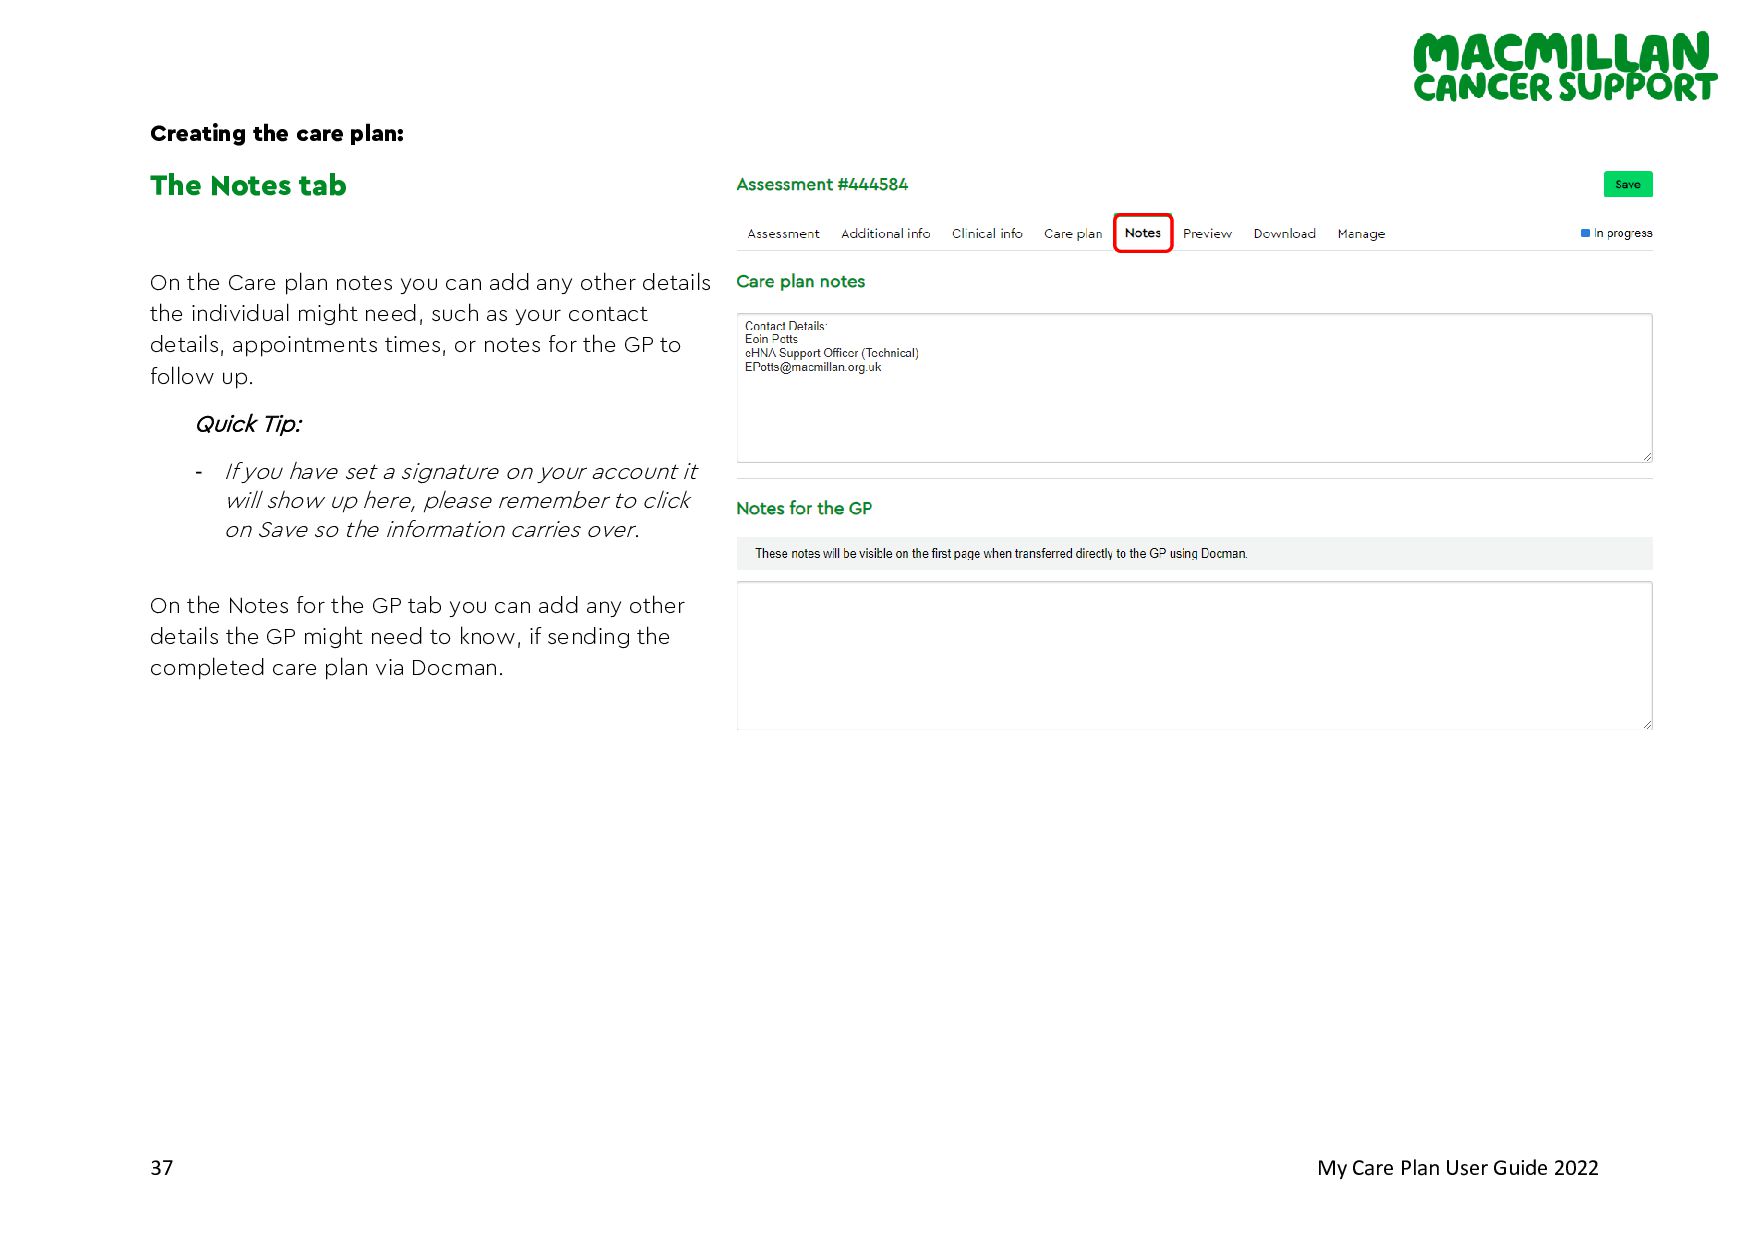
plan: The Notes tab On the Care plan notes you can add any other details the individual might need, such as your contact details, appointments times, or notes for the GP to follow up. Quick Tip: - If you have set a signature on your account it will show up here, please remember to click on Save so the information carries over. On the Notes for the GP tab you can add any other details the GP might need to know, if sending the completed care plan via Docman.
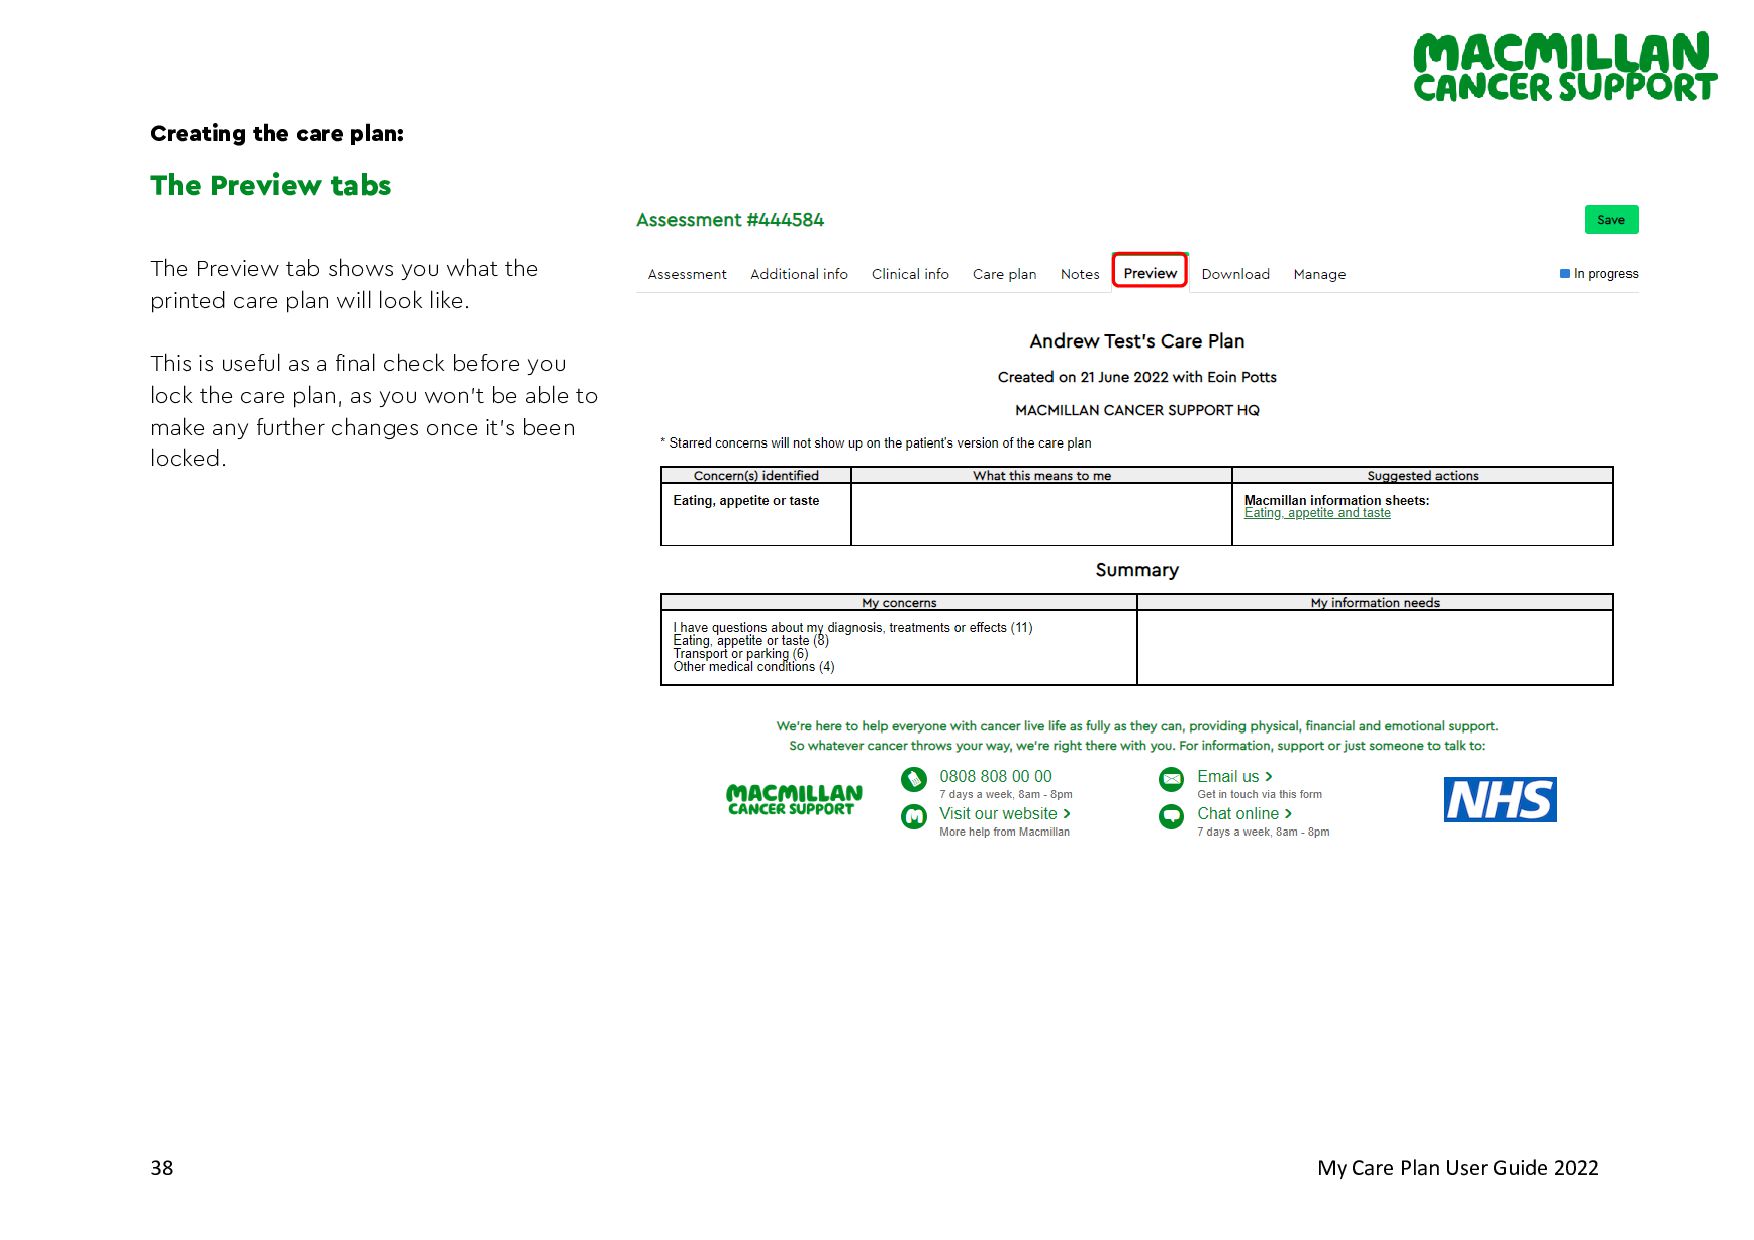
plan: The Preview tabs The Preview tab shows you what the printed care plan will look like. This is useful as a final check before you lock the care plan, as you won’t be able to make any further changes once it’s been locked.
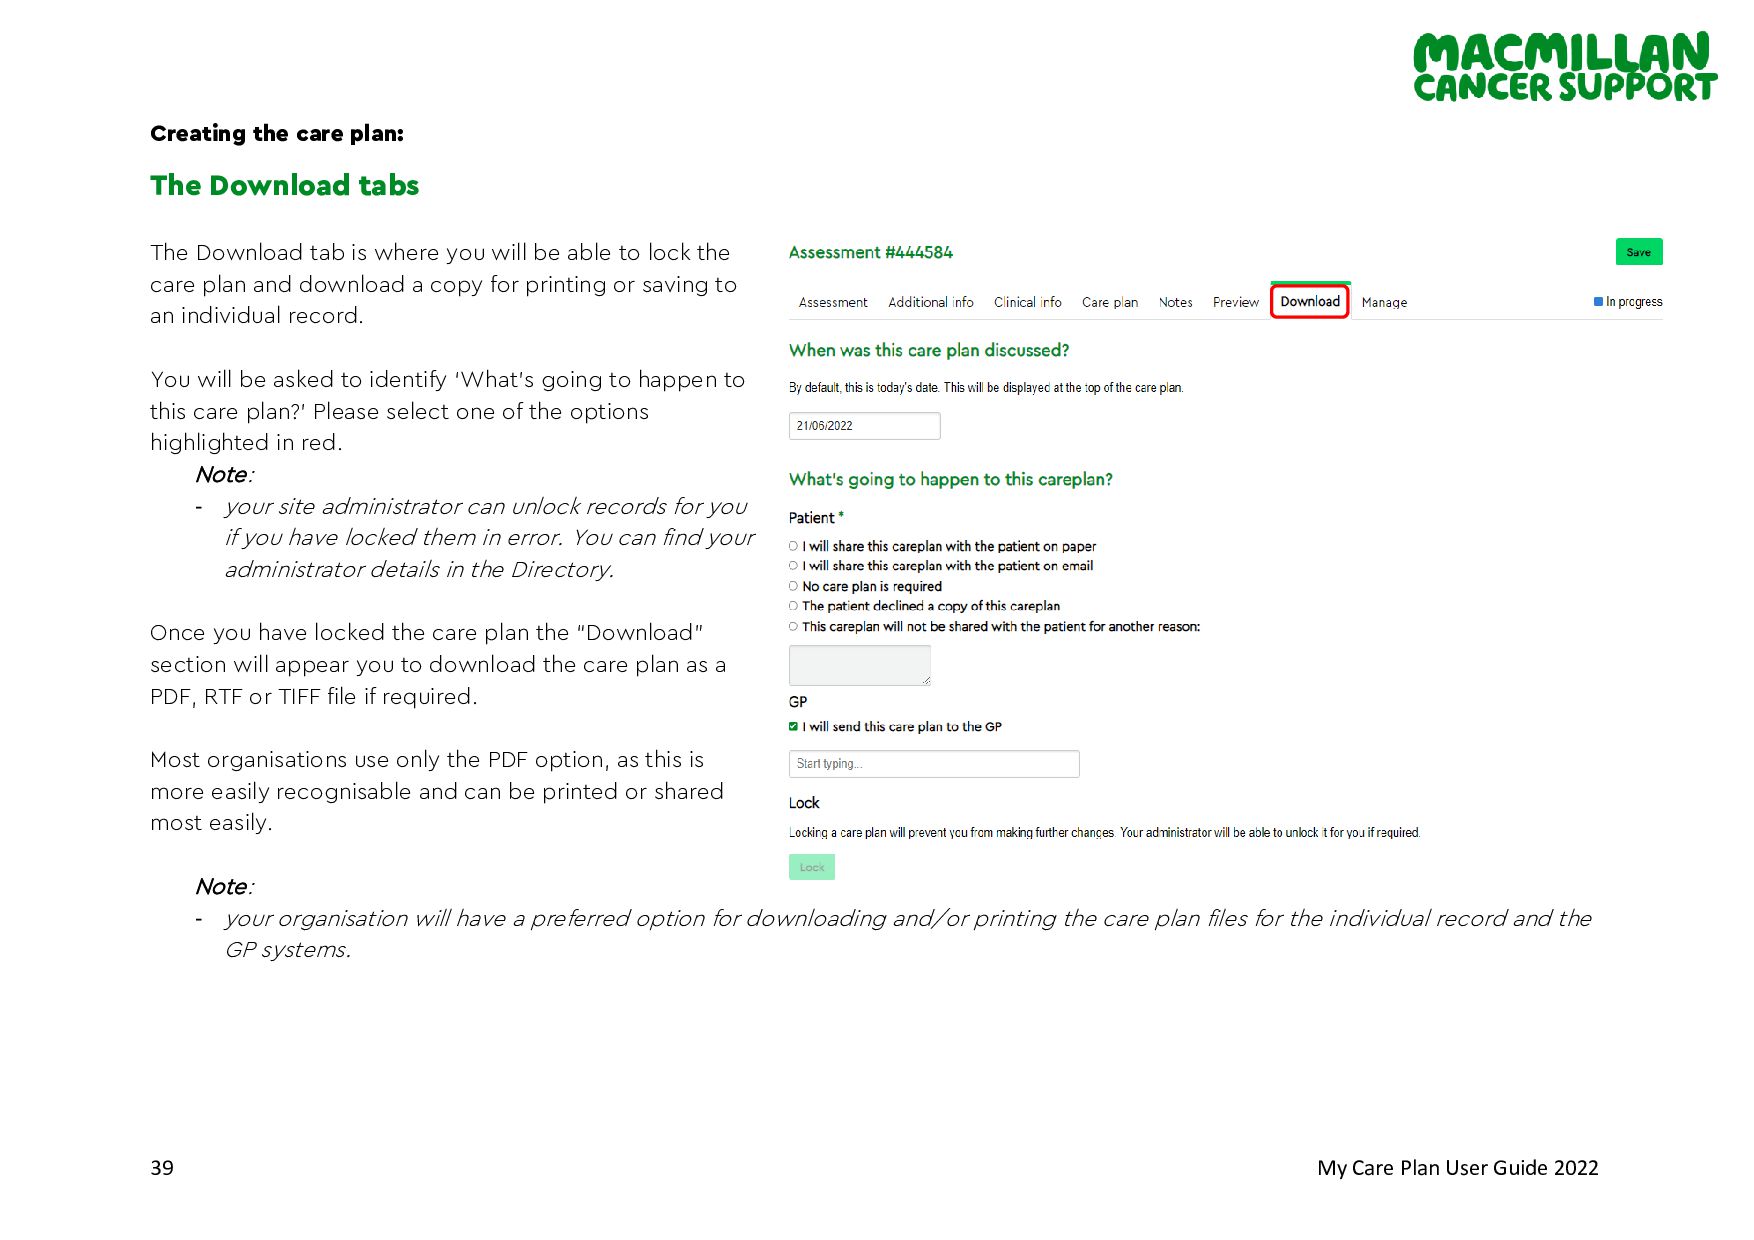
plan: The Download tabs The Download tab is where you will be able to lock the care plan and download a copy for printing or saving to an individual record. You will be asked to identify ‘What’s going to happen to this care plan?’ Please select one of the options highlighted in red. Note: - your site administrator can unlock records for you if you have locked them in error. You can find your administrator details in the Directory. Once you have locked the care plan the “Download” section will appear you to download the care plan as a PDF, RTF or TIFF file if required. Most organisations use only the PDF option, as this is more easily recognisable and can be printed or shared most easily. Note: - your organisation will have a preferred option for downloading and/or printing the care plan files for the individual record and the GP systems.
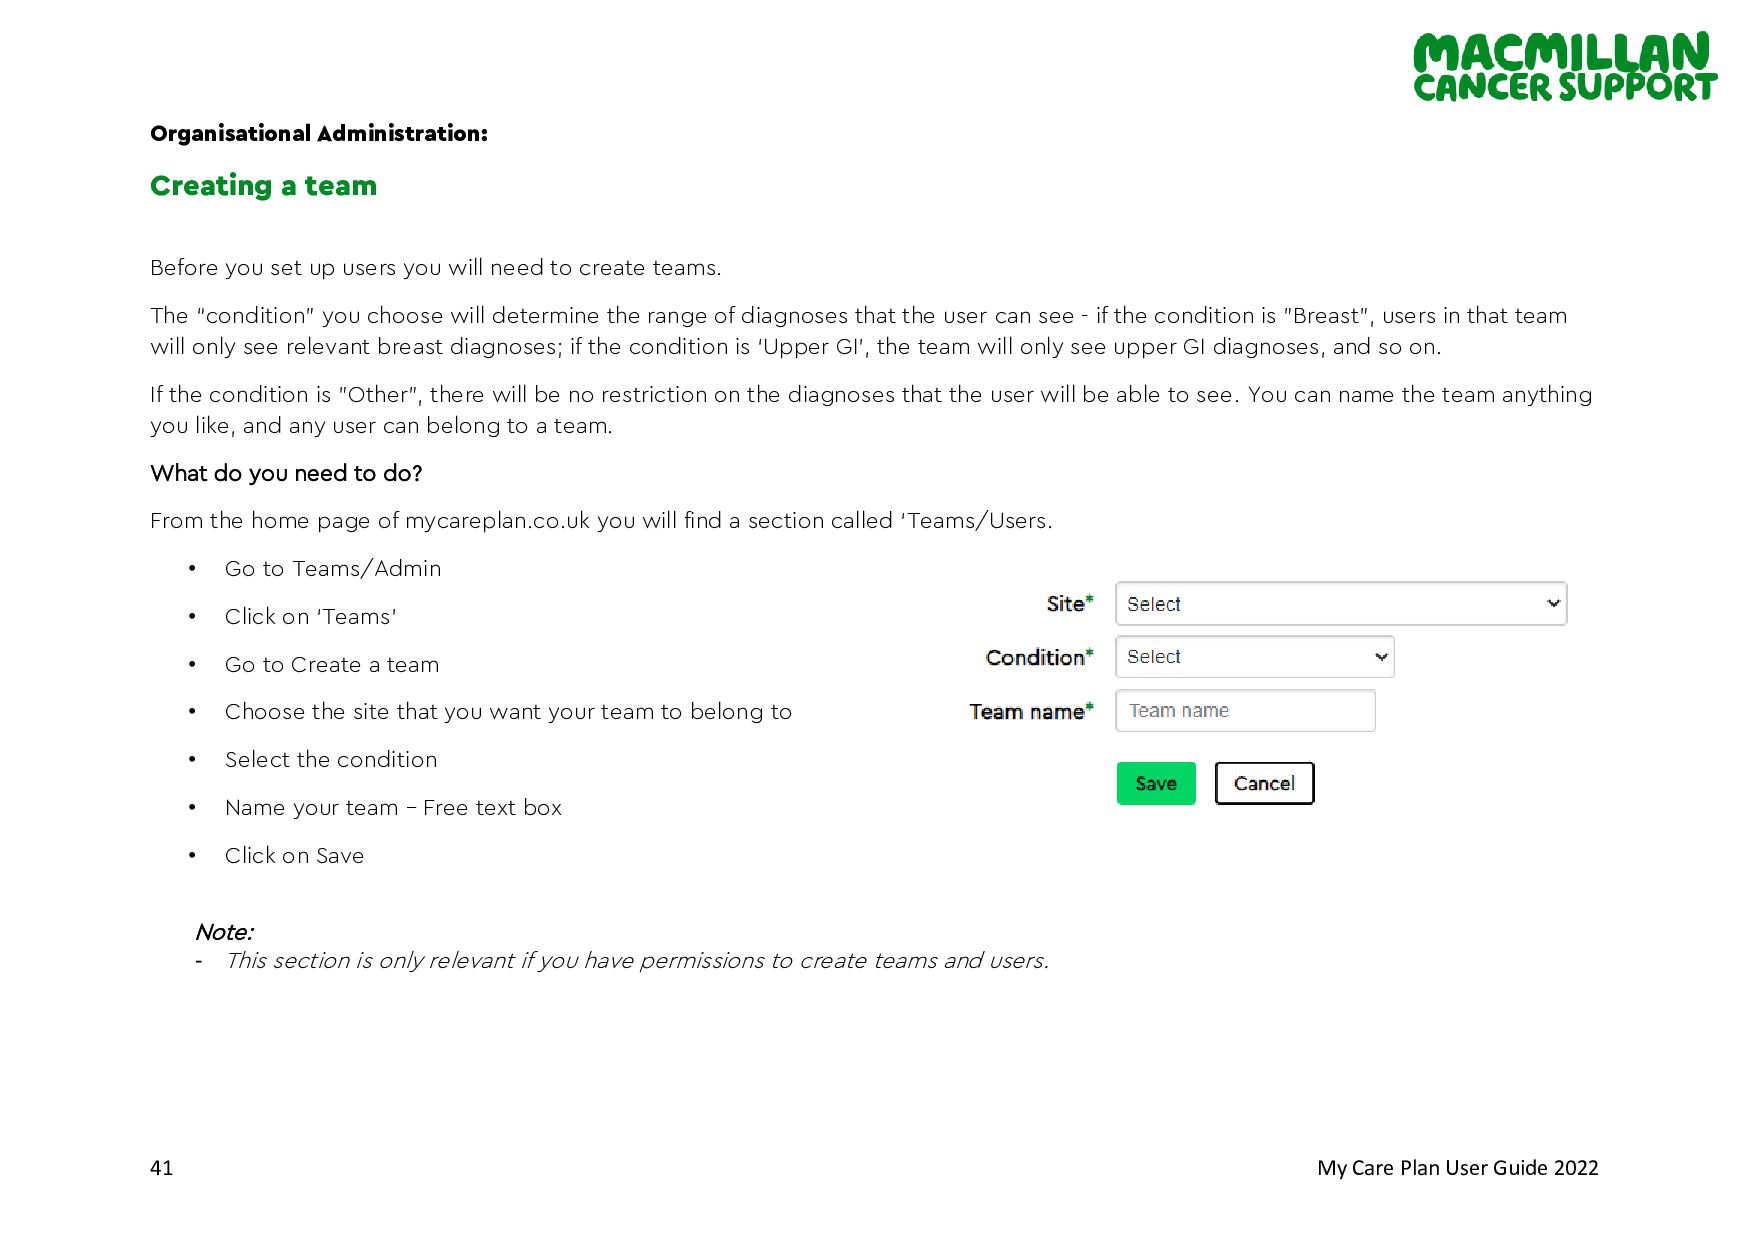
a team Before you set up users you will need to create teams. The “condition" you choose will determine the range of diagnoses that the user can see - if the condition is "Breast", users in that team will only see relevant breast diagnoses; if the condition is ‘Upper GI’, the team will only see upper GI diagnoses, and so on. If the condition is "Other", there will be no restriction on the diagnoses that the user will be able to see. You can name the team anything you like, and any user can belong to a team. What do you need to do? From the home page of mycareplan.co.uk you will find a section called ‘Teams/Users. • Go to Teams/Admin • Click on ‘Teams’ • Go to Create a team • Choose the site that you want your team to belong to • Select the condition • Name your team – Free text box • Click on Save Note: - This section is only relevant if you have permissions to create teams and users.
a user It’s now time to check that you can create a user accounts for a member of staff who will be using the eHNA. For this you will need to have the email address of the person you are creating an account for, personal accounts must not be used only approved organisation provided email address and nhs.net addresses. Users will also need to be allocated to one of the following roles: • Setup – set up assessment only • View – setup assessment, view assessment and care plans • Edit – setup, view and edit care plan • Lock – all the above and lock the care plan • Administrator – all the above, unlock care plans and delete test records. Note: - The user can belong to multiple teams, so various levels of accessibility should be used for keeping the individuals’ details secure. - The user can have the ability to create and manage teams, user and download identifiable data files, ensure you grant the appropriate permission to the user.
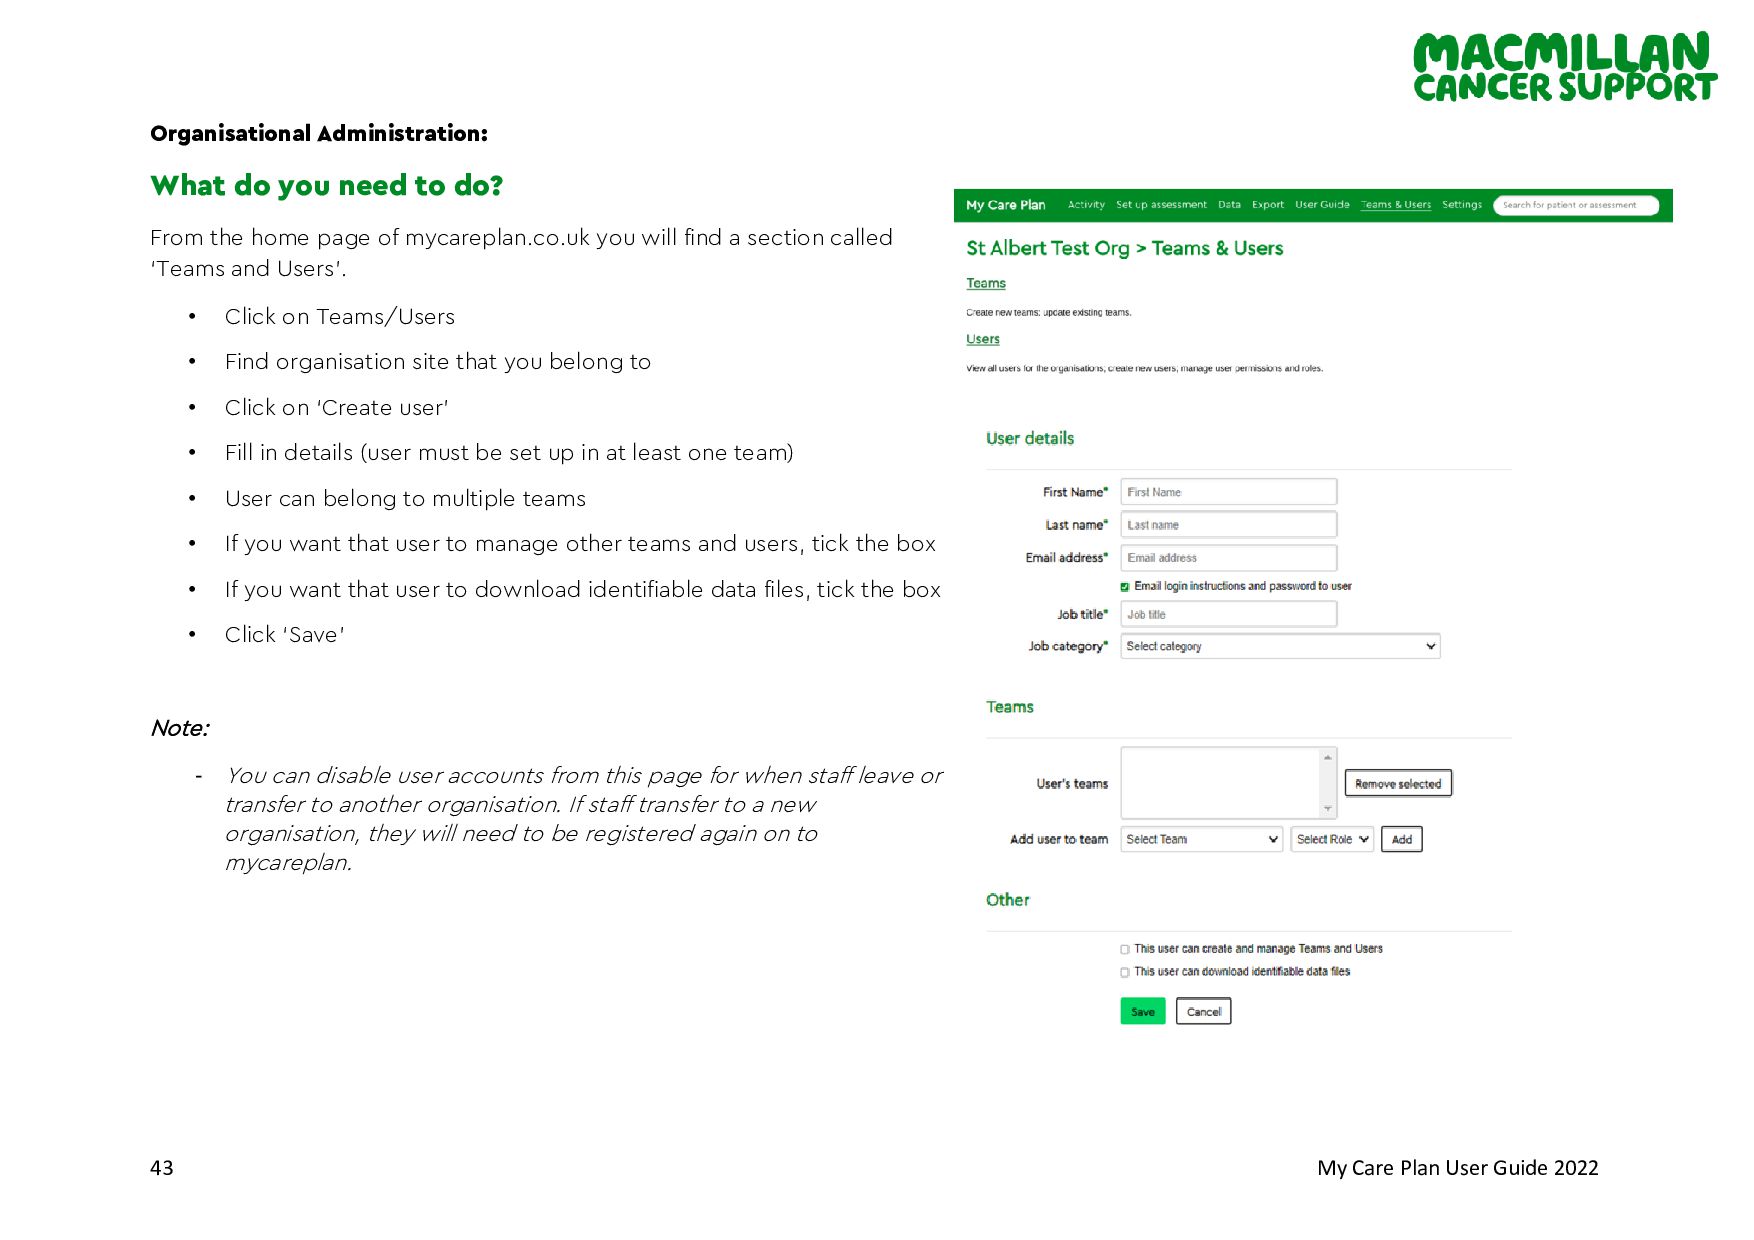
do you need to do? From the home page of mycareplan.co.uk you will find a section called ‘Teams and Users’. • Click on Teams/Users • Find organisation site that you belong to • Click on ‘Create user’ • Fill in details (user must be set up in at least one team) • User can belong to multiple teams • If you want that user to manage other teams and users, tick the box • If you want that user to download identifiable data files, tick the box • Click ‘Save’ Note: - You can disable user accounts from this page for when staff leave or transfer to another organisation. If staff transfer to a new organisation, they will need to be registered again on to mycareplan.
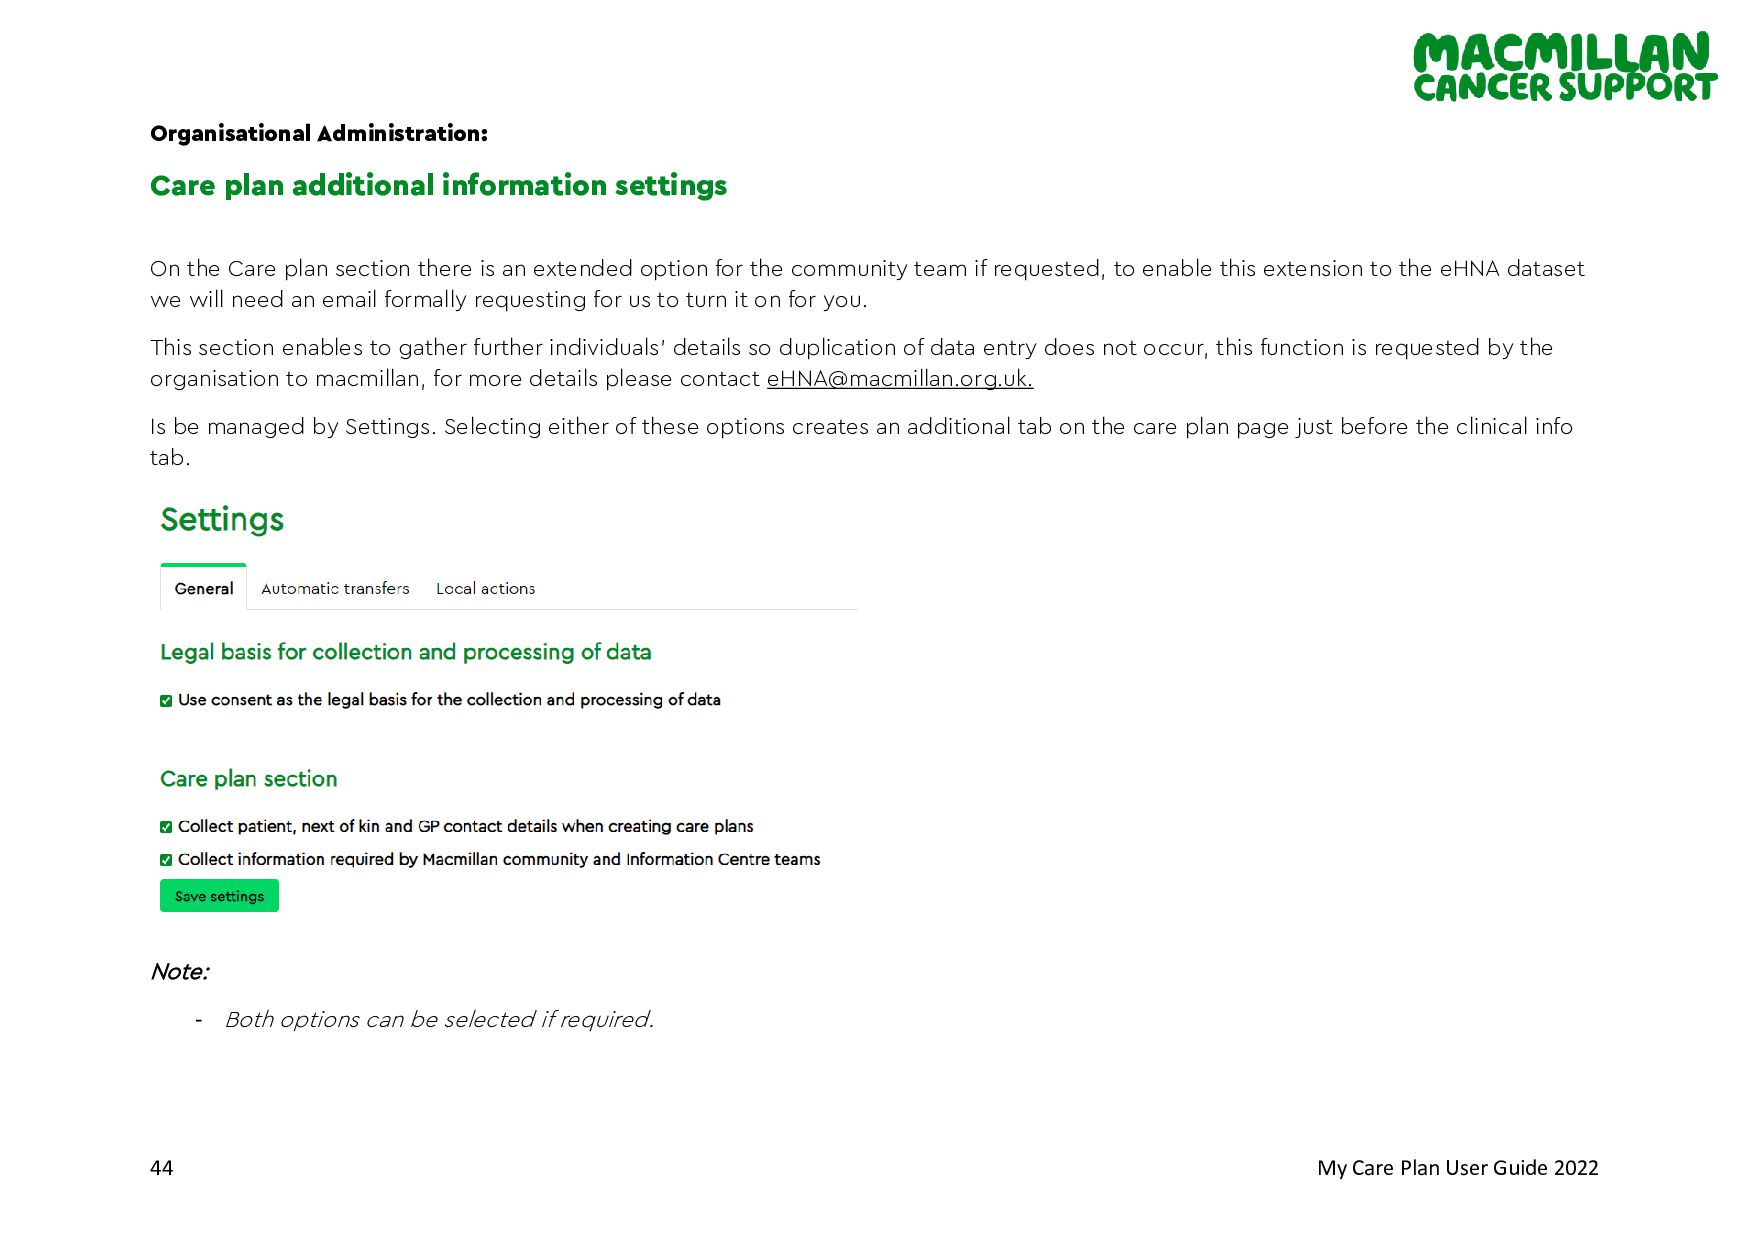
plan additional information settings On the Care plan section there is an extended option for the community team if requested, to enable this extension to the eHNA dataset we will need an email formally requesting for us to turn it on for you. This section enables to gather further individuals’ details so duplication of data entry does not occur, this function is requested by the organisation to macmillan, for more details please contact [email protected]. Is be managed by Settings. Selecting either of these options creates an additional tab on the care plan page just before the clinical info tab. Note: - Both options can be selected if required.
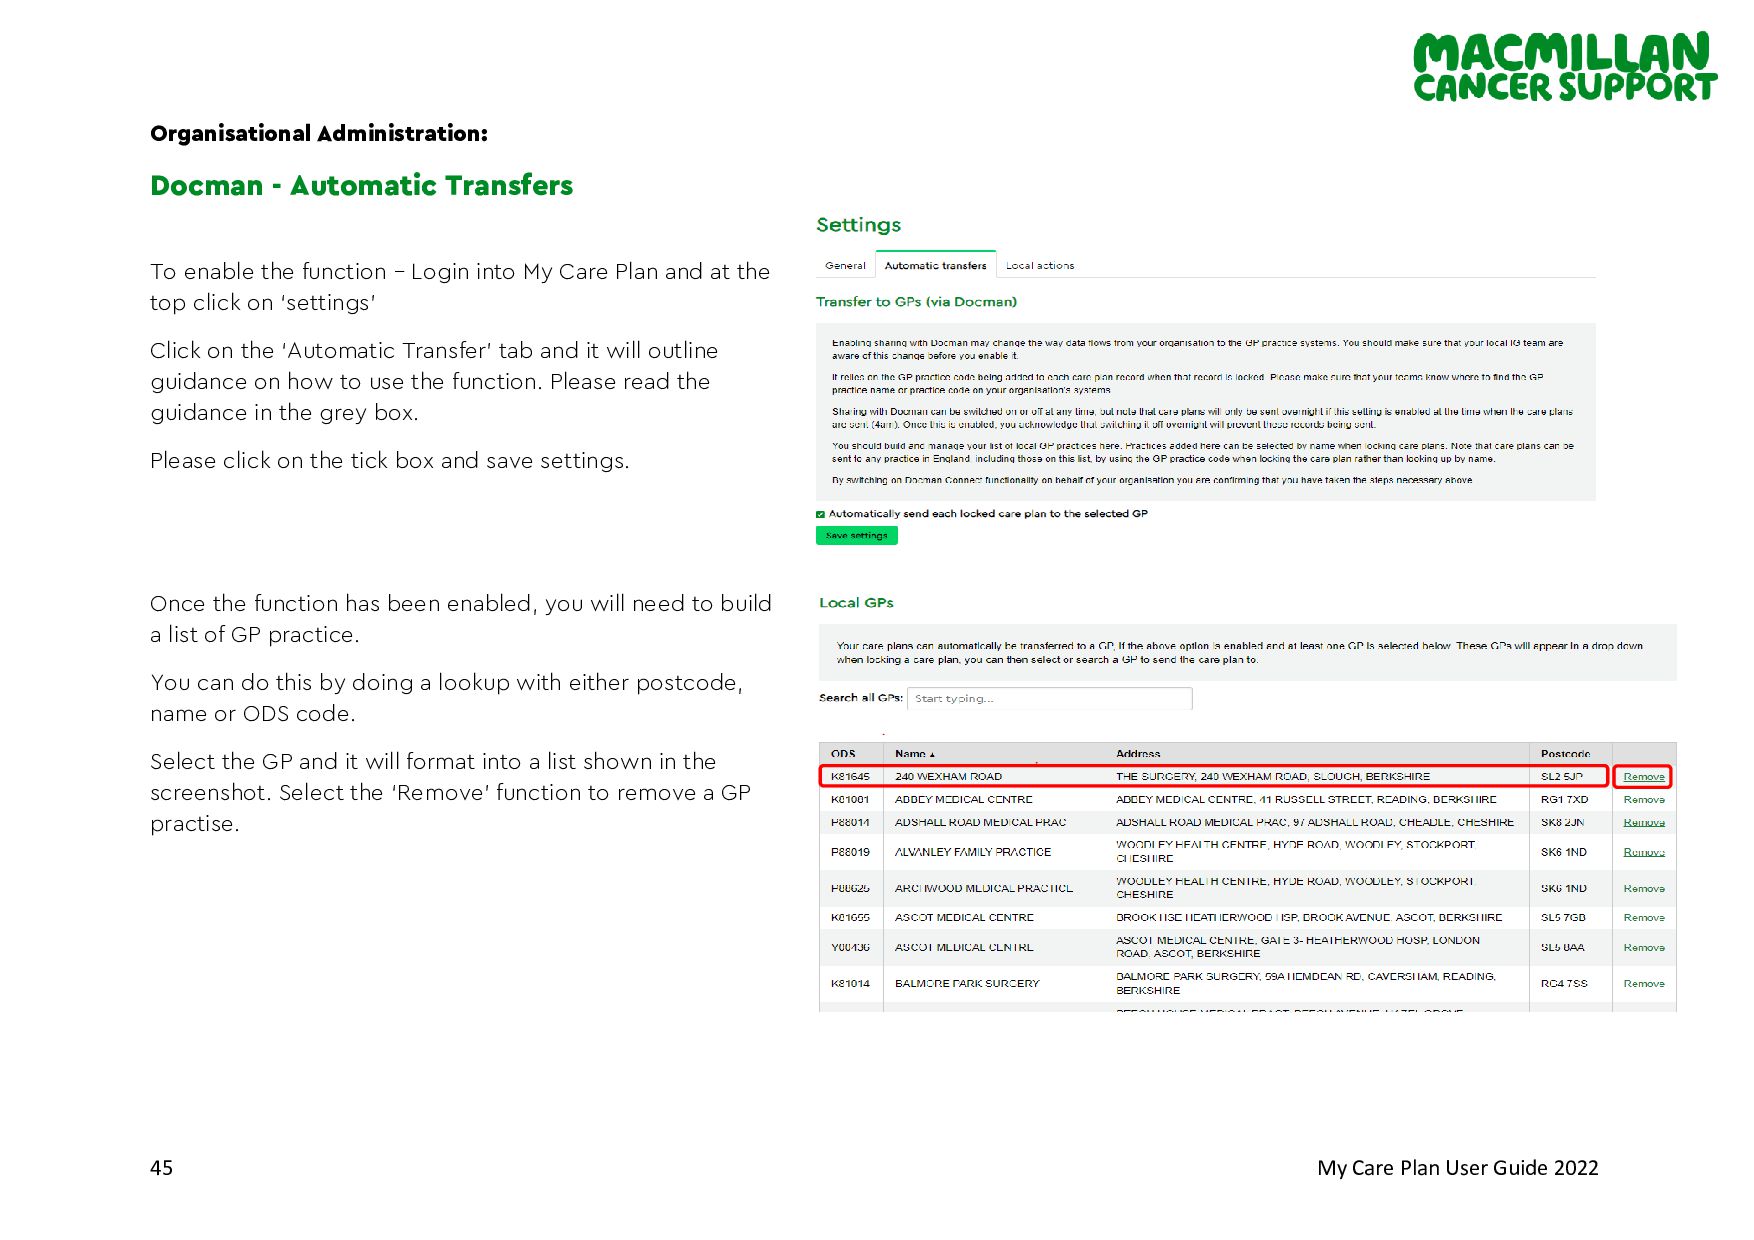
- Automatic Transfers To enable the function – Login into My Care Plan and at the top click on ‘settings’ Click on the ‘Automatic Transfer’ tab and it will outline guidance on how to use the function. Please read the guidance in the grey box. Please click on the tick box and save settings. Once the function has been enabled, you will need to build a list of GP practice. You can do this by doing a lookup with either postcode, name or ODS code. Select the GP and it will format into a list shown in the screenshot. Select the ‘Remove’ function to remove a GP practise.
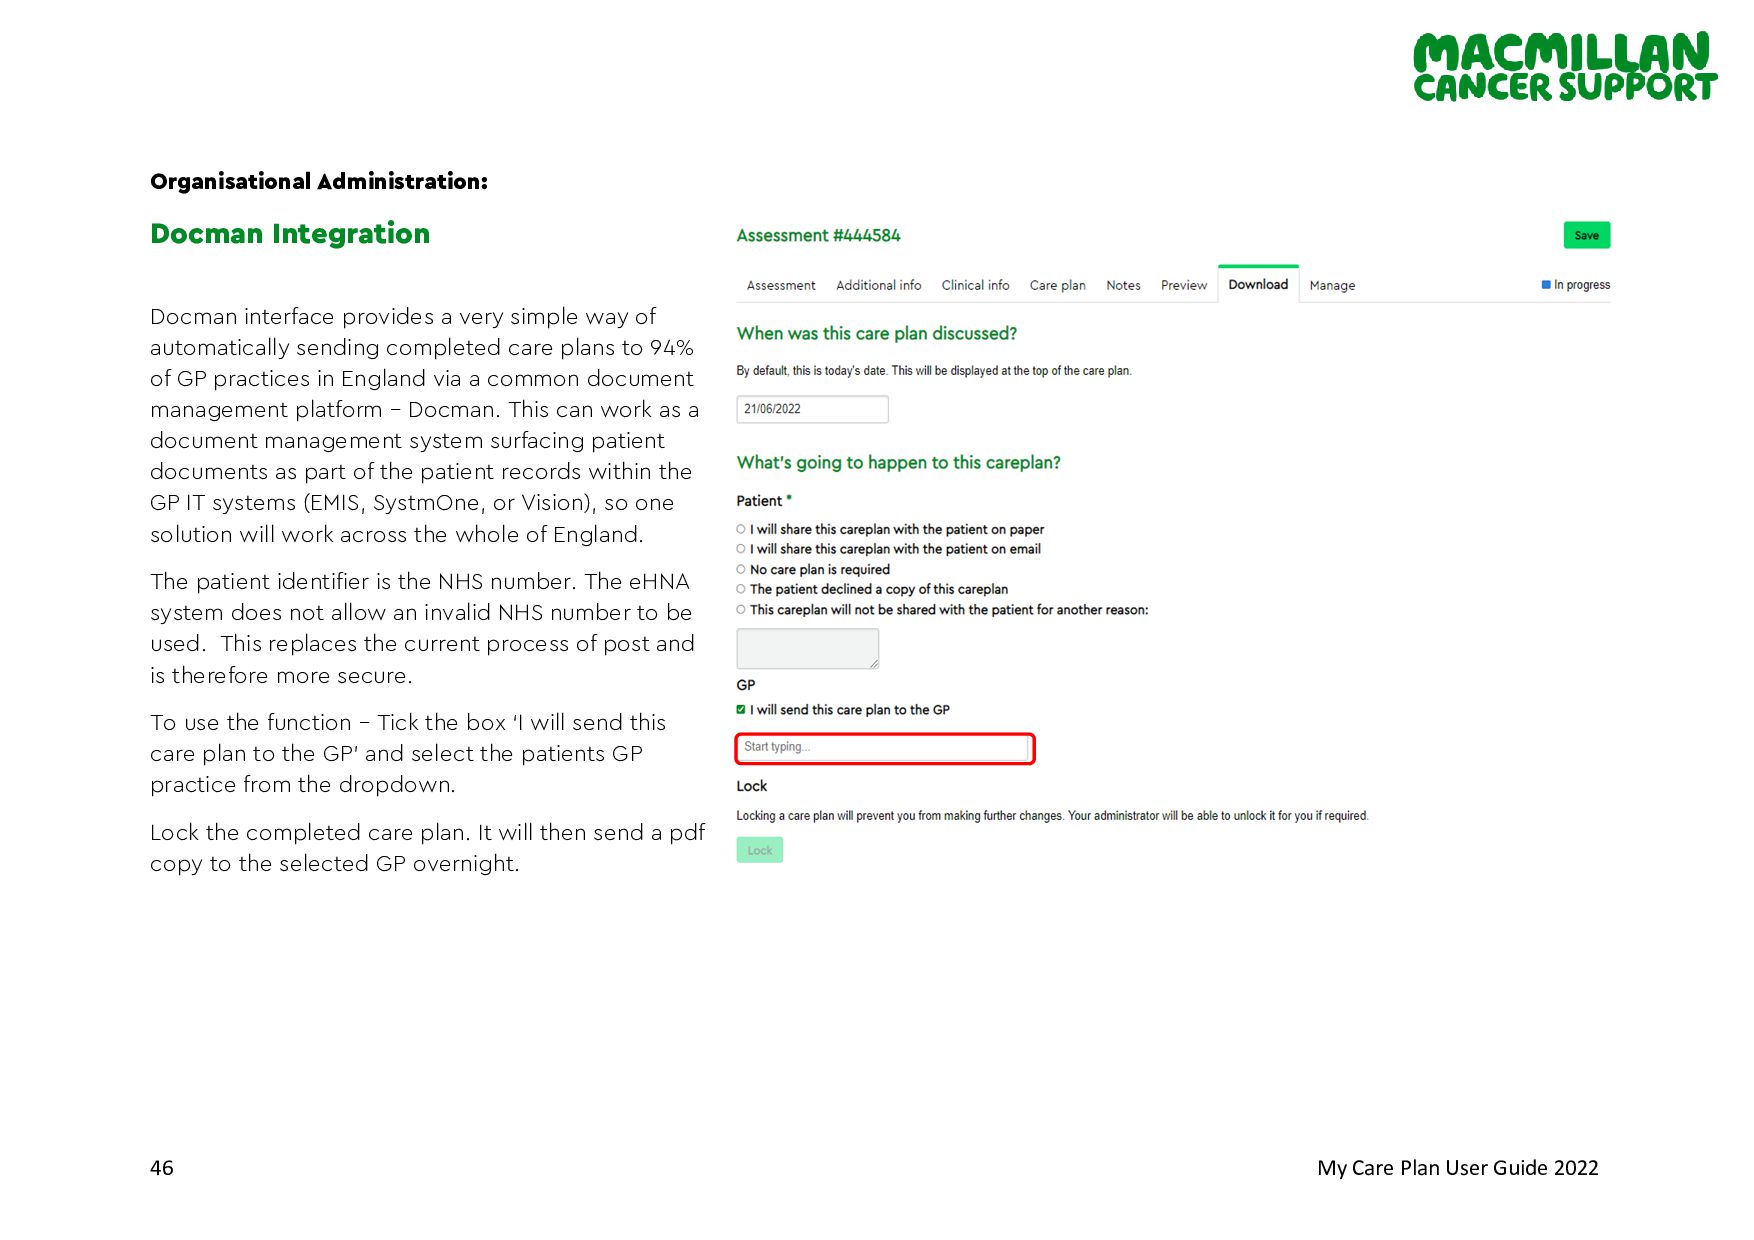
Integration Docman interface provides a very simple way of automatically sending completed care plans to 94% of GP practices in England via a common document management platform – Docman. This can work as a document management system surfacing patient documents as part of the patient records within the GP IT systems (EMIS, SystmOne, or Vision), so one solution will work across the whole of England. The patient identifier is the NHS number. The eHNA system does not allow an invalid NHS number to be used. This replaces the current process of post and is therefore more secure. To use the function – Tick the box ‘I will send this care plan to the GP’ and select the patients GP practice from the dropdown. Lock the completed care plan. It will then send a pdf copy to the selected GP overnight.
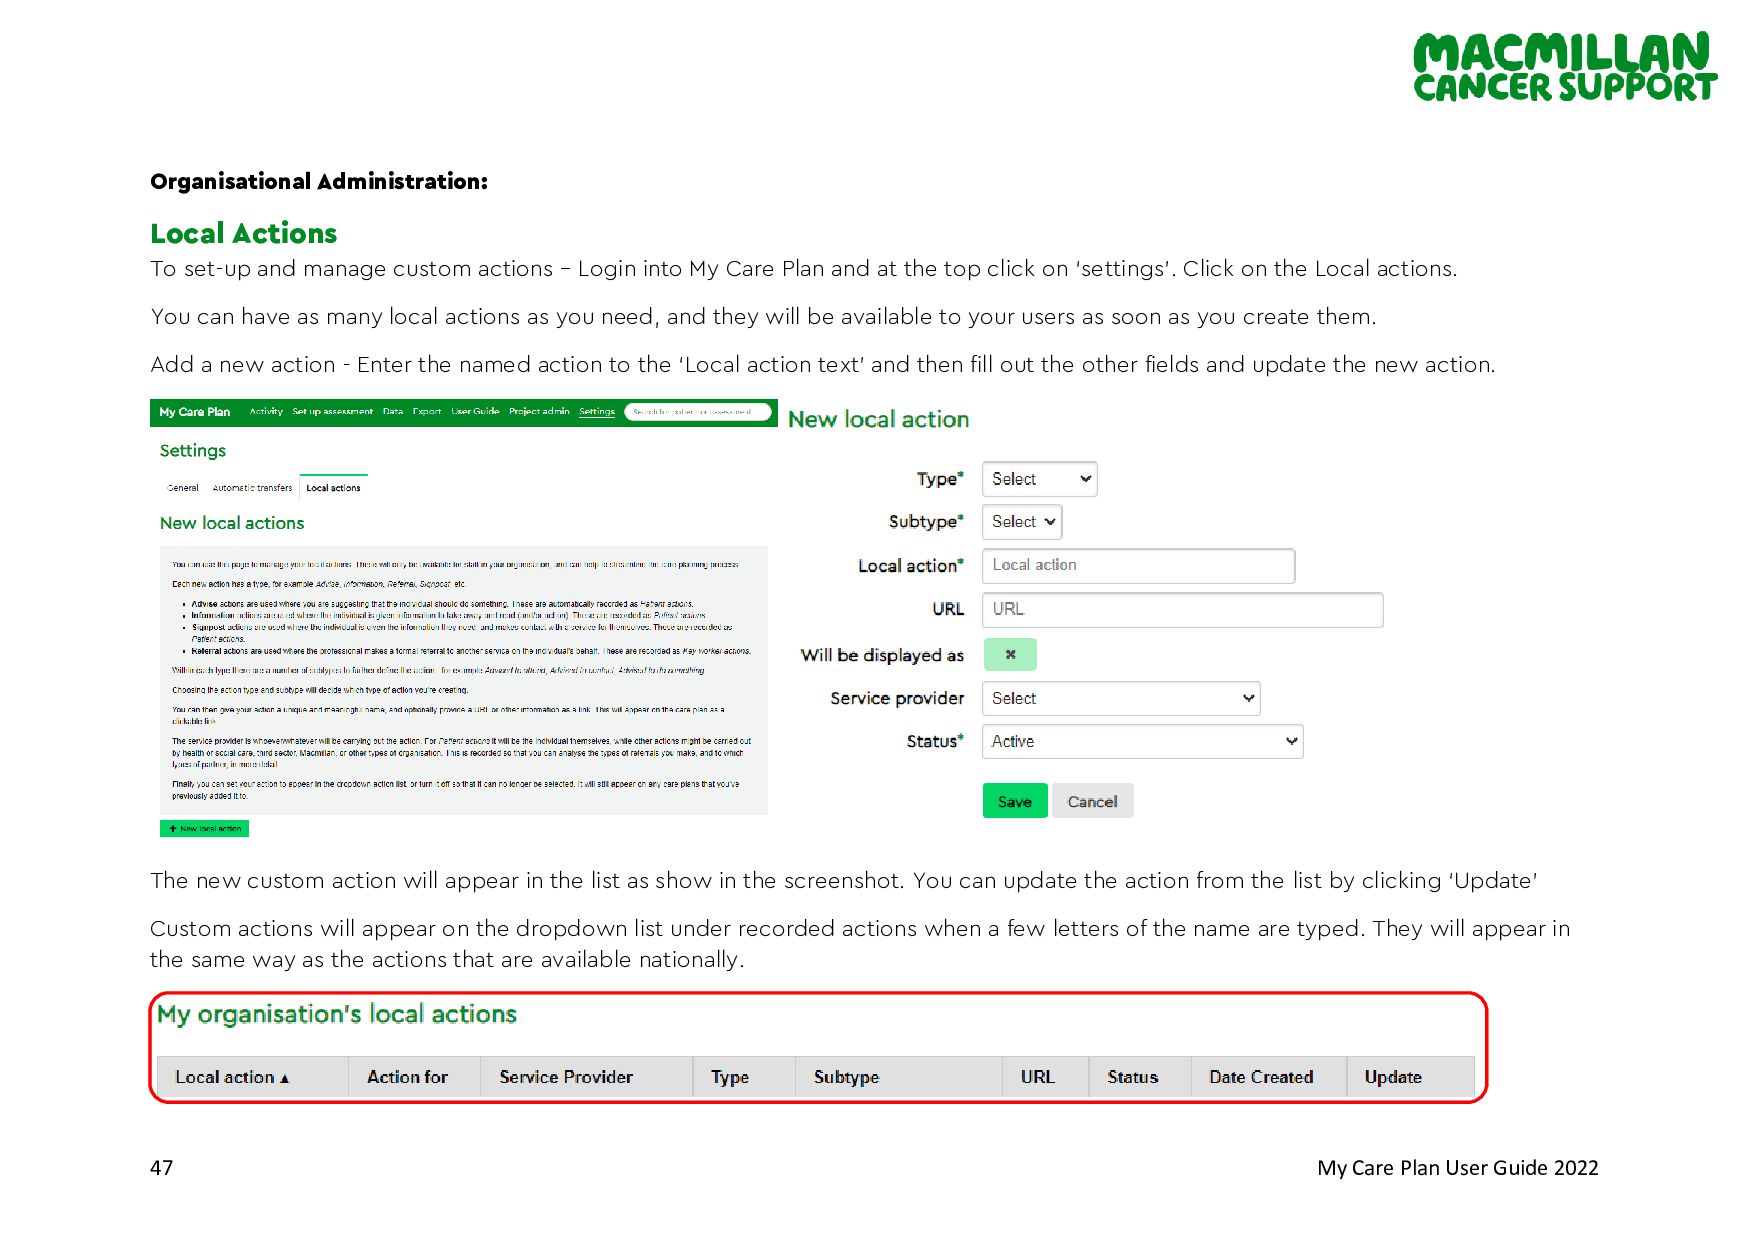
Actions To set-up and manage custom actions – Login into My Care Plan and at the top click on ‘settings’. Click on the Local actions. You can have as many local actions as you need, and they will be available to your users as soon as you create them. Add a new action - Enter the named action to the ‘Local action text’ and then fill out the other fields and update the new action. The new custom action will appear in the list as show in the screenshot. You can update the action from the list by clicking ‘Update’ Custom actions will appear on the dropdown list under recorded actions when a few letters of the name are typed. They will appear in the same way as the actions that are available nationally.
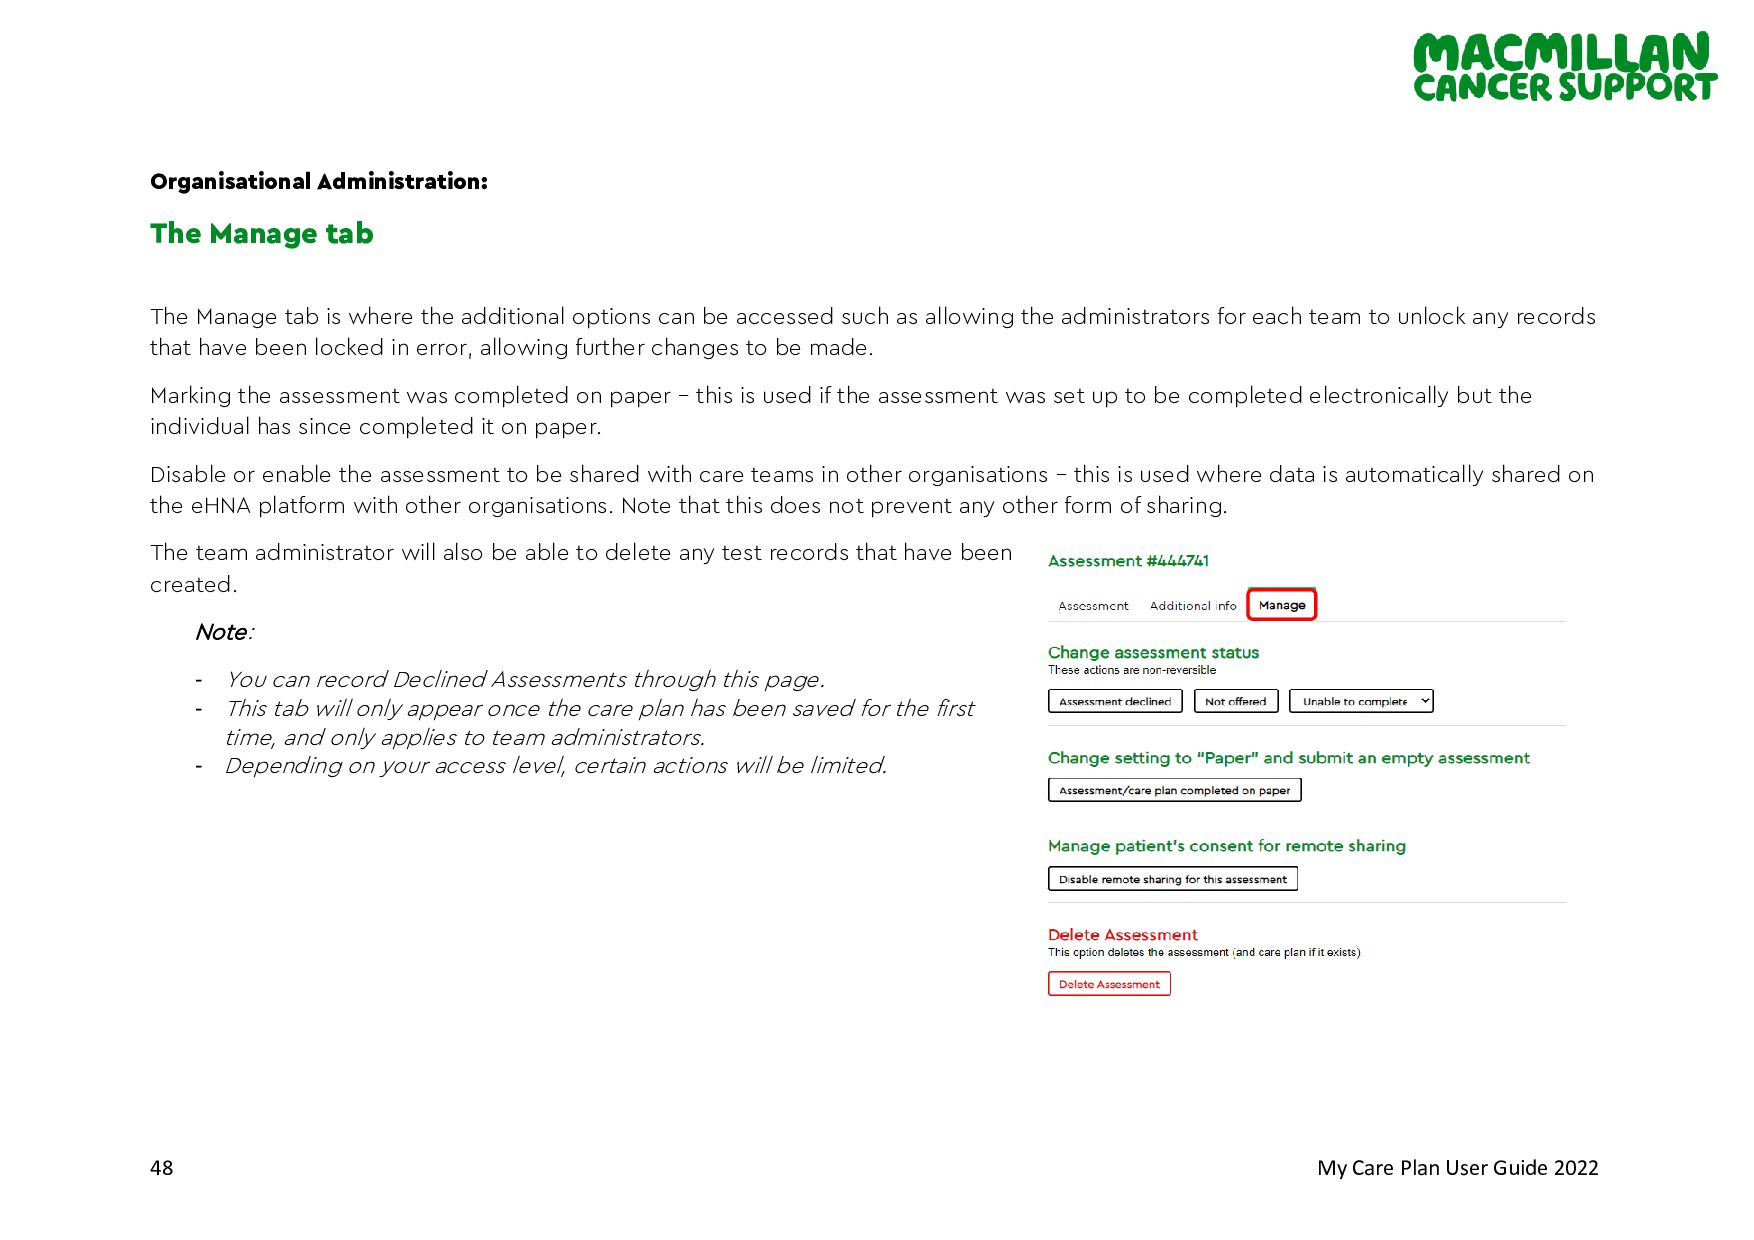
Manage tab The Manage tab is where the additional options can be accessed such as allowing the administrators for each team to unlock any records that have been locked in error, allowing further changes to be made. Marking the assessment was completed on paper – this is used if the assessment was set up to be completed electronically but the individual has since completed it on paper. Disable or enable the assessment to be shared with care teams in other organisations – this is used where data is automatically shared on the eHNA platform with other organisations. Note that this does not prevent any other form of sharing. The team administrator will also be able to delete any test records that have been created. Note: - You can record Declined Assessments through this page. - This tab will only appear once the care plan has been saved for the first time, and only applies to team administrators. - Depending on your access level, certain actions will be limited.
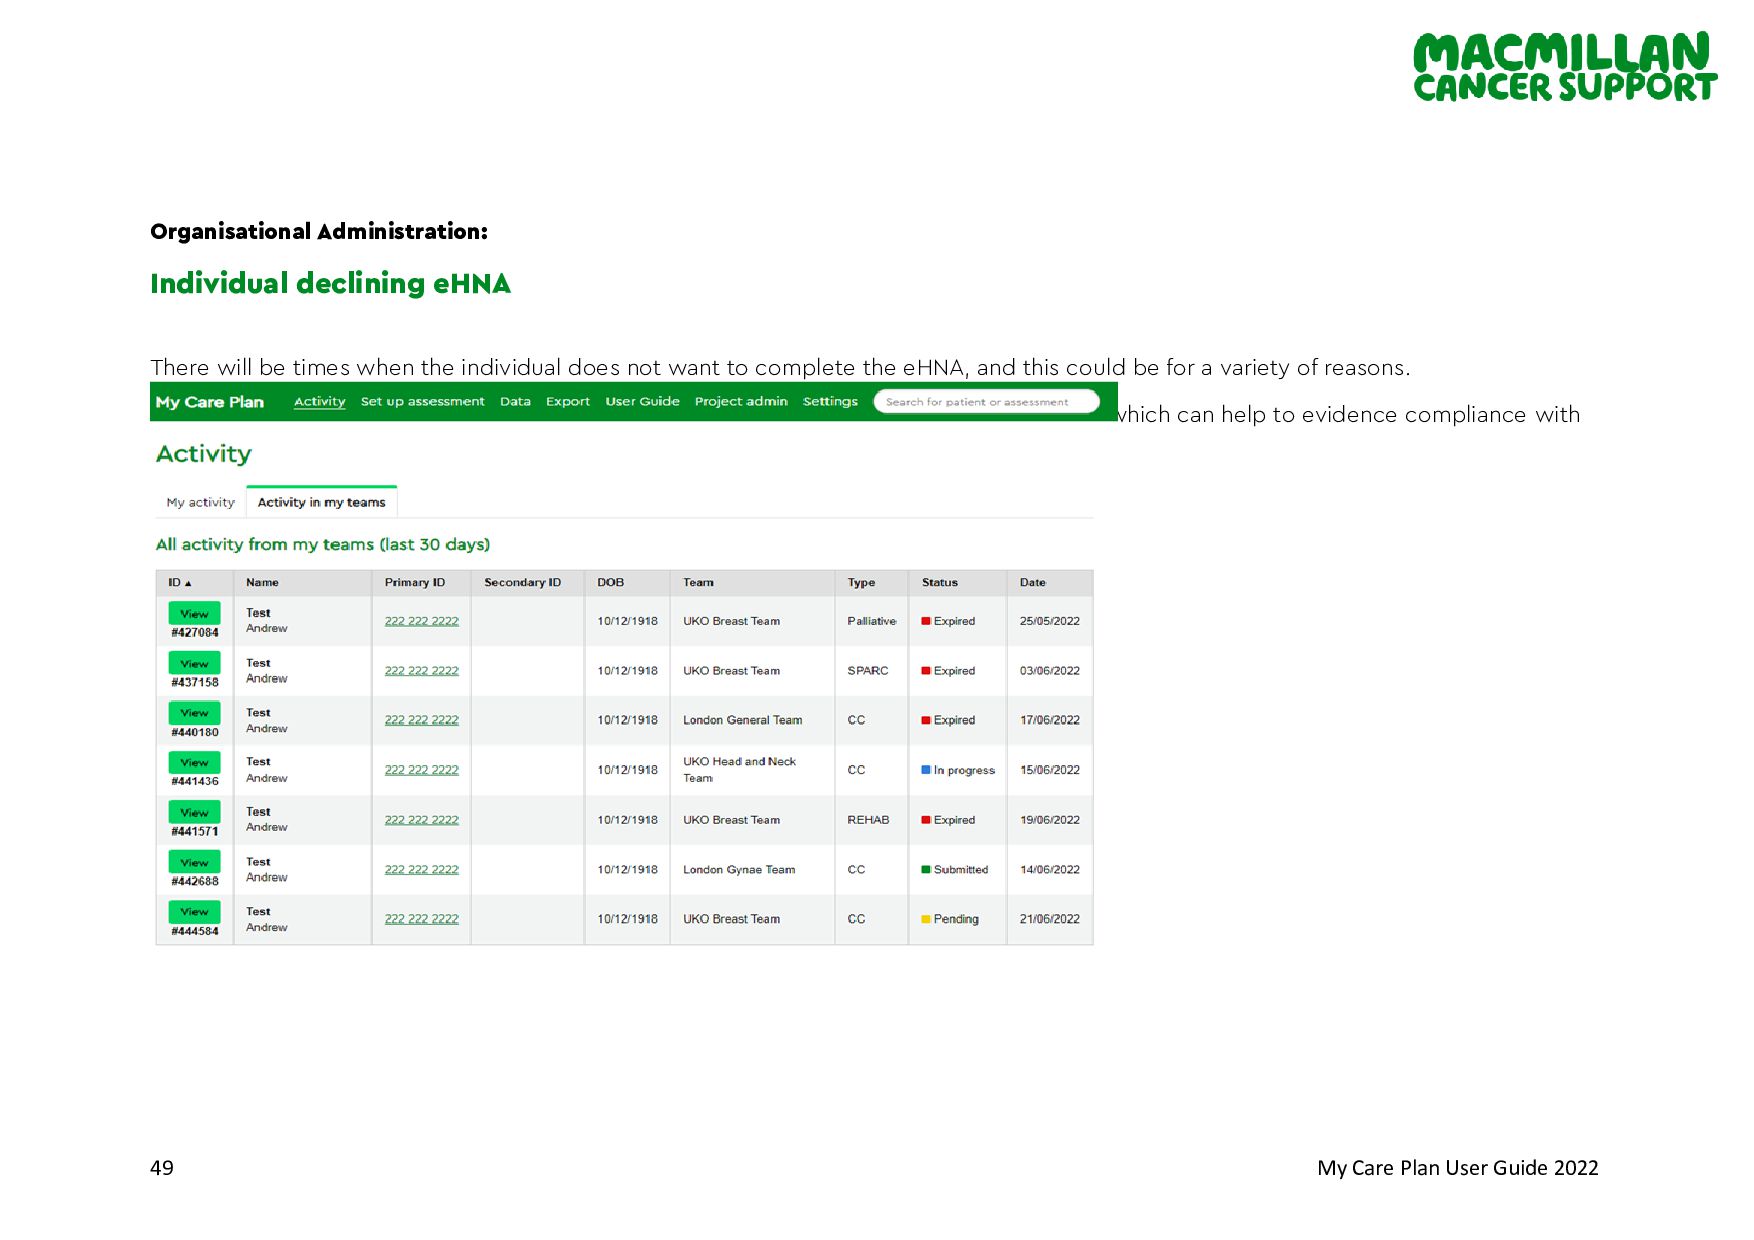
declining eHNA There will be times when the individual does not want to complete the eHNA, and this could be for a variety of reasons. By recording this on the system we can show that the HNA has been offered but declined, which can help to evidence compliance with any local performance metrics.
clicked on the view button you will be provided details of the assessment. Please ensure that you have the correct record before continuing. Now click on the “Manage” tab and you will see several options, depending on your access level. To mark the assessment as “Declined”, click the “Assessment declined” button. Note: - That this action is not reversible. After you clicked on the button you will automatically be redirected to the activity page with a notification that the assessment has been updated The assessment history will now show you the new statuses.
a care plan If a care plan has been locked before it was fully completed, and you need to go back to amend or add to the text, your Team Administrator can unlock it again for you. If you are a Team Administrator and you need to unlock a care plan: Search for individual and open the correct assessment via the view link. Select the Manage tab and clink on the Unlock care plan button Note: - You may not have the correct access to unlock so you will have to contact your team lead or the admin staff under your directory.
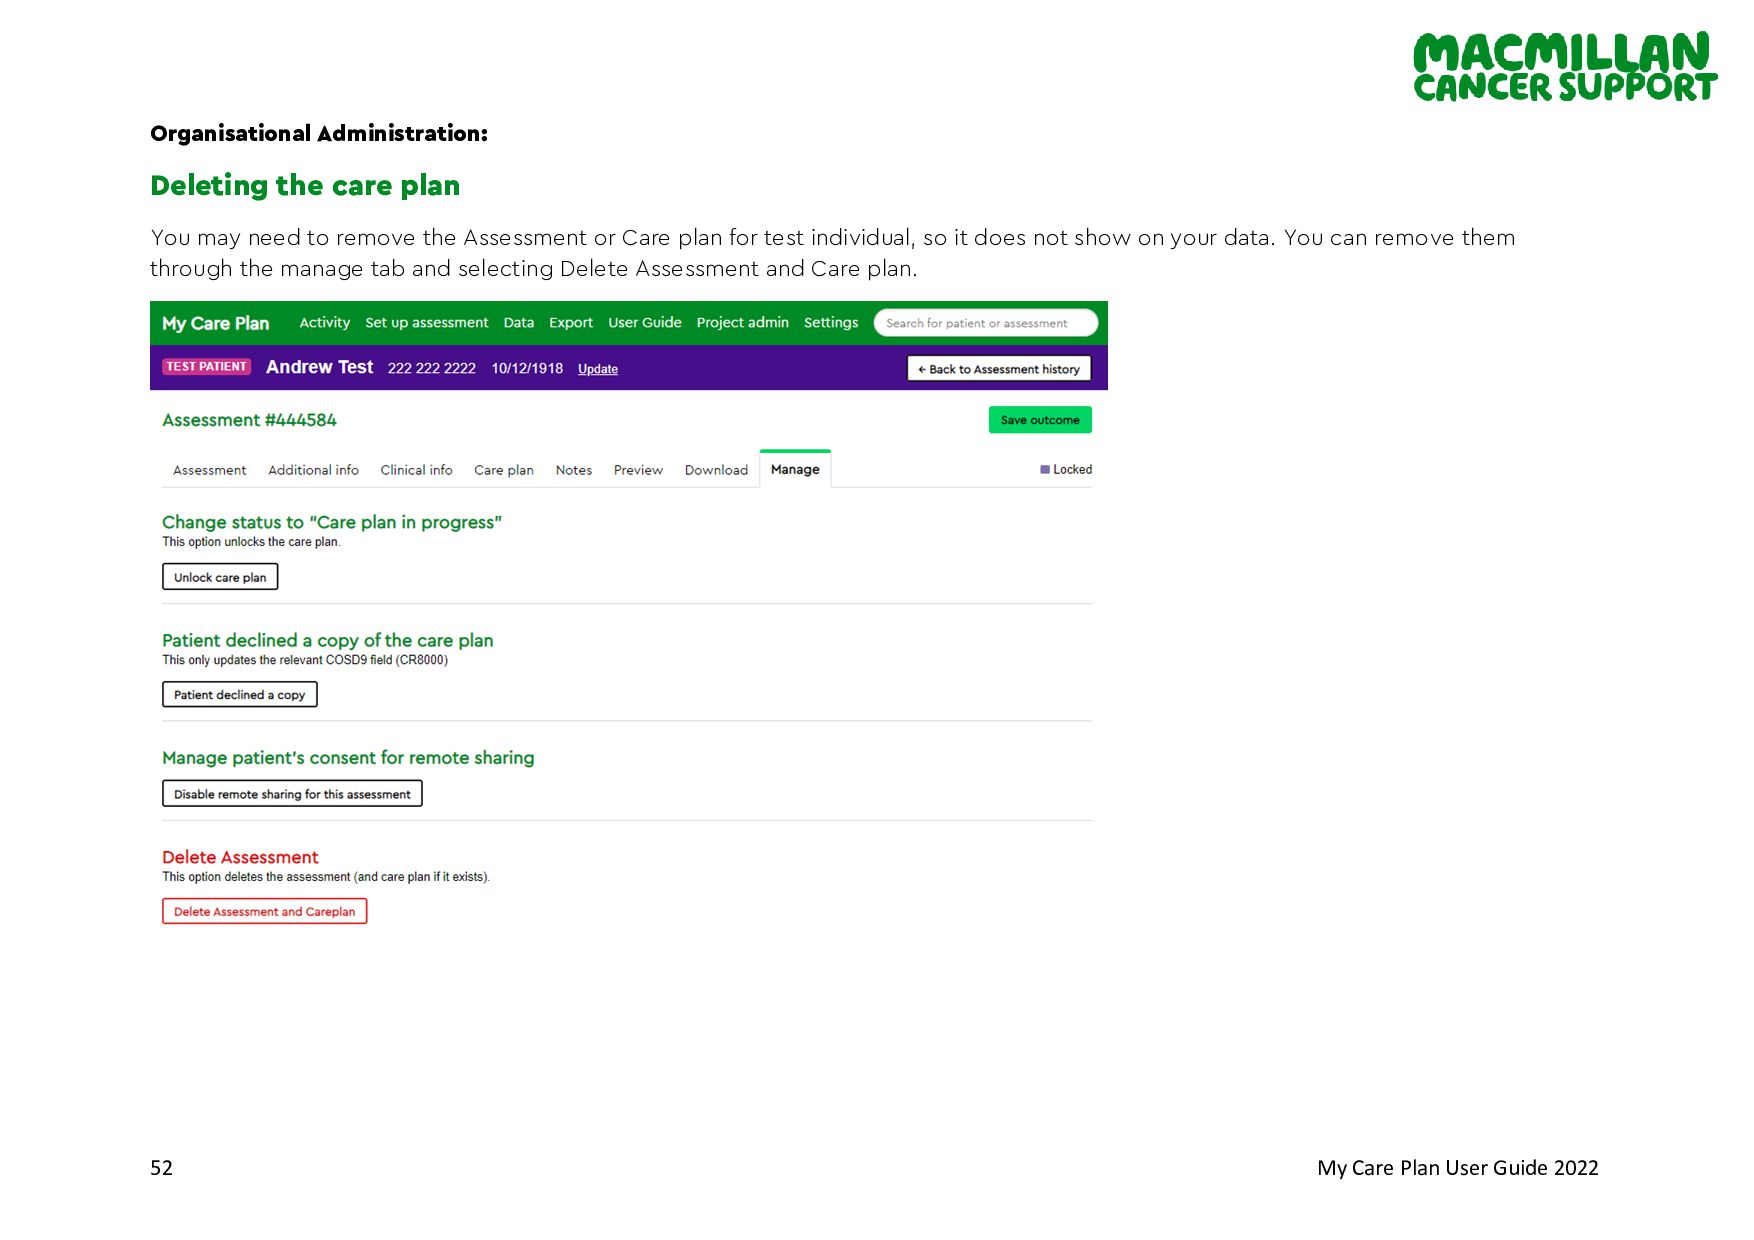
the care plan You may need to remove the Assessment or Care plan for test individual, so it does not show on your data. You can remove them through the manage tab and selecting Delete Assessment and Care plan.
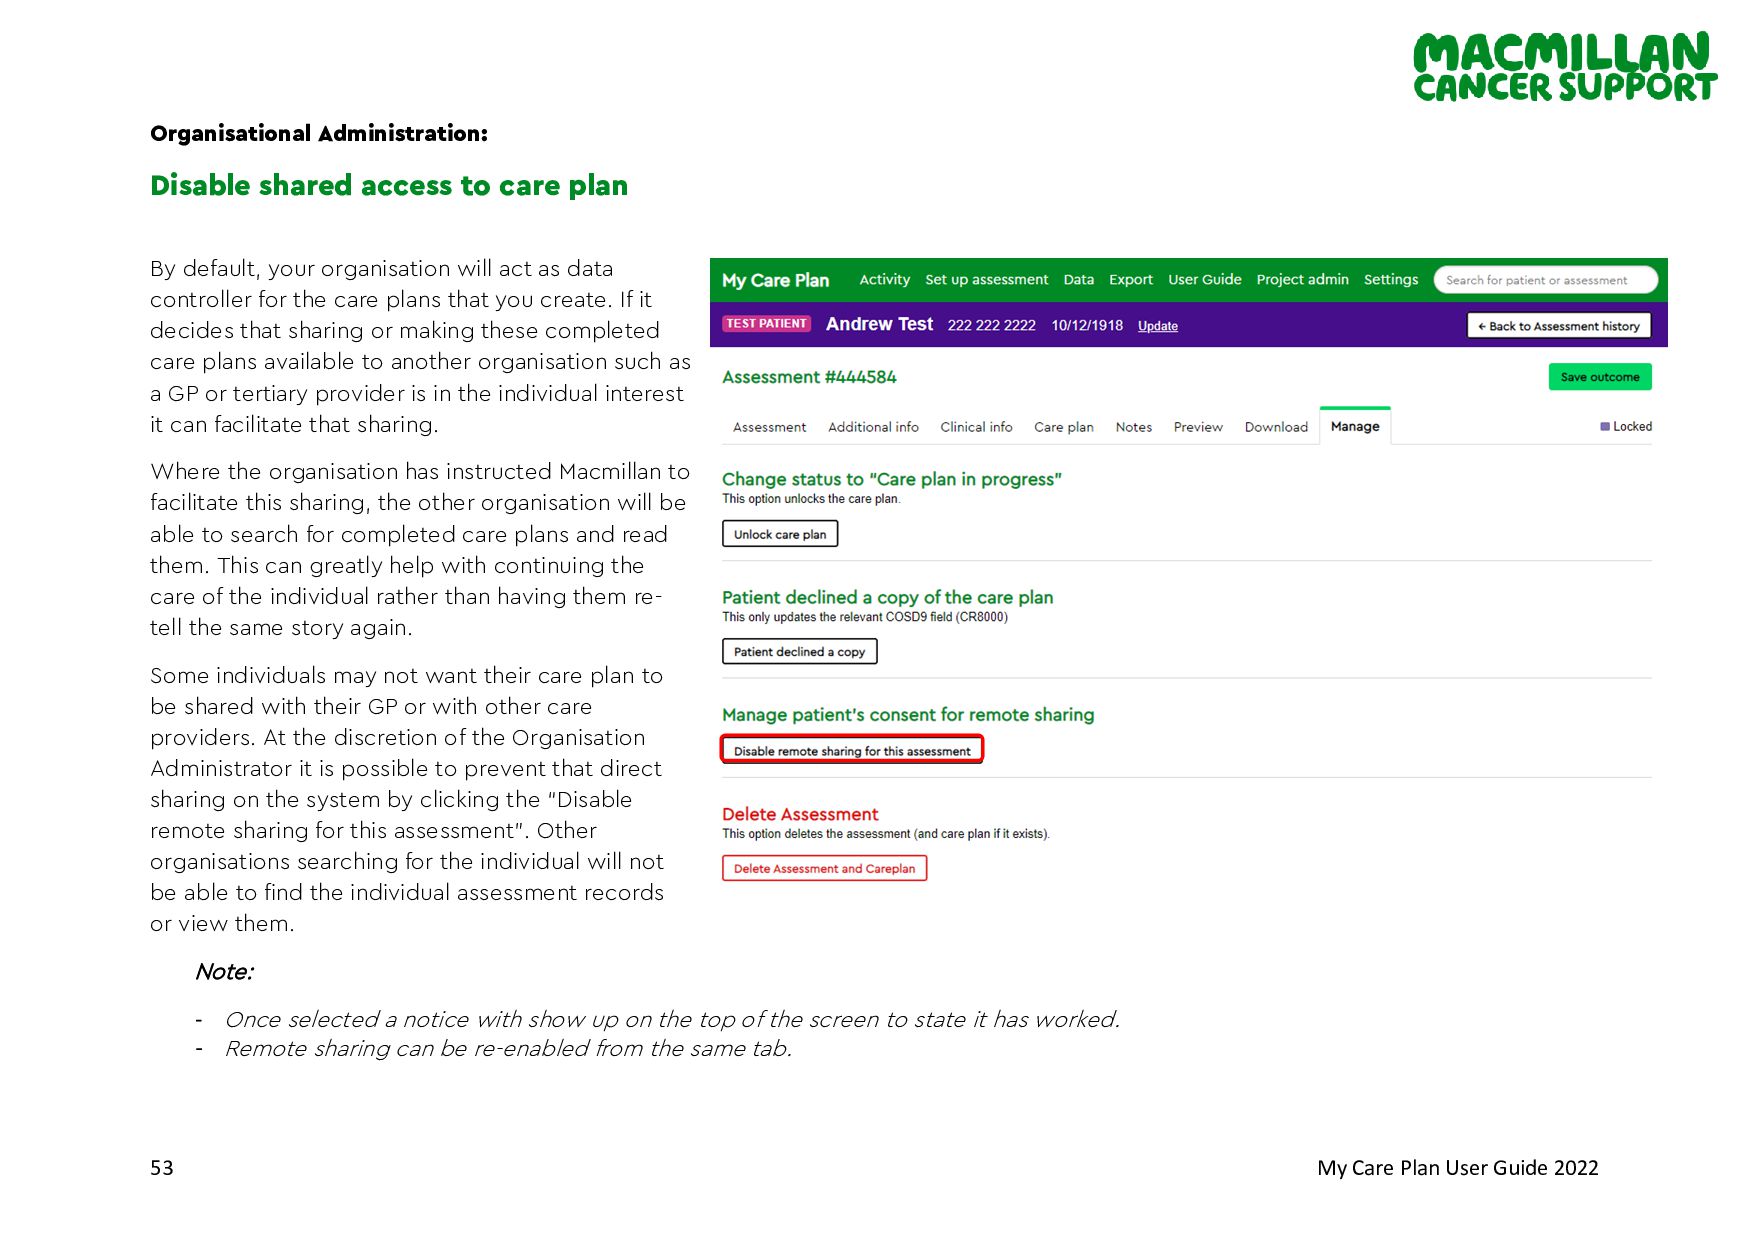
shared access to care plan By default, your organisation will act as data controller for the care plans that you create. If it decides that sharing or making these completed care plans available to another organisation such as a GP or tertiary provider is in the individual interest it can facilitate that sharing. Where the organisation has instructed Macmillan to facilitate this sharing, the other organisation will be able to search for completed care plans and read them. This can greatly help with continuing the care of the individual rather than having them re- tell the same story again. Some individuals may not want their care plan to be shared with their GP or with other care providers. At the discretion of the Organisation Administrator it is possible to prevent that direct sharing on the system by clicking the “Disable remote sharing for this assessment”. Other organisations searching for the individual will not be able to find the individual assessment records or view them. Note: - Once selected a notice with show up on the top of the screen to state it has worked. - Remote sharing can be re-enabled from the same tab.
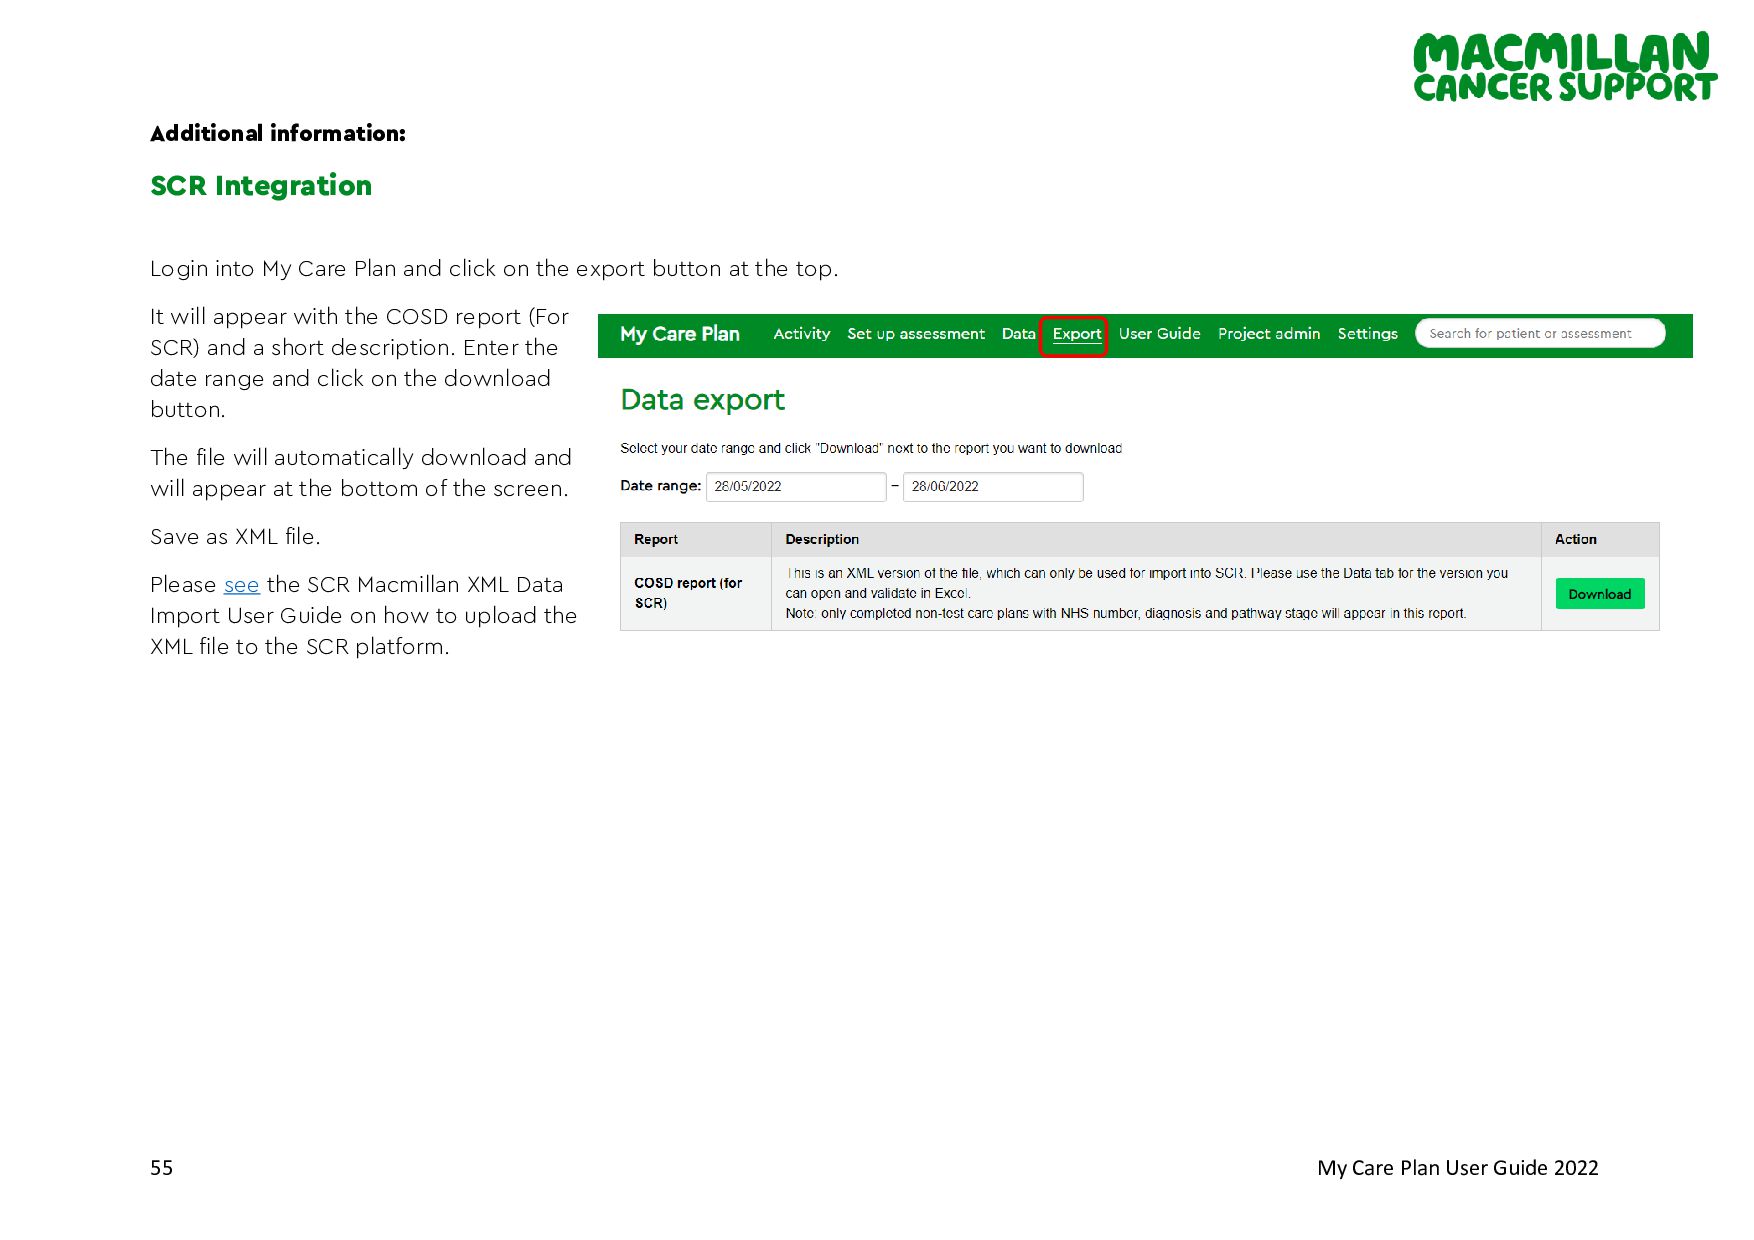
Integration Login into My Care Plan and click on the export button at the top. It will appear with the COSD report (For SCR) and a short description. Enter the date range and click on the download button. The file will automatically download and will appear at the bottom of the screen. Save as XML file. Please see the SCR Macmillan XML Data Import User Guide on how to upload the XML file to the SCR platform.
Package resources Recovery Package Main Page - view all latest resources via our main page www.macmillan.org.uk/recoverypackage Recovery Package Learn Zone page – learn about each of the interventions of the Recovery Package and have access to our videos, templates, and other resources www.learnzone.org.uk/recoverypackage. URL for video presentation https://vimeo.com/207469651/205b8498d4 Have a look at some of our other key resources. All of them are available to order via be.macmillan.org.uk
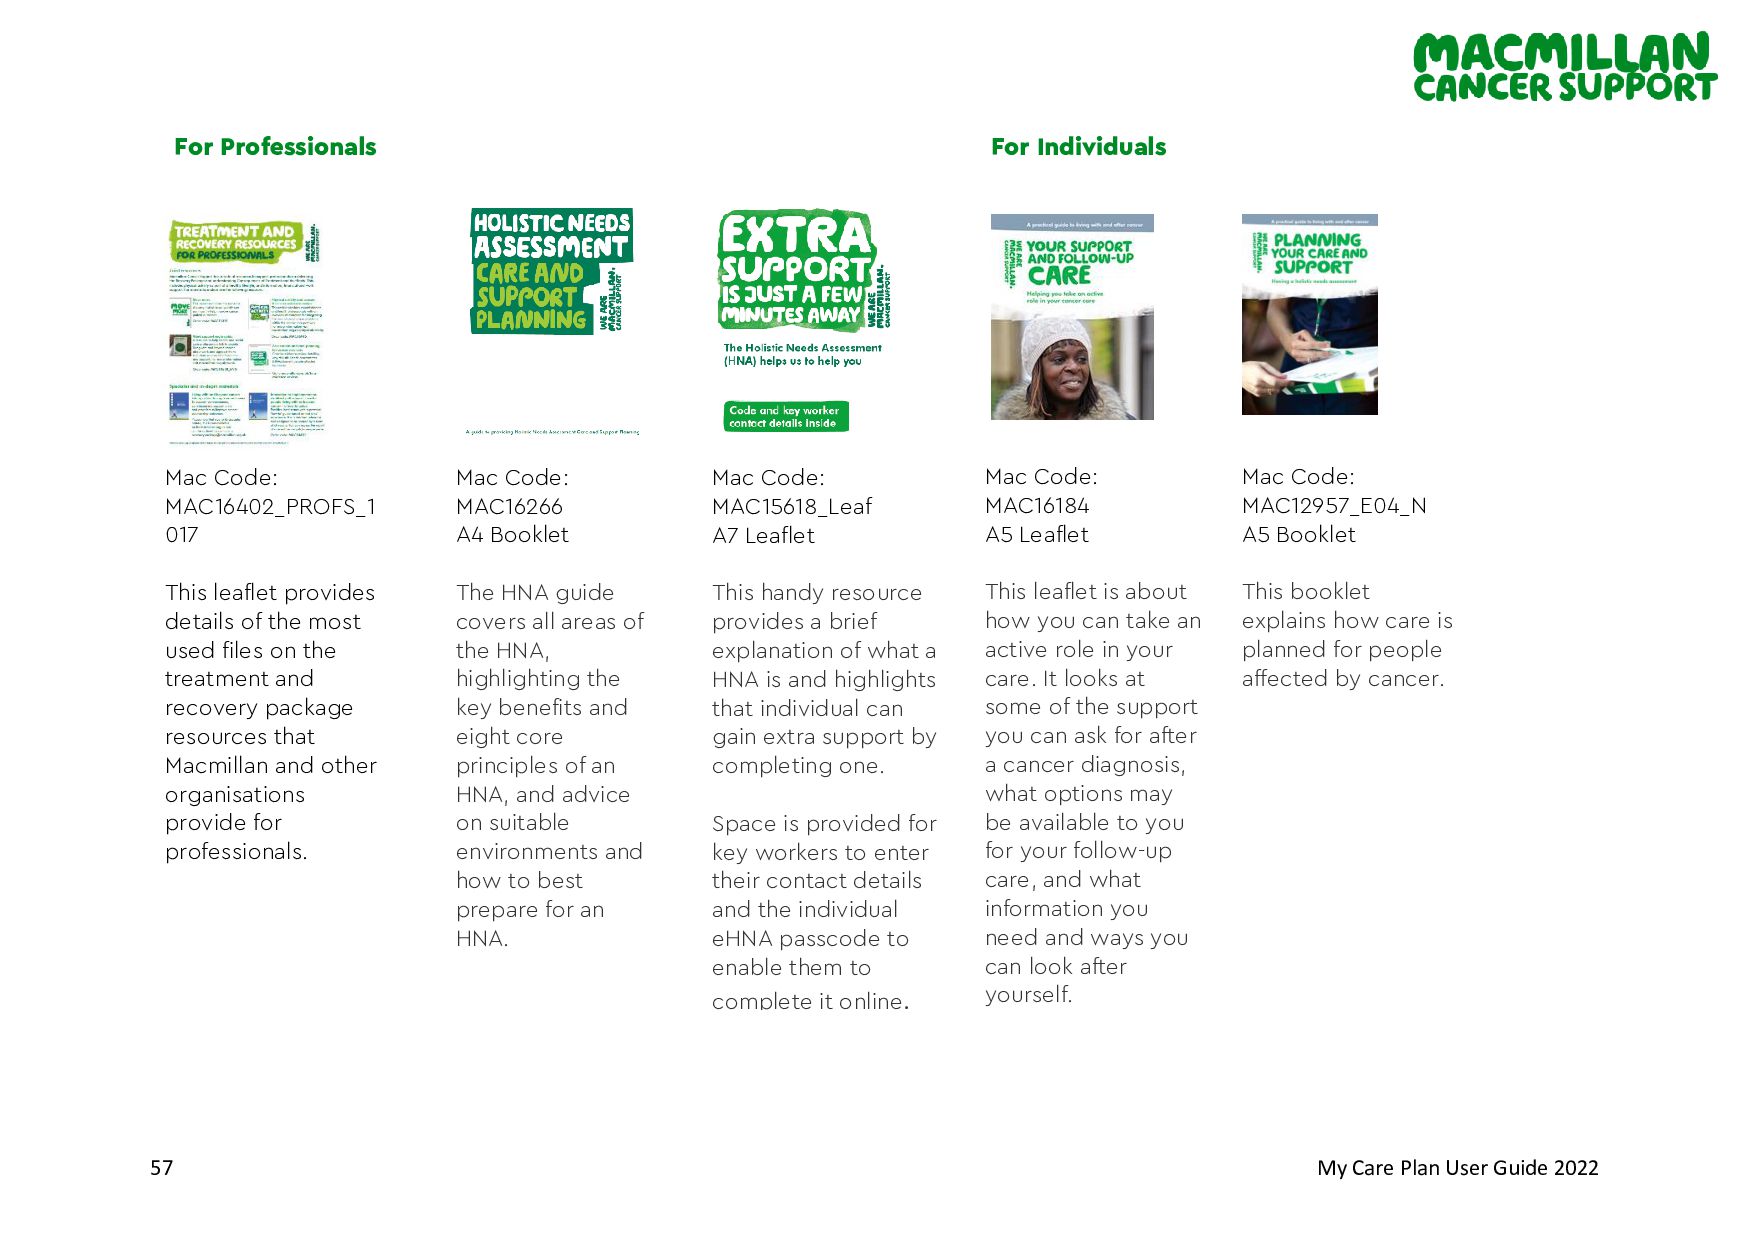
A5 Leaflet This leaflet is about how you can take an active role in your care. It looks at some of the support you can ask for after a cancer diagnosis, what options may be available to you for your follow-up care, and what information you need and ways you can look after yourself. Mac Code: MAC16266 A4 Booklet The HNA guide covers all areas of the HNA, highlighting the key benefits and eight core principles of an HNA, and advice on suitable environments and how to best prepare for an HNA. Mac Code: MAC15618_Leaf A7 Leaflet This handy resource provides a brief explanation of what a HNA is and highlights that individual can gain extra support by completing one. Space is provided for key workers to enter their contact details and the individual eHNA passcode to enable them to complete it online. For Professionals Mac Code: MAC16402_PROFS_1 017 This leaflet provides details of the most used files on the treatment and recovery package resources that Macmillan and other organisations provide for professionals. For Individuals Mac Code: MAC12957_E04_N A5 Booklet This booklet explains how care is planned for people affected by cancer.