Upgrade to Pro — share decks privately, control downloads, hide ads and more …

Mastering Github

Ian Clarke
February 26, 2015

Mastering Github

Since most students don't have proper knowledge of version control, like git, this was another workshop I organized and spoke at Carleton.

Ian Clarke

February 26, 2015
Tweet

More Decks by Ian Clarke

Other Decks in Programming

Transcript

  1. It ORGANIZES • Keeping history/versions manually is inefficient • Git/Source

    control keeps things tidy • Make deployments super easy • Git bash makes sure you know what files are added
  2. It SAVES YOUR BUTT • Ensures you always have access

    to you code (GitHub) • Made an error? No problem • Makes deployments super easy • Go back to any point in time
  3. Its EASY • Not much knowledge is needed to use

    • Tons of tutorials online • Makes contributing to open source stuff really easy • Lots of Git GUI's!
  4. Wait, What's the diff!!!?? GIT/GITHUB • Online social repo tool

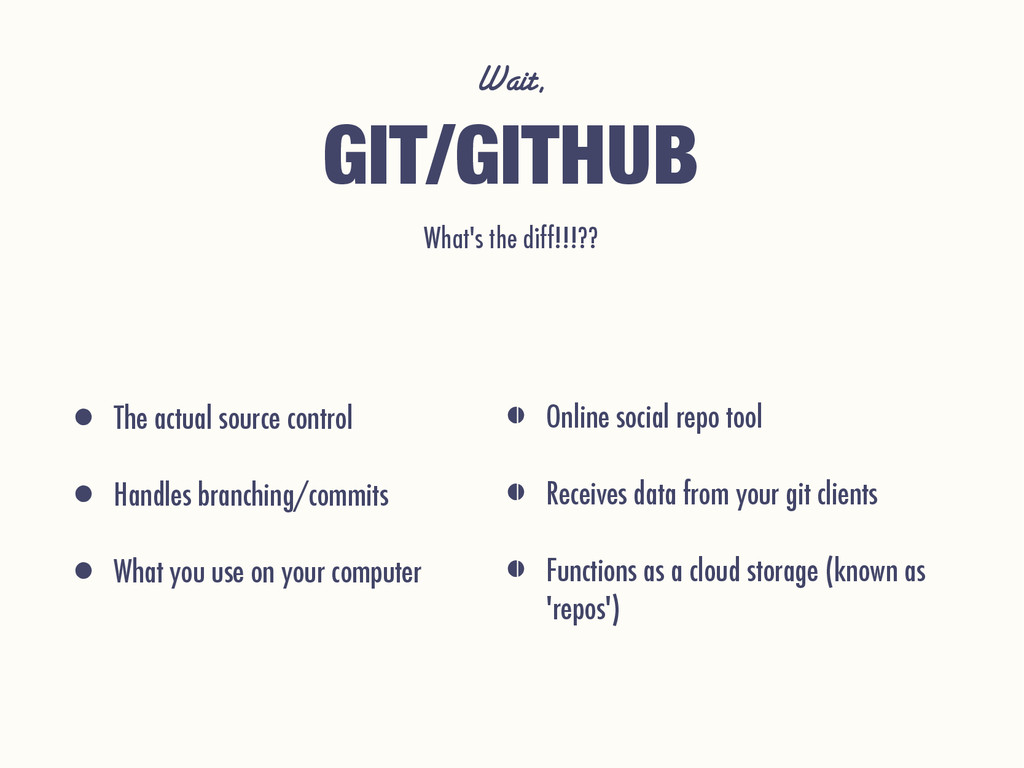
    • Receives data from your git clients • Functions as a cloud storage (known as 'repos') • The actual source control • Handles branching/commits • What you use on your computer
  5. Now FIRST, 1. Go to git-scm.com 2. Download the client

    for windows 3. Open up the exe once it's done
  6. Click through the setup until you come to these screens

    and follow them NEXT, Then, open up 'Git Bash' from the start menu
  7. Finally! LETS PUSH SOME CODE! Quick clarification: • 'Pushing' in

    git means to send some code to a remote server • 'git init' initializes a new repository • Navigating in windows: • 'cd' = navigate into • 'ls' = list items within this directory
  8. FIRST, We need to make sure git knows who we

    are, so let's set up our username on github and email! 15
  9. ADDING CODE Let's just make a new file in notepad

    called 'bleh.txt' Save this in a folder called 'GitWorkshop' on your desktop 16
  10. ADDING CODE Now, we need to go into this folder!

    Open up git bash and navigate to your folder where you put the .txt file 17
  11. ADDING CODE Now we need to tell git that this

    is a repository! To do this, write in 'git init' 18
  12. ADDING CODE Now we need to add our 'bleh.txt' To

    do this, write in 'git add bleh.txt' 19
  13. ADDING CODE Now we need to tell git to remember

    what is in 'bleh' at THIS point in time To do this, merely say 'git commit -m 'This is my first commit'' 20
  14. ADDING CODE Now we need to send our code somewhere,

    so lets send it to the empty repository we made on github. To do this, we need to add a destination, then 'push' it 21
  15. CHECKING CODE If you ever want to see what code

    you have ready for committing or if you are missing something, use 'git status' We can also look at the commit history by saying 'git log' 23
  16. PULLING CODE Ok.... now we need to get that README

    into our computer so we can edit it better. To do this, simply say 'git pull' 25
  17. BRANCHING 101 What if I have a new bit of

    code that I want to work on that might be a new feature? Something that might involve a new set of files other than the ones we just created To do this in git and allow us to work with multiple people, we use what is called 'branching' 26
  18. BRANCHING 101 To create a branch, write 'git branch branch-name-here'

    And to actually edit that branch, 'git checkout branch-name- here' 27
  19. BRANCHING 101 Now let's push that branch to github so

    people can see we're working on it 29
  20. BRANCHING 101 Now say we're done with that branch! So

    lets merge it into the master branch as it is completed! 30
  21. Well,what if I made a MISTAKE? • If you have

    made a mistake and want to redo it, simply follow these steps