Upgrade to Pro — share decks privately, control downloads, hide ads and more …

Prueba 2

Jano Espejel
June 22, 2012
68

Prueba 2

Varias laminas

Jano Espejel

June 22, 2012
Tweet

Transcript

  1. Intermec 761 (HH) Job Aid 1. Screen 2. Navigation Keys

    3. LED indicator 4. Power button 5. Alphanumeric keyboard 6. Antenna 7. Clear 8. Scan button 9. Battery Status Indicator 1
  2. 761B, continued 10. Stylus 11. Scan Triggers (yellow buttons on

    the side) 12. Infrared (IR) Port 13. Hand strap 14. Battery pack 2
  3. 1. On/Off - Press to place in Sleep mode. Press

    and hold 10 seconds to reset the device. 2. Shift - Press to change from alpha to numeric characters and vice versus 3. SP - Press to add one blank space in a field. 4. Back - Press the Back key to move to the previous menu 5. Backlight - Press the F key on the keypad to the screen backlight. 6. Send (left arrow) & End (right arrow) - Press to move one field to the left or right. When pressed together aborts a function and returns to the previous menu. 7. Page Up & Down Arrows - Press to move one screen. 8. Clear - Press to clear data one character at a time 9. GO - Press the GO key to enter information and to move to the next page. 10. Scan - Press the Scan key to activate the laser scanner. 11. Line Up & Down Arrows - Press to move one line up or down. 4
  4. 1. Network Connection Status - When the device is docked,

    the Light Emitting Diode (LED) indicates the following: -Green - Communication idle -Yellow - Communication occurring with Multidoc Note: When the device is not docked, this LED displays a solid red light that indicates the keyboard is set to numeric mode. 2. Battery Status - When the device is docked, this LED indicates the following: -Green - Fully charged -Red - Charging Note: When the device is not docked, this LED displays a blinking red light to indicate a low battery status. 5
  5. There are four key icons at the bottom of the

    screen that will display throughout the screen selections. These icons are: Network Connectivity down (red) Network Connectivity good (green) Only 1 Connectivity Icon will show at time. Utilities (Wrench Icon) - Associates the printer/ scanner and controls the volume. Hot Keys menu - not active Battery Status Warm Boot Perform a warm boot in the event your device “locks up” on a scan or function. 761B Warm Boot Press and hold the ON/OFF key until the screen turns completely black and release. 6
  6. Connecting and Using the 761 HH The Intermec 761 Handheld

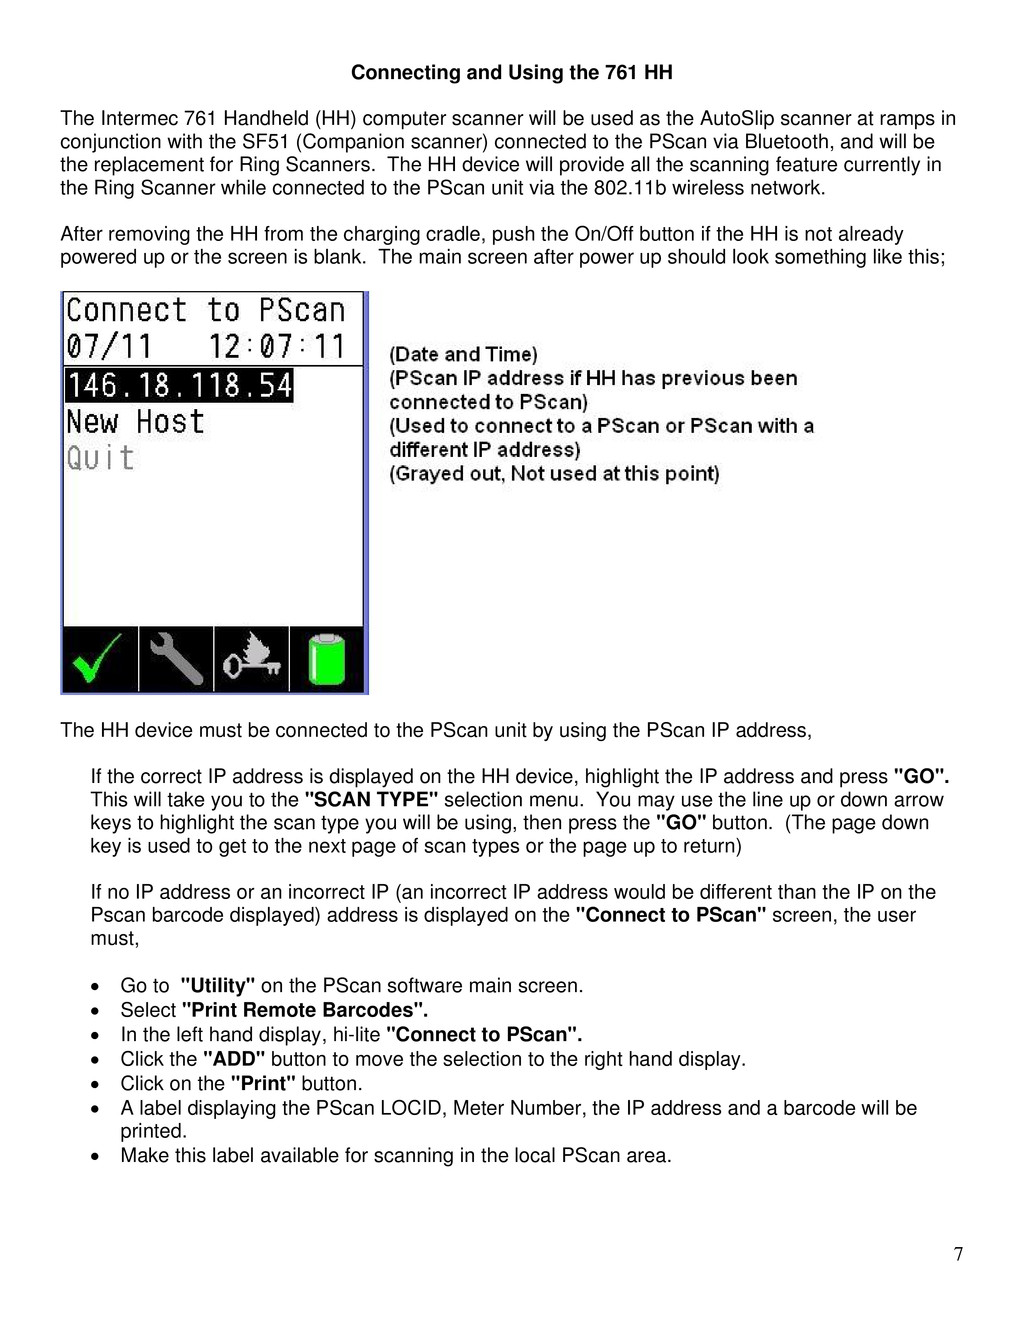
    (HH) computer scanner will be used as the AutoSlip scanner at ramps in conjunction with the SF51 (Companion scanner) connected to the PScan via Bluetooth, and will be the replacement for Ring Scanners. The HH device will provide all the scanning feature currently in the Ring Scanner while connected to the PScan unit via the 802.11b wireless network. After removing the HH from the charging cradle, push the On/Off button if the HH is not already powered up or the screen is blank. The main screen after power up should look something like this; The HH device must be connected to the PScan unit by using the PScan IP address, If the correct IP address is displayed on the HH device, highlight the IP address and press "GO". This will take you to the "SCAN TYPE" selection menu. You may use the line up or down arrow keys to highlight the scan type you will be using, then press the "GO" button. (The page down key is used to get to the next page of scan types or the page up to return) If no IP address or an incorrect IP (an incorrect IP address would be different than the IP on the Pscan barcode displayed) address is displayed on the "Connect to PScan" screen, the user must, • Go to "Utility" on the PScan software main screen. • Select "Print Remote Barcodes". • In the left hand display, hi-lite "Connect to PScan". • Click the "ADD" button to move the selection to the right hand display. • Click on the "Print" button. • A label displaying the PScan LOCID, Meter Number, the IP address and a barcode will be printed. • Make this label available for scanning in the local PScan area. 7
  7. 8 When "New Host" is highlighted on the 761 HH,

    • Press the "GO" key. • The user will be prompted to "Scan PScan address barcode" (printed in the previous paragraph). • Using the "Scan" key or the yellow buttons on the side of the HH, scan the PScan barcode. • A message of "connecting to pscan ip address..." will be displayed. • The "SCAN TYPE" selection screen will then be available. • Hi-lite and select the desired scan type. NOTE: If the user receives an error "unable to connect to pscan" the user should try to "warm boot" the HH by pressing and holding the On/Off button until the display goes blank. Wait for the HH to reboot back to the "Connect to PScan" screen and retry. If the HH still does not connect to the PScan, contact FTS. Scan types currently available on the first page are; EXIT (Returns device to the "Connect to PScan" screen) AUTOSLIP (Only if your Pscan has AutoSlip selected in the custom scan list) CONS SIP SOP Scan types currently available on the 2nd page are; 86CONS F86CONS RIP ROP USPS-PSP USPS-DSP Returning the “SCAN TYPE” Screen When the User wishes to leave a scan type, depress and release the Left and Right arrow keys simultaneously. NOTE: Anytime an hour glass or clocking icon is displayed on the screen, DO NOT use any key functions until it finishes.
  8. 761 HH Trouble Shooting 1. LED Status Indicator 1.1. Power

    status indicator light: tells the status of the battery when the device is on the charger: 1.2. Scanning/Alpha LED: Scanner's indicator light: Momentary Green The Scan is good Blinking Green The scanner is initializing. Blinking Red The Keypad is in suspend mode and the battery may need charge or the handheld needs to be reset Yellow The Scan is good. This only occurs in Alpha mode when the light briefly changes from red to yellow 2. Troubleshooting 2.1. HH does not power ON Probable cause Corrective action Battery discharged If battery is discharged, replace with known charged battery and place the discharged battery in dock to recharge. Intermec 761 HW defective 1. If battery is charged and the Intermec 761 will not power on, attempt cold boot; 2. If Intermec 761 will not power ON after cold boot, return the Intermec 761 to the TSC for repair. 9
  9. 10 2.2. HH powers itself OFF Probable cause Corrective action

    Intermec 761 is in sleep mode (red LED on Intermec 761 is blinking) Press the ON key. Battery low Recharge unit or replace battery with a charged battery. Intermec 761 HW defective Return Intermec 761 unit to the TSC for repair. 2.3 HH cannot logon Probable cause Corrective action Operator error Back out of Logon process and reattempt. Software failure Warm boot the Intermec 761 by holding down the on/off button until the screen goes dark. Intermec 761 defective Return Intermec 761 unit to the TSC for repair. 2.4. No response to tap or key press Probable cause Corrective action Software locked up 1. Attempt warm boot. 2. Cold boot with known charged battery. Intermec 761 HW defective Return Intermec 761 unit to the TSC for repair. 2.5. No scan by barcode reader Probable cause Corrective action Dirty scanner lens Clean lens with a clean clothe and scan gain. Illegible barcode label Manually enter scan data. Intermec 761 HW failure Return Intermec 761 unit to the TSC for repair. 3. How to do a Warm Boot To do a warm boot of the Intermec 761, hold down the on/off button until screen goes dark. The Intermec 761 should return to the Login screen
  10. 11 4. How to do a Cold Boot WARNING: A

    cold boot should only be done as a last resort as the 761 will need to be returned to the charging cradle for a software download that will take the unit it out of operation for a period of time. 1. Ensure the 761 is powered OFF by pressing and releasing the on/off button. 2. Remove the Battery 3. Push and hold the circular indention (button) for 5 sec, to the right of the battery contacts in the 761 battery cavity. 4. Install the battery and place unit in the charging cradle until all software have been downloaded. 5. How to send the Intermec 761 to repair 1. Intermec 761 units are to be boxed in their original boxes or the PowerPad shipping boxes. If neither box is available, proper packaging is required to prevent damage to the HH device. (The unit will be returned in a specially designed box from the TSC, keep this box for reuse). 2. Units are to be sent to TSC @ 477 Distribution Parkway Collierville, TN. 38000 NOTE: Never ship electronic devices like the 761 HH with a battery installed. Remove and keep the battery on site. 6. Intermec 761 Cleaning Procedures • Keep Intermec 761 units clean by wiping with a dry, clean lint free cloth. • An additional approved cleaning source (alcohol wipes) is available through ARIBA. Screen Wipes Orders. • If the battery contacts, screen or surface of the Intermec 761 become dirty, use a soft, lint free cloth moistened with diluted Isopropyl Alcohol (IPA) solution to remove dirt. The Isopropyl Alcohol (IPA) can be diluted with water up to 20%. 7. Battery 7.1. Battery Overview The battery is a rechargeable lithium ion cell. This battery supports 10 hours of normal operation. The Intermec 761 also contains a single rechargeable lithium coin cell used as a backup to the battery pack. If the battery pack fails, it must be replaced with another battery pack as soon as possible. During operation the Intermec 761 will let the user know if the battery is getting low allowing plenty of time to either replace or recharge the battery (Fully re-charged after 4 hours in the charger. 7.2. Connecting and Removing the Battery
  11. 12 - Line the battery up to the battery connections

    on the back of the Intermec 761. - Insert the battery bottom end first, and press the battery into the Intermec 761 until it clicks in place. When removing the battery you will need to turn the Intermec 761 off by pressing the power button for at least 4 seconds. Then press the battery release button on the back of the unit while pulling the battery off the back of the Intermec 761. 7.3. Checking the Battery Charge Level To check the charge level of the battery pack: Press the battery light on the upper right hand corner of the keypad will display yellow. The status indicator screen will display the level of charge the battery. A fully charged battery should last twelve (12) hours. 7.4. Charging Batteries There are separate quad battery chargers for the Intermec 761 batteries. Individual batteries can be placed in the Quad chargers to be charged or they can be charged while installed in the Intermec 761. After being charged the first time, a battery will be fully charged in three hours. A new Intermec 761 battery should be left in the quad chargers for 24 hours to fully charge the battery pack and coin cell (it can be used after charging for two hours if necessary). Note: To ensure data contained in the Intermec 761 is not lost, a charged battery must be installed within 8 hours of removing a battery from the Intermec 761. The coin cell battery has 8 hours of life, after depletion the Intermec 761 will lose configuration settings.