Upgrade to Pro
— share decks privately, control downloads, hide ads and more …
Speaker Deck
Features
Speaker Deck
PRO
Sign in
Sign up for free
Search
Search
Cloud Slide P3 - Deploy Application & DataBase
Search
Sponsored
·
SiteGround - Reliable hosting with speed, security, and support you can count on.
→
Panyakorn Timchantheuck
September 17, 2025
Technology
0
63
Cloud Slide P3 - Deploy Application & DataBase
Panyakorn Timchantheuck
September 17, 2025
Tweet
Share
More Decks by Panyakorn Timchantheuck
See All by Panyakorn Timchantheuck
Cloud Slide P2 - Deploy App in VMware (Windows + Ubuntu)
modpanyakorn
0
26
Cloud Slide P1 - Deploy Web Application in GCP
modpanyakorn
0
31
Other Decks in Technology
See All in Technology
Webhook best practices for rock solid and resilient deployments
glaforge
2
300
Red Hat OpenStack Services on OpenShift
tamemiya
0
130
量子クラウドサービスの裏側 〜Deep Dive into OQTOPUS〜
oqtopus
0
140
Bedrock PolicyでAmazon Bedrock Guardrails利用を強制してみた
yuu551
0
260
Exadata Fleet Update
oracle4engineer
PRO
0
1.1k
[CV勉強会@関東 World Model 読み会] Orbis: Overcoming Challenges of Long-Horizon Prediction in Driving World Models (Mousakhan+, NeurIPS 2025)
abemii
0
150
Codex 5.3 と Opus 4.6 にコーポレートサイトを作らせてみた / Codex 5.3 vs Opus 4.6
ama_ch
0
190
AIエージェントを開発しよう!-AgentCore活用の勘所-
yukiogawa
0
180
22nd ACRi Webinar - NTT Kawahara-san's slide
nao_sumikawa
0
100
プロダクト成長を支える開発基盤とスケールに伴う課題
yuu26
4
1.4k
Amazon S3 Vectorsを使って資格勉強用AIエージェントを構築してみた
usanchuu
4
450
今日から始める Amazon Bedrock AgentCore
har1101
4
420
Featured
See All Featured
Heart Work Chapter 1 - Part 1
lfama
PRO
5
35k
Building a Scalable Design System with Sketch
lauravandoore
463
34k
Navigating the moral maze — ethical principles for Al-driven product design
skipperchong
2
250
Google's AI Overviews - The New Search
badams
0
910
How To Stay Up To Date on Web Technology
chriscoyier
791
250k
We Have a Design System, Now What?
morganepeng
54
8k
Jess Joyce - The Pitfalls of Following Frameworks
techseoconnect
PRO
1
67
Dominate Local Search Results - an insider guide to GBP, reviews, and Local SEO
greggifford
PRO
0
79
Rebuilding a faster, lazier Slack
samanthasiow
85
9.4k
[RailsConf 2023 Opening Keynote] The Magic of Rails
eileencodes
31
9.9k
Sharpening the Axe: The Primacy of Toolmaking
bcantrill
46
2.7k
The Director’s Chair: Orchestrating AI for Truly Effective Learning
tmiket
1
98
Transcript
Presented by 9old DEPLOY APP & DB Explore Now 01
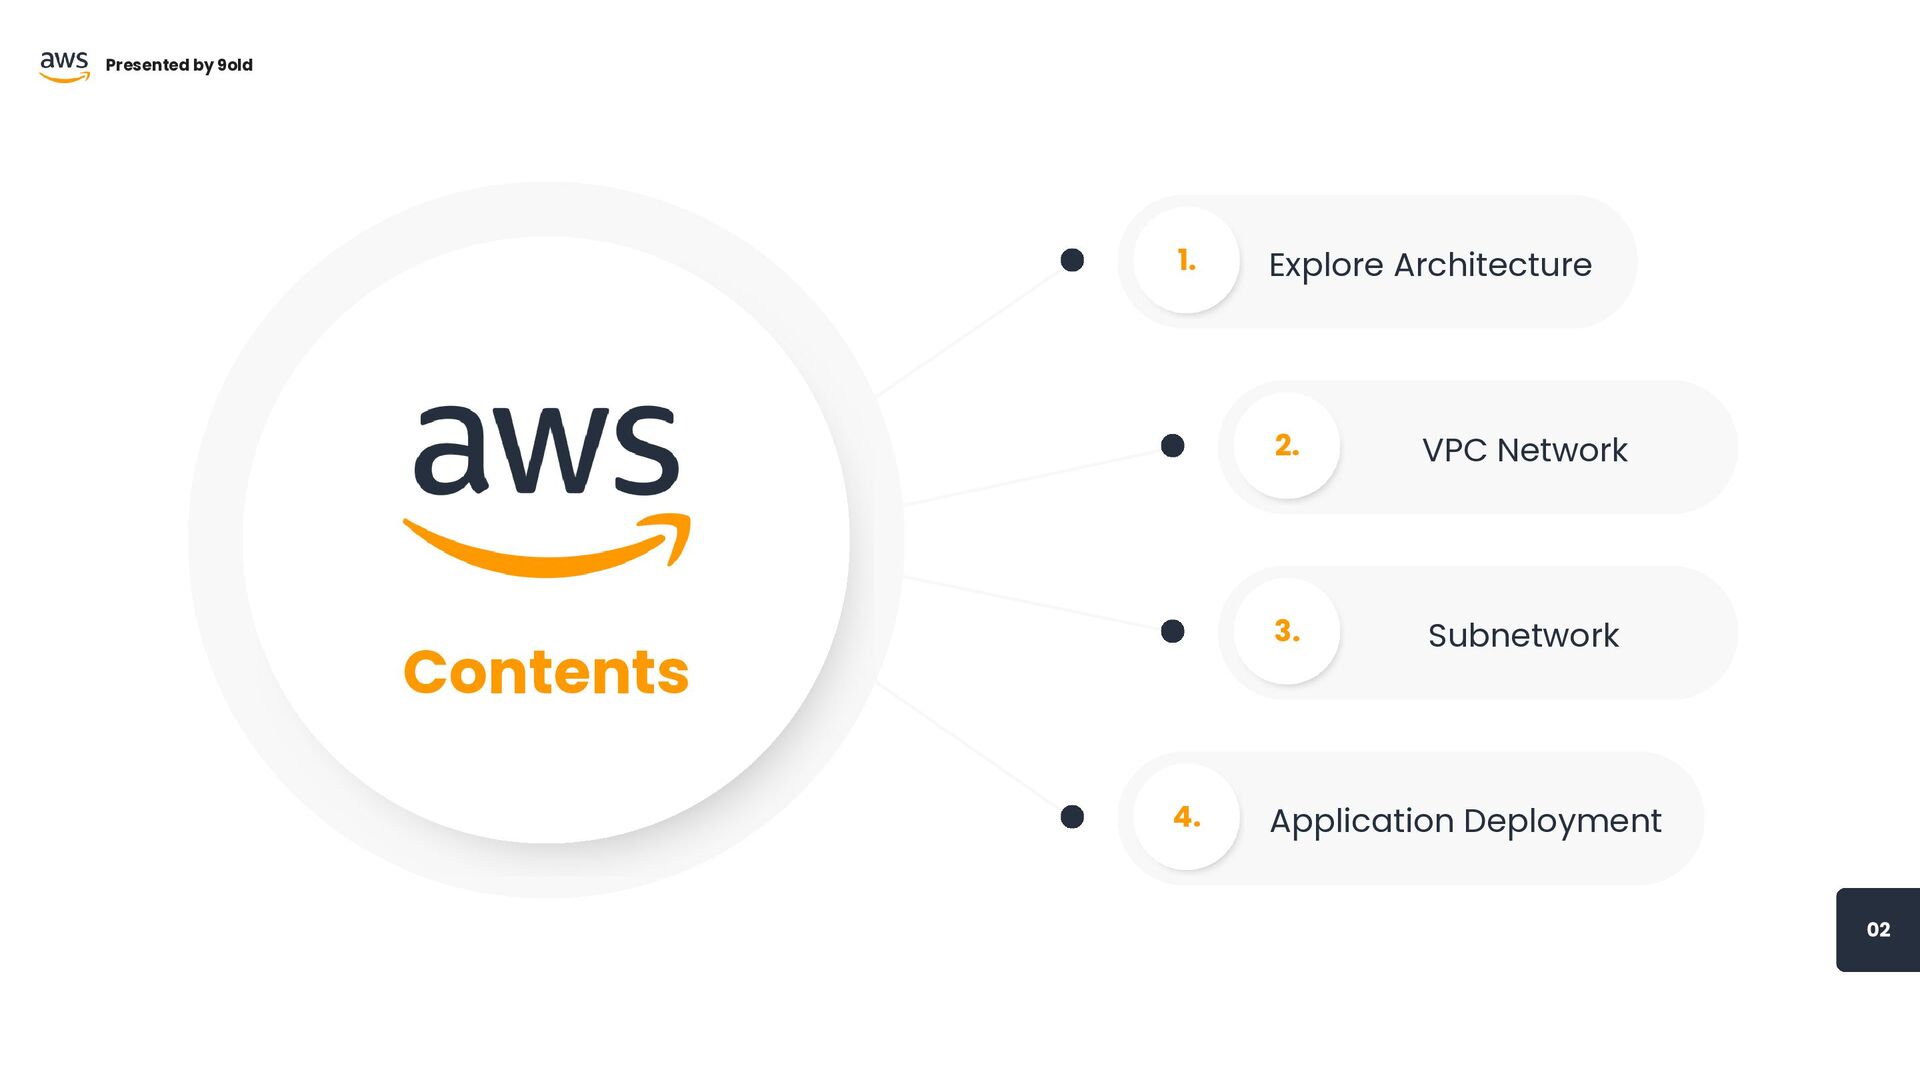
Contents Explore Architecture 1. VPC Network 2. Subnetwork 3. Application
Deployment 4. 02 Presented by 9old
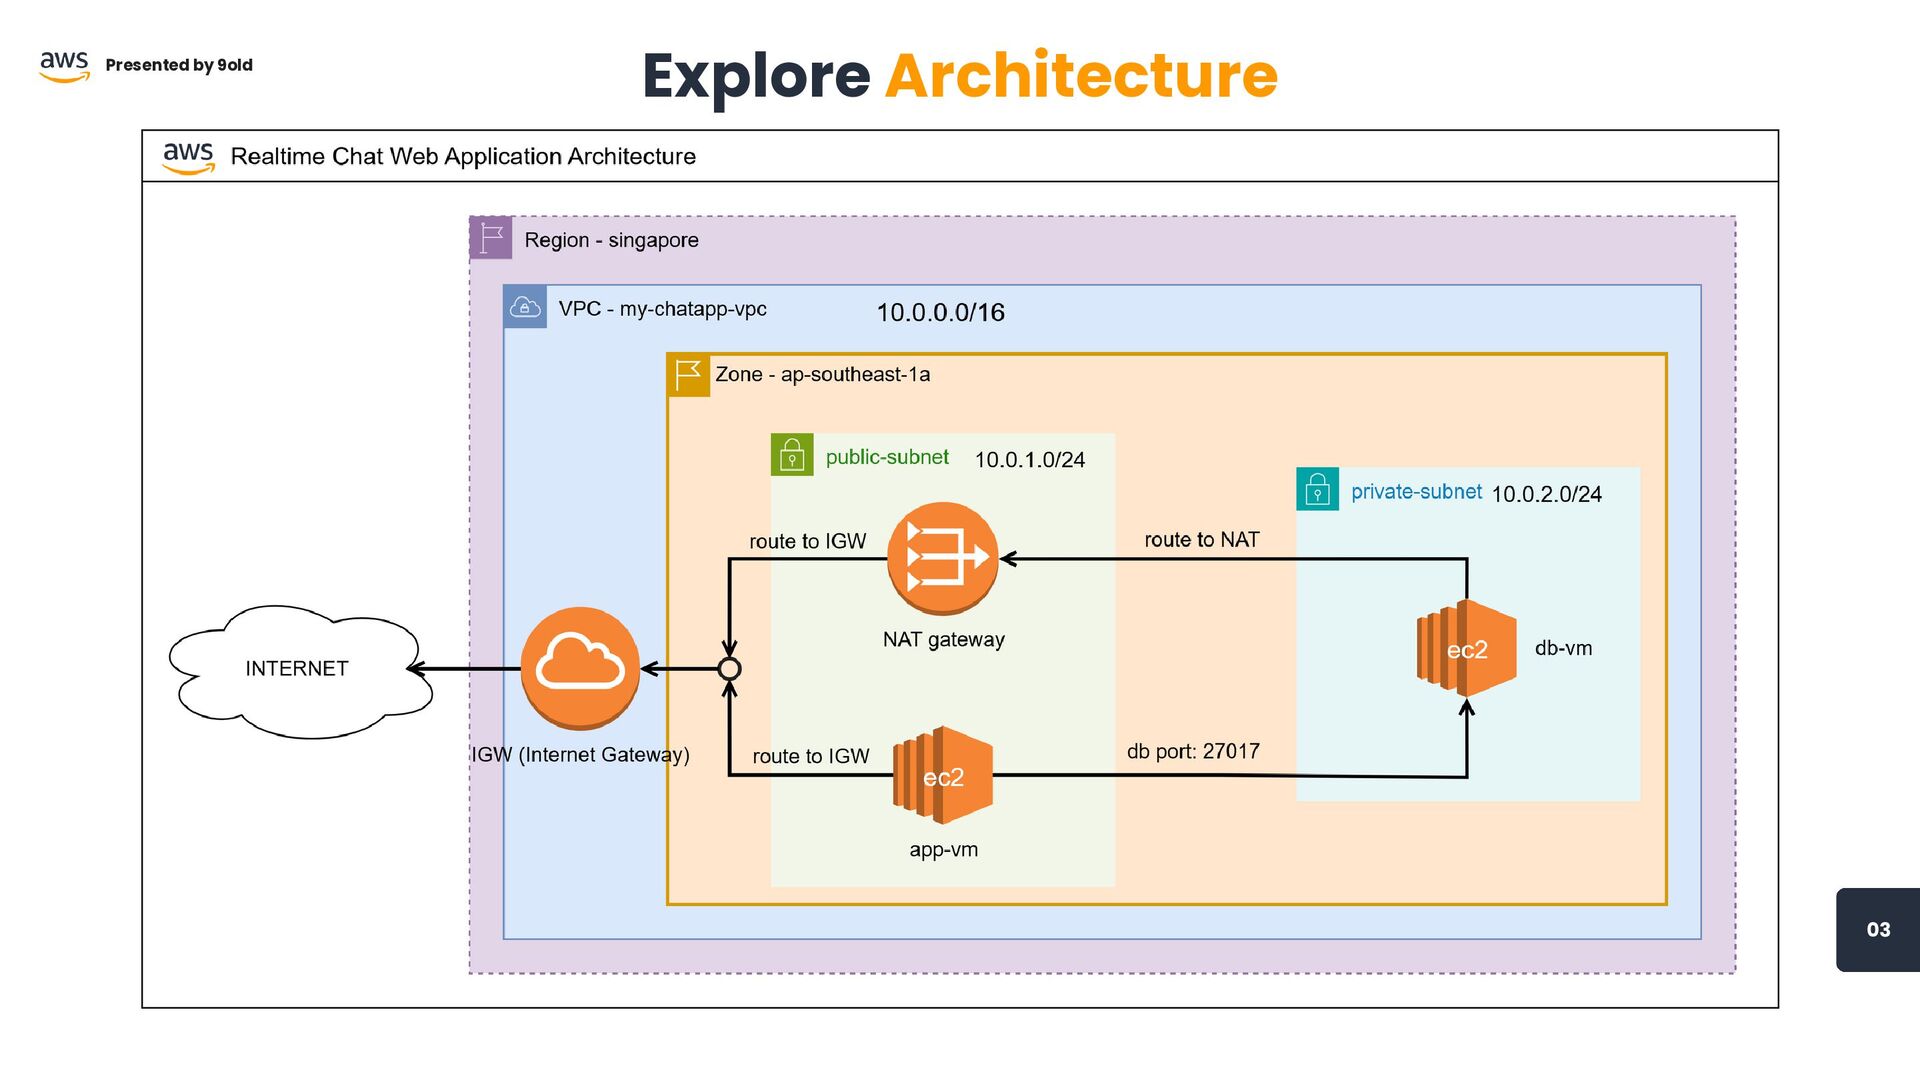
03 Explore Architecture Presented by 9old
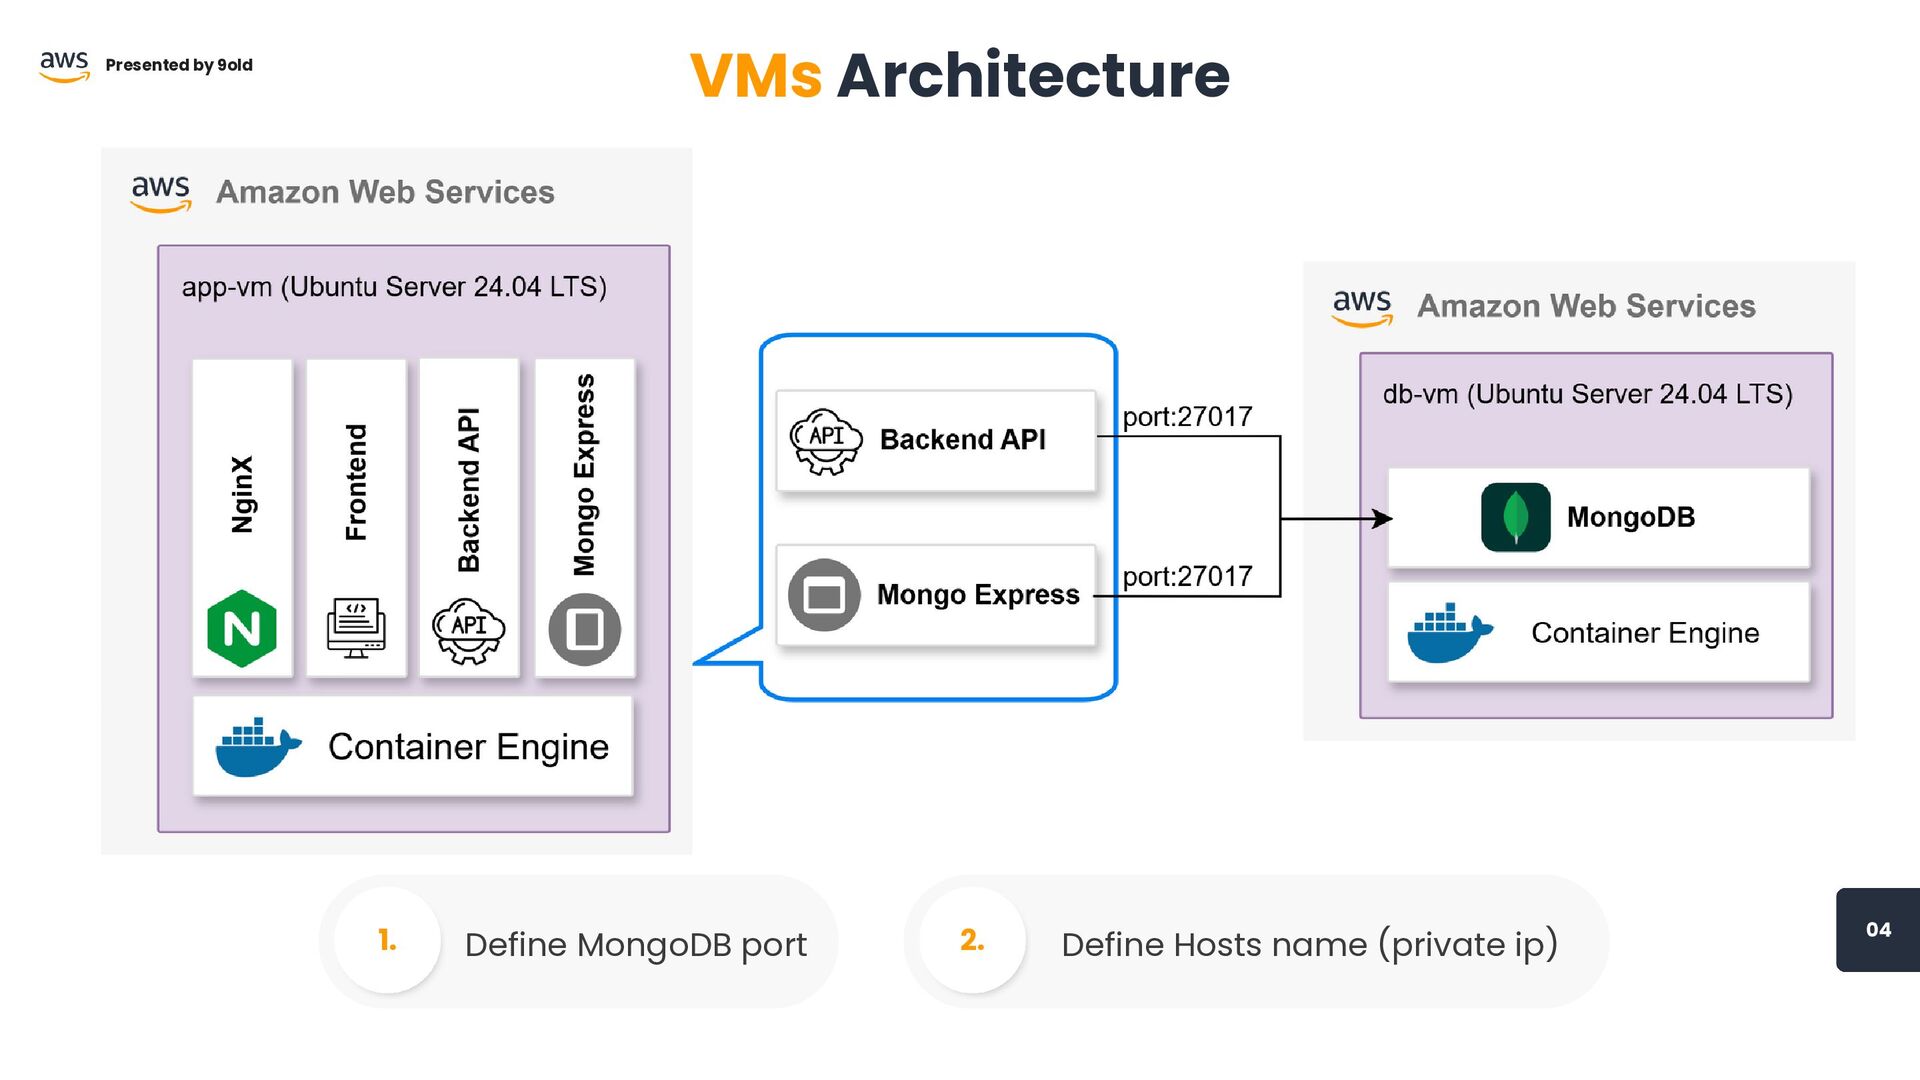
04 Define MongoDB port 1. Define Hosts name (private ip)
2. Presented by 9old VMs Architecture
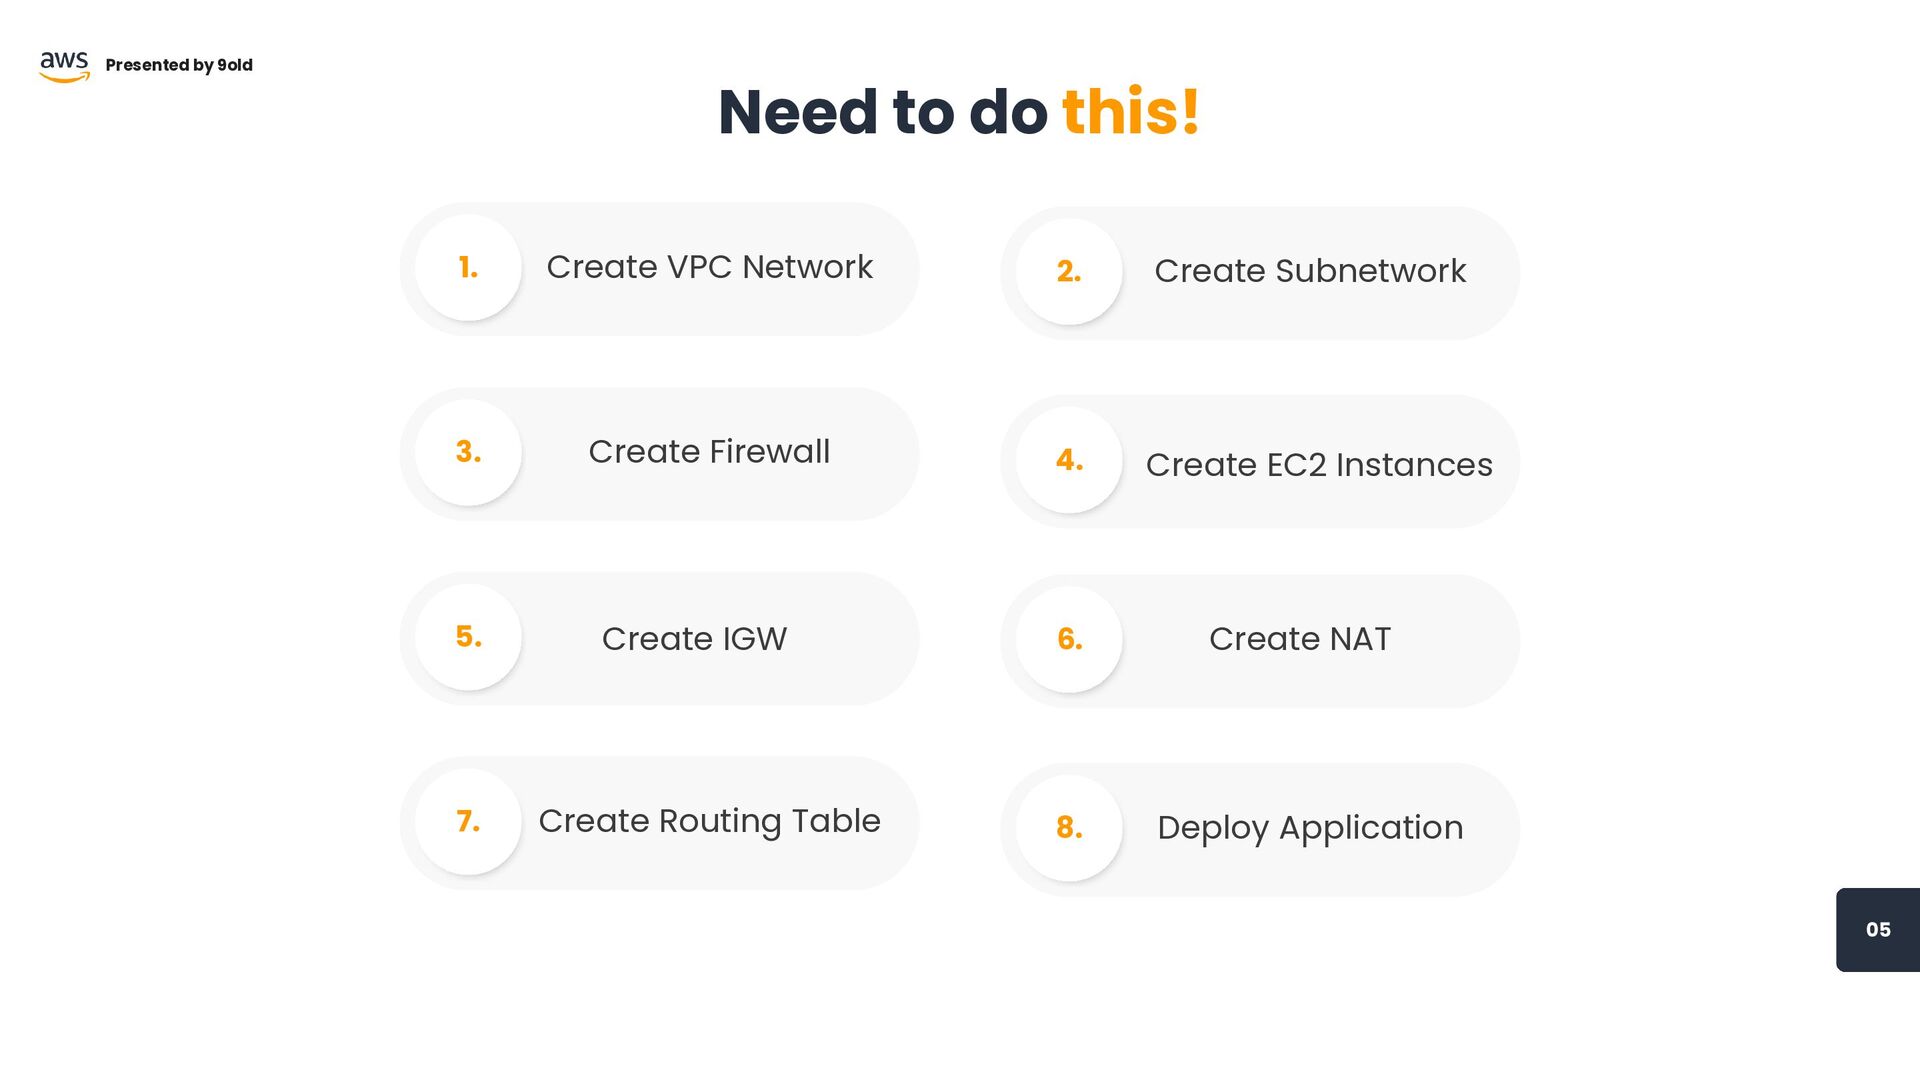
05 Need to do this! Presented by 9old Create VPC
Network 1. Create EC2 Instances 4. Create Subnetwork 2. Create Firewall 3. Create IGW 5. Create NAT 6. Create Routing Table 7. Deploy Application 8.
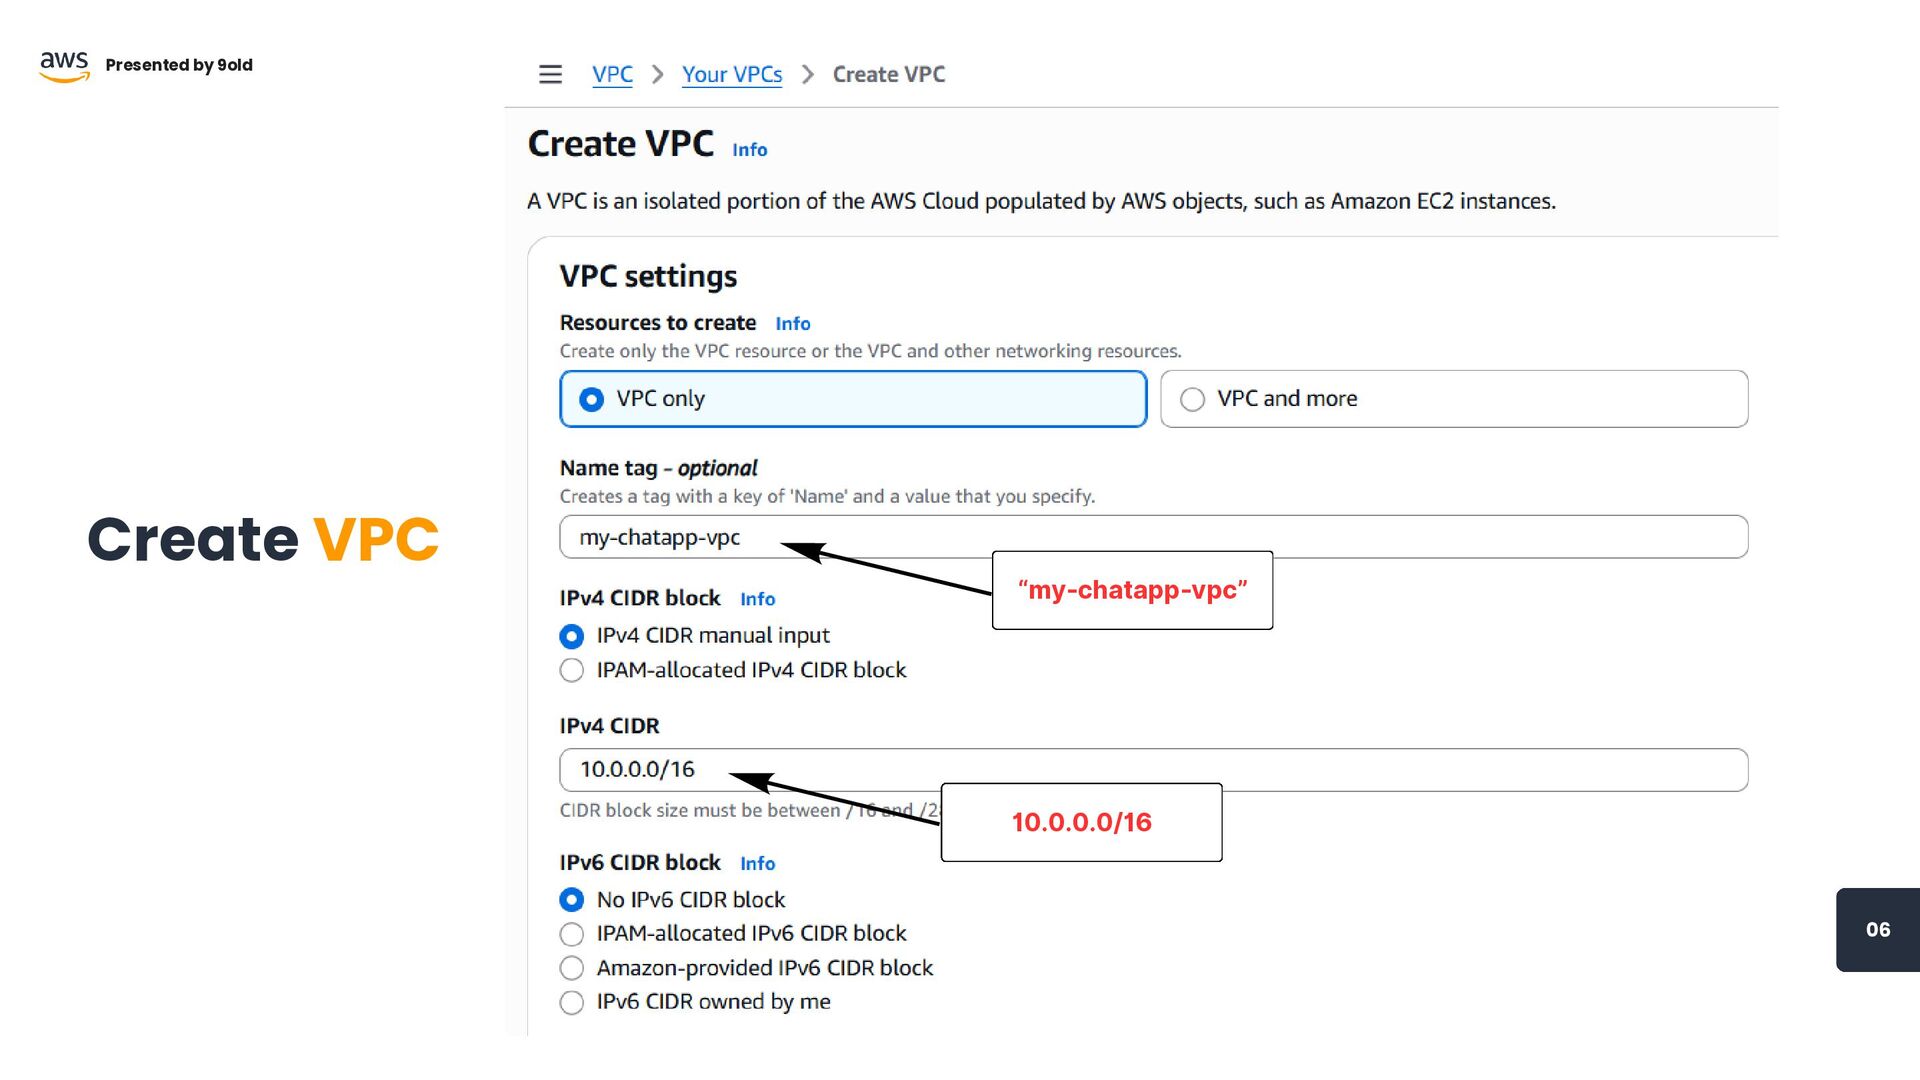
“my-chatapp-vpc” 06 Create VPC Presented by 9old 10.0.0.0/16
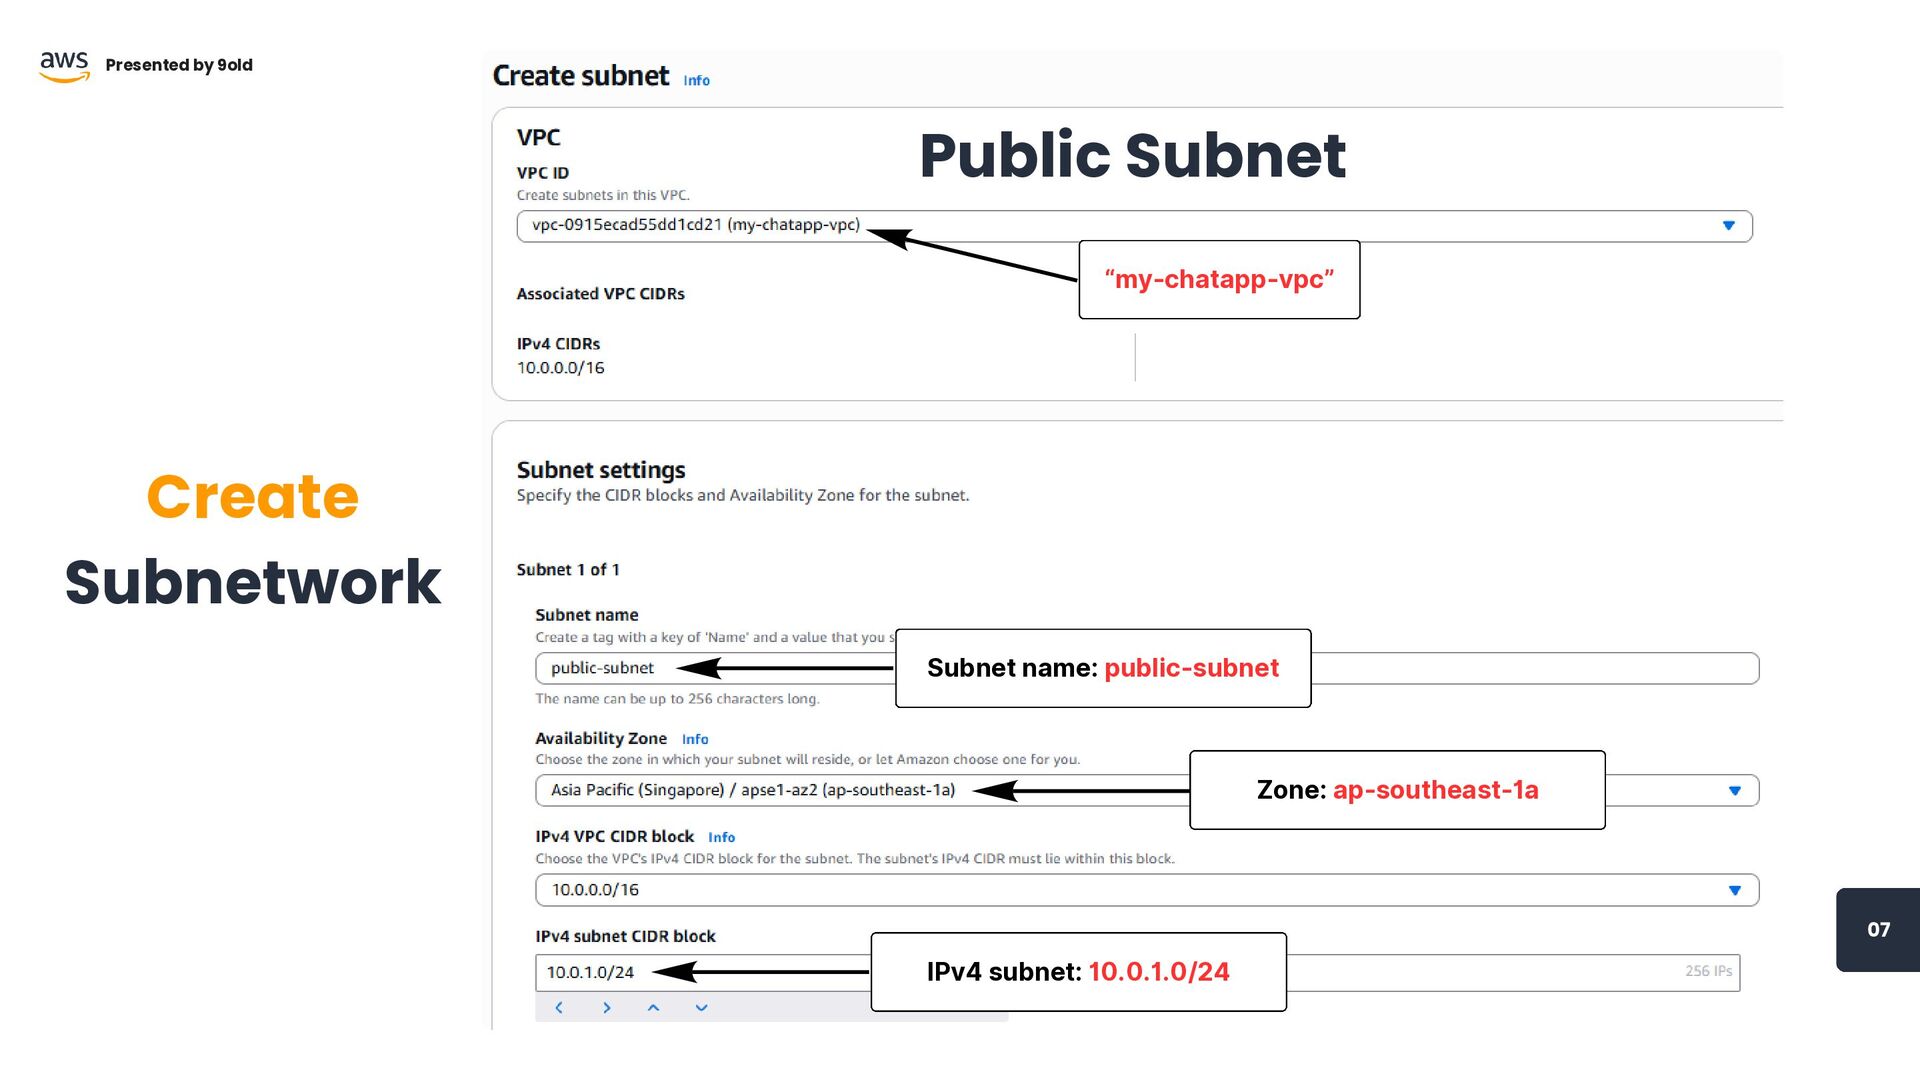
“my-chatapp-vpc” Subnet name: public-subnet 07 Create Subnetwork Presented by 9old
IPv4 subnet: 10.0.1.0/24 Public Subnet Zone: ap-southeast-1a
“my-chatapp-vpc” Subnet name: private-subnet IPv4 subnet: 10.0.2.0/24 Zone: ap-southeast-1a 08
Create Subnetwork Presented by 9old Private Subnet
SG name: public-subnet-sg VPC: my-chatapp-vpc 09 Presented by 9old Create
Public Subnetwork Security Group (Firewall)
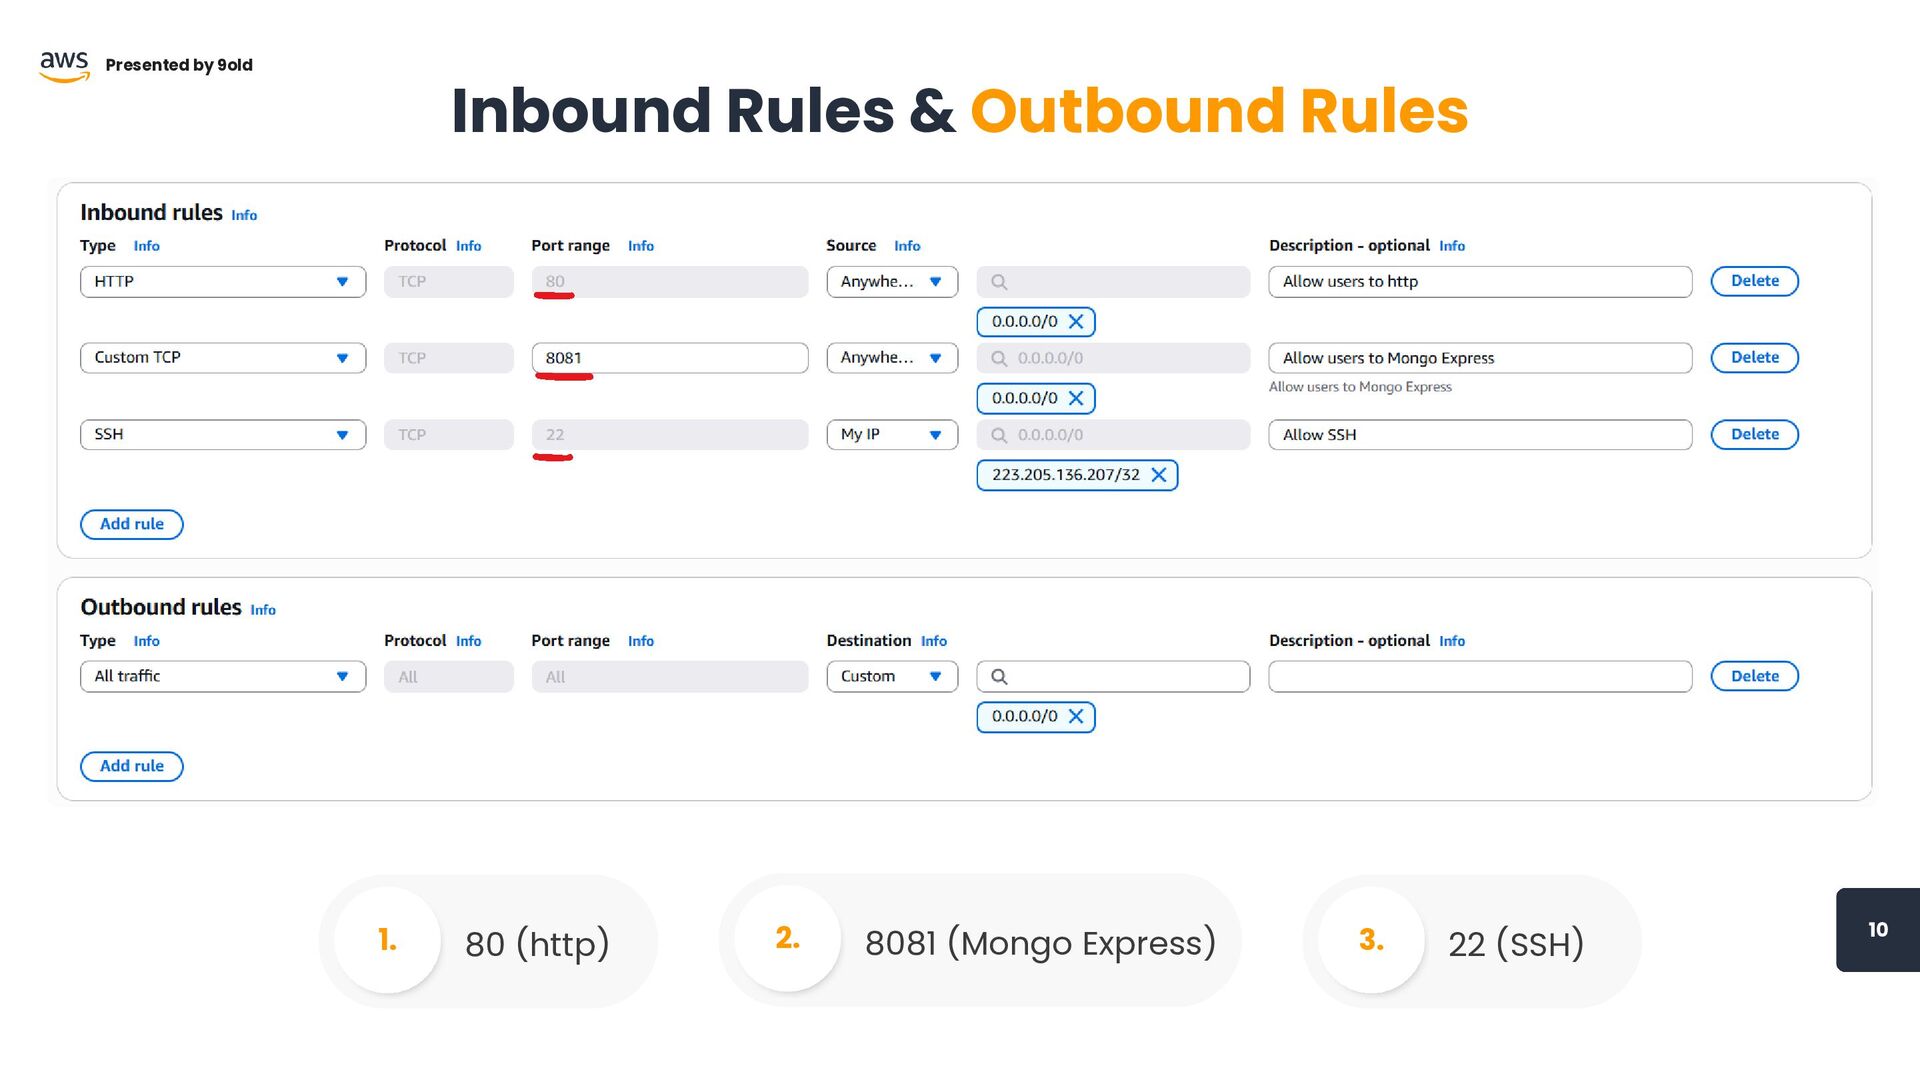
10 Presented by 9old Inbound Rules & Outbound Rules 80
(http) 1. 8081 (Mongo Express) 2. 22 (SSH) 3.
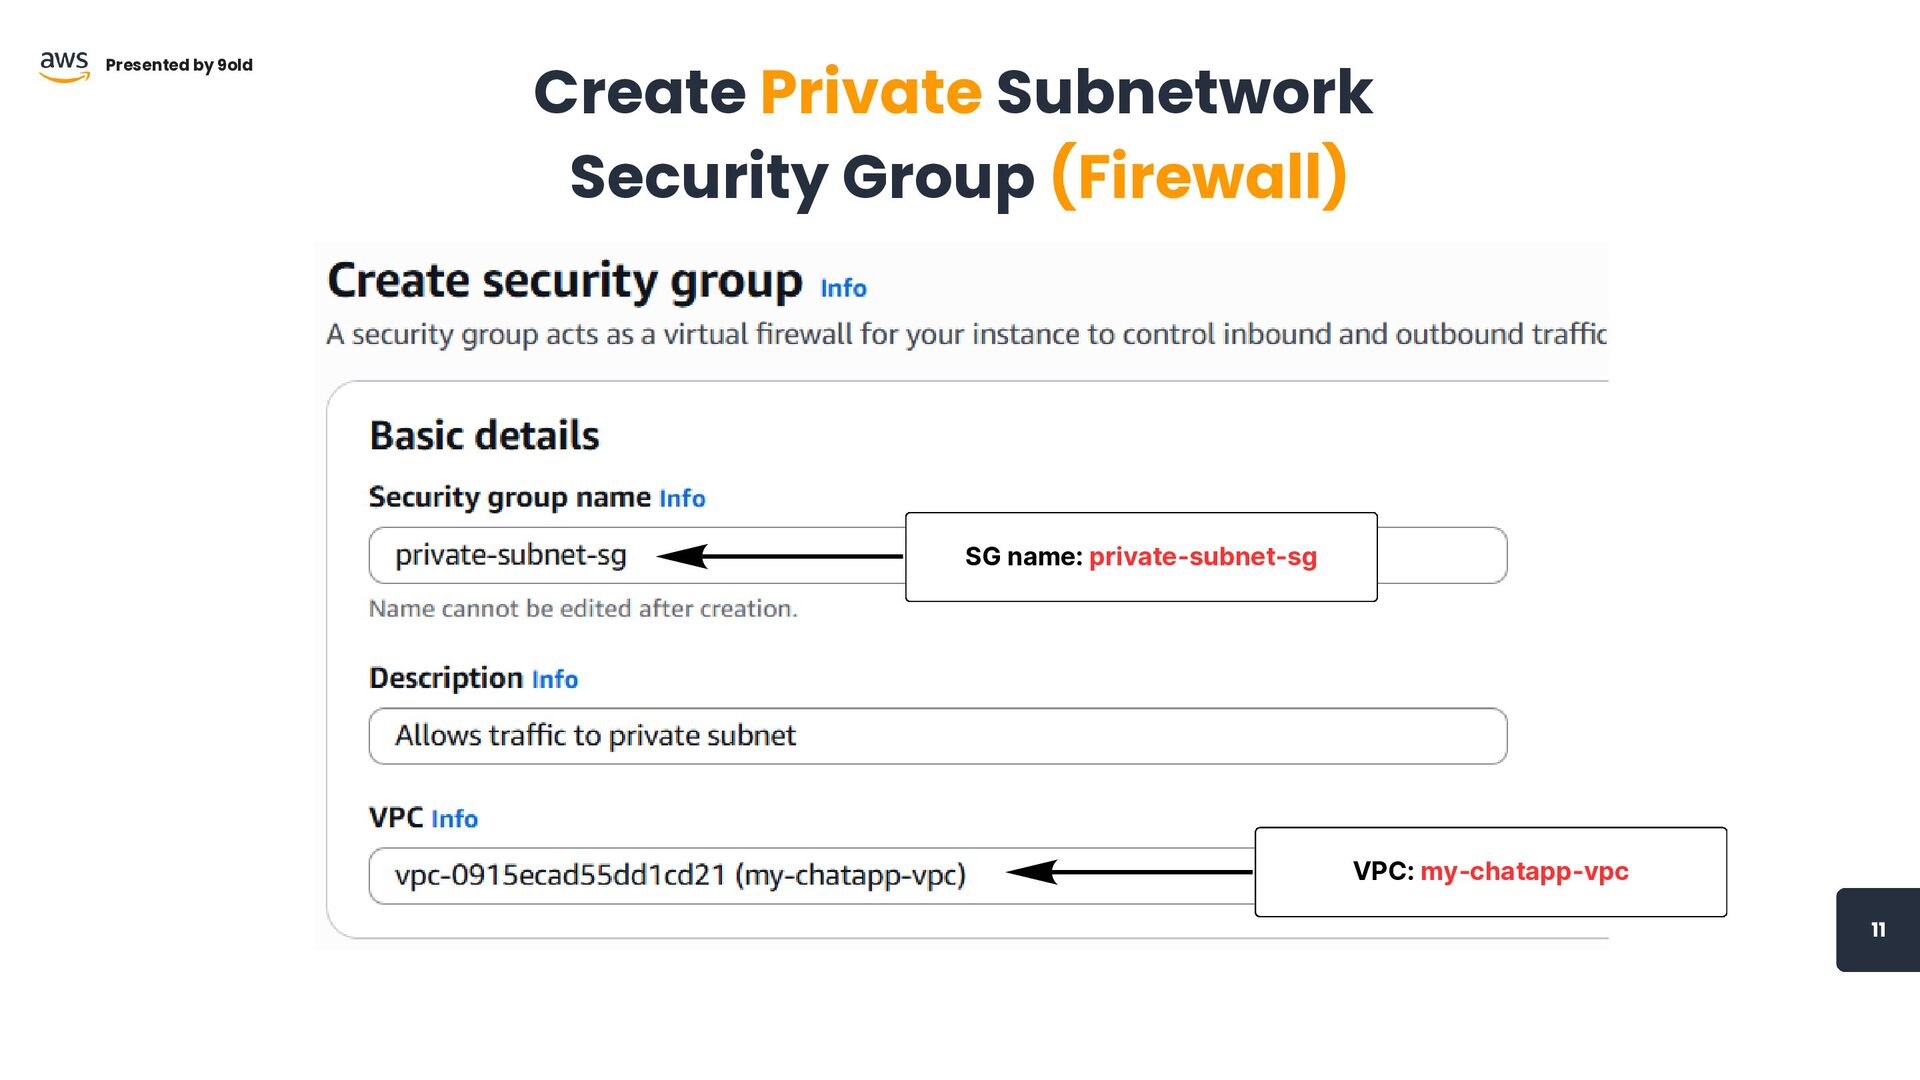
SG name: private-subnet-sg VPC: my-chatapp-vpc 11 Presented by 9old Create
Private Subnetwork Security Group (Firewall)
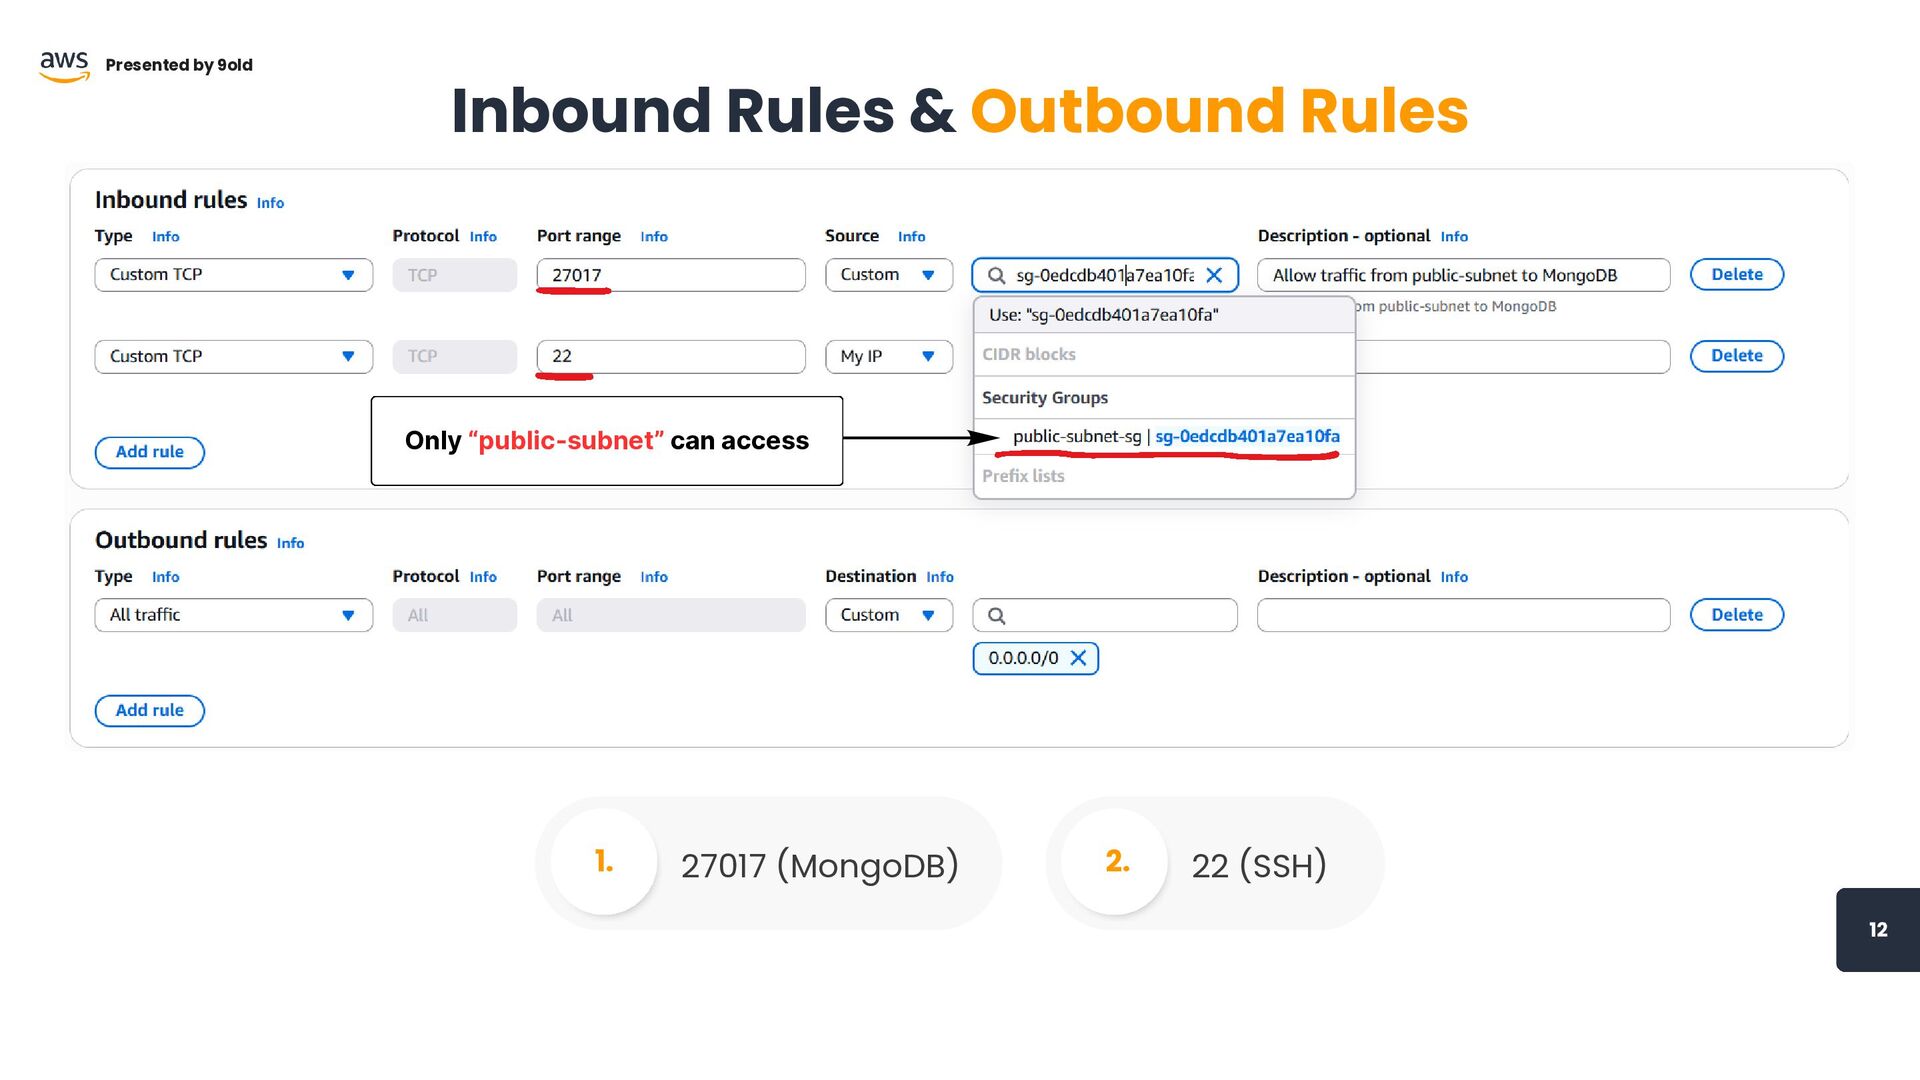
12 Presented by 9old Inbound Rules & Outbound Rules 27017
(MongoDB) 1. 22 (SSH) 2. Only “public-subnet” can access
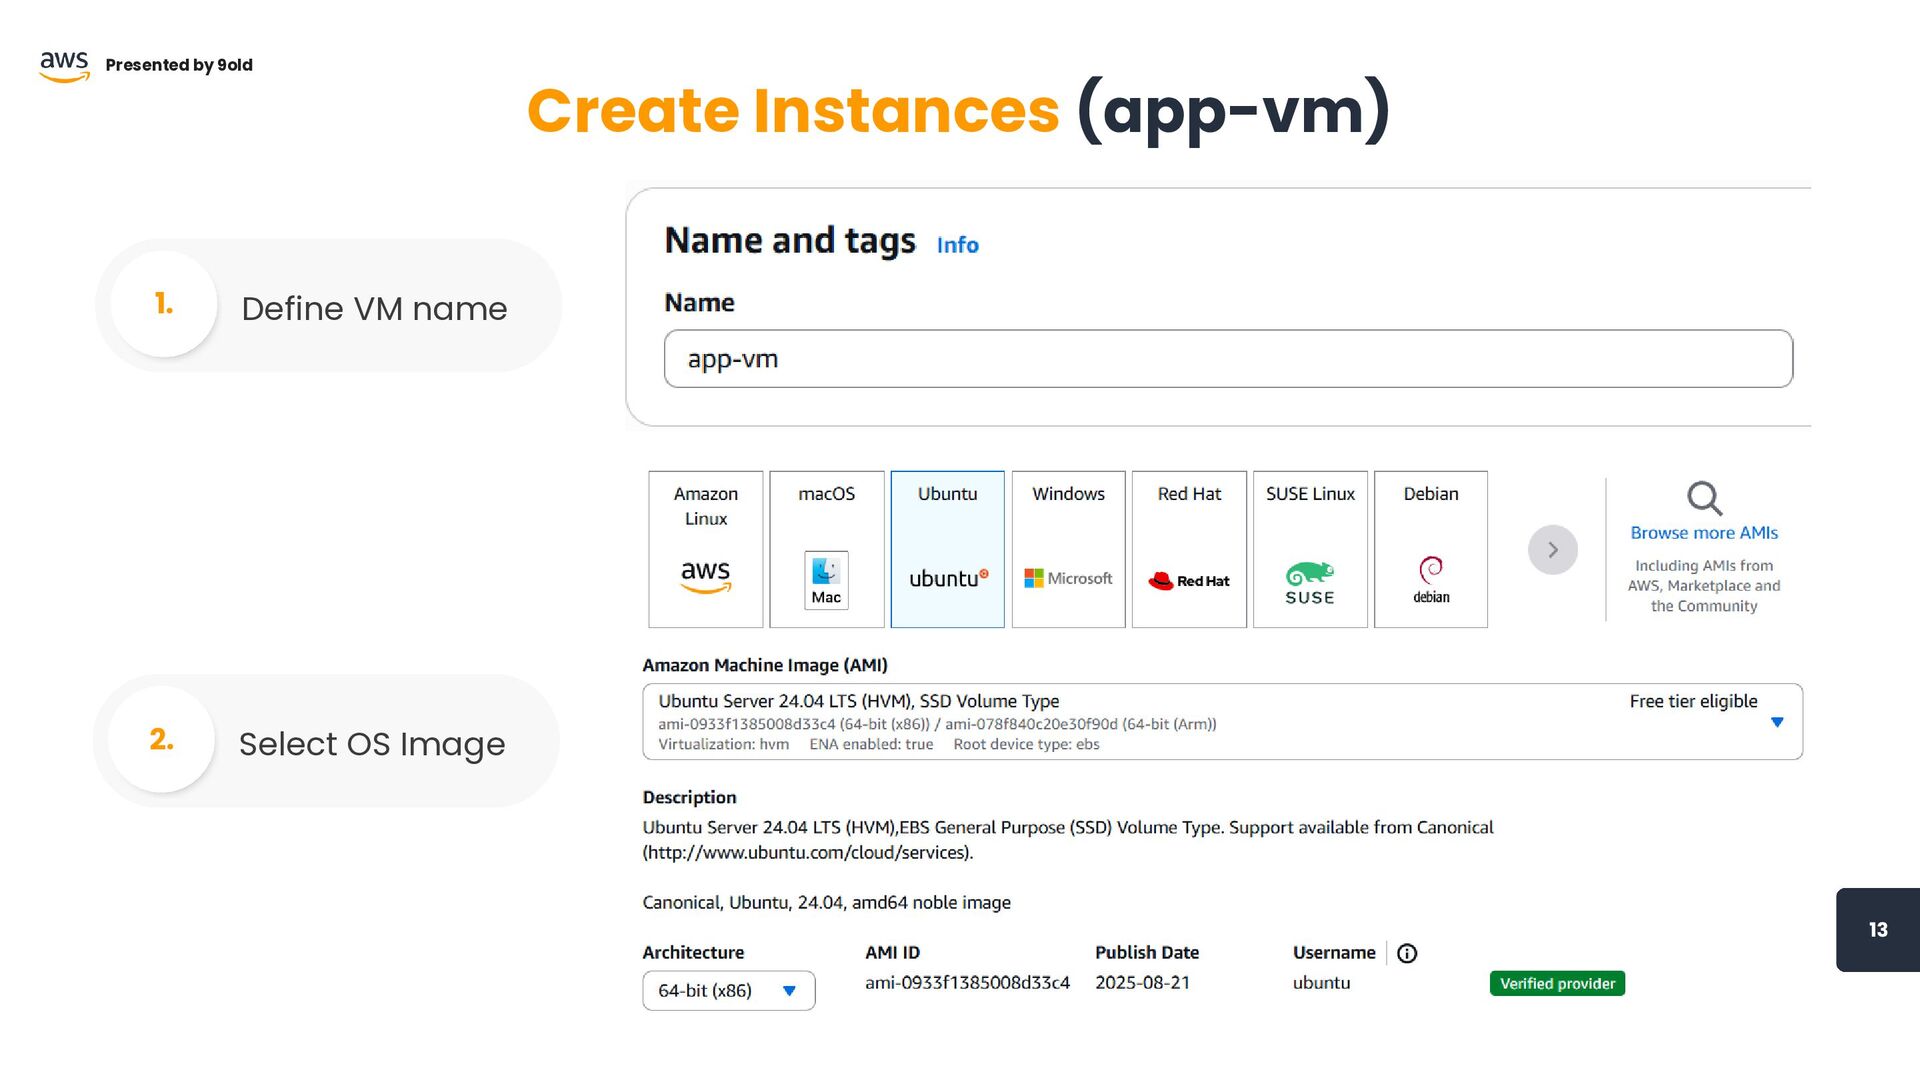
13 Presented by 9old Create Instances (app-vm) Define VM name
1. Select OS Image 2.
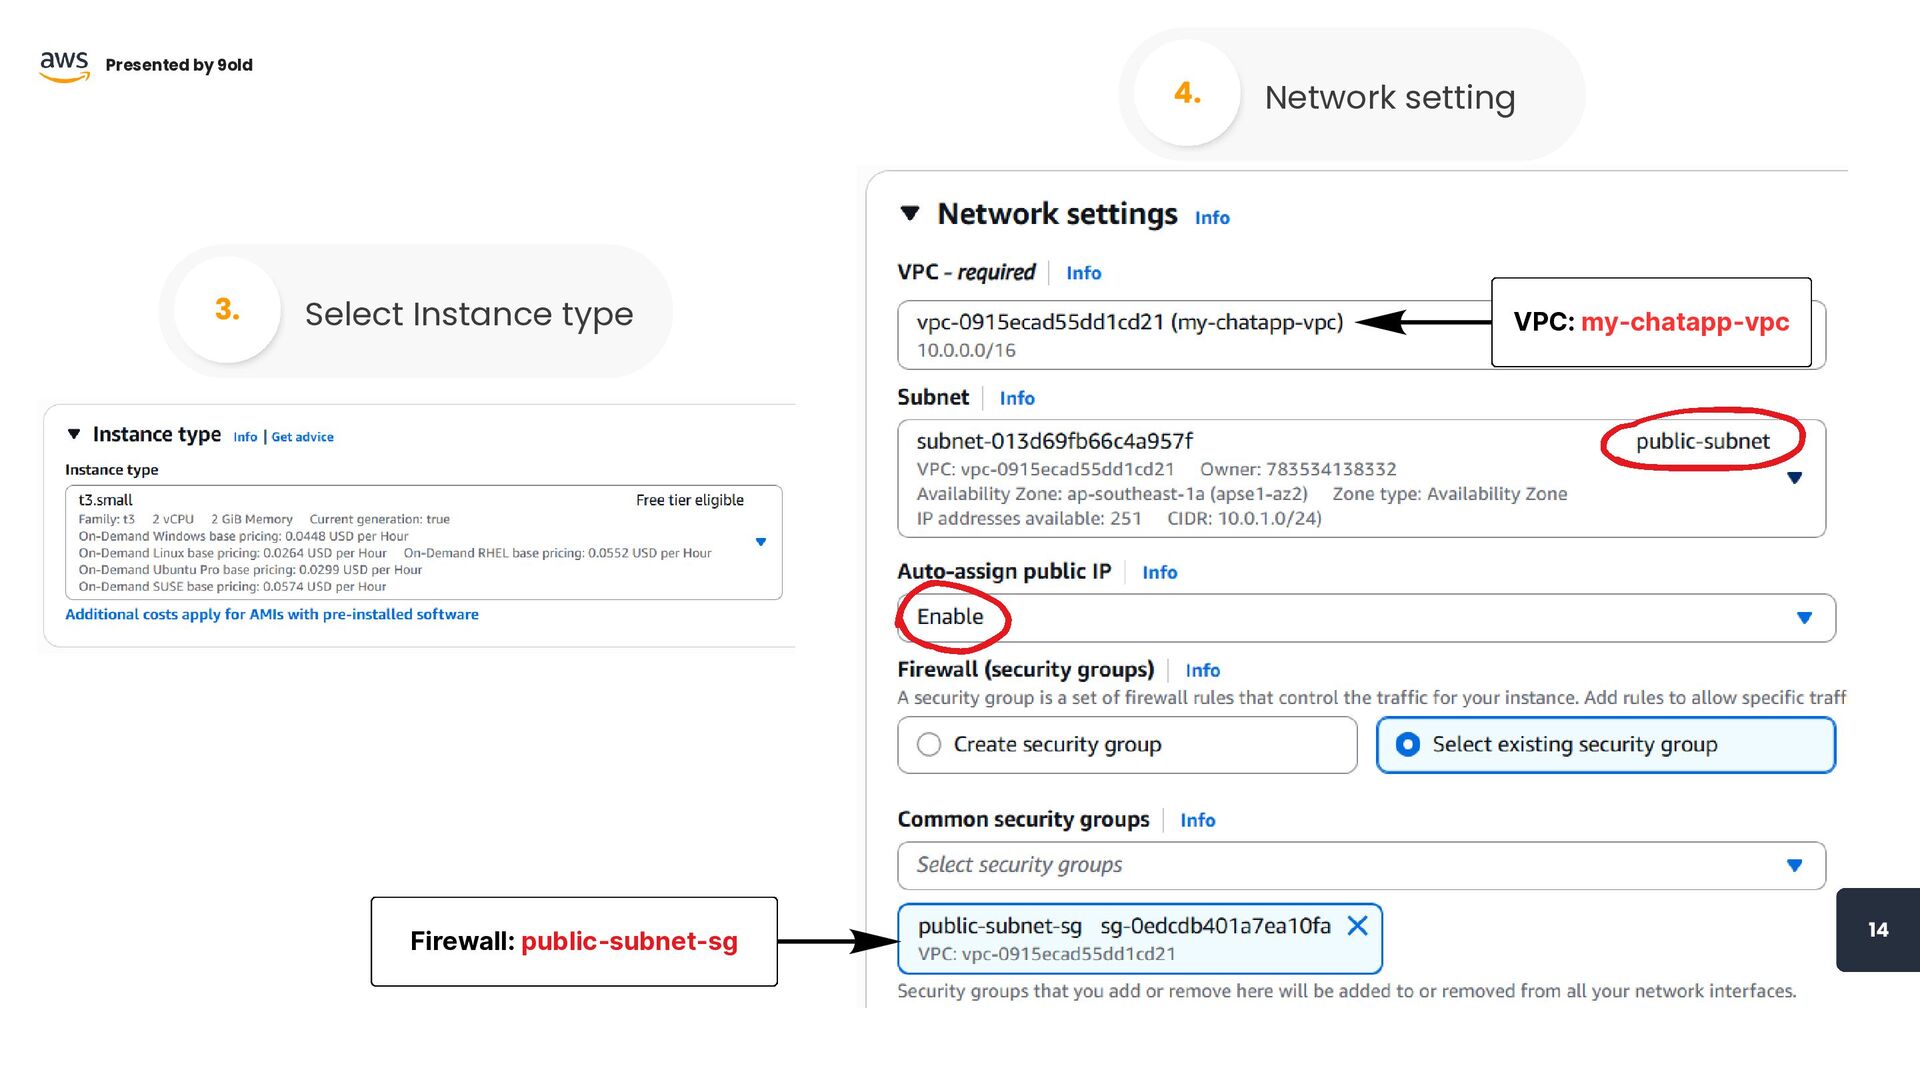
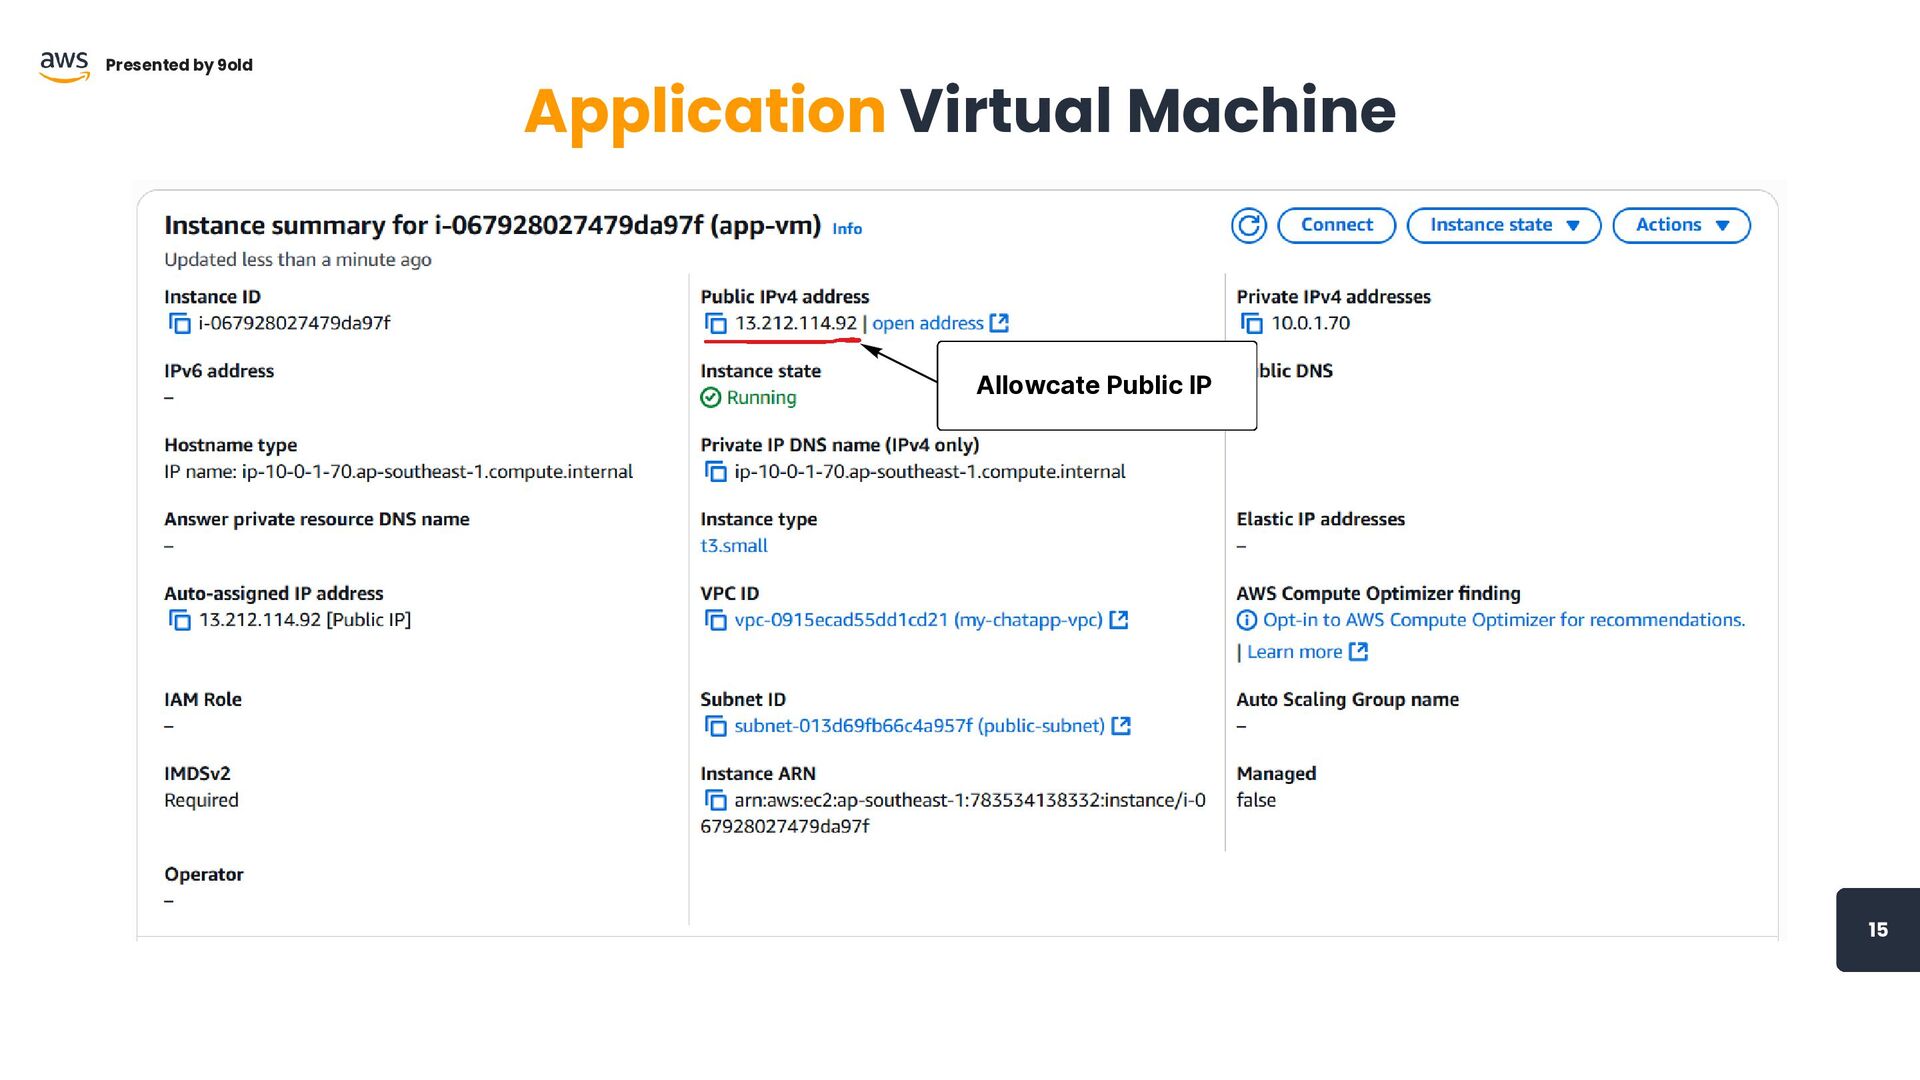
14 Presented by 9old Select Instance type 3. Network setting
4. VPC: my-chatapp-vpc Firewall: public-subnet-sg
15 Presented by 9old Application Virtual Machine Allowcate Public IP
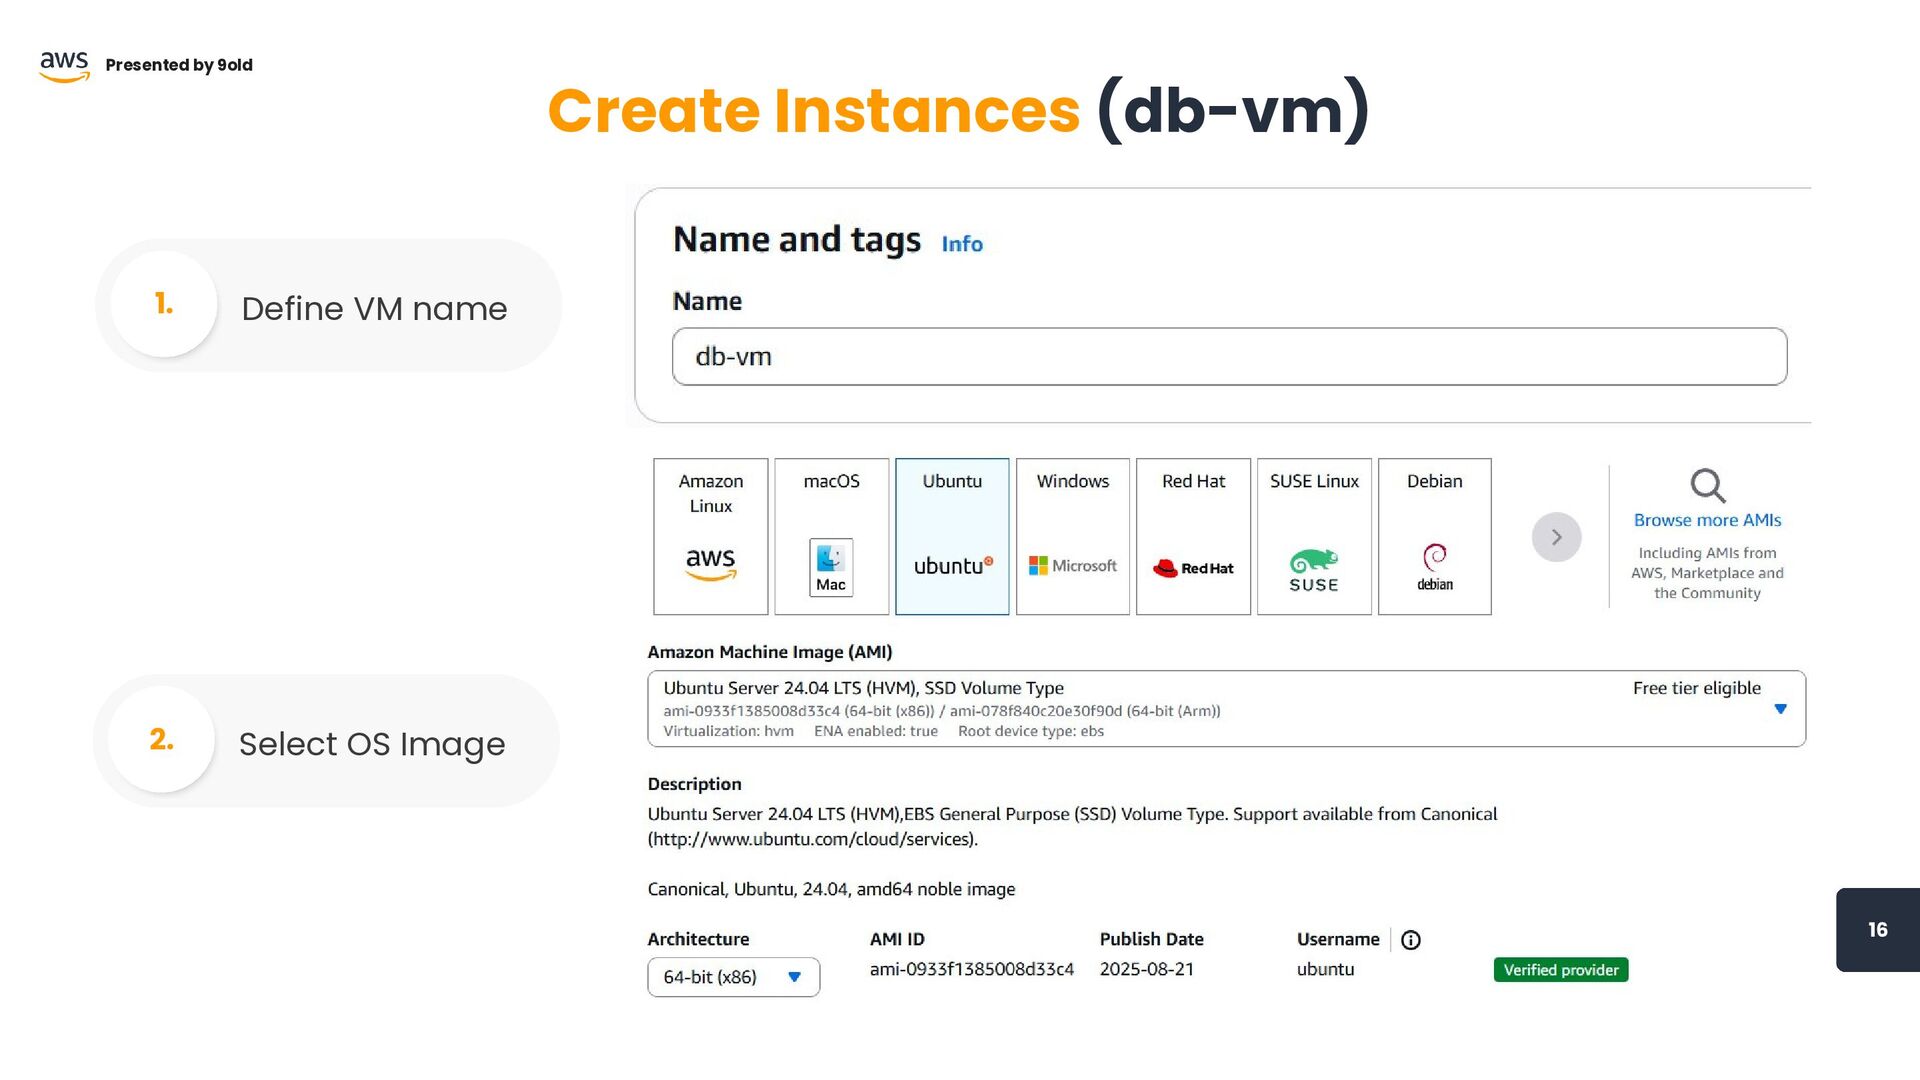
16 Presented by 9old Create Instances (db-vm) Define VM name
1. Select OS Image 2.
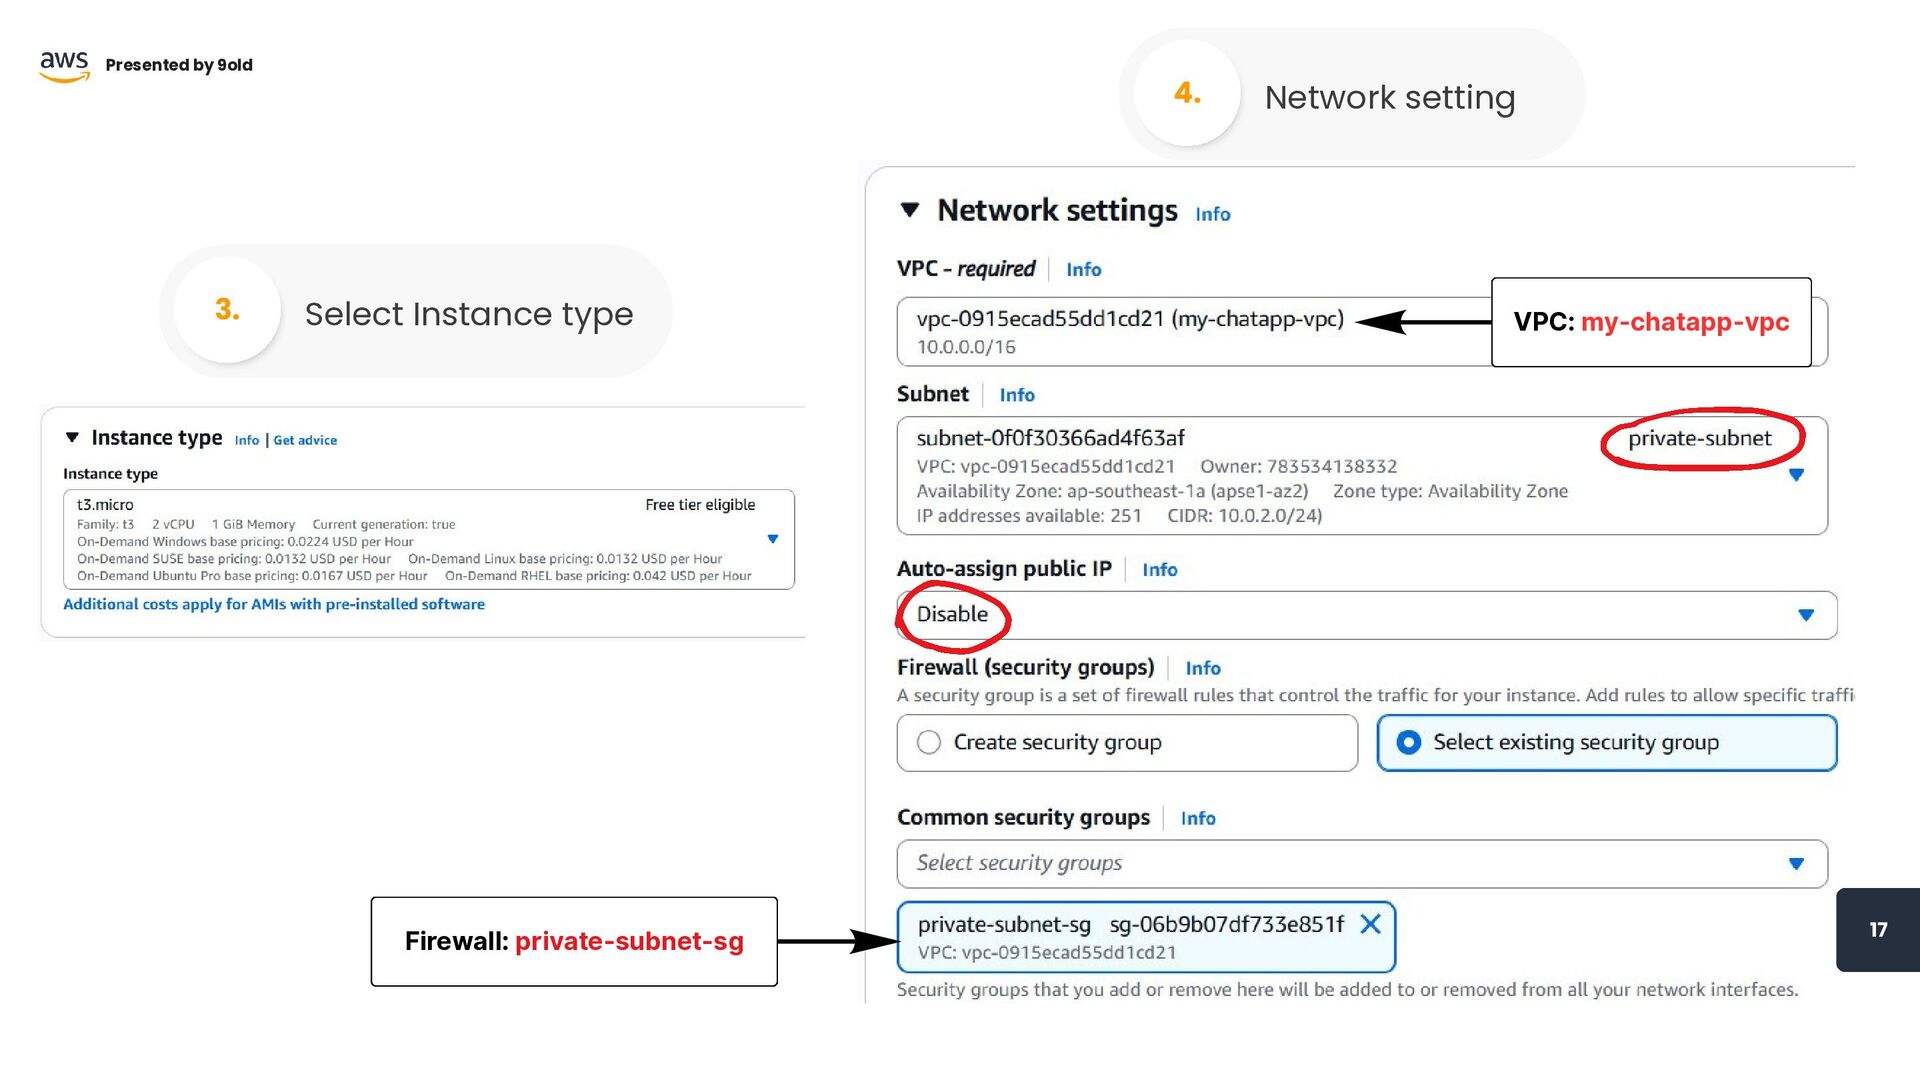
VPC: my-chatapp-vpc Firewall: private-subnet-sg 17 Presented by 9old Select Instance
type 3. Network setting 4.
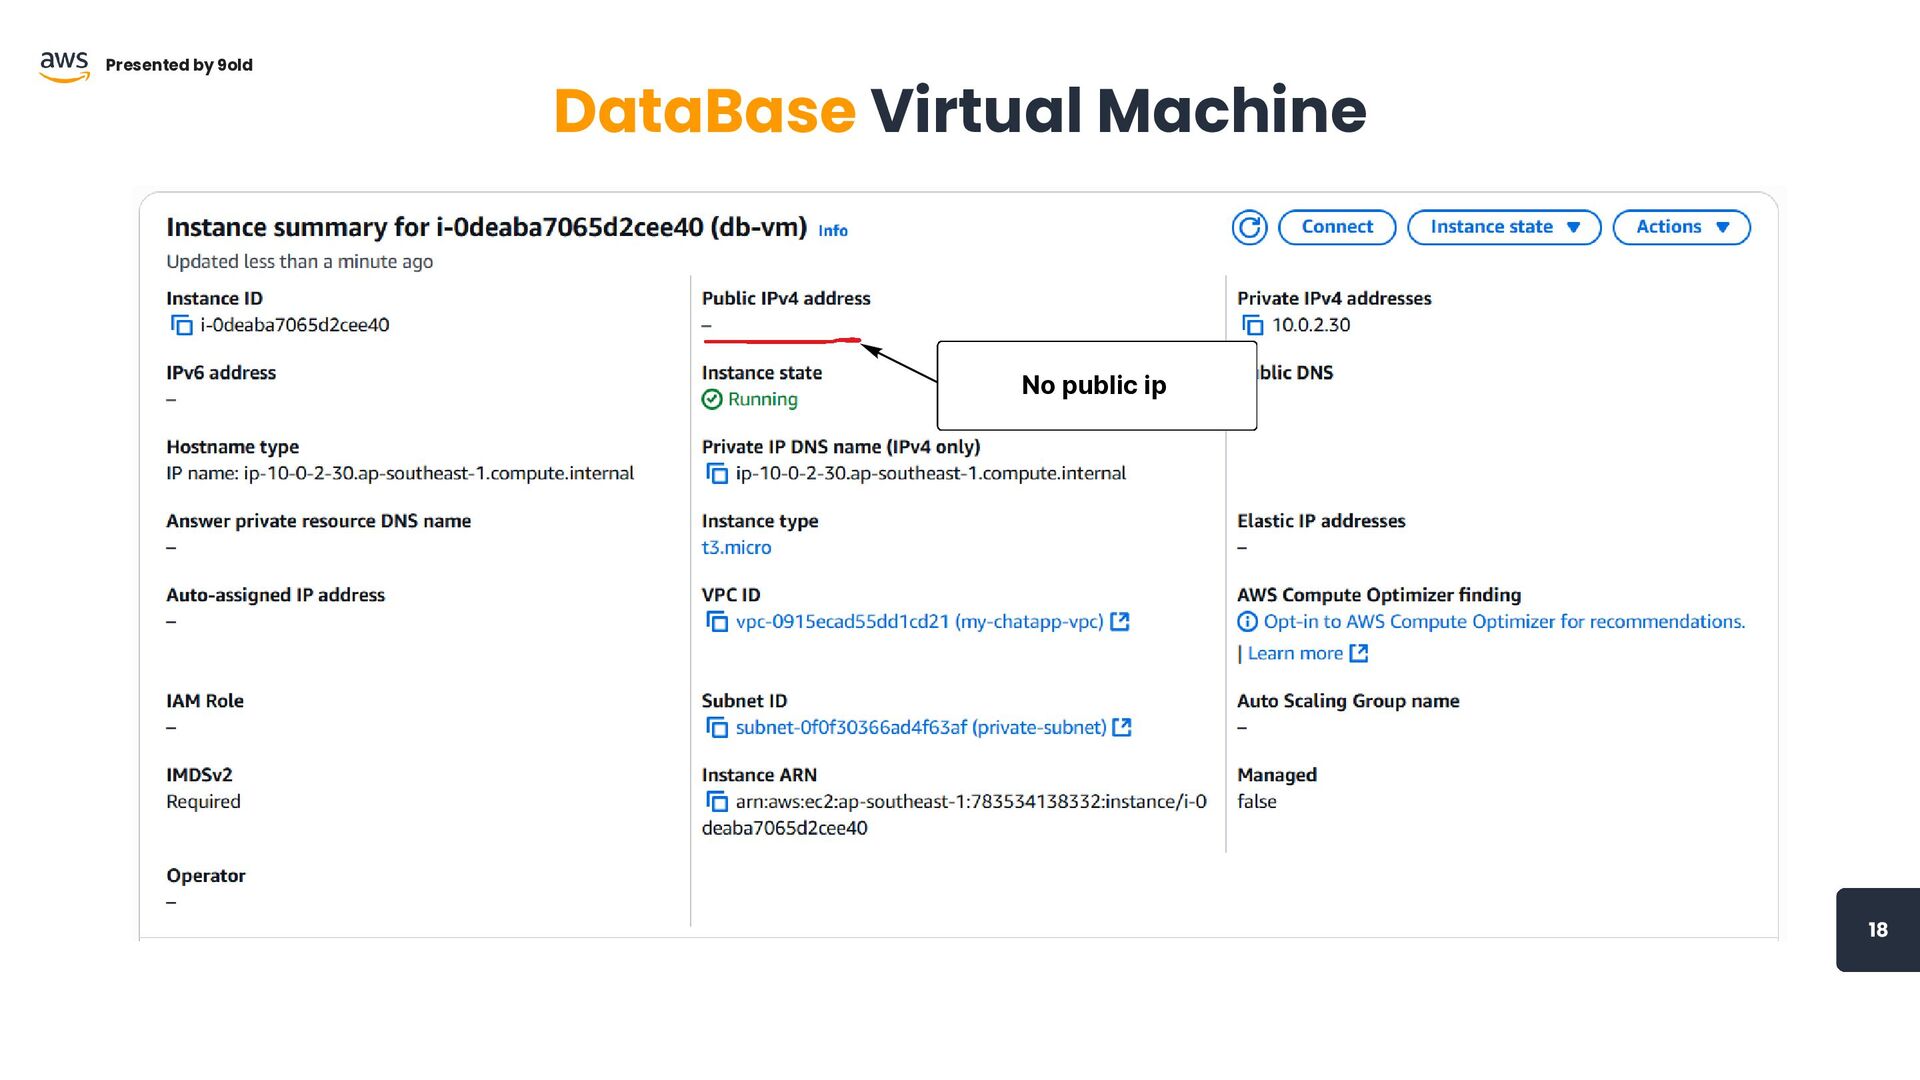
No public ip 18 Presented by 9old DataBase Virtual Machine
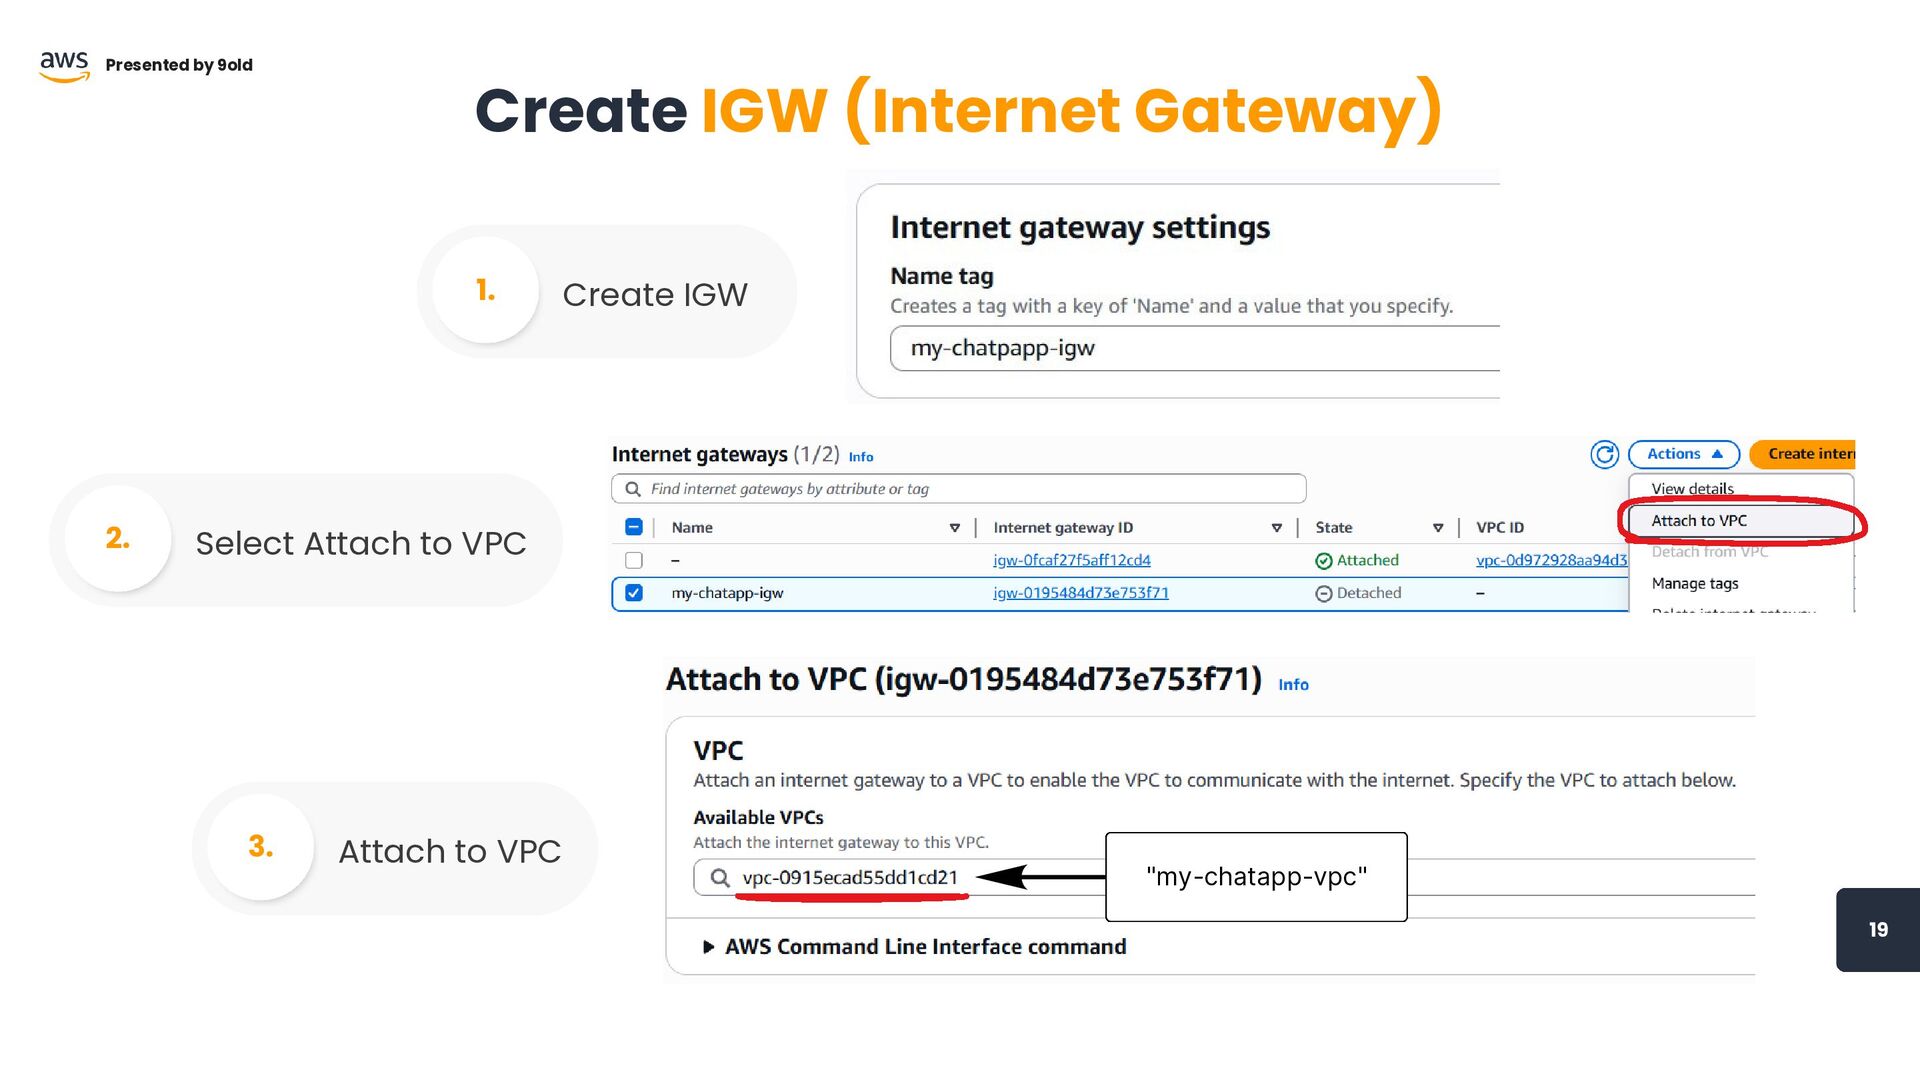
19 Presented by 9old Create IGW (Internet Gateway) Create IGW
1. Select Attach to VPC 2. Attach to VPC 3. "my-chatapp-vpc"
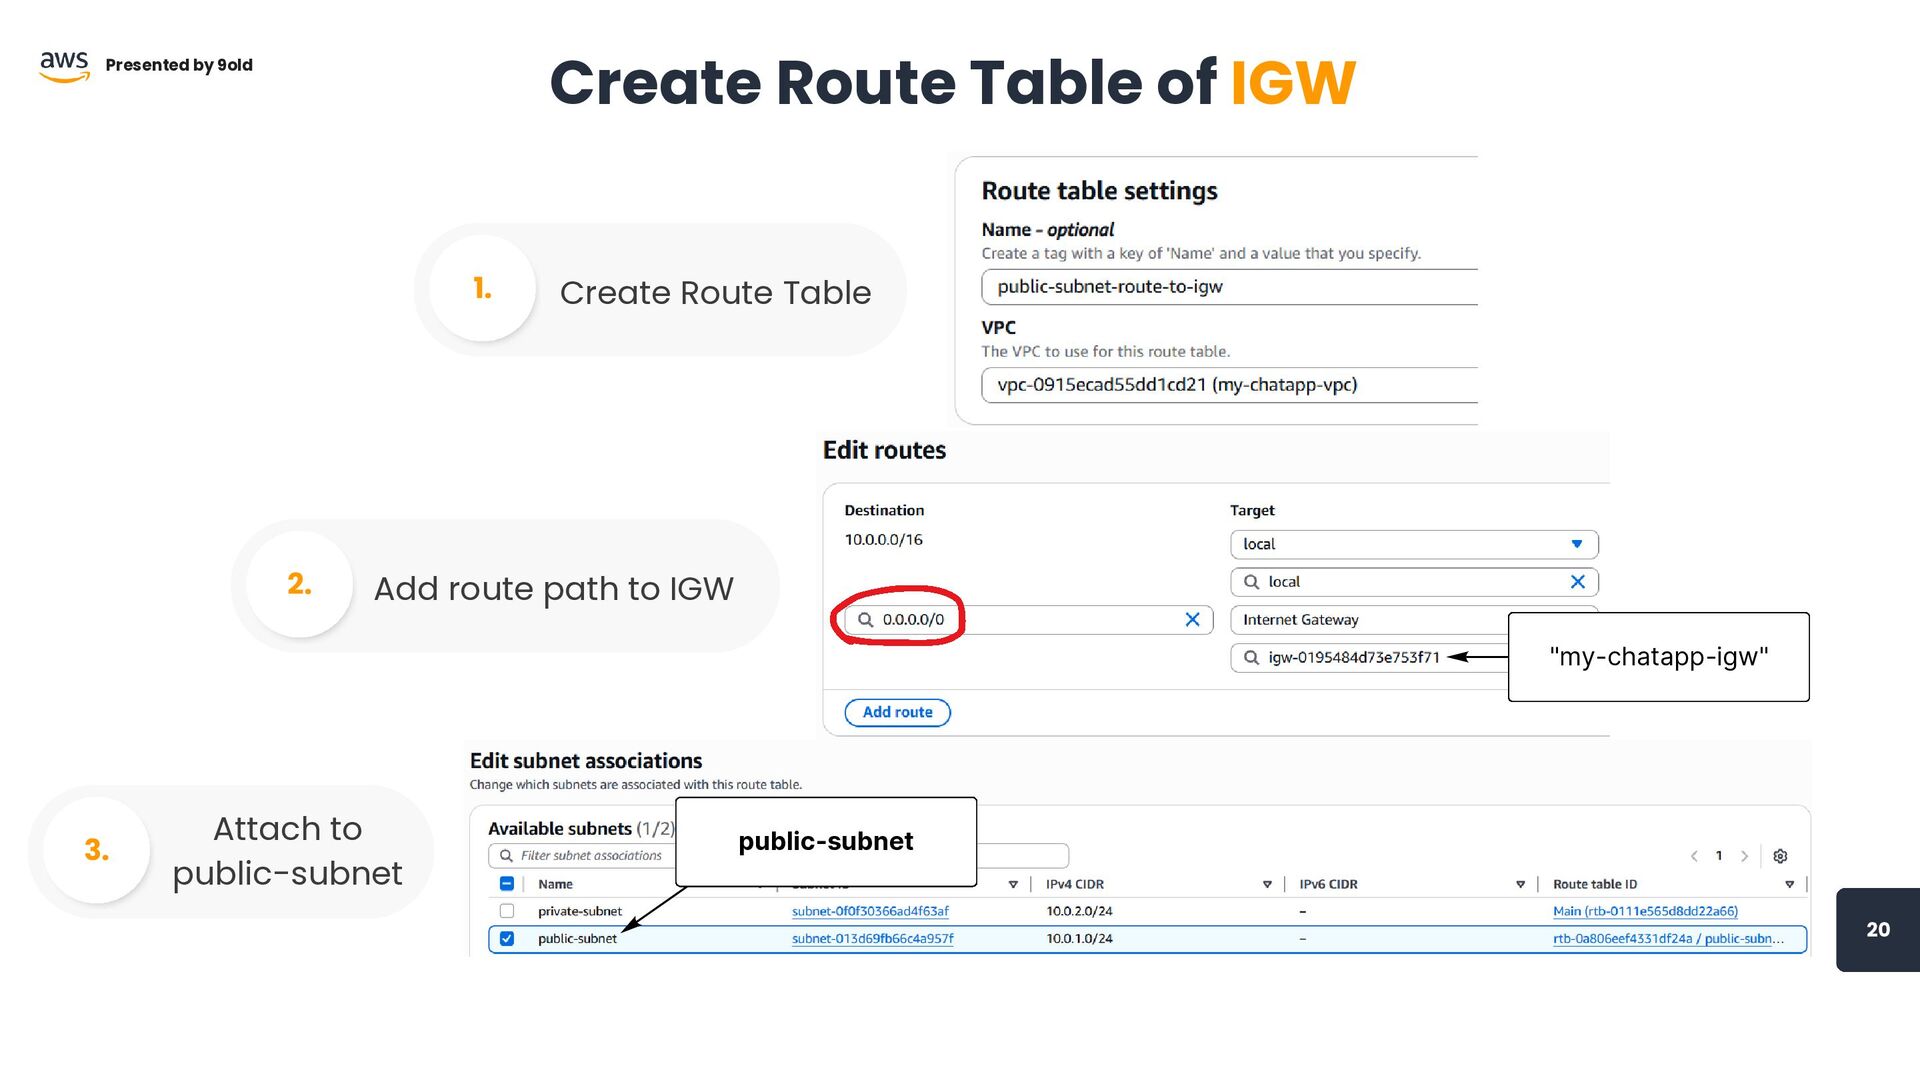
20 Presented by 9old Create Route Table of IGW Create
Route Table 1. Add route path to IGW 2. Attach to public-subnet 3. "my-chatapp-igw" public-subnet
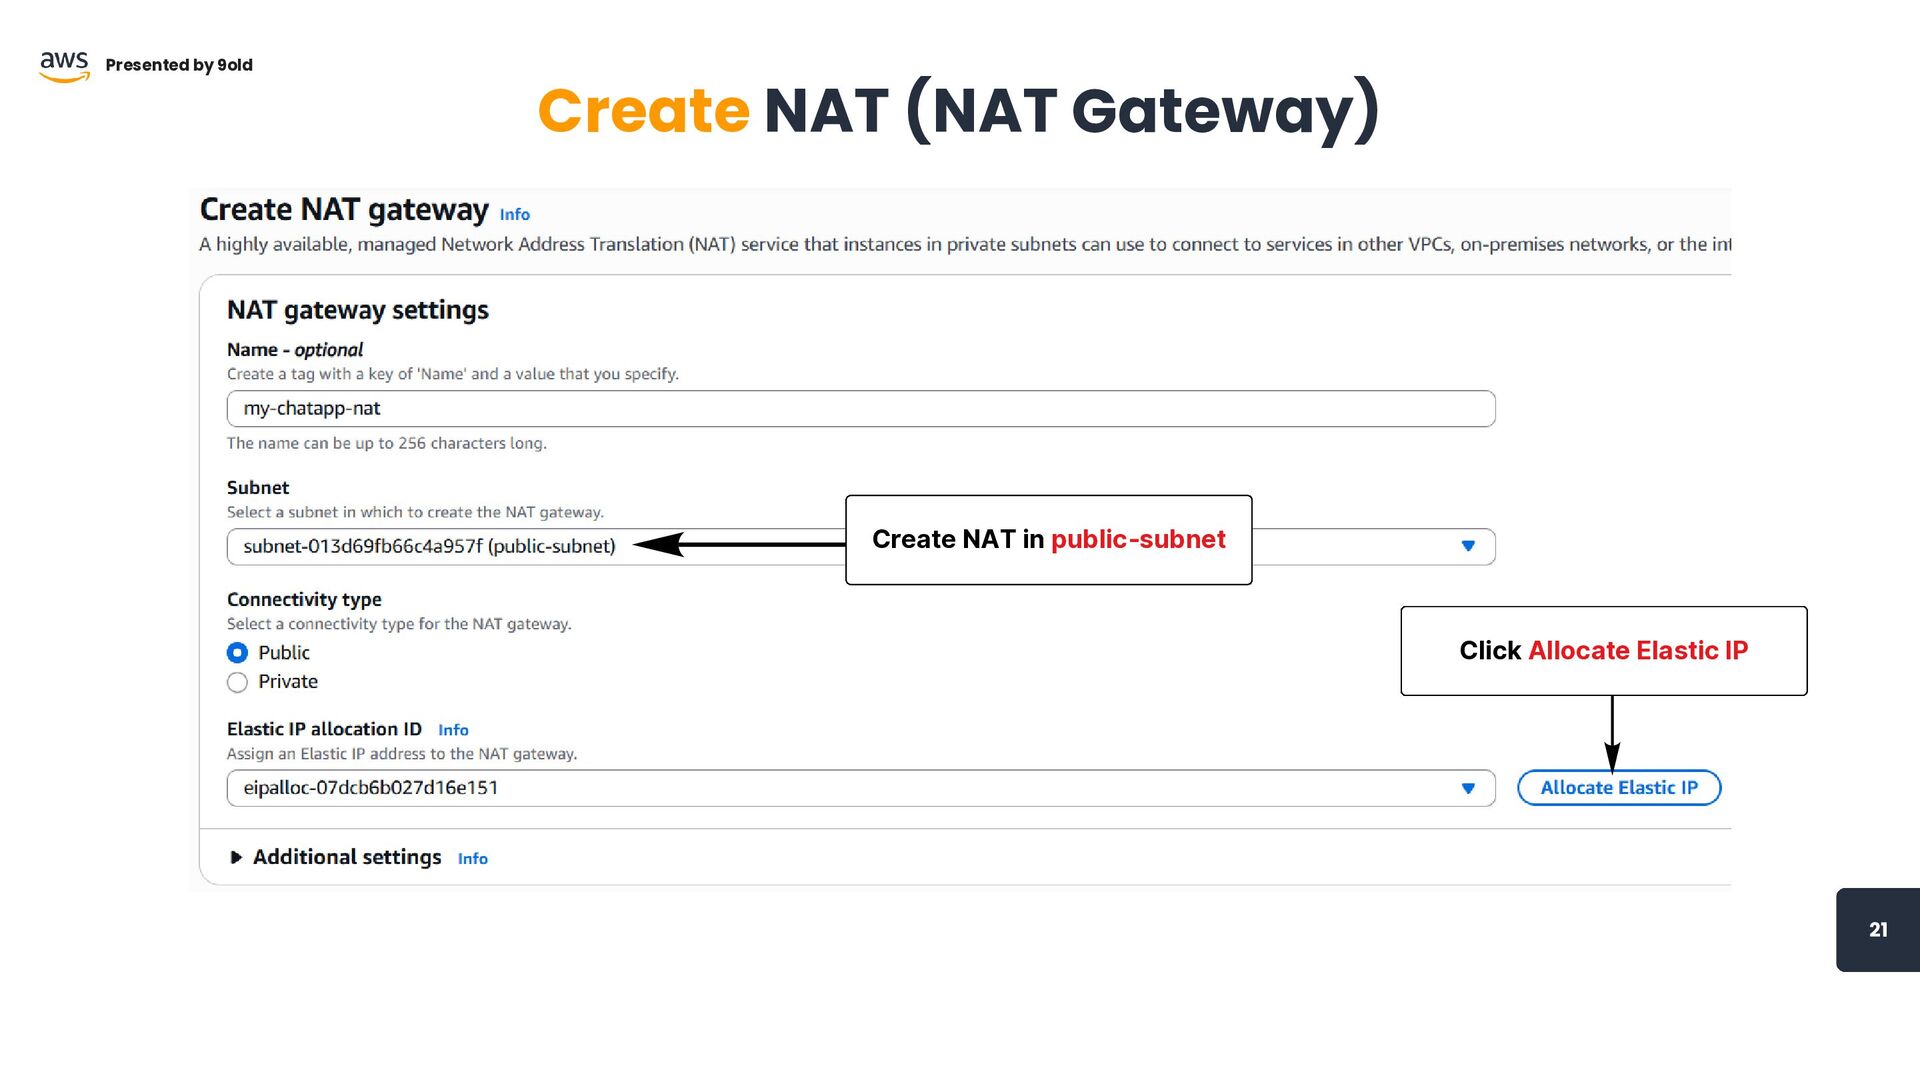
21 Presented by 9old Create NAT (NAT Gateway) Click Allocate
Elastic IP Create NAT in public-subnet
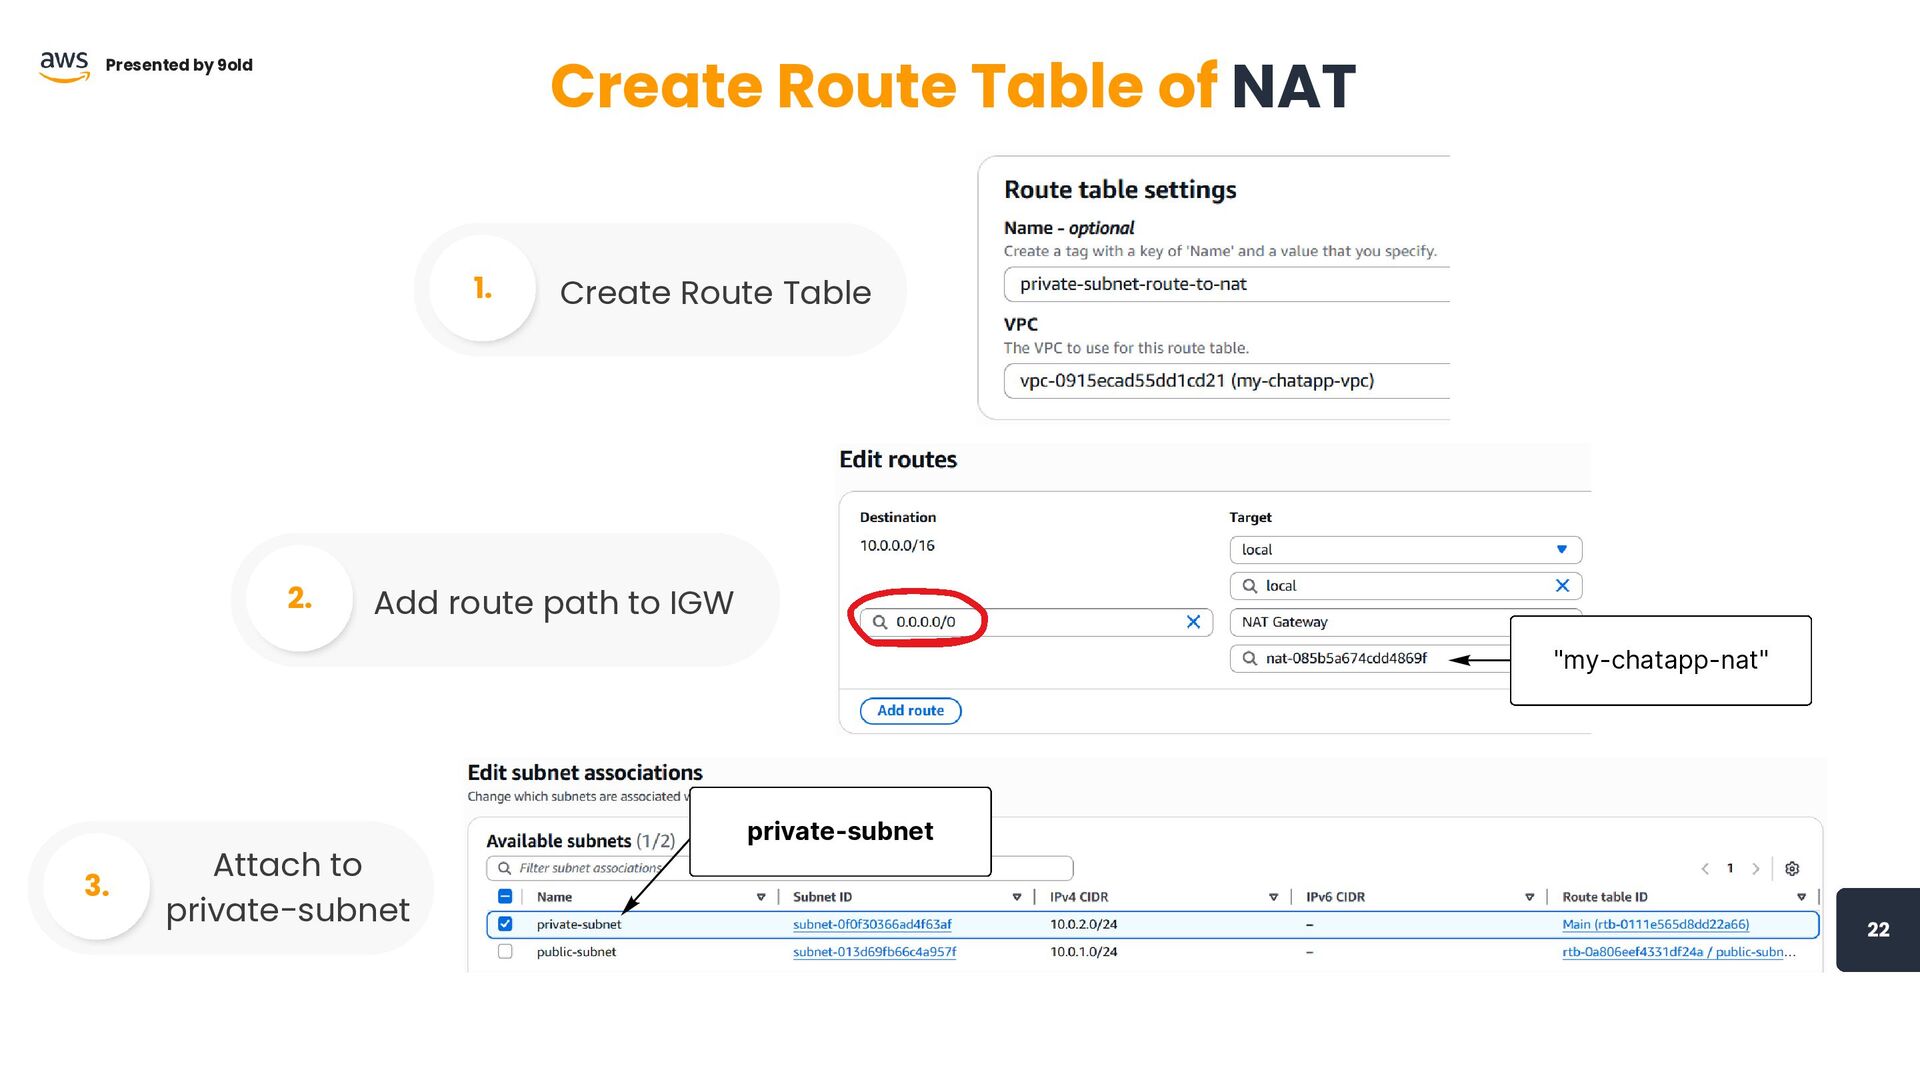
"my-chatapp-nat" 22 Presented by 9old Create Route Table of NAT
Create Route Table 1. Add route path to IGW 2. Attach to private-subnet 3. private-subnet
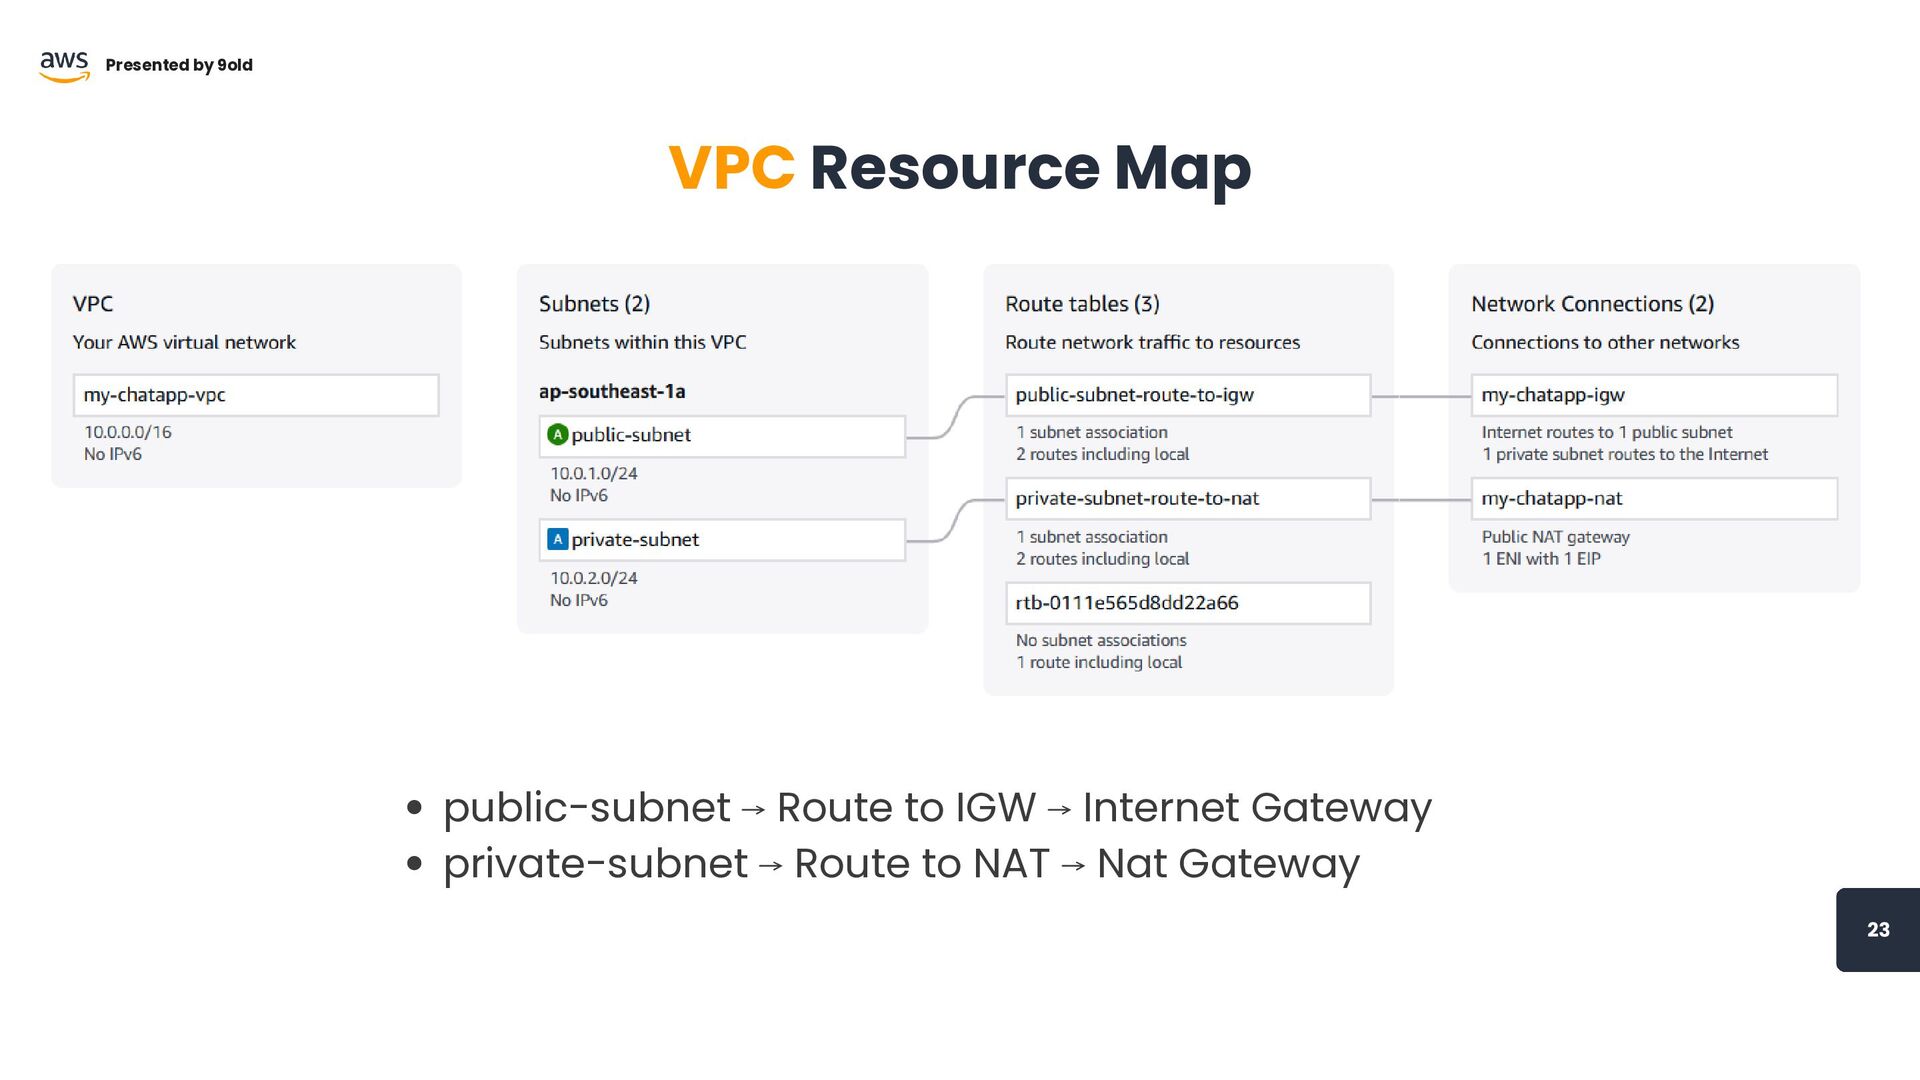
23 Presented by 9old VPC Resource Map public-subnet ⟶ Route
to IGW ⟶ Internet Gateway private-subnet ⟶ Route to NAT ⟶ Nat Gateway
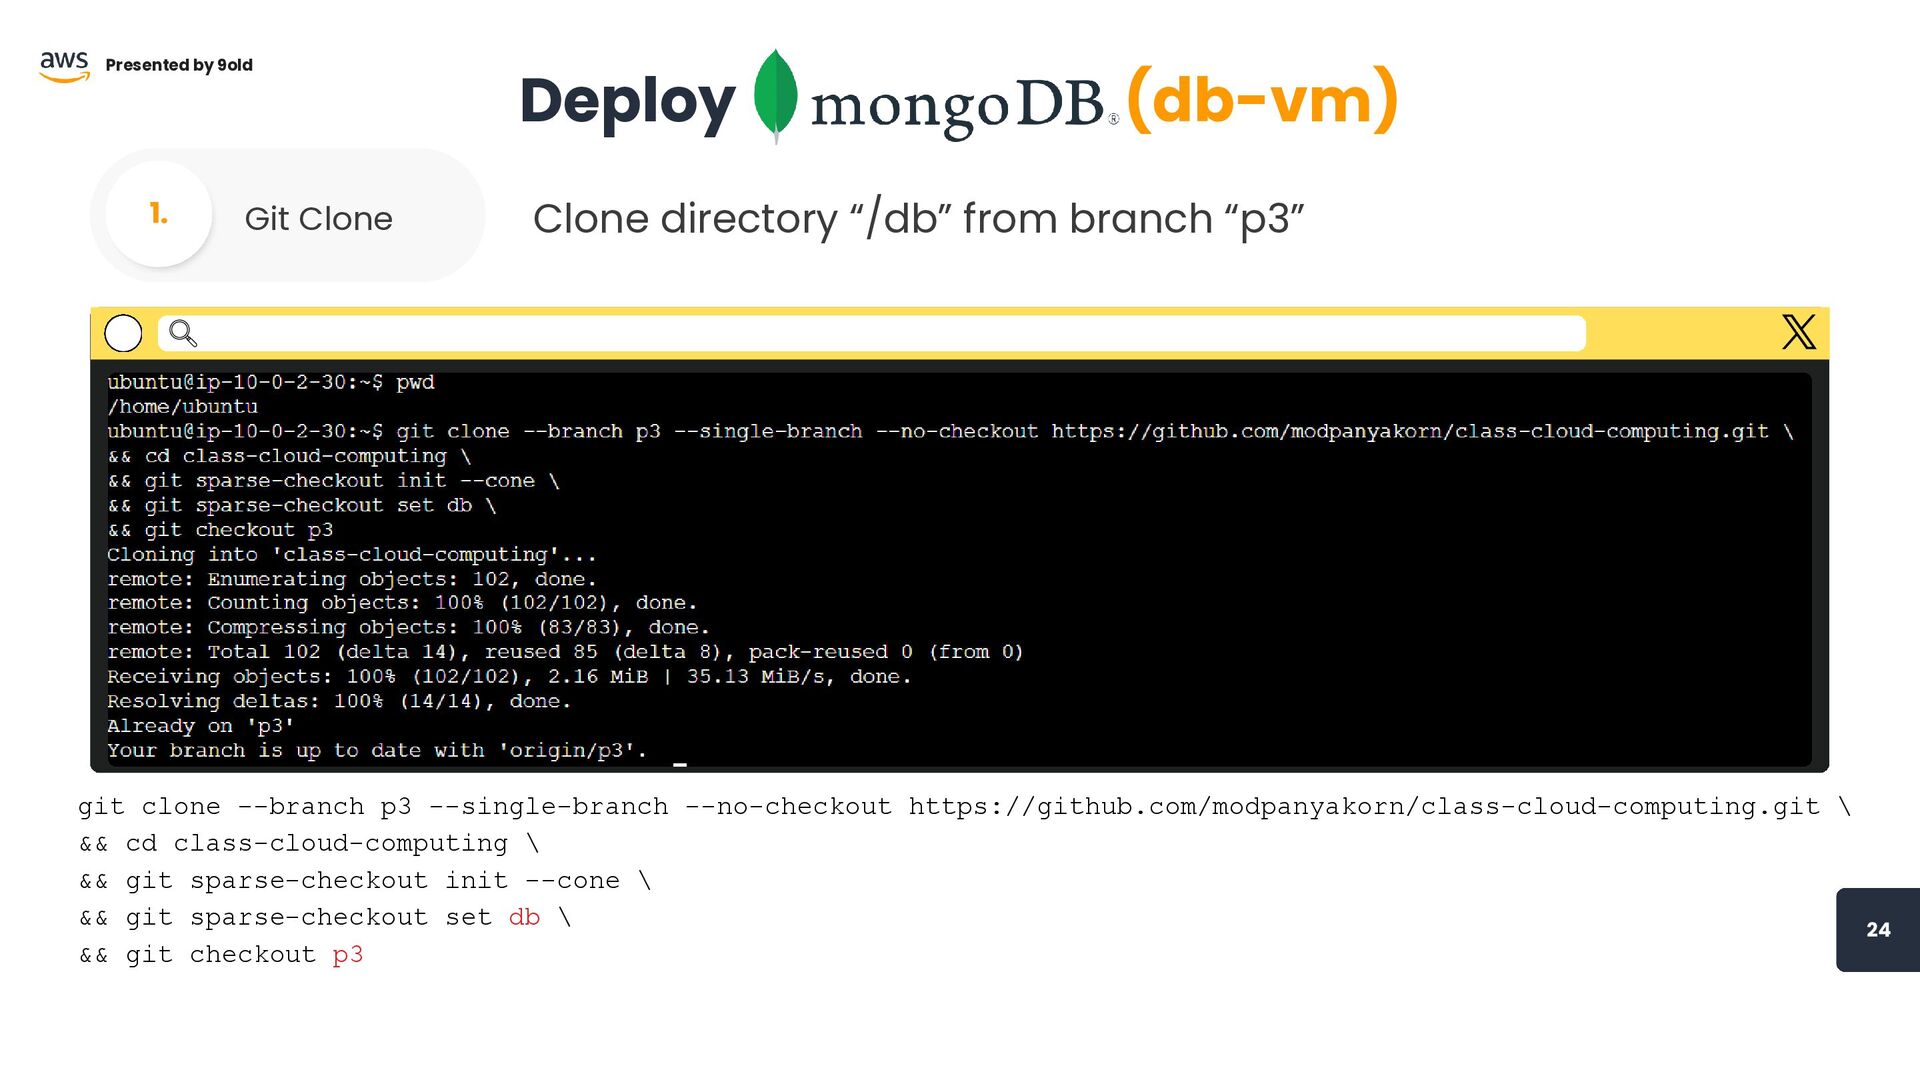
24 Presented by 9old Deploy (db-vm) Git Clone 1. git
clone --branch p3 --single-branch --no-checkout https://github.com/modpanyakorn/class-cloud-computing.git \ && cd class-cloud-computing \ && git sparse-checkout init --cone \ && git sparse-checkout set db \ && git checkout p3 Clone directory “/db” from branch “p3”
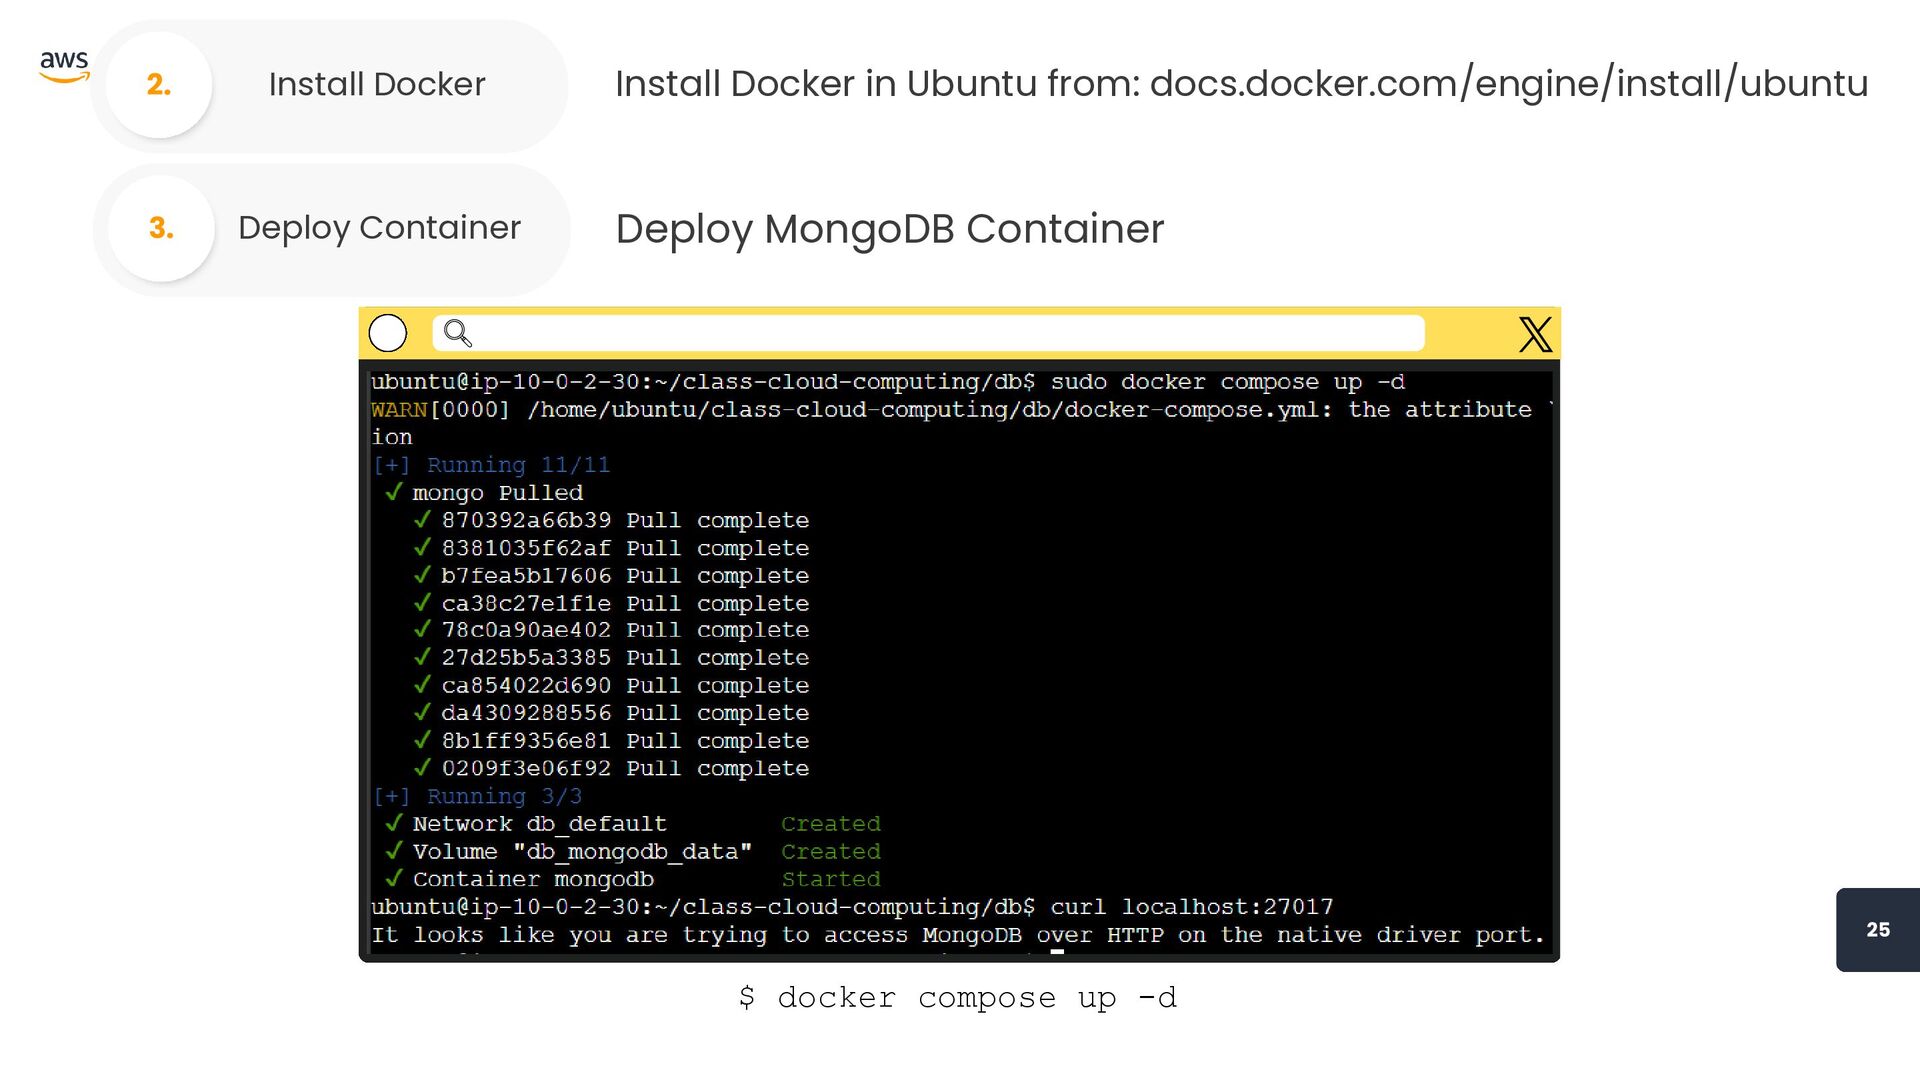
Presented by 9old 25 Install Docker 2. Install Docker in
Ubuntu from: docs.docker.com/engine/install/ubuntu Deploy Container 3. Deploy MongoDB Container $ docker compose up -d
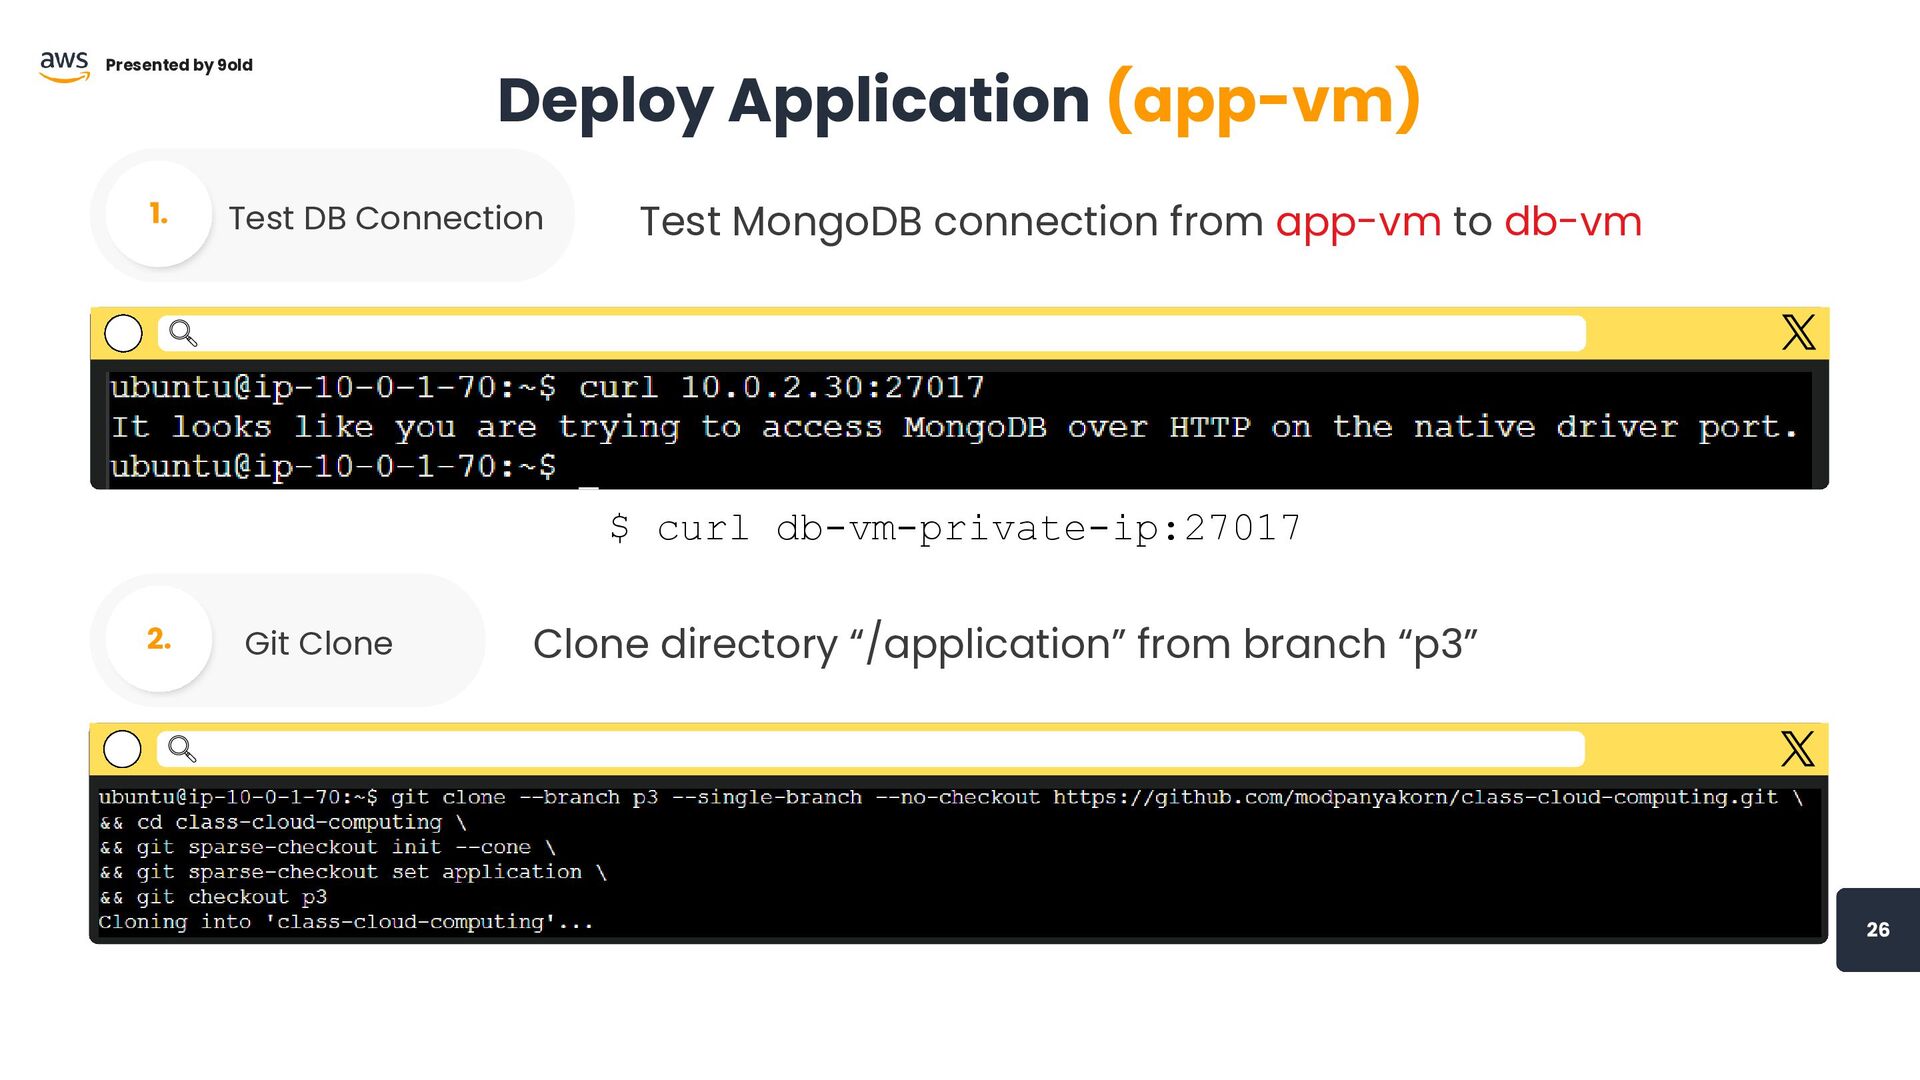
26 Presented by 9old Deploy Application (app-vm) Test DB Connection
1. $ curl db-vm-private-ip:27017 Test MongoDB connection from app-vm to db-vm Git Clone 2. Clone directory “/application” from branch “p3”
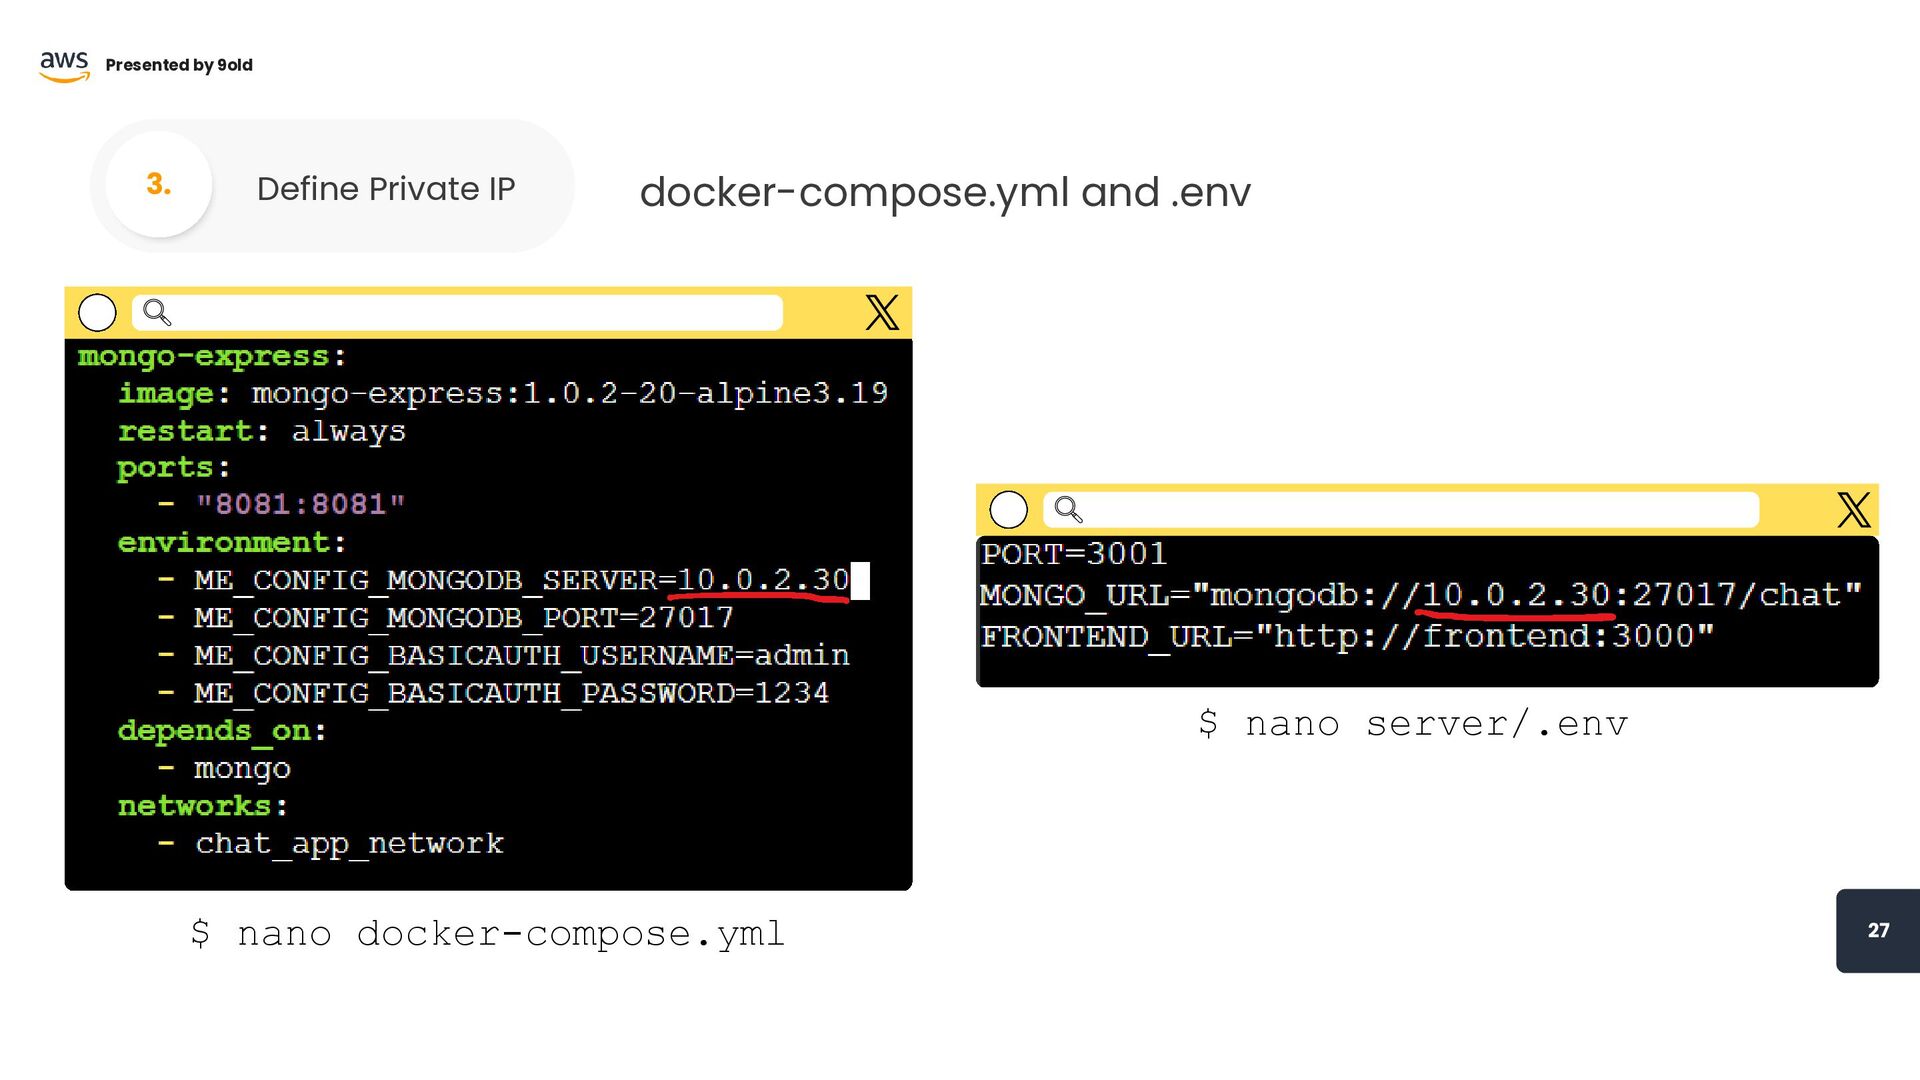
27 Presented by 9old Define Private IP 3. docker-compose.yml and
.env $ nano docker-compose.yml $ nano server/.env
Presented by 9old 28 Deploy Container 5. Deploy Application Containers
$ docker compose up -d Install Docker 4. Install Docker in Ubuntu from: docs.docker.com/engine/install/ubuntu
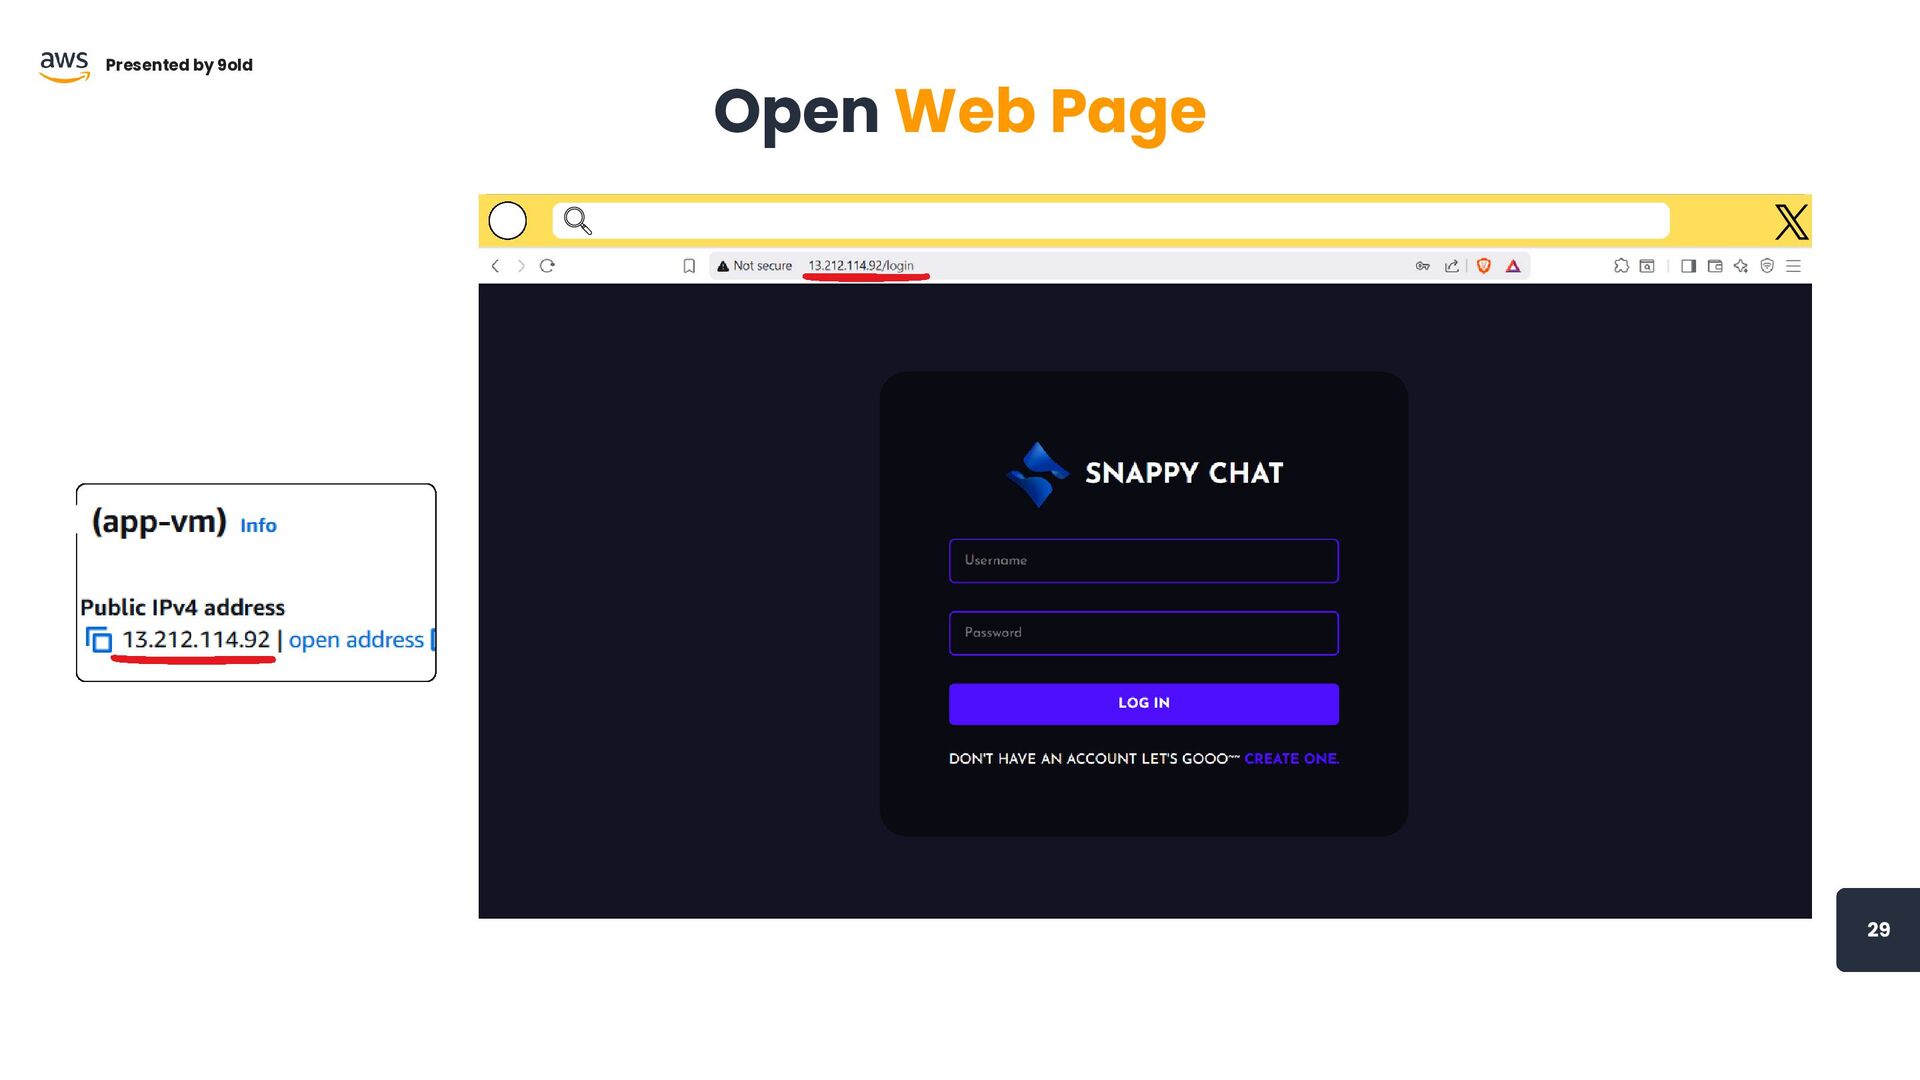
29 Open Web Page Presented by 9old
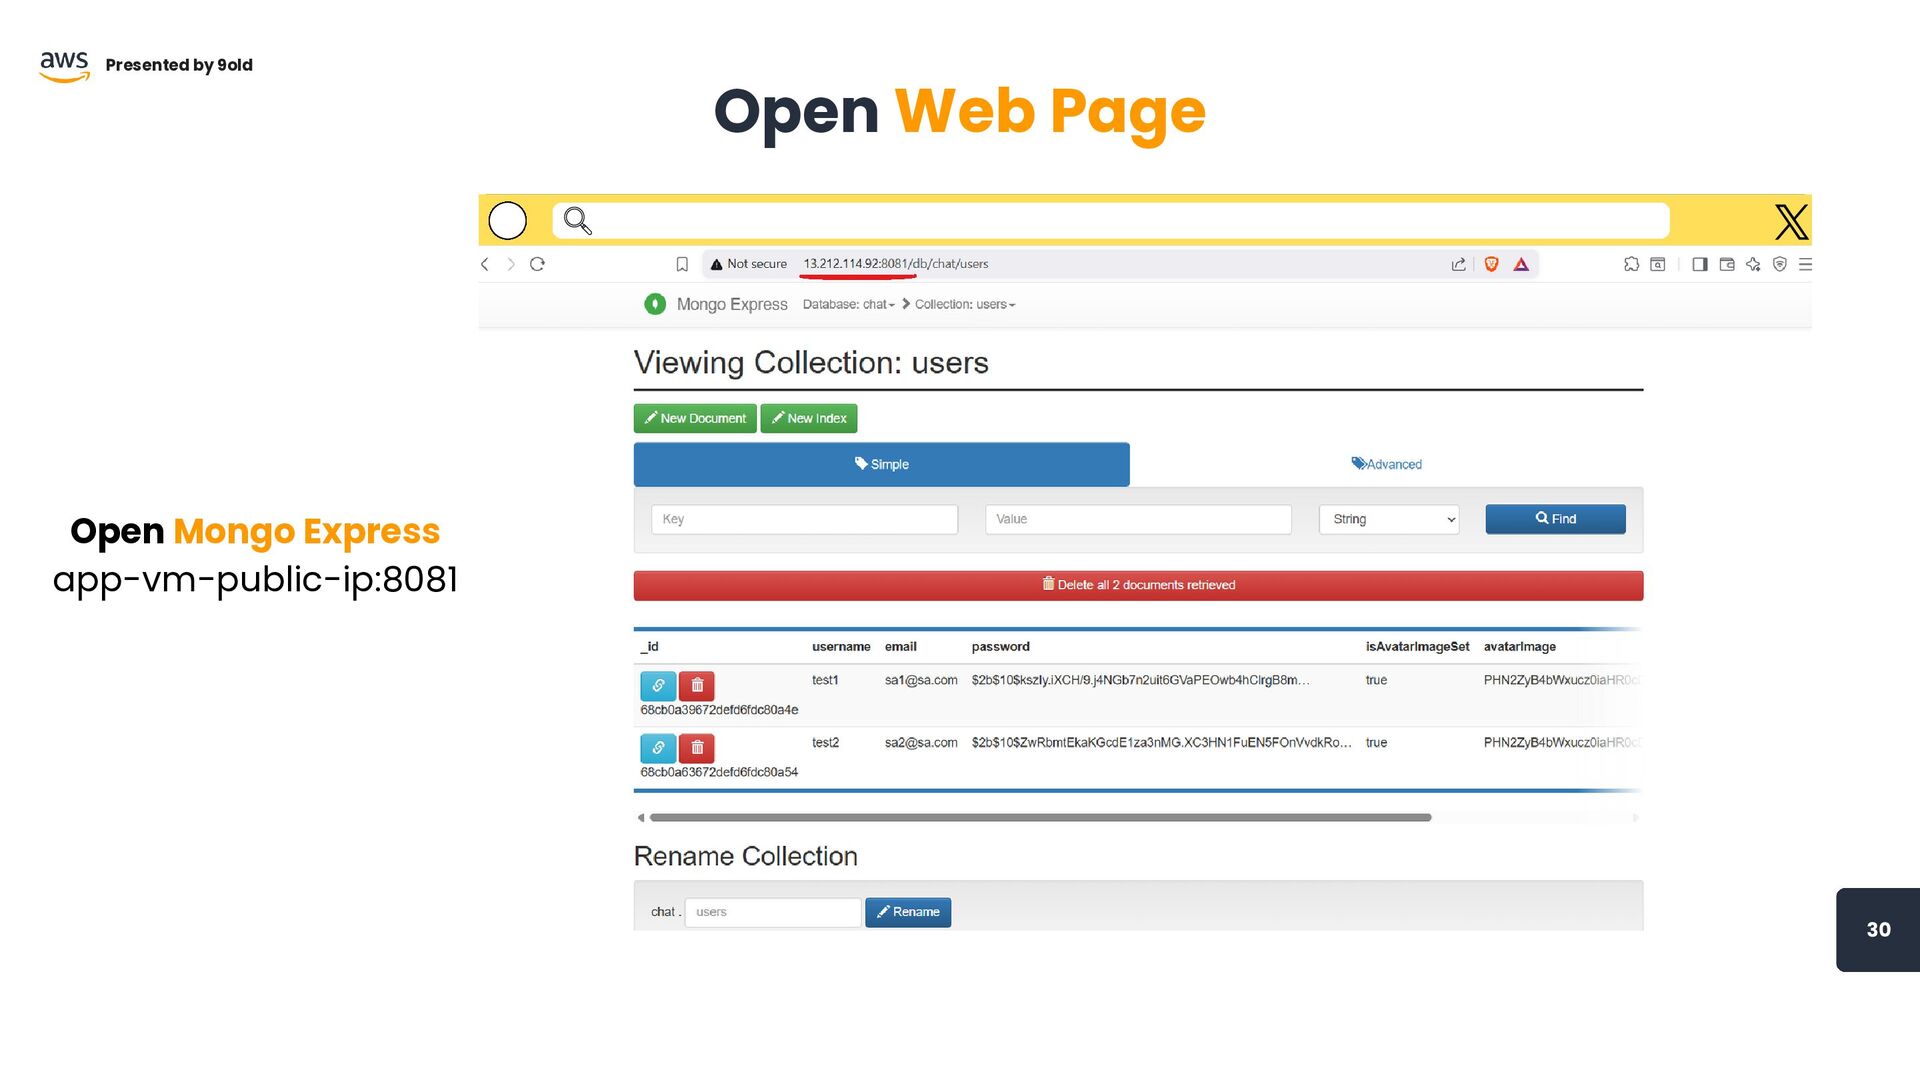
30 Open Web Page Presented by 9old Open Mongo Express
app-vm-public-ip:8081
31 Presented by 9old 😊 Dev: “ก็แค่เปิด EC2 เครื่องเดียวพอ” 😎
Cloud Engineer: “งั้นผมขอทำ VPC, Subnet, NAT Gateway, Route Table, SG, IAM Role, Auto Scaling Group, CloudWatch, ALB, WAF...” 😑 Dev: ....... THANK YOU