- Part 2 paulgoetz.7 on Facebook seascripts on Instagram Santo Hancroft in Second Life Viewing Tip: Best viewed full screen or in a large window. Look for the expand arrows icon and/or use CTRL+/-. Tools used in this booklet: • DSLR camera • Various web images • Corel PaintShop Pro • Paper • Screen captures from Second Life Each page contains the key points of the daily assignment and the work produced.
will spend some time looking for moving images of Stonehenge. Imagine you go there for a trip and need to take one picture. Find the appropriate video and take a screenshot of the appropriate view. The rules are very simple: you need to find a video of the real thing. In your “screenshot” image, add a pictogram or icon of a person (to give a scale to the whole thing). Why do we do this? Because we are flooded with information. In the contemporary world, the point is not about getting information. The point is about not drowning into information! Out of one thousand videos, only one shall become yours. Out of ten thousand frames inside this chosen video, only one will become yours. What will I learn? To select. Online, you’ll find thousands of videos related to Stonehenge. Which one is to become yours? Why?
existing videos on Stonehenge. Today, the task is to choose an image (from the video or from the images in the linked article) and to add an existing diagram to it. The diagram should refer to the sun and / or stars. Source one: image (or still from the video) Source two: a diagram (found somewhere) What will I learn? To generate a sophisticated visual concept starting from existing materials. To generate new meaning. Why do we do this? To get rid of this curious idea we have about having to be original. This is not our case. Not in today’s homework.
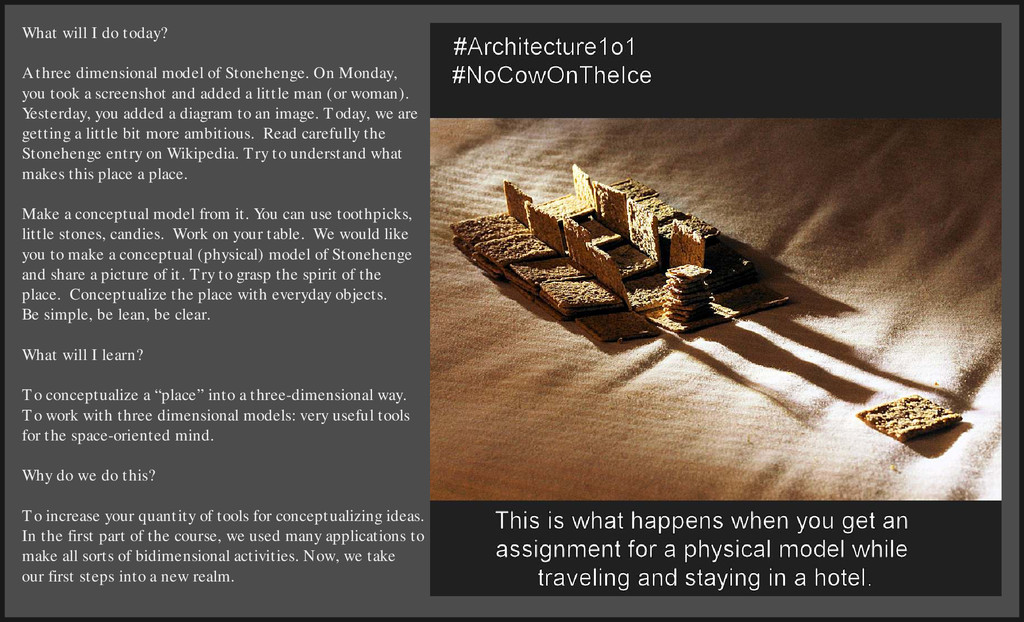
Stonehenge. On Monday, you took a screenshot and added a little man (or woman). Yesterday, you added a diagram to an image. Today, we are getting a little bit more ambitious. Read carefully the Stonehenge entry on Wikipedia. Try to understand what makes this place a place. Make a conceptual model from it. You can use toothpicks, little stones, candies. Work on your table. We would like you to make a conceptual (physical) model of Stonehenge and share a picture of it. Try to grasp the spirit of the place. Conceptualize the place with everyday objects. Be simple, be lean, be clear. What will I learn? To conceptualize a “place” into a three-dimensional way. To work with three dimensional models: very useful tools for the space-oriented mind. Why do we do this? To increase your quantity of tools for conceptualizing ideas. In the first part of the course, we used many applications to make all sorts of bidimensional activities. Now, we take our first steps into a new realm.
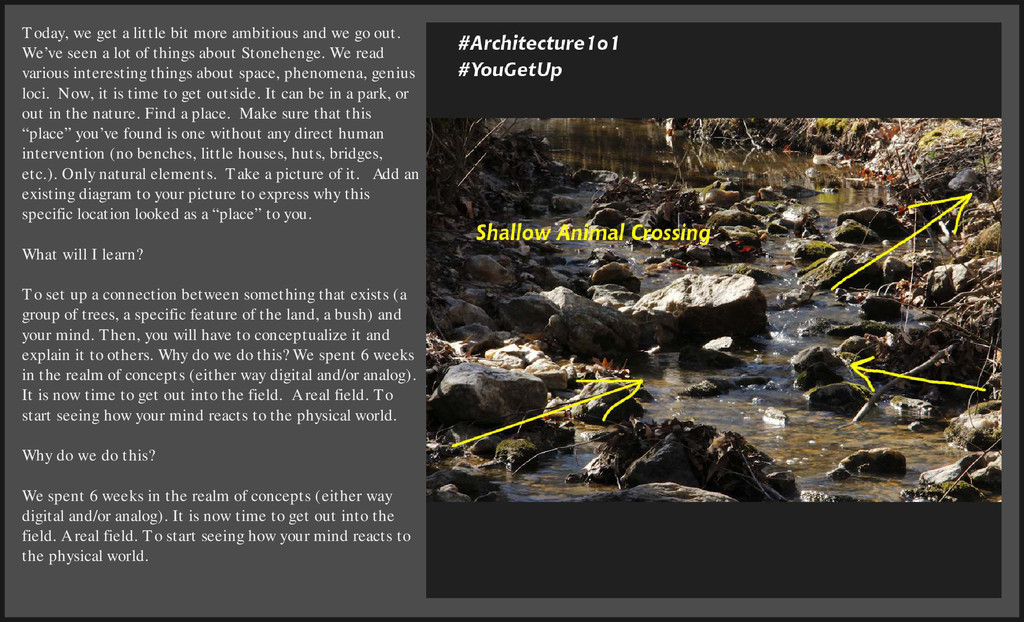
go out. We’ve seen a lot of things about Stonehenge. We read various interesting things about space, phenomena, genius loci. Now, it is time to get outside. It can be in a park, or out in the nature. Find a place. Make sure that this “place” you’ve found is one without any direct human intervention (no benches, little houses, huts, bridges, etc.). Only natural elements. Take a picture of it. Add an existing diagram to your picture to express why this specific location looked as a “place” to you. What will I learn? To set up a connection between something that exists (a group of trees, a specific feature of the land, a bush) and your mind. Then, you will have to conceptualize it and explain it to others. Why do we do this? We spent 6 weeks in the realm of concepts (either way digital and/or analog). It is now time to get out into the field. A real field. To start seeing how your mind reacts to the physical world. Why do we do this? We spent 6 weeks in the realm of concepts (either way digital and/or analog). It is now time to get out into the field. A real field. To start seeing how your mind reacts to the physical world.
it as “your place” using little or big (if you are ambitious) stones. You found a place in nature. Now, enhance its “placeness” using stones. What will I learn? Yesterday, we introduced you to John Berger. He said: “What makes photography a strange invention is that its primary raw materials are light and time”. This is important. In fact, today you will work on the relationship between a natural environment, your personal idea of place, a minimal intervention from your side, light and photography Why do we do this? To understand how complex and sophisticated a minimal operation as “putting little stones in a natural environment and taking a picture of the thing” is. How to invent space? How to make space? You can build a wall. Put a chair in an empty spot. Stack some stones
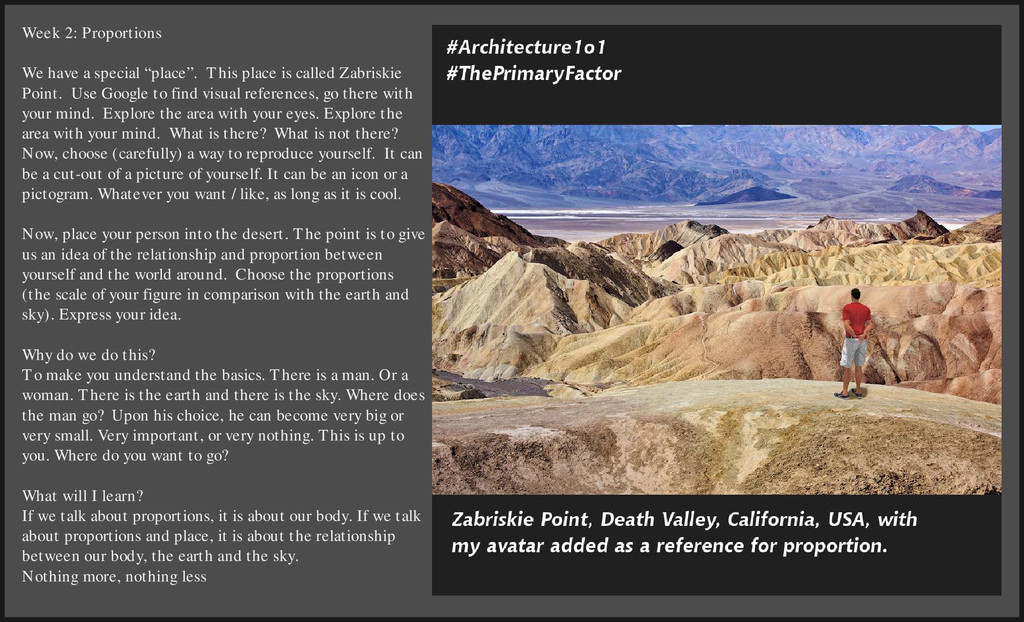
is called Zabriskie Point. Use Google to find visual references, go there with your mind. Explore the area with your eyes. Explore the area with your mind. What is there? What is not there? Now, choose (carefully) a way to reproduce yourself. It can be a cut-out of a picture of yourself. It can be an icon or a pictogram. Whatever you want / like, as long as it is cool. Now, place your person into the desert. The point is to give us an idea of the relationship and proportion between yourself and the world around. Choose the proportions (the scale of your figure in comparison with the earth and sky). Express your idea. Why do we do this? To make you understand the basics. There is a man. Or a woman. There is the earth and there is the sky. Where does the man go? Upon his choice, he can become very big or very small. Very important, or very nothing. This is up to you. Where do you want to go? What will I learn? If we talk about proportions, it is about our body. If we talk about proportions and place, it is about the relationship between our body, the earth and the sky. Nothing more, nothing less
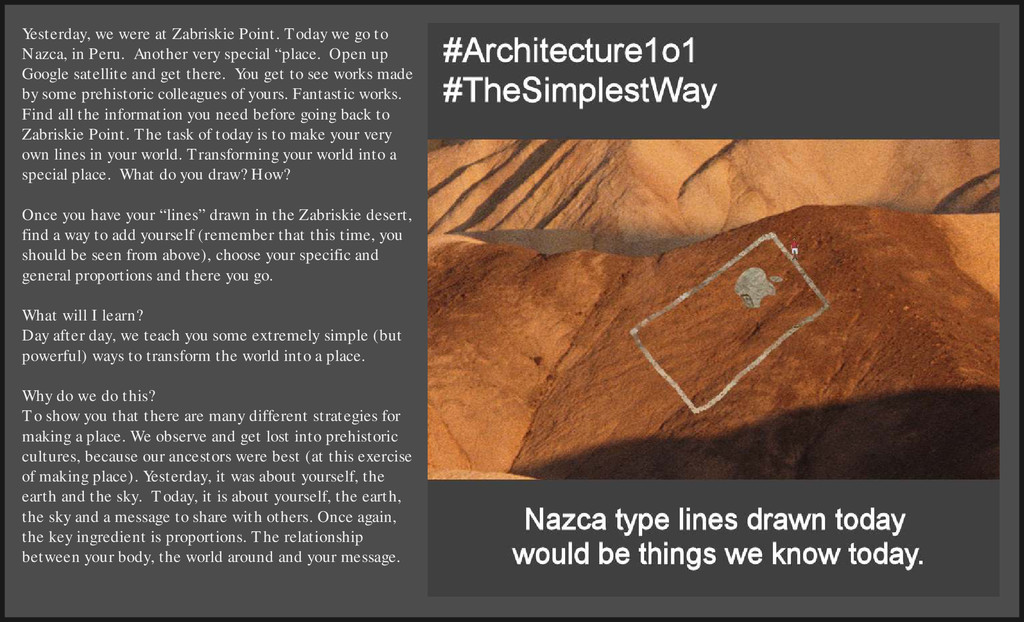
Nazca, in Peru. Another very special “place. Open up Google satellite and get there. You get to see works made by some prehistoric colleagues of yours. Fantastic works. Find all the information you need before going back to Zabriskie Point. The task of today is to make your very own lines in your world. Transforming your world into a special place. What do you draw? How? Once you have your “lines” drawn in the Zabriskie desert, find a way to add yourself (remember that this time, you should be seen from above), choose your specific and general proportions and there you go. What will I learn? Day after day, we teach you some extremely simple (but powerful) ways to transform the world into a place. Why do we do this? To show you that there are many different strategies for making a place. We observe and get lost into prehistoric cultures, because our ancestors were best (at this exercise of making place). Yesterday, it was about yourself, the earth and the sky. Today, it is about yourself, the earth, the sky and a message to share with others. Once again, the key ingredient is proportions. The relationship between your body, the world around and your message.
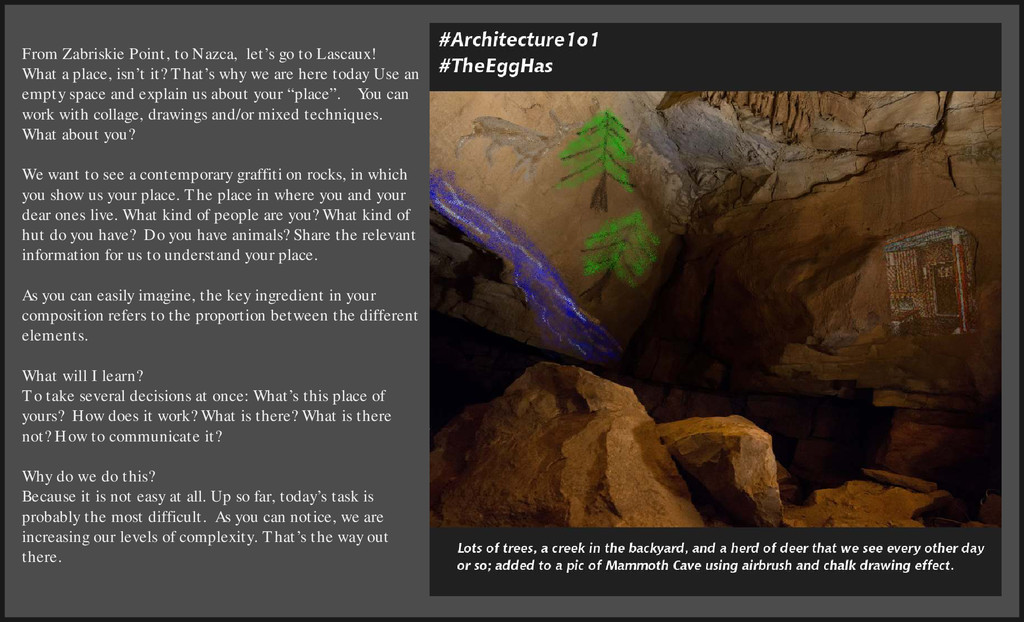
a place, isn’t it? That’s why we are here today Use an empty space and explain us about your “place”. You can work with collage, drawings and/or mixed techniques. What about you? We want to see a contemporary graffiti on rocks, in which you show us your place. The place in where you and your dear ones live. What kind of people are you? What kind of hut do you have? Do you have animals? Share the relevant information for us to understand your place. As you can easily imagine, the key ingredient in your composition refers to the proportion between the different elements. What will I learn? To take several decisions at once: What’s this place of yours? How does it work? What is there? What is there not? How to communicate it? Why do we do this? Because it is not easy at all. Up so far, today’s task is probably the most difficult. As you can notice, we are increasing our levels of complexity. That’s the way out there.
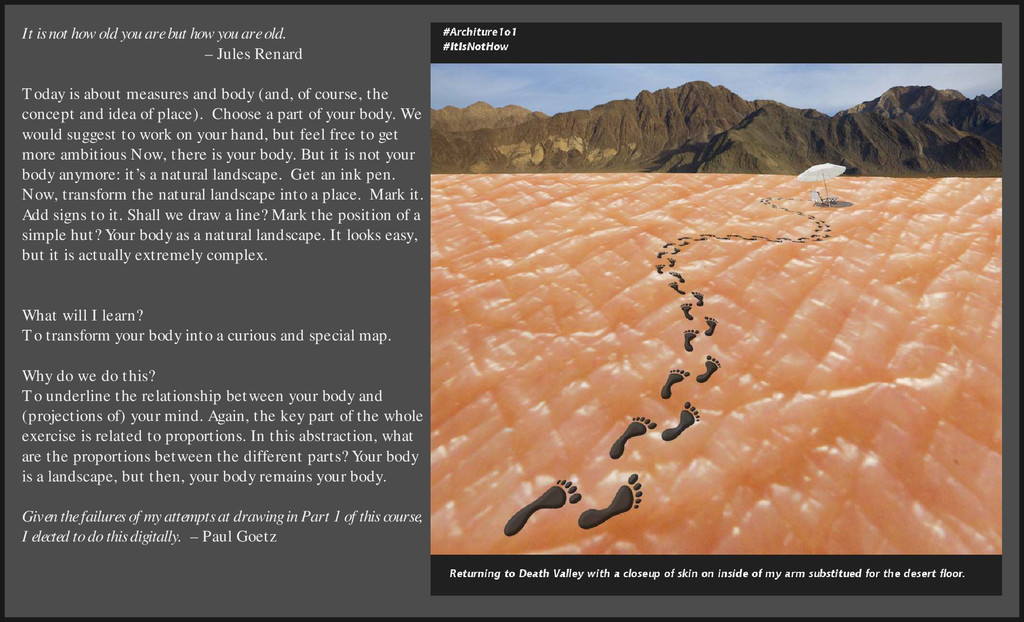
are old. – Jules Renard Today is about measures and body (and, of course, the concept and idea of place). Choose a part of your body. We would suggest to work on your hand, but feel free to get more ambitious Now, there is your body. But it is not your body anymore: it’s a natural landscape. Get an ink pen. Now, transform the natural landscape into a place. Mark it. Add signs to it. Shall we draw a line? Mark the position of a simple hut? Your body as a natural landscape. It looks easy, but it is actually extremely complex. What will I learn? To transform your body into a curious and special map. Why do we do this? To underline the relationship between your body and (projections of) your mind. Again, the key part of the whole exercise is related to proportions. In this abstraction, what are the proportions between the different parts? Your body is a landscape, but then, your body remains your body. Given the failures of my attempts at drawing in Part 1 of this course, I elected to do this digitally. – Paul Goetz
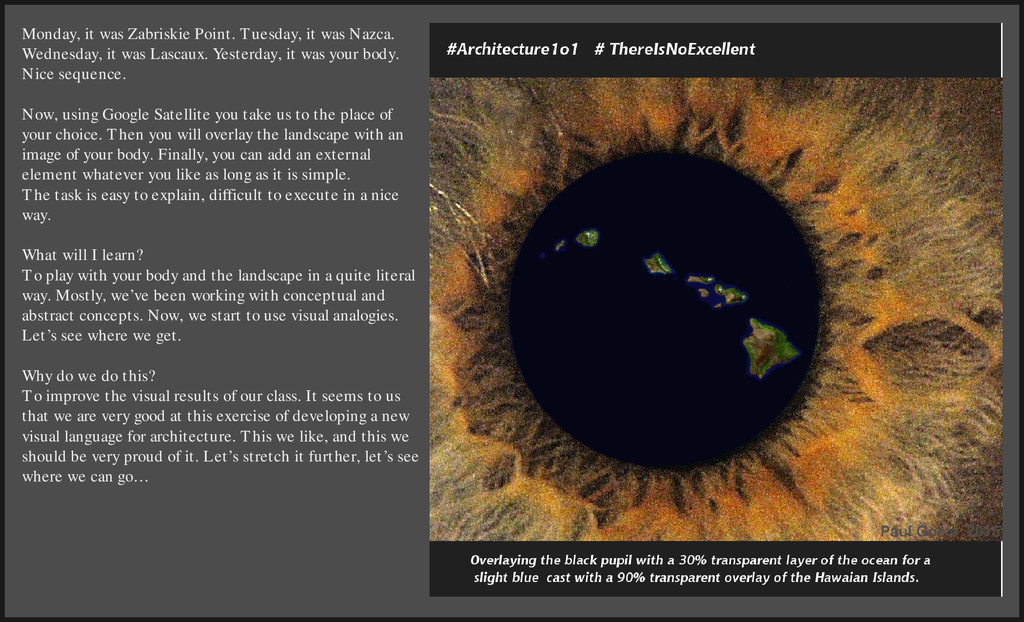
it was Lascaux. Yesterday, it was your body. Nice sequence. Now, using Google Satellite you take us to the place of your choice. Then you will overlay the landscape with an image of your body. Finally, you can add an external element whatever you like as long as it is simple. The task is easy to explain, difficult to execute in a nice way. What will I learn? To play with your body and the landscape in a quite literal way. Mostly, we’ve been working with conceptual and abstract concepts. Now, we start to use visual analogies. Let’s see where we get. Why do we do this? To improve the visual results of our class. It seems to us that we are very good at this exercise of developing a new visual language for architecture. This we like, and this we should be very proud of it. Let’s stretch it further, let’s see where we can go…
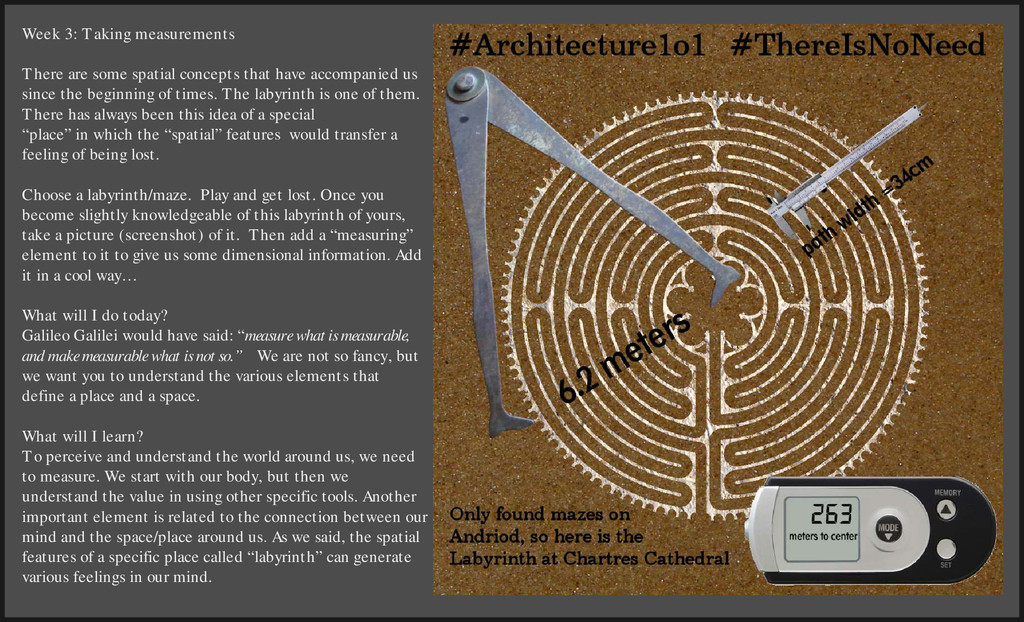
have accompanied us since the beginning of times. The labyrinth is one of them. There has always been this idea of a special “place” in which the “spatial” features would transfer a feeling of being lost. Choose a labyrinth/maze. Play and get lost. Once you become slightly knowledgeable of this labyrinth of yours, take a picture (screenshot) of it. Then add a “measuring” element to it to give us some dimensional information. Add it in a cool way… What will I do today? Galileo Galilei would have said: “measure what is measurable, and make measurable what is not so.” We are not so fancy, but we want you to understand the various elements that define a place and a space. What will I learn? To perceive and understand the world around us, we need to measure. We start with our body, but then we understand the value in using other specific tools. Another important element is related to the connection between our mind and the space/place around us. As we said, the spatial features of a specific place called “labyrinth” can generate various feelings in our mind.
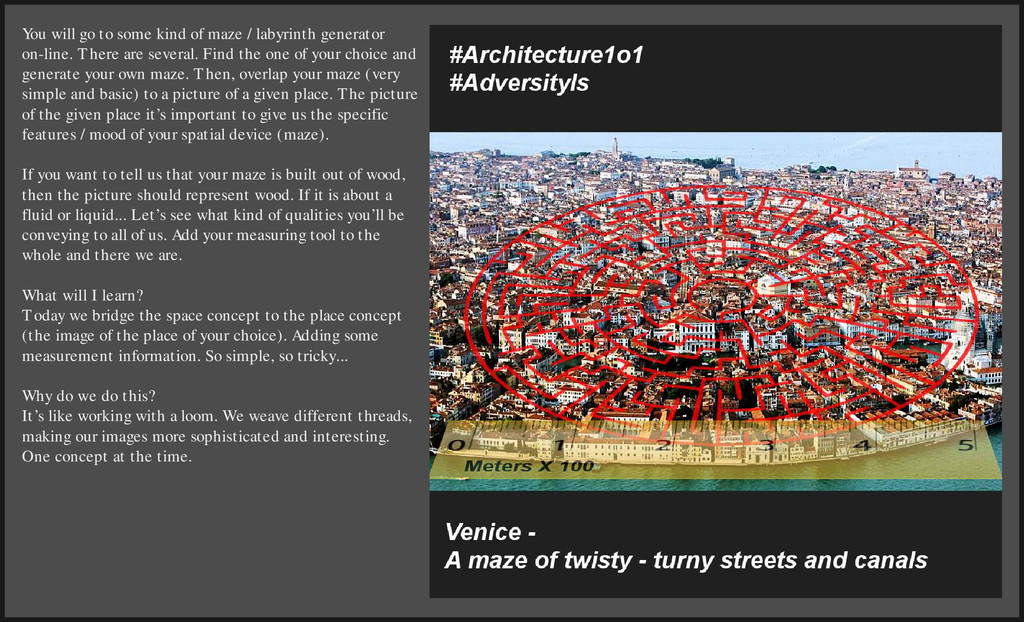
generator on-line. There are several. Find the one of your choice and generate your own maze. Then, overlap your maze (very simple and basic) to a picture of a given place. The picture of the given place it’s important to give us the specific features / mood of your spatial device (maze). If you want to tell us that your maze is built out of wood, then the picture should represent wood. If it is about a fluid or liquid... Let’s see what kind of qualities you’ll be conveying to all of us. Add your measuring tool to the whole and there we are. What will I learn? Today we bridge the space concept to the place concept (the image of the place of your choice). Adding some measurement information. So simple, so tricky... Why do we do this? It’s like working with a loom. We weave different threads, making our images more sophisticated and interesting. One concept at the time.
This quote applies to life, but also to place / space / architecture. What we are talking about today is related to the void. The filing of it comes as a consequence. Concentrate on the empty, on the void. This applies in our labyrinths, in Stonehenge, in Nazca, in the caves... The idea of a place, the idea of space, it is always a function of empty space. Learn to see this emptiness. If you learn this, everything will get very easy... Today, the challenge is to lay out a Cretan maze for an ant. Draw your maze. Take a picture of it to use as a background, then, add an ant, or several ants, (in order to give us an understanding in terms of measure of the whole thing). Finally, add your measuring tool to the whole. What will I learn? Today we link a spatial concept (the labyrinth) with a place concept (the image of the place of your choice). Then, we add a peculiar animal + the measuring tool. Again, so simple, but so complex... Why do we do this? As we said yesterday, it’s about adding layers to layers. Try not to lose control on what we are doing. Always remember: it’s very important to know when to stop. If your image doesn’t contain enough information, it is bad. If your image contains too much information, it is also bad.
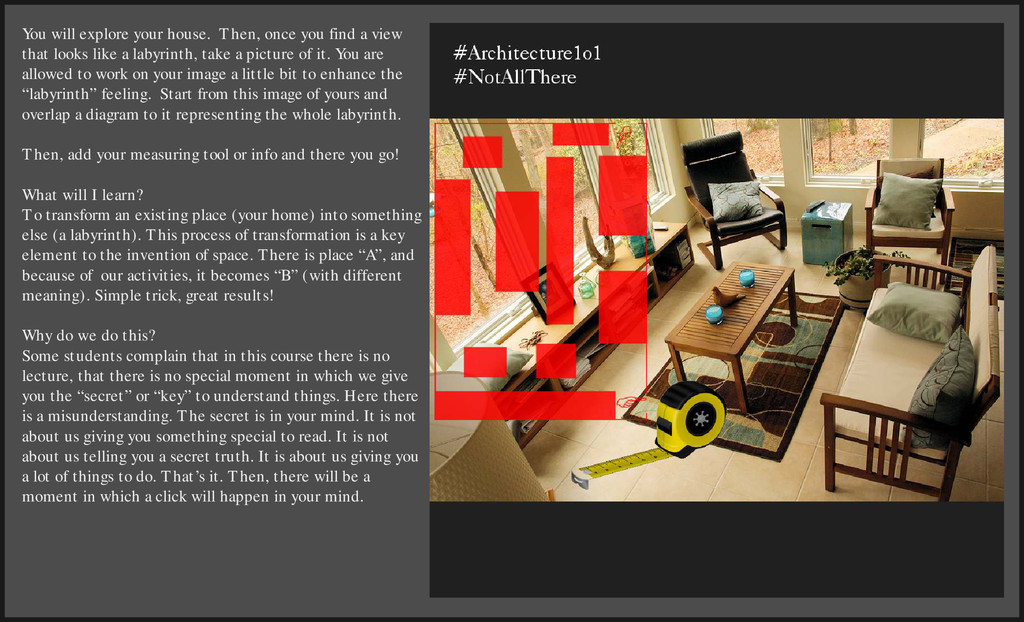
view that looks like a labyrinth, take a picture of it. You are allowed to work on your image a little bit to enhance the “labyrinth” feeling. Start from this image of yours and overlap a diagram to it representing the whole labyrinth. Then, add your measuring tool or info and there you go! What will I learn? To transform an existing place (your home) into something else (a labyrinth). This process of transformation is a key element to the invention of space. There is place “A”, and because of our activities, it becomes “B” (with different meaning). Simple trick, great results! Why do we do this? Some students complain that in this course there is no lecture, that there is no special moment in which we give you the “secret” or “key” to understand things. Here there is a misunderstanding. The secret is in your mind. It is not about us giving you something special to read. It is not about us telling you a secret truth. It is about us giving you a lot of things to do. That’s it. Then, there will be a moment in which a click will happen in your mind.
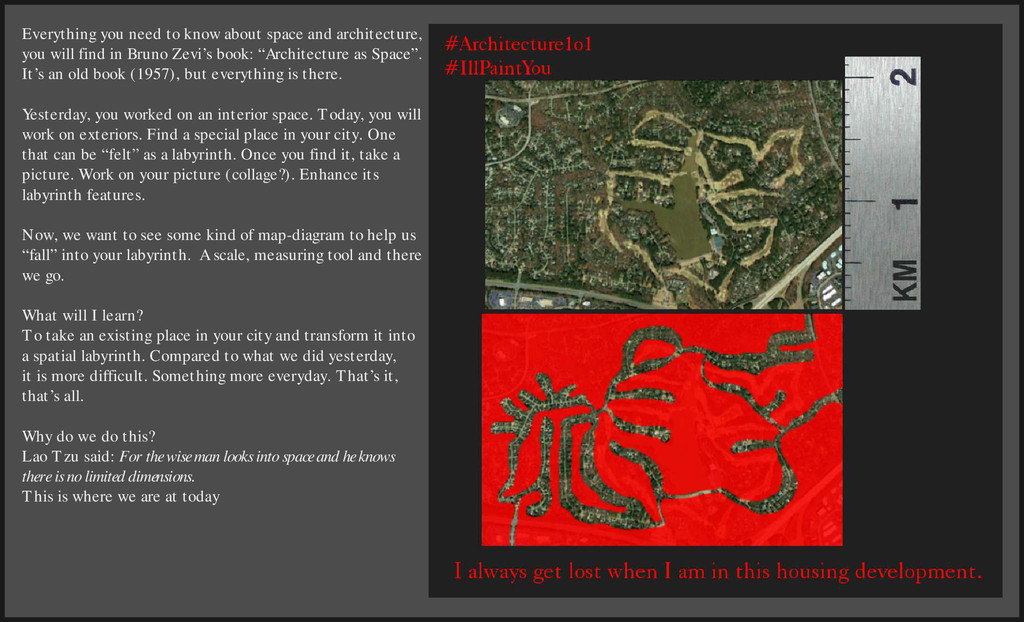
will find in Bruno Zevi’s book: “Architecture as Space”. It’s an old book (1957), but everything is there. Yesterday, you worked on an interior space. Today, you will work on exteriors. Find a special place in your city. One that can be “felt” as a labyrinth. Once you find it, take a picture. Work on your picture (collage?). Enhance its labyrinth features. Now, we want to see some kind of map-diagram to help us “fall” into your labyrinth. A scale, measuring tool and there we go. What will I learn? To take an existing place in your city and transform it into a spatial labyrinth. Compared to what we did yesterday, it is more difficult. Something more everyday. That’s it, that’s all. Why do we do this? Lao Tzu said: For the wise man looks into space and he knows there is no limited dimensions. This is where we are at today
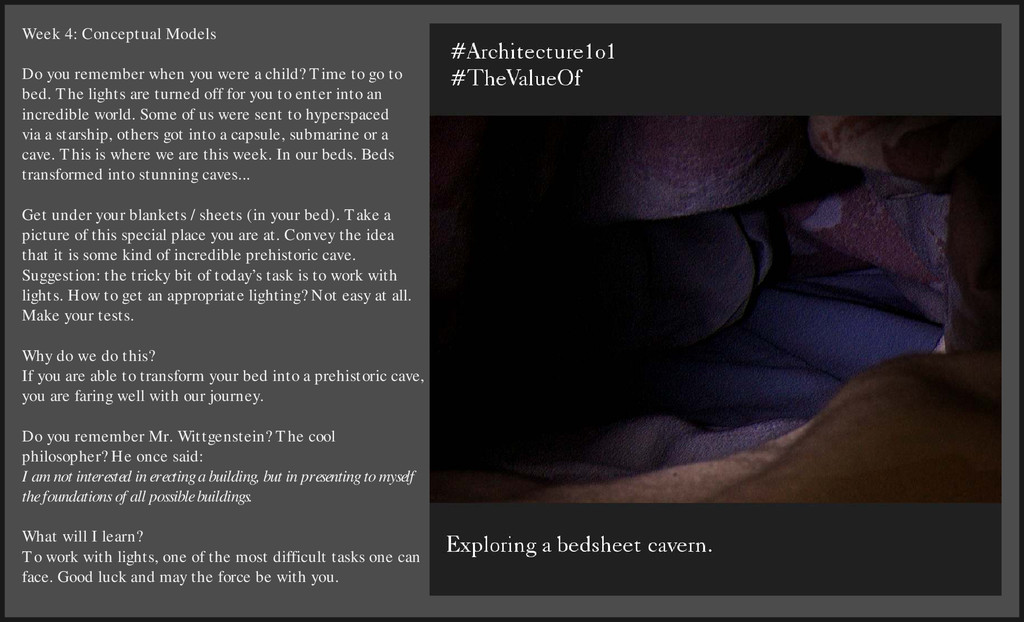
a child? Time to go to bed. The lights are turned off for you to enter into an incredible world. Some of us were sent to hyperspaced via a starship, others got into a capsule, submarine or a cave. This is where we are this week. In our beds. Beds transformed into stunning caves... Get under your blankets / sheets (in your bed). Take a picture of this special place you are at. Convey the idea that it is some kind of incredible prehistoric cave. Suggestion: the tricky bit of today’s task is to work with lights. How to get an appropriate lighting? Not easy at all. Make your tests. Why do we do this? If you are able to transform your bed into a prehistoric cave, you are faring well with our journey. Do you remember Mr. Wittgenstein? The cool philosopher? He once said: I am not interested in erecting a building, but in presenting to myself the foundations of all possible buildings. What will I learn? To work with lights, one of the most difficult tasks one can face. Good luck and may the force be with you.
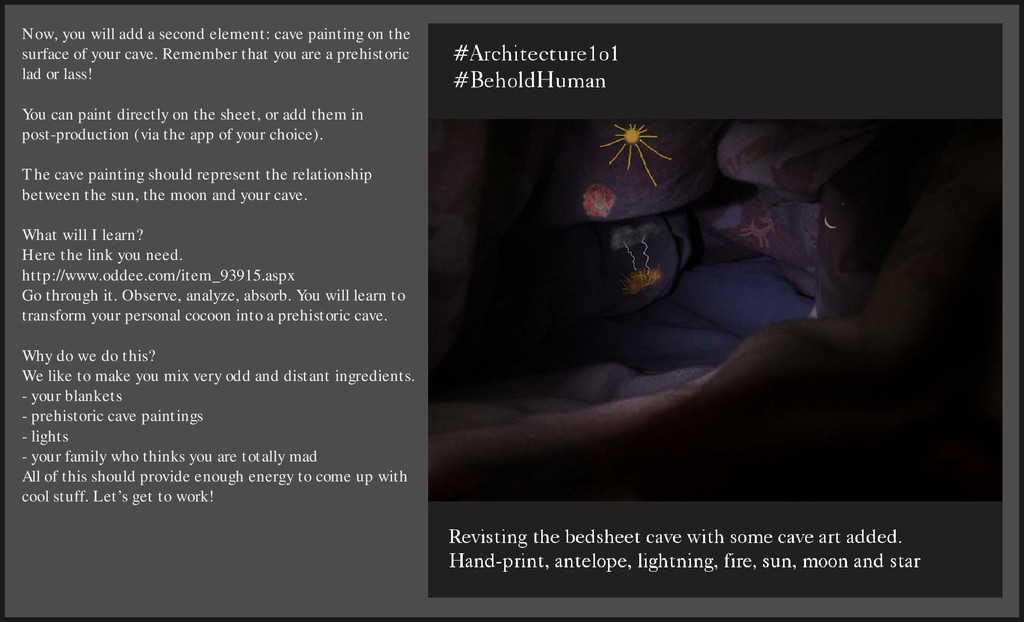
the surface of your cave. Remember that you are a prehistoric lad or lass! You can paint directly on the sheet, or add them in post-production (via the app of your choice). The cave painting should represent the relationship between the sun, the moon and your cave. What will I learn? Here the link you need. http://www.oddee.com/item_93915.aspx Go through it. Observe, analyze, absorb. You will learn to transform your personal cocoon into a prehistoric cave. Why do we do this? We like to make you mix very odd and distant ingredients. - your blankets - prehistoric cave paintings - lights - your family who thinks you are totally mad All of this should provide enough energy to come up with cool stuff. Let’s get to work!
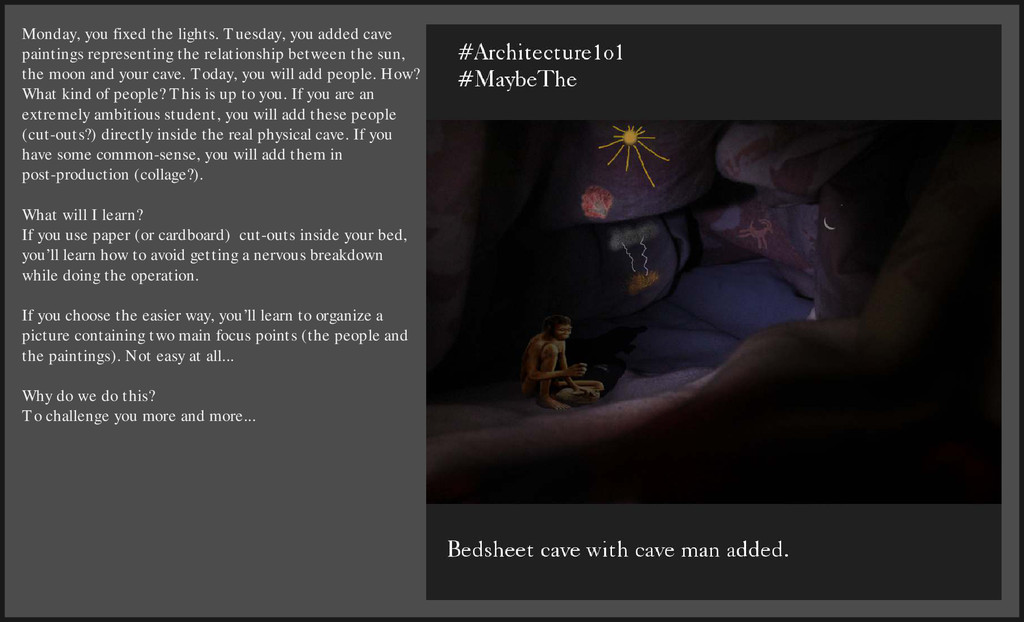
representing the relationship between the sun, the moon and your cave. Today, you will add people. How? What kind of people? This is up to you. If you are an extremely ambitious student, you will add these people (cut-outs?) directly inside the real physical cave. If you have some common-sense, you will add them in post-production (collage?). What will I learn? If you use paper (or cardboard) cut-outs inside your bed, you’ll learn how to avoid getting a nervous breakdown while doing the operation. If you choose the easier way, you’ll learn to organize a picture containing two main focus points (the people and the paintings). Not easy at all... Why do we do this? To challenge you more and more...
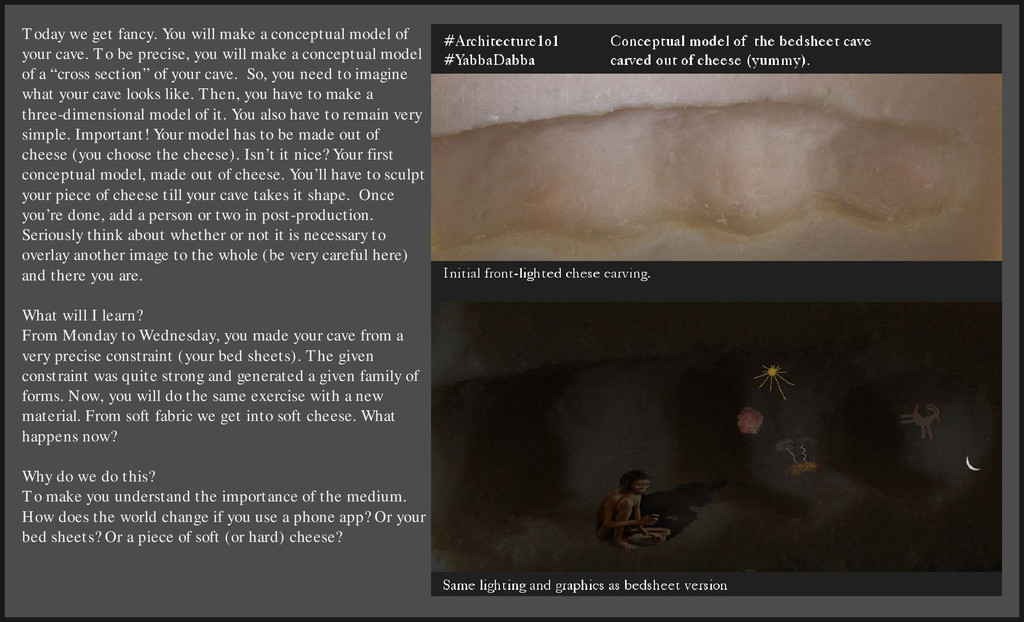
of your cave. To be precise, you will make a conceptual model of a “cross section” of your cave. So, you need to imagine what your cave looks like. Then, you have to make a three-dimensional model of it. You also have to remain very simple. Important! Your model has to be made out of cheese (you choose the cheese). Isn’t it nice? Your first conceptual model, made out of cheese. You’ll have to sculpt your piece of cheese till your cave takes it shape. Once you’re done, add a person or two in post-production. Seriously think about whether or not it is necessary to overlay another image to the whole (be very careful here) and there you are. What will I learn? From Monday to Wednesday, you made your cave from a very precise constraint (your bed sheets). The given constraint was quite strong and generated a given family of forms. Now, you will do the same exercise with a new material. From soft fabric we get into soft cheese. What happens now? Why do we do this? To make you understand the importance of the medium. How does the world change if you use a phone app? Or your bed sheets? Or a piece of soft (or hard) cheese?
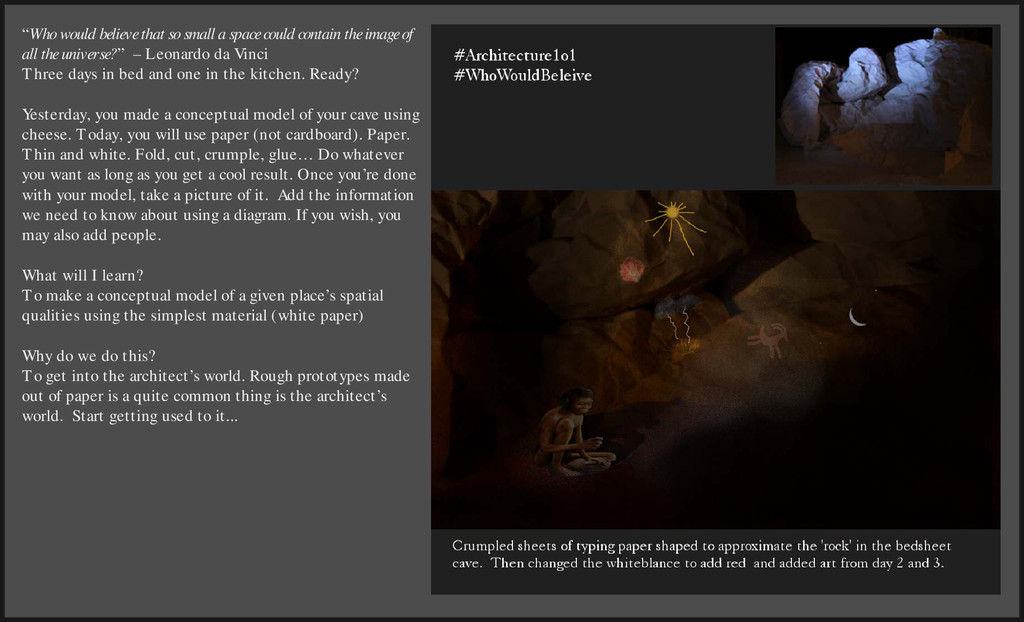
the image of all the universe?” – Leonardo da Vinci Three days in bed and one in the kitchen. Ready? Yesterday, you made a conceptual model of your cave using cheese. Today, you will use paper (not cardboard). Paper. Thin and white. Fold, cut, crumple, glue… Do whatever you want as long as you get a cool result. Once you’re done with your model, take a picture of it. Add the information we need to know about using a diagram. If you wish, you may also add people. What will I learn? To make a conceptual model of a given place’s spatial qualities using the simplest material (white paper) Why do we do this? To get into the architect’s world. Rough prototypes made out of paper is a quite common thing is the architect’s world. Start getting used to it...
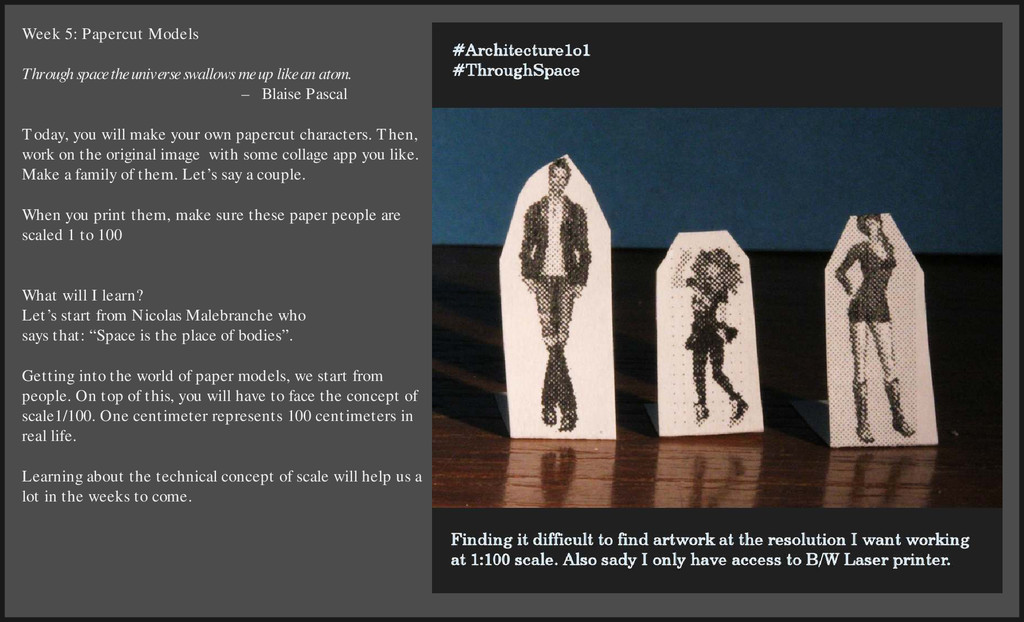
up like an atom. – Blaise Pascal Today, you will make your own papercut characters. Then, work on the original image with some collage app you like. Make a family of them. Let’s say a couple. When you print them, make sure these paper people are scaled 1 to 100 What will I learn? Let’s start from Nicolas Malebranche who says that: “Space is the place of bodies”. Getting into the world of paper models, we start from people. On top of this, you will have to face the concept of scale1/100. One centimeter represents 100 centimeters in real life. Learning about the technical concept of scale will help us a lot in the weeks to come.
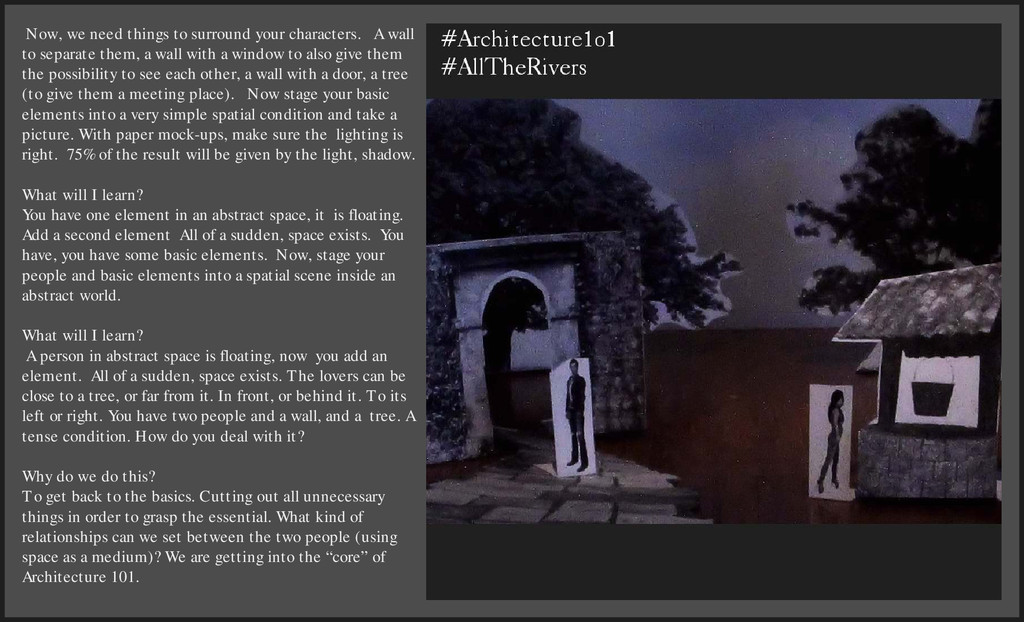
to separate them, a wall with a window to also give them the possibility to see each other, a wall with a door, a tree (to give them a meeting place). Now stage your basic elements into a very simple spatial condition and take a picture. With paper mock-ups, make sure the lighting is right. 75% of the result will be given by the light, shadow. What will I learn? You have one element in an abstract space, it is floating. Add a second element All of a sudden, space exists. You have, you have some basic elements. Now, stage your people and basic elements into a spatial scene inside an abstract world. What will I learn? A person in abstract space is floating, now you add an element. All of a sudden, space exists. The lovers can be close to a tree, or far from it. In front, or behind it. To its left or right. You have two people and a wall, and a tree. A tense condition. How do you deal with it? Why do we do this? To get back to the basics. Cutting out all unnecessary things in order to grasp the essential. What kind of relationships can we set between the two people (using space as a medium)? We are getting into the “core” of Architecture 101.
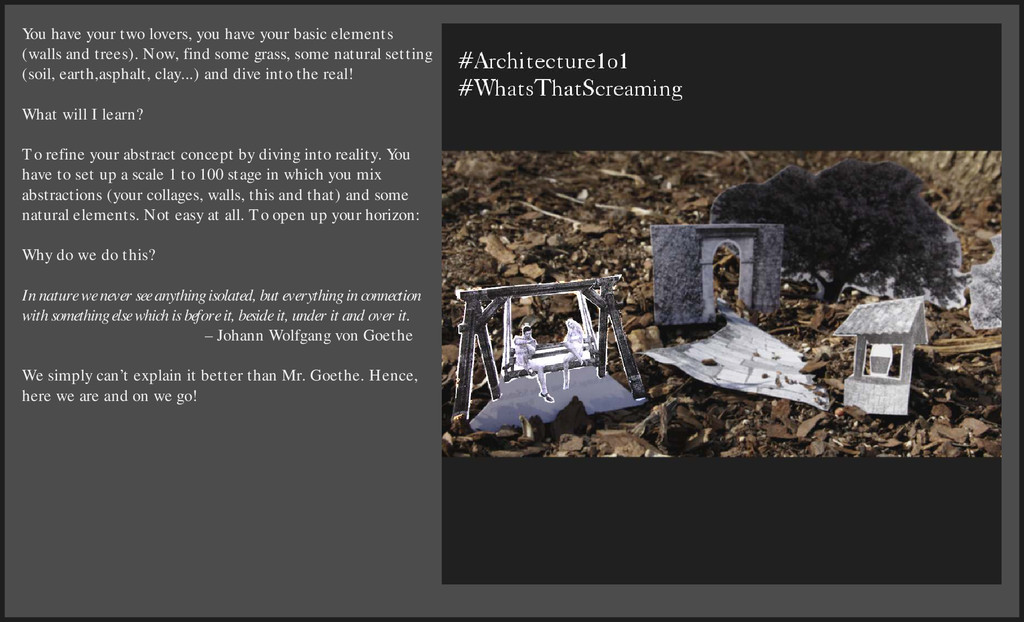
(walls and trees). Now, find some grass, some natural setting (soil, earth,asphalt, clay...) and dive into the real! What will I learn? To refine your abstract concept by diving into reality. You have to set up a scale 1 to 100 stage in which you mix abstractions (your collages, walls, this and that) and some natural elements. Not easy at all. To open up your horizon: Why do we do this? In nature we never see anything isolated, but everything in connection with something else which is before it, beside it, under it and over it. – Johann Wolfgang von Goethe We simply can’t explain it better than Mr. Goethe. Hence, here we are and on we go!
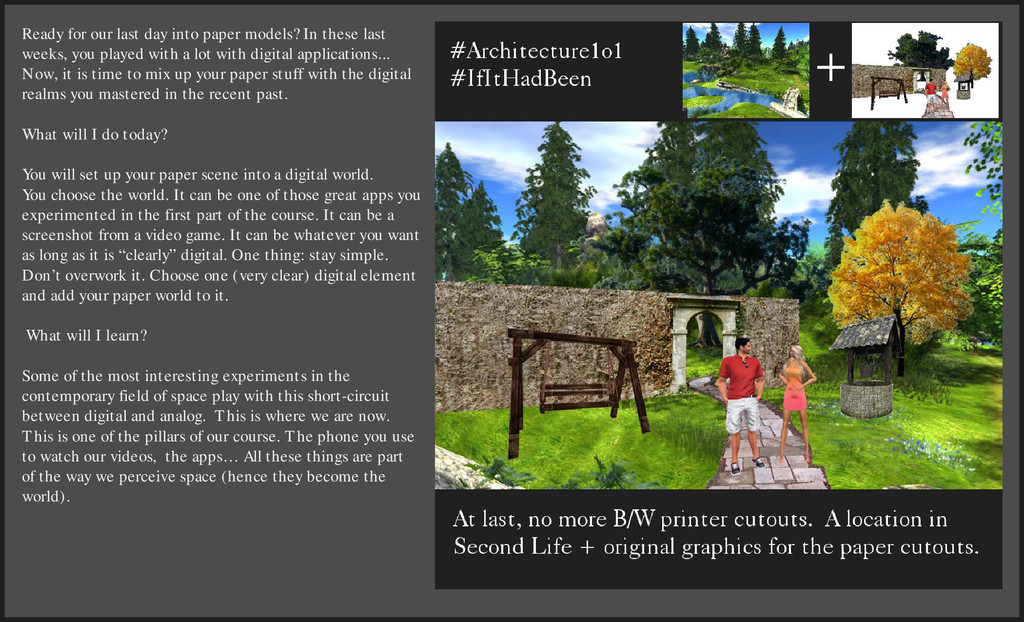
last weeks, you played with a lot with digital applications... Now, it is time to mix up your paper stuff with the digital realms you mastered in the recent past. What will I do today? You will set up your paper scene into a digital world. You choose the world. It can be one of those great apps you experimented in the first part of the course. It can be a screenshot from a video game. It can be whatever you want as long as it is “clearly” digital. One thing: stay simple. Don’t overwork it. Choose one (very clear) digital element and add your paper world to it. What will I learn? Some of the most interesting experiments in the contemporary field of space play with this short-circuit between digital and analog. This is where we are now. This is one of the pillars of our course. The phone you use to watch our videos, the apps… All these things are part of the way we perceive space (hence they become the world).
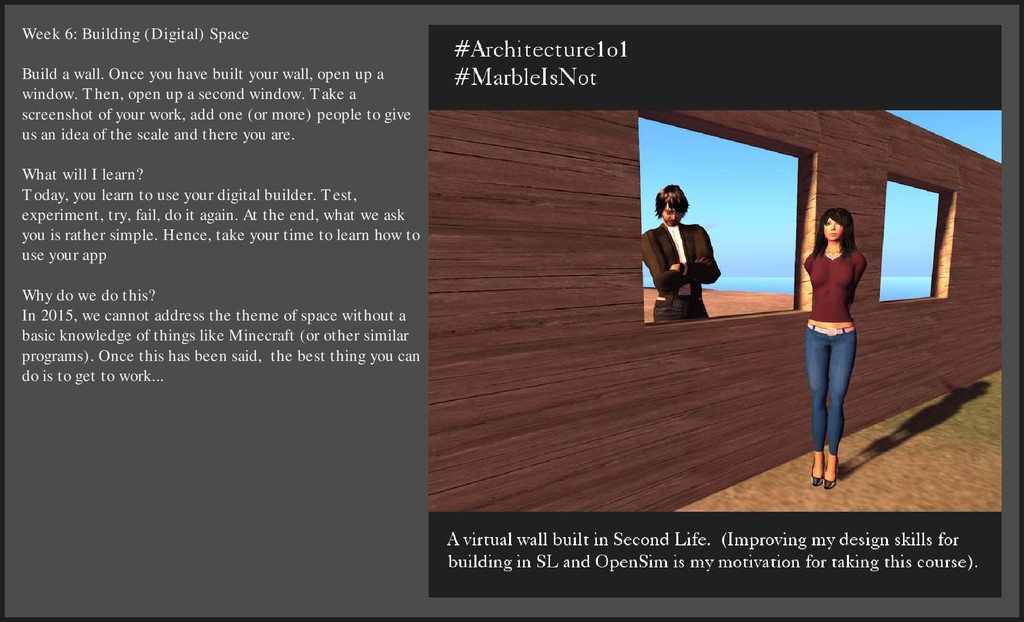
have built your wall, open up a window. Then, open up a second window. Take a screenshot of your work, add one (or more) people to give us an idea of the scale and there you are. What will I learn? Today, you learn to use your digital builder. Test, experiment, try, fail, do it again. At the end, what we ask you is rather simple. Hence, take your time to learn how to use your app Why do we do this? In 2015, we cannot address the theme of space without a basic knowledge of things like Minecraft (or other similar programs). Once this has been said, the best thing you can do is to get to work...
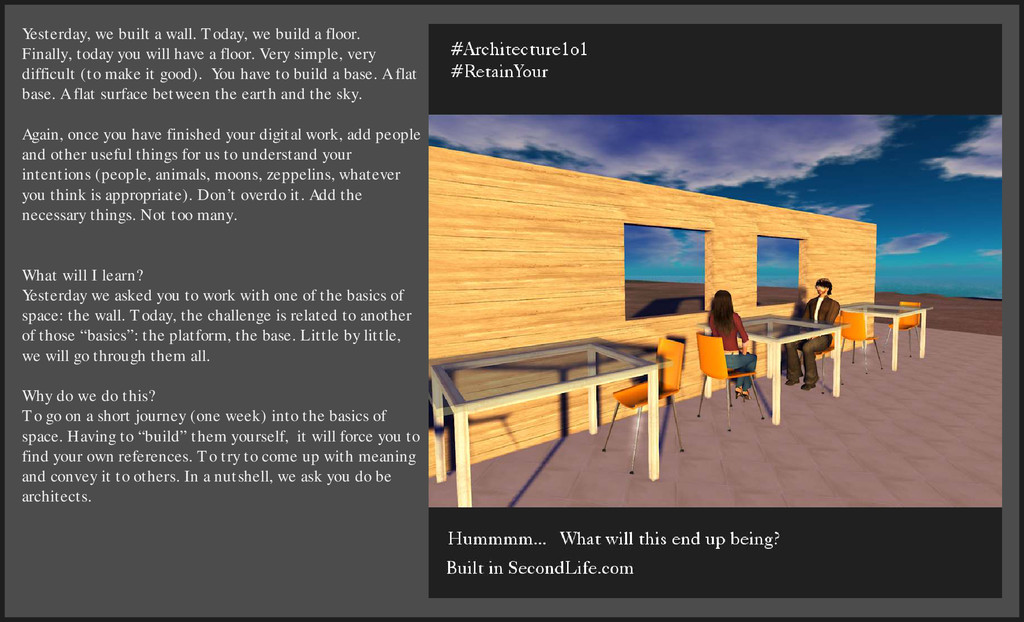
Finally, today you will have a floor. Very simple, very difficult (to make it good). You have to build a base. A flat base. A flat surface between the earth and the sky. Again, once you have finished your digital work, add people and other useful things for us to understand your intentions (people, animals, moons, zeppelins, whatever you think is appropriate). Don’t overdo it. Add the necessary things. Not too many. What will I learn? Yesterday we asked you to work with one of the basics of space: the wall. Today, the challenge is related to another of those “basics”: the platform, the base. Little by little, we will go through them all. Why do we do this? To go on a short journey (one week) into the basics of space. Having to “build” them yourself, it will force you to find your own references. To try to come up with meaning and convey it to others. In a nutshell, we ask you do be architects.
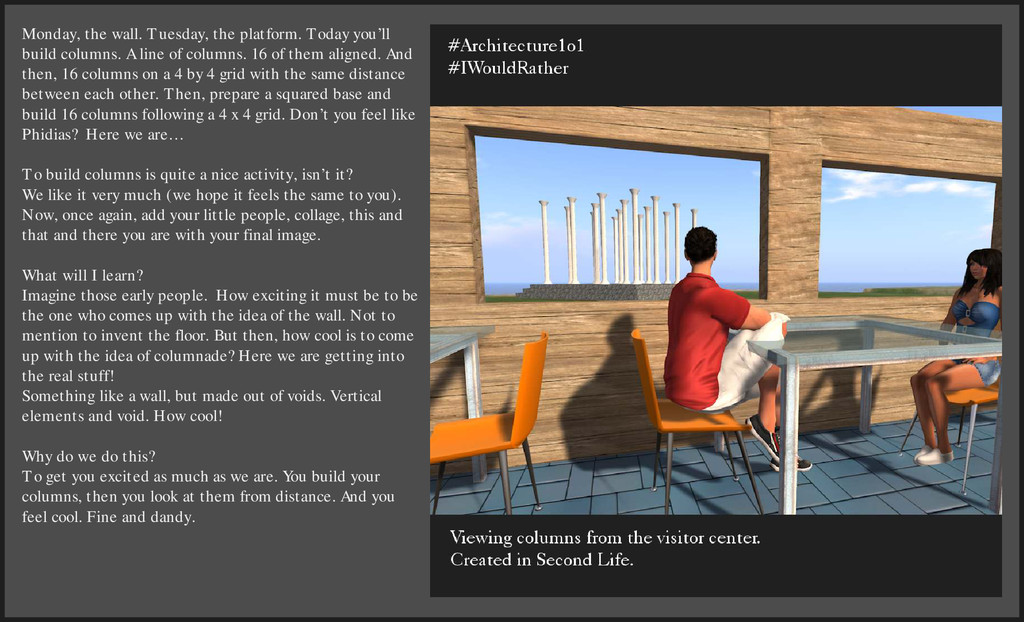
A line of columns. 16 of them aligned. And then, 16 columns on a 4 by 4 grid with the same distance between each other. Then, prepare a squared base and build 16 columns following a 4 x 4 grid. Don’t you feel like Phidias? Here we are… To build columns is quite a nice activity, isn’t it? We like it very much (we hope it feels the same to you). Now, once again, add your little people, collage, this and that and there you are with your final image. What will I learn? Imagine those early people. How exciting it must be to be the one who comes up with the idea of the wall. Not to mention to invent the floor. But then, how cool is to come up with the idea of columnade? Here we are getting into the real stuff! Something like a wall, but made out of voids. Vertical elements and void. How cool! Why do we do this? To get you excited as much as we are. You build your columns, then you look at them from distance. And you feel cool. Fine and dandy.
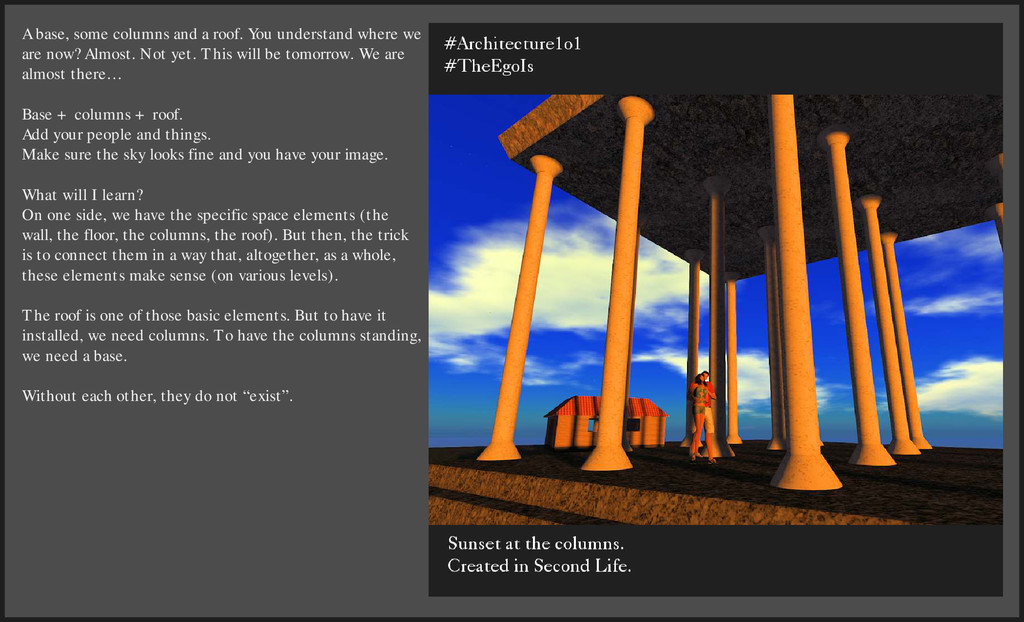
we are now? Almost. Not yet. This will be tomorrow. We are almost there… Base + columns + roof. Add your people and things. Make sure the sky looks fine and you have your image. What will I learn? On one side, we have the specific space elements (the wall, the floor, the columns, the roof). But then, the trick is to connect them in a way that, altogether, as a whole, these elements make sense (on various levels). The roof is one of those basic elements. But to have it installed, we need columns. To have the columns standing, we need a base. Without each other, they do not “exist”.
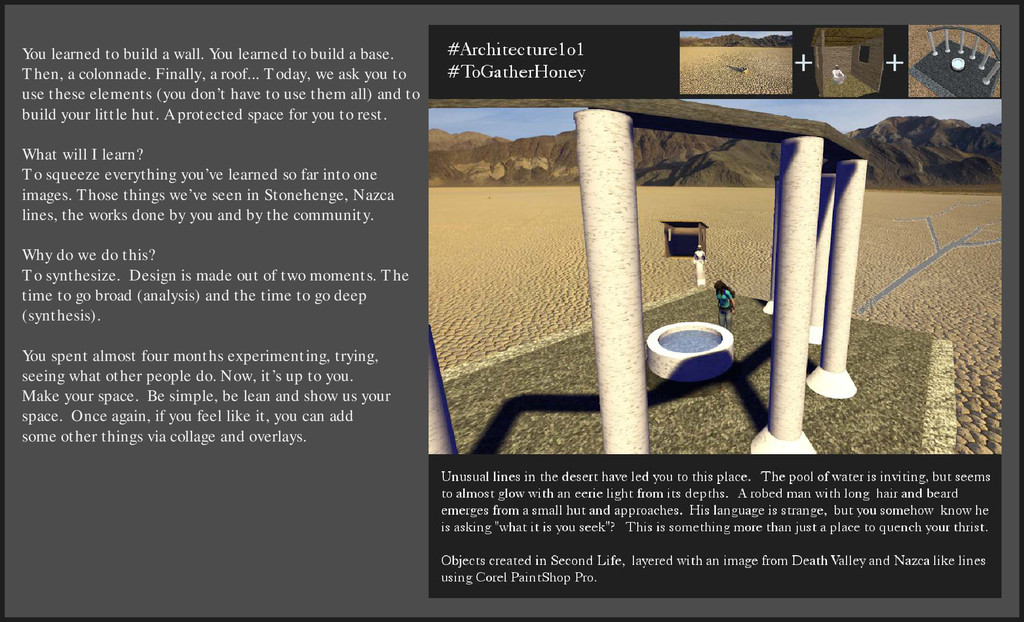
a base. Then, a colonnade. Finally, a roof... Today, we ask you to use these elements (you don’t have to use them all) and to build your little hut. A protected space for you to rest. What will I learn? To squeeze everything you’ve learned so far into one images. Those things we’ve seen in Stonehenge, Nazca lines, the works done by you and by the community. Why do we do this? To synthesize. Design is made out of two moments. The time to go broad (analysis) and the time to go deep (synthesis). You spent almost four months experimenting, trying, seeing what other people do. Now, it’s up to you. Make your space. Be simple, be lean and show us your space. Once again, if you feel like it, you can add some other things via collage and overlays.