Upgrade to Pro — share decks privately, control downloads, hide ads and more …

RSpec with Swagger

vitali
March 26, 2021

RSpec with Swagger

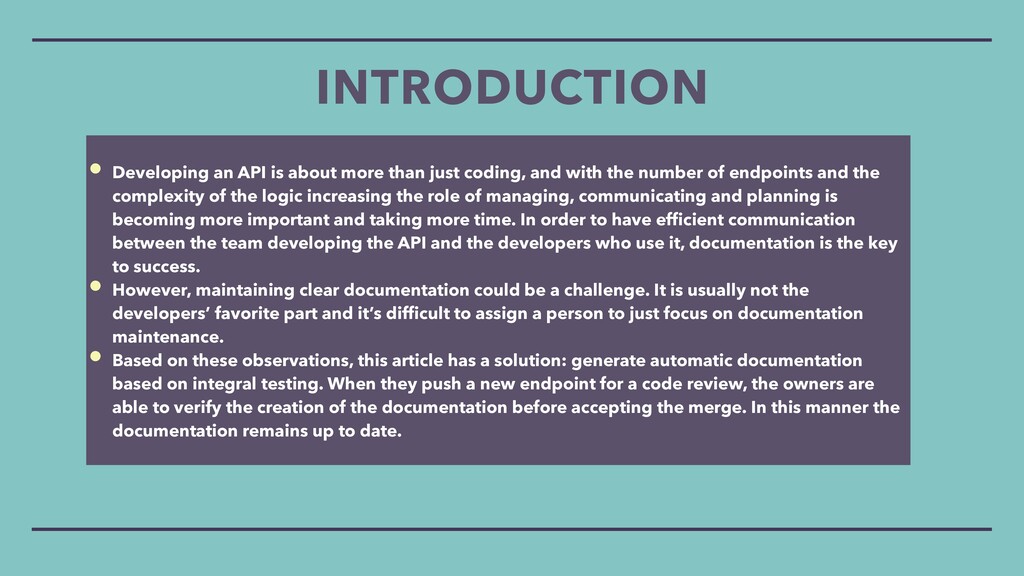
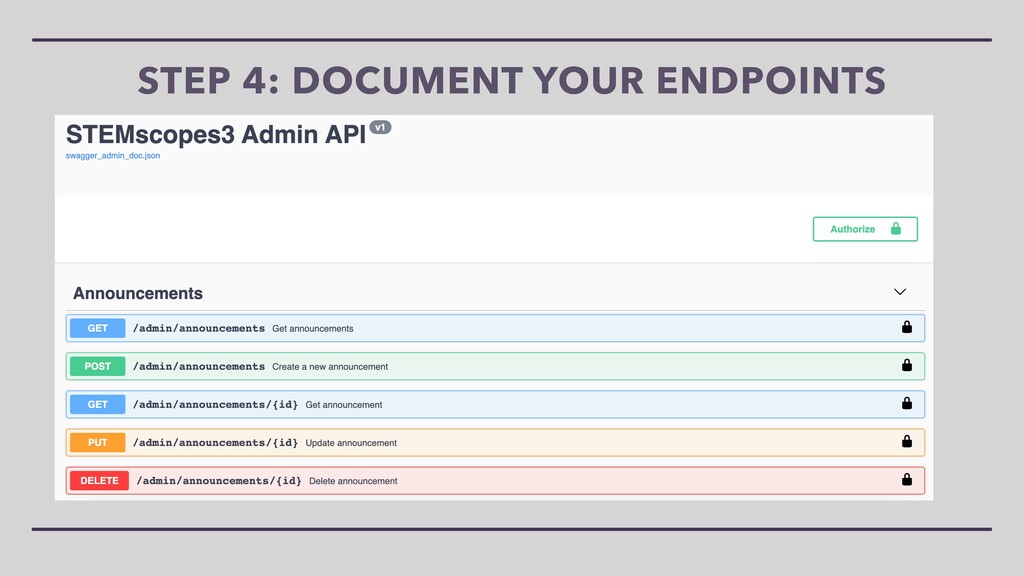
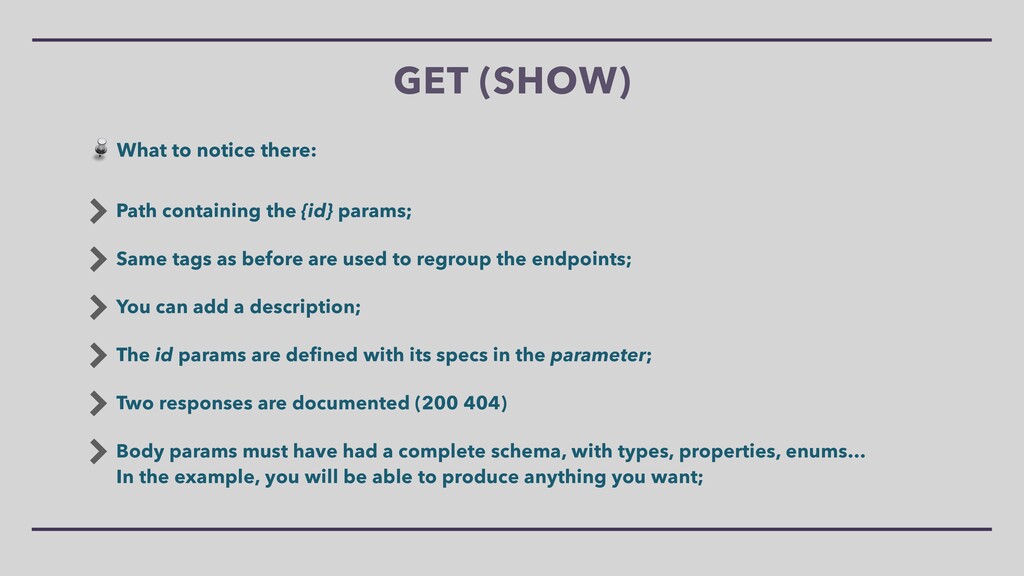
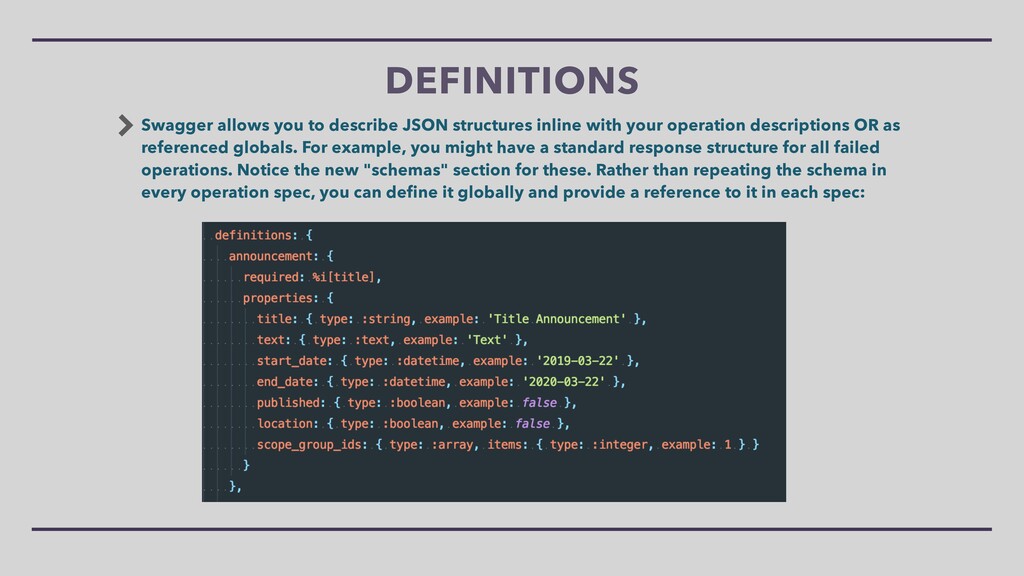
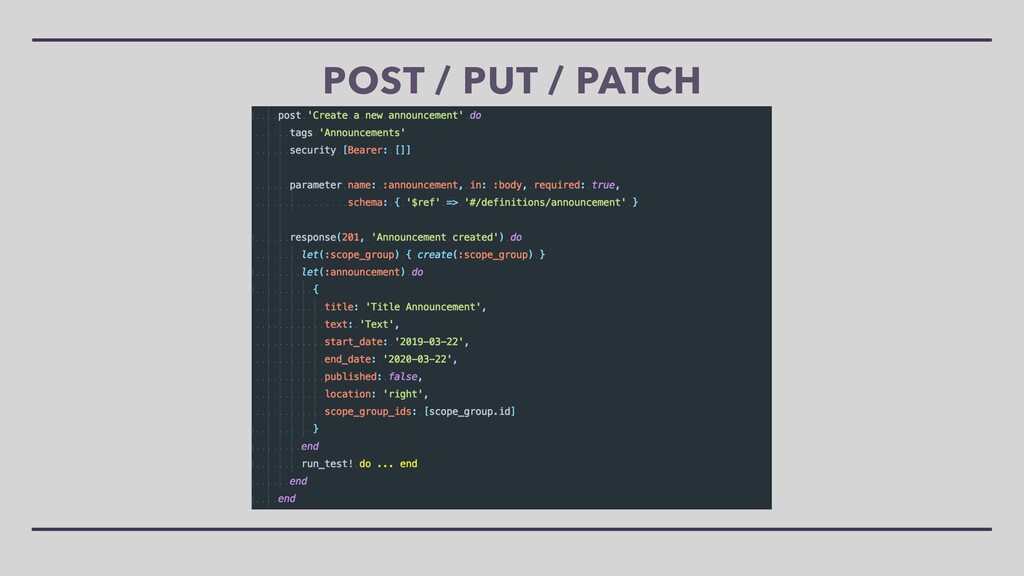
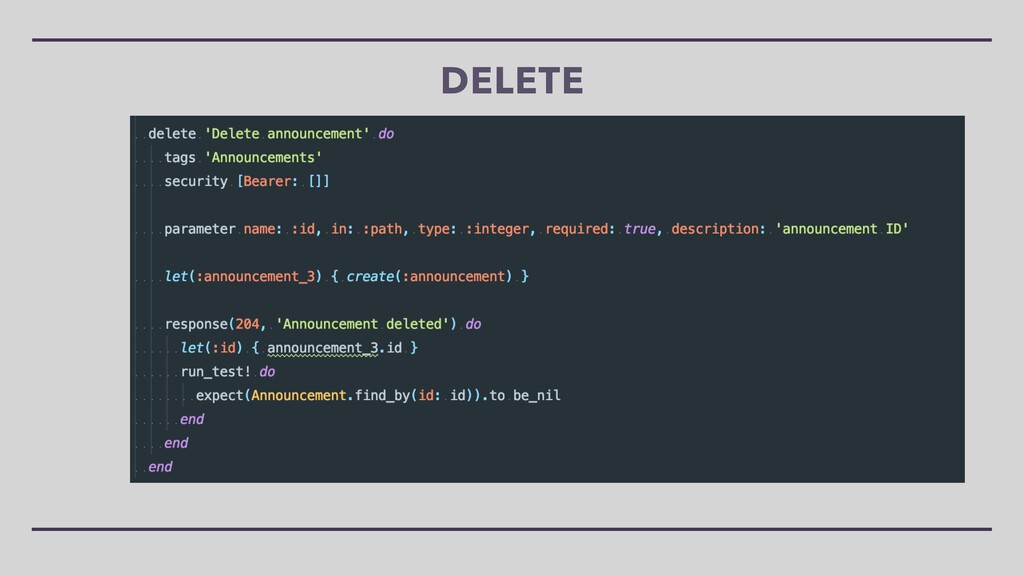
This is going to be a complete guide about how to document a Rest Api and why it is important to document an API. Also, we will present a gem, Rswag, which will ease the amount of work needed to generate Swagger documentation, with a complete tutorial to set it in a Ruby On Rails API.

vitali

March 26, 2021
Tweet

Other Decks in Programming

Transcript

  1. • Developing an API is about more than just coding,

    and with the number of endpoints and the complexity of the logic increasing the role of managing, communicating and planning is becoming more important and taking more time. In order to have ef fi cient communication between the team developing the API and the developers who use it, documentation is the key to success. • However, maintaining clear documentation could be a challenge. It is usually not the developers’ favorite part and it’s dif fi cult to assign a person to just focus on documentation maintenance. • Based on these observations, this article has a solution: generate automatic documentation based on integral testing. When they push a new endpoint for a code review, the owners are able to verify the creation of the documentation before accepting the merge. In this manner the documentation remains up to date. INTRODUCTION
  2. • Documentation is validated by an integration test: In order

    to generate the documentation we need. to run a valid test, that’s why devs must keep the documentation up to date; • Continuous maintenance of documentation: during the code review process (pull or merge request) it’s possible to verify the addition of the valid integration test to generate documentation, and have up to date documentation; • Assign a documenting task to each dev: each dev from the API has the duty to maintain his/her modi fi cations of the code to re fl ect on the documentation; • It’s automatic: only the integration test needs to be generated, the rest is the job of the gem; • UI 3.0 from Swagger; PROS
  3. • Adds time on endpoint crafting: every time a new

    endpoint is a craft or modi fi cation, the dev must take time to update the documentation; • Adds time for the reviewer: the reviewer needs to check more lines with counting integration tests; • Run on Swagger 2.0 Open API Speci fi cation: schema option not always all available, if you need to document an API built on micro services it’s more dif fi cult…; • One body response by HTTP status code: sometimes you have multiple responses to a document on the same HTTP status code, and depending on the header, Swagger does not allow this. CONS
  4. Install the gem and use task from them to generate

    files needed: STEP 1: INSTALL IT
  5. Before creating any documentation let’s take a look at the

    configuration files. In /config/initializer/rswag-api.rb the path where JSON configuration files will be created is defined. It should be equal to this, but it can be adapted to fit your requirement: STEP 2: CONFIGURE IT
  6. Let’s resume with the routes config. These 2 lines should

    be added and [api] should be replaced by the name of your choice. The UI route is the one that will be used to access to the documentation on the browser: STEP 2: CONFIGURE IT
  7. where the gem should look for the JSON configuration file

    in your project. The first part of the path depends on the routing you use in routes.rb for API the name which will show up on the HTML: STEP 2: CONFIGURE IT
  8. We will edit the file (swagger_helper.rb) generated by the task

    that we ran before, which helped us define the structure of our documentation and our general settings. Two configurations are used here: swagger_root: is the path where the gem will generate JSON configuration file and should be the same as the one in the initializer for rswag-api; swagger_docs: is the general configuration of the documentation. Here, we need to organize the different endpoints we have, one for the admin side and one for suit STEP 3: SET UP THE SWAGGER HELPER
  9. Now we will be going deeper into some options used

    in swagger_docs config: First of all, you should define the path where the JSON configuration file will be generated; swagger: This is the version of Swagger (OpenAPI) Spec. used, there is no version higher than 2.0 maintained by the actual gem :/ ; info: some generic information on the documentation (title: will appear on the top of the doc; version: will appear near the title); path: we will let this option to {} to have the complete path on the endpoint; securityDefinitions: is used to define the way we deal with the authentication. ( If you use microservices and Bearer Token, this will not be supported by swagger 2.0). STEP 3: SET UP THE SWAGGER HELPER
  10. Each endpoint needs specific data, and the structure must be

    adapted for each one. But here we will try to give the general structure for each type (GET, POST, PATCH, DELETE), so we have common knowledge about how to build the integration test. And that’s perfect because in our CRUD we have this type of endpoint. Also, gem allows us to use all method from rspec. Moreover, we call this integration test because when rspec is run, this integration test will also be run and should not fail…This will allow us to better maintain the documentation and be sure we are creating the necessary documentation. STEP 4: DOCUMENT YOUR ENDPOINTS
  11. GET (SHOW) Path containing the {id} params; Same tags as

    before are used to regroup the endpoints; You can add a description; The id params are defined with its specs in the parameter; Two responses are documented (200 404) Body params must have had a complete schema, with types, properties, enums… In the example, you will be able to produce anything you want; What to notice there:
  12. DEFINITIONS Swagger allows you to describe JSON structures inline with

    your operation descriptions OR as referenced globals. For example, you might have a standard response structure for all failed operations. Notice the new "schemas" section for these. Rather than repeating the schema in every operation spec, you can define it globally and provide a reference to it in each spec:
  13. GENERATE THE DOCUMENTATION Take special note of the run_test! method

    that's called within each response block. This tells rswag to create and execute a corresponding example. It builds and submits a request based on parameter descriptions and corresponding values that have been provided using the rspec "let" syntax. For example, the "post" description in the example above specifies a "body" parameter called "announcement". It also lists 2 different responses. For the success case (i.e. the 201 response), notice how "let" is used to set the blog parameter to a value that matches the provided schema. For the failure case (i.e. the 422 response), notice how it's set to a value that does not match the provided schema. When the test is executed, rswag also validates the actual response code and, where applicable, the response body against the provided JSON Schema.
  14. GENERATE THE DOCUMENTATION First of all, verify your integration test

    passed; Generate the documentation; Run your server. Documenting an API and keeping it updated is essential. It is hard work and can be painful. Luckily there are tools to reduce the amount of work and Rswag is a quite good solution even if it has some limitations.