(50 min) – brief overview on OACIS – hands-on 1 • How to submit jobs using OACIS • session2 (30 min) – hands-on 2 • How to set up your simulator • How to set up Hosts • session3 (40 min) – hands-on 3 • OACIS APIs to automate parameter search
3 • setting up a Simulator – how jobs are executed by OACIS – the requirements for Simulator • format of input parameters • format of output files – Hands-on • setting up Host and HostGroup – how OACIS are connected to hosts – demonstration: setting up a Host • SSH login and authentication using key • xsub • register a Host on OACIS – demonstration: defining a HostGroup • Q&A
5 1. Work directory and shell script are created. Jobs are submitted to the scheduler. 2. Jobs are executed by the job scheduler. Current directory is set to the work directory. 3. Results are downloaded to OACIS server. The files are parsed and the records are updated. database job scheduler (ex. Torque) OACIS Computational Host qsub SSH login sh execute in the work directory the work directory is compressed into a single file. tar download (scp) & expand parse job status & update the record
Simulator must satisfy the following requirements. • Input parameters must be given as command line arguments or by a JSON file (Details are shown in the next slide.) • Output files must be created under the current directory. • These files are created by OACIS. Simulator must not conflict with these files. – _output.json,_status.json, _time.txt, _version.txt, _log.txt, _stdout.txt, _stderr.txt • Returns 0 when it finished successfully. Return a non zero code when it has an error.
parameters 7 • By command-line arguments – Input parameters and the random number seed are appended to the command. • ~/simulator.out <p1> <p2> <p3> ... <seed> • By JSON file – When running the command, a file “_input.json” is created, in which input parameters are written. • {"p1": 30,"p2": 10,"_seed":12345}
• In order to register your simulator to OACIS, create a script which makes your simulator conform to the input format of OACIS. Register the script as a Simulator of OACIS. wrap script simulation program run.py _input.json a.out 1. Input parameters given by OACIS 2. parse command line args and make an XML file 3. launch the simulation program as a subprocess
• As long as output files are created in the current directory, you have nothing to do. • If you would like to plot scalar values in OACIS, the values should be written in “_output.json” file. • If you would like to use "figure viewer", write files in bmp, png,jpg and other figure format. (eps files are not supported.) {"flow": 0.235, "velocity": 1.245 }
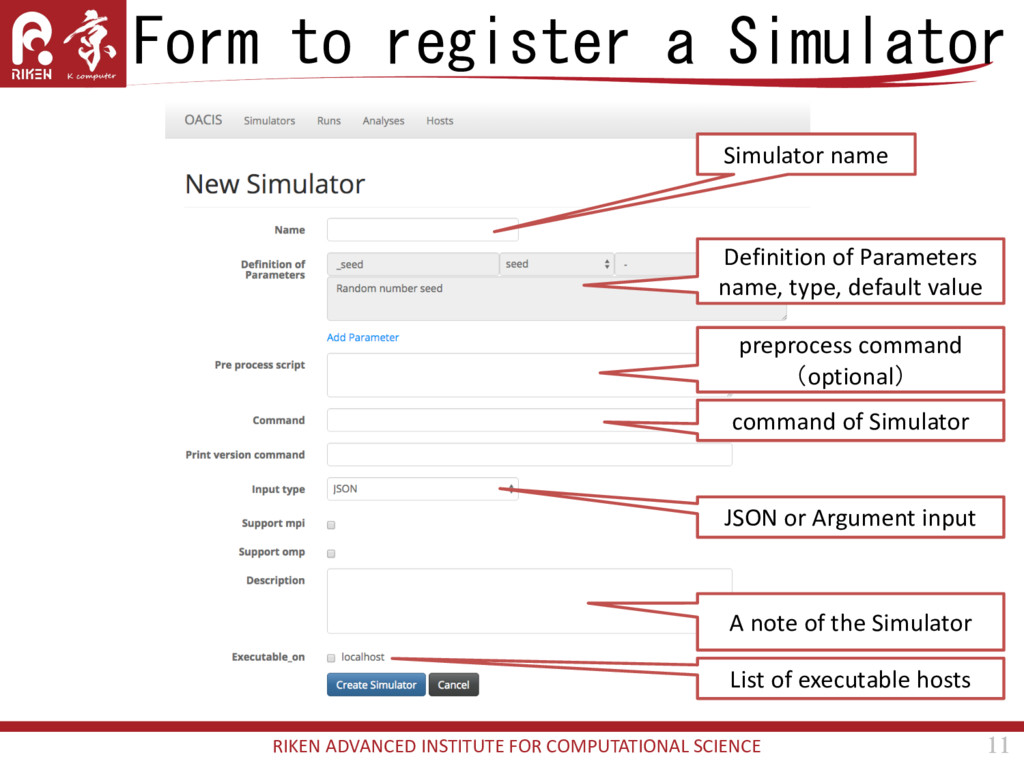
Simulator 11 Simulator name Definition of Parameters name, type, default value preprocess command (optional) command of Simulator JSON or Argument input A note of the Simulator List of executable hosts
• You may want to try a simulation model which is slightly different from the current one. In such case, you can create a new simulator based on the existing one. Duplicating Simulator
us register the Nagel-Schreckenberg simulator by ourselves. – Login to the container – Execute the simulator by yourself. Key Description l Road length v Maximum velocity rho Car density p deceleration probability t_init initialization steps t_measure measurement steps mkdir temp && cd temp ~/sim_ns_model/run.sh 200 5 0.3 0.1 100 300 12345 docker exec -it -u oacis my_oacis bash -l
top page of OACIS, click “New Simulator” button and fill in the form. Item Contents Name MySimulator Definition of Parameters L, v, rho, p, t_init, t_measure Command ~/sim_ns_model/run.sh Input Type Argument Executable_on localhost Key Type Default Val l Integer 200 v Integer 5 rho Float 0.3 p Float 0.1 t_init Integer 100 t_measure Integer 300 Click “Add Parameter” to increase the number of parameters.
A typical sequence for setting up computational host is as follows. • Setting up SSH authorization key. SSH connections must be established without entering password. • Install XSUB • register host information See http://crest-cassia.github.io/oacis/en/install.html
• Specification of job schedulers are different for each system. • XSUB is a small script which absorbs the difference of the specification of job schedulers. OACIS uses XSUB to submit a job therefore you must install xsub in advance. • Ruby 1.8 or later is required. Refer to https://github.com/crest-cassia/xsub
host information for SSH connection Directory used for running jobs. OACIS will create sub directories under this. Maximum number of concurrent jobs. Worker checks the status of the remote host with this interval. The available range of the number of MPI processes and threads. List of executable simulators on that host. http://crest-cassia.github.io/oacis/en/tutorial.html#registering-a-host
We can define a HostGroup, a group of Hosts. When creating a job, HostGroup can be specified as a destination of the submission. The jobs are submitted to one of the hosts in the HostGroup.
have shown how to register Simulators, Hosts and HostGroups. – This might be a bit complicated, but once you have done these registration, the remaining workflow becomes much more productive. • If you have any question and feedbacks – [email protected] ⇒ In the next session, we will demonstrate how to use APIs to automate parameter-space exploration.