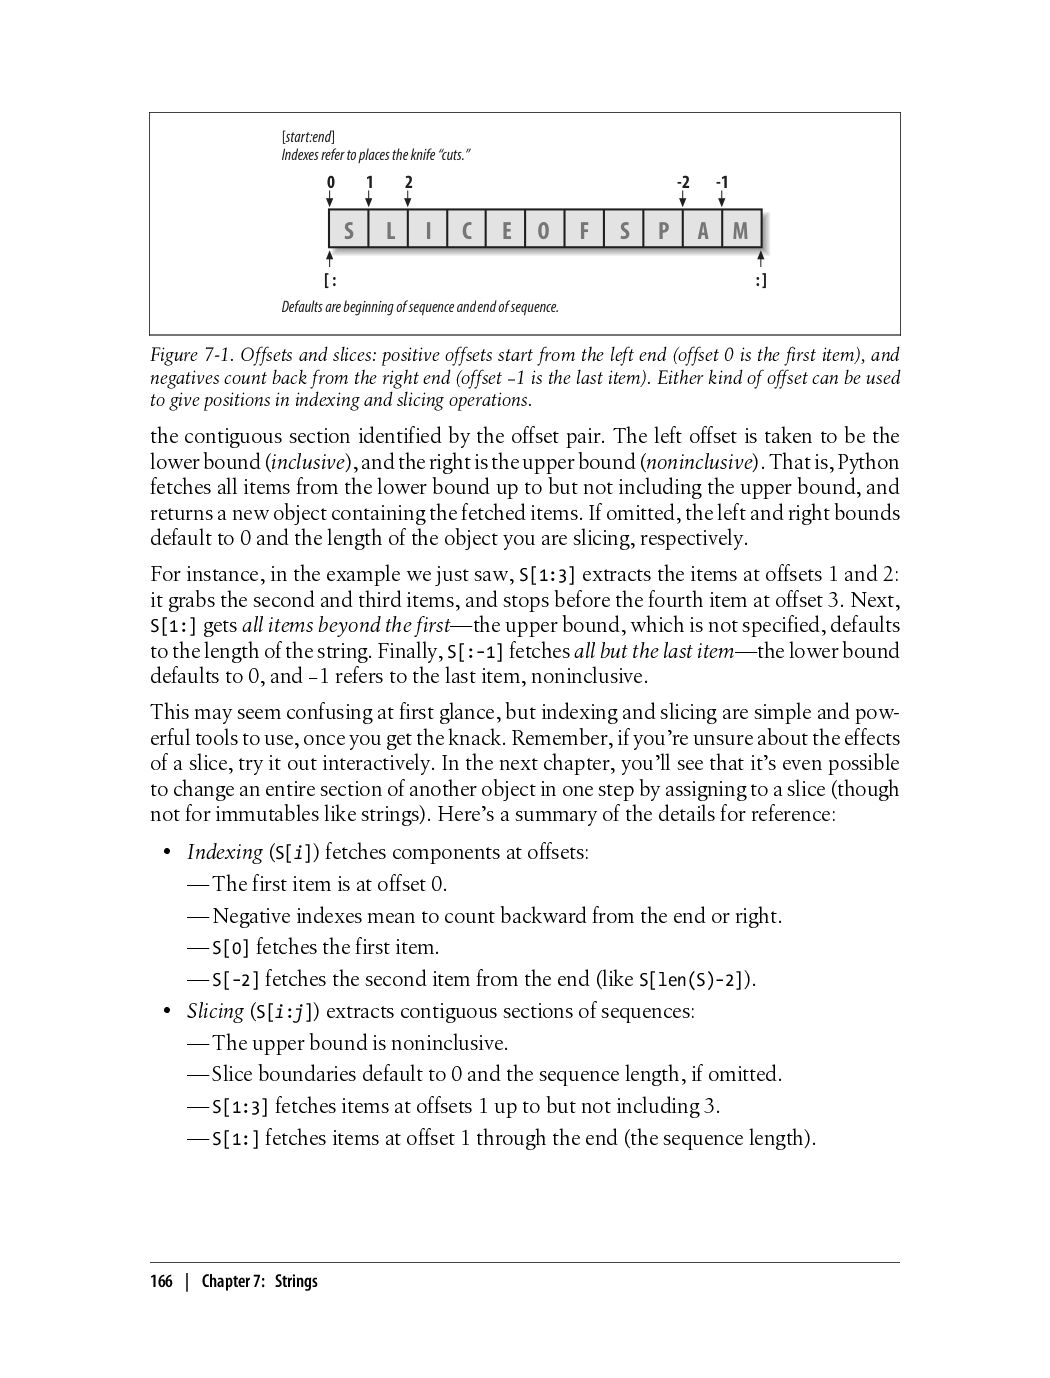
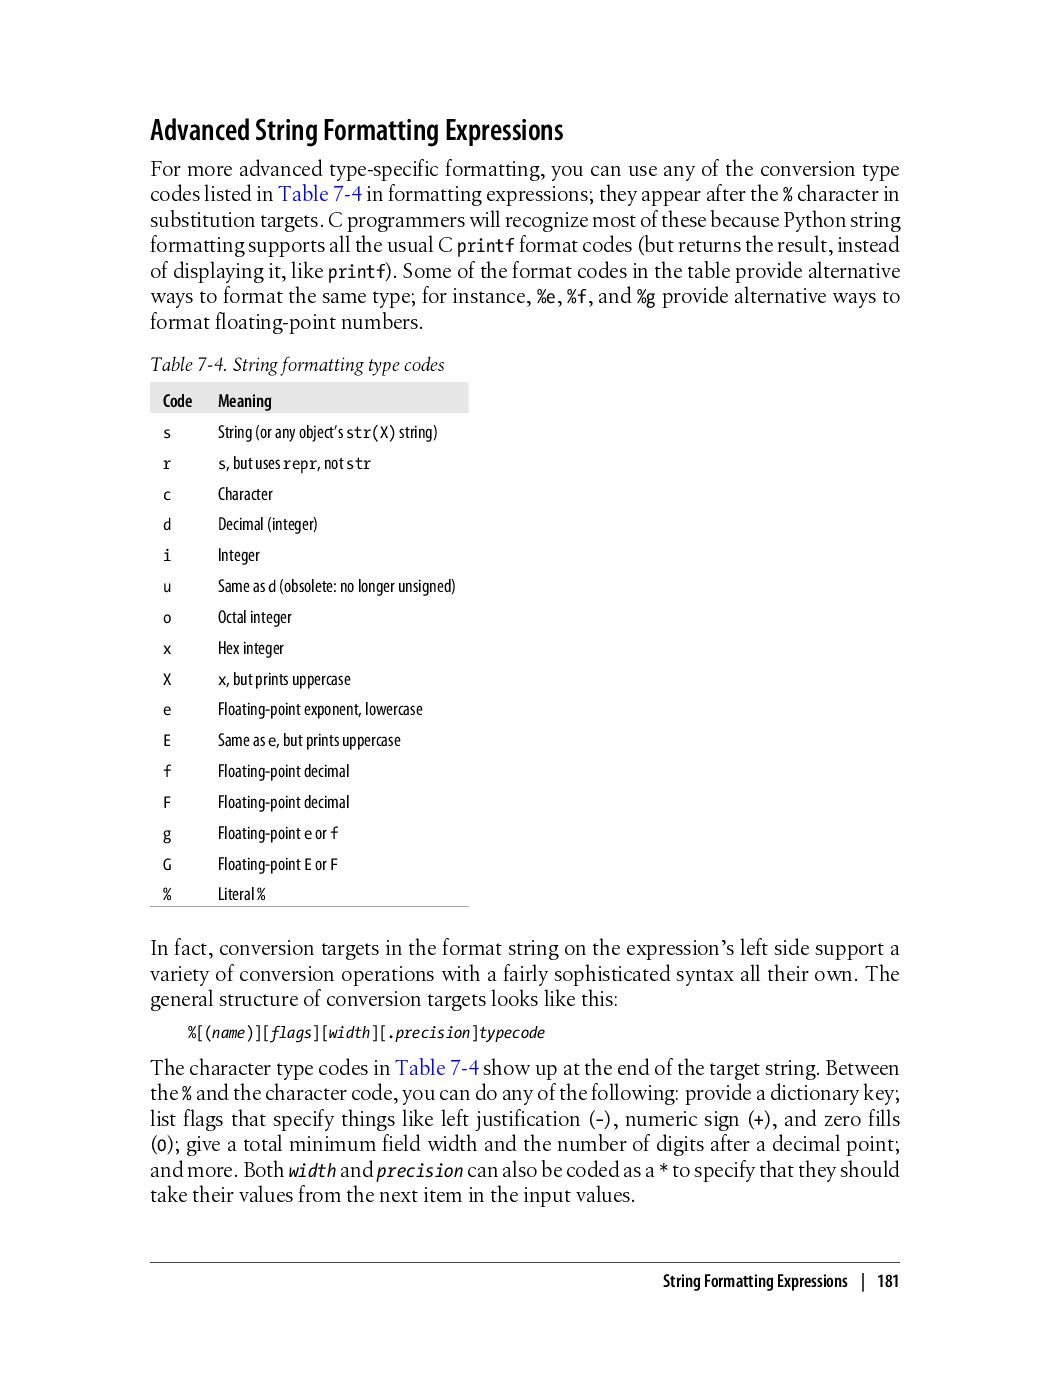
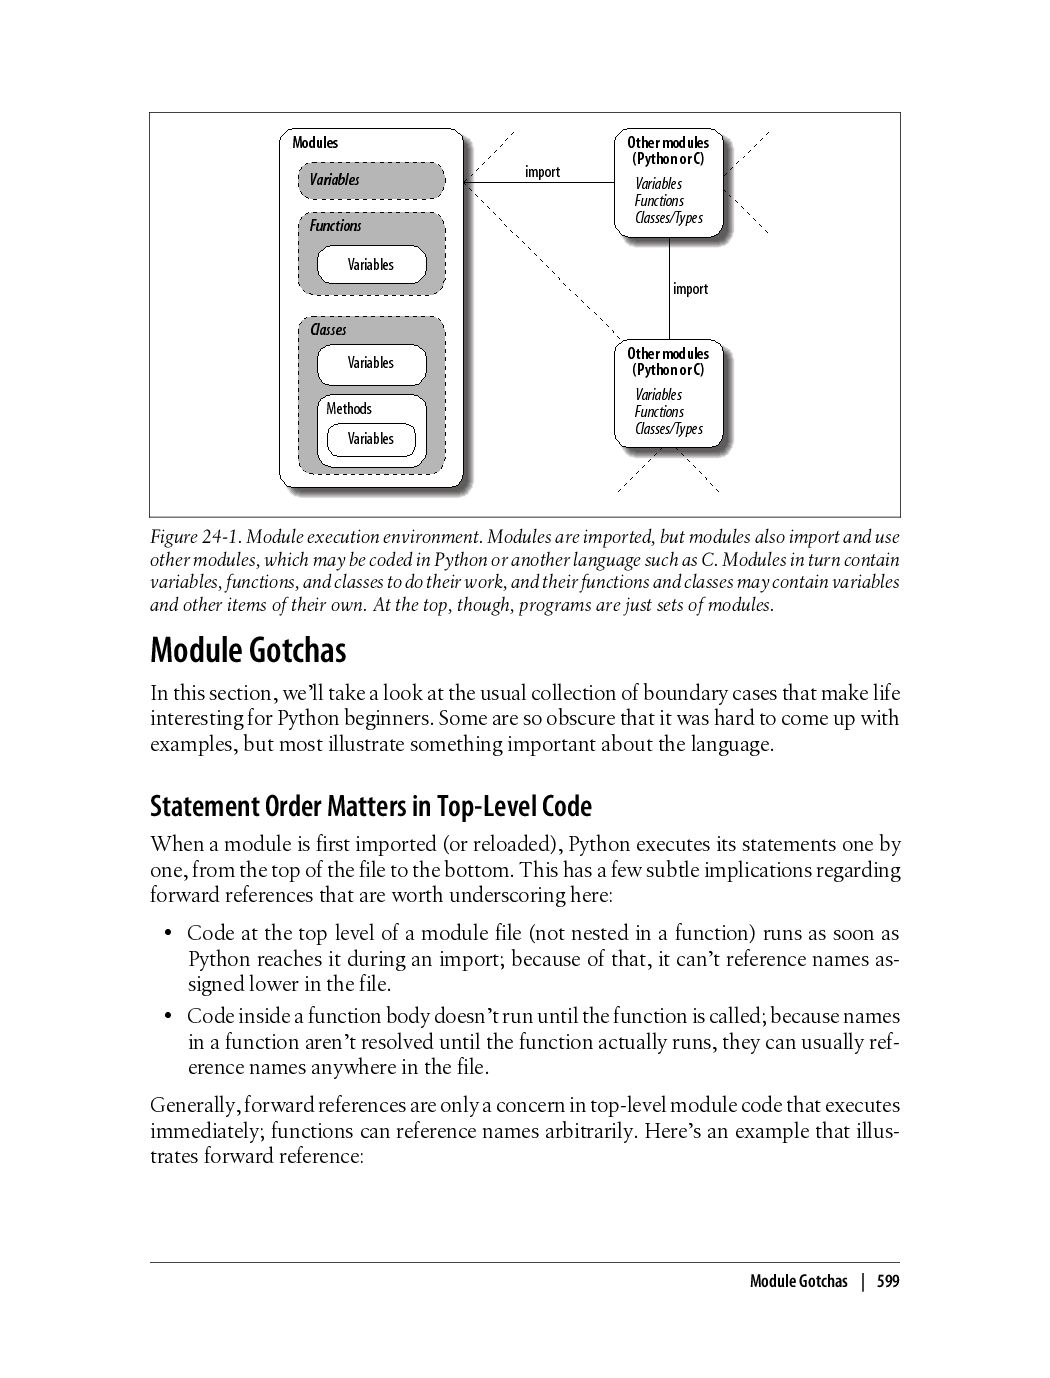
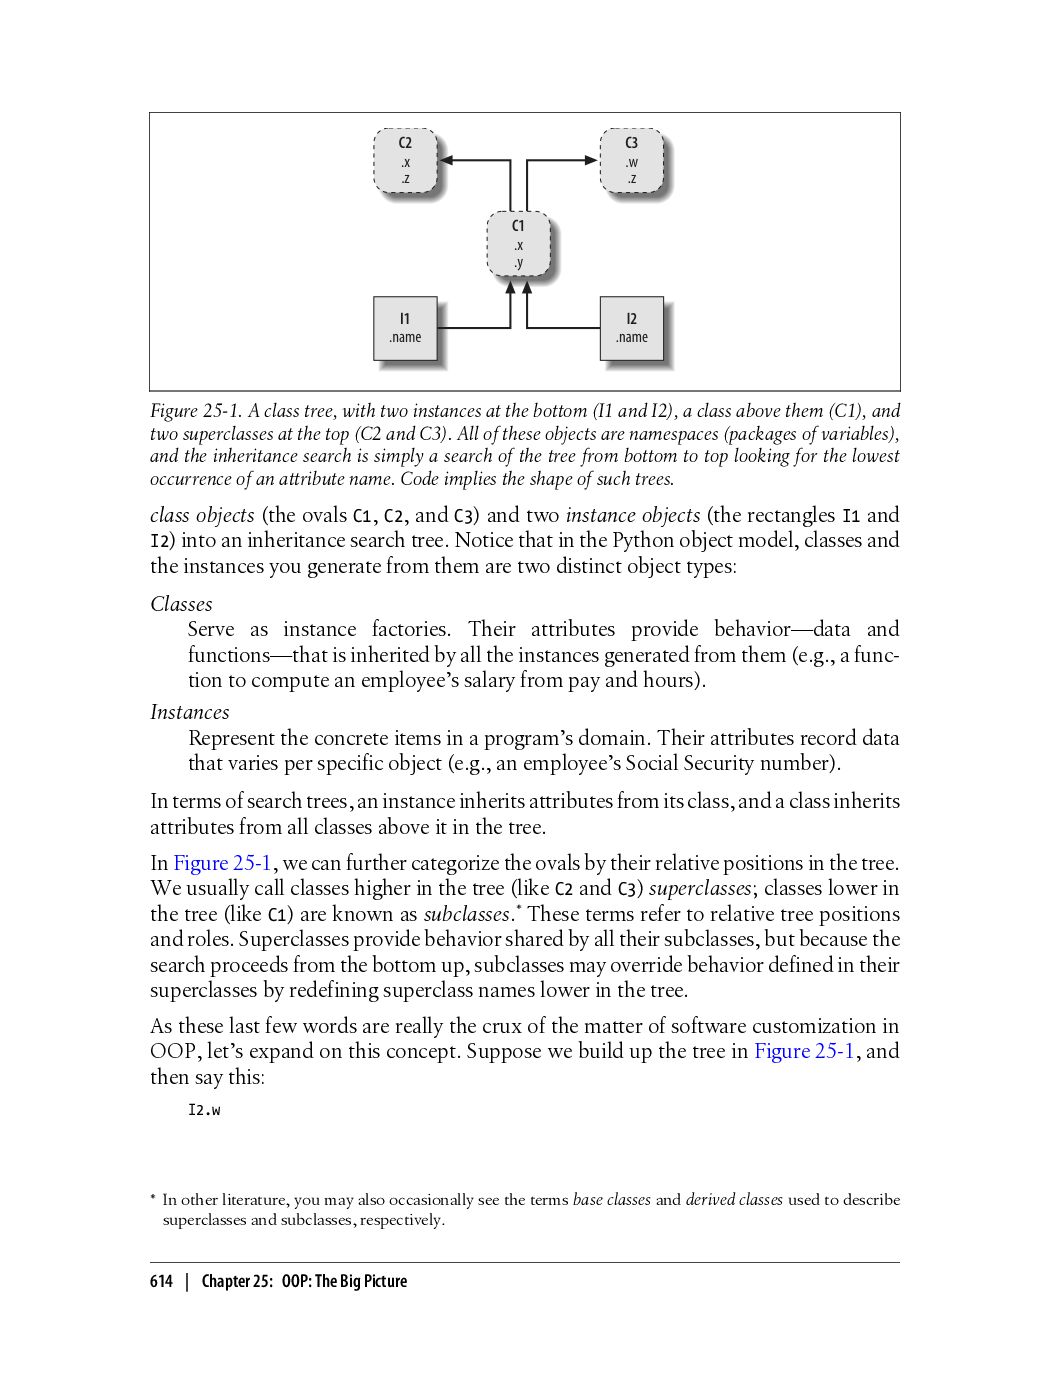
functions, 796 single quotes (') and strings, 158 site module, 537 slice assignment in lists, 202 slice objects, 168 slicing, 81, 165, 166 example, 168 extended slicing, 167 loops, usage in, 343 software components, 653 sort method, 87, 203, 388, 454 sorted function, 93, 363 sorts in Python 3.0, 204 source code, 26 source file character set encoding declarations, 912 spaces, 314 special characters, 897 split method, 235 square brackets [ ], 78, 108, 269 dictionaries and, 209 list comprehensions and, 359, 486, 504 lists and, 89, 199 square roots, 126 stack trace, 828, 840 Stackless Python, 33 standard library, 4, 533 library directories, 537 standard manual set, 386 standard output stream (stdout), 297 state information, 102, 644 state retention, 429–432, 727, 997–1000 state with classes, 430 statements, 75, 261–276 assignment statements (see assignment statements) compound statements, 264 differences from other C-like languages, 265 end-of-line, 265 expression statements, 295 in-place changes, 296 indentation syntax, 266 multiline statements, 317 Python 3.0 statement set, 262 syntax, 264 block rule special case, 270 colon (:), 264 indentation, 266 interactive loops, 271–276 semicolons, 269 statement separators, 269 static methods, 686, 795–801 alternatives to, 798 coding with decorator syntax, 804 counting instances, 800 Python 2.6 and 3.0, 796 using, 799 staticmethod function, 799 steps, 167 StopIteration exception, 352 str, 79, 157, 169 repr, compared to, 116 str object type data encoding in, 901 str string type, 899 Python 2.6 operation set, 911 Python 3.0 compared to 2.x, 899 Unicode and, 85 stream processors, 742 stream redirection, 44 strides, 167 string exceptions, 859 deprecation of, 858 string formatting, 179–183 advanced expressions, 181 dictionary-based formatting expressions, 182 string formatting type codes, 181 string formatting method calls, 183–193 format method, 184–193 % formatting expression, compared to, 187 justification for, 190 keys, attributes, and offsets, 184 string methods, 172–179 additional examples, 177 changing strings example, 174 parsing text example, 176 Python 2.x string module, 178 string method calls to format method, 185 string method calls, Python 3.0, 173 string object type, 80–86, 155–163 coding special characters, 85 pattern matching, 85 raw string literals, 85 Index | 1157
![>>> L[99] = 1 ...error text omitted... IndexError: list assignment](https://files.speakerdeck.com/presentations/7cff6627b21d4b20a929c1af5a1a0aa8/slide_138.jpg)
![>>> rec['name'] # 'name' is a nested dictionary {'last': 'Smith',](https://files.speakerdeck.com/presentations/7cff6627b21d4b20a929c1af5a1a0aa8/slide_142.jpg)
![self.pay = pay def lastName(self): return self.name.split()[-1] # Split string](https://files.speakerdeck.com/presentations/7cff6627b21d4b20a929c1af5a1a0aa8/slide_152.jpg)
![—S[:3] fetches items at offset 0 up to but not](https://files.speakerdeck.com/presentations/7cff6627b21d4b20a929c1af5a1a0aa8/slide_217.jpg)
![>>> S = 'abcedfg' >>> S[5:1:−1] 'fdec' Skipping and reversing](https://files.speakerdeck.com/presentations/7cff6627b21d4b20a929c1af5a1a0aa8/slide_218.jpg)
![S.isidentifier() S.splitlines([keepends]) S.islower() S.startswith(prefix [, start [, end]]) S.isnumeric() S.strip([chars])](https://files.speakerdeck.com/presentations/7cff6627b21d4b20a929c1af5a1a0aa8/slide_224.jpg)
![>>> line = 'bob,hacker,40' >>> line.split(',') ['bob', 'hacker', '40'] Delimiters](https://files.speakerdeck.com/presentations/7cff6627b21d4b20a929c1af5a1a0aa8/slide_227.jpg)
![>>> matrix[1] [4, 5, 6] >>> matrix[1][1] 5 >>> matrix[2][0]](https://files.speakerdeck.com/presentations/7cff6627b21d4b20a929c1af5a1a0aa8/slide_252.jpg)
![Operation Interpretation del D[key] Deleting entries by key list(D.keys()) D1.keys()](https://files.speakerdeck.com/presentations/7cff6627b21d4b20a929c1af5a1a0aa8/slide_259.jpg)
![>>> D = {} >>> D[99] = 'spam' >>> D[99]](https://files.speakerdeck.com/presentations/7cff6627b21d4b20a929c1af5a1a0aa8/slide_264.jpg)
![... else: ... print(0) ... 0 >>> try: ... print(Matrix[(2,3,6)])](https://files.speakerdeck.com/presentations/7cff6627b21d4b20a929c1af5a1a0aa8/slide_265.jpg)
![>>> mel['home']['zip'] 80513 Although we’ll learn in Part VI that](https://files.speakerdeck.com/presentations/7cff6627b21d4b20a929c1af5a1a0aa8/slide_266.jpg)
![>>> D = dict.fromkeys(['a', 'b', 'c'], 0) # Initialize dict](https://files.speakerdeck.com/presentations/7cff6627b21d4b20a929c1af5a1a0aa8/slide_269.jpg)
![>>> list(V) [1, 3, 2] >>> list(D.items()) [('a', 1), ('c',](https://files.speakerdeck.com/presentations/7cff6627b21d4b20a929c1af5a1a0aa8/slide_270.jpg)
!["Spam\n43,44,45\n[1, 2, 3]${'a': 1, 'b': 2}\n" >>> print(chars) # User-friendly](https://files.speakerdeck.com/presentations/7cff6627b21d4b20a929c1af5a1a0aa8/slide_285.jpg)
!["[1, 2, 3]${'a': 1, 'b': 2}\n" >>> parts = line.split('$')](https://files.speakerdeck.com/presentations/7cff6627b21d4b20a929c1af5a1a0aa8/slide_286.jpg)
![>>> X = [1, 2, 3] >>> L = ['a',](https://files.speakerdeck.com/presentations/7cff6627b21d4b20a929c1af5a1a0aa8/slide_294.jpg)
![D['w'] = 0 D['x'] + D['w'] D[(1,2,3)] = 4 list(D.keys()),](https://files.speakerdeck.com/presentations/7cff6627b21d4b20a929c1af5a1a0aa8/slide_306.jpg)
![('S', 'P', 'AM') >>> a, b = string[:2] # Same,](https://files.speakerdeck.com/presentations/7cff6627b21d4b20a929c1af5a1a0aa8/slide_333.jpg)
![>>> a, b, c ('s', ['p', 'a'], 'm') This is](https://files.speakerdeck.com/presentations/7cff6627b21d4b20a929c1af5a1a0aa8/slide_336.jpg)
![For example: >>> ['f', 't'][bool('')] 'f' >>> ['f', 't'][bool('spam')] 't'](https://files.speakerdeck.com/presentations/7cff6627b21d4b20a929c1af5a1a0aa8/slide_373.jpg)
![>>> S = 'abcdefghijk' >>> for c in S[::2]: print(c,](https://files.speakerdeck.com/presentations/7cff6627b21d4b20a929c1af5a1a0aa8/slide_394.jpg)
![>>> [line.replace(' ', '!') for line in open('script1.py')] ['import!sys\n', 'print(sys.path)\n',](https://files.speakerdeck.com/presentations/7cff6627b21d4b20a929c1af5a1a0aa8/slide_411.jpg)
![a = 2 b[0] = 'spam' # Changes our list](https://files.speakerdeck.com/presentations/7cff6627b21d4b20a929c1af5a1a0aa8/slide_489.jpg)
![print(min2("bb", "aa")) print(min3([2,2], [1,1], [3,3])) All three solutions produce the](https://files.speakerdeck.com/presentations/7cff6627b21d4b20a929c1af5a1a0aa8/slide_505.jpg)
![>>> mysum(['spam', 'ham', 'eggs']) 'spamhameggs' If you study these three](https://files.speakerdeck.com/presentations/7cff6627b21d4b20a929c1af5a1a0aa8/slide_517.jpg)
![>>> counters = [1, 2, 3, 4] >>> >>> updated](https://files.speakerdeck.com/presentations/7cff6627b21d4b20a929c1af5a1a0aa8/slide_530.jpg)
![>>> [M[i][i] for i in range(len(M))] [1, 5, 9] Finally,](https://files.speakerdeck.com/presentations/7cff6627b21d4b20a929c1af5a1a0aa8/slide_540.jpg)
![def mymapPad(*seqs, pad=None): seqs = [list(S) for S in seqs]](https://files.speakerdeck.com/presentations/7cff6627b21d4b20a929c1af5a1a0aa8/slide_554.jpg)
![return (tuple(S[i] for S in seqs) for i in range(minlen))](https://files.speakerdeck.com/presentations/7cff6627b21d4b20a929c1af5a1a0aa8/slide_555.jpg)
![--------------------------------- forLoop : 2.60754 => [10...10009] --------------------------------- listComp : 1.57585](https://files.speakerdeck.com/presentations/7cff6627b21d4b20a929c1af5a1a0aa8/slide_563.jpg)
![(1.1822605247314932, 4294967296) >>> timer(power, 2, 100000)[0] # 2 ** 100,000](https://files.speakerdeck.com/presentations/7cff6627b21d4b20a929c1af5a1a0aa8/slide_567.jpg)
![M.name # Qualify object M.__dict__['name'] # Index namespace dictionary manually](https://files.speakerdeck.com/presentations/7cff6627b21d4b20a929c1af5a1a0aa8/slide_642.jpg)
![>>> list(y.__dict__.keys()) # list() not required in Python 2.6 []](https://files.speakerdeck.com/presentations/7cff6627b21d4b20a929c1af5a1a0aa8/slide_688.jpg)
![[Person: Bob Smith, 0] [Person: Sue Jones, 121000] [Person: Tom](https://files.speakerdeck.com/presentations/7cff6627b21d4b20a929c1af5a1a0aa8/slide_707.jpg)
![Bob Smith => [Person: job=None, name=Bob Smith, pay=0] Sue Jones](https://files.speakerdeck.com/presentations/7cff6627b21d4b20a929c1af5a1a0aa8/slide_725.jpg)
![Method Implements Called for __getitem__ Indexing, slicing, iteration X[key], X[i:j],](https://files.speakerdeck.com/presentations/7cff6627b21d4b20a929c1af5a1a0aa8/slide_757.jpg)
![>>> [x ** 2 for x in range(1, 6)] [1,](https://files.speakerdeck.com/presentations/7cff6627b21d4b20a929c1af5a1a0aa8/slide_764.jpg)
![if self.ix == len(self.data): raise StopIteration item = self.data[self.ix] self.ix](https://files.speakerdeck.com/presentations/7cff6627b21d4b20a929c1af5a1a0aa8/slide_767.jpg)
![_name=44355632 _tclCommands=[] ...much more omitted... > Of course, there’s much](https://files.speakerdeck.com/presentations/7cff6627b21d4b20a929c1af5a1a0aa8/slide_817.jpg)
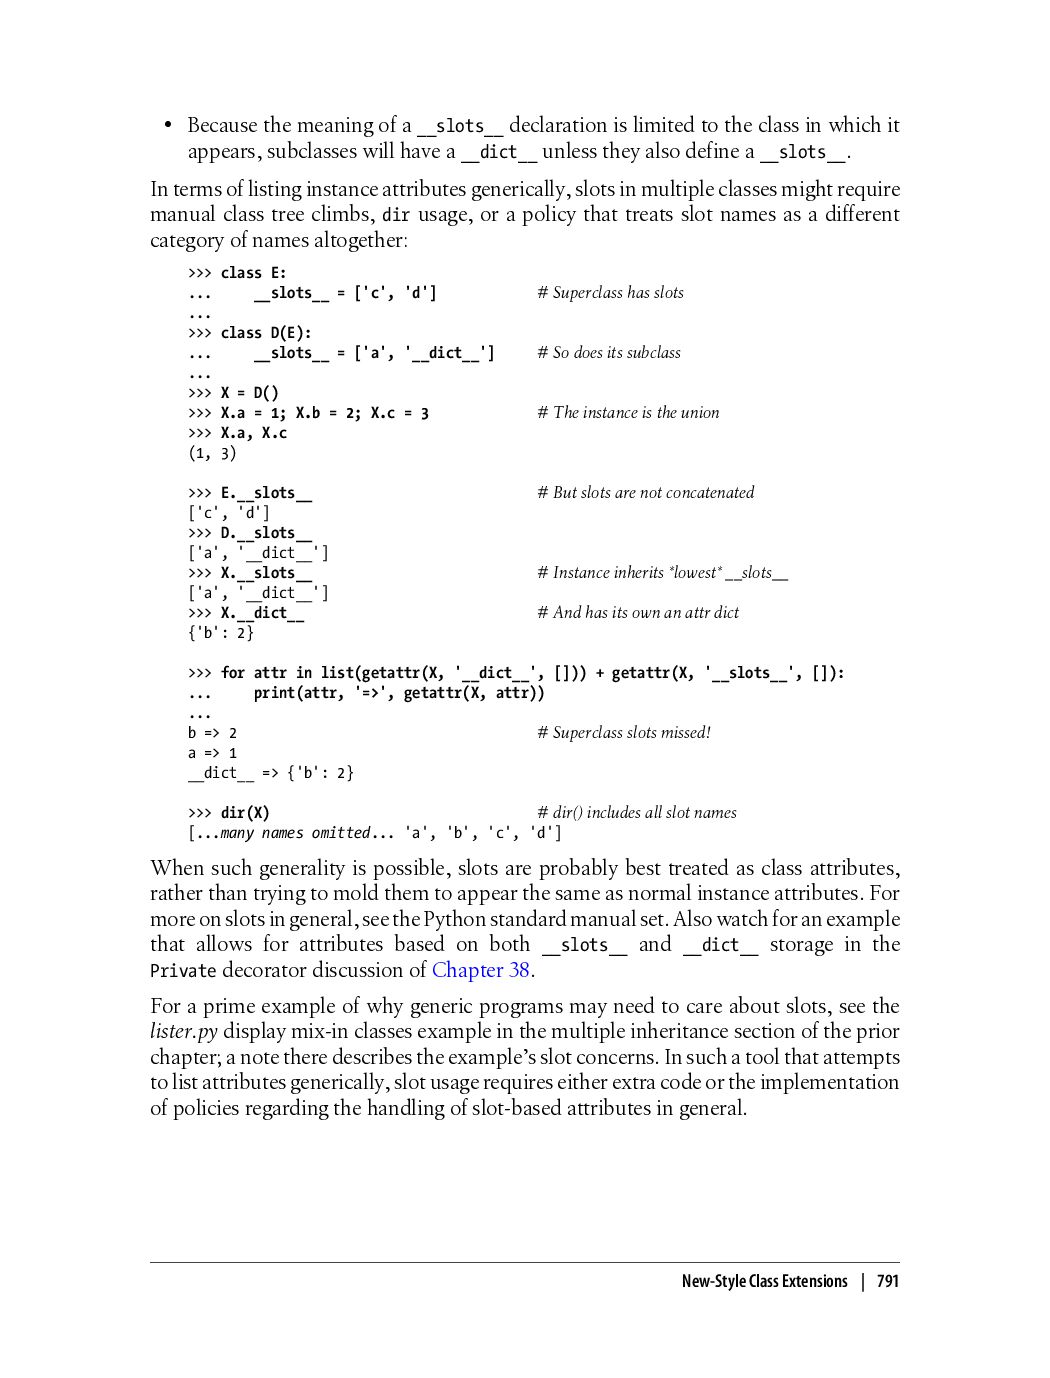
![>>> X.__slots__ ['a', 'b', '__dict__'] >>> X.c 3 >>> X.a](https://files.speakerdeck.com/presentations/7cff6627b21d4b20a929c1af5a1a0aa8/slide_840.jpg)
![x = 'spam'[3] except IndexError: print('except run') else: print('else run')](https://files.speakerdeck.com/presentations/7cff6627b21d4b20a929c1af5a1a0aa8/slide_897.jpg)
![# Mutable, but must assign ints, not strings >>> C[0]](https://files.speakerdeck.com/presentations/7cff6627b21d4b20a929c1af5a1a0aa8/slide_968.jpg)
![>>> data = file.read() >>> data[:20] b'MZ\x90\x00\x03\x00\x00\x00\x04\x00\x00\x00\xff\xff\x00\x00\xb8\x00\x00\x00' The first of](https://files.speakerdeck.com/presentations/7cff6627b21d4b20a929c1af5a1a0aa8/slide_976.jpg)
![# Accesssing bits of parsed integers >>> bin(values[0]) # Can](https://files.speakerdeck.com/presentations/7cff6627b21d4b20a929c1af5a1a0aa8/slide_982.jpg)
![b'\x80\x03]q\x00(K\x01K\x02K\x03e.' >>> pickle.dumps([1, 2, 3], protocol=0) # ASCII protocol 0,](https://files.speakerdeck.com/presentations/7cff6627b21d4b20a929c1af5a1a0aa8/slide_983.jpg)
![['a'] >>> Y = C() >>> Y.a # Y still](https://files.speakerdeck.com/presentations/7cff6627b21d4b20a929c1af5a1a0aa8/slide_1000.jpg)
![def __setattr__(self, name, value): self.__dict__['other'] = value # Use atttr](https://files.speakerdeck.com/presentations/7cff6627b21d4b20a929c1af5a1a0aa8/slide_1009.jpg)
![C:\misc> c:\python26\python person.py Jones [Person: Sue Jones, 110000] Jones [Person:](https://files.speakerdeck.com/presentations/7cff6627b21d4b20a929c1af5a1a0aa8/slide_1022.jpg)
![class Acct: def __get__(self, instance, owner): return self.acct[:-3] + '***'](https://files.speakerdeck.com/presentations/7cff6627b21d4b20a929c1af5a1a0aa8/slide_1027.jpg)
![[MMM]==>mapcall: 0.00002, 0.00002 [MMM]==>mapcall: 2.29260, 2.29262 [0, 2, 4, 6,](https://files.speakerdeck.com/presentations/7cff6627b21d4b20a929c1af5a1a0aa8/slide_1099.jpg)
![classdict['ham'] = hamfunc else: classdict['ham'] = lambda *args: 'Not supported'](https://files.speakerdeck.com/presentations/7cff6627b21d4b20a929c1af5a1a0aa8/slide_1123.jpg)
![2 >>> D = {'x':1, 'y':2, 'z':3} >>> D['w'] =](https://files.speakerdeck.com/presentations/7cff6627b21d4b20a929c1af5a1a0aa8/slide_1155.jpg)
![>>> L = [1,2,3,4] >>> L[2] = [] >>> L](https://files.speakerdeck.com/presentations/7cff6627b21d4b20a929c1af5a1a0aa8/slide_1156.jpg)
![>>> D = {'a':1, 'b':2, 'c':3} >>> D['a'] 1 >>>](https://files.speakerdeck.com/presentations/7cff6627b21d4b20a929c1af5a1a0aa8/slide_1157.jpg)
![>>> >>> [][:] [] >>> ""[:] '' 8. String indexing.](https://files.speakerdeck.com/presentations/7cff6627b21d4b20a929c1af5a1a0aa8/slide_1158.jpg)
![0.1769041177020938 >>> >>> timer(dictcomp, 1000000, _reps=50)[0] # 1,000,000-item dict 10.692516087938543](https://files.speakerdeck.com/presentations/7cff6627b21d4b20a929c1af5a1a0aa8/slide_1169.jpg)
![print('not implemented!') def __init__(self, start=[]): self.data = start def __add__(self,](https://files.speakerdeck.com/presentations/7cff6627b21d4b20a929c1af5a1a0aa8/slide_1173.jpg)
![print(x + ['eggs']) print(x * 3) x.append('a') x.sort() for c](https://files.speakerdeck.com/presentations/7cff6627b21d4b20a929c1af5a1a0aa8/slide_1175.jpg)
![a ['p', 'a', 'm'] ['s', 'p', 'a', 'm', 'eggs'] ['s',](https://files.speakerdeck.com/presentations/7cff6627b21d4b20a929c1af5a1a0aa8/slide_1176.jpg)
![Set:[1, 2, 3, 4, 5] >>> z = Set("hello") #](https://files.speakerdeck.com/presentations/7cff6627b21d4b20a929c1af5a1a0aa8/slide_1177.jpg)
![>>> from multiset import * >>> x = MultiSet([1,2,3,4]) >>>](https://files.speakerdeck.com/presentations/7cff6627b21d4b20a929c1af5a1a0aa8/slide_1178.jpg)
![if thisDir.upper() in visited: continue else: visited[thisDir.upper()] = True for](https://files.speakerdeck.com/presentations/7cff6627b21d4b20a929c1af5a1a0aa8/slide_1183.jpg)
![for key in db: print(key, '=>', db[key]) bob = db['bob']](https://files.speakerdeck.com/presentations/7cff6627b21d4b20a929c1af5a1a0aa8/slide_1188.jpg)