Upgrade to Pro — share decks privately, control downloads, hide ads and more …

[Shmuela Jacobs] Workshop: Reactive Forms in Angular

[Shmuela Jacobs] Workshop: Reactive Forms in Angular

Content level: Intermediate

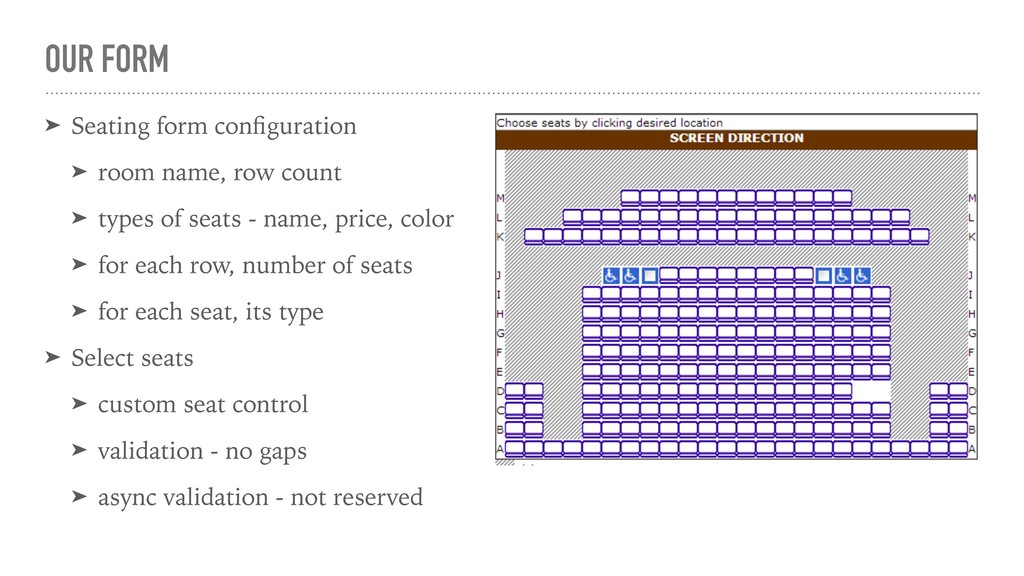
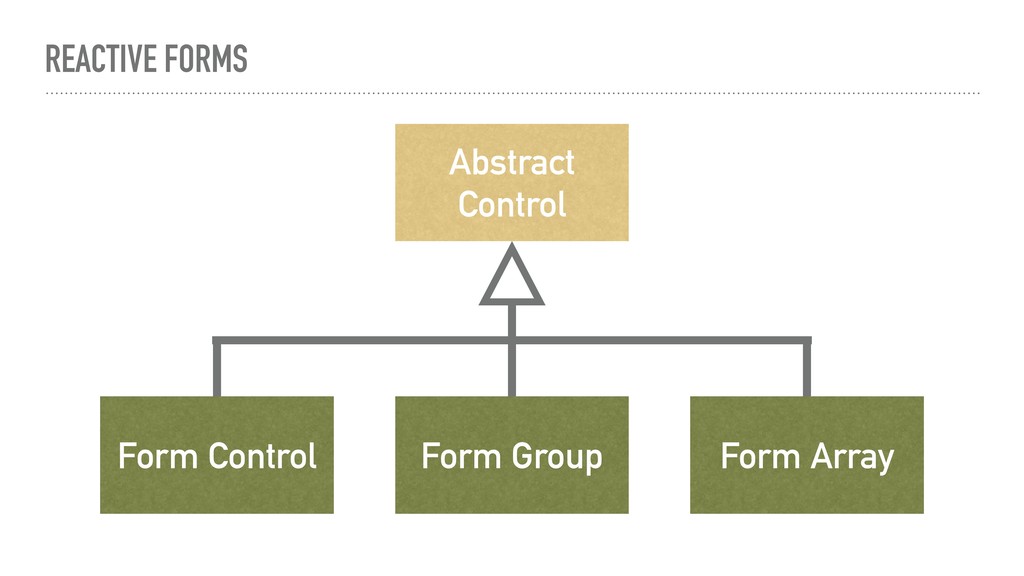
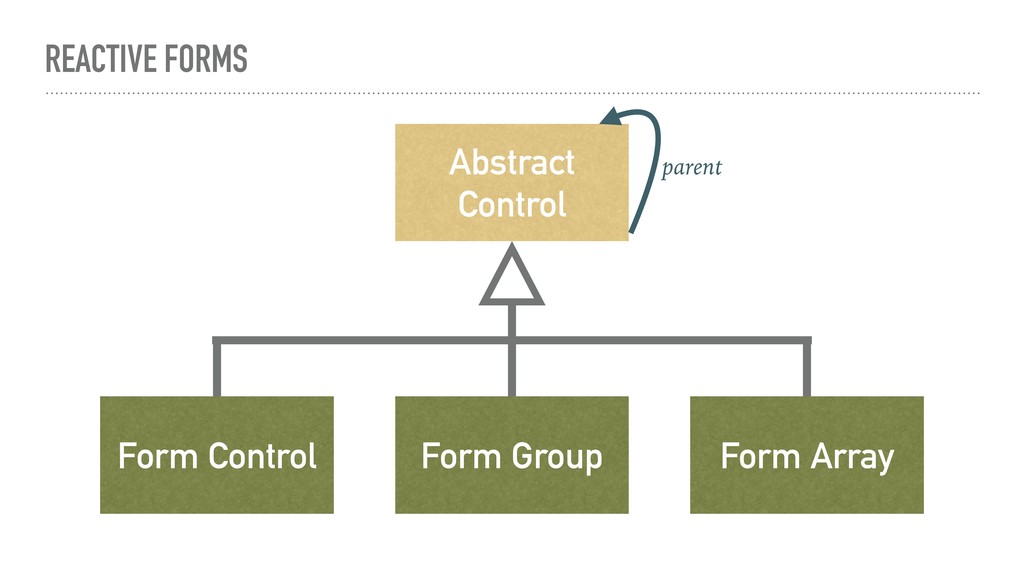
Forms are found in most web applications, and they are used as the main interaction point between the user and the system. With advancements in Web technologies, we’re able to design forms for great UX. The Reactive Forms Module, written by the Angular core team, is designed with a wide range of options and an understandable API. It lets us developers manage and manipulate forms and form controls dynamically while tracking their state of usage and validity. We can create custom, reusable form controls with sync and async validators. In this hands-on workshop, we will learn how to leverage the Angular Reactive Forms for our needs.

Shmuela Jacobs
Google Developer Expert / Israel

Google Developers Group Lviv

October 12, 2018
Tweet

More Decks by Google Developers Group Lviv

Other Decks in Programming

Transcript

  1. OUR FORM ➤ Seating form configuration ➤ room name, row

    count ➤ types of seats - name, price, color ➤ for each row, number of seats ➤ for each seat, its type ➤ Select seats ➤ custom seat control ➤ validation - no gaps ➤ async validation - not reserved
  2. OUR FORM ➤ We'll use: ➤ Clarity Design System -

    UI components
 https://vmware.github.io/clarity/ ➤ Dexie.js - Minimalistic IndexedDB Wrapper
 http://dexie.org/
  3. REACTIVE FORMS ➤ Also called model-driven forms ➤ All the

    form configuration is done in the controller ➤ Minimal additions to the template ➤ Advantages: ➤ more flexible and dynamic ➤ easier to test ➤ Recommended resource: Angular Reactive Forms Book
 by Nir Kaufman, https://leanpub.com/angular-forms
  4. REACTIVE FORMS ➤ Create the form using: ➤ new FormGroup()

    ➤ new FormControl() ➤ new FormArray() ➤ Parameters: ➤ initial value (or { value, disabled }) ➤ validators (or options object) ➤ async validators
  5. REACTIVE FORMS ➤ Attach the form group to the form

    using the directive formGroup: ➤ <form [formGroup]="myForm"> - pass the form group object ➤ Attach to form controls (input, etc.) and containers (div) with the given name (as a string or bind a value) ➤ formControlName ➤ formGroupName ➤ formArrayName ➤ Or, bind directly to the form control / group, if it's explicit in the controller: ➤ formControl, formGroup
  6. FIRST CONTROL ➤ Create a formControl in the controller ➤

    Create an input element in the template ➤ Bind the input element to the formControl using the formControl directive
  7. FORM ➤ Create a form configuration in the controller -

    
 one FormGroup with three FormControls: ➤ roomName ➤ number of rows ➤ average number of seats ➤ Create a form element bound to the form group, with input elements bound to the respective form controls ➤ Add a submit button ➤ Use ngSubmit to log the configuration (later we'll save it in IndexedDB)
  8. CONTROL/FORM STATE ➤ disabled ➤ enabled ➤ valid ➤ invalid

    ➤ pending ➤ dirty ➤ pristine ➤ touched ➤ untouched ➤ submitted
  9. BUILT-IN VALIDATION ➤ required ➤ requiredTrue ➤ min ➤ max

    ➤ pattern ➤ email ➤ length ➤ minlength ➤ maxlength
  10. FORM VALIDATION ➤ Use the build in validators to validate:

    ➤ the room name is required ➤ the row count and average number of seats must be a positive integer ➤ Disable the submit button if the form is not valid ➤ remember, !valid invalid ➤ Use validation classes to style invalid controls ➤ Add error messages ≠
  11. FORM GROUP ➤ Add seat type group, with the following

    controls and default values: ➤ type name, default: 'regular' ➤ color, default: '#666666' ➤ price, default: 10 ➤ Add the group and controls to the template
  12. FORM ARRAY ➤ Wrap the seat type group with a

    form array - in the controller and in the template ➤ Add methods to add (push) a type (group) and to remove one ➤ Add buttons to add and to remove types ➤ The types will be identified by ID (their index in the array)
  13. ADD A FORM GROUP ➤ Change the save button to

    save the configuration and generate a form group of the seating in the room: ➤ form array of form groups: ➤ number of seats ➤ array of app-seat ➤ app-seat is a customized (styled) select control
  14. MODEL-DRIVEN FORM ➤ The model is the room configuration +

    taken seats ➤ create a new component with a form ➤ array of rows ➤ array of seats ➤ each seat is a styled checkbox: ➤ background: seat type color ➤ border: grey - free, red (+disabled) - taken, green - selected ➤ Submit button
  15. CUSTOM VALIDATION ➤ Write a validation function that checks whether

    there's a gap of 1 between selected seats ➤ Add this validation to the row array ➤ The form should be validated on submit
  16. ASYNC VALIDATION ➤ Write an async validation function that checks

    whether the selected seat is already taken ➤ Add this validation to the seat control ➤ If the seat is taken: ➤ display an error message ➤ mark the seat (flickering background for 5 seconds) ➤ unselect the seat and disable it
  17. ASYNC VALIDATION ➤ Custom controls- ➤ plug to control lifecycle

    hooks ➤ form builder ➤ (real) dynamic forms ➤ forms libraries ➤ ngx-formly Juri Strumpflohner - Supercharge your Angular forms! https://www.youtube.com/watch?v=XYFrWkzHVxw