Upgrade to Pro — share decks privately, control downloads, hide ads and more …

Introduction to Google Cloud Endpoints

Nacho Coloma
November 01, 2014

Introduction to Google Cloud Endpoints

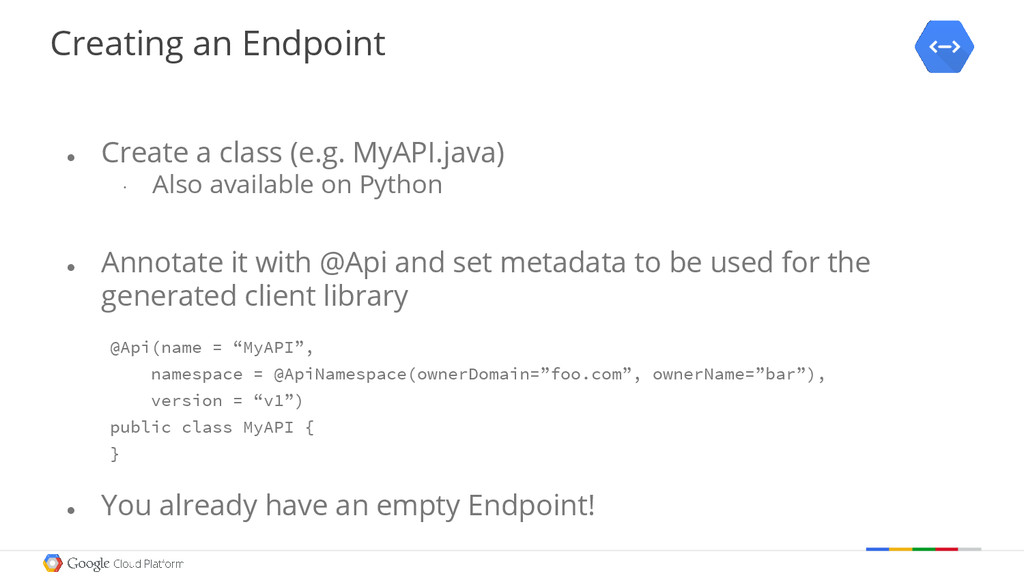
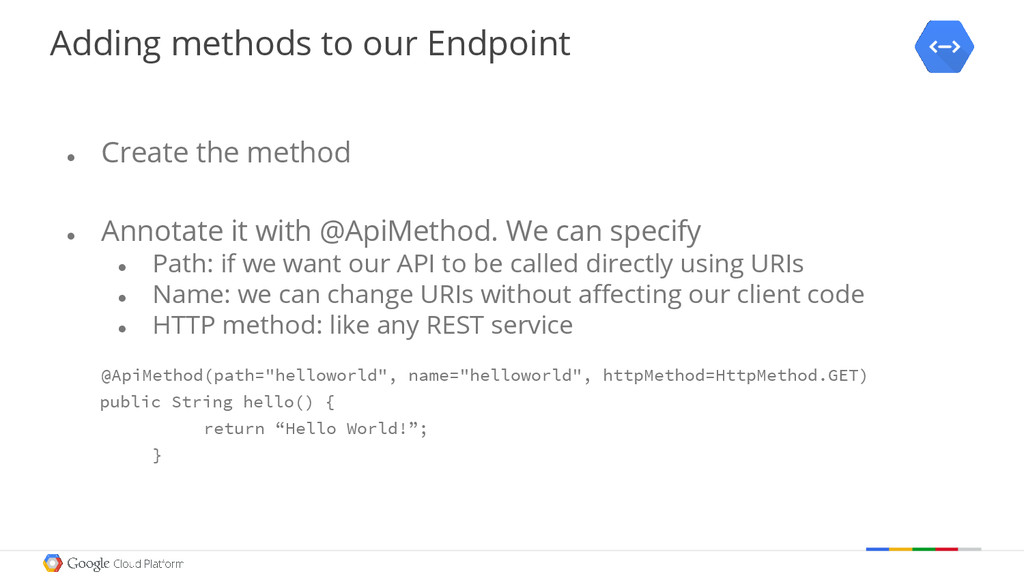
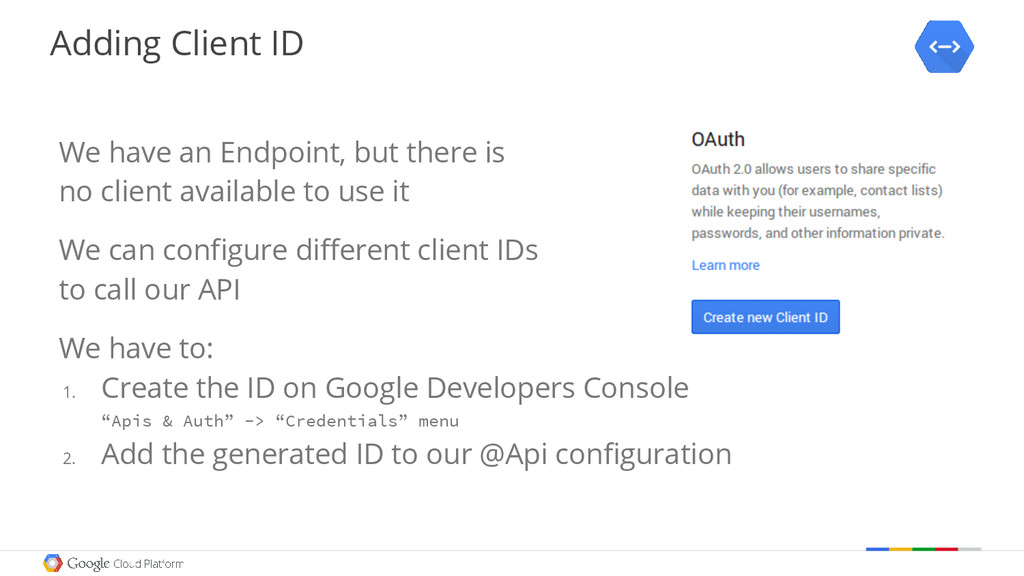
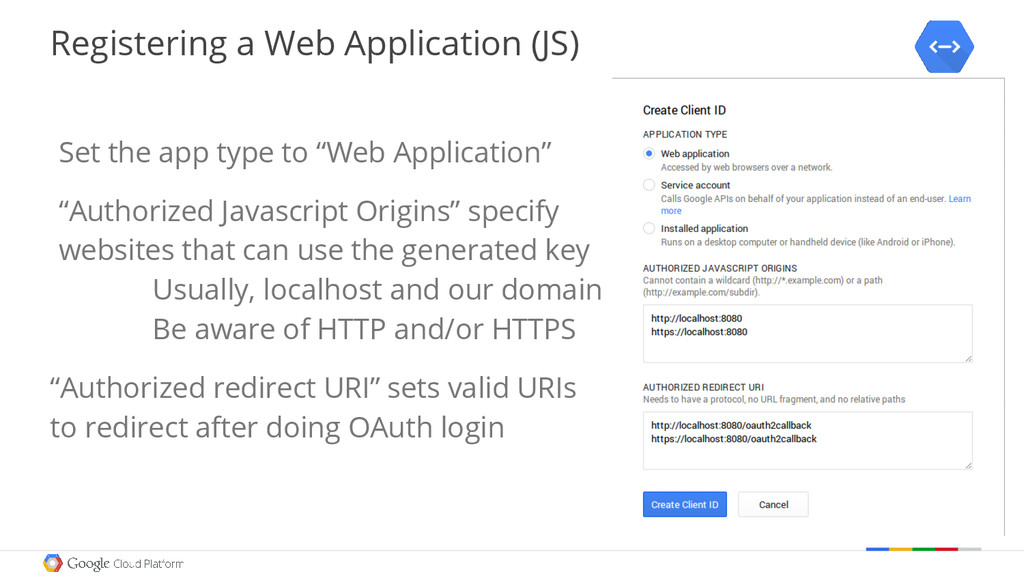
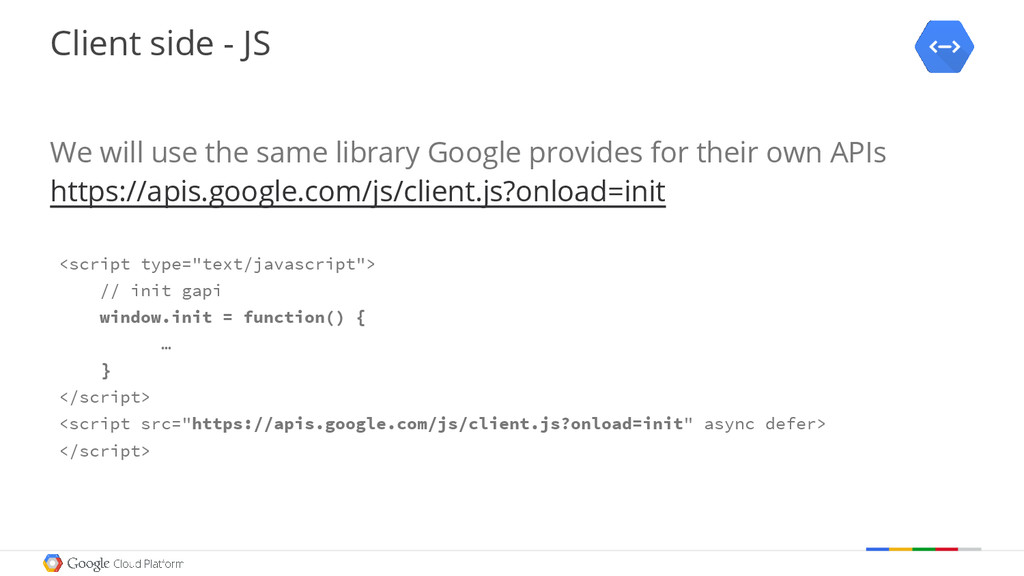
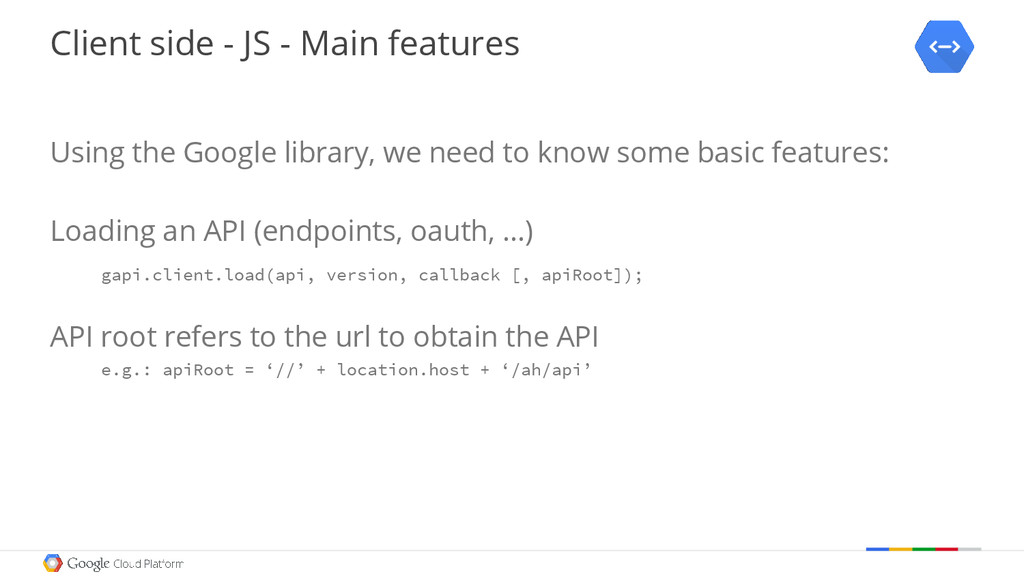
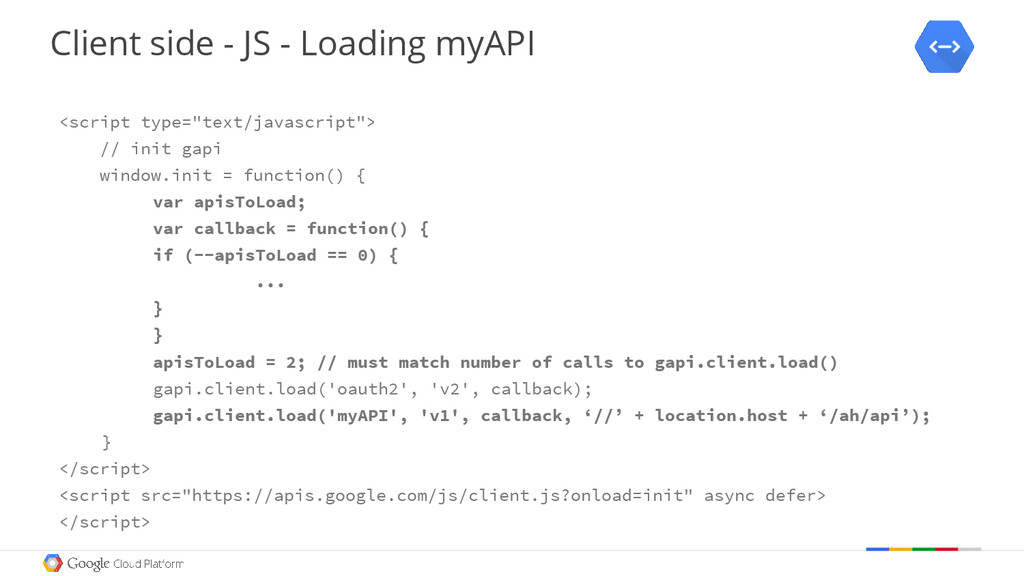
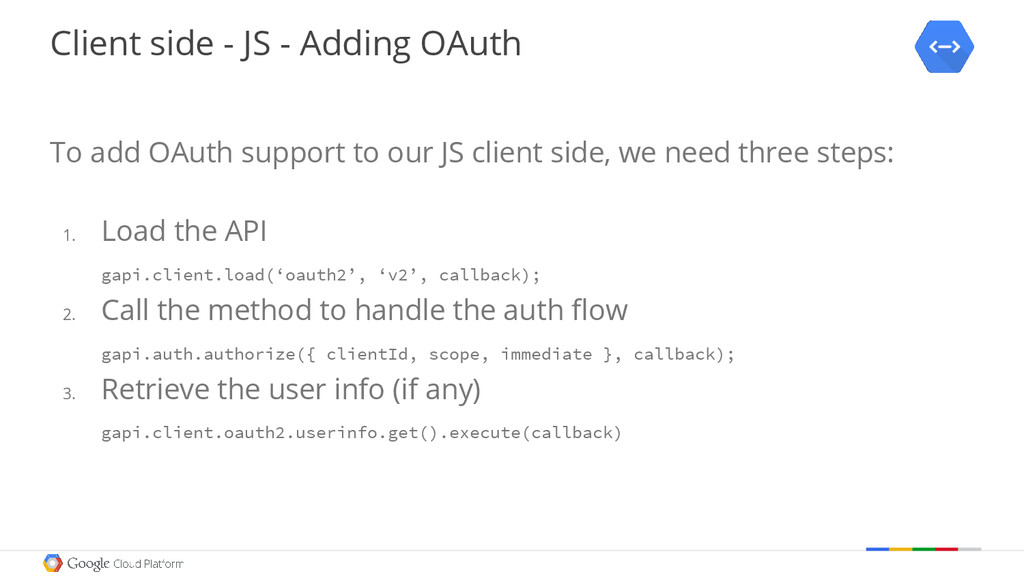
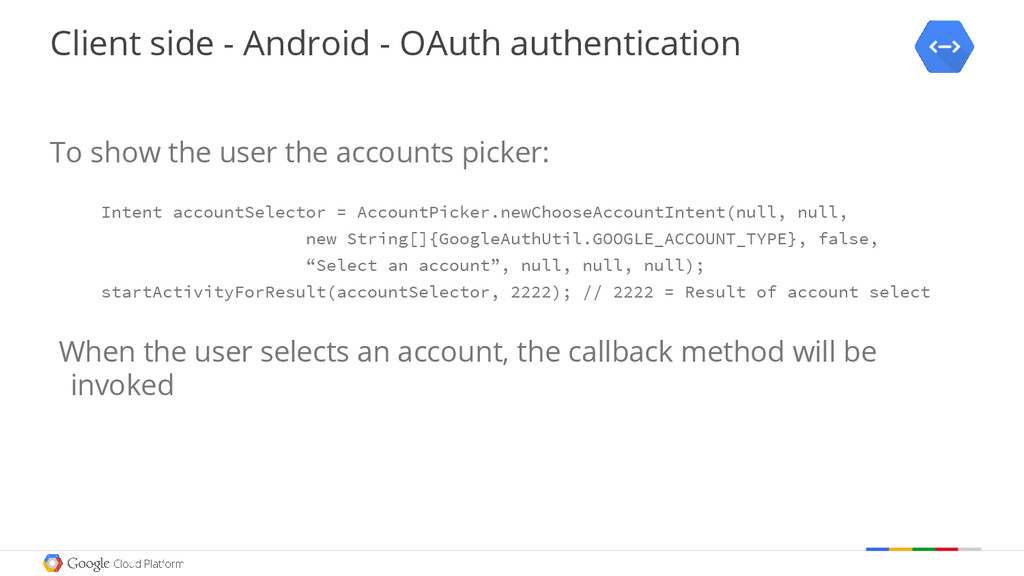
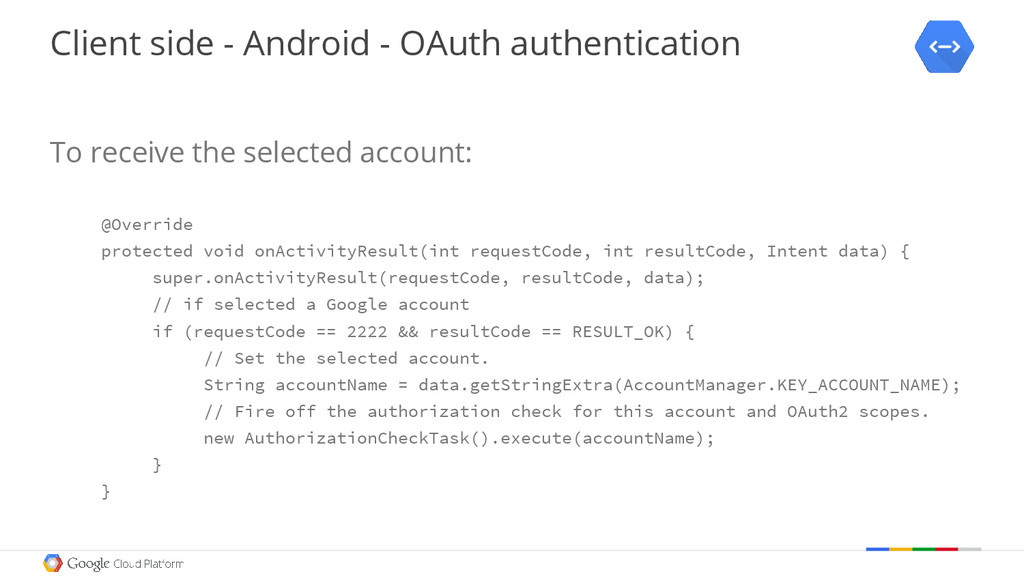
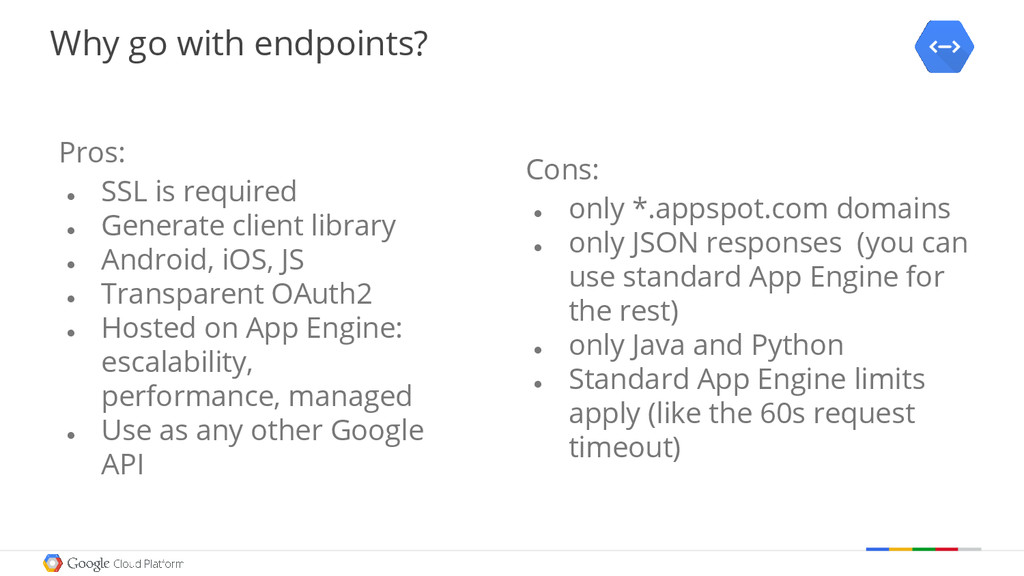
This talk introduces how Google Cloud Endpoints can be used to deploy a REST API that behaves exactly the same as any other API developed by Google. Presented at Madrid DevFest 2014, the contents include OAuth2, client lib generation and a small list of perks of App Engine.

Nacho Coloma

November 01, 2014
Tweet

More Decks by Nacho Coloma

Other Decks in Technology

Transcript

  1. Intro to Google Cloud Endpoints Nacho Coloma — CTO at

    Extrema Sistemas Google Developer Expert @nachocoloma http://gplus.to/icoloma
  2. Google Cloud Platform Storage Cloud Storage Cloud SQL Cloud Datastore

    Compute Compute Engine (IaaS) App Engine (PaaS) Services BigQuery Cloud Endpoints
  3. Google Cloud Platform Storage Cloud Storage Cloud SQL Cloud Datastore

    Compute Compute Engine (IaaS) App Engine (PaaS) Services BigQuery Cloud Endpoints
  4. Cloud Platform solutions IaaS PaaS SaaS Infrastructure-as-a-Service Platform-as-a-Service Software-as-a-Service Applications

    Data Runtime Middleware O/S Virtualization Servers Storage Networking Applications Data Runtime Middleware O/S Virtualization Servers Storage Networking Applications Data Runtime Middleware O/S Virtualization Servers Storage Networking Packaged Software Applications Data Runtime Middleware O/S Virtualization Servers Storage Networking You Manage Vendor Managed
  5. App Engine If you don’t have a DevOps team to

    guarantee these: • Infinite scaling • High availability. • Transparent security upgrades. and instead just want to focus on delivering new features, that’s what App Engine is for.
  6. My system is not always down But when it is,

    I have an entire team of Googlers fixing it
  7. Cloud Endpoints runs on App Engine • Generates REST API

    automatically • JS, Android and iOS client libraries • Server/Client communication is hidden • Runs on same powerful infrastructure, scales infinitely
  8. Creating an Endpoint • Create a class (e.g. MyAPI.java) ·

    Also available on Python • Annotate it with @Api and set metadata to be used for the generated client library @Api(name = “MyAPI”, namespace = @ApiNamespace(ownerDomain=”foo.com”, ownerName=”bar”), version = “v1”) public class MyAPI { } • You already have an empty Endpoint!
  9. Adding methods to our Endpoint • Create the method •

    Annotate it with @ApiMethod. We can specify • Path: if we want our API to be called directly using URIs • Name: we can change URIs without affecting our client code • HTTP method: like any REST service @ApiMethod(path="helloworld", name="helloworld", httpMethod=HttpMethod.GET) public String hello() { return “Hello World!”; }
  10. Adding Client ID We have an Endpoint, but there is

    no client available to use it We can configure different client IDs to call our API We have to: 1. Create the ID on Google Developers Console “Apis & Auth” -> “Credentials” menu 2. Add the generated ID to our @Api configuration
  11. Registering a Web Application (JS) Set the app type to

    “Web Application” “Authorized Javascript Origins” specify websites that can use the generated key Usually, localhost and our domain Be aware of HTTP and/or HTTPS “Authorized redirect URI” sets valid URIs to redirect after doing OAuth login
  12. Adding the Web Application ID To add the previously created

    ID to our configuration, go to @Api config and set the clientIds attribute @Api(name = “MyAPI”, namespace = @ApiNamespace(ownerDomain=”foo.com”, ownerName=”bar”), version = “v1”, clientIds = { “960794397679-78s0s8v.apps.googleusercontent.com” }) public class MyAPI { } Now, we can call the API from JS (See later)
  13. Registering an Android Application Set the app type to “Installed

    Application” and type to “Android” Now, we only have to specify our Android application base package and the fingerprint of the app certificate
  14. Adding Android Application ID To add the Android ID to

    our API, go to @Api config and add it to the “clientIds” attribute. Also, you need to set the “audiences” attribute to any Web Application ID @Api(name = “MyAPI”, namespace = @ApiNamespace(ownerDomain=”foo.com”, ownerName=”bar”), version = “v1”, clientIds = { “960794397679-5qkdoj0.apps.googleusercontent.com” }, audiences = { “960794397679-78s0s8v.apps.googleusercontent.com” }) public class MyAPI { }
  15. Registering and adding an iOS Application Set the app type

    to “Installed Application” and application type to “iOS” Now, we only have to specify our iOS application bundle ID and AppStore ID To finalize, add it to @Api “clientIds” attr
  16. Adding OAuth authentication At the moment, we can create an

    API that can be invoked from JS, Android and iOS. Now we can add security. To add OAuth2 authentication we must specify: 1. OAuth2 scopes with the user info we want to retrieve 2. Which methods require authentication control
  17. Adding OAuth Scopes Set the scopes attribute @Api(name = “MyAPI”,

    namespace = @ApiNamespace(ownerDomain=”foo.com”, ownerName=”bar”), version = “v1”, scopes = { “https://www.googleapis.com/auth/userinfo.email” }) public class MyAPI { } For a list of available scopes, visit https://developers.google. com/+/api/oauth#login-scopes
  18. Registering OAuth protected methods Just add a com.google.appengine.api.users.User argument to

    your method and it will be injected public String helloworld(User user) { … } If there is no authenticated user this param will be null, so it must be checked if (user == null) { throw new OAuthRequestException(“This method is protected!”); }
  19. Complete Endpoint example @Api(name = “MyAPI”, namespace = @ApiNamespace(ownerDomain=”foo.com”, ownerName=”instructormatters”),

    version = “v1”, scopes = {Constants.EMAIL_SCOPE}, clientIds = {Constants.WEB_CLIENT_ID, Constants.ANDROID_CLIENT_ID, Constants. IOS_CLIENT_ID}, audiences = {Constants.ANDROID_AUDIENCE} ) public class MyAPI { @ApiMethod(path="helloworld", name="helloworld") public String hello() { return “Hello World!”; } }
  20. Client side - JS We will use the same library

    Google provides for their own APIs https://apis.google.com/js/client.js?onload=init <script type="text/javascript"> // init gapi window.init = function() { … } </script> <script src="https://apis.google.com/js/client.js?onload=init" async defer> </script>
  21. Client side - JS - Main features Using the Google

    library, we need to know some basic features: Loading an API (endpoints, oauth, …) gapi.client.load(api, version, callback [, apiRoot]); API root refers to the url to obtain the API e.g.: apiRoot = ‘//’ + location.host + ‘/ah/api’
  22. Client side - JS - Loading myAPI <script type="text/javascript"> //

    init gapi window.init = function() { var apisToLoad; var callback = function() { if (--apisToLoad == 0) { ... } } apisToLoad = 2; // must match number of calls to gapi.client.load() gapi.client.load('oauth2', 'v2', callback); gapi.client.load('myAPI', 'v1', callback, ‘//’ + location.host + ‘/ah/api’); } </script> <script src="https://apis.google.com/js/client.js?onload=init" async defer> </script>
  23. Client side - JS - Adding OAuth To add OAuth

    support to our JS client side, we need three steps: 1. Load the API gapi.client.load(‘oauth2’, ‘v2’, callback); 2. Call the method to handle the auth flow gapi.auth.authorize({ clientId, scope, immediate }, callback); 3. Retrieve the user info (if any) gapi.client.oauth2.userinfo.get().execute(callback)
  24. Client side - JS - Adding OAuth window.init = function()

    { var apisToLoad; var callback = function() { if (--apisToLoad == 0) { gapi.auth.authorize( { client_id: WEB_CLIENT_ID, scope: SCOPES, immediate: true }, authorizeCallback ); } } apisToLoad = 2; // must match number of calls to gapi.client.load() gapi.client.load('myAPI', 'v1', callback, ‘//’ + location.host + ‘/ah/api’); gapi.client.load(‘oauth2’, ‘v2’, callback); }
  25. Client side - JS - Adding OAuth authorizeCallback = function()

    { gapi.client.oauth2.userinfo.get().execute(function(user) { if (user && !user.error) { // user is logged … } else { // anonymous user … } }); } Now, let’s see how to call our API
  26. Client side - JS - Calling myApi To call the

    different APIs we need to use the following pattern: gapi.client.{{API}}.{{methodName}}([params]).execute(callback) Examples: gapi.client.myAPI.helloworld().execute(function(resp) { … }); gapi.client.oauth2.userinfo.get().execute(function(resp) { … }); gapi.client.anotherAPI.entries.delete({ id: 2 }).execute(function(resp) { … });
  27. Client side - JS - Calling myAPI authorizeCallback = function()

    { gapi.client.oauth2.userinfo.get().execute(function(user) { if (user && !user.error) { // user is logged gapi.client.myAPI.securedMethod().execute(function(resp) { … }); … } else { // anonymous user gapi.client.myAPI.unsecuredMethod().execute(function(resp) { … }); … } }); }
  28. Client side - Android To use our API from an

    installed application (Android|iOS), we will need to generate a library. There are two ways of doing this: • Using a Gradle task gradle appengineEndpointsInstallClientLibs • Using dependencies compile project(path: ‘:my-server-project’, configuration: ‘android-endpoints’)
  29. Client side - Android - Instantiating our API To create

    a new instance of our service, we have a Builder that needs: • HttpTransport AndroidHttp.newCompatibleTransport() • JsonFactory new AndroidJsonFactory() • GoogleAccountCredential GoogleAccountCredential.usingAudience(MyActivity.this, AUDIENCE) * AUDIENCE = "server:client_id:" + WEB_CLIENT_ID; (Not Android ID!!)
  30. Client side - Android - Instantiating our API Optionally, we

    can specify “rootUrl” property to the builder. Useful to connect to our local server deployment instead of production. // debug needs server address if (BuildConfig.DEBUG) { builder.setRootUrl(getServerUrl() + "/_ah/api/"); }
  31. Client side - Android - Calling our API Once we

    have an instance of our API client, we just have to use it like with JS: myAPIService.{{methodName}}.execute() Examples: String message = myAPIService.helloworld().execute(); // helloworld method name Entry entry = myAPIService.entries().get().execute(); // entries.get method name myAPIService.entries().create(entry).execute(); //entries.create method name
  32. Client side - Android - Requirements Requests to the API

    must be invoked on an async task class HelloworldTask extends AsyncTask<Integer, Void, String> { @Override protected String doInBackground(Integer... integers) { … myAPIService.helloworld().execute(); … } @Override protected void onPostExecute(String message) { … } }
  33. Client side - Android - OAuth authentication The following Android

    permissions are required: <uses-permission android:name=”android.permission.GET_ACCOUNTS”/> <uses-permission android:name=”android.permission.USE_CREDENTIALS”/> To log in, we will need the help of the AccountManager: AccountManager am = AccountManager.get(MyActivity.this); Account[] accounts = am.getAccountsByType(GoogleAuthUtil.GOOGLE_ACCOUNT_TYPE);
  34. Client side - Android - OAuth authentication To show the

    user the accounts picker: Intent accountSelector = AccountPicker.newChooseAccountIntent(null, null, new String[]{GoogleAuthUtil.GOOGLE_ACCOUNT_TYPE}, false, “Select an account”, null, null, null); startActivityForResult(accountSelector, 2222); // 2222 = Result of account select When the user selects an account, the callback method will be invoked
  35. Client side - Android - OAuth authentication To receive the

    selected account: @Override protected void onActivityResult(int requestCode, int resultCode, Intent data) { super.onActivityResult(requestCode, resultCode, data); // if selected a Google account if (requestCode == 2222 && resultCode == RESULT_OK) { // Set the selected account. String accountName = data.getStringExtra(AccountManager.KEY_ACCOUNT_NAME); // Fire off the authorization check for this account and OAuth2 scopes. new AuthorizationCheckTask().execute(accountName); } }
  36. Why go with endpoints? Pros: • SSL is required •

    Generate client library • Android, iOS, JS • Transparent OAuth2 • Hosted on App Engine: escalability, performance, managed • Use as any other Google API Cons: • only *.appspot.com domains • only JSON responses (you can use standard App Engine for the rest) • only Java and Python • Standard App Engine limits apply (like the 60s request timeout)
  37. Storage options on App Engine Google Cloud Datastore Managed noSQL

    storage Unlimited scale Limited query capabilities Entities < 1MB Google Cloud Storage Store big files in the cloud Reliable storage Encrypted at rest Resumable uploads / downloads using HTTP
  38. More storage options on App Engine Google Cloud SQL Managed

    plain ol’ MySQL Max database size is 500GB BigQuery Blazing fast analytics and reporting Scales indefinitely (though you may want to break data in chunks for cost) Can be used via API, command line or web interface Cloud Storage Cloud Datastore
  39. Even more storage options on App Engine Google Compute Engine

    · Deploy your own storage solution using persistent disks: PostgreSQL, Redis, MongoDB, etc. · Some of these are available using a preconfigured stack that can be deployed with a single click. · Choose the type of storage: Standard Persistent Disks, SSD Persistent Disks, Local SSD Disks (upcoming). · Choose size: bigger is faster. Cloud Storage Cloud Datastore Cloud SQL BigQuery
  40. Yet Even more storage options on App Engine Google Drive

    API · Store your data in rows using Google Spreadsheets · Store files in Google Drive Cloud Storage Cloud Datastore Cloud SQL BigQuery Compute Engine For Android · Cloud Save: Save and load a small amount of data for each user (4 x 256KB) · Saved Games: Like Cloud Save for games (since Jul 2014). Includes a default UI, and counts against the Drive quota of the user.
  41. Storage options on App Engine Cloud Storage Cloud Datastore Cloud

    SQL BigQuery Compute Engine Drive Android
  42. Storage options on App Engine Compute Engine Cloud Storage Cloud

    Datastore Cloud SQL BigQuery Compute Engine Drive Android
  43. HTTP 2.0 (based on SPDY) Enabled out-of-the-box on App Engine

    You don’t have to do anything Supported in other environments Included with the latest Nginx Adding mod_spdy with Apache · Up to 50% reduction in Page Load Time by reducing network latency · Requires SSL (in practice) and is backwards-compatible · Supported in all browsers (even Explorer) · Learn if you are already supporting it: http://spdycheck.org/
  44. Q? A! Nacho Coloma — CTO at Extrema Sistemas Google

    Developer Expert @nachocoloma http://gplus.to/icoloma
  45. • The Official Google Cloud Platform Course is here in

    Europe! • 5 days of the best training: · App Engine, Compute Engine, Cloud Storage, Cloud SQL and BigQuery • Upcoming: · Madrid: January 2015 · Barcelona: December 2014 · Other cities coming soon! • Register here. CP300 IS HERE!
  46. If you are a member of a GDG, it’s 30%

    OFF http://blog.extrema-sistemas.com/gdg-30/