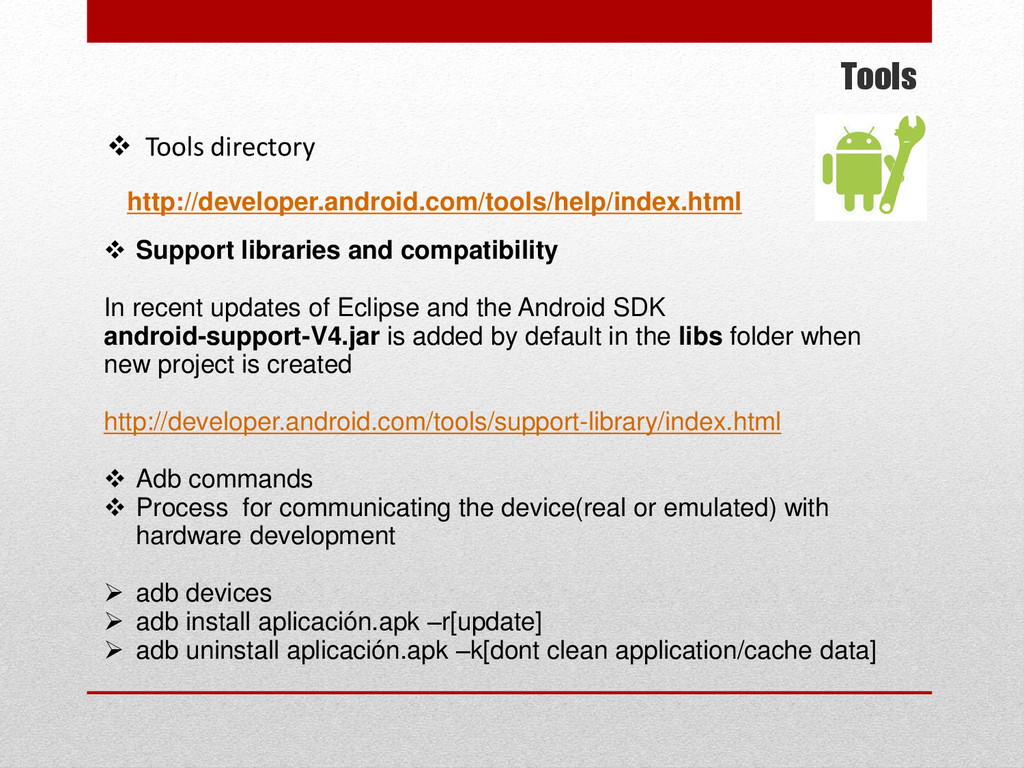
In recent updates of Eclipse and the Android SDK android-support-V4.jar is added by default in the libs folder when new project is created http://developer.android.com/tools/support-library/index.html Adb commands Process for communicating the device(real or emulated) with hardware development adb devices adb install aplicación.apk –r[update] adb uninstall aplicación.apk –k[dont clean application/cache data]
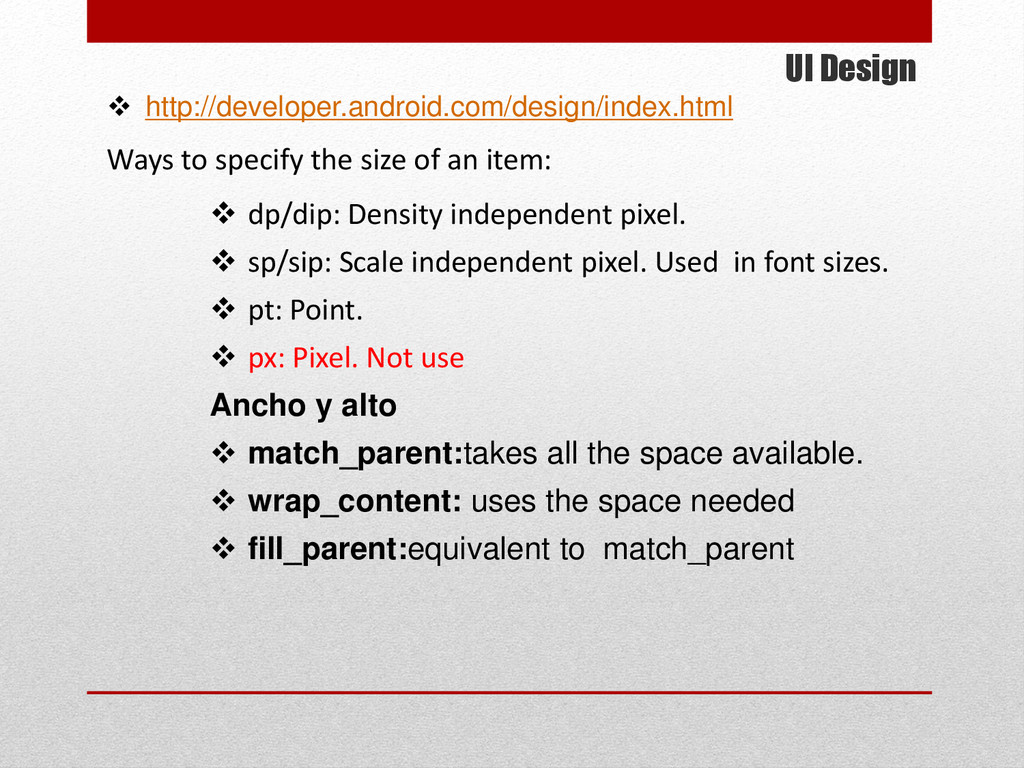
an item: dp/dip: Density independent pixel. sp/sip: Scale independent pixel. Used in font sizes. pt: Point. px: Pixel. Not use Ancho y alto match_parent:takes all the space available. wrap_content: uses the space needed fill_parent:equivalent to match_parent
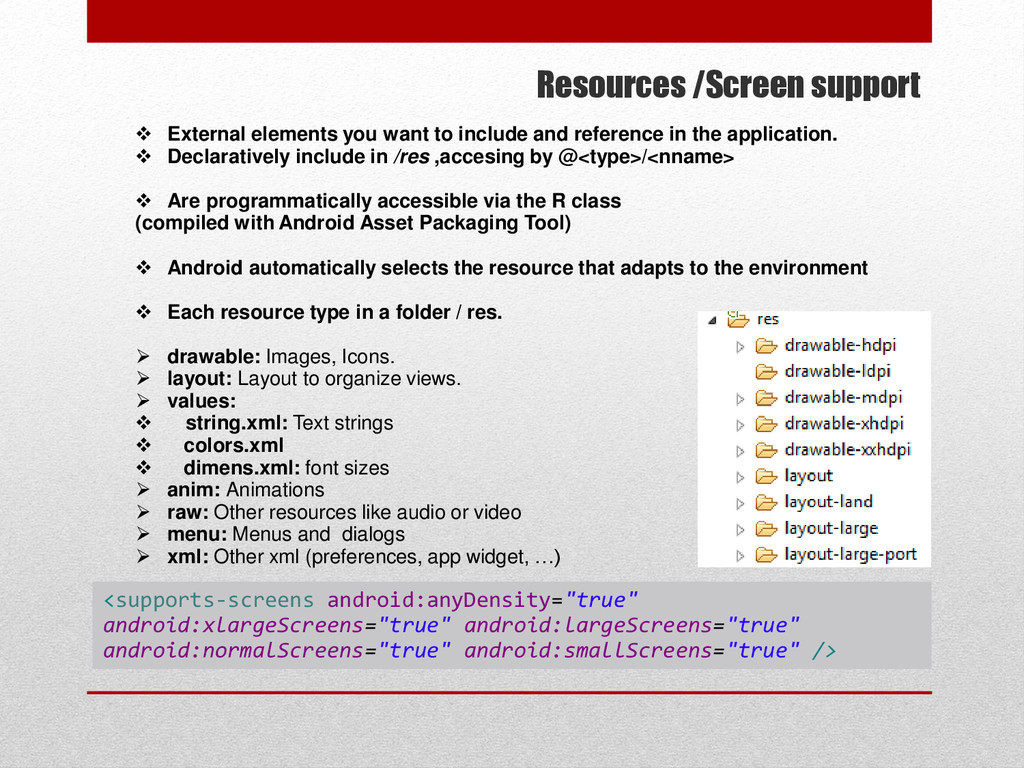
and reference in the application. Declaratively include in /res ,accesing by @<type>/<nname> Are programmatically accessible via the R class (compiled with Android Asset Packaging Tool) Android automatically selects the resource that adapts to the environment Each resource type in a folder / res. drawable: Images, Icons. layout: Layout to organize views. values: string.xml: Text strings colors.xml dimens.xml: font sizes anim: Animations raw: Other resources like audio or video menu: Menus and dialogs xml: Other xml (preferences, app widget, …) <supports-screens android:anyDensity="true" android:xlargeScreens="true" android:largeScreens="true" android:normalScreens="true" android:smallScreens="true" />
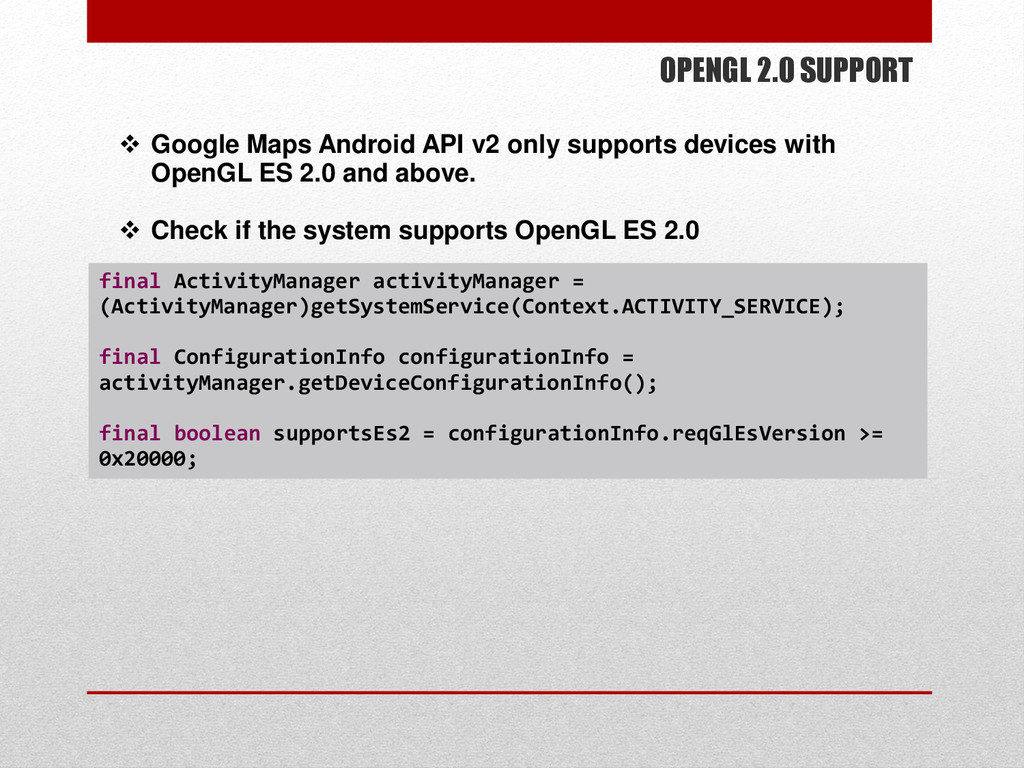
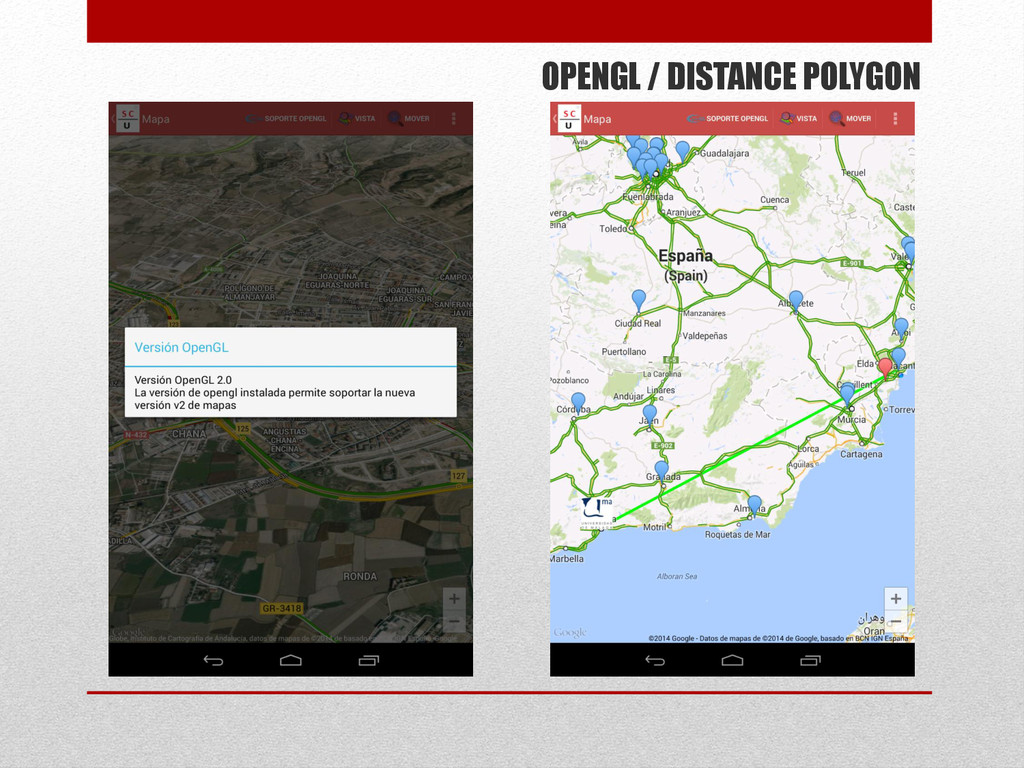
supports devices with OpenGL ES 2.0 and above. Check if the system supports OpenGL ES 2.0 final ActivityManager activityManager = (ActivityManager)getSystemService(Context.ACTIVITY_SERVICE); final ConfigurationInfo configurationInfo = activityManager.getDeviceConfigurationInfo(); final boolean supportsEs2 = configurationInfo.reqGlEsVersion >= 0x20000;
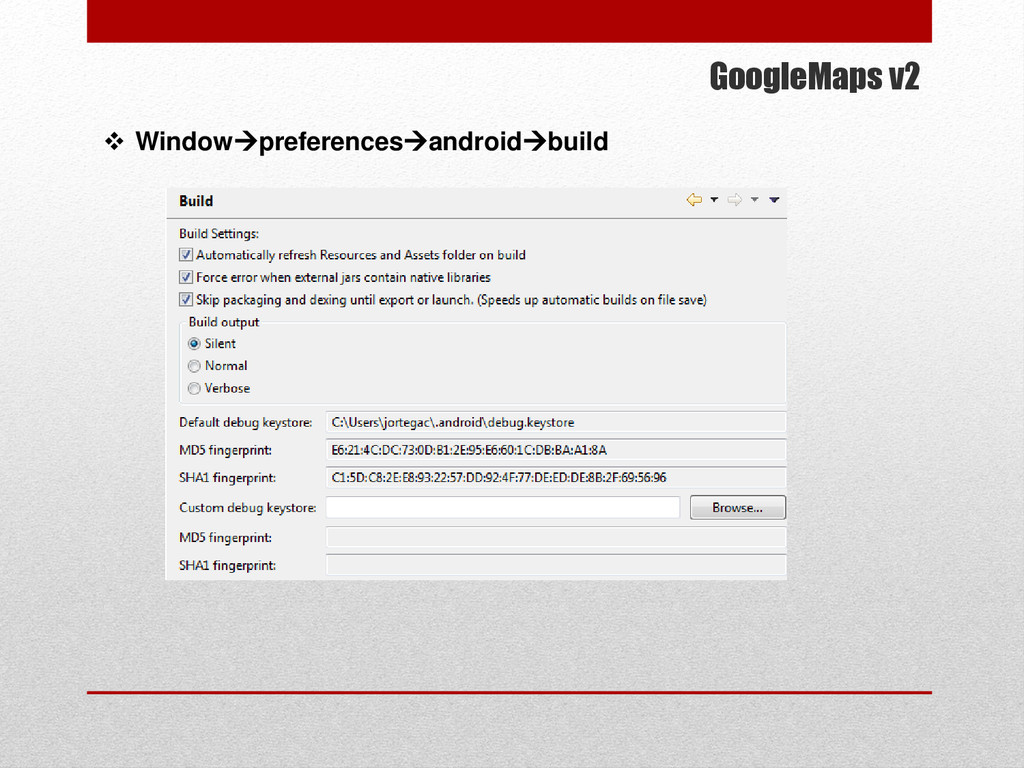
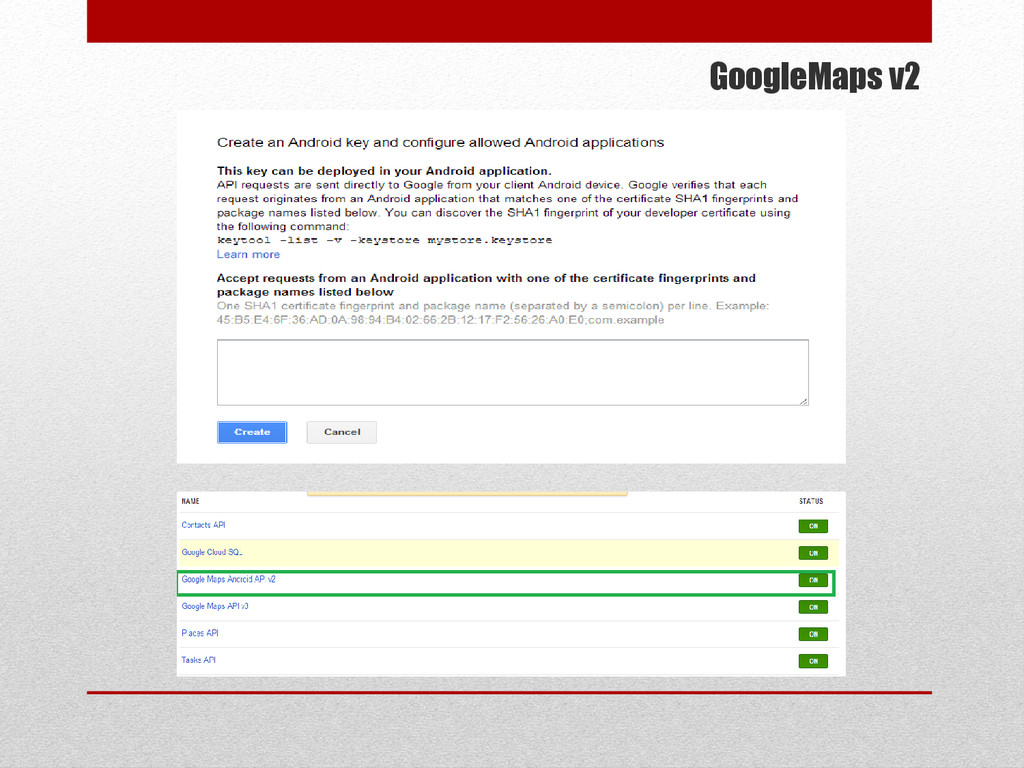
play Obtain key https://developers.google.com/maps/documentation/android/start#the_goo gle_maps_api_key Get signed certificate using the keytool command Google APIS Console https://code.google.com/apis/console/ Google CLOUD Console https://cloud.google.com/console keytool -list -v -keystore "%USERPROFILE%/.android/debug.keystore"
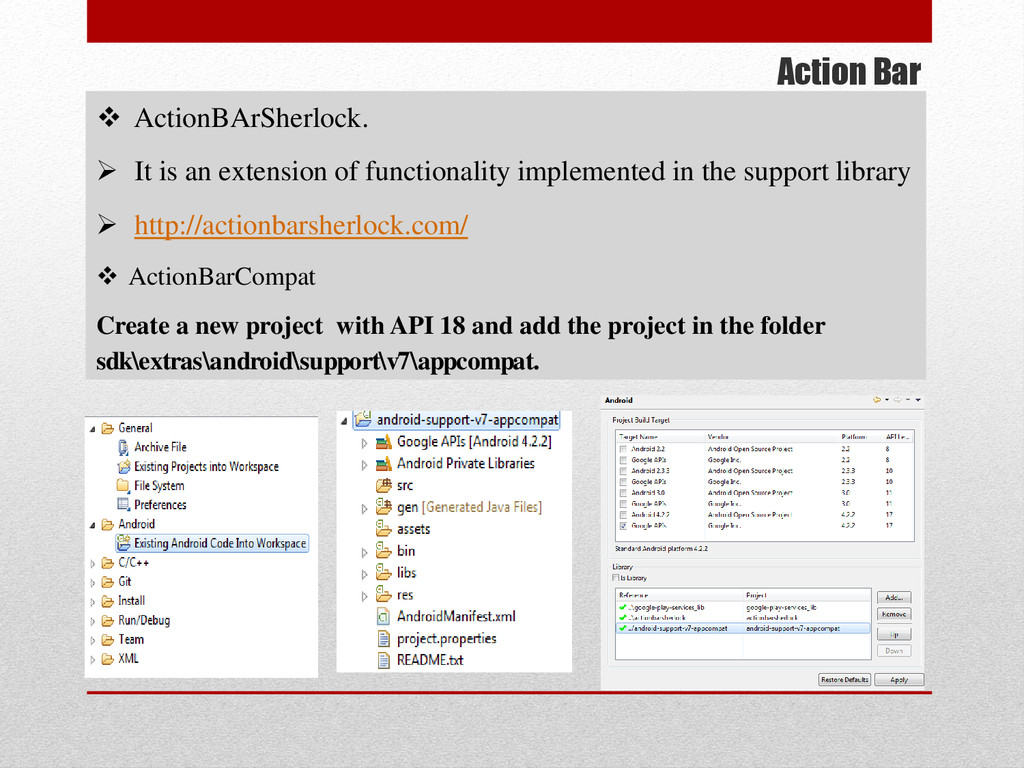
functionality implemented in the support library http://actionbarsherlock.com/ ActionBarCompat Create a new project with API 18 and add the project in the folder sdk\extras\android\support\v7\appcompat.
ActionBar ab = getSupportActionBar(); ab.setDisplayOptions(ActionBar.DISPLAY_SHOW_TITLE |ActionBar.DISPLAY_SHOW_HOME|ActionBar.DISPLAY_HOME_AS_UP); @Override public boolean onOptionsItemSelected(MenuItem item) { switch (item.getItemId()) { case android.R.id.home: this.finish(); break; } return super.onOptionsItemSelected(item); } Action Bar in fragments setHasOptionsMenu(true) onCreateOptionsMenu: to inflate the menu provided by the fragment. onOptionsItemSelected: to respond to the user touch in an item provided by the fragment menu.
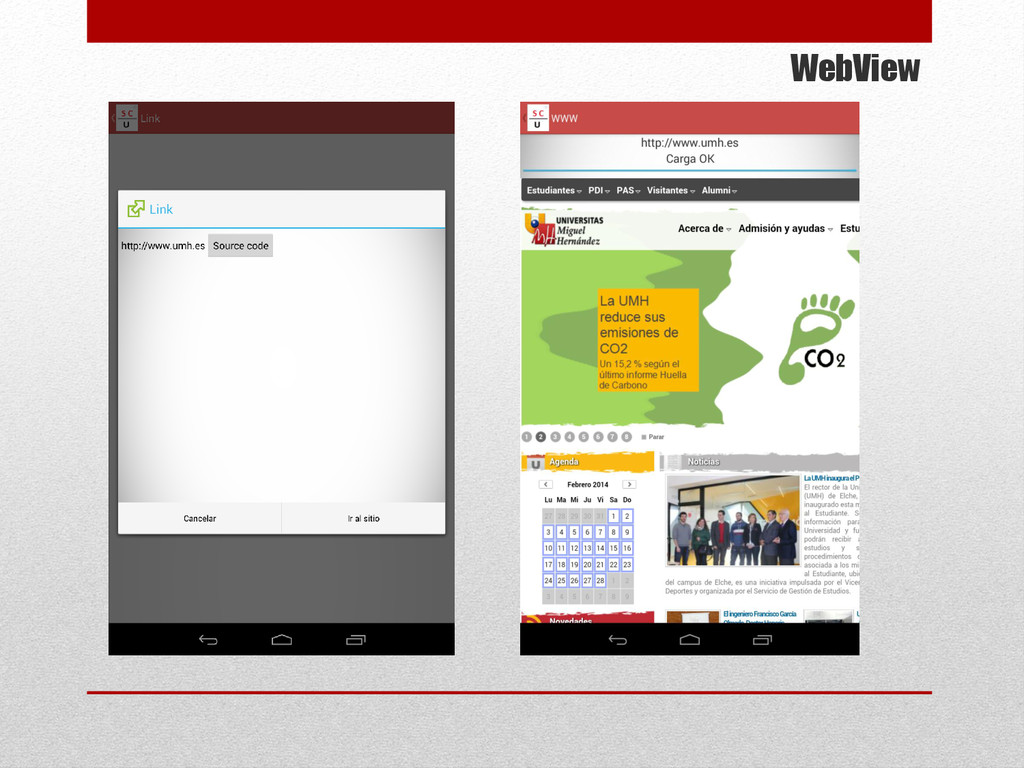
Activity activity = this; @Override public void onCreate(Bundle savedInstanceState) { super.onCreate(savedInstanceState); this.getWindow().requestFeature(Window.FEATURE_INDETERMINATE_PROGRESS); ActionBar ab = getSupportActionBar(); ……… } activity.setProgressBarIndeterminateVisibility(true); viewer.setWebViewClient(new WebViewClient() { public void onPageFinished(WebView view, String url) { activity.setProgressBarIndeterminateVisibility(false); } Show the progress bar to start loading and hide when finished.
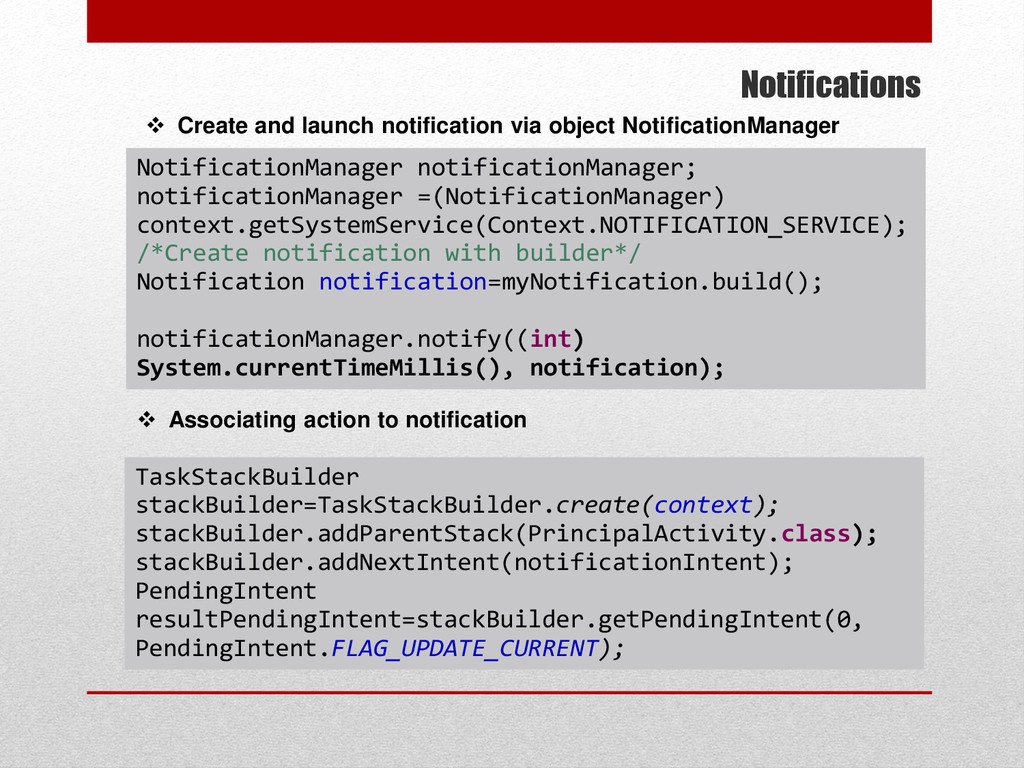
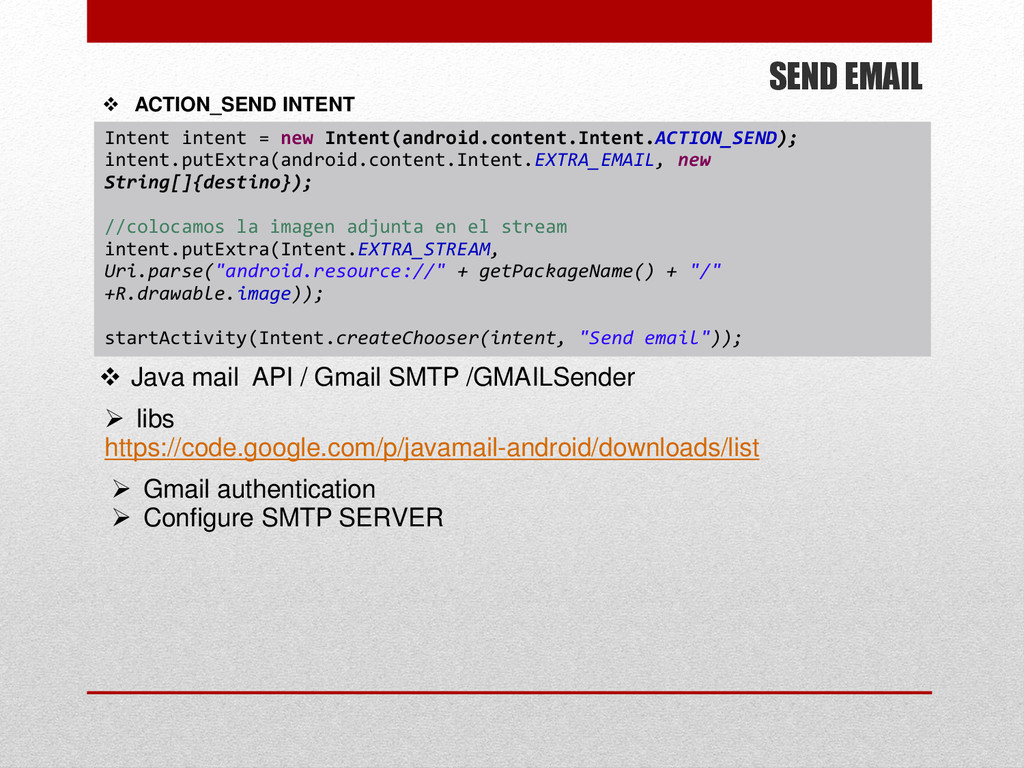
the system we use a class included in library compatibility android-support-v4.jar. The class is NotificationCompat.Builder and we have to create a new object passing by parameter application context and assign all the properties you want through their set () methods. import android.support.v4.app.NotificationCompat; import android.support.v4.app.TaskStackBuilder; NotificationCompat.Builder myNotification = new NotificationCompat.Builder(context) .setContentTitle(titulo) .setContentText(texto) .setTicker(aviso) .setWhen(System.currentTimeMillis()) .setContentIntent(contentIntent) .setDefaults(Notification.DEFAULT_SOUND) .setAutoCancel(true) .setSmallIcon(R.drawable.favorito) .setLargeIcon(largeIcon);
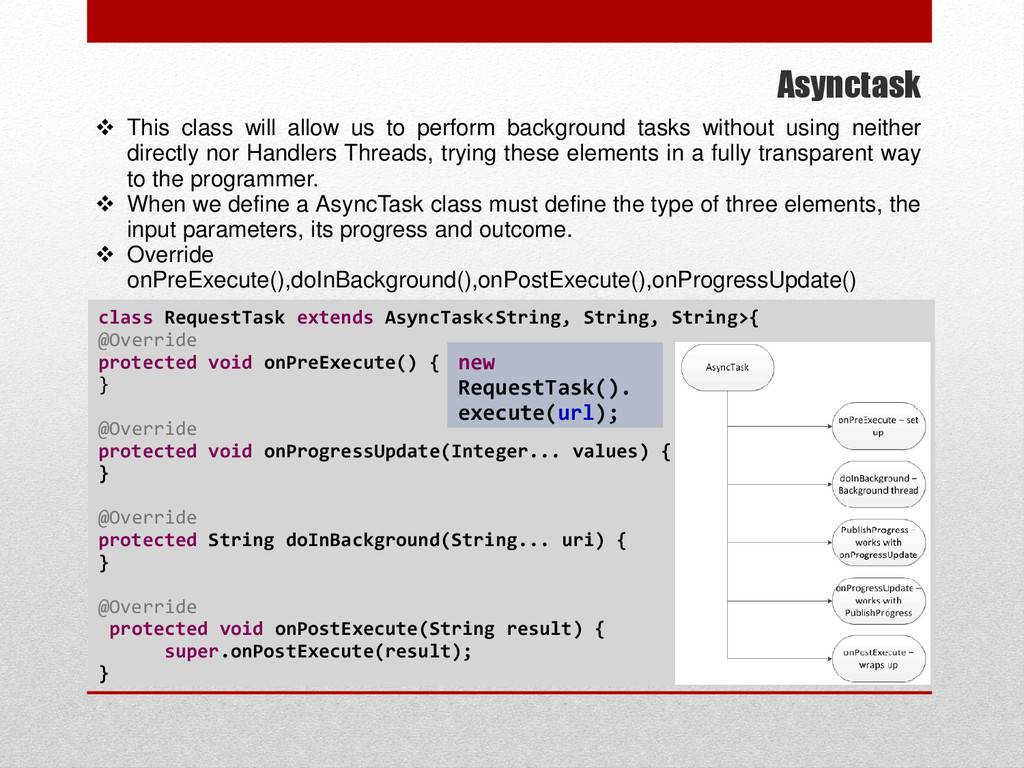
tasks without using neither directly nor Handlers Threads, trying these elements in a fully transparent way to the programmer. When we define a AsyncTask class must define the type of three elements, the input parameters, its progress and outcome. Override onPreExecute(),doInBackground(),onPostExecute(),onProgressUpdate() class RequestTask extends AsyncTask<String, String, String>{ @Override protected void onPreExecute() { } @Override protected void onProgressUpdate(Integer... values) { } @Override protected String doInBackground(String... uri) { } @Override protected void onPostExecute(String result) { super.onPostExecute(result); } new RequestTask(). execute(url);
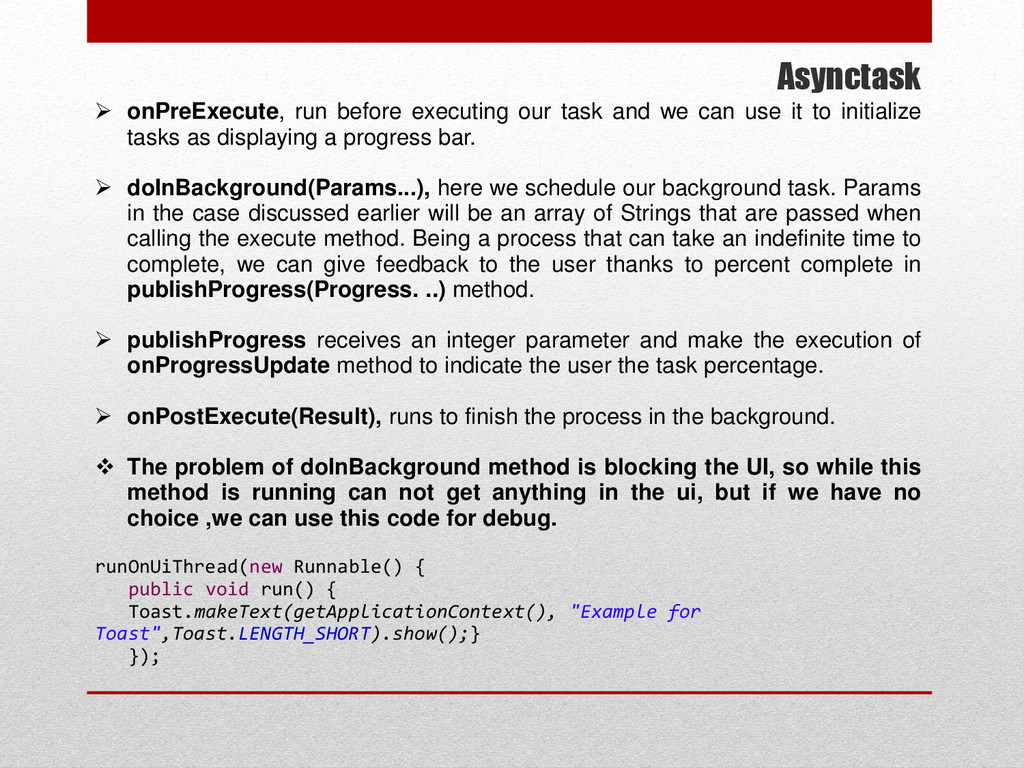
can use it to initialize tasks as displaying a progress bar. doInBackground(Params...), here we schedule our background task. Params in the case discussed earlier will be an array of Strings that are passed when calling the execute method. Being a process that can take an indefinite time to complete, we can give feedback to the user thanks to percent complete in publishProgress(Progress. ..) method. publishProgress receives an integer parameter and make the execution of onProgressUpdate method to indicate the user the task percentage. onPostExecute(Result), runs to finish the process in the background. The problem of doInBackground method is blocking the UI, so while this method is running can not get anything in the ui, but if we have no choice ,we can use this code for debug. runOnUiThread(new Runnable() { public void run() { Toast.makeText(getApplicationContext(), "Example for Toast",Toast.LENGTH_SHORT).show();} });
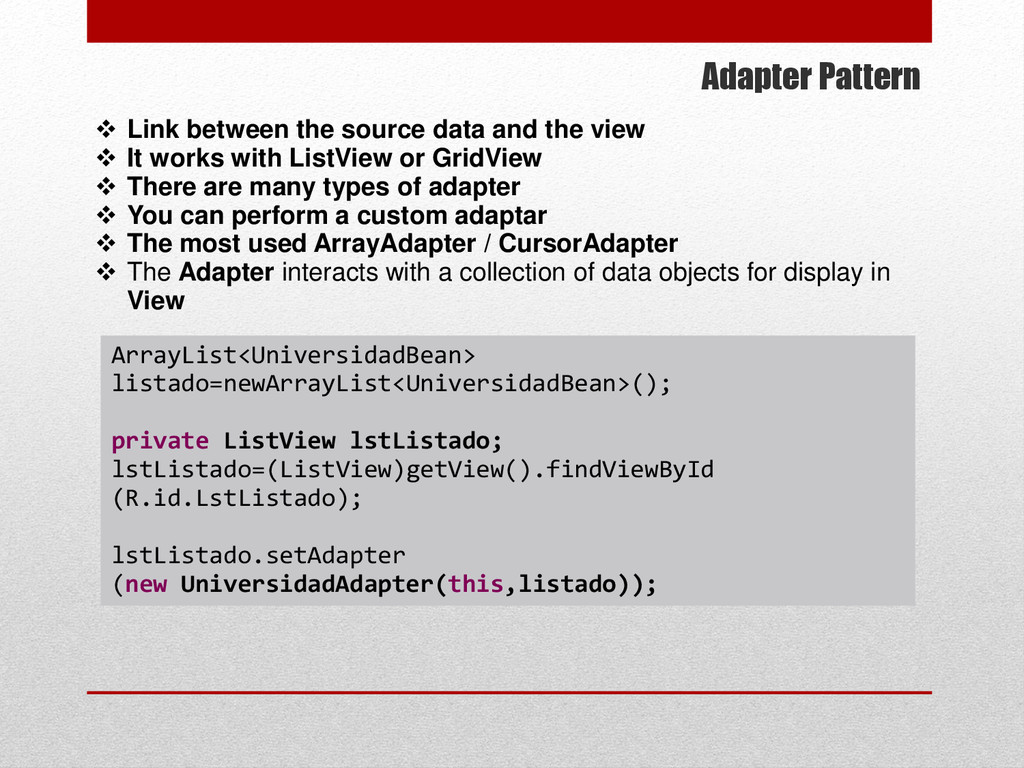
view It works with ListView or GridView There are many types of adapter You can perform a custom adaptar The most used ArrayAdapter / CursorAdapter The Adapter interacts with a collection of data objects for display in View ArrayList<UniversidadBean> listado=newArrayList<UniversidadBean>(); private ListView lstListado; lstListado=(ListView)getView().findViewById (R.id.LstListado); lstListado.setAdapter (new UniversidadAdapter(this,listado));
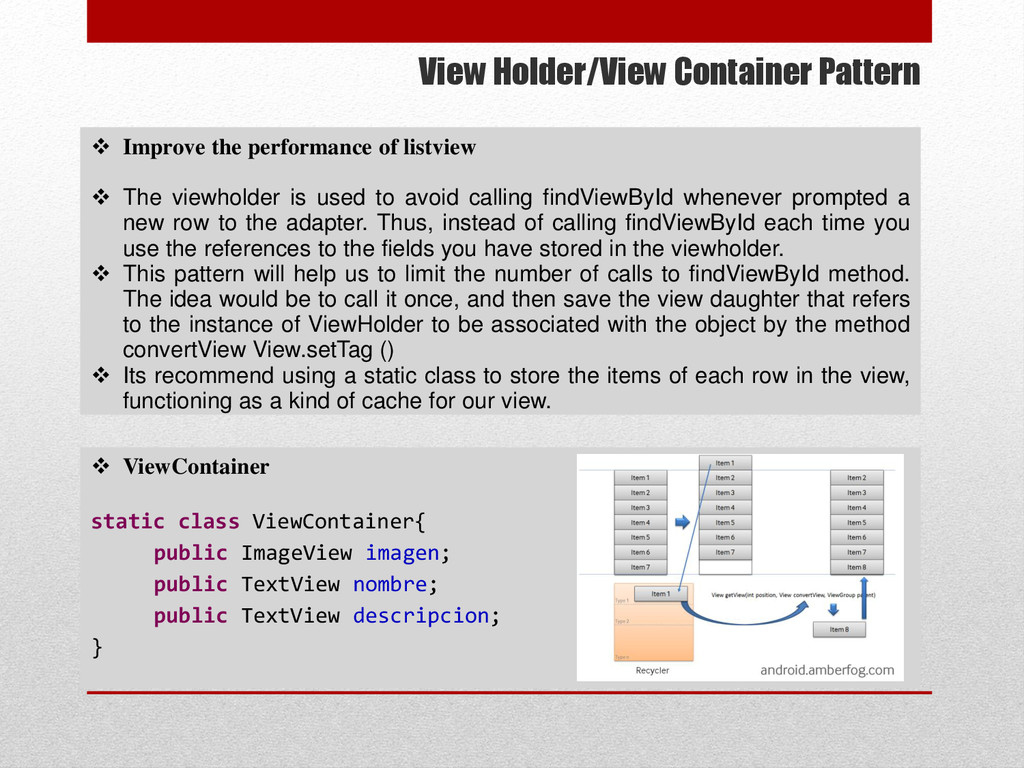
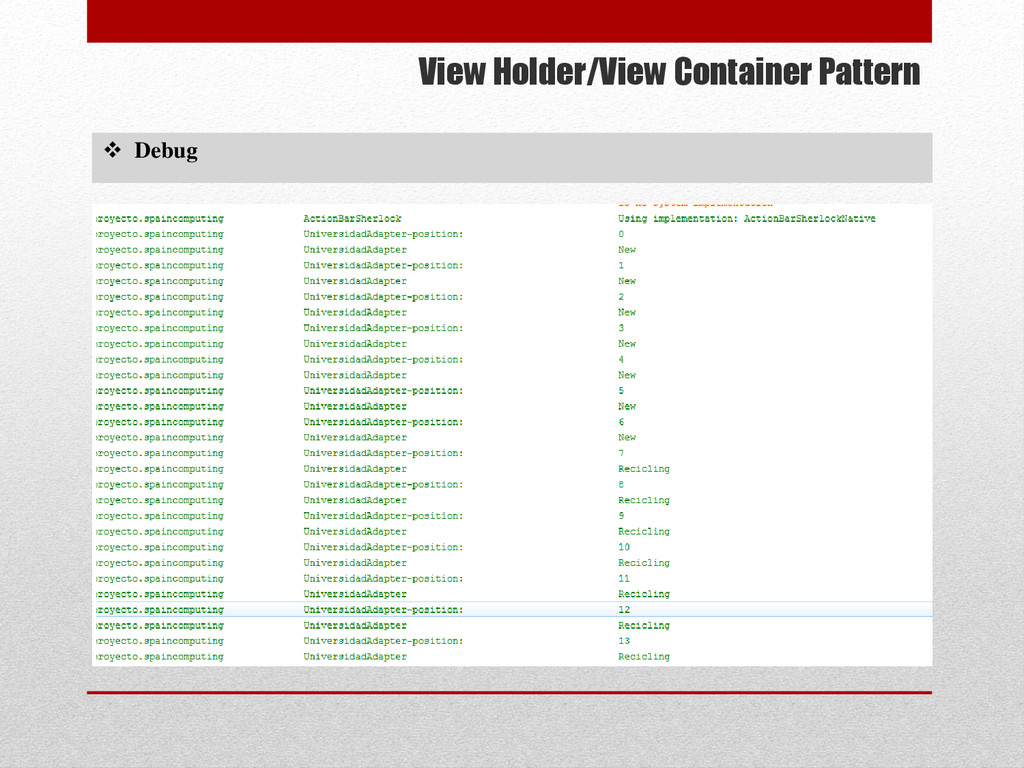
ImageView imagen; public TextView nombre; public TextView descripcion; } Improve the performance of listview The viewholder is used to avoid calling findViewById whenever prompted a new row to the adapter. Thus, instead of calling findViewById each time you use the references to the fields you have stored in the viewholder. This pattern will help us to limit the number of calls to findViewById method. The idea would be to call it once, and then save the view daughter that refers to the instance of ViewHolder to be associated with the object by the method convertView View.setTag () Its recommend using a static class to store the items of each row in the view, functioning as a kind of cache for our view.
convertView,ViewGroup parent) { ViewContainer viewContainer; //si es la primera vez que se imprime la fila if(convertView==null){ LayoutInflater inflater = context.getLayoutInflater(); convertView = inflater.inflate(R.layout.row, null,true); //crea una vista para el objeto contenedor viewContainer=new ViewContainer() //obtiene una referencia a todas las vistas de la fila viewContainer.nombre=(TextView)convertView.findViewById(R.id.textView_superior); viewContainer.descripcion=(TextView)convertView.findViewById(R.id.textView_inferior); viewContainer.imagen=(ImageView)convertView.findViewById(R.id.imageView_imagen); //asigna el contenedor de la vista a rowView convertView.setTag(viewContainer); }else{ viewContainer=(ViewContainer) convertView.getTag(); //recicling } //personaliza el contenido de cada fila basándone en su posición viewContainer.nombre.setText(listado.get(position).getNombre()); viewContainer.descripcion.setText(listado.get(position).getDescripcion()); viewContainer.imagen.setImageResource(listado.get(position).getIdImagen()); return(convertView); }
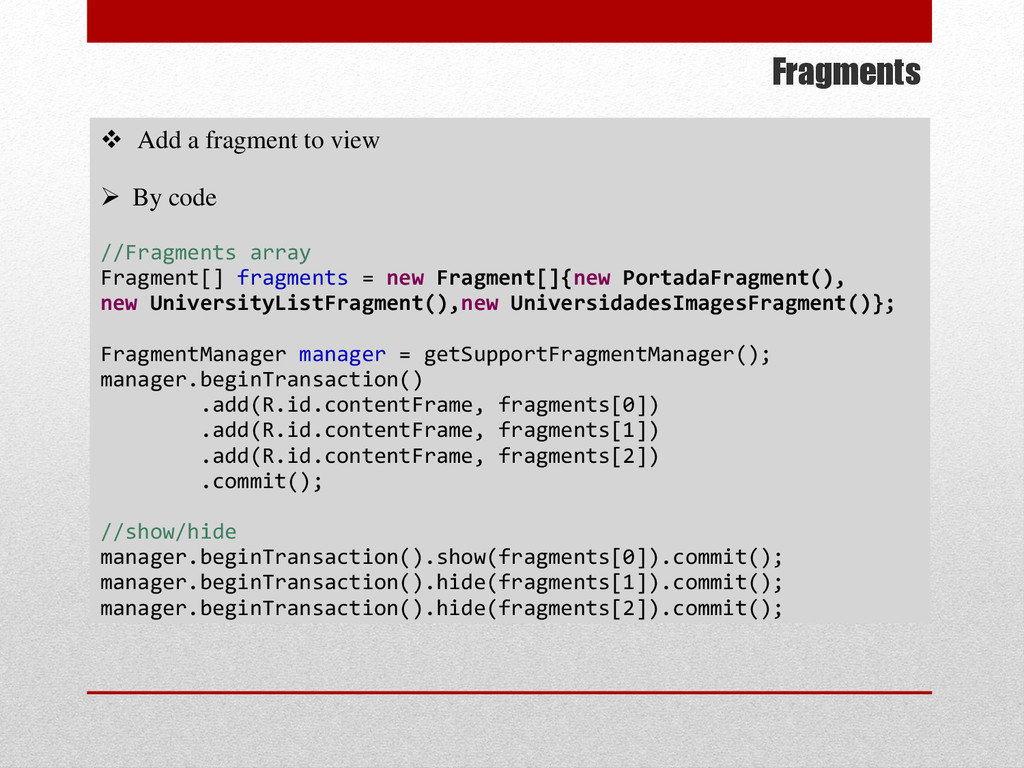
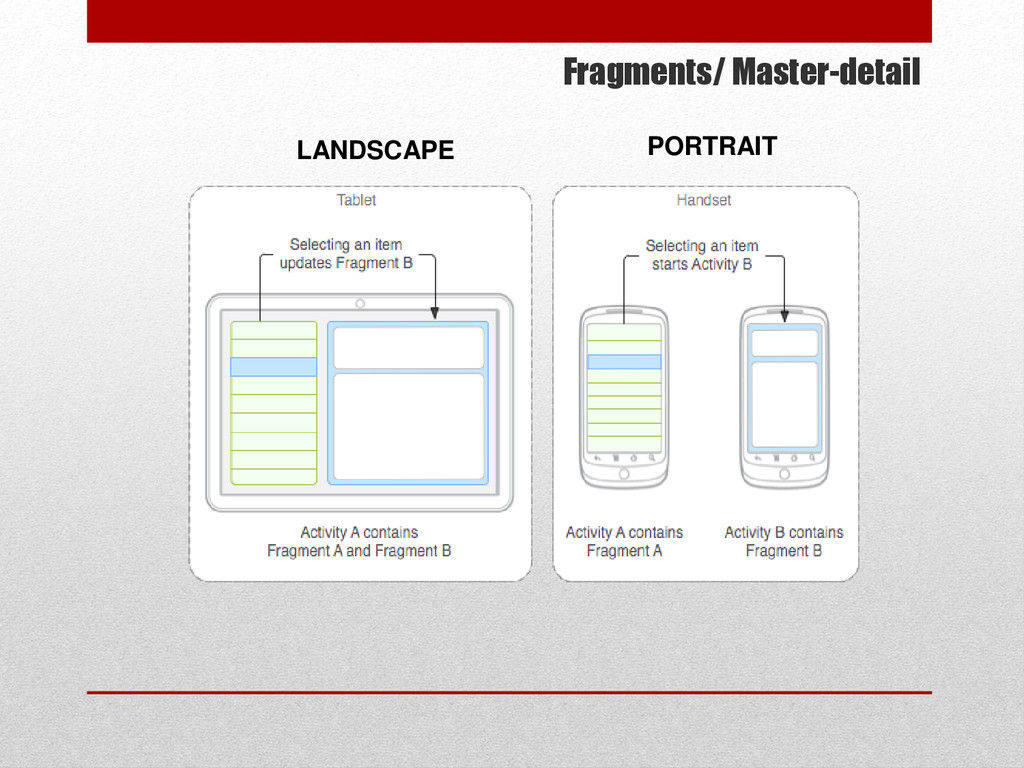
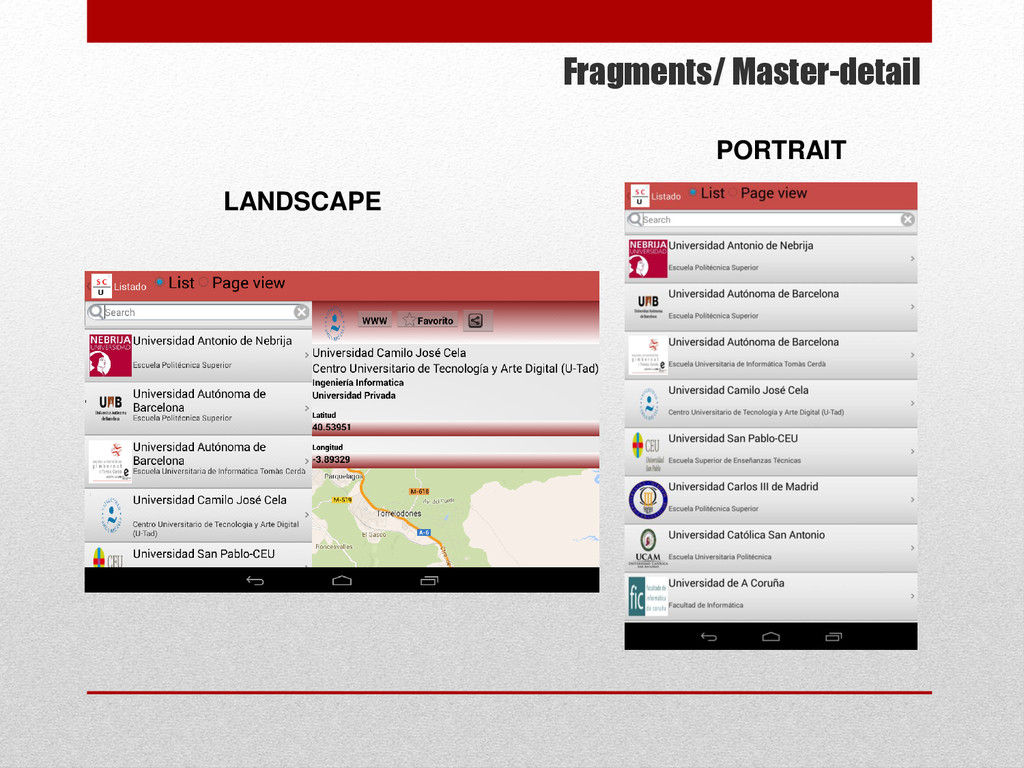
portion of a user interface activity. Multiple fragments can be combined. A fragment must always be part of an activity. They emerged to provide greater flexibility to build the user interface Override methods @Override //called when finish onCreate method in activity public void onActivityCreated(Bundle savedInstanceState) { super.onActivityCreated(savedInstanceState); } @Override public void onCreate(Bundle savedInstanceState) {//inicializar componentes super.onCreate(savedInstanceState); } @Override public View onCreateView(LayoutInflater inflater, ViewGroup container,Bundle savedInstanceState) { } http://developer.android.com/guide/components/fragments.html
you need to create a dialogue and change its appearance. It was introduced in Android 3.0 (API 11) and is available in the support library, so that it can be used without problems with older versions. Use the class you DialogFragment ensures proper management of events that may occur, such as clicking the Back button or rotate the screen. Furthermore, using this class we can reuse the interface dialogues as a larger component interface. To create a dialogue create a class that inherits from the DialogFragment class and create an AlertDialog object in the onCreateDialog() method import android.support.v4.app.DialogFragment; public class LinkDialogFragment extends DialogFragment { @Override public Dialog onCreateDialog(Bundle savedInstanceState) { AlertDialog.Builder builder = new AlertDialog.Builder(getActivity()); builder.setTitle(getText(R.string.title).toString()); .setNegativeButton(R.string.cancel, new DialogInterface.OnClickListener() { public void onClick(DialogInterface dialog, int id) { listener.onDialogNegativeClick(LinkDialogFragment.this); } }); return builder.create(); }}
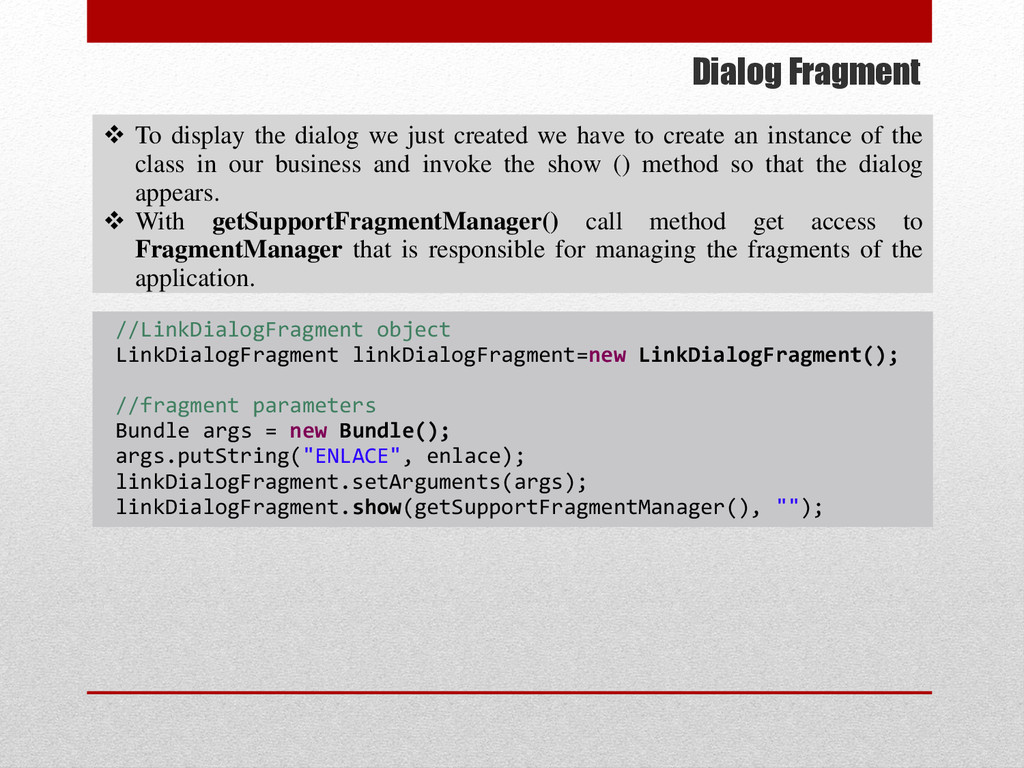
we have to create an instance of the class in our business and invoke the show () method so that the dialog appears. With getSupportFragmentManager() call method get access to FragmentManager that is responsible for managing the fragments of the application. //LinkDialogFragment object LinkDialogFragment linkDialogFragment=new LinkDialogFragment(); //fragment parameters Bundle args = new Bundle(); args.putString("ENLACE", enlace); linkDialogFragment.setArguments(args); linkDialogFragment.show(getSupportFragmentManager(), "");
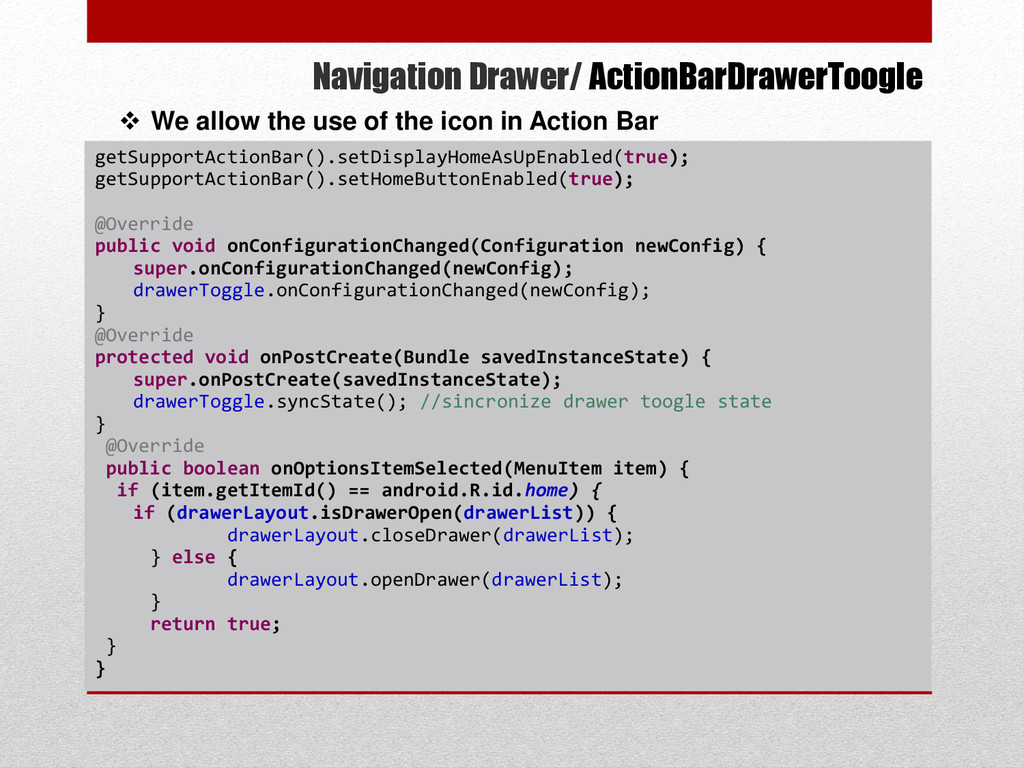
{ super.onConfigurationChanged(newConfig); drawerToggle.onConfigurationChanged(newConfig); } @Override protected void onPostCreate(Bundle savedInstanceState) { super.onPostCreate(savedInstanceState); drawerToggle.syncState(); //sincronize drawer toogle state } @Override public boolean onOptionsItemSelected(MenuItem item) { if (item.getItemId() == android.R.id.home) { if (drawerLayout.isDrawerOpen(drawerList)) { drawerLayout.closeDrawer(drawerList); } else { drawerLayout.openDrawer(drawerList); } return true; } } We allow the use of the icon in Action Bar
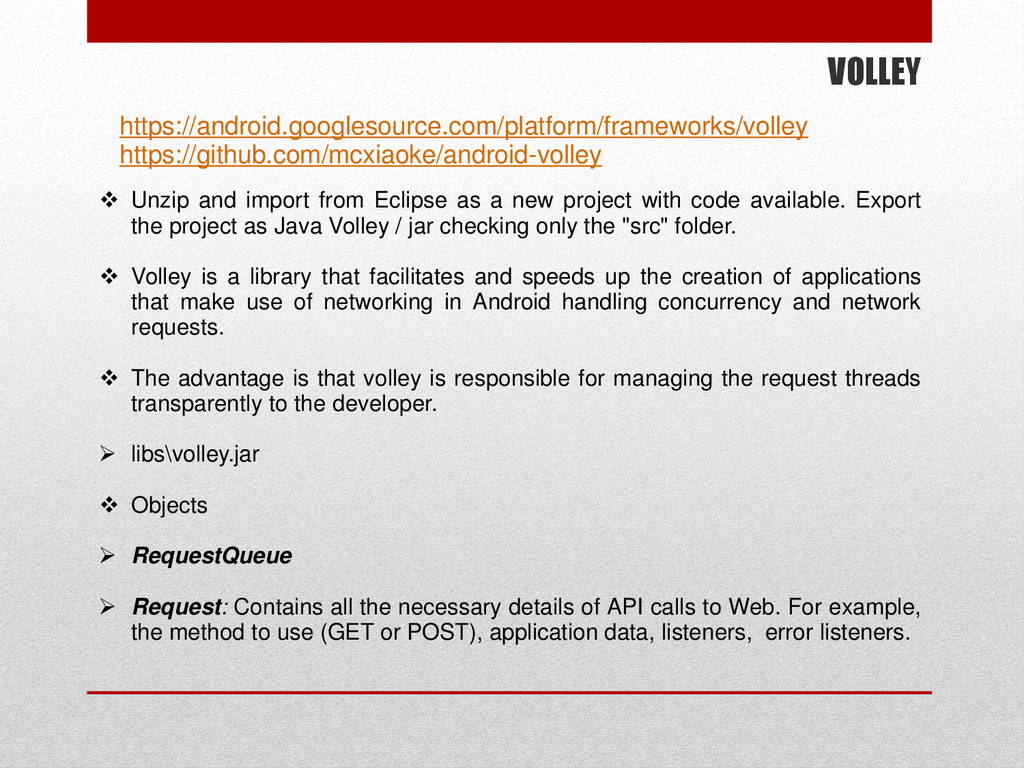
a new project with code available. Export the project as Java Volley / jar checking only the "src" folder. Volley is a library that facilitates and speeds up the creation of applications that make use of networking in Android handling concurrency and network requests. The advantage is that volley is responsible for managing the request threads transparently to the developer. libs\volley.jar Objects RequestQueue Request: Contains all the necessary details of API calls to Web. For example, the method to use (GET or POST), application data, listeners, error listeners.
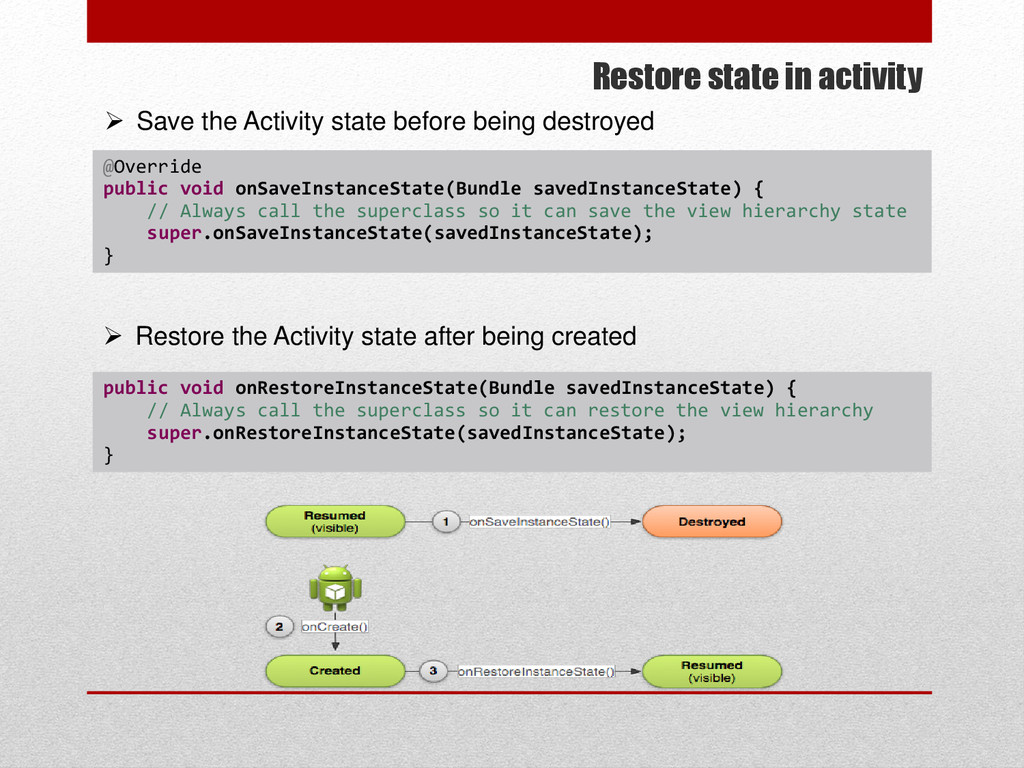
// Always call the superclass so it can save the view hierarchy state super.onSaveInstanceState(savedInstanceState); } Save the Activity state before being destroyed Restore the Activity state after being created public void onRestoreInstanceState(Bundle savedInstanceState) { // Always call the superclass so it can restore the view hierarchy super.onRestoreInstanceState(savedInstanceState); }
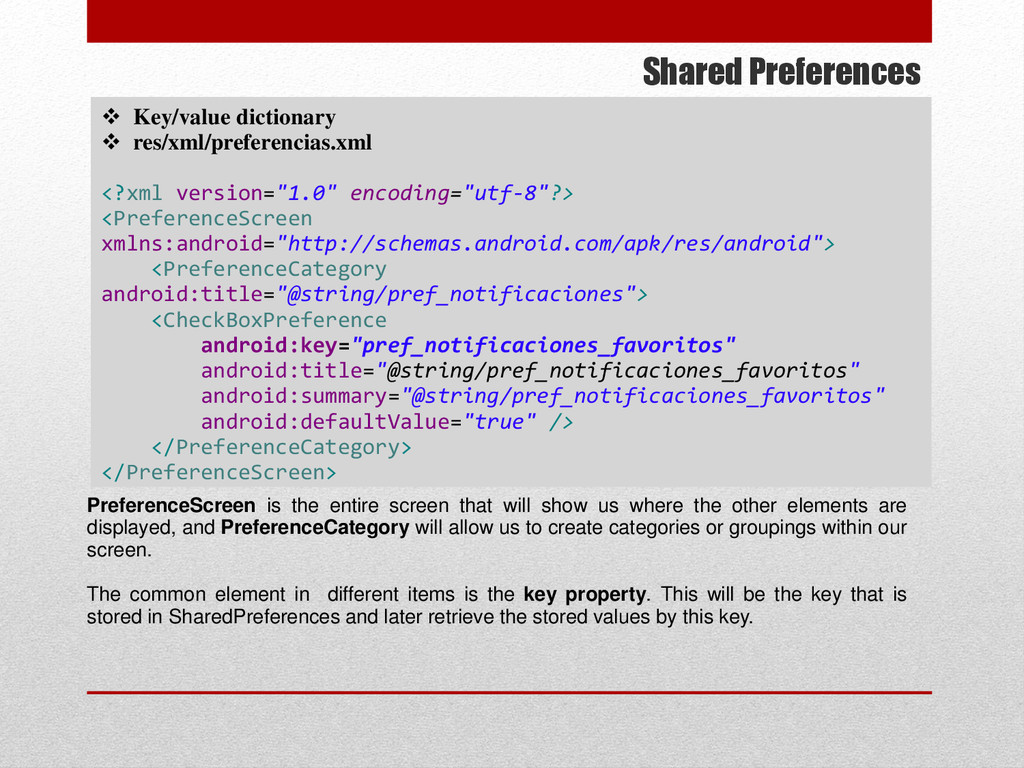
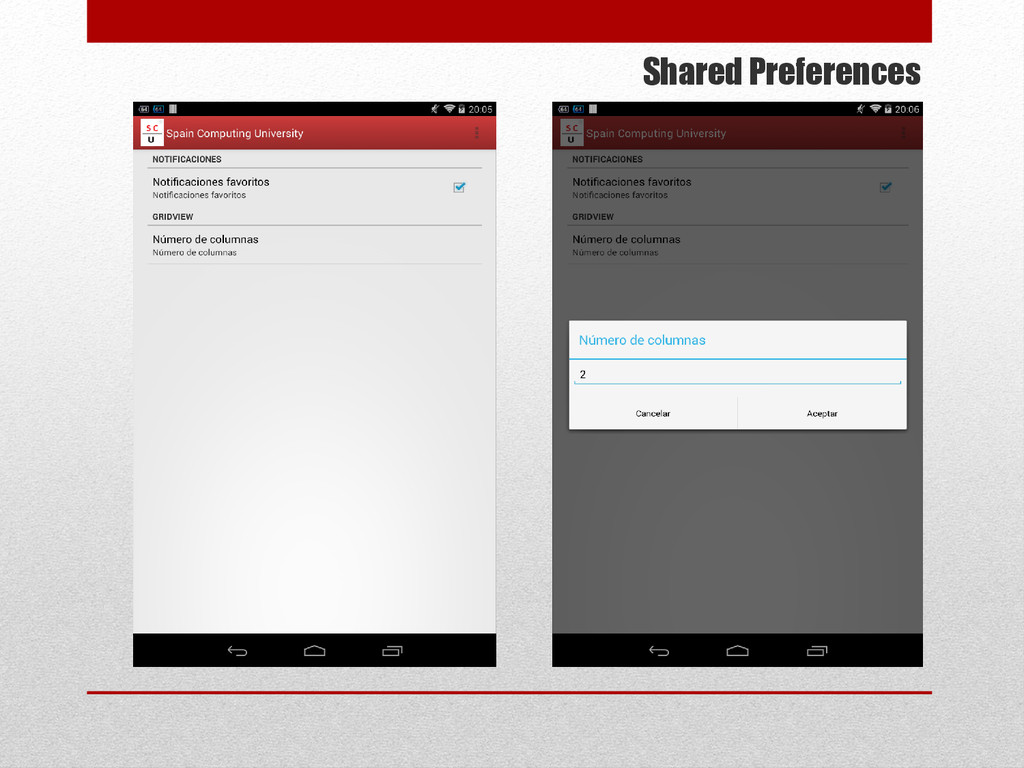
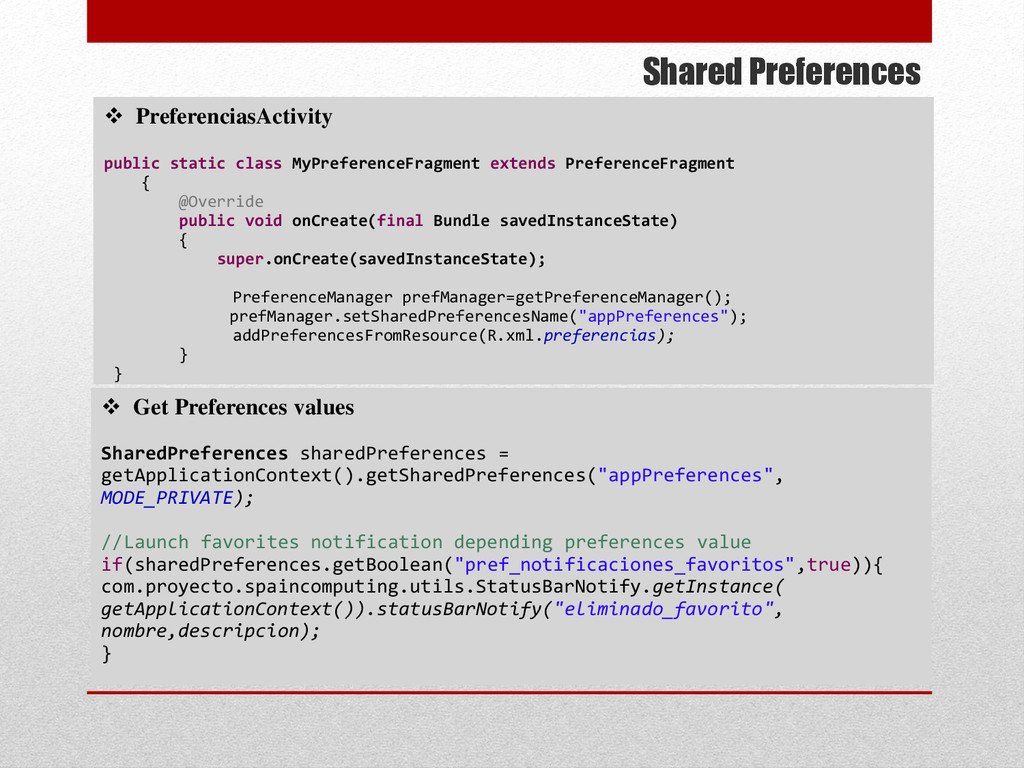
<PreferenceScreen xmlns:android="http://schemas.android.com/apk/res/android"> <PreferenceCategory android:title="@string/pref_notificaciones"> <CheckBoxPreference android:key="pref_notificaciones_favoritos" android:title="@string/pref_notificaciones_favoritos" android:summary="@string/pref_notificaciones_favoritos" android:defaultValue="true" /> </PreferenceCategory> </PreferenceScreen> PreferenceScreen is the entire screen that will show us where the other elements are displayed, and PreferenceCategory will allow us to create categories or groupings within our screen. The common element in different items is the key property. This will be the key that is stored in SharedPreferences and later retrieve the stored values by this key.
![Navigation Drawer private ListView drawerList; private String[] drawerOptions; private DrawerLayout](https://files.speakerdeck.com/presentations/90dcef81c6c14de39fb443d488a96d01/slide_59.jpg)
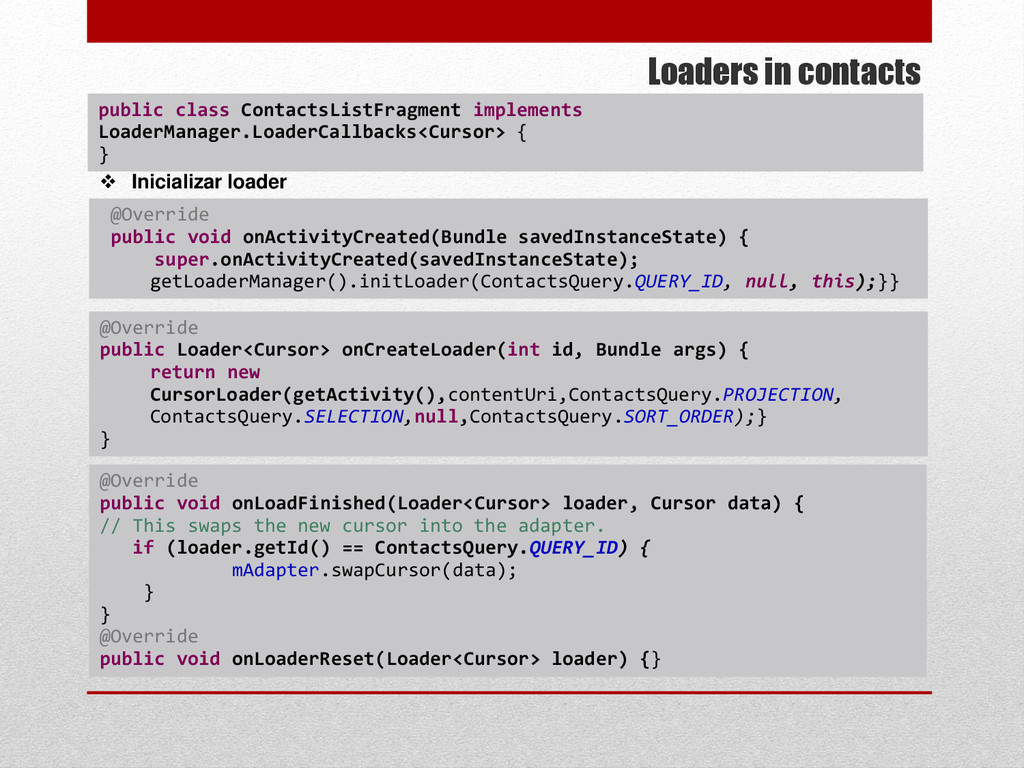
![Contacts CursorLoader cursorLoader=new CursorLoader(this, Data.CONTENT_URI, new String[] { Data._ID, Data.DISPLAY_NAME,](https://files.speakerdeck.com/presentations/90dcef81c6c14de39fb443d488a96d01/slide_69.jpg)
![About me https://github.com/jmortega/apps https://github.com/jmortega/android https://www.linkedin.com/in/jmortega1 [email protected] https://play.google.com/store/apps/developer?id=Jos%C3%A9+Manuel+Ortega+Candel](https://files.speakerdeck.com/presentations/90dcef81c6c14de39fb443d488a96d01/slide_95.jpg)