Upgrade to Pro — share decks privately, control downloads, hide ads and more …

Build Your Own Private OpenStack Cloud

Kyle Bai
January 13, 2016

Build Your Own Private OpenStack Cloud

Kyle Bai

January 13, 2016
Tweet

More Decks by Kyle Bai

Other Decks in Technology

Transcript

  1. 關於我們 !2 • ⼀一群魯魯蛇們,彼此利利⽤用⾃自⼰己的左右⼿手,來來開發程式 與維護系統等IT技術。 • 絕對有伴陪你積極參參與各⼤大台灣 IT 活動, OpenStack

    Day Taiwan、Hadoop Conf、台灣資料年年 會、SITCON等各種 Conf。 • 絕⼤大多數都是不會放棄丟下專案的背叛你的單⾝身漢 。 i.m.a.c NUTCimac imac-cloud
  2. Agenda !3 • 基本環境建置與設定 • Keystone ⾝身份驗證服務 • Glance 映像檔服務

    • Nova 運算服務 • Neutron 網路路服務 • Horizon 控制儀表板服務 • Deploy and Management Tools 介紹 • 與 SSCloud 共舞
  3. 安裝 Network Time Protocol (NTP) !9 在每個節點安裝 NTP 服務,來來讓節點時間同步,不會誤差太⾼高: $

    sudo apt-get install -y ntp 在 Controller 設定同步的 Server 來來源,編輯 /etc/ntp.conf 加入: restrict 10.0.0.0 mask 255.255.255.0 nomodify notrap server 2.tw.pool.ntp.org server 3.asia.pool.ntp.org server 0.asia.pool.ntp.org 在其他節點設定同步的 Controller ,編輯 /etc/ntp.conf 加入: server controller iburst
  4. 驗證 Network Time Protocol (NTP) !10 在 Controller 節點,下該指令驗證: $

    ntpq -c peers +123.204.45.116 59.149.185.193 2 u 196 256 353 158.773 70.671 20.943 *186.211.189.118 203.123.48.219 2 u 215 256 377 59.255 -1.832 2.092 +time.iqnet.com 62.201.207.162 2 u 18 256 377 391.601 4.016 3.642 在其他節點,執⾏行行⼀一樣指令: $ ntpq -c peers *controller 10.0.0.11 3 u 47 64 37 0.308 -0.251 0.079
  5. 安裝 OpenStack 套件 !12 在 Ubuntu 15.04 的版本以上⽀支援最新版的 Repository,然⽽而在較 低版本需加入

    Repository 來來獲取套件,在每個節點執⾏行行以下: $ sudo apt-get install -y software-properties-common $ sudo add-apt-repository -y cloud-archive:liberty 完成後更更新 更更新 Repository 與套件: $ sudo apt-get update && sudo apt-get -y dist-upgrade P.S. 若若有更更新核⼼心需要重新開機。
  6. SQL database 安裝(1/2) !13 ⼤大部份的 OpenStack 套件服務都是使⽤用 SQL 資料庫來來儲存訊息,該資料 庫安裝於

    Controller 上: $ sudo apt-get install -y mariadb-server python-mysqldb 完成後,建立 /etc/mysql/conf.d/mysqld_openstack.cnf 檔案,並加入以下 內容: [mysqld] bind-address = 10.0.0.11 P.S. 安裝時,會在過程設定帳號密碼,這邊範例例為 p@ssw0rd。
  7. SQL database 安裝(2/2) !14 ... default-storage-engine = innodb innodb_file_per_table collation-server

    = utf8_general_ci init-connect = 'SET NAMES utf8' character-set-server = utf8 完成後重新啟動服務,並對資料庫進⾏行行安全設定: $ sudo service mysql restart $ sudo mysql_secure_installation P.S. 這邊 … 代表前⾯面有其他參參數設定。
  8. Message queue 安裝(1/2) !15 OpenStack使⽤用 Message Queue 來來對整個叢集提供協調與狀狀態訊息服務,這邊 我們使⽤用了了RabbitMQ來來實現,並安裝於Controller上: $

    sudo apt-get install -y rabbitmq-server 完成後,我們可以選擇開啟 web console 來來查看狀狀態: $ sudo rabbitmq-plugins enable rabbitmq_management $ sudo sh -c "echo '[{rabbit, [{loopback_users, []}]}].' > /etc/rabbitmq/ rabbitmq.config" $ sudo service rabbitmq-server restart P.S. 完成後進入 http://<ip>:15672 ,輸入 guest/guest。
  9. Message queue 安裝(2/2) !16 安裝完成後,新增⼀一個 User 給 OpenStack 服務使⽤用: $

    sudo rabbitmqctl add_user openstack <password> Creating user "openstack" ... …done. 為剛建立的 User 開啟權限: $ sudo rabbitmqctl set_permissions openstack ".*" ".*" “.*" Setting permissions for user "openstack" in vhost "/" ... ...done. P.S. 請記住⾃自⼰己的密碼,這邊為 p@ssw0rd
  10. 安裝前準備(1/2) !21 本章節會說明與操作如何安裝 Identity 到 Controller 節點上,⾸首先在 Database 底下建立儲存 Keystone

    資訊的資料庫: $ mysql -u root -p # CREATE DATABASE keystone; # GRANT ALL PRIVILEGES ON keystone.* TO 'keystone'@'localhost' IDENTIFIED BY 'keystone'; # GRANT ALL PRIVILEGES ON keystone.* TO 'keystone'@'%' IDENTIFIED BY 'keystone';
  11. 安裝前準備(2/2) !22 完成後離開資料庫,並透過 openssl 建立隨機的 admin token: $ openssl rand

    -hex 16 1ed64bdb7ebda9ae6d01d811565d4d64 P.S. 請記住⾃自⼰己的 token,不要忘了了
  12. 安裝 Keystone 套件 !23 ⾸首先我們設定安裝完成後,不要⾃自動開啟服務: $ echo "manual" | sudo

    tee /etc/init/keystone.override 這邊安裝⼀一律律採⽤用 Packaging-Deb,我們透過 apt-get 安裝 keystone : $ sudo apt-get install keystone python-openstackclient apache2 libapache2-mod-wsgi memcached python-memcache P.S. 在 Kilo 的 Keystone 捨棄了了 Eventlet,改⽤用 WSGI Server 來來代替
  13. 設定 Keystone 組態檔(1/3) !24 安裝完後,編輯 /etc/keystone/keystone.conf,將 ADMIN_TOKEN 替換為 剛產⽣生的隨機字串串: [DEFAULT]

    admin_token = 1ed64bdb7ebda9ae6d01d811565d4d64 在 [database] 部分修改如下: [database] connection = mysql://keystone:[email protected]/keystone P.S. connection 的紅⾊色部分為剛建立的 MySQL Keystone 密碼。
  14. 設定 Keystone 組態檔(2/3) !25 在 [memcache] 部分修改如下: [memcache] servers =

    localhost:11211 在 [token] 部分修改如下: [token] provider = keystone.token.providers.uuid.Provider driver = keystone.token.persistence.backends.memcache.Token
  15. 設定 Keystone 組態檔(3/3) !26 在 [revoke] 部分修改如下: [revoke] driver =

    keystone.contrib.revoke.backends.sql.Revoke 完成後同步資料庫來來新增資料表: $ sudo keystone-manage db_sync P.S. 因為安裝時,預設是⽤用 SQLite 儲存,故要新增資料表。
  16. 設定 Apache2 HTTP 提供服務(1/3) !27 編輯 /etc/apache2/apache2.conf 的 ServerName 設為

    controller: ServerName controller 再來來建立 /etc/apache2/sites-available/wsgi-keystone.conf,修改為以 下:: $ sudo vim /etc/apache2/sites-available/wsgi-keystone.conf Listen 5000 Listen 35357
  17. 使⽤用 Apache2 HTTP 提供服務(2/3) !28 <VirtualHost *:5000> WSGIDaemonProcess keystone-public processes=5

    threads=1 user=keystone display-name=%{GROUP} WSGIProcessGroup keystone-public WSGIScriptAlias / /var/www/cgi-bin/keystone/main WSGIApplicationGroup %{GLOBAL} WSGIPassAuthorization On <IfVersion >= 2.4> ErrorLogFormat "%{cu}t %M" </IfVersion> LogLevel info ErrorLog /var/log/apache2/keystone-error.log CustomLog /var/log/apache2/keystone-access.log combined </VirtualHost>
  18. 使⽤用 Apache2 HTTP 提供服務(3/3) !29 <VirtualHost *:35357> WSGIDaemonProcess keystone-admin processes=5

    threads=1 user=keystone display-name=%{GROUP} WSGIProcessGroup keystone-admin WSGIScriptAlias / /var/www/cgi-bin/keystone/admin WSGIApplicationGroup %{GLOBAL} WSGIPassAuthorization On <IfVersion >= 2.4> ErrorLogFormat "%{cu}t %M" </IfVersion> LogLevel info ErrorLog /var/log/apache2/keystone-error.log CustomLog /var/log/apache2/keystone-access.log combined </VirtualHost>
  19. 建立 WSGI (1/2) !30 完成後,開啟⾝身份驗證服務虛擬主機: $ sudo ln -s /etc/apache2/sites-available/wsgi-keystone.conf

    /etc/apache2/sites- enabled 建立 WSGI ⽬目錄,並從網路路下載 WSGI 到該⽬目錄底下: $ sudo mkdir -p /var/www/cgi-bin/keystone $ sudo curl http://git.openstack.org/cgit/openstack/keystone/plain/httpd/ keystone.py?h=stable/liberty | sudo tee /var/www/cgi-bin/keystone/main /var/ www/cgi-bin/keystone/admin
  20. 建立 WSGI(2/2) !31 透過 chown 與 chmod 調整⽬目錄權限: $ sudo

    chown -R keystone:keystone /var/www/cgi-bin/keystone $ sudo chmod 755 /var/www/cgi-bin/keystone/* 重新開啟 Apache2 服務,並刪除預設產⽣生的SQLite資料庫: $ sudo service apache2 restart $ sudo rm -f /var/lib/keystone/keystone.db
  21. 建立服務實體 !32 ⾸首先透過 export 設定 OS_TOKEN 環境變數,輸入 admin_token 與 API

    URL: $ export OS_TOKEN=1ed64bdb7ebda9ae6d01d811565d4d64 $ export OS_URL=http://10.0.0.11:35357/v2.0 建立服務實體和⾝身份驗證服務: $ openstack service create --name keystone --description "OpenStack Identity" identity
  22. 建立服務 API 端點 !33 ⾝身份驗證服務管理理與環境相關的 API 端點⽬目錄。服務使⽤用這個 ⽬目錄來來決定如何與環境中其他服務進⾏行行溝通。透過以下建立⼀一 個 API

    端點: $ openstack endpoint create --publicurl http://10.0.0.11:5000/v2.0 \ --internalurl http://10.0.0.11:5000/v2.0 \ --adminurl http://10.0.0.11:35357/v2.0 \ --region RegionOne identity
  23. 建立管理理者帳號 !34 驗證服務會對 Openstack 的服務提供⾝身份驗證,驗證服務使⽤用的 domains, projects (tenants), users 與

    roles 的組合,我們要建立admin 的 Project、User 和 Role: $ openstack project create --description "Admin Project" admin $ openstack user create --password p@ssw0rd --email [email protected] admin $ openstack role create admin $ openstack role add --project admin --user admin admin $ openstack project create --description "Service Project" service P.S. 請記住⾃自⼰己的密碼,這邊為 p@ssw0rd
  24. 建立⼀一般使⽤用者帳號 !35 為了了驗證,我們建立⼀一個沒有特權的使⽤用者 Demo: $ openstack project create --description "Demo

    Project" demo $ openstack user create --password demo --email [email protected] demo $ openstack role create user $ openstack role add --project demo --user demo user P.S. 請記住⾃自⼰己的密碼,這邊為 demo
  25. 驗證操作 !36 在安裝其他服務之前,我們要確認 Keystone 的是否沒問題。⾸首先取消 OS_TOKEN 與 OS_URL 環境變數: $

    unset OS_TOKEN OS_URL 透過 admin 來來驗證 Identity v2.0,請求⼀一個 token,並輸入設定的密碼: $ openstack --os-auth-url http://10.0.0.11:35357 --os-project-name admin --os-username admin --os-auth-type password token issue P.S. 請記住⾃自⼰己的密碼,這邊為 p@ssw0rd
  26. 建立 admin client 端腳本 !37 我們會分別為 admin 與 demo 建立腳本,來來⽅方便便我們做操作與驗證,⾸首先建

    立 admin 檔案為 admin-openrc.sh,並加入以下參參數: export OS_PROJECT_DOMAIN_ID=default export OS_USER_DOMAIN_ID=default export OS_PROJECT_NAME=admin export OS_TENANT_NAME=admin export OS_USERNAME=admin export OS_PASSWORD=p@ssw0rd export OS_AUTH_URL=http://10.0.0.11:35357/v3 P.S. 請記住⾃自⼰己的密碼,這邊為 p@ssw0rd
  27. 建立 user client 端腳本 !38 建立 demo 檔案為 demo-openrc.sh,並加入以下參參數: export

    OS_PROJECT_DOMAIN_ID=default export OS_USER_DOMAIN_ID=default export OS_PROJECT_NAME=demo export OS_TENANT_NAME=demo export OS_USERNAME=demo export OS_PASSWORD=demo export OS_AUTH_URL=http://10.0.0.11:5000/v3 P.S. 請記住⾃自⼰己的密碼,這邊為 demo
  28. 安裝前準備(1/2) !44 本章節會說明與操作如何安裝 Image Service 到 Controller 節點上, ⾸首先在 Database

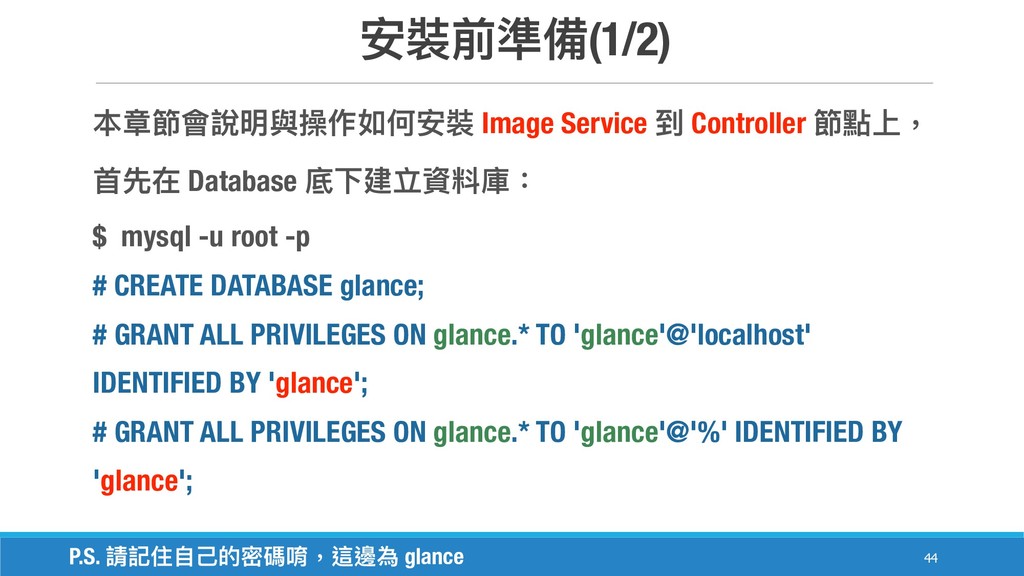
    底下建立資料庫: $ mysql -u root -p # CREATE DATABASE glance; # GRANT ALL PRIVILEGES ON glance.* TO 'glance'@'localhost' IDENTIFIED BY 'glance'; # GRANT ALL PRIVILEGES ON glance.* TO 'glance'@'%' IDENTIFIED BY 'glance'; P.S. 請記住⾃自⼰己的密碼唷,這邊為 glance
  29. 安裝前準備(2/2) !45 之後我們要導入 Keystone 的 admin 帳號,來來建立服務: $ openstack user

    create --password glance --email [email protected] glance $ openstack role add --project service --user glance admin $ openstack service create --name glance --description "OpenStack Image service" image $ openstack endpoint create --publicurl http://10.0.0.11:9292 \ --internalurl http://10.0.0.11:9292 \ --adminurl http://10.0.0.11:9292 --region RegionOne image P.S. 請記住⾃自⼰己的密碼唷,這邊為 glance
  30. 設定 Glance 組態檔(1/6) !47 安裝完後,編輯 /etc/glance/glance-api.conf,在 [DEFAULT] 部分,設定 noop 訊息驅動:

    [DEFAULT] notification_driver = noop 在 [database] 部分修改如下: [database] connection = mysql://glance:[email protected]/glance P.S. connection 的紅⾊色部分為剛建立的 MySQL 密碼。
  31. 設定 Glance 組態檔(2/6) !48 在 [keystone_authtoken] ,加入以下: [keystone_authtoken] auth_uri =

    http://10.0.0.11:5000 auth_url = http://10.0.0.11:35357 auth_plugin = password project_domain_id = default user_domain_id = default project_name = service username = glance password = glance P.S. 這邊密碼為 glance。
  32. 設定 Glance 組態檔(3/6) !49 在 [paste_deploy] ,加入以下: [paste_deploy] flavor =

    keystone 在 [glance_store] ,加入以下: [glance_store] default_store = file filesystem_store_datadir = /var/lib/glance/images/
  33. 設定 Glance 組態檔(4/6) !50 之後,還要編輯 /etc/glance/glance-registry.conf,在 [DEFAULT] 部分, 設定 noop

    訊息驅動: [DEFAULT] notification_driver = noop 在 [database] 部分修改如下: [database] connection = mysql://glance:[email protected]/glance P.S. connection 的紅⾊色部分為剛建立的 MySQL 密碼。
  34. 設定 Glance 組態檔(5/6) !51 在 [keystone_authtoken] ,加入以下: [keystone_authtoken] auth_uri =

    http://10.0.0.11:5000 auth_url = http://10.0.0.11:35357 auth_plugin = password project_domain_id = default user_domain_id = default project_name = service username = glance password = glance P.S. 這邊密碼為 glance。
  35. 設定 Glance 組態檔(6/6) !52 在 [paste_deploy] ,加入以下: [paste_deploy] flavor =

    keystone 完成檔案 /etc/glance/glance-api.conf 與 /etc/glance/glance-registry.conf 後,即可同 步資料庫、重啟服務,並刪除SQLite 檔案: $ sudo glance-manage db_sync $ sudo service glance-registry restart $ sudo service glance-api restart $ sudo rm -f /var/lib/glance/glance.sqlite
  36. 驗證 Glance 服務 !53 在 admin-openrc.sh 與 demo-openrc.sh 加入 Glance

    API環境變數: $ echo "export OS_IMAGE_API_VERSION=2" | sudo tee -a admin-openrc.sh demo- openrc.sh $ source admin-openrc.sh 下載測試⽤用映像檔,並上傳到 Glance 服務: $ wget -P /tmp/images http://download.cirros-cloud.net/0.3.4/cirros-0.3.4-x86_64- disk.img $ glance image-create --name "cirros-0.3.4-x86_64" --file cirros-0.3.4-x86_64- disk.img --disk-format qcow2 --container-format bare --visibility public --progress
  37. 安裝前準備(1/2) !58 本章節會說明與操作如何安裝 Compute 服務到 Controller 與 Compute 節點上,⾸首先在 Controller

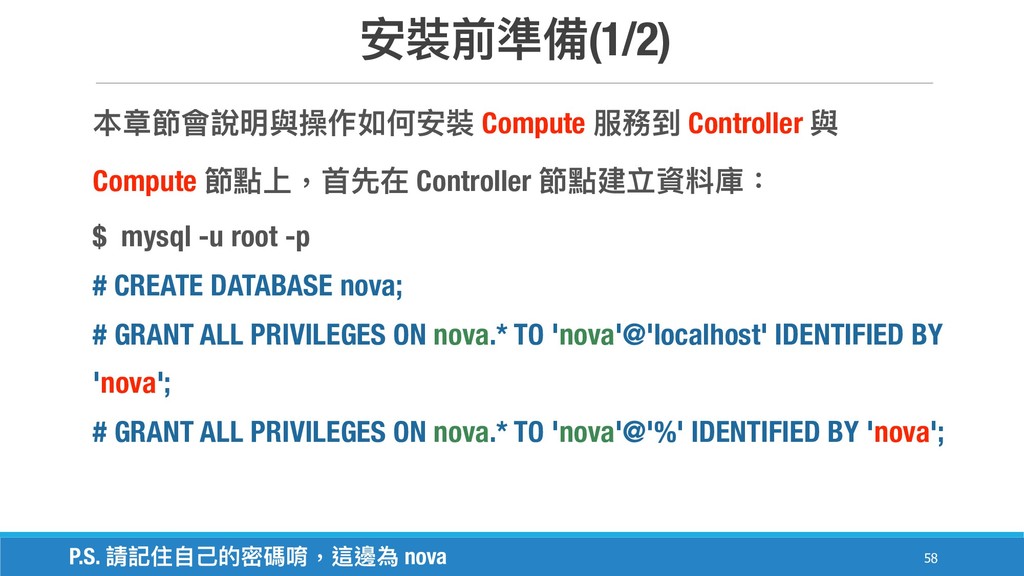
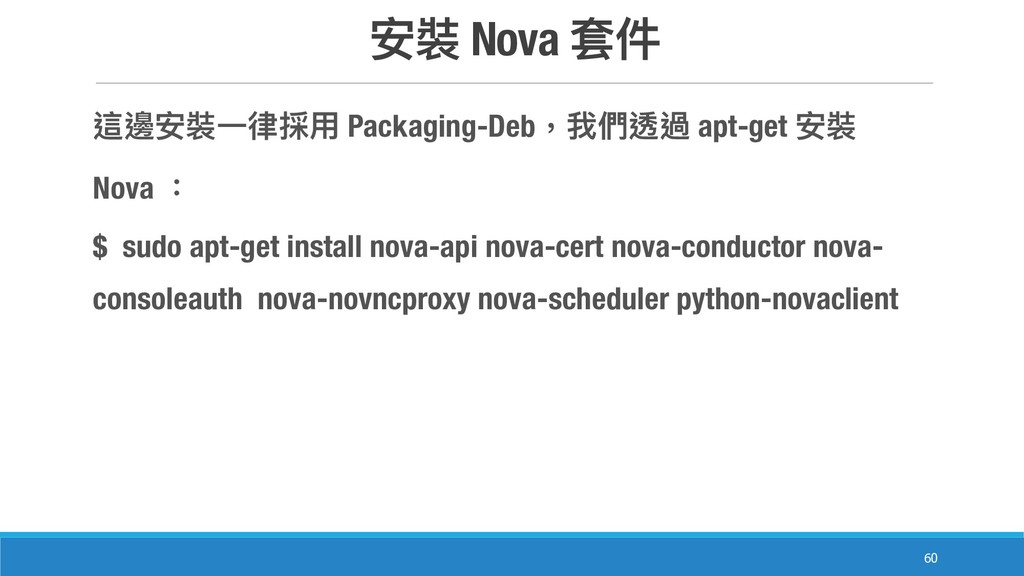
    節點建立資料庫: $ mysql -u root -p # CREATE DATABASE nova; # GRANT ALL PRIVILEGES ON nova.* TO 'nova'@'localhost' IDENTIFIED BY 'nova'; # GRANT ALL PRIVILEGES ON nova.* TO 'nova'@'%' IDENTIFIED BY 'nova'; P.S. 請記住⾃自⼰己的密碼唷,這邊為 nova
  38. 安裝前準備(2/2) !59 我們要導入 Keystone 的 admin 帳號,來來建立服務: $ openstack user

    create --password nova --email [email protected] nova $ openstack role add --project service --user nova admin $ openstack service create --name nova --description "OpenStack Compute" compute $ openstack endpoint create --publicurl http://10.0.0.11:8774/v2/%\(tenant_id\)s \ --internalurl http://10.0.0.11:8774/v2/%\(tenant_id\)s \ --adminurl http://10.0.0.11:8774/v2/%\(tenant_id\)s \ --region RegionOne compute P.S. 請記住⾃自⼰己的密碼唷,這邊為 nova
  39. 安裝 Nova 套件 !60 這邊安裝⼀一律律採⽤用 Packaging-Deb,我們透過 apt-get 安裝 Nova :

    $ sudo apt-get install nova-api nova-cert nova-conductor nova- consoleauth nova-novncproxy nova-scheduler python-novaclient
  40. 設定 Nova 組態檔(1/4) !61 安裝完後,編輯 /etc/nova/nova.conf,在 [DEFAULT] 部分加入以下設定: [DEFAULT] ...

    rpc_backend = rabbit auth_strategy = keystone my_ip = 10.0.0.11 vncserver_listen = 10.0.0.11 vncserver_proxyclient_address = 10.0.0.11
  41. 設定 Nova 組態檔(2/4) !62 在 [database] 部分加入以下設定: [database] connection =

    mysql://nova:[email protected]/nova 在 [oslo_messaging_rabbit] 部分加入以下設定: [oslo_messaging_rabbit] rabbit_host = 10.0.0.11 rabbit_userid = openstack rabbit_password = p@ssw0rd P.S. connection 的紅⾊色部分為剛建立的 MySQL 密碼,還要輸入 Rabbit 密碼
  42. 設定 Nova 組態檔(3/4) !63 在 [keystone_authtoken] 部分加入以下設定: [keystone_authtoken] auth_uri =

    http://10.0.0.11:5000 auth_url = http://10.0.0.11:35357 auth_plugin = password project_domain_id = default user_domain_id = default project_name = service username = nova password = nova P.S. 輸入 Keystone 密碼,這邊為 nova
  43. 設定 Nova 組態檔(4/4) !64 加入 [glance] 與 [oslo_concurrency],設定 Glance Host

    與 lock_path : [glance] host = 10.0.0.11 [oslo_concurrency] lock_path = /var/lib/nova/tmp 完成後,同步資料庫 : $ sudo nova-manage db sync
  44. 重啟服務 !65 重新啟動 Nova 的所有服務,並刪除 SQLite: $ sudo service nova-api

    restart $ sudo service nova-cert restart $ sudo service nova-consoleauth restart $ sudo service nova-scheduler restart $ sudo service nova-conductor restart $ sudo service nova-novncproxy restart $ sudo rm -f /var/lib/nova/nova.sqlite
  45. !70

  46. Compute 節點安裝與設定 !72 設定好 controller 上的 compute service 之後,接著要來來設定實際 執⾏行行

    VM instance 的 Compute 節點,⾸首先安裝套件: $ sudo apt-get install -y nova-compute sysfsutils
  47. 設定 Nova-Compute 組態檔(1/5) !73 安裝完後,編輯 /etc/nova/nova.conf,在 [DEFAULT] 部分加入以下設 定: [DEFAULT]

    ... rpc_backend = rabbit auth_strategy = keystone resume_guests_state_on_host_boot = true my_ip = 10.0.0.31
  48. 設定 Nova-Compute 組態檔(2/5) !74 加入 [vnc] 設定 VNC Server 資訊:

    [vnc] enabled = True vncserver_listen = 0.0.0.0 vncserver_proxyclient_address = 10.0.0.31 novncproxy_base_url = http://10.0.0.11:6080/vnc_auto.html
  49. 設定 Nova-Compute 組態檔(3/5) !75 加入 [oslo_messaging_rabbit] 設定 VNC Server 資訊:

    [oslo_messaging_rabbit] rabbit_host = 10.0.0.11 rabbit_userid = openstack rabbit_password = p@ssw0rd P.S. 輸入 Rabbit 密碼,這邊為 p@ssw0rd
  50. 設定 Nova-Compute 組態檔(4/5) !76 加入 [keystone_authtoken] 設定 VNC Server 資訊:

    auth_uri = http://10.0.0.11:5000 auth_url = http://10.0.0.11:35357 auth_plugin = password project_domain_id = default user_domain_id = default project_name = service username = nova password = nova P.S. 輸入 Keystone 密碼,這邊為 nova
  51. 設定 Nova-Compute 組態檔(5/5) !77 加入 [glance] 與 [oslo_concurrency],設定 Glance Host

    與 lock_path : [glance] host = 10.0.0.11 [oslo_concurrency] lock_path = /var/lib/nova/tmp 完成後,同步資料庫 : $ sudo nova-manage db sync
  52. 設定 Compute libvirt !78 最後我們要確認 Compute 是否⽀支援虛擬化加速,可以透過以下指令得知: $ kvm-ok $

    egrep -c '(vmx|svm)' /proc/cpuinfo 8 若若 CPU 沒有⽀支援 KVM 虛擬化加速,我們可以將 /etc/nova/nova- compute.conf 的 virt_type 改為 QEMU: [libvirt] virt_type = qemu
  53. 安裝前準備(1/2) !85 本章節會說明與操作如何安裝 Networking 到 Controller、Network、 Compute 節點上,在⾸首先 Controller 建立資料庫:

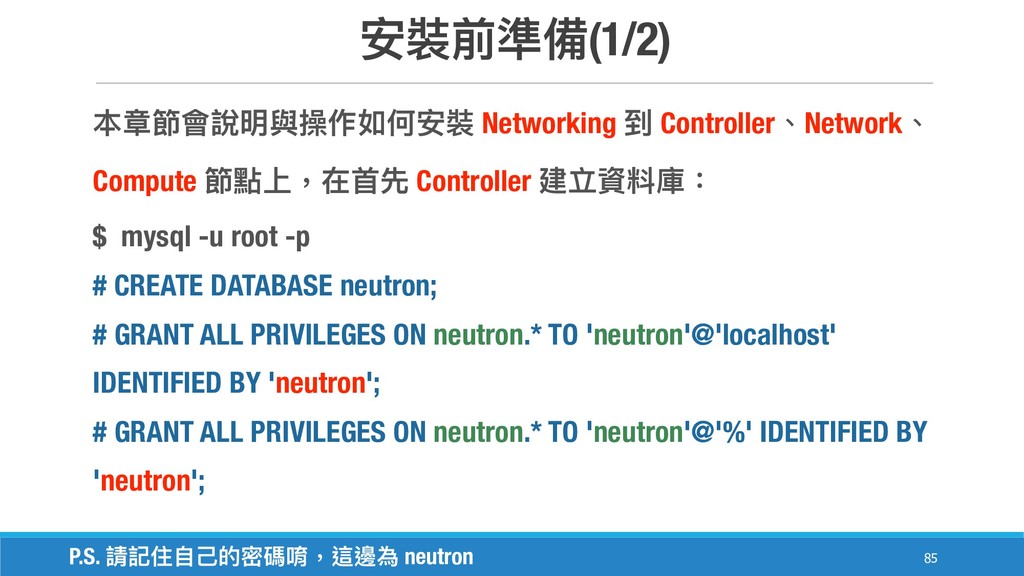
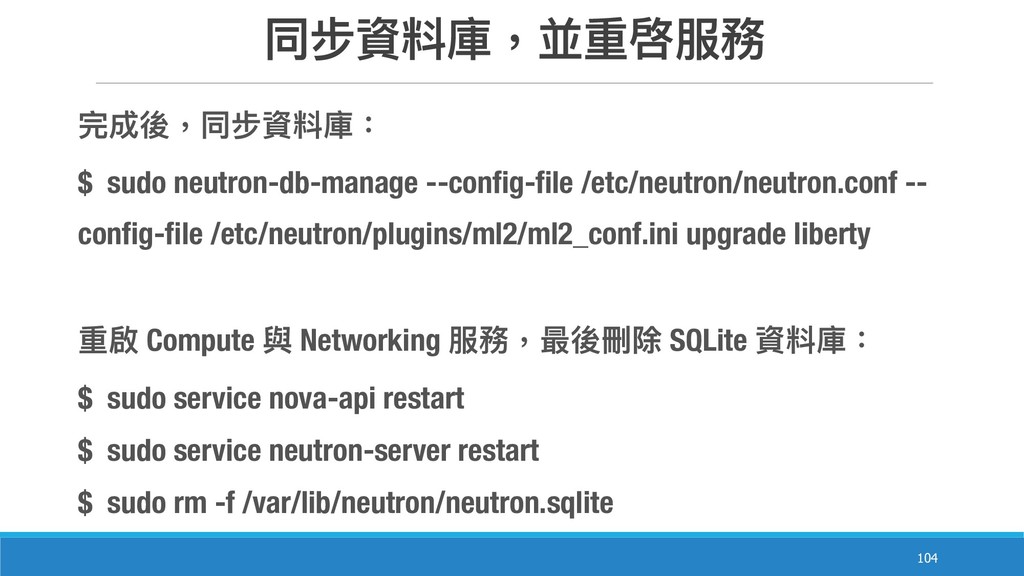
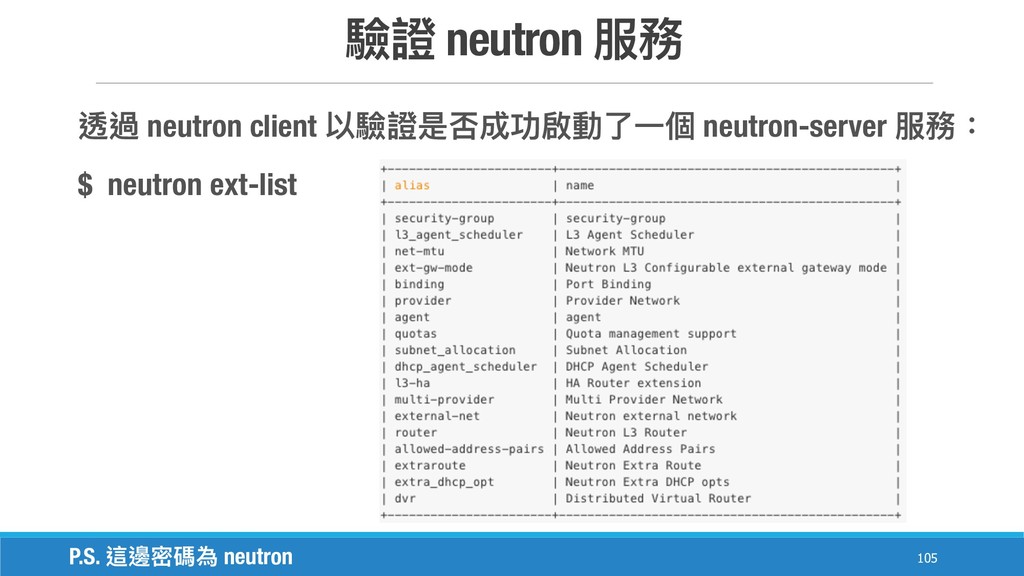
    $ mysql -u root -p # CREATE DATABASE neutron; # GRANT ALL PRIVILEGES ON neutron.* TO 'neutron'@'localhost' IDENTIFIED BY 'neutron'; # GRANT ALL PRIVILEGES ON neutron.* TO 'neutron'@'%' IDENTIFIED BY 'neutron'; P.S. 請記住⾃自⼰己的密碼唷,這邊為 neutron
  54. 安裝前準備(2/2) !86 之後我們要導入 Keystone 的 admin 帳號,來來建立服務: $ openstack user

    create --password neutron --email [email protected] neutron $ openstack role add --project service --user neutron admin $ openstack service create --name neutron --description "OpenStack Networking" network $ openstack endpoint create --publicurl http://10.0.0.11:9696 \ --adminurl http://10.0.0.11:9696 \ --internalurl http://10.0.0.11:9696 \ --region RegionOne network P.S. 請記住⾃自⼰己的密碼唷,這邊為 neutron
  55. 安裝 Neutron 套件 !87 這邊安裝⼀一律律採⽤用 Packaging-Deb,我們透過 apt-get 安裝 Neutron :

    $ sudo apt-get install neutron-server neutron-plugin-ml2 python- neutronclient
  56. 設定 Neutron 組態檔(1/4) !88 安裝完後,編輯 /etc/neutron/neutron.conf,在 [DEFAULT] 部分加入以下設定: [DEFAULT] rpc_backend

    = rabbit auth_strategy = keystone core_plugin = ml2 service_plugins = router allow_overlapping_ips = True notify_nova_on_port_status_changes = True notify_nova_on_port_data_changes = True nova_url = http://10.0.0.11:8774/v2
  57. 設定 Neutron 組態檔(2/4) !89 在 [database] 部分加入以下設定: [DEFAULT] connection =

    mysql://neutron:[email protected]/neutron 在 [oslo_messaging_rabbit] 部分加入以下設定: [oslo_messaging_rabbit] rabbit_host = 10.0.0.11 rabbit_userid = openstack rabbit_password = p@ssw0rd P.S. 這邊 MySQL 密碼為 neutron,rabbit 為 p@ssw0rd
  58. 設定 Neutron 組態檔(3/4) !90 在 [keystone_authtoken] 部分加入以下設定: [keystone_authtoken] auth_uri =

    http://10.0.0.11:5000 auth_url = http://10.0.0.11:35357 auth_plugin = password project_domain_id = default user_domain_id = default project_name = service username = neutron password = neutron P.S. 這邊密碼為 neutron
  59. 設定 Neutron 組態檔(4/4) !91 在 [nova] 部分加入以下設定: [nova] auth_uri =

    http://10.0.0.11:5000 auth_url = http://10.0.0.11:35357 auth_plugin = password project_domain_id = default user_domain_id = default project_name = service username = nova password = nova P.S. 這邊密碼為 nova
  60. 設定 Modular Layer 2 組態檔(1/2) !92 編輯 /etc/neutron/plugins/ml2/ml2_conf.ini,在[ml2]部分,啟⽤用, GRE 租⼾戶網路路和

    OVS 驅動: [ml2] type_drivers = flat,vlan,gre,vxlan tenant_network_types = gre mechanism_drivers = openvswitch
  61. !99

  62. 設定 Modular Layer 2 組態檔(2/2) !101 在[ml2_type_gre]部分,設定通道 id: [ml2_type_gre] tunnel_id_ranges

    = 1:1000 在[securitygroup]部分,部分設定啟⽤用安全群組、ipset並設置OVS iptables 防火牆 驅動: enable_security_group = True enable_ipset = True firewall_driver = neutron.agent.linux.iptables_firewall.OVSHybridIptablesFirewallDriver
  63. 設定 Nova 套件使⽤用 Networking(1/2) !102 編輯 /etc/nova/nova.conf 完成以下操作,在[DEFAULT]部分,設置 APIs 和

    Drivers: [DEFAULT] ... network_api_class = nova.network.neutronv2.api.API security_group_api = neutron linuxnet_interface_driver = nova.network.linux_net.LinuxOVSInterfaceDriver firewall_driver = nova.virt.firewall.NoopFirewallDriver
  64. 設定 Nova 套件使⽤用 Networking(2/2) !103 在[neutron]部分,加入以下: [neutron] auth_uri = http://10.0.0.11:5000

    auth_url = http://10.0.0.11:35357 auth_plugin = password project_domain_id = default user_domain_id = default project_name = service username = neutron password = neutron P.S. 這邊密碼為 neutron
  65. 同步資料庫,並重啓服務 !104 完成後,同步資料庫: $ sudo neutron-db-manage --config-file /etc/neutron/neutron.conf -- config-file

    /etc/neutron/plugins/ml2/ml2_conf.ini upgrade liberty 重啟 Compute 與 Networking 服務,最後刪除 SQLite 資料庫: $ sudo service nova-api restart $ sudo service neutron-server restart $ sudo rm -f /var/lib/neutron/neutron.sqlite
  66. 安裝前準備(1/2) !107 Network 節點主要是為了了處理理虛擬內部和外部網路路 L3 及 DHCP 服務, ⾸首先設定系統網路路調整,編輯 /etc/sysctl.conf

    將以下參參數加入: net.ipv4.ip_forward=1 net.ipv4.conf.all.rp_filter=0 net.ipv4.conf.default.rp_filter=0 修改後,透過以下指令來來載入: $ sudo sysctl -p
  67. 安裝前準備(2/2) !108 透過 apt-get 安裝相關套件:: $ sudo apt-get install neutron-plugin-ml2

    neutron-plugin- openvswitch-agent neutron-l3-agent neutron-dhcp-agent neutron- metadata-agent
  68. 設定 Neutron 組態檔(1/3) !109 安裝完後,編輯 /etc/neutron/neutron.conf,在 [DEFAULT] 部分加入 以下設定: [DEFAULT]

    rpc_backend = rabbit auth_strategy = keystone core_plugin = ml2 service_plugins = router allow_overlapping_ips = True
  69. 設定 Neutron 組態檔(2/3) !110 在 [database] 部分加入以下設定: [DEFAULT] # connection

    = sqlite:////var/lib/neutron/neutron.sqlite 在 [oslo_messaging_rabbit] 部分加入以下設定: [oslo_messaging_rabbit] rabbit_host = 10.0.0.11 rabbit_userid = openstack rabbit_password = p@ssw0rd P.S. 這邊 MySQL 密碼為 neutron,rabbit 為 p@ssw0rd
  70. 設定 Neutron 組態檔(3/3) !111 在 [keystone_authtoken] 部分加入以下設定: [keystone_authtoken] auth_uri =

    http://10.0.0.11:5000 auth_url = http://10.0.0.11:35357 auth_plugin = password project_domain_id = default user_domain_id = default project_name = service username = neutron password = neutron P.S. 這邊密碼為 neutron
  71. 設定 Modular Layer 2 組態檔(1/4) !112 編輯 /etc/neutron/plugins/ml2/ml2_conf.ini,在[ml2]部分,啟⽤用 GRE 租⼾戶網路路和

    OVS 驅動: [ml2] type_drivers = flat,vlan,gre,vxlan tenant_network_types = gre mechanism_drivers = openvswitch
  72. 設定 Modular Layer 2 組態檔(2/4) !113 在[ml2_type_flat]部分設定外部網路路: [ml2_type_flat] flat_networks =

    external 在[ml2_type_gre]部分,設定通道 id: [ml2_type_gre] tunnel_id_ranges = 1:1000
  73. 設定 Modular Layer 2 組態檔(3/4) !114 在[securitygroup]部分設定啟⽤用安全群組、ipset並設置OVS iptables 防火牆驅動: enable_security_group

    = True enable_ipset = True firewall_driver = neutron.agent.linux.iptables_firewall.OVSHybridIptablesFirewallDriver 在[ovs]部分,設定橋接與通道 IP: [ovs] local_ip = 10.0.1.21 bridge_mappings = external:br-ex
  74. 設定 Layer-3 (L3) Proxy !116 編輯 /etc/neutron/l3_agent.ini 在[DEFAULT]部分設定以下內容: [DEFAULT] ...

    verbose = True interface_driver = neutron.agent.linux.interface.OVSInterfaceDriver external_network_bridge = router_delete_namespaces = True
  75. 設定 DHCP Proxy(1/2) !117 編輯 /etc/neutron/dhcp_agent.ini 在[DEFAULT]設定介⾯面與DHCP驅動: [DEFAULT] ... verbose

    = True interface_driver = neutron.agent.linux.interface.OVSInterfaceDriver dhcp_driver = neutron.agent.linux.dhcp.Dnsmasq dhcp_delete_namespaces = True dnsmasq_config_file = /etc/neutron/dnsmasq-neutron.conf
  76. 設定 DHCP Proxy(2/2) !118 建立並修改 /etc/neutron/dnsmasq-neutron.conf 啟⽤用 DHCP MTU 選項(26)

    並設定為1454 bytes: $ echo 'dhcp-option-force=26,1454' | sudo tee /etc/neutron/dnsmasq- neutron.conf
  77. 設定 Metadata Proxy(1/2) !119 編輯 /etc/neutron/metadata_agent.ini 在[DEFAULT]部分設定服務存取與 metadata 主 機:

    [DEFAULT] auth_uri = http://10.0.0.11:5000 auth_url = http://10.0.0.11:35357 auth_region = RegionOne auth_plugin = password project_domain_id = default
  78. 設定 Metadata Proxy(2/2) !120 繼續編輯 /etc/neutron/metadata_agent.ini 在[DEFAULT]部分設定往下加入: [DEFAULT] … user_domain_id

    = default project_name = service username = neutron password = neutron nova_metadata_ip = 10.0.0.11 metadata_proxy_shared_secret = d88ec459ab1e0bdaf5d8 P.S. 這邊 Keystone 為 neutron, 請記住 metadata_proxy_shared_secret
  79. 讓 Nova 使⽤用 Metadata Proxy !122 編輯 /etc/nova/nova.conf,在[neutron]部分讓 Nova 使⽤用

    metadata proxy: [neutron] ... service_metadata_proxy = True metadata_proxy_shared_secret = d88ec459ab1e0bdaf5d8 在 Controller 上重新啟動 Compute API 服務: $ sudo service nova-api restart P.S. 這邊 metadata_proxy_shared_secret 為 d88ec459ab1e0bdaf5d8
  80. 設定Open vSwitch (OVS) 服務 !124 重啟 Open vSwitch 服務: $

    sudo service openvswitch-switch restart 增加外部網路路橋接: $ sudo ovs-vsctl add-br br-ex 增加連接到實體外部網路路介⾯面的外部橋接: $ sudo ovs-vsctl add-port br-ex INTERFACE_NAME P.S. 這邊 INTERFACE_NAME 為 Public 網路路的網卡,範例例為 eth1
  81. 重新啟動 Networking 服務 !125 $ sudo service neutron-plugin-openvswitch-agent restart $

    sudo service neutron-l3-agent restart $ sudo service neutron-dhcp-agent restart $ sudo service neutron-metadata-agent restart 回到 Controller 節點,導入Keystone的 admin 帳號,並執⾏行行以下指令來來 驗證服務: $ neutron agent-list
  82. 設定 Neutron 組態檔(1/3) !129 安裝完後,編輯 /etc/neutron/neutron.conf,在 [DEFAULT] 部分加入 以下設定: [DEFAULT]

    rpc_backend = rabbit auth_strategy = keystone core_plugin = ml2 service_plugins = router allow_overlapping_ips = True
  83. 設定 Neutron 組態檔(2/3) !130 在 [database] 部分加入以下設定: [DEFAULT] # connection

    = sqlite:////var/lib/neutron/neutron.sqlite 在 [oslo_messaging_rabbit] 部分加入以下設定: [oslo_messaging_rabbit] rabbit_host = 10.0.0.11 rabbit_userid = openstack rabbit_password = p@ssw0rd P.S. 這邊 MySQL 密碼為 neutron,rabbit 為 p@ssw0rd
  84. 設定 Neutron 組態檔(3/3) !131 在 [keystone_authtoken] 部分加入以下設定: [keystone_authtoken] auth_uri =

    http://10.0.0.11:5000 auth_url = http://10.0.0.11:35357 auth_plugin = password project_domain_id = default user_domain_id = default project_name = service username = neutron password = neutron P.S. 這邊密碼為 neutron
  85. 設定 Modular Layer 2 組態檔(1/3) !132 編輯 /etc/neutron/plugins/ml2/ml2_conf.ini,在[ml2]部分,啟⽤用 GRE 租⼾戶網路路和

    OVS 驅動: [ml2] type_drivers = flat,vlan,gre,vxlan tenant_network_types = gre mechanism_drivers = openvswitch
  86. 設定 Modular Layer 2 組態檔(2/3) !133 在[ml2_type_gre]部分,設定通道 id: [ml2_type_gre] tunnel_id_ranges

    = 1:1000 在[securitygroup]部分設定啟⽤用安全群組、ipset並設置OVS iptables 防火牆驅動: enable_security_group = True enable_ipset = True firewall_driver = neutron.agent.linux.iptables_firewall.OVSHybridIptablesFirewallDriver
  87. 設定 Modular Layer 2 組態檔(3/3) !134 在[ovs]部分,設定橋接與通道 IP: [ovs] local_ip

    = 10.0.1.31 在[agent]部分,部分啟⽤用GRE通道: [agent] tunnel_types = gre
  88. 設定 Compute 使⽤用 Networking(1/2) !135 編輯 /etc/nova/nova.conf 在[DEFAULT]部分設定 APIs 和

    Drivers: [DEFAULT] ... network_api_class = nova.network.neutronv2.api.API security_group_api = neutron linuxnet_interface_driver = nova.network.linux_net.LinuxOVSInterfaceDriver firewall_driver = nova.virt.firewall.NoopFirewallDriver
  89. 設定 Compute 使⽤用 Networking(2/2) !136 在[neutron]部分設定 Keystone 存取參參數: [DEFAULT] auth_uri

    = http://10.0.0.11:5000 auth_url = http://10.0.0.11:35357 auth_plugin = password project_domain_id = default user_domain_id = default project_name = service username = neutron password = neutron P.S. 這邊密碼為 neutron
  90. 重新啟動 Compute Networking 服務 !137 $ sudo service openvswitch-switch restart

    $ sudo service nova-compute restart $ sudo service neutron-plugin-openvswitch-agent restart 回到 Controller 節點,導入Keystone的 admin 帳號,並執⾏行行以下指令來來 驗證服務: $ neutron agent-list
  91. External network(1/2) !140 透過 neutron net-create 指令建立網路路: $ neutron net-create

    ext-net --router:external --provider:physical_network external --provider:network_type flat
  92. External network(2/2) !141 我們可以透過 neutron subnet-create 建立⼦子網路路: $ neutron subnet-create

    ext-net 192.168.20.0/24 --name ext-subnet -- allocation-pool start=192.168.20.101,end=192.168.20.200 --disable-dhcp -- gateway 192.168.20.1
  93. Horizon 安裝與設定(1/2) !144 本章節會說明與操作如何安裝 Dashboard 到 Controller 節點上,假設我們 的基本 OpenStack

    環境都確認完成後,即可透過 apt-get 安裝 dashboard 服務: $ sudo apt-get install openstack-dashboard Ubuntu 安裝 openstack-dashboard 時,會有 ubuntu-theme 套件,覺得很醜 可以砍掉: $ sudo apt-get purge openstack-dashboard-ubuntu-theme
  94. Horizon 安裝與設定(2/2) !145 安裝完成後,編輯 /etc/openstack-dashboard/local_settings.py 修改以下: OPENSTACK_HOST = "controller" ALLOWED_HOSTS

    = '*' CACHES = { 'default': { 'BACKEND': 'django.core.cache.backends.memcached.MemcachedCache', 'LOCATION': '127.0.0.1:11211', } } OPENSTACK_KEYSTONE_DEFAULT_ROLE = "user"