Farley Linn Øyen Farley • • @LinnOyenFarley @LinnOyenFarley drollic.ca drollic.ca Foundations of Digital Communications Strategy and Social Media November 26th 2014, University of Toronto
HTML and CSS are languages. They work together to present the majority of websites you see on the internet. In short: HTML is for content. CSS is for design and layout.
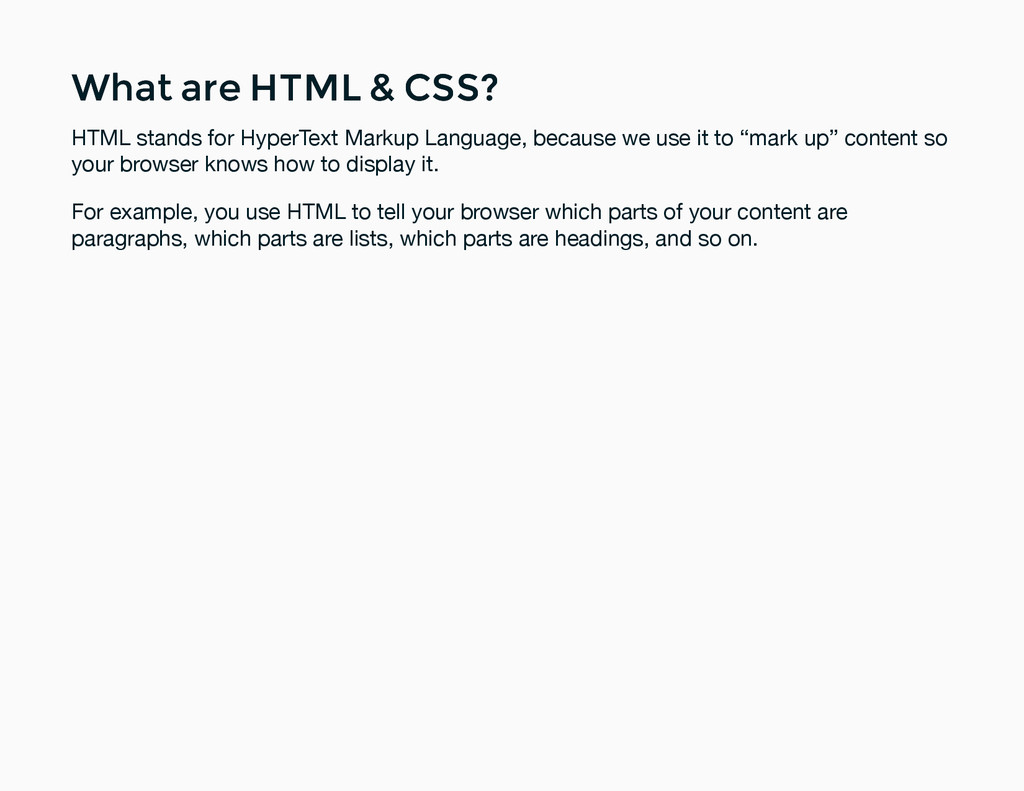
HTML stands for HyperText Markup Language, because we use it to “mark up” content so your browser knows how to display it. For example, you use HTML to tell your browser which parts of your content are paragraphs, which parts are lists, which parts are headings, and so on.
CSS stands for Cascading Style Sheets. You use CSS to apply styles to your HTML. Without CSS, each browser applies its own (very basic) styles to various elements. For example, paragraph text is usually black Times New Roman with a size of 16 pixels. And headings are just larger, bolded Times New Roman. Using CSS, we can tell the browser to ignore these defaults, and instead show paragraphs (for example) in dark grey Georgia at 18 pixels, and headings in purple italic Verdana.
You can have HTML without CSS (although it looks boring), but you can’t have CSS without HTML (it would just be a list of styles that aren’t being applied to anything).
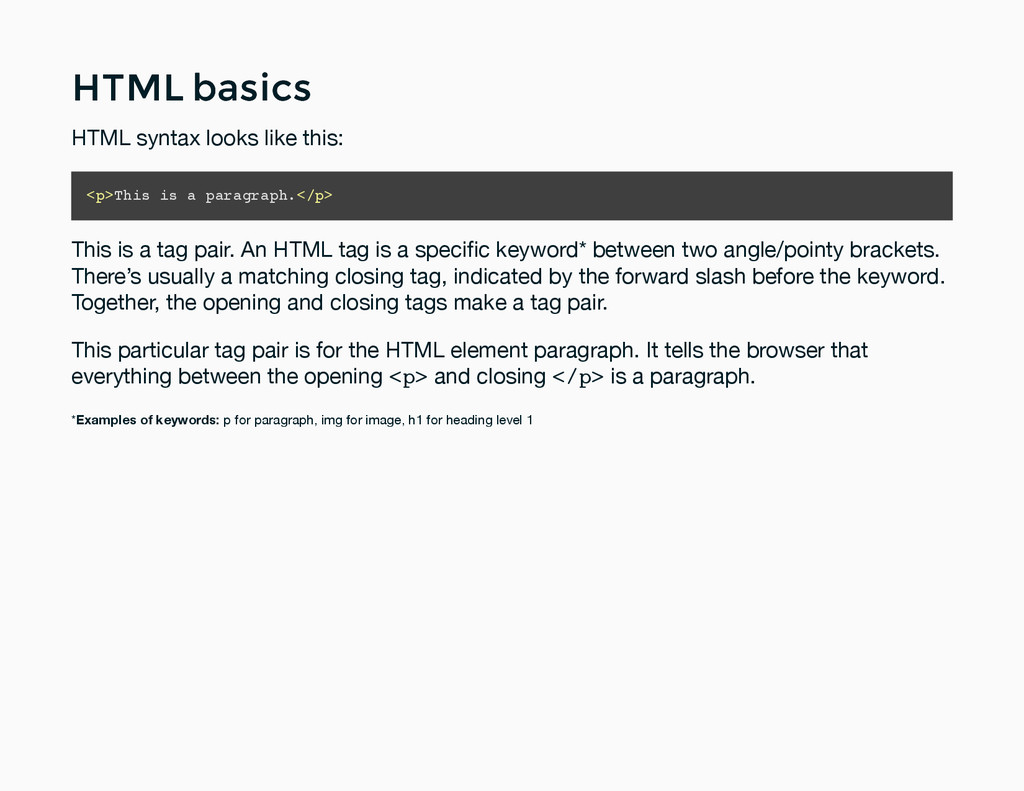
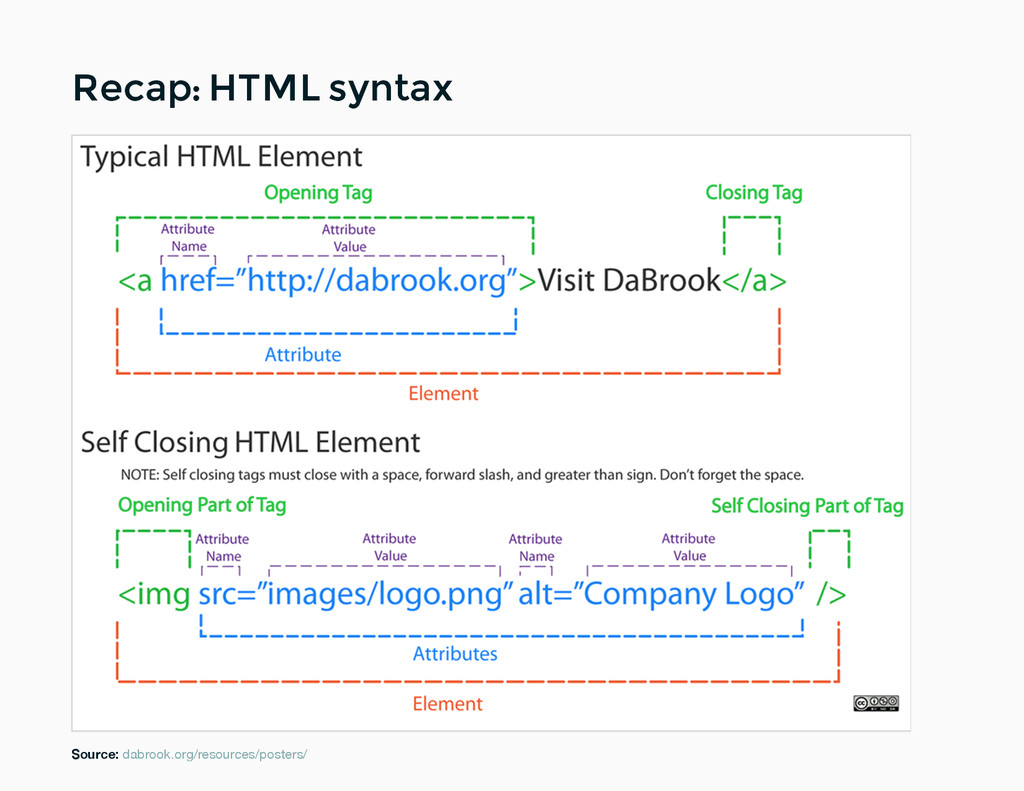
is a paragraph.</p> This is a tag pair. An HTML tag is a specific keyword* between two angle/pointy brackets. There’s usually a matching closing tag, indicated by the forward slash before the keyword. Together, the opening and closing tags make a tag pair. This particular tag pair is for the HTML element paragraph. It tells the browser that everything between the opening <p> and closing </p> is a paragraph. *Examples of keywords: p for paragraph, img for image, h1 for heading level 1
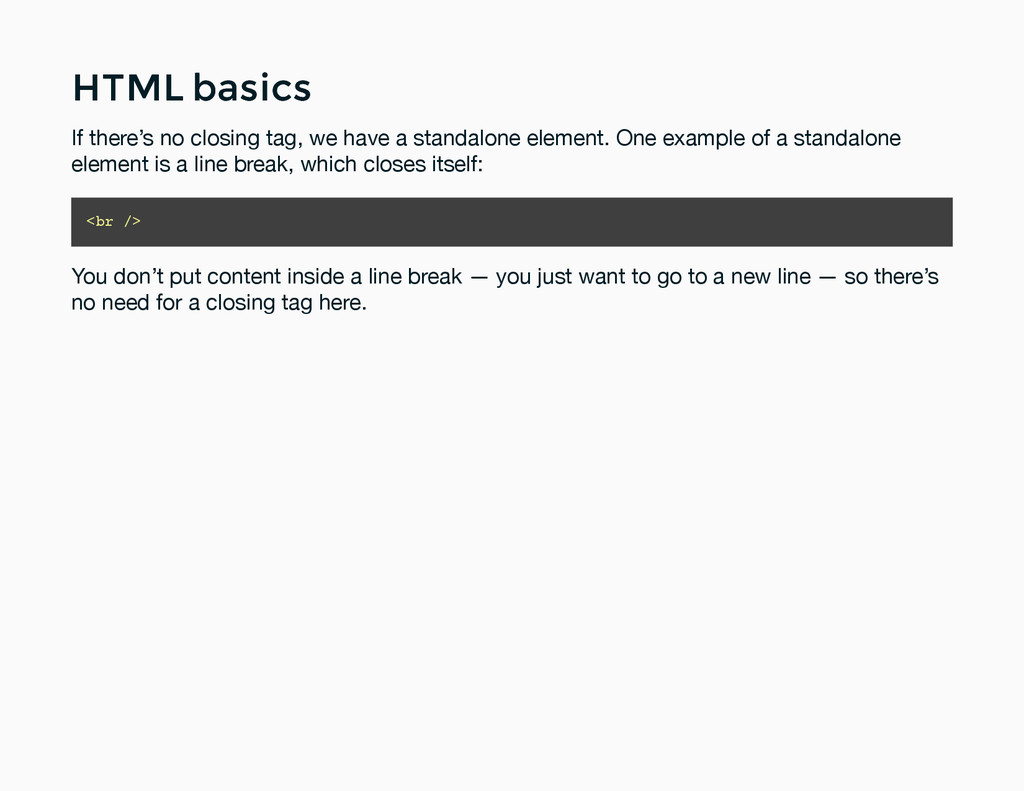
have a standalone element. One example of a standalone element is a line break, which closes itself: <br /> You don’t put content inside a line break — you just want to go to a new line — so there’s no need for a closing tag here.
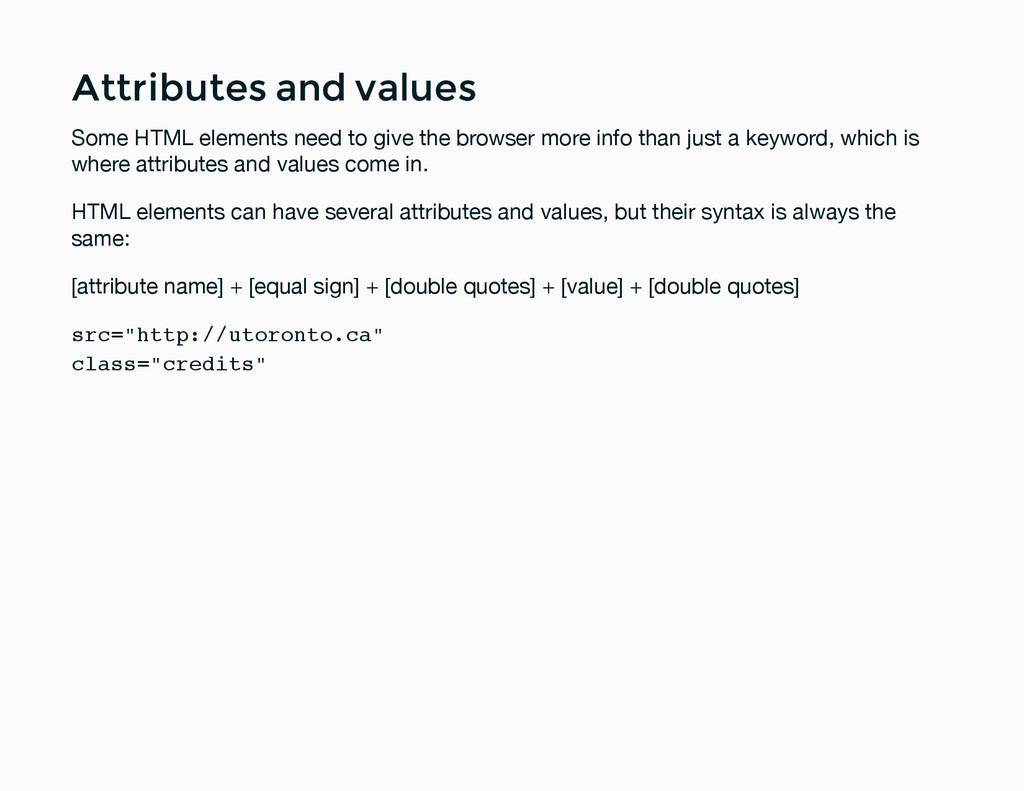
to give the browser more info than just a keyword, which is where attributes and values come in. HTML elements can have several attributes and values, but their syntax is always the same: [attribute name] + [equal sign] + [double quotes] + [value] + [double quotes] src="http://utoronto.ca" class="credits"
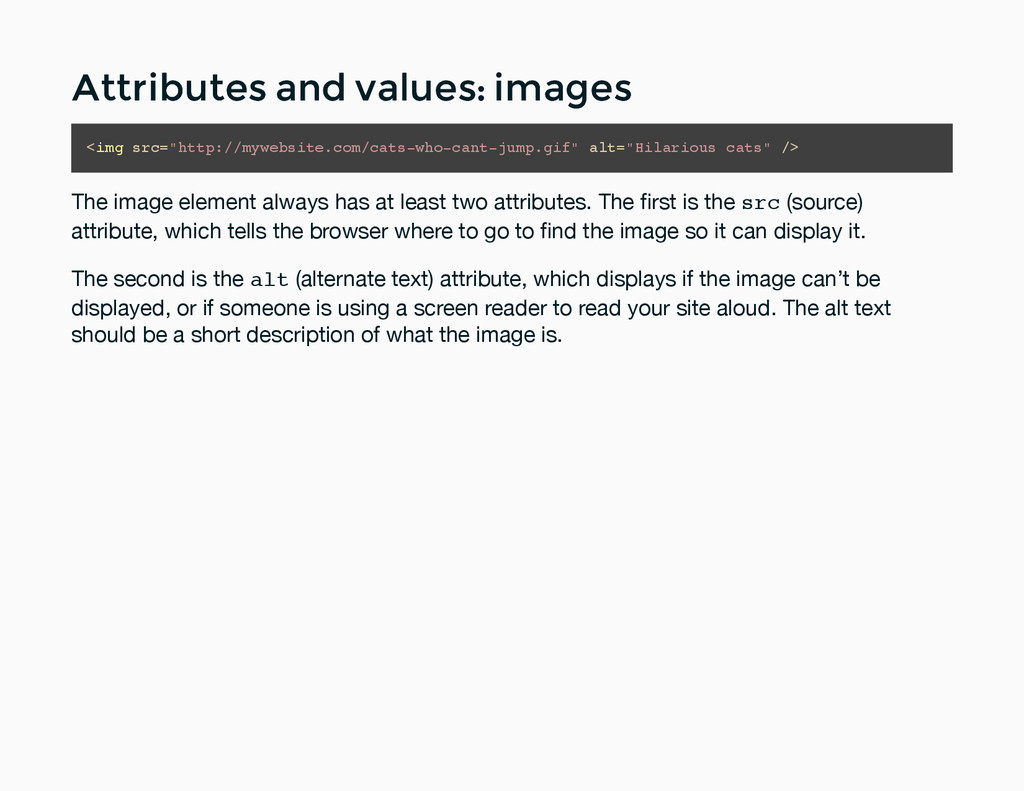
alt="Hilarious cats" /> The image element always has at least two attributes. The first is the src (source) attribute, which tells the browser where to go to find the image so it can display it. The second is the alt (alternate text) attribute, which displays if the image can’t be displayed, or if someone is using a screen reader to read your site aloud. The alt text should be a short description of what the image is.
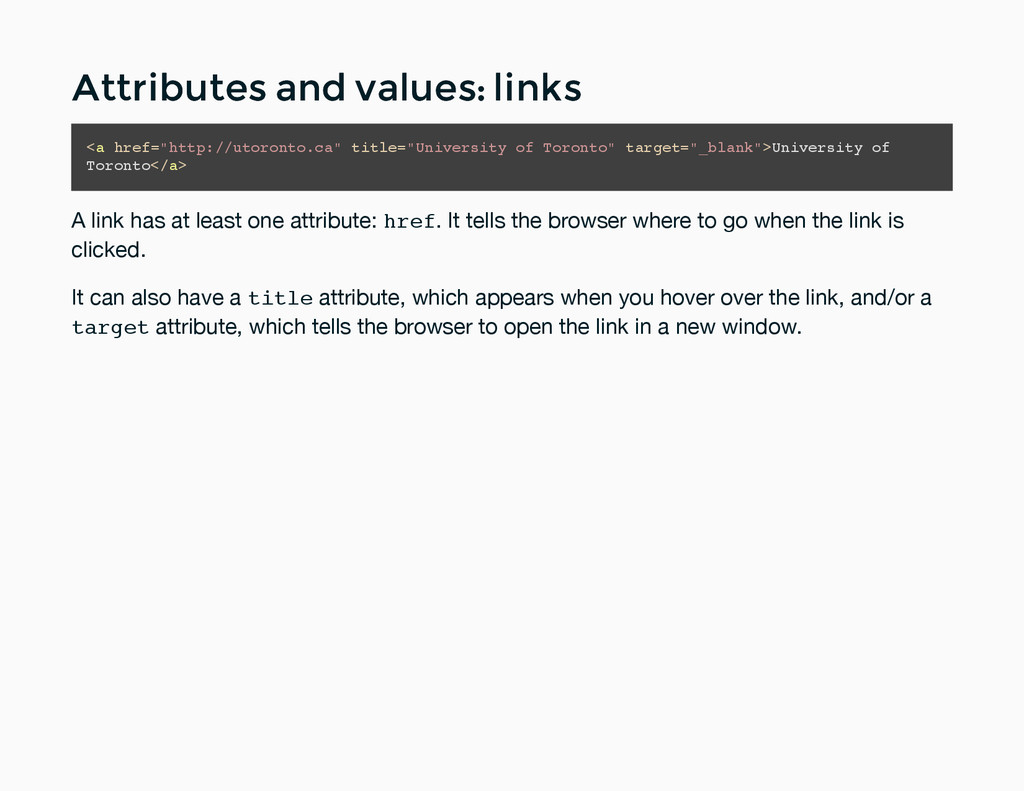
title="University of Toronto" target="_blank">University of Toronto</a> A link has at least one attribute: href. It tells the browser where to go when the link is clicked. It can also have a title attribute, which appears when you hover over the link, and/or a target attribute, which tells the browser to open the link in a new window.
notes about links: the href value should always start with http://, unless the link is pointing to somewhere else on your website: <a href="/about-us">About Us</a> or if it’s an email address link: <a href="mailto:[email protected]">[email protected]</a> When clicked, a mailto link opens the default mail program on your computer with the address pre-filled. This isn’t always ideal for your visitor, so you should use them with care.
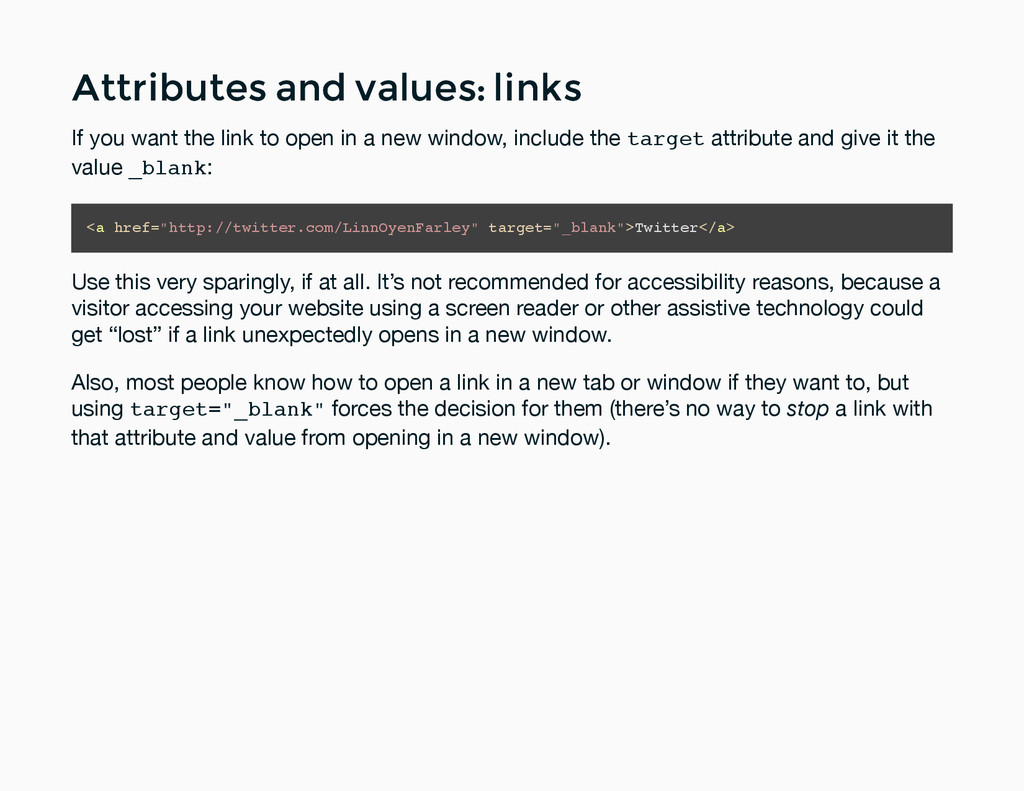
want the link to open in a new window, include the target attribute and give it the value _blank: <a href="http://twitter.com/LinnOyenFarley" target="_blank">Twitter</a> Use this very sparingly, if at all. It’s not recommended for accessibility reasons, because a visitor accessing your website using a screen reader or other assistive technology could get “lost” if a link unexpectedly opens in a new window. Also, most people know how to open a link in a new tab or window if they want to, but using target="_blank" forces the decision for them (there’s no way to stop a link with that attribute and value from opening in a new window).
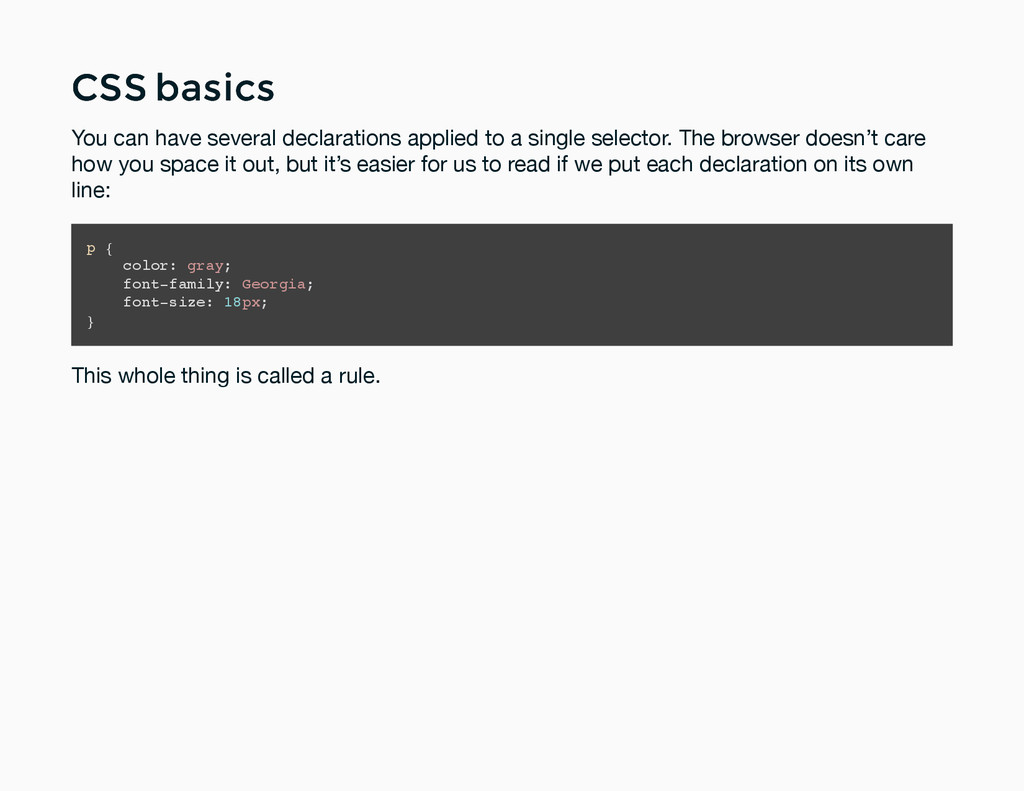
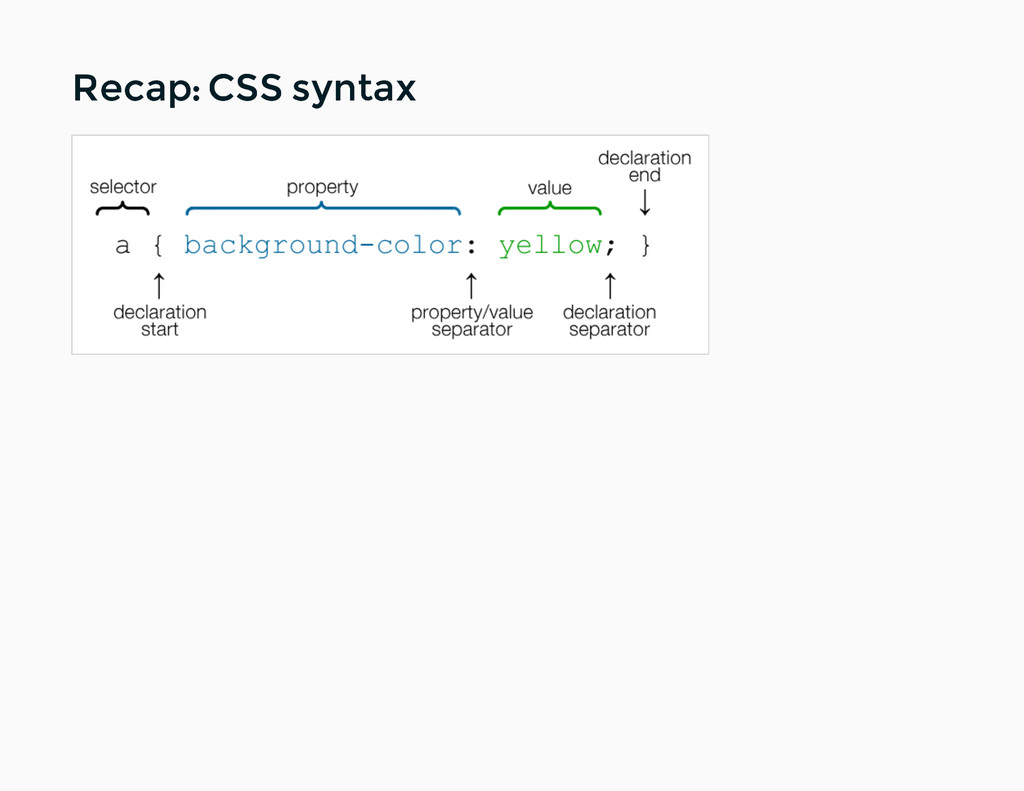
{ color: gray; } The first part is a selector. This selects a specific HTML element — in this case, the paragraph. Then there are two curly braces, and within those braces, you add styles to apply to the selector. These styles are called declarations, or property/value pairs. In the above example, the property is color, and the value is gray. I’m telling the browser to display all paragraphs in the colour grey (note the American spelling).
to a single selector. The browser doesn’t care how you space it out, but it’s easier for us to read if we put each declaration on its own line: p { color: gray; font-family: Georgia; font-size: 18px; } This whole thing is called a rule.
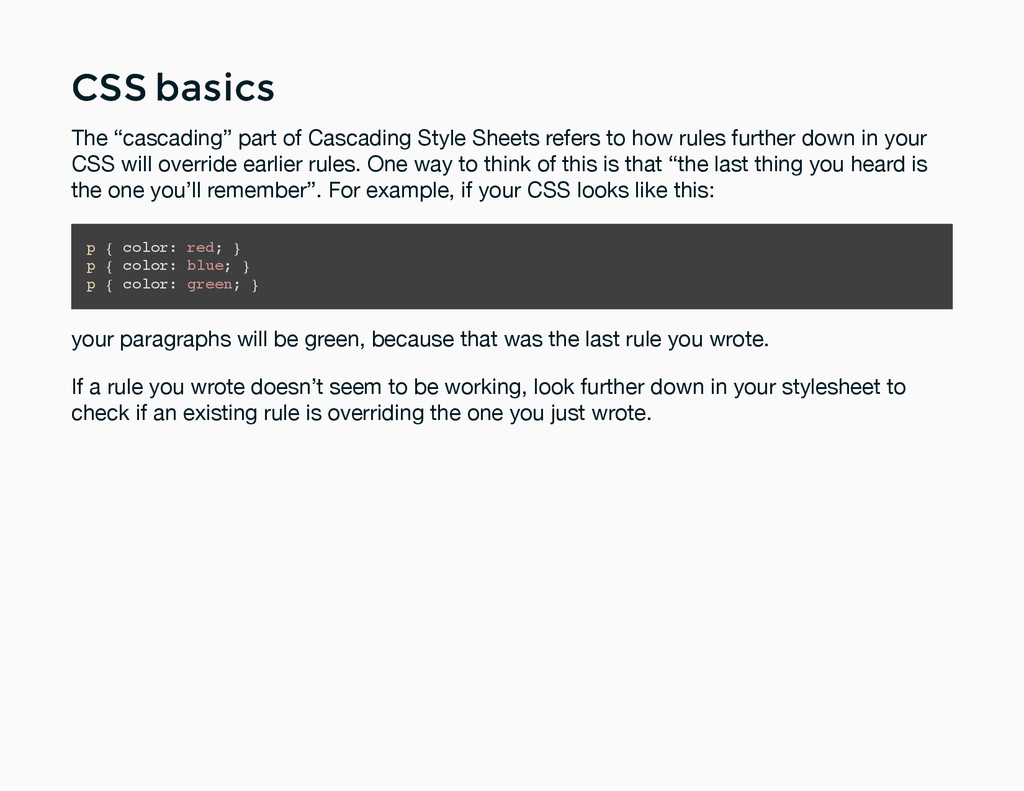
Sheets refers to how rules further down in your CSS will override earlier rules. One way to think of this is that “the last thing you heard is the one you’ll remember”. For example, if your CSS looks like this: p { color: red; } p { color: blue; } p { color: green; } your paragraphs will be green, because that was the last rule you wrote. If a rule you wrote doesn’t seem to be working, look further down in your stylesheet to check if an existing rule is overriding the one you just wrote.
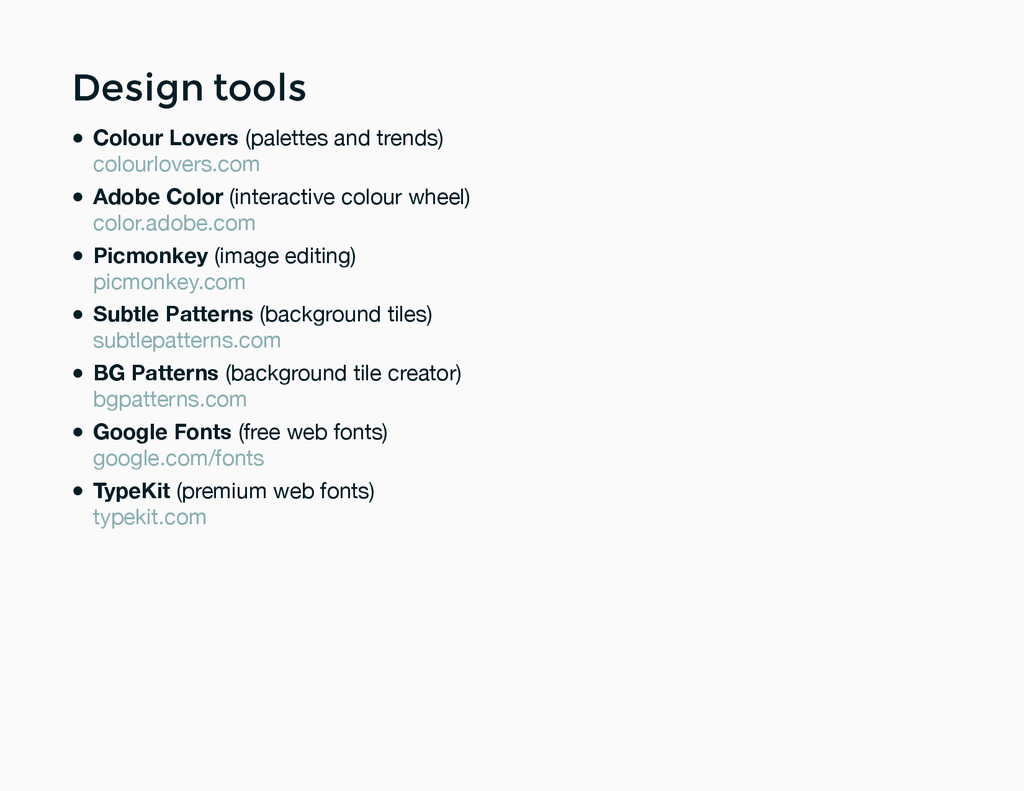
in a few different formats: Colour name: e.g. red, blue, coral, lime ... the full list is at , but you’re limited to 140 (mostly weird) colours in total Hex value: e.g. #FF1493 (most common) RGB value: e.g. rgb(30,144,255) RGBA value: e.g. rgba(30,144,255,0.5) where the final value is opacity www.w3schools.com/cssref/css_colornames.asp
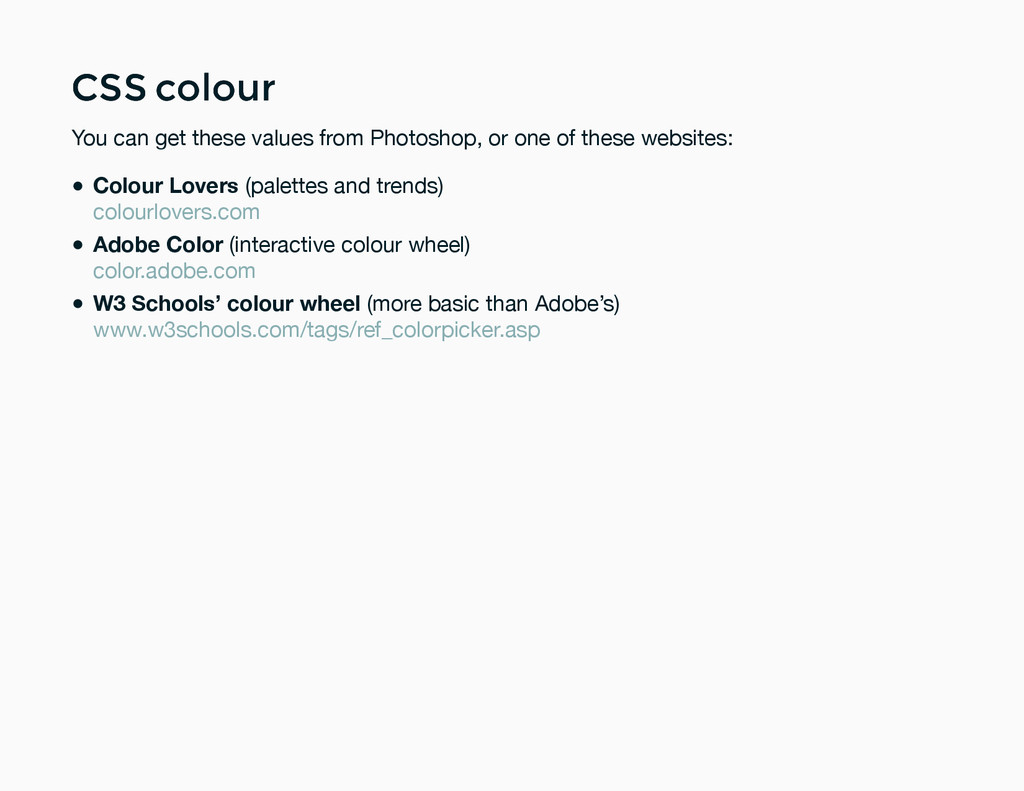
Photoshop, or one of these websites: Colour Lovers (palettes and trends) Adobe Color (interactive colour wheel) W3 Schools’ colour wheel (more basic than Adobe’s) colourlovers.com color.adobe.com www.w3schools.com/tags/ref_colorpicker.asp
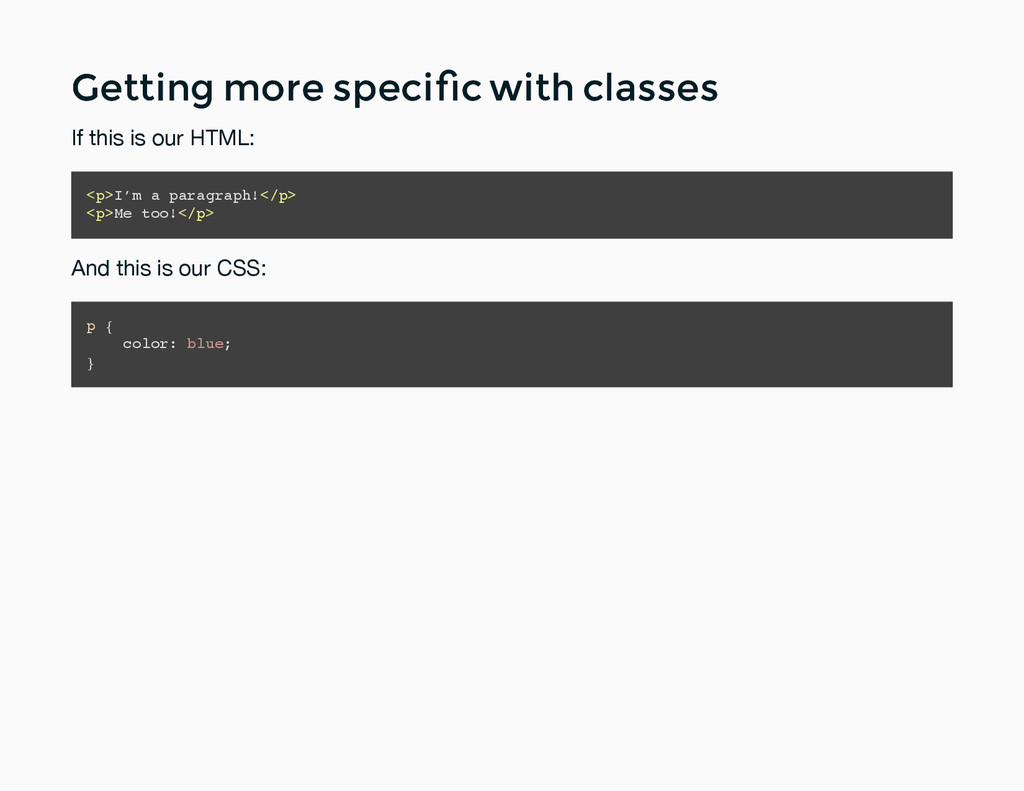
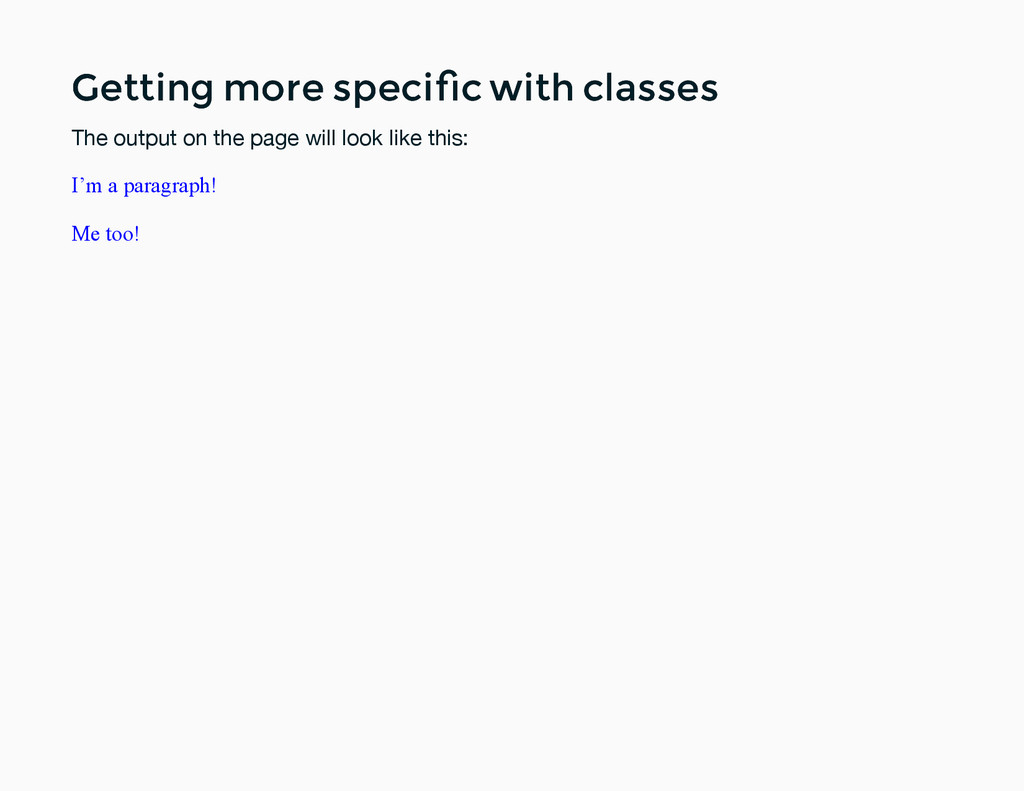
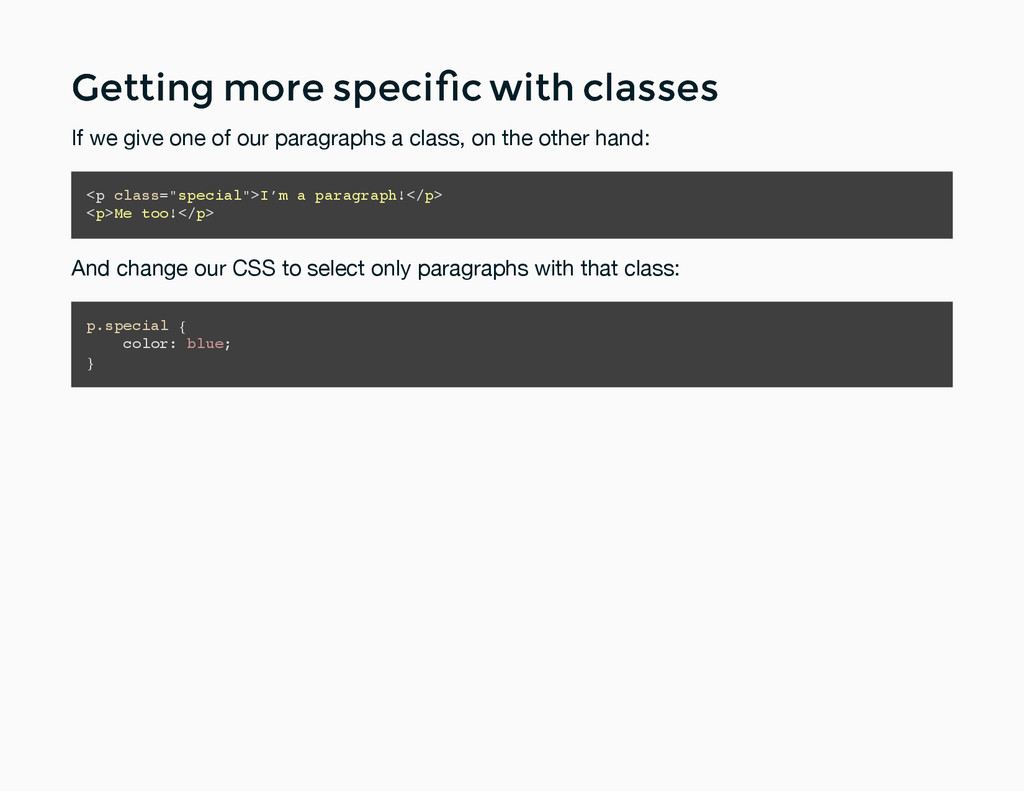
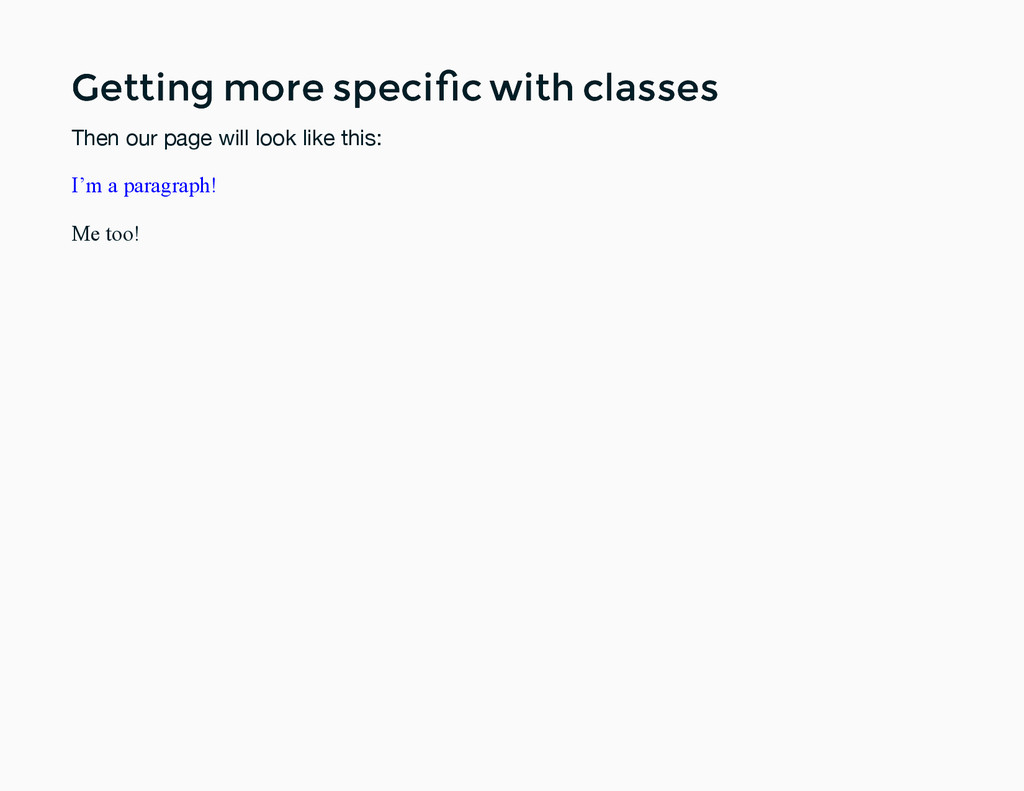
What if you want to give one specific paragraph a different style with CSS? This is where classes come in. A class is a bit of additional info we add to our HTML elements, which we can later select in our CSS. If we’re not going to use CSS, we don’t need to add classes to our HTML.
If we give one of our paragraphs a class, on the other hand: <p class="special">I’m a paragraph!</p> <p>Me too!</p> And change our CSS to select only paragraphs with that class: p.special { color: blue; }
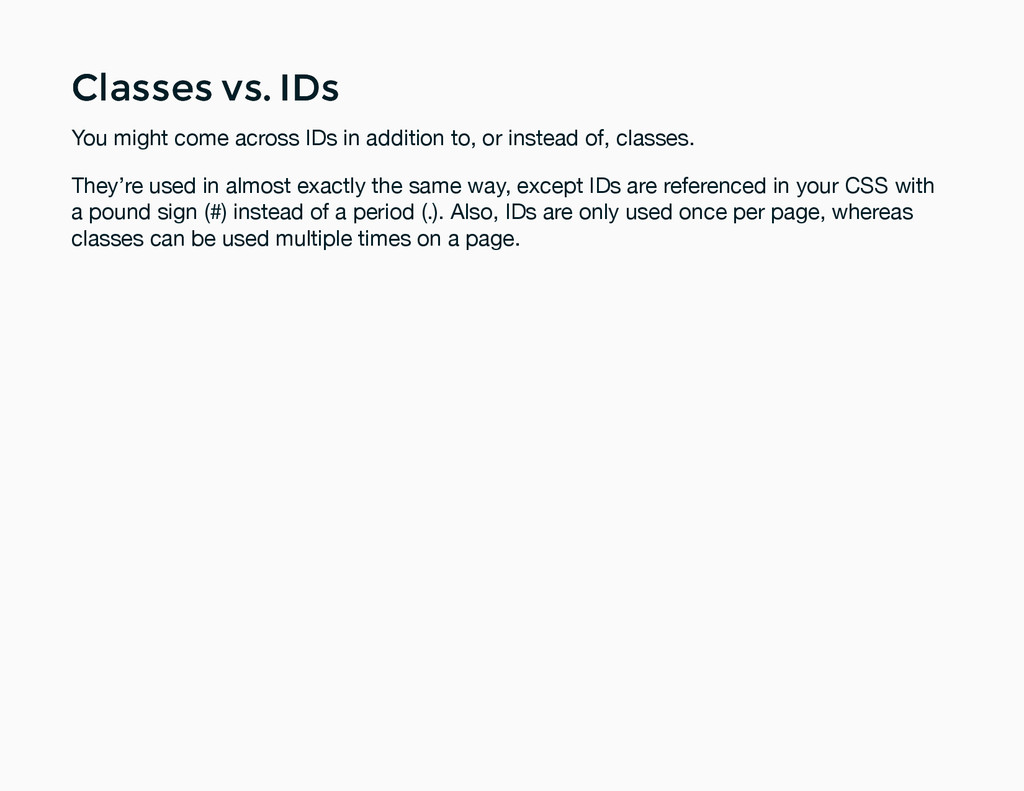
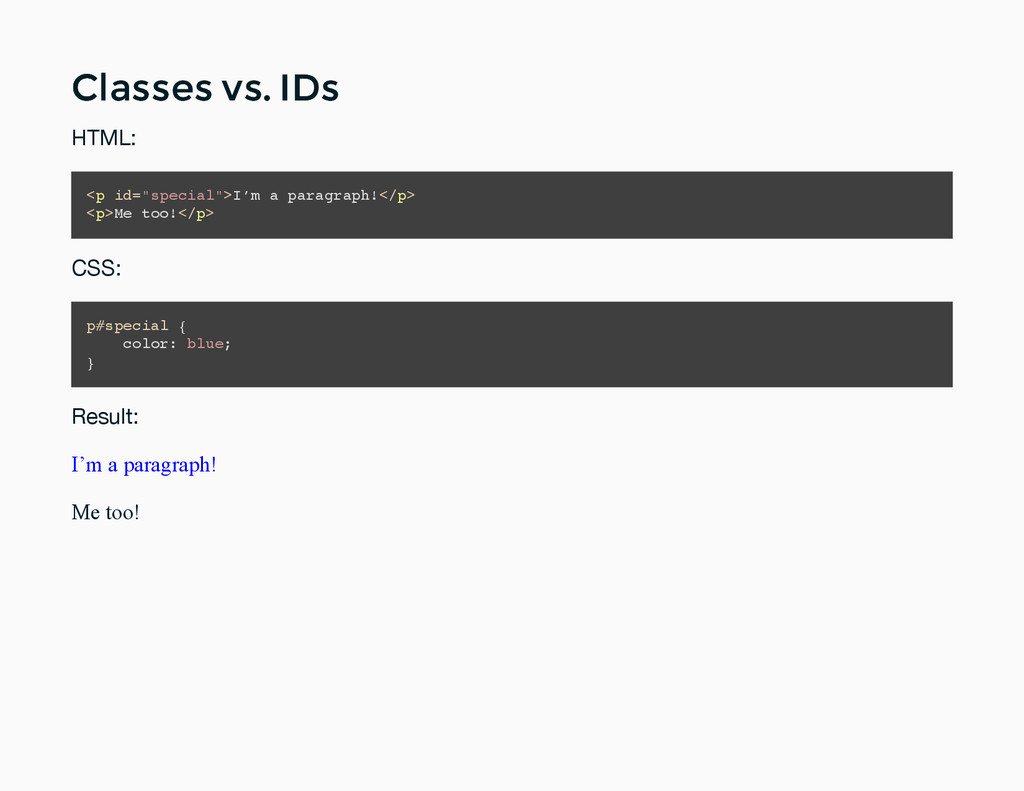
IDs in addition to, or instead of, classes. They’re used in almost exactly the same way, except IDs are referenced in your CSS with a pound sign (#) instead of a period (.). Also, IDs are only used once per page, whereas classes can be used multiple times on a page.
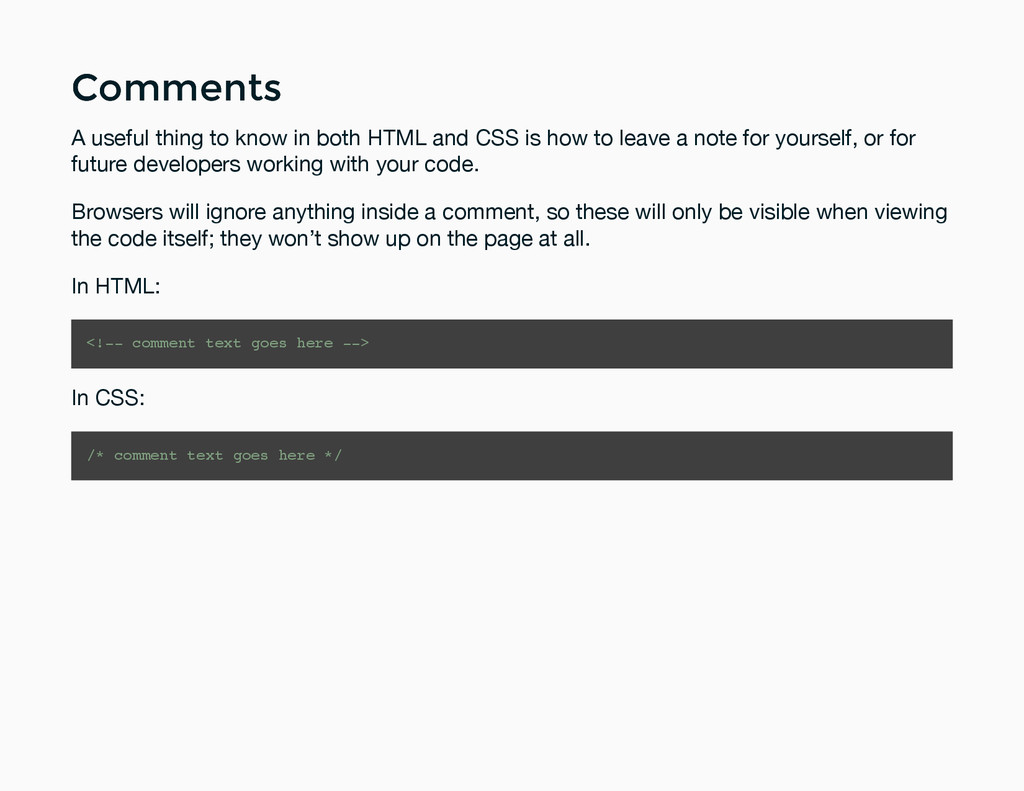
and CSS is how to leave a note for yourself, or for future developers working with your code. Browsers will ignore anything inside a comment, so these will only be visible when viewing the code itself; they won’t show up on the page at all. In HTML: <!-- comment text goes here --> In CSS: /* comment text goes here */
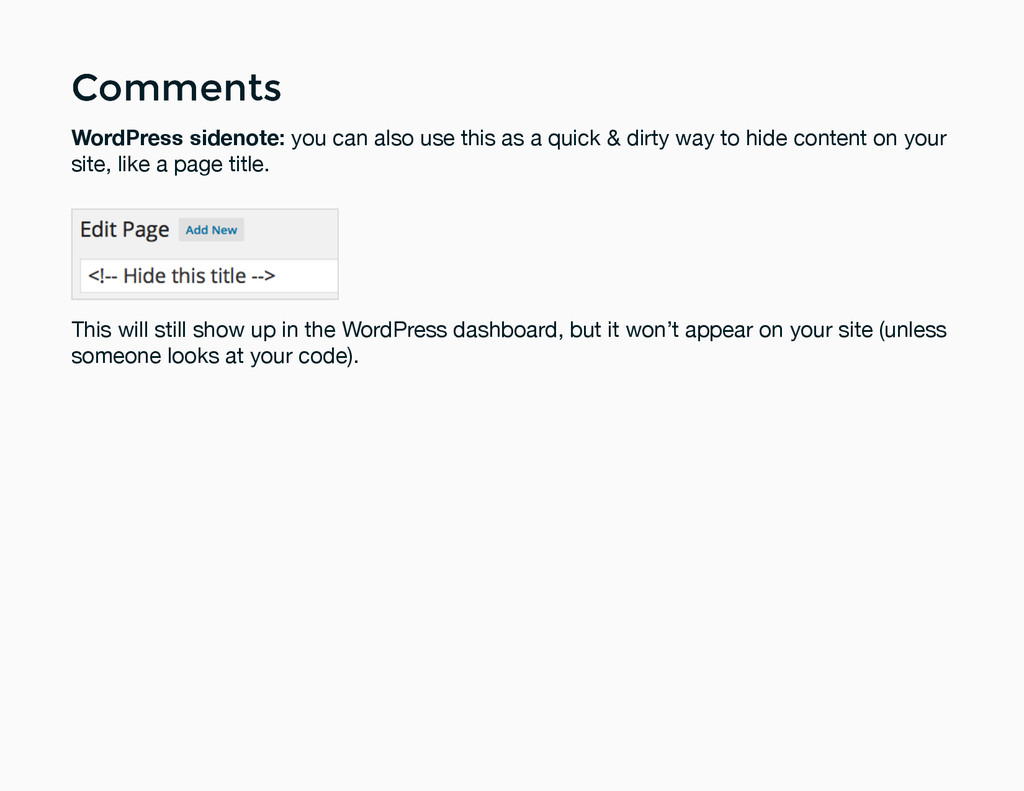
a quick & dirty way to hide content on your site, like a page title. This will still show up in the WordPress dashboard, but it won’t appear on your site (unless someone looks at your code).
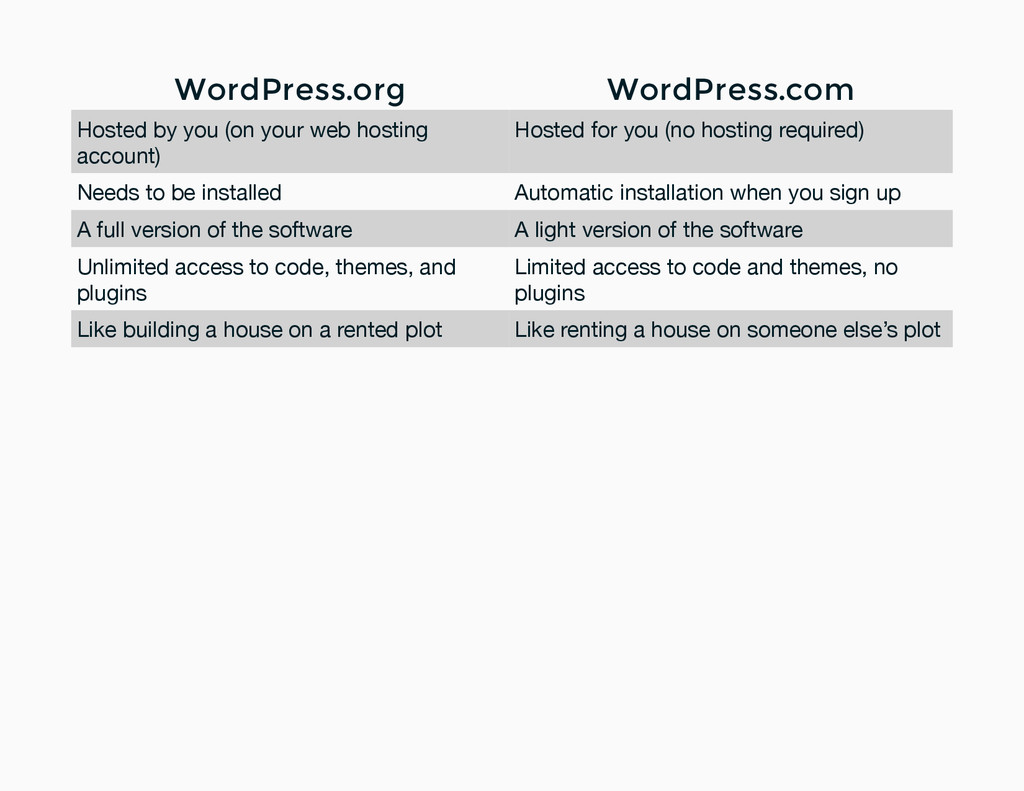
Hosted for you (no hosting required) Needs to be installed Automatic installation when you sign up A full version of the software A light version of the software Unlimited access to code, themes, and plugins Limited access to code and themes, no plugins Like building a house on a rented plot Like renting a house on someone else’s plot
your site comes from your theme, and possibly from plugins (if you have any). When you write a blog post or a page in the Visual editor, WordPress is writing your content-related HTML for you. That’s what you’ll see when you switch to the Text tab. Some HTML is “invisible” within the WordPress editor, like your post or page title — your theme is likely wrapping the title in a heading like h1, but you won’t see that in the editor.
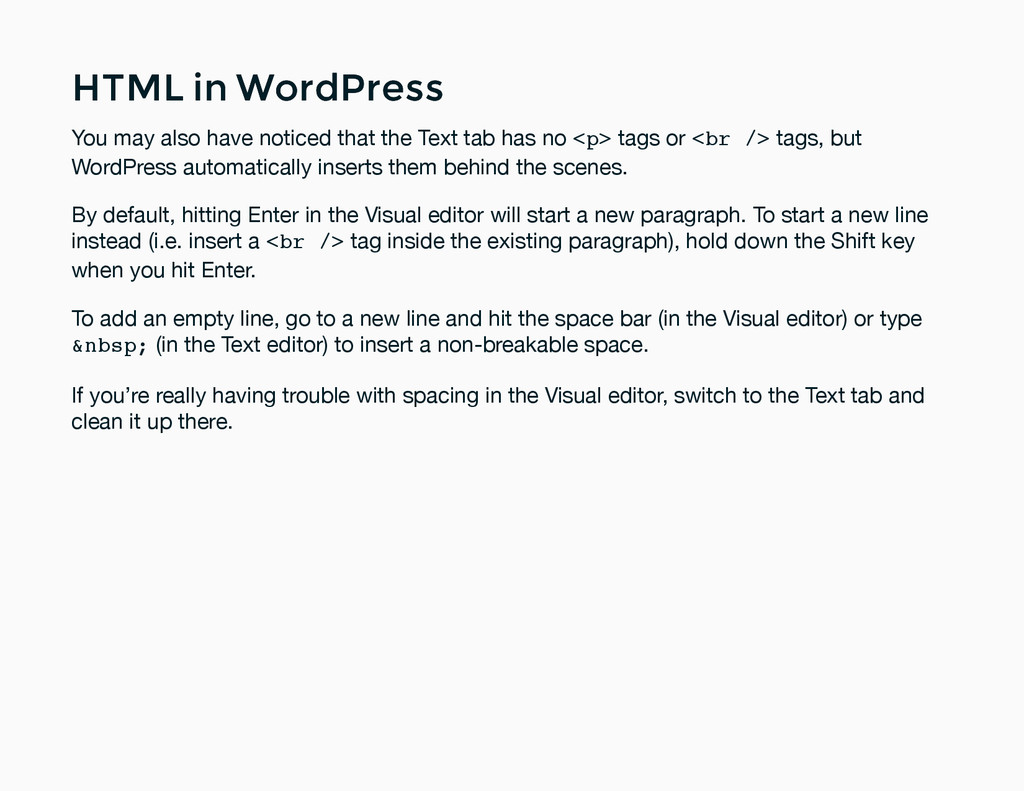
noticed that the Text tab has no <p> tags or <br /> tags, but WordPress automatically inserts them behind the scenes. By default, hitting Enter in the Visual editor will start a new paragraph. To start a new line instead (i.e. insert a <br /> tag inside the existing paragraph), hold down the Shift key when you hit Enter. To add an empty line, go to a new line and hit the space bar (in the Visual editor) or type (in the Text editor) to insert a non-breakable space. If you’re really having trouble with spacing in the Visual editor, switch to the Text tab and clean it up there.
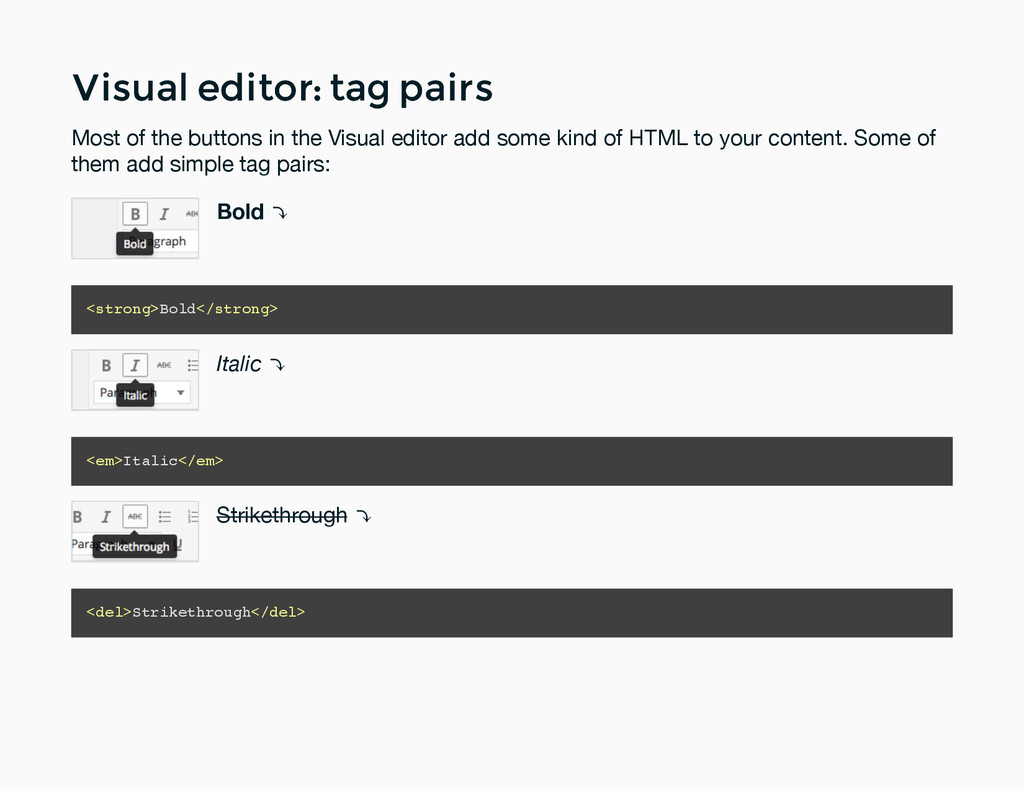
the buttons in the Visual editor add some kind of HTML to your content. Some of them add simple tag pairs: Bold ⤵ <strong>Bold</strong> Italic ⤵ <em>Italic</em> Strikethrough ⤵ <del>Strikethrough</del>
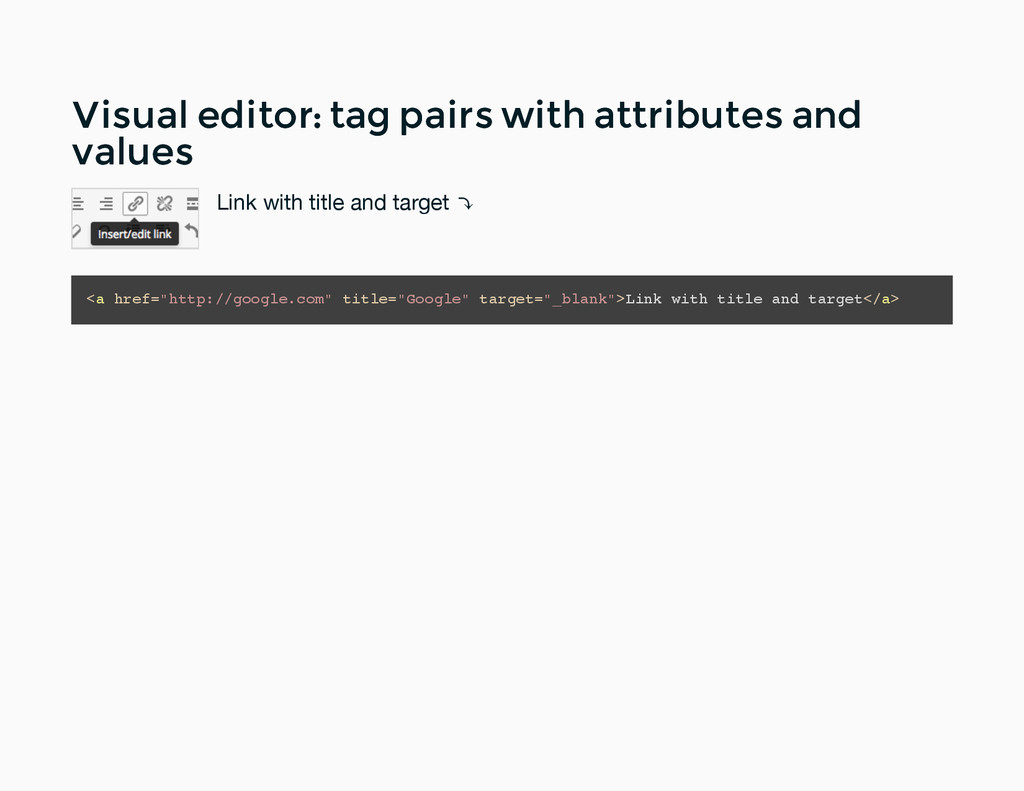
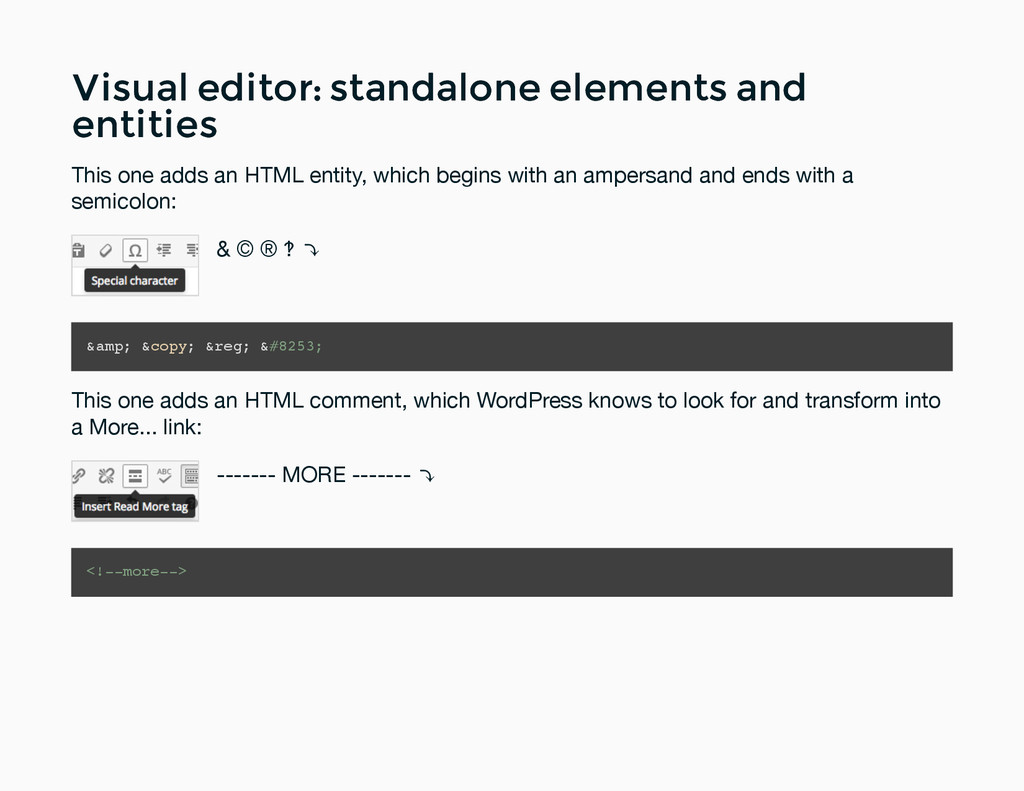
pairs with attributes and values values Link with title and target ⤵ <a href="http://google.com" title="Google" target="_blank">Link with title and target</a>
entities entities Some buttons add a standalone element: Horizontal rule ⤵ <hr /> Image linked to media file, aligned centre, and sized to thumbnail ⤵ <a href="https://drollicdesign.files.wordpress.com/2014/11/ronja.png"><img class="aligncenter wp-image-107 size-thumbnail" src="https://drollicdesign.files.wordpress.com/2014/11/ronja.png?w=150" alt="ronja" width="150" height="150" /></a>
in the Text widget. To insert some complex content into one of these, create a draft post and make WordPress write your code for you. Then switch to the Text tab, copy the contents, and paste into a Text widget.
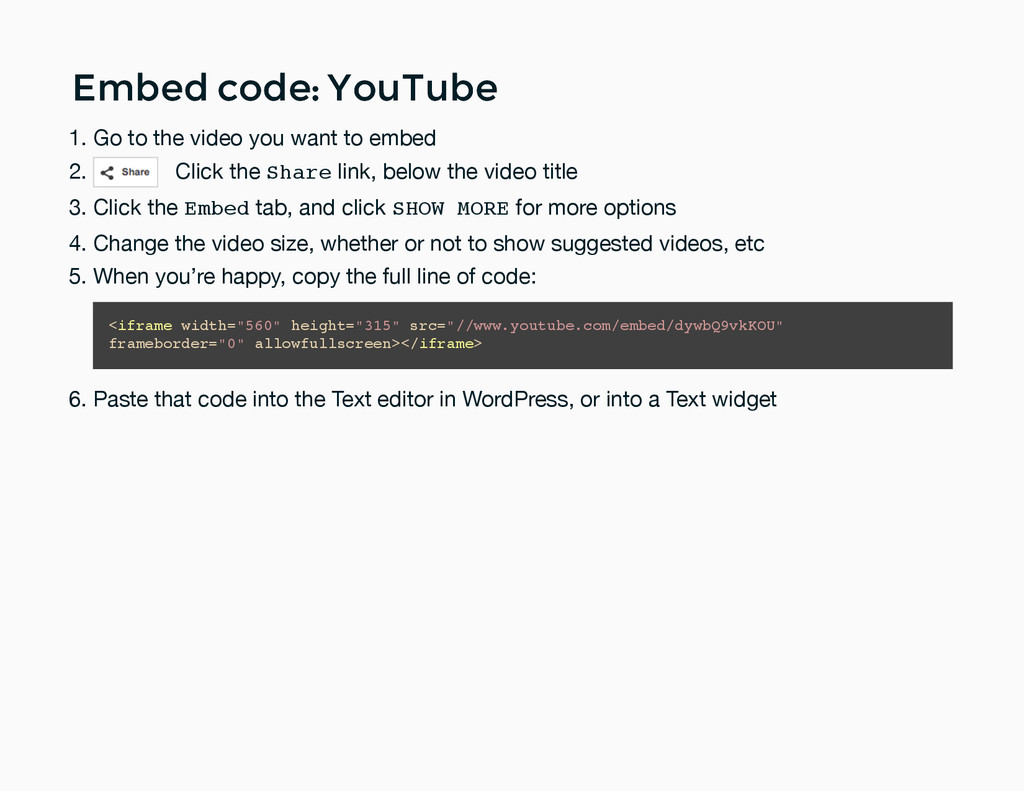
you want to embed 1. Click the Share link, below the video title 2. Click the Embed tab, and click SHOW MORE for more options 3. Change the video size, whether or not to show suggested videos, etc 4. When you’re happy, copy the full line of code: 5. Paste that code into the Text editor in WordPress, or into a Text widget 6. <iframe width="560" height="315" src="//www.youtube.com/embed/dywbQ9vkKOU" frameborder="0" allowfullscreen></iframe>
you want to embed 1. Click the Share button, on the video’s right side 2. Click + Show options next to the Embed heading 3. Change the video size, colour, whether or not to autoplay the video, etc 4. When you’re happy, copy the full line of code: 5. Paste that code into the Text editor in WordPress, or into a Text widget 6. <iframe src="//player.vimeo.com/video/55999985" width="500" height="281" frameborder="0" webkitallowfullscreen mozallowfullscreen allowfullscreen></iframe> <p><a href="http://vimeo.com/55999985">Supermundane at Cow&Co</a> from <a href="http://vimeo.com /user1284099">Mark McNulty</a> on <a href="https://vimeo.com">Vimeo</a>.</p>
like this. A few examples: Twitter (either single tweets or full timelines) Google Maps (zoomable maps with one or more markers) Flickr (single images or slideshows) Instagram (single images) Look for the word “embed” or “share”, or Google “[service name] embed code”.
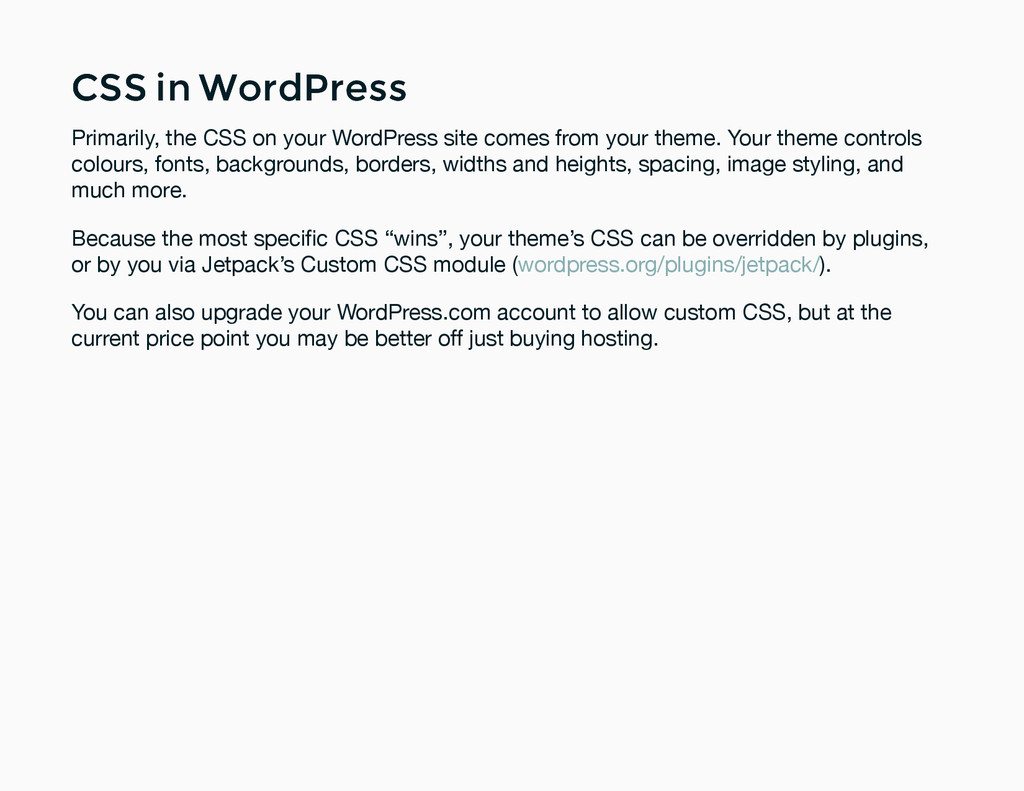
your WordPress site comes from your theme. Your theme controls colours, fonts, backgrounds, borders, widths and heights, spacing, image styling, and much more. Because the most specific CSS “wins”, your theme’s CSS can be overridden by plugins, or by you via Jetpack’s Custom CSS module ( ). wordpress.org/plugins/jetpack/ You can also upgrade your WordPress.com account to allow custom CSS, but at the current price point you may be better off just buying hosting.
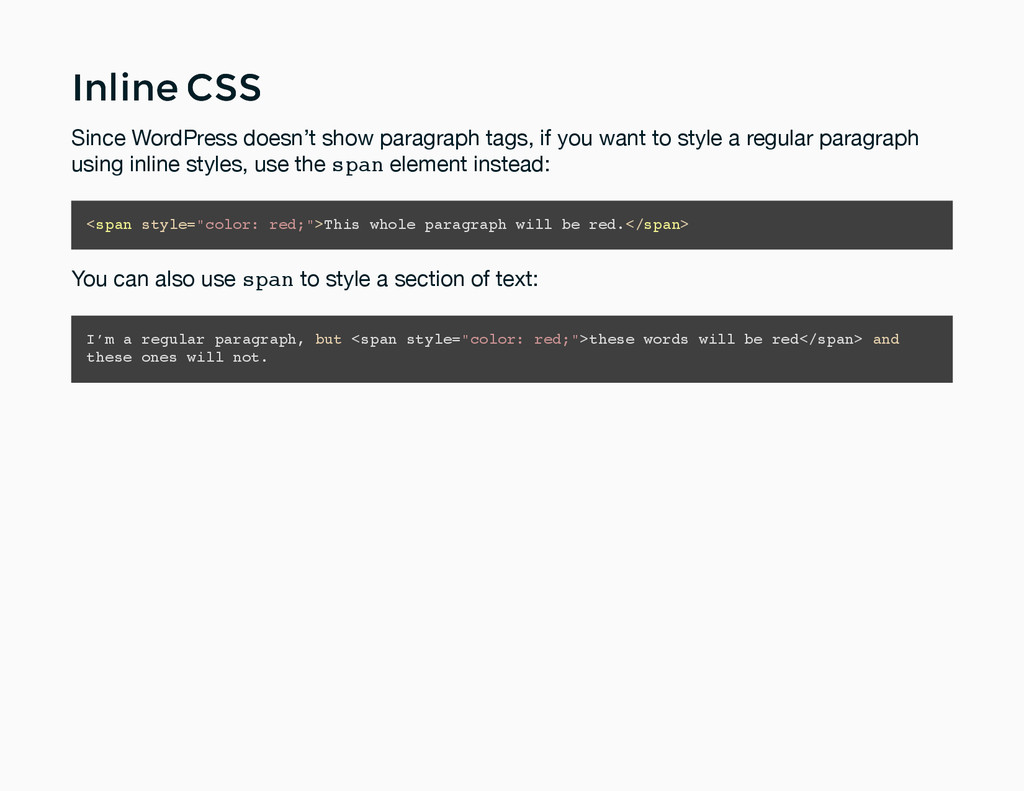
control with CSS by putting it right into HTML elements in the Text tab. This is referred to as inline CSS, because it’s not being applied globally across your site. Normally this is a bad thing — if you decide you want your drop cap colour to be green instead of purple, you’ll have to edit hundreds of blog posts — but for simple tweaks it works well.
you’re writing CSS in a separate file, with property and value pairs separated by semicolons, but instead of selecting an HTML element and putting the declarations inside curly braces, you use the style attribute directly within the element you want to style. For example, this will make the first heading blue: <h2 style="color: blue;">This heading will be blue.</h2> <h2>This one will not.</h2>
if you want to style a regular paragraph using inline styles, use the span element instead: <span style="color: red;">This whole paragraph will be red.</span> You can also use span to style a section of text: I’m a regular paragraph, but <span style="color: red;">these words will be red</span> and these ones will not.
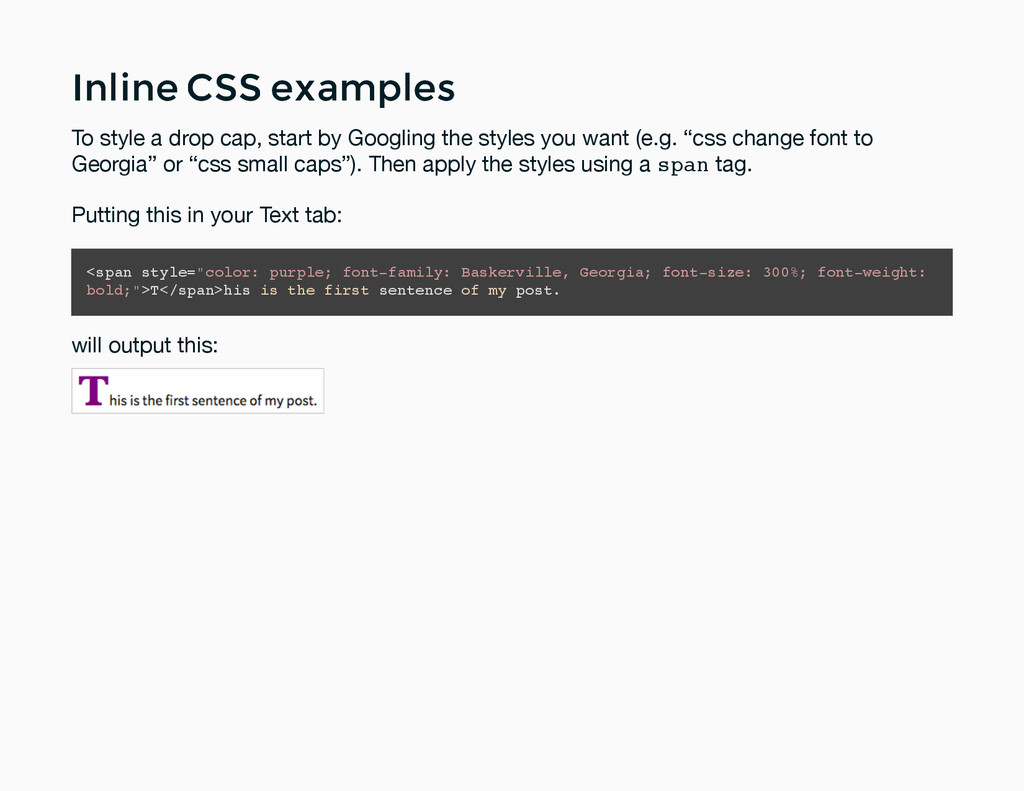
cap, start by Googling the styles you want (e.g. “css change font to Georgia” or “css small caps”). Then apply the styles using a span tag. Putting this in your Text tab: <span style="color: purple; font-family: Baskerville, Georgia; font-size: 300%; font-weight: bold;">T</span>his is the first sentence of my post. will output this:
shadow to an image, add a style attribute to an img tag: <img style="box-shadow: 10px 10px 5px #888888;" class="aligncenter wp-image-107 size-thumbnail" src="https://drollicdesign.files.wordpress.com/2014/11/ronja.png?w=150" alt="ronja" width="150" height="150" /> This will add a dark grey drop shadow 10 pixels to the right and 10 pixels below the image, with a 5 pixel blur, which looks like this:
into the Visual editor, it can bring a lot of junk with it that you need to clean up in the Text tab. WordPress is getting better at doing this automatically, but it doesn’t always catch everything.
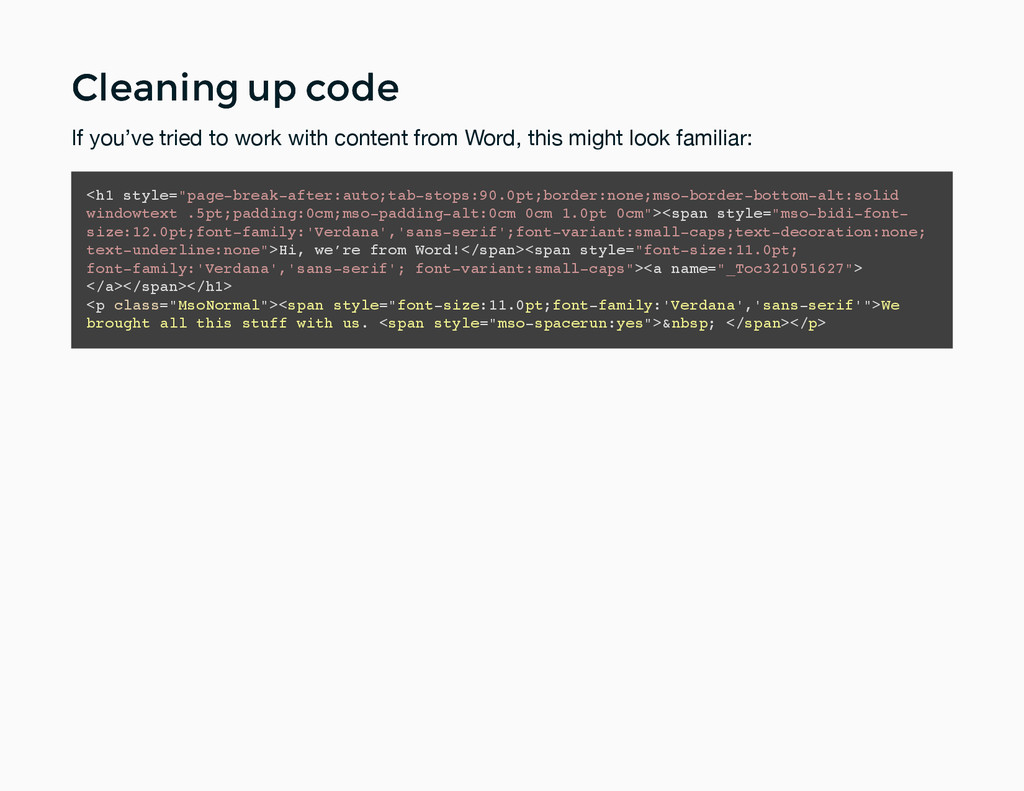
work with content from Word, this might look familiar: <h1 style="page-break-after:auto;tab-stops:90.0pt;border:none;mso-border-bottom-alt:solid windowtext .5pt;padding:0cm;mso-padding-alt:0cm 0cm 1.0pt 0cm"><span style="mso-bidi-font- size:12.0pt;font-family:'Verdana','sans-serif';font-variant:small-caps;text-decoration:none; text-underline:none">Hi, we’re from Word!</span><span style="font-size:11.0pt; font-family:'Verdana','sans-serif'; font-variant:small-caps"><a name="_Toc321051627"> </a></span></h1> <p class="MsoNormal"><span style="font-size:11.0pt;font-family:'Verdana','sans-serif'">We brought all this stuff with us. <span style="mso-spacerun:yes"> </span></p>
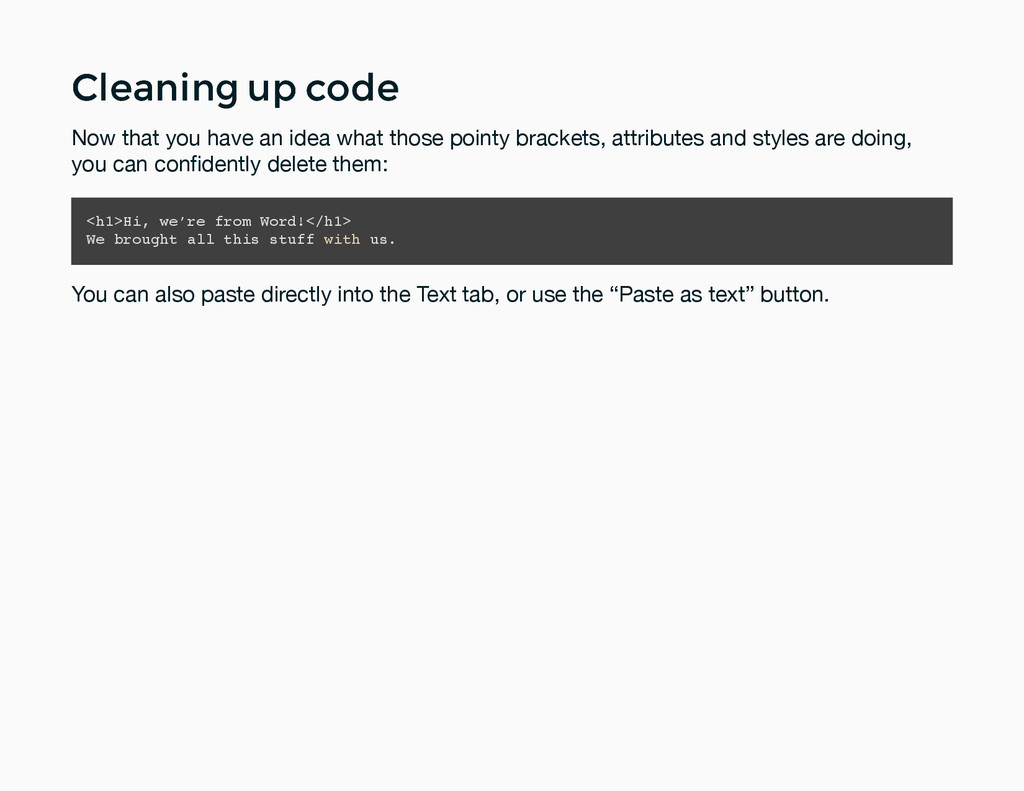
an idea what those pointy brackets, attributes and styles are doing, you can confidently delete them: <h1>Hi, we’re from Word!</h1> We brought all this stuff with us. You can also paste directly into the Text tab, or use the “Paste as text” button.
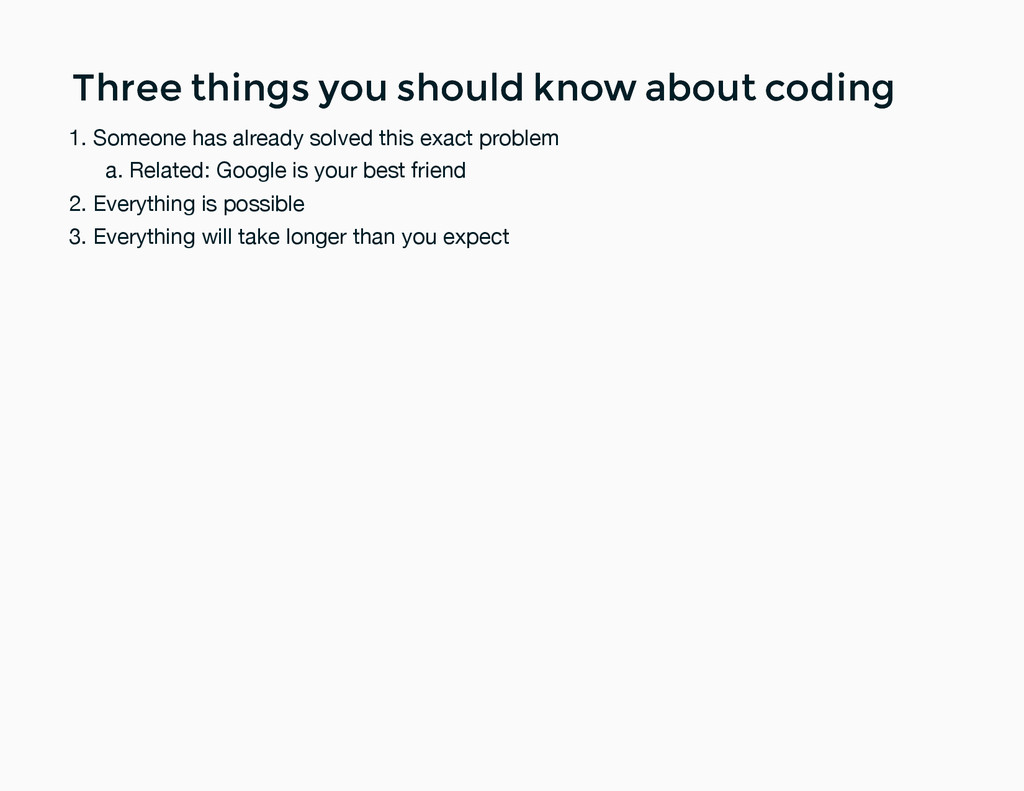
should know about coding Someone has already solved this exact problem Related: Google is your best friend a. 1. Everything is possible 2. Everything will take longer than you expect 3.
![Questions? Questions? @LinnOyenFarley @LinnOyenFarley [email protected] [email protected]](https://files.speakerdeck.com/presentations/82828a8df8e34190aafc0c821cbb0862/slide_64.jpg)