Upgrade to Pro — share decks privately, control downloads, hide ads and more …

Fuzzing 101

LJP-TW
August 30, 2021

Fuzzing 101

LJP-TW

August 30, 2021
Tweet

More Decks by LJP-TW

Other Decks in Technology

Transcript

  1. # whoami - LJP / LJP-TW - Pwn / Rev

    - NTUST / NCTU / NYCU - 10sec CTF Team 3
  2. Fuzzing 簡介 - 模糊測試 aka fuzz testing / fuzzing -

    產生隨機輸入餵給程式,檢查程式是否異常 5
  3. AFL 簡介 - AFL (American Fuzzy Lop) - https://github.com/google/AFL -

    Coverage-guided - 以使 code coverage 變大為目標 - Mutation-based - Linux only 9
  4. AFL 安裝 - OS: Ubuntu 20.04 (其他 Linux distribution 也可嘗試)

    - 能給越多 CPU、 RAM 越好 - 下載 AFL - https://github.com/google/AFL - 進到 AFL 目錄執行指令 - make - sudo make install 12
  5. AFL 基本操作 1 > 建立目錄 - 可以參考以下目錄配置 - fuzz-dir -

    victim - 放置待測試程式碼 - fuzz-in - fuzz-out - run.sh - 存放 afl-fuzz 指令 15
  6. AFL 基本操作 2 > 編譯程式 - 使用 AFL 改過的編譯器: afl-gcc

    - 使用方式與 gcc 相同 - afl-gcc test1.c -o test1-afl 16
  7. 17

  8. AFL 基本操作 3 > 新增 test cases - 存放一些正常使用的 test

    cases - 可以更快找到執行路徑 - Size 盡量小一點 - 可以從軟體官方網站給的範例 - echo -ne “aaa” > fuzz-in/aaa.txt 18
  9. AFL 基本操作 4 > 執行 afl-fuzz - afl-fuzz -i fuzz-in

    -o fuzz-out victim/test1-afl - 可以將命令存到 run.sh 19
  10. AFL 基本操作 5 > 檢查結果 21 - 查看是否產生出 crash -

    試圖重現 crash - 通過 debug 試圖追蹤漏洞位置、 成因
  11. AFL 基本操作 5 > 檢查結果 22 - fuzz-out 目錄結構如下 -

    crashes - 會造成 crash 的 test case 存放在此 - hangs - queue - fuzz_bitmap - fuzzer_stats - plot_data
  12. AFL 面板資訊 25 run time: 總執行時間 last new path: 距離上次發現新路徑的時間

    last uniq crash: 距離上次發現新 crash 的時間 last uniq hang: 距離上次發現新 hang 的時間
  13. AFL 面板資訊 26 cycles done: 完成的 cycle 數 若變成綠色表示再出現 crash

    的 機率很低, 可以停止 fuzzing 了 total paths: 發現的路徑數 uniq crashes: 發現的 crash 數 uniq hangs: 發現的 hang 數
  14. AFL 面板資訊 27 now processing: 正在測試的 test case ID paths

    timed out: 因超時而放棄繼續測試的 test cases 數
  15. AFL 面板資訊 29 now trying: 目前執行的變異方式 stage execs: 執行了幾個 /

    此 stage 要執行多少 test cases total execs: 共執行了幾個 test cases exec speed: 執行速度
  16. AFL 面板資訊 30 favored paths: Fuzzer 感興趣的路徑數 new edges on:

    code coverage 較好的 test case 數 total crashes: 總共的 crash 數 total tmouts: 總共的 timeout 數
  17. AFL 面板資訊 32 levels: 目前 fuzzing 路徑的深度 pending: 尚未執行過的 input

    數 pend fav: fuzzer 較想執行的 input 數 own finds: 在平行 fuzzing 中, 此 section 找到的新路徑數 imported: 在平行 fuzzing 中, 其他 section 找到的新路徑數 stability: 若同個輸入皆為同個輸出, 則此值為 100%
  18. AFL 實作細節 > Coverage measurements - 先了解什麼是 code coverage -

    此次測試中執行到哪些路徑? - 測試到越多路徑, 越有機會發現漏洞 - 畢竟沒有測試到的路徑, 就不可能發現漏洞 - 跟買彩券一樣 - 又要先了解兩個東西 - Basic block - Edge 35
  19. AFL 實作細節 > Coverage measurements - Basic block - 此區塊第一個指令被執行到後,

    這個區塊的所有指令都一定會被 執行到 - 例如右圖的三個 BB 36
  20. AFL 實作細節 > Coverage measurements - AFL 主要紀錄哪些 edge 被走過,

    而不是紀錄哪些 BB 被走過 - <from, to> - 紀錄方式如下 - 給每一個 BB 一個隨機值 - 執行右邊算法 - shared_mem: 共享記憶體 38
  21. AFL 實作細節 > Coverage measurements - AFL 主要紀錄哪些 edge 被走過,

    而不是紀錄哪些 BB 被走過 - 此算法好處是 - 簡單 - 快速 - 能夠分辨 A->B 和 B->A 39
  22. AFL 實作細節 > Coverage measurements - AFL 主要紀錄哪些 edge 被走過,

    而不是紀錄哪些 BB 被走過 - 面板資訊中的 map density 與此相關 40
  23. AFL 實作細節 > Instrument - 先講講 afl-gcc - afl-gcc 實際上只是

    gcc 的 wrapper - 設定了許多 gcc 參數 - 其中最主要影響是設定了 -B - -B <dir> - 將 <dir> 加入到編譯器搜尋路徑中 - Dir 設定為 afl-as 所在目錄 - 編譯時 as 是使用 afl-as 41
  24. AFL 實作細節 > Instrument - afl-as - 在將 assembly 送往真正的

    as 之前, 進行 instrument - Instrument 意思為插入一段 code, 對岸用語為插樁 - 這邊就是插入實作前面 code coverage 算法的 code 42
  25. AFL 實作細節 > Instrument - afl-as - 存放各種暫存器 - 將代表

    BB 的隨機數存到 rcx - 呼叫 __afl_maybe_log - 復原各種暫存器 43
  26. AFL 實作細節 > Fork Server - 試想怎麼實作一個 fuzzer - 每次

    fuzz 前先創造出一個新的 process 來測試 - 每次都用 fork + execve 創造新 process ? - 缺點是 execve 時有各種準備工作 - 這些工作每次創造新 process 時都會做 - 都是一樣的工作 (e.g. library load) - 因此浪費效能 45 Ref: https://lcamtuf.blogspot.com/2014/10/fuzzing-binaries-without-execve.html
  27. AFL 實作細節 > Fork Server - AFL 的設計思路 - 既然每次

    execve 都會做一次一樣的準備工作 - 能不能讓 process 做完準備工作後, 就先停在這個已經準備好的 狀態 - 而每次要 fuzz 時, 是直接複製這個已經準備好的狀態 47 Ref: https://lcamtuf.blogspot.com/2014/10/fuzzing-binaries-without-execve.html
  28. AFL 實作細節 > Fork Server - AFL fuzzer 的確會先 fork

    + execv 創造 process - execv 跟 execve 差不多 - Process 的 main 再執行 fork - 還記得 process 的 main 被 instrument 嗎 - 執行到 main 時表示準備工作都完成了 - 此次 fork 後, parent 的用途就像是用來記住這個準備完成狀態 - Child 的用途則是真正拿來測試 48 Ref: https://lcamtuf.blogspot.com/2014/10/fuzzing-binaries-without-execve.html
  29. AFL 實作細節 > 變異策略 - AFL 集合各種變異策略, 而非只做某種理論的 PoC 50

    Ref1: https://github.com/google/AFL/blob/master/docs/technical_details.txt
  30. AFL 實作細節 > 變異策略 - Deterministic stage - Havoc stage

    - Splicing stage 51 Ref: https://www.usenix.org/system/files/sec19-lyu.pdf
  31. AFL 實作細節 > 變異策略 - Deterministic stage - 初次 mutate

    的 test case 會進到的部分 - 以固定的方式去變異 - 此部分沒有隨機性 52 Ref: https://www.usenix.org/system/files/sec19-lyu.pdf
  32. AFL 實作細節 > 變異策略 - Havoc stage - 執行各種隨機變異 -

    將各種操作隨機組合在一起產生出變異測資 - 看 code 註解感受一下 53 Ref: https://www.usenix.org/system/files/sec19-lyu.pdf
  33. AFL 實作細節 > 變異策略 - Splicing stage - 將兩個 test

    cases 接在一起產出新的 test case 55 Ref: https://www.usenix.org/system/files/sec19-lyu.pdf
  34. AFL Case Study - AFL 挖到的洞很多 - Reference 中有列出 -

    挑幾個 cases 跟大家分享 - 看看大神們怎麼用 AFL 挖洞 57 Ref: https://lcamtuf.coredump.cx/afl/
  35. AFL Case Study > PHP 篇 - Heap use after

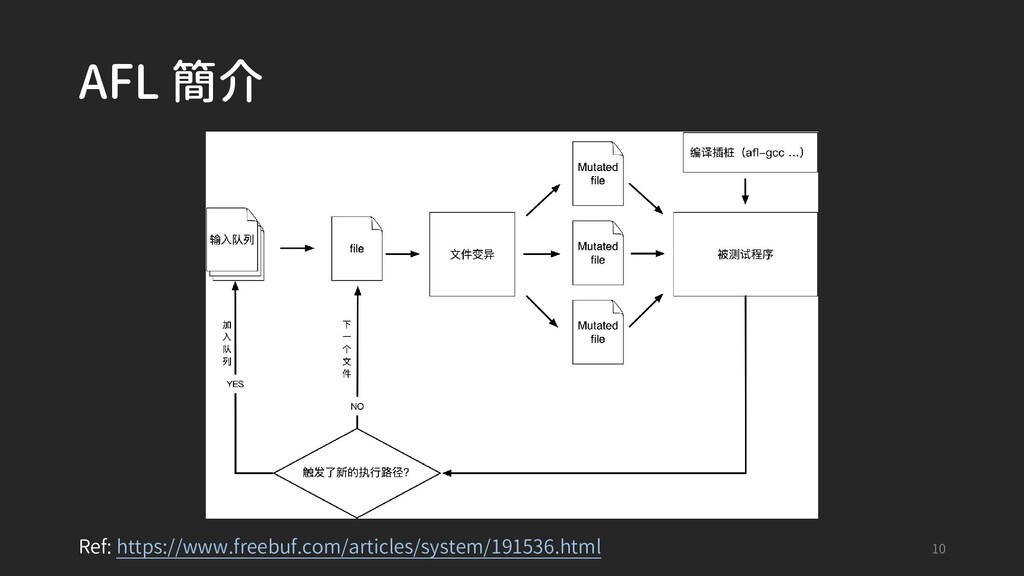
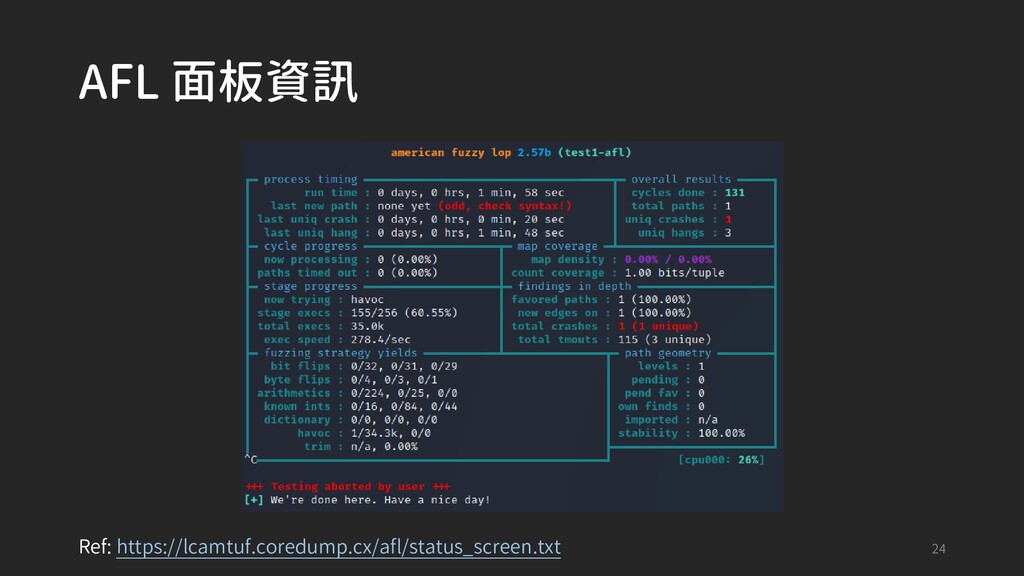
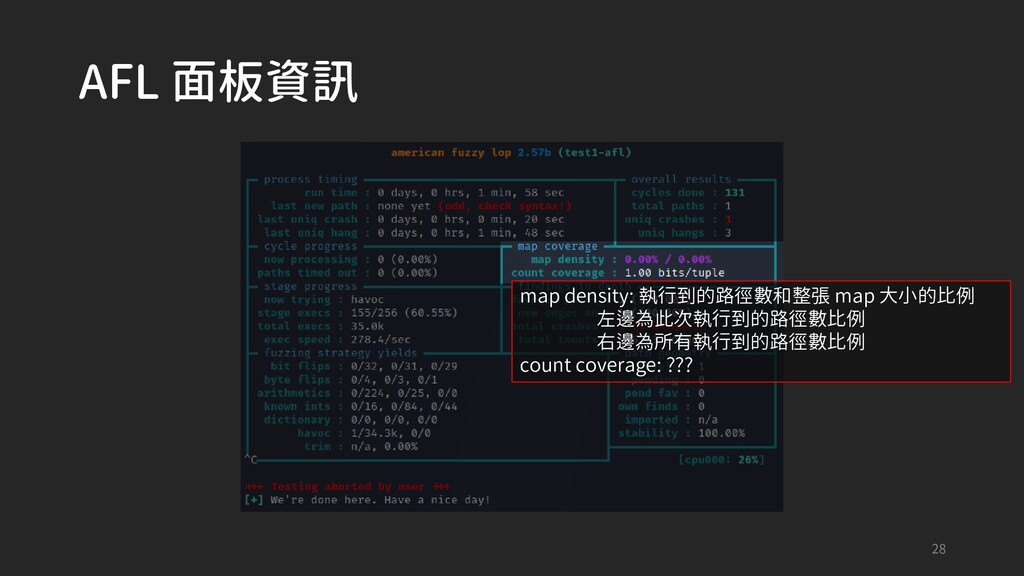
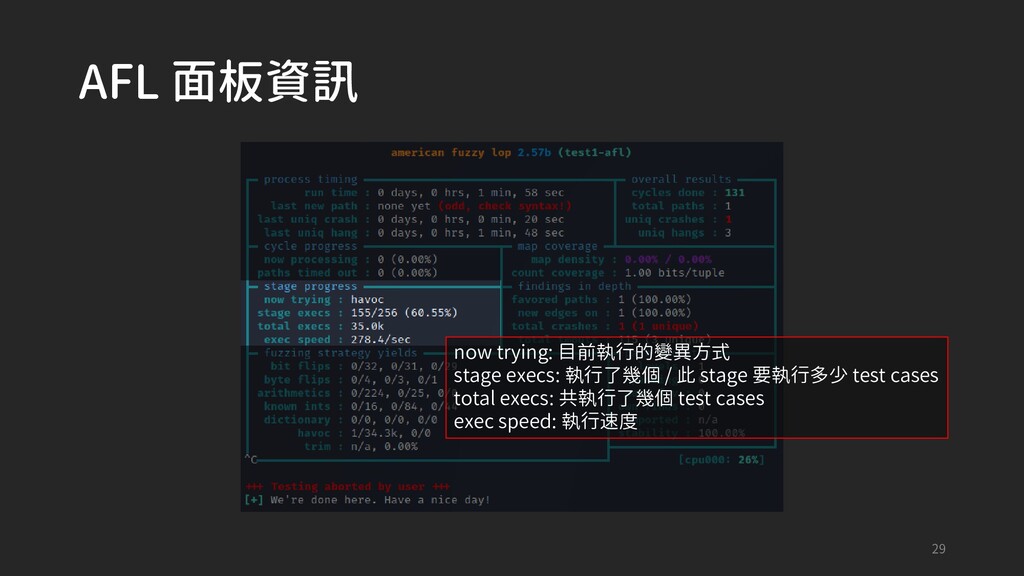
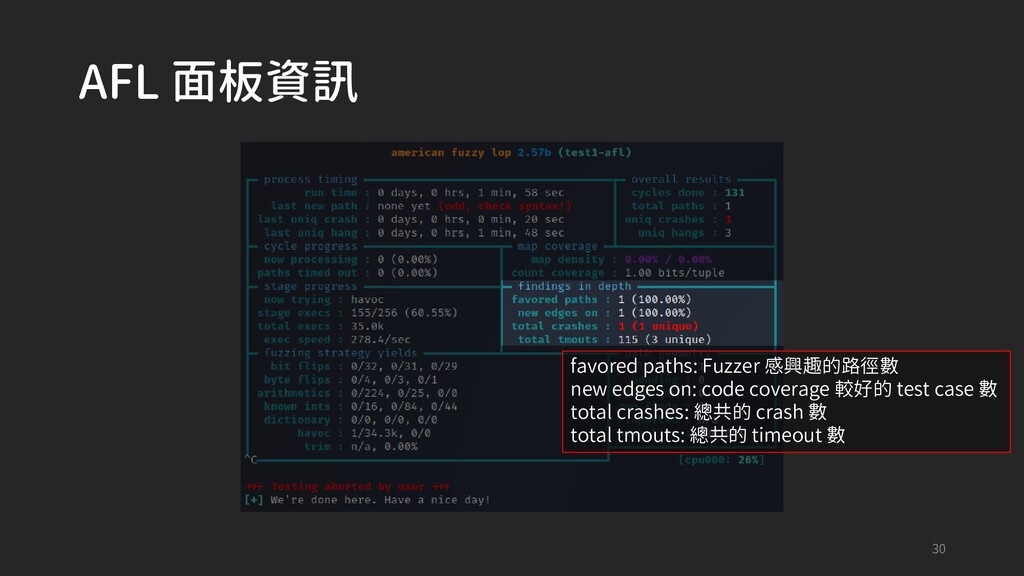
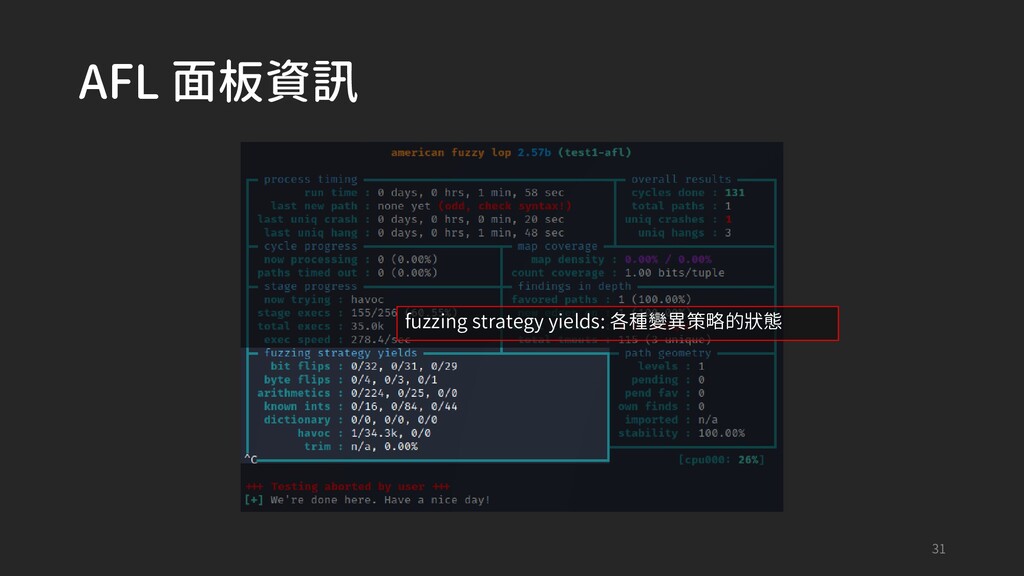
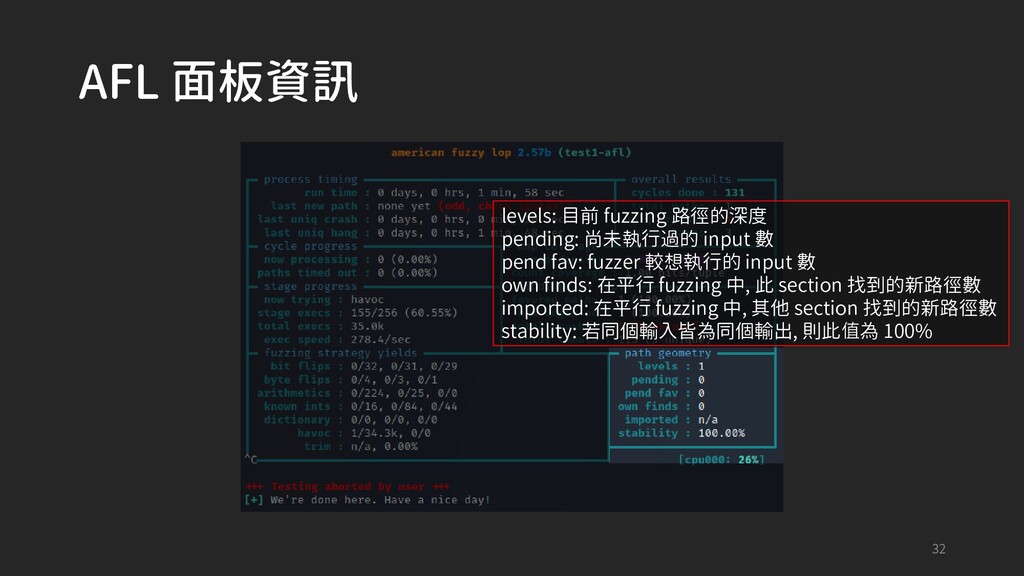
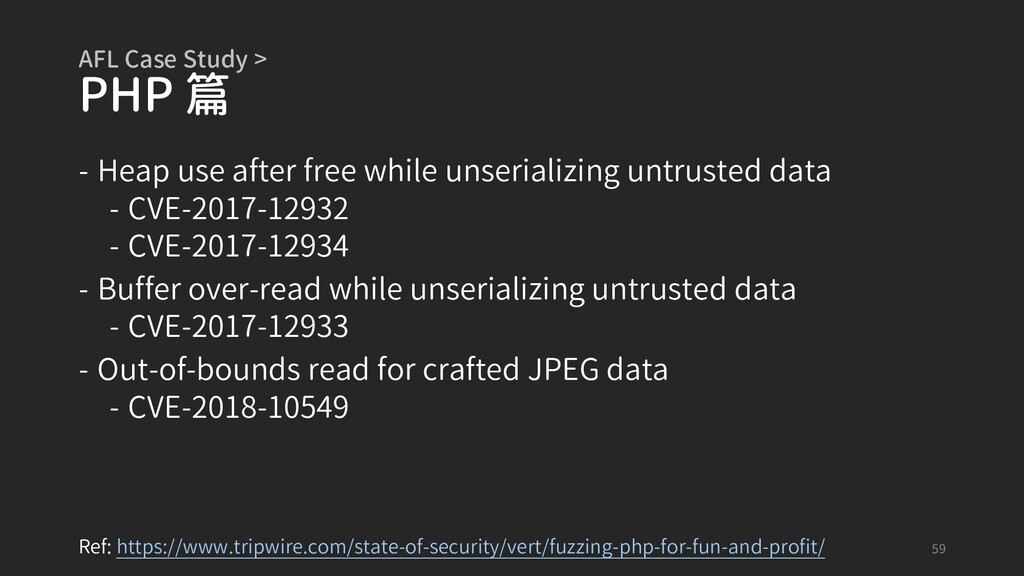
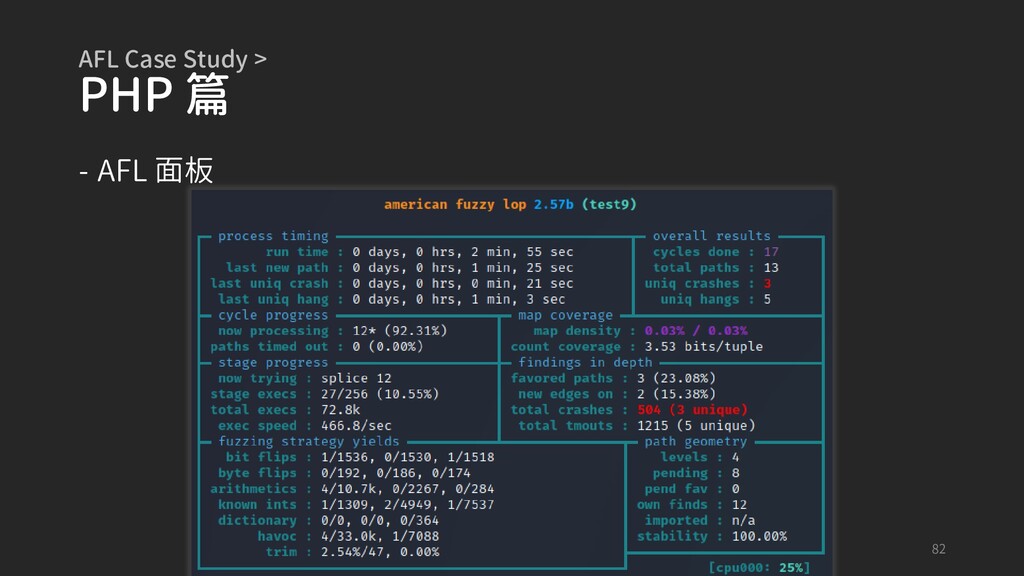
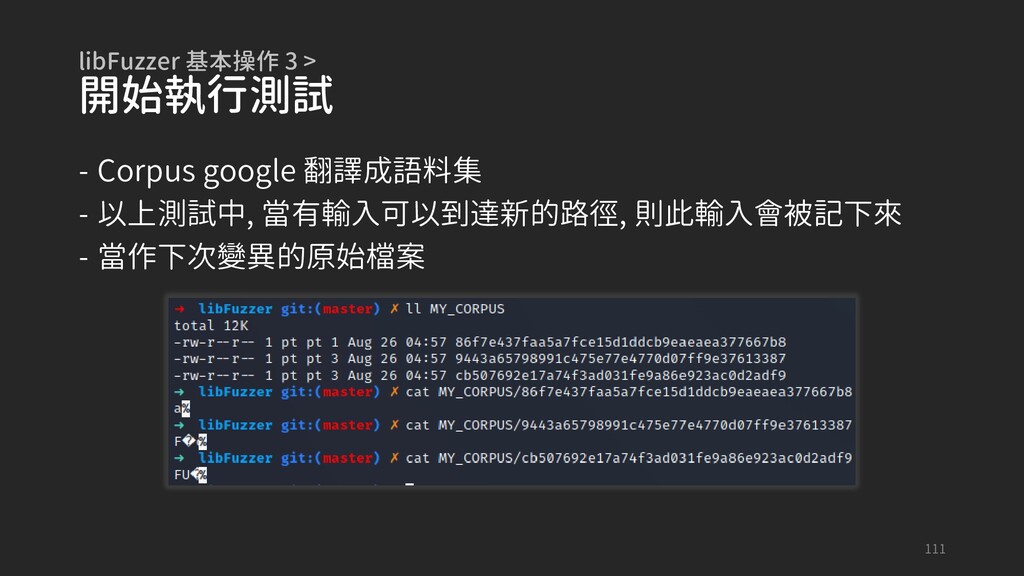
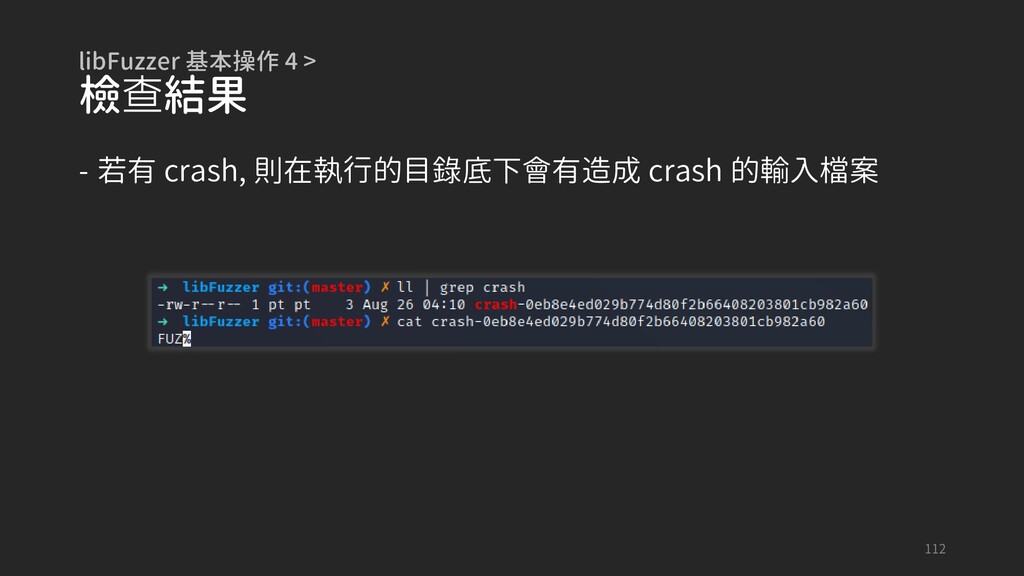
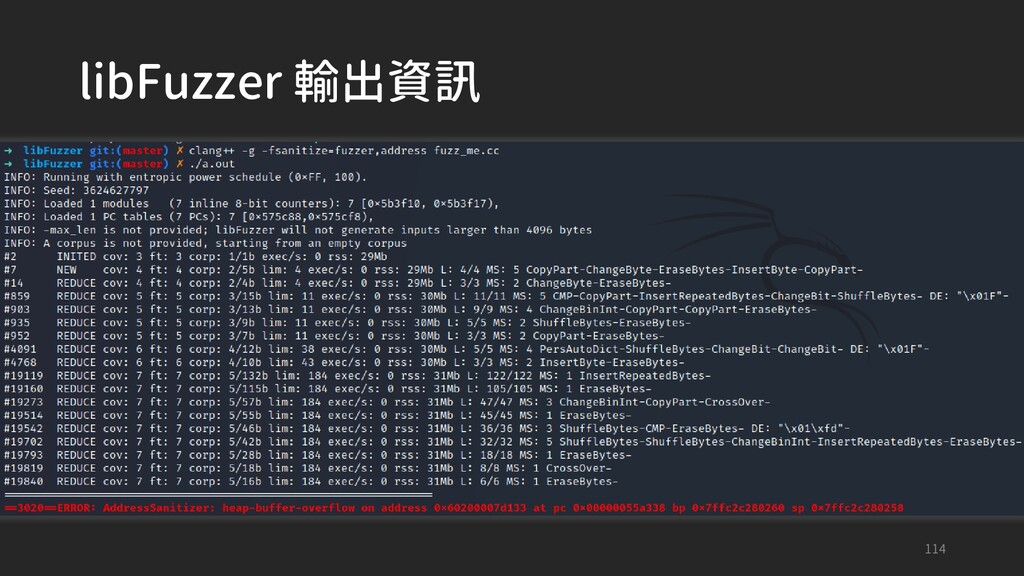
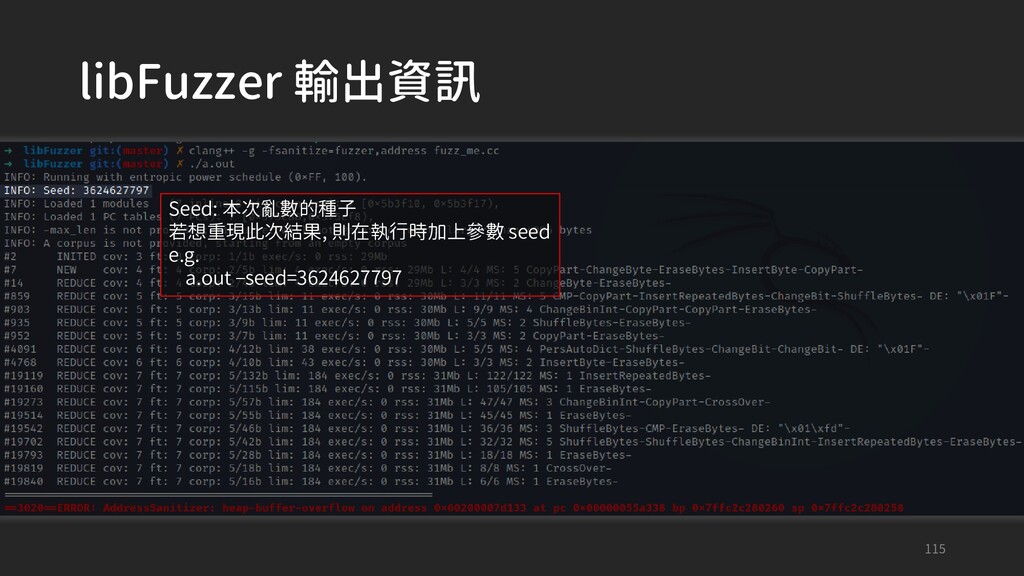
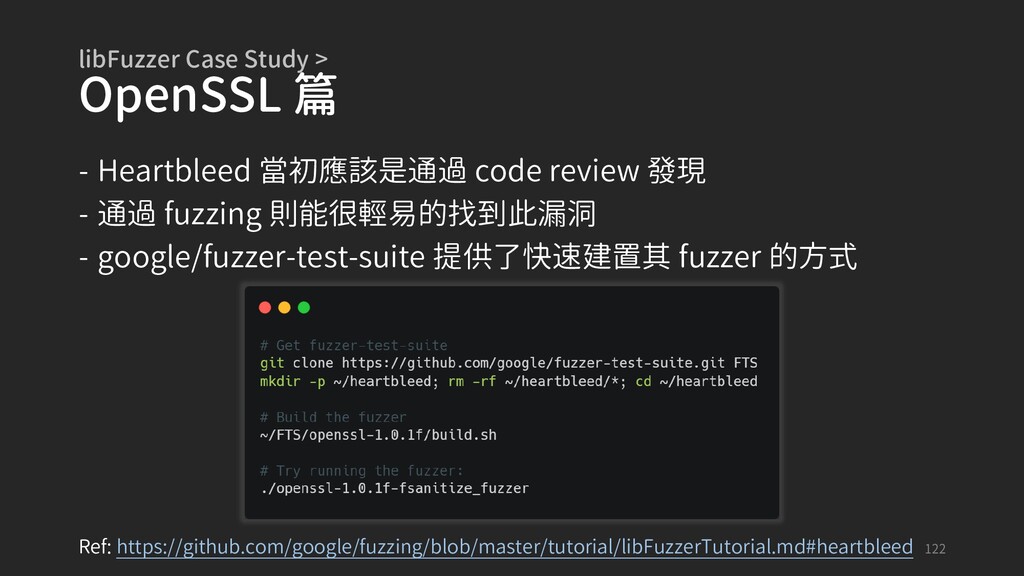
    free while unserializing untrusted data - CVE-2017-12932 - CVE-2017-12934 - Buffer over-read while unserializing untrusted data - CVE-2017-12933 - Out-of-bounds read for crafted JPEG data - CVE-2018-10549 59 Ref: https://www.tripwire.com/state-of-security/vert/fuzzing-php-for-fun-and-profit/
  36. AFL Case Study > PHP 篇 - php -r 參數可以把接下來的字串當作

    php 執行 - 通過以上, 就能從 stdin 餵入 serialized 字串 - 藉此測試 unserialize 60
  37. AFL Case Study > PHP 篇 - Deferred instrumentation -

    還記得前面講到的 fork server 嗎? - 將原本在 main 開頭啟動的 fork server 改成到 __AFL_INIT() 處 才啟動 - 有些程式在主要邏輯之前還會進行一些準備工作, 若想連這些準 備工作的時間都節省, 就可以用這個方式 62 Ref: https://github.com/google/AFL/blob/master/llvm_mode/README.llvm
  38. AFL Case Study > PHP 篇 - Persistent mode -

    之所以要創造新的 process 用來測試的原因是要一個隔離環境 - 怕測一測測爆了 - 怕不同輪次的測試之間其實會互相影響 - 但其實也可以同一個 process 重複測試, 只要確保每次測試時狀 態有復原成原狀即可 65
  39. AFL Case Study > PHP 篇 - Persistent mode -

    __AFL_LOOP() 區間中的 code 會在同個 process 底下被測試 66
  40. AFL Case Study > PHP 篇 - 上面提到的兩個功能皆為 AFL LLVM_MODE

    提供的功能 - Deferred instrumentation - Persistent mode 67
  41. AFL Case Study > PHP 篇 - 安裝方式 - 從

    Reference 下載對應版本的 clang + llvm 壓縮包解壓縮 - 將解壓縮後的目錄底下的 bin 加入到 PATH 環境變數中 68 Ref: https://github.com/llvm/llvm-project/releases/tag/llvmorg-12.0.1
  42. AFL Case Study > PHP 篇 - 安裝方式 - 移動到

    AFL 目錄 - cd llvm_mode - make - cd ../ - sudo make install 69 Ref: https://github.com/llvm/llvm-project/releases/tag/llvmorg-12.0.1
  43. AFL Case Study > PHP 篇 - 這邊新知識點的部分除了使用 afl-clang-fast 作為

    compile 以外 - 還有編譯時加入的環境變數 AFL_USE_ASAN=1 71
  44. AFL Case Study > PHP 篇 - Address Sanitizer (ASAN)

    - 記憶體越界讀寫不一定會馬上造成程序崩潰 - ASAN 在 malloc()、 free()、 stack buffer 分配附近加上檢查程式 - 若有記憶體越界讀寫, ASAN 就能回報 - 通過 AFL_USE_ASAN=1 啟用 72
  45. AFL Case Study > PHP 篇 - Address Sanitizer (ASAN)

    - 但須注意由於其實作的方式, 導致其很消耗記憶體 - 想像一下要監控記憶體存取這件事情怎麼實作 - 對於 32-bit 程序, 要消耗 800 MB - 對於 64-bit 程序, 要消耗 20 TB 73
  46. AFL Case Study > PHP 篇 - 練習一下以下這些東西 - Deferred

    instrumentation (__AFL_INIT()) - Persistent mode (__AFL_LOOP()) - ASAN (AFL_USE_ASAN=1) 74
  47. AFL Case Study > PHP 篇 - 修改前面章節 「AFL 基本操作」

    中的範例程式 - 前面 init 和 printf 不是主要邏輯, 將 __AFL_INIT() 設定在他們後面 - 主要邏輯部分用 __AFL_LOOP() 包住 - 在 LOOP 的結尾要將必要的變數回復原狀 - 這邊是重新設定陣列 s 75
  48. AFL Case Study > PHP 篇 - 在 x64 上

    compile x86 程式需要額外安裝 - sudo apt install gcc-multilib - 另外有遇到以下問題 78
  49. AFL Case Study > Knot DNS 篇 - Knot DNS

    為 open source 的 DNS Server - AFL 通常 fuzz 的對象都是以 stdin 或是檔案作為輸入 - 要如何將 AFL 應用到以 socket 作為輸入的程式? 84 Ref: https://www.fastly.com/blog/how-fuzz-server-american-fuzzy-lop
  50. AFL Case Study > Knot DNS 篇 - 註解 AFL

    的部分是作者有進行修 改 code 的地方 85
  51. AFL Case Study > Knot DNS 篇 - 作者核心概念是通過另外讀 stdin

    或是檔案, 再添加網路相關的 code 把檔案內容通過 network API 送給 server - 重點看一下 code 86
  52. AFL Case Study > Knot DNS 篇 - Knot DNS

    Server 情境是 UDP select server - 寫一個測試用 server 模擬一下 - 基於 reference 小改的 server, 加了一些 bug 當作測試 88 Ref: https://www.geeksforgeeks.org/tcp-and-udp-server-using-select/
  53. AFL Case Study > Knot DNS 篇 - 解釋一下新增的 code

    - 使用者輸入會是以 <size>: <data> 的形式 - e.g. 10: aaaabbbbcc - 會創造 <size> 大小的記憶體 - 將 <data> 複製進去 - 結束後會釋放記憶體 90
  54. AFL Case Study > Knot DNS 篇 - 為了讓 AFL

    fuzz 而需要改 code - 從 stdin 讀取 test case - 往 udp socket fd 傳送資料 - 在 select 前加 code 91
  55. AFL Case Study > Knot DNS 篇 - 由於 server

    通常是有一個 loop 一直 handle client - 導致不會停止, AFL 會以為是 timeout - 在 server 處理完資料後加上強制結束 93
  56. AFL Case Study > Knot DNS 篇 - 編譯使用 -

    AFL_USE_ASAN=1 - afl-clang-fast - -m32 95
  57. libFuzzer 簡介 - A library for coverage-guided fuzz testing -

    是 LLVM project 的一部分 - Fuzzing 的目標與 AFL 相比 - AFL fuzz 整支程式 - libFuzzer fuzz 某幾個函數 99 Ref: https://llvm.org/docs/LibFuzzer.html
  58. libFuzzer 簡介 - In-process - 在同個 process 中進行 fuzzing -

    Coverage-guided - Mutation-based 100 Ref: https://llvm.org/docs/LibFuzzer.html
  59. libFuzzer 安裝 - 安裝 clang (版本高於 6.0) - 從 Reference

    下載對應版本的 clang + llvm 壓縮包解壓縮 - 將解壓縮後的目錄底下的 bin 加入到 PATH 環境變數中 - 前面 AFL Case Study - PHP 篇有安裝過 102 Ref: https://github.com/llvm/llvm-project/releases/tag/llvmorg-12.0.1
  60. libFuzzer 基本操作 1 > 實作 fuzz target - Fuzz target

    需撰寫類似以下程式 - LLVMFuzzerTestOneInput() 105
  61. libFuzzer 基本操作 1 > 實作 fuzz target - 舉個栗子 106

    Ref: https://github.com/google/fuzzing/blob/master/tutorial/libFuzzer/fuzz_me.cc
  62. libFuzzer 基本操作 2 > 編譯程式 - 使用 clang - 參數加上

    -fsanitize - fuzzer 為必要 - 其他 sanitizer 為選用 107
  63. libFuzzer 基本操作 3 > 開始執行測試 - Corpus google 翻譯成語料集 -

    以上測試中, 當有輸入可以到達新的路徑, 則此輸入會被記下來 - 當作下次變異的原始檔案 111
  64. libFuzzer 輸出資訊 117 #7: 第 7 次的輸入 NEW: Event code

    (後面介紹) cov: 目前覆蓋的 code blocks / edges 數目 ft: 用什麼方式計算 code coverage corp: 幾個 test corpus/test corpus 的 size (單位為 Byte) lim: 目前 corpus 大小限制, 不超過 max_len exec/s: 每秒 fuzzer iterations 的數量 rss: 目前記憶體消耗 L: 新輸入的大小 MS <n> <operations>: 使用的變異方式及次數
  65. libFuzzer 輸出資訊 - Event codes - READ - 已讀取完 input

    samples - INITED - 完成 initialization - NEW - 創造了新的 test case - REDUCE - 找到了更小的、 能發現一樣特徵的 input 118
  66. libFuzzer 輸出資訊 - Event codes - pulse - Fuzzer 已生成了

    2^n 個輸入 - (沒什麼功能, 就是告訴使用者 fuzzer 還在工作) - DONE - 執行到了指定的 iteration 數量 (以 -runs 指定) - 執行到了指定的時間 (以 -max_total_time 指定) - RELOAD - 重新從 corpus 目錄載入 input 119
  67. libFuzzer Case Study > OpenSSL 篇 - OpenSSL 為被廣泛使用的密碼學函數庫, 實作了

    SSL / TLS - Heartbleed (CVE-2014-0160) - 能讓攻擊者讀取 64 KB 資料 - 可能含有 SSL private key、 session cookie、 密碼 121 Ref: https://devco.re/blog/2014/04/09/openssl-heartbleed-CVE-2014-0160/
  68. libFuzzer Case Study > OpenSSL 篇 - Heartbleed 當初應該是通過 code

    review 發現 - 通過 fuzzing 則能很輕易的找到此漏洞 - google/fuzzer-test-suite 提供了快速建置其 fuzzer 的方式 122 Ref: https://github.com/google/fuzzing/blob/master/tutorial/libFuzzerTutorial.md#heartbleed
  69. libFuzzer Case Study > OpenSSL 篇 - 觀察一下其 fuzz target

    怎麼寫 - 主要測試 BIO_write() - 其他 code 為配置環境 124 Ref: https://github.com/google/fuzzer-test-suite/blob/master/openssl-1.0.1f/target.cc
  70. honggfuzz 簡介 - Repos 底下提供大量 real world examples 可供參考學習 -

    apache-httpd - bind - openssl - … - AFL 和 libFuzzer 綜合起來的加強版 127 Ref: https://github.com/google/honggfuzz/tree/master/examples
  71. honggfuzz 安裝 - 安裝 dependencies - sudo apt install binutils-dev

    libunwind-dev - 安裝 honggfuzz - git clone https://github.com/google/honggfuzz.git - cd honggfuzz - make - sudo make install 129
  72. honggfuzz 基本操作 1 > 建立目錄 - 可以參考以下目錄配置 - fuzz-dir -

    victim - 放置待測試程式碼 - fuzz-in - run.sh - 存放 honggfuzz 指令 132
  73. honggfuzz 基本操作 3 > 新增 test cases - echo -ne

    "2\ntestyo\n" > fuzz-in/testcase 134
  74. honggfuzz 基本操作 4 > 執行 honggfuzz - honggfuzz -i fuzz-in

    -x -s -- ./victim/test1 - 可以將命令存到 run.sh 135 Ref: https://github.com/google/honggfuzz/blob/master/docs/USAGE.md
  75. honggfuzz Case Study > Apache 篇 - Apache 為廣泛使用的 Web

    Server - Fuzz server 的難處在前面章節 「AFL Case Study - Knot DNS 篇 」 提到過 - AFL 通常 fuzz 的對象都是以 stdin 或是檔案作為輸入 - 要如何將 AFL 應用到以 socket 作為輸入的程式 - 來觀察如果是使用 honggfuzz, 要怎麼處理以上問題 139
  76. honggfuzz Case Study > Apache 篇 - Reference 中沒有完整的安裝+編譯教學 -

    使用了 httpd-master.honggfuzz.patch 檔案 - 使用後會產生出 compile_and_install.asan.sh - 執行以上腳本就編譯出 fuzz target - 直接 fuzz 即可 - 重點就是看 patch 跟腳本做了什麼 140 Ref: https://github.com/google/honggfuzz/tree/master/examples/apache-httpd
  77. honggfuzz Case Study > Apache 篇 - 在 patch 中會發現,

    沒有大量向 source code 添加為了 fuzz 而寫 的 code - compile_and_install.asan.sh 中也只是編譯相關指令 - 編譯器使用 hfuzz-pcguard-clang - 總之, source code 更改非常的少, 就能直接 fuzz 了 141 Ref: https://github.com/google/honggfuzz/tree/master/examples/apache-httpd
  78. honggfuzz Case Study > Apache 篇 - Apache 為廣泛使用的 Web

    Server - Fuzz server 的難處在前面章節 「AFL Case Study - Knot DNS 篇 」 提到過 - AFL 通常 fuzz 的對象都是以 stdin 或是檔案作為輸入 - 要如何將 AFL 應用到以 socket 作為輸入的程式 - 來觀察如果是使用 honggfuzz, 要怎麼處理以上問題 - 使用上幾乎不需要改 source code - 跟 AFL 相比方便太多了 142
  79. honggfuzz Case Study > Apache 篇 - 新增 test cases

    - 在網路上尋找 http request corpus - 把 reference clone 下來 - 把 httpreq/corpus 複製到 fuzz-in/ 147 Ref: https://github.com/dvyukov/go-fuzz-corpus/tree/master/httpreq/corpus
  80. honggfuzz Case Study > Apache 篇 - 將 main 修改成

    HFND_FUZZING_ENTRY_FUNCTION - src/ezhttpd.c 149
  81. honggfuzz Case Study > Apache 篇 - 重新編譯 - 將

    EZhttpd/obj 和 EZhttpd/bin 刪除 - make 150