Upgrade to Pro — share decks privately, control downloads, hide ads and more …

デバイスドライバを作ってみよう!

Sponsored · Ship Features Fearlessly Turn features on and off without deploys. Used by thousands of Ruby developers.

 デバイスドライバを作ってみよう!

Avatar for Masami Ichikawa

Masami Ichikawa

May 08, 2010
Tweet

More Decks by Masami Ichikawa

Other Decks in Programming

Transcript

  1. ドライバ作成の準備 • 資料を揃える – メジャーなデバイスだと、 TECH I が便利 • ドライバを書きたい

    OS の作法を調べる – Linux, OpenBSD, Plan 9 and so forth • ユーザランドで実装できる場合もある – USB デバイスなら libusb が使える • 実装方法を考える
  2. PCI デバイスの検索 • 下記 3 個の組み合わせを総当たりで – デバイス番号 0 〜

    7 – バス番号 0 〜 31 – 機能番号 0 〜 7 • 機能番号が 0 のデバイスの場合の注意 – コンフィギュレーションレジスタからヘッダタ イプを読み込む – マルチファンクションか調べる – マルチファンクションで無ければ、機能番号 1 〜 7 にはデバイスはなし
  3. PCI デバイスの検索 • Config Address レジスタ( 0x0cf8 )に対して、どのデバ イス・バス・機能番号を使うかを書き込む –

    bit0-1 : 0 – bit2-7 :レジスタアドレス – bit8-10 :機能番号 – bit11-15 :デバイス番号 – bit16-23 :バス番号 – bit24-30 : 0 – bit31 :データを読み書きするときは 1 に • レジスタアドレスに、読み出したいデータのアドレスを セット
  4. PCI デバイスの検索 • Configuration レジスタからデータを読む – レジスタの範囲は 0x0cfc 〜 0x0cff

    – I/O ポートに 0x0cfc を指定して 32bit アクセスすれば OK • 主なデータ – 16 進数は Config Address で指定するレジスタアドレス – ベンダ ID : 0x00 : bit0-15 – デバイス ID : 0x00:bit16-31 – クラスコード: 0x08 : bit8-31 – ヘッダタイプ :0x0c:bit16-23 • bit23 :マルチファンクションデバイス
  5. HDD の初期化 initialize_ata() |--> initialize_common() | |--> get_device_type() | |

    |--> do_identify_device() | | | |--> do_device_selection_protocol() | | | | |--> wait_until_BSY_and_DRQ_are_zero() | | | |--> get_DRDY() | | | |--> write_command() コマンド 0xec の Write | | | |--> wait_until_BSY_is_zero() | | | |--> inb() Alternate Status レジスタの Read | | | |--> inb() Status レジスタの Read | | | |--> is_error() | | | |--> is_drq_active() | | | |--> is_device_fault() | | | |--> inw() データレジスタの Read
  6. HDD の R/W 共通部前半 static bool sector_rw_common(u_int8_t cmd, int device,

    u_int32_t sector) { ... // nIEN bit should be enable and other bits are disable. outb(DEVICE_CONTROL_REGISTER, 0x02); // Features register should be 0. outb(FEATURES_REGISTER, 0x00); // Set Logical Sector. outb(SECTOR_NUMBER_REGISTER, sector & 0xff); outb(CYLINDER_LOW_REGISTER, (sector >> 8) & 0xff); outb(CYLINDER_HIGH_REGISTER, (sector >> 16) & 0xff); outb(DEVICE_HEAD_REGISTER, ((sector >> 24) & 0x1f) | 0x40); outb(SECTOR_COUNT_REGISTER, 1); // Execute command. outb(COMMAND_REGISTER, cmd); Read:0x20 Write:0x30 LBA 方式で アドレスを設定
  7. HDD の R/W 共通部後半 DRQ ビットがアクティブに なるまで実行 ちょっと待ってから、 データの空読み wait_loop_usec(4);

    inb(ALTERNATE_STATUS_REGISTER); read_status_register_again: status = inb(STATUS_REGISTER); if (is_error(status)) { ... } if (!is_drq_active(status)) { if (loop > 5) { ... } loop++; goto read_status_register_again; } return true; }
  8. HDD の Read 処理 int read_sector(int device, u_int32_t sector, sector_t

    *buf, size_t buf_size) { ... ret = sector_rw_common(PIO_SECTOR_READ_CMD, device, sector); if (!ret) return -1; for (i = 0; i < buf_size; i++) buf[i] = inw(DATA_REGISTER); finish_sector_rw(); return 0; } static inline void finish_sector_rw(void) { inb(ALTERNATE_STATUS_REGISTER); inb(STATUS_REGISTER); } 読み込みが終わったら 終了処理
  9. HDD からデータを読む 00001580 a4 81 01 00 e8 03 e8

    03 07 00 00 00 39 11 db 4b |............9..K| 00001590 39 11 db 4b 39 11 db 4b dd 00 00 00 00 00 00 00 |9..K9..K........| 000015a0 00 00 00 00 00 00 00 00 00 00 00 00 00 00 00 00 |................| 00036400 03 00 2e 00 00 00 00 00 00 00 00 00 00 00 00 00 |................| 00036410 00 00 00 00 00 00 00 00 00 00 00 00 00 00 00 00 |................| 00036420 02 00 2e 2e 00 00 00 00 00 00 00 00 00 00 00 00 |................| 00036430 00 00 00 00 00 00 00 00 00 00 00 00 00 00 00 00 |................| 00036440 07 00 66 6f 6f 62 61 72 2e 74 78 74 00 00 00 00 |..foobar.txt....| 00036450 00 00 00 00 00 00 00 00 00 00 00 00 00 00 00 00 |................| * 00037400 66 6f 6f 62 61 72 0a 00 00 00 00 00 00 00 00 00 |foobar..........| 00037410 00 00 00 00 00 00 00 00 00 00 00 00 00 00 00 00 |................| * mkfs.minix (バージョンは V2 )で作った HDD のイメージで、 /dir_a/dir_b/foobar.txt を読みます。 ダンプの 00001580 が foobar.txt の inode で、 00036440 から始まっているのはディレクトリエントリ、 00037400 から始まっているのが実データです。
  10. libusb + YUREX int Yurex::findDevices() throw (const char *) {

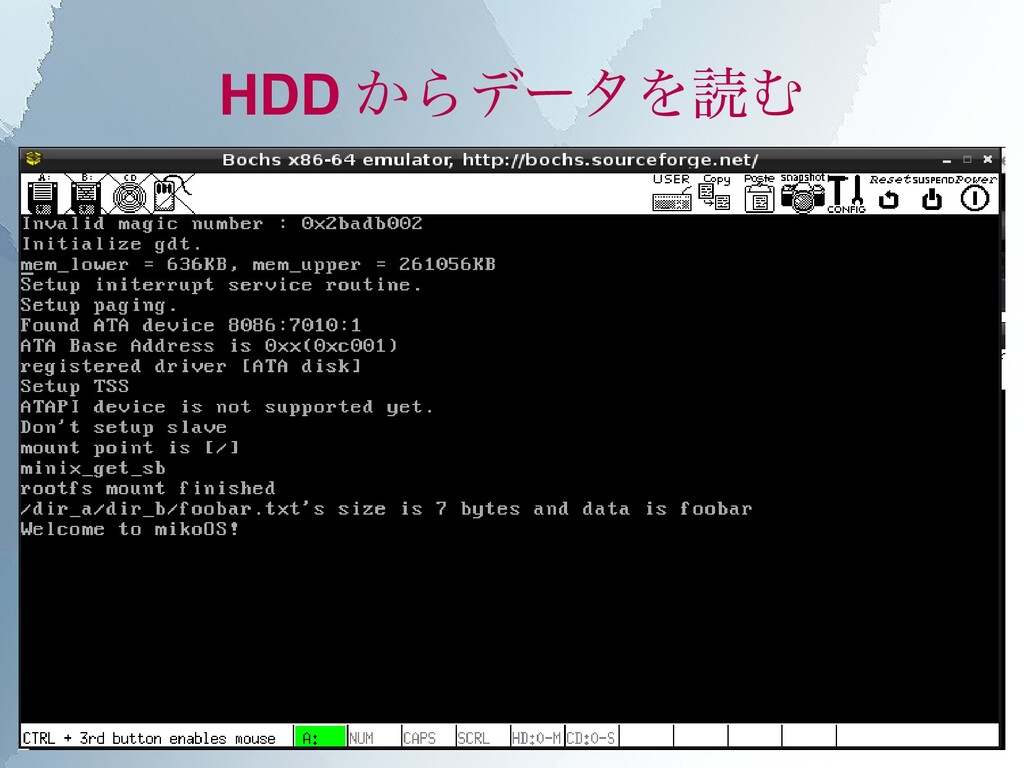
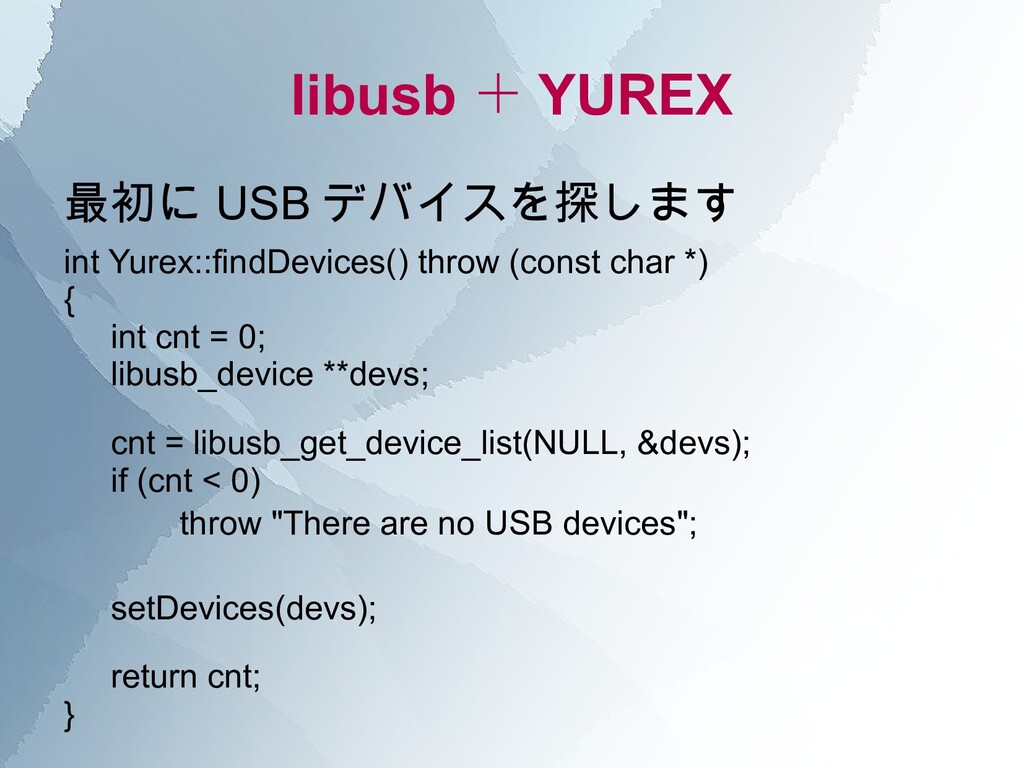
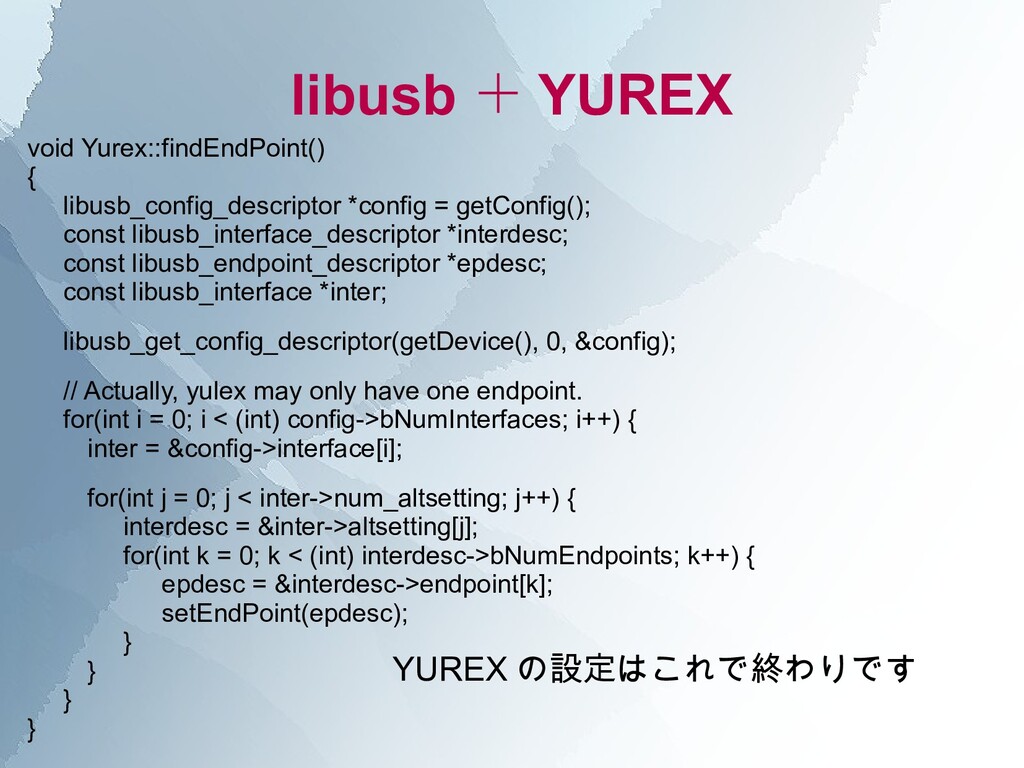
    int cnt = 0; libusb_device **devs; cnt = libusb_get_device_list(NULL, &devs); if (cnt < 0)   throw "There are no USB devices"; setDevices(devs); return cnt; } 最初に USB デバイスを探します
  11. libusb + YUREX bool Yurex::checkYurexDevice() throw (const char *) {

    libusb_device *dev; libusb_device **devs = getDevices(); int i = 0; bool ret = false; while ((dev = devs[i++]) != NULL) { struct libusb_device_descriptor desc; int r = libusb_get_device_descriptor(dev, &desc); if (r < 0) throw ("failed to get device descriptor"); if (desc.idVendor == YUREX_VENDOR_ID && desc.idProduct == YUREX_PRODUCT_ID) { setDescriptor(desc); setDevice(dev); ret = true; break; } } return ret; } 見つかったデバイスから、 YUREX があるかをチェック
  12. libusb + YUREX bool Yurex::openYurex() { libusb_device_handle *h; h =

    libusb_open_device_with_vid_pid(NULL, getDescriptor()->idVendor, getDescriptor()->idProduct); if (h)     setHandle(h); clearDeviceList(); return h ? true : false; } YUREX が見つかったら、 デバイスをオープン
  13. libusb + YUREX bool Yurex::claimToYurex() { libusb_device_handle *handle = getHandle();

    int ret; ret = libusb_claim_interface(handle, 0); if(ret < 0) std::cout << "Cannot Claim Interface" << std::endl; return ret < 0 ? false : true; } YUREX を使えるようにしていきます
  14. libusb + YUREX void Yurex::findEndPoint() { libusb_config_descriptor *config = getConfig();

    const libusb_interface_descriptor *interdesc; const libusb_endpoint_descriptor *epdesc; const libusb_interface *inter; libusb_get_config_descriptor(getDevice(), 0, &config); // Actually, yulex may only have one endpoint. for(int i = 0; i < (int) config->bNumInterfaces; i++) { inter = &config->interface[i]; for(int j = 0; j < inter->num_altsetting; j++) { interdesc = &inter->altsetting[j]; for(int k = 0; k < (int) interdesc->bNumEndpoints; k++) { epdesc = &interdesc->endpoint[k]; setEndPoint(epdesc); } } } } YUREX の設定はこれで終わりです
  15. libusb + YUREX bool Yurex::readDataSync() { unsigned char data[8] =

    { CMD_PADDING }; int ret; int actual = 0; data[0] = CMD_READ; data[1] = CMD_EOF; ret = libusb_bulk_transfer(getHandle(), getEndPoint()->bEndpointAddress, data, sizeof(data), &actual, 2000); if(ret < 0) {    std::cout << "Reading Error" << std::endl; } else {    std::cout << "Reading Successful!" << std::endl; for (int i = 0; i < sizeof(data); i++) std::cout << std::hex << std::showbase << (int) data[i] << ":"; std::cout << std::endl; } return true; } YUREX からデータの読み込み
  16. libusb + YUREX [masami@moonlight:~/experiment/yurex]% sudo ./yurex Yurex info Vendor: 0xc45

    Product: 0x1010 Open Yurex device is success Kernel Driver Active Kernel Driver Detached! Claim to Yurex device ret is 0 Start search endpoint find endpoint Number of alternate settings: 0x1 | Interface Number: 0 | Number of endpoints: 0x1 | Descriptor Type: 0x5 | EP Address: 0x81 | ret is 0 : actual is 0x8 Writing Successful! ret is 0 : actual is 0x8 Reading Successful! 0x43:0:0:0:0:0x94:0xd:0: Done.
  17. ご清聴ありがとうございました @yojiro さんのプレゼン資料「 OPENBSD MEETS "YUREX" 」 http://groups.google.com/group/kernelvm ↑ の「第三回

    カーネル/ VM 探検隊まとめ」 資料で使用したソースコード http://github.com/masami256/miko http://github.com/masami256/yurex はてなダイアリー http://d.hatena.ne.jp/masami256/