Upgrade to Pro — share decks privately, control downloads, hide ads and more …

How to: Add an Image to a Page or Post in Wordpress

How to: Add an Image to a Page or Post in Wordpress

This is a quick tutorial covering the basics on adding an image to a post or page in Wordpress.

Slide 01: Introduction
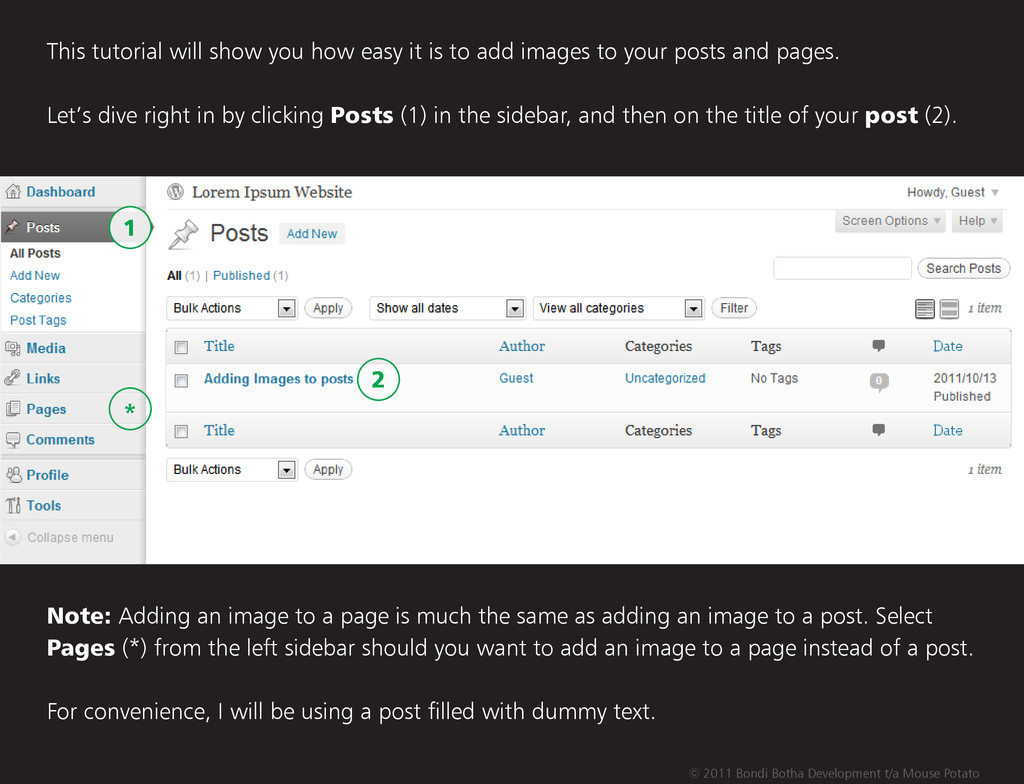
Slide 02: The Posts menu in the Wordpress Admin
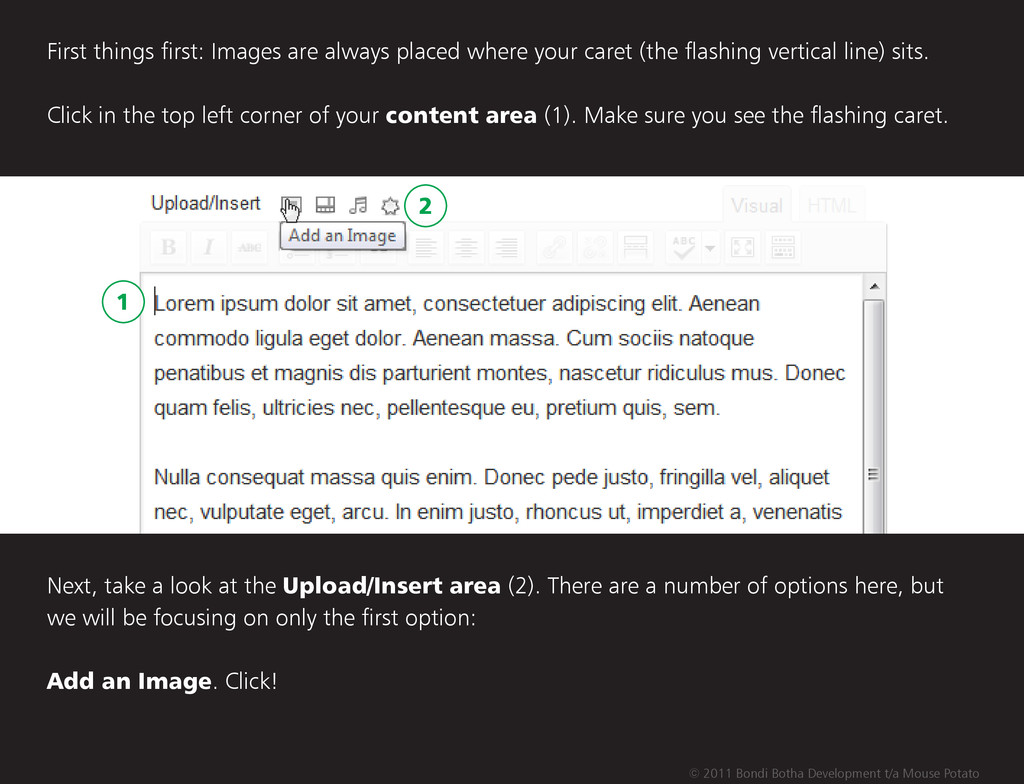
Slide 03: Editing a post - the caret's position, the Upload/Insert area
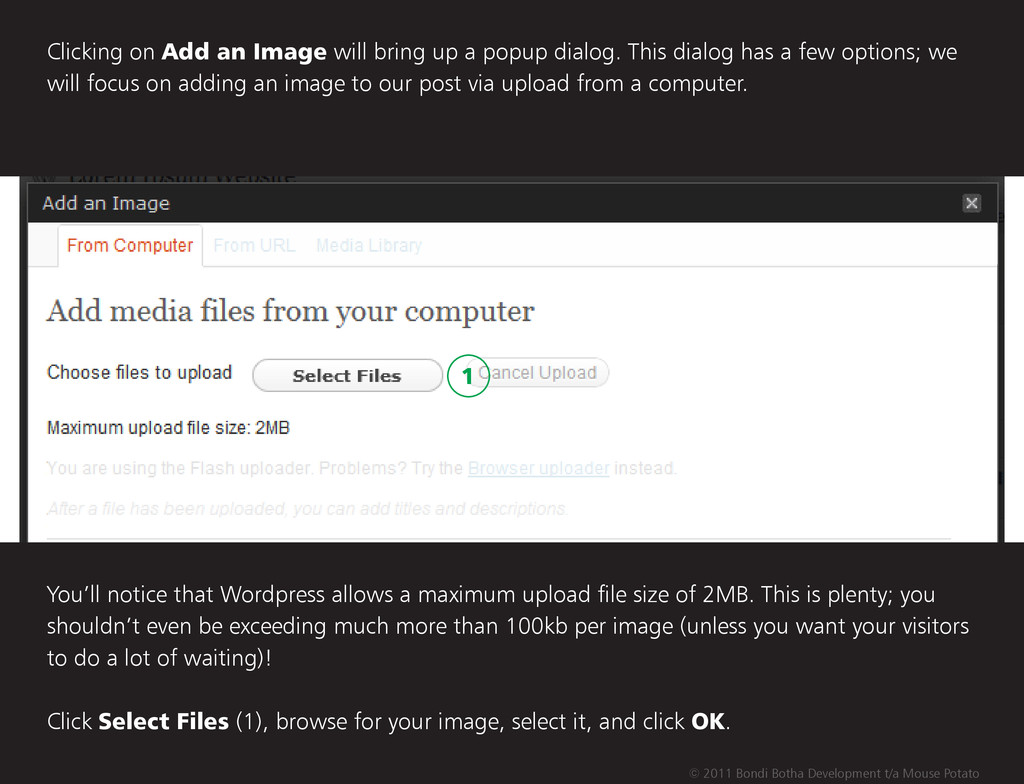
Slide 04: Adding an image with the file uploader
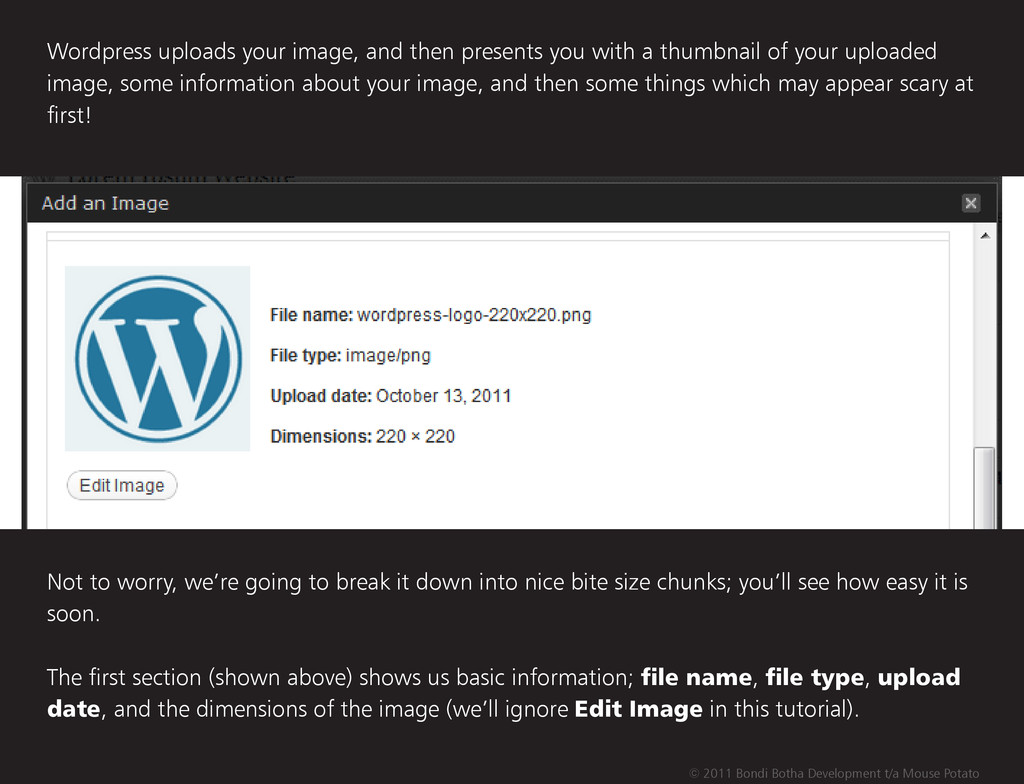
Slide 05: Uploaded image info - basic information
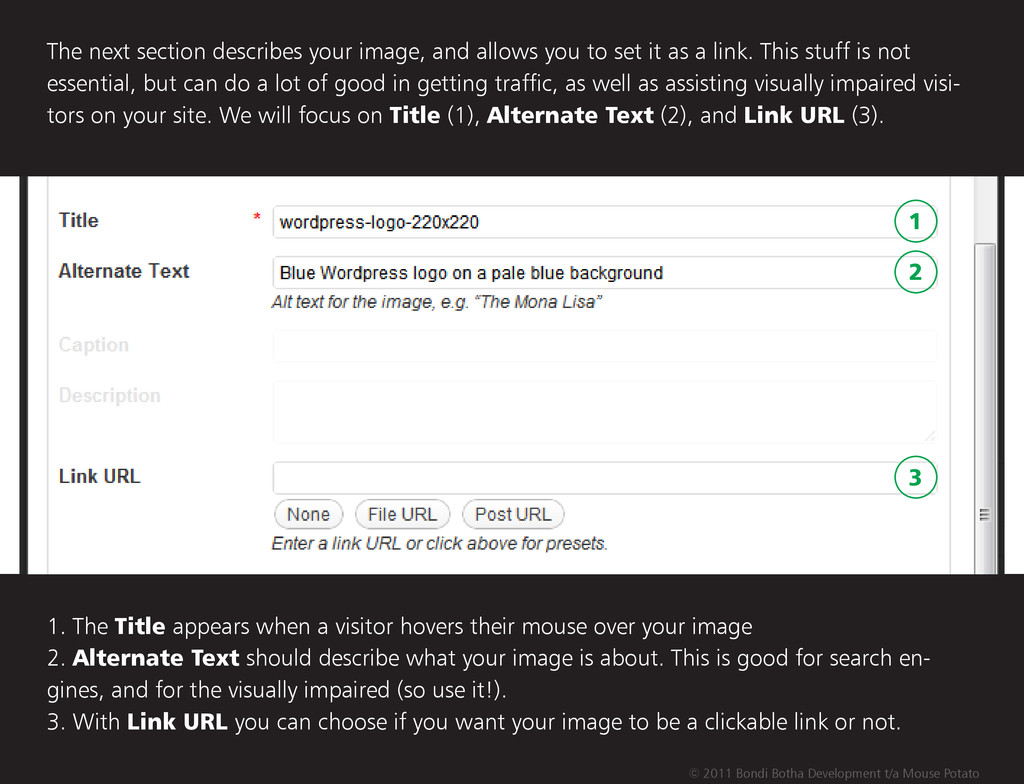
Slide 06: Uploaded image info - title, alternate text, and linking the image
Slide 07: Uploaded image info - alignment, positioning, and inserting into the post
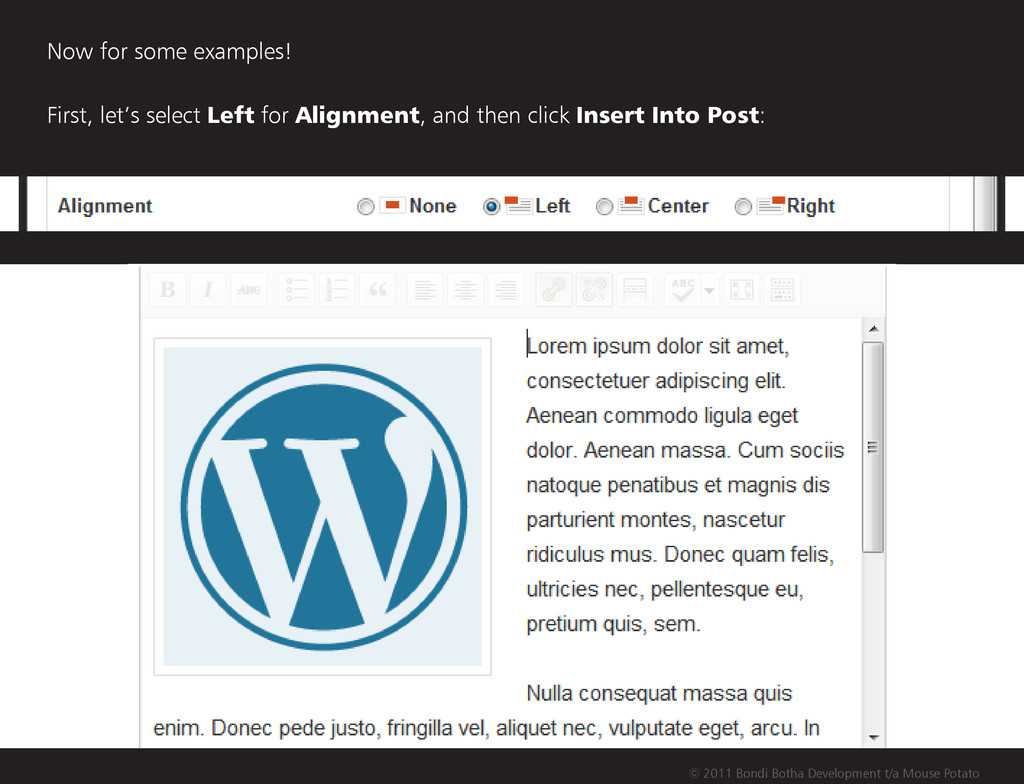
Slide 08: Alignment example - left alignment
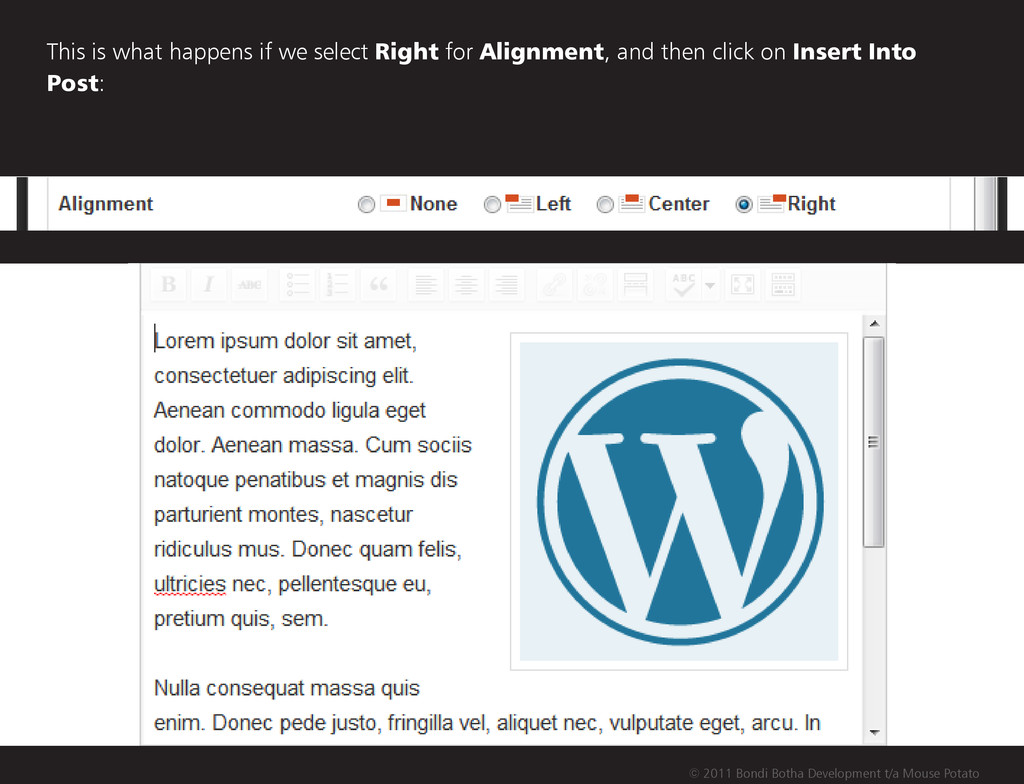
Slide 09: Alignment example - right alignment
Slide 10: Alignment example - center alignment
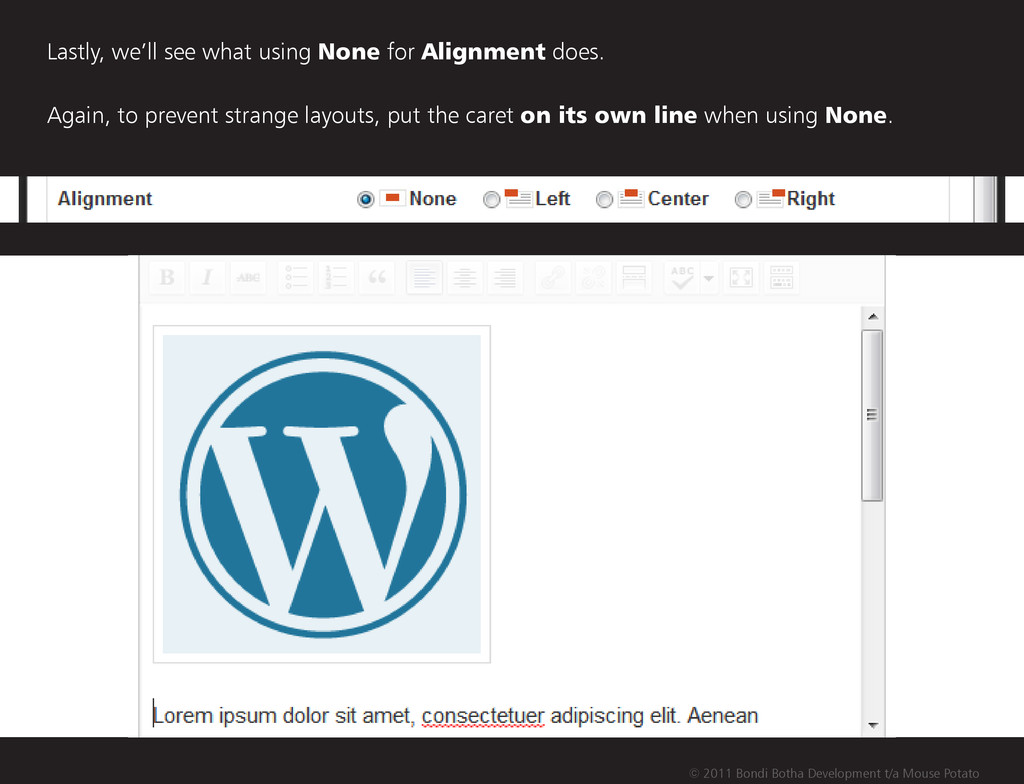
Slide 11: Alignment example - no alignment
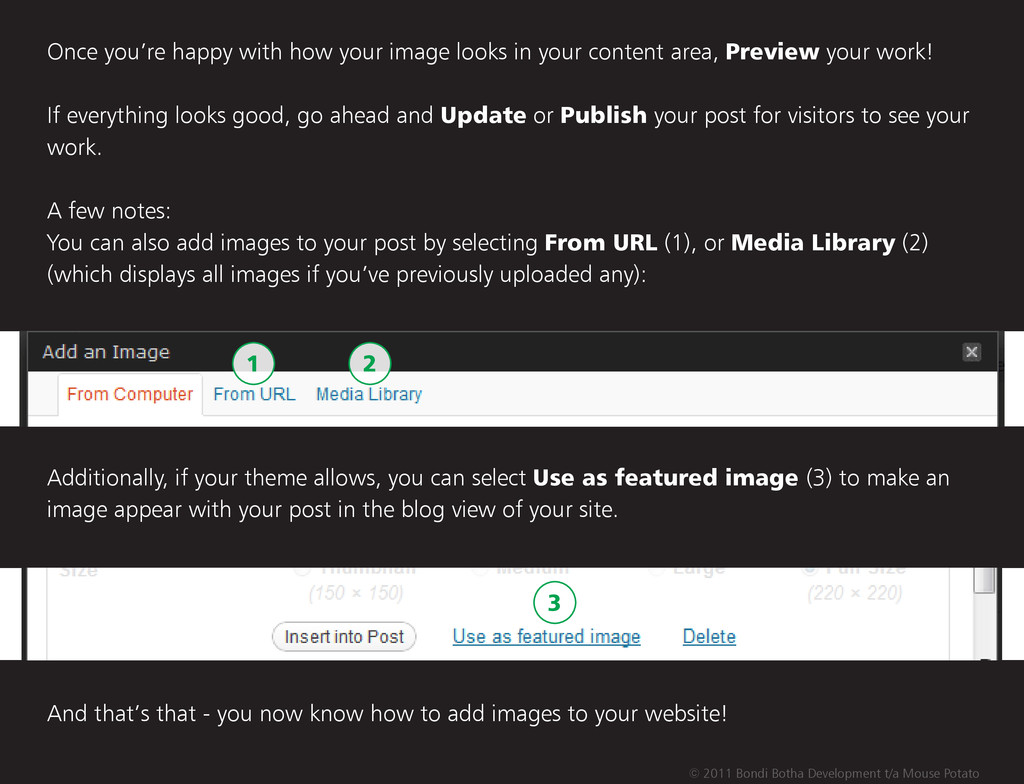
Slide 12: Previewing and publishing changes; additional notes on other image adding options; using an image as the featured image of a post.
Slide 13: Complete!

Mouse Potato

October 14, 2011
Tweet

More Decks by Mouse Potato

Other Decks in How-to & DIY

Transcript

  1. © 2011 Bondi Botha Development t/a Mouse Potato This tutorial

    will show you how easy it is to add images to your posts and pages. Let’s dive right in by clicking Posts (1) in the sidebar, and then on the title of your post (2). Note: Adding an image to a page is much the same as adding an image to a post. Select Pages (*) from the left sidebar should you want to add an image to a page instead of a post. For convenience, I will be using a post filled with dummy text. * 2 1
  2. © 2011 Bondi Botha Development t/a Mouse Potato First things

    first: Images are always placed where your caret (the flashing vertical line) sits. Click in the top left corner of your content area (1). Make sure you see the flashing caret. Next, take a look at the Upload/Insert area (2). There are a number of options here, but we will be focusing on only the first option: Add an Image. Click! 1 2
  3. © 2011 Bondi Botha Development t/a Mouse Potato Clicking on

    Add an Image will bring up a popup dialog. This dialog has a few options; we will focus on adding an image to our post via upload from a computer. You’ll notice that Wordpress allows a maximum upload file size of 2MB. This is plenty; you shouldn’t even be exceeding much more than 100kb per image (unless you want your visitors to do a lot of waiting)! Click Select Files (1), browse for your image, select it, and click OK. 1
  4. © 2011 Bondi Botha Development t/a Mouse Potato Wordpress uploads

    your image, and then presents you with a thumbnail of your uploaded image, some information about your image, and then some things which may appear scary at first! Not to worry, we’re going to break it down into nice bite size chunks; you’ll see how easy it is soon. The first section (shown above) shows us basic information; file name, file type, upload date, and the dimensions of the image (we’ll ignore Edit Image in this tutorial).
  5. © 2011 Bondi Botha Development t/a Mouse Potato The next

    section describes your image, and allows you to set it as a link. This stuff is not essential, but can do a lot of good in getting traffic, as well as assisting visually impaired visi- tors on your site. We will focus on Title (1), Alternate Text (2), and Link URL (3). 1. The Title appears when a visitor hovers their mouse over your image 2. Alternate Text should describe what your image is about. This is good for search en- gines, and for the visually impaired (so use it!). 3. With Link URL you can choose if you want your image to be a clickable link or not. 1 2 3
  6. © 2011 Bondi Botha Development t/a Mouse Potato Finally, we

    get to positioning, sizing, and inserting your image into your post! 1. Alignment determines whether your image will allow text to wrap around it, or be pushed above and below the image. 2. Size - Wordpress creates up to 4 different sizes of an image when we upload, depending on how big our original image is. We are then free to choose which size we want to put into our post! I will use the full size image for this tutorial. 3. Insert Into Post does just that - inserts your image, with the settings you chose, into your post. Tip: When using the None and Center options for Alignment, place your caret on its own line in the content area to avoid any awkward wrapping, or strange text alignment. 2 1 3
  7. © 2011 Bondi Botha Development t/a Mouse Potato Now for

    some examples! First, let’s select Left for Alignment, and then click Insert Into Post:
  8. © 2011 Bondi Botha Development t/a Mouse Potato This is

    what happens if we select Right for Alignment, and then click on Insert Into Post:
  9. © 2011 Bondi Botha Development t/a Mouse Potato Using Center

    is just as easy! Make sure you place the caret on its own line before using Center!
  10. © 2011 Bondi Botha Development t/a Mouse Potato Lastly, we’ll

    see what using None for Alignment does. Again, to prevent strange layouts, put the caret on its own line when using None.
  11. Lastly, we’ll see what using None for Alignment does. Again,

    to prevent strange layouts, put the caret on its own line when using None. © 2011 Bondi Botha Development t/a Mouse Potato Once you’re happy with how your image looks in your content area, Preview your work! If everything looks good, go ahead and Update or Publish your post for visitors to see your work. A few notes: You can also add images to your post by selecting From URL (1), or Media Library (2) (which displays all images if you’ve previously uploaded any): 2 1 Additionally, if your theme allows, you can select Use as featured image (3) to make an image appear with your post in the blog view of your site. And that’s that - you now know how to add images to your website! 3