Upgrade to Pro — share decks privately, control downloads, hide ads and more …

How to: Create / Edit a Page or Post in Wordpress

How to: Create / Edit a Page or Post in Wordpress

This is a quick tutorial covering the basics of creating and editing posts and pages in Wordpress.

Slide 01: Introduction
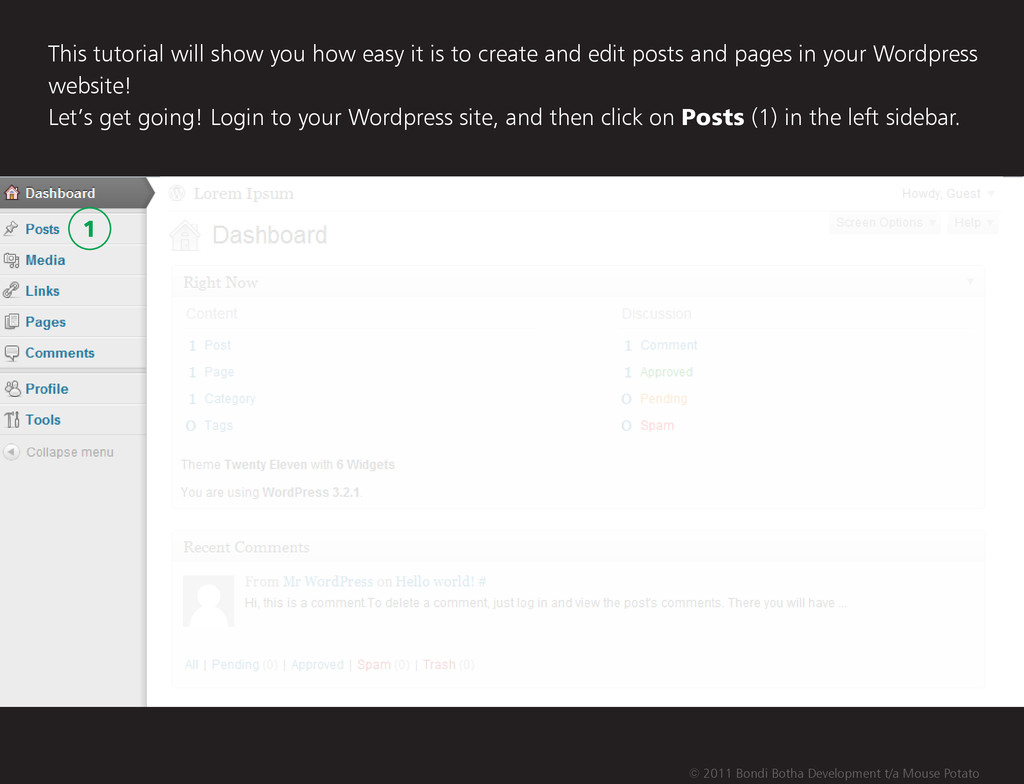
Slide 02: Wordpress dashboard once logged in
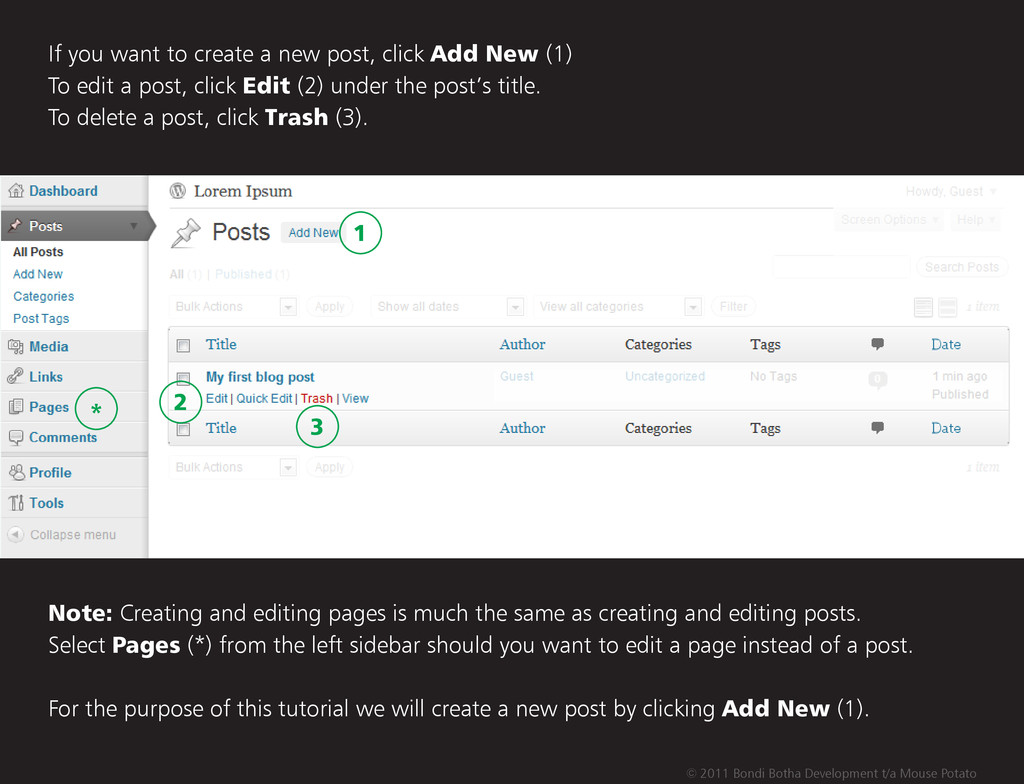
Slide 03: Posts screen
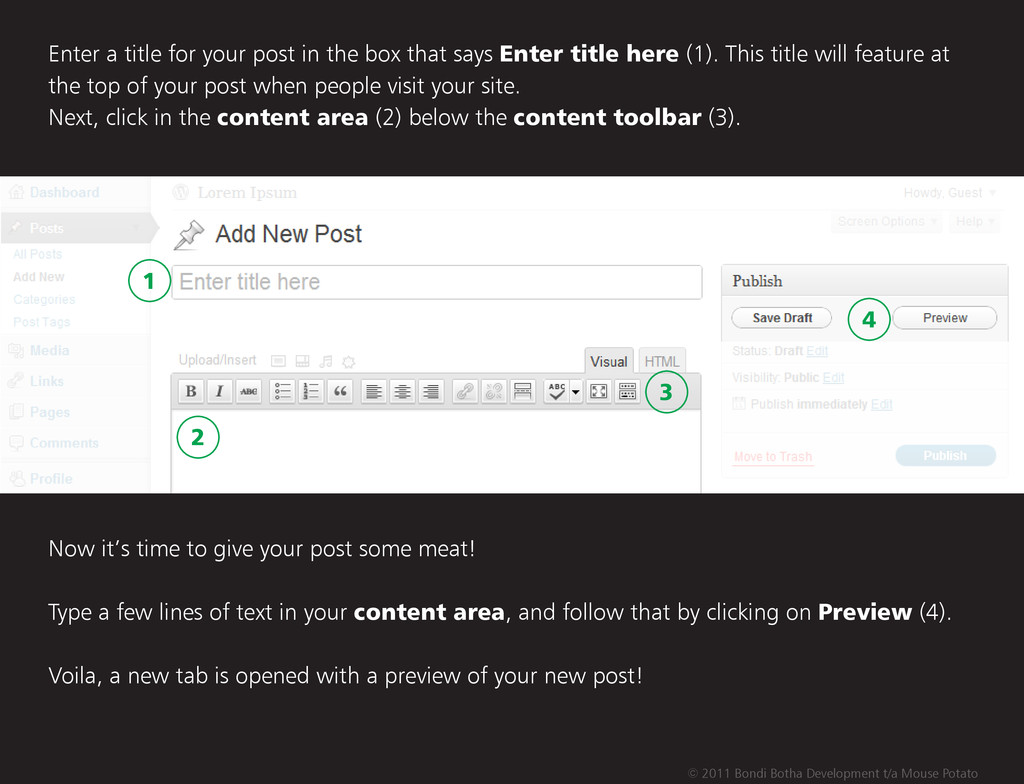
Slide 04: Add New Post screen; rundown of the editing interface
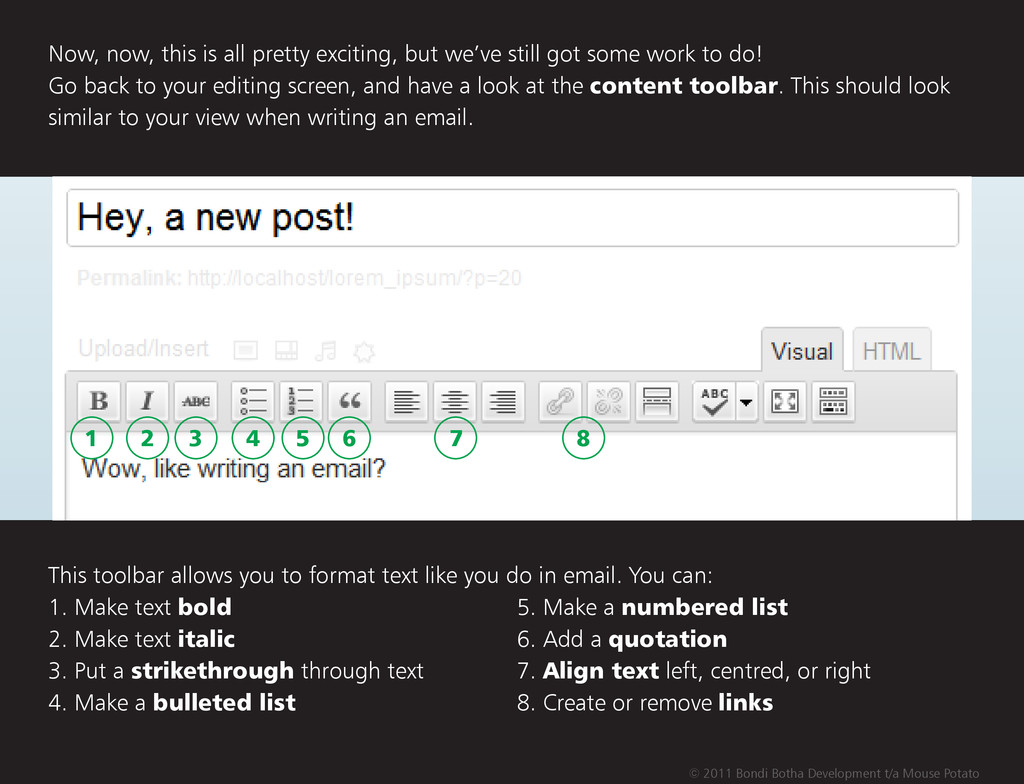
Slide 05: Content toolbar and button explanations
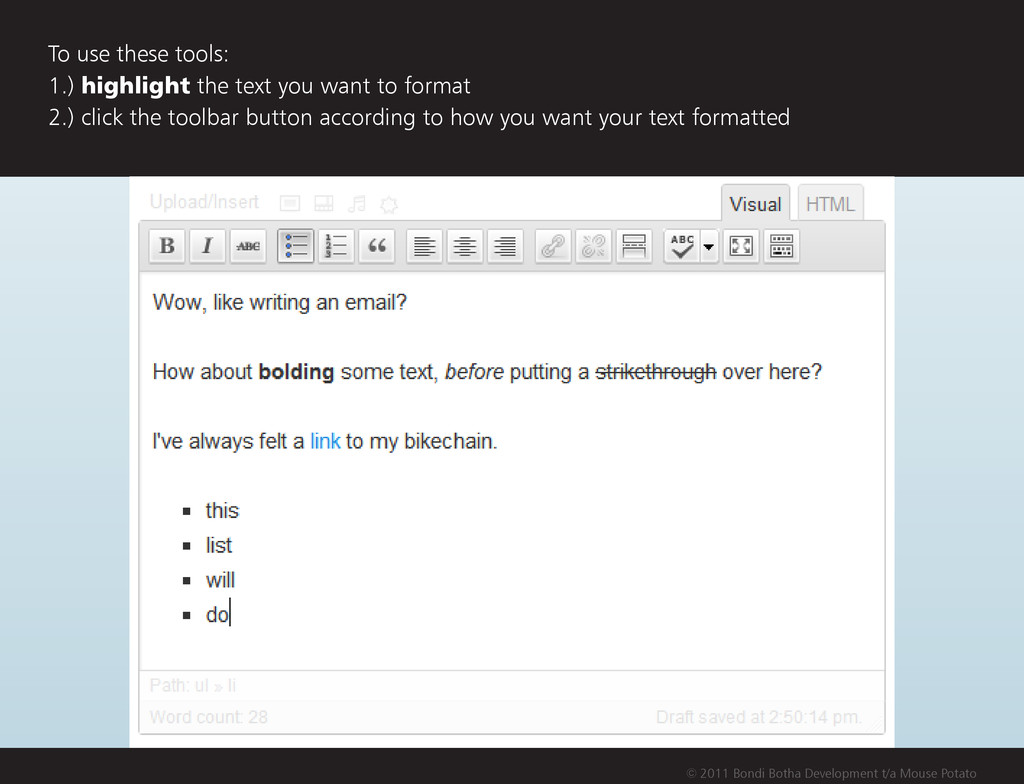
Slide 06: How to use the toolbar; examples
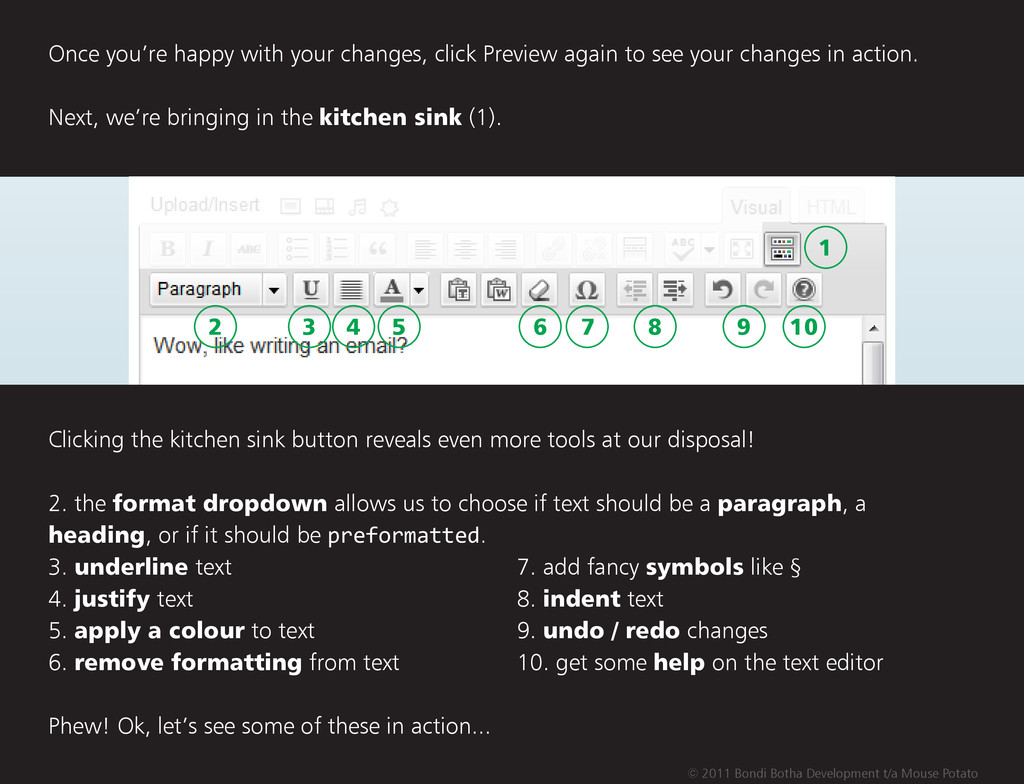
Slide 07: Kitchen sink and button explanations
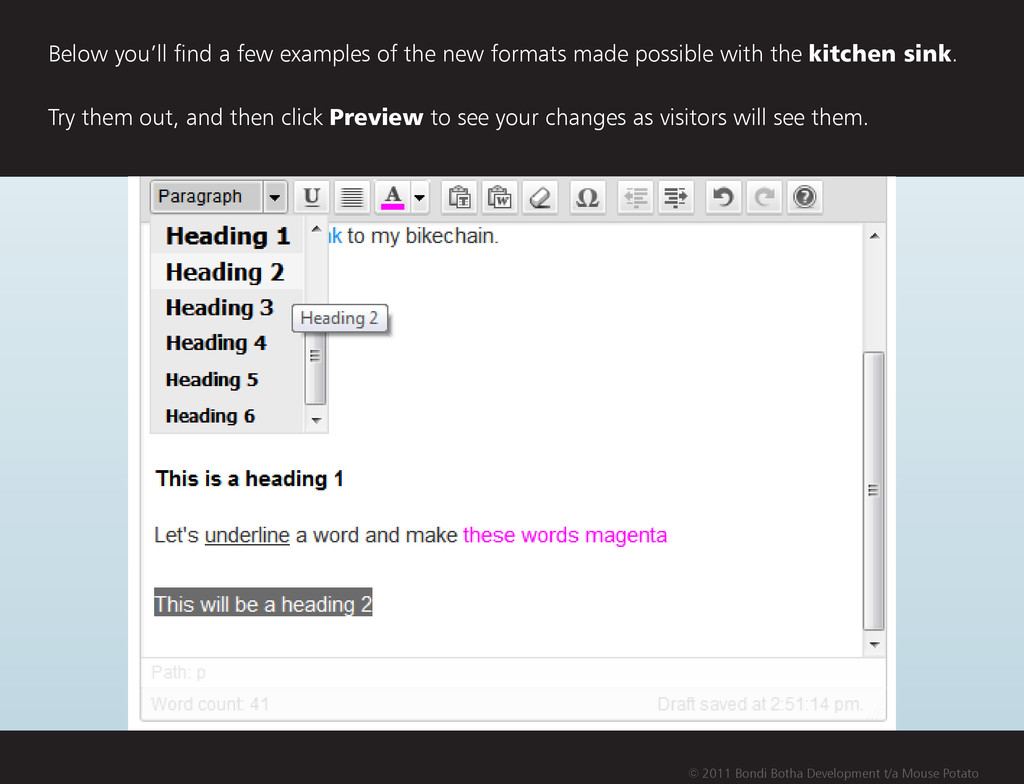
Slide 08: Examples of kitchen sink tools
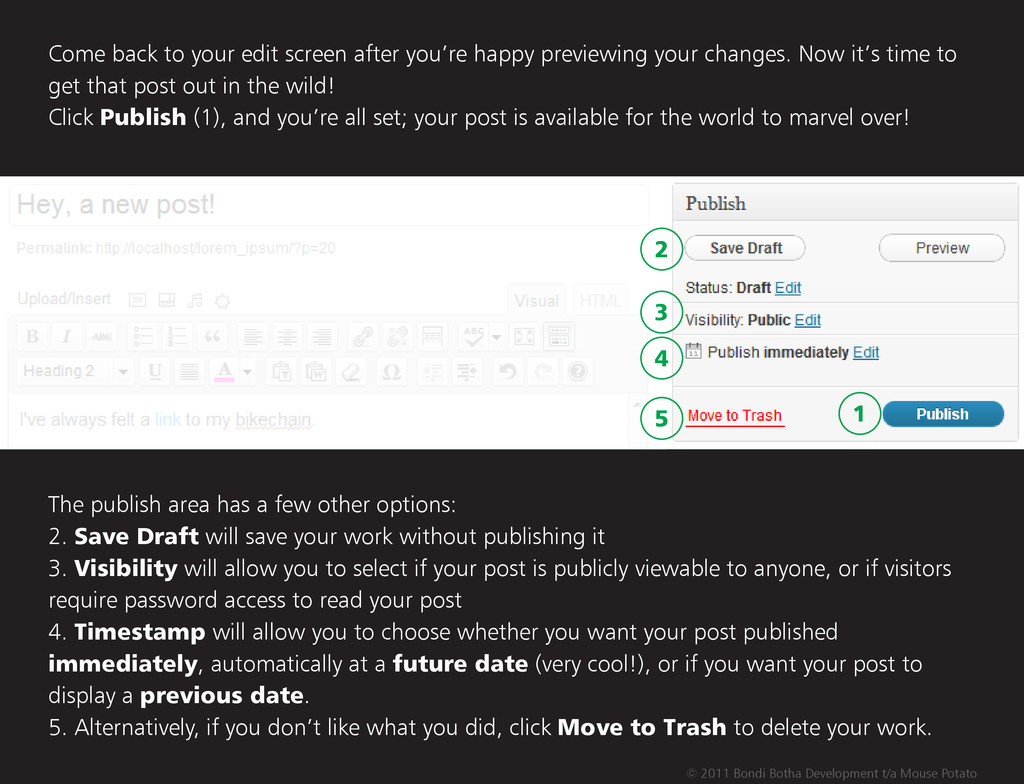
Slide 09: Publishing widget; explanation of tools available
Slide 10: Completed!

Mouse Potato

October 13, 2011
Tweet

More Decks by Mouse Potato

Other Decks in How-to & DIY

Transcript

  1. This tutorial will show you how easy it is to

    create and edit posts and pages in your Wordpress website! Let’s get going! Login to your Wordpress site, and then click on Posts (1) in the left sidebar. 1 © 2011 Bondi Botha Development t/a Mouse Potato
  2. If you want to create a new post, click Add

    New (1) To edit a post, click Edit (2) under the post’s title. To delete a post, click Trash (3). Note: Creating and editing pages is much the same as creating and editing posts. Select Pages (*) from the left sidebar should you want to edit a page instead of a post. For the purpose of this tutorial we will create a new post by clicking Add New (1). 1 2 3 * © 2011 Bondi Botha Development t/a Mouse Potato
  3. Enter a title for your post in the box that

    says Enter title here (1). This title will feature at the top of your post when people visit your site. Next, click in the content area (2) below the content toolbar (3). Now it’s time to give your post some meat! Type a few lines of text in your content area, and follow that by clicking on Preview (4). Voila, a new tab is opened with a preview of your new post! 1 2 3 4 © 2011 Bondi Botha Development t/a Mouse Potato
  4. Now, now, this is all pretty exciting, but we’ve still

    got some work to do! Go back to your editing screen, and have a look at the content toolbar. This should look similar to your view when writing an email. This toolbar allows you to format text like you do in email. You can: 1. Make text bold 5. Make a numbered list 2. Make text italic 6. Add a quotation 3. Put a strikethrough through text 7. Align text left, centred, or right 4. Make a bulleted list 8. Create or remove links 1 2 3 4 5 6 7 8 © 2011 Bondi Botha Development t/a Mouse Potato
  5. To use these tools: 1.) highlight the text you want

    to format 2.) click the toolbar button according to how you want your text formatted © 2011 Bondi Botha Development t/a Mouse Potato
  6. Once you’re happy with your changes, click Preview again to

    see your changes in action. Next, we’re bringing in the kitchen sink (1). Clicking the kitchen sink button reveals even more tools at our disposal! 2. the format dropdown allows us to choose if text should be a paragraph, a heading, or if it should be preformatted. 3. underline text 7. add fancy symbols like § 4. justify text 8. indent text 5. apply a colour to text 9. undo / redo changes 6. remove formatting from text 10. get some help on the text editor Phew! Ok, let’s see some of these in action... 1 2 3 4 5 6 7 8 9 10 © 2011 Bondi Botha Development t/a Mouse Potato
  7. Below you’ll find a few examples of the new formats

    made possible with the kitchen sink. Try them out, and then click Preview to see your changes as visitors will see them. © 2011 Bondi Botha Development t/a Mouse Potato
  8. Come back to your edit screen after you’re happy previewing

    your changes. Now it’s time to get that post out in the wild! Click Publish (1), and you’re all set; your post is available for the world to marvel over! The publish area has a few other options: 2. Save Draft will save your work without publishing it 3. Visibility will allow you to select if your post is publicly viewable to anyone, or if visitors require password access to read your post 4. Timestamp will allow you to choose whether you want your post published immediately, automatically at a future date (very cool!), or if you want your post to display a previous date. 5. Alternatively, if you don’t like what you did, click Move to Trash to delete your work. 1 2 3 4 5 © 2011 Bondi Botha Development t/a Mouse Potato