Upgrade to Pro
— share decks privately, control downloads, hide ads and more …
Speaker Deck
Features
Speaker Deck
PRO
Sign in
Sign up for free
Search
Search
適当に教える最近のフロントエンド開発第一歩
Search
Sponsored
·
SiteGround - Reliable hosting with speed, security, and support you can count on.
→
pvcresin
October 20, 2017
Programming
190
0
Share
Embed
Copy iframe code
Copy JS code
Copy link
Start on current slide
適当に教える最近のフロントエンド開発第一歩
最近のフロントエンド開発の第一歩をめちゃくち
ゃ雑に紹介します
https://github.com/pvcresin/testMarp
pvcresin
October 20, 2017
More Decks by pvcresin
See All by pvcresin
関係性から理解する"同一性"の型用語たち
pvcresin
2
690
リセットCSSを1行消したらアクセシビリティが向上した話
pvcresin
4
570
Reduxモダナイズ 〜コードのモダン化を通して、将来のライブラリ移行に備える〜
pvcresin
2
950
text-box-trim について 1 分で
pvcresin
0
160
Web IDEの進化とそれを支える技術
pvcresin
0
140
ステップアップOSSコントリビュート
pvcresin
0
510
Webアプリケーションのアーキテクチャパターンから読み解くNext.js
pvcresin
0
450
Eight WebフロントエンドのDX向上に関する取り組み
pvcresin
0
210
TS 未経験者が 社内向け JS ライブラリを TS に置き換えている話
pvcresin
0
430
Other Decks in Programming
See All in Programming
「正の参照」と 「負の導出」で組む ハーネスエンジニアリング
cottpan
1
120
ECSアプリログをFireLensでコスト削減しようとしたけど諦めた話 in Fargate×Node.js
akihisaikeda
2
4.2k
Hatena Engineer Seminar #37「言語モデルの活用に関する研究」
slashnephy
0
500
Developing with AI Agents — Codex, Claude Code & Cowork Practical Guide
x5gtrn
PRO
0
1.3k
TypeScript+Orvalで実現する型安全かつ堅牢でスケーラブルなマルチチャネル通知基盤 / TSKaigi Night talks ~after conference~
d0riven
0
390
気圧・高度・GPSを記録&可視化するアプリ「Koudo」を作った話
hjmkth
1
340
例外の正しい扱い方 そのエラー try-catchして大丈夫?
jinwatanabe
0
340
Signal Forms: Details & Live Coding @enterJS 2026 in Mannheim
manfredsteyer
PRO
0
220
Welcome to the "Parametricity" 🏙️ − Generic だけど Specific な世界 −
guvalif
1
120
Vite+ Unified Toolchain for the Web
naokihaba
0
700
「AIで開発し、AIを届ける」をEvalでつなぐ 〜AIネイティブに始めるプロダクト開発の実践〜 / Connecting "Develop with AI, deliver AI" with Eval
rkaga
4
5.7k
Snowflake Summitでの新機能 CoCo / CoWork / snowflake-summit-2026-overall-what-new-coco
tatsuhiro
1
220
Featured
See All Featured
Measuring Dark Social's Impact On Conversion and Attribution
stephenakadiri
2
230
How to optimise 3,500 product descriptions for ecommerce in one day using ChatGPT
katarinadahlin
PRO
1
3.7k
Put a Button on it: Removing Barriers to Going Fast.
kastner
60
4.3k
sira's awesome portfolio website redesign presentation
elsirapls
0
300
The Mindset for Success: Future Career Progression
greggifford
PRO
0
410
Git: the NoSQL Database
bkeepers
PRO
432
67k
Understanding Cognitive Biases in Performance Measurement
bluesmoon
32
3k
Being A Developer After 40
akosma
91
590k
[RailsConf 2023 Opening Keynote] The Magic of Rails
eileencodes
31
10k
Beyond borders and beyond the search box: How to win the global "messy middle" with AI-driven SEO
davidcarrasco
3
180
Building AI with AI
inesmontani
PRO
1
1.1k
The World Runs on Bad Software
bkeepers
PRO
72
12k
Transcript
適当に教える 最近のフロントエンド開発 第一歩
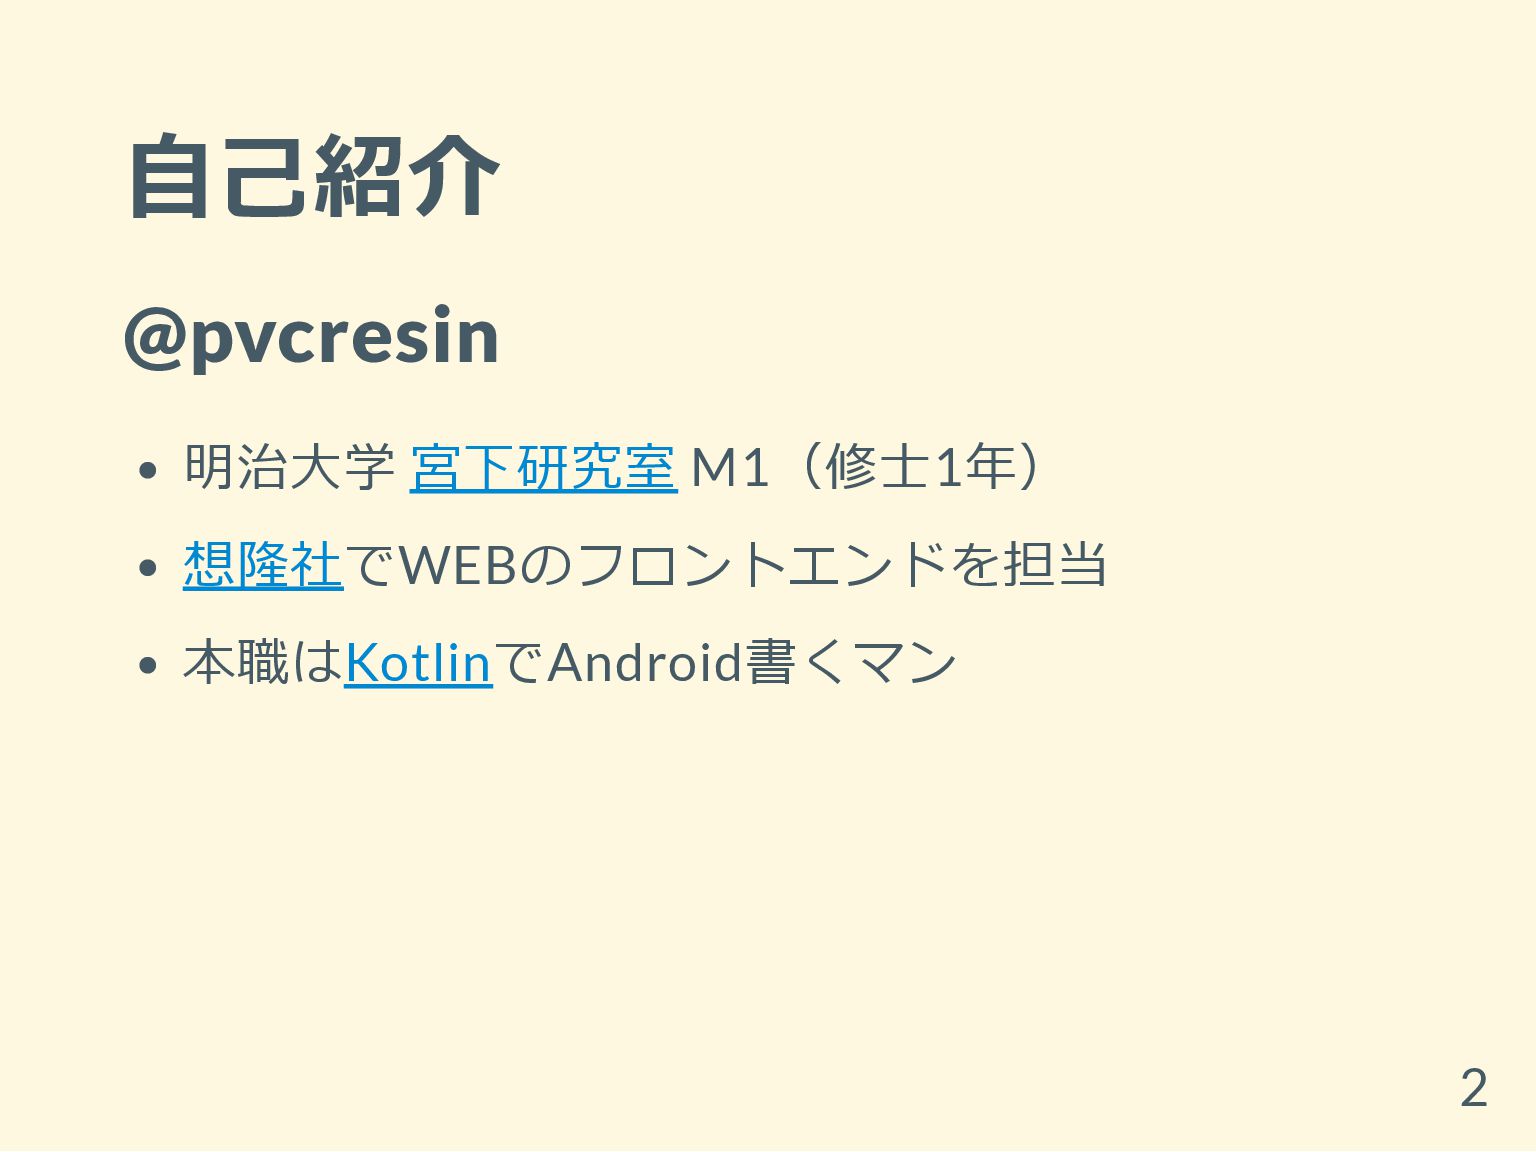
自己紹介 @pvcresin 明治大学 宮下研究室 M1(修士1年) 想隆社でWEBのフロントエンドを担当 本職はKotlinでAndroid書くマン 2
はじめに 最近のフロントエンド開発の第一歩をめちゃくち ゃ雑に紹介します (2017/10 現在) 目標は 「へぇ~こういうのもあるんだ~」 フロントエンドの開発環境は,毎年のように移り 変わっていくので,このスライドも 2018/10
には ほぼ使いものにならないでしょう(泣 3
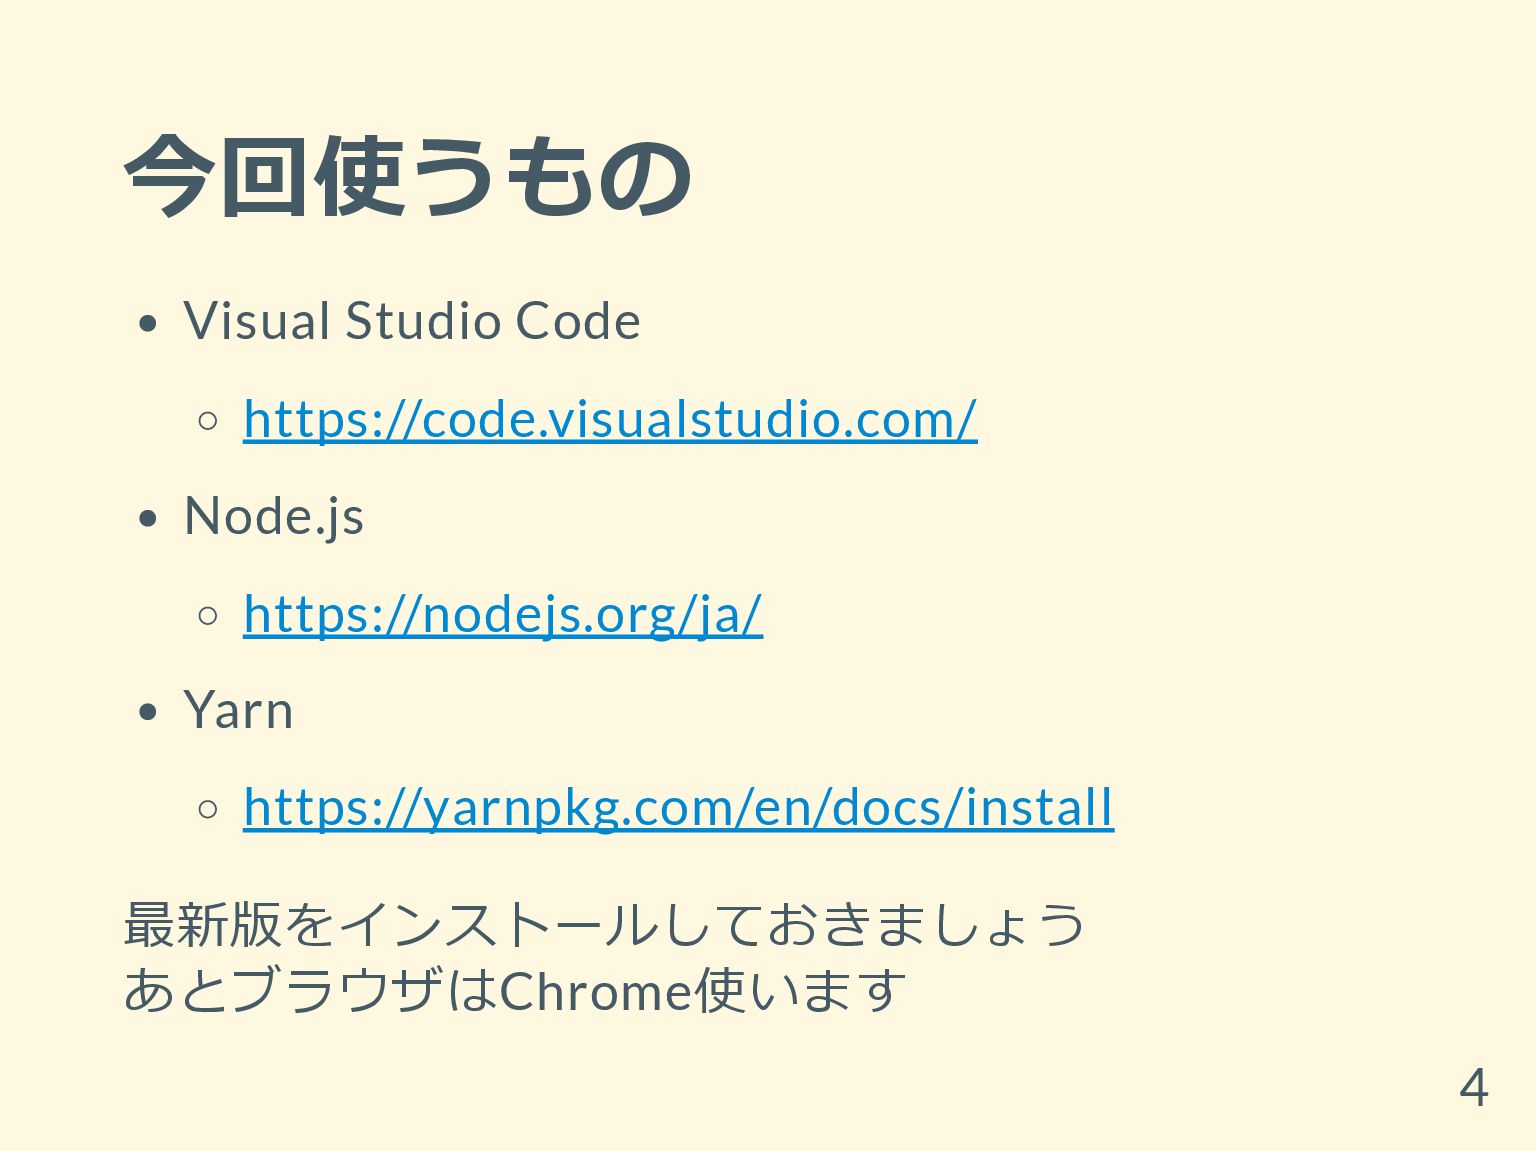
今回使うもの Visual Studio Code https://code.visualstudio.com/ Node.js https://nodejs.org/ja/ Yarn https://yarnpkg.com/en/docs/install 最新版をインストールしておきましょう
あとブラウザはChrome使います 4
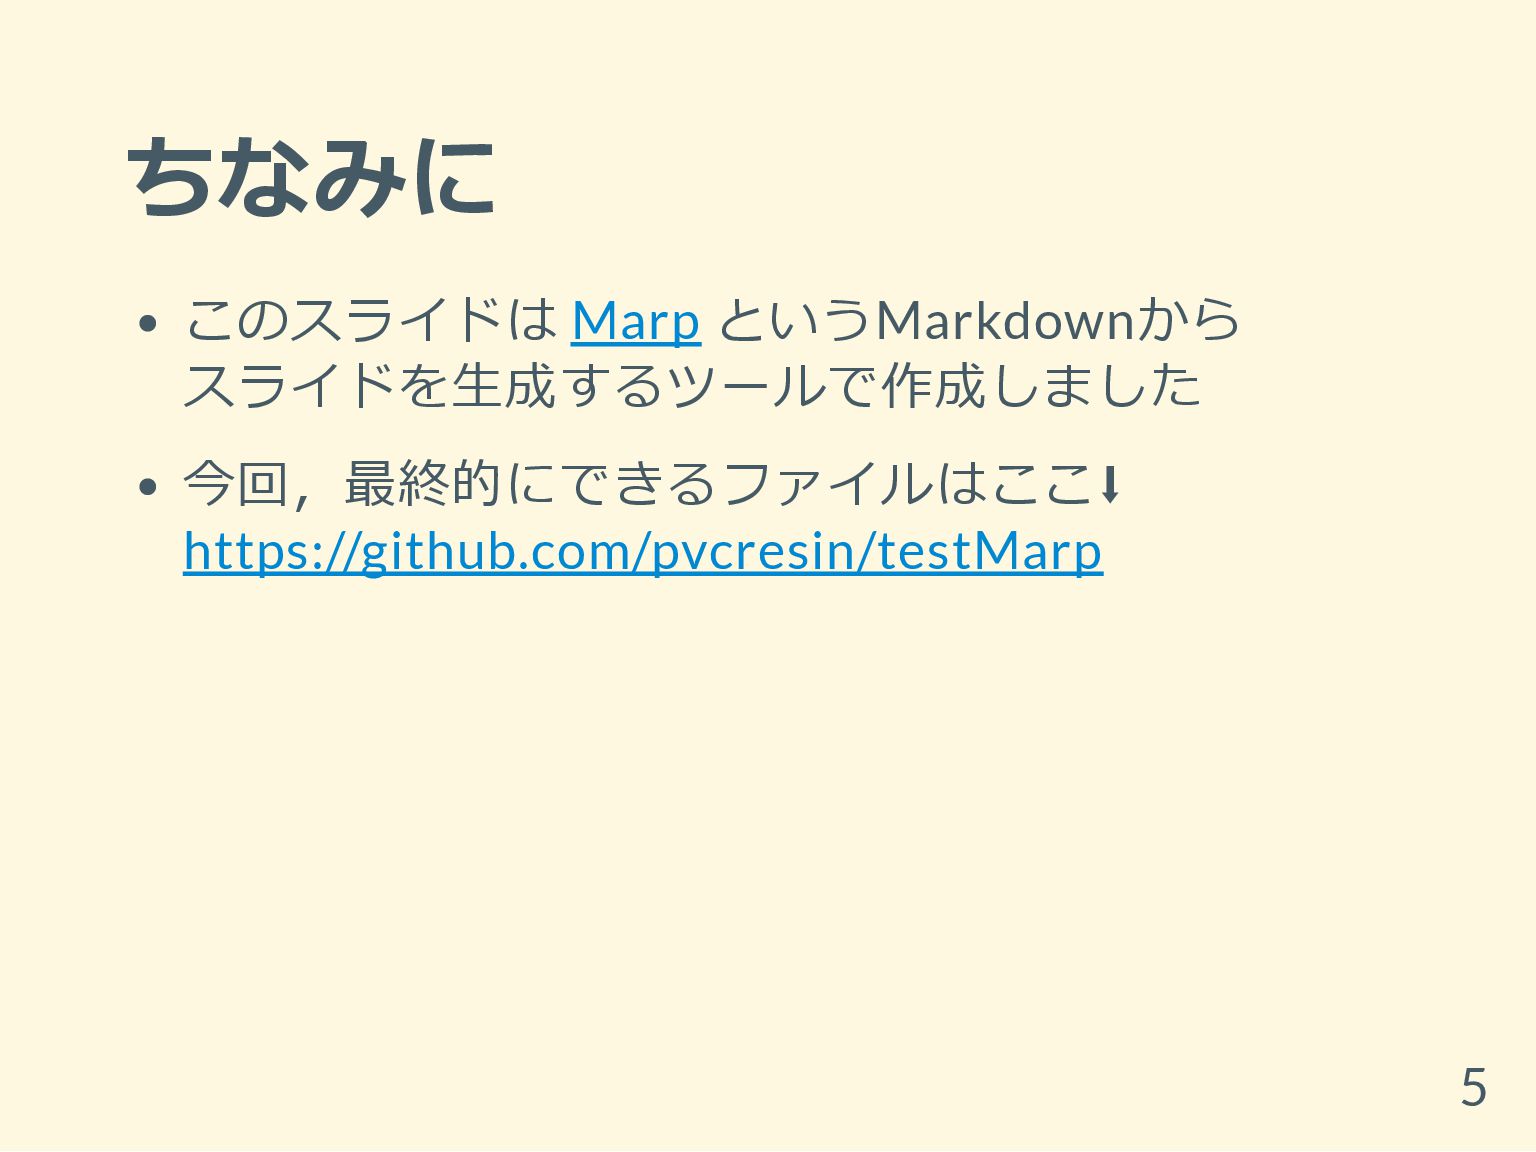
ちなみに このスライドは Marp というMarkdownから スライドを生成するツールで作成しました 今回,最終的にできるファイルはここ⬇ https://github.com/pvcresin/testMarp 5
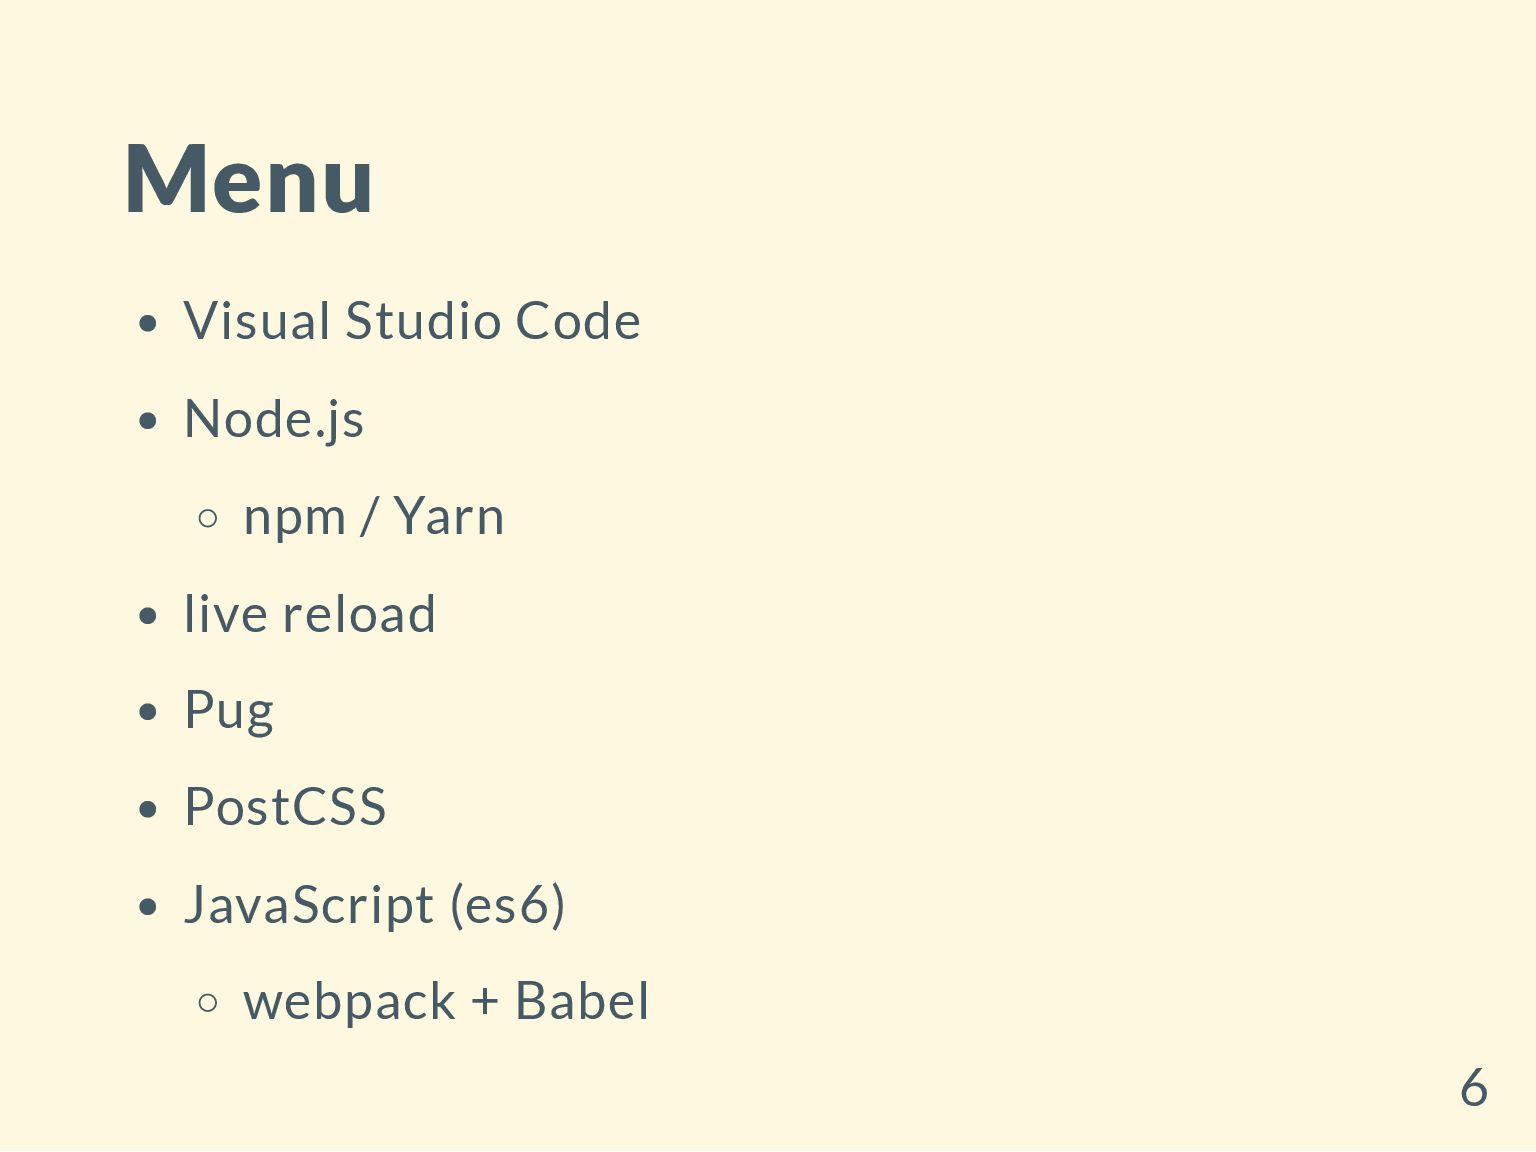
Menu Visual Studio Code Node.js npm / Yarn live reload
Pug PostCSS JavaScript (es6) webpack + Babel 6
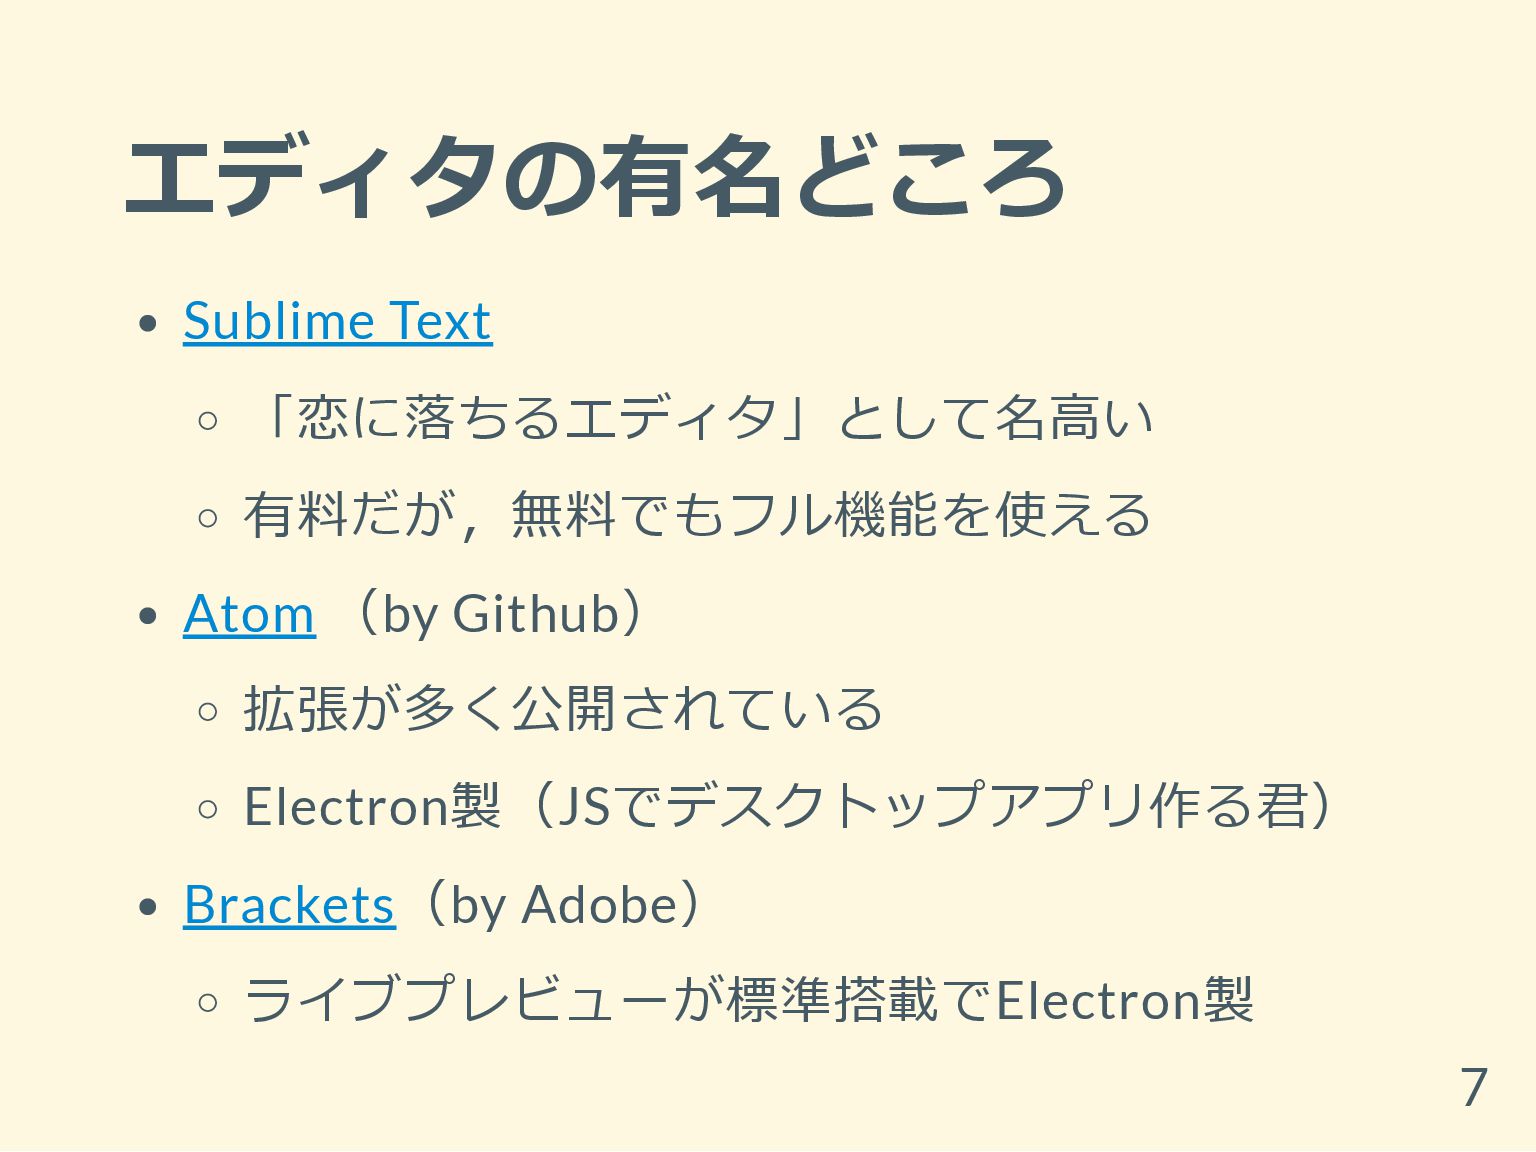
エディタの有名どころ Sublime Text 「恋に落ちるエディタ」として名高い 有料だが,無料でもフル機能を使える Atom (by Github) 拡張が多く公開されている Electron製(JSでデスクトップアプリ作る君)
Brackets(by Adobe) ライブプレビューが標準搭載でElectron製 7
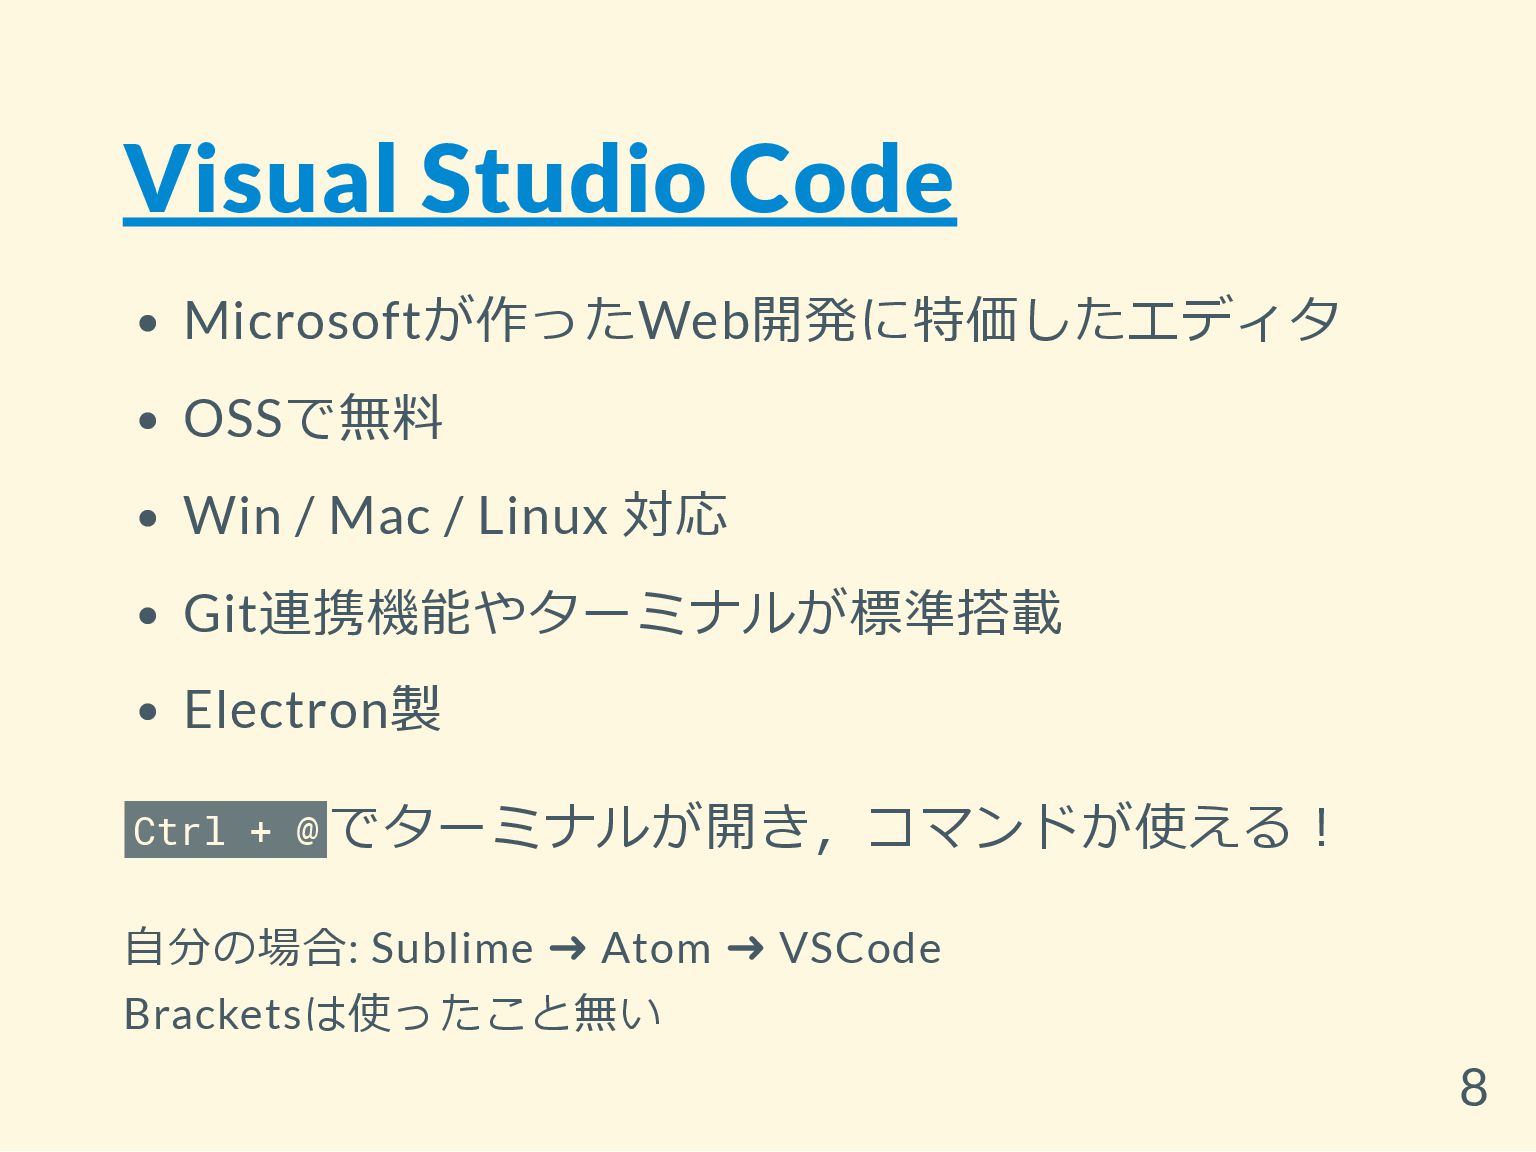
Visual Studio Code Microsoftが作ったWeb開発に特価したエディタ OSSで無料 Win / Mac / Linux
対応 Git連携機能やターミナルが標準搭載 Electron製 Ctrl + @ でターミナルが開き,コマンドが使える! 自分の場合: Sublime ➜ Atom ➜ VSCode Bracketsは使ったこと無い 8
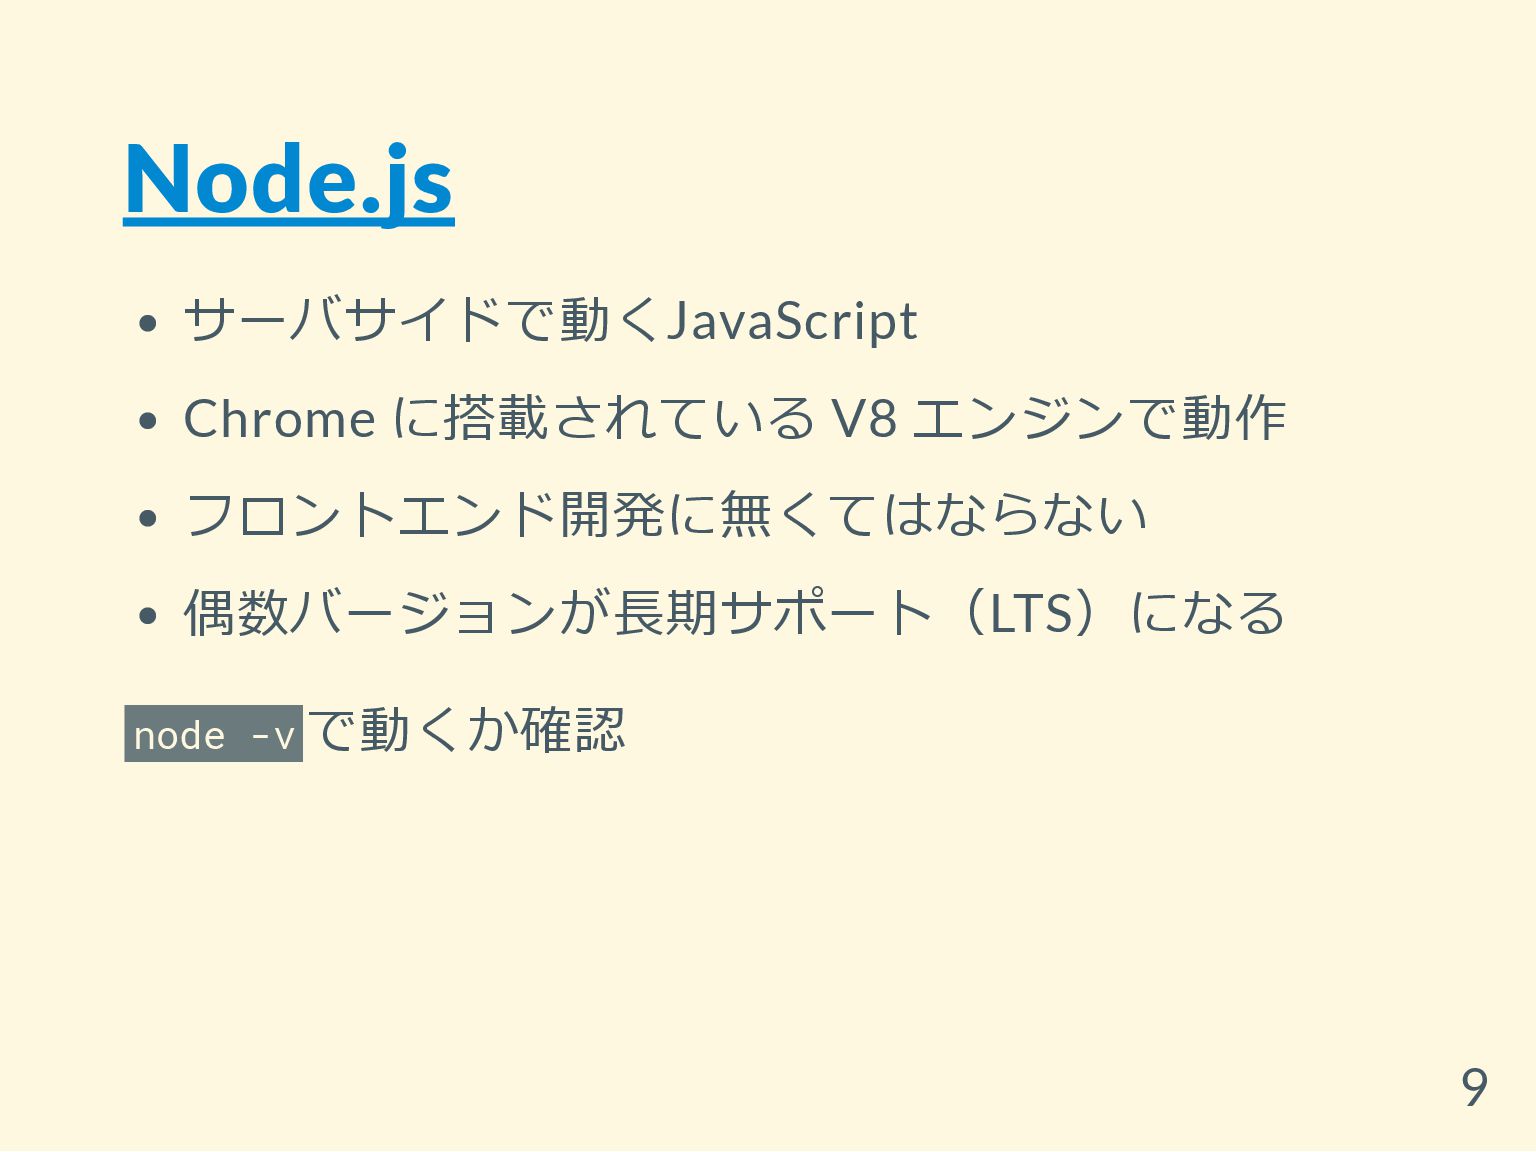
Node.js サーバサイドで動くJavaScript Chrome に搭載されている V8 エンジンで動作 フロントエンド開発に無くてはならない 偶数バージョンが長期サポート(LTS)になる node -v
で動くか確認 9
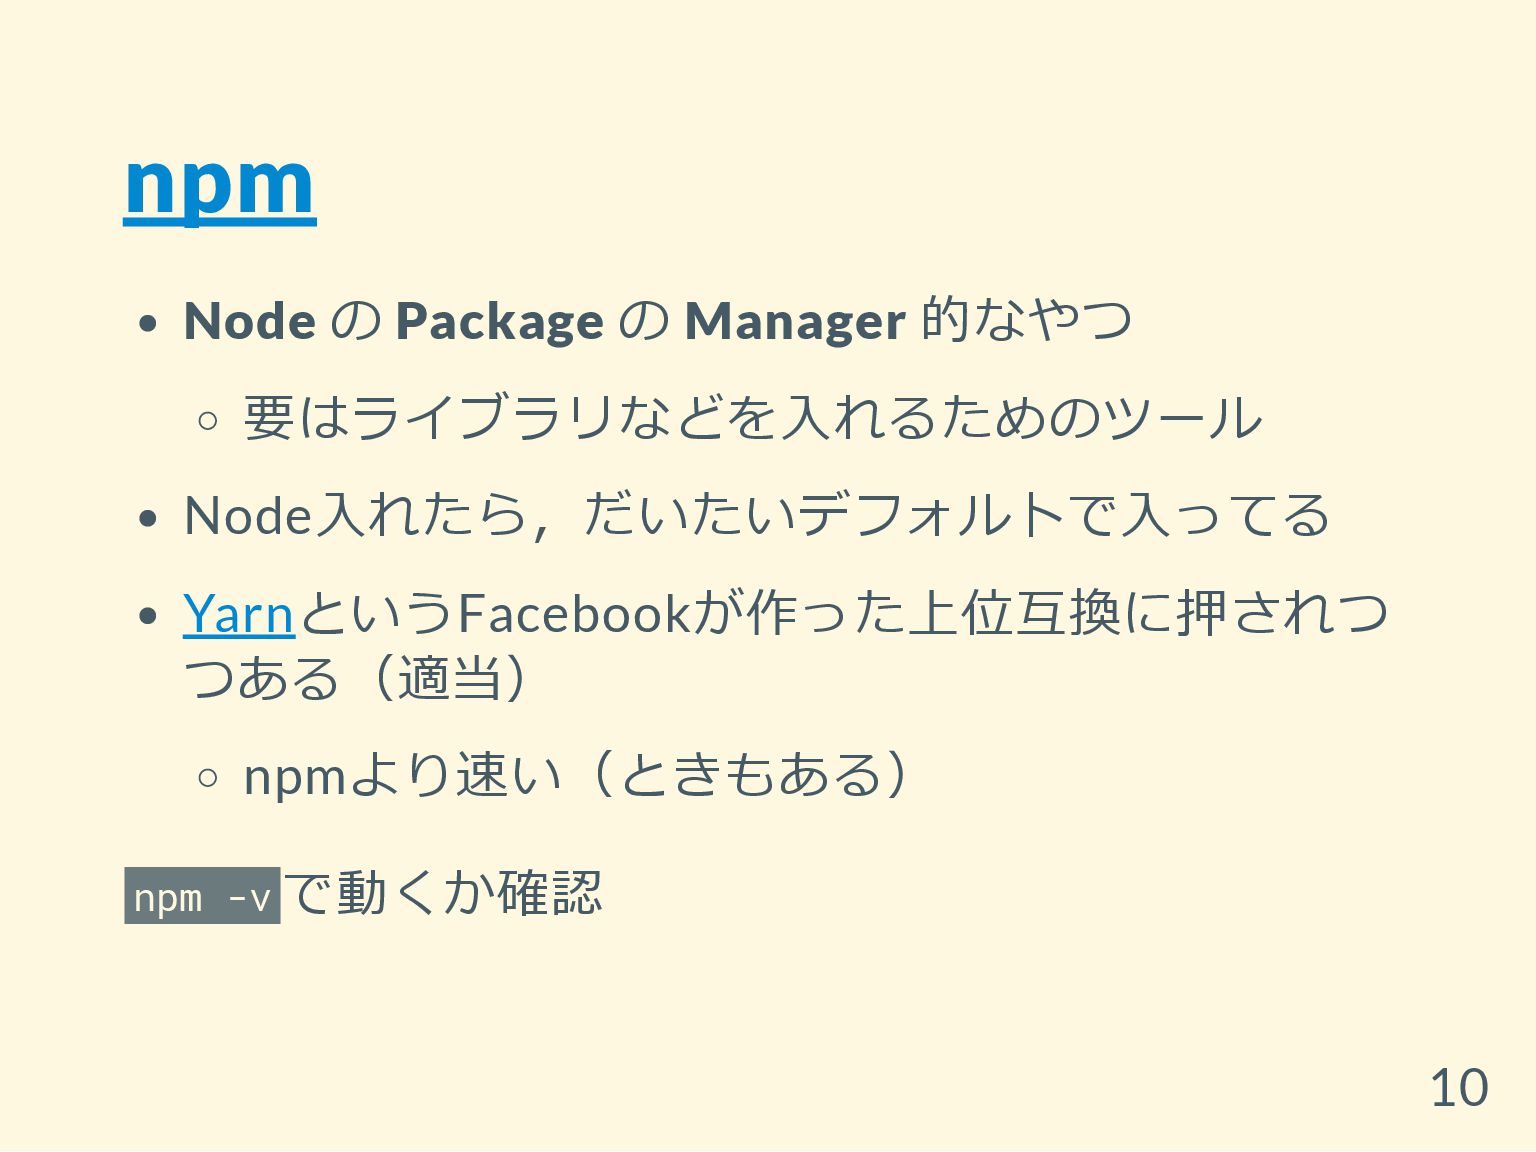
npm Node の Package の Manager 的なやつ 要はライブラリなどを入れるためのツール Node入れたら,だいたいデフォルトで入ってる YarnというFacebookが作った上位互換に押されつ
つある(適当) npmより速い(ときもある) npm -v で動くか確認 10
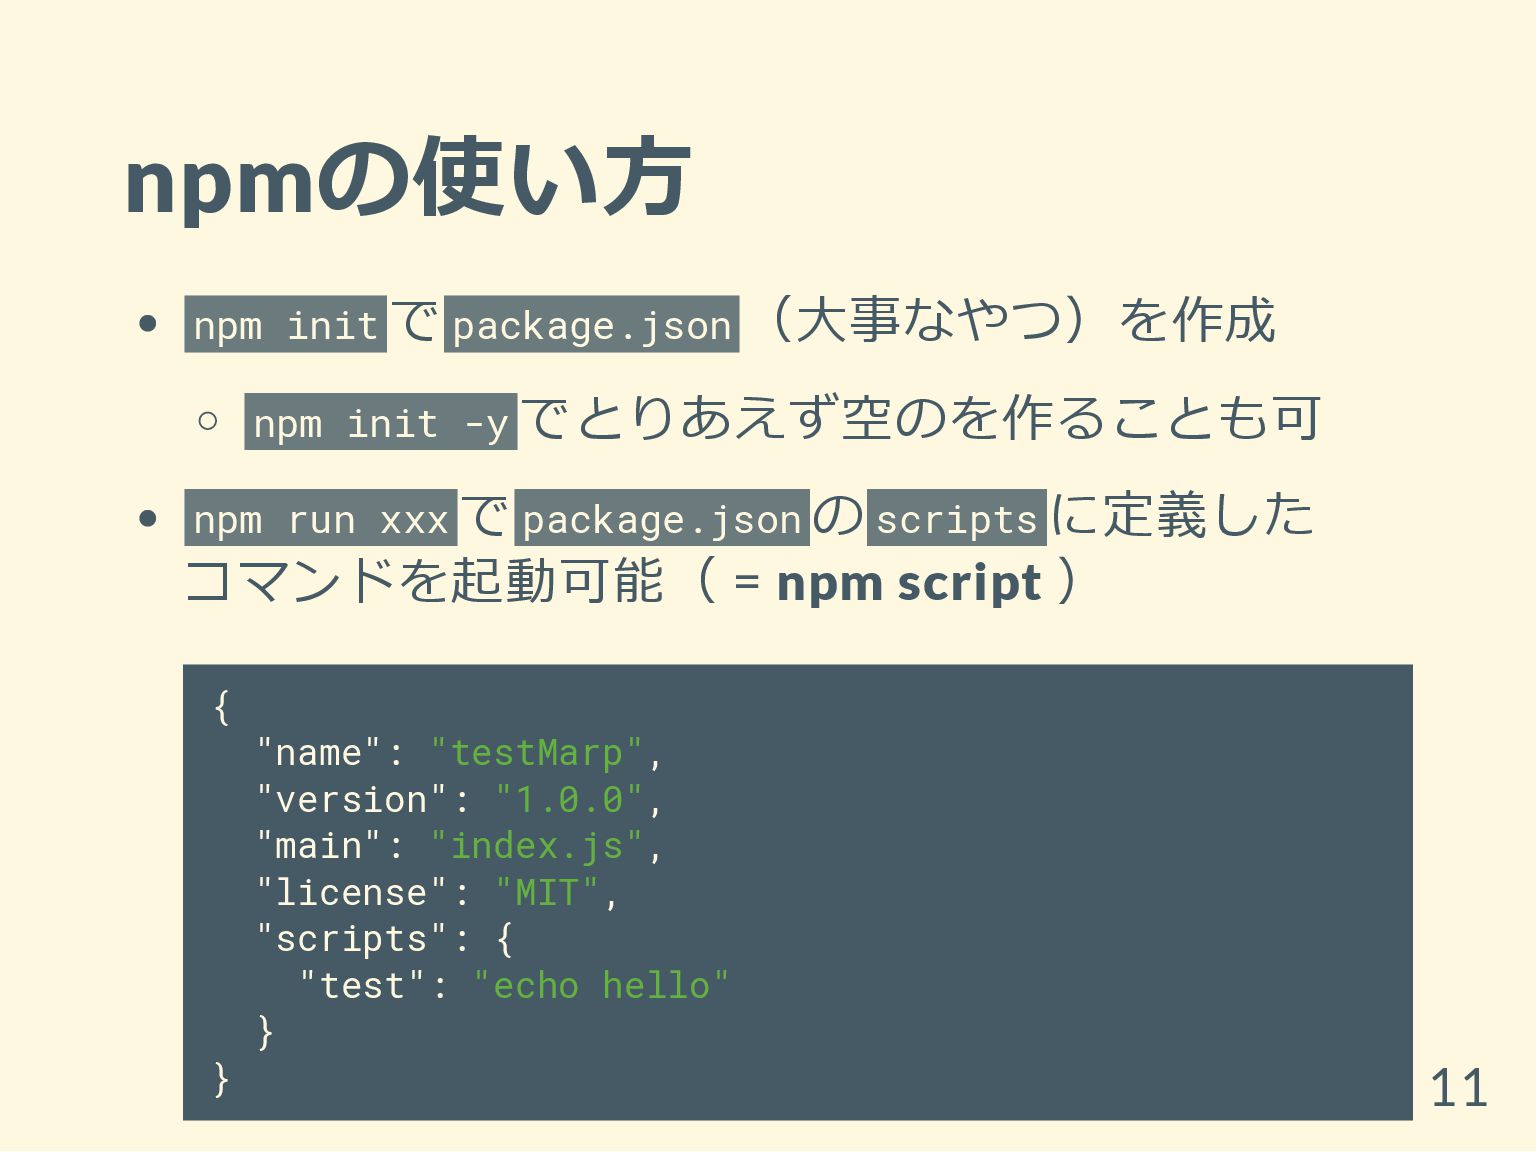
npmの使い方 npm init で package.json (大事なやつ)を作成 npm init -y でとりあえず空のを作ることも可
npm run xxx で package.json の scripts に定義した コマンドを起動可能( = npm script ) { "name": "testMarp", "version": "1.0.0", "main": "index.js", "license": "MIT", "scripts": { "test": "echo hello" } } 11
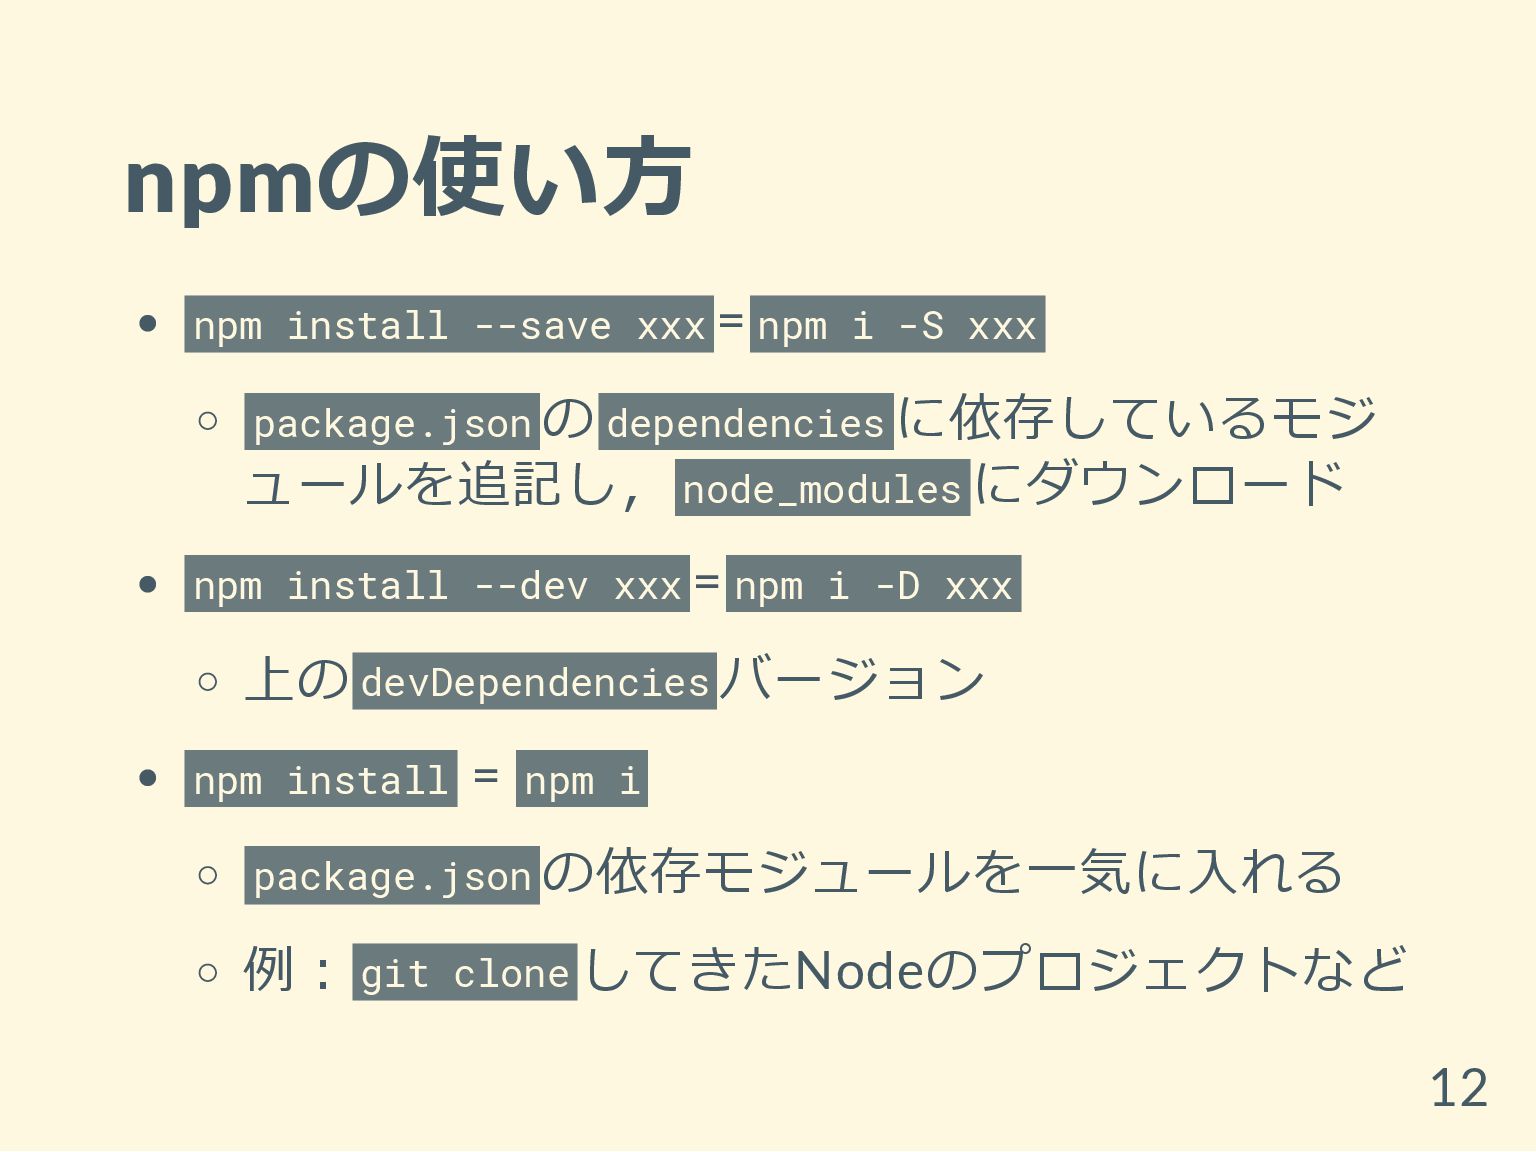
npmの使い方 npm install --save xxx = npm i -S xxx
package.json の dependencies に依存しているモジ ュールを追記し, node_modules にダウンロード npm install --dev xxx = npm i -D xxx 上の devDependencies バージョン npm install = npm i package.json の依存モジュールを一気に入れる 例: git clone してきたNodeのプロジェクトなど 12
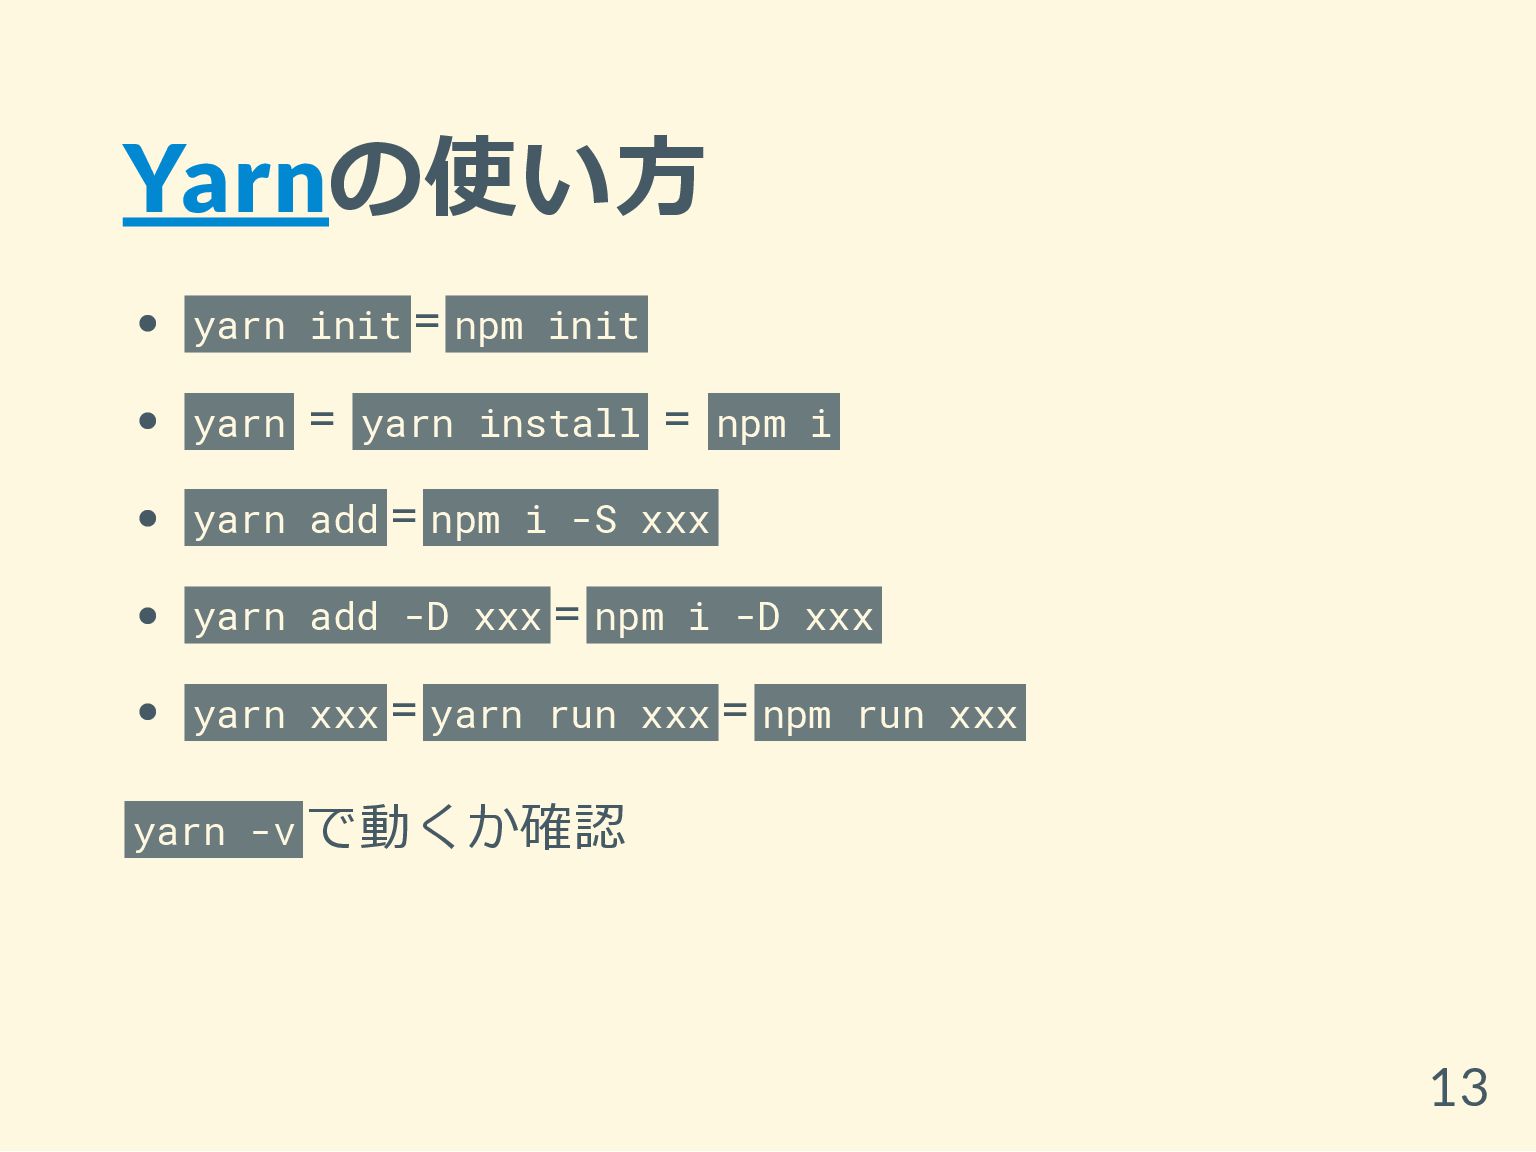
Yarnの使い方 yarn init = npm init yarn = yarn install
= npm i yarn add = npm i -S xxx yarn add -D xxx = npm i -D xxx yarn xxx = yarn run xxx = npm run xxx yarn -v で動くか確認 13
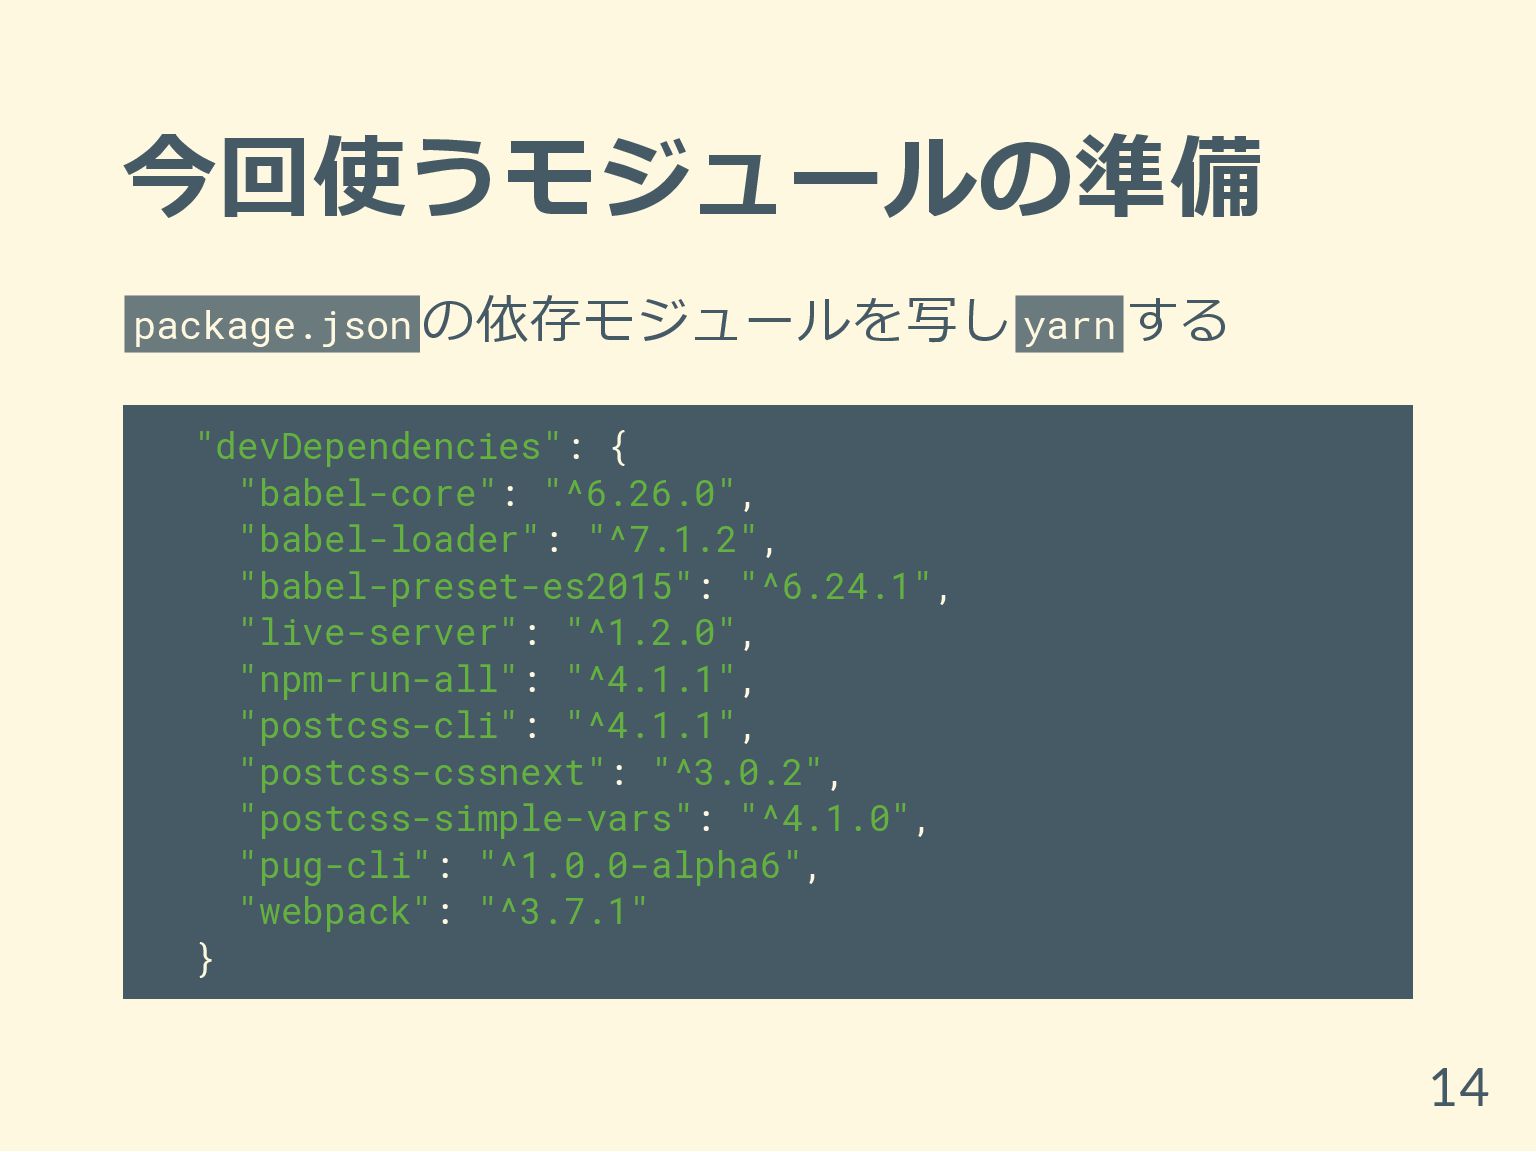
今回使うモジュールの準備 package.json の依存モジュールを写し yarn する "devDependencies": { "babel-core": "^6.26.0", "babel-loader":
"^7.1.2", "babel-preset-es2015": "^6.24.1", "live-server": "^1.2.0", "npm-run-all": "^4.1.1", "postcss-cli": "^4.1.1", "postcss-cssnext": "^3.0.2", "postcss-simple-vars": "^4.1.0", "pug-cli": "^1.0.0-alpha6", "webpack": "^3.7.1" } 14
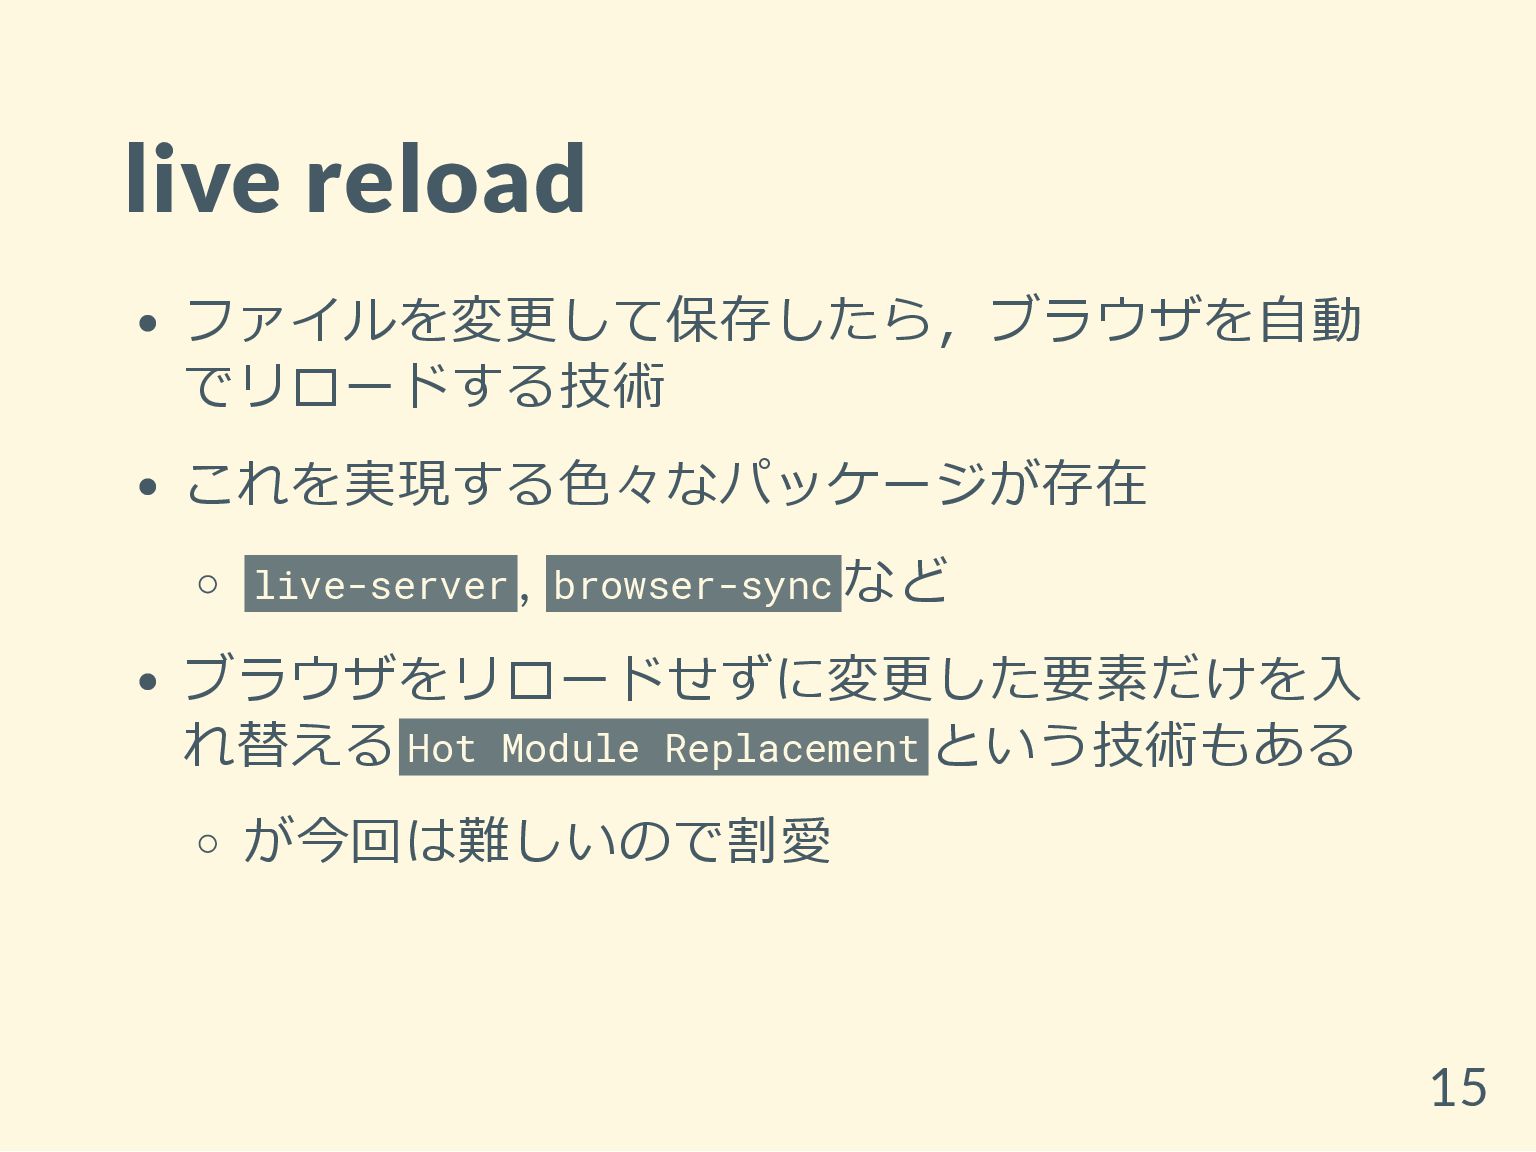
live reload ファイルを変更して保存したら,ブラウザを自動 でリロードする技術 これを実現する色々なパッケージが存在 live-server , browser-sync など ブラウザをリロードせずに変更した要素だけを入
れ替える Hot Module Replacement という技術もある が今回は難しいので割愛 15
live-serverを使ってみる 1. dist フォルダを作成し,その中に index.html を作成 2. scripts に "watch:browser":
"live-server dist --browser=chrome --watch=/" を追加 3. yarn watch:browser したら, dist/index.html を編集 して保存するとブラウザがリロードする 出力フォルダ名をよく dist にするけど,distribution(配布 物) や district(特定の場所) という説がある 16
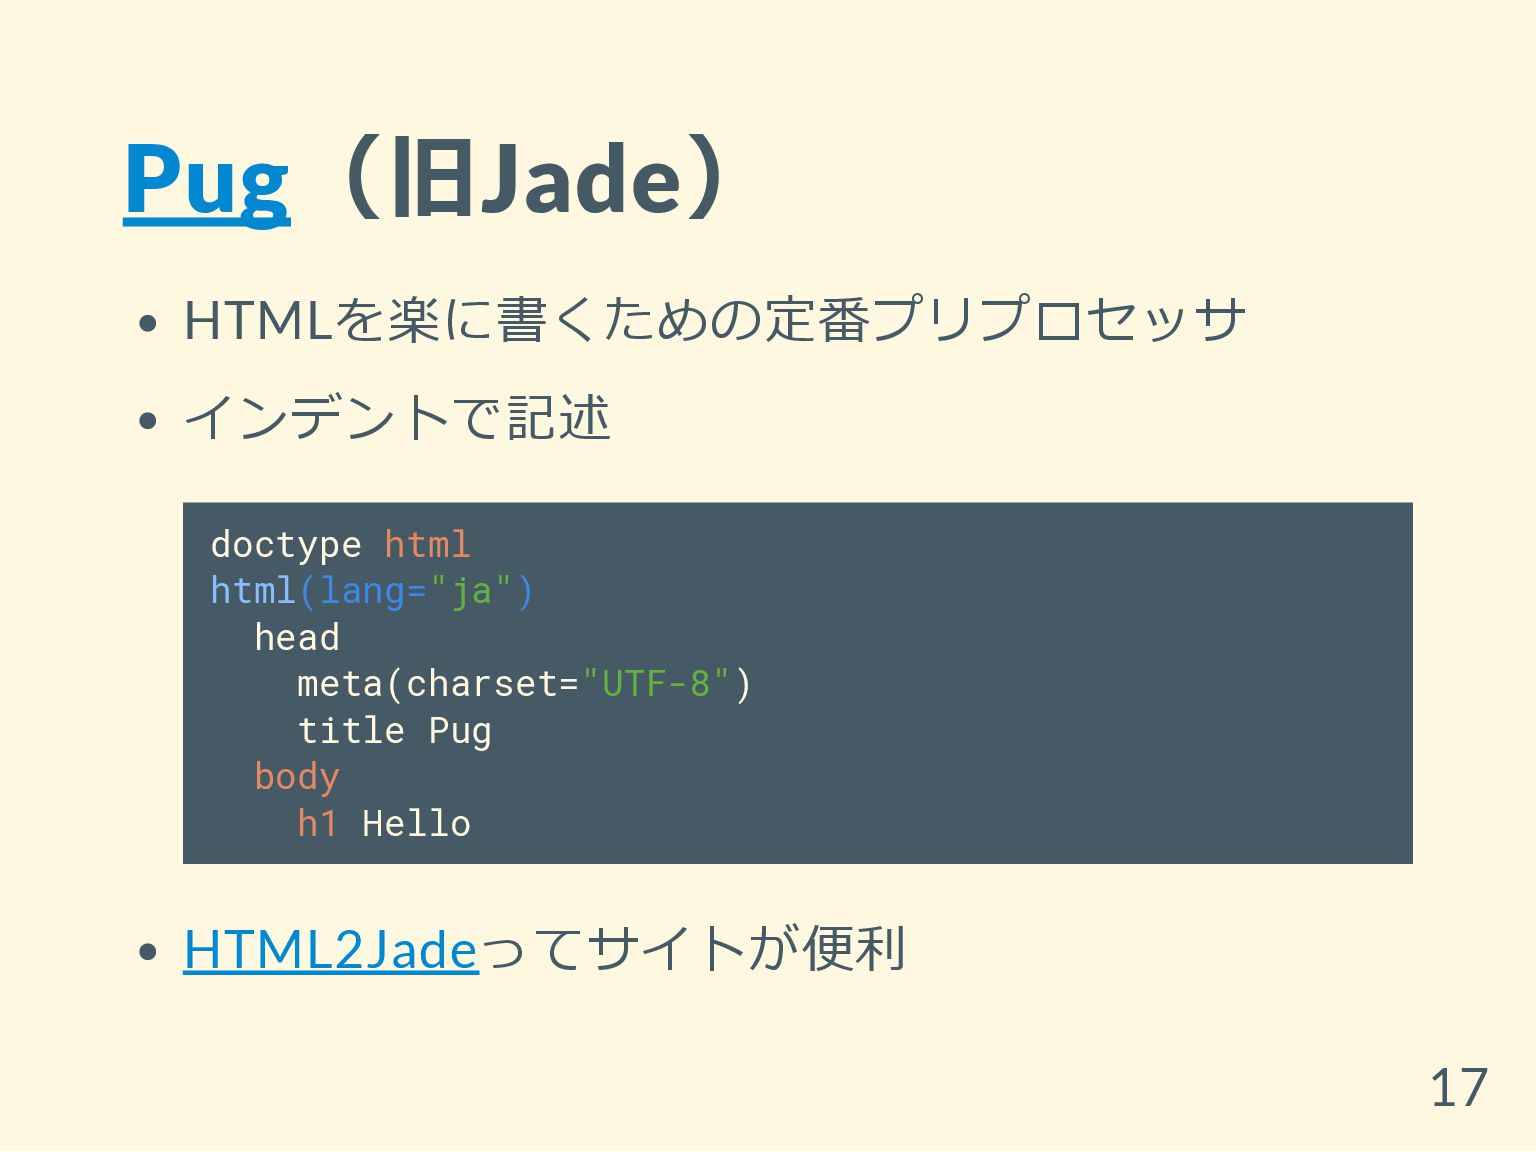
Pug(旧Jade) HTMLを楽に書くための定番プリプロセッサ インデントで記述 doctype html html(lang="ja") head meta(charset="UTF-8") title Pug
body h1 Hello HTML2Jadeってサイトが便利 17
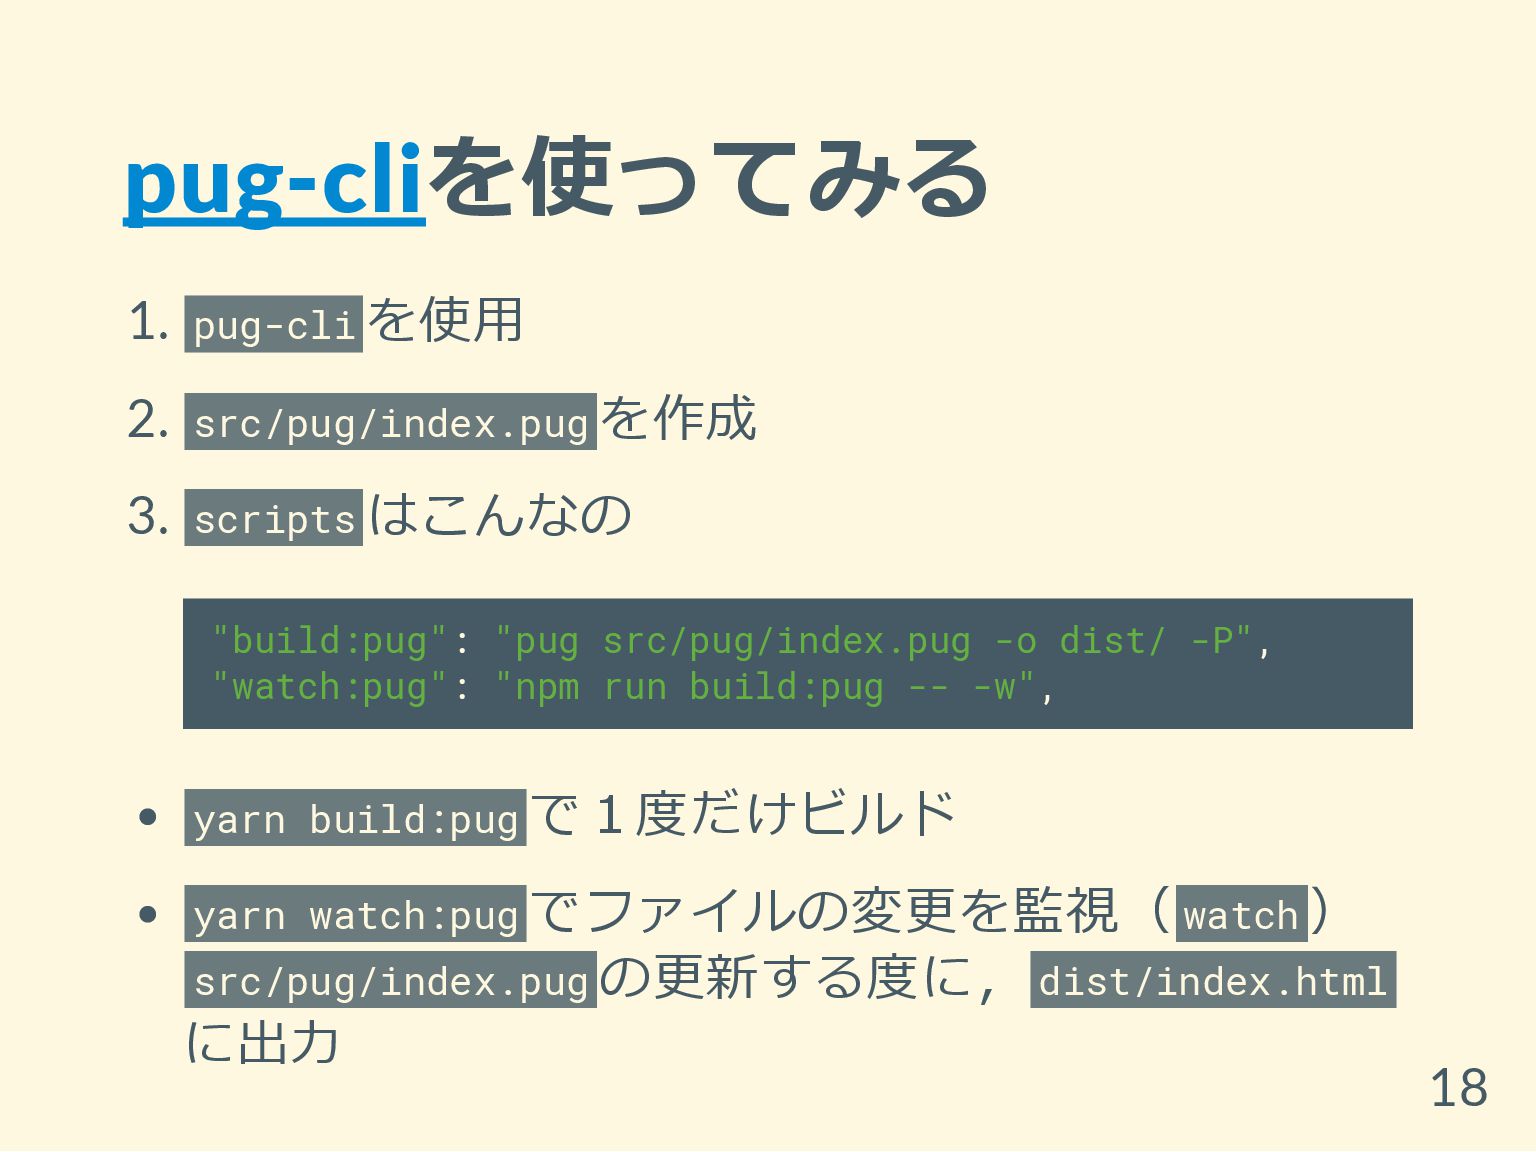
pug-cliを使ってみる 1. pug-cli を使用 2. src/pug/index.pug を作成 3. scripts はこんなの
"build:pug": "pug src/pug/index.pug -o dist/ -P", "watch:pug": "npm run build:pug -- -w", yarn build:pug で1度だけビルド yarn watch:pug でファイルの変更を監視( watch ) src/pug/index.pug の更新する度に, dist/index.html に出力 18
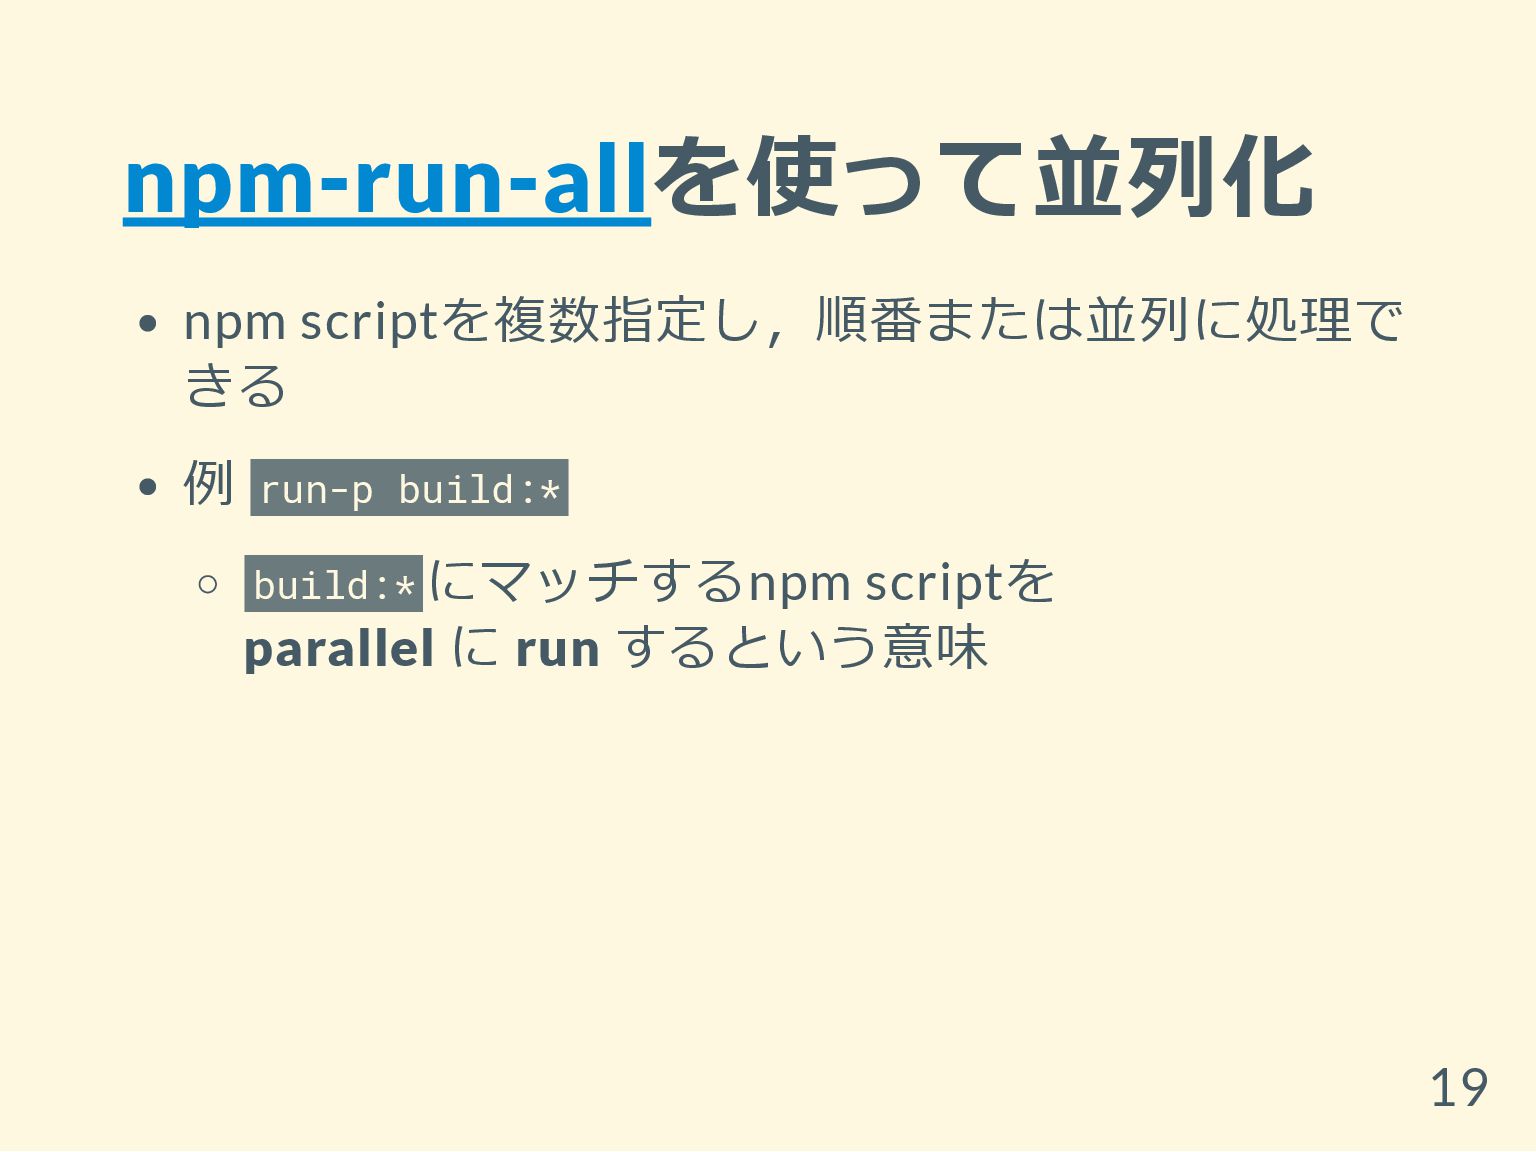
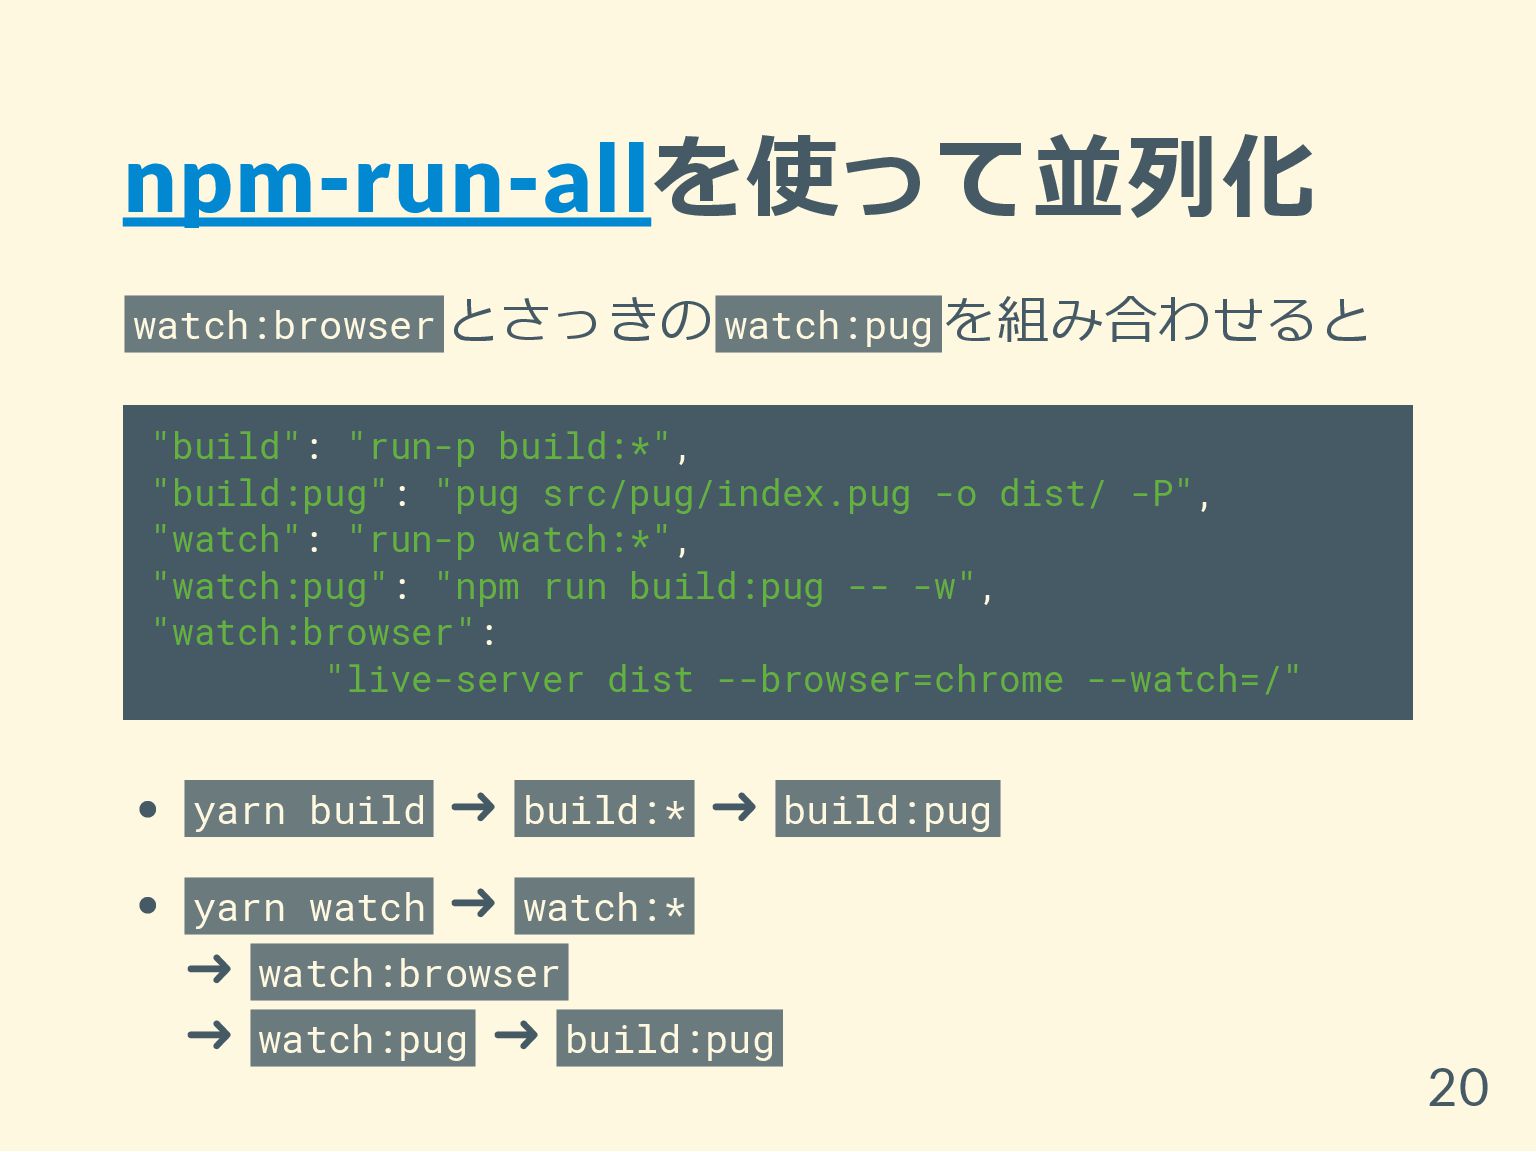
npm-run-allを使って並列化 npm scriptを複数指定し,順番または並列に処理で きる 例 run-p build:* build:* にマッチするnpm scriptを
parallel に run するという意味 19
npm-run-allを使って並列化 watch:browser とさっきの watch:pug を組み合わせると "build": "run-p build:*", "build:pug": "pug
src/pug/index.pug -o dist/ -P", "watch": "run-p watch:*", "watch:pug": "npm run build:pug -- -w", "watch:browser": "live-server dist --browser=chrome --watch=/" yarn build ➜ build:* ➜ build:pug yarn watch ➜ watch:* ➜ watch:browser ➜ watch:pug ➜ build:pug 20
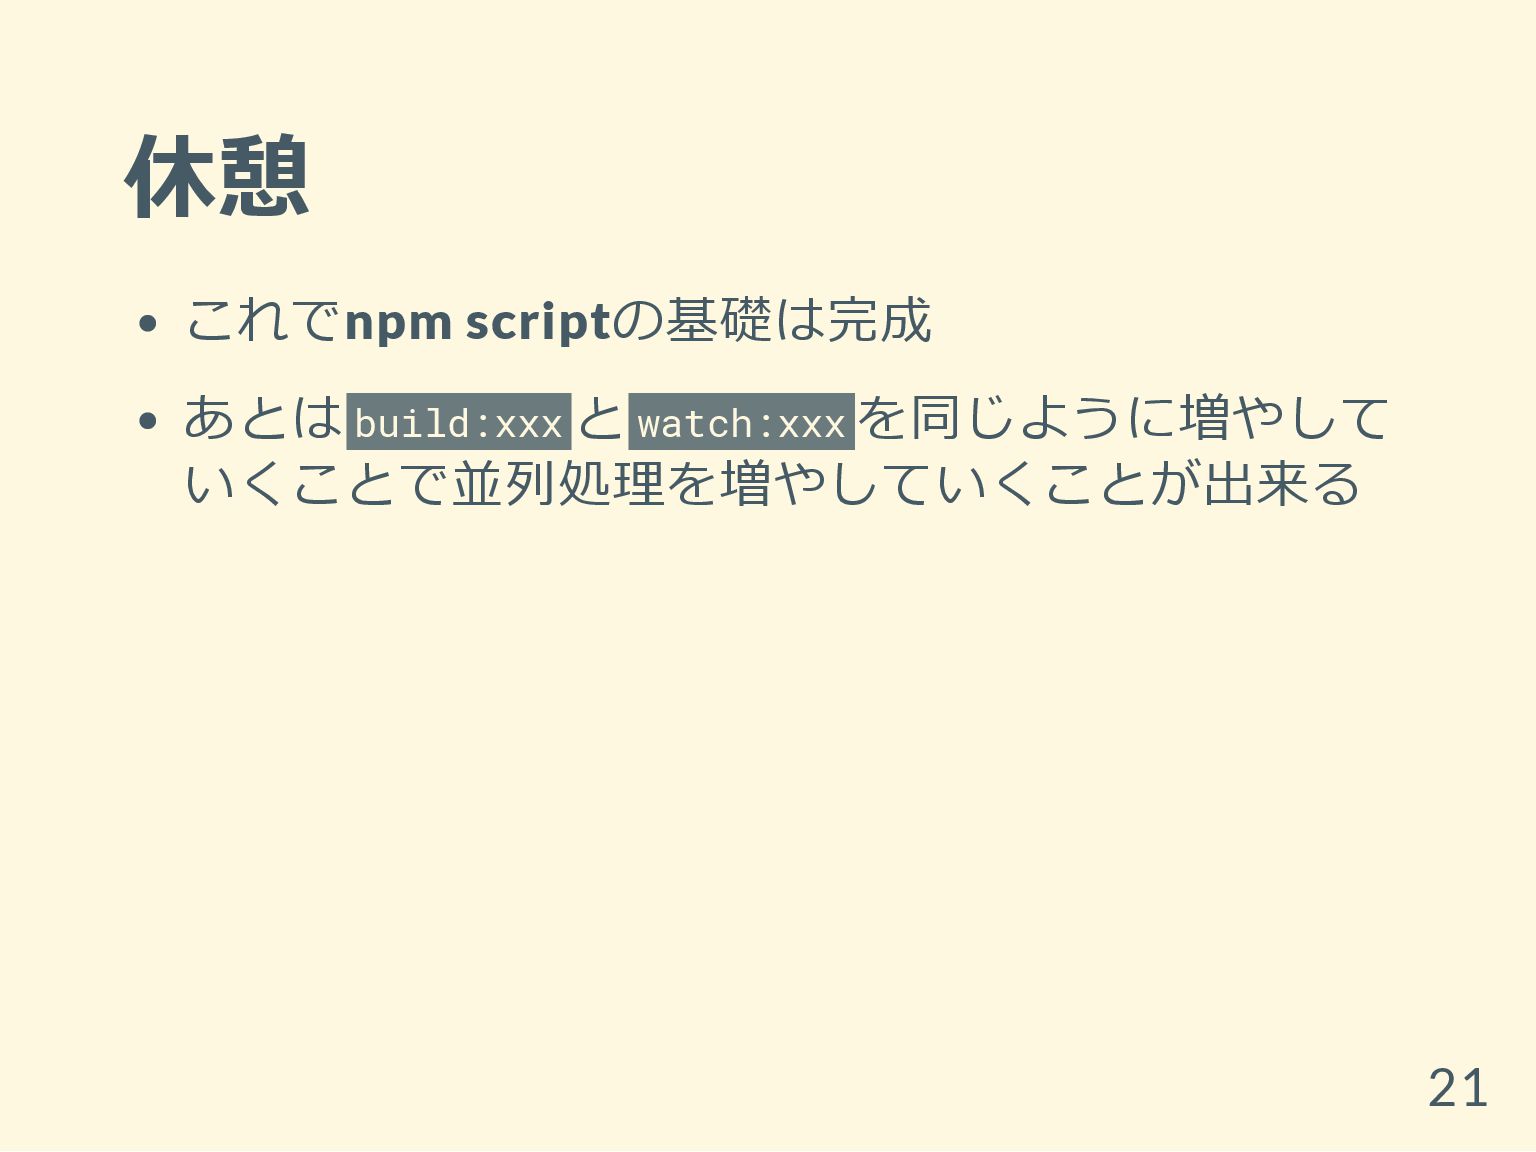
休憩 これでnpm scriptの基礎は完成 あとは build:xxx と watch:xxx を同じように増やして いくことで並列処理を増やしていくことが出来る 21
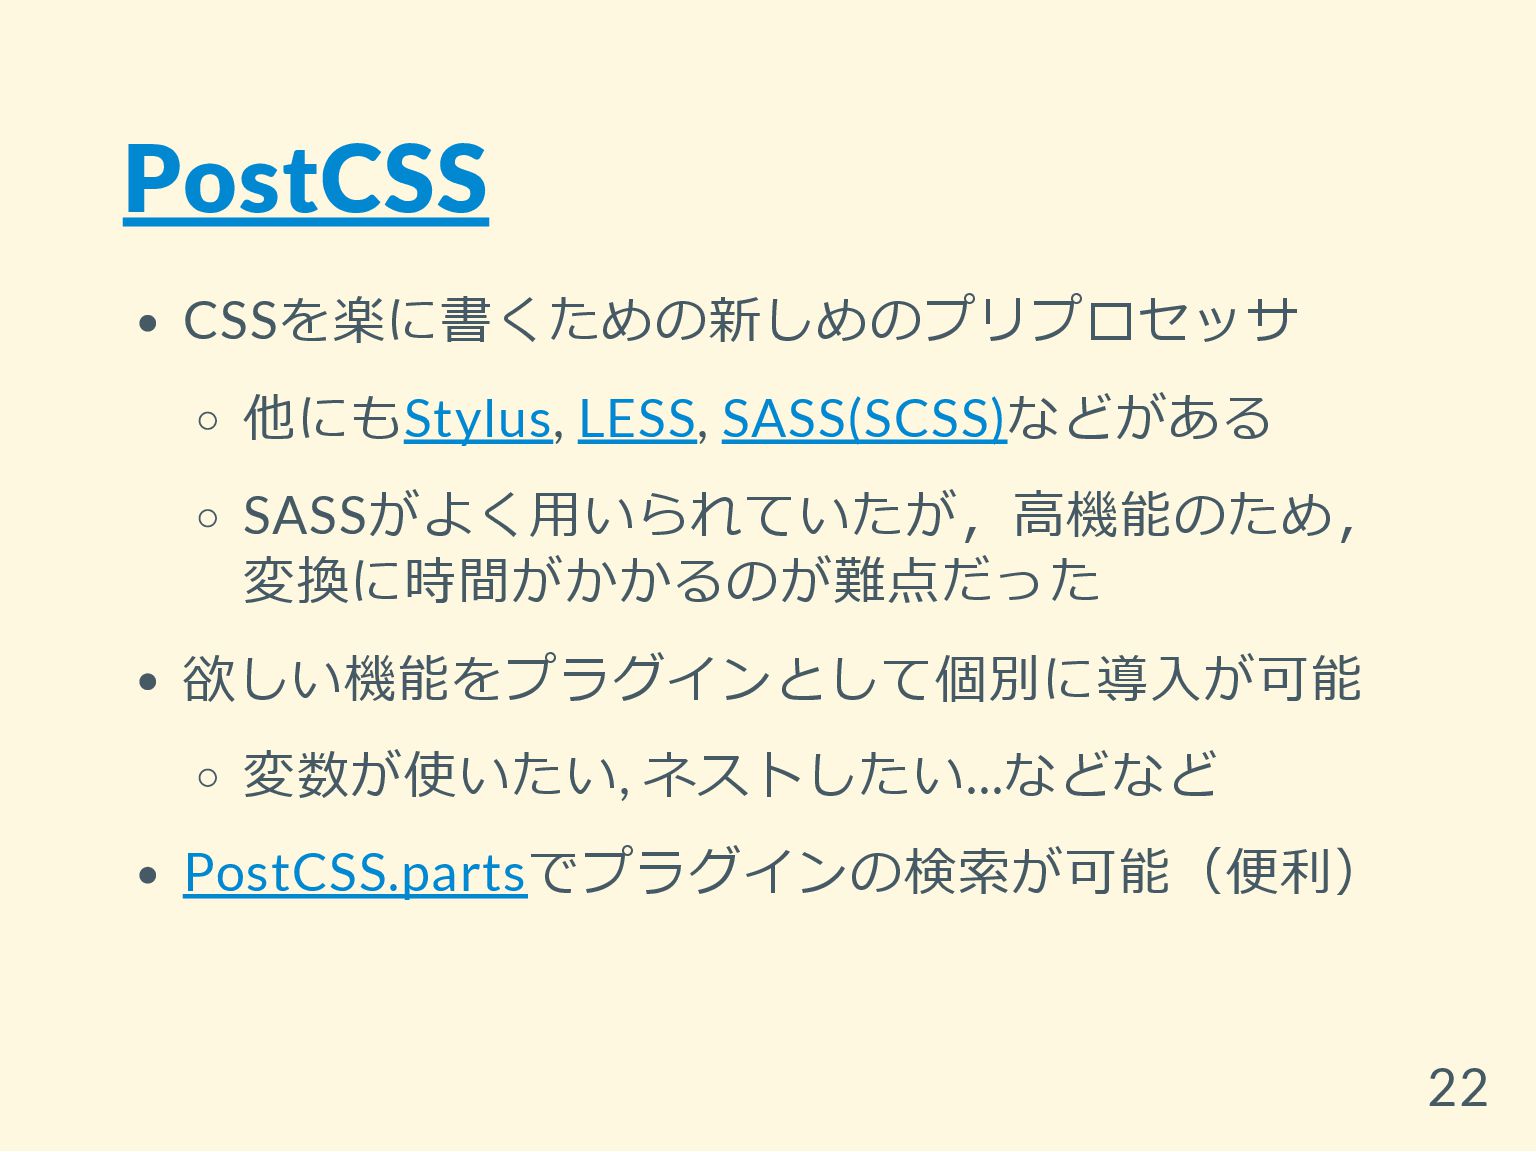
PostCSS CSSを楽に書くための新しめのプリプロセッサ 他にもStylus, LESS, SASS(SCSS)などがある SASSがよく用いられていたが,高機能のため, 変換に時間がかかるのが難点だった 欲しい機能をプラグインとして個別に導入が可能 変数が使いたい, ネストしたい...などなど
PostCSS.partsでプラグインの検索が可能(便利) 22
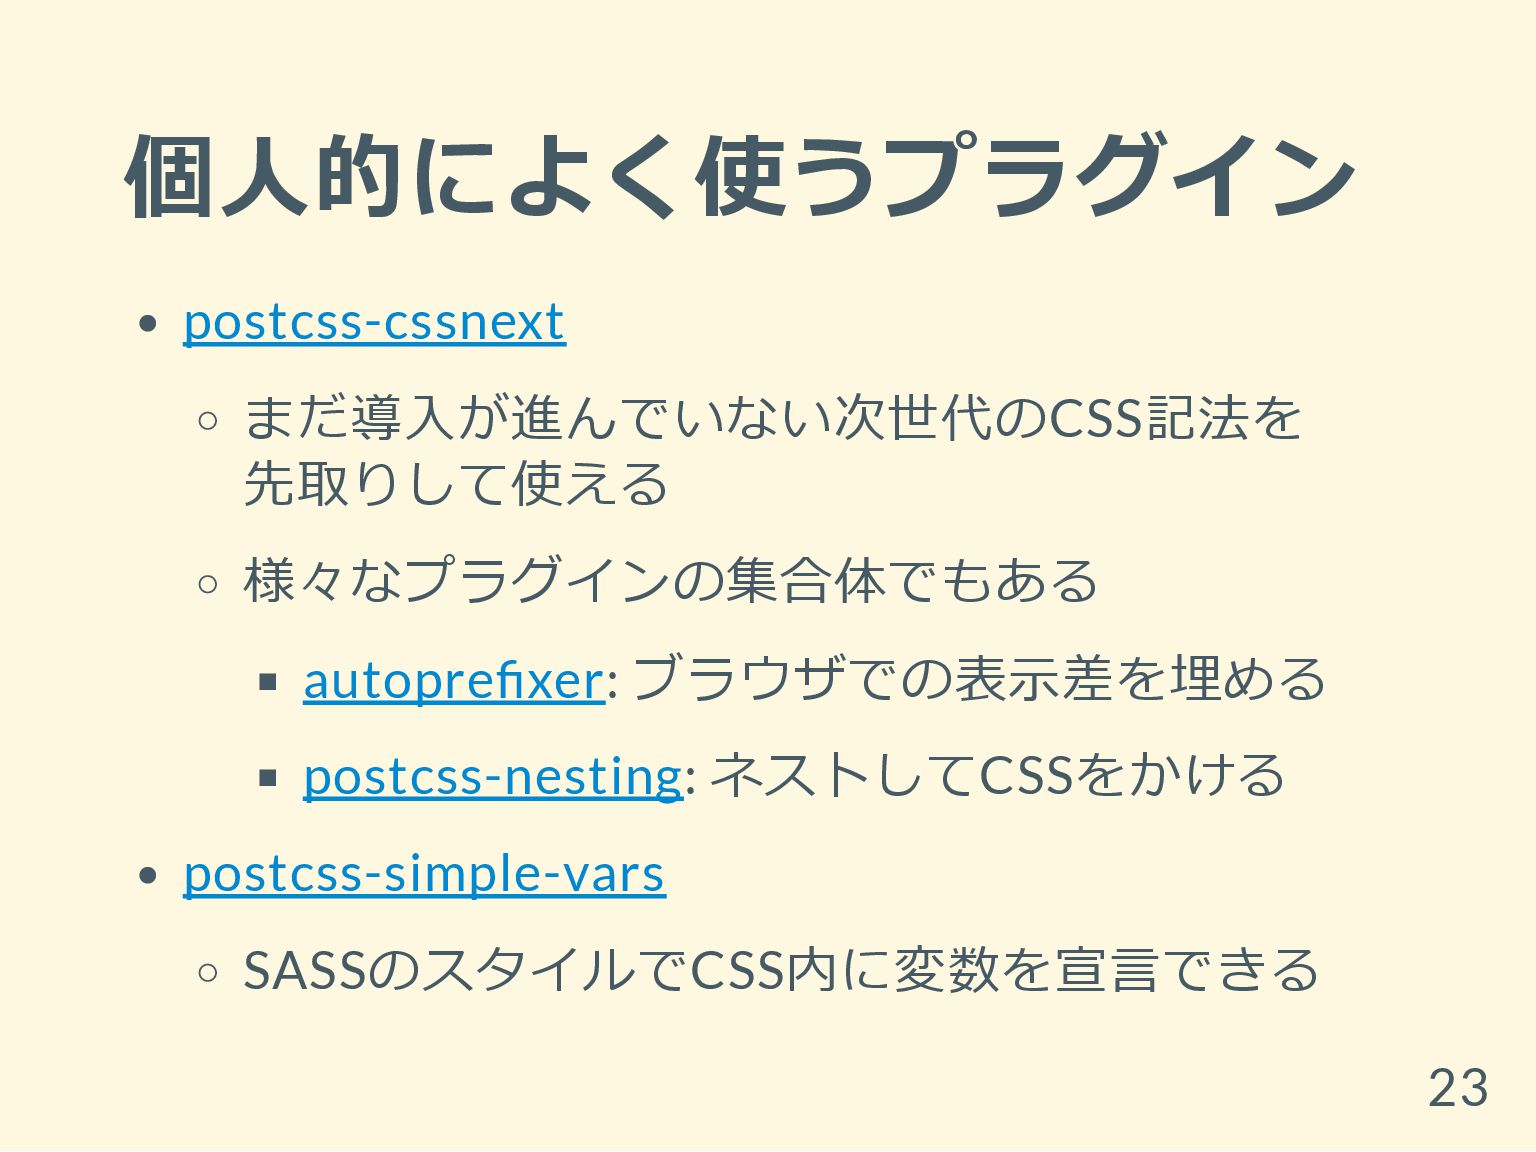
個人的によく使うプラグイン postcss-cssnext まだ導入が進んでいない次世代のCSS記法を 先取りして使える 様々なプラグインの集合体でもある autopre xer: ブラウザでの表示差を埋める postcss-nesting: ネストしてCSSをかける
postcss-simple-vars SASSのスタイルでCSS内に変数を宣言できる 23
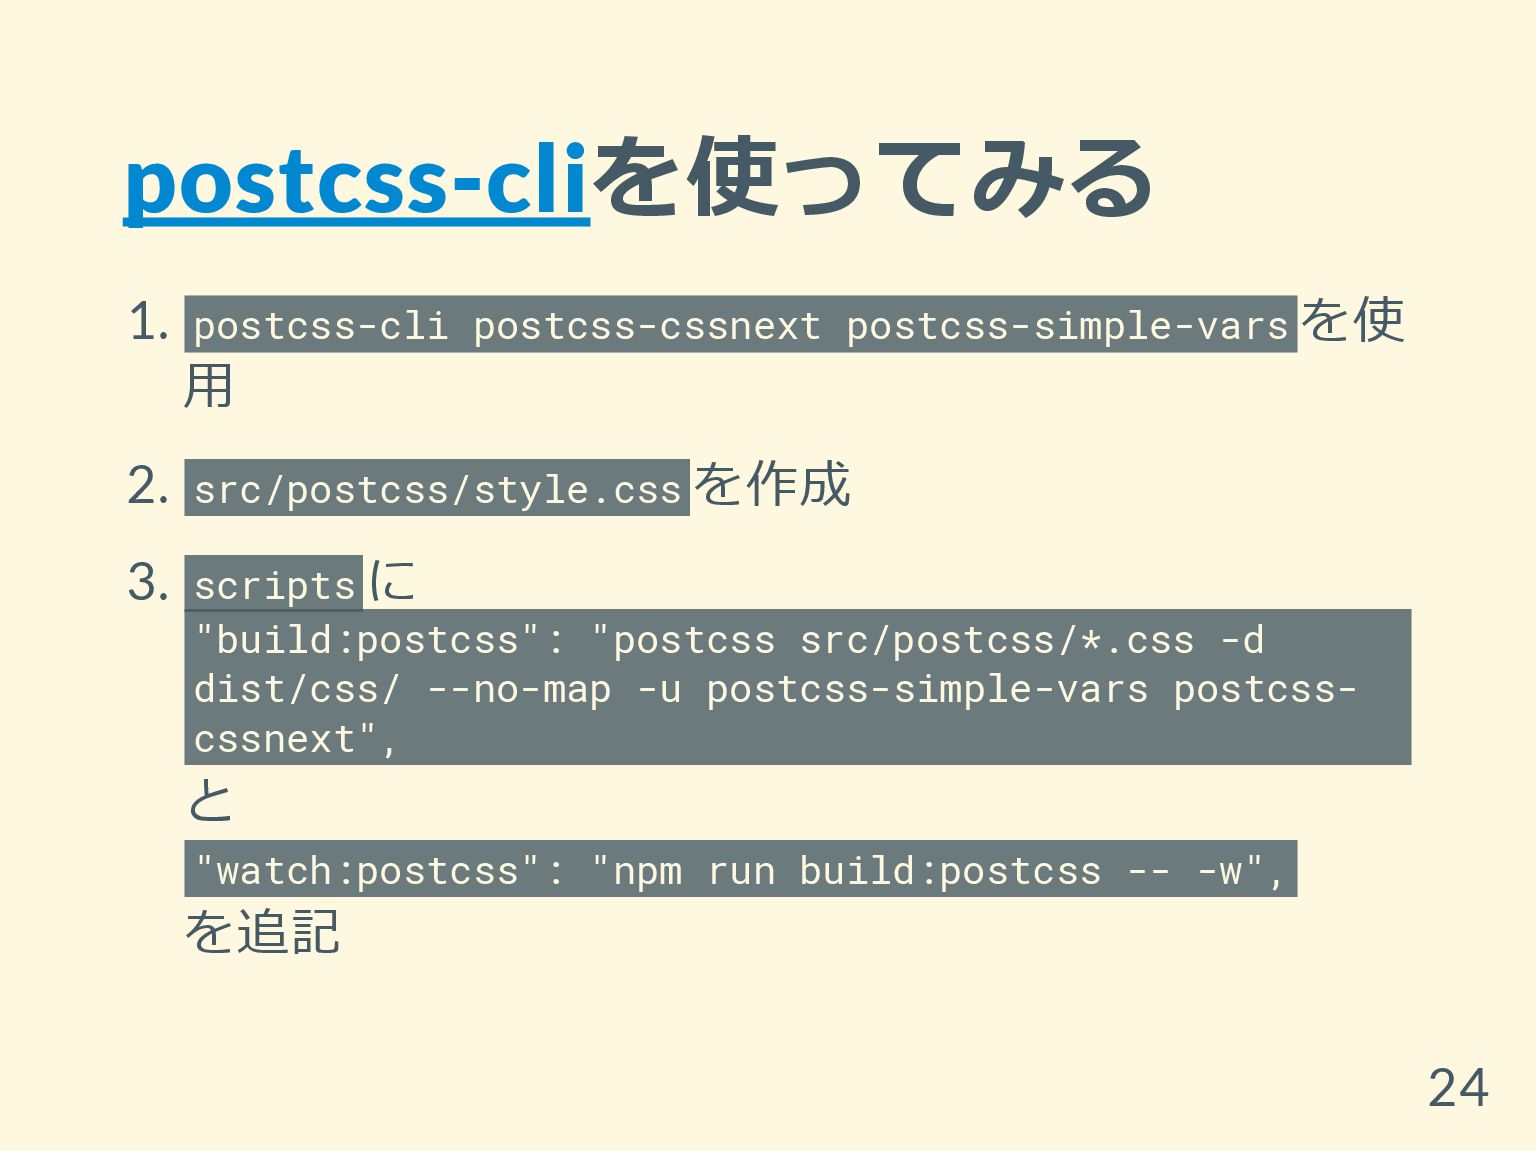
postcss-cliを使ってみる 1. postcss-cli postcss-cssnext postcss-simple-vars を使 用 2. src/postcss/style.css を作成
3. scripts に "build:postcss": "postcss src/postcss/*.css -d dist/css/ --no-map -u postcss-simple-vars postcss- cssnext", と "watch:postcss": "npm run build:postcss -- -w", を追記 24
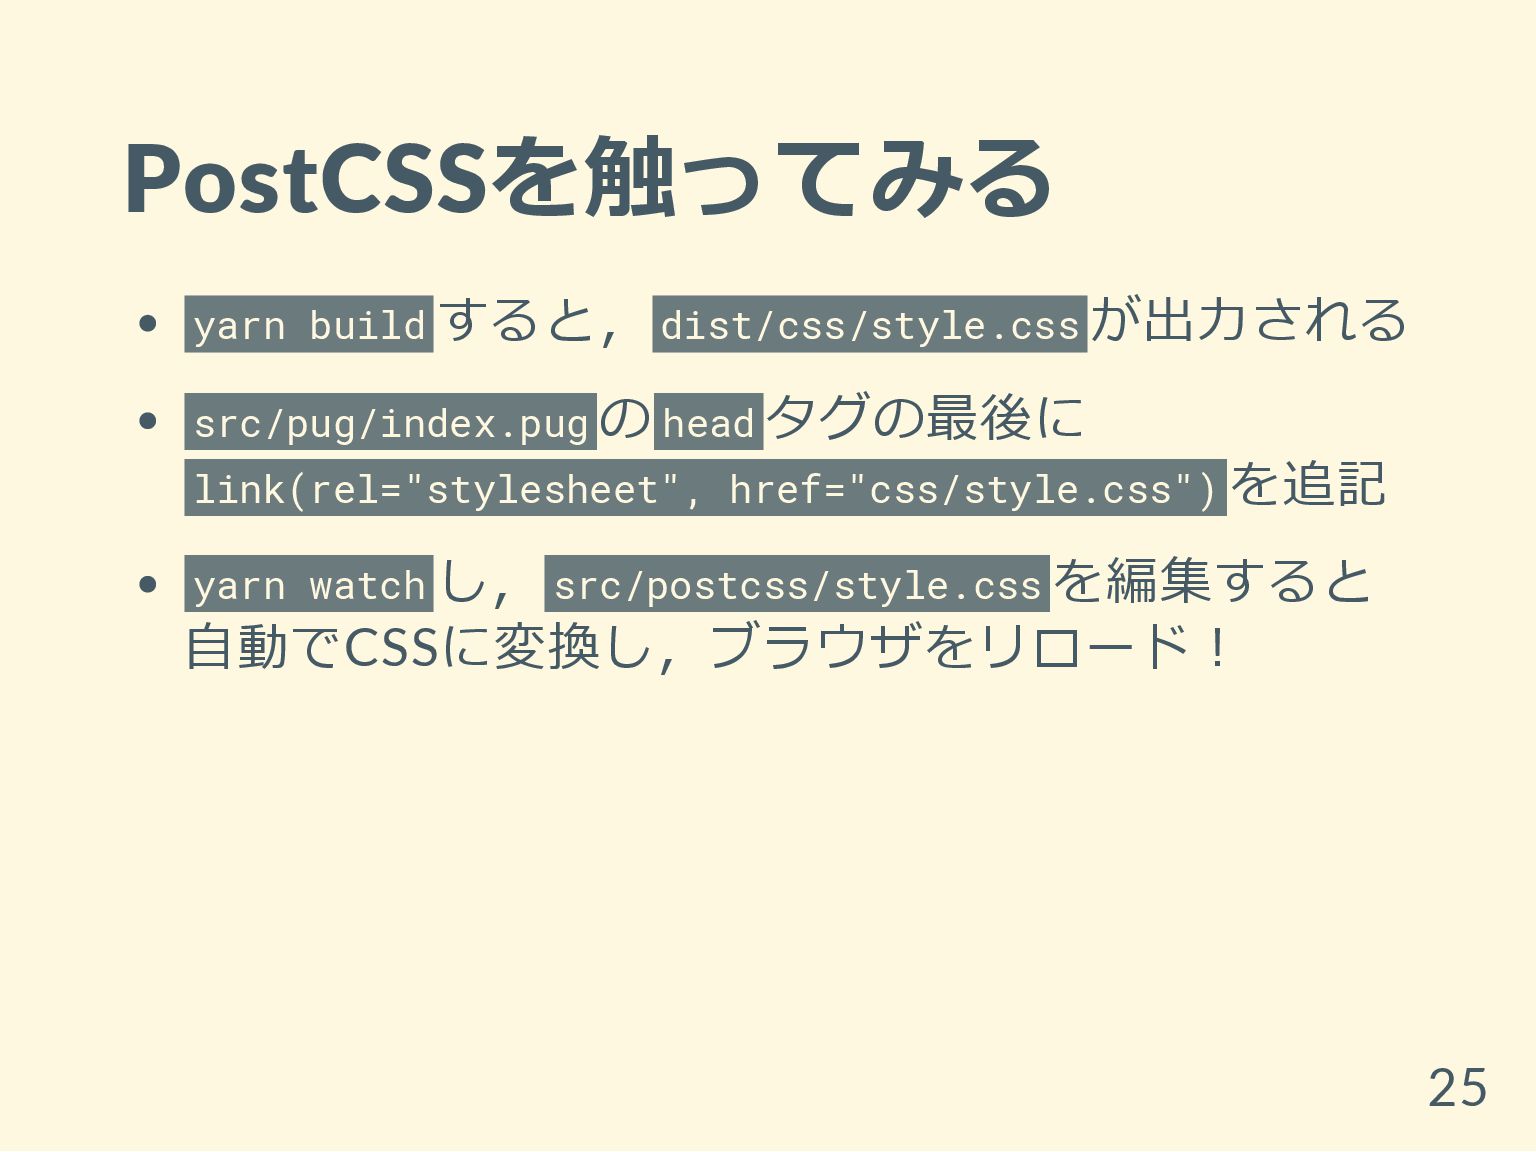
PostCSSを触ってみる yarn build すると, dist/css/style.css が出力される src/pug/index.pug の head タグの最後に
link(rel="stylesheet", href="css/style.css") を追記 yarn watch し, src/postcss/style.css を編集すると 自動でCSSに変換し,ブラウザをリロード! 25
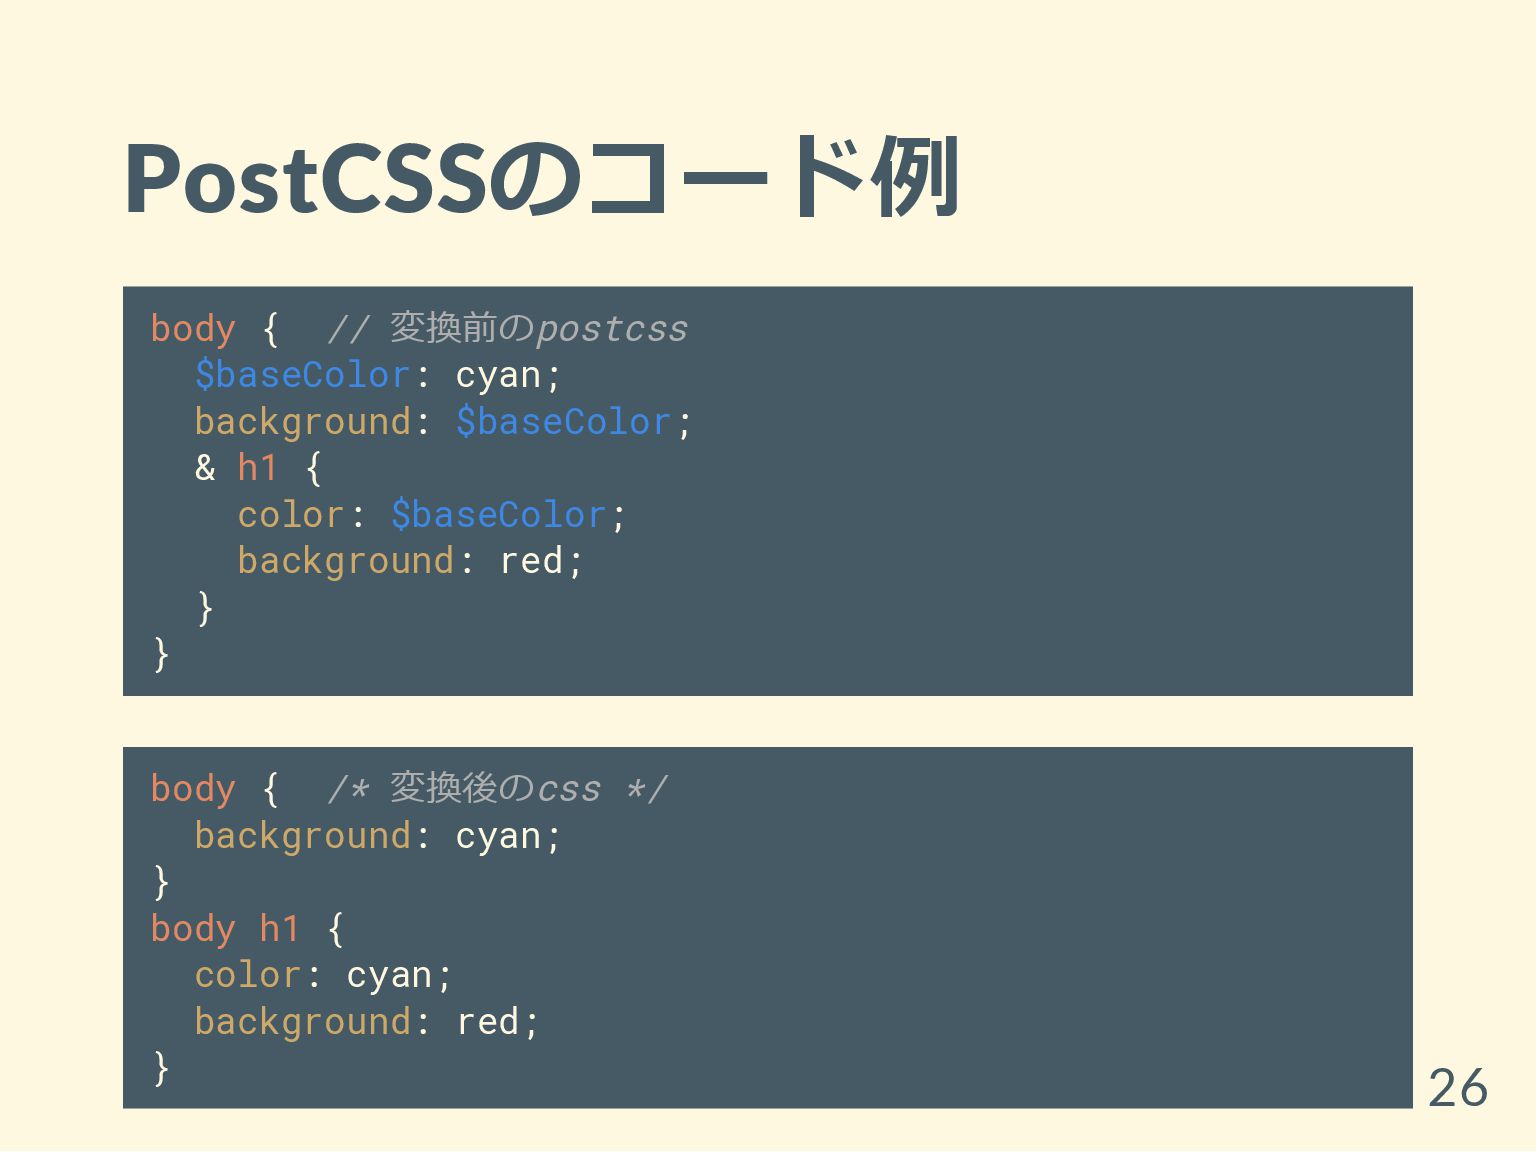
PostCSSのコード例 body { // 変換前のpostcss $baseColor: cyan; background: $baseColor; &
h1 { color: $baseColor; background: red; } } body { /* 変換後のcss */ background: cyan; } body h1 { color: cyan; background: red; } 26
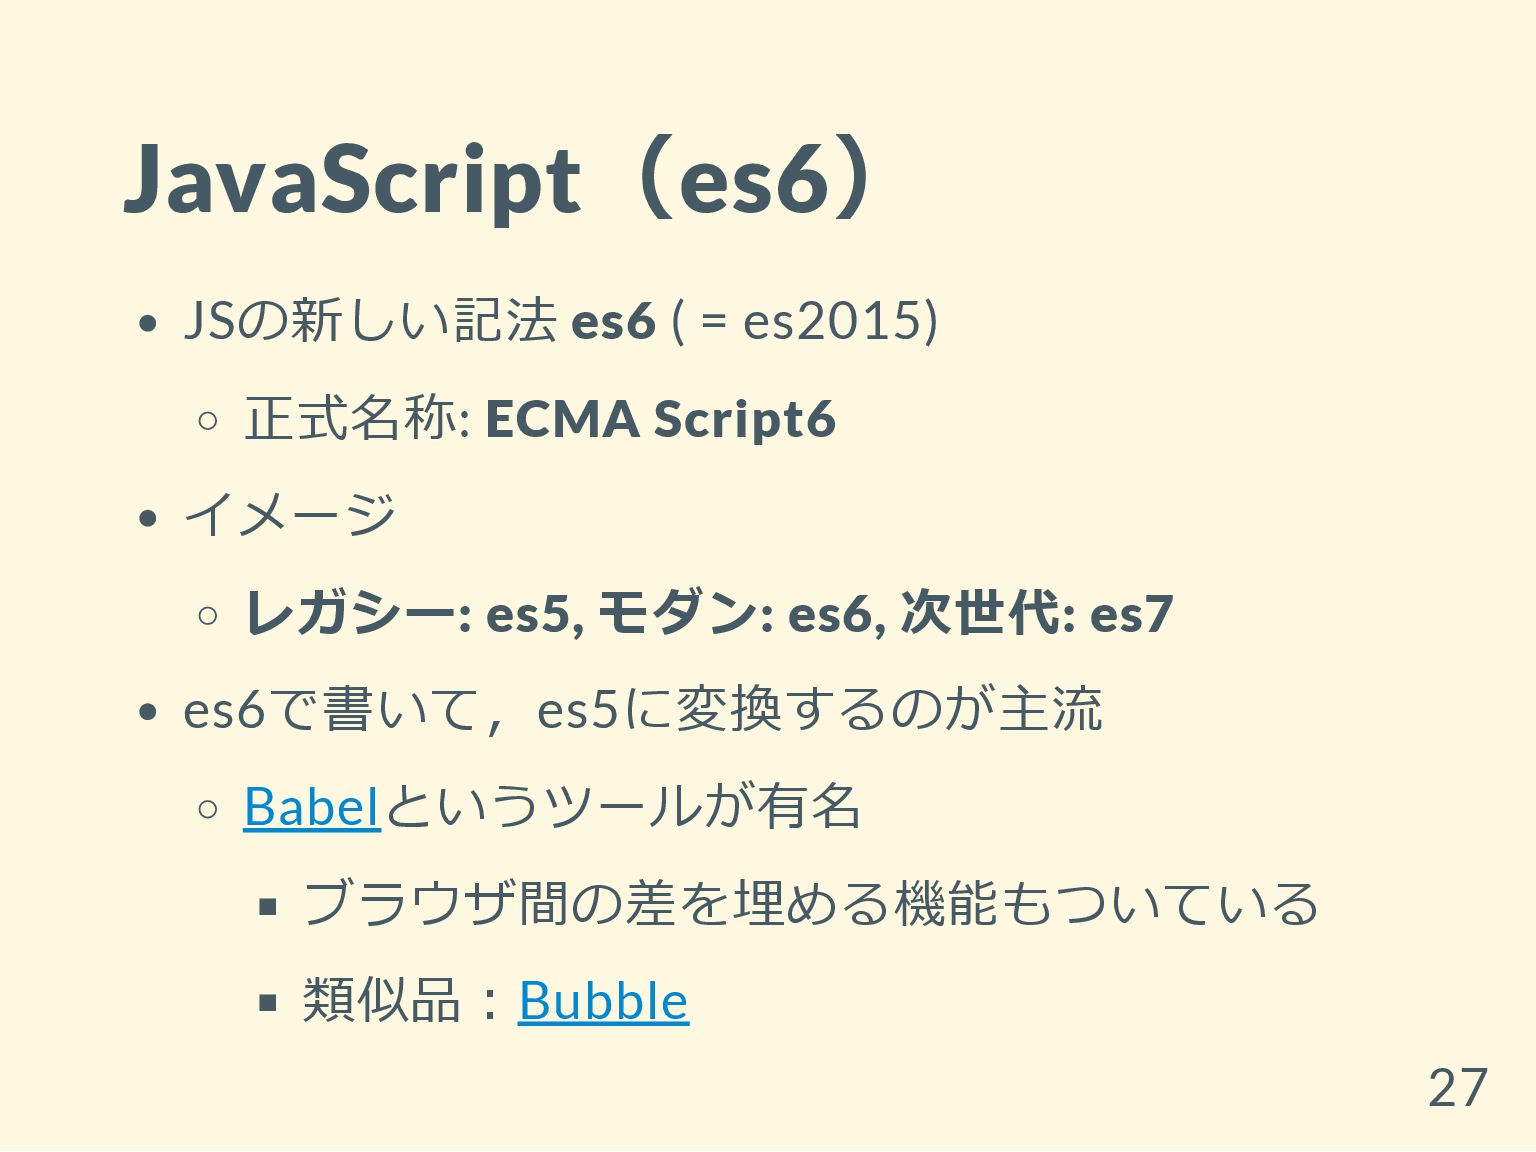
JavaScript(es6) JSの新しい記法 es6 ( = es2015) 正式名称: ECMA Script6 イメージ
レガシー: es5, モダン: es6, 次世代: es7 es6で書いて,es5に変換するのが主流 Babelというツールが有名 ブラウザ間の差を埋める機能もついている 類似品:Bubble 27
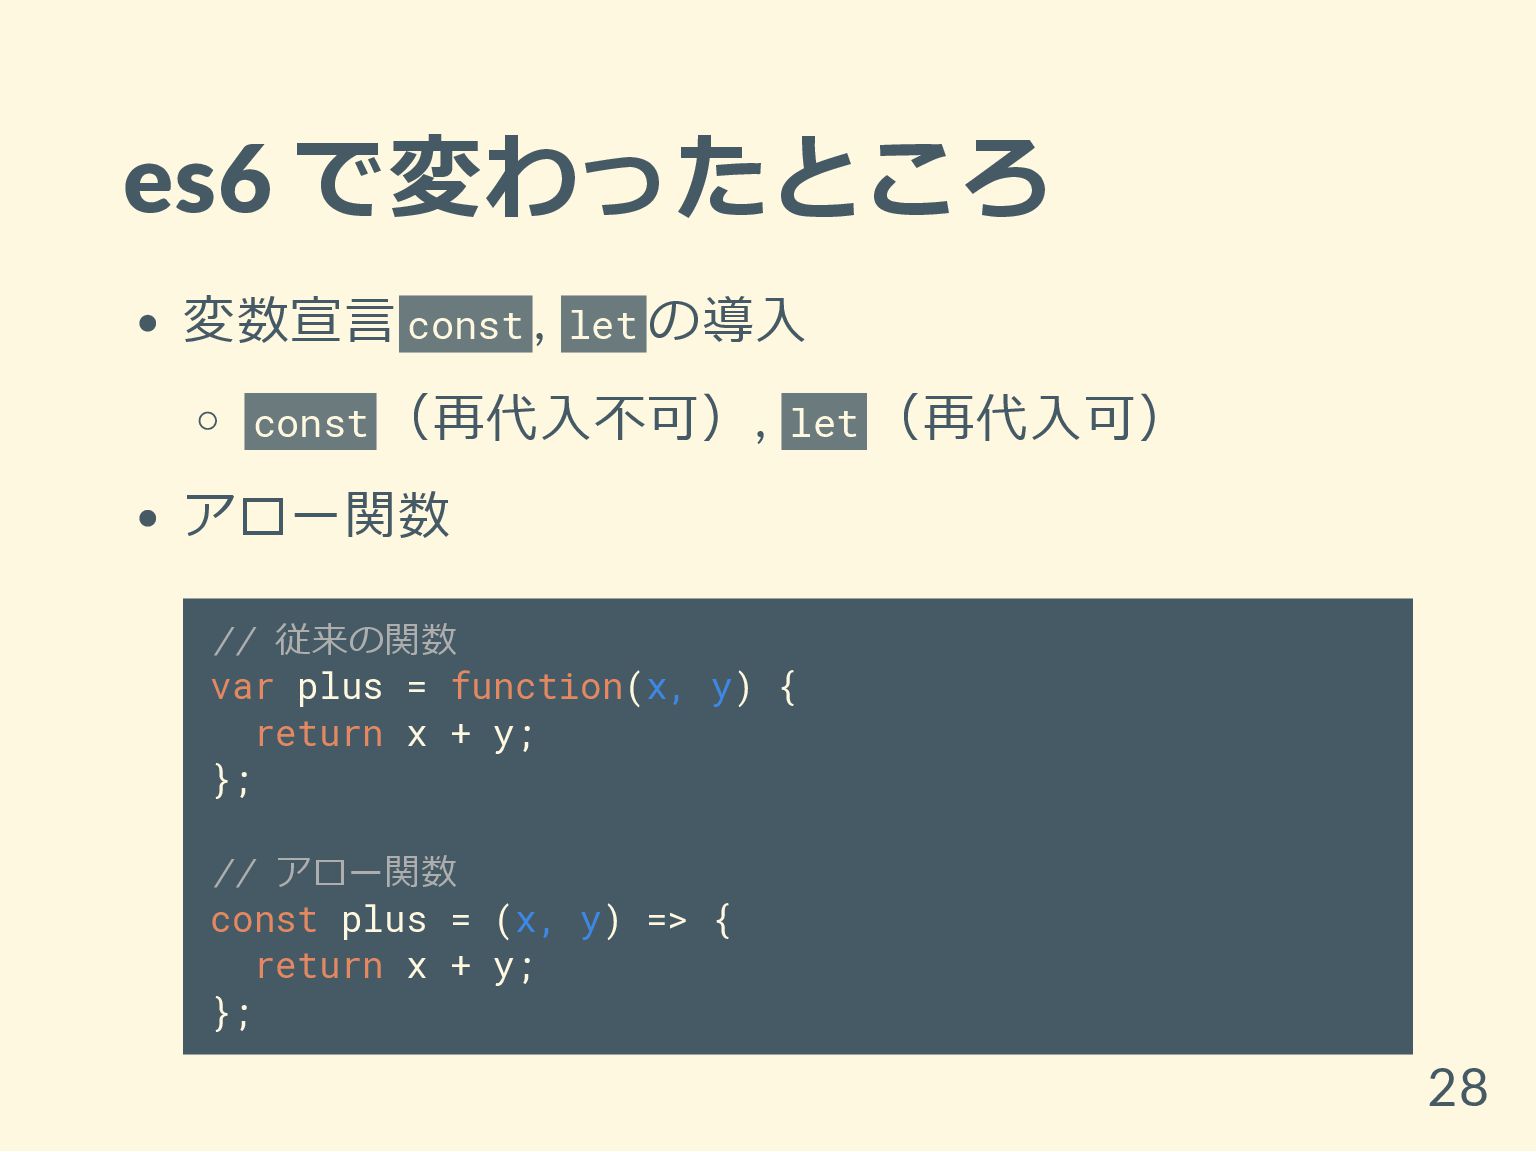
es6 で変わったところ 変数宣言 const , let の導入 const (再代入不可), let
(再代入可) アロー関数 // 従来の関数 var plus = function(x, y) { return x + y; }; // アロー関数 const plus = (x, y) => { return x + y; }; 28
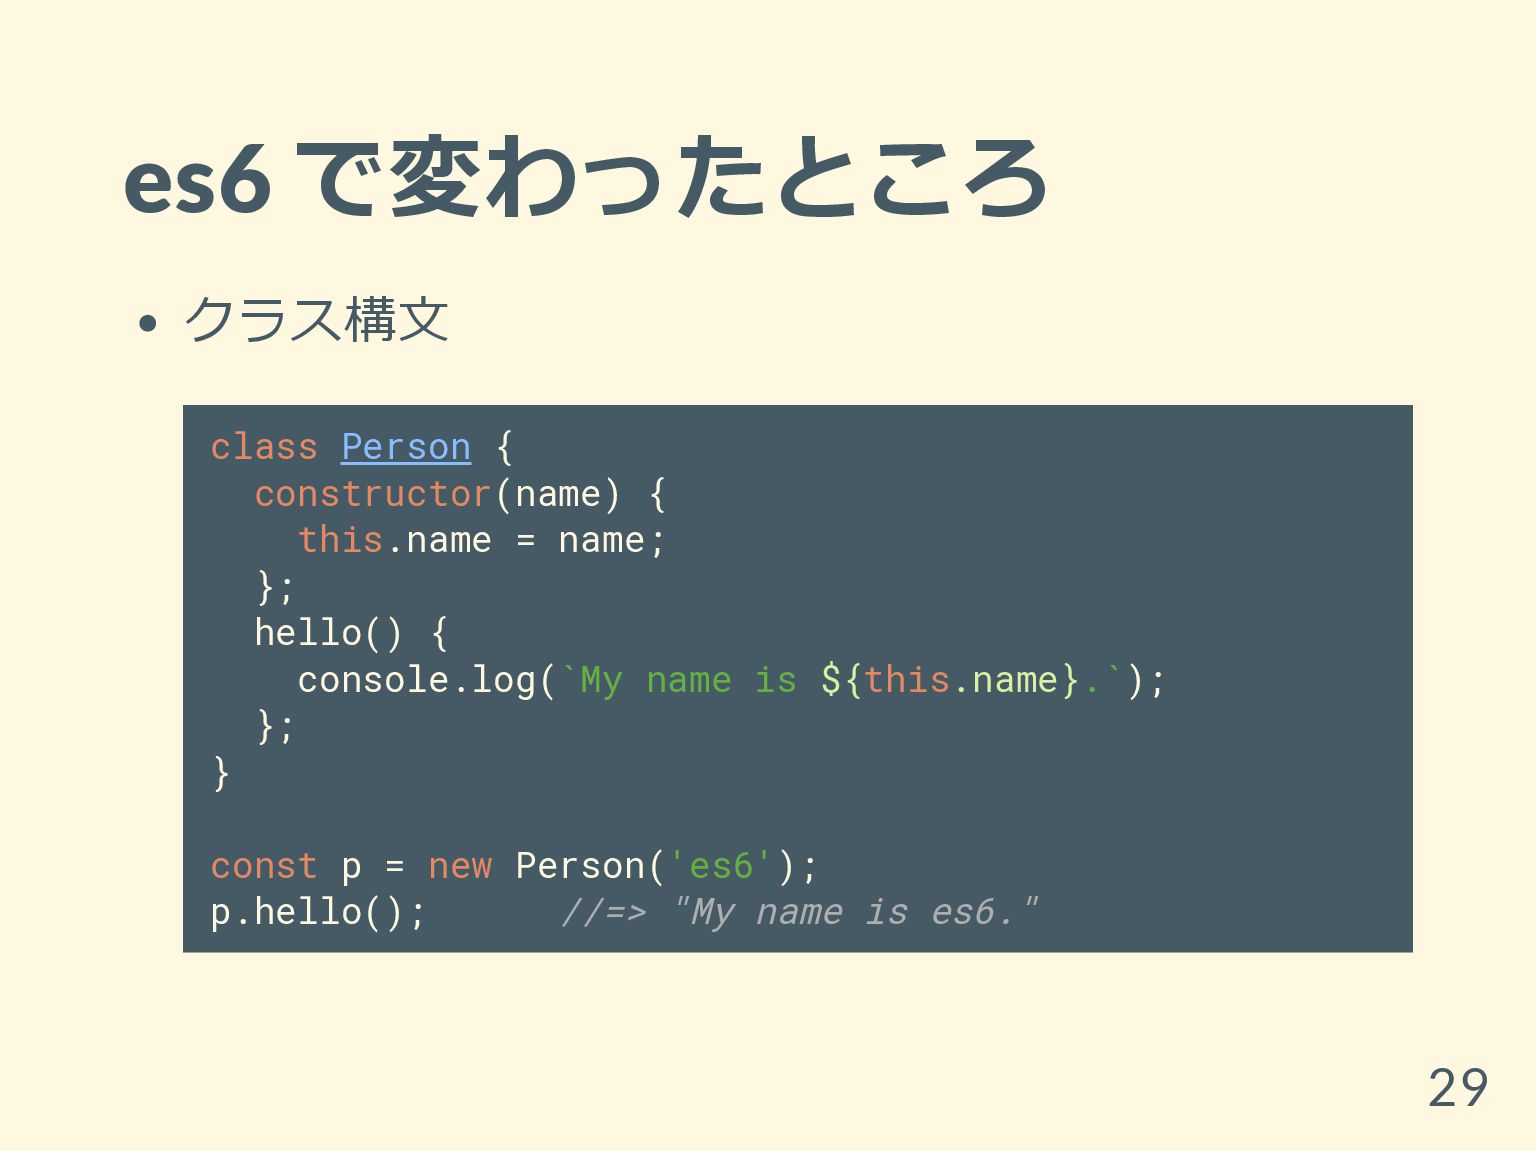
es6 で変わったところ クラス構文 class Person { constructor(name) { this.name =
name; }; hello() { console.log(`My name is ${this.name}.`); }; } const p = new Person('es6'); p.hello(); //=> "My name is es6." 29
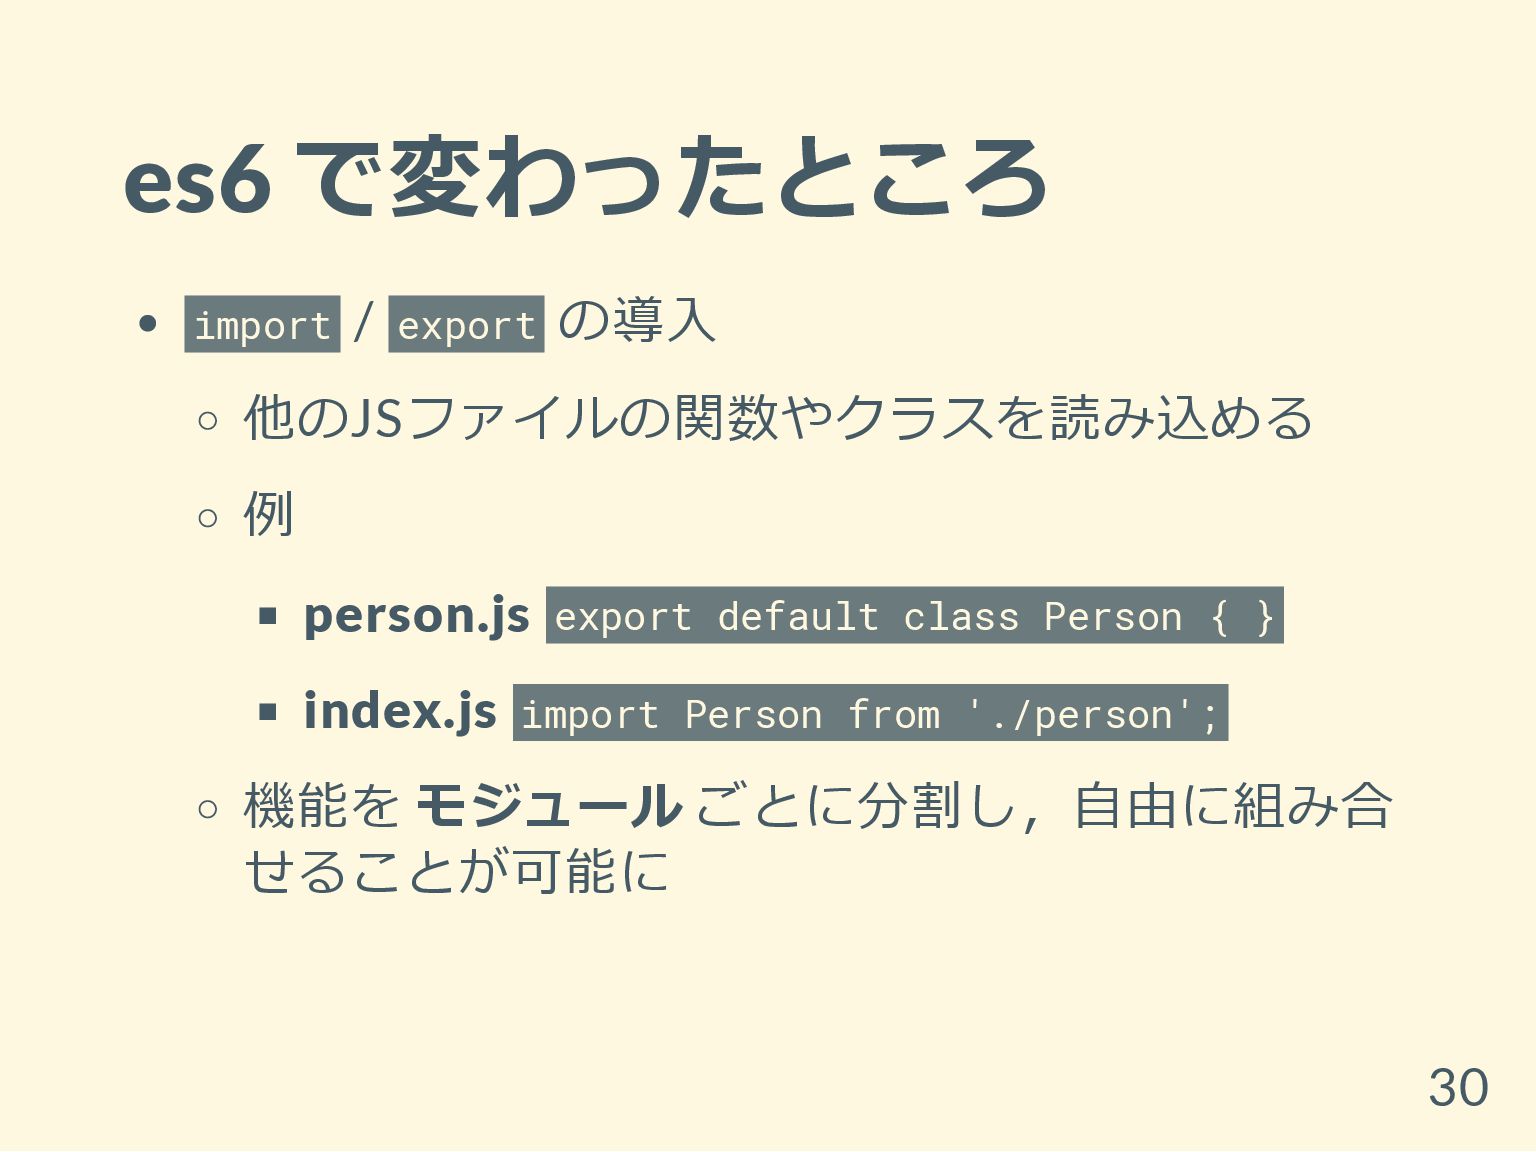
es6 で変わったところ import / export の導入 他のJSファイルの関数やクラスを読み込める 例 person.js export
default class Person { } index.js import Person from './person'; 機能を モジュール ごとに分割し,自由に組み合 せることが可能に 30
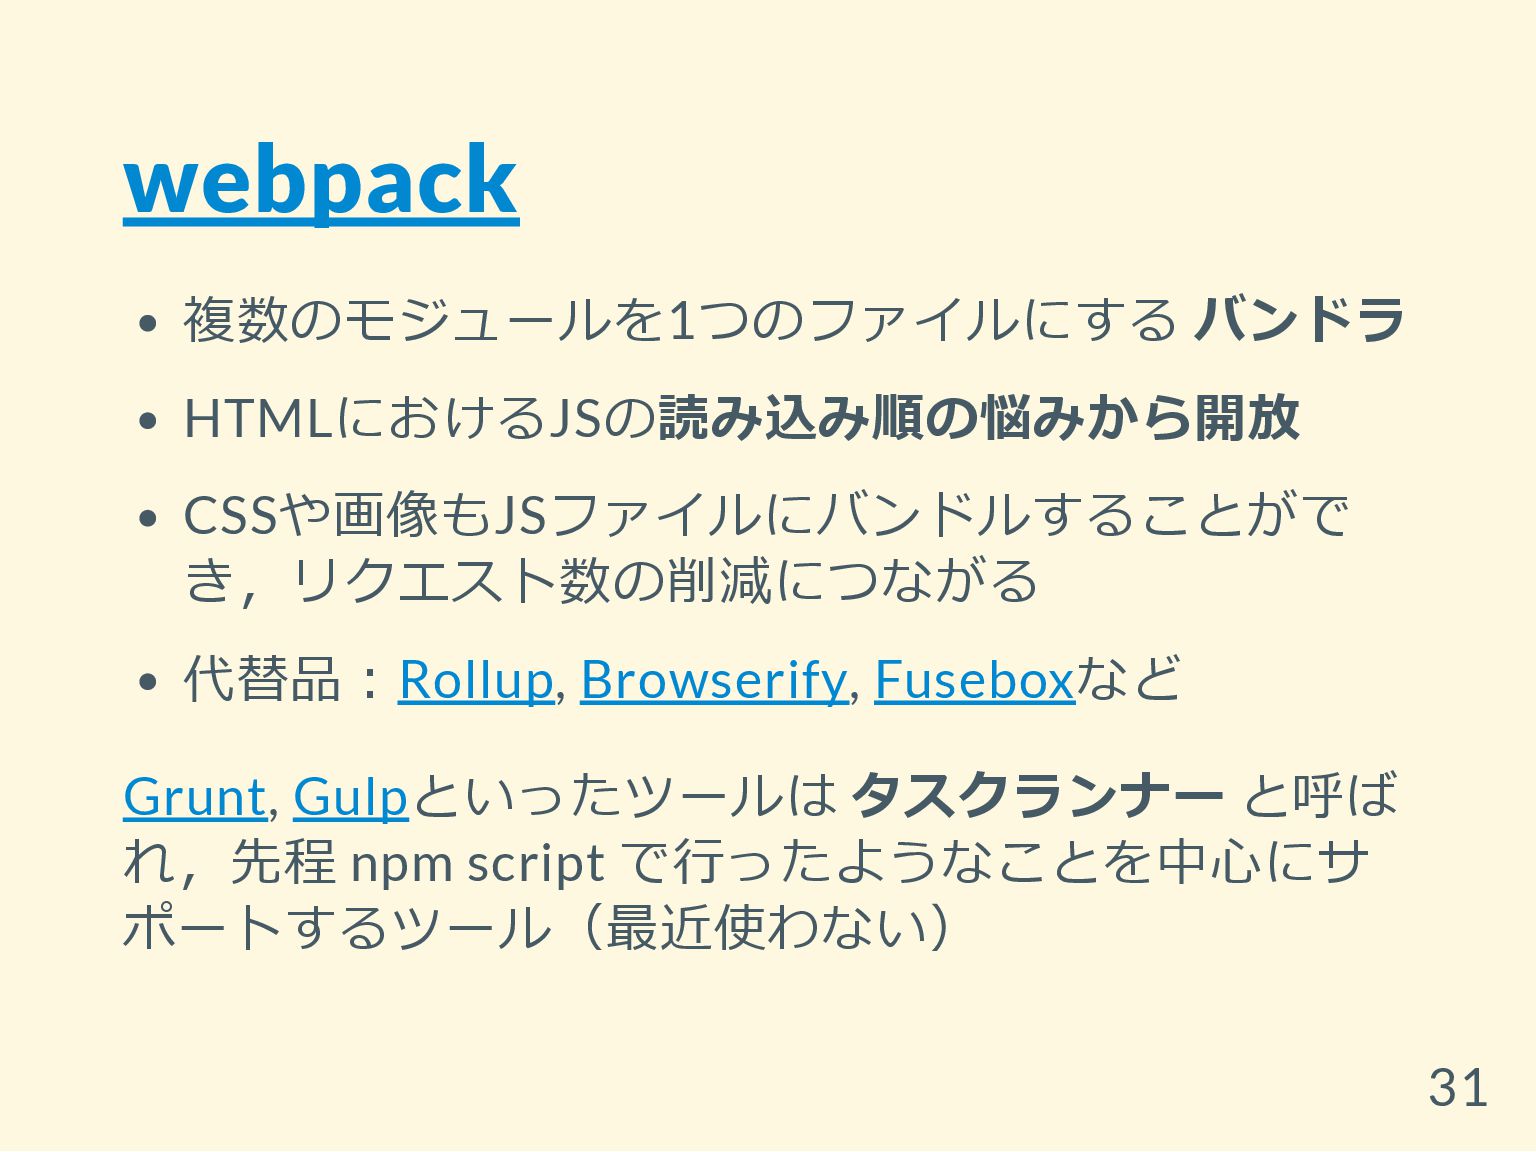
webpack 複数のモジュールを1つのファイルにする バンドラ HTMLにおけるJSの読み込み順の悩みから開放 CSSや画像もJSファイルにバンドルすることがで き,リクエスト数の削減につながる 代替品:Rollup, Browserify, Fuseboxなど Grunt,
Gulpといったツールは タスクランナー と呼ば れ,先程 npm script で行ったようなことを中心にサ ポートするツール(最近使わない) 31
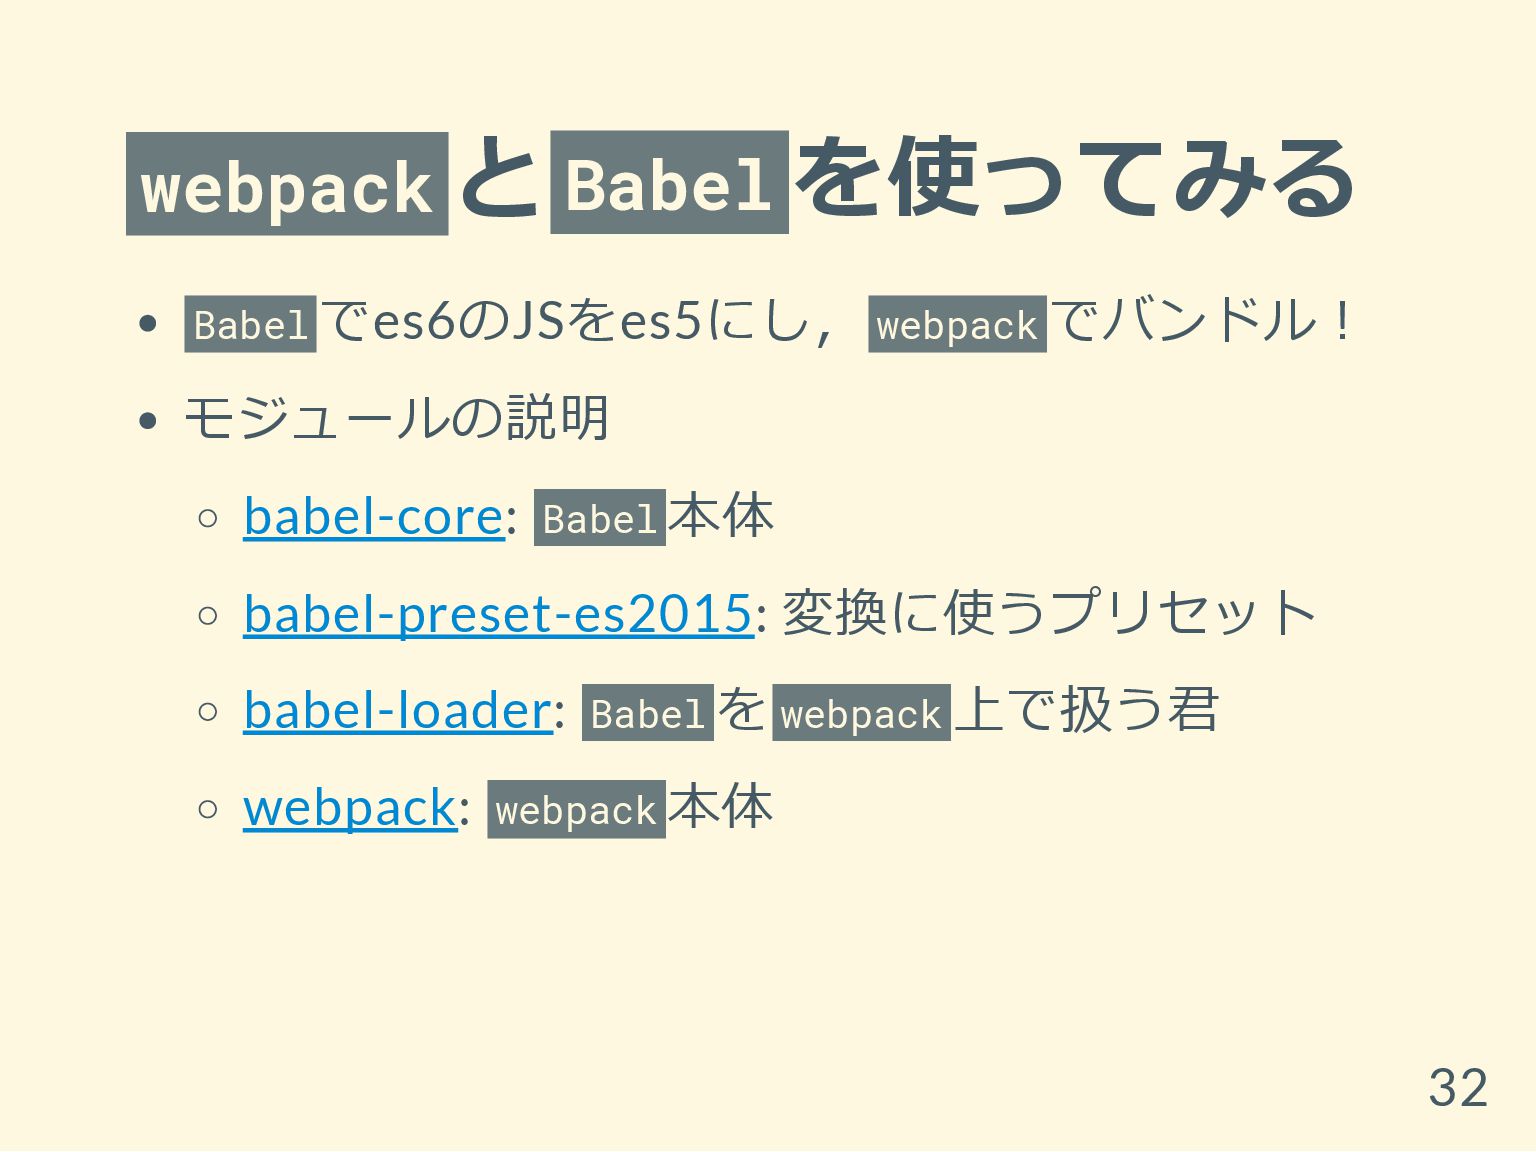
webpack と Babel を使ってみる Babel でes6のJSをes5にし, webpack でバンドル! モジュールの説明 babel-core:
Babel 本体 babel-preset-es2015: 変換に使うプリセット babel-loader: Babel を webpack 上で扱う君 webpack: webpack 本体 32
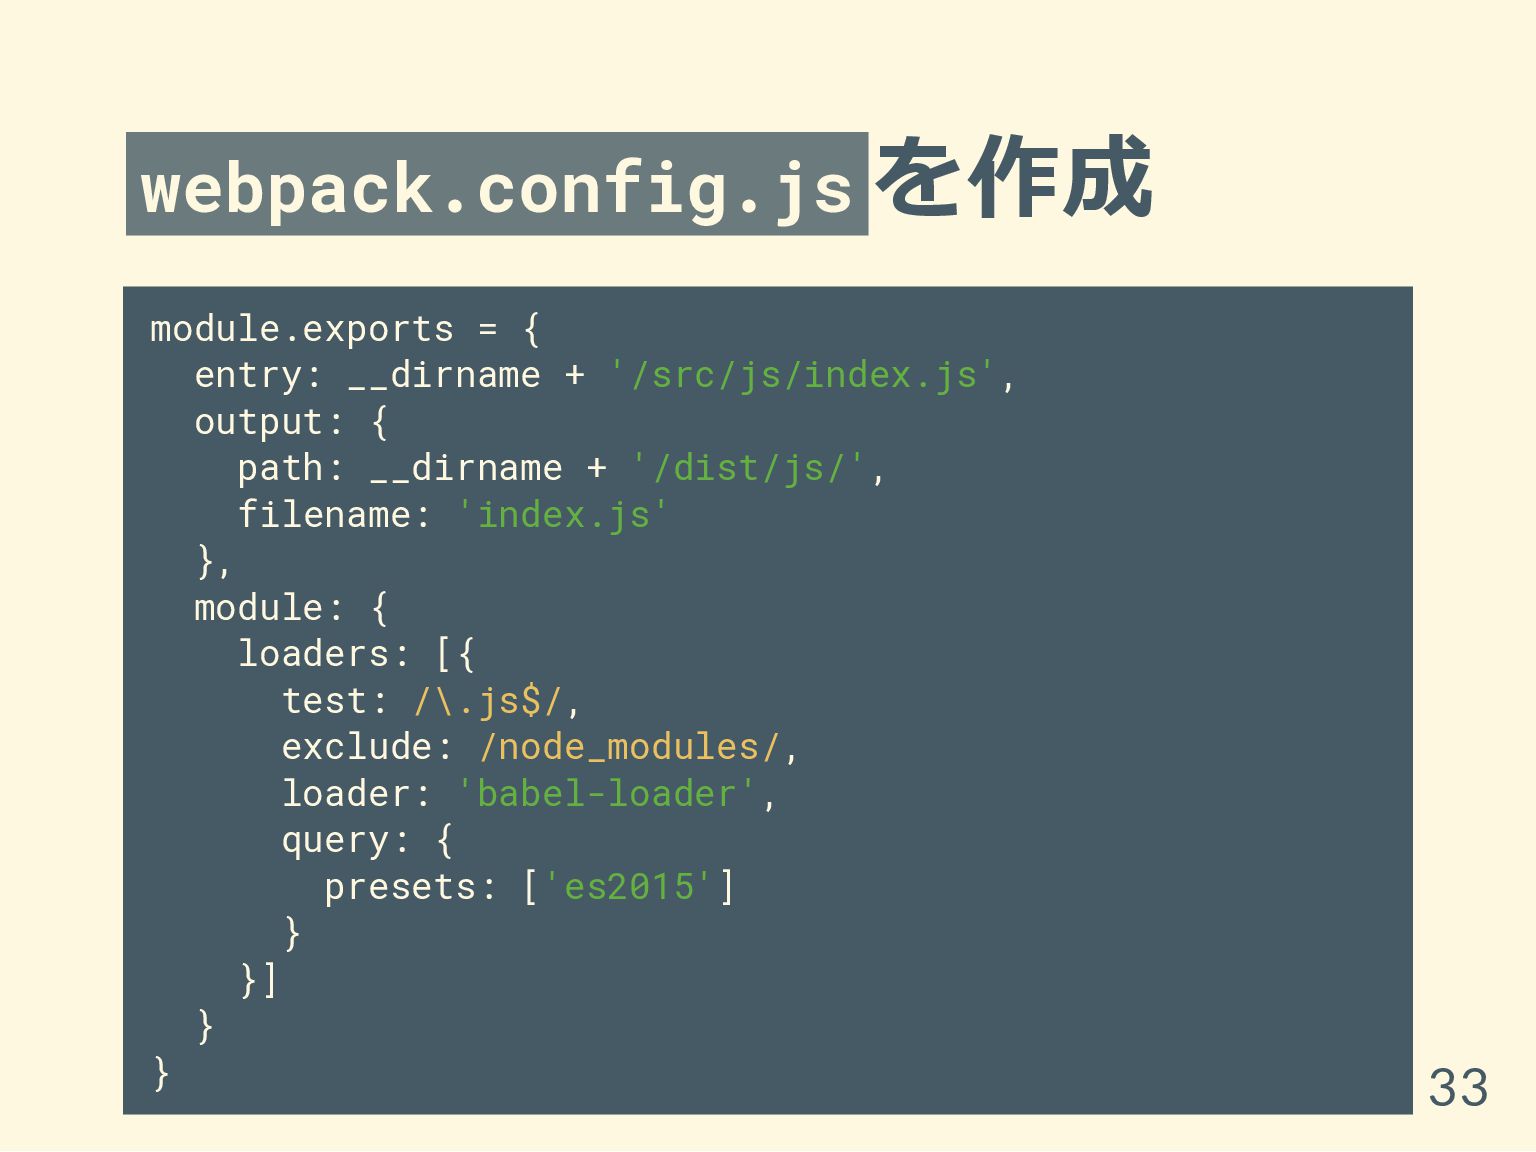
webpack.config.js を作成 module.exports = { entry: __dirname + '/src/js/index.js', output:
{ path: __dirname + '/dist/js/', filename: 'index.js' }, module: { loaders: [{ test: /\.js$/, exclude: /node_modules/, loader: 'babel-loader', query: { presets: ['es2015'] } }] } } 33
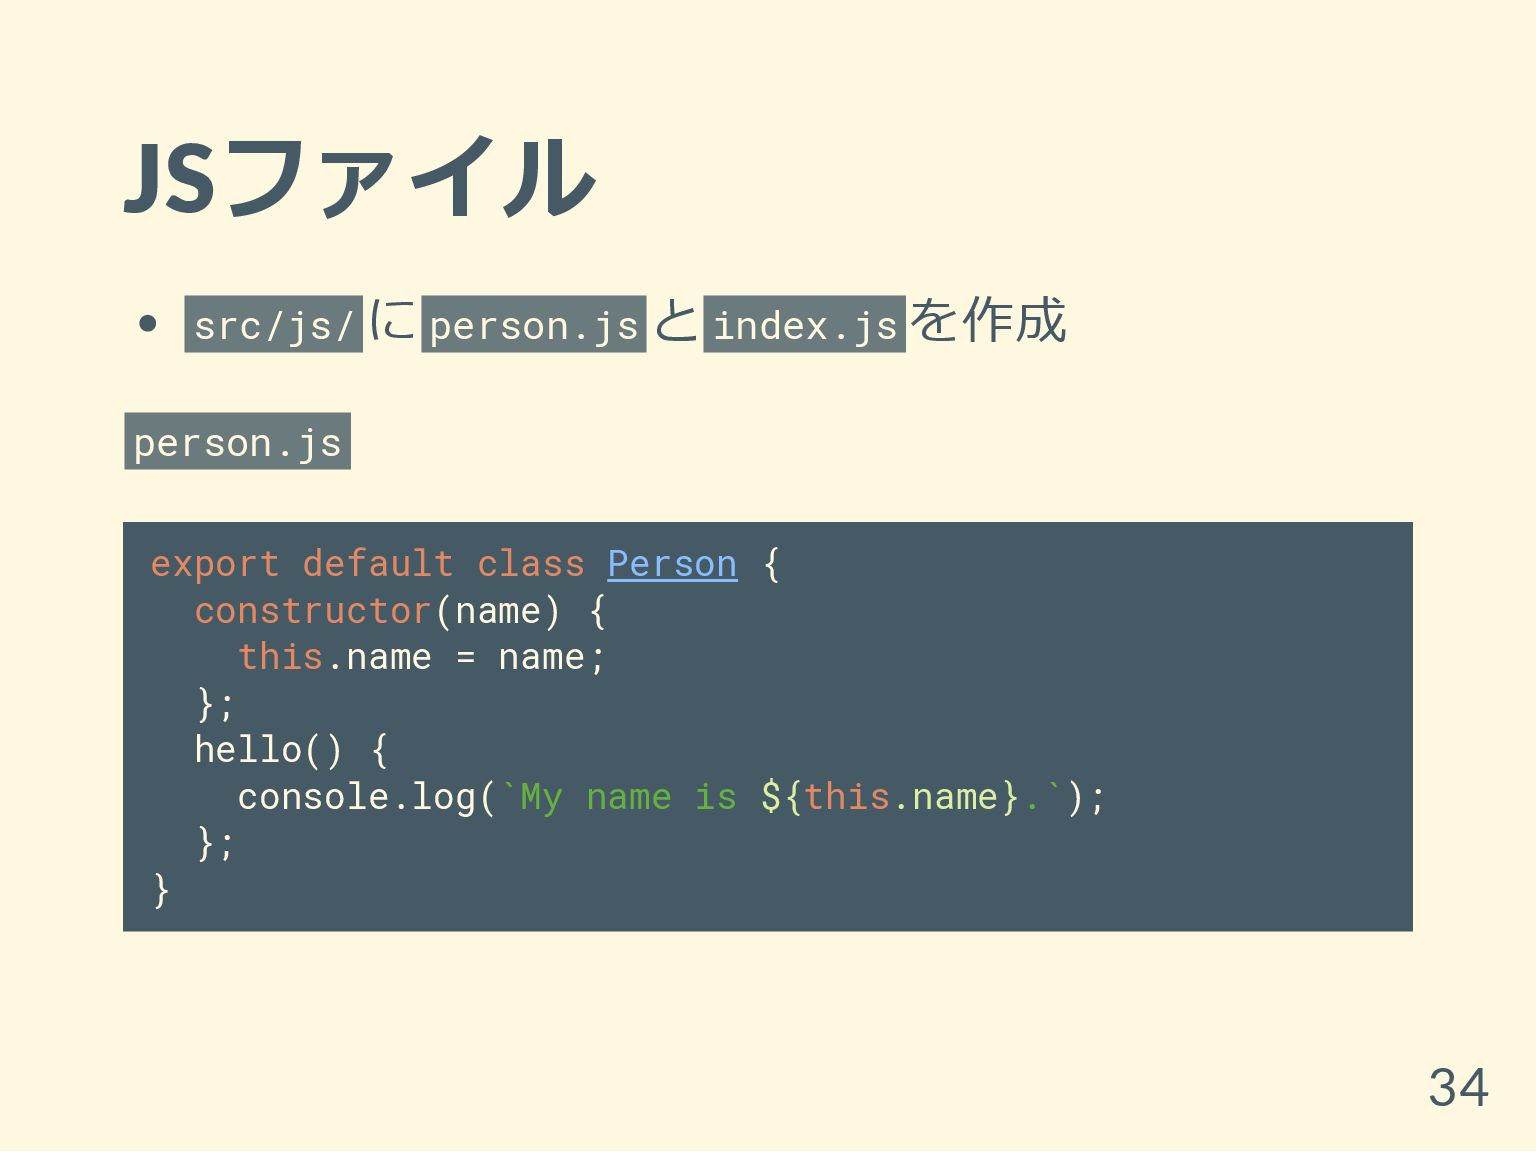
JSファイル src/js/ に person.js と index.js を作成 person.js export default
class Person { constructor(name) { this.name = name; }; hello() { console.log(`My name is ${this.name}.`); }; } 34
JSファイル index.js import Person from './person'; const p = new
Person('es6'); p.hello(); src/pug/index.pug の body タグの最後に script(src="js/index.js") を追加 35
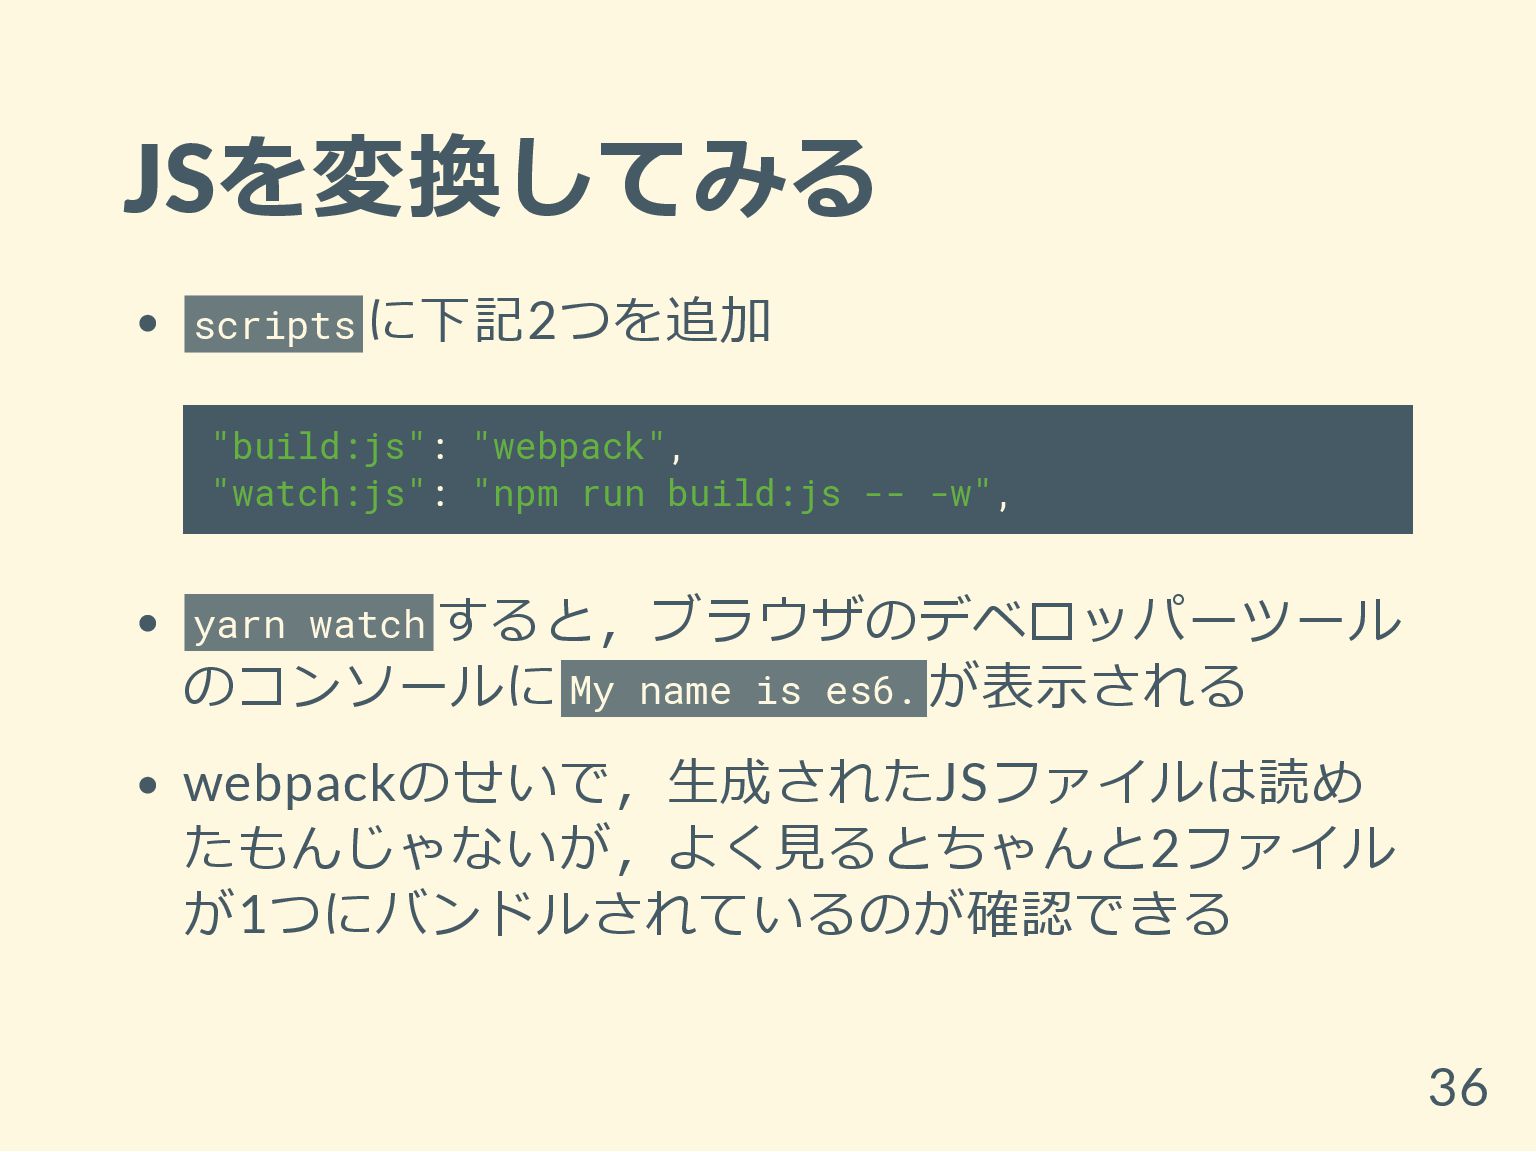
JSを変換してみる scripts に下記2つを追加 "build:js": "webpack", "watch:js": "npm run build:js --
-w", yarn watch すると,ブラウザのデベロッパーツール のコンソールに My name is es6. が表示される webpackのせいで,生成されたJSファイルは読め たもんじゃないが,よく見るとちゃんと2ファイル が1つにバンドルされているのが確認できる 36
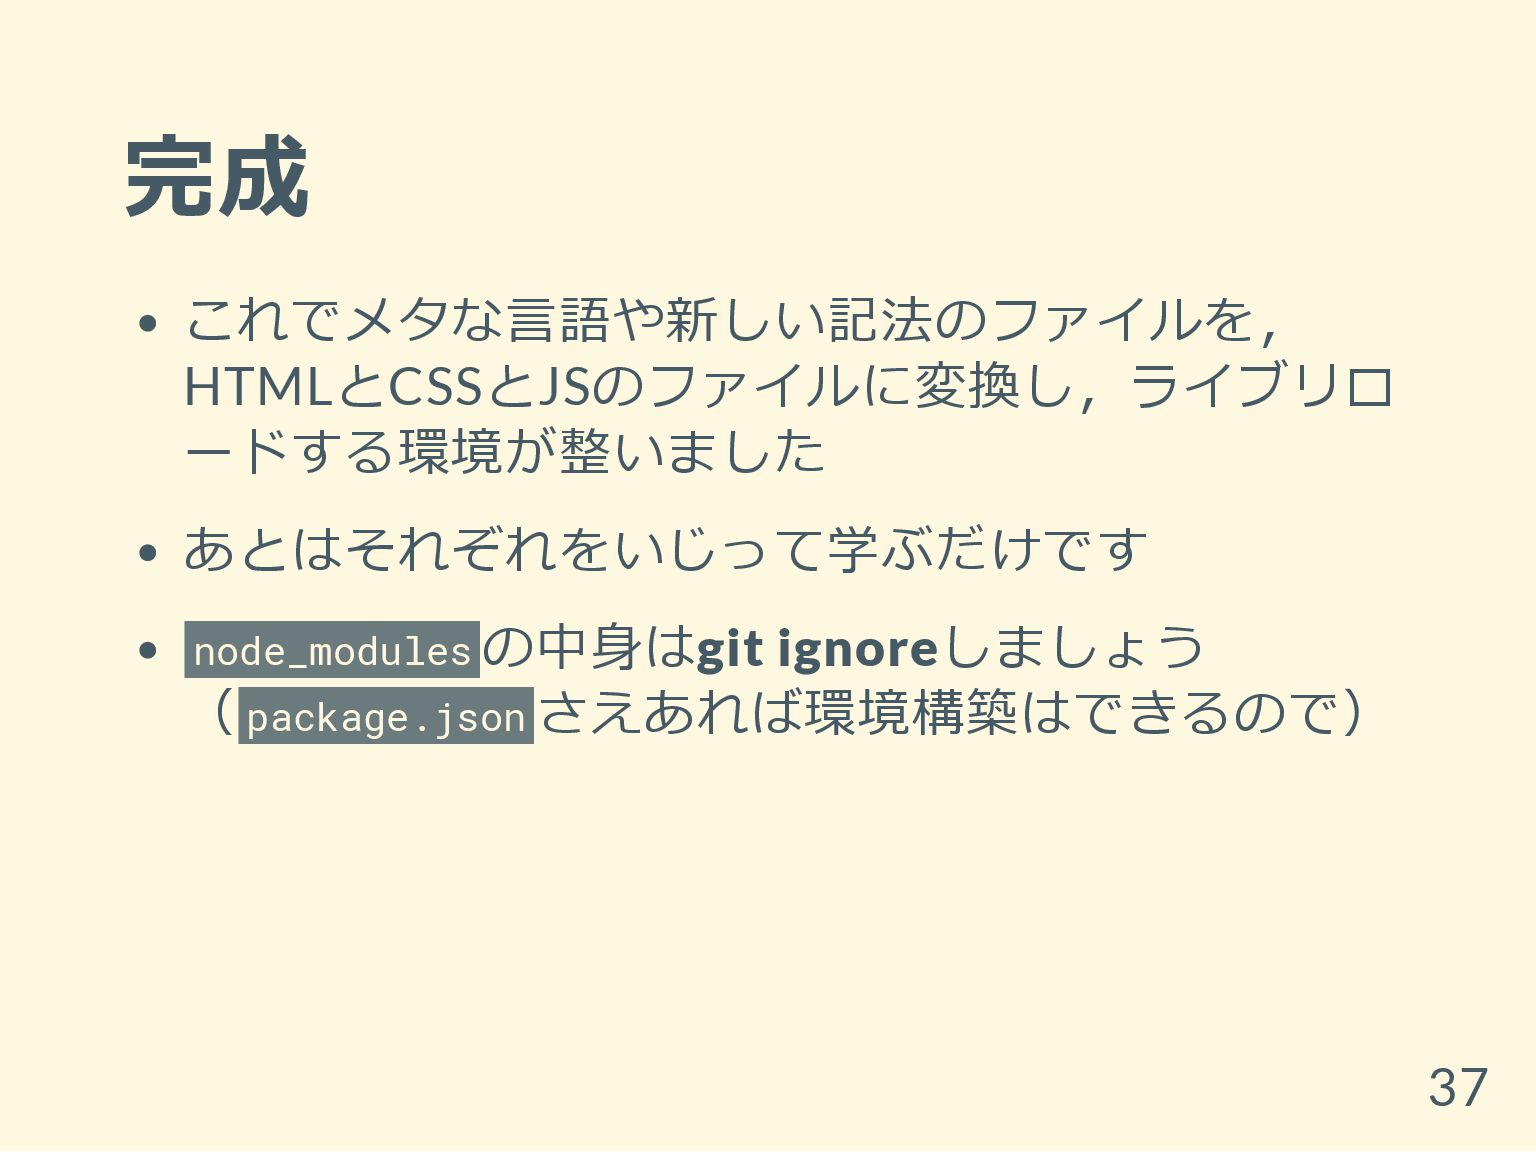
完成 これでメタな言語や新しい記法のファイルを, HTMLとCSSとJSのファイルに変換し,ライブリロ ードする環境が整いました あとはそれぞれをいじって学ぶだけです node_modules の中身はgit ignoreしましょう ( package.json
さえあれば環境構築はできるので) 37
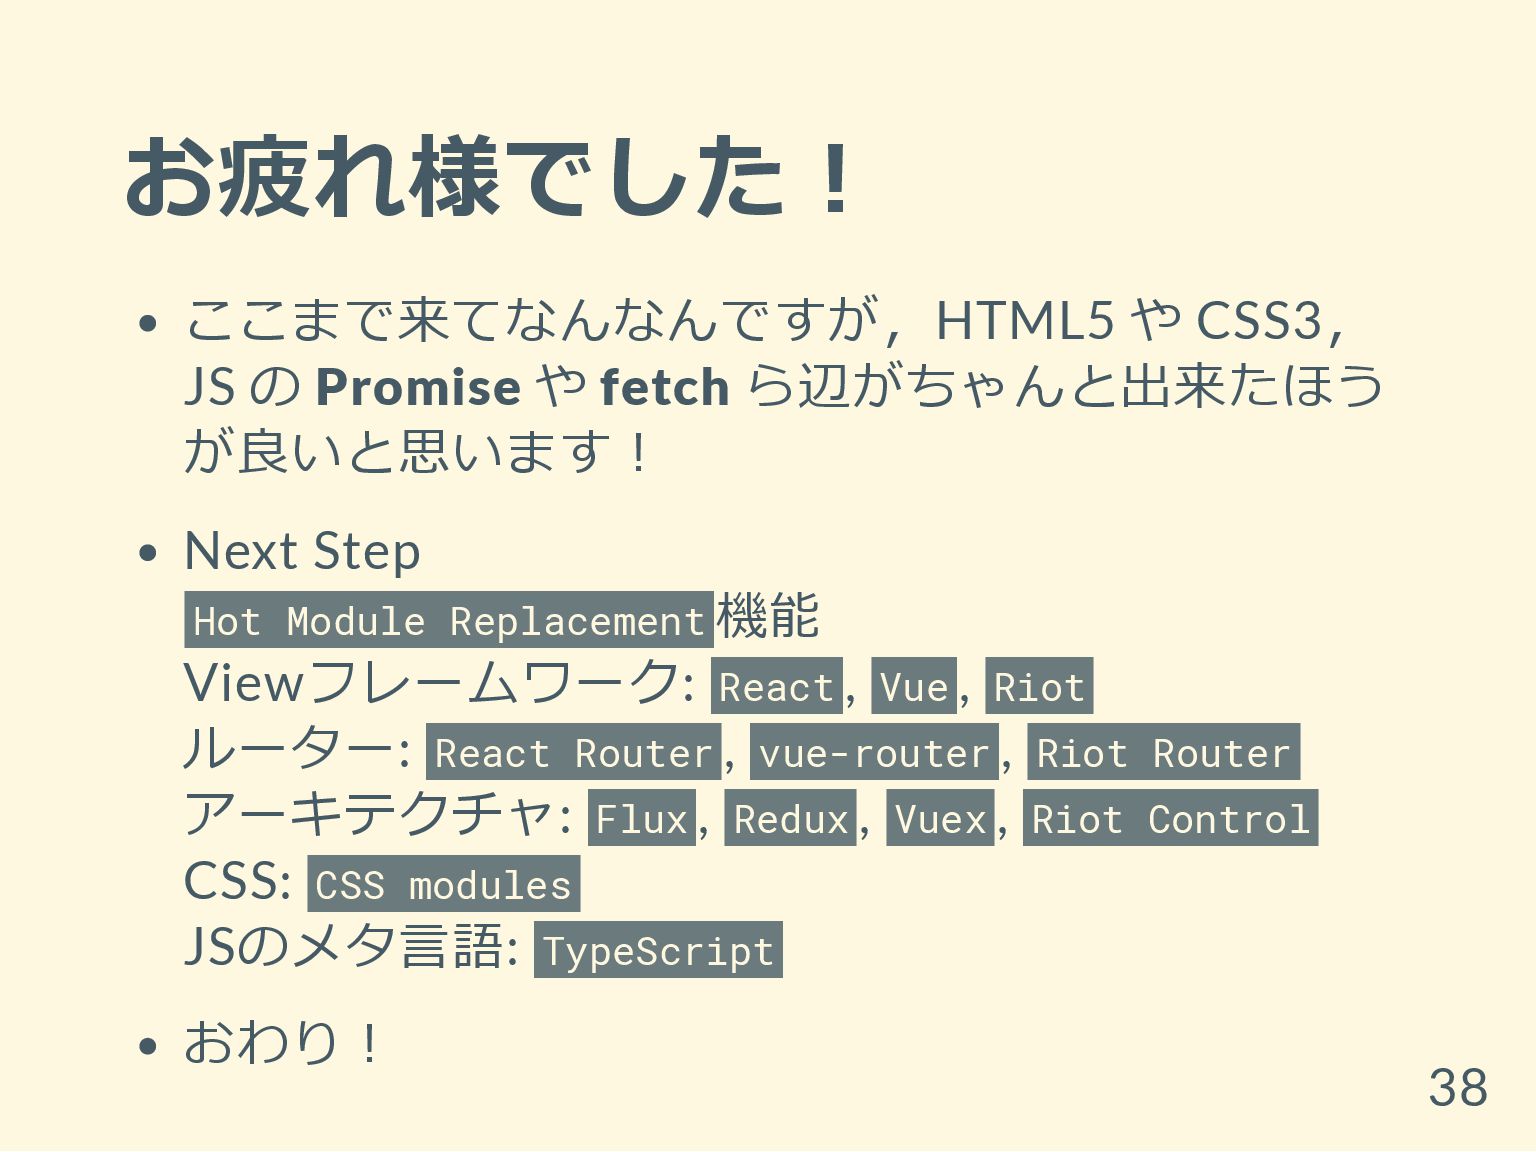
お疲れ様でした! ここまで来てなんなんですが,HTML5 や CSS3, JS の Promise や fetch ら辺がちゃんと出来たほう
が良いと思います! Next Step Hot Module Replacement 機能 Viewフレームワーク: React , Vue , Riot ルーター: React Router , vue-router , Riot Router アーキテクチャ: Flux , Redux , Vuex , Riot Control CSS: CSS modules JSのメタ言語: TypeScript おわり! 38