Upgrade to Pro — share decks privately, control downloads, hide ads and more …

Lab Techniques Project Slideshow

Sponsored · Your Podcast. Everywhere. Effortlessly. Share. Educate. Inspire. Entertain. You do you. We'll handle the rest.
Avatar for Tj Haigler Tj Haigler
April 28, 2025
9

Lab Techniques Project Slideshow

Avatar for Tj Haigler

Tj Haigler

April 28, 2025
Tweet

Transcript

  1. Screenwashing Project: NCSM Merry Oaks 19-713 Triassic North Carolina Results:

    Very little breakdown Routine: - Weighed out 600g masses of sediment and placed into five gallon and one gallon paint sieves - Placed bags submerged in water to soak for 48 hours - Came in to message bags at 24 hour mark - Removed bags from water and placed on drying rack - Reweighed bags and determined breakdown percent (100-((final/initial)x100)
  2. Molding Routine: - Mounted tooth upright with clay in the

    bottom of a small cup - Sprayed tooth with release spray - Measured and mixed equal parts Mold Max part A and B in separate cups - Poured a small stream of solution over the tip of the tooth - Waited for mold to solidify - Removed specimen Initial specimen used: Fossil Crocodile Tooth Late Cretaceous (70 Ma) South Carolina Peedee Formation
  3. Casting Routine: - Obtained rubber molds and sprayed the inside

    with release spray - Mixed equal parts Smooth Cast parts A and B - Quickly poured into multiple molds when mixture begins to feel hot to the touch - Waited for casts to harden and cool before removal Initial specimens casted: - Trilobite x2 - Coprolite - Hadrosaur Teeth - Gastropod x2 - Claw
  4. Preparing and Painting Casts Initial specimens painted: - Trilobite -

    Gastropod Preparation Routine: - Sanded down rough edges on the bottom of the casts - Washed casts briefly - Used primer to spray all sides of the casts and waited for the primer to dry Painting Routine: - Applied multiple coats of brown and orange acrylic paints - Antiqued the casts using black paint - Waited for casts to dry and sprayed a final clear coat over them
  5. Photography Routine: - Set up Neewer box with a ring

    light coming through the top of the box - Set all lights to be a bright white - Set up neutral colored background - Took pictures of specimen flesh with a scale bar - Made sure scale was accurate to how image was taken Initial specimen used: Fossil Crocodile Tooth Late Cretaceous (70 Ma) South Carolina Peedee Formation
  6. Keyence Routine: - Turned on Keyence monitor and TV screen

    - Centered fossil and placed parallel to the lined paper to help with scale - Set lower limit to when the green lines appeared clear - Set upper limit for when the top of the fossil appears blurry - Made sure to add a scale and move light source to the upper left corner
  7. 3D Printing Routine: - On the computer → find a

    3D model off of sketchfab and download and extract files - Open Creality Slicer and import downloaded file - Make model even with the bottom of the plate to aid the printing process - Click slice and download model onto flash drive - Set plate temperature to 60 degrees and nozzle temperature to 200 degrees - Insert flash drive into printer and select file - When done printing, remove from base with a spatula and gently remove supports
  8. SEM (Scanning Electron Microscope) Routine: - Placed 1mm specimen on

    stub - Loaded sample holder and slid holder into place lined up with the stage - Clicked the “observation” and “fast” buttons at top of monitor - Moved working distance to 15mm - Used joystick “Z/T” to move the stage to try to match to the working distance - Used focus, brightness, and contrast knobs on control panel - Pressed photo button and saved file to a USB drive Initial specimen used: Unknown Tooth Rebecca’s Hollow 1mm
  9. Consolidants and Adhesives Routine: - Weighed our empty bottle -

    initial mass of 62 grams - Our bottle was labelled 50:1 meaning one gram butvar to fifty grams acetone - We already had 10 grams of butvar that needed to be dissolved - Tried to get as close to 1:50 as possible but did not reach 500 grams of acetone - Only measured out 452 grams of acetone but since acetone evaporates rapidly our ratio was closer to 44:1 Some Notes: - Adhesion = taking parts and creating a whole - Consolidating = trying to keep things together - Acetone is reversible - Paleobond is nonreversible - Thin butvar - more acetone - Thick butvar (1 to 1) - Acetone kept in flammable cabinet
  10. Pin Vises, Air Scribes, Sectioning Routine: - Took oscillating tool

    and attached saw bit - Measured around perimeter of cast for class purposes - Carefully held tool against cast to let the tool do the most work and to not risk damaging bone - Cut a square of cast - Attached air scribe and turned on air flow, rotated air scribe to open up air flow - Air scribed away from my body and bone to remove small chunks of matrix - Kept matrix in a bag Some Notes: - Grind metal only, not casts - Air scribes require small amounts of oil to properly work - Make sure handle to air is perpendicular while plugging in (off)
  11. Plaster and Cradles Routine: - Made sure bone was glued,

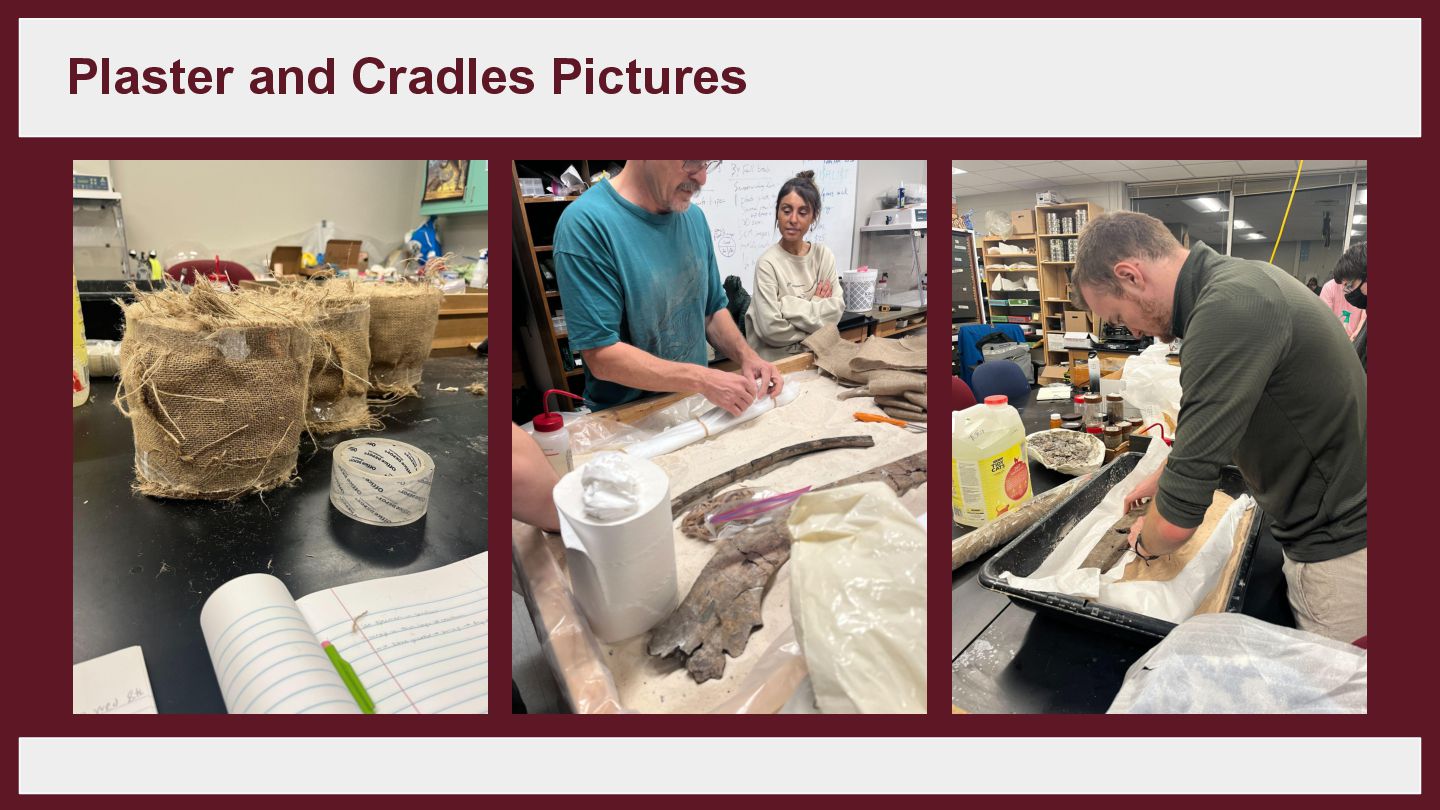
    laid a small layer of thin paper towels over the bone, then laid ethafoam and formed to the bone, followed by a layer of thick paper towels that were formed to the bone - Cut burlap into sections with power tool and then into smaller strips - Added water into large bowl and then slowly added plaster powder in while mixing until the consistency is slightly thick and can stick to the burlap - Got burlap wet and then fed the burlap through the plaster and out to be laid onto paper towels - Continued to make strips until bone was covered - Waited until hardened, flipped, and cut off excess plaster jacket on sides of bone to produce a finished cradle
  12. Saws and Sectioning Routine: - Made sure water was flowing

    through saw and slowly guided the item forward and into the saw - If large rough spots or knobs were present, used grinder starting with coarse grained and moving to finer grained. Moved carefully back and forth on the grinder. - Polished the item using multiples of figure-8 motions on a rough surface that had water underneath to remove imperfections Some Notes: - Saws come in variety of forms including diamond plated (to cut mostly everything) - Used to see internal structures, calcification rates, mineralogy of fossiliferous materials, etc. - Important to not cross contaminate What I prepared: - Coprolite in epoxy - Iron formation chunk
  13. Final Projects Some Notes: - My two projects that I

    have chosen are mammoth versus mastodon dentition as well as demonstrating common symmetry types in invertebrates - 3D elements planned for each project: - Dentition: Mammoth molar and Mastodon molar - Symmetry: Trilobite (bilateral), Brachiopod (bilateral perpendicular to hinge), Bivalve (bilateral parallel to hinge), Ammonite (bilateral), and a regular Echinoid (radial/pentaradial)
  14. Final Projects Steps: - Created poster for symmetry using time

    scale elements for relation back to Evolution of the Earth lab in which symmetry was a component of - Created short write ups about differences in mammoth and mastodon molars as well as created simplified skull tracings for each - Found lateral view photos of mammoth and mastodon skulls and a simple cladogram - Began 3D prints for all projects - Primed and painted 3D prints for all projects - ABH assisted in printing 11x17 for my symmetry “poster” - Printed, laminated and cut out all other write ups, labels etc. - Hot glued all components onto a foam board for final projects and cut to size