Have you been struggling to wireframe rich website experiences? Interactive prototypes communicate those experiences much more effectively, and they allow you to integrate effective and iterative usability testing besides.
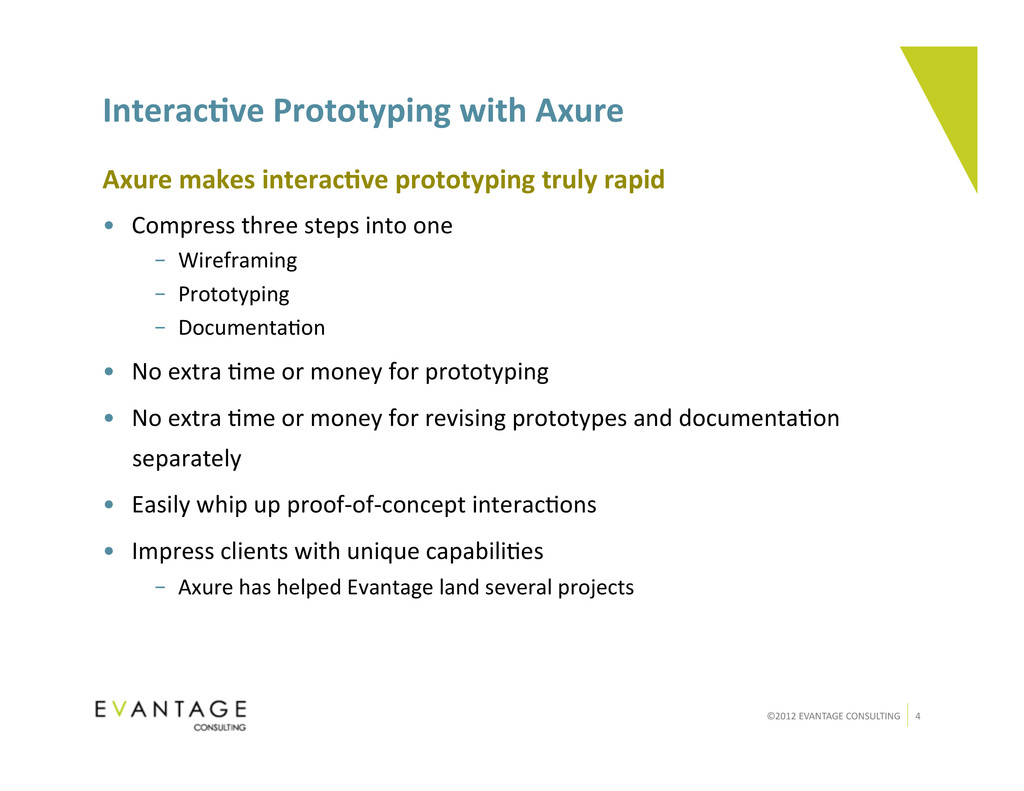
Axure makes interac)ve prototyping truly rapid • Compress three steps into one – Wireframing – Prototyping – Documenta=on • No extra =me or money for prototyping • No extra =me or money for revising prototypes and documenta=on separately • Easily whip up proof-‐of-‐concept interac=ons • Impress clients with unique capabili=es – Axure has helped Evantage land several projects
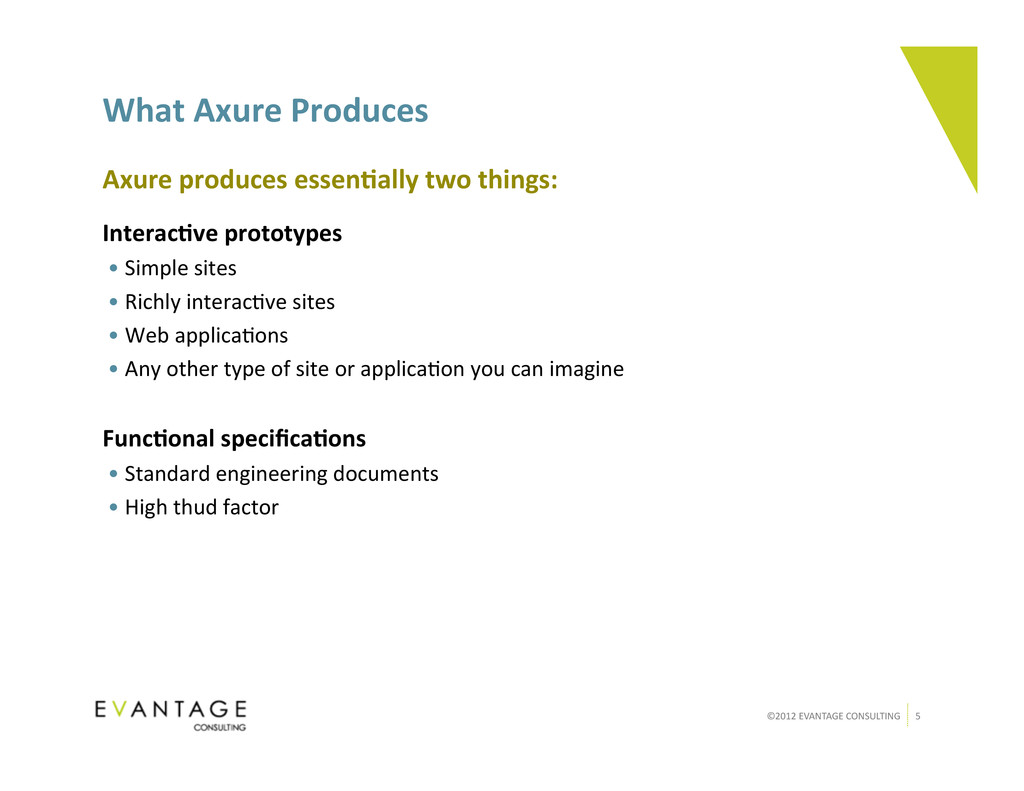
Axure produces essen)ally two things: Interac)ve prototypes • Simple sites • Richly interac=ve sites • Web applica=ons • Any other type of site or applica=on you can imagine Func)onal specifica)ons • Standard engineering documents • High thud factor
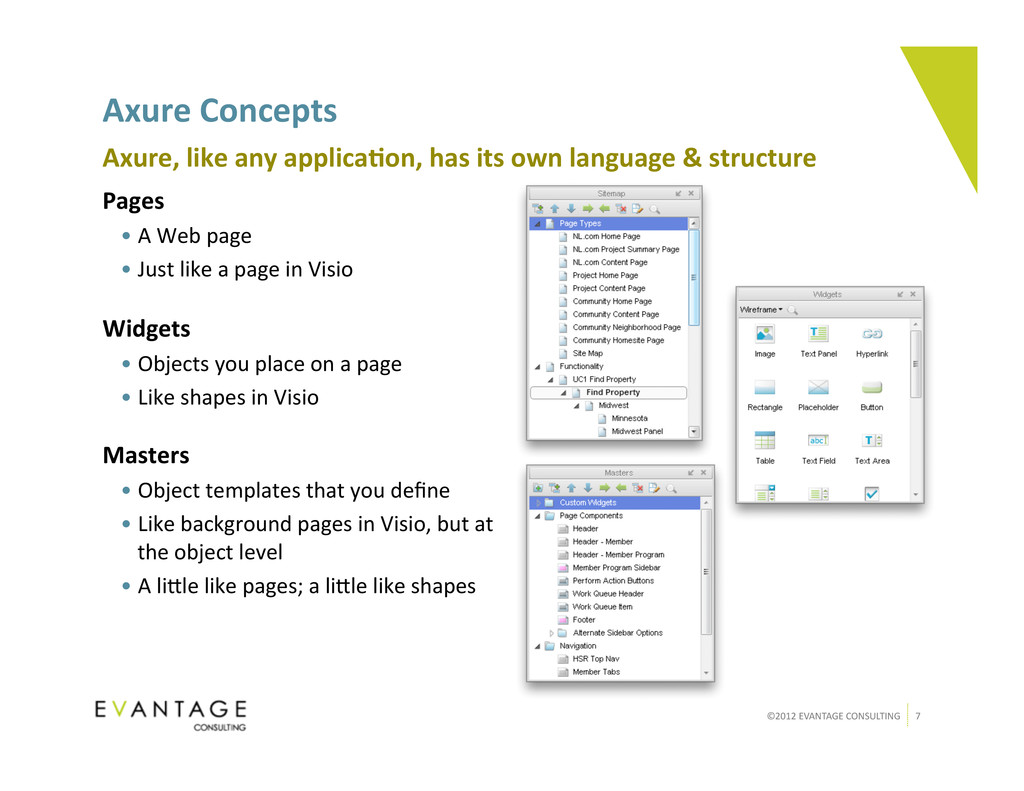
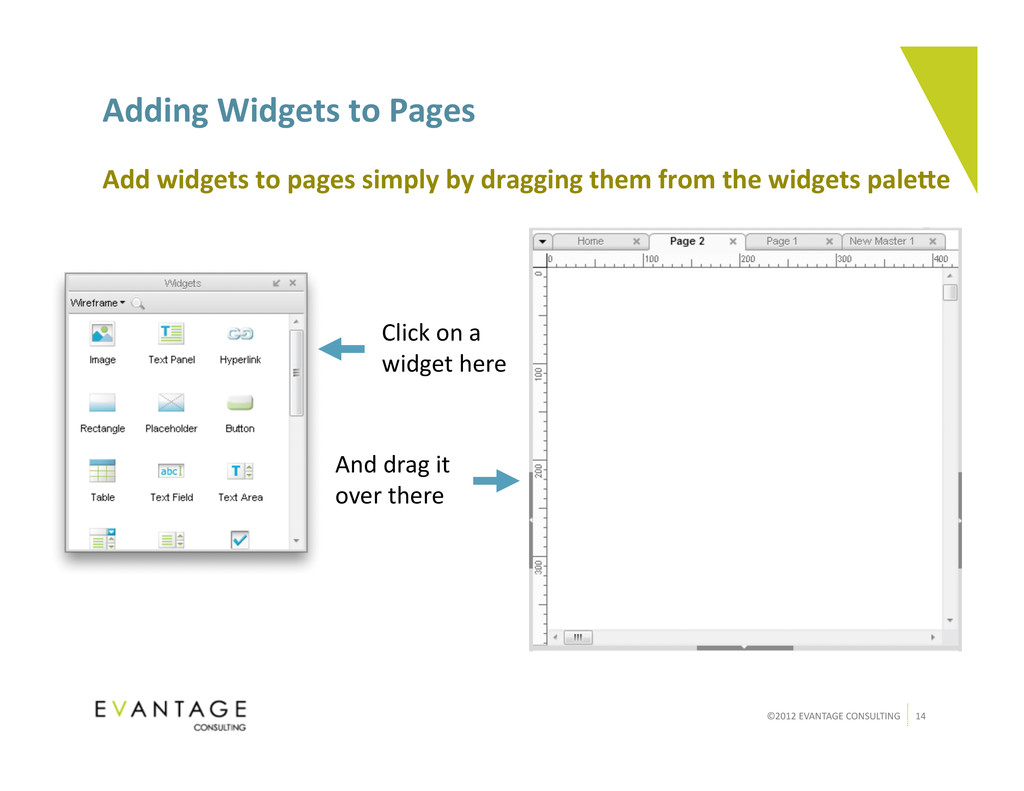
like any applica)on, has its own language & structure Pages • A Web page • Just like a page in Visio Widgets • Objects you place on a page • Like shapes in Visio Masters • Object templates that you define • Like background pages in Visio, but at the object level • A li]le like pages; a li]le like shapes
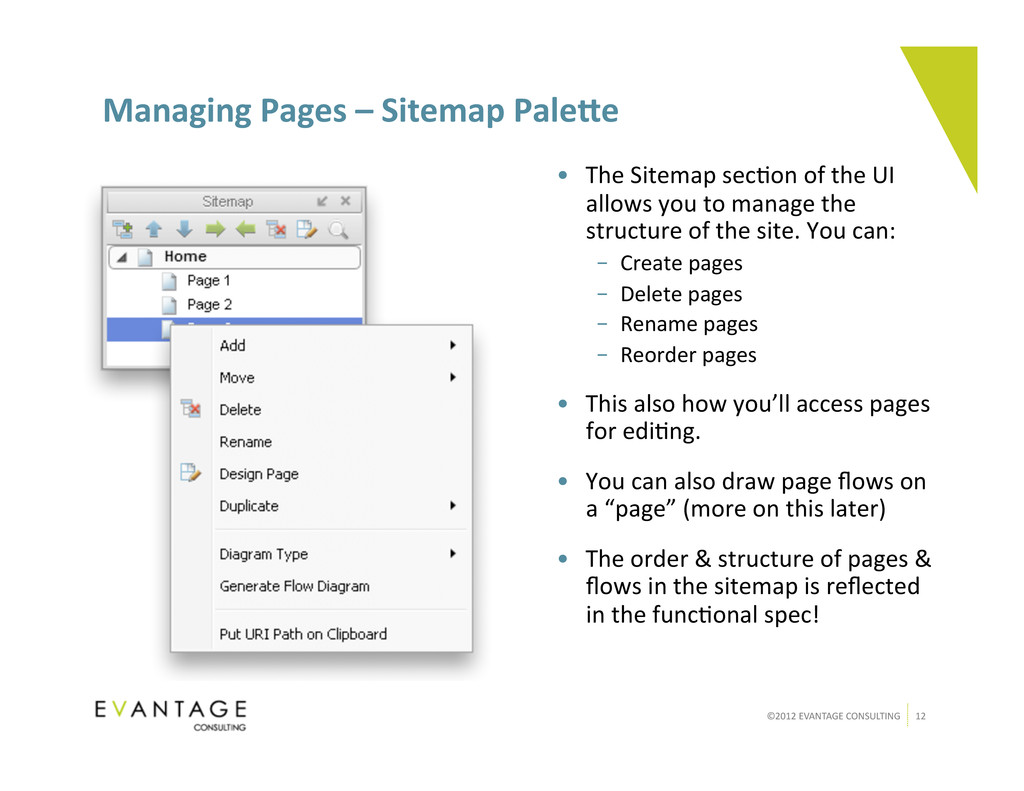
PaleYe • The Sitemap sec=on of the UI allows you to manage the structure of the site. You can: – Create pages – Delete pages – Rename pages – Reorder pages • This also how you’ll access pages for edi=ng. • You can also draw page flows on a “page” (more on this later) • The order & structure of pages & flows in the sitemap is reflected in the func=onal spec!
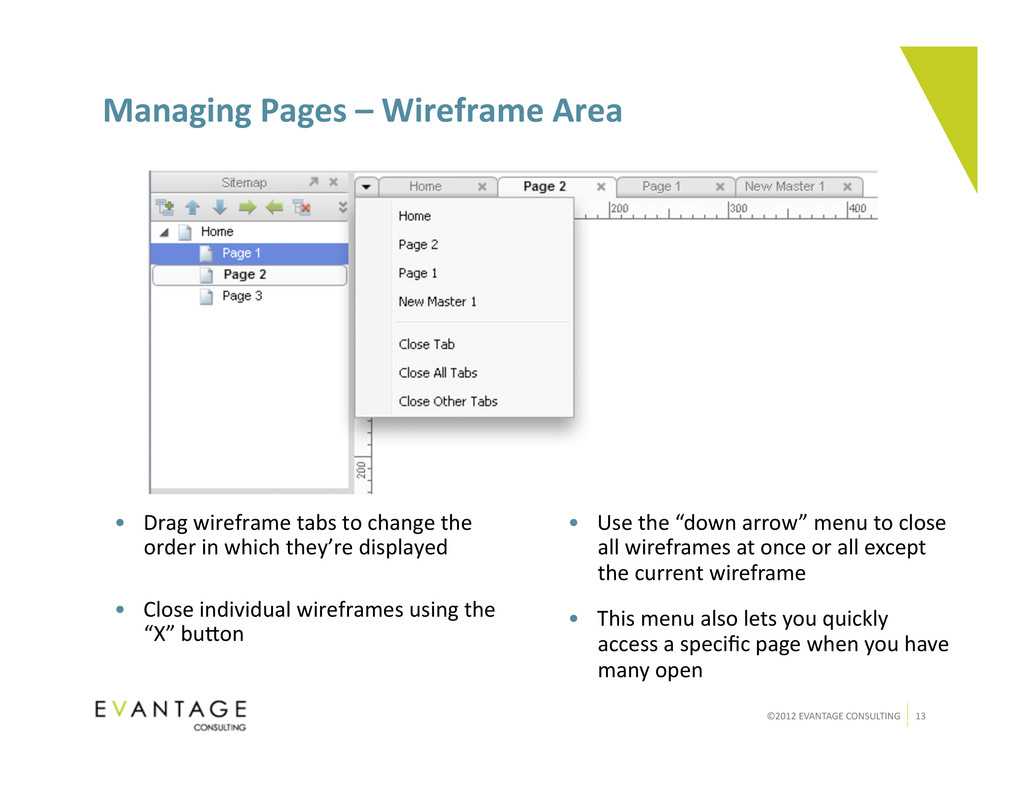
Area • Drag wireframe tabs to change the order in which they’re displayed • Close individual wireframes using the “X” bu]on • Use the “down arrow” menu to close all wireframes at once or all except the current wireframe • This menu also lets you quickly access a specific page when you have many open
Axure Axure offers a rich set of wireframing tools. This sec)on looks at how to use these tools most effec)vely: 1. Specify page formaJng 2. Add guides 3. Add widgets to pages 4. Arrange widgets 5. Format the widgets
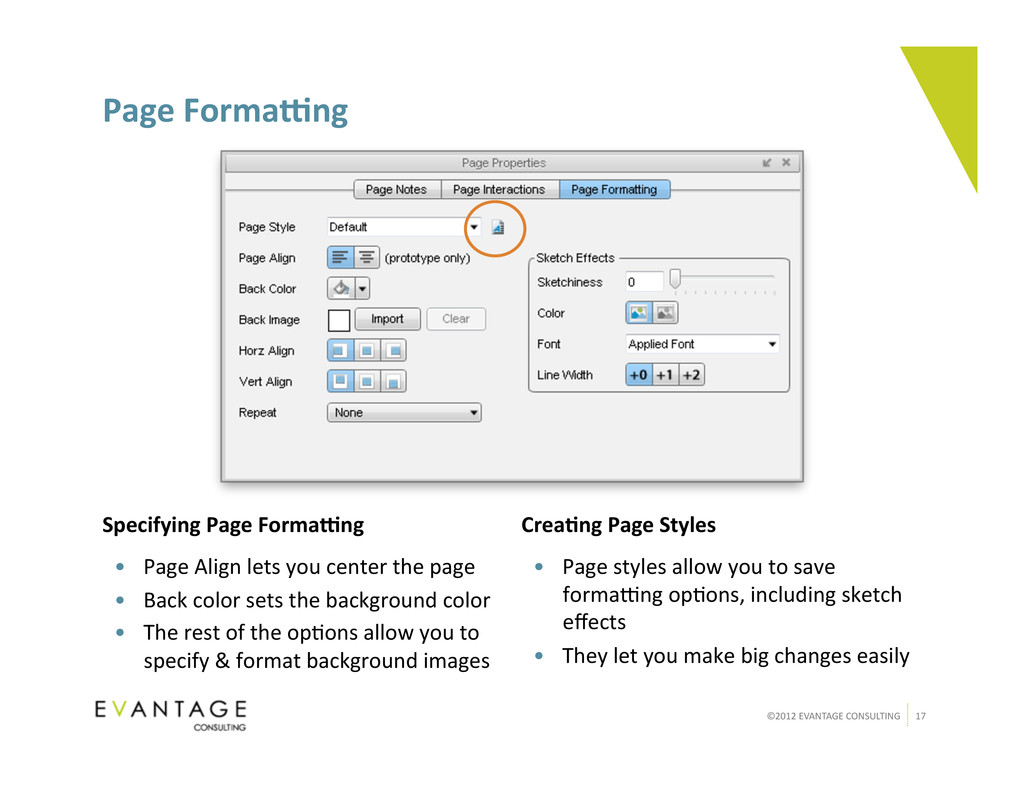
Page FormaJng • Page Align lets you center the page • Back color sets the background color • The rest of the op=ons allow you to specify & format background images Crea)ng Page Styles • Page styles allow you to save formaJng op=ons, including sketch effects • They let you make big changes easily
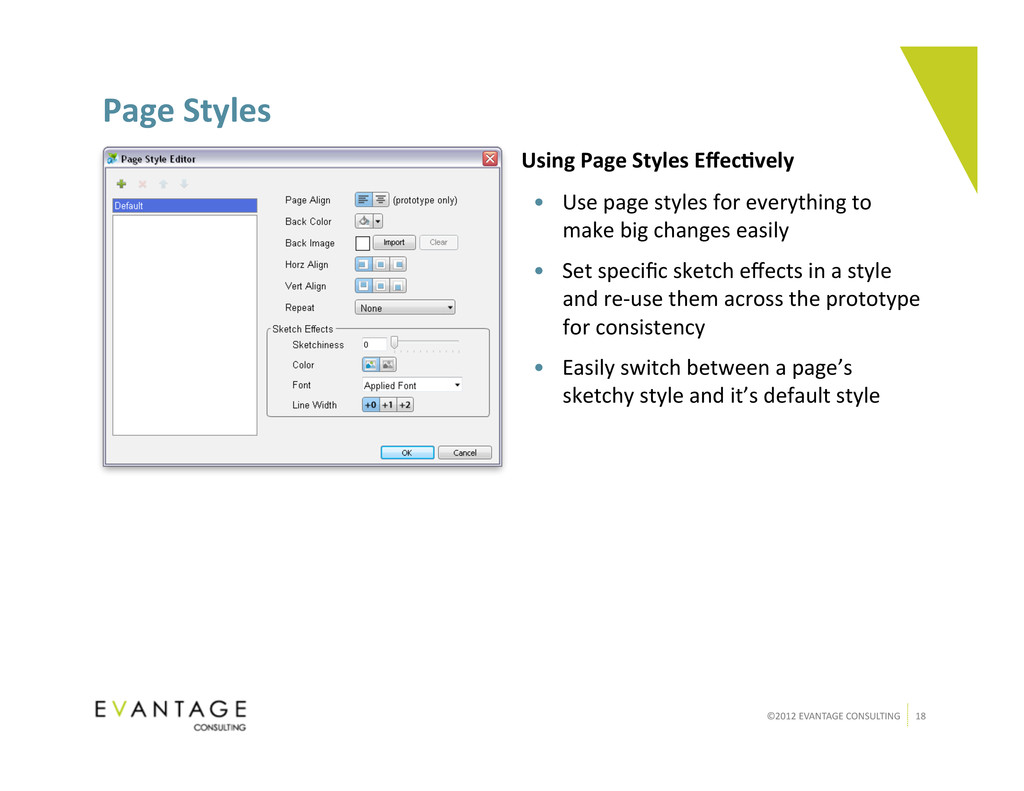
Page Styles Effec)vely • Use page styles for everything to make big changes easily • Set specific sketch effects in a style and re-‐use them across the prototype for consistency • Easily switch between a page’s sketchy style and it’s default style
You’ll prac)ce what you learn today by wireframing the popular Remember the Milk Web-‐based to-‐do list. 1. Go to the site and log in as me and play around a bit – h]p://www.rememberthemilk.com/ – Login: fred.beecher – Password: axurer1a 2. Pay special a]en=on to the Tasks page
Page Style Create a page style you can use to easily control the formaJng and layout of each page in your prototype. 1. Open the “Intro to Axure” folder on your deskstop 2. Open the file “Intro to Axure Exercise.rp” 3. Go to the Tasks page 4. Create a new page style with the following characteris=cs – White background (#FFFFFF) – Centered horizontally within the viewport 5. Name the style whatever you want 6. Apply the style to the Tasks page
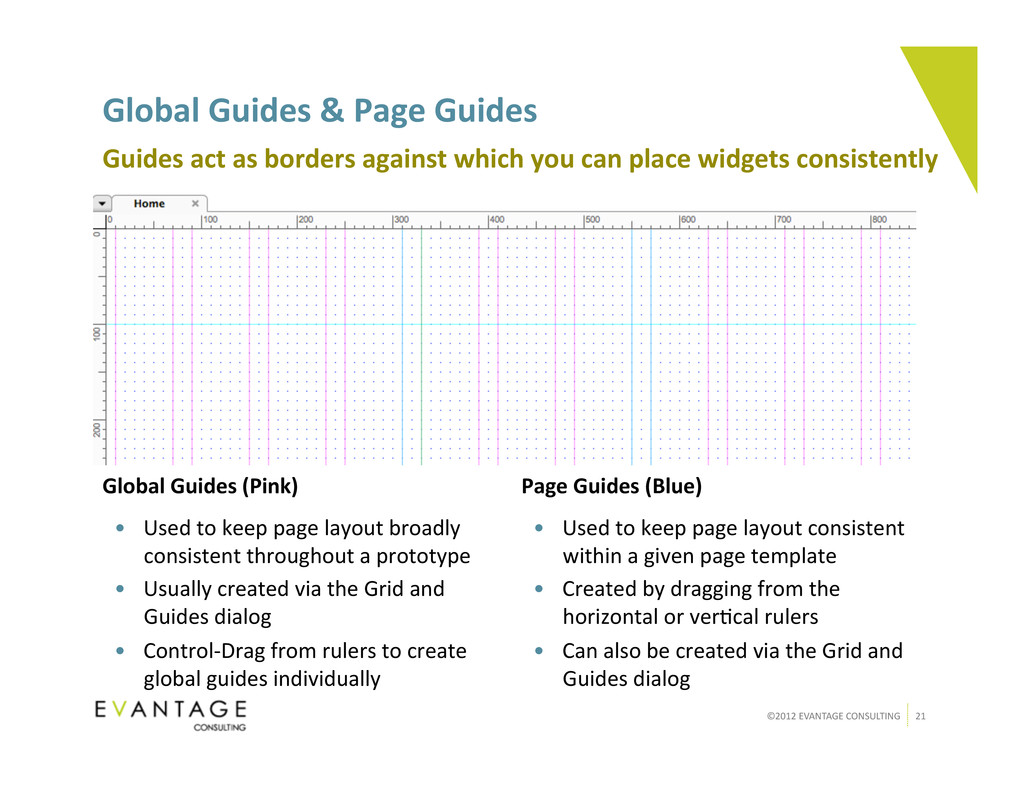
Guides Global Guides (Pink) • Used to keep page layout broadly consistent throughout a prototype • Usually created via the Grid and Guides dialog • Control-‐Drag from rulers to create global guides individually Page Guides (Blue) • Used to keep page layout consistent within a given page template • Created by dragging from the horizontal or ver=cal rulers • Can also be created via the Grid and Guides dialog Guides act as borders against which you can place widgets consistently
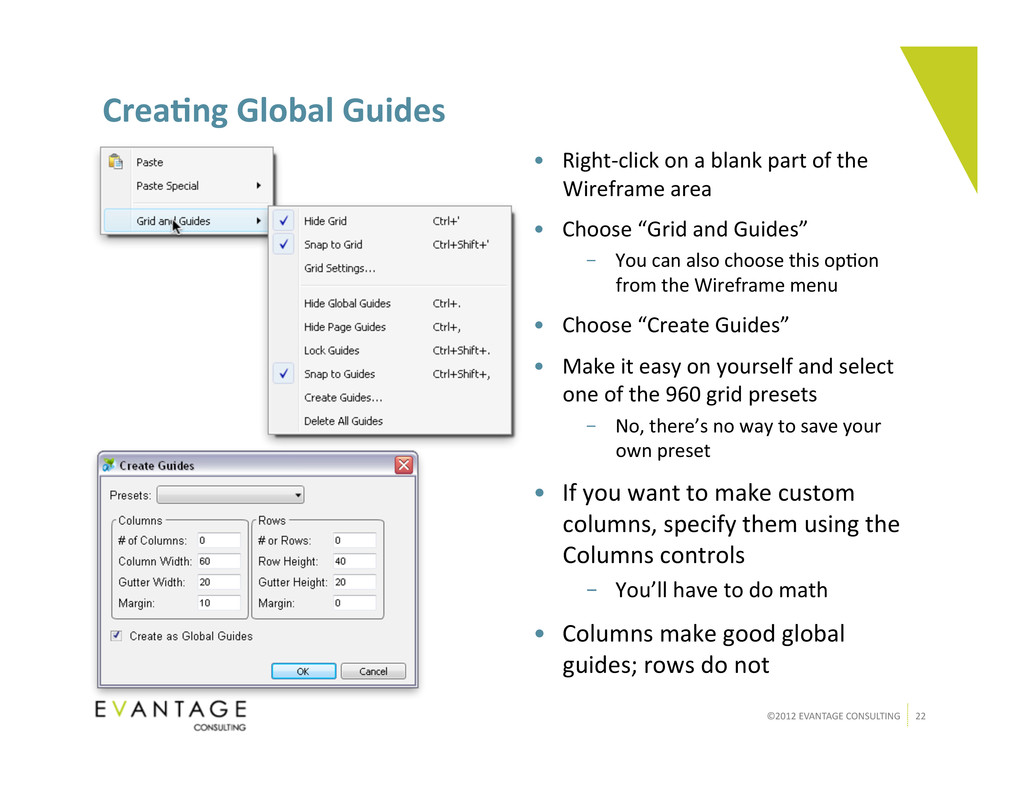
• Right-‐click on a blank part of the Wireframe area • Choose “Grid and Guides” – You can also choose this op=on from the Wireframe menu • Choose “Create Guides” • Make it easy on yourself and select one of the 960 grid presets – No, there’s no way to save your own preset • If you want to make custom columns, specify them using the Columns controls – You’ll have to do math • Columns make good global guides; rows do not
Working With Guides • Keep “Snap to Guides” selected • Lock guides to prevent moving them accidentally • Hide Page or Global guides individually if the wireframe is geJng too messy – Keyboard shortcuts are your friends – Hidden guides cannot be snapped to Using Guides Effec)vely • Only create columns as global guides • Create page guides on template pages • Duplicate template pages and make the necessary updates
Global Guides Create global guides to help you lay the site’s pages out neatly. 1. Create horizontal guides at the following coordinates – y = 105 – y = 125 2. Create ver=cal guides at the following coordinates – x = 50 – x = 674 – x = 927 Remember the trick for crea/ng global guides?
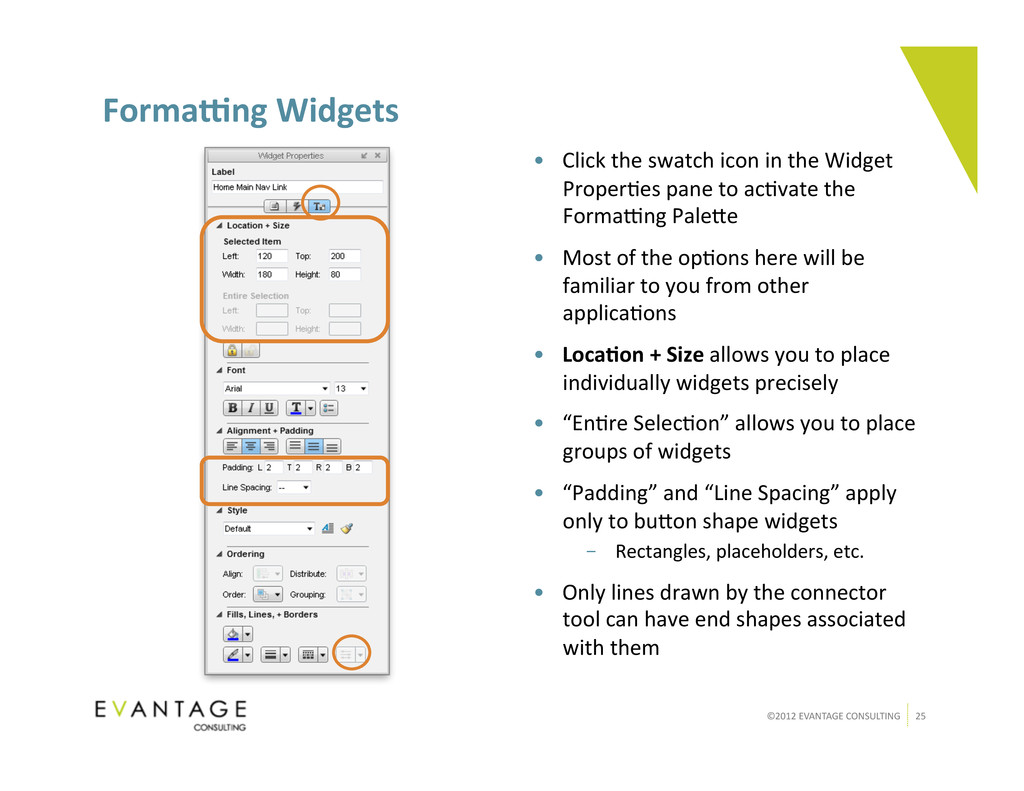
Click the swatch icon in the Widget Proper=es pane to ac=vate the FormaJng Pale]e • Most of the op=ons here will be familiar to you from other applica=ons • Loca)on + Size allows you to place individually widgets precisely • “En=re Selec=on” allows you to place groups of widgets • “Padding” and “Line Spacing” apply only to bu]on shape widgets – Rectangles, placeholders, etc. • Only lines drawn by the connector tool can have end shapes associated with them
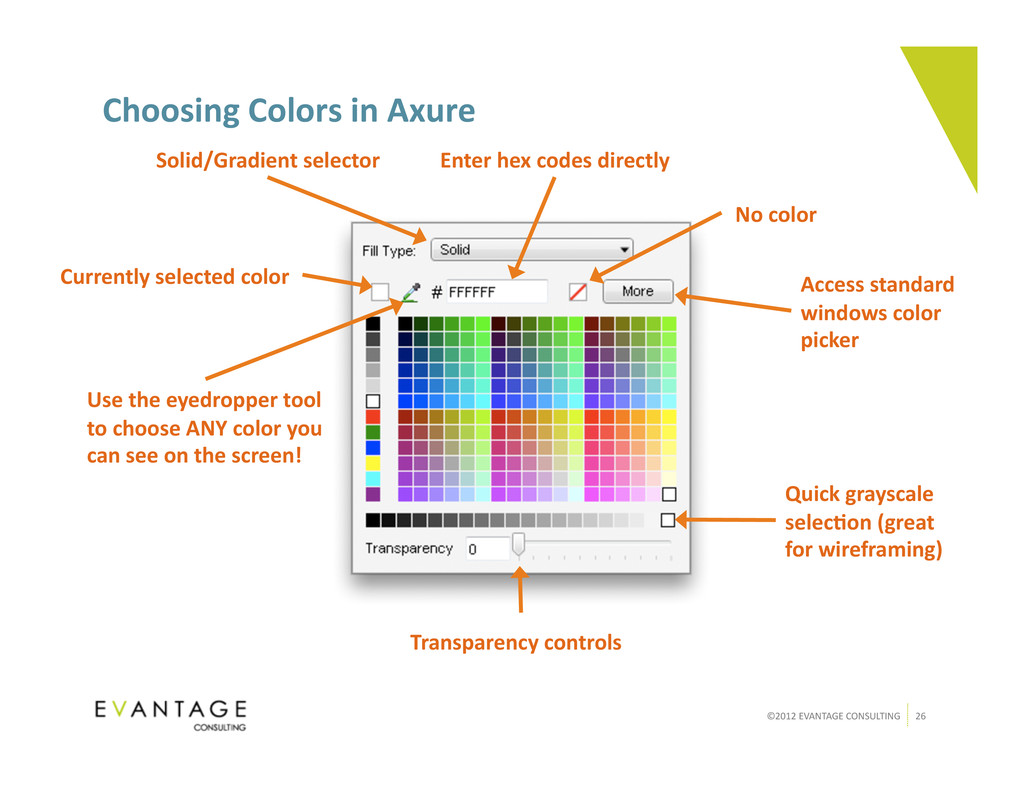
Solid/Gradient selector Use the eyedropper tool to choose ANY color you can see on the screen! Enter hex codes directly No color Access standard windows color picker Quick grayscale selec)on (great for wireframing) Transparency controls Currently selected color
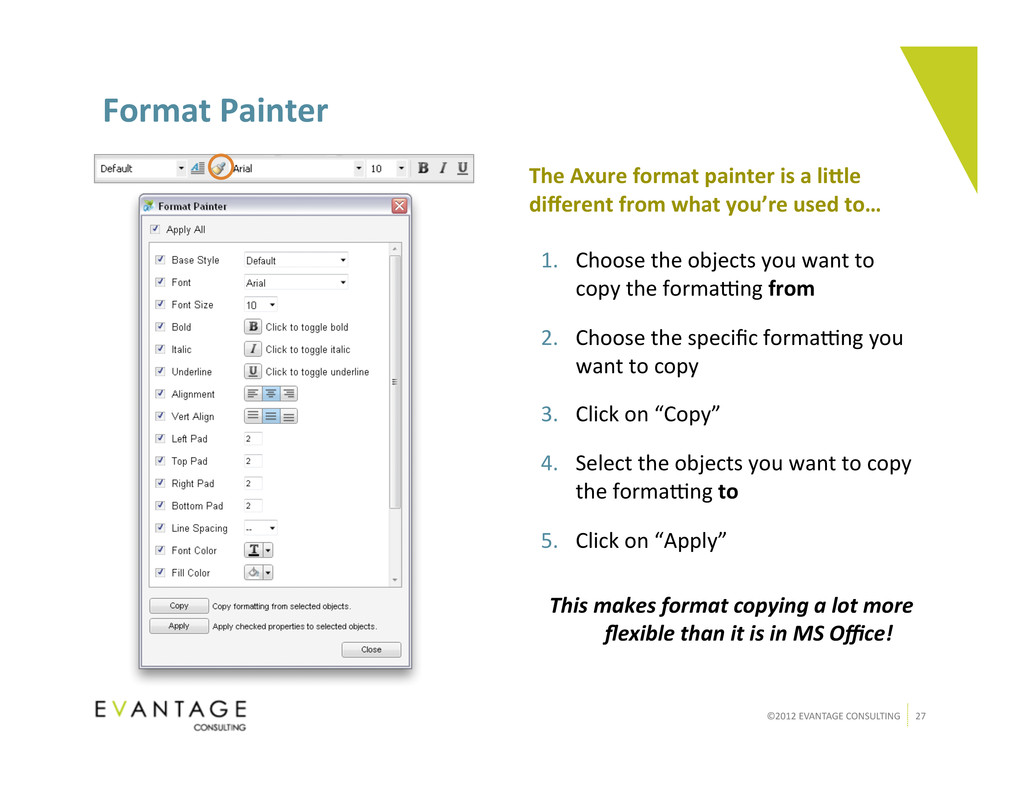
Axure format painter is a liYle different from what you’re used to… 1. Choose the objects you want to copy the formaJng from 2. Choose the specific formaJng you want to copy 3. Click on “Copy” 4. Select the objects you want to copy the formaJng to 5. Click on “Apply” This makes format copying a lot more flexible than it is in MS Office!
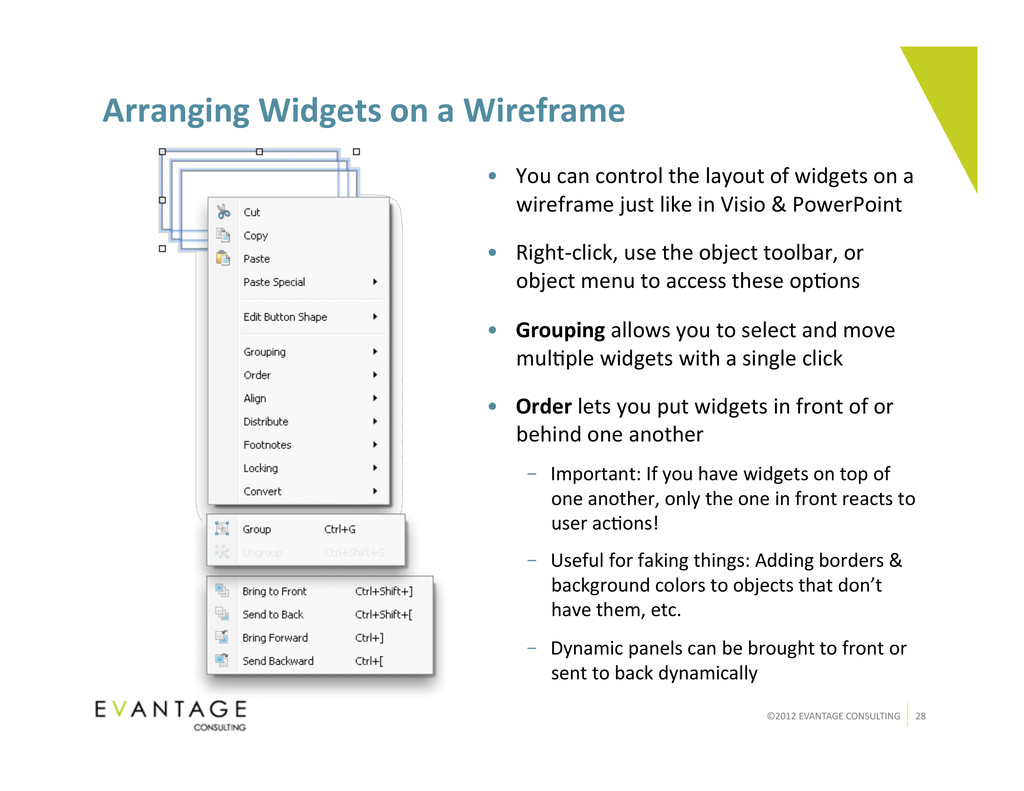
Wireframe • You can control the layout of widgets on a wireframe just like in Visio & PowerPoint • Right-‐click, use the object toolbar, or object menu to access these op=ons • Grouping allows you to select and move mul=ple widgets with a single click • Order lets you put widgets in front of or behind one another – Important: If you have widgets on top of one another, only the one in front reacts to user ac=ons! – Useful for faking things: Adding borders & background colors to objects that don’t have them, etc. – Dynamic panels can be brought to front or sent to back dynamically
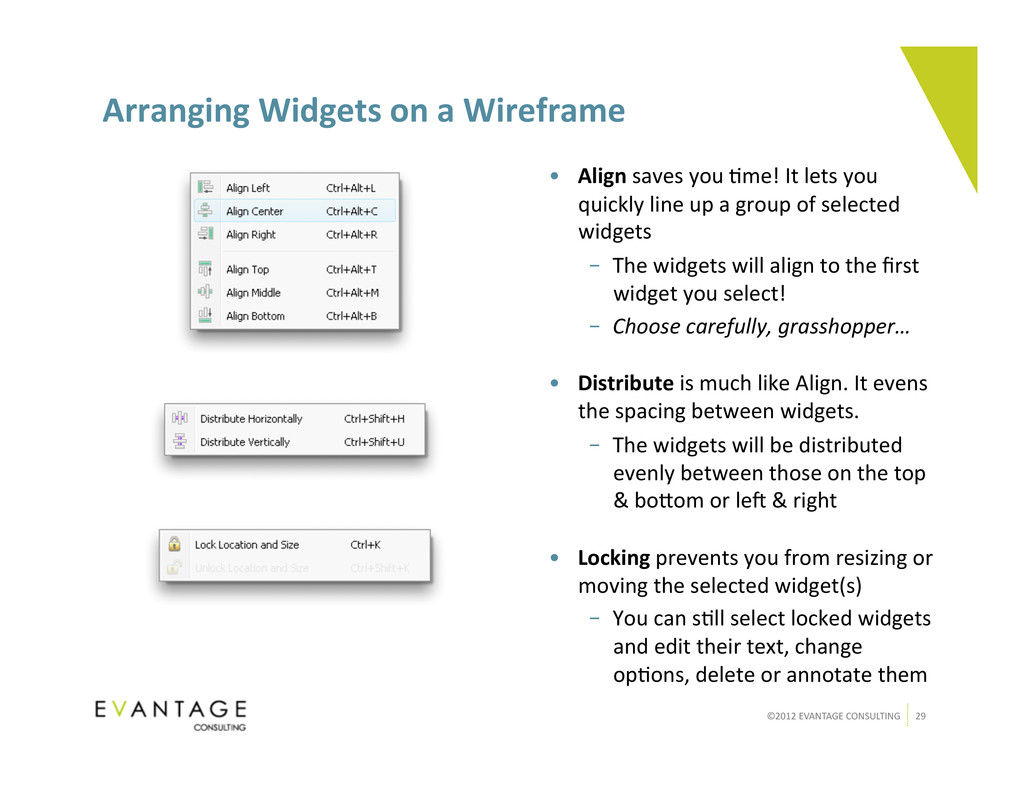
Wireframe • Align saves you =me! It lets you quickly line up a group of selected widgets – The widgets will align to the first widget you select! – Choose carefully, grasshopper… • Distribute is much like Align. It evens the spacing between widgets. – The widgets will be distributed evenly between those on the top & bo]om or leu & right • Locking prevents you from resizing or moving the selected widget(s) – You can s=ll select locked widgets and edit their text, change op=ons, delete or annotate them
a Wireframe You’ve got your pages ready… now wireframe! 30 minutes! • Wireframe the Tasks page of the Remember the Milk site with as much visual fidelity as possible – I was nice to you and made images of the top & side naviga=on. Feel free to totally cheat and use those. I won’t judge. – You’ll find several more images to import in the Intro to Axure folder on your desktop – To get the tab shape, right-‐click a rectangle and select Edit Bu]on Shape > Rounded Top – Don’t forget the color picker! • Don’t worry about interac=vity yet – We’ll get to that in just a bit. – Oh yes.
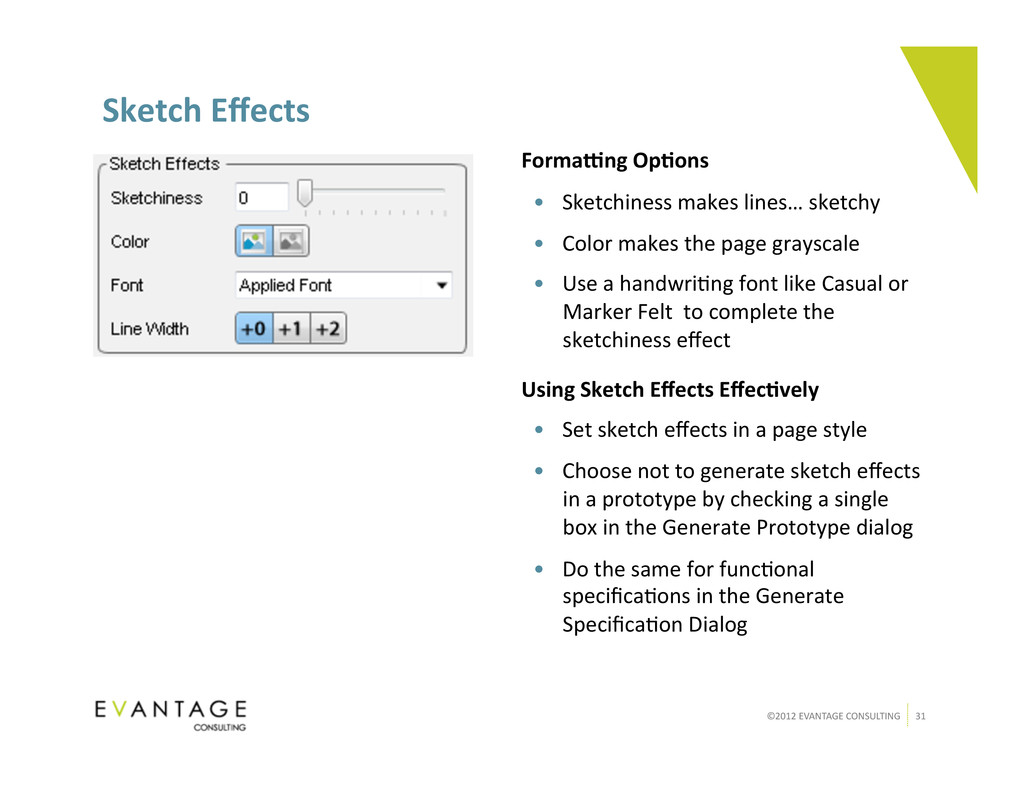
Op)ons • Sketchiness makes lines… sketchy • Color makes the page grayscale • Use a handwri=ng font like Casual or Marker Felt to complete the sketchiness effect Using Sketch Effects Effec)vely • Set sketch effects in a page style • Choose not to generate sketch effects in a prototype by checking a single box in the Generate Prototype dialog • Do the same for func=onal specifica=ons in the Generate Specifica=on Dialog
Up Your Beau)ful Wireframe Make a sketchy page style and apply it to your nice neat wireframe… 1. 60-‐70 on the sketchy scale seems best to me 2. Turn off the color 3. Comic Sans! – This is probably the only =me in your life you’ve been instructed to use Comic Sans… – Revel in the irony 4. Now apply the other style you created – Slick, eh?
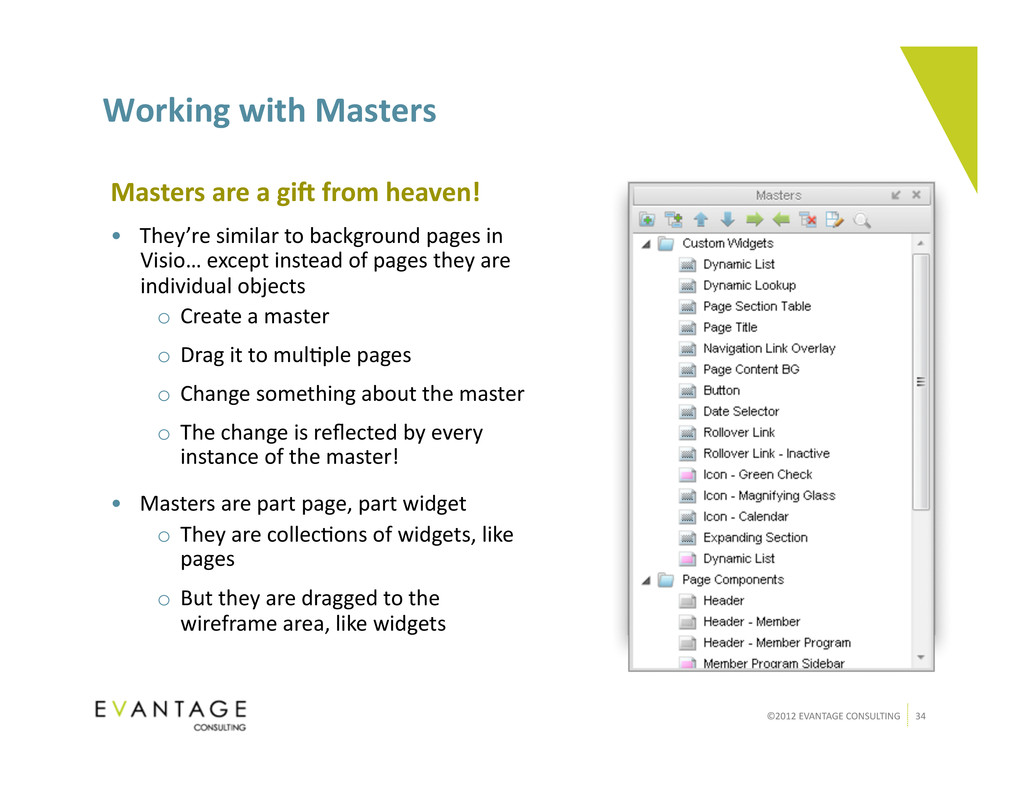
Masters are a gik from heaven! • They’re similar to background pages in Visio… except instead of pages they are individual objects o Create a master o Drag it to mul=ple pages o Change something about the master o The change is reflected by every instance of the master! • Masters are part page, part widget o They are collec=ons of widgets, like pages o But they are dragged to the wireframe area, like widgets
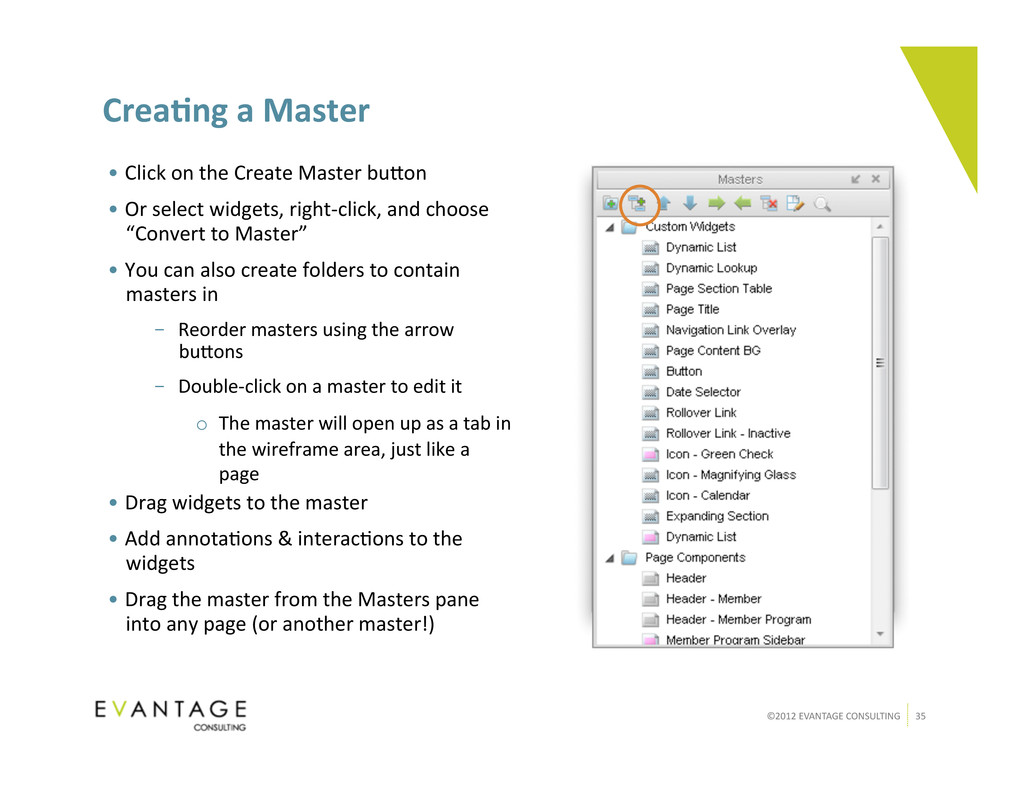
• Click on the Create Master bu]on • Or select widgets, right-‐click, and choose “Convert to Master” • You can also create folders to contain masters in – Reorder masters using the arrow bu]ons – Double-‐click on a master to edit it o The master will open up as a tab in the wireframe area, just like a page • Drag widgets to the master • Add annota=ons & interac=ons to the widgets • Drag the master from the Masters pane into any page (or another master!)
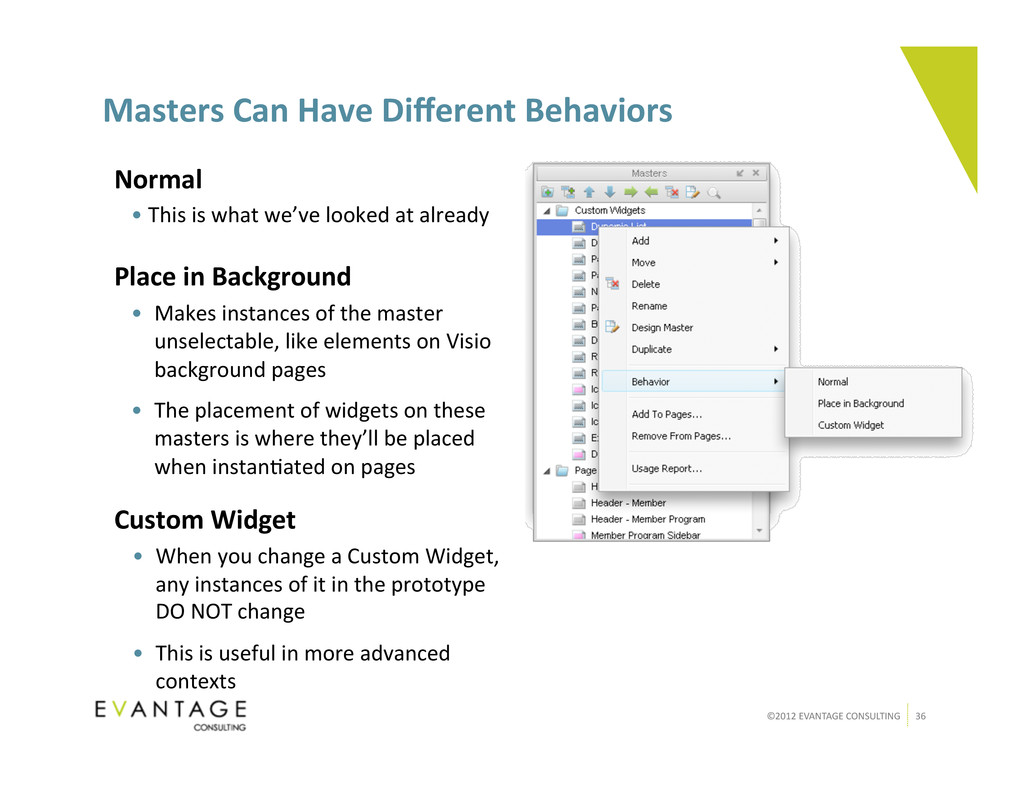
Behaviors Normal • This is what we’ve looked at already Place in Background • Makes instances of the master unselectable, like elements on Visio background pages • The placement of widgets on these masters is where they’ll be placed when instan=ated on pages Custom Widget • When you change a Custom Widget, any instances of it in the prototype DO NOT change • This is useful in more advanced contexts
Masters Naviga)on is exactly the kind of thing that needs to be a master • Make the top and right naviga=on into two separate masters – “Convert to Master” or… – Create a new master o Copy & paste widgets into it o Place an instance of the master onto the tasks page
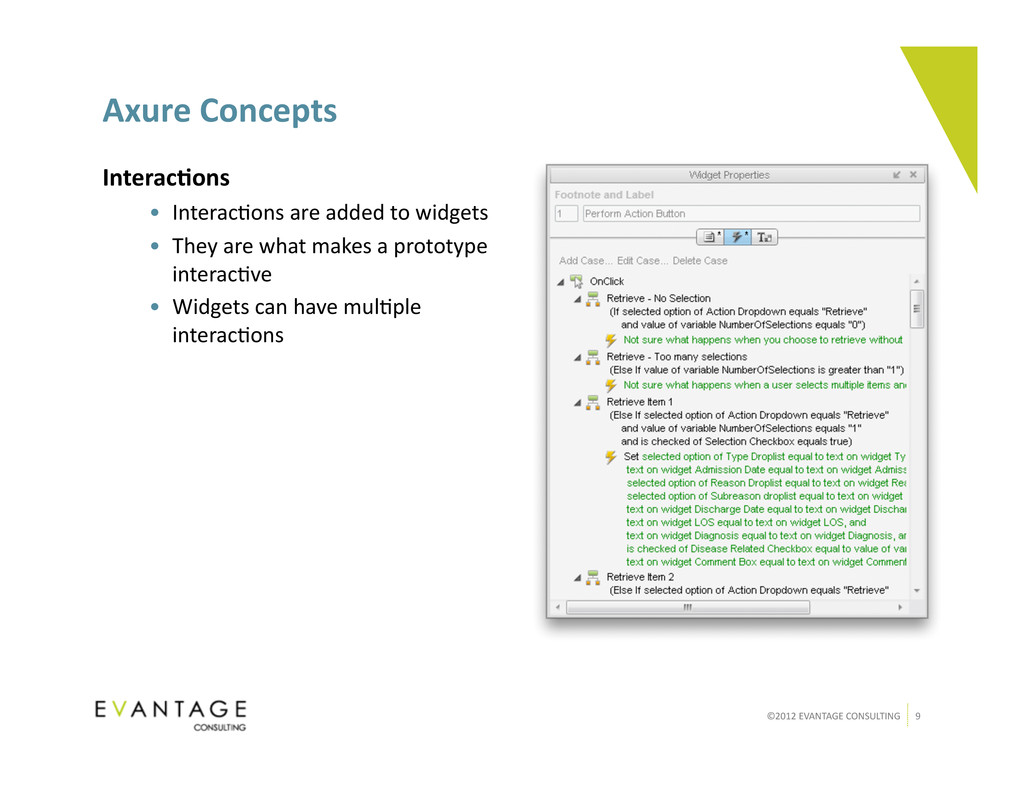
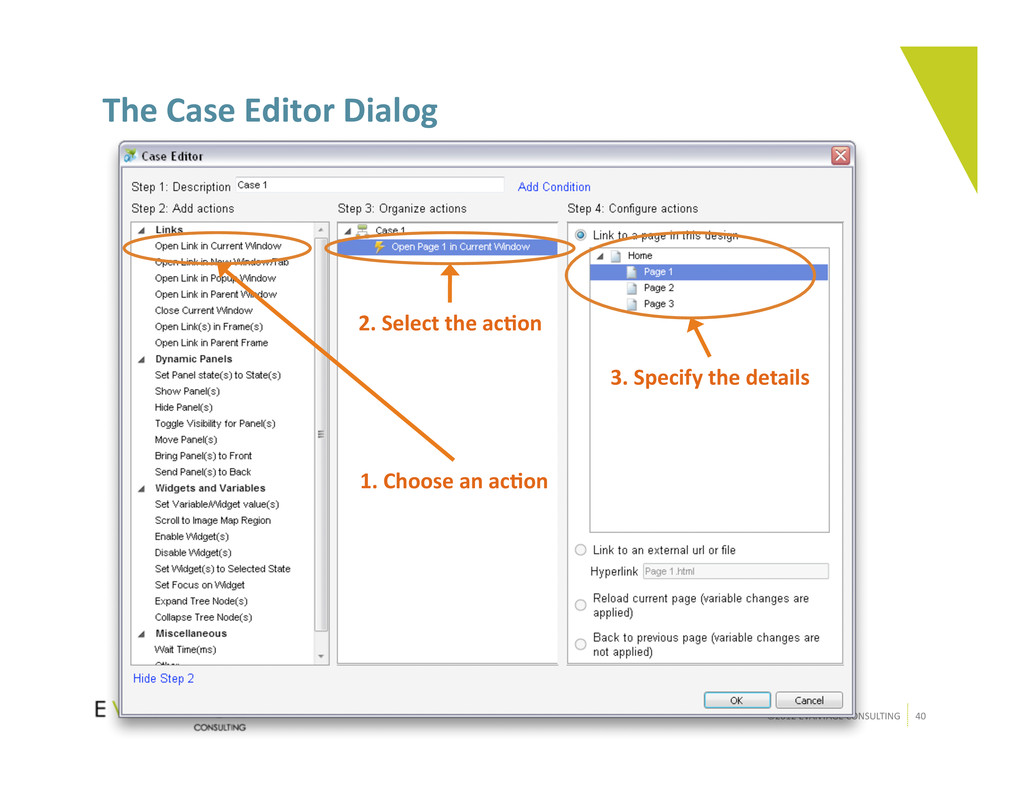
“Interac)ons” are what allow Axure prototypes to be interac)ve • They represent ac=ons the user can take on the prototype • You design how the prototype will respond to different user ac=ons • Axure has a defined list of ac=ons a prototype can take in response to user ac=ons • For any user ac=on, the prototype can respond with one or more of its own ac=ons
• Click on an ac=on in the leu column and it appears in the middle column – Click on more than one ac=on to create complex cases • Click on an ac=on in the middle column to select it – Drag and drop the ac=ons to change the order in which they’re performed – Press Delete to remove the selected ac=on • Use the right column to define the specifics of an ac=on – The page to go to – The text to display – The dynamic panel to move and how far to move it – And more
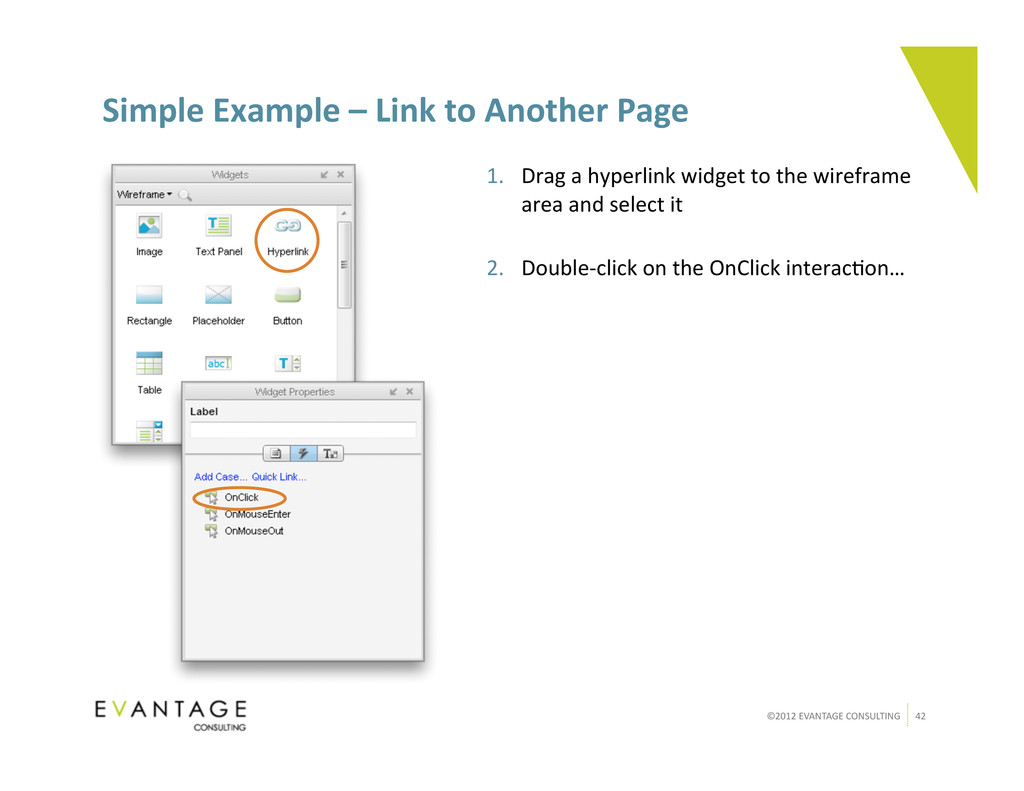
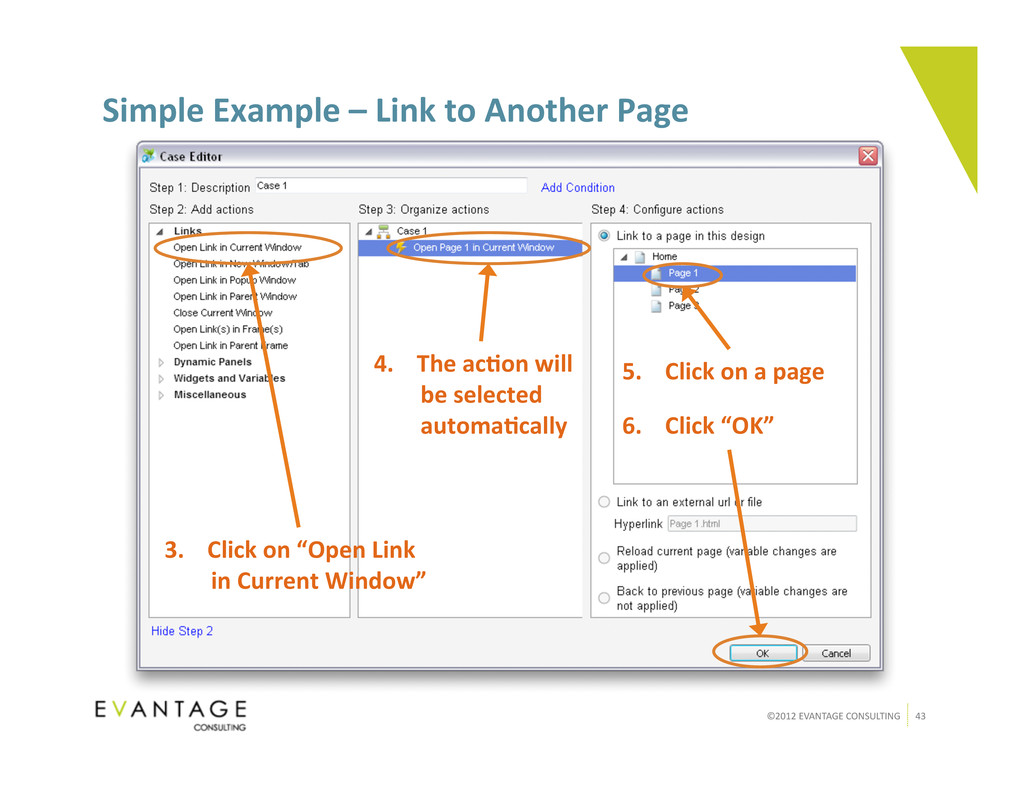
Links Now that your wireframe is all set, it’s )me to make it do something 1. Open the “Log In” page – It has already been wireframed out for you 2. Make the Log In bu]on take you to the tasks page – Don’t worry about whether or not anything is typed into the username and password fields
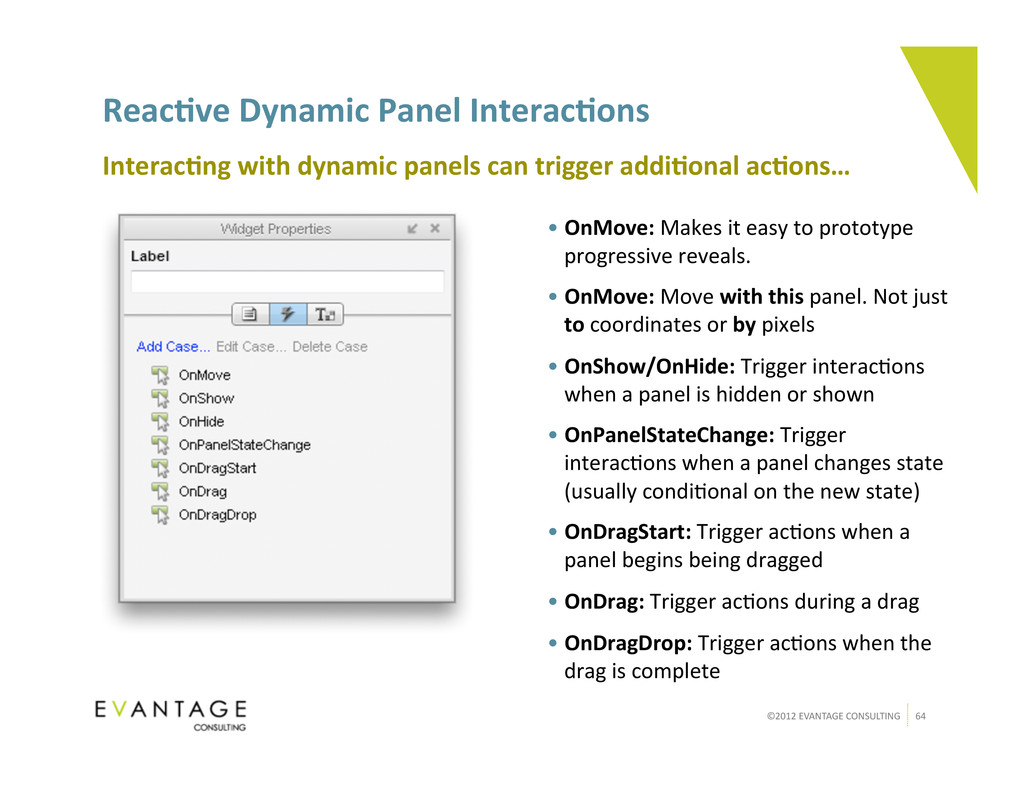
Axure Axure relies on three things to create rich interac)vity Interac)ons • Interac=ons allow the prototype to respond with specified ac=ons in response to the user’s ac=ons • The standard interac=ons: OnClick, OnMouseEnter, OnMouseOut • Special interac=ons for form elements: OnChange, OnKeyUp, OnFocus, OnLostFocus • Special interac=ons for dynamic panels: OnPanelStateChange, OnShow, OnHide, & more • Using mul=ple cases on a single interac=on • Controlling widgets when the page loads with OnPageLoad Widgets • Some basic widgets have advanced proper=es • Axure includes a few widgets specifically for prototyping interac=vity Variables & Condi)onal Logic • Custom-‐definable variables • Condi=ons can be set on any interac=on
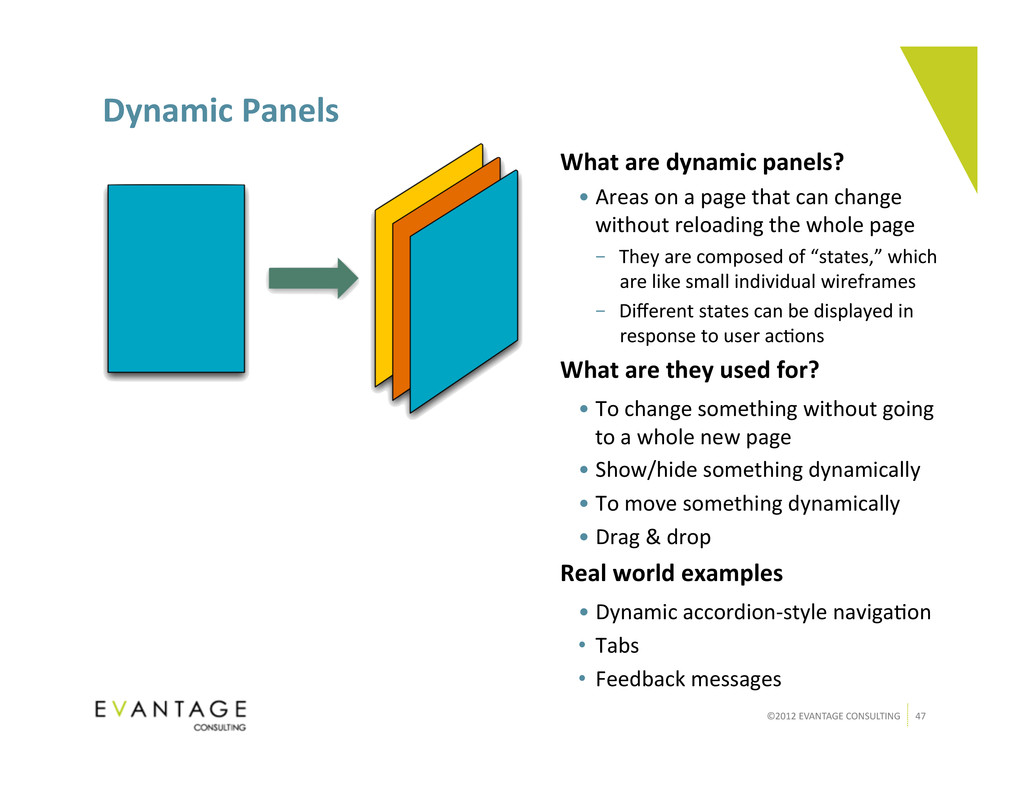
are dynamic panels? • Areas on a page that can change without reloading the whole page – They are composed of “states,” which are like small individual wireframes – Different states can be displayed in response to user ac=ons What are they used for? • To change something without going to a whole new page • Show/hide something dynamically • To move something dynamically • Drag & drop Real world examples • Dynamic accordion-‐style naviga=on • Tabs • Feedback messages
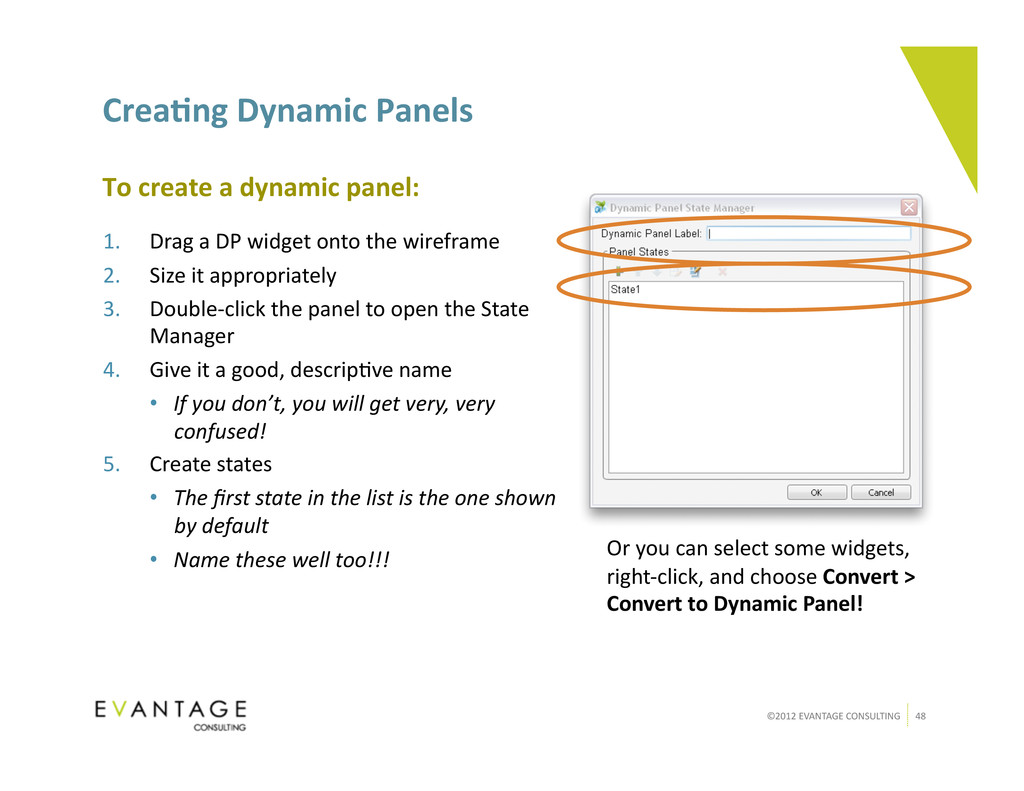
To create a dynamic panel: 1. Drag a DP widget onto the wireframe 2. Size it appropriately 3. Double-‐click the panel to open the State Manager 4. Give it a good, descrip=ve name • If you don’t, you will get very, very confused! 5. Create states • The first state in the list is the one shown by default • Name these well too!!! Or you can select some widgets, right-‐click, and choose Convert > Convert to Dynamic Panel!
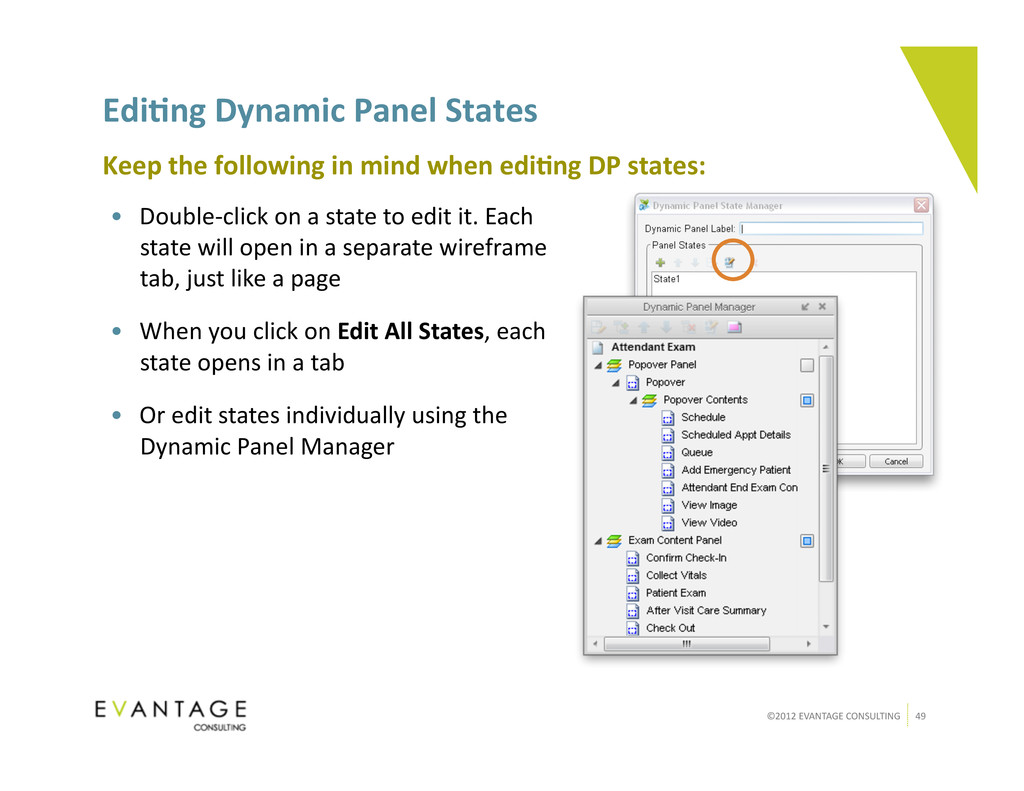
Keep the following in mind when edi)ng DP states: • Double-‐click on a state to edit it. Each state will open in a separate wireframe tab, just like a page • When you click on Edit All States, each state opens in a tab • Or edit states individually using the Dynamic Panel Manager
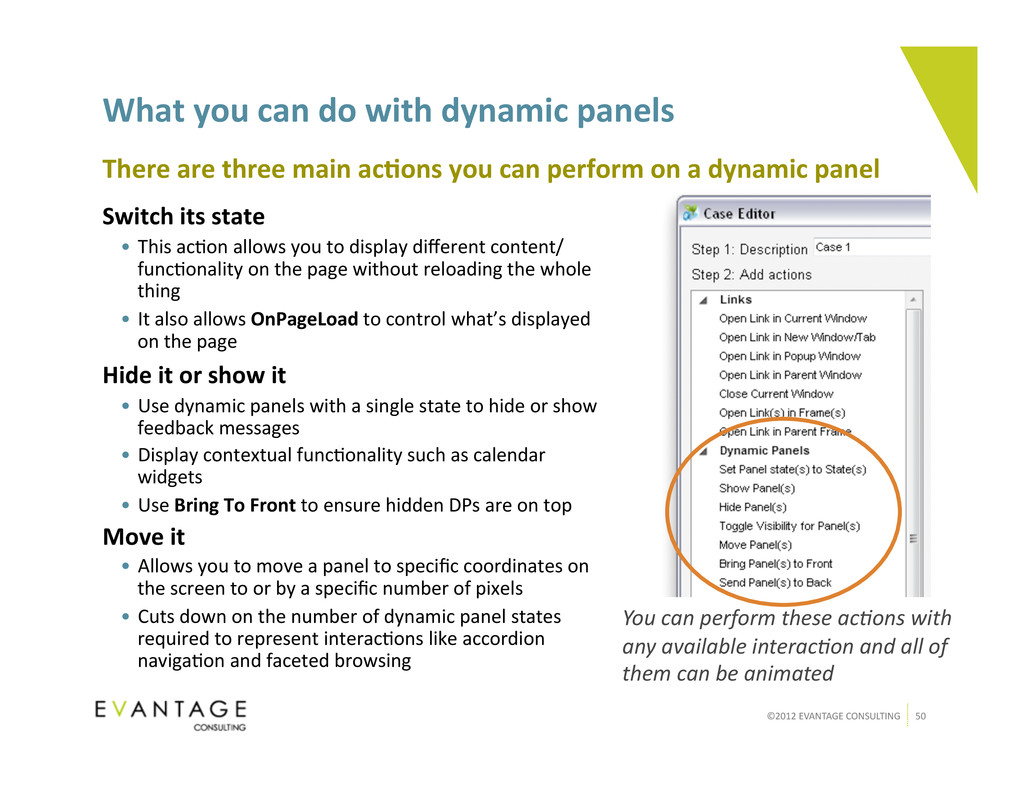
with dynamic panels There are three main ac)ons you can perform on a dynamic panel You can perform these ac/ons with any available interac/on and all of them can be animated Switch its state • This ac=on allows you to display different content/ func=onality on the page without reloading the whole thing • It also allows OnPageLoad to control what’s displayed on the page Hide it or show it • Use dynamic panels with a single state to hide or show feedback messages • Display contextual func=onality such as calendar widgets • Use Bring To Front to ensure hidden DPs are on top Move it • Allows you to move a panel to specific coordinates on the screen to or by a specific number of pixels • Cuts down on the number of dynamic panel states required to represent interac=ons like accordion naviga=on and faceted browsing
Example: Dynamic Tab Interac)on • Clicking on a tab to display different content on a page without reloading How to do it: 1. Create tabs to click on 2. Create a dynamic panel with mul=ple states, one per tab 3. Select a tab and double-‐click any interac=on 4. Choose Set Panel state to State from the case editor 5. Choose a panel 6. Choose the state of that panel that goes with this par=cular tab 7. Choose to animate the transi=on if necessary (in milliseconds) The most common thing you’ll do with a panel is switch states
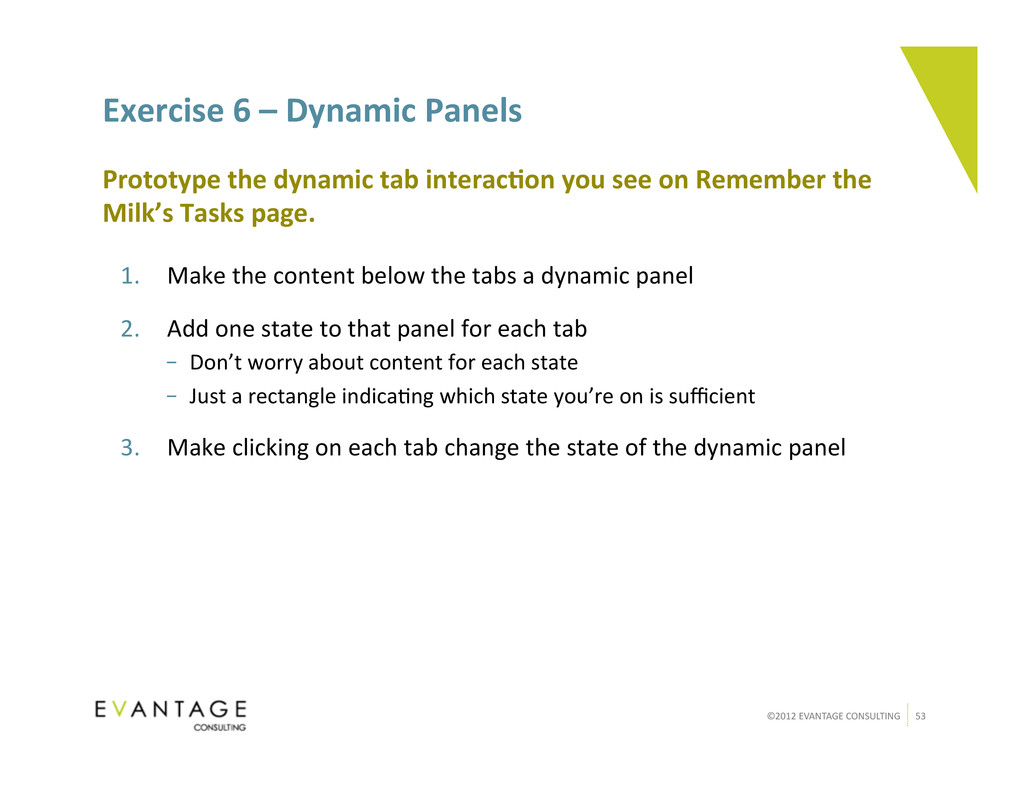
Panels Prototype the dynamic tab interac)on you see on Remember the Milk’s Tasks page. 1. Make the content below the tabs a dynamic panel 2. Add one state to that panel for each tab – Don’t worry about content for each state – Just a rectangle indica=ng which state you’re on is sufficient 3. Make clicking on each tab change the state of the dynamic panel
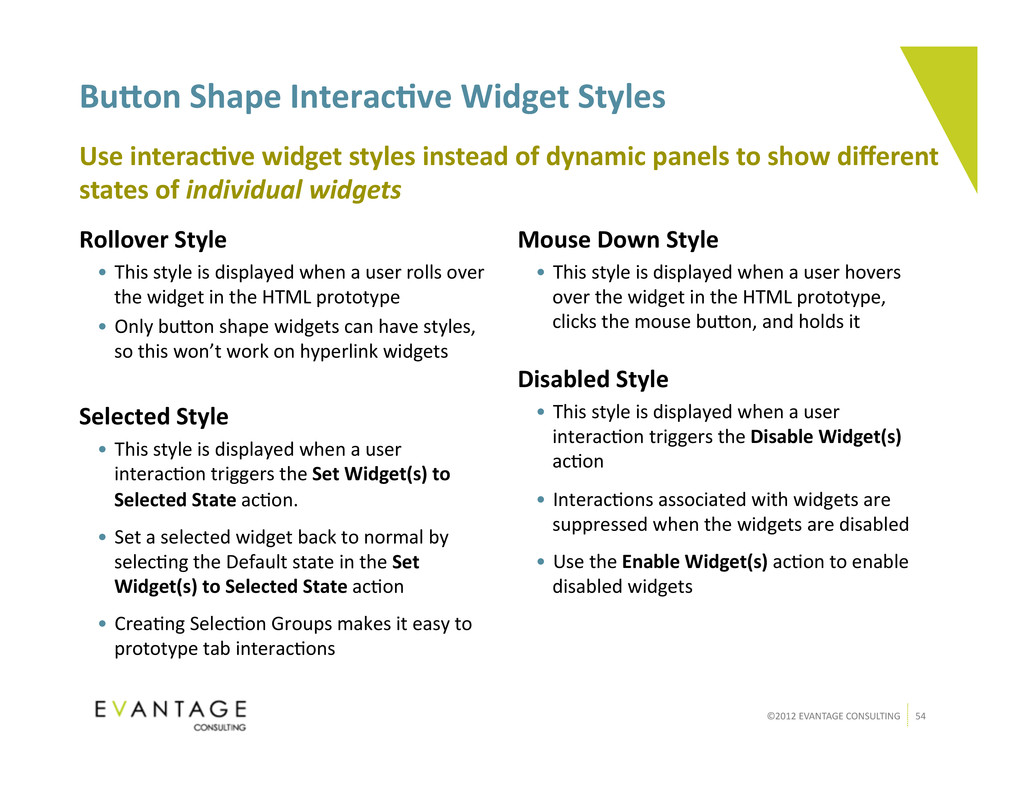
Styles Rollover Style • This style is displayed when a user rolls over the widget in the HTML prototype • Only bu]on shape widgets can have styles, so this won’t work on hyperlink widgets Selected Style • This style is displayed when a user interac=on triggers the Set Widget(s) to Selected State ac=on. • Set a selected widget back to normal by selec=ng the Default state in the Set Widget(s) to Selected State ac=on • Crea=ng Selec=on Groups makes it easy to prototype tab interac=ons Mouse Down Style • This style is displayed when a user hovers over the widget in the HTML prototype, clicks the mouse bu]on, and holds it Disabled Style • This style is displayed when a user interac=on triggers the Disable Widget(s) ac=on • Interac=ons associated with widgets are suppressed when the widgets are disabled • Use the Enable Widget(s) ac=on to enable disabled widgets Use interac)ve widget styles instead of dynamic panels to show different states of individual widgets
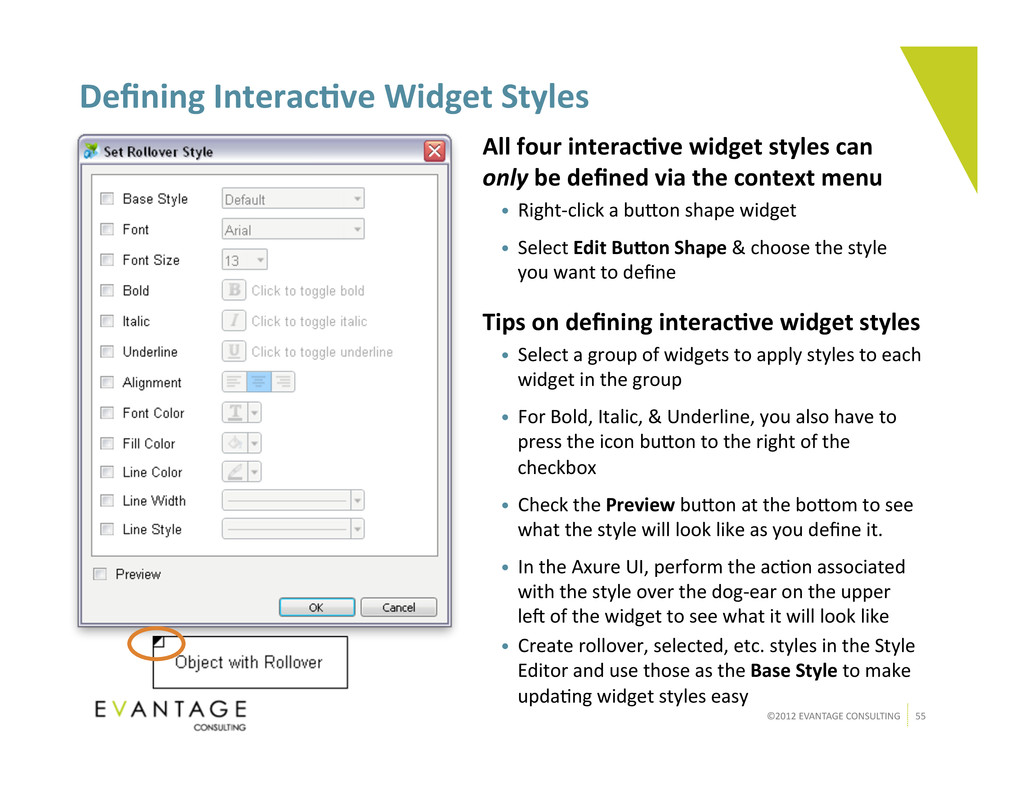
All four interac)ve widget styles can only be defined via the context menu • Right-‐click a bu]on shape widget • Select Edit BuYon Shape & choose the style you want to define Tips on defining interac)ve widget styles • Select a group of widgets to apply styles to each widget in the group • For Bold, Italic, & Underline, you also have to press the icon bu]on to the right of the checkbox • Check the Preview bu]on at the bo]om to see what the style will look like as you define it. • In the Axure UI, perform the ac=on associated with the style over the dog-‐ear on the upper leu of the widget to see what it will look like • Create rollover, selected, etc. styles in the Style Editor and use those as the Base Style to make upda=ng widget styles easy
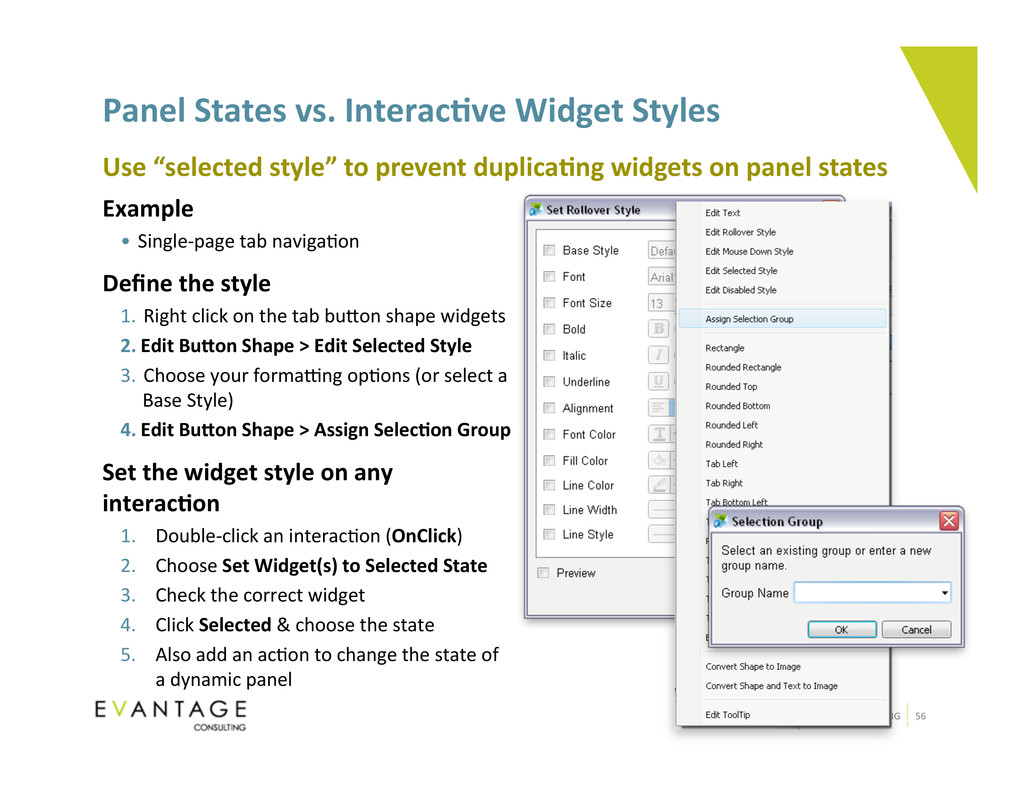
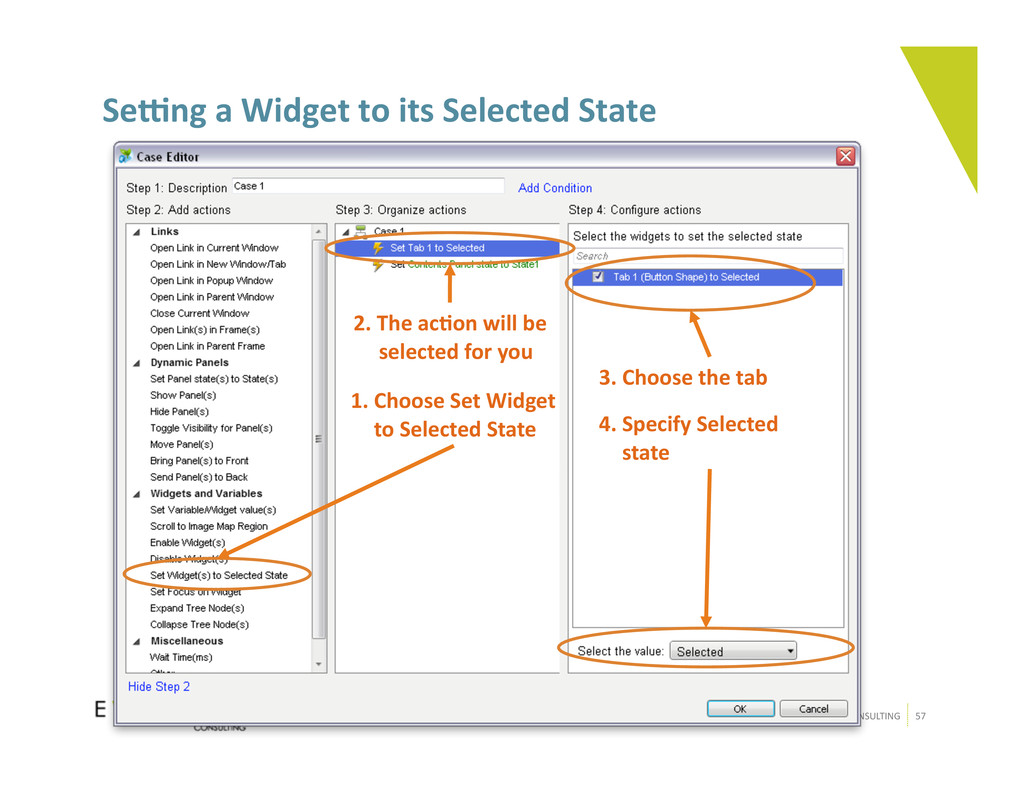
Widget Styles Example • Single-‐page tab naviga=on Define the style 1. Right click on the tab bu]on shape widgets 2. Edit BuYon Shape > Edit Selected Style 3. Choose your formaJng op=ons (or select a Base Style) 4. Edit BuYon Shape > Assign Selec)on Group Set the widget style on any interac)on 1. Double-‐click an interac=on (OnClick) 2. Choose Set Widget(s) to Selected State 3. Check the correct widget 4. Click Selected & choose the state 5. Also add an ac=on to change the state of a dynamic panel Use “selected style” to prevent duplica)ng widgets on panel states
an interac)on that occurs when the page loads Any ac)on that can be )ed to any other interac)on can be )ed to OnPageLoad • Open a pop-‐up window (but you would never, ever do this, right?) • Display the correct naviga=on op=ons from within a dynamic panel • Use the Wait ac=on with a dynamic panel to simulate a progress bar • Display the selected state of a widget This can be very powerful when combined with condi)onal logic & variables • Make error pages display specific, dynamic feedback about what the user did wrong • Open the correct view of a Web app document with mul=ple views • Simulate storing data on a cookie to allow for dynamic preferences
Tabs Use your exis)ng Remember the Milk prototype Make your tabs respond to rollover & show selec)on • Add the appropriate widget styles to each tab • Add interac=ons to each tab that will make only that tab appear to be selected when it’s clicked • Make the Inbox tab appear selected when the page opens
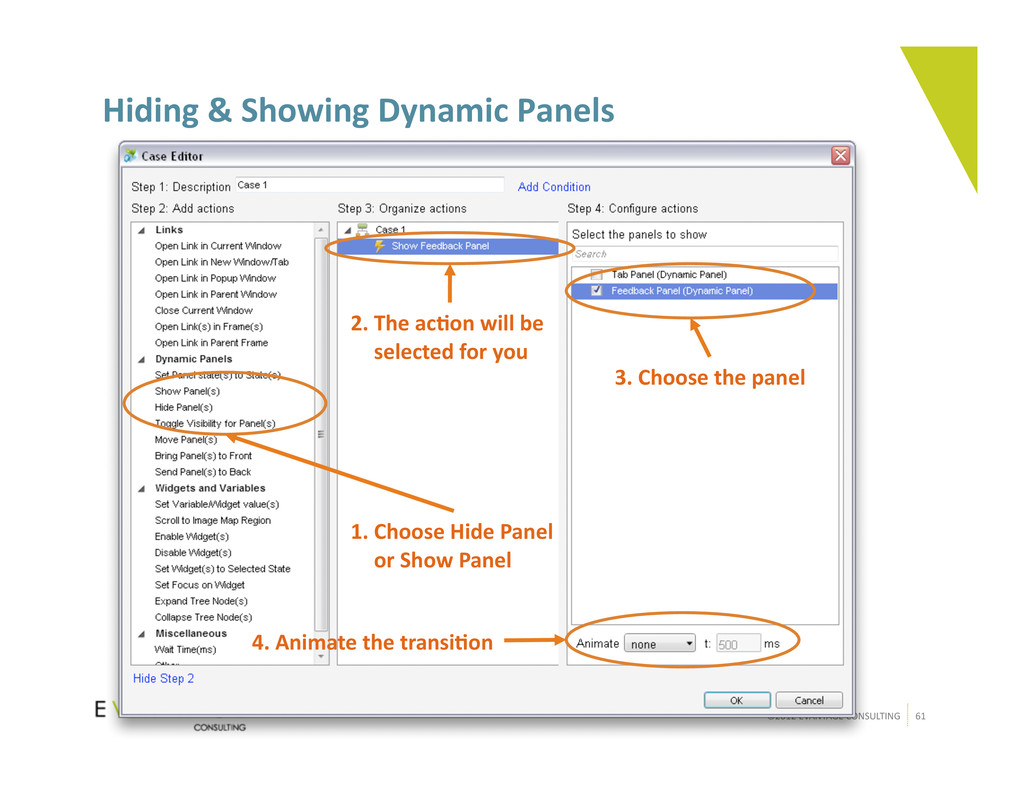
Panels Example: Feedback messages & lightboxes • Performing an ac=on causes the system to display a hidden message or layer Panel visibility can be set explicitly (hide/show) or toggled • Hide Panel, Show Panel • Toggle Visibility for Panel How to do it: 1. Double-‐click any interac=on 2. Select Show Panel(s) or Hide Panel(s) 3. Or select Toggle Visibility for Panel(s) 4. Select the ac=on in the second column 5. Choose the panel 6. Choose to animate the transi=on if necessary Dynamic panels can be hidden and shown
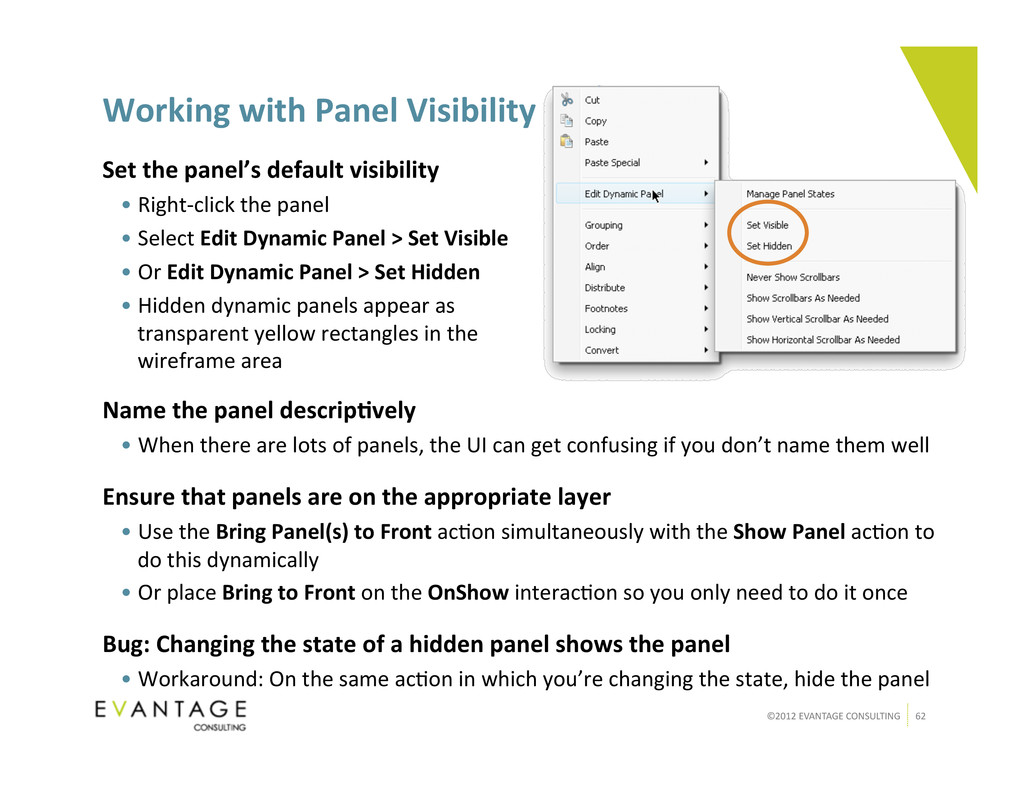
Name the panel descrip)vely • When there are lots of panels, the UI can get confusing if you don’t name them well Ensure that panels are on the appropriate layer • Use the Bring Panel(s) to Front ac=on simultaneously with the Show Panel ac=on to do this dynamically • Or place Bring to Front on the OnShow interac=on so you only need to do it once Bug: Changing the state of a hidden panel shows the panel • Workaround: On the same ac=on in which you’re changing the state, hide the panel Set the panel’s default visibility • Right-‐click the panel • Select Edit Dynamic Panel > Set Visible • Or Edit Dynamic Panel > Set Hidden • Hidden dynamic panels appear as transparent yellow rectangles in the wireframe area
Visibility Use your exis)ng Remember the Milk prototype On the Tasks page, make the Complete and Postpone buYons on the Inbox tab give feedback • Display this message when you click on Complete: o “You must select something to complete” • Display this message when you click on Postpone: o “You must select something to postpone” • Images have been provided for you in the .RP file on the Feedback Images page. • Provide a way to get rid of the feedback panel when it appears
• OnMove: Makes it easy to prototype progressive reveals. • OnMove: Move with this panel. Not just to coordinates or by pixels • OnShow/OnHide: Trigger interac=ons when a panel is hidden or shown • OnPanelStateChange: Trigger interac=ons when a panel changes state (usually condi=onal on the new state) • OnDragStart: Trigger ac=ons when a panel begins being dragged • OnDrag: Trigger ac=ons during a drag • OnDragDrop: Trigger ac=ons when the drag is complete Interac)ng with dynamic panels can trigger addi)onal ac)ons…
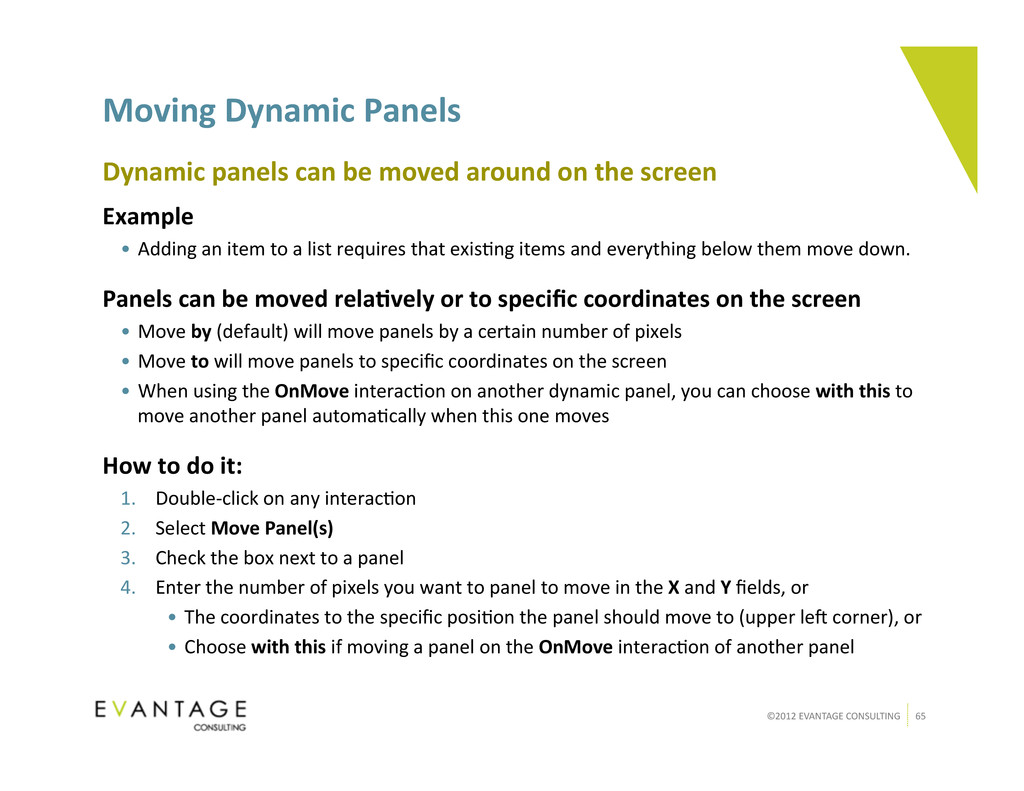
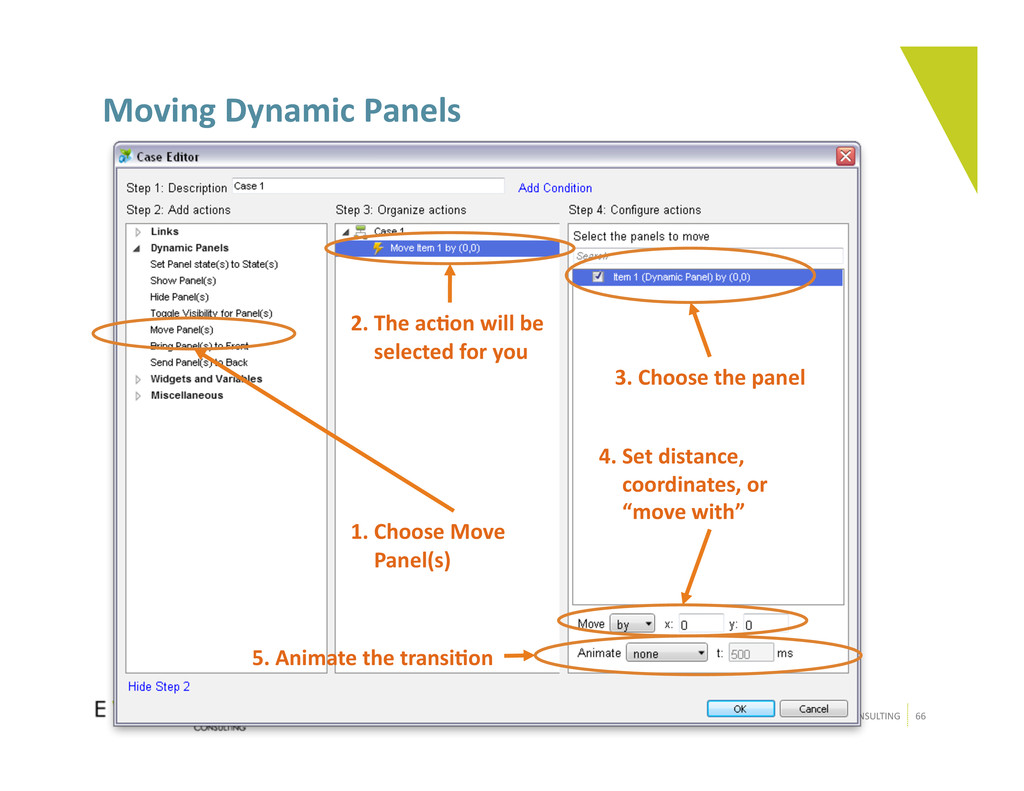
Example • Adding an item to a list requires that exis=ng items and everything below them move down. Panels can be moved rela)vely or to specific coordinates on the screen • Move by (default) will move panels by a certain number of pixels • Move to will move panels to specific coordinates on the screen • When using the OnMove interac=on on another dynamic panel, you can choose with this to move another panel automa=cally when this one moves How to do it: 1. Double-‐click on any interac=on 2. Select Move Panel(s) 3. Check the box next to a panel 4. Enter the number of pixels you want to panel to move in the X and Y fields, or • The coordinates to the specific posi=on the panel should move to (upper leu corner), or • Choose with this if moving a panel on the OnMove interac=on of another panel Dynamic panels can be moved around on the screen
1. Choose Move Panel(s) 2. The ac)on will be selected for you 3. Choose the panel 4. Set distance, coordinates, or “move with” 5. Animate the transi)on
Panel Chaining Example • Adding new items to a list of exis=ng items Structure and lay out your dynamic panels to accommodate this • Make each item a dynamic panel • When an item panel is shown/hidden (OnShow, OnHide), move the panel beneath it down by the size of the panel being shown • When any panel moves (OnMove), move the panel beneath it with this panel Chaining panel movement interac)ons together with OnShow/Hide and OnMove makes it easy to prototype dynamic UIs
Panels Use your exis)ng Remember the Milk prototype On the Inbox tab, make the Add Task link add two new tasks at the top of the list 1. To appear, new tasks need to be dynamic panels • Don’t worry about whether the task =tle matches what you type into the text field • You’ll need two cases, one to make each panel visible 2. To move the exis=ng task, it needs to be a dynamic panel. Can you think of an easy way to make that happen? 3. Ensure that all the items beneath the new ones move down the appropriate number of pixels • The height of the panel that is being shown
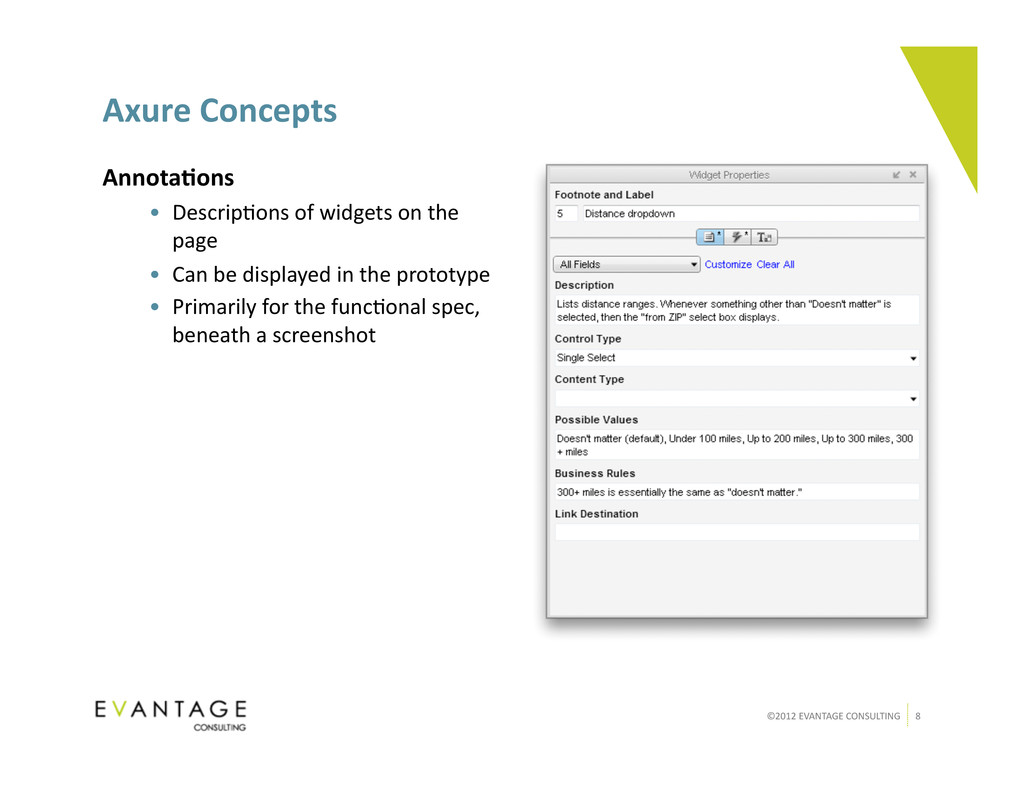
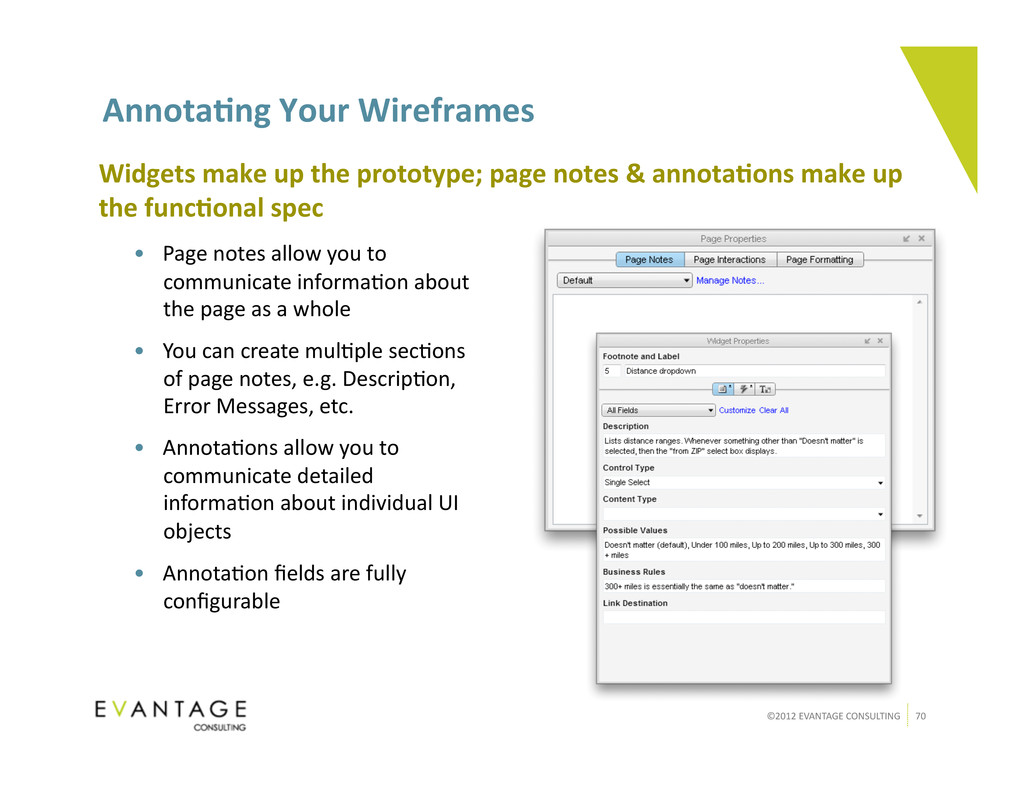
Widgets make up the prototype; page notes & annota)ons make up the func)onal spec • Page notes allow you to communicate informa=on about the page as a whole • You can create mul=ple sec=ons of page notes, e.g. Descrip=on, Error Messages, etc. • Annota=ons allow you to communicate detailed informa=on about individual UI objects • Annota=on fields are fully configurable
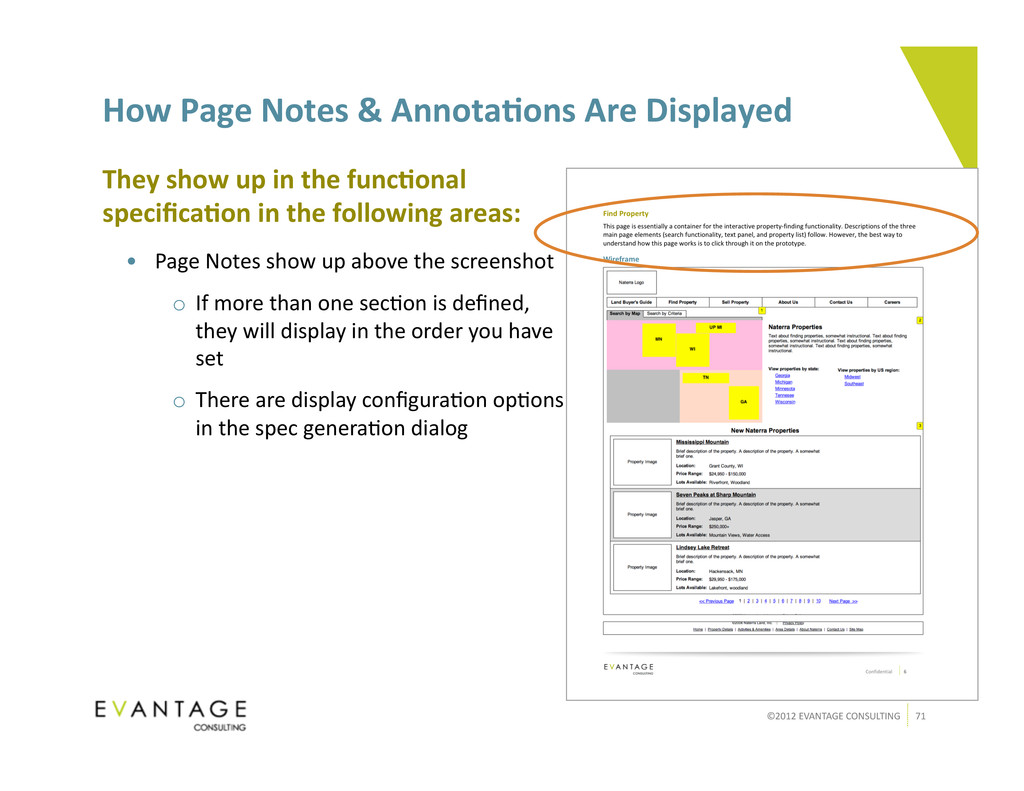
Annota)ons Are Displayed They show up in the func)onal specifica)on in the following areas: • Page Notes show up above the screenshot o If more than one sec=on is defined, they will display in the order you have set o There are display configura=on op=ons in the spec genera=on dialog
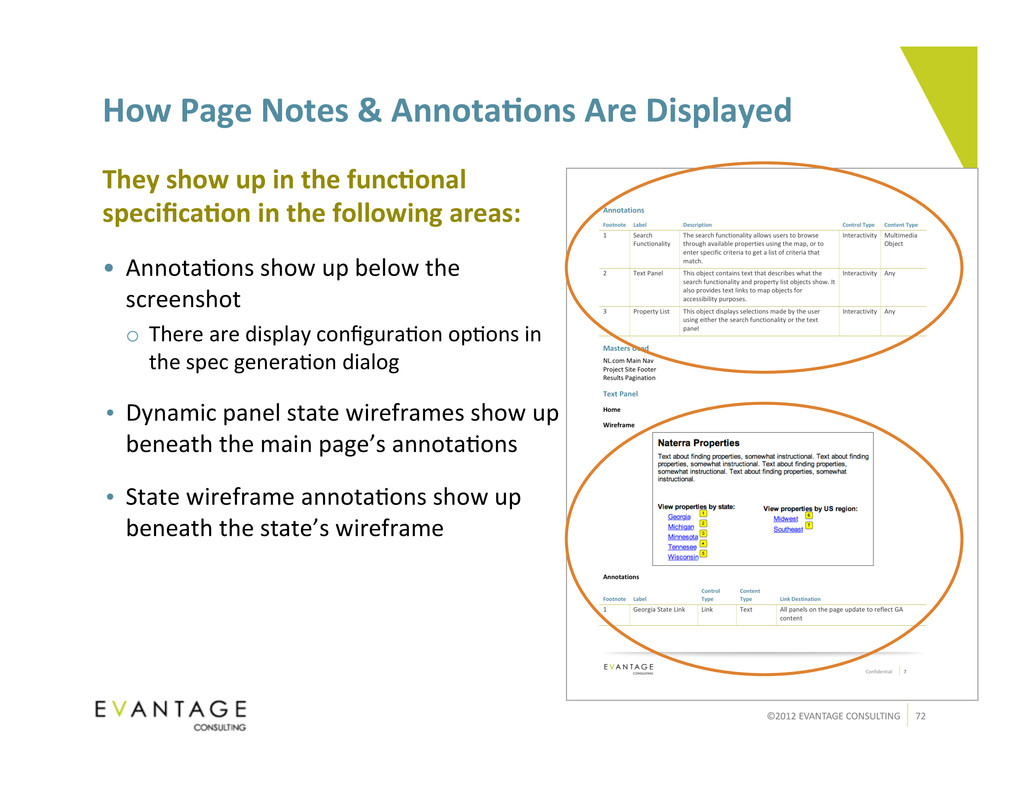
Annota)ons Are Displayed They show up in the func)onal specifica)on in the following areas: • Annota=ons show up below the screenshot o There are display configura=on op=ons in the spec genera=on dialog • Dynamic panel state wireframes show up beneath the main page’s annota=ons • State wireframe annota=ons show up beneath the state’s wireframe
• Click the box and begin typing to add page notes • If you’ve created addi=onal sec=ons of notes (“Notes Fields”), click on the dropdown box to access them • Click on “Manage Notes” to define different sec=ons • Add, remove, rename, & re-‐order sec=ons in the dialog • Sec=on defini=ons are document-‐ wide
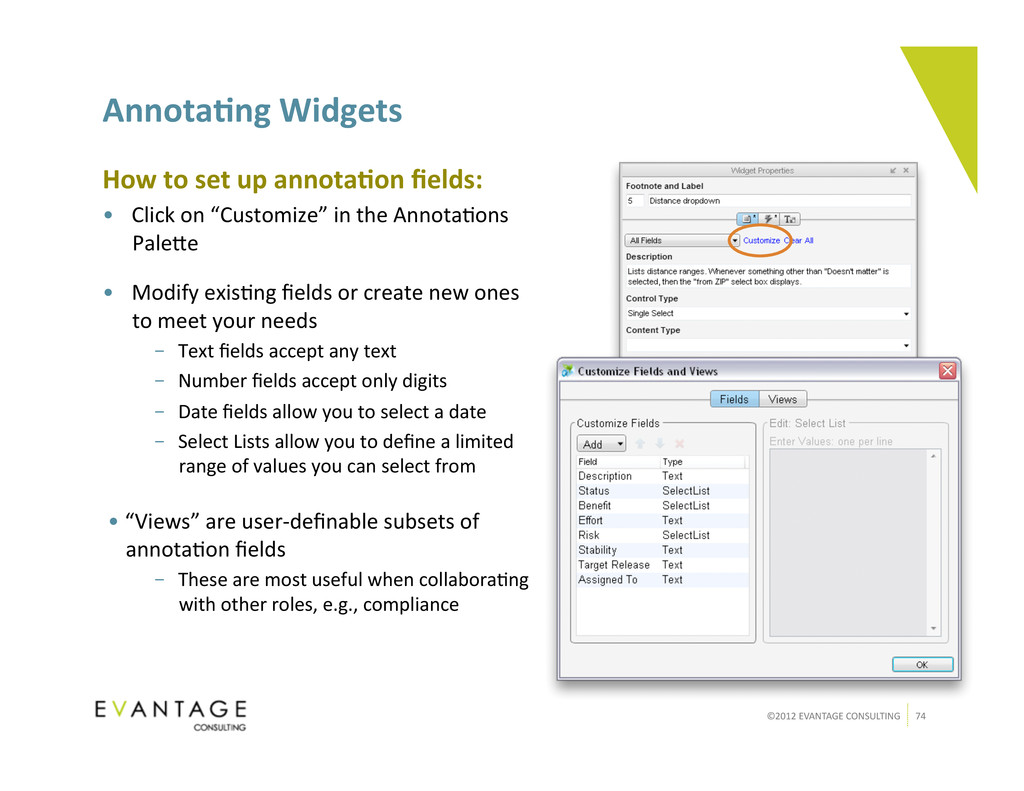
to set up annota)on fields: • Click on “Customize” in the Annota=ons Pale]e • Modify exis=ng fields or create new ones to meet your needs – Text fields accept any text – Number fields accept only digits – Date fields allow you to select a date – Select Lists allow you to define a limited range of values you can select from • “Views” are user-‐definable subsets of annota=on fields – These are most useful when collabora=ng with other roles, e.g., compliance
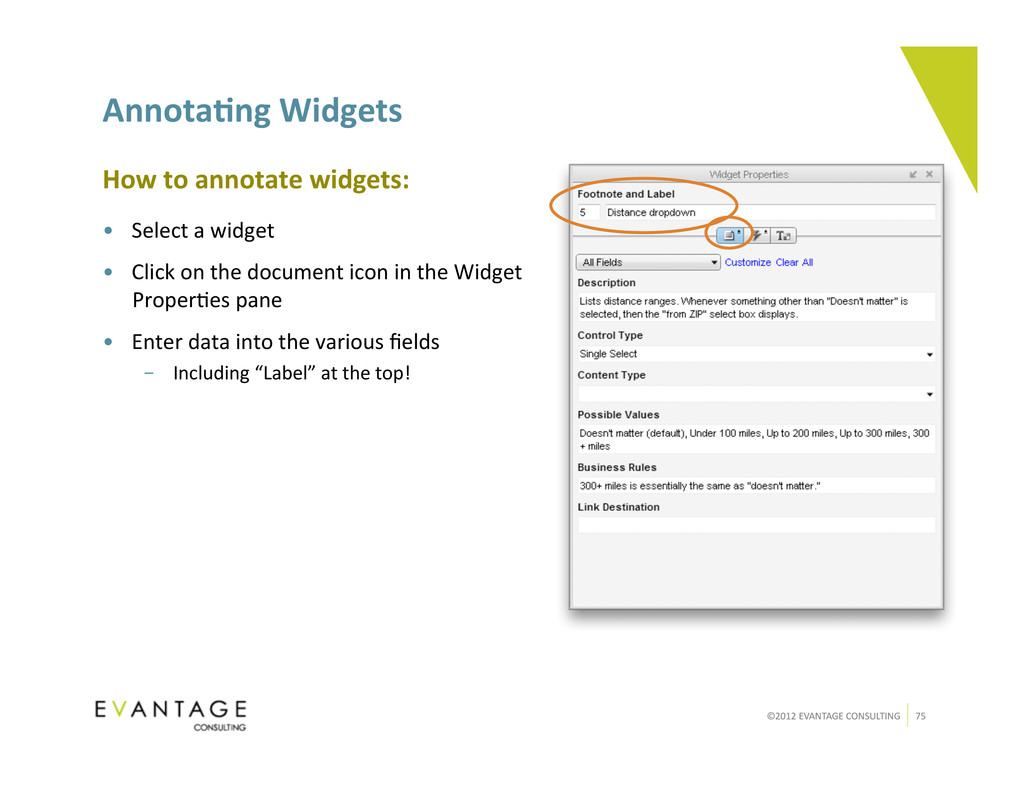
to annotate widgets: • Select a widget • Click on the document icon in the Widget Proper=es pane • Enter data into the various fields – Including “Label” at the top!
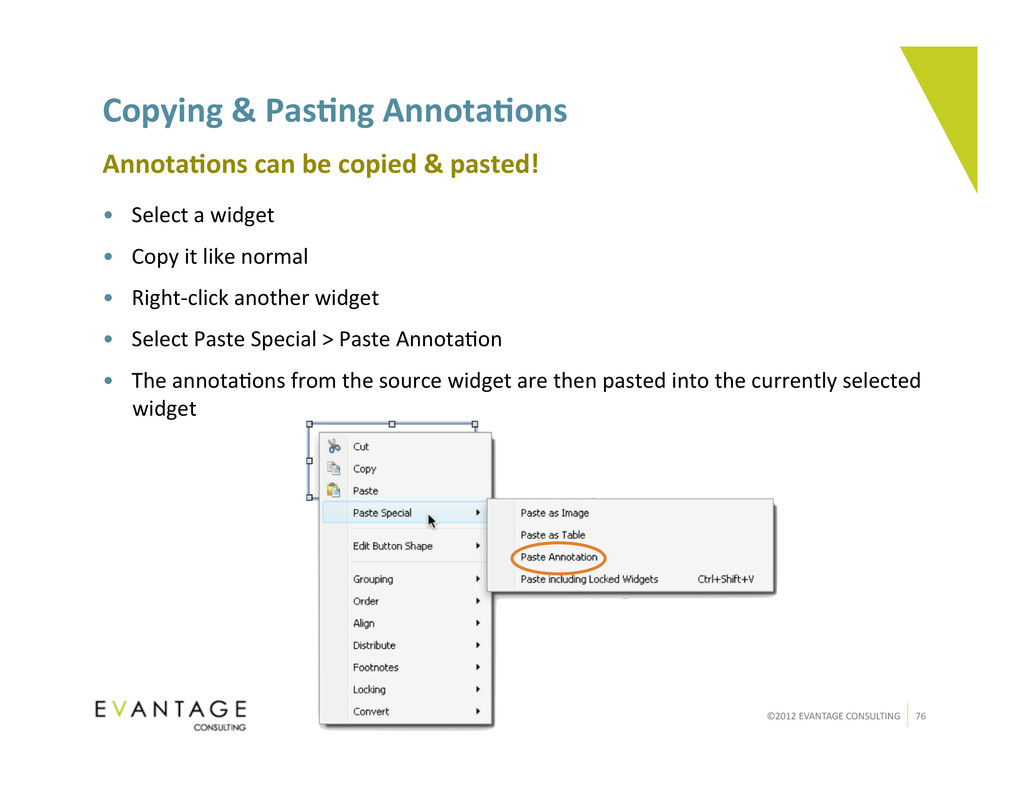
Annota)ons can be copied & pasted! • Select a widget • Copy it like normal • Right-‐click another widget • Select Paste Special > Paste Annota=on • The annota=ons from the source widget are then pasted into the currently selected widget
best prac)ces • Before you begin prototyping at all, work with developers to define the annota=on fields! • Annotate widgets at least upon the comple=on of each page. Copy & Paste annota=ons to speed this process up. • Use pre-‐annotated custom widget masters to speed up the annota=on of similar objects! If you don’t do these things, it will take you a lot of /me and tedium to do annota/ons at the end of the project!