Upgrade to Pro
— share decks privately, control downloads, hide ads and more …
Speaker Deck
Features
Speaker Deck
PRO
Sign in
Sign up for free
Search
Search
IOST ハンズオン
Search
YutaSugimura
September 01, 2019
Programming
360
0
Share
Embed
Copy iframe code
Copy JS code
Copy link
Start on current slide
IOST ハンズオン
YutaSugimura
September 01, 2019
More Decks by YutaSugimura
See All by YutaSugimura
Uniswapについて調べてみた
yutasugimura
0
430
Other Decks in Programming
See All in Programming
Apache Hive: そしてCloud Native Lakehouseへ
okumin
1
170
コーディングルールの鮮度を保ちたい for SRE NEXT 2026 / keep-fresh-go-internal-conventions-sre-next-2026
handlename
0
150
AIエージェントで 変わるAndroid開発環境
takahirom
2
720
yield再入門 #phpcon
o0h
PRO
0
740
型も通る、synthも通る、それでも危ない 〜AIのCDKの権限とコストを機械で検証する〜 / It Passes Type Checks, It Passes Synth Checks, but It’s Still Risky — Automatically Verifying Permissions and Costs in AI’s CDK —
seike460
PRO
1
420
ルールを書いて終わらせないハーネスエンジニアリング
yug1224
4
1.7k
php-fpmのプロセスが枯渇した日-調査・対処・そして本当にやるべきだったこと-
shibuchaaaan
0
140
アルゴリズムは何を圧縮しているのか ─ Haskell から育った「圧縮代数」というメンタルモデル
naoya
16
3.6k
act1-costs.pdf
sumedhbala
0
250
JAWS-UG横浜 #102 AWSサ終供養LT会 成仏できない AWS サービスたち 〜本日、三体供養します〜
maroon1st
0
240
PostgreSQL 18で考えるUUID主キー
kazuhiro1982
0
350
人間の目はかわらない、だからJPEGは30年もつ
yuzneri
8
14k
Featured
See All Featured
Evolution of real-time – Irina Nazarova, EuRuKo, 2024
irinanazarova
9
1.5k
Responsive Adventures: Dirty Tricks From The Dark Corners of Front-End
smashingmag
254
22k
The Power of CSS Pseudo Elements
geoffreycrofte
82
6.5k
技術選定の審美眼(2025年版) / Understanding the Spiral of Technologies 2025 edition
twada
PRO
118
120k
Organizational Design Perspectives: An Ontology of Organizational Design Elements
kimpetersen
PRO
1
770
Rebuilding a faster, lazier Slack
samanthasiow
85
9.6k
Site-Speed That Sticks
csswizardry
13
1.3k
Designing for humans not robots
tammielis
254
26k
What's in a price? How to price your products and services
michaelherold
247
13k
Navigating the moral maze — ethical principles for Al-driven product design
skipperchong
2
420
Neural Spatial Audio Processing for Sound Field Analysis and Control
skoyamalab
0
390
What the history of the web can teach us about the future of AI
inesmontani
PRO
1
640
Transcript
javaScriptでブロックチェーンを学ぶ!名古屋編
IOSTでスマートコントラクトを作成する
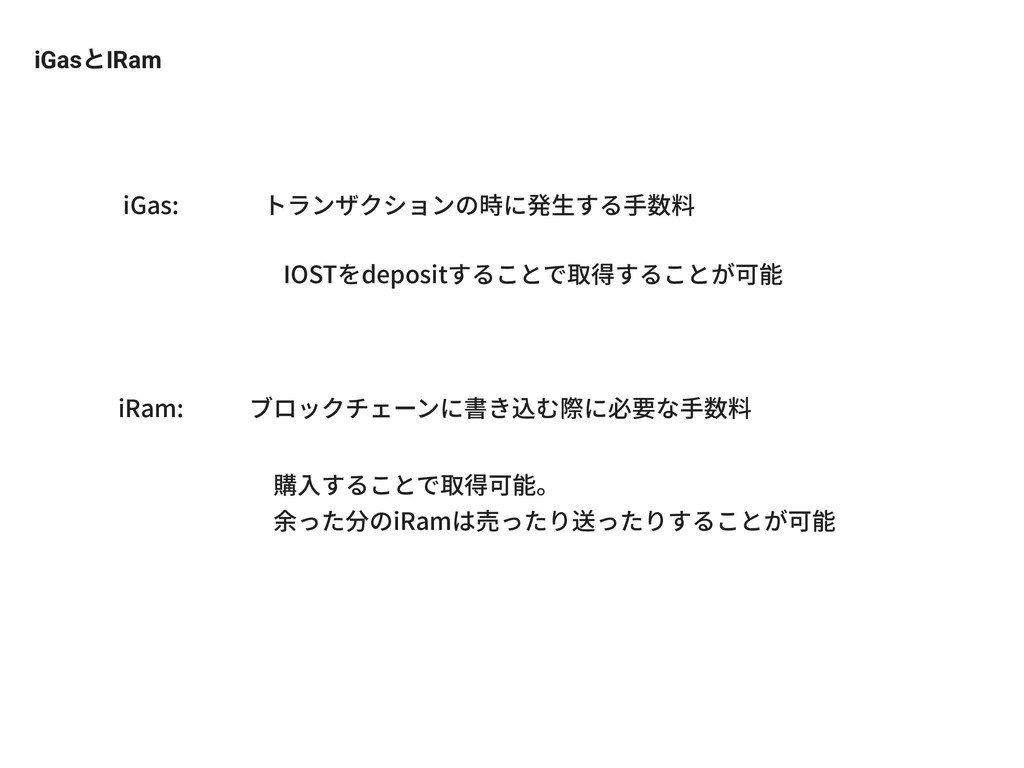
iGasͱIRam iGas: トランザクションの時に発⽣する⼿数料 iRam: ブロックチェーンに書き込む際に必要な⼿数料 購⼊することで取得可能。 余った分のiRamは売ったり送ったりすることが可能 IOSTをdepositすることで取得することが可能
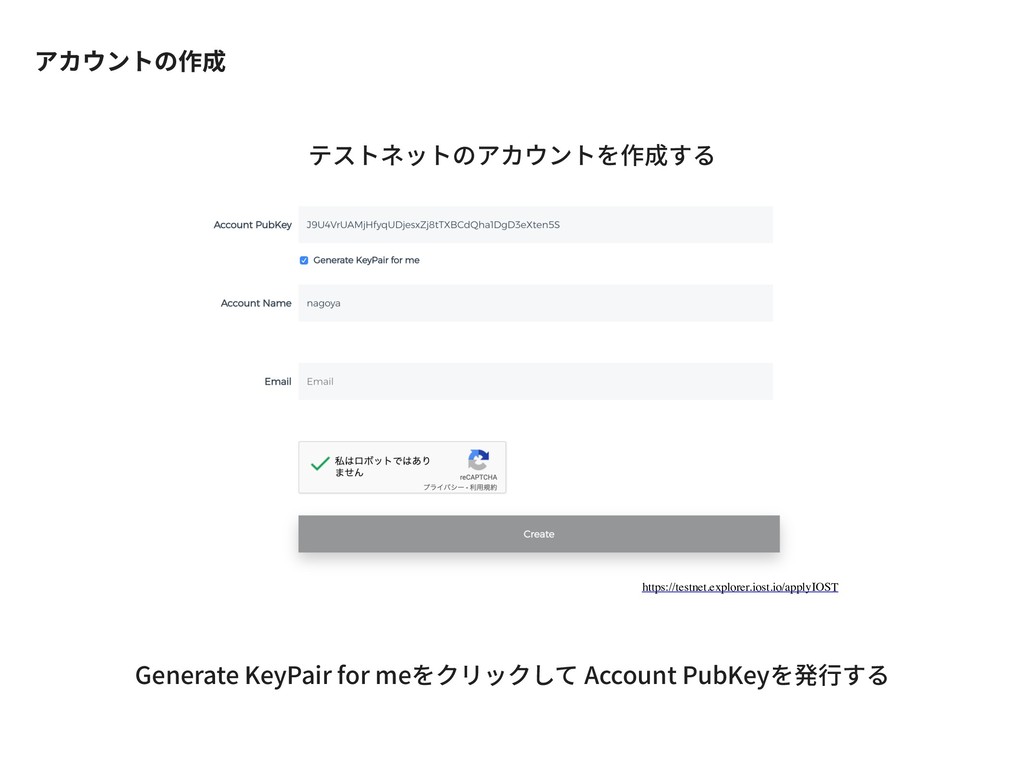
テストネットのアカウントを作成する アカウントの作成 https://testnet.explorer.iost.io/applyIOST Generate KeyPair for meをクリックして Account PubKeyを発⾏する
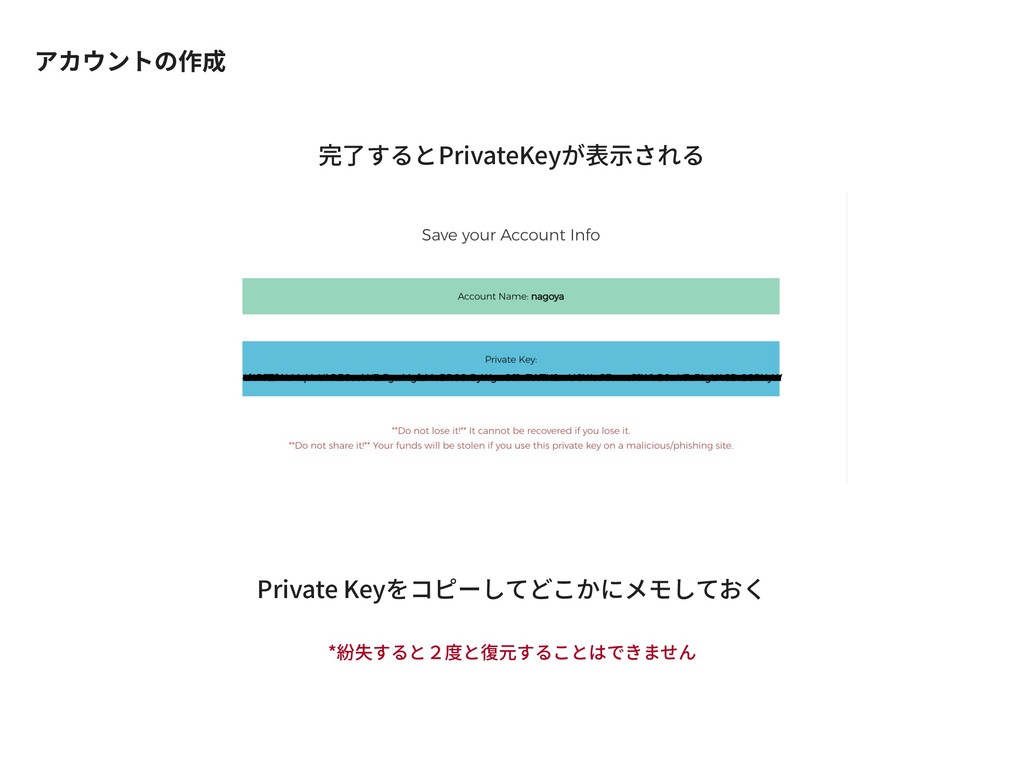
アカウントの作成 完了するとPrivateKeyが表⽰される Private Keyをコピーしてどこかにメモしておく *紛失すると2度と復元することはできません
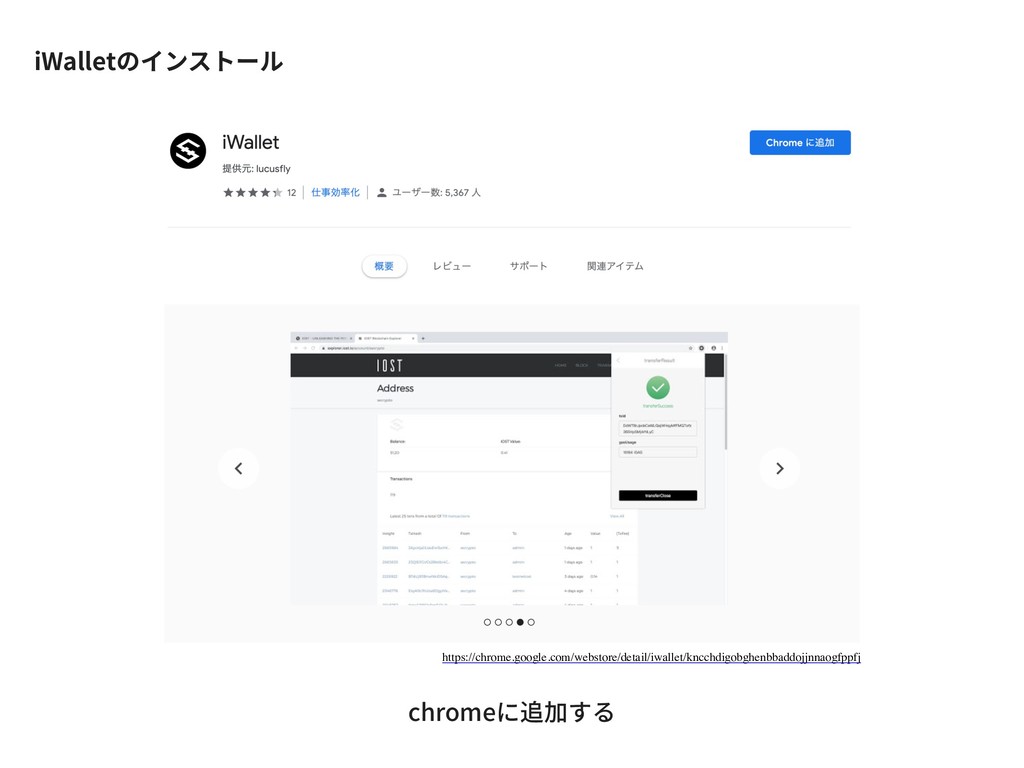
https://chrome.google.com/webstore/detail/iwallet/kncchdigobghenbbaddojjnnaogfppfj iWalletのインストール chromeに追加する
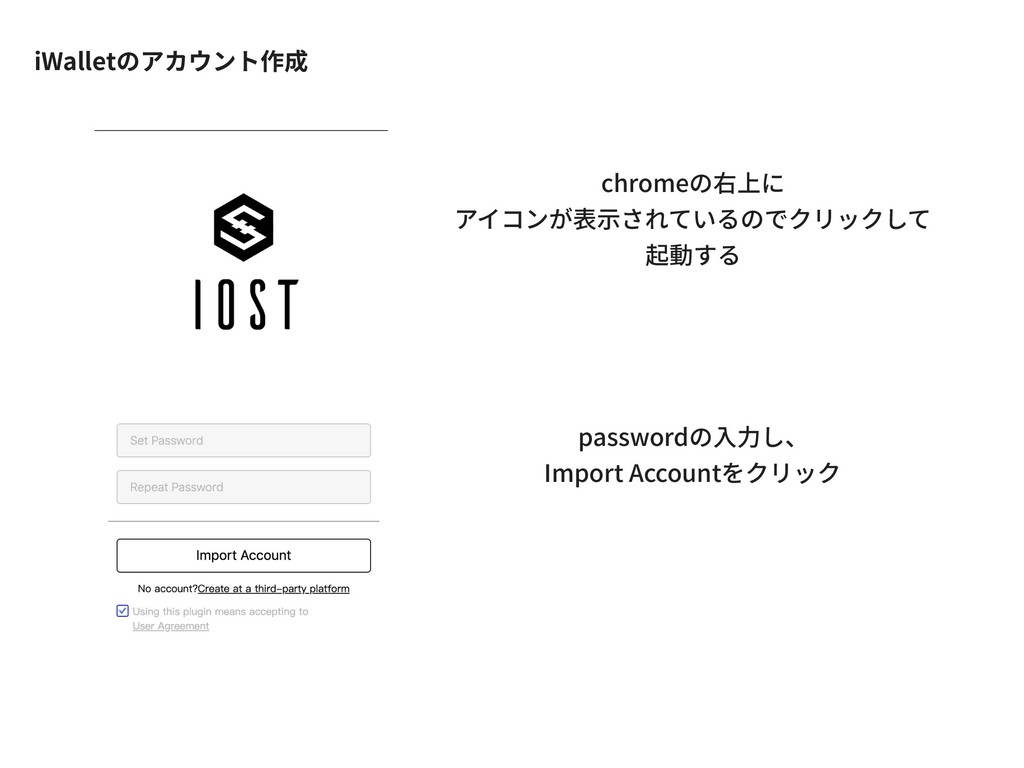
iWalletのアカウント作成 chromeの右上に アイコンが表⽰されているのでクリックして 起動する passwordの⼊⼒し、 Import Accountをクリック
アカウント追加 先ほど作成した アカウントのPrivateKeyを貼り付け Submitをクリックする
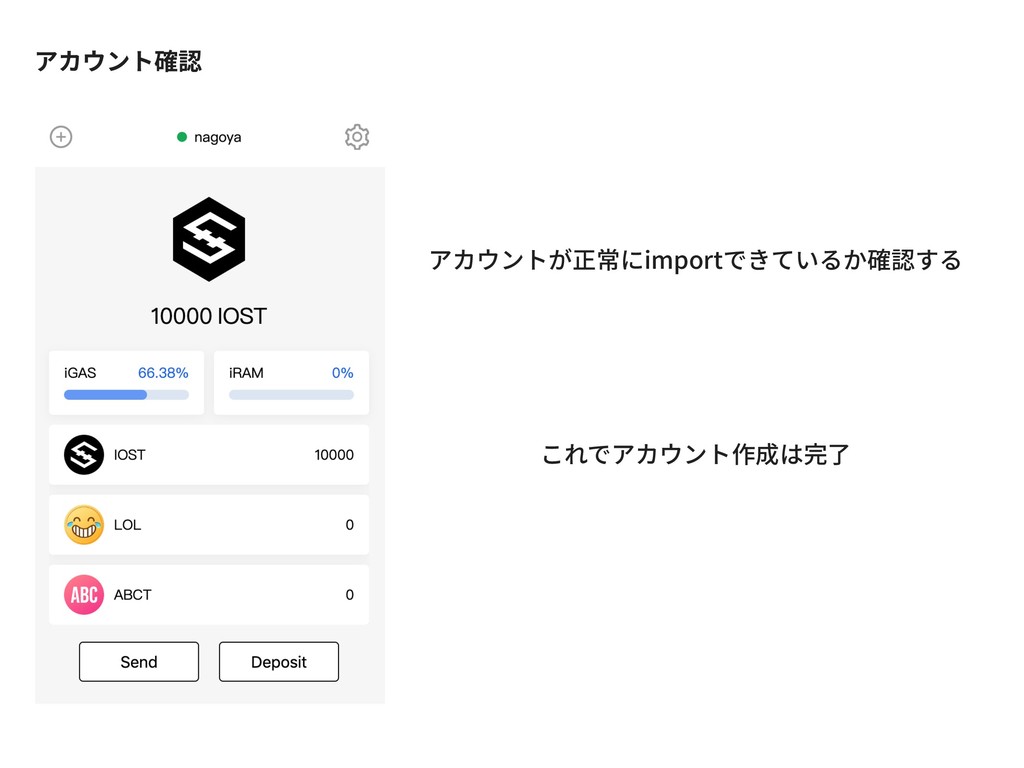
アカウント確認 アカウントが正常にimportできているか確認する これでアカウント作成は完了
IDEについて
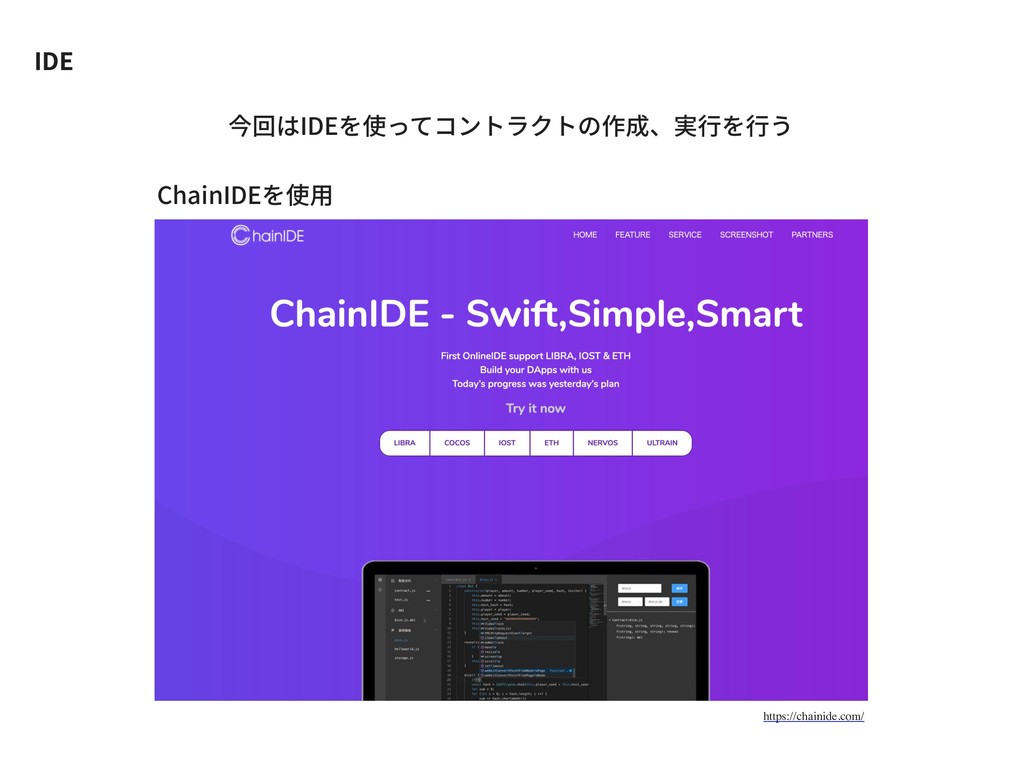
IDE https://chainide.com/ 今回はIDEを使ってコントラクトの作成、実⾏を⾏う ChainIDEを使⽤
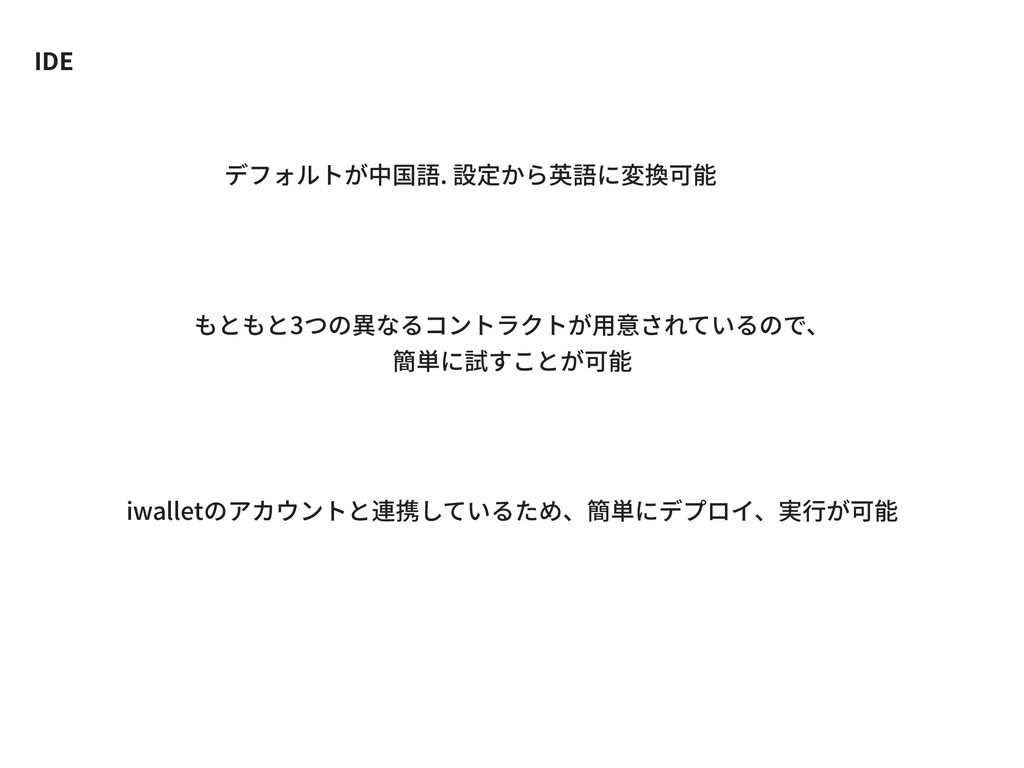
IDE デフォルトが中国語. 設定から英語に変換可能 もともと3つの異なるコントラクトが⽤意されているので、 簡単に試すことが可能 iwalletのアカウントと連携しているため、簡単にデプロイ、実⾏が可能
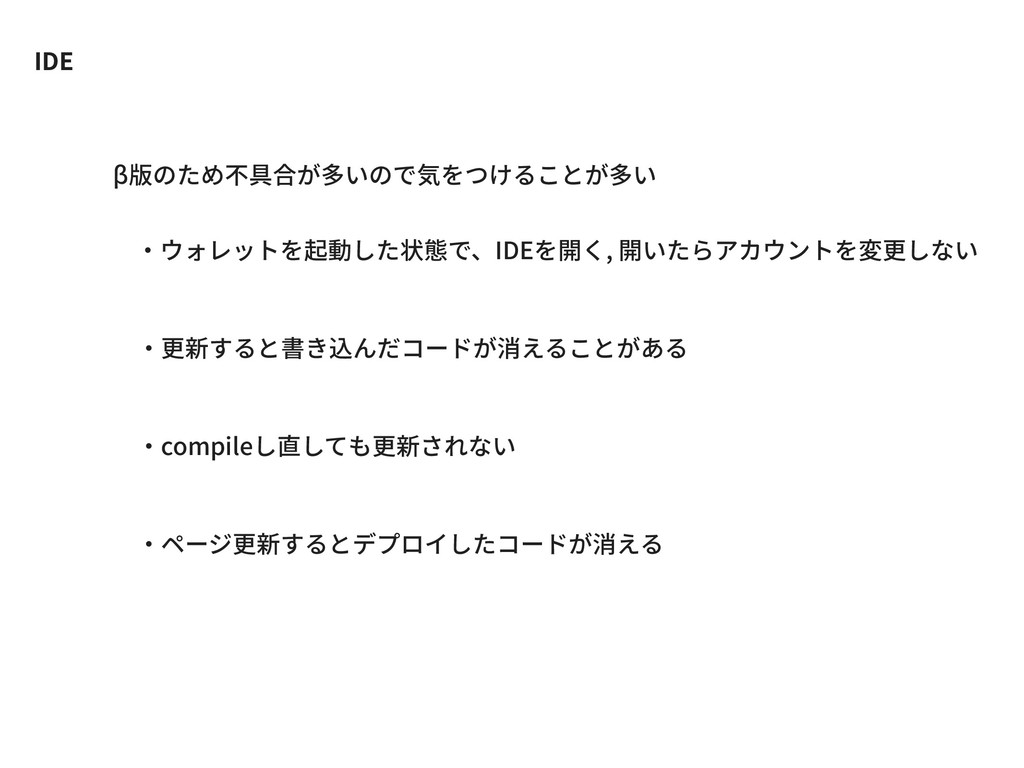
IDE β版のため不具合が多いので気をつけることが多い ・ウォレットを起動した状態で、IDEを開く, 開いたらアカウントを変更しない ・更新すると書き込んだコードが消えることがある ・compileし直しても更新されない ・ページ更新するとデプロイしたコードが消える
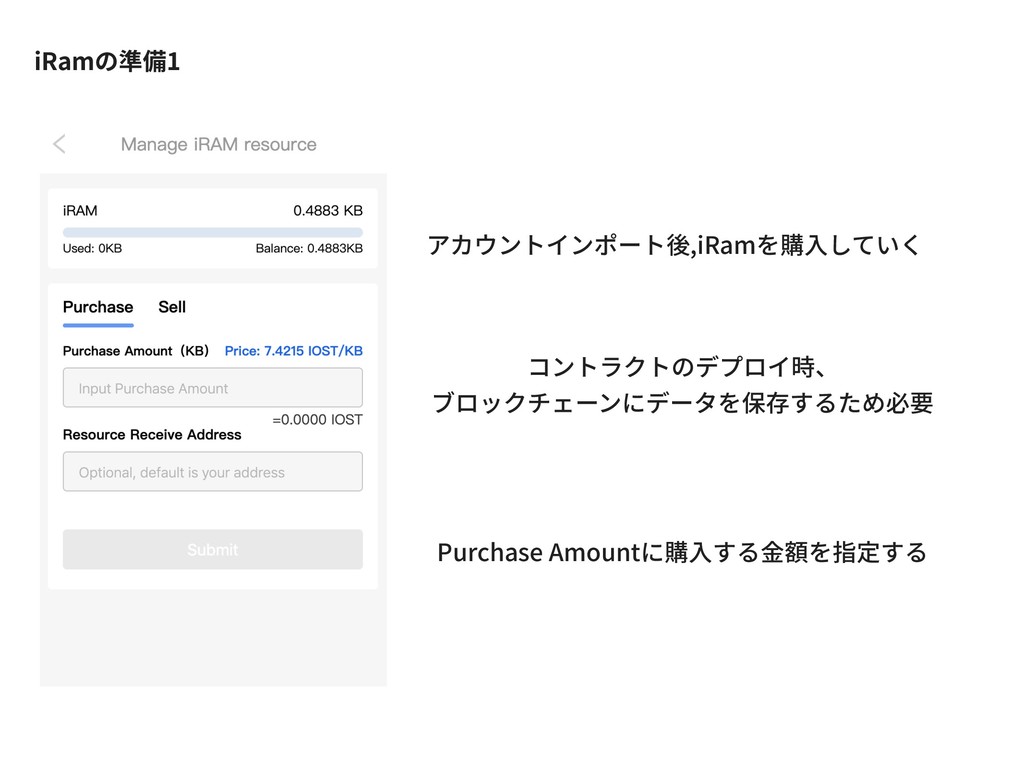
iRamの準備1 アカウントインポート後,iRamを購⼊していく コントラクトのデプロイ時、 ブロックチェーンにデータを保存するため必要 Purchase Amountに購⼊する⾦額を指定する
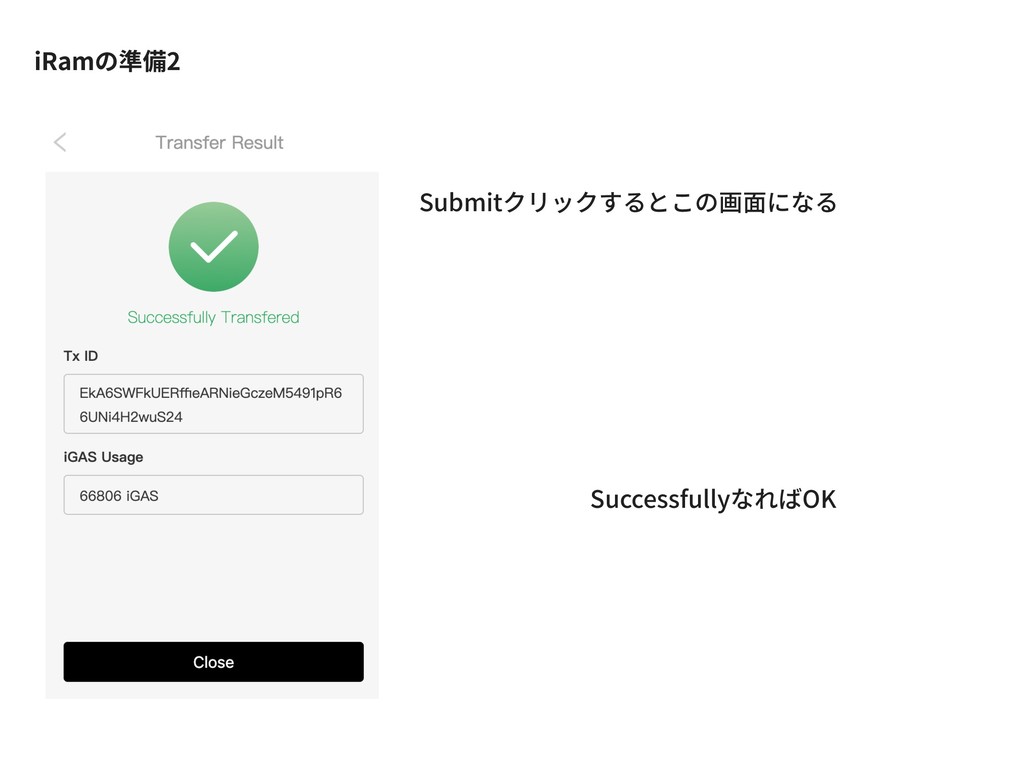
iRamの準備2 Submitクリックするとこの画⾯になる SuccessfullyなればOK
今回はIRC20tokenを作成する
トークンについて IOSTではFungible Tokenを作成するための規格が⽤意されている https://developers.iost.io/docs/en/3-smart-contract/Token.html 今回は最低限の機能のみで作成 create, issue, transfer, balanceOf, supply,
totalSupply のみ使⽤ Iost.tokenのインターフェース Iost.tokenという組み込みシステムコントラクトを使⽤
実際にトークンを作成する
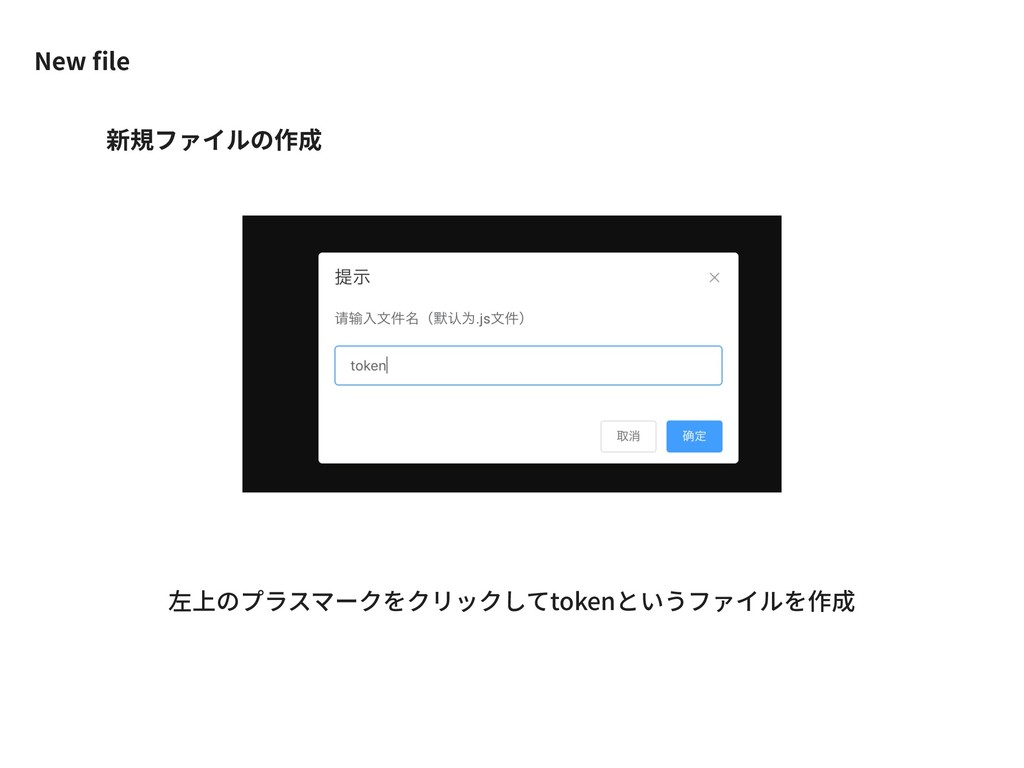
New file 左上のプラスマークをクリックしてtokenというファイルを作成 新規ファイルの作成
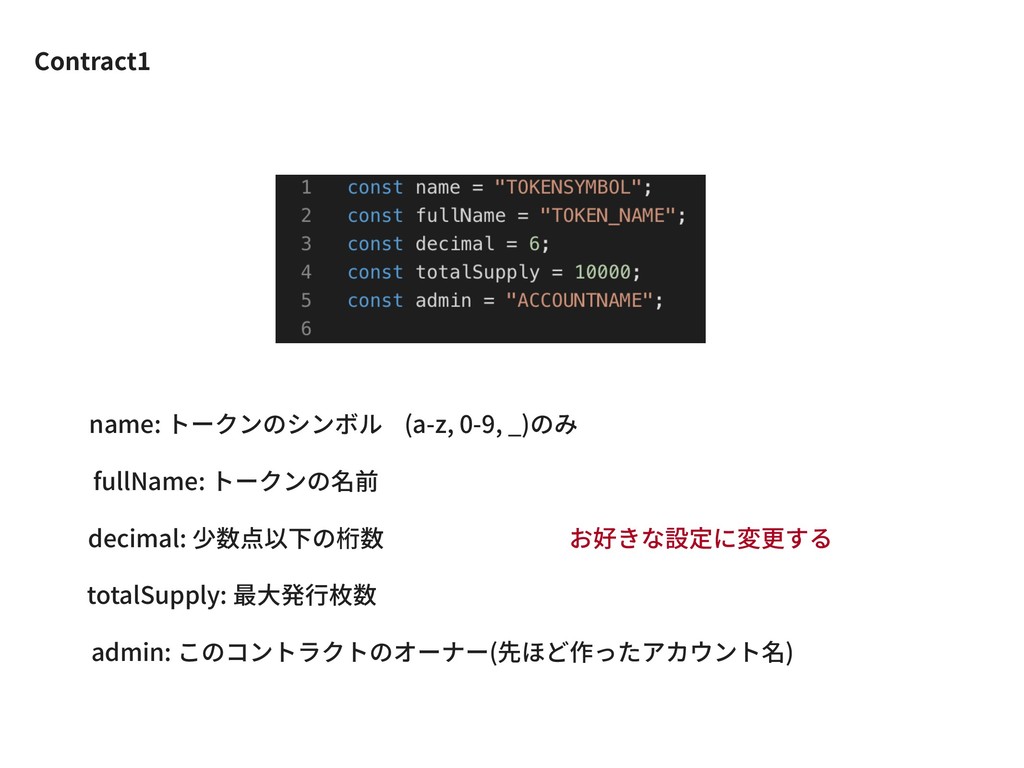
Contract1 name: トークンのシンボル fullName: トークンの名前 decimal: 少数点以下の桁数 totalSupply: 最⼤発⾏枚数 admin:
このコントラクトのオーナー(先ほど作ったアカウント名) お好きな設定に変更する (a-z, 0-9, _)のみ
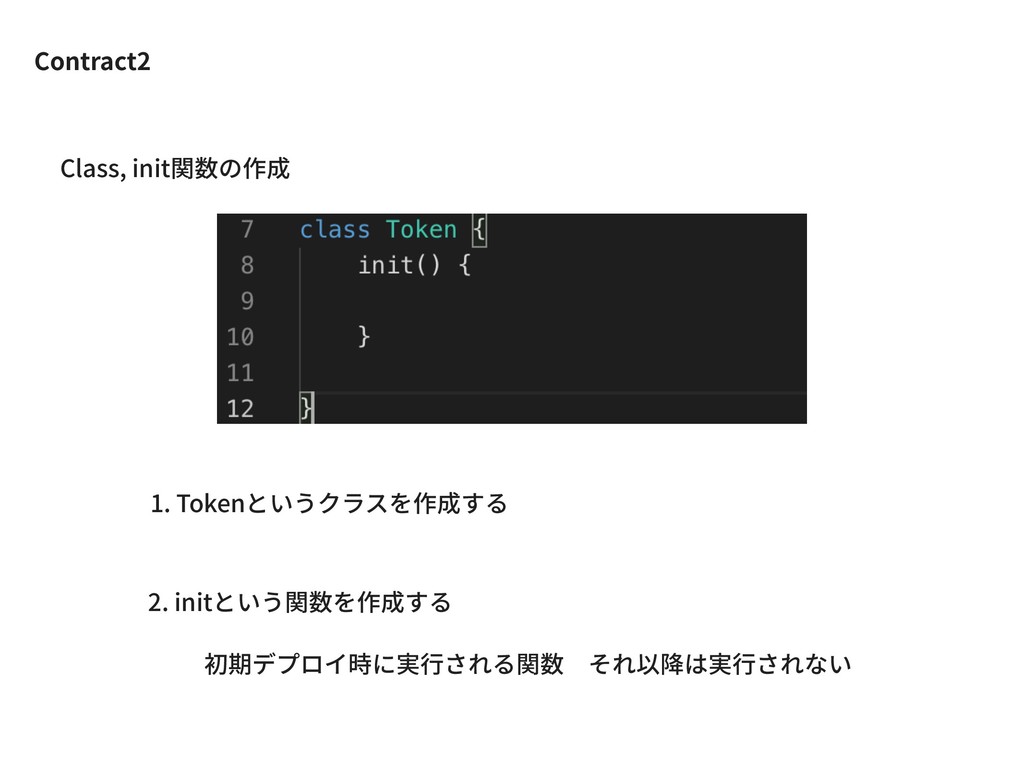
Contract2 Class, init関数の作成 1. Tokenというクラスを作成する 初期デプロイ時に実⾏される関数 それ以降は実⾏されない 2. initという関数を作成する
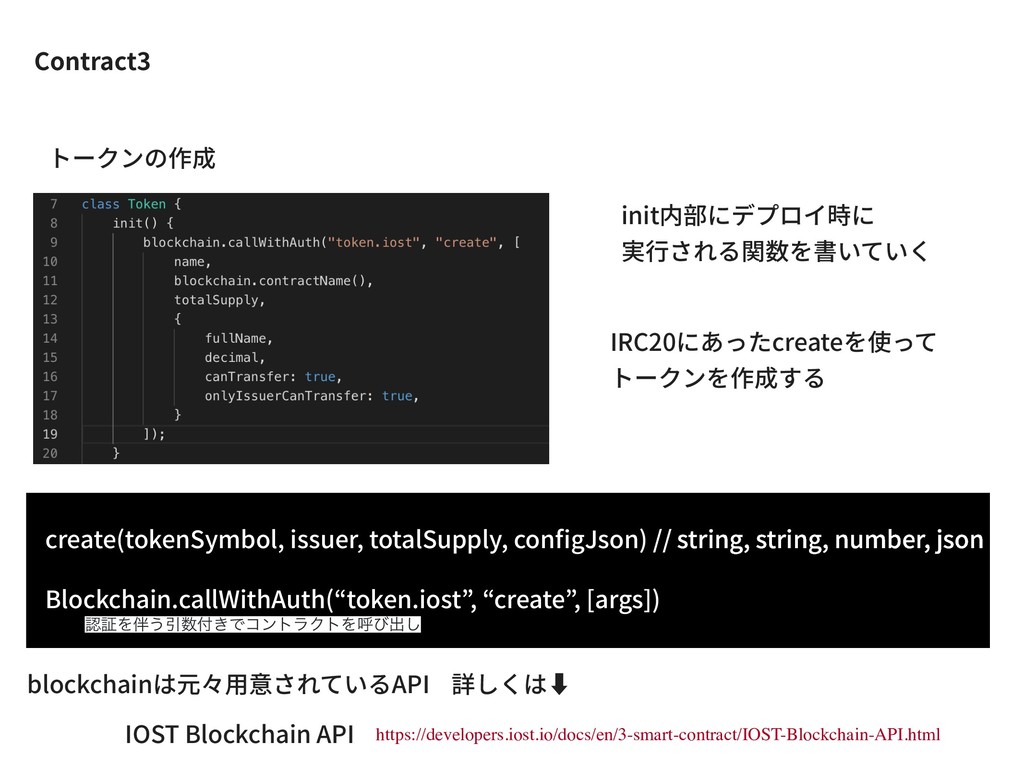
Contract3 トークンの作成 IOST Blockchain API https://developers.iost.io/docs/en/3-smart-contract/IOST-Blockchain-API.html init内部にデプロイ時に 実⾏される関数を書いていく IRC20にあったcreateを使って トークンを作成する
Blockchain.callWithAuth(“token.iost”, “create”, [args]) create(tokenSymbol, issuer, totalSupply, configJson) // string, string, number, json blockchainは元々⽤意されているAPI 詳しくは⬇ ೝূΛ͏Ҿ͖ͰίϯτϥΫτΛݺͼग़͠
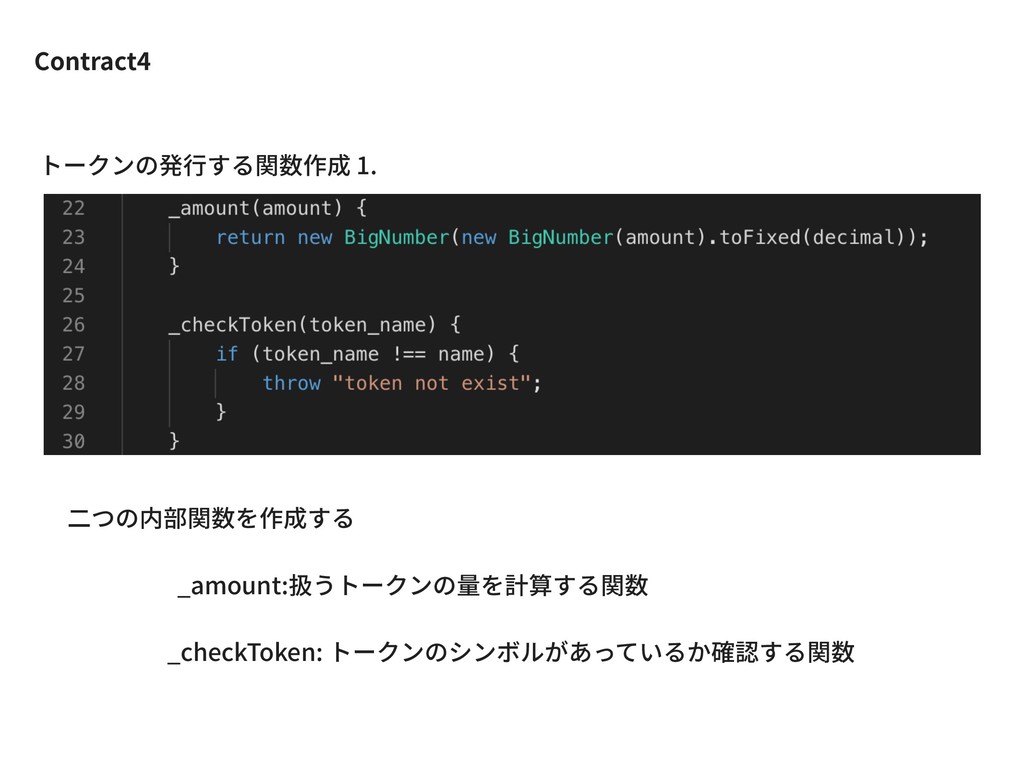
Contract4 トークンの発⾏する関数作成 1. ⼆つの内部関数を作成する _amount:扱うトークンの量を計算する関数 _checkToken: トークンのシンボルがあっているか確認する関数
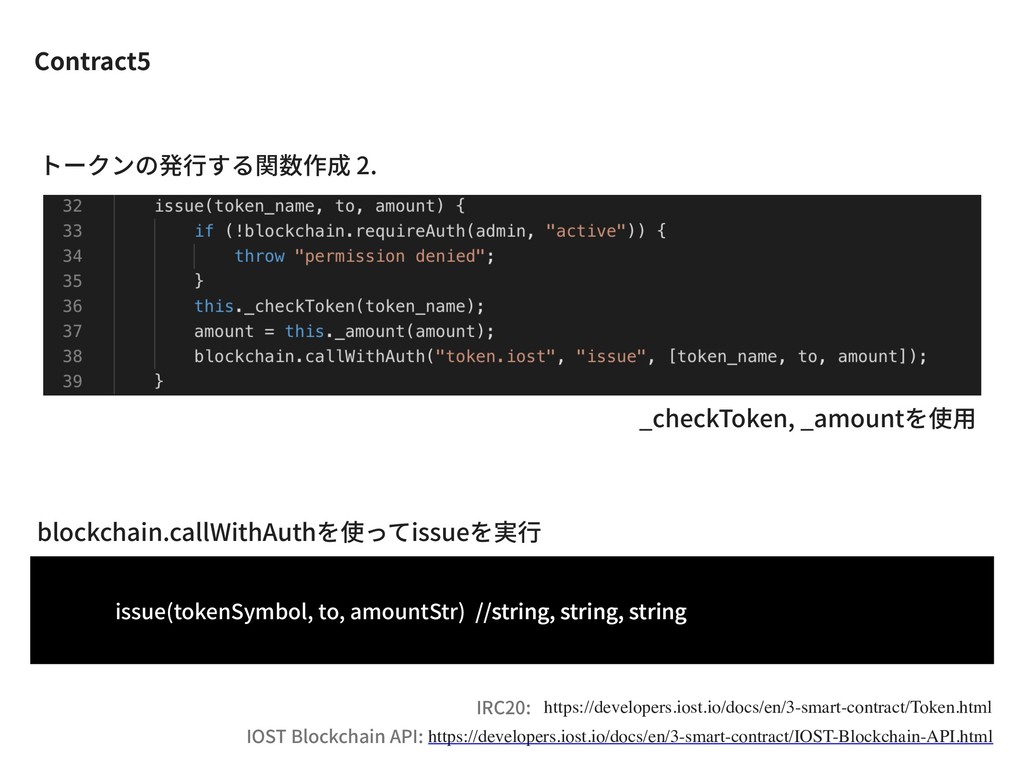
Contract5 _checkToken, _amountを使⽤ トークンの発⾏する関数作成 2. blockchain.callWithAuthを使ってissueを実⾏ issue(tokenSymbol, to, amountStr) //string,
string, string https://developers.iost.io/docs/en/3-smart-contract/IOST-Blockchain-API.html IOST Blockchain API: https://developers.iost.io/docs/en/3-smart-contract/Token.html IRC20:
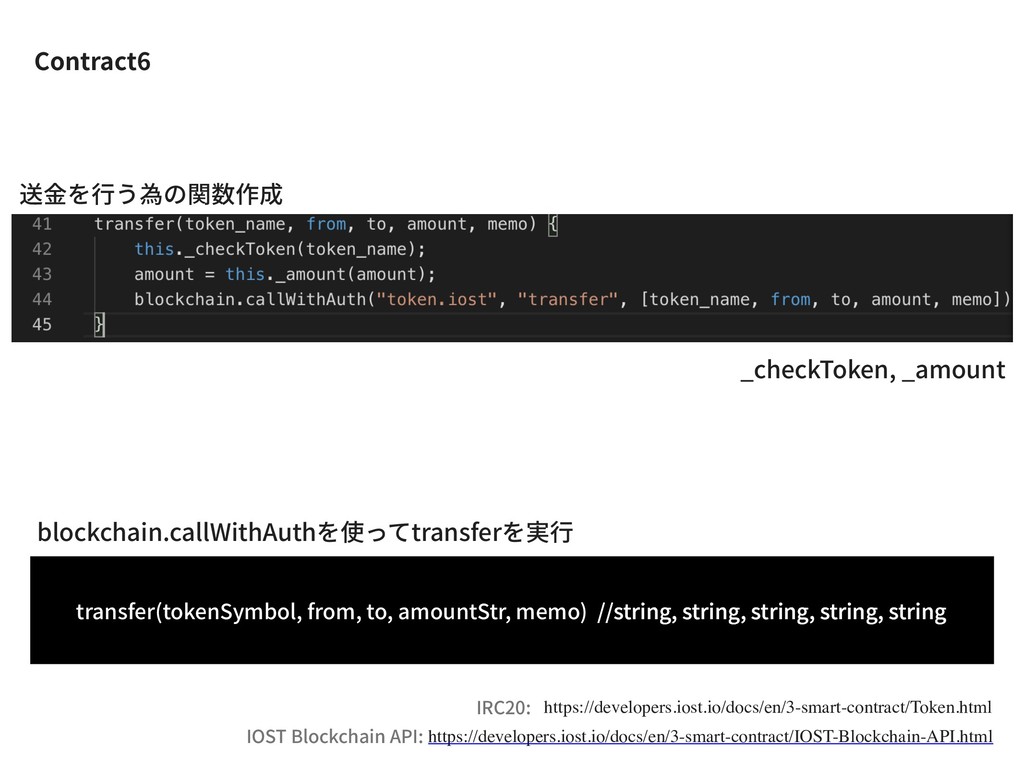
Contract6 _checkToken, _amount 送⾦を⾏う為の関数作成 blockchain.callWithAuthを使ってtransferを実⾏ transfer(tokenSymbol, from, to, amountStr, memo)
//string, string, string, string, string https://developers.iost.io/docs/en/3-smart-contract/IOST-Blockchain-API.html IOST Blockchain API: https://developers.iost.io/docs/en/3-smart-contract/Token.html IRC20:
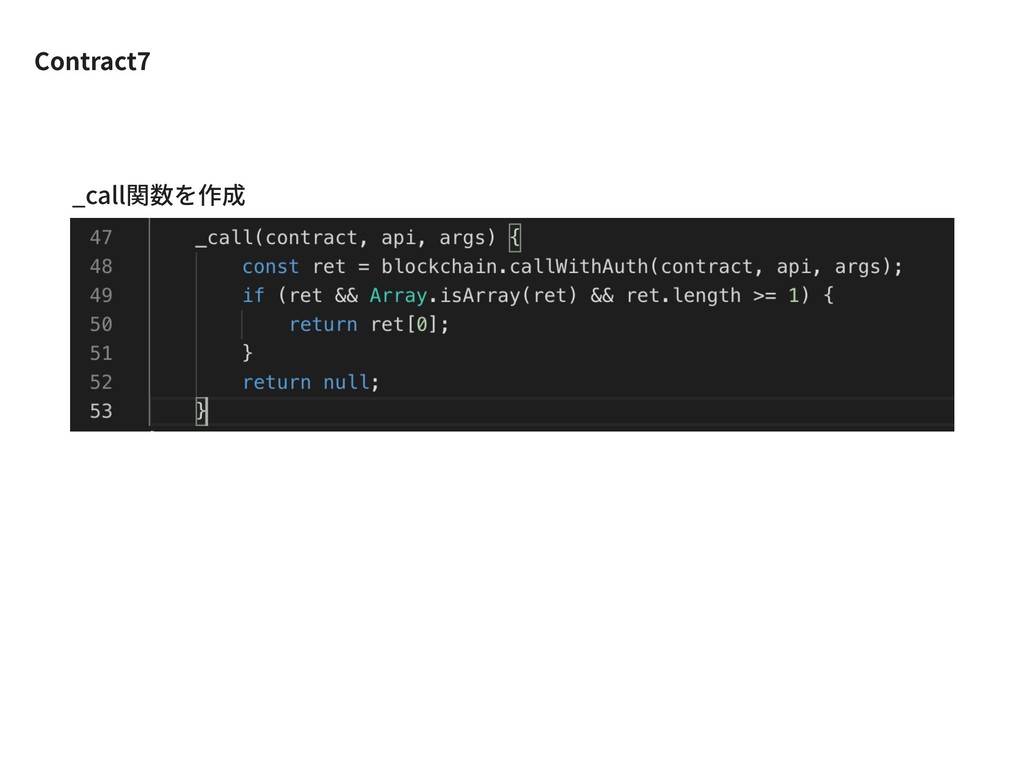
Contract7 _call関数を作成
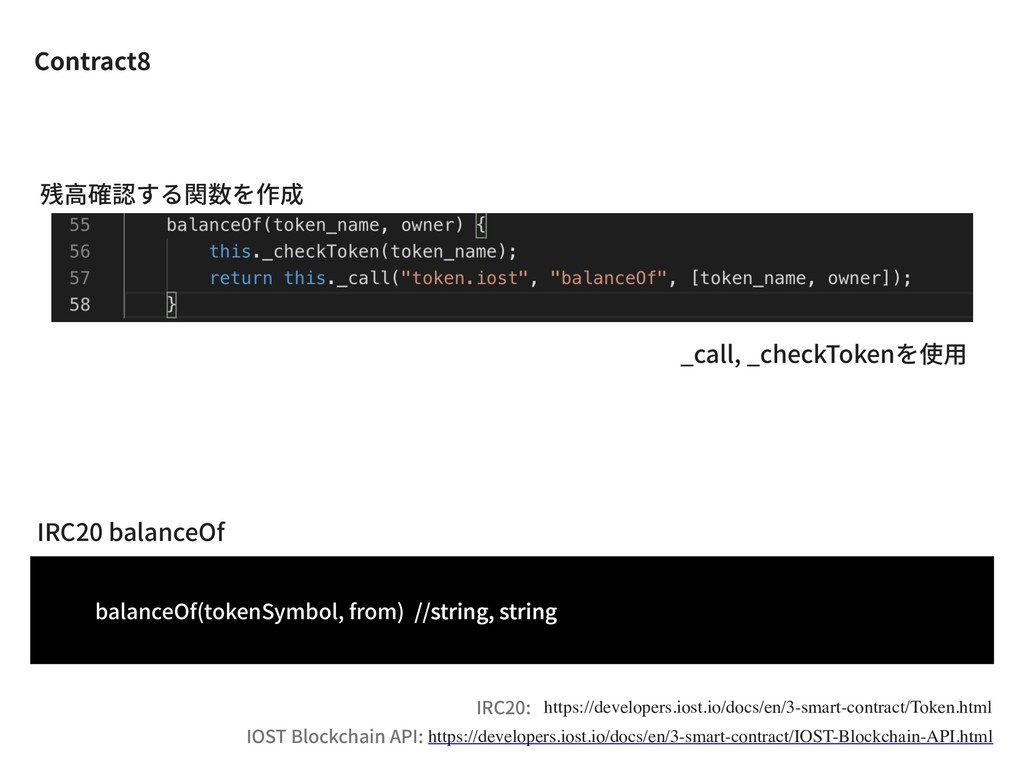
Contract8 _call, _checkTokenを使⽤ 残⾼確認する関数を作成 IRC20 balanceOf balanceOf(tokenSymbol, from) //string, string
https://developers.iost.io/docs/en/3-smart-contract/IOST-Blockchain-API.html IOST Blockchain API: https://developers.iost.io/docs/en/3-smart-contract/Token.html IRC20:
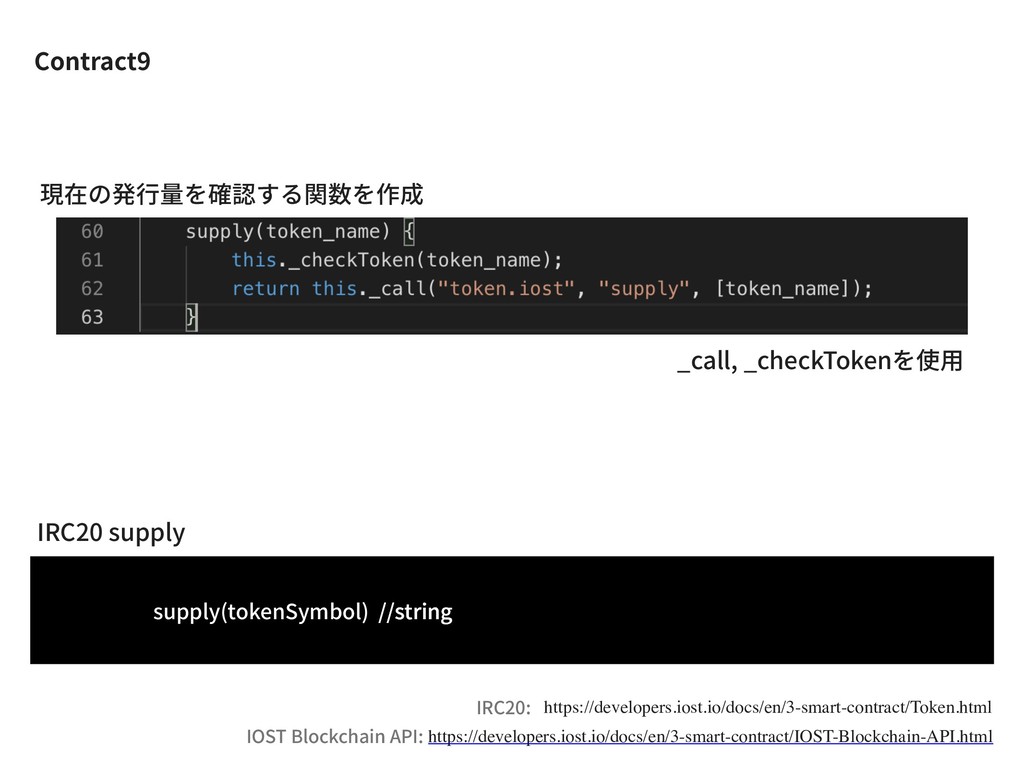
Contract9 _call, _checkTokenを使⽤ 現在の発⾏量を確認する関数を作成 IRC20 supply supply(tokenSymbol) //string https://developers.iost.io/docs/en/3-smart-contract/IOST-Blockchain-API.html IOST
Blockchain API: https://developers.iost.io/docs/en/3-smart-contract/Token.html IRC20:
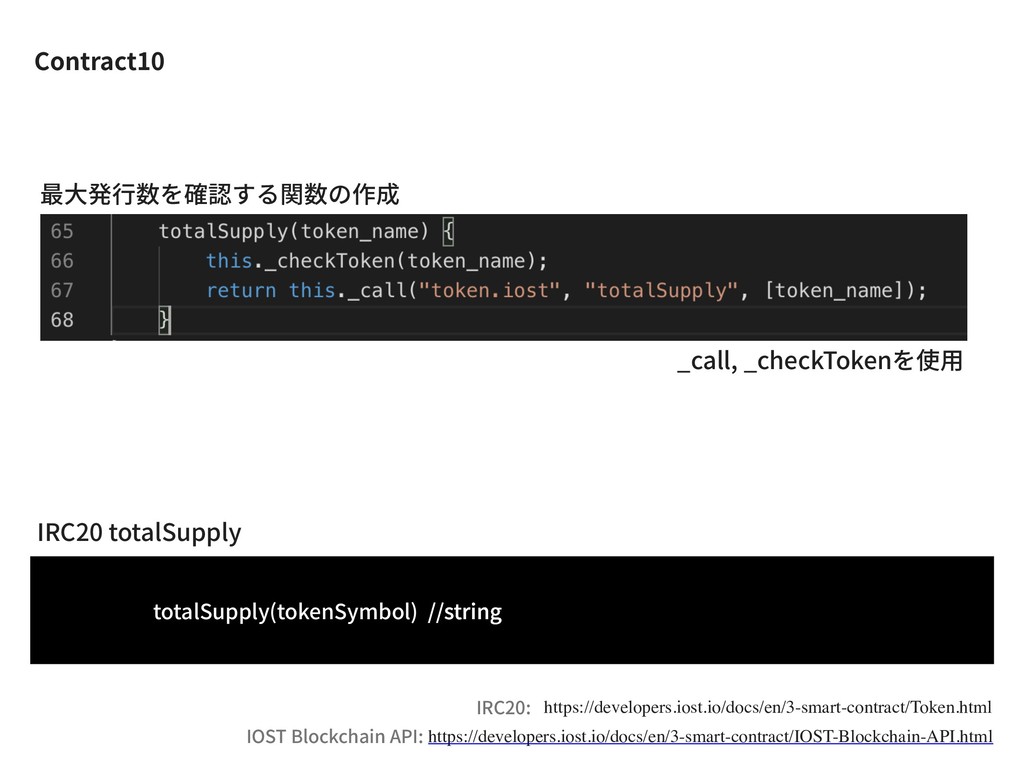
Contract10 https://developers.iost.io/docs/en/3-smart-contract/IOST-Blockchain-API.html IOST Blockchain API: _call, _checkTokenを使⽤ 最⼤発⾏数を確認する関数の作成 IRC20 totalSupply
totalSupply(tokenSymbol) //string https://developers.iost.io/docs/en/3-smart-contract/Token.html IRC20:
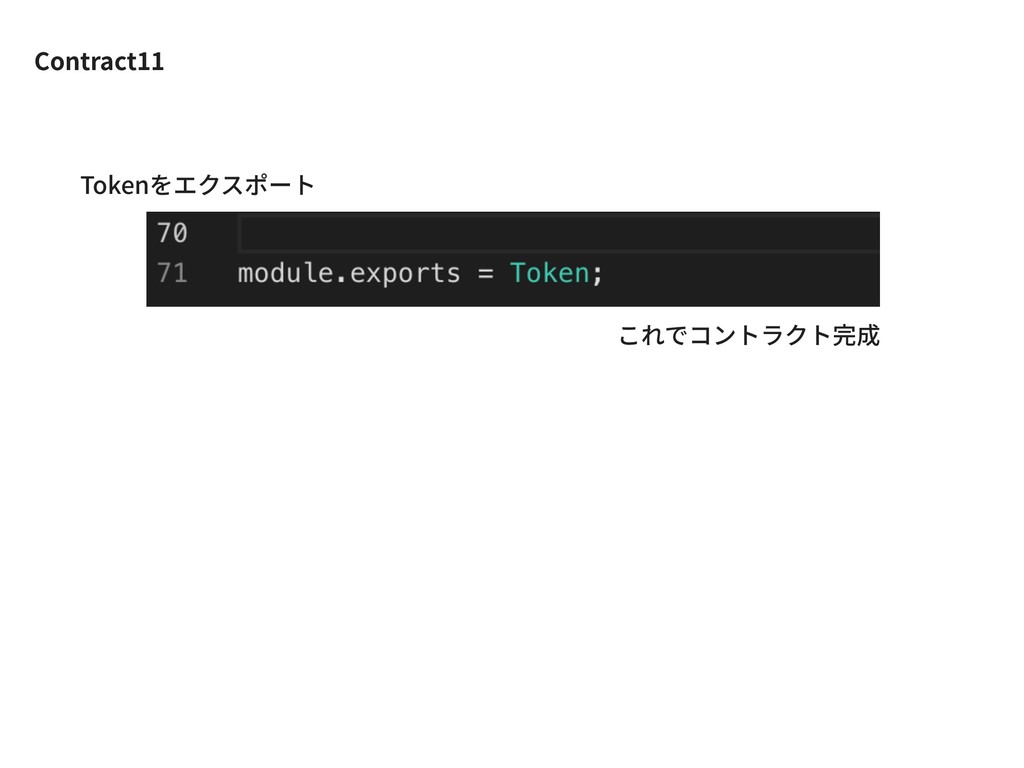
Contract11 Tokenをエクスポート これでコントラクト完成
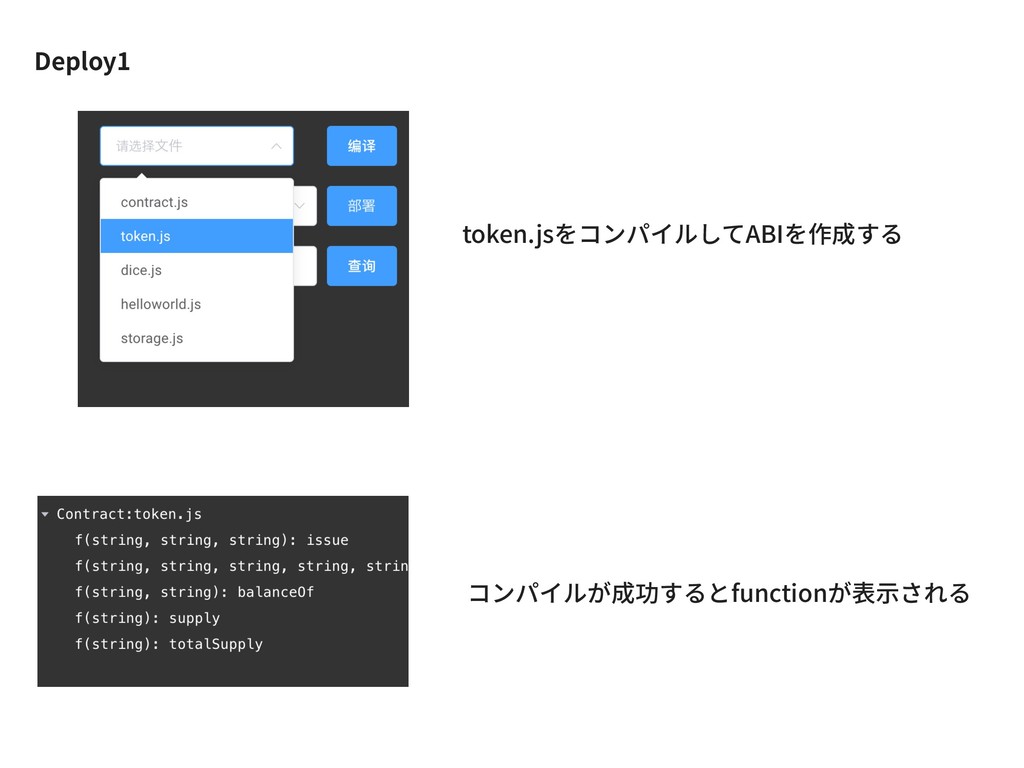
Deploy1 token.jsをコンパイルしてABIを作成する コンパイルが成功するとfunctionが表⽰される
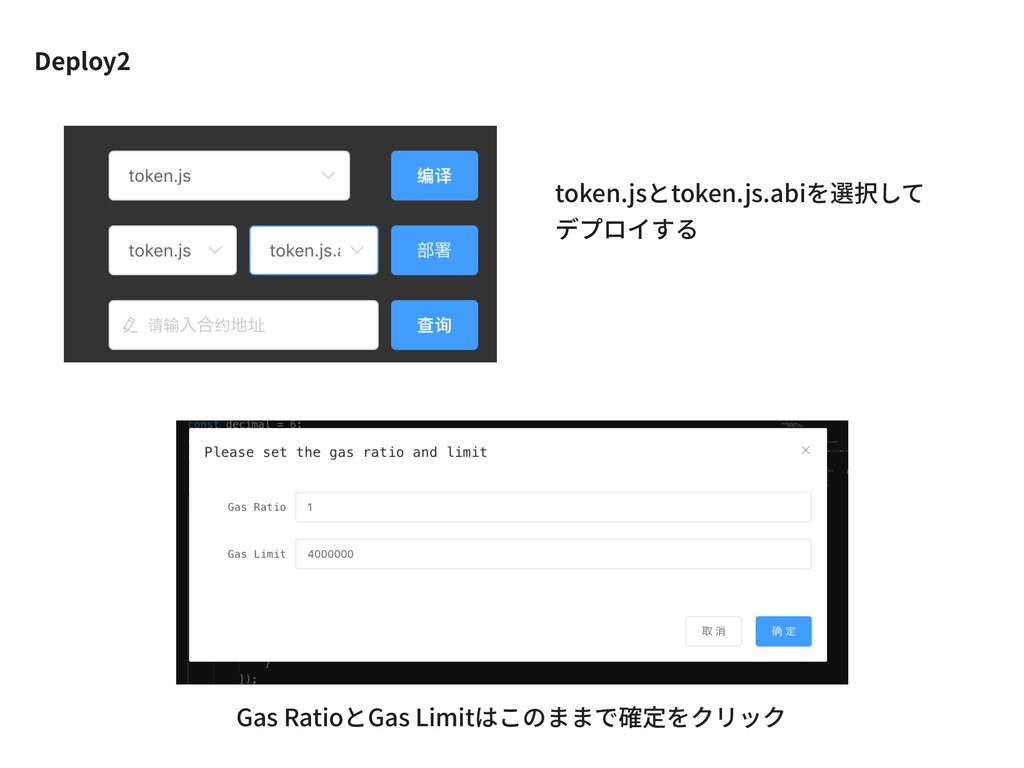
Deploy2 token.jsとtoken.js.abiを選択して デプロイする Gas RatioとGas Limitはこのままで確定をクリック
Deploy3 デプロイが成功すると 失敗する場合はnameが被っている可能性がほとんど 今回の設定
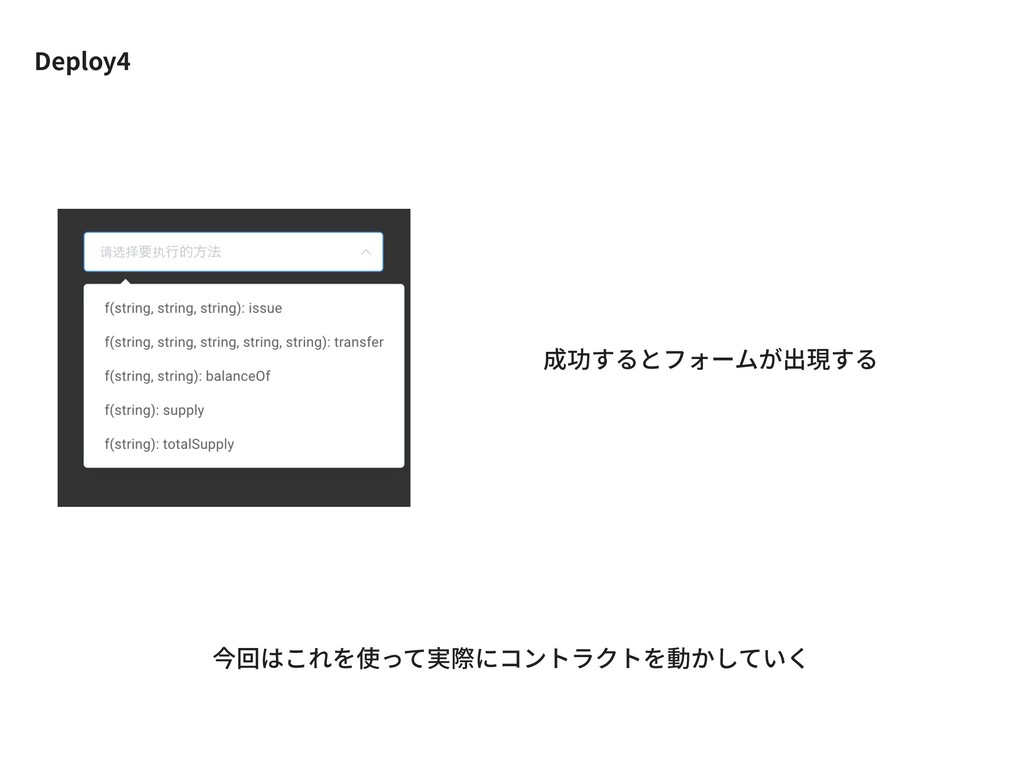
Deploy4 成功するとフォームが出現する 今回はこれを使って実際にコントラクトを動かしていく
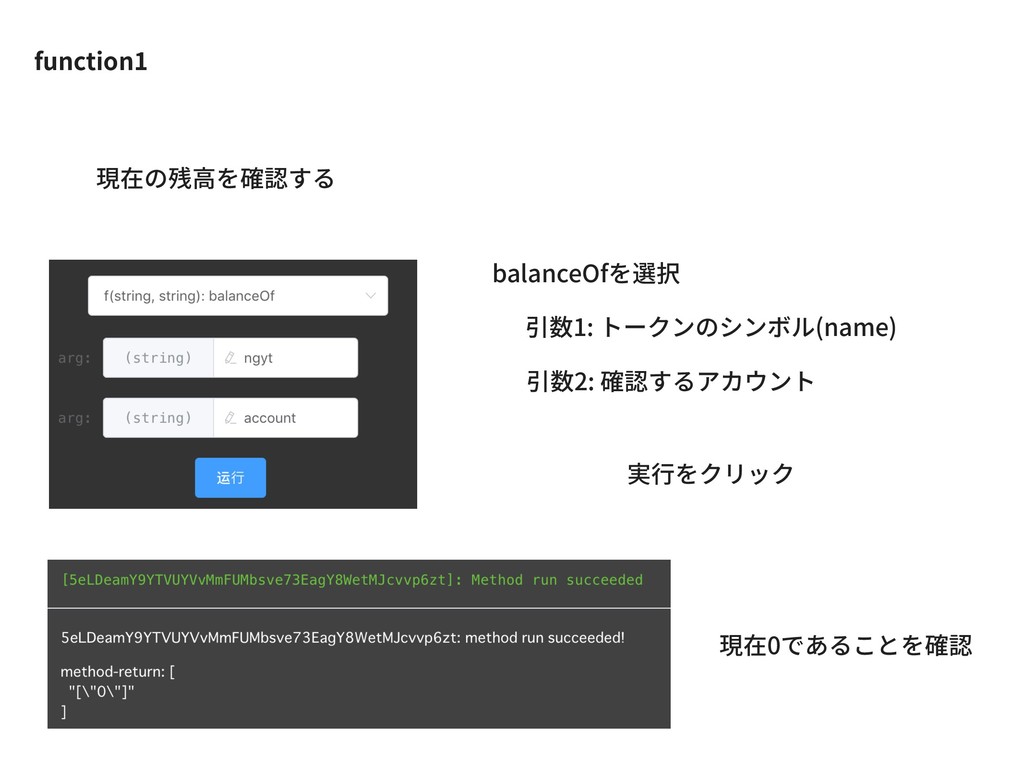
function1 現在の残⾼を確認する balanceOfを選択 実⾏をクリック 引数1: トークンのシンボル(name) 引数2: 確認するアカウント 現在0であることを確認
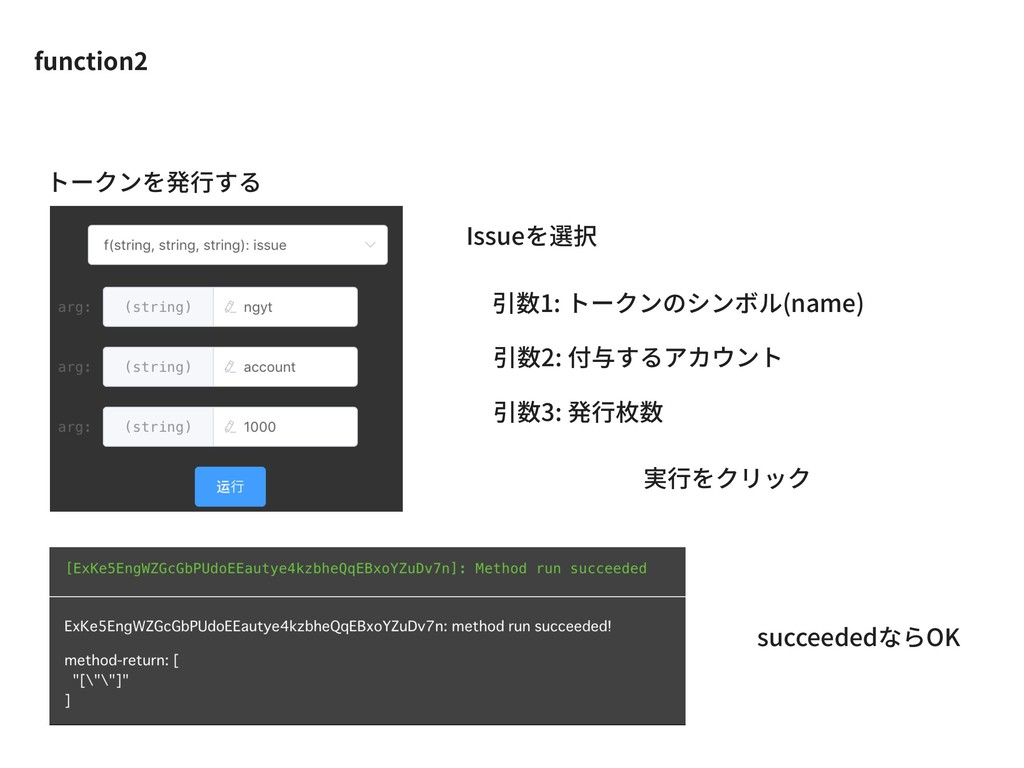
function2 トークンを発⾏する Issueを選択 実⾏をクリック 引数1: トークンのシンボル(name) 引数2: 付与するアカウント succeededならOK 引数3:
発⾏枚数
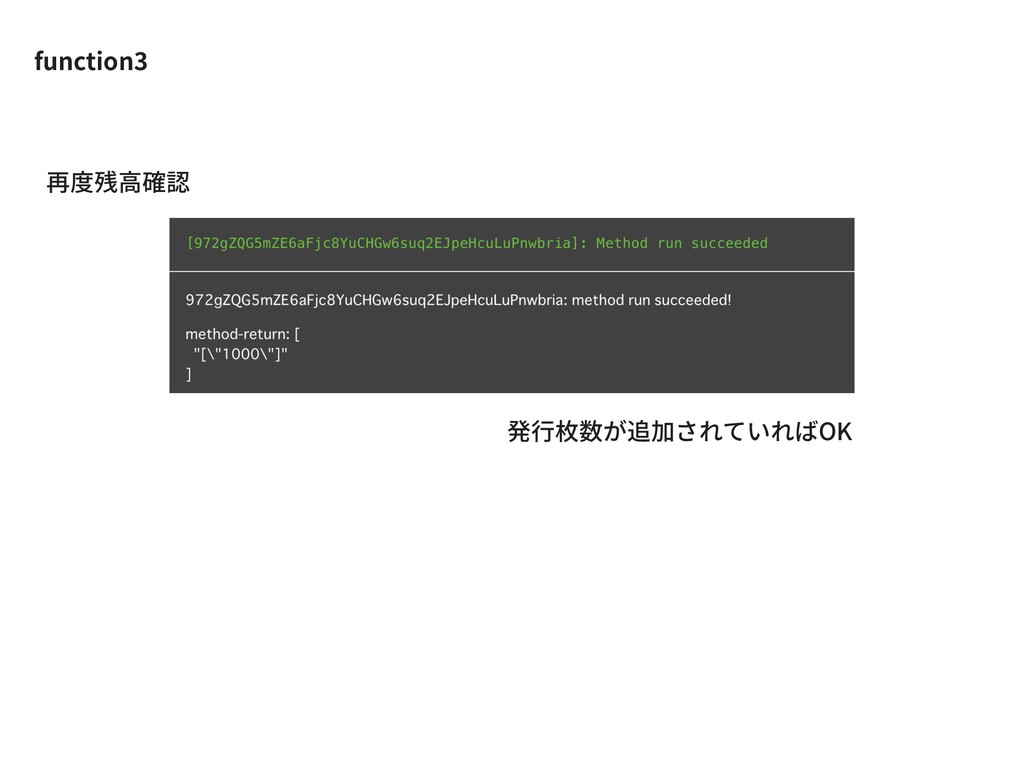
function3 再度残⾼確認 発⾏枚数が追加されていればOK
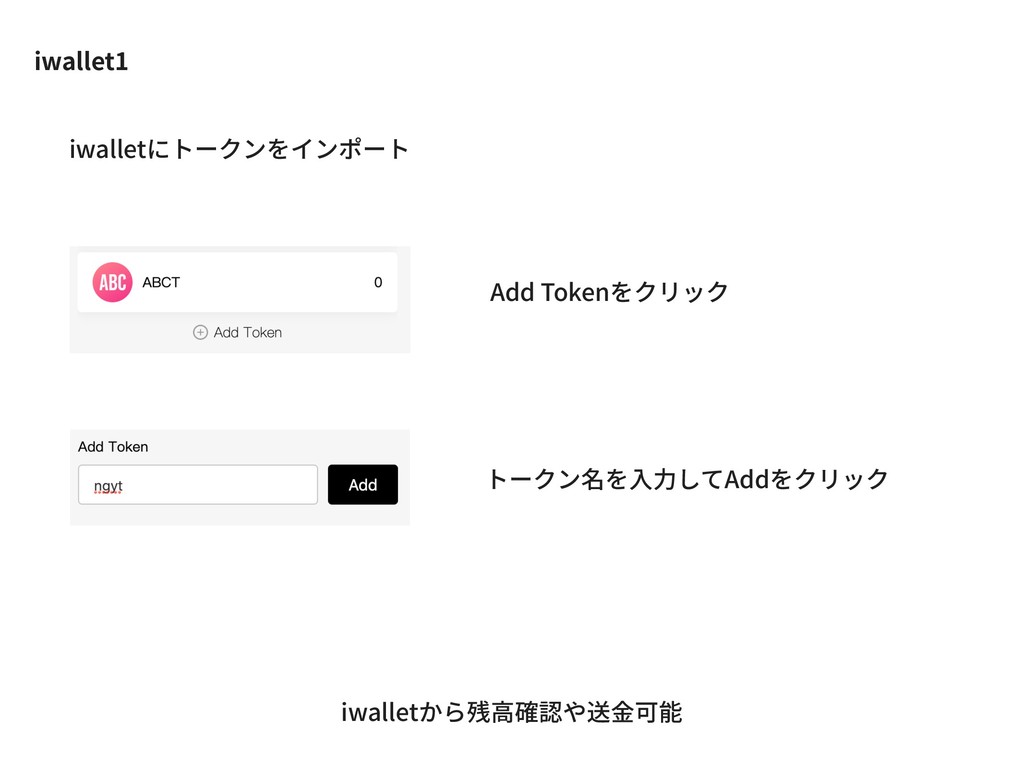
iwallet1 Add Tokenをクリック トークン名を⼊⼒してAddをクリック iwalletから残⾼確認や送⾦可能 iwalletにトークンをインポート
Happy Hacking!!