Upgrade to Pro — share decks privately, control downloads, hide ads and more …

Snowpark Container Services で dbt を動かします

Avatar for d.harato d.harato
March 04, 2024

Snowpark Container Services で dbt を動かします

The slide introduces how to run dbt using Snowflake Container Service.

Avatar for d.harato

d.harato

March 04, 2024
Tweet

More Decks by d.harato

Other Decks in Technology

Transcript

  1. dbtを動かそう SPCSでdbtを実⾏する⼤まかな流れになります リソース作成 作業内容 1 ⼿順 2 3 作業環境 詳細

    Imageの作成 Serviceの作成 SPCSを動かすための オブジェクトを作成 Dockerfileでdbtを 実⾏するためのImageを作成 Serviceを起動し、 dbtを動かす
  2. create schema if not exists dbt_spcs; use schema dbt_spcs; create

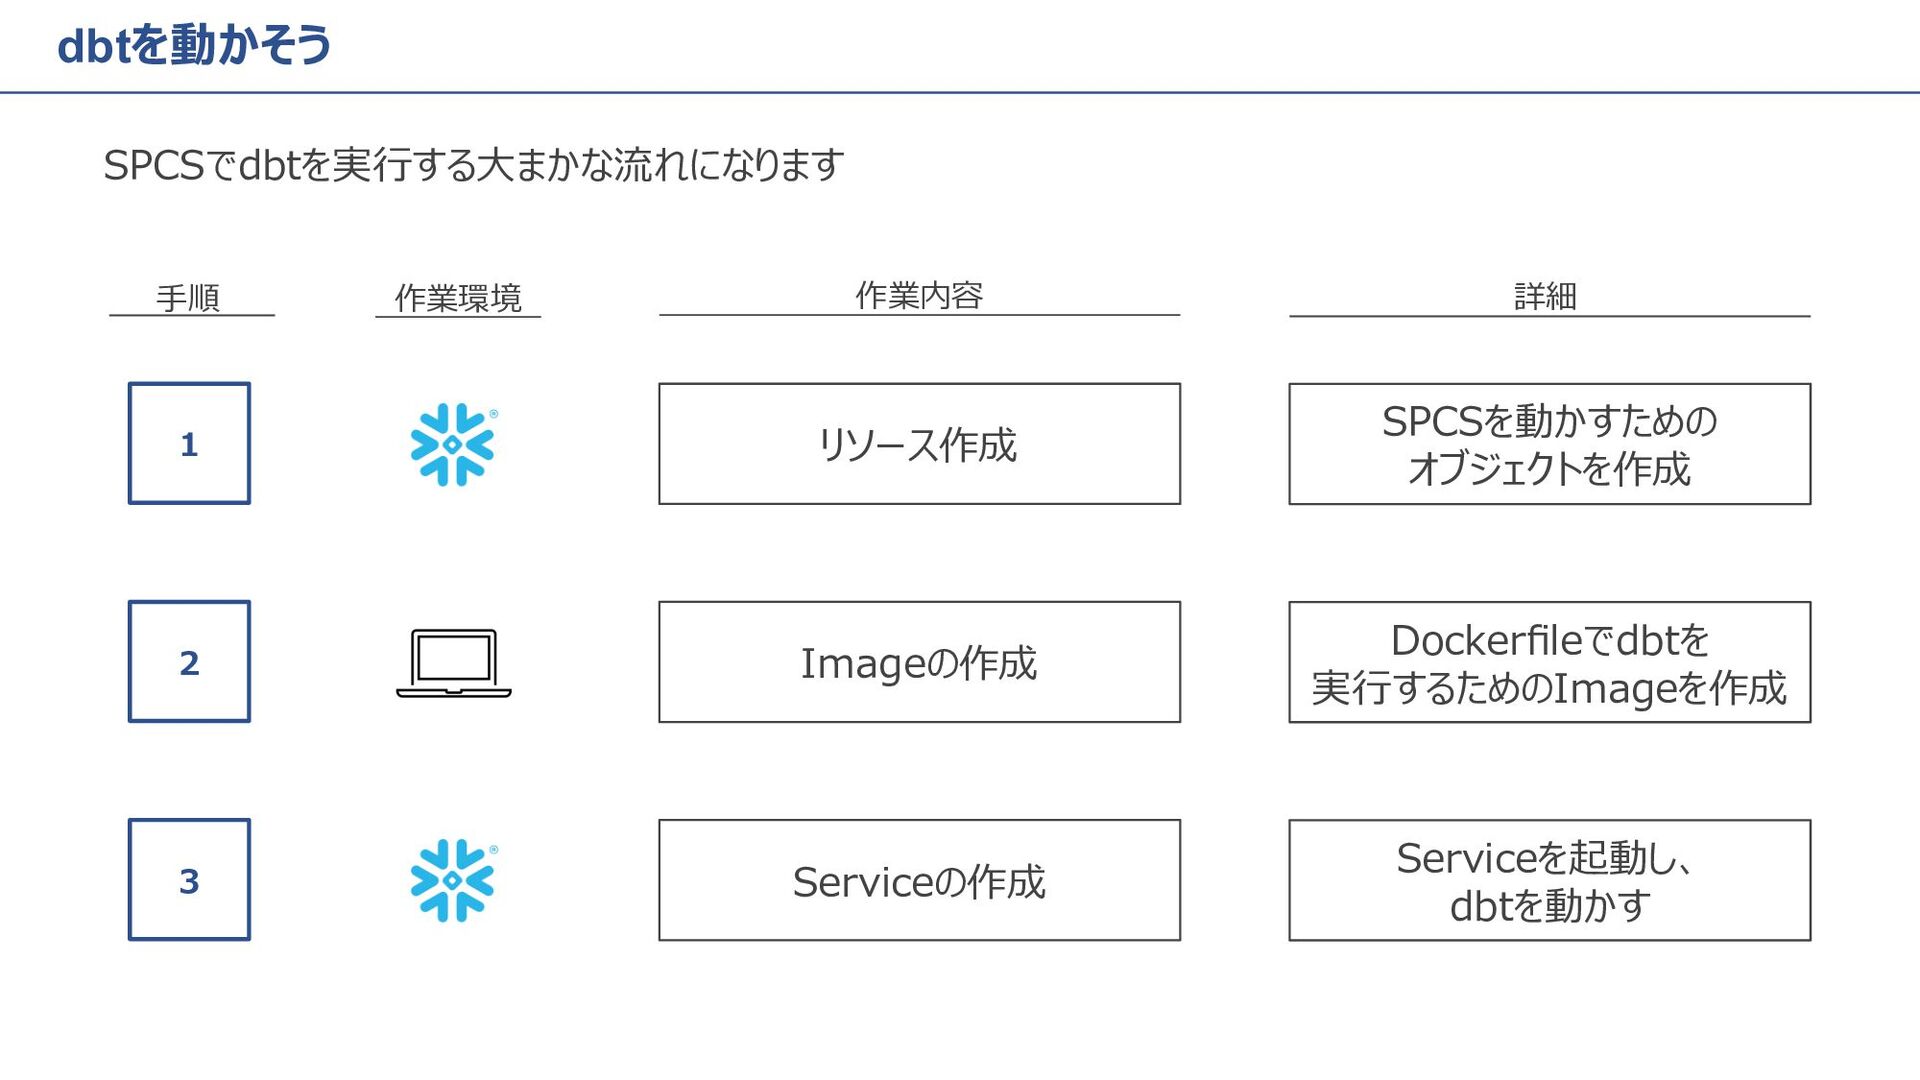
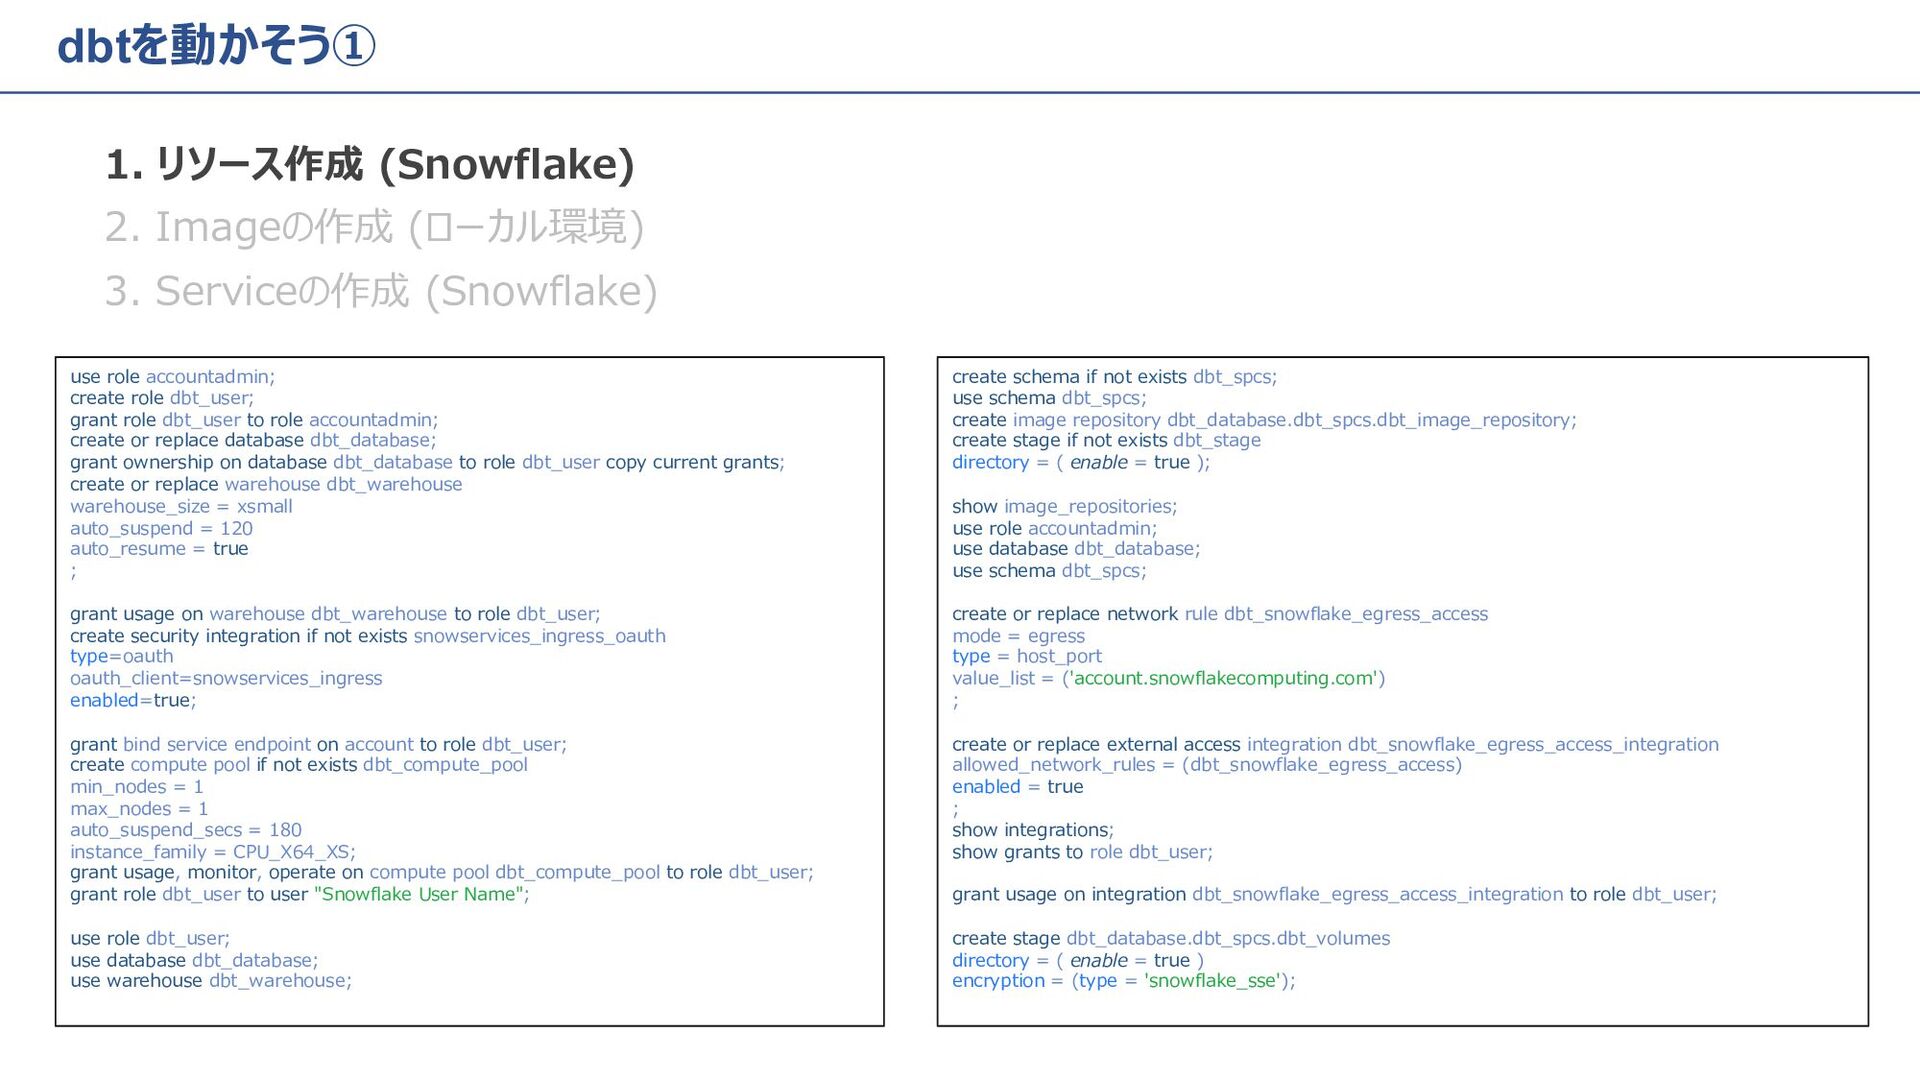
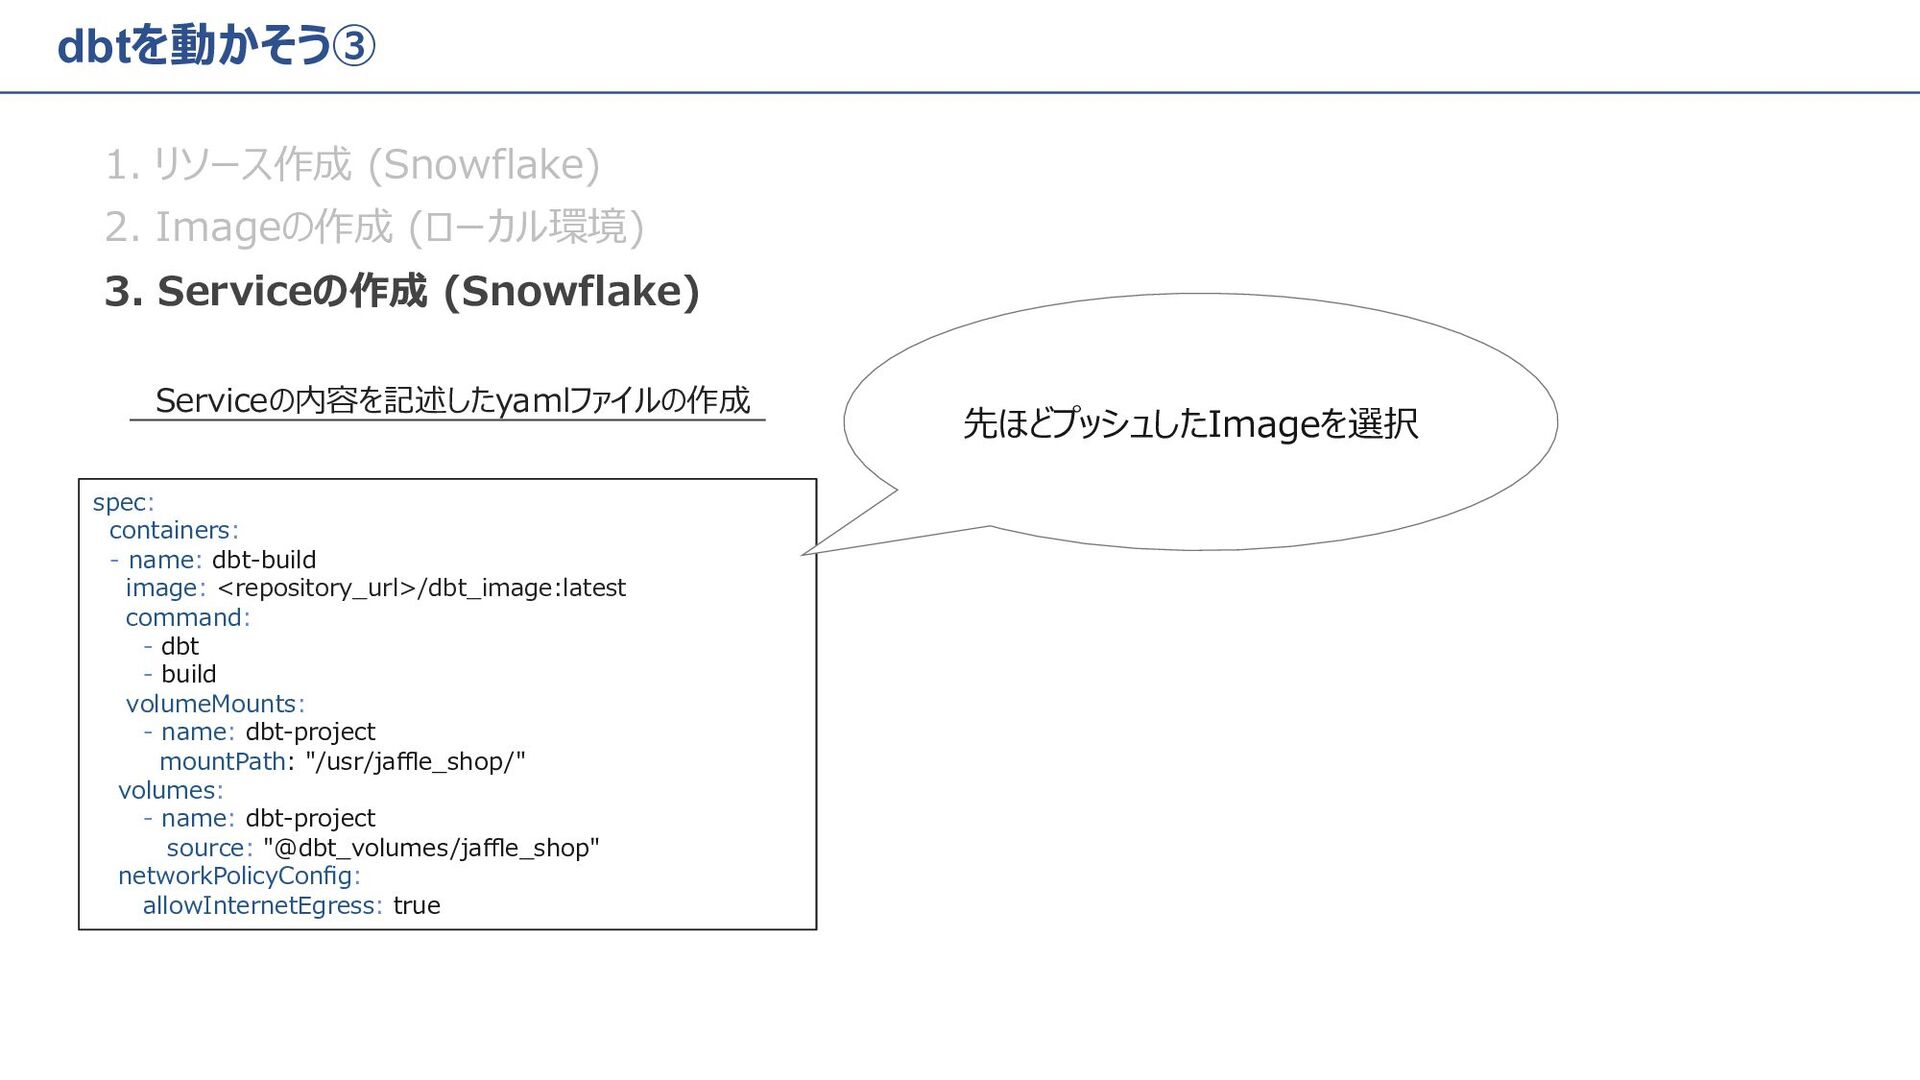
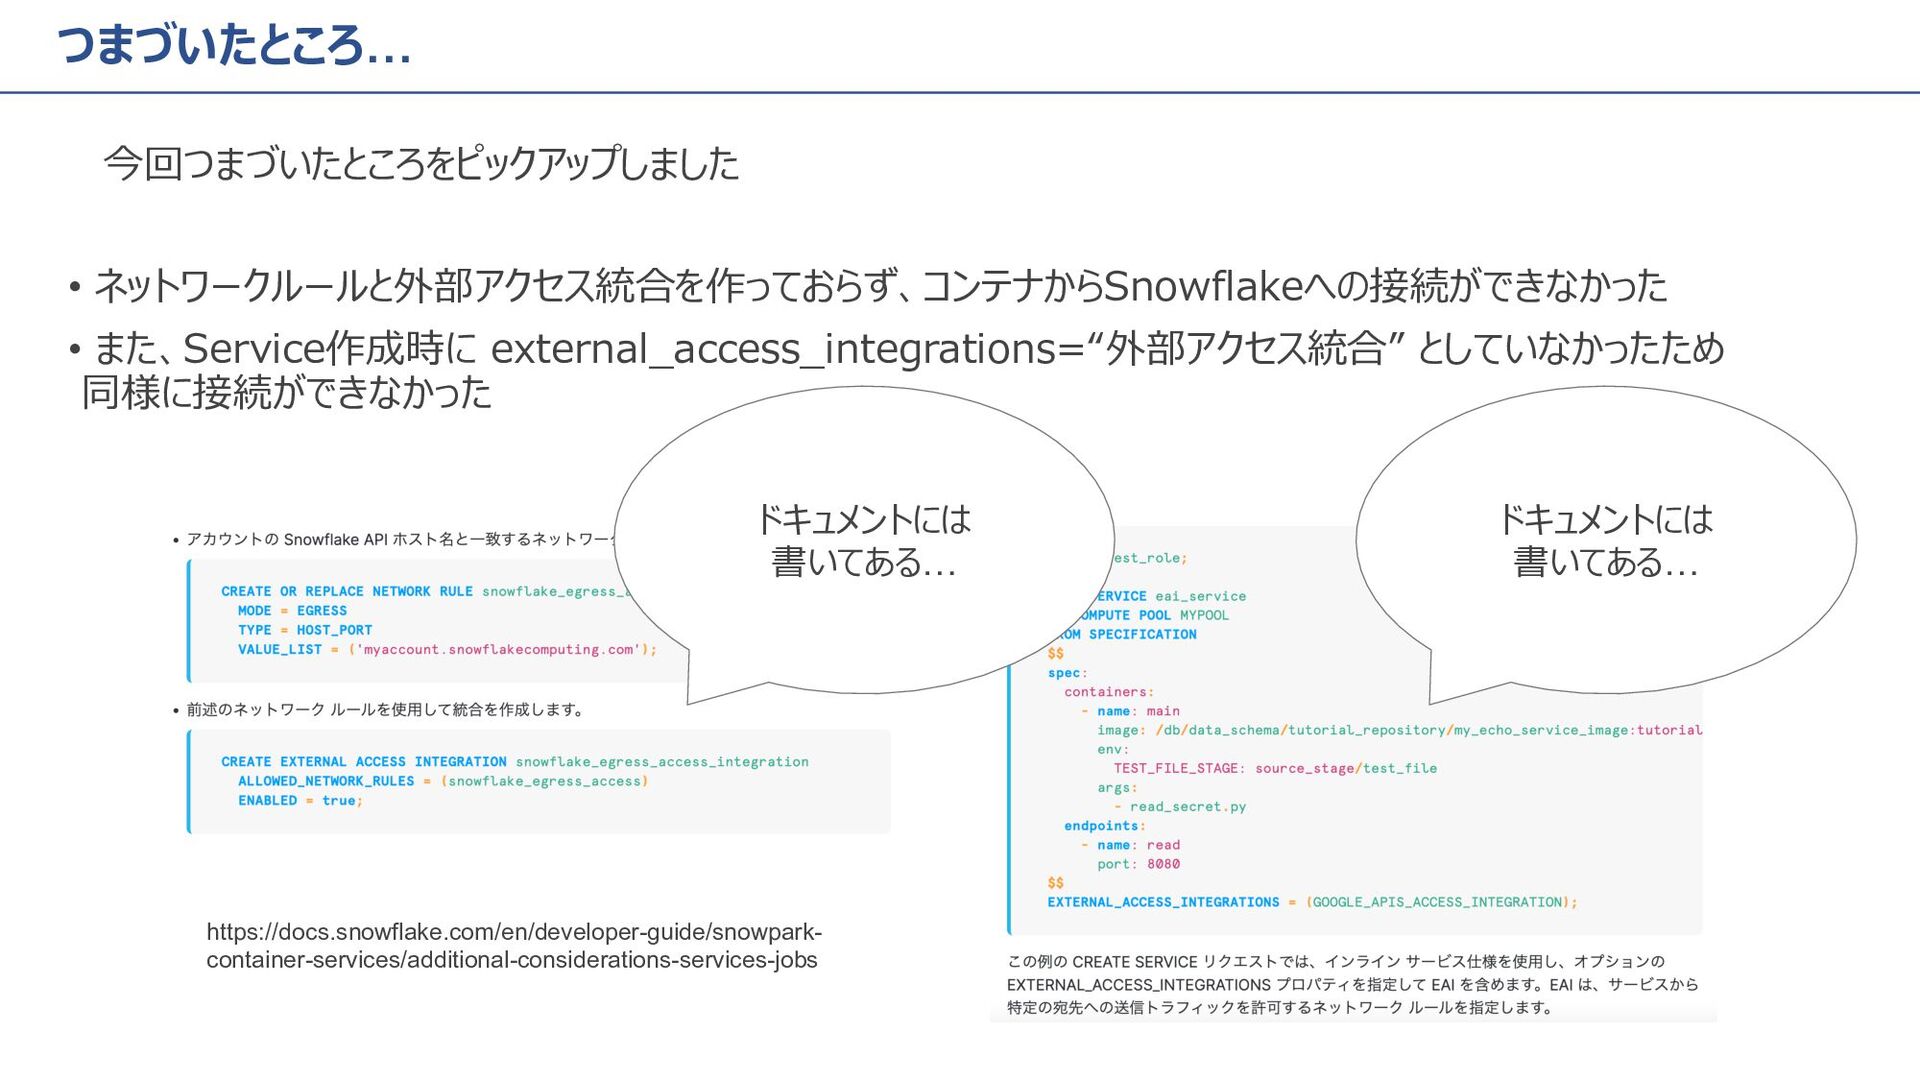
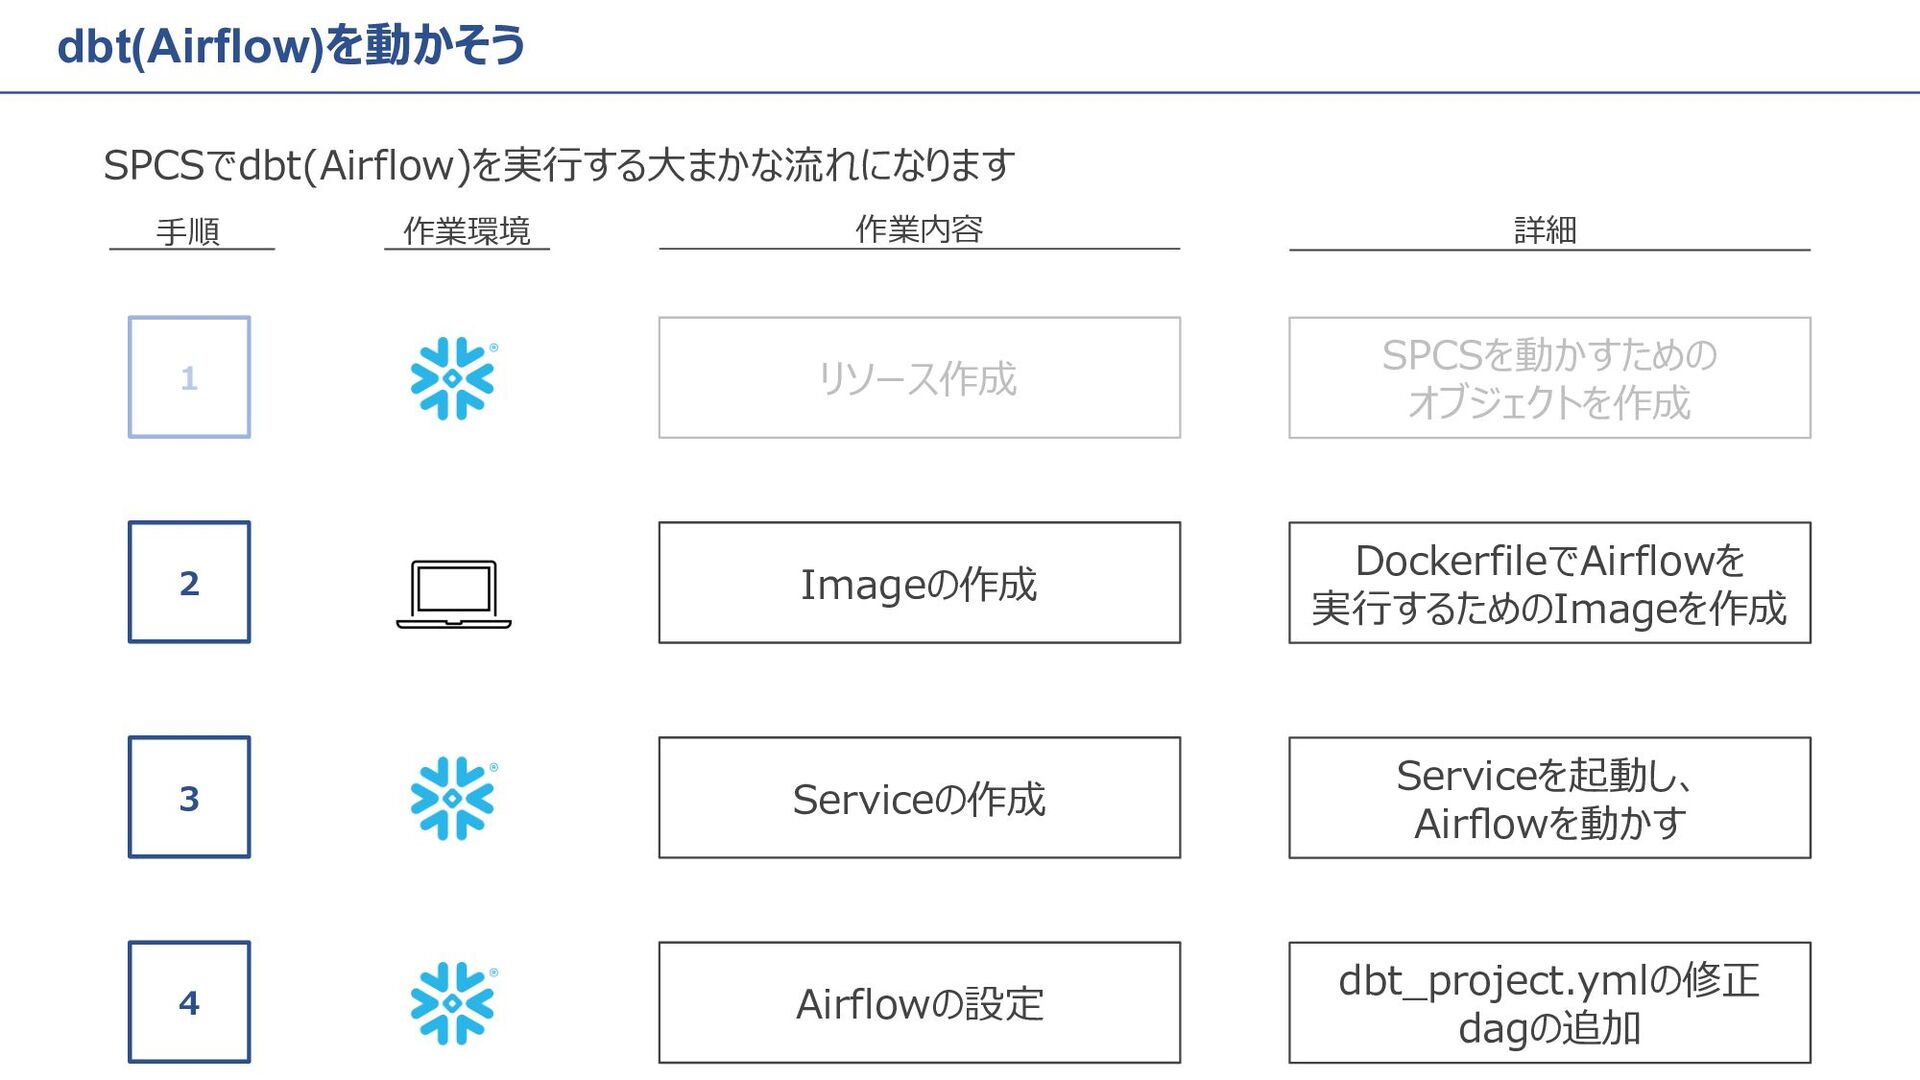
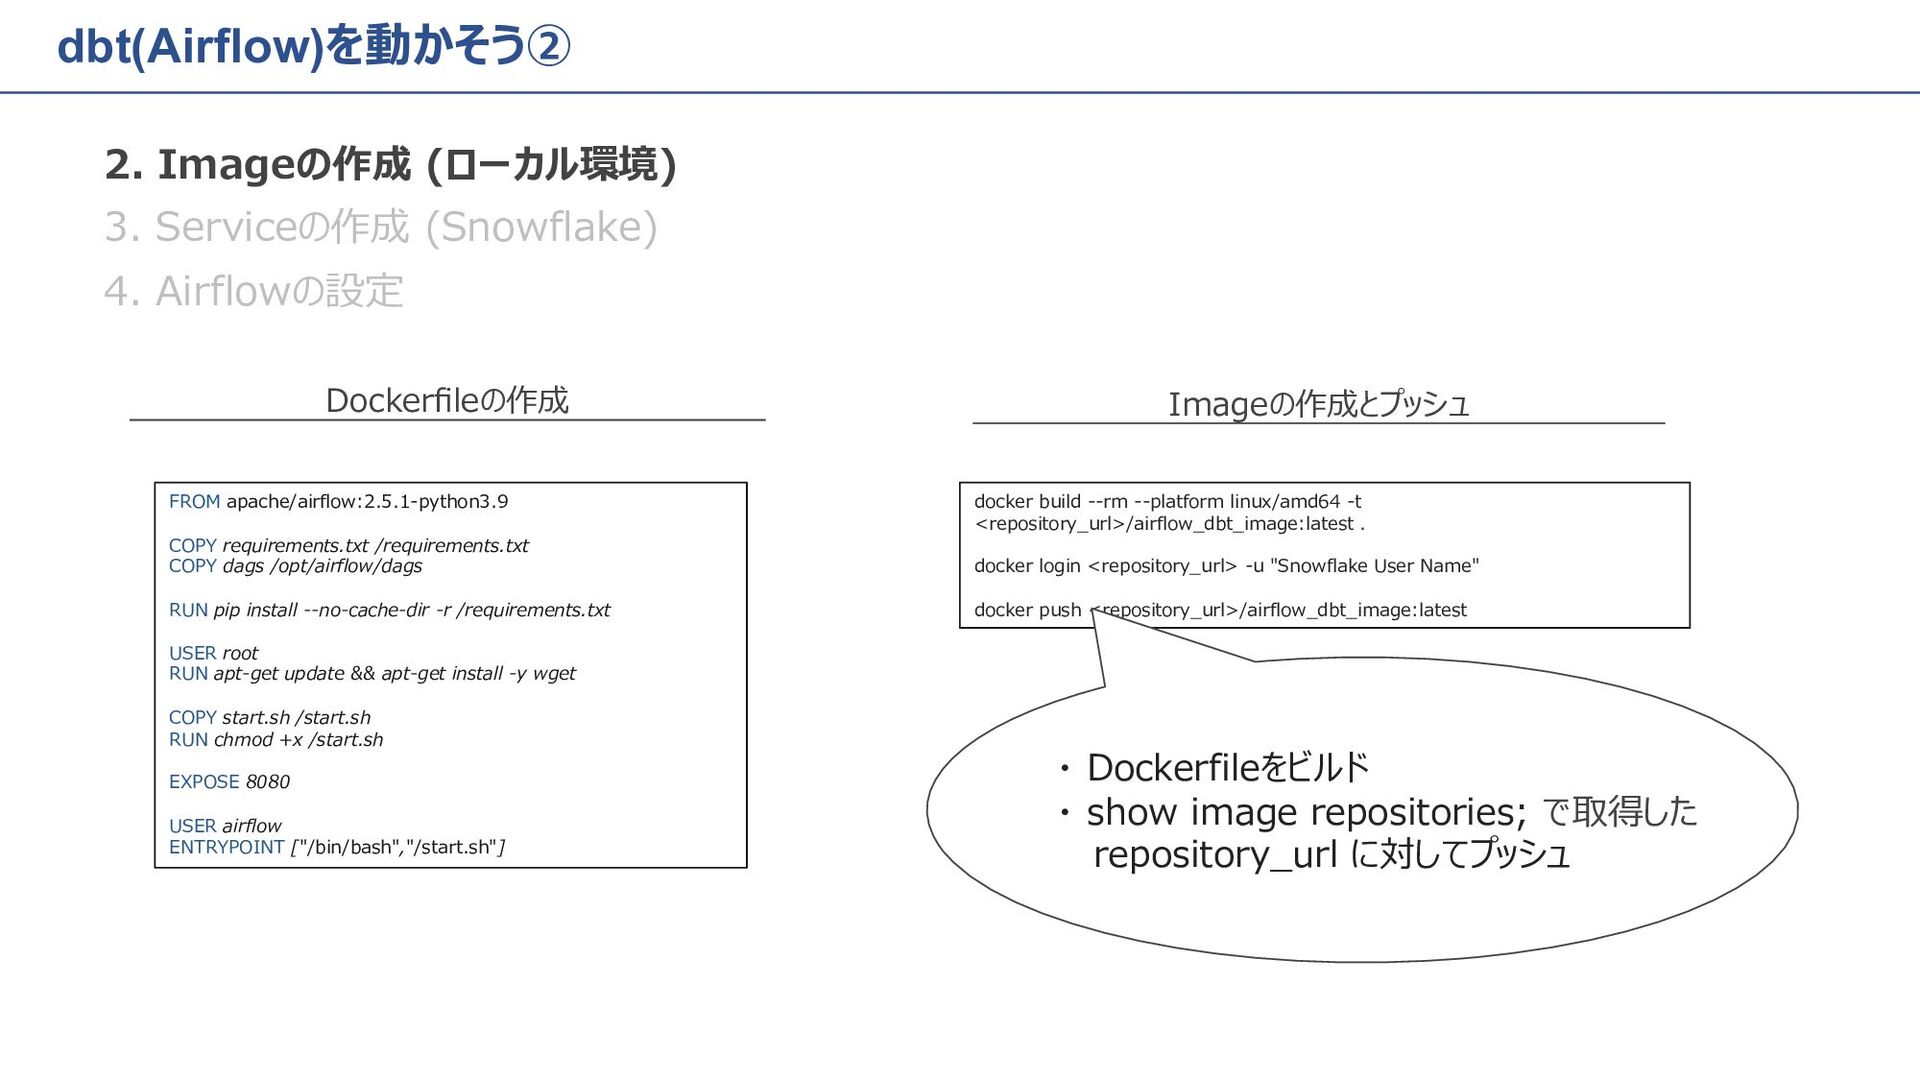
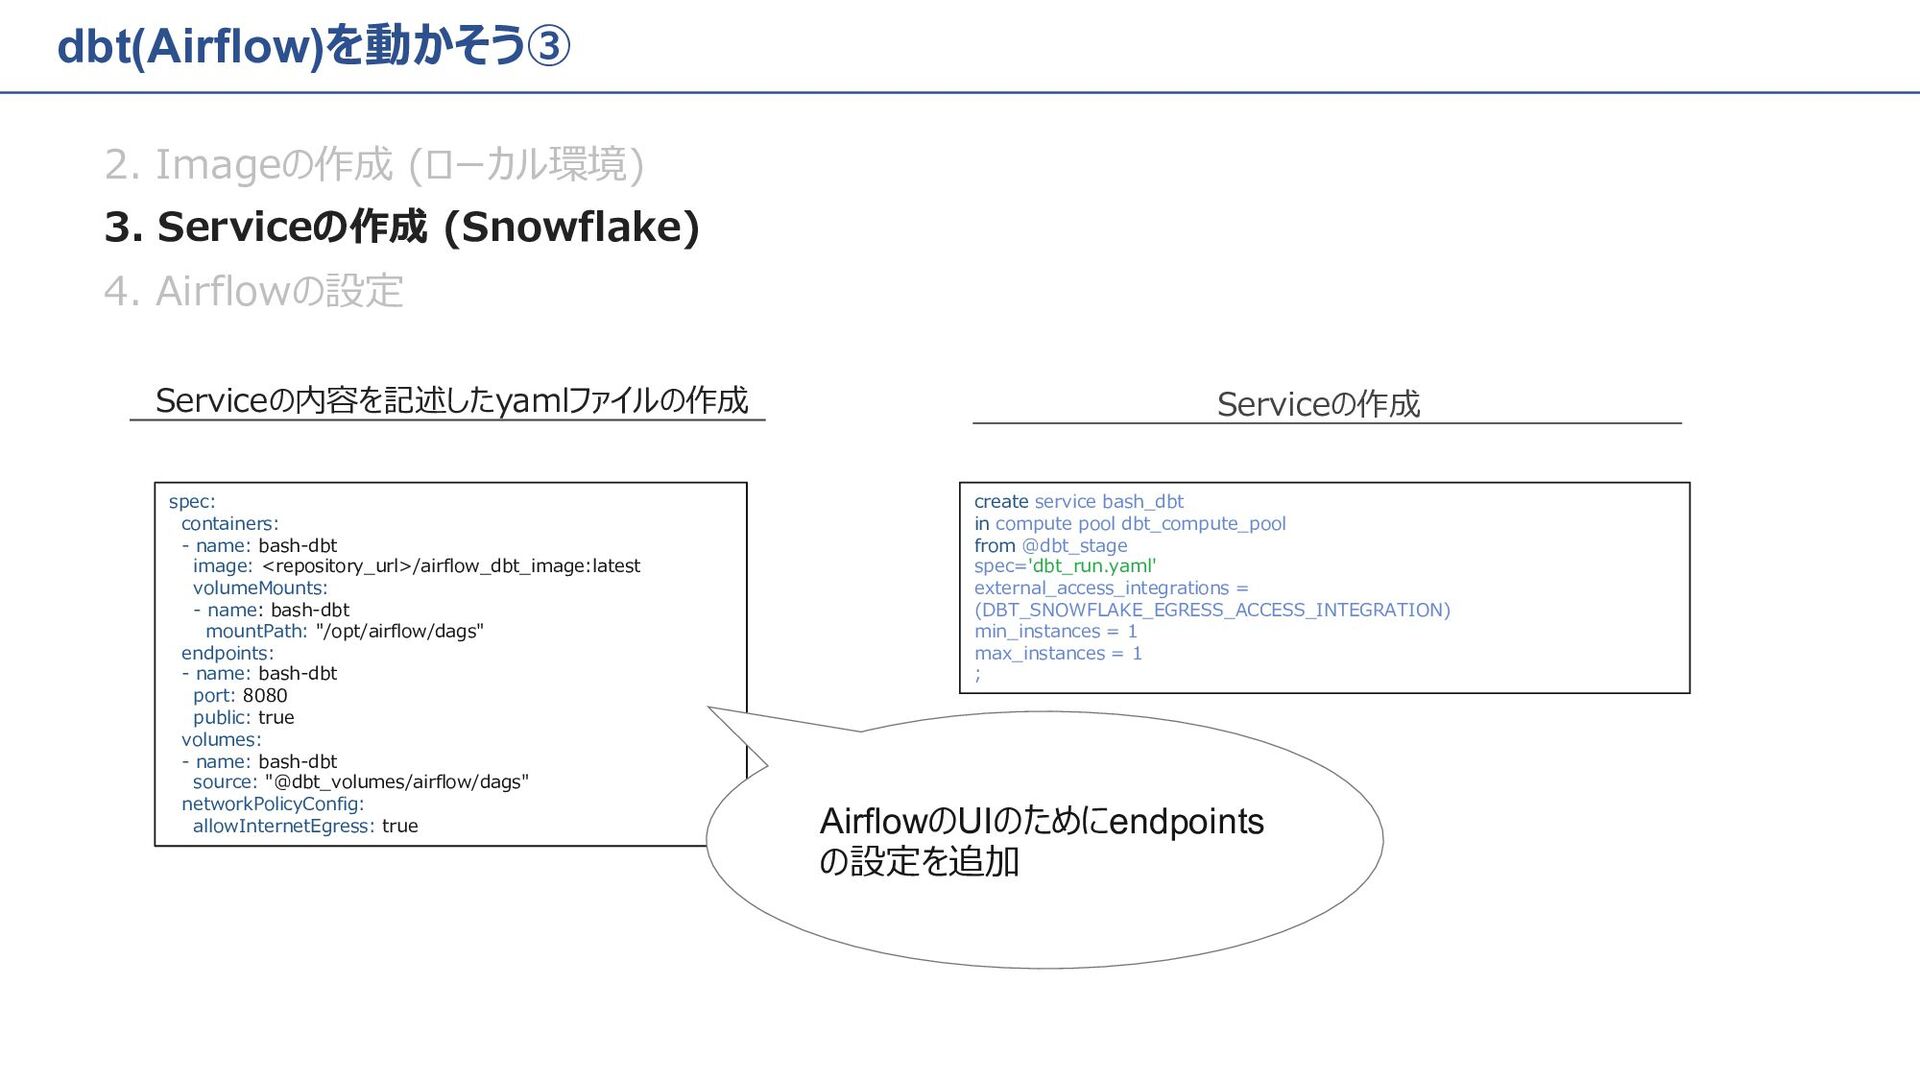
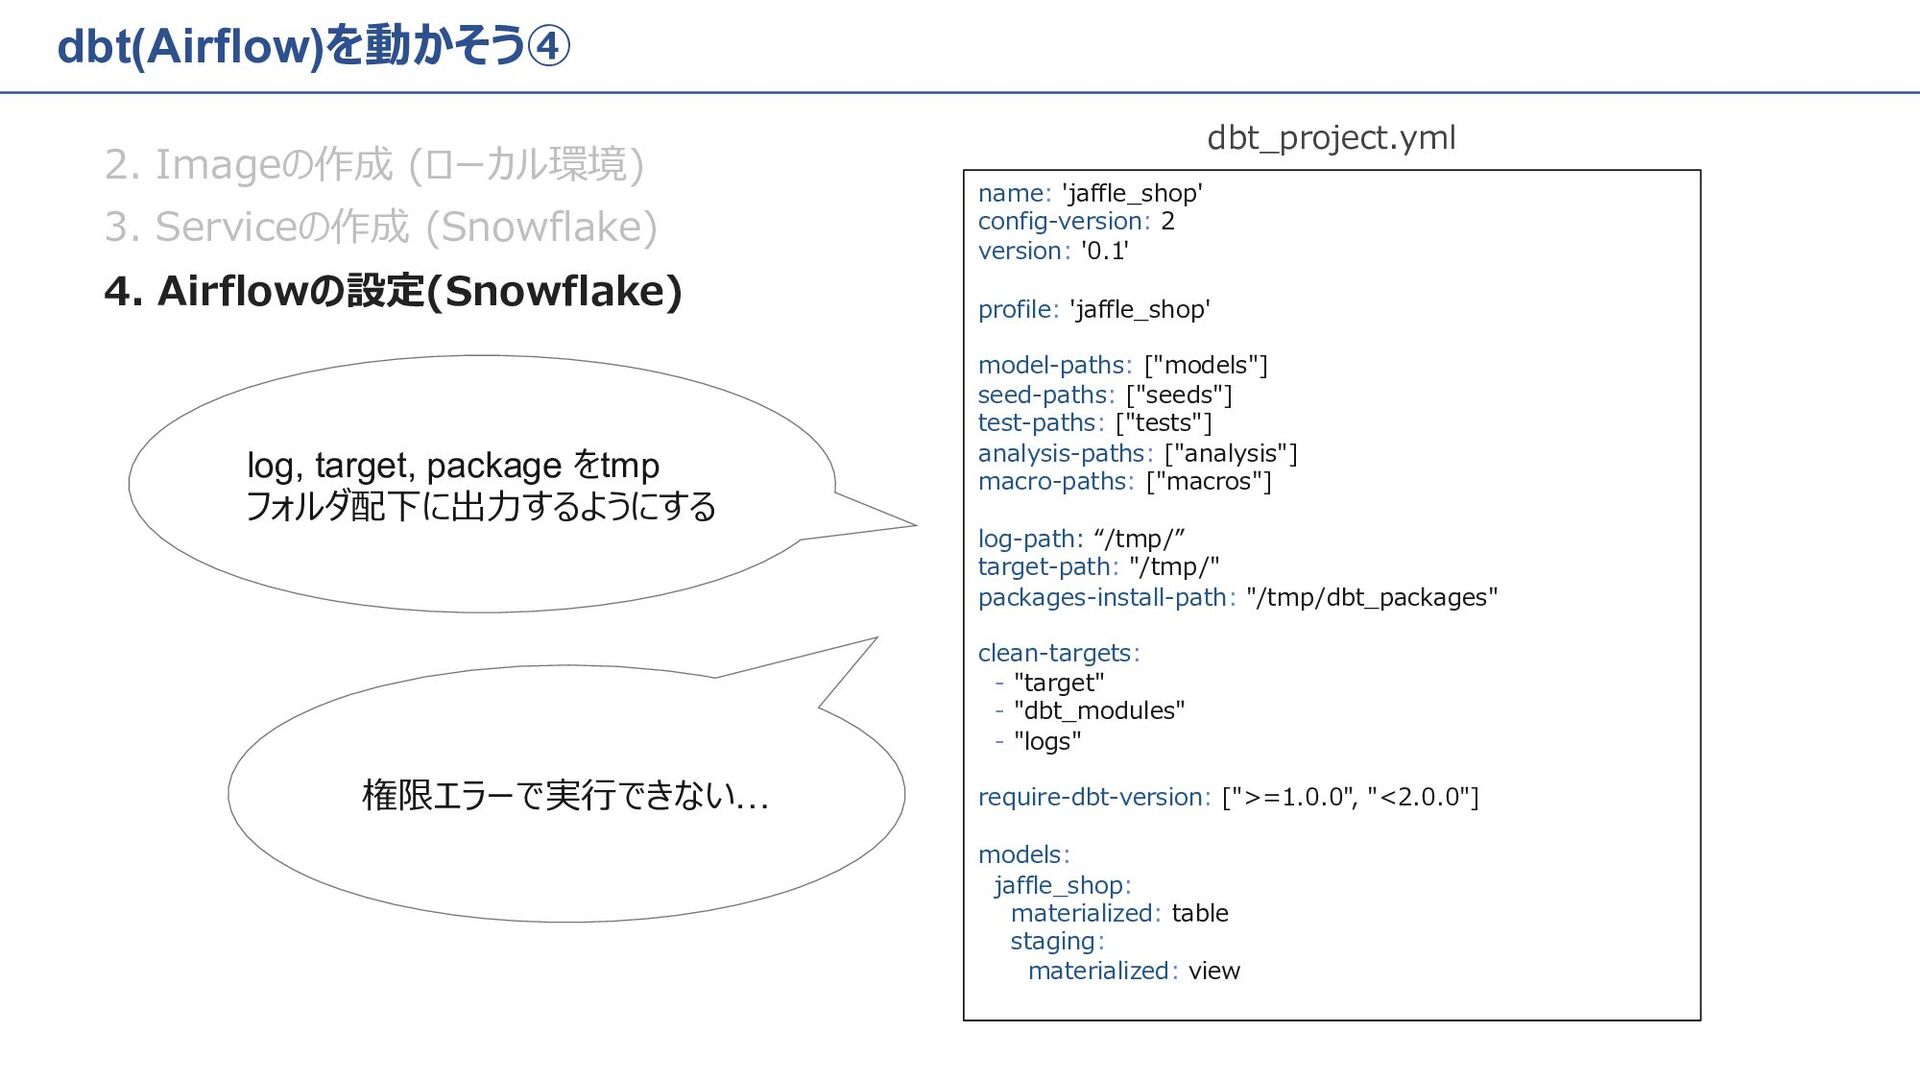
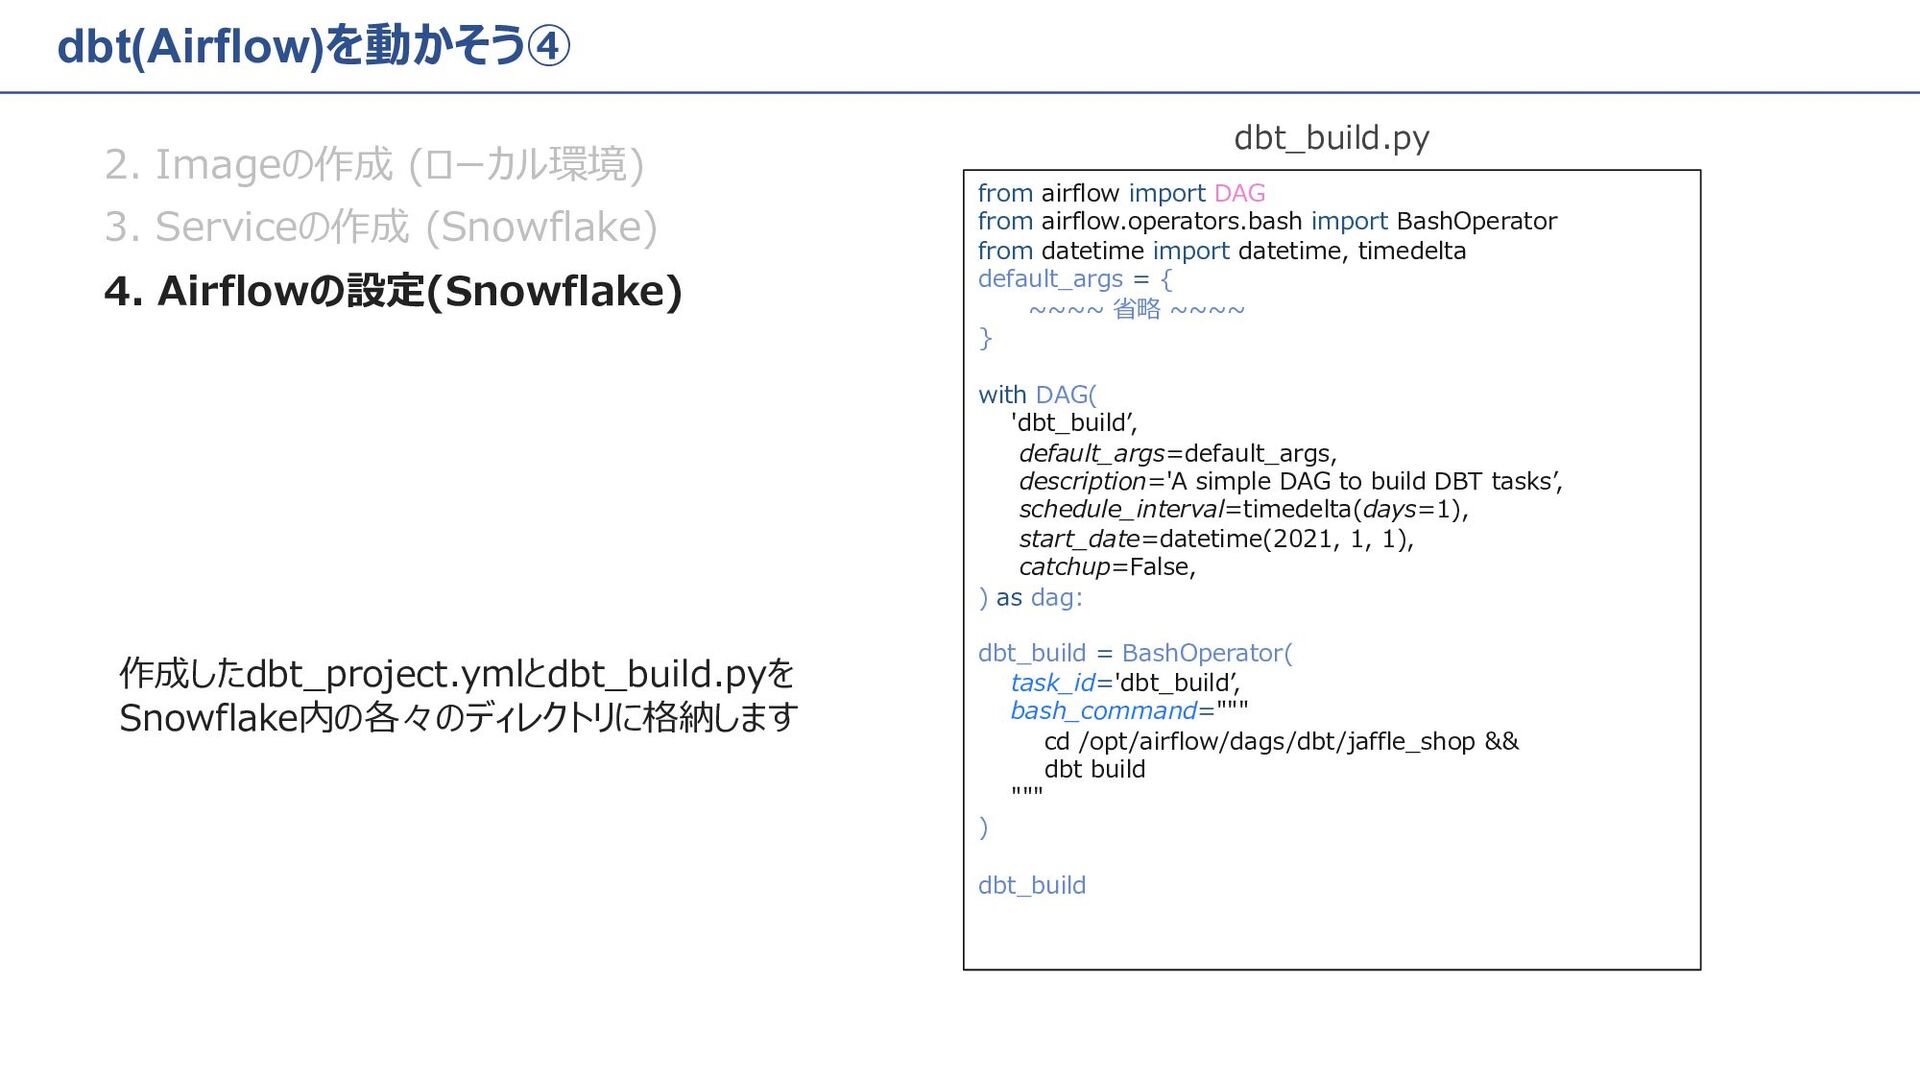
    image repository dbt_database.dbt_spcs.dbt_image_repository; create stage if not exists dbt_stage directory = ( enable = true ); show image_repositories; use role accountadmin; use database dbt_database; use schema dbt_spcs; create or replace network rule dbt_snowflake_egress_access mode = egress type = host_port value_list = ('account.snowflakecomputing.com') ; create or replace external access integration dbt_snowflake_egress_access_integration allowed_network_rules = (dbt_snowflake_egress_access) enabled = true ; show integrations; show grants to role dbt_user; grant usage on integration dbt_snowflake_egress_access_integration to role dbt_user; create stage dbt_database.dbt_spcs.dbt_volumes directory = ( enable = true ) encryption = (type = 'snowflake_sse'); use role accountadmin; create role dbt_user; grant role dbt_user to role accountadmin; create or replace database dbt_database; grant ownership on database dbt_database to role dbt_user copy current grants; create or replace warehouse dbt_warehouse warehouse_size = xsmall auto_suspend = 120 auto_resume = true ; grant usage on warehouse dbt_warehouse to role dbt_user; create security integration if not exists snowservices_ingress_oauth type=oauth oauth_client=snowservices_ingress enabled=true; grant bind service endpoint on account to role dbt_user; create compute pool if not exists dbt_compute_pool min_nodes = 1 max_nodes = 1 auto_suspend_secs = 180 instance_family = CPU_X64_XS; grant usage, monitor, operate on compute pool dbt_compute_pool to role dbt_user; grant role dbt_user to user "Snowflake User Name"; use role dbt_user; use database dbt_database; use warehouse dbt_warehouse; dbtを動かそう① 1. リソース作成 (Snowflake) 2. Imageの作成 (ローカル環境) 3. Serviceの作成 (Snowflake)
  3. dbtを動かそう② 1. リソース作成 (Snowflake) 2. Imageの作成 (ローカル環境) 3. Serviceの作成 (Snowflake)

    docker build --rm --platform linux/amd64 -t <repository_url>/dbt_image:latest . docker login <repository_url> -u "Snowflake User Name" docker push <repository_url>/dbt_image:latest FROM ghcr.io/dbt-labs/dbt-snowflake:1.7.1 COPY ./jaffle_shop/ /usr/jaffle_shop/ WORKDIR /usr/jaffle_shop dbt-snowflakeから公開されている Imageを取得 Dockerfileの作成 Imageの作成とプッシュ ・ Dockerfileをビルド ・ show image repositories; で取得した repository_url に対してプッシュ
  4. dbtを動かそう③ 1. リソース作成 (Snowflake) 2. Imageの作成 (ローカル環境) 3. Serviceの作成 (Snowflake)

    spec: containers: - name: dbt-build image: <repository_url>/dbt_image:latest command: - dbt - build volumeMounts: - name: dbt-project mountPath: "/usr/jaffle_shop/" volumes: - name: dbt-project source: "@dbt_volumes/jaffle_shop" networkPolicyConfig: allowInternetEgress: true 先ほどプッシュしたImageを選択 Serviceの内容を記述したyamlファイルの作成
  5. dbtを動かそう③ 1. リソース作成 (Snowflake) 2. Imageの作成 (ローカル環境) 3. Serviceの作成 (Snowflake)

    ステージに置いたyamlファイルをもとにServiceの 作成を⾏います 実⾏するdbtプロジェクトおよびサービスの内容を 記述したyamlファイルを各ステージに置きます create service dbt_jaffle_shop_shop in compute pool dbt_compute_pool from @dbt_stage spec='dbt_run.yaml' external_access_integrations = (DBT_SNOWFLAKE_EGRESS_ACCESS_INTEGRATION) min_instances = 1 max_instances = 1 ; ファイルの配置 Serviceの作成
  6. dbt(Airflow)を動かそう SPCSでdbt(Airflow)を実⾏する⼤まかな流れになります リソース作成 作業内容 1 ⼿順 2 3 作業環境 詳細

    Imageの作成 Serviceの作成 SPCSを動かすための オブジェクトを作成 DockerfileでAirflowを 実⾏するためのImageを作成 Serviceを起動し、 Airflowを動かす 4 Airflowの設定 dbt_project.ymlの修正 dagの追加
  7. dbt(Airflow)を動かそう② 2. Imageの作成 (ローカル環境) 3. Serviceの作成 (Snowflake) 4. Airflowの設定 docker

    build --rm --platform linux/amd64 -t <repository_url>/airflow_dbt_image:latest . docker login <repository_url> -u "Snowflake User Name" docker push <repository_url>/airflow_dbt_image:latest FROM apache/airflow:2.5.1-python3.9 COPY requirements.txt /requirements.txt COPY dags /opt/airflow/dags RUN pip install --no-cache-dir -r /requirements.txt USER root RUN apt-get update && apt-get install -y wget COPY start.sh /start.sh RUN chmod +x /start.sh EXPOSE 8080 USER airflow ENTRYPOINT ["/bin/bash","/start.sh"] Dockerfileの作成 Imageの作成とプッシュ ・ Dockerfileをビルド ・ show image repositories; で取得した repository_url に対してプッシュ
  8. dbt(Airflow)を動かそう③ spec: containers: - name: bash-dbt image: <repository_url>/airflow_dbt_image:latest volumeMounts: -

    name: bash-dbt mountPath: "/opt/airflow/dags" endpoints: - name: bash-dbt port: 8080 public: true volumes: - name: bash-dbt source: "@dbt_volumes/airflow/dags" networkPolicyConfig: allowInternetEgress: true AirflowのUIのためにendpoints の設定を追加 2. Imageの作成 (ローカル環境) 3. Serviceの作成 (Snowflake) 4. Airflowの設定 create service bash_dbt in compute pool dbt_compute_pool from @dbt_stage spec='dbt_run.yaml' external_access_integrations = (DBT_SNOWFLAKE_EGRESS_ACCESS_INTEGRATION) min_instances = 1 max_instances = 1 ; Serviceの内容を記述したyamlファイルの作成 Serviceの作成
  9. dbt(Airflow)を動かそう④ log, target, package をtmp フォルダ配下に出⼒するようにする 2. Imageの作成 (ローカル環境) 3.

    Serviceの作成 (Snowflake) 4. Airflowの設定(Snowflake) 権限エラーで実⾏できない… name: 'jaffle_shop' config-version: 2 version: '0.1' profile: 'jaffle_shop' model-paths: ["models"] seed-paths: ["seeds"] test-paths: ["tests"] analysis-paths: ["analysis"] macro-paths: ["macros"] log-path: “/tmp/” target-path: "/tmp/" packages-install-path: "/tmp/dbt_packages" clean-targets: - "target" - "dbt_modules" - "logs" require-dbt-version: [">=1.0.0", "<2.0.0"] models: jaffle_shop: materialized: table staging: materialized: view dbt_project.yml
  10. dbt(Airflow)を動かそう④ from airflow import DAG from airflow.operators.bash import BashOperator from

    datetime import datetime, timedelta default_args = { ~~~~ 省略 ~~~~ } with DAG( 'dbt_buildʼ, default_args=default_args, description='A simple DAG to build DBT tasksʼ, schedule_interval=timedelta(days=1), start_date=datetime(2021, 1, 1), catchup=False, ) as dag: dbt_build = BashOperator( task_id='dbt_buildʼ, bash_command=""" cd /opt/airflow/dags/dbt/jaffle_shop && dbt build """ ) dbt_build 2. Imageの作成 (ローカル環境) 3. Serviceの作成 (Snowflake) 4. Airflowの設定(Snowflake) dbt_build.py 作成したdbt_project.ymlとdbt_build.pyを Snowflake内の各々のディレクトリに格納します
  11. あぺんでぃくす ちなみにログってどうやって確認するの ➡ イベントテーブルを使おう︕ USE ROLE accountadmin; CREATE OR REPLACE

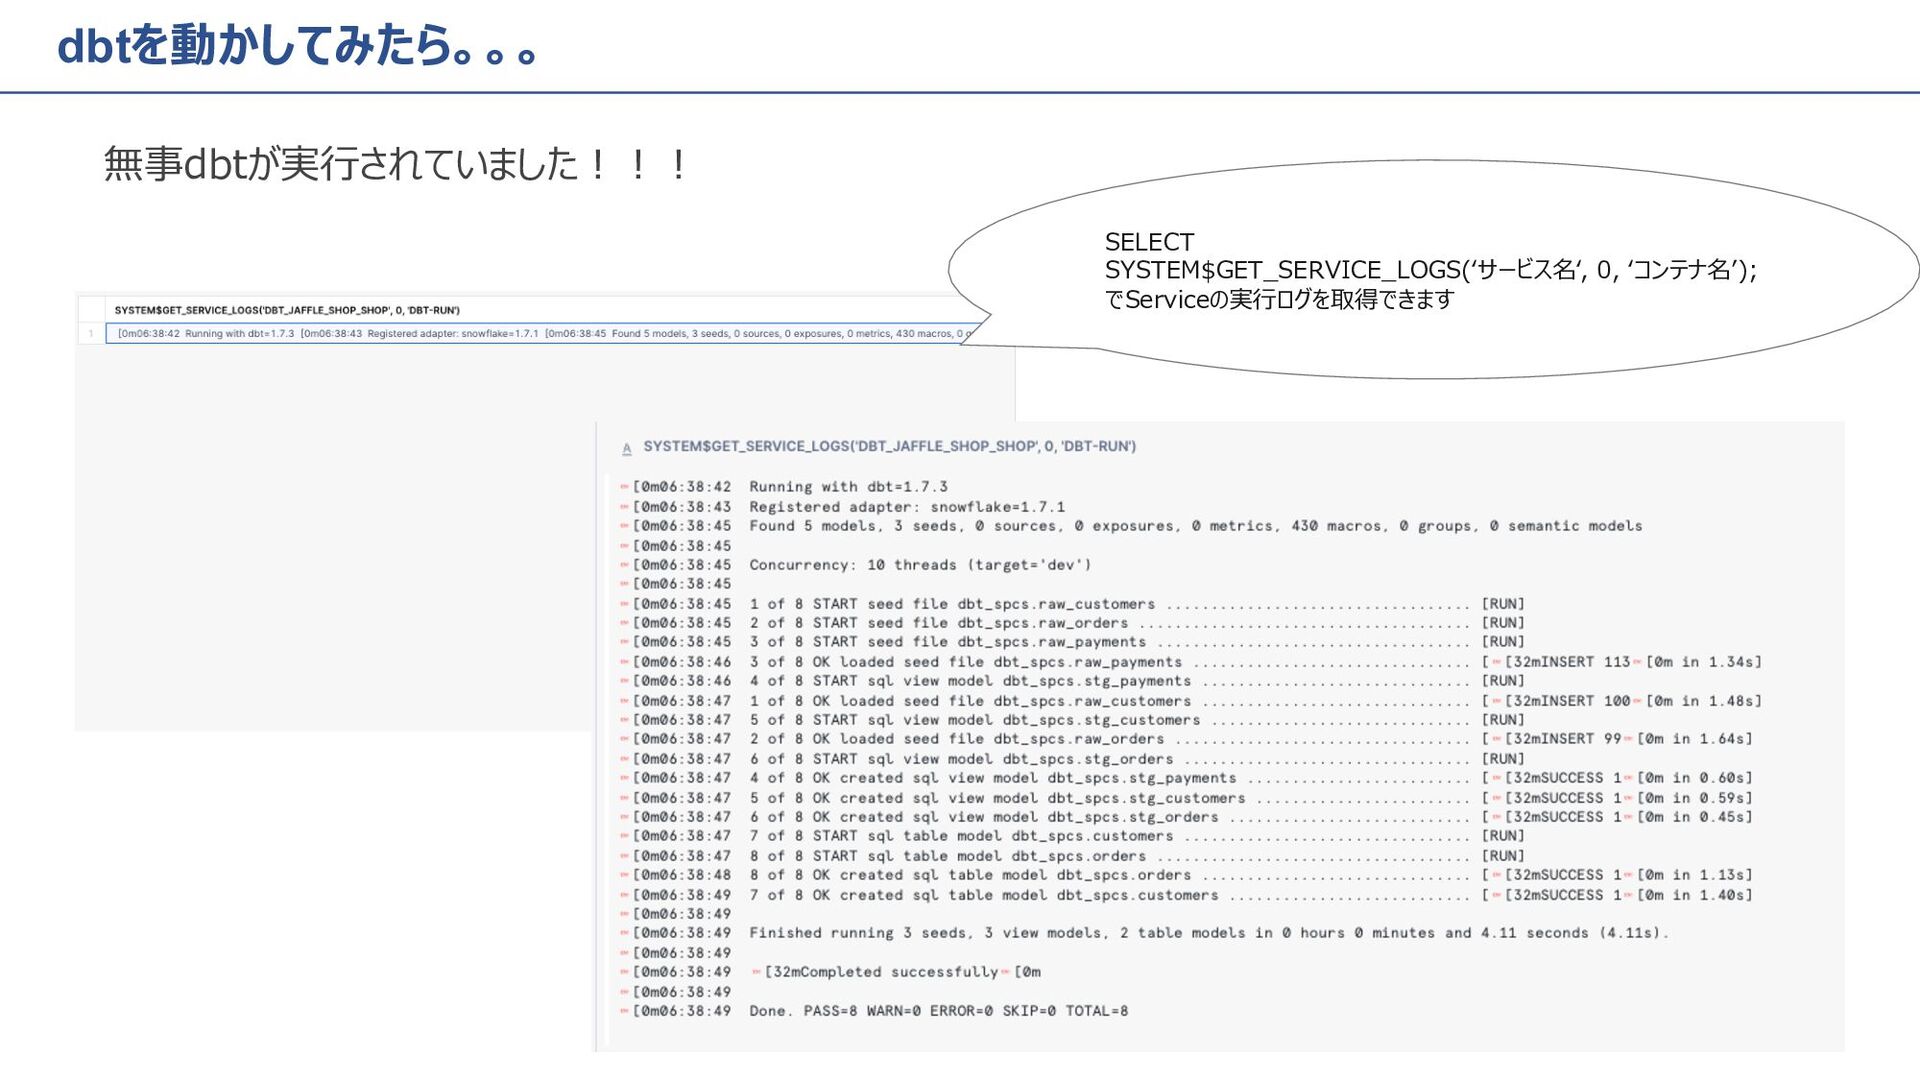
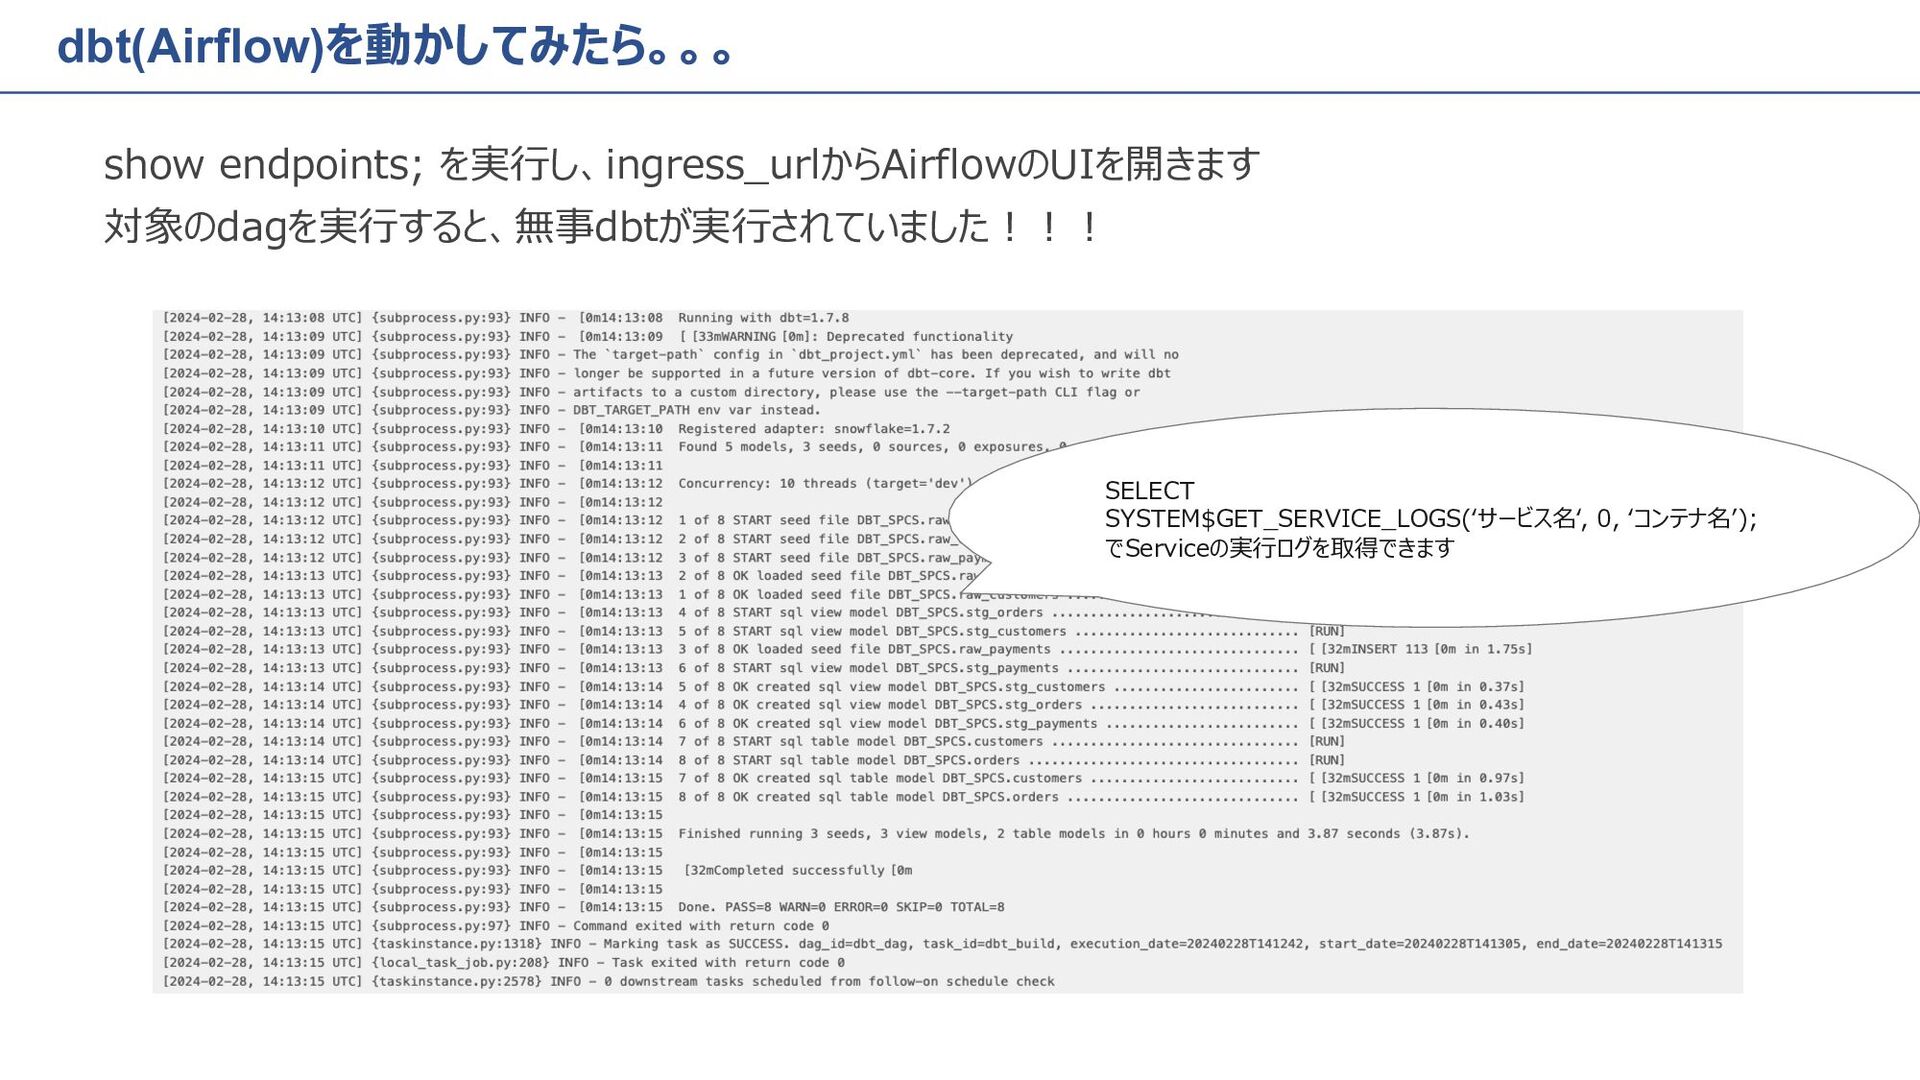
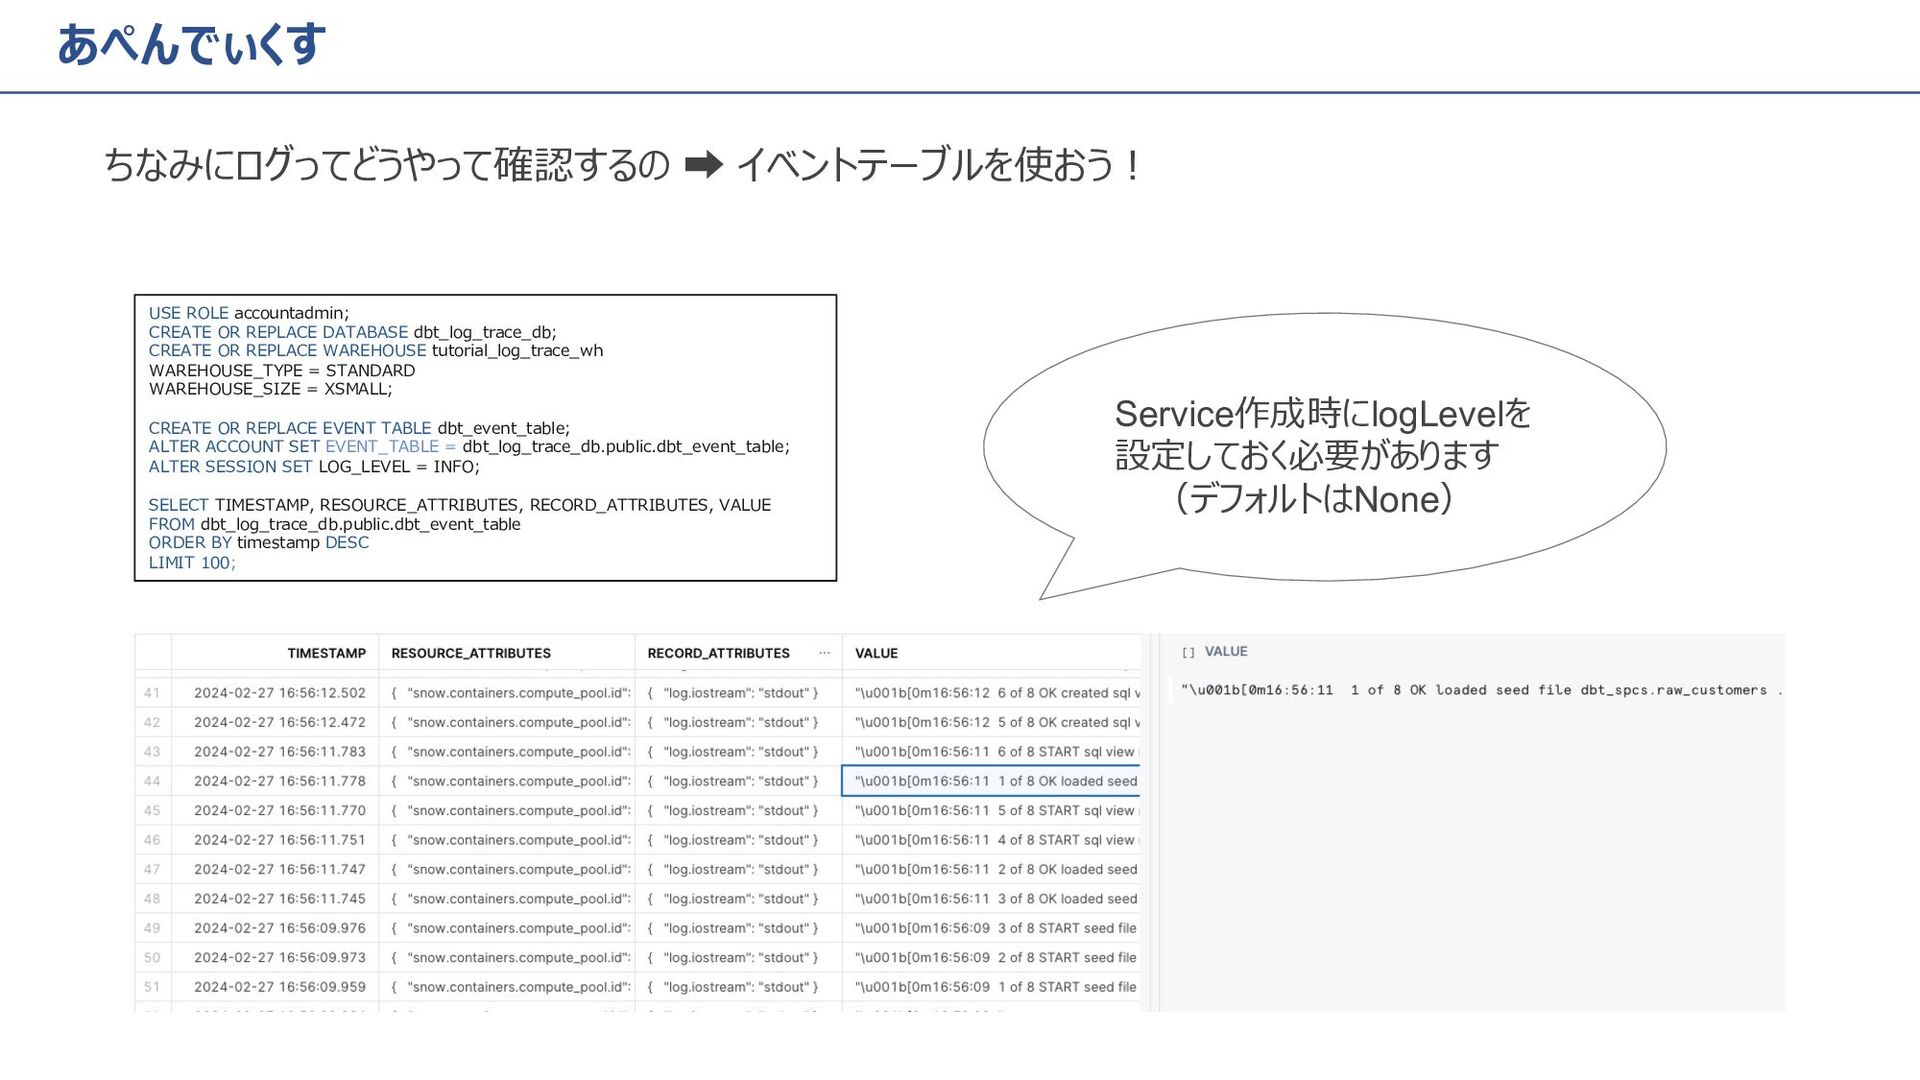
    DATABASE dbt_log_trace_db; CREATE OR REPLACE WAREHOUSE tutorial_log_trace_wh WAREHOUSE_TYPE = STANDARD WAREHOUSE_SIZE = XSMALL; CREATE OR REPLACE EVENT TABLE dbt_event_table; ALTER ACCOUNT SET EVENT_TABLE = dbt_log_trace_db.public.dbt_event_table; ALTER SESSION SET LOG_LEVEL = INFO; SELECT TIMESTAMP, RESOURCE_ATTRIBUTES, RECORD_ATTRIBUTES, VALUE FROM dbt_log_trace_db.public.dbt_event_table ORDER BY timestamp DESC LIMIT 100; Service作成時にlogLevelを 設定しておく必要があります (デフォルトはNone)