Upgrade to Pro — share decks privately, control downloads, hide ads and more …

Introduction to Git and GitHub

Introduction to Git and GitHub

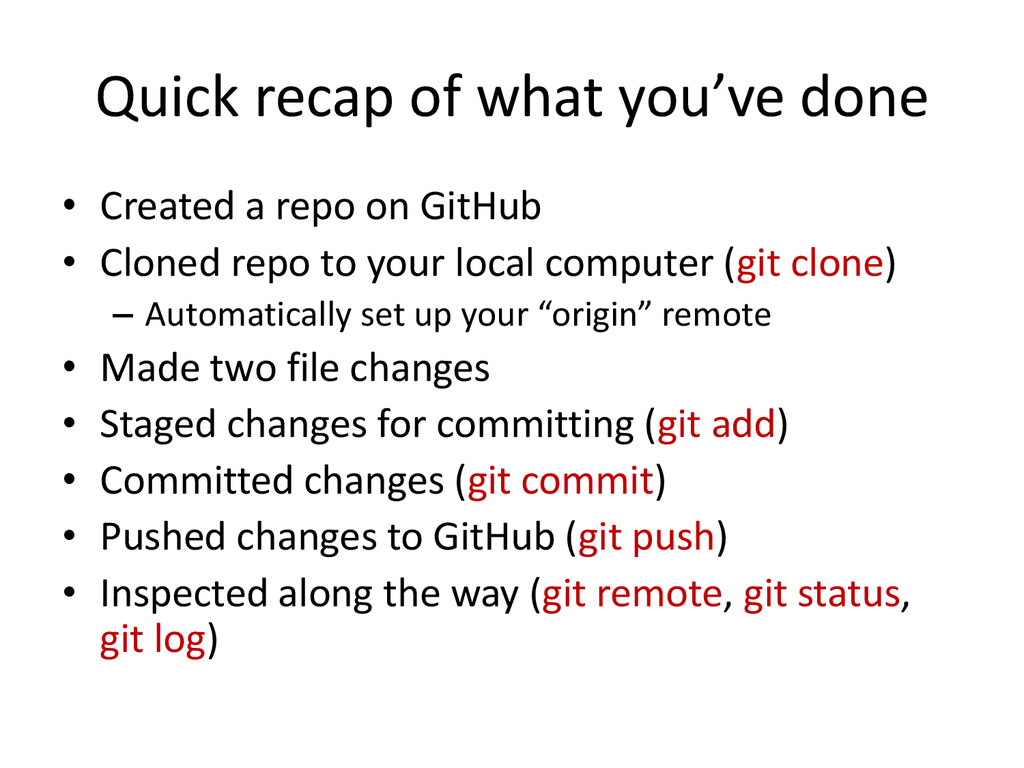
These are my slides from a 90-minute lesson introducing Git and GitHub to Data Science students at General Assembly's DC campus.

My YouTube video series with similar content: https://www.youtube.com/playlist?list=PL5-da3qGB5IBLMp7LtN8Nc3Efd4hJq0kD

My Git quick reference guide: http://www.dataschool.io/git-quick-reference-for-beginners/

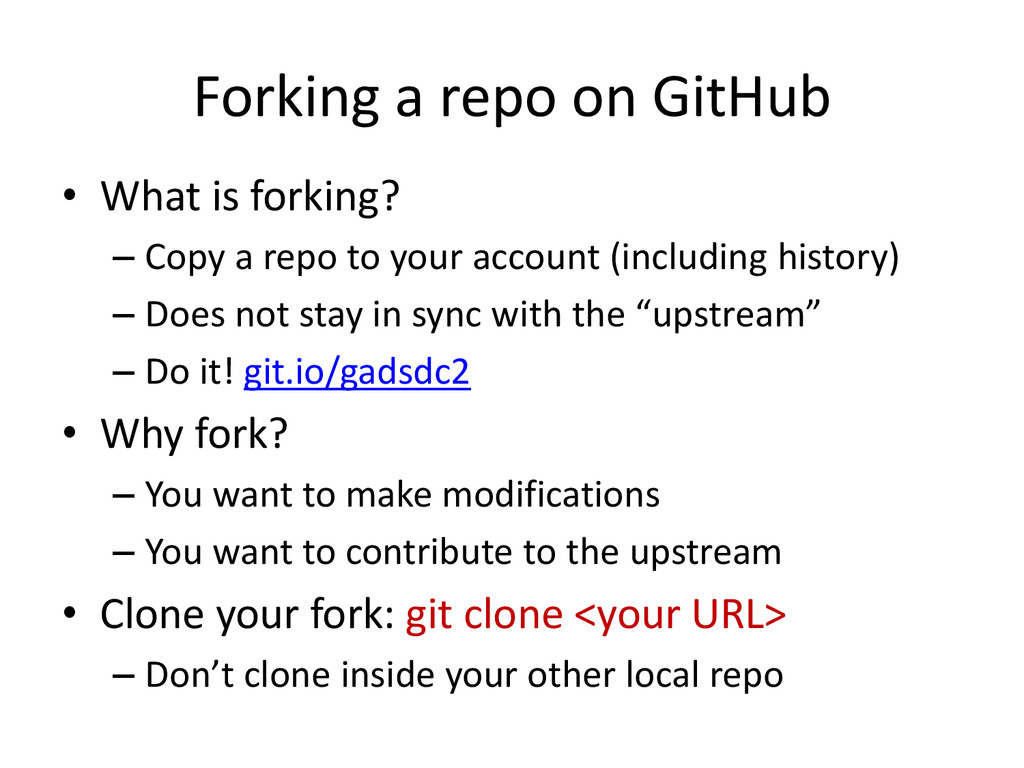
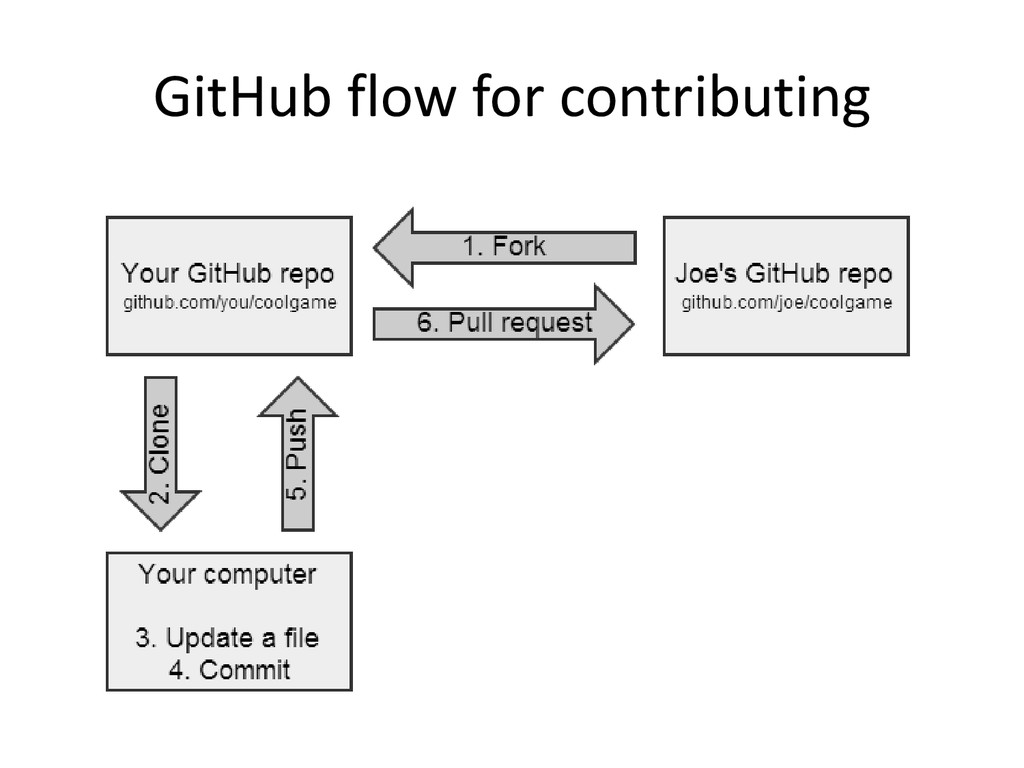
Understanding the Git and GitHub workflow: http://www.dataschool.io/simple-guide-to-forks-in-github-and-git/

Blog post about the presentation: http://www.dataschool.io/github-is-just-dropbox-for-git/

Kevin Markham

July 21, 2014
Tweet

More Decks by Kevin Markham

Other Decks in Technology

Transcript

  1. Agenda • What is Git? What is GitHub? • Why

    are we learning this? • Reflections on learning Git • Getting set up • Practical exercises (many!) • Further resources • What we didn’t cover
  2. What is Git? • Version control system that allows you

    to track files and file changes in a repository (“repo”) • Primarily used by programmers • Runs from the command line (usually) • Can be used alone or in a team
  3. What is GitHub? • A website, not a version control

    system • Allows you to put your Git repos online • Benefits of GitHub: – Backup of files – Visual interface for navigating repos – Makes repo collaboration easy – “GitHub is just Dropbox for Git” • Note: Git does not require GitHub
  4. Why are we learning this? • Version control is useful

    when you write code, and data scientists write code • Enables teams to easily collaborate on the same codebase • Enables you to contribute to open source projects • Attractive skill for employment
  5. Git can be hard for beginners • Designed (by programmers)

    for power and flexibility over simplicity • Hard to know if what you did was right • Hard to explore since most actions are “permanent” (in a sense) and can have serious consequences • Most learning resources are command- focused instead of workflow-focused
  6. Don’t sweat it! • We’ll focus on the most important

    10% of Git • Being slow to learn Git will not hold you back in the rest of the course • We can help you to troubleshoot • We’re all in this together!
  7. Installation • GitHub: – Create an account at github.com –

    There’s nothing to install – Note: “GitHub for Windows” & “GitHub for Mac” are GUI clients (alternatives to command line) • Git: – Download from git-scm.com/downloads – Install
  8. Setup • Open Git Bash (Windows) or Terminal (Mac/Linux): –

    git config --global user.name “YOUR FULL NAME” – git config --global user.email “YOUR EMAIL” • Use the same email address you used with your GitHub account • Generate SSH keys: tiny.cc/gitssh – Not required, but more secure that HTTPS
  9. Navigating a GitHub repo (1 of 2) • Example repo:

    git.io/ggplot2 • Account name, repo name, description • Folder structure • Viewing files: – Rendered view (with syntax highlighting) – Raw view • README.md: – Describes a repo – Automatically displayed – Written in Markdown
  10. Navigating a GitHub repo (2 of 2) • Commits: –

    One or more changes to one or more files – Revision highlighting – Commit comments are required – Most recent commit comment shown by filename • Profile page
  11. Creating a repo on GitHub • Click “Create New” (plus

    sign): – Define name, description, public or private – Initialize with README (if you’re going to clone) • Notes: – Nothing has happened to your local computer – This was done on GitHub, but GitHub used Git to add the README.md file
  12. Cloning a GitHub repo • Cloning = copying to your

    local computer – Like copying your Dropbox files to a new machine • First, change your working directory to where you want the repo to be stored: cd • Then, clone the repo: git clone <URL> – Get SSH or HTTPS URL from GitHub (ends in .git) – Clones to a subdirectory of the working directory – No visual feedback when you type your password • Navigate to the repo (cd) then list the files (ls)
  13. Checking your remotes • A “remote alias” is a reference

    to a repo not on your local computer – Like a connection to your Dropbox account • “origin” remote was set up by “git clone” • View remotes: git remote -v
  14. Making changes, checking your status • Making changes: – Modify

    README.md in any text editor – Create a new file: touch <filename> • Check your status: – git status • File statuses (possibly color-coded): – Untracked (red) – Tracked and modified (red) – Staged for committing (green) – Committed
  15. Committing changes • Stage changes for committing: – Add a

    single file: git add <filename> – Add all “red” files: git add . • Check your status: – Red files have turned green • Commit changes: – git commit -m “message about commit” • Check your status again! • Check the log: git log
  16. Pushing to GitHub • Everything you’ve done to your cloned

    repo (so far) has been local • You’ve been working in the “master” branch • Push committed changes to GitHub: – Like syncing local file changes to Dropbox – git push <remote> <branch> – Often: git push origin master • Refresh your GitHub repo to check!
  17. Quick recap of what you’ve done • Created a repo

    on GitHub • Cloned repo to your local computer (git clone) – Automatically set up your “origin” remote • Made two file changes • Staged changes for committing (git add) • Committed changes (git commit) • Pushed changes to GitHub (git push) • Inspected along the way (git remote, git status, git log)
  18. Forking a repo on GitHub • What is forking? –

    Copy a repo to your account (including history) – Does not stay in sync with the “upstream” – Do it! git.io/gadsdc2 • Why fork? – You want to make modifications – You want to contribute to the upstream • Clone your fork: git clone <your URL> – Don’t clone inside your other local repo
  19. Sync your gadsdc2 fork • We’ve added a new file

    to gadsdc2 • Add an “upstream” remote (one-time operation): – git remote add upstream <Aaron’s URL> – Check that it worked: git remote -v • Pull the changes from the upstream: – Like updating your local files from Dropbox – git pull upstream master – Pull = fetch + merge (basically) • Push the changes up to GitHub (optional): – git push origin master
  20. Working with branches • A branch is a “context” for

    your work: – Controls your files – Managed by the “.git” folder – View your branches: git branch • Try branching in the test repo you created: – Create branch and switch to it: git checkout -b new_branch – Create a file, stage the change, commit it – Switch to the master branch: git checkout master • ls: the file is gone! • git log: the commit is gone! – Switch to the new branch: git checkout new_branch • The file and commit are back
  21. Recipe for submitting homework 1. git checkout master 2. git

    pull upstream master 3. git checkout -b name_of_branch 4. do your assignment 5. git add . 6. git commit -m “message” 7. git push origin name_of_branch 8. GitHub: switch to branch, submit pull request
  22. Further resources • Pro Git (book): git-scm.com/book • Git Reference:

    gitref.org • Recipe for submitting homework: git.io/recipe • My quick reference guide: tiny.cc/gitref – Common sets of commands explained • My video series: tiny.cc/gitvideos – Watch most of this presentation again!
  23. Not covered (but useful to learn!) • Initializing a repo

    locally (git init), then later pushing it to GitHub • Deleting or moving a repo locally • Deleting a branch • Using .gitignore to ignore certain files • Rolling back or unstaging changes • Resolving merge conflicts • Fixing LF/CRLF issues