Upgrade to Pro — share decks privately, control downloads, hide ads and more …

Enterprise Web App. Development (3): Test Tool Training Ver. 3.1

Enterprise Web App. Development (3): Test Tool Training Ver. 3.1

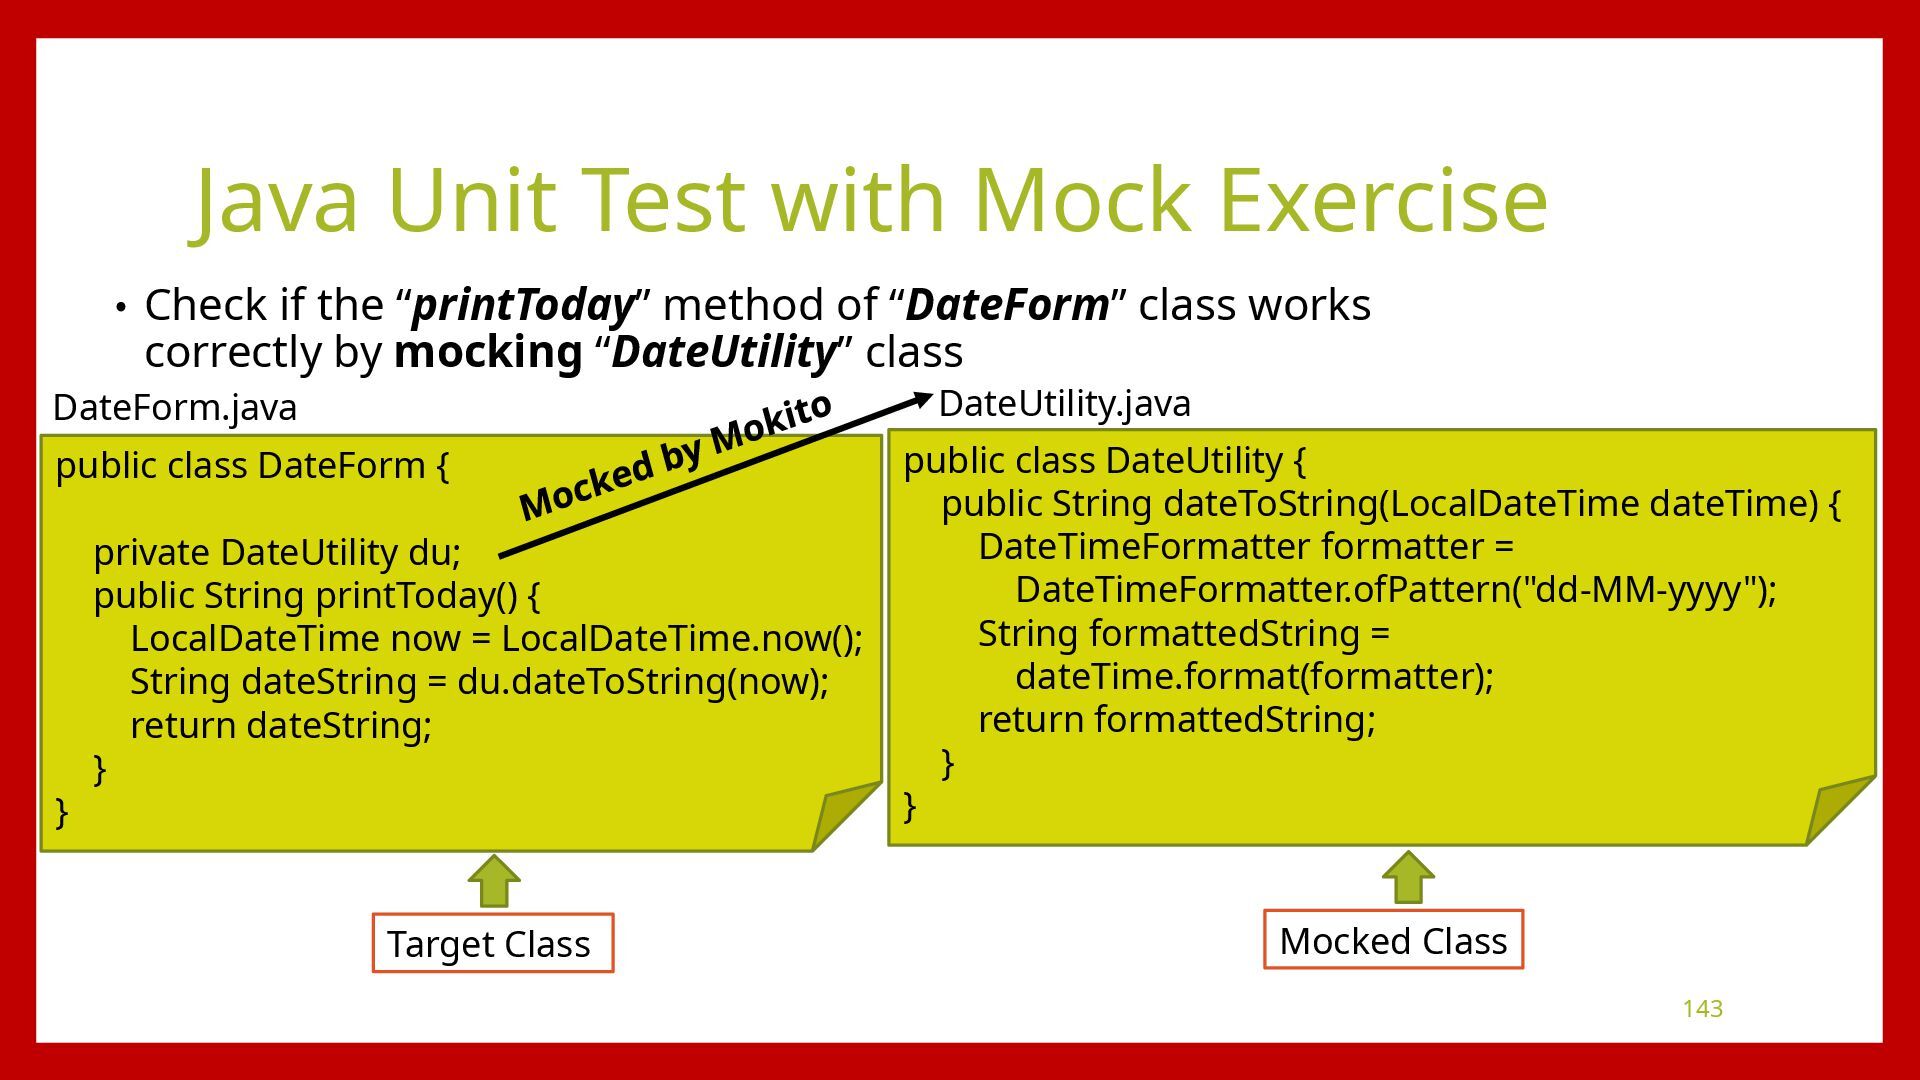
This is the third course of a series of the courses for Enterprise Web Application development based on several Open Source products. As open source development tools, we are going to take care of Apache Maven as a build tool, Git as a version control tool and JUnit5 as a test tool. After then, we are going into the Jakarta EE framework. Therefore this series requires the basic skills of Windows 10, Rocky Linux, Eclipse IDE, Java SE (Oracle JDK, Open JDK), Payara Server and PostgreSQL. Regarding the Payara Server, we can use another Web Application Server conforming to Jakarta EE specification. As for PostgreSQL, we might be able to use another RDBMS product instead. We can also make use of another Linux distribution instead of Rocky Linux.

Koichi NAKAGAWA

November 26, 2020
Tweet

More Decks by Koichi NAKAGAWA

Other Decks in Programming

Transcript

  1. TEST TOOL (VER. 3.1) A part of the Open Source

    Development Tools Using JUnit with JDT™ & M2Eclipse™ Eclipse™ Plug-ins 1 By Koichi NAKAGAWA Enterprise Web Application Development Course (3)
  2. Update Information • Ver. 3: Use Rocky Linux™ instead of

    CentOS™ as a Linux platform and Payara Server 6™ certified as Jakarta EE 9.1 Platform Compatible Products. • Ver. 2 : Use JDK 11 instead of JDK 8 in all exercises and Jakarta EE 9 instead of Jakarta EE 8 in the section of “Java Web System Test Exercise” where we develop a JSF based web application. 2
  3. EWA development course curriculum JSF with CDI JPA + JTA

    with CDI JAX-RS Application Architecture Design Patterns Eclipse IDE™ Version Control Tool with Git™ Build Tool with Apache Maven™ Payara Server™ Administration Windows 10™ + Linux (Rocky Linux™) Total EWA Development Exercise Jakarta Batch Java SE (Oracle JDK™/OpenJDK™) Required Skills to take courses Test Tool with JUnit5 PostgreSQL™ Administration 4 Object Oriented Development Methodology
  4. Open Source Development Tools • Build Tool (Apache Maven™ with

    Eclipse™ Plug-in) • Version Control Tool (Git™ with Eclipse™ Plug-in) • Test Tool (JUnit5 with Eclipse™ Plug-in) 5
  5. Trademarks Notice • Jakarta™ EE and their logo( ) are

    trademarks of the Eclipse Foundation. • Payara™ Server and their logo( ) are trademarks of Payara Services® LTD. • PrimeFaces™ is trademarks of Prime Tek Informatics. • Eclipse Java development tools™, Java development tools™, Eclipse JDT™, JDT™ are trademarks of the Eclipse Foundation. • Eclipse IDE for Enterprise Java Developers™, Eclipse IDE for Enterprise Java Developers™ logo( ) are trademarks of the Eclipse Foundation. • Eclipse m2eclipse™, m2eclipse™ are trademarks of the Eclipse Foundation. • Apache Maven™, Maven™ are trademarks of the Apache Software Foundation (ASF). • Java™ is trademark of Oracle Corporation. 6
  6. Assumption for this course • The trainees who take this

    course are required the following skills in advance • Oracle JDK/OpenJDK (Version: 11) • Eclipse IDE for Enterprise Java Developers (Version: 2021-09 (4.21.0)) • Payara Server (Version: 6.2021.1.Alpha1) – Basic Administration Operations • Build Tool Training Course 7
  7. Objectives this course • Learning the JUnit5 Test Tool, you

    will obtain the concepts of test tool and how to operate it through JDT™ Eclipse™ plug-in for JUnit and M2Eclipse™ Eclipse™ plug-in for Apache Maven. You also learn how to perform Java Unit Test, Java Unit Test with Mock, Java CDI Integration Test and Web Application System Test. 8
  8. JUnit Test Tool • Java Test Framework Basics • JUnit

    Concepts • JUnit + Apache Maven™ • Eclipse Java development tools™ Eclipse Plug-in 9
  9. Target Java Application Components CDI Component What’s Java Testing Framework?

    • Definition of Java Testing Framework Test Application Check Java SE (JDK) • Dependency Injection • Transaction with JTA • Directly Access from JSF, JSP • Several Scoped Contexts • Interceptor (AOP) • Support JavaSE (from CDI 2.0) CDI: A part of Jakarta EE Java Testing Framework Web Component Java Component 11
  10. Testing Types • Unit Test Java Component A Java Test

    Application Check Java Component A Java Test Application Check Java Component B Mock for Java Component B Create Call Simple Unit Test Unit Test with Mock JUnit5 JUnit5 + Mockito-Jupiter Extension Mockito Java SE (JDK) Java SE (JDK) 12
  11. Testing Types • Integration Test CDI Component A CDI Test

    Application Check CDI Component B Integration Test between CDI Components on Java SE JUnit5 + Weld SE + Weld JUnit 5 Extensions (for CDI Components) Java SE (JDK) 13
  12. Java SE (JDK) Payara Server (Jakarta EE Framework) Testing Types

    • System Test CDI Component A Web Test Application Check CDI Component B System Test for Total Java Application JUnit5 + Selenium + Selenium-Jupiter Extension (for Web Interface Components) Web Component C Java SE (JDK) 14
  13. What’s JUnit? • Definition of JUnit JUnit is a simple

    framework to write repeatable tests. It is an instance of the xUnit architecture for unit testing frameworks. (Source: JUnit. “About JUnit4”, https://junit.org/junit4/) JUnit 5 is the next generation of JUnit. The goal is to create an up-to-date foundation for developer-side testing on the JVM. This includes focusing on Java 8 and above, as well as enabling many different styles of testing. JUnit 5 is the result of JUnit Lambda and its crowdfunding campaign on Indiegogo. (Source: JUnit. “About JUnit5”, https://junit.org/junit5/) 16
  14. JUnit 5 • JUnit 5 = JUnit Platform + JUnit

    Jupiter + JUnit Vintage JUnit Platform Java SE (JDK) Launching testing framework foundation (Run TestEngine from IDE like Eclipse™ and Build Tool like Maven™) TestEngineAPI JUnit Jupiter (TestEngine for JUnit 5) JUnit Vintage (TestEngine for JUnit 3 & 4) JUnit 5 Test Application JUnit 3 & 4 Test Application Launch TestEngine Launch TestEngine 17
  15. JUnit Test Application: Test class and test • Test class

    and method public class XyzTest { : @Test public void funcTest1() { : assertXXXX(); } @Test public void funcTest2() { : } : } Test class : - Definition: Java Class including Test methods. - Naming Convention: xxxTest (Apache Maven™ automatically detect Test classes which have “Test” as its suffix to put it in its “test scope”.) Test method: - Definition: Java Method annotated with @Test inside Test class. - Validation: “assert” methods are used inside to validate the test results. - Naming Convention: meaningful names should be used to be understood easily. - Execution Order: Arbitrary order (Any test should not be dependent on each other.) Test Method Test Method Test class . . . Assertions: Judge whether this test method finished successfully or not. 18
  16. JUnit: Annotations for test • Useful Annotations for test (1)

    Annotation Meaning @Test Identifies a method as a test method. @Before (JUnit4) @BeforeEach (JUnit5) Executed before each test. It is used to prepare the test environment (e.g., read input data, initialize the class). @After (JUnit4) @AfterEach (JUnit5) Executed after each test. It is used to cleanup the test environment (e.g., delete temporary data, restore defaults). It can also save memory by cleaning up expensive memory structures. @BeforeClass (JUnit4) @BeforeAll (JUnit5) Executed once, before the start of all tests. It is used to perform time intensive activities, for example, to connect to a database. Methods marked with this annotation need to be defined as static to work with JUnit. @AfterClass (JUnit4) @AfterAll (JUnit5) Executed once, after all tests have been finished. It is used to perform clean-up activities, for example, to disconnect from a database. Methods annotated with this annotation need to be defined as static to work with JUnit. 19
  17. JUnit: Annotations for test • Useful Annotations for test (2)

    Annotation Meaning @Ignore(["Why disabled“]) (JUnit4) @Disabled([“Why disabled”]) (JUnit5) Marks that the test should be disabled. This is useful when the underlying code has been changed and the test case has not yet been adapted. With JUnit5, assumeTrue() or assumeFalse() asserts can be also used to disable the test, when a condition is false or true respectively. @Test (expected = Exception.class) (JUnit4) Fails if the method does not throw the named exception. With JUnit5, assertThrows() assert can be used for this purpose. @Test(timeout=100) (JUnit4) Fails if the method takes longer than a specified value in milliseconds. With JUnit5, assertTimeout() assert can be used for this purpose. @DisplayName(“message”) (JUnit5) Declare a custom display name for the annotated test class or test method. 20
  18. JUnit: Asserts for test • Useful Asserts for test (1)

    Assert Meaning fail([message]) Let the method fail. Might be used to check that a certain part of the code is not reached or to have a failing test before the test code is implemented. The message parameter is optional. assertTrue([message,] boolean condition) Checks that the boolean condition is true. assertFalse([message,] boolean condition) Checks that the boolean condition is false. assertEquals([message,] expected, actual) Tests that two values are the same. Note: for arrays the reference is checked, not the content of the arrays. assertEquals([message,] expected, actual, tolerance) Test that float or double values match. The tolerance is the number of decimals which must be the same. 21
  19. JUnit: Asserts for test • Useful Asserts for test (2)

    Assert Meaning assertNull([message,] object) Checks that the object is null. assertNotNull([message,] object) Checks that the object is not null. assertSame([message,] expected, actual) Checks that both variables refer to the same object. assertNotSame([messag e,] expected, actual) Checks that both variables refer to different objects. 22
  20. Java Unit Test • Check if a target class works

    correctly import static org.junit.jupiter.api.Assertions.assertXXX; import org.junit.jupiter.api.Test; public class XXXTest { @Test public void yyy() { : : assertXXX(); } } XXXTest.java Check if Component A worked correctly with assertions. In case of JUnit5Test Application Test Class Test Method Java Component A Java Test Application JUnit Java SE (JDK) Test Code for Component A 23
  21. Exercise for Java Unit Test • Let’s make a JUnit

    Test program for Java Unit Test Check if the “evaluate” method of “Calculate” class works correctly public class Calculator { public int evaluate(String expression) { int sum = 0; for (String summand: expression.split("\\+")) sum += Integer.valueOf(summand); return sum; } } Calculator.java Target Test Class 24 Exercise: Let’s write a Java Test Application for the above Target Class.
  22. Exercise for Java Unit Test • Sample JUnit Test program

    for Java Unit Test import static org.junit.jupiter.api.Assertions.assertEquals; import org.junit.jupiter.api.Test; public class CalculatorTest { @Test public void evaluatesExpression() { Calculator calculator = new Calculator(); int sum = calculator.evaluate("1+2+3"); assertEquals(6, sum); } } CalculatorTest.java Check if the sum of “1+2+3” is “6”. 25
  23. Java Unit Test with Mock • Check if a target

    class works correctly using Mock technology @ExtendWith(MockitoExtension.class) public class XXXTest { @Mock ComponentB compB; @InjectMocks ComponentA compA; @Test public void funcTest1() { when(compB.func1()).thenReturn(new ComponentB()); compA.funcA(); : } } XXXTest.java Java Component A Java Test Application Check Java Component B Mock for Java Component B Create Call JUnit + Mockito-Jupiter Extension Mockito Java SE (JDK) Mocked Component Component Injecting Mocked Component Specify when a method of Mocked Component is called and what is returned. Extend with Mockito Extension When ComponentB#func1() is called inside ComponentA#funcA(), an instance of ComponentB is returned. 26
  24. Exercise for Java Unit Test with Mock • Let’s make

    a JUnit Test program for Java Unit Test using Mock Check if the “add” method of “Score” class works correctly by mocking “Calculator” class public class Calculator { public int evaluate(String expression) { int sum = 0; for (String summand: expression.split("\\+")) sum += Integer.valueOf(summand); return sum; } } Calculator.java public class Score { private Calculator calc; public int add(String expA, String expB) { int sum = calc.evaluate(expA) + calc.evaluate(expB); return sum; } } Score.java Target Test Class 27 Exercise: Let’s write a Java Test Application for the above Target Test Class.
  25. Exercise for Java Unit Test with Mock • Sample JUnit

    Test program for Java Unit Test with Mock @ExtendWith(MockitoExtension.class) public class ScoreTest { @Mock Calculator calc; @InjectMocks Score score; @Test public void testAdd() { when(calc.evaluate(anyString())).thenReturn(5); int sum = score.add(“1+4”, “1+2+2”); assertEquals(10, sum); } : } ScoreTest.java 28
  26. Java CDI Integration Test • Check if a target CDI

    class works correctly communicating with other CDI classes @EnableWeld public class XXXTest { @WeldSetup public WeldInitiator weld = WeldInitiator.from(ComponentA.class, ComponentB.class) .activate(RequestScoped.class, ApplicationScoped.class).build(); @Inject ComponentA compA ; @Test public void funcTest1() { : assertXXX(…); } } XXXTest.java Enable Weld SE with Weld JUnit 5 Extension Initialize Weld SE with CDI components Inject the target CDI component Test the target CDI component CDI Component A <RequestScoped> CDI Test Application Check CDI Component B <ApplicationScoped> JUnit + Weld SE + Weld JUnit 5 Extension (for CDI Components) Java SE (JDK) 29
  27. Exercise for Java CDI Integration Test • Let’s make a

    Junit Test program for Java CDI Integration Test  Check if the “add()” method of “Score” class works correctly along with “Calculator” class @RequestScoped public class Calculator { public int evaluate(String expression) { int sum = 0; for (String summand: expression.split("\\+")) sum += Integer.valueOf(summand); return sum; } } Calculator.java @RequestScoped public class Score { @Inject private Calculator calc; public int add(String expA, String expB) { int sum = calc.evaluate(expA) + calc.evaluate(expB); return sum; } } Score.java Target Test Class 30 Exercise: Let’s write a Java Test Application for the above Target Test Class.
  28. Exercise for Java CDI Integration Test • Sample JUnit Test

    program for Java CDI Integration Test @EnableWeld public class ScoreTest { @WeldSetup public WeldInitiator weld = WeldInitiator.from (Score.class, Calculator.class) .activate(RequestScoped.class, RequestScoped.class).build(); @Inject Score score; @Test public void testAdd() { int sum = score.add(“1+2+3”, “3+6”); assertEquals(15, sum); } } ScoreTest.java 31
  29. Java Web System Test • Check if a target Web

    Component works correctly communicating with other CDI classes @ExtendWith(SeleniumExtension.class) public class XXXIT { @Test public void testChrome(ChromeDriver driver) { driver.get(“<Application URL ex. http://localhost:8080/app/>"); WebElement element = driver.findElement(By.id(“<HTML Id for input>")); element.sendKeys(“Input Data"); element = driver.findElement(By.id(“<HTML Id for submit>")); element.click(); assertThat(driver.getTitle(), startsWith(“<HTML Title>")); } } XXXIT.java Enable Selenium-Jupiter JUnit5 Extension Inject Chrome Driver Search for a web element Click a button Java SE (JDK) Payara Server (Jakarta EE Framework) CDI Component A Web Test Application Check CDI Component B JUnit + Selenium + Selenium-Jupiter Extension (for Web Interface Components) Web Component C Java SE (JDK) Enter some data in the web element 32
  30. Exercise for Java Web System Test • Let’s make a

    JUnit Test program for Java Web System Test Check if the “Calculate” button of a JSF menu works correctly @RequestScoped public class Calculator { public int evaluate(String expression) { int sum = 0; for (String summand: expression.split("\\+")) sum += Integer.valueOf(summand); return sum; } } Calculator.java @ReuqestScoped @Named public class Score { @Inject private Calculator calc; private String expA, expB, expSum; public void add() { int sum = calc.evaluate(expA) + calc.evaluate(expB); expSum = new Integer(sum).toString(); } } Score.java CDI Bean for JSF A: (Id: expA) B: (Id: expB) = (Id: expSum) + Calculate Accessors are required Web menu using JSF (URL: http://localhost:8080/app/) (Id: calculate) Bind Target Web Menu 33 Exercise: Let’s write a Java Test Application for the above Target Web Component.
  31. Exercise for Java Web System Test • Sample JUnit Test

    program for Java Web System Test @ ExtendWith(SeleniumJupiter.class) public class ScoreIT { @Test public void testAdd(ChromeDriver driver) throws InterruptedException{ driver.get(“http://localhost:8080/app/"); WebElement element = driver.findElement(By.id(“expA")); element.sendKeys(“1+2+3"); element = driver.findElement(By.id(“expB")); element.sendKeys(“5+7+9"); element = driver.findElement(By.id(“calculate")); element.click(); Thread.sleep(5000); element = driver.findElement(By.id(“expSum")); assertEquals(“27”, element.getText()); } } ScoreIT.java 34 ChromeDriver is automatically downloaded over internet and stored into the Maven local repository at its “integration-test” phase.
  32. Apache Maven™ Build Life Cycle • Test Phase of Apache

    Maven™ Build Life Cycle Compile Test Package Integration Test Install Deploy • Java Unit Test • Java Unit Test with Mock • CDI Integration Test maven-surefire-plugin 36
  33. Unit Test with JUnit + Apache Maven™ • Location of

    Test Programs using Apache Maven™ Project src main test target pom.xml Package Folders xxxTest.java “maven-surefire-plugin” fetches these classes as test class. 37
  34. Java Unit Test • pom.xml for JUnit Test Application (1)

    ... <build> <plugins> <plugin> <artifactId>maven-surefire-plugin</artifactId> <version>2.22.2</version> </plugin> </plugins> </build> ... From 2.22.0, maven-surefire-plugin supports JUnit Platform (JUnit5) natively. 38
  35. Java Unit Test • pom.xml for JUnit Test Application (2)

    <dependencies> ... <dependency> <groupId>junit</groupId> <artifactId>junit</artifactId> <version>4.13.2</version> <scope>test</scope> </dependency> <dependency> <groupId>org.junit.vintage</groupId> <artifactId>junit-vintage-engine</artifactId> <version>5.8.2</version> <scope>test</scope> </dependency> ... </dependencies> <dependencies> ... <dependency> <groupId>org.junit.jupiter</groupId> <artifactId>junit-jupiter-api</artifactId> <version>5.8.2</version> <scope>test</scope> </dependency> <dependency> <groupId>org.junit.jupiter</groupId> <artifactId>junit-jupiter-engine</artifactId> <version>5.8.2</version> <scope>test</scope> </dependency> ... (continued…) For JUnit4 Application For JUnit5 Application 39
  36. Java Unit Test • pom.xml for JUnit Test Application (3)

    ... <dependency> <groupId>org.hamcrest</groupId> <artifactId>hamcrest</artifactId> <version>2.2</version> <scope>test</scope> </dependency> ... </dependencies> For JUnit5 Application Including useful Assertions which are bundled in JUnit4 APIs 40
  37. Java Unit Test with Mock • pom.xml for JUnit Test

    Application with Mockito <dependencies> ... <dependency> <groupId>org.mockito</groupId> <artifactId>mockito-core</artifactId> <version>4.1.0</version> <scope>test</scope> </dependency> <dependency> <groupId>org.mockito</groupId> <artifactId>mockito-junit-jupiter</artifactId> <version>4.1.0</version> <scope>test</scope> </dependency> ... </dependencies> Including Mockito Core functionalities Including Mockito Extension for JUnit5 For JUnit5 Application 41
  38. Java CDI Integration Test • pom.xml for CDI Integration Test

    Application with Weld JUnit5 Extension <dependencies> ... <dependency> <groupId>org.jboss.weld</groupId> <artifactId>weld-junit5</artifactId> <version>3.0.0.Final</version> <scope>test</scope> </dependency> <dependency> <groupId>org.jboss.weld.se</groupId> <artifactId>weld-se-core</artifactId> <version>4.0.2.Final</version> </dependency> ... </dependencies> Including Weld-JUnit5 functionalities For JUnit5 Application 42
  39. Apache Maven™ Build Life Cycle • Integration Test Phase of

    Apache Maven™ Build Life Cycle Compile Test Package Integration Test Install Deploy • Web System Test with Selenium-Jupiter maven-failsafe-plugin 43
  40. System Test with JUnit + Apache Maven™ • Location of

    Integration Test Programs using Apache Maven™ Project src main test target pom.xml Package Directories xxxIT.java “maven-failsafe-plugin” fetches these classes as integration test class. 44
  41. Web System Test • pom.xml for Web System Test Application

    with Selenium-Jupiter JUnit5 Extension (1) <dependencies> ... <dependency> <groupId>io.github.bonigarcia</groupId> <artifactId>selenium-jupiter</artifactId> <version>4.0.1</version> <scope>test</scope> </dependency> <dependency> <groupId>org.seleniumhq.selenium</groupId> <artifactId>selenium-devtools-v96</artifactId> <version>4.1.0</version> <scope>test</scope> </dependency> ... Including Selenium-Jupiter functionalities 45 ... <dependency> <groupId>org.seleniumhq.selenium</groupId> <artifactId>selenium-chrome-driver</artifactId> <version>4.1.0</version> <scope>test</scope> </dependency> <dependency> <groupId>org.seleniumhq.selenium</groupId> <artifactId>selenium-firefox-driver</artifactId> <version>4.1.0</version> <scope>test</scope> </dependency> </dependencies> ... Including one of the Selenium WebDriver (This dependency shows “FireFoxDriver”) Including one of the Selenium WebDriver (This dependency shows “ChromeDriver”) For the specific version of WebDriver (Option)
  42. Web System Test • pom.xml for Web System Test Application

    with Selenium-Jupiter JUnit5 Extension (2) <build> <plugins> : <plugin> <groupId>org.apache.maven.plugins</groupId> <artifactId>maven-failsafe-plugin</artifactId> <version>2.22.2</version> <executions> <execution> <id>perform-it</id> <goals> <goal>integration-test</goal> </goals> </execution> </executions> </plugin> : </plugins> </build> Take care of tests in “Integration Test” phase of Maven life-cycle 46
  43. Eclipse Java development tools™ (JDT™) • JDT™ Eclipse Plug-in JDT™

    includes JUnit Plug-in for Eclipse and is bundled into Eclipse IDE for Enterprise Java Developers™ 48
  44. How to execute Tests with Eclipse™ • Execute JUnit directly

    from Eclipse  Right click on the project in Package Explorer and select “Run As”  “2 JUnit Test”. 49
  45. How to execute Tests with Eclipse™ • Execute JUnit through

    M2Eclipse™ (Eclipse™ plugin for Apache Maven™) Right click on the project in Package Explorer and select “Run As” “4 Maven build …”. Build Name Goal Name Profile Name Ex. clean package, integration-test Ex. payara5x-local, payara5x-remote 50
  46. Exercise to prepare for Java Test Environment • Create a

    new Eclipse™ workspace and configure “Installed JREs” for the workspace 51 Eclipse™ Workspace C:\Users\<User Id>\eclipse-workspace\ws3 Configure “Installed JREs” Exercise: Let’s create a new Eclipse™ workspace and configure “Installed JREs” for the workspace with the above information.
  47. Exercise to prepare for Java Test Environment • Create a

    new Eclipse™ Workspace named “ws3”.  Click “File”  “Switch Workspace”  “Other…”  Fill in the new workspace folder path of “ws3” and click “Launch” button on “Select a directory as workspace” pane screen. C:\Users\<User Id>\eclipse-workspace\ws3 52
  48. • (Option) Configure Installed JRE (1) [If JDK11 has not

    been selected yet] 1. Select “Window  Preferences” and navigate to “Preferences” dialog screen. 2. Select “Java  Installed JREs” and click “Add …” button. 53 Exercise to prepare for Java Test Environment
  49. • (Option) Configure Installed JRE (2) [If JDK11 has not

    been selected yet] 3. Select “Standard VM” and click “Next >” button and “Add JRE” dialog menu comes up. 4. Click “Directory …” button and select an installed JDK home directory and click “Finish” button. 54 Exercise to prepare for Java Test Environment
  50. • (Option) Configure Installed JRE (3) [If JDK11 has not

    been selected yet] 5. Select the added JDK entry from a list of “Installed JREs” and click “Apply and Close” button. 55 Exercise to prepare for Java Test Environment
  51. Exercise for Java Unit Test • Check if the “evaluate()”

    method of “Calculator” class works correctly. public class Calculator { public int evaluate(String expression) { int sum = 0; for (String summand: expression.split("\\+")) sum += Integer.valueOf(summand); return sum; } } Calculator.java Target Class 56 Exercise: Let’s make a Java Unit Test Application to test the “evaluate()” method of the “Calculator” class with the above information.
  52. Exercise for Java Unit Test • Procedure of the Exercise

    Make a Project and edit pom.xml Make the Calculator Java Class Make a JUnit Test Class for the Calculator Execute JUnit from Eclipse Execute JUnit from Maven 57
  53. Exercise for Java Unit Test • Procedure of the Exercise

    Make a Project and edit pom.xml Make the Calculator Java Class Make a JUnit Test Class for the Calculator Execute JUnit from Eclipse Execute JUnit from Maven 58
  54. Exercise for Java Unit Test • Create a new Eclipse™

    Project named “test1” (1)  Click “Create a Maven project” in Project Explorer. And then “New Maven Project” dialog screen comes up. 59
  55. Exercise for Java Unit Test • Create a new Eclipse™

    Project named “test1” (2)  Confirm “Use default Workspace location” is selected and click “Next >” button on “Select project name and location” pane screen.  Enter “maven-archetype-simple” in “Filter” field and select an archetype of “org.apache.maven.archetypes maven-archetype-simple 1.4” and then click “Next >” button on “Select an Archetype” pane screen. 60
  56. Exercise for Java Unit Test • Create a new Eclipse™

    Project named “test1” (3)  On “Specify Archetype parameters” pane screen, enter “org.example” in “Group Id” field and “test1” in “Artifact Id” field and “0.0.1” in “Version” field and click “Finish” button. 61
  57. Exercise for Java Unit Test • Modify the created Maven

    Object Model file (pom.xml)  Change the compiler version to “11”.  Change the version of “maven-surefire-plugin” to “2.22.2” and delete other plug-ins. <build> <pluginManagement> <plugins> <plugin> <artifactId>maven-surefire-plugin</artifactId> <version>2.22.2</version> </plugin> </plugins> </pluginManagement> </build> <properties> <project.build.sourceEncoding>UTF-8</project.build.sourceEncoding> <maven.compiler. source>11</maven.compiler. source> <maven.compiler. target>11</maven.compiler. target> </properties> 62 <properties> <project.build.sourceEncoding>UTF-8</project.build.sourceEncoding> <maven.compiler. source>1.7</maven.compiler. source> <maven.compiler. target>1.7</maven.compiler. target> </properties>
  58. Exercise for Java Unit Test • Modify the created Maven

    Object Model file (pom.xml) Add “junit-jupiter-api”, “junit-jupiter-engine” and “hamcrest” as dependency and delete “junit” dependency. <dependency> <groupId>org.hamcrest</groupId> <artifactId>hamcrest</artifactId> <version>2.2</version> <scope>test</scope> </dependency> </dependencies> 63 <dependencies> <dependency> <groupId>org.junit.jupiter</groupId> <artifactId>junit-jupiter-api</artifactId> <version>5.8.2</version> <scope>test</scope> </dependency> <dependency> <groupId>org.junit.jupiter</groupId> <artifactId>junit-jupiter-engine</artifactId> <version>5.8.2</version> <scope>test</scope> </dependency>
  59. Java Unit Test Exercise • Procedure of the Exercise Make

    a Project and edit pom.xml Make the Calculator Java Class Make a JUnit Test Class for the Calculator Execute JUnit from Eclipse Execute JUnit from Maven 64
  60. Java Unit Test Exercise • Created a Java source file

    named “Calculator.java”  Right click on the package of “org.example.test1” under “src/main/java” folder and select “New”  “Class”.  Fill “Calculator” in “Name” field and click “Finish” button on “New Java Class” dialog screen. 65
  61. Java Unit Test Exercise • Modify the created Java source

    file (Calculator.java)  In the “Calculator” class, add a method of “evaluate(String expression)”. package org.example.test1; public class Calculator { public int evaluate(String expression) { int sum = 0; for (String summand: expression.split("\\+")) sum += Integer.valueOf(summand); return sum; } } 66
  62. Java Unit Test Exercise • Procedure of the Exercise Make

    a Project and edit pom.xml Make the Calculator Java Class Make a JUnit Test Class for the Calculator Execute JUnit from Eclipse Execute JUnit from Maven 67
  63. Java Unit Test Exercise • Create a Test Class file

    for the created Java source file named “CalculateTest.java”  Right click on “org.example.test1” package under “src/test/java” folder and select “New”  “Other…”.  Select “Java”  “JUnit”  “JUnit Test Case” and click “Next >” button on “Select a wizard” pane screen. 68
  64. Java Unit Test Exercise • Create a Test Class file

    for the created Java source file named “CalculateTest.java” Check if “New JUnit Jupiter test” is selected on “JUnit Test Case” pane screen. Enter “CalculateTest” in “Name” field and click “Finish” button.  Delete “AppTest.ava” of “org.example.test1” package under “src/test/java” folder. 69
  65. Java Unit Test Exercise • Modify the created Java Test

    source file (CalculatorTest.java)  In the “CalculatorTest” class, add a method of “evaluateExpression()” with “@Test” annotation. package org.example.test1; import static org.junit.jupiter.api.Assertions.*; import org.junit.jupiter.api.Test; class CalculateTest { @Test public void evaluatesExpression() { Calculator calculator = new Calculator(); int sum = calculator.evaluate("1+2+3"); assertEquals(6, sum); } } 70
  66. Java Unit Test Exercise • Update Apache Maven™ Project to

    remove a warning icon on the project. Confirm that there is a warning icon for “test1” project in Project Explorer. Right click on “test1” project and select “Maven”  “Update Project …”.  Select “test1” from Maven Codebases and click “OK” button on “Update Maven Project” pane screen. 71 Warning Icon Warning Icon is disappeared.
  67. Java Unit Test Exercise • Procedure of the Exercise Make

    a Project and edit pom.xml Make the Calculator Java Class Make a JUnit Test Class for the Calculator Execute JUnit from Eclipse Execute JUnit from Maven 72
  68. Java Unit Test Exercise • Execute JUnit directly for the

    created Java Test source file  Right click on “test1” project and select “Run As”  “JUnit Test”.  Confirm that JUnit finished successfully showing “Green” flag in “JUnit” pane screen. 73
  69. Java Unit Test Exercise • If we got an error

    like the above Error Dialog, change the configuration of JUnit Test  Right click on the project and select “Run As”  “Run Configurations…”  Select “JUnit  test1” and change “Test runner” to “JUnit 5” and click “Run” button. 74 Error Dialog
  70. Java Unit Test Exercise • Procedure of the Exercise Make

    a Project and edit pom.xml Make the Calculator Java Class Make a JUnit Test Class for the Calculator Execute JUnit from Eclipse Execute JUnit from Maven 75
  71. Java Unit Test Exercise • Execute JUnit through M2Eclipse™ for

    the created Java Test source file  Right click on “test1” project and select “Run As”  “Maven build”  Put “test1 – package” in “Name” field and “clean package” in “Goals” field and click “Run” button.  Confirm that test completes successfully in “Console” pane screen. 76
  72. Java Unit Test with Mock Exercise • Check if the

    “add” method of “Score” class works correctly by mocking “Calculator” class. public class Calculator { public int evaluate(String expression) { int sum = 0; for (String summand: expression.split("\\+")) sum += Integer.valueOf(summand); return sum; } } Calculator.java public class Score { private Calculator calc; public int add(String expA, String expB) { int sum = calc.evaluate(expA) + calc.evaluate(expB); return sum; } } Score.java Target Class Mocked Class 77 Exercise: Let’s make a Java Unit Test Application to test the “add()” method of the “Score” class by mocking the “Calculator” class with the above information.
  73. Java Unit Test with Mock Exercise • Procedure of the

    Exercise Edit pom.xml Make the Score Java Class Make a JUnit Test Class for the Score Execute JUnit from Eclipse Execute JUnit from Maven 78
  74. Java Unit Test with Mock Exercise • Modify the Maven

    Object Model file (pom.xml) For “test1” project, add “mockito-core”and “mockito-junit-jupiter” as dependency. <dependencies> : <dependency> <groupId>org.mockito</groupId> <artifactId>mockito-core</artifactId> <version>4.1.0</version> <scope>test</scope> </dependency> <dependency> <groupId>org.mockito</groupId> <artifactId>mockito-junit-jupiter</artifactId> <version>4.1.0</version> <scope>test</scope> </dependency> : </dependencies> 79
  75. Java Unit Test with Mock Exercise • Procedure of the

    Exercise Edit pom.xml Make the Score Java Class Make a JUnit Test Class for the Score Execute JUnit from Eclipse Execute JUnit from Maven 80
  76. Java Unit Test with Mock Exercise • Created a Java

    source file named “Score.java”  Right click on “org.example.test1” package under “src/main/java” folder and select “New”  “Class”. And “New Java Class” dialog screen comes up.  Fill “Score” in “Name” field and click “Finish” button on “Java Class” pane screen. 81
  77. Java Unit Test with Mock Exercise • Modify the created

    Java source file (Score.java)  In the “Score” class, add a property of “Calculator” class’s instance named “calc” and a method of “add(String expA, String expB)” which includes the following logic. package org.example.test1; public class Score { private Calculator calc; public int add(String expA, String expB) { int sum = calc.evaluate(expA) + calc.evaluate(expB); return sum; } } 82
  78. Java Unit Test with Mock Exercise • Procedure of the

    Exercise Edit pom.xml Make the Score Java Class Make a JUnit Test Class for the Score Execute JUnit from Eclipse Execute JUnit from Maven 83
  79. Java Unit Test with Mock Exercise • Create a Test

    Class file for the created Java source file named “ScoreTest.java”  Right click on the package of “org.example.test1” under “src/test/java” folder and select “New”  “Other…”. And “New” dialog screen comes up.  Select “Java”  “JUnit”  “JUnit Test Case” and click “Next >” button on “Select a wizard” pane screen. 84
  80. Java Unit Test with Mock Exercise • Create a Test

    Class file for the created Java source file named “ScoreTest.java”  Fill “ScoreTest” in the Test Class’s “Name” field and click “Finish” button on “Junit Test Case” pane screen. 85
  81. Java Unit Test with Mock Exercise • Modify the created

    Java Test source file (ScoreTest.java) For the “ScoreTest” class, add “@ExtendWith(MockitoExtension.class)” annotation. In the “ScoreTest” class, add a Mock property of “Calculator” with “@Mock” and a property injecting Mocks of “Score” with “InjectMocks” annotation and a method of “testAdd()” with “@Test” annotation. In the method, add a mocking condition using “when”. package org.example.test1; import static org.junit.jupiter.api.Assertions.*; import org.junit.jupiter.api.Test; import org.junit.jupiter.api.extension.ExtendWith; import org.mockito.Mock; import org.mockito.InjectMocks; import org.mockito.junit.jupiter.MockitoExtension; import static org.mockito.Mockito.when; import static org.mockito.ArgumentMatchers.anyString; @ExtendWith(MockitoExtension.class) class ScoreTest { @Mock Calculator calc; @InjectMocks Score score; @Test public void testAdd() { when(calc.evaluate(anyString())).thenReturn(5); int sum = score.add("1+4", "1+2+2"); assertEquals(10, sum); } } 86
  82. Java Unit Test with Mock Exercise • Procedure of the

    Exercise Edit pom.xml Make the Score Java Class Make a JUnit Test Class for the Score Execute JUnit from Eclipse Execute JUnit from Maven 87
  83. Java Unit Test with Mock Exercise • Execute JUnit directly

    for the created Java Test source file  Right click on “test1” project and select “Run As”  “JUnit Test”  Confirm that JUnit finished successfully showing “Green” flag. 88
  84. Java Unit Test with Mock Exercise • Procedure of the

    Exercise Edit pom.xml Make the Score Java Class Make a JUnit Test Class for the Score Execute JUnit from Eclipse Execute JUnit from Maven 89
  85. Java Unit Test with Mock Exercise • Execute JUnit through

    M2Eclipse™ for the created Java Test source file  Right click on “test1” project and select “Run As”  “Maven build”. Confirm that test completes successfully in “Console” pane screen. 90
  86. Java CDI Integration Test Exercise • Check if the “add”

    method of “Score” CDI class works correctly along with “Calculator” CDI class @RequestScoped public class Calculator { public int evaluate(String expression) { int sum = 0; for (String summand: expression.split("\\+")) sum += Integer.valueOf(summand); return sum; } } Calculator.java @RequestScoped public class Score { @Inject private Calculator calc; public int add(String expA, String expB) { int sum = calc.evaluate(expA) + calc.evaluate(expB); return sum; } } Score.java Target Class Injected Class 91 Exercise: Let’s make a Java CDI Integration Test Application to test the “add()” method of the “Score” CDI class injecting the “Calculator” CDI class with the above information.
  87. Java CDI Integration Test Exercise • Procedure of the Exercise

    Edit pom.xml Edit the Score and Calculator Java Class Make a JUnit Test Class for the Score Execute JUnit from Eclipse Execute JUnit from Maven 92
  88. Java CDI Integration Test Exercise • Modify the Maven Object

    Model file (pom.xml) Add “weld-junit5” and “weld-se-core” as dependency in pom.xml of project “test1”. <dependencies> : <dependency> <groupId>org.jboss.weld</groupId> <artifactId>weld-junit5</artifactId> <version>3.0.0.Final</version> <scope>test</scope> </dependency> <dependency> <groupId>org.jboss.weld.se</groupId> <artifactId>weld-se-core</artifactId> <version>4.0.2.Final</version> </dependency> : </dependencies> 93
  89. Java CDI Integration Test Exercise • Procedure of the Exercise

    Edit pom.xml Edit the Score and Calculator Java Class Make a JUnit Test Class for the Score Execute JUnit from Eclipse Execute JUnit from Maven 94
  90. Java CDI Integration Test Exercise • Modify the Java source

    file (Score.java)  In the “Score” class, add an annotation of “@RequestScoped” to its Class definition and add an annotation of “@Inject” for the “Calculator” property for DI. package org.example.test1; import jakarta.inject.Inject; import jakarta.enterprise.context.RequestScoped; @RequestScoped public class Score { @Inject private Calculator calc; public int add(String expA, String expB) { int sum = calc.evaluate(expA) + calc.evaluate(expB); return sum; } } 95
  91. Java CDI Integration Test Exercise • Modify the Java source

    file (Calculator.java)  In the “Calculator” class, add an annotation of “@RequestScoped” to its Class definition. package org.example.test1; import jakarta.enterprise.context.RequestScoped; @RequestScoped public class Calculator { public int evaluate(String expression) { int sum = 0; for (String summand: expression.split("\\+")) sum += Integer.valueOf(summand); return sum; } } 96
  92. Java CDI Integration Test Exercise • Procedure of the Exercise

    Edit pom.xml Edit the Score and Calculator Java Class Make a JUnit Test Class for the Score Execute JUnit from Eclipse Execute JUnit from Maven 97
  93. Java CDI Integration Test Exercise • Create a Test Class

    file for the created Java source file named “ScoreCDITest.java”  Right click on the package of “org.example.test1” under “src/test/java” folder and select “New”  “Other…”.  Select “Java”  “JUnit”  “JUnit Test Case” and click “Next >” button 98
  94. Java CDI Integration Test Exercise • Create a Test Class

    file for the created Java source file named “ScoreCDITest.java”  Fill “ScoreCDITest” in the Test Class “Name” field and click “Finish” button. 99
  95. Java CDI Integration Test Exercise • Modify the Java Test

    source file (ScoreCDITest.java) Just before the “ScoreCDITest” class definition, add “@EnableWeld”annotation. In the “ScoreCDITest” class, setup Weld with “@WeldSetup” for “Score” and “Caluculator” CDIs and add a property injecting “Score” CDI with “@Inject” annotation and a method of “testAdd()” with “@Test” annotation. package org.example.test1; import jakarta.inject.Inject; import jakarta.enterprise.context.RequestScoped; import static org.junit.jupiter.api.Assertions.*; import org.junit.jupiter.api.Test; import org.jboss.weld.junit5.EnableWeld; import org.jboss.weld.junit5.WeldSetup; import org.jboss.weld.junit5.WeldInitiator; @EnableWeld class ScoreCDITest { @WeldSetup public WeldInitiator weld = WeldInitiator.from(Score.class, Calculator.class).activate(RequestScoped.class, RequestScoped.class).build(); @Inject Score score; @Test public void testAdd() { int sum = score.add("1+4", "1+2+2"); assertEquals(10, sum); } } 100
  96. Java CDI Integration Test Exercise • Procedure of the Exercise

    Edit pom.xml Edit the Score and Calculator Java Class Make a JUnit Test Class for the Score Execute JUnit from Eclipse Execute JUnit from Maven 101
  97. Java CDI Integration Test Exercise • Execute JUnit directly for

    the created Java Test source file  Right click on “test1” project and select “Run As”  “2 JUnit Test”  Confirm that JUnit finished successfully showing “Green” flag. 102
  98. Java CDI Integration Test Exercise • Procedure of the Exercise

    Edit pom.xml Edit the Score and Calculator Java Class Make a JUnit Test Class for the Score Execute JUnit from Eclipse Execute JUnit from Maven 103
  99. Java CDI Integration Test Exercise • Execute JUnit through M2Eclipse™

    for the created Java Test source file  Right click on “test1” project and select “Run As”  “Maven build”.  Confirm that test completes successfully in “Console” pane screen. 104
  100. Java Web System Test Exercise • Check if a JSF

    menu works correctly binding the Score CDI component. @RequestScoped public class Calculator { public int evaluate(String expression) { int sum = 0; for (String summand: expression.split("\\+")) sum += Integer.valueOf(summand); return sum; } } Calculator.java @ReuqestScoped @Named public class Score { @Inject private Calculator calc; private String expA, expB, expSum; public void add() { int sum = calc.evaluate(expA) + calc.evaluate(expB); expSum = new Integer(sum).toString(); } } Score.java CDI Bean for JSF A: (Id: expA) B: (Id: expB) = (Id: expSum) + Calculate Accessors are required Web menu using JSF (Id: calculate) Bind Target Web Menu 105 Exercise: Let’s make a Java Web System Test Application to test a Web menu built with JSF Facelet which binds the “Score” CDI component.
  101. Java Web System Test Exercise • Procedure of the Exercise

    Make a Project and edit pom.xml Copy Score and Calculator Java Class and edit Score Make a web interface and JUnit Test Class for it Execute JUnit from Maven 106
  102. Java Unit Test Exercise • Create a new Eclipse™ Project

    named “test2” (1)  Right click in Project Explorer and navigate to “New Project” dialog screen by selecting “New”  “Project…”.  Select “Maven”  “Maven Project” and click “Next >” button on “Select a wizard” pane screen. 107
  103. Java Unit Test Exercise • Create a new Eclipse™ Project

    named “test2” (2)  Confirm “Use default Workspace location” is selected and click “Next >” button on “Select project name and location” pane screen.  From “Select an Archetype” pane screen, enter “myfaces-archetype-codi-jsf20” in Filter field and select “org.apache.myfaces.buildtools myfaces-archetype-codi-jsf20 1.0.4” and click “Next >” button on “Select an Archetype” pane screen. 108
  104. Java Unit Test Exercise • Create a new Eclipse™ Project

    named “test2” (3)  On “Specify Achetype parameters” pane screen, enter “org.example” in “Group Id” field and “test2” in “Artifact Id” field and “0.0.1” in “Version” field and click “Finish” button. 109
  105. Java Web System Test Exercise • Modify the Maven Object

    Model file (pom.xml) (1)  Replace all parameters to access Payara Server™ which accommodates the target war file. <properties> <project.build.sourceEncoding>UTF-8</project.build.sourceEncoding> <maven.compiler.source>11</maven.compiler.source> <maven.compiler.target>11</maven.compiler.target> <servlet.port>8080</servlet.port> <payara.adminPort>4848</payara.adminPort> <payara.username>admin</payara.username> <payara.password>xxxxxxxx</payara.password> <payara.hostname>localhost</payara.hostname> <payara.domainName>domain1</payara.domainName> <payara.home>C:\payara6</payara.home> <payara.domainDir>${payara.home}/glassfish/domains</payara.domainDir> </properties> 110
  106. Java Web System Test Exercise • Modify the Maven Object

    Model file (pom.xml) (2)  Replace the build element to execute system test during “integration-test” phase. <build> <defaultGoal>package</defaultGoal> <finalName>${project.artifactId}</finalName> <plugins> <plugin> <artifactId>maven-surefire-plugin</artifactId> <version>2.22.2</version> </plugin> <plugin> <groupId>org.apache.maven.plugins</groupId> <artifactId>maven-failsafe-plugin</artifactId> <version>2.22.2</version> <executions> <execution> <id>perform-it</id> <goals> <goal>integration-test</goal> </goals> <configuration> <systemPropertyVariables> <servlet.host>${payara.hostname}</servlet.host> <servlet.port>${servlet.port}</servlet.port> <servlet.context>${project.artifactId}</servlet.context> </systemPropertyVariables> </configuration> </execution> </executions> </plugin> </plugins> </build> 111
  107. Java Web System Test Exercise • Modify the Maven Object

    Model file (3) (pom.xml)  Replace all dependencies. (Continued to next slide) <dependencies> <dependency> <groupId>org.junit.jupiter</groupId> <artifactId>junit-jupiter-api</artifactId> <version>5.8.2</version> <scope>test</scope> </dependency> <dependency> <groupId>org.junit.jupiter</groupId> <artifactId>junit-jupiter-engine</artifactId> <version>5.8.2</version> <scope>test</scope> </dependency> <dependency> <groupId>org.hamcrest</groupId> <artifactId>hamcrest-core</artifactId> <version>2.2</version> <scope>test</scope> </dependency> <dependency> <groupId>jakarta.platform</groupId> <artifactId>jakarta.jakartaee-api</artifactId> <version>9.1.0</version> <scope>provided</scope> </dependency> : 112
  108. : <dependency> <groupId>io.github.bonigarcia</groupId> <artifactId>selenium-jupiter</artifactId> <version>4.0.1</version> <scope>test</scope> </dependency> <dependency> <groupId>org.seleniumhq.selenium</groupId> <artifactId>selenium-devtools-v96</artifactId>

    <version>4.1.0</version> <scope>test</scope> </dependency> Java Web System Test Exercise • Modify the Maven Object Model file (4) (pom.xml)  Replace all dependencies. <dependency> <groupId>org.seleniumhq.selenium</groupId> <artifactId>selenium-chrome-driver</artifactId> <version>4.1.0</version> <scope>test</scope> </dependency> <dependency> <groupId>org.seleniumhq.selenium</groupId> <artifactId>selenium-firefox-driver</artifactId> <version>4.1.0</version> <scope>test</scope> </dependency> </dependencies> 113
  109. Java Web System Test Exercise • Modify the Maven Object

    Model file (pom.xml) (5)  Replace all profiles to start, stop Payara Server and deploy and undeploy war file to it. Profile description part will be provided by teacher 114
  110. Java Web System Test Exercise • Procedure of the Exercise

    Make a Project and edit pom.xml Copy Score and Calculator Java Class and edit Score Make a web interface and JUnit Test Class for it Execute JUnit from Maven 115
  111. Java Web System Test Exercise • Copy the Java source

    files (Score.java and Calculator.java)  Copy “Score.java” and “Calculator.java” from “test1” project and paste to “test2” project.  Delete “GreetingService.java” and “HelloWorldController.java”.  Update the Apache Maven™ Configuration of the “test2” project. (Hint: Right click on “test2” project and select “Maven” and click “Update project …”.) Delete Copy & Paste 116 Update Maven
  112. Java Web System Test Exercise • Modify the Java source

    file (Score.java) to be accessed from JSF Facelet menus  For the “Score” class, add an annotation of “@Named”.  Add menu field properties and their accessors and change add() method to use the properties. package org.example.test1; import jakarta.inject.Inject; import jakarta.inject.Named; import jakarta.enterprise.context.RequestScoped; @Named @RequestScoped public class Score { @Inject private Calculator calc; private String expA, expB, expSum; public String add() { int sum = calc.evaluate(expA) + calc.evaluate(expB); expSum = Integer.toString(sum); return "helloWorld"; } public String getExpA() { return expA;} public void setExpA(String expA) { this.expA = expA;} public String getExpB() { return expB;} public void setExpB(String expB) { this.expB = expB;} public String getExpSum() { return expSum;} public void setExpSum(String expSum) { this.expSum = expSum;} } 117
  113. Java Web System Test Exercise • Procedure of the Exercise

    Make a Project and edit pom.xml Copy Score and Calculator Java Class and edit Score Make a web interface and JUnit Test Class for it Execute JUnit from Maven 118
  114. Java Web System Test Exercise • Create Test folder 

    Right click on “src” folder under “test2” project and navigate to “Folder” dialog screen by selecting “New”  “Folder”.  Fill in “test/java” for “Folder name” field and click “Finish” button. 119
  115. Java Web System Test Exercise • Create a Test Class

    file for the created Java source file named “ScoreIT.java” (1)  Right click on the created folder of “src/test/java” and navigate to “New” dialog screen by selecting “New”  “Other…”.  Select “Java”  “JUnit”  “JUnit Test Case” and click “Next >” button on “Select a wizard” pane screen. 120
  116. Java Web System Test Exercise • Create a Test Class

    file for the created Java source file named “ScoreIT.java” (2)  Fill “org.example.test2” in “Package” field and “ScoreIT” in “Name” field and click “Finish” button on “JUnit Test Case” pane screen. 121
  117. Java Web System Test Exercise • Modify the Java Test

    source file (ScoreIT.java) For the “ScoreIT” class definition, add “@ExtendWith(SeleniumJupiter.class)”annotation. In the “ScoreIT” class, add a method of “testAdd(ChromeDriver driver)” with “@Test” annotation. @ ExtendWith(SeleniumJupiter.class) public class ScoreIT { @Test public void testAdd(ChromeDriver driver) throws InterruptedException{ String hostname = System.getProperty("servlet.host"); String port = System.getProperty("servlet.port"); String context = System.getProperty("servlet.context"); driver.get("http://" + hostname + ":" + port + "/" + context + "/"); WebElement element = driver.findElement(By.id("expA")); element.sendKeys("1+2+3"); element = driver.findElement(By.id("expB")); element.sendKeys("5+7+9"); element = driver.findElement(By.id("calculate")); element.click(); Thread.sleep(5000); element = driver.findElement(By.id("expSum")); assertEquals("27", element.getText()); }} package org.example.test2; import static org.junit.jupiter.api.Assertions.*; import org.junit.jupiter.api.Test; import org.junit.jupiter.api.extension.ExtendWith; import org.openqa.selenium.chrome.ChromeDriver; import org.openqa.selenium.WebElement; import org.openqa.selenium.By; import io.github.bonigarcia.seljup. SeleniumJupiter; 122
  118. Java Web System Test Exercise • Modify the Java Test

    source file (ScoreIT.java) (Optional) In the “ScoreIT” class, add a method of “setup()” with “@BeforeAll” annotation to force to specify a Chrom Driver version and to use Cache in the repository. @ ExtendWith(SeleniumJupiter.class) public class ScoreIT { @BeforeAll static void setup() { // Specify a version of ChromeDriver WebDriverManager.chromedriver().driverVersion ("96.0.4664.93"); } : @Test public void testAdd(ChromeDriver driver) throws InterruptedException{ : } } package org.example.test2; import static org.junit.jupiter.api.Assertions.*; import org.junit.jupiter.api.Test; import org.junit.jupiter.api.BeforeAll; import org.junit.jupiter.api.extension.ExtendWith; import org.openqa.selenium.chrome.ChromeDriver; import org.openqa.selenium.WebElement; import org.openqa.selenium.By; import io.github.bonigarcia.seljup. SeleniumJupiter; import io.github.bonigarcia.wdm.WebDriverManager; 123
  119. Java Web System Test Exercise • Modify the Web XML

    file (web.xml) (1)  Open “web.xml” by selecting “Deployed Resources”  “webapp”  “WEB-INF”  “web.xml”  Change the “<web-app>” element to use Jakarta Servlet 5.0. 124 <web-app xmlns="http://java.sun.com/xml/ns/javaee" xmlns:xsi="http://www.w3.org/2001/XMLSchema-instance" xsi:schemaLocation="http://java.sun.com/xml/ns/javaee http://java.sun.com/xml/ns/javaee/web-app_2_5.xsd" version="2.5"> <web-app xmlns="https://jakarta.ee/xml/ns/jakartaee" xmlns:xsi="http://www.w3.org/2001/XMLSchema-instance" xsi:schemaLocation="https://jakarta.ee/xml/ns/jakartaee web-app_5_0.xsd" version="5.0">
  120. Java Web System Test Exercise • Modify the Web XML

    file (web.xml) (2) Rename Application Configuration Parameters starting “javax.faces….” to “jakarta.faces….”. 125 <!-- JSF standard parameters --> <context-param> <description>Project stage for the application (new in 2.0). Expects one of the following values: Development, Production, SystemTest, UnitTest </description> <param-name>jakarta.faces.PROJECT_STAGE</param-name> <param-value>Development</param-value> </context-param> <context-param> <description> If this parameter is set to true and the submitted value of a component is the empty string, the submitted value will be set to null </description> <param-name>jakarta.faces.INTERPRET_EMPTY_STRING_SUBMITTED_VALUES_AS_NULL</param-name> <param-value>true</param-value> </context-param> <context-param> <description>Define the state method to be used. There are two different options defined by the specification: 'client' and 'server' state.</description> <param-name>jakarta.faces.STATE_SAVING_METHOD</param-name> <param-value>server</param-value> </context-param>
  121. Java Web System Test Exercise • Modify the Web XML

    file (web.xml) (3) Delete all the Application Configuration Parameters for Apache MyFaces. Delete All 126 <!-- MyFaces specific parameters --> <!-- See http://myfaces.apache.org/docindex.html for documentation about MyFaces Projects --> <!-- See http://myfaces.apache.org/core21/myfaces-impl/webconfig.html for an updated list of web config parameters for MyFaces Core See http://wiki.apache.org/myfaces/Secure_Your_Application for instructions about how to secure your web application --> <context-param> <description>Only applicable if state saving method is "server" (= default). Defines the amount (default = 20) of the latest views are stored in session.</description> <param-name>org.apache.myfaces.NUMBER_OF_VIEWS_IN_SESSION</param-name> <param-value>20</param-value> </context-param> <context-param> <description>Only applicable if state saving method is "server" (= default). If true (default) the state will be serialized to a byte stream before it is written to the session. If false the state will not be serialized to a byte stream.</description> <param-name>org.apache.myfaces.SERIALIZE_STATE_IN_SESSION</param-name> <param-value>false</param-value> </context-param> <context-param> <description>Only applicable if state saving method is "server" (= default) and if org.apache.myfaces.SERIALIZE_STATE_IN_SESSION is true (= default) If true (default) the serialized state will be compressed before it is written to the session. If false the state will not be compressed.</description> <param-name>org.apache.myfaces.COMPRESS_STATE_IN_SESSION</param-name> <param-value>false</param-value> </context-param> <context-param> <description>Defines which packages to scan for beans, separated by commas. Useful for when using maven and jetty:run (version 6) or tomcat:run </description> <param-name>org.apache.myfaces.annotation.SCAN_PACKAGES</param-name> <param-value>org.example.test2</param-value> </context-param>
  122. Java Web System Test Exercise • Modify the Web XML

    file (web.xml) (4) Delete “Listener” element which uses Apache OpenWebBeans. Delete 127 <!–- Listener for OpenWebBeans configuration --> <listener> <listener-class> org.apache.webbeans.servlet.WebBeansConfigurationListener </listener-class> </listener >
  123. Java Web System Test Exercise • Modify the Web XML

    file (web.xml) (5) Rename the Faces Servlet class name of “javax.faces….” to “jakarta.faces….”. 128 <!-- Faces Servlet --> <servlet> <servlet-name>Faces Servlet</servlet-name> <servlet-class>jakarta.faces.webapp.FacesServlet</servlet-class> <load-on-startup>1</load-on-startup> </servlet>
  124. Java Web System Test Exercise • Modify the JSF Facelet

    file (helloWorld.xhtml)  Open “Deployed Resources”  “webapp”  “helloWorld.xhtml”  Change “<h:form>” element of the Facelet file : <h:form id="mainForm" prependId="false"> <h:panelGrid columns="7"> <h:outputLabel for="expA" value="A:"/> <h:inputText id="expA" value="#{score.expA}" required="true"/> <h:outputText value="+"/> <h:outputLabel for="expB" value="B:"/> <h:inputText id="expB" value="#{score.expB}" required="true"/> <h:outputText value="="/> <h:outputText id="expSum" value="#{score.expSum}" /> <h:messages showDetail="true" showSummary="false"/> </h:panelGrid> <h:commandButton id="calculate" value="Calculate" action="#{score.add}"/> </h:form> : 129
  125. Java Web System Test Exercise • Modify the version of

    Dynamic Web Module  Right click on the project of “test2” and select “Properties”.  Select “Project Facets” and then “Dynamic Web Module” and change the “version” to “5.0”. 130
  126. Java Web System Test Exercise • Procedure of the Exercise

    Make a Project and edit pom.xml Copy Score and Calculator Java Class and edit Score Make a web interface and JUnit Test Class for it Execute JUnit from Maven 131
  127. Java Web System Exercise • Execute JUnit through M2Eclipse™ for

    the created Java Test source file (Remote Profile)  Start-up Payara Server.  Right click on “test2” project and navigate to “Edit Configuration” dialog screen by selecting “Run As”  “Maven build…”.  Put “test2 – post-integration-test (Remote)” in “Name” field and “post-integration-test” in “Goals” field and click “Run” button on “Edit configuration and launch” pane screen.  Confirm that test completes successfully in “Console” pane screen. 132
  128. Java Web System Exercise • Execute JUnit through M2Eclipse™ for

    the created Java Test source file (Local Profile)  Edit C:\payara5\glassfish\domains\password.properties to change current admin password.  Shutdown Payara Server, if it’s working. Right click on the project and select “Run As”  “5 Maven build…”.  Put “test2 – post-integration-test (Local)” in “Name” field and “post-integration-test” in “Goals” field and “payara6x-local” in “Profile” field and click “Run” button on “Edit configuration and launch” pane screen.  Confirm that test completes successfully in “Console” pane screen. 133 Before proceeding this step, just confirm that $PAYARA_HOME/glassfish/domains/password .properties has a correct admin password.
  129. Java Unit Test Exercise • Check if the “dateToString” method

    of “DateUtility” class works correctly public class DateUtility { public String dateToString(LocalDateTime dateTime) { DateTimeFormatter formatter = DateTimeFormatter.ofPattern("dd-MM-yyyy"); String formattedString = dateTime.format(formatter); return formattedString; } } DateUtility.java Target Class 135
  130. Java Unit Test with Mock Exercise • Check if the

    “printToday” method of “DateForm” class works correctly by mocking “DateUtility” class public class DateUtility { public String dateToString(LocalDateTime dateTime) { DateTimeFormatter formatter = DateTimeFormatter.ofPattern("dd-MM-yyyy"); String formattedString = dateTime.format(formatter); return formattedString; } } DateUtility.java public class DateForm { private DateUtility du; public String printToday() { LocalDateTime now = LocalDateTime.now(); String dateString = du.dateToString(now); return dateString; } } DateForm.java Target Class Mocked Class ZonedDateTime zonedDateTimeNow = ZonedDateTime.now(ZoneId.of("UTC")); 136
  131. Java CDI Integration Test Exercise • Check if the “printToday”

    method of “DateForm” CDI class works correctly along with “DateUtility” CDI class @RequestScoped public class DateUtility { public String dateToString(LocalDateTime dateTime) { DateTimeFormatter formatter = DateTimeFormatter.ofPattern("dd-MM-yyyy"); String formattedString = dateTime.format(formatter); return formattedString; } } DateUtility.java @RequestScoped public class DateForm { @Inject private DateUtility du; public String printToday() { LocalDateTime now = LocalDateTime.now(); String dateString = du.dateToString(now); return dateString; } } DateForm.java Target Class Injected Class 137