Upgrade to Pro — share decks privately, control downloads, hide ads and more …

Navigation component 2.0.0

Navigation component 2.0.0

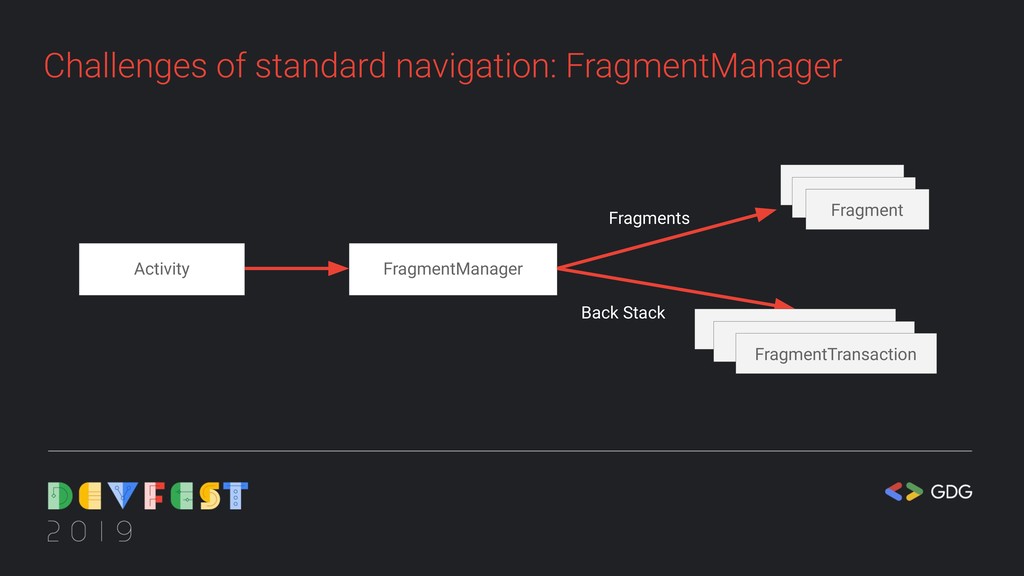
This talk will describe what is new in Android Navigation Component, how easy it’s to navigate between fragment et the pros and cons of using the Navigation Component.

https://devfest2019.gdgmontreal.com/schedule/2019-09-29?sessionId=100

Laurence de Villers

September 29, 2019
Tweet

More Decks by Laurence de Villers

Other Decks in Programming

Transcript

  1. Laurence de Villers Mobile dev at Transit Lead organizer of

    GDG Montreal Women Techmakers Lead Canada Regional Mentor @L_de_V
  2. Navigation Component • Simplified setup for commun navigation patterns ◦

    Handles backstack ◦ Automates fragment transaction • Type safe argument passing • Handles transition animations • Simplified deep link
  3. Challenges of standard navigation: Pop Inclusive Home Category Item Size

    • Need to add dynamically code to pop Inclusive some screen with the fragmentManager Remove fragments
  4. Principal of view navigation • Up button vs Back button

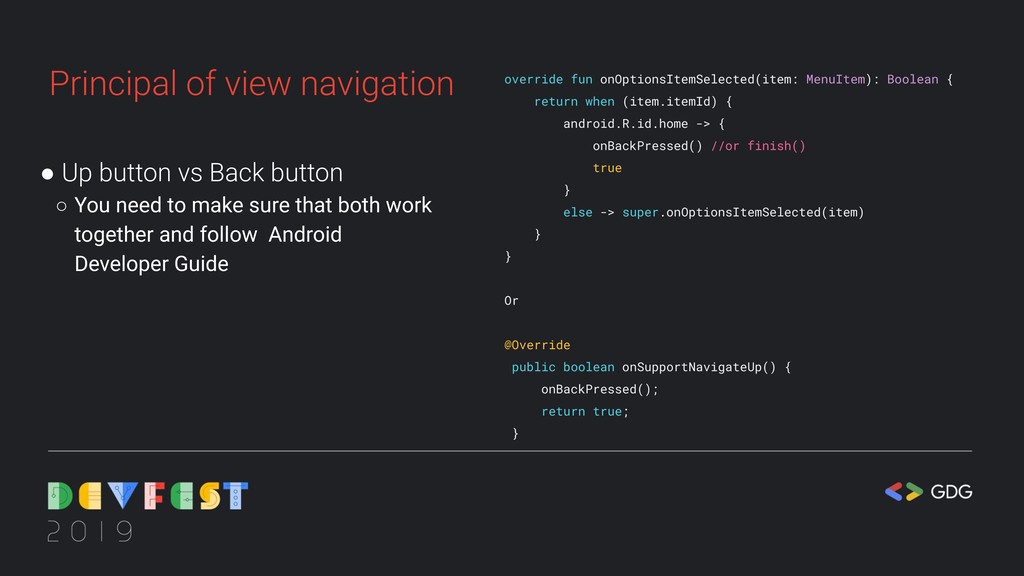
    ◦ You need to make sure that both work together and follow Android Developer Guide override fun onOptionsItemSelected(item: MenuItem): Boolean { return when (item.itemId) { android.R.id.home -> { onBackPressed() //or finish() true } else -> super.onOptionsItemSelected(item) } } Or @Override public boolean onSupportNavigateUp() { onBackPressed(); return true; }
  5. Up button • The Up button is used to navigate

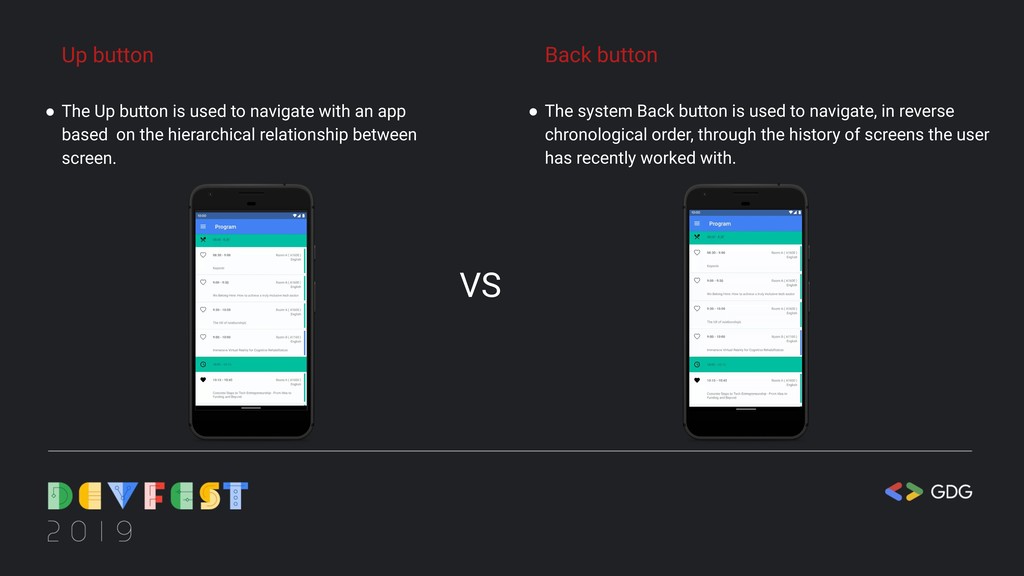
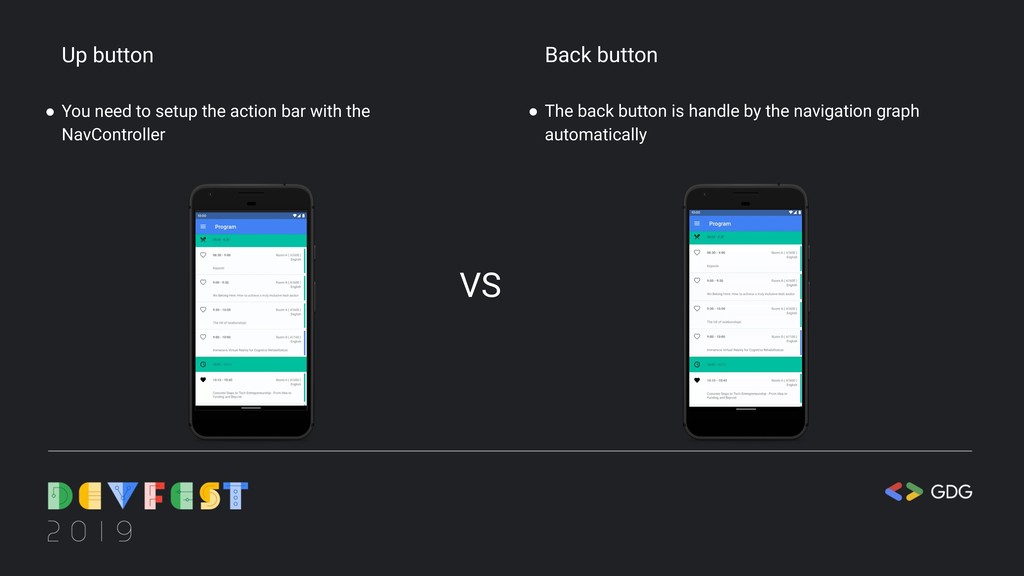
    with an app based on the hierarchical relationship between screen. Back button • The system Back button is used to navigate, in reverse chronological order, through the history of screens the user has recently worked with. VS
  6. Gradle dependencies { def nav_version = "2.1.0" // Java implementation

    "androidx.navigation:navigation-fragment:$nav_version" implementation "androidx.navigation:navigation-ui:$nav_version" // Kotlin implementation "androidx.navigation:navigation-fragment-ktx:$nav_version" implementation "androidx.navigation:navigation-ui-ktx:$nav_version" }
  7. Create your graph By default, android studio will find all

    the fragment that you have in your application
  8. Nested Graph If you have too much screen you can

    separate graph into groups Move to Nested Graph > New Graph
  9. Add a Navigation Host Fragment in your main activity <LinearLayout

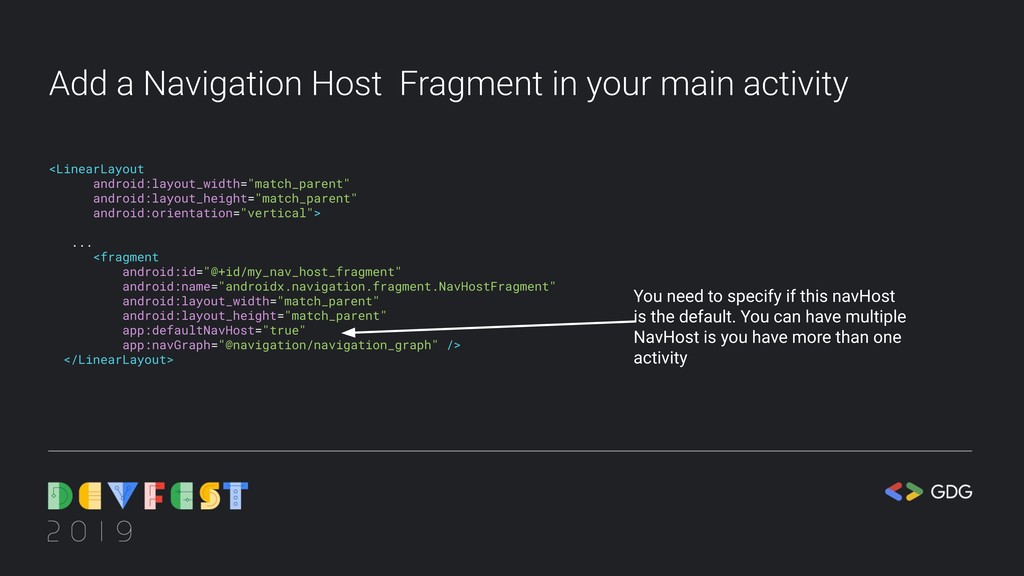
    android:layout_width="match_parent" android:layout_height="match_parent" android:orientation="vertical"> ... <fragment android:id="@+id/my_nav_host_fragment" android:name="androidx.navigation.fragment.NavHostFragment" android:layout_width="match_parent" android:layout_height="match_parent" app:defaultNavHost="true" app:navGraph="@navigation/navigation_graph" /> </LinearLayout> You need to specify if this navHost is the default. You can have multiple NavHost is you have more than one activity
  10. How it works ? A NavHostFragment swaps different destinations in

    and out as you navigate through the navigation graph.
  11. Navigate between fragments NavController is a special class that triggers

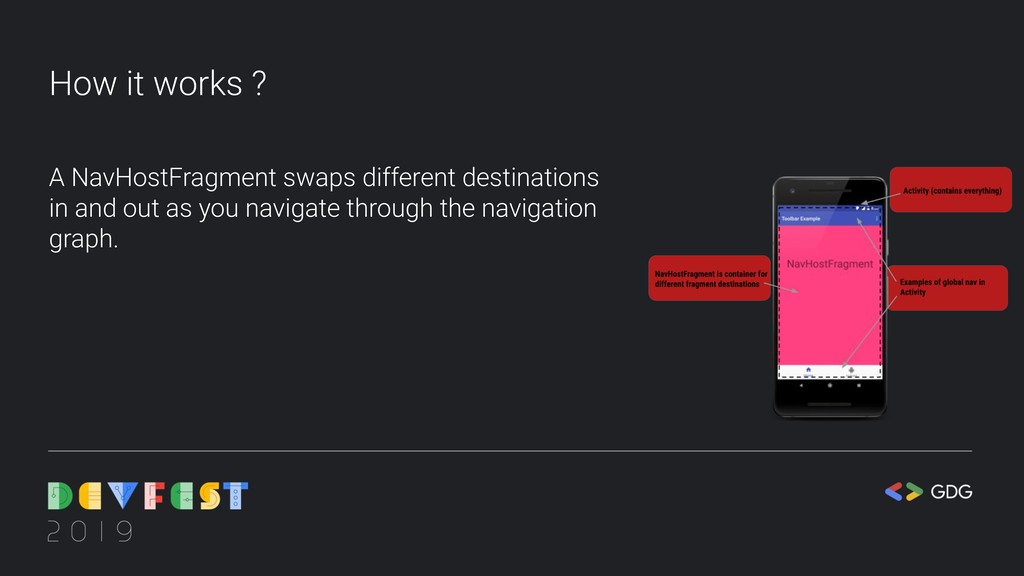
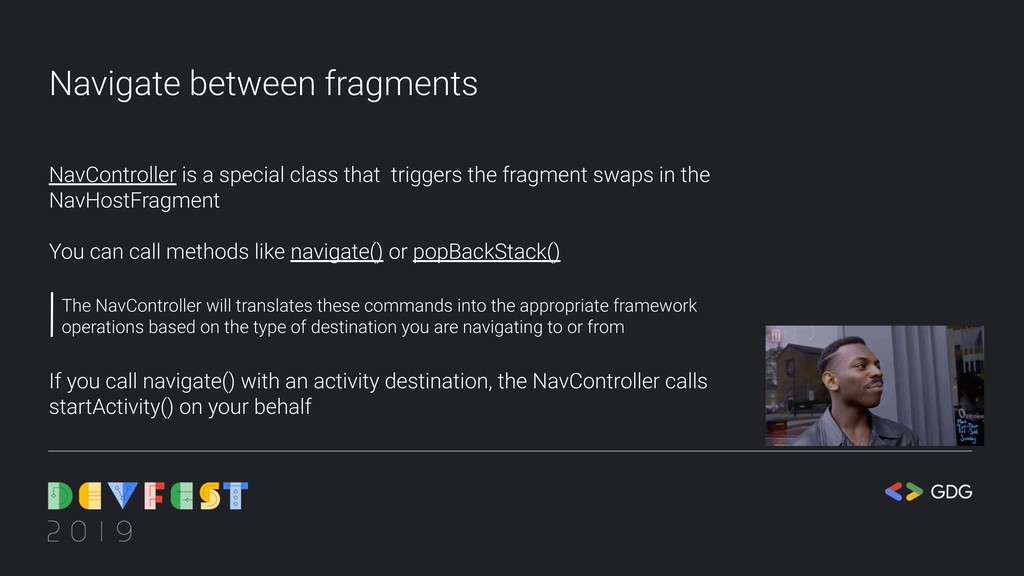
    the fragment swaps in the NavHostFragment You can call methods like navigate() or popBackStack() The NavController will translates these commands into the appropriate framework operations based on the type of destination you are navigating to or from If you call navigate() with an activity destination, the NavController calls startActivity() on your behalf
  12. Up button • You need to setup the action bar

    with the NavController Back button • The back button is handle by the navigation graph automatically VS
  13. Setup the up button navigation private fun setupNavigation() { val

    host: NavHostFragment = supportFragmentManager .findFragmentById(R.id.mainNavigationFragment) as NavHostFragment? ?: return val navController = host.navController val topLevelDestinations = HashSet<Int>() topLevelDestinations.add(R.id.nav_program) ... topLevelDestinations.add(R.id.nav_twitter) appBarConfiguration = AppBarConfiguration.Builder(topLevelDestinations) .setDrawerLayout(drawer_layout).build() setupActionBarWithNavController(this, navController, appBarConfiguration) }
  14. Navigate using drawers and navigation view <com.google.android.material.navigation.NavigationView android:id="@+id/nav_view" android:layout_width="wrap_content" android:layout_height="match_parent"

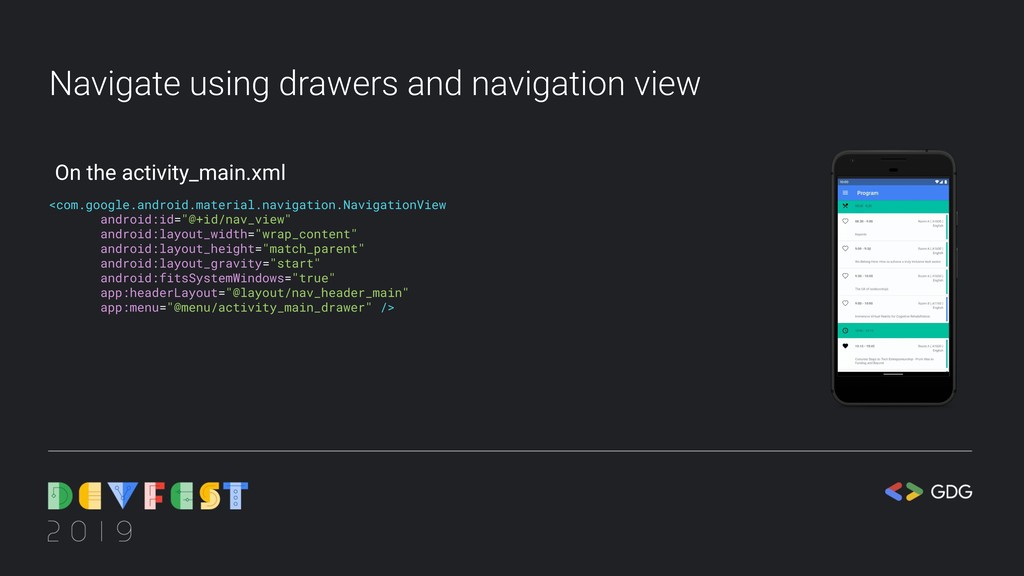
    android:layout_gravity="start" android:fitsSystemWindows="true" app:headerLayout="@layout/nav_header_main" app:menu="@menu/activity_main_drawer" /> On the activity_main.xml
  15. Auto setup NavigationView with the navigation graph Use the same

    ID in your NavigationView menu and on your graph. <menu xmlns:android="..."> <group android:checkableBehavior="single"> <item android:id="@+id/nav_program" android:icon="@drawable/ic_event_black_24dp" android:menuCategory="container" android:title="@string/program" /> <item android:id="@+id/nav_speakers" android:icon="@drawable/ic_group_black_24px" android:menuCategory="container" android:title="@string/speakers" /> ... </menu> <navigation xmlns:android="..." <fragment android:id="@+id/nav_program" android:name="com.montreal.wtm.ui.fragment.ProgramFragment" android:label="@string/program" tools:layout="@layout/program_fragment" > </fragment> <fragment android:id="@+id/nav_speakers" android:name="com.montreal.wtm.ui.fragment.SpeakersFragment" android:label="@string/speakers" tools:layout="@layout/simple_recycler_list" > </fragment> </navigation>
  16. Code that is not needed anymore override fun onNavigationItemSelected(item: MenuItem):

    Boolean { val id = item.itemId var fragment: Fragment when(id) { R.id.nav_program -> { fragment = ProgramFragment.newInstance() setActionBarName(getString(R.string.program)) } ... R.id.nav_twitter -> { fragment = TwitterFragment.newInstance() setActionBarName(getString(R.string.twitter)) } else -> { fragment = ProgramFragment.newInstance() setActionBarName(getString(R.string.program)) } } val drawer = findViewById<View>(R.id.drawer_layout) as DrawerLayout drawer.closeDrawer(GravityCompat.START) FragmentManager fragmentManager = activity.getFragmentManager(); fragmentManager.beginTransaction().replace(R.id.container, fragment).commit(); return true } val toggle = ActionBarDrawerToggle(this, drawer, toolbar, string.navigation_drawer_open, string.navigation_drawer_close) drawer.addDrawerListener(toggle) toggle.syncState()
  17. Navigate using drawers and navigation view private fun setupNavigationView() {

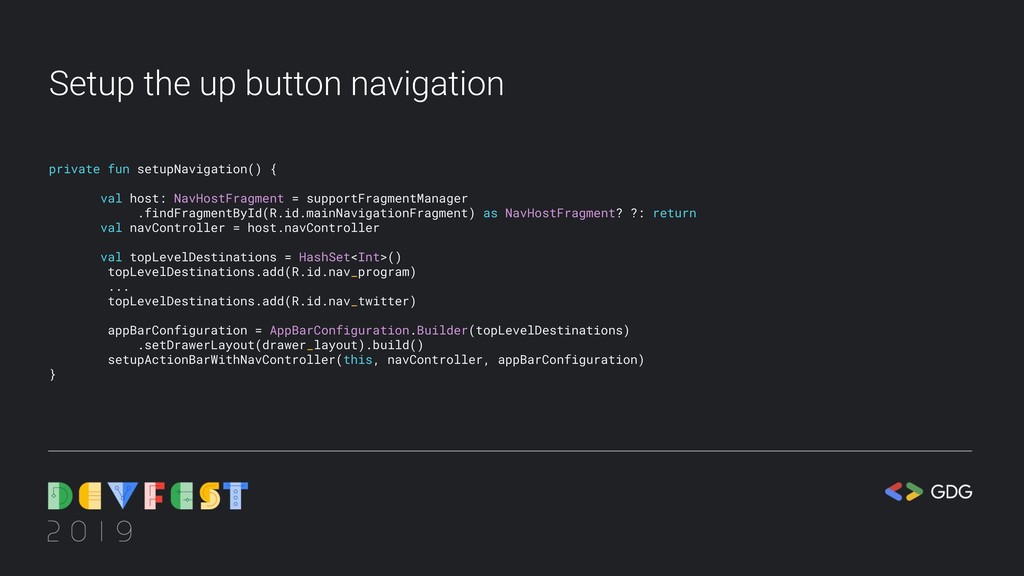
    val host: NavHostFragment = supportFragmentManager .findFragmentById(R.id.my_nav_host_fragment) as NavHostFragment? ?: return val navController = host.navController NavigationUI.setupWithNavController(findViewById<NavigationView>(R.id.nav_view), navController) } On the MainActivity.kt override fun onSupportNavigateUp(): Boolean { // Allows NavigationUI to support proper up navigation or the drawer layout // drawer menu, depending on the situation return NavigationUI.navigateUp(findNavController(this, R.id.mainNavigationFragment), appBarConfiguration) }
  18. Passing Bundle talkViewHolder.itemView.setOnClickListener(v -> { Bundle bundle = new Bundle();

    bundle.putParcelable(EXTRA_TALK, talk); Navigation.findNavController(v).navigate(R.id.action_nav_program_to_talkFragment, bundle); }
  19. Safe Args Safe Arg is a plugin that generates simple

    object and builder classes for type-safe access to arguments specified for destinations and actions. val username = arguments?.getString("usernameKey") Is replace by val username = args.username
  20. Safe Args Gradle Build.gradle dependencies { classpath "android.arch.navigation:navigation-safe-args-gradle-plugin:$navigationVersion" //... }

    app/build.gradle apply plugin: 'kotlin-android' apply plugin: 'androidx.navigation.safeargs'
  21. Passing Safe Args The plugin will generate a class {currentFragment}Directions

    with a function action{currentFragment}To{NextFragment)({Object specified } obj) talkViewHolder.itemView.setOnClickListener(v -> { Bundle bundle = new Bundle(); bundle.putParcelable(EXTRA_TALK, talk); Navigation.findNavController(v).navigate(R.id.action_nav_program_to_talkFragment, bundle); } talkViewHolder.itemView.setOnClickListener(v -> { ProgramFragmentDirections.ActionNavProgramToTalkFragment action; action = ProgramFragmentDirections.actionNavProgramToTalkFragment(talk); Navigation.findNavController(v).navigate(action); }
  22. Receiving the Safe Args @Override public View onCreateView(@NonNull LayoutInflater inflater,

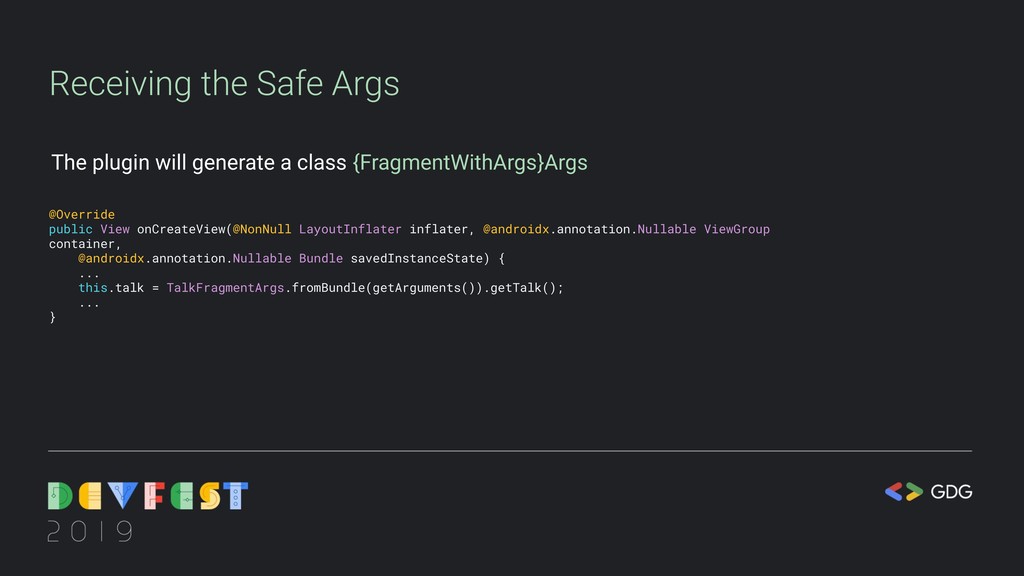
    @androidx.annotation.Nullable ViewGroup container, @androidx.annotation.Nullable Bundle savedInstanceState) { ... this.talk = TalkFragmentArgs.fromBundle(getArguments()).getTalk(); ... } The plugin will generate a class {FragmentWithArgs}Args
  23. Pros and cons of SafeArgs Pros • You know easily

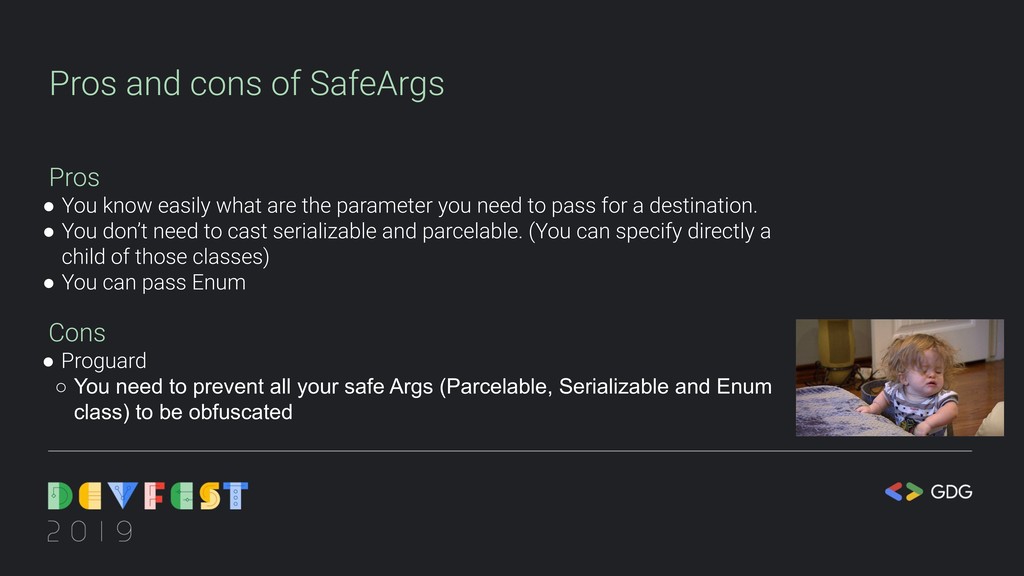
    what are the parameter you need to pass for a destination. • You don’t need to cast serializable and parcelable. (You can specify directly a child of those classes) • You can pass Enum Cons • Proguard ◦ You need to prevent all your safe Args (Parcelable, Serializable and Enum class) to be obfuscated
  24. Animations • You can still overwrite onCreateAnimator @Override public Animator

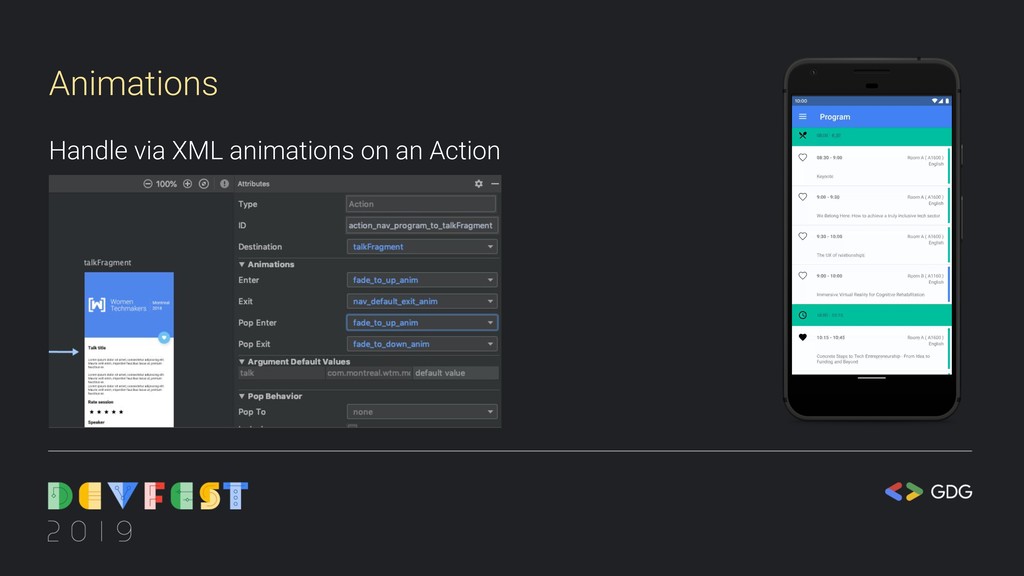
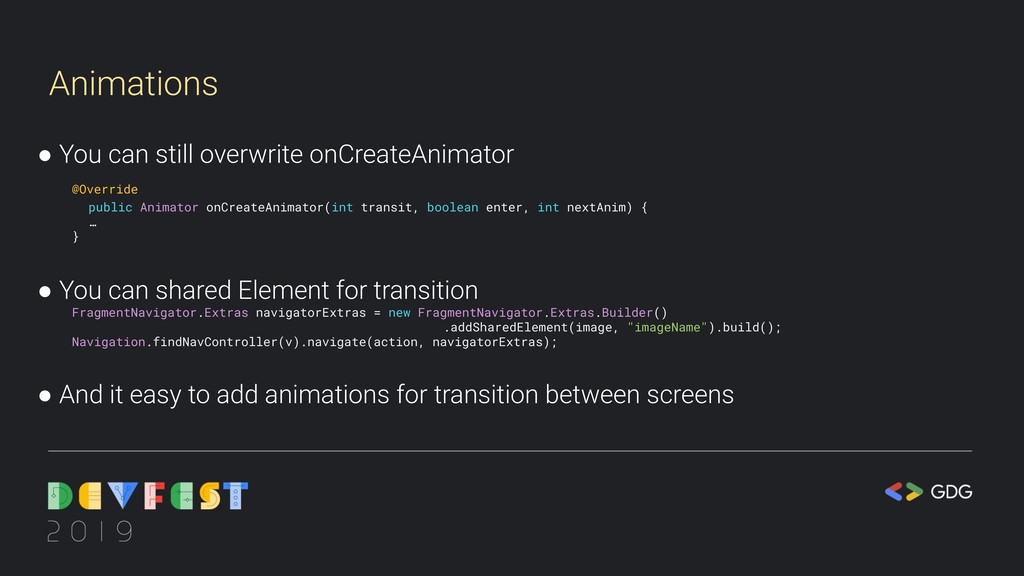
    onCreateAnimator(int transit, boolean enter, int nextAnim) { … } • You can shared Element for transition FragmentNavigator.Extras navigatorExtras = new FragmentNavigator.Extras.Builder() .addSharedElement(image, "imageName").build(); Navigation.findNavController(v).navigate(action, navigatorExtras); • And it easy to add animations for transition between screens
  25. Challenges of Deep Links Home Category Item gdg://item For deeplink

    those screen need to be recreated and added to the back sack
  26. Deep Linking with Navigation Component There is two type of

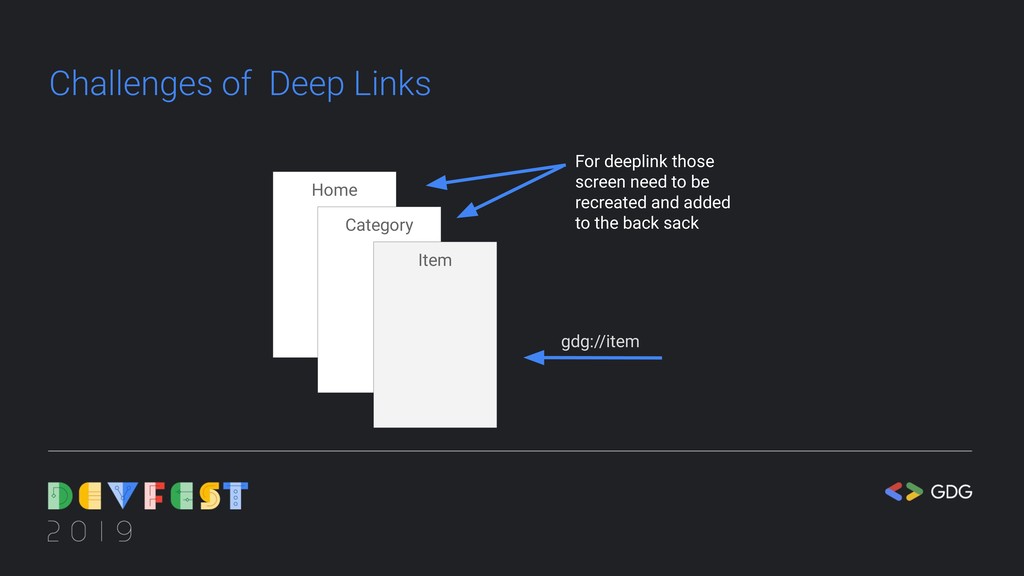
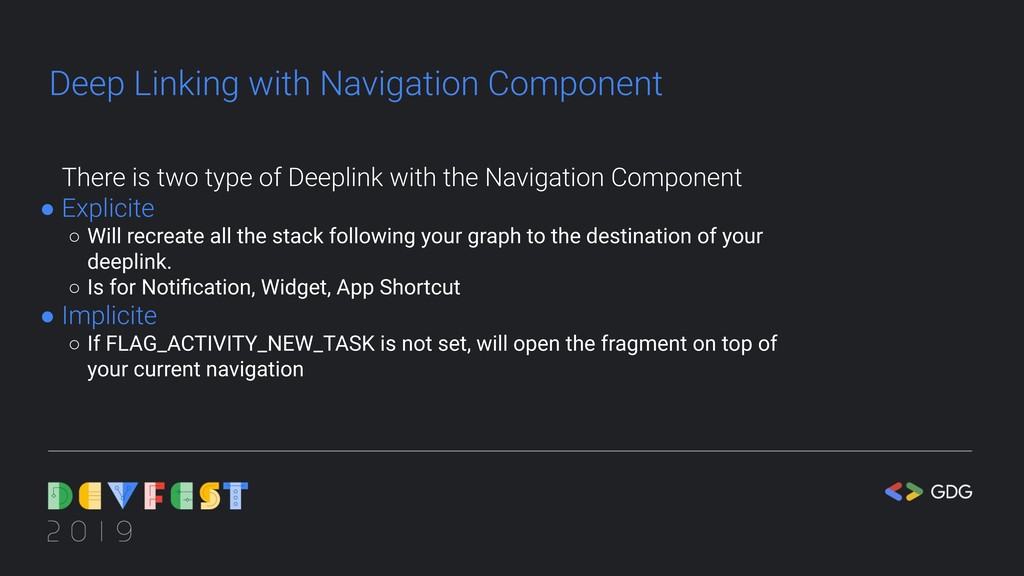
    Deeplink with the Navigation Component • Explicite ◦ Will recreate all the stack following your graph to the destination of your deeplink. ◦ Is for Notification, Widget, App Shortcut • Implicite ◦ If FLAG_ACTIVITY_NEW_TASK is not set, will open the fragment on top of your current navigation
  27. Explicite DeepLink You need to use NavDeepLinkBuilder to create your

    pendingIntent val args = Bundle() args.putString("myarg", "From Widget"); val pendingIntent = NavDeepLinkBuilder(context) .setGraph(R.navigation.mobile_navigation) .setDestination(R.id.deeplink_dest) .setArguments(args) .createPendingIntent() remoteViews.setOnClickPendingIntent(R.id.deep_link_button, pendingIntent) You can also use navController to create the deeplink Navigation.findNavController(v).createDeepLink() .setGraph(R.navigation.mobile_navigation) .setDestination(R.id.deeplink_dest).createPendingIntent();
  28. Implicite DeepLink To enable implicit deep linking, you need to

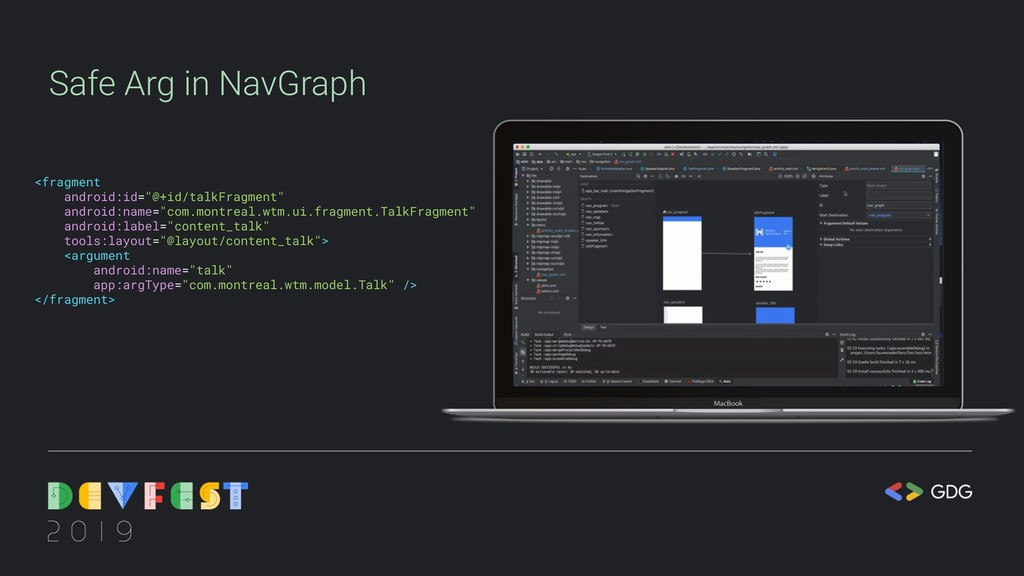
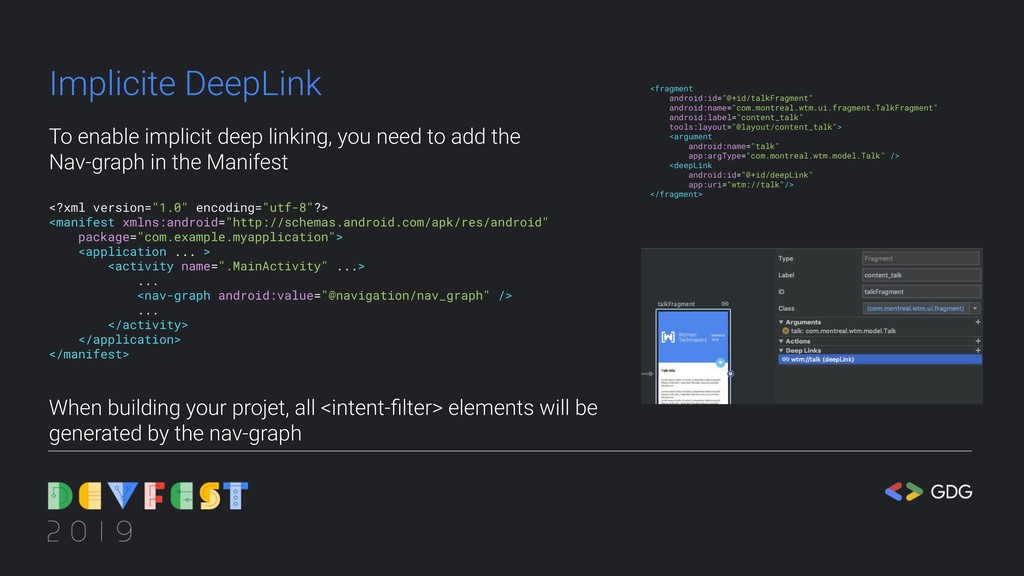
    add the Nav-graph in the Manifest <?xml version="1.0" encoding="utf-8"?> <manifest xmlns:android="http://schemas.android.com/apk/res/android" package="com.example.myapplication"> <application ... > <activity name=".MainActivity" ...> ... <nav-graph android:value="@navigation/nav_graph" /> ... </activity> </application> </manifest> When building your projet, all <intent-filter> elements will be generated by the nav-graph <fragment android:id="@+id/talkFragment" android:name="com.montreal.wtm.ui.fragment.TalkFragment" android:label="content_talk" tools:layout="@layout/content_talk"> <argument android:name="talk" app:argType="com.montreal.wtm.model.Talk" /> <deepLink android:id="@+id/deepLink" app:uri="wtm://talk"/> </fragment>
  29. Change from 1.0.0 to 2.0.0 // Allows NavigationUI to support

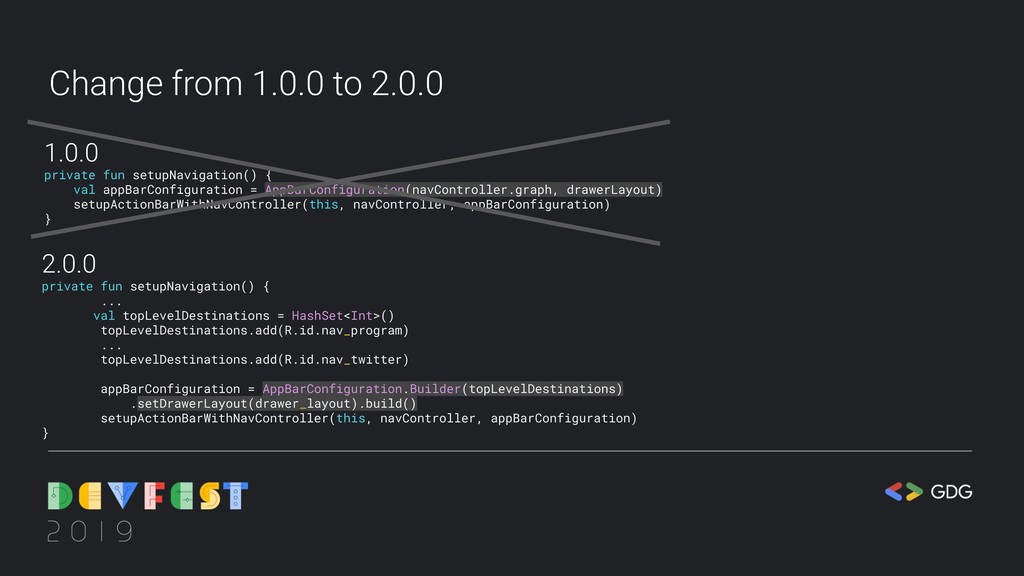
    proper up navigation or the drawer layout // drawer menu, depending on the situation override fun onSupportNavigateUp(): Boolean { return findNavController(R.id.my_nav_host_fragment).navigateUp(appBarConfiguration) } Everything function that hooks navigation drawer, bottom nav bar with the NavController is now on the class NavigationUI override fun onSupportNavigateUp(): Boolean { return NavigationUI.navigateUp(findNavController(this, R.id.mainNavigationFragment), appBarConfiguration) } 2.0.0
  30. Change from 1.0.0 to 2.0.0 2.0.0 private fun setupNavigation() {

    ... val topLevelDestinations = HashSet<Int>() topLevelDestinations.add(R.id.nav_program) ... topLevelDestinations.add(R.id.nav_twitter) appBarConfiguration = AppBarConfiguration.Builder(topLevelDestinations) .setDrawerLayout(drawer_layout).build() setupActionBarWithNavController(this, navController, appBarConfiguration) } 1.0.0 private fun setupNavigation() { val appBarConfiguration = AppBarConfiguration(navController.graph, drawerLayout) setupActionBarWithNavController(this, navController, appBarConfiguration) }
  31. New in 2.0.0 New Method Navigation.createNavigateOnClickListener(NavDirections) New features • You

    can create ViewModels that are scoped at a navigation graph • You can call navigation on Uri and deeplink • You can create <dialog> destinations