Upgrade to Pro — share decks privately, control downloads, hide ads and more …

Animate me, if you don't do it for me, do it fo...

Animate me, if you don't do it for me, do it for chet

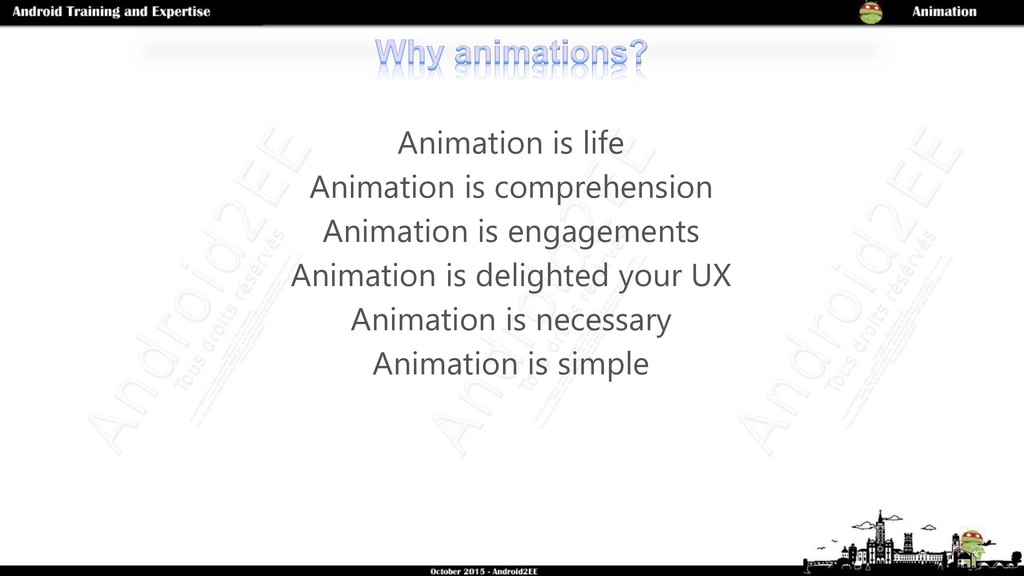
Animation is a key point when building your application….
But, “Animation is complicated with Android”, is your feeling.
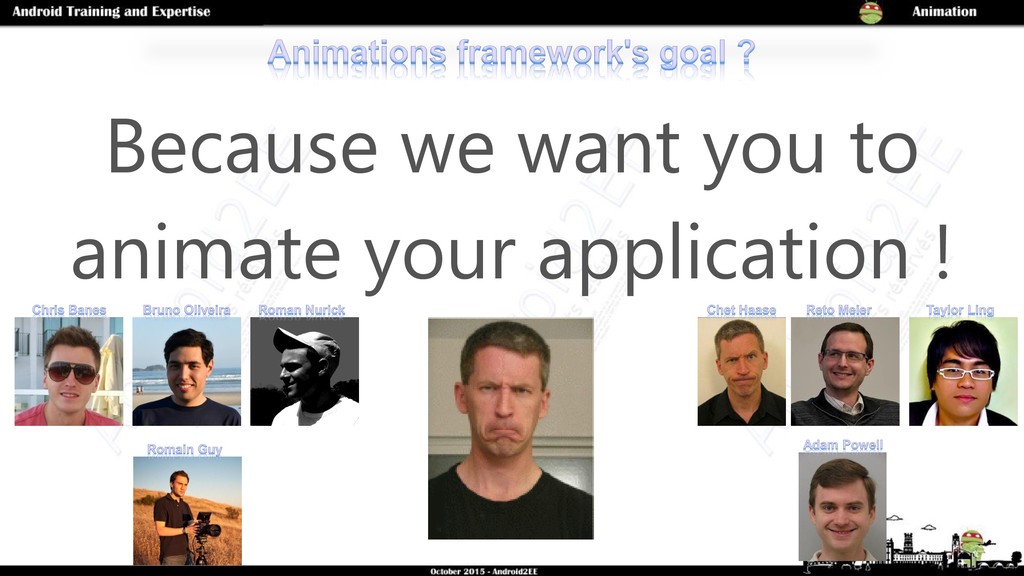
Well, in fact, it’s not. I will show you how simples they are, how magic they could be and how fun your application can become.
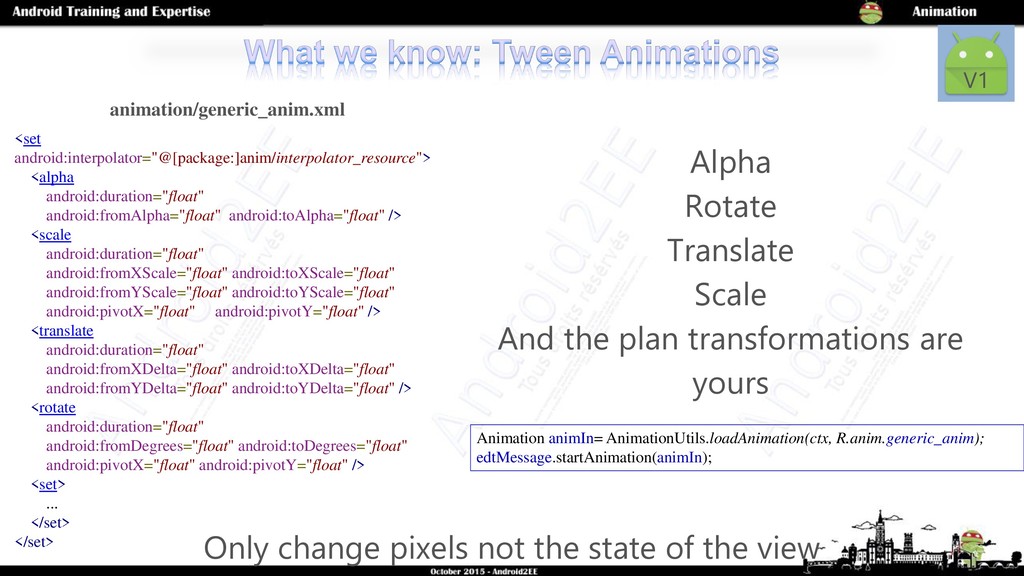
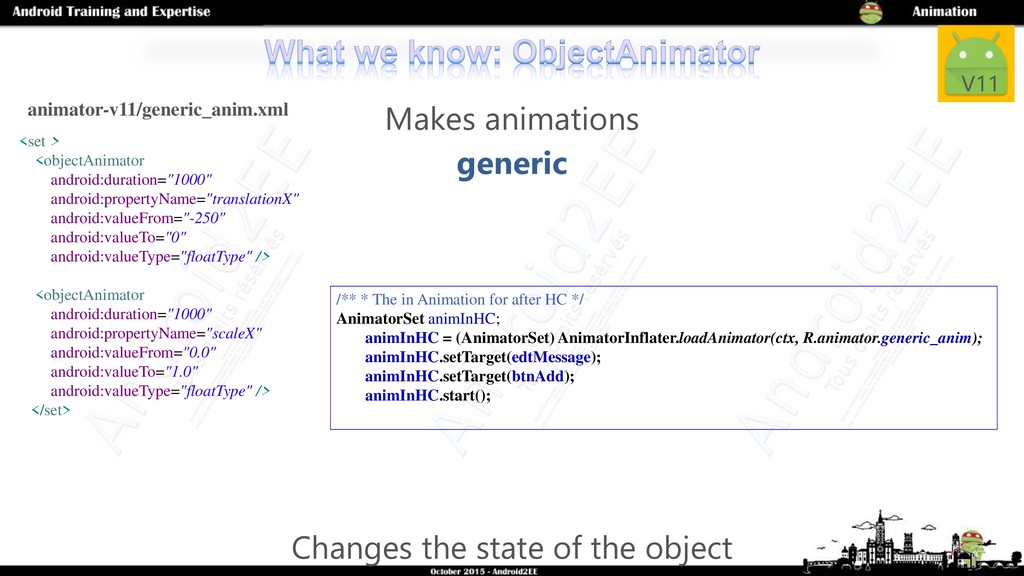
I will explains which animation to use for which version of the system, what are your choices and what is your strategy. We will have a complete overview on the Android Animation framework.
So I hope to see you in the room for this conference, because at the end, your application will be enhanced :)

Avatar for Mathias Seguy - Android2EE

Mathias Seguy - Android2EE

September 15, 2015
Tweet

More Decks by Mathias Seguy - Android2EE

Other Decks in Programming

Transcript

  1. Animation is life Animation is comprehension Animation is engagements Animation

    is delighted your UX Animation is necessary Animation is simple
  2. Alpha Rotate Translate Scale And the plan transformations are yours

    V1 <set android:interpolator="@[package:]anim/interpolator_resource"> <alpha android:duration="float" android:fromAlpha="float" android:toAlpha="float" /> <scale android:duration="float" android:fromXScale="float" android:toXScale="float" android:fromYScale="float" android:toYScale="float" android:pivotX="float" android:pivotY="float" /> <translate android:duration="float" android:fromXDelta="float" android:toXDelta="float" android:fromYDelta="float" android:toYDelta="float" /> <rotate android:duration="float" android:fromDegrees="float" android:toDegrees="float" android:pivotX="float" android:pivotY="float" /> <set> ... </set> </set> Animation animIn= AnimationUtils.loadAnimation(ctx, R.anim.generic_anim); edtMessage.startAnimation(animIn); animation/generic_anim.xml Only change pixels not the state of the view
  3. Makes animations generic V11 /** * The in Animation for

    after HC */ AnimatorSet animInHC; animInHC = (AnimatorSet) AnimatorInflater.loadAnimator(ctx, R.animator.generic_anim); animInHC.setTarget(edtMessage); animInHC.setTarget(btnAdd); animInHC.start(); <set > <objectAnimator android:duration="1000" android:propertyName="translationX" android:valueFrom="-250" android:valueTo="0" android:valueType="floatType" /> <objectAnimator android:duration="1000" android:propertyName="scaleX" android:valueFrom="0.0" android:valueTo="1.0" android:valueType="floatType" /> </set> animator-v11/generic_anim.xml Changes the state of the object
  4. Uses Handler and Runnable Simple but dangerous (memory leak, runs

    in UI thread, can generates frames drops) Not optimized Animation is changing the view/object state by dropping changes in the UI thread Handler clipDrawableHandler=new Handler(); Runnable clipDrawableRunnable=new Runnable() { @Override public void run() { myView.changeSomething(level); clipDrawableHandler.postDelayed(clipDrawableRunnable,32); } }; V1
  5. Uses Handler and Runnable Simple but dangerous (memory leak, runs

    in UI thread, can generates frames drops) Not optimized V11 Animation is changing the view/object state by dropping changes in the UI thread Handler clipDrawableHandler=new Handler(); Runnable clipDrawableRunnable=new Runnable() { @Override public void run() { myView.changeSomething(level); clipDrawableHandler.postDelayed(clipDrawableRunnable,32); } };
  6. Don't be scared, it's simple. How do you go from

    the point from to the point to ? V1 t1 t0 v0 v1 from to ? i(t)=v, where i(t0)=v0 and i(t1)=v1 float time
  7. t1 t0 v0 v1 You can use the system's ones

    V1 t1 t0 v0 v1 from to deceleration acceleration to from t1 t0 v0 v1 to bouncing from <set android:interpolator= "@android:anim/accelerate_interpolator"> <set android:interpolator= "@android:anim/decelerate_interpolator"> <set android:interpolator= "@android:anim/bounce_interpolator" >
  8. Or build your own. V1 t1 t0 v0 v1 from

    to alcoholic public class MyInterpolator implements Interpolator { float v; @Override public float getInterpolation(float input) { //v=i(input) return v; }...}
  9. ClipDrawable RotateDrawable ScaleDrawable AnimationDrawable TransitionDrawable StateListDrawable AnimatedStateListDrawable AnimatedVectorDrawable Handler clipDrawableHandler=new

    Handler(); Runnable clipDrawableRunnable=new Runnable() { @Override public void run() {level++; clipDrawableHorizontal.setLevel(level); clipDrawableHandler.postDelayed(clipDrawableRunnable,32); } }; <?xml version="1.0" encoding="utf-8"?> <clip xmlns:android="http://schemas.android.com/apk/res/android" android:drawable="@drawable/ic_android2ee" android:clipOrientation="horizontal" android:gravity="left" /> V1
  10. RotateDrawable rotateDrawableWheel; Handler rotateDrawableHandler=new Handler(); Runnable rotateDrawableRunnable=new Runnable() { public

    void run() {level++; rotateDrawableWheel.setLevel(level); rotateDrawableHandler.postDelayed(rotateDrawableRunnable,32); } }; <?xml version="1.0" encoding="utf-8"?> <rotate xmlns:android="http://schemas.android.com/apk/res/android" android:drawable="@drawable/ic_android2ee" android:fromDegrees="0" android:pivotX="50%" android:pivotY="50%" android:toDegrees="360" /> V1 ClipDrawable RotateDrawable ScaleDrawable AnimationDrawable TransitionDrawable StateListDrawable AnimatedStateListDrawable AnimatedVectorDrawable
  11. ScaleDrawable scaleDrawable; Handler scaleDrawableHandler=new Handler(); Runnable scaleDrawableRunnable=new Runnable() { public

    void run() {level++; scaleDrawable.setLevel(level); scaleDrawableHandler.postDelayed(scaleeDrawableRunnable,32); } }; <?xml version="1.0" encoding="utf-8"?> <scale xmlns:android="http://schemas.android.com/apk/res/android" android:drawable="@mipmap/ic_edit" android:scaleGravity="center" android:scaleHeight="100%" android:scaleWidth="100%" /> V1 ClipDrawable RotateDrawable ScaleDrawable AnimationDrawable TransitionDrawable StateListDrawable AnimatedStateListDrawable AnimatedVectorDrawable
  12. animationDrawable.start(); <animation-list android:id="@+id/selected" android:oneshot="false"> <item android:drawable="@drawable/attack_magic1" android:duration="100" /> <item android:drawable="@drawable/attack_magic2"

    android:duration="100" /> <item android:drawable="@drawable/attack_magic3" android:duration="100" /> <item android:drawable="@drawable/attack_magic4" android:duration="100" /> </animation-list> ClipDrawable RotateDrawable ScaleDrawable AnimationDrawable TransitionDrawable StateListDrawable AnimatedStateListDrawable AnimatedVectorDrawable V1
  13. transitionDrawable.startTransition(3000); transitionDrawable.reverseTransition(3000); <?xml version="1.0" encoding="utf-8"?> <transition xmlns:android="http://schemas.android.com/apk/res/android"> <item android:drawable="@mipmap/ic_ok" />

    <item android:drawable="@mipmap/ic_nok" /> </transition> ClipDrawable RotateDrawable ScaleDrawable AnimationDrawable TransitionDrawable StateListDrawable AnimatedStateListDrawable AnimatedVectorDrawable V1
  14. <?xml version="1.0" encoding="utf-8"?> <selector xmlns:android="http://schemas.android.com/apk/res/android" android:enterFadeDuration="300" android:exitFadeDuration="300"> <!--Sorry below v21

    there is no animated selector you can just fade in and fade out--> <item android:id="@+id/item_pressed" android:state_pressed="true"> <bitmap android:src="@drawable/ic_android2ee"/></item> <item android:id="@+id/item_normal"> <bitmap android:src="@drawable/ic_nut"/> </item> </selector> fade fade Normal Pressed Normal View state Display V1 ClipDrawable RotateDrawable ScaleDrawable AnimationDrawable TransitionDrawable StateListDrawable AnimatedStateListDrawable AnimatedVectorDrawable
  15. <?xml version="1.0" encoding="utf-8"?> <animated-selector > <item android:id="@+id/item_pressed" android:state_pressed="true"> <bitmap android:src="@drawable/ic_android2ee"/></item>

    <item android:id="@+id/item_normal"> <bitmap android:src="@drawable/ic_nut"/> </item> <transition android:fromId="@+id/item_pressed" android:toId="@+id/item_normal"> <animation-list android:id="@+id/selected" android:oneshot="true"> <item android:drawable="@drawable/attack_magic1" android:duration="100" /> <item android:drawable="@drawable/attack_magic2" android:duration="100" /> </animation-list></transition></animated-selector> V21 Normal Pressed Normal View state Display ClipDrawable RotateDrawable ScaleDrawable AnimationDrawable TransitionDrawable StateListDrawable AnimatedStateListDrawabl e AnimatedVectorDrawable
  16. <?xml version="1.0" encoding="utf-8"?> <vector android:viewportWidth="500" android:viewportHeight="500" android:width="500px" android:height="500px"> <!--Make group

    to animate them separately using ObjectAnimator--> <!--Define the pivot in the group they will be used by ObjectAnimator--> <group android:name="tete" android:pivotX="250.0" android:pivotY="100.0"> <path android:name="head" android:fillColor="#9FBF3B" android:pathData="..." /> </group>...</vector> <?xml version="1.0" encoding="utf-8"?> <animated-vector android:drawable="@drawable/my_svg" > <target android:name="tete" android:animation="@anim/anim_svg" /> </animated-vector> <?xml version="1.0" encoding="utf-8"?> <set xmlns:android="http://schemas.android.com/apk/res/a ndroid"> <!-- res/anim/rotation.xml --> <objectAnimator android:duration="6000" android:propertyName="rotation" android:valueFrom="0" android:valueTo="360" /> </set> drawable/my_svg drawable/my_svg_animated anim/anim_svg use us e layout/my_view use <ImageView android:id="@+id/imvAnimatedVector" android:layout_width="wrap_content" android:layout_height="wrap_content" android:layout_weight="1" android:src="@drawable/my_svg_animated"/> animatedVectorDrawable.start(); V21 TransitionDrawable StateListDrawable AnimatedStateListDrawable AnimatedVectorDrawable
  17. <?xml version="1.0" encoding="utf-8"?> <vector android:viewportWidth="500" android:viewportHeight="500" android:width="500px" android:height="500px"> <!--Make group

    to animate them separately using ObjectAnimator--> <!--Define the pivot in the group they will be used by ObjectAnimator--> <group android:name="tete" android:pivotX="250.0" android:pivotY="100.0"> <path android:name="head" android:fillColor="#9FBF3B" android:pathData="..." /> </group>...</vector> <?xml version="1.0" encoding="utf-8"?> <animated-vector android:drawable="@drawable/my_svg" > <target android:name="tete" android:animation="@anim/animpath_svg" /> </animated-vector> <?xml version="1.0" encoding="utf-8"?> <set > <!-- res/anim/rotation.xml --> <objectAnimator android:duration="6000" android:propertyName="pathData" android:valueFrom="M300,70 l 0,-70 70,70 0,0 - 70,70z" android:valueTo="M300,70 l 0,-70 70,0 0,140 - 70,0 z" android:valueType="pathType"/> </set> drawable/my_svg drawable/my_svg_animated anim/animpath_svg use us e layout/my_view use <ImageView android:id="@+id/imvAnimatedVector2" android:layout_width="wrap_content" android:layout_height="wrap_content" android:layout_weight="1" android:src="@drawable/my_svg_animated"/> animatedVectorDrawable.start(); V21 TransitionDrawable StateListDrawable AnimatedStateListDrawable AnimatedVectorDrawable
  18. The constraints that kill for path transformation: "Note that the

    paths must be compatible for morphing. In more details, the paths should have exact same length of commands , and exact same length of parameters for each commands." It means: you won't use it expect for so simple trick (arrow to hamburger). =>Waiting for tools ! V21
  19. Create Svg and/or simplify them https://inkscape.org/ To convert Svg into

    VectorDrawable http://inloop.github.io/svg2android/ou AndroidStudio And then run: AnimatedVectorMorphingTool V21 The files are generated for you :)
  20. Make it simple and magic: You can animate any view

    translationX , translationY, rotationX, rotationY, rotation, scaleX, scaleY, pivotX,pivotY, x,y,alpha and more with one line of code ! myView.animate().setDuration(300).x(20).rotationY(60).star t(); V13
  21. First extends what you want (Object or View or what

    ever) public class BlueDot extends View { V13
  22. Define the property to animate using set/*MyProperty*/ public class BlueDot

    extends View { /** * The property to animate * * @param parameter value of the state to calculate the animation of the object */ private void setToto(int parameter) { /*Do your stuff, (call invalidate to redraw view)*/ V13
  23. Then animate public class BlueDot extends View { /** *

    The property to animate * @param parameter value of the state to calculate the animation of the object */ private void setToto(int parameter) {/*Do your stuff,(call invalidate to redraw view)*/ ObjectAnimator.ofInt(blueDot, "toto", 0, 110) .start(); V13
  24. ClipDrawable Handler clipDrawableHandler=new Handler(); Runnable clipDrawableRunnable=new Runnable() { @Override public

    void run() {level++; clipDrawableHorizontal.setLevel(level); clipDrawableHandler.postDelayed(clipDrawableRunnable,32); } }; <?xml version="1.0" encoding="utf-8"?> <clip xmlns:android="http://schemas.android.com/apk/res/android" android:drawable="@drawable/ic_android2ee" android:clipOrientation="horizontal" android:gravity="left" /> It was before Works with every think ! V13
  25. Works with every think ! public class MyActivity extends Activity{

    private void setMoveDrawable(int level){ clipDrawableHorizontal.setLevel(level); } private void animateDrawable() { ObjectAnimator.ofInt(this, "MoveDrawable", 0, 10000).start(); } No more Handler neither Runnable !!! yes thanks Chet ! V13
  26. One xml line to add <LinearLayout android:layout_width="match_parent" android:layout_height="match_parent" android:id="@+id/llSceneRoot" android:animateLayoutChanges="true"

    > One line of code to add if(postICS){ LayoutTransition transition = ((ViewGroup)findViewById(R.id.llSceneRoot)).getLayoutTransition(); // New capability as of Jellybean; monitor the container for *all* layout changes // (not just add/remove/visibility changes) and animate these changes as well.(==size) transition.enableTransitionType(LayoutTransition.CHANGING); } v16
  27. You have the choice between Custom animation Intent slidingActivity =

    new Intent(this, SlidingActivity.class); ActivityCompat.startActivity(this, slidingActivity, translationBundle);} v16 v8 Bundle translationBundle = ActivityOptionsCompat.makeCustomAnimation(this, R.anim.anim_push_left_in_a2ee,R.anim.anim_push_left_out_a2ee).toBundle();
  28. You have the choice between Custom animation Scaling Component Intent

    slidingActivity = new Intent(this, SlidingActivity.class); ActivityCompat.startActivity(this, slidingActivity, translationBundle);} v16 v8 Bundle translationBundle = ActivityOptionsCompat.makeCustomAnimation(this, R.anim.anim_push_left_in_a2ee,R.anim.anim_push_left_out_a2ee).toBundle(); Bundle translationBundle = ActivityOptionsCompat.makeScaleUpAnimation(btnScaling,0,0,btnScaling.getWidth(), btnScaling.getHeight() ).toBundle();
  29. You have the choice between: Custom animation Scaling Component Scaling

    bitmap Intent slidingActivity = new Intent(this, SlidingActivity.class); ActivityCompat.startActivity(this, slidingActivity, translationBundle);} Bundle translationBundle = ActivityOptionsCompat.makeCustomAnimation(this, R.anim.anim_push_left_in_a2ee,R.anim.anim_push_left_out_a2ee).toBundle(); Bundle translationBundle = ActivityOptionsCompat.makeScaleUpAnimation(btnScaling,0,0,btnScaling.getWidth(), btnScaling.getHeight() ).toBundle(); Bundle translationBundle = ActivityOptionsCompat.makeThumbnailScaleUpAnimation(imvSmiley,bitmap,0,0) .toBundle(); v16 v8
  30. You have the choice between: Custom animation Scaling Component Scaling

    bitmap You need to reverse : public class otherActivity extends Activity { public void finish() { super.finish(); //this work for all version superior to level 5 overridePendingTransition(R.anim.anim_push_right_in_a2ee, R.anim.anim_push_right_out_a2ee); }} v16 v8
  31. Awesome First manage your theme <resources> <!-- Thanks to :-->

    <!-- http://code.tutsplus.com/tutorials/introduction-to-the-new-lollipop-activity-transitions&#45;&#45;cms-23711--> <!-- Base application theme. --> <style name="AppTheme" parent="BaseTheme"> <!-- Set the transition between activities effective --> <item name="android:windowContentTransitions">true</item> <item name="android:windowEnterTransition">@android:transition/slide_bottom</item> <item name="android:windowExitTransition">@android:transition/slide_bottom</item> <item name="android:windowAllowEnterTransitionOverlap">true</item> <item name="android:windowAllowReturnTransitionOverlap">true</item> <item name="android:windowSharedElementEnterTransition">@android:transition/move</item> <item name="android:windowSharedElementExitTransition">@android:transition/move</item> </style> </resources> v21
  32. Set the android:transitionName to your components <ImageButton android:id="@+id/ibtnSprite" android:transitionName="@string/imvSprite_transition" android:layout_width="wrap_content"

    android:layout_height="wrap_content" android:layout_alignParentRight="true" android:layout_alignParentTop="true" android:layout_gravity="center" android:src="@drawable/attack_magic_animation" /> <ImageView android:id="@+id/imvSprite" android:transitionName="@string/imvSprite_transition" android:layout_width="wrap_content" android:layout_height="wrap_content" android:layout_gravity="center" android:src="@drawable/attack_magic_animation" /> layout/main_activity layout/other_activity v21
  33. Make your pairs and launch the new Activity if (isPostLollipop)

    { ActivityOptionsCompat options = ActivityOptionsCompat.makeSceneTransitionAnimation( this, new Pair<View, String>(imvSprites, getString(R.string.imvSprite_transition)), ); } ActivityCompat.startActivity(MainActivity.this, intent, options.toBundle()); } v21
  34. V7

  35. 56 dependencies { ... compile 'com.android.support:recyclerview-v7:23.0.1' <!-- A RecyclerView with

    some commonly used attributes --> <android.support.v7.widget.RecyclerView android:id="@+id/my_recycler_view" android:scrollbars="vertical" android:layout_width="match_parent" android:layout_height="match_parent" app:layout_behavior="@string/appbar_scrolling_view_behavior" /> V7
  36. 58 Its the natural evolution of the ListView, the ViewHolder

    is the one responsible of the view management public View onCreateView(LayoutInflater inflater, ViewGroup container, Bundle savedInstanceState) { View myView=inflater.inflate(R.layout.recyclerview,container,false); recyclerView= (RecyclerView) myView.findViewById(R.id.my_recycler_view); // use a layout manager recyclerViewLayoutManager = getLayoutManager(); recyclerView.setLayoutManager(recyclerViewLayoutManager); // specify an adapter (see also next example) recyclerViewAdapter = new RecyclerViewAdapter(humans,getActivity()); recyclerView.setAdapter(recyclerViewAdapter); return myView ; } find the View set the LayoutManager set the Adapter V7
  37. 59 This is the same code as for the ListView

    (ViewHolder next slide) public class RecyclerViewAdapter extends RecyclerView.Adapter<RecyclerViewAdapter.ViewHolder>{ /****Attributes (t for temp)**/ private ArrayList<Human> humans; private LayoutInflater inflater; private View tNewView; private ViewHolder tViewHolder; private Human tHuman; /****** Constructor**/ public RecyclerViewAdapter(ArrayList<Human> dataSet,Context ctx){ humans=dataSet; inflater=LayoutInflater.from(ctx); } @Override public RecyclerViewAdapter.ViewHolder onCreateViewHolder(ViewGroup parent, int viewType) { tNewView=inflater.inflate(R.layout.simple_item,parent,false); tViewHolder=new ViewHolder(tNewView); return tViewHolder; } @Override public void onBindViewHolder(RecyclerViewAdapter.ViewHolder holder, int position) { tHuman=humans.get(position); holder.getTxvName().setText(tHuman.getName()); holder.getTxvFirstName().setText(tHuman.getFirstName()); holder.getTxvMessage().setText(tHuman.getMessage()); } @Override public int getItemCount() { return humans.size(); } V7
  38. 60 This is the same code as for the ListView

    (ViewHolder next slide) public class RecyclerViewAdapter extends RecyclerView.Adapter<RecyclerViewAdapter.ViewHolder>{ /****Attributes (t for temp)**/ private ArrayList<Human> humans; private LayoutInflater inflater; private View tNewView; private ViewHolder tViewHolder; private Human tHuman; /****** Constructor**/ public RecyclerViewAdapter(ArrayList<Human> dataSet,Context ctx){ humans=dataSet; inflater=LayoutInflater.from(ctx); } @Override public RecyclerViewAdapter.ViewHolder onCreateViewHolder(ViewGroup parent, int viewType) { tNewView=inflater.inflate(R.layout.simple_item,parent,false); tViewHolder=new ViewHolder(tNewView); return tViewHolder; } @Override public void onBindViewHolder(RecyclerViewAdapter.ViewHolder holder, int position) { tHuman=humans.get(position); holder.getTxvName().setText(tHuman.getName()); holder.getTxvFirstName().setText(tHuman.getFirstName()); holder.getTxvMessage().setText(tHuman.getMessage()); } @Override public int getItemCount() { return humans.size(); } Inflate the view and its viewHolder Return the ViewHolder Update the View using the ViewHolder Set your DataSet and your LayoutInflater V7
  39. 61 Le ViewHolder gère la vue qu'il encapsule public class

    ViewHolder extends RecyclerView.ViewHolder{ TextView txvName=null; TextView txvFirstName=null; TextView txvMessage=null; View.OnClickListener clickListener; int position; public ViewHolder(View itemView) { super(itemView); txvName= (TextView) itemView.findViewById(R.id.txvName); txvFirstName= (TextView) itemView.findViewById(R.id.txvFirstName); txvMessage= (TextView) itemView.findViewById(R.id.txvMessage); clickListener=new View.OnClickListener() { public void onClick(View v) {changeTxvMessageVisibilityState(); } }; itemView.setOnClickListener(clickListener); } public TextView getTxvFirstName() {return txvFirstName;} public TextView getTxvMessage() {return txvMessage;} public TextView getTxvName() {return txvName;} public void changeTxvMessageVisibilityState(){ //Do the stuff } } V7
  40. 63 Le StaggeredLayoutManager public RecyclerView.LayoutManager getLayoutManager() { StaggeredGridLayoutManager stagLayoutManager=new StaggeredGridLayoutManager(2,GridLayoutManager.VERTICAL);

    stagLayoutManager.setGapStrategy(StaggeredGridLayoutManager.GAP_HANDLING_MOVE_ITEMS_BETWEEN_SPANS); return stagLayoutManager; } V7
  41. 64 Le GridLayoutManager public RecyclerView.LayoutManager getLayoutManager() { GridLayoutManager gridLayoutManager=new GridLayoutManager(getContext(),2,GridLayoutManager.VERTICAL,false);

    //define specific span of specific cells according to a rule gridLayoutManager.setSpanSizeLookup(new GridLayoutManager.SpanSizeLookup() { @Override public int getSpanSize(int arg0) { return (arg0 % 3) == 0 ? 2 : 1; } }); return gridLayoutManager; } V7
  42. V7 68 <android.support.design.widget.CoordinatorLayout > <android.support.design.widget.AppBarLayout ... android:theme="@style/ThemeOverlay.AppCompat.Dark.ActionBar"> <android.support.v7.widget.Toolbar ... app:layout_scrollFlags="scroll|enterAlways"/>

    <android.support.design.widget.TabLayout ... android:fillViewport="true"/> </android.support.design.widget.AppBarLayout> <android.support.v4.view.ViewPager //Your content ... app:layout_behavior="@string/appbar_scrolling_view_behavior" /> </android.support.design.widget.CoordinatorLayout >
  43. V7 69 <AppBarLayout ... > <CollapsingToolbarLayout android:id="@+id/collapsing_toolbar" android:layout_width="match_parent" android:layout_height="match_parent" app:layout_scrollFlags="scroll|exitUntilCollapsed"

    android:fitsSystemWindows="true" app:contentScrim="?attr/colorPrimary" app:expandedTitleMarginStart="48dp" app:expandedTitleMarginEnd="64dp"> <ImageView ... android:fitsSystemWindows="true" app:layout_collapseMode="parallax" /> <Toolbar ... app:layout_scrollFlags="scroll|enterAlways"/> <TabLayout ... android:fillViewport="true"/> </CollapsingToolbarLayout> </AppBarLayout>
  44. V7 73 <AppBarLayout ... > <CollapsingToolbarLayout ... > <ImageView ...

    /> <widget.Toolbar ... /> </CollapsingToolbarLayout> <TabLayout /> </AppBarLayout> collapsingToolbar.setContentScrimResource(R.drawable.cardview_background_toolbar);
  45. 77 activity_main.xml <?xml version="1.0" encoding="utf-8"?> <android.support.v4.view.ViewPager android:layout_width="fill_parent" android:layout_height="fill_parent" android:id="@+id/viewpager" android:background="#FF00F0F0">

    </android.support.v4.view.ViewPager> public class MainActivity extends ActionBarActivity { private MyPagerAdapter pagerAdapter; private ViewPager viewPager; @Override protected void onCreate(Bundle savedInstanceState) { ... //instanciate the PageAdapter pagerAdapter=new MyPagerAdapter(this); //Find the viewPager viewPager = (ViewPager) super.findViewById(R.id.viewpager); // Affectation de l'adapter au ViewPager viewPager.setAdapter(pagerAdapter); } V13
  46. 78 public class MyPagerAdapter extends FragmentPagerAdapter { private final ArrayList<Fragment>

    fragments; public MyPagerAdapter(ActionBarActivity ctx) { super(ctx.getSupportFragmentManager()); fragments = new ArrayList<Fragment>(); //A stuff I never did before, instanciate my fragment Fragment frag =new MyFragment1(); fragments.add(frag);... } public Fragment getItem(int position) { return fragments.get(position); } public int getCount() {return fragments.size(); } V13
  47. 79 public class MainActivity extends ActionBarActivity { @Override protected void

    onCreate(Bundle savedInstanceState) { ... //instanciate the PageAdapter pagerAdapter=new MyPagerAdapter(this); //Find the viewPager viewPager = (ViewPager) super.findViewById(R.id.viewpager); // Affectation de l'adapter au ViewPager viewPager.setAdapter(pagerAdapter); if(Build.VERSION.SDK_INT>=Build.VERSION_CODES.HONEYCOMB){ viewPager.setPageTransformer(true, new PageTransformer(this)); } V13
  48. 80 public class MyPageTransformer implements ViewPager.PageTransformer{ RecyclerView myRecyclerView; public void

    transformPage(View view, float position) { //Only the main layout is passed here/ myRecyclerView= (RecyclerView) view.findViewById(R.id.my_recycler_view); if (position < -1) { // [-Infinity,-1)This page is way off-screen to the left. view.setAlpha(0); } else if (position < 1) { //in the visible range [-1,1] myRecyclerView.setAlpha(1-Math.abs(position)); view.setAlpha(1); if (position < 0) {//coming from left myRecyclerView.setRotationX((position * 360)); } else {//coming from right myRecyclerView.setRotationX(-1*position *360); } } else { // (1,+Infinity] // This page is way off-screen to the right. view.setAlpha(0); } }} V13
  49. How to get the screen size ? @SuppressLint("NewApi") private void

    getViewSize() { //this is an usual trick when we want to know the dimension of our view //initialize dimensions of the view WindowManager wm = (WindowManager) getSystemService(Context.WINDOW_SERVICE); Display display = wm.getDefaultDisplay(); if (postICS) { Point size = new Point(); display.getSize(size); width = size.x; height = size.y; } else { width = display.getWidth(); // deprecated height = display.getHeight(); // deprecated } } V1
  50. When customizing you view, you have to overwrite the following

    method: protected void onSizeChanged(int w, int h, int oldw, int oldh) { super.onSizeChanged(w, h, oldw, oldh); this.w = w; this.h = h; centerX = w / 2; centerY = h / 2; //...} V1
  51. Use the ViewTreeObserver private void getEditButtonWidth() { //this is an

    usual trick when we want to know the dimension of the elements of our view //find the dimension of the EditButton ViewTreeObserver vto = btnEdit.getViewTreeObserver(); vto.addOnGlobalLayoutListener(new ViewTreeObserver.OnGlobalLayoutListener() { @Override public void onGlobalLayout() { btnEdit.getViewTreeObserver().removeGlobalOnLayoutListener(this); btnEditWidth = btnEdit.getMeasuredWidth(); } }); } V1
  52. Use the LayoutParameter of the ViewGroup private void changeImvSprite1Size(){ //Change

    the LayoutParameter to change the size of view if(isImvSprite1Expended){ imvSprite1.setLayoutParams(imvSpritesLayoutParamNormal); }else{ imvSprite1.setLayoutParams(imvSpritesLayoutParamExpanded); } isImvSprite1Expended=!isImvSprite1Expended; } private void initializeImvSpriteSize() { //get the real size of the components imvSprite1Height = imvSprite1.getMeasuredHeight(); //initialize the layout parameter for the normal size imvSpritesLayoutParamNormal = new LayoutParams( ViewGroup.LayoutParams.MATCH_PARENT, imvSprite1Height); //initialize the layout parameter for the expanded size imvSpritesLayoutParamExpanded= new LayoutParams( ViewGroup.LayoutParams.MATCH_PARENT, 2*imvSprite1Height);} private LinearLayout.LayoutParams imvSpritesLayoutParamNormal, imvSpritesLayoutParamExpanded ; V1
  53. Make your own paint : Paint dotPaint= new Paint(); //initialize

    the shader (stuff that make the color of the paint depending on // the location in the screen and a set of colors) //@chiuki at droidcon london int[] rainbow = getRainbowColors(); Shader shader = new LinearGradient(0, 0, 0, w, rainbow, null, Shader.TileMode.MIRROR); Matrix matrix = new Matrix(); matrix.setRotate(90); shader.setLocalMatrix(matrix); dotPaint.setShader(shader); private int[] getRainbowColors() { return new int[]{ getResources().getColor(R.color.rainbow_red), getResources().getColor(R.color.rainbow_yellow), getResources().getColor(R.color.rainbow_green), getResources().getColor(R.color.rainbow_turquoise), getResources().getColor(R.color.rainbow_blue), getResources().getColor(R.color.rainbow_purple) };} V1
  54. First: Simplify your layout !!! if not enough you can

    also: User LayerType Hardware accelerated btnDoNotPress.setLayerType(View.LAYER_TYPE_HARDWARE,null); new Animator.AnimatorListener() { public void onAnimationEnd(Animator animation) { btnDoNotPress.setLayerType(View.LAYER_TYPE_NONE, null); } V1
  55. Use Interface and Factory /** * The animation */ MainActivityAnimMother

    anim; //the factory for the animations (you can create a Class to do that if you want) : if(isPostLollipop){ anim=new MainActivityAnimLLP(); }else if(postICS){ anim=new MainActivityAnimICS(); }else{ anim=new MainActivityAnimGinger(); } V1 MainActivity MainActivity MainActivityAnimGinger MainActivityAnimICS MainActivityAnimLLP MainActivity MotherAnim MainActivityAnimIntf Animation code Animation attributes Animation methods declaration v21